

Page 1
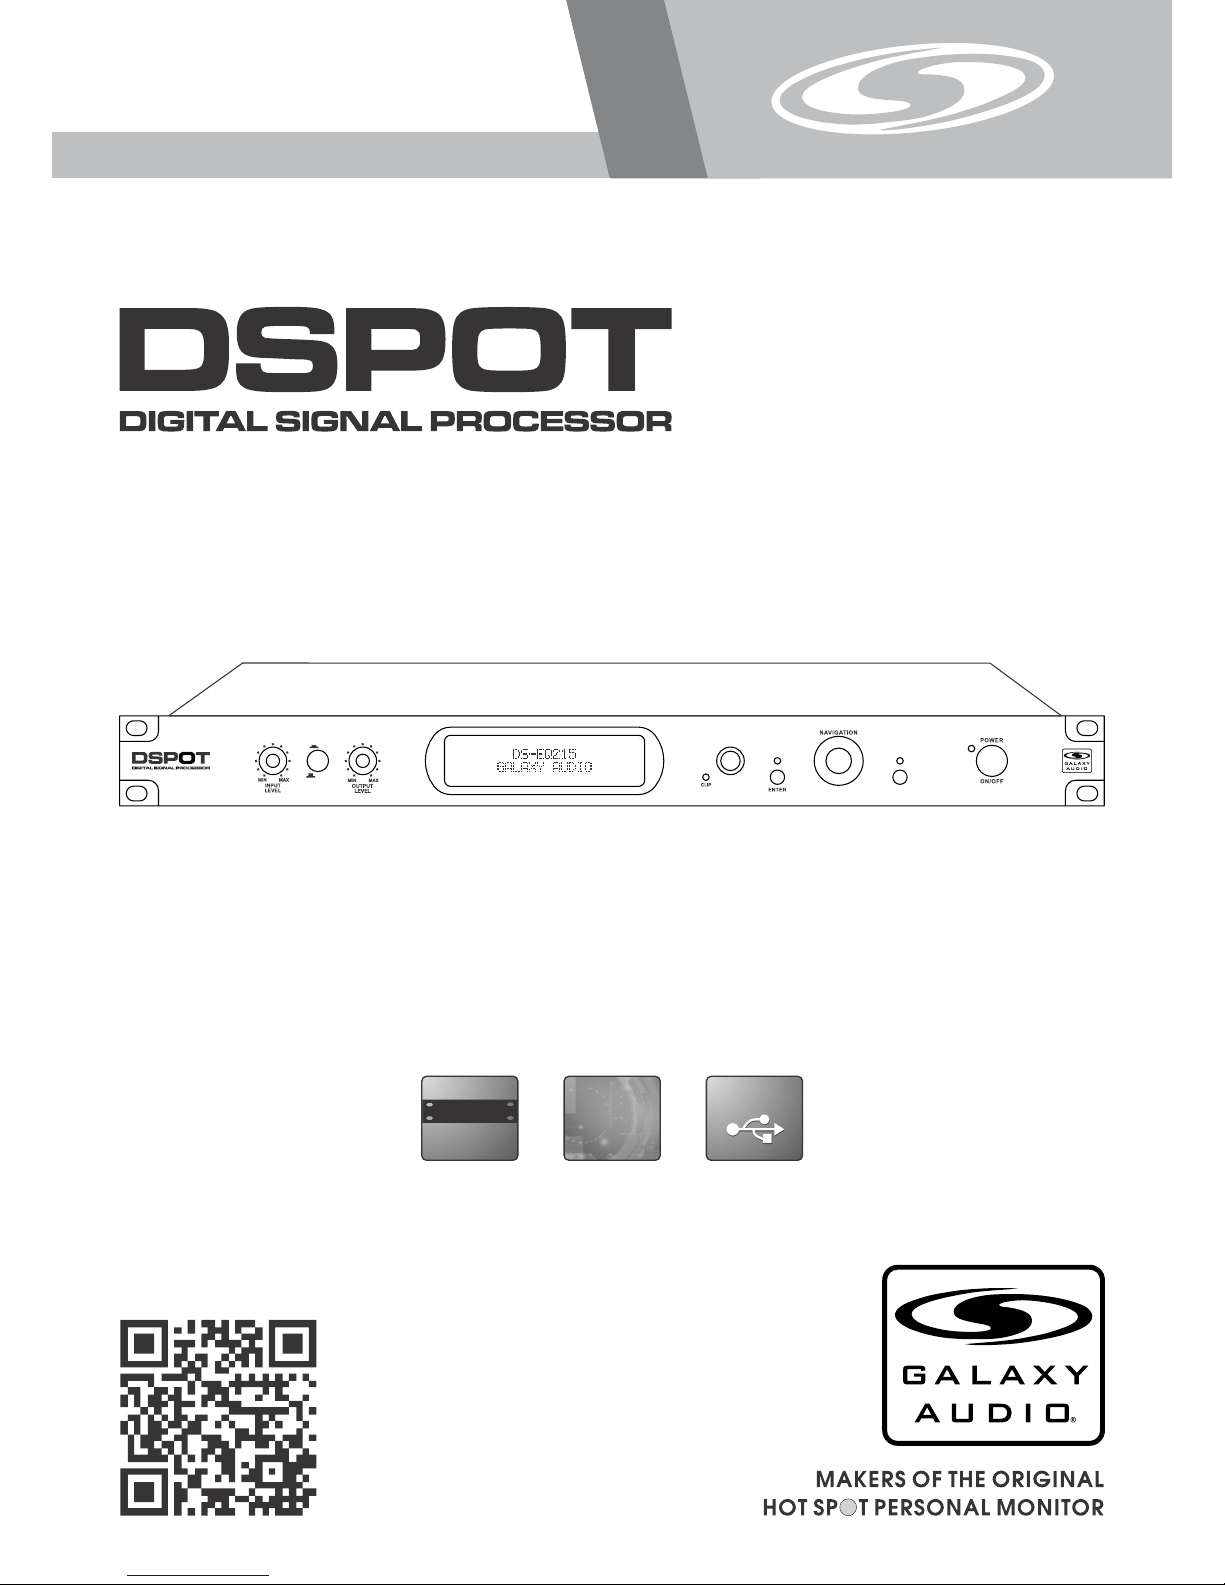
USER’S MANUAL
DS-EQ215
Dual Channel 15 Band EQ
USB
USB
(482mm )
19"
DIGITAL
DIGITAL
®
DS-E Q215
IN
OUT
EQUALIZER
PARAMETER
ESCAPE
Page 2

Page 3

1
Contents
Contents
Introduction..........................................................................................1
Safety Instructions................................................................................ 2
Getting Started with Front Panel Controls......................................... 3 - 8
Using the PC Interface.................................................................... 9 - 13
MIDI Program Table............................................................................. 14
Specifications..................................................................................... 15
Introduction
Introduction
Thank you for choosing a Galaxy DSPOT Digital Signal Processor. You have joined
hundreds of thousands of other satisfied Galaxy customers. Since 1977 Galaxy Audio’s
professional experience in design and manufacturing ensure our products' quality,
performance and reliability.
For the most up to date manual and information
visit www.galaxyaudio.com.
Page 4
2
Safety Instructions
Safety Instructions
!
IMPORTANT SAFETY INSTRUCTIONS !
READ these instructions.
KEEP these instructions.
HEED all warnings.
FOLLOW all instructions.
DO NOT use this apparatus near water.
CLEAN ONLY with dry cloth.
DO NOT block any ventilation openings. Install in accordance with the manufacturer's instructions.
DO NOT install near any heat sources such as radiators, heat registers, stoves,
or other apparatus (including amplifiers) that produce heat.
DO NOT defeat the safety purpose of the polarized or grounding-type plug. A
polarized plug has two blades with one wider than the other. A grounding type
plug has two blades and a third grounding prong. The wider blade or the third
prong are provided for your safety. If the provided plug does not fit into your
outlet, consult an electrician for replacement of the obsolete outlet.
PROTECT the power cord from being walked on or pinched, particularly at plugs,
convenience receptacles, and the point where they exit from the apparatus.
ONLY USE attachments/accessories specified by the manufacturer.
1.
2.
3.
4.
5.
6.
7.
8.
9.
10.
11.
This symbol indicates that dangerous voltage
Constituting a risk of electric shock is present
within this unit.
This symbol indicates that there are important
Operating and maintenance instructions in the
Literature Accompanying This Unit
UNPLUG this apparatus during lightning storms or when unused for long periods of
time.
REFER all servicing to qualified service personnel. Servicing is required when the
apparatus has been damaged in any way, such as power-supply cord or plug is damAged, liquid has been spilled or objects have fallen into the apparatus, the apparatus
has been exposed to rain or moisture, does not operate normally, or has been
dropped.
DO NOT expose the apparatus to dripping and splashing. DO NOT put objects filled
with liquids, such as vases, on the apparatus.
USE only with a cart, stand, tripod, bracket, or table
Specified by the manufacturer, or sold with the
Apparatus. When a cart is used, use caution when
moving the cart/apparatus combination to avoid
injury from tip-over.
Remove the batteries from the receiver if the system will not be used for a long
period of time. This will avoid any damage resulting from a defective, leaking
battery.
DO NOT throw used batteries into a fire. Be sure to dispose of or recycle used
batteries in accordance with local waste disposal laws.
12.
13.
14.
15.
16.
17.
Page 5
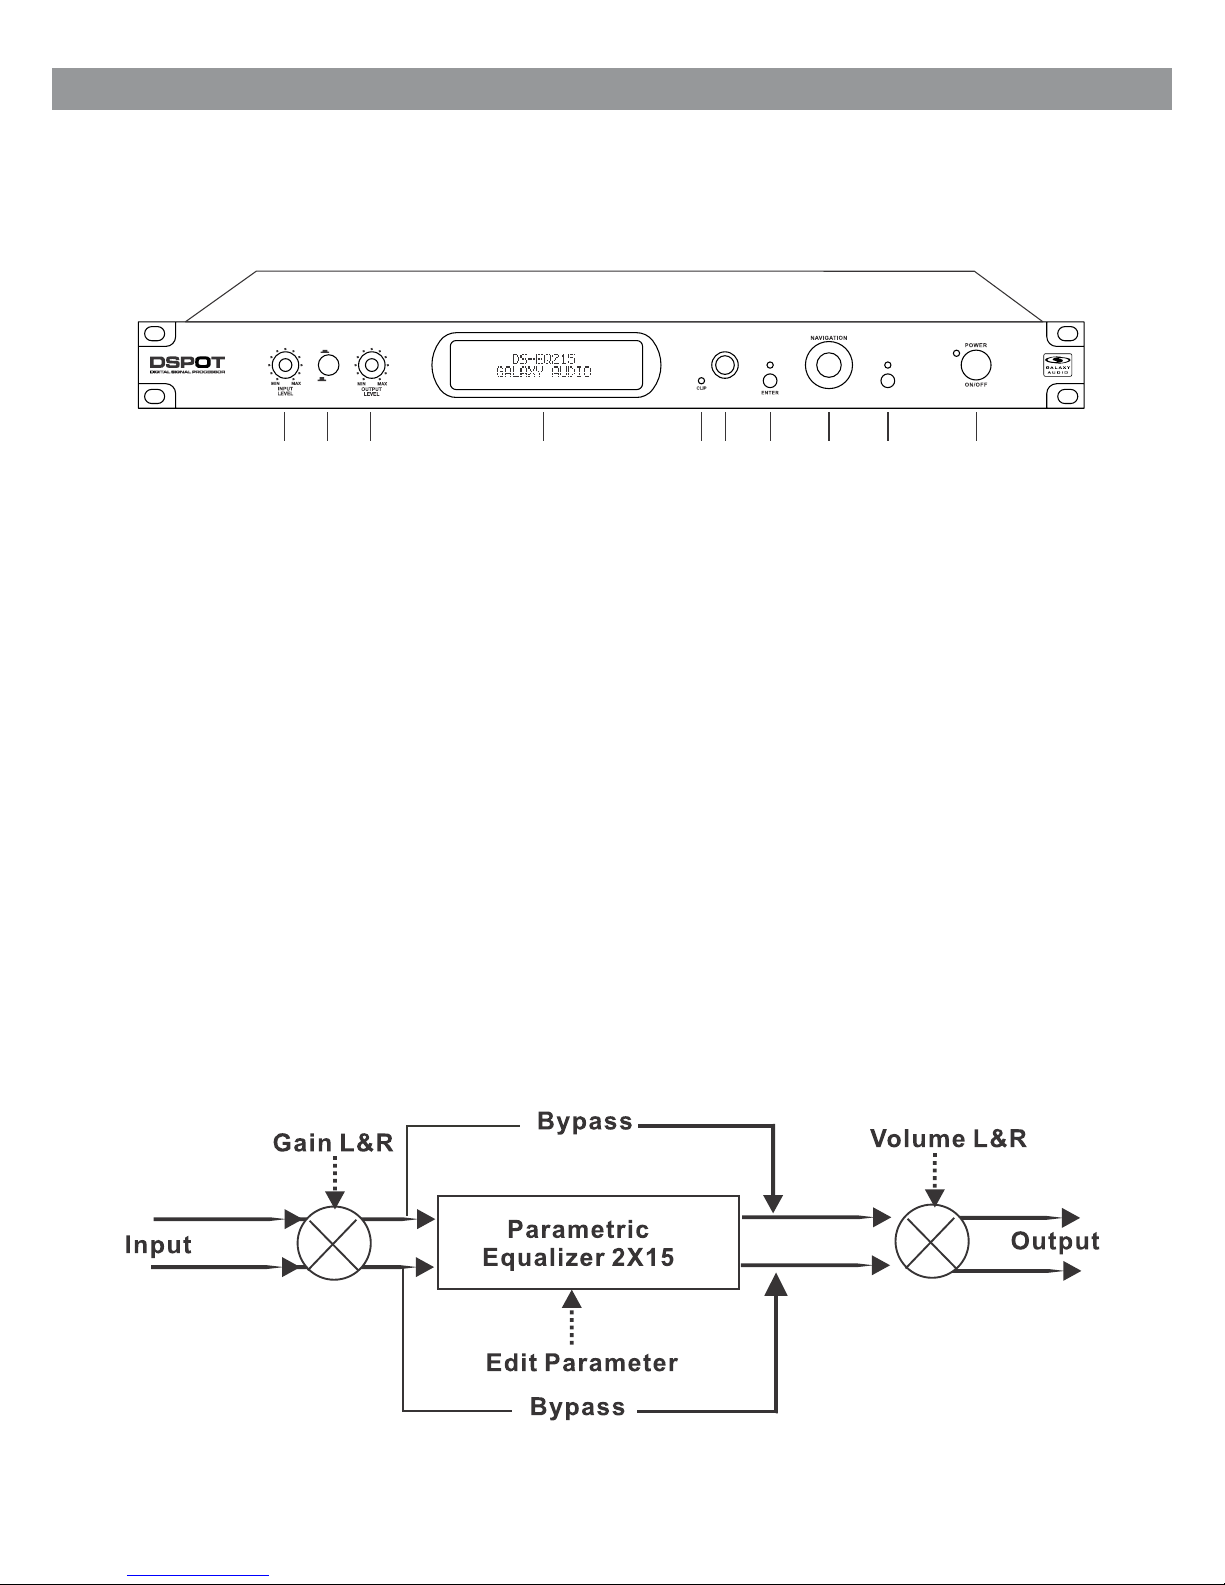
Described below are the functions of the front panel control buttons and encoders for the DS-EQ215
Parametric Equalizer.
®
DS-EQ 215
IN
OUT
EQUALIZER
PARAMETER
ESCAPE
3
1 2
3
4
5
6 7 8 9 10
1 - Input Level: Input Gain Left, Right
2 - EQ Bypass
3 - Output Level: Output Volume Left, Right
4 - LCD Display
5 - Clip LED: Process Overflow
6 - Parameter Key: Parameter Variation
7 - Enter Key: Enters Sub-Menus
8 - Navigation Key: Navigation Menus
9 - Escape Key: Exit Sub-Menus
10 - Power Button
Overview
Page 6
Brief descript ion
The DS-EQ215 is a gr aphic/parametric 2-channel EQ with 1 5+15 filters and channel link
possibility. Its fi lters are symmetrical, and High/Low pass filters are included. A delay line f or each
channel is also av ailable. Its settings are stored into 16 F actory and 16 User Presets. The devic e
can also be linked t o a controller using MIDI, RS232, or USB.
User Interface
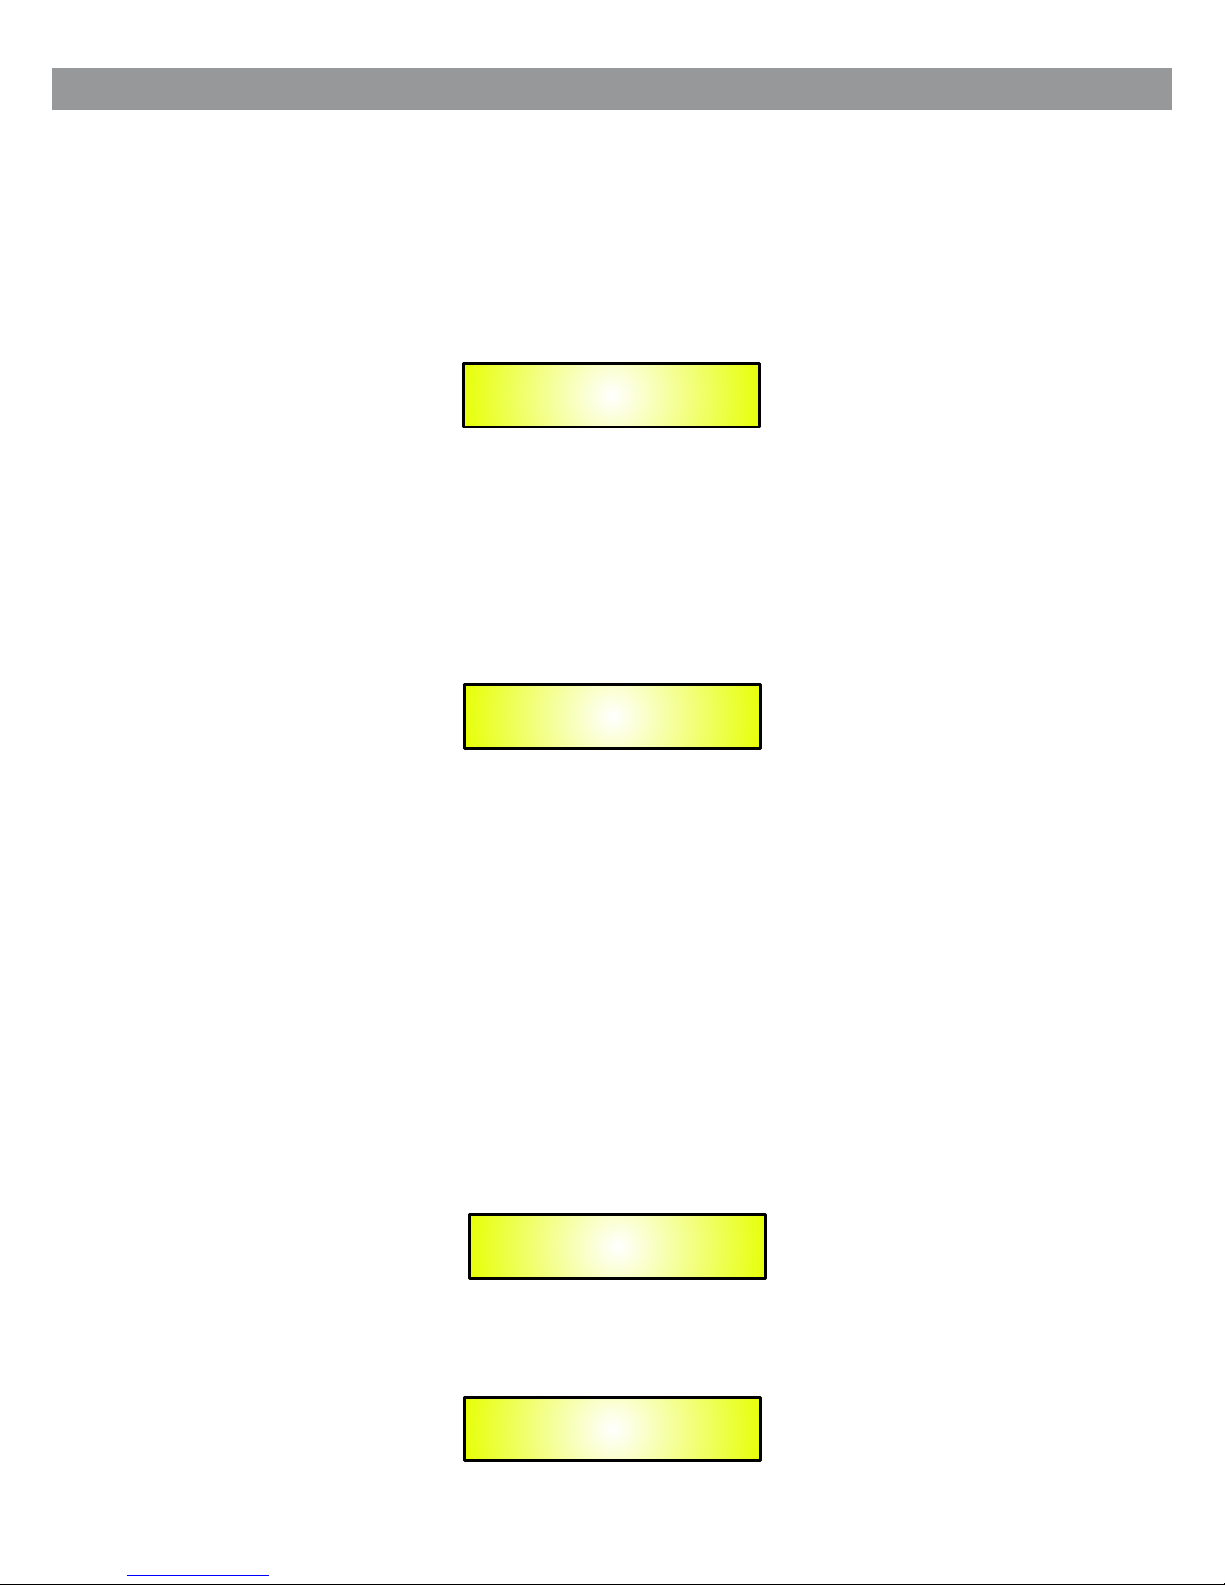
At power on, after t he initialization phase, the unit show s on the LCD display the following:
On the upper row the p reset number and the preset name are visib le, on the lower row the
vu-meter shows t he input signal level, after the analog GA IN L&R.
To access the main men u the user pushes the ENTER key or rotate the NAVIG ATION encoder.
To return to the vu-me ters, the user pushes the QUIT key.
Every time the use r pushes a key, the LED near it changes its state.
After an encoder r otation or an ENTER key press, the LCD displ ay shows:
Using the PARAMETER e ncoder, the main menu is accessibl e through the lower row:
1. LOAD PRESET
2. SAVE PRESET
3. UTILITY FUNCTIO N
4. EDIT CHANNEL L
5. EDIT CHANNEL R
EDIT CHANNEL R won’t b e shown if the system is configured as (Link L& R = ON).
To select a field, use t he NAVIGATION encoder. To access a sub-menu pres s ENTER. To exit,
press QUIT. Enter an d quit are also used to confirm user choices .
LOAD PRESET MENU
Here, it is possib le to select and load one of the 16+16 available presets.
To select a preset, us e the PARAMETER encoder.
If the current pre set is the selected one, but has been modifi ed, an asterisk will be shown.
Preset XX: Name Preset
L:|||||||| R:||||||||
Preset XX: Name Preset
Load Preset
Load Preset
01: Name Preset
Load Preset
01: Name Preset
*
4
Getting Started Using Front Panel Interface
Page 7
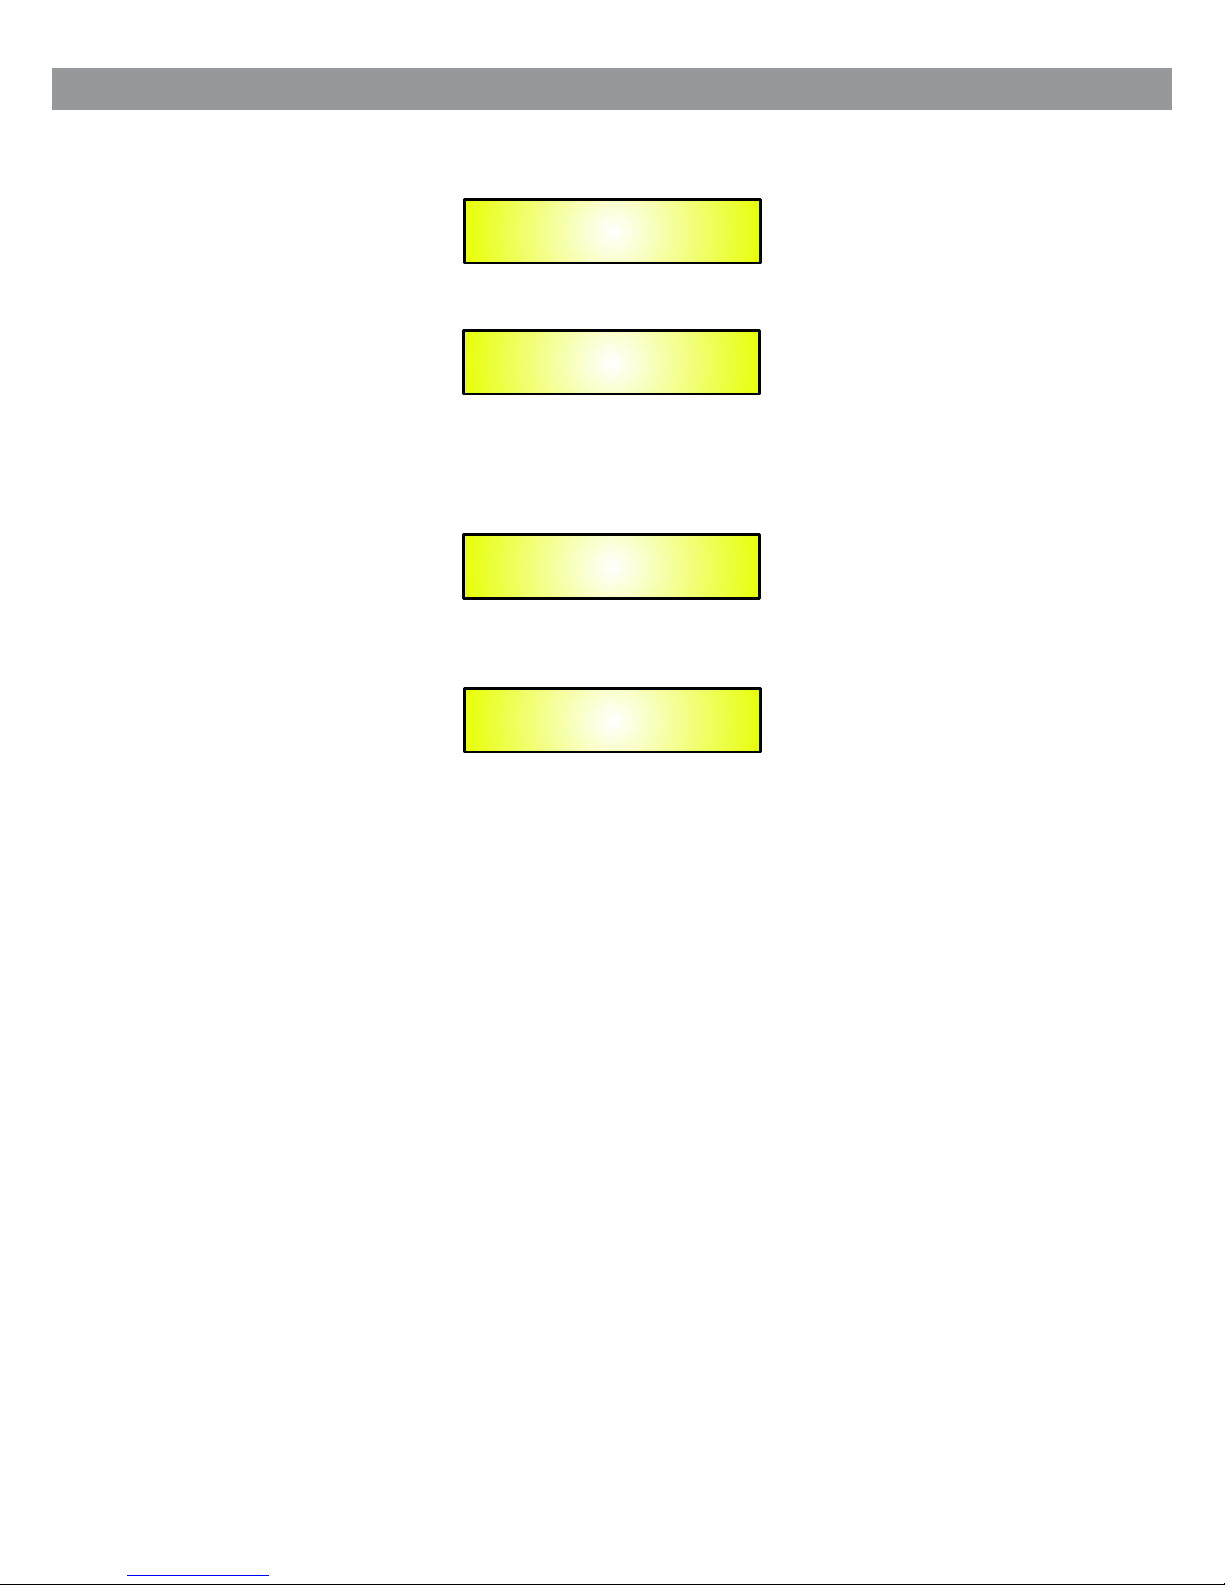
To load the selected p reset press ENTER. To leave sub-menu pr ess QUIT. During preset loading,
the display will s how:
If the user tries to load an empty preset, a warning will be given :
SAVE PRESET MENU:
Within this menu , use the NAVIGATION encoder to select the desired location between the user
presets. By pres sing enter, it is possible to save the preset . If the chosen location is occupied, the
user will see a warn ing:
Pressing QUIT, the s ystem returns to SAVE menu. Pressing ENTER, t he preset will be saved and
the screen will sh ow:
After that, saved preset name editing will be possible.
Use the NAVIGATION encod er to select character position a nd the PARAMETER encoder to
change the chara cter. To save, press ENTER. To maintain defaul t name, press QUIT. After this, the
system returns t o main menu.
If a preset is not saved, switching off the device will lose it.
UTILITY FUNCTION M ENU:
It is possible to se lect one of these functions:
1. Link L & R
2. Config Commun ication
3. Config Delay un it
4. Config Equ type
5. Flat Equ L
6. Flat Equ R (0)
7. Copy L to R (*)
8. Copy R to L (*)
Use the NAVIGATION encod er to select the desired function a nd press ENTER to access it. Press
QUIT to exit.
Link L & R:
Link L & R is used to set the foll owing configurations:
Link L & R = OFF Dual mono mode
Link L & R = ON Stereo mode.
If Link L & R is ON, the menu asso ciated functions are reduced, a nd whatever editing is made on
the Left channel w ill be applied also to the Right one.
Use the PARAMETER enc oder to select OFF or ON. To confi rm press ENTER.
When passing fro m OFF to ON the display will show:
Wait: Loading . . . . . .
Error: Preset Empty
Overwrite Preset?
Yes = Enter; No = Quit
Wait: Saving . . . . . .
5
Page 8
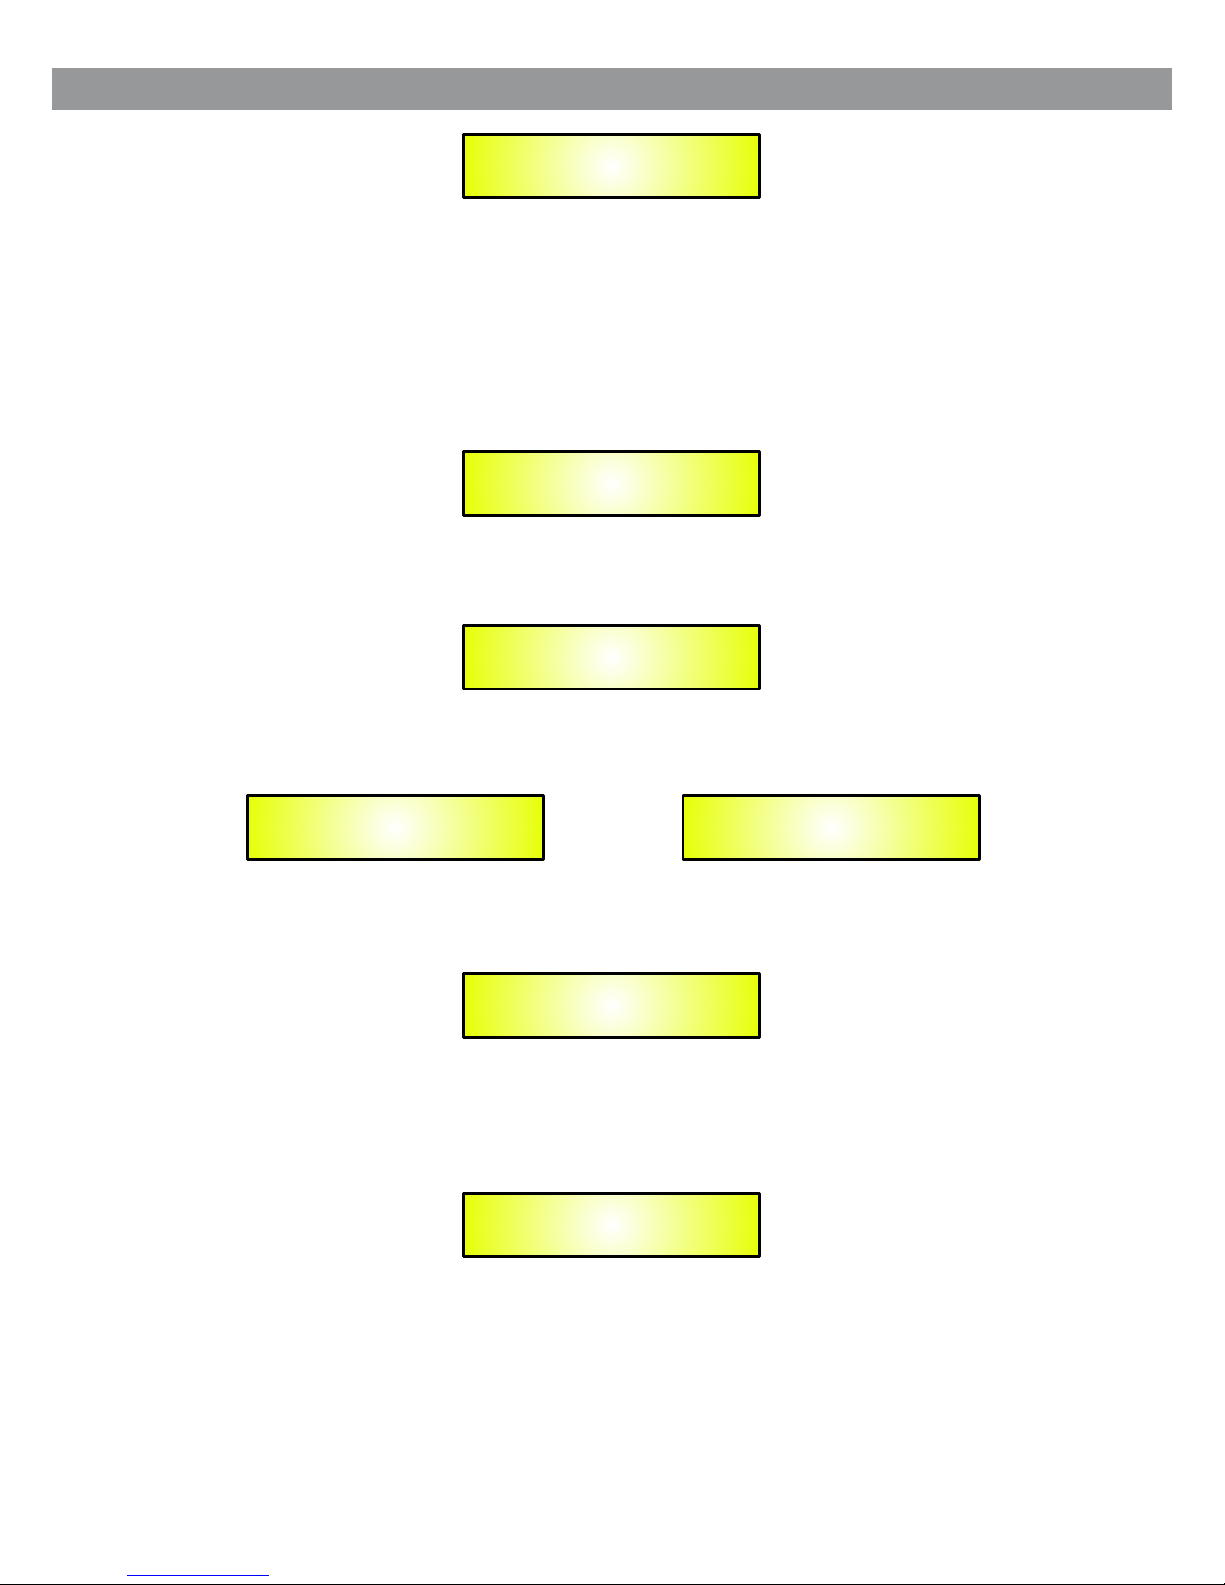
If confirmed, th is command will wipe out Right channel settings, replaced by settings ide ntical to
the Left channel .
Config Communication
It is possible to se lect the remote control interface to use . Use the PARAMETER encoder to select
one of the followi ng: RS-232, USB, or MIDI Channel 1 through 15. Use the PARAMETER encoder
to change the sett ing. Also check the corresponding setti ng on the back panel hardware switc h. To
exit, press QUIT.
When the unit is rem otely controlled (through RS232 or USB n ull-modem cables), then the fro nt
panel is disable d and the LCD display shows:
Config Delay Unit
This function al lows the user to edit the delay time in meters o r in seconds.
Config Equ Type
This function al lows the user to select a graphic equalizer or a parametric equalizer.
In order to confir m the blinking parameter, push the ENTER ke y.
There are no probl ems when changing from graphic eq ualizer to parametric equalizer.
When the user asks t o turn from parametric equalizer to grap hic equalizer, then the LCD displa y
shows:
If the user confir ms his request, the system automatical ly changes the frequency and the Q values
of each filter to su itable values for 2/3 octave filters.
When a parametri c equalizer preset is loaded when the system is in graphic mode, then the syste m
automaticall y changes the frequency and the Q values of each filter to suitable values for 2/ 3
octave filters .
So the user has to be su re to load presets consistent with the cur rent equalizer mode.
Config Delay Unit
Unit: Meter
Config Delay Unit
Unit: Second
Link : Are You Sure?
Yes = Enter; No = Quit
Communication
Device: <RS-232>
System Lock
PC Connection
Configure Equ Type
Type: Parametric
-> GEQ : Are You Sure?
Yes = Enter; No = Quit
6
Page 9
Flat Equ L/R
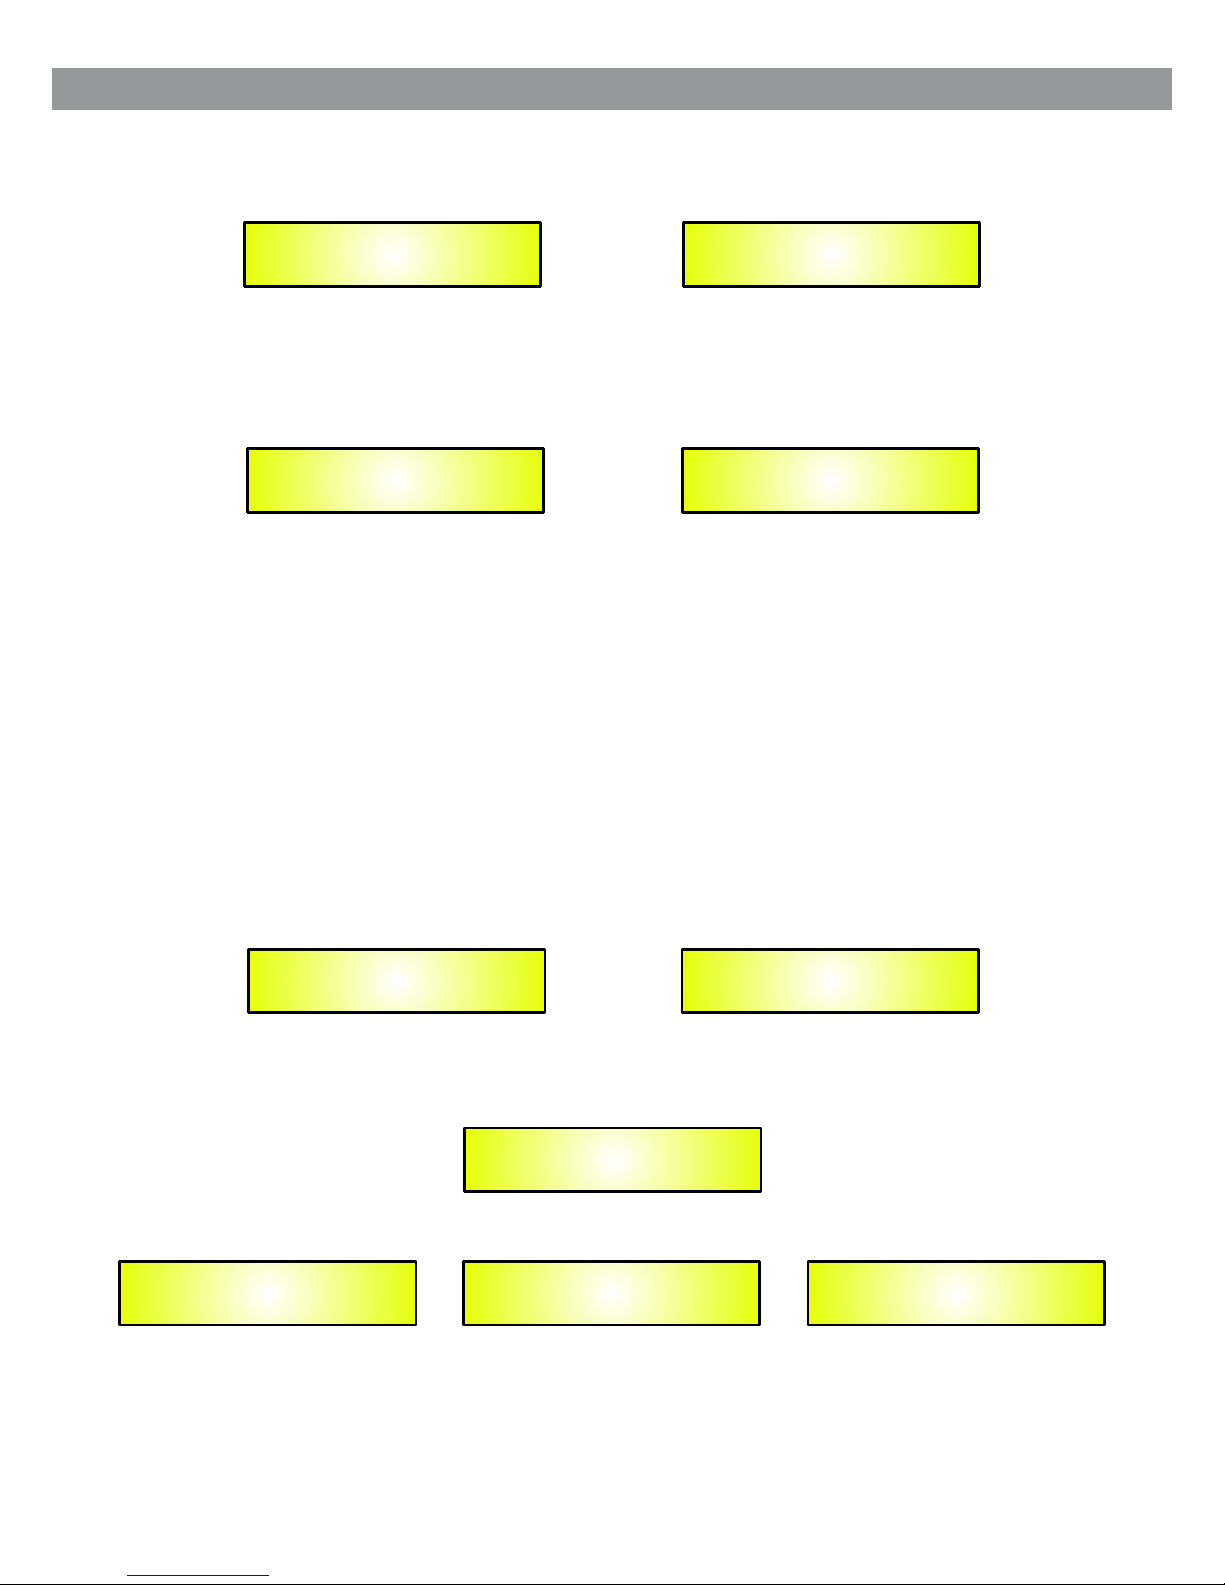
This function re sets all parametric filters of the Left/ Right channel. After pressing ENTER, th e
following will b e shown:
Press ENTER to con firm, QUIT to cancel.
Copy L to R / R to L
This function co pies the settings of one channel to the othe r. Press ENTER to show the following
message:
Press ENTER to con firm, QUIT to cancel.
EDIT CHANNEL L/R MEN U
This sub-menu al lows channel parameters editing:
1. Equalizer
2. Hp Filter
3. Lp Filter
4. Delay
5. Mute Channel
Use the ENCODER to s elect the desired function and press ENT ER to access it, press QUIT to
exit.
Equalizer
Here, it’s possible to edit the 15 filters’ gain (+/-15dB ste p 0.5dB), frequency (20Hz to 20kH z step
1/12 octave), ba ndwidth (from Q=0.4 to Q=1.00 step 0.05, f rom Q=1.00 to Q=10 step 0.1 and from
Q=10 to Q=128 step 1 ).
After selectin g Equalizer and pressing enter, the display shows:
Using the ENCODE R, it’s possible to select the filter to edit (upper right in the display).
Scrolling all 15 f ilters, the lower row will show the setting of each. To edit the selected filter, pres s
ENTER.
The NAVIGATION encoder s elects Gain, Freq, and Q.
The PARAMETER encod er varies the parameter value.
HP/LP Filler
This sub-menu ed its a Butterworth High/Low Pass filter. Available parameters are frequency (20Hz
to 20kHz step 1/12 o ctave) and order (filter bypass, 1st ord er, 2nd order).
Flat R: Are You Sure?
Yes = Enter; No = Quit
Flat L: Are You Sure?
Yes = Enter; No = Quit
CopyRL: Are You Sure?
Yes = Enter; No = Quit
CopyLR: Are You Sure?
Yes = Enter; No = Quit
Right Equ PEQ 01
G01.5 F1K05 Q0.35
Left Equ PEQ 01
G01.5 F1K05 Q0.35
Left Equ PEQ 01
<G01.5>F1K05 Q0.35
Left Equ PEQ 01
G01.5 F1K05<Q0.35>
Left Equ PEQ 01
G01.5<F1K05>Q0.35
Left Equ PEQ 01
<G01.5>F1K05 Q0.35
7
Page 10
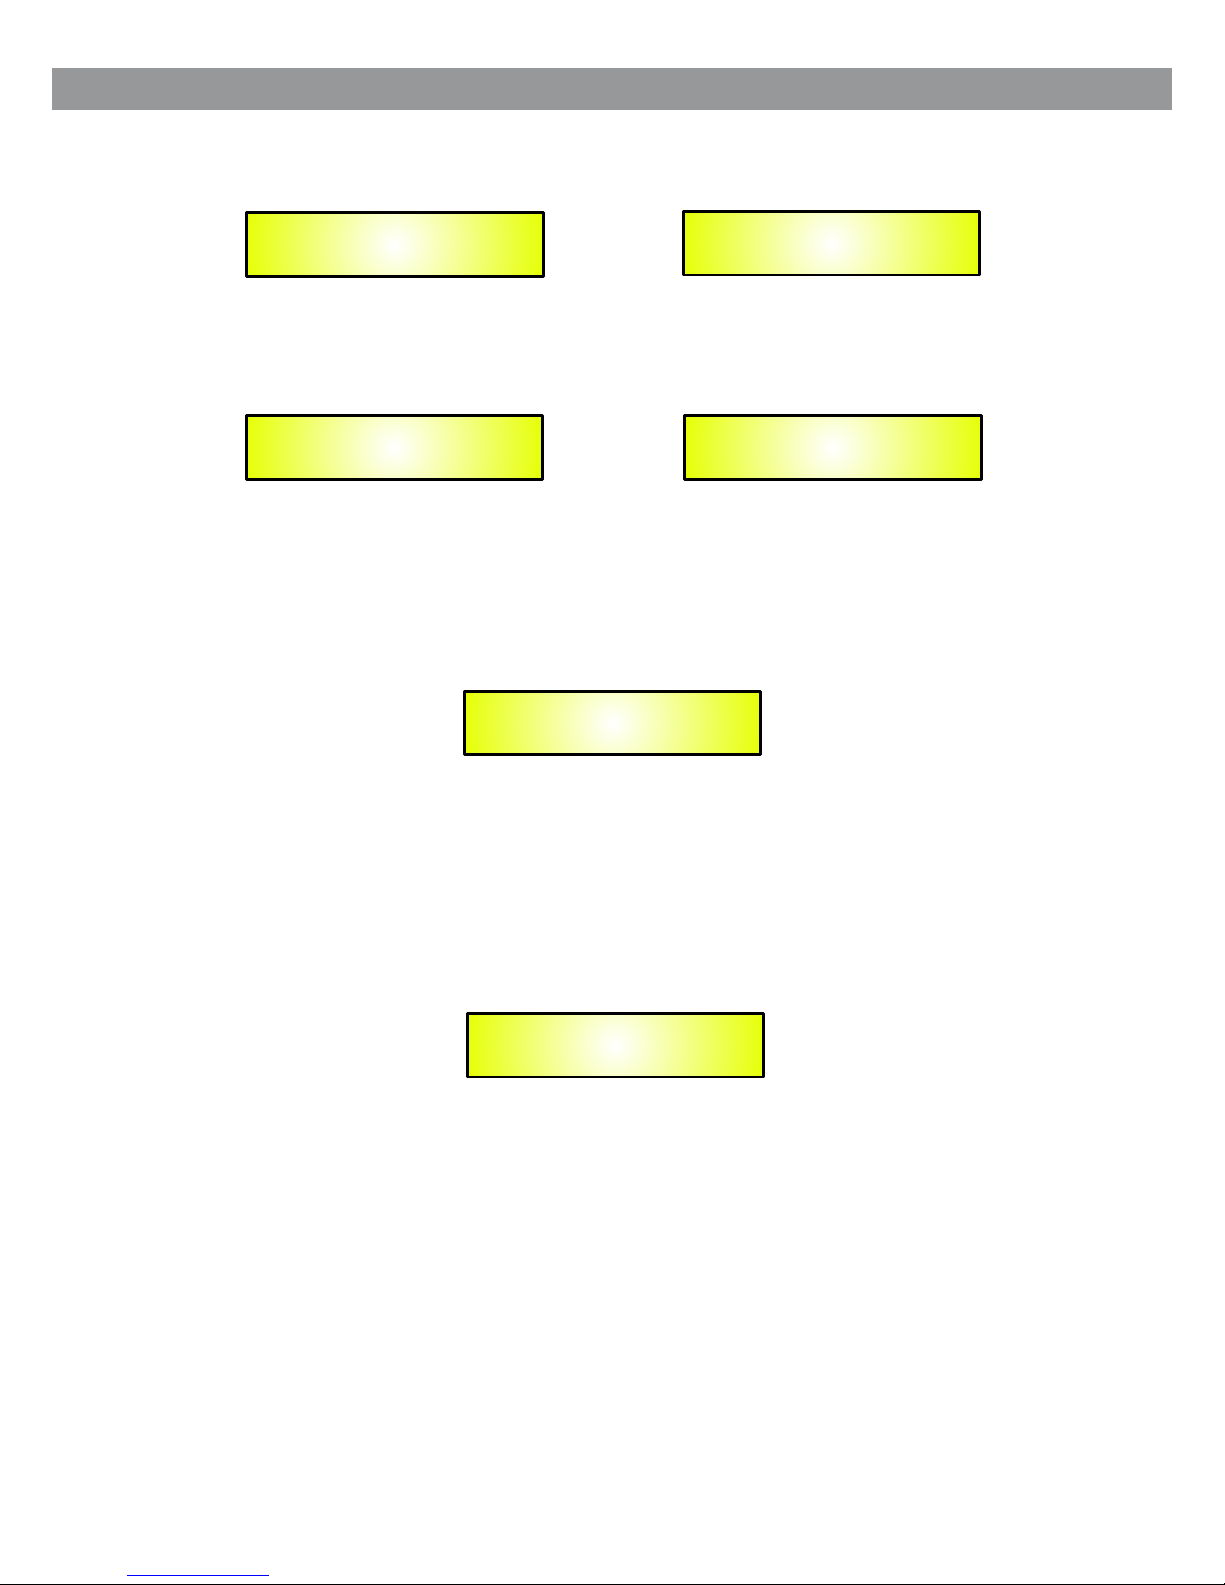
Upon selecting H /L pass and pressing enter, the user acces ses the menu:
The NAVIGATION encoder s elects Freq. Order.
The PARAMETER encod er varies the parameter value.
Delay
This sub-menu ed its a delay line (from 0ms to 199.987ms step 2 1 us).
The NAVIGATION encoder a llows to select the value of hundre ds, tens, units and decimals.
The selected dig it is blinking.
The PARAMETER encod er allows YOU to change the selected di git.
Mute
This function al lows to mute the selected channel.
Left LP Filter
<F20.0> Order 1
Left LP Filter
<F20.0> Order 1
Left LP Filter
F20.0 < Order 1 >
Left LP Filter
<F20.0> Order 1
Left Delay
<199.94ms 65.981ms>
Left Channel
< Mute - Off >
8
Page 11
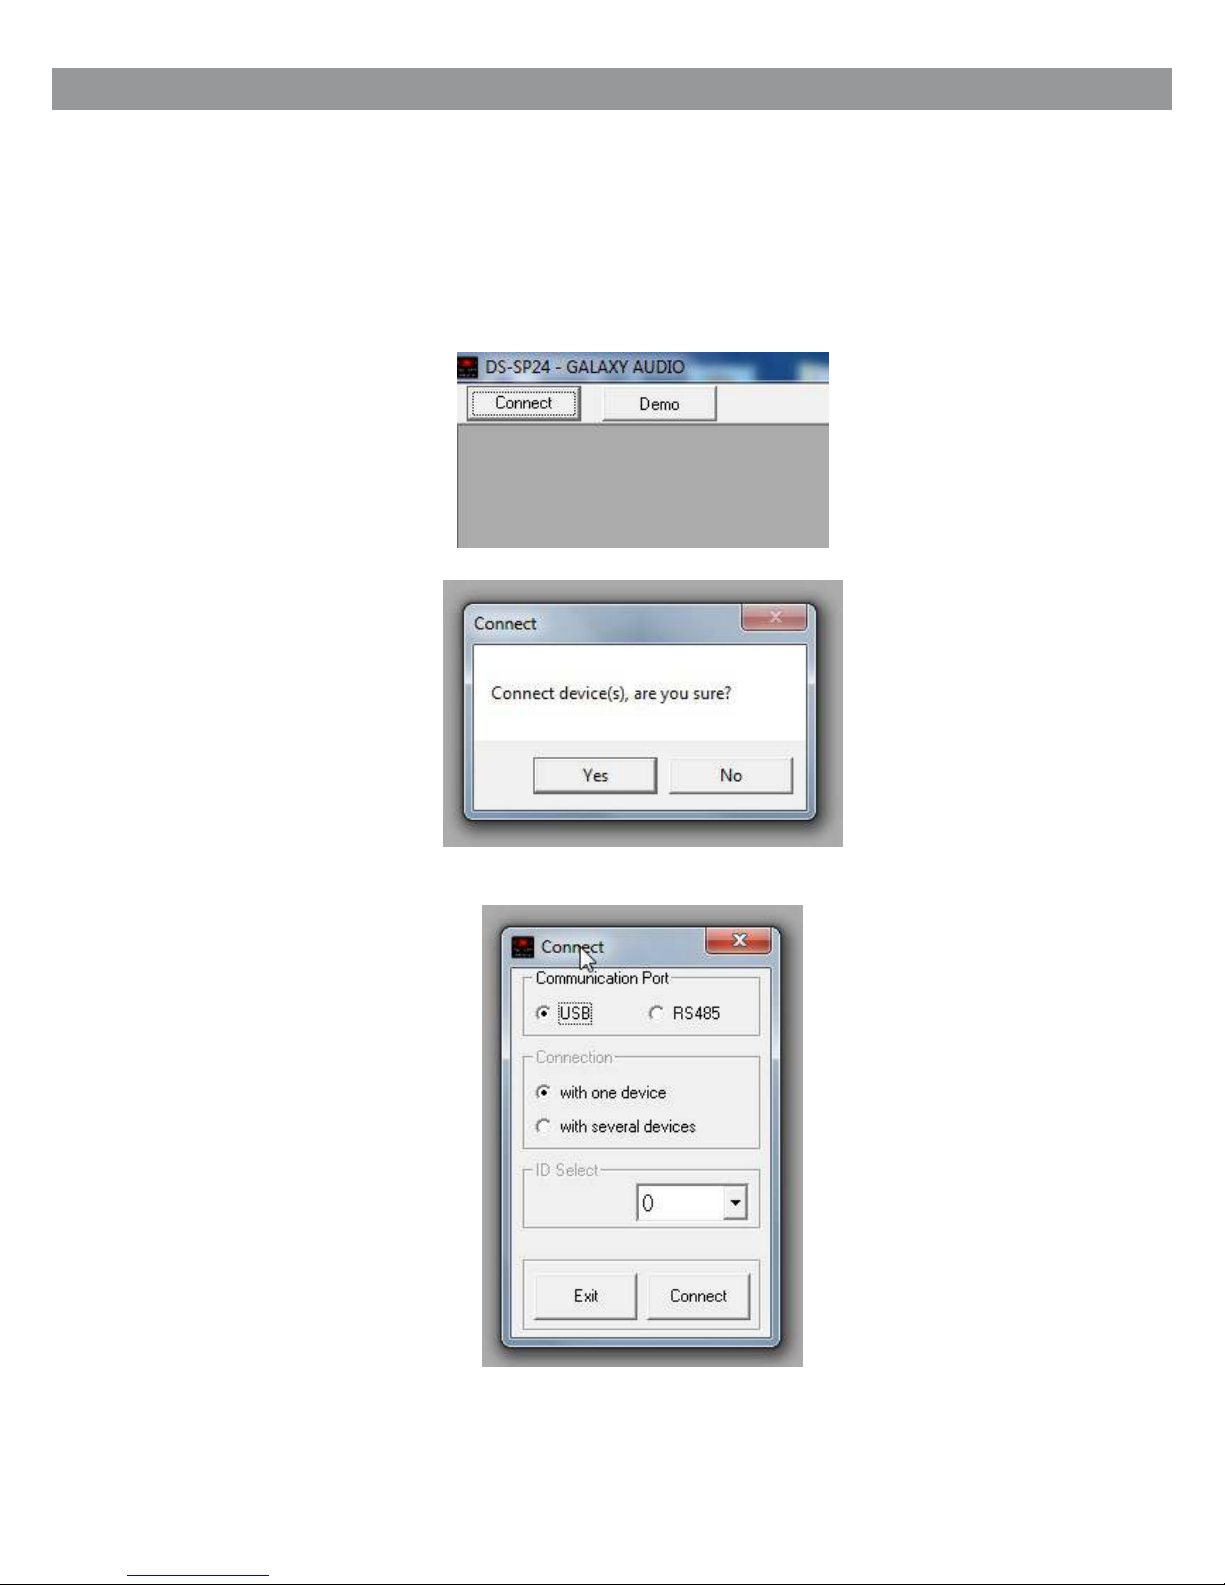
Using the DS-EQ215 Software
l
Load the Software “SetupDS-EQ215V1.0.0” either with the included CD or via the Galaxy Website.
l
Double click on “Setup”, choose “Run” the software will load.
l
Go to programs and double click on DS-EQ215V1.0.0
l
Connect the SDS-EQ215 with the USB cable to your computer.
l
Turn on the DS-EQ215, the driver software will load automatically.
l
When the driver has finished loading, click once on “connect”.
If you want to continue select “Yes”
Choose your connection type.
Then Click on Connect.
9
Using the PC Interface
Page 12
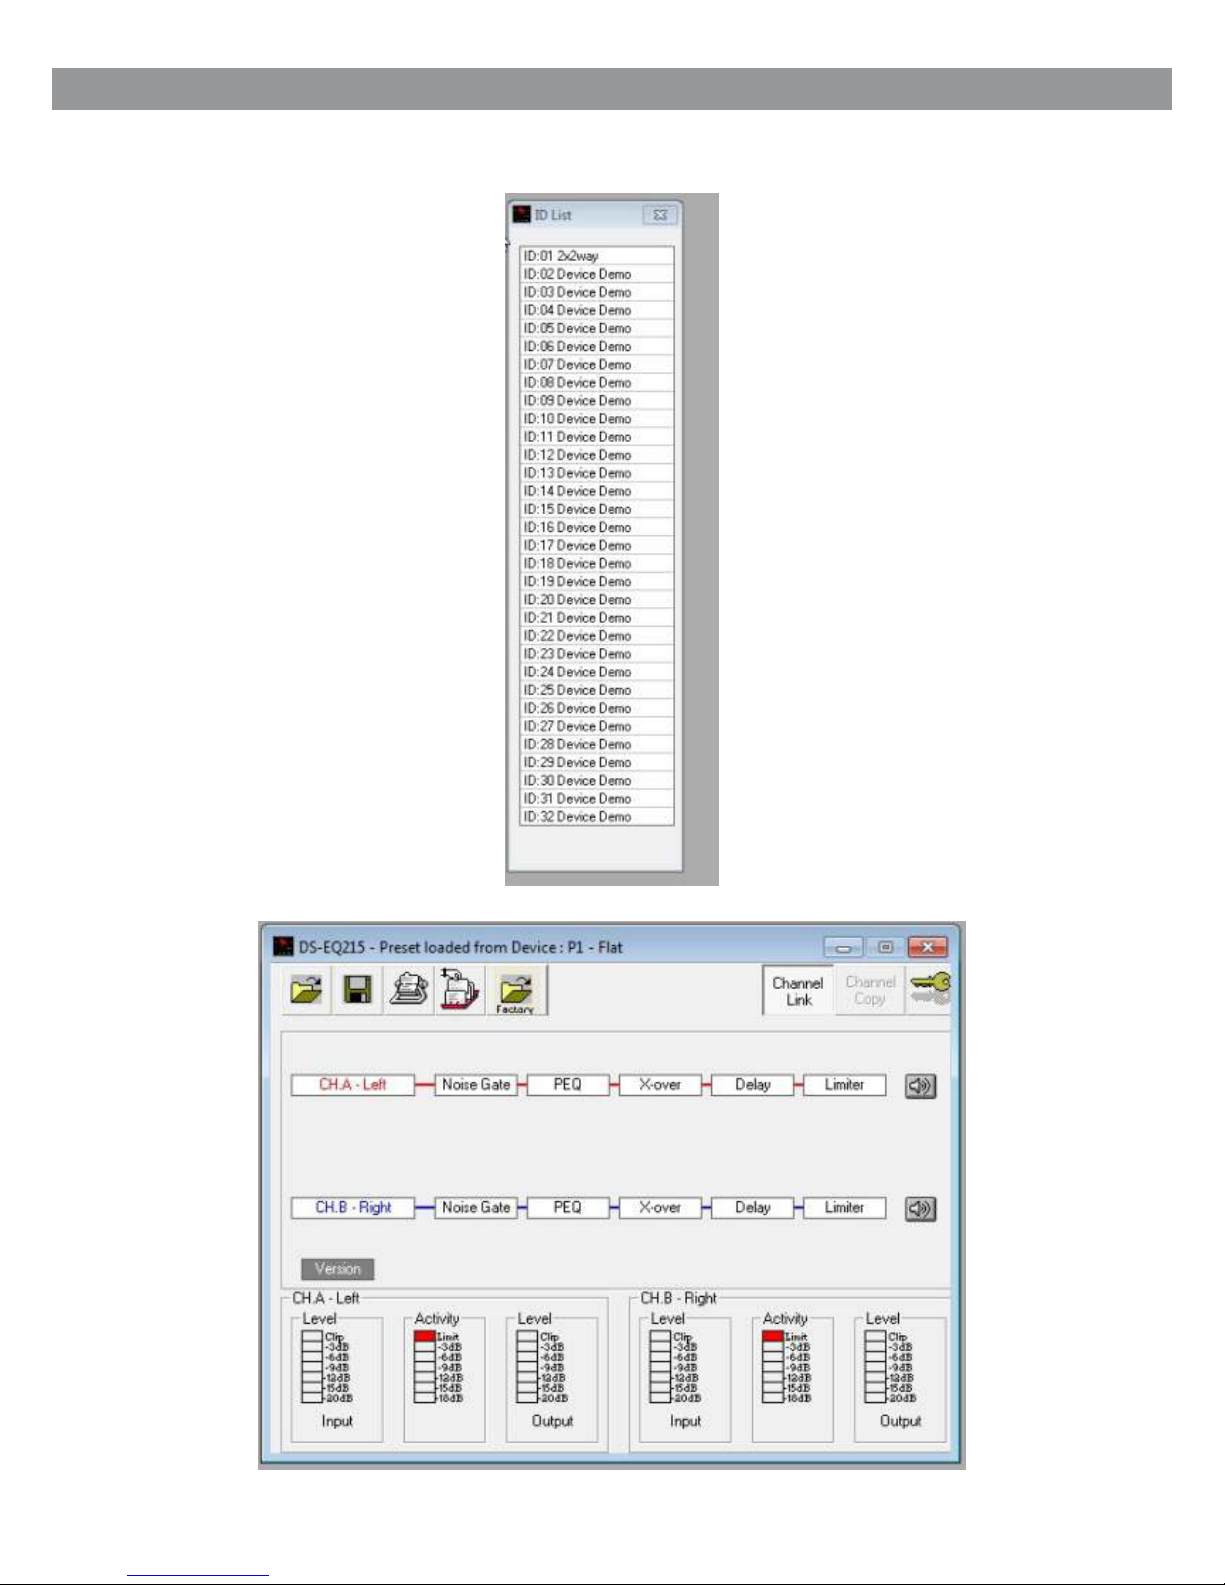
The Main Page will load.
The software will look for active devices and show them in a list.
To edit Double click on the desired device in the ID list.
10
Page 13
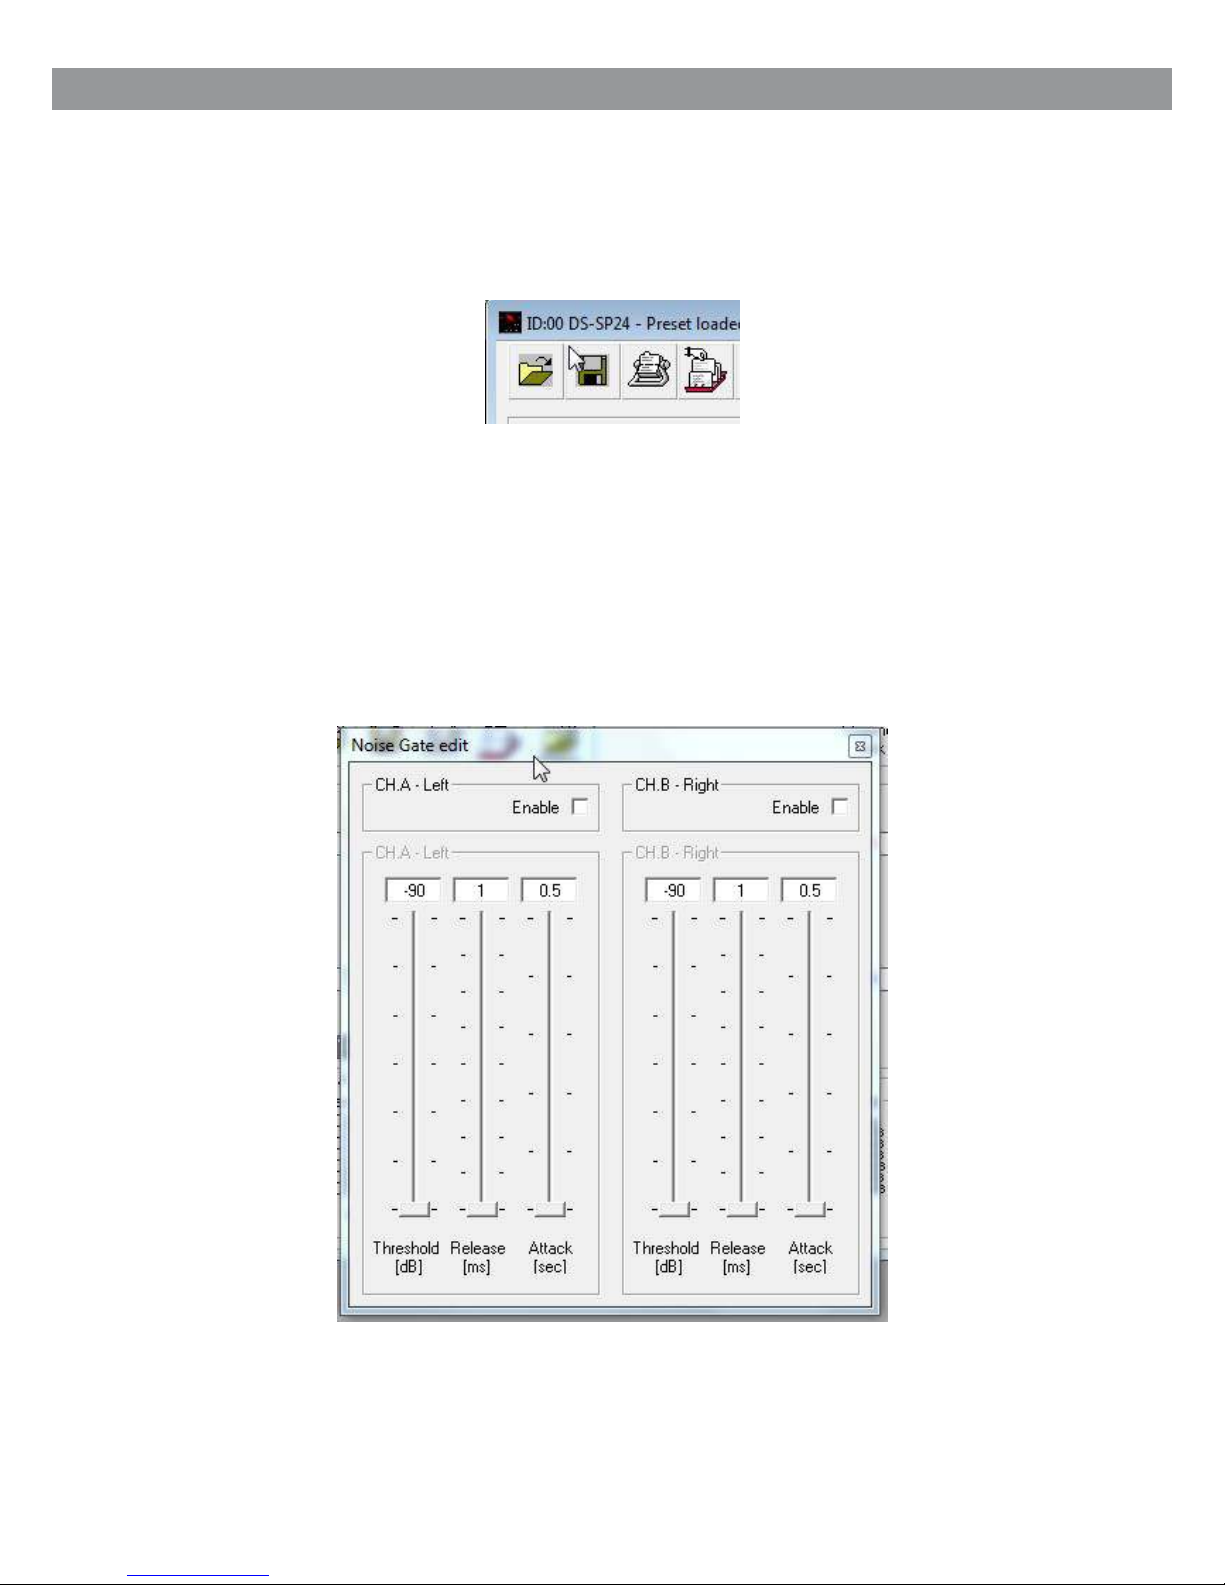
From the main page you can choose the section you want to adjust by clicking on the associated block.
Once you have accessed the block you can adjust parameters by either using the sliders, arrows, or typing
the values in directly.
Select the noise gate block to access the noise gate parameters for each channel.
The device will also be locked out from front panel control at this point.
You may choose to “Load Preset from PC”, “Save Preset to PC”, “Store Preset to Device”, “Read Preset
from Device”
11
Page 14
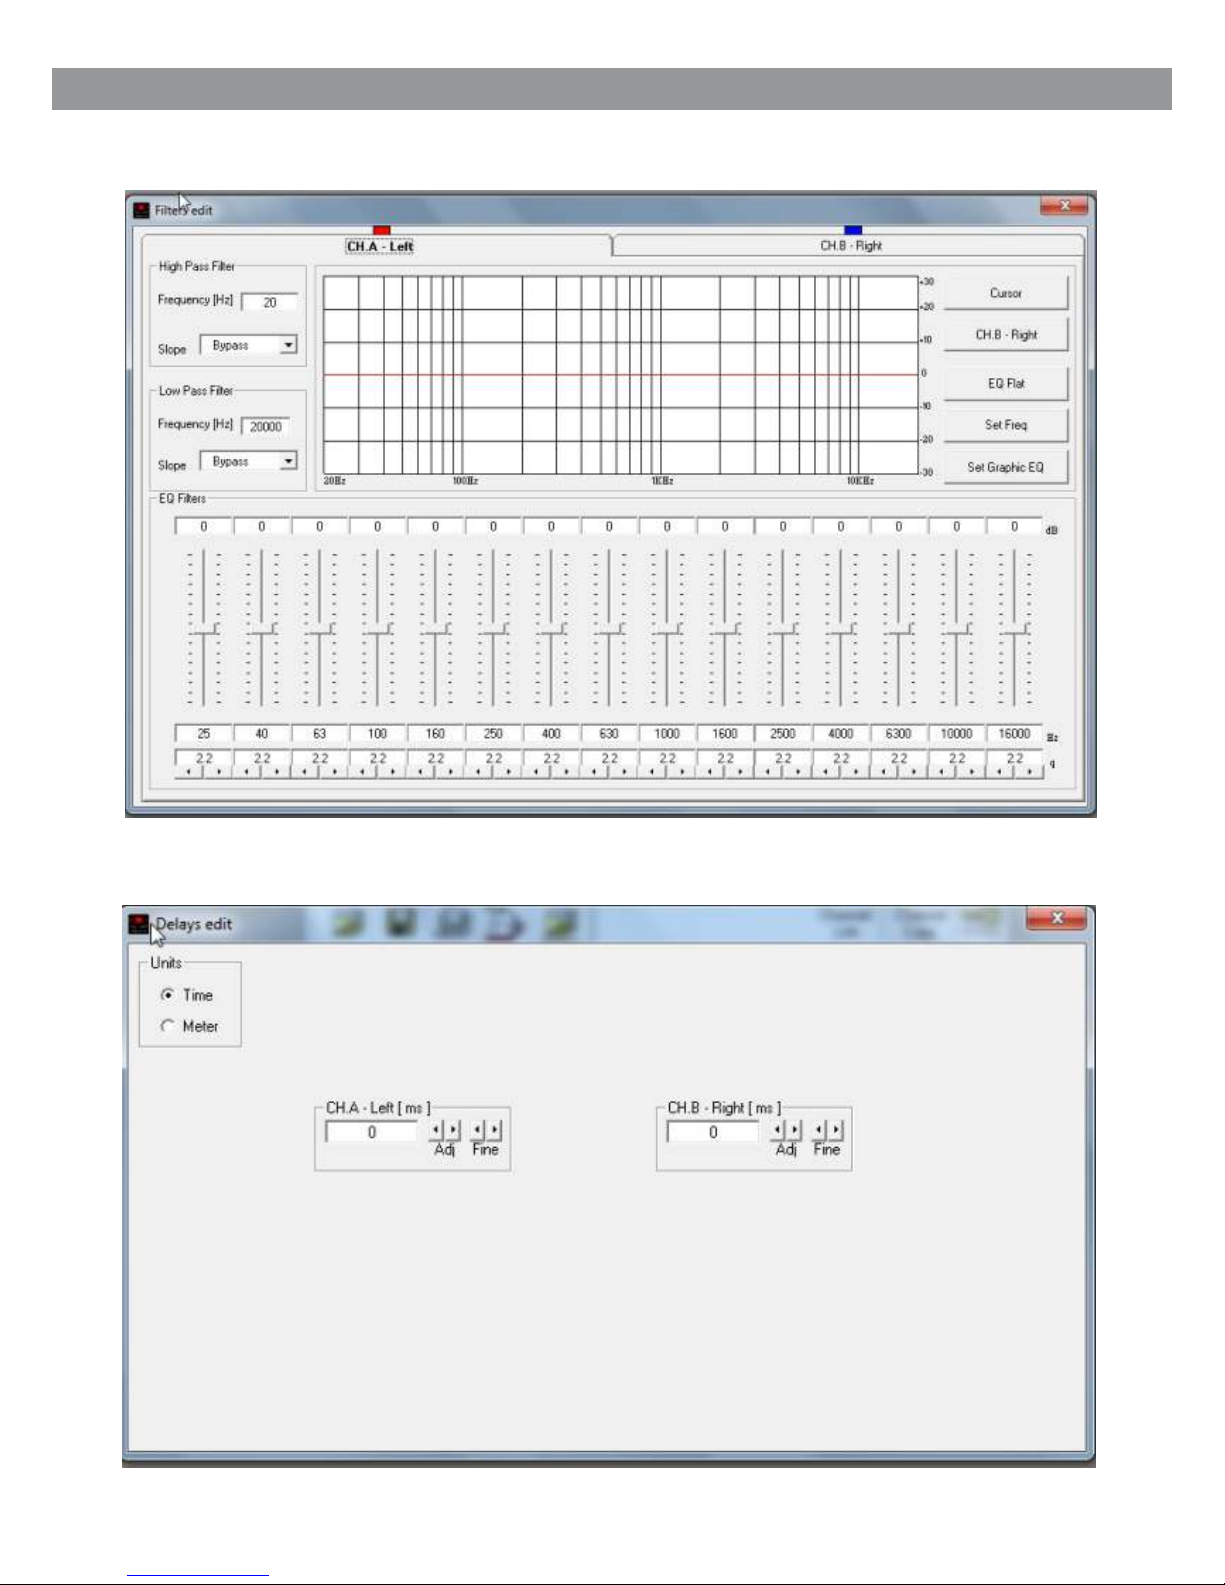
Select the Delay block to access the left and right delay parameters.
Select the PEQ block to access the filter parameters.
12
Page 15
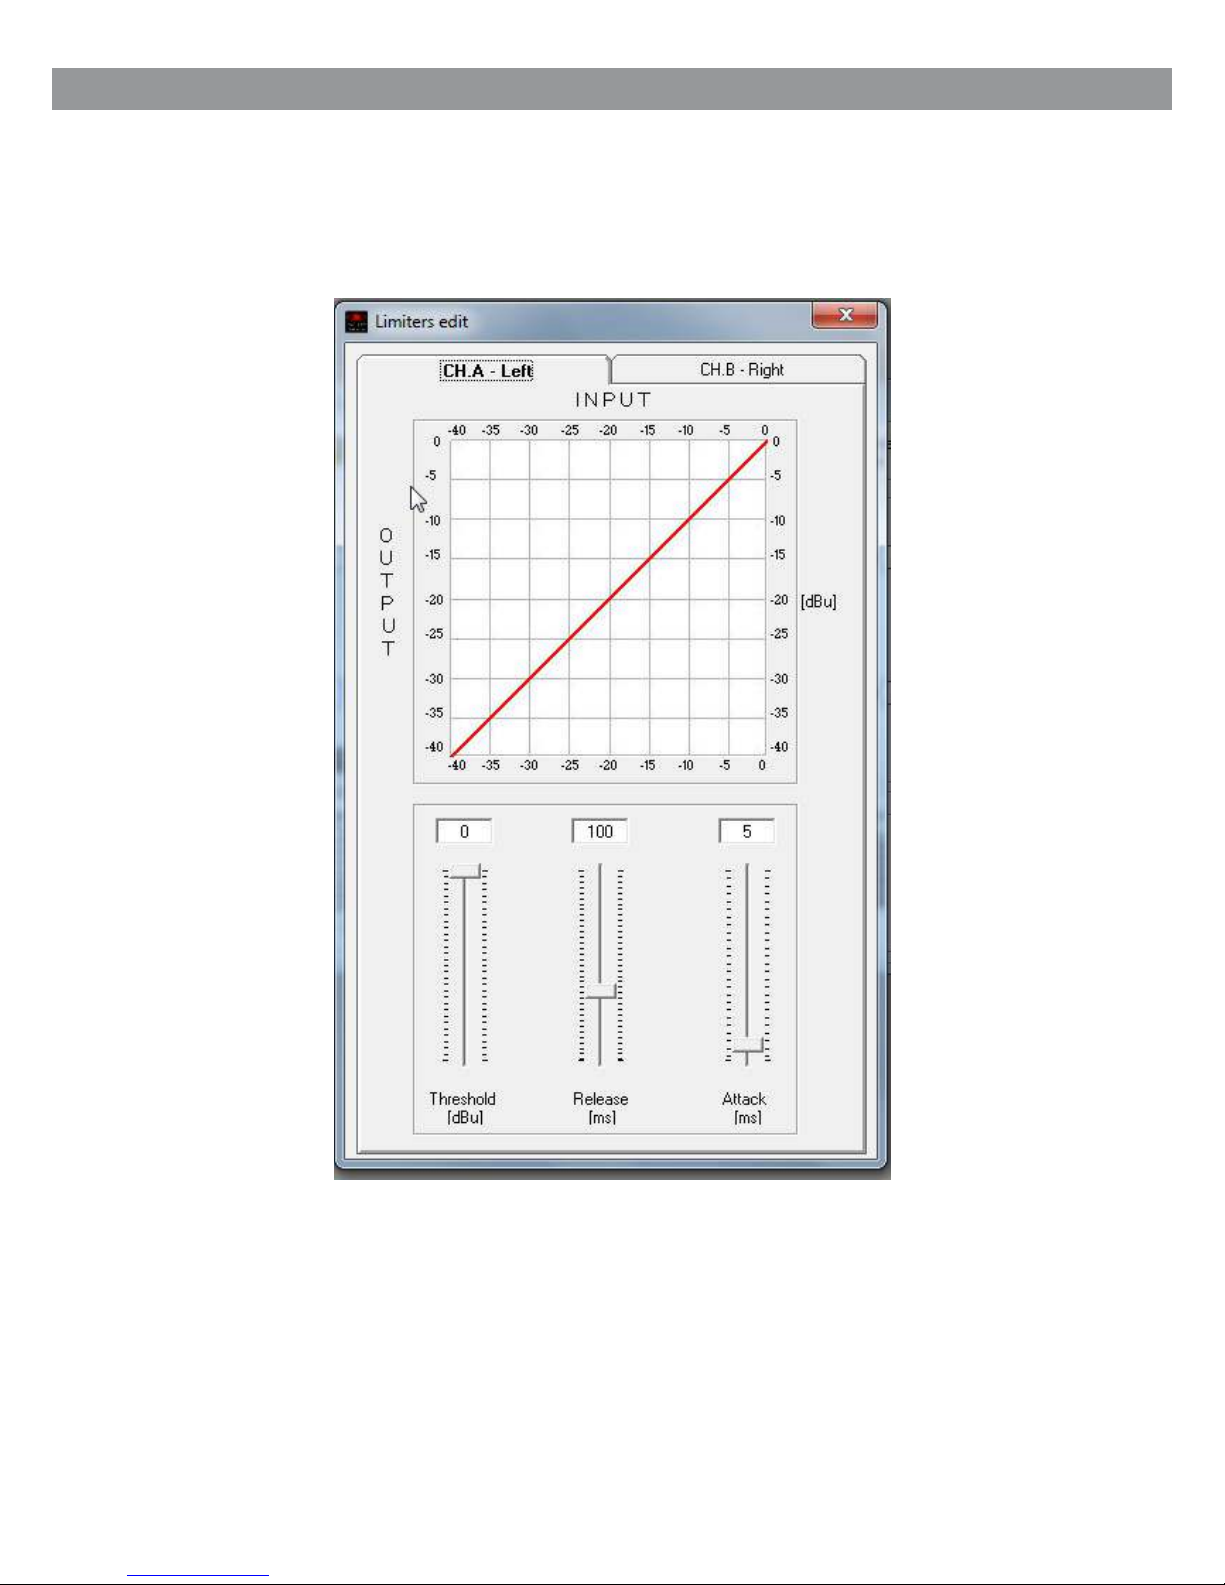
Select the Limiter Block to access the left and right Limiter parameters.
13
Page 16
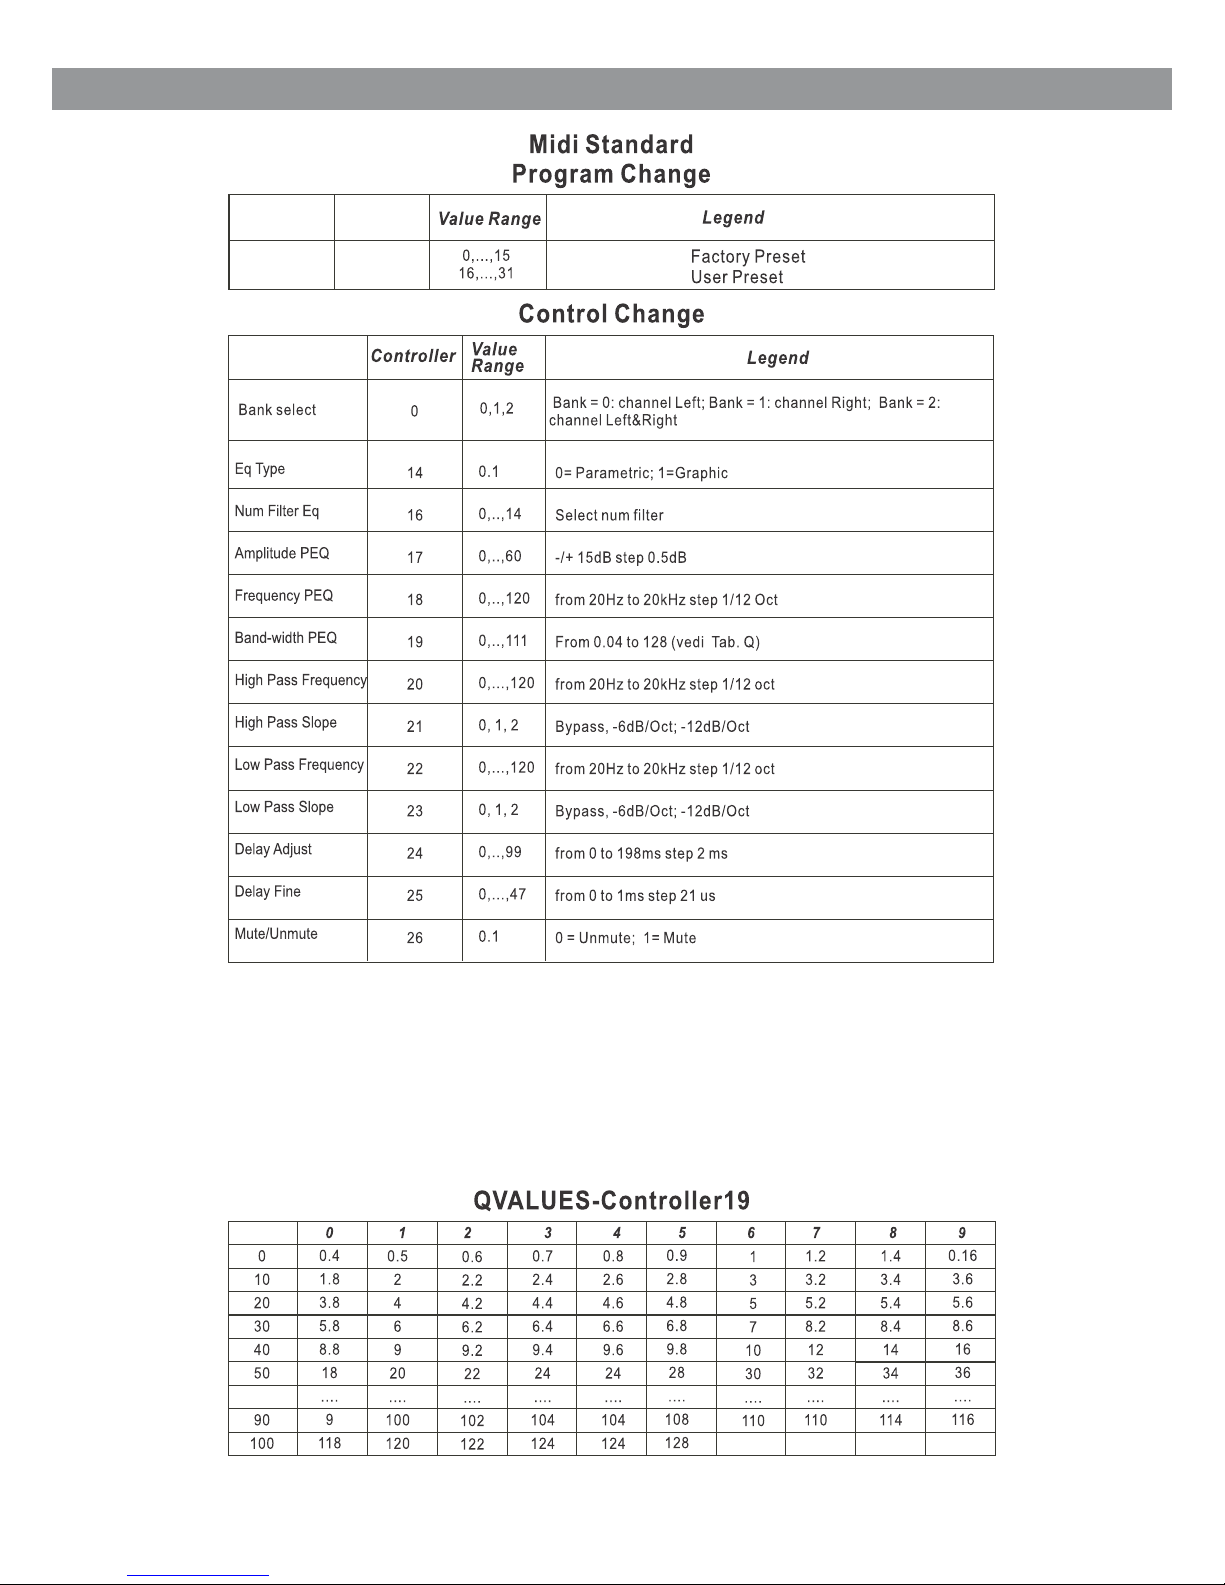
Edit using the fol lowing steps:
I. Be sure about the selected equalizer mode
2. Select the chan nel controller 0
3. Select the numb er of the filter controller 14
4. Change the ampl itude of the selected filter controlle r 17
5. Change the freq uency of the selected filter controlle r 18
6. Change Q value of t he selected filter controller 19
Repeat the steps 3 ,4,5,6 for each filter you wish to edit.
14
MIDI Program Table
Page 17
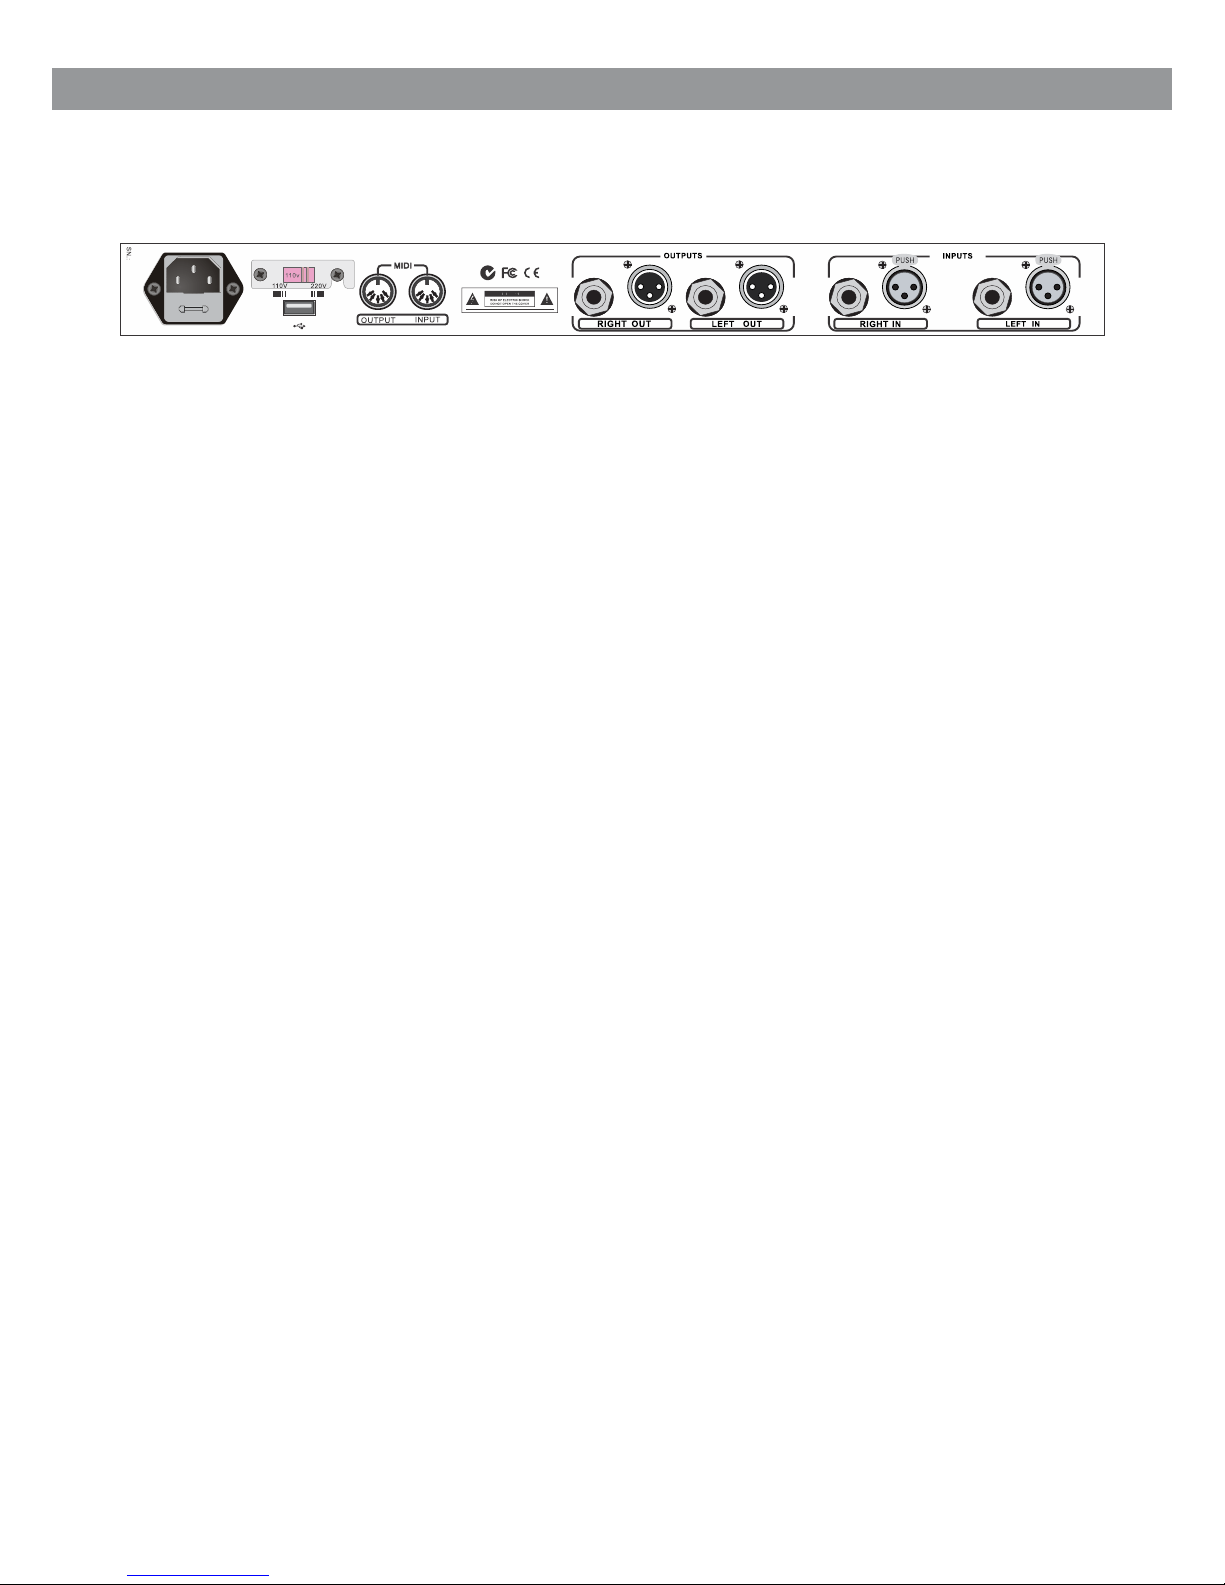
Inputs: 2 TRS Unbalanced
Input Max Level: 9dBu
Outputs: 2 TRS Unbalanced
Output Max Level: 9dBu
AID and DIA Resolution: 20 bit
Process Resolution: 24x32 bit
Processes: Equalizer
Display: LCD 2x20 alphanumeric
Connectivity: RS232/MIDI/USB
SIN Ratio: >90 dBA (Bypass)
THD+N: <0.01 % @ -6 dBFS (Bypass)
Frequency Response: 20Hz-20kHz +1- 0.5dB
Dimensions: 7.75" x 19" x 1.75" (196.85 x 482.6 x 44.45 mm)
Weight: 5.51lb (2.5kgs)
15
FUSE: REPLACE WITH 800mA SAME TYPE FUSE
USB
Specifications
Page 18

Page 19

Page 20

1-800-369-7768 www.galaxyaudio.com
V02072014
Printed in China
© Copyright Galaxy Audio 2014
WARRANTY Information can be viewed online at
http://www.galaxyaudio.com/warranty.php
THREE YEA R LI MITED WARRA NT Y
Specifications in this manual are subject to change without notice.
For the most up to date manual and information
visit www.galaxyaudio.com.
DS-EQ215
 Loading...