

Page 1
Page 2

TITLE PAGE
C O N T E N T S
Safety Information………………………….
I.
II.
General Description.……………………….
III.
Specifications……………..………………2-3
Controls………………………………..….
IV.
V.
Calibration Procedures………..………...
Measurement Preparation……..……….….7
VI.
Operating Precautions………..……………
VII.
VIII. Measurement………………………………
4-5
... 6
7-8
1
1
7
Page 3

SOUND LEVEL METER
I. Safety Information
Read the following safety information carefully before
attempting to operate or service the meter.
Use the meter only as specified in this manual; otherwise,
the protection provided by the meter may be impaired.
± Environment Conditions
Altitude up to 2000 meters
Relative humidity 90% max.
Operation Ambient 0 to 40℃
± Maintenance & Clearing
Repairs or servicing not covered in this manual should
only be performed by qualified personnel.
Periodically wipe the case with a dry cloth. Do not use
abrasives or solvents on this instrument.
± Safety symbols
Complies with EMC
When servicing, use only specified replacement
parts.
II. General Description
To ensure that you can get the most from the Mini Sound
Level Meter, we recommend that you read and follow the
manual carefully before use.
R Range from 40dB to 130dB at frequencies between
125Hz and 8 KHz.
R Display with 0.5dB steps on a 4-digit LCD.
R Two equivalent weighted sound pressure levels, A and
C.
1
Page 4

SOUND LEVEL METER
III. Specifications
Frequency Range: 125Hz to 8KHz
Measuring Level Range: 40dB to 130dB
Frequency Weighting: A/C
Microphone: 1/2 inch electret condenser
microphone
Display: LCD
Digital Display: 4 digit
Resolution: 0.5dB
Display Update: 2 times/sec.
Time Weighting:
FAST 125ms
SLOW 1 second
Level Ranges:
Range1: 40 dB to 70 dB
Range2: 60 dB to 90 dB
Range3: 80 dB to 110 dB
Range4: 100 dB to 130 dB
Accuracy: ±2dB(under reference conditions
94dB@1kHz )
Dynamic Range: 30 dB
Alarm Function: “OVER” is displayed when the
MAX Hold function: Holds readings of the maximum value.
Power Supply: One 9V battery
006P or IEC 6F22 or NEDA 1604.
input is more than the upper limit
of the range.
“UNDER” is displayed when the
input is less than the lower limit of
the range.
2
Page 5

SOUND LEVEL METER
Power Life: Approximately 110 hours
(Alkaline Battery)
Operation Temperature: 0 to 40℃ ( 32 to 104℉ )
Operation Humidity: 10 to 90% RH
Storage Temperature: -10 to 60℃ ( 14 to 140℉ )
Storage Humidity: 10 to 75% RH
Dimensions: 9.1” L ×2.1” W ×1.3” H
Weight: 170g (0.37 lbs) ( including battery )
Accessories: 9V battery, instruction manual, and carrying
case.
23.1 cm ×5.3 cm ×3.3 cm
3
Page 6

IV. Controls
1
2
3
MAX
4
A / C
5
FAST
6
SLOW
LEVEL
7
70 dB
40
90 dB
60
110 dB
80
130 dB
100
SOUND LEVEL METER
TERY
9V BAT
NEDA 1604 6F22 006P
8
CAL
OPEN
9
1
Microphone
○
1/2 inch Electret Condenser microphone
2
○
Display
Maximum indication
Low battery indication
Sound Level readout
Range indicate
4
Fast response
Slow response
A-Weighting
C-Weighting
Over range
Under range
Page 7

SOUND LEVEL METER
3
Power Button
○
I
button turns the sound level meter ON or OFF.
The ○
4
○
MAX Hold button
Press the button to enter the maximum recording
MAX
mode. Select the proper level range before using MAX to
ensure that read value would not exceed the
measurement range. Press again to exit the MAX mode.
Note: If the sound level or A-C weight are changed,
the MAX mode will clear.
5
Frequency Weighting Select Button
○
A: A-Weighting for general sound level measurements
C: C-Weighting for checking the low-frequency content
of noise
(If the C-Weighted level is much higher than the
A-weighted level, then there is a large amount of
low-frequency noise.)
6
Time Weighting Select Button.
○
FAST: for normal measurements
SLOW: for checking average level of fluctuating noise
7
○
Level Range Control Button
Each time the level button is pressed, the level range
will cycle through the “Range1”, “Range2”, “Range3”,
and “Range4”, levels.
8
○
CAL Potentiometer
Calibration control for level calibration adjustment.
9
○
Battery Cover
5
Page 8
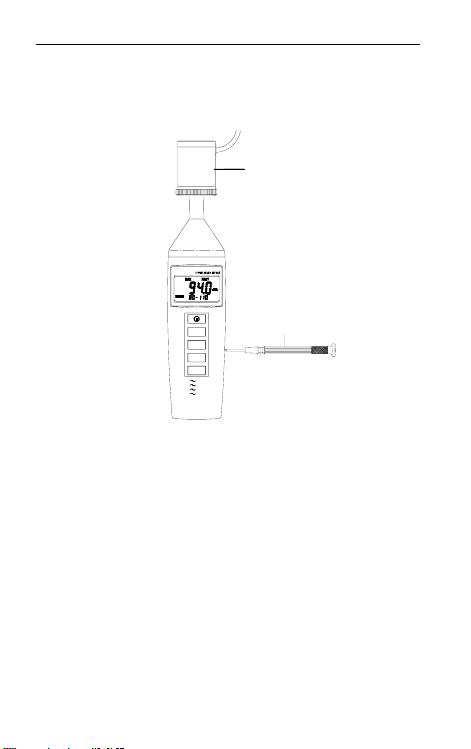
V. Calibration Procedures
Using a standard Acoustic Calibrator
(94dB, 1KHz sine wave)
Acoustic Calibrator
SOUND LEVEL METER
MAX
A / C
FAST
SLOW
LEVEL
40
60
80
100
(1) Make the following switch settings.
Screwdriver
70 dB
90 dB
110 dB
130 dB
Display: dBA
Time Weighting: FAST
Measurement Mode: MAX Mode function disable.
Level Range: 80 to 110dB
(2) Insert the microphone housing carefully into the insertion
hole of the calibrator.
(3) Turn on the calibrator and adjust the CAL potentiometer
of the meter until the level display indicates the desired
level. The meter is calibrated before shipment. We
recommend recalibration annually.
6
Page 9

SOUND LEVEL METER
VI . Measurement Preparation
(1) Battery Loading
Remove the battery cover on the back and install one
9V Battery.
(2) Battery Replacement
When the battery voltage drops below that required for
reliable operation, the low battery symbol will
appear, indicating it is time to replace the battery.
VII. Operating Precautions
(1) Calibrate the instrument before operation if the instrument
has not been used for a long period of time.
Do not store or operate the instrument in high temperature
(2)
and high humidity environments.
(3) Keep the microphone dry and avoid severe vibration.
(4) Remove the battery from the instrument, and store in a
low humidity environment when not in use.
VIII. Measurement
(1) Open the battery cover and install a 9V battery in the
battery compartment.
(2) Turn power ON and select the desired response time
and weighting. If the sound source consists of short
bursts, or the meter is only catching sound peaks, set
response to FAST. To measure average sound levels,
use the SLOW setting.
Select A-weighting for general noise sound level and
C-weighting for measuring sounds with high low
frequency content.
(3) Select desired level.
7
Page 10

SOUND LEVEL METER
(4) Hold the instrument comfortably in your hand and point
the microphone at the suspected noise source. Read the
sound pressure level from the display.
(5) When MAX (maximum hold) mode is chosen, the
instrument captures and holds the maximum noise level
values indefinitely. The MAX function operates on all
settings, regardless of the response time, weighting, or
range.
Press the MAX button again to clear the MAX reading. The
“MAX ” symbol will disappear.
(6) Turn OFF the instrument and remove the battery when
not is use.
8
 Loading...