


GALAXY 1 COMMUNICATIONS
The G1 Intelligent Gateway
Users Manual
4611 South University Dr. #454
Fort Lauderdale FL 33328
Confidentiality Notice: The information contained in this document is strictly confidential and is to be considered as
Customer/Galaxy 1 propriatary information. It is intended solely for the use of the Customer and Galaxy 1, and its contents
may be legally privileged and protected from disclosure by law. Notice is hereby given that any disclosure, use or copying of the
information by anyone other than the intended recipient is strictly prohibited and may be illegal.
Galaxy 1 Proprietary Information
1

Rev 1.1
Version 1.2 of the G1 IG Users Manual is provided for revision A hardware and revision 156 firmware.
Comments, questions, concerns, and capability discussions are welcome and may be directed towards
Galaxy 1, +1.954.472.9599 or support@G1sat.com.
Table of Contents
1 Introduction ................................................................................................................... 4
1.1 Background and Capabilities ................................................................................................4
1.2 Physical Characteristics .......................................................................................................4
1.2.1 Size ........................................................................................................................................ 4
1.2.2 Weight ................................................................................................................................... 4
1.2.3 Power .................................................................................................................................... 4
1.3 Interfaces and Indicators .....................................................................................................5
1.3.1 Indicator Panel ...................................................................................................................... 5
1.3.2 Port Panel .............................................................................................................................. 5
1.4 Common Configurations ......................................................................................................6
1.4.1 G1 Intelligent Gateway ......................................................................................................... 6
1.4.2 Cisco Router Fronting G1 IG .................................................................................................. 7
2 Configuration Basics and Initial Setup ............................................................................. 7
2.1 G1 Intelligent Gateway Initial Setup .....................................................................................7
2.1.1 Changing the Default Password ............................................................................................ 7
2.1.2 Setting the System Time ....................................................................................................... 7
3 Configuration of the G1 IG .............................................................................................. 8
3.1 General Interface Concepts .................................................................................................8
3.2 The Basic Tab ......................................................................................................................9
3.2.1 Ethernet Configuration Page ................................................................................................. 9
3.2.2 Wi-Fi Access Point Page ...................................................................................................... 12
3.2.3 USB Page ............................................................................................................................. 13
3.2.4 Load Balancing & Fail Over Page ......................................................................................... 14
3.3 Advanced Tab ................................................................................................................... 16
3.3.1 Routes Page ......................................................................................................................... 16
3.3.2 Hosts Page ........................................................................................................................... 17
3.3.3 Firewall Page ....................................................................................................................... 17
3.3.4 Services Page ....................................................................................................................... 18
3.3.5 VLAN Page ........................................................................................................................... 19
3.3.6 DHCP Page ........................................................................................................................... 19
3.3.7 Backup & Restore Page ....................................................................................................... 20
3.3.8 Firmware Upgrade Page...................................................................................................... 21
3.3.9 Log Page .............................................................................................................................. 22
Galaxy 1 Proprietary Information
2

Rev 1.1
3.3.10 The User Management Page ............................................................................................... 22
3.4 Status Tab ......................................................................................................................... 23
Galaxy 1 Proprietary Information
3

Rev 1.1
1 Introduction
1.1 Background and Capabilities
The G1 IG’s main purpose is to provide remote access for dynamic mobile users and users that utilize a
variety of WAN access technologies. The G1 IG provides intelligent WAN access management
capabilities.
The G1 IG’s Router functions are capable of managing numerous WAN access technologies. The design
is agile and easily upgradable to support new technologies as they become available. The configuration
scenarios supported include Static Ethernet, DHCP Ethernet, PPPoE Ethernet, various USB cellular
modems, and 802.11n Wi-Fi as an access point. The G1 IG allows users to configure and manage WAN
connections as simply as if user’s were on their laptop PC.
1.2 Physical Characteristics
1.2.1 Size
Table 1: Various Size Measurements
Height Depth Width
Body 1.14”
29mm
7”
178mm
7.5”
191mm
1.2.2 Weight
The G1 IG weighs approximately .9 pounds.
1.2.3 Power
The G1 IG requires approximately 18-30W depending on loading and accepts power in the range of
9VDC to 25VDC.
The G1 IG supports operation using unregulated battery chemistries (9VDC to 24VDC) such as
automobile batteries or military standard series batteries. Using the G1 IG with cellular modems is likely
to result in a slightly shorter battery operated duration. Disabling and/or disconnecting interfaces that
are not essential, especially USB devices, will increase battery-operated duration.
Galaxy 1 Proprietary Information
4

Rev 1.1
1.3 Interfaces and Indicators
1.3.1 Indicator Panel
Figure 1: G1 IG Indicator Panel
G1 IG indicators:
• 0, 1, 2, 3 – Ethernet activity indicators illuminate when a Ethernet link is present and flash when
Ethernet traffic is sent or received on the interface. 0, 1, 2, and 3 correspond with the eth0,
eth1, eth2, and eth3 Ethernet interfaces on the port panel.
• Busy – The busy indicator illuminates when the G1 IG is executing commands from the router’s
internal storage media. It behaves much like a computer’s drive activity indicator.
• Error – The error indicator illuminates when the G1 IG is experiencing an error condition.
• Power – The power indicator is illuminated when the G1 IG device is powered on.
G1 IG Wi-Fi antenna – The G1 IG antennae are a pair of Reverse Polarity Threaded Female SMA type
jacks mounted on the front of the indicator panel.
1.3.2 Port Panel
Power port – The G1 IG power port is a 5.5mm outside diameter 2.5mm inner diameter industry
standard barrel jack. The G1 IG requires approximately 15W and accepts power in the range of 9VDC to
26VDC. The power port pin out is as follows:
• Pin – DC + (9V-26V)
• Barrel – Ground
G1 IG ports:
• eth0, eth1, eth2, eth3 – In the default configuration the eth0, eth1, and eth2 ports behave as
Ethernet LAN ports and the eth3 port behaves as an Ethernet WAN port. These ports are
10/100 Fast Ethernet interfaces with an auto-crossover (auto-MDIX) capability. Auto-crossover
means that either regular or crossover Ethernet cables will work with the ports.
• Console – In the default configuration the console port allows users to locally attach to the
command line configuration interface of the G1 IG. The Console port is a standard DB9 DTE
Galaxy 1 Proprietary Information
5

Rev 1.1
serial port. Alternatively, this port can be configured by G1 as an RS232 port (contact G1 for
additional information on this capability)
• USB 1 – The G1 IG USB ports are USB 2.0 compatible and support connection of USB cellular
modems.
Figure 2: G1 IG Port Panel
1.4 Common Configurations
1.4.1 G1 Intelligent Gateway
The G1 IG supports auto MDIX or auto crossover and therefore either a patch or crossover Ethernet
cable may be used. Configuring the Eth0 as the only LAN, Connecting Eth1 to Primary communications
equipment, and Eth2 for High Available Failover such as Inmarsat L-Band BGAN equipment.
Figure 3: Rear of G1 IG
Galaxy 1 Proprietary Information
6

Rev 1.1
1.4.2 Cisco Router Fronting G1 IG
In default configuration, to configure the G1 IG to operate with a Cisco router fronting the G1 IG Router
the eth3 port must be connected to the Cisco router FE0, FE1, FE2, or FE3 ports. The G1 IG supports
auto MDIX or auto crossover and therefore either a patch or crossover Ethernet cable may be used.
Figure 4: Rear G1 IG
2 Configuration Basics and Initial Setup
The configuration guidance in this document is organized by the outline of the GUI web page. Each
section of the document explains how a page of the GUI behaves and is configured.
Configuration of the G1 IG is performed using an industry standard Internet Browser (Internet Explorer,
Firefox, Chrome, Safari, etc.).
2.1 G1 Intelligent Gateway Initial Setup
The G1 IG supports configuration from an industry standard web browser. In order to access the web
GUI a PC must be connected to the G1 IG LAN interface which by default are either eth0, eth1, or eth2.
The PC should be configured to use DHCP for its address. The default web page GUI is found at
http://192.168.1.1
2.1.1 Changing the Default Password
When performing initial configuration of the G1 IG it is recommended that the user change the default
admin password.
User and password management is performed under the Advanced tab on the User Management page.
From this page an authenticated user can create new users and reset users passwords. On the G1 IG all
users have administrative privileges.
. The default username is admin and the default password is password123.
2.1.2 Setting the System Time
Configuring the G1 IG system clock is necessary prior to utilizing the G1 IG in an operational scenario.
Portions of the G1 IG rely on an accurate time value in order to operate. The user can set the time using
the web interface’s Status Page. On the Status Page the user clicks on the time field and is presented
with a dialog box that allows them to manually set the time or to sync the time to the value of the
workstation which they are using to access the web page configuration interface.
Galaxy 1 Proprietary Information
7

Rev 1.1
WAN Status
Indicators
Interface
Section Tabs
Configuration
Pane
3 Configuration of the G1 IG
3.1 General Interface Concepts
Feature Pages
Figure 5: Web Page Sections
An example screen shot of the configuration web page can be seen above. The major portions of the
interface are called out. The Configuration Pane is where the individual configuration items will appear.
The WAN Status Indicators provide the user with a concise indication of the status of the network. The
Interface Section Tabs allow the user to navigate from one general interface section to another. The
Feature Pages list shows the features that are available for configuration entry.
Figure 6: WAN Status Indicator
The WAN Status Indicators, shown in Figure 6, show the interface failover order as specified in the Load
Balance Failover Page (see 3.2.5.3). Each interface has a stoplight indicator to show if the interface is
operational or in a fail state. Green interfaces are active and red interfaces have experienced a failure
and are offline. The interfaces are shown in failover order with the primary interface on the left. If
interfaces are configured for use only in load balancing and not in a failover sequence then they are
shown to the right of the “Load Balance ” indicator. Further details on load balancing and failover can
be found in section 3.2.5.3.
Galaxy 1 Proprietary Information
8

Rev 1.1
Configuration Panes that allow multiple values to be changed or that could potentially interrupt service
or connectivity have a series of buttons at the bottom to allow the user to manipulate how and when
changes are saved and applied. The Save button commits any changes made on the page to non-volatile
memory but does not enable the changes. The Save & Apply button commits any changes on the page
to non-volatile memory and changes the running configuration of the router possibly momentarily
interrupting connectivity. The Cancel button discards any changes made on the page and displays the
current running configuration. Navigating away from a page with changes also discards any changes
that were made but not saved.
Figure 7: Configuration Pane Buttons
3.2 The Basic Tab
The Basic tab holds the configuration pages for changing the Ethernet, Wi-Fi, USB modems, and the load
balance and fail over configuration of the G1 IG. These are the configuration pages that most users will
need to manipulate in order to reach desirable device functionality.
3.2.1 Ethernet Configuration Page
The Ethernet page allows users to manipulate the configuration of the wired Ethernet ports of the G1
IG. From this page the user can create new “networks” or IP subnets, assign an addressing scheme to
the networks, and assign Ethernet ports to the networks.
By default the G1 IG is configured with a LAN network, and a WAN network. The G1 IG has a default IP
address of 192.168.1.1 on the LAN network and performs DHCP dynamic address configuration on the
WAN network. The default Ethernet port assignments are eth0, eth1, and eth2 on the LAN network and
eth3 on the WAN network.
The entire Ethernet page and the default configuration of the page can be seen on the following page.
Galaxy 1 Proprietary Information
9

Rev 1.1
Figure 8: Ethernet Configuration Page
Galaxy 1 Proprietary Information
10

Rev 1.1
3.2.1.1 Creating a New Ethernet Network
Users can create a new “network” by completing the empty network information at the top of the
Ethernet page. Users must provide a name for the network, select if the network is LAN or WAN facing,
and select an addressing scheme (disable, static, DHCP, or PPPoE) and provide any required address
configuration data.
The following example creates a secondary DHCP WAN Ethernet port named WAN2. Once this
information is completed then the network must be saved using the red Save or Save & Apply buttons at
the bottom of the page.
Figure 9: Creating a Secondary WAN Ethernet Port
After the network is saved then it will appear as an option within the port assignment table at the
bottom of the page. Assigning a port to the new network is the final step in the process of creating a
new network. An Ethernet port can only be assigned to a single network at a time. Selecting a new
network for an Ethernet port will remove the port from its previous network
Figure 10: Ethernet Port Assignment Table
Use caution when assigning ports to networks. Improperly manipulating this configuration can interrupt
connectivity to the G1 IG configuration web page.
Galaxy 1 Proprietary Information
11

Rev 1.1
3.2.2 Wi-Fi Access Point Page
The Wi-Fi Access Point page allows the user to configure the G1 IG as a traditional Wi-Fi access point.
The page includes a Wi-Fi Radio power toggle that enables or completely disables Wi-Fi on the G1 IG.
NOTE: Disabling the Wi-Fi Radio power toggle disables both the Wi-Fi Access Point capability. A status
section and a configuration section are also included on the Wi-Fi Access Point page.
Figure 11: Wi-Fi Access Point Page
3.2.2.1 Creating a Wi-Fi Access Point
When a Wi-Fi access point is created on the G1 IG it is automatically connected to the G1 IG’s LAN
network and clients that connect to the access point are able to use the DHCP server configured for the
LAN network.
To configure an access point the user must complete the information requested on the page including
an SSID value, the visibility, encryption type, encryption passphrase, and channel. Once the information
is entered the configuration must be saved and applied before the access point can be used.
Galaxy 1 Proprietary Information
12

Rev 1.1
3.2.3 USB Page
The USB page allows a user to configure USB cellular modems for use as a WAN access technology.
Supported models of USB cellular modems are automatically recognized when inserted into the G1 IG
USB ports and will appear on the USB page. By default modems are given an identifying name based on
their serial number. The USB modem name field can be changed by the user to facilitate easier
recognition of individual modems if desired.
Figure 12: USB Page
3.2.3.1 Initializing a New Modem
Prior to use, a modem configuration must be initialized by enabling the device, selecting the network
type, (GSM or CDMA) and clicking the Save and Apply button. Once a modem is activated on the G1 IG,
and connects to the service provider, its IP address is displayed (not shown in Figure 14). Certain cellular
service providers require additional information in order to connect to their networks. Specifically GSM
providers may require the entry of an APN value. Known good APN strings are: AT&T (ISP.CINGULAR)
and T-Mobile (internet2.voicestream.com).
3.2.3.2 Deleting a Modem Configuration
Once a modem is configured its configuration will always be shown on the USB page even if the modem
is not connected. In order to delete a modem configuration click the Delete button associated with the
individual modem configuration. After the delete button is clicked the change is committed by pressing
the Save or Save & Apply button. If the delete action is not saved then the modem configuration will
remain intact.
Galaxy 1 Proprietary Information
13
Rev 1.1
3.2.4 Load Balancing & Fail Over Page
The Load Balance & Fail Over page allows the user to configure the order and manner in which the
available WAN access technologies are used. The G1 IG is capable of performing WAN interface fail
over. Alternatively, the available WAN interfaces can be opportunistically used in combination with one
another in the load balance mode. These modes can be used individually or in concert with each other.
The fail over mode is best utilized in contingency scenarios or when the WAN technologies available
have drastically different bandwidth characteristics. A good example is a remote office location that has
wired Internet but also has a satellite service for backup.
The load balancing mode is best utilized in a bandwidth multiplication scenario when multiple similar
access technologies are available and maximum throughput is desired. A good example is a vehicular
application where multiple USB cellular modems are leveraged.
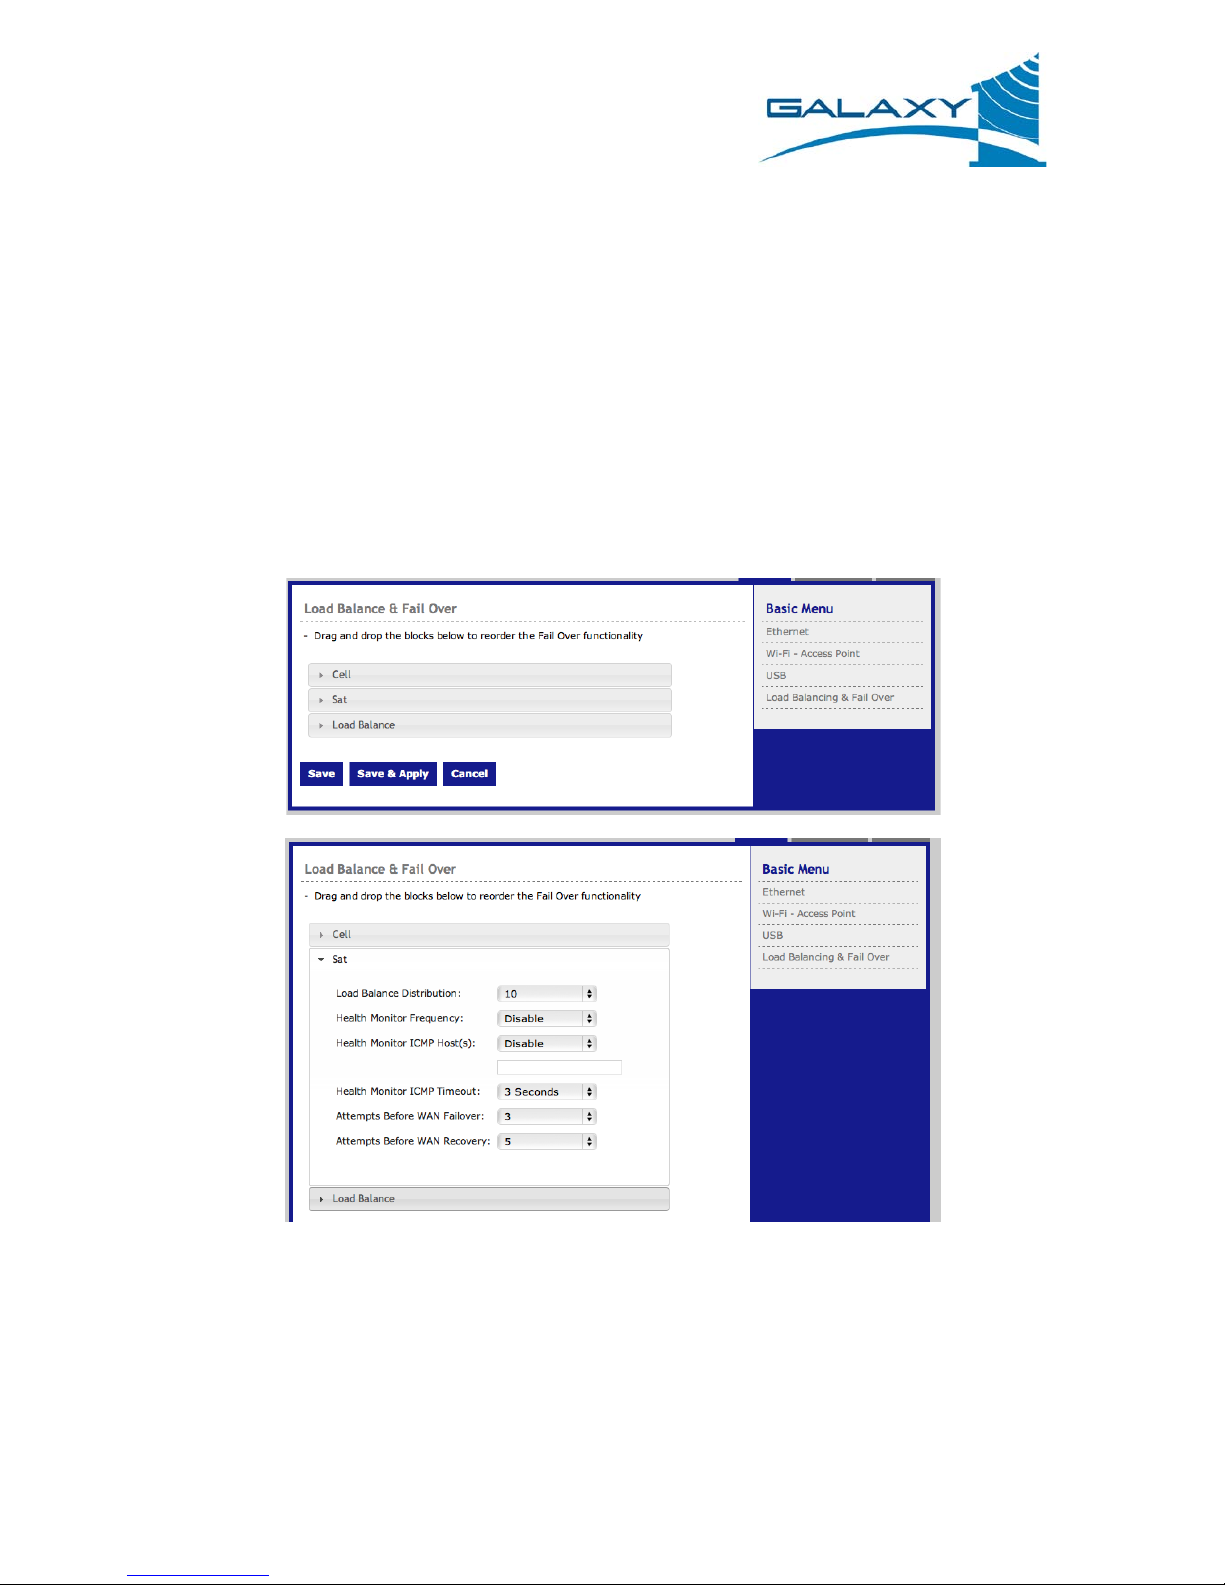
Figure 13: The Load Balance & Fail Over Page
3.2.4.1 Configuring the Fail Over Capability
The primary configuration item of the fail over capability is to define an order in which WAN interfaces
are to be used. Fail over preference is defined by the order in which the WAN interface blocks are listed
on the page. The interface listed at the top of the page is the first interface that the G1 IG tries to use,
followed by the next interface down the list, and so on. The interface blocks are reordered using a click
Galaxy 1 Proprietary Information
14

Rev 1.1
and drag technique and the detailed configuration items can be hidden or shown by clicking on the WAN
interface individual block. As an example, Figure 15 shows the wan interface detailed configurations
and as the first interface in the failover progression with the load balancer in the secondary position.
The Load Balance block appears as if it were a WAN interface block on the Load Balance & Fail Over
page. By default the Load Balance feature is disabled and therefor the default behavior is any interfaces
that are below the Load Balance block are not used. If the Load Balance feature is enabled then all
interfaces that have a viable route to the Internet are used in the load-balancing scheme.
3.2.4.2 Configuring the Load Balance Capability
The load balance capability of the G1 IG has 2 modes of operation: compatibility mode and aggressive
mode. In compatibility mode traffic is split among the available interfaces in a more conservative
manner while in aggressive mode traffic is split up into more pieces and spread among the available
interfaces more equally. Users should see better throughput results with the aggressive mode and it is
recommended as the default balancer mode, however if issues are experienced with a particular
application then switching to compatibility mode may alleviate the issue.
Not all traffic is compatible with load balancing technology. If your application consistently fails to
operate with the load balancer enabled please contact G1 for further assistance.
3.2.4.3 Load Balance & Fail Over Advanced Configuration
Each interface block on the Load Balance & Fail Over page has a set of configuration items that allow the
user to fine-tune how interfaces are shared and monitored. The configuration items of the connectivity
or viability test can be seen below.
Figure 14: Load Balance & Fail Over Interface Viability Configuration Items
The Load Balance Distribution value can range from 1-10 and is the amount of shares or weight that the
interface has in relation to all interfaces when using load balancing. If all interfaces have the same
capacity then they should all have the same Distribution value. If one interface has twice the capacity
then it should have a Distribution value that is twice the value of the other interface. The Load Balance
Distribution value is only used in load balancing configurations.
Galaxy 1 Proprietary Information
15

Rev 1.1
The G1 IG uses an ICMP ping test in order to track the viability of individual WAN network interfaces.
This feature is referenced as the Health Monitor. The Health Monitor has several configuration values
associated with the capability:
• Health Monitor Frequency - how often, in seconds, a ping is sent out the interface
• Health Monitor ICMP Host - defines the address or location on the network that is pinged, can
be an IP address, a fully qualified domain name, the gateway address learned via DHCP, or the
DNS server learned via DHCP
• Health Monitor ICMP Timeout – how long, in seconds, before a ping is declared lost
• Attempts Before WAN Failover – the number of consecutive lost pings that are required before
a viable interface is redefined as failed
• Attempts Before WAN Recovery – the number of consecutive successful pings that are required
before a failed interface is redefined as viable
3.3 Advanced Tab
The Advanced tab holds the configuration pages for modifying routes, host names, firewall rules,
running services, VLAN, DHCP, configuration images, firmware images, logging, and user management.
These pages are provided for use by system administrators, advanced users, and network architects.
3.3.1 Routes Page
The Routes page allows users to create static routes and also shows a listing of configured routes as well
as the current active route table. Configuring a static route requires a traffic destination network
address and subnet mask, a gateway through which the matched traffic will be sent, a metric or route
priority value, and the interface on which the route is applied. Previously configured static routes can
be deleted by clicking the word “Delete” next to the route being deleted.
Figure 15: Routes Page
Galaxy 1 Proprietary Information
16

Rev 1.1
3.3.2 Hosts Page
The Hosts page allows users to create local DNS records for IP addresses on the LAN subnet. The page
also shows a table of the currently configured hostname to IP address mappings. Deleting a previously
configured host name to IP address mapping is accomplished by clicking the word “Delete” that is next
to the mapping being deleted.
Figure 16: Hosts Page
3.3.3 Firewall Page
The Firewall page allows users to create port-forwarding rules such that a server on the LAN can be
reached on the WAN IP address of the G1 IG. Each port-forwarding rule requires a name, a protocol to
forward, a WAN port to forward, and a LAN destination IP address and port that will receive the traffic.
Figure 19 shows an example configuration that would allow a webserver located on the LAN at
192.168.1.100 to be visible on the WAN interface. Port-forwarding configurations can be removed by
clicking on the word “Delete” next to the entry that is to be deleted.
Figure 17: Firewall Page
Galaxy 1 Proprietary Information
17

Rev 1.1
3.3.4 Services Page
The Services page lists the services running on the G1 IG. The page can be used to kill an errant service
or to manually restart a service. The Services should be use with caution. Under normal conditions
every service listed should be running.
Figure 18: Services Page
Galaxy 1 Proprietary Information
18

Rev 1.1
3.3.5 VLAN Page
The VLAN page allows users to configure virtual interfaces. A virtual interface uses the 802.1q VLAN tag
to logically separate traffic that exists on a single physical interface. Once a VLAN tagged virtual
interface has been created it can be added to one of the G1 IG’s configured interfaces by assigning it in
the interface table or it can be removed by clicking the “Delete” link next to the VLAN to be deleted.
Figure 21 shows that VLAN tag 1 and VLAN tag 2 have been assigned to interface eth0.
NOTE: Once a VLAN tag is defined for an interface the “base” interface or raw Ethernet interface is no
longer available for assignment to a network.
3.3.6 DHCP Page
The DHCP page allows users to fine-tune how the G1 IG serves DHCP addresses to connected networks.
The DHCP page allows users to set the range of IP addresses that are served, how long DHCP leases will
last, and also configure DHCP option fields such as a TFTP server address or WINS server address. Figure
22 shows that the DHCP server is disabled on the wan and enabled on the lan. The lan network serves
DHCP IP addresses beginning at 100 and serves a total of 150 address with a lease time of 12 hours and
2 DHCP options. DHCP options must be entered in the following manner: <option number>,<value>. If
multiple DHCP options are entered then they must be separated by a space.
Figure 19: VLAN Page
Galaxy 1 Proprietary Information
19

Rev 1.1
3.3.7 Backup & Restore Page
The Backup & Restore page allows users to create and download or restore a configuration image of the
currently running configuration of the G1 IG. Using this feature, users can effectively save backups of
the configuration. This page also allows users to reset the device to a factory default configuration.
NOTE: Configuration backups do not include saved user or user authentication data (passwords).
Figure 20: DHCP Page
Galaxy 1 Proprietary Information
20

Rev 1.1
Figure 21: Backup and Restore Page
3.3.8 Firmware Upgrade Page
The Firmware Upgrade page allows users to update the firmware version running on the G1 IG. Users
should only attempt upgrades with firmware images supplied directly from G1. Once started the
upgrade process must not be interrupted. The process takes approximately 2 minutes and may cause
the device to reboot several times.
Galaxy 1 Proprietary Information
21

Rev 1.1
Figure 22: Firmware Upgrade Page
3.3.9 Log Page
The Log page allows users to view the G1 IG system and kernel logs.
3.3.10 The User Management Page
The User Management page allows users to create, delete, and alter user accounts on the G1 IG. All
users accounts for the G1 IG are administrator accounts.
Figure 23: Status Page
Galaxy 1 Proprietary Information
22

Rev 1.1
3.4 Status Tab
The Status tab shows the device status page. The Status page provides system information such as the
current hostname, device loading, uptime, and time/date. Additionally information such as WAN
interface and wireless interface configuration details are shown.
The system time can be altered by clicking on the displayed time. A dialog box appears that allows the
user to set the time manually or the user can click the “Now” button to set the G1 IG time to match the
time on the browser/PC.
Figure 24: Status Page
Galaxy 1 Proprietary Information
23
 Loading...