

Galaxy VDR 14/100 Owner's Manual
GALAXY
g
VDR 14/100
Water Softener
OWNER’S
MANUAL
Caution:
Read and Follow
All Safety Rules and
Operating Instructions
Before First Use of
This Product.
If you have questions when
installing, operating ormaintaining your softener, and
when setting the timer, call
your local dealer.
SAVE THIS MANUAL
X Warranty
X Start Up / Setting Timer
X How It Works
X Care Of
X Specifications
X Repair Parts
Use plastic bag and tie provided, to hang manuals nearby
the softener for future reference.
EcoWater Systems Europe
Geelse Weg 56
2250 Olen
ium
Bel
Version 01--2006
FACTS AND FIGURES
FACTS AND FIGURES TO KEEP
Fill in the blanks below and keep this book in a safe
place so you always have these facts.
Water Softener Model No.
1
Serial Number/ Date code1:
Date Installed
Water Hardness ∞fH or ∞dH
Iron Content Parts Per Million
1
pH Taste And/Or Odor
Water Pressure Bar
Water Flow Rate l/min
1
See the rating decal, located on the rim, under the
salt hole cover.
European Directive 2002/96/EC requires all electrical and electronic
equipmenttobedisposed of accordingtoWasteElectricalandElectronicEquipment(WEEE)requirements. This directiveorsimilarlawsareinplacenationally
and can vary from region to region. Please refer to your state andlocal lawsfor
proper disposal of this equipment.
2

TABLE OF CONTENTS
PAGE
NO.
SECTION 1 SOFTENER S TART UP
A. SAFETY GUIDES 4
B. CHECK LIST OF STEP-BY-STEP GUIDES TO INSTALL 5
C. PROGRAM THE TIMER 6-8
D. SANITIZING THE WATER SOFTENER 9
E. FILL THE STORAGE TANKWITH SALT 10
SECTION 2 HOW YOUR WATER SOFTENER WORKS
A. FACE PLATE TIMER FEATURES 11
B. SOFT WATER SERVICE AND REGENERATION 12-14
SECTION 3 CARE OF YOUR SOFTENER
A. SALT…REFILLING STORAGE TANK, SALT BRIDGE 15
B. KEEPING THE WATER SOFTENER CLEAN 16
C. KEEP THE SOFTENER FROM FREEZING 17
D. HELPFUL HINTS CHECKLIST 18
SECTION 4 OTHER THINGS TO KNOW
A. DIMENSIONS/SPECIFICA TIONS 19
SECTION 5 SERVICE TECH INFORMATION
A. TROUBLESHOOTING 20-23
B. ROT ARY VALVE SERVICE 24
C. WATER FLOW THROUGH THE SOFTENER VALVE 25-27
SECTION 6 REPAIR PARTS 29-32
3

SECTION 1
1A. SAFETY GUIDES
WATER SOFTENER START-UP
V Read all steps, guides and rules carefully be foreinstalling and u sin g yournew watersoftener.
Follow all steps exactly to correctly install. Failureto follow themcould causepersonal injury or
property damage. Reading this book will also
help you to get all of the benefits from your water
softener.
V You r water softener will remove hardness minerals and “clear water” iron from water, up to the
limits shown on page 18. It will not remove oth e r
types of iron, acids, tastes and odors, etc. It will
not purify polluted water or make it safe to drink.
V Protect the softener and piping from freezing.
Damagefrom freezing voids the softenerwarranty. See pag e 16.
CAUTIONS
PLEASEREADANDCOMPLYWITHTHEFOLLOWING GUIDES TO PREVENT DAMAGE TO
THE SOFTENER OR OTHER PROPERTY,
PERSONAL INJURY, OR POSSIBLE FATAL
SHOCK.
V THIS SOFTENER WORKS ON 24 VAC
VOLTS ONLY. BE SURE TO USE THE TRANSFORMER INCLUDED, AND PLUG IT INTO A
220--240V/50Hz OUTLET.
V Unplug the transformer right away if the
power cable should become damaged or
frayed. Make repairs before plugging back
into the power outlet.
V Always unplug the softener from electrical
power before removing outer valve covers.
IMPORTANT: Salt is used to recharge the mineral in your
water softener...see page 9. Before shipping, the mineral
is factory pretreated with salt. Before usin g water from
this softener, be sure t o do the sanitizing procedures and
start a recharge (page 8), to flush salt from it.
4
SECTION 1
1B. CHECK LIST OF ALL STEP-BY-STEP GUIDES TO INSTALL
Refer to the Installation Manual, for step-by-step
guides.
To be sure you have done all the steps to install
the softener, read the following list. Page numbers referred to are in the Installation Manual.
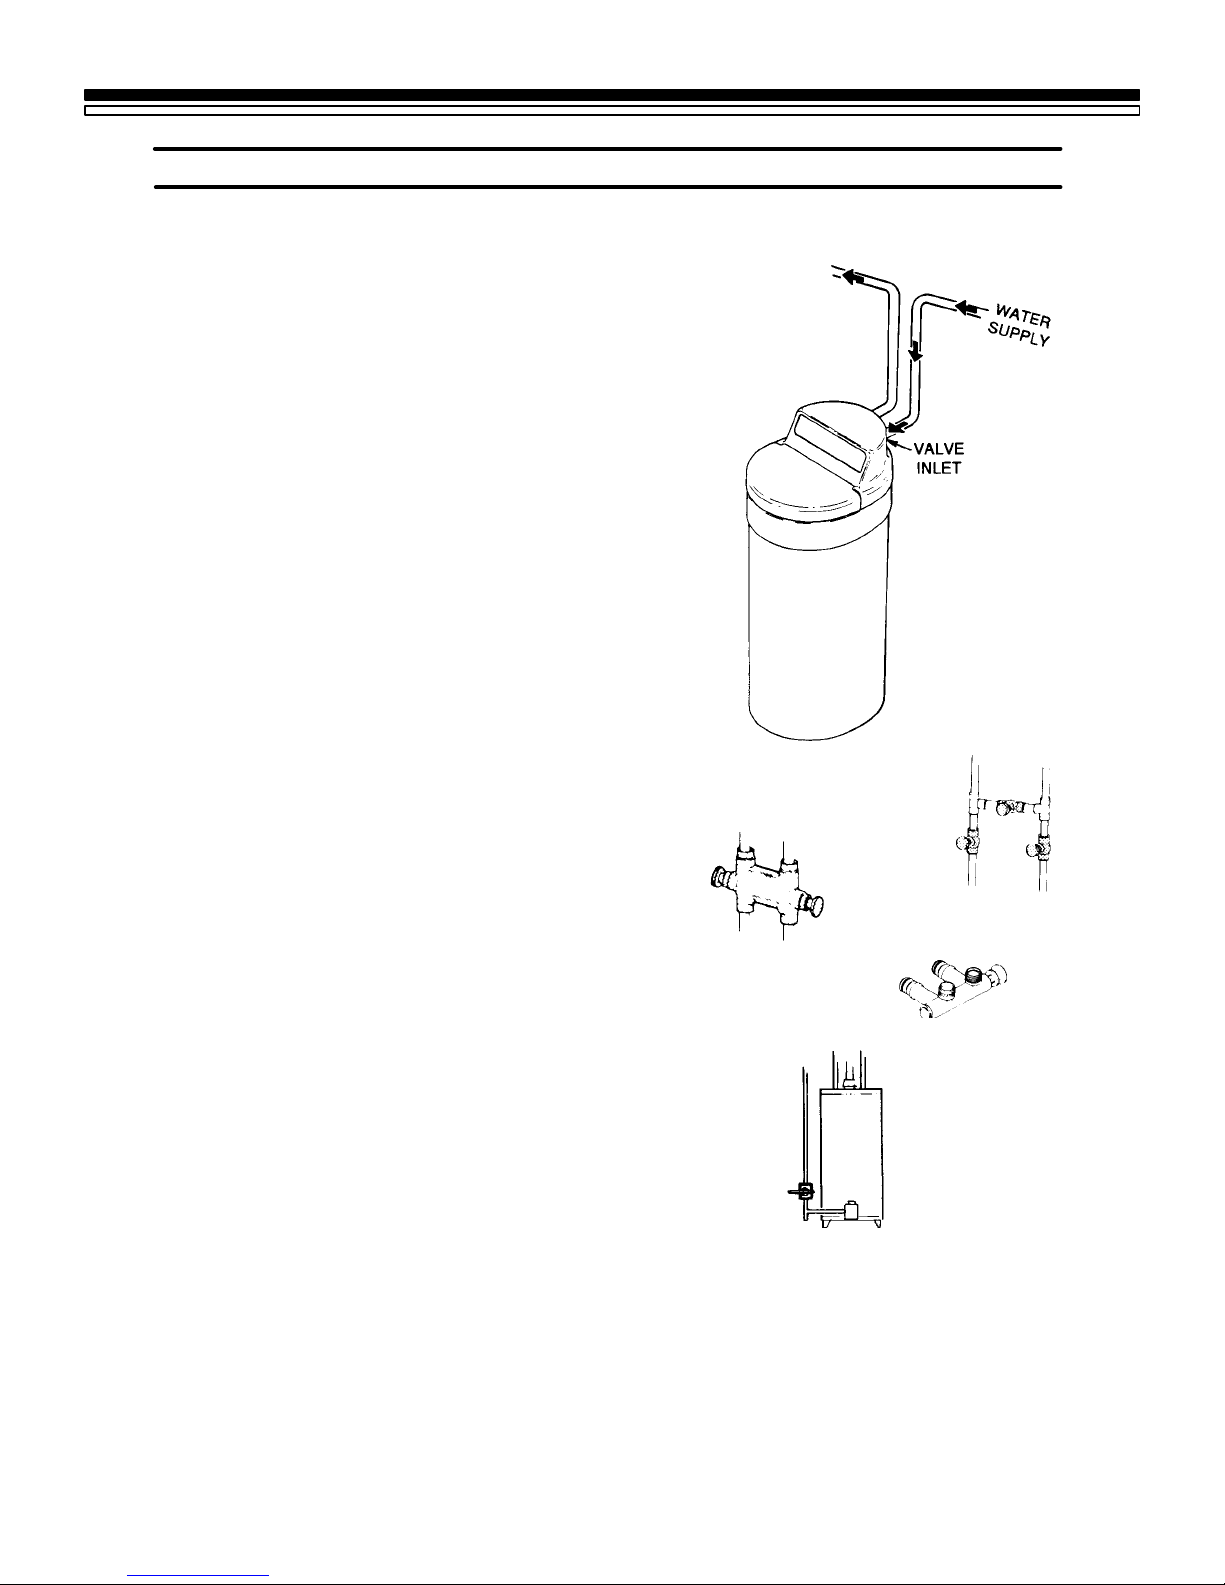
Is the house water flow going INTO the soft-
ener valve INLET? Trace piping to be sure.
See pages 10 and 11 of the installation manual
Is the plumbing bypassvalve (or 3 valves) set
for SERVICE? See page 18 of the installation
manual.
WATER SOFTENER START-UP
Isthevalvedrainhoseconnectedtheright
way, and without sharp bends or kinks that
could stop or reduce water flow? See page 16
of the installation manual.
Is the softener power cable connected to the
transformer…and is the transformer
plugged into an inside, 220 - 240V-50Hz electrical outlet. See page 20 of the installation
manual.
Be sure to restart the water heater. See page 20
of the installation manual.
Note: If applicable set the hardness bleed
screw of the bypass to the d esired residual
hardness.
BRASS BYPASS
VALVE
3 -- VALVE
BYPASS
PLASTIC BYPASS
VALVE
WATER
HEATER
5
SECTION 1
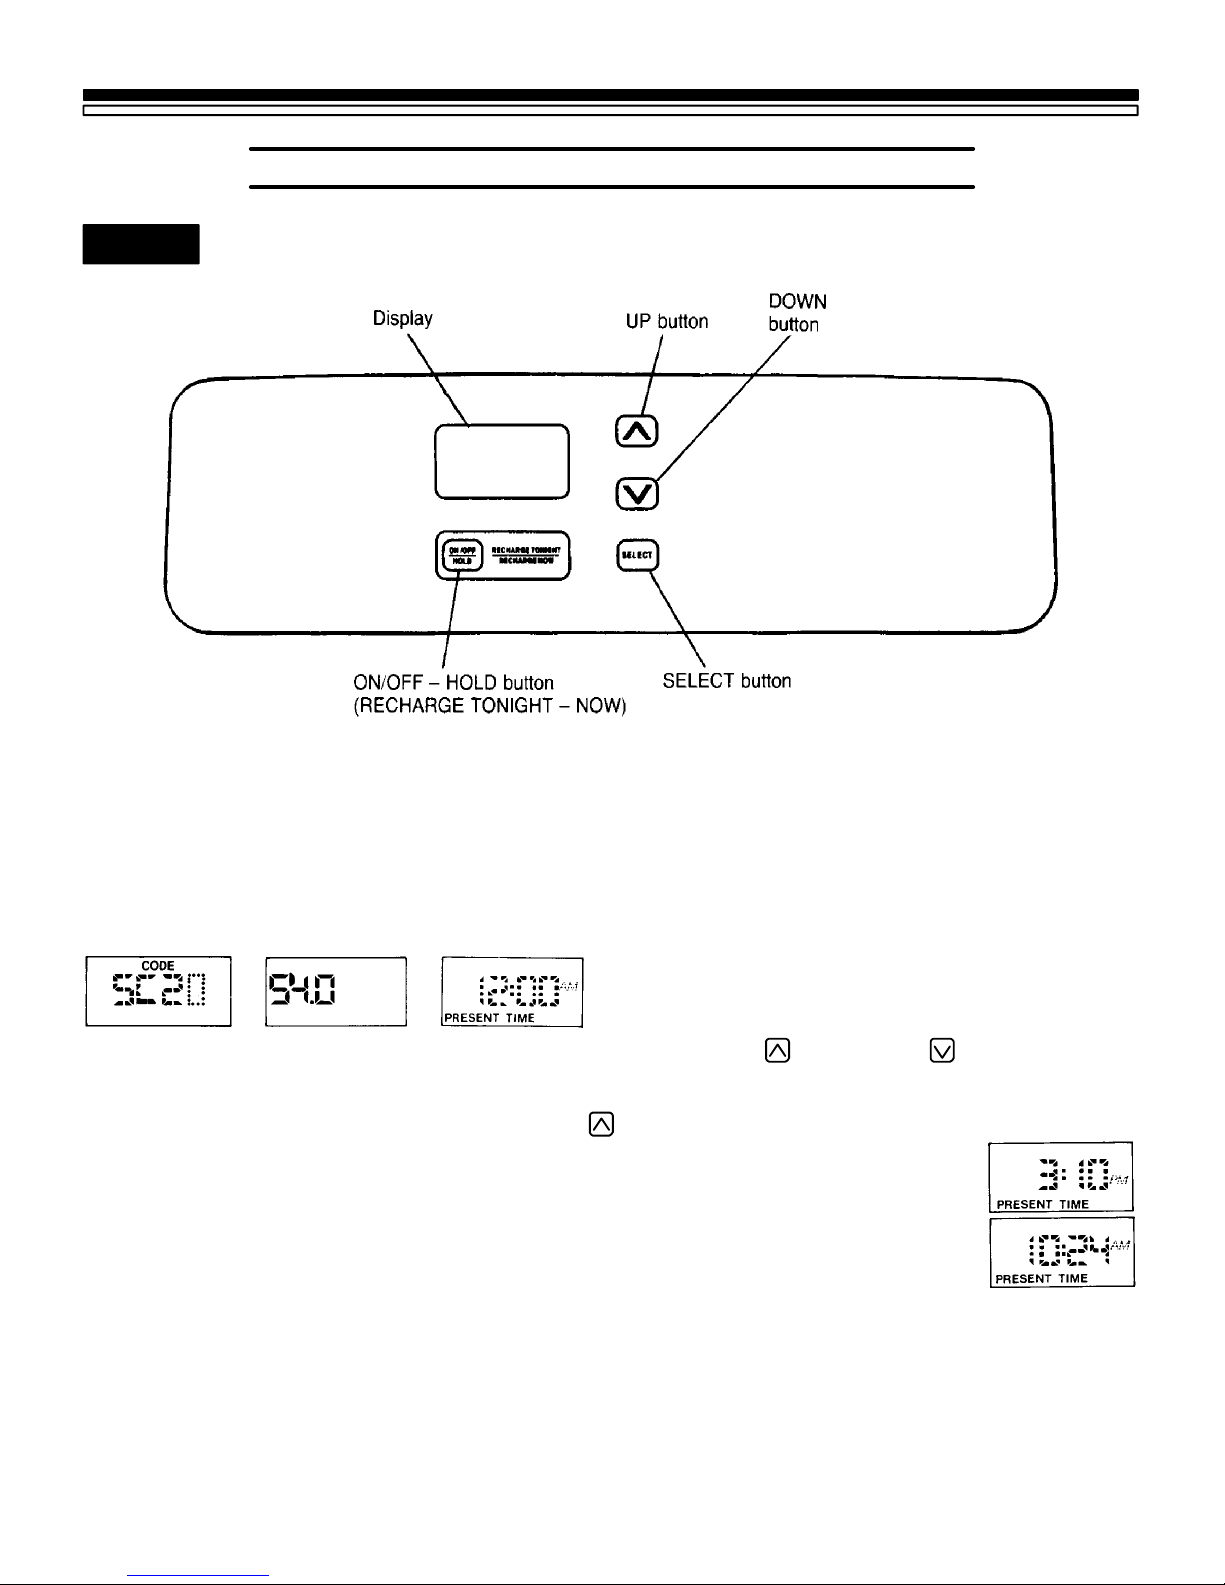
1C. PROGRAM THE TIMER
FIG. 1
Galaxy
VDR 14/100
WATER SOFTENER START-UP
When the transformer is plugged in, the model
code SC20 shows in the face plate display for a
few seconds, followed by a test number (example: S4.0). After the test number, 12:00 AM begins
to flash. PRESENT TIME and RECHARGE
TONIGHT show at the bottom of the display.
NOTE:
If SC - - flashes in the display, press the UP
button (FIG. 1) until SC20 does show. Then press
the SELECT button to display the flashing 12:00
AM. If other than SC20 shows, when the
transformer is plugged in, please seepage17to
reset.
SOUND “BEEPER”: A “beeper” sounds while
pressing buttons for timer set-up. One beep
signals a change in the face plate display.
Repeated beeps means the timer will not accept a
changefrom the button you have pressed,telling
you to use another button. For example, while
setting the hardness (step 2), the beeper sounds
repeatedly when the display reaches 1 using the
DOWN button, or the highest hardness setting
using the UP button.
1. SET PRESENT TIME OF DAY:
NOTE:
If the w ords…PRESENT TIME do not show
in the display, press the SELECT button (FIG.
1) until they do.
Q Press the UP/DOWN buttons to set the
present time. Press UP to move the display
ahead; press DOWN to move the time backward.
If the present time is between
noon and midnight, be sure PM
shows.
If the present time is between
midnight and noon, be sure AM
shows.
NOTE:
Each press of the UP/DOWN buttons changes
the time by 1 minute. Holding the buttons in
changes the time 32 minutes each second.
6

SECTION 1
1C. PROGRAM THE TIMER
WATER SOFTENER START-UP
2.
SET WATER HARDNESS NUMBER:
Q Press the SELECT buttononceto display15
(flashing) and HARDNESS. The hardness is
set in gpg. To recalculate from ∞dor∞F use
following conversion. 1gpg = 0.959 ∞d = 1.71
∞F= 171 ppm
The grains per gallon (gpg)
hardness of your water supply is
on your water analysis report.
Be sure to enter water test results
on page 2, for future reference.
NOTE:
If your water supply contains iron, compensate
for it by adding to the water hardness number.
For exampl e, assume your water i s 15 gpg har d and
contains2 ppmiron.Add5 totheha rdne s snum berfo r
each 1 ppm of iron. I n this example, you would use 25
foryourhardnessnumber.
15 gpg hardness
2 ppm iron x 5 = 10 +10
(times) 25 HARDNESS NUMBER
At the 2:00 AM RECHARGE
TIME setting, the softener begins regeneration (see pages 11
and 12) at 2:00 AM, ending no
later than 4:00 AM. This is a good time in most
households because water is not being used (see
AUTOMATIC BYPASS, page 14). If a different
RECHARGE TIME setting would be better for
your household, do the following.
Q Press the UP/DOWN buttons to set the
desired RECHARGE starting hour. Be sure to
observe the AM-PM as you did when setting the
present time of day.
NOTE:
Each press of the UP/DOWN buttons changes
the display 1 hour. Continuous pressure on the
buttons changes the display twice each second.
Q Press the SELECT button once again, to
return the present time (steady) of day and
RECHARGE TONIGHT in the display.
4. SET SAL T EFFICIENCY
Q Press the UP/DOWN buttons to set your
waterhardnessnumberinthedisplay.The
DOWN button moves the display to 1. The UP
button moves the display to the highest setting
(see maximum setting for your model in the
specifications).
NOTE:
Each press of the UP/DOWN button changes the
display by 1 between 1 and 25. Between 25 and
the highest number, the display changes 5 at a
time…25, 30, 35, etc. Continuous pressure on the
UP or DOWN button changes the display twice
each second.
3. SET RECHARGE (REGENERATION)TIME:
Q Press the SELECT button once to display
2:00 AM (fl ashing) and RECHARGE TIME.
When this feature is ON, the unit will operate at
salt efficiencies of 4000 grains of hardness per
pound of salt ( = 57 ∞Fm3/Kg salt) or higher.
Q Press and hold for 3 seconds the SELECT
button until the following screen is displayed.
More information on this particular display is
found in the Troubleshooting Section of the
manual, under Manual Initiated Electronics
Diagnostics.
Q Once in this display,press the SELECT button
and one of the following two displays is shown.
7
SECTION 1
WATER SOFTENER START-UP
Q Press the UP button to set this feature ON,
press the DOWN button to set OFF. When the
SaltEfficiency is ON,the iconwill be displayedin
the normal run display.
5. MAXIMUM DAYS BETWEEN RE-
CHARGES:
QPress the Select button once again and the
words “Auto RECHARGE” flash in the display.
UsetheUp or Downbuttonsto set the number of
days between recharges (1 to 15 days are an
available setting).The default setting (Auto)
allowsthe timerto control regeneration frequency based on water usage readings from the
water meter. It provides the most economical
operation.Youcanseta maximum time ( in days)
between regenerations.
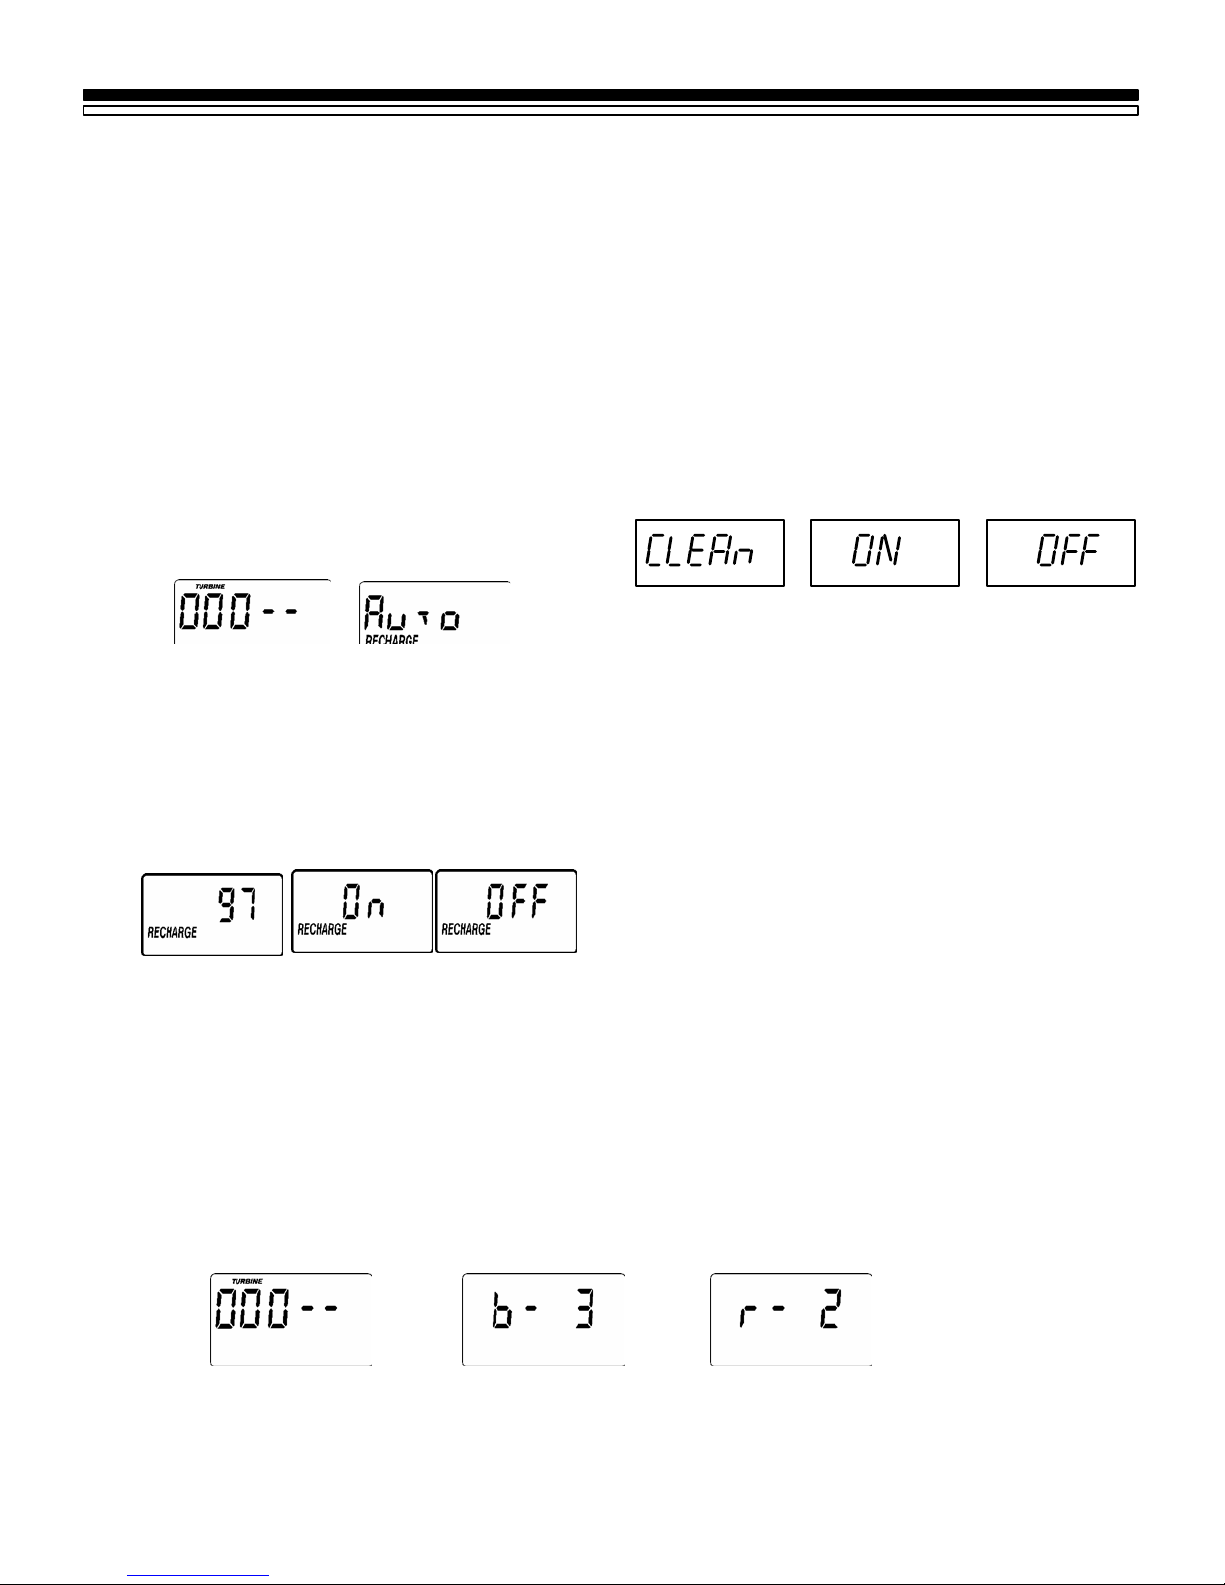
6. SET 97% FEATURE:
By setting to On, unit will automatically recharge
when 97% capacity has been used, at any time
of day. Display toggles between 97 Recharge
and OF F. Use the up or down arrows to toggle
this setting either ON or OFF
7. 12 OR 24 HOUR CLOCK:
Alltime displays are shown in 24 hr. mode. If the
12 hr (1 to 12 PM and 1 to 12 AM) mode is
disired,use the Up or Down buttons to change
thetimedisplay.
Press the SELECT button once again, to complete initial programming, and RECHARGE
TONIGHT shows in the display.
8. SET ‘‘CLEAN’’ FEATURE:
J Press the SELECT button again. The display alternates between ‘‘CLEAn’’, and
‘‘OFF’’ ( d efault).
When set to ‘‘CLEAn’’/‘‘ON’’, a backwash is assured after every 1893 liters (500 Gallons) of water usage. Backwash is described on page 13.
This cleaning backwash is in addition to the
backwash during recharge. If you have iron in
the water supply, or higher amounts of sediments (sand, silt, dirt, etc.) you should set this
feature to ON.
J To set to ON, or to turn off if already on, press
either the UP or D OWN button once. The length
of this extra backwash is 1 minute (default time
setting).
IMPORTANT: Salt is used to recharge the mineral in your water softener...see page 10. Before
shipping, the mineral is factory pretreated with salt. Before using water from this softener,be
sure to do the sanitizing procedures and start a recharge (page 9), to flush salt from it.
Note: The timer can be changed to allow differ-
ent backwash and fast rinse times, if so desired.Eachofthesecanbe adjustedfrom1to
30minutes.
8
SECTION 1
1D. SANITIZING THE WATER SOFTENER
WATER SOFTENER START-UP
Care is taken at the factory to keep your water
softener clean a nd sanitary. Materials used to
make the softener will not infect or contaminate
your water supply, and will not cause bacteria to
form or grow. However, during shipping, storage, installing and operating, bacteria could get
into the softener. For this reason, sanitizing as
follows is suggested{when installing.
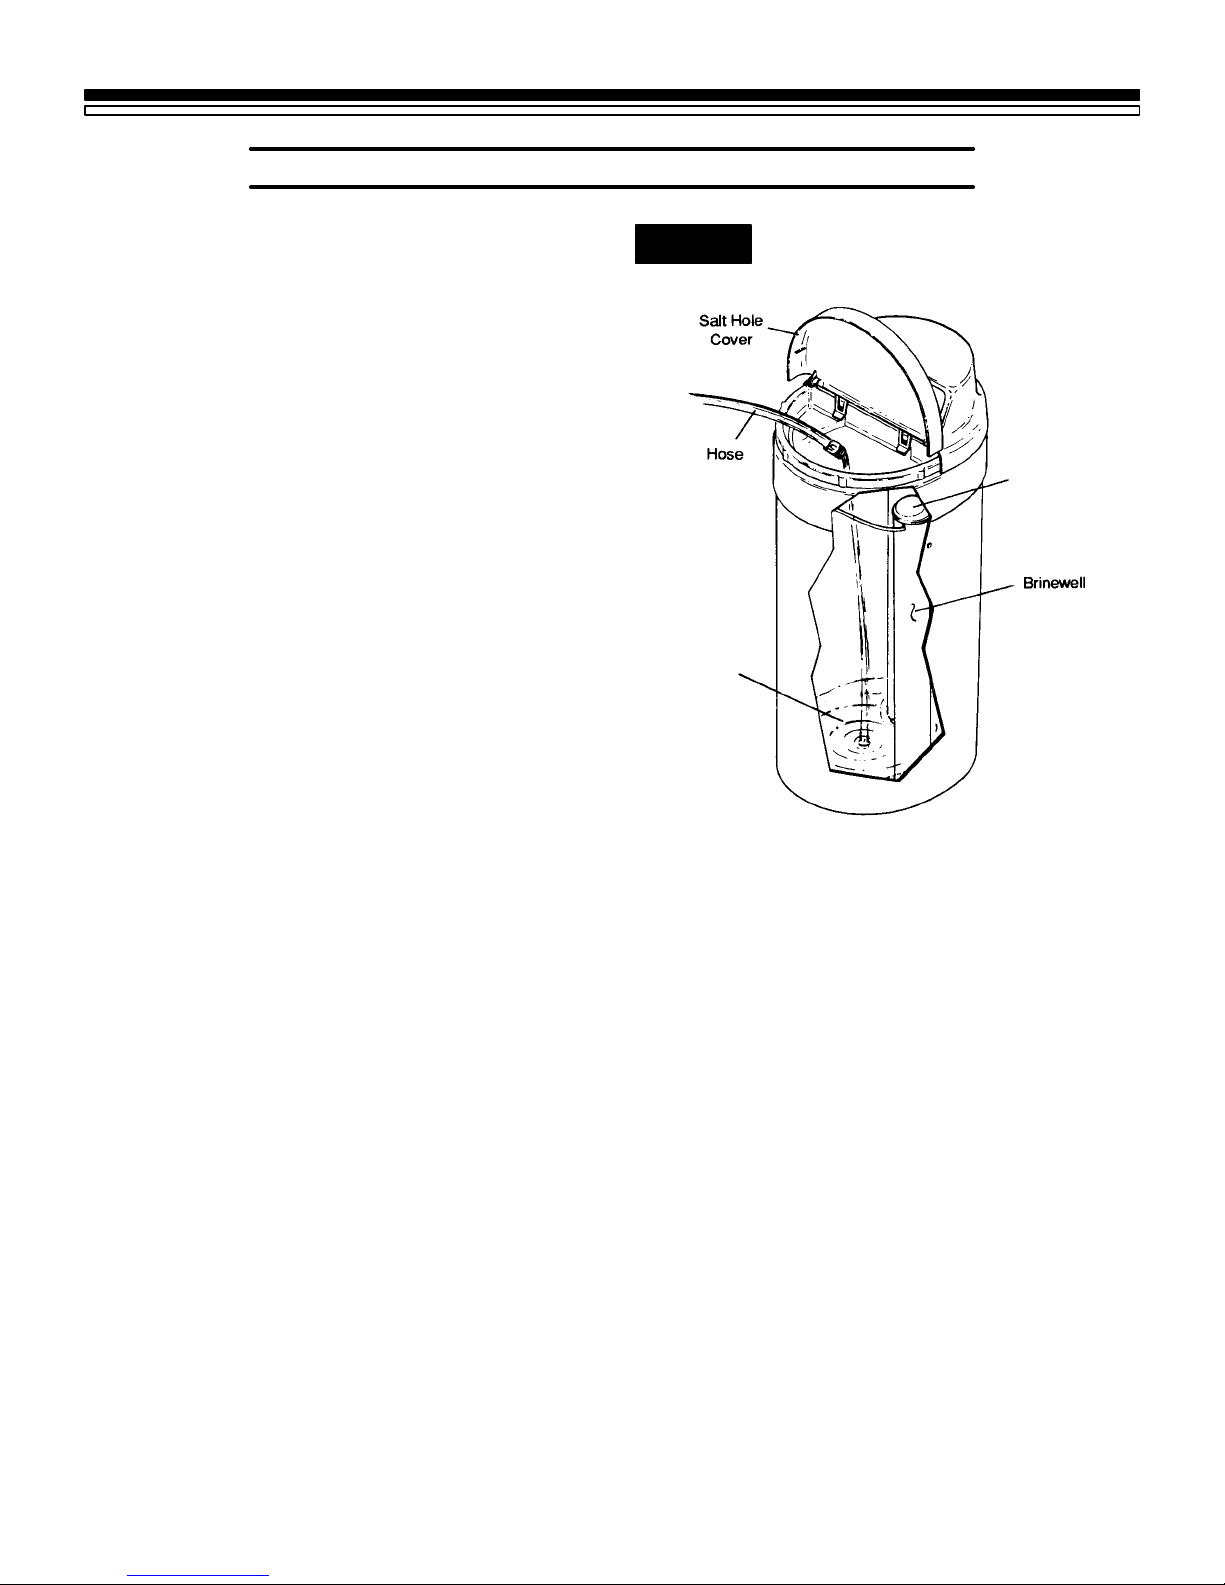
1. Lift the salt hole cover and use a pail or hose
to fill the salt storage tank with at least 4 liters
of water.
2. Remove the brinewell cover (FIG. 2) and
pour about 22 ml,or 1 to 2 tablespoons, of
common 5.25% household bleach (Clorox,
Linco, BoPeep, White Sail, Eagle, etc.) in the
softener brinewell.
3. Press the ON/OFF-HOLD button and holdfor
3 seconds to start a recharge. This first recharge does several things.
FIG. 2 ADD WATER
Brinewell
Cover
(remove and add
about 20 ml. bleach)
Water,
About 4 liters
— It draws the bleach into and through the
softener to sanitize it.
— It fills the salt tank to the water level
needed.
— It gets all the air out of the resin tank.
— It makes the resin bed ( see page 12) ready
for service.
NOTES:
This recharge takes about 2 hours.
You can sanitize the softener without or
with salt in the storage tank.
{
Recommended by the Water Quality Association. On
somewatersupplies, the water softener may need periodicdisinfecting. Sanitize either with or without salt in
the storage tank.
9
SECTION 1
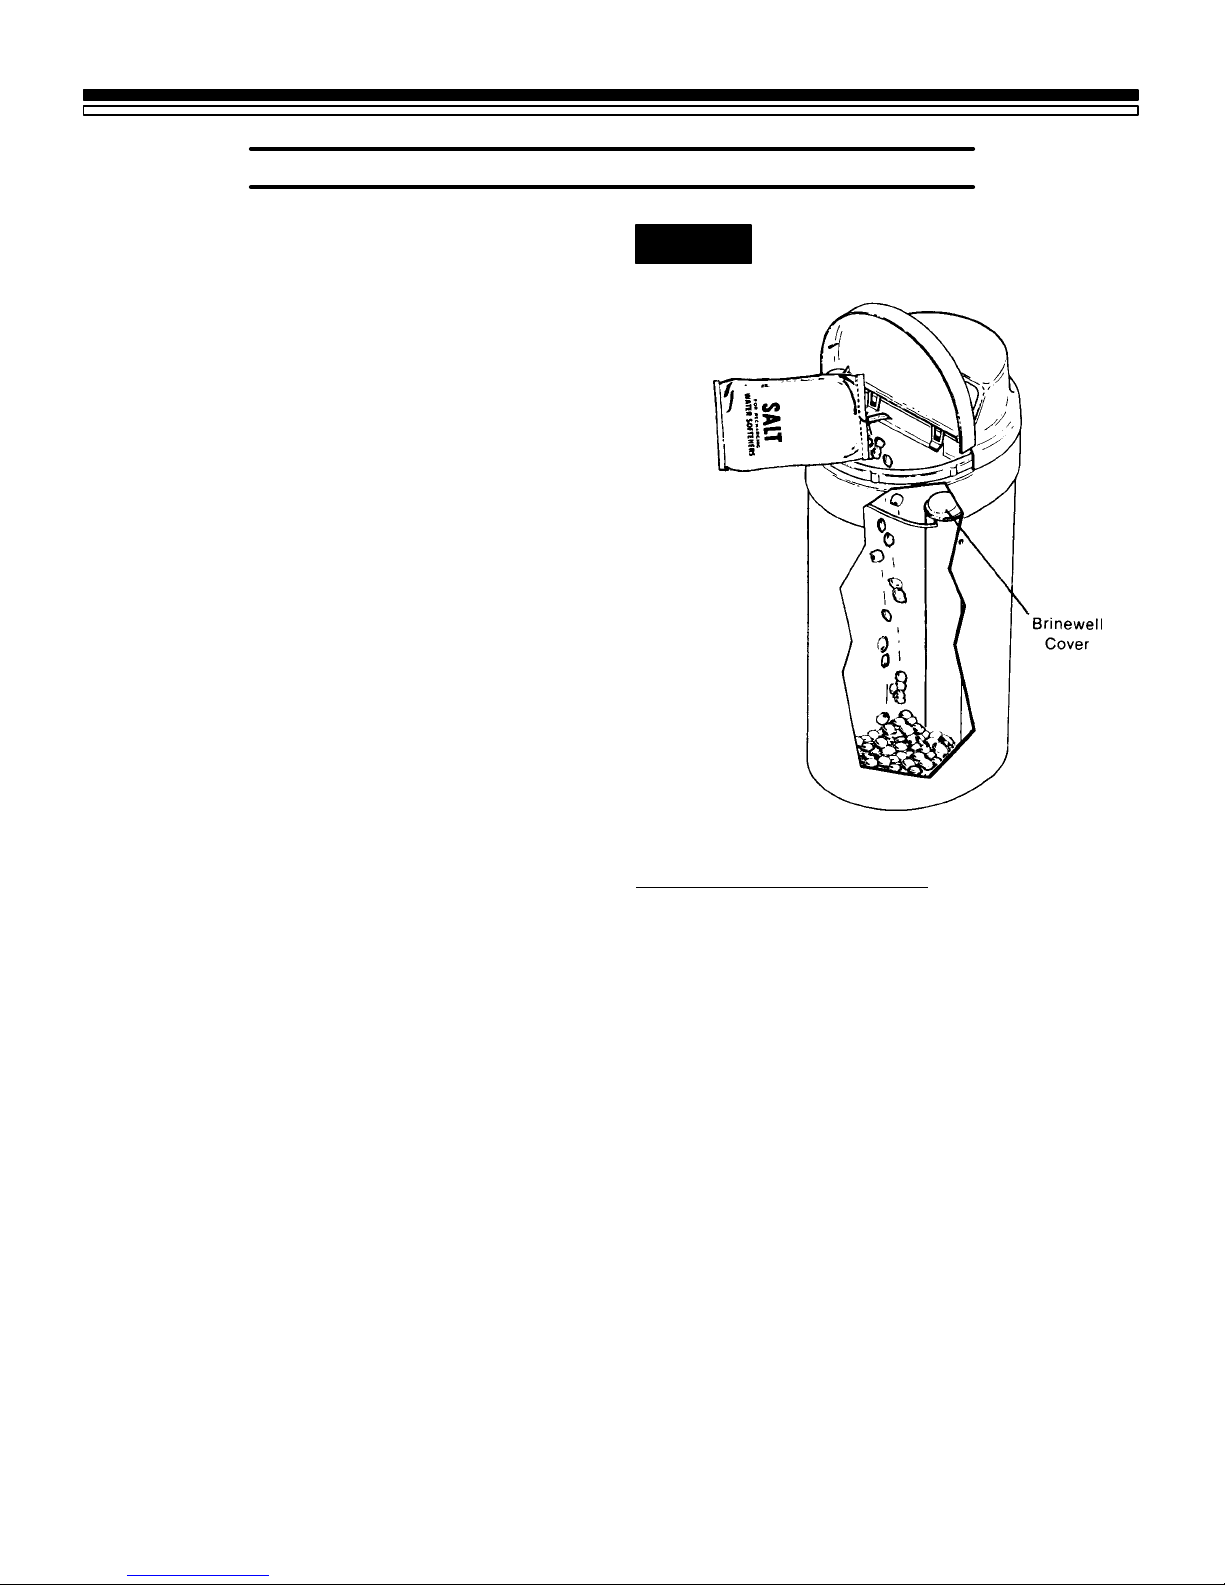
1E. FILL THE STORAGE TANK WITH SALT
WATER SOFTENER START-UP
Brine (salt dissolved in water) is needed for each
and every regeneration. The water for making
brine is metered into the salt storage tank by the
softener. However, you must keep the tankfilled
with salt.
Fill the tank with NUGGET or PELLET water
softener salt. DO NOT use rock salts, as they
have dirt and sediments that will stop the
softener from working.
Before filling, be sure the brinewell cover is in
place on the top of the brinewell. Salt storage
capacity is shown on page 19.
NOTE:
In humid areas, it is best to fill the storage tank
half-full, and to refill it more often. Salt bridging
(see page 15) occurs more often when conditions
are humid.
WATER SOFTENING SALT WITH IRON REMOVING ADDITIVES — Some salts have an
additive to help the softener handle iron in the
water supply. Although this additive may help
to keep the softener resin clean, it may also
release corrosive fumes that will weaken and
shorten the life of some softener parts.
FIG. 3 ADD SALT
SODIUM INFORMATION: Water softeners using sodium chloride for regeneration add sodium to the water. Persons who are on sodium
restricted diets should consider the added sodium as part of their overall sodium intake.
YOU HAVE NOW FINISHED THE WATER SOFTENER STAR T-UP. AFTER THE SANITIZING RECHARGE, ON PAGE 9, THE SOFTENER WILL BE GIVING YOU SOFT WATER.
For example, if your water supply i s 15 grains
hard (= 14.4 )dH =25.6 )fH), you would have to
drink 3 liters of softened water to consume 335
milligrams of sodium. That is equivalent to
eating 2-1/2 slices of white bread.
Persons who are concerned about their drinking
water should consider a Drinking Water System
that will remove or reduce in excess of 90% of the
sodium and other drinking water contaminants.
10
 Loading...