

Page 1
INSTRUCTION MANUAL
- PH40V
- PH45V
Page 2

CONTECTS
1.! SAFETY)...............................................................................................................................)1!
2.! INTRODUCTION)..............................................................................................................)2!
3.! SPECIFICATION)&)COMPONENTS)..............................................................................)5
!
4.! INSTALLATION)INSTRUCTIONS).................................................................................)6
! A.! FEED TABLE)...........................................................................................................)6
!
B.! FOLDING)PLATES)....................................................................................................)6
!
C.! VERTICAL STACKER)..........................................................................................)6!
5.! FOLD)PRINCIPAL)AND)STYLE)GUIDE)........................................................................)
7!
6.! FOLD)SETUP)ADJUSTMENT).........................................................................................)9
!
7.! OPERATION)AND)FOLDS)............................................................................................)2
0!
8.! FOLD)CORRECTIONS)....................................................................................................)2
3!
9.! OPTIONAL)ACCESSORIES)...........................................................................................)26
!
A.! SCORING)OR)PERFORATING)WHEEL)..............................................................)2
6!
10.!FAULTS,)CAUSE)AND)REMEDY)..................................................................................)27!
Page 3

!
1. SAFETY
Please make sure to read this manual for safety in operation before using this
product. Take good care of this manual and keep it where you can always find it.
This manual contains cautions and warnings in order to prevent harm to the
purchaser and other persons, lives, or the damage to the properties. Attain
complete understanding before using this product.
1
Page 4

2
2. INTRODUCTION
Your new Folder is a table top automatic folding machine which will
efficiently solve all your folding problems over many years if your handle
if carefully and with care. Thanks to new advances in production
technology. The machine offers you outstanding capacity at reasonable
cost.
This manual provides a permanent record for ready reference, covering
the function of the separate units and the preparatory work for the various
folding applications. Please read this instruction in detail.
Installation of the machine should be carried out only by trained personnel
authorized by the manufactures or his representatives. Additional
instruction are provided for this purpose
Repairs and service should be carried out only by trained personnel
authorized by the manufacturers or his representatives. The interval
between inspections including safety-related function depends on the
machine usage.
Employ only trained or qualified staff and set out clearly the individual
responsibilities of the personnel for operations, set-up, maintenance and
repair.
Avoid any operational mode that might be detrimental to safety.
Machine Model
Your machine offers a wide range of applications and configurations
to suit your requirement of the folding job at hand. The machine
model number serves as a useful indication of what the configuration
of each machine is.
The components/accessories available are as follow:
• 4-Plate Folding Machine, PH40 & PH45
• Counter
• Batch-Counter
• Conveyor Belt
• Vertical Stacker with the PH40v & PH45v
Page 5

3
The model number shows the machine configuration, for example:
PH
-40
DF-30
Feed width of 300mm
4
4-
Plate Folding Machine
V
Vertical Stacker
C
Counter
DF-45
Feed width of 350mm
4
4-
Plate Folding Machine
V
Vertical Stacker
B
Batch-Counter
Note:
1. For all 4-Plate Folding Machine Unit configurations, Counter is included.
2. If the model number includes V, Vertical Stacker will be the default collecting
device.
Machine Check List
Check completeness of the accompanying accessories:
Page 6

4
3. SPECIFICATION & COMPONENTS
Model
PH40
V
PH45
V
Max. paper size (mm) 300(W)x 500(L) 350(W)x 540(L)
Min. paper size (mm) 80(W) x 100(L)
Folding paper weight (gsm) 45 to 150
Min. folding size (mm) 24
Dimension (LxWxH in mm) 1100x525x510 1100x570x510
Weight (kg) 68kg 71kg
1 Feed table 2 Feed guide Bracket 3 Feeder
4 Infeed Roller 5 Feed Roller 6 Pressure Roller
7 Folding plate 1 8 Folding plate 2 9 Folding plate 3
10 Folding plate 4 11 Deflector Bar 12 Fold Roller 1
13 Fold Roller 2 14 Fold Roller 3 15 Fold Roller 4
16 Fold Roller 5 17 Fold Roller 6 18 Ejector Rollers
4. INSTALLATION INSTRUCTIONS
First, mount the machine on a sufficiently strong table or similar base.
Page 7

5
A. Feed Table
Hook in the Feed table. First place it on the support shaft, slide it down at
an angle until the lower slots engage with the pins on the side panels. The
upper slots must engage with the support shaft. After which, install the
two bracket guides.
B. Folding Plates
Hook the folding plates according to their designated slots into position
like the feed table. You will note that the plate has a deflector bar on one
side, while the other is formed as an open “pocket”. Hook in the plates as
dictated by the desired type of fold (refer to Folding Style Guide). To do
so, place the plate on the two-front pins in the side panels of the machine,
then slide it towards the folding rollers until you can clearly hear all four
pins clicking into engagement. You may turn the handwheel to ensure
that the folding plate is properly engaged and there is no hindrance.
C. Vertical Stacker
Due to tension from the paper materials, if the paper has been folded into
very small dimension or has been folded several times, the paper will
spring back out of the fold. If conveyor belt system was used, the paper
might not be nicely fanned out. Thus, it is advisable for the user to fit the
machine with a vertical stacker (especially for collecting paper less than
30mm or perform up to 3folds).
Insert the vertical stacker into the support shaft in the rear of folding
machine using the groove provided.
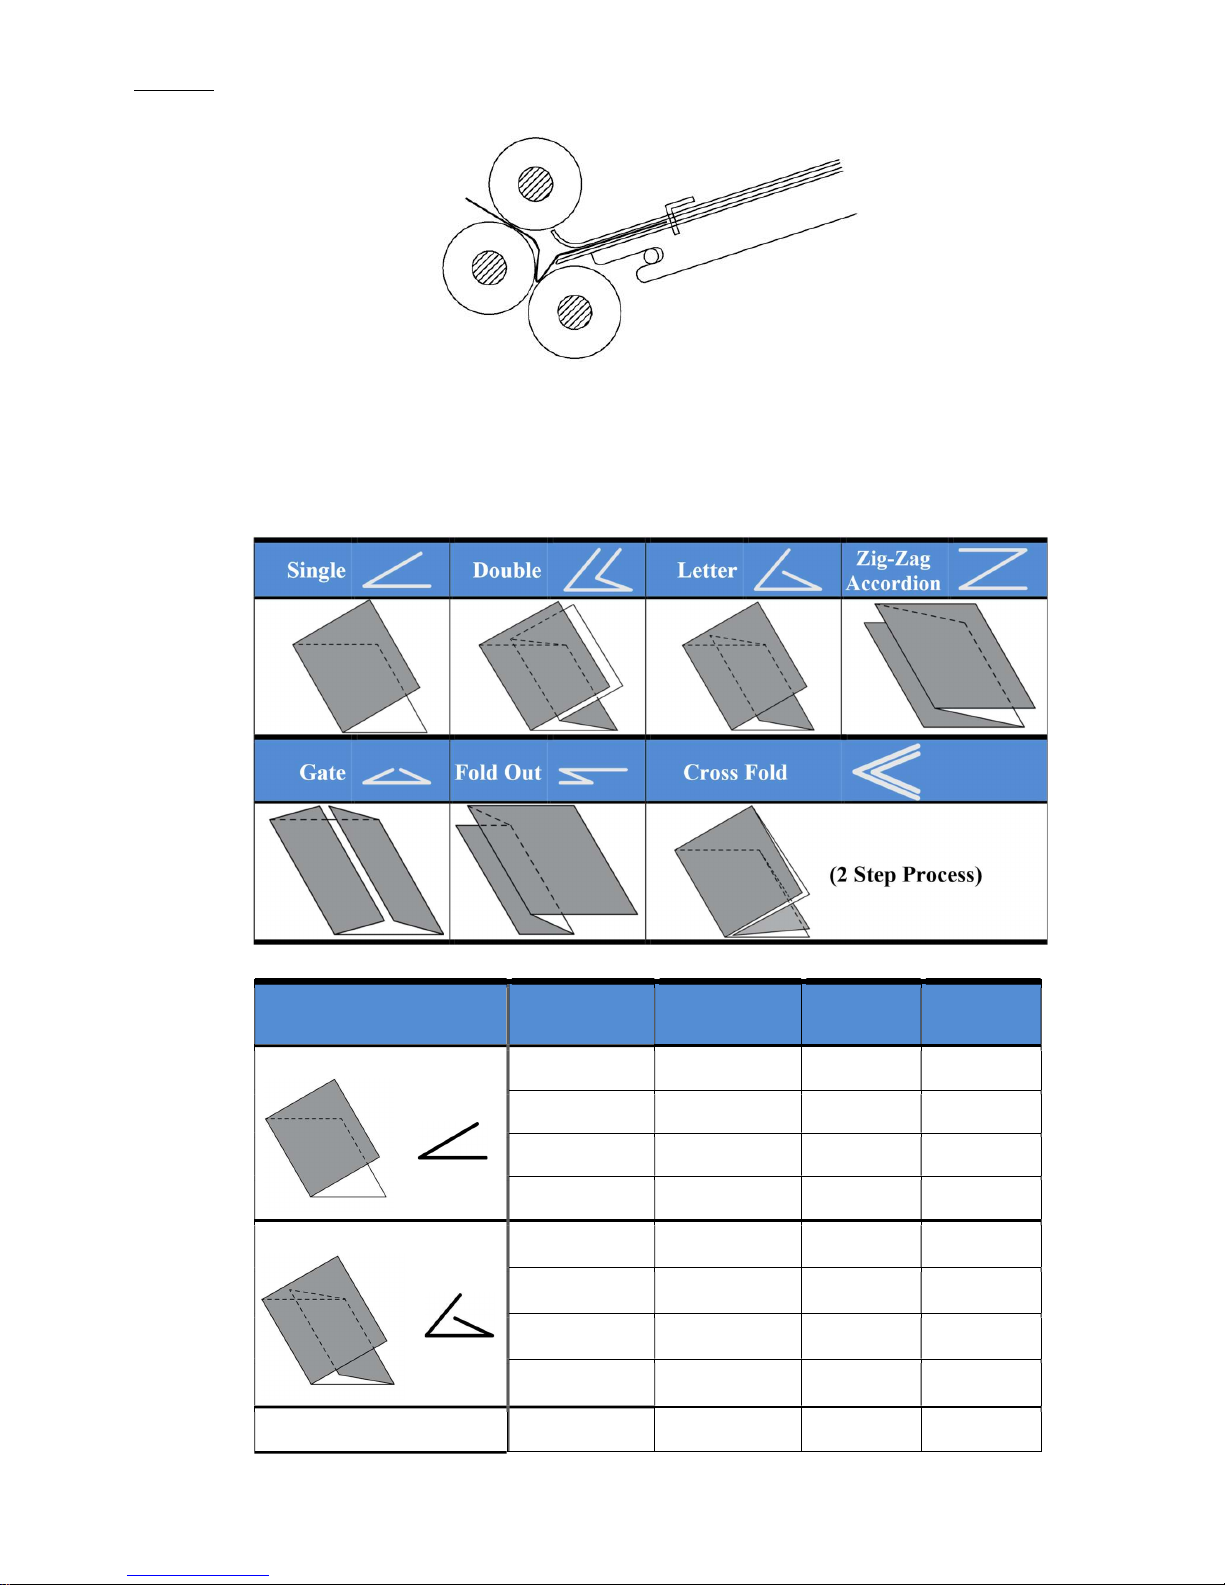
5. FOLD PRINCIPAL AND STYLE GUIDE
Folding is carried out by folding plates. This section will provide a brief
description on the folding process and the fold styles. These will enable
you to carry out settings for any desired style without extensive trial runs.
Fold Principal
The feeder takes the sheet between the first pair of fold rollers which
drives it into the first folding plate until it comes up against the adjustable
stop. But as the rear of the sheet is still advanced by the fold roller, a loop
is formed. As the loop gets bigger, the paper is seized by the second pair of
roller, creating a fold line and carried to second folding plate. The process
is repeated.
Page 8
6
Below are some of the common folds and setup guide that you will come
across during your folding. With the 4-plate machine, there more
combinations essentially based on these principal and setup.
Basic Fold Style
Fold Style Setting Guide
Type of fold Fold Plate
Set To Paper
Length
A4 A3
Single
1 1/2 148 210
2 -* - -
3 - - -
4 - - -
Letter
1 2/3 198 280
2 1/3 99 140
3 - - -
4 - - -
Double Parallel 1 1/2 148 210
Page 9

7
2 1/4 74 105
3 - - -
4 - - -
Triple Parallel (8-Page)
1 1/2 148 210
2 1/4 74 105
3 - - -
4 1/8 37 52
Zig-Zag/Accordion**
1 1/3 99 140
2 1/3 100 140
3 - - -
4 - - -
1 1/4 74 105
2 1/4 75 105
3 1/4 76 105
4 - - -
* The dash line – means to insert the fold plate with the paper deflector side into the
machines.
**For Accordion Fold, fold plate stops should be set so they increase by 1 mm from one
plate to the next.
6. FOLD SETUP ADJUSTMENT
Controls and Accessories
• Main Start/Stop Switch
• Speed control:
Varies speed while machine is running or stopped.
• Counter (model C & B)
• Feed Switch (model B)
• Feed Table: adjustable to different paper format and right-angle
feed of paper into machine.
8 - Page
Accordi
on **
Page 10

8
• Paper Thickness Adjusting Knob:
Variable adjustment for thickness of papers between 45-150 gsm.
• Feeder:
With adjustable infeed pressure roller.
• Folding plates:
With micro-adjust for length and angle setting, fitted with scales.
• Vertical Stacker:
Adjust the stacker wheels according to the paper size.
• Hand wheel:
Turns machine when motor is switched off.
Hand Wheel
With the interest to protect the machine operator and also compliance with
the safety regulation, the hand wheel is now detachable.
You may attach the hand wheel when you need to adjust for paper
thickness or remove paper jam.
Page 11

9
Please remove the hand wheel before switching on the machine.
Adjust Paper Thickness
Paper thickness is to be adjusted so that the feeder only feeds one piece of
paper at a time. By adjusting to the pressure roller, you can limit the
passage gap to any paper thickness.
Set the gap between feed roller and pressure roller to paper thickness by
turning the knob (1) at the machine side. To reduce the gap, turn knob (1)
clockwise. Once you can feel the rollers lightly pulling the sheet, stop the
adjustment. Do not set the gap too small as it will result in abnormal
wear on the feeder wheels.
You can double check the thickness setting by trying to feed two pieces of
paper together. If the feeder is able to separate the sheets, the thickness is
set correctly.
Page 12

10
Adjust Feed Guide
First align the left feed bracket guide (1) so that the sheet is fed centered
on the table as far as possible. A notch (2) in the table under the
removable center panel marks table center, but you can also align the
sheet using the feed or pressure roller as gauge.
To shift the guide, firstly loosen the knurled nut (3), pull away the clip
lightly. Shift and align the guide, then fasten the nut.
After finish setting the left guide, then adjust the right guide (4). Put the
paper on the feed table; align the paper with the left guide, then move the
right guide to the edge of the paper, leaving a gap around 0.5mm. Do not
press the guide too tightly close to the paper. Fasten the nut to fix the right
guide. Check again whether the paper is in the middle between the left
and right guide and ensure the guide is not too tightly or loose placed
against the paper.
Displace the hold-down disks in such a way that they serve as guides
which is placed about 2-3 cm from the edge of the sheet.
Page 13

11
Paper Stack
It is important to fan the paper stack before placing it on the feed table:
Grip the left end of the paper with your left hand and bend it towards the
right.
Press on the right side of the paper with your right hand, and then release
your left hand. The paper stack will snap back and will be fanned out
slightly. Repeat the process once or twice more until the stack if fanned
out properly.
Place the fanned out stack on the feed table in such a way that the
uppermost sheet is located under the feed roller.
Page 14

12
Feeder Pressure
To adjust the feed pressure, first place the feeder unit at its rest position
(Infeed roller raised). Set the pressure of roller on feeder with the knurled
nut (1).
For paper weight from 60gsm to 90gsm, place the nut in the middle,
neutral position.
For over 90gsm paper, loosen the nut and push it towards the paper stack,
thus applying more pressure.
For the paper less than 60gsm, shift the nut at the opposite direction
(towards the delivery direct).
If the paper pressure is adjusted not properly, the paper will be pressed too
tightly and will leave crease on the paper.
Page 15

13
When the pressure is set, place the feeder to its work position.
To sum up, set paper feed in the following steps:
• Set gap between feed and pressure roller approximately to paper
thickness.
• Align guides.
• Set infeed roller contact pressure with the knurled nut on the feeder.
Setting the Folding Table
According to the folding type, adjust the folding plate.
1 Plate Stop
2 Angle Adjustment Screw
3 Vertical Adjustment Knob
4 Plate Stop Setting Knob
5 Adjustment Shaft
6 Deflector
You can firstly fold one paper by hand, then refer to the folded size, shift
plate stop (1) or refer to the Fold Style Guide.
First loosen the Plate Stop Setting Knob (4), then shift the stop plate to
the designated place and fasten the screw. When the folding plate is not
Page 16

14
needed, take it out and fit it reversely with the deflector (6) end into the
machine. When the setting is completed, please test folding several papers
first.
You can fine-tune the stops for length and angle with the knurled screws.
Angle Micro-Adjustment (2) Vertical Micro-Adjustment (3)
Connect the Counter (for model number C & B only)
The counter will work only when combined with the sensor. Before using the
counter, please connect the sensor in advanced.
Please note that there are three metallic contacts in one side of the power
cord of the sensor. The sensor MUST BE connected with the flat side
with NO Metallic Contact Side on top (picture A). Do not connect the
sensor with this side on top (picture B),
Page 17

15
Vertical Stacker
Installation of the vertical stacker
Insert the vertical stacker into the support shaft in the rear of folding
machine using the groove (1) provided.
Adjustment of the Vertical Stacker Belts
Adjust the belts according to the width of the folded paper. The belt should
have at least 10 to 15mm gap to the edge of the paper.
Minimum Fold Size Adjustment
Position the minimum size folded
paper at the center of the stacker.
Adjust the belt to the size of the
paper, leaving around 10~15mm
space to the edge of the paper.
Page 18

16
Maximum Fold Size Adjustment
Position the maximum size folded
paper at the center of the stacker.
Adjust the upper outer belt to space
1/4 of the paper length from the
centre.
The lower outer belt should be
positioned as such that it leaves
around 10~15mm to the edge of the
paper.
Adjustment of the Vertical Stacker Guides Ensure
that a gap of 1 to 2mm is kept between the two
paper guides located after the belt system. This can
be done by adjusting the screw of shaft (2).
The right and left paper guides (3) are adjusted
according to the width of the paper.
Put the stop board (4) after the folded paper.
Start the vertical stacker:
After above steps, switch on the power switch and adjust the speed (5)
of the vertical stacker. As a general rule, the speed of the stacker should
be faster than the speed of the machine.
The Folder is now ready to run. But before you switch on, please note the
following important points:
A change of speed while the machine is running may change the fold style
applied. This may happen as you start the machine, since it needs a little
time to run up to speed.
Page 19

17
For this reason, it is advisable to place your left hand on the stack before
switching on the power. Release the paper only when the machine has run
up to the selected speed (you will hear the steady hum).
The same applies when you switch the machine off with sheets of paper
remain on the feed table. Again, hold them down to stop the feed, when the
motor is running at steady speed, release the grip.
In the way, the whole run from first to last sheet will be evenly folded.
Page 20

18
7. OPERATION AND FOLDS
1. Choice between Auto/Manual for Counter Mode
2. Choice between increment or decrement count
3. Set batch count quantity
Enter Button
Once setting is completed under Count Mode, press enter to
store memory
In Count Mode
• Press to increase the display number
• Select Auto Mode for counter
• Select incremental counting for counter
In Speed Mode (when machine stops)
• Press to increase the speed of machine
In Count Mode
• Press to decrease the display number
• Select Manual Mode for counter
• Select decremental counting for counter
In Speed Mode (when machine stops)
• Press to decrease the speed of machine
Select Button
–
Select “ Count ”
Mode
In Count
Safety Caution
Mode Selection
Start/Stop
Quantity Se tting and Counter Screen
Increase/Decrease,
Left/Right
Enter
and Test
Page 21

19
In Count Mode
• Press to move left for digit position
• Digit flashes indicating the current position
In Count Mode
• Press to move right for digit position • Digit flashes indicating
the current position
When the counter is set and machine at the stop position, press
Right button to perform test fold (3 sheets).
In Count Mode
displays the counter number to set with flashing digit
indicating the position In
Speed Mode
displays the speed of the machine to be set
When Machine is running displays the
current sheet count When Machine stops
displays the total sheet folded
When the preset counter quantity has not complete and feed
table runs out of paper, displays E2 (with Buzzer alarm)
When sensor detects no infeed of paper, displays E1 (with
Buzzer alarm)
Feeder When Feeder safety lights lid up, indicates feed table
has no paper, displays E2 in counter
screen with buzzer alarm
Start/Stop Button
Press once to start(green light), press again to stop (red light)
When the machine stops, Speed light lid up
able to adjust the speed of the machine
1. When machine stops and displays the total
paper count, long press for 3 secs to reset to zero
2. Press once to deactivate the buzzer alarm
Operation Example
Counter Set with number of sheets to fold
Auto mode and decrement counting for Counter Setting
Page 22

20
1. Press to enter Count Mode.
Auto and Manual LED will blink. Press to select Auto mode.
Add and Sub LED will blink. Press to select Sub for decrement
count style
Use the direction buttons to set the number of sheets to fold.
2. Press to store setting
3. Press to determine machine speed
4. Press to test fold. 3 sheets will be folded.
5. When the test fold result is okay, press to start the machine
With the above setting, when the machine is running:
The display panel will:
1. Indicates the paper count
Under ADD method (increment style) the displays starts from 0 to the
preset value
Under SUB method (decrement style) the displays starts from the preset
value and counts down to 0
2. Under Auto mode, once it reaches the preset value, the batch light will
blink with a buzzer sound, stops feeding for 3 sec and continue another
cycle
3. Under Manual mode, when the preset value is reached, the machine runs
for 3 sec and then stops. Press to resume folding.
When the counter value is set to 000000, no counting will be made. Press
to operate the machine. However, this mode is not recommended
8. FOLD CORRECTIONS
Eliminating a diagonal fold
Page 23

21
Mark the first sheet you run through the machine with a cross on the top
side, so that you know in which direction it has been fed. If it leaves the
machine with the fold diagonally shifted from the straight line, first fold it
by hand to an even more acute diagonal offset from the straight, then
place it again on the feed table in the correct running direction. Since the
fold always runs parallel to the spindles, you must now turn the sheet (and
adjust the guides correspondingly) until the next trial fold runs exactly
parallel to the spindles. The next sheet will already show an improvement.
Possibly, you may have to make another trial fold, continuing with the
sheet alignment until the diagonal shift is completely corrected.
Setting to pointed tips or out-of-square paper
Where the sheet end has pointed tips (diagonal cuts) or out-of-square, use
the angle micro-adjust to adjust to the correct angle.
Correcting minor fold variations
Once you have accurately set the plate stops to the desired style of fold by
the scales, it should not normally be necessary to equalize minor fold
variation, provided the running speed is not changed drastically after
setting up.
Placing and replenishing the paper stack
When feed table, automatic-paper feed, plates and delivery have been set to
the required fold, place the first paper stack on the table - between 100 and
300 sheets, depending on paper grade, evenly fanned out. Align the stack
at the sides. To avoid the last sheets of a stack being drawn together under
rollers and spindles, it is advisable to stick a single sheet with adhesive
Page 24

22
tape to the table. Place the fanned stack on top, holding it in position with
your left hand and guiding it with the right. Cautiously slide the stack up to
the feed roller working range so that the fanning will not collapse again. As
the top sheet must be seized first, slide it closest to the feeder.
Replenishing the stack
You can top up the stack while the machine is running in two ways:
a) When only a few sheets are left, slide the new stack under the last sheet
and the machine can run on without a break.
b) Alternatively, you can let the last sheet be drawn in and then place a
newly prepared stack on the table. This briefly breaks the machine run,
but the negligible time loss will not reduce average output
Adjusting Roller Pressure
Depending on the weight of the paper, sometimes it is necessary to adjust
the roller pressure according to ensure a smooth and accurate fold.
The roller pressure can be adjusted by turning on the nut (1) clockwise or
anti-clockwise to achieve the desire pressure. The direction/point of rotation
reference is always the view from the nut looking towards the roller.
Turn the adjustment nut (1) Clockwise:
This action will pull the rod and create a gap between the rollers. This
step is to release pressure on the fold rollers.
1
Direction of
View
Page 25

23
Turn the adjustment nut (1) Anti-Clockwise:
This action will push the rod and close the gap between the rollers. This
step is to increase pressure on the fold rollers
9. OPTIONAL ACCESSORIES
A. Scoring!or!Perforating!Wheel!
First, mark the scoring position on a test paper then adjust the ejector roller
to the paper edge. Roll out the paper to the ejector shafts by turning the
handwheel. Adjust the scoring wheel to the required position. After which,
adjust the upper wheels towards the scoring wheel. This will create the
score line when the paper is run through. Please test the depth of the score.
In general, for thin paper, set the distance between the scoring wheel is
closer. For thicker paper, set the distance further apart.
This set-up and principle also applies to perforation wheel.
When the scoring/perforating wheels are not in use, loosen the roller
and move it 1cm away from the cam.
D
irection of
View
Page 26

24
10. FAULTS,
CAUSE AND
REMEDY
Perforating Stripper
Perforating stripper eliminates the
tendency of paper sticking on the
perforating wheel, which might cause a
jam during the output. Install perforating
stripper on the hold - down roller shaft.
Page 27

25
(
Fault Cause Remedy
Intermittent(and(
irregular(feed(
1.(Feed(bracket(set(too(narrow(
2.(Gap(between(feed(and(
pressure(roller(too(narrow(
3.(Infeed(roller(pressure(
insufficient(or(roller(worn(out(
4.(Feeder(Shaft(drive(belt(worn(
1.(Loosen(the(bracket(by(a(little(
2.(Increase(gap(with(setting(knob((
(
3.(Increase(feed(on(the(feeder(or(
replace(infeed(roller(
4.(Replace(belt(
Very(lightDweight(
paper(grade(
becomes(creased(
1.(Infeed(roller(pressure(too(
strong(
2.(Gap(between(feed(and(
pressure(roller(too(narrow(
3.(Speed(too(high(
4.(Paper(runs(at(an(angle(
5.(Pressure(of(first(pair(of((fold(
rollers(too(strong(our(uneven(
1.(Reduce(feed(pressure(with(
knurled(nut(
2.(Increase(gap(with(setting(knob((
(
3.(Reduce(speed(
4.(Correct(with(feed(brackets(
5.(Have(pressure(and(parallel(fold(
roller(alignment(set(by(our(
service(engineer(((fold(roller(
arrangement(is(suitable(for(all(
paper(grades(in(general(use,(but(
for(some(very(thin(papers,(fold(
roller(pressure(can(be(altered()(
Two(or(more(sheets(
drawn(in(together(
The(folding(machine(
has(stopped(
1.(Gap(between(feed(and(
pressure(roller(too(wide(
2.(Paper(jam,(the(blocking(
prevention(has(switched(off(
the(folder(
1.(Narrow(gap(with(setting(knob(
(
2.(Clear(paper(jam.(To(restart(the(
machine,(it(has(to(be(switched(off
and(then(switched(on(again.(
Folded(sheets(slide(
one(inside(the(other(
Gap(betw
een(ejector(roller(and(
holdDdown(rollers(too(wide(or(
too(short(
Correct(the(holdDdown(wheel(
distance(
Sheets(jam(between(
ejector(roller(and(
holdDdown(rollers(
1.(Gap(between(ejector(spindles(
and(holdDdown(rollers(too(
short(
2.(Ejector(rollers(not(evenly(
spaced(over(sheet(width(
(
3.(Ejector(rollers(worn(
1.(Correct(the(holdDdown(wheel(
distance(
(
2.(Reposition(the(rollers,(together(
with(the(scoring(wheels,(so(that(
they(will(guide(the(paper(evenly(
3.(Replace(rollers(
Sheets(not(evenly(
fanned(on(delivery(
1.(Paper(feed(irregular(
(
2.(Ejector(rollers(worn(or(not(
evenly(set(
3.(Delivery(belt(is(slack(
(
4.(Drive(belt(of(delivery(belt(worn(
1.(Correct(setting(((see(section(on(
“paper(feed”()(
2.(Replace(or(reposition(rollers(
(
3.(Tension(belt(or(replace(it,(if(
necessary(
4.(Fit(new(drive(belt(
Page 28

26
 Loading...