

Galaxy 721.35078, 721.35079 Owner's Manual
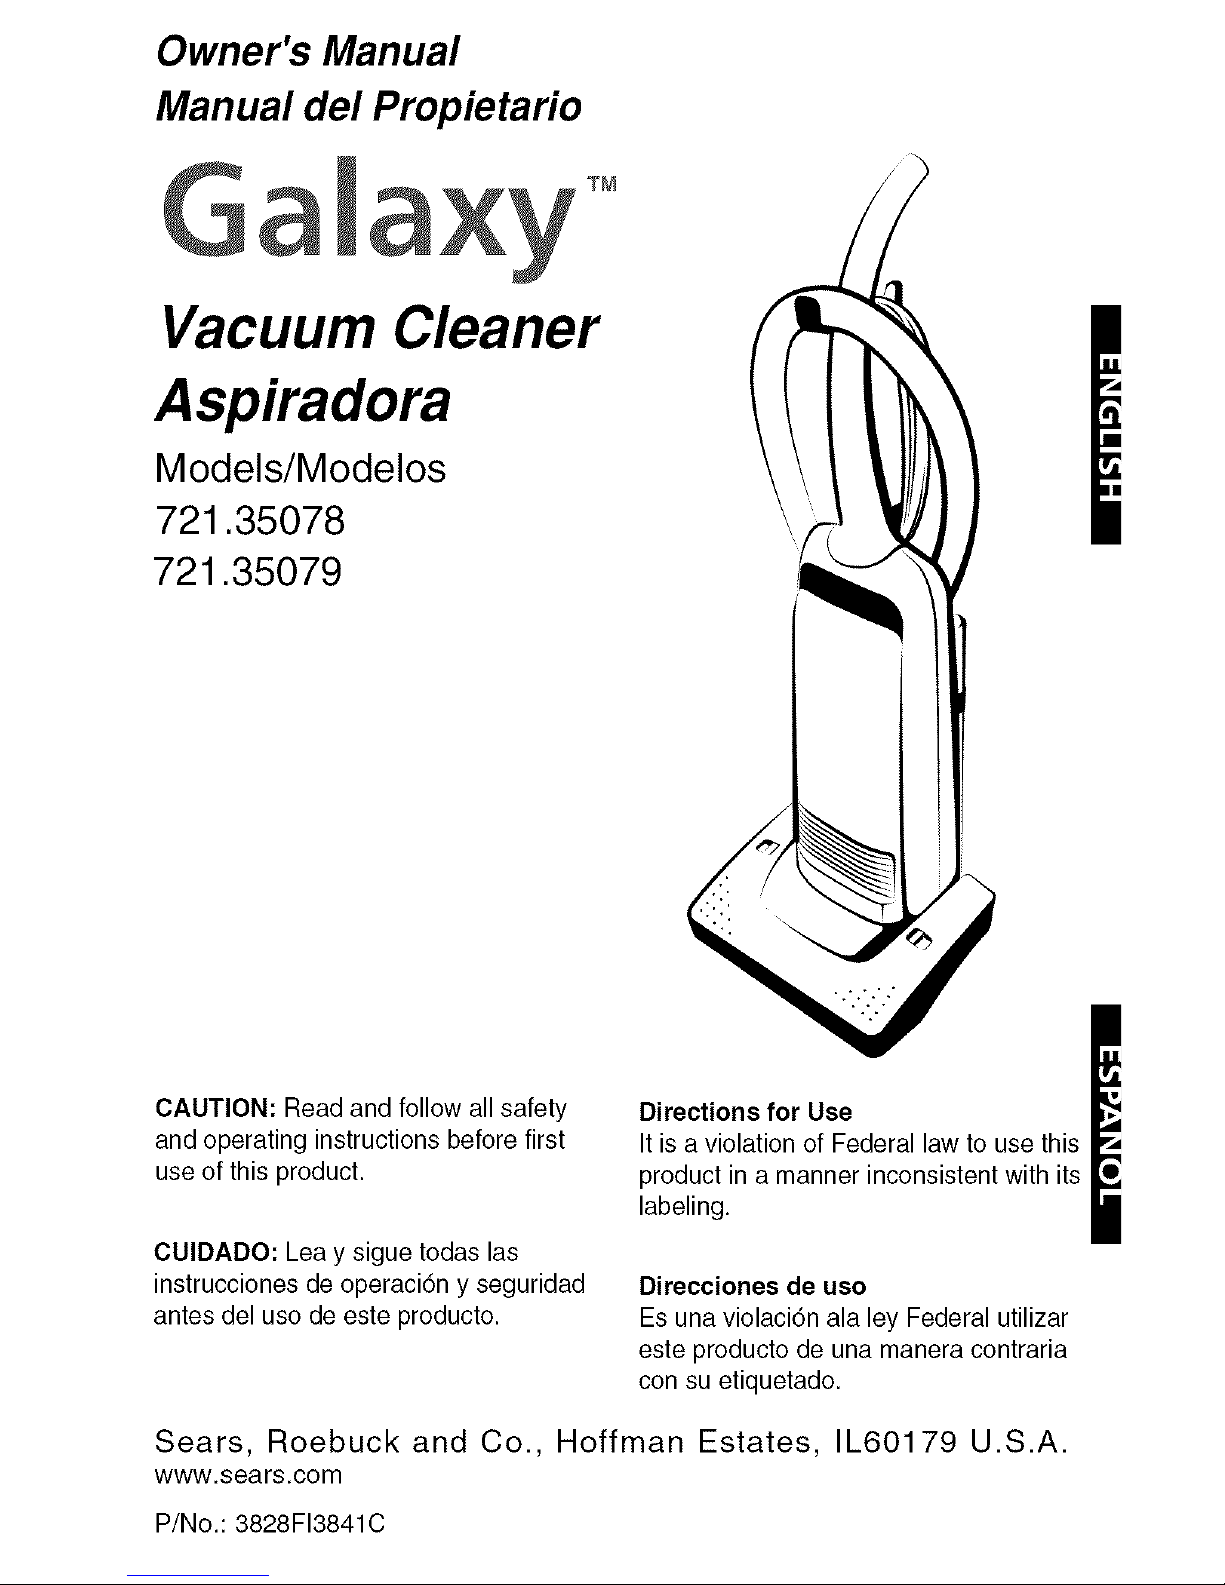
Owner's Manual
Manual del Propietario
TM
Vacuum Cleaner
Aspiradora
Models/Modelos
721.35078
721.35079
CAUTION: Read and follow all safety
and operating instructions before first
use of this product.
CUIDADO: Lea y sigue todas las
instrucciones de operaci6n y seguridad
antes del use de este producto.
Sears, Roebuck and Co.
www.sears.com
P/No.: 3828FI3841C
Directions for Use
It is a violation of Federal law to use this
product in a manner inconsistent with its
labeling.
Direcciones de uso
Es una violaci6n ala ley Federal utilizar
este producto de una manera contraria
con su etiquetado.
Hoffman Estates, IL60179 U.S.A.
Before UsingYourNew Vacuum.......................2
GalaxyVacuumCleanerWarranty ................2
ImportantSafety Instructions............................3
Partsand Features.............................................4
AssemblyInstructions.......................................5
OperatingInstructions.......................................6
CordRelease....................................................6
AutomaticHeightAdjustment...........................7
HandleReleaseandPositions..........................7
On/OffSwitch....................................................7
Attachments......................................................7
AttachmentsUseChart.....................................9
VacuumingTips................................................9
PerformanceFeatures....................................10
Vacuum Cleaner Care....................................... 1t
Vacuum Storage............................................. 1t
Cleaning Exterior and Attachments ................ 11
Dust Bag Changing ......................................... 12
Motor Safety Filter Cleaning ........................... 13
Exhaust Filter Cleaning and Replacement.....13
Belt Changing and Agitator Cleaning .............. 14
Agitator Servicing ............................................ 16
Clog Removal ................................................. 17
Troubleshooting ............................................... 18
Master Protection Agreements ........................ 19
Service ................................................ Back Cover
Please read this guide. It will help you assemble and operate your new Galaxy vacuum in the safest
and most effective way.
For more information about the care and operation, call your nearest Sears store.
You will need the complete model and serial numbers when requesting information.
Your vacuum's model and serial numbers are located on the Model and Serial Number Plate.
Use the space below to record the model number and serial number of your new Galaxy vacuum.
Model No.
Serial No.
Date of Purchase
Keep this book and your sales check (receipt) in a safe place for future reference.
LIMITED ONE YEAR WARRANTY ON GALAXY VACUUM CLEANER
This warranty is for one year from the date of purchase, and includes only private household
vacuum cleaner use. During the warranty year, when this vacuum cleaner is operated and
maintained according to the owner's manual instructions, Sears will repair any defects in material
or workmanship free ofcharge.
This warranty excludes vacuum bags, belts, light bulbs, and filters, which are expendable parts
and become worn during normal use.
For warranty service, return this vacuum cleaner to the nearest Sears Parts and Repair
Center in the United States.
This warranty applies only while this product is in use in the United States.
This warranty gives you specific legal rights, and you may also have other rights which vary from
state to state.
Sears, Roebuck and Co., D/817WA, Hoffman Estates, IL 60170
-2-
m
I_/Al_l_l I I_1/__
U --/'_1_1_11 I_1_1 - To reduce the risk of fire, electric shock, or injury:
Your safety is important to us. To reduce the risk of fire, electric shock, injury to
persons or damage when using your vacuum cleaner, follow basic safety precautions
including the following:
Read this manual before assembling or using
¢our vacuum cleaner.
Use your cleaner only as described in this
manual. Use only with supplied attachments.
To reduce the risk of electric shock- Do not
use outdoors or on wet surfaces.
Do not vacuum up water.
Disconnect electrical supply before servicing
or cleaning out brush area. Failure to do so
could result in electric shock or brush suddenly
starting.
Always turn cleaner off before connecting or
disconnecting the hose.
Always turn cleaner off before unplugging.
Do not unplug by pulling on cord. To unplug,
grasp the plug, not the cord.
Hold plug when rewinding onto cord reel.
Do not allow plug to whip when rewinding.
Do not use with damaged cord or plug. If
cleaner is not working as it should, has been
dropped, damaged, left outdoors, or dropped
into water, return it to a Sears Service Center.
Do not pull or carry by cord, use cord as a
handle, close door on cord, or pull cord around
sharp edges or corners. Do not run cleaner over
cord. Keep cord away from heated surfaces.
De not leave cleaner when plugged in.Unplug
from outlet when not in use and before servicing.
Do not allow to be used as a toy. Close attention
is necessary when used by er near children.
Do not handle plug or cleaner with wet hands.
Do not operate the cleaner with a punctured
hose. Replace if cut or worn. Avoid vacuuming
sharp objects.
De notuse withany openingblocked;keep
free of dust, lint,hair and anythingthat may
reduceair flow.
Keephair,looseclothing,fingers, and all parts
of bodyawayfrom openingsand movingparts.
De notuse cleanerwithoutdust bag and/or
filters in place.
Alwayschangethe dust bag aftervacuuming
carpetcleanersor freshener,powdersandfine
dust.These productsclogthe bag,reduce
airflowand cancausethe bagto burst. Failure
to changebagcould cause permanentdamage
to the cleaner.
Keepthe PEbag(withholes)awayfrombabies
andchildren,donot usein cribs,beds,carriages,
or playpens.This thinfilm mayclingto noseand
mouthand preventbreathing.
De notusethe cleanerto pick upsharp hard
objects,small toys, pins,paper,etc.Theymay
damagethe cleaneror dust bag.
Donot pickupanythingthatisburningorsmoking,
suchascigarettes,matches,or hotashes.
Donot usevacuumcleaner
topick upflammableorcombustibleliquids
(gasoline,cleaningfluids,perfumes,etc.),or use
in areaswheretheymay bepresent.Thefumes
fromthese substancescancreateafire hazard
or explosion.
Useextra care when cleaningon stairs. Donot
put onchairs,tables,etc.Keeponfloor.
Youare responsiblefor makingsurethatyour
vacuumcleaneris not usedby anyone unable
to operate it properly.
SAVE THESE INSTRUCTIONS
Proper assembly and safe use of your vacuum cleaner are your responsibilities. Your cleaner is
intended only for household use. Read this Owner's Manual carefully for important use and
safety information. This guide contains safety statements under warning and caution symbols.
Please pay special attention to these boxes and follow any instructions given. WARNING
statements alert you to such hazards as fire, electric shock, burns and serious personal injury.
CAUTION statements alert you to such hazards as moderate personal injury and/or property damage.
-3-
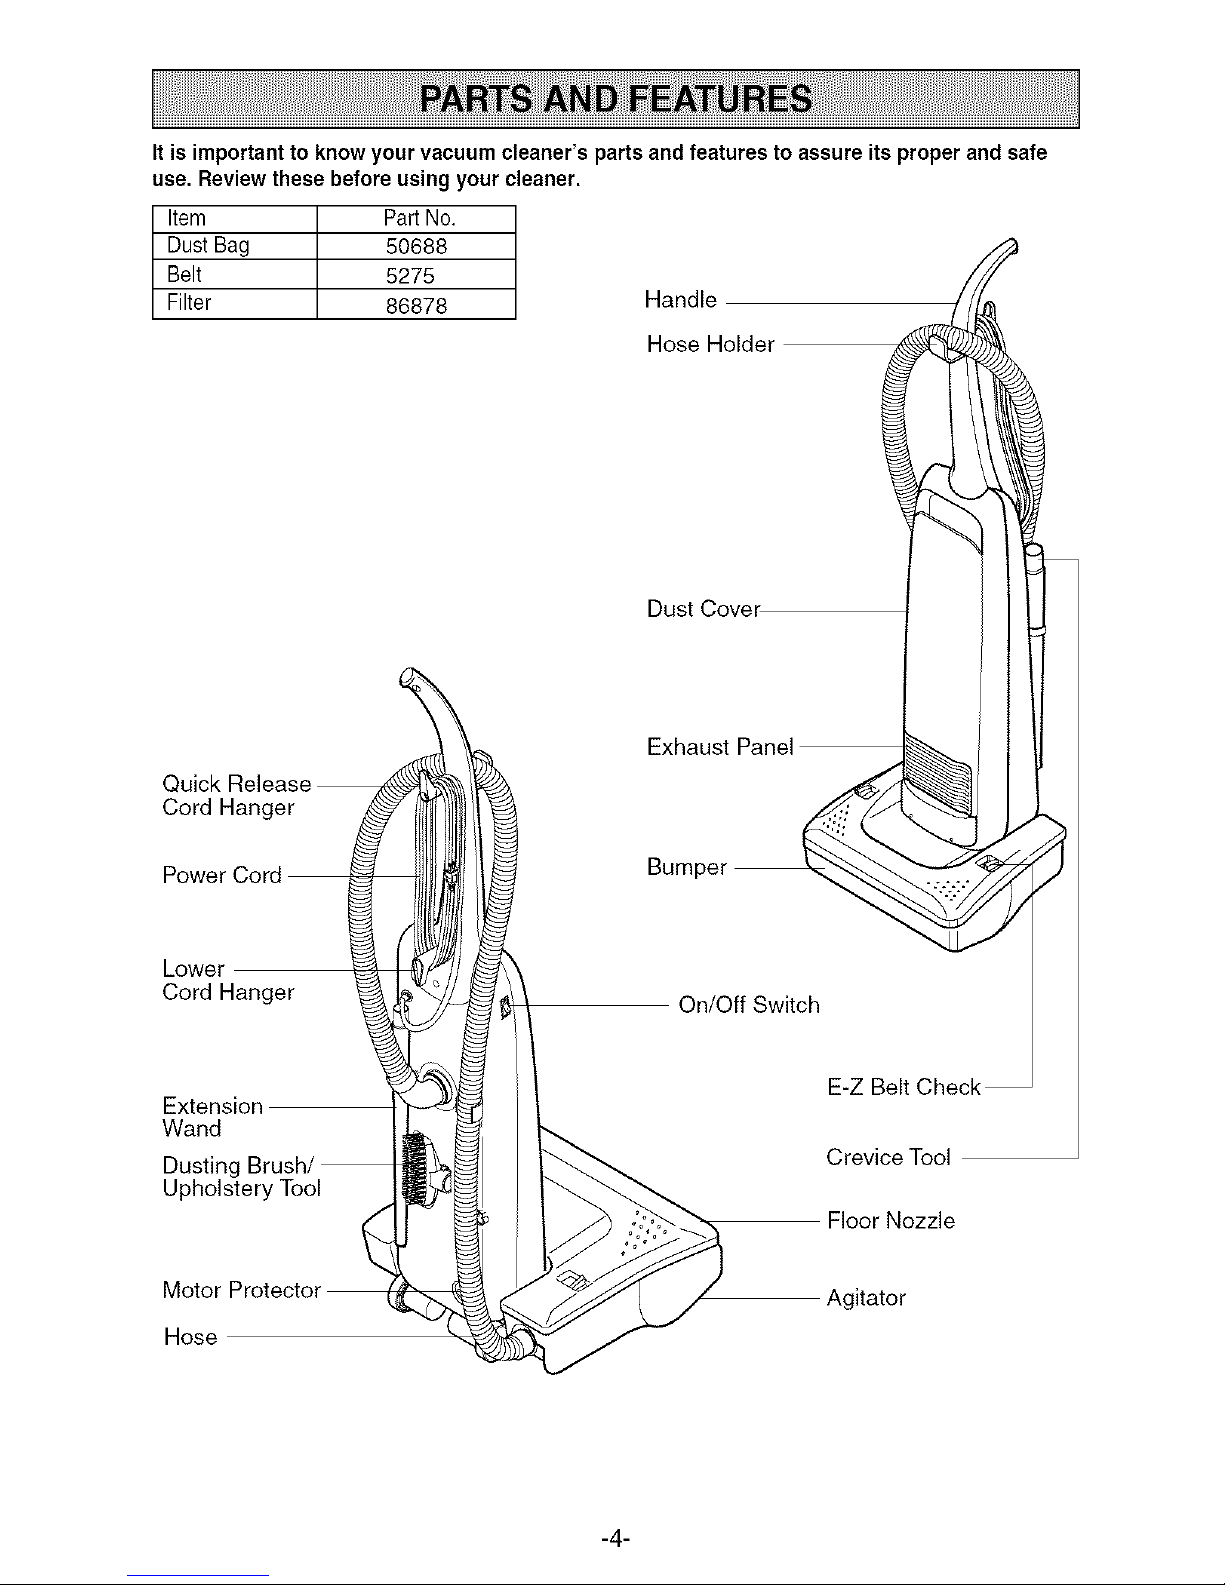
It is importantto knowyourvacuumcleaner's parts andfeaturesto assureits properand safe
use, Reviewthesebefore usingyour cleaner.
Item Part No.
Dust Bag 50688
Belt 5275
Filter 86878
Handle
Hose Holder
Dust
Quick
Cord Hanger
Exhaust Panel
Bumper
Lower
Cord Hanger
Extension
Wand
Dusting
Upholstery Tool
Motor
Hose
On/Off Switch
E-Z Belt
Crevice Tool
Floor Nozzle
Agitator
-4-
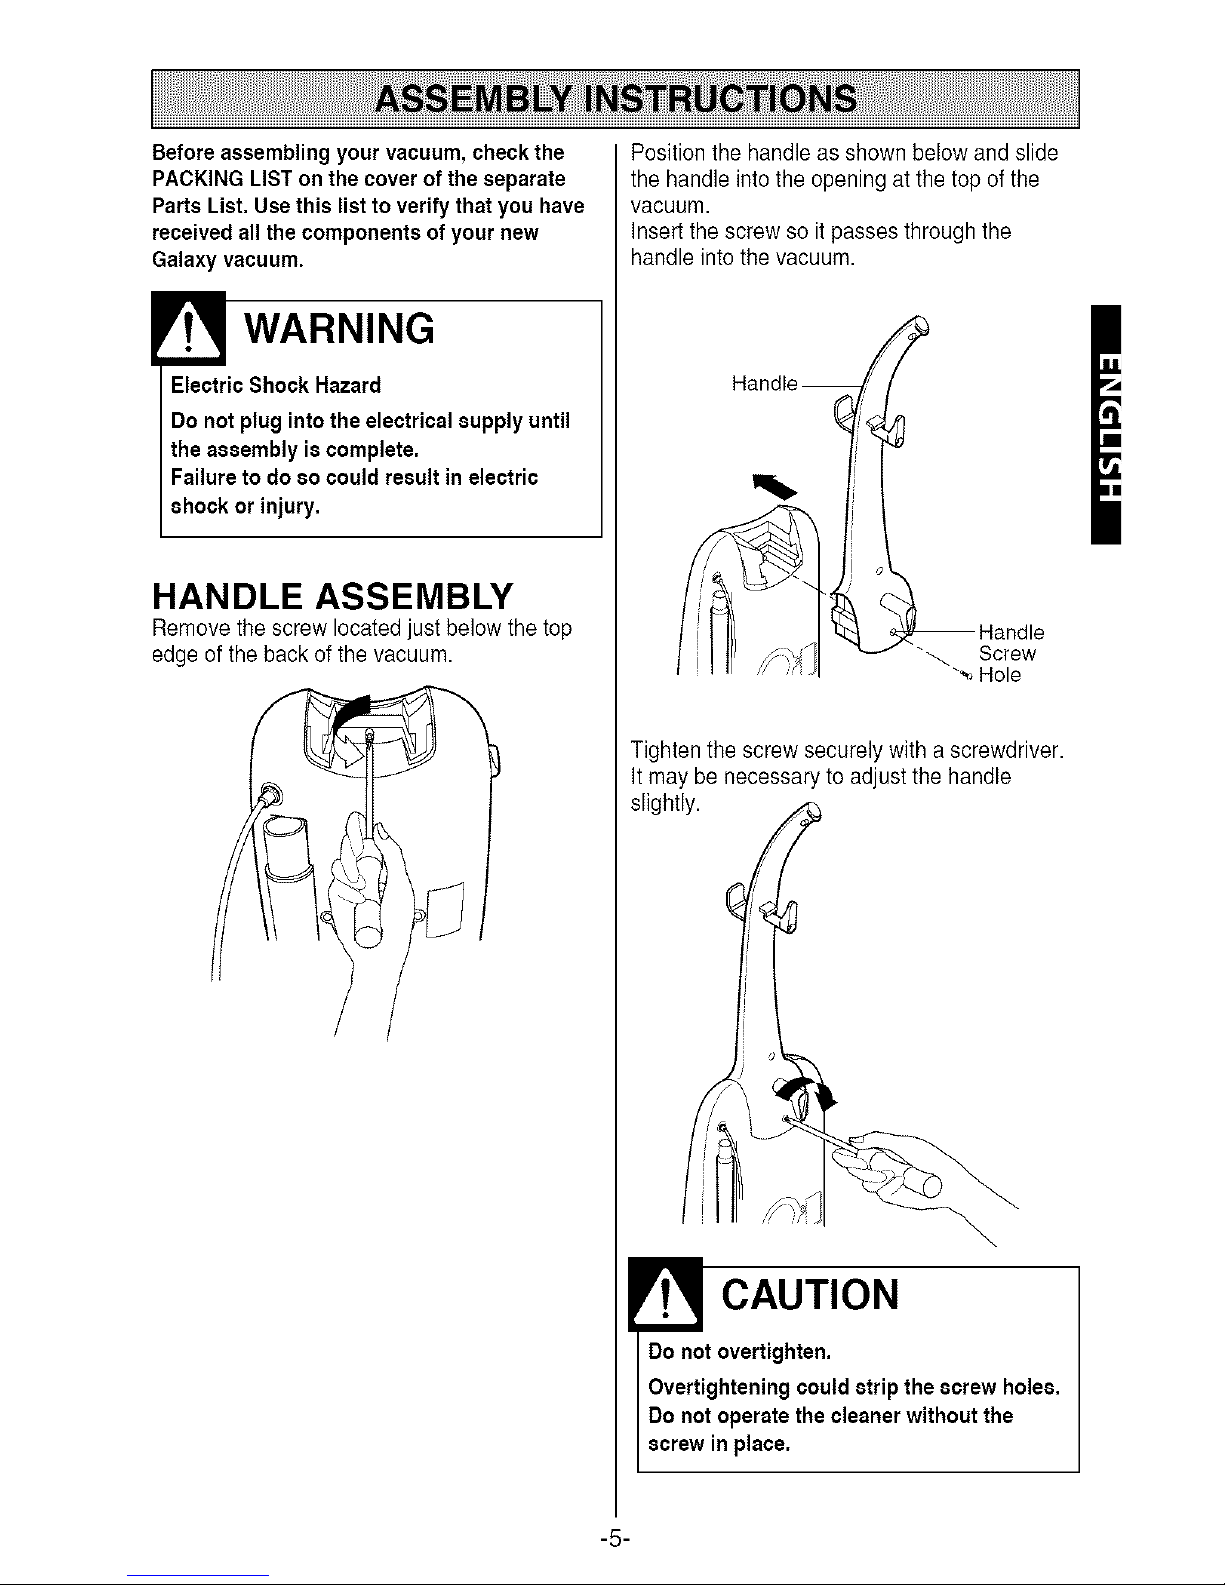
Before assemblingyour vacuum,check the
PACKINGLISTon the coverof the separate
Parts List. Use this list to verify that you have
received all the components of your new
Galaxy vacuum.
WARNING
ElectricShock Hazard
Donot plugintothe electricalsupplyuntil
the assemblyiscomplete,
Failureto do so could resultin electric
shockor injury,
HANDLE ASSEMBLY
Remove the screw located just below the top
edge of the back of the vacuum.
Positionthe handle as shown below and slide
the handle into the opening at the top of the
vacuum.
Insert the screw so it passes through the
handle into the vacuum.
Tighten the screw securely with a screwdriver.
It may be necessary to adjust the handle
slightly.
CAUTION
Donot overtighten,
Overtightening could stripthe screw holes,
Donot operatethe cleanerwithoutthe
screwin place,
-5-
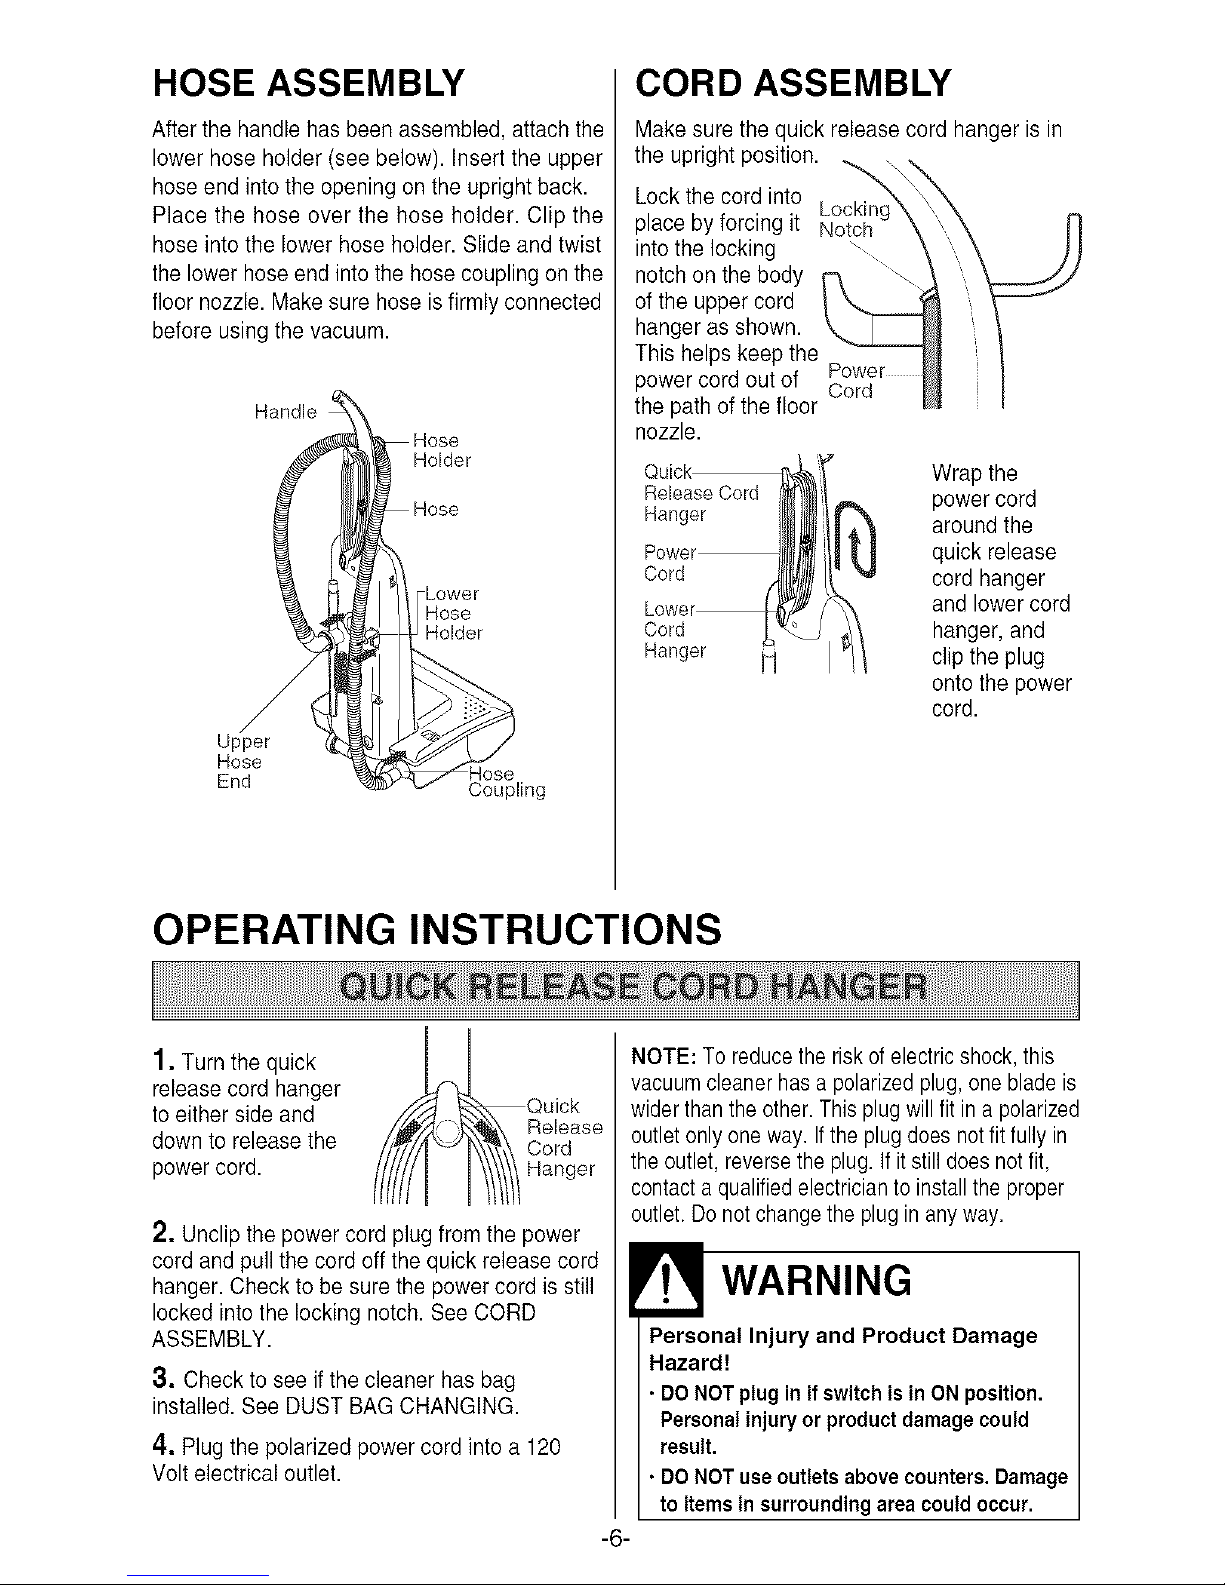
HOSE ASSEMBLY
After the handle has been assembled, attach the
lower hose holder (see below). Insert the upper
hose end into the opening on the upright back.
Place the hose over the hose holder. Clip the
hose into the lower hose holder. Slide and twist
the lower hoseend into the hose coupling on the
floor nozzle. Make sure hose is firmly connected
before using the vacuum.
Handle
Holder
Hose
Holder
Upper
Hose
End
Coupling
CORD ASSEMBLY
Makesure the quick release cord hanger is in
the upright position. _,,
Lock the cord into
place by forcing it Notch
intothe locking \ .....
notchon the body
of the upper cord
hanger as shown.
This helps keep the
power cord out of Cord
the path of the floor
nozzle.
Release Cord
Ranger
Cord
Cord
Ranger
Wrap the
power cord
around the
quick release
cord hanger
and lower cord
hanger, and
clip the plug
onto the power
cord.
OPERATING INSTRUCTIONS
1, Turn the quick
release cord hanger
to either side and
down to release the
power cord.
Quick
Release
Cord
Hanger
2, Unclip the power cord plug from the power
cord and pull the cord off the quick release cord
hanger. Check to be sure the power cord is still
locked into the locking notch. SeeCORD
ASSEMBLY.
3, Check to see if the cleaner has bag
installed. See DUST BAG CHANGING.
4, Plugthe polarized power cord into a 120
Volt electrical outlet.
-6-
NOTE: To reducethe risk ofelectricshock,this
vacuumcleanerhas a polarizedplug, one bladeis
widerthanthe other. Thisplug willfit in a polarized
outletonlyone way.If the plugdoes notfit fully in
the outlet,reversethe plug. If it stilldoes notfit,
contactaqualifiedelectricianto installthe proper
outlet.Do notchange the plugin anyway.
WARNING
Personal Injury and Product Damage
Hazard!
•DONOTpluginif switchis inONposition,
Personalinjuryor productdamagecould
result,
•DONOTuse outletsabovecounters,Damage
toitemsinsurroundingareacouldoccur.
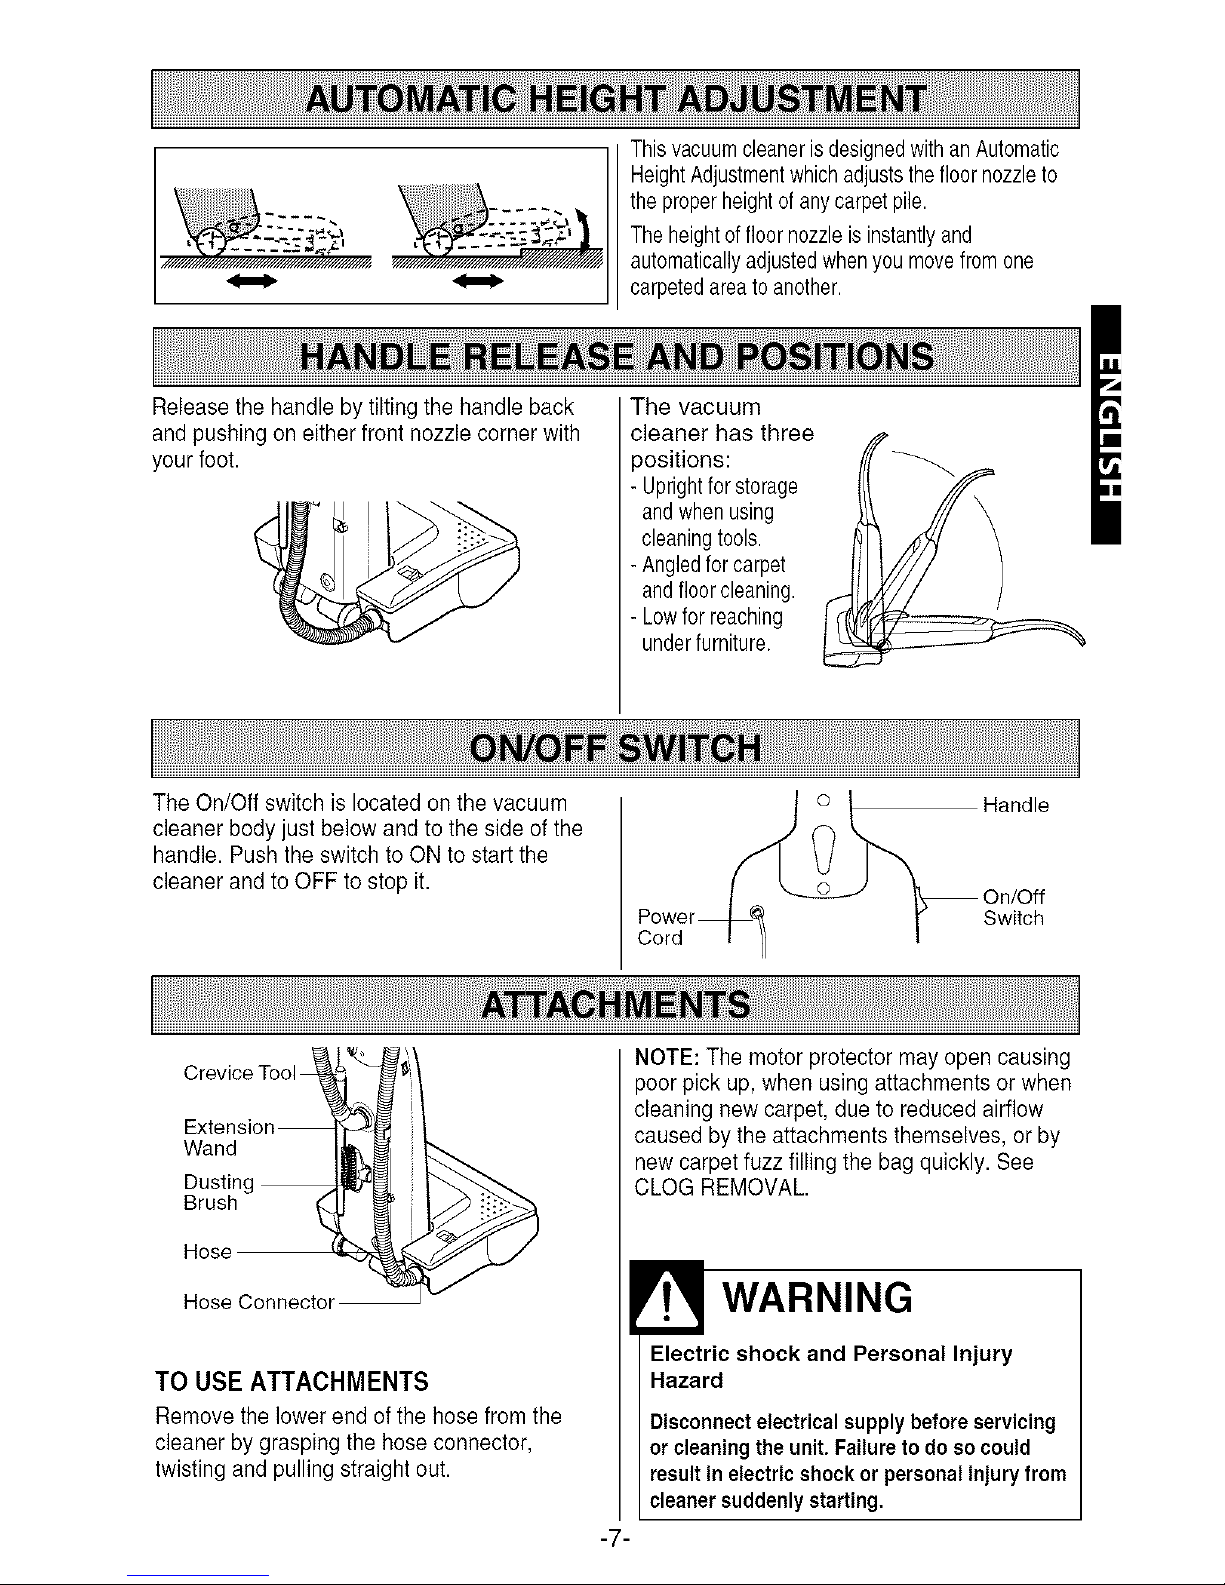
ThisvacuumcleanerisdesignedwithanAutomatic
HeightAdjustmentwhichadjuststhefloornozzleto
the properheightofanycarpetpile.
Theheightoffloornozzleisinstantlyand
automaticallyadjustedwhenyoumovefromone
carpetedareatoanother.
Release the handle by tilting the handle back
and pushing on either front nozzle corner with
your foot.
The vacuum
cleaner has three
positions:
- Uprightforstorage
andwhenusing
cleaningtools.
-Angledforcarpet
andfloorcleaning.
- Lowforreaching
underfurniture.
The On/Off switch is located on the vacuum
cleaner body just below and to the side of the
handle. Push the switch to ON to start the
cleaner and to OFF to stop it.
Cord
Handle
Switch
Crevice Tool _'_'
• i
Extension_'_ ii
Wand
Dusting __ i
Brush
Hose
Hose Connector
TO USE ATTACHMENTS
Remove the lower end ofthe hose from the
cleaner by grasping the hose connector,
twisting and pulling straight out.
NOTE: The motor protector may open causing
poor pick up, when using attachments or when
cleaning new carpet, due to reduced airflow
caused by the attachments themselves, or by
new carpet fuzz filling the bag quickly. See
CLOG REMOVAL.
WARNING
Electric shock and Personal Injury
Hazard
Disconnectelectricalsupplybeforeservicing
orcleaningtheunit.Failureto do socould
resultinelectricshockorpersonalinjuryfrom
cleanersuddenlystarting,
-7-
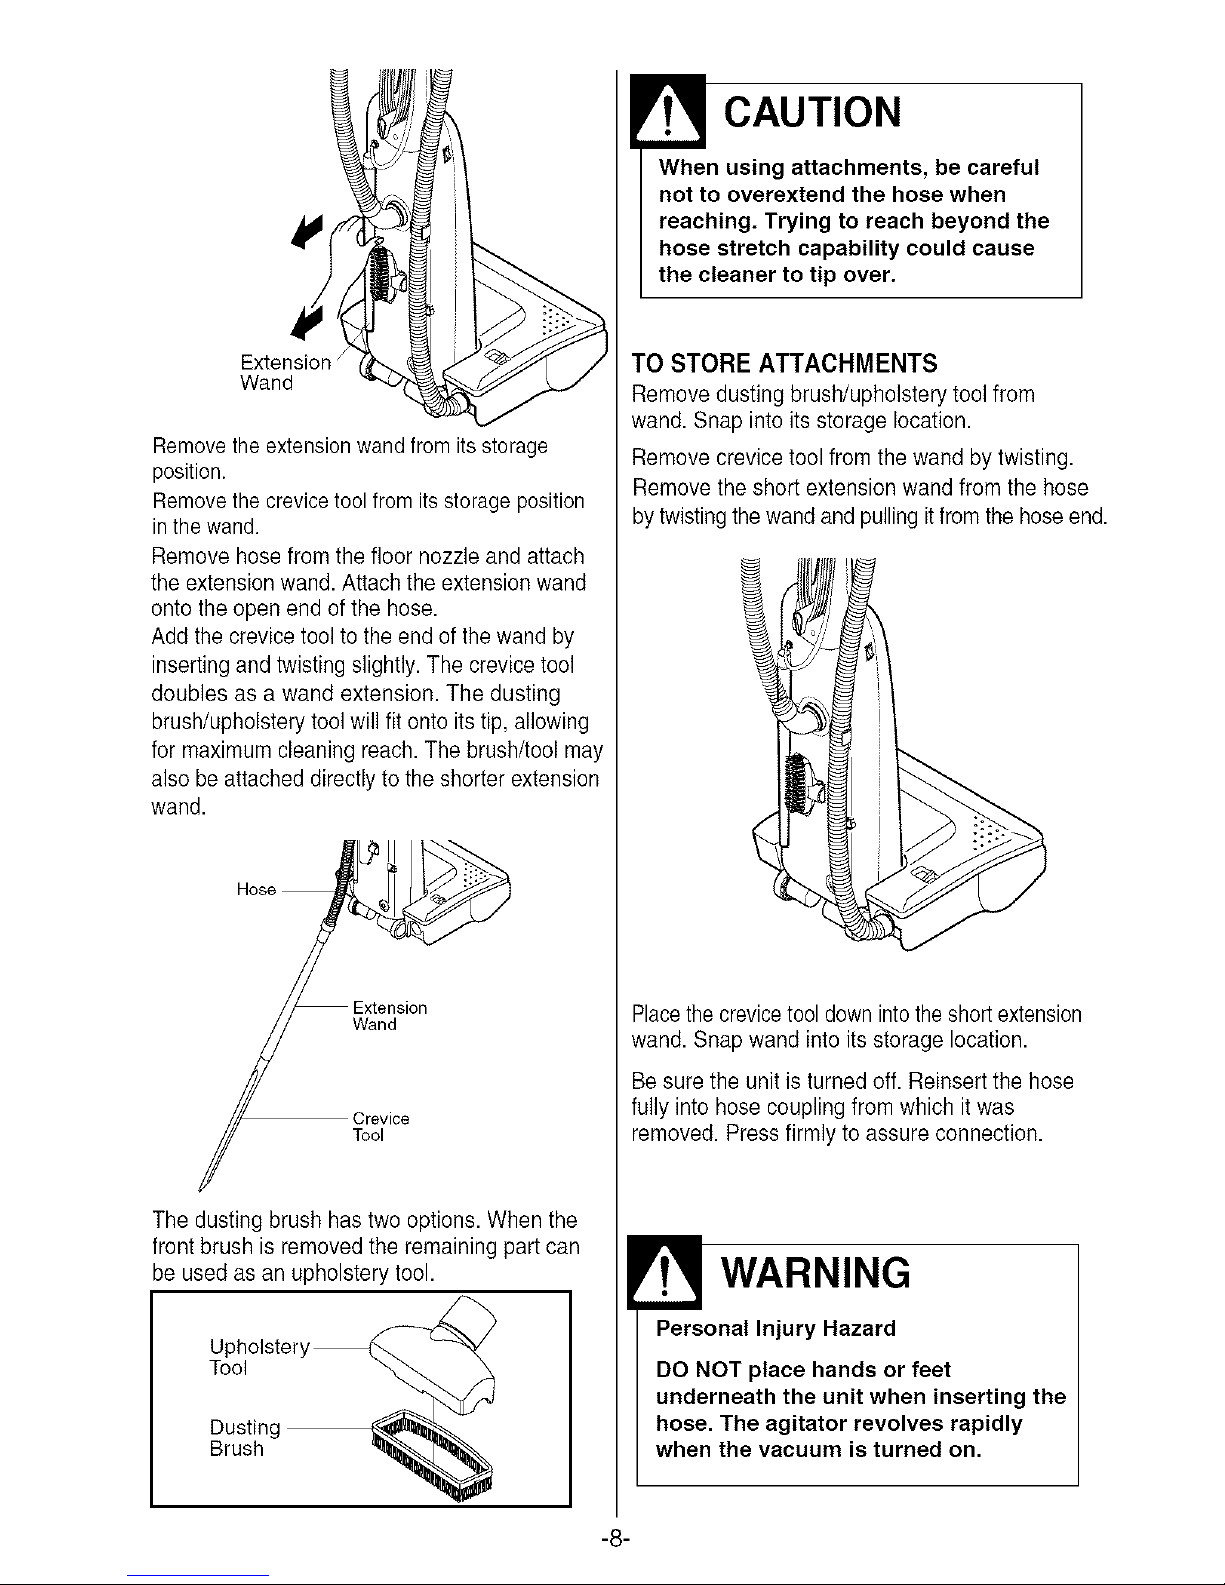
Extension
Wand
Removethe extensionwand fromits storage
position.
Removethe crevicetool from its storageposition
in the wand.
Remove hose from the floor nozzle and attach
the extension wand.Attach the extension wand
onto the open end of the hose.
Add the crevice tool to the end ofthe wand by
inserting and twistingslightly. The crevicetool
doubles as a wand extension. The dusting
brush/upholstery tool will fit onto itstip, allowing
for maximumcleaning reach. The brush/tool may
also be attached directly to the shorter extension
wand.
i!::._
The dusting brush has two options. When the
front brush is removed the remaining part can
be used as an upholstery tool.
Upholstery_@
Brush
CAUTION
When using attachments, be careful
not to overextend the hose when
reaching. Trying to reach beyond the
hose stretch capability could cause
the cleaner to tip over.
TO STORE ATTACHMENTS
Remove dusting brush/upholstery tool from
wand. Snap into its storage location.
Remove crevice tool from the wand by twisting.
Remove the short extension wand from the hose
bytwistingthe wand and pullingitfrom the hoseend.
Placethe crevicetool downintothe shortextension
wand. Snap wand into its storage location.
Be sure the unit is turned off. Reinsert the hose
fully into hose coupling from which it was
removed. Press firmly to assure connection.
WARNING
Personal Injury Hazard
DO NOT place hands or feet
underneath the unit when inserting the
hose. The agitator revolves rapidly
when the vacuum is turned on.
-8-
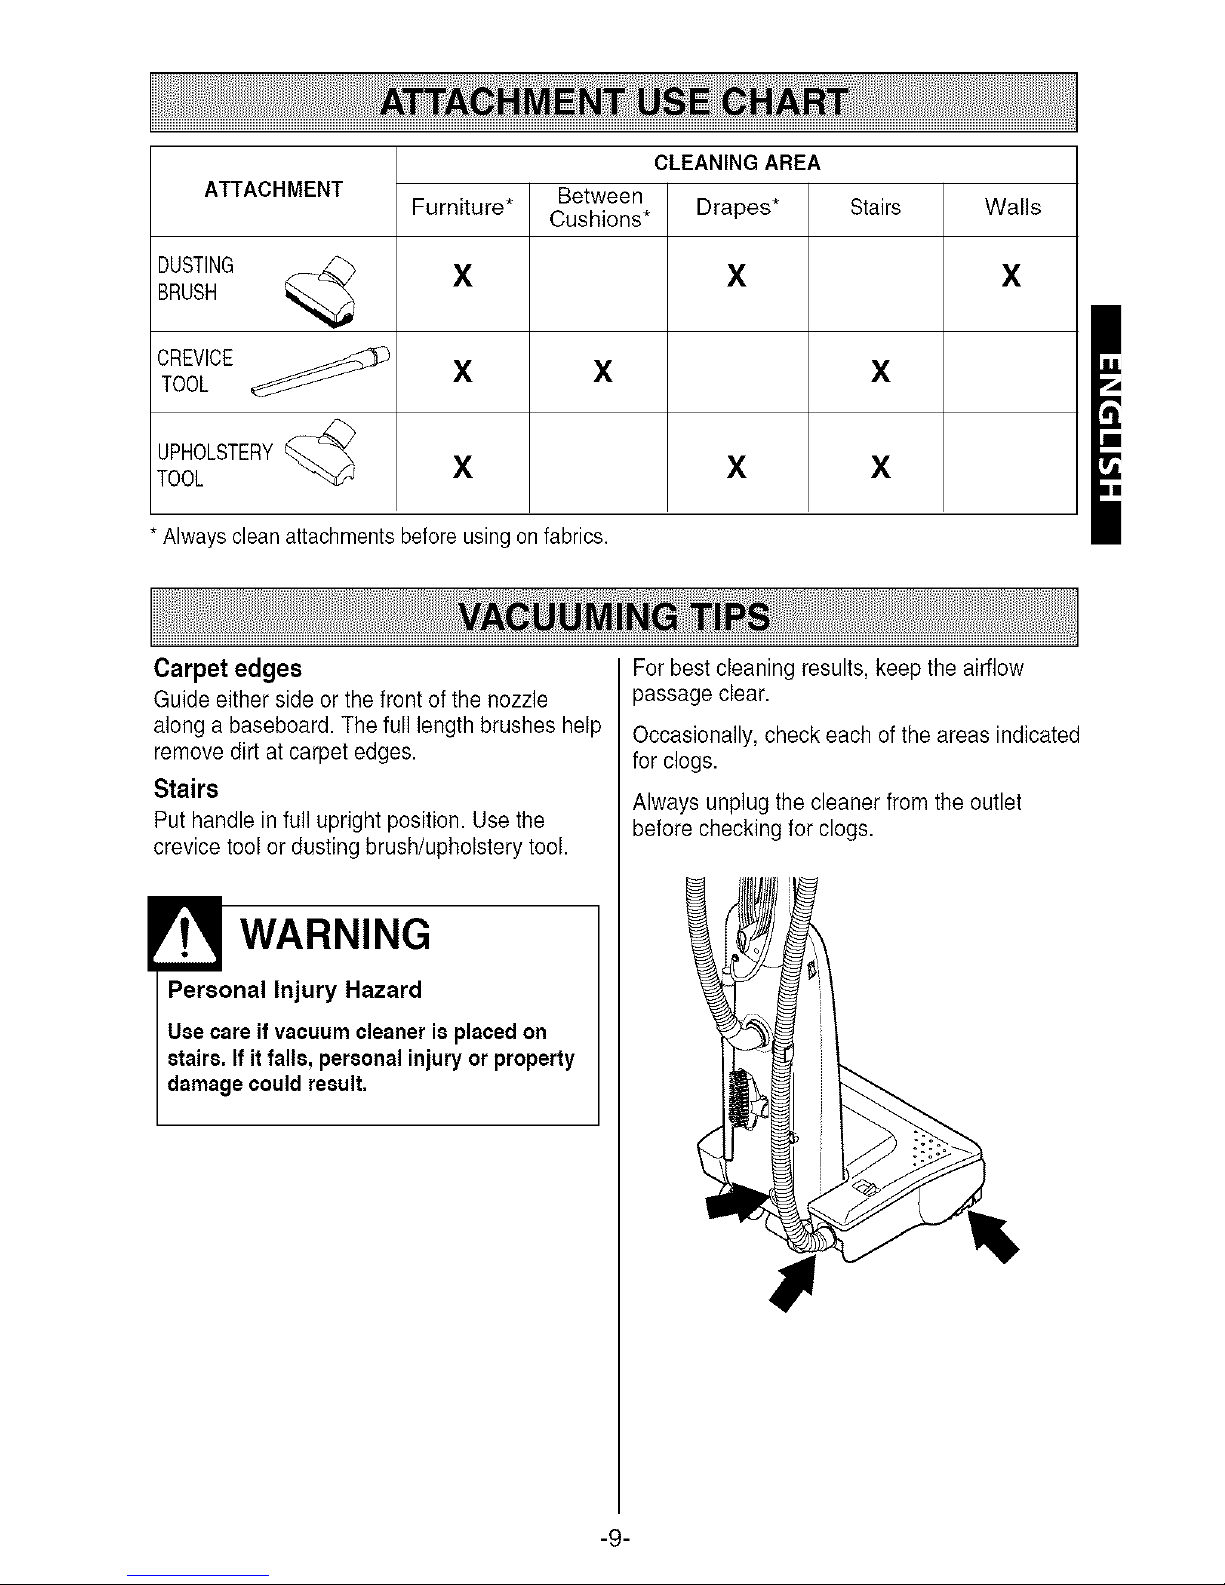
CLEANINGAREA
ATTACHMENT Between
Furniture* Cushions* Drapes* Stairs Wails
DUSTING ___ X X X
BRUSH
CREVICE_TOOL X X X
UPHOLSTERY_
TOOL X X X
* Always cleanattachmentsbeforeusingon fabrics.
Carpet edges
Guide either side or the front of the nozzle
along abaseboard. The full length brushes help
remove dirt at carpet edges.
Stairs
Put handle in full upright position. Use the
crevice tool or dusting brush/upholstery tool.
WARNING
Personal Injury Hazard
Use careif vacuumcleaneris placedon
stairs, If it falls, personalinjury or property
damagecould result.
For best cleaning results, keep the airflow
passage clear.
Occasionally, check each of the areas indicated
for clogs.
Always unplug the cleaner from the outlet
before checking for clogs.
-9-
WARNING
Electric Shock And Personal Injury
Hazard
Disconnect electrical supply before
servicing or cleaning the unit.
Failure to do so could result in
electric shock or personal injury from
cleaner suddenly starting.
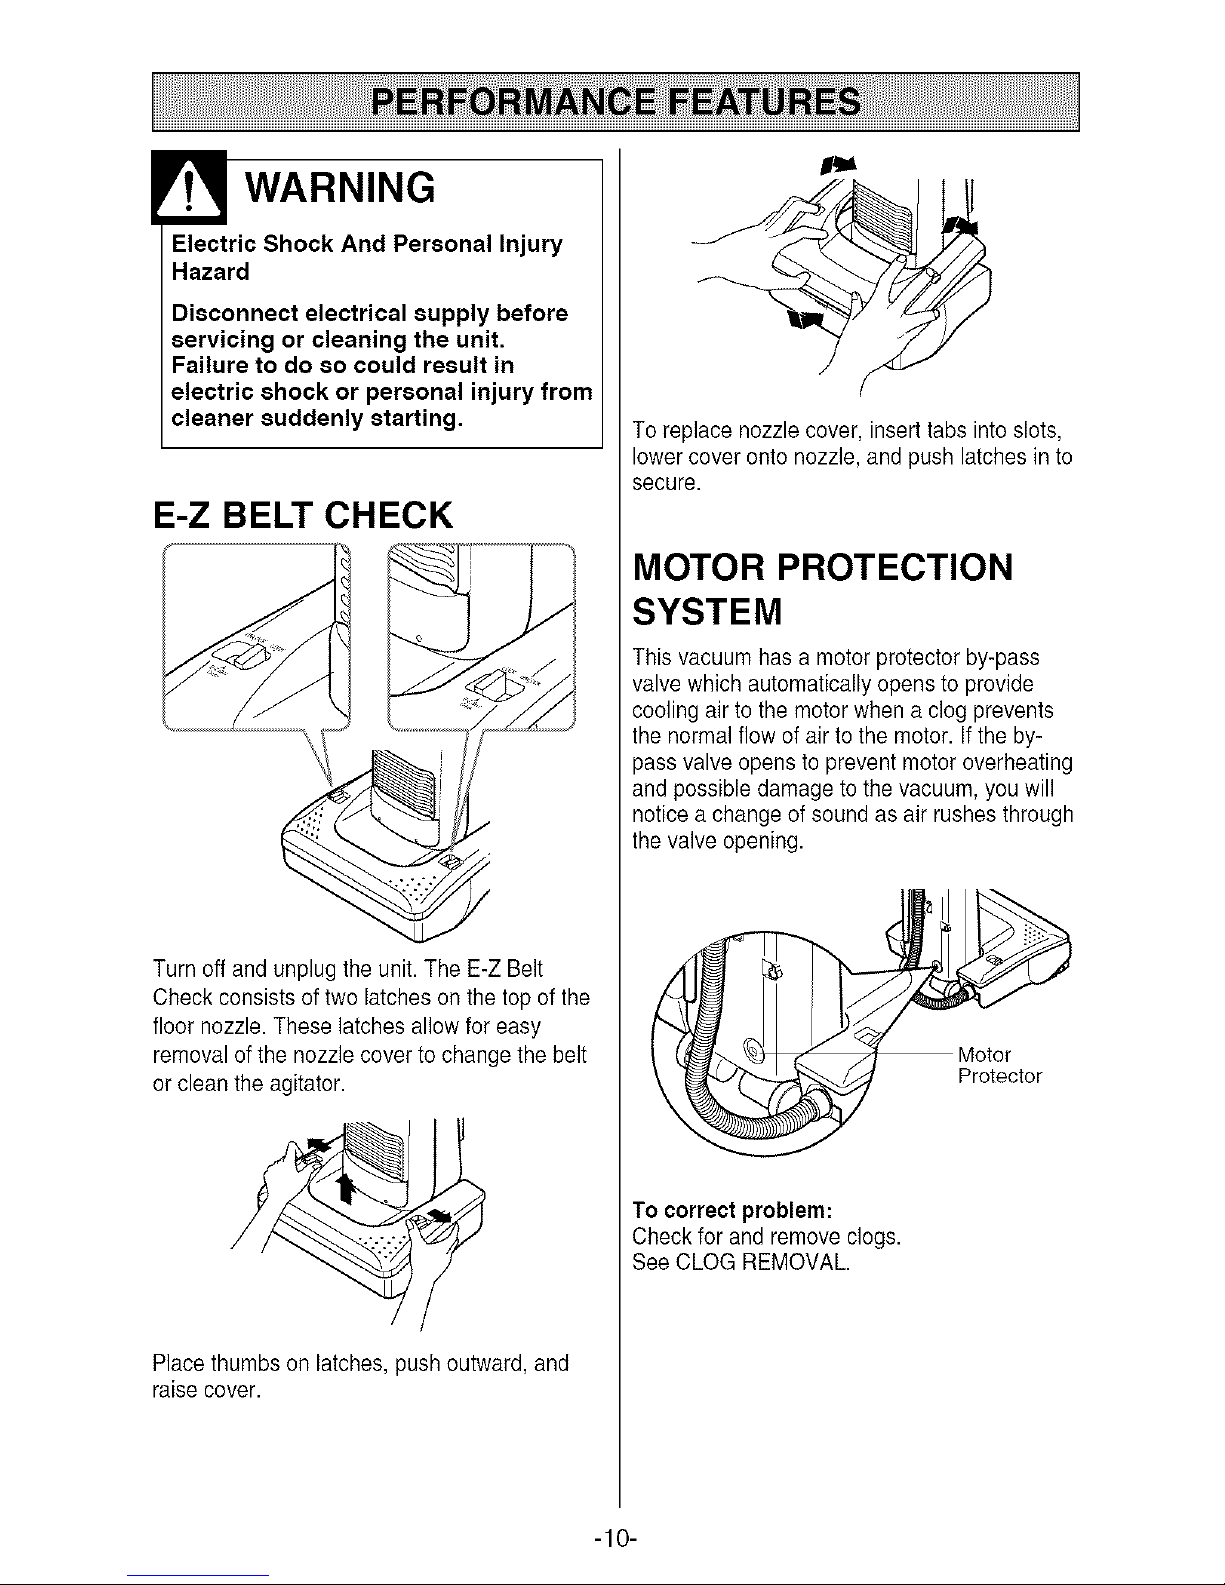
E-Z BELT CHECK
Turn off and unplug the unit. The E-Z Belt
Check consists of two latches on the top of the
floor nozzle. These latches allow for easy
removalof the nozzle coverto change the belt
or clean the agitator.
Place thumbs on latches, pushoutward, and
raise cover.
To replace nozzle cover, insert tabs into slots,
lower cover onto nozzle, and push latches in to
secure.
MOTOR PROTECTION
SYSTEM
This vacuum has a motor protector by-pass
valve which automatically opens to provide
cooling air to the motor when a clog prevents
the normal flow of air to the motor. Ifthe by-
pass valve opens to prevent motor overheating
and possible damage to the vacuum, you will
noticea change of sound as air rushes through
the valve opening.
Protector
To correct problem:
Check for and remove clogs.
See CLOG REMOVAL.
-10-

VACUUM CLEANER CARE
Always follow alI safety precautions when
cleaning and servicing the vacuum cleaner.
WARNING
Electric Shock And Personal Injury
Hazard
Disconnect electrical supply before
servicing or cleaning the unit.
Failure to do so could result in
electric shock or personal injury from
cleaner suddenly starting.
Gather the cord and wrap it loosely around the
quick release cord hanger and lower cord
hanger.
Store the cleaner in a
dry, indoor area, on the
floor with the handle
locked in the upright
position.
WARNING
Electric Shock And Personal Injury
Hazard
Wrapping the cord too tightly puts
stress on the cord and can cause
cord damage. A damaged cord is an
electric shock hazard and could
cause personal injury or damage.
Unplug cord from wall outlet. DO NOT
drip water on cleaner.
Clean exterior using a clean, soft cloth that has
been dipped in a solution of mild liquid
detergent and water, then wrung dry. Wipe dry
after cleaning.
Wash attachments in warm soapy water, rinse
and air dry. Do not clean in dishwasher.
CAUTION
Do not use attachments if they are
wet. Attachments used in dirty areas,
such as under a refrigerator, should
not be used on other surfaces until
they are washed. They could leave
marks.
-11-
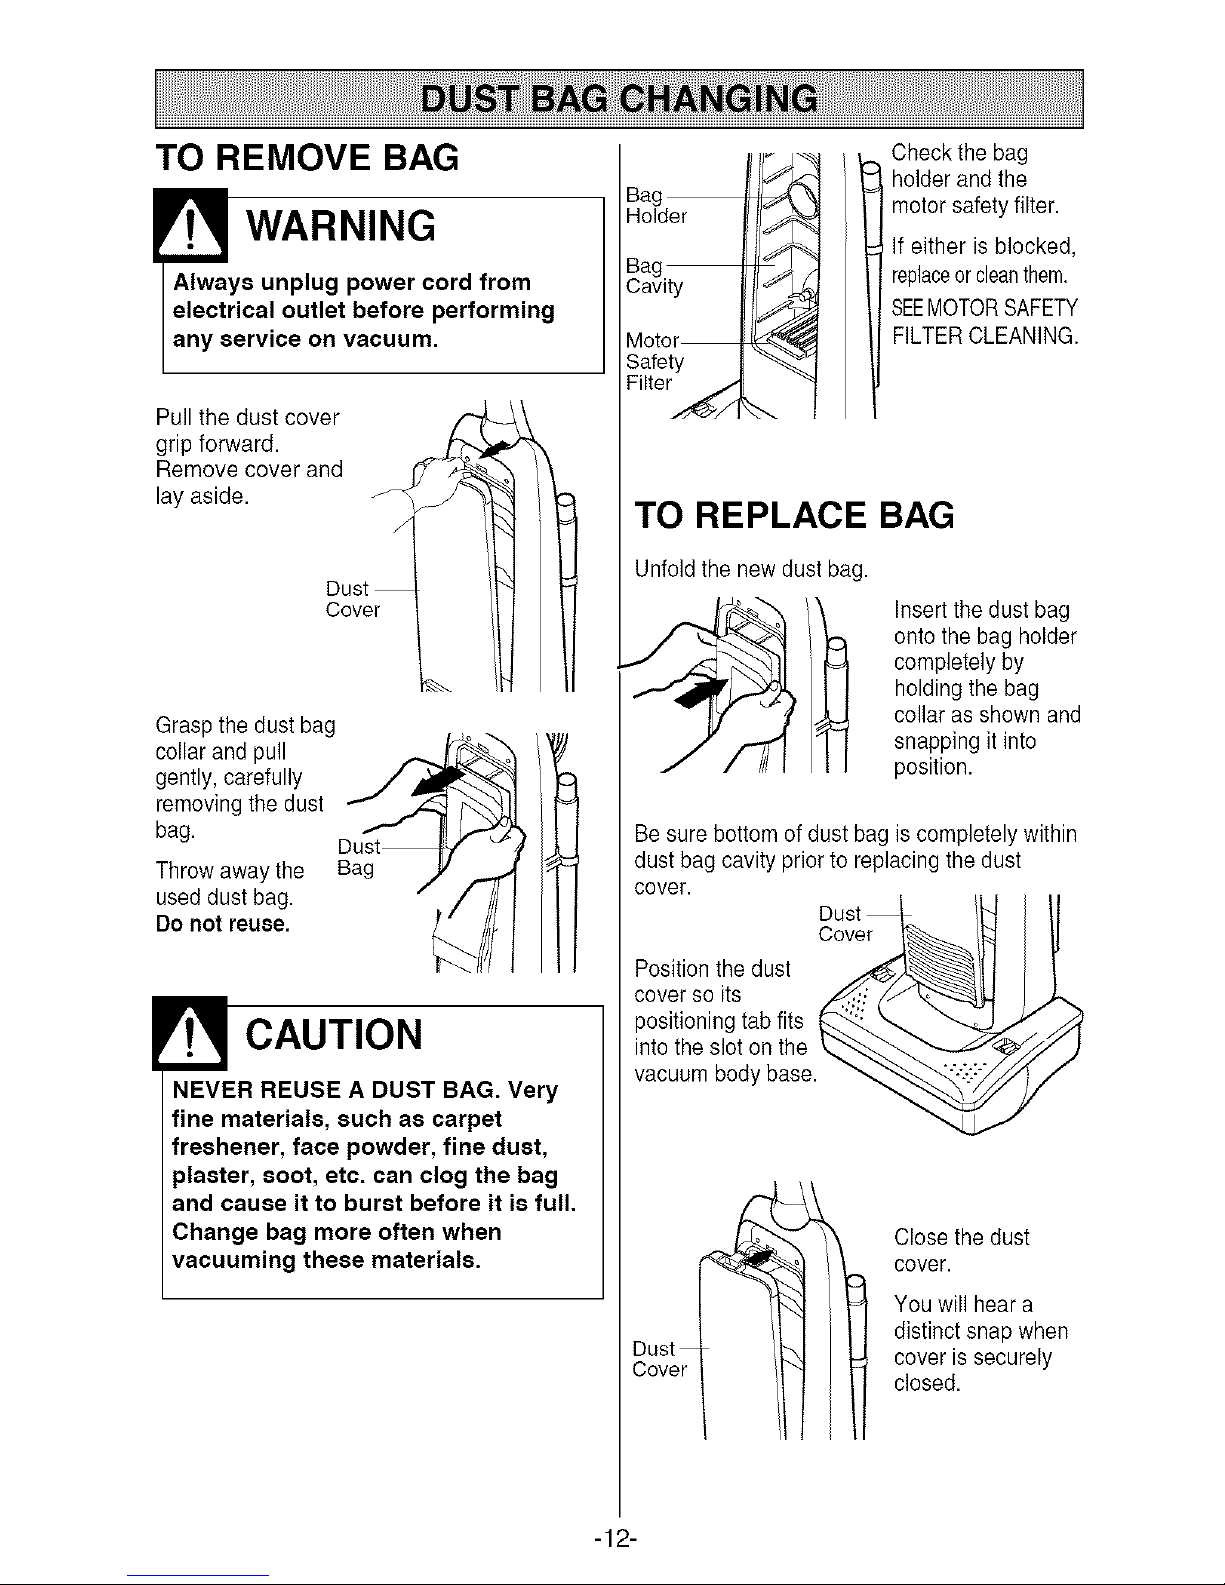
TO REMOVE BAG
WARNING
Always unplug power cord from
electrical outlet before performing
any service on vacuum.
Pull the dust cover /-7
grip forward. _._._
Remove cover and i_
lay aside. _
Dust
Cover _._.
Graspthe dust bag
collar and pull
gently,carefully
removing the dust
bag.
Throw away the Bag
useddust bag.
Donot reuse.
CAUTION
NEVER REUSE A DUST BAG. Very
fine materials, such as carpet
freshener, face powder, fine dust,
plaster, soot, etc. can clog the bag
and cause it to burst before it is full.
Change bag more often when
vacuuming these materials.
Bag
Holder
Bag
Cavity
Motor
Safety
Filter_
Check the bag
holder and the
motorsafety filter.
If either is blocked,
replaceorcleanthem.
SEEMOTORSAFETY
FILTERCLEANING.
TO REPLACE BAG
Unfold the new dust bag.
Insert the dust bag
onto the bag holder
completely by
holding the bag
collar as shown and
snapping it into
position.
Be sure bottom of dust bag is completely within
dust bag cavity prior to replacing the dust
cover.
.Dust /N l
Position the dust _,,._._. _ _-"_-_
cover so its
positioning tab fits
into the slot on the k,,__@
vacuum body base.
Dust
Cover
Close the dust
cover.
You will hear a
distinct snap when
cover is securely
closed.
-12-
 Loading...