

Page 1
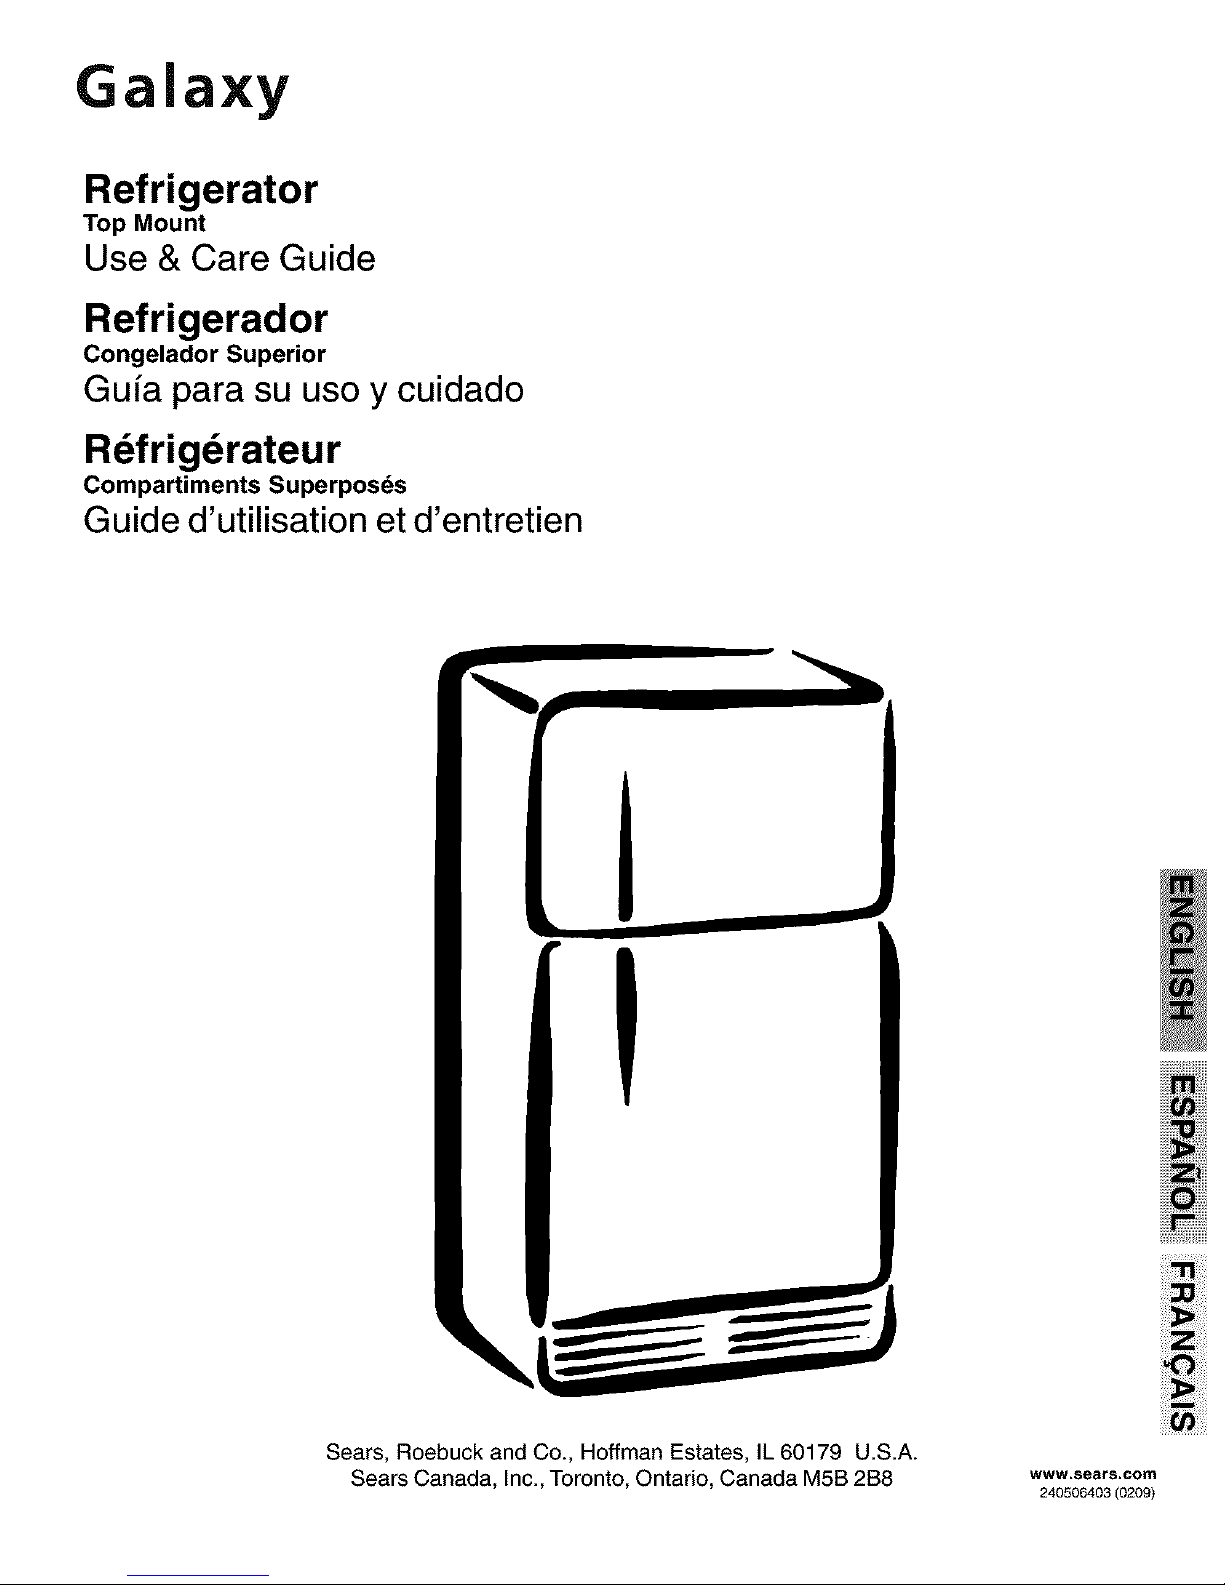
Gala×y
Refrigerator
Top Mount
Use & Care Guide
Refrigerador
Congelador Superior
Gufa para su uso y cuidado
Rdfrigdrateur
Compartiments Superposds
Guide d'utilisation et d'entretien
Sears, Roebuck and Co., Hoffman Estates, IL 60179 U.S.A.
Sears Canada, Inc., Toronto, Ontario, Canada M5B 2B8
www.sears.com
240506403 (0209)
Page 2
Congratulations on your purchase of a new refrigerator! We
here at Sears are very proud of our product and we are
completely committed to providing you with the best
service possible. Your satisfaction is our #1 priority.
We know you'll enjoy your new refrigerator and Thank You
for choosing our product. We hope you consider us for
future purchases.
PLEASE READ AND SAVE THESE
INSTRUCTIONS
This Owner's Guide provides specific operating
instructions for your model. Use your refrigerator only as
instructed in this manual. These instructions are not meant
to cover every possible condition and situation that may
occur. Common sense and caution must be practiced
when installing, operating and maintaining any appliance.
Please record your model and serial numbers below
for future reference. This information is found on the
serial plate located inside the refrigerator
compartment.
Model Number: 253
FOR YOUR SAFETY
• Do not store or use gasoline, or other flammable liquids
in the vicinity ofthis or any other appliance. Read product
labels for warnings regarding flammability and other
hazards.
• Do not operate the refrigerator inthe presence of
explosive fumes.
• Avoid contact with any moving parts of automatic ice
maker.
• Remove all staples from the carton. Staples can cause
severe cuts, and also destroy finishes if they come in
contact with other appliances or furniture.
CHILD SAFETY
Destroy or recycle the carton, plastic bags, and any
exterior wrapping material immediately after the refrigerator
is unpacked. Children should NEVER use these items to
play. Cartons covered with rugs, bedspreads, plastic
sheets or stretch wrap may become airtight chambers,
and can quickly cause suffocation.
or: 970
Serial Number:
Purchase Date:
Welcome ............................................. 2
Safety Instructions .............................. 2 - 3
Warranty .............................................. 3
Canada - Limited Warranty .................. 4
Protection Agreements ........................ 5
Installation--Includes Connecting Optional Ice
Maker To Water Supply ..................................... 6 - 7
Door Removal & Reversal .................. 8
Temperature Controls .......................... 9
Looking Inside ..................................... 10
Ice Service .......................................... 11
Food Storage & Energy Saving Tips ... 12
Normal Operating Sounds & Sights .... 13
Care & Cleaning .................................. 14 - 15
Before You Call .................................... 16
PROPER DISPOSAL OF YOUR REFRIGERATOR
OR FREEZER
Risk of child entrapment
are not problems of the past.
Junked or abandoned refrigerators
or freezers are still dangerous -
even if they will sit for "just a few
days." Ifyou are getting rid of your
old refrigerator orfreezer, please
follow the instructions below to
help prevent accidents.
Before you throw away your
old refrigerator/freezer:
• Remove doors.
• Leave shelves in place so children may not easily climb
inside.
• Have refrigerant removed by a qualified service
technician.
2
Page 3
ELECTRICAL INFORMATION
• The refrigerator must be plugged into its own
dedicated 115 Volt, 60 Hz., AC only electric outlet.
The power cord of the appliance is equipped with a
three-prong grounding plug for your protection against
electrical shock hazards. It must be plugged directly
into a properly grounded three-prong receptacle. The
receptacle must be installed in accordance with local
codes and ordinances. Consult a qualified electrician.
Do not use an extension cord or adapter plug.
• Immediately repair or replace any power cord that
becomes frayed or damaged.
• Never unplug the refrigerator by pulling on the power
cord. Always grip the plug firmly, and pull straight out
from the receptacle to prevent damaging the power cord.
• Unplug the refrigerator before cleaning and before
replacing a light bulb to avoid electrical shock.
• Performance may be affected if the voltage varies by
10% or more. Operating the refrigerator with insufficient
power can damage the compressor. Such damage is
not covered under your warranty.
• Do not plug the unit into an outlet controlled by a wall
switch or pull cord to prevent the refrigerator from being
turned off accidentally.
• Avoid connecting refrigerator to a Ground Fault Interruptor
(GFI) circuit.
FULL ONE-YEAR WARRANTY ON
REFRIGERATOR
For one year from the date of purchase, when this
refrigerator is operated and maintained according to the
instructions provided in this Owner's Guide, Sears will
repair this refrigerator, free of charge, if defective in
material orworkmanship.
FULL FIVE-YEAR WARRANTY ON SEALED
REFRIGERATION SYSTEM
For five years from the date of purchase, when this
refrigerator is operated and maintained according to the
instructions provided in this Owner's Guide, Sears will
repair the sealed system (consisting of refrigerant,
connecting tube, and compressor motor), free of charge, if
defective in material or workmanship.
The above refrigerator warranty applies only to
refrigerators which are used for storage of food for private
household purposes.
This warranty gives you specific legal rights and you may
also have other rights which vary from state to state.
Warranty service is available by contacting the NEAREST
SEARS SERVICE CENTER/DEPARTMENT inthe United
States. See the back page of this manual.
For warranty questions, please contact the following
address:
Sears, Roebuck and Co.
Dept. 817WA
Hoffman Estates, IL 60179
Page 4
CANADA m LIMITED WARRANTY
Refrigerators
Sears Canada Inc., warrants every new Kenmore refrigerator to be free from defects in material or workmanship. What Sears
will do, free of charge, in case of defect:
The Compressor TEN (10) YEARS TEN (10) YEARS FIVE (5) YEARS
The Sealed System
(consisting of refrigerant, FIVE (5) YEARS FIVE (5) YEARS FIVE (5) YEARS
evaporator,and condenser)
All other parts or
adjustments ONE (1) YEAR ONE (1) YEAR ONE (1) YEAR
Normal Responsibility of the Customer
The following items since they are not manufacturing defects, are not included in the warranty, but are the responsibility of
the customer:
1) Damage to finish after delivery.
2) Improper power supply, low voltage, or any defects in the house wiring system or appliance not connected
to electric outlet.
3) Replacement of light bulbs.
4) Damage caused by moving the product from its original installation.
5) Service required as a result of alteration, abuse, fire, floods, or acts of God.
6) Providing adequate air circulation to the refrigerating system.
7) Proper use and care of product as listed in the customer's manual; proper setting of the controls.
If any service is required under this warranty, simply call 1-800-4-MY-HOME sM(1-800-469-4663).
This warranty is in addition to any statutory warranty. The above warranty covers Kenmore Refrigerators sold and operated
in Canada only and shall not apply if the refrigerator is used for other than domestic purposes.
Sears Maintenance Agreement
Maintain the value of your Kenmore refrigerator with a Sears Maintenance Agreement.
SEARS CANADA INC. • Toronto, Canada ,, M5B 2B8
PRINTED IN U.S.A.
4
Page 5

In the U.S.A.
Master Protection Agreements
Congratulations on making a smart purchase. Your
new Kenmore ®appliance is designed and
manufactured for years of dependable operation. But
like all products, it may require preventive
maintenance or repair from time to time. That's when
having a Master Protection Agreement can save you
money and aggravation.
Purchase a Master Protection Agreement now and
protect yourself from unexpected hassle and expense.
The Master Protection Agreement also helps extend
the life of your new appliance. Here's what's included
in the Agreement:
_( Expert service by our 12,000 professional repair
specialists
_( Unlimited service and no charge for parts and
labor on all covered repairs
_" "No-lemon" guarantee- replacement of your
covered product if more than three product failures
occur within twelve months
_(
_(
_(
_(
_(
Product replacement if your covered product
can't be fixed
Annual Preventive Maintenance Check at your
request - no extra charge
Fast help by phone - non-technical and
instructional assistance on products repaired in
your home, plus convenient repair scheduling
Power surge protection against electrical
damage due to power fluctuations
Rental reimbursement if repair ofyour covered
product takes longer than promised
Once you purchase the Agreement, a simple phone
call is all that it takes for you to schedule service. You
can call anytime day or night, or schedule a service
appointment online.
Sears has over 12,000 professional repair specialists,
who have access to over 4.5 million quality parts and
accessories. That's the kind of professionalism you
can count on to help prolong the life of your new
purchase for years to come. Purchase your Master
Protection Agreement today!
Some limitations and exclusions apply. For prices
and additional information, call 1-800-827-6655.
Sears Installation Service
For Sears guaranteed professional installation of home
appliances and items like garage door openers and
water heaters, in the U.S.A. call 1-800-4MY-HOME _.
In Canada
Maintenance Agreements
Your purchase has added value because you can
depend on Sears HomeCentral ®for service. With over
2400 Service Technicians and access to over 900,000
parts and accessories, we have the tools, parts,
knowledge and skills to ensure the pledge: We Service
What We Sell.
Your Kenmore ®appliance is designed, manufactured
and tested to provide years of dependable operation.
Yet any major appliance may require service from time
to time. The Sears Maintenance Agreement offers you
an outstanding service program, affordably priced.
The Sears Maintenance Agreement
• Is your way to buy tomorrow's service at today's
price.
• Eliminate repair bills resulting from normal wear
and tear.
• Provides for non-technical and instructional
assistance.
• Even if you don't need repairs, provides an annual
Preventive Maintenance Check, at your request, to
ensure that your appliance is in proper running
condition.
Some limitations apply. For information
concerning Sears Canada Maintenance
Agreements, call 1-800-361-6665
Page 6
This Use & Care Manual provides specific operating
instructions for your model. Use the refrigerator only as
instructed in this Use & Care Manual. Before starting the
refrigerator, follow these important first steps.
LOCATION
• Choose a place that is near a grounded electrical outlet.
Do Not use an extension cord or an adapter plug.
• If possible, place the refrigerator out of direct sunlight
and away from the range, dishwasher or other heat
sources.
• The refrigerator must be installed on a floor that is level
and strong enough to support a fully loaded refrigerator.
• Consider water supply availability for models equipped
with an automatic ice maker.
INSTALLATION
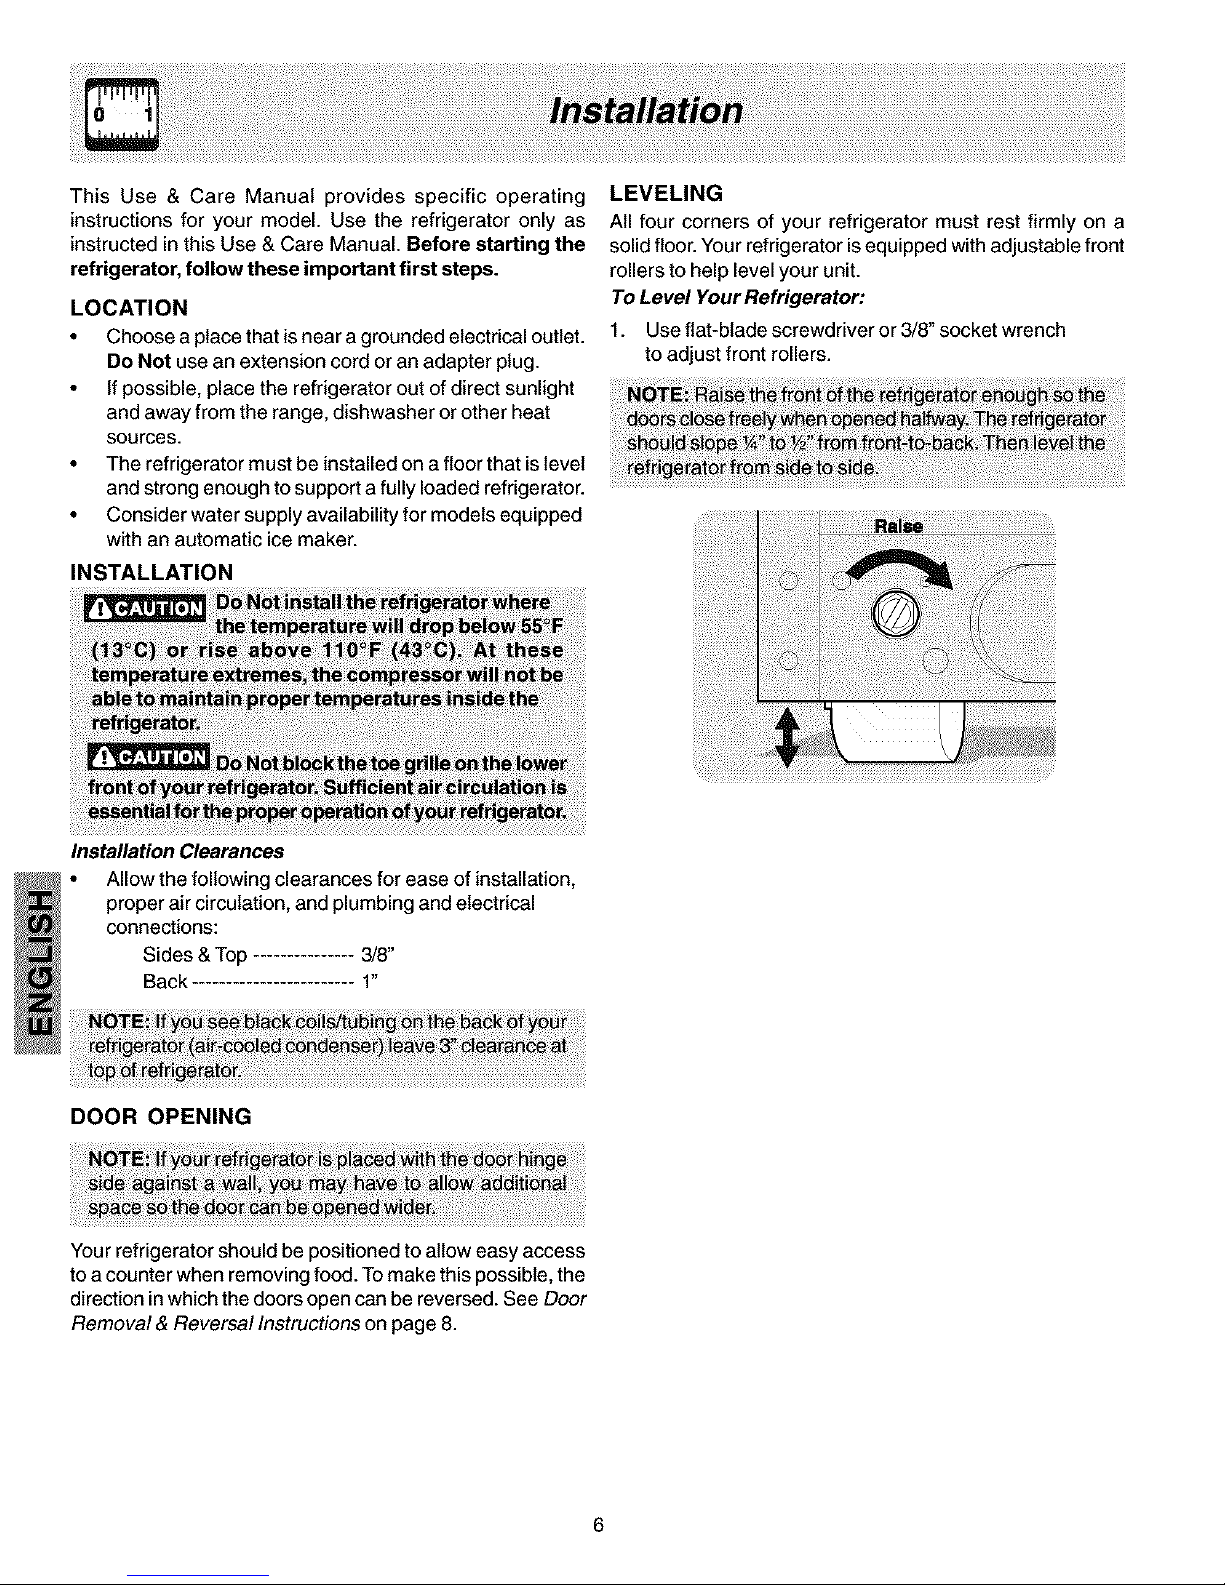
LEVELING
All four corners of your refrigerator must rest firmly on a
solid floor. Your refrigerator isequipped with adjustable front
rollers to help level your unit.
To Level Your Refrigerator:
1. Use flat-blade screwdriver or 3/8" socket wrench
to adjust front rollers.
Installation Clearances
Allow the following clearances for ease of installation,
proper air circulation, and plumbing and electrical
connections:
Sides & Top 3/8"
Back 1"
DOOR OPENING
Your refrigerator should be positioned to allow easy access
to a counter when removing food. To make this possible, the
direction in which the doors open can be reversed. See Door
Removal & Reversal Instructions on page 8.
6
Page 7
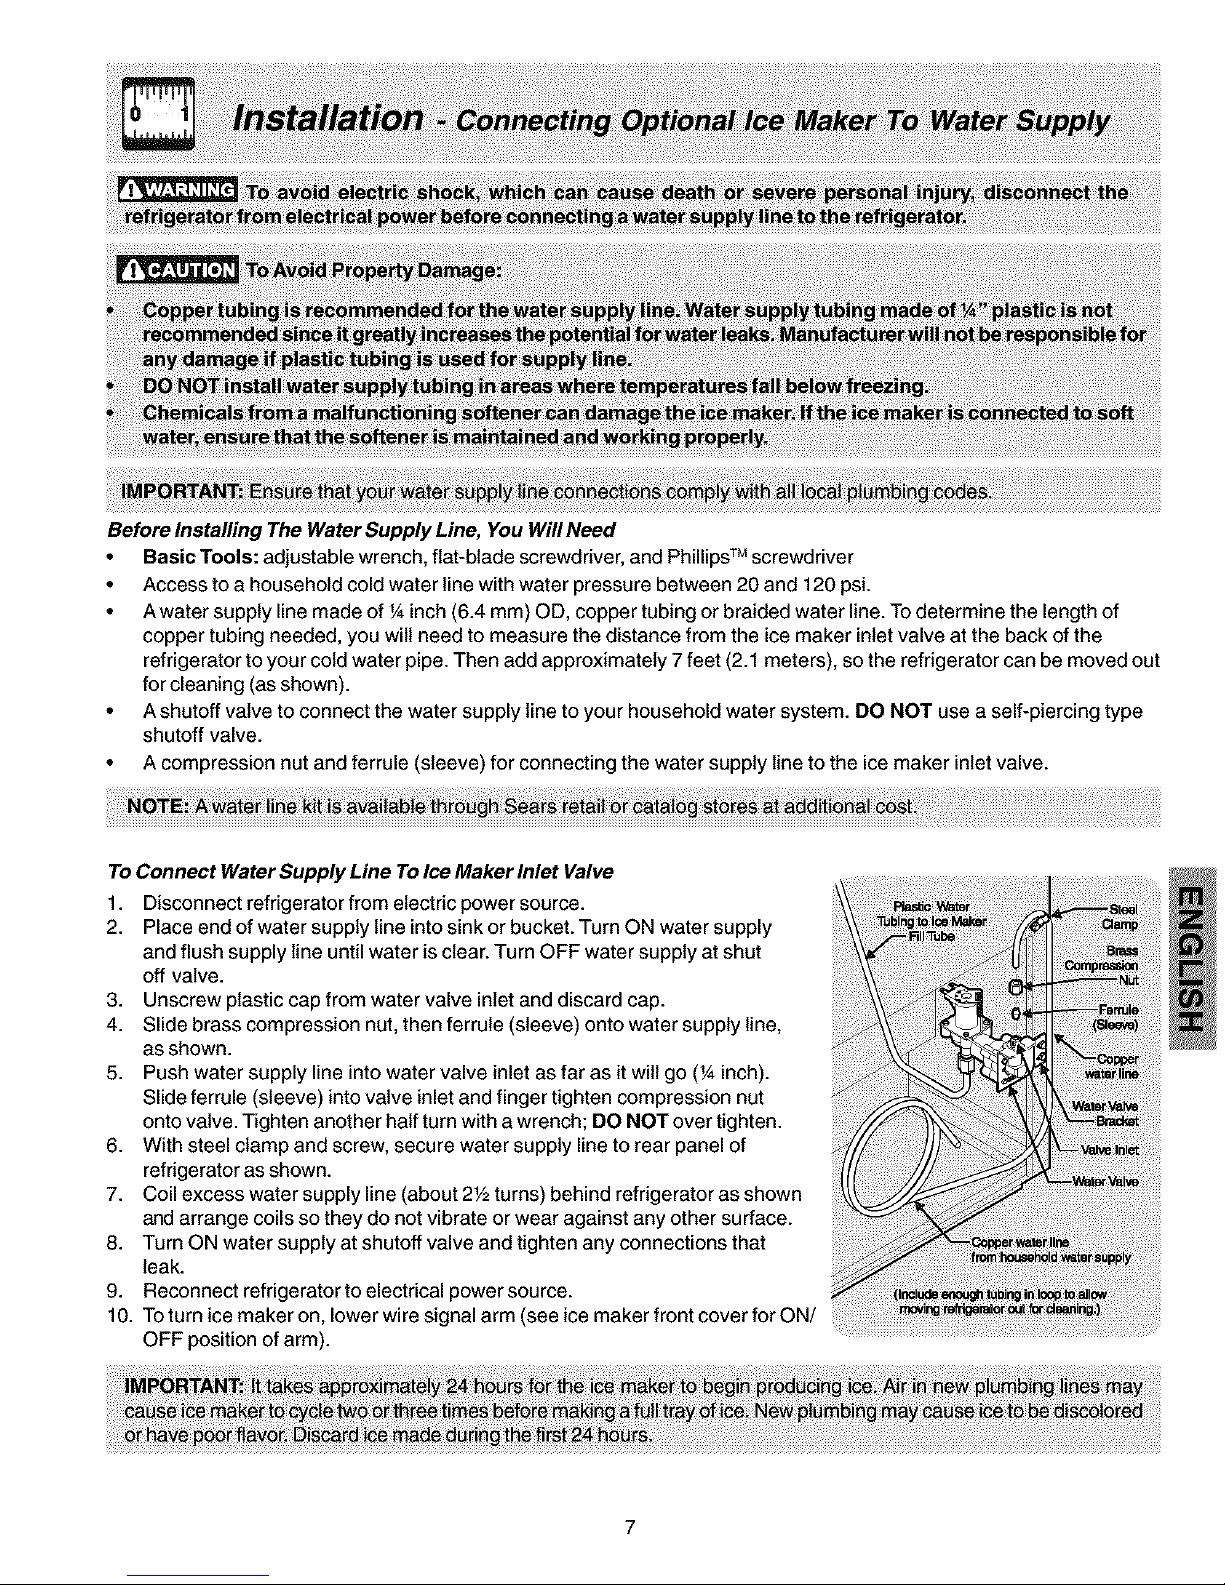
Before Installing The Water Supply Line, You Will Need
• Basic Tools: adjustable wrench, flat-blade screwdriver, and Phillips TM screwdriver
• Access to a household cold water line with water pressure between 20 and 120 psi.
• A water supply line made of _Ainch (6.4 mm) OD, copper tubing or braided water line. To determine the length of
copper tubing needed, you wilt need to measure the distance from the ice maker inlet valve at the back of the
refrigerator to your cold water pipe. Then add approximately 7 feet (2.1 meters), so the refrigerator can be moved out
for cleaning (as shown).
• A shutoff valve to connect the water supply line to your household water system. DO NOT use a self-piercing type
shutoff valve.
• A compression nut and ferrule (sleeve) for connecting the water supply line to the ice maker inlet valve.
To Connect Water Supply Line To Ice Maker Inlet Valve
1. Disconnect refrigerator from electric power source.
2. Place end of water supply line into sink or bucket. Turn ON water supply
and flush supply line until water is clear. Turn OFF water supply at shut
off valve.
3. Unscrew plastic cap from water valve inlet and discard cap.
4. Slide brass compression nut, then ferrule (sleeve) onto water supply line,
as shown.
5. Push water supply line into water valve inlet as far as it wilt go (_Ainch).
Slide ferrule (sleeve) into valve inlet and finger tighten compression nut
onto valve. Tighten another half turn with a wrench; DO NOT over tighten.
6. With steel clamp and screw, secure water supply line to rear panel of
refrigerator as shown.
7. Coil excess water supply line (about 2V2turns) behind refrigerator as shown
and arrange coils so they do not vibrate or wear against any other surface.
8. Turn ON water supply at shutoff valve and tighten any connections that
leak.
9. Reconnect refrigerator to electrical power source.
10. To turn ice maker on, lower wire signal arm (see ice maker front cover for ON/
OFF position of arm).
Page 8
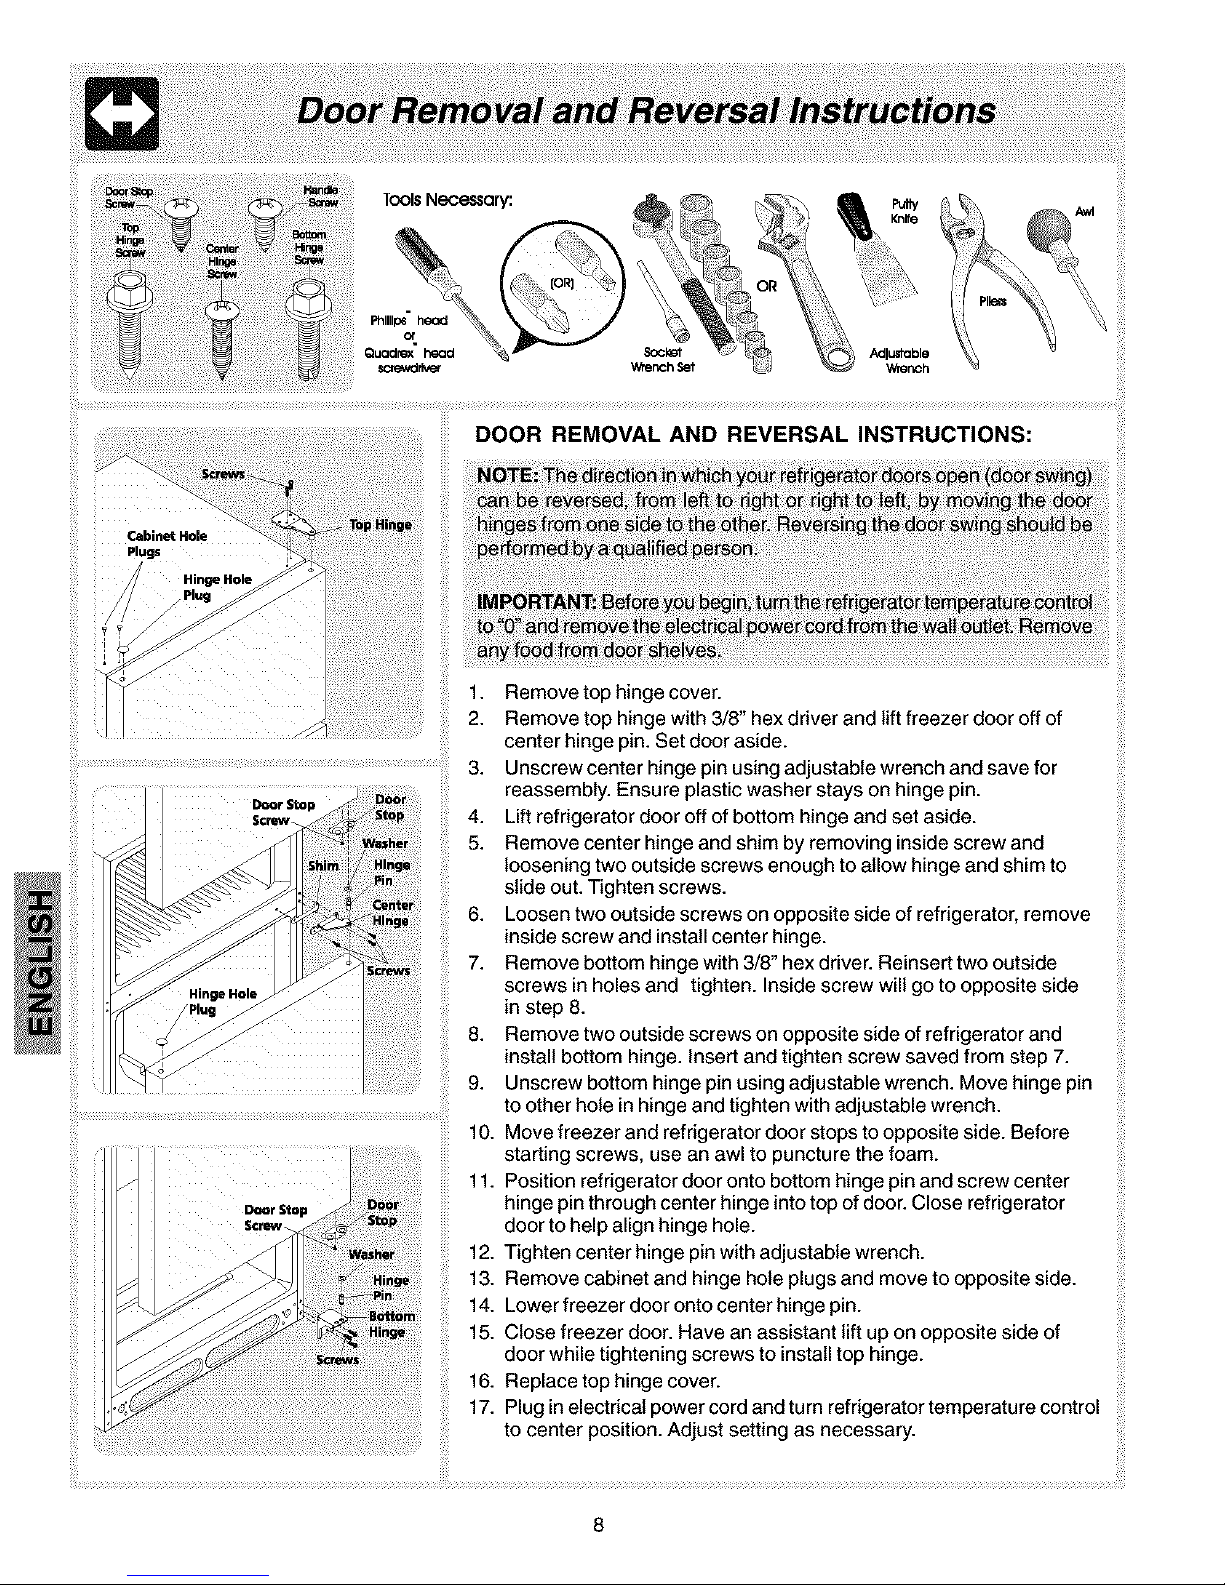
ToolsNecessQry:
Fhllllp_"head
Quaclr_ heacl
screv_rk_r
= Top Binge
Cabinet Hol
Pugs =,
Hinge Hole
Pug
DOOR REMOVAL AND REVERSAL INSTRUCTIONS:
1. Remove top hinge cover.
2. Remove top hinge with 3/8" hex driver and lift freezer door off of
center hinge pin. Set door aside.
3. Unscrew center hinge pin using adjustable wrench and save for
reassembly. Ensure plastic washer stays on hinge pin.
4. Lift refrigerator door off of bottom hinge and set aside.
5. Remove center hinge and shim by removing inside screw and
loosening two outside screws enough to allow hinge and shim to
slide out. Tighten screws.
6. Loosen two outside screws on opposite side of refrigerator, remove
inside screw and install center hinge.
7. Remove bottom hinge with 3/8" hex driver. Reinsert two outside
screws in holes and tighten. Inside screw will go to opposite side
in step 8.
8. Remove two outside screws on opposite side of refrigerator and
install bottom hinge. Insert and tighten screw saved from step 7.
9. Unscrew bottom hinge pin using adjustable wrench. Move hinge pin
to other hole in hinge and tighten with adjustable wrench.
10. Move freezer and refrigerator door stops to opposite side. Before
starting screws, use an awl to puncture the foam.
11. Position refrigerator door onto bottom hinge pin and screw center
hinge pin through center hinge into top of door. Close refrigerator
door to help align hinge hole.
12. Tighten center hinge pin with adjustable wrench.
13. Remove cabinet and hinge hole plugs and move to opposite side.
14. Lower freezer door onto center hinge pin.
15. Close freezer door. Have an assistant lift up on opposite side of
door while tightening screws to install top hinge.
16. Replace top hinge cover.
17. Plug in electrical power cord and turn refrigerator temperature control
to center position. Adjust setting as necessary.
8
Page 9
COOL DOWN PERIOD
To ensure safe food storage, allow the refrigerator to operate with the doors closed for at least 8 to 12 hours before loading
it with food.
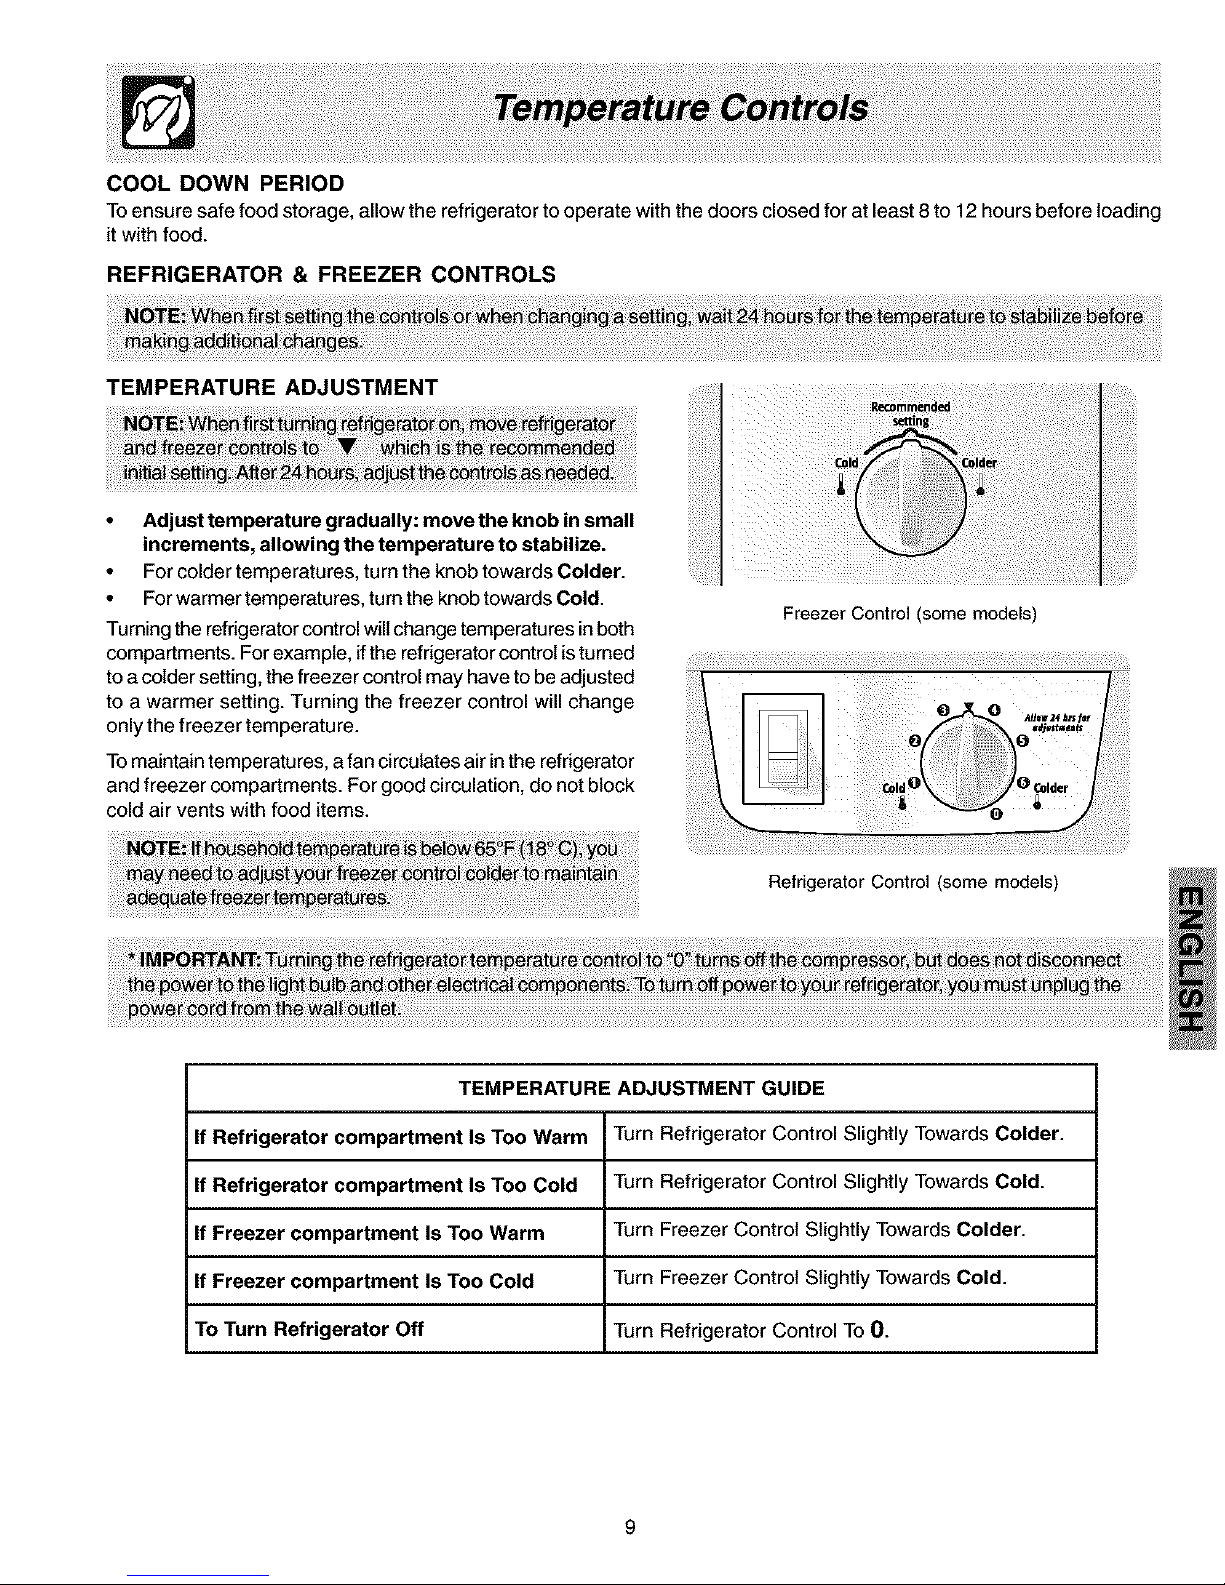
REFRIGERATOR & FREEZER CONTROLS
TEMPERATURE ADJUSTMENT
• Adjust temperature gradually: move the knob in small
increments, allowing the temperature to stabilize.
• For colder temperatures, tum the knob towards Colder.
• For warmer temperatures, turn the knob towards Cold.
Turning the refrigerator control will change temperatures in both
compartments. Forexample, ifthe refrigerator control is turned
to a colder setting, the freezer control may have to be adjusted
to a warmer setting. Turning the freezer control will change
only the freezer temperature.
To maintain temperatures, afan circulates air in the refrigerator
and freezer compartments. For good circulation, do not block
cold air vents with food items.
_i,_ ...................
Freezer Control (some models)
Refrigerator Control (some models)
TEMPERATURE ADJUSTMENT GUIDE
If Refrigerator compartment Is Too Warm Turn Refrigerator Control Slightly Towards Colder.
If Refrigerator compartment Is Too Cold Turn Refrigerator Control Slightly Towards Cold.
If Freezer compartment Is Too Warm Turn Freezer Control Slightly Towards Colder.
If Freezer compartment Is Too Cold Turn Freezer Control Slightly Towards Cold.
To Turn Refrigerator Off Turn Refrigerator Control To 0.
Page 10
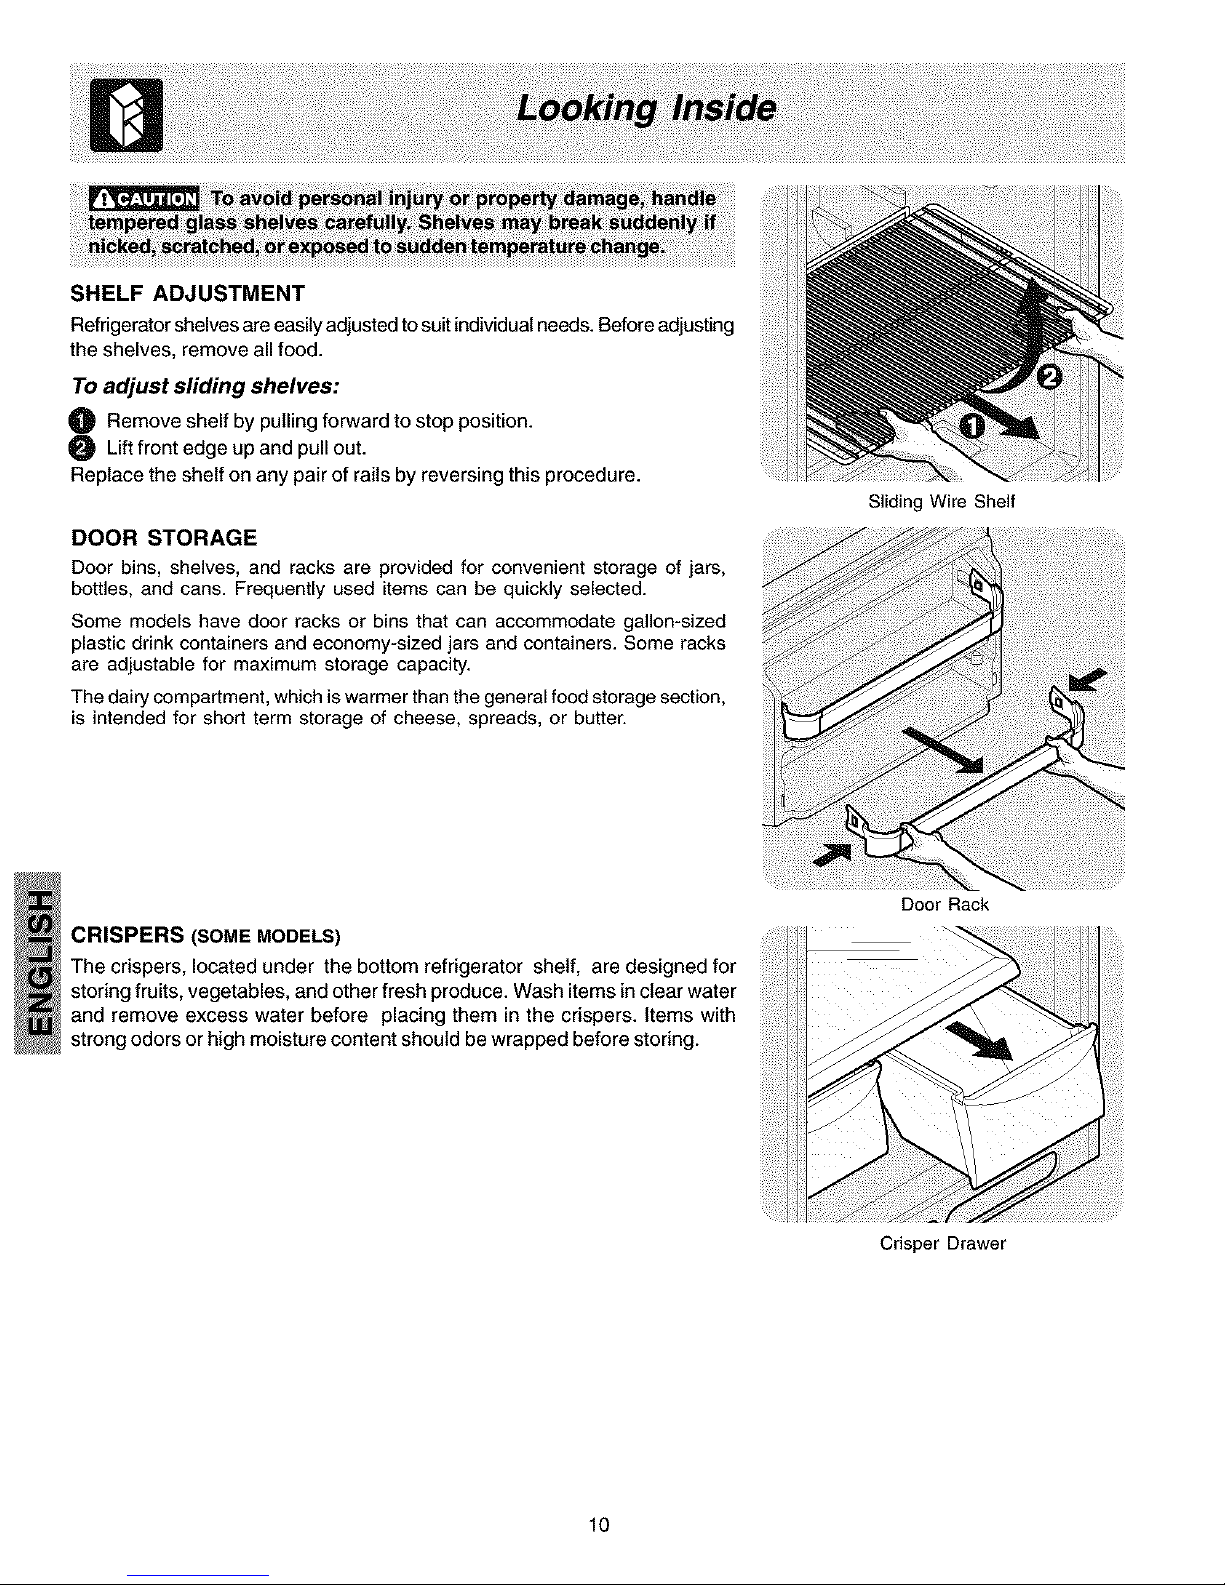
SHELFADJUSTMENT
Refrigerator shelves are easily adjusted to suit individualneeds. Before adjusting
the shelves, remove all food.
To adjust sliding shelves:
O Remove shelf by pulling forward to stop position.
Lift front edge up and pull out.
Replace the shelf on any pair of rails by reversing this procedure.
DOOR STORAGE
Door bins, shelves, and racks are provided for convenient storage of jars,
bottles, and cans. Frequently used items can be quickly selected.
Some models have door racks or bins that can accommodate gallon-sized
plastic drink containers and economy-sized jars and containers. Some racks
are adjustable for maximum storage capacity.
The dairy compartment, which is warmer than the general food storage section,
is intended for short term storage of cheese, spreads, or butter.
CRISPERS (SOME MODELS)
The crispers, located under the bottom refrigerator shelf, are designed for
storing fruits, vegetables, and other fresh produce. Wash items in clear water
and remove excess water before placing them in the crispers. Items with
strong odors or high moisture content should be wrapped before storing.
10
Sliding Wire Shelf
Door Rack
Crisper Drawer
Page 11
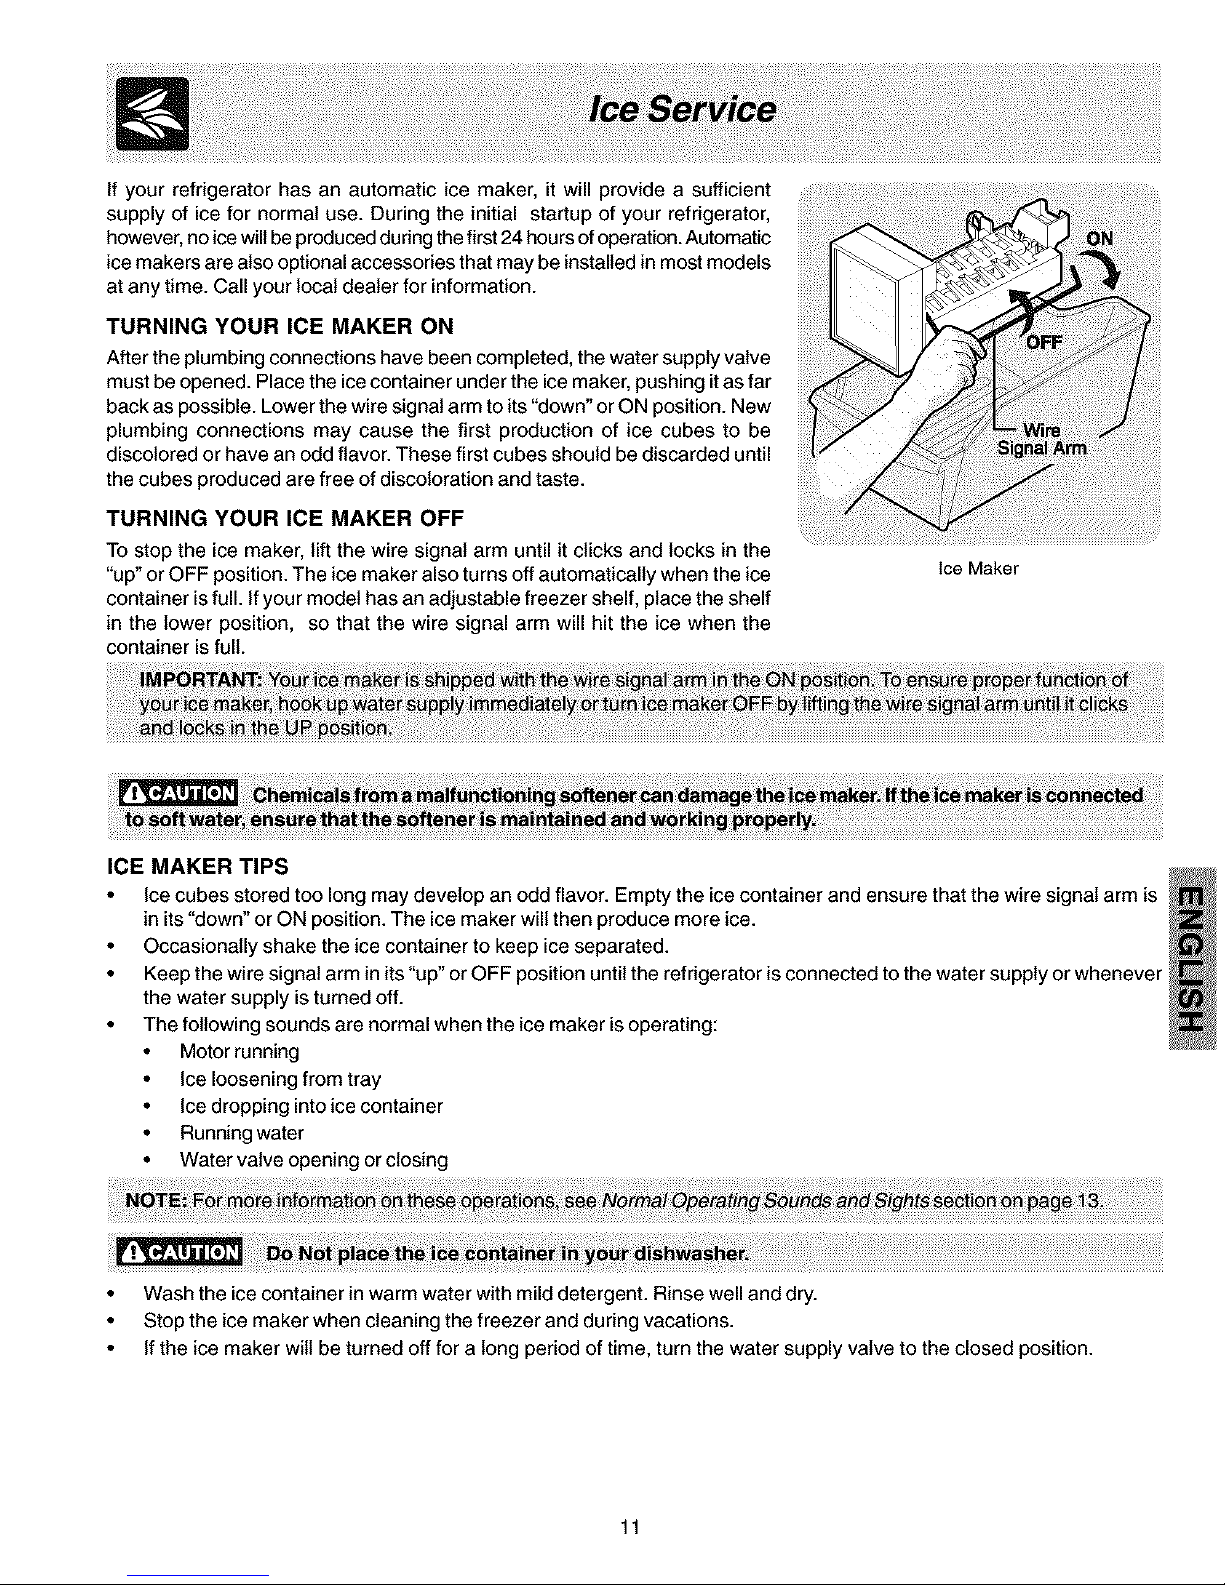
If your refrigerator has an automatic ice maker, it will provide a sufficient
supply of ice for normal use. During the initial startup of your refrigerator,
however, no ice will be produced during the first 24 hours ofoperation. Automatic
ice makers are also optional accessories that may be installed inmost models
at any time. Call your local dealer for information.
TURNING YOUR ICE MAKER ON
After the plumbing connections have been completed, the water supply valve
must be opened. Place the ice container under the ice maker, pushing itas far
back as possible. Lower the wire signal arm to its "down" or ON position. New
plumbing connections may cause the first production of ice cubes to be
discolored or have an odd flavor. These first cubes should be discarded until
the cubes produced are free of discoloration and taste.
TURNING YOUR ICE MAKER OFF
To stop the ice maker, lift the wire signal arm until it clicks and locks in the
"up" or OFF position. The ice maker also turns off automatically when the ice
container is full. Ifyou r model has an adjustable freezer shelf, place the shelf
in the lower position, so that the wire signal arm will hit the ice when the
container is full.
Ice Maker
ICE MAKER TIPS
• Ice cubes stored too long may develop an odd flavor. Empty the ice container and ensure that the wire signal arm is
in its "down" or ON position. The ice maker will then produce more ice.
• Occasionally shake the ice container to keep ice separated.
• Keep the wire signal arm in its "up" or OFF position until the refrigerator is connected to the water supply or whenever
the water supply is turned off.
• The following sounds are normal when the ice maker is operating:
• Motor running
• Ice loosening from tray
• Ice dropping into ice container
• Running water
• Water valve opening or closing
• Wash the ice container in warm water with mild detergent. Rinse well and dry.
• Stop the ice maker when cleaning the freezer and during vacations.
• If the ice maker will be turned off for a long period of time, turn the water supply valve to the closed position.
11
Page 12
FOOD STORAGE IDEAS
Fresh Food Storage
. The fresh food compartment should be kept between 34" F and 40" F with an optimum temperature of37" F.
. Avoid overcrowding the refrigerator shelves. This reduces the circulation of air around the food and results in uneven
cooling.
Fruits and Vegetables
° Storage in the crisper drawers traps moisture to help preserve the fruit and vegetable quality for longer time periods.
Meat
. Raw meat and poultry should be wrapped securely so leakage and contamination of other foods or surfaces does not
Occur.
Frozen Food Storage
. The freezer compartment should be kept at 0" F or lower.
. A freezer operates most efficiently when it is at least 2/3 full.
Packaging Foods for Freezing
. To minimize dehydration and quality deterioration, use aluminum foil, freezer wrap, freezer bags or airtight containers.
Force as much air out of the packages as possible and seal them tightly. Trapped air can cause food to dry out,
change color, and develop an off-flavor (freezer burn).
. Wrap fresh meats and poultry with suitable freezer wrap prior to freezing.
. Do not refreeze meat that has completely thawed.
Loading the Freezer
. Avoid adding too much warm food to the freezer at one time. This overloads the freezer, slows the rate of freezing,
and can raise the temperature of frozen foods.
. Leave a space between the packages, so cold air can circulate freely, allowing food to freeze as quickly as possible.
. Avoid s_ering hard-to-freeze foods such as ice cream and orange juice on the freezer door shelves. These foods are
best stored in the freezer interior where the temperature varies less.
ENERGY SAVING IDEAS
• Locate the refrigerator inthe coolest part of the room, out of direct sunlight,
and away from heating ducts or registers. De not place the refrigerator
next to heat-producing appliances such as a range, oven, ordishwasher.
If this is net possible, a section of cabinetry or an added layer of insulation
between the two appliances will help the refrigerator operate more
efficiently.
• Level the refrigerator so that the doors close tightly.
• Refer to this Use & Care Manual for the suggested temperature control
settings.
• Periodic cleaning of the condenser will help the refrigerator run more
efficiently. See the Care and Cleaning Charten page 14.
• De not overcrowd the refrigerator or block cold air vents. Doing so causes
the refrigerator to run longer and use more energy.
• Cover foods and wipe containers dry before placing them in the
refrigerator. This cuts down on moisture build-up inside the unit.
• Organize the refrigerator to reduce door openings. Remove as many
items as needed at one time and close the door as soon as possible.
12
Page 13
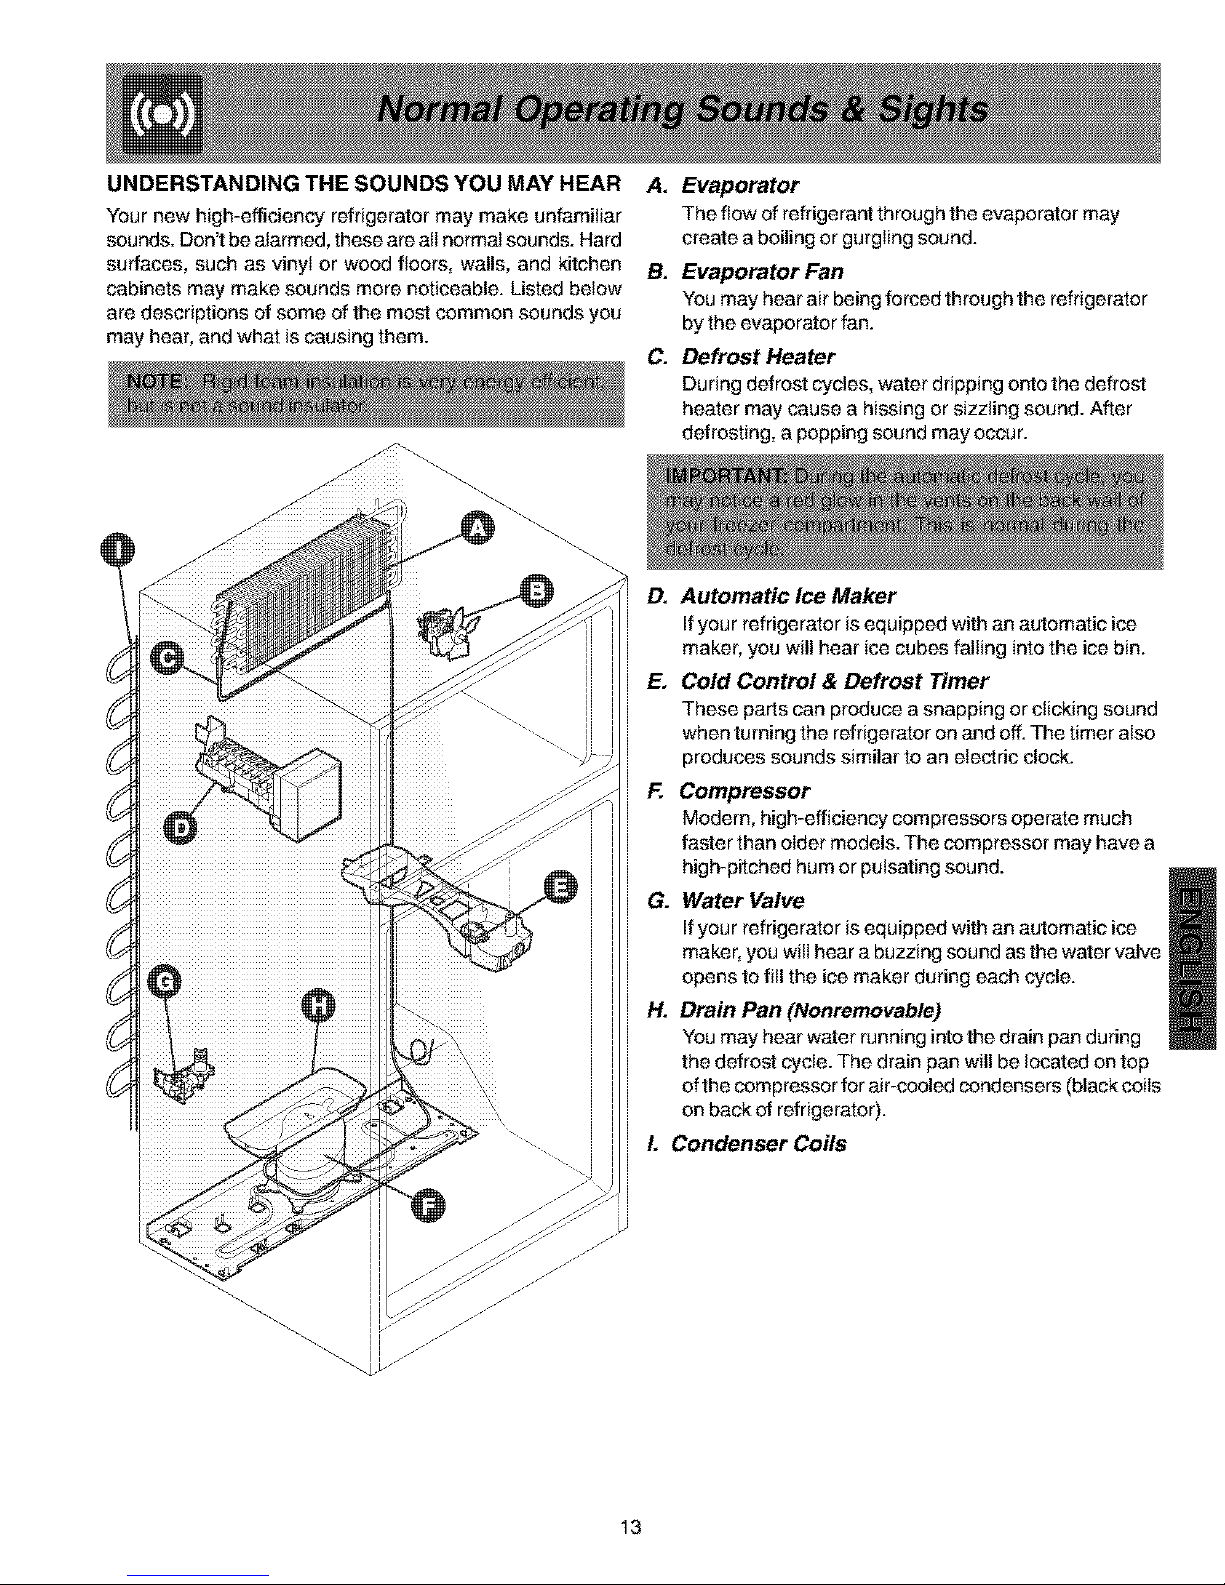
UNDERSTANDING THE SOUNDS YOU MAY HEAR
Your new high-efficiency refrigerator may make unfamiliar
sounds. Don't be alarmed, these are all normal sounds. Hard
surfaces, such as vinyI or wood floors, walls, and kitchen
cabinets may make sounds more noticeable. Listed below
are descriptions of some of the most common sounds you
may hear, and what is causing them.
A. Evaporator
The flow of refrigerant through the evaporator may
create a boiling or gurgling sound.
B. Evaporator Fan
You may hear air being forced through the refrigerator
by the evaporator fan.
C. Defrost Heater
During defrost cycles, water dripping onto the defrost
heater may cause a hissing or sizzling sound. After
defrosting, a popping sound may occur.
D. Automatic Ice Maker
If your refrigerator isequipped with an automatic ice
maker, you will hear ice cubes falling intothe ice bin.
E. Cold Control & Defrost Timer
These parts can produce a snapping or clicking sound
when turning the refrigerator on and off. The timer also
produces sounds similar to an electric clock.
F_ Compressor
Modern, high-efficiency compressors operate much
faster than older models. The compressor may have a
high-pitched hum or pulsating sound.
G. Water Valve
If your refrigerator is equipped with an automatic ice
maker, you will hear a buzzing sound as the water valve
opens to fill the ice maker during each cycle.
H. Drain Pan (Nonremovable)
You may hear water running into the drain pan during
the defrost cycle. The drain pan will be located on top
of the compressor for air-cooled condensers (black coils
on back of refrigerator).
L Condenser Coils
13
Page 14
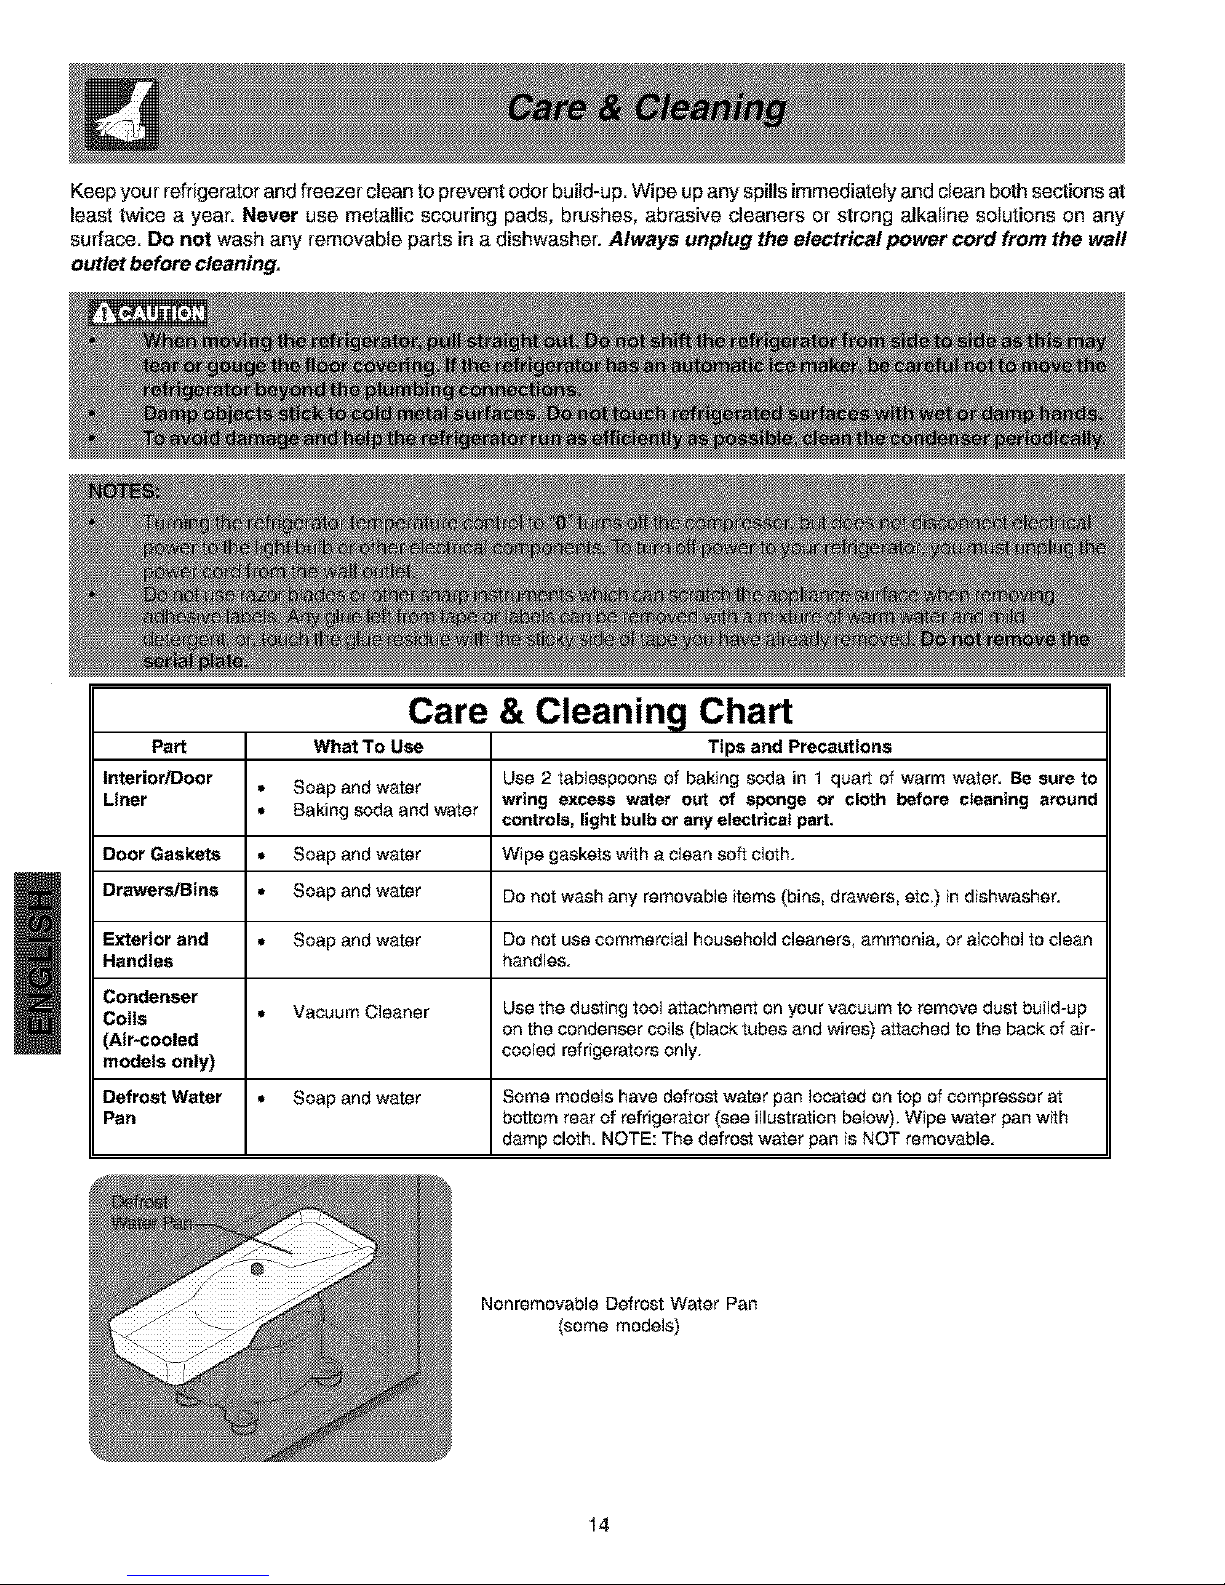
Keep your refrigerator and freezer clean to prevent odor build-up. Wipe up any spills immediately and clean both sections at
least twice a year. Never use metallic scouring pads, brushes, abrasive cleaners or strong alkaline solutions on any
surface. Do not wash any removable parts in a dishwasher. Always unplug the electrical power cord from the wall
outlet before cleaning.
Care & Cleaning Chart
Part What To Use Tips and Precautions
Interior/Door = Soap and water Use 2 tablespoons of baking soda in 1 quart of warm water. Be sure to
Liner wring excess water out of sponge or cloth before cleaning around
= Baking soda and water controls, light bulb or artyelectrical part,
Door Gaskets = Soap and water Wipe gaskets with a clean soft cloth.
Drawer_JBins • Soap and water Do not wash any removable items (bins, drawers, etc.) in dishwasher.
Exterior and • Soap and water Do not use commercial household cleaners, ammonia, or alcohol to clean
Handles handles.
Condenser
Coils = Vacuum Cleaner Use the dusting too] attachment on your vacuum to remove dust build-up
on the condenser coils (black tubes and wires) attached to the back of air-
(Air-cooled
models only) cooled refrigerators only.
Defrost Water • Soap and water Some models have defrost water pan located on top of compressor at
Pan bottom rear of refrigerator (see illustration below). Wipe water pan with
damp cloth. NOTE: The defrost water pan is NOT removable.
Nonremovable Defrost Water Pan
(some models)
14
Page 15

Vacation and Moving Tips
• Leave refrigerator operating during vacations of 3 weeks or less.
Short
• Use all perishable itemsfrom refrigerator compartment.
Vacations
• Turn automatic ice maker off, even if you will only be gone for a few days.
• Remove atl food and ice if you wilt be gone one month or more.
• Turn controls to "0" (the OFF position) and disconnect power.
Long • Turn off automatic ice maker and turn water supply valve to closed position.
Vacations • Clean interiorthoroughly.
• Leave both doors open to prevent odors and mold build-up. Block doors open if
necessary.
• Remove attfood and ice.
• If using handcart, load from side.
Moving
• Adjust rollers all the way up to protect them during sliding or moving.
• Pad cabinet to avoid scratching surface.
15
Page 16

To Properlylnstafl Your Refrigerator
See "Installation" Section On Pages 6-7
OR
To Reverse The Doors
See "Door Removal & Reversal" Section On Page 8
Common Before calling for service, review this list. It may save you time and
expense. This list includes common occurrences that are not the result of
Occurrences defective workmanship or materials inthis appliance.
,, Ensure plug is tightly pushed into electrical outlet.
• Check/replace fuse with a 15 amp time-delay fuse. Reset circuit
Refrigerator does not run. breaker.
• The temperature control is turned to "O'.
• Refrigerator may be in defrost cycle. Wait 20 minutes and check again.
Freezer temperature too cold. • Set freezer control to a warmer setting until freezer temperature is
Refrigerator temperature is satisfactory. Allow 24 hours for the temperature to stabilize.
satisfactory.
Refrigerator temperaturetoocold. • Set refrigerator control to a warmer setting. Allow 24 hours for
Freezer temperature is temperature to stabilize. Then check freezer temperatures and adjust
satisfactory, as needed.
• The cabinet is not level.
* Refrigerator is noisy or vibrates.
• Floor is weak.
• Interior needs to be cleaned.
Odors in refrigerator.
• Foods that produce odors should be covered or wrapped.
• Replace light bulb.
• Ensure plug is tightly pushed into electrical outlet.
Cabinet light not working.
• Light switch may be stuck. Push in light switch, located on the
refrigerator control box, to release.
• Ensure the Wire Signal Arm is not in UP position.
• Ice maker should produce 4to 5 pounds of ice in a 24 hour period.
Automatic ice maker not working.
• Water supply isturned off.
(some models)
• Water pressure is too low.
• The freezer is not cold enough.
* See Normal Operating Sounds and Sights section on page 13.
16
Page 17

iFelicitaciones per Ia compra de su nuevo refrigerador! En
Sears nos sentimos muy orgulIosos de nuestro producto y
nos comprometemos totalmente a brindarle el mejor servicio
posible. Su satisfacci6n es nuestra primera prioridad.
Estamos segu ros de que disfrutar#, su nuevo refrigerador y
permitanos darle las gracias pot preferir nues'tro producto.
Esperamos contar con su preferencia en futuras compras.
SiRVASE LEER Y GUARDAR ESTAS INSTRUCCIONES
Este manual de uso y cuidado contiene instrucciones
especfficas para el funcionamiento de su unidad. Use el
refrigerador s61ocome se especifica en es_emanual. Estas
instrucciones no pretenden abarcar todas las condiciones y
situaciones que pudieran presentarse. Per favor, use el
sentido comSn y tenga precauci6n al instalar, poner en
funcionamiento y darle mantenimiento a cualquier
electrodom6stico.
Escriba los ndmeros de modelo y de serie en las
siguientes line.as para futura referencia. Dichos ndmeros
se encuentran en la placa de identificacibn ubicada en
el compartimiento interne del refrigerador.
PARA SU SEGURIDAD
Ne almacene ni utilice gasolina u etros Ifquides inflamables
cerca de este o cualquier etre electredem_stice. Lea las
advertencias sobre inflamabilidad y etres peligres que
aparesen en las etiquetas del preducte.
Ne penga a funcienar el refrigerader cuando haya vapores
explesives.
Evite el centacte con las partes m6viles del fabricader
automatice de hiele.
Quite todas }as grapas del cart6n, ya que 6stas pueden
causar heridas graves y tanbi6n da_'iar el acabado de otros
electrern_stices e muebles con los que pueden entrar en
contacto.
PARA LA SEGURIDAD DE LOS NII_OS
Destruya e recicle el cartSn, las belsas plAsticas y cualquier
material de embalaje externo imrnediatamente despu_s de
desempacar el refrigerador. Los ni_es nunea deben utilizarles
para jugar. Les cartones cubiertes con alfornbras, cubrecamas,
sAbanas plAsticas e envoltura el_stica pueden convertirse en
cAmaras herm_ticas y provecar asfixia r_pidamente.
Ndmero de modelo: 253.
O 970_
Ndmero de serie:
Fecha de compra:
Bienvenido .............................................................. 17
Instrucciones de seguridad ..................................... 17-18
Garantia .................................................................. 18
Canada - Garantia Iimitada ...................................... 19
Contractos de proteccion ........................................ 20
Instalaci6n -- Incfuye laconexi6ndelfabricadordehieloal
suministrode agua................................................ 21-22
Ins_rucciones para la extracci6n e inversi6 de
puertas ............................................................. 23
Controles de temperatura ........................................ 24
Vista interior ............................................................ 25
Fabricaci6n de hielo ................................................ 26
Almacenamiento de alimentos y consejos para el
ahorro de energia .............................................. 27
Sonidas y seRales que indican funciomamiento
normal .............................................................. 28
Cuidado y Iimpieza .................................................. 29-30
Antes de Ilamar al servicio t6cnico .......................... 31
ELIMINACI()N CORRECTA DE SU REFRIGERADOR O
CONGELADOR
Reisgo de encerramiento
accidental para los ni_os
El encerramiente accidental y la
asfixia de ni_os ne son ploblemas
del pasado. Los refrigeraderes o
congeladores desechados o
abandenades siguen peligreses,
incluso si van a permanecer en
un lugar s61e per unos pocos
d&s'. Si usted va a deschacerse
de un viejo refrigerador o
congelador, siga las instruccienes que se indican a continuaciSn
para prevenir accidentes.
Antes de eliminar su viejo refrigerador o congelador:
Quitele las puertas.
Deje los anaqueles en su lugar para impedir que les nifies
pueden meterse f&cilmente dentro de la unidad.
Asegcirese de que un t_cnico deservicio calificado extraiga
el liquido refrigerante.
17
Page 18

INFORMACI(_N ELECTRICA
El refrigerador debe enchufarse en una toma de corriente
independiente de corriente alterna _nicamente y de 115
voltios, 60 Hz. Para su protecci6n contra descargas
el_ctdcas, el cable de alimentaci6n del refrigerader tiene
en enchufe de tres clavijas con conexi6n a tierra. Debe
enchufarse directamente en un recept&culo debe estar
instalade seg_n los cSdiges y nermativas locales. Censulte
con un e]ectricista calificado. No utilice una extensi6n ni
un adaptador.
Immediatamente repare o reemplace cuaiquier cable de
energfa el_rica que est_ desgastado o da_oado.
Nunea tire bruseamente del cable de alimentaei6n para
desenchufar el refrigerador. Sujete el enchufe firmemente y
j&lelo para sacarlo del recept_culo, evitando daSar el cable
de energ[a el_ctrica.
Para evitar descargas el_tricas, desenchufe el refrigerador
antes de limpiarlo o cambiarle la bombill&
Las variaciones del 10% o m&s en el voltaje pueden afectar
el buen funcionamiento de la unidad. Poner a funcionar el
refrigerador con alimentaci6n insuficiente puede da_ar el
compresor. Tal da_io no estA cubierto per su garantfa.
Para evitar que el refrigerador sea apagado
accidentalmente, no Io enchufe en un toma controlada per
un interrupter de pared ni tire del cable de alimentaci6n.
Evite conectar el refrigerador en un circuito de interrupter
de aver[a per puesta a tierra.
GARANTIA COMPLETA DE UN AI_O PARA EL
REFRIGERADOR
Dentro de un aSo a part# de la fecha de compra, cuando
este refrigerador sea operado y mantenido de acuerdo con
Ias instrucoiones provistas en el Manal deI Usuario, Sears
repararA este refrigerado, gratuitamente, si tiene defec_os
de material o mane de obra.
GARANTIA COMPLETA DE CINCO AhlOS EN
EL SISTEMA DE REFRIGERACION SELLADO
Durante cinco aSos a partir de Iafecha de compra,
cuando este refrigerador sea operado y mantenido de
acuerdo con las instrucoiones indicadas en el Manual del
Usuario, Sears repararA el sistema sellado (que se
compone del refrigerante, tuberia de conexi6n y motor del
compresor), gratuitamente, si tiene defectos de material o
mane de obra.
La garantia antes mencionada se aplica solamente a los
refrigeradores que son usados para concervaci6n de
alimentos en hogares privados.
Esla garantia te otorga derechos especfficos y tambi6n
puede tenet otros que varian de eslado en estado.
Contacte et Centre De Servicio sears en los Eslados
Unidos mas proximo a usted para cualquier servicio de
garantia. Refiera la ultima pagina de este manual.
Para informacion sobre garantias, per favor contacte la
siguiente direccion:
Sears, Roebuck and Co.
Dept. 817WA
Hoffman Estates, IL 60179
18
Page 19

CANADA --- GARANTIA LIMITADA
Ref " radores
Sears Canad#. Inc., garantiza que cada refrigerador Kenmore nuevo sea libre de defectos de material ofabricaci6n.
Sears har_ to siguiente, gratuito, en el case un defecto:
El compresor DIEZ (10) AltOS DIEZ (10) AltOS CINCO (5) A_]OS
El sistema sellado
(consitiendo del refrigerante, CINCO (5) A_]OS CINCO (5) A_]OS CINCO (5) A_]OS
evaporador, y condensador)
Todas las otras partes y
adjustos UN (1) AgO UN (1) AgO UN (1) AI_O
Resposabilidades Normales del Cliente
Las cosas siguientes, como no son defectos de fabricaci6n, no son incluidas en la garantia, sine son la responsabitidad
del cliente:
1) DaSos al acabamientodespu_s de Ia entrega.
2) Fuente de energia inadecuada, voltaje inadecuado, o cualquier defectos del sistema el_ctrico de la casa o el
aparato no conectado a un tomacorriente.
3) Reemplazo de ampolletas.
4) Dafios causados por mover el aparado de su sitio de instalaci6n original.
5) Servicio requerido como resuttado de alteraciSn, abuso, incendio, inundada, o desatres naturales.
6) Asegurarse de que circutaci6n de aire adecuada sea disponible aI sistema de refrigeraci6n.
7) Cuidad y uso apropiados deI artefacto, como se detalla en el Manual del Usuario; colocaci6n de los controles
apropiada.
Si se requiere algdn servicio bajo _sla garantia, sencittamente Ilame al 1-SO0-4-MY-HOME sa(1-800-469-4663).
Esta garantia es establecida en adici6n a cualquier garantia estatuida. La garantia arriba cubre los refrigeradores
Kenrnore vendidos y operarados en el Canad#. dnico y no aplica si el refrigrador se usa para propSsitos no dom6sticos.
Convenio de Mantenimiento Sears
Mantenga el valor de su refrigerador Kenmore con un Convenio de Mantenimiento Sears.
SEARS CANADA INC. • Toronto, Canada • M5B 2B8
19
IMPRESOENEE.UU.
Page 20

En los EE.UU.
Contratos de Protecci6n Principales
Lo felicitamos por su sabia decisi6n de compra. Su
nuevo electrodom6stico Kenmore ha sido diseRado y
fabricado para ofrecerle muchos aRos de rendimiento
seguro. Pero, al igual que todos los productos, de vez
en cuando puede necesitar mantenimiento preventivo
o reparaci6n. En tal momento es cuando un Contrato
de Protecci6n le puede ahorrar preocupaciones y
gastos.
Adquiera un Contrato de Proteccidn Principal ahora y
prot_jase contra incertidumbres y gastos
inesperados.
El Contrato de Protecci6n Principal ademas le ayuda
a prolongar }a vida _til de su nuevo electrodom6stico.
El Contrato inciuye 1osiguiente:
Servicio posventa por nuestros 12.000
profesionales especializados en reparaciones
Servicio posventa iNmitado y gratis de piezas y
mano de obra para todas las reparaciones
cubiertas pot el contrato
Garantia de rendimiento reemplazo del
producto bajo contrato si ocurren ma.s de tres
fallas del producto dentro de doce meses.
Reemplazo de su producto si el producto bajo
contrato no puede ser reparado.
Revisi6n Anual de Mantenimiento Preventivo
cuando Io solicite - sin costo adicional
Ayuda rapida pot tel6fono - ayuda e informaci6n
no t6cnica para los productos reparados en su
hogar, adem&s de fijaci6n de fechas
convenientes para }as reparaciones
Protecci6n contra arremetidas el6ctricas debido a
fiuctuaciones de la corriente electrica
Reembolso de costos de arriendo si las
reparaciones de su producto bajo contrato
demoran mas tiempo que Io prometido
Una vez que usted ha comprado el Contrato,
solamente necesita una Ilamada por tel6fono para
fijar }a fecha del servicio. Puede Ilamar a cualquier
hora, durante el dia o en la noche o puede fijar la
fecha para el servicio a trav6s de la computadora.
Sears tiene ma.s de 12.000 profesionales
especiaNzados on reparaciones, que tienen acceso a
m&s de 4,5 millones de piezas y accesorios de
calidad. Este es el tipo de profesionalismo al que
usted puede recurrir para prolongar la visa Otil de su
nuevo electrodomestico durante muchos aRos.
iCompre hoy mismo su Contrato de Protecci6n
Principal.
Existen ciertas limitaciones y exclusiones.
Para precios y mayor informaci6n,
Ilame al 1-800-827-6655.
Servicio de Instalaci6n Sears
Para instalaci6n profesional garantizada de
electrodom6sticos Sears y articulos tales como
sistema de apertura de puertas de cocheras y
calefactores de agua, en los EE.UU. llame al 1-800-
4-My-HOME®
En Canad_
Contratos de Mantenimiento
Su compra tiene mayor valor pues usted puede
depender de Sears Home Central® para servicio.
Con m&s de 2400 t6cnicos de servicio y acceso a
m&s de 900.000 repuestos y accesorios, tenemos las
herramientas, los repuestos, los conocimientos y las
destrezas para cumplir nuestra promesa: Reparamos
Io que Vendemos.
Su electrodomestico Kenmore@ ha sido diseRado,
fabricado y probado para ofrecerle muchos eros de
funcionamiento seguro. Sin embargo, cualquier
electrodom6stico puede requerir servicio de vez en
cuando. El Contrato de Mantenimiento Sears le
ofrece un programa de servicio sobresaNente y
econ6mico.
El Contrato de Mantenimiento Sears
• Significa que usted esta comprando el servicio de
boy a los precios de maRana.
• Elimina los gastos en reparaciones resultantes
de uso y desgaste normal.
• Le ofrece ayuda e informaci6n no tecnica.
• AOn si usted no necesita reparaciones, }e ofrece
una revisi6n anual de mantenimiento preventivo,
cuando Io solicita, a fin de asegurar de que su
electrodom6stico est6 siempre en buenas
condiciones de uso.
Existen ciertas limitaciones. Para informaci6n sobre
los Contratos de Mantenimiento Sears Canada, Name
al 1-800-361-6665.
2O
Page 21

Este manual de uso y cuidado contiene instrucciones
especfficas para el funcionamiento de su unidad. Use el
refrigerador s61ocomo se especifica en este manual de uso
y cuidado. Antes de encender el refrigerador, siga estos
primeros pasos importantes.
UBICACION
• Eliia um lugar que est6 cerca de una toma el_dca con
conexi6n a tierm. No utilice una extensi6n ni un adeptador.
• Si es posible, coloque el refdgerader emun lugar donde
no r_cibaluz solar di_-'t& Col(iquelo lejc_ de la estufa,del
lavavajillasautom_tico y de cualquierotra fuente de calor.
• El refrigemder debe instalarse en un piso que tenga la
superficie nivelada y que resista el peso del refdgerader
completamente cargado.
• Tenga en cuenta la disponibilidad de suministro de agua
en aquellos modelos que incluyen unfabdcador autom4tico
de hielo.
INSTALACI()N
NIVELACION
Las cuatro asquinas del rafrigerador daban apoyarsa firmamante
sobre piso establa. El refrigarador astA aquipado con ruedas
dalantaras ajustables qua parmiten su nivelaci6n.
PaPa nivelar el refrigerador:
1. Utilice un destornillador piano o una Ilave de cubo de 9 mm
(3/8 de pulg,) para ajustar las ruadas delanteras.
Espacios libres para la instalaci6n
Daja los aspacios libres siguiantes para facilitar la circulaci6n
de aira adecuada durante la instalaci6n y para las
conaxiones al6ctricas de fontanar[a:
Lados y parta superior---- 3/8_
Parte trasera ................. 1"
APERTURA DE PUERTAS
El refdgarador deba astar colocado de manera tal qua permita
el accaso f&cil a un mostrador an e} momento de sacar los
alimentos, Para Iograr asto, se puede invartir la diracci6n de
apertura de las puartas, Lea la secci6n danominada Extracci6n
a invarsi6n de puartas an la p&gina 23,
21
Page 22

Para instalar la tuberia de suministro de agua, usted necesitar_:
Herramientas b_eicas: Ilave ajustable, destemillador piano y destornillader con punta Phillips TM.
Acceso a una tuberfa de suministro dom_stico de agua frfa con una presi6n de agua entre 1,4 y 6,3 barios (20 a 120 Ibipulg2.)
Una Ifnea de suministro de agua de tubo de cobre con un D.E de 6,4 mm o una Irnea de agua trenzada. Para determinar la
Iongitud necesaria de la tuberfa de cobre, mida la distancia entre la vAIvula de entrada del fabncador de hielo ubicada, en la
parte posterior del refrigerador, y la tuberfa de agua frfa. AI resultado s_mele 2,1 metros (7 pies) aproximadamente para que
quede espacio libre que permita mover hacia afuera el refrigerador para hacer limpieza (como se muestra).
Una v&lvula de apagado para conectar la tuberfa de suministro de agua al sistema de suministro dom6stico de agua. NO utilice
una v_lvula de apagado tipo autoperforante.
Una tuerca de compresi6n y guarnici6n (manguito) para conectar la tuberfa de suministro de agua a la vAIvula de entrada del
fabricador de hielo.
Para conectar la tuberia de suministro de agua a la v_lvula de entrada del fabricador de hielo
1. Desconecte el refrigerador de la fuente de alimentaci6n el_ctrica.
2. Coloque el extremo de la tuberfa de suministro de agua dentro del fregadero o una
cubeta. Abra el suministro de agua y deje cotter agua per la tuberfa de suministro
hasta que el agua salga limpia. Cierre el suministro de agua en la vAIvula de apagado.
3. Desenrosque la tapa plAstica de la boca de la v&lvula de agua. Deseche la tapa.
4. Deslice la tuerca de compresi6n de bronce, seguida de la guamici6n (manguito), en
la tuberfa de suministro de agua, come se muestra.
5. Introduzca la tuber& de suministro de agua en la boca de la vAIvula de agua hasta
el punto mAximo permitido (6,4 mm o _ de pulg). Deslice la guamici6n (manguito)
dentro de la boca de la v&lvula y enrosque manualmente la tuerca de compresi6n
dentro de la vAIvula. Con una llave, enr6squela una media vuelta mAs. NO la
enrosque demasiado.
6. Utilice una abrazadera de acero y un tomillo para asegurar la tuber& de suministro
de agua en el panel posterior del refrigerador, como se muestra.
7. Enrolle el exceso de la tuberfa de suministro de agua (aproximadamente 2F=vueltas)
detrAs del refrigerador, como se muestra en la figura 1, y arregle la tuberfa enrollada
de manera tal que no vibre o se desgaste per el roce con otra superficie.
8. Abra el suministro de agua en la vAIvula de apagado y apriete cualquier conexi6n
que filtre agua.
9. Reconecte el refrigerador a la fuente de alimentaci6n el6ctrica.
10. Para encender el fabricador de hielo, baje el braze metAlico indicador (verifique la
posici6n de encendido/apagado (ON/OFF) del brazo en la cubierta delantera del
fabricador de hielo).
22
Page 23

Herromlentclsnecesarlcls:
De_omllladar
COn purfia Phlllps TM
o
punlo Quodre_"
Lk_e
Juego de lave_ oJultal_e
de cubo
INSTRUCCIONES PARA LA EXTRACCION E INVERSION DE PUERTAS:
1. Quite la rejilla de {a base y la cubierta de la bisagra superior.
2. Retire la bisagra superior con una v&lvula hexagonal de 3/8" y levante la
puerta de la congeladora retir4ndota de la clavija de la bisagra del centro.
Coloque la puerta a un lado.
3. Desatomille el v&stago de la bisagra central con una Ilave ajustable y p6ngale
en un lugar seguro para utilixado luego en la reinstalaci6n.
AsegOrese de que la arandela pl4stiea permanezca en el v_tstago de la
bisagra.
4. Levante la puerta del refrigerador, sac&ndola de la bisagra inferior, y
col6quela a un lado.
5. Retire la bisagra central y coloque un especiador y, a continuaci6n, quite el
tornillo interior y desafioje los dos tornillos extedores Io suficiente para permitir
que la bisagra y el especiador se deslicen hacia fuera. Vuelva a apretar los
torniilos.
6. Afloje les dos tornilIos extemes en el otro lado del refrigerador; quite el tornillo
intemo e instale la bisagra central.
7. Retire la bisagra inferior con una v&ivula hexagonal de 3/8_.Coloque de
nuevo los dos tornillos externos en los orificios y apri_teles. Los tornilles
intemos se colocarAn en el otto lado, como se describe en el paso 8.
8. Quite los dos tornilIes externos del otto lado del refrigerador e instale la
bisagra inferior. Coloque y apriete los tomillos que retir6 en el paso 7.
9. Desatomilie el v&stago de la bisagra inferior con una Ilave ajustabie. Cambie
el v&stago de la bisagra al otto orificio de la bisagra y apri6telo con una Ilave
ajustable.
10. 11. Mueva los tom de las puer_asdel congelador y del refrigerador hacia el otto
lade. Antes de comenzar a atomillar, deber& agujerear la espuma con un
punz6n.
11. Coloque la puerta del refrigerador en el v4stago de la bisagra inferior y
atornille el v4stago de la bisagra central a tray,s de la bisagra central, ubieada
en la parte superior de la puerta. Cierre la puerta del equipo de refrigeraci6n
para alinear el agujeto.
12. Apriete el v&stago de la bisagra central con una Ilave ajustable.
13. Retire los tapones de los agujeres de la bisagra y la caja y col6quelos en el
lade opuesto.
14. Coleque la puerta del congelador sobre el v&stago de la bisagra central.
15. Cierre la puerta del refrigerador. Mientras un/a ayudante eleva la puerta desde el
lado opuesto de la misma, apdete los tomillos de ir_alaci6n de la bisagra superior.
16. Vuelva a colocar la rejilla de la base y la cubierta de la bisagra superior.
17. Enchufe el cable de alimentaci6n el6ctriea y coloque el control de temperatura
del refrigerador en la posici6n central. Ajuste la posici6n seg0n sea necesario.
23
Page 24

PERIODO DE ENFRIAMIENTO
Para garantizar el almacenamiento correcto de los alimentos, deje funcionar el refrigeradorcon ins puertas cerradas por un tiempo
mi'nimode 8 a 12 horns antes de colocar alimentos en eI interior.
CONTROLES DEL REFRIGERADOR Y EL CONGELADOR
AJUSTE DE LA TEMPERATURA
Ajuste gradualmente el control de la temperatura: mueva
la perilla poco a poco, haste Iograr que la temperatura se
estabilice.
Para obtener una temperatura rods if[a, gire la perilla haeia
Colder (mAs fri'o).
Para obtener una temperatura menos fr&, gire la perilla hacia
Cold (if[o).
AI ajustar el control del refrigerador, cambiarA la temperatura en
ambos compartimientes. Por ejemplo, si el control de1refrigerador
se coloca en un valor m_s fri=o,puede ser necesario seleccionar un
valor menos fri=oen el control de1congelador. AI ajustar el control del
congelador, cambiar_ solamente la temperatura del congelador.
Para mantener Ins temperaturas, un ventilador hace circular el
aire en los compartimientos del refrigerador y del congelador.
Para Iograr una buena circulaci6n, no bloquee con alimentos las
salidas de aire fri'o.
Control dol congelador (en cier[os modelos)
Control del rofrigerador (on oiertos modolos)
GUfA PARA EL AJUSTE DE TEMPERATURA
Si el compartimiento del refrigerador no
esta Io suficientemente frio
Si el compartimiento del refrigerador
esta excesivamente frio
Si el compartimiento del congelador no
esta Io suficientemente frio
Si el compartimiento del congelador estd
excesivamente fifo
Para apagar el refrigerador
)Gire Iigeramente el control del refrigerador hacia
el control del refrigerador hacia
Gire ligeramente el control del congelador hacia
Colder (rn_s ffio)
Gire ligeramente el control del congelador haoia
Cold (ffio)
Gire el control del refrigerador hacia 0 (apagado)
24
Page 25

AJUSTE DE ANAQUELES
Los anaqueles del refrigerador so pueden ajustar f4cilmente para satisfacer las
necesidades individuales. Antes de ajustar los anaqueles, saque todos los
alimentos.
Para ajustar los anaqueles corredizos:
0 Para quitar eIanaquel, tire de _I basra que se detenga.
Levante el borde delantero hacia arriba y tire de 6I.
Siga esta mismo procedimiento a la inversa para co!ocar el anaquel en
cualquier otro par de rieles.
ALMACENAMIENTO EN LAS PUERTAS
Los compartimientos, anaqueles y rejillas de las puertas est#.n disefiados
para el fAcit almacenamiento de tarros, botellas y latas. Permiten el acceso
r_pido a articulos de uso frecuente.
Ciertos modelos tienen rejillas o compartimientos en las puertas con espacio
suficiente para recipientes pl#.sticos de bebidas de 3,8 litros (1 galSn) de
capacidad, ademAs de tarros y otros recipientes de tama5o econSmico.
Algunas rejittas ajustables brindan mayor capacidad de almacenamiento.
El compartimiento de los productos I#.cteos, que es menos frio que la secoi6n
general de almacenamiento de alimentos, est#. disefiado para almacenar
quesos, cremas para untar o mantequilla pot perfodo cortos.
Anaquel corredizo de metal
Rejilla de la puerta
COMPARTIMIENTO PARA PRODUCTOS FRESCOS
(EN CIERTOS MODELOS)
Los compartimientos para productos frescos, ubicados debajo del anaquel
inferior del refrigerador, est#.n diseSados para almacenar frutas, vegetales y
otros productos frescos. Lave los atimentos enagua limpia y elimine el exceso
de agua antes de colocarlos en los compartimientos para productos frescos.
Se recomienda envolver los alimentos que tengan un otor penetrante o mucha
humedad antes de almacenarlos.
25
Compartimiento para productos frescos
Page 26

Si au refdgeredor tiene un fabricador autom4tico de hielo, 6ste suministrar_
hieJo suficiente para el conaumo normal. Sin embargo, durante el inicio de
funcionamiento del refrigerador, no ae producir_ hielo en las primeras 24
hares de funcionamiento. Losfabricadores autom4ticoa de hielo son accesorioa
opcionales que pueden set instaladoa en la mayorfa de los modeloa en
cualquier momenta. P6ngase en contacto con su distribuidor local pare obtener
mayor informaci6n.
ENCENDIDO DEL FABRICADOR DE HIELO
Una vez terminada la conexi6n de tuber_as, ae debe abrir la v41vula de
suministre de agua. Coloque el recipiente de hielo debajo del fabricador de
hielo, empujAndolo tan profundamente coma sea posible. Baje el brazo met41ico
indicador para colocarlo "abajo" o en la posici6n ON (encendido). Laa
conexiones de tuber[as nuevas pueden provocar que la primera producci6n
de cubos de hielo tenga una decoloraci6n o sabot extraao. Deaeche los
primeres cubos hasta que los cubos producidos no presenten decoloraci6n ni
sabot.
APAGADO DEL FABRICADOR DE HIELO
Pare apagar el fabricador de hielo, levante el brezo metAlico indicador hasta
que emita un clic y encaje _ardba"o en la posici6n OFF (apagado). El fabricador
de hielo tambi6n se apaga autom4ticamente cuando el recipiente de hielo estA
lleno. Si el modelo de su refdgeredor tiene un anaquel ajustable del congelador,
col6quelo en la posici6n m4s baja, de manere que el bmzo met41icoindicador
entre en contacto con el hieio cuando el recipiente eat6 Ileno.
Fabricador de hielo
CONSEJOS SABRE EL FABRICADOR DE HIELO
• Los cubos de hielo que quedan aimacenados par mucho tiempo pueden adquidr sabot extraFio. Vacfe el recipiente
de hielo y asegdrese de que el brezo met41ico indicador eat4 "abajo" o en la posici6n ON (encendido). Entonces el
fabricador de hielo producir4 m_.s hielo.
• De vez en cuando sacuda el recipiente de hielo para mantener aeparados los cuboa de hielo.
• Mantenga el brazo met41ico indicador "ardba" o en su posici6n OFF (apagado) hasta que el refrigerador sea conectado
al suministre de agua y cada vez que el suministre de agua eat_ cerredo.
• Los siguientes aonidos son normales durente el funcionamiento del fabricador de hielo:
• Motor encendido
• Hielo que se desprende de la bandeja
• Hielo que cae dentro del compartimiento de almacenamiento de hielo
• Agua que carte
• V41vula de agua que se cierra o se abre
• Lave el recipiente de hielo con agua tibia y detergente suave. Enjuague bien y s_ueio.
• Apague el fabricador de hielo mientras limpia el congelador y durente laa vacaciones.
• Si el fabricador de hielo va a permanecer apagado durante un largo perfodo, cierre la v4vula de suministro de agua.
26
Page 27

IDEAS PARA EL ALMACENAMIENTO DE ALIMENTOS
Atmacenamiento de atimentos frescos
• El compartimiento de elimentos frescos debe mentenerse entre 1,1'; C (34° F) y 4,4'; C (40° F) con une temperature
6ptima de 2,8 ° C (37'; F).
• Evite ebarrotar los anequeles del refdgemdor, ya que esto reduce le circuleci6n de aim alrededor de los elimentos y
provoca enfriamiento irregular.
Frutas y vegetales
• El almecenamiento en los compartimientos pare productos frescos encierra le humeded pare ayuder a conservar le
calided de les flutes y vegeteles durante m4s tiempo.
Carnes
• Se debe envolver de manera segura la came roje y de eves cruda pare eviter el derrame de Ifquidos y la contamineci6n
de otros elimentos o superficies.
Atmacenamiento de atimentos congelados
, El compartimiento del congeledor debe mantenerse e une temperature iguel o menor e _17,8° C (0° F).
• El congeledor funcione m4s eficientemente cuendo tiene per Io menos 2,/3 de su cepecidad llene.
Empacado de alimentos para su congelaciSn
• Pare reducir la deshidrataci6n y el deterioro de la celided, utilice papel de aluminio, envoltura pare congelar, bolsas
pare congelar o recipiente herm6ticos. Extraiga tedo el aire que sea posible de los empaques y s611elosbien. El aire
que quede encerrado puede secer los alimentos, cembiarles el color y darles un saber desegredable (quemedum per
congelaci6n).
• Envuelve bien las cames rojes y de ayes frescas con envoltura pare congeler antes de congelarlas.
• No congele de nuevo la came que ya ha side completemente descongeleda.
Carga del congelador
• Evite colocer demesiedos elimentos calientes en el congelador el mismo tiempo, ya que eso provoca que el congeledor
se sobrecergue, se reduce le velocidad decongeleci6n y puede eumentar la temperature de los elimentos ye congeledos.
• Deje espacio entre los empaques, de manera tel que el eire fr_opuede circular libremente y los elimentos se congelen
tan r4pidamente come see posible.
• Evite almecenar en los anequeles de la puerta del congeledor alimentos que sean dificiles de congelar, tales come
heledo y jugo de narenje. Estos alimentos se conservan meier en el interior del congeledor deride la varieci6n de la
temperature es menor.
IDEAS PARA EL AHORRO DE ENERGIA
Sit_e el refrigerador en la parte m_s fresca de la habitaci6n, lejos de la luz
solar directa y de conductos de calefacci6n o registros. No sit_e el refdgerador
junto a electrodom6sticos que generen calor tales come estufas, homes o
lavavajillas aurora&rices. De no ser posible, la colocaci6n de una secci6n de
gabinetes o una cape de aislamiento adicional entre los dos electrodom_sticos
permitir& el funcionamiento m4s eficiente del refrigerador.
Nivele el refrigerador pare que las puertas cierren bien.
Consuite este manual de use y cuidado pare verificar la graduaci6n
recomendada del control de temperature.
La limpieza peri6dica del condensador pem_itir& que el refrigerador funcione
m4s eficientemente. Yea la table de cuidado y limpieza en la p4gina 29.
No abarrote el refrigerador ni bloquee las salidas de aire fri'o, ya que esto
provoca que el refrigerador trabaje per m4s tiempo y consume m&s energfa.
Cubra los alimentos y seque los recipientes antes de colocarlos en el
refrigerador. Esto reduce la acumulaci6n de humedad dentro de la unidad.
Organice el refrigerador pare reducir el tiempo de aperture de las puertas.
Saque la mayor cantidad de arti'culos que necesite de una sole vez y cierre la
puerta tan pronto come sea posible.
27
Page 28

EL SIGNIFICADO DE LOS SONIDOS QUE
USTED PUEDE ESCUCHAR
Su nuevo refrigerador de alta eficiencia puede hacer ruidos a
los que usted no est_ ecostumbrado. No se asuste, estos
ruidos son norma}es. Les superficies duras, come los pisos de
vini}o o readers, paredes y armarios de cocina pueden
aumentar el nivel de los ruidos. A continuaci6n }e demos une
lists de descripci6n de algunos de }os sonidos m4s comunes
que usted puede escuchar y su cause.
A. Evaporador
EI flujo de Ifquido refrigerante e tray,s del evaporador
puede crear un sonido de ebulliciSn o borboteo.
B. Ventilader del evaporader
Puede escucher el flujo de sire que el ventiiador del
evaporador hece pesera trav6s del refrigerador.
C. Calentader de descengelacion
Durante los ciclos de descongelaci6n, el ague que
escurre sobre el celentador de descongeJaciSn puode
ceusar un sonido sibilante o chisporroteo. Despu6s de
}a descongeleci6n, puede heber un sonido de este}lido.
D. Fabrieador autom_ti¢o de hielo
SI su refrigeredor est'. equipado con un fabricador
autom4tico de hielo, usted escucharA el sonido de los
cubitos de hielo al caer en el recipiente de hielo.
E. Reloj de descongelaci6n y control de enfriamiento
Estes pertes pueden producir un chesquido al encender
y apegar el refrigerador. El reloj tambi_n produce sonidos
similares a los de un reloi el_trico.
F. Ventilador del condensader
Si los serpentines del condensador est4n ubicedos
debaio de] refrigeredor, como se muestre en e] dibujo
de ]a izquierde, existe un ventilador del condensador.
Ustod puede escucher e] sire que e] ventiiador del
condensador hece pasar e tmv6s del condensador.
G. Compresor
Los compresores modemos de alta eficiencia funcionan
con mayor velocidod que los modelos entiguos. El
compresor puede generar un zumbido alto o un sonido
palpitante.
H. Vdlvula de agua
SI su refrigeredor est'. equipado con un fabricador
autom4tico de hielo, usted escucharA un zumbido a
medida que la v41vula de ague se abre pare Ilenar el
fabdcador de hielo en cede ciclo.
I. Bandeja de drenaje (no se puededesmontar)
Es posible que usted escuche el ague correr hacia }a
baodeje de dreneje durante el ciclo de descongelaciSn.
Este bendeja est'. ubiceda sobre el compresor de los
condensadores enfriados pot eire (serpentines negros
en le perte posterior del refrigerador).
J. Serpentines de cendensaei6n
28
Page 29

Mantenga su refrigerador y congelador limpios para evitar la aparici6n de olores desagradablea. Limpie cualquier
derrame inmediatamente y limpie ambos compartimientos per Io menoa dos veces al a_io. Nunca utilice eaponjas para
restregar, cepillos, limpiadorea abrasives ni aoluciones alcalinas fuertes para limpiar las superficies. No lave ninguna de
las piezas m6viles en el lavavaiillas autom4tico. Siempre desenchufe el cable de alimentaei6n el_ctrica de Is toms
de cerriente de pared antes de Is limpieza.
Tabla de cuidado y limpieza
Parte Que debe utilizar Consejos y precauciones
Interior/ • Jab6n y agua Use 2 cucharadas de bicarbonate de soda en 0,97 litros (1/4 de gal6n) de
Revestimier_e de • Bicarbonate de soda agua ti'bia. Asegw3rese de exprimir tode el exseso de aqua de Is
la puerta y agua esponja o el pa_o antes de limpiar la zona alrededor de los cordroles,
Ia bombilla y cualquier otra parte eldctrica.
Juntas de lea • Jab6n y agua Limpie las juntas con un patio suave y limpio.
paertas
Compartimientos • Jab6n y agua No lave ninguna de las partes m6viles (compartimientos, cajones, etc.) en
el lavavajillas aurora&rico.
Exterior y • Jab6n y agua No utilice limpiadores comereiales para use dom6stise, amoniaco ni
manilles alcohol para limpiar las manillas.
Serpentines del
condensador • Aspiradora Utilice la boquilla para quitar polvo de la aspiradora para quitar el excuse de
(s61o en modelos polvo de los serpentines del condensador (tubes negros y cableado) que
de refrigeraci6n est_n en el parts posterior de los refrigeradores enfriados per aire.
pot aire)
Bandeja de agua • Jab6n y agua Ciertos modelos tienen una bandeja para reseger el agua descongelador,
descongelada ubicada sobre el compresor en la parts posterior inferior del refrigerador
(yea la ilustraci6n en la p4gina siguiente). Limpie la bandeja de agua sen
una pa_o h0medo. NOTA: La bandeja de agua de dessengelaci6n NO es
desmontable.
29
Page 30

Consejos para las vacaciones y mundanzas
,, Deje el refrigerador funcionando durante periodos de vacaciones de hasta 3
semanas de duraci6m
Vacaciones
. Consuma todos los alimentos perecederos del compartimiento del refrigerador.
cottas
,, Apague el fabricador autom_ticode hielo, incluso si s61ose ausenta por unos
pocos dias.
,, Retire todos los alimentos el hielo si se va a ausentar pot un mes o m_s tiempo.
,, Apague todos los controles "8" (Apagado) desconecte la engergfa el_rica.
Vacaciones ,, Apague el fabricador autom_tica de hielo y cierre la v_lvula de suministro de agua.
largas ,, Limpie prfundamente el interior del refdgerador.
,, Deie las dos puertas abiertas para evitar la aparici6n de olores y de moho. Si es
N_cesa_io,
,, Retire todos los alimentos y el hielo.
,, Su usa una carretilla, cargue el refrigerador por el costado.
Mudanza ,, Ajuste las ruedas completamente hacia arriba para protegerias durante el traslodo
o mudanza.
,, Acolche el gabinete papa evitar raspaduras en la superficie.
3O
Page 31

Para garantizar lacorrectainstalaci6n delrefrigerador;
vea la secci6n "lnstalaci6n" en las pdginas 21 y 22
O
Para realizar la inversi6n de las puertas, yea la seccibn
"lnstrucciones Para La Extraccion E Inversion De Puertas"
en las pdgina del 23
Problemas frecuentes
El refrigerador no funciona.
Antes de Ilamar al servicio t_cnico, revise la siguiente lista. AI hacerlo
puede ahorrar tiempo y dinero. La siguiente lista inctuye problemas
frecuentes que no son el resuttado de defectos en Ia mano de obra o de
materiales de este aparato.
• Asegt_rese de que el enchufe est_ introducido firmemente en Ia toma
de corriente el6ctrica.
• Verifique/reemplace el fusible con un fusible de tiempo de retardo de
15 amp. Reajuste el disyuntoro cortacircuitos.
• El control de temperatura ester en la posici6n "O" (apagado).
• El refrigerador puede estar en el ciclo de descongelado. Espere 20
minutes y vuelva a revisar.
• GradSe el control del congelador a una posici6n menos frfa hasta que
la temperatura del congelador sea satisfactoria. Espere 24 horas para
que la temperatura se estabitice.
La temperatura del congelador es
muy frfa. La temperatura del
refrigerador es satisfactoria.
La temperatura del refrigerador es • Grad6e el control del refrigerador a una posici6n menos frfa. Espere 24
muyfri'a. Latemperaturadel betas para que Ia temperatura se estabitice. Luego verifique la
congelador es satisfactoria, temperatura del congelador y haga los ajustes que sean necesarios.
* El refrigerador hace mucho • El gabinete no est,. nivelado.
ruido o vibra. • E! piso no es resistente.
Hay olores en el refrigerador.
La luz del gabinete no funciona.
El fabricador automdtico de hielo
no funciona (en ciertos modelos).
Se debe limpiar et interior.
Se deben cubrir o envolver los alimentos que producen o!or.
Reemplace la bombitla.
Asegt_rese de que el enchufe ester introducido firmemente en Ia toma
de corriente el6ctrica.
E! interruptor de la luz puede estar trabado. Para soltarlo, haga presiSn
sobre el interruptor, ubicado en Ia caia de contro! del refrigerador.
Asegt_rese de que el braze met_tlico indicador no est6 en Ia posiciSn
hacia *'arriba" .
El fabricador de hielo debe producir 1,8 a 2,25 kg. (4 a 5 Iibras) de hielo
en un perfodo de 24 betas.
El suministro de agua est_ cerrado.
La presi6n de agua es muy baja.
E! congelador no estersuficientemente ffio.
*Lea Ia secci6n denominada Sonidos y sefiales que indican funcionamiento normal en la p#gina 28.
31
Page 32

F61icitationspourI'achatdevotrenouveau_frig_mteur}
Nous,deSears,sommsstr6stiersdenosproduitset
nouesommesd_termin6s&vousoffrirlemeiiieurservice
possible.Votresatisfactionestnotrepriorit&
Noussommeecertainsquevousappr_cierezvotre
nouveaur_frig6rateuret merci d'avoir choisi un de hoe
produite. Nous eouhaitons que vous nous soyez fiddles
pour vos prochains achats.
VEUILLEZ LIRE CES INSTRUCTIONS ET LES
CONSERVER
Ce Manuel d'utilisstion et d'entretien foumit des
instructions de fonctionnement sp_cifiques pour votre
module. N'utilieez votre r_frig6rateur que de la fa£on
indiqu_e dane ce manuel. Cee instructions n'ont pas la
pr_tention de couvrir toutee les conditions ou situations
sueceptibies de se produire. II faut faire preuve de bon
sens et de prudence chaque lois que I'on installe un
appareil, qu'on le fait fonctionner ou qu'on en fair la
maintenance.
Veuillez indiquer les num_ros de modble et de sdrie
ci-dessous pour r_fdrence future. Ces informations se
trouvent sur la plaque signal_tique situ_e b I'interieur
de votrs refrig_rateur.
Num_ro de modble : 253
Ou: 970
Num_ro de sdrie:
Date de I'achat :
Bienvenue .................................................... 32
Recommandations pour une utilisstion
s_curitaire .............................................. 32 - 33
Garantie ....................................................... 33
Canada - Garantie ....................................... 34
Contrate De Protection ................................ 35
Installation - Inclutleraocorden oplion pour
raocorderla glaciate &I'alimentationen eau..,,,36 - 37
D6poee des pores et instructions pour
rinversion ..................................................... 38
Commandes de temperature ....................... 39
Vue de I'int_rieur .......................................... 40
Fabrication de glace .................................... 41
Conseile pour la conservation des aliments
et i'6conomie d'energie ......................... 42
Bruits de fonctionnement normaux et
aspects .................................................. 43
Entretien et netloyage ................................. 44 - 45
Avant d'appeler ............................................ 46
POUR VOTRE SI_CURIT#
• Ne pas ranger ni utiiieer d'essense ou tout autre liquide
inflammable & proximit_ de cet appareil ou de tout autre
appareil. Life lee 6tiquettes du produit pour vous informer
de tout indice d'inflammabilit6 ou de toutes autres
pr_autions d'usage.
• Ne pas faire fontionner le r6frig_rateur en pr6sence
d'_manatione explosives.
• Eviter tout contact avec Iss pi6css mobiles de la glaciate
automatique.
• Enlever toutes lee agrafss du carton. Lee agrefes
peuvent causer des coupures importantes et
endommager le fin des meubles et des appareiis
_lectrem6nagers.
LA SleOURITle DES ENFANTS
Jeter au rebut ou recycler le carton, les sacs de piastique
et tous lee autres mat_riaux d'embaiiage imm_iatement
apr_s avoir d_bail_ le _frig_reteur. Les enfants ne
devreient jamaie iouer avec cee mat_daux. Les morceaux
de carton couverts de tapis, d'un couvre-lit, de feuiiiee de
piastique ou de film 6tirabie peuvent facilement ee
transformer en construction _tanche et causer repidement
I'asphyxie.
MISE AU REBUT APPROPRI#E DE VOTRE
REFRIGERATEUR OU CONGELATEUR
Risque de pidgeage des enfants
Le pi_geage et la suffocation
d'enfants n'eet pae un probl6me
du pass& Lee r _frig_rateurs et les
cong_lateure au rebut ou
abandonn6s eont toujours
dangereux-m6me pour quelques
iours. Si voue voue d_barrasser
de votre vieux r6frigerateur ou
cong_lateur, veuiliez suivre les
consignee suivantes pour _viter
lee accidents.
Avant de jeter au rebut votre vieux r_frigdrateur!
cong_lateur:
• Enlever les portee.
• Laissez lee tablettes en place pour emp_her que lee
enfants n'y entrent facilement.
• Faites enlever le _frig_rant par un technicien qualifi&
32
Page 33

INFORMATIONS SUR LE SYSTEME IeLECTRIQUE
Le r_frig_rateur doit _tre branch_ b sa propre prise de
courant alternatif de 115 volts et de 60 Hz. Le cordon
d'alimentation de I'appareiI est muni de 3 broches avec
mise & la terre pour assurer une protection accrue centre les
nsques d'61ectrocution. La fiche 61ectrique & 3 broches doit
_tre branch_e directment dens une prise de courant
appropri6e avec raise & la terre. La prise de courant doit
respecter les codes Iocaux et les ordonnances. Consulter
un 61ectricien qualifi& Ne pas utilissr de rallonge ni
d'adaptateur.
R_parer ou remplacer imm_diatement un cordon _lectrique
us6 ou endommag&
Ne jamais d6brancher le r_frig_rateur en tirant sur le cordon
61ectrique. Toujours saisir refinement la fiche et la tirer
directement de la prise de courant afin de ne pas
endommager le cordon 61ectrique.
Pour r6duire les risques de choc 61ectrique, toujours
d6brancher le r_frig_rateur event de le nettoyer ou de
changer une ampoule.
Le rendement de I'appareil peut 6tre affect6 par une variation
de tension de 10% ou plus. Faire fonctionner le r6frig6rateur
avec une alimentation 61estrique insuffisante peut
endommager le compresseun Ce type de dommages ne
sent pas couverts par votre garantie.
Pour 6viter que le couvant 61ectrique qui aliments le
r6frig_rateur ne soit accidentellement coup6, ne pas
brancher J'appareil & une prise de courant contr616e pau un
interrupteur mural ni tirer sur le cordon 61ectrique.
,, Eviter de brancher le r6frig6rateur & un interrupteur &circuit
de terre contr61&
GARANTIE COMPLr:TE DE UN AN SUR LE
REFRIG_:RATEUR
Pendant un an & partir de la date d'achat, sice
r_frig6rateur fonctionne etest entretenu selon lee
instructions du guide de I'itisateur, Sears r_parera ce
r_frig6rateur, gratuitement, en ces de d_faut de met6riau
ou de fabrication.
GARANTIE COMPLi=TE DE CINQ ANS SUR LE
SYST_:ME DE REFRIGERATION SCELLE
Pendant cinq ans & pertir de la date d'achat, sice
r_frig6rateur fonctionne et est maintenu selon les
instructions du guide de I'utifisateur, Sears r6parera
gratuitement le syst6me de r_flig_ration scell_
(comprenant le n_frig_rant, la tuyauterie et le moteur du
compresseur), en ces de defeut de mat_ieu ou de
fabrication.
La garantie ci dessus ne s'applique qu'& dee r_frig6rateurs
utilis_s & fins domestiques.
Cette garentie vous donne dee droits sp6cifiques. II se peut
que vous b6n_ficiez d'eutres droits, lesquels verient d'_tats
& _tats.
Le service de garantie est disponible en contectent le
CENTRE DE SERVlCE!DEPARTEMENT DE SEARS
PLUS PROCHE eux Etets - Unis. Voir le page post6rieure
de ce manuel.
Pour les questions eu garentie, s'il vous plait contacter
I'edresse suivente:
Sears, Roebuck and Co.
Dept. 817WA
Hoffman Estates, IL 60179
33
Page 34

CANADA --- GARANTIE
R frig rateu
Canada Inc. garantit tous los r_frig6rateurs Kenmore neufs contre tout vice de mat6riau ou de fabrication. En cas de
d_faut, voici ce que Sears effectuera gratuitement:
Le compressear DIX (10) ANS CINQ (10) ANS DIX (10) ANS
Le syst_me scell_
(r_rig6rant, _vaporatear et CINQ (5) ANS CINQ (5) ANS CINQ (5) ANS
condenseur)
Toutes los autres pi_ces,
tous Ies autres r_glages UN (1) AN UN (1) AN UN (1) AN
Responsabilit6 normale du consommateur
Los points suivants, qui ne sont pas des d6fauts de fabrication, ne sont pas compris darts la garantie, mais sont & la
charge du client:
1)
2)
Dommages du fini apr_s livraison.
Alimentation 6]ectrique impropre, faible tension, tout d_faut du c_blage de la maison, appareil non branch_ & une
prise 61ectrique.
3) Remplacement des ampoules 61ectriques.
4) Dommages causes par le d6placement de I'appareil.
5) R6parations & la suite de modifications, usage abusif, incendie, inundation ou causes naturelles.
6) Bonne circulation d'air au syst&me de r6frig6ration.
7) Utilisation et entretien appropfi6s, comme il est indiqu6 darts le guide, bun r_glage des commandos.
Pour tout entretien n_cessaire sous cette garantie, appelez simplement 1-STT-LE-FOYER s_ (1-877-533-6937).
La gamntie ci-dessus conceme los r6frig6rateurs Kenmore vendus et fonctionnant au Canada seulement.
Elle ne s'applique pas sile r_fdg_mteur est utilis6 & d'autres fins que domestiques.
Contrat d'entretien Sears
Conservez la valour de votre r_frig_rateur Kenmore avec un contrat d'entretlen Sears.
SEARS CANADA INC. • Toronto, Canada • MSB 2B8
IMPRIME_AUXI_.-U.
34
Page 35

Aux Etats-Unis
Contrats de protection principaux
Nous vous f_licitons pour votre achat. De par sa conception
st sa fabrication, votre nouvel appareil Kenmore _ vous
foumira de nombreuses ann6es de service fiable. Male,
comme tout autre produit, il pourrait n_cessiter des
r6parations ou travaux d'entretien de temps _ autre. C'est
dane tee circonstances qu'un contrat de protection
principal vous permettra d'_viter soucis et d_penses.
Souscrivez maintenant & un contrat de protection principal
pour vous prot_ger contre lee probl_mes st d6penses
inattendues.
Le contrat de protection principal vous permettra _galement
de maximiser la Iong_vit_ de votre nouvel appareil. Voici ce
qu'il inclut:
Service apr_s-vente dispens_ par 12 000 professionnels,
sp_cialistes des r6parations des appareils m_nagers
[Y_ Service apr_s-vente illimit6, et gratuit_ (pi_ces et main-
d'oeuvre) de toutes lee r_parations couvertes
[_ Garantie de performance - remplacement du produit
couvert s'il subit pJus de trois d6faillances pendant une
p_riode de douze mois
[_ Remplacement du produit couvert s'il ne peut 6tre r_par_
[_ Contr61e annuel d'entretien pr6ventif sur demande de
I'utilisateur - sans frais additionnel
[_ Acc_s instantan_ & un service d'aide par t61_phone -
foumiture d'instruction et d'information non technique sur
les produits r6par_s & domicile, et price de rendez-vous
pour route intervention
[_ Protection contre les surtensions et les dommages
imputables aux fluctuations de I'alimentation _lectrique
[_ Remboursement des frais de location d'un appareil dane
le cas o5 le produit r_par_ n'est pas disponible & la date
promise
Lorsque vous 6tes prot_g_ par le contrat de protection, il
suffit d'un appel t616phonique pour demander une
intervention. Vous pouvez t616phoner & tout moment du jour
ou de la nuit, ou fixer un rendez-vous en ligne.
Sears dispose d'une 6quipe de 12 000 professionnels
sp_cialistes des r_parations qui ont acc_s & plus de
4,5 millions d'accessoires et de pi_ces de qualit& C'est le
genre de professionnalisme sur lequel vous pouvez
compter, et qui vous aidera & maximiser la Iong6vit6 de
votre nouvel appareil. Souscrivez sans attendre & votre
contrat de protection.
Certaines limitations et exclusions sont applicables.
Pour les prix et de rinformation additionnelle,
composez Ie 1-800-827-6655.
Service d'installation Sears
Pour I'installation garantie par les professionnels Sears de
tout appareil m_nager ou de produit comme syst_me
d'ouverture de porte de garage ou chauffe-eau, aux E.-U.
composez le 1-800-4-MY-HOME _.
Au Canada
Contrats d'entretien
Votre achat a une valeur suppl_mentaire parce que vous
pouvez compter sur le HomeOentraP de Sears pour un
service apr_s-vente. Avec plus de 2 400 sp_cialistes
form,s & I'entretien et un acc_s A plus de 900 000 pi_ces et
d'accessoires, nous avons lee outils, les pi_ces, le savoir
et le talent pour r_pondre & votre demande: nous r6parons
ce que nous vendons.
Votre appareil Kenmore ÷ est con£u, fabriqu6 et essay6 pour
vous assurer des ann6es d'un fonctionnement fiable.
Cependant, comme tout appareil m6nager, il peut
n6cessiter un entretien de temps & autre. Le contrat
d'entretien Sears vous offre un remarquable programme de
service & un prix abordable.
Le contrat d'entretien Sears
° C'est votre mani_re d'acheter un service pour demain au
prix d'aujourd'huL
• Elimine les factures de r6paration r_sultant d'usure
normale.
• Foumit une assistance non technique et informative.
• Meme si vous n'avez pas besoin de r6paration, vous
fournit un contrSle d'entretien pr6ventif annuel & votre
demande, pour vous assurer que votre appareil est en
bon _tat de marche.
Certaines limites s'appliquent. Pour de plus amples
informations sur Ies contrats d'Entretien Sears Canada,
composez Ie 1-800_61-6665.
35
Page 36

CeManueld'utilisationetd'entretienfoumitdesinstructions
defonctionnementsp6cifiquespourvotremod61e.N'utilieez
le r_frig6reteurquedelafat;onindiqu6edenscemanuel
d'utilieationetd'entretien.Avantdefairs fonstionnerIs
r_frig_ratsur,suivsz ces premieres _tapes importantes.
EMPLACEMENT
• Placer le r_fdg6rateur pr6s d'une pdee de courent avec
raise & le terre. Ne pae utiliser de rallonge ni d'adapteteur.
• Si possible, ne pas placer le r_frig6rateur directement
eous le lumi_re du eoleil et le placer loin de la cuisini6re,
du }ave-veisselle et des eutres sources de cheleun
• Le _fdg_rateur dolt 6tre instell_ cur un plencher & niveeu
et suffisemment solide pour supporter le poide du
r6frig6rateur une fois rempli.
• Prendre en coneid6retion la proximit_ de Papprovision-
nement en eeu pour lee mod61ee6quip_s d'une glaci6re
automatique.
INSTALLATION
MISE A NIVEAU
Les quatre coins de votre r_frig6rateur doivent reposer
fermement sur un plancher eolide. Votre r_frig_rateur eet
_quip_ de piede de nivellement & I'avant pour vous aider le
mettre & niveau.
Pour me#re votre r#frig_rateur _ niveau :
1. Utilisez un tournevis & lame plate ou une cl6 & douiilee
de 9 mm (3/8 po) pour r6gler lee piede de nivellement
avent.
_gagement n#cessaire pour/'installation
• Laisser le d_gegement euivent pour feciliter I'inetailetion
et permettre une bonne circulation d'air et les
connexions _lectriquee et de plombede:
C_t_s et dessus .......... lcm (3/8 po)
Ard_re ........................ 2,5 cm (1 po)
OUVERTURE DE LA PORTE
Votre r_frig_reteur dolt 6tre plec6 pros d'un comptoir de
meni6re _ vous permettre d'y d_poeer facilement le nourdture.
Pour voue faciliter la t_che, le direction des portes pout _tre
invers_e. Consulter lee instructions de la section ,, D_pose
et inversion dee portee _,& la page 38.
36
Page 37

Avant d'installer de I'alimentation en eau, vous aurez besoin
o
Outile n6ceseaires : cl_ & ouverture variable, toumevis standard & lame plate et teurnevis Phillips TM,
Acc_s au conduit d'alimentatien en eau freide de la maisen ayant une pressien d'eau de 20 _ 120 psi.
Une alimentation d'eau faite de tuyau de cuivre eu de boyau renferc6 de 6,4 mm (W') de diam. Pour d6terminer la lengueur du
conduit en cuivre dent veus aurez besoin, veus devrez mesurer la distance entre la seupape de la glaci_re, situ6e & rarri_re du
r6fdg_rateur, et le conduit d'eau freide. Puis ajeuter environ 2,1 m (7 pi), din de pem_ettre le d6placement du r6frig6rateur Iors
du nettoyage (voir illustration).
Une vanne d'arr¢t branch6e au conduit en eau de votre maison, tie PAS utiliser de vanne d'arr6t autotaraudeus.
Un 6creu & compression et une bague d'extr6mit6 (douille) pour racoerder le conduit d'alimentation en eau & la soupape
d'admission de la glaci_re.
Pour raccorder le conduit d'alimentation en eau _ la soupape d'admission de la glaciate
1. D6brancher le r6fdg6rateur de la pdse de courant.
2. Placer rextr6mit6 du conduit d'alimentation en eau dans un 6vier ou un seau. OUVRIR
ralimentation en eau et laisser s'6couler reau jusqu'& ce qu'elle soit claire. FERMER
ralimentation en eau & partir de la vanne d'arr6t.
3. D6visser le capuchon de plastique de la soupape d'admissien (cerfains mod_les) et
le jeten
4. Faire glisser r_crou & compression en laiten puts la bague d'extr6mit_ (douille) sur
le conduit d'alimentation en eau, tel qu'illustr&
5. Peusser le conduit d'alimentatien en eau dans la soupape d'admissien aussi
prefend6ment que possible (6,4 mm [_t pe]). Faire glisser la bague d'extr_mit_
(deuille) dans la soupape d'admission et visser & la main I'_creu &compression sur
la soupape. Visser d'un autre demi4eur avec une cl6; NE PAS trep serrer.
6. .&I'aide d'un collier de serrage et d'une vis, bien fixer le conduit d'alimentatien en
eau A I'arri_re du panneau du r_frig_rateur & rendroit illustr&
7. Enrouler le surplus du conduit d'alimentation en eau (environ 2 tours et demi) &
rarri_re du r6frig_rateur tel qu'illustr_ & la figure 1 et le placer de mani_re Ace qu'il
ne vibre pas et ne frette pas contre une surface.
8. OUVRIR ralimentation en eau A parfir de la vanne d'arr_t et resserrer teus les
ra_ords qui pr&sentent des fuites.
9. Brancher le r_frig6rateur & la prise de courant.
10. Pour faire fonctionner la glaci_re, rabaisser le levier de signalisation (le commutateur
du levier de signalisation se trouve & I'avant de la glaciate).
37
Page 38

Outlls n6cessalres:
DF;POSE DES PORTES ET INSTRUCTIONS POUR L'INVERSION :
1. Enlever le gdllage inf6deur et le couvercle de la chami_re sup6deure.
2. Enlevez la penture du haut avec une douille de 3/8" et souJevez la porte du
cong6iateur hers du gond de la penture de centre. Mettre la porte de c&&
3. D6visser I'axe de charni_re centrale & raide d'une cl6 & ouverture vadable
et mettre de c5t6 pour le r6assemblage. S'assurer que la ronclelle en
plastique reste sur I'axe de chami_re.
4. Soulever la porte du r6fdg_rate_Jrde la chami_re inf6deure et la mettre de oSt&
5. Enlevez la penture du centre et ]a cale en enlevant ]avis int6rieure et tel&chant
les deux vis ext6rieures suffisamment pour permettre & la penture et la cale
d'6tre gliss6s hors position. Resserrez les vis.
6. Desserrer les deux vis & I'ext6rieur qui se trouvent du c&6 oppos6 clu
r6frig6rateur, enlever la vis & rint6rieur et installer la chami_re centrale.
7. Enlevez la penture de bas avec une clouille de 3/8'L Ins6rer les deux vis &
I'ext_rieur et resserrer. La vis & Iqnt6rieur va du c6t6 oppos6 & r6tape 8.
8. Enlever les deux vis & I'ext_rieur qui se trouvent du c6t_ oppos6 du
r6frig6rateur et installer la chami_re inf6rieute. Ins6rez les vis mises de c6t6
&r6tape 7 et serrez les.
9. D6visser I'axe de la chami_re inf6rieure & I'aide d'une cl6 & ouverture
variable. Mettre raxe de chami_re clans le trou cle I'autre c6t6 et resserrer &
I'aide d'une cl6 & ouverture variable.
10. D6placer les but6es de la porte du cong61ateur et de celle clu r6frig6rateur
du c5t6 oppos& Avant clecommencer &visser, utilisez un poin_n pour
percer la mousse.
11. Placer la porte du r6frig6rateur clans raxe cle la chami_re inf6rieure et
visser I'axe cle la chami_re centrale clans la chami_re centrale au haut de
la porte. Fermez la porte clu r6frig6rateur pour aider & I'enlignement du trou.
12. Resserrer I'axe cle la chami_re inf6rieure & I'aide d'une cl6 & ouverture
variable.
13. Enlevez les bouche-trous de cabinet et penture et placez les au c6t_ oppos&
14. Descenclre la porte clu cong61ateur dans I'axe cle la chami_re central&
15. Fermez la porte du cong61ateur. Ayez un assistant qui soul,re rautre c&_ de
la porte pendant que vous serrez les vis pour installer la penture cluhaut.
16. Replacer le grillage inf6rieur et le couvercle de la chami_re sup6rieure.
17. Brancher le cordon 6]ectrique et toumer la commande cletemp6rature du
r6frig6rateur & la position centrale. R6gler la commande de temp6rature au
besoin.
38
Page 39

PERIODE DE REFROIDISSEMENT
Pour assurer la conservation des aliments, fairefonctionnsr Is r_frig_ratsur avsc los portes fsrm_es pendant au moins 8 & 12 hsures
avant de mettre de la nourfiturs darts le r_frig_rateur.
COMMANDES DU REFRIGERATEUR ET DU CONGI=LATEUR
REGLAGE DE LA TEMPERATURE
Ajustez graduellement Is bsuton de csmmande de
temp6retureen le d6pla_:ant un petit peu _ la lois pour
permettre laetabilisatisn de la temp_reture.
Pour obtenir uns temp_raturs plus froids, toumsr Is cadran
vsrs _ Cslder _ (plus freid).
Pour obtenir une tsmp_raturs plus chauds, toumer le cadran
vsrs _ Csld_ (froid).
La commands du r_fdg6ratsur contr61e la tsmp_raturs des dsux
compartimsnts. Par exsmpls, si la commands du r_frig6ratsur est
raise & un r_glags plus froid, il est possible qus la commande du
cong61atsur doivs 6tre r_gl6e & un r_glage plus chaud. La
commands du cong@ateur ne contr61e qus la tsmp6rature du
cong@ateur.
Le vsntilatsur fair circulsr Fair darts les compartimsnts du
r6frig_rateur st du cong_lateur afin d'y maintsnir la temp6rature.
Ne pas obstruer los volsts d'entr6e de Fair froid avec des alimsnts
afin ds maintenir uns bonns circulation.
La commande du cong61ateur (terrains mod61es)
L_ commende du r6frig6rateur (certains mod_tes)
GUIDE DE RI_GLAGE DE LA TEMPI_RATURE
Si le compartiment du r_frig_rateur est Tourner un peu la commande du r_frig_rateur
trop chaud dans Ie sens de ,, Colder _ (plus froid)
Si le ¢ompartiment du r_frig_rateur est Toumer un peu la commande du r_frig6rateur
trop froid dans Ie sens de ,, Cold ,, (froid)
Si le ¢ompartiment du congdlateur est trop Toumer un peu la commande du cong61ateur
chaud dans Ie sens de ,, Colder ,, (plus froid)
Si le ¢ompartiment du congdlateur est trop Toumer un peu la commande du cong61ateur
froid dans Ie sens de ,, Cold ,, (froid)
Pour 6teindre le r_frig_rateur Toumer la commande du r_frig_rateur & ,, 0 ,,
39
Page 40

REGLAGE DES CLAYETTES
Les clayettes du r_fdg_rateur peuvent _tre facilement ajust_es selon les besoins.
Avant d'ajuster les clayettes, enlever toute nourriture.
Pour r#gler les clayettes coulissantes :
O Enlever la clayette en tirant vers I'avant jusqu'au point d'arr_t.
Soulever I'avant et tirer vers I'ext_rieur.
Replacer la clayette sur n'importe quelle paire de rails, en inversant cette proc6dure.
PORTE ETAG_:RE
Les balconnets, les clayettes et les porte-bouteilles servent & ranger les pots, les
bouteilles et bottes. Les items les plus utilis&s peuvent _tre s_lectionn_s rapidement.
Certains modules ont des balconnets et des bacs de porte qui peuvent accommoder
les bouteilles d'eau gazeuses de grand format et les bocaux de format _'_conomique.
Certains balconnets se r_glent pour offrir une plus grande capacit_ de rangement.
Le easier laitier, qui est moins froid que le reste du r6frig6rateur, est congu pour y
ranger le fromage, les tartinades et le beurre pour de courtes p6riodes de temps.
Clayette coulissante en m6tal
E_tag_rede porte
BAC A LEGUMES (CERTAINS MOD_:LES)
Les bacs A[6gumes, situ6s sous la clayette inf_rieure du r6frig_rateur, sont congus
pour y placer }es fruits, les 16gumes et les autres produits frais. Laver ces produits A
reau frafche et bien les faire _goutter avant de les placer darts les bacs& 16gumes.
Les aliments qui ont une odeur forte ou un haut taux d'humidit_ doivent _tre emball_ts
avant d'etre rang_ts dans le r_frig6rateur.
/
40
Bac & I_tgumes
Page 41

Sivotrer_frig6rateurcomporteuneglaci_reautomatique,ellaproduirasuffisamment
degla#onspourunusagenormal.Cependant,pendantles24premieresheures
delap6riodeded_marrageinitialdevotrer_frig6rateur,laglaci_reneproduira
pasdeglaQons.Lesglaci_resautomatiquessontdesaccessoiresenoptionqui
peuvent6treinstall6sentouttempssurlaplupartdesmodules.Contactezvotre
distributeurlocalpourplusd'informations.
METTRE EN MARCHE VOTRE GLACIERE
Lorsque les conduits d'alimentation en eau sent install_s, la soupape d'admission
dolt 6tre ouverte. Placer le bac & glagons sous la glaci_re, en le poussant aussi }oin
qua possible. Rabaisser le levier de signalisation & sa position _ ON _ (allum_).
L'utilisation de nouveaux conduits d'alimentation en eau peut amener la production
de glagons d6color6s ou ayant un go_3td6sagr_able. Jeter ces premiers glagons
jusqu'& ce qu'ils ne pr6sentent plus de d6coloration ou de go_3td_tsagr6able.
ARRETER VOTRE GLACIF:RE
Pour _teindre la glaciate, soulever le levier de signalisation & sa position _ OFF _
(6taint). De plus, la glaci_re s'6teint automatiquement Iorsque le bac &glagons est
plain. Si votre module comporte une clayette de cong61ateur r6glable, la placer &
sa position la plus basse afin que le levier de signalisation touche & la glace
Iorsque le bac est plain.
Glaci_re
CONSEILS SUR LA FABRICATION DE GLA(_ONS
Les g[a_ons peuvent prendre un go_t d_sagr_able avec le temps. Vider le bac & g[a_ons et s'assurer que le levier de signa[isation
& sa position _ ON _ (allum_). La glaci_re produira alors d'autres glagons.
De temps & autre, secouer le bac & gla£ons pour maintenir les cubes de glace s_par6s.
Maintenir le levier de signalisation & sa position 61ev_e ou _ OFF _ (6taint) Iorsque le r6frig_rateur n'est pas rail6 au conduit
d'alimentation en eau ou Iorsque I'alimentation en eau est ferrule.
Lorsque la glaci_re fonctionne, les bruits suivants sont normaux :
Moteur qui fonctionne
Les gla£ons qui se d6tachent du bac
Les gla£ons qui tombent dans le bac
L'eau qui circule
La soupape d'admission qui s'ouvre et se ferme
Laver le bac & glagons avec de I'eau chaude et un d_tergent doux. Bien rincer et ass_cher.
Arr¢ter la glaciate Iorsque vous nettoyez le cong_lateur et _orsque vous 6tes absent pendant plusieurs jours.
Si la glaci_re est arr¢t6e pour une Iongue p6riode de temps, farmer la soupape d'admission de reau.
41
Page 42

CONSEILS SUR LA CONSERVATION DES ALIMENTS
Conservation des aliments frais
Le compartiment pour la nourriture frafche doit _tre maintenu entre 1,1 '_Cet 4,4 '_C(34 F et 40 '_F),la temperature id_ale @rant
2,7 <_C(37 F).
Eviter de surcharger les clayettes du r@frig6rateur. Cela r@duitla circulation d'air autour des aliments et amine un refroidissement
in6gal.
Fruits et I#gumes
Les bacs& 16gumes emprisonnent rhumidit6 afin d'aider & conserver la qualit_ des fruits et des I_tgumes pendant plus
Iongtemps.
Viande
La viande et la volaille non cuites doivent _tre bien emball_tes afin d'_viter la contamination des autres aliments et des surfaces.
Conservation des aliments congel#s
Le compartiment du cong_lateur dolt 6tre maintenu & une temp6rature de -17,7 "C (0 "F) ou moins.
Les cong61ateurs fonctionnent plus efficecement Iorsquqls sont remplis aux trois quarts.
Emballage pour la cong#lation
Pour r@duire la d_shydratation et la d_t_rioration de la nourriture, utiliser une feuille d'aluminium, une pellicule pour cong_lation,
un sac pour cong_lation ou un contenant herm_tique. Extraire autant d'air que possible et refermer herm_tiquement L'air peut
ass_cher, d_colorer ou alt6rer le goOt de la nourriture (par brOlure au froid).
Suremballer la viande et la volaille fratche avec un emballage pour cong_!lation appropri_ avant de congeler.
Ne jamais congeler de nouveau de la viande d_tcongel6e.
Remplir /e cong_lateur
Eviter de placer trop de nourriture chaude dans le cong_lateur en m_me temps. Cela surcharge le cong_lateur, ralentit le taux
de cong_iation et risque de faire augmenter la temp6rature des aliments congel6s.
Laisser de respace entre les emballages afin que rair froid puisse circuler librement et que les aliments refroidissent aussi
rapidement que possible.
Eviter de ranger des aliments difficiles &congeler comme de la cr_me giac6e et du jus d'orange dans la porte du cong_tlateur.
II est pr_f@rable de ranger ces aliments & I'int_rieur du cong6iateur o_ la temp_trature subit moins de variations.
CONSEILS EN MATIERE D'I_CONOMIE D'ENERGIE
Placer le r@frig6rateur & I'endroit le plus frais de la piece, loin de la lumi_re
directe du soleil et des tubulures ou des registres de chauffage. Ne pas placer
le r6frig6rateur pros des appareils producteurs de chaleur comme une plaque
chauffante, une cuisini_re ou un lave-vaisselle. Si cela n'est pas possible,
installez une section d'armoire ou ajoutez une couche additionnelle d'isolant
entre les deux appareils afin de permettre au r@frig_rateur de fonctionner plus
efficacement.
Mettre le r6frig6rateur & niveau afin que les portes se referment bien.
Consulter ce manuel d'utilisation et d'entretien pour des suggestions de
r@giages de la commande de temp6rature.
Nettoyer r_guii_rement de condenseur ce qui permet de maintenir I'efficacit_
du r@frig_rateur. Consulter la fiche d'entretien et de nettoyage, & la page 44.
Ne pas surcharger le r@frig6rateur ni obstruer les volets d'entr_e de I'air froid
Le r@frigttrateur devra alors fonctionner plus Iongtemps et consommera plus
d'6nergie.
Recouvrir les aliments et essuyer les contenants avant de les ranger au
r@frig6rateur. Ceci diminue raccumulation d'humidit_ & I'int_rieur de rappareil
Organiser le r@frig@rateurde mani_re & r@duire la fr@quence de I'ouverture de
la porte. Retirer tous les items dont vous avez besoin en une seule fois et
refermer imm6diatement la porte.
42
Page 43

IDENTIFIER LES SONS QUE VOUS ENTENDEZ
Votre nouveau r6frig_rateur & rendement 61ev6 peut _mettre des
sons avec lesquels vous n'_tes pas familier. Ne vous inqui6tez
pas, ces bruits sont normaux. Les surfaces dures, comme les
planchers en vinyle ou en bois, les murs et les comptoirs de
cuisine peuvent amplifier les sons. Vous trouverez ci-dessous la
liste des bruits les plus communs que vous risquez d'entendre
ainsi que leur cause.
A. Evaporateur
Le [iquide de refroidissement qui passe darts le circuit
d'6vaporatien peut produire un bruit de gargouillis ou de
bouillonnement.
B. Ventilateu r de I'evaporateur
II est possible que vous entendiez le bruit de I'air renvoy_
dans le r6frig_rateur par le ventilateur de 1'6vaporateun
C. Chaufferette de decong61ation
Pendant les cycles de d_cong_lation, les gouttes d'eau qui
tombent sur la chaufferette de d_cong61atien peuvent
produire un bruit de sifflement ou de gr6sillement. Apr_s la
d6cong61ation, un bruit de craquement peut se produire.
d
d
#
d
d
d
#
D. Glacibre automatique
Si votre r_fdg_rateur est 6quip6 d'une glaci_re automatique,
vous entendrez les cubes de giace tomber dans le bac &
glagons.
E. Thermostat et minuteur de decong61ation
Ces compesantes peuvent produire des bruits de
claquement eu des cliquetis Iorsqu'ils allument ou 6teignent
le r6frig_rateur. Le minuteur peut 6galement 6mettre un
tic-tac semblable & celui d'une horloge 61ectrique.
R Ventilateur du cendenseur
Si les serpentins du condenseur se trouvent sous le
r_frig6rateur, comme sur l'illustration de gauche, c'est qu'il
est 6quip6 d'un ventilateur de condenseun II est possible
que vous entendiez le bruit de l'air renvoy_ dans le
r_frig6rateur par le ventilateur du condenseun
G. Cempresseur
Les compresseurs & haut rendement fonctiennent beaucoup
plus rapidement que ceux des anciens modules. Le
compresseur peut produire un ronronnement aigu ou un
bruit de pulsation.
H. Soupape
Si votre r_frig_rateur est _quip_ d'une glaci_re automatique,
vous entendrez un bruit de vibration Iorsque la soupape
s'ouvre pour remplir la glaciate & chaque cycle.
I. Plateau de recup6ration (non amovible)
II est possible que vous entendiez le bruit de I'eau qui coule
dans le plateau de r6cup_tration pendant le cycle de
d6cong61ation. Le plateau de r6cup_ration sert pour les
condenseurs refroidis par air et se trouve sur le dessus du
compresseur (serpentins noirs & rarri_re du r6frig6rateur).
J. Serpentins du condensateur
43
Page 44

Taujours maintanir le r_fdg6rataur at le cang_lataur propras afin d'6vitar I'apparitian de mauvaises adaurs. Nettoyer imm6diatamant
las d6varsements at laver las deux sections au mains daux fois par an. Ne jamais utilisar de tampon & r_curar m_tallique, de
brosses, de p&ta abrasive ou de solution alcaline forte pour nattoyar les surfaces. Ne jamais laver les parties amovib]es dens le
lave-vaisselle. Toujaurs ddbrancher le cordon d'alimentatian 61ectrique de la prise de caarant murale avant de commencer le
nettoyage.
Fiche d'entretien et de nettoyage
Piece Ce qua vous devez
utiliser Conseils et prdcautions
Rev_.tement • Eau et savon Lltiliser 2 cuill_res de kable de bicarbonate de scuds dens Y_ litre (1 pints) d'eau
int_rieur/dela • Eauetbicarbonatede chade, Bien essor I'_ponge au le chiffon avant de nettayage autout des
porte soude commandos, de l'ampoele _lectrique et de touteales autres compossntea
_lectriqees,
Joints de porte • Eau et savon Essuyer les joints avec un chiffon doux et propre.
Bats ! Balconnets • Eau et savon Ne jamais laver los parties amovibles (balcannets, bacs etc.} dana le lave-vaisselie.
Surfaces • Eau et savon Ne pas utilissr de produitc d'entretien m_nager, d'ammoniaque ou d'afeoo! pour
ext_rieeres et nettoyer les poignees.
poign_es
Serpentinsdu • Aspirateur_lectriqca Utiliser la brosse a _pousseter de votre aspirateur pour enlever la poussi_re
candeasateur accurnul@ sur los serpentins du condenseur (tubes et ills noira) fixes &l I'arri_re des
(read,los ,_ r_frig_rateurs refroidis par air.
ventilation naturelle
seutement)
Plateau • Eauetsavon Certains mod_les comportent un plateau d'evaporation plac_ au-dessus du
d'_',vaparatian compresseur au has du r_frig_rateur (voir I'illustration _ la page suivante). Essuyer le
plateau d'evaporation avec un chiffon humide. REMARQUE: Le cabaret de r_caption
d'eau de d_givrage n'est PAS detachable.
44
Page 45

Conseils pour les vacances et les d m nagements
• Laisser le r_frig_rateur fontcionner pendant les absences de 3 semaines ou moins.
Absences de • Consommer tousles aliments p_rissables ranges dans la section du r_frig_rateur.
coute duroc • E_teindre la glaciate automatique, m_me si vous ne vous absentez que pour quelques
jours.
• Eniever tousles aliments et la glace si vous vous absentez pour un mois ou plus.
• Mettre les commandes sur ,,0,, O'arr_t) et d_brancher I'appareil.
Absences de ,, E_teindre la glaciate automatique et fermer la soupape d'admission d'eau.
Iongue durde ,, Nettoyer enti_rement I'int_rieur de I'appareiL
• Laisser les deux pontes ouvertes din d'_viter I'apparition d'odeur et de moisissure..
Blequer los portes en position ouvente se n6cessaire.
• Enlever route la nourriture et la glace.
• Si vous utilisez un chariot, charger le r_frig_rateur de c6t_.
D_mdnegement • R_gler les pieds de nivellement _ leur position la plus r_tract_e a fin de les prot_ger Iors
des d_placements.
• Receuvir le bottler pour en prot_ger la surface.
45
Page 46

i_iiiiiiiiiiiiiiiiiiiiiiiiiiiiiiiiiiiiiiiiiiiiiiiiP_urii_si_riic_rrec_mentiii_tre_ir_frig_rai_u_iiiiiiiiiiiiiiiiiiiiiiiiiiiiiiiiiiii_
consulterla section .Installatiom,, auxpages 36 et 37
OU
Pour inverser les portes, consulter la section _Ddpose des
portes et instructions pour I'inversion_, aux page 38
Consulter cette liste avant de faire un appel de service. Cesi peut vous faire
Probl_mes courants _eonomiser temps et argent. Cette liste indut les principales causes de prob_mes
qui ne sent pas causes par des d_festuosit_s de mat_daux.
• S'assurer que la fiche 61estfique est bien enfonc6e darts prise de courant.
• V6rifiedremplaeer le fusible par un fusible de temporisation de 15 amperes.
Le r_frig_rateur ne fonctienne pas. R_armer le disjoneteur.
• La commande de temperature est _ _ O ," (_teint).
• II est possible que le r_frig6rateur soit dans un cycle de d6cong6lation.
Attendez 20 minutes avant de v_rifier de nouveau.
La temperature du cong_lateur est • R_g_er la commande du cong_Iateur & un r_glage plus chaud jusqu'& ce que la
trop froide. La tempdrature du temp6rature soit ad6quate. Attendre 24 heures pour que la temperature se
rdfrigdrateur est addquate, stabilise.
La tempdrature du r_frigdrateur est ,, R_g_er la commande du r_frig_rateur & un r_glage plus chaud. Attendre 24
tropfroide. Latempdraturedu heures pour que la temperature se stabilise. Vdrifier la temperature du
congdlateur est addquate, eong_lateur et r_g_er au besoin.
• Le r_frig6rateur est • L'appareil n'est pas & niveau.
bruyant ou vibre. • Le plancher n'est pas assez solide.
Presence d'odeurs dans le • L'int_rieur a besoin d'etre nettoy_.
r_rigdrateur. • Les aliments qui ddgagent une odeur forte doivent _tre emballds ou couverts.
Rempiacer I'ampoule 6lectfique.
L'ampoule no fonctionne pas. ,, S'assurer que la fiche _lestfique est bien enfonc_e darts prise de courant.
L'interrupteur est peut-_tre coinc_. Appuyez sur I'interrupteur, situ6 sur le
bo_'tier de commande du r6frig6rateur, pour le d6coincer.
S'assurer que le levier de signaiisation est en position _lev_e.
La glaci6re automatique ne fon_ionne " La glaci_re doit produire entre 1,8 et 2,25 kg (4 et 5 Ib) de glace en 24 heures.
pae (certains mod_les). ,, L'a]imentation en eau est couple.
,, La pression d'eau est trop faible.
• Le cong_lateur n'est pas suffisamment froid.
* Consulter ta section .Bruits de fontionnment normaux et aspects_, _ ta page 43.
46
Page 47

Your Home
For repair-in your home-of aii major brand appliances,
Jawn and garden equipment, or heating and cooling systems,
no matter who made it, no matter who sold iti
For the replacement parts, accessories and
owner's manuals that you need to do-it-yourself.
For Sears professional installation of home appliances
and items like garage door openers and water heaters.
i -i (1°80e-469°486s)
Call anytime, day or night (U.S.A. and Canada)
WWWoSear_°com ww'w.searsoca
Oar Home
For repair of carry-in items like vacuums, lawn equipment,
and electronics, call or go on-line for the location of your nearest
Seats Parts & Repair Center.
Call anytime, day or night (LLSoAo only)
To purchase a protection agreement (U.S.A.)
or maintenance agreement (Canada) on a product serviced by Sears:
1_800-827-6655 (u,s°A°) 1-800-361=6665 (Canada)
Para pedir servicio de reparaci6n
a dornicilio, y para ordenar piezas:
(1-888-784-6427)
Au Canada pour set€ice en frangais:
1-800-LE=FOYi=R_c
(1 =800-533-6937)
WWW 8,_;_P3:.Ca
,SEA/R-kS
 Loading...