

Page 1
Gal
Side by Side Refrigerator
Use & Care Guide
Refrigerador de dos puertas
Manual de uso y cuidado
Rdfrig_mteur c6te & c6te
Guide d'utilisation et d'entretien
Sears Roebuck and Co., Hoffman Estates, IL 60179 U.S.A. www.sears.com
2305803 Sears Canada, Inc., Toronto, Ontario, Canada M5B 2B6 www.sears.ca
Page 2

TABLE OF CONTENTS
WARRANTY ..................................................................................... 2
REFRIGERATOR SAFETY .............................................................. 3
Proper Disposal of Your Old Refrigerator .................................... 3
INSTALLATION INSTRUCTIONS .................................................. 4
Unpack the Refrigerator ............................................................... 4.
Location Requirements ................................................................ 4
Electrical Requirements ................................................................ 5
Water Supply Requirements ........................................................ 5
Base Grille .................................................................................... 5
Refngerator Doors ........................................................................ 6
Adjust the Doors ........................................................................... 8
Connect the Water Supply ........................................................... 8
Water System Preparation ........................................................... 9
Normal Sounds ............................................................................. 9
REFRIGERATOR USE ................................................................. 10
Ensuring Proper Air Circulation ................................................. 10
Using the Controls ..................................................................... 10
Water and Ice Dispensers ......................................................... 11
Water Filter Status Light ............................................................ 12
Water Filtration System ............................................................. 12
Ice Maker and Storage Bin........................................................ 13
REFRIGERATOR FEATURES ..................................................... 13
Refngerator Shelves .................................................................. 13
Dell Drawer ................................................................................ 13
Convertible Vegetable/Meat Drawer, Crisper and Covers ....... 14
Convertible Vegetable/Meat Drawer Temperature Control ...... 14
Cnsper Humidity Control ........................................................... 14
Wine Rack .................................................................................. 14
Utility Bin .................................................................................... 14
FREEZER FEATURES ................................................................. 16
Freezer Shelf .............................................................................. 15
Freezer Basket or Bin ................................................................ 15
DOOR FEATURES ....................................................................... 15
Door Rails or Bins ...................................................................... 15
Door Bins ................................................................................... 15
REFRIGERATOR CARE ............................................................... 16
Cleaning ..................................................................................... 16
Changing the Light Bulbs .......................................................... 16
Power Interruptions ................................................................... 17
Vacation and Moving Care........................................................ 17
TROUBLESHOOTING .................................................................. 18
PROTECTION AGREEMENTS .................................................... 20
Inthe U.S.A ................................................................................ 20
In Canada .................................................................................. 21
Accessones ............................................................................... 21
WATER FILTER CERTIFICATIONS ............................................ 21
PRODUCT DATA SHEETS .......................................................... 22
SERVICE NUMBERS ............................................... BACK COVER
WARRANTY
ONE-YEAR FULL WARRANTY ON REFRIGERATOR
For one year from the date of purchase, when this refrigerator is
operated and maintained according to instructions attached to or
furnished with the product, Sears will repair this rafdgerator, free
of charge, if defective in material or workmanship.
FIVE-YEAR FULL WARRANTY ON SEALED REFRIGERATION
SYSTEM
For five years from the date of purchase, when this refrigerator is
operated and maintained according to owner's instructions
attached to or furnished with the product, Sears will repair the
sealed system (consisting of refrigeration, connecting tubing, and
compressor), free of charge, if defective in materials or
workmanship.
The above warranty coverage applies only to refrigerators which
are used for storage of food for private household purposes and
excludes odginal and replacement Galaxy _Filtered Ice & Water
filter cartndges (ff equipped with the filter system). Original and
replacement cartridges are warranted for 30 days, parts only,
against defects in matedal or workmanship.
WARRANTY SERVICE IS AVAILABLE BY CONTACTING THE
NEAREST SEARS SERVICE CENTER IN THE UNITED STATES
OR CANADA.
This warranty applies only while this product is in use in the
United States or Canada. This warranty gives you specific
legal rights, and you may also have other rights which vary
from state to state or province to province.
Warranty terms may vary in Canada. Contact your local Sears
Service Center for complete details.
Sears, Roebuck and Co.
Dept. 817WA, Hoffman Estates, IL 60179
Sears Canada, Inc., Toronto, Ontario, Canada MSB 2B8
Product Record
In the space below, record your complete model number, serial
number, and purchase date. You can find this information on the
model and serial number label located on the inside wall of the
refrfgerafor compartment.
Nave this infomnation available to help you obtain assistance or
service more quickly whenever you contact Sears concerning
your refrigerator.
Model number 106,
Serial number
Purchase date
Save these instructions and your sales receipt for future
reference.
2
Page 3
REFRIGERATOR SAFETY
Your safety and the safety of others are very important.
We have provided many important safety messages in this manual and on your appliance. Always read and obey all safety
messages,
This is the safety alert symbol.
This symbol alerts you to potential hazards that can kill or hurt you and ethers.
All safety messages will fellow the safety alert symbol and either the word "DANGER _ or "WARNING.'
These words mean:
You can be killed or seriously injured if you don't immediatel_t
follow instructions.
You can be killed or seriously injured if you don't follow
instructions.
All safety messages will tell you what the potential hazard is, tell you how to reduce the chance of injury, and tell you what can
happen if the instructions are net followed.
IMPORTANT SAFETY INSTRUCTIONS
WARNING: To reduce the risk of fire, electric shock, or injury when using your refrigerator, follow these basic precautions:
• Plug into a grounded 3 prong outlet.
• DO not remove ground prong.
• Do not use an adapter.
• Do not use an extension cord.
• Disconnect power before semicing.
• Replace all panels before operating.
• Remove doors from your old refrigerator.
i Use nonflammable cleaner.
i Keep flammable materials and vapors, such as gasoline,
away from refrigerator.
i Use two or more people to move and install refrigerator.
i Disconnect power before installing ice maker (on ice maker
kit ready models only).
i Use a sturdy glass when dispensing ice or water (on some
models).
SAVE THESE INSTRUCTIONS
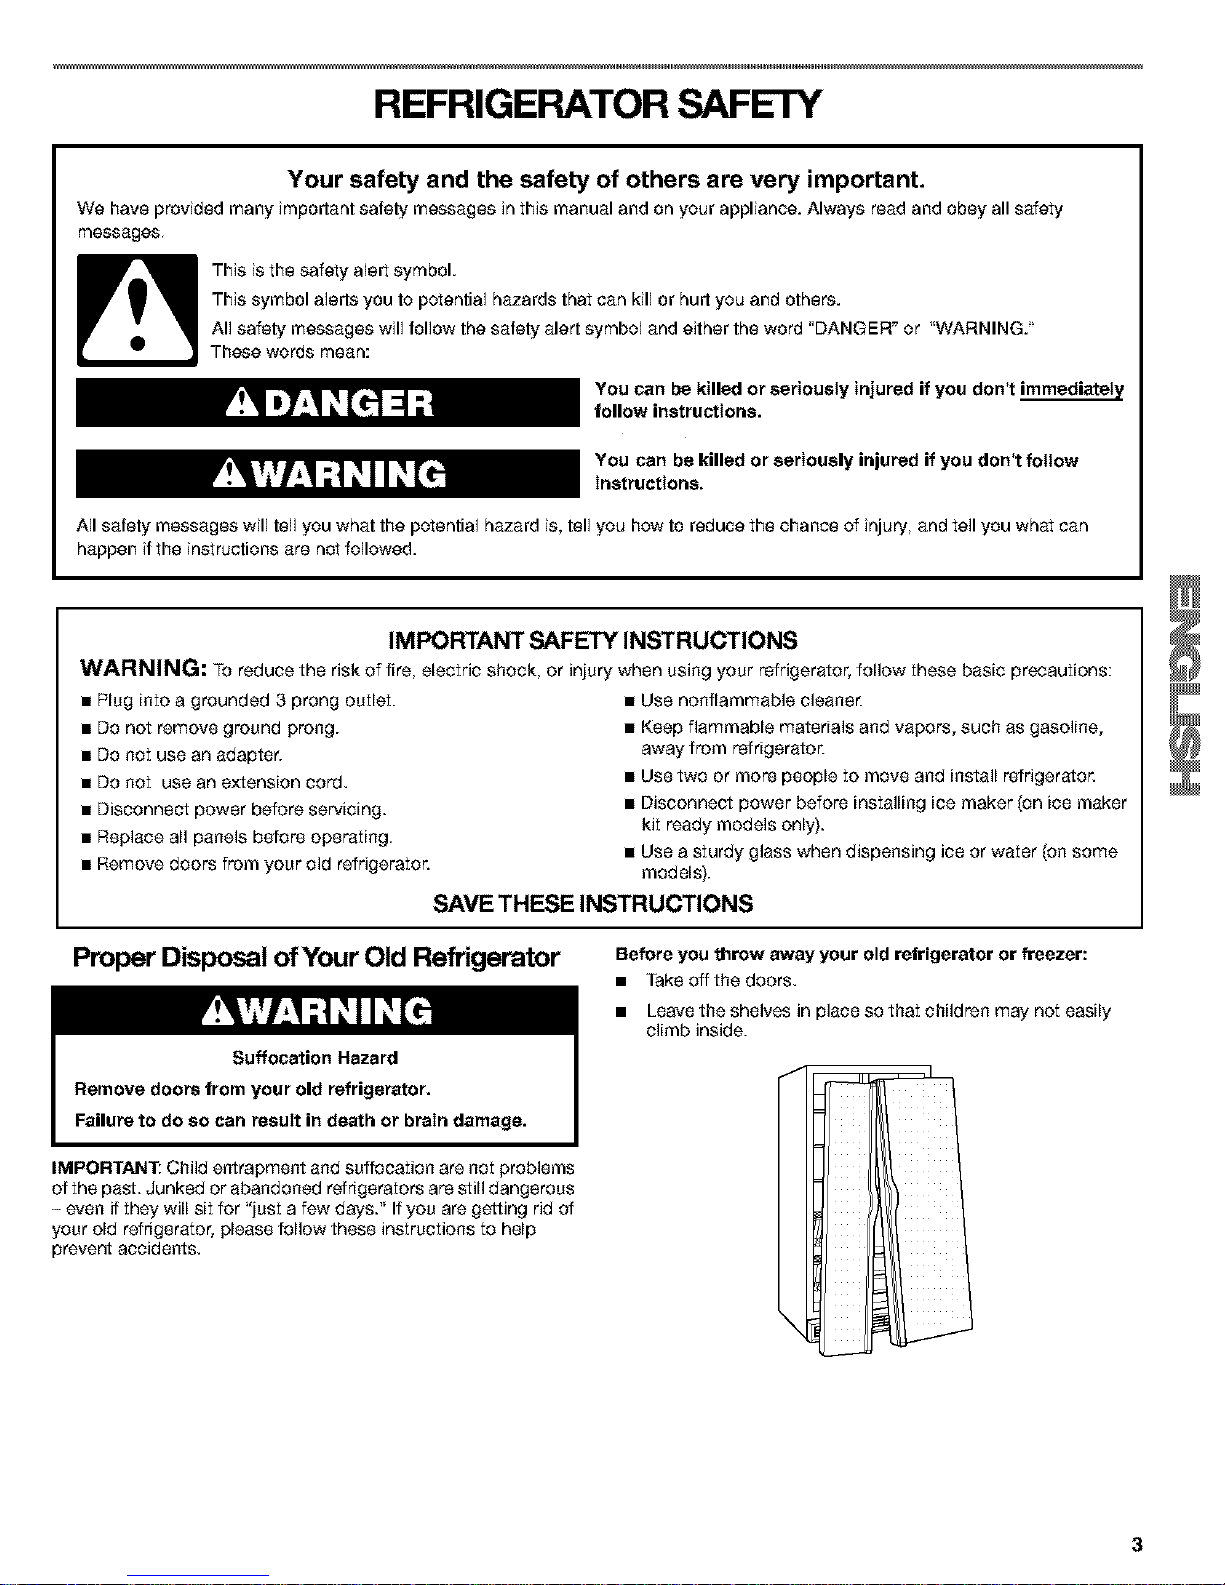
Proper Disposal ofYour Old Refrigerator
Before you "_row away your old refrigerator or freezer:
• Take off the doors.
• Leave the shelves in place so that children may not easily
climb inside.
IMPORTANT: Child entrapment and suffocation are not problems
of the past. Junked or abandoned refrigerators are still dangerous
- even if they will sit for "just a few days." Ifyou are getting rid of
your old refrigerator, please follow these instructions to help
prevent accidents.
Page 4
INSTALLATION INSTRUCTIONS
Unpack the Refrigerator Location Requirements
Remove the Packaging Materials
• Remove tape and glue residue from surfaces before turning
on the refrigerator. Rub asmall amount of liquid dish soap
over the adhesive with your fingers. Wipe with warm water
and dry.
Do not use sharp instruments, rubbing alcohol, flammable
fluids, or abrasive cleaners to remove tape or glue. These
products can damage the surface of your refrigerator. For
more information see "Refrigerator Safety."
When Moving Your Refrigerator:
Your refrigerator is heavy. When moving the refrigerator
for cleaning or service, be sure to protect the floor.
Always pull the refrigerator straight out when moving it.
Do not wiggle or "walk" the refrigerator when trying to move
it, as floor damage could occur.
Clean Before Using
After you remove all of the packaging materials, clean the inside
of your refrigerator before using it. See the cleaning instructions
in "Refrigerator Care."
Important information to know about glass shelves
and covers:
Do not clean glass shelves or covers with warm water when
they are cold. Shelves and covers may break if exposed to
sudden temperature changes or impact, such as bumping.
For your protection, tempered glass is designed to shatter
into many small, pebble-size pieces. This is normal. Glass
shelves and covers are heavy. Use special care when
removing them to avoid impact from dropping.
Explosion Hazard
Keep flammable materials and vapors, such as
gasoline, away from refrigerator.
Failure to do so can result in death, explosion, or fire.
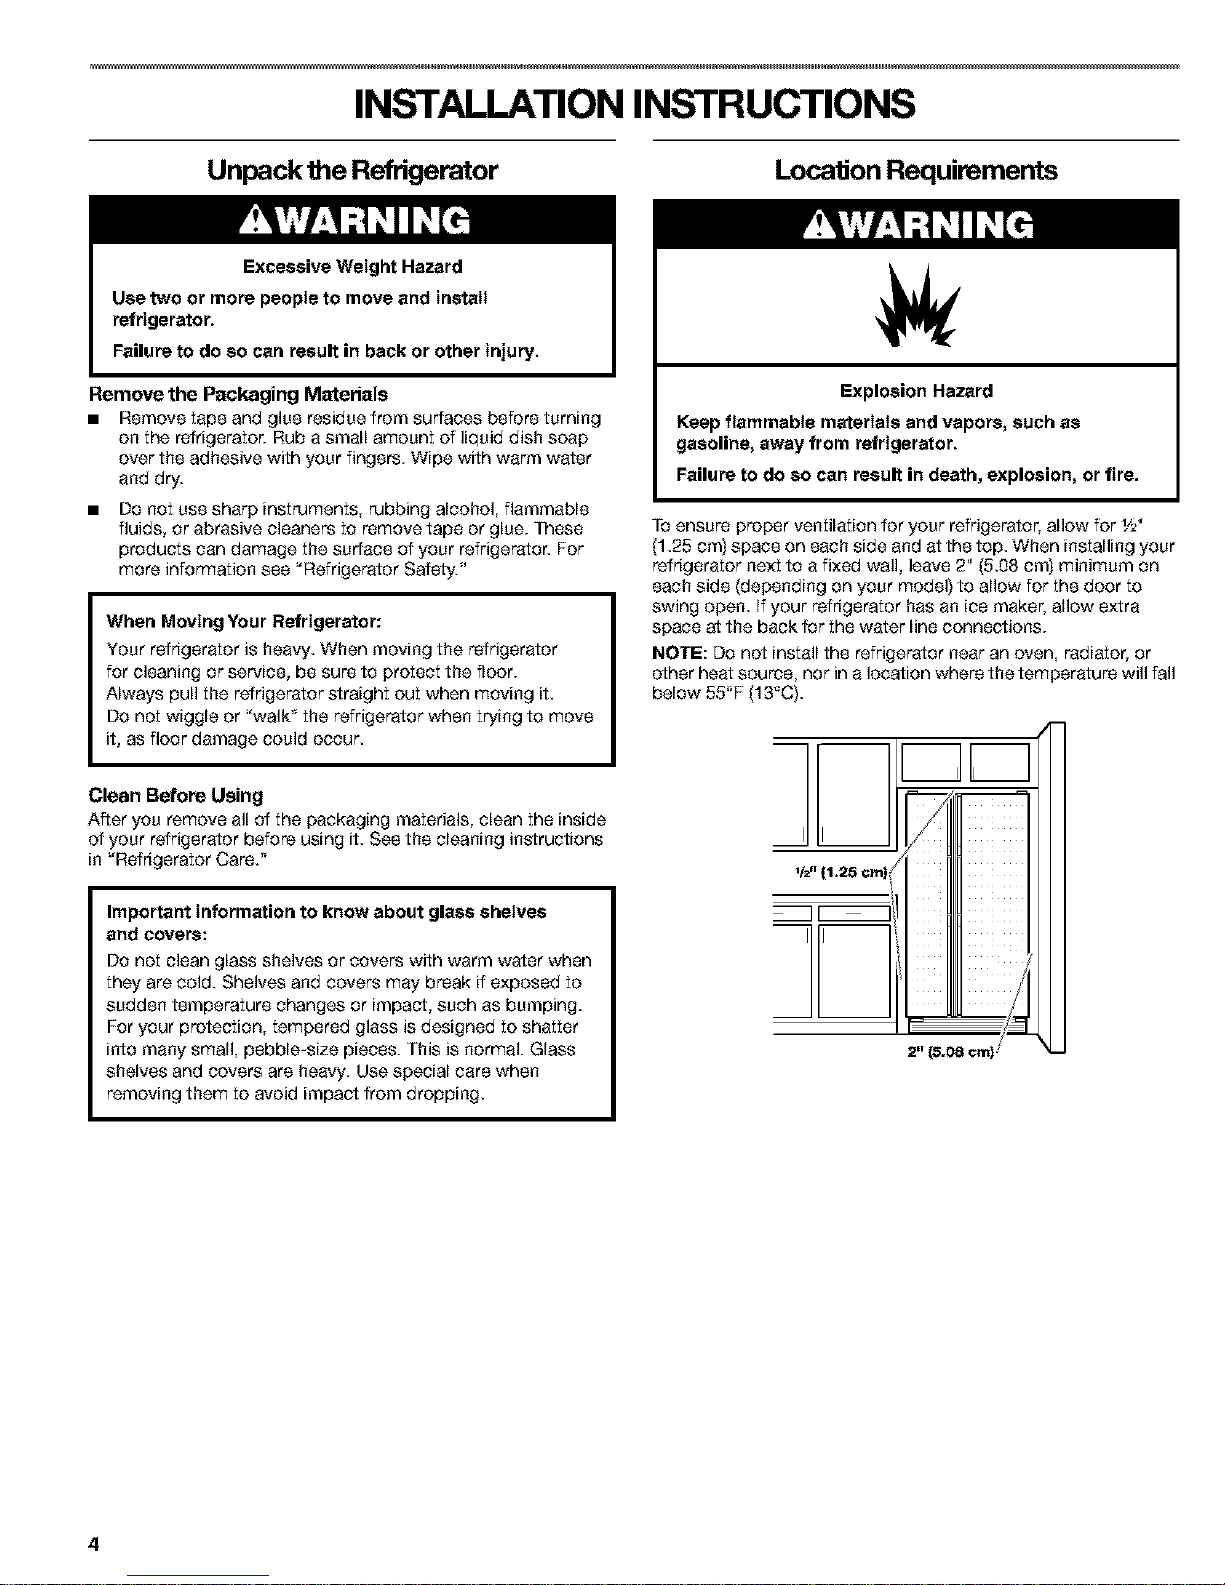
To ensure proper ventilation for your refrigerator, allow for 1/£,,
(1.25 cm) space on each side and at the top. When installing your
refrigerator next to a fixed wall, leave 2" (5.08 cm) minimum on
each side (depending on your model) to allow for the door to
swing open. If your refrigerator has an ice maker, allow extra
space at the back for the water line connections.
NOTE: Do not install the refrigerator near an oven, radiator, or
other heat source, nor in a location where the temperature will fall
below 55"F (13°C).
JL
II_' {1.;;_5 ore} (// IIIIII
i
IIIIII /
2" (5.08_ml
4
Page 5
Electrical Requirements
Electrical Shock Hazard
Plug into a grounded 3 prong outlet.
Do not remove ground prong.
Do not use an adapter.
Do not use an extension cord.
Failure to follow these instructions can result in death,
fire, or electrical shock.
Before you move your refrigerator into its final location, it is
important to make sure you have the proper electrical
connection.
Recommended Grounding Method
A 115 Volt, 60 Hz., AC only 15 or 20 amp fused, grounded
electrical supply is required. It is recommended that a separate
circuit serving only your refrigerator be provided. Use an outlet
that cannot be turned off by a switch. Do not use an
extension cord.
NOTE: Before performing any type of installation, cleaning, or
removing a light bulb, turn the control (Thermostat, Refrigerator
or Freezer Control depending on the model) to OFF and then
disconnect the refrigerator from the electrical source. When you
are finished, reconnect the refrigerator to the electrical source
and reset the control (Thermostat, Refrigerator or Freezer Control
depending on the model) to the desired setting.
Water Supply Requirements
Read all directions carefully before you begin.
IMPORTANT:
• If you turn the refrigerator on before the water line is
connected, turn the ice maker OFF.
• All installations must meet local plumbing code requirements.
• Use copper tubing and check for leaks. Install copper tubing
only in areas where the household temperatures will remain
above freezing.
TOOLS NEEDED: Flat-blade screwdriver, _s" and W' open-end
wrenches or two adjustable wrenches, _A"nut driver and drill bit,
hand drill or electric drill (properly grounded).
NOTE: Your refrigerator dealer has a kit available with a 1/;¢,
(6.35 ram) saddle-type shutoff valve, a union, and copper tubing.
Before purchasing, make sure a saddle-type valve complies with
your local plumbing codes. Do not use a piercing-type or %d'
(4.76 ram) saddle valve which reduces water flow and clogs more
easily.
Water Pressure
A cold water supply with water pressure of between 30 and
120 psi (207 - 827 kPa) is required to operate the water dispenser
and ice maker. If you have questions about your water pressure,
call a licensed, qualified plumber.
Reverse Osmosis Water Supply
IMPORTANT: The pressure of the water supply coming out of a
reverse osmosis system going to the water inlet valve of the
refrigerator needs to be between 30 and 120 psi (207 - 827 kPa).
If a reverse osmosis water filtration system is connected to your
cold water supply, the water pressure to the reverse osmosis
system needs to be a minimum of 40 to 60 psi (276 - 414 kPa).
Ifthe water pressure to the reverse osmosis system is less than
40 to 60 psi (276 - 414 kPa):
• Check to see whether the sediment filter in the reverse
osmosis system is blocked. Replace the filter if necessary.
• Allow the storage tank on the reverse osmosis system to refill
after heavy usage.
• If your refrigerator has a water filter cartridge, it may further
reduce the water pressure when used in conjunction with a
reverse osmosis system. Remove the water filter cartridge.
See "Water Filtration System."
Ifyou have questions about your water pressure, call a licensed,
qualified plumber.
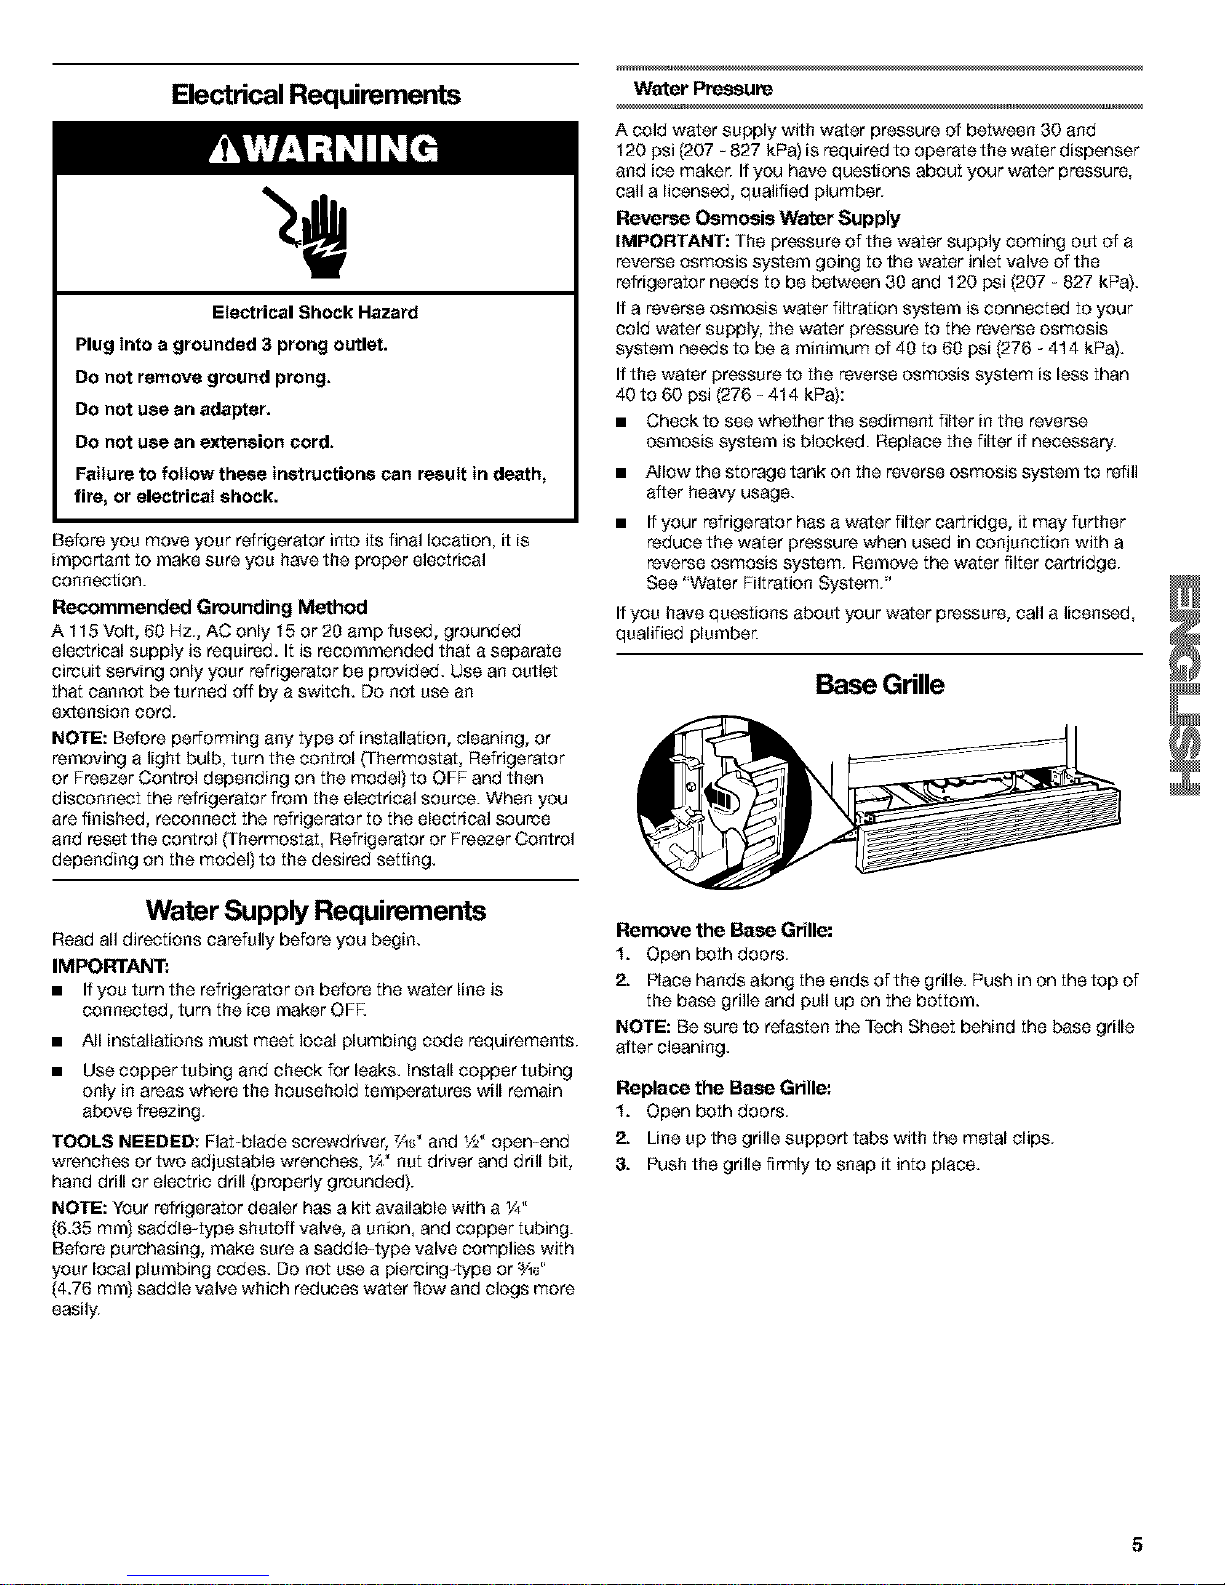
Base Grille
Remove the Base Grille:
1. Open both doors.
2. Place hands along the ends of the grille. Push in on the top of
the base grille and pull up on the bottom.
NOTE: Be sure to refasten the Tech Sheet behind the base grille
after cleaning.
Replace the Base Grille:
1. Open both doors.
2. Line up the grille support tabs with the metal clips.
& Push the griUe firmly to snap it into place.
Page 6
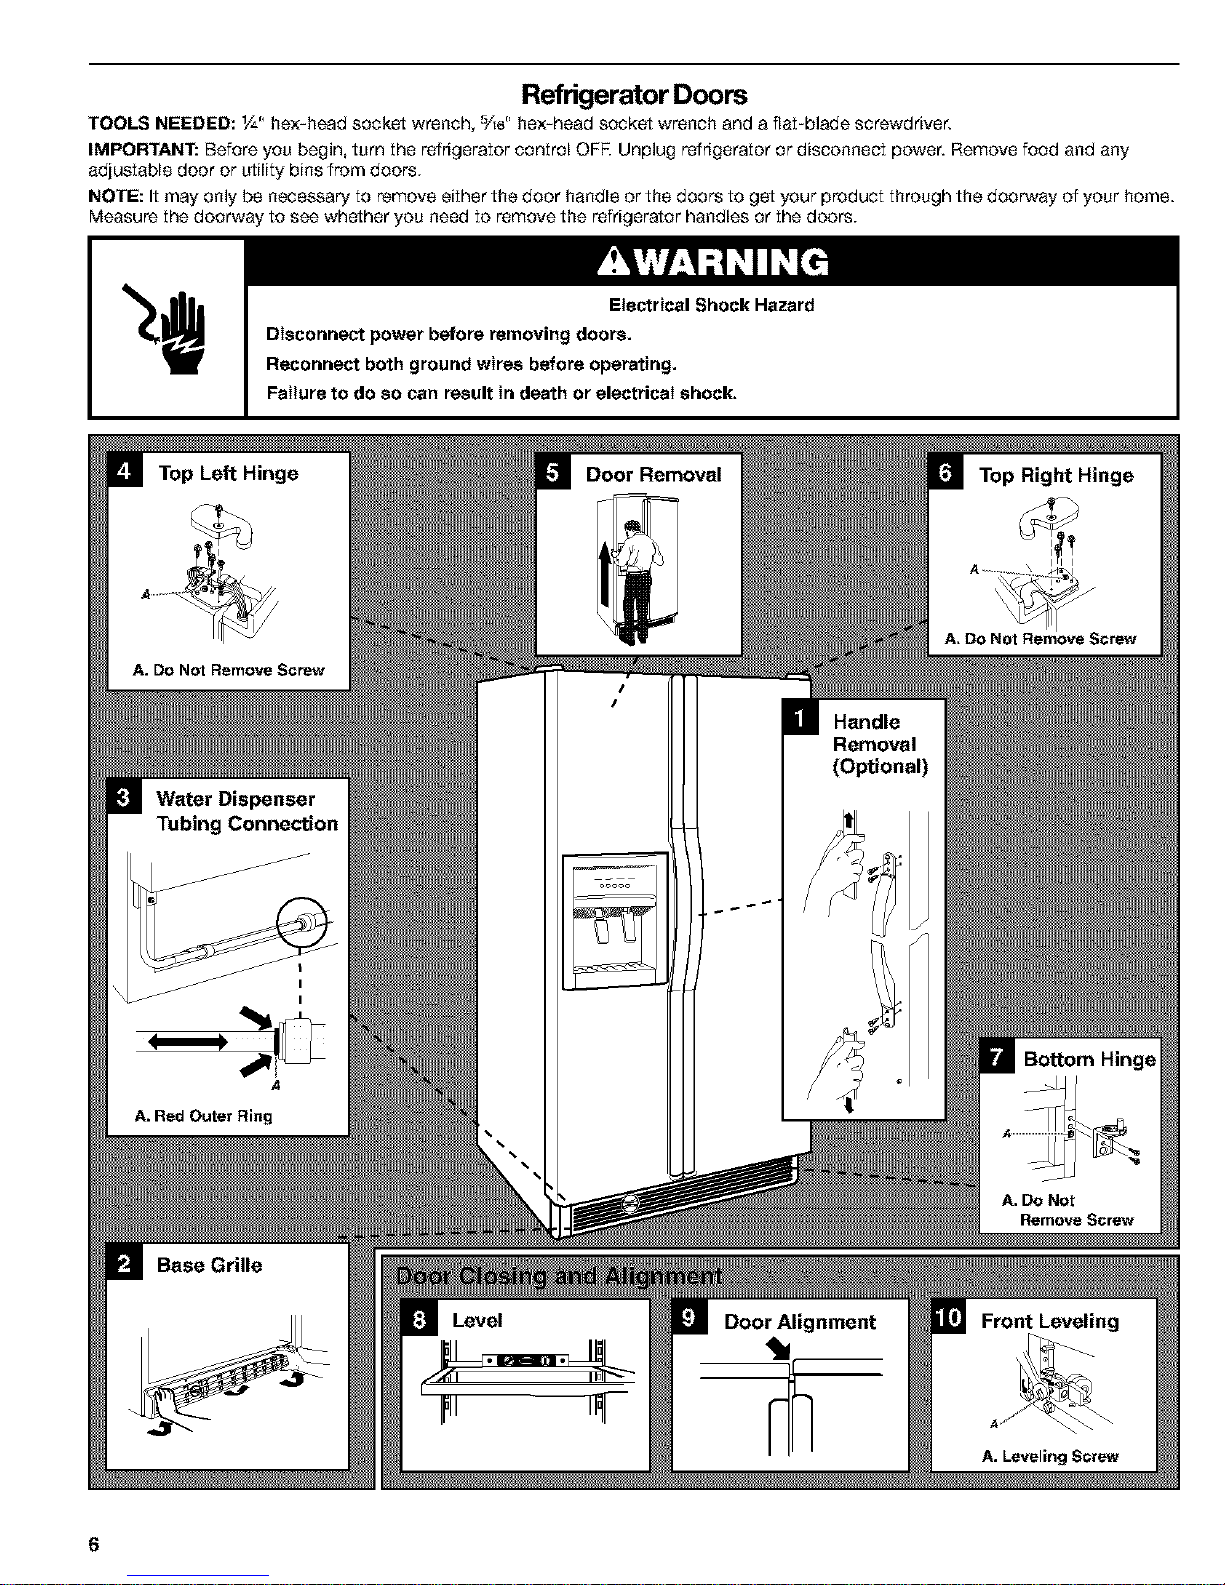
Refrigerator Doors
TOOLS NEEDED: _/&"hex=head socket wrench, _Ad' hex=head socket wrench and a flat-blade screwdriver.
IMPORTANT: Before you begin, turn the refrigerator control OFK Unplug refrigerator or disconnect power. Remove food and any
adjustable door or utility bins from doors.
NOTE: It may only be necessary to remove either the door handle or the doors to get your product through the doorway of your home.
Measure the doorway to see whether you need to remove the refrigerator handles or the doors.
Top Left Hinge
A. Do Not Remove Screw
Water Dispenser
Tubing Connection
I
A. Red Outer Ring
Base Grille
Door Removal
I
/
Level
I
Door Alignment
Top Right Hinge
A, Do Not Remove Screw
Handle
Removal
(Optional)
Bottom Hinge
A. Do Not
Remove Screw
Front Leveling
6
Page 7
Remove the Handles {optional)
1. Apply fimn pressure with your hand ee the face of trim. Slide
top trim up and bottom trim down away from handle. Lift trim
pieces off shoulder screws. See Graphic 1.
2. Remove handle screws and handles. See Graphic 1.
& Move refrigerator into place. Replace handles as shown. See
Graphic 1.
9. Lift the refrigerator deer straight up and off of the bottom
hinge.
10. It may not be necessary to remove the bottom hinge to move
the refrigerator through a doorway. Both bottom hinges have
similar construction.
• Remove the hinges as shown. See Graphic 7. Do not
remove screw A.
Replace the Doors and Hinges
Remove the Doors
Electrical Shock Hazard
Disconnect power before removing doors.
Failure to do so can result in death or electrical shock.
1. Replace both bottom hinges, if removed. Tighten screws.
2. Carefully feed the dispeneer tubing threegh the bottom left
hinge before replacing the freezer door on the hinge.
Assistance may be needed.
NOTE: Provide additional support for the doors while the top
hinges are being replaced. Do not depend on the door magnets
to hold the doors in place while you are working.
& Reconnect water dispenser tubing by pushing tubing into
fitting until it stops and black mark touches face of fitting. See
Graphic 3. On some models, replace tubing in hose clip.
4. Align and replace the top left hinge as shown. See Graphic 4.
Tighten screws.
1. Unplug refrigerator or disconnect power.
2. Open both refrigerator doors. Remove the base grille by
pulling up on the bottom outside corners. See Graphic 2.
& Close both doors and keep them closed until you are ready to
lift them free from the cabinet.
4. If you have a diepeneer (ice or water), disconnect the water
dispenser tubing located behind the base grille on the freezer
door side. See Graphic 3.
• Press the red outer ring against the face of the fitting and
pull the dispenser tubing free.
• On some models, remove the tubing from hose clip.
5. Remove the top left hinge cover and screws as shown. See
Graphic 4. Do not remove screw A.
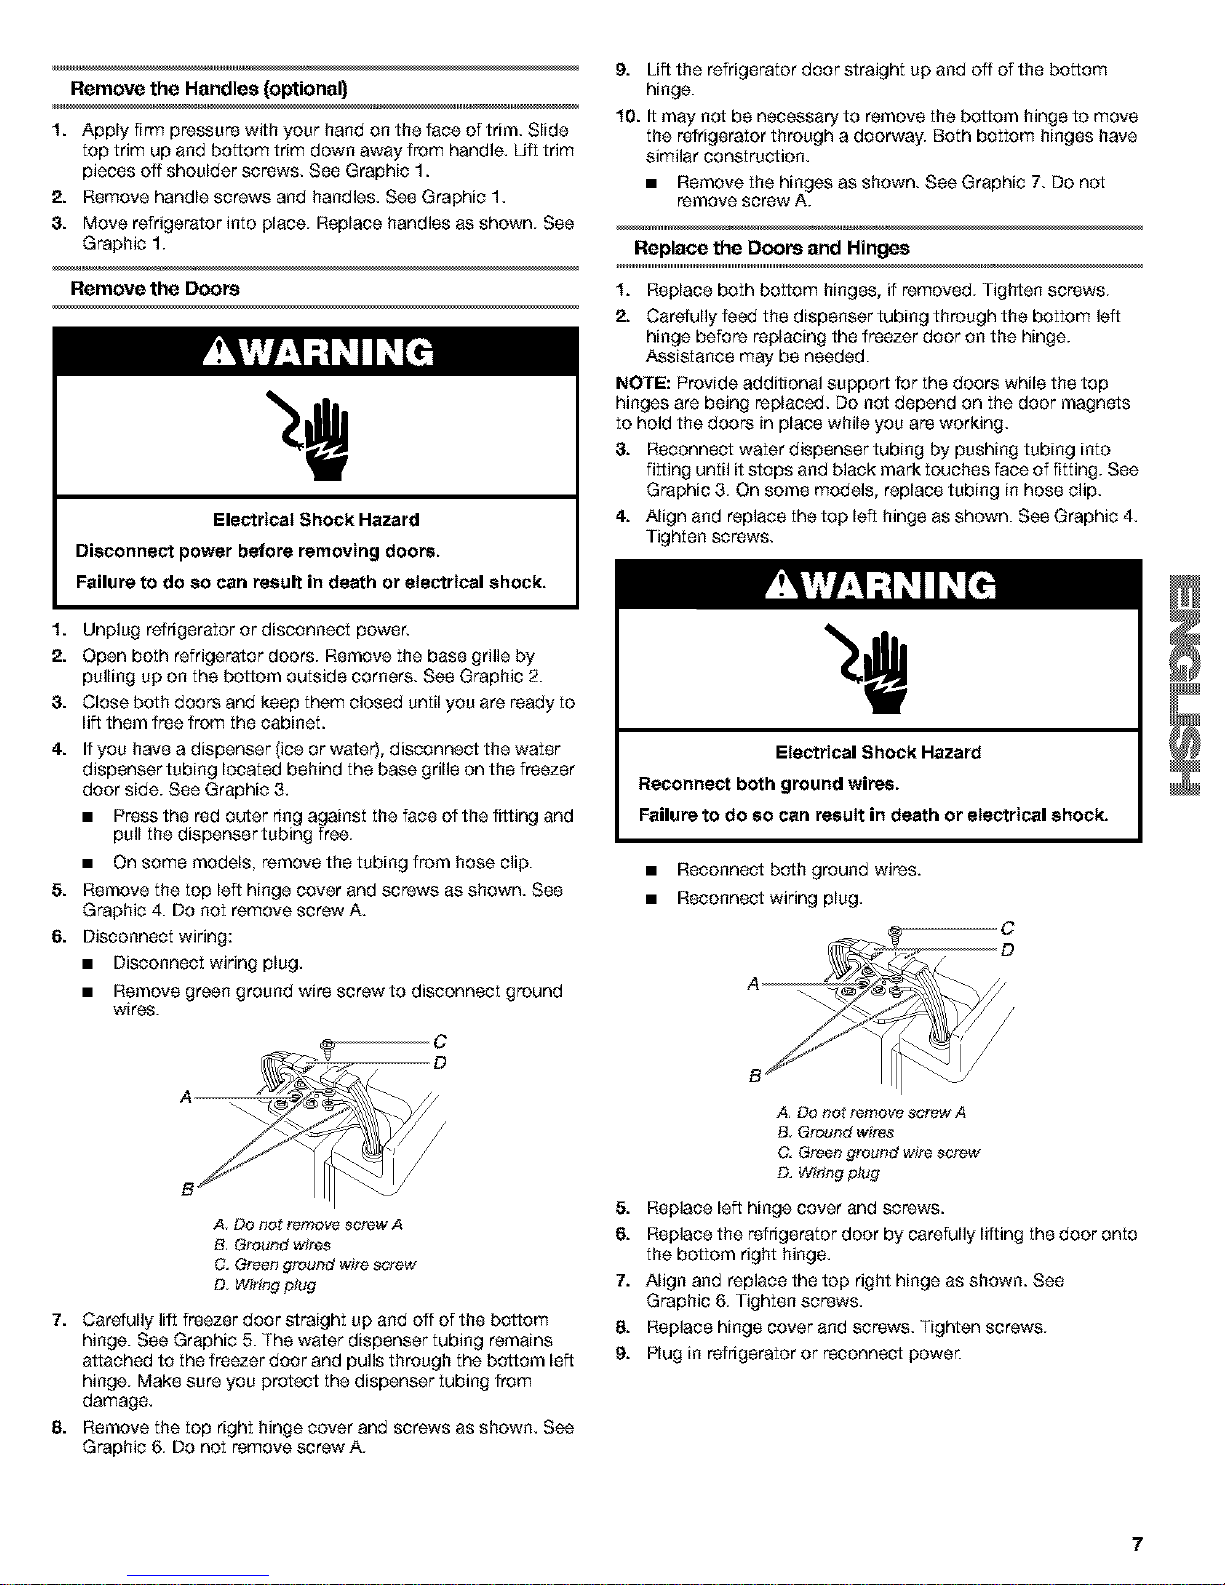
6. Disconnect wiring:
• Disconnect wiring plug.
• Remove green ground wire screw to disconnect ground
wires.
C
A
A DO not remove screw A
B, Ground wires
C. Green ground wire screw
D. Wiring plug
7. Carefully lift freezer door straight up and off of the bottom
hinge. See Graphic 5. The water dispenser tubing remains
attached to the freezer door and pulls through the bottom left
hinge. Make sure you protect the dispenser tubing from
damage.
8. Remove the top right hinge cover and screws as shown. See
Graphic 6. Do not remove screw A.
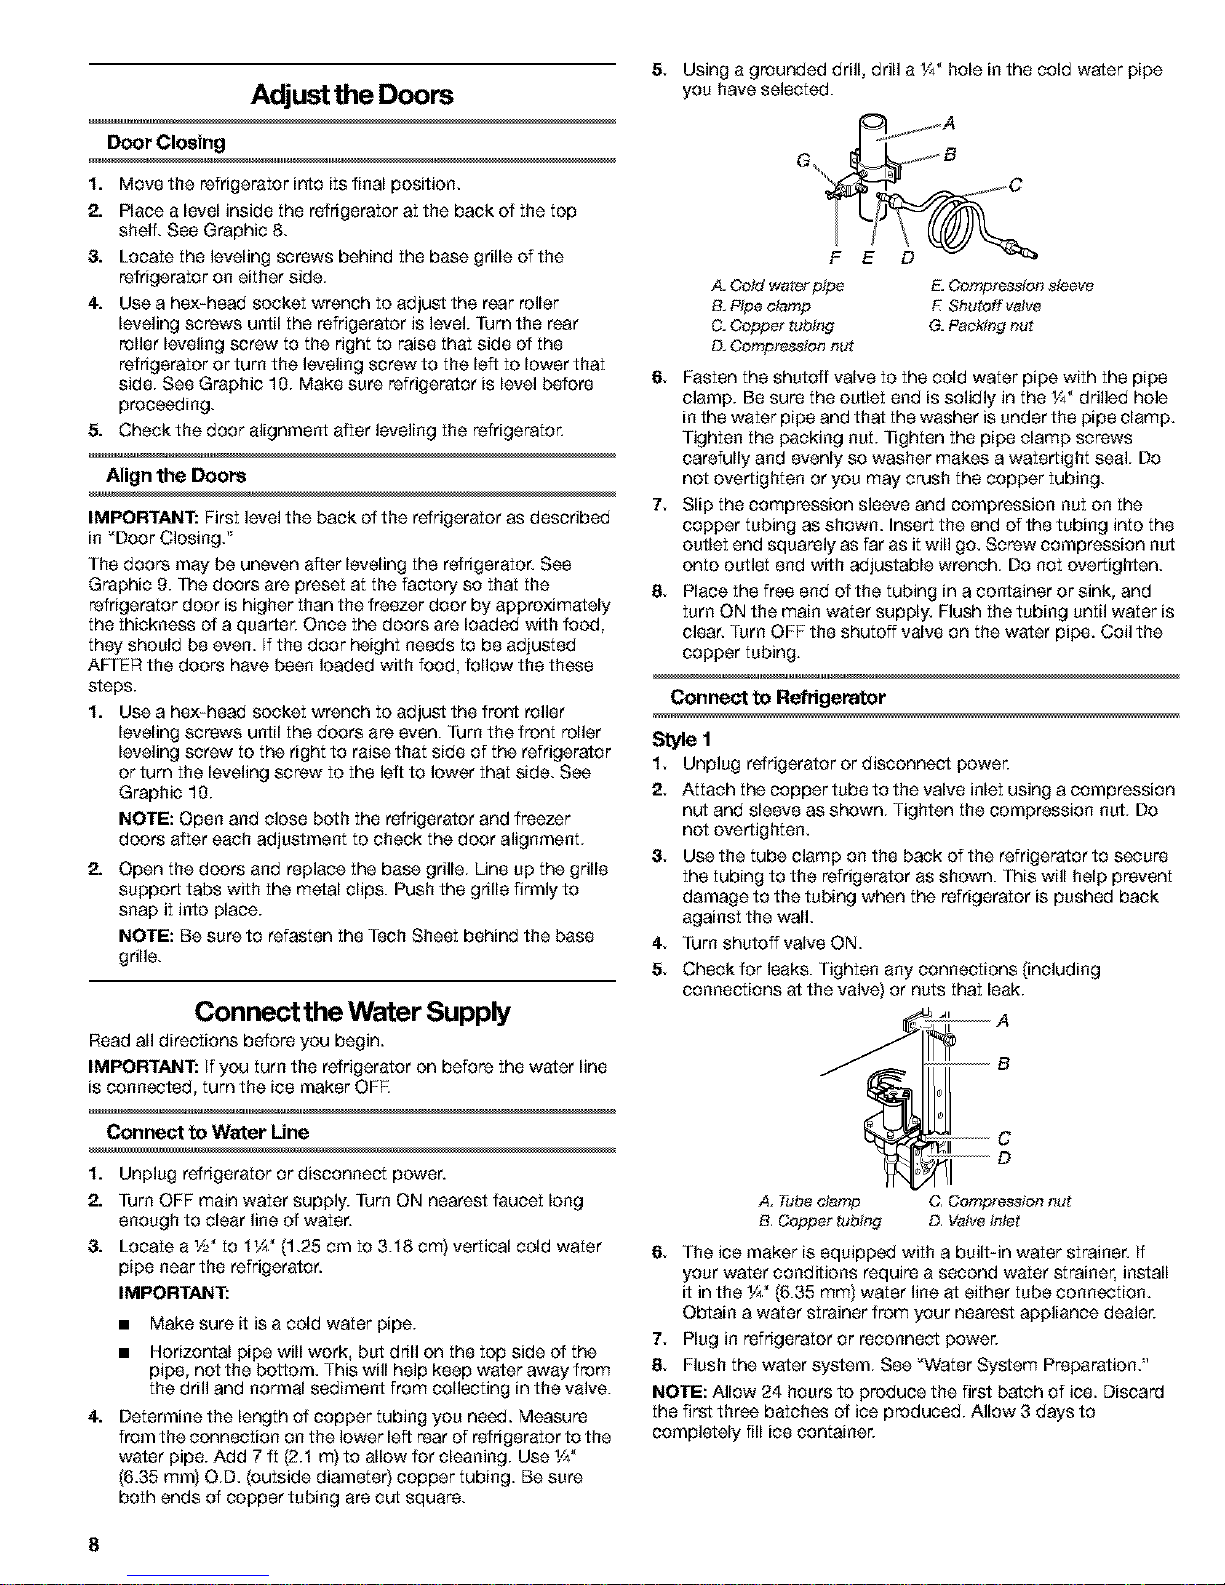
Electrical Shock Hazard
Reconnect both ground wires.
Failure to do so can result in death or electrical shock.
Reconnect beth ground wires.
Reconnect wiring plug.
C
A, Do nor remove _crew A
B Ground wire_
C. Green ground wire screw
D. Wiling plug
5. Replace left hinge cover and screws.
6. Replace the refrigerator door by carefully lifting the door onto
the bottom right hinge.
7. Align and replace the top right hinge as shown. See
Graphic 6. Tighten screws.
8. Replace hinge cover and screws. Tighten screws.
9. Plug in refrigerator or reconnect power
Page 8
Adjust the Doors
Door Closing
1. Move the refrigerator into its final position.
2. Place a level inside the refrigerator at the back of the top
shelf. See Graphic 8.
8. Locate the leveling screws behind the base grille of the
refrigerator on either side.
4. Use a hex-head socket wrench to adjust the rear roller
leveling screws until the refrigerator is level. Turn the rear
roller leveling screw to the right to raise that side of the
refrigerator or turn the leveling screw to the left to lower that
side. See Graphic 10. Make sure refrigerator is level before
proceeding.
5. Cheek the deer alignment efter leveling the rofrigerator.
Align the Doors
IMPORTANT: First level the back of the refrigerator as described
in "Door Closing."
The doors may be uneven after leveling the refrigerator. See
Graphic 9. The doors are preset at the factory so that the
refrigerator door is higher than the freezer door by approximately
the thickness of a quarter. Once the doors are loaded with food,
they should be even. if the door height needs to be adjusted
AFTER the doors have been loaded with food, follow the these
steps.
1. Use a hex-head socket wrench to adjust the front roller
leveling screws until the doors are even. Turn the front roller
leveling screw to the right to raise that side of the refrigerator
or turn the leveling screw to the left to lower that side. See
Graphic 10.
NOTE: Open and close both the refrigerator and freezer
doors after each adjustment to check the door alignment.
2. Open the doors and replace the base grille. Line up the grille
support tabs with the metal clips. Push the grille firmly to
snap it into place.
NOTE: Be sure to refasten the Tech Sheet behind the base
grille.
Connect the Water Supply
Read all directions before you begin.
IMPORTANT: If you turn the refrigerator on before the water line
is connected, turn the ice maker OFK
Connect to Water Une
1. Unplug refrigerator or disconnect power.
2. Turn OFF main water supply. Turn ON nearest faucet long
enough to clear line of water.
& Locate a _" to 1_A" (1.25 cm to 3.18 ore) vertical cold water
pipe near the refrigerator.
IMPORTANT:
• Make sure it is a cold water pipe.
• Horizontal pipe will work, but drill on the top side of the
pipe, not the bottom. This will help keep water away from
the drill and normal sediment from collecting in the valve.
4. Determine the length of copper tubing you need. Measure
from the connection on the lower left rear of refrigerator to the
water pipe. Add 7 ft (2.1 m) to allow for cleaning. Use 1/_,,
(6.35 ram) O.D. (outside diameter} copper tubing. Be sure
both ends of copper tubing are cut square.
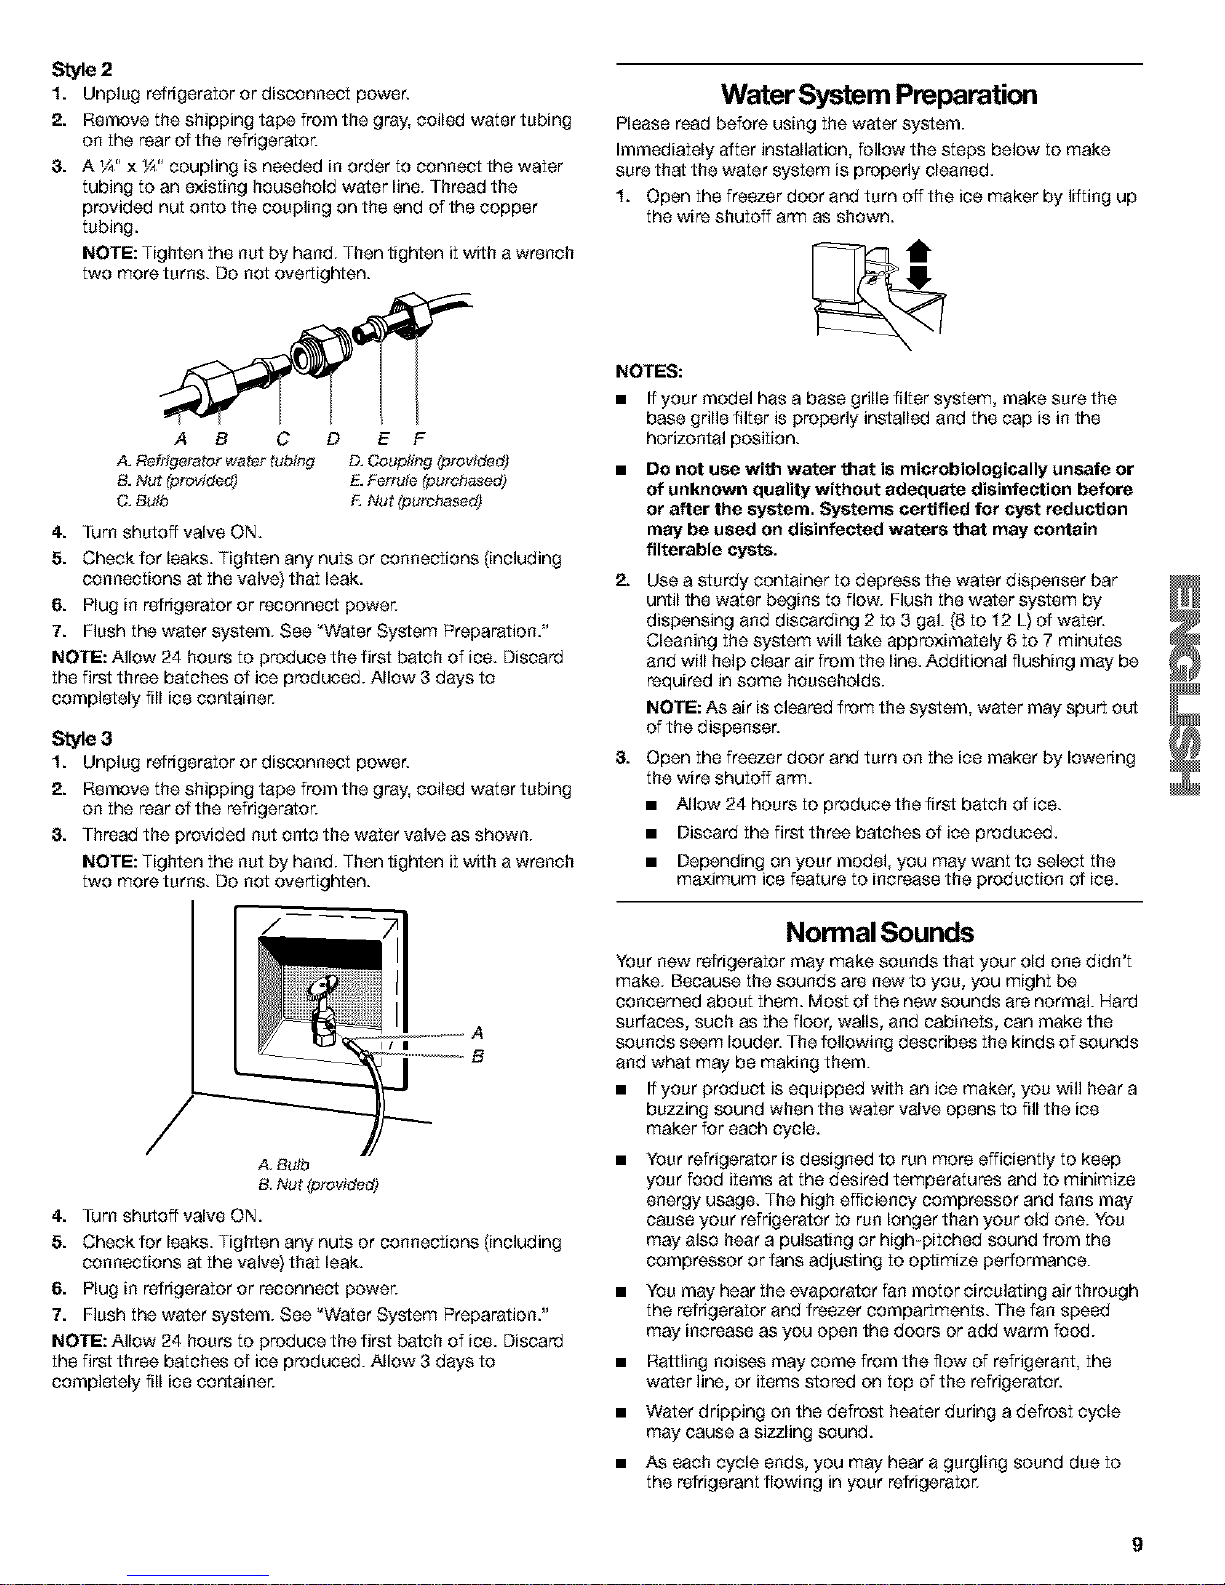
5. Using a grounded drill, drill a %" hole in the cold water pipe
you have selected.
j_A
"_ JO
A. Cold we_er pipe
B. P_pe clamp
C. Copper tubing
D. Compreeeion nut
E. Compreeeion eleeve
F_Shutoff valve
& Packing nut
6. Fasten the shutoff valve to the cold water pipe with the pipe
clamp. Be sure the outlet end is solidly in the %" drilled hole
in the water pipe and that the washer is under the pipe clamp.
Tighten the packing nut. ]]ghten the pipe clamp screws
carefully and evenly so washer makes a watertight seal. Do
not overtighten or you may crush the copper tubing.
7. Slip the compression sleeve and compression nut on the
copper tubing as shown. Insert the end of the tubing into the
outlet end squarely as far as it will go. Screw compression nut
onto outlet end with adjustable wrench. Do not overtighten.
8. Place the free end of the tubing in a ceetainer or sink, and
turn ON the main water supply. Flush the tubing until water is
clear. Turn OFF the shutoff valve on the water pipe. Coil the
copper tubing.
Connect to Refngerator
Style 1
1. Unplug refrigerator or disconnect power.
2. Attach the copper tube to the valve inlet using a compression
nut and sleeve as shown. Tighten the compression nut. DO
not overtighten.
8. Uee the tube clamp ee the back of the refrigerator to seeura
the tubing to the refrigerator as shown. This will help prevent
damage to the tubing when the refrigerator is pushed back
against the wall.
4. Turn shutoff valve ON.
5. Check for leaks. Tighten any conneetions (including
connections at the valve} or nuts that leak.
B
C
D
A. Tube clamp
B, Copper tubing
C Compressio# nut
D, Valve inlet
6. The ice maker is equipped with a built4n water strainer. If
your water conditions require a second water strainer, install
it in the _/_"(6.35 ram) water line at either tube connection.
Obtain a water strainer from your nearest appliance dealer.
7. Plug in refrigerator or reconnect power.
8. Flush the water system. See "Water System Preparation."
NOTE: Allow 24 hours to produce the first batch of ice. Discard
the first three batches of ice produced. Allow 3 days to
completely fill ice container.
8
Page 9
Style2
1. Unplug refrigerator or disconnect power.
2. Remove the shipping tape from the groy, coiled water tubing
on the roar of the refrigerator.
& A _A"x 1A,,coupling is needed in order to connect the water
tubing to an existing household water line. Thread the
provided nut onto the coupling on the end of the copper
tubing.
NOTE: Tighten the nut by hand. Then tighten it with a wrench
two more turns. Do not overtighten.
A B C D E F
A. Refrigerator water tubing D.Coupfing (provided)
B. Nut (provided) E.Ferrule (puroha._e_}
C. Bulb F.Nut (purchased)
4. Turn shutoff valve ON.
5. Cheek for leaks. Tighten any nuts or ceeneetions (including
connections at the valve) that leak.
6. Plug in refrigerator or reconnect power.
7. Flush the water system. See "Water System Preparation."
NOTE: Allow 24 hours to produce the first batch of ice. Discard
the first three batches of ice produced. Allow 3 days to
completely fill ice container.
Style3
1. Unplug refrigerator or disconnect power.
2. Remove the shipping tape from the groy, coiled water tubing
on the roar of the refrigerator.
& Thread the provided nut onto the water valve as shown.
NOTE: Tighten the nut by hand. Then tighten it with a wrench
two more turns. Do not overtighten.
A
A Bulb
B Nut (provided)
4. Turn shutoff valve ON.
5. Cheek for leaks. Tighten any nuts or ceeneetions (including
connections at the valve) that leak.
6. Plug in refrigerator or reconnect power.
7. Flush the water system. See "Water System Preparation."
NOTE: Allow 24 hours to produce the first batch of ice. Discard
the first three batches of ice produced. Allow 3 days to
completely fill ice container.
Water System Preparation
Please read before using the water system.
Immediately after installation, follow the steps below to make
sure that the water system is properly cleaned.
1. Open the froezer door and turn off the ice maker by liftieg up
the wire shutoff arm as shown.
NOTES:
• If your model has a base grille filter system, make sure the
base grille filter is properly installed and the cap is in the
horizontal position.
Do not usa wi'dl water "dlatis microbiologically unsafe or
of unknown quality without adequate disinfection before
or after the system. Systems certified for cyst reduction
may be used on disinfected waters _at may contain
filterable cysts.
2.
Use a sturdy container to depress the water dispenser bar
until the water begins to flow. Flush the water system by
dispensing and discarding 2 to 3 gal. (8 to 12 L) of water.
Cleaning the system will take approximately 6 to 7 minutes
and will help clear air from the line. Additional flushing may be
required in some households.
NOTE: As air is cleared from the system, water may spurt out
of the dispenser.
& Open the freezer door and turn on the ice maker by lowering
the wire shutoff arm.
• Allow 24 hours to produce the first batch of ice.
• Discard the first three batches of ice produced.
• Depending on your model, you may want to select the
maximum ice feature to increase the production of ice.
Normal Sounds
Your new refrigerator may make sounds that your old one didn't
make. Because the sounds are new to you, you might be
concerned about them. Most of the new sounds are normal. Hard
surfaces, such as the floor, walls, and cabinets, can make the
sounds seem louder. The following describes the kinds of sounds
and what may be making them.
• If your product is equipped with an ice maker, you will hear a
buzzing sound when the water valve opens to fill the ice
maker for each cycle.
Your refrigerator is designed to run more efficiently to keep
your food items at the desired temperatures and to minimize
energy usage. The high efficiency compressor and fans may
cause your refrigerator to run longer than your old one. You
may also hear a pulsating or high-pitched sound from the
compressor or fans adjusting to optimize performance.
• You may hear the evaporator fan motor circulating air through
the refrigerator and freezer compartments. The fan speed
may increase as you open the doors or add warm food.
• Rattling noises may come from the flow of refrigerant, the
water line, or items stored on top of the refrigerator.
• Water dripping on the defrost heater during a defrost cycle
may cause a sizzling sound.
• As each cycle ends, you may hear a gurgling sound due to
the refrigerant flowing in your refrigerator.
Page 10
Contractionandexpansionoftheinsidewallsmaycausea
poppingnoise.
Youmayhearairbeingforcedoverthecondenserbythe
condenserfan.
• Youmayhearwaterrunningintothedrainpanduringthe
defrostcycle.
REFRIGERATOR USE
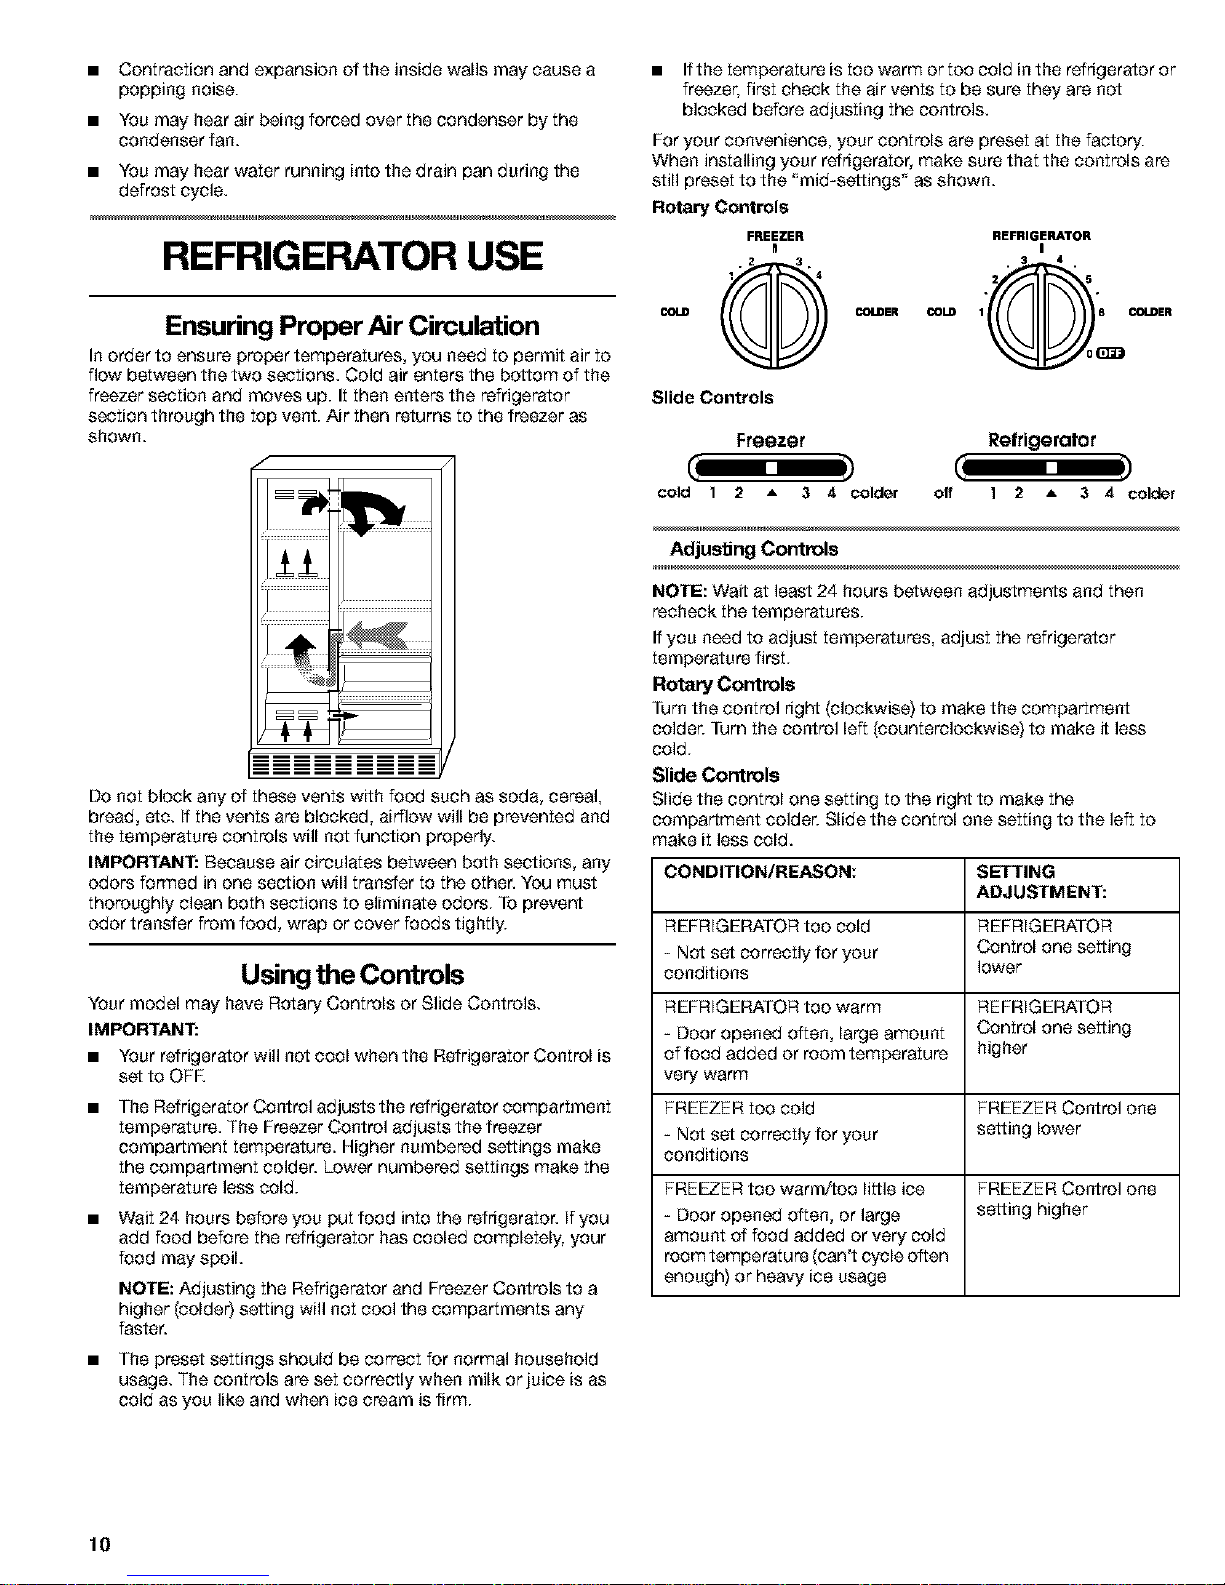
Ensuring Proper Air Circulation
In order to ensure proper temperatures, you need to permit air to
flow between the two sections. Cold air enters the bottom of the
freezer section and moves up. It then enters the refrigerator
section through the top vent. Air then returns to the freezer as
shown.
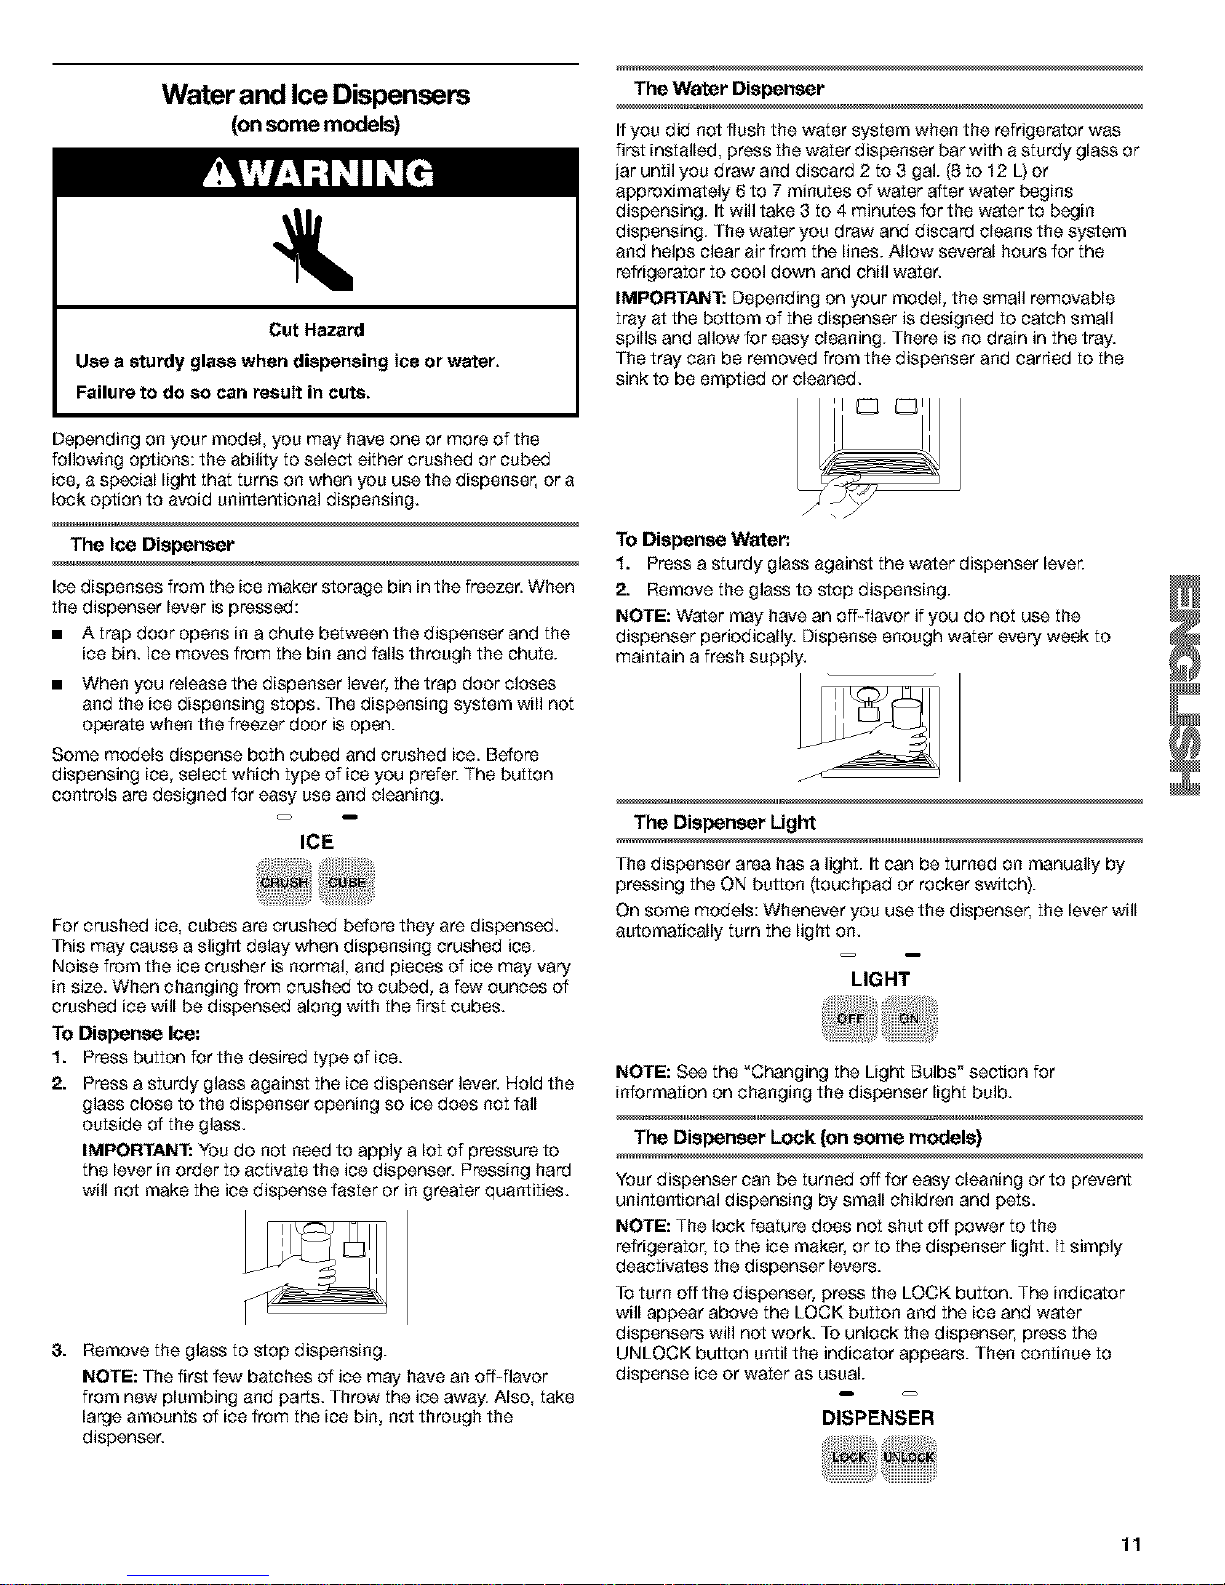
• If the temperature is too warm or too cold in the refrigerator or
freezer, first check the air vents to be sure they are not
blocked before adjusting the controls.
For your convenience, your controls are preset at the factory.
When installing your refrigerator, make sure that the controls are
still preset to the "mid-settings" as shown.
Rotary Controls
FREEZER REFRIGERATOR
m I
2 3 . 3 4 .
COLD COLDER I_U) 1 8 COLDER
Slide Controls
Freezer Re|rigeratet
Do not block any of these vents with food such as soda, cereal,
bread, etc. If the vents are blocked, airflow will be prevented and
the temperature controls will net function properly.
IMPORTANT: Because air circulates between both sections, any
odors formed in one section will transfer to the other. You must
thoroughly clean both sections to eliminate odors. To prevent
odor transfer from food, wrap or cover foods tightly.
Using the Controls
Your model may have Rotary Controls or Slide Controls.
IMPORTANT:
• Your refrigerator will not ceel when the Refrigerator Control is
set to OFK
The Refrigerator Control adjusts the refrigerator compartment
temperature. The Freezer Control adjusts the freezer
compartment temperature. Higher numbered settings make
the compartment colder. Lower numbered settings make the
temperature less cold.
Wait 24 hours before you put food into the refrigerator. If you
add food before the refrigerator has cooled completely, your
food may spoil.
NOTE: Adjusting the Refrigerator and Freezer Controls to a
higher (colde¢} setting will not cool the compartments any
faster.
• The preset settings should be correct for normal household
usage. The controls are set correctly when milk or juice is as
cold as you like and when ice cream is firm.
cold 1 2 - 3 4 colder off 1 2 A 3 4 colder
AdjuslJng Controls
NOTE: Wait at least 24 hours between adjuetrnents and then
recheck the temperatures.
Ifyou need to adjust temperatures, adjust the refrigerator
temperature first.
Rotary Controls
Turn the control right (clockwise) to make the cor'npartr'nect
colder. Turn the control left (counterclockwise) to make it less
cold.
Slide Controls
Slide the control one setting to the right to make the
compartment colder. Slide the control one setting to the left to
make it less cold.
CONDITION/REASON: SETTING
ADJUSTMENT:
REFRIGERATOR tee cold REFRIGERATOR
- Not set correctly for your Control one setting
conditions lower
REFRIGERATOR tee warm REFRIGERATOR
- Boor opened often, large amount Control one setting
of food added or room temperature higher
very warm
FREEZER toe cold FREEZER Control one
- Not set correctly for your setting lower
conditions
FREEZER tee warm/toe little ice FREEZER Control one
- Boor opened often, or large setting higher
amount of food added or very cold
room temperature (can't cycle often
enough) or heavy ice usage
lO
Page 11
Water and Ice Dispensers
(on some models)
Cut Hazard
Use a sturdy glass when dispensing ice or water.
Failure to do so can result in cuts.
The Water Dispenser
Ifyou did not flush the water system when the refrigerator was
first installed, press the water dispenser bar with a sturdy glass or
jar until you draw and discard 2 to 3 gal. (8 to 12 L) or
approximately 6 to 7 minutes of water after water begins
dispensing. It will take 3 to 4 minutes for the water to begin
dispensing. The water you draw and discard cleans the system
and helps clear air from the lines. Allow several hours for the
refrigerator to cool down and chill water.
IMPORTANT: Depending on your model, the small removable
tray at the bottom of the dispenser is designed to catch small
spills and allow for easy cleaning. There is no drain in the tray.
The tray can be removed from the dispenser and carried to the
sink to be emptied or cleaned.
Depending on your model, you may have one or more of the
following options: the abilily to select either crushed or cubed
ice, a special light that turns on when you use the dispenser, or a
lock option to avoid unintentional dispensing, j
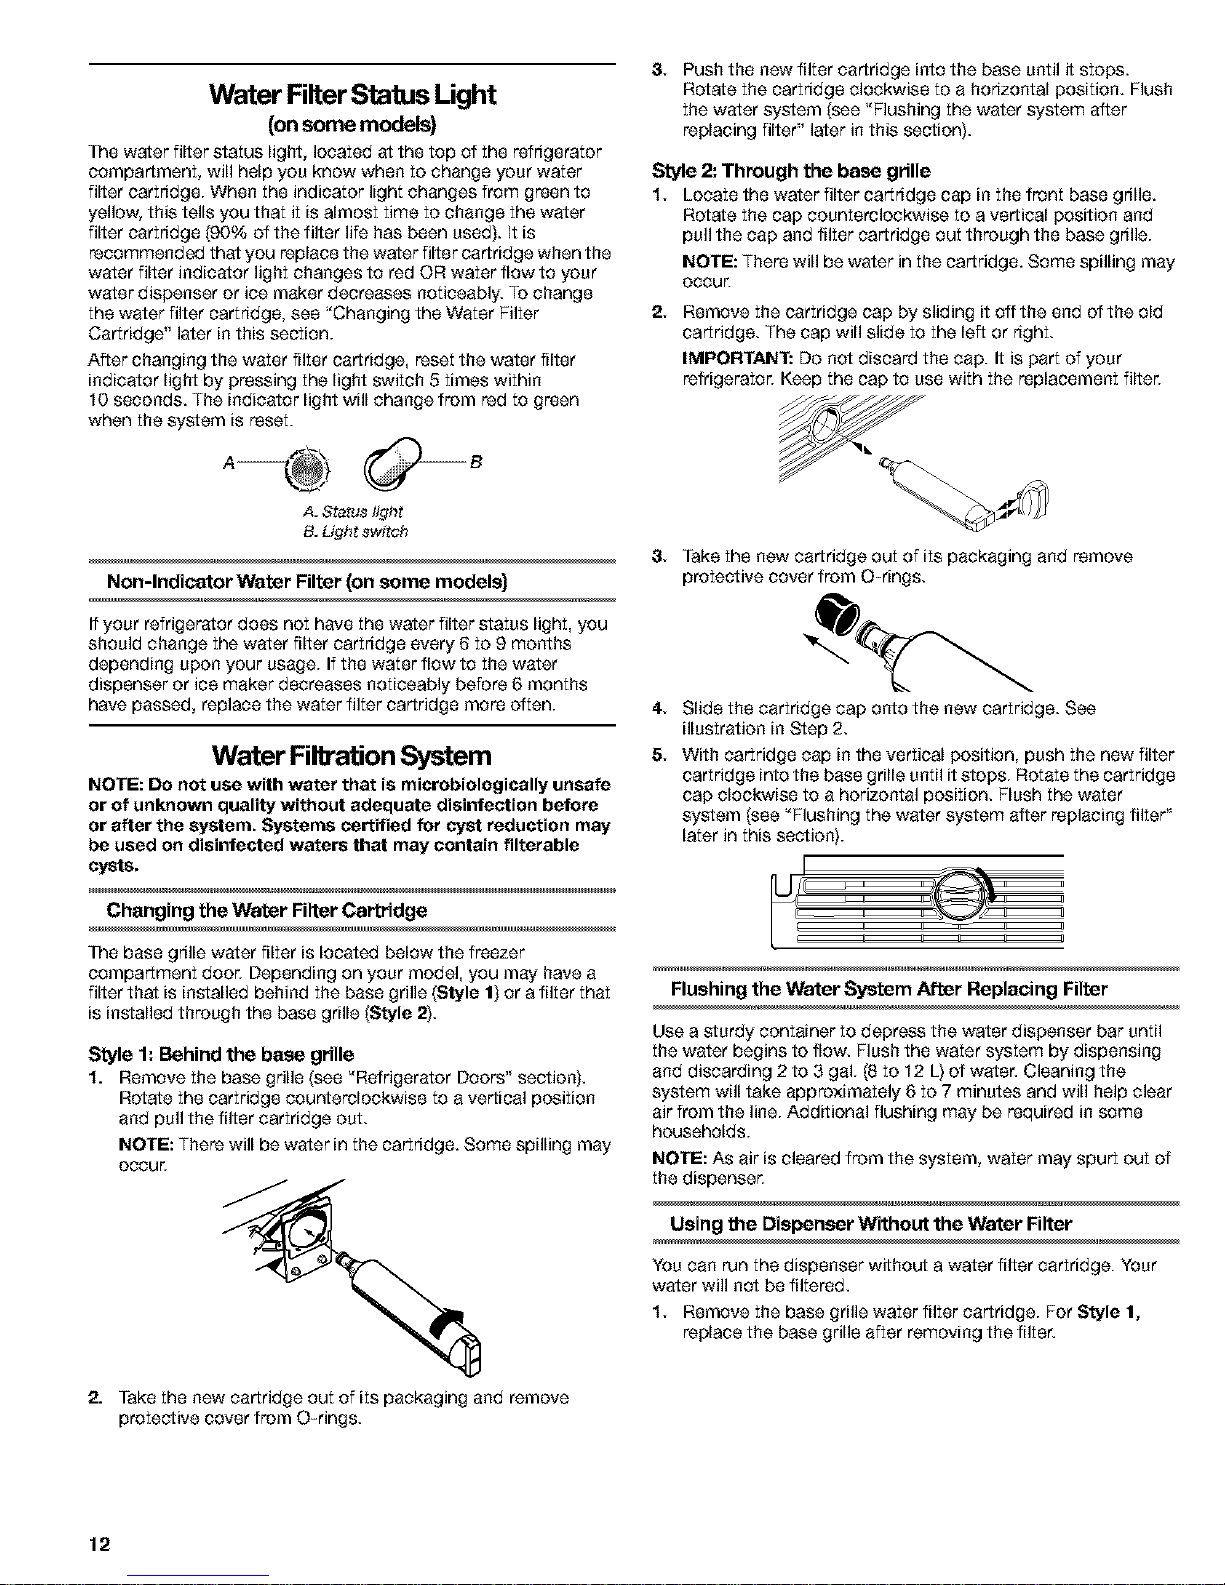
The Ice Dispenser To Dispense Water.
__ 1. Press a sturdy glass against the water dispenser lever.
Ice dispenses from the ice maker storage bin in the freezer. When
the dispenser lever is pressed:
• A trap door opens in a chute between the dispenser and the
ice bin. Ice moves from the bin and falls through the chute.
• When you release the dispenser lever, the trap door closes
and the ice dispensing stops. The dispensing system will not
operate when the freezer door is open.
Some models dispense both cubed and crushed ice. Before
dispensing ice, select which type of ice you prefer. The button
controls are designed for easy use and cleaning.
ICE
For crushed ice, cubes are crushed before they are dispensed.
This may cause a slight delay when dispensing crushed ice.
Noise from the ice crusher is normal, and pieces of ice may vary
in size. When changing from crushed to cubed, a few ounces of
crushed ice will be dispensed along with the first cubes.
To Dispense lee:
1. Prass button for the desirad type of ice.
2. Press a sturdy glass against the ice dispenser lever. Hold the
glass close to the dispenser opening so ice does not fall
outside of the glass.
IMPORTANT: You do not need to apply a lot of pressure to
the lever in order to activate the ice dispenser. Pressing hard
will not make the ice dispense faster or in greater quantities.
9.
Remove the glass to step dispensing.
NOTE: The first few batches of ice may have an off-flavor
from new plumbing and parts. Throw the ice away. Also, take
large amounts of ice from the ice bin, not through the
dispenser.
2. Remove the glass to step dispensing.
NOTE: Water may have an off-flavor if you do not use the
dispenser periodically. Dispense enough water every week to
maintain a fresh supply.
_eDispenserUg_
The dispenser area has a light. It can be turned on manually by
pressing the QN button (teuchpad or rocker switch).
Qn some models: Whenever you use the dispenser, the lever will
automatically turn the light on.
LIGHT
NOTE: See the "Changing the Light Bulbs" section for
information on changing the dispenser light bulb.
The Dispenser Lock {on some models}
Your dispenser can be turned off for easy cleaning or to prevent
unintentional dispensing by small children and pets.
NOTE: The lock feature does not shut off power to the
refrigerator, to the ice maker, or to the dispenser light. It simply
deactivates the dispenser levers.
To turn off the dispenser, press the LOCK button. The indicator
will appear above the LOCK button and the ice and water
dispensers will not work. To unlock the dispenser, press the
UNLOCK button until the indicator appears. Then continue to
dispense ice or water as usual.
DISPENSER
11
Page 12
Water FilterStatus Light
(on some models)
The water filter status light, located at the top of the refrigerator
compartment, will help you know when to change your water
filter cartridge. When the indicator light changes from green to
yellow, this tells you that it is almost time to change the water
filter cartridge (90% of the filter life has been used). It is
recommended that you replace the water filter cartridge when the
water filter indicator light changes to red OR water flow to your
water dispenser or ice maker decreases noticeably. To change
the water filter cartridge, see "Changing the Water Filter
Cartridge" later in this section.
After changing the water filter cartridge, reset the water filter
indicator light by pressing the light switch 5 times within
10 seconds. The indicator light will change from red to green
when the system is reset.
A. Status light
B. LJght switch
Non-Indicator Water Filter (on some models)
Ifyour refrigerator does not have the water filter status light, you
should change the water filter cartridge every 6 to 9 months
depending upon your usage. If the water flow to the water
dispenser or ice maker decreases noticeably before 6 months
have passed, replace the water filter cartridge more often.
Water Filb'ationSystem
NOTE: Do not use with water that is microbiologically unsafe
or of unknown quality without adequate disinfection before
or after the system. Systems certified for cyst reduction may
be used on disinfected waters that may contain filterable
cysts,
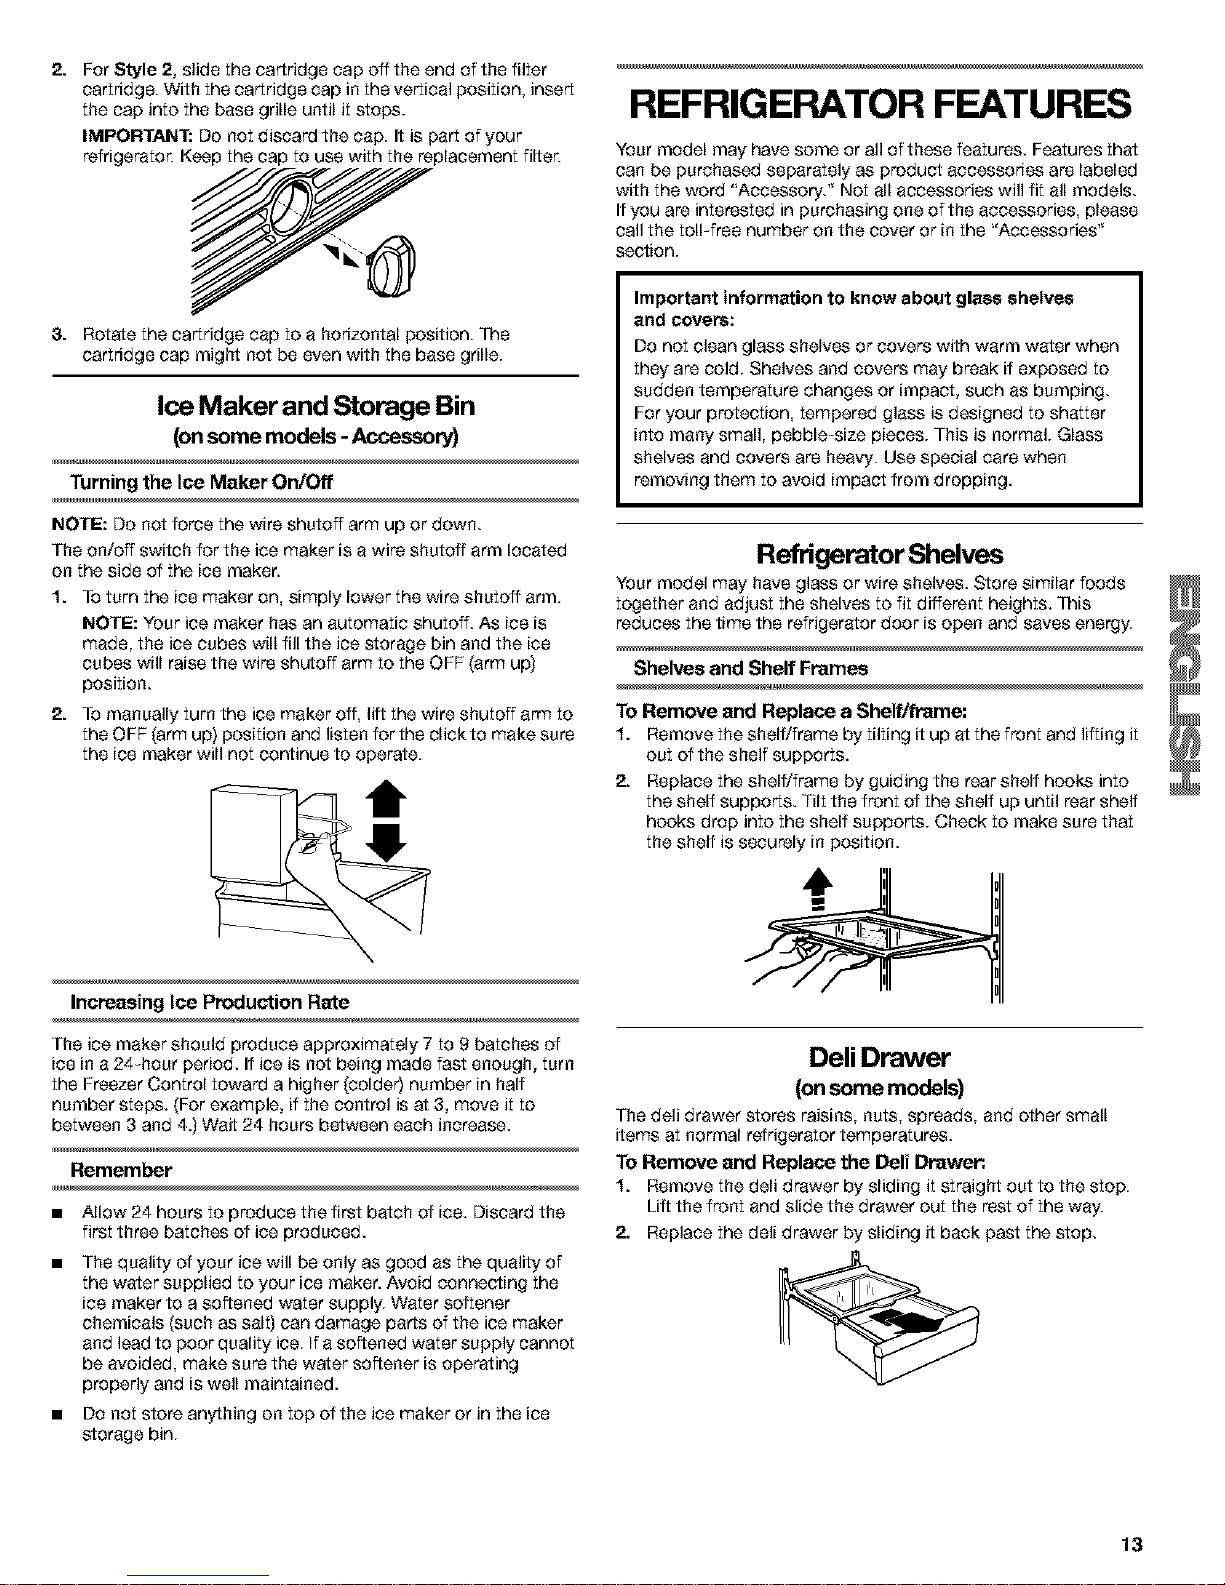
Changing the Water Filter Cartridge
The base grille water filter is located below the freezer
compartment door Depending on your model, you may have a
filter that is installed behind the base grille (Style f) or a filter that
is installed through the base grille (Style 2).
Style 1: Behind the base grille
1. Remove the base grille (see "Refrigerator Doors" section).
Rotate the cartridge counterclockwise to a vertical position
and pull the filter cartridge out.
NOTE: There will be water in the cartridge. Some spilling may
OCCUR
2. Take the new cartridge out of its packaging and remove
protective cover from O-rings.
& Push the new filter Cartridge into the base until it stops.
Rotate the cartridge clockwise to a horizontal position. Flush
the water system (see "Flushing the water system after
replacing filter" later in this section).
Style 2: Through the base grille
1. Locate the water filter cartridge cap in the front base grille.
Rotate the cap counterclockwise to a vertical position and
pull the cap and filter cartridge out through the base grille.
NOTE: There will be water in the cartridge. Some spilling may
OCCUR
2.
Remove the cartridge cap by sliding it off the end of the old
cartridge. The cap will slide to the left or right.
IMPORTANT: Do net discard the cap. It is part of your
refrigerator. Keep the cap to use with the replacement filter.
& Take the new cartridge Out of its packaging and remove
protective cover from O-rings.
4. Slide the cartridge cap onto the new cartridge. See
illustration in Step 2.
& With cartridge cap in the vertical position, push the new filter
cartridge into the base grille until it stops. Rotate the cartridge
cap clockwise to a horizontal position. Flush the water
system (see "Flushing the water system after replacing filter"
later in this section).
I
Flushing the Water System After Replacing Filter
Use a sturdy container to depress the water dispenser bar until
the water begins to flow. Flush the water system by dispensing
and discarding 2 to 3 gal. (8 to 12 L) of water. Cleaning the
system will take approximately 6 to 7 minutes and will help clear
air from the line. Additional flushing may be required in some
households.
NOTE: As air is cleared from the system, water may spurt out of
the dispenser.
Using the Dispenser Without the Water Filter
You can run the dispenser without a water filter cartridge. Your
water will net be filtered.
1. Remove the base griUe water filter cartridge. For Style f,
replace the base grille after removing the filter.
12
Page 13
2.
For Style 2, slide the cartridge cap off the end of the filter
cartridge. With the cartridge cap in the vertical position, insert
the cap into the base grille until it stops.
IMPORTANT: Do not discard the cap. It is part of your
refrigerator. Keep the cap to use with the replacement filter.
8. Rotate the cartridge cap to a horizontal position. The
cartridge cap might not be even with the base grille.
Ice Maker and Storage Bin
(on some models - Accessory)
Turning the Ice Maker On/Off
NOTE: DO not force the wire shutoff arr'n up or down.
The ee/off switch for the ice maker is a wire shutoff arm located
on the side of the ice maker.
1. To turn the ice maker on, simply lower the wire shutoff arm.
NOTE: Your ice maker has an automatic shutoff. As ice is
made, the ice cubes will fill the ice storage bin and the ice
cubes will raise the wire shutoff arm to the OFF (arm up)
position.
2. To manually turn the ice maker off, lift the wire shutoff arm to
the OFF (arm up) position and listen for the click to make sure
the ice maker will not continue to operate.
Increasing Ice Production Rate
The ice maker should produce approximately 7 to 9 batches of
ice in a 24-beer period. If ice is not being made fast enough, turn
the Freezer Control toward a higher (colder) number in half
number steps. (For example, if the control is at 3, move it to
between 3 and 4.) Wait 24 hours between each increase.
Remember
• Allow 24 hours to produce the first batch of ice. Discard the
first three batches of ice produced.
• The quality of your ice will be only as good as the quality of
the water supplied to your ice maker. Avoid connecting the
ice maker to a softened water supply. Water softener
chemicals (such as salt) can damage parts of the ice maker
and lead to poor quality ice. If a softened water supply cannot
be avoided, make sure the water softener is operating
properly and is well maintained.
• Do not store anything on top of the ice maker or in the ice
storage bin.
REFRIGERATOR FEATURES
Your model may have some or all of theee features. Features that
can be purchased separately as product accessories are labeled
with the word "Accessory." Not all accessories will fit all models.
Ifyou are interested in purchasing one of the accessories, please
call the toll-free number on the cover or in the "Accessories"
section.
Important information to know about glass shelves
and covers:
Do not clean glass shelves or covers with warm water when
they are cold. Shelves and covers may break if exposed to
sudden temperature changes or impact, such as bumping.
For your protection, tempered glass is designed to shatter
into many small, pebble-size pieces. This is normal. Glass
shelves and covers are heavy. Use special care when
removing them to avoid impact from dropping.
Refrigerator Shelves
Your model may have glass or wire shelves. Store similar foods
together and adjust the shelves to fit different heights. This
reduces the time the refrigerator door is open and saves energy.
Shelves and Shelf Frames
To Remove and Replace a Shelf/frame:
1. Remove the shelf/frame by tilting it up at the front and lifting it
out of the shelf supports.
2. Replace the shelf/frame by guiding the rear shelf hooks into
the shelf supports. Tilt the front of the shelf up until rear shelf
hooks drop into the shelf supports. Check to make sure that
the shelf is securely in position.
Dell Drawer
(on some models)
The dell drawer stores raisins, nuts, spreads, and other small
items at normal refrigerator temperatures.
To Remove and Replace the Dell Drawer:.
1. Remove the dell drawer by sliding it straight Out to the stop.
Lift the front and slide the drawer out the rest of the way.
2. Replace the deli drawer by sliding it back past the stop.
13
Page 14
Convertible Vegetable/Meat Drawer,
Crisper and Covers
(onsomemodels)
Crisper and Convertible Vegetable Meat Drawers
To Remove and Replace Drawers:
1. Slide crisper or meat drawer straight out to the stop. Lift the
front of drawer with one hand while supporting the bottom of
drawer with other hand and slide the drawer out the rest of
the way.
2. Replace the crisper or meat drawer by sliding it back in fully
past the drawer stop.
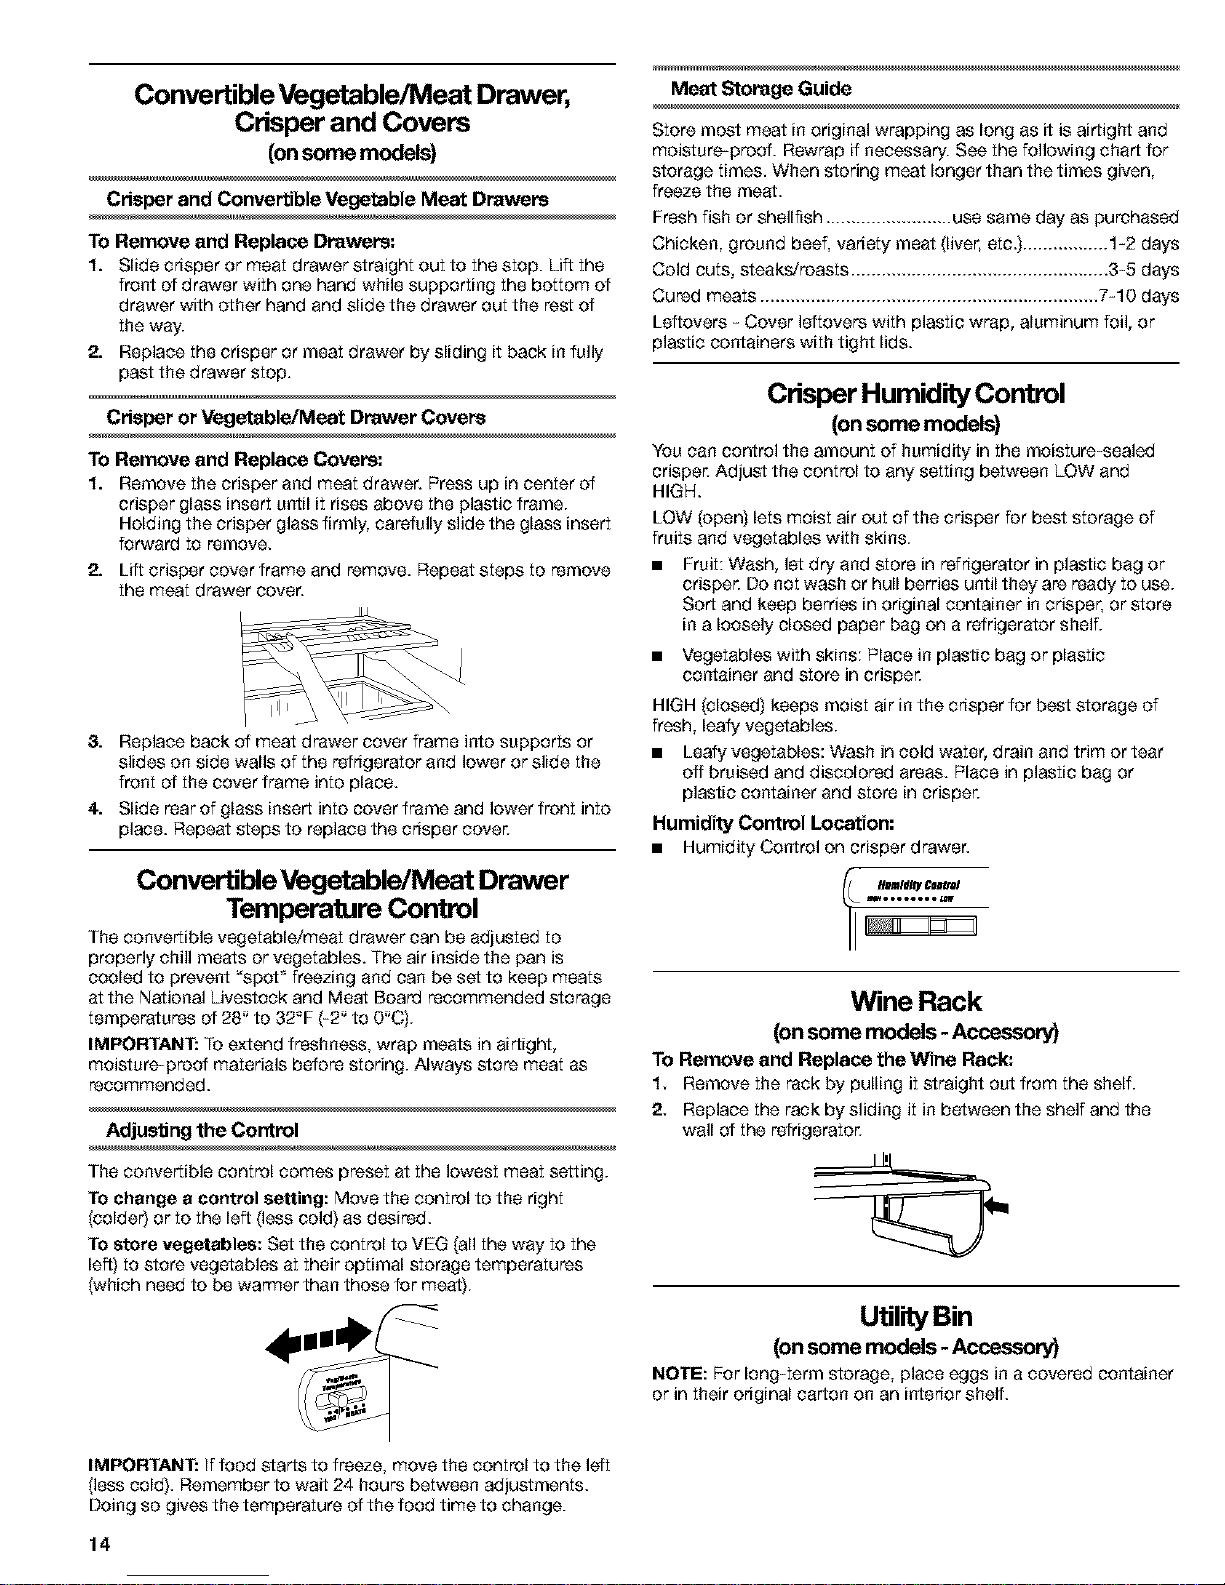
Crisper or Vegetable/7_leat Drawer Covers
To Remove and Replace Covers:
1. Remove the crisper and meat drawer. Press up in center of
crisper glass insert until it rises above the plastic frame.
Holding the crisper glass firmly, carefully slide the glass insert
forward to remove.
2. Lift crisper cover frame and remove. Repeat steps to remove
the meat drawer covet.
3. Replace back of meat drawer cover frame into supports or
slides on side walls of the refrigerator and lower or slide the
front of the cover frame into place.
4. Slide rear of glass insert into cover frame and lower front into
place. Repeat steps to replace the crisper cover.
Convertible Vegetable/Meat Drawer
Temperature Control
The convertible vegetable/meat drawer can be adjusted to
properly chill meats or vegetables. The air inside the pan is
cooled to prevent "spot" freezing and can be set to keep meats
at the National Livestock and Meat Board recommended storage
temperatures of 28" to 32_F (-2" to 0"C).
IMPORTANT: To extend freshness, wrap meats in airtight,
moieture_proof materials before storing. Always store meat as
recommended.
AdjuslJng the Control
The convertible control comes preset at the lowest meat setting.
To change a control setting: Move the control to the right
(colder) or to the left (less cold} as desired.
To stere vegetables: Set the control to VEG (all the way to the
left} to store vegetables at their optimal storage temperatures
(which need to be warmer than those for meat}.
Meat Storage Guide
Store most meat in original wrapping as long as it is airtight and
moieture_proof. Rewrap if necessary. See the following chart for
storage times. When storing meat longer than the times given,
freeze the meat.
Fresh fish or shellfish ......................... use same day as purchased
Chicken, ground beef, variety meat (liver, etc.) ................. 1-2 days
Cold cuts, steaks/roasts ................................................... 3-5 days
Cured meats ................................................................... 7-10 days
Leftovers - Cover leftovers with plastic wrap, aluminum foil, or
plastic containers with tight lids.
Crisper Humidity Control
(on some models)
You can control the amount of humidity in the moisture-sealed
crisper. Adjust the control to any setting between LOW and
HIGH.
LOW (open) lets moist air out of the crisper for best storage of
fruits and vegetables with skins.
• Fruit: Wash, let dry and store in refrigerator in plastic bag or
crisper. Do not wash or hull berries until they are ready to use.
Sort and keep berries in original container in crisper, or store
in a loosely closed paper bag on a refrigerator shelf.
• Vegetables with skins: Place in plastic bag or plastic
container and store in crisper
HIGH (closed} keeps moist air in the crisper for best storage of
fresh, leafy vegetables.
• Leafy vegetables: Wash in cold water, drain and trim or tear
off bruised and discolored areas. Place in plastic bag or
plastic container and store in crisper.
Humidity Control Location:
• Humidity Control on crisper drawer.
Wine Rack
(on some models - Accessory)
To Remove and Replace the Wine Rack:
1. Remove the rack by pulling it straight out from the shelf.
2. Replace the rack by sliding it in between the shelf and the
wall of the refrigerator.
Utility Bin
(on some models - Accessory)
NOTE: For long-term storage, place eggs in a covered container
orin their original carton on an interior shelf.
IMPORTANT: If food starts to freeze, move the control to the left
(less cold}. Remember to wait 24 hours between adjustments.
Doing so gives the temperature of the food time to change.
14
Page 15
FREEZER FEATURES
Your model may have some or all of these features. Features that
can be purchased separately as product accessories are labeled
with the word "Accessory." Not all accessories will fit all models.
Ifyou are interested in purchasing one of the accessories, please
call the toll-free number on the cover or in the "Accessories"
section.
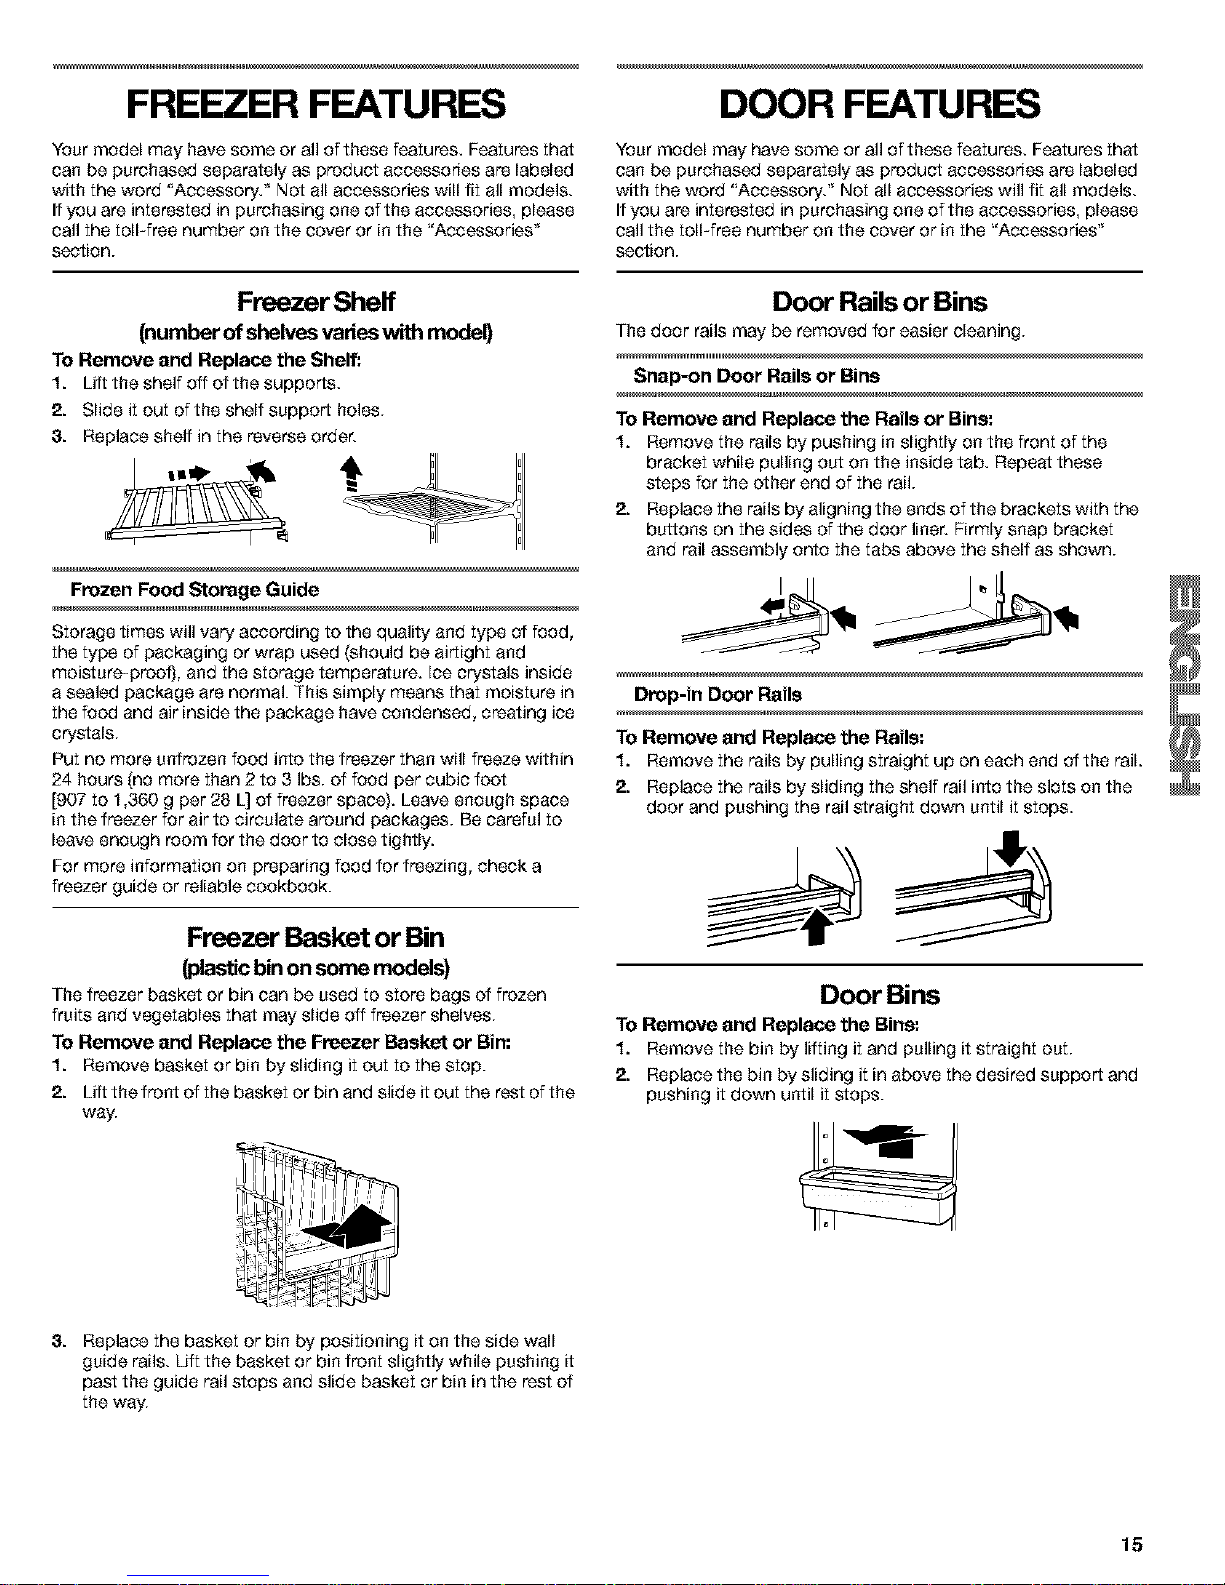
Freezer Sheff
(number of shelves varies with model)
To Remove and Replace the Shelf:
1. Lift the shelf off of the supports.
2. Slide it out of the shelf support holes.
& Replace shelf in the reverse order.
Frozen Food Storage Guide
Storage times will vary according to the quality and type of food,
the type of packaging or wrap used (should be airtight and
moisture-proofS, and the storage temperature. Ice crystals inside
a sealed package are normal. This simply means that moisture in
the food and air inside the package have condensed, creating ice
crystals.
Put no more unfrozen food into the freezer than will freeze within
24 hours (no more than 2 to 3 Ibe. of food per cubic foot
[907 to 1,360 g per 28 L] of freezer space). Leave enough space
in the freezer for air to circulate around packages. Be careful to
leave enough room for the door to close tightly.
For more information on preparing food for freezing, check a
freezer guide or reliable cookbook.
Freezer Basket or Bin
(plas_c bin on some models)
The freezer basket or bin can be used to store bags of frozen
fruits and vegetables that may slide off freezer shelves.
To Remove and Replace the Freezer Basket or Bin:
1. Remove basket or bin by sliding it out to the stop.
2. Lift the front of the basket or bin and elide it out the rsst of the
way.
DOOR FEATURES
Your model may have some or all of thsse features. Features that
can be purchased separately as product accessories are labeled
with the word "Aecessory. " Not all accessories will fit all models.
Ifyou are interested in purchasing one of the accessories, please
call the toll-free number on the cover or in the "Accessories "
section.
Door Rails or Bins
The door rails may be removed for easier cleaning.
Snap-on Door Rails or Bins
To Remove and Replace the Rails or Bins:
1. Remove the rails by pushing in slightly on the front of the
bracket while pulling out on the inside tab. Repeat these
steps for the other end of the rail.
2. Replace the rails by aligning the ends of the brackets with the
buttons on the sides of the door liner. Firmly snap bracket
and rail assembly onto the tabs above the shelf as shown.
Drop-in Door Rails
To Remove and Replace the Rails:
1. Remove the reils by pulling straight up on each ecd of the rail
2. Replace the rails by sliding the shelf rail into the slots on the
door and pushing the rail straight down until it stops.
Door Bins
To Remove and Replace the Bins:
1. Remove the bin by lifting it and pulling it straight out.
2. Replace the bin by sliding it in above the desired ecpport and
pushing it down until it stops.
9.
Replace the basket or bin by positioning it on the side wall
guide rails. Lift the basket or bin front slightly while pushing it
past the guide rail stops and slide basket or bin in the rest of
the way.
15
Page 16
REFRIGERATOR CARE
Cleaning
Explosion Hazard
Use nonflammable cleaner.
Failure to do so can result in death, explosion, or fire.
Both the refrigerator and freezer sections defrost automatically.
However, clean both sections about once a month to prevent
odors from building up. Wipe up spills immediately.
To Clean Your Refrigerato_
1. Unplug refrigerator or disconnect power.
2. Remove all removable parts from inside, such as shelves,
crispers, etc.
& Hand wash, rinse, and dry removable parts and interior
surfaces thoroughly. Use a clean sponge or soft cloth and a
mild detergent in warm water.
• Do not use abrasive or harsh cleaners such as window
sprays, scouring cleansers, flammable fluids, cleaning
waxes, concentrated detergents, bleaches or cleansers
containing petroleum products on plastic parts, interior
and door liners or gaskets. Do not use paper towels,
scouring pads, or other harsh cleaning tools. These can
scratch or damage materials.
• To help remove odors, you can wash interior walls with a
mixture of warn water and baking soda (2 the. to 1 qt.
[26 g to 0.95 L] of water).
4. Determine whether your refrigerator exterior is painted metal,
Ultra Satin _,_(stainless look) finish, brushed aluminum or
stainless steel, and choose the appropriate cleaning method.
NOTE: Ultra Satin _,_(stainless look) finish has a smooth,
uniform color with a glossy finish that resists fingerprints.
Stainless steel has a distinct grainy texture with variation in
color that is natural to steel.
Painted metal: Wash exteriors with a clean sponge or soft
cloth and a mild detergent in warm water. Do not use abrasive
or harsh cleaners, or cleaners designed for stainless steel.
Dry thoroughly with a soft cloth. For additional protection
against damage to painted metal exteriors, apply appliance
wax (or auto paste wax) with a clean, soft cloth. Do not wax
plastic parts.
Brushed aluminum: Wash with a clean sponge or soft Cloth
and a mild detergent in warTn water. Do not use abrasive or
harsh cleaners, or cleaners designed for stainless steel. Dry
thoroughly with a soft cloth.
Ultra Satin TM (stainless look) finish: Wash with a clean
sponge or soft cloth and a mild detergent in warm water. Do
not use abrasive or harsh cleaners, or cleaners designed for
stainless steel. Dry thoroughly with a soft cloth.
Stainless steel finish: Wash with a clean sponge or soft
cloth and a mild detergent in warm water. Do not use abrasive
or harsh cleaners. Dry thoroughly with a soft cloth.
• To keep your stainless steel refrigerator looking like new
and to remove minor ecuf[s or marks, it is suggested that
you use the manufacturer s approved Stainless Steel
Cleaner & Polish.
IMPORTANT: This cleaner is for stainless steel parts only!
Do not allow the Stainless Steel Cleaner & Polish to come
into contact with any plastic parts such as the trim
pieces, dispenser covers or door gaskets. If accidental
contact does occur, clean plastic part with a sponge and
mild detergent in warm water. Dry thoroughly with a soft
cloth. To order the cleaner, see "Accessories."
There is no need for routine condenser cleaning in normal
home operating environments. If the environment is
particularly greasy or dusty, or there is significant pet traffic in
the home, the condenser should be cleaned every 2 to
3 months to ensure maximum efficiency.
Ifyou need to clean the condenser:
• Remove the base grille. See "Base Grille" graphic or
"Base Grille" section.
• Use a vacuum cleaner with a soft brush to clean the grille,
the open areas behind the grille and the front surface area
of the condenser
• Replace the base grille when finished.
6. Plug in refrigerator or reconnect power.
Changing the Ught Bulbs
NOTE: Not all appliance bulbs will fit your refrigerator. Be sure to
replace the bulb with one of the same size and shape. The
dispenser light requires a heavy duty 10-waft bulb. All other lights
require a 40-watt appliance bulb. Replacement bulbs are
available from your dealer.
1. Unplug refrigerator or disconnect power.
2. Remove light shield when applicable as shown.
NOTE: To clean the light shield, wash it with warTn water and
liquid detergent. Rinse and dry the shield well.
& Remove light bulb and replace with one of the same size,
shape and wattage.
4. Replace light shield when applicable as shown.
5. Plug in refrigerator or reconnect power.
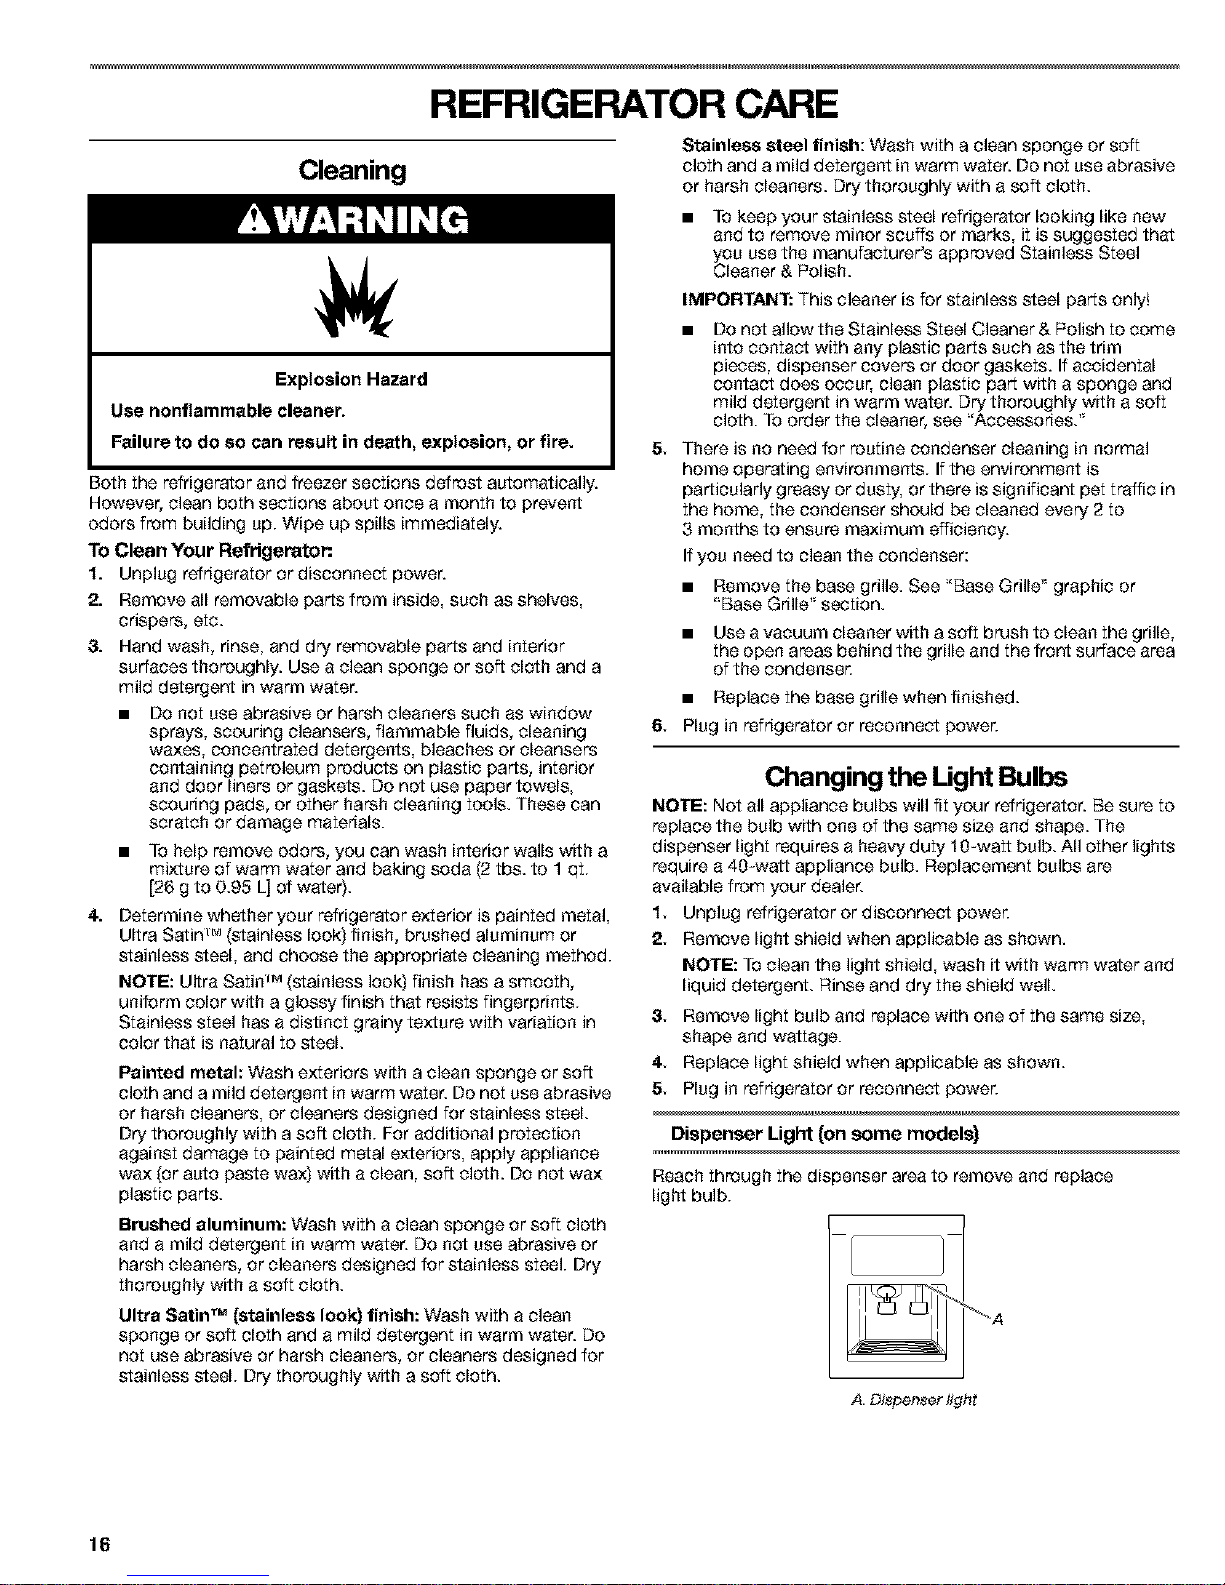
Dispenser Light {on some models)
Reach through the dispenser area to remove and replace
light bulb.
_A
A, Dispenser li_jht
16
Page 17
Refrigerator Control Panel Light
Reach behind the refrigerator control panel to remove and
replace light bulb.
Crisper Lights
• If necessary, remove the top crisper drawer to access the
crisper light shield. Remove the light shield by lifting the ends
out of the brackets as shown.
• Replace the light shield by inserting the ends into the
brackets. If necessary, replace the top crisper drawer.
Upper Freezer Light (on some models)
Remove light shield by grasping the top center of the shield
and pulling forward while turning it slightly to one side. If
necessary, remove top crisper drawer to gain access to the
crisper light shield.
Replace the light shield by inserting the tabs on one end into
the slotted holes in the refrigerator or freezer liner. Then,
carefully bend the shield at the center to insert the tabs on
the other end.
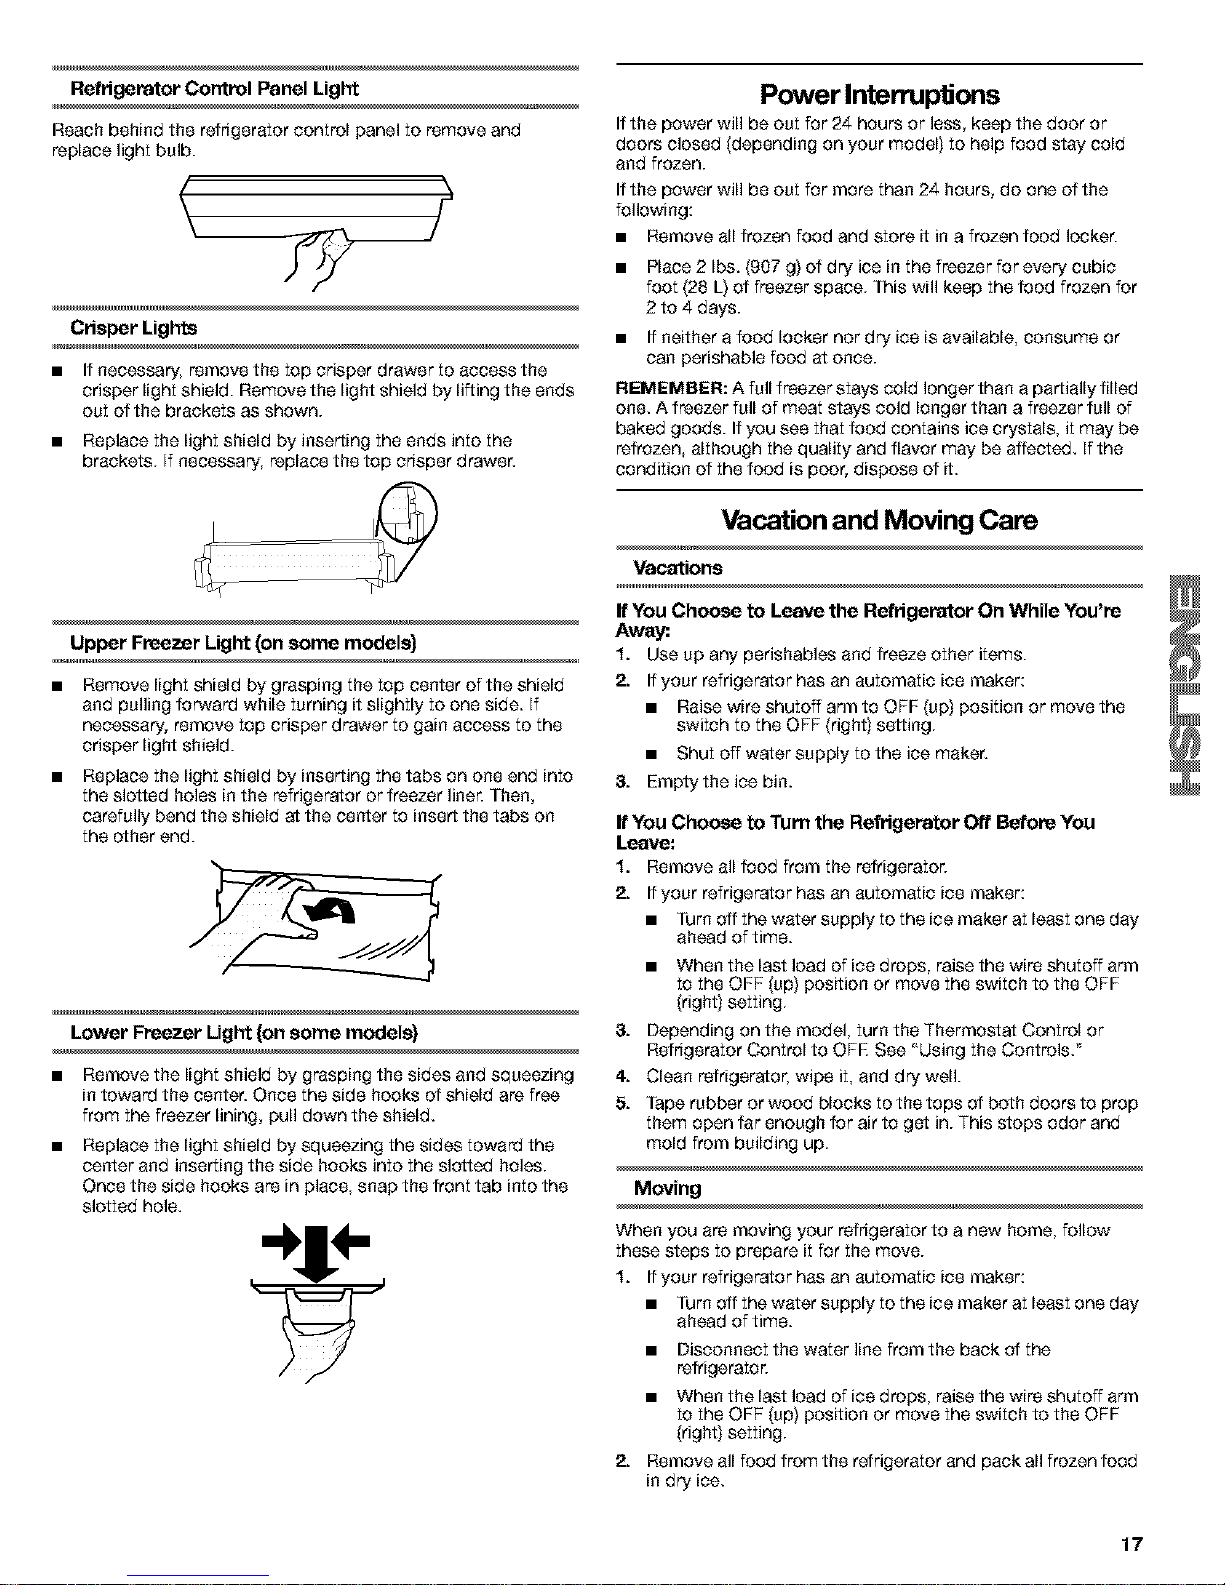
Lower Freezer Ught (on some models}
• Remove the light shield by grasping the sides and squeezing
in toward the center. Once the side hooks of shield are free
from the freezer lining, pull down the shield.
Replace the light shield by squeezing the sides toward the
center and inserting the side hooks into the slotted holes.
Once the side hooks are in place, snap the front tab into the
slotted hole.
•" ILI" '
Power Interruptions
Ifthe power will be out for 24 hours or less, keep the door or
doors closed (depending on your model) to help food stay cold
and frozen.
Ifthe power will be out for more than 24 hours, do one of the
following:
• Remove all frozen food and store it in a frozen food locker.
• Place 2 Ibs. (907 g) of dry ice in the freezer for every cubic
foot (28 L) of freezer space. This will keep the food frozen for
2 to 4 days.
• If neither a food locker nor dry ice is available, consume or
can perishable food at once.
REMEMBER: A full freezer stays cold longer than a partially filled
one. A freezer full of meat stays cold longer than a freezer full of
baked goods. Ifyou see that food contains ice crystals, it may be
refrezen, although the quality and flavor may be affected. If the
condition of the food is poor, dispose of it.
Vacation and Moving Care
Vacations
If You Choose to Leave the Refrigerator On While You're
Away_.
1. Use up any perishables and freeze other items.
2. If your refrigerator has an automatic ice maker:
• Raise wire shutoff arm to OFF (up) position or move the
switch to the OFF (right) setting.
• Shut off water supply to the ice maker.
8. Emply the ice bin.
ff You Choose to Turn the Refrigerator Off Before You
Leave:
1. Remove all food from the refrigerator.
2. If your refrigerator has an automatic ice maker:
• Turn off the water supply to the ice maker at least one day
ahead of time.
9.
4.
5.
• When the last load of ice drops, raise the wire shutoff arm
to the OFF (up) position or move the switch to the OFF
(right) setting.
Depending on the model, turn the Thermostat Control or
Refrigerator Control to OFE See "Using the Controls."
Clean refrigerator, wipe it, and dry well.
Tape rubber or wood blocks to the tops of both doors to prop
them open far enough for air to get in. This stops odor and
mold from building up.
Moving
When you are moving your refrigerator to a new home, follow
these steps to prepare it for the move.
1. If your refrigerator has an automatic ice maker:
• Turn off the water supply to the ice maker at least one day
ahead of time.
• Disconnect the water line from the back of the
refrigerator.
• When the last load of ice drops, raise the wire shutoff arm
to the OFF (up) position or move the switch to the OFF
(right) setting.
2. Remove all feed from the refrigerator and pack all frozen feed
in dry ice.
17
Page 18
8. Empty the ice bin.
4. Depending on the model, turn the Thermostat Control or
Refrigerator Control to QFK See "Using the Controls."
5. Unplug refrigerator.
6. Empty water from the defrost pan.
7. Clean, wipe, and dry thoroughly.
8. Take out all removable parts, wrap them well, and tape them
together so they don't shift and rattle during the move.
g. Depending ee the model, raiee the freer ef the refrigerator ee
it rolls more easily OR screw in the leveling legs so they don't
scrape the floor. See "Adjust the Doors."
18. Tape the doors closed and tape the power cord to the
refrigerator cabinet.
When you get to your new home, put everything back and refer to
the "Installation Instructions" section for preparation instructions.
Also, if your refrigerator has an automatic ice maker, remember to
reconnect the water supply to the refrigerator.
"IROUBLESHOOTING
Try the solutions suggested hero first in order to avoid the cost of an unnecessary service call.
__ • Are the doors not closed completely?.Closethe doors
Your refrigerator will not operate
• Is the power supply cord unplugged? Plug into a grounded
3 prong outlet.
Has a household fuse blown or circuit breaker tripped?
Replace the fuse or reset the circuit breaker.
Is the refrigerator or freezer control turned to the OFF
position? See "Using the Controls."
Is the refrigerator defrosting? Recheck to see whether the
refrigerator is operating in 30 minutes. Your refrigerator will
regularly run an automatic defrost cycle.
Is the refrigerator not cooling? For models with digital
controls, turn the unit OFF then ON again to reset. See "Using
the Controls." Ifthis does not correct the problem, call for
service.
The lights do not work
• Is the power supply cord unplugged? Plug into a grounded
3 prong outlet.
• Is a light bulb loose in the socket or burned out? See
"Changing the Light Bulbs."
There is water in the defrost drain pan
• Is the refrigerator defrosting? The water will evaporate. It is
normal for water to drip into the defrost pan.
• Is it more humid l_an normal? When it is humid, expect that
the water in the defrost pan will take longer to evaporate.
The motor seems to run too much
Is the room temperature hotter l_an normal? The motor
will run longer under warm conditions. At normal room
temperatures, expect your motor to run about 40% to 80% of
the time. Under warmer conditions, it will run even more.
Has a large amount of food just been added to the
refrigerator? Adding a large amount of food warms the
refrigerator. The motor normally will run longer to cool the
refrigerator back down.
• Are the doors opened often? The motor will run longer
when this occurs. Conserve energy by getting all items Out at
one time, keeping food organized, and closing the door as
soon as possible.
• Are the controls not set correctly for the surrounding
conditions? See "Using the Controls."
fifthly. If they do not close completely, see "The doors will not
close completely" later in this section.
• Are the condenser coils dirty?. This prevents air transfer and
makes the motor work harder. Clean the condenser coils. See
"Cleaning."
• Are the door gaskets not sealed all l_e way around?
Contact a technician or other qualified person.
NOTE: Your new refrigerator will run longer than your old one
due to its high-efficiency motor.
The refrigerator seems to make too much noise
• The sounds may be normal for your refrigerator. See "NorTnal
Sounds."
The ice maker is not producing ice or not enough ice
Has the ice maker just been installed? Wait 72 hours for full
ice production to begin. Once your refrigerator is cooled, the
ice maker should produce 70 to 120 cubes every 24 hours.
Is l_e freezer temperature cold enough to produce ice?
Wait 24 hours after ice maker hookup for ice production. See
"Using the Controls."
Is the ice maker wire shutoff arm in the OFF (arm up)
position (on some models)? Lower the wire shutoff arm to
the ON (arTndown) position. See "Ice Maker and Storage
Bin."
Is the ice maker switch in the OFF (right) position (on
some models)? Move ice r'nakerswitch to the ON (left)
position. See "Ice Maker and Storage Bin."
Is the water line shutoff valve to the refrigerator turned
on? Turn on the water valve. See "Connect the Water
Supply."
Does the ice maker mold have water in it or has no ice
been produced? Make sure your refrigerator has been
connected to a water supply and the supply shutoff valve is
turned on. See "Connect the Water Supply."
Is an ice cube jammed in the ice maker ejector arm?
For models with a standard ice storage bin, remove the ice
from the ejector arm with a plastic utensil. For models with an
ice storage bin on the freezer door, access the ice maker by
depressing the ice sensor door on the upper left side of the
freezer interior. While depressing the sensor door, lift the ice
maker service door and remove the ice from the ejector with
a plastic utensil. See "Ice Maker and Storage Bin."
Has a large amount of ice just been removed? Allow
24 hours for ice maker to produce more ice.
18
Page 19
• Are the controls set correctly? See "Using the Controls. '_
• Is there a water filter installed on the refrigerator? The
filter may be clogged or installed incorrectly. Check the filter
installation instructions to ensure that the fitter was installed
correctly and is not clogged. If installation or clogging is not a
problem, call a technician or other qualified person.
• Is a reverse osmosis water filtration system connected to
your cold water supply?. See "Water Supply Requirements. "
NOTE: If not due to any of the above, there may be a problem
with the water line. Call for service.
Off-taste, odor or gray color in the ice
• Are the plumbing connections new, causing discolored or
off-flavored ice? Discard the first few batches of ice.
• Have the ice cubes been stored too long? Throw old ice
away and make a new supply.
• Does the freezer and ice storage bin need to be cleaned?
See "Cleaning '_or "Ice Maker and Storage Bin.'_
• Has food in the freezer or refrigerator been wrapped
properly?. Use airtight, moieture-preof packaging to help
prevent odor transfer to stored food.
• Does the water contain minerals (such as sulfur)? A filter
may need to be installed to remove the minerals.
• Is there a water filter installed on the refrigerator? Gray or
dark discoloration in ice indicates that the water filtration
system needs additional flushing. Run additional water
through the water dispenser to flush the water filtration
system more thoroughly (at least 2 to 3 gal. [8 to 12 L] or 6 to
7 minutes initially). Discard discolored ice.
The ice dispenser will not operate properly
• Is the freezer door closed completely?. Push the door firmly
closed. If it will not close all the way, see "The doors will not
close completely" later in this section.
• Is the ice storage bin installed correctly? For models with a
standard ice storage bin, push the ice storage bin in all the
way. For models with an ice storage bin on the freezer door,
the bin should sit level. Remove and replece the bin in the
door making sure it is preperly aligned and snapped securely
into place. See "Ice Maker and Storage Bin."
• Has the wrong ice been added to l_e bin? Use only cubes
produced by the current ice maker` If other cubes have been
added, remove all cubes and check to see that none have
become stuck in the delivery chute.
• Has the ice frozen in the ice storage bin? Shake the ice
storage bin to separate cubes, if cubes de not separate,
empty bin and wait 24 hours for ice to restock.
• Has the ice melted around the auger (metal spiral} in l_e
ice storage bin? Dump the ice cubes and clean the ice
storage bin completely. Allow 24 hours for the ice maker to
restock. Do not try to remove the melted ice with a sharp
object. You could damage the ice storage bin.
• Is ice stuck in the delivery chute? Clear the ice from the
delivery chute with a plastic utensil. Do not use anything
sharp to remove the ice. You could cause damage.
• IS the ice dispenser stalling while dispensing _=crushed"
ice? Stop dispensing ice. Change the ice button from
"crushed" to "cubed." Depress the ice dispenser arm using a
sturdy glass, if cubed ice dispenses correctly, depress the
button for "crushed" ice and begin dispensing again. See
"Water and ice Dispensers."
• Is there ice in the storage bin? See "The ice maker is not
producing ice or enough ice" earlier in this section.
• Has the dispenser arm been held in too long? Release
dispenser arm. Ice will stop dispensing when the arm is held
in too long. Wait 3 minutes for dispenser motor to reset
before using again. It is best to take large amounts of ice
directly from the ice storage bin, not through the dispenser.
Ice storage bin difficult to remove
• Is the ice storage bin difficult to remove (on some
models)? For models with an ice storage bin located on the
freezer door, select "cubed" ice. Using a sturdy glass, quickly
depress and release the ice dispenser arm. Open the freezer
door, depress the release button on the ice storage bin and
lift upward. See "Ice Maker and Storage Bin."
The water dispenser will not operate properly
• Has the water system not filled? The water system needs
to be filled the first time it is used. Use a sturdy container to
depress the water dispenser bar until the water begins to
flow. Flush the water system by dispensing and discarding
2 to 3 gal. (8 to 12 L) of water. Cleaning the system will take
approximately 6 to 7 minutes and will help clear air from the
line. Additional flushing may be required insome households.
See "Water and Ice Dispensers."
Is the water shutoff valve not turned on or the water line
connected at the source? Make sure the water shutoff valve
is turned on and the water source is connected to the
refrigerator. See "Connect the Water Supply."
• Is the water shutoff valve clogged or incorrectly installed?
See "Connect the Water Supply." If clogging or installation is
not a problem, call for service or contact a plumber.
• Is there a kink in l_e home water source line? If you find or
suspect a kink in the water line, contact a licensed, qualified
plumber.
Is there a water filter installed on the refrigerator? The
filter may be clogged or incorrectly installed. First, check the
filter installation instructions to ensure that the filter was
installed correctly and is not clogged. If installation or
clogging is not a problem, call for service.
• Is a reverse osmosis water filtration system connected to
your cold water supply?. See "Water Supply Requirements. "
Water or ice is leaking from the dispenser
• Is the glass not being held under the ice dispenser long
enough, causing the ice to spill? Hold the container under
the ice chute for 2 to 3 seconds after releasing the dispenser
lever. Water or ice may continue to dispense during this time.
Is an ice cube stuck in the chute and holding the trap
door open? Remove the cube.
Is there a water filter installed on the refrigerator? The
water filtration system may have air in the lines, causing water
to drip. Additional flushing may help clear air from the lines.
Normal dispenser use should flush air from the lines within 24
to 72 hours.
19
Page 20
_ _l_lmlmlmlmlmlml_lmlmlmlmlmlm
Water flow from the dispenser decreases noticeably There is interior moisture buildup
• Is there a water filter installed on the refrigerator? • Are the air vents blocked in the refrigerator? Remove any
The filter may be full or incorrectly installed. Remove the
water filter cartridge. See "Water Filtration System." Operate
the dispenser. If the water flow increases noticeably, replace
the filter.
The dispenser water is not cool enough •
• Has the refrigerator been newly installed? Allow 24 hours
for the refrigerator to cool completely. •
• Has a large amount of water been recently dispensed?
Allow 24 hours for the water to cool completely.
• Has water not been recently dispensed? The first glass of
water may not be COOLDiscard the first glass of water.
The divider between the two compartments is warm
objects from in front of the air vents. See "Ensuring Proper Air
Circulation " for the location of air vents.
Are the doors opened often? Avoid humidity buildup by
getting all items out at one time, keeping food organized, and
closing the door as soon as possible.
Is the room humid? It is normal for moisture to build up
inside the refrigerator when the room air is humid.
Is l_e food packaged correctly?. Check that all food is
securely wrapped. Wipe Off damp food containers before
placing in the refrigerator.
Are the confrols set correctly for l_e surrounding
conditions? See "Using the Controls. '_
Was a self-defrost cycle completed? It is normal for
droplets to form after the refrigerator eeff-detrests.
• The warmth is probably due to normal operation of the The doors will not close completely
automatic exterior moisture control. If still concerned, call for __
service. • Are food packages blocking the door open? Rearrange
Temperature is too warm
• Are the air vents blocked in either compartment? This
prevents the r'nover'nentof cold air from the freezer to the
refrigerator Remove any objects from in front of the air vents.
See "Ensuring Proper Air Circulation" for the location of air
vents.
• Are the door(s) opened often? The refrigerator will warm
when this occurs. Keep the refrigerator ceel by getting all
items Out at one time, keeping food organized, and closing
the door as soon as possible.
Has a large amount of food just been added to the
refrigerator or freezer? Adding a large amount of food
warms the refrigerator. It can take several hours for the
refrigerator to return to the normal temperature.
• Are the controls set correctly for the surrounding
conditions? See "Using the Controls. '_
Is the refrigerator not cooling? For models with digital
controls, turn the unit OFF then ON again to reset. See "Using
the Controls." Ifthis does not correct the problem, call for
service.
containers so that they fit more tightly and take up less
space.
Is the ice storage bin out of position? For models with an
interior ice storage bin, push the ice storage bin in all the way.
Ifthe ice storage bin does not go in all the way, it may not be
put in straight. Pull it Out and try again. For models with an ice
storage bin located on the freezer door, the bin should sit
level. To remove the bin, press the release button on the right
side of the bin and lift straight up. Replace the bin in the door
making sure it is properly aligned and snapped securely into
place. See "Ice Maker and Storage Bin."
Are the pans, shelves, bins, or baskets out of position?
Put the crisper cover and all pans, shelves, bins, and baskets
back into their correct positions. See the "Convertible
Vegetable/Meat Drawer, Crisper and Covers" section for
more information.
Are the gaskets sticking? Clean gaskets according to the
directions in the "Cleaning" section.
Does the refrigerator wobble or seem unstable? Level the
refrigerator. See "Adjust the Doors."
Were the doors removed during product installation and
not properly replaced? Remove and replace the doors
according to the instructions in the "Refrigerator Doors"
section, or call a qualified service technician.
The doors are difficult to open
• Are the gaskets dirty or sticky? Clean gaskets according to
the directions in the "Cleaning" section.
PROTECTION AGREEMENTS
Inthe U.S=A.
Master Protection Agreements
Congratulations on making a smart purchase. Your new Galaxy '_
appliance is designed and manufactured for years of dependable
operation. But like all products, it may require preventive
maintenance or repair from time to time. That's when having a
Master Protection Agreement can save you money and
aggravation.
Purchase a Master Protection Agreement now and protect
yourself from unexpected hassle and expense.
The Master Protection Agreement also helps extend the life of
your new appliance. Here's what's included in the Agreement:
Expert service by our 12,000 professional repair specialists
1/Unlimited service and no charge for parts and labor on all
covered repairs
28
Page 21
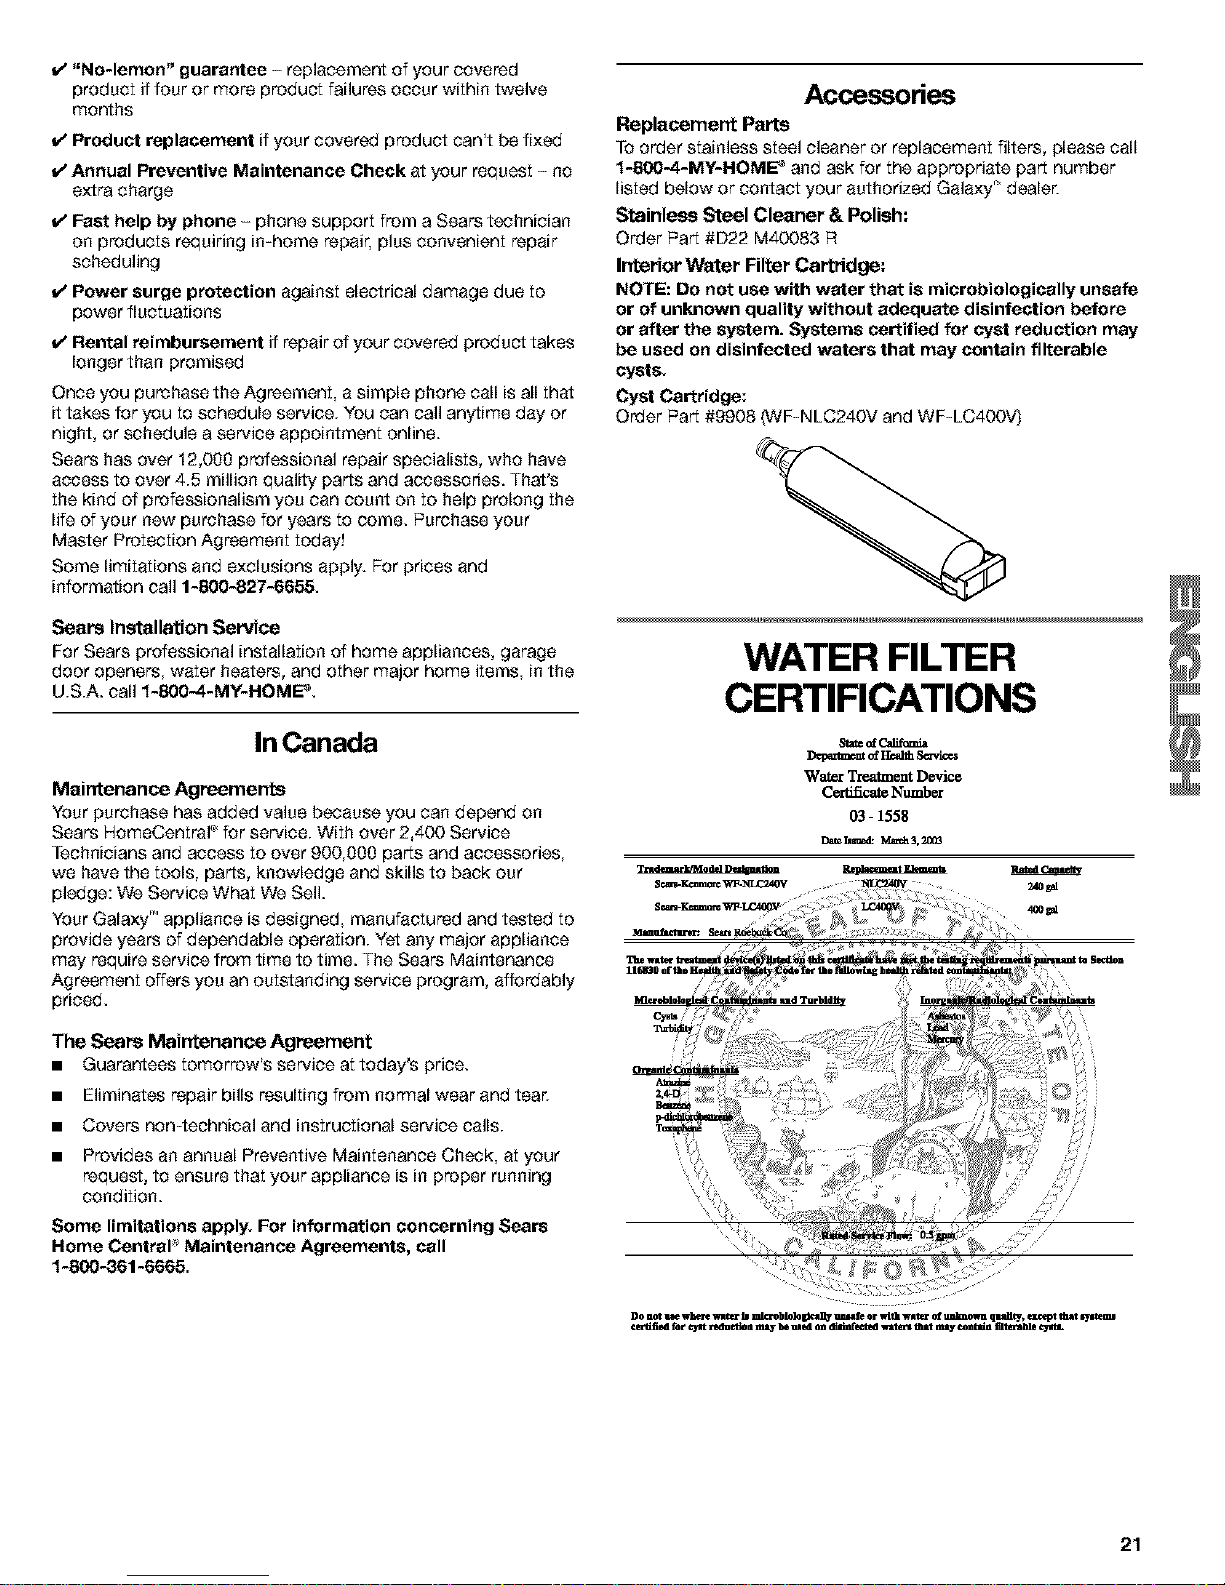
_'No-lemon" guarantee - replacement of your covered
product if four or more product failures occur within twelve
months
v' Product replacement if your covered product can't be fixed
Annual Preventive Maintenance Check at your request - no
extra charge
v' Fast help by phone - phone support from a Sears technician
on products requiring in-home repair, plus convenient repair
scheduling
v' Power surge protection against electrical damage due to
power fluctuations
Rental reimbursement if repair of your covered product takes
Gongerthan promised
Once you purchase the Agreement, a simple phone call is all that
it takes for you to schedule service. You can call anytime day or
night, or schedule a service appointment online.
Sears has over 12,000 professional repair specialists, who have
access to over 4.5 million qualily parts and accessories. That's
the kind of professionalism you can count on to help prolong the
life of your new purchase for years to come. Purchase your
Master Protection Agreement today!
Some limitations and exclusions apply. For prices and
information call 1-800-827-6655.
Sears Installation Service
For Sears professional installation of home appliances, garage
door openers, water heaters, and other major home items, in the
U.S.A. call 1-80O4-MY-HOME _.
InCanada
Maintenance Agreements
Your purchase has added value because you can depend on
Sears HomeOentre] e for service. With over 2,400 Service
Technicians and access to over 900,000 parts and accessories,
we have the tools, parts, knowledge and skills to back our
pledge: We Service What We Sell.
Your Galaxy '' appliance is designed, manufactured and tested to
provide years of dependable operation. Yet any major appliance
may require service from time to time. The Sears Maintenance
Agreement offers you an outstanding service program, affordably
priced.
The Sears Maintenance Agreement
• Guarantees tomorrow's service attoday's price.
• Eliminates repair bills resulting from normal wear and tear.
• Covers non-technical and instructional service calls.
• Provides an annual Preventive Maintenance Check, at your
request, to ensure that your appliance is in proper running
condition.
Some limitations apply. For information concerning Sears
Home CentraP Maintenance Agreements, call
1-800-361-6665.
Accessories
Replacement Parts
To order stainless steel cleaner or replacement filters, please call
1-800-.4--MY-HOME "_and ask for the appropriate part number
listed below or contact your authorized Galaxy' dealer.
Stainless Steal Cleaner & Polish:
Order Part #D22 M40083 R
Interior Water Filter Cartridge:
NOTE: Do not use with water that is microbiologically unsafe
or of unknown quality without adequate disinfection before
or after the system. Systems certified for cyst reduction may
be used on disinfected waters that may contain filterable
cysts.
Cyst Cartridge:
Order Part #9908 (WF-NLC240V and WF-LC4OOV)
WATER FILTER
CERTIFICATIONS
Sla_of_
IX-pezlm_toftI_lffa_
Wate_ T_atment D_1ice
CertLficateNumber
03-1558
Da_ luu_l: M=_h 3,20_
Do not _e where w_t_ b md_'oblo]olOlCd_' uncle or wltk wm_" r4'm_mowu quallq', ezcept 1fair sys_
_ for _ ]n_luelJon m_ be led en dhb_e_ed wlh_l thmt nl_ e_nimhl fll_ _
21
Page 22
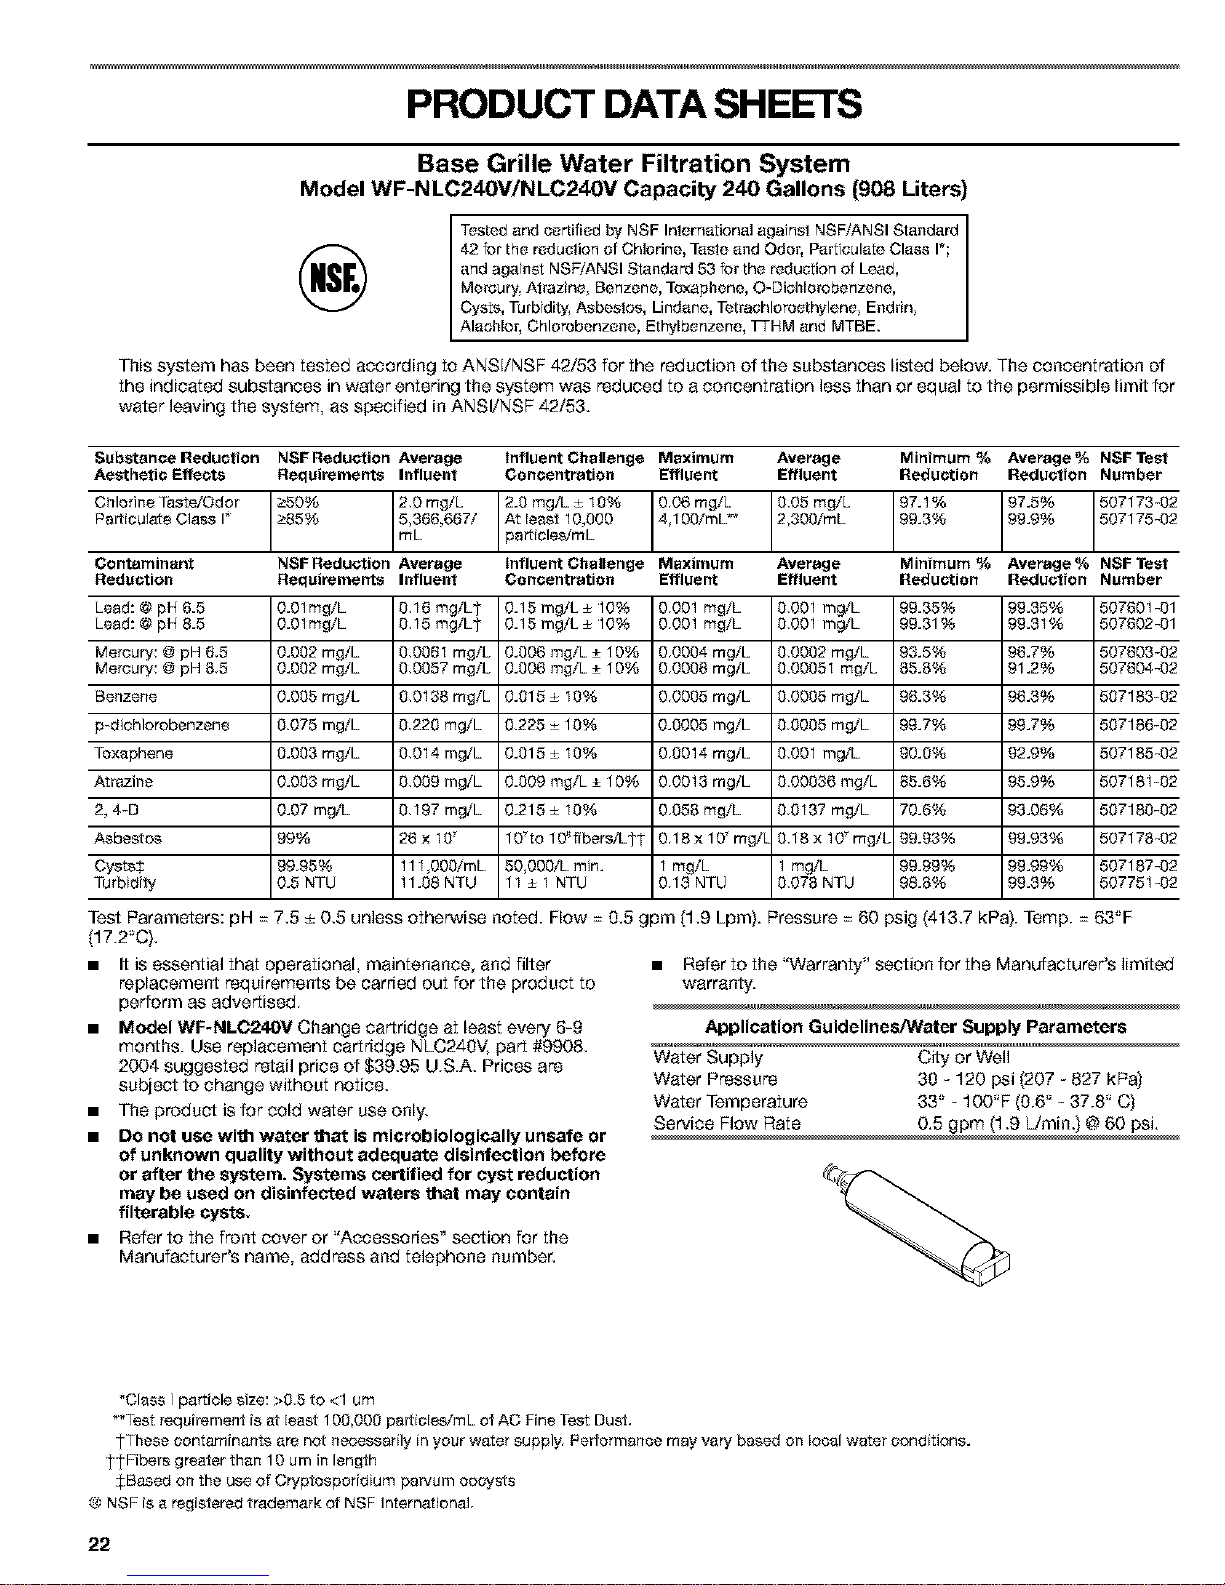
PRODUCT DATA SHEETS
Base Grille Water Filtration System
Model WF-NLC240V/NLC240V Capacity 240 Gallons {908 Liters)
Tested and certified by NSF International against NSFiANSI Standard
42 for the redublion of Chlorine, Tasle and 6dot, Particulate Class I*;
and against NSFiANSI Standard 53 for the reduction of Lead,
Mercury, Atrazine, Benzene, Toxaphene, O-Diohlorobeczece,
Cysts, ]-urbidity, Asbestos, Lindane, Tetrashloroethylene_ Endrin_
A ash or, Ch orobenzene, Ethy benzene, ]q-HM and MTBE.
This system has been tested according to ANSI/NSF 42/53 for the reduction of the substances listed below. The concentration of
the indicated substances in water entering the system was reduced to a concentration less than or equal to the permissible limit for
water leaving the system, as specified in ANSI/NSF 42/53.
8ubctaneeReduetfon NSFReducd;ion Average InfluentChallenge Maximum Average Minimum% Average% NSFTest
AestheticEffeets Requirements Influent Concentration Effluent Effluent Reduction Reduction Number
_85% 2,0 m9/[. 2.0 moiL ± 10% 97.1% 97.5% 507173-02Chlorine Taste/Odor _50% 5366,667/ At least 10,000 O,O6moil. 0,05 moil. 99.3% 99.9%
Particulate Class I_ 2,300/mL 507175-02
4,100/mL *_
mL part o as/mL
Contaminant NSFReduction Average Influent Challenge Maximum Average Minimum % Average% NSF Test
Reduction Requirements Influent Concentration Effluent Effluent Reduction Reduction Number
[.ead: @ pH 5.5 0.01moiL 0,15 molL1- 0.15 m@_L -+10% 0,001 molL 0,001 mglL 99.35% 99.35% 507501-01
[.ead: @ pN 8.5 0.01moiL 0,15 moiL1- 0.15 mg!L_+ 10% 0,001 mg/L 0,001 mg/L 99.31% 99.31% 507602-01
Mereury:@pHC,5 0.002mg/L 0,0061moiL 0.006mg1[.÷10% 0,0004m@ZL 0,0002mg/L 93.5% 95.7% 507603-02
Mereury:@pH55 0.002m_L 0,0057moiL 0.006m91[.÷10% 0,0008mg!L 0,00051 moll. 55.5% 91.2% 507604-02
Benzene 0.005 m_L 0,0139 moil. 0.015_+10% 0,0005 mg!L 0,0005 m_L 95.3% 95.3% 507193-02
p-@ohlorobeczece 0,075 mg/L 0220 mgtL 0,225 _ 10% 0.0005 moiL 00005 m_L 99.7% 99.7% 507196-02
Toxaphene 0.003 m_L 0,014 mg/L 0.015 _+10% 0,0014 mg!L 0,001 mg/L g0.O% 92.9% 507185-02
Atrasine 0.003 m_ZL 0,009 mg/L 0.009 moll. ÷ 10% 0,0013 mg!L 0,00006 moll. 85.6% 95.9% 507191-02
2, 4-D 0.07 mgtL 0,197 mg/L 0.215 _+10% 0,055 mgtL 00137 m_ZL 70.6% 90.06% 507190-02
Asbestos 99% 25x10 10 tolC_fibersiL1-T 0,19×10_m_£ 0,19x10_m_L 99.90% 99.93% 507175-02
Cysts$ 99,95% 111,000/mL 50,000/L rain. 1 moil. 1 moiL 99.99% 99.99% 507187-02
Turbidity 0.5 NTU 11.08 NTU 11 _+1 NTU 0,13 NTU 0,075 NTU 98.5% 99.3% 507751-02
Test Parameters: pH = 7.5 ± 0.5 unless otherwise noted. Flow = 0.5 gpm (1.9 Lpm). Pressure = 60 peig (413.7 kPa). Temp. = 63_F
(17.2_C).
• It is essential that operational, maintenance, and filter
replacement requirements be carried out for the product to
perform as advertised.
• Model WF-NLC240V Change cartridge at least every 6-9
months. Use replacement cartridge NLC240V, part 99908.
2004 suggested retail price of $39.95 U.S.A. Prices are
subject to change without notice.
• The product is for cold water use only.
• Do not use wi_ water "_at is microbiologically unsafe or
of unknown quality without adequate disinfection before
or after the system. Systems certified for cyst reduction
may be used on disinfected waters "_at may contain
filterable cysts.
• Refer to the front cover or "Accessories" section for the
Manufacturer's name, address and telephone number.
• Refer to the "Warranty" section for the Manufacturer's limited
warranty.
Application Guidelines/Water Supply Parameters
Water Supply City or Well
Water Pressure 30 - 120 psi (207 - 827 kPa)
Water Temperature 33 _ - 100"F (0.6" - 37.8" C)
Service Flow Rate 0,5 gpm (1.9 Wmim) @ 60 psi,
_Class / particle size: ;_0,5 to <1 um
_Tast _equiremect is at least 1O0OO0 particles/m[_ of AC Fine Test Dust,
_-Thase contaminants are not necessarily in your water supply. Performance may vary based on local water conditions.
_-l-Fiber_ greater than 10 um in length
_:Based on the use of Cryptasporidium parvum oooysts
(9 NSF is a registered trademark of NSF International.
22
Page 23

Base Grille Water Filtration System
Model WF-LC400ViLC400V Capacity 400 Gallons (1514 Liters)
Tested and certified by NSF International against NSFiANSI Standard
42 for the raduclion of Chlorine, Tasle and Odor, Particulate Class I*;
and against NSFiANSI Standard 53 for the reduction of Load,
Mercury. Atrazine, Benzene, Toxaphene, O-Diohloredenzene,
Cysts, Turbidity, Asbestos, Lindano, Tetrechloreethylene_ Endrin_
Alaohlor, Chlorebenzene, Ethyldenzene, ]q-HM and MTBE.
This system has been tested according to ANSI/NSF 42/53 for the reduction of the substances listed below. The concentration of
the indicated substances in water entering the system was reduced to a concentration less than or equal to the permissible limit for
water leaving the system, as specified in ANSI/NSF 42/53.
Substance Reduction NSF Average Intlueet Challenge Maximum Average Minimum % AvePage % NSF Teat
Aesthetic Effects Reduction Influent Conc_ntretion Effluent Effluent Reduction Reduetion Number
Requirements
Chlorine Taste/Odor _50% 2,1 rng/L 2,0 mgiL i 10% 0,06 rng/L 0,05 mgiL g7,1% ST,g% 507170-02
Particulate Class 1_ _B5% 5 3ge,gg7imL At least 10,000 99,3%
507175-0299,9%2.300/rnLpart a e&imL 4, OOimL**
Contaminant NSF Average Intlueet Challenge Maximum Average Minimum % AvePage % NSF Teat
Reduction Reduetion Influent Conc_ntretion Effluent Effluent Reduction Reduetion Number
Requtrementa
Lead: @ pH 6.5 O,01mgiL 0,16 mgiL1- 0,15 rng/L ÷ 10_;_ 0,001 mgiL 0,001 mgiL 99,3% 99,35_;_ 507601-01
Lead: @ pH 8.5 O,01mgiL 0,15 mgiL1- 0,15 mg!L ÷ 10% 0,001 mgiL 0,001 mgiL 99,2% 99,01% 507602-01
Mercury: @ pH 6.5 0,002 mgiL 0,0061 rng/L 0,006 mgiL _ 10% 0,0004 mg/L 0,0003 rngiL 93,5% 96,7% 507600-02
Mercury: @ pH 8.5 0,002 mglL 0,0057 rn_q= O,OOgmgiL _ 10% 0,0008 mg/L 0,00051 mg/L 85,8% 91,2% 507604-02
Benzene 0,005 mglL 0,0108 rn_L 0,015_+ 10% 0,0005 mg/L 0,005 mgiL 96,3% 96,3% 507183-02
)-diuhlorcbenzene 0,075 mgiL 0220 mg/L 0,225 _ 10% 0,0005 mg/L 00005 rnglL g9,7% g9,7% 507186-02
Toxaphene 0,003 mgiL 0,014 mg/L 0,015 _ 10% 0,0014 mg/L 0001 mg/L 90% g2,g6% 507185-02
Atrazine 0,003 mgiL 0,009 mgiL O,OO9mg/L ± 10% 0,0013 mg/L 0,00036 mg/L 85,6% 85,6% 507181-02
2, 4-D 0,07 rn_ZL 0,197 mgiL 0,215 _ 10% 0,058 mgiL 0,0107 rn_iL 70,6% 93,06% 507180-02
Asbestos 99% 26 x 10 10to 10_fibere/Ll-1" 0,18 × 10 mgA 0,18 x 10_mgiL 9993 g9,93% 507178-02
Cysts_ 99,95% 11t ,OO0tmL 50 O0O/L min. 1rn#/L 1 mg/L 99,99% 99,99% 507187-02
Turbidity 0,5 NTU 11.08 NTU 11 ÷ 1 NTU 0,13 NTU 0,078 NTU 98,8% 99,0% 507751-02
Test Parameters: pH = 7.5 ± 0.5 unless otherwise
(17.2_C).
• It is essential that operational, maintenance, and filter
replacement requirements be carried out for the product to
perform as advertised.
• Model WF-LO400V The filter monitor system measures the
amount of water that passes through the filter and alerts you
to replace the filter. When 90% of the filter's rated life is used,
the filter indicator light changes from green to yellow. When
100% of the filter's rated life is used, the filter indicator light
changes from yellow to red, and it is recommended that you
replace the filter. Use replacement cartridge LC400'_ part
#9908. 2004 suggested retail price of $39.95 U.S.A. Prices
are subject to change without notice.
• The product is for cold water use only.
• DO not usa wil_ water l_at is microbiologically unsafe or
of unknown quality without adequate disinfection before
or after the system. Systems certified for cyst reduction
may be used on disinfected waters that may contain
filterable cysts.
noted. Flow = 0.5 gpm (1.9 Lpm). Pressure = 60 psig (413.7 kPa). Temp. = 63_F
• Refer to the front cover or "Accessories" section for the
Manufacturer's name, address and telephone number.
• Refer to the "Warranty" section for the Manufacturer's limited
warranty.
Application Guidelines/Water Supply Parameters
Water Supply City or Well
Water Pressure 30 - 120 psi (207 - 827 kPa)
Water Temperature 33 _ - 100"F (0.6" = 37.8" C)
Service Flow Rate 0.5 GPM (1.89 Wmin,) @ 60 psi,
_Class / particle size: ;_0,5 to <1 um
_Tast requirement is at least 1O0OO0 particledmL of AC Fine Test Dust.
_-Thase contaminants are not nesessarily in your water supply. Performance may vary based on local water conditions,
_-l-Fibere greater than 10 um in length
_:Based on the use of Cryptosporidium parvum oocysts
('_NSF is a registered trademark of NSF International.
23
Page 24

|NDICE
GARANTiA .................................................................................... 24
SEGURIDAD DEL REFRIGERADOR .......................................... 25
C6mo deshaeerse adecuaaamente de eu refrigerador viejo ... 25
INSTRUCCIONES DE INSTALACI6N ........................................ 26
Desempaque el refrigerador ...................................................... 26
Requisites de ubieaei6n ............................................................ 26
Requisites el6ctrieos ................................................................. 27
Requisites del suministro de agua ............................................ 27
Rejilla de la base ........................................................................ 27
Puertas del refrigerador ............................................................. 28
Ajuste las puertas ...................................................................... 30
Conexi6n del suministro de agua ............................................. 30
Preparaci6n del sietema de agua .............................................. 31
Sonidoe nomnalee ...................................................................... 32
USO DE SU REFRIGERADOR .................................................... 32
C6mo asegurar la debida circulaci6n del aire .......................... 32
Use de los controles .................................................................. 32
Despachadores de ague y hielo ................................................ 33
La luz del estado del filtro de ague ........................................... 34
Sistema de filtraci6n de agua .................................................... 35
F,_brica de hielo y dep6sito ....................................................... 36
CARACTER|STICAS DEL REFRIGERADOR ............................. 86
Estantes del refrigerador ........................................................... 36
Cajdn pare eames fries ............................................................. 36
Cajdn convertible pare verauras/came,
caj6n pare verduras y tapas ...................................................... 37
Control de temperature pare el
caj6n convertible de verduras/cames ....................................... 37
Control de humedaa del eaj6n pare verdures .......................... 38
Portavinos .................................................................................. 38
Compartimiento pare alimentoe ................................................ 38
CARACTER|STICAS DEL CONGELADOR ................................ 38
Estante del eongelador ............................................................. 38
Canastilla o dep6sito del congelador ....................................... 38
CARACTER|STICAS DE LA PUERTA ........................................ 3,9
Rieles o recipientes de la puerta ............................................... 39
Recipientes de la puerta ............................................................ 39
CUIDADO DE SU REFRIGERADOR ........................................... 89
Lir'npieza .................................................................................... 39
C6mo eambiar los feces ........................................................... 40
Cortes de corriente .................................................................... 41
Cuidaao durante las vacaciones y mudanzas .......................... 41
SOLUCI(_N DE PROBLEMAS ..................................................... 42
CONTRATOS DE PROTECCI_N ................................................ 45
En los EE.UU ............................................................................. 45
En Canad_ ................................................................................. 45
Accesorios ................................................................................. 45
HOJA DE DATOS DEL PRODUCTO .......................................... 46
NOMEROS DE SERVICIO .............................. CONTRAPORTADA
GARANTiA
GARANT|A TOTAL POR UN A_IO PARA EL REFRIGERADOR
Per un a_o desde la fecha de oompra, ouando el refrigeredor es
operatic y mantenido de acuerdo alas instrucciones adheridas al
producto o provistas con el mismo, Sears reparar_ este
refrigerador, libre de cargo, si hay defectos de material o de
mane de obra.
GARANTIA TOTAL POR CINCO AltOS PARA EL SISTEMA
SELLADO DE REFRIGERACI(_N
Per cinco aaos desde la fecha de compra, cuando el refrigerador
es operado y mantenido de acuerdo a las instrueciones para el
propietario adheridas al producto o provistas con el mismo,
Sears reparar& el sistema sellado (que consiste en la
refrigeracidn, tuberia de conexi6n, y compresor) libre de cargo, si
hay defectos de material o de mane de obra.
La cobertura de la garantfa mencionada anteriormente se aplica
s61oa los refrigeradores que se usan con el prop6sito de
conservar alimentos en hogares y excluye los cartuchos de
filtracidn Galaxy '_Filtered Ice & Water (el estuviesen equipados
con el sistema de filtracidn). LOScartuchos originales y de
reemplazo est&n garantizados solamente per 30 dfas contra
defectos de fabricaci6n o de mane de obra de sue componentes.
LA GARANTiA DE SERVICIO EST,_.DISPONIBLE LLAMANDO
AL CENTRO DE SERVICIO SEARS MAS CERCANO EN LOS
ESTADOS UNIDOS 0 CANAD,_..
Esta garant[e se aplica s61o mientras el producto se usa en
los F-._adoe Unidos o en Caned& Esta garantia le de
dereehos legales espoeilicoe y Ud. tambi6n puede tener
otros dereehos que varian de estado a estado o de provincia
a provincia.
Los t6rminos de la garantia pueden variar en Canad& Contacte a
su Centre de Servicio Sears para detalles completes.
Sears, Roebuck and Co.
Dept. 817WA, Hoffman Estates, IL 60179
Sears Canada, Inc., Toronto, Ontario, Canada MSB 2138
Registro del producto
En el espacio de abajo, anote su nSmero complete de modelo y
eerie y la fecha de compra. Usted puede encontrar esta
informaci6n en la etiqueta del nQmero de medelo y de eerie que
se encuentra en la pared interior del eompartimiento del
refrigerador.
Tenga esta informaci6n disponible para facilitarle laobtencidn de
asistencia o servicio con prontitud siempre que Ilame a Sears
con respeeto a su refrigerador.
N_mero de modelo 106,
N_mero de serie
Feoha de oomp_a
Guarde estae ins_rucciones y su comprobante de compra
pare referencia future.
24
Page 25

SEGURIDAD DEL REFRIGERADOR
Su seguridad y la seguridad de los demos es muy importante.
Heroes ]neJuido touches mensajea impertantes de seguridad en eate manual yen su eleetredem_stice. Lea y ebedezea siempre
redes lea mensajes de seguridad.
Este ea el simbolo de advertencia de seguridad.
Este sfmbole le llama la atenci6n sobre peligros potenciales que pueden ecasionar la muerte o una lesiSn a
usted y a los dem&s.
Todos los mensa]es de seguridad ir&n a centinuaci6n de] aimbo]e de advertencia de seguridad y de la palabra
"PELIGRO _ e "ADVERTENCIA _. Estas palabras significan
$i no sigue Ias instrucciones de inmediato, usted puede
modr o sufrir una Iesi6n grave.
Si no sigue Ias instrucciones, usted puede morir o sufrir
una Iesi6n grave.
Todoa lea mensajes de seguridad le dir&n el peligro potencial, le dir,_n c6mo redueir las posibilidades de sufrir una lesi6n y le que
puede suceder si no se siguen las instruecienes.
INSTRUCCIONES IMPORTANTES DE SEGURIDAD
ADVERTENCIA: Para reducir el rieego de incendie, cheque el6ctrico, o lesienes persenales al usar su refrigerador siga
estes precauciones b&sicas:
• NOquite la terminal de cone×i6n a tierra.
• No use un cable el@ctrico de extensi6n.
• Deeconecte el suminietro de energia antes de dade servicio.
• Vuelva a colocar todos los panelee antes de ponedo a
funcionar.
• Remueva lae puertes de su refrigerador viejo.
• Use un limpiador no infiamable.
• No use un adaptader.
• Mantenga los materiales y vapores infiamablee, tales come
geselina, alejados del refrigerador.
• Use des e m,_s personas para mover e inetalar el
refrigerador.
• Deeconecte el suminietro de energia antes de inetalar la
f,_brica de hielo (en aquellos modelos que incluyen el juego
de inetalaci6n de la f&brica de hielo).
• Use un vase reeietente para recibir hielo o agua del
despachador (en algunos modeloe).
• Conecte a un contacto de pared de conexi6n a tierra de
3 terminalee.
CONSERVAR ESTAS INSTRUCCIONES
C6mo deshacerse adecuadamente de su
refrigerador viejo
Antes de tirar su refdgerador o congelador viejo:
• Saqueles puertes.
• Deje los estantes en su lugar aei los nines no pueden meterse
con facilidad.
IMPORTANTE: El atrapamiento y aefi×ia de ni_oe no ee un
preblema del pesado. Los refrigeradoree tirades y abandonados
sen un peligro...a0n si van a quedar ahi "per unos pocos dfae'L Si
Ud. eet& per deshacerse de su refrigerador viejo, per favor siga
lae inetrucciones que se dan a continuaci6n para prevenir
accidentee.
25
Page 26

INSTRUCCIONES DE INSTALACION
Desempaque el refrigerador Requisites de ubicacibn
Peligro de Peso Excesivo
Use dos o mds personas para mover e instatar
el refrigerador.
No seguir esta instrucci6n puede ocasionar una
lesi6n en la espalda u otto tipo de Iesiones.
C6mo quitar los materiales de empaque
• Quite las cintas y gomas de su rafrigerador antes de
encenderlo. Frete un pete de detergente Ifquido sebre el
adhesive con los dedos. Limpie con agua tibia y seque.
No use instrumentos filosos, alcohol para friccienes, liquidos
inflamables e limpiaderas abrasives para eliminar testes de
cinta e goma. Estes preductes pueden dafiar la superficie de
su refrigerador. Para m&s informaci6n, yea "Seguridad del
refrigerader'L
C6mo mover su refrigerador:
Su refdgerador es muy pesado. Cuande mueva su
refrigerador para limpiade o darle eervicio, proteja el piso.
AI mover el refrigerador, siempre tire diraotamente hacia
afuera. No menee el rafrigerador de lade a lade ni Io haga
"caminar" cuande Io trate de mover ya qua pedria dafiar
el piso.
C6mo limpiar su refrigerador antes de us.ado
Una vez que usted haya quitade redes los matedales de
empaque, limpie el interior de su refrigerador antes de usarlo.
Vea Ins instrucciones de limpieza en "Cuidado de su
refrigerader'L
Informaci6n importante para saber acerca de los estantes
y tapas de vidrio:
No limpie los estantes y tapas de vidrio con agua caliente
mientras est&n fries. Los estantes y tapas pueden romperse
sise exponen a cambios bruscos de temperatura o impacto,
come seria un golpe brusco. Para su proteceiSn, el vidrio
templado se ha disefiado para hacerse a_icos. Esto as normal.
Los estantes y tapas de viddo son muy pesados. Tenga
touche cuidado al sacarlos para evitar qua se darien al caer.
Peligro de Explosi6n
Mantenga los materiates y vapores inflamables,
tales come gasolina, atejados del refrigerador.
No seguir esta instrucci6n puede ocasionar Ia muerte,
explosi6n, o incendio.
Para asegurar la adecuada ventilaci6n para su refrigerador, deje
un espacio de Y_"(1,25 ore) a carla lade y per encima. Si Ud.
instala el refdgerador pr6ximo a una pared fija, deje come minimo
2" (5,08 ore) a carla lade (dependiendo del modelo) para permitir
qua la puerta abra bien. Si su refdgerador tiene una f&brica de
hiele, asegQrase que hay espacio adicional atr&s para Ins
conexiones de la Ifnea de agua.
NOTA: No instale el refrigerador cerca de un homo, radiador, u
otra fuente de taler, ni en un lugar deride la temperatura puede
set menor de 55"F (13"C).
ill iiii
ill iiiiiii_
/
2" (5,08era)
26
Page 27

Requisites el6ctricos
Peligre de Cheque EI6ctrico
Conecte a un eontacto de pared de eonexi6n a tierra de
3 terminales.
No quite el terminal de sonexi6n a tierra.
No use un adaptador.
No use un cable el6ctriso de extensi6n.
No seguir estas instrucciones puede ocasionar
la muerte, insendio o cheque el6ctrico.
Antes de mover el refrigerador a su posici6n definitiva, es
impertante asegurarae que Ud. tiene la cone×i6n el6ctrica
adecuada.
Metodo de conexi6n a tierra recomendado
Se requiera una fuente de energia el6ctrica de 115 Volties,
60 Hz., CA selamente y con fusibles de 15 6 20 amperios,
debidamente conectados a tierra. Se recomienda que se use un
cirouite separado s61opara su refrigerador. Use un temacorriente
que no se puede apagar con un interrupter. No use un cable
el6ctrico de sxtensi6n.
NOTA: Antes de realizar cualquier tipo de instalaci6n, limpieza o
de quitar un foco de luz, ponga el control (del termostato, del
refrigerader o del congelader dependiende del modelo) en la
posici6n OFF (apagado) y luego desconecte el refrigerador de la
fuente de energia. Cuando Ud. haya terminado, reconecte el
refrigerador a la fuente de energfa el6ctrica y vuelva a porter el
control (del tsrmostate, del refrigerador o del congelador
dependiende del modelo) en la posici6n deseada.
Requisites del suministro de agua
Lea todas las instrucciones con cuidado antes de cornenzar.
IMPORTANTE:
• Si usa el refrigerador antes de instalar la conexi6n del agua,
ponga la f,_brica de hiele en la pesici6n OFF (apagado).
• Tedas Ins instalaciones deben hacerse de acuerdo a los
requerimientos locales de plomeria.
• Use tuberias de cobra y revise si hay fugas. Instale tuberia de
cobra s61o en _raas donde la temperatura va a permanecer
per encima del punto de congelaci6n.
HERRAMIENTAS NECESARIAS: Desternillador de hoja plan&
Ilaves de boca de _d' y _A"e 2 Ilaves ajustables, Ilave para
tusrcas y breca de barrana de 1/;¢,taladro manual o el6ctrico
(debidamente conectado a tierra).
NOTA: El distribuider de su refrigerader tiene un juego dispenible
con una v,_lvula de cierra tipe montura de 1/_,,(6,35 ram), una
uni6n y tubefia de cobra. Antes de comprar, asegSrase que la
v_lvula tipo montura cumpla con los c6digos de plomerfa de su
Iocalidad. No use una v_lvula perforadora o una v,_lvula de
montura de 3/m" (4,76 ram) que reduce el flujo de agua y se
obstruye con m&s facilidad.
Presi6n del agua
Se necesita un suministro de agua fria con presiSn de agua entre
30 y 120 Ibs/pulg 2 (207 a 827 kPa) para hater funcionar el
despachador de agua y la f&brica de hielo. Si usted tiene
preguntas acerca de la presi6n de agua, Ilame a un plomere
competente autorizado.
Suministro de agua de osmosis inversa
IMPORTANTE: La presi6n del suministro de agua que sale de un
sistema de 6smosis inveraa y va a la v,_lvula de entrada de agua
del refrigerador necesitar_ ser entre 30 y 120 Ib/pulg 2 (207 a
827 kF'a).
Si se ooneota un sistema de filtraoi6n de agua de 6smosis
inversa al suministro de agua fria, la presi6n de agua al sistema
de 6smosis inveraa necesitan_ ser de un minimo de 40 a 60 Ibs/
pulg 2(276 a 414 kPa).
Si la presi6n del agua del sistema de 6smosis inveraa es menor
de 40 a 60 Ibdpulg 2(276 a 414 kPa):
• Fijese si el filtre de sedimentos en el sistema de 6smosis
inversa est,_ bloqueado y reempl&cele si fuera necesario.
• Deje que se vuelva a Ilenar el tanque de almacenaje del
sistema de 6smosis inveraa despu@s del use intense.
• Si su refrigerador tiene un cartucho del filtre de agua, se
podr_ reducir la presi6n a_n m_s si se usa en conjunto con
un sistema de 6smosis inveraa. Quits el cartucho del filtro de
agua; yea "Sistema de filtraci6n de agua'L
Si tiene preguntas acerca de la presi6n del agua, Ilame a un
plemero competente auterizado.
Rejilla de la base
Quite la rejilla de la base:
1. Abraambas puertas.
2. Sujete la rajiUa con sus manes per los sxtramos. Empuje
hacia adentra sebra la parte superior de la rajilla de la base y
jale hacia arriba sebra la parte inferior.
NOTA: Aseg_rase de velvet a fijar la ficha t6cnica en la parte
trasera de la rajilla de la base despu@s de limpiar.
Vuelva a colocar la rejilla de la base;
1. Abraambas puertas.
2. Alinee las lengSetas del seporte de la rejilla con los
sujetadores met,_licos.
& Empuje la rajiUa con firmeza para que encaje en su lugar.
27
Page 28

Puertas del refrigerador
HERRAMIENTAS NECESARIAS: Llaves de tubo de cabeza hexagonal de 1A' y _/_" y ua destornillac_or de eabeza plan&
IMPORTANTE: Antes de comenzar, fije el control del rdrigerador a OFF (Apagado). Desenchufe el refrigerador o desconecte el
suministro de energia. Quite los alimentos y cualquier puerta ajustable o recipientes utilitarios de lee puertas.
NOTA: Solamente pudiera set necesario quitar la agarradera de la puerta o lee puertas pare Iograr introducir el producto pot la entrada
a su hogar. Mida la abertura de la puerta pare determiner si es necesario quitar lee puertas o lee agarraderas.
\
Bisagra superior
izquierda
A. No quite el tornillo
Conexi6n de la
tuberia del despa-
chador de ague
I
A, Anillo roioexterior
Rejilla de la base
C6mo quitar
la puerta
Nivel
I
C6mo quitar
las agarraderas
(opcional)
Alineaei6n de Ice
puertas
-}l
Bisagra superior
derecha
Bisegre inferior
Nivelaci6n delantera
A. Tornillo nivelador
28
Page 29

Quite las agarraderas (opcional)
1. Apriete con su mane firmemente el frente del adomo. Deslioe
el adorno supenor haeia arriba y el infenor haeia abajo de la
agarrader'a. Separe Ins piezas del adorno de los tornillos de
tope. Yea la ilustraci6n 1.
2. Quite los tomillos de Ins agarrader'as y Ins agarraderas. Vea la
ilustraci6n 1.
3. Coloque el refrigerador en su eitio. Reemplace Ins
agarraderas come se muestra. Vea la ilustr'aei6n 1.
Quite las puertas
Peligro de Choque EI6ctrico
Desconeete el suministro de energia antes de saear
las puertas.
No seguir esta instrucci6n puede ocasionar Ia muerte
o choque el_ctrico.
1. Desenchufe el refrigerador o desconecte el euminietm de
energia.
2. Abra ambas puertas del refrigerador. Quite la r'ejilla de la base
tirando de los extremes exteriores del fondo hacia arriba. Vea
la ilustraci6n 2.
3. Cierre ambas puertas y mant6ngalas cerradas hasta que est6
lieto par'a separadas del gabinete.
4. Si tiene un despachador (de hielo o de agua), desconecte la
tuberia del despachador de agua ubicada detr_s de la rejilla
de la base en el lade de la puerta del congelador. Vea la
ilustraci6n 3.
• Presione el anillo r'ojo exterior contra la car'a del encaje y
jale la tuber[a del despachador par'a liberarla.
• En algunos modelos, quite la tubeda de la abrazadera de
la manguera.
5. Quite la cubierta de la bisagra superior izquierda y los
tornillos seg_n se muestra. Vea la ilustraci6n 4. No quite el
tornillo A.
6. Desconecte el cableado:
• Desconecte el enchufe de cableado.
• Quite el tomillo del hilo verde de conexidn a tierra para
deseonectar los hiloe a tierra.
C
A
7. Levante cuidadosamente la puerta del congelador
directamente hacia arriba para separarla de la bisagr'a
inferior. Yea la ilustraci6n 5. La tuberia del despachador de
agua queda afianzada a la puerta del congelador y se jala a
trav6s de la bisagra izquie_a inferior. Cerci6rese de proteger
la tubeda del despachador de agua contra dafios.
8. Quite la cubierta de la bisagra superior derecha y los tornillos
seg_n se muestra. Vea la ilustraci6n 6. No quite el tornillo A.
9. Levante la puerta del refrigerador directamente hacia arriba
para separarla de la bisagra inferior.
10. Quiz_ no sea necesario quitar la bisagra inferior para pasar el
refrigerador per una puerta. Ambas bisagras inferiores tienen
la misma construcci6n.
• Desensamble Ins bisagras seg6n se muestra. Vea la
ilustracidn 7. No quite el tornillo A.
Vuelva a colocar las puertas y las bisagras
1. Si las quit6, vuelva a colocar ambas bisagras inferiores.
Apdete los tomillos.
2. Pase cuidadosamente la tuberia del despachador de agua a
trav6s de la bisagra inferior izquierda antes de r'eemplazar la
puerta del congelador en la bisagra. Es posible que necesite
ayuda.
NOTA: Disponga de un soporte adicional par'a Ins puertas
mientras r'eemplaza Ins bisagras superiores. NOse conffe en que
los imanes de Ins puertas van a sostener Ins puertas mientras
trabaja.
3. Vuelva a conectar la tuberia del despachador de agua
empuj_ndola dentro del encaje hasta que pare y la marca
negra toque la car'a del encaje. Vea la ilustracidn 3. En
algunos modelos, vuelva a colocar latuberia en laabrazadera
de la manguera.
4. Alinee y template la bisagra superior izquierda seg6n se
muestra. Vea la iluetraci6n 4. Apriete los tomilloe.
Peligro de Choque El_ctrico
Reconeete las doe eonexiones a tierra.
No seguir estas instruceionee puede oeasionar
Ia muerte o ehoque el_ctrico.
• ReeoneeteInsdos conexione8 atierm.
• Reconecteel enchufe del cableado.
C
A
A, No qui_ d tom#to A
B. H#O_ de conexidn a tieffa
O Tom#to de! bile verde de conexi6n a fieme
D. Enchufe de caf_leado
A. No quite e_ torn#lo A
B. H_IO8de conexidn a fiet_
C Torn#lo del bile verde de conexidn a derffa
D. Enchufe de cableado
5. Reemplace la cubierta de la bisagra izquierda y los tornillos.
29
Page 30

6. Reemplace la puerta del refrigerador, encaj_ndola
cuidadosamente sobra la bisagra inferior derecha.
7. Alinee y reemplace la bisagra superior deracha seg0n se
muestra. Yea la ilustracidn 6. Apriete los tornillos.
8. Reemplace la cubierta de la bisagra y los tornillos. Apriete los
tornillos.
2. CIERRE el suministro principal de agua. ABRA el grifo de
agua m_s cercano el tiempo suficiente para que la tuberia de
agua se vacfe totalmente.
8. Busq ue una tuberfa vertical de agua fria de ¢/_,"a 11/4"
(1,25 cm a 3,18 ore) cercana al refrigerador.
IMPORTANTE:
9. Enchufe el refrigerador o reconecte el suministra de energia.
Ajuste las puertas
C6mo cerrar la puerta
1. Ubique el refrigerador en su posici6n definitiva.
2. Coloque un nivel dentra del refrigerador, en la parte tresera
del estante superior. Vea la ilustraci6n 8.
8. Ubique los tornillos niveladores detr&s de la rejiUade la base
del refrigerador, en cualquiera de los lados.
4. Use una Ilave de tube de cabeza hexagonal para ajustar los
tornillos niveladoras del radiUo tresero hesta que el
refrigerador quede nivelado. Gira el torniUo nivelador del
radillo tresero hacia la deracha para levantar ese lado del
refrigerador o gira el tornillo nivelador hacia la izquierda para
bajar ese lado. Vea la ilustraci6n 10. Aseg0rase de que el
refrigerador est6 nivelado antes de proceder.
5. Compruebe la alineaci6n de les puertes despu6s de haber
nivelado el refrigerador.
Aseg0rese de que sea una tuberfa de agua frfa.
Una tuberia horizontal funcionar_, pera taladre por el lado
superior de la tuberia, no per debajo. Esto ayudar,_ a
mantener el agua alejada del taladro. Esto tambi6n evita
que se junte sedimento normal en la v_lvula.
Para determinar la Iongitud de la tuberia de cobra que va a
necesitar, mida desde la conexi6n baja de la parte tresera
izquierda del refrigerador hesta la tuberia de agua. Agrague
7 pies (2,1 m) para la limpieza. Use tuberfa de cobra de _A"
(6,3 ram) de all,metro externo. Aseg0rase que ambos
extramos de la tuberia de cobra est6n cortados rectos.
Usando un taladro conectado a tierra, haga un orificio de 1/4"
en la tuberia de agua frfa que Ud. eligi6.
Alinee las puertas
IMPORTANTE: Nivele primero la parte posterior del refrigerador
come se describe en "Cdmo cerrar la puerta'L
6.
Es posible que les puertes queden desparajas despu6s de nivelar
el refrigerador. Vea la ilustraci6n 9. Les puertes est&n prefijadas
de f&brica, de manera que la puerta del refrigerador est& m,_saita
que la puerta del congelador apraximadamente per el espesor de
una moneda. Una vez que les puertes est6n cargades de
alimentos, deberian estar nivelades. Si se necesita ajustar la
altura de la puerta DESPUES de que les puertes est6n cargades
de alimentos, siga estos pesos.
1. Use una Ilave de tube de cabeza hexagonal para ajustar los 7.
tornillos niveladoras del rodillo delantera hesta que las
puertes est6n parejes. Gire el tornillo nivelador del rodillo
delantero hacia la deracha para levantar ese lado del
refrigerador o gira el tornillo nivelador hacia la izquierda para
bajar ese lado. Vea la ilustraci6n 10.
NOTA: Oespu6s de carla ajuste, abra y cierra les puertes del 8.
congelador y del refrigerador para comprobar el alineamiento
de les puertes.
2. Abra las puertes y reemplace la rejilla de la base. Alinee les
pestaf_as de apoyo de la rejiUacon los sujetadores met,_licos.
Empuje la rejilla con firmeza, hesta que ajuste a presi6n en su
sitio.
NOTA: Cerci6rese de reponer la Hoja T6cnica detr,_s de la
rejilla de la base.
Conexibn del suministro de agua
Lea todes les instrucciones con cuidado antes de comenzar.
IMPORTANTE: Si usa el refrigerador antes de instalar la
conexi6n del agua, ponga la f,_brica de hielo en la posicidn de
apagado (OFF).
Conexion a la linea de agua
1. Desenchufe el refrigerador o desconecte el suministra de
energia.
A. Tubef_a de agua fr(a
B, Abt_zader_ pare tuberfa
C. Tubef_a de oobre
D. Tuerca de comp_sidn
E. Man_ja de compresidn
F..V_dvulade cierfe
G, Tuerca de pre_i6n
Ajuste la v&lvula de cierra a la tuberia de agua frfa con una
abrazadera para tuberfa. AsegQrase que el extramo de salida
est6 firmemente insertado en el orificio taladrado de 1/4"en la
tuberia de agua y que la arandela est6 por debajo de la
abrazadera para tuberia. Ajuste la tuerca de presi6n. Ajuste
los tornillos de la abrazadera para tuberfa con cuidado yen
forma paraja de manera que la arandela provea un cierra
herm6tico. No apriete demesiado porque se puede quebrar la
tuberia de cobra.
Deslice la manga de compresi6n y la tuerca de compresi6n
sobra la tuberfa de cobra como se muestra. Inserte el
extramo de la tuberia en el extreme de salida hasta donde
sea posible. AtorniUe la tuerca de compresi6n sobra el
extramo de salida con una Ilave ajustable. No apriete
demesiado.
Coloque el extramo libra de la tuberfa dentro de un recipiente
o fregadero, yABRA la Ilave de agua principal para lavar la
tuberia hesta que el agua salga limpia. CIERRE la v&lvula de
cierre del agua en la tuberfa de agua. Enralle la tuberia de
cobra en espiral.
Conexion al refrigerador
Es_lo 1
1. Desenchufe el refrigerador o desconecte el suministra de
energia.
2. Fije el tube de cobra a la entrada de la v,_lvula usando una
tuerca de compresi6n y manga de compresi6n como se
muestra. Ajuste latuerca de compresi6n. No apriete
demesiado.
9.
Use la abrazadera para tuberfa en la parte trasera del
refrigerador para afianzar la tuberia al refrigerador segQn se
muestra. Esto ayudar& a evitar da_os a la tuberia cuando el
refrigerador se empuje contra la pared posterior.
4. ABRA la v&lvula de cierra.
30
Page 31

Revise si hay fugas. Ajuste Ins conexiones (incluee Ins de la
v_lvula) o tuercas que tienee fugas.
a_ _, A
A, Abrazadera para tuberfa C. Tuerca de compre_i6n
B, Tuber{a de cobre D. Entrad_ de la v_tvuta
6.
La f_brica de hielo est,_equipada con un filtro de agua
ieeorporade. Si Ins ceedicieees del agua local requieren un
segunde filtro de agua, se debe inetalar en la linea de agua de
W' (6,35 ram) en cualquiera de las cone×ieees de la tuberia.
Consign un filtro de agua del distribuidor de
electredom6sticos m,_scercano a su domicilio.
7. Enchufe el refrigerador o reconecte el suministro de energia.
8. Enjuague el sistema de agua. Yea "Prepare el sistema de
agua".
NOTA: Deje transcurrir 24 horns para la producci6n de la primera
tanda de hielo. Desh_gase de los tree primeree lores de hiele
preducido. Deje pasar 3 dfas para que ee Ilene completamente el
recipiente para hiele.
Eerie 2
1. Deeenchufe el refrigerador e desceeecte el suminietro de
energia.
2. Quite la cinta de empaque de la tubefia gris enrellada en la
parte trasera del refrigerador.
8. Se necesita un acoplamieete de 1/4"× W' para conectar la
tuberia de agua a una linen dom6stica de agua existeete.
Enrosque la tuerca provista eebre el acoplamiento en el
extreme de la tuberia de ochre.
NOTA: Apriete la tuerca a mane. Luego apri6tela des vueltas
con una Ilave de tuercas. No apriete demasiado.
A B C D E F
A. Tuber{a de adua at D. Acopt_enfo (pfov_sto)
ref#gerador E. F_rula (_dquidda)
B. Tuerca {provista) K Tuerca {adquifida)
C. Butbo
4. ABRA la v_lvula de cierre.
5. Revise si hay fugas. Apriete aquellas tuercas o cone×ieees
que tengan fugas (incluidas Ins cone×Jones en la v_lvula).
6. Enchufe el refrigerador o reconecte el suministro de energia.
7. Enjuague el sistema de agua. Yea "Prepare el sistema de
agua".
NOTA: Deje transcurrir 24 horns para la producci6n de la primera
tanda de hielo. Desh_gase de los tree primeree lores de hiele
preducido. Deje pasar 3 dfas para que ee Ilene completamente el
recipiente para hiele.
Eerie 3
1. Deeenchufe el refrigerador o desceeecte el suministro de
energia.
2. Quite la cinta de empaque de la tubefia gris enrellada en la
parte trasera del refrigerador.
8. Enrosq ue la tuerca provista sobre la v,_lvula de agua come ee
muestra.
NOTA: Apriete la tuerca a mane. Luego apri6tela 2 vueltas
con una Ilave de tuercas. No apriete demasiado.
A
A, Butbo
B, Tuerca (provi_ta)
4. ABRA la v_lvula de cierre.
5. Revise si hay fugas. Apriete aquellas tuercas e cone×ieees
que tengan fugas (incluidas Ins cone×Jones en la v_lvula).
6. Enchufe el refrigerader o reconecte el suministro de energia.
7. Enjuague el sistema de agua. Vea "Prepare el sistema de
agua".
NOTA: Deje transcurrir 24 horns para la producci6n de la primera
tanda de hielo. Desh_gase de los tree primeree lores de hielo
preducido. Deje pasar 3 dfas para que se Ilene completamente el
recipiente para hiele.
Preparacibn del sistema de agua
Sfrvaee leer antes de usar el sistema de agua.
Inmediatamente despu6s de la instalaci6n, sign los paees a
ceetinuaci6n para asegurarse de que el sistema de agua est6
debidamente limpie.
1. Abra la puerta del ceegelador y apague la f_brica de hielo
levantando el braze de control de alambre come ee muestra.
NOTAS:
• Si su modelo tieee un sistema de filtro de la rejilla de la base,
aseg_reee de que el filtro de la rejilla de la base est6 instalado
adecuadameete y que la tapa est6 ee la posici6n horizontal
No use con agua que no sea microbiol6gicamente segura
o que sea de ealidad deaconoeida sin desinfectarla
adeeuadamente antes o deapu6s del sistema. Pueden
userse sistemas certifieados para la reducci6n de quistes
en aguas deainfec_tadas que puedan contener quistea
filtrablea.
31
Page 32

use DE SU REFRIGERADOR
2. Use un recipiente resietente para oprimir la barra del
despachador de ague hesta que el ague comience a salir.
Limpie el sistema de ague distribuyendo y desechande de
2 a 3 gel (de 8 a 12 L) de ague. La limpieza del sistema
tomar,_ aproximadamente de 6 a 7 minutes y ayudar_ a
despejar el aira de la line& En algunes cases se podr,_
requerir limpieza adicionaL
NOTA: A medida que sale aira del sistema, es posible que
salgan chorros de ague repentinos del despachador.
8. Abra la puerta del congelador y encienda la fzfbrica de hiele
bajande el braze de control de alambre.
• Deje transcurrir 24 hores pare la producci6n de la primera
tanda de hielo.
• Desh&gese de les tree primeres tandas de hielo
producido.
• Dependiendo de su modelo, puede set que Ud. desee
elegir la caracteristica m&_ima de hielo pare incrementar
la produccidn de hielo.
Sonidos normales
Su nuevo refrigerador puede hater ruidos que su viejo
refrigerader no hacia. Come estes sonidos son nuevos pare Ud.,
puede set que se preocupe. La mayofia de los sonidos nueves
sen normales. Superficies dures, come el piso, les parades y los
gabinetes, pueden hater que los sonides parezcan m,_sfuertes
de Io que sen en realidad. A continuaci6n se describen los tipos
de senidos y qu6 puede causeries.
• Si su preducto est,_ equipado con una f_brica de hielo, Ud.
escuchar;_ un zumbido cuando la v_lvula de agua se abra
pare Ilenar la f;_brica de hielo en cada ciclo.
Su refrigerader est,_ disefiade pare funcionar con m_s
eficiencia pare conserver sue alimentes ala temperature
deseada y pare minimizer el use de energfa. El compresor y
los ventiladores de alto rendimiento pueden causer que su
nueve refrigerador funcione per periodos de tiempe m,_s
largos que su refrigerador viejo y Ud. puede escuchar un
senido pulsante e agudo que proviene del compreser o de
los ventiladores que se ajustan pare un randimiente 6primo.
Puede set que Ud. escuche el motor del ventilador del
evaporador circulando el aira a t rav@sde los compartimientes
del refrigerador y del congelador. Es posible que aumente la
velecidad del ventilador cuando usted abra la puerta o
agregue alimentes calientes.
• Las vibraciones pueden producirae per el flujo de liquido
refrigerante, tuberia de ague e art[culos guardades arriba del
refrigerader.
• El ague que gotea en el calentador del descongelador
durante el cicle de descongelaci6n puede causer
chisporreteos.
• /_ final de cada cicle, Ud. puede escuchar un gorgoteo
debido al fluje de liquido refrigerante en su refrigerador.
• La contracci6n y expansi6n de les parades internes pueden
causer un ligero estallido.
• Ud. puede escuchar aira forzado per el ventilador del
condensador sebre el condensador.
• Ud. puede escuchar ague corriendo haole la bandeja
recolectora durante el title de descongelaci6n.
Cbmo asegurar ladebida circulaci6n del
aire
Para esegurar les temperatures corractes, debe permitir que el
ape fiuya entre les dos seccienes. El aira file entre per la parte
inferior de la seccidn del congelador y continua haole arriba.
Luego entre en la seccidn del rafrigerador a trav@s del orificio de
ventilacidn superior El aira regrasa al congelador come se
muestra.
No bloquee ninguno de estos erificioe de ventilaci6n con
alimentos come sodas, cereales, pan, etc. Si estos orificios est_n
blequeados, el aire no circular_ y los contreles de temperature no
funcionarzfn correctamente.
IMPORTANTE: Debido a que el aire circula entre ambes
secciones, los olores que se formen en una secci6n pesar,_n a la
otra. Pare eliminar los oloras, limpie completamente ambes
seccienes. Pare evitar que pesen de una secci6n aotra, envuelva
o cubra bien los alimentos.
Uso de los controles
Su modelo puede tenet controles rotativos o deslizables.
IMPORTANTE:
• Su refrigerader no enfriar_ cuando el control del refrigerador
est8 fijade en OFF (apagado).
El control del refrigerador regula la temperature del
compartimiento del rafrigerador. El control del congelador
regula la temperature del cempartimiento del congelador.
Los ajustes numerados m&s altos, hacen el compartimiento
m&s frie. LOSajustes numerados m&s bajos, hacen que la
temperature sea menos fr[a.
Espera 24 bores antes de poner alimentos en el rafrigerador.
Si usted agrega alimentes antes de que el refrigerador se
haya enfriade per complete, sue alimentos pedfian
malegrarae.
NOTA: El regular los contreles del refrigerador y del
congelador aun ajuste m_s alto (m_s frie) no enfriar_ los
compartimientos con m_s rapidez.
Los ajustes prefijados deber[an set los corractos pare el use
dom6stico normal. Los controles est_n fijados corractamente
cuando la lethe o el jugo est,_n tan fries come a usted le
gusta y cuando el helado est,_firme.
Si la temperature est,_ demesiado caliente o demesiado fria
en el rafrigerador o en el congelador, antes de regular los
controles, revise primero los conductos de ventilaci6n pare
cerciorarse de que no est6n obstruidos.
32
Page 33

Para eu conveniencia, los controlee vienen prefijadoe de f_brica.
AI inetalar eu refrigerader, aeeg_rese de que los controles tengan
a_n los "ajustes medics" prefijados eegQn ee ilustra.
Oorrtmles m_ves
FREEZER REFRIGERATOR
n i
• , . , 3 4 ,
Controles deslizables
Freezer Refrigerator
cold I 2 A 3 4 colder off I 2 • 3 4 colder
C6mo ajustar los controles
NOTA: Espere per Io menos 24 horns entre ajustee y luego vuelva
a verificar Ins temperaturas.
Si necesita regular Ins temperaturae, ajuete primero la
temperetura del refrigerador.
Controles ro_vos
Gire el control a la derecha (en el sentido de Ins manecillas del
reloj/para hater el compartimiento m&efifo. Gire el control a la
izquierda (en el sentide contrario a Ins maneciUae del reloj) para
hacedo menoe fifo.
Controles deslizables
Deslice el control un ajuete hacia la derecha para hater el
compartimiento m_e file. Deslice el control un ajuste hacia la
izquierda para hacedo menoe fifo.
CONDICI6N / MOTIVe: REGULACI(_N DEL
AJUSTE:
REFRIGERADOR demasiado frfo Control del
- NOest_n fijados de acuerdo a Ins REFRIGERADOR aun
condiciones ambientales ajuste m_s bajo
REFRIGERADQR demasiado Control del
caliente REFRIGERADQR aun
- Se abre la puerta a menudo, se ha ajuste m_s alto
agregado una gren cantidad de
alimentee o la temperatura
ambiental es demaeiade caliente
CONGELADOR demaeiado frio Control del
- NOest_n fijados de acuerdo a Ins CONGELADOR aun
condiciones ambientales ajuste m_s bajo
CONGELADOR demasiado
caliente/muy poco hielo
- Se abre la puerta a menudo, e ee
ha agregado una gren cantidad de
alimentee o la temperatura
ambiental es muy fria (no puede
cambiar de cicle con la debida
frecuencia) e ee usa touche hielo
Control del
CONGELADOR aun
ajuste m_s alto
Despachadores de agua y hielo
(en algunos modelos)
Peligro de Cortadurae
Use un vase reeietente para recibir hielo o agua del
despachador.
No seguir esta inetrucci6n puede ocaeionar
eortaduras.
Su despachader electr6nico ofrece varias epciones: la
poeibilidad de eeleccienar hielo picade o en cubes, una luz
especial que ee enciende cuande ueted utiliza el despachader y
que puede fijaree en el mode autem,_tico y una opci6n de cierre
para evitar que salga hielo o agua involuntario.
El despachador de hielo
El hiele previene del dep6eito de hielo de la f_brica de hielo, en el
congelador. Cuando ueted oprime la barra del despachador:
• Se abre una escotilla en un conducto eituado entre el
despachador y el dep6sito del hielo. El hielo baja del
depdsite y cae a trav6s del conducto.
• Cuando deja de oprimir la barra del despachador, ee cierra la
escotilla y deja de ealir hielo. El sistema de distribuci6n no
funcionar,_ cuande la puerta del congelador est6 abierta.
Algunoe modelos despachan hielo en cubes y hielo picado.
Antes de eacar hielo, seleccione el ripe de hielo que desea. LOS
botches de control est,_n disehadoe para facilitar el use y
limpieza.
ICE
Pare obtener hielo picado, los cubes sen trituradee antes de set
despachados. Este puede retraear un poco la dietribuci6n del
hiele picado. El ruido proveniente del triturader de hielo es
normal y los trozos de hielo pueden variar en tamaao. Cuande
cambia de crushed (hielo picado) a cubed (hielo en cubes), caen
unae enzae de hielo picado junto con los primeros cubes.
Para despachar hielo;
1. Optima el bot6n del ripe de hielo que desee.
2. Optima con un vase resistente la barra del despachador de
hiele. Sestenga el vase junto al orificio del despachador para
que el hiele no caiga fuera del vase.
IMPORTANTE: No necesita aplicar mucha presi6n a la barra
para activar el despachador de hielo. Qprimir touche no hat&
que el despachador funcione con m_s rapidez e preduzca
mayor cantidad de hiele.
33
Page 34

& Retire el vase para detener la salida de hielo.
NOTA: LOSprimeros lores de hielo pueden tenet real saber
debido alas eone×iones de plemerfa y piezas nuevas.
Deseche ese hielo. Adem,_s, saque grandes eantidades de
hielo del dep6sito de hielo, y no a trav6s del despachador.
El despachador de agua
Si no limpi6 el sistema de agua cuando se instal6 el refrigerador
per primera vez, optima la barra del despachador de agua con un
vase resistente e jaffa resistente hasta que saque y descarte de
2 a 3 galones (de 8 a 12 litree) o apreximadamente 6 a 7 minutes
despu6s de que el agua comience a salir. Toma de 3 a 4 minutes
para que el agua comience a calif. Elagua que usted saca y
descarta limpia el sistema y ayuda a despejar el aire de la lineas.
Deje que pasen varias her'as para que el refrigerador se enfrie y
pueda enfriar el agua.
IMPORTANTE: Dependiendo de su modelo, la charela pequefia
desmontable que se encuentra en el rondo del despachador est_
disefiada para contener derrames pequefios y pemnitir una
limpieza f_eil. La charela no tiene drenaje. La charola puede
quitarse del despachador y Ilevarse a un lavabo para vaciarse e
limpiarse.
Para despachar agua."
1. Optima un vase resistente contra la barra del despachador
de agua.
2. Retire el vase para detener la salida del agua.
NOTA: El agua puede tenet un real saber si no se usa el
despachader con frecuencia. Naga ealir eufieiente agua cada
semana para mantener un suministre fresco.
La luz del despachador
El _rea del despachador tiene una luz. Puede eneenderse con la
mane eprimiende el bot6n de ON (encendide) (bot6n t,_ctil o
interrupter escilante).
En algunos modelos: cuando usted utilice el despachador, la
barra encender& autom&ticamente la luz.
LIGHT
El cierre del despachador {en algunos modelos)
Su despachader puede apagarse para facilitar la limpieza o para
evitar que sea aetivado inveluntario per ni¢_oso animales
dem6stieos.
NOTA: La funci6n de cierre no interrumpe el flujo el6ctrieo al
refrigerader, a la f_brica de hielo o a la luz del despaehador.
Unicamente desactiva las barras del despachador.
Para apagar el despachador, optima el bet6n de LOCK (cierre}. El
indicader aparecer,_ sobre el bot6n de LOCK (cierre) y los
despachadores de hielo y de agua no funcionar,_m Para reaetivar
el despachador, optima el bot6n de UNLOCK (reactivaci6n)
hasta que el indicador aparezca. Luego continQe distribuyendo
hiele e agua come de costumbre.
DISPENSER
La luzdel estado del filtro de agua
(en algunos modelos)
La luz del estado del filtro de agua, ubicada en la parte superior
del compartimiento del refrigerador, le indicar_ cu,_ndo cambiar
el cartucho del filtro de agua. Cuando la luz indicadora cambie de
verde a amarillo, significa que es casi el tiempo de cambiar el
cartucho del filtro de agua (90% de la vida _til del filtro ha side
usada). Se recomienda cambiar el cartucho del filtro cuando la
luz indicadera del estado del filtro de agua cambie a rojo Q
cuando el flujo de agua al despachador de agua o a la f_briea de
hielo disminuya visiblemente. Para cambiar el cartucho del filtro
de agua, yea "C6mo cambiar el cartueho del filtro de agua" m&s
adelante en esta secci6n.
Despu6s de cambiar el cartucho del filtro de agua, reajuste la luz
del estado del filtre de agua presionando el interrupter de la luz
5 veces en menos de 10 segundos. La luz indicadora cambiar,_
de roja a verde una vez que se haya reajustado el sistema.
A. Luz de e_tado
B. Interrupter de ta ]uz
Filtra de agua sin indicadore (en algunos modelos)
Si su refrigerador no tiene la luz indicadora del estado del filtro de
agua, usted debe cambiar el cartucho del filtro de agua cada 6 a
9 meses segQn el use. Si el flujo de agua hacia el despachader
de agua o la f_brica de hielo disminuye notablemente antes de
que transcurran 6 meses, reemplace el cartueho del filtre m,_s a
menudo.
NOTA: Para informaci6n sobre c6mo cambiar el fete del
despaehador, vea la secci6n "C6mo cambiar los feces".
34
Page 35

Sistema de filb'acibn de agua
NOTA: No use con agua que no sea mierobiol6gieamente
segura o que sea de calidad deseonocida sin desinfectarla
adeeuadamente antes o despu6s del sistema. Pueden usarse
sistemas eertiticados para la reducei6n de quistes en aguas
desinfectadas que puedan eontener quistes filtrables.
C6mo cambiar el cartucho del filtro de agua
El filtro de agua de la rejilla de la base estA situado debajo de la
puerta del compartimiente del congelador. Dependiendo de su
modele, usted puede tenet un filtro que estA ubicado detrAs de la
rejilla de la base (Estilo t) o un filtro que est_ ubicado
atravesando la rejilla de la base (Estilo 2).
Es_Io 1: Ubicado detras de la rejilla de la base
1. Quite la rejilla de la base (yea la seooi6n "Puertas del
refrigerader"). Gire el cartucho en direcci6n contraria a las
manecillas del reloj hasta la pesici6n vertical y jale el cartucho
del filtro hacia afuera.
NOTA: Siempre queda agua en el cartucho. Es pesible que
se derrame un pete de esa agua.
2. Saque el cartucho nuevo de su empaque y quite la cubierta
proteotera de los anillos O.
8. Empuje el cartucho del flltre nuevo dentro de la base hasta
que se detenga. Gire el cartucho en direoci6n de las
manecillas del reloj hasta la posici6n horizontal. Enjuague el
sistema de agua, (yea "C6mo enjuagar el sistema de agua
despu@s de reemplazar el filtro", m_s adelante en esta
seocidn).
Es_Io 2: Que atraviesa la rejilla de la base
1. Localice la tapa del cartucho en el frente de la rejilla de la
base. Gire la tapa en direoci6n contraria alas manecillas del
reloj hasta la posici6n vertical y jale la tapa y el cartucho del
filtro a trav@s de la rejilla de la base.
NOTA: Siempre queda agua en el cartucho. Es pesible que
se derrame un poco de esa agua.
2. Quite la tapa del cartucho del filtro de agua desliz&ndola del
extreme del cartucho viejo. La tapa se deslizar& hacia la
izquierda o hacia la derecha.
IMPORTANTE: No descarte la tapa. Es parte de su
refrigerador. Guarde latapa pare usada con el filtre de
reemplazo.
8. Saque el cartucho nueve de su empaque y quite la cubierta
pretectora de los aniUos O.
4. Deslice la tapa del cartucho sobre el cartucho nueve. Yea la
ilustraci6n del paso 2.
5. Con la tapa del cartucho en pesici6n vertical, empuje el
cartucho nuevo del filtre dentro de la rejilla de la base hasta
que se detenga. Gire la tapa del cartucho en direcci6n de las
manecillas del reloj hasta la posici6n horizontal. Enjuague el
sistema de agua, (yea "C6mo enjuagar el sistema de agua
despu@s de reemplazar el filtro", m_s adelante en esta
secci6n).
I
C6mo enjuagar el sistema de agua despues de
reemplazar el firm
Use un recipiente resistente para oprimir la barra del
despachador de agua hasta que el agua comience a salir. Limpie
el sistema de agua despachando y desechando de 2 a 3 galones
(de 8 a 12 L) de agua. La limpieza del sistema temar_
apreximadamente de 6 a 7 minutes y ayudar_ a despejar el aire
de la Ifnea. En algunas casas se podrA requerir limpieza adicional.
NOTA: A medida que sale aire del sistema, es posible que salgan
chorres de agua repentinos del despachador.
Use del despachador sin el filtro de agua
Puede usar el despachador sin un cartucho de filtre de agua. El
agua no estar_ filtrada.
1. Quite el cartucho del filtro de agua de la rejiUade la base.
Para el Estilo t, vuelva a colocar la rejilla de la base despu@s
de quitar el filtre.
2. Rata el Estilo 2, deslice la tapa del cartucho basra el fin del
cartucho del filtro. Inserte la tapa del cartucho en posici6n
vertical en la rejilla de la base hasta que se detenga.
IMPORTANTE: No descarte la tapa. Es parte de su
refrigerador. Guarde latapa pare usarla con el filtre de
reemplazo.
3. Gire latapa del cartucho hasta Ilegar a la posici6n horizontal
La tapa del cartucho puede no estar alineada con la rejilla de
la base.
35
Page 36

Fbbrica de hielo y depbsito CARACTER|STICAS
(en algunos modelos - Accesorio) DEL REFRIGERADOR
Paraencender y apagar la f_brica de hielo
El modelo de su refrigerador podr_ contar con algunae o todae
NOTA: No fuerce el braze de control de alambre hacia arriba o
hacia abajo.
El interrupter de encendido/apagado (on/off) de la f,_brica de
hielo es un braze de control de alambre Iocalizado en un costado
de la f_brica de hielo.
1. Para porter a funcionar la f,_brica de hielo, seneillamente baje
el braze de control de alambre.
NOTA: Su f&brica de hielo tiene un apagado autom&tico. A
medida que se produce el hielo, los cubitos de hielo Ilenar&n
el dep6sito para hielo y @stos levantar,_n el braze de control
de alambre a la posici6n de apagado (OFF-braze elevado).
2. Para apagar la f&brica de hielo manualmente, levante el braze
de control de alambre a la posici6n de apagado (OFF-braze
elevado) y escuche el chasquido para cerciorarse de que la
f&briea de hielo no vaa continuar funcionando.
Para aumentar el ritmo de producci6n del hielo
La f_brica de hielo deber,_ producir aproximadamente entre
7 y 9 lores de hielo durante un pefiodo de 24 horns. Si no se
produce el hielo con suficiente rapidez, gire el Control del
congelador hacia un n_mero m_s alto (m_s file) en pasos de
n_meros intermedios. (Per ejemplo, si el control est,_en 3,
p6ngalo entre 3 y 4.) Espere 24 horns entre cada ajuste.
Recuerde
• Deje transcurrir 24 horns para la producci6n del primer lore
de hielo. Desh,_gase de Ice tres primeros lores de hielo
producido.
La calidad del hielo depender_ de la calidad del agua que
suministre a su f,_brioa de hielo. Evite la conexi6n de su
f_brioa de hielo aun suministro de agua ablandada. LOS
quir'nicos para ablandar el agua (come la sal) pueden dafiar
ciertos componentes de la f_brioa de hielo y produoir un hielo
de muy baja oalidad. Si no se puede evitar el use de un
suministro de agua ablandada, aseg0rese de que el
ablandador de agua est@funcionando oorreotamente y que
gooe de un buen mantenimiento.
• No guarde nada encima de la f_brica de hielo o en el
dep6sito de hielo.
estas caractefisticas. Las caractefisticas que se pueden adquirir
per separado come accesorios vienen identificadas come
"Accesorio". No redes los accesorios encajarSn en redes los
modelos. Si est_ interesado en adquirir uno de los aeeesorios,
per favor Ilame al n0mero gratuito que se encuentra en la portada
o en la secci6n "Accesorios'L
Informaci6n importante para saber acerca de los estantes
y tapes de vidrio:
No limpie los estantes y tapas de vidrio con agua caliente
mientras es_n fries. Los estantes y tapas pueden remperse
si se exponen a cambios bruscos de temperatura o impacto,
come serfa un golpe brusco. Para su protecci6n, el vidrie
templado se ha disefiado para hacerse a_icos. Esto es normal.
Los estantes y tapas de vidrio son muy pesados. Tenga
touche euidado al saearlos para evitar que se darien al eaer.
Estantes del refrigerador
Su r'nodelopuede tenet estantes de vidrio o alambre. Si usted
guarda alimentos similar'as juntos y ajusta los estantes para que
se adapten a Ins diferentes aituras de Ice artfculos, se reduce el
tiempo que el refrigerador permanece abierto y se ahorra
energia.
Estantes y marcos de los estantes
Para quitar y volver a colocar un estante/marco:
1. Quite el estante/marco inclin,_ndolo per el frente y
levant&ndolo fuera de Ice soportes del estante.
2. Vuelva a colocar el estante/marco guiando Ice ganchos
posterior'as del estante dentro de Ice soportes del estante.
Incline el frente del estante hacia arriba hasta que los
ganchos posteriores del estante caigan dentro de los
soportes del estante. Verifique que el estante est6 seguro en
su lugar.
Caj6n para carnes frias
(en algunos modelos)
El caj6n para tames ffias es muy conveniente para guardar
pasas, nueces, comidas para untar y otros arFculos pequefios a
la temperatura normal del refrigerador.
36
Page 37

Pare quitar y volver a color el e.aj6n pare _rnes fHas:
1. Quite el oaj6n de earnes fria$ desliz_ndolo hacia afuera basra
el tope. Levante el frente y deslice el caj6n hacia afuera haeta
que salga.
2. Vuelva a eolocar el eaj6n de eames frias desliz&ndolo hacia
atr&s pasando el tope.
Cajbn convertible para verduras/carne,
cajbn para verduras y tapas
(en algunos modelos)
Caj6n papa verduras y cajon convertible papa verduras!
carrle
Para quitar y volver a colocar los cajones:
1. Deslice el caj6n para verduras o el caj6n para came hasta el
tope. Eleve el frente del cajdn con una mano mientras sujeta
la parte inferior con la otra mano y deslice el caj6n basra que
salga.
2. Vuelva a colocar el caj6n para verduras o el caj6n para came
desliz_ndolo hacia atr,_s pasando el tope.
Tapas del caj6n papa verduras o el caj6n papa verduras/
carrle
Para quitar y volver a colocar las tapas:
1. Quite los cajones para verduras y came. Presione hacia
arriba en el centro de la parte de vidrio del caj6n para
verduras hasta que se separe del marco de pl,_stieo.
Sostenga el vidrio del caj6n para verduras firmemente y con
cuidado deslieelo hacia adelante para quitarlo.
2. Levante el marco de la tapa del cajdn para verduras y qultelo.
Repita Ice pasos para quitar la tapa del caj6n para came.
3. Vuelva a colocar la parte posterior del marco de la tapa del
caj6n para came en los soportes o galas que se encuentran
en las paredes laterales del refrigerador y baje o deslice el
frente del marco de la tapa a su lugar.
4. Deslice la parte posterior de la pieza de vidrio en el marco de
la tapa y baje el frente a su lugar. Repita los pasos para volver
a colocar la tapa del caj6n para verduras.
Control de temperature para el cajbn
convertible de verduras/carnes
El eajdn convertible de verduras/cames puede ajustarse de
manera que enfrie correctamente la came o las verduras. El aire
dentrc de la charola se enfria para prevenir que pares de los
alimentos se congelen y puede ajustarse para mantener la came
alas temperaturas de almacenaje recomendadas pot el National
Livestock and Meat Board (Consejo National de Ganado y
Carnes): 28_ a 32_F (-2" a 0"C).
IMPORTANTE: Para mantener la frescura pot m&s tiempo, antes
de guardar siempre envuelva la came en materiales que sean
herm6ticos y a prueba de humedad. Siempre almacene la came
siguiendo las recomendaciones.
C6mo ajust;ar el control
El control convertible viene ajustado de f&brica en la posici6n
menos fr[a para tames.
Para cambiar el aju_e: Mueva el control hacia la derecha (m&s
frio) o hacia la izquierda (menos frio), segSn desee.
Para guardar verduras: Para guardar las verduras a la
temperatura 6prima (que debe set m&s caliente que para la
came), mueva el control hasta el extremo izquierdo, a la
posici6n VEG.
IMPORTANTE: Si los a]imentos se empiezan a congelar, mueva
el control hacia la izquierda (menos fifo). Recuerde que debe
esperar 24 horas entre ajustes. Si Io hate asi, le da tiempo a la
temperatura de Ice alimentos a que eatable.
l
Guia pare la conservaci6n de carnes
Guarde la mayoria de las cames en su envoltura original siempre
y cuando sea hemn6tica y a prueba de humedad. Vuelva a
envolvedas si fuera necesario. Consulte el cuadro siguiente
respecto a los periodos de conservacidn. Para guardar la came
pot un tiempo m_s prolongado que los periodos indicados,
cong61ela.
Pescado fresco o mariscos ................ el mismo dia de su compra
Polio, came de tee molida,
tames varias (hfgado,etc) ............................................... 1 - 2 dias
Cames frias, filetes/asados ........................................... 3 - 5 dias
Cames curadas ............................................................. 7 - 10 dias
Sobras - Cubra las sobras con papel pl_stieo, o papel de
aluminio o gu&rdelas en recipientes de pl,_stico con tapas
herm6ticas.
37
Page 38

Controldehumedaddelcajbnpara
verduras
(en algunos modelos)
Ueted puede controlar el nivel de humedad en el eaj6n herin@leo
para verduras. Regule el control a oualquier ajuste entre Bajo
(LOW) y Alto (HIGH).
LOW (posiei6n abierta) deja que el aire h_medo salga del eaj6n
para verduras, yes el mAs adecuado para conservar Ins frutas y
verduras con cascara.
Frutas: LAvelas, d6jelas secar y guArdelas en el refrigerador
en bolsas de plAstico o en el caj6n para verduras. No lave ni
pele Ins morns sine en el memento de usarlas. Separe y
guarde las morns en su recipiente original en el caj6n para
verduras, o guArdelas en una bolsa de papel eerreda sin
apretar en un estante del refrigerador.
• Verduras con cascaras: Col6quelas en bolsas de plAstico o
recipientes de plAstico y guArdelas en el cajdn para verduras.
HIGH (posici6n cerrada) mantiene el aim hOmedo en el caj6n
para verduras, y es el mAs adecuado para conservar Ins verduras
frescas de hoja.
• Verduras de hoja: LAvelas con agua ffia, escOrralas y
deshAgase de Ins partes magulladas o amariUentas.
Col6quelas en una bolsa de plAstieo o un recipiente de
plAstieo y guArdelas en el caj6n para verduras.
Ubicaci6n del control de humedad:
• Control de la humeded en el caj6n para verduras.
('L ::'Y
Portavinos
(en algunos modelos - Accesorio)
Para quitar y volver a colocar el portavinos:
1. Quite el portabotellas jalAndolo directamente hacia afuera del
estante.
2. Vuelva a colocar el portabotellas deslizAndolo entre el estante
y la pared del refrigerador.
Compartimiento para alimentos
(en algunos modelos - Accesorio)
NOTA: Para almaoenamiento a largo plazo, guarde los huevos en
un recipiente con tapa o en su recipiente original en un estante
interior.
CARACTERISTICAS
DEL CONGELADOR
Su medelo pedrA contar con algunas o todas estas
caracteristicas. Las caracteristicas que pueden adquirirse per
separado come accesorios vienen identificedas come
"Aceesorio". No redes los aeeesorios eneajarAn en redes los
modelos. SiestA interesado en adquirir uno de los aeeesorios,
per favor Ilame a] nOmero gratuito que se encuentra en la portada
o en la secci6n "Accesorios".
Estante del congelador
(el ndmem de estantes var_a dependiendo del modelo)
Para quitar y volver a colocar el estante:
1. Levante el estante y lib6relo de los soportes.
2. Deslfcelo fuera de los hoyos de soporte del estante.
8. Vuelva a colocar el estante en el orden contrario.
Guia pare la conservaci6n de alimentos congelados
Los periodos de consewaci6n variarAn seg_n la calidad y tipo de
alimentos, el tipo de embalaje o envoltura empleada (deberA set
herm6tico y a prueba de humeded), y la temperatura de
consewaci6n. ES normal que hayan cristales de hielo dentro de
un paquete sellado. Esto simplemente iedica que la humeded y
el aire dentro del paquete se han condensado, creaedo cristales
de hielo.
No coloque en el congelador mAs alimentos sin congelar de los
que puedan congelarse en 24 horns (no mAs de 2 a 3 libras de
alimentos per pie cObico [907 a 1,350 g per 28 L] de espacio en
el congelador). Deje suficiente espaeio en el congelador para la
circulaci6n de aire entre los paquetes. Tenga cuidado de dejar
suficiente espacio para que la puerta pueda cerrarse
herm6ticamente.
Para obtener mAs informaci6n respecto a la preparaci6n de
alimentos para su congelaci6n, consulte una guia de
congeledores o un buen libro de cocina.
Canastilla o dep6sito del congelador
(recipiente de pl&stico en algunos modelos)
La canastilla o dep6sito del congeledor se puede utilizar para
guardar bolsas de frutas y verduras congeledas que pudieran
caerse de los estantes del congeledor.
PaPa quitar y volver a colocar la canastilla o deposito del
congeladon
1. Quite la canastiUa o dep6sito deslizAndola hasta el tope.
2. Levante el frente y deslicela hacia afuera totalmente.
38
Page 39

& Vuelva a eolocar la eanastilla o dep6sito en su lugar,
colee,_ndola en los rieles de guia de ]a pared lateral. Levante
la parte frontal de la eanestilla e dep6sito ligeremente al
tiempo que la empuja hesta despu6s de los topes de los
deles de gufa y deslice la eanestilla o dep6sito hacia adentro
per complete.
CARACTERISTICAS
DE LA PUERTA
Su modele pedr_ contar con algunes e tedes estes
caracteristices. Les careeteristiees que pueden adquiriree per
separado come accesorios vienen ideetificades come
"Aeceserio". No tedes los aeeesorios encajar_n en redes los
modeles. Si est_ interesado en adquirir uno de los accesories,
per favor Ilame al n0mere gretuite que se encueetra en la portada
o en la secci6n "Accesorios'L
Rieles o recipientes de la puerta
Se pueden quitar los deles de la puerta para facilitar la lir'npieza.
Rieles o recipientes a presi6n de la puerta
Para quitar y volver a colocar los rieles o recipientes:
1. Quite los rieles er'npujando hacia adentre ligeremente en la
parte frontal del seperte mieetres jala hacia afuera la leng0eta
interior. Repita estes pesos para el etre extreme del rieL
2. Vuelva a colocar los deles alineande los extremes de los
sepertes con los betones que est_n en los costados del
revestimiento de la puerta. Encaje a presi6n el seporte y les
pieses del riel en les leng0etes que est,_n encima del estaete,
tal come se iluetra.
Rieles calzables de la puerta
Para quitar y volver a colocar los rieles:
1. Quite los rieles jalando direetamente hacia arriba cada
extreme del rieL
2. Vuelva a coleear los rieles deslizando el riel del estante en les
renures de la puerta y empujande el riel direetamente hacia
abajo hesta que se detenga.
Recipientes de la puerta
Para quitar y volver a colocar los recipientes:
1. Quite el recipieete levant,_ndolo y jal_ndole directameete
hacia afuera.
2. Vuelva a colocar el recipiente desliz&ndelo hacia adentre
sebre el soperte elegido y empuj_ndolo hacia abajo hasta
que se detenga.
CUIDADO DE SU
REFRIGERADOR
Limpieza
Peligro de Explosi6n
Use un Iimpiador no inflamable.
No seguir esta instrucci6n puede ocasionar Ia muerte,
explosi6n o incendio.
Tante la secci6n del refrigerader come la del congelador se
descongelan autom&ticamente. No obstante, limpie ambes
seccienes m&s o menos una vez al rues para evitar la
acumulaei6n de olores. Limpie los derrames de inmediato.
Para limpiar su reftigerador,
1. Desenchufe el refrigerador o desconeete el suministre de
energia.
2. Quite redes les partes desmontables del interior, tales come
estantes, cajones para verdures, etc.
8. Lave a mane, enjuague y seque redes les partes
desmontables y les superficies interiores meticulosamente.
Use una espenja limpia e un patio suave y un detergeete
suave con agua tibia.
• No use productos de limpieza abrasives o _speros, come
aereseles para ventanes, produetes de limpieza para
pulir, Ifquides inflamables, terns para limpieza,
detergeetes concentrados, blanqueaderes o preduetos
de limpieza que contengan preduetes de petr61eo en les
partes de pl_stico, en el interior, revestimieetes de la
puerta e juntas. No use tealles de papel, estrepajos para
fregar u etres utensilios de limpieza _speros. Estos
pueden rayar o dafiar los materiales.
Pare ayudar a eliminar elores, puede lavar les parades
intedores con una mezcla de agua tibia y bicarbonate de
sodio (2 cucharades en un cuarto de gal6n [26 g en
0,95 L] de agua).
39
Page 40

4. Fijese si su refrigerador tiene el exterior de metal pintado,
acabado con apariencia inoxidable Ultra Satin _, aluminio
cepillade o de acero inoxidable y decida el re@redo de
limpieza adecuado.
NOTA: El acabado Ultra Satin _ (con apariencia inoxidable)
tiene un color suave y uniforme con un acabado brillante que
resiste Ins marcas de los dedos. El acero inoxidable tiene una
textura veteada bien diferenciada con variaci6n en el color, le
cual es natural en el acere.
Metal pintado: Limpie el exterior con una esponja limpia e un
patio liso y un detergente suave en agua tibia. No use
limpiadores Asperos e abrasives ni limpiadores destinados a
acero inoxidable. Seque meticulosamente con un patio
suave. Para obtener una protecci6n adicional contra dafios a
Ins superficies exterieres metAlicas pintadas, aplique cera
para electredom6sticos (o cera en pasta para autos) con un
patio limpio y suave. No encere Ins partes de pl;_stico.
Aluminio cepillado: Lave con una esponja limpia o un patio
lice y un detergente suave en agua tibia. No use limpiadores
Asperos o abrasives ni limpiadores destinados a acero
inoxidable. Seque meticulosamente con un patio suave.
Aeabado con aparieneia inoxidable Ultra Satin _: Lave
con una esponja limpia o un patio lice y un detergente suave
en agua tibia. No use limpiadoras Asperos o abrasives ni
limpiadores destinados a acero inoxidable. Seque
meticulosamente con un patio suave.
Acabado de acero inoxidable: Lave con una esponja limpia
oun patio lise y un detergente suave en agua tibia. No use
preductos de limpieza abrasives o &speres. Seque
meticulosamente con un patio suave.
Para mantener come nuevo su rafrigerador de acero
inoxidable y para quitar marcase rayaduras pequefias, se
sugiere usar un limpiader de acero inoxidable aprobado
per el fabricante.
IMPORTANTE: ;Este limpiador es solamente para partes de
acero inoxidable!
No permita que el limpiador para acere inoxidable entre
en contacto con ninguna parte de pl;_stico tales come Ins
piezas decorativas, Ins tapas del despachador e Ins
empaquetaduras de la puerta. Si se produce contacto
accidental, limpie la pieza de pl;_stico con una espenja y
detergente suave en agua tibia. Seque meticulesamente
con un patio suave. Para ordenar el limpiador, yea
"Acceserios'L
5. Una limpieza rutinaria del condensador no es necesaria en
ambientes normales de operaci6n en el hogar. Si el ambiente
contiene mucha grasa o polve, eei hay bastante trAnsite de
mascotas en el hogar, el condensador deberA limpiarse cada
des o tree meses para asegurar la m_xima eficacia.
Si necesita limpiar el condensador:
• Quite la rejilla de base. Vea "Rejilla de la base" o "C6mo
quitar la puerta'L
• Use una aspiradera con un cepillo suave para limpiar la
rejilla, Ins Areas abiertas detrAs de la rejilla y la superficie
frontal del condensador.
• Vuelva a colocar la rejilla de la base cuando termine.
6. Enchufe el refrigerador o raconecte el suministro de energia.
Cbmo cambiar los focos
NOTA: No tedos los feces para aparates electrodom@sticos sen
adecuados para su rafrigerador. Aseg_rese de cambiar el boo
con otto que sea del mismo tamafio y forma. La luz del
despachador requiere de un foco de 10 Watts de use pesado y
Ins demAs luces requieren un foco de 40 Watts para
electrodom@sticos. Puede conseguir los feces con su
distribuidor.
1.
2.
Desenchufe el refrigerador o desconecte el suministro de
energia.
Si se indica, quite la pantalla de la luz come se muestra.
NOTA: Para limpiar la pantalla de la luz, IAvela con agua tibia
y un detergente liquido. Enjuague y sequela pantalla
meticulosamente.
3. Quite el fete y reemplAcelo con uno del mismo tamafio,
forma y vatiaje.
4. Si se indica, vuelva a colocar la pantaUa come se muestra.
5. Enchufe el refrigerador o reconecte el suministro de energia.
Luz del despachador (en algunos modelos}
Quite y raemplace el foco del Area del despachador.
A, Luz del despachador
Luz del panel de control del refrigerador
Quite y raemplace el foco que estA detrAs del panel de control
del refrigerador.
Luz del cajSn para verduras
Si es necesario, quite el caj6n superior para verduras frescas
para tenet acceso al protector de luz. Quite el protector de
luz levantando los extremes hacia fuera de los soportes,
come se muestra.
• Vuelva a colocar el protector de luz insertando los extremes
en los soportes. Si es necesario, vuelva a colocar el caj6n
superior para verduras frescas.
Luz superior del congelador (en algunos modelos)
Quite ]a pantalia de luz sujet;_ndola per la parte superior del
centre y jalAndola hacia afuera mientras gira de ella hacia uno
de los lades. Si es necesario, quite el caj6n para verduras
superior para alcanzar la pantalla de luz.
40
Page 41

• Vuelva a colocar la pantalla de luz insertando lae leng_etae
de uric de los lados en los orificios ranurados del
revestimiento del refrigerador o congelador. Despu6s doble
con cuidado la pantalla en el centro para insertar lae
lengQetas eobre el otro lado.
Luz inferior del congelador (en algunos modelos)
• Quite la pantalla de luz sujetAndola por los lados y apretando
hacia el centro. Una vez que Ice ganchos en los lados de la
pantalla est6n fuera del reveetimiento interne del congelador,
jAlela hacia abajo.
• Vuelva a colocar la pantalla apretando los lados hacia el
centro e insertando los ganchoe en los ladoe de la pantaUa en
los orificios ranuradoe. Una vez que los ganchoe est6n en su
lugar, encaje el frente de la pantalla en el orificio ranurado.
I" '
Cortes de corriente
Si no va a haber electricidad por 24 horas o menoe, mantenga la
puerta o las puertas del refrigerador cerradas (eeg_n el modelo)
para que los alimentoe se mantengan frios y congelados.
Si el torte de electricidad va a durar m_s de 24 horae haga una
de lae opciones eiguientes:
• Saque todoe los alimentoe congelados y gu&rdeloe en una
conservadora de comida congelada.
• Ponga 2 libras (907 g) de hielo seco en el congelador por
cada pie cQbico (28 L) de espacio en su congelador. Eeto
mantendr& Ice alimentos congelados de 2 a 4 dfae.
• Si no tiene conservadora de alimentoe ni hielo eeoc, use
todos los alimentos perecederos de una vaz o p6ngalos en
latae.
RECUERDE: Un congelador Ileno ee mantiene frio per m_e
tiempo que uno a medic IlenaR Un congelador Ileno de came se
mantiene frio per m&e tiempo que uno Ileno de alimentoe de
paetelerfa. Si Ud. ve que los alimentoe contienen crietales de
hielo, se pueden velvet a congelar, pero la calidad y el saber
pueden afectarse. Si el alimento no est,_ en buenas condiciones,
desc,_rtelo.
Cuidado durante lasvacaciones y
mudanzas
Vacaciones
Si Ud. decide dejar el refrigerador funcionando mientras
est_ ausente:
1. Use todos los articulos perecederos y congele el resto.
2. Si eu refrigerador tiene f_brica de hielo autom,_tica:
• Levante el braze de control de alambre a la poeici6n OFF
(apagado - hacia arriba) o mueva el interruptor a la
posicidn OFF (apagado - hacia la derecha).
• Cierre el euminietro de agua a la f&brica de hielo.
& Vacie el depdsito de hielo.
Si Ud. decide apagar el refdgerador antes de irse:
1. Saq ue toda la comida del refrigerador.
2. Si su refrigerador tiene f&brica de hielo autom,_tica:
• Cierre el euminietro de agua a la f&brica de hielo por Io
menoe un dia antes.
9.
• Cuando el Qltimo Iote de hielo caiga, levante el brazo de
control de alambre a la poeici6n OFF (apagado - hacia
arriba) o mueva el interruptor a la posici6n OFF
(apagado - hacia la derecha).
Coloque el control del termostato o control del refrigerador,
dependiendo del modelo, en la posici6n de OFF (apagado).
Vea la secci6n "Uso de los controles".
4.
5.
Limpie el refrigerador, p,_sele un trapo y e6quelo bien.
Fije bloques de goma o de madera con cinta adhesiva a la
parte superior de ambae puertae para que queden abiertae y
el aire circule. Esto evita que se formen olores y que crazcan
bongos.
Mudanza
Si Ud. muda su refrigerador a una casa nueva, siga los siguientes
paeoe para prepararse para la mudanza.
1. Si su refrigerador tiene f&brica de hielo autom,_tica:
• Cierre el euminietro de agua a la f_brica de hielo por Io
menoe un dia antes.
2.
&
4.
• Desconecte la tuberia de agua de atr,_s del refrigerador.
• Cuando el Qltimo Iote de hielo caiga, levante el brazo de
control de alambre a la poeici6n OFF (apagado - hacia
arriba) o mueva el interruptor a la poeicidn OFF (apagado
- hacia la derecha).
Saque toda la comida del refrigerador y empaque todoe los
alimentos congeladoe en hielo seco.
Vacie el dep6sito de hielo.
Coloque el control del termostato o control del refrigerador,
dependiendo del modelo, en la posici6n de OFF (apagado).
Yea la secci6n "Use de los controles".
5. Desenchufe el refrigerador.
6. Vacie el agua de la bandeja recolectora.
7. Limpie, p,_sele un trapo y eeque bien.
8. Saq ue todae las partes desmontables, envu61valae bien y
asegSrelas con cinta adhesiva para que no ee muevan y se
eacudan durante la mudanza.
9. SegQn el modelo, levante la parte delantera del refrigerador
para que ruede con facilidad Q atomille lae paras niveladorae
para no rayar el pieo. Coneulte la eecci6n "Ajuste las
puertas".
10. Sostenga las puertas cerradas y el cable el6ctrico pegado al
gabinete del refrigerador con cinta adhesiva.
Cuando Ilegue a la casa nueva, ponga todo de nuevo y lea la
secci6n "lnstrucciones de instalaci6n" para obtener
instrucciones de preparaci6n. Adem&s, ei eu refrigerador tiene
f&brica de hielo autom&tica, recuerde velvet a conectar el
euminietro de agua al refrigerador.
41
Page 42

SOLUCION DE PROBLEMAS
Siga Inssugerencias que aparecen a continuacion para evitar el costo de una visita de servicio innecesaria.
• &Estdn sucios los serpentinesdel condensador?
Su refdgerador no funciona
• &Estd desconectado el cable el6ctrico? Con_te a un
oontaeto de pared de oonexi6n a tierra de 3 terminales.
&Se quem6 un fusible de la _sa o se dispar6 un
dieyuntor? Reemplace el fusible e reposicione el circuits.
&Estd el control del refrigerador o del congelador en la
posicibn OFF (apagado)? Yea "Use de los oontroles'L
&Se estd descongelando el refrigerador? En 30 minutes
vuelva a revisar si el refrigerador est_ funcionando. Su
refrigerader aetiva regularmente un eielo de deseongelaci6n
autom&tica.
&No esl_ entriando el refrigerador? Para modelos con
contreles digitales, gire la unidad a OFF (apagado) y luego a
ON (encendido) para velvet a fijarla. Vea "Use de los
controles". Si a0n asi no puede corragir el problem& tiaras
selicitande servicie.
Las luces no funcionan
• &Estd desconectado el cable el6ctrico? Conecte a un
contaeto de pared de conexi6n a tierra de 3 terminales.
• &Esld flojo un fete o se ha quemado? Vea "C6mo cambiar
los feces".
Hay agua en la bandeja recolectora de agua
• &Se estd descongelando el refrigerador? El agua se
evaporar& Es norTnal que caigan gotas de agua en la bandeja
recolectora de agua.
• &Esld mds hmJmedoque Io normal? Cuande est6 hOmedo,
tenga en cuenta que el agua en la bandeja recolectera
tardar& m&s en evaporarse.
Parece que el motor funciona excesivamente
Este impide la transferancia del aira y hace que el motor
trabaje m,_s. Limpie los serpentines del condensador. Vea
"Limpieza'L
&No estdn selladas per complete Ins empaquetaduras de
Is puerta? Llame a una persona calificada o a un t6cnico.
NOTA: Su nuevo refrigerador funcionar_ per perfodos m_s
largos que su refrigerader anterior debide al motor de alto
rendimiento.
El refrigerador parsee hacer mucho ruido
• Los sonidos pueden set normales para su refrigerador.
Consulte la secci6n "Sonidos normales'L
La f_brica de hielo no produce hielo o no produce
suficiente hielo
&Estd la temperatura ambiente rods caliente que Io
normal? En condiciones de taler, el motor funciona per
periodos m_s largos. Cuando la temperatura ambiente es
normal, el motor funciona entre 40% y 80% del tiempo. Si la •
habitaci6n est_ caliente, puede funcionar per m_s tiempo.
&Se acaba de agregar una gran cantidad de alimentos al
refrigerador? Agragar grandes cantidades de alimentos
hate que se caliente el refrigerador. Es norTnal que el motor
funcione per periodos m_s prolongados para velvet a enfriar
el refrigerador.
&Se acaba de instalar la fdbrica de hielo? Deje transcurrir
72 horns para que la f_brica de hielo comience a producir
hiele. Una vez que su refrigerader se ha enfriado, la f_brica
de hielo debe empezar a preducir de 70 a 120 cubes cada
24 horns.
&Se hart abiemlo Ins puemlas a menudo? Cuando esto
ocurre, el motor puede funcienar per perfodes m,_s largos.
Para ahorrar energfa, trate de sacar tode Io que necesita det
refrigerader de una sola vez, mantenga los aHmentes
organizados y cierre ta puerta inmediatamente despu6s de
saeades.
&Estd la temperatura del congelador Io suficientemente
frfa para hacer hielo? Espere 24 horns despu6s de haber
conectado la f,_brica de hielo para que se produzca hielo. Yea
"Use de los oontroles".
&No se hart ajustado los controles correc_amente de
acuerdo con Ins condiciones circundantes? Vea _'Uso de
los controles'L
&No eat_n Ins puertaa completamente cerradas? Cierre
Ins puertas con firmeza. Si no cierran cor'npletar'nente, yea
"Las puertas no cierran completamente" m&s adelante en
esta secci6n.
&Estd el braze de control de alambre de la fbbrica de
hielo (on algunos modelos) en la posici0n OFF (apagado -
braze hacia arriba)? Baje el braze de control de alambra a la
posicidn ON (encendide - braze de control de alambra hacia
abajo). Yea "F&brica de hielo y dep6site de hielo'L
&Estd el interrupter de la fz_brica de hielo (en algunos
modelos) en la posici6n OFF (apagado -hacia la
derecha)? Mueva el interrupter de la f_brica de hielo a la
posicidn ON (encendido - hacia la izquierda). Yea "F_brica de
hiele y depdsite de hielo".
&Estd abierta la vdlvula de cierre de la tuberfa del agua al
refrigerador? Abra la v_lvuta de agua. Yea _'Cenecte el
suministro de agua'L
&Tiene agua el molde de la fbbrica de hielo o no se ha
producido hielo? Verifique si su refrigerador ha side
oonectado al suministre de agua de su casa y si la v_lvula de
cierre est_ abierta. Yea "Censors el suministro de agua'L
&Se trab6 un cube de hielo en el braze eyector de Is
f_brica de hielo? En los modelos con dep6site de hielo
est_ndar, saque el hielo del braze eyector con un utensilio de
pl_stico. En modelos con dep6site de hielo ubicado en la
puerta del congelador, puede tenet acceso a la f_brica de
hiele oprimiendo la puerta del sensor de hiele que se
eneuentra en el lade izquierde superior del interior del
congeladoR Mientras oprime la puerta del sensor, eleve la
puerta de servicio de la f_brica de hielo y quite el hielo del
braze eyector con un utensilio de pl,_stieo. Vea "F&brica de
hiele y dep6site de hielo".
&Se acaba de sacar una gran cantidad de hielo? Deje
transcurrir 24 horns para que la f,_brica de hiele se
restablezca.
• &SO han ajustado correctamente los controles? Vea "Use
de los controles'L
42
Page 43

• &Tiene un filtro de ague instalado en el refrigerador? Este •
filtro puede ester obstruido o haberse instalado
incorrectamente. Primere revise las instrucciones de
instalacidn del filtro par'a asegurarse de que el filtr'o rue
instalado correctamente y no est& obstruido. Si la instalaci6n •
es correcta y no hay obstrucciones, Ilame a una persona
calificada o a un t6cnico.
• &Se ha conectado un sistema de fil_racibn de ague de
bsmosis inverse al suministro de ague fria? Vea
"Requisites del suministre de ague."
NOTA: Si el preblema no se debe a ninguna de las alternatives
indicadas, puede haber un problema en la tuberia de ague.
Llame solieitando servicie.
El hielo tiene mal saber, real olor o un color grisaceo
• &Son nuevas lee conexiones de plomeria, produciendo un
hielo descolorido o de mal saber? Deseche los primeros
lores de hielo.
• &Se hen guardado Ice cubes de hielo par touche tiempo?
Tire los cubes de hielo viejos y obtenga un nueve late.
• &Se necesita limpiar el congelador y el dep6sito de hielo?
Yea "Limpieza" o "F,_brioa de hiele y dep6sito de hielo'L
• LSe hen envuelto debidamente los alimentos en el
congelador o el refrigerador? Use empaques herin@rices
centre humedad pare ayudar a prevenir transfersncia de
olor'es en la comida almacenada.
• &Contiene el agua minerales {coma el azufre)? Podria set
necesario instalar un filtr'o pare eliminar los minerales.
• &Tiene un fil_ro de ague instalado en el refrigerador? Un
descolorar'niento o un color gris del hielo indican que el
sistema de filtr'ado de ague necesita enjuagarse m_s. Haga
corrsr m_s ague a trav6s del despaohador de ague pare
enjuagar el sistema de filtr'ado de ague con mayor cuidado
(inioialmente, per Io menos de 2 a 3 gal. [8 a 12 L]o per 6 a
7 minutes). Deseohe el hielo descolorido.
El despachador de hielo no funciona debidamente
• &Estd cerrada completamente la puerta del congelador?
Cierre la puerta con firmeza. Si no so cierr'a completamente,
yea "Las puertas no cierran completamente" m&s adelante
en esta secci6n.
• &Se ha instalado correctamente el depbsito de hielo? En
modeles con dep6sito de hielo est_ndar, empuje el dep6site
de hielo completamente haste el fondo. En modelos con
dep6sito de hielo ubicado en la puerta del congelador, el
dep6sito debe ester nivelado. Quite y vuelva a colocar el
dep6sito en la puerta asegur,_ndose de que est@
debidamente alineado y que encaje firmemente en su lugar.
Yea "F_brica de hielo y dep6sito de hielo".
• &Se ha agregado hielo incorrecto en el dep6sito?
Use 0nicamente el hielo pr'oducide per su f,_brica de hiele
actual. Si ha intreducido otto ripe de hielo, saque redes los
cubes y revise que no se haya atascado ninguno en el
conducto de salida.
• &Se ha congelado el hielo en el dep6sito? Agite el dep6sito
pare que so separen los cubes. Si no se separan, vacie el
dep6sito y deje transcurrir 24 hares par'a que se vuelva a
Ilenar de hielo.
• &Se ha derretido el hielo alrededor del espiral met_lieo en
el dep6eito de hielo? Descarte los cubes de hielo y limpie
bien el dep6sito. Deje transcurrir 24 hares pare que se vuelva
a Ilenar de hielo. No trate de quitar el hielo derrstido con un
objeto afilado. Puede daaar el dep6sito.
&Hay hielo atascado en el conducto de salida? Quite el
hiele del conducto de salida con un utensilio de pl_stico. No
use ning0n objeto afilado pare quitar el hielo. Puede daaar la
unidad.
&El despachador de hielo se atasca mientras vierte el
hielo "picado"? Detenga el despachador de hielo. Cambie el
bot6n de hielo de "picado" a "en cubes". Optima el braze del
despachador de hielo con un vase resistente. Si despacha el
hiele en cubes correctamente, Optima el bot6n pare hiele
"picado" y comience a despachar de nuevo. Censulte la
secci6n "Despachadores de ague y hielo'L
&Hay hielo en el dep6sito? Vea "La f&brica de hielo no
produce hielo o no produce suficiente hielo" anteriormente en
esta secci6n.
• &Se ha mantenido el braze del despachador oprimido per
touche tiempo? Suelte el braze del despachador. Cuando el
braze se mantiene oprimido touche tiempo, se interrumpe la
distribuci6n de hielo. Espers tr'es minutes pare que el motor
del despachador se repesicione antes de usado de nuevo. Es
mejor sacar grandes cantidades de hielo dir'ectamente del
dep6sito de hielo, no del despachador.
El dep6sito de hielo es dificil de sacar
• &F_.sdificil sacar el dep6sito de hielo (en algunos
modelos)? Pare modeles dotados de dep6site de hiele
ubicade on la puerta del congelador, seleccione hielo "en
cubes". Usando un vase resistente, Optima y suelte con
r'apidez el braze del despachader de hielo. Abra la puerta del
congelador, optima el bet6n interrupter que est_ en el
dep6site de hielo y lev_ntelo. Consulte la secci6n "F_brica de
hielo y dep6sito de hielo".
El despachador de ague no funciona debidamente
• &NO se ha Ilenado el sistema de ague? Elsistema de ague
debe Ilenarse la primera vaz que se usa. Use un rscipiente
resistente pare oprimir la barra del despachador de ague
haste que el ague comience a salir. Limpie el sistema de ague
distribuyende y desechando de 2 a 3 galones (8 a 12 L) de
ague. La limpiaza del sistema temar,_ apreximadamente de
6 a 7 minutes y ayudar,_ a despejar el aire de la linea. En
algunas cases se podr,_ requerir limpiaza adicionaL Vea
"Despachador'es de ague y hielo".
&La vdlvula de cierre de ague no estd abierta o la tuberia
del ague no es'_ conectada al suministro? Verifique si la
v_lvula de cierre del ague est;J abierta y el suministro de ague
est_ conectado al refrigerador. Vea "Cenecte el suministro de
ague".
&F-..stdla v_lvula de cierre del ague atascada o no rue
instalada correc_Lamente? Vea "Conecte el suministm de
ague". Si el preblema no es atascamiento o male instalaci6n,
selicite sewicie e Ilame a un plemero.
&Hay un estrechamiento en la tuberia de ague de la case?
Si encuentra o sospecha que hay un estrechamiente on la
tuberia del ague, Ilame a un plomero competente auterizado.
• &Tiene un filtro de ague instalado en el refrigerador? Este
filtro puede ester obstruido e haberse instalado
incorrectamente. Primero revise las instrucciones de
instalacidn del filtro pare asegurarse de que el filtro rue
instalado correctamente y no est_ ebstruido. Si la instalaci6n
es cerrecta y no hay obstrucciones, selicite sewicie.
• &Se ha conectado un sistema de fil_raci6n de ague de
6smosis inverse al suministro de ague fria? Vea
"Requisites del sur'ninistre de ague".
43
Page 44

Hay filtraci6n de ague o hielo en el despachador
&No se deja el vase el tiempo suficiente debajo del
despachador de hielo, haciendo que se derrame el hielo?
Sostenga el recipiente debajo del oonducto de hielo dos o
tree segundos despu6s de soltar la palanea del despachador.
Puede despaehar agua o hielo durante este tiempo.
&Se ha atascado un cube de hielo en el conducto y
mantiene abierta la escotilla? Quite el cube.
&Tiene un filtro de ague instalado en el refrigerador? El
sistema de fiErado de agua pudiera tenet aire en lee fineas, le
que oeasionafia que gotee el ague. Se puede eliminar el aire
de lee Ifneas son enjuagues adicionales. El use normal del
despachador deberia eliminar el aim de las lineas en un
perfodo de 24 a 72 bores.
El flujo de ague del despachador disminuye
considerablemente
&Tiene un filtro de ague instalado en el relrigerador? Este
filtro puede ester Ileno o incorrectamente instalado. Saque el
cartueho del filtro de ague. Yea "Sistema de filtraei6n de
agua'L Pongaa funcionar el despachador. Si el fiujo de agua
aumenta notablemente, cambie el filtro.
• &Se hen ajustado los controles correc_amente de
acuerdo a lee condiciones circundantes? Yea "Use de los
oontroles".
• &No es'_ enfriando el refrigerador? Pare modelos son
controles digitales, gire la unidad a OFF (apagado) y luego a
ON (eneendido) pare velvet a fijarla. Vea "Use de los
controles". SiaSn asi no puede corregir el problem& flame
eelicitande eervicie.
Hay acumulacion de humedad en el interior
El ague del despachador no est_ Io suflcientemente fria
• &Ha instalado recientemente su refrigerador? Deje
transcurrir 24 bores pare que el refrigerador se enfrie
completamente.
• &Se ha despaehade reeientemente una gran cantidad de
ague? Deje transcurrir 24 her'as pare que el agua se enfrie
completamente.
• &No se ha usado el despachador de ague recientemente?
Puede set que el primer vase de agua no est6 file. Descarte
el agua del primer vase.
El divisor entre los dos compartimientos est_ caliente
• Probablemente el taler se debe aI funcionamiento normal del
control autem;_tico de humedad exterior. Si sigue teniende
problemas, solicite servicio.
La temperatura estb demasiado caliente
&Estdn bloqueados los orifieios de ventilaci6n en el
refrigerador? Saque todos los ebjetes que bloquean los
orificios de ventilaci6n. Vea la ubicaci6n de los orificies en la
secci6n "C6mo asegurar la debida circulaci6n del aire".
&Estdn bloqueados los orifieios de ventilaci6n en
eualquiera de los compartimientos? Este impide la
circulaci6n del aire frie del congelador al refrigerador. Saque
redes los objetos que bloquean los orificios de ventilaci6n.
Yea la ubieaei6n de estes erificios en la secei6n "C6mo
asegurar la debida circulaci6n del aire".
&Se abre(n) la(s) puerta(s) con frecuencia? El refrigerador
se calienta cuando este ocurre. Mantenga el refrigerador frie
saeando tedo Io que necesita del refrigerador de una sola
vez, manteniendo los alimentes organizados y cerrando la
puerta inmediatamente despu6s de saearlos.
• &Se abren las puertas con Irecuencia? Evite la
acumulaci6n de humedad sacando rode Io que necesita del
refrigerador de una sole vez, manteniendo los alimentos
organizados y cerrando la puerta inmediatamente despu6s
de saoarlos.
• &F-.81dhumeda la habitacibn? ES normal que se acumule
humedad dentre del refrigerador cuando el aire exterior est,_
h0medo.
• &Se hen envuelto correctamente los alimentos? Verifique
que redes los alimentos est6n bien envueltos. Seque los
recipientes hSmedes antes de colocados en el refrigerador.
&Se hen ajustado los controles correc_amente de
acuerdo a las eondieiones circundantes? Yea "Use de los
oontroles".
• &Se ha completado un ciclo de descongelaci6n
automdtica? Es normal que se formen gotitas cuande el
refrigerador se descongela autom_tticamente.
Las puertas no se cierran completamente
• &Hay paquetes de comida que impiden que se eierre la
puerta? Ordene los recipientes de manera que queden r'n_s
juntos y ocupen menos espacio.
&Se acaba de agregar una gran cantidad de alimentos al •
relrigerador oal congelador? Agregar grandes eantidades
de alimentos calienta el refrigerador. Pueden transcurrir
varies horas pare que el refrigerador recupere su temperature •
normal.
&Estd el depbsito de hielo real colocado? En modeles con
dep6site de hielo interior, empuje el dep6sito de hielo haste el
rondo. Si el dep6site de hielo no liege haste el fondo, puede
set que no est6 derecho. S_quelo y vuelva a empujario. En
modeles con dep6sito de hielo ubicade en la puerta del
congelador, el dep6site debe ester nivelado. Pare quitar el
dep6sito, optima el bot6n pare liberar el dep6site que se
encuentra del lade derecho del mismo y levante directamente
haole arriba. Vuelva a colocar el dep6site en la puerta
asegur_ndose de que est6 debidamente alineado y que
encaje firt'nemente en su lugar. Yea "F,_brica de hiele y
dep6site de hielo'L
&Estdn las bandejas, estantes, dep6sitos o canastillas
real colocados? Coloque la tapa del caj6n de verdures y
redes las bandejas, estantes, dep6sites y canastillas en la
posici6n correct& Pare m&s informaei6n, Yea "Caj6n
convertible pare verdures/came, oaj6n pare verdures y
tapes".
&Estdn las empaquetaduras pegajosas? LJmpie las
empaquetaduras de acuerdo con las instrucciones en la
seccidn "Limpieza".
&Se balancea el refrigerador o no estd nivelado? Nivele el
refrigerader. Yea "Ajuste las puertas".
44
Page 45

• &Se desmontaron las puertas durante la instalacibn de la
unidad y no se volvieron a instalar correctamente? Quite y
vuelva a colocar les puertes de acuerdo con la secciSn
"Puertes del refrigerado¢' o Ilame a un t6enico de servicio
calificado.
Es dif[cil abr|r las puertas
• LEstdn lee empaquetaduras sueias o pegajosas? Limpie
les er'npaquetadures de acuerdo con les inetrucciones en la
secciSn "Limpieza".
CONTRATOS DE PROTECClON
En los EE.UU.
Oorrtratos Maestros de Proteccibn
;Felicitaciones per su inteligente adquisici6n! Su nuevo
electrodom6stieo Galaxy '_ha side disefiado y fabricado para
brindarle aries de funeionamiento confiable. Pete a] igual que
todos los productos, puede necesitar mantenimiento preventive
o reparaci6n de vez en cuando. Es aIli donde el Contrato Maestro
de Protecci6n puede ahorrarle dinero e inconvenientes.
Adquiera un Contrato Maestro de Proteccidn hey y protdjase
centre molestias y gastos inesperados.
El Contrato Maestro de Protecci6n tambi6n ayuda a prolongar la
vida de su nuevo artefacto. He aqui Io que se incluye en el
Contrato:
Servicio Experto per nuestros 12.000 especialistes en
reparacidn competentes
Servicio ilimitado y gratuito para repuestos y mane de obra
en redes les reparaciones protegides per el contrato
Garantia '_sindisgustos" - reemplazo de eu producto
protegido si ocurren cuatro o m_s falles del producto en el
transcurso de dote meses
Reemplazo del produ¢io si su producto protegido no puede
set reparado
1/Revisi6n Anual de Mantenimiento Preventive a eolicitud
suya - sin costo adicional
Ayuda rdpida per tel6fono - esistencia per tel6fono a cargo
de un t6cnico de Sears para productos que deban se
reparados en su hogar, adem,_s de un horatio de reparaci6n
conveniente
Protecci6n de sobrevoltaje contra dafios el6ctricos debido a
fiuctuaciones de electricidad
Reembolso de la rerrla si la reparaci6n de su producto
protegido tarda m_s de Io prometido
Una vez adquirido el Contrato, tan sdlo tiene que Ilamar para fijar
la visita de servicio t6cnico. Usted puede Ilamar a cualquier hera,
de dfa o de noche, o fijar una visita t6cnica en Internet.
Sears cuenta con un equipo de m,_sde 12.000 especialistes en
reparacidn competentes, quienes tienen a disposici6n m&s de
4,5 millones de repuestos y accesorios de calidad. Ese es el tipo
de profesionalismo con el que usted puede contar para ayudarle
a prolongar la vida de su nuevo artefacto per touches aries m&s.
;Adquiera hey su Contrato Maestro de Proteccidn!
Se aplican algunes limitaciones y exclusiones. Para obtener
precios e informacidn adicional, Ilame al 1-888-784-6427.
Servicio de Instalaci6n de Sears
Para la instalaci6n profesiona] de artefactos electrodom6sticos,
arbridores de puertes de garaje, calentadores de agua y otros
articulos importantes de la cesa, en los EE.UU. flame al
1-800"4-MY-HOME _.
EnCanad&
Con_ratos de mantenimiento
Su compra adquiere un nuevo valor ya que usted puede confiar
en Sears HomeCentraff para obtener servicio de reparaci6n. Con
m_s de 2.400 especialistes capacitados en reparaciones y
acceso a m,_s de 900.000 piezes de repuesto y accesorios,
contamos con les herramientas, piezes, conocimiento y la
destreza para esegurarnos de respaldar nuestra promesa de que:
Reparamos Io que vendemos.
Su electrodom6stico Galaxy: est_ disefiado, fabricado y
sometido a prueba para proporcionade aries de funcionamiento
confiable. No obstante, cuaiquier electrodom6stico moderno
puede necesitar servicio t6cnico de vez en cuando. El contrato
de mantenimiento Sears le ofreee un programa de servieio
excepcional, a un precio accesible.
El contrato de mantenimiento Sears
• Garantiza el servicio t6cnico del mafiana a precios de hey.
• Elimina les facturas de reparacidn producides per el use
normal y el desgeste.
• Cubre les visites de servicio no t6cnices y educatives.
• Proporciona una revisidn anual de mantenimiento preventive
a solicitud suya, para esegurarse de que su electrodom6stico
est& en condiciones apropiades de funcionamiento.
Se apliean ¢iertas res_rieciones. Pare obtener informacibn
referente a los Contratos de mantenimiento de Seers Home
Central _',Ilame al 1-800-861-666&
Accesorios
Refacciones
Para pedir el limpiador de acero inoxidable o cartuchos internes
de filtraci6n de agua de repuesto, Ilame al
1-SO0-4-MY-HOME e y pida el n_mero de pieza apropiado que
se enlista abajo o pdngese en contacto con su distribuidor
autorizado Galaxy _.
Limpiador de Acero Inoxidable:
Pieza NO. D22 M40083 R
Cartucho interne de filtraci6n de ague:
NOTA: No usar con agua que no sea microbiol6gicamente
segura o de calidad deseonocida sin desinfec_arla
adeeuadamente antes o despuds del sistema. Pueden usarse
sistemas eertificados para la reducei6n de quistes en aguas
desinfsetadas que puedan eontener quistes filtrables.
Cartueho de quistes:
Pida ]a Pieza No. 9908 (WF=NLC240V y WF-LC400V)
45
Page 46

HOJA DE DATOS DEL PRODUCTO
Sistema de filtracibn de agua de la rejilla de la base
Modelo WF-NLC24.0V/NLC24.0V Capacidad de 240 galones (908 litros}
Comprobado y ceriificado per NSF International, segDn la norms 42
NSFiANSI pare reducci6n de cloro, saber y clot, close de
_ertfculas F; y baio la norma 53 NSFiANSI pare la roduu*ci6n de
}lomo_ mercuric, atrazina, benceno_ toxefeno, o-diclorobenceno,
_uistes, turbidez, asbestos lindano, tet_{eloroefileno, endrina_ alaolor<
_lorobenoeno, etilbenceno_ 7rFIM (trialometano) y MTBE (_ter
metiltereiobut flioo).
Este sistema ha side comprebade segSn la norrna ANSI/NSF 42/53 pare la reducciTn de Ins sustancias citadas a continuaci6n. La
concentracidn de Ins sustancias indicadas en ague entrando al sistema fue reducida a una concentraciTn monet o igual al limite
permitido pare ague saliende del sistema, tel come se especifica en la norms ANSI/NSF 42/53.
Reduooibn do Requisitos de Promedfo Concentrecf6n on el M_ximo Promedio % M[nfmo Promedfo N_mero
sustancies reduooibn de fnfluente ague e tratar efluente efluente reduocf6n % de pruebe
Efeotos est_tioos N$F reducof6n N$F
Clase de pertfuulasI*Cl°r° saber/clot _95%_50% 205,350.657/mLmg/L2,0perIo menos10.000mgiL± 10% 4,100tmL*_0'06mg/L 0,05 mg/L 971% 97,5% 5071507175-0273-02
99,9%99,3%part uu as/mL 2,300imL
Reduooibn de Requisites de Promedfo Concentreofen on el M_xirno Promedie % M[nfmo Promedfo N_mere
contemfnantes reduooibn de fnfluente ague e tratar efluente efluente reduoof6n % de pruebe
N$F reducot6n N$F
Plomo: @ pH 5,5 0,01mgiL 015 mgiL1- 0,15 mgiL _+10% 0_001 mg/L 0_001 mgiL 9935% 99,35% 507601-01
Plomo: @ pH 5,5 0,01mgiL 0,15 mgiL1- 0,15 mgiL_+ 10% 0,001 mg/L 0,001 mgiL 99,31% 99,31% 507602-01
Mercuric: @pH 6,5 0,002 mgiL 0,0051 mg/L 0,005 mg/L + 10% 0,0004 mg!L 0,0002 mg/L 93,5% 95,7% 507503-02
Mercuric: @pH 5,5 0,002 mgiL 0,0057 mg!L 0,006 mg!L + 10% 0,0008 mg!L 0,00051 mgiL 95,9% 91,2% 507604-02
Beneeno 0,005 mgiL 0,0139 mg!L 0,015 ± 10% 0,0005 mgiL 0,0005 mg/L 95,3% 98,3% 507193-02
Paradielorobeneeno 0075 mg!L 0220 mg/L 0225 + 10% 0,0005 mg/L 0,0005 mgiL 99,7% 997% 507186-02
To×alone 0,003 mgiL 0014 mglL 0,015 ± 10% 0,0014 mgiL 0,001 mgiL 900% 92,9% 507195-02
Atrazina 0,003 mgiL 0009 mgiL 0,009 mg!L + 10% 0,0013 mg!L 0,00036 mg!L 956% 95,9% 507191-02
2, 4-D 0,07 mg!L 0197 mglL 0,215 ± 10% 0,055 mg/L 0,0137 mg/L 706% 93,06% 507190-02
Asbestos 99% 26 x 10 10_a ICe'fibres/L1-1- 0,19x 10_mgiI 0,18 x 10 m_t 9993% 99,93% 507178-02
Quisies:_ 99,95% 11t .000/mL 50.000iL rain. 1 mgiL 1 mg/L 9999% 99,99% 507197-02
Turbidez 0,5 NTU 11,08 NTU 11 ± 1 NTU 0,13 NTU 0,079 NTU 95,9% 99,3% 507751-02
Par&metros de la prueba: pH = 7,5 =_0,5 si no se indies Io contrario. Flujo= 0,5 gpm (1,9 Lpm). Presidn = 60 Ibs./pulg? (413,7 kPa)
Temp. = 63"F (17,2_C).
• Es esencial que los requerimientos de operacidn,
mantenimiento y reemplazo del filtro se Ileven a cabo pare
que este producto se desempefie tel come se ofrece en la
publicidad.
• Modelo WF-NLC240V Cambie los cartuchos per Io menos
cads 6 a 9 moses. Use el cartucho de repuesto NLC240V,
pieza N_9908. El precio sugerido de vents al per monet
durante el afio 2004 es de $39,95 EE.UU. Precios sujetos a
cambio sin previo arise.
• El preducte es pare use con ague fria 5nicamente.
• No use con ague que no sea microbioldgicamente segura o
que sea de calidad desconocida sin desinfectada
adecuadamente antes o despu6s del sistema. Pueden usarse
sistemas certificados pare la reduccidn de quistes en aguas
desinfectadas que puedan contener quistes filtrables.
• Favor de vet la portada o la seccidn "Accesorios" pare
obtener el hombre, direccidn y nSmero telefdnico del
fabricante.
• Favor de vet la seccidn "Garantia" pare verificar la garantfa
limitada del fabricante.
Pautas de aplicaci6niPardmetros pare el suministro de ague
Suministro de ague Municipal o de pozo
Presi6n del ague 30 - 120 Ibs./pulg. 2 (207 - 827 kPa)
Temperature del ague 33" - 100"F (0,6 _ - 37,8 _ C)
Flujo nominal de servicio 0,5 gpm (1,9 Wmin.) @ 60 Ibs./pulg.
Wamat_o de Ins partleulas olase I: ;>05 e <1 um
"El requisite de prueba es de euando menos 100.000 pertfoulasiml de Polvo Fine de prueba AC.
_-Estos eontaminantes no se eneuentran neeesariamente en su suministro de egua, El desemper_o puede verier dependiendo de Ins condiciones del
ague local.
_-_-Fibras mayores de 10 um de Iongitud
SBasedo en la filtraeiSn de quistes de Cryptospofidium parvum
('_NSF es una mares registrada de NSF International,
46
Page 47

Sistema de filtracibn de agua de la rejilla de la base
Modelo WF-LC400ViLC400V Capacidad de 400 galones (1514 litros)
Comprobado y ceriificado per NSF Inlernational, segDn la norms 42
NSFiANSI pare reducci8n de cloro, saber y clot, class de
part[culas F; y bajo ]a norms 53 NSFiANSI pare la roduoci6n de
plomo_ mercuric, alrazina, benceno_tosafeno, o-diclorobenceno,
quisles, turbidez, asbestos, lindano, tot_{cloroe01eno, endrina, alaclor.
olorobenoeno, otilbenceno, TrHM (tdalometano) y MTBE (6ter
metiltereiobut flico).
Este eietema ha side comprobado eeg0n la nomna ANSI/NSF 42/53 pare la reducci6n de Ins eustancias citadas a continuaci6n. La
concentracidn de lee sustancias indicadae en ague entrando al sistema fue reducida a una concentraci8n monet o igual al limits
permitido pare ague saliendo del sistema, tel come ee especifica en la norms ANSI/NSF 42/53.
Reduccibn de Requisites de Promedio Concentrecibn en M_ximo P_omedfo % Mfnfmo Promedio N_mero
eustaaoiee reduocibn de influente el ague e tratar efluente efluente reducoibn % de prueba
Efectos estetfcoe NSF reduocibn N$F
CIoro, saber/clot _50% 2,1 mgiL 2,0 mgiL ± 10% 0,06 mgiL 005 mgiL 971% 97,8% 507173-02
Class de partfoulss/* _85% 5.366867/mL partPerIOoumenoss&/mL10.0004.100/mL *_ 2.300/mL 993% 99,9% 507175-02
Reducoibn de Requisites de Promedio Cencentrecibn en M_xime P_omedfo % Mfnfmo Promedie N_mere
oontaminantes reduocibn de influente el ague e tratar efluente efluente reduooibn % de prueba
NSF reduocibn NSF
Plomo: @ pH 6,5 0,01mgiL 0,16 moiL1" 0,15 mg!L _+10% 0,001 mg/L 0001 mg/L 993% 99,35% 507601-01
Plomo: @ pH 8,5 0,01mgiL 0,15 mgiLl" 0,15 mg!L _+10% 0,001 mg/L 0,001 mg/L 99,2% 99,31% 507602-01
Mercuric: @ pH 6,5 0,002 mg/L 0,0061 mgiL 0,006 mgiL ÷ 10% 0,0004 mgiL 00003 mg/L 935% 96,7% 507603-02
Mercuric: @ pH 8,5 0,002 rng!L 0,0057 mgiL 0,006 mgiL ÷ 10% 0,0008 rngiL 0,00051 mgiL 85,8% 91,2% 507604-02
Benoeno 0,005 rn_L 0,0138 mgiL 0,015 _ 10% 0,0005 mgiL 0,005 mg/L 06,3% 06,3% 507183-02
Parsdiolorobenueno 0075 mgiL 0,220 mg/L 0225 _ 10% 0,0005 mgiL 00005 mgiL 097% 09,7% 507186-02
Toxafeno 0,003 rngiL 0,014 mg/L 0,015 _+10% 0,0014 rngiL 0001 mg/L 90% 92,96% 507185-02
Atrazina 0,003 rn_ZL 0,009 mg/L 0,009 m_iL + 10% 0,0013 rn_ZL 0,00038 mglL 85,6% 85,6% 507181-02
2 4-D 0,07 mg/L 0,197 mgiL 0,215 _+10% 0,058 mgiL 00137 rn_ZL 706% 9306% 507180-02
Asbestos 99% 26 x 10_ 10a 10_fibrasiLl"l - 0,18 × 10 mgA 018 × 10_rng!L 9993 99,93% 507178-02
Quistes$ 99,95% 111.000/mE 50.000/L rain. 1 ingle 1 mg/L 99,99% 99,99% 507187-02
Turbidez 0,5 NTU 1108 NTU 11 _+1 NTU 0,13 NTU 0078 NTU 988% 99,3% 507751-02
Par&metros de la prueba: pH = 7,5 =_0,5 ei no ee indies Io contrario.
Temp. = 63"F (17,2_C).
• Es eeencial que los requerimientos de operacidn,
mantenimiento y reemplazo del filtro ee Ileven a cabo pare
que este producto se desempefie tel come ee effete en la
publicidad.
• Models WF-LO400V El sietema de control del filtro mide la
cantidad de ague que paeaa trav8s del filtro y le aviea que
debe reemplazarlo. Cuando ee ha ueado el 90% de la
duracidn nominal del filtro, la luz indicadora del filtro cambia
de verde a amarillo. Cuando se ha usado 100% de la duracidn
nominal del filtro, la luz indicadora del filtro cambia de amarillo
a rojo y se le recomienda reempiazar el filtro. Use el cartucho
de repuesto LC400V, pieza N" 9908. El precio sugerido de
vents al per monet durante el afio 2004 es de S39,95 EE.UU.
Precioe sujetos a cambio sin previo arise.
• El producto es pare use con ague fria 5nicamente.
• No use con ague que no sea microbioldgicamente segura o
que sea de calidad desconocida sin deeinfectarla
adecuadamente antes o deepu8s del cisterns. Pueden usarse
eietemas certificadoe pare la reduccidn de quistee en aguas
deeinfectadae que puedan contener quietes filtrable&
Flujo= 0,5 gpm (1,9 Lpm). Preeidn = 60 Ibe./pulg? (413,7 kPa)
• Favor de vet la portada o la seccidn "Accesorios" pare
obtener el hombre, direccidn y n_mero telef8nico del
fabricante.
• Favor de vet la seccidn "Garantia" pare verificar la garanffa
limitada del fabricante.
Pautae de aplicacibniPar_metroe pare el euministro de ague
Sur'ninistro de agua Municipal o de pozo
Presi8n &el ague 30 - 120 Ibe./pulg? (207 - 827 kPa)
Temperature del agua 33" - 100_F (0,6" - 37,8" C)
Flujo nominal de servicio 0,5 gpm (1,9 Wmin.) @ 60 Ibs./pulg.
"Tamale de Ins psrtloulas class I: ;_0,5 e <1 um
"El requisite de prueba es de ousndo menos 100,000 psrtfoulasim] de Polvo Fine de pruebs AC,
_-Estos oontsminantes no se enouentrsn neoessriamente en su suministro de egua. El desemper_o puede verier dependiendo de Iss condiciones del
sgus local.
_-_-Fibras mayores de 10 um de Iongitud
SBassdo en Is filtraoi8n de quistes de Cryptospofidiurn parvum
('_NSF es uns mares registrada de NSF International.
47
Page 48

TABLE DES MATII RES
GARANTIE .................................................................................... 48
Sm_CURITEDU REFRIGm_RATEUR.............................................. 49
Mise au rebut de votre vieux r_frig6reteur ................................ 49
INSTRUCTIONS D'INSTALLATION ............................................ 50
D6ballage du r6frig6rateur ......................................................... 50
Emplacement d'instaUation ....................................................... 50
Sp6cifications 61ectriques ......................................................... 51
Sp6cifications de I'alimentation en eau .................................... 51
Grille de la base ......................................................................... 51
Portes du r_rig6rateur .............................................................. 52
Ajuster les portes ....................................................................... 54
Raccordement de la canalisation d'eau .................................... 54
Preparation du syst_me d'eau .................................................. 55
Sons normaux ........................................................................... 56
UTIUSATION DU RI_FRIGI_RATEUR ......................................... 56
Pour s'assurer d'une circulation d'air apprepri6e ..................... 56
Utilisation des commandes ....................................................... 56
Distributeurs d'eau et de glagons ............................................. 57
Le t6moin lumineux de I'@at du filtre &eau .............................. 58
Syst_me de filtration d'eau ........................................................ 58
Machine & glagons et bac ......................................................... 59
CARACTm_RISTIQUES DU REFRIGERATEUR ........................... 60
Tablettes du r_rig6rateur .......................................................... 60
]]roir pour sp6cialit6s alimentaires ............................................ 60
]]roir & 16gumes/viande convertibl&
bac & I_jumes et couvereles .................................................... 60
R6glage de la temp6rature du tiroir &
16gumes/viande convertible ...................................................... 61
R6glage de I'humidit6 dane le bac & 16gumes .......................... 61
Casier & vin ................................................................................ 61
Casier utilitaire ........................................................................... 62
CARACTERISTIQUES DU CONGELATEUR .............................. 62
Tablette de cong61ateur ............................................................ 62
Panier ou bac de cong61ateur ................................................... 62
CARACTI_RISTIQUES DE LA PORTE ........................................ 62
Tringles ou balconnete de porte ............................................... 62
Baleennets de porte .................................................................. 63
ENTRETIEN DU REFRIGI_RATEUR ........................................... 63
Nettoyage .................................................................................. 63
Remplacement des ampoules d'6dairege .............................. 64
Pannes de courant .................................................................... 64
Entretien avant les vacances ou lore d'un d6m6nagement...... 65
DEPANNAGE ................................................................................ 65
CONTRATS DE PROTECTION ................................................... 69
Aux Etats-Unis ........................................................................... 69
Au Canada ................................................................................. 69
Accessoires ............................................................................... 69
FEUILLES DE DONNEES SUR LE PRODUIT ............................ 70
NUMEROS DE SERVICE ....................... COUVERTURE ARRIERE
GARANTIE
GARANTIE COMPLETE DE UN AN DU RI_FRIGERATEUR
Pendant un an & tempter de la date d'achat, Ioreque ce
r6frig6rateur est utilie6 et entretenu d'apr_s les instructions
jointes ou fournies avec le produit, Sears r6parera ce r6frig6rateur
sans frais, si la d6fectuosit6 previent des mat6riaux ou de la
fabrication.
GARANTIE COMPL/=TE DE CINQ ANS DU SYST/=ME SCELL I_
DU RI_FRIGERATEUR
Pendant cinq ans & compter de la date d'achat, Iorsque ce
r6frig6rateur est utilie6 et entretenu d'apr_s les instructions au
prepri6taire jointes ou feurnies avec le produit, Sears r6parera le
syst_me sceU6 (comprenant le syst_me de r6frig6ration, la
tubulum de raccordement et le compresseur) sans frais, efil
existe une d6fectuosit6 des mat6riaux ou de fabrication.
La garantie ci-dessus s'applique seulement aux r6frig6rateure qui
ont 6t6 utilie6e pour la conservation des aliments en utilieation
demestique priv6e et exclut les cartouches originales et de
rechange des filtres & eau et & glace Galaxy' (si le r6frig6rateur
est dot6 du syst_me de filtration). Lee cartouches originales et de
rechange sent garenties pendant 30 joure, pi_ces seulement,
centre les vices de mat6riaux ou de fabrication.
LE SERVICE DE GARANTIE EST DISPONIBLE EN
COMMUNIQUANT AVEC LE CENTRE DE SERVICE SEARS LE
PLUS PROCHE AU CANADA OU AUX ETATS-UNIS.
Cette garantie s'applique seulement pendant que ce produit
eat utilisd au Canada ou aux Etsts-Unis. Cette garantie vous
donne des droits juridiques sp6cifiques et vous pouvez aussi
avoir d'autres droits qui varient d'une province _ I'autre ou
d'un Etat _ I'autre.
Les termes de garantie peuvent varlet au Canada. Communiquer
avec votre centre de service Sears local pour des d_tails
complets.
Sears, Roebuck and Co.
Dept. 817WA, Hoffman Estates, IL 60179
Sears Canada, Inc., Toronto, Ontario, Canada MSB 2138
Enregis_ement du produit
Dane I'espace ckdesseus, veuiUez inscrire yes nur'n6res
complets de mod_le et de s6rie ainsi que la date d'achat. Qn
peut treuver ces renseignements sur F@iquette signal6tique de
mod_le et du num6re de s6rie situ_e sur la parei int6rieure du
r6frig6rateur.
Ayez ces renseignements & port6e de la main pour vous aider
obtenir de I'assistance ou du service plus rapidement Ioreque
veus communiquez avec Sears & propes de vetre r6frig6rateur :
Numero de medble 106,
Num_ro de a_e
Date d'aehat
Garder ces instructions et votre tasture de vente pour
rbfbrence ultbrieure.
48
Page 49

SI CURITI DU RI FRIGI RATEUR
Votre s6curit6 et celle des autres est trbs importante.
Neus dennons de nombreux messages de s_curit_ impertants dans oe manuel et sur vetre appareil m_nager. Assurez-vous de
toujeurs life teus les messages de s_curit_ et de veus y conformer.
Voici le symbele d'alerte de s_curit_.
Ce symbole d_alerte de s_curit_ vous signale les dangers petentiels de d_c_s et de blessures graves &veus
et & d'autres.
Teus les messages de s_curit_ suivrent le symbele d'alerte de s_curit_ et le mot "DANGER" eu
"AVERTISSEMEN'F'. Ces roots signifient :
Risque possible de d_c_s ou de blessure grave ei voue ne
suivez pas imm6diatement lee instructions.
Risque possible de d_c_s ou de blessure grave si vous
ne suivez pas les instructions.
Teus les messages de s_curit_ vous dirent quel est le danger petentiel et veus disent comment r_duire le risque de blessure et
ce qui peut se produire en cas de non-respect des instructions.
IMPORTANTES INSTRUCTIONS DE SI_CURITI_
AVERTISSEMENT : F_eurr@duireles risques d'incendie, de choc @lectriqueou des blessures Iorsde I'utilisatien du
r6frig6rateur, prendre quelques pr'6cautions fondamentales, y compris les suivantes :
• Brancher I'appareil sur une prise & 3 alv@oles reli6e & la terre.
• Ne pas enlever la breche de liaison & la terre.
• Ne pas utiliser un adaptateur.
• Ne pas utiliser un c&ble de rallonge.
• Utiliser deux ou plus de personnes pour d6placer et installer
le r6frig@rateur.
• D@brancher la source de courant @lectrique avant I'entretien.
• Replacer tousles panneaux avant de faire la remise en
marche.
• Utiliser un produit de nettoyage ininfiammable.
• Garder les mat6riau× et les vapeurs inflammables, telle que
I'essence, loin du r@frig@rateur.
• D@brancher le r6frig@rateur avant I'installation de la machine
&glagons (seulement pour mod_les pr@ts& recevoir une
machine & glagons).
• Utiliser un verre robuste pour prendre des glagons ou de
I'eau (sur certains mod_les).
• Enlever les portes de votre vieux r6frig@rateur.
CONSERVEZ CES INSTRUCTIONS
Mise au rebut de vob'evieux r frig rateur
IMPORTANT : L'emprisonnement et 1'6teuffement des enfants ne
sent pas un prebl_me du pass& Les r6frig6rateurs jet6s ou
abandonn6s sent encore dangereux, m_me s'ils sent laiss_s
abandonn_s pendant "quelques jours seulement'L Sivous veus
d@barrassez de votre vieux r6frig@rateur, veuillez suivre les
instructions suivantes pour aider & _viter les accidents.
Avant de jeter votre vieux refrigerateur ou congelateur :
• Enlever les pertes.
• Laisser les tablettes en place de sorte que les enfants ne
puissent pas y p_n6trer facilement.
49
Page 50

INSTRUCTIONS D'INSTALLATION
D ballage du r frig rateur Emplacement d'installation
Risque du poids excessif
Utiliser deux ou plus de personnes pour d_placer st
installer Ie r_frig6rsteur.
Le non-respect de cstte instruction peut causer
uos bleesure au dos ou d'autre blessure.
Enl_vement des materiaux d'emballage
• Enlever le ruban adh@sif et tout r@sidu de colle du
r6frig@rateur avant de le mettre en marche. Potter une petite
quantit@ de savon liquide & vaisselle sur Fadh@sifavec lee
deigts. Rincer & Feau tilde et essuyer.
Ne pas utiliser d'instruments coupants, d'alcool &friction, de
liquides inflammables eu de nettoyants abrasifs pour enlever
le ruban adh6sif ou la colle. Ces preduits peuvent
endommager la surface de votre r@frig@rateuRPour plus de
renseignements, veir "S6curit@ du r6frig6rateur'L
D6placement de votre r_rig_rsteur :
Votre r@frig@rateurest Iourd. Lore du d@placement du
r6frig@rateur pour le netteyage eu le service, veiller & prot@ger
le plancher. Toujours tirer le r@frig@rateurtout droit lore du
d6placement. Ne pas incliner le r6frig@rateur d'un 06t6 ou de
Fautre ni le "faire marcher" en essayant de le d6placer car le
plancher peurrait 6tre endommag&
Nettoyage avant I'utilisation
Apr_s avoir enlev@ tousles mat@riaux d'emballage, nettoyer
I'int6rieur du r6frig6rateur avant de I'utilieer. Voir les instructions
de nettoyage dane "Entretien du r6frig6rateur'L
Importants renseignements b savoir au sujst des tablsttes
st des couvercles en verre :
Ne pas nettoyer lee tablettes ou eouvereles en verre avec de
I'eau tilde quand ils sent froids. Les tablettes et les
couvercles peuvent se briser s'ils sont expos6s _ des
changements soudains de temperature ou _ un impact tel
que coup brusque. Pour votre protection, le verre tremp_ est
congu pour _clater en d_innombrables pi_ces minuseules.
Ceci est normal. Les tablettes et les couvercles en verre sent
Iourds. Un soin special sqmpose lots de leur d_plaeement
pour _viter I'impact d'une chute.
Risque d'explosion
Garder Ies mst6riaux st tee vapeurs inflammables, telle
que I'eesence, loin du r_frig_rateur.
Le non-respect de cette instruction peut causer
un d_c&s, uos explosion ou un incendie.
Pour ebtenir une a@ration appropri@e pour votre r6frig6rateur,
laisser un espace de 1/_,,(1,25 ore) de chaque c6t_ et au sommet.
Si vous installez vetre r@frig@rateurpros d'un tour fi×e, laisser un
minimum de 2" (5,08 cm) de chaque c6t@(selon le mod_le} pour
permettre & la porte de s'ouvrir sans obstruction. Si votre
r6frig@rateur comporte une machine &glagons, s'assurer qu'un
espace additionnel est pr@vu& Yarri_re pour permettre les
connexions des conduits d'eau.
REMARQUE : Ne pas installer le r_frig_rateur pros d'un four,
d'un radiateur ou d'une autre source de chaleur, ni dane un
endroit eQ la temp6rature baissera au-dessous de 55"F (13°C).
Vd' {1,2S cm}
¢2
It" 15,08cm)
5O
Page 51

Sp ifica ons lecb'iques
Risque de choc _lectrique
Brancher sur une prise _ 3 alveoles reli_e _ Ia terre.
Ne pas entever la broche de liaison _ la terre.
Ne pas utiliser un adaptateur.
Ne pas utiliser un cable de ratlonge.
Le non-respect de ces instructions peut causer
un d_c6s, un incendie ou un choc _lectrique.
Avant de placer le r6frig6rateur & son emplacement final, il est
important de voue assurer d'avoir la connexion 61ectrique
appropri6e.
M_}thode recornrnand_e de mise & la term
Une source d'alimentation de 115 volts, 60 Hz, type 15 ou
20 amperes CA seulement, pr'ot_J6e par fusibles et
ad6quatement mice & la terre est n6cessaire. IIest recommand6
d'utilieer un circuit distinct pour alimenter uniquement votrs
r6frig6rateur. Utilieer une prise rout'ale qui ne peut pae @treraise
hers circuit & I'aide d'un commutateur. Ne pae employer de
rallenge.
REMARQUE : Avant d'ex6cuter tout lype dfinetallation,
nettoyage ou rsmplacement d'une ampoule d'6clairage, teurner
la commande (du thermostat, du r6frig6rateur ou du cong61ateur
eelen le mod_le) & OFF (ar_t) et d6brancher ensuite le
r6frig6rateur de la source d'alimentation 61ectrique. Lorsque voue
avez terrain6, reconnecter le r6frig6rateur & la source
d'alimentation 61ectrique et mettre de nouveau la commande (du
thermostat, du r6frig6r'ateur ou du cong61ateur selon le mod_le)
au r6glage d6sir6.
Specifications de I'alimentation en eau
Life attentivement routes les instructions avant de cor'nmencer.
IMPORTANT:
• Si on dolt utiliser le r6frig6rateur avant qu'il eeit raccord6 ,_la
canalieation d'eau, placer la commande de la machine
glagens _ la position OFF (art@t).
• Teutes les installations doivent _tr'e confomnes aux exigences
des codes Iocaux de plomberie.
• Utiliser un tube en cuivre et v6rifier efil y a des fuitee. Installer
lee tubes en cuivre seulement _ des endreits o6 la
temp6raturs se maintient au-dessue du point de cong61atien.
OUTILLAGE REQUIS : Un teurnevis & lame plate, cl6s plates de
_d' et W' ou 2 cl6s &molette r6glables, tourne-6creu et foret de
_", perceuee manuelle ou 61ectrique (convenablement reli6e & la
terre).
REMARQUE : Votre marchand de r6frig6r'ateurs propose une
treuese disponible avec un rebinet d'arr_t & 6trier de Y.V'
(6,35 ram), un racco_d et un tube en cuivrs. Avant I'achat,
e'assurer que le r'obinet d'arr_t & 6trier est conforme & yes codes
Iocaux de plomberie. Ne pas employer de robinet d'arr_t &6trier
de _,_e"(4,76 ram) ou de type & percer, ce qui r_duit le d_bit d'eau
et cause une obstruction plus facilement.
Pression de Peau
Une alimentation en eau freide avec une pr'eseien entre 30 et
120 Ib/pe _(207 - 827 kPa) est n6ceseaire pour fairs fenctionner le
distributeur d'eau et la machine _ glagone. Si voue avez des
questions au sujet de la pression de vetre eau, appel _ un
plembier qualifi_ agr6_.
AlimentatJon en eau par osmose inverse
IMPORTANT : La pr'eseion de I'alimentation en eau entre le
eyet_me d'osmoee inverse et la valve d'arriv_e d'eau du
r_rig_rateur dolt @treentre 30 et 120 Ib/po _(207 - 827 kPa).
Si un syst_me de purification de I'eau par oemose inverse est
raccord6 & vetre alimentation en eau fr'oide, la pression de I'eau
au syet_me dolt _tre d'un minimum de 40 & 60 Ib/po _(276 -
4f 4 kPa).
Si la pression de I'eau au syst_me d'osmose inverse est
inf_rieure & 40 - 60 Ib/pe _(276 - 414 kPa) :
• V_rifier pour veir ei le filtrs du eyet_me d'osmoee inverse est
blequ6 et le r'emplacer ei n_cessairs.
• Laisser le r6semeir du syst_me d'osmose inverse se rsmplir
apr_s une utilisation intense.
Si votre r6frig6rateur a une cartouche de filtrs _ eau, celle-ci
peut _duirs encore plus la pressien de I'eau lersqu'elle est
utilis_e avec un eyet_me d'osmose inverse. Retirer la
cartouche du filtre _ eau. Veir "Syst_me de filtration d'eau'L
Si vous avez des questions au eujet de la pr'eseion de votrs eau,
appeler un plombier qualifi6 agr66.
Grille de la base
Retirer la grille de la base :
1. Ouvrir lee deux pontes.
2. Placer lee mains le long des extr_mit6s de la grille. Appuyer
sur le deseus de la grille de la base et tirsr sur le has.
REMARQUE : Ne pas oublier de remettre la fiche technique en
place derriere la grille de la base apr_s le netteyage.
R_installer la grille de la base :
1. Ouvrir lee deux pontes.
2. Aligner lee languettes d'appui de la grille avec lee agr'afes en
m@aL
3. Appuyer fermement sur la grille pour I'enclencher en place.
51
Page 52

Portes du r frig rateur
OUTILLAGE REQUIS : CI6s & douiUee & t6te he×agonale de ¼" et %e" et un tournevis & lame plate.
IMPORTANT : Avant de commencer, tourner la commande du r6frig6rateur & OFF (arr6t), d6brancher le r6frig6rateur ou d6connecter la
source de courant 61ectrique. Enlever lee aliments et tousles compartiments ou contenants utilitaires r6glables dans les portes.
REMARQUE : II peut 6tre n6cessaire seulement d'enlever soit la poign6e de la porte soit les portes pour faire passer votre appareil
dane un cadre de porte de votre r6sidence. Mesurer le cadre de la porte pour d6terminer si oui ou non il faut enlever lee poign6es ou les
portes du r6frig6rateur.
\
Charniere
sup6rieure gauche
A. Ne pes enlever levis
Raccord du conduit
du distributeur d'eau
A
A. Anneeu ext6rieur rouge
Grille de la base
Enl_vement
des portes
/
/
Niveau
I
Alignement des
portes
Charniere
sup6rieure droite
Charni_re
inMrieure
Nivellement event
A. Vis de nivellement
52
Page 53

Enlever lee poignees {facultatif)
1. Appliquer une pressien forte avec vetre main sur la surface
de la garniture. Glieser la garniture sup6rieure vere le haut et
la garniture inf6rieure vers le has here de la peign6e. Soulever
les pi_ces de la garniture des vis de fixation. Voir dessin 1.
2. Enlever les vis des peign6es et les poign6es. Veir dessin 1.
& Mettre le r6frig6rateur en place. Replacer les poign6es tel
qu'indiqu& Voir dessin 1.
Enlever lee portes
Risque de choc 61ectrique
D_conneeter la source de courant _leetrique event
d*enlever lee portes.
Le nomrespect de cette instruction peut causer
un d6c6s ou un choc 6lectrique.
1. D6brancher le r6frig6rateur ou d6connecter la source de
courant 61ectrique.
2. Quvrir les deux pertes du r6frig6rateur. Enlever la grille de la
base en tirant vere le haut les coins inf6rieure externes. Veir
deesin 2.
& Fermer les deux portes et les garder ferm6es jusqu'& ce que
veus seyez pr6t & les soulever pour les d6gager de la caiese.
4. Si le r6frig6rateur est muni d'un distributeur (glagens ou eau),
d6connecter le conduit du distributeur d'eau situ6 derriere la
grille de la base du 06t6 de la porte du cong61ateur. Veir
deesin 3.
• Presser I'anneau externe rouge centre la face du raccorq
et tirer sur le conduit pour le d_jager.
• Sur certains mod_les, retirer le conduit du collier de
serrage.
5. Enlever le couvercle de la charni_re sup6rieure gauche et la
vis. Veir dessin 4. Ne pes enlever la vis A.
6. D6connecter les ills :
• D6connecter la fiche des ills.
• Enlever lavis verte de liaison & la terre pour d6connecter
les ills de liaison & la terre.
7. Soulever soigneusement et verticalement la porte du
cong61ateur pour Fenlever de la charni_re inf6rieure. Veir
deesin 5. Le conduit du distributeur d'eau demeure joint & la
porte du cong61ateur et passe & travere la charni_re inf6rieure
gauche. S'aesurer de pret6ger le conduit du distributeur
d'eau centre tout dommage.
8. Enlever le couvercle de la charni_re sup6rieure dreite et les
vis tel qu'indiqu& Veir dessin G.Ne pes enlever lavis A.
9. Soulever verticalement la porte du r6frig6rateur pour I'enlever
de la charni_re inf6rieure.
10. II peut ne pes 6tre n6cessaire d'enlever la charni_re inf6rieure
pour faire passer le r6frig6rateur dens un cadre de porte. Les
deux charni_res inf6rieures ont une construction similaire.
• D6monter les chami_res tel qu'indiqu& Veir deesin 7. Ne
pes enlever lavis A.
Remplacer lea portes et lee charni_res
1. Replacer les deux charni_res inf6rieures, si elles ont 6t6
enlev6es. Serrer les vis.
2. Faire passer seigneusement le conduit d'eau &travere la
charni_re inf_rieure gauche event de r'_installer la porte sur la
charni_re. De I'aide peut _tre n_cessaire.
REMARQUE : Feurnir un appui additionnel pour les portes
pendant que les chami_res sup6rieures sent replac6es. Ne pes
compter sur les aimants des portes pour tenir les portes en place
pendant que vous faites le travail.
8. Reconnecter le conduit du distributeur d'eau en le peuesant
dens le raccorq jusqu'& ce qu'il s'arr_te et que la marque
noire touche la face du raccord. Voir dessin 3. Sur certains
mod_les, remplacer le conduit dens le collier de serrage.
4. Aligner et replacer la chami_re sup_rieure gauche tel
qu'indiqu& Veir dessin 4. Setter les vis.
Risque de choc _lectrique
Reconnecter lee deux file de liaison b Ia term.
Le non-respect de eette instruction peut causer
un d_c_s ou un choc _lectrique.
• Reconnecter les deux ills de liaison & la terre.
• Reconnecter la fiche des ills.
C
A Ne pes enlever le vis A
B. F#Sde lieieon _ le terte
C. Vie verte de Iiei._en _ le ferre
D Fiche des file
A Nepes enleverle vis A
B, File de liei._en _ le _ma
C. ViSretie de liaison _ le ferre
D Fiche des file
5. Replacer le couvercle de la charni_re gauche et los vis.
53
Page 54

6. Replacer la porte du r6frig6reteur en soulevant
seigneusement la porte clans la charni_re inf6rieure droite.
7. Aligner et replacer la charni_re sup6rieure dreite tel
qu'indiqu& Veir dessin 6. Setter les vis.
8. Replacer le couverole de la charni_re et les vie. Serrer les vie.
9. Brancher le r6frig6reteur eu reconnecter la source de courant
61ectrique.
Ajuster les portes
Raccordement de la canalisation d'eau
Life attentivement routes les instructions avant de commencer.
IMPORTANT : Si on dolt utiliser le r6frig6rateur avant qu'il eoit
raccord6 & la canalisation d'eau, placer la commande de la
machine & glagons & la position OFF (arr6t).
Raccordement & une canalisation d'eau
Fermeture des portes
1. Placer le r6frig6rateur & sa position finale.
2. Placer un niveau & I'int6rieur du r6frig6rateur & Farri_re de la
tablette sup6rieure. Veir dessin 8.
8. Localiser lee vie de nivellement derriere la grille de la base de
cheque 06t6 du r6frig6rateur.
4. Utiliser une cl6 & douille & t6te hexagonale pour ajuster les vie
de niveUement des roulettes & rarri_re jusqu'& ce que le
r6frig6rateur soit d'aplomb. Tourner lavis de niveUement des
roulettes &rarri_re vers la droite pour seulever ce 06t6 du
r6frig6rateur eu tourner lavis de nivellement vere la gauche
pour abaisser ce c6t& Voir dessin 10. S'assurer que le
r6frig6rateur est d'aplomb event de proc6der.
5. V6rifier Falignement des pertes apr_s que le r6frig6rateur est
mis d'aplomb.
1. D6brancher le r6frig6rateur ou d6connecter la source de
courant 61ectrique.
FERMER le rebinet principal d'arriv6e d'eau. OUVRIR le
robinet de puisage le plus proche pendant une p6riode
suffisante pour que la canalisation d'eau se vide.
8. Treuver une canalisation d'eau freide verticale de
W' & 11/_" (1,25 cm & 3,18 ore) pros du r6frig6rateur.
IMPORTANT :
Aligner les portes
4.
IMPORTANT : Niveler d'aberd I'arri_re du r6frig6rateur tel que
d6crit dans "Fermeture des pertes".
Les pertes peuvent 6tre in&gales apr6s le nivellement du
r6frig6rateur. Voir dessin 9. Lee pertes sent pr6r6gl6es & I'usine
de fagon & ce que la porte du r6frig6rateur eoit plus haute que
celle du ceng61ateur d'enviren une piece de vingt-cinq cents
d'6paisseur. Lorsque lee pertes sent charg6es d'aliments, elles
devraient _tre 6gales. Si la hauteur des pertes a besoin d'@tre
ajust6e APRES que les portes sent charg6es d'aliments, suivre
ces 6tapes.
1. Utiliser une cl6 & douille & t6te hexagonale pour ajuster les vie
de nivellement des roulettes & ravant jusqu'& ce que lee
portes seient 6gales. Teurner la vie de nivellement des
roulettes &Favant vers la dreite pour seulever le 06t6 du
r6frig6rateur eu tourner lavis de nivellement vere la gauche
pour abaisser ce c6t& Voir dessin 10.
REMARQUE : Ouvrir et fermer les portes du r_frig_rateur et
du cong61ateur apr_s chaque ajustement pour v_rifier
Falignement des pertes.
2. Ouvrir lee pertes et replacer la grille de la base. Aligner les
languettes d'appui de la grille avec les agrafes en m_tal.
Pousser la grille refinement pour qu'elle s'enclenche en
position.
REMARQUE :S'assurer de refixer la fiche technique derri6re
la grille de la base.
• Assurez-vous qu'il s'agit d'un conduit d'eau freide.
Un conduit horizontal fonctionnera, mais peroer par le
dessus de la canalisation et non pas par le desseus.
Alnsi, I'eau ne risquera pas d'arreser la peroeuse. Ceci
emp_che 6galement lee s_diments qu'on treuve
normalement dens Feau de s'accumuler dans le rebinet
d'arr_t.
Pour d6terminer la Iongueur du tube en cuivre, il faut mesurer
la distance entre le point de connexion inf6rieur gauche
Farri_re du r6frig6rateur et le tuyau d'arriv6e d'eau. Ajouter
une Iongueur de 7 pi (2,1 m) pour permettre le d6placement
du r_frig_rateur pour le nettoyage. Utilieer un tube en cuivre
de _" (6,35 ram) de diam6tre ext6rieur. Veiller & ce que le
tube eeit coup_ d'6querre aux deux extr6mit6s.
A Faide d'une perceuse _lectrique reli_e & la terre, peroer un
trou de _" dans le tuyau de canalisation d'eau freide choisi.
A. Canalization d'eau froicle
B. Bride de fuyau
C. Tube en cuivre
D. _crou de compassion
E. Bague de compression
F. Robinef d'arr#t
O [_crou tie _erra_je
6. Fixer le rebinet d'arr@t sur la canalisatien d'eau froide avec la
bride de tuyau. V6rifier que le reccord du rebinet est bien
engag6 dens le trou de _" pero_ dans la canalisatien et que
la rondelle d'@anch_it_ est plac_e seus la bride de tuyau.
Setter I'_creu de serrage. Serrer soigneusement et
uniform6ment les vie de la bride de tuyau afin que la rendelle
forme une jonction _tanche. Ne pas setter excessivement car
ceci pourrait provoquer 1'6crasement du tube en cuivre.
7. Enfiler 1'6creu et la bague de compression du raccord sur le
tube en cuivre comme On le volt sur Fillustration. Ins6rer
Fextr_mit_ du tube aussi loin que possible dane I'euverture
de sortie du rebinet. Visser F6creu de compression sur le
reccord de sortie avec une cl_ & molette. Ne pas setter
excessivement.
8. Placer le bout libre du tube dane un contenant ou _vier et
QUVRIR le rebinet principal d'arriv_e d'eau et laisser I'eau
s'_couler par le tube jusqu'& ce que I'eau soit limpide.
FERMER le rebinet principal d'arriv_e d'eau. Enreuler le tube
en cuivre en spirele.
54
Page 55

Raccordement au r@frigerateur
Style 1
1. D6brancher le r6frig6rateur ou d6connecter la source de
courant 61ectrique.
2. Connecter le tube en cuivre au robinet d'eau en utilisant un
6crou et une bague de compression tel qu'illustr& Setter
F6crou de compression. Ne pas setter excessivement.
& Utiliser la bride du tube & I'arri_re du r6frig6rateur pour fixer le
tube au r6frig6rateur tel qu'illustr& Ceci aidera & emp6cher
les dommages au tube Iorsque le r6frig6rateur est pouss6
oontre le tour.
4. OUVRIR le robinet d'arr_t.
5. Inspecter pour rechercher les fuites. Setter tous les raccords
(y compris les raccordements de la valve d'entr6e d'eau) ou
les 6crous qui coulent.
A
B
C
D
A. Bdde du tube C. Ecrou de compression
B. Tube en cu_vre D, _z_Ived'entr#e d'eau
6. La machine & glagons est 6quip6e d'un filtre & eau incorpor6.
SI la qualit6 de Feau distribu6e Iocalement n6cessite un
deuxi6me filtre &eau, il serait utile de I'installer clans le tube
de raccordement de 1/_,,(6,35 ram). On peut obtenir un tel
filtre & eau chez le marchand d'appareils 61ectrom6nagers le
plus proche.
7. Brancher le r6frig6rateur ou reconnecter la source de courant
61ectrique.
8. Vider le syst_me d'eau. Voir "Pr6parer le syst_me d'eau'L
REMARQUE : Attendre 24 heures pour produire la premiere
quantit6 de glagons. Jeter les trois premieres quantit6s de
glagons produites. Attendre 3 jours pour que le bac & glagons se
remplisse enti_rement.
Style 2
1. D6brancher le r6frig6rateur ou d6connecter la source de
courant 61ectrique.
2. Enlever le ruben gomm6 d'exp6dition du tube gris, en
serpentin pour I'eau, & Farri_re du r6frig6rateur.
8. Un raccord de %" x %" est n6cessaire pour connecter le
conduit pour I'eau &une canalisation d'eau de la maison.
Enfiler 1'6crou dans le joint & I'extr6mit6 du tube de cuivre.
REMARQUE :Setter 1'6crou & la main. Ensuite le setter avec
une cl6 deux tours de plus. Ne pas setter excessivement,
A B C D E F
A. Tubeversler_fdg#rateur D.RaccoffJ (foumi)
B,_cmu (foum_) E.Vi_ole{_echefer)
G Renflement F._crou {_echeter)
4. OUVRIR le robinet d'arr_t.
5. Inspecter pour rechercher les fuites. Setter tous les raccords
(y compris les raccordements de la valve d'entr6e d'eau) ou
les 6crous qui coulent.
6. Brancher le r6frig6rateur ou reconnecter la source de courant
61ectrique.
7. Vider le syst_me d'eau. Voir "Pr6parer le syst_me d'eau'L
REMARQUE : Attendre 24 heures pour produire la premiere
quantit6 de glagons. Jeter les trois premieres quantit6s de
glagons produites. Attendre 3 jours pour que le bac & glagons se
remplisse enti_rement.
Style3
1. D6brancher le r6frig6rateur ou d6connecter la source de
courant 61ectrique.
2. Enlever le ruben gomm6 d'exp6dition du tube gris, en
serpentin pour I'eau, & Farri_re du r6frig6rateur.
& Enfiler 1'6crou fourni dens le robinet d'eau comme sur
Fillustration.
REMARQUE : Setter 1'6crou & la main. Ensuite, le setter avec
une cl6 2 tours de plus. Ne pas setter excessivement.
A
A. He_lrle_le_[
B.£crou #oumi)
4. OUVRIR le robinet d'arr_t.
5. Inspecter pour rechercher les fuites. Setter tous les raccords
(y compris les raccordements de la valve d'entr6e d'eau) ou
les _crous qui coulent.
6. Brancher le r_frig_rateur ou reconnecter la source de courant
61ectrique.
7. Vider le syst_me d'eau. Voir "Pr6parer le syst_me d'eau'L
REMARQUE : Attendre 24 heures pour produire la premiere
quantit6 de glagons. Jeter les trois premieres quantit6s de
glagons produites. Attendre 3 jours pour que le bac & glagons se
remplisse enti_rement.
Preparation du syst me d'eau
Veuillez lira event d'utiliser le syst_me d'eau.
Imm6diatement apr_s I'installation, suivre les 6tapes ci-dessous
pour vous assurer que le syst_me d'eau est bien nettoy6.
1. Quvrir la porte du cong61ateur et arrC,ter la machine & glagons
en relevant le bras de commande m6tallique tel quqllustr6.
REMARQUES :
• Si votre module est muni d'un syst_me de filtre & la griUe de la
base, s'assurer que le filtre & la grille de la base est bien
install6 et que la capsule est & la position horizontale.
Ne pas utiliser avec de reau microbiologJquement
dangereuse ou de qualit6 inconnue sans une d6sinfection
ad6quate avant ou aprbs le systbme. Lee syst6mes
certifi6s pour diminution des kystes peuvent 6tre utilis6s
sur les eaux d6sinfect6es qui peuvent contenir des kystes
filtrables.
55
Page 56

2. Utiliser un contenant selide pour appuyer sur la barre de
distribution jusqu'& ce que I'eau commence & couler. Vider le
syst_me d'eau en laiesant couler et en jetant 2 &3 gallons
(8 & 12 L) d'eau. Le nettoyage du syst_me prendra environ
6 & 7 minutes et aidere & d_jager I'air du conduit. Un
6coulement additiennel peut _tre requis dane certains
domiciles.
REMARQUE : Pendant 1'6vacuation de I'air, I'eau peut gicler
du distributeur.
8. Ouvrir la porte du cong61ateur et mettre la machine & glagons
en marche en abaissant le bras de commande m6tallique tel
qu'illustr6.
• Attendre 24 heures pour obtenir la premiere quantit6 de
glagens.
• Jeter les trois premieres quantit6s de glagons preduites.
• Selon le mod_le que veus avez, vous pouvez vouloir
choisir la caract6ristique de production maximale de
glagens pour augmenter la production de glagens.
Sons normaux
IIest possible que le r6frig6rateur neuf 6metre des sons que
I'appareil pr6c6dent ne produisait pes. Comme ces sons sent
nouveau×, ils peuvent vous inqui6teR La plupart de ces nouveaux
sons sent normau×. Des surfaces dures cornme le plancher, les
inure et lee armoires peuvent faire paraftre les sons plus forts
qu'en r6alit6. Les descriptions suivantes indiquent le genre de
sons et leur origine.
• Si votre appareil est 6quip6 d'une machine & glagons, vous
entendrez un bruit de gargouillement Ioreque la valve d'eau
s'ouvre pour remplir la machine & glagons pour chaque
programme.
Vetre r6frig6rateur est congu pour fonctienner plus
efficacement afin de garder les aliments & la temp6rature
d6sir6e et pour minimiser la consommation d'6nergie. Le
compresseur et les ventilateurs tr_s efficaces peuvent faire
fonctienner votre r6frig6ratesr plus Iongtemps que I'ancien.
Veus peuvez auesi entendre des bruits saccad6s ou aigus
prevenant du compresesur et des ventilateure qui s'ajustent
pour eptimiser la performance.
Vous pouvez entendre le moteur du ventilateur d'6vaporation
qui fait circuler I'air dans le r6frig6rateur et le cong61ateur. La
vitesse du ventilateur peut augmenter si on ouvre les porte.s
ou si on ajoute des aliments chauds.
• Les vibrations sonores peuvent prevenir de 1'6coulement du
r6frig6rant, de la canalisation d'eau ou d'articles plac6s sur le
r6frig6rateur.
• L'eau qui d6goutte sur le dispositif de chauffage durant le
programme de d6givrage pest produire un gr6sillement.
• A la fin de chaque programme, vous pouvez entendre un
gargouillement attribuable au r6frig6rant qui circule dans
votre r6frig6rateur.
• La contraction et I'e×pansion des pareis internes peuvent
preduire un bruit sec.
• Veus pouvez entendre de I'air forc6 sur le condenseur par le
ventilateur du condensesr.
• VOUSpeuvez entendre 1'6coulement de I'eau dane le plat de
r6cup6ratien d'eau pendant le programme de d6givrage.
UTILISATION DU
RI FRIGI RATEUR
Pour s'assurer d'une circulation d'air
appropri6e
Pour s'aesurer d'aveir les temp6ratures appropri6es, il faut
permettre & I'air de circuler entre les deux sections. L'air froid
p6n_tre & la base de la section du cong61ateur et se d6place vere
le haut. II p6n_tre ensuite darts la section du r6frig6rateur
travers I'ouverture d'a6ration sup6riesre. L'air retourne au
cong61ateur tel qu'iUustr6.
i
Ne pas obstruer I'une ou I'autre de ces euvertures d'a6ration
avec des aliments tels que boiesons gazeuses, c6r6ales, pain,
etc. Si lee ouvertures d'a6ration sent obstru6es, le d6bit d'air
sera bloqu6 et le r6glage de la temp6rature ne fonctionnera pes
bien.
IMPORTANT : Cemme I'air circule entre lee des× sections,
routes lee odeure form6es dane une section seront transf6r6es
I'autre. Vous devez netteyer &fond les deux sections pour
61iminer les odeure. Pour emp_cher le transfert d'odeure, bien
envelopper eu recouvrir herm6tiquement lee aliments.
U lisation des commandes
Votre mod_le peut avoir des commandes rotatives ou des
commandes & gliesi_re.
IMPORTANT :
• L'appareil ne refroidire pes Ioreque la commande du
r6frig6rateur est r6gl6e & OFF (arrC,t).
La commande du r6frig6rateur r_gle la temp6rature du
compartiment de r6frig6ratien. La commande du cong61ateur
r_jle la temp6rature du compartiment de cong61ation. Les
r_glages plus 61ev6s refroidiesent le compartiment alore que
lee r6glages plus bes sent racine froids.
Attendre 24 heures avant de placer des aliments darts le
r6frig6rateur. Si veus ajoutez des aliments avant que le
r6frig6ratesr ne eeit compl_tement refroidi, les aliments
peuvent se g&ter.
REMARQUE :Ajuster les commandes du r6frig6rateur et du
cong61ateur & un niveau plus 61ev6 (plus freid) ne refreidire
pas les compartiments plus vite.
Les r6glages pr6r6gl6s devraient _tre corrects pour
I'utilisation normale. Les rb_glagessent fairs correctement
Ioreque le lair ou le jus est aussi freid que veus I'aimez et
Ioreque la cr_me glac6e est ferme.
56
Page 57

• Si la temp6rature est trop tilde ou trop froide dans le
r6frig6rateur ou le cong61ateur, v6rifier d'abord les ouvertures
d'a6ration pour s'assurer qu'elles ne sent pas obstr_6es,
avant d'ajuster les cornmandes.
Pour vous accommoder, les commandes ont 6t6 pr6r6gl6es &
I'usine. Lore de I'installation du r6frig6rateur, s'assurer que les
commandes sont encore pr6r6gl6es aux "r6glages moyens" tel
qu'indiqu6.
Commandes Rotatives
FREEZER REFRIGERATOR
n I
• . • , 3 4 ,
COLD I_EIIDER _U_ 1 8 COLDER
Commandes _ glissi_re
Freezer Refrigerator
cold 1 2 A 3 4 colder off 1 2 = 3 4 colder
Ajustement des commandes
REMARQUE : Attendre au r'noins24 heures entre lee
ajustements, puis v6rifier de nouveau la temp6rature.
Si la temp6rature dolt _tre ajust6e, ajuster d'abord la temp6rature
du r6frig6rateur.
Conmanded Rotatives
Tourner la cornmande vere ]a dreite (dans le sens horaire) pour
rendre le compartiment plus froid. Tourner la commande vers la
gauche (darts le sens antihoreire) pour le rendre moins froid.
Commandes b Curseur
Glisser la commande d'un degr6 vere la dreite pour rendre le
compartiment plus froid. Glisser la commande d'un degr6 vers la
auche pour le rendre moins froid.
CONDITION/RAISON : AJUSTEMENT :
REFRIGERATEUR trep froid R6gler la commande
- Ru_jlages incorrects pour lee du REFRIGERATE[JR
conditions existantes un r6glage plus bas
REFRIGERATEUR trep tilde R6gler la commande
- Porte fr6quemment ouverte, du REFRIGERATE[JR &
grande quantit6 d'aliments ajout6e un r6glage plus 61ev6
ou temp6rature ambiante chaude
CONGELATEUR trop froid R6gler la commande
- R_jlages incorrects pour lee du CONGELATE[JR &
conditions existantes un r6glage plus bas
CONGELATEUR trop ti_de/trop
peu de glagons
- Porte fr6quemment ouverte,
grande quantit6 d'aliments ajout6e
ou temp6rature ambiante tr6s
freide (programme en
fonctionnement trop peu fr6quent)
ou usage intense de glagons
R6gler la commande
du CONGELATE[JR
un r6glage plus _lev_
Distributeurs d'eau et de glagons
(surcertainsmodules)
Risque de coupure
Utiliser un verre robuste pour prendre des gtagons ou
de I'eau.
Le non-respect de cette instruction peut causer
dee coupures.
Selon le module que vous avez, vous pouvez avoir une ou
plusieurs des options suivantes : la capacit6 de choisir de la
glace concass_e ou des glagons, une lumi_re sp6ciale qui
s'allume Ioreque vous employez le distributeur ou une option de
verreuillage pour 6viter la distribution involontaire.
Le distributeur de glagons
Lee glagons sont distribu6s du bac d'entreposage de glagons du
cong61ateur. Lorsqu'on appuie sur le levier du distdbuteur :
• Une trappe s'ouvre dans une goulotte entre le distributeur et
le bac d'entreposage de glagons. Lee glagons passent du
bac et tombent dans la goulotte.
• Lorequ'on rel&che le levier du distributeur, la trappe se ferme
et la distribution de glagons s'arr_te. Le syst_me de
distribution ne fonctionne pas Iorsque la porte du cong61ateur
est ouverte.
Certains mod61es distribuent des glagons en cubes et de la glace
concass_e. Avant la distribution de glace, choisir queue sore
vous pr6f_rez. Lee boutons de commande sont tongue pour une
utilisation et un nettoyage faciles.
ICE
Pour de la glace concass6e, lee glagons sent concass6s avant
d'etre distribu6s. Cette action peut causer un court d61ai lore de
la distribution de glace concass_e. Le bruit du breyeur de
glagons est normal et la dimension des mor'ceaux de glace peut
varier. Lorsqu'on change de CR[JSH (concass_e) _ CUBE
quelques onces de glace concass6e seront distribu6es avec lee
premiers glagons.
Distribution de glagons :
1. Appuyer sur le bouton pour le lype de glace d6sir6.
2. Appuyer un verre rebuste centre le levier de distribution de
glagons. Tenir le verre pros de I'ouverture du distributeur pour
que lee glagons ne tombent pas _ 06t6 du verre.
IMPORTANT : II n'est pas n6cessaire d'appliquer beaucoup
de pression au levier pour activer le distributeur de glagons.
Une pression forte ne donne pas une distribution plus rapide
de glagons ou des quantit6s plus grandee.
57
Page 58

8. Retirer le verre pour arr_ter la distribution.
REMARQUE : Lee quelques premieres quantit6s de glagens
peuvent aveir une saveur d6sagr6able prevenant d'une
plemberie ou de pi_ces neuves. Jeter ces glagone. Prendre
de grandes quantit6s de glagons du bac & glagens plutSt que
par I'entremiee du dietributeur.
Le distributeur d'eau
Si le syst_me n'a pas fair I'objet d'une vidange lore de
Ifinstallation du r6frig6rateur, appuyer cur la barre du dietributeur
d'eau avec un verre robuete ou autre r6cipiect pour pulser et jeter
de 2 & 3 gallons (8 & 12 L) ou environ 8 &7 minutes apr_s le
commencement de 1'6coulemect. IIfaudra de 3 & 4 minutes pour
que la distribution de I'eau commence. Cette eau ainei puie6e et
jet6e netteie le syst_me et aide & d6gager Fair des conduits.
Accorder plusiecre heures pour que le r6frig6rateur ee refroidiese
et refreidiese I'eau.
IMPORTANT : Selon le mod_le que vous oyez, le petit r6cipiect
amovible & la base du dietributeur est congu pour recueiUir les
petits renvereemecte et pour permettre un netteyage facile. II n'y
a pas de conduit d'6coulement dane le r6cipiect. Le r6cipient
peut 6tre enlev6 du distributeur et transport6 & 1'6vier pour 6tre
rid6 ou nettey6.
Distribution d'eau :
1. Appuyer un verre centre le levier du dietributeur d'eau.
2. Retirer le verre robuste pour arr6ter la distribution.
REMARQUE : L'eau risque de ne poe avoir boa go_t ei le
distributeur n'est poe utilie6 p6riodiquement. Pulser une quantit6
euffieante d'eau chaque semaine pour maintenir un
approvieionnement frais.
Lampe du distributeur
Le distributeur est r'nunid'une lampe. Elle peut Ctre allum6e
manuellement en appuyant sur le bouton ON (touche &
efflecrement ou commutateur & baecule).
Sur certaine med_les : chaque lois que vous utilisez le
distributeur, le levier allumera automatiquemect la lumi_re.
LIGHT
REMARQUE : Voir la section "Remplacemect des ampoules
d'6clairage" pour des reneeignemects cur le changemect de
I'ampoule d'6clairege du dietributecr.
Verrouillage du distributeur {sur certains mod_les)
Le distributecr peut 6tre art@t6 pour le nettoyage facile ou pour
emp6cher la distribution invelentaire par de petits enfants et
animau× de compagnie.
REMARQUE : La carect6ristique de verreuillage ne coupe pas le
courant 61ectrique au r6frig6rateur, & la machine & glagons ou & la
lumi_re du distributeur. Elle sert simplement &d6sactiver lee
leviers du dietributeur.
Pour arr6ter le distributeur, appuyer sur le bouton LOCK
(verrouillage} jusqu'& ce que I'indicateur apparaisse. Lee
distributeurs de glagone et d'eau ne fenctionneront pas. Pour
d6verreuiller le dietributeur, appuyer cur le beuten UNLOCK
(d6verrouillage) jusqu'& ce que I'indicateur apparaisse. Enecite
continuer & dietribuer des glagons eu de I'eau comme
d'habitude.
DISPENSER
Lel moin lumineux de I' tat du filtre b eau
(sur certains rnod_les)
Le t6moin lumineux de I'@at du filtre & eau vous aidera & saveir
quand changer la cartouche de filtre & eau. Le t6moin luminec×
ee treuve dons la pattie eup6rieure du compartimect de
r6frig6ration. Le t6moin lumineu× passera du vert au jaune. Oe
changement voue signale qu'il est presque temps de changer la
cartouche du filtre &eau (90 % de la vie utile du filtre s'est
6coul6e). II est recommand6 de remplecer la cartouche de filtre &
eau Iorsque le t6moin lumineux de I'@at du filtre &eau passe au
rouge OU Ioreque le d6bit d'eau & vetre distributecr ou & la
machine & glagens diminue de fagon marqu6e. (Voir
"Remplacement de la cartouche de filtre & eau" plus loin dons
cette section.)
Apr_s avoir chang6 la carteeche de filtre &eau, r_gler de nouveau
le t6moin luminec× de I'_tat du filtre & eau.
A. Temoin
B. Cornmutateur de lumi,_re
Filtre b eau sans indicateur lumineux {sur certains
mod_les)
Si votre r6frig6rateur n'est poe muni du t6moin lumineu× de filtre
_.eau vous devriez changer le filtre &eau teus lee 8 & 9 mois
eelon I'utilisation. Si le d_bit d'eau au distributecr ou & la machine
& glagons diminue de fagen mar'qu6e avant que 8 mole se soient
_coul6s, remplecer la carteuche du filtre & eau plus ecuvect.
Systbme de filtration d'eau
(surcertainsmodbles)
REMARQUE : Ne pas utiliser avec de I'eau
microbiologiquement dangereuse ou de qualitb inconnue
sans une d_sinfection adbquate avant ou apr_s le syst_me.
Les syst_mes certifies pour diminution des kystes peuvent
_tre utilis_s sur les eaux dbsinfectbes qui peuvent contenir
des kystes filtrables.
58
Page 59

Remplacement de la cartouche de filtre b eau
Le filtre & eau sur la grille de la base est situ6 seus la porte du
compartiment ceng61ateur. Selon votre mod@le, le filtre peut se
treuver derri@re la grille de la base (Style 1) ou & travers la grille
de la base (Style 2).
Style I : Derriere la grille de la base
1. Retirer la griUe de la base (volt la section "Portes du
r6frig6rateur"). Tourner la cartouche clans le sens antihoraire
jusqu'& ce qu'elle seit en position verticale et la sertir du filtre
en tirant.
REMARQUE : II y aura de I'eau dens la cartouche. II est
possible qu'il y ait un d6versement.
2. Sortir la nouveUe cartouche de son emballage, puis d6gager
le couvercle protecteur des anneaux d'6tanch6it&
8. Pousser la nouvelle carteuche dens la base jusqu'au bout.
Teurner la cartouche dens le seas horaire jusqu'& ce qu'elle
seit en position horizontal& Purger le syst_me d'eau (volt
"Purge du syst_me d'eau apr_s le remplacement du filtre"
plus loin dens cette section).
Style 2 : A travers la grille de la base
1. Rep6rer le couvercle de la cartouche de fiitre situ6 dens la
grille de la base &Favant. Tourner le couvercle dens le seas
antihoraire jusqu'& ce quql soit en position verticale et retirer
ensuite le couvercle et la cartouche de filtre & travers la grille
de la base.
REMARQUE : II y aura de I'eau dens la cartouche. II est
possible qu'il y ait un d6versement.
2.
Retirer le couvercle de la cartouche en le glissant hers du
bout de la vieille cartouche. Le couvercle glissera vers la
gauche ouvers la droite.
IMPORTANT: Ne pas jeter le couvercle. II fait partie de vetre
r_rig6rateur. Conserver le couverole pour I'utiliser avec le
filtre de rechange.
& Sortir la nouvelle cartouche de son emballage puis d6gager le
couvercle protecteur des anneaux d'6tanch6it&
4.
Faire glisser le couvercle de la cartouche sur la nouvelle
cartouche comme le montre I'illustration & F@ape 2.
5. Avec le couvercle de la carteuche en position verticale,
ins6rer la nouveUe carteuche de filtre dens la grille de la base
en la poussant jusqu'au bout. Tourner le couvercle de la
cartouche dens le seas horaire jusqu'& ce qu'il soit en
position horizontal& Purger le syst_me d'eau (voir "Purge du
syst_me d'eau apr_s le remplacement du filtre" plus loin dens
cette section).
Purge du syst6me d'eau apr_s le remplacement du fiRre
Utiliser un contenant solide pour appuyer sur la barre de
distribution jusqu'& ce que I'eau commence &couler. Purger le
syst_me d'eau en laissant couler et en jetant 2 & 3 gallons
(8 & 12 L) d'eau. Le nettoyage du syst_me prendra environ
6 & 7 minutes et aidera & d6gager I'air du conduit. Un 6coulement
additionnel peut 6tre requis dens certains domiciles.
REMARQUE : Pendant 1'6vacuation de I'air, I'eau peut gicler du
distributeur.
UtilisatJon du distributeur sans filtre beau
IIest possible de faire fonctionner le distributeur sans utiliser une
cartouche de filtre. L'eau ne sere pas filtr6e.
1. Retirer la carteuche de fiitre & eau & la grille de la base. Pour
le Style 1, replacer la grille apr_s avoir enlev6 le filtre.
2. Pour le Style 2, glisser le couvercle du bout de la cartouche
de filtre. Le ceuvercle de la cartouche @ant en position
verticale, ins6rer le couvercle dens la grille de la base
jusqu'au bout.
IMPORTANT: Ne pas jeter le couvercle. II fair partie de votre
r_rig6rateur. Conserver le couverole pour I'utiliser avec le
filtre de rechange.
8. Teurner le couvercle de la carteuche jusqu'& ce quql soit en
position horizontal& Le couvercle de la cartouche peut ne
pas Ctre au mCme niveau que la grille de la base.
Machine &glagons et bac
(sur certains mod_les - accessoire)
Mise en marche!arr_t de la machine b glac_;ons:
REMARQUE : Ne pas forcer le cor_qmutateur du bras en broche
vers le haut eu vers le has.
Le commutateur marche/arr6t pour la machine & glagons est un
bras de commande en broche situ6 sur le c6t6 de la machine &
glagens.
1. Pour mettre la machine &glagons en marche, il suffit
d'abaisser le bras de commande en broche.
REMARQUE :Vetre machine & glagons aun arr_t
automatique. Au fur et & mesure de la fabrication de la glace,
les glagens remplissent le bac d'entreposage de glagons. Les
glagens soul,vent le bras de commande en broche & la
position OFF (61ev6e).
59
Page 60

2. Pour un arr_ manuel, soulever le brae de commando en
breche & la position OFF (61ev6e)et 6touter pour le d6clic
pour s'aesurer que la machine &glagons ne continuera pes
de fonctionner.
Augmentation du taux de production de glagons :
La machine & glagons devrait produire de 7 & 9 lots de glagons
par p6riode de 24 heures. Si los glagons ne sent pes fabriqu6s
essez rapidement, tourner la commando du cong61ateur vere un
chiffre plus 61ev6(plus froid) en 6tapes de un demi num6ro. (Par
exemple, si la commando est & 3, la d6placer entre 3 et 4.)
Attendre 24 heures entre chaque augmentation.
A noter :
• Accorder 24 heures pour produire la premiere quantit6 de
glagons. Jeter lee trois premieres quantit6s de glagons
produites.
La qualit6 de vos glagens sera seulement auesi benne que la
qualit6 de I'eau fournie &vetre machine & glagens. Eviter de
brancher la machine &glagons &un apprevisionnement d'eau
adoucie. Lee preduits chimiques adouciesesre d'eau (role
que le eel) peuvent endemmager des pi_ces de la machine &
glagens et causer une pierre qualit6 des glagons. Si une
alimentation d'eau adoucie ne pest pes 6tre 6vit6e, s'essurer
que Fadeucisseur d'eau fonetionne bien et est bien
entretenu.
• Ne pas garder quoi quece soit sur le deesus de la machine &
glagons ou clans le bac &glagons.
CARACTI RISTIQUES
DU RI FRIGI RATEUR
Le mod_le que veus avez pout avoir certaines eu routes cos
caract6rietiques. Los caract6rietiques qui peuvent @treachet6es
s6par6ment, relies que lee accessoires, compertent le mot
"accessoire'L Tous lee acceesoires ne conviendrent pes & teus
lee mod_les. Si Fachat d'acceesoires vous int6reese, veuillez
composer le num6re sans frais sur la couverture eu & la section
"Acceesoires'L
Importants renseignements & savoir au sujet des tablettes
et des couvercles en verre :
Ne pas nettoyer lee tablettes ou eouvereles en verre avec de
I'eau tilde quand ils sent froids. Los tablettes et los
eouvercles peuvent se briser s'ils sent expos6s & des
changements soudains de temperature ou & un impact tel
que coup brusque. Pour vetre protection, le verre tremp_ est
eongu pour _clater en d_innombrables pi_ees minuseules.
Ceciest normal. Los tablettes et los eouvercles en verre sent
Iourds. Un soin special sqmpose lots de leur d_plaeement
pour _viter I'impact d'une chute.
Tablettes du rdfrig rateur
Votre mod_le pout 6tre dot6 de tablettes en verre ou de clayettes.
Le remisage d'aliments semblables ensemble et le r6glage des
tablettes pour convenir aux diff6rentes hauteurs r6duirent le
temps d'ouverture de la porte du r6frig6reteur, ce qui
6conomisera de 1'6nergie.
Tablettes et cadres de tablettes
Pour rotifer et replacer une tablette/un cadre :
1. Enlever la tablette/le cadre on Iqnclinaet vere le haut & I'avant
et en Idle soulevant here des supports de tablette.
2. Replacer la tablette/le cadre en guidant lee crochets &
Farri_re de la tablette dane los supports de tablette. Incliner le
devant de la tablette yore le haut jusqu'& ceque lee crochets
artiste de la tablette tombent dans los supports de la tablette.
V6rifier pour veus assurer que la tablette est bien fi×6e en
position.
Tiroir pour sp cialit s alimentaires
(sur certains modbles)
Le tireir pour sp6cialit6s alimentaires fournit un endreit pratique
pour garder lee raisins sees, noix, tartinades et autres petite
articles & des temp6ratures normales de r_frig6rateur.
Pour retirer et r_installer le tJroir pour Sl_Cialites
alimentaires :
1. Faire glieser le tiroir direeterneet yore I'ext_rieur juequ'b. la
but6e. Soulever le devant et glieser le tiroir yore I'ext6rieur
pour le rotifer compl_tement.
2. Replacer letireir pour ep_cialit_s alimentaires en le gliesaet &
sa position au-del& de la butte.
Tiroir I gumes/viande conve ble, bac
I gumes et couvercles
(sur certains modbles)
Le bac & I_gumes et los tiroirs & I_gumesiviande
convertibles
Pour enlever et replacer lee tiroire :
1. Glieser le bac & I_gumes ou le tiroir & viande directement yore
Fext6rieur jusqu'& la but6e. Soulever le devant du tireir avec
une main tout en suppertant le fond du tireir avec Fautre main
et glieser le tireir pour le sortir compl_tement.
2. R_inetaller le bac & 16gumes ou le tireir & viande en le gliesant
compl_tement, au-del& de la butte du tireir.
68
Page 61

Les couvemles du bac b I_Jumes ou du _roir b
I_Jumesiviande
Pour enlever et replacer les couvereles :
1. Enlever le bac _ 16gumes _t le tiroir & viande. Appuyer au
centre de I'encart de verre du bac & k,_jumes jusqu'& ce qu'il
se soul_ve au-dessus du cadre en plastique. En tenant
ferrnement le verre du bac & I@gumes, glisser soigneusement
Fencart de verre vers ravant pour renlever.
2. Soulever le cadre du couvercle du bac & 16gumes et Fenlever.
R6p6ter lee @tapes pour enlever le couvercle du tiroir &
viande,
& Replacer le cadre du couvercle du tiroir & viande dane les
supports sur lee patois lat6tales du r6trig6tateur et abaisser le
devant du cadre du couvercle en place.
4. Glisser rencart artiste de verre dens le cadre du couvercle et
abaisser le devant en place. R6p6ter les 6tapes pour replacer
le ceuvercle du bac & 16gumes.
R glage de latemperature du tiroir
I gumes/viande convertible
Le tireir & 16gumes/viande convertible peut 6tre ajust6 pour
refreidir correctement lee viandes eu I_jumes. L'air & rint6tieur
du contenant est refreidi pour emp@cher lee "petits espaces" de
cong61ation et peut _tre r6g16 pour garder les viandes aux
temp6tatures recommand6es d'entreposage de 28" & 32"F
(de =2_& 0"C) tel que recommend@ par FOffice national du b6tail
et des viandes.
IMPORTANT : Pour prolonger la frafcheur, envelopper les
viandes dane un emballage herm6tique et & r6preuve de
Fhumidit@ event rentrepesage. Teujours entrepeser les viandes
selon les recommendations.
Ajustement du rt_glage
Le r6glage convertible est pr6r6gl6 pour veus au r6glage le plus
bee pour les viandes.
Pour changer un rdglage : O6placer la commande vers la droite
(plus freid) eu vers la gauche (racine froid) selon votre d6sir.
Pour entreposer des 16gumes : R@gler la commande &VEG
(16gumes)compl6tement vers la gauche pour garder lee 16gumes
aux temp6ratures optimales d'entreposage (qui demandent une
temp6tature plus chaude que celle pour les viandes).
IMPORTANT : Si les aliments commencent & geler, d6placer le
r6glage vers la gauche (racine froid). Se rappeler d'attendre
24 heures entre les ajustements. Avec ce d61ai, lee temp6ratures
des aliments ont le temps de changer.
Guide d'entreposage des viandes
Garder la plus grande pattie des viandes dane leur embaUage
original en autant qu'il est herm6tique et & F6preuve de
Fhumidit& Envelopper de nouveau si n6cessaire. Voir le tableau
suivant pour lee temps d'entrepesage. Lorsque la viande dolt 6tre
entrepes6e plus Iongtemps que les temps indiqu6s, congeler la
viande.
Poisson frais ou crustac6s ......... & utiliser le jour re@me de rachat
Poulet, boeuf hach@,abate comestibles (role, etc.) ......... 1-2 jours
Charcuteries, steaks/r6tis ................................................ 3-5 jours
Viandes salaisonn6es ..................................................... 7-10 jeurs
Restes - Couvrir lee testes avec de la pellicule en plastique ou du
papier d'aluminium ou utiliser des contenants en plastique avec
couvercles herm6tiq ues.
R glage de I'humidit dans le bac
Idgumes
(sur certains mod_les)
On peut contr61er le degr6 d'humidit6 dane le bac & 16gumes &
r6preuve de I'humidit& La commande peut 6tre ajust6e
nqmperte quel r_glage entre LOW et HIGH.
En position LOW (ouvert}, le r6glage laisse 6chapper fair humide
du bac & 16gumes pour mieu× conserver lee fruits et I@gumes
pelure.
• Fruits : Laver, laisser s_cher et garder au r6trig_rateur dens un
sac en plastique ou dens le bac & I_gumes. Ne pas laver ni
_queuter les petits fruits event le moment de leur utilisation.
Trier et garder les petits fruits dens bur contenant original
dane le bac & I@gumes eu les conserver sur une tablette du
r6trig6tateur dane un sac en papier ferm_ sans @treserf&
• L6gumes & pelure : Placer dane des sacs en plastique ou
contenants en plastique et ranger dane le bac & I_gumes.
En position HIGH (fermi), le r_glage permet de retenir rhumidit_
& rint_rieur du bac pour mieu× conserver les k,_jumes & feuiUes
frais.
• L6gumes & feuilles : Laver & reau froide, 6goutter et couper
ou _liminer les sections endommag_es et d_color6es. Placer
dane un sac eu un contenant en plastique et ranger dane le
bac & I_jumes.
Emplacement de la commande d'humidite :
• Commande d'humidit_ sur le tiroir & I_gumes.
Casier &vin
(sur certains mod_les - Accessoire)
Pour retirer et r_installer le casier & vin :
1. Retirer le casier en le tirant tout dreit hers de la tablette.
2. R_instafler le easier en le glissant entre latablette et la paroi
du r6trig_rateur.
61
Page 62

Casier utilitaire
(sur certains modules - Accessoire)
REMARQUE : Garder lee oeufs dans un contenant & couvercle
ou dane le contenant original sur une tablette int6rieure pour un
remisage prolong6.
CARACTI RISTIQUES
DU CONGELATEUR
Votre meddle peut comporter I'ensemble de ces caract6ristiques
ou certaines d'entre eUes. Les caract6ristiques qui peuvent _tre
achet@s s@a4ment comme accessoires du produit comportent
le mot "accessoire". Tousles accessoires ne conviennent pas
tousles mod_les. Si vous d6sirez acheter Fun des accessoires,
veuillez composer notre num6ro d'appel sans frais sur la
couverture ou dane la section "Accessoires".
Tablette de cong lateur
(le nornbre de tablettes vade scion le module)
Pour enlever et r_insCaller la tablette :
1. Soulever la tablette hers de see appuis.
2. Glisser la tablette hore des orifices d'appui de la tablette.
8. Replacer la tablette selon I'ordre inverse.
Guide d'entreposage des aliments surgeles
Les p6riodes de conservation varierent selon la qualit6 et le type
des aliments, le lype d'emballage et de peUicule utilis6s
(herm6tiques et & I'@reuve de I'humidit6) et la temp6rature
d'entreposage. Les cristaux de glace & Rnt6rieur d'un emballage
scell6 sent normaux. Les cristaux signifient simplement que
I'humidit6 clans lee aliments et Fair & I'int6rieur de I'emballage se
sont condens6s.
Ne pas placer plus d'aliments non congel6s dans le cong61ateur
que la quantit6 qui cong_lera clans I'intervalle de 24 heures (pas
plus de 2 & 3 Ib [907 & 1 350 g par 28 L] d'aliments par pied cube
d'espace clans le cong61ateur). Laisser assez d'espace dane le
cong61ateur pour permettre la circulation d'air entre lee
emballages. S'assurer aussi de laisser assez d'espace pour que
la porte se ferme herm6tiquement.
Pour plus de renseignements au sujet de la pr@aration des
aliments pour la cong61ation, consulter un guide pour
cong61ateur ou un livre de recettes liable.
Panier ou bac de cong lateur
(bac en plastique sur certains modules)
Le panier ou bac du cong61ateur peut _tre utilis6 pour garder des
sacs de fruits et de 16gumes congel6s qui peuvent glisser hore
des tablettes de cong61ateur.
Pour enlever et replacer le panier ou bac du cong_lateur:
1. Retirer le panier ou bac en le glissant vere I'ext6rieur jusqu'_
la bu4e.
2. Soulever le devant du panier ou bac et le glisser
compl_tement vere I'ext6rieur.
3. Replacer le partier ou bac en le plagant sur les glissBres de la
paroi lat6rale. Soulever 16g_rement le devant du panier en le
poussant au-del& des bu4es de la glissBre et glisser le
panier ou bac jusqu'au fond.
CARACTI RISTIQUES
DE LA PORTE
Votre meddle peut comporter I'ensemble de ces caract6ristiques
ou certaines d'entre eUes. Les carect6ristiques qui peuvent _tre
achet@s s@ar6ment comme accessoires du produit comportent
le mot "accessoire". Tousles accessoires ne conviennent pas
tousles mod_les. Si vous d6sirez acheter Fun des accessoires,
veuillez composer notre num6ro d'appel sans frais sur la
couverture ou dane la section "Accessoires".
Tringles ou balconnets de porte
Lee tringles dane la porte peuvent 6tre enlev@s pour faciliter le
nettoyage.
Tringles ou balconnets _ enclencher dans la porte
Pour retirer et r_installer les _ingles ou balconnets :
1. Retirer lee tringles en appuyant k,_j_rement sur le devant du
support tout en tirant sur la languette int6rieure. R@6ter ces
_tapes pour I'autre ext4mit_ de la tringle.
2. R_installer lee tringles en alignant lee e×tr6mit6s des supports
avec les attaches de chaque c6t_ de la paroi de la porte.
Enclencher ferrnement le support et la tringle dane lee
languettes au-dessus de la tablette tel qu'indiqu6.
Tringles d_pos_ dans la porte
Pour retirer et r_installer les _ingles :
1. Retirer les tringles en les soulevant tout droit & chaque
extr6mit6 de la tringle.
2. R_installer lest tingles en glissant la tringle de la tablette dane
lee fentes sur la porte et en poussant la tringle tout droit
jusqu'& I'arrC,t.
62
Page 63

Balconnets de porte
Pour retirer et reinstaller lee balconnets de porte :
1. Retirer le balconnet en le soulevar_t et le tirant tout droit.
2. R6inetaller le balconnet en le glissant en place au=dessue du
support d6sir6 et en le pouesant juequ'& ce qu'il e'arr@te.
ENTRETIEN DU
RI FRIGI RATEUR
Nettoyage
Risque d'explosion
Utilissr un produit de nettoyage ininflammable.
Le non-respect de cette instruction peut causer un d_c6s,
une explosion ou un incendie.
Les sections de r6frig6ration et de cong61ation se d6givrent
automatiquement. Toutefoie, nettoyer lee deux sections environ
une lois par mois pour emp6cher une accumulation d'odeurs.
Essuyer lee renvereements imm6diatement.
Nett_ge du r_'ti_rateur :
1. D6brancher le r6frig6rateur ou d6connecter la source de
courant 61ectrique.
2. Retirer routes lee pi_ces amovibles de Fint6rieur, relies que
lee tablettes, bacs, etc.
8. Laver & la main, tinter et s6cher les pi_ces amovibles et lee
surfaces internes & fond. Utilieer une 6ponge propra ou un
linge doux etun d@ergent doux dane de I'eau tilde.
• Ne pes utiliser de nettoyants abraeifs tels que lee
nettoyants & vitre en atomieeurs, nettoyants & r6curer,
liquides inflammables, cites nettoyantes, d6tergents
concentr6s, eaux de Javel ou nettoyants contenant du
p6trole cur les pi_ces en plaetique, lee garnitures
int6rieures, ou lee joints de portes. Ne pes utilieer
d'eesuie4out, tampons & r6curer ou autre outil de
nettoyage abresif. Ces produits risquent d%&gratigner ou
d'endommager lee mat6riaux.
• Pour aider & 61iminer lee odeurs, on peut laver les parole
int6rieures avec un m61ange d'eau ti&de et de
bicarbonate de scuds (2 c. & soups pour 1 pinte [26 g
pour 0,95 L] d'eau).
4,
6,
D6terminer ei votre r6frig6ratesr aun ext6rieur en m@al peint,
un fini Ultra Satin _ (apparence inox), en aluminium bross6 ou
en acier inoxydable et choisir la m6thode de nettoyage
appropri6e.
REMARQUE : Le fini Ultra Satin _ (apparance inox) a une
couleur liese, uniforms avec un fini brillant qui r6siste aux
traces de doigts. L'acier inoxydable a eouvent une texture
grenel6e unique avec des variations de coulesr, ce qui est
natural pour I'acier.
M6tal peint : Laver lee surfaces ext6rieures avec une 6ponge
propre ou un linge doux et un d6tergent doux dons de I'eau
tilde. Ne pes utiliser de nettoyant fort ou abresif, ni de
nettoyant congu pour I'acier inoxydable. S6cher & fond avec
un linge doux. Pour mieux prot6ger lee surfaces m@alliques
ext6riesres peintes contre les dommages, appliquer une cite
pour appareil 61ectrom6nager (ou cite en pate) avec un linge
propre et doux. Ne pes citer lee pi_ces en plaetique.
Aluminium bross6 : Laver avec une 6ponge propre ou un
linge doux etun d@ergent doux dane de I'eau tilde. Ne poe
utilieer de nettoyant fort ou abrasif, ni de nettoyant congu
pour I'acier inoxydable. S6cher &fond avec un linge doux.
Fini Ultra Satin TM (apparence inox) : Laver avec une _ponge
propre ou un linge doux etun d_tergent doux dons de I'eau
tilde. Ne pes utiliser de nettoyant fort ou abresif, ni de
nettoyant congu pour I'acier inoxydable. S6cher & fond avec
un linge doux.
Fini en acier inoxydable : Laver aveo une _ponge propra ou
un linge doux etun d_tergent doux dons de I'eau tilde. Ne
poe utilieer de nettoyants abresife. S6cher &fond avec un
linge doux.
• Pour que votra r6frig6rateur en acier inoxydable conserve
son aspect neuf et pour enlever lee petites _gratignures
ou marques, il est eugg_r6 d'utilieer le nettoyant et poli
pour acier inoxydable approuv_ par le fabricant.
IMPORTANT : Ce nettoyant dolt @treutilie_ cur les pi_ces en
acier inoxydable uniquement!
• Veiller & ce que le nettoyant et poli pour acier inoxydable
n'entre poe en contact avec lee pi_ces de plastique relies
que garnitures, couvercles de dietributeurs ou joints de
porte. En ces de contact accidentel, nettoyer la piece de
plestique avec une 6ponge etun d@ergent doux et de
I'eau tilde. S_cher &fond avec un linge doux. Pour
commander le nettoyant, voir la section "Accessoiras'L
Le condeneeur n'a pes besoin d'_tra nettoy6 souvent dane
des conditions de fonctionnement normales. Si
I'environnement set particuli_rement graieeeux ou
pouesi_reux, ou e'il y a des animaux domestiques dons la
maison, le condeneeur devrait _tre nettoy6 toueles deux ou
trois mole pour assurer une efficacit_ maximum.
Si vous oyez besoin de nettoyer le condenseur :
• Oter la grille de la base. Voir I'illuetration de la grille de la
has ou la section "Grille de la base".
• Utiliser un espirateur & brcese douce pour nettoyer la
grille, les endroits ouverts derriere la grille et la surface
I'avant du condenseur.
• Replacer la grille de la base Iorsque vous avez terrain&
Brancher le r_frig_rateur ou raconnecter la source de courant
_lectrique.
63
Page 64

Remplacement des ampoules d' clairage
REMARQUE : Vetre r_rig6rateur ne pourra pae accommoder
routes les ampoules pour les appareils m6nagere. S'assurer de
faire le remplacement par une ampoule de grosseur et de forme
semblables. La lampe du distributeur demande une ampoule
pour service intense de 10 watts et routes lee autres lampes
demandent une ampoule d'appareil m6nager de 40 watts. Les
ampoules de remplacement sent disponibles chez votre
marchand.
1. D6brancher le r6frig6rateur ou d6conneeter la source de
courant 61eetrique.
2. Enlever le protecteur d'ampeule s'il y a lieu, comme
I'illuetration.
REMARQUE : Pour nettoyer le protecteur d'ampoule, le laver
& I'eau tilde et avec un d6tergent liquide. Bien tinter et
s6cher le pretecteur d'ampoule.
8. Enlever I'ampoule d'6clairage et la remplacer par une de
m6me taille, forme et puissance.
4. Replacer le protecteur d'ampeule s'il y a lieu, comme
I'illuetration.
5. Brancher le r6frig6reteur eu reconneeter la source de courant
61eetrique.
Lampe de distributeur {sur certains mod_les)
letreduire la main dens I'espace de distribution pour enlever et
remplacer I'ampeule.
A, Lampe de distdbuteur
Larnpe du tableau de cornrnande du refrigerateur
Acc6der & I'arri_re du tableau de commande du r6frig6rateur
pour enlever et remplacer I'ampoule d'6clairage.
Lampe du bac & legumes
• Si n6cessaire retirer le bac & 16purees sup6rieur pour acc6der
au protecteur de lumi_re du bac. Retirer le protecteur en
soulevant lee bouts hers des crochets tel qu'illuetr6.
• Replacer le protecteur de lumi_re en ins6rant lee bouts dane
lee crochets. Si n6cessaire, replacer le bac & 16purees
sup6rieur.
Lampe SUl_rieure du congelateur
(sur certains mod_les)
Enlever le protecteur de I'ampoule en saisissant le centre
sup6rieur du protecteur et le retirer vere I'avant en le tournant
16g_rement d'un c6t6. Si n6cessaire, enlever le bac &16purees
sup6rieur pour acc6der au pretecteur de I'ampoule du bac.
Replacer le protecteur de I'ampeule en ins6rant les
languettes & une extr6mit6 dens lee fentes sur la paroi interne
du r6frig6rateur eu du cong61ateur. Ensuite ceurber
d61icatement le protecteur au centre pour ins6rer les
languettes & I'autre extr6mit6.
Lampe inferieure du congelateur {sur certains mod_les)
Enlever ]e protecteur d'ampoule en saisissant ]es c6t6s et en
pressant vere le centre. Loreque lee crochets lat6raux du
preteeteur sent d_Jag6s de la paroi interne du cong61ateur,
retirer le proteeteur.
Replacer le protecteur de I'ampoule en pressant les c6t6s
vere le centre et en ins6rant les crochets lat6rau× dane les
fentes. Une lois que lee crochets lat6raux sent en place,
enclencher la languette event dane la fente.
Pannes de courant
Si le courant 61eetrique dolt 6tre interrompu pendant 24 heures
ou racine, garder la eu lee porte(s) (selen votre mod_le) ferm6e(s)
pour aider lee aliments & demeurer freids et congel6s.
Si le service dolt _tre interrompu pendant plus de 24 heures, faire
I'une des theses suivantes :
• Retirer tous lee aliments congel6s et les entrepeser dens un
casier frigorifique.
Placer 2 Ib (907 g) de neige carbonique dane le cong61ateur
pour cheque pied cube (28 L) d'espace de cong_lation. Ceci
permettra de garder les aliments congel6s durant deux &
quatre joure.
• S'il n'y apas de easier frigorifique ni de neige carbenique,
consommer ou mettre imm_diatemeet en conserve lee
aliments p_rissables.
A NOTER : Un cong_lateur plein restera froid plus Iongtemps
qu'un cong61ateur partieUement remplL Un cong61ateur plein de
viande demeure freid plus Iongtemps qu'un cong_lateur rempli
d'aliments cults. Si les aliments contiennent des crietaux de
place, lie peuvent _tre remis &congeler m_me si la qualit6 et la
saveur risquent d'etre affeet6es. Si les aliments semblent de
pi_tre qualit6, lee jeter.
64
Page 65

Entre en avant les vacances ou Iors
d'un d m nagement
Vacances
Si vous choisissez de laisser le r_ffrigerateur en
fonctionnement pendant votre absence :
1. Consommer teus lee aliments p6tiesables et congeler les
autras.
2. Si vctre r6frig6rateur a une machine & glagons autematique :
• Soulever le brae de commande m6tallique &la position
OFF (61ev6e)ou d6placer le commutateur & la position
OFF (arr_t) & dreite.
• Fermer I'apprevisionnement d'eau de la machine
glagens.
3. Vider le bac & glagens.
Si vous choisissez d'arr_er le fonctionnement du
r_frigerateur avant votre d_part :
1. Enlever tous lee aliments du r6trig6tateur.
2. Si vctre r6frig6rateur a une machine & glagons autematique :
• Fermer I'apprevisionnement d'eau de la machine &
glagens au moths une journ6e & I'avaece.
• Lorsque la derni_re quantit6 de glagons est d6pos6e,
seulever le brae de commande m6tallique & la position
OFF (61ev6e)ou d6placer le commutateur & la position
OFF (arr_t) & dreite.
3. Teurner la commande du thermostat (ou la commande du
r6trig6tateur, selon le mod61e) & OFF (arr6t). Voir '%tilisation
des cornmandes".
4. N6ttoyer le r6frig6rateur, I'eesuyer et bien le s6cher.
5. A I'aide d'un ruban adh6sif, placer des blocs de caoutchouc
ou de bole clans la pattie sup6tieure de chaque porte de
fagon & ce qu'elles soient suffisamment ouvertes pour
permettre I'entr6e de I'air & I'int6rieur, afin d'6viter
I'eccumulation d'odeur eu de moisiesure.
D6m_nagement
Lorsque vous d6m6nagez votre r6trig6tateur & une nouvelle
habitation, suivra ces 6tapes pour pr6parer le d6m6nagemect.
1. Si votre r6frig6rateur a une machine & glagons automatique :
• Fermer I'approvisionnement d'eau de la machine &
glagons au moths une journ6e & I'avaece.
• D6braecher la canalisation d'eau de I'arri_re du
r6trig6tateur.
• Lorsque la derni_re quantit6 de glagons est d6pos6e,
soulever le brae de commande m6tallique & la position
OFF (61ev6e)ou d6plecer le commutateur & la position
OFF (arr_t) & droite.
2. Retirer teus lee aliments du r6frig6rateur et placer teus les
aliments congel6s dane de la neige carbonique.
3. Vider le bac & glagens.
4. Teurner la commande du thermostat (ou la commande du
r6trig6tatecr, selon le mod_le) & OFF (arr6t). Voir "Utilisation
des cornmandes".
5. D6braecher le r6frig6rateur.
6. Vider I'eau du plat de d6givrage.
7. Nettoyer, eesuyer et s6cher & fond.
8. Retirer teutes lee pi_ces amovibles, bien les ecvelopper et les
attacher ensemble & I'aide de ruban adh6sif pour qu'elles ne
bougect pes nine s'ectrechoquent durant le d6m6nagemect.
9. Selon le mod_le, seulever le devant du r6frig6tatecr pour qu'il
roule plus fecilement OU vieser les pieds de nivellement pour
quills n'_gratignent pes le plancher. Veir "Ajuster lee portes'L
10. Fermer lee portes & I'aide de ruban adh_sif et fixer le cordon
d'alimentation & la caiese du r6frig6ratecr.
Lorsque vous arriverez &votre nouvelle habitation, remettre tout
ec place et consulter la section "instructions d'installation" pour
lee instructions de pr6paration. Aussi, si votre r6trig6tateur a une
machine & glagens automatique, rappelez-veus de raecorder
I'approvisionnement d'eau au r6frig6rateur.
DI PANNAGE
Essayer les solutions suggerees ici en premier afin d'_viter
les coots d'une visite de service inutile,
Le r_frigerateur ne fonctionne pas
• Le cordon d'alimentation _.lectrique est-il d_branch_.?
Braecher sur une prise & 3 alv_oles reli_e &la terre.
• Un fusible est-il grill_ ou le disjoncteur s'est-il d_.clench_.?
Remplacer lefusible ou r_eccleecher le disjoncteur.
• Le rbglage du rdfrigbrateur ou du cong_lateur est-il b la
position OFF (arr_.t)? Voir "Utilisation des cor'nmandes'L
• Le r_rig6rateur est-il en train de se d_givrer? V_rifier pour
veir si le r6frig6rateur fenctionne au bout de 30 r'ninutes. Le
r6trig6tateur ex_cutera r_guli_rament un programme
automatique de d6givrage.
• Le r_.ffig_.rateur ne retroidit pasT Pour les mod_les avec
commandes num6tiques, tourner I'appareil & OFF ensuite &
QN de nouveau pour la remise ec marche. Volt "Utilisation
des commandes'L Si cette action ne corrige pes le probl6me,
faire un appel de service.
Les ampoules n'6clairent pas
• Le cordon d'alimentation _.lectrique est-il d_branch_.?
Braecher sur une prise & 3 alv_oles reli_e &la terre.
• Une ampoule d'bclairage est-elle desserrbe dans la
douille ou grill_e? Veir "Remplacement des ampoules
d'6clairage'L
Le plat de degivrage contient de I'eau
• Le rdfrigdrateur est-il en train de se ddgivrer? Ueau
s'_vaporera. C'est normal pour I'eau de d_joutter dans le
plat de d6givrage.
• Y a-t-il plus d'humidit_ que d'habitude? Pr_voir que I'eau
dane le plat de d_givrage prend plus de temps & s'_vaperer.
Ceci est normal quand il fait humide.
65
Page 66

Le moteur semble fonctionner excessivement
La temp6rature ambiante eat-elle plus chaude que
d'habitude? Pr@voirque le moteur fencfionnera plus
Iongtemps dane des conditions de chalecr. Pour des
temp@ratures ambiantes normales, pr6veir que le moteur
foectionne environ 40 % &80 % du temps. Dane des
conditions plus chaudes, pr6veir un fonctionnement encore
plus fr6quect.
• Vient-on d'ajouter une grande quantit6 d'aliments au
r6frig6rateur? L'addition d'une grande quantit@ d'aliments
r6chauffe le r6frig6rateur. II est normal que le mcteur
foectienne plus Iongtemps afin de refroidir de nouveau le
r6frig@rateur.
Lee portes sont-elles ouvertes tr6quemment? Pr6voir que
le mcteur fonctionnera plus Iongtemps dane ce ces. Afin de
conserver I'@nergie, essayer de eertir tout ce dent veus oyez
besein du r@frig@rateur&la fete, garder les aliments organis6s
de serte qu'ile ecient feciles &trouver et fermer la porte d@s
que lee aliments sent retir@s.
Les r6glages sont-ils fairs correctement pour les
conditions ambiantes? Veir "Utilieation des commandes'L
Les portes sont-elles compl6tement ferm6es? Poueser lee
portes pour qu'elles ecient bien ferm@es. Si les portes ne se
femnent pes compl@temect, voir "Lee portes ne se ferment
pes oompl@tement" plus loin dons cette section.
Lee serpentine du condenseur sent-its sales? Cette
situation emp6che le transfert de Fair et fair travailler
davantage le moteur. Netteyer les serpentine du condenseuR
Veir "Nettoyage'L
Les joints des portes sent-its herm6tiques sur tout le
contour? Contacter une personne qualifi@e eu un techniciec.
REMARQUE :Votre r6frig@ratecr neuf fonctionnera plus
Iongtemps que Faecien appareil du fait de son mcteur tr@s
efficace.
• Le robinet d'arr_t de la canalisation d'eau reli6e au
r6frig6rateur eat-il ouvert? Quvrir le robinet d'eau. Voir
"Raecordement de la canalisatien d'eau'L
Le refrigerateur semble loire tn:_pde bruit
• Les bruits pecvent 6tre norTnaux pour vetre r6frig6rateur.
Voir "Sons normaux'L
La machine & glagons ne produR pas de glagons ou
trop peu •
Y a-tql de I'eau dons le moule de la machine _ gla_;ons ou
est-ce qu'aucun glaqon n'a 6t6 produit? V6rifier pour veir si
le r_frig6rateur a 6t@raccord@ & la canalisatien d'eau de la
maiecn, et si le robinet d'arrC,t de la canalisation est ouvert.
Voir "Raecordement de la canalisation d'eau".
La machine _ gla_ons vient-elle juste d%tre inatall6e?
Attendre 72 heures pour le cornrneccement de la production
complete de glagens. Une fete que le r@frig@rateur a rdroidi,
la machine & giagens devrait commencer & produire de 70
120 glagens teutes les 24 heures.
Un glad;on eat-il coinc6 dons le brae de 1'6jecteur? Pour
lee mod@les avec bac & glagons standard, enlever le glagon
coinc@ & I'aide d'un ustensile en plestique. Pour lee mod_les
avec bec & glagens dane la porte du cong@lateur, acc6der &
la machine & glagens ec baiesant la porte du d6tectecr du
bec & glagons sur le c6t@sup@rieur gauche de Fint@rieur du
cong61ateur. En baiesant la porte du d6tecteur, lever la porte
de service de la machine & glagons et enlever le glagen de
F@jecteur & I'aide d'un ustensile ec plestique. Voir "Machine
glagens et bec d'entreposage".
Une grande quantit6 de gla_;ons vient-elle d'6tre enlev6e?
Attendre 24 heures pour que la machine &glagens produise
plus de glagens.
Les r6glages sont-ils fairs correctement? Voir '%tilisation
des cornmandes".
Un filtre _ eau est-il install6 sur le r6trig6rateur? Le filtre
peut 6tre obstru6 ou install@iecorrectement. V6rifier d'abord
lee instructions dqnstallation du filtre pour s'aesurer que le
filtre a 6t6 bien install@et qu'il n'est pes obstru& Si
Finstallation eu I'ebstrucfion n'est pesle prebl@me,
t@l@phoner& une perecnne qualifi@e eu un techniciec.
Un syst_me de filtration de I'eau _ osmose inverse est-lt
connect6 _ votre canalisation d'eau froide? Voir
"Sp@cifioations de I'alir'nentation ec eau'L
REMARQUE : Si cette situation n'est pes attribuable & ce qui
pr6c6de, il peut exister un prebl@me avec la canalisatien d'eau.
Faire un appe] de service.
Mauvais go0t, odeur ou couleur grise des glagons
La temp6rature du congdlateur est-elle asaez Woide pour
produire des gla_;ons? Attecdre 24 heures apr@sla •
connexion de ]a machine & glagons pour la production de
glagens. Voir "Utilisation des commandes'L
Le bras de commande m_tallique de la machine
glaqons eat-il en position OFF (_lev_e) (sur certains
mod_les)? Abaisser le bres de commande r'n6tallique& la
position ON (abaies_e}. Veir "Machine & glagens et boo
d'ent reposage".
Le commutateur de la machine _ gla_;ons est-il _ la
position OFF (_ droite) (sur certains mod_les}? D_placer le
cornrnutateur de la machine & giagons & ]a position ON (&
gauche). Veir "Machine & glagens et bae d'entreposage'L
Lee raccords de plomberie sent-lie neufs et causent-ils
une d_coloration et un mauvais go0t des glad;one? Jeter
lee premi@res quantlt@s de glagons.
Lee glad;one ontqls _d gard_s trop Iongtemps? Jeter lee
vieux giagens et en loire une nouvelle prevision.
Le congdlateur et le bac & gla£ons ont-ils besoin d'etre
nettoy_s? Veir "Netteyage" eu "Machine & glagens et bac
d'ent reposage".
Les aliments dons le cong_lateur ou le r_frig_rateur ont-
ils _t_ bien emball_s? Utiliser un embaflage herm@tique eL&
F@preuvede I'humidit_ pour aider & emp6cher le transfert
d'odeur aux aliments entrepos6s.
Ueau contient-elle des min_raux (tels que le soufre)?
L'installafion d'un filtre peut 6tre requise afin d'enlever lee
min@raux.
Un filtre _ eau est-il installd sur le r_trigdrateur? Une
d@coloration grise ou fonc_e de la glace indique que le
syst@me de filtration de I'eau a besein d'un ringage
additionnel. Faire couler de I'eau suppl_mentaire dane le
distributeur d'eau pour mieux nettoyer le syst_me de filtration
de Feau (au moths 2 &3 gallons [8 & 12 L]ou pendant 6
7 minutes initialement). Jeter la glece d_color@e.
66
Page 67

Le distr|buteur de glagons ne fonctionne pas
correctement
• La porte du cong61ateur eat-elle ferm6e complstement?
Pousser la porte pour qu'elle seit bien ferr'n6e. Si elle ne
ferTne pes compl_tement, voir plus loin dans cette section
"Lee portes ne se ferment pas compl_tement".
• Le bac & gla£ons est-il correctement install6? Pour les
r'nod_les avec bac & glagons standard, peueser le bac &
glagens compl_tement jusqu'au fond. Pour les mod_les avec
un bac & glagens dane la porte du r6frig6rateur, le bac dolt
_tre d'aplomb. Retirer le bac et le replacer dane la porte en
veus essurant qu'il est bien align6 et bien enclench6 en
place. Veir "Machine & glagons et bac d'entreposage'L
• Lee mauvais gla£ons ont-ils st6 ajout6s au bac? Utiliser
seulement des glagens produits par cette machine & glagens
courante. Si d'autres glagons ont 6t6 ajout6s, enlever tousles
glagens et v6rifier pour voir si un glagon s'est coinc6 dans la
goulotte.
• Les gla_ons ont-ils gel6 dans le bac _ gla_ons?
Secouer le bac & glagons pour s6parer les glagons. Si lee
glagens ne se s6parent pes, vider le bac et attendre
24 heures pour que le stock de glagons seit regarni.
• La glace a-t-elle fondu autour de la tige en instal dane le
bac _ glagons? Vider les giagons et netteyer le bac &
glagens compl_tement. Accorder 24 heures pour que la
machine & glagens regarniese le stock. Ne pes essayer
d'enlever la giace fondue avec un objet pointu. Vous pourriez
endommager le bac & glagens.
• Un gla£on eat-il coinc6 dane la goulotte? D_jager le
glagon de la goulotte & I'aide d'un ustensile en plestique. Ne
pes utilieer un article pointu pour enlever la glace. Vous
pourriez causer des dommages.
• Eat-ce que le dis_ributeur de gla£ons se bloque lore de la
distribution de glace =_concassde"? Arr6ter la distribution
de glace. Changer le bouton de "glace concaes6e" &
"glagons". Abaieser le bres du distributeur avec un verre
robuste. Si les glagons sent distribu6s correctement, remettre
le beuten &"glace concess6e" et recommencer la
distribution. Voir "Distributeur d'eau et de glagons".
• Y a-t-il des gla£ons dans le bac? Voir "La machine &
glagens ne produit pes de glagons ou trep peu" plus haut
dane cette section.
• Le brae de distribution a-t-il 6t6 tenu trop Iongtemps?
D6gager le bras de distribution. Lee glagons ceeserent d'6tre
distribu6s Iorsque le brae est tenu trop Iongtemps. Attendre
3 minutes pour que le moteur du distributeur soit r6g16de
nouveau avant d'etre utilis& Prendre de grandes quantit6s de
glagens directement du bac &glagons plut6t que du
distributeur.
Le bac & glagons est difficile & enlever
• Eat-ce que le seau & gla£ons eat difficile _ enlever (sur
cer'uains modbles)? Sur lee mod_les avec bac & giagons
dane la porte du cong61ateur, choisir "glagons'L Avec un verre
robuste, abaieser rapidement et d6gager le bres de
distribution de glace. Ouvrir la porte du cong61ateur abaisser
le beuton de d6gagement du bac & glagons et seulever. Veir
"Machine & glagens et bac d'entrepesage".
Le distributeur d'eau ne fonctionne pas bien
• LO syst_me d'eau s'eat-il rempli? Le syst_me d'eau a
besein d'etre rempli la premiere fois quql est utilis& Utiliser un
contenant solide pour appuyer cur la barre de distribution
jusqu'& ce que I'eau commence & couler. Purger le eyst_me
d'eau en laiesant couler et en jetant 2 & 3 gallons (8 & 12 L)
d'eau. Le nettoyage du syst_me prendra environ 6 &
7 minutes et aidera &d_jager Fair du conduit. Un 6coulement
additionnel peut 6tre requis dans certains domiciles. Voir
"Distributeur d'eau et de glagons".
Le robinet de fermeture d'eau eat-il ouvert ou la
canalisation d'eau est-elle raccord6e _ la source? V6rifier
pour s'aesurer que le robinet d'arr@t d'eau est ouvert et que la
source d'eau est connect6e au r6frig6rateuR Voir
"Raccordement de la canalisatien d'eau'L
Le robinet de fermeture d'eau eat-il obstrub ou
incorrectement installb? Voir "Raccordement de la
canalisation d'eau". Si I'obstruction ou HnstaUatien n'est pes
un prebl_me, faire un appel de service ou faire venir un
plembier.
La canalisation de la source d'eau du domicile comporte-
t-elle une d_formation? Si vous d_couvrez eu soupgonnez
une d_ferTnation de la canalisation d'eau, contacter un
plombier agr_&
Un tiltre _ eau est-il installd sur le r_trigdrateur? Le filtre
peut _tm obstru_ ou incorrecternent install& V_rifier d'abord
lee instructions dqnstallation du filtre pour s'aesurer que le
filtre a _t_ install_ correctement et n'est pes obstru& Si
Finstallation ou I'obstruction n'est pes un prebl_me, faire un
appel de service.
Un syst_me de filtration de I'eau & osmose inverse est-il
connectd &votre canalisation d'eau froide? Veir
':Sp6cifications de I'alimentation en eau'L
Ueau ou la glace coule du distr|buteur
• Le glece se renverse-t-elle parce que le verre n'est pas
tenu sous le distributeur de gla£ons assez Iongtemps?
Tenir le contenant sous la goulotte de glagons pendant 2 &
3 secondes apr_s avoir tel&oh6 le brae de distribution. Une
petite quantit_ d'eau ou de glagons peut _tre distribute apr_s
le d6gagement du brae.
Un gla£on coincd dens la goulotte maintient-il ouverte la
porte de distribution? Enlever le giagen.
Un tiltre _ eau est-iI installd sur le r_trigdrateur? Itpeut y
avoir de Fair dane les canalisatiens du syst_r'ne de filtration
de Feau ce qui cause la formation de gouttes. Une purge
suppl6mentaire pourrait aider & faire sortir Fair des
canalisations. L'utilisation norTnale du distributeur devrait
expulser YaP des canalisations en deg& de 24 &72 heures.
Le debit d'eau du distributeur diminue beaucoup
• Un tiltre _ eau est-il installd sur le r_trigdrateur? Le filtre
peut _tre plein ou incorrectement install& 0ter la carteuche
du filtre & eau. Voir "Syst_me de filtration de I'eau". Faire
fonctionner le distributeur. Si le d6bit d'eau augmente de
fagon notable, remplacer le filtre.
67
Page 68

Ueau du distributeur n'est pas assez f_oide
• Le r6frig6rateur vient-il d'_re install6? Attendre 24 heures
pour que le r6frig6rateur _frcidiese compl_temect.
Une grande quantit6 d'eau a-t-elle 6t6 r6cemment
dis_ribu6e? Attecdre 24 heures pour que I'eau refreidiese
cempl6temect.
We-t-on pas r6cemment distribub de reau? Le premier
verre d'eau peut ne pes 6tre freid. Jeter le premier verre
d'eau.
La cloison entre lea deux sections est tilde
• La temp6rature tilde est prebabtement attribuable _ un
fonctiennement normal du r6glage automafique de Fhumidit6
de Vext6rieur. En cas de doute, faire un appe] de service.
La teml_rature eat trap tilde
Les ouvertures d'a_.ration sont-elles bloqu6es dens une
section ou I'autre? Cette obstruction emp6che le
mouvemect de Fair frcid du cong61atesr au r6frig6rateur.
Enlever tous les objets plac6s devant les euvertures
d'a6ration. Consulter la section "Pour s'assurer d'une
circulation d'air apprepri6e" pour Femplacement des
ouvertures d'a6ration.
La ou les portes sont-elles ouvertes souvent? Pr6voir que
le r6frig6rateur deviendra tilde clans ce ces. Pour garder le
r6frig6ratesr freid, essayer de sortir tout ce dent vous avez
besein du r6frig6rateur &la lois, garder les aliments bien
rang6s et fermer la porte d_s que les aliments sent retir6s.
• Vient-on d'ajouter une grande quantitb d'alimenls au
r6frig6rateur ou au eong61ateur? Uaddition d'une grande
quantit6 d'aliments r6chauffe le r6frig6rateur. Plusieure
heures peuvect 6tre n6ceesaires pour que le r6frig6rateur
reviecne & la temp6rature normale.
Les r6glages sont-ils felts correctement pour les
conditions ambiantes? Veir "Utilisation des commandes'L
Le r6frig6rateur ne refroidit pasT Pour les mod_les avec
commandes num6riques, toumer I'appareil A OFF ensuite &
ON de nouveau pour la remise ec marche. Voir "Utilisation
des commandes'L Si eette action ne corrige pes le prebl_me,
faire un appel de service.
IIy a une accumulation d'humidite & I'int_fieur
Les ouvertures d'e_.ration sont-elles obstru_.es dans le
rbfrigbrateur? Enlever tousles objets devant les ouvertures
d'air. Se r6f6rer &la section "Pour s'aesurer d'une circulation
d'air apprepri6e" pour I'emplacement des euvertures d'air.
La ou les portes sont-elles ouvertes souvent? Pour 6viter
I'eccumulation d'humidit6, essayer de sortir tout ce dent
vous avez besoin du r6frig6rateur & la lois, ec gardant les
aliments organis6s et en fermant la porte d_s que les aliments
sent retir@s.
La pi6ce esl-elle humide? It est normal que rhumidit6
s'eccumule & Iqnt6rieur du r6frig6ratesr Ioreque I'air de la
piece est humide.
Les aliments sont-ils bien emballds? V6rifier que tousles
aliments sent bien emball6s. Essuyer les contenants humides
d'aliments avant de les placer au r_frig_rateur.
Les r_glages sont-ils fails correctement pour les
conditions ambiantes? Voir '%tilisation des commandes'L
Un programme autoddgivreur vient-il de se terminer? II
est normal que des gouttelettes se formect apr_s que le
r6frig6rateur se d6givre automafiquemect.
Lse pores ne se ferment pas compl_tement
• Les emballages d'alimenls emp6chentqls la porte de
fermer? R_organiser les contenants de sorte quqls ecient
plus rapprcch6s et prennent moins d'espece.
Le bac _ gla_ponsest-il en bonne position? Pour les
mod_les de machines & glagons avec bac int_rieur & glagons,
poueser le bec & glagons compl_temect jusqu'au fond. Si le
bacne vapes jusqu'au fond, il n'est peut-_tre pes dreit. Le
retirer et essayer de nouveau. Pour les mod_les avec un bac
& glagons clans la porte du cong61ateur, le bac dolt _tre
d'aplomb. Pour retirer le bac, appuyer sur le bouton de
d6gagement du 06t6 dreit du bec et le eculever dreit vers le
haut. Replacer le bac dans la porte en vous aesurant qu'il est
bien align_ et bien enclench_ en place. Voir "Machine &
glagens et bec d'entreposage".
Les plats, tablettes, becs ou peniers sont-ils en bonne
position? Placer ]e couvercle du bac & ]b_Jur'neset tous]es
plats, tablettes, bacs et paniere & la position correcte. Voir
plus de renseignements & la section "Tireir convertible &
viande/k,_jumes, bac & 16gumes et couvercles" pour plus de
renseignements.
• Les joints sont-ils collants? Nettoyer les joints d'6tanch6it6
conform_ment aux directives clans la section "Netteyage'L
• Le r_trigdrateur branle4-il ou semble4-il instable? Niveler
le r_frig_rateur. Veir "Ajuster les portes".
Les portes ont-elles _t_ enlev_.es durant I'installation de
I'appareil et mal rdinstalldes? Enlever et replacer les portes
en suivant la section "Portes du r6frig6rateur" sur certains
mod_les ou faire vecir un technicien qualifi&
Lse portes sent difficiles & ouvrir
• Les joints sont-ils sales ou collants? Nettoyer les joints
d'_taech_it_ conform_rnent aux directives dans la section
"Nettoyage'L
68
Page 69

CONTRATS DE PROTECTION
Aux Etats-Unis
Contr"a_ principaux de protection
Noue vous f61ieitons d'avoir fair un aohat judicieux. Votre nouvel
appareil Galaxy' est congu et fabriqu6 pour vous procurer des
ann6es de fonctionnement fiable. Male comme pour toue lee
produits, il pourra & I'occasion n6cessiter un entretien pr6ventif
ou une r6paration. Le cas 6ch6ant, un Contrat principal de
protection peut vous 6pargner de I'argent et des soucis.
Achetez d_s maintenant un Contrat principal de protection et
prot6gez-vous contre les d6penses et ennuis inattendu&
Le Contrat principal de protection contribue aussi & prolonger la
vie utile de vctre nouvel appareil m6nager. Voici ce qui est inclue
dane le contrat :
Service expert par nee 12 000 r6parateum professionnels
Service illimit6 et sans frais pour les pi_ces et la main-
d'oeuvre pour routes les r6paretions couvertes
Garantie "Anti-citron" - remplacement de votre produit
couvert si quatre pannes ou plus ee produisent en deg& de
douze mois
vSRemplacement du produit si vctre produit couvert ne peut
_tre r6par6
1/V6rification annuelle d'entretien pr6ventif sur demande =
sans frais suppl6t'nentaires
Aide rapide au t616phone = assistance t616phonique foumie
par un teehnicien de Sears pour les produits r6parables &
domicile, plus un horaire de r6paration commode
1/Protection centre les sautes de puissance pour pr6venir lee
dor'nr'nages attribuables aux fluctuations de courant
Remboursement de location si la r6paration prend plus de
temps que promis
D&Squevous achetez le Contrat, il suffit d'un appel t616phonique
pour obtenir un rendez-vous de service. Vous pouvez appeler en
tout temps jour et nuit ou prendre un rendez-vous de service en
direct.
Sears compte plus de 12 000 r6parateure professionnels qui oat
acc_s & plus de 4,5 millions de pi_ces et accessoires de qualit&
C'est le genre de professionnalisme sur lequel vous pouvez
tempter pour aider & prolonger la vie de votre nouvel achat
pendant des ann6es. Achetez votre Contrat principal de
protection aujourd'hui m6me!
Certaines limitations et exclusions s'appliquent. Pour des prix et
renseignements suppl6mentaires, composer le
1-800-827-6655.
Service d'installation Sears
Pour I'instaUation professionnelle par Sears d'appareils
m6nagere, d'ouvre-portes de garage, de chauffe-eau et d'autres
articles importants de la maison, aux E.=U. composer le
1-800-4-MY-HOME _.
Au Canada
Contrats d'entretien
Votre achata plus de valeur parce que vous pouvez tempter sur
Sears HomeCentrel _ pour le service. Avec plus de 2400
sp6cialistes form6s et I'acc_s & plus de 900 000 pi_ces et
accessoires, nous avons lee outils et lee pi_ces ainsi que les
connaissances et comp6tences pour remplir cette promesse que
nous vous faisons : Nous assurons le service de nos produits.
Votre appareil Galaxy" est congu, fabriqu6 et v6rifi6 pour qu'il
puisse vous fournir de nombreuses ann6es de service en route
confiance. Cependant, tout appareil m6nager peut n6cessiter
des interventions de service de temps & autre. Le contret
d'entretien Sears vous offre un programme de service
remarquable & un prix abordable.
Le contrat d'entretien Sears
• Garantit lee prix d'aujourd'hui pour lee services que vous
utiliserez plus tard.
• Elimine les factures pour lee r6parations imputables & I'usure
normale.
• Couvre lee appels de service pour une aide non technique et
pratique.
• Comprend une inspection annuelle d'entretien pr6ventif (sur
votre demande} pour maintenir vctre appareil en boa 6tat de
fonctionnement.
Certaines limitations s'appliquect. Pour des renseignements
concernant les contrats d'entretien de Sears Home Cen_raP,
composer le 1-800-861-6665.
Accessoires
Pi_ces de rechange
Pour commander un nettoyant pour acier inoxydable ou des
cartouches de filtre & eau interne, composer le 1-888-4-MY-
HOME eet demander le num6to de piece appropri6 mentionn6 ci-
dessous ou contacter le marchand Galaxy' agr6&
Ncttoyact ct poll pour acier inoxydable
Commander la piece N° D22 M40083 R
Cartouche de filtre & eau irrt6rieur :
REMARQUE : Ne pas utilisar avec de I'eau
microbiologiquement dangereusa ou de qualit6 inconnue
sans une d6sinfection adbquate avant ou apr6s le syst6me.
Un systbme homologub pour la rdtention des kystes peut
6tre utilis6 pour le traitement d'une eau dbsinfectbe qui peut
contenir des kystes filtrable&
Cartouche centre lee kystes :
Commander la piece N° 9908 (WF-NLC240V et WF-LC400V}
69
Page 70

FEUILLES DE DONNI ES SUR LE PRODUIT
Syst_me de filtration d'eau & la grille de la base
Mod_le WF-NLC24.0V/NLC24.0V Capacit_ 240 gallons {908 litres)
Preduit !eat6 et sertifi6 par NSF In!ernational en vertu de la norton
NSFiAN.S142 (r6duclion du go6! et de I odaur du oblate, et partioulas
(classe I )); at en vertu de la norme NSFiANS153 (r6duclion de
plomb_ meroure, atrazine, benz6ne, tsxaph6ne, o-dichlorebanzSne_
kystes, turbidit6, amiante, Iindane, t6trechlore6thyi_ne_ endrine,
alachlore, chlorebenz_na< @hyibanz_ne_ lq-HM et 6that
m@hy ter!obuty qua).
Ce produit a 616 test6 salon les normes 42 et 53 ANSI/NSF pour la r6duction des substances 6num6r6es cFdesseus. La
concentration des substances indiqu6es dens I'eau entrant dens le syst_me a 616 r6duite & une concentration moindre eu 6gale & la
limite permissible pour Feau qui quitte le syst_me, tel qua sp6cifi6 dens 42 et 53 ANSI/NSE
R_I, de aubstaneea Critbres de Affluent Conc_entl,ation Effluent Effluent % de red, % de r_=d, Num_ro de
Effets esth_tiquea _duetion NFS moyen dana I'eau _ tPatter maximal moyen minimale moyenne teat NSF
_95% 2,0 mg/L 2_0 mgiL -+ 0,05 mg!L 97_1% 99,9% 507173-02Goat/odeur de chlore _50% 5 366 667/ Au mains 10O0_() 0,05 mglL 2300imL 97,5%
4100tmL *_ 99,3% 507175-02Partieules (classe I*)
mL part aules/mL
R_cluetfen de Critbres de Affluent Cenoentl, atien Effluent Effluent % de red, % de r_=d, Numero de
contaminant _duction NFS moyen dana I'eau _ tPafter maximal moyen minimale rnoyenne teat NSF
PIomb : _ pH 55 0,01mg/L 0,15 ra!!L1- 0,15 mg/L ÷ 10% 0001 mg/L 0,001 mglL 99,35% 99,35% 507501-01
PIomb : & pH 95 0,01mg!L 0,15 ra!!L1- 0,15 mg!L ÷ 10% 0001 mg/L 0,001 mglL 99,31% 99,31% 507602-01
Mereure : _ pH 6,5 0,002 mglL 0,0061 mg/L 0,008 mg/L__ 10% 00004 mg/L 0,0002 mg/L 93,5% 96,7% 507603-02
Mereure : _ pH 8,5 0,002 mglL 0,0057 mg/L 0,008 rag/L_+ 10% 00009 mg!L 0,00051 mg!L 85,8% 91,2% 507804-02
Benz_ne 0,005 mglL 0,0139 mg/L 0,015 _+10% 00005 mg!L 0,0005 mg/L 96,3% 96,3% 507193-02
p-dichlorebenz_ne 0,075 mglL 0,220 mgiL 0,225_+ 10% 00005 mg!L 0,0005 mg/L 99,7% 99,7% 507196-02
Toxaph_ne 0,003mglL 0,014mglL 0,015_+ 10% 00014mg!L 0,001 mglL 90,0% 92,9% 507195-02
Atrazine 0,003 mglL 0,009 mglL 0009 mglL_+ 10% 00013 mg!L 0,00038 mg!L 95,6% 95,9% 507181-02
2 4-D 0,07 mg!L 0,197 mglL 0,215_+ 10% 0058 mg/L 0,0137 mg/L 70,6% 93,06% 507190-02
Amiante 99% 26 x 10_ 10to 10_fibresiLl-1 - 019>: 10 mglL 0,18 × 10_mgl[ 9993% 9993% 507179-02
Kystes:_ 9995% 1I 1 000/mL 50 000/L min. 1 mg/L 1 mg/L 99,99% 99,99% 507187-02
Turbidit6 0,5 NTU 11,09 NTU 11 ÷ 1 NTU 013 NTU 0,078 NTU 98,9% 99,3% 507751-02
Param_tres de test : pH : 7,5 :_0,5 & mains dqndications contrairas. D6bit = 0,5 gpm (1,9 Lpm). Pression = 60 Ib/po 2 (413,7 kPa).
Temp6ratura = 63"F (17,2_C).
• II est essential qua les exigences de fonctionnement,
d'entretien et de ramplacement de filtra soient respect6es
pour que ce preduit donne le randement annonc&
• Mod_le WF-NLC240V Remplacer la cartouche au mains &
tousles 6 & 9 reals. Utiliser une cartouche de ramplacement
NLC240V, n" de piece 9908. Prix sugg6r6 au d@ail en 2004
de 39,95 $US. Les pri× sent sujets & des changements sans
pr6avis.
• Le preduit ne dolt _re utilis6 qua pour I'eau froide seulement.
Nepas utiliser avec de Feau micrebiologiquement
dangereuse ou de qualit_ inconnue sans une d6sinfection
adequate event eu apr_s le syst_me. Un syst_me homologu6
pour la r@entien des kystes peut _tra utilis_ pour le
traitement d'une eau d_sinfect_e qui peut contenir des kystes
filtrables.
• Veuillez veus r6f6rer &la couvertura eu & la section
"Accessoires" pour le nora, I'adresse et le num_re de
t616phone du fabricant.
• Veuillez vous r6f6rer &la section "Garantie" pour la garantie
limit6e du fabricant.
Directives d'application/
Param_res d'approvisionnement en eau
Approvisionnement en eau Collectivit6 ou puits
Prassion d'eau 30 - 120 Ib/pd' (207 - 827 kPa)
Temp6rature d'eau 33 _ - 100"F (0,6" - 37,8" C)
D_bit nominal 0,5 gpm (1,9 Wmin.) & GO Ib/po _
_Classe I _tailles des partiaules : > 05 & <1 IJm
_Exigenae de test : au mains 100 000 particules/mL (poussiOre de test fine AC).
?Ces contaminants ne sent pas n_cessairement presents dens votre apprevisionnement d'eau Le rendement peut verier salon les conditions
locales de leau.
??Fibres de Iongueur superieure & 10 pm
:ECas de la filtration de kystes de Cryptosporidium parvum
('_NSF eat une marque d_pos_e de NSF International
78
Page 71

Syst_me de filtration d'eau b la grille de la base
Model WF-LC400V/LC400V Capacity 400 gallons {1514 litres)
Praduit test6 et certifi6 par NSF International en vertu de la norton
NSFiANS142 (r6duclion du go_! et de I'odeur du chlore_ et partiaules
(classe I*)); at en vertu de la norme NSFiANS153 (r6duclion de
plomb_ mercure, atrazine, benz6ne, toxaph6ne, o-dichlorobanz_ne_
kystes_ turbidi!6_ amianle, lindane, t6trachloro6thyl_ne_ endrine,
alachlore, chlorobenz_na. @hylbanz_ne_ T]-HM et 61her
m@hylteriiobutylique).
Ce produit a 6t6 test6 salon les normes 42 et 53 ANSI/NSF pour la r6duction des substances 6num6r6es ci-desseus. La
concentration des substances indiqu6es darts I'eau entrant dans le syst_me a 6t6 r6duite & une concentration moindre eu 6gale & la
limite permissible pour Feau qui quitte le syst_me, tel qua sp6cifi6 dans 42 et 53 ANSI/NSE
Red, de substances Effluent Numero de
Effeta esthetiques maximal test NSF
Go01iodeur de ehlore 0,06 mg/L 507173-02
PartiauEes (elasse I*) 4100/mL** 507175-02
R_duction de
contaminant
P]omb : _ pH 6,5
Plomb : & pH 8,5
Meroure : _ pH 6,5
Mereure : _ pH 9,5
Benz_ne
_-diahlorobenz¢ne
Toxaph@ne
Atrazine
2 4-D
Amiante
Kystes_
Turbidit@
Crit6tes de Affluent Concentration
reduction NF8 moyen dana I'eau b tPafter
_50% 2,1 mgiL 2,0 mgiL ± 10%
5 366 667/mL Au mains 10 000
_95%
part au es/mL
Cdt_tes de Affluent
reduction NF8 moyen
001 mgiL 0,16 mgiLl"
001mgiL 0,15 mgiLl"
0,002 mg!L 0,0061 mg!L
0,002 mg!L 0,0057 mg!L
0005 mg!L 0,0138 mg!L
0075 mg!L 0,220 mgiL
0003 mg!L 0,014 mgiL
0003 mg!L 0,009 mgiL
007 mg/L 0,197 mgiL
99% 26x10 _
99,95% 111 000imL
05 NTU 1109 NTU
Concentration
dana Peau _ teafter
0,15 ra!!L-+ 10%
0,15 ra!!L-+ 10%
0,006 mgiL + 10%
0,006 mgiL + 10%
0,015 -+ 10%
0,225 +- 10%
0,015 -+ 10%
0,009 mglL + 10%
0,215 -+ 10%
10 to 10 '_fibre&ILl"l
50 000/L rain.
11 _+1 NTU
Effluent
maximal
0,001 mg/L
0,001 mg!L
0,0004 mgiL
0,0009 mgiL
0,0005 mgiL
0,0005 mgiL
0,0014 mgiL
0,0013 mgiL
0,058 mg!L
0,19 x 10_mgi[
1 mgiL
0,13 NTU
Effluent
moyen
0,05 mgiL
2300imL
Effluent
moyen
0,001 mg/L
0,001 mg/L
0,0003 mg!L
0,00051 mglL
0,005 mg/L
0,0005 mg!L
0,001 mg/L
000036 mgiL
0,0137 mg!L
019}{ 10_mg!L
mgiL
0,079 NTU
% de r_d,
mfnfmale
97,1%
99,3%
% de r_d,
mfnfmale
99,3%
99,2%
93,5%
85,9%
96,3%
99,7%
90%
85,6%
70,6%
09,93
99,99%
98,9%
% de r._.d,
moyenne
97,6%
99,9%
% de r@d,
moyenne
99,35%
99,31%
96,7%
91,2%
96,3%
99,7%
92,96%
85,6%
93,06%
99,93%
99,99%
99,3%
NUmeFO de
test NSF
507601_01
507602-01
507603_02
507604-02
507193-02
507196-02
507195-02
507191-02
507190-02
507178-02
507197-02
507751-02
Param_tres de test : pH = 7,5 =_0,5 &moins dqndications contrairas. D6bit = 0,5 gpm (1,9 Lpm). Pression = 60 Ib/po 2 (413,7 kPa).
Temp6ratura = 63"F (17,2_C).
• II est essential qua les exigences de fonctionnement,
d'entretien et de ramplacement de filtra soient respect6es
pour que ce produit donne le randement annonc6.
• Mod_le WF-LC400V Le syst_me de contr61e du fiffre mesure
la quantit6 d'eau qui passe par le filtra et vous signale quand
remplacer le filtre. Lorsque 90 % de la vie utile du filtra est
6coul6e, le t6moin lumineux du filtra passe du vert au jaune.
Lorsque 100 % de la vie utile du filtra est 6eoul@e, le t6moin
lumineux du filtre passe du jaune au rouge et il est
recommand6 de ramplacer le filtre. Utiliser une carteuche de
remplacement LC400V, n" de piece 9908. Prix sugg6r6 au
d6tail en 2004 de 39,95 $US. Les prix sent sujets & des
changements sans pr6avis.
• Le produit ne dolt 6tre utilis6 qua pour I'eau froide seulement.
Ne pas utiliser avec de Feau micrebiologiquement
dangereuse ou de qualit6 inconnue sans une d6sinfection
ad6quate avant eu apr_s le syst_me. Un syst_me homologu@
pour la r@entien des kystes peut @trautilis_ pour le
traitement d'une eau d_sinfect_e qui peut contenir des kystes
filtrables.
• Veuillez veus r@f@rer& la couvertura eu & la section
"Accessoires" pour le nora, I'adresse et le num_re de
t@l@phonedu fabricant.
• Veuillez vous r6f6rer &la section "Garantie" pour la garantie
limit@e du fabricant.
Directives d'application,/
Parambtres d'approvisionnement en eau
Approvisionnement en eau Collectivit_ eu puits
Prassion d'eau 30 - 120 Ib/po _ (207 - 827 kPa}
Temp_ratura d'eau 33" - 100"F (0,6" - 37,8 _ C)
D@bit nominal 0,5 gpm (1,89 Wmin.) & 60 Ib/po
_Classe I _tallies des partiaules : > 05 _ <1 IJm
"Exigenae de test : au mains 100 000 partioules/mL (poussi¢re de test fine AC),
_Ces oemtarninants ne sent pas n_oessai_ement presents dams votre approvisionmement d'eau Le rendement peut varier selon lea conditions
Josala_de leau,
_Fibres de lengueur sup@rieu_e & 10 gm
_:Cas de la filtration de kystes de Cp_pto_pofidium parvum
('_NSF eat une marque d_pos_e de NSF International
71
Page 72

Your Home
For repair-in your home-of all major brand appliances,
lawn and garden equipment, or heating and cooling systems,
no matter who made it, no matter who sold it!
For the replacement parts, accessories and
owner's manuals that you need to do-it-yourself.
For Sears professional installationof home appliances
and items like garage door openers and water heaters.
1-800-4-MY-HOME ® (1-800-469-4663)
Call anytime, day or night(U.S.A. and Canada)
www.sear$.com www.sear$.ca
Our Home
For repair of carry-in items like vacuums, lawn equipment,
and electronics, call or go on-line for the locationof your nearest
Sears Parts & Repair Center.
1-800-488-1222
Call anytime, day or night (U.S.A. only)
www.sears.com
To purchase a protection agreement (U.S.A.)
or maintenance agreement (Canada) on a product serviced by Sears:
1-800-827-6655 (U.S.A.) 1-800-361-6665 (Canada)
Para pedir servicio de reparaci6n
a domicilio, y para ordenar piezas:
1-888-SU-HOGAR _
(1-888-784-6427)
Au Canada pour service en fran_ais:
I"800"LE'FOYER Mc
(1-800-533-6937)
www.sears.ca
SEAVRS
2305803
© 2004 Sears, Ro(_buck and GO.
(_ R(_glst _ (_d Trad(_ma k/ Tmd(_mark/ Se w]ce Mark of Sea_, Ro(_buck and Go.
• , SM
Maria Regist rada / ;_Marca de Fabr_¢a / Marca de Serv_c_o de $eaes, Roebuck and Co
®Ma_quedecomme_d_po_e/ "Ma_uedecommer_z 8 Marqucd¢*¢rviccd¢Sca*,RcebuckandCo.
3/04
Prin_c-d in U.S.A
Impreso (_n EE UU
Impdm_ au_: E-U
 Loading...