

Page 1
All about the
Use & Care
of your Microwave Oven
TABL E OF CONTENTS
WELCOME & CONGRATULATIONS...........................2
IMPORTANT SAFETY INSTRUCTIONS ......................2
PART NAMES ........................................................8
CONTROL PANEL ..................................................9
BEFORE OPERATING. ...........................................10
www.frigidaire.com USA 1-800-374-4432
MANUAL COOKING .............................................11
AUTO COOKING .................................................16
CONVENIENT FEATURES .....................................18
CLEANING AND CARE .........................................20
A06823423 (NOV 2019)
Page 2
WELCOME & CONGRATULATIONS
Congratulations on your purchase of a new microwave oven! At Electrolux Home Products,
Questions?
1-800-374-4432
(United States)
Please attach sales receipt
here for future reference.
we are very proud of our product and are completely committed to providing you with the best
service possible. Your satisfaction is our number one priority.
We know you’ll enjoy your new microwave oven and Thank You for choosing our product. We
hope you consider us for future purchases.
PLEASE CAREFULLY READ AND SAVE THESE INSTRUCTIONS
This Use & Care Manual provides speci¿ c operating instructions for your model. Use your
microwave oven only as instructed in this manual. These instructions are not meant to cover
every possible condition and situation that may occur. Common sense and caution must be
practiced when installing, operating and maintaining any appliance.
Please record your model and serial numbers below for future reference.
Model Number:
Serial Number:
Purchase Date:
______________________________________________________________________________
______________________________________________________________________________
______________________________________________________________________________
NEED HELP?
Visit the Frigidaire Web Site at: http://www.frigidaire.com
Before you call for service, there are a few things you can do to help us serve you better.
Read this manual.
It contains instructions to help you use and maintain your microwave oven properly.
If you received a damaged Microwave Oven... immediately contact the dealer (or builder)
that sold you the Microwave Oven.
Save time and money.
Check the section titled “Service Call Check”. This section helps you solve common problems
that might occur. If you do need service, you can relax knowing help is only a phone call away.
A list of toll-free customer service numbers is included in the back of this manual. Or call
Frigidaire Customer Services at 1-800-374-4432, 24 hours a day, 7 days a week.
IMPORTANT SAFETY INSTRUCTIONS
For your safety the information in this manual must be followed to minimize the risk
of ¿ re or explosion or to prevent property damage, personal injury or loss of life.
PRECAUTIONS TO AVOID POSSIBLE
EXPOSURE TO EXCESSIVE
MICROWAVE ENERGY
(a) Do not attempt to operate this oven with the door open since open-door operation can result in harmful exposure to
microwave energy. It is important not to defeat or tamper with the safety interlocks.
(b) Do not place any object between the oven front face and the door or allow soil or cleaner residue to accumulate on
sealing surfaces.
(c) Do not operate the oven if it is damaged. It is particularly important that the oven door close properly and that
there is no damage to the: (1) door (bent), (2) hinges and latches (broken or loosened), (3) door seals and
sealing surfaces.
(d) The oven should not be adjusted or repaired by anyone except properly quali¿ ed service personnel.
2
Page 3
IMPORTANT SAFETY INSTRUCTIONS
De¿ nitions
This is the safety alert symbol. It is used to alert you to potential personal injury hazards. Obey all safety messages
that follow this symbol to avoid possible injury or death.
WARNING
WARNING indicates a potentially hazardous situation which,
if not avoided, could result in death or serious injury.
READ ALL INFORMATION BEFORE USING
CAUTION indicates a potentially hazardous situation which,
if not avoided, may result in minor or moderate injury.
To reduce the risk of ¿ re in the microwave oven cavity:
WARNING
To reduce the risk of ¿ re, burns, electric shock, injury
to persons, or exposure to excessive microwave energy
when using your appliance, follow basic precautions,
including the following sections.
Read all instructions before using the appliance.
Read and follow the speci¿ c “PRECAUTIONS TO
AVOID POSSIBLE EXPOSURE TO EXCESSIVE
MICROWAVE ENERGY” on page 2.
This appliance must be grounded. Connect only
to properly grounded outlet. See “GROUNDING
INSTRUCTIONS”on page 5.
Install or locate this appliance only in accordance with
the provided installation instructions.
Some products such as whole eggs and sealed containers
—for example, closed glass jars—are able to explode
and should not be heated in this microwave oven.
Use this appliance only for its intended use as described
in this manual. Do not use corrosive chemicals or
vapors in this appliance. This type of microwave oven is
speci¿ cally designed to heat, cook or dry food. It is not
designed for industrial or laboratory use.
As with any appliance, close supervision is necessary
when used by children.
Do not operate this appliance if it has a damaged cord
or plug, if it is not working properly or if it has been
damaged or dropped.
This appliance should be serviced only by quali¿ ed
service personnel. Contact nearest Electrolux Authorized
Servicer for examination, repair or adjustment.
Do not cover or block any openings on the appliance.
Do not store or use this appliance outdoors. Do not use
this product near water—for example, near a kitchen
sink, in a wet basement or near a swimming pool, or
similar locations.
Do not immerse cord or plug in water.
Keep cord away from heated surfaces.
Do not let cord hang over edge of table or counter.
See door surface cleaning instructions on page 20.
When À aming food under the hood, turn the fan on.
This appliance is suitable for use above both gas and
CAUTION
- Do not overcook food. Carefully attend
appliance when paper, plastic or other
combustible materials are placed inside the
microwave oven to facilitate cooking.
- Remove wire twist-ties from paper or plastic bags
before placing bag in microwave oven.
- If materials inside the microwave oven ignite,
keep microwave oven door closed, turn
microwave oven off and disconnect the power
cord or shut off power at the fuse or circuit
breaker panel.
- Do not use the cavity for storage purposes. Do not
leave paper products, cooking utensils or food in the
cavity when not in use.
Liquids, such as water, coffee or tea are able to be
overheated beyond the boiling point without appearing to
be boiling. Visible bubbling or boiling when the container
is removed from the microwave oven is not always
present. THIS COULD RESULT IN VERY HOT LIQUIDS
SUDDENLY BOILING OVER WHEN A SPOON OR
OTHER UTENSIL IS INSERTED INTO THE LIQUID.
To reduce the risk of injury to persons:
- Do not overheat the liquid.
-
Stir the liquid both before and halfway through heating it.
- Do not use straight-sided containers with narrow
necks. Use a wide-mouthed container.
- After heating, allow the container to stand in the
microwave oven at least for 20 seconds before
removing the container.
- Use extreme care when inserting a spoon or other
utensil into the container.
Clean ventilation openings and grease ¿ lters frequently .
Grease should not be allowed to accumulate on
ventilation openings, louver or grease ¿ lters.
Use care when cleaning the louver and the grease ¿ lters.
Corrosive cleaning agents, such as lye-based oven
cleaners, may damage the louver and the grease ¿ lters.
electric cooking equipment 36” wide or less.
SAVE THESE INSTRUCTIONS.
3
Page 4
IMPORTANT SAFETY INSTRUCTIONS
Do not clean with metal scouring pads. Pieces off the
pad can touch electrical parts involving risk of electric
shock.
WARNING
Cancel
If you see arcing, press the
the problem.
Arcing is the microwave term for sparks in the oven.
Arcing is caused by:
Metal or foil touching the side of the oven.
Foil not molded to food (upturned edges act
like antennas).
Metal, such as twist-ties, poultry pins, or goldrimmed dishes, in the microwave.
Recycled paper towels containing small metal
pieces being used in the microwave.
button and correct
Federal Communications Commission Radio Frequency Interference Statement
(U.S.A. Only)
This equipment generates and uses ISM frequency energy and if not installed and used properly, that is in strict
accordance with the manufacturer’s instructions, may cause interference to radio and television reception. It has
been type tested and found to comply with limits for ISM Equipment pursuant to part 18 of FCC Rules, which are
designed to provide reasonable protection against such interference in a residential installation.
However, there is no guarantee that interference will not occur in a particular installation. If this equipment does
cause interference to radio or television reception, which can be determined by turning the equipment off and on,
the user is encouraged to try to correct the inference by one or more of the following:
Reorient the receiving antenna of the radio or television.
Relocate the microwave oven with respect to the receiver.
Move the microwave oven away from the receiver.
Plug the microwave oven into a different outlet so that the microwave oven and the receiver are on different
branch circuits.
The manufacturer is not responsible for any radio or television interference caused by unauthorized modification to
this microwave oven. It is the responsibility of the user to correct such interference.
4
Page 5
IMPORTANT SAFETY INSTRUCTIONS
UNPACKING AND EXAMINING YOUR
MICROWAVE OVEN
(a)Unpacking and Examining Your Oven
(b)Carefully remove oven from carton.SAVE THE CARTON
AS IT MAY MAKE INSTALLATION EASIER.
(c)Remove
(d)All packing materials from inside the oven cavity;
however, DO NOT REMOVE THE WAVEGUIDE COVER,
which is located on the ceiling in the oven cavity.
Check to see that there are Installation Instructions,
Wall Template, Top Cabinet Template, bag of
Installation Hardware, Charcoal Filter and Exhaust
Damper Assembly. Read enclosures and SAVE the
Owner’s Instructions.
(e)The feature sticker from the outside of the door, if
there is one.
(f)Check the oven for any damage, such as misaligned or
bent door, damaged door seals and sealing surfaces,
broken or loose door hinges and latches and dents
inside the cavity or on the door. If there is any
damage, do not operate the oven and contact your
dealer.
(g)See Installation Instruction for more details.
GROUNDING INSTRUCTIONS
This appliance must be grounded. This microwave oven
is equipped with a cord having a grounding wire with a
grounding plug. It must be plugged into a wall receptacle
that is properly installed and grounded in accordance
with the National Electrical Code and local codes and
ordinances. In the event of an electrical short circuit,
grounding reduces risk of electric shock by providing an
escape wire for the electric current.
Improper use of the grounding plug can result in a risk
of electric shock.
Electrical Requirements
Check Installation Instructions for proper location for the
power supply.
The electrical requirements are a 120 volt 60 Hz, AC
only, 15 amp. or more protected electrical supply. It is
recommended that a separate circuit serving only the
microwave oven be provided.
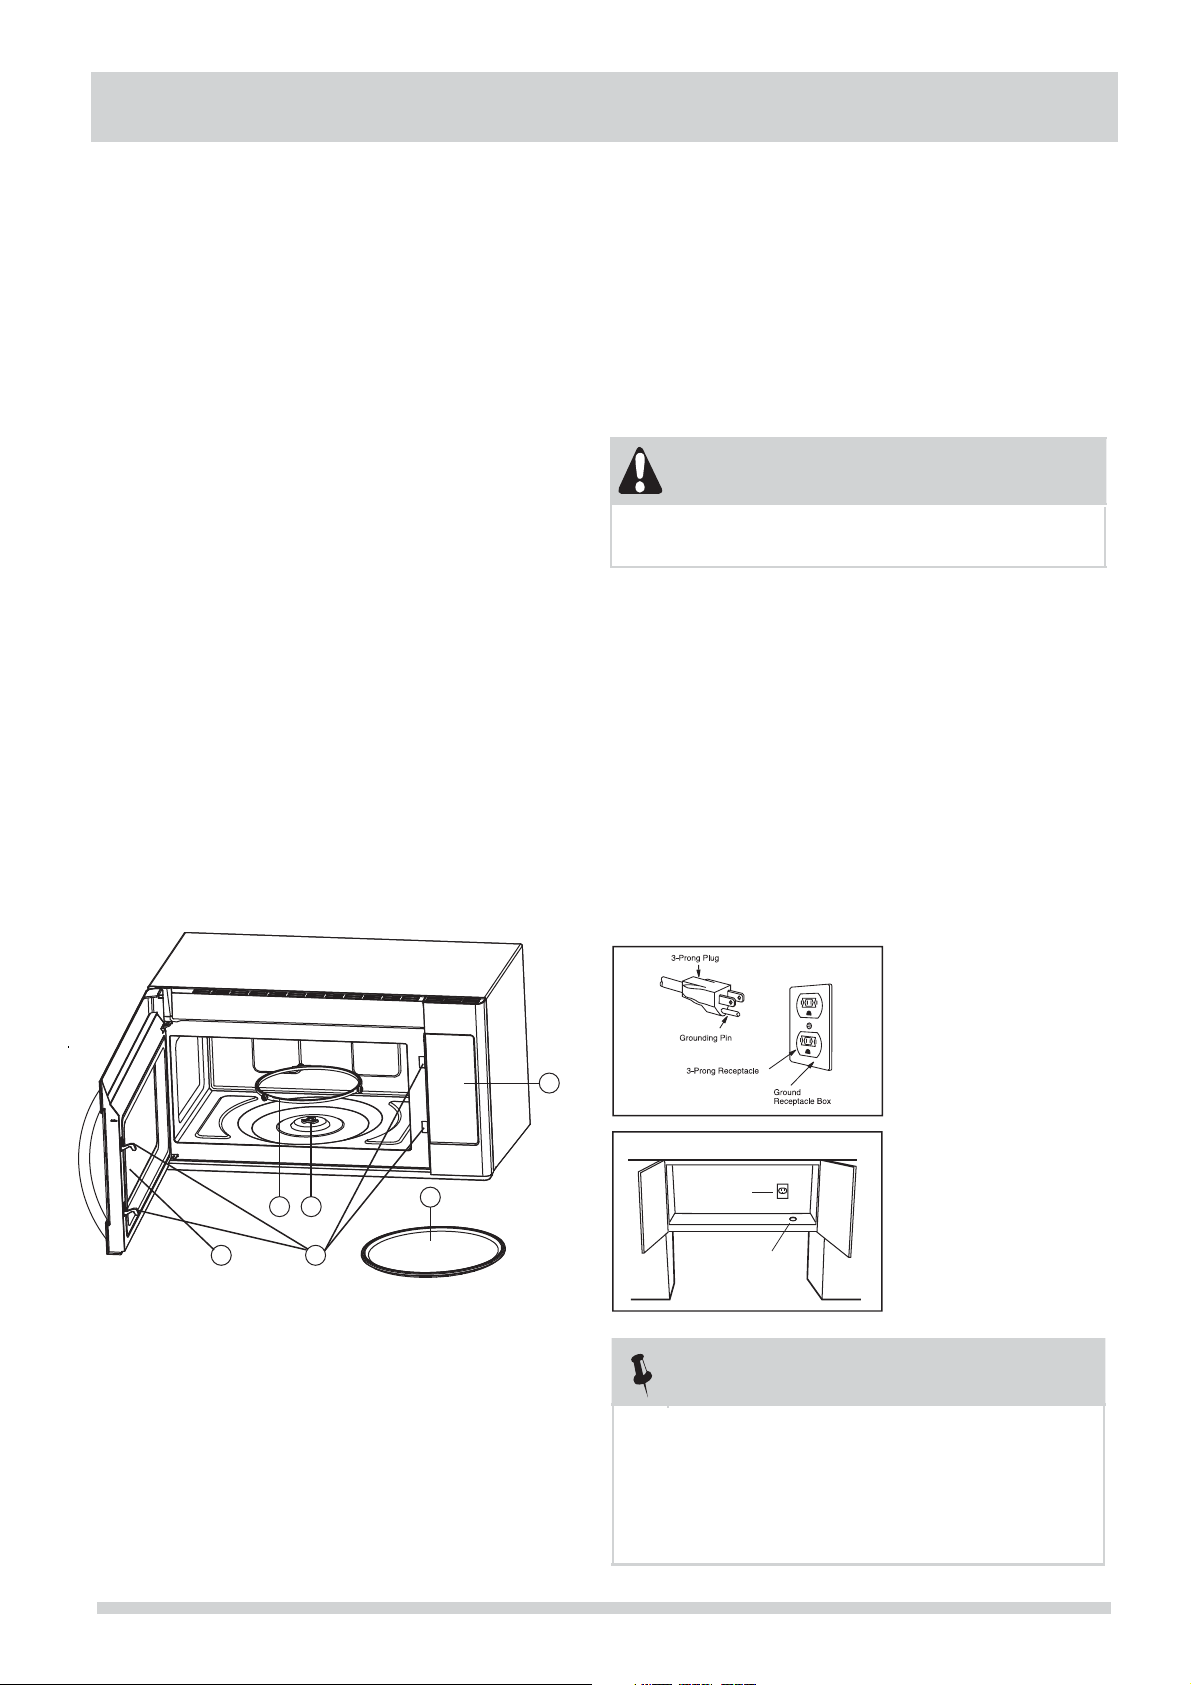
The microwave oven is equipped with a 3-prong
grounding plug. It must be plugged into a wall receptacle
that is properly installed and grounded. DO NOT
UNDER ANY CIRCUMSTANCES CUT OR REMOVE THE
GROUNDING PIN FROM THE PLUG.
DO NOT USE AN EXTENSION CORD.
WARNING
4
3
12
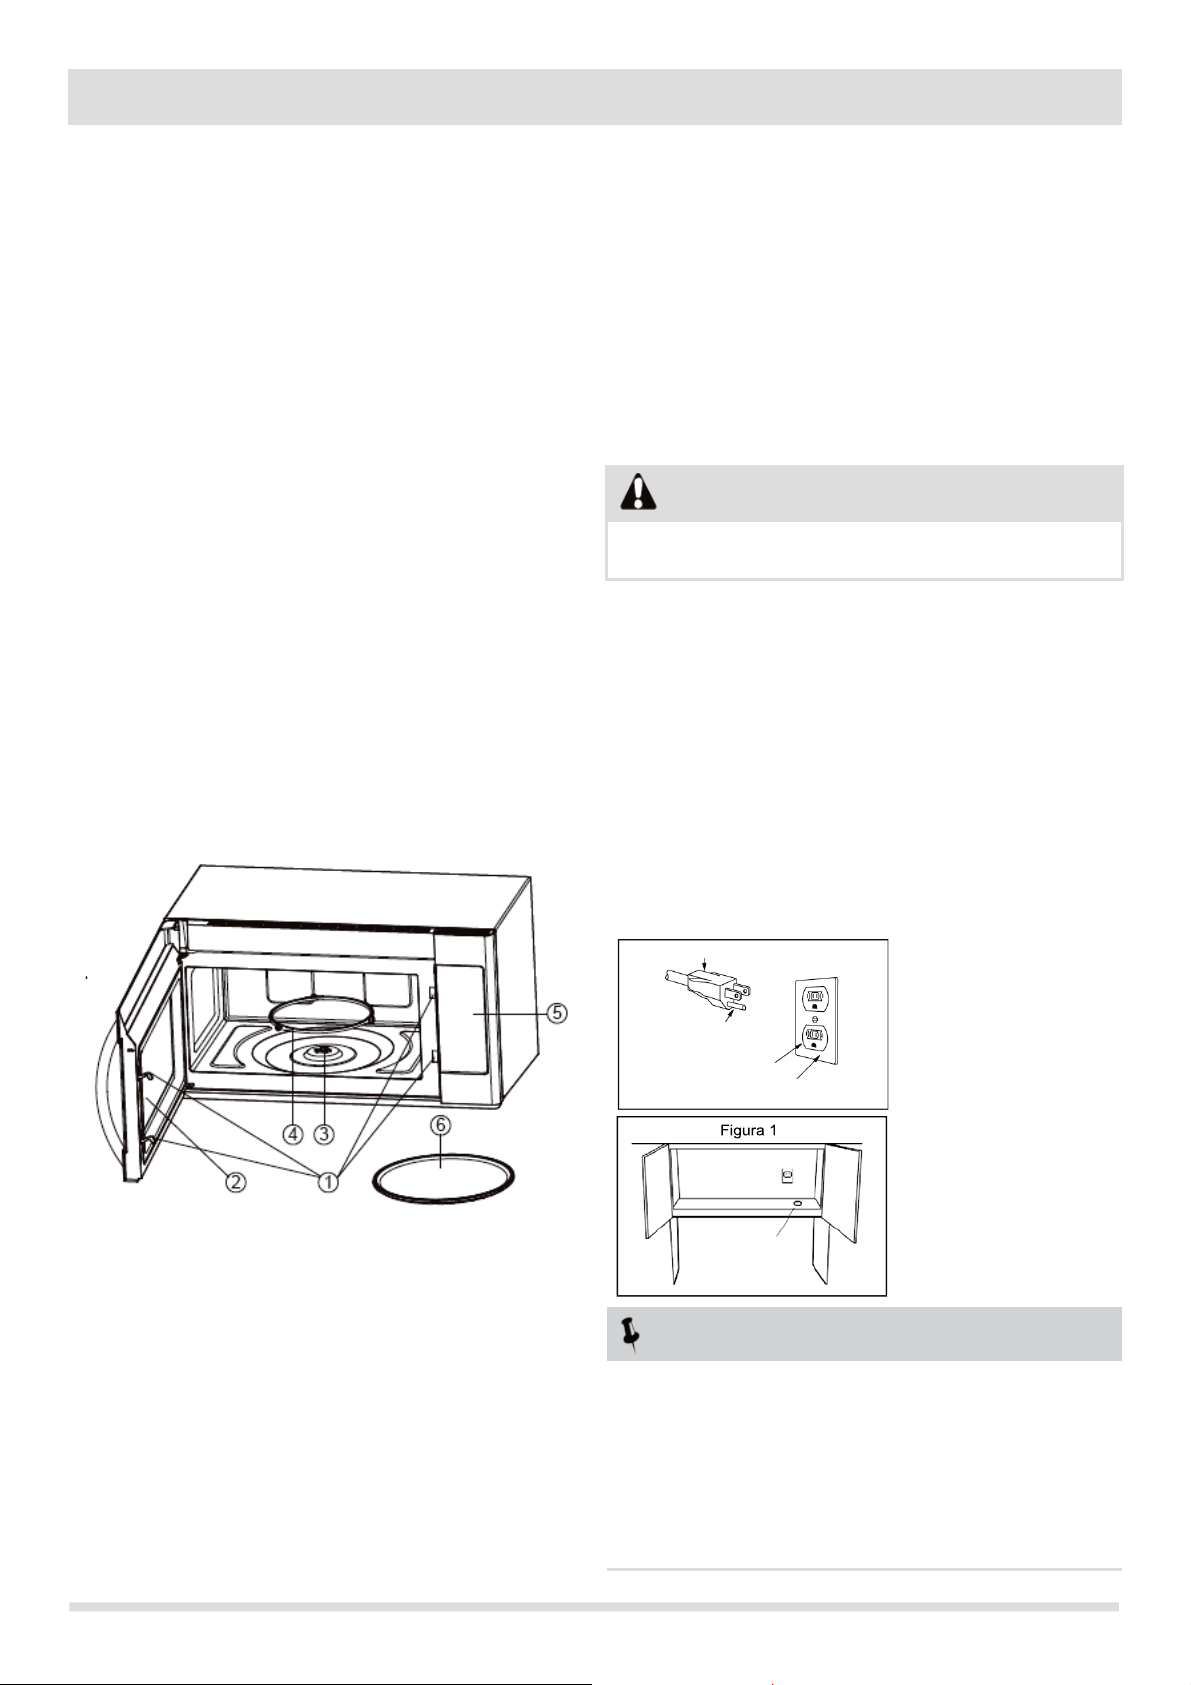
1. Door Safety Lock System
2. Oven Window
3. Shaft
4. Roller Ring
5. Control Panel
6. Glass Tray
5
Figure 1
6
Ground
Receptacle
Opening for
Power Cord
NOTES
If you have any questions about the grounding or electrical
1.
instructions, consult a quali¿ ed electrician or service person.
2. Neither Electrolux nor the dealer can accept any
liability for damage to the microwave oven or
personal injury resulting from failure to observe the
correct electrical connection procedures.
5
Page 6
IMPORTANT SAFETY INSTRUCTIONS
ABOUT YOUR MICROWAVE OVEN
This Use and Care Manual is valuable: read it carefully and
always save it for reference.
A good microwave cookbook is a valuable asset. Check it for
microwave cooking principles, techniques, hints and recipes.
NEVER use the microwave oven without the turntable and
support nor turn the turntable over so that a large dish could
be placed in the microwave oven. The turntable will turn both
clockwise and counterclockwise.
ALWAYS have food in the microwave oven when it is on to
absorb the microwave energy.
When using the microwave oven at power levels below 100%,
you may hear the magnetron cycling on and off. It is normal
for the exterior of the microwave oven to be warm to the touch
when cooking or reheating.
Condensation is a normal part of microwave cooking. Room
humidity and the moisture in food will inÀ uence the amount
of moisture that condenses in the microwave oven. Generally,
covered foods will not cause as much condensation as
uncovered ones. Ventilation openings must not be blocked.
The microwave oven is for food preparation only. It should not
be used to dry clothes or newspapers.
Your microwave oven is rated 1000 watts by using the IEC
Test Procedure. In using recipes or package directions, check
food a minute or two before the minimum time and add time
accordingly.
ABOUT FOOD
ABOUT MICROWAVE COOKING
Arrange food carefully. Place thickest areas towards outside of dish.
Watch cooking time. Cook for the shortest amount of
time indicated and add more as needed. Food severely
overcooked can smoke or ignite.
Cover foods while cooking. Check recipe or cookbook for
suggestions: paper towels, wax paper, microwave plastic wrap or
a lid. Covers prevent spattering and help foods to cook evenly.
Shield with small À at pieces of aluminum foil any thin areas
of meat or poultry to prevent overcooking before dense, thick
areas are cooked thoroughly.
Stir foods from outside to center of dish once or twice during
cooking, if possible.
Turn foods over once during microwaving to speed cooking
of such foods as chicken and hamburgers. Large items like
roasts must be turned over at least once.
Rearrange foods such as meatballs halfway through cooking
both from top to bottom and from the center of the dish to
the outside.
Add standing time. Remove food from microwave oven and
stir, if possible. Cover for standing time which allows the food
to ¿ nish cooking without overcooking.
Check for doneness. Look for signs indicating that cooking
temperatures have been reached.
Doneness signs include:
- Food steams throughout, not just at edge.
- Center bottom of dish is very hot to the touch.
- Poultry thigh joints move easily.
- Meat and poultry show no pinkness.
- Fish is opaque and À akes easily with a fork.
FOOD
Eggs,
sausages,
nuts, seeds,
fruits &
vegetables
Popcorn
Baby food
General
DO
Puncture egg yolks before cooking to prevent
“explosion”.
Pierce skins of potatoes, apples, squash, hot dogs
and sausages so that steam escapes.
Use specially bagged popcorn for microwave cooking.
Listen while popping corn for the popping to slow
to 1 or 2 seconds or use special popcorn pad.
Transfer baby food to small dish and heat carefully,
stirring often. Check temperature before serving.
Put nipples on bottles after heating and shake
thoroughly. “Wrist” test before feeding.
Cut baked goods with ¿ lling after heating to release
steam and avoid burns.
Stir liquids briskly before and after heating to avoid
“eruption”.
Use deep bowl, when cooking liquids or cereals, to
prevent boilovers.
DON’T
Cook eggs in shells.
Reheat whole eggs.
Dry nuts or seeds in shells.
Pop popcorn in regular brown bags or glass bowls.
Exceed maximum time on popcorn package.
Heat disposable bottles.
Heat bottles with nipples on.
Heat baby food in original jars.
Heat or cook in closed glass jars or air tight
containers.
Can in the microwave as harmful bacteria may not
be destroyed.
Deep fat fry.
Dry wood, gourds, herbs or wet papers.
6
Page 7
IMPORTANT SAFETY INSTRUCTIONS
ABOUT UTENSILS AND COVERINGS
It is not necessary to buy all new cookware. Many pieces already in your
kitchen can be used successfully in your new microwave oven. Make
sure the utensil does not touch the interior walls during cooking.
Use these utensils for safe microwave
cooking and reheating:
glass ceramic (Pyroceram®), such as Corningware®.
®
heat-resistant glass (Pyrex
microwave-safe plastics
paper plates
microwave-safe pottery, stoneware and porcelain
browning dish (Do not exceed recommended preheating time.
Follow manufacturer’s directions.)
)
These items can be used for short time reheating
of foods that have little fat or sugar in them:
wood, straw, wicker
DO NOT USE
metal pans and bakeware
dishes with metallic trim
non-heat-resistant glass
non-microwave-safe plastics (margarine tubs)
recycled paper products
brown paper bags
food storage bags
metal twist-ties
Should you wish to check if a dish is safe for microwaving, place
the empty dish in the microwave oven and microwave on HIGH for
30 seconds. A dish which becomes very hot should not be used.
ABOUT CHILDREN AND THE MICROWAVE
Children below the age of 7 should use the microwave oven with
a supervising person very near to them. Between the ages of 7
and 12, the supervising person should be in the same room.
As with any appliance, close supervision by an adult is
necessary when used by children.
At no time should anyone be allowed to lean or swing on the
microwave oven door.
Children should be taught all safety precautions: use
potholders, remove coverings carefully, pay special attention to
packages that crisp food because they may be extra hot.
Don’t assume that because a child has mastered one cooking
skill he/she can cook everything.
Children need to learn that the microwave oven is not a toy. See
page 10 for Child Lock feature.
ABOUT SAFETY
Check foods to see that they are cooked to the United States
Department of Agriculture’s recommended temperatures.
TEMP FOOD
145°F
(63°C)
160°F
(71°C)
165°F
(74°C)
- For beef, lamb or veal cut into steaks, chops or
roasts, ¿ sh
- For fresh pork, ground meat, seafood, egg dishes,
frozen prepared food and beef, lamb or veal cut into
steaks, chops or roasts
- For leftover, ready-to-reheat refrigerated, deli and
carry out “fresh” food, whole chicken or turkey,
chicken or turkey breasts and ground poultry used
in chicken or turkey burgers
The following coverings are ideal:
Paper towels are good for covering foods for reheating and
absorbing fat while cooking bacon.
Wax paper can be used for cooking and reheating.
Plastic wrap that is specially marked for microwave use can
be used for cooking and reheating. DO NOT allow plastic
wrap to touch food. Vent so steam can escape.
Lids that are microwave-safe are a good choice because heat
is kept near the food to hasten cooking.
Microwave oven cooking bags are good for large meats or
foods that need tenderizing. DO NOT use metal twist ties.
Remember to slit bag so steam can escape.
How to use aluminum foil in your
microwave oven:
Small À at pieces of aluminum foil placed smoothly on the food can be
used to shield areas that are either defrosting or cooking too quickly.
Foil should not come closer than one inch to any surface of
the microwave oven.
Should you have questions about utensils or coverings, check a
good microwave cookbook or follow recipe suggestions.
ACCESSORIES There are many microwave accessories available
for purchase. Evaluate carefully before you purchase so that they
meet your needs. A microwave-safe thermometer will assist you
in determining correct doneness and assure you that foods have
been cooked to safe temperatures. Electrolux is not responsible
for any damage to the microwave oven when accessories are used.
NOTE
Do not cook whole, stuffed poultry. Cook stuf¿ ng
separately to 165°F.
To test for doneness, insert a meat thermometer in a thick
or dense area away from fat or bone. NEVER leave the
thermometer in the food during cooking, unless it is approved
for microwave oven use.
ALWAYS use potholders to prevent burns when handling
utensils that are in contact with hot food. Enough heat from
the food can transfer through utensils to cause skin burns.
Avoid steam burns by directing steam away from the face and
hands. Slowly lift the farthest edge of a dish’s covering and carefully
open popcorn and oven cooking bags away from the face.
Stay near the microwave oven while it’s in use and check
cooking progress frequently so that there is no chance of
overcooki
NEVER use the cavity for storing cookbooks or other items.
Select, store and handle food carefully to preserve its high
quality and minimize the spread of foodborne bacteria.
Keep waveguide cover clean. Food residue can cause arcing
and/or ¿ res.
Use care when removing items from the microwave oven so
that the utensil, your clothes or accessories do not touch the
safety door latches.
Keep aluminum foil used for shielding at least 1 inch away
from walls, ceiling and door.
ng food.
7
Page 8
PART NAMES
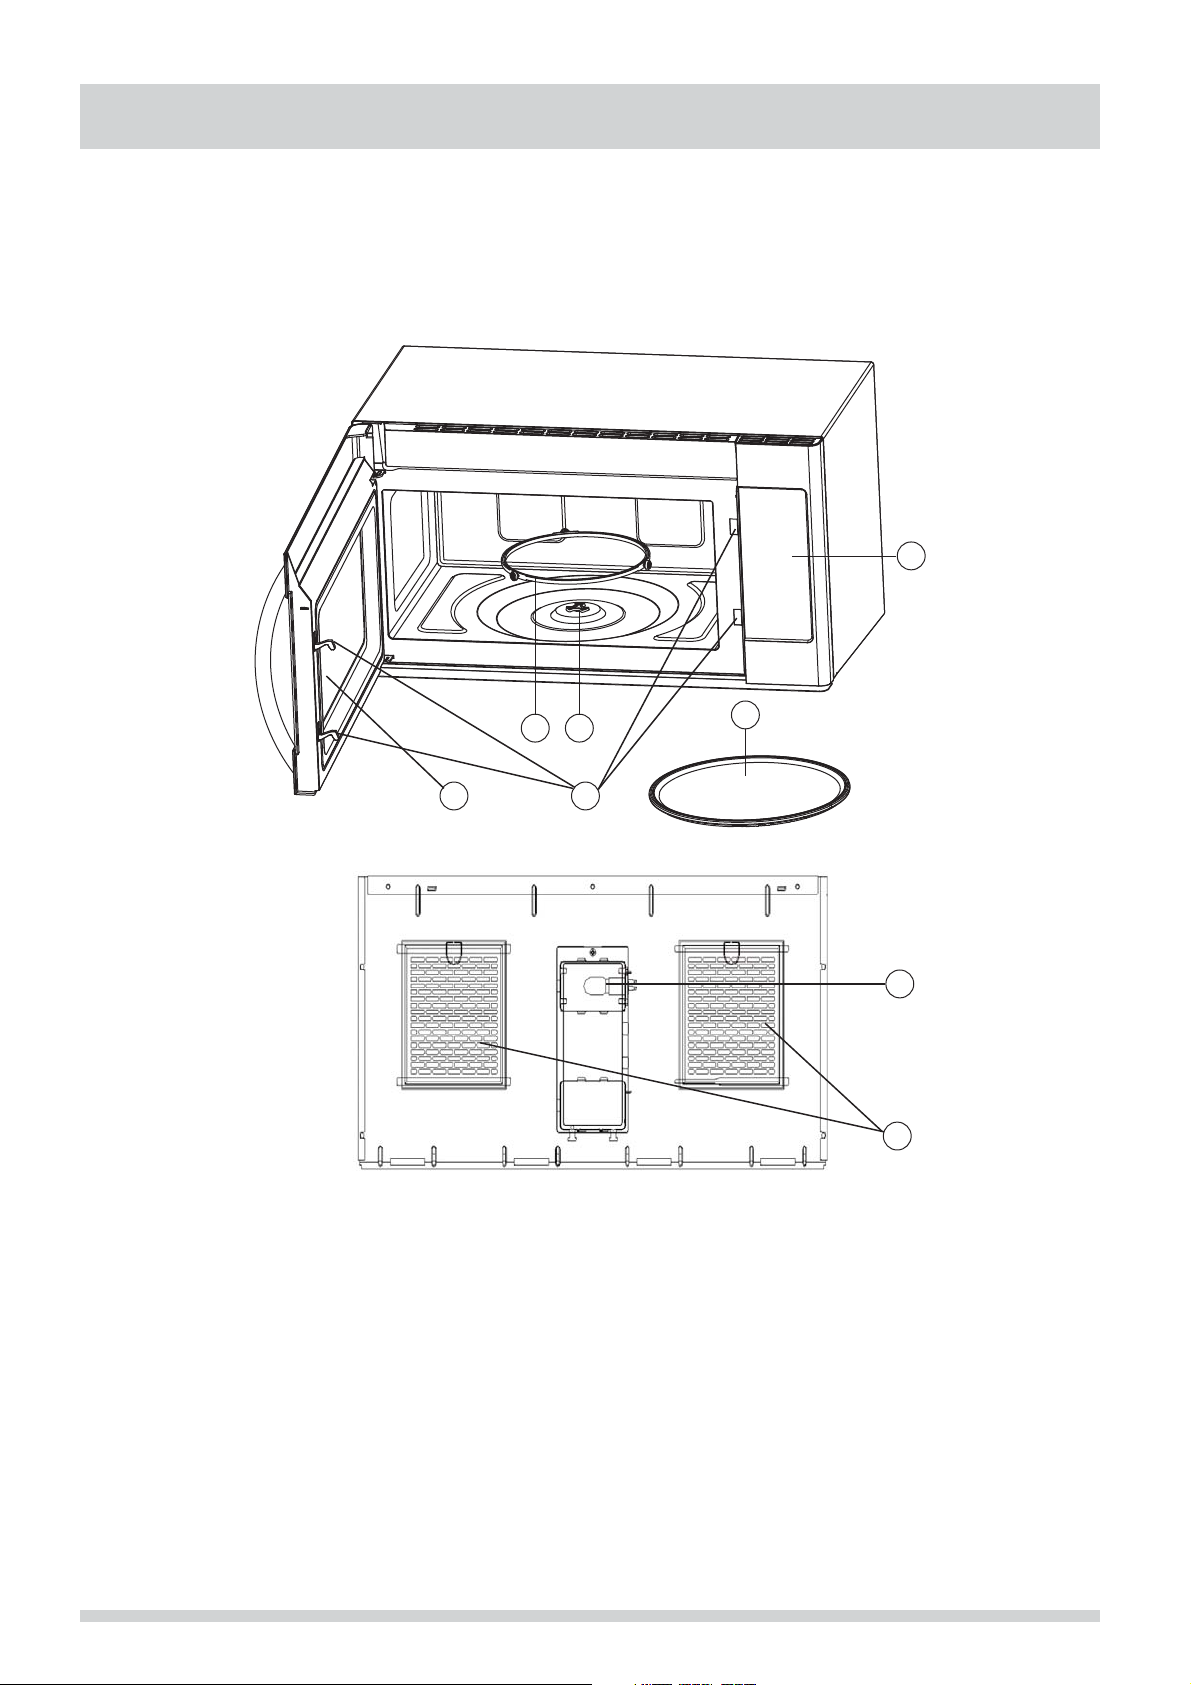
Microwave features
5
4
3
12
1. Door Safety Lock System
2. Oven Window
3. Shaft
4. Roller Ring
5. Control Panel
6
. Glass Tray
7. Filter
8. Cooktop Lamp
6
8
7
8
Page 9
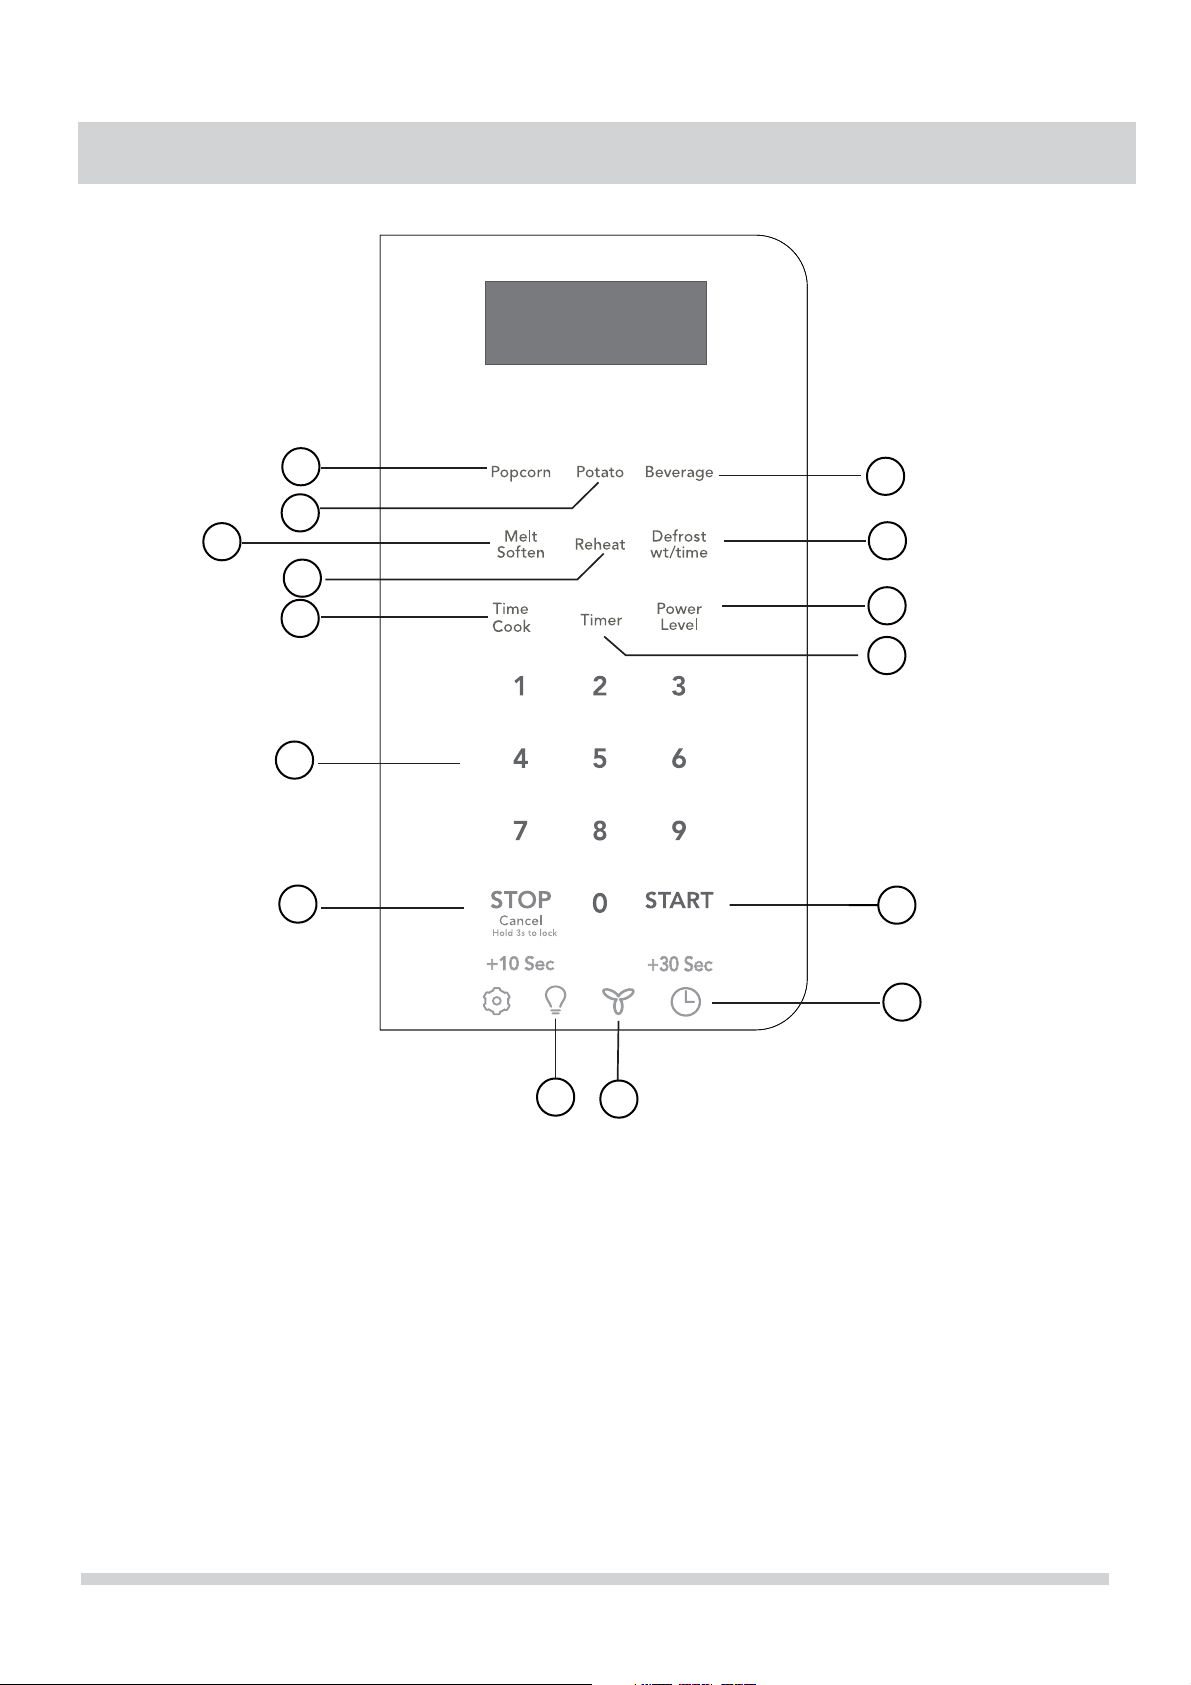
CONTROL PANEL
15
1
3
4
9
6
12
2
5
10
8
11
7
(11)
(1)
Popcorn (P16)
(2)
Beverage (P16)
(3)
Potato (1-4 potatoes) (P16)
(4)
Reheat (3 different settings) (P14)
(5)
Defrost (by time or weight) (P13)
(6)
Numeric pads(0 thru 9)
(7)
C
lock
Settings (P10)
(8)
Timer (P1 )
((9)
Power Level(10 power levels
10)
available) (P11)
Note:For detailed information,please go to relative page listed above.
0
(P1 )
Cook Time
1
14
13
START
Stop/Cancel (P12)
(12)
(13)
Exhaust (High/Low/Off) ~ Use
to turn the
adjust fan speed. (P10)
Surface Light ~ Press this pad
(14)
to turn the
or off. (P10)
) 51(
P( 12)
exhaust fan on, off, or to
surface lights on
4)1P( netfoS tleM
9
Page 10
BEFORE OPERATING
Clock
The microwave oven has settings that allow you to
customize the operation for your convenience. Below
is the table showing the various settings. Touch the
Settings
setting function.
Settings
key multiple times to scroll to
Key press
Settings
Settings
Settings
Settings
x1
x2
x3
x4
Option
Sound
Low/nor/Hi/Off(nor=Normal)
Weight lb/kg
Clock ON/OFF
Demo
the desired
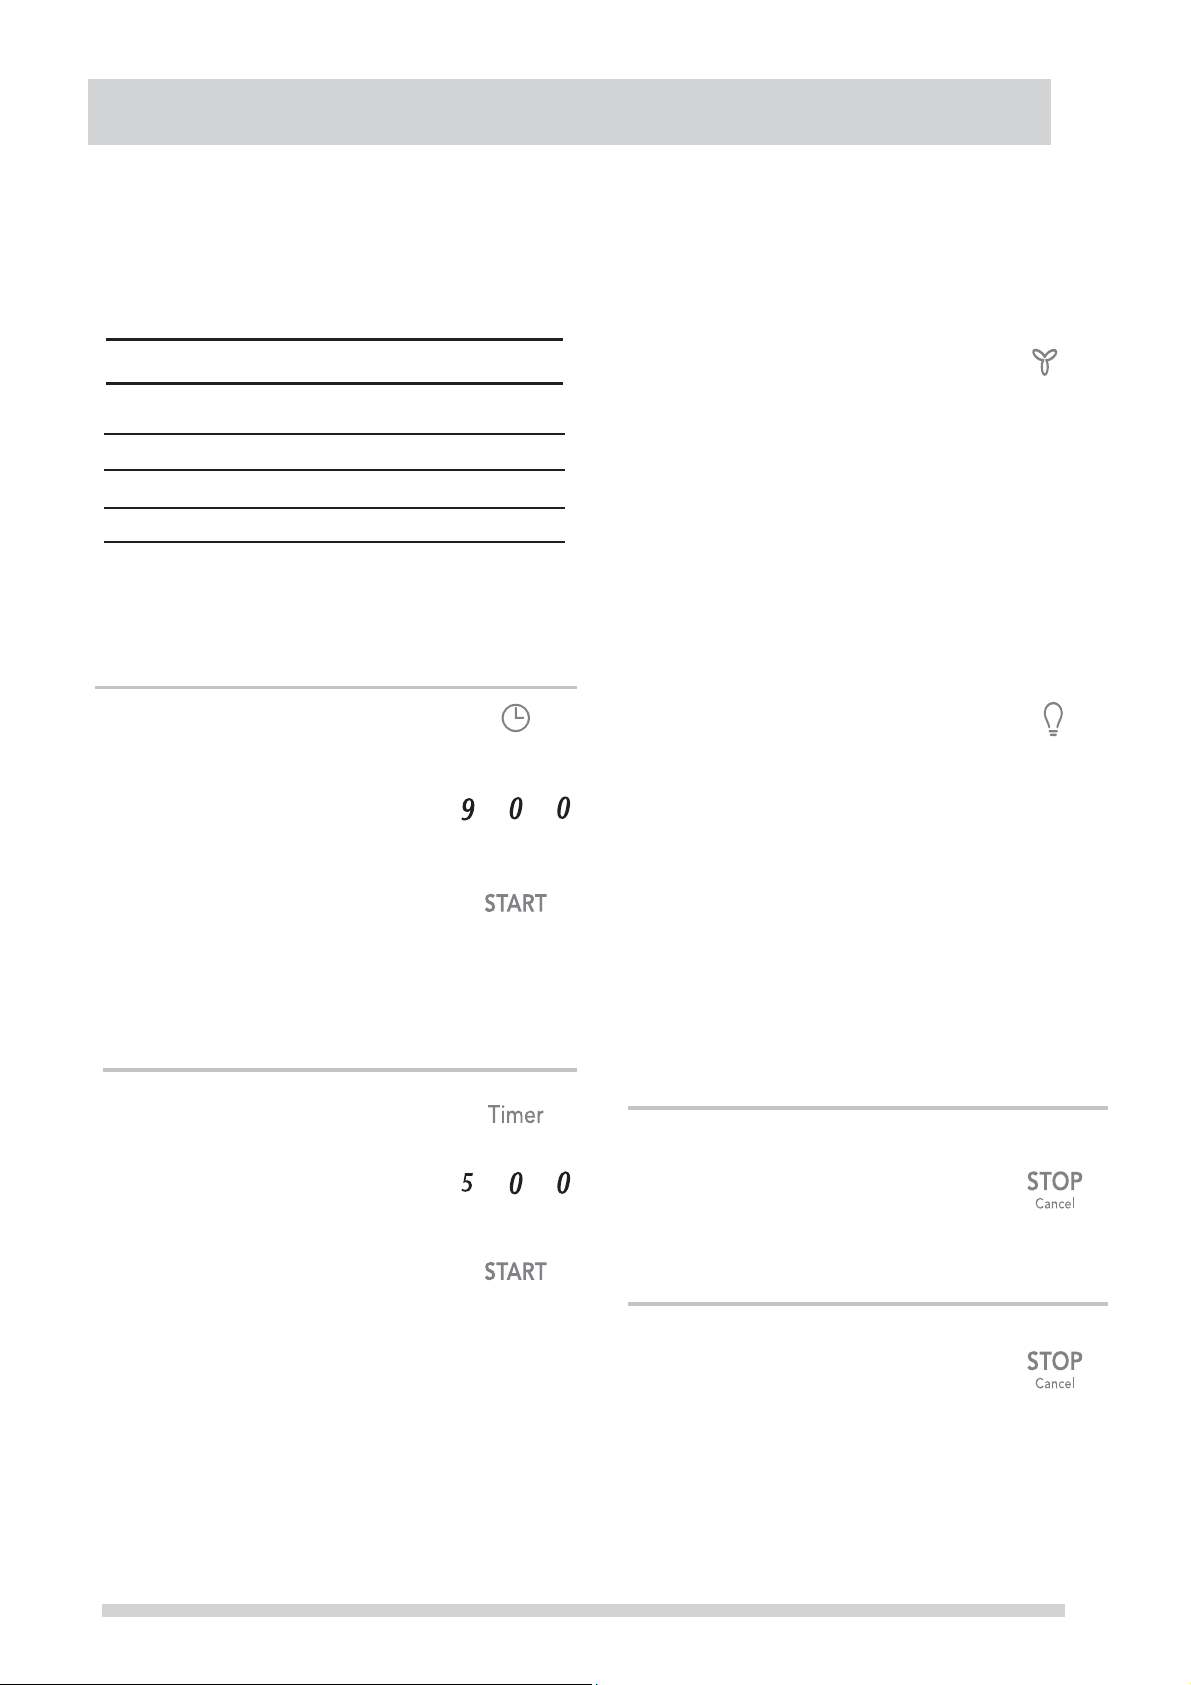
Setting the clock
Example: setting clock display for 9:00:
1. Touch Clock
p a d once .
Exhaust High / Low / Off
The exhaust ventilation removes steam and other cooking
vapors from the cooking surface of the range below the
microwave oven.
To operate the exhaust vent, Touch the
Exhaust High/Low/Off pad once for the
Low speed setting. Touch the pad again to
choose the High speed setting and a 3rd time
to turn the exhaust ventilation off.
Note: If the temperature gets too hot around the microwave
oven, the fan in the exhaust vent hood will automatically turn
on at the High setting to cool the oven. The fan will
automatically turn off when the internal parts are cool. When
this occurs, the vent cannot be turned off.
Surface Light / On / Off
Touch the Surface Light/On/Off pad
once for a cooking surface light. Press the
pad again to turn the light off.
2. Enter time using number pads.
Control Lock
3. Touch pad again.
Setting the timer
Example: setting timer for 5 minutes:
1. Touch
2. Enter desired time using number pads.
3. Touch pad.
Timer count down does not stop even if the door is opened.
To stop/cancel the timer, press the key once .
When the timer has reached the end of set time, you will
hear beep alerts indicating the timer has run out.
START
Timer
START
pad once.
START
You may lock the control panel to prevent the microwave
from being accidentally started or used by children.
The control lock feature is very useful when cleaning the
control panel. The lock will prevent accidental programming
when wiping the control panel clean.
Example: to set the control lock ON:
Touch and hold the pad for more
than 3 seconds. The Lock icon will appear in
the display window along with 1 beeps.
Example: to change the control lock from ON to OFF:
Touch and hold the pad for
more than 3 seconds. The Lock icon will
disappear in the display window.
Stop/Cancel
Hold 3s to lock
Stop/Cancel
Hold 3s to lock
10
Page 11
MANUAL COOKING
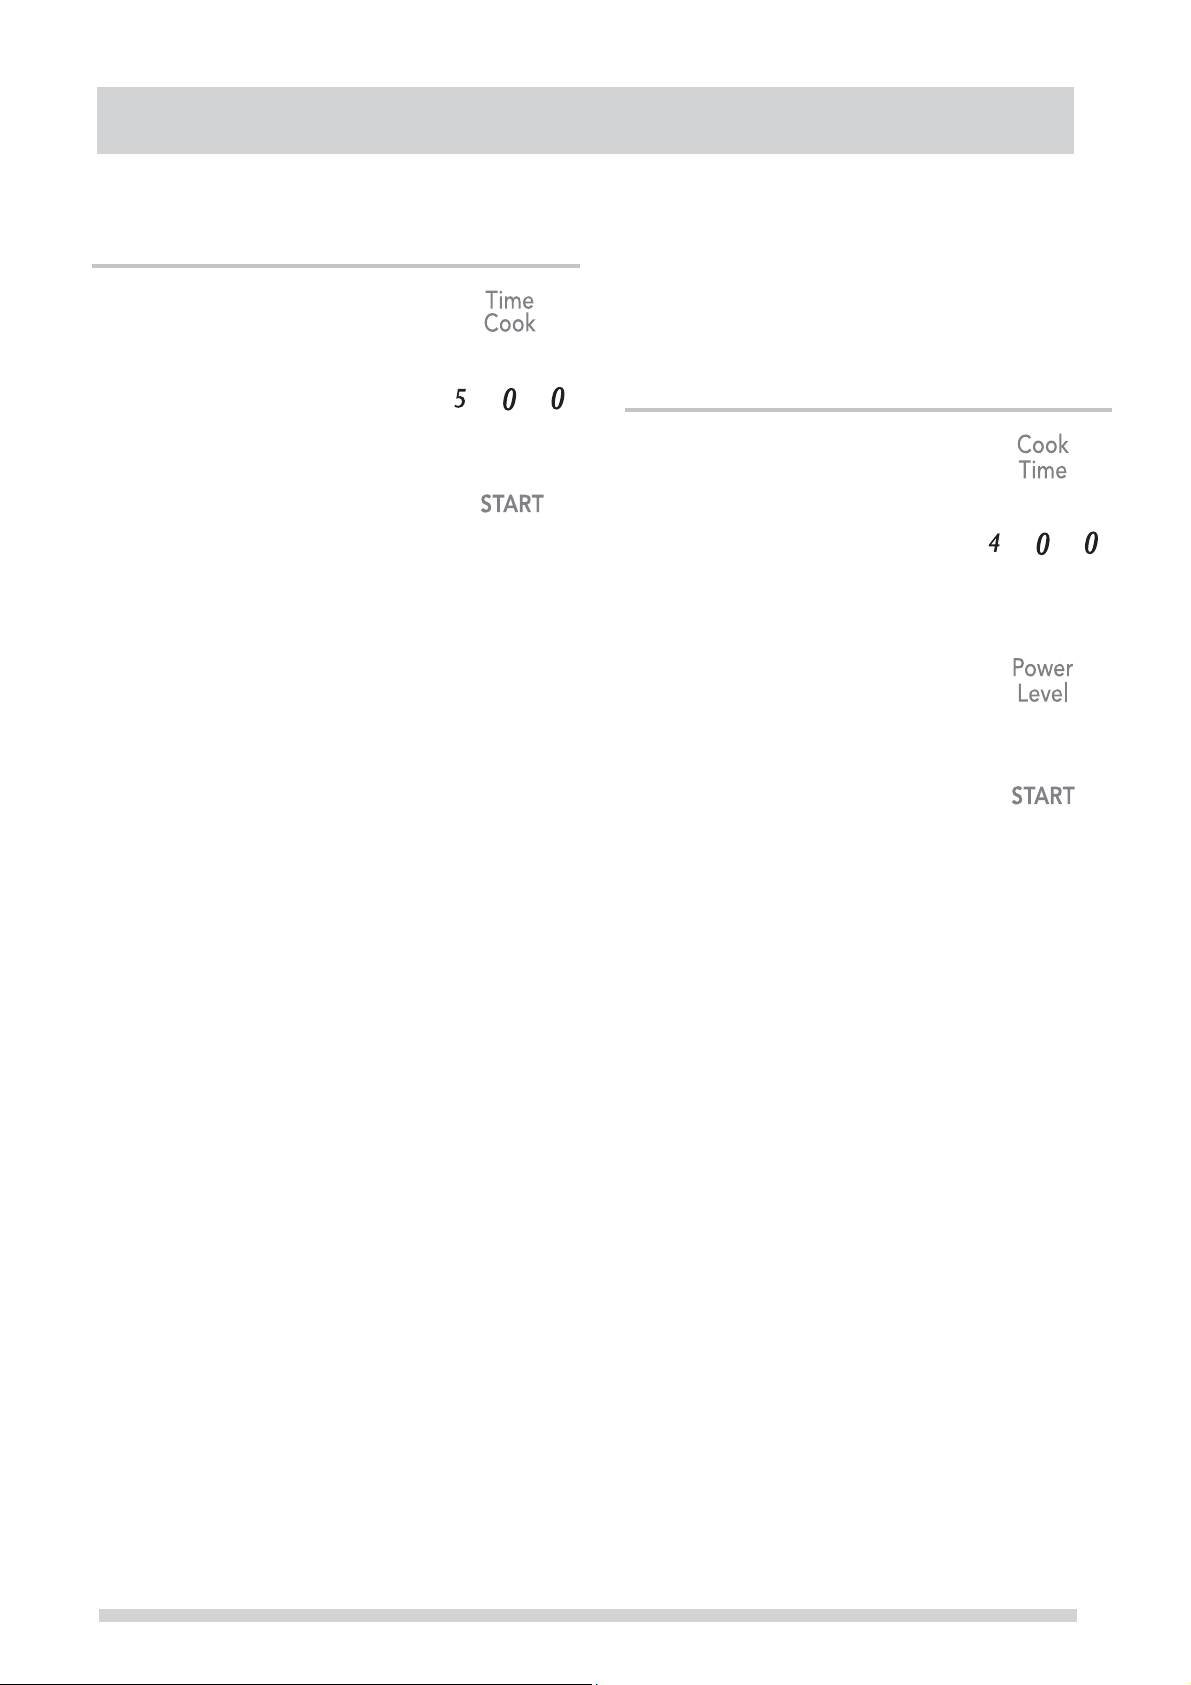
Heating with high power level
Example: to heat for 5 minutes at 100% power:
1. Press Cook Time pad.
2. Use the number pads to enter
desired heating time (cook time may
be set up to 99 minutes and 99
seconds).
3. Touch
When heating has finished you will hear beeps and
"End" will display.
START
pad.
Heating with lower power levels
Using the highest power level to heat foods with does not
always give the best results when some types of food need
slower cooking, such as roasts, baked goods or custards.
Your oven has nine other power levels you may choose.
Example: to heat for 4 minutes at 70% power:
1. Press Cook Time.
2. Use the number pads to enter desired
heating time (cook time may be set
up to 99 minutes and 99 seconds).
3. Press Power Level pad 4 times
power level 7 (70% power). PL-70
appears in the display (70 % power).
4. Press pad.
When heating has finished you will hear beeps and
"End" will display.
START
11
Page 12
MANUAL COOKING
Heating with multiple cooking stages
For best results, some microwave recipes call for different
power levels or different lengths of time for cooking. Your
microwave may be set to change from one stage to another
automatically (2 stages maximum).
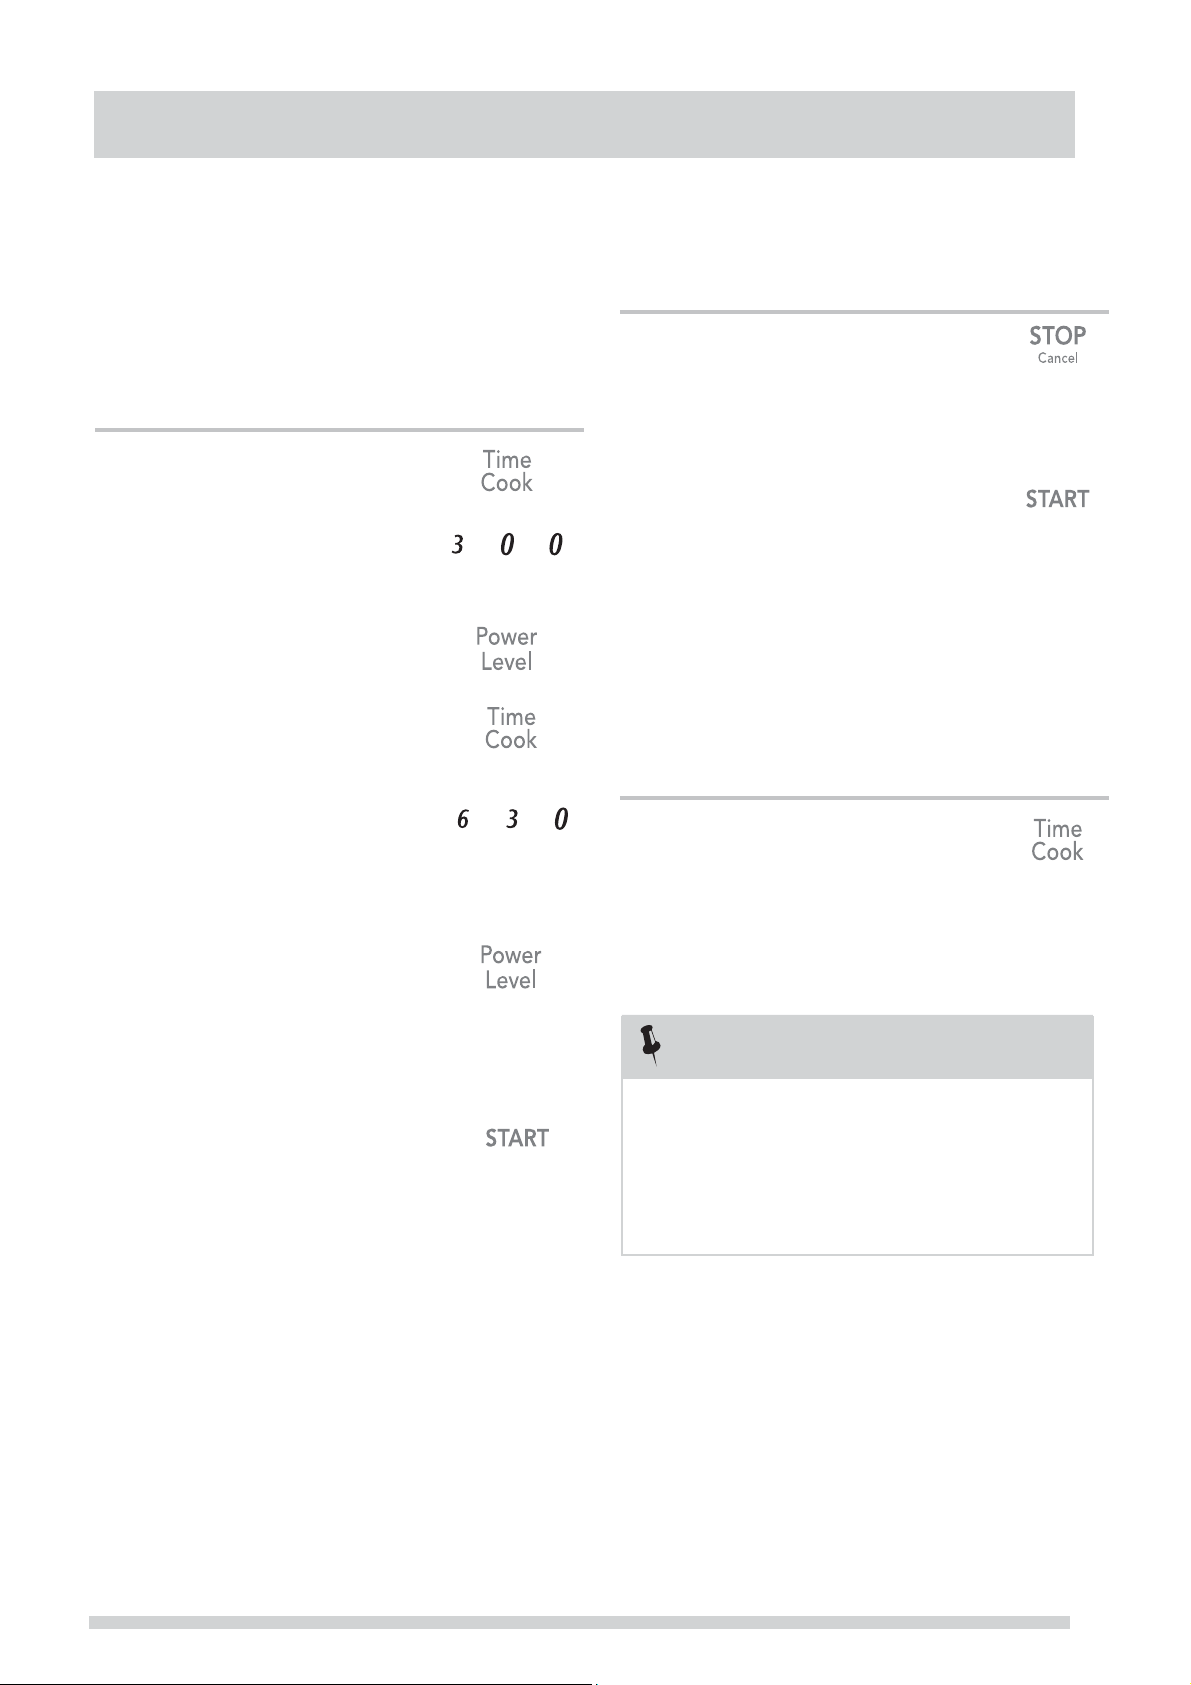
Example: to cook food for 3 minutes at 80% power and
then 50% power for 6 minutes 30 seconds:
1. Press Cook Time .
2. Use the number pads to enter
heating time for the 1st stage (cook
time may be set up to 99 minutes
and 99 seconds).
3. Press Power Level pad 3 times
PL-80 (80 % power).
for
4. Press pad for 2nd
stage.
5. Use the number pads to enter
heating time for the 2nd stage (cook
time may be set up to 99 minutes
and 99 seconds).
Cook Time
Using the Stop/Cancel key
This feature will let you quickly stop or cancel the cooking
process.
Touch the
Erase if you have entered wrong information.
1.
2.
Cancel timer setting process.
Press pad once to pause the oven
3.
temporarily during cooking.
resume cooking.)
Return the time of day (clock) to the display
4.
after cooking cycle is completed.
5.
Cancel a program during cooking, touch twice.
Using the
This feature will let you quickly stavt or add 30 secomds
1. Press time cook.
2.
Press + 30 for 30 seconds at 100% power/level
Stop/Cancel
START
pad again to(Touch
Start
pad to :
key
Hold 3s to lock
6.
7.
8. Press
When heating has finished you will hear beeps and
"End" will display.
Note:
sta g e.
Power Level
Press pad for 2nd
stage.
Power Level
Press pad for 6 times
PL-50 (50 % ).
for
START
Power level must always be programmed for first
pad.
50 %
3. Extend cooking time in multiples of 30 seconds
each time this pael TS touched during microwave
cooking.
NOTE
“Food” will be displayed for 5s once you start cooking
if a cooking cycle is not selected or open and close
door within 5 minutes.You must open then close the
door to start cooking.
12
Page 13
MANUAL COOKING
Setting Defrost (by Weight)
Example: to defrost 1lb. of food with the default power
level and cook time determined automatically:
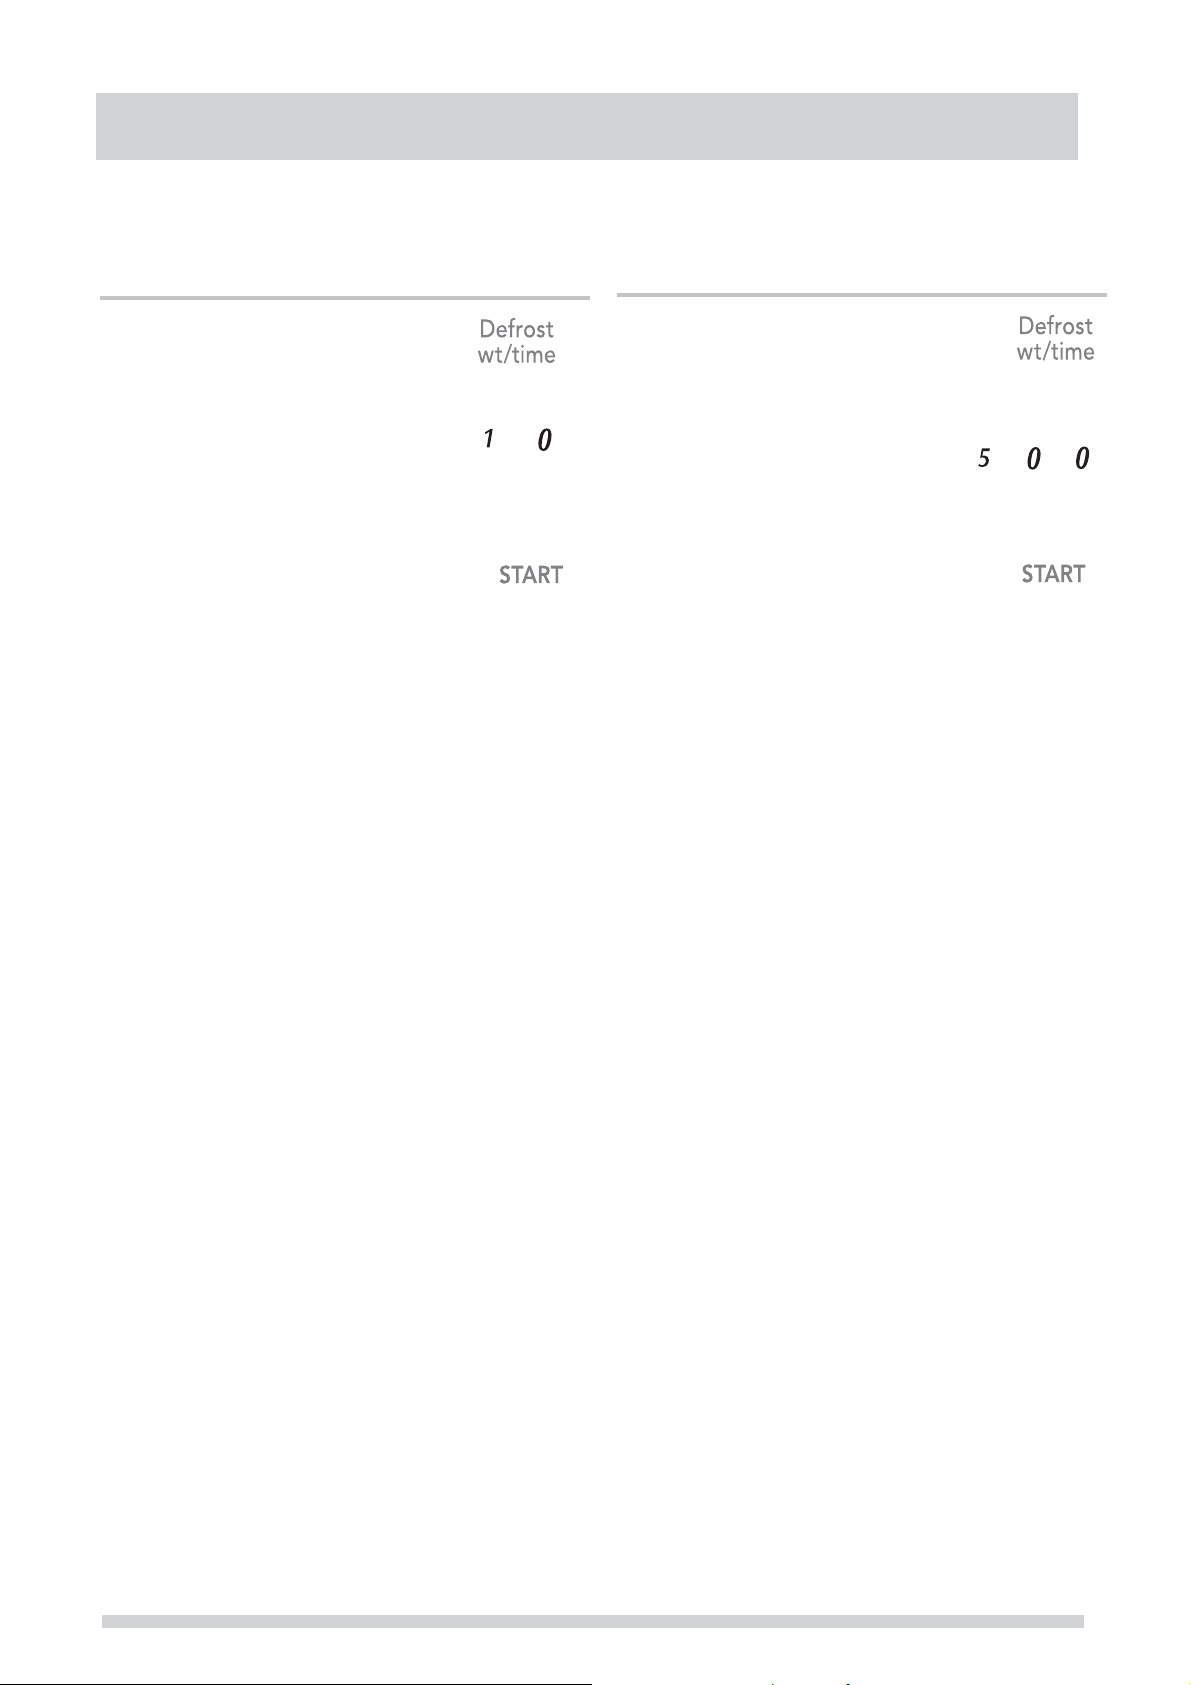
1. Press Defrost
appear in the display.
2. Use the numeric pads to input weight
of food to defrost in pounds (10 = 1.0lb.)
You may enter any weight from 0.1 to
6.0lbs.
3.
Press pad.
START
When defrosting has finished you will hear beeps and
"End" will display.
Note: The weight amount must be a valid entry for this
feature to start. A valid weight entry is 0.1 to 6.0 pounds.
pad once. 0.0 will
Setting Defrost (by Time)
Example: to defrost food with the default 30% power level
for 5 minutes:
1. Press pad twice. 0:00 wi ll
appear in the display.
2. Use the number pads to enter desired
defrost time (defrost time may be set
up to 99 minutes and 99 seconds).
3.
Press pad.
When heating has finished you will hear beeps and "End"
will display.
Note: Power levels cannot be changed for both defrost (by
weight) or defrost (by time) because the defrost performance
will be adversely affected.
Defrost
START
Special notes for defrosting by weight and time
After pressing
t
defrost cycle. At this time open the door
Touch the
When heating has finished you will hear beeps.
START
START
resume the defrost cycle.
key to
count down remaining defrost time. The oven will beep key, the display will
and turn the food and remove any portions that have already thawed.
during the
13
Page 14
MANUAL COOKING
Reheat
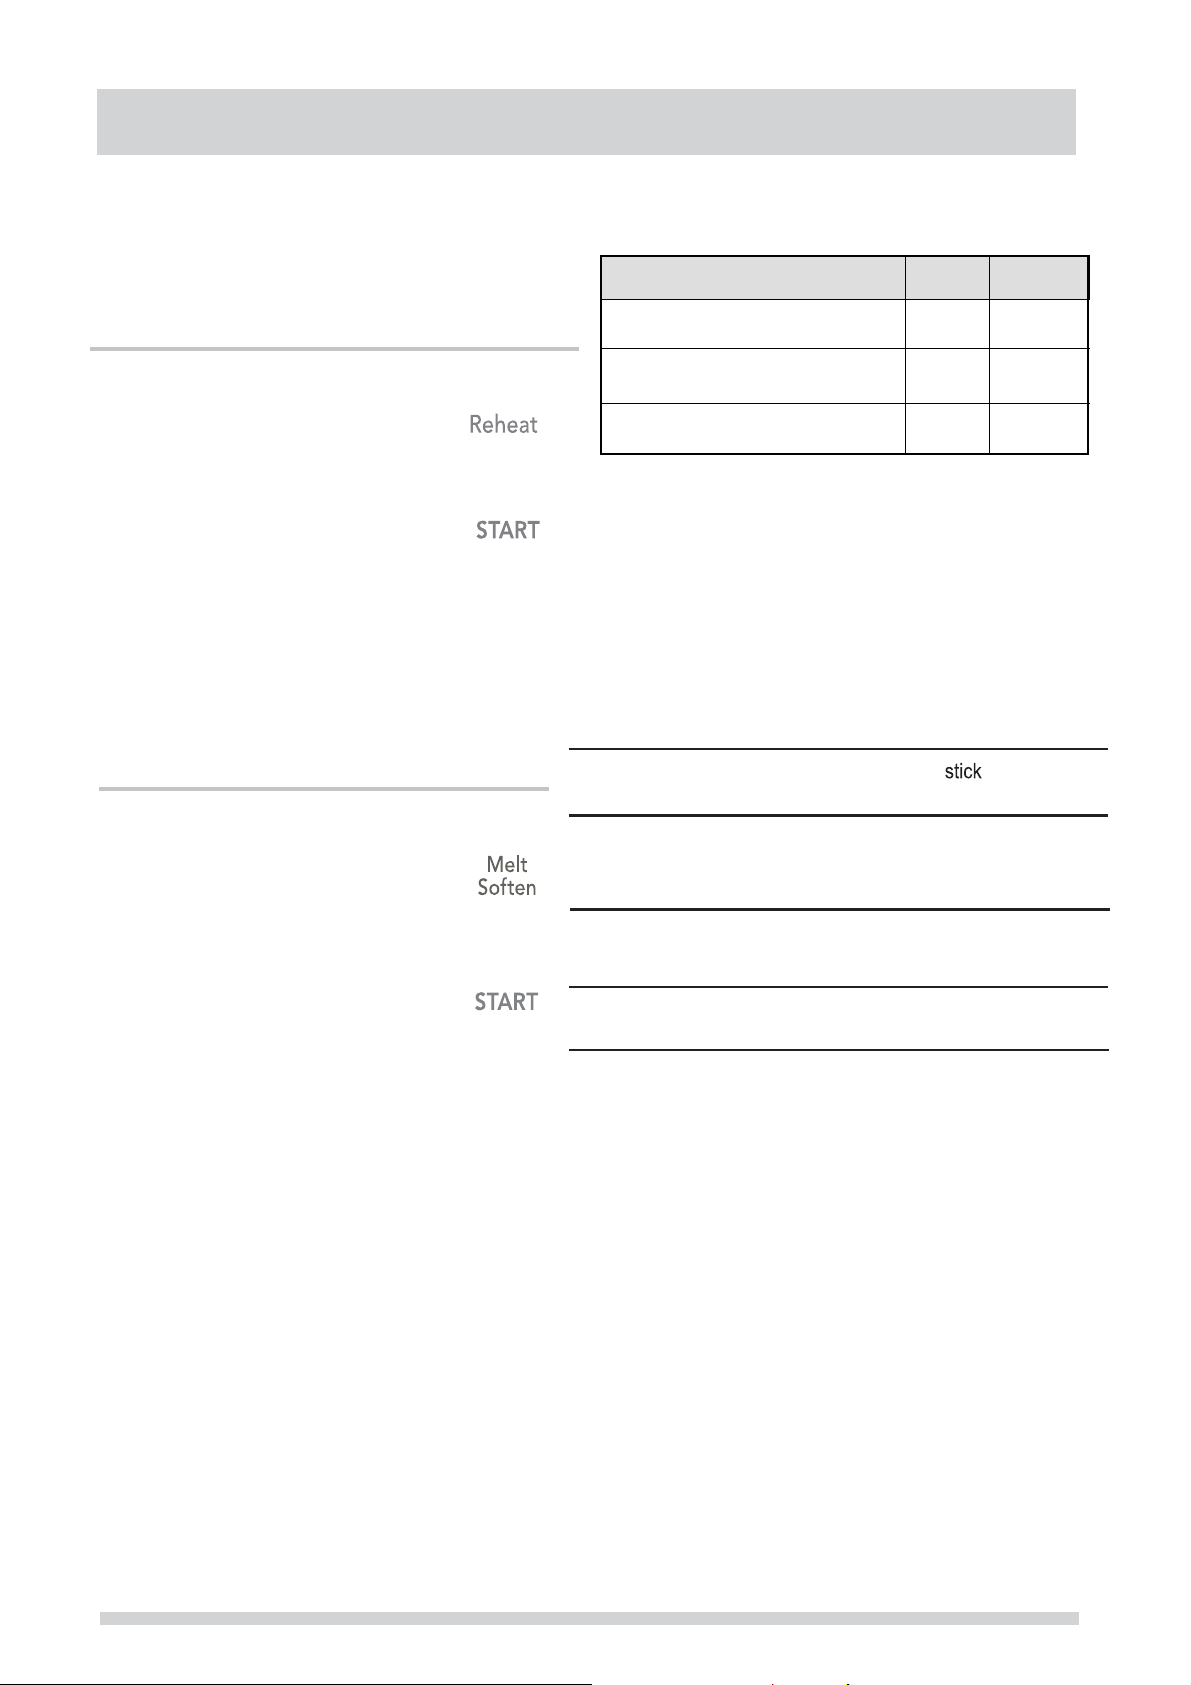
The reheat feature provides 3 quick preset settings based
on serving size to reheat food for your cooking convenience.
Example: to reheat 24 ounces of food.
1. Press Reheat pad 3 tim es
(see reheat category table) to reheat
24oz. of food. 24 oz will appear in the
display
2. Press pad.
START
Melt/ Soften
The oven uses low power to melt and soften items.
See the following table.
Example: to melt 8 oz
1. Press
Melt/Soften pad 4 times to reheat
8oz. of food.
display (see Melt/Soften category table).
Then press 2 number pad , wi ll
appear in the display .
.
will appear in the
So-4
of Cream Cheese.
.
8 oz
MELT / SOFTEN CATEGORY
PRESS DISPLAY
Soften
Reheat Category
8 ounces of food
16 ounces of food
24 ounces of food
Melt
x 1
Melt
x 2
Soften
Melt
x 3
Soften
So-1
So-2
So-3
CATEGORY
BUTTER
CHOCOLATE
ICE CREAM
Press
once
twice
3 times
1
2 sticks
2
oz.
4
oz.
8
oz.
1 Pint
1.5 Quart
Display
8 oz
16 oz
24 oz
YEK TNUOMA
1
2
1
2
3
1
2
2. Press pad.
START
Melt
Soften
x 4
So-4
CREAM
CHEESE
3
8
oz.
oz.
1
2
14
Page 15
MANUAL COOKING
Suggested power levels for cooking
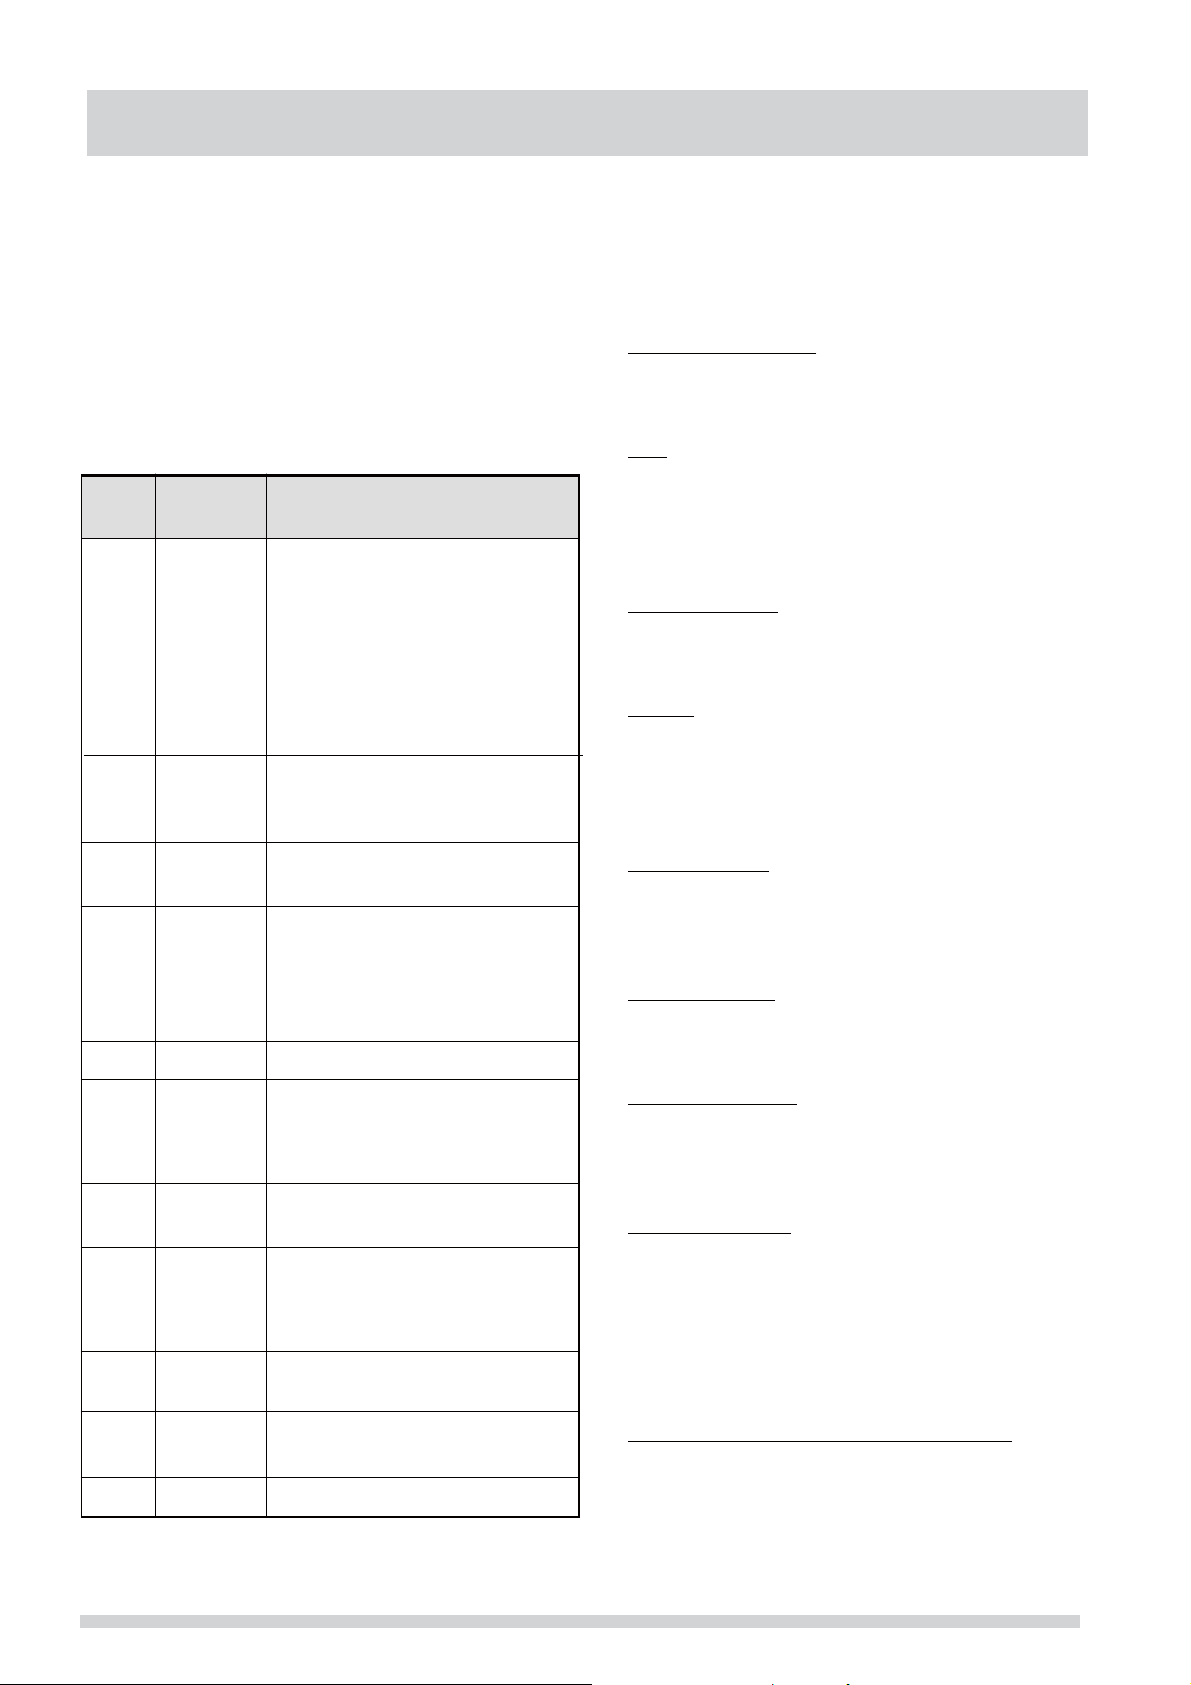
The 10 power levels available with this microwave will help
you to adjust to the power output best suited for the food
type you are preparing. As with any food preparation in the
Suggestions for getting
the best results
To help you achieve the best possible results from your
microwave oven, read the following suggestions below;
microwave, it is best to follow the microwave instructions
that are printed on food packaging.
t Storage temperature
The table below provides suggested power levels for various
types of food that you can be prepare in the microwave.
t
Power
level
PLHI
PL-90
Microwave
output
100 %
90 %
Use to prepare when:
Boiling water.
Cooking ground beef.
Making candy.
Cooking fresh fruits & vegetables
Cooking fish & poultry.
Preheating browning dish.
Reheating beverages.
Cooking bacon slices.
Reheating meat slices quickly.
Saute onions, celery & green
peppers.
t
t
Foods taken from the freezer or refrigerator take longer to
cook than the same foods would at room temperature.
Size
Small pieces of food cook faster than large ones. Pieces
similar in size and shape will cook more evenly when
cooked together. For more even results, reduce the
power levels when cooking large pieces of food.
Natural moisture
Very moist foods cook more evenly because microwave
energy heats water molecules very efficiently.
Stirring
Stir foods such as casseroles and vegetable from the
outside to the center to distribute the heat more evenly.
This will allow the food to cook faster. Constant stirring is
not necessary.
PL-80
PL-70
PL-60
PL-50
PL-40
PL-30
PL-20
PL-10
80 %
70 %
60 %
50 %
40 %
30 %
20 %
10 %
All reheating.
Cooking scrambled eggs.
Cooking breads & cereal
products.
Cooking cheese dishes & veal.
Cakes, muffins, brownies &
cupcakes.
Cooking pasta.
Cooking meats & whole poultry.
Cooking custard.
Cooking spare ribs, rib roast &
sirloin roast.
Cooking less tender cuts of meat.
eheating frozen packaged foods.
R
Thawing meat, poultry & seafood.
Cooking small quantities of food.
Finish cooking casseroles, st
some sauces.
Softening butter & cream cheese.
Heating small amounts of food.
Softening ice cream.
Raise yeast dough.
Demo mode. PL-0 0 %
ew &
t
Turn over items
Turn over foods such as pork chops, roasts or whole
cauliflower halfway through the cook time. This will help
to expose all sides equally to microwave energy.
Food placement
t
Place delicate areas of food items, such as asparagus
tips, toward the center of the turntable tray.
t
Food arrangement
Arrange unevenly shaped foods, such as chicken pieces
or salmon, with the thicker or meatier parts toward the
outside of the turntable tray.
t
Let the food stand
After removing the food from the microwave, cover the
food with foil or a casserole lid and let it stand to finish
cooking. This will help the food finish in the center and
avoids overcooking the out edges, The length of stand
time depends on the density and surface area of the food
items.
t
Wrapping in paper towels or waxed paper
Sandwiches and many other food types containing prebaked bread should be wrapped prior to placing in the
microwave to help prevent the food items from drying out
while heating.
15
Page 16
AUTO COOKING
Popcorn
t DO NOT
popping corn.
The microwave will beep when finished.
Notes:
elihw dednettanu nevo evaworcim evae l
t Before cooking, pierce potatoes with fork several times.
t After cooking, let potatoes stand for 5 minutes.
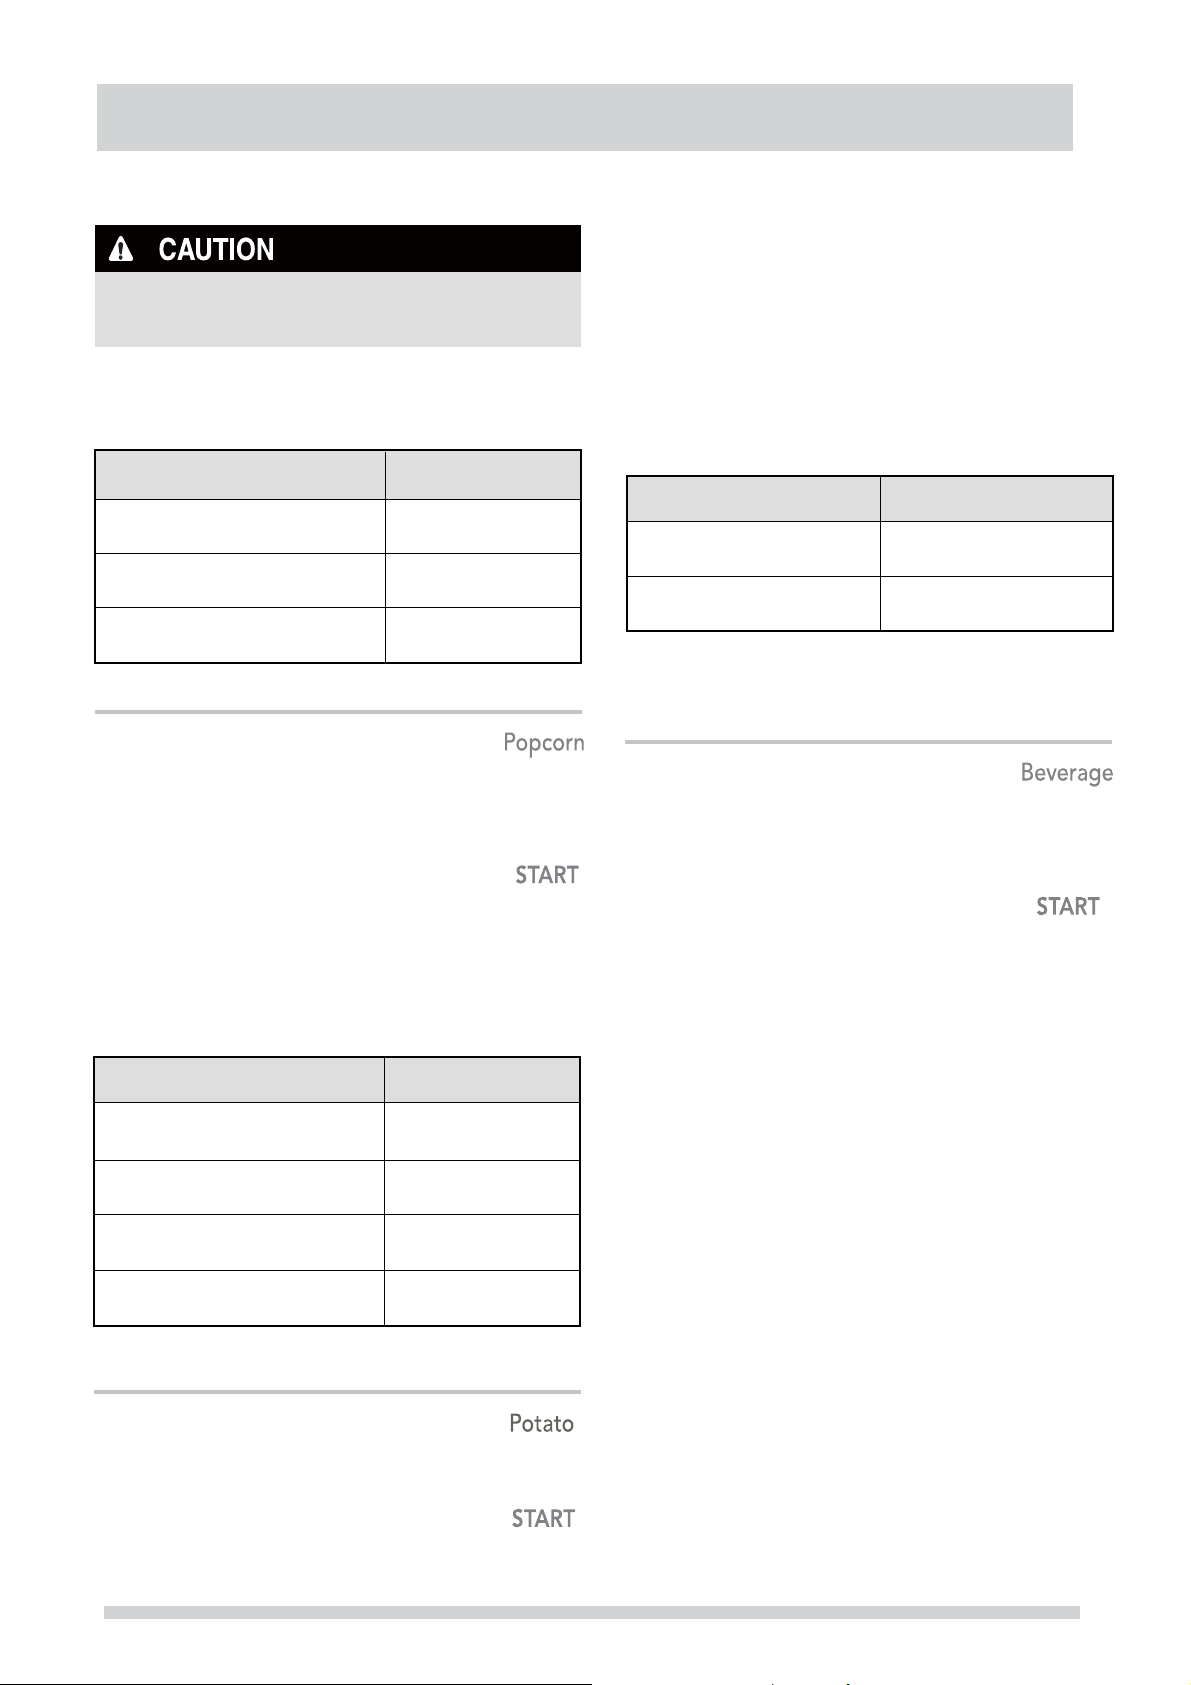
The popcorn feature lets you pop 3 different commercially
packaged microwave popcorn sized bags. Use the table
below to determine the setting to use.
Amount
3.3 oz. (default setting)
3.0 oz.
1.75 oz.
Example: to pop a 3.0 oz. bag of popcorn automatically.
1. Press Popcorn pa d 2 ti m e s.
2. Press pad.
The microwave will beep when finished.
START
Press popcorn pad
once
2 times
3 times
Potato
The potato feature cooks 1, 2 , 3 or 4 (cooking times based on
8 to 32 oz.) potatoes automatically. Use the table below to
determine the setting to use.
Beverage
The beverage feature heats 1 or 2 cups of beverage. Use
the table below to determine the setting to use.
Amount
1 cup ( about 8 oz.)
2 cups (about 16 oz.)
Example: to heat 1 cup of a beverage.
1. Press Beverage pad
2. Press
The microwave will beep when finished.
START
once.
pad.
Press beverage pad
once (default setting)
2 times
Amount
1 potato (default setting)
2 potatoes
3 potatoes
4 potatoes 4 times
Example: to cook 1 potato automatically.
1. Press Potato pad once.
Press potato pad
once
2 times
3 times
2. Press
START
pad.
16
Page 17
Convenience cooking suggestions
AUTO COOKING
Convenience category
Popcorn
Potato
Beverage
Amount
1.75,3.0,
3.3 oz.
1 pkg.
1,2,3,4
potatoes
8,16,24,36 oz.
1,2
cups
(8 oz,16 oz
)
Suggestions
Cook a single “microwave-only” bag of popcorn at a time. Use caution when
removing and opening the hot popcorn bag from the oven. Let microwave oven cool
down at least 5 minutes before using again.
Pierce each potato several times using a fork. Place on turntable in spoke-like
fashion. After cooking, let stand for 3-5 minutes. Let oven cool for at least 5
minutes before using again. Use the pad to increase cook time for
larger potatoes.
Use a microwave-safe measuring cup or mug; do not cover. Place the beverage in
the microwave. After heating, stir well. Let oven cool for at least 5 minutes before
using again. Beverages heated with the beverage category may be very hot.
Remove the container with care.
+30sec
17
Page 18
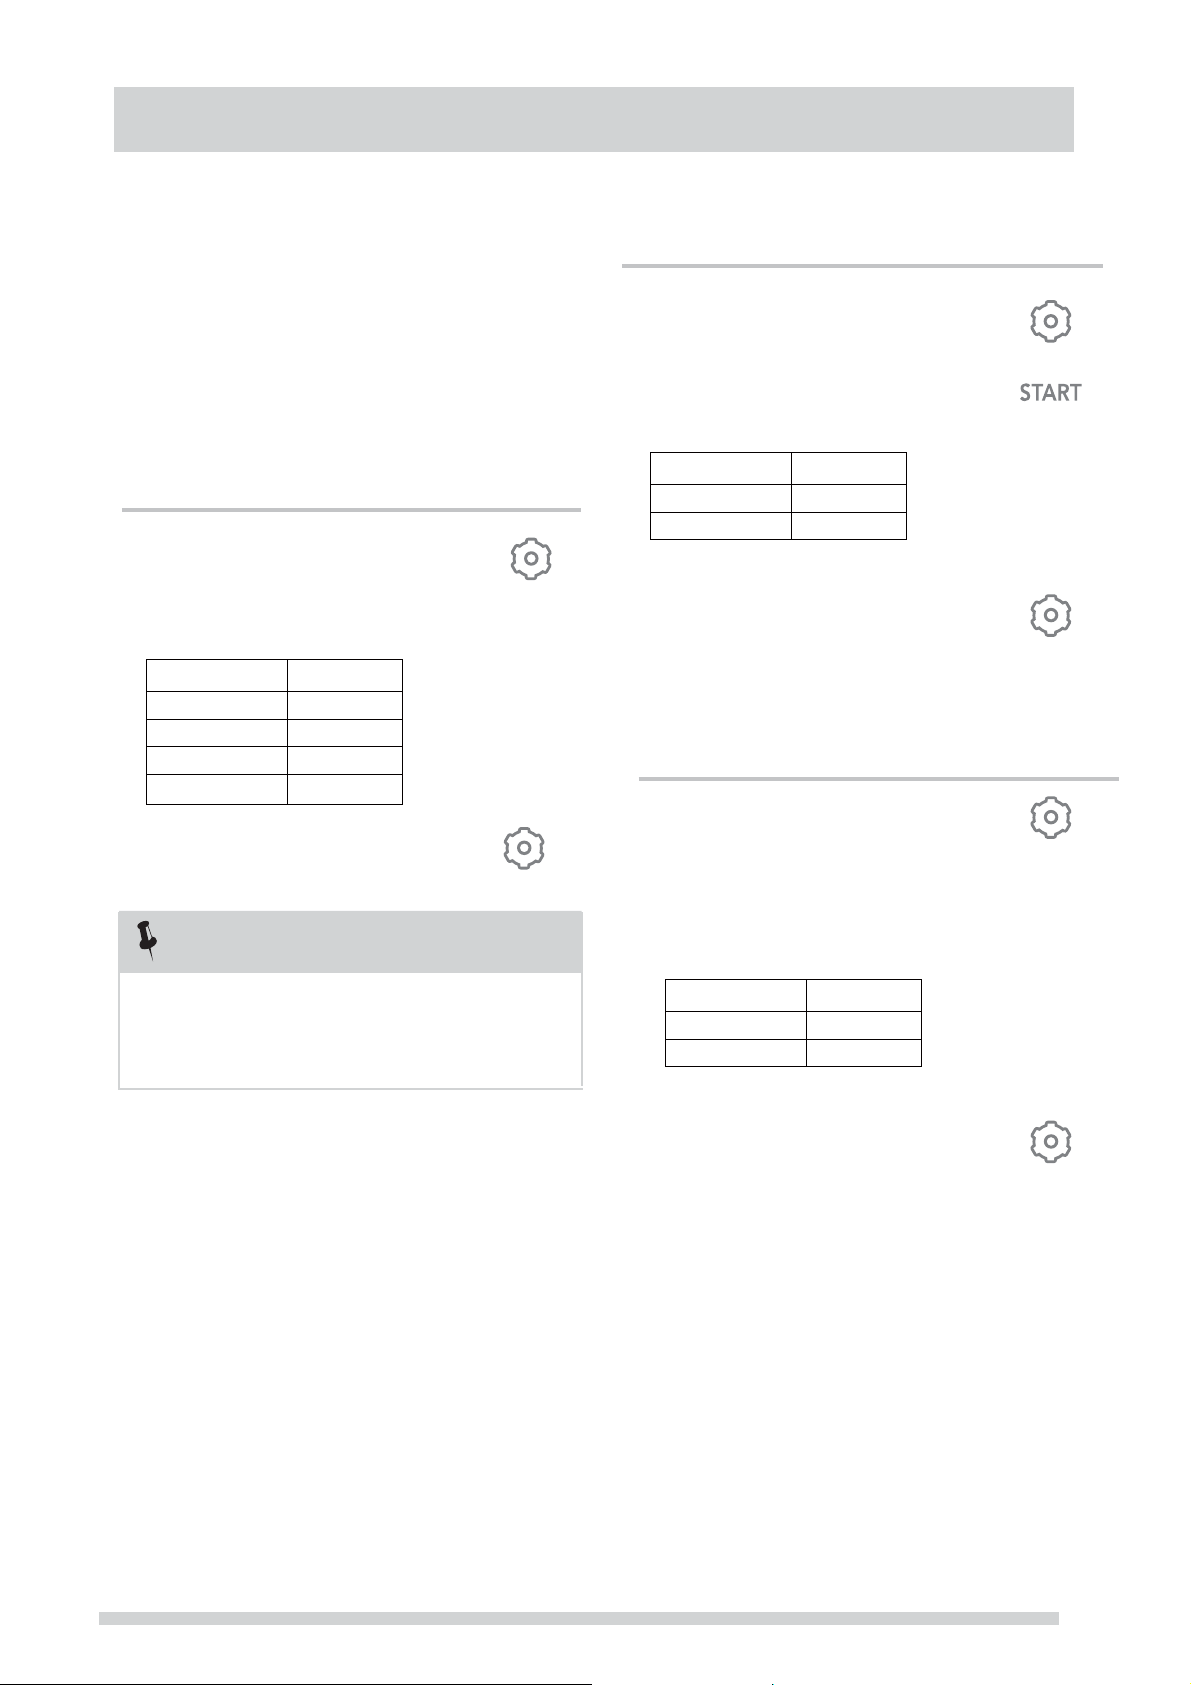
CONVENIENT FEATURES
Setting the ound
S
Setting Weight Ib/Kg
Turning Sound Low/nor/Hi/Off
Audible signals are available to guide you when
setting and using your oven.
v A programming tone
touch a pad.
Three tones
signal the end of a Kitchen Timer
count down.
signal the end of a cooking cycle.
Three tones
Example: setting audible signal off:
1. Touch
2. Op-1 will display
3.
Sound Level
Lo
Nor
HI
OFF
Touch pad to confirm
4.
Settings
will sound each time you
Settings
p a d once
Press
1
2
3
4
Example: setting weight between pounds & kilograms:
1. Touch
2. Op-2 will display
3.
4.
TURNING OFF THE CLOCK DISPLAY
1. Touch p a d.
2. Op-3 will display
Settings
Units
Lb
kg
Touch pad to confirm
Settings
your selection.
Settings
p a d.
Press
semit 2
1
2
semit 3
NOTE
When the cooking cycle is completed END will be
displayed and the audible signal will sound if the
sound is turned on.
3.
Clock Dbplay
ON
OFF
Settings
Touch pad to confirm
4.
t he LED shows .
on
Press
1
2
18
Page 19
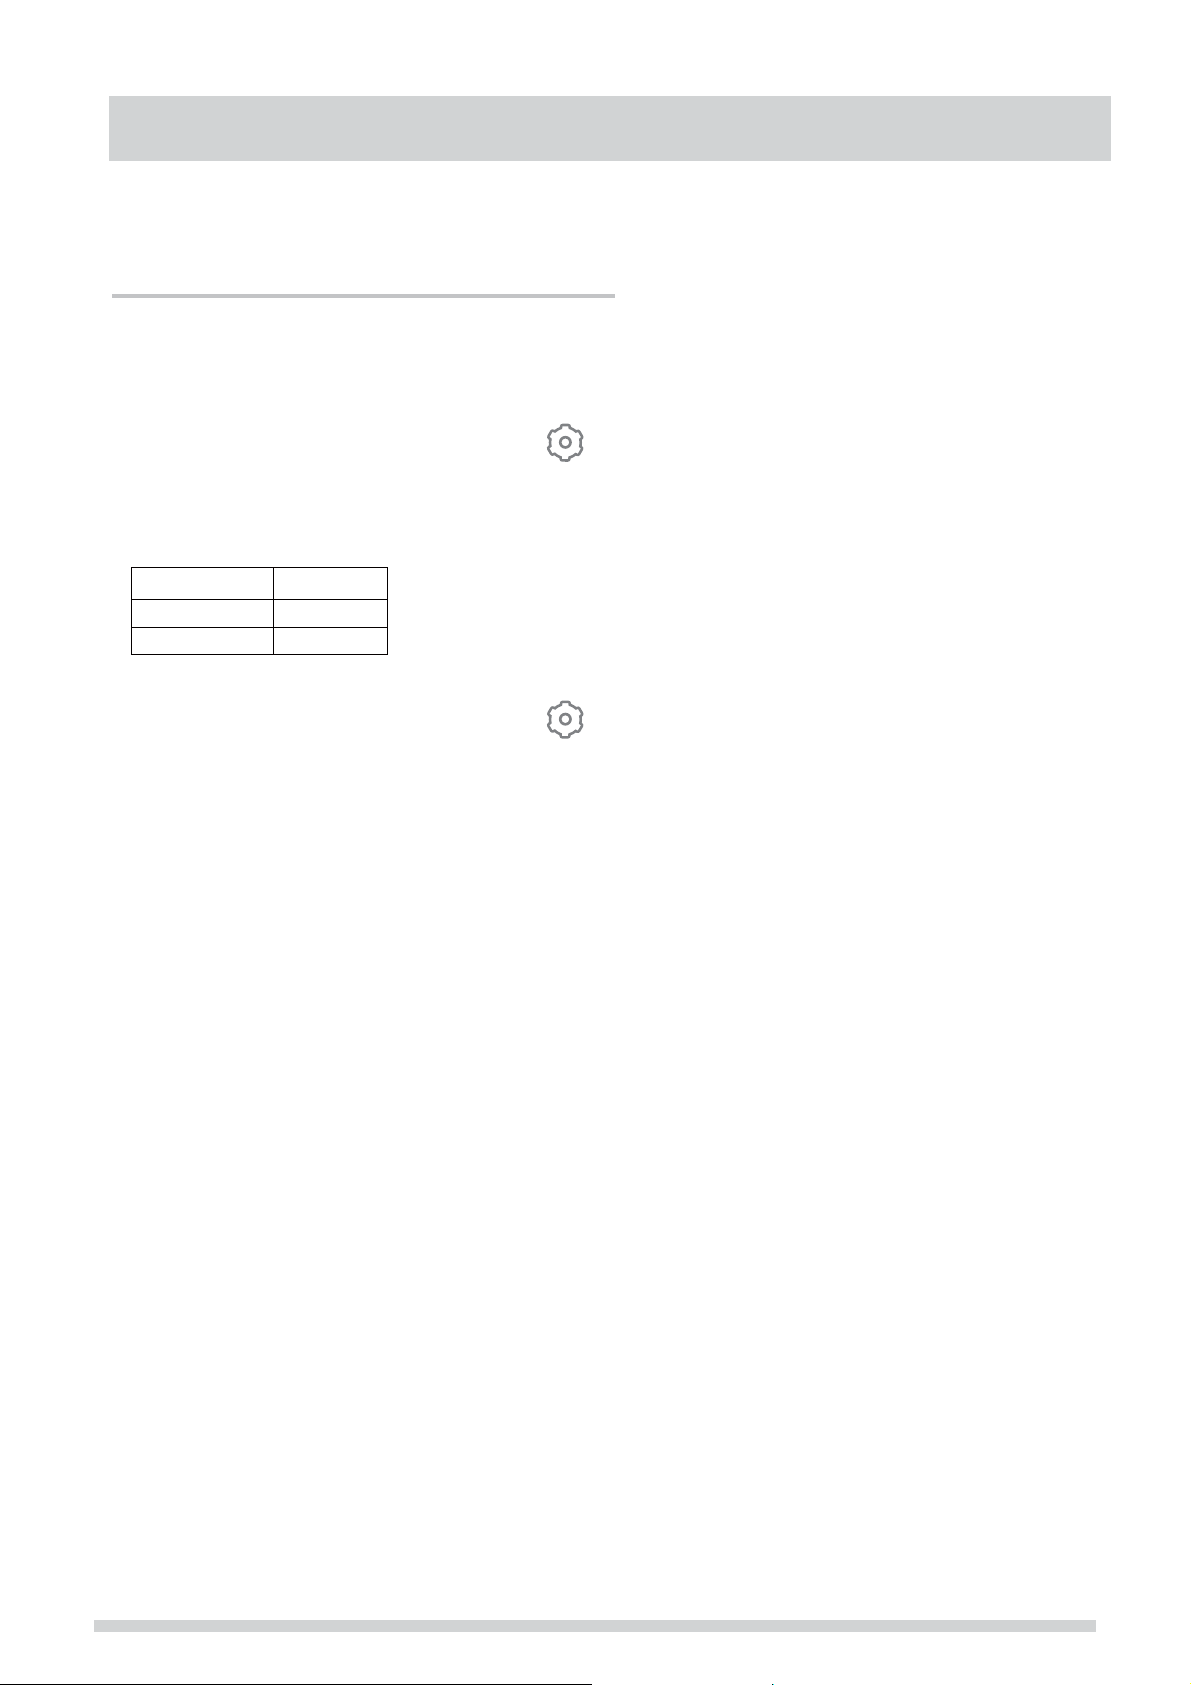
Setting Demo Mode
Example: setting the demo mode on:
Suppose you want to enter Demo mode. When Demo
mode is ON programming functions will work in a
rapid countdown mode with no cooking power.
CONVENIENT FEATURES
1. Touch
2.
3.
4.
Settings
Op-4 will display
Demo
ON
OFF
Touch pad to confirm
when th e display s hows .
Settings
p a d. semit 4
Press
1
2
on
19
Page 20
CLEANING AND CARE
s
o
a an
_/
()y
g
Disconnect the power cord or leave the door open to deactivate the oven
during cleaning. Disconnect the power cord before replacing filters and lights.
EXTERIOR
The outside surface is precoated ste el and plastic. Clean
the outside with mild soap and water; rinse and dry with
a soft cloth. Do not use any type of household or abrasive
cleaner.
DOOR
W
ipe the window on both sides with a soft cloth to remove
any spills or spatters. Metal parts will be easier to maintain
if wiped frequently with a soft cloth. Avoid the use of spray
and other harsh cleaners as they may stain, streak or dull
the door surface.
EASY CARE STAINLESS STEEL/
SMUDGE_PROOF STAINLESS STEEL/
TM
TM
BLACK STAINLESS STEEL(SOME MODELS)
Your microwave oven (some models) may have a
Stainless Steel finish or coating. Clean the stainless with
warm soapy water using a clean sponge or cloth. Rinse
with clean water and dry with a soft clean cloth.
DO NOT use ANY store bought cleaners like Stainless
Steel cleaners or any other types of cleaners containing
any abrasive, chlorides, chlorines or ammonia. It is
recommended to use mild dish soap and water or a 50/50
solution of water and vinegar.
TOUCH CONTROL PANEL
Care should be taken in cleaning the touch control panel.
If the control panel becomes soiled, open the microwave
oven door before cleaning. Wipe the panel with a cloth
dampened slightly with water only. Dr y with a soft cloth.
Do not scrub or use any sort of chemic al cleaners. Close
door and touch
STOP/Cancel.
WAVEGUIDE COVER
The waveguide cover is located on the right side in
microwave oven cavity. It is made from mica so
the
requires
to assure
Carefully
from the surface of the
occur . Built-up splashes may
or possibly catch fire.
WAVEGUIDE COVER.
special care. Keep the waveguide cover clean
good microwave oven performance.
wipe with
a damp cloth any food spatters
cover immediately after they
overheat and cause smoke
DO NOT
REMOVE THE
ODOR REMOVAL
Occasionally , a cooking odor may remain in the microw ave
oven. To remove, combine 1 cup water, grated peel and
juice of 1 lemon in a 2 -cup glass
Boil for several minutes using 100% power.
Allow to set in microwave o ven until cool. Wipe int erior with
a soft cloth.
measuring cup.
TURNTABLE/TURNTABLE SUPPORT
The turntable and turntable support can be removed for
easy cleaning. Wash them in mi ld, sudsy water; for stubborn
stains use a mild cleanser and non-abrasive scouring
sponge. They are also dishwasher-proof. Use upper
wirerack
sealed, so
immediately.
of dishwasher. The turntable motor shaft is not
excess water or spills should be wiped up
INTERIOR
Cleaning is easy because little heat is generated to the
interior surfaces
a soft cloth and warm water . DO NOT USE ABRASIVE
OR HARSH CLEANER S OR SCOURING PADS. Fo r heavier
soil, use baking soda or a mild soap; rinse thoroughly with
hot water. The round wire rack and shelf can be cleane d
with hot
soapy water,
. To clean the interior surfaces, wipe
rinsed and dried.
with
20
Page 21
CLEANING AND CARE
Disconnect the power cord or leave the door open to deactivate the oven
during cleaning. Disconnect the power cord before replacing filters and lights.
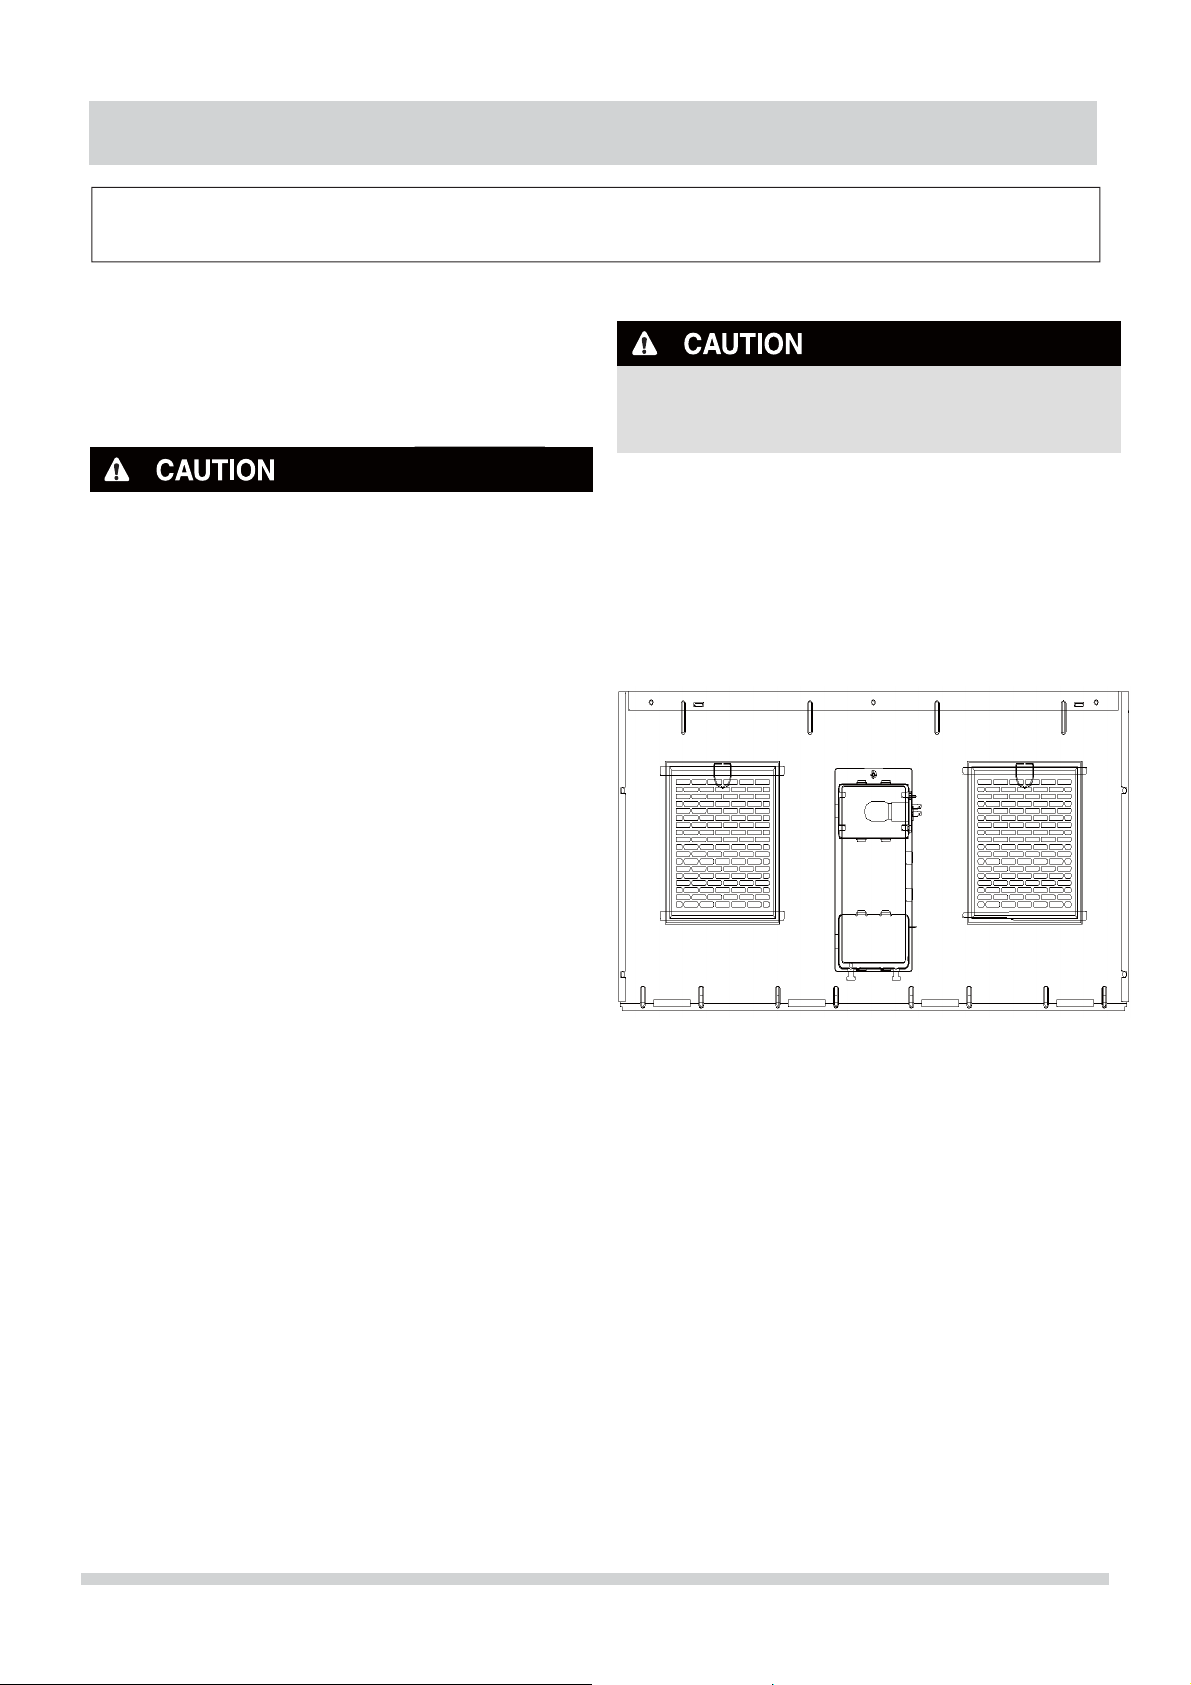
Cleaning the exhaust filters
The oven ventilation exhaust filters should be removed and
cleaned often; generally at least once every month.
Vent exhaust filter part number
To order parts call 800-599-7569
Filters should be cleaned at least once a month. Never
operate the fan or oven without the filters in place.
Pull down slightly on the tab toward the front of the
oven and remove the filter. Repeat for the other filter.
Soak the filter in a sink or dish pan filled with hot water
and detergent. DO NOT use ammonia or other alkali;
they will react with the filter material and darken it.
Agitate and scrub with a brush to remove embedded
dirt.
Rinse thoroughly and shake dry.
Replace by fitting the filter back into the opening.
5304522066
Surface light replacement
To avoid risk of personal injury or property damage, wear
gloves when replacing the light bulbs.
To replace light bulbs, first disconnect power to the oven at
the circuit breaker panel or by unplugging.
To release cover, remove the screw on the light cover. (See
illustration.)
DO NOT USE A BULB LARGER THAN 30 WATTS.
Close light cover and secure with screw removed in step 2.
CAUTION: Light cover may become very hot. Do not touch
glass when light is on.
21
Page 22
CLEANING AND CARE
your microwave
Disconnect the power cord or leave the door open to deactivate the oven
during cleaning. Disconnect the power cord before replacing filters and lights.
Charcoal filter replacement
Charcoal filter part number
To order parts call 800-599-7569
Charcoal Filter when installed in your microwave oven,is used
for nonvented, recirculated Installation. The filter should
be changed every 6 to 12 months depending on use.
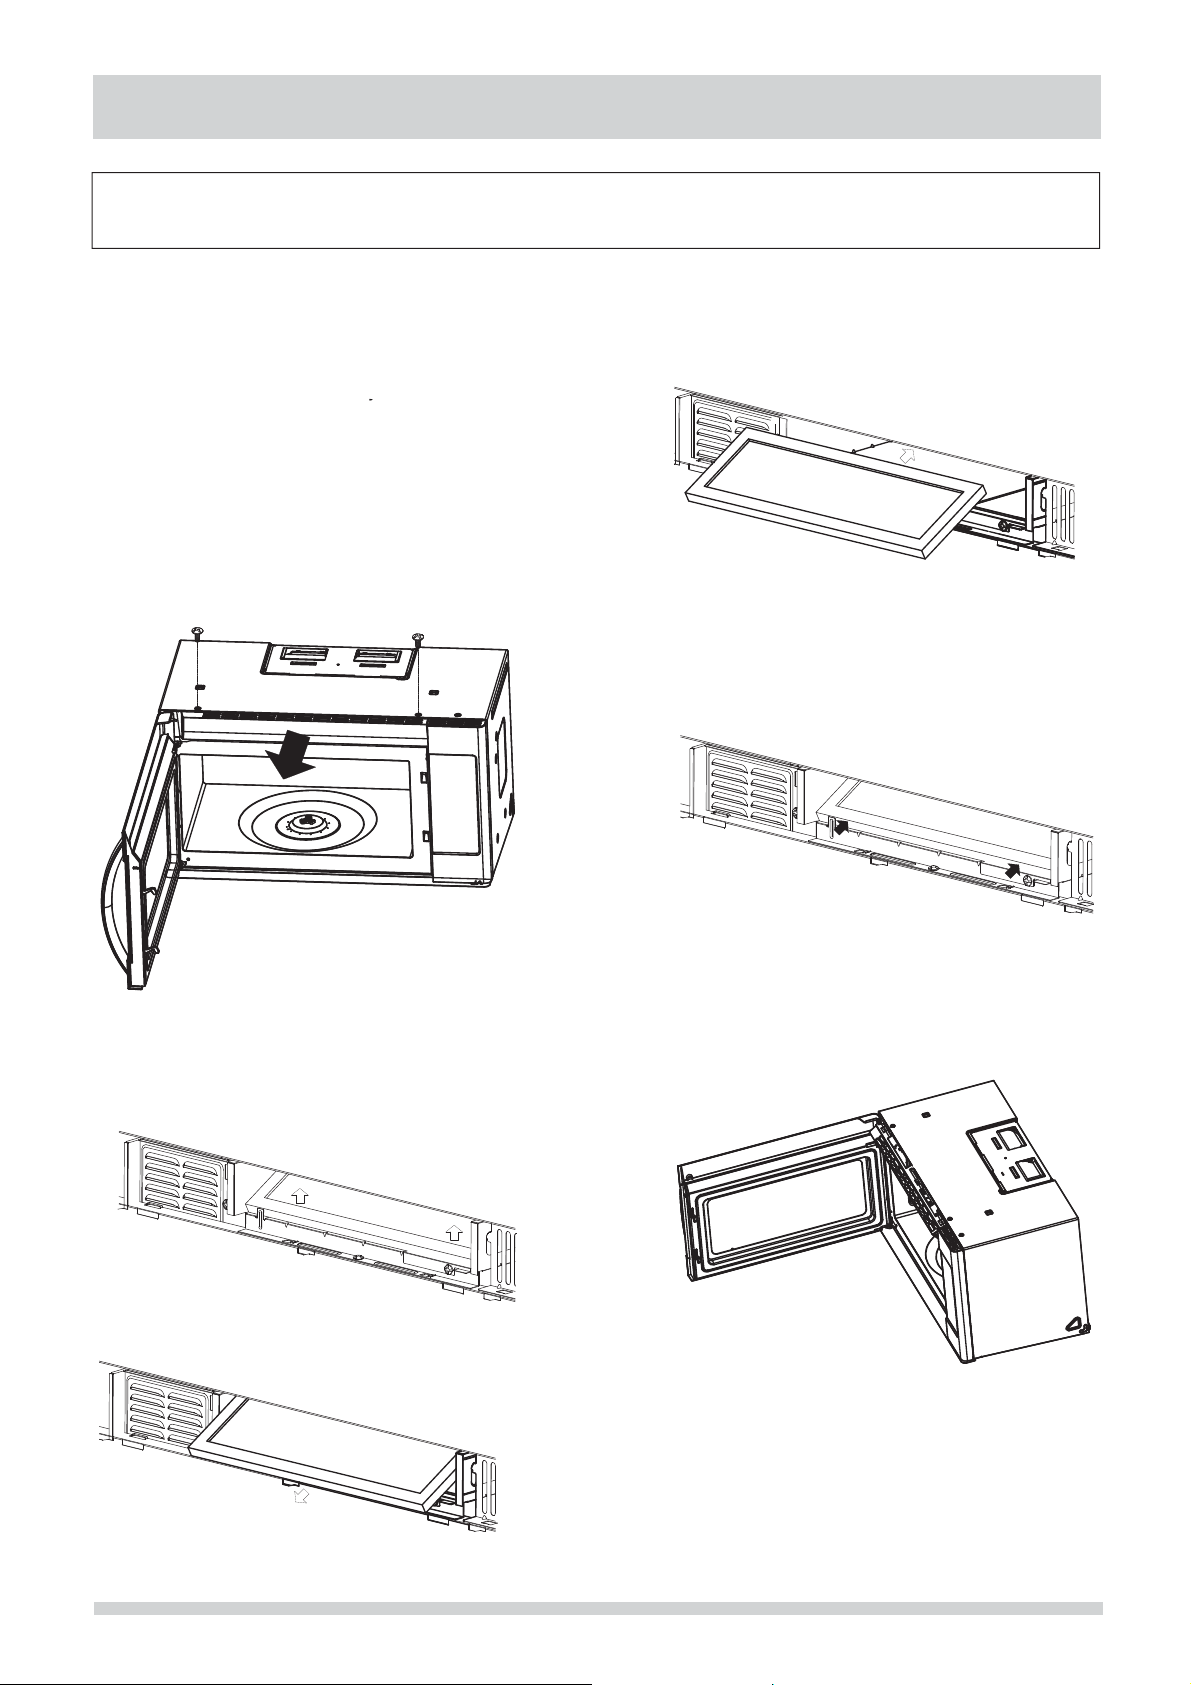
1 .Disconnect power to the microwave oven at the circuit
breaker panel or by unplugging.
2. Remove the vent grill mounting screws.
P
3.
ull the vent grill away from the unit.
5304522067
5. Slide the top of the new charcoal filter into ????
the top area of the filter cavity.
6. Press the bottom of charcoal filter to place it
into the correct position.
inwards,
then pull it forward out from the unit.
7. Put the vent grille bottom tabs into the slots
push the top of
retlif eht fo pot t??hegnihsup yb retlif laocrahc eht evomeR .4
then the vent grille into place.
. Reinstall the vent grille screws.8
22
Page 23
Disconnect the power cord or leave the door open to deactivate the oven
f
a
N
T US
ARGER THAN 30
ATT
a
e
p
c
during cleaning. Disconnect the power cord before replacing filters and lights.
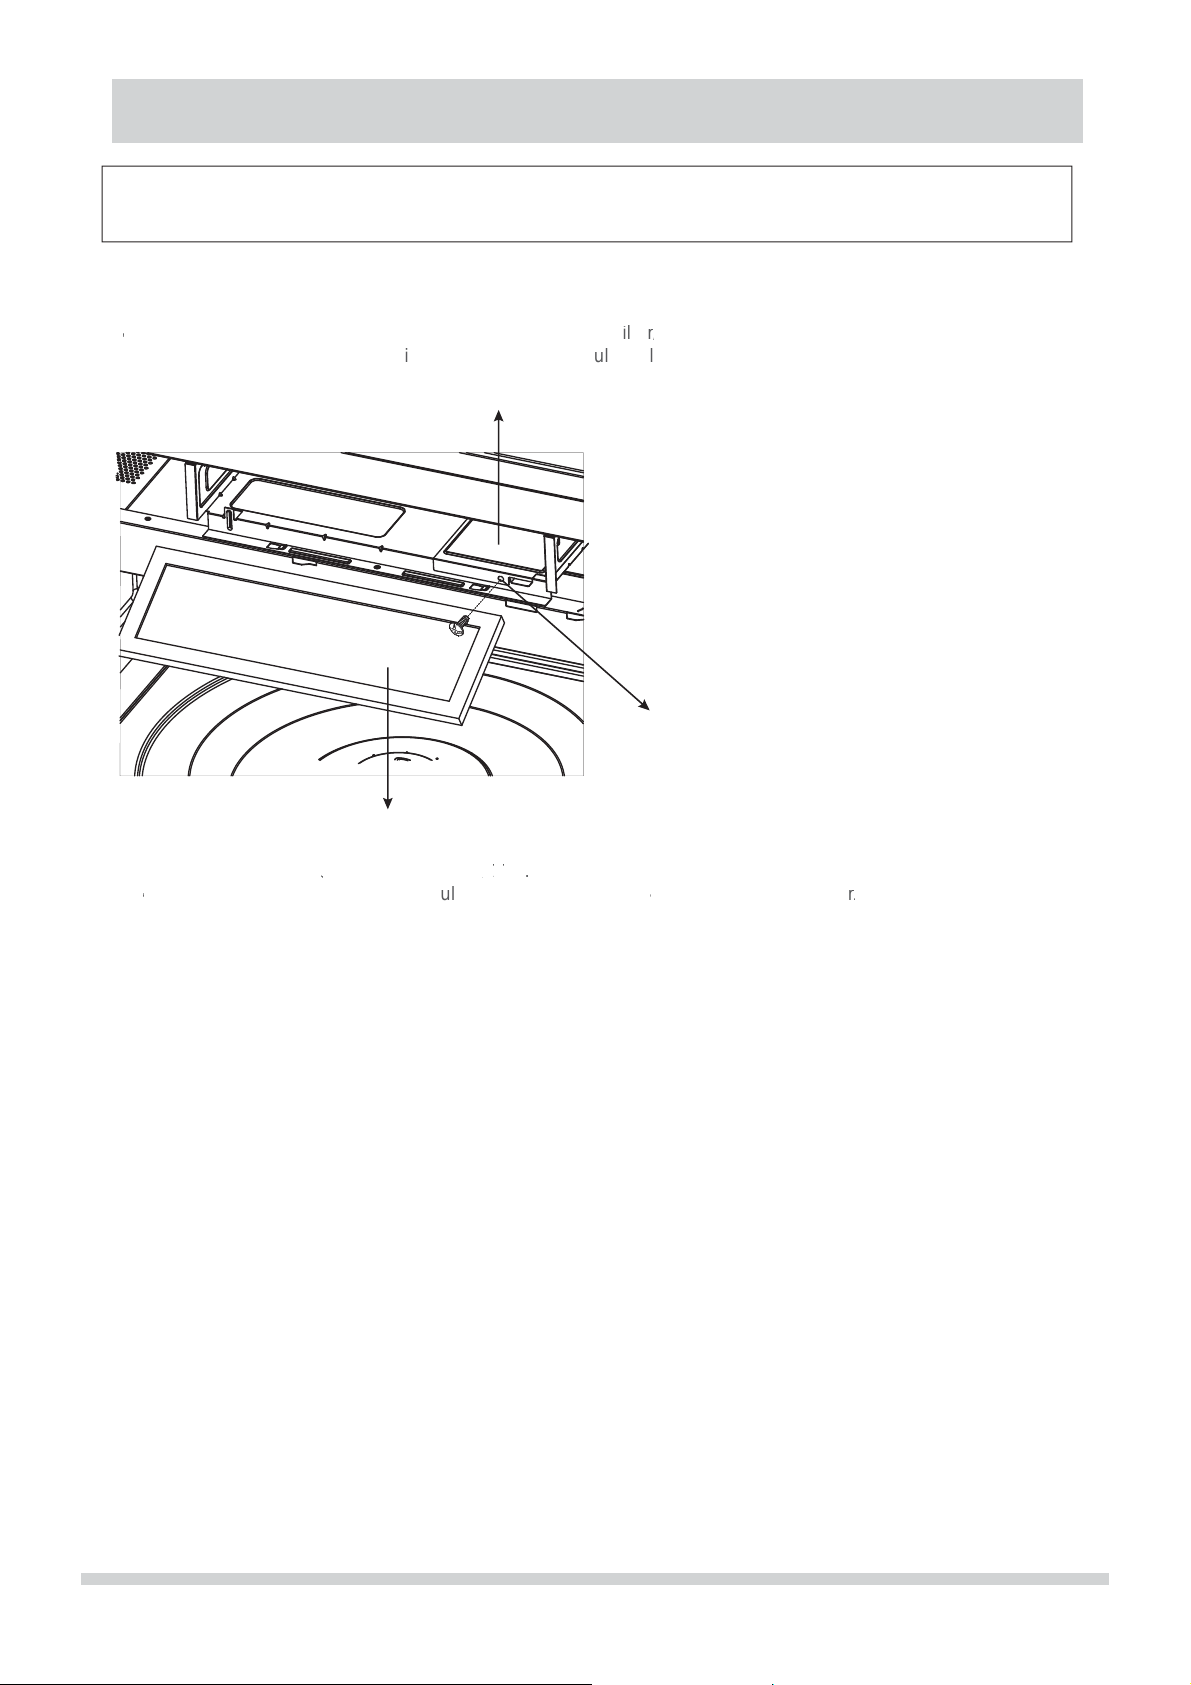
Oven light replacement
e the louer per instructions 1~3 aboe and chacoal
1.Open light cer located behind fter mounting by c
Light Cover
CLEANING AND CARE
pu
ing up on the
nt edge.
.DO
.
back into
E A BULB
en light cer by c
lace and
eplace the lou
Charcoal Filter
er mounting s
y pushing into place.
Light Cover Screw
coal filt
r
23
Page 24
SERVICE CALL CHECK
5
Please check the following before calling for service:
Place one cup of water in a glass measuring cup in the microwave oven and close the door securely.
Operate the microwave oven for one minute at HIGH 100%.
A Does the mic rowave oven light come on? YES ____ NO ____
Does the cooling fan work? (Put your hand at top above
B
C Does the turntable rotate? (It is normal for the turntable to turn in either direction.) YES ____ NO ____
D Is the water in the microwave oven warm? YES ____ NO ____
If “NO” is the answer to any of the above questions,
please check electrical outlet, fuse and/or circuit
breaker. If they are functioning properly, CONTA CT
YOUR NEAREST ELECTROLUX AUTHORIZED SERVICER.
A microwave oven should never be serviced by a
“do-it-yourself” repair person.
Display.)
NOTES
1. If time appearing in the display is counting down
very rapidly, check Demonstration Mode on page 22.
2. If the oven is set for more than 30 minutes
90 or 100 percent power level, after the ¿ rst 30
minutes the power level will automatically adjust
itself to 80 percent power to avoid overcooking.
YES ____ NO ____
at00
SPECIFICATIONS
AC Line Voltage: Single phase 120V, 60Hz, AC only
AC Power Required:
Output Power*: 1000 W
Frequency: 2450 MHz (Class B/Group2)**
Outside Dimensions (including handle): ”(H)
Cavity Dimensions:
Microwave oven Capacity***:
Cooking Uniformity: Turntable
Weight:
Work/Night Light:
Oven Light:
* The International Electrotechnical Commission’s standardized method for measuring output wattage. This test method
is widely recognized.
**
This is the classification of ISM (Industrial, Scientific and Medical) equipment described in the International Standard CISPR11.
***
Internal capacity is calculated by measuring maximum width, depth and height. Actual capacity for holding food is less.
In compliance with standards set by:
FCC - Federal Communications Commission Authorized.
DHHS -
Complies with Department of Health and Human Services (DHHS) rule, CFR, Title 21, Chapter I, Subchapter J.
1520W 13.0 amps.
29.9 ”(W) x 17.83 ”(D) x 16.9
22.16
”(W) x 13.80 ”(D) x 10.55”(H)
1.8 Cu.Ft.
Approx. (net) 58.64 lb, (gross) 66.6 lb
1.5*W LED, the part number is 5304522068
1*30W incandescent, the part number is 5304522069
(for LFMV1846VF
x 16.9
x 10.
- This symbol on the nameplate means the product is listed by Underwriters Laboratories, Inc.
- This symbol on the nameplate means the pro duct is listed by Underwriters Laboratories, Inc. for use in
USA or Canada.
24
Page 25
MAJOR APPLIANCE WARRANTY INFORMATION
Your appliance is covered by a one year limited warranty. For one year from your original date of
purchase, Electrolux will pay all costs for repairing or replacing any parts of this appliance that prove
to be defective in materials or workmanship when such appliance is installed, used and maintained in
accordance with the provided instructions.
Exclusions
This warranty does not cover the following:
1. Products with original serial numbers that have been removed, altered or cannot be readily determined.
2. Product that has been transferred from its original owner to another party or removed outside the USA or
Canada.
3. Rust on the interior or exterior of the unit.
4. Products purchased “as-is” are not covered by this warranty.
5. Food loss due to any refrigerator or freezer failures.
6. Products used in a commercial setting.
7. Service calls which do not involve malfunction or defects in materials or workmanship, or for appliances not
in ordinary household use or used other than in accordance with the provided instructions.
8. Service calls to correct the installation of your appliance or to instruct you how to use your appliance.
9. Expenses for making the appliance accessible for servicing, such as removal of trim, cupboards,
shelves, etc., which are not a part of the appliance when it is shipped from the factory.
10. Service calls to repair or replace appliance light bulbs, air ¿ lters, water ¿ lters, other consumables, or
knobs, handles, or other cosmetic parts.
11. Surcharges including, but not limited to, any after hour, weekend, or holiday service calls, tolls, ferry trip
charges, or mileage expense for service calls to remote areas, including the state of Alaska.
12. Damages to the ¿ nish of appliance or home incurred during installation, including but not limited to
À oors, cabinets, walls, etc.
13. Damages caused by: services performed by unauthorized service companies; use of parts other than
genuine Electrolux parts or parts obtained from persons other than authorized service companies; or
external causes such as abuse, misuse, inadequate power supply, accidents, ¿ res, or acts of God.
DISCLAIMER OF IMPLIED WARRANTIES; LIMITATION OF REMEDIES
CUSTOMER’S SOLE AND EXCLUSIVE REMEDY UNDER THIS LIMITED WARRANTY SHALL BE PRODUCT
REPAIR OR REPLACEMENT AS PROVIDED HEREIN. CLAIMS BASED ON IMPLIED WARRANTIES,
INCLUDING WARRANTIES OF MERCHANTABILITY OR FITNESS FOR A PARTICULAR PURPOSE, ARE
LIMITED TO ONE YEAR OR THE SHORTEST PERIOD ALLOWED BY LAW, BUT NOT LESS THAN ONE
YEAR. ELECTROLUX SHALL NOT BE LIABLE FOR CONSEQUENTIAL OR INCIDENTAL DAMAGES SUCH
AS PROPERTY DAMAGE AND INCIDENTAL EXPENSES RESULTING FROM ANY BREACH OF THIS
WRITTEN LIMITED WARRANTY OR ANY IMPLIED WARRANTY. SOME STATES AND PROVINCES DO
NOT ALLOW THE EXCLUSION OR LIMITATION OF INCIDENTAL OR CONSEQUENTIAL DAMAGES, OR
LIMITATIONS ON THE DURATION OF IMPLIED WARRANTIES, SO THESE LIMITATIONS OR EXCLUSIONS
MAY NOT APPLY TO YOU. THIS WRITTEN WARRANTY GIVES YOU SPECIFIC LEGAL RIGHTS. YOU MAY
ALSO HAVE OTHER RIGHTS THAT VARY FROM STATE TO STATE.
If You Need
Service
This warranty only applies in the USA and Canada. In the USA, your appliance is warranted by Electrolux Major Appliances
North America, a division of Electrolux Home Products, Inc. In Canada, your appliance is warranted by Electrolux Canada Corp.
Electrolux authorizes no person to change or add to any obligations under this warranty. Obligations for service and parts under
this warranty must be performed by Electrolux or an authorized service company. Product features or speci¿ cations as described
or illustrated are subject to change without notice.
USA
1-800-374-4432
Electrolux Home Products, Inc.,
10200 David Taylor Drive
Charlotte, NC 28262
Keep your receipt, delivery slip, or some other appropriate payment record to establish the warranty period
should service be required. If service is performed, it is in your best interest to obtain and keep all receipts.
Service under this warranty must be obtained by contacting Electrolux at the addresses or phone
numbers below.
Printed in China
PN.: ECP10050AL-JEUC001
25
Page 26
Uso
Cuidado
BIENVENIDA & FECILITACIONES ........................ 2
INSTRUCCIONES DE SEGURIDAD
IMPORTANTES
...................... 2
NOMBRE DE PIEZAS
............ 8
PANEL DE CONTROL ........................................... 9
ANTES DE OPERAR ............................................ 10
COCINA MANUAL
................ 11
COCINA AUTOMÁTICA
........ 16
C
............... 18
LIMPIEZA Y CUIDADO ......................................... 20
A06823423 (NOV 2019)
Todo sobre el
&
De su Horno de microondas
TABLA DE CONTENIDOS
................................
................................
www.frigidaire.com EE.UU. 1-800-374-4432
................................
................................
ARACTERÍSTICAS CONVENIENTES
Page 27

BIENVENIDA & FECILITACIONES
¿PREGUNTAS?
1
4432
Por favor, adjunte el
recibo de venta aquí
para futura referencia.
¡Felicitaciones por su compra de un nuevo horno de microondas! En Electrolux Home
Products,
estamos muy orgullosos de nuestro producto y estamos completamente
comprometidos a ofrecerle el mejor servicio posible. Su satisfacción es nuestra prioridad
número uno.
Sabemos que disfrutará de su nuevo horno de microondas y muchas gracias por elegir
nue
stro producto. Esperamos que nos considere para futuras compras.
LEA Y GUARDE CUIDADOSAMENTE ESTAS INSTRUCCIONES
Este Manual de Uso & Cuidado proporciona instrucciones de funcionamiento específicas
para su modelo. Use su horno de microondas solo como se indica en este manual. Estas
instrucciones no están destinadas a cubrir todas las condiciones y situaciones posibles
que puedan ocurrir. Se debe practicar el sentido común y la precaución al instalar, operar
y mantener cualquier aparato.
Registre su modelo y número de serie abajo para futura referencia.
Nº Modelo: _________________________________________________
Nº Serie:
_________________________________________________
Fecha de Compra:
_________________________________________________
¿NECESITA AYUDA?
Visite el Sitio de Web de Frigidaire en:
http://www.frigidaire.com
Antes de llamar al servicio, hay unas cosas que puede hacer para ayudarnos a servirle
mejor.
Lea ese manual.
Contiene instrucciones para ayudarlo a usar y mantener el horno de microondas
adecuadamente.
Si recibió un horno de microondas dañado... comuníquese inmediatamente con el
distribuidor (o el fabricante) que le vendió el horno de microondas.
Ahorre tiempo y dinero.
Consulte la sección titulada "Verificación de llamadas de servicio". Esta sección lo ayuda
a resolver problemas comunes que pueden ocurrir. Si realmente necesita servicio, puede
relajarse sabiendo que
la ayuda está a la sola distancia de una llamada. Se incluye al
final de este manual una lista de números gratuitos de servicio al cliente. O llame a
Servicios al Cliente de Frigidaire al 1
-800-374-4432, las 24 horas del día, los 7 días de la
semana.
INSTRUCCIONES DE SEGURIDAD IMPORTANTES
PRECAUCIONES PARA EVITAR
No intente operar este horno con la puerta abierta, ya que el funcionamiento con la puerta abierta puede provocar
alterar los enclavamientos de seguridad.
No coloque ningún objeto entre la cara delantero del horno y la puerta, ni permita la acumulación de suciedad o
rticularmente importante que la puerta del horno se cierre correctamente y
-800-374-
(EE.UU.)
incendio o explosión o para evitar daños a la propiedad, lesiones personales o pérdida de vidas.
Para su seguridad, se debe seguir la información de este manual para minimizar el riesgo de
2
POSIBLE EXPOSICIÓN A ENERGÍA DE
MICROONDAS EXCESIVA
(a)
exposición dañina a la energía de microondas. Es importante no vencer ni
(b)
residuos de limpiadores en las superficies de sellado.
(c) No opere el horno si está dañado. Es pa
que no haya daños en: (1) puerta (doblada), (2) bisagras y pestillos (rotos o flojos), (3) sellos de puerta y
superficies de sellado.
(d) El horno no debe ser ajustado o reparado por nadie, excepto personal de servicio debidamente calificado.
Page 28
INSTRUCCIONES DE SEGURIDAD IMPORTANTES
Definiciones
Éste es el símbolo de alerta de seguridad. Se utiliza para alertarlo sobre posibles riesgos de lesión personal.
Obedezca todos los mensajes de seguridad que siguen a este símbolo para evitar posibles lesiones o muerte.
WARNING
WARNING indica una situación potencialmente
peligrosa que, si no se evita, puede provocar muerte
o lesiones graves
LEA TODA LA INFORMACIÓN ANTES DE USAR
WARNING
Para reducir el riesgo de incendio, quemaduras, descargas
eléctricas, lesiones a personas o exposición a energía de
microondas excesiva al usar el aparato, siga las
precauciones básicas, incluidas las siguientes
secciones.
Lea todas las instrucciones antes de usar el aparato.
Lea y siga las "PRECAUCIONES ESPECÍFICAS PARA
EVITAR POSIBLE EXPOSICIÓN A LA ENERGÍA DE
MICROONDAS EXCESIVA" en la página 2.
Este aparato debe estar conectado a tierra. Conecte solo a
una toma de corriente puesta a tierra. Consulte
"INSTRUCCIONES DE PUESTA A TIERRA" en la página
5.
Instale o coloque este aparato solo de acuerdo con las
instrucciones de instalación proporcionadas.
Algunos productos como huevos enteros y envases
sellados.—Por ejemplo, frascos de vidrio cerrados—
pueden explotar y no se deben calentar en este horno de
microondas.
Use este aparato solo para el uso previsto como se
describe en este manual. No use productos químicos o
vapores corrosivos en este aparato. Este ti
microondas está diseñado específicamente para calentar,
cocinar o secar alimentos. No está diseñado para uso
industrial o de laboratorio.
Igual que con cualquier aparato, es necesaria una estrecha
supervisión cuando lo usan niños.
No opere este aparato si tiene un cordón o enchufe
dañado, si no funciona correctamente o si se ha dañado o
caído.
Este aparato solo debe ser reparado por personal de
servicio calificado. Contacte con el técnico autorizado más
cercano de Electrolux para su examen, reparación o ajuste.
No cubra ni bloquee ninguna abertura en el aparato.
No almacene ni use este aparato al aire libre. No use este
producto cerc
de la cocina, en un sótano húmedo o cerca de una piscina
o lugares similares.
No sumerja el cordón ni el enchufe en agua.
Mantenga el cordón alejado de superficies calientes.
No permita que el cordón cuelgue del borde de la mesa o
mostrador.
Consulte las instrucciones de limpieza de la superficie de la
puerta en la página 20.
a del agua - por ejemplo, cerca del fregadero
po de horno de
CAUTION
CAUTION indica una situación potencialmente
peligrosa que, si no se evita, puede provocar
lesiones leves o moderadas
Para reducir el riesgo de incendio en la cavidad del horno:
- No sobrecocine los alimentos. Use cuidadosamente
el aparato cuando se coloque papel, plástico u otros
materiales combustibles dentro del horno de
microondas para facilitar la cocinar.
- Quite las ataduras de cable de papel o de bolsa de
plástico antes de poner bolsa en el horno.
- Si los materiales dentro del horno se encienden,
mantenga la puerta del horno cerrada, apague el
aparato y desconecte el cable de alimentación o
apague el fusible o el panel del disyuntor.
- No utilice la cavidad con fines de almacenamiento. No
deje productos de papel, utensilios de cocina o alimentos
en la cavidad cuando no esté en uso.
Los líquidos, como el agua, el café o el té pueden
sobrecalentarse más allá del punto de ebullición sin que
parezca que están hirviendo. No siempre es presente el
burbujeo o la ebullición visible cuando se retira el recipiente
del horno de microondas. ESTO PODRÍA RESULTAR EN
LÍQUIDOS MUY CALIENTES QUE HIRVIENEN DE
REPENTE CUANDO SE INSERTE UNA CUCHARA O
OTRO UTENSILIO EN EL LÍQUIDO.
Para reducir el riesgo de lesiones a personas:
- No sobrecaliente el líquido.
- Agite el líquido antes y a la mitad del calentamiento.
- No utilice recipientes de lados rectos con cuellos
estrechos. Use un recipiente de boca ancha.
- Después de calentar, mantenga el recipiente en el horno
de microondas al menos durante 20 segundos antes de
retirar el recipiente.
- Tenga mucho cuidado al insertar cuchara u otro utensilio
en el recipiente.
Limpie las aberturas de ventilación y los filtros de grasa con
frecuencia. No se debe permitir que se acumule grasa en las
aberturas de ventilación, rejillas o filtros de grasa.
Tenga cu
agentes de limpieza corrosivos, como limpiadores de horno
a base de lejía, pueden dañar la rejilla y los filtros de grasa.
Cuando arroje alimentos debajo del capó, encienda el
ventilador.
idado al limpiar la rejilla y los filtros de grasa. Los
Este aparato es apto para usar sobre equipos de cocina de
gas y eléctricos de 36" de ancho o menos.
GUARDE ESAS INSTRUCCIONES.
3
Page 29
INSTRUCCIONES DE SEGURIDAD IMPORTANTES
• No limpie con estropajos metálicos. Las piezas de botones
WARNING
Si ve arcos, presione la tecla Cancel y corrija el
problema.
Arco es el término de microondas para chispas en el horno.
El arco se causa por:
•
•
• Metal, como tiras de alambre, alfileres de aves de corral o
•
pueden tocar partes eléctricas que implican riesgo de
descarga eléctrica.
Metal o papel aluminio tocando el costado del horno.
Lámina de aluminio no moldeado a los alimentos (los
bordes hacia arriba actúan como antenas).
platos con bordes dorados en el microondas.
Toallas de papel recicladas que contienen pequeñas
piezas de metal que se utilizan en el microondas.
Declaración de Interferencia de Radiofrecuencia de la Comisión Federal de Comunicaciones
(solo EE. UU. )
Este equipo genera y utiliza energía de frecuencia ISM y, si no se instala y utiliza correctamente, es decir, de acuerdo con las
instrucciones del fabricante, puede causar interferencias en la recepción de radio y televisión. Se ha probado su tipo y se encontró
que cumple con los límites para el Equipo ISM de conformidad con la parte 18 de las Reglas de la FCC, que están diseñadas para
proporcionar una protección razonable contra dicha interferencia en una instalación residencial.
Sin embargo, no garantiza que no se produzcan interferencias en una instalación particular. Si este equipo causa interferencia en la
recepción de radio o televisión, lo cual se puede determinar apagando y encendiendo el equipo, se recomienda al usuario que
intente corregir la inferencia mediante uno o más de los siguientes:
• Reoriente la antena receptora de la radio o televisión.
• Recoloque el horno de microondas con respecto al receptor.
• Aleje el horno microondas del receptor.
• Enchufe el horno de microondas en un tomacorriente diferente para que el horno de microondas y el receptor estén en diferentes
circuitos derivados.
El fabricante no es responsable de ninguna interferencia de radio o televisión causada por modificaciones no autorizadas a este
horno de microondas. Es responsabilidad del usuario corregir dicha interferencia.
4
Page 30
5
INSTRUCCIONES DE SEGURIDAD IMPORTANTES
DESEMBALAR Y EXAMENAR SU HORNO
DE MICROONDAS
(a) Desembale y examene su horno.
(b) Retire con cuidado el horno de la caja de cartón.
GUARDE EL CARTÓN COMO PUEDE
FACILITAR LA INSTALACIÓN.
(c) Retire
(d) Todos los materiales de embalaje del interior de la
cavidad del horno; sin embargo, NO RETIRE LA
CUBIERTA DE GUÍA DE ONDA, que se encuentra
en el techo en la cavidad del horno. Verifique que
haya Instrucciones de Instalación, Plantilla de
Pared, Plantilla de Gabinete Superior, bolsa de
Hardware de Instalación, Filtro de Carbón y
Conjunto de Amortiguador de Escape. Lea los
anexos y GUARDE las instrucciones del
propietario.
(e) La calcomanía característica desde el exterior de
la puerta, si hay.
(f) Revise el horno por daños, como puerta
desalineada o doblada, sellos de la puerta y
superficies de sellado dañadas, bisagras de la
puerta rotas o flojas, pestillos y abolladuras dentro
de la cavidad o en la puerta. Si hay algún daño, no
opere el horno y contacte a su distribuidor.
(g) Consulte Instrucción de Instalación para más
detalles.
1.
Sistema de Bloqueo de Seguridad de Puerta
2. Ventana de Horno
3. Eje
4. Anillo de Rodillo
5. Panel de Control
6. Bandeja de Cristal
INSTRUCCIONES DE
PUESTA A TIERRA
Este aparato debe estar conectado a tierra. Este horno
de microondas está equipado con un cordón que tiene
un cable a tierra con un enchufe a tierra. Debe
conectarse a un receptáculo de pared que esté
instalado y puesto a tierra de acuerdo con el Código
Eléctrico Nacional y los códigos y ordenanzas locales.
En el caso de un cortocircuito eléctrico, la puesta a
tierra reduce el riesgo de descarga eléctrica mediante
proporcionar un cable de escape para la corriente
eléctrica.
WARNING
El uso inadecuado del enchufe a tierra puede resultar
en riegos de descarga eléctrica.
Requisitos eléctricos
Consulte las Instrucciones de Instalación para conocer
la ubicación adecuada de la fuente de alimentación.
Los requisitos eléctricos son 120 voltios 60 Hz, solo
CA, 15 amperios, o suministro eléctrico más protegido.
Se recomienda proporcionar un circuito separado que
sirva solo al horno de microondas.
El horno de microondas está equipado con un enchufe
a tierra de 3 clavijas. Debe enchufarse a un
receptáculo de pared que esté instalado y puest
tierra correctamente. NO, BAJO NINGUNA
CIRCUNSTANCIA, CORTE O QUITE EL PIN DE
PUESTA A TIERRA DEL ENCHUFE.
NO UTILICE UN CORDÓN DE EXTENSIÓN.
NOTAS
1. Si tiene cualquier pregunta sobre la puesta a tierra o
las instrucciones eléctricas, consulte a un electricista
2.
microondas o lesiones personales causadas por no
observar los procedimientos correctos de conexión
eléctrica.
Apertura para Cordón
de Alimentación
Receptáculo
de Tierra
___
Pin Puesto a Tierra
Receptáculo de 3 terminales
Caja de Receptáculo
de Tierra
Enchufe de 3 clavijas
o personal de servicio calificado.
Ni Electrolux ni el distribuidor pueden aceptar
ninguna responsabilidad por daños al horno de
o a
Page 31
INSTRUCCIONES DE SEGURIDAD IMPORTANTES
SOBRE SU HORNO DE MICROONDAS
Este Manual de Uso y Cuidado es valioso: léalo atentamente y
guárdelo siempre como referencia.
Un buen libro de cocina de microondas es un activo valioso.
Chequee los principios, técnicas, consejos y recetas de cocina con el
microondas.
NUNCA use el horno de microondas sin el plato giratorio y el
soporte, ni gire el plato giratorio para colocar un plato grande en el
horno de microondas. El plato giratorio girará en sent
ido horario y
antihorario.
SIEMPRE tenga alimentos en el horno de microondas cuando esté
encendido para absorber la energía del microondas.
Cuando utilice el horno de microondas a niveles de potencia
inferiores al 100%, es posible que escuche que el magne
trón se
enciende y apaga. Es normal que el exterior del horno de microondas
esté caliente al tacto al cocinar o recalentar.
La condensación es una parte normal de la cocina con microondas.
La humedad de la habitación y la de los alimentos influirán en la
cantidad de humedad que se condensa en el horno de microondas.
En general, los alimentos cubiertos no causarán tanta condensación
como los no cubiertos. No deben bloquearse las aberturas de
ventilación.
El horno de microondas es solo para preparar alimentos. No se debe
usar para secar ropa o periódicos.
Su horno de microondas tiene una potencia de 1000 vatios mediante
el procedimiento de prueba IEC. Al usar recetas o instrucciones del
paquete, chequee los alimentos uno o dos minutos antes del tiempo
mínimo y
agregue el tiempo correspondiente.
SOBRE COCINA CON MICROONDAS
• Organice la comida con cuidado. Coloque las áreas más gruesas
hacia el exterior del plato.
• Mire el tiempo de cocinar. Cocine por el menor tiempo indicado y
agregue más según sea necesario. Los alimentos sobrecocinados
pueden humear o encenderse.
• Cubra los alimentos mientras cocina. Consulte la receta o el libro
de cocina para sugerencias: toallas de papel, papel encerado,
envoltura de plástico para microondas o una tapa. Las cubiertas
evitan las salpicaduras y ayudan a que los alimentos se cocinen
de manera uniforme.
• Proteja cualquier área fina de carne o pollo con pequeñas piezas
planas de lámina de aluminio para evitar sobrecocina antes de que
las áreas densas y gruesas se cocinen completamente.
• Revuelva los alimentos del exterior al centro del plato una o dos
veces durante la cocina, si es posible.
• Voltee los alimentos una vez durante el microondas para acelerar
la cocina de alimentos como pollo y hamburguesas. Los artículos
grandes como los asados deben voltearse al menos una vez.
• Reorganice los alimentos como las albóndigas a la mitad de la
cocina, tanto de arriba a abajo como desde el centro del plato
hacia afuera.
• Agregue tiempo de reposo. Retire la comida del horno de
microondas y revuelva, si es posible. Cubra durante el tiempo de
reposo para que la comida termine de cocinarse sin pasarse.
• Chequee la cocina. Busque señales que indiquen que se han
alcanzado las temperaturas de cocina.
Señales de estar cocinado incluyen:
- La comida humea por todas partes, no solo en el borde.
- El fondo central del plato está muy caliente al tacto.
- Las articulaciones del muslo de pollo se mueven fácilmente.
- La carne y el pollo no muestran color rosado.
- El pescado es opaco y se desmenuza fácilmente con un
tenedor.
ALIMENTOS
SÍ
NO
Huevos,
salchichas,
nueces, semillas,
frutas & verduras
• Perforar las yemas de huevo antes de cocinar para evitar la
•
salchichas para que salga el vapor.
•
•
•
Palomit
• Usar palomitas embolsadas especialmente para cocinar en el
•
segundos o use una almohadilla especial para palomitas.
• Haer palomitas en bolsas marrones
• Superar el tiempo máximo en el paquete de
palomitas.
Alimentos para
beb
• Transferir los alimentos para bebés a un plato pequeño y caliéntelos
•
pezones en los biberones después de calentar y agite bien.
Pruebe la temperatura con muñeca antes de alimentar.
•
•
•
General
• Cortar los productos horneados con relleno después de calentarlos
•
•
tar los
volcaduras.
•
•
•
SOBRE ALIMENTO
as
é
6
"explosión".
Perforar las pieles de patatas, manzanas, calabazas, hotdogs y
microondas.
Escuchar mientras hace palomitas para que disminuya a 1 u 2
con cuidado, revolviendo con frecuencia. Chequee la temperatura
antes de servir.
Colocar los
para liberar vapor y evitar quemaduras.
Revolver los líquidos rápidamente antes y después de calentar para
evitar la "erupción".
Usar un tazón hondo, cuando cocine líquidos o cereales, para evi
Cocinar los huevos en cáscaras.
Recalentar huevos enteros.
Secar nueces o semillas en cáscaras.
regulares o cuencos de vidrio.
Calentar botellas desechables.
Calentar biberones con pezones.
Calentar los alimentos para bebés en
frascos originales.
Enlatar en el microondas ya que las
bacterias dañinas no pueden destruirse.
Freir con mucha grasa.
Secar madera, calabazas, hierbas o
papeles húmedos.
Page 32
7
INSTRUCCIONES DE SEGURIDAD IMPORTANTES
SOBRE UTENSILIOS Y CUBIERTAS
No es necesario comprar todo utensilio de cocina nuevo. Se pueden
utilizar en su nuevo horno de microondas con éxito muchas piezas
que ya están en su cocina. Asegúrese de que el utensilio no toque
las paredes interiores durante la cocina.
Use esos utensilios para cocinar y recalentar con el
microondas de forma segura:
• vitrocerámica (Pyroceram
®
), tales como Corningware®.
• vidrio resistente al calor (Pyrex
®
)
• plásticos aptos para microondas
• platos de papel
• cerámica, gres y porcelana aptos para microondas
• plato dorador (no se debe exceder tiempo de precalentamiento
recomendado. Siga las direcciones del fabricante.)
Estos artículos se pueden usar para recalentar por
corto tiempo los alimentos que contienen poca
grasa o azúcar:
• madera, paja, mimbre
NO USE
• bandejas de metal y utensilios para hornear
• platos con adornos metálicos
• vidrio no resistente al calor
• plásticos no aptos para microondas (tinas de margarina)
• productos de papel reciclado
• bolsas de papel marrón
• bolsas de almacenamiento de alimentos
• lazos metálicos
Si desea chequear si un plato es apto para microondas, coloque el
plato vacío en el horno microondas y el microondas en HIGH durante
30 segundos. No se debe usar un plato que se caliente mucho.
Los siguientes revestimientos son ideales:
• Las toallas de papel son buenas para cubrir los alimentos para
recalentar y absorber la grasa mientras se cocina el tocino.
• El papel encerado se puede usar para cocinar y recalentar.
• La envoltura de plástico marcada especialmente para uso en
microondas se puede usar para cocinar y recalentar. NO deje que
la envoltura de plástico toque los alimentos. Ventile para que el
vapor pueda escapar.
• Las tapas que son aptas para microondas son una buena opción
porque el calor se mantiene cerca de los alimentos para acelerar
la cocina.
• Las bolsas para cocinar en el horno de microondas son buenas
para carnes grandes o alimentos que necesitan ablandarse. NO
use lazos metálicos. Recuerde abrir la bolsa para que el vapor
pueda escapar.
Cómo usar lámina de aluminio en su horno de
microondas:
• Pequeñas piezas planas de lámina de aluminio colocadas
suavemente sobre los alimentos pueden usarse para proteger
áreas que se están descongelando o cocinando demasiado
rápido.
• La lámina no debe acercarse más de una pulgada a ninguna
superficie del horno de microondas.
Si tiene preguntas sobre utensilios o cubiertas, consulte un buen libro
de cocina para microondas o siga las sugerencias de recetas.
ACCESORIOS Hay muchos accesorios de microondas disponibles
para comprar. Evalúe cuidadosamente antes de comprar para que
satisfagan sus necesidades. Un termómetro apto para microondas lo
ayudará a determinar la cocina adecuada y asegurará que los
alimentos se hayan cocinado a temperaturas
seguras. Electrolux no
es responsable de ningún daño al horno de microondas cuando se
utilizan accesorios.
SOBRE LOS NIÑOS Y LA MICROONDAS
Los niños menores de 7 años deben usar el horno microondas con
una persona supervisora muy cerca de ellos. Entre las edades de 7 y
12 años, la persona supervisora debe estar en la misma habitación.
Al igual que con cualquier aparato, es necesaria la supervisión de un
adulto cuando lo usan niños.
En ningún momento se debe permitir que nadie se incline o se
balan
cee sobre la puerta del horno microondas.
A los niños se les debe enseñar todas las precauciones de
seguridad: usar agarraderas, retirar los revestimientos con cuidado,
prestar especial atención a los paquetes de alimentos crujientes
porque pueden estar mu
y calientes.
No asuma que porque un niño ha dominado una habilidad para
cocinar, puede cocinar todo.
Los niños necesitan aprender que el horno de microondas no es un
juguete. Consulte la página 10 para ver la función de bloqueo para
niños.
SOBRE LA SEGURIDAD
• Chequee los alimentos para ver si están cocinados a las
temperaturas recomendadas por el Departamento de Agricultura
de los Estados Unidos.
TEMP
ALIMENTOS
45°F
(63°C)
- Para ternera, cordero o ternera cortada en filetes,
chuletas o asados, pescado
160°F
(71°C)
- Para carne de cerdo fresca, carne molida, mariscos,
platos de huevo, alimentos preparados congelados y
ternera, cordero o ternera cortada en filetes, chuletas o
asados
165°F
(74°C)
- Para las sobras, alimentos refrigerados listos para
calentar, alimentos "frescos" para llevar, pollo o pavo
utilizado en hamburguesas de pollo o pavo
NOTAS
No cocine pollo entero y rellenadopoultry. Cocine el
relleno por separado a to 165°F.
Para comprobar si está cocinado, inserte un termómetro para carne
en un área gruesa o densa alejado de la grasa o el hueso. NUNCA
deje el termómetro en los alimentos durante la cocina, a menos que
esté aprobado para uso en hornos de microondas.
• SIEMPRE use agarraderas para evitar quemaduras al manipular
puede transferir suficiente calor de los alimentos a través de los
• Evite las quemaduras por vapor alejando el vapor de la cara y las
manos. Levante lentamente el borde más alejado de la cubierta de
un plato y abra con cuidado las palomitas y las bolsas de cocina
• Manténgase cerca del horno de microondas mientras está en uso
• NUNCA use la cavidad para almacenar libros de cocina u otros
•
ne, almacene y manipule los alimentos con cuidado para
preservar la alta calidad y minimizar la propagación de bacterias
• Mantenga limpia la cubierta de la guía de onda. Los residuos de
• Tenga cuidado al retirar artículos del horno de microondas para
que el utensilio, su ropa o accesorios no toquen los pestillos de la
• Mantenga la lámina de aluminio protegedora al menos 1 pulgada
entero, pechugas de pollo o pavo y pollo molido
utensilios que están en contacto con alimentos calientes. Se
utensilios para causar quemaduras en la piel.
de horno lejos de la cara.
y chequee el progreso de la cocina con frecuencia para que no
haya posibilidad de sobrecocinar los alimentos.
artículos.
Seleccio
transmitidas por los alimentos.
alimentos pueden causar arcos y/o incendios.
puerta de seguridad.
de las paredes, el techo y la puerta.
Page 33
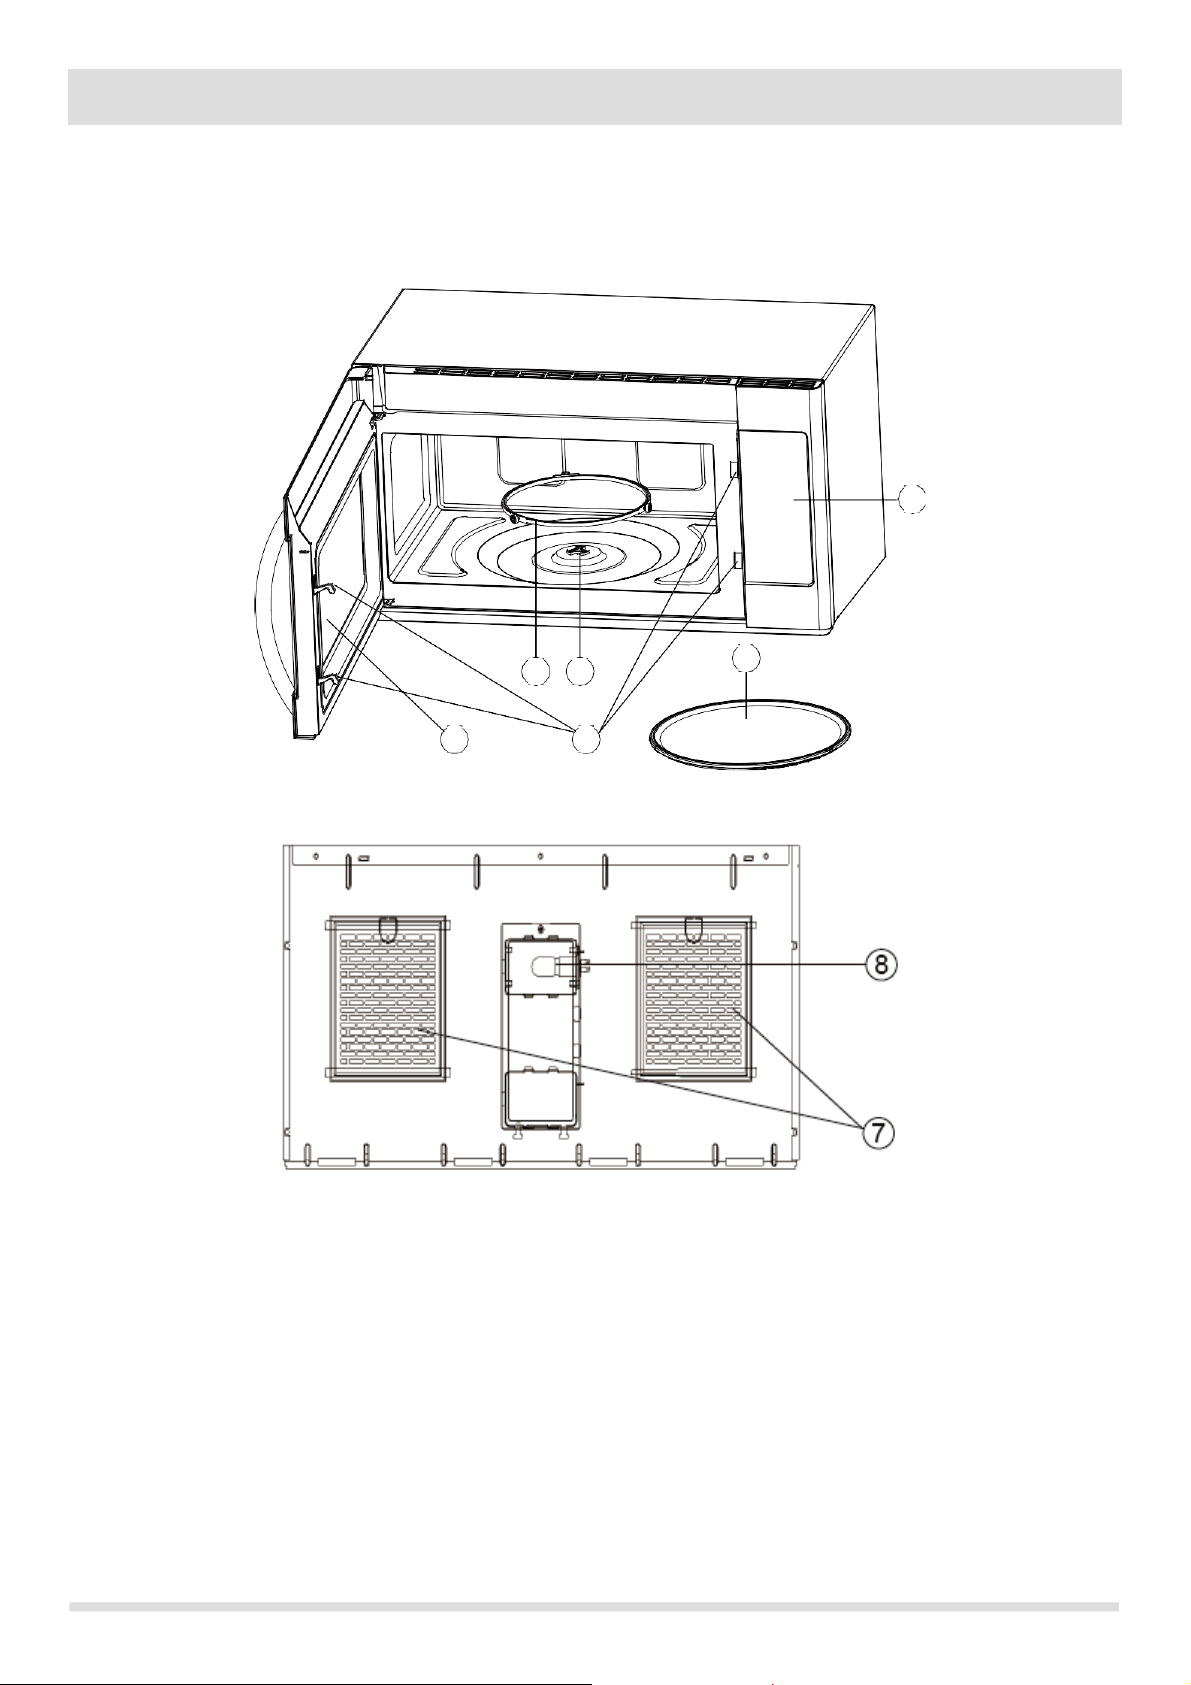
NOMBRE DE PIEZAS
5
4
3
6
2
1
Características de microondas
1. Sistema de Bloqueo de Seguridad de Puerta
2. Ventana del Horno
3. Eje
4. Anillo de Rodillo
5. Panel de Control
6. Bandeja de Cristal
7. Filtro
8. Lámpara de estufa
8
Page 34
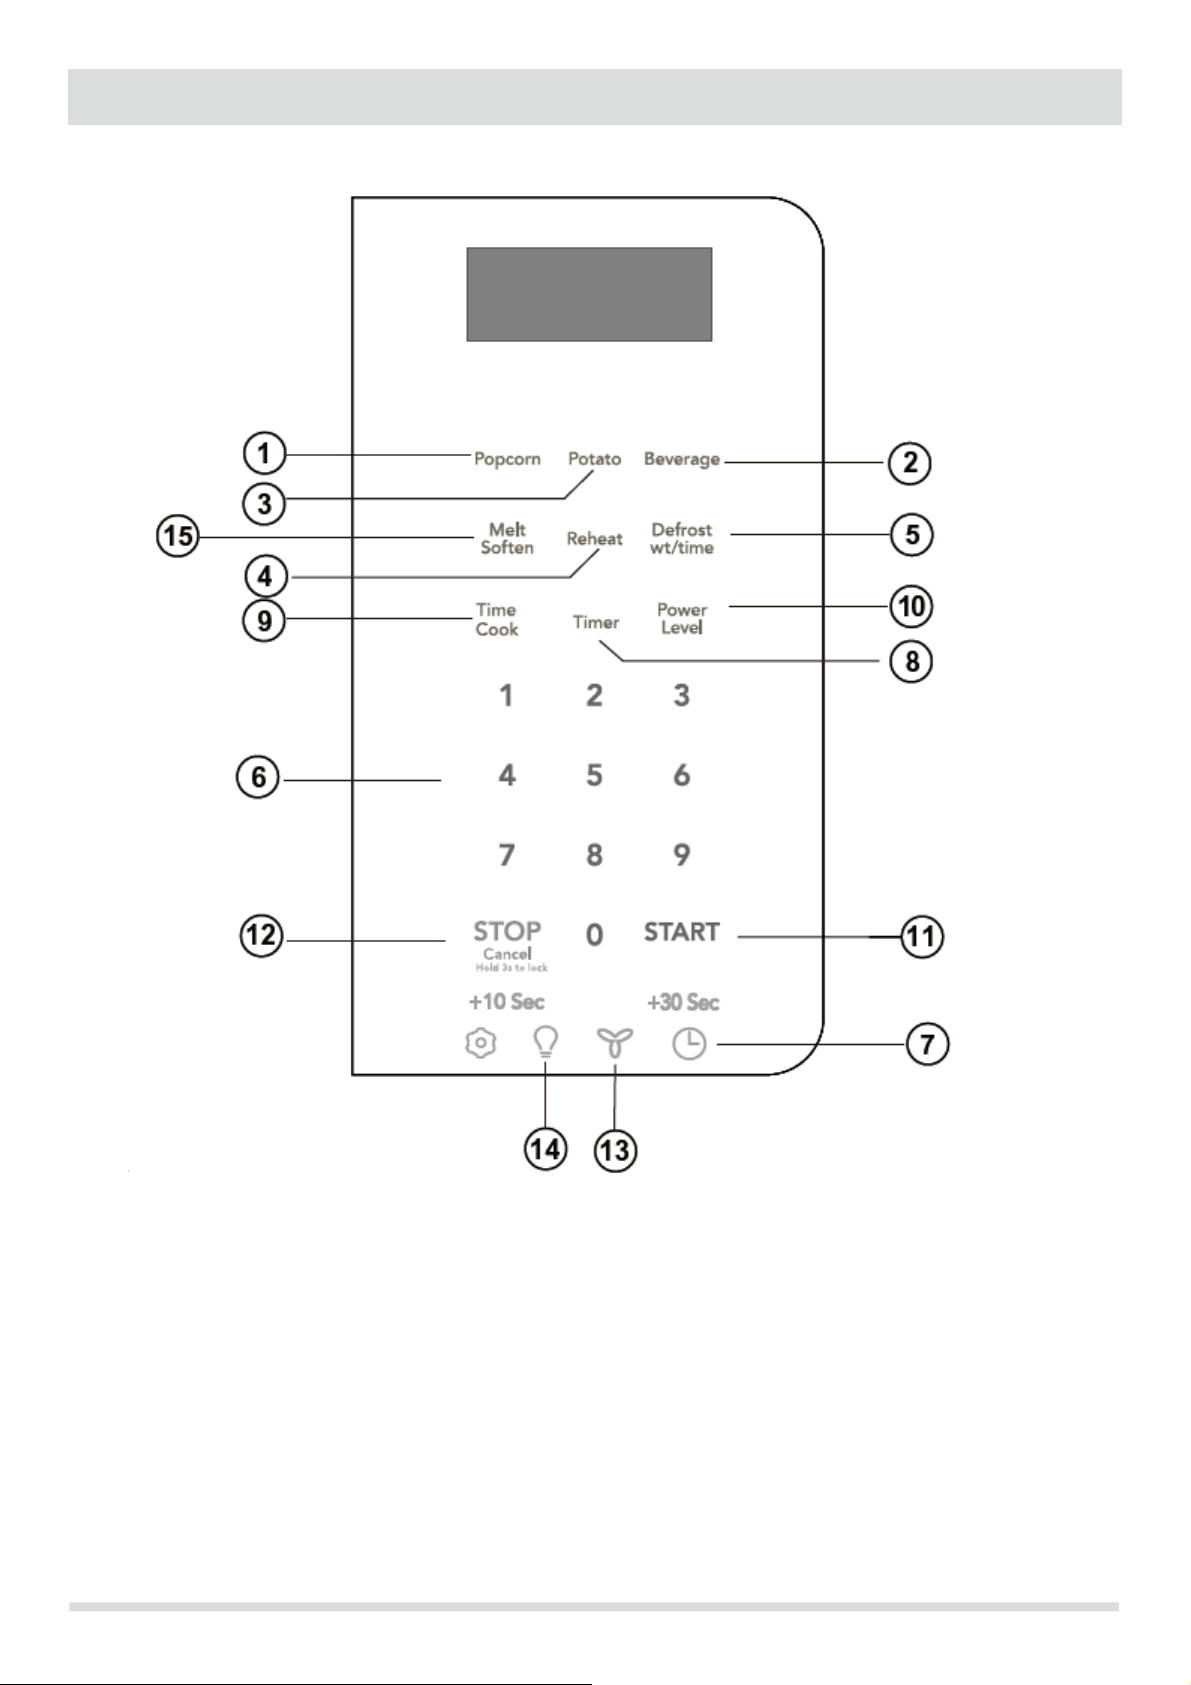
) (
PANEL DE CONTROL
(1) Palomitas (P16)
(2) Bebida (P16)
(3) Patata (1-4 patatass) (P16)
(4) Recalentar (3 configuraciones diferentes) (P14)
(5) Descongelar (por tiempo o peso) (P13)
(6) Teclas numéricas0 a 9
(7) Ajustes del reloj (P10)
(8) Temporizador (P10)
(9) Cocina de tiempo (P11)
(10) Nivel de potencia (10 niveles de potencia
disponibles
P11)
(11) INICIO (P12)
(12) Parar/Cancelar (P12)
(13) Escape (Alto/Bajo/Apagado) ~ Usar para
encender y a pagar la ventilación de escape, o
ajustar la velocidad. (P10)
(14) Luz de superficie ~ Presionar para encender y
apagar la luz de superficie (P10)
(15) Derretir / Suavizar (P14)
NOTAS: Para obtener informaciones detalladas, consulte la página correspondiente anteriormente listada.
9
Page 35
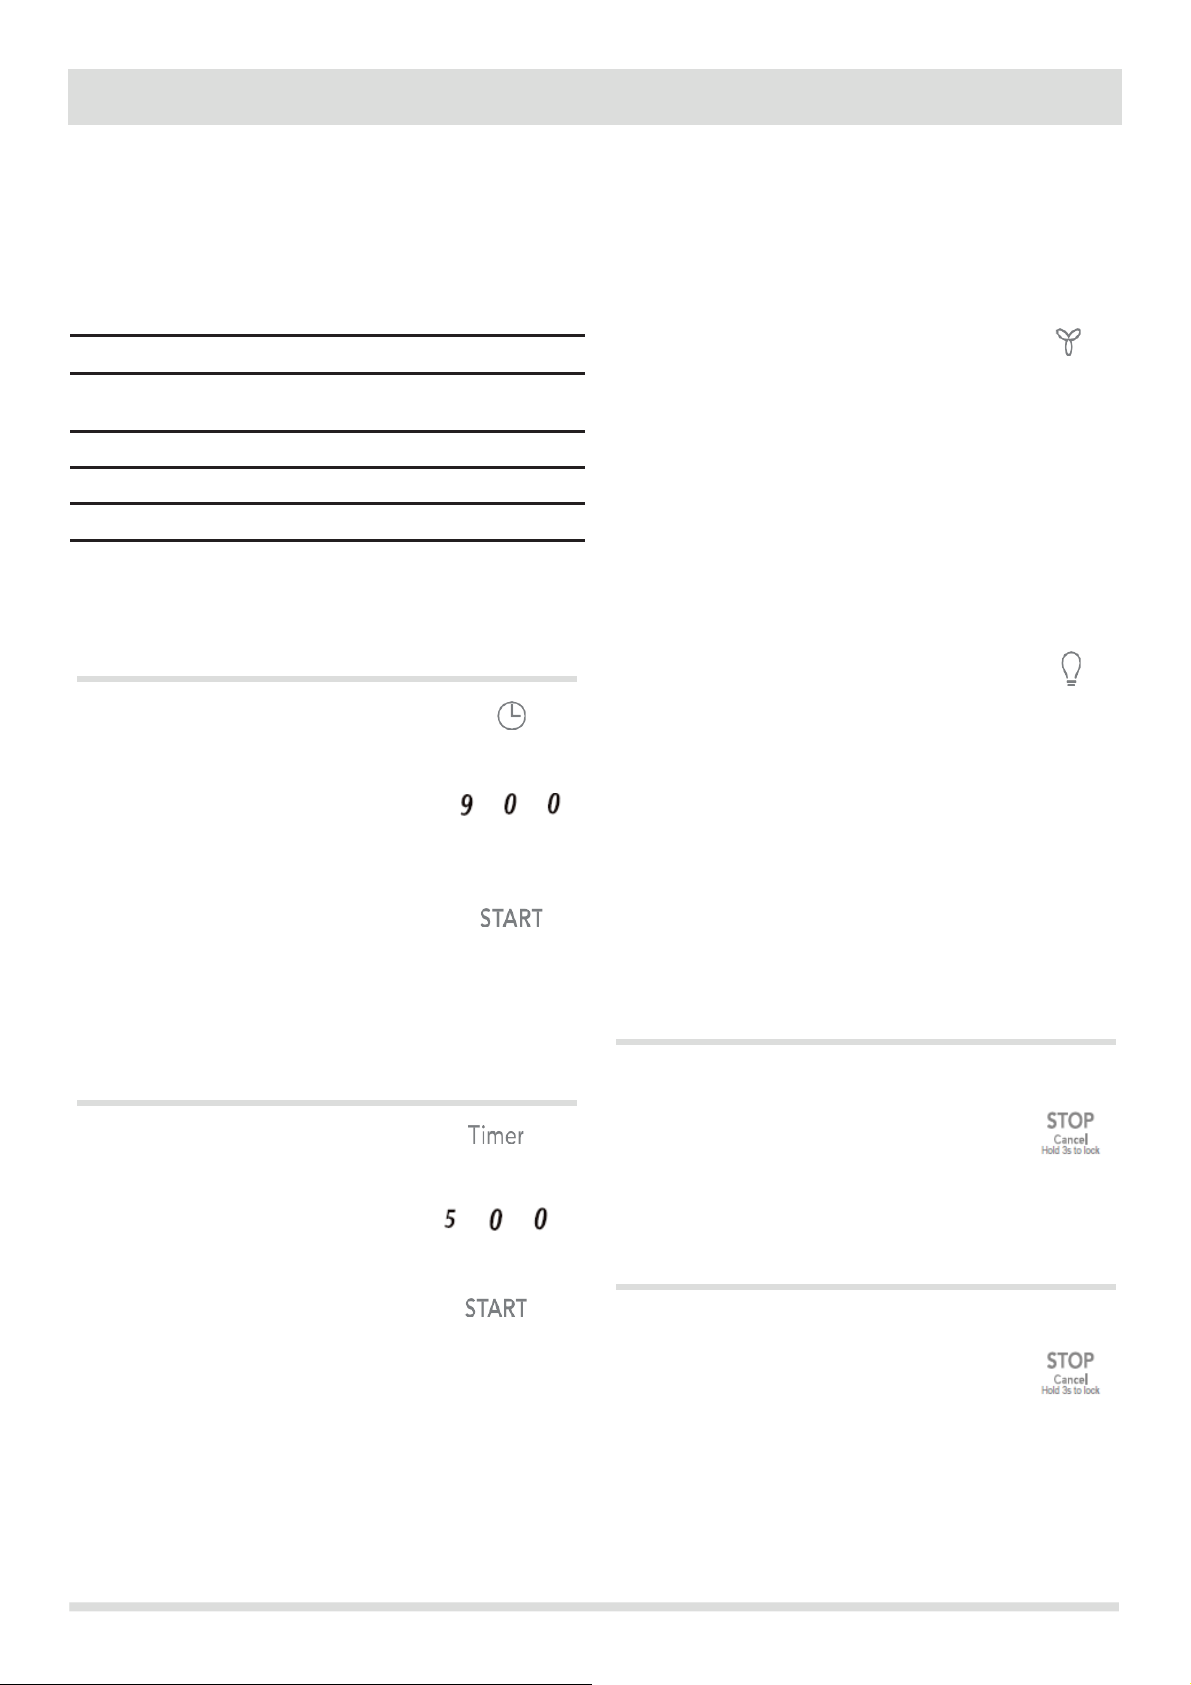
ANTES DE OPERAR
Configuraciones de reloj
El horno de microondas tiene configuraciones que le
permiten personalizar la operación para su
conveniencia. A continuación se muestra la tabla que
muestra las diversas configuraciones. Toque la tecla
Settings
varias veces para desplazarse a la función de
configuración deseada.
Escape Alto/Bajo/Apagado
La ventilación de escape echa el vapor y otros vapores
de cocina de la superficie de cocina del rango debajo
del horno de
microondas.
Para manejar la ventilación de escape, toque
la tecla
Exhaust High/Low/Off una vez para
configuración de velocidad baja. Toque la tecla otra
vez para elegir velocidad alta y una tercera vez para
apagar el ventilador.
NOTA: Si la temperatura se calienta demasiado alrededor del
horno de microondas, el ventilador en el escape se
encenderá automáticamente en la configuración Alta para
enfriar el horno. El ventilador se apagará automáticamente
cuando las partes internas estén frías. Cuando esto ocurre, la
ventilación no se puede apagar.
Luz de superficie On / Off
Toque la tecla Surface Light/On/Off una vez
para la luz de superficie de cocina. Presione la
tecla otra vez para apagarla
.
Bloqueo de Control
Puede bloquear el panel de control para evitar que los niños
enciendan o usen accidentalmente el microondas.
La función de bloqueo de control es muy útil al limpiar el
panel de control. El bloqueo evitará la programación
accidental al limpiar el panel de control.
Ejemplo: a poner el bloqueo de control ON:
Toque y mantenga presionado la tecla Stop/Cancel
por más de 3 segundos. El icono Lock
aparecerá en la ventana de visualización
junto con 1 pitido.
Ejemplo: a cambiar el bloqueo de control de ON a
OFF:
Toque y mantenga presionado la tecla
Stop/Cancel
por más de 3 segundos. El
icono Lock desaparecerá en la ventana de
visualización.
Prestar tecla
Opción
Sonido
Bajo/nor/Alto/Apagado (nor=Normal)
Settings x2
Peso lb/kg
Settings x3
Reloj ON/OFF
Settings x4
Demo
Configuar el reloj
Ejemplo: configurar la pantalla de reloj para 9:00:
1.
Toque Clock una vez .
2.
Ingrese tiempo usando teclas
numéricas.
3.
Toque la tecla START de nuevo.
Cofigurar el temporizador
Ejemplo: configurar temporizador para 5 minutos:
1.
Toque la tecla Timer una vez.
2.
Ingrese tiempo usando teclas numéricas.
3.
Toque la tecla START.
La cuenta regresiva del temporizador no se detiene aunque
se abra la puerta. Para detener / cancelar el temporizador,
presione la tecla START una vez.
Cuando el temporizador haya llegado al final del tiempo
establecido, oirá alertas de pitido que indican q
temporizador se ha agotado.
Settings x1
10
ue el
Page 36
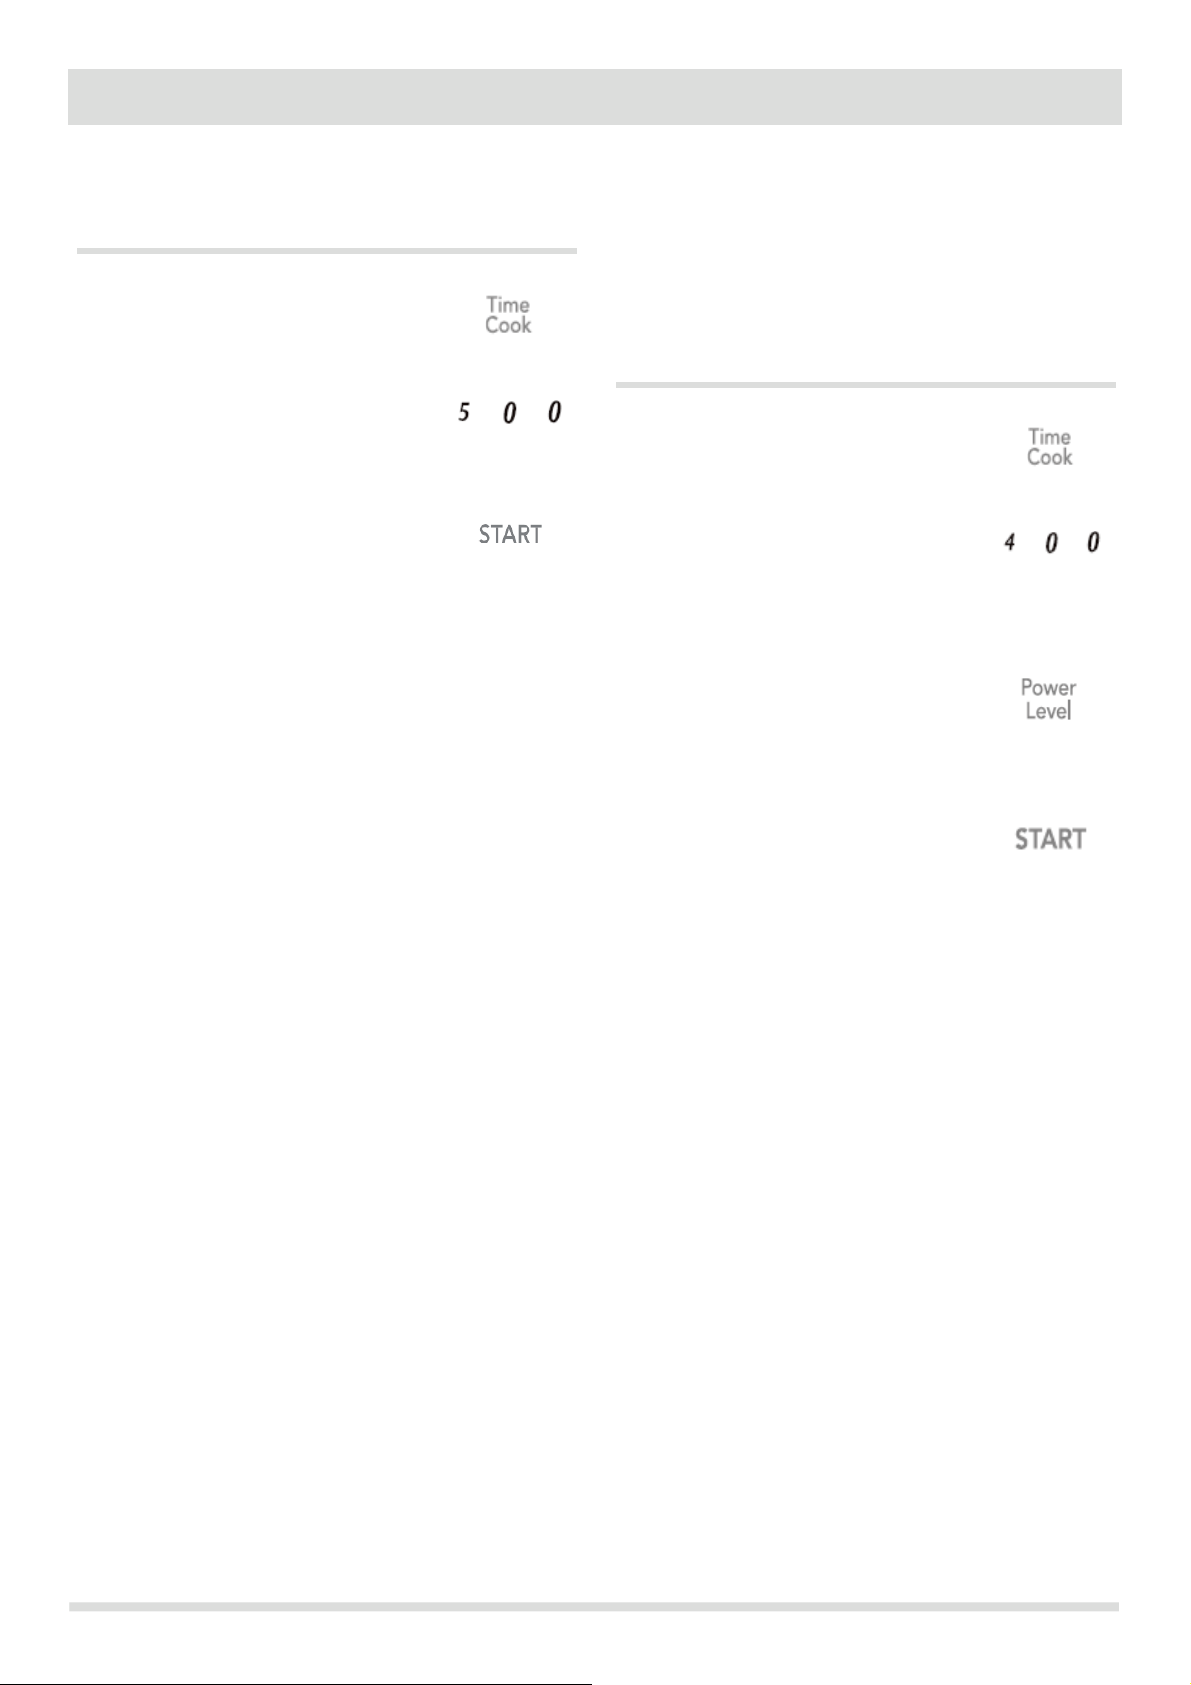
11
COCINA MANUAL
Calentar con alto nivel de potencia
Ejemplo: a calentar durante 5 minutos al 100% de
potencia:
1.
Presione la tecla Time Cook.
2.
Use las teclas numéricas para
ingresar tiempo de calentamiento
deseado (puede ser hasta 99 minutos
y 99 segundos).
3.
Toque la tecla START.
Cuando haya terminado de calentar, escuchará pitidos y se
mostrará "End".
Calentar con bajo nivel de potencia
El hecho de usar el nivel de potencia más alto para calentar
los alimentos no siempre da los mejores resultados cuando
algunos tipos de alimentos necesitan una cocina más lenta,
como asados, productos horneados o natillas. Su horno tiene
otros nu
eve niveles de potencia que puede elegir.
Ejemplo: a calentar durante 4 minutos al 70% de
potencia:
1.
Presione Cook Time.
2.
Use las teclas numéricas para ingresar
tiempo de calentamiento deseado
(puede ser hasta 99 minutos y 99
segundos).
3.
Presione la tecla Power Level 4 veces
nivel de potencia 7 (70% de potencia).
PL
-70 aparece en la pantalla (70% de
potencia).
4.
Presione la tecla START.
Cuando haya terminado de calentar, escuchará pitidos y se
mostrará "End".
Page 37
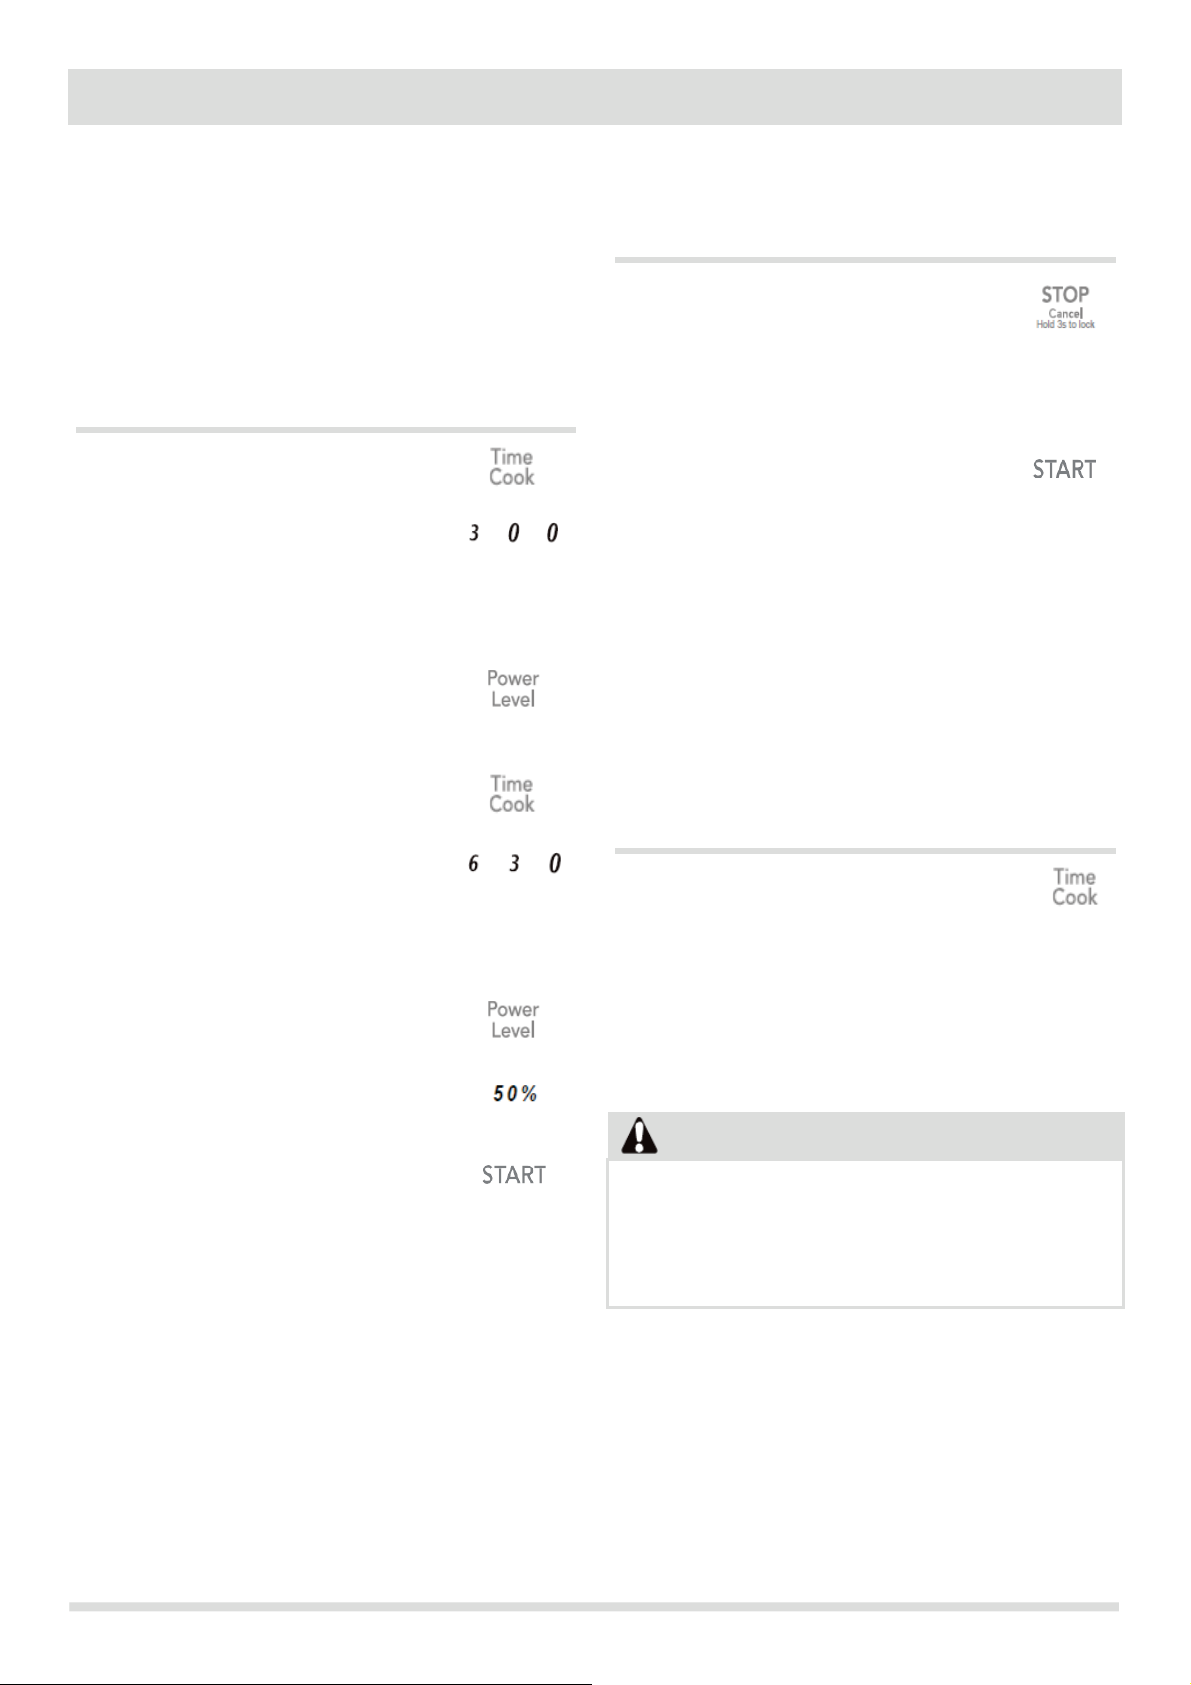
COCINA MANUAL
Calentar con múltiples etapas de
cocción
Para obtener mejores resultados, algunas recetas de
microondas requieren diferentes niveles de potencia o
diferentes períodos de tiempo para cocinar. Su
microondas puede configurarse para cambiar de una
etapa a otra automáticamente (2 etapas como
máximo).
Ejemplo: a cocinar alimentos durante 3 minutos al 80%
de potencia y luego 50% por 6 minutos 30 segundos
:
1.
Presione Time Cook .
2.
Use las teclas numéricas para
ingresar el tiempo de
calentamiento de la primera etapa
(puede ser hasta 99 minutos y 99
segundos).
3.
Presione la tecla Power Level pad
3 veces para
PL-80 (80 % de
potencia).
4.
Presione la tecla Time Cook para
la secunda etapa.
5.
Use las teclas numéricas para
ingresar
el tiempo de
calentamiento de la secunda etapa
(puede ser hasta 99 minutos y 99
segundos).
6.
Presione la tecla Power Level para
la secunda etapa.
7.
Presione la tecla Power Level 6
veces para PL-50 (50 %).
8.
Presione la tecla START.
Cuando haya terminado de calentar, escuchará pitidos
y se mostrará "End".
NOTA:
El nivel de potencia siempre debe programarse para la
primera etapa.
Usar la tecla Stop/Cancel
Esta característica le permitirá parar o cancelar
rápidamente el proceso de cocina.
Toque la tecla Stop/Cancel para:
1.
Borrar si ha ingresado información
incorrecta.
2.
Cancelar el proceso de configuración
del temporizador.
3.
Presione la tecla una vez para pausar
el horno temporalmente durante la
cocina. (Toque la tecla
START
nuevamente para reanudar la
cocina.).
4.
Regresar la hora del día (reloj) a la
pantalla después de completar el ciclo
de cocina.
5.
Cancelar un programa durante la
cocina, toque dos veces.
Usar la tecla Start
Esta característica le permitirá comenzar
rápidamente o agregar 30 segundos
1.
Presione time cook.
2.
Presione + 30 para 30 segundos al
100% nivel de potencia
3.
Extienda el tiempo de cocina en
múltiplos de 30 segundos cada vez que
se toca este panel TS durante la cocina
en microondas.
NOTAS
“Food” se mostrará durante 5 segundos una vez que
empiece a cocinar si no se selecciona un ciclo de
cocina o no abre y cierra la puerta en 5 minutos. Debe
abrir la puerta para comenzar a cocinar.
12
Page 38
13
COCINA MANUAL
Configurar para descongelar (por
peso)
Ejemplo: a descongelar 1lb. de alimentos al nivel
de potencia nominal y tiempo de cocina
determinado automaticamente:
1.
Presione la tecla Defrost una vez. 0.0
aparecerá en la pantalla.
2.
Use las teclas numéricas para
ingresar el peso de los alimentos por
descongelar en libras (10 = 1.0lb.)
Puede ingresar cualquier peso de 0.1
a 6.0lbs.
3.
Presione la tecla START.
Cuando haya terminado de descongelar, escuchará
pitidos y se mostrará "End".
NOTA:
La cantidad de peso debe ser una entrada
válida para que esta función comience. Una entrada de
peso válida es de 0.1 a 6.0 libras.
Configurar para descongelar (por
tiempo)
Ejemplo: a descongelar alimentos al nivel de
potencia 30% por 5 minutos:
1.
Presione la tecla Defrost dos
veces.
0:00 aparecerá en la
pantalla.
2.
Use las teclas numéricas para
ingresar el tiempo de
descongelación deseado (puede
ser hasta 99 minutos y 99
segundos.
3.
Presione la tecla START.
Cuando haya terminado de calentar, escuchará pitidos
y se mostrará "End".
NOTA:
Los niveles de potencia no se pueden cambiar
tanto para descongelar (por peso) como para
descongelar (por tiempo) porque afectará el
rendimiento del descongelamiento negativamente.
NOTAS especiales para descongelar por peso y tiempo
• Depués de presionar la tecla START, la pantalla mostrará una cuenta regresiva del tiempo de descongelamiento
restante. El horno emitirá un pitido durante el ciclo de descongelación. En este momento, abra la puerta, gire la
comida y retire cualquier porción que ya se haya descongelado. Toque la tecla START para reanudar el ciclo de
descongelamiento.
• Cuando haya terminado de calentar, escuchará pitidos.
Page 39
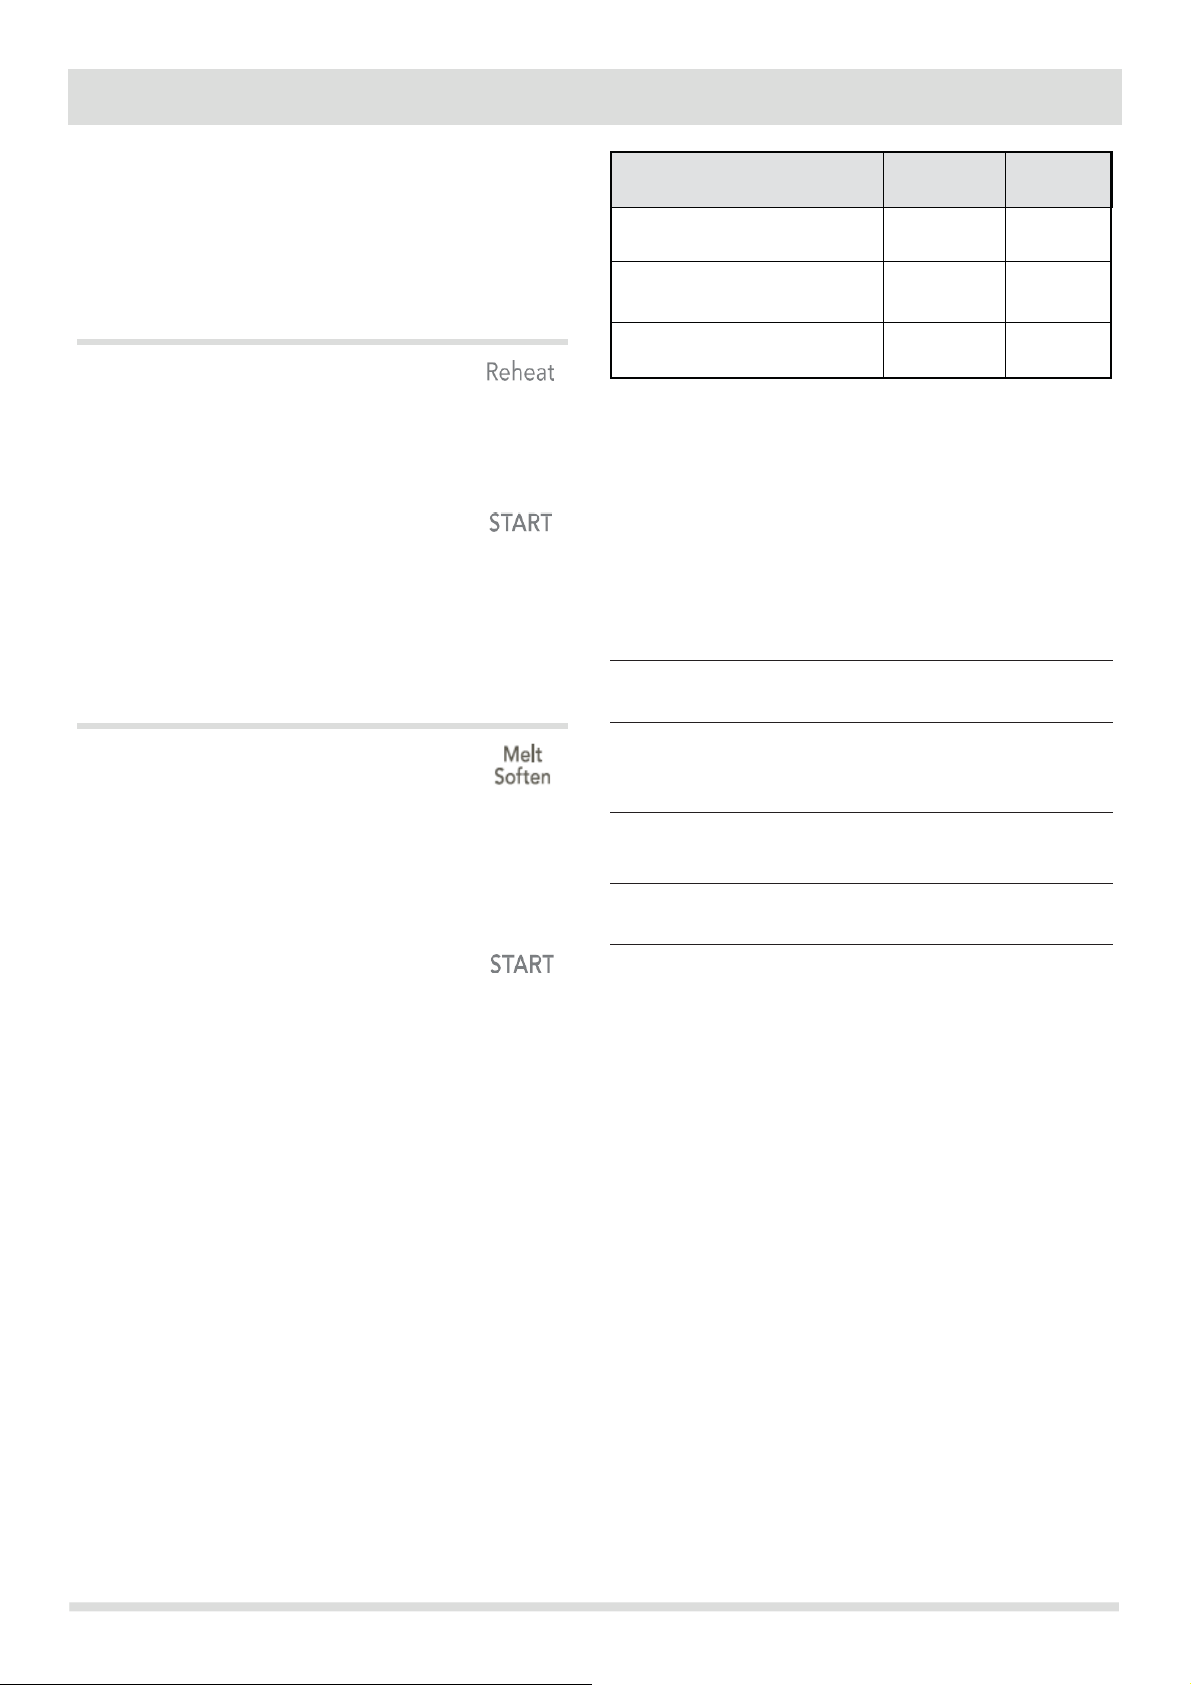
COCINA MANUAL
Reheat
La función de recalentamiento proporciona 3
configuraciones predeterminadas rápidas en base
del tamaño de la porción para recalentar los
alimentos para su conveniencia de cocina.
Ejemplo: a calentar 24 onzas de alimentos.
1.
Presione la tecla Reheat 3 veces
(consulte tabla de categoría de
recalentamiento
) para recalentar 24
onzas de alimento.
24 oz aparecerá
en la pantalla
2.
Presione la tecla START.
Categoría de
Recalentamiento
Presionar
Pantalla
8 onzas de alimentos
una vez
8 oz
16 onzas de alimentos
2 veces
16 oz
24
3 veces
24 oz
Derretir / Suavizar
El horno utiliza potencia baja para derretir y
ablandar artículos. Vea la siguiente tabla.
Ejemplo: a derretir 8 oz. de queso crema.
1.
Presione la tecla Melt/Soften 4
veces para recalentar 8oz. de
alimentos
pantalla
Derretir / Suavizar).
Luego presione la tecla numérica 2,
8 oz
aparecerá en la pantalla.
2.
Presione la tecla START.
CATEGORÍA DE DERRETIR / SUAVIZAR
PRESIONAR
PANTALLA
CATEGORIA
CANTIDAD
TECLA
Melt
Soften
x 1
1
MANTEQUILLA
1 stick
1
2 barras
2
Melt
Soften
x 2
2
CHOCOLATE
2 oz.
1
4 oz.
2
8 oz.
3
Melt
Soften
x 3
3
GELADO
1 Pint
1
1.5 Quart
2
Melt
Soften
x 4
4
QUESO DE
3oz.
1
8oz.
2
onzas de alimentos
So-
. So-4 aparecerá en la
(Consulte categoría de
So-
So-
So-
CREMA
14
Page 40
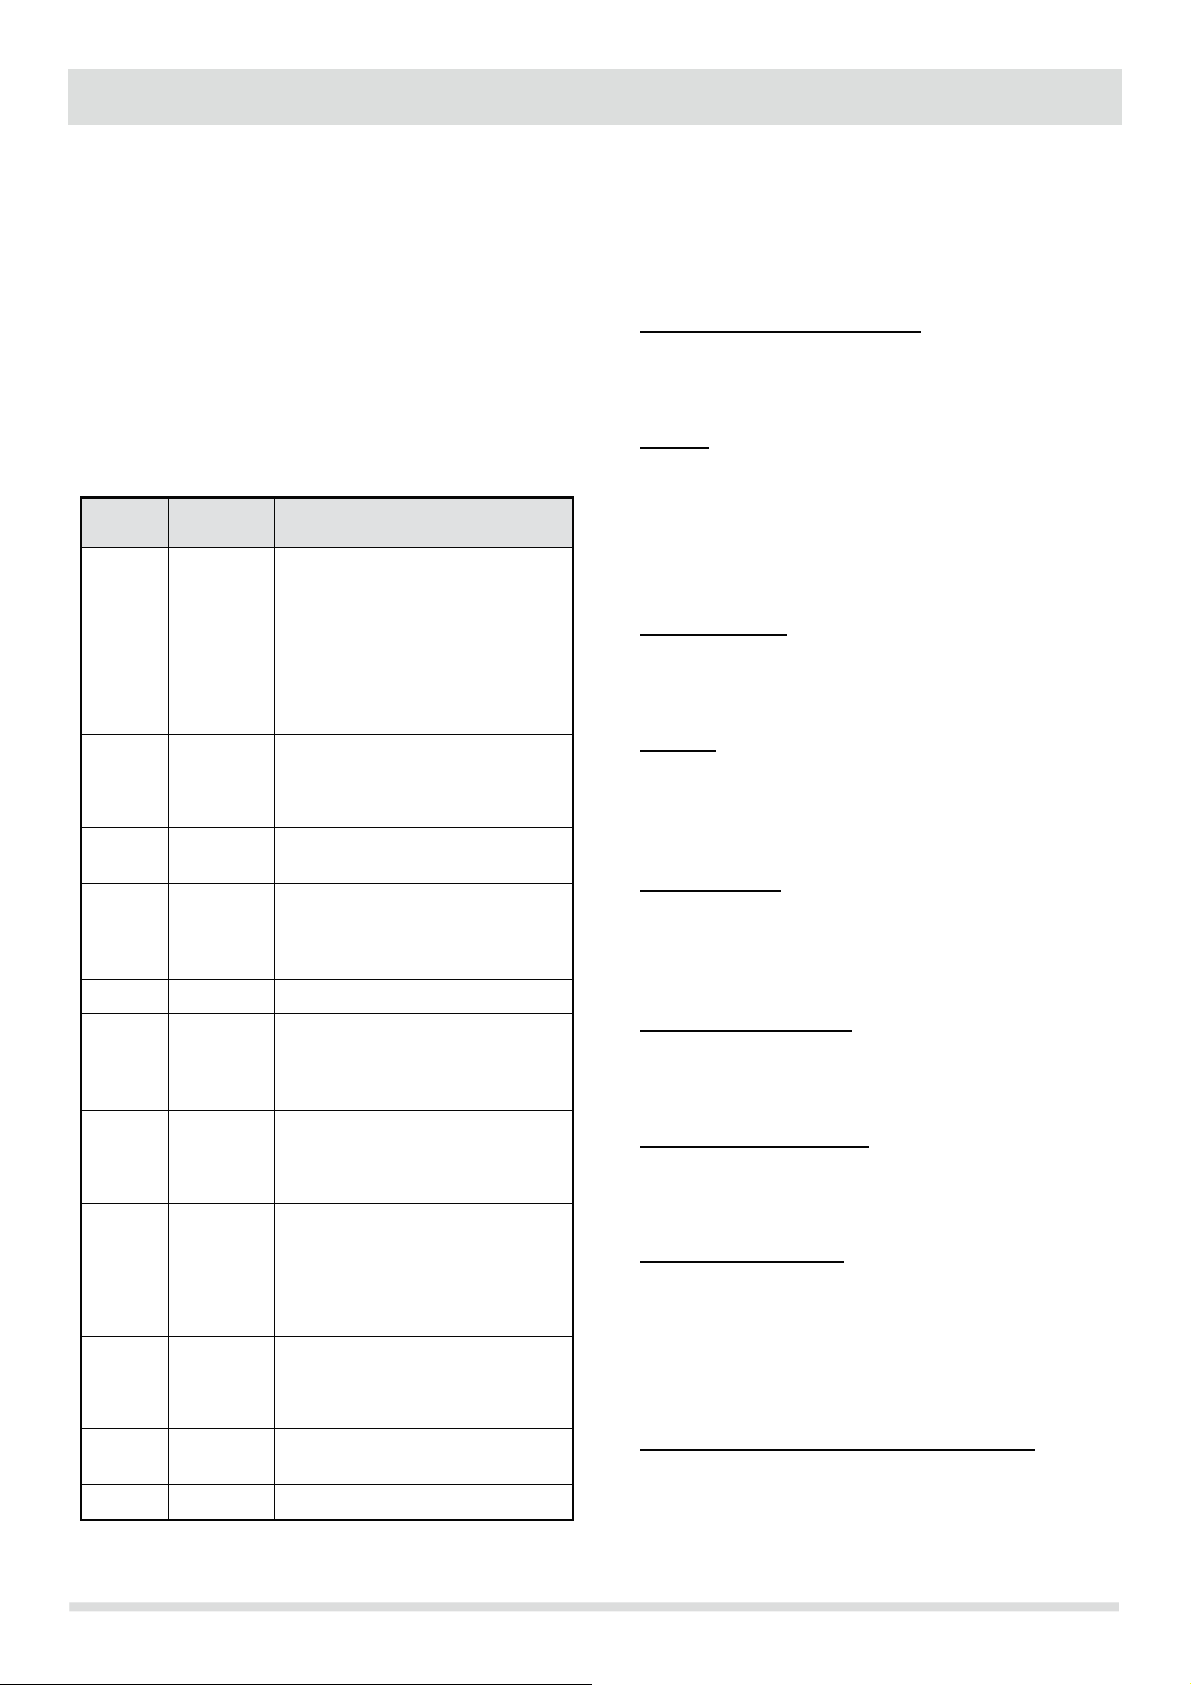
15
COCINA MANUAL
Niveles de potencia sugeridos para
cocinar
Los 10 niveles de potencia disponibles con este
microondas lo ayudarán a adaptarse a la potencia de
salida más adecuada para el tipo de alimento que está
preparando. Al igual que con cualquier preparación de
alimentos en el microondas, es mejor seguir las
instrucciones de microondas que están impresas en el
empaque de los alimentos.
La siguiente tabla proporciona niveles de potencia
sugeridos para varios tipos de alimentos que puede
preparar en el microondas.
Nivel
Potencia
Salida
microondas
Usar para preprar cuando:
PLHI
100 %
• Hriviendo el agua.
•
Cocinando ternera molida.
•
Hacienda dulces.
• Cocinando frutas y verduras frescas
•
Cocinando pollo y pescado.
•
Precalentando plato dorador.
•
Recalentando bebidas.
• Cocinando rebanadas de tocino.
PL-
90
90 %
• Recalentando lonchas de carne
rápidamente.
• Salteando cebollas, apio y pimientos
verdes.
PL-
80
80 %
• Recalentando todo.
• Hacienda huevos revueltos.
PL-
70
70 %
• Haciendo panes y productos de
cereales.
• Cocinando platos de queso y ternera.
• Tortas, muffins, brownies y cupcakes.
PL-60
60 %
• Cocinando pasta.
PL-
50
50 %
• Cocinando carne y pollo entero.
•
Cocinando natillas.
•
Cocinando costillas, asados y
solomillos.
PL-
40
40 %
• Cocinando cortes de carne menos
tiernos.
• Recalentando alimentos envasados
congelados.
PL-
30
30 %
• Descongelando carne, pollo y
marisco.
• Cocinando pequeñas cantidades de
alimentos.
•
Terminando de cocinar guisoos,
estofados y algunas salsas.
PL-
20
20 %
• Suavizando mantequillas y queso
crema.
• Calentando pequeñas cantidades de
alimentos.
PL-
10
10 %
• Suavizando helado.
• Levantando levadura.
PL-0
0 %
• Modo demo.
Sugerencias para obtener los mejores
resultados
Para ayudarlo a lograr los mejores resultados posibles de su
horno de microondas, lea las siguientes sugerencias a
continuación;
• Temperatura de almacenamiento
Los alimentos tomados del congelador o refrigerador
tardan más en cocinarse que los mismos alimentos a
temperatura ambiente.
• Tamaño
Las piezas pequeñas de alimentos se cocinan más rápido
que las grandes. Las piezas de tamaño y forma similares
se cocinarán de manera más uniforme cuando se cocinen
juntas. Para obtener resultados más uniformes, reduzca
los niveles de potencia al cocinar grandes piezas de
comida.
• Humedad natural
Los alimentos muy húmedos se cocinan de manera más
uniforme porque la energía de microondas calienta las
moléculas de agua de manera muy eficiente.
• Revolver
Revuelva alimentos como guisos y vegetales desde el
exterior hacia el centro para distribuir el calor de manera
más uniforme. Esto permitirá que la comida se cocine más
rápido. El movimiento constante no es necesaria.
• Voltear artículos
Voltee los alimentos como chuletas de cerdo, asados o
coliflor entera a la mitad del tiempo de cocina. Esto
ayudará a exponer todos los lados por igual a la energía
de microondas.
• Colocación de alimentos
Coloque áreas delicadas de alimentos, como puntas de
espárragos, hacia el centro de la bandeja del plato
giratorio.
• Organización de alimentos
Organice los alimentos de forma desigual, como trozos de
pollo o salmón, con las partes más gruesas o más
carnosas hacia el exterior de la bandeja del plato giratorio.
• Dejar reposar la comida
Después de retirar el alimento del microondas, cúbralo con
lámina de aluminio o con una tapa de cacerola y déjelo
reposar para terminar de cocinar. Esto ayudará a que la
comida se termine en el centro y evitará que los bordes se
sobrecocinen. La duración del tiempo de reposo depende
de la densidad y el área de superficie de los alimentos.
• Envolver en toallas de papel o papel encerado
Los sándwiches y muchos otros tipos de alimentos que
contienen pan precocido deben envolverse antes de
co
locarlos en el microondas para ayudar a evitar que los
alimentos se sequen mientras se calientan.
Page 41
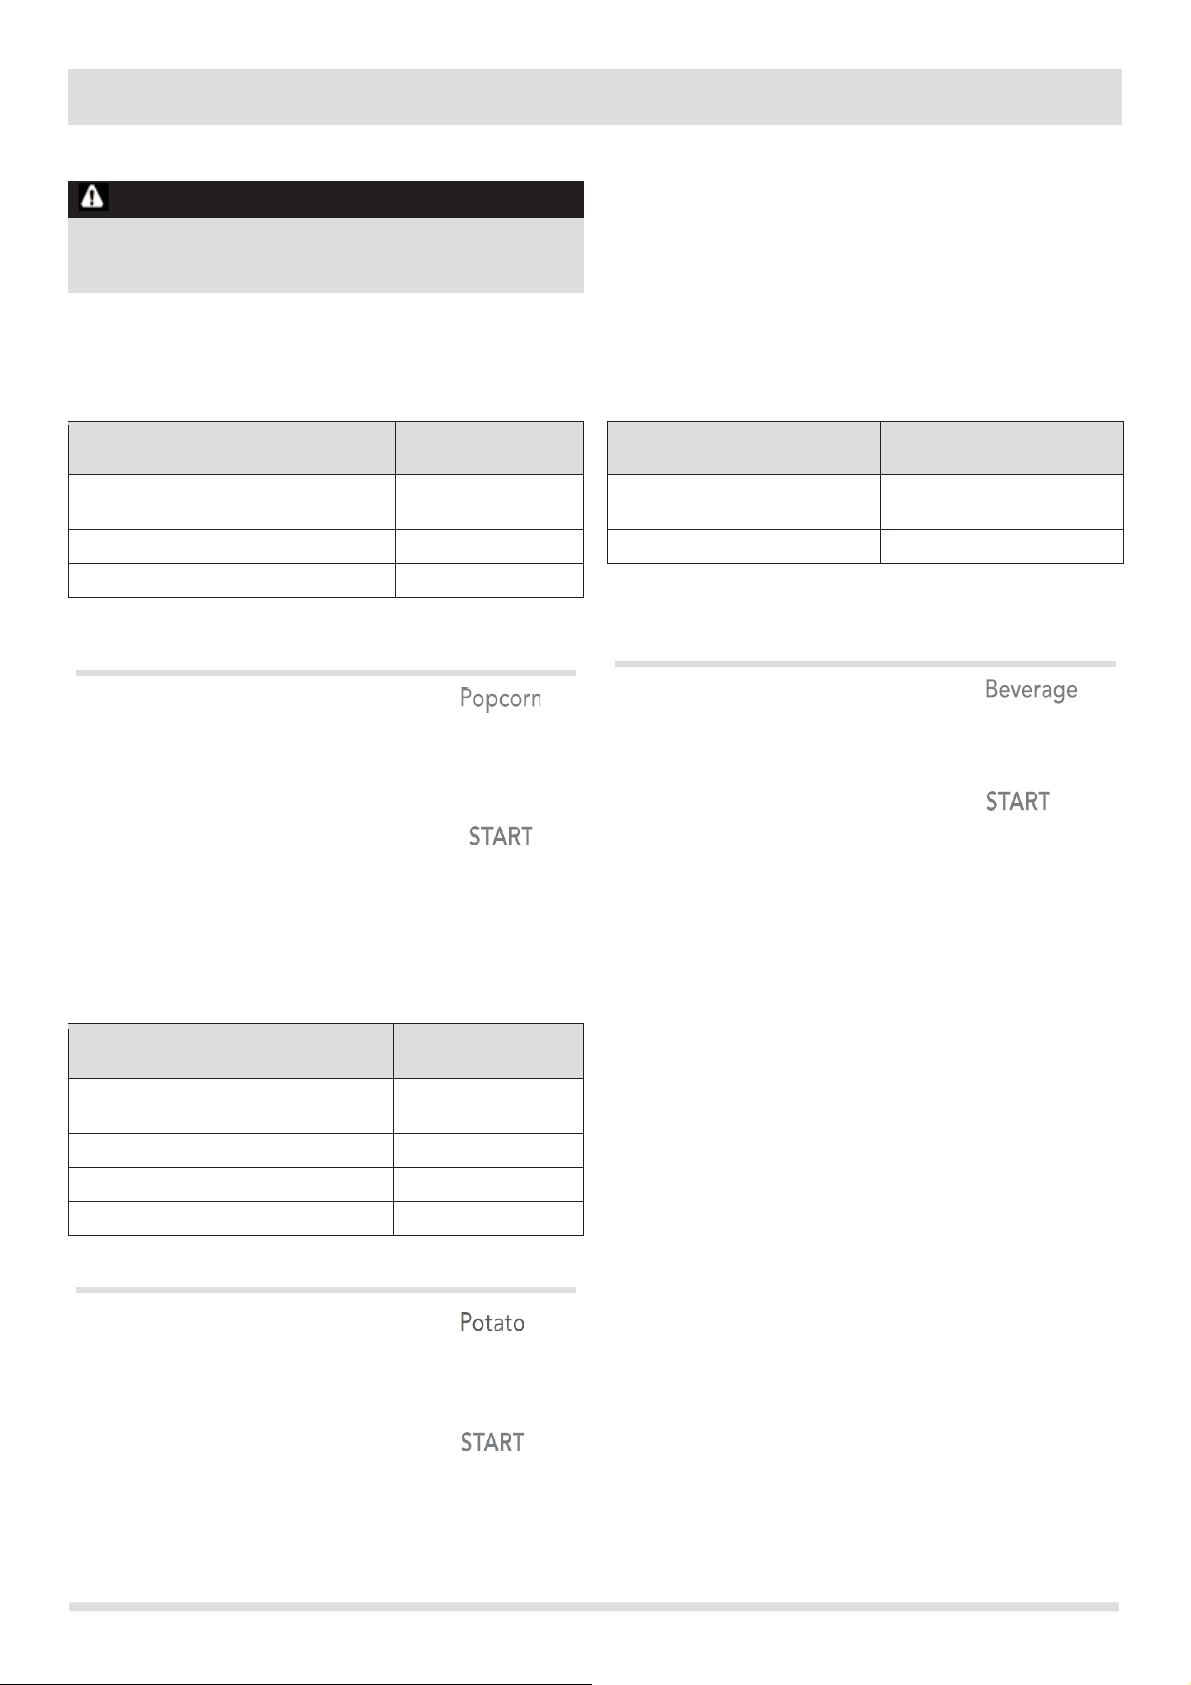
COCINA AUTOMÁTICA
CAUTION
El microondas emitirá un pitido cuando termine.
NOTAS:
• Antes de cocinar, perfore las patatas con un tenedor varias
veces.
• Después de cocinar, deje reposar las patatas por 5
minutos.
Bebida
La función de bebidas calienta 1 o 2 tazas de bebida. Use la
tabla a continuación para determinar la configuración a usar.
La función de palomitas le permite preparar 3 bolsas
diferentes de palomitas para microondas empaquetadas
comercialmente. Use la tabla a continuación para determinar
la configuración a
Cantidad
Presione la tecla
Popcorn
Cantidad
Presione la tecla
Beverage
3.3 oz. (configuración
predeterminada)
1 taza (acerca de 8 oz.)
una vez (configuración
predeterminada)
3.0 oz.
2 veces
2 tazas (acerca de 16 oz.)
2 veces
1.75 oz.
3 veces
Ejemplo: a calendar una taza de bebida.
1.
Presione la tecla Beverage una vez.
2.
Presione la tecla START.
El microondas emitirá un pitido cuando termine.
Ejemplo: a hacer una bolsa de palomitas de 3.0 oz. de
forma automática.
1.
Presione la tecla Popcorn 2 veces.
2.
Presione la tecla START.
El microondas emitirá un pitido cuando termine.
Patata
La función de patata cocina 1, 2, 3 o 4 patatas (tiempos de
cocina basados en 8 a 32 oz.) de patatas automáticamente.
Use la tabla a continuación para determinar la configuración a
usar.
Cantidad
Presione la tecla
Patata
1 patata (configuración
predeterminada)
2 patatas
2 veces
3 patatas
3 veces
4 patatas
4 veces
Ejemplo: a cocinar 1 patata automáticamente.
1.
Presione la tecla Potato una vez.
2.
Presione la tecla START.
Palomitas
Ь NO deje el horno de microondas sin vigilancia
mientras hace palomitas.
usar.
una vez
16
una vez
Page 42
17
COCINA AUTOMÁTICA
Categoría de
Conveniencia
Cantidad
Sugerencia
Palomitas
1.75,3.0,
3.3 oz. 1
pkg.
Cocine a la vez una sola bolsa de palomitas “solo para microondas”. Tenga
cuidado al retirar del horno y abrir la bolsa de palomitas caliente. Deje que
el horno de microondas se enfríe al menos 5 minutos antes de volver a
usarlo.
Patata
1,2,3,4
patatas
8,16,24,36
Perfore cada patata varias veces con un tenedor. Coloque en el plato
giratorio en forma de radio. Después de cocinar, deje reposar durante 3
5
minutos. Deje que el horno se enfríe durante al menos 5 minutos antes de
usar de nuevo. Use la tecla de + 30 segundos para aumentar el tiempo de
cocina para patatas más grandes
Bebida
1,2 tazas
(8 oz,16
Use una taza o taza medidora apta para microondas; no cubra. Coloque la
bebida en el microondas. Después de calentar, revuelva bien. Deje enfriar
el horno durante al menos 5 minutos antes de volver a usar. Las bebidas
calentadas con la categoría de bebidas pueden estar muy calientes.
Retire el recipiente con cuidado.
Sugerencias para conveniencia de cocina
oz
oz)
-
Page 43
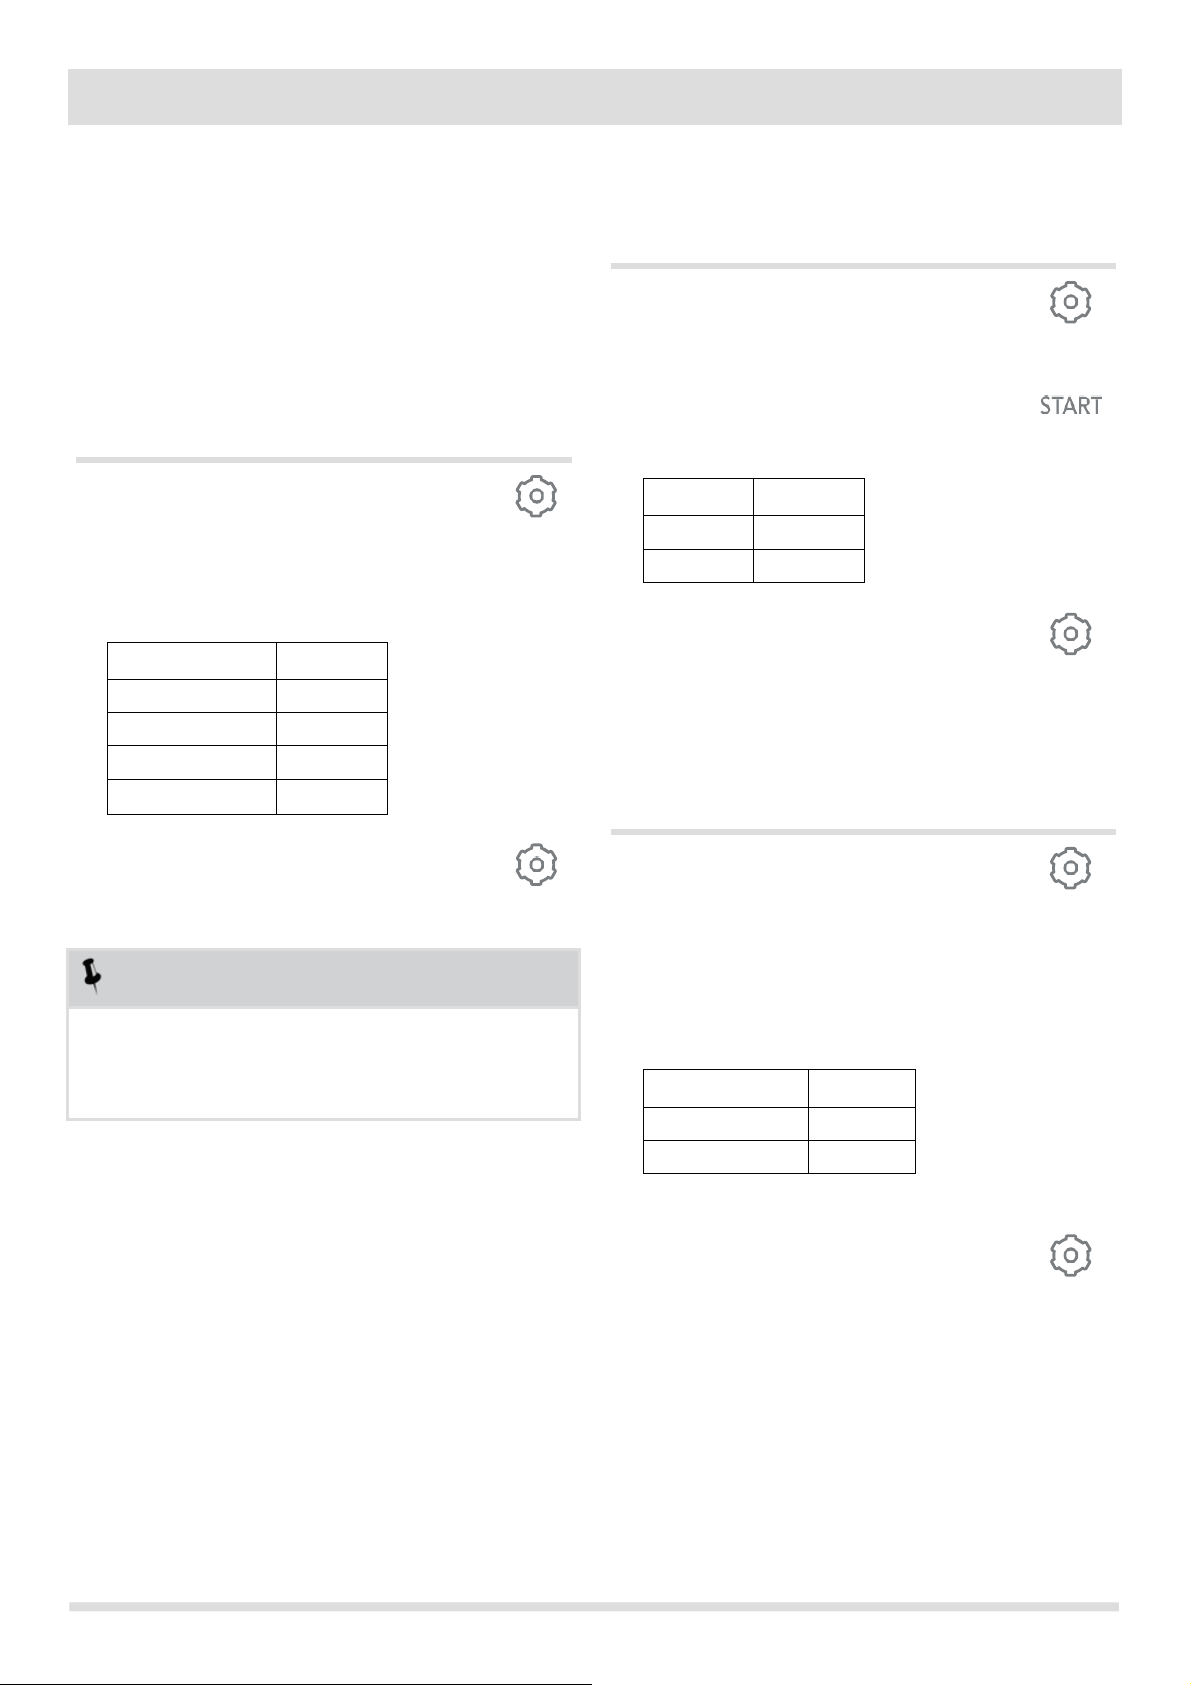
CARACTERÍSTICAS CONVENIENTES
Configurar el Sonido
Poniendo el Sonido Bajo/nor/Alto/Apagado
Las señales audibles están disponibles para guiarlo
al configurar y usar su horno.
• Se escuchará un tono de programación cada
vez que toque una tecla.
• Tres tonos señalan el final de una cuenta
regresiva del temporizador de cocina.
• Tres tonos señalan el final de un ciclo de cocina.
Ejemplo: apagar la señal audible:
1.
Toque la tecla Settings una vez
2.
Op-1 se mostrará
3.
Nivel de Sonido
Presionar
Bajo
1
Normal
2
Alto
3
Apagado
4
4.
Toque la tecla Settings para confirmar
Configurar Peso Ib/Kg
Ejemplo: configurar peso entre libras &
kilogramos:
1.
Toque la tecla Settings 2 veces.
2.
Op-2 se mostrará
3.
Unidades
Presionar
Lb
1
kg
2
4.
Toque la tecla Settings para
confirmar su selección.
APAGAR LA PANTALLA DEL
RELOJ
1.
Presione la tecla Settings 3 veces.
2.
Op-3 se mostrará.
3.
Pantalla de reloj
Presionar
ON
1
OFF
2
4.
Toque la tecla Settings para
confirmar que el LED se muestra
encendido.
NOTAS
Cuando se complete el ciclo de cocina, se mostrará
END y la señal audible sonará si el sonido está
activado.
18
Page 44
19
CARACTERÍSTICAS CONVENIENTES
Configurar Modo Demo
Ejemplo: poner en modo demo:
Suponga que desea ponerlo en modo Demo.
Cuando el modo Demo está activado, las
características de programación funcionarán en
un modo de cuenta regresiva rápida sin potencia
de cocina
.
1.
Toque la tecla Settings 4 veces.
2.
Op-4 se mostrará.
3.
Demo
Presionar
ON
1
OFF
2
4.
Toque la tecla Settings para
confirmar cuando la pantalla sigue
activada.
Page 45

LIMPIEZA Y CUIDADO
puerta abierta para desactivar el horno durante la
EXTERIOR
La superficie exterior es de acero y plástico
prerrevestidos
agua; enjuague y seque con un paño suave. No utilice
ningún tipo de limpiador doméstico o abrasive.
PUERTA
Limpie la ventana en ambos lados con un paño suave
para eliminar cualquier derrame o salpicadura. Las
partes metálicas serán más fáciles de mantener si se
limpian con un paño suave con frecuencia. Evite el uso
de aerosoles y otros limpiadores fuertes, ya que
pueden manchar, rayar u opacar la superficie de la
puerta.
ACERO INOXIDABLE FACÍL DE CUIDAR/
ACERO INOXISAB
LODOS/ ACERO INOXIDABLE NEGRO
(ALGUNOS MODELOS)
Su horno de microondas (algunos modelos) puede
tener un acabado o revestimiento de acero inoxidable.
Limpie el acero inoxidable con agua jabonosa tibia
usando una esponja o paño limpio. Enjuague con agua
limpia y seque con un paño suave y limpio.
NO use NINGÚN limpiador comprado en la tienda
como limpiadores de Acero Inoxidable o cualquier otro
tipo de limpiadores que contengan abrasivos, cloruros,
cloro o amoníaco. Se recomienda usar agua y jabón
suave para platos o una solución 50/50 de agua y
vinagre.
PANEL DE CONTROL
Hay de tener cuidado al limpar el panel de control. Si el
panel de control se ensucia, abra la puerta del horno
de microondas antes de limpiar. Limpie el panel con un
paño ligeramente humedecido solo con agua. Seque
con un paño suave. No frote ni use ningún tipo de
limpiador químico. Cierre la puerta y toque
STOP/Cancel.
INTERIOR
Es facíl la limpieza ya que se genera poco calor en las
superficies interiores. Para limpiar las super
interiores, limpie con un paño suave y agua tibia. NO
USE LIMPIADORES ABRASIVOS O FUERTES O
ALMOHADILLAS. Para suciedad para más fuerte, use
bicarbonato de sodio o un jabón suave; enjuague bien
con agua caliente. La rejilla y el estante de alambre
redondo se pueden limpiar con agua jabonosa caliente,
se puede enjuagar y secar.
CUBIERTA DE GUÍA DE ONDA
La cubierta de la guía de onda está ubicada en el lado
derecho de la cavidad del horno de microondas. Está
hecha de mica, por lo que requiere un
especial. Mantenga limpia la cubierta de la guía de
onda para garantizar un buen rendimiento del horno de
microondas.
Limpie cuidadosamente con un paño húmedo cualquier
salpicadura de alimentos de la superficie de la cubierta
inmediatamente después
salpicaduras acumuladas pueden sobrecalentarse y
causar humo o posiblemente incendiarse. NO RETIRE
LA CUBIERTA DE GUÍA DE ONDA.
ELIMINACIÓN DE OLOR
Ocasionalmente, un olor a cocina puede quedar en el
horno de microondas. Para eliminarlo, combine 1 taza
de agua, cáscara rallada y jugo de 1 limón en una taza
medidora de vidrio de 2 tazas.
Hierva durante varios minutos usando 100% de
potencia.
Deje reposar en el horno microondas hasta que se
enfríe. Limpie el interior con un paño suave.
PLA
Se pueden quitar el plato giratorio y su soporte para
facilitar la limpieza. Lávelos con agua suave y
jabonosa; Para las manchas difíciles, utilice un
limpiador suave y una esponja limpiadora no abrasiva.
Son aptos también para lavavajillas. Use rejilla superior
del lavavajillas. El eje del motor del plato giratorio no
está sellado, por lo que debe limpiarse inmediatamente
el exceso de agua o derrames.
Desconecte el cable de alimentación o deje la
limpieza. Desconecte el cable de alimentación antes de reemplazar los filtros y las luces.
. Limpie el exterior con jabón suave y
cuidado
LE A PRUEBA DE
ficies
de que ocurra. Las
TO GIRATORIO/EL SOPORTE
20
Page 46
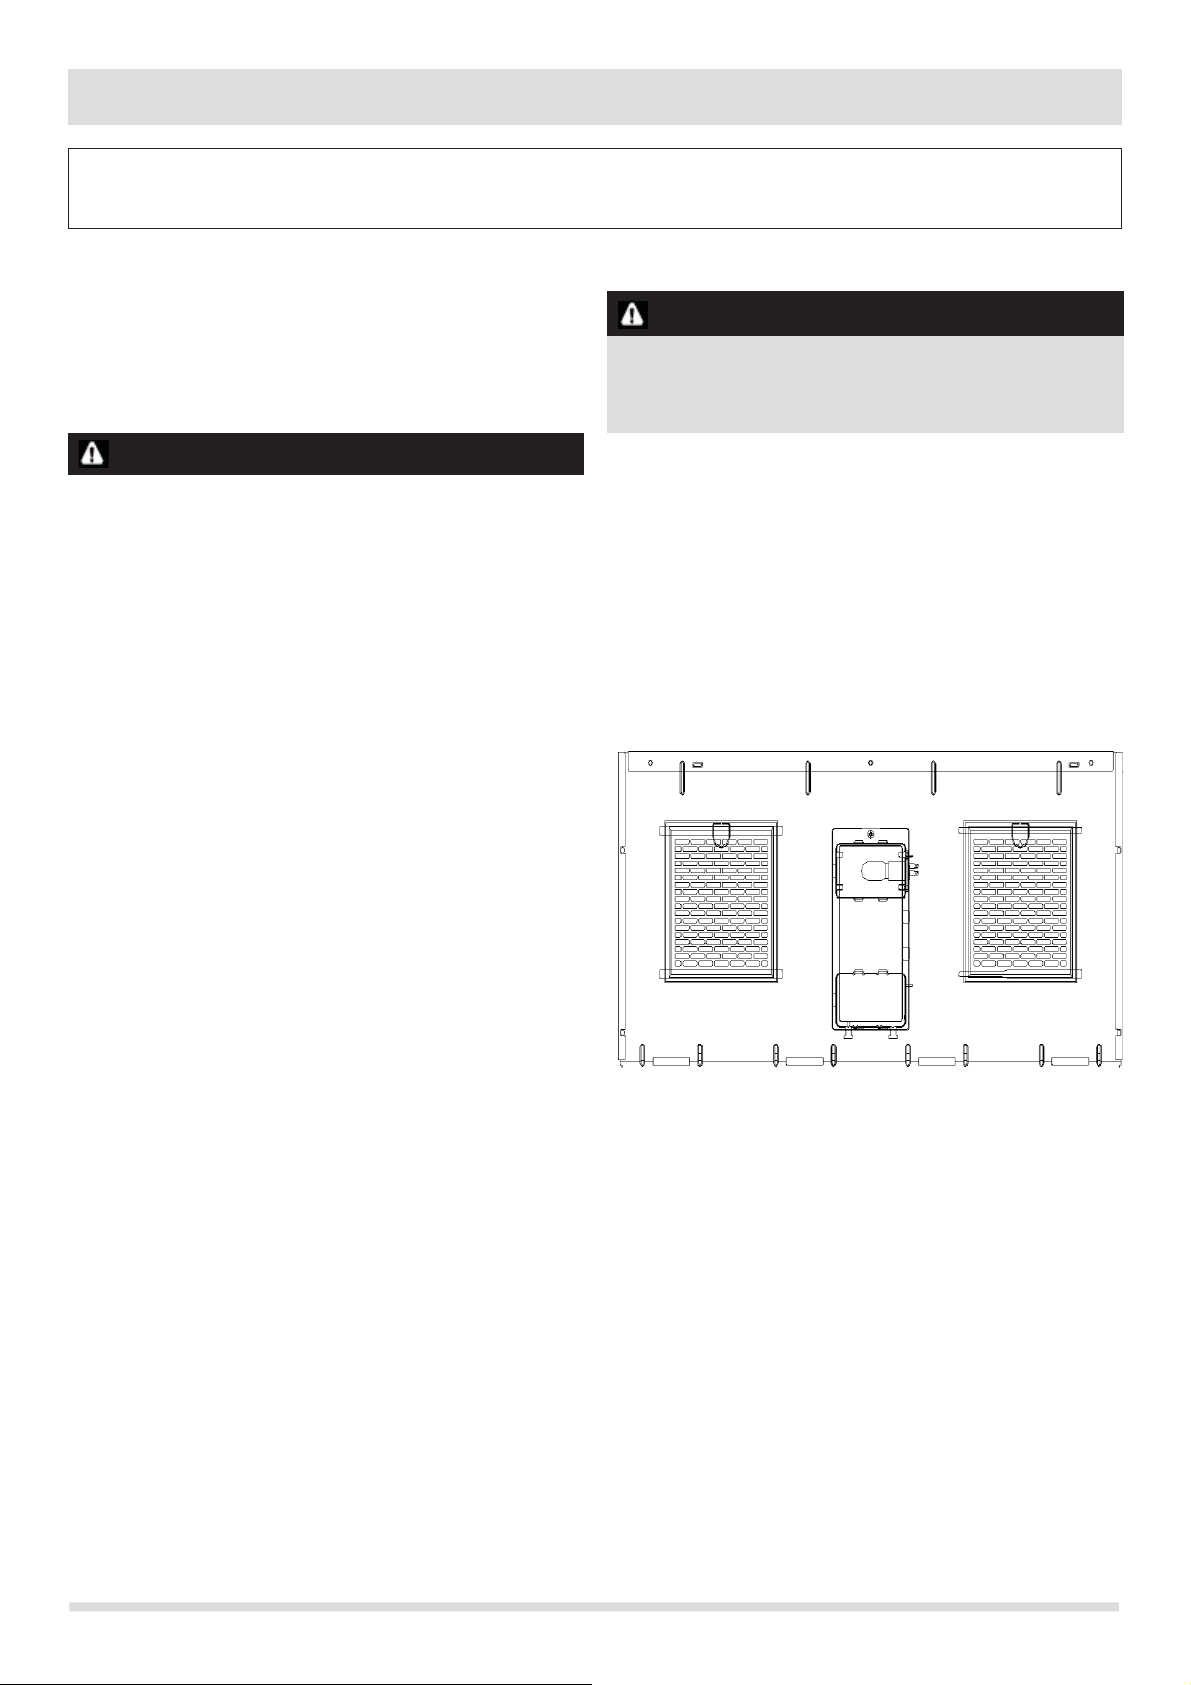
21
LIMPIEZA Y CUIDADO
abierta para desactivar el horno durante la
Limpieza de los filtros de escape
Los filtros de escape de ventilación del horno se
deben quitar y limpiar con frecuencia; generalmente
al menos una vez cada mes.
Número de pieza del filtro de escape 5304522066
Para pedir piezas, llame al 800-599-7569
Reemplazo de luz de superficie
CAUTION
Para evitar el riesgo de lesiones personales o daños
a la
bombillas.
CAUTION
Para reemplazar las bombillas, primero desconecte
la alimentación del horno en el panel del interruptor
de circuito o desenchufando.
Para liberar la cubierta, quite el tornillo de la cubierta
de la luz. (Ver ilustración.)
NO USE UNA BOMBILLA MÁS GRANDE DE 30
WATTS.
Cierre la cubierta de la luz y asegúrela con el tornillo
que quitó en el paso 2. PRECAUCIÓN: La cubierta
de la luz puede estar muy caliente. No toque el vidrio
cuando la
Deben limparse los filtros al menos una vez cada
mes. Nunca opere el ventilador o el horno sin los
filtros en su lugar.
Tire hacia abajo ligeramente la pestaña hacia la parte
delantero
del horno y retire el filtro. Repita para el otro
filtro. Remoje el filtro en un fregadero o cacerola llena
de agua caliente y detergente. NO use amoníaco u
otro álcali; reaccionarán con el material del filtro y lo
oscurecerán.
Agite y frote con un cepillo para quitar la suciedad
incrustada.
Enjuague totalmente y agite para secarlo.
Reemplace volviendo a colocar el filtro en la abertura.
Desconecte el cable de alimentación o deje la puerta
limpieza. Desconecte el cable de alimentación antes de reemplazar los filtros y las luces.
propiedad, use guantes al reemplazar las
luz esté encendida.
Page 47
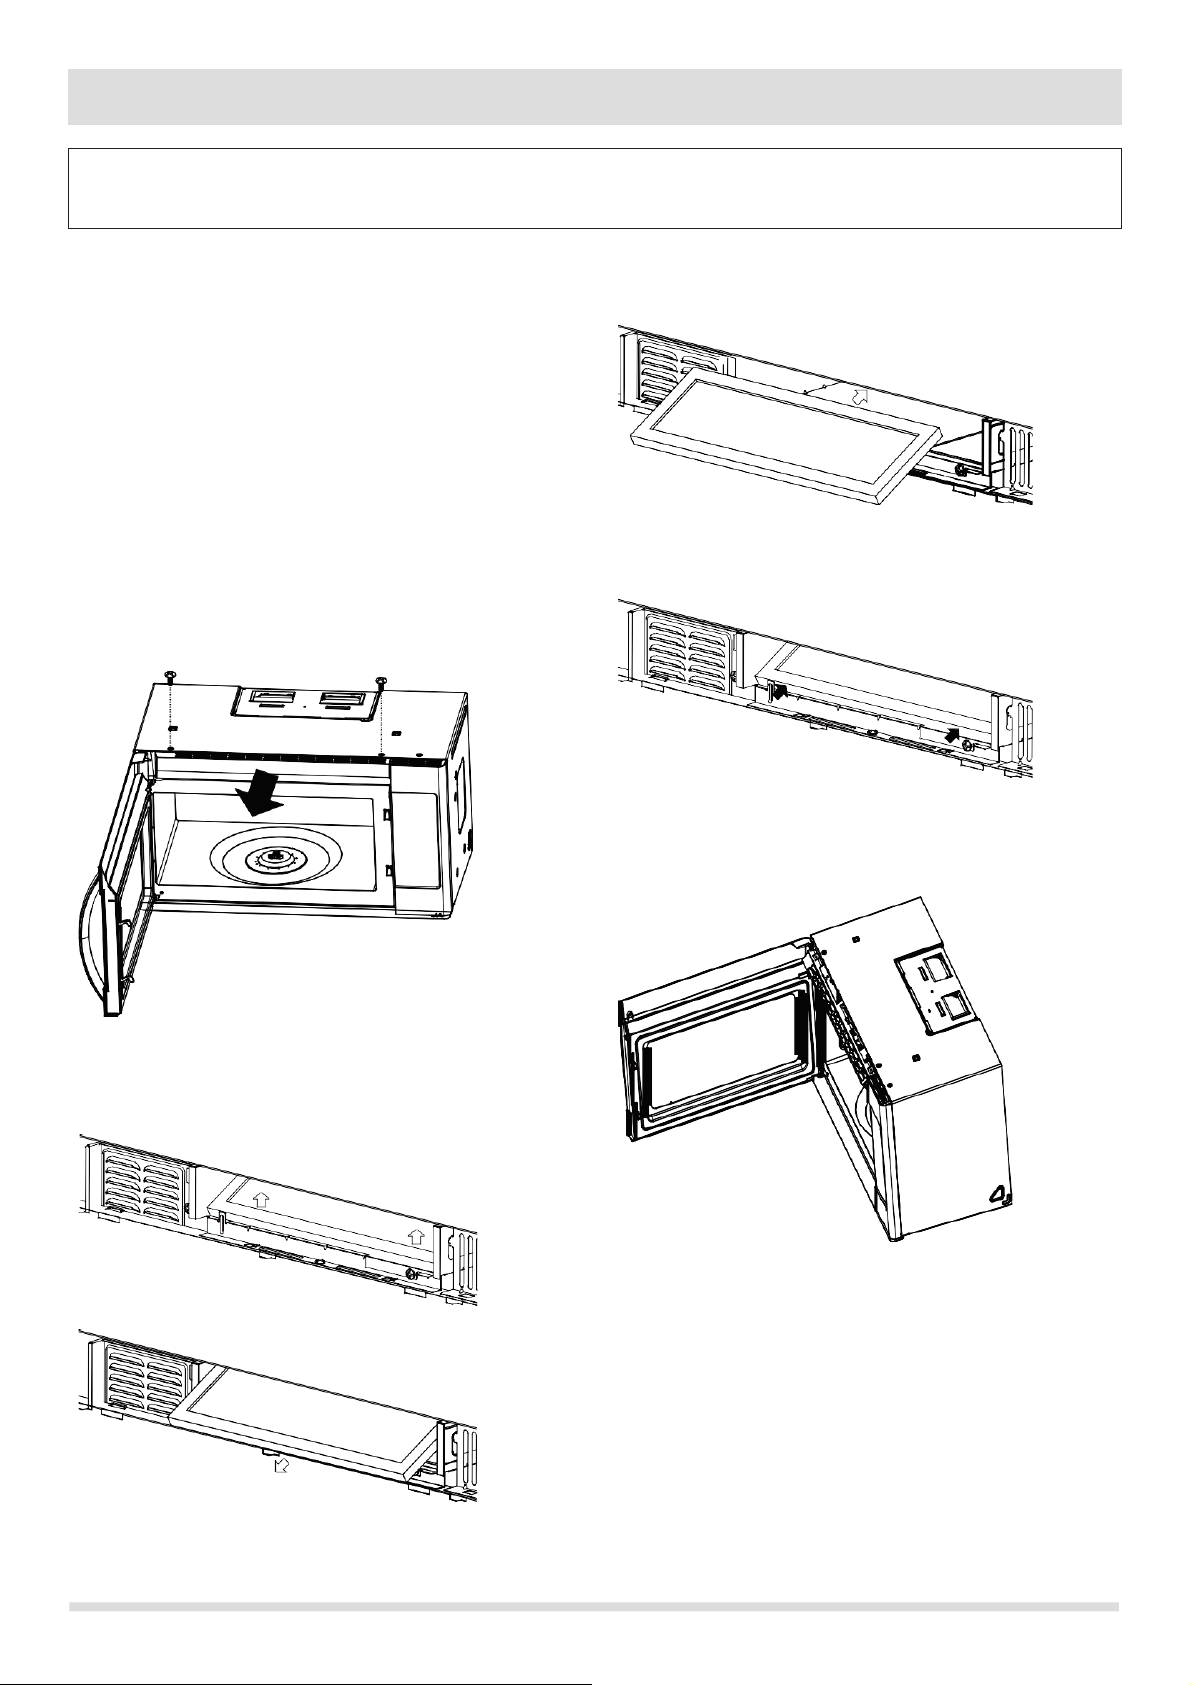
LIMPIEZA Y CUIDADO
horno durante la
Reemplazo del filtro de carbón
Número de pieza del filtro de carbón 5304522067
Para pedir piezas, llame al 800
Cuando se instala el
microondas, se usa para una instalación recirculada sin
ventilación. El filtro se debe cambiar cada 6 a 12
meses según el uso
1.
Desconecte la alimentación al horno de microondas
2.
3.
4.
Retire el filtro de carbón empujando la parte superior
del filtro hacia dentro, luego sáquelo hacia fuera de
5. Deslice la parte superior del nuevo filtro de carbón en
6.
7.
rejilla de ventilación en
las ranuras y luego presione la parte superior de la
8.
Desconecte el cable de alimentación o deje la puerta abierta para desactivar el
limpieza. Desconecte el cable de alimentación antes de reemplazar los filtros y las luces.
-599-7569
filtro de carbón en el horno de
en el panel del interruptor de circuito o
desenchufando.
Retire los tornillos de montaje de la rejilla de
ventilación.
Quite la rejilla de ventilación de la unidad.
.
el área superior de la cavidad del filtro.
Presione la parte inferior del filtro de carbón para
colocarlo en la posición correcta.
la unidad.
Coloque la parte inferior de la
rejilla de ventilación en su lugar.
Vuelva a instalar los tornillos de la rejilla de
ventilación.
22
Page 48
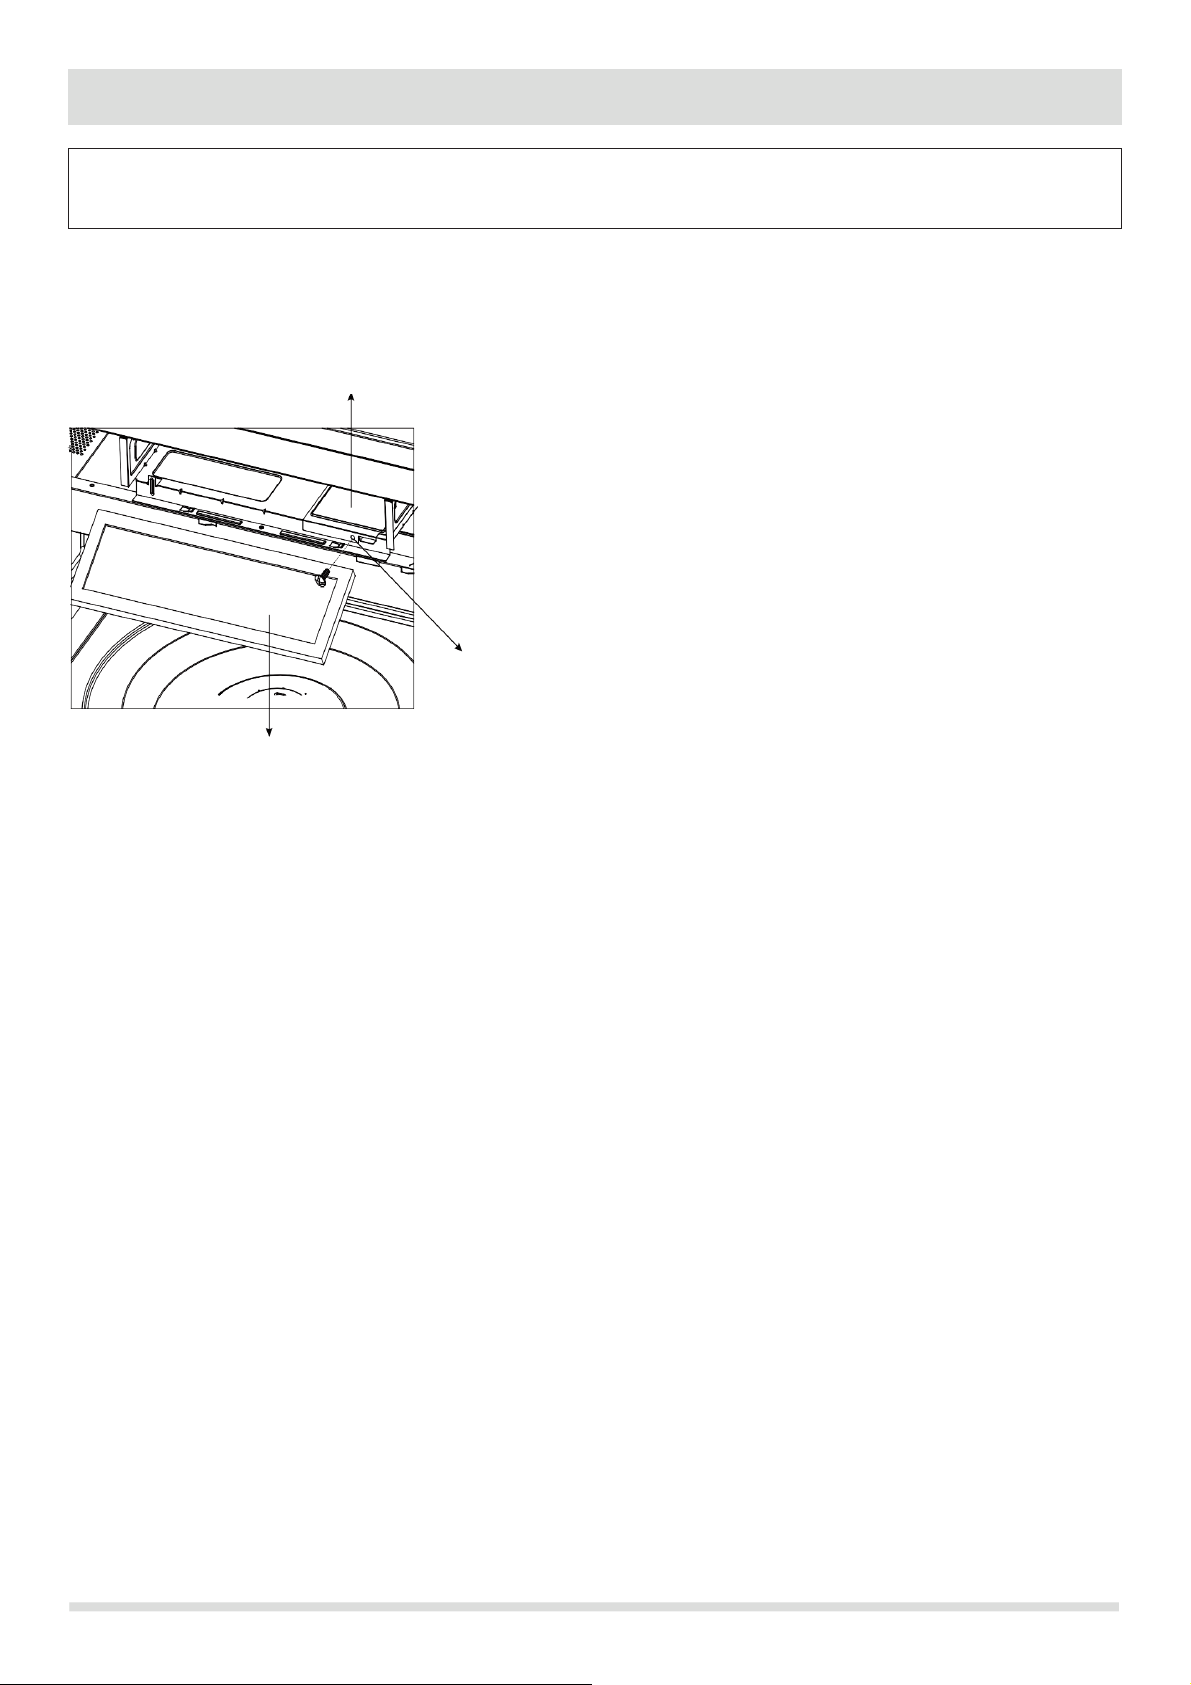
23
LIMPIEZA Y CUIDADO
puerta abierta para desactivar el horno durante la
Cubierta de la luz
Tornillo de la cubierta de la luz
Filtro de carbón
Desconecte el cable de alimentación o deje la
limpieza. Desconecte el cable de alimentación antes de reemplazar los filtros y las luces.
Reemplazo de luz de horno
Retire la rejilla según las instrucciones 1 ~ 3 anteriores y el filtro de carbón, si se usa.
1. Abra la cubierta de la luz ubicada detrás del montaje del filtro tirándola cuidosamente en el borde delantero.
2. NO USE UNA BOMBILLA MÁS GRANDE DE 30 WATTS.
3. Vuelva a colocar la cubierta de la luz del horno empujándola cuidadosamente en su lugar. Reemplace el filtro de carbón, si
se usa. Empuje la rejilla en su lugar y vuelva a colocar el tornillo de montaje de la rejilla.
Page 49
VERIFICACIÓN ANTES DE LLAMADA DE SERVICIO
Por favor verifique los siguientes puntos antes de llamar por servicios:
Coloque una taza de agua en una taza medidora de vidrio en el horno de microondas y cierre la puerta de forma segura.
Opere el horno de microondas durante un minuto a HIGH 100%.
A ¿Se enciende la luz del horno de microondas? SÍ ____ NO ____
B ¿Funciona el ventilador de enfriamiento? (Coloque la mano en la parte superior de la pantalla) SÍ ____ NO ____
C ¿Gira el plato giratorio? (Es normal que el plato giratorio gire en cualquier dirección.) SÍ ____ NO ____
D ¿El agua del horno de microondas está tibia? SÍ ____ NO ____
Si "NO" es la respuesta a alguna de las preguntas
anteriores, verifique el tomacorriente, el fusible y /
o el cortacircuitos. Si todos ellos funcionan
correctamente, CONTACTE CON EL SERVIDOR
AUTORIZADO ELECTROLUX MÁS CERCANO.
Un horno de microondas nunca se debe reparar por
una persona de reparación "do-it-yourself".
NOTAS
1. Si el tiempo que aparece en la pantalla hace cuenta
regresiva muy rápida, verifique el Modo de Demostración
en la página 22.
2. Si el horno está configurado para más de 30 minutos a un
nivel de potencia de 90% u 100%, después de los primeros
30 minutos, el nivel de potencia se ajustará
automáticamente al 80% para evitar sobrecocina.
ESPECIFICACIONES
Voltaje de línea de CA: Monofásico 120V, 60Hz, solo CA
Potencia de CA requerida: 1520W 13.0 amps. (para LFMV1846VF
Potencia de salida*: 1000 W
Frecuencia: 2450 MHz (Clase B/Grupo2)**
Dimensiones exteriores (incluido la manija): 29.9 ”(ancho) x 17.83 ”(profundidad) x 16.9 ”(altura)
Dimensiones de la cavidad: 22.16 ”(ancho) x 13.80 ”(profundidad) x 10.55”(altura)
Capacidad del horno de microondas***: 1.8 Cu.Ft.
Uniformidad de cocina: Plato giratorio
Peso: Approx. (neto) 58.64 lb, (bruto) 66.6 lb
Trabajo/Luz nocturno: 1.5*W LED, número de pieza 5304522068
Luz de horno: 1*30W incandescente, número de pieza 5304522069
* El método estandarizado de la Comisión Electrotécnica Internacional para medir la potencia de salida. Este método de prueba es ampliamente
reconocido.
** Es la clasificación del equipo ISM (Industrial, Científico y Médico) descrita en el Estándar Internacional CISPR11.
*** La capacidad interna se calcula midiendo el ancho, la profundidad y la altura máximos. La capacidad real para almacenar alimentos es menor.
En cumplimiento de las normas establecidas por:
FCC
DHHS
- Comisión Federal de Comunicaciones (Federal Communications Commission) Autorizada.
- Cumple con la regla del Departamento de Salud y Servicios Humanos (Department of Health and Human Services DHHS), CFR,
Título 21, Capítulo I, Subcapítulo J.
- Este símbolo en la placa de identificación significa que el producto está listado por Underwriters Laboratories, Inc.
- Este símbolo en la placa de identificación significa que el producto está listado por Underwriters Laboratories, Inc. para su uso en
EE. UU. O Canadá.
24
Page 50
25
INFORMACIÓN DE GARANTÍA PRINCIPAL DE APARATOS
Su aparato está cubierto por una garantía limitada de un año. Durante un año a partir de la fecha original de
compra, Electrolux pagará todos los costos de reparación o reemplazo de cualquier pieza de este aparato que
demuestre ser defectuosa en materiales o mano de obra cuando dicho aparato se in
acuerdo con las instrucciones proporcionadas.
Exclusiones
Esta garantía no cubre lo siguiente:
1. Productos con números de serie originales que se han eliminado, alterado o que no se pueden determinar fácilmente.
2.
3.
4.
5.
6.
7.
Llamadas de servicio que no involucren mal funcionamiento o defectos en materiales o mano de obra, o para aparatos
8.
9.
eliminación de molduras, gabinetes, estantes, etc., que
10.
ltros de agua, otros consumibles, o
11.
Recargos que incluyen, entre otros, llamadas de servicio fuera de horario, fines de semana o fiestas, peajes, tarifas de
12.
Daños en el acabado del aparato o del hogar incurridos durante la instalación, incluidos, entre otros, suelos, gabinetes,
13.
DESCARGO DE RESPONSABILIDAD DE GARANTÍAS IMPLÍCITAS; LIMITACIÓN DE RECURSOS
EL ÚNICO Y EXCLUSIVO RECURSO DEL CLIENTE BAJO ESTA GARANTÍA LIMITADA SERÁ REPARACIÓN O
REEMPLAZO DEL PRODUCTO SEGÚN SE PROPORCIONA AQUÍ. LAS RECLAMACIONES BASADAS EN GARANTÍAS
IMPLÍCITAS, INCLUIDAS GARANTÍAS DE COMERCIABILIDAD O APTITUD PARA UN PROPÓSITO PARTICULAR, SE
LIMITAN A UN AÑO O AL PERÍODO MÁS CORTO PERMITIDO POR LEY, PERO NO MENOS DE UN AÑO. ELECTROLUX
NO SERÁ RESPONSABLE POR DAÑOS CONSECUENTES O INCIDENTALES, COMO DAÑ
GASTOS INCIDENTALES RESULTANTES DE CUALQUIER INCUMPLIMIENTO DE ESTA GARANTÍA LIMITADA ESCRITA
O CUALQUIER GARANTÍA IMPLÍCITA. ALGUNOS ESTADOS Y PROVINCIAS NO PERMITEN LA EXCLUSIÓN O
LIMITACIÓN DE DAÑOS INCIDENTALES O CONSECUENTES, O LIM
IMPLÍCITAS, POR LO QUE ESTAS LIMITACIONES O EXCLUSIONES PUEDEN SER NO APLICABLES EN SU CASO.
ESTA GARANTÍA ESCRITA LE OTORGA DERECHOS LEGALES ESPECÍFICOS. TAMBIÉN PUEDE TENER OTROS
DERECHOS QUE VARÍAN DE ESTADO A ESTADO
Si necesita
servicio
Guarde su recibo, albarán de entrega u otro registro de pago apropiado para establecer el período de garantía si se requiera
servicio. Si se realiza el servicio, le conviene obtener y conservar todos los recibos.
Esta garantía solo se aplica en EE. UU. Y Canadá. En EE. UU., su aparato está garantizado por Electrolux Major Appliances North America,
división de Electrolux Home Products, Inc. En Canadá, su aparato está garantizado por Electrolux Canada Corp. Electrolux no a
ni
garantía por Electrolux o una compañía de servicio autorizada. Las características o especificaciones del producto como se describe o ilustra
están sujetas a cambios sin previo aviso.
EE. UU.
1
Electrolux Home Products, Inc., 10200 David
Taylor Drive
Charlotte, NC 28262
Impreso en China
PN.: ECP10050AL-JEUC001
stale, use y mantenga de
Producto que ha sido transferido de su propietario original a otra parte o removido fuera de los EE. UU. O Canadá.
Óxido en el interior o exterior de la unidad.
Los productos comprados "tal cual" no están cubiertos por esta garantía.
Pérdida de alimentos debido a fallos en el refrigerador o congelador.
Productos utilizados en un entorno comercial.
no usados en el hogar ordinario o que se usen de otra manera que no sea de acuerdo con las instrucciones
proporcionadas.
Llamadas de servicio para corregir la instalación del aparato o para indicarle cómo usarlo.
Gastos por la accesibilidad del aparato para el servicio, como la
no son parte del aparato cuando se envía desde la fábrica.
Llamadas de servicio para reparar o reemplazar las bombillas, los filtros de aire, los fi
las perillas, manijas u otras partes cosméticas.
viaje en ferry o gastos de millaje por llamadas de servicio a áreas remotas, incluido el estado de Alaska.
paredes, etc.
Daños causados por: servicios prestados por compañías de servicio no autorizadas; uso de piezas que no sean
originales de Electrolux o piezas obtenidas de personas que no sean compañías de servicio autorizadas; o causas
externas como abuso, mal uso, suministro de energía inadecuado, accidentes, incendios o actos de Dios.
OS A LA PROPIEDAD Y
ITACIONES A LA DURACIÓN DE GARANTÍAS
.
nguna persona a cambiar o agregar ninguna obligación bajo esta garantía. Se debe realizar las obligaciones de servicio y piezas bajo esta
utoriza a
-800-374-4432
 Loading...