

Page 1

Pub. 42004-200B
GAI-TRONICS® CORPORATION
A HUBBELL COMPANY
Intrinsi call y-Safe Rack-Mount
Telephone System
Confidentiality Notice
This manua l is provide d sole ly as an operatio nal, installation, and ma inte nance guide and conta ins
sensitive business and t e chnical informatio n tha t is confidentia l and pr opri et ary to GAI- Tronics. GAITronics retains all intellectual property and other rights in or to the information contained herein, and
such information may on ly be u sed in conn e ction with the operatio n of you r GAI-Tr onics p rodu c t or
system. This manu al may not be dis clos e d in any form, in whole or in pa rt, direct ly or i ndir ectly, to a ny
third pa r ty.
General Information
The GAI-Tronics Intrinsically-Safe Series Telephones are designed to be installed in hazardous areas.
The r ack-mount co mpone nts li ste d belo w are placed in a non- haza rdous area up t o one mil e f rom t he
telephone. This limits the energy levels going to the hazardous area to conform to all of UL’s
intrinsically safe requirements. This publication contains installation, operation, and detailed
specifications for the I.S. telephone rack-mount system.
GAI-Tronics Intrinsically-Safe (I.S.) Series Rack-Mount Telephone System configurations include the
following components:
Model Description
265 Line Card
266 Power Supply
267 Subrack Assembly
268 Patch Panel
OTE: Please refer to the Ordering Information table on page 9 for information on ordering these
N
components.
CAUTION
All det ails i n t his manual must
be followed to conform to UL req uirements for intrinsic safety.
GAI-Tronics Corporation P.O. Box 1060, Readi ng, PA 19607-1060 USA
610-777-1374 800-492-1212 Fax: 610-796-5954
ISIT WWW.GAI-TRONICS.COM FOR PRODUCT LITERATURE AND MANUALS
V
Page 2

Pub. 42004-200B
Intrinsically Safe Rack-Mount Telephone System Page: 2 of 13
Installation and Setup
1. Install each Model 267 Subrack into a standard 19-inch cabinet by inserting and tightening the two
screws into the holes on each side of the subrack.
OTE: This rack is designed for M6 metric screws. Addit ional hard ware wi ll be re quired if th is
N
cabinet is to be used with 10-32 screws.
If installing multiple subrack assemblies, install one Model 268 Patch Panel between each pair of
subracks. See Figure 1 for details. The Model 268 Patch Panels are installed in the same manner as
the subrack assemblies. When installing the patch panels, install the two user-supplied 25-pair
har ness assemblies to th e rear of each patch panel.
2. Install the Model 265 Line Cards into the subrack assemblies by sliding them into the card guides.
Once fully inserted (so that the front surface of the card is flush with the subrack assembly), secure it
into place by tightening the four captive screws located on the bezel of the line card. Each subrack
assembly accommodates up to seven cards. When using less than seven cards in any one subrack
assembly, we recommend installing Part No. 14758-001 Blank Front Panel Bezels, which are
available from GAI-Tronics.
3. Install the Model 266 Power Supplies. Each subrack assembly requires one power supply.
OTE: To select 220 V power, slide the switch on the top of the Model 266 Power Supply to the
N
220 V position before installation.
Fit the supply into the guide at the left end of the subrack assembly. Insert it fully so that the front
surface of the card is flush with the subrack assembly, and secure it into place by tightening the four
captive screws located on the bezel of the power supply. Access the rear of the subrack assembly,
and locate the grounding screw at the right end of the assembly. Tighten the screw into the power
supply by turning it clockwise.
4. Packed with each Model 265 Line Card is a modular telephone line cord with a connector on each
end. Connect o ne end of th is cord is to be connected to a line card, and the other end to a jack in a
patch panel. Refer to Figure 1 to clarify the general wiring configuration.
OTE: The Model 268 Patch Panel provides 24 connectors, but for this application a maximum of 14
N
will be used. Connector selection is limited only by the length of the line cord.
\\s_eng\gtc proddoc s \st andard iom s - current release\42004 instr. manuals \ 42004-200b. doc
02/06
Page 3

Pub. 42004-200B
Intrinsically Safe Rack-Mount Telephone System Page: 3 of 13
Figure 1. Typical Mechanical Configuration for Rack Mount System - Front View
\\s_eng\gtc proddoc s \st andard iom s - current release\42004 instr. manuals \ 42004-200b. doc
02/06
Page 4

Pub. 42004-200B
Intrinsically Safe Rack-Mount Telephone System Page: 4 of 13
5. Wire the central office (CO) or PBX lines to a punch-down block (66) near the cabinet. Then wire
the appropriate conductors from the 25-pair patch panel harness assembly to the punch-down block.
Refer to Figure 2. Verify that the wired pairs are from the connectors used in the patch panel. This
can be verified by checking the color coding of the harness assembly wires.
6. We recommend creating a local “base station” to aid in adjusting the telephone ring pitch and to
verify the correct operation of each line card. The base station will aid in ring pitch adjustment by
allowing personnel at the cabinet to communicate to those in the field to adjust the ring pitch level.
The base sta t ion ca n a lso be connected to each diode barr ier t ermi na l st rip to check for th e corr ect
operation of that circuit. See Step 7 to assure the correct connection of the base station to a line card.
7. Install the I.S. Series Telephones and wire them back to the central cabinet. The wires will terminate
at the back of the Model 267 Subrack on terminal strips provided on the diode barriers (one terminal
strip per telephone). Follow the wiring instructions in Pub. 42004-380.
N
OTE: The wiring on this drawing must be followed to maintain intrinsic safety.
8. Plug a user-supplied power cord with a type IEC 320 connector into the socket located on the rear
right side of the subrack assembly. Be sure to select the appropriate cord for the voltage selected on
the power supply (110 V or 220 V). Connect the power cord to a power source.
9. Use the base station to assist in adjusting the ring pitch of each telephone. Several calls must be
placed from the base station to the remote telephone to complete each adjustment. When all the
telephones are properly adjusted, remove the base station, and install it at the desired location.
10. Perform any necessary troubleshooting. See the Troubleshooting section on page 6.
\\s_eng\gtc proddoc s \st andard iom s - current release\42004 instr. manuals \ 42004-200b. doc
02/06
Page 5
Pub. 42004-200B
Intrinsically Safe Rack-Mount Telephone System Page: 5 of 13
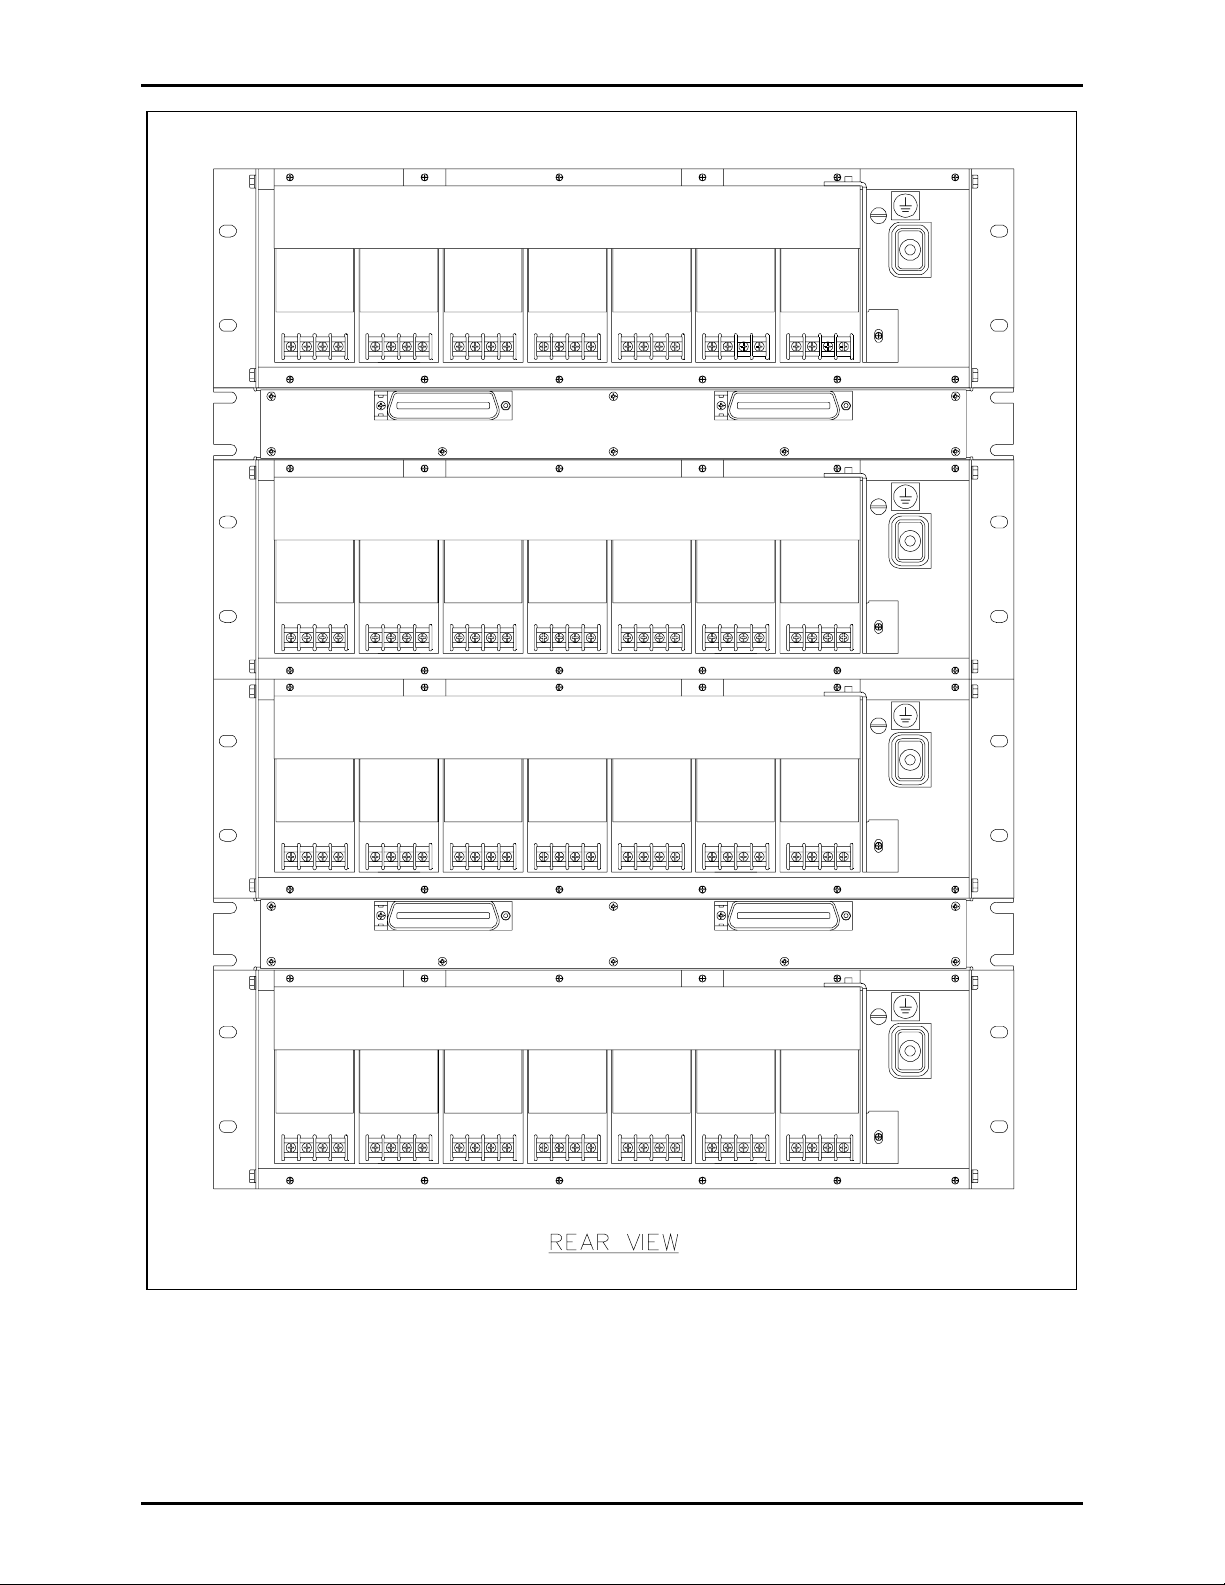
Figure 2. Typical Mechanical Configuration for Rack Mount System - Rear View
\\s_eng\gtc proddoc s \st andard iom s - current release\42004 instr. manuals \ 42004-200b. doc
02/06
Page 6

Pub. 42004-200B
Intrinsically Safe Rack-Mount Telephone System Page: 6 of 13
Troubl eshooting
This section inclu des two trou bles hooting c harts desi gned t o quickly p inpoint the sou rce o f problems.
N
OTE: It may be advantageous to temporarily connect an I.S. telephone panel directly to the output
terminals of the Model 267 Subrack when troubleshooting. Then, using the charts below, the cause of the
problem should be more easily determined.
Non-E quipment Rel ated Problems
Problem Solution
The I.S. phone is inactive with
no light s on the IBU when t he
phone is off-hook.
The power light is on only when
the phone is off hook.
The I.S. phone has no dial tone.
1. Check the ac power to the Model 266 Power Supply.
2. Check the ac fuse F1 at the Model 266 Power Supply.
Check for I.S. telephone wiring open.
1. If there is a problem with the ac power to the
Model 266 Power Supply, the IBU lights will be lit in the
following pattern: O =
ISLOOP O LOCK
On, P = Off
P
HOOK
P
TELCO
P
2. If the I.S. telephone has a wiring short, the IBU lights will be lit
in the following pattern: O =
On, P = Off
(Short may be between conductors, or either/both conductor(s) to
ground/shield.)
ISLOOP O LOCK
P
HOOK P TELCO
P
3. If the TELCO line has an open, the IBU lights will be lit in the
following pattern: O =
ISLOOP O LOCK
O
HOOK O TELCO
P
The lights on the IBU flash
randomly.
The I.S. telephone has an intermittent wiring short. The short may be
between the conductors or either/both conductor(s) to ground/shield.
\\s_eng\gtc proddoc s \st andard iom s - current release\42004 instr. manuals \ 42004-200b. doc
02/06
On, P = Off
Page 7

Pub. 42004-200B
Intrinsically Safe Rack-Mount Telephone System Page: 7 of 13
Equipm ent-rel ated Probl ems
Problem Solution
There is no incoming ring tone. 1. Check the I.S. telephone panel.
2. Check the Model 265 Line Card.
There i s no receiver audio, no
1. Check the I.S. telephone panel.
side tone, and no touch tones
when pressed.
2. Check the Model 265 Line Card.
3. Check for an ope n or s hort in the connec tin g c abl e.
Ca nnot dial out , but c an hear
touch tones when pressed.
1. Check the Model 265 Line Card.
2. Check the TELCO line c onnec tion. It may be bad or there ma y
be no connection.
I.S. telephone is inactive. 1. Check the I.S. telephone panel.
2. Check the Model 265 Line Card.
3. Check for an ope n or s hort in the connec tin g c abl e.
No power lights are on. Check the Model 266 Power supply.
CAUTION
Any field repa irs on the intrinsically-safe des ign of the phone are st rictly prohi b ited. Any such
cha nge will void ALL hazardous app rovals . Please co nta c t the GAI - Tr onics F ield Service Department a t
800-492-1212 inside the USA or 610-777-1374 outside the USA for the Regional Service Center closest
to you.
\\s_eng\gtc proddoc s \st andard iom s - current release\42004 instr. manuals \ 42004-200b. doc
02/06
Page 8

Pub. 42004-200B
Intrinsically Safe Rack-Mount Telephone System Page: 8 of 13
Lightning Protecti on
Telephone lines are susceptible to lightning strikes and must be properly protected and maintained. Onpremise line protection is usually provided at the building entrance by the responsible telephone company
when it is installed. T his protection is o f ten n e g lected after installatio n.
Degradation of conventional protection, such as carbon blocks or gas discharge types, will occur with
each lightni ng strike. To ensure sa fe operat ion, p rotec tive e lemen ts should be replaced freque ntly and
checked for proper connection and grounding. Gas discharge types are by far the most robust, costeffective mea ns of protectio n.
The registered I.S. equipment meets all isolation and safety requirements of FCC, Part 68 and UL 913.
However, lightning strikes are not predictable or considered to be a condition of fault likely to occur in
practice as defined by the guidelines for intrinsic safety. Therefore, it is imperative that the user employ
and ma inta in a proper lightning p rotec tion sche me. Thi s is tr ue for a ll haza rdous area equipment and all
telecommunications equipment subject to lightning.
Figure 3. Example of L ightnin g Protection D esign
Proper grounding is the most critical consideration in any intrinsically-safe system. Unsafe energy levels
are limited by the protective diode barrier with reference to the I.S. ground terminals.
It is imperative
to make good mechanical and electrical ground connections to maintain intrinsic safety
(for low impedance ground connections, less than 1 ohm required; less than 0.1 ohms is recommended).
Use the latest National Electrical Code (NEC) published by NFPA to ensure that proper ground
connections are made.
References: UL 913 NEC, Article 504
N
OTE: Do not connect the intrinsically-safe ground directly to the ac power ground terminals.
WARNING
Installation must be in accordance with GAI-Tronics Pub. 42004-380 to ensure intrinsic safety.
\\s_eng\gtc proddoc s \st andard iom s - current release\42004 instr. manuals \ 42004-200b. doc
02/06
Page 9

Pub. 42004-200B
Intrinsically Safe Rack-Mount Telephone System Page: 9 of 13
Ordering Information
Quantity of
Stations Desired
1-7 1-7 (same as
Number of Model
265 Line Cards
Required
Number of Model
266 Powe r
Supplies Requi red
1 1 1
Number of
Model 267 Card
Cage s Required
quantit y of st a t ions )
8-14 8-14 (same as
2 2 1
quantit y of st a t ions )
15-21 15-21 (same as
3 3 2
quantit y of st a t ions )
22-28 22-28 (same as
4 4 2
quantit y of st a t ions )
29-35 29-35 (same as
5 5 3
quantit y of st a t ions )
For 36 or more tele phones, follow the s ame r atio as demo nstr ated above.
Number of Model
268 Patch Panels
Required
Service Information
Per UL requirement, no replacement parts are available for this unit. Please contact the GAI-Tronics
Field Service Department at 800-492-1212 inside the USA or 610-777-1374 outside the USA for the
Regi onal Serv ice Ce nter c l osest to you.
\\s_eng\gtc proddoc s \st andard iom s - current release\42004 instr. manuals \ 42004-200b. doc
02/06
Page 10

Pub. 42004-200B
Intrinsically Safe Rack-Mount Telephone System Page: 10 of 13
User Instructions
This equipment complies with Part 68 of the FCC Rules. On the side of the Model 265 Line Card is a
label that contains, among other information, the FCC Registration Number and Ringer Equivalence
Number (REN) for this equipment. If requested, this information must be provided to the telephone
company.
This equipment uses the RJ11C USOC ja ck.
The REN is used to determine the quantity of devices that may be connected to the telephone line.
Excessive RENS on the telephone line may result in the devices not ringing in response to an incoming
call. In most, but not all areas, the sum of the RENS should not exceed five (5.0). To be certain of the
number of devices that may be connected to the line, contact the telephone company to find out the
maximum REN for the calling area.
If this equipment causes harm to the telephone network, the telephone company will notify you in
advance. If advance notice is not practical, the telephone company will notify the customer as soon as
possible. Also, you will be advised of your right to file a complaint with the FCC if you believe it is
necessary.
The telephone company may mak e chan g es in it s fac i lities, e quip m e nt, opera tions, or p rocedu res that
could affect the operation of the equipment. If this happens, the telephone company will provide advance
notice for you to make the necessary modifications to maintain uninterrupted service.
If trouble is experienced with this equipment please contact GAI-Tronics at 800-492-1212 (if calling from
outside Pennsylvania), or 610-777-1374 (within Pennsylvania and outside the US) for repair and/or
warranty information. If the trouble is causing harm to the telephone network, the telephone company
may request you remove the equipment until the problem is resolved.
This equipment cannot be used on telephone company-provided coin service. Connection to party-line
service i s subj ect to sta te tari ffs.
When making test calls to emergency numbers:
• Remain on the line and briefly explain to the dispatcher the reason for the call.
• Perform such a ct ivit i es i n the off-peak hours, s u ch as ear ly mornin g or la t e ev enings.
\\s_eng\gtc proddoc s \st andard iom s - current release\42004 instr. manuals \ 42004-200b. doc
02/06
Page 11

Pub. 42004-200B
Intrinsically Safe Rack-Mount Telephone System Page: 11 of 13
Specification s
General/Environmental
Location (rack-mounted IBU)..................................................... Ordinary (non-classified) indoor/outdoor
FCC Registration Number .................................................................................... ADGUSA-65066-TE-E
Ringer Equivalence Number (REN)................................................................................................... 0.4B
Operating temperatur e ra n ge
I.S. Series Telephones......................................................... -40° F to +140° F (-40° C to +60° C)
Rack equipment..................................................................... +32° F to +104° F (0° C to +40° C)
Relative humidity.................................................................................. 95% (non-condensing) maximum
Maximum safe wiring distance between IBU and I.S. Series telephon es
Standard wire types......................................................................................................................... 1 mile
Using GTC 60059-001 conductor............................................................................................... 1.5 miles
Using GTC 60021-301 conductor............................................................................................... 1.5 miles
Wiring
Construction.......................................................................................................................... Twiste d pair
Type.......................................................................................................................................... Shielded*
Conductor size (minimum)......................................................................................................... 24 AWG
Wiring loop resistance (maximum)............................................................................................ 275 ohms
Wiring capacitance (maximum).................................................................................................. 0.316 uF
*Shielded cable is required where multiple I.S. telephone wires are routed together.
Shipping weight
Model 265 Line Card.................................................................................................... 2.88 lbs. (1.31 kg)
Model 266 Power Supply ............................................................................................. 4.88 lbs. (2.22 kg)
Model 267 Subrack Assembly...................................................................................... 8.42 lbs. (3.83 kg)
Model 268 Patch Panel................................................................................................. 1.56 lbs. (0.71 kg)
Dimensions
Model 265 Line Card....................................... 5.06 H × 2 W × 12.9 D; inches (128.6 × 50.8 × 327.6 mm)
Model 266 Power Supply ............................. 5.06 H × 3.8 W x 12.1 D; inches (128.6 × 96.5 × 307.3 mm)
Model 267 Subrack Assembly..................... 5.25 H × 19 W × 14.5 D; inches (133.3 × 482.6 × 368.3 mm)
Model 268 Patch Panel........................... 1.75 H × 19.75 W × 1.25 D; inches (44.5 × 501.65 × 31.75 mm)
\\s_eng\gtc proddoc s \st andard iom s - current release\42004 instr. manuals \ 42004-200b. doc
02/06
Page 12

Pub. 42004-200B
Intrinsically Safe Rack-Mount Telephone System Page: 12 of 13
Electrical /Acoustical
Rack-mounted IBU consisting of......................................................... One Model 267 Subrack Assembly
One Model 266 Power Supply
Up to seven Model 265 Line Cards
Telephone Network Interface
2-wire........................................................................................... BELL PUB 61100 Compatible
4-wire............................................................................... See the 4-Wire Option Interface below
AC power input
Voltage (selectable) ....................................................................................... 90-130V/180-240V
Frequency...................................................................................................................... 47-63 Hz
Current ....................................................................................................... 0.5 amps (maximum)
Ringer pitch adjust ................................................................................................. 1 kHz-8 kHz (nominal
Intrinsically-Safe Interface
Voltage (maximum).............................................................................................................. 18 V
Resistance (minimum).................................................................................................... 66 ohms
Current Limited (maximum) ............................................................................................ 136 mA
IBU Indicators
I.S. Loop Current.......................................................................................................... I.S. LOOP (GRN)
I.S. Lock Detect............................................................................................................ I.S. LOCK (GRN)
Telephone Line Loop Current.............................................................................................T ELCO (YEL)
Hook...................................................................................................................................HOOK (YEL)
Model 265 4-Wire Option Interface
Receive (TB2-1, 2).............................................................................................................. DRY (No dc)
Signal Level................................................................................................................... 0 dBm (nominal)
+3 dBm (maximum)
Transmit (TB2-3, 4)..........................................................................................................................WET
DC loop current ................................................................................................... 20 mA - 70 mA
Signal level........................................................................................................ 0 dBm (nominal)
Ring voltage input.............................................................................................. 40 V - 150 Vrms
\\s_eng\gtc proddoc s \st andard iom s - current release\42004 instr. manuals \ 42004-200b. doc
02/06
Page 13

Pub. 42004-200B
Intrinsically Safe Rack-Mount Telephone System Page: 13 of 13
I.S. Series Telephones
Electrical specifications (nominal)......................................................................................... 12 V, 12 mA
Ringer performance (typical)............................................................................................98 dB @ 10 feet
Frequency (adjustable at IBU)................................................................. 1 kHz - 8 kHz (nominal)
Ring signal loss (18 AWG)...........................................................................................-4 dB/mile
Signaling........................................................................................................................................ DTMF
Transmission path (2-conductor) ..............................................................................................Full du plex
Microphone...................................................................................................................... Noise-canceling
Earpiece................................................................................................................Hearing aid compatible
Output (0 dBm @ IBU TELCO Line) ..........................................................105 dB SPL @ 1 kHz
Audio signal loss (18 AWG)......................................................................................-1.3 dB/mile
N
OTE: Must be connected in accordance with GAI-Tronics publication 42004-380.
Approvals
When connected according to GAI-Tronics Pub. 42004-380:
......................................................................................................Class I, Div. 1, Groups A, B, C, and D;
Class II, Div. 1, Groups E, F, a nd G; Clas s III;
\\s_eng\gtc proddoc s \st andard iom s - current release\42004 instr. manuals \ 42004-200b. doc
02/06
Page 14

Warranty
Equipment. GAI-Tronics warrants for a period of one (1) year from the date of shipment, that any
GAI-Tronics equipment supplied hereunder shall be free of defects in material and workmanship, shall
comply with the then-current product specifications and product literature, and if applicable, shall be fit
for the purpose specified in the agreed-upon quotation or proposal document. If (a) Seller’s goods prove
to be defective in workmanship and/or material under normal and proper usage, or unfit for the purpose
specified and agreed upon, and (b) Buyer’s claim is made within the warranty period set forth above,
Buyer may return such goods to GAI-Tronics’ nearest depot repair facility, freight prepaid, at which time
they will be repaired or replaced, at Seller’s option, without charge to Buyer. Repair or replacement shall
be Buyer’s sole and exclusive remedy. The warranty period on any repaired or replacement equipment
shall be the greater of the ninety (90) day repair warranty or one (1) year from the date the original
equipment was shipped. In no event shall GAI-Tronics warranty obligations with respect to equipment
exceed 100% of the total cost of the equipment supplied hereunder. Buyer may also be entitled to the
manufacturer’s warranty on any third-party goods supplied by GAI-Tronics hereunder. The applicability
of any such third-party warranty will be determined by GAI-Tronics.
Services. Any services GAI-Tronics provides hereunder, whether directly or through subcontractors,
shall be performed in accordance with the standard of care with which such services are normally
provided in the industry. If the services fail to meet the applicable industry standard, GAI-Tronics will
re-perform such services at no cost to buyer to correct said deficiency to Company's satisfaction provided
any and all issues are identified prior to the demobilization of the Contractor’s personnel from the work
site. Re-performance of services shall be Buyer’s sole and exclusive remedy, and in no event shall GAITronics warranty obligations with respect to services exceed 100% of the total cost of the services
provided hereunder.
Warranty Periods. Every claim by Buyer alleging a defect in the goods and/or services provided
hereunder shall be deemed waived unless such claim is made in writing within the applicable warranty
periods as set forth above. Provided, however, that if the defect complained of is latent and not
discoverable within the above warranty periods, every claim arising on account of such latent defect shall
be deemed waived unless it is made in writing within a reasonable time after such latent defect is or
should have been discovered by Buyer.
Limitations / Exclusions. The warranties herein shall not apply to, and GAI-Tronics shall not be
responsible for, any damage to the goods or failure of the services supplied hereunder, to the extent
caused by Buyer’s neglect, failure to follow operational and maintenance procedures provided with the
equipment, or the use of technicians not specifically authorized by GAI-Tronics to maintain or service the
equipment. THE WARRANTIES AND REMEDIES CONTAINED HEREIN ARE IN LIEU OF AND
EXCLUDE ALL OTHER WARRANTIES AND REMEDIES, WHETHER EXPRESS OR IMPLIED BY
OPERATION OF LAW OR OTHERWISE, INCLUDING ANY WARRANTIES OF
MERCHANTABILITY OR FITNESS FOR A PARTICULAR PURPOSE.
Return Policy
If the equipment requires service, contact your Regional Service Center for a return authorization number
(RA#). Equipment should be shipped prepaid to GAI-Tronics with a return authorization number and a
purchase order number. If the equipment is under warranty, repairs or a replacement will be made in
accordance with the warranty policy set forth above. Please include a written explanation of all defects to
assist our technicians in their troubleshooting efforts.
Call 800-492-1212 (inside the USA) or 610-777-1374 (outside the USA) for help identifying the
Regional Service Center closest to you.
(Rev. 10/06)
 Loading...