

Page 1
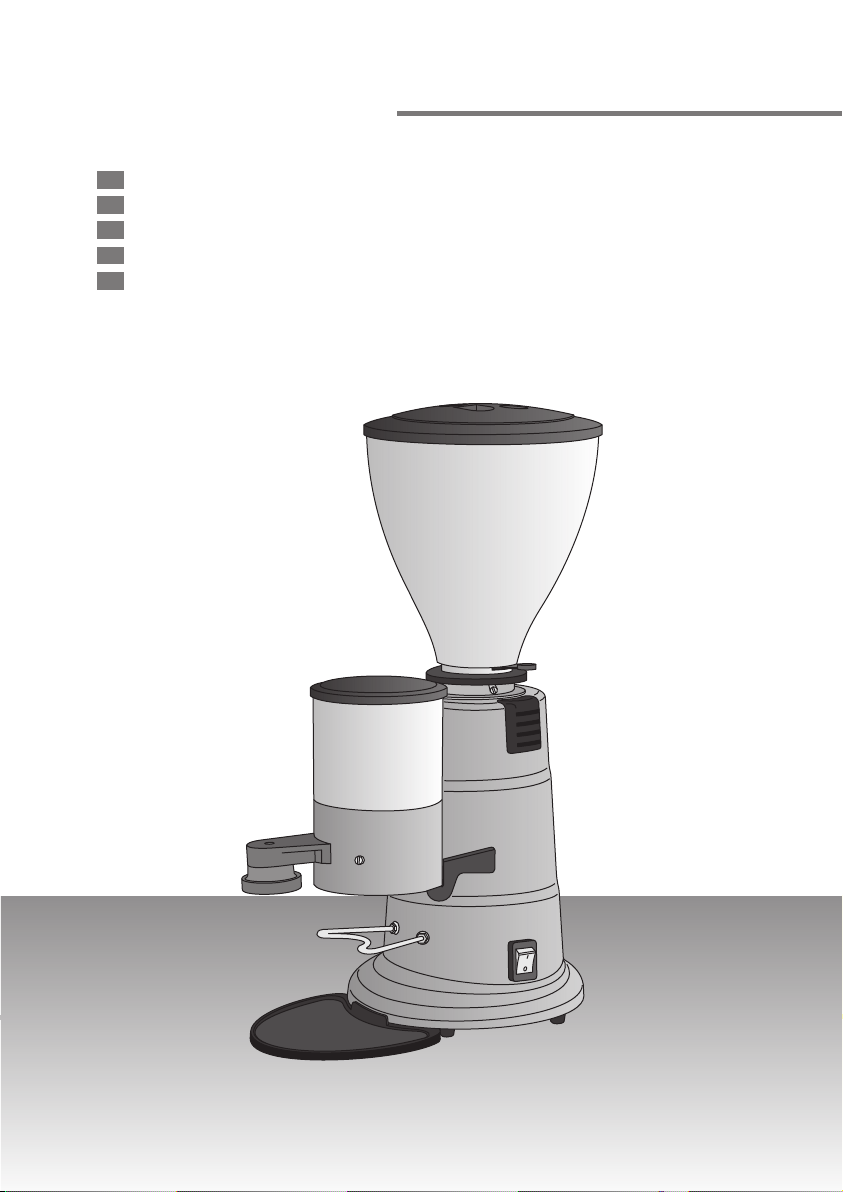
MD CONIK AUTOMATIC
I
MACINADOSATORE:
GB
DOSER COFFEE-GRINDER:
F
MOULIN DOSEUR:
D
DOSIERMÜHLE:
E
MOLINO DOSIFICADOR:
Bedienungsanleitung
Istruzioni d'uso
Operating Instructions
Mode d'emploi
Instrucciones de uso
Page 2
CE
DICHIARAZIONE DI CONFORMITA'
DECLARATION OF CONFORMITY
DECLARATION DE CONFORMITE
KONFORMITATSERKLARUNG
DECLARACIÓN DE CONFORMIDAD
Tipo di prodotto Macinadosatore
Product type Doser Coffee-Grinder
Type de produit Broyeur-doseur
Produktart Dosiermühle
Tipo de producto Molino-Dosificador
Modelli
Types
Modèles MD CONIK AUTOMATIC
Type
Modelos
- Con la presente l'azienda dichiara sotto la propria responsabilità, che il prodotto soddisfa per
progettazione e costruzione i requisiti della Direttiva:
- We, the company, declare here with on our own responsability that the above-metioned product meets
the requirements of the Directive:
- Par la présente, la société déclare sous sa propre responsabilité que le produit est conforme quant à sa
conception et à sa construction aux dispositions de la directive :
- Hier mit bestatigt die Firma unter eigener Verantwortung, dab das o.a.produkt in bezug auf Entwurf und
Fertigung den Anforderungen der Richtlinie:
- Con la presente la empresa declara bajo su propia responsabilidad, que en cuanto a diseño y
construcción el producto cumple con los requisitos establecidos por las siguientes normas:
Direttiva Bassa Tensione
Low Voltage Directive 73/23/CEE
Directive Basse Tension 93/68/CEE
Niederspannungsrichtlinie
Norma para Baja Tensión
- La conformità è stata verificata con l'ausilio delle seguenti norme armonizzate:
- Conformity has been controlled with the aid of the following Harmonized Standards:
- La conformité a été vérifiée d'après les normes harmonisées suivantes :
- Die Konformitat wunder auf Grunde u.a. Harmonisierten Normen gepruft:
- La conformidad ha sido comprobada con la ayuda de las siguientes normas conformes:
EN 60335-1 EN 60335-2-14
Direttiva Compatibilità Elettromagnetica
Electromagnetic Compatibility Directive 89/336/CEE
Directive Compatibilité Electromagnétique 92/31/CEE
EMV Richtlinie 93/68/CEE
Normas sobre Compatibilidad Electromagnética
- La conformità è stata verificata con l'ausilio delle seguenti norme armonizzate:
- Conformity has been controlled with the aid of the following Harmonized Standards:
- La conformité a été vérifiée d'après les normes harmonisées suivantes :
- Die Konformitat wunder auf Grunde u.a. Harmonisierten Normen gepruft:
- La conformidad ha sido comprobada con la ayuda de las siguientes normas conformes:
EN 55014 EN61000-3-2 EN 61000-3-3
AMMINISTRATORE DELEGATO
_____________________________
Dott. Mario Muttoni
Page 3
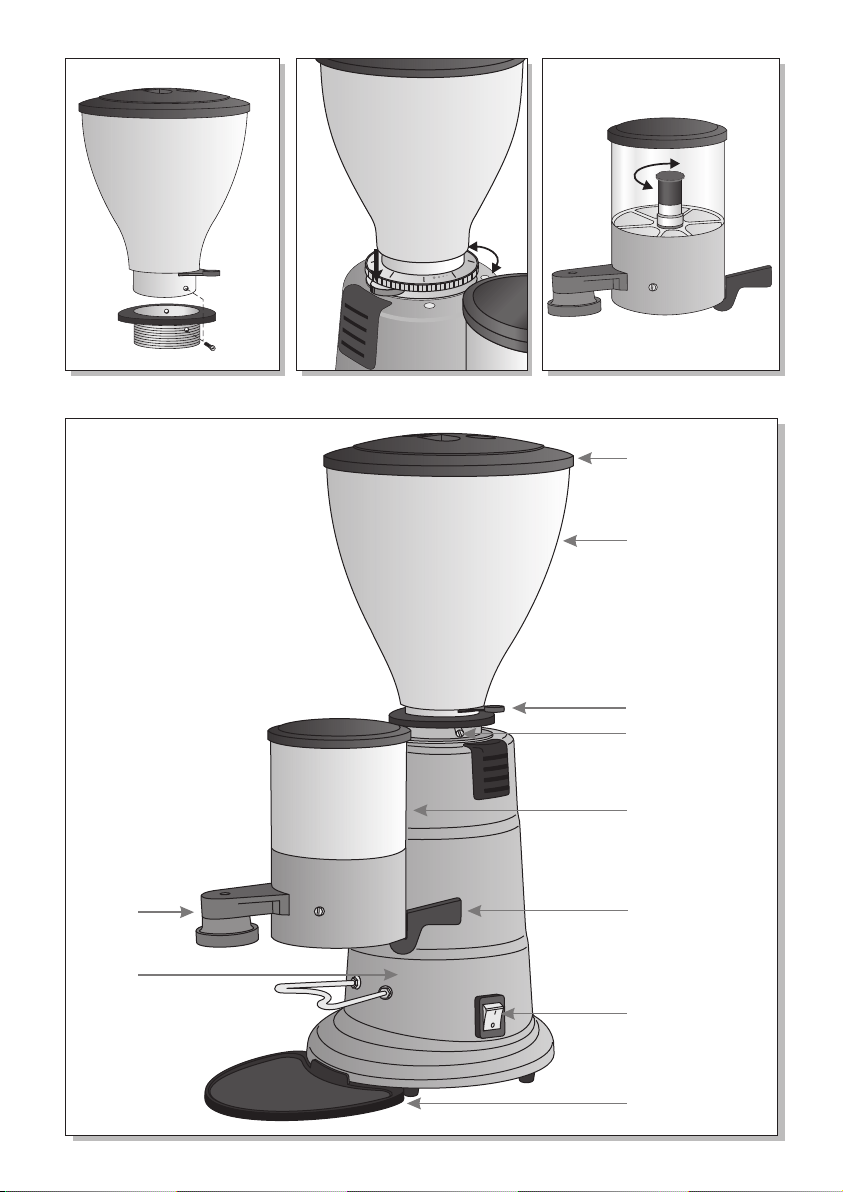
Fig.1
A
B
C
D
E
F
H
I
G
L
1
2
3
4
5
+
-
Fig.3
Fig.2
+
-
Fig.4
Page 4

ITALIANO
1 AVVERTENZE GENERALI
1-1 Prima di azionare l’apparecchio leggete attentamente le seguenti istruzioni.
1-2 Si ricorda che l’apparecchio è adibito ad uso professionale e quindi solo
1-3 Posizionate la macchina lontano da getti d’acqua, da luoghi particolarmente
1-4 Per qualsiasi operazione di manutenzione o riparazione rivolgetevi a
2 DESCRIZIONE DELLA MACCHINA (Fig. 1)
A) Coperchio campana caffè G) Pressino
B) Campana caffè H) Interruttore
C) Ventola chiusura campana caffè I) Piattino macinadosatore
D) Coperchio dosatore L) Corpo macchina
E) Dosatore F) Leva dosatore
3 FISSAGGIO DELLA CAMPANA AL CORPO DEL MACINADOSATORE O
3-1 Quest’operazione deve essere eseguita prima di iniziare ad usare il
3-2 Allineate il foro della campana con uno dei fori della ghiera di regolazione
3-3 Verificate che la ventola non impedisca di togliere il coperchio del dosatore o
3-4 Fissate il tutto con la vite apposita.
ITALIANO
persone qualificate ne possono fare uso.
umidi e da fonti di calore.
personale specializzato.
MACINACAFFÈ
macinadosatore o macinacaffè.
(Fig. 2).
di abbassare il perno di arresto del disco regolazione, altrimenti cambiate foro.
4 INSTALLAZIONE
4-1 L’installazione deve essere eseguita in conformità alle disposizioni del
paese di utilizzo; sono da osservare in modo particolare le disposizioni in
merito a: prescrizioni di legge, prescrizioni antinfortunistiche e
antincendio, regolamentazioni dell’ente erogante l’energia elettrica.
4-2 Prima di allacciare il vostro apparecchio alla rete, assicuratevi che il
voltaggio indicato nella targhetta corrisponda a quello del vostro impianto.
4-3 Effettuate un’accurata pulizia di tutti i componenti (vedi punto 6).
4-4 Accertatevi che l’interruttore sia spento (posizione 0).
4-5 Inserite la spina nella presa di alimentazione.
4-6 Qualsiasi manomissione o allacciamento non conforme è fonte di pericolo e
annulla la garanzia del costruttore.
5 FUNZIONAMENTO
5-1 Mettete il caffè in grani nella campana caffè, aprite la ventola e accendete
l’interruttore finche la quantità di caffè macinato sarà quella desiderata.
Estraete le dosi tirando la leva dosatore.
5-2 Non riempite mai il dosatore oltre i 2/3 della capacità.
5-3 Nel macinadosatore automatico la partenza e l’arresto sono automatici. Di
1
Page 5

notte o in assenza di operatori nel locale, spegnete l’interruttore.
5-4 Regolazione grana caffè macinato (Fig. 3): abbassate il perno di arresto
del disco regolazione, Girate il disco in senso orario per avere una grana
più grossa, in senso antiorario per una grana più fine.
5-5 Regolazione dose caffè macinato (Fig. 4): ruotate il perno all’interno del
dosatore in senso orario (dose minore) o in senso antiorario (dose maggiore).
6 PULIZIA
6-1 TOGLIETE LA SPINA DALLA PRESA DI ALIMENTAZIONE PRIMA DI
EFFETTUARE QUALSIASI TIPO DI PULIZIA.
6-2 Togliete le parti mobili della macchina e lavatele con abbondante acqua e
detersivo (non lavatele mai in lavastoviglie).
6-3 Pulite il corpo macchina con un panno umido (non immergetelo mai in acqua).
6-4 Accertatevi che all’interno del dosatore non si formino delle incrostazioni.
6-5 La pulizia risulterà più efficace se effettuata ogni giorno.
7 ALTRE AVVERTENZE
7-1 Smaltimento imballo: dopo aver liberato la macchina dall’imballo, smaltire i
vari componenti secondo le norme vigenti nel paese.
7-2 Smaltimento dell’apparecchio a fine utilizzo: al termine della sua vita,
l’apparecchio non va abbandonato nell’ambiente, ma scomposto e smaltito in
base al tipo di materiale. La ditta consiglia che la scomposizione e lo
smaltimento dell’apparecchio siano affidate ad aziende specializzate in tali
operazioni.
7-3 NON DISPERDETE NULLA NELL’AMBIENTE.
ITALIANO
8 GARANZIA
8-1 La macchina è coperta da garanzia per 12 mesi dalla data di acquisto.
8-2 Non sono soggetti a garanzia difetti dovuti ad usura ed uso errato od improprio.
8-3 La garanzia decade nel prodotto manomesso.
2
Page 6

ENGLISH
1 GENERAL INSTRUCTIONS
1-1 Before starting up the appliance, carefully read the following instructions.
1-2 This appliance has been designed for professional use only and hence
ENGLISH
1-3 Keep the appliance well clear of water jets, damp areas and heat sources.
1-4 Always consult a qualified electrician for repairs and maintenance.
2 DESCRIPTION OF APPLIANCE (Fig. 1)
A) Coffe tub lid G) Press
B) Coffee tub H) Switch
C) Coffee tub hatch I) Grinder plate
D) Dispenser lid L) Body of machine
E) Coffee dispenser F) Measuring lever
3 INSTRUCTIONS FOR FITTING THE BELL TO THE BODY OF THE
3-1 The bell must be fitted before using the doser coffee-grinder or coffee-grinder.
3-2 Align the hole of the bell with one of the holes of the adjusting ring-nut (Fig. 2).
3-3 Ensure that the fan does not prevent you removing the dispenser cover or
3-4 Fasten, using the appropriate screw.
4 INSTALLATION
4-1 Installation must be carried out in strict compliance with the provisions of
4-2 Before connecting the appliance to the mains supply, make sure that the
4-3 Carefully clean all the components (see point 6).
4-4 Make sure that the switch is off (position 0).
4-5 Insert the plug in the power inlet.
4-6 Tampering with the appliance or failure to comply with the relative
must only be used by trained personnel familiar with its operation.
DOSER COFFEE-GRINDER OR COFFEE-GRINDER
lowering the stop pin of the adjusting disk - if it does, change holes.
law currently in force in the country of use, with particular reference to said
country’s accident and fire-prevention requirements and electricity
authority regulations.
voltage indicated on the data plate is commensurate with that of the mains
supply.
connection requirements causes undue danger and consequently renders
the manufacturer’s guarantee null and void.
5 OPERATION
5-1 Place the coffee beans in the tub, open the hatch and switch on, operating
the machine until the desired quantity of powder has been ground. Measure
out the ground coffee, pulling the lever.
5-2 Never fill the coffee dispenser more than 2/3rds.
5-3 The automatic doser coffee-grinder model starts and stops automatically.
Always switch off the appliance when not in use and at the end of the day.
5-4 Regulating ground coffee granule size (Fig. 3): lower the check pin on
3
Page 7

the regulating disk. Turn the disk in a clockwise direction to increase the
size of the granule, or anti-clockwise to obtain finer granules.
5-5 Regulating measures (Fig. 4): turn the pin inside the coffee dispenser in a
clockwise direction (to decrease measure) or in an anti-clockwise direction
(to increase measure).
6 CLEANING
6-1 ALWAYS REMOVE THE PLUG FROM THE POWER INLET BEFORE
CLEANING THE APPLIANCE.
6-2 Detach all removable parts from the appliance and hand wash in soapy
water (never clean in the dishwasher).
6-3 Clean the appliance body with a damp cloth (never immerse the appliance
in water).
6-4 Make sure that encrustations do not form inside the coffee dispenser.
6-5 The appliance can be kept clean more easily if washed every day.
7 FURTHER INSTRUCTIONS
7-1 Packing disposal: following removal of the appliance from its packing,
dispose of said packing in compliance with the standards currently in force
in the country of use.
7-2 Appliance disposal: When the appliance reaches the end of its service life,
do not discard in the environment, but rather dismantle and dispose of the
appliance in accordance with the regulations governing the various
materials used for its construction. We recommend that such operations be
performed by a qualified waste disposal company.
7-3 DO NOT DISCARD IN THE ENVIRONMENT.
ENGLISH
8 WARRANTY
8-1 The machine is guaranteed for a period of 12 months from the date of
purchase.
8-2 Defects resulting from normal wear or caused by improper use of the
appliance are not covered by the warranty.
8-3 Tampering with the appliance will automatically invalidate the warranty.
4
Page 8

FRANÇAIS
1 AVERTISSEMENTS GÉNÉRAUX
1-1 Avant de mettre l’appareil en marche, lisez attentivement les instructions
suivantes.
1-2 Nous vous rappelons que cet appareil est destiné à un usage
professionnel; par conséquent, son utilisation est exclusivement destinée
aux personnes qualifiées.
1-3 Installez l’appareil dans un endroit où il ne pourra pas être atteint par
d’éventuelles éclaboussures d’eau, loin de lieux particulièrement humides et
FRANÇAIS
1-4 Pour toute opération d’entretien ou de réparation, adressez-vous à un
2 DESCRIPTION DE L’APPAREIL (Fig. 1)
A) Couvercle réservoir à café G) Presseur
B) Réservoir à café H) Interrupteur
C) Lamelle de fermeture du réservoir à café I) Soucoupe broyeur-doseur
D) Couvercle du doseur L) Corps de l’appareil
E) Doseur F) Levier doseur
3 FIXATION DE LA COUPOLE AU CORPS DU MOULIN DOSEUR OU DU
3-1 Cette opération doit être effectuée avant de commencer à utiliser le moulin
3-2 Alignez le trou de la coupole à l’un des trous du collier de réglage (Fig. 2).
3-3 Vérifiez que le ventilateur n’empêche pas de retirer le couvercle du doseur ou
3-4 Fixez le tout à l’aide de la vis prévue à cet effet.
de sources de chaleur.
personnel spécialisé.
MOULIN
doseur ou le moulin.
de baisser le pivot d’arrêt du disque de réglage, auquel cas changez de trou.
4 INSTALLATION
4-1 L’installation doit être réalisée conformément aux dispositions du Pays dans
lequel l’appareil est utilisé; il est nécessaire en particulier de respecter les
prescriptions législatives, les prescriptions relatives à la protection
contre les accidents et contre les incendies, les réglementations de la
Société distributrice de l’énergie électrique.
4-2 Avant de brancher votre appareil au réseau, assurez-vous que le voltage
indiqué sur la plaque corresponde à celui de votre installation.
4-3 Nettoyez soigneusement tous les composants (voir point 6).
4-4 S’assurer que l’interrupteur soit bien désactivé (position 0).
4-5 Introduisez la fiche dans la prise d’alimentation.
4-6 Toute modification effectuée sur l’appareil ou tout branchement non
conforme est source de danger et annule la garantie assurée par le
constructeur.
5 FONCTIONNEMENT
5-1 Placer les grains de café dans le réservoir à café, ouvrir la lamelle et actionner
5
Page 9

l’interrupteur jusqu’à ce que la quantité de café moulu ne corresponde à la
quantité souhaitée. Extraire les doses en tirant le levier du doseur.
5-2 Ne jamais remplir le doseur au delà des 2/3 de la contenance.
5-3 Dans le moulin doseur automatique le démarrage et l’arrêt sont
automatiques. La nuit ou en cas d’absence de tout opérateur dans le local,
désactiver l’interrupteur.
5-4 Réglage de la mouture du café moulu (Fig. 3): baisser la broche d’arrêt
du disque de réglage. Tourner le disque dans le sens des aiguilles d’une
montre pour avoir une mouture plus grosse et dans le sens contraire à celui
des aiguilles d’une montre pour une mouture plus fine.
5-5 Réglage de la dose de café moulu (Fig. 4): tourner la broche à l’intérieur
du doseur dans le sens horaire (dose moindre) ou dans le sens contraire à
celui des aiguilles d’une montre (dose plus importante).
6 NETTOYAGE
6-1 RETIREZ LA FICHE DE LA PRISE D’ALIMENTATION AVANT D’EFFECTUER
TOUT TYPE DE NETTOYAGE.
6-2 Retirez les parties mobiles de l’appareil et lavez-les à l’eau et au savon
(jamais au lave-vaisselle).
6-3 Nettoyez le corps de l’appareil avec un chiffon humide (ne mettez jamais le
corps de l’appareil dans l’eau).
6-4 S’assurer qu’il n’y ait aucune formation d’incrustations à l’intérieur du doseur.
6-5 Le nettoyage sera plus efficace s’il est effectué tous les jours.
7 AUTRES AVERTISSEMENTS
7-1 Elimination de l’emballage: après avoir libéré l’appareil de son emballage,
éliminez les différents composants en respectant les normes en vigueur
dans le Pays.
7-2 Elimination de l’appareil usé: lorsque l’appareil usé devra être éliminé, il ne
devra pas être abandonné dans l’environnement mais décomposé et
l’élimination des différentes pièces devra être effectuée en fonction du type de
matériau. La Société conseille que la décomposition et l’élimination de
l’appareil soient confiées à des entreprises spécialisées dans ce secteur.
7-3 NE RIEN JETER DANS L’ENVIRONNEMENT.
FRANÇAIS
8 GARANTIE
8-1 L’appareil est garanti pendant 12 mois à compter de la date d’achat.
8-2 Cette garantie ne s’applique pas aux défauts résultant de l’usure ou d’une
mauvaise utilisation de l’appareil.
8-3 La garantie déchoit en cas d’altération de l’appareil.
6
Page 10

DEUTSCH
1 ALLGEMEINE HINWEISE
1-1 Vor Benutzung des Geräts die folgenden Anweisungen aufmerksam
durchlesen.
1-2 Das Gerät ist für den Fachgebrauch bestimmt und darf deshalb nur von
Fachpersonal bedient werden.
1-3 Das Gerät sollte fern von Wasserstrahlen, sehr feuchten Stellen und
Wärmequellen aufgestellt werden.
1-4 Für Wartungen oder Reparaturen sollte man sich an einen Fachbetrieb
wenden.
2 BESCHREIBUNG DES GERÄTS (Abb. 1)
A) Deckel G) Druckscheibe
B) Kaffeetrichter H) Schalter
C) Schließring des Kaffeetrichters I) Gerätesockel
DEUTSCH
D) Dosiererdeckel L) Gerätekorpus
E) Dosierer F) Dosierhebel
3 BEFESTIGUNG DER GLOCKE AN DEN KORPUS DES DOSIERMÜHLE
BZW. DES KAFFEEMÜHLE
3-1 Diese Operation muß vor Benutzung des Dosiermühleoder des Kaffeemühle
erfolgen.
3-2 Das Loch der Glocke genau auf ein Loch des Schließrings positionieren
(Abb. 2).
3-3 Verhindert der Ventilator das Abnehmen des Dosiererdeckels bzw. das
Niederdrücken des Arretierstifts am Schließring, muß das Loch gewechselt
werden.
3-4 Das Ganze festschrauben.
4 ANSCHLUSS
4-1 Der Anschluß muß unter Einhaltung der landesüblichen Vorschriften
erfolgen. Dabei sind im einzelnen die gesetzlichen Bestimmungen,
die Unfallschutz- und Brandschutzvorschriften sowie die
Verordnungen des zuständigen Elektrizitätswerks zu beachten.
4-2 Vor Anschluß des Geräts an das Stromnetz überprüfen, ob die auf dem
Typenschild angegebene Betriebsspannung des Geräts mit der
Netzspannung übereinstimmt.
4-3 Vor Gebrauch des Geräts alle Bauteile gründlich reinigen (siehe Punkt 6).
4-4 Darauf achten, daß der Schalter ausgeschaltet ist (Position “0”).
4-5 Den Netzstecker anschließen.
4-6 Der unsachgemäße Gebrauch bzw. unvorschriftsmäßige Anschluß ist eine
Gefahrenquelle. Der Hersteller übernimmt in diesem Fall keine Haftung.
5 BETRIEB
5-1 Die Kaffeebohnen in den Kaffeetrichter einfüllen, den Schließring öffnen und
den Schalter eingeschaltet lassen, bis die gewünschte Kaffeemenge
7
Page 11

gemahlen ist. Den dosierten Kaffee durch Betätigung des Dosierhebels
entnehmen.
5-2 Den Dosierer nie über 2/3 seines Füllinhaltes füllen.
5-3 Am automatische Dosiermühle sind der Start und der Stopp automatisch.
Nachts oder bei Abwesenheit von zuständigem Personal den Schalter
ausschalten.
5-4 Einstellung der Mahlfeinheit (Abb. 3): Den Arretierstift des Schließringes
nach unten verstellen. Den Schließring in Uhrzeigerrichtung für gröber und
entgegen der Uhrzeigerrichtung für feiner gemahlenen Kaffee drehen.
5-5 Einstellung der Dosiermenge (Abb. 4): Den Stift im Dosierer in
Uhrzeigerrichtung (kleinere Dosis) oder entgegen der Uhrzeigerrichtung
(größere Dosis) drehen.
6 REINIGUNG
6-1 VOR DER REINIGUNG DEN NETZSTECKER ZIEHEN.
6-2 Die beweglichen Geräteteile abbauen und mit reichlich Wasser und
Reinigungsmittel säubern (nie in der Geschirrspülmaschine reinigen).
6-3 Den Gerätekorpus mit einem feuchten Tuch reinigen (unter keinen
Umständen in Wasser tauchen).
6-4 Darauf achten, daß sich im Dosierer keine Ablagerungen bilden.
6-5 Die Reinigung ist sofort nach dem Gebrauch von größerer Wirkung.
7 SONSTIGE HINWEISE
7-1 Entsorgung der Verpackung: Die einzelnen Verpackungsteile nach den
einschlägigen Bestimmungen entsorgen.
7-2 Entsorgung des Altgeräts: Das ausgediente Gerät sollte für die getrennte
Entsorgung in die Einzelteile zerlegt werden. Es gibt dafür zuständige
Spezialfirmen.
7-3 SCHÜTZT DIE UMWELT.
DEUTSCH
8 GARANTIE
8-1 Das Gerät hat eine Garantie von 12 Monaten ab dem Kaufdatum.
8-2 Für Schäden infolge von Abnutzung und falschem oder unsachgemäßem
Gebrauch wird keine Garantie übernommen.
8-3 Die Garantie verfällt bei unbefugten Eingriffen am Gerät.
8
Page 12

ESPAÑOL
1 ADVERTENCIAS GENERALES
1-1 Antes de poner en marcha el equipo, lea atentamente las siguientes
instrucciones.
1-2 Recuerde que el equipo está destinado al uso profesional, por lo tanto, sólo
podrá manejarlo personal cualificado.
1-3 Sitúe la máquina lejos del agua, la humedad o las fuentes de calor.
1-4 Para llevar a cabo cualquier reparación u operación de mantenimiento,
diríjase a personal especializado.
2 DESCRIPCIÓN DE LA MÁQUINA (Fig. 1)
A) Tapa de la campana de café G) Prensa
B) Campana de café H) Interruptor
C) Mampara de cierre de la campana de café I) Platillo de molienda
D) Tapa del dosificador L) Cuerpo del aparato
E) Dosificador F) Palanca del dosificador
3 FIJACIÓN DE LA CAMPANA AL CUERPO DEL MOLINO DOSIFICADOR
O MOLINO DE CAFÉ
3-1 Esta operación debe ser realizada antes de empezar a utilizar el molino
ESPAÑOL
3-2 Alinee el agujero de la campana con uno de los agujeros de la abrazadera
3-3 Verifique que el ventilador no impida retirar la tapa del dosificador o bajar el
3-4 Fije todos los componentes con los tornillos correspondientes.
dosificador o molino de café.
de regulación (Fig. 2).
tornillo de parada del disco de regulación. Si impide alguna de estas
acciones, cambie el agujero.
4 INSTALACIÓN
4-1 La instalación debe realizarse siguiendo las normativas de cada país;
deberán observarse particularmente las disposiciones referentes a:
normativas de ley, normativas contra el ruido, incendios,
reglamentación de la compañía de suministro de energía eléctrica.
4-2 Antes de conectar el equipo a la toma de red, asegúrese de que el voltaje
indicado en la tarjeta de características sea el mismo que el de su
instalación eléctrica.
4-3 Limpie cuidadosamente todos los componentes (consulte el punto 6).
4-4 Verifique que el interruptor esté apagado (posición 0).
4-5 Inserte el enchufe en la toma de red.
4-6 Cualquier manipulación o instalación que difiera a lo indicado en este manual,
representa una fuente de peligro y anula la garantía del fabricante.
5 FUNCIONAMIENTO
5-1 Coloque el café en grano en la campana de café, abra la mampara y
encienda el interruptor hasta que la cantidad de café molido sea la
deseada. Extraiga el café tirando de la palanca del dosificator.
9
Page 13

5-2 No llene nunca el dosificador con más de las dos terceras partes de su
capacidad.
5-3 En el molino dosificador automático, la puesta en funcionamiento y su
interrupción son automáticos. Apague el interruptor durante la noche o
cuando el lugar donde se encuentra el aparato quede vacío de personal.
5-4 Regulación del grado de molienda (Fig. 3): baje el gozne de parada del
disco de regulación, gire el disco en el sentido de las agujas del reloj para
obtener un grano más grueso y en sentido contrario a las agujas del reloj
par obtener un grano más fino.
5-5 Regulación de la dosis de café molido (Fig. 4): gire el gozne hacia el
interior del dosificador en el sentido de las agujas del reloj (dosis menor) o
en sentido contrario a las agujas del reloj (dosis mayor).
6 LIMPIEZA
6-1 EXTRAIGA EL ENCHUFE DE LA TOMA DE RED ANTES DE EFECTUAR
CUALQUIER OPERACIÓN DE LIMPIEZA.
6-2 Retire las piezas móviles de la máquina y lávelas con abundante agua y
detergente (nunca en el lavavajillas).
6-3 Limpie el cuerpo de la máquina con un paño húmedo (nunca lo sumerja en
agua).
6-4 Compruebe que en el interior del dosificador no haya incrustaciones.
6-5 La limpieza resultará más eficaz si se realiza cada día.
7 OTRAS ADVERTENCIAS
7-1 Eliminación del embalaje: cuando haya desembalado la máquina, elimine
los diferentes componentes del embalaje siguiendo las normativas vigentes
en su país.
7-2 Eliminación del equipo: al finalizar la vida útil del equipo, este no puede
abandonarse en el entorno, tiene que desmontarse y eliminarse según el
tipo de los materiales. El fabricante aconseja que estas operaciones sean
realizadas por alguna empresa especializada en la materia.
7-3 NO ABANDONE NADA EN EL ENTORNO.
ESPAÑOL
8 GARANTÍA
8-1 Este aparato dispone de una garantía de 12 meses a partir de la fecha de
compra.
8-2 Quedan excluidos de la garantía los defectos derivados del desgaste y del
uso incorrecto o indebido.
8-3 La garantía no tendrá vigencia en caso de que el producto haya sido
maltratado.
10
Page 14

MD CONIK automatic
CARATTERISTICHE TECNICHE - FEATURES
e)
Diametro macine coniche Conical grinding blades diam. 63 mm
Potenza Power 250 W
Motore Motor 350 rpm
Produzione caffè Grinding capacity 8-10 Kg/h
Dispositivo contadosi Dose counter si / yes
Dimensioni Dimensions 220 x 370 h 600
Peso netto Net weight 15,0 Kg
Peso lordo Gross weight 16,5 Kg
00706VisualComunicazione(V
LA DITTA GAGGIA SI RISERVA DI MODIFICARE SENZA PREAVVISO LE CARATTERISTICHE TECNICHE DEI PRODOTTI
THE GAGGIA COMPANY RESERVES THE RIGHT TO CHANGE SPECIFICATIONS WITHOUT NOTICE
®
S.p.A.
20087 Robecco sul Naviglio – Milano – Italia
Telefoni: 0294993-1 (15 linee) 029471654 - Fax: 029470888
Sede legale: Via C.Gomes,16 - 20124 Milano
www.gaggia.it - E-mail: gaggia@gaggia.it
 Loading...