

Page 1

ITALIANO
• 1 •
Ci congratuliamo per la vostra scelta!
Grazie a questa macchina Gaggia potrete
gustare un delizioso caffè o cappuccino nel
comfort della vostra casa.
L’espresso viene preparato facendo filtrare rapidamente dell’acqua sotto pressione e riscaldata
alla giusta temperatura attraverso una miscela
finemente torrefatta.
Il cuore della macchina espresso è costituito da
una pompa ad alta prestazione.
Il flusso dell’acqua è comandato tramite un
interruttore.
AVVERTENZA:
La macchina espresso è stata studiata
unicamente per uso domestico.
Qualsiasi intervento di assistenza o di ripa-
razione fatta eccezione per le operazioni di
pulizia e di normale manutenzione, dovrà
essere effettuato da un Centro di Assistenza
autorizzato.
1. Controllare che il voltaggio indicato sulla
targhetta corrisponda al vostro.
2. Non utilizzare mai acqua tiepida o calda per
riempire il serbatoio dell’acqua. Utilizzare
unicamente acqua fredda.
3. Non toccare con le mani le parti calde
della macchina ed il cavo di alimentazione
durante il funzionamento.
4. Non pulire mai con detersivi corrosivi o
utensili che graffino. E’ sufficiente un panno
morbido inumidito con acqua.
5. Per evitare la formazione di calcare, si può
utilizzare acqua minerale naturale.
6. Non immergere la macchina in acqua.
PRECAUZIONI
IMPORTANTI
Durante l’utilizzo di elettrodomestici, è
consigliabile prendere alcune precauzioni per limitare il rischio di incendi,
scosse elettriche e/o incidenti.
1 Leggere attentamente tutte le istruzioni ed
informazioni riportate in questo manualetto
e in qualsiasi altro opuscolo contenuto nell’imballo prima di avviare ed utilizzare la
macchina espresso.
2 Non toccare superfici calde.
3 Non immergere cavo, spine o il corpo della
macchina in acqua o altro liquido per evi-
rare incendi, scosse elettriche o incidenti.
4 Fare particolare attenzione durante l’utilizzo della
macchina espresso in presenza di bambini.
5 Togliere la spina dalla presa se la macchina
non viene utilizzata o durante la pulizia. Far-
la raffreddare prima di inserire o rimuovere
pezzi e prima di procedere alla sua pulizia.
6 Non utilizzare la macchina con cavo o spina
danneggiati o in caso di guasti o rotture. Far
controllare o riparare l’apparecchio presso
il centro di assistenza più vicino.
7
L’utilizzo di accessori non consigliati dal pro-
duttore può causare danni a cose e persone.
8 Non utilizzare la macchina espresso all’aperto.
9 Evitare che il cavo penda dal tavolo o che
tocchi superfici calde.
10 Tenere la macchina espresso lontano da
fonti di calore.
1
1 Controllare cha la macchina espresso sia
in posizione “spento” prima di inserire la
spina nella presa. Per spegnerla, posizio-
narla su “spento” e rimuovere quindi la
spina dalla presa.
12 Utilizzare la macchina unicamente per uso
domestico.
13 Fare estrema attenzione durante l’utilizzo
del vapore.
14 Questo elettrodomestico non è progettato
per essere usato da persone (compresi i bam-
bini) con ridotte capacità motorie, sensorie o
mentali, o che manchino di esperienza o di
conoscenze pratiche, a meno che siano state
adeguatamente istruite all’uso del dispositivo
o che agiscano sotto la supervisione di una
persona responsabile della loro incolumità.
I bambini devono essere sorvegliati perché
non giochino con l’apparecchio.
15 Conservare queste istruzioni
Page 2

ITALIANO
Descrizione:
FIG. 01
1 Interruttore principale
2 Tasto erogazione caffè 1 corto/2 corti
3
Tasto erogazione caffè 1 lungo/2 lunghi
4 Tasto prelievo acqua calda
5 Spia prelievo vapore
6
Tasto programmazione dosi/erogazione manuale
7 Spia raggiungimento temperatura corretta
8 Tromboncino vapore (estraibile)
9 Portafiltro
10 Filtro (1 tazza)
11 Filtro (2 tazze)
12 Bacinella (estraibile)
13 Filtro “crema perfetta” (OPTIONAL)
14 Gruppo di erogazione caffè
15 Guarnizione sottocoppa
16 Porta-doccetta
17 Doccetta
18 Pressino
19 Cavo e spina di alimentazione
20 Misurino
21 Beccuccio erogazione
22 Coperchio serbatoio
23 Griglia (estraibile)
24 Kit cappuccinatore (OPTIONAL)
25 Manopola rubinetto vapore/acqua calda
26 Serbatoio dell’acqua (estraibile)
27 Foro antitracimazione
28 Pulitore antimpronta per acciaio inox
29 Indicatore bacinella piena
30 Filtro per cialde
Istruzioni sul cavo elettrico
A Viene fornito un cavo elettrico abbastanza
corto per evitare che si attorcigli o che vi
inciampiate.
B Si possono utilizzare, con molta attenzione,
delle prolunghe.
C Qualora venga utilizzata una prolunga,
verificare:
1 che il voltaggio riportato sulla prolunga sia
perlomeno, uguale al voltaggio elettrico
dell’elettrodomestico;
2 se l’elettrodomestico è munito di messa a ter-
ra, la prolunga deve essere realizzata con un
cavo a 3 fili adatto per il collegamento a terra e
3 se viene utilizzata una prolunga, il cavo in
eccesso deve essere disposto in maniera tale
• 2 •
Preparazione della macchina da
caffè Espresso:
1. Togliere il coperchio del serbatoio dell’acqua
(22) e riempirlo con acqua fredda fino alla
tacchetta MAX del serbatoio (26). Vedi FIG.
02.
N.B.: In prossimità della scritta MAX del ser-
batoio è presente il foro di sicurezza antitra-
cimazione (27), per eventuali sovradosaggi
di riempimento serbatoio.
E’ possibile anche rimuovere il serbatoio
dell’acqua, dopo aver rimosso il coperchio
serbatoio (22) e utilizzando la maniglia.
Riposizionare il serbatoio con l’acqua e il
coperchio.
2 Inserire la spina (19) in una presa adeguata
(Cfr.”Avvertenza” punto 1)
3 Premere l’interruttore principale (1) . La spia
di raggiungimento temperatura (7) lampeg-
gerà fino a raggiungimento temperatura;
a temperatura raggiunta la spia rimarra
accesa.
Le spie dei tasti 2 - 3 - 5 - 6 si accenderanno
fisse (modalità stand-by).
Messa in servizio
Questa procedura consente di riempire la caldaia con acqua fredda.
Si consiglia di seguire questa procedura ogni
qualvolta la macchina viene usata per la “prima” volta.
Questa macchina utilizzando una pompa per
l’erogazione del caffè, è dotata di un sistema
autoinnescante.
Collocare una tazza vuota sotto il tromboncino
vapore (8), premere il tasto acqua calda (4)
e ruotare la manopola vapore (25) in senso
orario.
Si potrà udire il suono della pompa così attivata
e dopo qualche secondo l’acqua comincerà a
scendere dal tromboncino vapore (8).
Dopo aver lasciato riempire la tazza chiudere la
manopola vapore (25) e premere nuovamente
il tasto acqua calda (4).
La macchina Gaggia è ora pronta all’uso.
che non penda dal piano di lavoro, questo
per evitare che un bambino possa tirarlo, o
inciamparci.
Page 3
ITALIANO
Cosa dovete sapere
1 Il sapore dell’espresso dipende dalla quan-
tità e dal tipo di caffè utilizzato.
Il particolare sapore di un chicco di caffè
dipende da diversi fattori ma il suo gusto ed
il suo aroma sono il risultato del processo
di torrefazione.
I chicchi di caffè torrefatti per un periodo
più lungo e a temperature più elevate presentano un colore più scuro. Chicchi più
scuri liberano più aroma rispetto a chicchi
chiari.
2 Troverete sul mercato diverse qualità di caf-
fè. Ogni tipo di torrefazione è caratterizzato
da una miscela di chicchi torrefatta ad una
particolare temperatura e con un particolare
tipo di aroma.
Esistono decaffeinati contenenti soltanto il
2% di caffeina.
Sperimentate con la vostra
macchina espresso uno dei vari tipi di caffè in
vendita. Scoprirete probabilmente un aroma
migliore rispetto a quello della miscela finora
utilizzata.
• 3 •
3 Le macchine espresso a pompa richiedono
una miscela finemente macinata. Assicurarsi
di acquistare o di farsi macinare questo tipo
di miscela. E’ preferibile usare un macinino
a macine piuttosto che un macinino a lama
perché questo libera troppa polvere di caffè
e produce una miscela macinata in modo
irregolare.
4 Il vero espresso si riconosce dal colore scuro,
dal gusto ricco e dalla tipica “crema”.
5 Il cappuccino è una speciale combinazione
di caffè espresso e latte caldo emulsionato.
Si può servire con una spruzzata di cannella,
noce moscata o cacao.
6 Servire immediatamente il caffè espresso
dopo averlo preparato.
7 Servire il caffè espresso in tazzine da caffè
ed il cappuccino in tazze da prima colazione.
8 Sarebbe l’ideale macinare il caffè appena
prima dell’uso. Non dimenticare che deve
essere macinato per la macchina espresso
a pompa.
9 E’ consigliabile conservare il caffè macinato
o in chicchi, in barattoli ermetici nel freezer. Il
caffè macinato assorbe facilmente gli odori.
Come preparare un buon Espresso
Programmazione delle dosi caffè.
Con questa macchina Gaggia è possibile
programmare due dosi differenti di acqua per
ottenere una o due tazze di caffè.
Per regolare le dosi di acqua e per poterle
memorizzare per una successiva richiesta di
erogazione, fare attenzione di eseguire prima
la procedura di “PREPARAZIONE DEL CAFFE’”
di pag.4 paragrafi 2-3-4, poi agendo nel
seguente modo:
1 Premere il tasto programmazzione (6) per
3 sec. fino a quando la spia (6) inizierà a
lampeggiare.
Contemporameamente si illuminaranno i
simboli dei tasti 2 - 3.
2 Inserito il filtro da una tazza, premere il tasto
(2) lasciando defluire il caffè.
3 Premere nuovamente il tasto (2) quando si
sarà raggiunta la dose ottimale per un caffè,
desiderata.
Attenzione! Non azionare mai la
pompa senza acqua nel serbatoio
onde evitare di danneggiare la pompa stessa. Un utilizzo scorretto della pompa
non è coperto da garanzia.
Dopo l’erogazione del caffè, comunque, ci potrà essere un leggero gocciolamento a causa dei
fondi di caffè bagnati contenuti nel portafiltro.
N.B.: La spia di raggiungimento della tempe-
ratura corretta (7) continuerà a spegnersi e ad
accendersi automaticamente durante il periodo
di riscaldamento. Dopo aver acceso la macchina, per il primo caffè, aspettare circa 6 minuti
per il riscaldamento ideale, mentre per quelli
successivi la macchina sarà sempre pronta.
Altra caratteristica della macchina è il sistema
anti-gocciolamento che elimina la maggior parte del gocciolio dal gruppo erogatore (14).
Page 4

ITALIANO
• 4 •
Preparazione del caffè.
1 Seguire la procedura descritta nel capitolo
“Preparazione della macchina da
caffè Espresso”.
2 Scegliere il filtro corretto (10 o 11) ed inse-
rirlo nel portafiltro (9).
Utilizzare il filtro piccolo per 1 tazza ed il
filtro grande per 2 tazze.
Inserire quindi il portafiltro (9) nella mac-
china.
3 Dopo il riscaldamento, togliere il portafiltro
(9) e riempirlo con caffè macinato utilizzando il misurino fornito.
Considerare un misurino per ogni tazza di caffè.
Non riempire troppo.
Premere utilizzando l’apposito pressino (18).
Non premere troppo.
4 Pulire il bordo del portafiltro (9) da eventuali
residui di caffè. Inserire il portafiltro nella macchina con un movimento a 45° verso sinistra.
Ruotare quindi verso destra per bloccarlo
in posizione. Il manico del portafiltro dovrà
trovarsi in posizione perpendicolare alla macchina o leggermente spostato verso destra.
5 Disporre una o due tazze sotto il portafiltro.
Premere il tasto corrispondente alla dose di
caffè memorizzata. Il caffè inizierà ad uscire.
6 L’erogazione del caffè si fermerà automa-
ticamente quando verrà raggiunto il livello
preimpostato (vedi Programmazione
delle dosi caffè); è comunque possibile interrompere l’erogazione del caffè
premendo il tasto (2 o 3) precedentemente
selezionato.
Un buon caffè preparato seguendo la giusta
procedura avrà la tipica “crema” marrone.
In caso contrario consultare “In caso di
malfunzionamento”
7 Togliere le tazze e servire.
8 Per preparare dell’altro caffè, togliere lenta-
mente ed attentamente il portafiltro muovendolo verso sinistra. Fare attenzione a non scottarsi
con l’acqua rimasta sui fondi di caffè. Un po’
d’acqua continuerà a sgocciolare una volta
rimosso il portafiltro. Questo è dovuto alla
pressione dell’acqua nel sistema. Togliere i
fondi dal filtro. Per preparare dell’altro caffè,
ripetere le fasi da 2 a 7.
4 A questo punto la dose di acqua attribuita,
per un caffè, al tasto (2) sarà memorizzata
e la spia posta sotto il tasto si spegnerà.
5 Ripetere i passaggi ai punti 3 e 4 per pro-
grammare la dose d’acqua per il tasto (3).
Ogni utente sarà libero di programmare le
dosi per ottenere un caffè più o meno forte e
di attribuire dosi minori o maggiori ai tasti
(2 e 3) per utilizzare il filtro da 1 o 2 tazze.
6 Dopo la memorizzazione di queste dosi,
premere nuovamente il tasto (6) “MENU” per
uscire dalla funzione di programmazione.
I simboli posti sotto i tasti, ricominceranno
ad illuminarsi alternativamente.
La macchina è pronta per ottenere l’eroga-
zione di ottimi caffè.
N.B.: per erogare 1 caffè premere una sola
volta il tasto (2 o 3); per erogare 2 caffè
premere 2 volte di seguito il tasto (2 o 3).
Pre-Infusione
La macchina consente di configurare la dosatura in modo tale che l’erogazione relativa alle
dosi caffè sia preceduta dalla preinfusione.
Premendo il tasto dose (2), il normale ciclo di
erogazione viene preceduto da un breve getto
d’acqua temporizzato utilizzato per inumidire
la pastiglia di caffè prima del passaggio dell’effettiva erogazione.
Questa funzione permette un migliore sfruttamento della pastiglia caffè.
La Pre-Infusione non è disponibile sul tasto
dose (3).
N.B.: la macchina è impostata con la pre-infu-
sione in ”ON”; nel caso in cui si voglia disattivare tale funzione occorre entrare in modalità programmazione ( vedi ”Program-
mazione delle dosi caffè”) e premere
il tasto prelievo acqua calda (4). La spia del
tasto che prima era accesa risulterà spenta.
La spia del tasto prelievo acqua calda (4) accesa indica la pre-infusione in ”ON”, mentre spenta indica la pre-infusione in ”OFF”.
Page 5

ITALIANO
• 5 •
Attenzione! Pericolo di scottature!
All’inizio dell’erogazione possono
verificarsi brevi spruzzi di acqua
calda. Il tubo di erogazione può raggiungere temperature elevate: evitare di toccarlo
direttamente con le mani.
Erogazione vapore/Preparazione
del cappuccino
Il vapore può essere utilizzato per montare il
latte per il cappuccino ma anche per il riscaldamento delle bevande.
Versione con tromboncino
1 Con la macchina pronta per erogare caffè,
dirigere il tubo vapore sopra la bacinella
(12), aprire la manopola rubinetto “Acqua
calda/vapore” (25) per qualche istante,
in modo da far uscire l’acqua residua dal
tubo vapore; in breve tempo comincerà ad
uscire solo vapore.
2 Chiudere la manopola rubinetto vapore/ac-
qua calda (25).
3 Preparare l’espresso in tazze grandi come
già specificato.
4 Riempire con latte freddo 1/3 del contenitore
che si desidera utilizzare per preparare il
cappuccino.
IMPORTANTE: Per garantire un miglior risultato nella preparazione del cappuccino, il latte
e la tazza utilizzata devono essere freddi.
5 Immergere il tubo vapore nel latte da riscal-
dare e aprire la manopola rubinetto (25);
far ruotare il recipiente con lenti movimenti
dal basso verso l’alto per rendere uniforme
la formazione di schiuma (Fig. 03).
N.B.: Si consiglia un’erogazione massima di
60 secondi.
6 Dopo aver utilizzato il vapore per il tempo
desiderato chiudere la manopola rubinetto
(25).
7 Lo stesso sistema può essere utilizzato per il
riscaldamento di altre bevande.
8 Pulire, dopo questa operazione il tubo va-
pore con un panno umido.
9 Per preparare un caffè in modalità manuale
ripetere le fasi indicate nei punti da 2 a 5 e
premere successivamente il tasto 6. Per interrompere l’erogazione (quando raggiunta la
dose preferita) premere nuovamente il tasto
6. Proseguire poi con i punti 6 e 7.
N.B.: Si consiglia un’erogazione massima di
40 secondi.
Come utilizzare caffè in cialde
Per l’utilizzo di cialde, utilizzare esclusivamente
il filtro corretto (30).
Dopo il riscaldamento, togliere il portafiltro (9) e
inserire la cialda; assicurarsi che la carta della
cialda non fuoriesca dal portafiltro.
Inserire il portafiltro nella macchina con un movimento a 45° verso sinistra.
Ruotare quindi verso destra per bloccarlo in
posizione. Il manico del portafiltro dovrà trovarsi
in posizione perpendicolare alla macchina o
leggermente spostato verso destra.
Seguire poi le fasi “Preparazione del
caffè” da 5 a 7.
OPTIONAL
Filtro “crema perfetta”(13)
Quando la macinatura del caffè non è corretta,
l’utilizzo del “filtro crema perfetta” favorirà la produzione della tipica crema del caffè
espresso. Con il “filtro crema perfetta” è
possibile inserire sia una dose che due dosi di
caffè macinato utilizzando l’apposito misurino.
Per un perfetto funzionamento si raccomanda di pulire il “filtro crema perfetta”
giornalmente, prima dell’uso. In caso di fori
di passaggio otturati si consiglia di lasciare
immerso, per qualche secondo, il “filtro
crema perfetta” in acqua bollente.
Page 6
ITALIANO
• 6 •
Istruzioni per la pulizia:
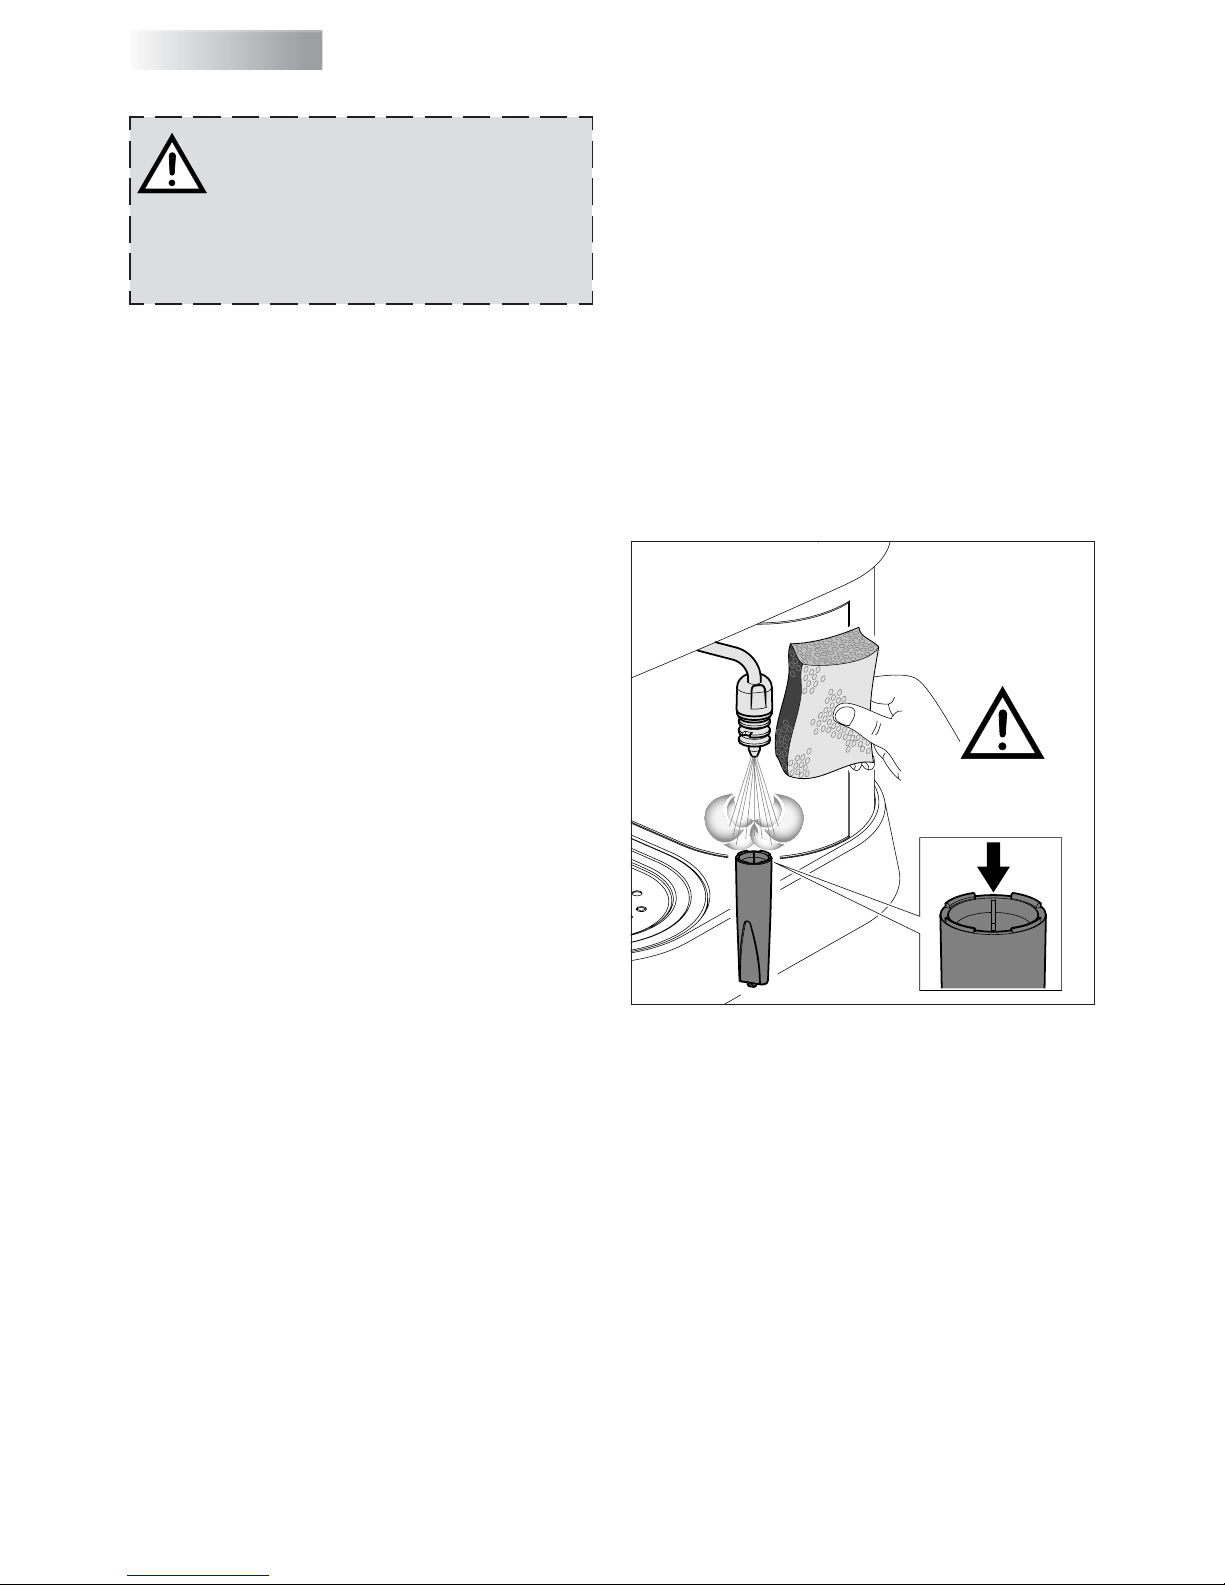
1 IMPORTANTE: Pulire l’ugello del vapore
dopo averlo immerso nel latte per evitare di
otturare l’ugello ed il foro di presa d’aria e per
non fare indurire i depositi di latte esterni.
Per facilitare l’operazione di pulizia, come
indicato alla voce “DESCRIZIONE” la parte
esterna dell’ugello è facilmente rimovibile
tirandola verso il basso.
Utilizzare un panno umido per pulire
l’estremità dell’ugello e aprire la valvola di
erogazione vapore.
Lasciare fuoriuscire il vapore per uno o due
secondi per liberare l’ugello.
Pulire l’esterno dell’ugello del vapore. Se
Fare molta attenzione a
non toccare il trombon-
cino vapore: potrebbe
essere molto caldo!
Presa d’aria da tenere
pulita e libera da residui
necessario utilizzare un ago per pulire il
foro del getto del vapore.
2 Pulire il portafiltro ed il filtro con acqua
tiepida e con regolarità.
3 Pulire il corpo macchina con un panno umido
.
N.B.: La macchina è dotata di una tastiera
che si attiva al semplice tocco o sfioramento
delle zone sensibili (tasti 2,3,4,6).
Per tale motivo si consiglia di spegnere la
macchina durante la operazioni di pulizia
per evitare azionamenti indesiderati.
4 Estrarre la bacinella e la griglia (12, 23) e
lavarle con acqua. Non usare abrasivi.
5 Pulire la guarnizione (15) all’interno del
gruppo di erogazione caffè (14).
Mantenerla pulita.
6 Svitare e pulire periodicamente, a seconda
della frequenza d’uso, la doccetta (17).
7 Se la macchina non viene utilizzata per
lunghi periodi, scaricare l’acqua nella caldaia ruotando in senso orario la manopola
vapore (25) fino ad esaurimento. Chiudere
la manopola vapore (25) ruotandola in
senso antiorario e spegnere la macchina.
Non azionare mai la pompa senza acqua.
8 N.B.: E’ normale che una macchina espres-
so emetta vapore o sgoccioli acqua di tanto
in tanto dato che la pressione dell’acqua
stessa cambia durante l’uso.
Non dimenticare di svuotare la bacinella
(12).
Erogazione acqua calda
Con la macchina pronta per erogare caffè,
procedere nel seguente modo:
1 Premere il tasto prelievo acqua calda (4),la
spia del tasto si accenderà mentre le spie dei
tasti 2 - 3 - 5 - 6 si spegneranno.
2 Mettere una tazza e/o un recipiente sotto al
tubo acqua calda/vapore.
3 Aprire lentamente, in senso orario, la
manopola rubinetto vapore acqua calda
(25) per consentire l’erogazione. Durante
l’erogazione la spia del tasto prelievo acqua
calda (4) lampeggerà per tutta la durata del
prelievo (Fig. 03).
N.B.: Si consiglia un’erogazione massima di
40 secondi.
4 Prelevare la quantità desiderata di acqua cal-
da; per fermare l’erogazione dell’acqua calda
ruotare in senso antiorario la manopola (25).
5 Premere nuovamente il tasto (4); la macchi-
na si riporta nel modo di funzionamento
normale. Rimuovere quindi la tazza e/o il
recipiente.
Le spie dei tasti 2 - 3 - 5 - 6 si accenderanno fisse.
Attenzione! Pericolo di scottature!
All’inizio dell’erogazione possono
verificarsi brevi spruzzi di acqua
calda. Il tubo di erogazione può raggiungere temperature elevate: evitare di toccarlo
direttamente con le mani.
Page 7

ITALIANO
Problema: Controllare :
Mancata erogazione di caffè.
Che vi sia acqua nel serbatoio.
Che il filtro non sia otturato perché la miscela è troppo fine o il
caffè troppo pressato.
Che la doccetta sia pulita.
L’erogazione del caffè è
troppo rapida.
Che il caffè non sia stato macinato troppo grossolanamente.
Che il caffè sia stato premuto con il pressino.
La pompa fa troppo rumore.
Che ci sia acqua nel serbatoio.
Che la pompa sia innescata.
Che il caffè non sia stato macinato troppo grossolanamente.
Eccessiva perdita di acqua
dal portafiltro.
Che il portafiltro sia stato inserito correttamente.
Che la guarnizione non sia sporca o consumata.
Che non vi siano residui di caffè sul bordo del portafiltro.
L’espresso ha poca “crema”.
Che il caffè non sia stato macinato troppo grossolanamente.
Che il caffè sia stato premuto con il pressino.
Che il caffè non sia troppo vecchio o secco.
Il caffè è troppo freddo. Che la macchina sia stata riscaldata (6 min.).
Che il caffè non sia stato macinato troppo grossolanamente.
Il latte non viene emulsionato
sufficientemente.
Che l’ugello vapore e/o foro di presa d’aria non siano otturati.
Che il latte non sia troppo caldo.
Allarmi - Quando i tasti 2 - 3 - 4 - 6 e la spia 5 lampeggiano:
Serbatoio vuoto
Mancanza acqua
Rumore della pompa
Riempire il serbatoio e ripetere le procedure di riempimento caldaia.
Macinatura troppo fine Modificare la macinatura
Filtro sporco Pulire la doccetta (17)
Caffè troppo premuto Evitare di premere in modo eccessivo il caffè
In caso di malfunzionamento
• 7 •
Decalcificazione:
In località con acqua particolarmente calcarea,
il funzionamento della macchina risulterà compromesso. Pulire ogni 2 mesi circa (a seconda
dell’uso e delle caratteristiche dell’acqua) la
macchina con l’apposito decalcificatore Gaggia
(seguire le istruzioni ivi riportate).
Estrarre la doccetta (17) e pulirla.
Diluire la soluzione prima di versarla nel
serbatoio. Versare la soluzione nel gruppo
di erogazione caffè e nell’ugello vapore per
alcuni secondi. Attendere 20 minuti e poi
ripetere l’operazione fino ad utilizzare tutta
la soluzione.
Risciacquare la macchina facendoci scorrere
acqua fredda. Ricollocare la doccetta (17).
N.B.: Guasti dovuti ad accumulo di calcare non
sono coperti da garanzia. L’utente non dovrà
prestare nessun altro servizio di manutenzione.
Utilizzare il decalcificante Gaggia per risultati
migliori.
Page 8

ENGLISH
Congratulations on your wise choice!
As the proud owner of the Gaggia machine,
you can now experience the taste of a delicious
cup of espresso or cappuccino in the comfort of
your own home.
Espresso coffee, originally created in Italy, is
made by rapidly forcing water that has been
heated to the correct brewing temperature,
through a special finely ground coffee.
The heart of the espresso machine is a precision
engineered pump.
The pump and water flow is easily controlled
with just a flick of the switch.
CAUTION:
This appliance is for household use
Any repairs or servicing operations, with the
exception of normal cleaning and maintenance
operations must be undertaken by an authorized service centre.
1. Check voltage to be sure that the voltage
indicated on the plate agrees with your
voltage.
2. Never use warm or hot water to fill the water
tank. Use cold water only.
3. Keep your hands and the cord away from hot
parts of the appliance during operation.
4. Never clean with scouring powders or hard
implements.
5. To avoid your machine scaling up, use
purified or bottled water.
6. Do not immerse base in water.
• 8 •
IMPORTANT
SAFEGUARDS
When using electrical appliances,
basic safety precautions should always
be followed to reduce the risk of fire,
electric shock, and/or injury to persons,
including the following:
1 Read all instructions and information in this
instruction book and any other literature included in this packaging referring to this pro-
duct before operating or using this appliance.
2 Do not touch hot surfaces. Use handles or knobs.
3 To protect against fire, electric shock and
personal injury do not immerse cord, plugs,
or appliance in water or other liquid.
4 Close supervision is necessary when any
appliance is used by or near children.
5 Unplug from outlet when not in use and be-
fore cleaning. Allow to cool before putting
on or taking off parts and before cleaning
the appliance.
6 Do not operate any appliance with a dama-
ged cord or plug or in the event of appliance
faults or damages. Return appliance to the
nearest authorized service centre for exami-
nation, repair or adjustment.
7 The use of accessory attachments not recom-
mended by the appliance manufacturer may
result in fire, electric shock or personal injury.
8 Do not use outdoors.
9 Do not let cord hang over edge of table or
counter, or touch hot surfaces.
10 Do not place on or near a hot gas or electric
burner, or in a heated oven.
11 Always turn appliance to “Off”, then plug cord
into the wall outlet. To disconnect, turn switch
to “Off”, then remove plug from wall outlet.
12 Do not use appliance for other than intended
household use.
13 Use extreme caution when using hot steam.
14 This appliance is not intended for use by
persons (including children) with reduced
physical, sensory or mental capabilities, or
lack of experience and knowledge, unless
they have been given supervision or instruc-
tion concerning use of the appliance by a
person responsible for their safety. Children
should be supervised to censure that they do
not play with the appliance.
15 Save these instructions
Page 9

ENGLISH
Description of parts:
FIG. 01
1 Main switch
2 Coffee dispensing button-1 strong/2 weak
3 Coffee dispensing button-1 weak/2 weak
4 Hot water supply button
5 Steam supply light
6 Dose programming/Manual dispensing
button
7 Correct temperature light
8 Turbo frother steam nozzle (removeable)
9 Filterholder
10 1 cup filter
11 2 cup filter
12 Basin (removable)
13 “Perfect crema” filter (OPTION)
14 Brewing head
15 Filterholder gasket
16 Shower disc holder
17 Shower disc
18 Tamper
19 Power cable and plug
20 Measuring spoon
21 Delivery spout
22 Tank cover
23 Grid (removable)
24 Cappuccino maker kit (OPTION)
25 Steam/hot water knob
26 Removable water tank
27 Overflowing protection hole
28 Anti-fingerprint cleaner for stainless steel
29 Level indicator for the basin
30 Coffee pod filter
Instructions for the power supply cord
A A short power-supply cord is provided to
reduce risks of getting tangled up or tripping
over a longer cord.
B Longer extension cords are available and
may be used if care is exercised in their use.
C If a long extension cord is used:
1 the marked electrical rating of the extension
cord should be at least as great as the electrical rating of the appliance.
2 if the appliance is of the grounded type, the
extension cord should be a grounding-type
3-wire cord, and
Preparation:
1. Remove the water tank cover (22) and fill
with cold water to the MAX line indicated
on tank (26). See FIG. 2.
N.B.: Near the word MAX on the tank there is
the overflowing safety hole (27) in case of
tank overfilling.
The water tank can also be removed, after
removing the tank cover (22) using the
handle.
Re-install tank with water and cover (22).
2. Insert plug (19) into a suitable wall outlet (see
point 1 under “Caution”).
3 Push the main switch (1). The temperature
light (7) will flash until the temperature is
reached; when the temperature is reached
the light will remain on.
The lights of buttons 2 - 3 - 5 - 6 will remain
on in a fixed way (stand-by mode).
Starting up
This procedure fills the water boiler with fresh
water.
This should be done whenever the machine is
switched on.
This machine, featuring a pump to brew coffee,
is equipped with a self-priming system.
Put an empty cup below the steam frother (8),
press the hot water button (4) and turn the steam
knob (25) clockwise.
You will hear the noise of the enabled pump
and after a few seconds water will come down
from steam rod (8).
When the cup is filled close the steam knob (25)
and press the hot water button (4) again.
The Gaggia machine is now ready to be
used.
• 9 •
3 the longer cord should be arranged so that it
will not drape over the counter top portable
top where it can be pulled on by children or
tripped over.
Page 10

ENGLISH
Important to know……
1. The taste of your coffee depends on the
characteristics of the beans from which it
is made, the type of bean, where it was
grown and processed. The coffee beans
that are roasted for a longer period of time
and at higher temperatures will be much
darker in colour.Darker beans will produce
a richer cup of coffee than the lightly-roasted
beans.
2. A variety of dark roasts are available from
which you can choose to brew your espresso. Each of these roasts is a blend of coffee
beans that are roasted at a specific temperature producing a specific type of flavour.
There are decaffeinated beans that have
up to 98% of the caffeine content removed.
The next time you purchase coffee for your
espresso maker, experiment with one of the
many kinds of coffee being sold. You may
just find that it tastes better than the blend
you have been using.
3. A fine “espresso grind” for pump-driven
machines must be used. Be sure to ask for this
when buying coffee or when having beans
ground. Do not use a blade-type grinder
because it makes too much coffee dust and
• 10 •
produces an irregular grind.
4. The mark of real espresso is its dark color,
rich taste and the light brown, natural froth
called “crema” in Italian.
5. Cappuccino is simply a combination of
espresso and hot, frothy milk.Cappuccino
is usually topped with cinnamon, nutmeg or
cocoa powder.
6. Espresso Coffee should be served immediately after it is made.
7. Espresso is served in 2 to 2 ½ oz. demitasse
cups. A 4 or 6 oz. cup or glass is used for
cappuccino
8. Ideally, coffee beans should be ground immediately before using. Remember, it must
be an “espresso grind” for pump-driven
espresso machines.
9. It’s best to store ground coffee or beans in
an airtight container in the freezer of your
refrigerator. Ground coffee tends to absorb
food odours.
How to make a good Espresso coffee:
Coffee dose programming
With this Gaggia appliance two different water
doses can be programmed to obtain one or two
cups of coffee. To adjust the water doses and
store them for a following dispensing request,
first of all carry out the “COFFE PREPARATION”
procedure on page 11- sections 2-3-4, and then
proceed as follows:
1 Press the programming button (6) for 3 sec.
until the light (6) starts flashing.
At the same time the symbols of buttons 2
- 3 will switch on.
2 After introducing the one-cup filter, press key
(2) and let the coffee flow down.
3 Press the same key (2) again until the desired
optimum dose for one coffee is reached.
4 Now the water dose assigned for one coffee
to key (2) will be stored and the light placed
below the key will turn off.
5 Repeat steps 3 and 4 to program the water
dose for key (3).
NOTE: The temperature ready-light (7) will
automatically flash as the machine boiler
heats. After switching on the machine for the
first coffee, wait 6 minutes until the machine
has fully heated up, while for all subsequent
coffees the machine will be ready to use.
Another feature of the machine is the “no-drip
system”, eliminating most of dripping from
brewing head (14).
After coffee brewing, however, a little dripping
may occur due to wet coffee grinds in the filterholder.
Caution: Never operate pump
without water in machine as damage
to the pump may occur.Damage of
pump run without water is not covered by
warranty.
Page 11

ENGLISH
Coffee preparation
1 Follow the procedure described under “Pre-
paration”.
2 Select the correct filter basket (10 or 11) and
insert it in the filter holder (9).
• 11 •
Every user will be free to program the doses
to obtain a more or less strong coffee and
to assign bigger or smaller doses to buttons
(2 and 3) to use 1 or 2 cup filter.
6 After storing these doses, press “MENU” key
(6) again to exit from the programming function. The symbols placed under the buttons
will re-start lighting up alternatively.
The appliance is now ready to dispense
excellent coffees.
N.B.: to brew 1 coffee press button (2 or 3)
once; to brew 2 coffees press button (2 or
3) twice.
Use the small filter for 1 cup and the large
filter for 2 cups of espresso.
Then insert filter-holder (9) into the appliance
and wait at least 10 minutes.
3 After the warm-up period, remove the warm
filter-holder (9) from the brewing head and
fill with correctly ground espresso coffee
using the measuring spoon provided.
Place one level measure of coffee in basket
for each cup of espresso. Do not overfill.
Gently tamp down coffee with the tamper
(18) provided. Do not compress too firmly.
4 Clean any excess coffee from the rim of
filter holder (9). Insert filter holder into brew
head by holding handle approximately 45
degrees to the left as you face machine.
When properly aligned,move handle firmly
to the right to lock into position.
The handle should point to the front of the
machine or slightly to the right.
5 Place one or two espresso cups on the drip plate
to line up with the spouts of the filter holder. Press
the button corresponding to the stored coffee
dose. Espresso will start to flow into cups.
6 The coffee dispensing will automatically stop
when the preset level is reached (see Coffee
dose programming);however it is possible to stop the coffee dispensing by pressing
the button (2 or 3) as previously selected.
When properly made, the espresso will have a
light brown foam “crema” floating on the top.
If not, refer to “In the event of faulty
function”.
7 Remove cups and serve.
8 To make more espresso, carefully and slowly
remove the filter holder by moving handle to
the left. Be careful as hot water will be on top
of the coffee grinds in the holder. Some wa-
ter will continue to drip from brewing head
as filter holder is removed. That is normal
and due to the pump pressure in the system.
Knock out used coffee grinds from filter. For
more espresso repeat steps 2 to 7 above.
9 To prepare coffee manually, carry out steps 2
through 5 and then press button 6. When you
have obtained the desired quantity of coffee
in the cup, press button 6 again to stop the
cycle. Then proceed with steps 6 and 7.
N.B.: Dispensing should not exceed 40
seconds.
Pre-Infusion
The machine allows you to adjust the dosage
settings so that the water produced for the COFFEE dose is preceded by a pre-infusion step.
Press the dose button (2) and the normal coffee
cycle is preceded by a brief, timed jet of water
that moistens the coffee wafer before the actual
coffee making cycle starts.
This function allows you to get the most flavor
out of the coffee wafer.
PRE-INFUSION is not available on the dose
button (3).
N.B.: the machine comes from the factory with
PRE-INFUSION function set to ON. Should
you choose to deactivate this function you
will need to enter the programming mode
(see “
Coffee dose programming”)
and press the hot water supply button (4).
The indicator light on the button will turn off.
The indicator light on the hot water supply
button (4) is ON when the PRE-INFUSION
function is ON. Vice versa, if the indicator
light is OFF, then the PRE-INFUSION function
is OFF.
Page 12
ENGLISH
• 12 •
Supplying steam/Preparing
Cappuccino
Steam can be used to froth the milk for cappuccinos and also to heat beverages.
Caution! Scalding hazard! Splashing
may occur at the start – scalding ha-
zard! The hot water nozzle and pipe
can reach high temperatures: avoid touching
it directly with your hands.
Milk frother version:
1 With the machine ready to deliver coffee,
convey the pipe over the drip tray (12),
open the “Hot water/steam” tap knob (25)
for a few seconds so to let the remaining
water come out of the steam pipe; after a
few seconds only steam will come out.
2 Close the steam/hot water tap knob (25).
3 Make espresso (in a large cups) as described
above.
4 Fill 1/3 of the container to be used to prepare
the cappuccino with cold milk.
IMPORTANT: To obtain a better cappuc-
cino, the milk and the cup must be cold.
5 Immerse the steam pipe into the milk to be
heated and open the tap knob (25); turn the
container slowly from downwards to upwar-
ds so to obtain a smooth foam (Fig. 03).
N.B.: Dispensing should not exceed 60 se-
conds.
6 After using the steam for the desired time
close the tap knob (25).
7 The same system can be used to heat up
other beverages.
8 After this operation clean the steam pipe with
a wet cloth.
How to use coffee wafers
Make sure you use the right filter (30) when making
espresso with coffee wafers.
Once the coffee machine is heated, remove the
portafilter (9) and put in the wafer. Make sure
that the wafer paper remains completely inside
the portafilter.
Insert the portafilter into the coffee machine by
rotating it 45° to the left.
Then lock the portafilter into place by rotating it to
the right. The portafilter handle should be perpendicular to the front of the machine or rotated
slightly to the right.
Then follow steps 5 to 7 of “Coffee prepa-
ration”.
OPTIONAL
“Perfect crema” Filter (13)
Even when the coffee is not properly ground,
the “perfect cream filter” will help produce the foamy ‘cream’ typical of fine espresso.
You can use the “perfect cream filter” with
a single or double dose of ground coffee by
using the special measuring scoop.
To ensure perfect performance, clean your
“perfect cream filter” every day prior to
use. Should your “perfect cream filter”
become clogged, immerse it for a few seconds
in boiling water.
Page 13

ENGLISH
• 13 •
Keeping it clean:
1 IMPORTANT: the steam nozzle should
be cleaned after each use in order to avoid
build up of milk deposits that are very difficult
to clean. Cleaning is made easy as can be
seen in the DESCRIPTION OF PARTS. The
outer part of nozzle can be removed by
pulling downward.
The outside of the steam pipe can be cleaned
with a damp cloth.
The steam jet is cleaned by running a shot
of steam through it.
The hole in the steam nozzle must be kept
Pay attention as the
Turbo-Frother steam
nozzle could be hot!
Air intake to be kept clean
and free from residues.
open. A needle may be used.
2 Clean filter holder and filter in warm water
after use.
3 Wipe body of machine with a damp cloth
as required.
N.B.: The machine has a sensitive keypad
activated by simply touching or brushing the
sensor areas (keys 2, 3, 4, 6). Turn off the
machine when cleaning in order to avoid
activating it by mistake.
4 Remove basin and grid (12, 23) and rinse
with water. Do not use abrasive substances.
5 Clean the seal (15) inside of the brewing
head (14) and keep it clean.
6 The shower disc (17) should be unscrewed
and cleaned periodically depending on
frequency of use.
7 If the machine is not used for a long period
of time, completely discharge the water
from the boiler by turning the steam knob
(25) clockwise. Press steam switch (5) until
completely discharged. Close the steam
knob (25) by turning it counterclockwise and
switch off the machine.
Never run the pump without water.
8 NOTE: It is very normal for an espresso
machine to emit steam and drip occasionally
as the water pressure changes during use.
Making hot water:
With the machine ready to brew coffee, proceed
as follows:
1 Press the hot water supply button (4), the
button light will switch on, while the lights of
buttons 2 - 3 - 5 - 6 will switch off.
2 Put a cup and /or a container below the hot
water/steam pipe.
3 Open slowly and clockwise the hot wa-
ter/steam tap knob (25) to allow supply.
Throughout the supply the hot water supply
button light (4) will flash (Fig. 03).
N.B.: A max.supply of 40 seconds is recom-
mended.
4 Take the desired quantity of hot water; to
stop the hot water supply turn knob (25)
counterclockwise.
5 Press button (4) again; the machine will re-
turn to normal running mode. Then remove
the cup and/or the container.
The lights of buttons 2 - 3 - 5 - 6 will switch
on in a fixed mode.
Caution! Scalding hazard! Splashing
may occur at the start – scalding ha-
zard! The hot water nozzle and pipe
can reach high temperatures: avoid touching
it directly with your hands.
Page 14

ENGLISH
• 14 •
Problem: Check to ensure against the following:
Coffee does not flow.
Water is in tank.
Filter basket clogged because coffee is too fine or compressed too firmly.
Shower disc requires cleaning.
Coffee flows too quickly.
Coffee is ground too coarsely.
Coffee is not pressed down with tamper.
Pump makes loud noise.
No water in tank.
Pump not primed.
Coffee is ground too coarsely.
Water leaking excessively
from filter holder.
Filter holder not properly inserted in brew head.
Gasket in brewing head dirty or worn.
Coffee grinds not cleaned off the rim of filter holder.
Espresso has little creamy
froth.
Coffee is ground too coarsely.
Coffee is not pressed down with tamper.
Coffee is too old or dried out.
Espresso is too cold.
Machine is not warmed up (10 min).
Coffee is ground too coarsely.
Not enough milk froth.
Steam nozzle and/or air intake hole clogged.
Milk is too hot.
Alarms - When the button being used flashes:
Empty tank
No water
Pump noise
Fill tank and repeat boiler filling procedures.
Too fine grinding Modify grinding
Dirty filter Clean shower (17)
Too pressed coffee Avoid press coffee excessively
In the event of faulty function
Descaling:
In hard water areas, minerals found in the water
will accumulate and affect operation of the unit.
Approximately every two months (this can vary
depending on use and water condition), clean
the machine with Gaggia descaler (in which
case follow the instructions on the packet).
Remove shower disc (17) and clean.
Dilute the solution before pouring it into the tank.
Pour the solution into the coffee dispensing group
and into the steam nozzle for a few seconds.
Wait 20 minutes, then repeat. process until
solution has been run through. Rinse machine
thoroughly by running plain cold water through
machine. Replace shower disc (17).
NOTE: Product failure due to scale accumulation is not covered by warranty. No other
servicing should be attempted by the user. Use
“Gaggia cleaner” for best results.
Page 15
DEUTSCH
• 15 •
Wir gratulieren Ihnen zu Ihrer Wahl!
Dank der Maschine können Sie jetzt bequem
zu Hause einen köstlichen Espresso oder Cappuccino trinken.
Den original italienischen Espresso bereitet man
zu, indem man schnell unter Druck gesetztes und
auf die richtige Temperatur erhitztes Wasser
durch eine fein geröstete Kaffeemischung filtern
lässt.
Das Mittelteil der Espressomaschine besteht aus
einer Hochpräzisionspumpe.
Pumpen- und Wasserzufluss können über einen
Schalter eingestellt werden.
HINWEISE:
Diese Espressomaschine wurde ausschliesslich
für den Haushalt entwickelt.
Wartungseingriffe oder Reparaturen müssen
von einem befugten Kundendienst erfolgen.
Das gilt nicht für Reinigungs- oder ordentliche
Wartungsarbeiten.
1. Sicherstellen, dass die auf dem Datenschild
des Geräts angegebene Spannung mit der
Ihres Netzanschlusses übereinstimmt.
2. Nie lauwarmes oder heisses Wasser in den
Wasserbehälter füllen. Ausschliesslich kaltes
Wasser verwenden.
3. Während des Betriebs nie die heissen
Teile oder das Netzkabel der Maschine
berühren.
4. Keine Schleif- oder Scheuermittel zum Reinigen verwenden.
5. Zur Vermeidung von Kalkablagerungen kohlesäurefreies Mineralwasser verwenden.
6. Das Gerät nicht in Wasser tauchen.
Bei der Verwendung von Elektrogeräten
empfiehlt es sich, sich an einige Vorsichtsmassnahmen zu halten, um die Gefahr von Brand, elektrischen Schlägen
und Unfällen einzuschränken.
1 Alle, in diesem oder jedem anderen in der
Verpackung enthaltenen Heft, angegebenen
Anweisungen und Informationen aufmerksam
durchlesen, ehe die Espressomaschine einge-
schaltet oder benutzt wird.
2 Keine heissen Flächen berühren.
3 Netzkabel, Stecker oder den Maschinenkör-
per nicht in Wasser oder andere Flüssigkeit
tauchen, um Brand, elektrische Schläge oder
Unfälle zu vermeiden.
4 Im Beisein von Kindern die Espressomaschi-
ne mit besonderer Vorsicht handhaben.
5 Den Stecker aus der Steckdose ziehen, sobald
die Maschinen nicht mehr benutzt wird oder
während der Reinigung. Bevor Teile entnom-
men oder eingesetzt werden, sowie vor der
Reinigung, die Maschine abkühlen lassen.
6 Keine kaputten, defekten oder Geräte mit
beschädigtem Netzkabel oder -Stecker
verwenden. Das schadhafte Gerät beim
nächsten Händler oder Kundendienst prüfen,
reparieren oder neu einstellen lassen.
7 Die Verwendung nicht vom Hersteller em-
pfohlenen Zubehörs kann Brand, elektrische
Schläge oder Unfälle verursachen.
8
Die Espressomaschine nicht im Freien verwenden.
9 Das Kabel darf nicht vom Tisch herunterhan-
gen oder heisse Flächen berühren.
10 Die Espressomaschine nicht in der Nähe
von heissen Küchenherden oder Backöfen
verwenden.
11 Prüfen, ob die Espressomaschine sich in
„Aus“ Stellung befindet, ehe man den Stecker
einsteckt. Zum Ausschalten auf „Aus“ stellen,
dann den Stecker aus der Steckdose ziehen.
12 Die Maschine nur im Haushalt verwenden.
13 Bei Verwendung von heissem Dampf mit
äusserster Vorsicht verfahren.
14 Das Gerät darf nicht von Personen (oder
Kindern) mit körperlichen oder geistigen
Behinderungen oder mit auf die Sinne
bezogenen Einschränkungen oder mit
mangelnden einschlägigen Erfahrungen und
Kenntnissen benutzt werden, sofern diese
Personen nicht spezifisch angeleitet oder
überwacht werden. Kinder müssen überwa-
cht werden, um zu verhindern, daß sie mit
dem Gerät spielen könnten. Das Gerät ist
kein Spielzeug: bitte vor Kindern schützen.
15 Diese anweisungen gut aufbewahren
WICHTIGE
VORSICHTSMASSNAHMEN
Page 16

DEUTSCH
Beschreibung:
FIG. 01
1 Hauptschalter.
2 Ausgabetaste für 1 oder 2 kurze Kaffee
3 Ausgabetaste für 1 oder 2 lange Kaffee
4 Taste für die Wasserausgabe
5 Kontrolllampe Dampfausgabe
6 Programmiertaste Dosis/manuelle
Ausgabe
7 Leuchtanzeige korrekte
Temperatur erreicht
8 Turbo-Dampfdüse (abnehmbar)
9 Filterhalter
10 Filter (1Tasse)
11 Filter 2 Tassen
12 Becken (ausziehbares)
13 Filter „Perfekte Creme“ (OPTION)
14 Brühkopf
15 Dichtung des Filterhalters
16 Verteilerhalter
17 Verteiler
18 Druckstück
19 Netzkabel und -Stecker
20 Messbecher
21 Ausgabekopf
22 Wasserbehälterdeckel
23 Gitter (ausziehbar)
24 Kit Cappuccinatore (OPTION)
25 Dampf-/Heisswasserknopf
26 Wasserbehälter (abnehmbar)
27 Überlauf
28 Edelstahl-politurmittel gegen
fleckenbildung
29 Anzeige Abtropfschale voll
30 Filter Kaffeeportion
Betriebsanleitungen zum Netzkabel
A Das mitgelieferte Netzkabel ist relativ kurz,
damit es sich nicht verdrehen kann oder Sie
darüber stolpern.
B Längere Netzkabel können verwendet
werden, doch sollte man dabei mit grösste
Vorsicht vorgehen.
C Sollte ein längeres Netzkabel verwendet
werden, folgendes überprüfen:
1 dass die auf der Verlängerungsschnur
vermerkte Spannung mindestens der des
Elektrogerätes entspricht;
2 Wenn das Elektrogerät eine Erdung hat,
sollte die Verlängerungsschnur ebenfalls
über drei Adern verfügen, damit die Verbindung zur Erdung hergestellt werden kann.
Außerdem
3 sollte das Kabel so angeordnet werden,
dass man weder darüber stolpert, noch
dass es über die Ablage herunterhängt und
Kleinkinder daran ziehen können.
Vorbereitung der Espressomaschine:
1. Den Deckel des Wasserbehälters (22) ab-
nehmen und diesen bis zum Strich MAX (26)
mit kaltem Wasser füllen. Siehe Abb.2.
N.B.: Neben der Schrift MAX auf dem Tank
befindet sich eine Öffnung zum Schutz vor
Überlauf (27), für den Fall, dass der Tank
zu voll gefüllt wird.
Auch der Wassertank kann mit dem entspre-
chenden Griff entfernt werden, nachdem der
Tankdeckel (22) abgenommen wurde.
Den mit Wasser gefüllten Tank wieder ein-
setzen und den Deckel (22) aufsetzen.
2. Den Netzstecker (19) in eine passende Ste-
ckdose (siehe HINWEISE, Punkt 1) stecken.
3 Den Hauptschalter (1) drücken. Die Tem-
peraturkontrolllampe blinkt, bis die richtige
Temperatur erreicht ist und bleibt dann
eingeschaltet.
Die Kontrolllampen der Tasten 2 - 3 - 5 - 6
schalten sich ein (Modalität Stand-by).
Inbetriebnahme
Durch Füllen des Boilers mit kaltem Wasser wird
die Pumpe funtionsfähig gemacht. Wie folgt
jedesmal dann verfahren, wenn die Maschine
zum „ersten“ Mal verwendet wird.
Diese Maschine, die eine Pumpe verwendet,
ist mit einem selbsteinschaltenden System
ausgestellt.
Eine leere Tasse unter die Dampfausgabe
(8)stellen, auf die Heißwassertaste (4) drücken
und den Dampfhahn (25) im Uhrzeigersinn
drehen.
Man kann hören, dass sich die Pumpe schaltet
und nach wenigen Sekunden beginnt das
Wasser aus dem Dampfdüse (8) zu fließen.
Ist die Tasse voll, den Dampfhahn (25)
schließen und nochmals die Heißwassertaste
(4) drücken.
Die Maschine Gaggia ist jetzt Betriebsbereit.
• 16 •
Page 17

DEUTSCH
Was Sie wissen müssen:
1. Der Geschmack des Kaffees hängt von
Qualität und Sorte der Kaffeebohnen ab,
aus denen er hergestellt wird. Der besondere Geschmack einer Kaffeebohne hängt
von verschiedenen Faktoren ab, aber sein
Geschmack und sein Aroma sind das Ergebnis des Röstverfahrens. Die länger und bei
höheren Temperaturen gerösteten Bohnen
sind dunkler. Dunklere Bohnen haben ein
stärkeres Aroma als hellere.
2. Der Handel bietet verschiedene Kaffeesorten.
Jedem Röstverfahren entspricht eine bei einer
bestimmten Temperatur geröstete Mischung
und jeweils ein besonderes Aroma. Desweiteren gibt es koffeinfreie Mischungen, die nur
2% Koffein enthalten. Probieren Sie mit
Ihrer Kaffeemaschine eine der verschiedenen, im Handel erhältlichen, Kaffeesorten
aus. Sie werden vielleicht dabei „Ihre“
Mischung finden.
3. Bei Espressomaschinen mit Pumpe müssen
feiner gemahlene Mischungen verwendet
werden. Vergewissern Sie Sich, dass Sie eine
solche Mischung kaufen oder mahlen lassen.
Keine Kaffeemühle mit Messer verwenden,
weil sie zuviel Kaffeestaub freisetzt und
• 17 •
eine unregelmässig gemahlene Mischung
herstellt.
4. Den richtigen Espresso erkennt man an der
dunklen Farbe, dem vollen Geschmack und
der typischen „Creme“.
5. Der Cappuccino ist eine besondere Verbindung von Espresso und heisser, aufgeschäumter Milch. Es empfiehlt sich, Kaffee,
Milch und Schaum in gleichen Mengen zu
verwenden. Kann mit etwas Zimt, Muskatnuss oder Kakao bestreut werden.
6. Den Espresso sofort nach dem Aufschütten
servieren.
7. Espresso in Mokka- und Cappuccino in
Kaffeetassen servieren.
8. Ideal ist es, den Kaffee erst kurz vor der Verwendung zu mahlen. Nicht vergessen, ihn
speziell für Espressomaschinen mit Pumpe
mahlen zu lassen.
9. Es empfiehlt sich, den gemahlenen Kaffee
oder die Kaffeebohnen in hermetisch verschlossenen Dosen im Gefrierfach aufzubewahren. Gemahlener Kaffee nimmt leicht
Gerüche an.
Wie man einen guten Espresso
zubereitet
Programmierung der Kaffeemengen.
Mit dieser Maschine von Gaggia können zwei
verschiedene Wassermengen für eine oder zwei
Tassen Kaffee programmiert werden. Um die
Wassermenge einzustellen und für eine nächste
Ausgabe zu speichern, sind erst die Anweisungen unter “KAFFEE ZUBEREITEN”, Seite 18,
Paragraph 2-3-4 zu befolgen, dann wie folgt
vorgehen:
1 Die Programmiertaste (6) 3 Sek. lang drüc-
ken, bis die Kontrolllampe (6) zu blinken
beginnt.
Die Symbole der Taste 2 - 3 leuchten glei-
chzeitig.
2 Den Filter für eine Tasse einsetzen, die Taste (2)
drücken und den Kaffee auslaufen lassen.
3 Die selbe Taste (2) noch einmal drücken,
bis die gewünschte, optimale Kaffeemenge
erreicht ist.
4 Jetzt ist die Wassermenge für einen Kaffee
für die Taste (2)gespeichert und die darunter
liegende Kontrolllampe schaltet sich aus.
HINWEIS: Die Kontrollampe, die das
Erreichen der richtigen Temperatur (7) anzeigt, schaltet sich während der Aufheizung
ständig an und aus. Nachdem das Gerät
eingeschaltet wurde, muss sich dieses erwärmen. Deshalb 6 Minuten abwarten und dann
den ersten Espresso aufbrühen. Danach
kann ein Espresso nach dem anderen ohne
Wartezeiten ausgegeben werden.
Eine weitere Eigenschaft der Maschine ist
das Tropfschutzsystem, das den Großteil des
Tropfens seitens des Brühkopfes beseitigt (14).
Nach der Abgabe des Kaffees kann es jedenfalls
zu einem leichten Tropfen wegen der im Filterhalter
befindlichen feuchten Kafferückstände kommen.
ACHTUNG: Um Beschädigungen zu
vermeiden, die Pumpe auf keinen Fall
einschalten, wenn kein Wasser in der
Espressomaschine ist. Eine missbräuchliche
Verwendung der Pumpe schliesst automatisch alle Garantieleistungen aus.
Page 18

DEUTSCH
• 18 •
Kaffee zubereiten.
1 Das im Kapitel „Vorbereitung der Espres-
somaschine“ beschriebene Verfahren
anwenden.
2 Den richtigen Filter (10-11) wählen und in
den Filterhalter (9) einsetzen. Den kleinen
Filter für 1 Tasse und den grossen für 2
Tassen verwenden. Die Brühgruppe (9) in
die Maschine einsetzen und mindestens 10
Minuten warten.
3 Nach der Erwärmung den heissen Filterhal-
ter (9) herausnehmen und mit gemahlenem
Kaffee füllen, wobei man den mitgelieferten
Messbecher verwendet.Jeweils einen Messbecher pro Tasse rechnen.
Nicht zuviel einfüllen. Mit dem Druckstück (18)
leicht andrücken.Nicht zu stark drücken.
4 Den Rand des Filterhalters (9) von eventuellen
Kaffeerückständen säubern.Den Filterhalter
mit einer um 45 Grad nach links gerichteten
Bewegung in die Maschine einsetzen. Dann
nach rechts drehen und in dieser Stellung
festklemmen. Der Griff des Filterhalters muss
rechtwinklig zur Maschine oder leicht nach
rechts verstellt stehen.
5 1 oder 2 Tassen unter den Filterhalter stellen. Die
Taste für die gespeicherte Kaffeedosis drücken.
Jetzt beginnt der Kaffee auszufliessen.
6 Die Kaffeeausgabe endet selbstständig,
sobald die voreingestellte Menge erreicht ist
(s. Programmierung Kaffeedosis); die
Kaffeeausgabe kann jedoch mit der zuvor
verwendeten Taste (2 oder 3) unterbrochen
werden. Ein guter, richtig aufgegossener
Kaffee zeigt an der Oberfläche die typische braune „Creme“. Andernfalls unter
„Störungen“ nachschlagen.
7 Die Tassen aus der Maschine nehmen und
servieren
8 Um weiteren Kaffee aufgiessen zu können, lan-
gsam und sorgfältig den Filterhalter entfernen,
indem man ihn nach links bewegt. Vorsicht
vor Verbrennungen durch eventuell auf dem
Kaffeesatz zurückgebliebenes Wasser!
Ein bisschen Wasser tropft nach Entfernung
des Filterhalters noch heraus. Das ist normal
und bedingt durch den Pumpendruck. Den
Kaffeesatz aus dem Filter entfernen und den
Filter ausspülen. Will man neuen Kaffee bereiten, die Phasen von 2 bis 7 wiederholen.
5 Die Punkte 3 und 4 wiederholen, um die
Wassermenge für die Taste (3) zu programmieren. Jeder kann für sich die Dosierungen
für einen mehr oder weniger starken Kaffee
programmieren und den Tasten (2 und 3)
geringere oder größere Wassermengen
zuordnen, um Filter für 1 oder 2 Tassen
verwenden zu können.
6 Nach der Speicherung dieser Dosierungen,
noch einmal die Taste (6) “MENÜ” drücken
und die Programmierung verlassen.
Die Symbole unter den Tasten leuchten
abwechselnd auf.
Die Maschine ist bereit,
ausgezeichneten Kaffee zu brühen.
N.B.: Für die Ausgabe eines Kaffees, die Taste
(2 oder 3) einmal drücken, für die Ausgabe
von 2 Tassen Kaffee, die Taste (2 oder 3)
zweimal hintereinander drücken.
Vorinfusion
Das Gerät ermöglicht eine Konfiguration der Dosierung, die derart ist, daß die Abgabe der KAFFEEDosierung vor dem Voraufguß erfolgt.
Bei Drücken der Taste (2) „Dose“ („Dosierung“)
wird vor dem normalen Abgabezyklus ein kurzer,
zeitgesteuerter Wasserstrahl abgegeben, der die
Anfeuchtung der Kaffeepastille vor der Abgabe
bewirkt.
Diese Funktion gewährleistet eine bessere Nutzung
der Kaffeepastille.
Die Funktion VORAUFGUSS steht auf der
Taste (3) „Dosierung“ nicht zur Verfügung.
ZU BEACHTEN: Das Gerät ist werkseitig
mit der Funktion VORAUFGUSS auf ON
eingestellt; zur Deaktivierung dieser Funktion
muß die Programmierungsmodalität
aufgerufen (siehe „Programmierung
der Kaffeemengen“) und die Taste für
die Wasserausgabe (4) gedrückt werden,
so daß die Leuchte der Taste, die vorher
aufleuchtete, erlischt.
Wenn die Leuchte der Taste für die
Wasserausgabe (4) aufleuchtet, zeigt sie an,
daß die Funktion VORAUFGUSS aktiviert ist
(ON), während die Funktion VORAUFGUSS
deaktiviert ist (OFF), wenn die Leuchte der
Taste nicht aufleuchtet.
Page 19

DEUTSCH
• 19 •
Dampfausgabe / Zubereitung
eines Cappuccino
Mit dem Dampf kann die Milch für den Cappuccino aufgeschäumt werden, er kann aber
auch zur Erwärmung von Getränken verwendet
werden.
Turbo-Dampfdüse Darstellung
1 Bei betriebsbereiter Maschine, das Damp-
frohr über das Becken (12) halten, den Hahn
(25) “Heißwasser/Dampf” einige Sekunden
öffnen, damit das restliche Wasser aus dem
Dampfrohr ausgelassen wird; nach kurzer
Zeit wird nur noch Dampf entweichen.
2 Den Dampf-/Heißwasserhahn (25)
schließen.
3 Den Espresso wie bereits erwähnt in grossen
Kaffeetassen zubereiten.
4 Den Behälter für den Cappuccino bis zu 1/3
mit kalter Milch füllen.
WICHTIG: Um einen ausgezeichneten Cap-
puccino zu erhalten, müssen sowohl die
Milch als auch die Tasse kalt sein.
5 Das Dampfrohr in die Milch tauchen und
den Hahn (25) öffnen; den Behälter drehen
und leicht von unten nach oben bewegen,
damit sich der Schaum gleichmäßig bildet
(Abb. 03).
NB.: Wir empfehlen ein Aufbrühen von höchstens 60 Sekunden.
6 Ist der gewünschte Schaum erreicht, den
Hahn (25) schließen.
7 Das selbe System kann auch für die Erwär-
mung anderer Getränke verwendet werden.
8 Das Dampfrohr nach jeder Anwendung mit
einem feuchten Tuch reinigen.
Achtung: Verbrühungsgefahr!
Achtung! Am Anfang der Ausgabe
können kurze Heißwasserspritzer
austreten. Die Ausgabedüse kann hohe
Temperaturen erreichen: nicht direkt mit den
Händen berühren!
9 Führen Sie zur Zubereitung von Kaffee im
Manualbetrieb die unter den Punkten 2 bis 5
beschriebenen Schritte aus und drücken Sie
anschließend die Taste 6. Zum Abbrechen
des Abgabevorgangs (wenn die gewünschte
Dosierung erreicht ist) erneut die Taste 6
drücken. Anschließend die Schritte Punkt 6
und 7 ausführen.
NB.: Wir empfehlen ein Aufbrühen von
höchstens 40 Sekunden.
Anleitungen zum Einsatz von
Kaffee in Monodosiskapseln
Zur Zubereitung von Kaffee in Monodosiskapseln muß der dafür vorgesehene Filter (30)
verwendet werden.
Nach der Erwärmungsphase der Maschine den
Filterhalter (9) abnehmen und die Kapsel so
einsetzen, daß die Kapselfolie nicht über den
Filterhalter hinausragt.
Den Filterhalter in die Maschine setzen, indem
Sie ihn um etwa 45° nach links drehen.
Anschließend den Filterhalter über Drehung
nach rechts in der Maschine blockieren. Der
Griff des Filterhalters muß im rechten Winkel
zur Maschine stehen oder leicht nach rechts
versetzt werden.
Folgen Sie anschließend den Schritten 5 – 7, die un-
ter “Kaffee zubereiten” beschrieben werden.
OPTION
Filter „perfekte Creme“ (13)
Wenn die Kaffeebohnen zu fein oder zu
grob gemahlen sind, sorgt der Siebeinsatz filter „perfekte creme“ für eine
gelungene Crema, das hellbraune Schaumhäubchen, das einen hochwertigen Espresso kennzeichnet. Der Siebeinsatz filter
„perfekte creme“ eignet sich sowohl
für eine als auch für zwei Kaffeeportionen (Kaffeepulver mit Maßlöffel dosieren).
Der Siebeinsatz für die perfekte Crema
filter „perfekte creme“ muss täglich vor dem Einsatz gereinigt werden.
Wenn die Löcher verstopft sind, empfiehlt
es sich, den Siebeinsatz einige Sekunden lang in heißes Wasser zu legen.
Page 20

DEUTSCH
• 20 •
Reinigungsanleitung
1 WICHTIG: Um zu vermeiden das sich Mil-
chreste ablagern, die dann sehr schwer zu
beseitigen sind, sollte die Dampfdüse nach
jedem Gebrauch gereinigt werden:
Die Anleitung zur Reinigung, die sehr einfach zu vollziehen ist, sehen Sie bitte in der
BESCHREIBUNG DER TEILE nach.
Die Ummantelung kann, indem man sie nach
unten drückt, abgenommen werden.
Dampf ein/zwei Sekunden auströmen lassen
und Düse freilegen.
Dampfdüse von aussen und falls erforderlich
das Loch mit einer Nadel reinigen.
2 Filterhalter und Filter nach Gebrauch mit
Vorsicht: Dampfdüse
nicht anfassen; diese
könnte heiss sein!
Belüftungshaube, ist
sauber und frei von
Rückständen zu halten
6 Von Zeit zu Zeit, je nach Häufigkeit der Ve-
rwendung, den Verteiler (17) abschrauben
und säubern.
7 Wird die Maschine längere Zeit nicht
benützt, das Wasser aus dem Kessel lassen,
dazu den Dampfhahn (25)im Uhrzeigersinn
drehen, bis der Kessel geleert ist. Den Dampfhahn gegen den Uhrzeigersinn drehen und
schließen und die Maschine ausschalten. Die
Pumpe nicht betätigen, wenn kein Wasser
vorhanden ist.
8 HINWEIS: Es ist durchaus normal, dass
aus der Espressomaschine ab und zu
Dampf strömt oder Wasser tropft, da der
Wasserdruck sich während des Gebrauchs
ändert.
Die Schale (12) entleeren.
lauwarmen Wasser spülen.
3 Den Maschinenkörper mit einem feuchten
Tuch abwischen.
N.B.: Die Maschine ist mit Soft-Touch-Ta-
sten (Tasten 2, 3, 4 und 6) ausgestattet, die
über kurzes Berühren aktiviert werden.
Um eine unbeabsichtigte Aktivierung dieser
Tasten auszuschließen, sollte die Maschine
zur Durchführung der Vorgänge zur Reinigung ausgeschaltet werden und ausgeschaltet bleiben.
4 Becken und Gitter (12, 23) entfernen und mit
Wasser reinigen. Zur Reinigung des Wassersammelbereichs einen Schwamm verwenden.
5 Die Dichtung (15) innen im Kaffeeausschütter
(14) reinigen.
Heisswasserbereitung
Bei betriebsbereiter Maschine, wie folgt vorgehen:
1 Die Taste für die Heißwasserausgabe (4)
drücken, die Kontrolllampe der Taste schaltet
sich ein und die Kontrolllampen der Tasten
2 - 3 - 5 - 6 schalten sich aus.
2 Eine Tasse oder einen Behälter unter das
Heißwasser/Dampfrohr stellen.
3 Den Dampf/Heißwasserhahn (25) langsam
im Uhrzeigersinn öffnen, um mit der Ausgabe zu beginnen. Während der Ausgabe
blinkt die Heißwassertaste (4) ununterbrochen (Abb. 03).
N.B.: Eine Ausgabezeit von 40 Sekunden sollte
nicht überschritten werden.
4 Die gewünschte Menge Heißwasser ent-
nehmen. Um die Heißwasserausgabe zu
beenden, den Hahn (25) gegen den Uhrzeigersinn drehen.
5 Nochmals die Taste (4) drücken und die Ma-
schine kehrt zur normalen Funktion zurück.
Die Tasse oder den Behälter entfernen.
Die Kontrolllampen der Tasten 2 - 3 - 5 - 6
schalten sich ein
Achtung: Verbrühungsgefahr!
Achtung! Am Anfang der Ausgabe
können kurze Heißwasserspritzer
austreten. Die Ausgabedüse kann hohe
Temperaturen erreichen: nicht direkt mit den
Händen berühren!
Page 21

DEUTSCH
Bei Störungen
Problem: Überprüfen:
Kein Brühvorgang.
Ob Wasser im Behälter ist.
Ob der Filter verstopft ist, weil der Kaffee zu fein gemahlen oder zu
stark gepresst wurde.
Ob der Verteiler sauber ist.
Der Kaffee fliesst zu schnell
aus.
Ob der Kaffee zu grob gemahlen ist.
Ob der Kaffee mit dem Druckstück angedrückt wurde.
Die Pumpe ist zu geräuschvoll. Ob Wasser im Behälter ist.
Ob die Pumpe vorbereitet wurde.
Ob der Kaffee zu grob gemahlen ist.
Die Pumpe ist zu geräuschvoll.
dem Filterhalter.
Ob der Filterhalter richtig eingesetzt wurde.
Ob die Dichtung verschmutzt oder verschlissen ist.
Ob sich Kaffeereste am Rand des Filterhalters befinden.
Der Espresso weist nicht die
typische „Creme“ auf.
Ob der Kaffee zu grob gemahlen wurde.
Ob der Kaffee mit dem Druckstück angedrückt wurde.
Ob der Kaffee zu alt oder zu trocken ist.
Der Kaffee ist zu kalt Ob die Maschine richtig aufgeheizt wurde (10 Minuten)
Ob der Kaffee zu grob gemahlen wurde.
Die Milch schäumt nicht genug.
Ob die Dampfdüse und/ oder das Luftloch verstopft sind.
Ob die Milch zu heiss ist.
Alarme - Wenn die angewendete Taste blinkt:
Wassertank leer
Nicht genügend Wasser
Pumpengeräusch
Den Wassertank füllen und die Vorgehensweise zum Auffüllen des
Heizkessels wiederholen.
Mahlung zu fein Die Mahlung ändern
Filter schmutzig Die Düse (17) reinigen
Kaffee zu fest gepresst Der Kaffee darf nicht zu fest gepresst werden.
• 21 •
Entkalkung:
Bei stark kalkhaltigem Wasser kann der Betrieb
der Maschine beeinträchtigt werden. Daher
sollte das Gerät etwa alle zwei Monate (je nach
Gebrauch und Kalkgehalt) mit einer Lösung aus
Wasser und dem Gaggia Entkalker (gemäss den
Anleitungen) ausgespült werden.
Den Verteiler (17) herausnehmen und säubern.
Die Lösung erst verdünnen, bevor sie in den
Tank geschüttet wird.
Die Lösung einige Sekunden in die Kaffeebrühgruppe und die Dampfdüse gießen.
Zwanzig Minuten abwarten, dann den Vorgang wierderholen, bis die ganze Lösung
aufgebraucht ist.
Die Maschine mit kaltem Wasser auspülen. Den
Verteiler (17) wieder einsetzen.
HINWEIS: Durch Ansammlung von Kalkablagerungen verursachte Schäden fallen nicht
unter die Garantieleistungen. Der Benutzer
braucht keine weiteren Wartungseingriffe vorzunehmen. Für optimale Ergebnisse Gaggia
Reinigungsmittel verwenden.
Page 22

FRANÇAIS
Félicitations pour votre choix.
Grâce à cette machine Gaggia, vous pouvez
maintenant déguster chez vous le véritable
espresso ou cappuccino à l’arôme inimitable.
Le café espresso nous vient d’Italie.
Il s’obtient en faisant passer rapidement de l’eau
sous pression, chauffée à la bonne température,
à travers un café spécial moulu très fin.
Le secret de la machine Gaggia est sa pompe
d’une grande précision technique.
Cette pompe et l’écoulement de l’eau se commandent par un simple interrupteur.
PRECAUTIONS:
Cette machine est réservée à un usage domestique.
Toute intervention d’assistance ou de réparation,
exception faite des opérations de nettoyage et
d’entretien courant, devra être effectuée par un
Centre d’assistance agréé.
1. Vérifier si le voltage correspond bien aux
spécifications apparaissant sur la plaque
des données techniques.
2. Ne jamais mettre de l’eau tiède ou chaude
dans le réservoir, mais toujours de l’eau
froide.
3. Ne pas toucher les surfaces chaudes de
l’appareil pendant le fonctionnement et en
écarter le cordon électrique.
4. Ne jamais nettoyer avec des poudres à
récurer ou des instruments durs.
5. Utiliser de l’eau purifiée ou en bouteille pour
éviter la formation de tartre.
6. Ne pas plonger la base dans l’eau.
• 22 •
IMPORTANT
Lors de l’utilisation d’appareils électriques, il est important de prendre les
précautions suivantes, afin d’éviter les
décharges électriques, les courts-circuits
et les accidents corporels:
1 Lire toutes les instructions et les indications
données dans cette brochure, ainsi que toute
autre information sur l’emballage, avant de
mettre la machine en marche.
2 Ne pas toucher les surfaces chaudes de la
machine.
3 Ne pas plonger le fil électrique, la prise ou
l’appareil lui-même dans de l’eau ou tout
autre liquide.
4 Faire très attention lorsque l’appareil est
utilisé par ou près des enfants.
5 Débrancher l’appareil lorsqu’il n’est pas en
service et laissez-le refroidir avant de retirer
les accessoires pour le nettoyage ou de les
mettre en place.
6 Ne pas utiliser l’appareil avec un cordon
ou une prise en mauvais état ou après que
l’appareil ait été endommagé de quelque
manière que ce soit. Confier votre appareil
au service après-vente autorisé le plus proche pour examen ou réparation.
7 L’utilisation d’accessoires non recommandés
par le fabricant de l’appareil pourrait poser
des problémes.
8 Ne pas utiliser à l’extérieur.
9 Ne pas laisser le cordon pendre de la table,
ni toucher des surfaces chaudes.
10 Ne pas poser sur une cuisinière ou dans un
four chaud.
11 Mettre toujours l’appareil en position
“Arrêt” avant de le brancher. Met-
tre également tous les interrupteurs à
“Arrêt” avant de le débrancher.
12 Usage domestique uniquement.
13 Faire très attention en utilisant la vapeur.
14 Cet appareil ne doit pas être utilisé par des
personnes (enfants compris) présentant des
capacités physiques ou mentales réduites,
ou manquant d’expérience et de connais-
sance, à moins qu’elles ne soient formées
ou supervisées par un sujet responsable
de leur sécurité. Il est nécessaire de sur-
veiller les enfants de manière à s’assurer
qu’ils ne jouent pas avec l’appareil. Il est
nécessaire de surveiller les enfants pour
les empêcher de jouer avec l’appareil.
15 Conserver ces instructions.
Page 23

FRANÇAIS
Légende du diagramme
FIG. 01
1 Interrupteur principal
2 Touche distribution café 1 serré/2 serrés
3 Touche distribution café 1 allongé/2
allongés
4 Touche prélèvement eau chaude
5 Voyant prélèvement vapeur
6 Touche programmation doses/
distribution manuelle
7 Voyant température correcte
8 Bec à vapeur Turbo (amovible)
9 Porte-filtre
10 Filtre (1 tasse)
11 Filtre 2 tasses
12 Bassin (extractible)
13 Filtre “Mousse parfaite” (OPTION)
14 Élément percolateur
15 Joint d’étanchéité
16 Logement du distributeur
17 Distributeur
18 Tampon
19 Cordon électrique et prise
20 Mesure
21 Bec de distribution
22 Couvercle du réservoir
23 Grille (extractible)
24 Kit Préparation Cappuccino (OPTION)
25 Bouton vapeur/eau chaude
26 Réservoir (amovible)
27 Trou anti-débordement
28 Produit nettoyant anti-empreintes
pour acier inoxydable
29 Indicateur de plein cuvette
30 Filtre pour capsules
Instructions sur le cordon electrique
A Votre appareil est muni d’un cordon électri-
que court afin d’éviter qu’il ne s’emmêle ou
qu’on ne s’y accroche.
B On peut utiliser une rallonge électrique en
prenant certaines précautions.
C Si on utilise une rallonge, vérifier
1 que sa tension est au moins égale à celle de
l’appareil
2 si l’appareil électroménager est muni
d’une mise à la terre, la rallonge doit être,
elle aussi, réalisée avec un câble à 3 fils
indiqué pour le raccordement à la terre et
3 le câble le plus long doit être disposé de
façon à ne pas s’entortiller sur la partie
supérieure du comptoir, avec le risque que
les enfants puissent tirer dessus ou que l’on
puisse y trébucher.
Préparation de la machine à
Espresso
1. Otez le couvercle du réservoir (22) et versez
de l’eau froide jusqu’à la ligne MAX (26).
Voir FIG.2.
N.B.: Près du mot MAX sur le réservoir se
trouve le trou de sécurité anti-débordement
(27) en cas de remplissage excessif du réservoir.
Le réservoir de l’eau peut aussi être enlevé,
après avoir enlevé le couvercle du réservoir
(22) au moyen de la poignée.
Repositionner le réservoir avec l’eau et le
couvercle (22).
2. Branchez le cordon d’alimentation (19) à
une prise électrique appropriée (voir «Précaution» point 1)
3 Appuyez sur l’interrupteur principal (1).
Le voyant de la température (7) clignotera
jusqu’à ce que la température n’est atteinte;
une fois atteinte la température, le voyant
restera allumé.
Les voyants des touches 2 - 3 - 5 - 6 s’allu-
ment fixes (mode stand-by).
Mise en service
Il s’agit de préparer la pompe et de remplir la
chaudière avec de l’eau fraîche.
On doit effectuer cette opération lorsqu’on met
la machine en service et chaque fois qu’elle n’a
pas servi depuis un certain temps.
Cette machine utilisant une pompe pour la
distribution du café, est équipée d’un système
autoamorçant.
Placez une tasse vide sous le bec à vapeur (8),
appuyez sur la touche eau chaude(4) et tournez
la poignée vapeur(25) dans le sens des aiguilles
d’une montre.
Vous entendrez le bruit de la pompe ainsi
activée et après quelques secondes l’eau va
commencer à descendre du tige vapeur (8).
• 23 •
Page 24

FRANÇAIS
Ce qu’il faut savoir…...
1 Le goût de votre café dépend du type de café
que vous utilisez, du grain, du pays d’origine
et du traitement qu’il a subi.Le goût caractéristique d’un café est dû à plusieurs facteurs, mais
sa saveur et son arôme sont le résultat de la
torréfaction. Les grains de café qui subissent
une plus longue torréfaction, à la température
plus élevée, sont beaucoup plus foncés. Ils
donnent un café à la saveur plus prononcée
que les cafés légèrement torréfiés.
2 On trouve sur le marché différents cafés noirs
qui conviennent pour l’espresso. Chacun de
ces cafés est un mélange de différents types
de café, torréfiés à une certaine température,
pour obtenir une saveur particulière.
On trouve également le café décaféiné,
dont 98% de la caféine a été enlevée. La
prochaine fois que vous achèterez du café
pour votre machine à espresso, essayez une
nouvelle variété. Vous découvrirez peut-être
qu’elle est meilleure que celle que vous utilisez actuellement.
3 Utilisez toujours du café à mouture «espres-
so» pour votre machine à pompe. N’oubliez
• 24 •
pas de le préciser lorsque vous achetez
votre café déjà moulu ou que vous le faites
moudre. N’utiliser pas un moulin à café à
lame, car il donne une mouture irrégulière.
4 Le cafè espresso se distingue à sa couleur
foncée, à sa saveur riche et à fine mousse
brune qui se forme à sa surface et que les
Italiens appellent «crema».
5. Le cappuccino est simplement une combinaison d’espresso et de lait chaud en mousse.
On recommande de mettre moitié espresso,
moitié lait. Habituellement, on le saupoudre
de cannelle, de muscade ou de cacao.
6 L’espresso doit être servi dès qu’il est prêt.
7 L’espresso se sert dans des petites tasses de 2
à 2 ½ onces. Le cappuccino dans des tasses
ou des verres de 5 à 8 onces.
8 L’idéal serait de moudre le café juste avant
de faire l’espresso. Ne pas oublier que les
machines à pompe demande une mouture
spéciale «espresso».
9 Le café moulu ou en grain doit être conservé
dans un bocal étanche dans la partie congélateur de votre réfrigérateur. Le café moulu
prend rapidement le goût des aliments.
Préparation de l’espresso
Programmation des doses de café.
Avec cette machine Gaggia on peut programmer deux doses différentes d’eau pour obtenir
des tasses de café plus ou moins fort.
Pour régler la dose d’eau et pouvoir mémoriser
celle-ci pour une demande suivante de distribution il faut procéder de la façon suivante:
Avec cet appareil Gaggia il est possible de programmer deux doses différentes d’eau pour obtenir
une ou deux tasses de café. Pour régler les doses
d’eau et pouvoir mémoriser celles-ci pour une
demande suivante de distribution, faites attention à
effectuer d’abord la procédure de “PREPARATION
DU CAFE” à page 4- paragraphes 2-3-4, ensuite
procédez de la façon suivante:
1 Appuyez sur la touche de programmation
(6) pour 3 sec. jusqu’à ce que le voyant (6)
commence à clignoter.
En même temps les symboles des touches 2
- 3 vont s’allumer.
2 Une fois inséré le filtre à une tasse, pressez
la touche (2) et laissez couler le café.
ATTENTION: Ne jamais mettre la
machine en marche lorsque le réser-
voir est vide, afin d’éviter d’endommager la pompe. Une utilisation incorrecte
n’est pas couverte par la garantie.
Après avoir laissé remplir la tasse fermez la
poignée vapeur(25) et appuyez à nouveau sur
la touche eau chaude (4)
La machine Gaggia est maintenant prête.
NOTE: Le voyant de température (7) clignote
pendant que l’eau chauffe. Il s’allume automatiquement lorsqu’elle a atteint la bonne
température pour le café (et la vapeur).
Après avoir allumé la machine, pour obtenir
le premier café, attendez environ 6 minutes
pour un chauffage idéal, alors que pour les
suivants, la machine sera toujours prête.
La machine se caractérise également par le système antigoutte qui élimine la plupart du liquide
s’égouttant du groupe de distribution (14).
Lorsque le café s’est écoulé, il peut se produire
un léger égouttement à cause du marc de café
mouillé contenu dans le portefiltre.
Page 25

FRANÇAIS
• 25 •
Préparation du café.
1 Effectuez les opérations décrites dans
la “Préparation de la machine à
Espresso”.
2 Choisissez le filtre approprié (10 ou 11) et
placez-le dans le porte-filtre (9).
Le petit pour un tasse, le grand pour deux
tasses. Ensuite insérez le porte-filtre (9)
dans la machine et attendez au moins 10
minutes.
3 Lorsqu’il est chaud, retirez le porte filtre (9)
et remplissez le filtre de café moulu espresso
avec la mesure fournie (1 mesure par tasse
d’espresso).
Ne remplissez pas trop le filtre. Tassez
légèrement le café avec le tampon fourni
(18). Ne tassez pas trop.
4 Enlevez la poudre de café sur le bord du
porte-filtre (9) et introduisez ce dernier dans
l’élément percolateur, en tenant la poignée à
un angle d’environ 45° vers la gauche lorsque vous faites face à l’appareil. Tournez la
poignée vers la droite pour le verrouiller.
La poignée devrait être perpendiculaire à la
machine ou légèrement à droite.
5 Placez une ou deux tasses à espresso sur
la grille d’égouttoir en correspondance des
deux orifices du porte-filtre. Appuyez sur la
touche relative à la dose de café mémorisée.
Le café coulera directement dans les tasses.
6 La distribution du café va s’arrêter automa-
tiquement lorsque le niveau préétabli est
atteint (voir Programmation des doses
de café); il est de toute façon possible
d’interrompre la distribution du café en appuyant sur la touche (2 ou 3) précédemment
sélectionnée.
Un bon espresso est recouvert d’une fine
crème brune. Si ce n’est pas le cas, voyez
la rubrique “En cas de dysfonctionne-
ment”.
7 Retirez les tasses et servez.
8 Pour faire d’autre espressos, retirez douce-
ment le porte-filtre en amenant la poignée
vers la gauche. Faites bien attention, car il
reste souvent un peu d’eau chaude sur le marc
de café dans le filtre. Il continuera aussi à
couler un peu d’eau de l’élément percolateur
lorsque vous retirerez le porte-filtre. Cela est
normal et est dû à la pression créée par la
pompe. Enlevez le marc de café du filtre et
rincez. Reprenez les étapes de 2 à 7.
3 Pressez la même touche (2) à nouveau
jusqu’à obtenir la dose optimale désirée
pour un café.
4 A ce point la dose d’eau attribuée, pour un
café, à la touche (2) sera mémorisée et le
voyant placé sous la touche va s’éteindre.
5 Répétez les passages aux points 3 et 4 pour
programmer la dose d’eau pour la touche
(3).
Chaque utilisateur sera libre de programmer les doses pour obtenir un café plus
ou moins fort et d’attribuer des doses plus
grandes ou plus petites aux touches (2 et 3)
pour utiliser le filtre à 1 ou 2 tasses.
6 Après la mémorisation de ces doses, pressez à
nouveau la touche (6) “MENU” pour sortir de
la fonction de programmation. Les symboles placés sous les touches recommencent à
s’allumer alternativement. La machine est prête
pour obtenir la distribution d’excellents cafés.
N.B.: pour distribuer 1 café appuyez une fois
sur la touche (2 ou 3); pour distribuer 2 cafés
appuyez 2 fois sur la touche (2 ou 3).
Pre-infusion
La machine permet de configurer le dosage de
sorte que la distribution relative aux doses de
CAFÉ soit précédée de la pré-infusion.
En appuyant sur la touche Dose (2), le cycle
de distribution normal est précédé d’un bref
jet d’eau temporisé qui sert à humidifier la
pastille de café avec le passage d’eau pour la
réalisation du café proprement dit.
Cette fonction permet à la pastille de café de
donner le meilleur d’elle-même.
La Pré-infusion n’est pas disponible sur la
touche Dose (3).
N.B.: La machine est configurée avec la pré-
infusion active. Pour éliminer cette fonction,
il est nécessaire d’entrer dans le mode
Programmation (Voir « Programmation
des doses de café ») et d’appuyer sur
la touche prélèvement eau chaude (4). Le
voyant de la touche qui s’était allumé est
éteint.
Lorsque le voyant de la touche prélèvement
eau chaude (4) est allumé, cela signifie que
la pré-infusion est active. Quand il est éteint,
cela veut dire que la pré-infusion n’est pas
programmée.
Page 26

FRANÇAIS
• 26 •
Distribution vapeur/Préparation
du cappuccino
Vous pouvez utiliser la vapeur pour faire
mousser le lait de votre cappuccino, mais vous
pouvez également l’utiliser pour chauffer vos
boissons.
Attention! Risques de brûlures! Au
début, il est possible qu’un peu d’eau
s’échappe de la machine. Le conduit
de distribution d’eau chaude peut atteindre
des températures élevées: évitez de le toucher
directement avec les mains.
Version bec à vapeur Turbo
1 Avec la machine prête pour distribuer le
café, dirigez le tube vapeur sur la grille
d’égouttoir (12), ouvrez la poignée robinet
(25) “Eau chaude/vapeur” pour quelques
instants pour laisser sortir toute eau résidue
du tube vapeur; après quelques instants
uniquement de la vapeur va sortir.
2 Fermez la poignée robinet vapeur/eau
chaude (25).
3 Faites de l’espresso (dans des grandes tas-
ses) selon la méthode décrite plus haut.
4 Remplissez avec du lait froid 1/3 du récipient
que vous désirez utiliser pour préparer le
cappuccino.
IMPORTANT: Pour obtenir un résultat meilleur
dans la préparation du cappuccino, le lait et
la tasse utilisée doivent être froids.
5 Immergez le tube vapeur dans le lait à ré-
chauffer et ouvrir la poignée robinet (25);
tournez le récipient avec des mouvements
lents de bas en haut pour rendre uniforme
la formation de mousse (Fig. 03).
N.B.: Une distribution maximim de 60 secondes est conseillée.
6 Après avoir utilisé la vapeur pour le temps
désiré fermez la poignée robinet (25).
7 Le même système peut être utilisé pour ré-
chauffer d’autres boissons.
8 Après cette opération nettoyez le tube va-
peur avec un chiffon trempé.
9) Pour préparer un café en modalité manuelle,
effectuer de nouveau les opérations de 2 à 5
et appuyer ensuite sur la touche 6. Pour couper
l’arrivée du café (lorsque l’on a atteint la dose
voulue), appuyer de nouveau sur la touche 6.
Effectuer alors les opérations 6 et 7.
N.B.: Une distribution maximim de 40
secondes est conseillée.
Comment utiliser le café en capsules
Pour l’utilisation de capsules, utiliser exclusivement le filtre correct (30).
Après le chauffage, enlever le porte-filtre (9) et
insérer la capsule. S’assurer que le papier de
la capsule ne sort pas du porte-filtre.
Insérer le porte-filtre dans la machine en effec-
tuant un mouvement de 45° vers la gauche.
Tourner ensuite vers la droite pour le bloquer
à la bonne position. Le manche du porte-filtre
devra se trouver dans une position perpendicu-
laire par rapport à la machine ou légèrement
décalé vers la droite.
Ensuite, suivre la démarche décrite du point 5,
6 et 7 de «Préparation du café»
OPTIONAL
Filtre “Mousse parfaite”(13)
Lorsque le café n’est pas moulu comme il se
doit, l’emploi du «filtre crema perfetta»
facilite la production de la mousse propre
au café espresso. Avec le «filtre crema
perfetta», il est possible d’insérer aussi bien
une dose que deux doses de café moulu en
utilisant le doseur prévu à cet effet.
Pour garantir le bon fonctionnement, il est
recommandé de nettoyer le «filtre crema
perfetta» chaque jour avant l’emploi. Si les
trous de passage sont bouchés, il est conseillé
de plonger le «filtre crema perfetta» pendant quelques secondes dans l’eau bouillante.
Page 27

FRANÇAIS
• 27 •
Instructions de nettoyage
1 IMPORTANT : Nettoyer le gicleur de la
vapeur après l’avoir immergé dans du lait
afin d’éviter d’obstruer le gicleur et l’orifice
de prise d’air et afin d’éviter également que
les dépôts de lait extérieurs ne durcissent.
Pour faciliter l’opération de nettoyage,
comme indiqué à la rubrique “DESCRIPTION”,
la partie externe du gicleur est facilement
démontable, en tirant vers le bas.
Utiliser un chiffon humide pour nettoyer
l’extrémité du gicleur et ouvrir le robinet de
distribution de la vapeur.
Laisser s’échapper la vapeur pendant une ou
deux secondes afin de libérer le gicleur.
Nettoyer l’extérieur du gicleur de la vapeur.
Faire très attention à ne
pas toucher le distributeur
de vapeur: il peut être
brûlant!
Prise d’air qui doit être
toujours propre et sans
résidus.
Utiliser, si nécessaire, une aiguille afin de
nettoyer l’orifice du jet de vapeur.
2 Lavez le porte-filtre et le filtre à l’eau tiède
après chaque utilisation.
3 Utilisez au besoin un chiffon humide pour
nettoyer le corps de la machine.
N.B.: La machine est équipée d’un clavier qui
s’active si l’on touche ou si l’on effleure simplement l’une des zones sensibles (touches
2,3,4,6).
Il est donc conseillé d’éteindre la machine
durant les opérations de nettoyage, afin
d’éviter tout actionnement non désiré.
4 Enlever le bassin et la grille (12, 23) et
rincer ces derniers à l’eau. Ne pas utiliser
d’abrasifs.
5 Nettoyer le joint (15) à l’intérieur du groupe
percolateur (14). Veiller à ce qu’elle soit
toujours propre.
6 De temps en temps, il faut dévisser le distri-
buteur (17) et le nettoyer. Cela dépendra de
la fréquence d’utilisation de la machine.
7 Si la machine n’est pas utilisée pour lon-
gtemps, déchargez complètement l’eau de
la chaudière en tournant dans le sens des
aiguilles d’une montre la poignée vapeur
(25). Fermez la poignée vapeur (25) en
tournant celle-ci dans le sens contraire aux
aiguilles d’une montre et arrêtez la machine.
N’actionnez jamais la pompe sans eau.
8 NOTE: Il est tout à fait normal qu’un peu
d’eau ou de vapeur s’échappe de temps
en temps d’une machine à espresso, car la
pression change en cours d’utilisation.
N’oubliez pas de vider la cuvette.
Preparations de l’eau chaude
Avec la machine prête pour distribuer café,
procédez de la façon suivante:
1 Appuyez sur la touche prélèvement eau chau-
de (4), le voyant de la touche va s’allumer
tandis que les voyants des touches 2 - 3 - 5
- 6 vont s’éteindre.
2 Mettez une tasse et/ou un récipient sous le
tube eau chaude/vapeur.
3 Ouvrez lentement dans le sens des aiguilles
d’une montre la poignée robinet vapeur eau
chaude (25) pour permettre la distribution.
Pendant toute la durée de la distribution le
voyant de la touche prélèvement eau chaude
(4) clignotera (Fig. 03).
N.B.: Une distribution maximum de 40 secon-
des est conseillée.
4 Prélevez la quantité désirée d’eau chaude;
pour arrêter la distribution de l’eau chaude
tournez la poignée (25) dans le sens contraire aux aiguilles d’une montre.
5 Appuyez à nouveau sur la touche (4); la ma-
chine va retourner au mode de fonctionnement normal. Otez la tasse et/ou le récipient.
Les voyants des touches 2 - 3 - 5 - 6 vont
s’allumer fixes.
Attention! Risques de brûlures! Au
début, il est possible qu’un peu d’eau
s’échappe de la machine. Le conduit
de distribution d’eau chaude peut atteindre
des températures élevées: évitez de le toucher
directement avec les mains.
Page 28

FRANÇAIS
En cas de dysfonctionnement
Problème: Contrôler :
Le café ne coule pas Réservoir vide.
Filtre bouché parce que le café est moulu trop fin ou est trop tassé.
Le distributeur a besoin d’être nettoyé.
Le café coule trop vite. Café moulu trop gros.
Café pas assez tassé.
La pompe fait beaucoup
de bruit.
Réservoir vide.
Pompe désarmorcée.
Café moulu trop gros.
Beaucoup d’eau coule du
porte-filtre.
Porte-filtre mal verrouillé dans l’élément percolateur.
Joint de l’élément percolateur sale ou usé.
Poudre de café sur le bord du porte-filtre.
Il n’y a presque pas de
mousse à la surface de
l’espresso.
Café moulu trop gros.
Café pas assez tassé.
Café trop vieux ou desséché.
L’espresso n’est pas assez
chaud.
La machine n’a pas eu le temps de chauffer
(10 MIN.).
Le café passe trop vite – café moulu trop gros.
Le lait mousse mal. Le bec à vapeur et/ou la prise d’air sont bouchés.
Le lait est trop chaud.
Alarmes - Quand la touche que l’on est en train d’utiliser clignote:
Réservoir vide
Bruit de la pompe
Manque d’eau
Remplissez le réservoir et répétez les procédures de remplissage
chaudière.
Mouture trop fine Modifiez la mouture
Filtre sale Nettoyez la petite douche (17)
Café trop pressé Evitez de presser excessivement le café
• 28 •
Détartrage
Dans les régions où l’eau est dure, elle contient
des minéraux qui s’accumulent dans la machine
et nuisent à son fonctionnement. Environ tous les
deux mois (cela varie selon l’eau et la fréquence
d’utilisation), nettoyer la machine avec le détartrant Gaggia (suivez les instructions). Enlevez le
distributeur (17) et nettoyez-le.
Diluez la solution avant de verser celle-ci dans
le réservoir. Versez la solution dans le groupe
de distribution café et dans le gicleur vapeur
pour quelques secondes. Attendez 20 minutes
et refaites la même opération.
Recommencez jusqu’à ce que le réservoir soit vide.
Rincez alors la machine en faisant circuler de l‘eau
pure. Remettez le distributeur (17) en place.
NOTE: les défectuosités dues au tartre ne sont
pas couvertes par la garantie. L’usager ne doit
effectuer aucun autre entretien. Pour de meilleurs résultats, utilisez le détartrant Gaggia.
Page 29

ESPAÑOL
• 29 •
Les felicitamos por su decisión!
Gracias a esta máquina Gaggia podrán gustar
un delicioso café o cappuccino en el comfort
de la casa.
El espresso, de origen italiano, se prepara haciendo filtrar rápidamente agua bajo presión
y calentada a la temperatura exacta a través
de una mezcla finamente tostada.
El nucleo central de la máquina Espresso Gaggia está constituído por una bomba de alta
precisión técnica.
El flujo del agua se puede regular mediante
un interruptor.
ADVERTENCIA:
La máquina espresso fué estudiada unicamente
para el uso doméstico.
Cualquier intervención de asistencia o de reparación, excepto las operaciones de limpieza y
de normal manutención, deberá ser efectuada
por un Centro de Asistencia autorizado.
1. Controlar que el voltaje indicado en la placa
coresponda al suyo
2. Nunca utilizar agua tibia o caliente para
llenar el recipiente del agua. Utilizar únicamente agua fría.
3. No tocar las partes calientes de la máquina
ni el cable de alimentación durante el funcionamiento.
4. No limpiar con detergentes abrasivos o
utensilios que rayen. Es suficiente un paño
suave humedecido con agua.
6. Para evitar la formación de calcáreo, es recomendado el uso de agua mineral natural.
6. No sumergir la máquna en agua.
PRECAUCIONES
IMPORTANTES
Durante el uso de electrodomésticos, se
aconseja tomar algunas precauciones
para limitar el riesgo de sacudidas
eléctricas o incendios.
1
Leer cuidadosamente todas las instrucciones e
informaciones anotadas en este manual y en
cualquier otro folleto contenido en el embalaje
antes de iniciar o de usar la máquina espresso.
2 No tocar superficies calientes.
3 No sumergir en el agua o en cualquier
otro líquido ni el cable, ni los enchufes ni el
tronco de la máquina para evitar incendios,
sacudidas eléctricas o accidentes.
4 Poner particular atención durante el uso de la
máquina espresso en presencia de los niños.
5 Desenchufar cuando no se use la máquina
o durante las operaciones de limpieza. Hacerla enfriar antes de colocar o remover las
piezas y antes de proceder a su limpieza.
6 No usar la máquina con cables o enchufes
dañados o en caso de averías o roturas. Hacer controlar o reparar el electrodoméstico
en el centro de asistencia más cercano.
7 El uso de accesorios no aconsejados por el fabri-
cante podrá causar daños a cosas y personas.
8 No usar la máquina espresso al abierto.
9 Evitar que el cable quede colgando de la
mesa o que toque superficies calientes.
10 Mantener la máquina espresso lejos fuentes
de calor.
11 Controlar que la máquina espresso esté en
posición “Apagado” antes de introducir el
enchufe en la toma. Para apagarla, colocar-
la en “Apagado” y desenchufar.
12 Utilizar la máquina únicamente para uso
doméstico.
13 Poner extremado cuidado durante el uso
de vapor.
14 Las personas adultas y los niños, que tengan
una discapacidad física, sensorial o mental,
no deben utilizar este aparato. Tampoco han
de usarlo quienes carezcan de la experien-
cia y conocimientos necesarios al efecto,
excepto si se les capacita y si les supervisa
otra persona, responsable de su seguridad.
Los niños deben usar el aparato bajo la
vigilancia de un adulto, que se cerciorará
de que no jueguen con el mismo. Controle
siempre a los niños para no jueguen con el
aparato.
15 Conservar estas instrucciones
Page 30

ESPAÑOL
Descripcion:
FIG. 01
1 Interruptor principal
2 Tecla suministro café 1 corto/2 cortos
3 Tecla suministro café 1 largo/2 largos
4 Tecla recogida agua caliente
5 Luz testigo recogida vapor
6
Tecla programación dosis/suministro manual
7 Luz testigo de alcance de la
temperatura correcta
8 Boquilla vapor Turbo (extraíble)
9 Porta filtro
10 Filtro (1 taza)
11 Filtro (2 tazas)
12 Vasija recogedora de agua
13 Filtro “cremita perfecta” (OPCIONAL)
14 Elemento de erogación café
15 Empaque de portafiltro
16 Porta-distribuidor
17 Distribuidor
18 Prensita
19 Cable y enchufe de alimentación
20 Medida
21 Boquilla de erogación
22 Tapa recipiente
23 Reja (extraíble)
24 Kit Dispositivo para capuchino
(OPCIONAL)
25 Perilla vapor/agua caliente
26 Recipiente del agua (extraíble)
27 Agujero antidesbordamiento
28
Limpiador antihuellas para acero inoxidable
29 Indicador de cubeta llena
30 Filtro para obleas
Instrucciones acerca del cable
eléctrico
A Se suministra un cable eléctrico corto para
evitar que se enrosque o que se enrede.
B También es posible utilizar extensiones pero
se aconceja utilizar con mucha atención.
C En caso de que se utilicen una extensión,
verificar.:
1 Que el voltaje anotado en la extensión sea
por lo menos igual al voltaje eléctrico del
electrodoméstico.;
2 Si el electrodoméstico posee puesta a tierra, la
extensión ha de ostentar un cable de 3 hilos,
idóneo para efectuar la conexión a tierra y
3 El cable más largo se ha de disponer de ma-
nera tal que no quede retorcido en la parte
superior (en la superficie donde descansa).
Preparación de la máquina de
café Espresso:
1 Quitar la tapa del recipiente del agua (22)
y llenarlo con agua fría hasta la señal de
MAX (26).Ver FIG.2
N.B.: Cerca de la escrita MAX del tanque
se encuentra el agujero de seguridad anti-
desbordamiento (27), en caso de eventuales
sobredosificaciones de llenado tanque.
También se puede extraer el tanque del
agua, luego de haber extraído la tapa del
tanque (22) y utilizando la manija.
Reposicionar el tanque con el agua y la
tapa (22).
2 Introducir el enchufe (19) en una toma ade-
cuada (Cfr. “Advertencia” punto 1).
3 Presionar el interruptor principal (1). La luz
testigo de alcance temperatura (7) centel-
leará hasta que se alcance la temperatura;
una vez alcanzada la temperatura la luz
testigo quedará encendida.
Las luces testigo de las teclas 2 - 3 - 5 - 6 se
encenderán fijas (modalidad stand-by).
Puesta en funcionamiento
Este procedimiento permite preparar la bomba
llenando la caldera con agua fría.
Se aconseja seguir este procedimiento cada vez
que la máquina se usa por la iaprimeraln vez.
Esta máquina está equipada con una bomba
para erogación del café, y con un sistema de
cebado automático.
Colocar una taza vacía debajo de la boquilla
del vapor (8), presionar la tecla del agua
caliente (4) y girar la manecilla del vapor (25)
hacia la derecha.
Se puede oir el ruido de la bomba que se ha
activado y, después de unos segundos, el agua
empieza a bajar desde el tubo del vapor (8).
Luego de haber dejado llenar la taza, cerrar
la manecilla del vapor (25) y presionar
nuevamente la tecla del agua caliente (4).
La máquina Gaggia ahora esta lista para el uso.
• 30 •
De lo contrario, existe el riesgo de que los
niños jalen del mismo y lo tiren al piso, o
bien, que la gente se tropiece.
Page 31

ESPAÑOL
Cosas importantes de saber:
1 El sabor del espresso depende de la can-
tidad y del tipo de café utilizado.El sabor
particular de un grano de cafè depende de
distintos factores pero su gusto y su aroma
son el resultado del proceso de tostado.Los
granos de café tostados por un período de
tiempo más largo y a temperaturas más
altas presentan un color más oscuro. Granos
más oscuros desprenden más aroma con
respecto a los granos más claros.
2 Encontraréis en el mercato distintas calida-
des de café.
Cada tipo de terrofacción se caracteriza
por una mezcla de granos tostados a una
temperatura particular y con un particular
tipo de aroma.Existen descafeinados que
contienen solamente el 2% de cafeína.
Es posible experimentar con su máquina
espresso uno de los distintos tipos de café
en venta. Descubriréis probablemente un
aroma mejor con respecto al de la mezcla
hasta ahora usada.
• 31 •
3 Las máquinas espresso de bomba requieren
una mezcla finamente molida. Cerciorarse
que la compra sea de este tipo o proveer a
hacer moler este tipo de mezcla. N o n
utilizar moledoras de cuchilla porque en
el proceso hacen liberar demasiado polvo
de café y producen una mezcla molida de
modo irregular.
4 El verdadero espresso se reconoce por el
color oscuro, por el gusto pleno y por la
típica “cremita”.
5 El cappuccino es una combinación especial
de cafè expreso y leche caliente espumosa.
Se sirve por lo general con un rociado de
canela, nuez moscada o chocolate.
6 Servir inmediatamente el café espresso de-
spués de haberlo preparado.
7 Servir el café espresso en tacitas de café y
el cappuccino en tazas de desayuno.
8 Lo ideal es moler el café apenas antes de
usarlo. No olvidéis que debe ser molido
para máquina espresso de bomba.
9 Se aconseja conservar el café molido o en
granos en tarros herméticos en el congela-
dor.El café molido absorbe fácilmente los
olores.
Como preparar un buen Espresso:
Programación de las dosis de café.
Gracias a esta máquina Gaggia es posible
programar dos dosis diferentes de agua para
obtener una o dos tazas de café.
Para regular las dosis de agua y, por consiguiente, memorizarlas para otro siguiente
pedido de suministro, pongan cuidado en ejecutar primero la operación de “PREPARACIÓN
DEL CAFÉ’” indicada en la pág.4 párrafos
2-3-4, y luego actúen según lo indicado a
continuación:
1 Presionar la tecla programación (6) durante
3 seg. hasta cuando la luz testigo (6) comen-
zará a centellear.
Se iluminarán simultáneamente los símbolos
de las teclas 2 - 3.
2 Tras poner el filtro para una taza, pulsen la
tecla (2) dejando salir el café.
¡Atención! No accionar nunca
la bomba sin agua a fin de evitar
daños a la bomba misma. El uso
incorrecto de la bomba no está amparada
por la garantía.
N.B.: la señal de logro de la temperatura
correcta (7) continuará a apagarse y a
encenderse automáticamente durante el
período de calentamiento. Luego de haber
encendido la máquina, aguardar aproximadamente 6 minutos para alcanzar
la temperatura ideal para el primer café,
mientras que para los sucesivos, la máquina
estará siempre lista.
Otra característica de la máquina consiste en el
sistema salvagotas, que elimina casi por completo el goteo del grupo de erogación (14).
Una vez que la máquina haya suministrado el
café, puede gotear un poco, a causa del resto de
café mojado que ha quedado en el portafiltro.
Page 32

ESPAÑOL
• 32 •
Preparación del café.
1 Seguir el procedimento descrito en el capítu-
lo “Preparación de la máquina de
café Espresso”.
2. Seleccionar el filtro correcto (10 - 11) e
introducilo en el porta filtro (9).
Usar el filtro pequeño para 1 taza y el filtro
grande para 2 tazas.
Introduzcan luego el portafiltro (9) en la máqui-
na y esperen por lo menos 10 minutos.
3. Después del calentamiento, quitar el porta
filtro (9) y llenarlo de café molido utilizando
la medida suministrada.
Considerar una medida para cada taza de café.
No llenar demasiado.
Oprimir utilizando la prensita correspondien-
te (18). No oprimir demasiado.
4. Limpiar el borde del porta filtro (9) de eventuales residuos de café.
Introducir el porta filtro en la máquina con
un movimento de 45° hacia la izquierda.
Darle la vuelta entonces hacia la derecha
para bloquearlo en su posición. El mango
del porta filtro deberá encontarse en posición perpendicular a la máquina y ligeramente corrido hacia la derecha.
5. Disponer una o dos tazas por debajo del
porta filtro. Pulsen la tecla correspondiente
a la dosis de café memorizada. El café
comenzará a salir.
6. El suministro del café se detendrá automáticamente cuando se alcanzará el nivel
predeterminado (véase Programación
de las dosis de café); igualmente se
puede interrumpir el suministro del café
presionando la tecla (2 ó 3) seleccionada
precedentemente.
Un buen café preparado siguiendo el proce-
dimeinto correcto tendrá la “cremita” típica
color marrón. En caso contrario consultar
“En el caso de un funcionamiento
incorrecto”.
7. Quitar las tazas y servir.
8 Para preparar otro café quitar lentamente y
con mucho cuidado el porta filtro moviéndolo
hacia la izquierda. Poner atención en no
quemarse con el agua que queda encima del
3 Vuelvan a pulsar la misma tecla (2) hasta
que se alcance la dosis optimal, deseada,
para un café.
4 Ahora, la dosis de agua atribuída, para un
café, a la tecla (2) se memoriza y la luz tetigo
posicionada debajo de la tecla se apaga.
5 Repitan las operaciones de los puntos 3 y 4
para programar la dosis de agua para la
tecla (3). Cada usuario puede programar
libremente las dosis para obtener cafés
más o menos fuertes y puede atribuir dosis
menores o mayores a las teclas (2 y 3) para
utilizar el filtro de 1 o 2 tazas.
6 Tras la memorización de dichas dosis, vuelvan
a pulsar la tecla (6) “MENÚ” para salir de la
función de programación.
Los símbolos posicionados debajo de las teclas,
volverán a iluminarse alternativamente.
La máquina está lista para obtener el suministro
de sabrosísimos cafés.
NOTA: para suministrar 1 café hay que
presionar una sola vez la tecla (2 ó 3);
para suministrar 2 cafés hay que presionar
2 veces seguidas la tecla (2 ó 3).
Pre-infusión
La máquina permite configurar la dosificación,
de manera tal que, antes de dispensar las dosis
de CAFÉ, tenga lugar una preinfusión.
Al pulsar la tecla dosis (2), antes de dispensar
el café, durante el ciclo normal, de la máquina
sale un chorrito de agua temporizado. El mismo
se utiliza para humedecer la pastilla de café
antes de que la máquina proceda a dispensar
efectivamente la bebida deseada.
Esta función permite aprovechar mejor la pastilla de café.
La preinfusión no está disponible en la tecla
dosis (3).
NOTA: La máquina viene ajustada de fábrica
con la preinfusión en ON.
Si desea desactivar dicha función, entre
en la modalidad de programación (véase
“Programación de la dosis de
café”). Acto seguido, pulse la tecla
recogida agua caliente (4). El testigo de la
tecla, que anteriormente estaba encendido,
queda apagado.
El testigo de la tecla recogida agua caliente
(4) encendido indica que la preinfusión está
en ON, mientras que, cuando está apagado,
indica que la preinfusión está en OFF.
Page 33

ESPAÑOL
• 33 •
Suministro de vapor/
Preparación del capuchino
Il vapore può essere utilizzato per montare il
latte per il cappuccino ma anche per il riscaldamento delle bevande.
¡Atención! ¡Peligro de quemaduras!
Al inicio de la erogación se pueden
producir pequeñas salpicaduras de
agua caliente. El tubo de erogación puede
alcanzar temperaturas elevadas: evitar tocarlo directamente con las manos.
Versión con boquilla vapor Turbo:
1 Con la máquina lista para suministrar café,
hay que dirigir el tubo de vapor sobre la
bandeja (12), abrir la manecilla grifo (25)
“Agua caliente/vapor” por algunos instantes, para hacer salir el agua residual del
tubo del vapor; en breve tiempo comenzará
a salir sólo vapor.
2 Cerrar la manecilla grifo vapor/agua ca-
liente (25).
3 Preparar el espresso en tazas grandes como
se especificó antes
4 Llenar con leche fría 1/3 del recipiente que
se desea utilizar para preparar el capuchino.
IMPORTANTE: Para garantizar un mejor re-
sultado en la preparación del capuchino, la
leche y la taza utilizada deben estar frías.
5 Sumergir el tubo del vapor en la leche que
hay que calentar y abrir la manecilla del
grifo (25); hacer girar el recipiente con movimientos lentos desde abajo hacia arriba,
para uniformar la formación de espuma
(Fig. 03).
N.B.
: Se aconseja un caudal máximo de 60
segundos.
6 Luego de haber utilizado el vapor durante
el tiempo deseado, cerrar la manecilla del
grifo (25).
7 Se puede utilizar el mismo sistema para
calentar otras bebidas.
8 Luego de esta operación, limpiar el tubo del
vapor con un paño húmedo.
café. Un poco de agua continuará a gotear
una vez quitado el porta filtro.Esto es normal
y se debe a la presión en el sistema.Quitar
los residuos del filtro.Para preparar otro café,
repetir las fases desde la 2 hasta la 7.
9 Para preparar un café, en la modalidad
manual, repita las instrucciones susodichas,
desde el punto 2 hasta el punto 5. Luego,
pulse el botón 6. Para que el chorro deje
de salir (cuando la dosis deseada ya está
en la taza), pulse de nuevo el botón 6. Acto
seguido, prosiga con los puntos 6 y 7.
N.B.
: Se aconseja un caudal máximo de
40 segundos.
Cómo usar el café en obleas
A la hora de utilizar los sobres monodosis de
café, emplee exclusivamente el filtro correcto (30).
Una vez que la temperatura haya subido al nivel
indicado, extraiga el portafiltro (9) y ubique en su
asiento el sobre monodosis. Cerciórese de que el
papel del mismo no sobresalga del portafiltro.
Coloque el portafiltro en la máquina, haciéndolo girar a 45°, hacia la izquierda.
Acto seguido, hágalo girar a la derecha para
bloquearlo en la posición correcta. La empuñadura del portafiltro ha de quedar perpendicular
a la máquina o ligeramente desplazado hacia
la derecha.
A continuación, siga las instrucciones del
apartado “Preparación del café”, desde
el paso 5 al 7.
OPTIONAL
Filtro “cremita perfecta” (13)
Cuando el café no está bien molido, usar el
“filtro crema perfecta”, facilita la formación de la crema típica del café exprés.
En el “filtro crema perfecta” es posible
preparar una o dos dosis de café molido:
añádalas mediante el medidor al efecto.
Para que el “filtro crema perfecta” siempre funcione correctamente, le recomendamos
que lo limpie todos los días, antes de usarlo. Si
los orificios de paso se obstruyen, es aconsejable sumergir el “filtro crema perfecta”
en agua hirviendo durante unos segundos.
Page 34

ESPAÑOL
• 34 •
Instrucciones para la limpieza:
1 IMPORTANTE: Limpiar la boquilla del
vapor después de haberla sumergido en la
leche para evitar que se obturen la boquilla
y el agujero de toma de aire y para no hacer
endurecer los depósitos de leche externos.
Para facilitar la operación de limpieza,
como se indica en la “DESCRIPCIÓN”, la
parte exterior de la boquilla se extrae con
facilidad tirándola hacia abajo.
Utilizar un paño húmero para limpiar los
extremos de la boquilla y abrir la válvula
de erogación del vapor.
Dejar salir el vapor por uno o dos segundos
para que la boquilla quede libre.
Prestar mucha atención
a no tocar la boquilla de
vapor: ¡podría estar
muy caliente!
Toma de aire que
mantener limpia y libre
de residuos
Limpiar el extremo de la boquilla del vapor.
De ser necesario, utilizar una aguja para
limpiar el agujero del chorro del vapor.
2 Limpiar el porta filtro y el filtro con agua
tibia después de uso.
3 Limpiar el cuerpo máquina con un paño
húmedo.
NOTA: La máquina consta de un teclado,
que se acciona sencillamente, nada más
tocar o rozar las zonas sensibles (teclas
2,3,4 y 6).
Por dicho motivo, es aconsejable apagar la
máquina durante las operaciones de limpieza para evitar que la misma se accione en
un mal momento.
4 Extraer la bandeja y la reja (12, 23) y
lavarlas con agua. No usar abrasivos.
5 Limpiar el empaque (15) que se encuentra
en el interior del elemento de salida café
(14). Mantenerla limpia.
6 Destornillar y limpiar el distribuidor periódica-
mente, según la frecuencia de uso (17)
7 Si la máquina no es utilizada durante lar-
gos períodos, hay que descargar el agua
en la caldera girando hacia la derecha la
manecilla del vapor (25) hasta que se agote.
Cerrar la manecilla del vapor (25) girándola
hacia la izquierda y apagar la máquina. No
accionar nunca la bomba sin agua.
8 N.B.: Es normal que una máquina espresso
emita vapor o deje gotear agua de vez en
cuando debido a que la presión del agua
misma cambia durante el uso.
Vaciar la vasija (12).
Como preparar el agua caliente
Con la máquina lista para suministrar café,
seguir las siguientes instrucciones:
1 Presionar la tecla de recogida del agua
caliente (4),la luz testigo de la tecla se encenderá mientras que se apagarán las luces
testigo de las teclas 2 - 3 - 5 - 6.
2 Poner una taza y/o un recipiente debajo del
tubo del agua caliente/vapor.
3 Abrir lentamente, hacia la derecha, la
manecilla del grifo del vapor agua caliente
(25) para permitir el suministro. Durante
el suministro, la luz testigo de la tecla de
recogida del agua caliente (4) centelleará
mientras dure la recogida (Fig. 03).
NOTA: Se aconseja efectuar un suministro
máximo de 40 segundos.
4 Recoger la cantidad deseada de agua ca-
liente; para detener el suministro del agua
caliente hay que girar la manecilla (25)
hacia la izquierda.
5 Presionar nuevamente la tecla (4); la máquina
se vuelve a poner en el modo de funcionamiento normal. Extraer entonces la taza y/o
el recipiente.
Las luces testigo de las teclas 2 - 3 - 5 - 6 se
encenderán fijas.
¡Atención! ¡Peligro de quemaduras!
Al inicio de la erogación se pueden
producir pequeñas salpicaduras de
agua caliente. El tubo de erogación puede
alcanzar temperaturas elevadas: evitar tocarlo directamente con las manos.
Page 35

ESPAÑOL
En el caso de un funcionamiento
incorrecto
Problema: Controlar :
Falta de salida de café.
Si existe agua en el recipiente.
Si el filtro se encuentra obturando porque la mezcla es demasiado
fina o le café demasiado prensado.
Si el distribuidor de café está limpio.
La salida del café es demasiado rápida.
Si el café está molido demasiado grueso.
Si el café ha sido apretado con la prensita.
La bomba hace demasiado
ruido.
Si existe agua en el recipiente.
Que la caldera esté llena.
Si el café está molido demasiado grueso.
Excesiva pérdida de agua
del porta filtro.
Si el porta filtro ha sido colocado correctamente.
Si el empaque está sucio o gastado.
Si existen residuos de cafè en le borde del porta filtro.
El espresso tiene poca
“cremita”.
Si el café ha sido molido demasiado grueso.
Si el café ha sido apretado con la prensita.
Si el café es demasiado viejo o seco.
El café es demasiado frío. Si la máquina ha sido calentada (10 minutos).
Si el café ha sido molido demasiado grueso.
La leche no hace bastante
espuma
Si la boquilla vapor y/o orificio de toma de aire están obturados.
Si la leche está demasiado caliente.
Alarmas - Cuando la tecla que se está utilizando parpadea:
Tanque vacío
Falta de agua
Ruido de la bomba
Llenen el tanque y vuelvan a repetir la operación de llenado caldera.
Moledura demasiado fina Modifiquen la moledura
Filtro sucio Limpien la ducha (17)
Café demasiado comprimido Eviten comprimir de forma excesiva el café
• 35 •
Descalcificación:
En localidades donde exista agua particularmente calcárea, el funcionamiento de la máquina
resultará comprometido por este factor. Limpiar
cada mes aproximadamente (según el uso y
las características del agua) la máquina con
una solución de agua y descalcificador Gaggia
(seguir las instrucciones aquí presentadas).Extraer
el distribuidor (17) y limpiarlo.
Diluyan la solución antes de trasiegarla en el
tanque. Trasieguen la solución en el grupo su-
ministro café y en la tobera del vapor durante
unos segundos. Esperar 20 minutos y repetit la
operación hasta utilizar toda la solución. Enjuagar la máquina haciendo descurrir agua fría.
Volver a colocar el distribuidor (17).
N.B.: Daños debidos a la acumulación de su-
stancias calcáreas no están cubiertos por la
garantía. El usuario no deberá prestar ningún
otro servicio de manutención. Utilizar el descalcificador Gaggia para mejores resultados.
Page 36

NEDERLAND
• 36 •
Wij feliciteren u met uw keuze!
Dankzij dit Gaggia apparaat kunt u thuis
van een lekker kopje koffie of cappuccino
genieten.
De espresso wordt gemaakt door snel onder
druk staand en op de juiste temperatuur verwarmd water door de fijn gebrande koffie te
filtreren.
De kern van het apparaat bestaat uit een pomp
met hoge prestaties.
De doorstroming van het water wordt bediend
door een schakelaar.
WAARSCHUWING:
Het espresso-apparaat is alleen geschikt voor
huishoudelijk gebruik.
Al de servicewerkzaamheden of reparaties
behalve de reiniging en het normale onderhoud
moeten door een bevoegd Servicecentrum uitgevoerd worden.
1. Controleren of de spanning op het plaatje
overeenkomt met de spanning van het
stopcontact.
2. Nooit lauw of warm water gebruiken om het
apparaat mee te vullen. Alleen koud water
gebruiken.
3. De warme onderdelen van het apparaat en
de elektriciteitskabel tijdens de werking niet
aanraken.
4. Nooit reinigen met schuurmiddelen of scherp
gereedschap. Een met water bevochtigde
zachte doek is voldoende.
5. Ter voorkoming van kalkaanslag kan er
mineraalwater zonder koolzuur gebruikt
worden.
6. Het apparaat niet in water onderdompelen.
Bij het gebruik van elektrische huishoudelijke
apparaten is het raadzaam enkele voorzorgsmaatregelen in acht te nemen om het
gevaar voor brand, elektrische schokken
en/of ongelukken te beperken.
1. Aandachtig alle aanwijzingen en informatie
in deze gebruiksaanwijzing en in wat voor
andere brochure dan ook die zich in de verpakking mocht bevinden, doorlezen alvorens
het espresso-apparaat te gebruiken.
2. Geen hete oppervlakken aanraken.
3. De kabel, stekkers of het apparaat zelf niet
onderdompelen in water of andere vloeistof
ter voorkoming van brand, elektrische schokken of ongelukken.
4. Extra goed opletten als het apparaat gebruikt
wordt met kinderen in de buurt.
5. De stekker uit het stopcontact trekken als het apparaat niet gebruikt wordt of als het wordt schoongemaakt. Het apparaat laten afkoelen alvorens
onderdelen aan te brengen of te verwijderen en
alvorens het apparaat te reinigen
6. Het apparaat niet gebruiken als de kabel of
stekker beschadigd is of als het apparaat niet
goed werkt of kapot is. Het apparaat laten
controleren of repareren bij het dichtstbijzijnde servicecentrum.
7. Door het gebruik van niet door de fabrikant aangeraden accessoires kan er schade aan dingen of
letsel aan personen worden aangericht.
8. Het espresso-apparaat niet buiten gebruiken.
9. De kabel niet van de tafel laten hangen en niet met
hete oppervlakken in aanraking laten komen.
10.Het espresso-apparaat uit de buurt van warmtebronnen houden.
11.Controleren of het espresso-apparaat in de stand
“Uit” staat voor de stekker in het stopcontact te
steken. Om het uit te zetten, het op “Uit” zetten
en dan de stekker uit het stopcontact trekken.
12.Het apparaat alleen voor huishoudelijke
doeleinden gebruiken.
13.Uiterst goed opletten tijdens het gebruik van
de stoom.
14. Dit apparaat mag niet worden gebruikt door
mensen (waarmee ook kinderen worden bedoeld) met verminderde lichamelijke, gevoelsof geestelijke vermogens, of zonder ervaring
en kennis, tenzij ze zijn geïnstrueerd of hierbij
worden gecontroleerd door een persoon die
verantwoordelijk is voor hun veiligheid. Kinderen moeten in de gaten worden gehouden
om zich ervan te verzekeren dat ze niet met het
apparaat spelen. Er moet op worden gelet dat
kinderen niet met het apparaat spelen.
15. Deze gebruiksaanwijzing bewaren
BELANGRIJKE
VOORZORGSMAATREGELEN
Page 37

NEDERLAND
Voorbereiding van het Espressoapparaat:
1. Verwijder het deksel (22) en vul het waterreservoir met koud water tot aan de MAX
lijn. Kunt u ook het waterreservoir (26) eerst
verwijderen door het naar voren te schuiven
en nadien vullen.
N.B.: Vlakbij de aanduiding MAX op het
reservoir zit een beveiligingsgaatje tegen
het overstromen (27), voor het geval het
reservoir te vol is.
Het waterreservoir kan ook verwijderd
worden nadat het deksel van het reservoir
(22) verwijderd is en door het handvat te
gebruiken.
Plaats het reservoir gevuld met water terug
met de deksel (22) erop.
2. De stekker (19) in een geschikt stopcontact
steken (Zie “Waarschuwingen” punt 1)
3 Druk de hoofdschakelaar (1) in. Het lampje
voor het bereiken van de temperatuur (7)
gaat knipperen totdat de juiste temperatuur
bereikt is; als de temperatuur bereikt is blijft
het lampje branden.
De lampjes van de knoppen 2 - 3 - 5 - 6
knipperen niet (stand-by modus).
Beschrijving:
FIG. 01
1 Aan/uit-knop
2 Knop maken koffie 1 klein/ 2 klein
3 Knop maken koffie 1 groot/ 2 groot
4 Knop heet water
5 Lampje stoomafname
6 Knop instellen hoeveelheid/ handmatig
hoeveelheid bepalen
7 Signaleringslampje dat de juiste
temperatuur bereikt is
8 Stoompijp (verwijderbaar)
9 Filterdrager
10 Filter (1 kopje)
11 Filter (2 kopjes)
12 Bakje
13 Filter “Perfecte crème” (OPTIONEEL)
14 Koffieuitloopsysteem
15 Afdichting
16 Douchekophouder
17 Douchekop
18 Aandrukker
19 Elektriciteitskabel en -stekker
20 Koffiemaatje
21 Spuitmond
22 Deksel waterreservoir
23 Rooster (verwijderbaar)
24 Cappuccinomaker (OPTIONEEL)
25 Kraanknop voor stoom/warm water
26 Waterreservoir (verwijderbaar)
27 Gat voorkoming overstroming
28 Vingerafdrukvrij reinigingsmiddel voor rvs
29 Indicator bak vol
30 Filter voor koffietablet
Aanwijzingen over de
elektriciteitskabel
A Er wordt een nogal kort elektriciteitssnoer
geleverd om te voorkomen dat het in elkaar
draait of dat u erover kunt struikelen.
B Er kan een verlengsnoer gebruikt worden.
C Als u een verlengsnoer gebruikt, controleer dan:
1 of de spanning die op het verlengsnoer ver-
meld is minstens gelijk is aan de spanning
van het apparaat;
2 als het apparaat geaard is, moet de verlan-
gkabel een geaarde drieaderige kabel zijn, en
3 de verlengkabel moet zodanig worden
• 37 •
Inbedrijfstelling
Met deze procedure wordt de boiler met koud
water gevuld.
Er wordt aangeraden deze procedure telkens te
volgen als het apparaat voor de “eerste” maal
gebruikt wordt.
Dit apparaat gebruikt een pomp voor de uitgifte
van de koffie en wordt daarvoor automatisch
gevoed.
Zet een leeg kopje onder het stoompijpje (8),
druk op de knop voor heet water (4) en draai
de stoomhendel (25)naar rechts.
Nu is het geluid van de pomp hoorbaar die
op deze manier in werking is gesteld. Na
enkele seconden zal er water uit de stoomtuit
(7) komen.
neergelegd dat hij niet over het aanrecht
naar beneden hangt, waardoor kinderen
eraan kunnen trekken of erover kan worden
gestruikeld.
Page 38

NEDERLAND
Wat u moet weten
1 De smaak van de espresso hangt af van de
hoeveelheid en het type gebruikte koffie.
De bijzondere smaak van een koffieboon is
van verschillende factoren afhankelijk maar
de smaak en het aroma van de koffie zijn
het resultaat van het systeem waarmee de
koffiebonen gebrand worden.
De koffiebonen die langer en met hogere
temperaturen gebrand zijn, zijn donkerder.
Donkere koffiebonen geven meer aroma dan
lichte koffiebonen.
2 Op de markt treft u verschillende kwaliteiten
koffie aan. Elk type branding wordt gekenmerkt door een mengsel bij een bepaalde
temperatuur gebrande koffiebonen met
een bepaald aroma.Er bestaan cafeïnevrije
koffiesoorten met slechts 2% cafeïne. Probeer met uw espresso-apparaat één van
de verschillende beschikbare koffiesoorten
uit. Waarschijnlijk zult u een beter aroma
ontdekken ten opzichte van het aroma van
de tot nog toe gebruikte koffie.
• 38 •
3 Voor de espresso-apparaten met een pomp
moet fijn gemalen koffie gebruikt worden.
Koop dit soort koffie of laat dit soort koffie
malen. Gebruik bij voorkeur geen koffiemolen met messen omdat er dan te veel
koffiepoeder vrijkomt en er hiermee een
te onregelmatig koffiemengsel verkregen
wordt.
4 Een echt kopje espresso herkent u aan de
donkere kleur, de rijke smaak en de typische
“crème”.
5 Cappuccino is een speciale combinatie van
espresso koffie en opgeschuimde warme
melk. Kan geserveerd worden met wat
kaneel, nootmuskaat of cacao.
6 De espresso direct na het bereid te hebben
serveren.
7 De espresso in espressokopjes en de cap-
puccino in ontbijtkoppen serveren.
8 Het beste zou zijn de koffie net voor het
gebruik te malen. Vergeet niet dat de koffie
gemalen moet worden voor espresso-apparaten met pomp.
9 Er wordt aangeraden de gemalen of onge-
malen koffie in een hermetisch afgesloten
verpakking in de diepvries te bewaren. Gemalen koffie absorbeert makkelijk geuren.
Hoe maakt u een lekker kopje
espresso klaar
Programmazione delle dosi caffè.
Met dit apparaat van Gaggia kunnen twee
verschillende hoeveelheden water geprogrammeerd worden voor het zetten van een of twee
kopjes espresso.
Voor het instellen van de hoeveelheden water en
het opslaan in het geheugen, moeten eerst de
handelingen zoals beschreven in “HET ZETTEN
VAN ESPRESSO” op bladzijde 4, paragraaf
2, 3 en 4 voltooid te worden. Ga daarna als
volgt te werk:
1 Houd de programmeerknop (6) 3 seconden
ingedrukt totdat het lampje (6) begint te
knipperen.
Gelijktijdig gaan de symbolen van knoppen
2 – 3 branden.
2 Plaats het filter voor een kopje, druk op knop (2)
om de espresso in het kopje te laten lopen.
3 Druk opnieuw op dezelfde knop (2) als de
gewenste hoeveelheid voor een espresso in
het kopje zit.
Let op! Nooit de pomp aanzetten
zonder water in het reservoir ter
voorkoming van schade aan de pomp
zelf. Een onjuist gebruik van de pomp wordt
niet door de garantie gedekt.
Draai als het kopje vol is de stoomhendel (25)
dicht en druk opnieuw de heet water knop (4) in.
Dan is het Gaggia apparaat klaar voor het
gebruik.
N.B.: Het lampje voor het bereiken van de
juiste temperatuur (7) blijft automatisch aanen uitgaan tijdens de opwarmingsperiode.
Na het apparaat aangezet te hebben moet u
ongeveer 6 minuten wachten voor een ideale
opwarming alvorens het eerste kopje koffie
te maken. Voor de volgende kopjes koffie
staat het apparaat altijd klaar.
Nog een bijzondere eigenschap van dit apparaat is het antidrupsysteem waardoor het
meeste gedruppel van het uitloopsysteem (14)
vermeden wordt.
Na een kopje met koffie gevuld te hebben kan
dit evenwel iets druppelen door het natte koffiedik in de filterdrager.
Page 39

NEDERLAND
• 39 •
Het zetten van de espresso.
1 De procedure die in het hoofdstuk “Voor-
bereiding van het Espresso-apparaat” beschreven is volgen.
2 Kies het juiste filter (10 of 11) en plaats het
in de filterdrager (9).
Gebruik het kleine filter voor 1 kopje en het
grote filter voor 2 kopjes.
Plaats de filterhouder (9) in het apparaat en
wacht minstens 10 minuten.
3 Nadat het apparaat is opgewarmd, de filter-
drager (9) verwijderen en met behulp van het
koffiemaatje met gemalen koffie vullen.
Gebruik 1 maatje voor ieder kopje koffie.
Niet te veel vullen.
Aandrukken met het speciale aandrukkertje (18).
Niet te veel aandrukken.
4 Maak de rand van de filterdrager (9) schoon.
Plaats de filterdrager in het apparaat met
een beweging van 45° naar links.
Draai hem dan naar rechts om hem op zijn
plaats te blokkeren. De handgreep van de
filterdrager moet loodrecht op het apparaat
staan of iets naar rechts.
5 Zet één of twee kopjes onder de filterdrager.
Druk op de knop die overeenkomst met de
gewenste hoeveelheid water in het geheu-
gen. De koffie begint in de kopjes te lopen.
6 Het zetten van de espresso stopt automatisch
als het vooraf ingestelde niveau is bereikt
(zie Instellen van de hoeveelheid
espresso); het is ook mogelijk het proces te
onderbreken door nogmaals op de knop (2
of 3) te drukken die eerder al is ingedrukt.
Een lekker kopje koffie dat volgens de juiste
procedure bereid is moet bedekt zijn met de
typische bruine “crème”. Raadpleeg anders
“In geval van storingen”.
7 Pak de kopjes en serveer ze.
8 Om nog een kopje koffie te maken de filter-
drager langzaam en voorzichtig verwijderen
door hem naar links te draaien. Let erop u niet
te branden aan het water dat op het koffiedik
is achtergebleven. Er zal wat water blijven
druppelen na de filterdrager verwijderd te
hebben. Dit komt door de druk van het water
in het systeem. Verwijder het koffiedik uit het
filter. Om nog meer koffie klaar te maken de
punten van 2 tot 7 herhalen.
4 Vanaf dit moment zal de hoeveelheid water
toegekend aan knop (2) wordt opgeslagen
in het geheugen en gaat lampje onder de
knop uit.
5 Herhaal de handelingen van punten 3 en 4
om de hoeveelheid water voor knop (3) te
programmeren.
Iedere gebruiker kan zo zijn of haar eigen
voorkeuren programmeren door kleine of
grote waterhoeveelheden aan de knoppen
(2 en 3) toe te wijzen. De filters voor 1 of
voor 2 kopjes kunnen gebruikt worden.
6 Druk na het programmeren van deze
hoeveelheden opnieuw op de ‘MENU’-knop
(6) om de programmeerfunctie te verlaten.
De symbolen onder de knoppen gaan op-
nieuw om de beurt branden.
Het apparaat is gereed om de heerlijkste
espresso te zetten.
N.B.: voor het zetten van 1 kopje espresso een
keer de knop (2 of 3) indrukken; voor het
zetten van 2 kopjes espresso 2 keer achter
elkaar de knop (2 of 3) indrukken.
Voorinfusie
Bij de machine kan de dosering zodanig worden
afgesteld, dat de afgifte van de KOFFIEDOSES
vooraf wordt gegaan door pre-infusie.
Door op doseertoets (2) te drukken, wordt de
normale afgiftecyclus voorafgegaan door een
afgestelde korte straal water, die wordt gebruikt
om de koffiepad te bevochtigen, voordat de
echte afgifte begint.
Met deze functie wordt er beter gebruik gemaakt van de koffiepad.
Op doseertoets (3) is er geen pre-infusie
mogelijk.
N.B.: de machine is ingesteld met de pre-in-
fusie op ON. Mocht u deze functie willen
uitschakelen, dan kan dit door de machine
op de programmeerstand te zetten (zie
“Instellen van de hoeveelheid
espresso”) en op knop heet water (4)
te drukken. Het controlelampje dat eerst
brandde is nu uit.
Als het controlelampje van knop heet water
(4) brandt, betekent dit dat de pre-infusie
op ON staat, terwijl deze op OFF staat
als het uit is.
Page 40

NEDERLAND
• 40 •
Stoomontwikkeling/ Het maken
van cappuccino
De stoom kan worden gebruikt om de melk voor
de cappuccino te kloppen, maar ook voor het
verwarmen van dranken.
Let op! Gevaar voor verbrandingen!
Aan het begin van de distributie
kunnen zich kort warm waterspatten
voordoen. De distributiepijp kan hoge temperaturen bereiken: een direct contact met de
handen vermijden.
Stoompijp version
1 Als de machine klaar is om koffie te maken,
het stoompijpje boven het bakje (12) zetten,
het kraantje (25) “heet water/stoom” enkele
seconden opendraaien, zodat het achtergebleven uit het stoompijpje komt; na korte tijd
zal er alleen stoom uitkomen.
2 Draai het kraantje voor stoom/ heet water
(25) dicht.
3 Maak espresso klaar in grote koppen zoals
reeds gespecificeerd is.
4 Vul het kannetje dat u wilt gebruiken voor
het maken van cappuccino voor 1/3 met
koude melk.
BELANGRIJK: Voor het beste resultaat dienen
voor de bereiding van de cappuccino de
melk en het gebruikte kopje koud te zijn.
5 Steek het stoompijpje in de te verwarmen
melk en draai de hendel (25) open; beweeg
het kannetje langzaam op en neer van
beneden naar boven voor de gelijkmatige
vorming van het schuim (Fig. 03).
N.B.: Gelieve nooit de distributie langer dan
60 sekonden uit te voeren.
6 Draai na de gewenste tijd de stoomhendel
(25) dicht.
7 Dezelfde methode kan gebruikt worden voor
het verwarmen van andere dranken.
8 Maak na het gebruik het stoompijpje schoon
met een vochtige lap.
9 Om op de handmatige wijze koffie te zetten,
dient men de fasen te herhalen die in de punten van 2 tot 5 staan en vervolgens op toets
6 te drukken. Om de afgifte te onderbreken
(als de gewenste hoeveelheid bereikt is),
dient men opnieuw op toets 6 te drukken. Ga
vervolgens verder met de punten 6 en 7.
N.B.: Gelieve nooit de distributie langer
dan 40 sekonden uit te voeren.
Het gebruik van koffiepads
Gebruik uitsluitend het juiste filter (30) om de
koffiepads te gebruiken.
Verwijder de filterhouder (9) na het verwarmen
en doe de koffiepad erin. Verzeker u ervan
dat het papier van de koffiepad niet uit de
filterhouder steekt.
Breng de filterhouder met een beweging van
45° naar links in de machine aan.
Draai hem vervolgens naar rechts om hem op de
juiste stand vast te zetten. De handgreep van de
filterhouder moet zich loodrecht ten opzichte
van de machine, of lichtelijk naar rechts ver-
plaatst, bevinden.
Volg vervolgens de fasen “Het zetten van
de espresso” van 5 tot 7.
OPTIONEEL
Filter “Perfecte crème” (13)
Als de koffie niet perfect is gemalen, helpt het
“Filter Perfecte crème” bij het vormen
van het typische crèmelaagje op espressokoffie. Met het “Filter Perfecte crème” kunt u
met behulp van het maatje zowel één als twee
doses gemaalde koffie in het apparaat doen.
Voor een perfecte werking wordt aanbevolen
het “Filter Perfecte crème” dagelijks
voor het gebruik schoon te maken. Indien de
gaatjes verstopt zijn, wordt aangeraden het
“Filter Perfecte crème” enkele seconden
in kokend water onder te dompelen.
Page 41

NEDERLAND
• 41 •
Aanwijzingen voor de reiniging:
1 BELANGRIJK: Reinig de stoompijp na
hem in de melk ondergedompeld te hebben ter voorkoming dat de spuitmond en
de luchtopening verstopt raken en om de
melkafzetting aan de buitenkant niet hard
te laten worden.
Om het schoonmaken te vergemakkelijken
kan, zoals beschreven onder het punt “BESCHRIJVING” het buitenste deel van de
stoompijp makkelijk verwijderd worden door
het naar beneden te trekken.
Gebruik een vochtige doek om het uiteinde
van de stoompijp schoon te maken en open
de stoomknop.
Laat één of twee seconden stoom vrijkomen
om de stoompijp vrij te maken.
Maak de buitenkant van de stoompijp schoon.
Let goed op de stoom-
pijp niet aan te raken:
deze zou erg heet
kunnen zijn!
Luchtgat, zuiver en
vrij van overblijfsels te
houden
Gebruik, indien nodig, een naald om de opening voor de stoomstraal schoon te maken.
2 Maak de filterdrager en het filter met lauw
water regelmatig schoon.
3 Maak het hoofddeel van het apparaat met
een vochtige doek schoon.
N.B.: De machine is voorzien van een toe-
tsenbord dat wordt ingeschakeld als het
wordt aangeraakt, of door aan de gevoelige
gebieden te komen (toetsen 2, 3, 4, 6).
Het wordt daarom aangeraden de machine
tijdens de reiniging uit te schakelen om te voorkomen dat ze ongewenst wordt ingeschakeld.
4 Verwijder het bakje en het rooster (12, 23)
en mak ze schoon met water. Geen schuurmiddelen gebruiken.
5 Maak de afdichting (15) in het koffieuitloop-
systeem (14) schoon.
Deze schoonhouden.
6 Draai de douchekop (17) regelmatig, afhanke-
lijk van het gebruik, los en maak hem schoon.
7 Als de machine langere tijd niet gebruikt
wordt, dient het water uit het verwarmin-
gselement gehaald te worden door de
stoomhendel (25) naar rechts te draaien
totdat er geen water meer uitkomt. Draai
de stoomhendel (25) dicht door naar links te
draaien en zet de machine uit. Zet de pomp
nooit aan zonder water.
8 N.B.: Het is normaal dat een espresso-
apparaat af en toe stoom vrijlaat of water
druppelt daar de druk van het water tijdens
het gebruik verandert.
Vergeet niet het bakje (12) te legen.
Hoe maakt u heet water
Ga als de machine klaar is voor het maken van
espresso, als volgt te werk:
1 Druk de heet water knop (4) in, het lampje
van de knop gaat branden terwijl de lampjes
van de knoppen 2 - 3 - 5 - 6 uitgaan.
2 Zet een kopje en/of iets anders onder het
heet water/ stoompijpje.
3 Open langzaam, door naar rechts de
draaien, de heet water/ stoomhendel (25)
om het proces te starten. Gedurende het
gehele proces zal het lampje van de heet
water knop (4) knipperen (Fig. 03).
N.B.: Het is raadzaam de hendel maximaal
40 seconden open te houden.
4 Draai als de gewenste hoeveelheid heet water
in het kopje zit de hendel (25) naar links om
de toevoer te onderbreken.
5 De knop opnieuw indrukken (4); het appa-
raat funktioneert wederom normaal. Daarna
het kopje e/o de koffiekan verwijderen.
De lampjes van de knoppen 2 - 3 - 5 - 6
blijven branden.
Let op! Gevaar voor verbrandingen!
Aan het begin van de distributie
kunnen zich kort warm waterspatten
voordoen. De distributiepijp kan hoge temperaturen bereiken: een direct contact met de
handen vermijden.
Page 42

NEDERLAND
In geval van storingen
Probleem: Controleren:
Er komt geen koffie uit het
apparaat.
Of er water in het reservoir zit.
Of het filter niet verstopt is door te fijn gemalen koffie of doordat
de koffie te veel is aangedrukt.
Of de douchekop schoon is.
De koffie loopt te snel uit het
apparaat.
Of de koffie niet te grof gemalen is.
Of de koffie wel met de aandrukker aangedrukt is.
De pomp maakt te veel
lawaai.
Of er water in het reservoir zit.
Of de pomp gevoed is.
Of de koffie niet te grof gemalen is.
Er lekt te veel water uit de
filterdrager.
Of de filterdrager goed is aangebracht.
Of de afdichting niet vuil of versleten is.
Of er geen koffieresten op de rand van de filterdrager aanwezig zijn.
De espresso heeft weinig
“crème”.
Of de koffie niet te grof gemalen is.
Of de koffie wel met de aandrukker aangedrukt is.
Of de koffie niet te oud of droog is.
De koffie is te koud.
Of het apparaat opgewarmd is (10 minuten).
Of de koffie niet te grof gemalen is.
De melk wordt niet voldoende opgeschuimd.
Of de stoomspuitmond en/of luchtopening niet verstopt zijn.
Of de melk niet te warm is.
Oplossen van problemen - Als de knop die u gebruikt gaat knipperen:
Leeg reservoir
De pomp maakt lawaai
Het water is op
Vul het reservoir en herhaal de handeling om het apparaat opnieuw
te vullen.
Een te fijne maling Pas de maling aan
Het filter is vuil Maak het filter (17) schoon
De koffie is te hard aangedrukt Zorg ervoor dat u de koffie niet te hard aandrukt
• 42 •
Ontkalken:
Op plaatsen waar het water erg kalkrijk is, wordt
de werking van het apparaat hierdoor beïnvloed.
Maak ongeveer om de twee maanden (afhankelijk van het gebruik en van de eigenschappen van
het water) het apparaat schoon met de speciale
Gaggia ontkalker (volg de aanwijzingen die
hierop vermeld zijn).
Verwijder de douchekop (17) en maak hem
schoon.
Verdun de oplossing eerst alvorens het in het reservoir te gieten. Laat de oplossing enkele seconden door het apparaat en de stoomtuit stromen.
Wacht 20 minuten en herhaal dan de handeling tot de hele oplossing gebruikt is. Spoel
het apparaat door met koud water. Plaats de
douchekop (17) weer.
N.B.: Storingen veroorzaakt door kalkaanslag
zijn niet gedekt door de garantie. De gebruiker
mag geen enkel ander onderhoud aan het apparaat verrichten. Gebruik de Gaggia ontkalker
voor de beste resultaten.
Page 43

PORTUGAL
• 43 •
Agradecemos pela escolha
Com esta maquina torna-se possível apreciar
um gostoso café ou cappuccino na sua casa.
O espresso vem preparado fazendo filtar
rapidamente água sob pressão e aquecida à
temperatura correta com uma mistura finemente
tostada.
Uma bomba de alta prestação constitue o
coração da maquina espresso.
O fluxo da água vem comandado por um
interruptor.
ADVERTENCIA:
A maquina espresso foi estudada exclusivamente
para o uso domestico.
Qualquer intervenção de assistencia ou conserto
exceto as operações de limpeza e normal manutenção, deve ser efetuada por pessoal tecnico
autorizado.
1. Controlar que a voltagem indicada na etiqueta corresponda à sua.
2. Nunca utilizar água morna ou quente para
encher o tanque da água. Usar somente
água fria.
3. Não mexer com as mãos as partes quentes
da maquina e o cabo de alimentação durante o funcionamento.
4. Não utilizar detergentes corrosivos ou
apetrechos que podem provocar riscos. E’
suficiente um pano macio molhado com
água.
5. Utilizar água mineral natural para impedir
a formação de calcário.
6. Não mergulhar a maquina na água.
PRECAUÇÕES
IMPORTANTES
Durante o utilizo dos eletrodomesticos é
aconselhavel tomar algumas precauções
para limitar a possibilidade de incendios,
choques elétricos e/ou acidentes.
1 Ler atentamente as instruções e informações
deste manual e de outros folhetos contidos
na embalagem antes de utilizar e acionar
a maquina espresso.
2 Não tocar as superficies quentes.
3 Não imerger cabo, tomadas ou corpo da
maquina em água ou outro liquido para evi-
tar incendios, choques elétricos ou acidentes.
4 Prestar particular atenção quando se utiliza
a maquina em presencia de crianças.
5 Tirar a tomada quando a maquina não vem
utilizada ou durante as operações de limpeza.
Deixá-la esfriar antes de inserir a tomada ou de
remover as peças e antes de efetuar a limpeza.
6 Não utilizar a maquina com cabo ou to-
mada estragados ou em caso de avaria ou
rupturas. Neste caso enviar a maquina para
um centro de assistencia especializado.
7 O utilizo de peças não originais pode causar
danos à coisas ou pessoas.
8 Não utilizar a maquina em lugares abertos.
9 Não deixar que o cabo pendure da mesa
ou toque as superficies quentes.
10 Por a maquina longe das fontes de calor.
11 Controlar que a maquina esteja em po-
sição “Desligado” antes de introduzir
a tomada. Para apagá-la, posicionar no
“Desligado” e desligar a tomada.
12 Utilizar a maquina só para uso domestico.
13 Prestar particular atenção durante o uso
do vapor.
14 Este aparelho não deve ser utilizado por
pessoas (inclusive crianças) com reduzidas
capacidades físicas, sensórias ou mentais
ou por pessoas sem experiência e conhe-
cimento, a menos que não tenham sido
instruídas ou sejam supervisionadas por
uma pessoa responsável por sua segurança.
Deve-se supervisionar as crianças para que
não brinquem com o aparelho. As crianças
deverão ser supervisionadas para que não
brinquem com o aparelho.
15 Guardar estas instruções
Page 44

PORTUGAL
Preparação da maquina para café
Espresso:
1. Retirar a tampa do reservatório de água (22)
e enché-lo de água fria até á marca MAX
do reservatótio (26). Ver FIG. 02
Nota: Próximo à frase MAX no reservatório
está o furo de segurança anti-inundação
(27), para eventual excesso de enchimento
do reservatório.
É possível também remover o reservatório
de água, após ter removido a tampa do
reservatório (22) e utilizando a manivela.
Posicionar novamente o reservatório com a
água e a tampa (22).
2. Introduzir a tomada (19) num ponto apro-
priado (Cfr.”Advertencia ponto 1)
3 Pressionar o interruptor principal (1). O
botão de atingimento da temperatura (7) irá
piscar até atingir a temperatura; quando a
temperatura for alcançada o botão perma-
necerá aceso.
Os botões das teclas 2 - 3 - 5 - 6 se acen-
derão fixos (modalidade stand-by).
Por em funcionamento
Este è o processo para o enchimento do tanque
com água fria.
Aconselhamos seguir estas indicações cada vez
que a maquina vem utilizada pela “primeira”
vez.
Utilizando uma bomba para a distribuição do
café, esta maquina é dotada de um sistema
autopuxante.
Colocar uma xícara vazia embaixo do bico de
vapor (8), pressionar a tecla de água quente (4) e
rodar a manivela de vapor (25) no sentido horário.
Será possível escutar o som da bomba assim
ativada e depois de alguns segundos a água
começará a descer do bico do vapor (8).
Após ter deixado encher a xícara, fechar o bico
de vapor (25) e apertar novamente a tecla de
água quente(4).
A maquina Gaggia está assim pronta para o uso.
DESCRIÇÃO
FIG. 01
1 Interruptor principal
2 Tecla de distribuição de café 1
expresso/2 expressos
3 Tecla de distribuição de café 1
expresso/2 expressos
4 Tecla de retirada de água quente
5 Botão de retirada de vapor
6 Tecla de programação de doses/
distribuição manual
7
Lâmpada de controle da temperatura correta
8 Biquinho vapor (extraível)
9 Portafiltro
10 Filtro (1 xícara)
11 Filtro (2 xícaras)
12 Recipiente
13 Filtro “creme perfeito” (OPCIONAL)
14 Grupo distribuidor café
15 Vedação da copa
16 Porta ducha
17 Ducha
18 Espatula para comprir o café
19 Cabo e tomada alimentação
20 Medidor
21 Biquinho distribuidor
22 Tampa de reservatório
23 Grelha (removível)
24 Kit Cappuccino (OPCIONAL)
25 Manopula vapor/água quente
26 Tanque água (extraível)
27 Furo anti inundação
28 Limpador de aço inox contra marcas
29 Indicador de recipiente cheio
30 Filtro pastilha de café
Instruços sobre o cabo eletrico
A O cabo eletrico fornecido é curto para fa-
cilitar o uso e para impedir que prenda-se
em outros objetos.
B Podem ser utilizados prolongamentos mas
prestando muito cuidado.
C Se utilizar um prolongamento controlar:
1 que a voltagem do prolongamento seja igual
à do eletrodomestico.
2 Se o aparelho for dotado de ligação à terra,
a extensão deverá ser feita com um cabo de
3 fios adequado para a ligação à terra e
• 44 •
3 o cabo mais longo deverá ser posicionado
de modo que não fique entrelaçado na parte
superior da consola para evitar que seja pu-
xado por crianças ou que se possa tropeçar.
Page 45

PORTUGAL
O que se deve saber
1 O sabor do espresso depende da quantida-
de e do tipo de café utilizado.
O particular sabor depende de muitos fato-
res mas o gosto e o aroma são o resultado
do processo de tostagem
Quanto mais tempo o café vem tostado e
quanto mais alta é a temperatura quanto
mais o café apresenta uma côr escura. Os
mais aromaticos são os cafés mais escu-
ros.
2 Existem no mercado muitas qualidades de
café. Cada tipo de tostagem vem carateri-
zado por uma mistura de graos tostados
com uma temperatura particular e com um
particular aroma.
Existem decafeinados com o 2% somente
de cafeina. Aconselhamos esperimentar um
dos vários tipos de café vendidos. E’ possível
assim descubrir o aroma mais agradavel.
3 As maquinas espresso de bomba precisam
de uma mistura muito fina. Na hora de
comprar o café pedir este tipo de mistura.
Se desejar moer o café em casa é melhor
• 45 •
utilizar um moedor de molas que um de
lámina porqué produz muito pó de café e
uma mistura irregular.
4 O verdadeiro espresso é reconhecível pela
cor escura, o gosto rico e o tipico “creme”.
5 O cappuccino é uma combinação de café
espresso e leite quente emulsionado.
Pode ser servido com uma pulverização de
canela, noz moscada ou cacau.
6 Servir o café imediatamente depois da
preparação.
7 Servir o café espresso em xícaras de café e
o cappuccino em xícaras maiores.
8 Seria bom moer o café imediatamente antes
do uso. Não esquecer que deve ser moido
para a maquina espresso de bomba.
9 E’ bom conservar o café moido ou em graos
em jarras hermeticas no freezer. O café
moido absorbe facilmente os cheiros.
Como prepar um bom Espresso
Programação das doses de café.
Com esta máquina Gaggia é possível programar duas doses diferentes de água para obter
uma ou duas xícaras de café.
Para regular as doses de água e para poder
memorizá-las para uma distribuição sucessiva,
seguir antes o procedimento de “PREPARAÇÃO
DO CAFÉ” à pag.4, parágrafos 2-3-4, depois
agir da seguinte maneira:
1 Apertar a tecla de programação (6) durante
3 segundos até quando o botão (6) começar
a piscar.
Simultaneamente se iluminam os símbolos
das teclas 2 - 3.
2 Introduzido o filtro para uma xícara, pres-
sionar a tecla (2) deixando defluir o café.
3 Pressionar novamente a mesma tecla (2) até
obter a dose desejada ideal para um café.
4 Neste ponto, a dose de água programada,
para um café, na tecla (2) será memorizada e a espia localizada embaixo da tecla
apagará.
N.B.: A espia da temperatura correta (7) con-
tinuarà a ligar-se e desligar-se automatica-
mente durante a fase de aquecimento. Depois
de ter ligado a maquina, para o primeiro
café, esperar mais ou menos 6 minutos para
o aquecimento ideal, para os sucessivos cafés
a maquina estarà sempre pronta
Outra importante carateristica é o sistema
ante-esgotamento que elimina quase todo o
problema do grupo distribuidor (14).
Depois da distribuição do café é possível que
se verifique um leve gotamento por causa
dos fundos de café molhados que estão no
portafiltro.
Atenção! Nunca acionar a bomba
sem água no tanque. Isto poderia
provocar danos à bomba. O utilizo
não correto da bomba não está previsto na
garantia.
Page 46

PORTUGAL
• 46 •
Preparação do café.
1 Seguir o processo descrito no capitulo
“Preparação da maquina para café
Espresso”.
2 Escolher o filtro correto (10 ou 11) e intro-
duzi-lo no portafiltro (9).
Utilizar o filtro pequeno para 1 xícara e o
grande para 2 xícaras.
Introduzir então o porta-filtro (9) na máqui-
na e esperar ao menos 10 minutos.
3 Depois do aquecimento, tirar o portafiltro
(9) e enché-lo com café moido utilizando o
medidor.
Considerar um medidor por cada xícara de café.
Não encher demais.
Premer com o pressino (18). Não premer
demais.
4 Limpar a borda do portafiltro (9) de eventuais
residuos de café. Introduzir o portafiltro na
maquina com um movimento de 45° à esquerda.
Virar depois à direita para blocá-lo em
posição. A alavanca do portafiltro deve
estar em posição perpendicular à maquina
ou levemente à direita.
5 Por uma ou duas xícaras debaixo do portafil-
tro. Pressionar a tecla correspondente à dose
de café memorizada. O café começa sair.
6 A distribuição do café será interrompida au-
tomaticamente quando será atingido o nível
pré determinado (ver Programação das
doses de café); de qualquer maneira é
possível interromper a distribuição do café
apertando a tecla (2 ou 3) anteriormente
selecionada.
Um bom café preparado segundo as
instruções apresentarà o tipico creme marrom. Em caso contrario consultar “Em
caso de malfuncionamento”.
7 Tirar as xicaras e servir.
5 Repetir as passagens nos ponto 3 e 4 para
programar a dose de água para a tecla
(3).
Cada usuário será livre para programar as
doses para obter um café mais ou menos
forte e de associar doses menores ou maiores às teclas(2 e 3),para utilizar o filtro de
1 ou 2 xícaras.
6 Depois da memorização destas
doses,pressionar novamente a tecla(6)
“MENU”, para sair da função de
programação.
Os símbolos, localizados sob as teclas,
recomeçarão a acenderem-se alternativamente.
A máquina está pronta para obter a distri-
buição de ótimos cafés.
N.B.: para distribuir o café apertar uma só vez
a tecla (2 ou 3); para distribuir o café apertar 2 vezes em seguida a tecla (2 ou 3).
Pre-infusão
A máquina permite configurar a dosagem de
modo que a dose de CAFÉ, antes de sair, passe
por processo de pré infusão.
Acionando o interruptor da dose (botão 2),
o ciclo normal de saída é precedido por um
breve jato de água temporizado, utilizado
para umedecer a pastilha de café antes da
saída do mesmo.
Esta função permite um maior desfrute da
pastilha de café.
A Pré-infusão não está disponível no interruptor (botão 3).
N.B.: A máquina encontra-se regulada com
pré infusão na modalidade ON; caso desejar desativar esta função, será necessário
entrar na modalidade de programação (ver
“programação de doses de café”) e
acionar o interruptor de retirada de água
quente (botão 4). O sinal luminoso do interruptor, que anteriormente se encontrava
ligado, irá desligar-se.
Quando o sinal luminoso do interruptor de
retirada de água quente (botão 4) estiver
ligado, a pré-infusão se encontrará na
modalidade ON, quando estiver desligado
a pré-infusão se encontrará na modalidade
OFF.
Page 47

PORTUGAL
• 47 •
Atenção! Perigo de queimaduras!
No início da emissão podem verificar-
se pequenos jactos de água quente. O
tubo distribuidor pode alcançar temperaturas
elevadas: evitar tocá-lo directamente com
as mãos.
Versão biquinho vapor
1 Com a máquina pronta para distribuir café,
dirigir o tubo de vapor acima da bacia (12),
abrir a manivela torneira (25) “Água quente/vapor” por alguns instantes, de forma a
fazer sair a água residual do tubo de vapor;
em pouco tempo começará a sair somente
vapor.
2 Fechar a manivela torneira vapor/água
quente (25).
3 Preparar o espresso em xicaras grandes
como jà indicado.
Encher com leite frio 1/3 do recipiente que
se deseja utilizar para preparar o cappuccino.
IMPORTANTE: Para garantir um resultado
melhor na preparação do cappuccino, o
leite e a xícara utilizada devem ser frios.
5 Colocar o tubo de vapor no leite a ser
esquentado e abrir a manivela da torneira
(25); fazer girar o recipiente com movimentos lentos de baixo para cima para tornar
uniforme a formação de espuma (Fig. 03).
N.B.: Aconselha-se uma distribuição máxima
de 60 segundos.
6 Após ter utilizado o vapor durante o tempo
desejado, fechar a manivela torneira (25).
7 O mesmo sistema pode ser utilizado para
o aquecimento de outras bebidas.
8 Limpar depois desta operação o tubo de
vapor com um pano úmido.
Distribuição de vapor/
Preparação do cappuccino
O vapor pode ser utilizado para bater o leite
para o cappuccino, mas também para o aquecimento de bebidas.
8 Preparar outro café, tirar lentamente e com
cuidado o portafiltro mexendo-o à esquerda.
Prestar atenção a não queimar-se com a
água nos fundos de café. Uma vez tirado
o portafiltro continua a sair um pouco de
agua. Isto por causa da pressão da água no
sistema. Tirar os fundos do filtro. Para prepar
outro café, repetir as fases de 2 até 7.
9 Para preparar um café na modalidade ma-
nual, repetir as etapas indicadas nos tópicos
de 2 a 5 e, em seguida, carregar na tecla
6. Ao alcançar a dose desejada carregar
novamente na tecla 6 para interromper o
fornecimento. Prosseguir conforme indicado
nos tópicos 6 e 7.
N.B.: Aconselha-se uma distribuição máxima de 40 segundos.
Como utilizar café em pastilha
Ao usar sachês, utilizar exclusivamente o filtro
correto (30).
Após o aquecimento, retirar o porta-filtro (9) e
inserir o sachê; certificar-se para que o papel
do sachê não saia do porta-filtro.
Inserir o porta-filtro na máquina fazendo um
movimento de 45° para a esquerda.
Girar, então, para a direita, bloqueando-o na
posição. A asa do porta-filtro deverá encontrarse em posição perpendicular à máquina, ou
levemente deslocada para a direita.
Em seguida, passar para as fases seguintes, de
5 a 7: “Preparação do café”.
OPTIONAL
Filtro “creme perfeito” (13)
Quando a moagem do café não é correcta, o
uso do “filtro creme perfeito” favorece a
produção do creme típico do café expresso.
Com o “filtro creme perfeito” é possível
inserir uma ou duas doses de café moído,
utilizando seu medidor exclusivo.
Para um funcionamento perfeito, recomendamos limpar o “filtro creme perfeito” diariamente, antes do uso. Em caso de obstrução
dos orifícios de passagem, aconselhamos
mergulhar o “filtro creme perfeito” em
água fervente durante alguns segundos.
Page 48

PORTUGAL
• 48 •
Instruções para a limpeza:
1. IMPORTANTE: Limpar o biquinho do
vapor depois da imersão no leite para
evitar de obstruir o biquinho e o furo do ar
e para não endurecer os depositos de leite
externos.
Para facilitar a operação de limpeza,
como indicado em, “DESCRIÇÃO” a parte
externa do biquinho é facilmente removível
tirando-a para baixo.
Utilizar um pano humido para limpar a
extremidade do biquinho e abrir a valvula
de distribuição vapor.
Deixar sair o vapor por um ou dois segundos
para limpar o biquinho.
Prestar atenção a não
tocar o biquinho vapor:
poderia ser muito
quente!
Entrada do ar que deve
ser mantida limpa e
livre de resíduos
Limpar o externo do biquinho vapor.
Se for necessário utilizar um alfinete para
limpar o furo do jato de vapor.
2. Limpar o portafiltro e o filtro com água
morna e com regularidade.
3 Limpar o corpo maquina com um pano humido.
N.B.: A máquina è munida de um teclado que
se activa após ser levemente tocado nas
zonas sensíveis (teclas 2,3,4,6).
Por este motivo, recomenda-se desligar a
máquina durante as operações de limpeza
para evitar accionamentos acidentais.
4 Extrair a bacia e a grelha (12, 23) e lavá-las
com água. Não usar abrasivos.
5 Limpar a vedação (15) no interno do grupo
de distribuição café (14).
Manté-la limpa.
6 Soltar e limpar periodicamente, em relação
à frequencia de uso, a ducha (17)
7 Se a máquina não for utilizada durante
longos períodos, descarregar a água na
caldeira rodando em sentido horário a
manivela de vapor(25) até o esgotamento.
Fechar a manivela de vapor (25) girando-a
no sentido anti-horário e desligar a máquina.Não acionar nunca a bomba sem água.
8 N.B.: E’ normal que uma maquina deixe
sair vapor ou gotas de água de tanto em
tanto porque a pressão da água muda
durante o uso.
Não esquecer de esvaziar o recipiente (12)
Como preparar água quente
Com a máquina pronta para distribuir café,
proceder da seguinte forma:
1 Pressionar a tecla de distribuição de água
quente(4),o botão da tecla acenderá enquanto os botões das teclas 2 - 3 - 5 - 6 se apagarão.
2 Colocar uma xícara e/ou um recipiente em-
baixo do tubo de água quente/vapor.
3 Abrir lentamente, em sentido horário, a ma-
nivela torneira de vapor de água quente(25)
para permitir a distribuição. Durante a
distribuição o botão da tecla de distribuição
de água quente (4) piscará durante toda a
duração da distribuição (Fig. 03).
N.B.: Aconselha-se uma distribuição máxima
de 40 segundos.
4 Retirar a quantidade desejada de água
quente; para interromper a distribuição de
água quente, girar em sentido anti-horário
a manivela(25).
5 Pressionar novamente a tecla (4); a máqui-
na se coloca no modo de funcionamento
normal. Remover então a xícara e/ou o
recipiente.
Os botões das teclas 2 - 3 - 5 - 6 se acen-
derão fixos.
Atenção! Perigo de queimaduras!
No início da emissão podem verificar-
se pequenos jactos de água quente. O
tubo distribuidor pode alcançar temperaturas
elevadas: evitar tocá-lo directamente com
as mãos.
Page 49

PORTUGAL
Em caso de malfuncionamento
Problema Controlar
Falta distribuição café Que haja água no tanque.
Que o filtro não esteja obstruido porque a mistura é
fina demais
ou o café pressado demais.
Que a ducha esteja limpa.
A distribuição do café é
rapida demais.
Que o café não seja moida grossa demais
Que o café seja comprimido com a espatula
A bomba faz muito barulho Que haja água no tanque.
Que a bomba esteja acionada
Que o café não seja moido grosso demais
Excessiva perda de água
do portafiltro
Que o portafiltro seja inserido corretamente
Que a vedação não seja suja ou consumida
Que não hajam residuos de café na borda do portafiltro.
O espresso tem pouco
“creme”
Que o café não seja moido grosso demais
Que o café seja comprimido com a espatula
Que o café não seja velho ou seco demais
O café é frio demais Que a maquina não seja aquecida (10 min)
Que o café não seja moido grosso demais
O leite não vem emulsionado
suficientemente
Que o biquinho vapor e/ou furo de ar não estejam
obturados.
Que o leite não esteja quente demais.
Alarmes - Quando a tecla que está sendo utilizada lampeja:
Reservatório vazio
Remover a bomba
Falta de água
Abastecer o reservatório e repetir os procedimentos de abastecimento da caldeira
Moagem muito fina Modificar a moagem
Filtro sujo Limpar a duchinha (17)
Café muito prensado Evitar prensar em modo excessivo o café
• 49 •
Decalcificação:
Em lugares com água particularmente calcarea,
o funcionamento da maquina pode ser comprometido. Limpar cada dois meses aproximadamente (segundo o uso e as carateristicas da
água) a maquina com o aposito decalcificador
Gaggia (seguir as instruções). Extrair a ducha
(17) e limpá-la.
Diluir a solução antes de colocá-la no reservatório. Colocar a solução no grupo de
distribuição do café e no conduto do vapor,
por alguns segundos.
Atender 20 minutos e repetir a operação até utilizar
toda a solução. Enxaguar a maquina deixando
fluir a água fria. Recolocar a ducha (17).
N.B.: Avarias devidas ao acumulo de calcário
não estão contemplados pela garantia. O
usuario não deve efetuar nenhum serviço de
manutenção. Utilizar o decalcificador Gaggia
para obter os melhores resultados
Page 50

Istruzioni per il trattamento a fine vita
Instructions for end-of-life disposal treatment
Hinweise für die Behandlung bei Außerbetriebnahme
Instructions pour le traitement de fin de vie utile
Instrucciones para el tratamiento al final de vida útil
Instruções para o tratamento em fim de vida útil
Instructies voor de behandeling aan het einde van de levensduur
INFORMAZIONE AGLI UTENTI
ai sensi dell’art. 13 del De-
creto Legislativo 25 luglio
2005, n. 151”Attuazione
delle Direttive 2002/95/CE,
2002/96/CE e 2003/108/CE,
relative alla riduzione dell’uso di sostanze pericolose
nelle apparecchiature elettriche ed elettroniche, nonché
allo smaltimento dei rifiuti”.
Il simbolo del cassonetto barrato
riportato sull’apparecchiatura o sulla
sua confezione indica che il prodotto
alla fine della propria vita utile deve
essere raccolto separatamente dagli
altri rifiuti. L’utente dovrà, pertanto,
conferire l’apparecchiatura giunta a
fine vita agli idonei centri di raccolta
differenziata dei rifiuti elettronici ed
elettrotecnici, oppure riconsegnarla
al rivenditore al momento dell’acquisto di una nuova apparecchiatura
di tipo equivalente, in ragione di
uno a uno. L’adeguata raccolta
differenziata per l’avvio successivo
dell’apparecchiatura dismessa al
riciclaggio, al trattamento e allo
smaltimento ambientalmente compatibile contribuisce ad evitare
possibili effetti negativi sull’ambiente
e sulla salute e favorisce il reimpiego e/o riciclo dei materiali di
cui è composta l’apparecchiatura.
Lo smaltimento abusivo del prodotto
da parte dell’utente comporta l’applicazione delle sanzioni amministrative previste dalla normativa vigente.
This product complies with
EU Directive 2002/96/EC.
The symbol
on the product
or on its packaging indicates that
this product may not be treated as
household waste. Instead it shall
be handed over to the applicable
collection point for the recycling of
electrical and electronic equipment.
By ensuring this product is disposed
of correctly, you will help prevent
potential negative consequences
for the environment and human
health, which could otherwise be
caused by inappropriate waste
handling of this product. For more
detailed information about recycling
of this product, please contact your
local city office, your household
waste disposal service or the shop
where you purchased the product.
Dieses Produkt entspricht der
EU-Richtlinie 2002/96/EG
Das Symbol
auf dem
Produkt oder seiner Verpackung
weist darauf hin, dass das Produkt
nicht als normaler Haushaltsabfall
zu behandeln ist, sondern an einem
Sammelpunkt für das Recycling
von elektrischen und elektronischen
Geräten abgegeben werden muss.
Durch Ihren Beitrag zum korrekten
Entsorgen dieses Produkts schützen
Sie die Umwelt und die Gesundheit
Ihrer Mitmenschen.
Umwelt und Gesundheit werden
durch falsches Entsorgen gefährdet.
Weitere Informationen über das
Recycling dieses Produkts erhalten
Sie von Ihrer Gemeinde, der Müllabfuhr oder dem Geschäft, in dem
Sie das Produkt gekauft haben.
L’ appareil est en conçu et fabriqué pour
faciliter sa valorisation, son recyclage
ou sa réutilisation conformément à la
directive européenne 2002/96/CEE
relative aux appareils électriques et
électroniques usagés (waste electrical
and electronic equipment - WEEE).
Le logo
ci-contre apposé
sur l’appareil indique que ce produit ne peut pas être éliminé avec
les déchets ménagers non triés.
Lorsque vous aurez décidé de vous en
séparer définitivement, il convient de
faire procéder à la collecte sélective
de cet appareil en vous conformant
au mode de reprise mis en place dans
votre commune (collecte ponctuelle des
encombrants, déchèterie), ou en
aisant appel au service de reprise proposé par votre distributeur, ou bien, en le confiant à des
organisations caritatives et des
associations à but non lucratif.
En vous assurant que ce produit est
éliminé correctement, vous favori-
sez la prévention des conséquences
négatives pour l’environnement et
la santé humaine.
Page 51

Este producto cumple con la Directiva
EU2002/96/EC.
El simbolo
en el producto
o en su empaque indica que este
producto no se puede tratar como
desperdicios normales del hogar.
Este producto se debe entregar al
punto de recolección de equipos elé-
ctricos y electrónicos para reciclaje.
Al asegurarse de que este pro-
ducto se deseche correctamente,
usted ayudará a evitar posibles
consecuencias negativas para el
ambiente y la salud pública, lo cual
podria acurrir si este producto no
se manipula de forma adecuada.
Para abtener información más
detallada sobre el reciclaje de este
producto, póngase en contacto con la
administración de su ciudad, con su
servicio de desechos del hogar o con
la tienda donde compró el producto.
Este produto está conforme a directiva
EU 2002/96/EC.
O simbolo
impresso no
produto ou na sua embalagem indica que este produto não se pode
tratar como lixo doméstico normal.
Este produto deve ser entregue num
ponto de recolha de equipamentos
eléctricos e electrónicos para reci-
clagem. Ao assegurar-se que este
produto é eliminado correctamente,
estará a ajudar a evitar possiveis
consequências negativas para o
ambiente e saúde pública que resultariam se este produto não fosse
manipulado de forma adquada.
Para obter informações mais detalhadas sobre a reciclagem deste produto, por favor contacte o gabinete da
câmara municipal da sua cidade
ou a loja onde comprou o produto.
Dit product voldoet aan de
EU-richtlijn 2002/96/EG.
Het symbool
op het product of op verpakking wijst erop
dat dit product niet als huishoudafval mag worden behandeld.
Het moet echter naar een plaats
worden gebracht waar elektrische
en elektronische apparatuur worden
gerecycled.
Als u ervoor zorgt dat dit product
op de correcte manier wordt verwijderd, voorkomt u mogelijk voor
het milieu negatieve gevolgen die
zich zouden kunnen voordoen in
geval van verkeerde afvalbehandeling. Voor meer details in verband
met het recyclen van dit product,
neemt u het best contact op met de
gemeentelijke instanties, het bedrijf
of de dienst belast met de verwijdering van huishoudafval of de winkel
waar u het product hebt gekocht.
 Loading...