

Gaggenau VG425111F/01 Instructions for Use

Instruction manual
Instrucciones de uso
Instruções de serviço
Οδηγíες χρήσεω
VG 425
Gas cooktop
Encimera a gas
Placa de fogão a gás
Βάση εστιών αερíου

Table of contents 3
Índice 16
Índice 30
Πίνακας περιεχομένων 43
2
Table of contents
Instruction manual
Intended use 4
Important safety information 5
Causes of damage 7
Environmental protection 7
Saving energy 7
Environmentally-friendly disposal 7
Familiarising yourself with your appliance 8
Gas hob 8
Control knob 8
Visual signals of the luminous disc 8
Individual parts of the burners 9
en
Operating the appliance 9
Switching on 9
Simmer setting 10
Electronic flame monitoring and automatic
re-ignition 10
Switching off 10
Residual heat indicator 10
Safety shut-off 10
Table of settings and tips 11
Tips for cooking and roasting 11
Information and tips regarding cookware 11
Suitable cooking vessels 11
Precautions for use 11
Cleaning and maintenance 12
Cleaning the appliance 12
Burnt-on dirt 13
Burner discolouration 13
Trouble shooting 14
Demo mode 15
After-sales service 15
E number and FD number 15
Additional information on products, accessories,
replacement parts and services can be found at
www.gaggenau.com and in the online shop
www.gaggenau.com/zz/store
3

en Intended use
Intended use
Intended use
Read these instructions carefully. Only then
will you be able to operate your appliance
safely and correctly. Retain the instruction
manual and installation instructions for future
use or for subsequent owners.
This appliance is only intended to be fully fitted
in a kitchen. Observe the special installation
instructions.
This appliance must be installed according to
the installation instructions included.
Check the appliance for damage after
unpacking it. Do not connect the appliance if it
has been damaged in transport.
Only allow a licensed professional to connect
the appliance. Damage caused by incorrect
connection is not covered under warranty. Call
the after-sales service if you want to convert
your appliance to a different type of gas.
This appliance may be used by children over
the age of 8 years old and by persons with
reduced physical, sensory or mental
capabilities or by persons with a lack of
experience or knowledge if they are supervised
or are instructed by a person responsible for
their safety how to use the appliance safely and
have understood the associated hazards.
Children must not play with, on, or around the
appliance. Children must not clean the
appliance or carry out general maintenance
unless they are at least 15 years old and are
being supervised.
Keep children below the age of 8 years old at a
safe distance from the appliance and power
cable.
Close the safety valve on the gas supply line if
the cooker will not be used for a prolonged
period.
This appliance is intended for domestic use
and the household environment only. This
appliance must only be used to prepare food
and drinks and must never be used as a heater.
Do not leave the appliance unattended during
operation. Only use the appliance indoors.
Do not install this appliance on boats or in
vehicles.
This appliance is intended for use up to a
maximum height of 2000 metres above sea
level.
This appliance is not intended for operation
with an external clock timer or a remote control.
Do not use covers. These can cause accidents,
for example due to overheating, catching fire or
materials shattering.
Only use safety devices or child protection
grilles approved by ourselves. Unsuitable
safety devices or child protection grilles may
result in accidents.
4

m Important safety information
Important safety information
m Warning – WHAT TO DO IF YOU SMELL
GAS!
Escaping gas may cause an explosion.
If you smell gas or notice any faults in the
gas installation:
▯ Immediately shut off the gas supply or
close the gas cylinder valve.
▯ Immediately extinguish all naked flames and
cigarettes.
▯ Do not use any light or appliance switches
and do not pull any plugs out of sockets.
Do not use any telephones or mobile
phones within the building.
▯ Open windows and ventilate the room.
▯ Call the aftersales service or the gas
supplier.
m Warning – Risk of asphyxiation!
The use of a gas cooker leads to a build-up of
heat, moisture and products of combustion in
the room where the appliance is installed.
Ensure that the installation room is well
ventilated. The natural ventilation openings
must be kept open or a mechanical ventilation
device must be provided (e.g. an extractor
hood). Intensive and persistent use of the
appliance may mean that it is necessary to have
additional ventilation (e.g. opening a window),
or more effective ventilation (e.g. operating the
existing mechanical ventilation device at a
higher setting).
m Warning – Risk of fire!
▯ Hot oil and fat can ignite very quickly. Never
leave hot fat or oil unattended. Never use
water to put out burning oil or fat. Switch
off the hotplate. Extinguish flames carefully
using a lid, fire blanket or something
similar.
Risk of fire!
▯ The hotplates become very hot. Never
place combustible items on the hob. Never
place objects on the hob.
Important safety information en
Risk of fire!
▯ The appliance becomes very hot and
flammable materials could catch fire. Never
store or use flammable objects (e.g. spray
cans, cleaning agents) under the appliance
or in its immediate vicinity. Never place
flammable items on or in the appliance.
Fire hazard!
▯ The appliance becomes very hot, fabrics
and other objects may ignite. Keep fabrics
(e.g. garments, curtains) away from the
flames. Never reach over the flames. Do not
place flammable objects (e.g. tea towel,
newspapers) on, next to or behind the
appliance.
Risk of fire!
▯ When gas hotplates are in operation
without any cookware placed on them, they
can build up a lot of heat. The appliance
and the extractor hood above it may
become damaged or be set on fire. Grease
residue in the filter of the extractor hood
may ignite. Only operate the gas burners
with cookware on them.
Risk of deflagration!
▯ If the burner does not ignite after
15 seconds, switch off the control knob
and open the door or window in the room.
Wait at least 1 minute before igniting the
burner again.
m Warning – Risk of burns!
▯ The appliance becomes hot during
operation. Allow the appliance to cool
down before cleaning.
Risk of burns!
▯ The hotplates and surrounding area
(particularly the hob surround, if fitted)
become very hot. Never touch the hot
surfaces. Keep children at a safe distance.
Risk of burns!
▯ The accessible parts become very hot
when in operation. Never touch hot parts.
Keep children at a safe distance.
5

en Important safety information
Risk of burns!
▯ When the appliance cover is closed, this
leads to a build-up of heat. Only operate or
switch on the appliance when the appliance
cover is open. Do not use the appliance
cover for keeping warm or setting down.
Only close the appliance cover once the
appliance has cooled down.
Caution!
Damage to the appliance
Remove spilled liquids before opening the
appliance cover.
Risk of burns!
▯ Empty cookware becomes extremely hot
when set on a gas hotplate that is in
operation. Never heat up empty cookware.
Risk of burns!
▯ If the liquefied gas bottle is not upright,
liquefied propane/butane can enter the
appliance. Intense darting flames may
therefore escape from the burners.
Components may become damaged and
start to leak over time so that gas escapes
uncontrollably. Both can cause burns.
Always use liquefied gas bottles in an
upright position.
m Warning – Risk of electric shock and
serious injury!
▯ The cable insulation on electrical
appliances may melt when touching hot
parts of the appliance. Never bring
electrical appliance cables into contact
with hot parts of the appliance.
Risk of electric shock!
▯ Do not use any high-pressure cleaners or
steam cleaners, which can result in an
electric shock.
Risk of electric shock!
▯ A defective appliance may cause electric
shock. Never switch on a defective
appliance. Unplug the appliance from the
mains or switch off the circuit breaker in the
fuse box. Contact the after-sales service.
Risk of electric shock!
▯ Incorrect repairs are dangerous. Repairs
may only be carried out by one of our
trained after-sales engineers. If the
appliance is faulty, unplug the mains plug
or switch off the fuse in the fuse box.
Contact the after-sales service.
m Warning – Risk of injury!
▯ Incorrect repairs are dangerous. Repairs
may only be carried out, and damaged
power and gas lines replaced, by an aftersales engineer trained by us. If the
appliance is faulty, unplug the mains plug
or switch off the fuse in the fuse box. Shut
off the gas supply. Contact the after-sales
service.
Risk of injury!
▯ Faults or damage to the appliance are
dangerous. Never switch on a faulty
appliance. Unplug the appliance from the
mains or switch off the circuit breaker in the
fuse box. Shut off the gas supply. Contact
the after-sales service.
Risk of injury!
▯ Unsuitable pan sizes, damaged or
incorrectly positioned pans can cause
serious injury. Observe the instructions
which accompany the cookware.
6
Causes of damage en
Causes of damage
Causes of damage
Caution!
– Risk of heat damage to adjacent appliances or
kitchen units: If the appliance is in operation for
an extended period, heat and moisture will be
generated. Additional ventilation is required.Open
the window or switch on an extractor hood that
discharges the extracted air and moisture outside
the building.
– Risk of damage to the appliance due to the build-
up of heat: Do not heat roasters, frying pans or
grill stones using more than one burner at a time.
– Malfunction: Always turn the control knob to the
"Off" position when the appliance is not being
used.
Environmental protection
Environmental protection
The sections below list a number of energy-saving tips
and provide information on disposing of your appliance.
Saving energy
▯ Choose a burner of roughly the same size as your
pan. Place the cookware in the middle.
▯ Use small saucepans for small quantities. Using a
large saucepan with little in it consumes a lot of
energy.
▯ Always place suitable lids on saucepans. Cooking
without a lid consumes significantly more energy.
Use a glass lid so that you can see into the pan
without having to lift the lid.
▯ Cook with only a little water. This will save energy
and preserve the vitamins and minerals in
vegetables.
▯ Switch to a lower heat setting in good time. This will
save energy.
Environmentally-friendly disposal
Dispose of packaging in an environmentally-friendly
manner.
This appliance is labelled in accordance
with European Directive 2012/19/EU
concerning used electrical and electronic
appliances (waste electrical and electronic
equipment - WEEE). The guideline
determines the framework for the return and
recycling of used appliances as applicable
throughout the EU.
7
en Familiarising yourself with your appliance
Familiarising yourself with your
appliance
Familiarising yourself with your appliance
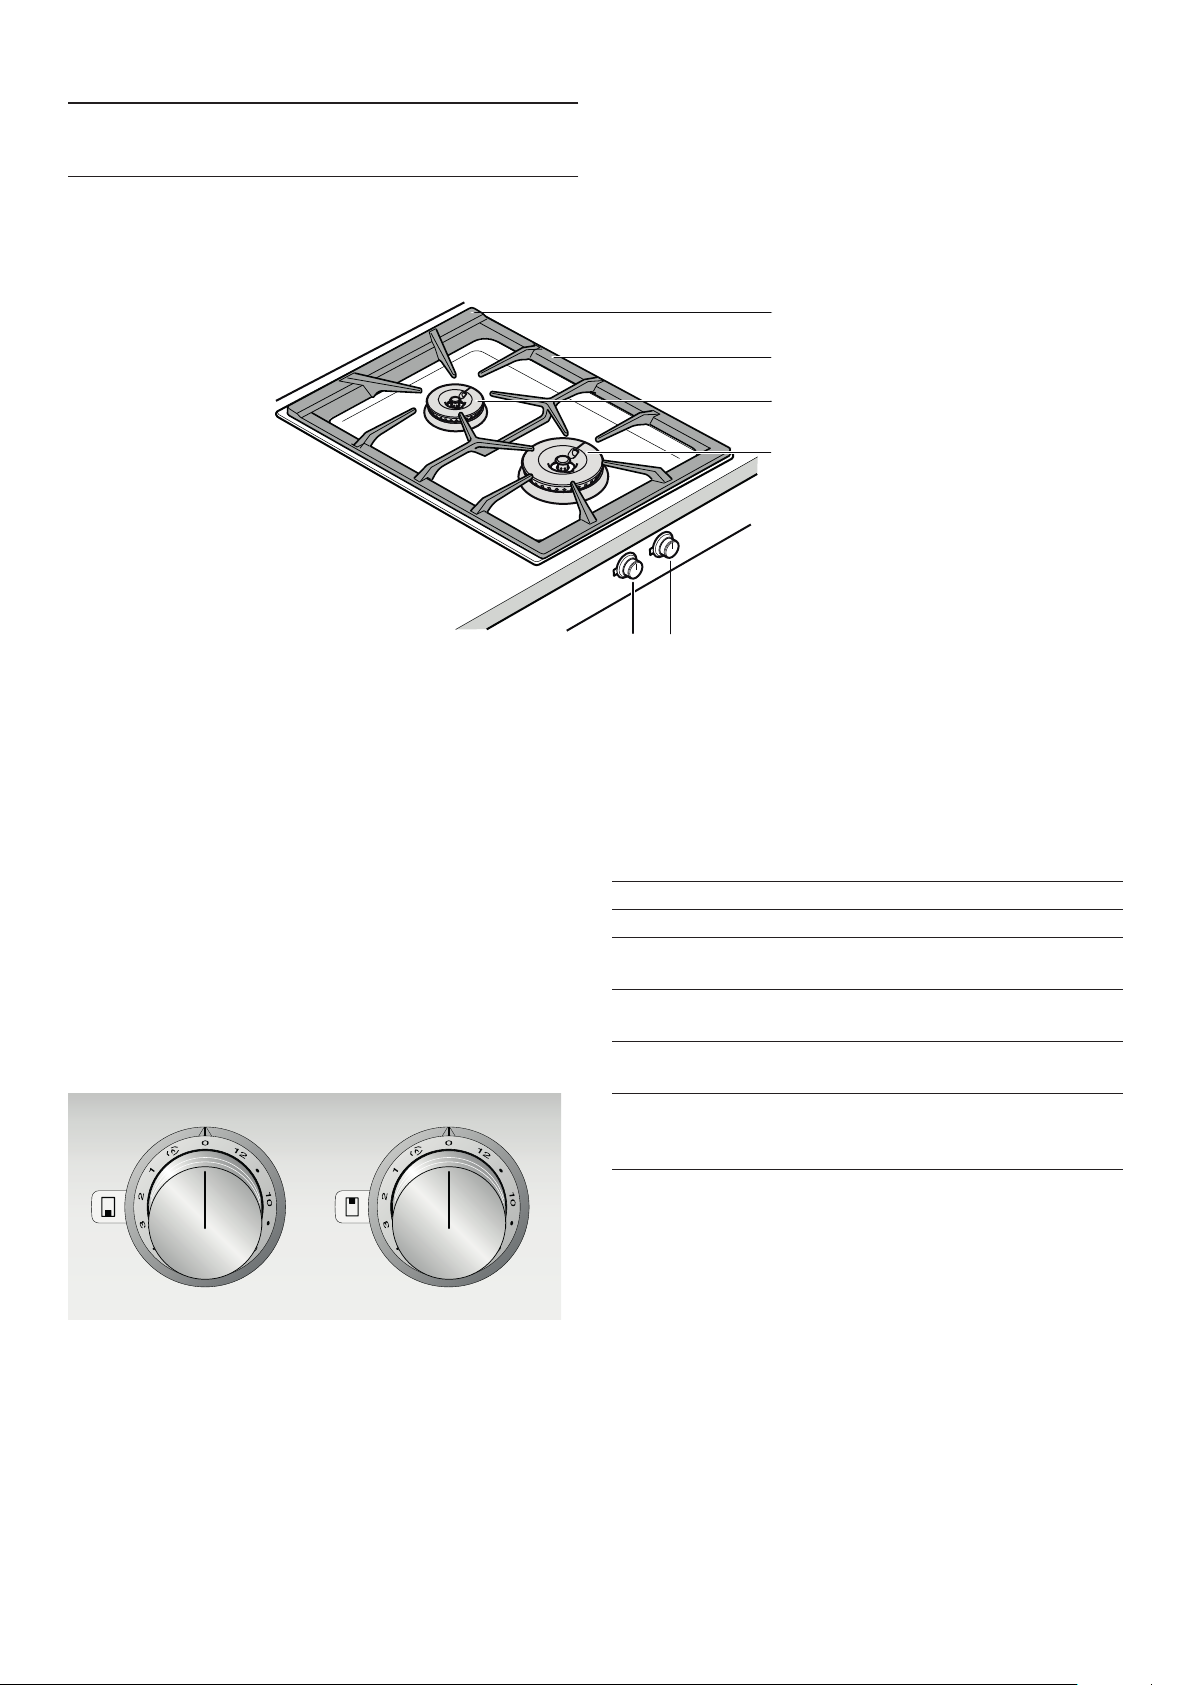
Gas hob
#
( Ventilation openings
(underneath pan support)
0 Pan support
8 Standard output burner 2.0 kW
@ High output burner 4.0 kW
H Control knob, front hotplate
P Control knob, rear hotplate
Control knob
3
+
Visual signals of the luminous disc
The control knob is encircled by an illuminated ring that
indicates a number of statuses and functions.
Indicator Meaning
Û Off Appliance off
Ú Lit continuously orange Appliance on
ˆ Flashing orange Appliance off
Residual heat indicator
ˆ Flashing orange and white
alternately
ˆ Flashing yellow and
magenta alternately
Ú Lit green and then yellow
for some seconds
Safety shut-off, power failure
Appliance fault
Call the after-sales service.
Appliance initialising,
only after first installation or
power failure
The markings show the position of the corresponding
burner and the setting between level 1 to 12 or
simmering Â.
8

Operating the appliance en
Individual parts of the burners
Ensure that the individual parts of the burners are fitted
in the correct position and are straight; otherwise, this
may result in ignition problems or problems during
operation.
Fit the burner head and the burner ring in such a way
that the latches on the lower section of the burner click
into place in the corresponding slots. The alignment of
the burner head and the burner ring is not important.
Note: If the burner parts are fitted at an angle, the
appliance will not work.
Individual parts of the standard output burner and
high output burner
Operating the appliance
Operating the appliance
Notes
– Only use the accessories specified. Do not line the
stainless steel recess (e.g. with aluminium foil).
– The burner and ignition plug must be clean and dry.
– Only light the hotplates if the pan supports and all
burner parts are correctly fitted.
– When one burner is ignited, an ignition spark will
also be generated at all the other burners.
– Do not touch the ignition plug while the gas
appliance is being lit.
– It is important to keep the appliance clean. If the
ignition plugs are dirty, this may cause ignition
problems. Clean the ignition plugs regularly with a
small, non-metallic brush. Take care to prevent the
ignition plugs from suffering any heavy knocks.
– When you switch from setting 3 to setting 4 or
higher, the burner will briefly switch to its maximum
output. This is to optimise ignition between the
burner rings.
– Do not cover the ventilation openings on the rear of
the gas hob.
– When the gas cooktop is switched on, the
electronics open up the gas supply, which
produces a short sound. This is normal.
– In the event of a power failure, the appliance will
not work. The gas supply is shut off.
( Burner cap
0 Burner ring
8 Burner head
@ Ignition plug
H Thermocouple
#
+
Switching on
Your gas hob has an automatic quick-ignition function.
1 Place a suitable item of cookware on the pan
support.
2 Push in the control knob for your chosen burner
and turn it clockwise or anti-clockwise to the heat
setting you require.
The burner ignites automatically.
Turn the control knob to set the heat setting.
m Warning – Risk of deflagration!
If the burner does not ignite after 15 seconds, switch off
the control knob and open the door or window in the
room. Wait at least 1 minute before igniting the burner
again.
9

en Operating the appliance
Simmer setting
With the simmer setting, the burner switches the gas
flame on and off. This allows you to melt chocolate or
heat up delicate sauces, for example.
Turn the control knob to Â. It takes 10 - 50 seconds to
switch on or off.
Electronic flame monitoring and
automatic re-ignition
For your safety, the hob has an electronic flame
monitoring system. If the flame goes out while the hob is
in use (e.g. due to a draught), the appliance will
automatically re-ignite the burner.
If re-ignition is unsuccessful (e.g. because liquid or food
has boiled over and remains on the burner), the
appliance will switch off the gas supply.The illuminated
ring behind the control knob will flash.
Turn the control knob to 0. Wait until the appliance is
cool enough and then check whether all the burner
parts are in the correct position. Check whether the
burner or the ignition plug are covered in food remnants
etc.~ "Trouble shooting" on page 14
Safety shut-off
For your safety, the appliance has a safety shut-off
function.The appliance is automatically switched off if it
has been in operation for an extended period. How long
the appliance waits before switching itself off depends
on the setting (setting 12 = 1 hour, setting 1 = 4 hours).
The illuminated ring behind the control knob will flash
orange and white alternately.
Turn the control knob to 0. You will now be able to start
the appliance again as usual.
Switching off
Turn the control knob to position 0. The appliance
electronics will shut off the gas supply.
m Warning – Risk of burns!
When the appliance cover is closed, this leads to a
build-up of heat. Only operate or switch on the
appliance when the appliance cover is open. Do not use
the appliance cover for keeping warm or setting down.
Only close the appliance cover once the appliance has
cooled down.
Caution!
Damage to the appliance
Remove spilled liquids before opening the appliance
cover.
Residual heat indicator
The luminous disc behind the control knob flashes after
switching off, to indicate that the appliance has still not
cooled down to such an extent that it can be touched
safely.
10
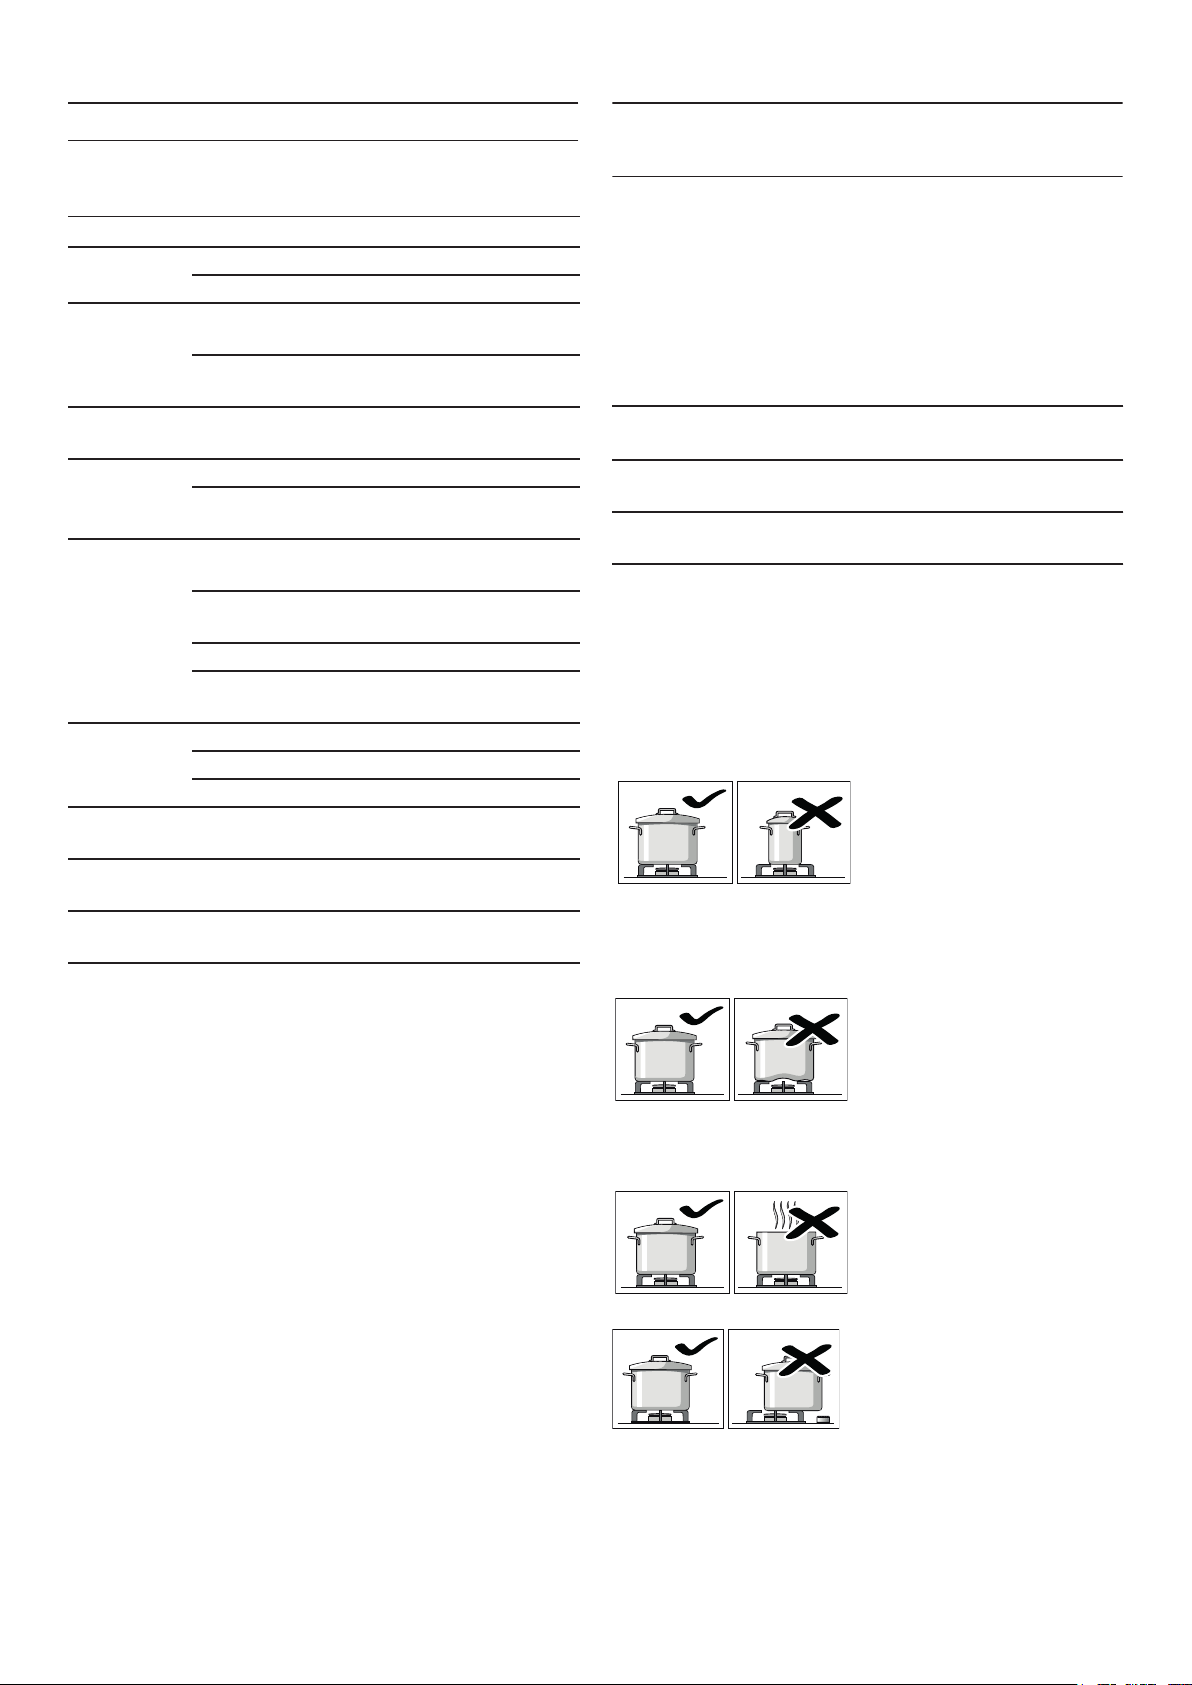
Table of settings and tips en
Table of settings and tips
Table of settings and tips
Heat setting Cooking method Examples
12 Heating Water, clear soups
Blanching Vegetables
10-12 Searing Meat, wok dishes/pan-
fried dishes
Frying at high temperatures
7-10 Simmering with the
lid open
6-8 Baking Flour-based food
Frying at medium
temperatures
4-6 Frying at low tem-
peratures
Warming Vegetables, soups,
Deep-frying Chips, pastries
Poaching with the
lid open
3-4 Defrosting Frozen food
Braising Beef olives, joints
Stewing Vegetables
2-4 Simmering with the
lid on
Simmer setting – up to 3
Simmer setting
Soaking Rice, rice pudding,
Melting, keeping
warm
Meat, potatoes
Liquids, dough-based
foods
Poultry, fish
Fried sausages, onions,
egg dishes
stews
Dumplings, boiled sausages
Soups, vegetables
cereals
Chocolate, butter
Information and tips regarding
cookware
Information and tips regarding cookware
The following information and tips have been provided
to help you save energy and avoid damaging your
cookware.
Suitable cooking vessels
Burner Recommended
pan base diameter
Standard-output
burner
High-output
burner
Pans with a diameter of less than 90 mm or more
than 280 mm should not be used.If you do use larger
pans, these should not protrude beyond the edges of
the appliance.
200 - 240 mm 90 mm
240 - 280 mm 90 mm
Minimum pan
base diameter
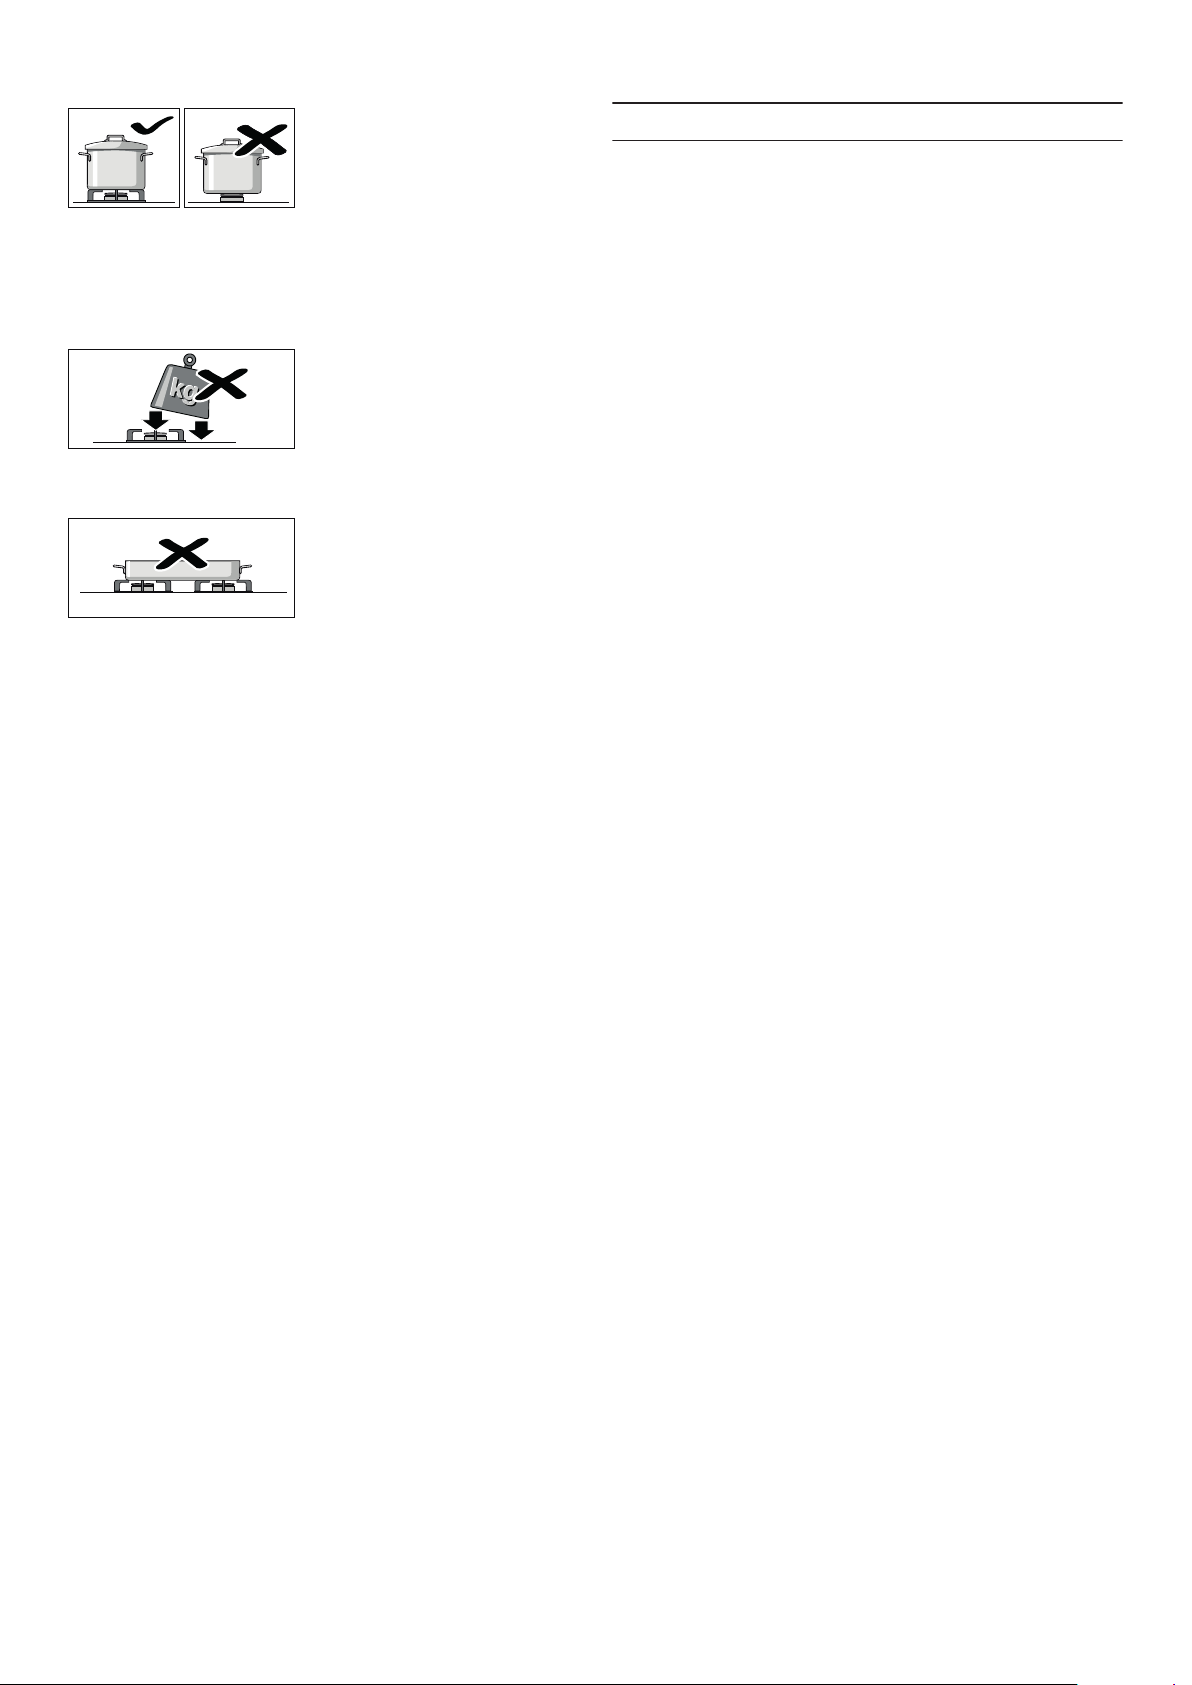
Precautions for use
Use pots or pans which
are the right size for
each burner.
Do not use small pots or
pans on large burners.
The flame should not
touch the sides of the
pot.
Tips for cooking and roasting
The values given in the settings table must be looked
upon as recommended values. The heat required
depends not only on the type and condition of the food,
but also the size and contents of the pot.
Due to the high performance of the cooktop, fat and oil
will heat up quickly. Never leave the cooktop
unattended, fat can ignite, food can burn.
Preferably use the rear cooking zones to prepare meals,
that need longer to cook.
Preferably use the high output burners for brief
cooking, deep fat frying and searing of large quantities.
Do not use damaged
pots or pans, which do
not sit evenly on the
cooktoop, they may tip
over.
Only use pots or pans
with a thick, flat base.
Do not cook without
using a lid and make
sure the lid is properly
fitted. This wastes
energy.
Always centre the pot or
pan over the burner,
otherwise it could tip
over.
Do not place large pots
on the burners near the
control knobs. These
may get damaged by the
high temperatures.
11
en Cleaning and maintenance
Place the pots or pans
on the pan support,
never directly on the
burner.
Make sure that the pan
supports and burner
caps are correctly
positioned before using
the appliance.
Pots or pans should be
placed on the cooktop
carefully.
Do not strike the cooktop
and do not place
excessive weight on it.
Do not heat a cooking
vessel (e.g. roaster, pan,
grill stone) on more than
one burner at the same
time. The resulting heat
accumulation will
damage the appliance.
Cleaning and maintenance
Cleaning and maintenance
m Warning – Risk of electric shock!
Do not use any high-pressure cleaners or steam
cleaners, which can result in an electric shock.
m Warning – Risk of burns!
The accessible parts become very hot when in
operation. Never touch hot parts. Keep children at a
safe distance.
Caution!
Risk of surface damage
Do not use these cleaners
– harsh or abrasive cleaning agents
– oven cleaners
– corrosive or aggressive cleaners, or those
containing chlorine
– cleaning agents with a high alcohol content
– hard and scratchy sponges, brushes or scouring
pads
If such an agent comes into contact with the appliance,
wash it off immediately with water.
Thoroughly wash out new sponge cloths before using
them!
Cleaning the appliance
Clean the appliance after each use once it has cooled
down. Remove liquids that have boiled over or spilled
immediately and do not allow any food remains to burn
on.
Make sure that the ventilation openings under the pan
support are always clean. The ventilation openings must
not be covered.
Dry the burners thoroughly after cleaning. Only operate
the appliance when the burners are dry. Damp burners
can cause ignition problems and/or an unstable flame.
During assembly, make sure that the burner parts (catch
tappets) are in the correct position. All parts must be
straight.
12

Cleaning and maintenance en
Appliance part/
surface
Stainless steel surfaces
Pan supports Carefully remove for cleaning. Soak in
Burner parts Clean using a soft, damp cloth and some
Control knobs Clean using a soft, damp cloth and a lit-
Recommended cleaning
Clean using a soft, damp cloth and some
washing-up liquid. Use a minimal amount
of water when cleaning to prevent water
from penetrating the appliance.
Soak burnt-on remains with a small
amount of soapy water; do not scour.
Remove heavy soiling or yellow discolouration caused by heat using our stainless steel cleaner (item no. 00311499).
the sink. Clean using a scrubbing brush
and washing-up liquid.
Clean the area around the rubber buffers carefully so that they do not become
detached.
Rinse with clean water and dry before
putting them back.
You can also clean the pan supports in
the dishwasher. This may cause the pan
support to become lighter in colour. This
does not affect its usability.
washing-up liquid. Dry with a soft cloth.
Make sure that the openings are not
blocked.
Make sure that no small parts are lost.
Do not clean in the dishwasher.
tle washing-up liquid; the cloth must not
be too wet. Dry with a soft cloth.
Burnt-on dirt
For hard-to-remove, burnt-on dirt, you can order a
cleaning gel from our online shop, from your specialist
retailer or our after-sales service (item
number 00311859). It is suitable for pan supports and
the stainless-steel recess. If necessary, let the dirt soak
overnight. Follow the instructions on the cleaning agent.
Caution!
Damage to the surface
Do not use the cleaning gel on the burner parts.
Burner discolouration
After extended use, the brass burner parts take on a
darker colour as a result of the oxidation process that
occurs naturally. The discolouration does not affect
their serviceability.
13

en Trouble shooting
Trouble shooting
Trouble shooting
Malfunctions often have simple explanations. Please
read the following notes before calling the after-sales
service.
Disruption Possible cause Solution
The burner will not ignite when it is
switched on.
The burner will not ignite when it is
switched on.
The illuminated ring behind the control
knob is flashing orange and white alternately.
The burner will not ignite when it is
switched on.
All the illuminated rings behind the control knobs are lit white for 10 seconds
after switch-on. Then the illuminated ring
around the active control knob is lit
orange.
The burner will not ignite when it is
switched on.
The illuminated ring behind the control
knob is flashing yellow and magenta
alternately.
The burner goes out while the appliance
is in operation.
The illuminated ring behind the control
knob is flashing orange and white alternately.
The burner goes out while the appliance
is in operation.
The illuminated ring behind the control
knob is flashing orange and white alternately.
There is a smell of gas in the kitchen. Gas may be leaking out where
Power supply disconnected. Turn all control knobs to 0. Check the fuse box
Burner or gas supply fault. Turn all control knobs to 0.
Demo mode is activated. Deactivate demo mode.
Electronics fault Turn all control knobs to 0 and disconnect the
Safety switch-off function:
No actions have been performed
for an extended period.
Domestic power failure:
Following a power failure, the
appliance will remain switched
off for safety reasons.
the gas cylinder is connected.
m Warning – Risk of electric shock!
Incorrect repairs are dangerous. Repairs may only be
carried out by one of our trained after-sales engineers.
If the appliance is faulty, unplug the mains plug or
switch off the fuse in the fuse box. Contact the aftersales service.
to see whether the circuit breaker has tripped.
Check:
▯ Are the burner parts positioned correctly?
▯ Is the main gas tap open?
▯ Is the burner clean and dry?
▯ Is there air in the line following initial con-
nection or a cylinder change (in the case of
liquid gas)?
▯ Is the gas cylinder empty (in the case of
liquid gas)?
appliance from the mains power supply for one
minute (switch off the circuit breaker or pull out
the plug).
Reconnect the appliance. The illuminated rings
around the control knobs will be lit green for a
few seconds and then turn yellow. Wait until the
illuminated rings switch off. Then turn any of the
control knobs to any of the heat settings and
then back to 0.
Switch on the burner. If the illuminated ring
starts flashing yellow and magenta again, call
our after-sales service.
Turn all control knobs to 0, and then switch
them back on if you wish to continue using the
appliance.
Turn all control knobs to 0, and then switch
them back on if you wish to continue using the
appliance.
Check that the gas cylinder connection is not
leaking. Open windows and ensure the room is
well ventilated.
14
After-sales service en
The appliance panelling becomes
slightly raised at the corners when it is in
operation.
The metal from which the cooktop is made expands as it heats
up.
Notes
– Each time the mains power is switched on or
following a power failure, a sound is produced
when the gas valves are started up. The illuminated
rings around the control knobs will be lit green for a
few seconds and then turn yellow. Wait until the
illuminated rings switch off.
– When the gas cooktop is switched on, the
electronics open up the gas supply, which
produces a short sound. A sound can also be heard
when the setting is changed. This is normal.
Demo mode
The demo mode is activated if all of the illuminated rings
around the control knobs light up white for 10 seconds
after switching on the appliance. The burner does not
ignite. The illuminated ring around the active control
knob lights up orange.
You can deactivate the demo mode as follows:
1 Turn all of the control knobs to 0. Disconnect the
appliance from the mains power supply. Wait at
least 30 seconds.
2 Reconnect the appliance. The illuminated rings
around the control knobs light up green for a few
seconds and then turn yellow. Wait until the
illuminated rings switch off.
3 Then deactivate demo mode within three minutes as
follows:
Turn any of the control knobs anti-clockwise to
position 12.
4 Turn the control knob clockwise to position 1.
5 Turn the control knob anti-clockwise to position 0.
Wait until the illuminated ring lights up yellow.
6 Turn the control knob clockwise to position 1. The
illuminated ring lights up green.
Wait for five seconds. The illuminated ring now
turns yellow.
Demo mode has now been deactivated. To save the
setting, always exit the menu as follows:
This is normal. It will contract again once it has
cooled down.
After-sales service
After- sales service
Our after-sales service is there for you if your appliance
needs to be repaired. We will always find an appropriate
solution, also in order to avoid after-sales personnel
having to make unnecessary visits.
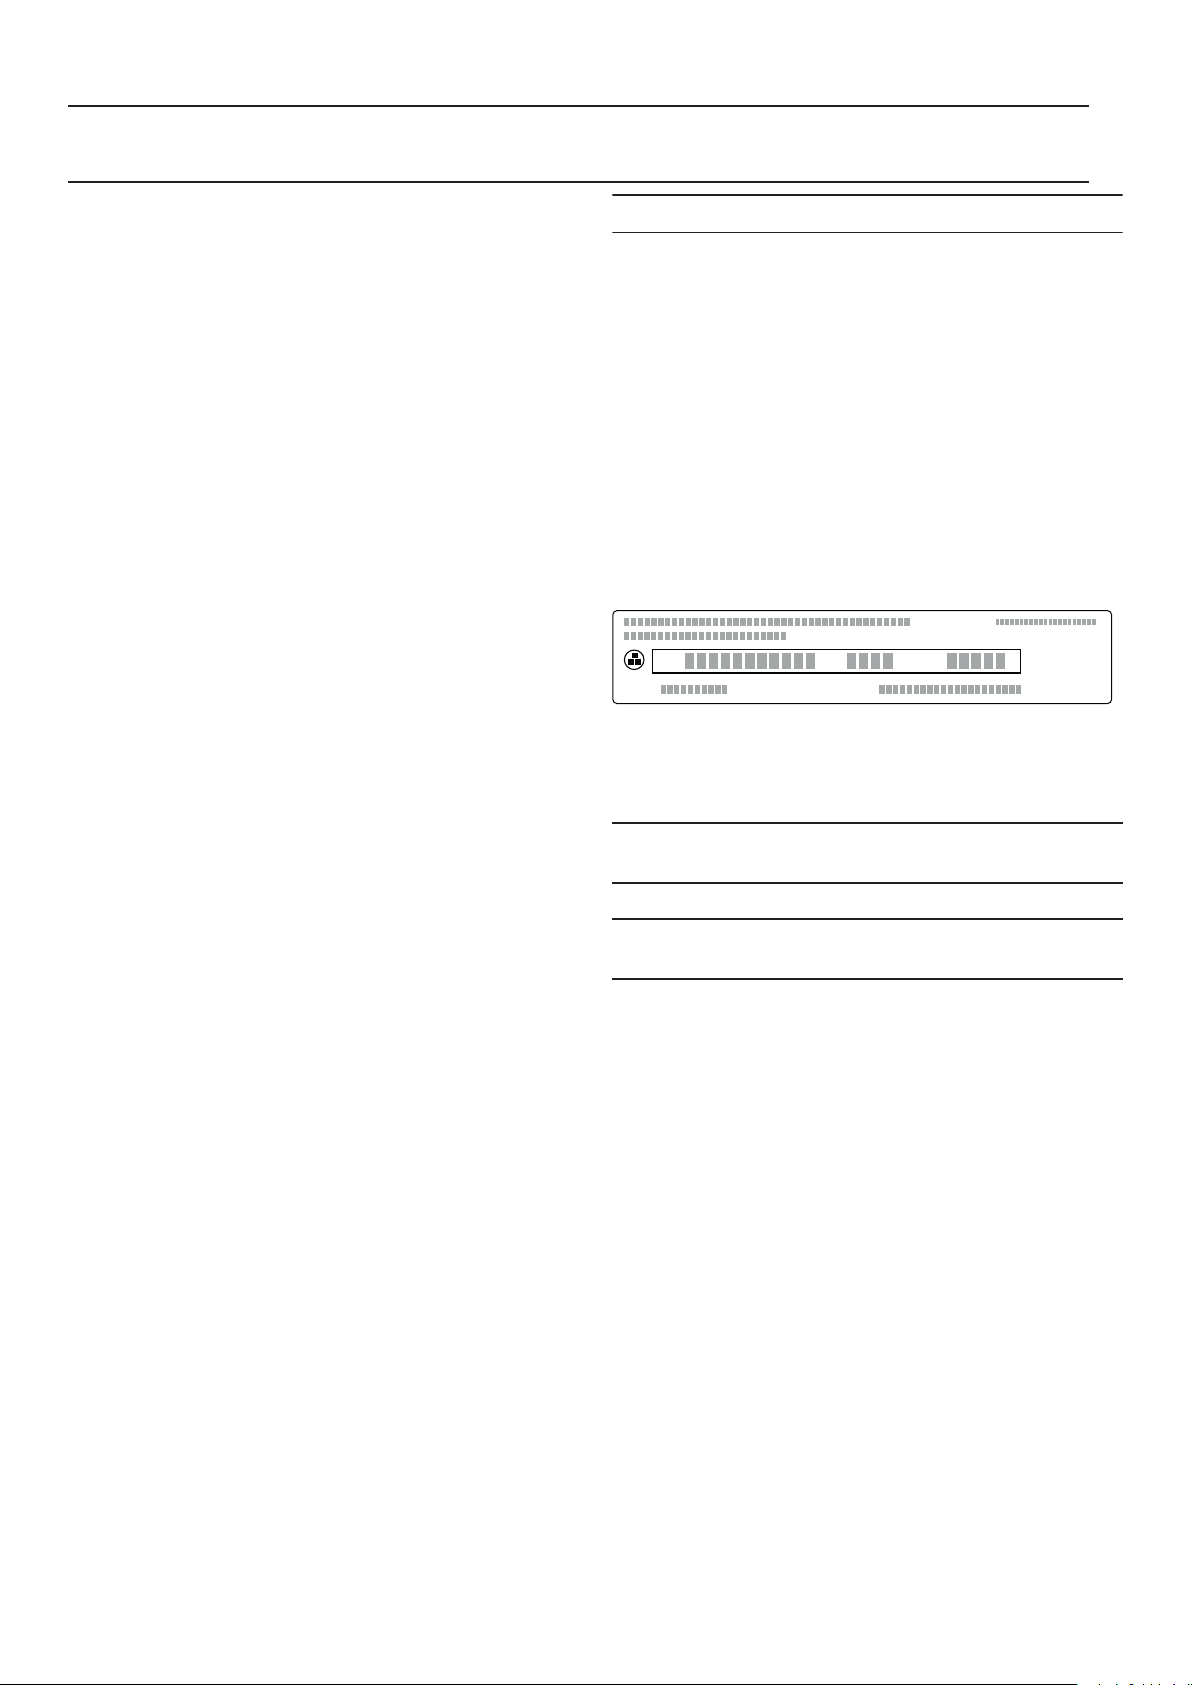
E number and FD number
When calling us, please quote the full product number
(E no.) and the production number (FD no.) so that we
can provide you with the correct advice. The rating plate
that features these numbers can be found on the
underside of the appliance.
=1U)'(1U
7\SH
To save time, you can make a note of the numbers for
your appliance and the telephone number of the aftersales service in the space below in case you need them.
E no.
FD no.
After-sales service O
Please note that a visit from an after-sales service
engineer is not free of charge in the event that the
appliance has been misused, even during the warranty
period.
Please find the contact data of all countries in the
enclosed customer service list.
To book an engineer visit and product advice
GB 0344 892 8988
Calls charged at local or mobile rate.
7 Turn the control knob to 0. Then turn the control
knob anti-clockwise to position 12. Turn the control
knob clockwise to position 1. Turn the control knob
anti-clockwise to position 0. Wait until the
illuminated ring goes out.
IE 01450 2655
0.03 € per minute at peak.
Off peak 0.0088 € per minute.
AU 1300 368 339
NZ 09 477 0492
Trust the expertise of the manufacturer, and rest
assured that the repair will be carried out by trained
service technicians using original spare parts for your
domestic appliance.
15

es
Índice
Instrucciones de uso
Uso conforme a lo prescrito 17
Indicaciones de seguridad importantes 18
Causas de daños 20
Protección del medio ambiente 20
Ahorro de energía 20
Eliminación de residuos respetuosa con el medio
ambiente 20
Presentación del aparato 21
Placa de cocción de gas 21
Maneta de mando 21
Indicación en el anillo luminoso 21
Componentes de los quemadores 22
Manejar el aparato 22
Conectar 23
Fuego lento 23
Control electrónico de la llama y reignición
automática 23
Apagar 23
Indicador de calor residual 23
Desconexión de seguridad 23
Tabla de ajustes y consejos 24
Consejos para cocinar y asar 24
Consejos para el uso de recipientes 24
Recipientes de cocción apropiados 24
Indicaciones de uso 24
Cuidados y limpieza 25
Limpiar el aparato 25
Suciedad quemada 26
Decoloración de los quemadores 26
¿Qué hacer en caso de avería? 27
Modo Demo 28
Servicio de Asistencia Técnica 29
Número de producto (E) y número de
fabricación (FD) 29
Encontrará más información sobre productos,
accesorios, piezas de repuesto y servicios en internet:
www.gaggenau.com y también en la tienda online:
www.gaggenau.com/zz/store
16

Uso correcto del aparato es
Uso conforme a lo prescrito
Uso correcto del aparato
Leer con atención las siguientes instrucciones.
Solo así se puede manejar el aparato de forma
correcta y segura. Conservar las instrucciones
de uso y montaje para utilizarlas más adelante
o para posibles futuros compradores.
Este aparato ha sido diseñado exclusivamente
para su montaje integrado. Prestar atención a
las instrucciones de montaje especiales.
Este aparato tiene que ser instalado según las
instrucciones de montaje incluidas.
Comprobar el aparato al sacarlo de su
embalaje. El aparato no debe conectarse en
caso de haber sufrido daños durante el
transporte.
La conexión del aparato debe realizarse
exclusivamente por un técnico especialista
autorizado. Los daños provocados por una
conexión incorrecta no están cubiertos por la
garantía. Para cambiar a otro tipo de gas, avisar
al Servicio Técnico.
Este aparato ha sido diseñado para uso
doméstico. Utilizar el aparato únicamente para
preparar alimentos y bebidas, nunca como
calefactor. Vigilarlo mientras está funcionando.
Utilizarlo exclusivamente en espacios
interiores.
Utilizar únicamente dispositivos de protección
o protecciones para niños autorizados por
nosotros. Los dispositivos de protección o las
protecciones para niños inapropiados pueden
provocar accidentes.
Este aparato puede ser utilizado por niños a
partir de 8 años y por personas con
limitaciones físicas, sensoriales o psíquicas, o
que carezcan de experiencia y conocimientos,
siempre y cuando sea bajo la supervisión de
una persona responsable de su seguridad o
que le haya instruido en el uso correcto del
aparato siendo consciente de los daños que se
pudieran ocasionar.
No dejar que los niños jueguen con el aparato.
La limpieza y el mantenimiento rutinario no
deben encomendarse a los niños a menos que
sean mayores de 15 años y lo hagan bajo
supervisión.
Mantener a los niños menores de 8 años
alejados del aparato y del cable de conexión.
Cerrar la válvula de seguridad situada en el
conducto de alimentación de gas cuando no se
vaya a utilizar el aparato durante un tiempo
prolongado.
No montar este aparato en barcos o vehículos.
Este aparato está previsto para ser utilizado a
una altura máxima de 2.000 metros sobre el
nivel del mar.
Este aparato no está previsto para el
funcionamiento con un reloj temporizador
externo o un mando a distancia.
No utilizar ninguna cubierta para la placa de
cocción. Pueden provocar accidentes, p. ej.,
debido al sobrecalentamiento, ignición o
desprendimiento de fragmentos de materiales.
17
 Loading...