

Page 1

Gaggenau Instruction manual
CE261/273
Glass ceramic cooktop
Page 2
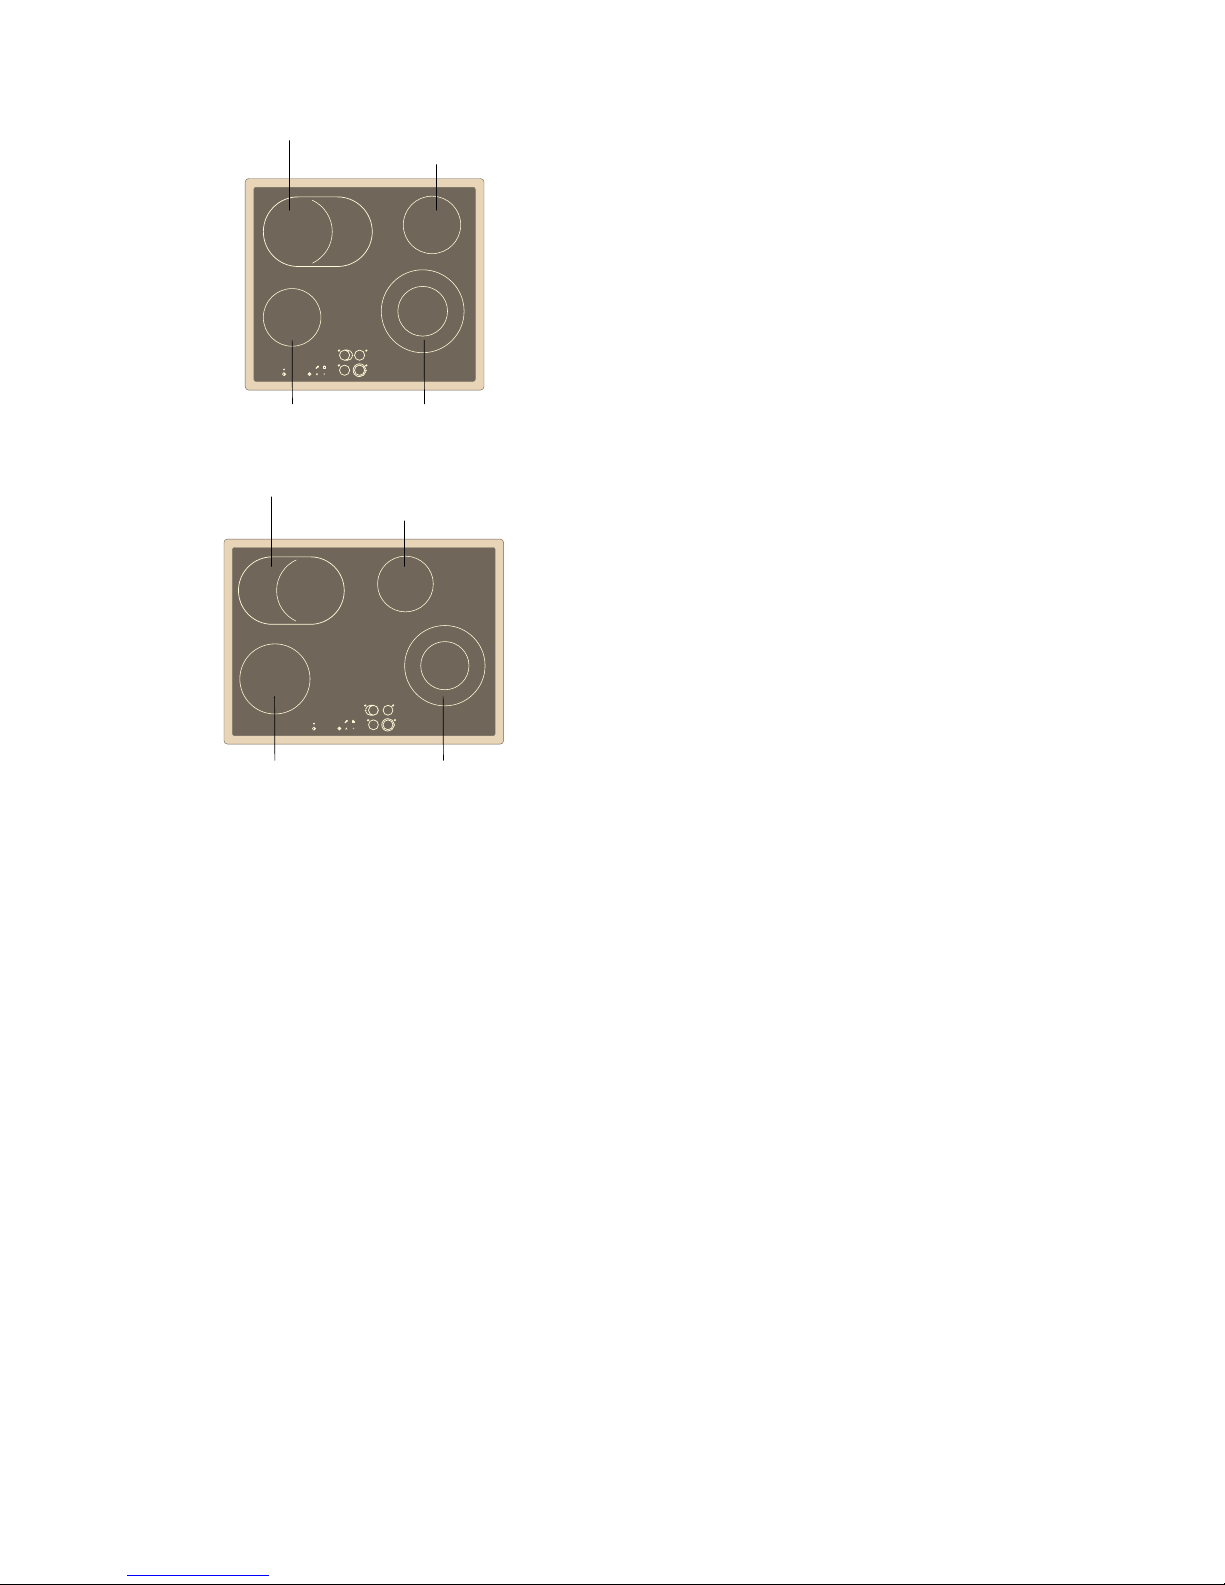
2
&
(
FP
FP
FPFP
FPFP[FP
&
(
FP
FP
FPFP
FPFP[FP
Page 3

3
Table of contents
Instruction manual
Safety precautions 4
Causes of damage 5
Environmental protection 6
Environmentally-friendly disposal 6
Tips for saving energy 6
Getting to know your appliance 7
The control panel 7
Touch keys 7
The hotplates 7
Residual heat indicator 7
Setting the cooktop 8
Switching the cooktop on and off 8
Setting the heat setting 8
Changing the heat setting 8
Switching off the cooking zone 8
Settings table 9
Quick boil timer 10
Switching on automatic boil start 10
Switching off the quick boil timer 10
Childlock 10
Activating the childlock 10
Deactivating the childlock 10
Timer 11
Setting the automatic cooking time 11
Changing the cooking time 11
Cancelling prematurely 11
Short-term timer 11
Setting the timer 11
Safety shut-off 12
Options menu 12
Settings in the options menu 12
Selecting the options menu 13
Cleaning and care 13
Ceramic 13
Hob surround 13
Rectifying minor faults yourself 14
After-sales service 15
Additional information on products, accessories,
replacement parts and services can be found at
www.gaggenau.com and in the online shop
www.gaggenau-eshop.com
Page 4

4
m Safety precautions
Please read this manual carefully. Please keep
the instruction and installation manual as well
as the appliance certificate in a safe place for
later use or for subsequent owners.
Check the appliance for damage after
unpacking it. Do not connect the appliance if it
has been damaged in transport.
Only a licensed professional may connect
appliances without plugs. Damage caused by
incorrect connection is not covered under
warranty.
This appliance is intended for domestic use
only. The appliance must only be used for the
preparation of food and drink. The appliance
must be supervised during operation. Only use
this appliance indoors.
Do not use lids or unsuitable child safety
grilles. These can cause accidents, due to
overheating, catching fire or materials
shattering, for example.
This appliance may be used by children over
the age of 8 years old and by persons with
reduced physical, sensory or mental
capabilities or by persons with a lack of
experience or knowledge if they are
supervised or are instructed by a person
responsible for their safety how to use the
appliance safely and have understood the
associated hazards.
Children must not play with the appliance.
Children must not clean the appliance or carry
out general maintenance unless they are at
least 8 years old and are being supervised.
Keep children below the age of 8 years old at a
safe distance from the appliance and power
cable.
Risk of fire!
▯ Hot oil and fat can ignite very quickly.
Never leave hot fat or oil unattended. Never
use water to put out burning oil or fat.
Switch off the hotplate. Extinguish flames
carefully using a lid, fire blanket or
something similar.
Risk of fire!
▯ The hotplates become very hot. Never
place combustible items on the hob. Never
place objects on the hob.
Risk of fire!
▯ The appliance gets hot. Do not keep
combustible objects or aerosol cans in
drawers directly underneath the hob.
Risk of fire!
▯ The hob switches off automatically and can
no longer be operated. It may switch on
unintentionally at a later point. Switch off
the circuit breaker in the fuse box. Contact
the after-sales service.
Risk of burns!
▯ The hotplates and surrounding area
(particularly the hob surround, if fitted)
become very hot. Never touch the hot
surfaces. Keep children at a safe distance.
Risk of burns!
▯ The hotplate heats up but the display does
not work. Switch off the circuit breaker in
the fuse box. Contact the after-sales
service.
Risk of electric shock!
▯ Incorrect repairs are dangerous. Repairs
may only be carried out by one of our
trained after-sales engineers. If the
appliance is faulty, unplug the mains plug
or switch off the fuse in the fuse box.
Contact the after-sales service.
Risk of electric shock!
▯ Penetrating moisture may cause an electric
shock. Do not use any high-pressure
cleaners or steam cleaners.
Risk of electric shock!
▯ A defective appliance may cause electric
shock. Never switch on a defective
appliance. Unplug the appliance from the
mains or switch off the circuit breaker in
the fuse box. Contact the after-sales
service.
Risk of electric shock!
▯ Cracks or fractures in the glass ceramic
may cause electric shocks. Switch off the
circuit breaker in the fuse box. Contact the
after-sales service.
Hazard due to magnetism!
The removable control element is magnetic
and may affect electronic implants, e. g. heart
pacemakers or insulin pumps. For people with
electronic implants: never carry the control
element in clothing pockets. The minimum
distance to heart pacemaker should be 10 cm.
Page 5

5
Risk of injury!
Saucepans may suddenly jump due to liquid
between the pan base and the hotplate.
Always keep the hotplate and saucepan bases
dry.
Causes of damage
Caution!
– Rough pot and pan bases scratch the ceramic.
– Avoid boiling pots dry. This may cause damage.
– Never place hot pots or pans on the control panel,
the display area or the surround. This may cause
damage.
– Damage can occur if hard or pointed objects fall
on the hob.
– Aluminium foil and plastic containers melt on hot
hotplates. Oven protective foil is not suitable for
your hob.
Overview
The following table provides an overview of the most
frequent kinds of damage:
Damage Cause Action
Stains Food spills Remove spills immediately with a glass scraper.
Unsuitable cleaning agents Only use cleaning agents which are suitable for ceramic
Scratches Salt, sugar and sand Do not use the hob as a work surface or storage space.
Rough pot and pan bases scratch the
ceramic.
Check your cookware.
Discolouration Unsuitable cleaning agents Only use cleaning agents which are suitable for ceramic
Pan abrasion (e.g. aluminium) Lift the pots and pans when moving them.
Blisters Sugar, food with a high sugar content Remove spills immediately with a glass scraper.
Page 6

6
Environmental protection
Environmentally-friendly disposal
Dispose of packaging in an environmentally-friendly
manner.
Tips for saving energy
▯ Always use a correctly fitting lid for the
pan.Cooking without the lid requires four times as
much energy. A glass lid allows you to observe
the cooking without having to lift the lid off.
▯ Use pots and pans with level bases. Using
cookware with unlevel bases increases energy
consumption.
▯ The diameter of the base of your pot or pan
should match the size of the hotplate. In
particular, if pots that are too small are placed on
a hotplate, energy is wasted. Please note:
Cookware manufacturers often specify the
diameter of the top of the pan. This is usually
bigger than the diameter of the base of the pan.
▯ Use a small pan for small quantities of food. A
large saucepan containing little food requires
more energy.
▯ Use only a little water when cooking. This will
save energy. It also preserves vitamins and
minerals in vegetables.
▯ Switch to a lower heat setting as soon as
possible.
▯ Use the residual heat of the hob. For longer
cooking times, you can switch the hotplate off as
early as 5 - 10 minutes before the end of the
cooking time.
This appliance is labelled in accordance with
European Directive 2012/19/EU concerning used
electrical and electronic appliances (waste
electrical and electronic equipment - WEEE). The
guideline determines the framework for the return
and recycling of used appliances as applicable
throughout the EU.
Page 7

7
Getting to know your appliance
The instruction manual is the same for various
different hobs. An overview of the models with their
dimensions is given on page 2.
The control panel
Touch keys
When you touch a symbol, the respective function is
activated.
Notes
‒ The settings will remain unchanged if you touch
several symbols at once. This allows you to wipe
up spills on the control panel.
‒ Always keep the touch keys dry. Moisture reduces
their effectiveness.
The hotplates
Residual heat indicator
The cooktop has a residual heat indicator for each
cooking zone.
If a zero continues to be displayed, the cooking zone
is still too hot. It may be used, for example, to keep a
small meal warm or to melt cooking chocolate. The
display remains lit until the cooking zone has cooled
sufficiently.
µ
±
´
³Å
Sensor buttons
ÿ Main switch
A Automatic boil start
t Options menu
+ Activation
K Childproof lock
M Timer
1-9 Heat settings
Displays
‚-Š Heat settings
s Timer
‹‹ Cooking time
‘ Automatic boil start
Hotplate Activating and deactivating
$ Single-circuit hotplate
ð Dual-circuit hotplate To activate: select the cooking zone, set the heat setting within 5 seconds, touch the
@ activation symbol within the next 5 seconds. To deactivate: select the cooking
zone, touch the @ activation symbol within 5 seconds.
p Extended cooking zone To activate: select the cooking zone, set the heat setting within 5 seconds, touch the
@ activation symbol within the next 5 seconds. To deactivate: select the cooking
zone, touch the @ activation symbol within 5 seconds.
When the hob is activated: a dot lights up next to the heat setting display.
Page 8

8
Setting the cooktop
This section familiarises you with how to make
settings on your cooktop. The table contains cooking
methods and examples for the different heat settings.
Switching the cooktop on and off
The main switch is used to switch the cooktop on and
off.
To switch on: touch the # symbol. A signal sounds.
The lamp above the main switch and the ‹ displays
lights up. The cooktop is ready for use.
To switch off: touch the # symbol until the light above
the main switch goes out. All cooking zones are
switched off. The residual heat indicator remains on
until the cooking zones have cooled down sufficiently.
Notes
‒ The cooktop switches off automatically if all
cooking zones have been switched off for more
than 20 seconds.
‒ The settings remain stored for 5 seconds after the
cooktop has been switched off. If you switch it on
again during this time, the cooktop will operate
using the previously stored settings.
Setting the heat setting
The hob must be switched on with the main switch.
Each cooking zone has 9 heat settings.
Heat setting 1 = lowest output
Heat setting 9 = highest output
1 Select the cooking zone by touching the
respective symbol in the display panel.
2 Select the required heat setting within 5 seconds.
The selected heat setting lights up in the heat setting
display. A signal sounds to confirm the setting after a
few seconds.
Changing the heat setting
Select the cooking zone and set the required heat
setting.
Switching off the cooking zone
Select the cooking zone and set to 0. The cooking
zone switches off. The residual heat indicator appears
after approx. 5 seconds.
¯
¯
¯
¯
¯
¯
¯
Page 9

9
Settings table
Each cooking zone has 9 settings. To reach the
required temperature quickly, you can use the
automatic boil start function or heat setting 9. Then
always adjust down to the required heat setting.
The range of settings is the same on all cooking
zones.
The values in the settings table are only to be used as
guidelines, as more or less heat may be required
depending on the type and state of the food and the
size and fill level of the pan.
Heat setting Cooking method Examples
9 Bringing to the boil Water
Searing Meat
Heating Fat, liquids
Heating through Soups, sauces
Blanching Vegetables
8 - 6 Frying Meat, potatoes
6 - 5 Frying Fish
7 - 6 Baking Egg- and flour-based dishes
Simmering in an uncovered pan Pasta, liquids
6 - 5 Browning Flour, onions
Toasting Almonds, bread crumbs
Rendering Bacon
Reducing Stock, sauces
5 - 4 Simmering in an uncovered pan Dumplings, meat or vegetables for soup, poached eggs
4 - 3 Simmering in an uncovered pan Boiled sausages
5 - 4 Steaming Vegetables, potatoes, fish
Poaching Vegetables, fruit, fish
Braising Roulades, joints, vegetables
4 - 3 Stewing Goulash
Simmering in a covered pan Soups, sauces
3 - 2 Defrosting Frozen food
Soaking Rice, pulses
Thickening Egg dishes
2 - 1 Heating/keeping warm Soups, stews, vegetables in sauce
Melting Butter, chocolate
Page 10

10
Quick boil timer
All of the cooking zones have quick boil timer. By
activating the quick boil timer, the heat setting that is
set increases to the maximum setting for a few
minutes. This means that the simmering temperature
for the food is reached sooner.
Once the boiling time has elapsed, the appliance
automatically switches to the heat setting that was set.
You can set the duration of the boiling time.
You cannot activate the quick boil timer in heat setting
9.
Switching on automatic boil start
The hob must be switched on with the main switch.
1 Select the cooking zone by touching the
respective symbol in the display panel.
2 Select the required heat setting within 5 seconds.
The selected heat setting lights up in the heat
setting display.
3 Touch the A symbol within 5 seconds.
The heat setting alternates with A in the display.
4 You can change the boil start time within 5
seconds. The default is 3 minutes. You can use
the number buttons to set a time between 1 and
20 minutes.
You can set different boil start times for each separate
hotplate. If you activate automatic boil start again, the
previously selected boil start time is suggested.
After the food has been brought to the boil, only the
ongoing cooking setting remains lit on the display.
Switching off the quick boil timer
You can also switch off the quick boil timer before the
boiling time has elapsed (e.g. because the food is
cooking too quickly).
1 Select the cooking zone.
2 Touch the A symbol within 5 seconds.
The cooktop switches back to the heat setting
that was set.
Childlock
You can use the childlock to prevent children from
switching on the cooking positions.
Note: To ensure that you can activate the childlock,
you must first enable this function in the options menu
(see Options menu).
Activating the childlock
1 Switch on the cooktop at the main switch. Do not
select any cooking zones or the timer.
After approx. 10 seconds, the K symbol is
displayed above the @ symbol.
2 Touch the @ symbol. A signal sounds. Press and
hold the @ symbol until another signal sounds.
The cooktop switches off. The K display flashes for
approximately 10 seconds. The childlock is activated.
Deactivating the childlock
To deactivate the childlock again, proceed in the same
way as for activating the childlock.
Page 11

11
Timer
You can use the integrated timer to select a time
between 1 and 90 minutes in 1-minute levels and, after
this time, the cooking zone is switched off (cooking
timer). You can set the cooking time for each cooking
zone.
Setting the automatic cooking time
The hob must be switched on with the main switch.
1 Select the cooking zone. Within 5 seconds, set
the required heat setting.
2 Within the next 5 seconds, touch the M symbol.
‹‹ lights up on the timer display. s lights up
next to the heat setting display.
3 Use the number buttons to set the required
cooking time of between 1 and 90 minutes.
When the cooking time has elapsed, the cooking zone
switches off. ‹ flashes in the heat setting display. A
signal sounds for three minutes. ‹‹ flashes in the
timer display. Touch any sensor button. The displays
go out and the audible signal ceases.
To find out the remaining cooking time for a cooking
zone, select the cooking zone. The cooking time is
displayed for 5 seconds.
If you have set a cooking time for several cooking
zones, the shortest cooking time set will be shown
counting down in the timer display. A s segment of a
circle lights up on the timer symbol for this cooking
zone.
Note: If you have set ™†£. in the options menu
(unlimited selection time for cooking zone selection),
the timer is called up if you touch the M symbol once.
Touch the M symbol a second time to call up the
automatic cooking time function for the selected
cooking zone.
Changing the cooking time
Select the cooking zone. Touch the M symbol.
Change the cooking time.
Cancelling prematurely
Select the cooking zone. Touch the M symbol. Set it
to ‹‹. The display goes out after a few seconds. The
cooking zone continues to heat with the selected heat
setting.
Note: The cooking timer is no longer active if there is
a power cut.
Short-term timer
You can also use the integrated timer independently of
the function of the appliance as a short-term timer.
The short-term timer can also be used if all of the
cooking zones are switched off.
Setting the timer
The hob must be switched on with the main switch. No
cooking zone should have been selected.
1 Touch the M symbol.
‹‹ lights up on the timer display.
2 Set the required time.
If all cooking zones are off, the appliance goes into
standby. Only the timer display lights up.
Once the time has elapsed, the ‹‹ display flashes. A
signal sounds for three minutes. Touch the M symbol.
The display goes out and the audible signal ceases.
To correct the time, touch the M symbol and change
the time.
Note: The timer no longer functions after a power cut.
¯
¯
¯
¯¯
¯
¯
¯
³
Page 12

12
Safety shut-off
A cooking zone is automatically switched off if the
setting is not changed for a long time. The time when
the safety shut-off is activated depends on the heat
setting selected (1 to 10 hours).
The cooking zone is switched off and the residual heat
indicator lights up on the heat setting display until the
cooking zone cools down.
You can switch the cooking zone back on again as
normal.
Options menu
In the options menu, you can adjust the following
functions for your cooktop:
▯ Activation
▯ Key tones
▯ Childlock
▯ Reset all values
▯ Selection time for selecting the cooking zone
Settings in the options menu
This table contains all of the functions and information
for making settings:
Display Function Information about making settings
™‚ Activation The activation can be set individually for each cook-
ing zone that has activation. First, select the desired
cooking zone. Then use the @ symbol to select the
required setting.
The activation is not activated when you switch on
the hob, and can be activated.*
The activation is activated when you switch on the
hob, and can be deactivated.
When you switch on the hob, the last state that
was used is set.
™ƒ Button tones Select the desired setting.
Note: This setting does not affect the audible timer
signals, warning signals or the main switch signal.
‹ Key tones off.
‚ Key tones on.*
™„ Child lock To be able to use the child lock, you must first ena-
ble this function in the options menu.
‹ Child lock cannot be activated.*
‚ Child lock can be activated.
™… Reset all values You can use this function to reset all of the values in
the options menu and the boiling times to their factory settings.
Reset all values: press the number 1 button. On the
display, a dot appears beside š.
Note: The values will only be reset when you save
and exit the options menu. If there is already a dot
displayed next to š, all settings already correspond
to the factory setting.
š Values do not correspond to the factory setting.
™† Selection time for selecting the cooking zone If you select a cooking zone, you must set the heat
setting within the selection time. If the selection
time is set to endless, you can change the heat setting at any time without having to reselect the cooking zone.
£ Selection time 5 seconds.*
£. Endless selection time.
*Factory setting
¦
Page 13

13
Selecting the options menu
1 Switch on the hob using the main switch. Do not
select a cooking zone. The timer must be
switched off.
After approx. 10 seconds, the ? symbol appears
above the A symbol.
2 Touch the A symbol until two signals sound.
3 Touch the A symbol repeatedly until the required
option appears.
4 Use the @ symbol or the number buttons to select
the required setting.
5 To save the settings and exit the options menu,
touch the A symbol until two signals sound.
Notes
‒ A signal will not sound if ™ƒ-‹. Button tones
off has been set.
‒ To exit the options menu without saving the
settings, touch the # main switch.
Cleaning and care
The information in this section provides help on how
best to care for your hob.
Suitable maintenance and cleaning products can be
purchased from the after-sales service or in our eShop.
Ceramic
Clean the hob after each use. This will prevent spills
from burning onto the ceramic.
Only clean the hob when it has cooled down
sufficiently.
Use only cleaning agents which are suitable for
ceramic. Follow the cleaning instructions on the
packaging.
Never use:
▯ Undiluted washing-up liquid
▯ Detergent intended for dishwashers
▯ Scouring agents
▯ Harsh cleaning agents such as oven spray or
stain remover
▯ Abrasive sponges
▯ High-pressure cleaners or steam jet cleaners
Ground-in dirt can be best removed with a glass
scraper, available from retailers. Please note the
manufacturer's instructions.
You can also obtain a suitable glass scraper from our
after-sales service or from the e-Shop.
Hob surround
To prevent damage to the hob surround, observe the
following instructions:
▯ Use only hot soapy water.
▯ Wash new sponge cloths thoroughly before use.
▯ Do not use any sharp or abrasive agents.
▯ Do not use the glass scraper.
¯
¯
¯
¯
Page 14

14
Rectifying minor faults yourself
Faults often have simple explanations. Please read the
following notes before calling the after-sales service.
Fault Measure
The hob does not work. Check the household fuse for the appliance. Check whether there is a power cut
by trying other electronic appliances.
You cannot switch the hob on. The main
switch flashes repeatedly when you touch
it.
There is an object on one of the touch keys (e.g. a tea towel). Remove the object
and switch the hob on as usual.
The hob works, but the cooking zones do
not heat up. A dot lights up on the timer
display.
The appliance is in demonstration mode after it is first connected. Disconnect
the appliance from the mains at the household fuse for at least 10 seconds.
Reconnect the appliance to the mains and carry out the following steps within 3
minutes:
1 Switch on the hob at the # main switch. The timer must be switched off.
2 Press and hold the @ symbol. In addition, touch the # main switch within 3
seconds.
The hob switches off.
3 Take your finger away from the main switch.
4 Take your finger away from the @ symbol.
An audible signal sounds. The dot on the timer display goes out.
The hob has switched itself off. The main switch was touched accidentally. You can now switch the hob on
again.
A cooking zone was operating without interruption for too long. The safety shutoff was activated. You can switch the cooking zone on again.
Ҥ display and numbers There is a fault in the electronics. Switch the appliance off and back on again
using either the household fuse or the circuit breaker in the fuse box (reset). If
the display appears again, disconnect the appliance from the mains using the
household fuse. Contact the after-sales service.
Alternating • and ˆ display A cooking zone that was set to heat setting 8 or 9 is too hot. The power for this
cooking zone was reduced to heat setting 7. When • goes out, you can set the
cooking zone to a higher setting again.
• display The appliance is too hot and a cooking zone has switched itself off. Remove the
pot from the heat. • goes out once the cooking zones have cooled down sufficiently.
Wait a few minutes until the cooking zones have cooled down. If • appears
again after switching on, the hob is still too hot. Switch off the cooking zones
and allow them to continue to cool down.
”‚ display Electronics fault in one of the cooking zones
Switch the appliance off and, after a few minutes, back on again using either the
household fuse or the circuit breaker in the fuse box (reset). If the display
appears again, disconnect the appliance from the mains using the household
fuse. Call the after-sales service.
”… display The control panel is too hot and the appliance has switched itself off. Check
whether there is a hot pan on the control panel.
Remove the pan from the control panel. Wait a few minutes until the control unit
has cooled down. If ”… appears again after switching on, disconnect the appliance from the mains using the household fuse. Call the after-sales service.
Page 15

15
After-sales service
Our after-sales service is there for you if your
appliance should need to be repaired. We are
committed fo find the best solution also in order to
avoid an unnecessary call-out.
E number and FD number:
Please quote the E number (product number) and the
FD number (production number) of your appliance
when contacting the after-sales service. The rating
plate bearing these numbers can be found on the
appliance certificate.
Please note that a visit from an after-sales service
engineer is not free of charge, even during the
warranty period.
Please find the contact data of all countries in the
enclosed customer service list.
To book an engineer visit and product advice
Trust the expertise of the manufacturer, and rest
assured that the repair will be carried out by trained
service technicians using original spare parts for your
domestic appliance.
GB 0844 89289988
Calls from a BT landline will be charged at up to
3 pence per minute. A call set-up fee of up to
6 pence may apply.
IE 01450 2655
AU 1300 727 421
NZ 09 477 0492
Page 16

Gaggenau Hausgeräte GmbH
Carl-Wery-Straße 34
D-81739 München
www.gaggenau.com
*9000681067*
9000681067 en (940404)
 Loading...