

Page 1

Gaggenau Operating instructions
Dishwasher
DI 230
9000 170 143 (8604) aus
Page 2

Page 3

aus
Index
Safety instructions 4. . . . . . . . . . . . . . . . . . . . . . . . .
Getting to know your appliance 5. . . . . . . . . . . . . .
Adding rinse aid 5. . . . . . . . . . . . . . . . . . . . . . . . . . .
Utensils 6. . . . . . . . . . . . . . . . . . . . . . . . . . . . . . . . . .
Detergent 8. . . . . . . . . . . . . . . . . . . . . . . . . . . . . . . .
Programme overview 9. . . . . . . . . . . . . . . . . . . . . .
Washing dishes 10. . . . . . . . . . . . . . . . . . . . . . . . . . .
Maintenance and care 11. . . . . . . . . . . . . . . . . . . . .
Fault finding 12. . . . . . . . . . . . . . . . . . . . . . . . . . . . . .
Customer Service 14. . . . . . . . . . . . . . . . . . . . . . . . .
Information 14. . . . . . . . . . . . . . . . . . . . . . . . . . . . . . .
Installation 15. . . . . . . . . . . . . . . . . . . . . . . . . . . . . . . .
Waste disposal 16. . . . . . . . . . . . . . . . . . . . . . . . . . . .
Page 4

4
Safety instructions
Delivery
Immediately check the packaging and dishwasher
for any damage which may have been caused in
transit. Do not use a damaged appliance, but consult
your supplier.
Please dispose of packaging material properly:
Installation
Install and connect the appliance according to the
installation and assembly instructions.
The dishwasher must NOT be connected to the
power supply during installation.
Ensure that the protective conductor system of the
domestic electricity supply has been installed
correctly.
Electrical connection conditions must correspond
with the specifications on the rating plate of the
dishwasher.
If the dishwasher is to be installed in a high-sided
unit, ensure that the unit is attached properly and
also at the rear.
Built-under and built-in appliances should always be
installed under a continuous work surface which is
attached to the adjacent cupboards, in order to
ensure that the appliance is entirely stable.
After the appliance has been installed, the mains
plug should still be easily accessible.
Not on all models:
The plastic housing on the water input contains an
electrically operated valve. The connecting wires are
inside the inlet hose. Do not cut through this hose
and do not immerse the plastic housing in water.
Warning
For safety reasons, if the appliance is not fitted in a
recess, thereby making a side wall accessible, the door
hinge area should be covered at the side.
(Risk of injury)
Covers are available as optional accessories from
customer services or specialist stores.
This appliance is not intended for use by young
children or infirm persons unless they have been
adequately supervised by a responible person to
ensure that they can use the appliance safely.
Young children should be supervised to ensure that
they do not play with the appliance.
In daily use
Warning
Knives and other sharp-pointed utensils must be placed
with the points down in the cutlery basket or
horizontally in the utensils basket.
Use the dishwasher only in the household and only
for its designed purpose, i.e. for washing domestic
dishes.
Do not lean or sit on the open door. The appliance
could tip.
Please note that free-standing appliances may tip
over if the baskets are overloaded.
The water in the appliance is not drinking water.
Do not add any solvents to the washing chamber.
Danger of explosion!
Open the door carefully when the programme is still
running. There is a risk of hot water spraying out of
the appliance.
To prevent injuries, e.g. caused by stumbling, open
the dishwasher only briefly in order to load and
unload the dishwasher.
Read and observe the safety nformation and
instructions for use on the packaging for cleaning
and rinsing agents.
Children in the household
If fitted, use the childproof lock. An exact description
can be found in the back of the envelope.
Do not allow children to play with or operate the
appliance.
Keep children away from detergents and rinse aid.
These may cause chemical burns in the mouth,
throat and eyes or asphyxiation.
Keep children away from an open dishwasher. There
could still be detergent residue inside.
If the appliance is installed at eye-level, ensure when
opening and closing the door that children are not
caught or crushed between the appliance door and
the cupboard door situated below.
Damage
The appliance may be repaired and opened up by a
technician only. First disconnect the appliance from
the power supply. Pull out the mains plug (do not tug
the power cord!) or switch off the fuse. Turn off the
tap.
Disposal
Make redundant appliances unusable to prevent
subsequent accidents.
Dispose of the appliance in an environmentally
friendly manner.
Warning
Children could get locked in the appliance (risk of
suffocation) or get stuck in other positions.
Therefore: Remove the mains plug, cut the mains wire
and set aside. Damage the door lock so that the door
can no longer be closed.
Page 5
5
Getting to know your appliance
Diagrams of the control panel and the interior of the
appliance can be found in the envelope at the front.
Individual positions are referred to in the text.
Control panel
1
Main switch
2
Door Opener
3
Programme selector
4 “Check water supply” display
5 Programme sequence display
6 “End of programme” display
7
Rinse-aid refill indicator
Appliance interior
20
Upper basket with 2-tiered cup rack
21
Additional cutlery basket for the top basket *
22
Upper spray arm
23
Lower spray arm
24
Filters
25
Cutlery basket
26
Lower basket
27
Lock for detergent dispenser
28
Dispenser for rinse aid
29
Detergent compartment
30
Nameplate
* not on all models
You will need to purchase the
following before using the dishwasher
for the first time:
– detergent
– rinse-aid
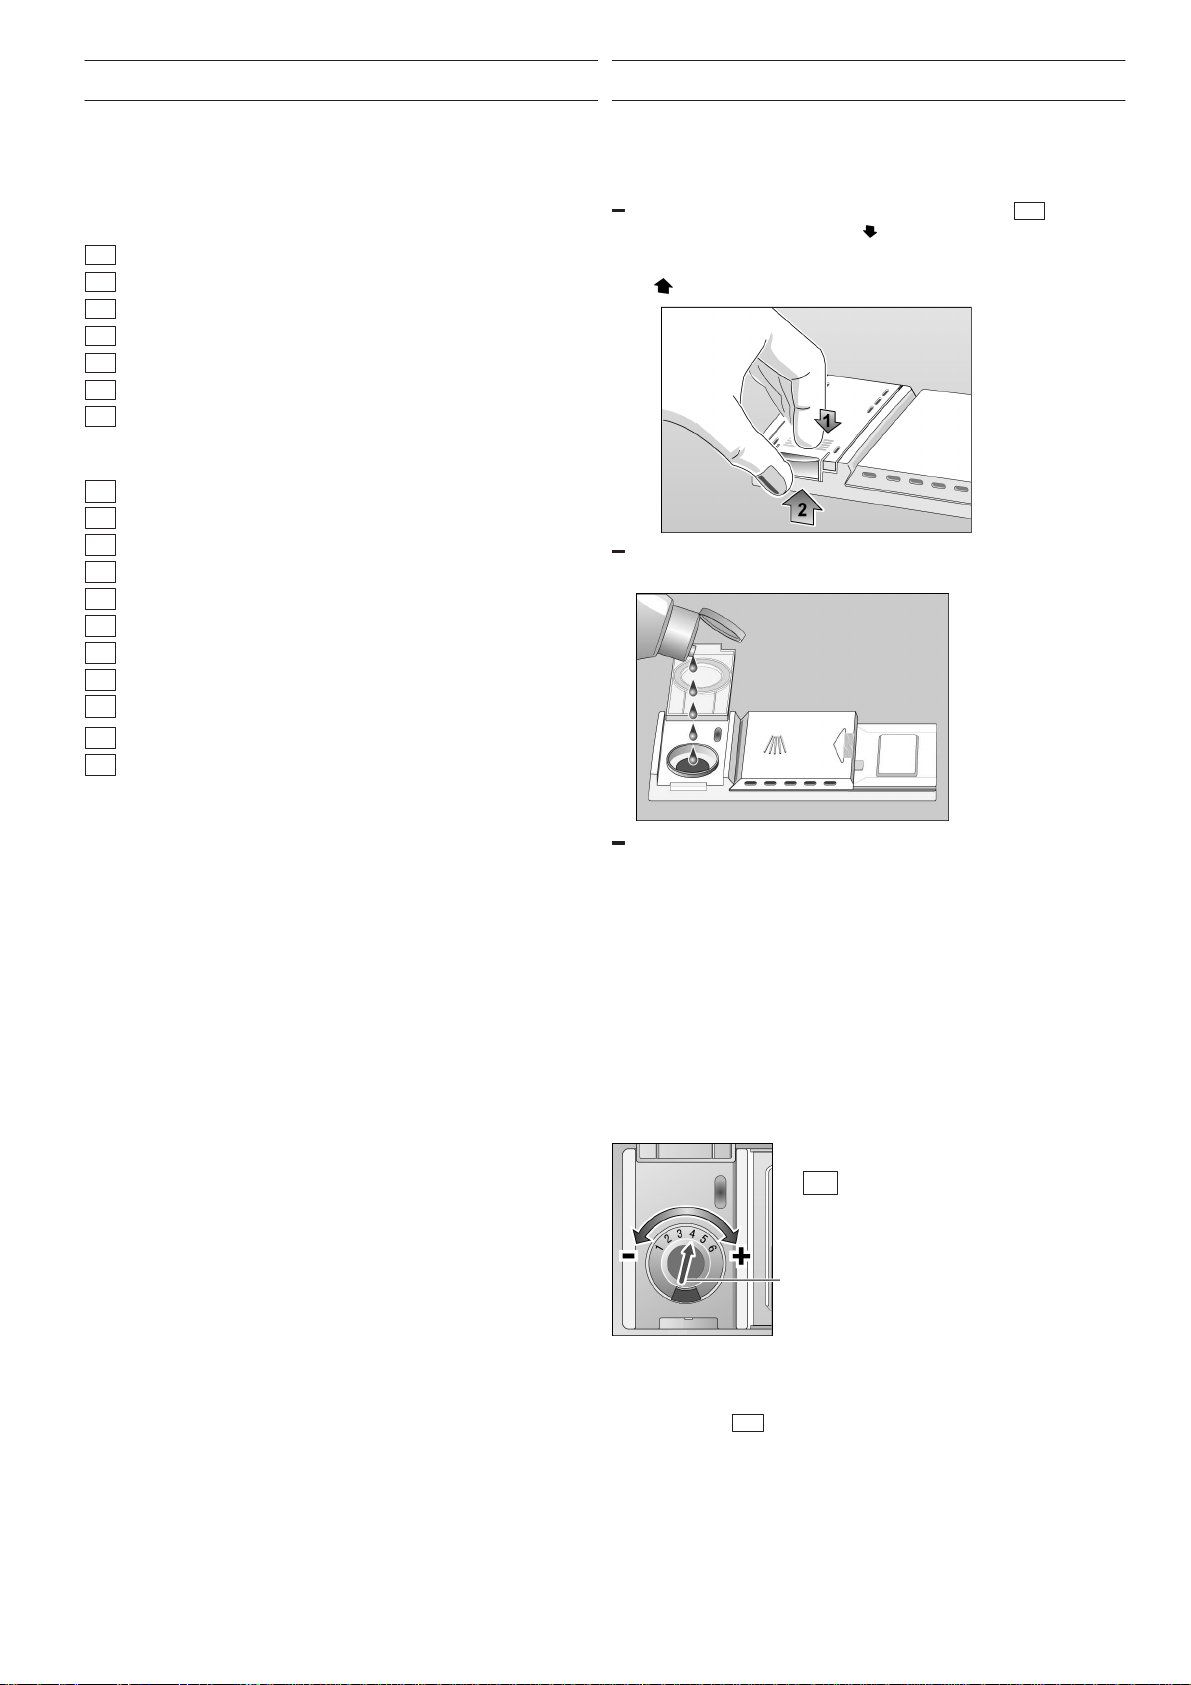
Adding rinse aid
The rinse aid is required for stain-free utensils and
clear glasses.
Use only rinse aid for domestic dishwashers.
Open the cover on the rinse-aid dispenser 28 . To
do this, press the mark (1
) on the cover and
simultaneously lift the cover on the control plate
(2
).
Carefully pour in the rinse aid to just below the edge
of the filler opening.
Close the lid, ensuring that you hear it snap closed.
To prevent excessive foam formation during the next
rinse cycle, remove any rinse aid which has run over
with a cloth.
Adjusting the amount of rinse-aid
The amount of rinse-aid added to the water can be
varied by adjusting the stepless control. The rinse-aid
control has been set to ”4” in the factory.
Do not alter the setting of the rinse-aid control unless
streaks (turn knob towards ”–”) or water marks (turn
knob towards ”+”) are left on the dishes.
28
Rinse aid controller
Rinse-aid refill indicator
As soon as the rinse-aid refill indicator lights up on the
control panel
7
, refill with rinse aid.
Page 6
6
Utensils
Not suitable
Cutlery and utensils made of wood.
Fragile decorative glasses, hand-crafted and antique
utensils. These decorative items are not
dishwasher-proof.
Plastic parts sensitive to hot water.
Copper and tin utensils.
Utensils which are soiled with ash, wax, lubricating
grease or ink.
Absorbent materials such as sponges and cloths.
Aluminium and silver parts have a tendency to
discolour and fade during the wash cycle. Even some
types of glass (e.g. crystal glass objects) may turn
cloudy after many wash cycles.
Recommendation:
In future buy utensils which are identified
as dishwasher-proof.
Damage to glassware and other
dishes
Possible causes:
type of glass or manufacturing process
chemical composition of detergent
water temperature and duration of dishwasher
programme.
Suggested remedy:
Use glassware or porcelain dishes that have been
marked ’dishwasher–proof’ by the manufacturer.
Use a mild detergent that is described as ’kind to
dishes’. If necessary, seek further information from
detergent manufacturers.
Select a programme with as low a temperature and
as short a duration as possible.
To prevent damage, take glass and cutlery out of the
dishwasher as soon as possible after the programme
has ended.
Loading the dishwasher
Remove large food remnants.
It is not necessary to rinse them off under running
water.
When loading the dishwasher, ensure that
D
all utensils are secure and cannot fall over.
D
the openings of all receptacles are face down.
D
curved or indented utensils are at an incline,
allowing water to drain.
D
the two spray arms can rotate freely.
Very small items should not be washed in the
dishwasher as they could easily fall out of the baskets.
Removing the dishes
To prevent water dripping from the top basket onto the
dishes in the lower basket, we recommend that you
empty the lower basket first and then the top basket.
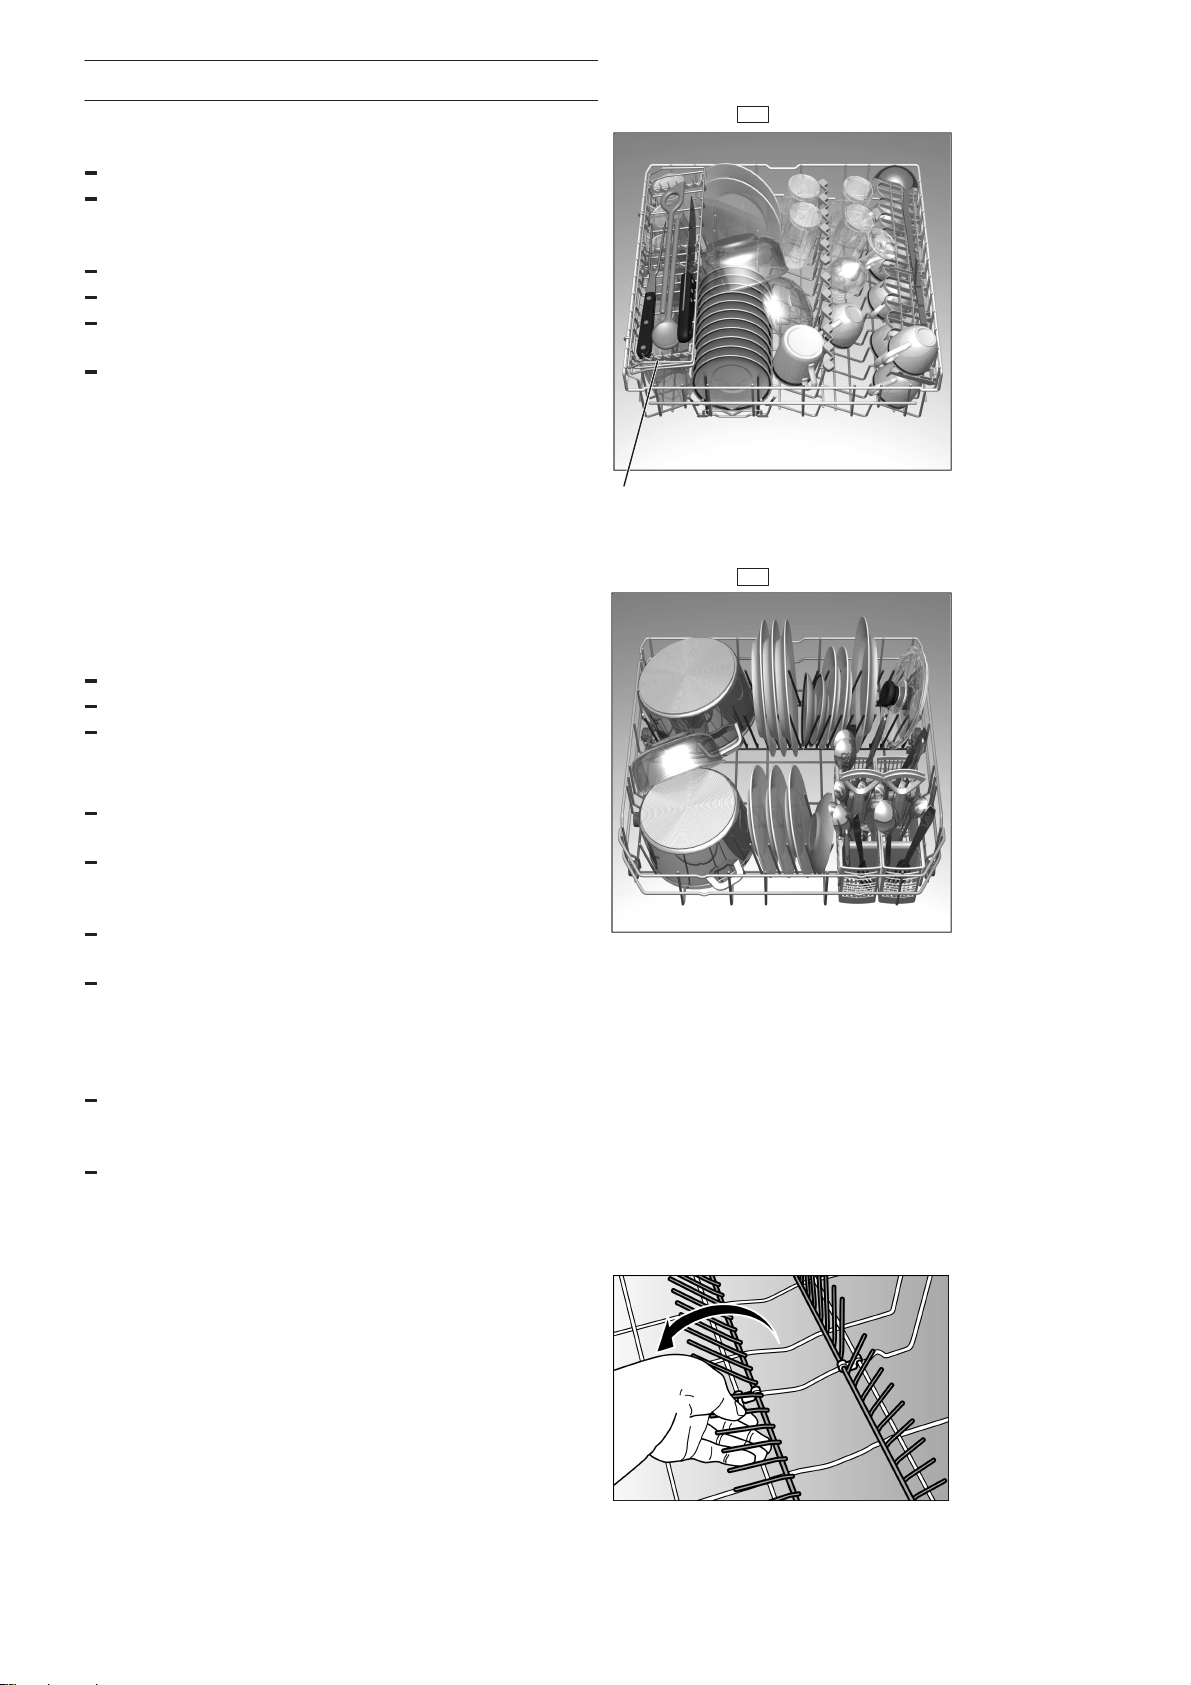
Cups and glasses
Upper basket
20
* not included with all models
Pots and pans
Lower basket
26
Cutlery
Cutlery should be placed in the dishwasher always
unsorted and with the eating surface pointing
downwards. The spray jet is then better able to reach
the individual parts.
To prevent injuries, place long, pointed accessories and
knives on the étagère (some models) or on the knife
shelf (available as an accessory).
Folding spikes *
* on applicable models
To improve stacking of pots and pans, the spikes can
be folded down.
Page 7

7
Shelf *
* not on all models
Lean tall glasses and those with long stems against the
shelf – not against other items to be washed.
The cup shelf can be inserted into either position 1 or 2
as shown in diagram.
Note: With the cup shelf in position 2, the top basket
must be locked into the upper position to prevent
interference with each other.
Long items such as serving utensils, kitchen knives, etc
should be place on the shelf and not in the cutlery
baskets so they do not obstruct the rotation of the
spray arms. When not in use the shelf can be fold
back.
Small accessories holder*
* some models
Light-weight plastic accessories, e.g. cups, lids, etc.
can be held securely in the small accessories holder.
Adjusting the height of the basket *
* some models
If required, the height of the upper utensils basket can
be adjusted to provide more space for tall utensils
either in the upper or lower basket.
Appliance height in
cm
81 86
Max. ø in cm upper 20/25* 20/25*
max. ø in cm lower 30/25* 34/29*
Select one of the two following procedures according to
the design of the top basket for your appliance model:
Top basket with upper and lower roller
pairs
Pull out the top basket.
Remove the top basket and re-attach it to the upper
or lower rollers.
Top basket with side levers
(Rackmatic)
Pull out the top basket.
To lower the basket, press in one lever and then the
other situated on the left and right of the basket
exterior, holding the basket firmly on the sides of the
upper edge to prevent it from falling down.
To raise the basket, hold the basket on the sides of
the upper edge and lift it up.
Before re-inserting the basket again, ensure that it is
at the same height on both sides. Otherwise, the
appliance door cannot be closed and the upper
spray arm will not be connected to the water circuit.
Page 8

8
Detergent
You can use commercially available liquid or powder
proprietary detergents for dishwashers or TABS (do not
use handwash!).
If phosphate-free detergents are used with hard tap
water, white deposits may be deposited more easily on
utensils and the container walls. This can be remedied
by adding more detergent.
See detergent packaging to determine whether a
detergent is suitable for silver parts.
If you have any other questions, we recommend that
you contact the helplines of the detergent
manufacturers.
Detergent dispenser with dosing aid
The graduated detergent dispenser helps you pour in
the correct amount.
Lower line: 15 ml
Middle line: 25 ml
Full to the brim: 40 ml
If the detergent dispenser
29 is still closed, press the
lock
27 to open the detergent dispenser.
Adding detergent
Fill the dispenser 29 with detergent. Dosage: see
manufacturer’s instructions on the detergent
packaging.
Important
Due to the different solvency properties of the
detergent tablets supplied by various manufacturers,
the cleaning efficiency of the detergent may not be fully
utilised by short programmes. It is recommended to
use washing powder for these programmes.
When you select the “Intensive” programme, tip an
extra 10–15 ml of detergent onto the inside surface
of the door.
Reduce costs!
If your dishes are only moderately dirty, you may be
able to use less detergent than recommended.
Close the lid on the detergent compartment.
Press down the lid (1) until it clicks shut (2).
If you are using detergent in tablet form, read the
manufacturer’s recommendations on the packaging
in order to
determine where the tablets should be placed inside
the dishwasher (e.g. in cutlery basket, detergent
compartment, etc.).
Make sure that the lid on the detergent compartment
is closed, even if you are using tablets.
CAUTION
IMPORTANT NOTE
ON THE USE OF
COMBINED CLEANING PRODUCTS
Please note the following when using ”combined
cleaning products” which eliminate the need for a
rinsing agent or salt, for example:
Some products with a built-in rinsing agent are only
used to their full effect in certain programmes.
This type of product does not generally produce the
desired effect with automatic programmes.
Products which eliminate the need for regeneration
salt can only be used within a certain water hardness
range.
If you wish to use these combined products, please
read the instructions carefully and heed any notes on
the packaging.
Contact the manufacturer of the cleaning agent if you
have any questions, particularly if:
the crockery is very wet once the programme has
finished.
limescale deposits are formed.
Any problems which arise as a direct result of the use
of these products are not covered by our warranty.
Page 9

9
Programme overview
This overview lists the max. possible number of programmes.
The programmes supplied with your appliance are indicated on the fascia.
105
2,00
110
1,05
30
0,80
23 18,4 13
delicateNon-
delicate
Mixed
Mixed
Normal
45_
Quick
35_
Intensive
65_
Pots and
Pans
70_
Pre-rinse
Programmesequence
Wash
programme
Drying
Rinse aid
70_
First
rinse
Wash
70_
Pre-rinse
50_
Second
rinse
19
0,10
5
Programme
details
Laboratory measured value in accordance with AS/NZS 2007
Duration in minutes
Electricity
consumption in kWh
Water consumption
in litres
very littlea littlea lot
stuck on hard
loosely attached
Drying
Rinse aid
70_
First
rinse
Wash
65_
Pre-rinse
Second
rinse
Drying
Rinse aid
55_
Main
rinse
Wash
45_
Pre-rinse
Rinse aid
55_
Main
rinse
Wash
35_
Pre-rinse
Type of crockery
e.g. china,
pots/pans,
cutlery,
glasses,
etc.
Type of food
remains
Amount of
food remains
Condition of
food remains
Soups, casseroles,
sauces, potatoes,
pasta, rice, eggs,
roast or fried food
Soups, potatoes,
pasta, rice, eggs,
roast or fried food
Coffee, cakes,
milk, sausage,
cold drinks,
salads
Rinse off if
the dishes
have been
stacked for
several days
in the
dishwasher
prior to
washing.
105
1,75
23
Page 10

10
Washing dishes
Reduce costs!
If only a small number of dishes have been loaded into
the dishwasher, selecting a programme that operates
at the next lowest temperature will usually suffice.
Programme data
The stated programme data are based on standard
operating conditions. The values can vary considerably
according to:
different amounts of dishes
temperature of mains water supply
pressure of mains water supply
ambient temperature
fluctuations in mains voltage
machine-related factors (e.g. temperature, water
volume, ...).
Switching on the appliance
Close the door.
Turn on the tap fully.
Rotate programme selector 3 to the required
programme.
Switch on the main switch 1.
The programme sequence display
5
lights up, the
programme sequence starts automatically.
End of programme
The programme ends when the Programme progress
indicator
5
has gone out and the End-of-programme
indicator 6 illuminates. When the programme ends,
the ”Top basket washing” function is de-activated if
required (only some models).
Several minutes after the programme has ended:
Open the appliance door.
Wait until the dishes have cooled down and then
remove.
When the programme has ended, you can either switch
off the appliance or restart it with the same or another
programme.
Switching off the appliance
Several minutes after the end of the programme:
Switch off the main switch 1.
”End of programme” display 6 goes out.
Turn off the tap
(does not apply to Aqua Stop).
It is not necessary to adjust the programme selector.
Remove the utensils when they have cooled down.
Interrupting the programme
Set the main switch 1 to OFF.
Indicator lights extinguish.
If the hot water was switched ON or the appliance has
already heated up and then the appliance door opened,
leave the door ajar for several minutes and then close.
Otherwise, the appliance door may fly open due to
expansion.
In order to resume the programme, set the main
switch to ON again.
Terminating the programme (Reset)
Only when the main switch is on:
Rotate programme selector to the Reset position.
The programme sequence lasts approx. 1 min.
When the programme has run, switch off the main
switch
1
.
To restart, rotate the programme selector
3
to the
required programme. Switch on the main switch 1.
The programme sequence starts automatically.
Changing the programme
It is possible to change the programme within 2 minutes after
you have switched the dishwasher on.
Should it be necessary to change the programme after this
period, the programme cycle that has already been begun
(e.g. washing) will be completed first of all.
Note
If the power supply is disconnected while the appliance
is operating, e.g. by switching off the appliance or due
to a power failure, all settings remain stored. Operation
continues automatically as soon as the power supply is
restored.
Page 11

11
Maintenance and care
A regular inspection and maintenance of your machine
will help to prevent faults. This saves time and prevents
problems.
Overall condition of the machine
Check washing chamber for grease and limescale
deposits.
If you find such deposits:
Fill the detergent dispenser with detergent, start the
appliance without utensils in the programme which
has the highest wash temperature.
Clean the appliance with detergents/ appliance
cleaners which are particularly suitable for use with
dishwashers.
Regularly wipe the door seal with a damp cloth.
Never use a steam cleaner to clean your dishwasher.
The manufacturer is not liable for any consequential
damage.
Regularly wipe the front of the appliance and panel with
a damp cloth; water and a little washing-up liquid will
suffice. Do not use sponges with a rough surface or
abrasive detergents, as these could scratch the
surfaces.
Attention!
Never use other chlorinated household detergents!
Health hazard!
Rinse-aid
As soon as the rinse-aid refill indicator lights up on
the control panel
7
, refill with rinse aid.
Filters
The filters
24 prevent larger remnants of food or other
objects from getting inside the pump. This residue can
occasionally clog up the filters.
The filter system consists of a filter cylinder, a flat fine
filter and, depending on the model, a microfilter (*).
Inspect the filters for obstructions every time the
dishwasher has been used.
By unscrewing the filter cylinder, you can remove the
filter system. Remove any food remnants and clean
the filters under running water.
Reassembly:
Insert the filter system and screw down with the filter
cylinder.
Spray arms
Lime and remnants of food in the washing water can
block the nozzles in the spray arms
22 and 23 and
the arm mountings .
Inspect the nozzles in the spray arms for blocked
holes due to remnants of food.
If necessary, pull the lower arm 23 upwards and lift
it off.
Unscrew the upper spray arm 22 .
Clean both spray arms under running water.
Refit the spray arms. Ensure that the lower arm has
locked into place and the upper one is screwed tight.
Page 12

12
Pump *
* on applicable models
Larger remnants of food that have not been trapped by
the filters and have been left in the water can cause a
blockage in the pump. The water is no longer pumped
out of the dishwasher and it can be seen covering the
filter.
Proceed as follows:
First, always disconnect the appliance from the
power supply.
Ladle out as much water as possible.
Remove the filters 24 .
Undo the screw in the cover (Torx T 20) and remove
the cover.
Inspect the inside and remove any obstructions that
you find.
Re-insert the cover and screw down.
Re-insert the filters and screw down.
Torx T20
2
1
Fault finding
Resolving minor problems yourself
Experience has shown that you can resolve most
problems that arise during normal daily usage yourself,
without having to call out a service engineer. Not only
does this save costs, but it also means that the
appliance is available for use again that much sooner.
The following list of common occurrences and their
remedies should help you identify the causes of most
problems.
Problems ...
Attention
Remember: Repairs may be carried out by a technician
only. If a component has to be replaced, ensure that
only original spare parts are used. Improper repairs
or use of non-original spare parts may cause
considerable damage and put the user at considerable
risk.
... when the appliance is switched on
The appliance does not start.
The mains fuse has tripped.
The appliance plug has not been inserted.
The appliance door has not been shut properly.
The tap has not been turned on.
The filter on the water supply hose is blocked.
Switch off the appliance and pull out the mains
plug. Turn off the tap. Then clean the filter which
is situated at the connection of the supply hose.
Finally, restore the power, turn on the tap and
switch on the appliance.
... with the appliance itself
Lower spray arm rotates with difficulty
Spray arm is blocked by small items or food
remains.
Lid in detergent compartment cannot be closed
Detergent compartment has been overfilled.
Mechanism is clogged with remnants of
detergent.
Indicator lamps do not extinguish after washing
has finished.
Indicator lights flash after the programme has
started.
No programme selected.
Indicator lamps do not extinguish after
washing has finished
Main switch is still set to ON.
Page 13

13
“Check water supply” display 4 lights up.
Tap turned off.
Water supply interrupted.
Filter in the water supply blocked.
Supply hose kinked.
Remnants of detergent stuck inside dispenser
Compartment was damp when it was filled up
with detergent. Compartment must be dry
before detergent is added.
Water remains inside appliance after
programme has ended
Blockage or kink in drainage hose.
Pump is jammed.
Filters are blocked.
The programme is still running. Wait for the
programme to end.
Perform “Reset” function.
... during washing
Unusual amount of foam is created
Normal washing up liquid has been poured into
the rinse-aid container.
Remove any spilled rinse aid with a cloth as it
could otherwise lead to excessive foaming
during the next washing cycle.
Appliance stops suddenly while washing is
taking place
Cut in electricity supply to appliance.
Water supply has been interrupted.
Knocking sound can be heard while washing is
taking place
A spray arm is knocking against the dishes
inside the appliance.
Rattling sound can be heard while washing is
taking place
Crockery has not been stacked properly inside
the appliance.
Knocking sound coming from inlet valves
This is caused by the way the water pipes have
been laid and it has no effect upon the way the
appliance functions. There is no remedy for this.
... with the dishes, cutlery, etc.
Remnants of food are stuck to the dishes,
cutlery, etc.
Dishwasher was not loaded properly. Jets of
water could not reach all parts of the dishes,
etc.
Too many items in the rack.
Items in the rack were touching each other.
Not enough detergent was added to dispenser.
Selected wash programme was not intensive
enough.
Rotation of spray arm was obstructed by dish,
etc.
Nozzles in spray arm are blocked by remnants
of food.
Filters are blocked.
Filters have been incorrectly fitted.
Waste-water pump is jammed.
Plastic items are discoloured
Not enough detergent was added to dispenser.
Detergent has insufficient bleaching properties.
Use a detergent containing a chemical
bleaching agent.
White stains are left on crockery, glasses have
a milky appearance
Not enough detergent was added to input
compartment.
Amount of rinse-aid was set too low.
If you used a phosphate-free detergent, try a
detergent containing phosphates and compare
results.
Dishes, cutlery, etc. have not been dried
Selected programme did not include drying
function.
Amount of rinse-aid was set too low.
Items were removed from dishwasher too soon.
Glasses have a dull appearance
Amount of rinse-aid was set too low.
Tea stains or traces of lipstick have not been
completely removed
Detergent does not have a sufficient bleaching
effect.
Washing temperature was set too low.
Traces of rust on cutlery
Cutlery is not sufficiently rustproof.
Glasses become clouded and discoloured;
coating cannot be wiped off
Unsuitable detergent was used.
Glasses are not dishwasher-proof.
Smears left behind on glasses and cutlery;
glasses have acquired a metallic appearance
Amount of rinse-aid set too high.
Page 14

14
Customer Service
Please call your local service agent, if you are not able
to resolve any problem yourself. The name of your
nearest service agent is shown in the Customer
Service address list. When you call, please provide
details of the model number (1) and the production
(FD) number (2) which are shown on the nameplate
30
on the appliance door.
FD
1
2
Attention
Please note that a visit by the customer service
technician in the event of a fault or one of the problems
previously discussed is not free of charge even during
the warranty period.
Information
Notes on comparison tests
You will find details of the conditions for the comparison
tests on the additional ”Notes on comparison tests”
sheet. The consumption values for the relevant
programmes are given in the introduction.
General
Built-under and integrated appliances which are
subsequently installed as free-standing appliances
must be secured to prevent them from falling over,
e.g. by screwing them to the wall or by installing
them under a continuous worktop which is screwed
to the adjoining units.
Page 15

15
Installation
The dishwasher must be connected by a qualified
technician to ensure correct operation. The
specifications for supply, drainage and connected load
must fulfil the required criteria as stated in the following
paragraphs or in the installation instructions.
Install the appliance in the following sequence:
– Check the delivery
– Install the appliance
– Connect the waste water
– Connect the fresh water
– Connect the power supply
Delivery
Your dishwasher was checked at the factory to ensure
that it was in perfect working order. This may have left
some small water stains in the dishwasher. These will
disappear after the first rinse cycle.
Installation
The required installation dimensions can be found in
the installation instructions. Using the height-adjustable
feet, adjust the appliance until it is level. Ensure that
the appliance is standing firmly.
Waste water connection
See the installation instructions for the required
connection steps. If required, attach a siphon with
drainage spigot. Using the enclosed parts, connect the
waste water hose to the drainage spigot of the siphon.
Ensure that the drainage hose is not kinked, crushed or
twisted (ensure that there is no sealing cover which
prevents the waster water from flowing away!).
Fresh water connection
Using the enclosed parts, connect the fresh water
connection to the tap according to the installation
instructions. Ensure that the fresh water connection is
not kinked, crushed or twisted.
When replacing the appliance, always connect a new
water supply hose to the water supply. The old supply
hose must not be re-used.
Water pressure:
Minimum 0,05 MPa (0,5 bar) – maximum 1 MPa (10
bar).
If the water pressure is higher, install a pressure
reducing valve.
Flow rate:
Minimum of 10 litres per minute.
Water temperature:
We recommend cold water connection only.
Electrical connection
This appliance should only be connected to a 230V /
240V AC source via a properly installed earthed
socket. See nameplate for size of required fuse.
The socket must be installed close to the dishwasher.
If you need to extend the mains connecting lead, do not
cut off the plug. Replace the whole cable, which can be
disconnected at the junction box on the rear of the
appliance.
If the domestic wiring includes a residualcurrent-operated (FI) circuit-breaker, make sure that it
bears the
mark, as only this type conforms to the
latest regulations
Disconnecting the dishwasher
Here too, it is important that tasks are carried out in the
correct sequence: always unplug the appliance from
the mains electricity first of all.
Pull plug out of wall socket.
Turn off water supply.
Disconnect drain and water input hoses.
Remove screws in underside of work surface. Detach
base board, if fitted.
Pull out appliance and carefully withdraw hoses at
same time.
Transporting the dishwasher
Drain water from the dishwasher. Secure all loose
parts. The appliance should only be transported in an
upright position.
If the appliance is not kept upright during transport,
any water left inside may seep into the control
module and cause subsequent errors with
programme functions.
Drain the appliance according to the following steps:
Turn on the tap.
Close the door.
Select ECO programme.
Switch on the main switch.
Wait until approx. 4 minutes have elapsed.
Rotate programme selector to the Reset
position.
After another minute switch off the appliance.
Turn off the tap.
Protection from freezing temperatures
If the appliance is installed in a location where there is
a risk of freezing temperatures (e.g. in a holiday home),
all water must be completely drained out of the interior
(see “Transporting the dishwasher”).
Turn OFF the tap, disconnect the supply hose and
allow to drain.
Page 16

16
Waste disposal
Disposal
Old appliances are not worthless rubbish. Valuable raw
materials can be reclaimed by recycling old appliances.
Pull out the mains plug of the redundant appliance. Cut
off the power cord and discard with mains plug.
To prevent children from locking themselves in the
appliance and suffocating, destroy the door lock
and childproof lock (if fitted).
You received your new appliance in a protective
shipping carton. All packaging materials are
environmentally friendly and recyclable.
Please contribute to a better environment by disposing
of packaging materials in an environmentally-friendly
manner. All plastic parts of the appliance are identified
by internationally standardised symbols (e.g. >PS<
polystyrene).
When the appliance is being disposed of, the plastic
waste can be sorted for environmentally-friendly
recycling.
Please ask your dealer or inquire at your local authority
about current means of disposal.
Disposal of the packaging
Please dispose of the packaging material in an
environmentally friendly manner.
Keep children away from shipping carton and
packaging components. Danger of suffocation from
folding cartons and plastic film.
D
Corrugated cardboard consists mainly of
wastepaper.
D
The moulded polystyrene parts do not contain
any chlorofluorohydrocarbons.
D
The polyethylene film (PE) consists partly of
secondary raw materials.
D
The wooden frames (if fitted) are made of
untreated residual wood.
D
The hoops (if fitted) consist of polypropylene
(PP).
Disposal of redundant appliances
Make redundant appliances unusable to prevent
subsequent accidents.
Dispose of the appliance in an environmentally
friendly manner.
Warning
Children could become locked in the appliance (risk of
suffocation) or find themselves in other dangerous
situations. Therefore: Pull out the mains plug, sever
and dispose of the power cord. Destroy the door lock
so that the door can no longer be closed.
This appliance is labelled in accordance with European
Directive 2002/96/EG concerning used electrical and
electronic appliances (waste electrical and electronic
equipment – WEEE). The guideline determines the
framework for the return and recycling of used
appliances as applicable throughout the EU.
Page 17

17
aus Subjekt to modification
Page 18

Child-proof lock *
40 Switch on the child-proof lock
41 Open the door with child-proof
lock switched on
42 Switch off the child-proof lock
Baking sheet spray head *
When the door is open, the child-proof
lock offers no protection.
Large sheets or grilles and plates which have a diameter greater than 30 cm
(gourmet plates, pasta plates, dinner plates) can be cleaned with the aid of the
spray head.
To do this, remove the top basket and insert the spray head as illustrated in the
diagram.
To ensure that the spray jet can reach all parts, arrange the baking sheets as
illustrated (max. 4 baking sheets and 2 grilles).
Never operate the dishwasher without the top basket or baking sheet spray
head!
* some models
Page 19

·
9000 170 143 aus (8604) 630o
 Loading...