

Page 1
Operating and Assembly Instructions
CK 481
CK 482
Electronic Glass-Ceramic Hob
Page 2

CK 481
CK 482
1
1. Important notes Page 3-4
For your safety Page 3
Operating for the first time Page 4
About use Page 4
2. Features Page 5
Features of the appliance Page 5
Control panel Page 5
Special accessories Page 5
3. Operating principles Page 6-7
4. Operation Page 8-11
Switching on and off Page 8-9
Residual heat display Page 9
Memory function Page 10
Energy saving tips Page 10
Settings table Page 11
5. Additional functions Page 12-17
Cooking zone extension front left Page 12
Cooking zone extension rear Page 13
Automatic quick-boil function Page 14
Timer operation Page 15-16
Overheating protection Page 17
Holiday safeguard Page 17
Child lock Page 17
6. Options menu Page 18-21
7. Cleaning and care Page 22
8. Maintenance Page 23
9. Remedying slight malfunctions yourself Page 24
10. Installation Page 25-28
Technical Data Page 25
Important notes on installation Page 25
Installation CK 481 Page 26
Installation CK 482 Page 27-28
Page 3
2
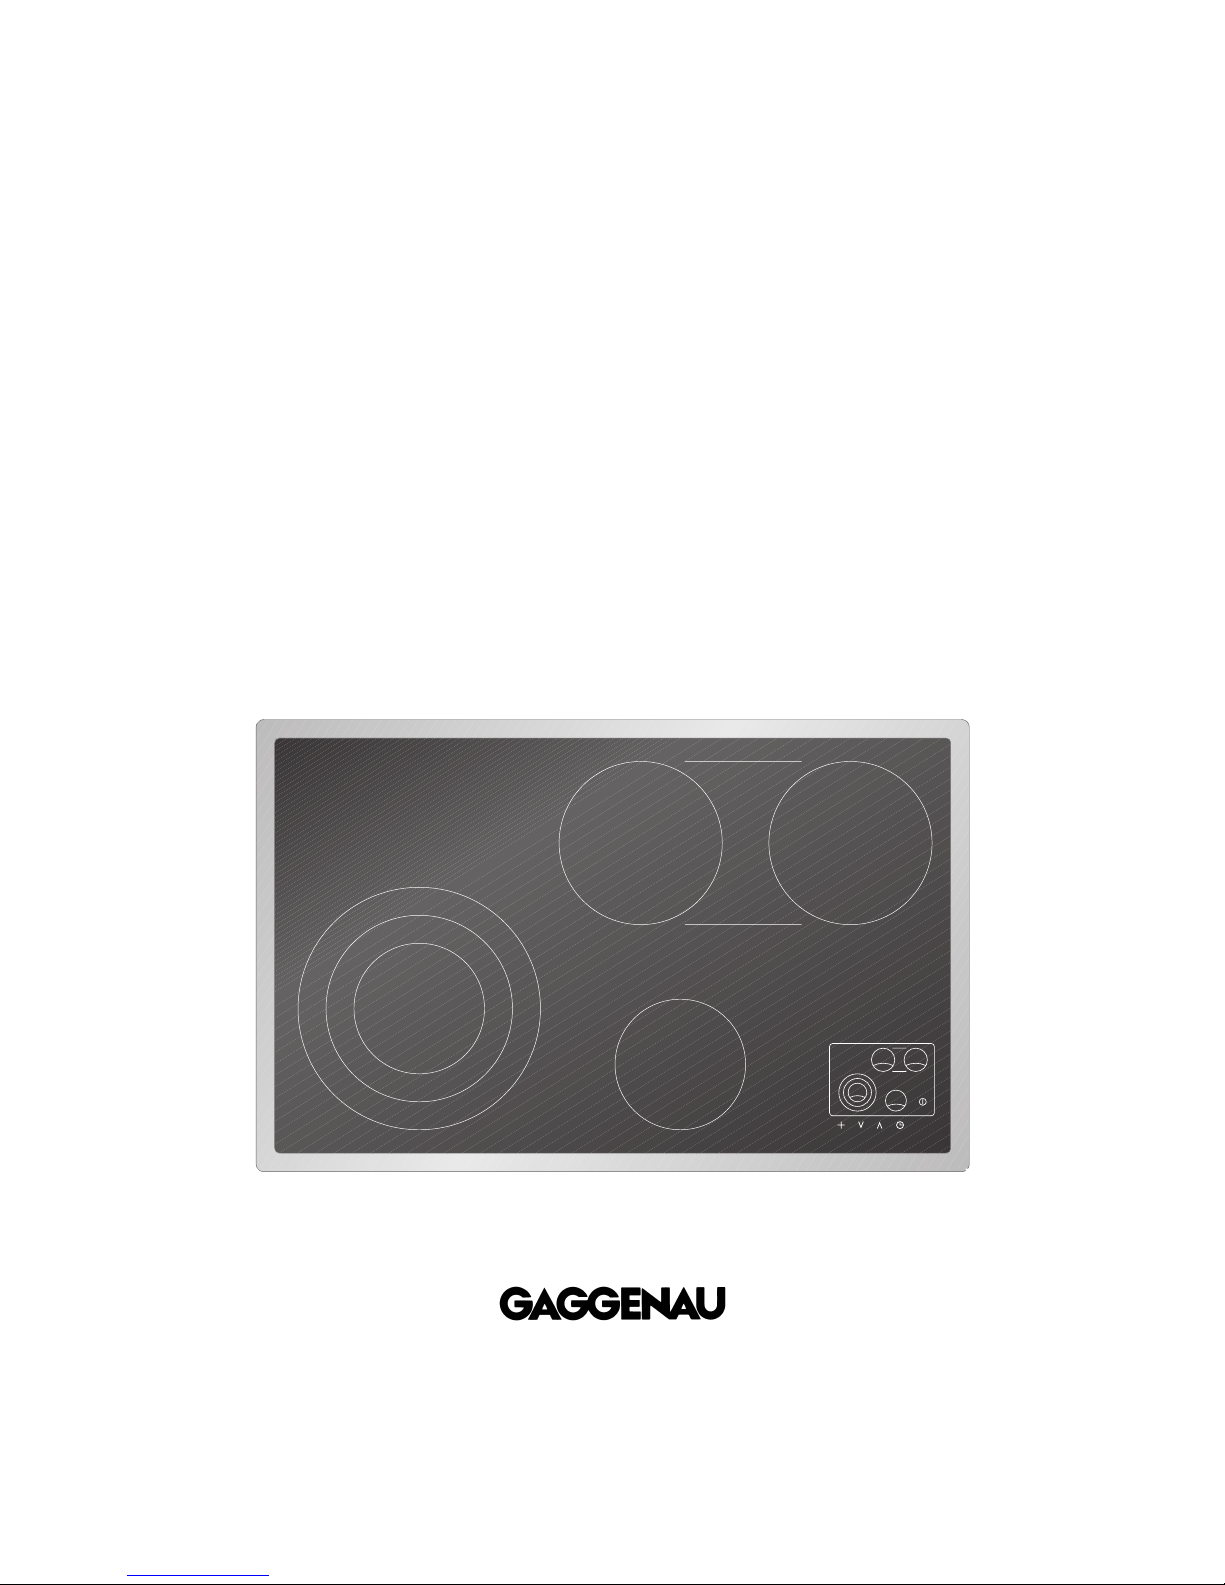
Cooking with your new glass-ceramic hob
will be even more fun than before.
The appliance offers you the following
advantages:
– A generous cooking area.
– Cooking zones for large pans and oval shaped
roasters – the cooking zone size can be adjusted
individually using the combination feature.
– Easy operation through sensor pads.
To ensure that you will be able to use this
appliance in all its diversity, read through
the operating and assembly instructions
conscientiously before operating it for the first
time. The instructions contain important notes
on use, installation and maintenance of the
appliance.
In the following pages you will find important notes
on safety and operation. These will serve to
ensure your personal safety and the lasting value
of your appliance.
You will find notes on page 4 that you ought to
observe before operating the appliance for the
first time.
The chapters entitled “Features", “Operating
principles" and “Operation" tell you all about what
your appliance can do and how you operate it.
The chapter entitled “Cleaning and care" will
make sure that your appliance will stay operable
and beautiful for a long time.
And now we wish you lots of fun cooking.
CK 481
CK 482
Page 4

3
For your safety
You must not operate the appliance if it is damaged.
The appliance must only be connected by
an authorised specialist, paying attention to
the relevant regulations of the power supply
companies and the regional construction
regulations.
Observe the assembly instructions!
The appliance could be damaged if connected
wrongly!
When connecting electrical appliances in the
proximity of cooking surfaces and ovens, make sure
that connecting cables do not become jammed
under the hot oven door or come into contact with
hot cooking surfaces.
Only ever operate the appliance under supervision.
Observe caution with oils and fats. Overheated oils
and fats can easily cause fires.
Caution: the appliance heats up during operation.
Keep children away.
Do not operate the cooking positions without pots
and pans placed on them.
To avoid jeopardising the electrical safety of the
appliance, do not use high-pressure or steam jet
cleaning devices.
Do not store any substances that are sensitive to
high temperatures, or which pose a fire hazard (e.g.
cleaning agents or spray cans), in drawers or
cupboards under the appliance.
Operation of the appliance must be discontinued
immediately if improper use produces cracks,
breaks or flaws on the cooking surface, with the
result that live parts can come into contact directly
or indirectly with seeping liquid or if there is a risk
of injury. Remove the mains plug or switch off the
corresponding mains fuse. Call after-sales service!
Isolate the appliance from the mains during every
maintenance operation. To do this, remove the
mains plug or switch off the corresponding fuse.
Repairs must be carried out by authorised
specialists, thus ensuring electrical safety.
As the user, you are responsible for maintenance
and proper use in the household. No warranty
claims can be lodged for any damage resulting
from failure to observe these instructions.
Subject to technical change without notice.
1. Important notes
Page 5

4
Operating for the first time
Remove the packaging from the appliance and
dispose of it according to local regulations. Be
careful to remove all accessories from the
packaging. Keep packaging elements and plastic
bags away from children.
This appliance is labelled in accordance
with the European Directive 2002/96/EG
concerning used electrical and electronic
appliances (waste electrical and
electronic equipment – WEEE). The
guideline determines the framework for the return
and recycling of used appliances as applicable.
Check the appliance for transport damage before
installing it.
The appliance must be installed and connected by
an authorised specialist before operation. Before
operating the appliance for the first time, make
sure that the mains connection is in proper working
order.
The serial number of the appliance can be found on
the quality control slip which is included with these
instructions. This quality control slip should be kept,
for guarantee reasons, together with your operating
and assembly instructions.
Read through these instructions attentively before
operating your appliance for the first time.
Thoroughly clean the appliance and accessories
before using them for the first time. This will
eliminate any 'newness' smells and soiling (see
chapter “Cleaning and care”).
About use
The appliance is intended solely for household use
and must not be put to any other uses.
Use the appliance to prepare meals only. Do not use
the appliance to heat up the room in which it is
installed.
Do not use the cooking surface as space to store
items. Do not place any hot pots on the display
panel.
Place a cooking vessel on the corresponding
cooking zone before operating it. Do not remove
the cooking vessel until you have switched off the
hotplate. The size of pots and pans should correspond to the size of the hotplate. This will save you
energy and time.
Switch off the hob after use.
Iridiscent discoloration can be caused by the bases
of some pots. These do not interfere with the
operation of the glass ceramic hob.
Always keep the cooking area and control panel
dry and clean. The surface can be scratched due to
dirt (e.g. sand grains).
Never heat food in aluminium or plastic containers
as the material can melt and damage your hob.
Built-in overheating protection prevents overheating
of the appliance and of surrounding kitchen
furniture.
If installed above a pyrolytic oven, the overheating
protection may be triggered when the hob is
operated during a pyrolytic cleaning cycle.
In the event of malfunction, first check your
household fuses. If the power supply is in proper
working order, but the appliance is still not
functioning, please inform your specialist dealer or
your nearest Gaggenau after-sales service.
Page 6
5
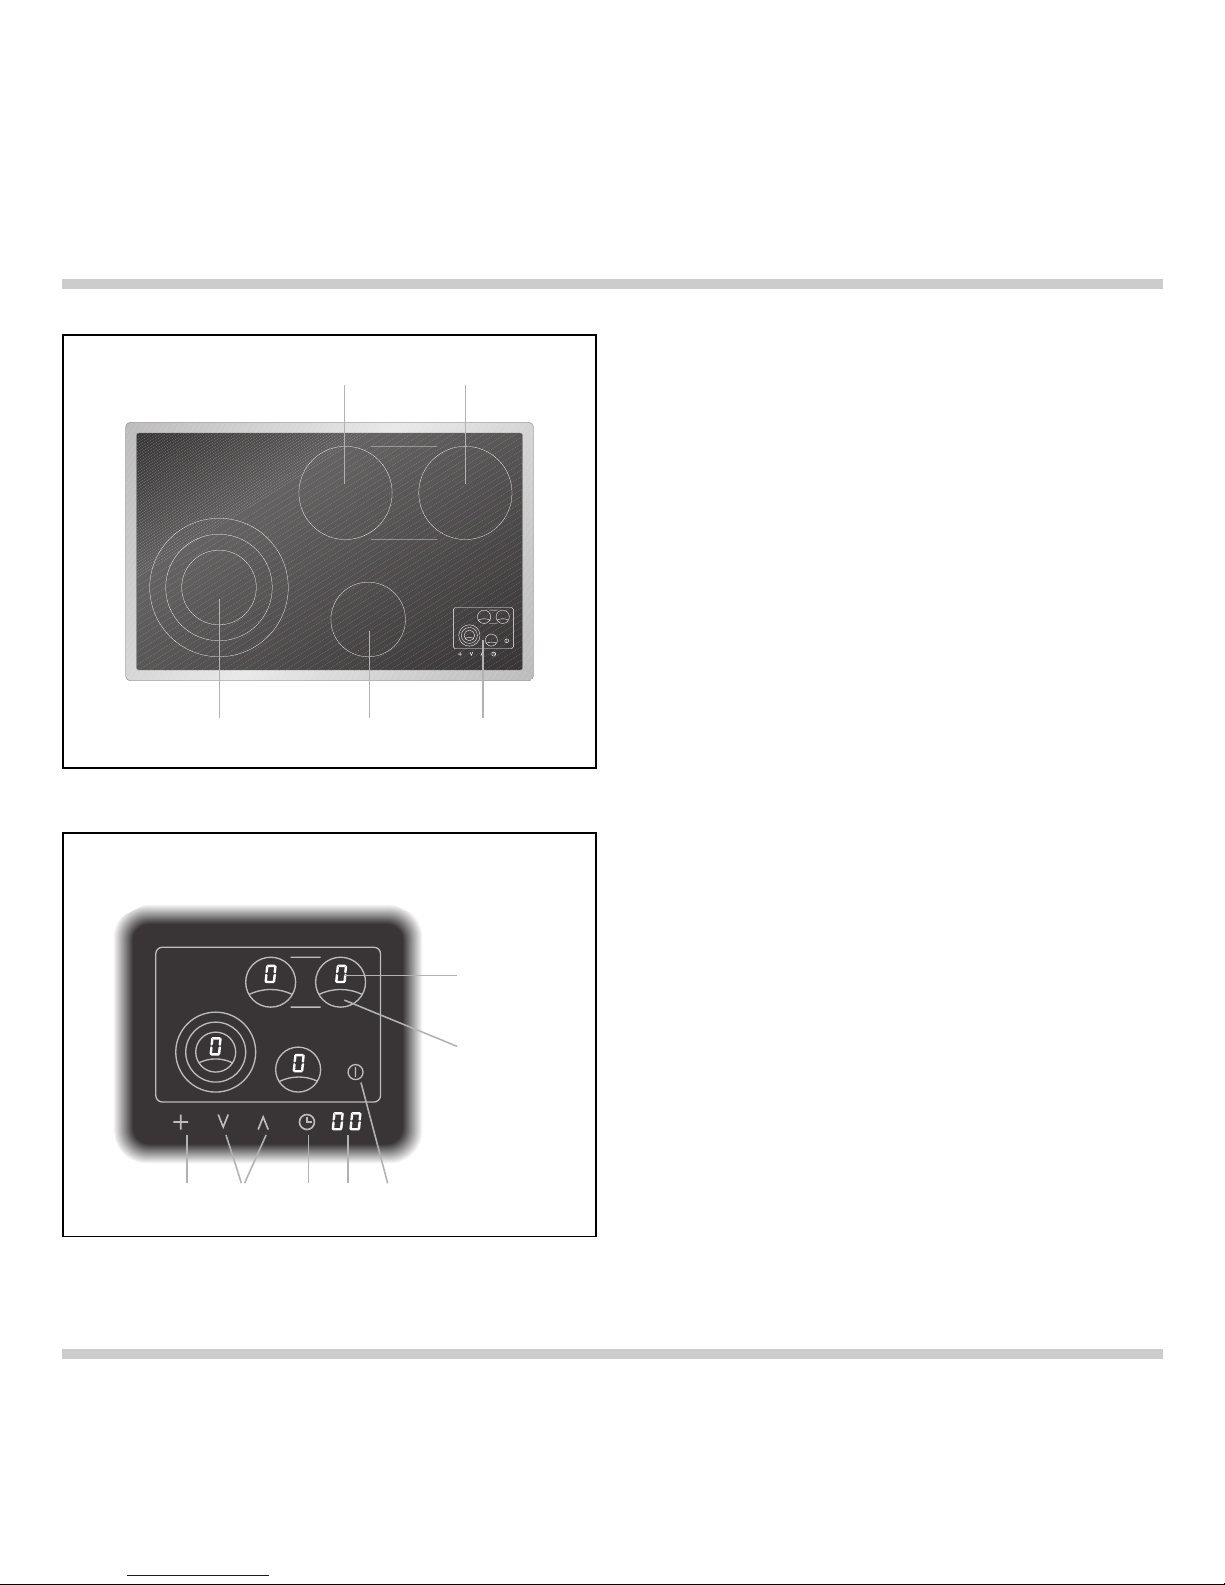
Features of the appliance
Control panel
Special accessories
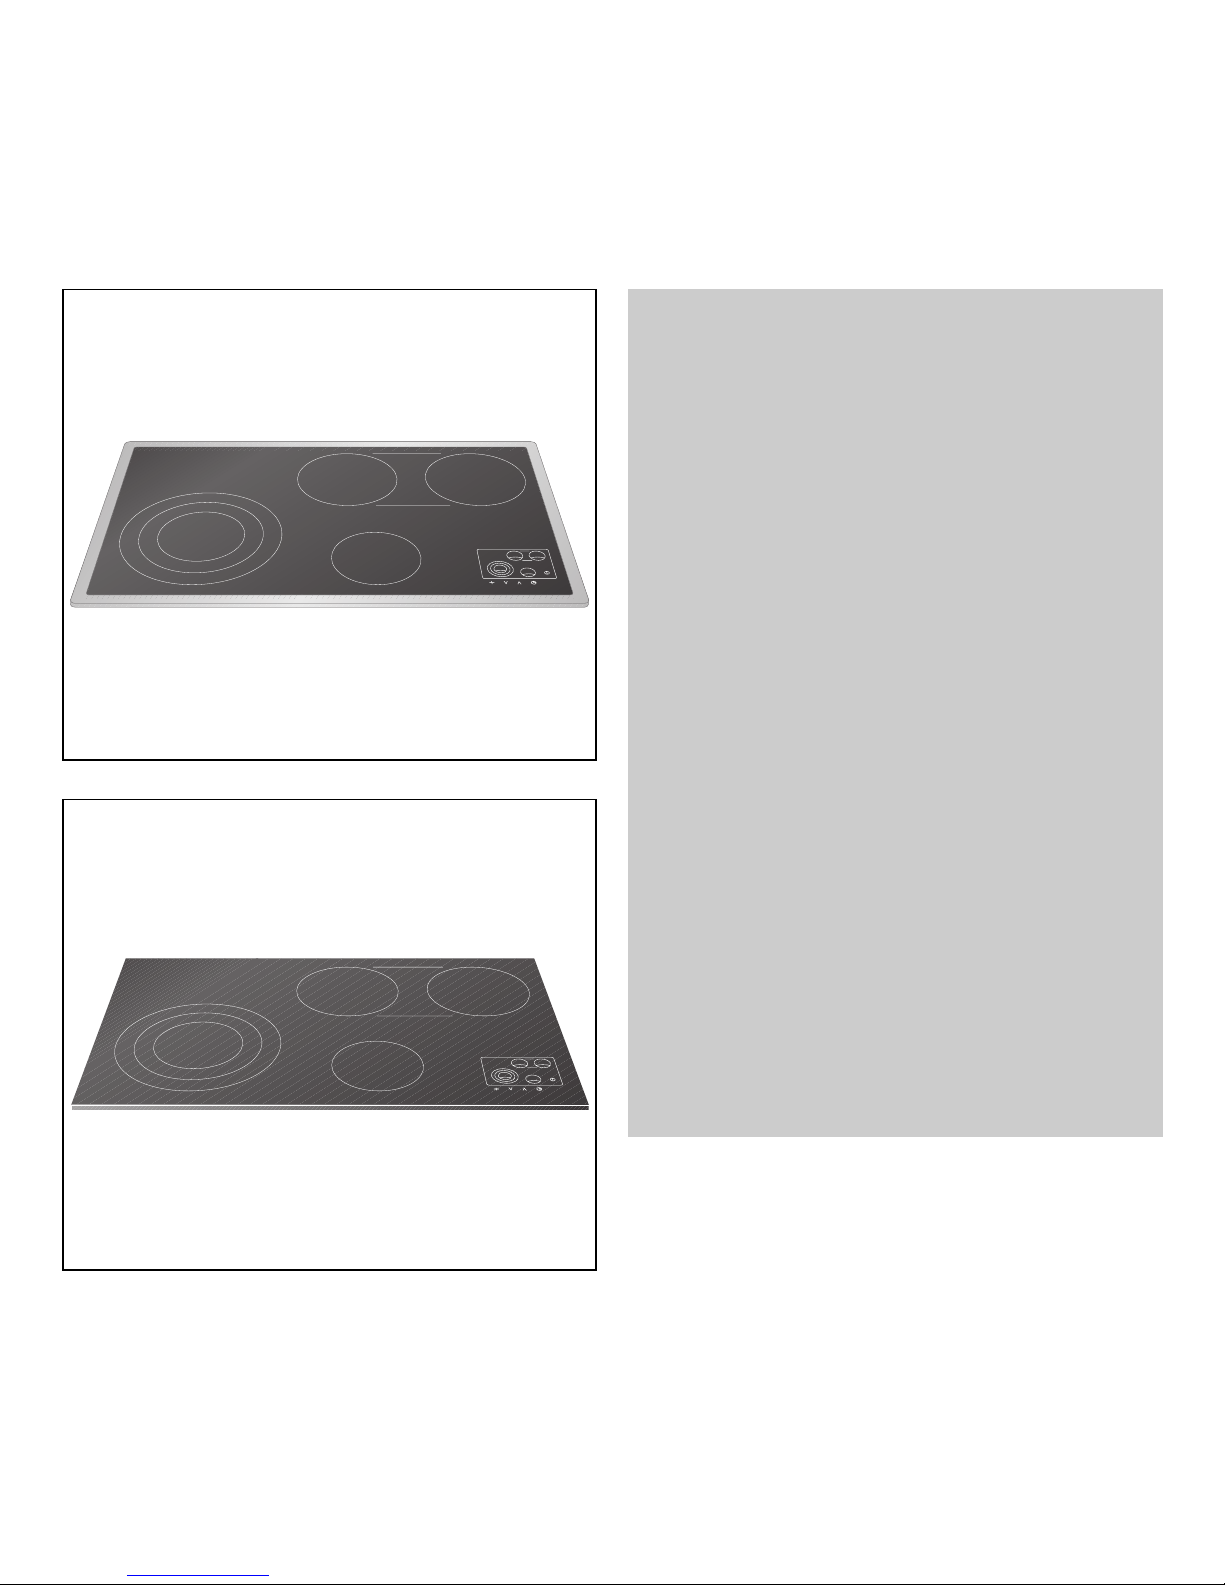
CK 481 is supplied with a stainless steel frame.
CK 482 is suitable for flush mounting into stone or
tiled worktops. The operation of both types is
identical.
1 SuperQuick cooking zone Ø 140 mm (1050 W),
converts to Ø 210 mm (2200 W)
or to Ø 280 mm (3080 W)
2 SuperQuick cooking zone Ø 180 mm (1800W)
3 SuperQuick cooking zone Ø 180 mm (1800W)
cooking zones 2 and 3 plus additional zone
800 W convert to oval roasting zone
180 x 415 mm (4400 W)
4 SuperQuick cooking zone Ø 145 mm (1200 W)
5 Display panel
6 Cooking level display
7 Cooking zone selection
8 Main switch
9 Timer display
10 Timer switch
11 UP-/DOWN-symbols to select cooking level
and timer
12 Cooking zone extension switch
You can order the following special accessory:
BT 481-000 Non-stick coated roaster with lid,
suitable for the roasting zone
2. Features
23
145
12 11 10 9 8
6
7
Page 7
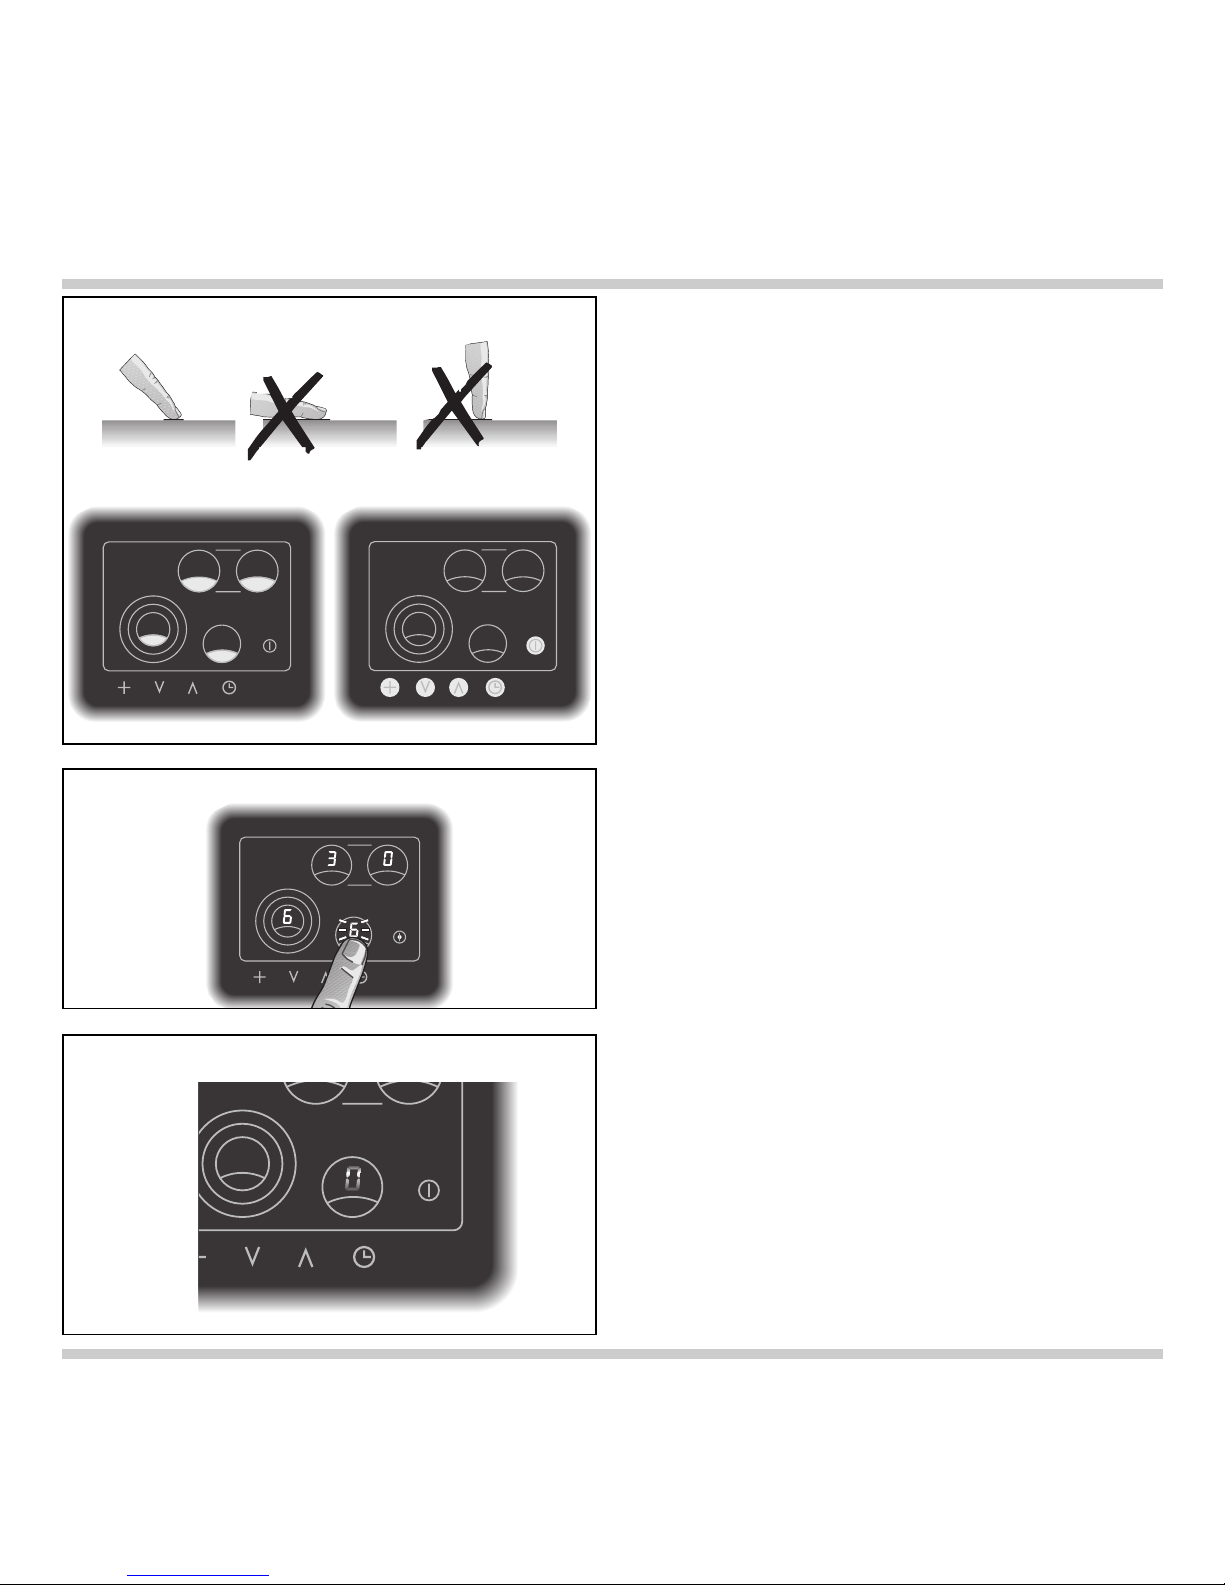
The cooking range is operated by touch control
sensors. Touch the required sensor pad in the
shaded area as shown in the picture. You only need
to touch the pad with your finger, no pressure is
required. Every accepted input is confirmed by an
audible signal.
Always keep the control panel clean. Do not place
hot cooking dishes on the control panel.
When you touch more than one sensor pad
simultaneously or if any object (e.g. cooking spoon,
dish cloth) lie on the sensor pads, the appliance
registers this as an error. No input is registered and
several short tones are sounded.
When the appliance is switched on, a spot lights up
on the main switch symbol.
The given cooking level is shown on the display of
each cooking zone.
A flashing display shows that a value has not yet
been confirmed.
The residual heat display appears on the display of
the relevant cooking zone after switching off.
The moving zero in the cooking level display
indicates that, after switching off, a cooking zone
has still not cooled down to such an extent that it
can be safely touched.
6
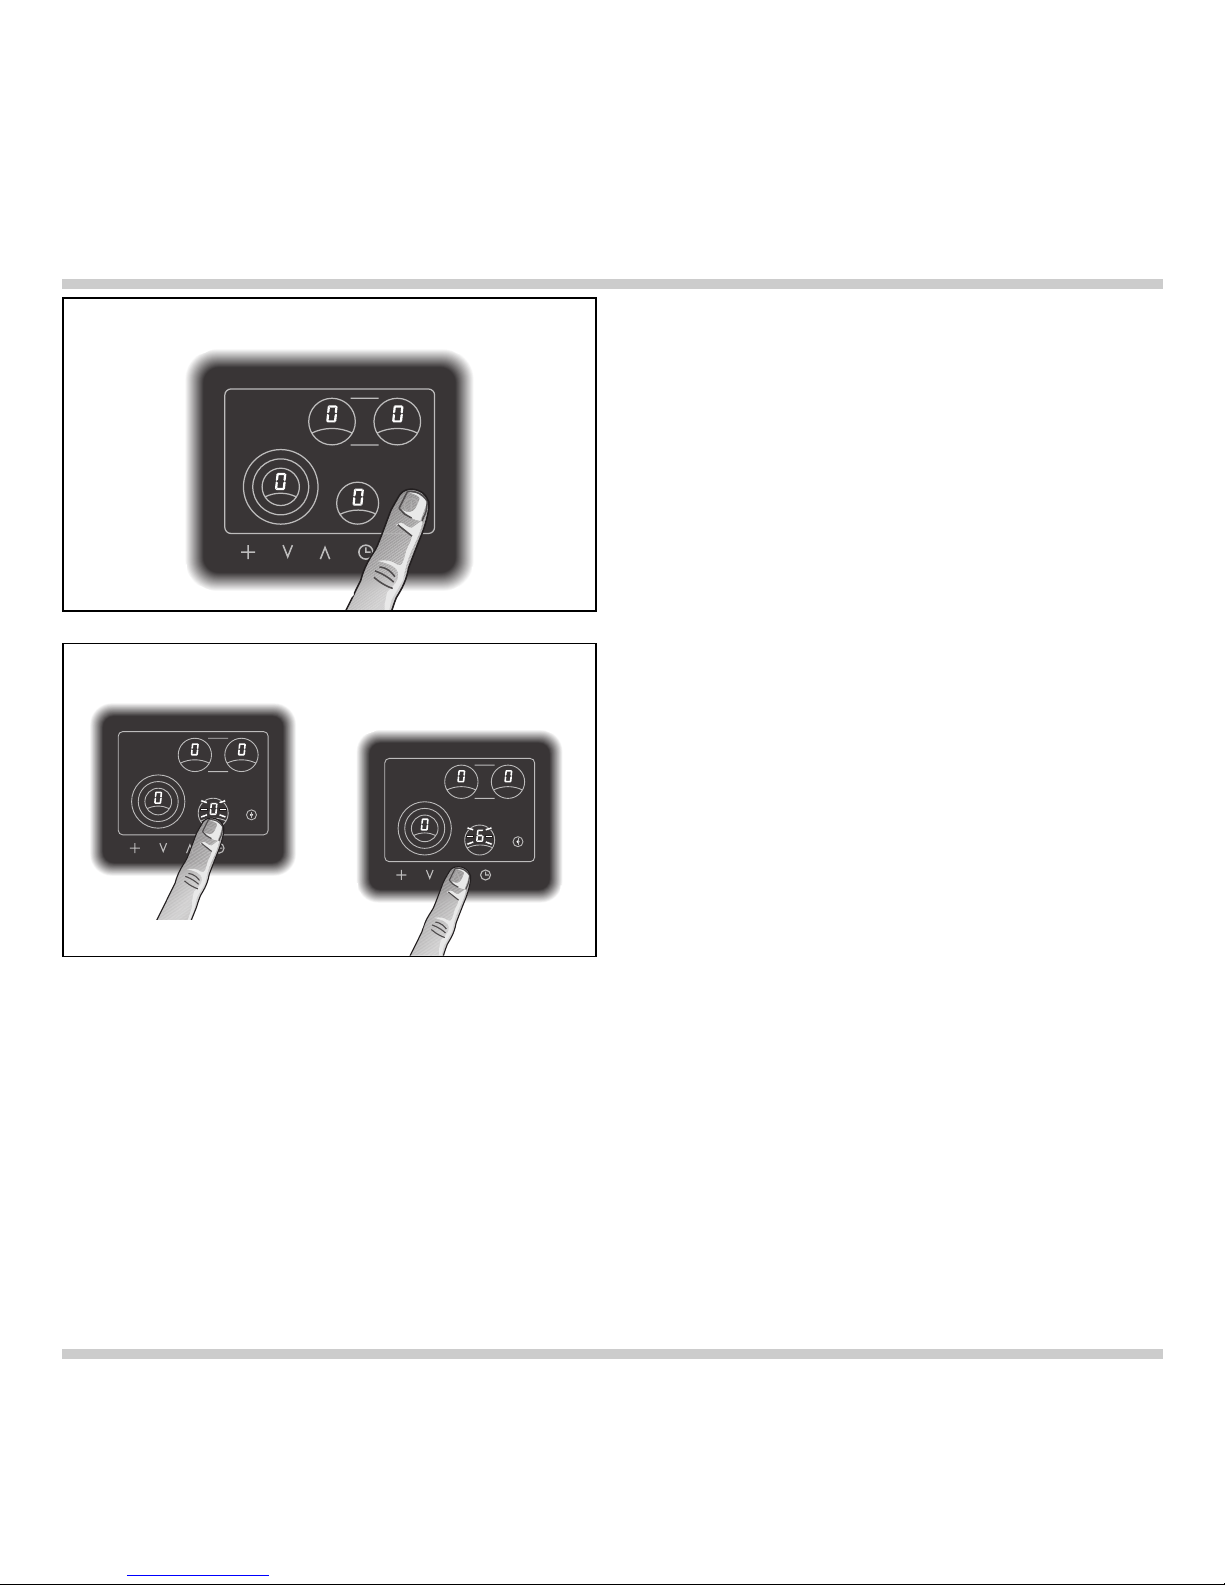
3. Operating principles
Sensor pads
Residual heat display
Display
Page 8

Additional features
Cooking zone extension page 12-13
The front left cooking zone can be extended to a
middle or large diameter.
Both rear cooking zones convert, together with an
additional zone, to an oval cooking zone especially
suitable for roasters.
Automatic quick-boil function page 14
The cooking range features an automatic quick-boil
function. The feature is selected by touching the
required cooking zone twice on the control panel.
The cooking zone returns to the selected level after
the quick-boil time has expired.
Memory function page 10
The cooking range stores all the set cooking levels
and time values for 15 seconds after it has been
switched off. You are therefore able to retrieve all
the previous values should you switch it off
accidentally.
Timer page 15-16
It is possible to program an automatic switch-off
time for one or several of the cooking zones. It is
also possible to use the timer independently.
Overheating protection page 17
The electronics of the cooking range are equipped
with an overheating protection.
Holiday safeguard page 17
If you should ever forget to switch off a cooking
zone after use, the appliance is set to automatically
switch off a cooking zone 4 hours after the last
operation.
Child lock page 17
It is possible to avoid switching on the appliance
accidentally by using the child lock. The child lock
function is de-activated when delivered and must
be chosen in the options menu.
Options menu page 18-21
Using the options menu, the automatic quick-boil
function, cooking zone extension and the child lock
can be programmed to suit your individual needs.
7
Page 9
Switching the hob on and off
Touch the main switch symbol. An audible signal is
sounded and a spot lights on the main switch
symbol. All the cooking zone display show 0. The
hob is now in operation.
If no further inputs are made within approx.
20 seconds the hob automatically switches off.
By touching the main switch symbol at any time the
hob can be quickly switched off.
Switching on a cooking zone
The hob must be switched on by the main switch.
The switching on and off for all cooking zones is
identical.
• Touch the required cooking zone in the control
panel. The zero on the display of the selected
cooking zone flashes.
• Select the required cooking level within
5 seconds using the UP/DOWN symbols.
(You can immediately select level 9, 8, etc. using
the DOWN symbol.) The display of the cooking
zone flashes the chosen level. Note: if no input is
given within 5 seconds the cooking zone must be
re-activated.
• The selected cooking level is confirmed after a
few seconds by an audible signal and the display
lights constantly. Alternatively you can confirm the
values by again touching the cooking zone in the
control panel.
• The cooking zones are elecronically controlled
and during use, in order to maintain a constant
heat, the cooking zone switches on and off
intermittently.
8
4. Operation
Switching the hob on and off
Switching on a cooking zone
Page 10

9
Changing the cooking level
• Touch the required cooking zone in the control
panel. The display of the cooking zone flashes.
• Select the required cooking level using the
UP/DOWN symbols. The display of the cooking
zone shows the chosen level.
Switching off a cooking zone
• Touch the required cooking zone in the control
panel. The display of the cooking zone flashes.
• Touch the the UP/DOWN symbols simultaneously.
Or: Touch the the DOWN symbol, until the display
of the cooking zone shows a zero. The cooking
zone is now switched off.
• The residual heat symbol lights in the display of
the cooking zone.
Note: if you want to switch off the whole hob (i.e.
when something is boiling over) then simply touch
the main switch.
Residual heat display
Once you have switched off a cooking zone,
residual heat is shown on the display as a moving
zero. This indicates that the cooking zone is still
giving off heat and has not cooled down sufficiently
to be touched safely.
Changing the cooking level
Switching off a cooking zone
Residual heat display
Page 11

Memory function
Energy saving tips
The cooking range stores all the set cooking levels
and time values for 15 seconds after it has been
switched off. You are therefore able to retrieve all
the previous values should you switch it off
accidentally.
Proceed as follows:
• Touch the main switch. The previous values flash
on the display panel.
• Should you wish to accept the stored values:
tap the symbol timer within 5 seconds. You will
hear a signal. The previous values are now
accepted.
• Failure to follow the above procedure exactly
results in the stored values being lost.
Pots and saucepans should always be covered by a
matching lid. The cooking time is shortened and
the energy use reduced.
Pay attention to the right size when choosing pots
and pans. The diameters of pots and pans should
correspond to that of the hotplate. When buying
pots, pay attention to the fact that the manufacturer
frequently specifies the top pot diameter, which is
generally larger than the diameter of the base.
We recommend that you use high quality pots and
pans with thick flat bases.
For longer cooking times, it is possible to switch off
the cooking zone before the end of the cooking
time to make use of the residual heat.
10
Page 12

11
Settings table
Cooking Cooking method Examples
level
9 Boiling Water
Searing Meat
Heating Fat, liquids
Boiling Soup, sauce
Blanching Vegetables
8 - 6 Roasting Meat, fish, potatoes
7 - 6 Browning Flour, onions
Roasting Almonds, breadcrumbs
Baking Pancakes, egg dishes
Boiling in open pot Liquids
6 - 5 Frying Bacon
Reducing Stocks, sauces
5 - 4 Simmering Sweet sauces
Simmering in open pot Dumplings, sausages, soup garnish,
meat stock, poached eggs
4 - 3 Boiling with closed lid Pasta, soup, sauces
Steaming Vegetables, potatoes, fish
Stewing Vegetables, fruit, fish
Braising Goulash, rolled beef steaks, roasts, vegetables
Thawing Frozen foods
3 - 1 Slow cooking Rice, pulses
Reheating / keeping warm Soup, casserole, vegetables in a sauce
Melting Butter, chocolate
Thickening Egg dishes
Switch to the highest cooking level in order to reach the required temperature quickly. Then always switch
back to the lower cooking level.
The cooking levels are identical for all cooking zones.
The values given above must be looked upon as recommended values. The heat required depends not
only on the type and condition of the food, but also the size and contents of the pot.
Page 13

Cooking zone extension front left
The front left cooking zone can be extended to a
middle or large diameter. In the options menu it is
possible to choose the larger diameters as the
standard cooking zone.
Activating extension,
front left cooking zone
The hob must be switched on by the main switch.
• Touch the front left cooking zone in the control
panel. The zero on the display of the cooking zone
flashes.
• Touch the + symbol until the symbol for the
required extension flashes on the display.
• Now select the required cooking level using the
UP/DOWN symbols. The display of the cooking
zone flashes the chosen level.
• The selected cooking level is confirmed after a
few seconds by an audible signal and the display
lights constantly. Alternatively you can confirm the
values by again touching the cooking zone in the
control panel.
De-activating extension,
front left cooking zone
• Touch the front left cooking zone in the control
panel. The cooking level on the display of the
cooking zone flashes.
• Touch the + symbol until the symbol for the
required extension disappears from the display.
• The cooking zone will now continue to operate on
the chosen level without the extension.
12
5. Additional functions
Activating extension,
front left cooking zone
De-activating extension,
front left cooking zone
Page 14

Cooking zone extension rear
Both rear cooking zones convert together with an
additional zone, to create an oval cooking zone
especially suitable for roasters. In the options menu
it is possible to choose the oval cooking zone as the
standard cooking zone.
Both rear cooking zones and the additional zone
operate as one single cooking zone. Each input for
one cooking zone will include both cooking zones
and the additional zone.
Activating extension, rear cooking zones
The hob must be switched on by the main switch.
• Touch either of the rear cooking zones in the
control panel. The zero on the display of the
cooking zone flashes.
• Touch the + symbol. The extension symbol flashes
on the display.
• Now select the required cooking level using the
UP/DOWN symbols. The display of both cooking
zones flashes the chosen level.
• The selected cooking level is confirmed after a
few seconds by an audible signal and the display
lights constantly. Alternatively you can confirm the
values by again touching the cooking zone in the
control panel.
De-activating extension, rear cooking zones
• Touch either of the rear cooking zones in the
control panel. The cooking level on the displays of
both cooking zones flashes.
• Touch the + symbol. The extension symbol
disappears from the display.
• Both cooking zones will now continue to operate
on the chosen level without the extension. Both
cooking zones can now be adjusted and used
seperately.
13
Activating extension,
rear cooking zones
De-activating extension,
rear cooking zones
Page 15

Automatic quick-boil function
All cooking zones feature an automatic quick-boil
function. When the automatic quick boil function is
activated, the set cooking level is boosted for
several minutes. This ensures that the continued
cooking or simmering temperature of the food is
reached faster. The length of the automatic quickboil function can be changed in the options menu.
The appliance is pre-set to a standard of four
minutes on delivery. The appliance switches
automatically to the set simmering or cooking level
after the quick boil time has elapsed.
Note: the automatic quick boil function cannot be
activated when using cooking level 9.
Switching on the automatic quick-boil function
The hob must be switched on by the main switch.
• Touch the required cooking zone in the control
panel. The zero on the display of the selected
cooking zone flashes.
• Now select the required cooking level using the
UP/DOWN symbols. The display of the cooking
zone flashes the chosen level.
• The selected cooking level is confirmed after a
few seconds by an audible signal and the display
lights constantly. Alternatively you can confirm the
values by again touching the cooking zone in the
control panel.
• Re-touch the cooking zone in the control panel
twice. The display of the cooking zone flashes
alternatively the chosen level and the symbol A for
automatic quick-boil.
Switching off the automatic quick-boil function
It is possible to switch off the automatic quick boil
function prematurely (e.g. because the food is
boiling over).
• Touch the required cooking zone in the control
panel twice. The symbol for automatic quick-boil
disappears from the display. The cooking zone
switches back to the set cooking level.
14
Switching on the automatic quick-boil
function
Switching off the automatic quick-boil
function
2x
2x
Page 16

Timer operation
Note: only ever operate the appliance under
supervision.
It is possible to program an automatic switch-off
time for one or several of the cooking zones. Any
value between 1 and 90 minutes can be entered on
the timer.
It is also possible to use the timer independently.
The timer can also be used when the hob is
switched off.
Programming a switch-off time
• Set the cooking zone which you want to time to the
required cooking level.
• Touch the timer symbol. The timer display flashes
00. Select the required time using the
UP-/DOWN-symbols.
• The value is confirmed a few seconds later by an
audible signal and the timer starts. Alternatively
you can confirm the values by again touching the
timer symbol in the control panel.
• Touch the cooking zone in the display panel which
you would like to timer operate. The display
flashes the selected cooking level. Touch the
timer symbol.
• A spot appears next to the cooking level on the
cooking zone display. The timer is now set for this
cooking zone.
• After the elapse of the programmed time an
audible signal is sounded. The selected cooking
zone is switched off. Both the selected cooking
value and the timer flash. By touching any symbol
on the display the audible signal is switched off
and the cooking zone display shows zero.
15
Programming a switch-off time
Page 17

Timer operation
Changing or erasing a given time value
• Touch the timer symbol.
• You can now change the programmed time using
the UP-/DOWN-symbols. Touch the UP-/DOWNsymbols simultaneously or touch the DOWNsymbol, until 00 shows on the display. The spot on
the cooking zone display disappears. The timer
program is now switched off. The cooking zone
remains on the selected cooking level without
timer operation.
Programming the timer without cooking zone
switch-off
It is also possible to use the timer independently
from the cooking zones and without switch-off
function.
Any value between 1 and 90 minutes can be
entered on the timer.
• Touch the timer symbol. The timer display flashes
00. Select the required time using the
UP-/DOWN-symbols.
• The value is confirmed a few seconds later by an
audible signal and the timer starts. Alternatively
you can confirm the values by again touching the
timer symbol in the control panel.
• The timer display shows the elapsed time.
• After the elapse of the programmed time an
audible signal is sounded. The timer display
flashes. By touching any symbol on the display the
audible signal is switched off.
• The timer can be switched off at any time
by touching the timer symbol and then the
UP-/DOWN-symbols simultaneously.
16
Programming the timer without
cooking zone switch-off
Page 18

Overheating protection
Holiday safeguard
(Automatic switch-off)
Child lock
It is possible to avoid switching on the appliance
accidentally by using the child lock.
Note: the child lock function is de-activated when
delivered and must be chosen in the options menu.
(see page 21 options menu).
The hob’s electronic circuitry features overheating
protection. If the critical temperature is exceeded,
the right front and back cooking zones are switched
back to level 7 provided they are set to level 8 or 9.
H and 7 alternately appear in the relevant cooking
level display areas.
When the temperature drops below the critial
value, the letter H disappear from the display. The
cooking zones remain on level 7 and can be turned
up to level 8 or 9 again if required.
The appliance is set to automatically switch off a
cooking zone 4 hours after the last operation.
The cooking zone can be switched on again as
normal.
Switching on the child lock
The appliance must be switched on by the main
switch and all cooking zones should be on 0.
• Touch the rear left cooking zone on the display
panel and keep the finger pressed.
• Simultaneously touch the main switch. An audible
signal is given. Remove the finger from the main
switch first and then the finger from the cooking
zone.
• The main switch symbol flashes. The hob can now
not be switched on. The timer, however, is still
operational.
Switching off the child lock
• Touch the rear left cooking zone on the display
panel and keep the finger pressed.
• Simultaneously touch the main switch. An audible
signal is given. Remove the finger from the main
switch first and then the finger from the cooking
zone.
17
Child lock switched on
Page 19

Using the options menu, the automatic quick-boil
function, cooking zone extension and the child lock
can be programmed to suit your individual needs.
Use the symbols UP and DOWN to access the
options menu and chose the required values.
Use the symbol timer to store the required value.
Use the symbol + to go through the options menu.
Use the main switch symbol to exit the options
menu at any time. Values which have not been
confirmed will not be stored.
Note: the options menu will automatically end
without storing any values, should you stop
operating it for more than 2 minutes.
Options menu, setting the automatic
quick-boil time
Proceed as follows:
• Switch on the appliance by touching the main
switch. (Note: the timer should not be activated
and all cooking zones should be on 0.)
• Touch symbols UP and DOWN when the hob is
switched on. You will hear a signal. Keep your
fingers pressed down until a second signal sounds
after a few seconds and P1 lights on the timer
display panel. Remove fingers immediately. A04
appears on the cooking zone display panel, i.e. a
quick boil time of 4 minutes is stored.
• You can now touch symbols UP or DOWN and
select a quick boil time from 1 to 15 minutes. The
selected quick boil time applies to all cooking
zones. The selected time (A01 to A15) is shown
on the cooking zone display panel and P1 flashes
(requesting to store values).
• Store the required option by touching the timer
symbol.You will hear a signal and P1 lights
constantly.
In order to exit the options menu touch the main
switch. Values which have not been confirmed will
not be stored.
Should you require to program further functions,
touch the symbol +.
18
6. Options menu
Options menu,
setting the automatic quick-boil time
Page 20

Options menu, setting the combination feature
front left cooking zone
• P2 flashes on the timer display panel. The symbol
for combination feature flashes on the display of
the front left cooking zone.
By repeatedly touching the cooking zone in the
display panel you can choose four options:
• the symbol for combination feature flashes:
every time the cooking range is switched on the
combination feature has to be activated if
desired.
• the symbol for the middle combination feature
lights:
every time the cooking range is switched on the
middle combination feature is activated,
however can be de-activated if desired.
• the symbol for the large combination feature
lights:
every time the cooking range is switched on the
large combination feature is activated, however
can be de-activated if desired.
• the symbol for the large combination feature
lights and appears on the cooking zone
display:
when the cooking range is switched on the
previously used option is activated.
• After choosing the required option P2 flashes
(requesting to store values).
• Store the required option by touching the timer
symbol
. You will hear a signal and
P2 lights
constantly
In order to exit the options menu touch the main
switch. Values which have not been confirmed will
not be stored.
Should you require to program further functions,
touch the symbol +.
19
Options menu, setting the combination
feature front left cooking zone
Page 21

Options menu, setting the combination feature
rear cooking zones
• P3 flashes on the timer display panel. The symbol
for combination feature flashes on the display of
the rear cooking zones.
By repeatedly touching one of the rear cooking
zones in the display panel you can choose three
options:
• the symbol for combination feature flashes:
every time the cooking range is switched on the
combination feature must be activated if
desired.
• the symbol for the combination feature lights:
every time the cooking range is switched on the
combination feature is activated, however can
be de-activated if desired.
• the symbol for the large combination feature
lights and appears on the cooking zone
display:
when the cooking range is switched on the
previously used option is activated.
• After choosing the required option P3 flashes
(requesting to store values).
• Store the required option by touching the timer
symbol
. You will hear a signal and
P3 lights
constantly.
In order to exit the options menu touch the main
switch. Values which have not been confirmed will
not be stored.
Should you require to program further functions,
touch the symbol +.
20
Options menu, setting the combination
feature rear cooking zones
Page 22

21
Options menu, setting the child lock
• P4 flashes on the timer display panel. The symbol
for child lock flashes on the display of the rear left
cooking zone. The child lock cannot be switched
on with this setting.
• Touch the cooking zone rear left. A spot appears
next to the child lock symbol. The child lock can
be switched on with this setting if required. P4
flashes (requesting to store values).
• Store the required option by touching the timer
symbol
. You will hear a signal and
P4 lights
constantly.
In order to exit the options menu touch the main
switch. Values that have not been confirmed will not
be stored.
Options menu, setting the child lock
Page 23

Caution, risk of burns! Before cleaning, please
wait until the hob has cooled to hand-warm.
Please thoroughly clean the appliance before
operating it for the first time and after every use.
Immediately remove food remains and burnt-in
residues with the blade scraper. The blade is very
sharp. Risk of injury! Only use the blade on the
glass-ceramic hob. Do not use the blade casing as
it may scratch the glass-ceramic.
Clean the hob with a damp, soft cloth or kitchen
paper and the Gaggenau glass ceramic cleaner or
similar cleaner suitable for glass ceramic cooktops.
Polish with a soft, dry cloth.
The Gaggenau glass ceramic cleaner will coat the
glass ceramic hob with a gleaming, dirt repellent
film. This will help to preserve the attractive
appearance of your hob over a long period of time
and make it easier to clean as well.
Do not apply the cleaner while the hob is still hot as
this may cause stains. Do not use scouring agents,
abrasives or chemically aggressive cleaners (for
example oven cleaner)! Do not use any nitro
polishing agents for cleaning! Do not use any
abrasive sponges either.
Food with a high sugar content (e.g. boiled-over
milk, jam) can damage the surface of your hob.
Immediately remove such food using the glass
scraper.
Iridiscent discoloration can be caused by the bases
of some pots. These do not interfere with the
operation of the glass ceramic hob.
Please refer to the enclosed brochure for further
notes on cleaning.
You can order our blade scraper (Order No.
087670) and the Gaggenau glass ceramic cleaner
(Order No. 098690) from your Gaggenau dealer.
The frame of the hob (only CK 481) should be
cleaned using a soft, damp cloth and light soapy
liquid or a commercially available stainless steel
cleaner.
22
7. Cleaning and care
Note: to avoid jeopardising the electrical safety of
the appliance, do not use high-pressure or steam
jet cleaning devices – risk of short circuits!
Page 24

If the appliance does not function correctly, check
the household fuses first.
If the power supply is functioning correctly, but your
appliance still does not work, please contact your
dealer or your local Gaggenau customer service
agency. Specify the appliance type. The serial
number and type of the appliance can be found on
the quality control slip which is included with these
instructions.
Repairs may only be carried out by authorised
electricians, in order to guarantee the safety of the
appliance.
Unauthorised tampering with the appliance
will invalidate any warranty claims.
23
8. Maintenance
The appliance must always be disconnected from
the mains when being repaired.
Page 25

Not every malfunction can be ascribed to a defect
of your cooker. If your appliance should not function
properly, search for the fault in the list below.
If you are not successful in remedying the fault with
the aid of the list below, then contact your
Gaggenau after-sales service.
24
Fault Possible cause Remedy
The appliance cannot be No electricity. Check the domestic fuse.
switched on. Objects lie on the control panel. Remove objects.
The appliance cannot be The child lock is switched on. Switch off the child lock.
switched on, the main
switch symbol blinks.
Both right cooking zones The overheating protection has It is possible to use the
are switched back to level 7. been triggered. remaining cooking zones.
H blinks on the cooking level After cooling down the
display. complete hob can be
used once again.
A cooking zone switches off The holiday safeguard is set to Switch the cooking zone on
after operating for a longer automatically switch off a cooking zone again as usual.
period of time. 4 hours after the last operation.
No reaction from the hob. Extremely excessive voltage in the Isolate the appliance from
mains, e.g. caused by lightning. the for 30 sec by switching
off the domestic fuse.
Control panel is soiled. Clean control panel. Always
keep the control panel clean.
The main switch was not touched Touch the main switch again.
long enough.
The display panel lights, a The appliance is on Disconnect the appliance
spot lights constantly on show room mode. from the power supply.
the timer display panel, Reconnect the appliance and
however the cooking zone within 3 minutes carry out the
does not heat up. following procedure: Touch
the + symbol and keep the
finger pressed down. Touch
the main switch until you
hear a signal. Immediately
remove your finger from the
main switch and then release
the + symbol.
9. Remedying slight malfunctions yourself
Page 26

25
Technical Data
Total connected load: 8680 W
Important notes on installation
Pay attention to the "Important notes" on page
3 and 4.
The appliance must only be connected by an
authorised specialist, paying attention to the
relevant regulations of the power supply companies
and the regional construction regulations.
The installation technician is responsible for the
correct functioning of the appliance at the place of
installation. He must instruct the user on how to
disconnect the appliance from electricity in an
emergency.
If the range is not installed over a built-in cooker,
protection against hazardous contact from below
must be ensured after assembly, e.g. by installing
an intermediate shelf that can only be detached
using a tool. The distance between the intermediate shelf and the worktop in which the range is
recessed must be at least 60 mm.
There must be a gap of at least 20 mm at each side
between the appliance and any flammable walls or
furnishings.
If all poles of the appliances cannot be isolated
from the mains by removing an accessible plug, an
isolating device with a contact gap of at least 3 mm
must be installed (e.g. domestic fuse).
No warranty claims can be lodged for any
damage resulting from failure to observe these
instructions.
Subject to technical change without notice.
Electrical connection
The appliance must only be connected by an
authorised specialist.
All corresponding regulations must be observed.
The mains connecting cable must at least
correspond to type H 05 VV-F.
Note for single phase connection:
This device is intended for the connection to a
power supply system with a maximum permissible
system impedance Z
max
of 0.46 Ohm at the interface
point (power service box) of the user’s supply.
The user has to ensure that this device is
connected only to a power supply system which
fulfills the requirement above. If necessary, the user
can the ask the public power supply company for
the system impedance at the interface point.
Pay attention to the data on the rating plate. The
appliance must be properly grounded. Connect the
connecting cable to the mains.
When connecting electrical appliances in the
proximity of cooking surfaces, make sure that
connecting cables do not come into contact with hot
cooking surfaces.
This appliance may be installed in kitchen
combinations made of wood or similar combustible
materials without taking additional measures.
The built-in furniture and worktop where the
appliance is installed must be heat resistant up to
temperatures of 200° F/90° C.
10. Installation
Page 27

26
Installation CK 481
The appliance is installed in a base cabinet with a
width of more than 900 mm.
• Produce the recess for the hob in your worktop.
Proceed as indicated on the installation sketch.
Note: the hob must not be stuck onto the worktop
with silicone.
• Insert the hob with the control panel front right
into the cut-out and align it.
• Secure the appliance on the worktop with the
clamping screws included. Fasten the clamping
screws as marked by the black arrows in the
picture. The dotted arrows show alternative fixing
points if required by the installation conditions.
Note:
During installation be careful that the front right
clamping screw is fitted to the worktop front side, as
fitting the clamping screw to the side can damage
the appliance base. Do not tighten the clamping
screws too tightly, as a uniform sealing gap should
be left all round.
• Connect the appliance to the electricity.
Check the appliance works correctly.
Removal of the hob
Disconnect the appliance from the electricity. Undo
all the clamping screws. Carefully push out the
appliance by the metal base from below.
Note:
Do not try to lever the hob out of the worktop cut out
using a tool.
min. 60
800
520
490
±2,5
780
±2,5
min. 30
46
min. 50
3
worktop
front
Page 28

Installation CK 482
The appliance is installed in a base cabinet with a
width of more than 900 mm. As the hob is fixed in
place, it has to be easily accessible from below in
case of repairs.
The surface of the installed hob should not be
below the worktop surface.
Through dimensional tolerance of the glass ceramic
plate and the worktop cut out, the width of the joint
may vary.
• Clean and degrease the edge of the cut-out, using
a suitable cleaner (follow the instructions given by
the silicone manufacturer).
• Insert the hob with the control panel front right
into the cut-out and align it. Make sure to leave an
even space all round.
• Secure the appliance to the worktop with the
clamping screws included. Make sure the
appliance is flush with the worktop.
27
CK 482 is suitable for flush mounting into
stone or tiled worktops.
Other worksurfaces (i.e. wood, plastic,
Corian, etc.) are unsuitable.
min. 60
793
513
490
±2,5
780
±2,5
min. 30
46
min. 50
800
±2,5
520
±2,5
Querschnitt
490
±2,5
520
±2,5
(15)
3,5
±2
mit Silikon
ausfüllen
7
(15)
3,5
±2
Längsschnitt
780
±2,5
800
±2,5
(10)
(10)
7
3,5
±2
3,5
±2
mit Silikon
ausfüllen
Cross section as
seen from the front
fill out with
silicone
Cross section as
seen from the side
fill out with
silicone
800
±1
780
±1
520
±1
490
±1
R 9
R 5
as seen from above
Page 29

• Connect the appliance to the electricity. Check
the appliance is working correctly before sealing.
• Seal the space between the work surface and the
hob with a suitable temperature resistant silicone
(e.g. Novasil, Pactan) and smooth the joint with the
suitable wetting agent recommended by the
manufacturer. Follow the manufacturer’s
instructions.
Note:
Unsuitable silicone can permanently discolour
natural stone work surfaces.
Do not use the appliance until the silicone is
completely dry.
Removal of the hob
Disconnect the appliance from the electricity. Undo
all the clamping screws. Using a sharp knife cut the
silicone along the edge of the glass ceramic
plate. From below push the hob carefully up, until it
is free from the cut-out. You can now carefully
remove the hob upwards.
28 5080006423ind01 en 06.05 EB
Page 30

GAGGENAU HAUSGERÄTE GMBH
CARL-WERY-STR. 34 · D-81739 MÜNCHEN
Y (089) 45 90-03
FAX (089) 45 90-23 47
www.gaggenau.com
 Loading...