

Page 1

Table of contents
Planning guide for modular refrigerator, freezer and wine columns.
Installation options . . . . . . . . . . . . . . . . . . . . . . . . 174
Kitchen Design — basic terms . . . . . . . . . . . . . . . 175
Cabinetry style & cut-out depth . . . . . . . . . . . . . . 176
Additional planning notes . . . . . . . . . . . . . . . . . . 177
Door swivel range . . . . . . . . . . . . . . . . . . . . . . . . 177
Appliance dimensions
Wall clearance RC/RF/RW . . . . . . . . . . . . . . . . . 178
Appliance dimensions
Wall clearance RB/RY . . . . . . . . . . . . . . . . . . . . . 179
Dimensions for the installation cavity . . . . . . . . . . . .180
Door panel dimensions . . . . . . . . . . . . . . . . . . . . .181
Planning example for an individual appliance . . . . . .182
Planning example for a side-by-side solution . . . . . .183
Planning examples . . . . . . . . . . . . . . . . . . . . . . . . .184
Planning information . . . . . . . . . . . . . . . . . . . . . . .186
Toe-kick area/upper molding of cut-out . . . . . . . . . .188
Installation accessories . . . . . . . . . . . . . . . . . . . . .189
Refrigeration 173
Page 2

Installation options.
Installation options artwork.pdf 1 9/23/2013 4:35 PM
Installation options artwork.pdf 1 9/23/2013 4:35 PM
Installation options artwork.pdf 1 9/23/2013 4:35 PM
The modular refrigerator and freezer column concept from Gaggenau oers you a variety of installation possibilities. In some
instances, special accessories are required!
Individual column installations
Any appliance can be installed as a stand-alone unit. Ensure a cutout
ush to the appliance at a depth of minimum 4" (102mm), preferably 6"
(152 mm) on the top and sides.
Note: It is absolutely essential to ensure that the appliance is installed in
such a way that the doors do not interfere with an adjacent wall or other
kitchen elements.
Side-by-Side installations (SxS)
The proper installation of any side-by-side two column combination
requires an installation kit (RA 460 000). It combines two individual units
into a side-by-side unit. For combinations that involve freezers and wine
columns, this kit is already pre-installed to the unit. For all other SxS
combinations or instances where any appliances are installed less than
6" (152 mm) apart from another but not connected SxS, a heating kit
(RA 460 010) is required.
Note: A partition of minimum ⅝" (16 mm) is required to ensure the
doors do not interfere with one another when opened. Use a partition
to separate appliances and observe the door swivel range. (See page
177 for details on door swivel range dimensions.)
Multiple column installations with partition walls between
When dimensioning the partition, note the thickness of the door panel
(including handles) as well as the swivel range (see page 177 on swivel
range) to prevent damage if the doors are opened at the same time. If
the thickness of a partition between two products is less than 6", then
a heating kit (RA 460 010) is required. It must be installed on the right
side wall of the left-side appliance.
Three appliances can be installed together only if a partition — minimum
⅝" (16 mm) — is placed between two of the appliances. Ensure that
door panel thickness (including handles) as well as the swivel range are
accounted for.
At the end of a cabinetry run
All Gaggenau refrigeration appliances must be completely enclosed on
the top and sides. If one side of the appliance is visible, a decorative
side panel must be used for covering it. This side panel must be
properly axed to the oor, room wall and any overhead furniture/
xtures before the appliance is placed in the cutout.
174 Refrigeration
Page 3

Kitchen design — basic terms.
This is the main body of a kitchen cabinet.
This is a decorative frame at the front of a kitchen cabinet and is typical for North America.
Variations by manufacturer in kitchen design construction may purposely have a clearly
visible face frame that is a part of the kitchen aesthetics. European design and styling of
cabinets (frameless cabinetry) typically do not have a frame.
The kitchen cabinetry door panel is the element of kitchen furniture largely defining the
aesthetic design of a kitchen. It can have any conceivable look – from modern to traditional.
In this quick reference a
3
/4" (19 mm) thick door panel is presumed.
The modular refrigerator and freezer columns from Gaggenau are intentionally designed to
be equipped and delivered with custom made appliance door panels that perfectly match
the end-user‘s installed kitchen cabinetry. Typically the normal appliance door panel thickness
is expected
to be
3
/4"
(19 mm).
However, a thicker appliance door panel can be accommodated
if such door
panels are used on the end-user‘s kitchen cabinetry or in order to emulate the
look of the visible face frame (addition to the door) on the refrigerator as well.
The niche is the cavity where a Gaggenau refrigerator or freezer is installed. The width of the
niche (18",24",30",....) is dependent on the appliance. The niche depth is equal to the
depth of the kitchen cabinet (case+face frame). It does NOT include the thickness of the
cabinetry door panel. For proper planning of the niche depth, please refer to the
respective chapter on page 16 in this quick reference.
The main idea of the Gaggenau modular refrigerator and freezer column concept is, that you
can simply replace any standard size kitchen cabinet with a refrigerator column. You c
an
create a suitable niche by leaving a respective gap between two tall cabinets. Alternatively
you may create an enclosure, that the appliance will fit into. However this is not the original
design intent (basic idea).
When planning the installation niche, it is important that the side walls are completely flush!
Please make sure that there is not any kind of face frame at the front of the niche. If, for
some reason this is not the situation, please make sure that the depth of this face frame
(furniture return) is more than 4" (100 mm) so that the appliances can be properly secured.
To clarify the terms which are used in this planning guide, please refer to the following denitions:
Case
Face Frame (Cabinet)
Door
Appliance Door Panel
Cutout (Niche)
Kitchen Cabinetry
Illustration
This is the main body of a kitchen cabinet.
This is a decorative frame at the front of a kitchen cabinet and is typical for North
America. Variations by manufacturer in kitchen design construction may purposely
have a clearly visible face frame that is a part of the kitchen aesthetics. European
design and styling of cabinets (frameless cabinetry) typically do not have a frame.
The kitchen cabinetry door panel is the element of kitchen furniture largely dening
the aesthetic design of a kitchen. It can have any conceivable look — from modern to
traditional. In this planning guide a ¾" (19 mm) thick door panel is presumed.
The modular refrigerator and freezer columns from Gaggenau are intentionally
designed to be equipped and delivered with custom made appliance door panels
that perfectly match the end-user‘s installed kitchen cabinetry. Typically the normal
appliance door panel thickness is expected to be ¾" (19 mm). However, a thicker
appliance door panel can be accommodated if such door panels are used on the
end-user‘s kitchen cabinetry or in order to emulate the look of the visible face frame
(addition to the door) on the refrigerator as well.
The cutout is the cavity where a Gaggenau refrigerator or freezer is installed. The
width of the cutout (18",24",30",..) is dependent on the appliance. The cutout depth
is equal to the depth of the kitchen cabinet (case+face frame). It does NOT include
the thickness of the cabinetry door panel. For proper planning of the cutout depth,
please refer to the respective chapter on page 180 in this planning guide.
The main idea of the Gaggenau modular refrigerator and freezer column concept
is, that you can simply replace any standard size kitchen cabinet with a refrigerator
column. You can create a suitable cutout by leaving a respective gap between two
tall cabinets. Alternatively you may create an enclosure, that the appliance will t into.
However this is not the original design intent (basic idea).
When planning the installation cutout, it is important that the side walls are complete-
ly ush! Please make sure that there is not any kind of face frame at the front of the
cutout. If, for some reason this is not the situation, please make sure that the depth of
this face frame (furniture return) is more than 4" (100 mm) so that the appliances can
be properly secured.
Refrigeration 175
Page 4

Cabinetry style and cut-out depth.
1 ½"
1 ½"
appliance door panel
(emulating a face frame)
¾"
As previously described, the required depth of the installation cavity is mainly dependent on the kitchen design.
Gaggenau refrigerator and freezer columns are designed for a cutout depth of 24" (610 mm). So, if the kitchen cabinet
(case + face frame) is 24" deep, this should accommodate many standard installations.
Please be advised that additional depth may be required for kitchen designs intending the look of ush fascia across
the cabinetry and the refrigerator door panel.
The below cabinetry styles detail requirements for the cutout and custom panel.
A) Standard Overlay Design — 25" (635 mm) cutout depth
On a kitchen with standard overlay cabinetry, the face frame is also an important part
of the design. If the same aesthetics are to be continued on the refrigerator, then not
only the door cabinetry panel thickness (e.g. ¾") is included, additionally the face frame
thickness must be emulated. Thereby the resulting thickness of the appliance door
panel is ¾" + ¾" = 1 ½" (face frame emulation + door panel = custom appliance door
panel). This cumulative thickness of the resulting custom appliance door panel requires
added depth for the installation cavity. Example 24"+ ¾" = 24 ¾" (recommended is 25").
appliance door panel
(emulating a face frame)
B) Full Overlay Design — 25" (635 mm) cutout depth
The above mentioned requirements are of course also valid for kitchens with full overlay
design. However there are some chances to work with a cutout depth of 24": For this, the
small remaining visible area of the fully overlaid face frame has to be emulated within the
standard appliance door panel thickness of ¾". This can be done by simply ignoring the
visible area of the face frame on the refrigerator (“extended size“ of the appliance door
panel) or by emulating the face frame by creating a respective “nose“ on the appliance
door panel (see drawing).
C) Oset Design, Flush Inset Design — 25" (635 mm) cutout depth
Here, the kitchen cabinetry door panels are NOT completely mounted on the cabinet,
but partially or fully inserted into the face frame. Due to this, such oset or inset design
kitchens do not gain sucient installation depth by the door panel. If any appliance
door panel (thickness e.g. ¾") is installed on the refrigerator, the complete depth
dimension of the “paneled refrigerator“ will be 24"+ ¾" = 24 ¾" (629mm). The minimum
depth of the cutout is therefore also 24 ¾" (recommended is 25").
D) European style kitchen cabinetry — 24" (610 mm) cutout depth
If the kitchen design is based on European style cabinetry, there is no need to emulate
the look of a face frame, as such a frame does not exist on any of the kitchen cabinets.
Therefore a 24" (610 mm) deep cutout will always be sucient.
appliance door panel with nose
24" Cutout depth is sucient for:
– frameless cabinetry kitchen design with any kind of appliance door panels
– standard overlay or full overlay kitchen design with appliance stainless steel door panels.
– full overlay kitchen design with appliance custom door panels with “extended size” or with “nose” (to
emulate face frame look).
25" Cutout depth is required for:
– standard or full overlay kitchen design with appliance door panels with thickness bigger than ¾" (to
emulate face frame look)
– offset or inset design kitchens with any kind of appliance door panels
176 Refrigeration
Page 5

Additional planning notes
¾" (19 mm).
Read all instructions in the installation manual completely
and carefully prior to installation. Installation manuals
are supplied with the appliance and are also available at
www.gaggenau-usa.com.
Refrigeration appliances are top heavy and must be
secure to prevent the possibility of tipping forward. Anti-tip
protection is required.
Keep doors closed until the appliance is completely
installed and secured per installation instructions.
Due to size and weight of appliance and to reduce risk of
personal injury or damage to the product — TWO PEOPLE
ARE REQUIRED FOR PROPER INSTALLATION.
When installing a refrigeration appliance next to a BO/
BS oven with handle (optional), a side clearance of 2 ⅜" (60
mm) is required if the BO/BS handle is on the same side as
the hinge of the refrigeration appliance.
Door swivel range
To ensure correct kitchen planning it is essential to take
opening angle of the appliance door into account (plus
tted cabinet door and handle). There should be no possibility of collision with other kitchen furnishings (worktops, handles of other cabinetry etc.) or parts of the room
(walls, protrusions etc.).
The space needed for the hinge and the consequential distance to the adjacent cabinetry and its handle can, depending on the panel thickness, be seen in the following drawing.
The drawing assumes a panel thickness of ¾".
– Restrict the door opening angle to 90°
(standard 115°) with a door stop pin installed into
the hinge.
– Install a spacer between the appliance and the
kitchen element that creates the interference.
– Rearrange surrounding cabinetry or appliance.
Numbers indicated
inside parenthesis ( ) = mm
Refrigeration 177
Page 6

Appliance dimensions & Wall clearance RC/RF/RW (single-door columns).
"
11 ⁵⁄₁₆"
(
287.4
)
11 ⁵⁄₁₆"
(
287.4
)
13 ⅛"
(
333.7
)
1 ⁵⁄₃₂"
(29)
4"
(
102
)
2 ¹³⁄₁₆"–4 ³⁄₁₆"
(
72-106.7
)
7⅛"
(
181
)
14 ³⁄₁₆"
(
360
)
14 ³⁄₁₆"
(
360
)
14 ³⁄₁₆"
(
360
)
24"
(
610
)⅛"(3)
79⅞"
(
2029
)
84"
(
2133
)
C
A
B
Wall clearance RC/RF/RW
E2
E1
D
Appliance type A B C D E1 E2
18" models 17 ¾" (451) 14 ⅛" (385) 18" (457) 20 ¹¹⁄₁₆" (525) 9 ¼" (235) 10 ⁷⁄₁₆" (265)
24" models 23 ¾" (603) 21 ³⁄₁₆" (538) 24" (610) 26 ⅝" (677) 11 ¾" (299) 13" (330)
30" models 29 ⅞" (756) 27 ³⁄₁₆" (690) 30" (762) 32 ¹¹⁄₁₆" (830) 14 ⁵⁄₁₆" (363) 15 ⁹⁄₁₆" (395)
Notes
– The leveling feet have an adjustment range of
+1 ⅜" to -½". The standard height displayed in the
pictures is ½".
– For proper ventilation of the appliance, the clear-
ance between the floor and bottom edge of the
178 Refrigeration
cabinet front must be at least 3 ⁵⁄₁₆".
– Dimension “B” indicates width position of door
panel fixation brackets.
– The panel thickness of customized doors can
range from between ¾" to 1 ⁷⁄₁₆".
Numbers indicated
inside parenthesis ( ) = mm
Page 7

Appliance dimensions & Wall clearance RB/RY (bottom freezers).
14 ³⁄₁₆"
(
360
)
30”/36"
(762/
908
)
29 ¾"/33 ⁵⁄₃₂"
(756/
852.4
)
29 ¾"/33 ⁵⁄₃₂"
(756/
852.4
)
33 ⁵⁄₃₂"
(
852.4
)
15 ⁵⁄₃₂"
(
385.2
)
15 ⁵⁄₃₂"
(
385.2
)
36"
(
908
)
24"
(
608
)
⅛"
(
3
)
⅛"
(3)
14 ³⁄₁₆"
(
360
)
13 ¹¹⁄₃₂"
(
338.9
)
13 ¹¹⁄₃₂"
(
338.9
)
13 ¹¹⁄₃₂"
(
338.9
)
13 ¹¹⁄₃₂"
(
338.9
)
7 ¾"
(
197.2
)
7 ¾"
(
197.2
)
8 ²¹⁄₃₂"
(
220
)
8 ²¹⁄₃₂"
(
220
)
8 ²¹⁄₃₂"
(
220
)
8 ²¹⁄₃₂"
(
220
)
12 ¹¹⁄₃₂"
(
313.7
)
12 ¹¹⁄₃₂"
(
313.7
)
84"
(
2133
)
28 ⁷⁄₁₆"
(
722
)
4"
(
102
)
51 ⁵⁄₁₆"
(
1304
)
1 ⁵⁄₃₂"
(29)
2 ¹³⁄₁₆"–4 ³⁄₁₆"
(
72-106.7
)
7⅛"
(
181
)
C
Wall clearance RB/RY 492
Wall clearance RB 472
E2
E1
D
Notes
– The leveling feet have an adjustment range of
+1 ⅜" to -½". The standard height displayed in the
pictures is ½".
– For proper ventilation of the appliance, the clear-
ance between the floor and bottom edge of the
cabinet front must be at least 3 ⁵⁄₁₆".
– Dimension “B” indicates width position of door
panel fixation brackets.
– The panel thickness of customized doors can
range from between ¾" to 1 ⁷⁄₁₆".
Numbers indicated
inside parenthesis ( ) = mm
Refrigeration 179
Page 8

Dimensions for the installation cavity.
84"
(
2133.6
)
84"
(
2133.6
)
90°
90°
90°
90°
Y
ABX
5 ⅛" (130
)
2 ⅛" (54
)
1 ¹³⁄₁₆" (46
)
5 ⅛" (130
)
48" SxS
(18" freezer and 30" refrigerator)
A
A
B
18"
(
457
)
24"
(
610
)
24"
(
610
)
13 ¾"
(
350
)
¹⁄₁₆"
(1)
30"
(
762
)
48"
(
1219
)
18"
(
457
)
30"
(
762
)
48"
(
1219
)
max. ¹³⁄₃₂"
(10)
2 ⁵⁄₁₆"
(59)
³¹⁄₃₂"
(25)
2 ⅛" (54
)
1 ¹³⁄₁₆" (46
)
9"
(
229
)
15"
(
381
)
Important!
The walls and the top panel of the installation cutout
must be made of a solid material with a thickness of
at least ⅝", to guarantee the secure installation of
the appliance. Make sure that the upper boundary is
completely ush for a depth of at least 4".
The side walls of the installation cutout must be
completely even and at along their entire depth.
Unlike conventional built-in appliances, Gaggenau
refrigerators stand on the oor.
This means that the installation cutout is a space in a line of
kitchen units.
Installation cutout for an individual appliance:
Installation cutout for a side-by-side solution:
In a side-by-side solution, there are many ways to combine
the appliances.
The cutout width is calculated from the sum of the widths of
the individual appliances.
The picture shows an example of an installation niche with
a width of 48", for installing a freezer (18") on the left-hand
side and a refrigerator (30") on the right-hand side.
The height and depth of the installation cutout correspond
to the specications for the individual appliances.
It is important to comply with the dimensions in the area set
aside for electric and water connections. For the precise
dimensions, please refer to the details given for individual
appliances.
Appliance type X Y
18" models 18" 9"
24" models 24" 12"
30" models 30" 15"
36" models 36" 18"
180 Refrigeration
A: Area where the electrical connection is installed
(appliance socket).
B: Area for running the water line (if required). It is
recommended to position the water box adjacent to
the installation cutout so that maintenance and repair
work is possible without dismantling the appliance.
Numbers indicated
inside parenthesis ( ) = mm
Page 9
Dimensions of the door panel and frame accessories
Appliance width 18
"
Appliance width 24"
9
1
/16"
(230.5)
2
3
/16"
(55)
79
7
/
8
"
(2029)
2 15/16"
(75)
10
1
/8"
(257)
5
7
/ 8"
(149)
79
7
/8"
(2029)
79
7
/8"
(2029)
*
*
23 3/4"
(603)
23 3/4"
(603)
23 3/4"
(603)
2
3
/16"
(55)
23/16"
(55)
14
1
/2"
(368)
2
13
/16"
(554)
2
13
/16"
(554)
2
13
/16"
(554)
2
13
/16"
(554)
2
13
/16"
(554)
2
13
/16"
(554)
RF 463
RF 461/RC 462
RW 464
Appliance width 30"
2
RF 471/RC 472 RB 472
Appliance width 36"
RY 492
RB 492
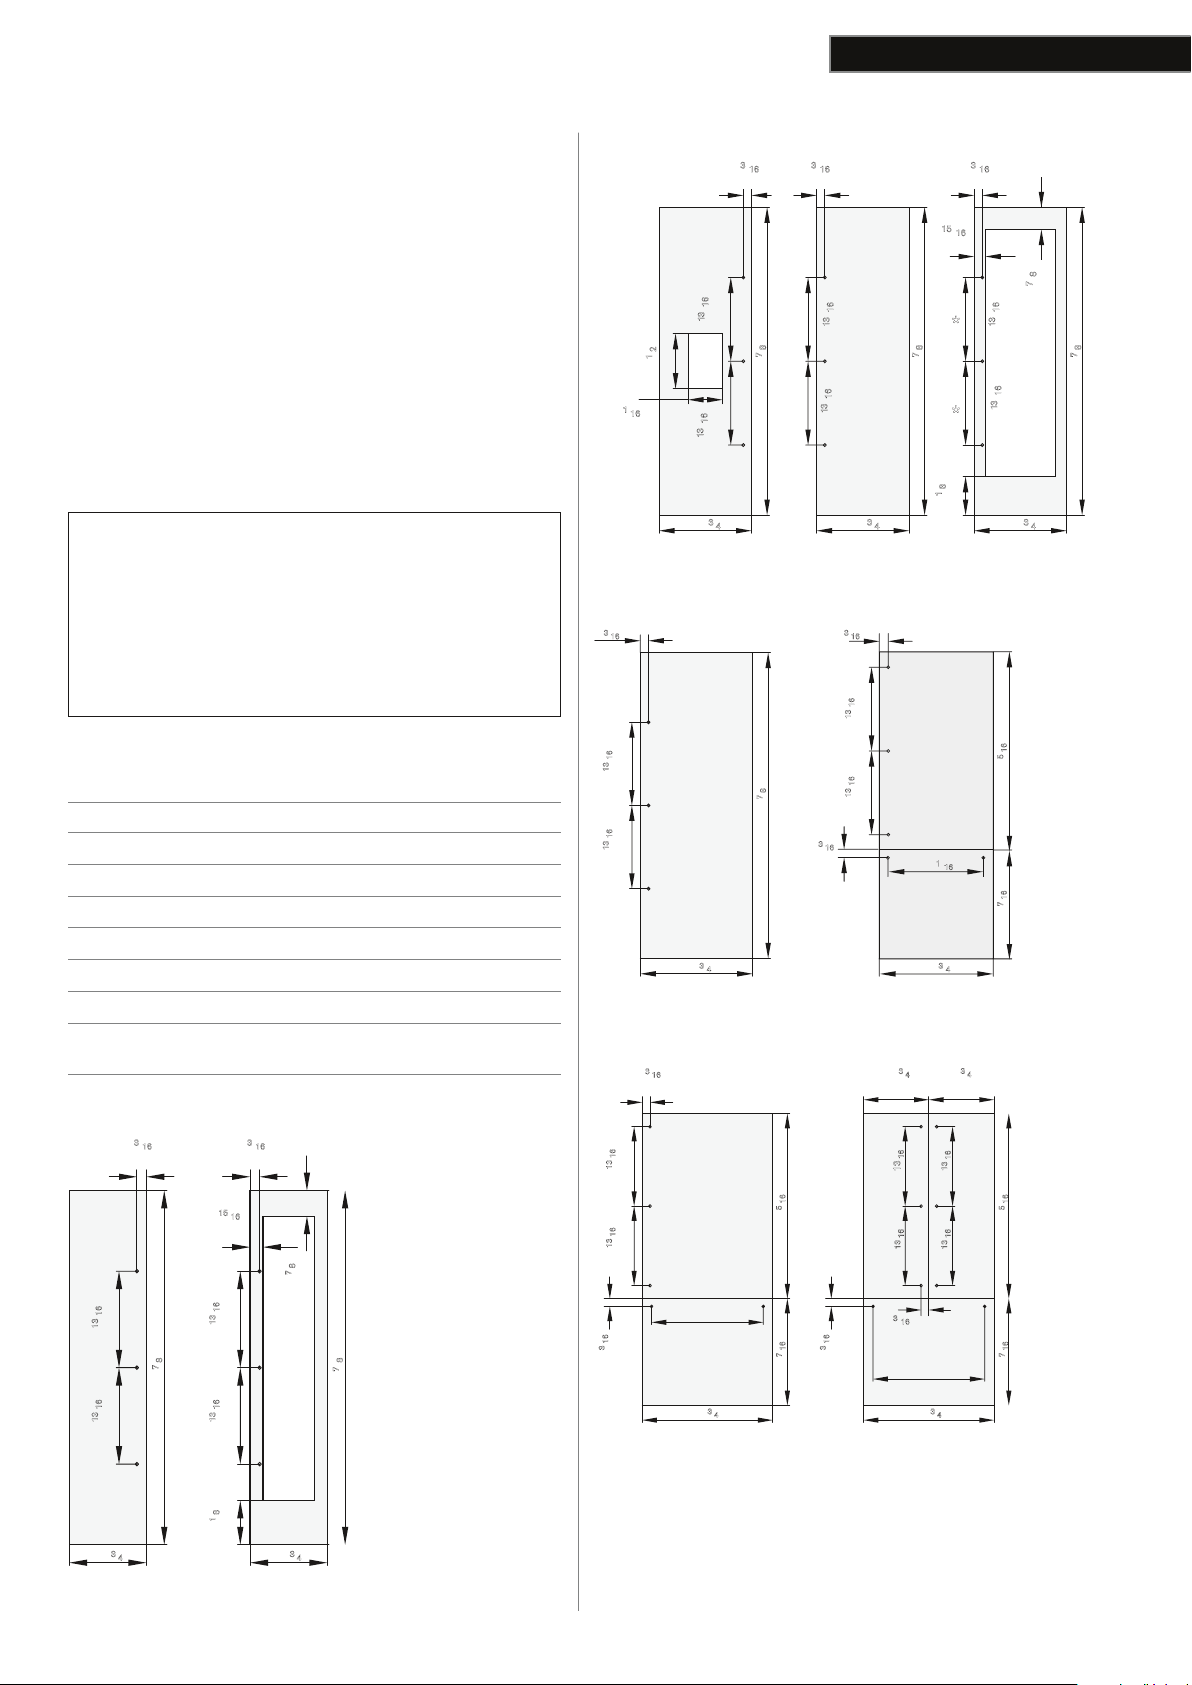
Door panel dimensions.
Gaggenau refrigeration appliances are designed to be
equipped with a decorative door panel. A panel can be
custom-made or purchased as a stainless steel accessory.
Below diagrams illustrate the dimensions of the stainless
steel panel accessories and can be used as a guide in
creating custom panels. At 79 ⅞" (2029 mm) tall, they are
designed for a toe kick height of 4" (102 mm), and a total
cutout height of 84" (2134 mm) yielding ⅛" (3 mm) reveals.
At ¾" (19 mm) deep, they are designed to attach to the 24"
(610 mm) deep appliance for an overall depth of 24 ¾" (629
mm). See page 176 for cutout planning.
When using custom panels, always ensure that the panel
reverse is nished to match the exterior, as parts of the
panel reverse will be visible when the refrigerator door
is opened.
Important!
While these diagrams can serve as a general guide
in planning panel dimensions, the correct panel
dimensions are dictated by design choices including
style and dimensions of surrounding kitchen cabinetry,
case and toe kick height, etc. Please ensure careful
planning based on the specic kitchen design.
Maximum permitted door panel weight
(for each door front)
Appliance width
18" without ice and water
24" with ice and water
24" without ice and water
30" Cooling zone with one door (RB 472)
36" Cooling zone with one door (RB 492)
Cooling zone with two doors (RY 492)
Freezer compartment drawer
(RB/RY 492/RB 472)
Appliance width 18"
3
/16"
13
13
17
(451)
/16"
21
/16"
21
(554)
(554)
3
/4"
2
(55)
/8"
7
79
(2029)
RF 411 RW 414
23/16"
(55)
215/16"
(75)
/16"
13
(554)
21
/16"
13
(554)
21
/8"
1
(257)
10
17 3/4"
(451)
/8"
7
5
(149)
/8 "
7
(2029)
79
Appliance width 24"
Appliance width 30"
3
/16"
(55)
/16"
13
(554)
21
/16"
40 lbs
139 lbs
88 lbs
77 lbs
77 lbs
126 lbs
22 lbs
13
.
(554)
21
.
.
.
.
29 3/4"
(756)
.
.
Appliance width 36"
2 3/16"
(55)
/16"
13
(554)
21
/16"
13
(554)
21
/16"
3
(55)
2
The panel thickness is ¾".
A: The cut-out for the ice and water dispenser must be horizontally and
31"
(787)
35 3/4"
(908)
/8"
7
(2029)
79
5
7
vertically aligned (centered).
B: The width of the side frame parts for the door for the wine storage unit
can vary between 2 ½" and 3 ¼ ". However, a width of 2 ¹ ⁵⁄₁₆"
is recommended
Numbers indicated
inside parenthesis ( ) = mm
/16"
51
/16"
28
2
(55)
(1304)
(722)
3
/16"
2
(55)
/16"
13
(554)
21
/16"
5
(1304)
/16"
13
(554)
21
3
/16"
/16"
3
(55)
2
25 1/16"
(637)
29 3/4"
(756)
3
17
/4"
17
(451) (451)
/16"
13
(554)
21
/16"
13
(554)
21
2 3/16"
(55)
31"
(787)
35 3/4"
(908)
51
/16"
7
(722)
28
3
/4"
/16"
13
(554)
21
/16"
5
(1304)
51
/16"
13
(554)
21
/16"
7
(722)
28
Refrigeration 181
Page 10

Planning example for an individual appliance in frameless (European) cabinetry.
Upper molding
Countertop
Kitchen
cabinet
Installation cutout
Kitchen cabinetry
Door panel
Toe-kick
Room
wall
Room
floor
min. 4"
(102)
24"
(610)
84"
(2134)
Upper molding
Custom door
panel
Kitchen
cabinet
Cutout for an individual 30" refrigeration appliance
In this example, the installation cutout is formed by two tall
cupboards (left and right) with an appropriate upper molding
to the niche.
The custom door panel ¾" for the appliance comes in an
identical design to the other kitchen cabinetry.
Requirements for the cutout:
– The top and side walls of cutout interior are com-
pletely flush, of solid material and at least 4" (120
mm) deep.
– Cutout width is exactly 30" (762 mm)
– Cutout (case) depth is 24" (610 mm) — does not
include door panel.
The side walls of installation cutout must be completely even and flush
to appliance.
24"
24"
(610)
(610)
Installation cutout
(vertical section)
182 Refrigeration
Kitchen
cabinet
30"
(762)
30-inch Installation cutout
(horizontal section)
Custom door panel
Numbers indicated
inside parenthesis ( ) = mm
Page 11

Cutout cabinet
Kitchen
cabinet
Kitchen cabinetry
Door panel
Installation cutout
(created by a separate cutout)
Toe-kick
Countertop
Room
floor
Room
wall
min. 4"
(102)
Custom door
panel
Furniture
return
Installation cutout
(vertical section)
84"
(2134)
24"
(610)
25"
(635)
42"
(1067)
min. 4"
(102)
min. 4"
(102)
Installation cutout
(created by a separate cutout)
Toe-kick
Countertop
Room
floor
Room
wall
min. 4"
(102)
Planning example for a side-by-side combination in standard overlay cabinetry.
Cutout for a 42" side-by-side combination
In this example, the installation cutout is formed by creating
a separate cutout around the appliances. It yields a look that
deviates from the general kitchen design.
The custom door panel has a cumulative thickness of 1 ½"
(38 mm), ¾" (19 mm) emulating the face frame and ¾" (19
mm) for the actual door panel). Thus, a 25" (635 mm) deep
installation cutout is required.
– cutout width is exactly 42" (for an 18" + 24" = 42"
side-by-side combination)
– cutout (case) depth is 25" (635 mm) due to 1 ½"
(38 mm) custom door panel
– any furniture return must be at least 4" (102 mm)
deep, on interior top and sides, of solid material
and should be finished to match the exterior at the
same depth (4" or 102 mm)
Numbers indicated
inside parenthesis ( ) = mm
min. 4"
(102)
25"
(635)
42"
(1067)
Refrigeration 183
Page 12
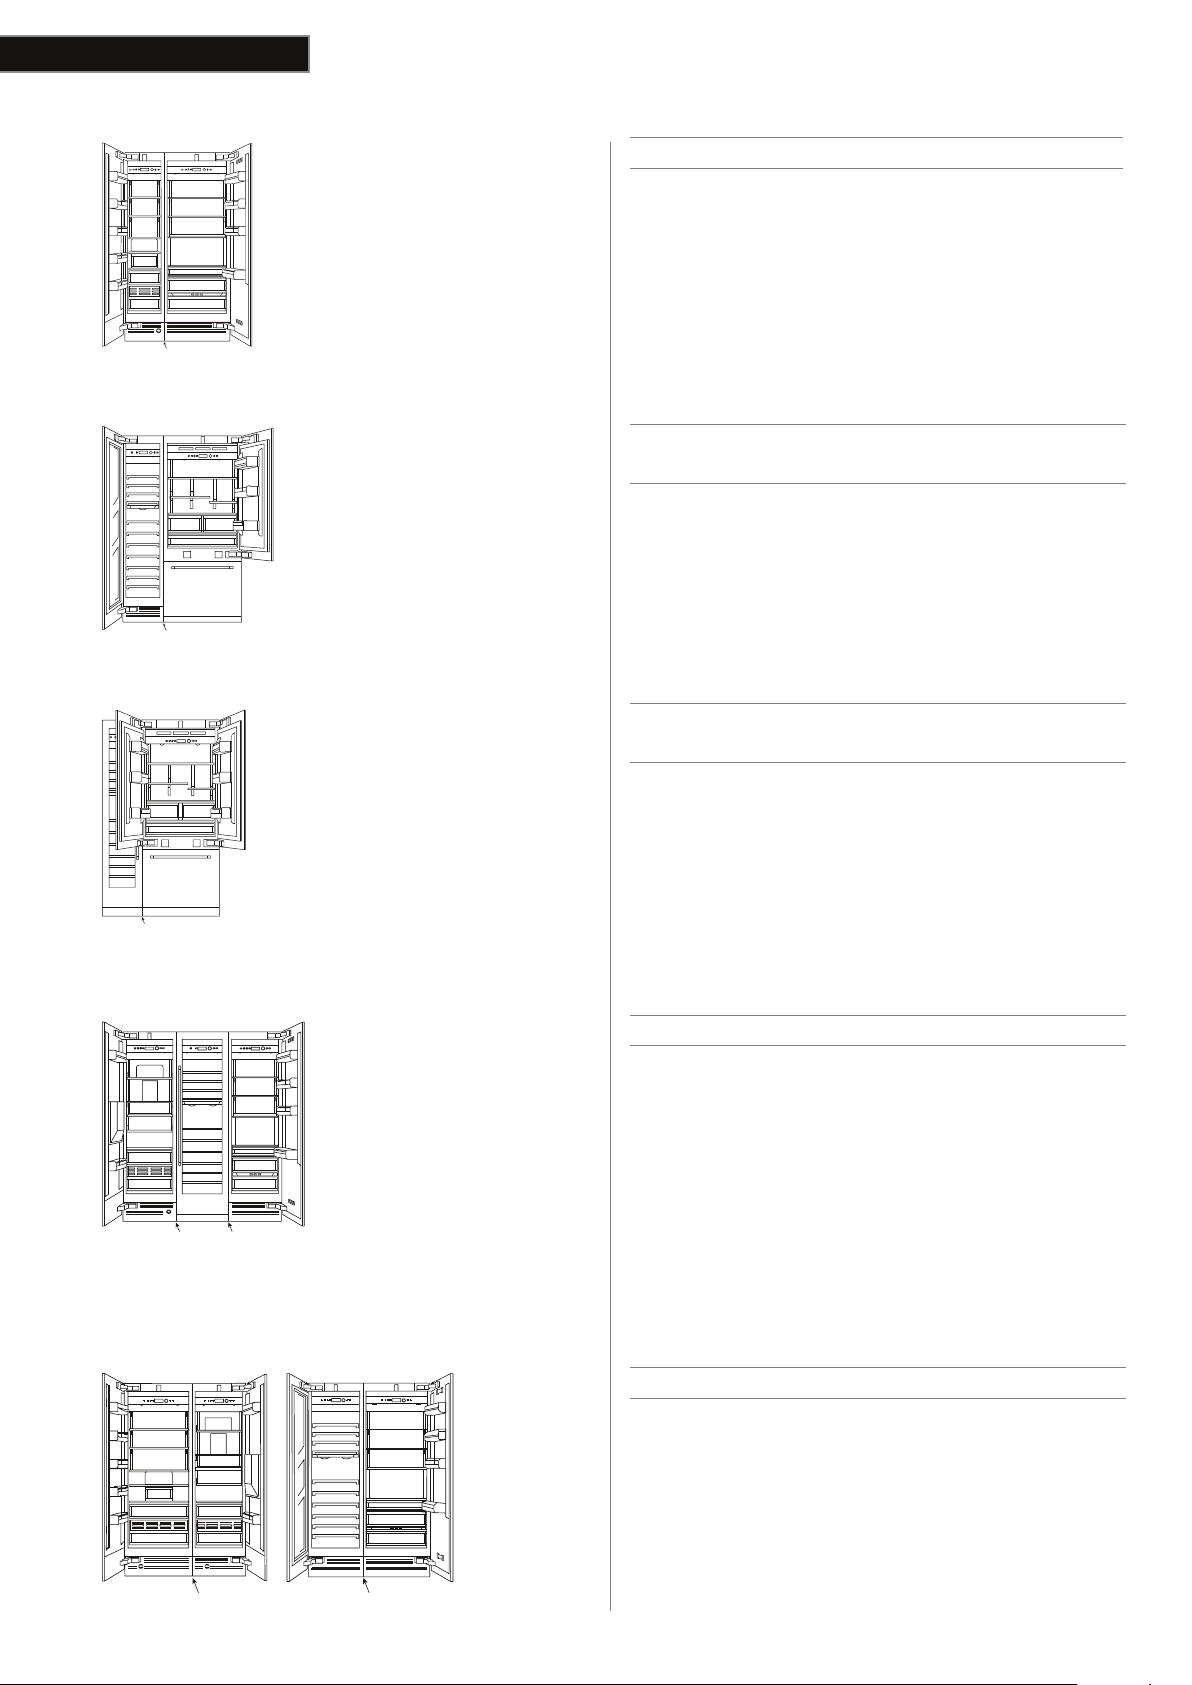
Planning examples.
SxS
SxS
Side-by-side combination
RF 414 / RC 472
Usability limitations: No limitation.
Installation accessories: None (Side-by-side kit RA 460 000 comes
already pre-installed on all RF freezer and RW wine columns.)
Notes: Door hinges on the outside.
Side-by-Side combination with
36" RB 492 bottom freezer
RW 414 / RB 492
Usability limitations: No limitation.
Installation accessories: None (Side-by-side kit RA 460 000 comes
already pre-installed on all RF freezer and RW wine columns.)
Notes: Side-by-side combination of a single column with a bottom
freezer, door hinges on the outside.
Change door hinge of RW wine column.
SxS
Side-by-Side combination with
36" RY 492 French door bottom freezer
RW 414 / RY 492
Usability limitations: Not all doors can be opened at the same time.
The left door of the RY may collide with the handle of the RW.
Installation accessories: None (Side-by-side kit RA 460 000 comes
already pre-installed on all RF freezer and RW wine columns.)
Notes: Fitting the left RY doors at 90° is recommended. Change
door hinge of RW wine column.
Combination of 3
RF 463 / RW 464 / RC 462
Usability limitations: The doors of RW and RC cannot be opened at
the same time.
Installation accessories: None (Side-by-side kit RA 460 000 comes
already pre-installed on all RF freezer and RW wine columns.)
Notes: All three appliances must be connected to each other
before installation and pushed together into the installation cutout.
SxSSxS
Independent removal of a single unit not possible.
SxS SxS
184 Refrigeration
Maximum distance
RF 471 / RF 463 / RW 464 / RC 472
Usability limitations: No limitation.
All doors can be opened fully.
Installation accessories: None (Side-by-side kit RA 460 000 comes
already pre-installed on all RF freezer and RW wine columns.
Notes: Two separate installation cutouts.
Clearance is large enough to open all doors at the same time.
Change door hinge of RW wine column.
Page 13

SxS
SxS
Distance larger than 6"
RF 471 / RF 463 / RW 464 / RC 472
Usability limitations: It may be necessary to open the middle
doors one after the other, rather than at the same time.
Installation accessories: None. SxS* kit comes already pre-installed
on RF and RW.
Notes: Two separate installation cutouts. The clearance between
the two installation cutouts is larger than 6". Change door hinge
SxS
of RF 471 and RW wine column.
Distance less than 6"
RF 471 / RF 463 / RW 464 / RC 472
Usability limitations: It may be necessary to open the middle doors
one after the other, rather than at the same time.
Installation accessories: None. SxS* kit comes already pre-installed
on RF and RW.
1x RA 460 010 HK*.
Notes: Two separate installation niches with a stable plinth
between them.
SxSHK
The clearance between the two installation niches is less than 6".
Therefore, an additional heating kit is required.
Change door hinge of RW wine column.
SxS SxS SxS
SxSSxSSxS
RF 471 / RF 463 / RW 464 / RC 472
Usability limitations: Only one of the middle doors can be opened
at once.
Installation accessories: None. SxS* kit comes already pre-installed
on RF and RW.
1x RA 460 010 HK*.
Notes: All 4 appliances must be connected to each other before
installation and pushed together into the installation niche.
Independent removal of a single unit not possible. Change door
hinge of RW wine column.
Combination of 4 — alternative
RF 471 / RF 463 / RW 464 / RC 472
Usability limitations: If the middle door is open, then neither of the
outer doors can be opened.
Installation accessories: None. SxS* kit comes already pre-installed
on RF and RW.
Notes: The appliances in the middle are connected side-by-side.
Connecting the others will require additional side-by-side kits.
All 4 appliances must be connected to each other before
installation and pushed together into the installation cutout.
*SxS side-by-side kit for side-by-side installation
*HK additional side heating kit
Refrigeration 185
Page 14
Planning information.
Location
Important
Do not install appliance
– outdoors
– in damp rooms
– in rooms with a risk of frost
The appliance should be installed in a dry, ventilated room. It may
not be installed outdoors. The ambient temperature of the room
must be between 55°F
(13°C) and 100°F (43°C).
The appliance should not be exposed to constant direct sunlight
or excessive heat. If installation next to a heat source, such as an
oven, radiator, etc. is unavoidable, use a suitable insulating plate or
observe the following minimum distances from the heat source:
– 1 ¼" (30 mm) from an electric cooking appliance,
– 11 ¹³⁄₁₆" (300 mm) from an oil or solid-fuel cooking
appliance.
Installation and cutout dimensions
It is important to observe the specied dimensions of the
installation cutout for a trouble-free installation of the appliance and
for the subsequent appearance of the door panel.
– In particular ensure that the cutout is square. Square-
ness can be checked by suitable means, e.g. spirit level,
diagonal measurements, etc.
– The side walls of the cutout must be flush. The minimum
thickness of the side and top walls is ⅝" (16 mm). The
minimum thickness of toe kick panel is ¼" (6 mm).
Furniture/xtures
During installation, the appliance is fastened to adjacent and
overhead furniture/xtures and it is therefore essential that all
such furniture/xtures are well secured to the substructure or
adjacent wall.
Flooring/substructure
Important
A fully loaded appliance is very heavy.
Can weigh up to 1,200 lbs.
On account of the heavy weight of a fully loaded appliance, a loadbearing substructure is required. To ensure correct installation and
function, the support must be at, level and made of hard, rigid
material. If in doubt, contact an architect or a building expert.
Refer to the following table for load-bearing capacity:
Appliance Load bearing capacity
24" Refrigeration Column 890 lbs. / 400 kg
30" Refrigeration Column 1,110 lbs. / 500 kg
18" Freezer Column 560 lbs. / 250 kg*
24" Freezer Column 780 lbs. / 350 kg*
30" Freezer Column 950 lbs. / 425 kg
30" Bottom Freezer 900 lbs. / 410 kg
36" Bottom Freezer 1,200 lbs. / 540 kg
*without water dispenser
Electrical requirements
Important
Electrical shock hazard
– plug into a grounded 3-prong outlet
– do not remove grounding prong
– do not use an adapter
– do not use an extension cord
The appliance comes with a 3-wire power supply cord.
UL listed in the USA.
The appliance requires a 3-wire receptacle that is tted with a 15
Amp fuse or higher.
The receptacle must be installed by a licensed electrician only.
For the installation position of the receptacle refer to diagram in
”Electrical Location“.
Grounding instruction
This appliance must be grounded. In the event of a malfunction
or breakdown, grounding will reduce the risk of electric shock by
providing a path of least resistance for the electric current.
Additional grounding procedure
Some local regulations may require a separate ground. In such
cases, the required accessory ground wire, clamp and screw must
be purchased separately. Never ground the appliance to plastic
plumbing lines, gas lines or water pipes.
A 4-conductor cord shall be used when the appliance is installed
in an area where local codes do not permit grounding through
the neutral. Power supply cord must be replaced by a licensed
electrician only.
186 Refrigeration
Page 15

Warning
Improper connection of the equipment grounding conductor may
result in electric shock. Have the appliance checked by a qualied
electrician or service technician if you are in doubt as to whether
the appliance has been properly grounded.
Electrical location
Split column installation
18-inch 24-inch 30-inch
X 18” (457 mm) 24” (610 mm) 30
Y 9” (229 mm) 12” (305 mm) 15
" (762 mm)
" (381 mm)
Side-by-side installation
Water location
A cold water connection is required for appliances that feature an
ice maker or an ice and water dispenser.
The water pressure must be between 40 and 120 p.s.i. (2.75-
8.25 bar). The installation must comply with local plumbing
regulations.
A separate shut-o valve must be installed for the appliance water
connection.
The shut-o valve for the water connection may not be behind the
appliance. It is recommended to place the shut-o valve outside
the cutout next to the appliance or in another easily accessible
location. When installing the water connection, observe the
permitted installation areas for the water supply line.
The supply line can be located to the right (a), to the left (b), or
underneath (c).
* Sealed refrigeration system includes compressor, evaporator, condenser, dryer/
strainer and connecting tubing.
Numbers indicated
inside parenthesis ( ) = mm
Warranty
Gaggenau oers a 2-year standard warranty on all refrigeration
appliances.
For 2 years, from the date of purchase, Gaggenau will provide,
free of charge, parts and service labor. A 7 year limited warranty
will be provided on sealed refrigeration system*, on parts and
labor. A 12 year limited warranty will be provided on sealed
refrigeration system, on parts only.
Refrigeration 187
Page 16

Toe-kick area/upper molding of cutout (niche).
Toe-kick and venting grill
Important
Poor ventilation leads to damage to the appliance.
Under no circumstances is it permitted to cover
the air inlets and the exhaust air outlets of the
appliance in the lower base area.
You must observe the minimum distance of 4"
between the upper edge of the oor and the
bottom edge of the door panel of the appliance.
Pay attention to the height adjustment for the
appliance by leveling the legs.
In relation to the standard height, the maximum height of the toekick is 4". The toe-kick can be maximum ¾" thick.
Velcro adhesive strips are supplied on the front panel of the
appliance to fasten the toe-kick to the appliance.
The venting grill and the exhaust air outlets of the appliance, as
well as the access to the water lter (if available) are located above
the toe-kick area. They must not be covered.
Upper molding
The planning of decorative upper molding above the cutout
requires taking into account the actual or desired height of the
door panel.
The overall height of the door panel will depend on:
– the height of the appliance, typically 84" (2134 mm)—lev-
eling legs allow height adjustment ranging from -½" (-13
mm) to +1 ⅜" (+35 mm)
– the installed height of the door panel (distance from the
bottom edge of the door panel to the floor, typically 4"
(102 mm), and, if desired, any extension of the custom
panel above the appliance cutout)
– the appliance type (single door or bottom freezer)
Vertical section, side view
4"
(
)
Possible extension of
the door panel
102
⅛"
(3)
Upper
molding
⅛"
(3)
Door panel
4"
(102)
Toe-kick
For design reasons, it may be necessary to increase the distance
between the upper edge of the oor and the bottom edge of the
door panel of the appliance, so that it extends beyond the standard
dimension of 4". The maximum dimension is 7 ⅛". The toe-kick
thickness must not exceed ¾". If this is the case, ventilation grill,
exhaust air outlets and the access to the water lter would become
visible.
4"
(
)
102
7 ⅛"
(
)
181
84"*
(
2136
Standard door panel
* Adjustment in leveling legs: -½" (-13 mm) to 1 ⅜" (35 mm)
79 ⅞"
)
(
2029
)
Appliance
door
Appliance
Important
Please recall that a panel should be installed at a
minimum height of 4" (102 mm) from the oor to
allow proper ventilation of the appliance.
Always ensure that the top of the cutout or upper decorative
molding is at least 4" (102 mm) deep, so that the refrigerator
can be properly secured to the cutout wall. This is particularly
important if a protruding cutout is specially created and
congured with a face frame. Furniture returns for any face frame
must be a minimum of 4" (102 mm) deep.
2 ¹³⁄₁₆" - 4 ³⁄₁₆"
188 Refrigeration
(
72 - 106
)
Numbers indicated
inside parenthesis ( ) = mm
Page 17

Installation accessories.
RA 460 000 Side-by-Side kit
When two single columns are connected to a side-by-side
combination, the side-by-side kit must be used.
Please note: This kit comes already included with freezer and wine
storage units. This kit is only required for combinations that do not
include freezer or wine storage (i.e. RC fresh food column and RB/
RY bottom freezer).
RA 460 010 Heating kit
If two columns are installed in separate cutout niches (any
conguration) and if the distance in-between these units is less
than 6" (160 mm), this special accessory is required. Included is a
thin heater blanket for placement on the right side-wall of the left
unit. This heater blanket will eliminate the temperature inuence of
the close installation so that humidity eects and condensation will
not occur.
If the installation distance exceeds 6", the accessory is not required.
Please note: This kit is also recommended for use with any
installation in areas that are subject to extreme humidity.
Heating kit
RA 460 020 / 030 Connecting element for
cabinet doors
If an appliance front panel of 30" or 36" wide column needs to be
divided into two parts to match the kitchen furniture design, these
unification parts can be used for safely combining them. There
are two different kits available. For single door models and for
bottom freezer models.
RA 461.. Stainless steel ventilation grills
Ventilation grills located on the refrigerator base are also
available in stainless steel.
Please note: Stainless-steel grills are available for all models
(width/type) and installation options for left-hinged or right-hinged
doors.
REPLFLTR10 Water lter
Replacement water lter for use in all freezer and bottom freezer
models.
RA 450 000 Filter by-pass
Filter by-pass for use with existing in-home water ltration systems.
For all freezer and bottom freezer models.
<6"
(
)
160
RA 425 110
Long handle for RB 472/492 and RY 492. Stainless
steel. Length 44 ½", with three brackets. Drilling distance
between each mount 21 ¹³⁄₁₆".
RA 425 910
Short handle for 36" RB/RY 492 freezer drawer. Stainless
steel. Length 31 ⅞" with two brackets. Drilling distance
between the mount 31".
RA 425 710
Short handle for 30" RB 472 freezer drawer. Stainless
steel. Length 25 ⅞" with two brackets. Drilling distance
between the mount 25 ¹⁄₁₆".
Numbers indicated
inside parenthesis ( ) = mm
Refrigeration 189
 Loading...