

Page 1

3-Axis Gimbal for Mirrorless Camera
GuiLin FeiYu Technology Incorporated Company
V 1.0ENUser Manual
Page 2
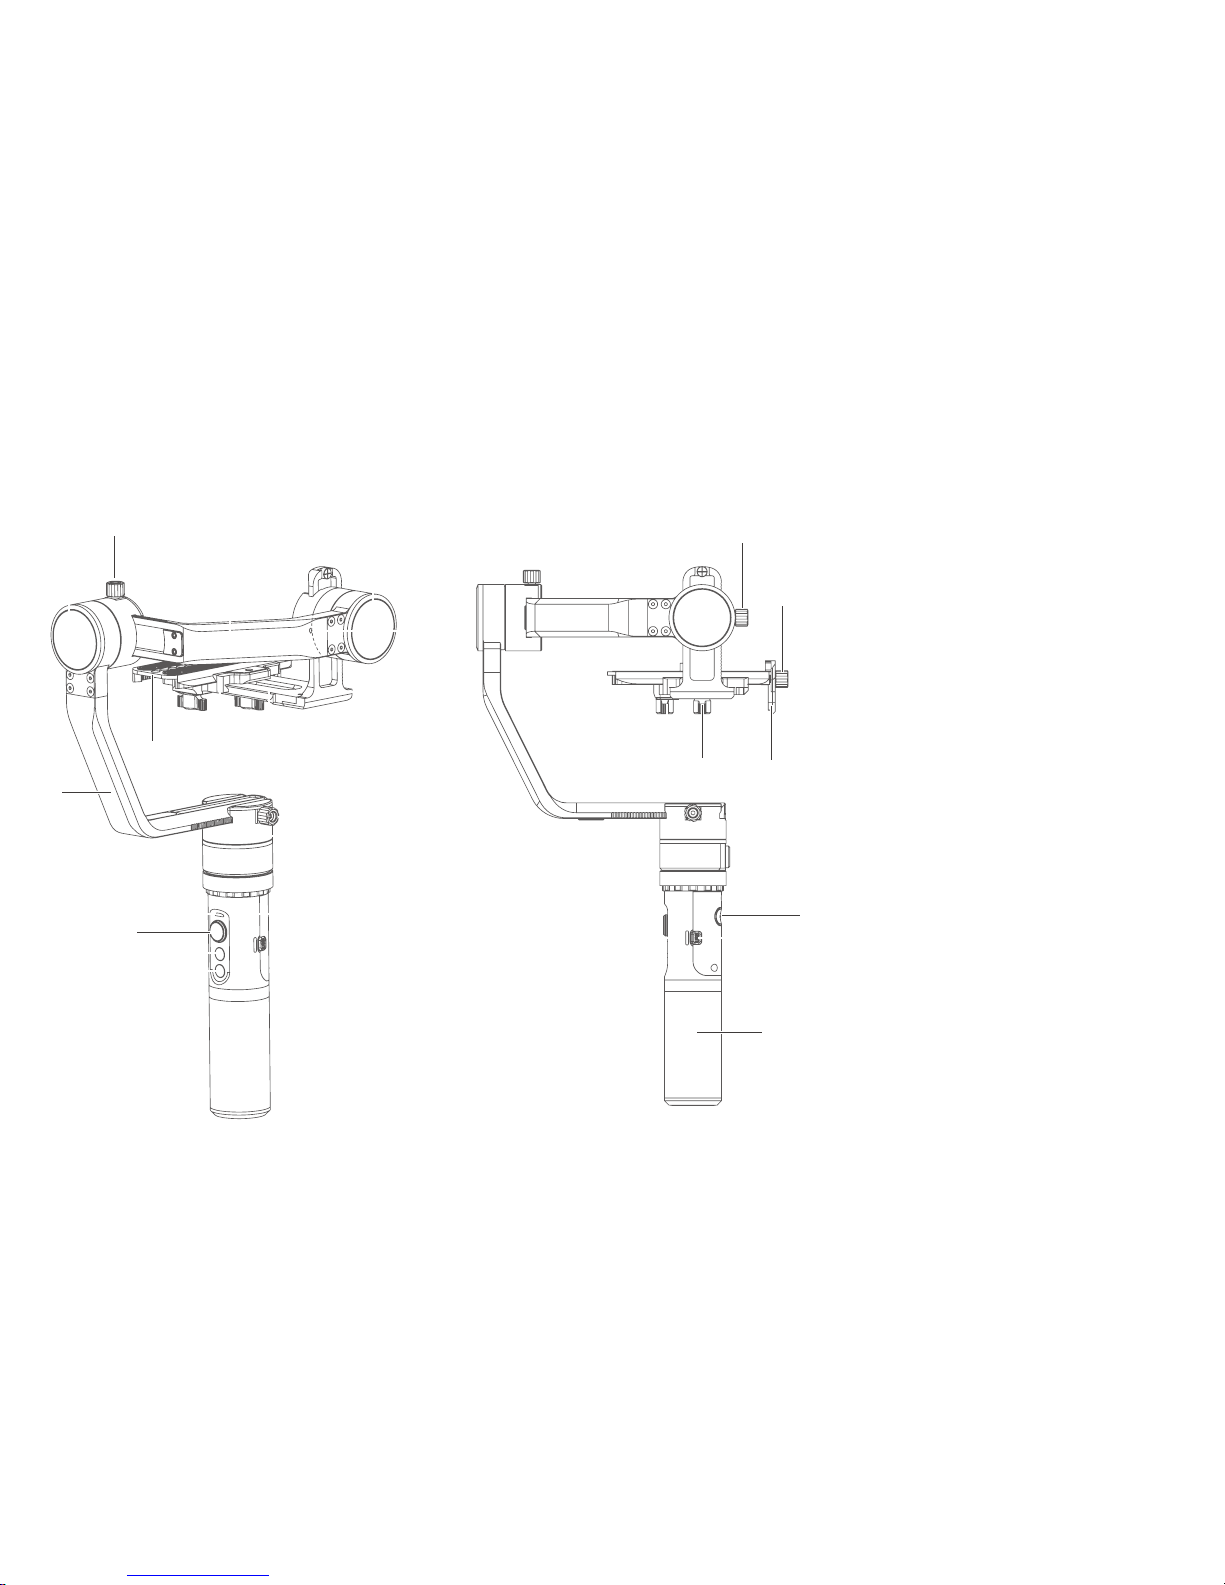
1
[19] Tilting lock screw
[20] Charging indicator
[21] Shutter cable socket
[22] Sliding arm
[23] Trigger button
[24] Camera support frame screw
[25] Camera support frame
[18] Cross arm
[2] Rolling axis
[3] Rolling lock screw
[4] Vertical arm
[13] Handle
[11] Socket connector
[7] Function button
[5] Indicator
[6] Joystick
[12] USB interface
[17] Thumb screw
[14] Quick plate
[15] Adjustment skateboard
[16] Adapter(Clamping plate)
[10] Panning axis
[9] Panning lock screw
[1] Tilting axis
1. Product Overview
[8] Shutter button
[1]
[2]
[3]
[18]
[19]
[24]
[16] [15]
[14]
[17]
[23]
[12]
[20]
[9]
[10]
[11]
[8]
[7]
[6]
[5]
[13]
[4]
[22]
[21]
[17]
[25]
Page 3
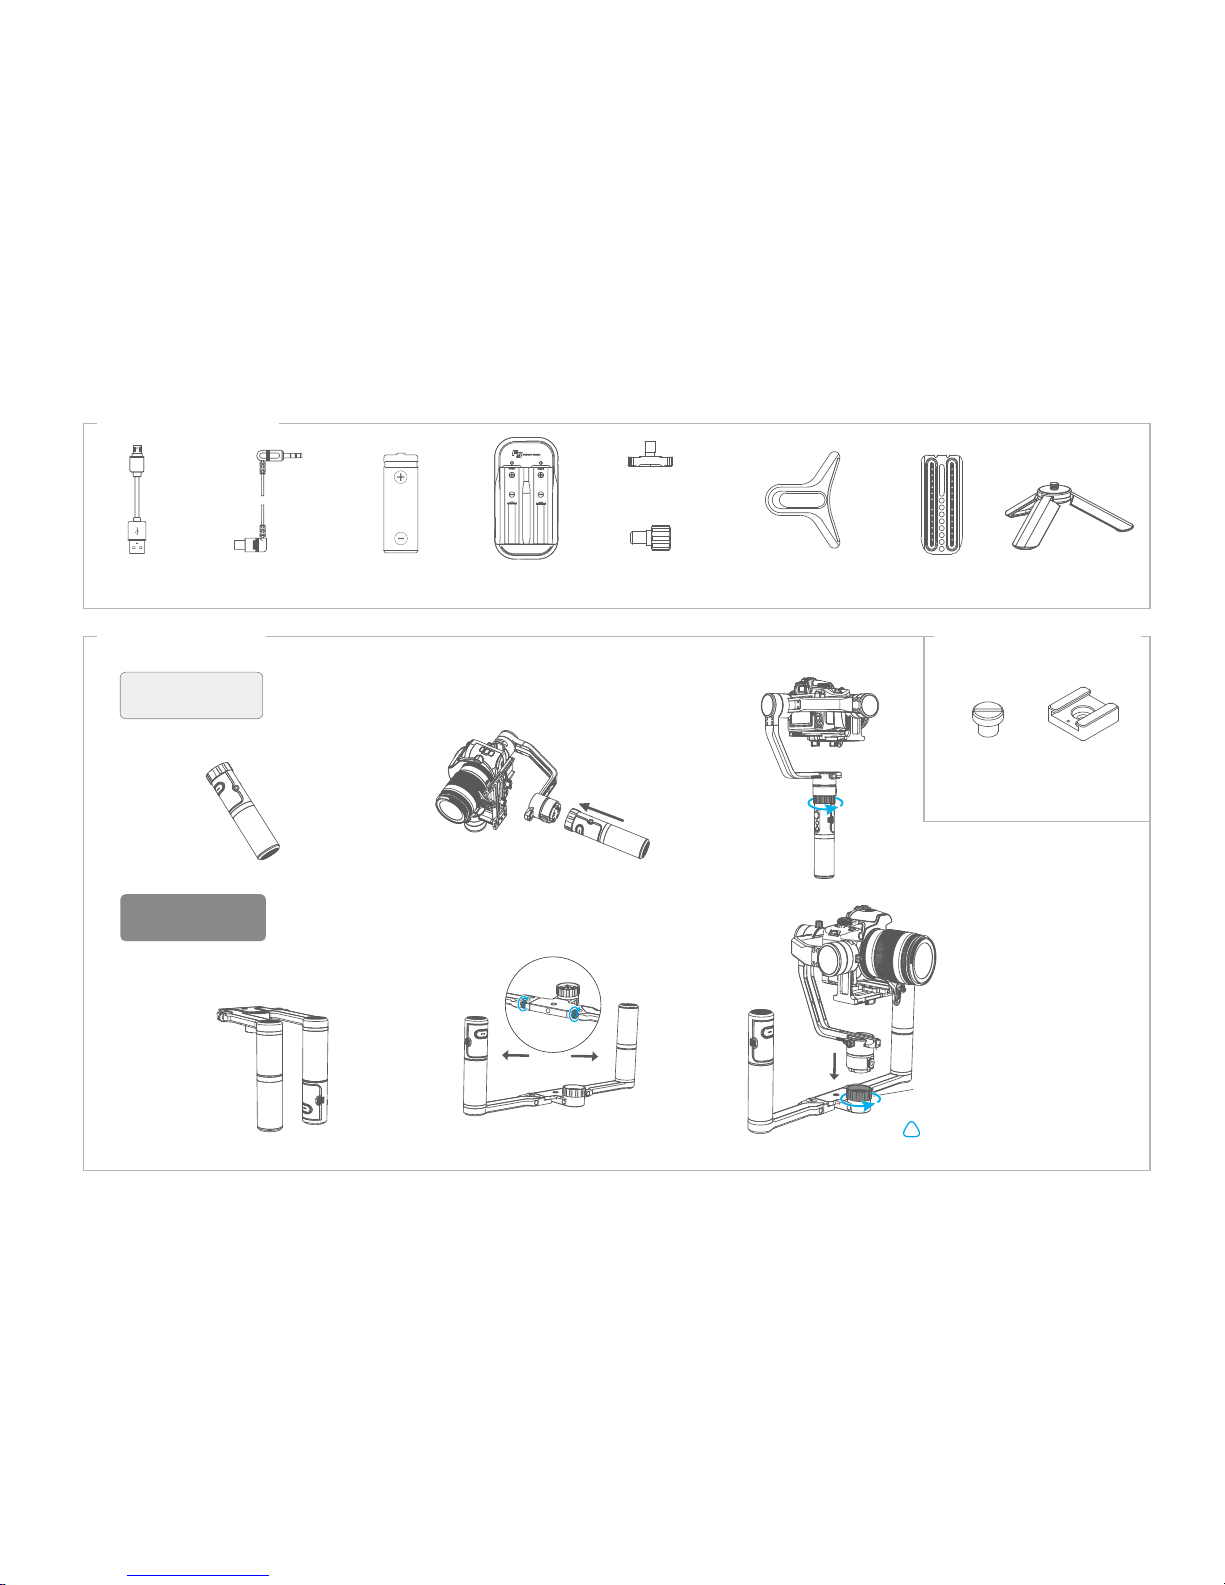
2
Basic accessories
After installation, please
tighten the retaining ring
!
Single-armed
installation
Dual Handheld
Installation
USB cable
Battery X2
(Type: 18650)
SONY shutter line
(3.5 audio to multi)
Smart charger Quick plate
Thumb screw
Camera support
frame screw
Camera support
frame
Code shoe
α2000 Double-hand foldable set (Optional)
Retaining ring
1/4 screw
(Double-hand foldable set)
α2000 Single Handle
Advanced accessories
Installation way
Tripod
Page 4
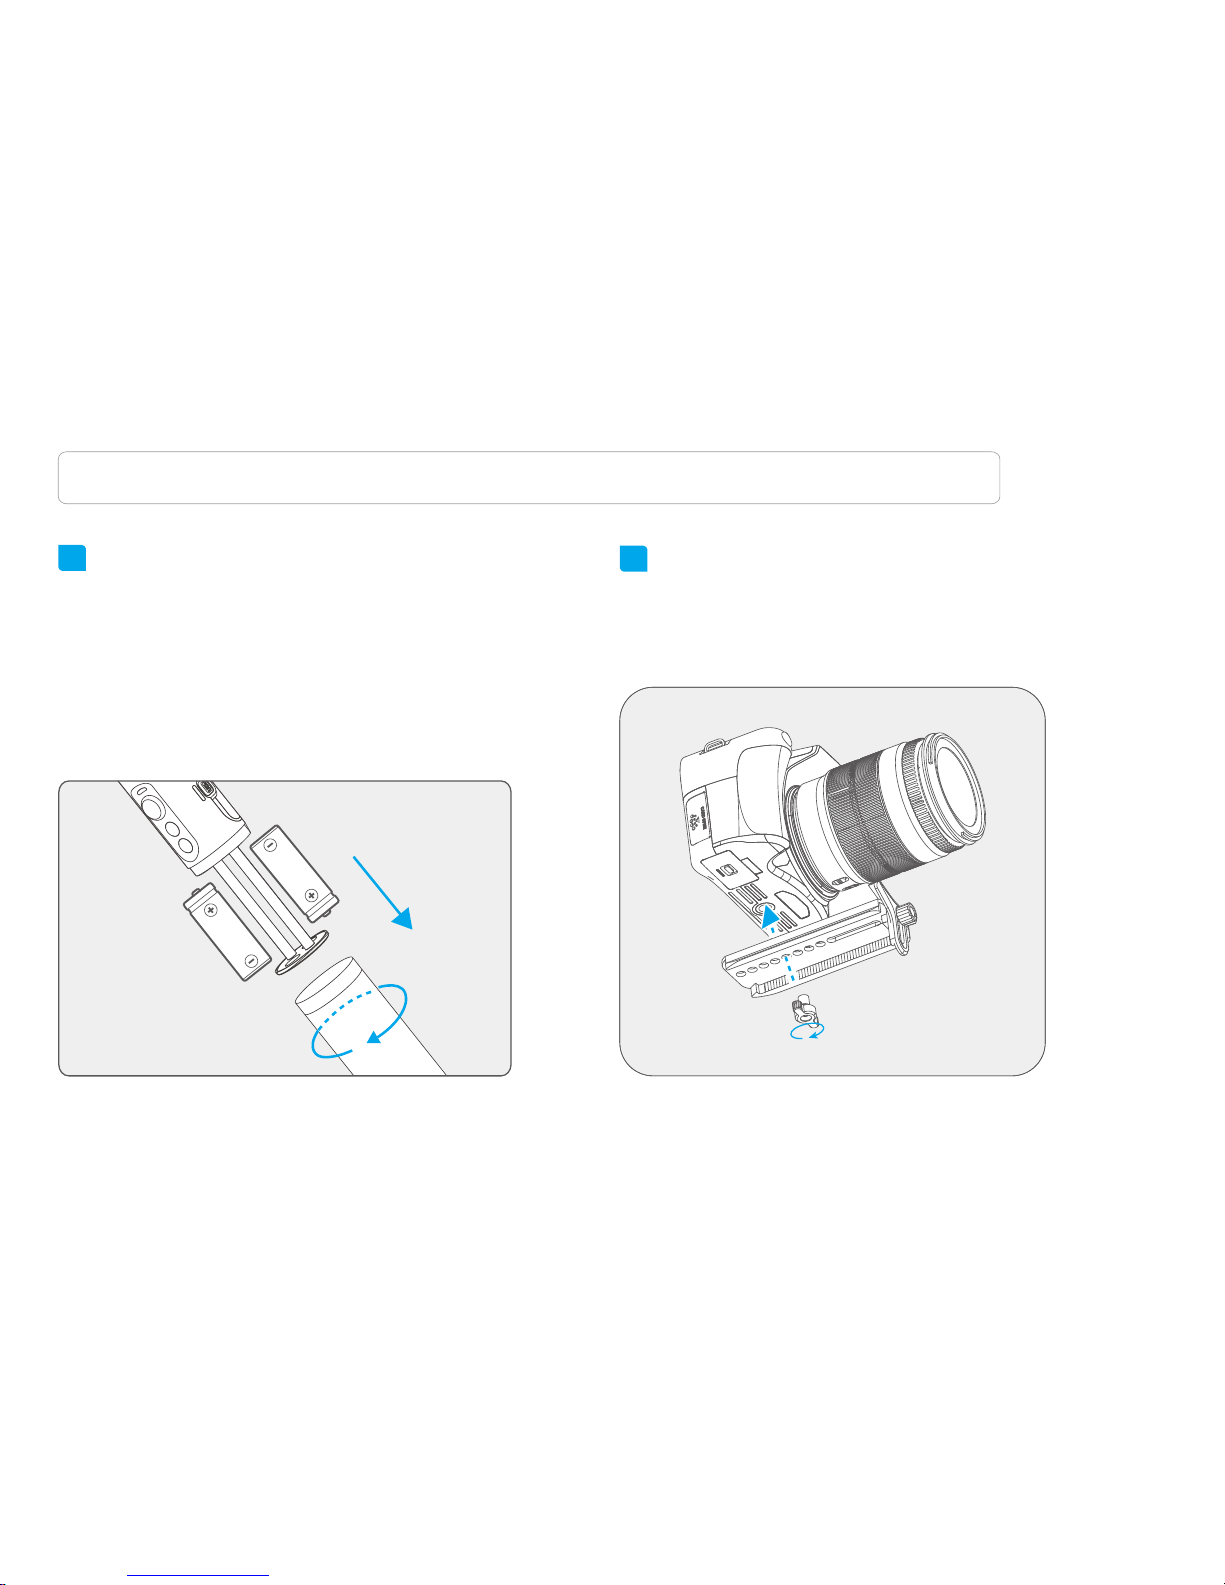
3
2
(1) Align the adjustment skateboard to the 1/4 screw
hole at the bottom of the camera and place to the
appropriate position,then tighten the screw.
1
2. Installation
Attention: Please complete the following instructions before power on the gimbal
Insert the batteries
Remove the handle, insert
2 pcs 18650 batteries and
tighten the handle.
Prior to use, please be sure to fill the batteries.
Installation of the camera
18650
18650
*The screw is screwed into the threaded
holes on the quick plate.
Page 5
4
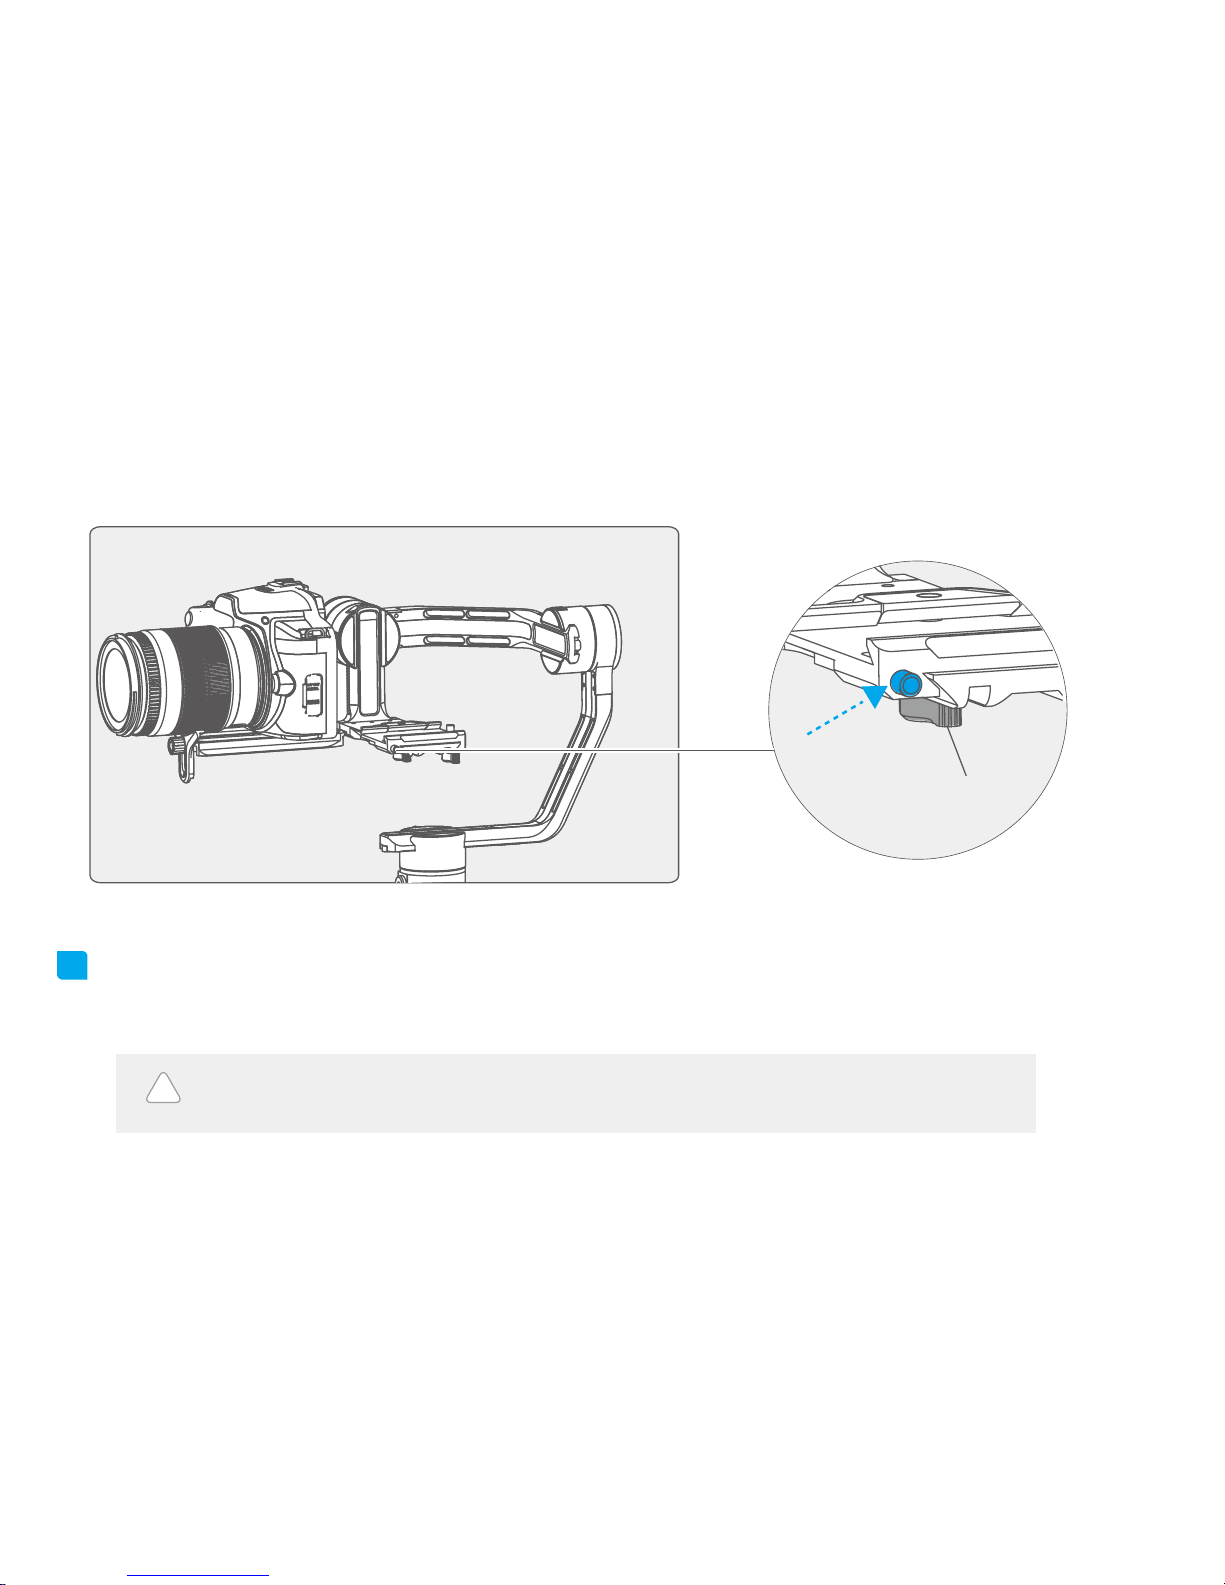
Balance Adjustment
After installing the camera, press and hold the anti-column, place the quick plate which the camera is
mounted on the clamping plate, and tighten the screws.
(2)
3
!
Anticolumn
Thumb
screw
Turn on the gimbal after adjust the center of gravity balance of the three axis(see the section
"7.Balance Adjustment" for details)
Note: center of gravity imbalance can lead to stable performance degradation,
or even can not balance the camera.
Page 6
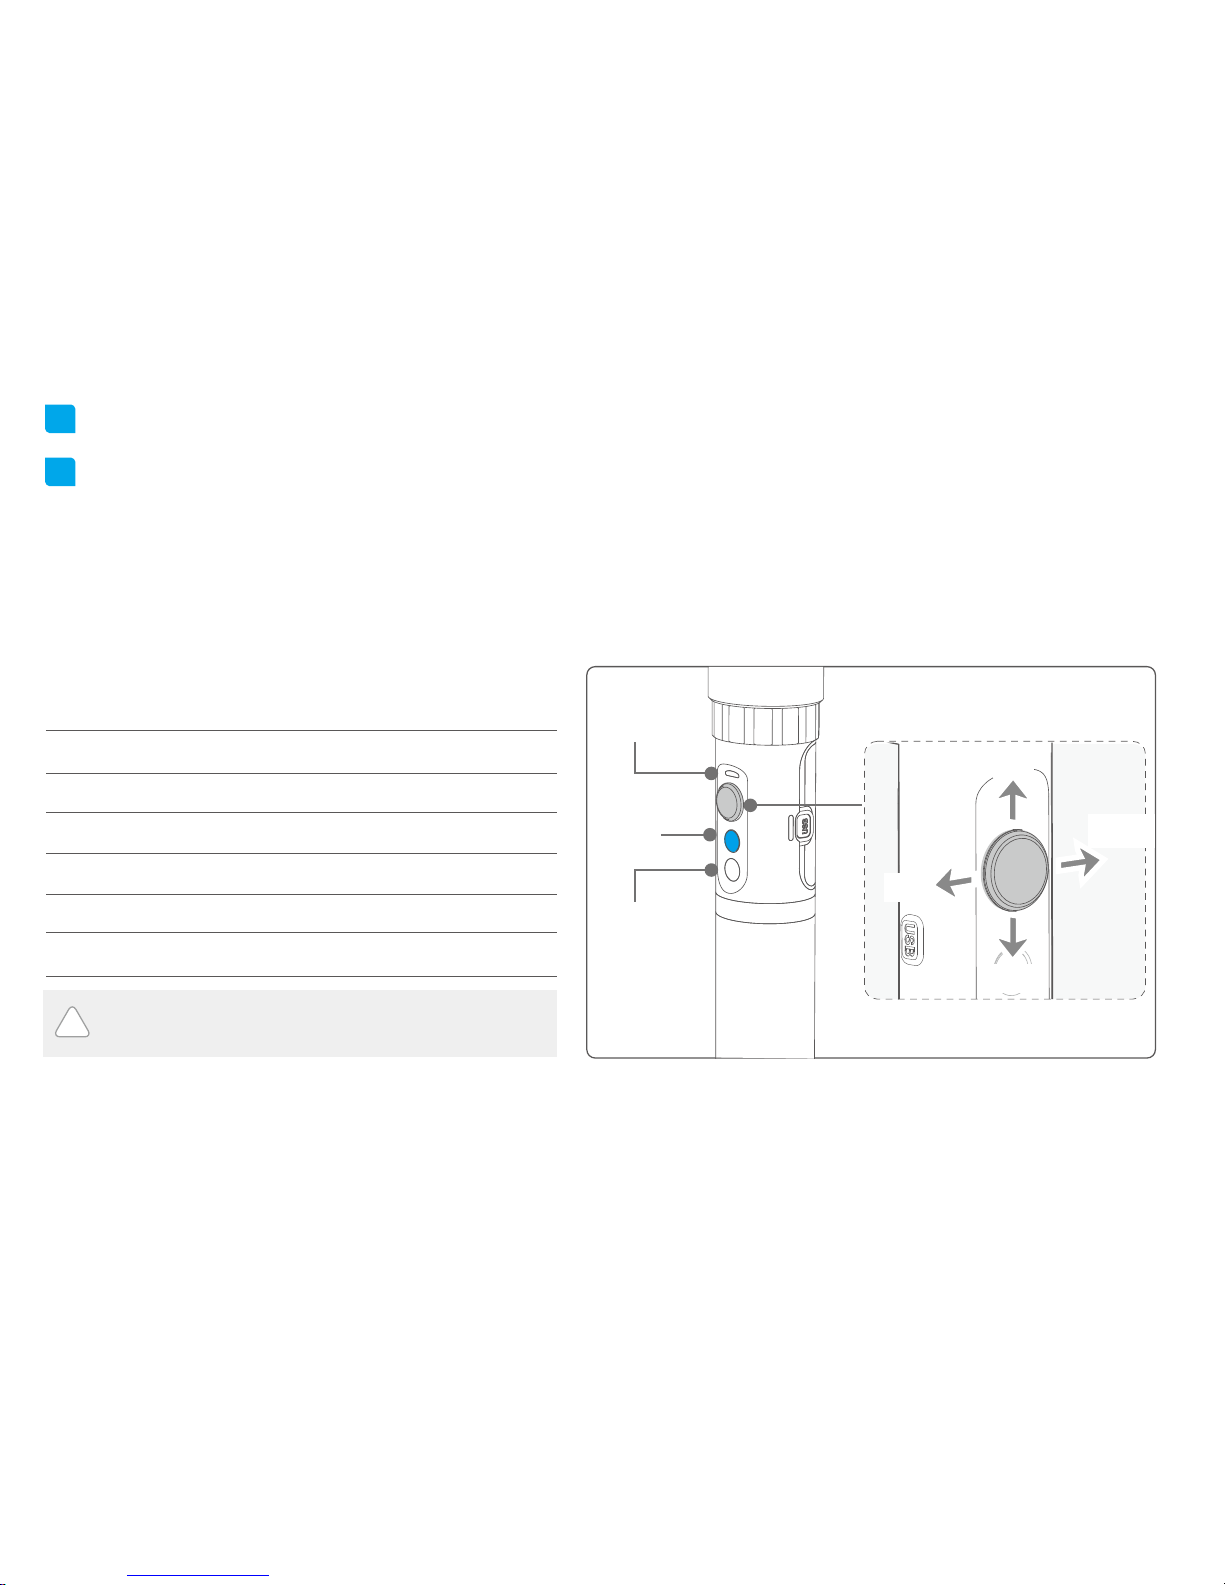
5
In case of low battery, the indicator will light red and flash 3 times
every 5 seconds. Please charge gimbal or replace the battery.
Power on:Long press the function button and release it until green light is on and hear the tone.
Power off:
Long press the function button and release it until red light changes from quick flashing to
constant and hear the tone.
The current mode of the gimbal can be identified
by the indicator status.
Explanation of LED indicator status
LED status Mode / Status
Blue light flashes once
Blue light flashes twice
Panning mode
Panning and Tilting mode
Lock mode / Initialize the gimbalBlue light constant on
Blue light keeps flashing Initialization failure / Malfunction
Low battery Red light flashes three times
Red light keeps flashing Entering power off
4
5
!
Explanation of joystick control
Function
Button
Shutter
button
Up
Indicator
Left
Right
Down
Page 7

6
Trigger button
Lock
Modes / Functions
Function button
Double tap
Double tap
Single tap
Function
Triple tap
Reset
Long press
Panning Mode (Default mode )
Panning and Tilting Mode
Lock Mode
Reset
The orientation of the camera is fixed.
Return to panning mode, tilting and rolling to return to initial level
Return to panning mode, tilting and rolling to return to initial level
Explanation
Function Explanation
Panning mode
Panning and Tilting mode
Under panning and tilting mode, single tap to switch to panning mode
Rotate 180°in horizontal Make the camera lens rotate 180 °
Single tap to switch to panning mode (Default mode )
Tilting and rolling direction are fixed, and the camera lens moves according to the hand movement of the user.
Operating Instructions of Button
Working Modes
Other Functions
The rolling direction is fixed, and the camera lens moves according to the hand movement of the user.
6
In the panning mode or panning and pitch mode, press and hold lock
shortcuts to enter the lock mode, release to return before mode
Quadruple tap
Quadruple tap to enter autototation mode
Autorotation Mode
Fifth tap
Fifth tap to automatically enters initialization
Initialization
Page 8
7
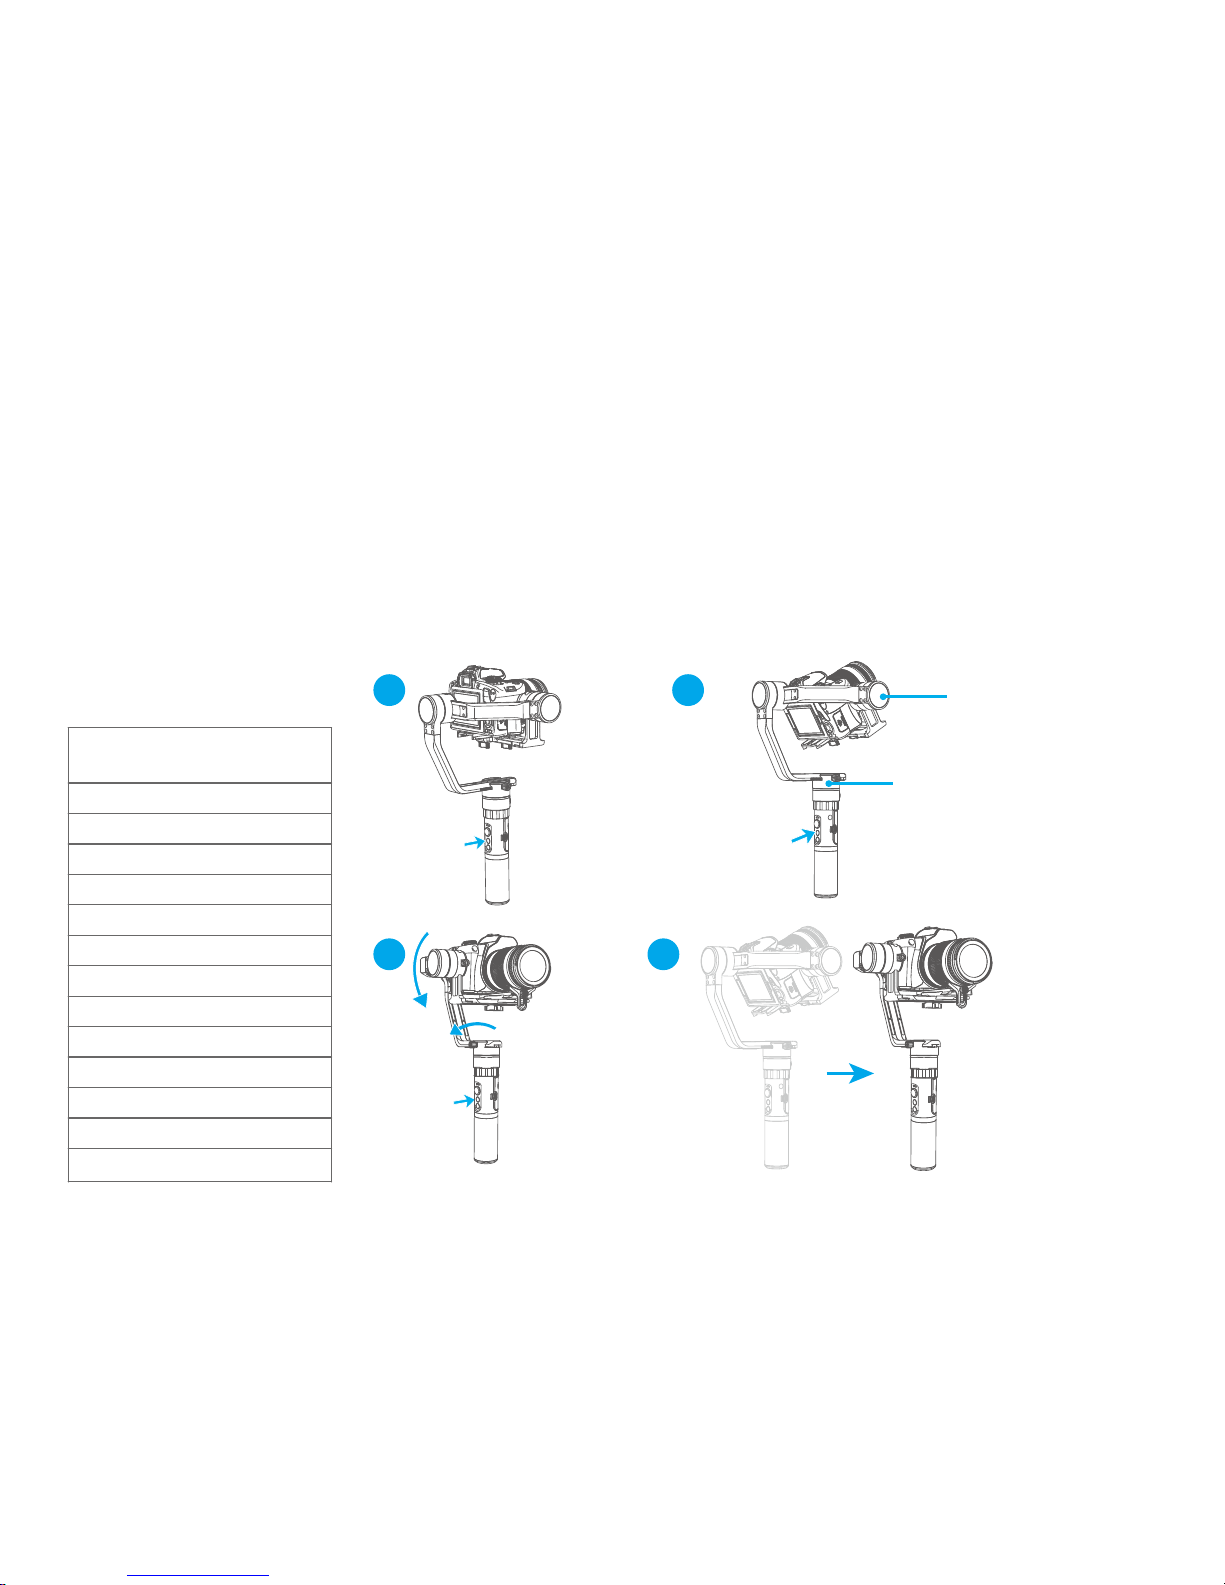
Autorotation Mode
1.Quadruple tap on function button, gimbal will access the autorotation mode .
2. Set the gimbal start rotation position: Pull the tilting axis or panning axis to the start position by hand,click the function button to record.
3. Pull the gimbal (which can be rotated more than one turn) according to the rotation path you want to set, and then click the function
button to record the end position again.The gimbal will go to the start position and start the automatic rotation.Gimbal autorotation function
with micrrorless camera delay photography function can be used to achieve a very special mobile delay photography.
1.Quadruple tap on function
button, gimbal will access the
autorotation mode setting.
Tilting
Tilting
Panning
Panning
2. Turn the panning axis or tilting
axis to the start position and hold for
half a second.Click on function
button, record the start position .
3 .Turn the panning axis
or tilting axis to the end
position and hold for half a
second.Lick on the function
button again,record the
end position .
Gimbal speed setting reference table
Annexed parameter table:
8 hours / turn
4 hours / turn
1 hour / turn (default)
30 minutes / turn
15 minutes / turn
2 minutes / turn
4 minutes / turn
8 minutes / turn
30 seconds / turn
24 seconds / turn
18 seconds / turn
12 seconds / turn
1 minute / turn
α2000 Rotate Speed
4.Gimbal will recover to
start position automatically.
Tilting axis and panning
axis turn to end position
at constant speed.The
gimbal is automatically
reset after the end.
Other operations:Click the function button to exit the autorotation mode during automatic rotation. The speed setting
is made by Feiyu ON App.
Note: Both the panning and tilting directions can be rotated.
1
3 4
2
Page 9
8
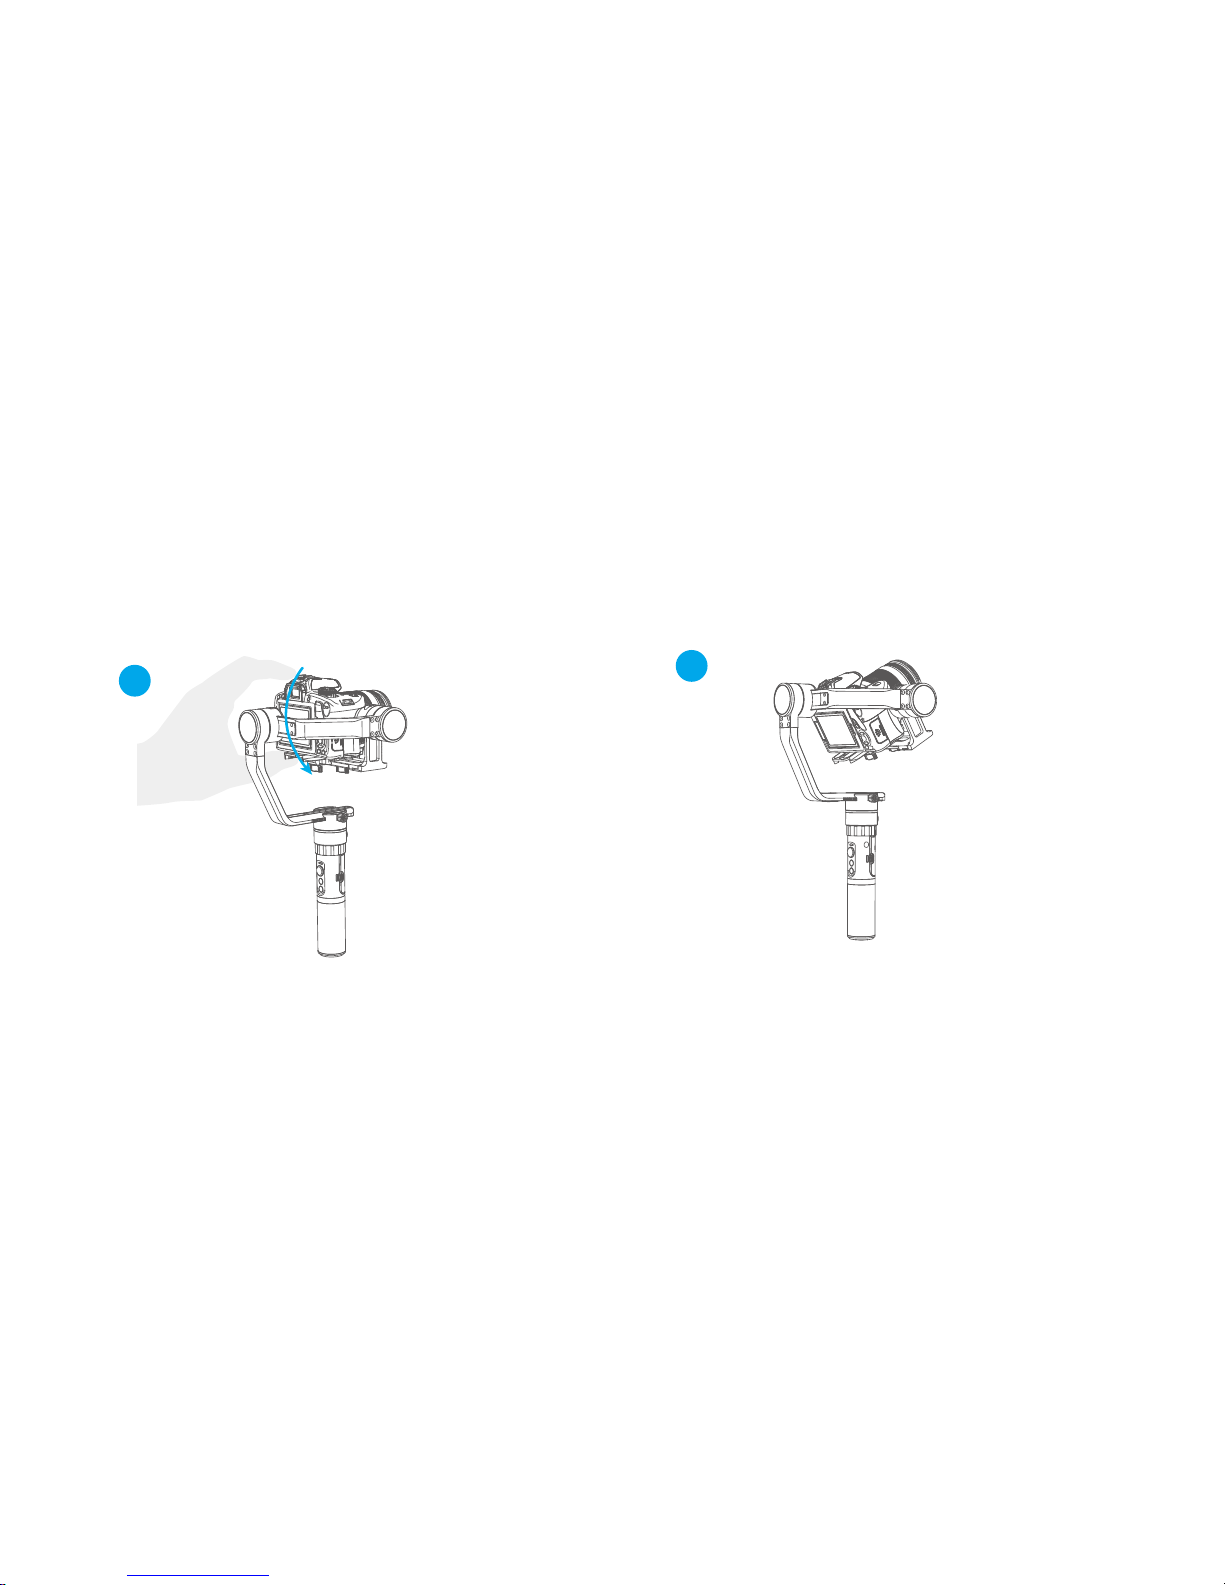
Manual Lock
Hold the camera and change its angle in
tilting axis direction.
Keep this position for half second, the
current angle will be locked manually.
2
1
Manual lock ,pull to the specified angle to stay half a second can be lock the current angle.(The tilting axis and
panning axis in the lock mode can be manual lock and the tilting axis can be manual lock in the panning mode.)
Take the tilting axis as an example:
Page 10
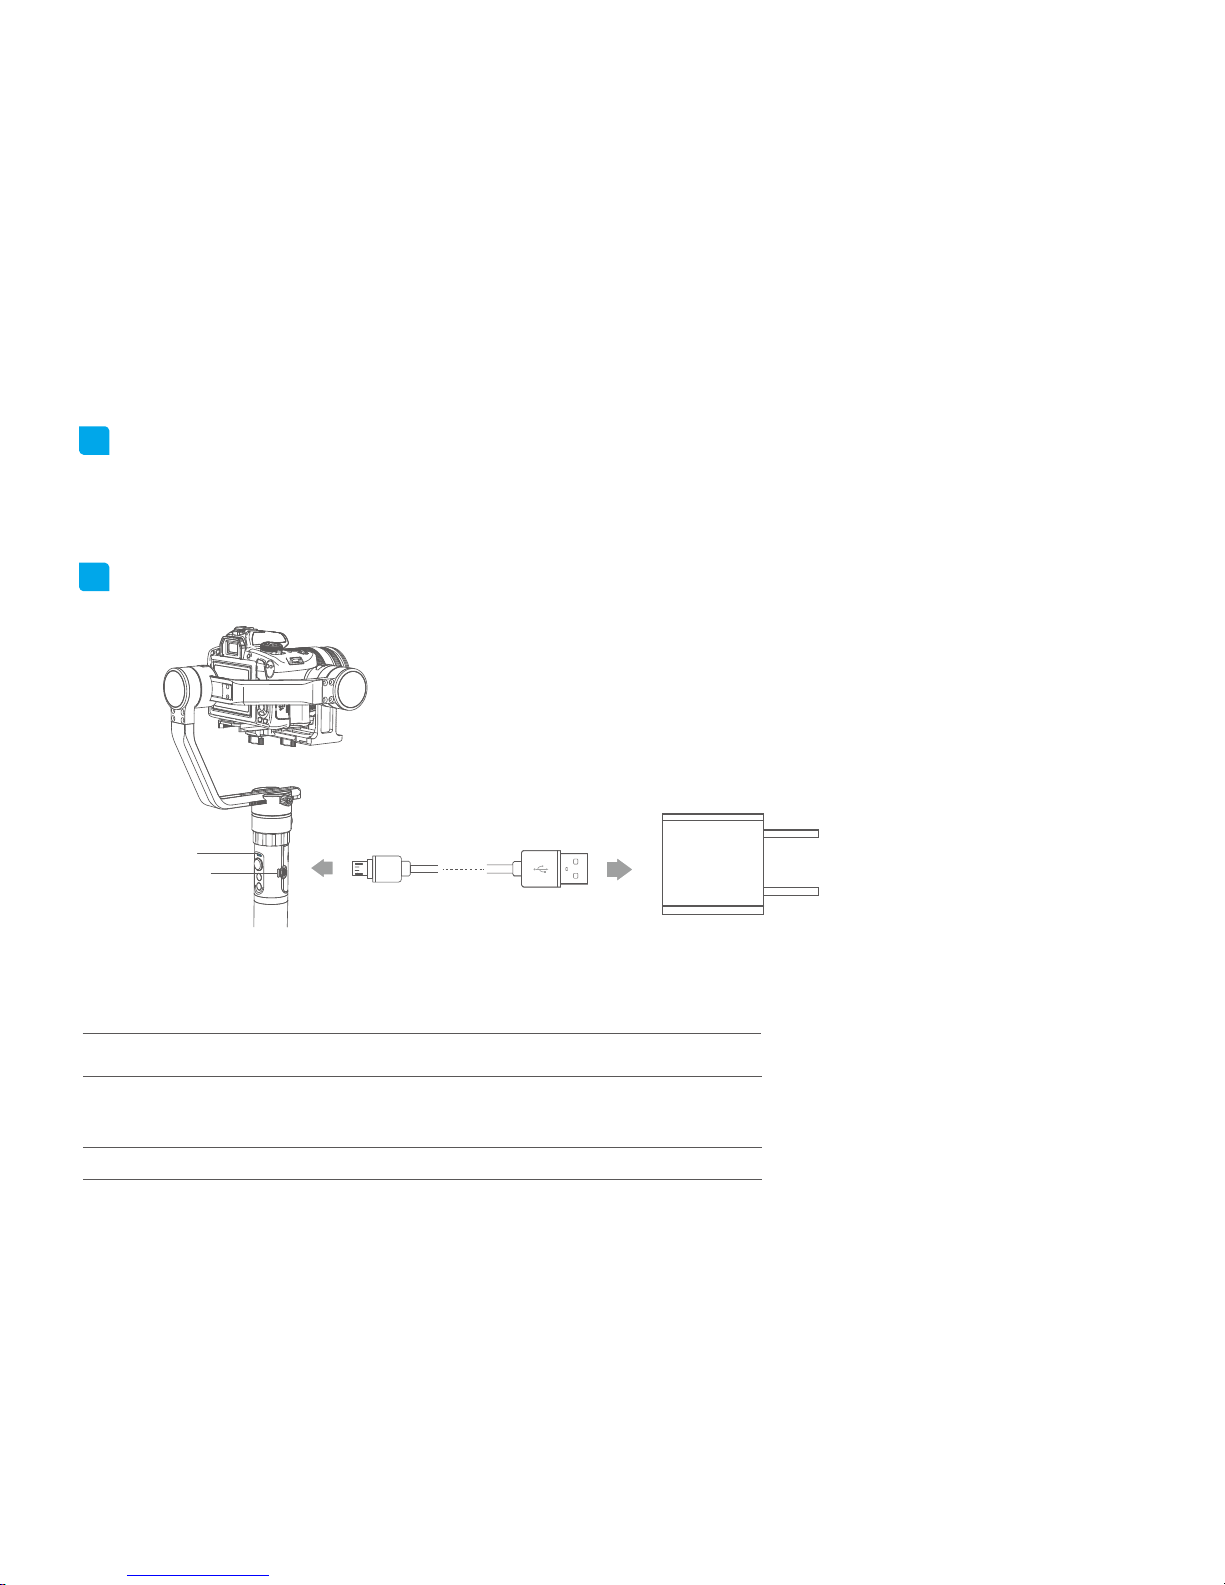
Charging
状态指示灯
状态指示灯
7
8
Photograph
9
The shutter button can take pictures via the shutter line.
Click the shutter button to focus, click again within 3s to take pictures.If there is no operation within 3s, the focus
state is cleared.
Indicator
Charging indicator
Micro USB
Input:5V/1A
(equipped by user)
Explanation of Charging indicator status
LED status Mode / Status
Blue light,
red light off
The blue and red light
are flashing
Stop charging
The voltage of two batteries
balance ajustment
The blue and red light
Charging
(If the two batteries voltage difference between the larger, the process takes a long time)
Page 11
10
2
App Store
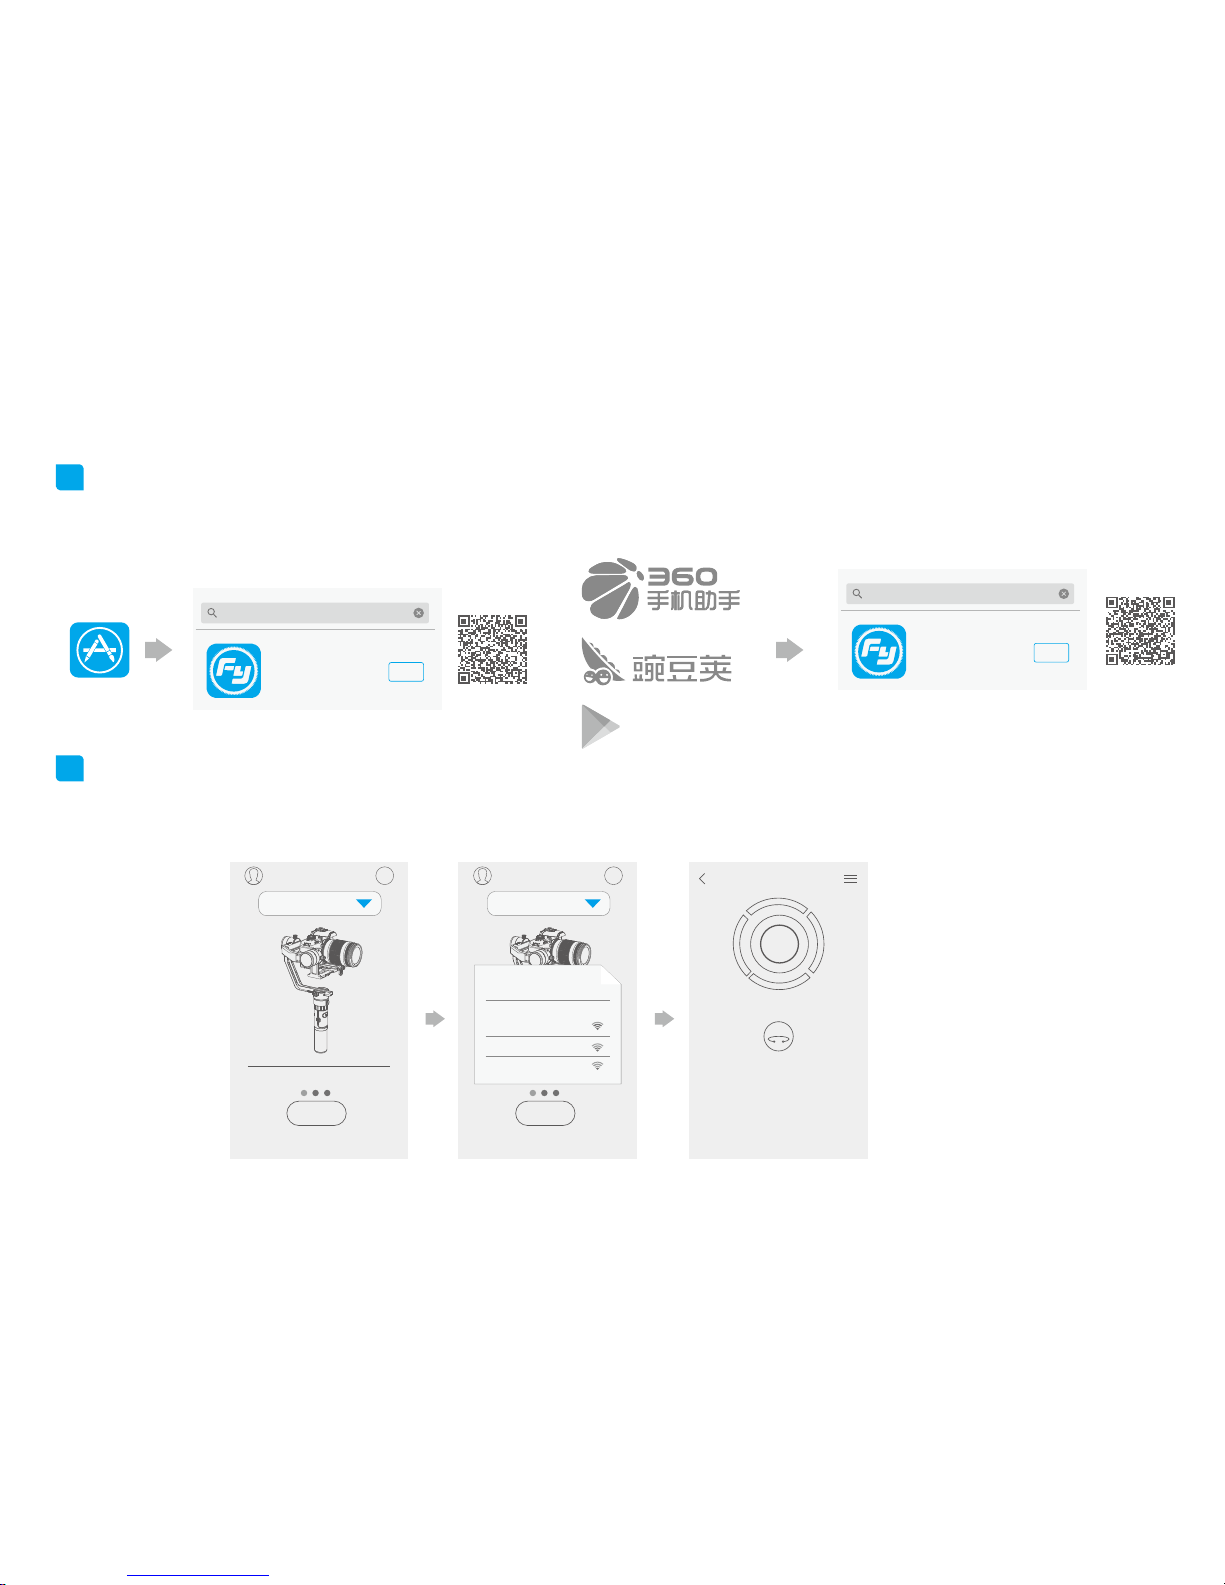
3. Download and connect App
Download "Feiyu ON" and install it.
(1) IOS version:
(2) Android version:
Google play
Feiyu ON
Download
GuiLin FeiYu Technology Incorporated Company
Feiyu ON
Connecting App
Start the App on your smartphone,follow the instructions to connect the smartphone App with gimbal via bluetooth.
1
Feiyu ON
Download
GuiLin FeiYu Technology Incorporated Company
Feiyu ON
?
A2000
A2000
?
A2000
α2000
FY_A2000_XX
FY_XXX_XX
FY_XXX_XX
FY_XXX_XX
×
360°
Connect Connect
Choose a gimbal
*Please scan the two-dimensional code
via the browser.
Page 12
11
1
2
3
Fifth tap function
button, the motors
stop working after
the vice "drop" ,
the blue light is
always on
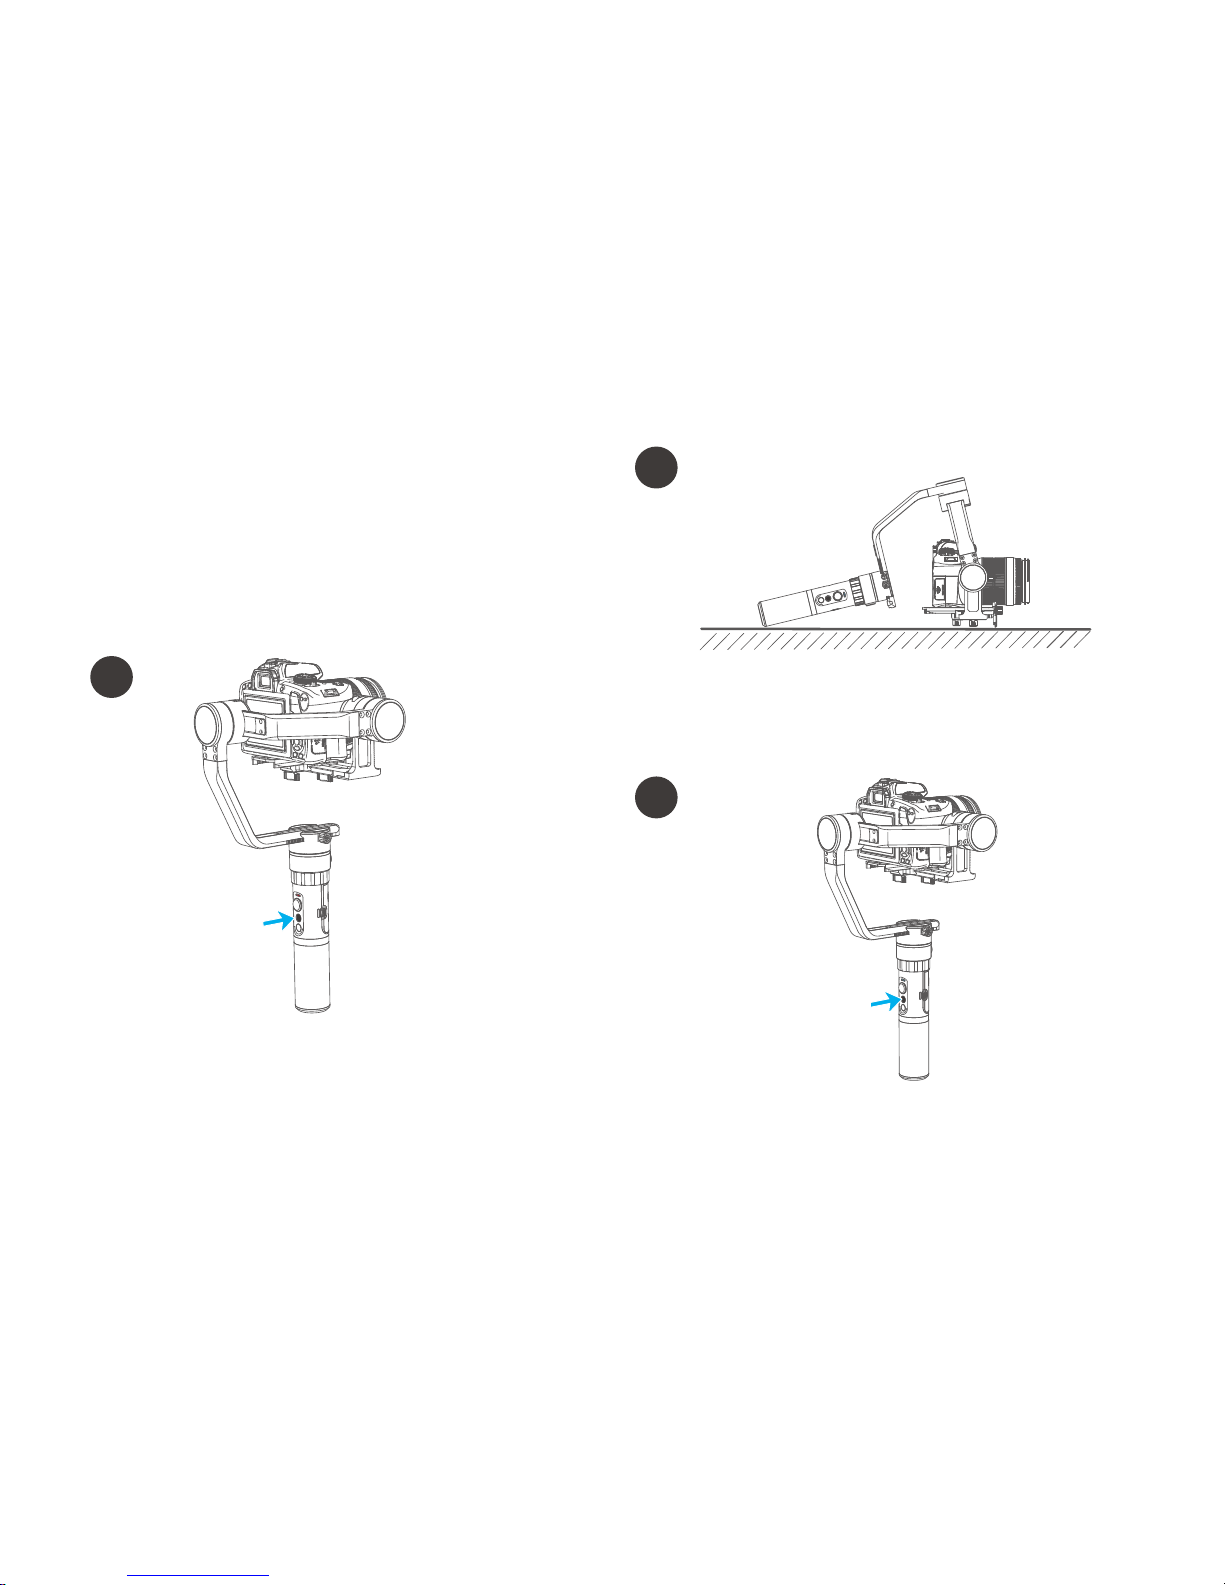
The gimbal still placed on the desktop, the gimbal
will automatically initialization when detects the
static, the blue light cycle three flash, then the
initialization end.
4. Gimbal initialization
Adjusting steps:
You can initialize your gimbal when:
(1) when camera is not level
(2) if not used for a long period of time
(3) in case of extreme temperature variations
After the initialization
is successful, click the
function button to
wake up.
Note: If the initialization is not successful for a long time, long press
the function button to turn off the gimbal,restart it and then initialize.
Page 13
12
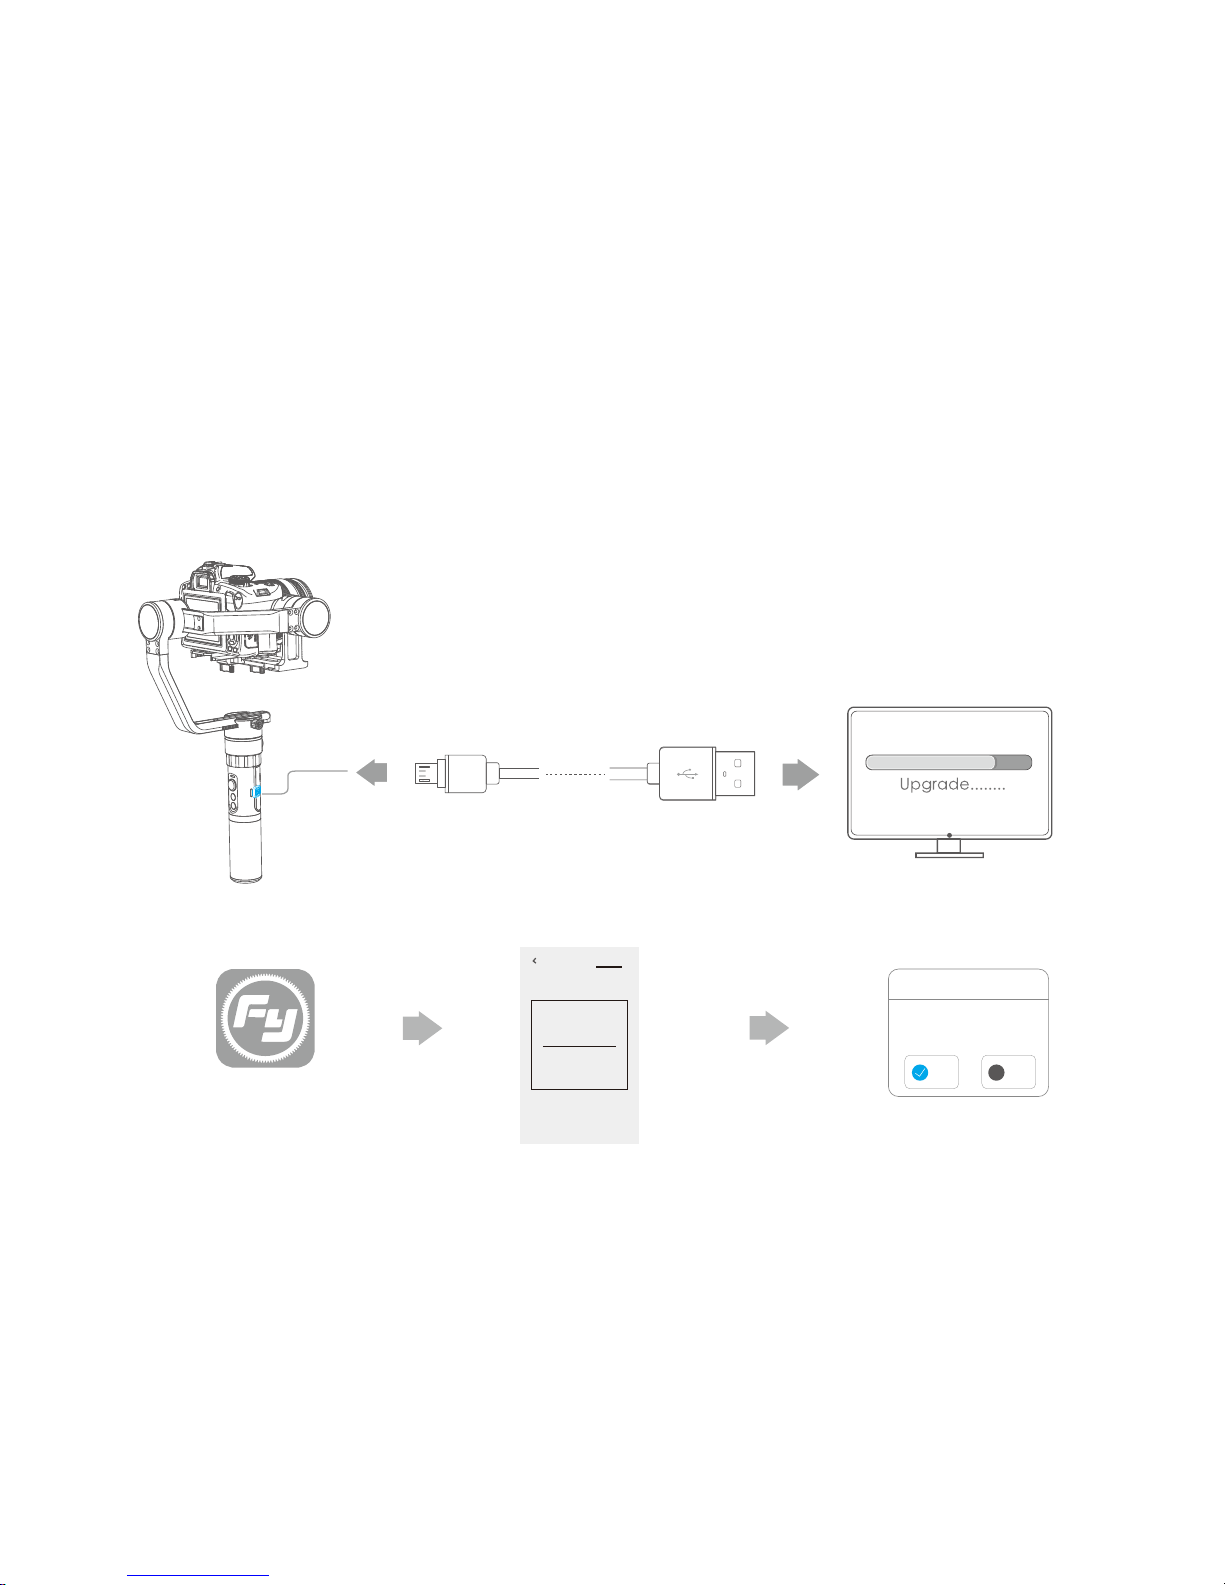
5. Firmware Upgrade
PC
Micro USB
Please visit the official website www.feiyu-tech.com to download the relevant software for upgrading, including USB
driver,firmware upgrade software and product firmware, and install the relevant software, decompress the firmware files .
Firmware upgrade according to the firmware upgrade instructions.
Feiyu ON
Option 1: Connect the gimbal with PC via micro USB cable, and then upgrade the firmware.
Option 2: Connect the gimbal with smartphone App via bluetooth, and then upgrade the firmware.
(1)
(2)
功能端口USB interface
Settings Updata
The current used version 1.7.2,
new firmware is available,
do you want to upgrade?
new firmware is available,
do you want to upgrade?
×
Firmware upgrade
Yes
No
Download
and install it.
Later
Page 14
176.5mm
376mm
219mm
13
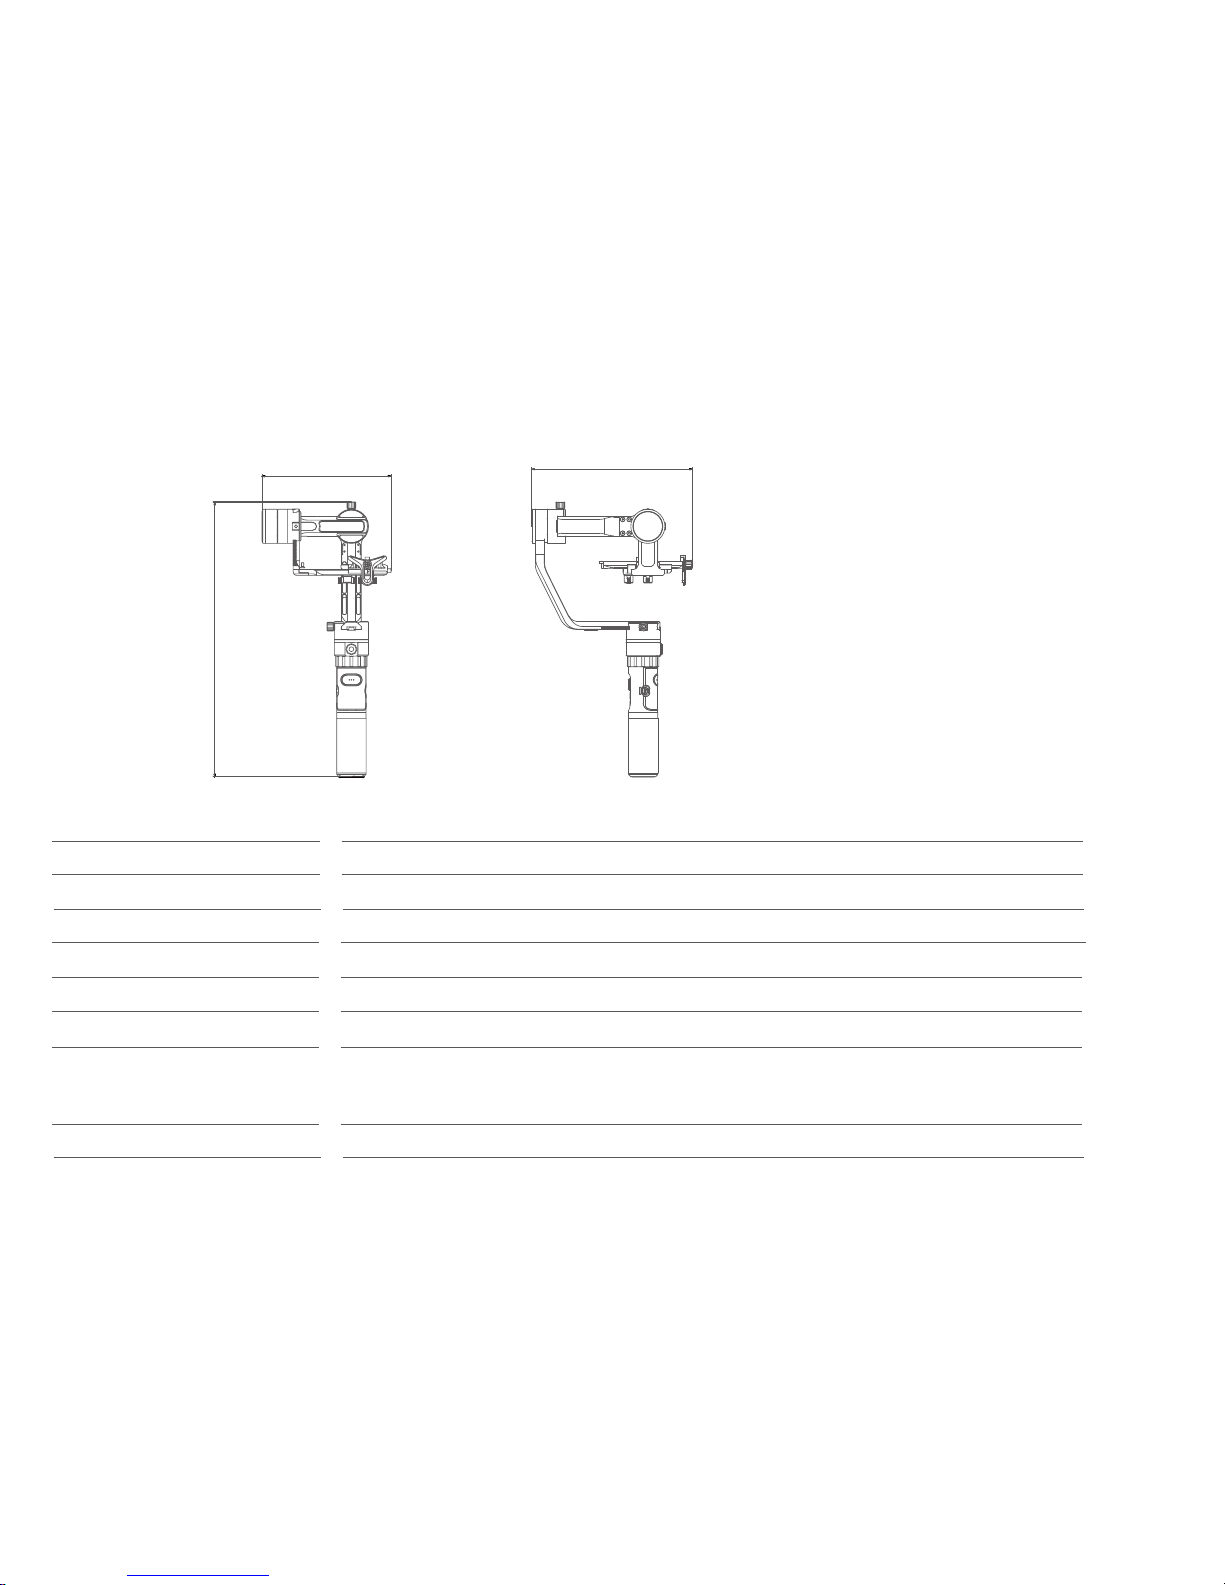
6. Parameters
1111.5g(Not including the accessories of batteries,camera,camera lens and ect.)
Panning Increments 3°/s ~ 150°/s
Adaption
Weight
Sony NEX-5N/NEX-7 and other N-series, SONY A7RII / ILCE-7R / ILCE-5100, Panasonic LUMIX GH4,
Canon 5D Mark III (with standard lens), and other cameras with similar dimensions with weight
less 2000g(The camera weight including the accessories of lens and ect.)
Life Time
Load weight
10 Hours (Center of gravity balance)
250g~2000g
Tilting Increments 2°/s ~ 75°/s
Titling Angle 360°
Rolling Angle 360°
Panning Angle 360°
Page 15
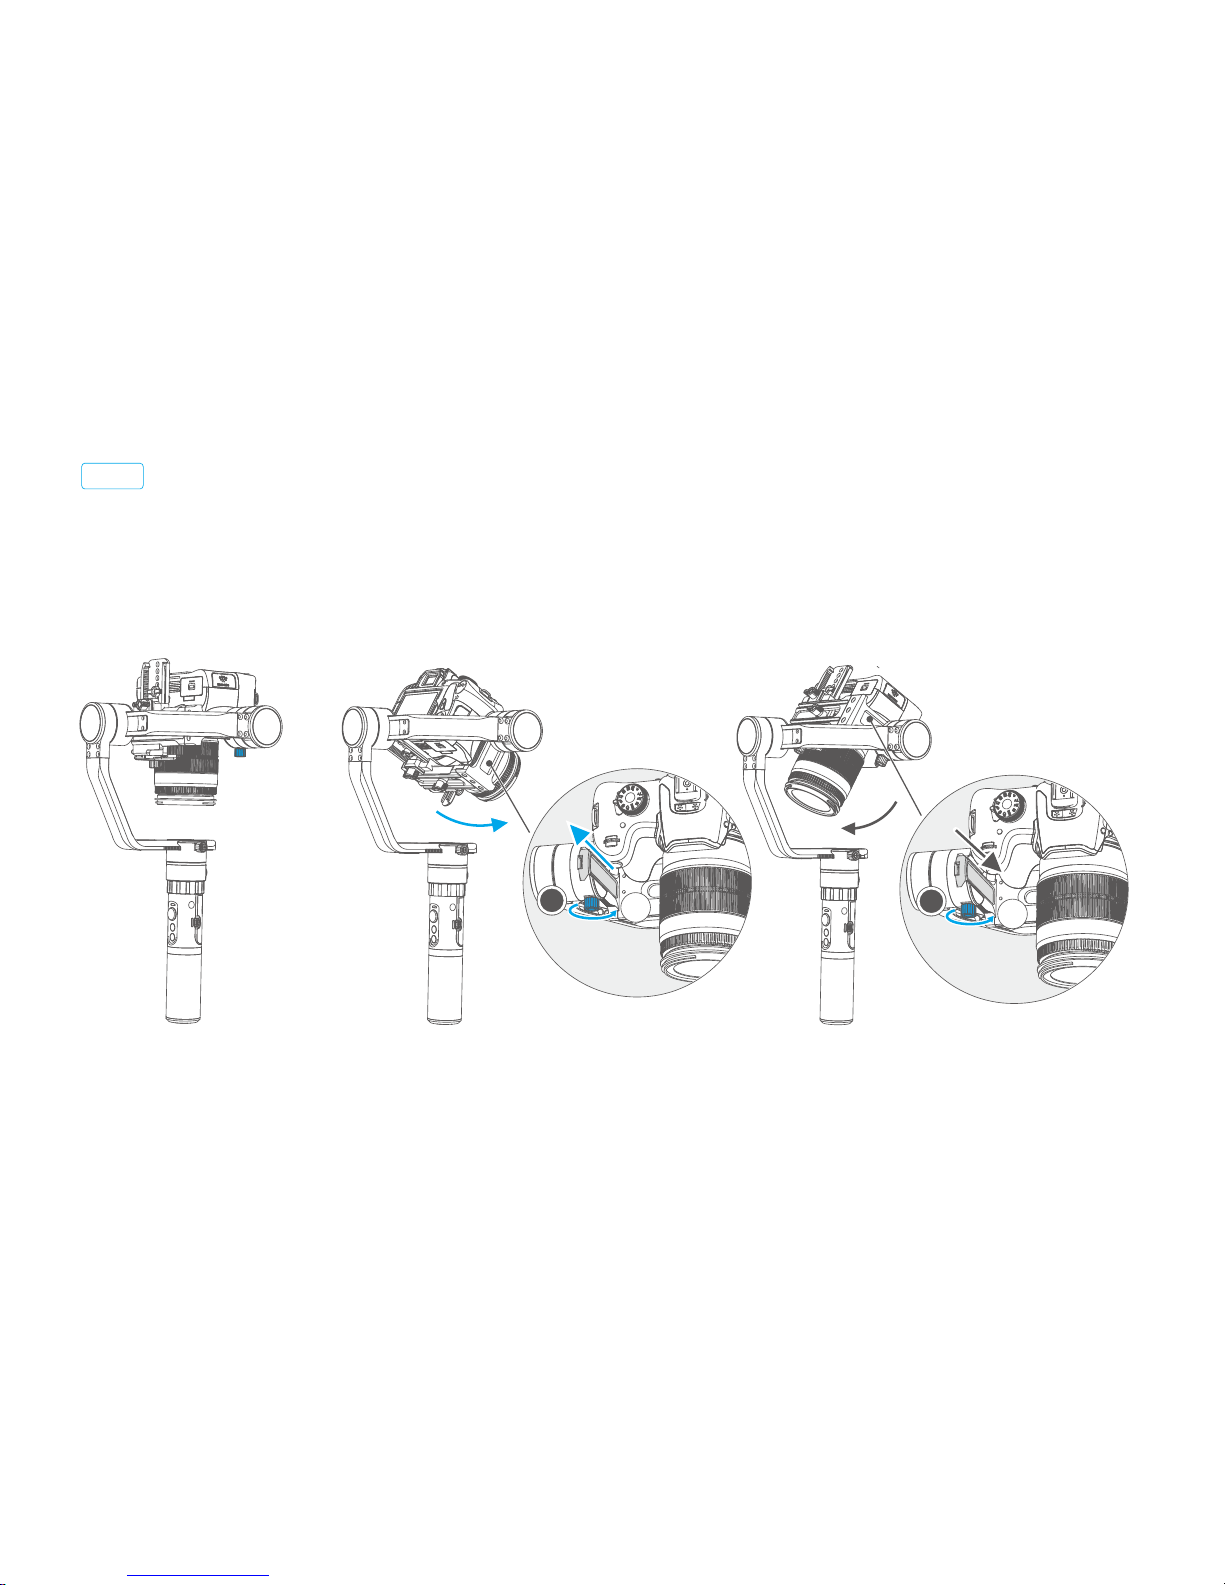
7. Balance Adjustment
14
STEP 1
(1)
Adjust the center of gravity of the camera in two steps to the axis of rotation of the tilting axis.
Adjust the center of gravity position of the tilting axis up and down: let the camera lens vertical down,
hand arm to maintain the level, as shown in figure ①, let go and observe the state of rotation.
Adjust the balance via adjust the sliding arm up and down . (Refer to figure ② ③)
L
T
L
T
① ② ③
Balance adjustment of the tilting axis
* After adjustment, be sure to tighten the lock screw.
Normal vertical
Camera forward
Camera backward
Slide the
sliding arm up to adjust
Slide the
sliding arm down to adjust
Page 16
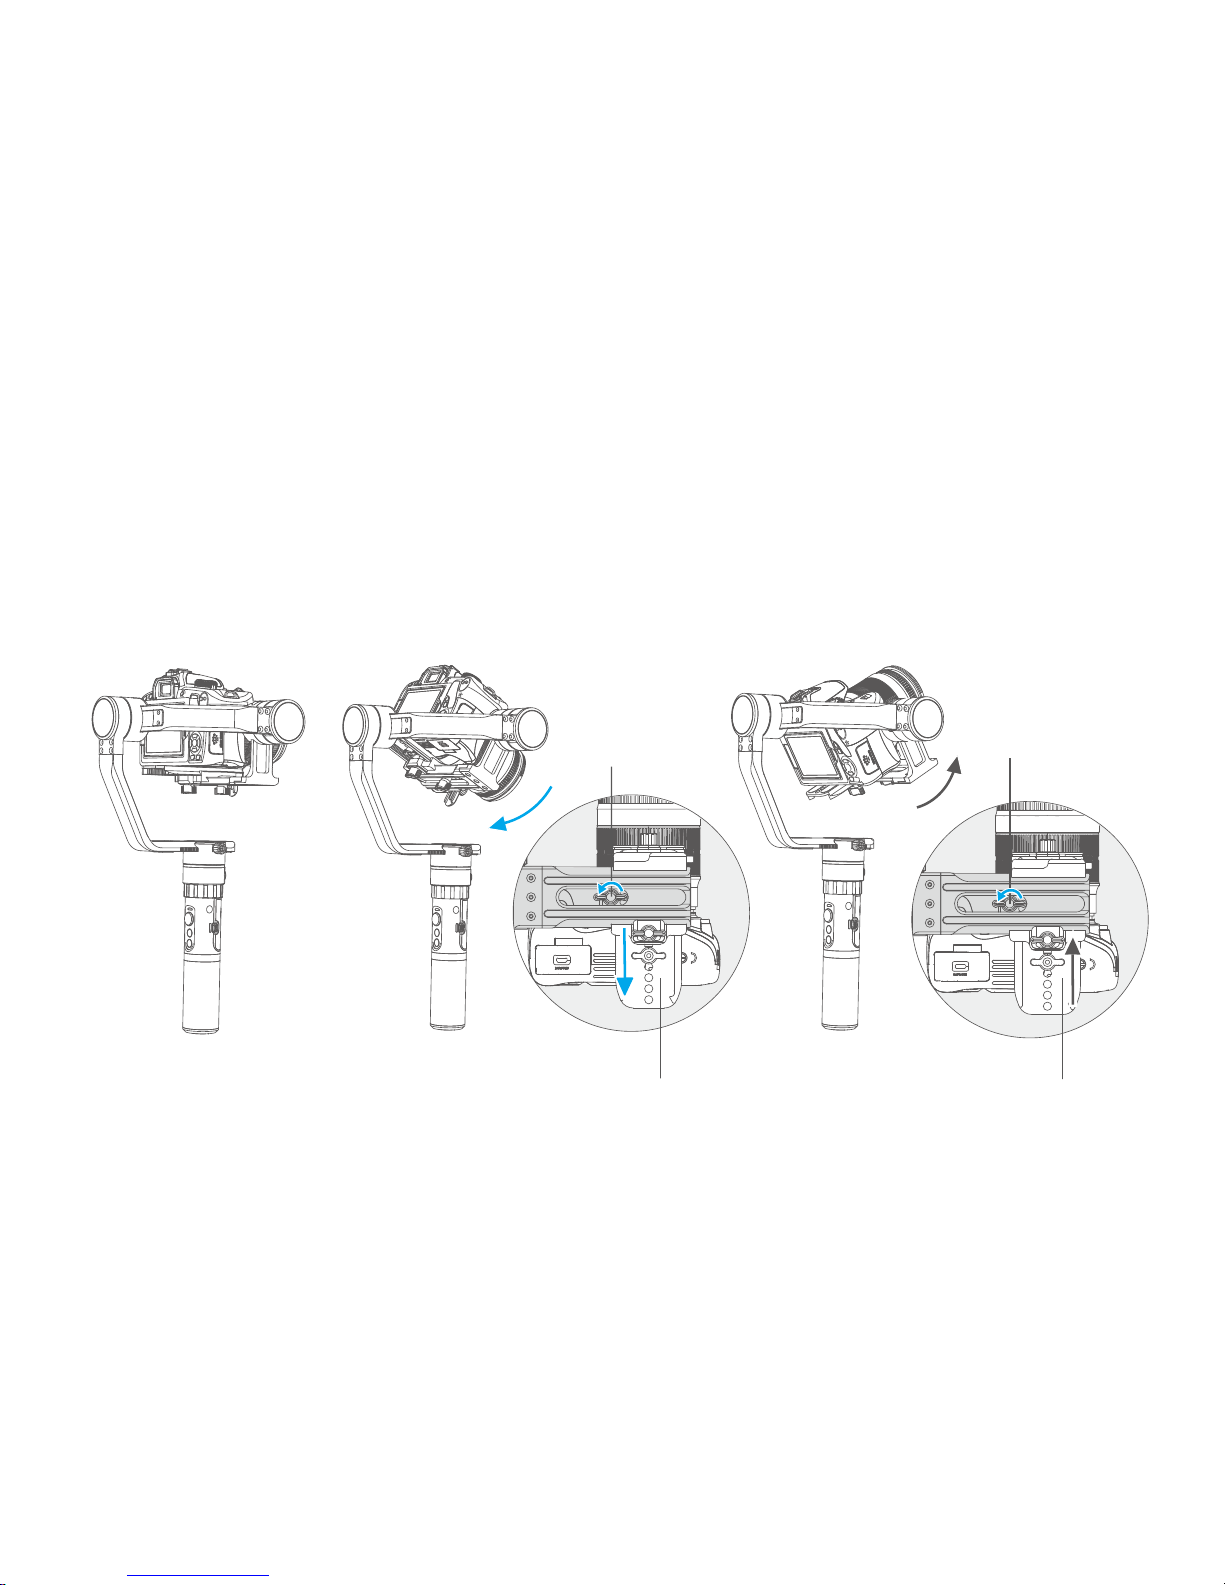
15
(2) Adjust the center of gravity position of the tilting axis forward and backward: let the camera lens
horizontal forward, hand arm to maintain the level, as shown in figure ①,let go and observe the state
of rotation.
Loosen the screw on the bottom of the camera and adjust the balance by slide the adjustment
skateboard to up and down at the bottom of the camera.(Refer to Figure ② ③)
① ② ③
* After adjustment, be sure to tighten the lock screw.
Camera forward Camera backward
Balanced
Thumb screw
Thumb screw
Slide the adjustment
skateboard
down to adjust
Slide the
adjustment
skateboard
up to adjust
Page 17
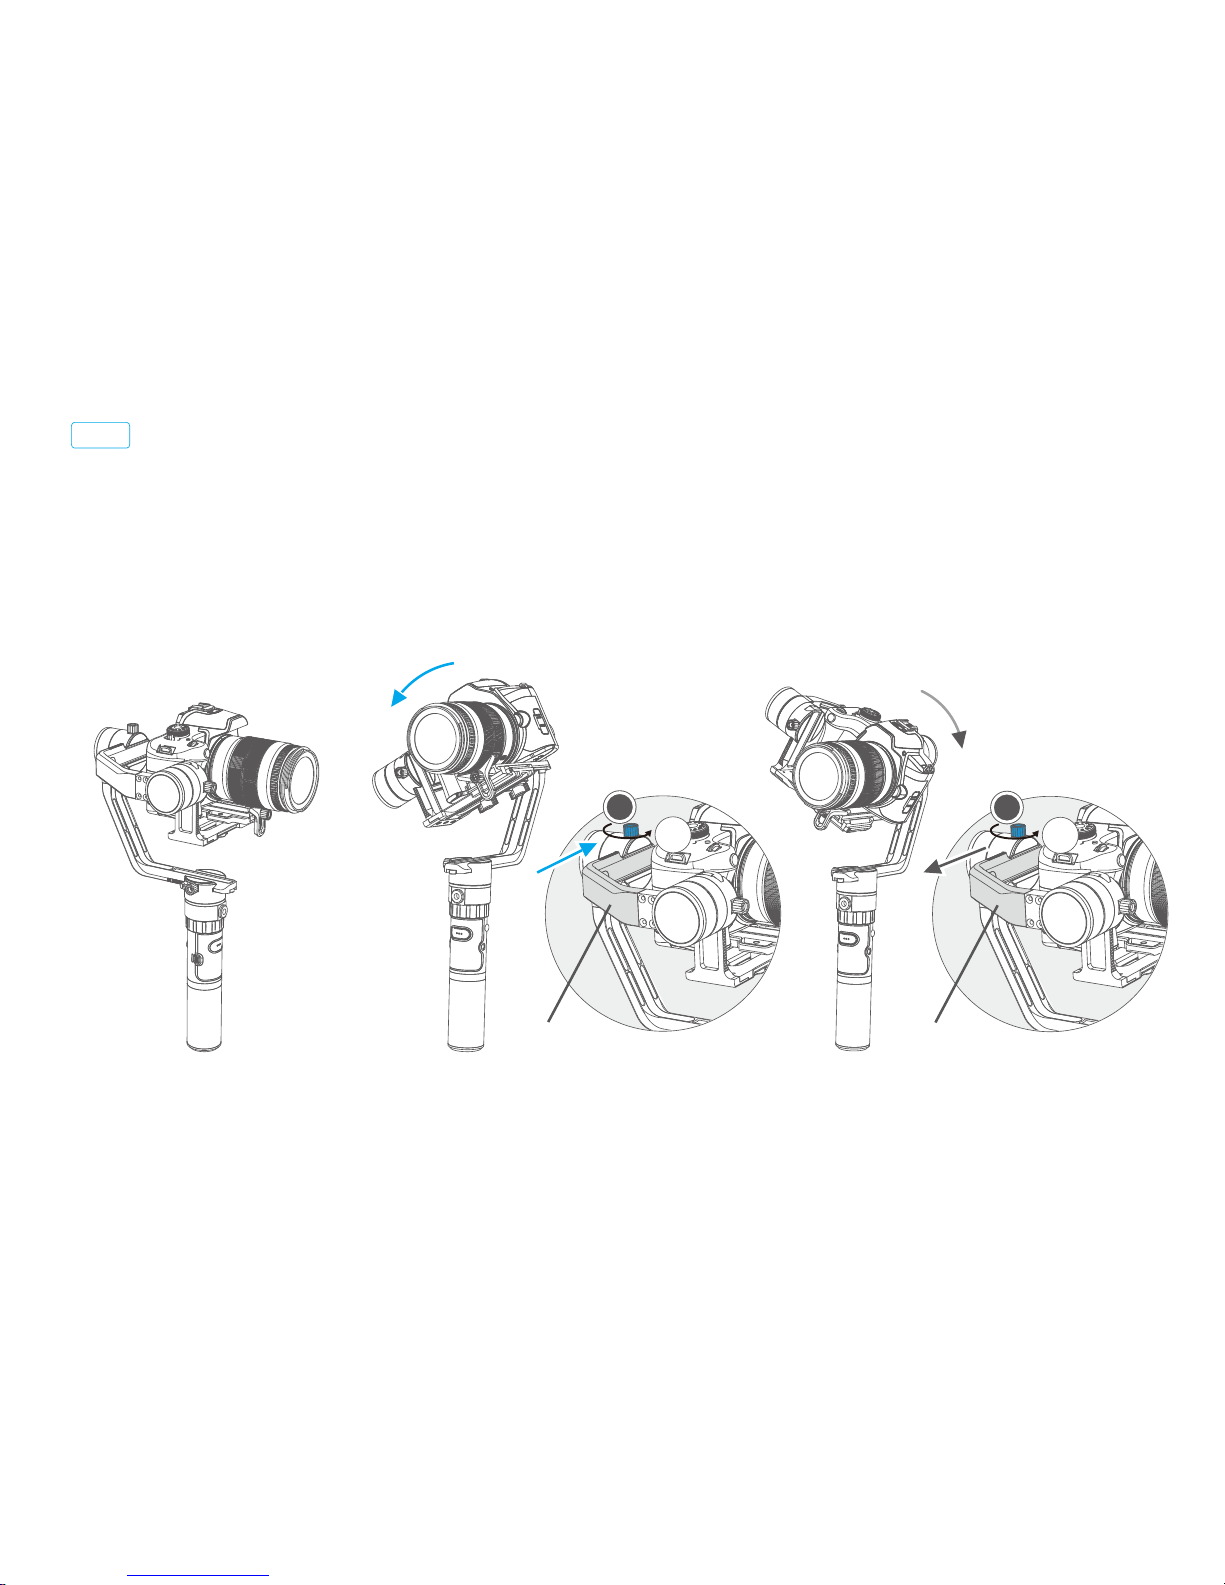
16
STEP 2
T
L
T
L
When the balance adjustment of tilting axis and rolling axis is completed, the balance of the panning axis
can be adjusted.Keep the gimbal socket connector with the horizontal ground,Hand-held panning axis as
shown in figure ①,let the arm in the natural state, observe the camera tilt state.
Loosen the lock screw on the rolling and slide the cross arm left and right to adjust. (Refer to figure ② ③)
① ② ③
Balance adjustment of the rolling axis
* After adjustment, be sure to tighten the lock screw.
Camera leftward
Slide the cross arm right to adjust
Slide the cross arm left to adjust
Camera rightward
Balanced
Cross arm
Cross arm
Page 18
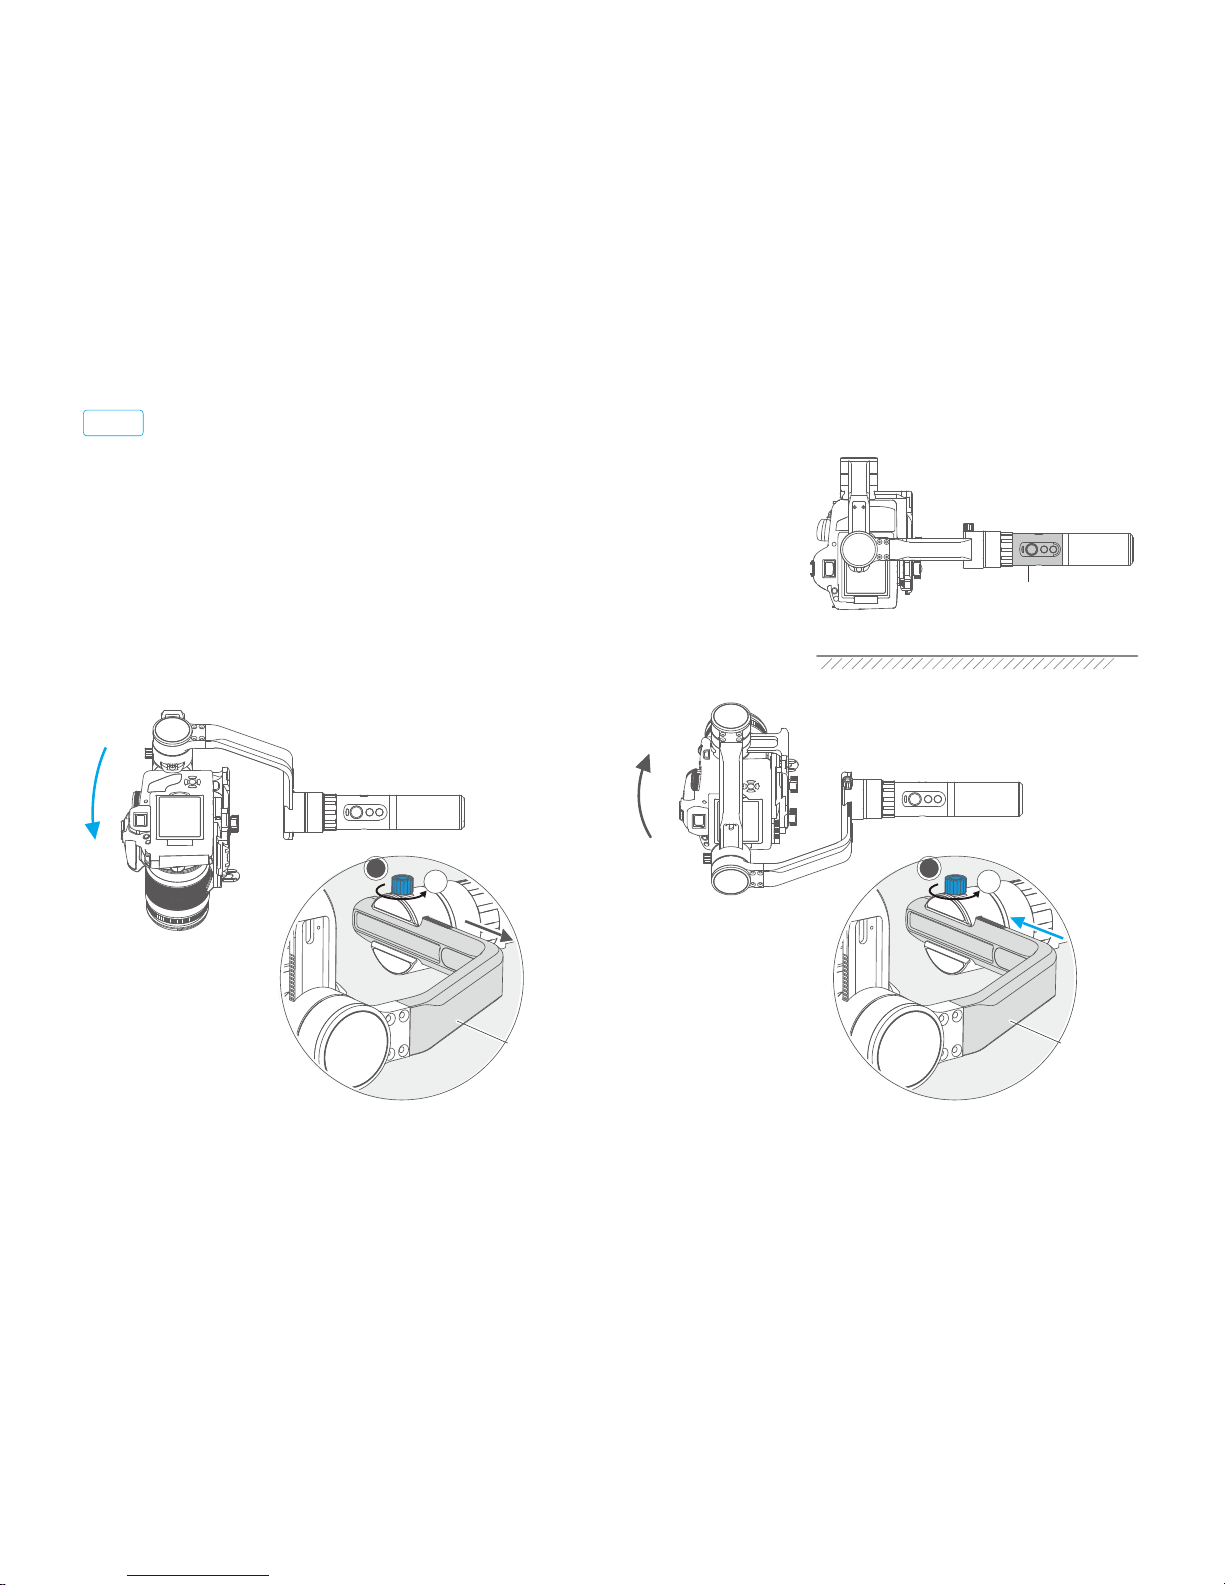
17
When the balance adjustment of tilting axis and rolling axis is
completed, the balance of the panning axis can be adjusted.
Keep the gimbal socket connector with the horizontal ground,
Hand-held panning axis as shown in figure ①,et go and observe
the state of rotation.
Loosen the lock screw on the panning and slide the vertical
arm forward and backward to adjust (Refer to figure ② ③)
STEP 3
T
L
T
L
①
②
③
* After adjustment, be sure to tighten the lock screw
Horizontal ground
Socket connector
Best balance
Vertical arm
Vertical arm
Slide the vertical arm backward to adjust Slide the vertical arm forward to adjust
The lens is down
The lens is up
Balance adjustment of the panning axis
Page 19

18
D I S C L A I M E R
Feiyu Tech reserves the right to amend this manual and the terms and conditions of use the gimbal at
any time.
You can get the latest user manual from the official website: www.feiyu-tech.com
The Company assumes no liability for any risks related to or resulting from the debug and use of this
product (including the direct, indirect or third-party losses).
Prohibit any user for any illegal purpose. Users will be responsible for all behaviors of purchase and
use products.
For any unknown sources of using, we will not be at any services.
The updating and changes of product firmware and program may cause changes in function
descriptions in this user manual, please read the instructions carefully before upgrading the firmware
and use the corresponding user manual.
Attention
When the gimbal is not in use or placed on the table, please ensure
it is powered off.
Please correctly assemble the gimbal in accordance with the
diagram.
Please install the phone before powering on the gimbal.
Remove the battery when not in use for a long time.
Page 20
GuiLin FeiYu Technology Incorporated Company
For more information, please visit our official website
Due to software and hardware improvements, your actual product might differ from the descriptions
and pictures in this user manual. You can get the latest user manual from the official website.
 Loading...