

FXO GATEWAY User Manual

F
F
X
X
O
O
A
A
G
G
A
A
T
T
E
E
W
W
A
A
Y
Y
U
Usseerr
M
Maa
n
n
u
uaall
(
(
2
2
/
/
44P
Poo
rrttss)
)

STEPS IN CONFIGURATION..........................................................................2
1. START UP...................................................................................................3
1.1 INTRODUCTION .........................................................................................3
1.2 FEA TURES AND SPECIFICATION...................................................................4
1.3 ACCESSORIES AND EQUIPMENT ..................................................................5
1.4 APPEARANCE............................................................................................5
2. HOW TO SETUP AND CONNECT BASICALLY.........................................8
2.1 SYSTEM REQUIREMENT.............................................................................8
2.2 IP ENVIRONMENT SETTING........................................................................9
2.2.1 For Windows 2000/NT.....................................................................9
2.3 NETWORK CONFIGURATIONS IN YOUR GATEWAY.........................................11
2.3.1 Static ip address ............................................................................13
2.3.2 DHCP mode................................................................................... 14
2.3.3 PPPoE mode.................................................................................15
2.4 MAKING A VOIP CALL..............................................................................16
2.4.1 Configure the gateway into the Peer-to-Peer mode.......................17
2.4.2 Configure the gateway into the GK routed mode...........................19
2.4.2.1 The type in GK routed mode...................................................21
3. ADVANCE CONFIGURA TIONS................................................................22
3.1 IP SHARING............................................................................................22
3.2 NETWORK INTERFACE .............................................................................26
3.3 H323 I
NFORMATION................................................................................28
3.4 LINE CONFIGURATION..............................................................................31
3.5 PHONE BOOK CONFIGURATION ................................................................32
3.6 SUPPORT CONFIGURATION ......................................................................34
3.7 SYSTEM CONFIGURATION ........................................................................35
3.8 V
OICE CONFIGURATION ...........................................................................38
3.9 PHONE CONFIGURATION..........................................................................40
3.10 RTP PAY LOAD TYPE CONFIGURATION ...................................................41
3.11 IP PACKET TOS ....................................................................................42
3.12 DDNS CONFIGURATION........................................................................43
3.13 PREFIX CONFIGURATION........................................................................44
3.14 PASSWORD CONFIGURATION..................................................................47
3.15 VERSION AND INFORMATION...................................................................48
3.16 ROM UPGRADE ...................................................................................49
3.17 FLASH CLEAN.......................................................................................53

FXO H.323 Gateway User Manual Document Ver.: 118a
Release Sep, 2004
1
3.18 COMMIT ...............................................................................................54
3.19 REBOOT SYSTEM..................................................................................55
3.20 TONE CONFIGURATION ..........................................................................56
3.21 ROUTING TABLE....................................................................................57
3.21.1 Change the default routing...........................................................58
3.21.2 Add a new Routing Table.............................................................60
3.22 FXO PASSWORD ..................................................................................62
4. COMMAND LIST.......................................................................................63
4.1 HYPER TERMINAL SETTING ......................................................................63
4.2 C
OMMAND LIST.......................................................................................66
4.2.1 [help]..............................................................................................66
4.2.2 [quit]...............................................................................................67
4.2.3 [debug]...........................................................................................67
4.2.4 [reboot]...........................................................................................68
4.2.5 [flash].............................................................................................68
4.2.6 [commit].........................................................................................69
4.2.7 [ifaddr]............................................................................................69
4.2.8 [time]..............................................................................................71
4.2.9 [ping]..............................................................................................71
4.2.10 [sysconf].......................................................................................72
4.2.11 [h323]...........................................................................................75
4.2.12 [line].............................................................................................79
4.2.13 [prefix]..........................................................................................80
4.2.14 [pbook]......................................................................................... 82
4.2.15 [voice]..........................................................................................84
4.2.16 [support].......................................................................................86
4.2.17 [sysinfo]........................................................................................88
4.2.18 [route]...........................................................................................89
4.2.19 [tone]............................................................................................91
4.2.20 [fxopwd].......................................................................................92
4.2.21 [record].........................................................................................94
4.2.22 [ddns]......................................................................................... 101
4.2.23 [pt]..............................................................................................102
4.2.24 [rom]...........................................................................................103
4.2.25 [passwd].....................................................................................105
FXO H.323 Gateway User Manual Document Ver.: 118a
Release Sep, 2004
2
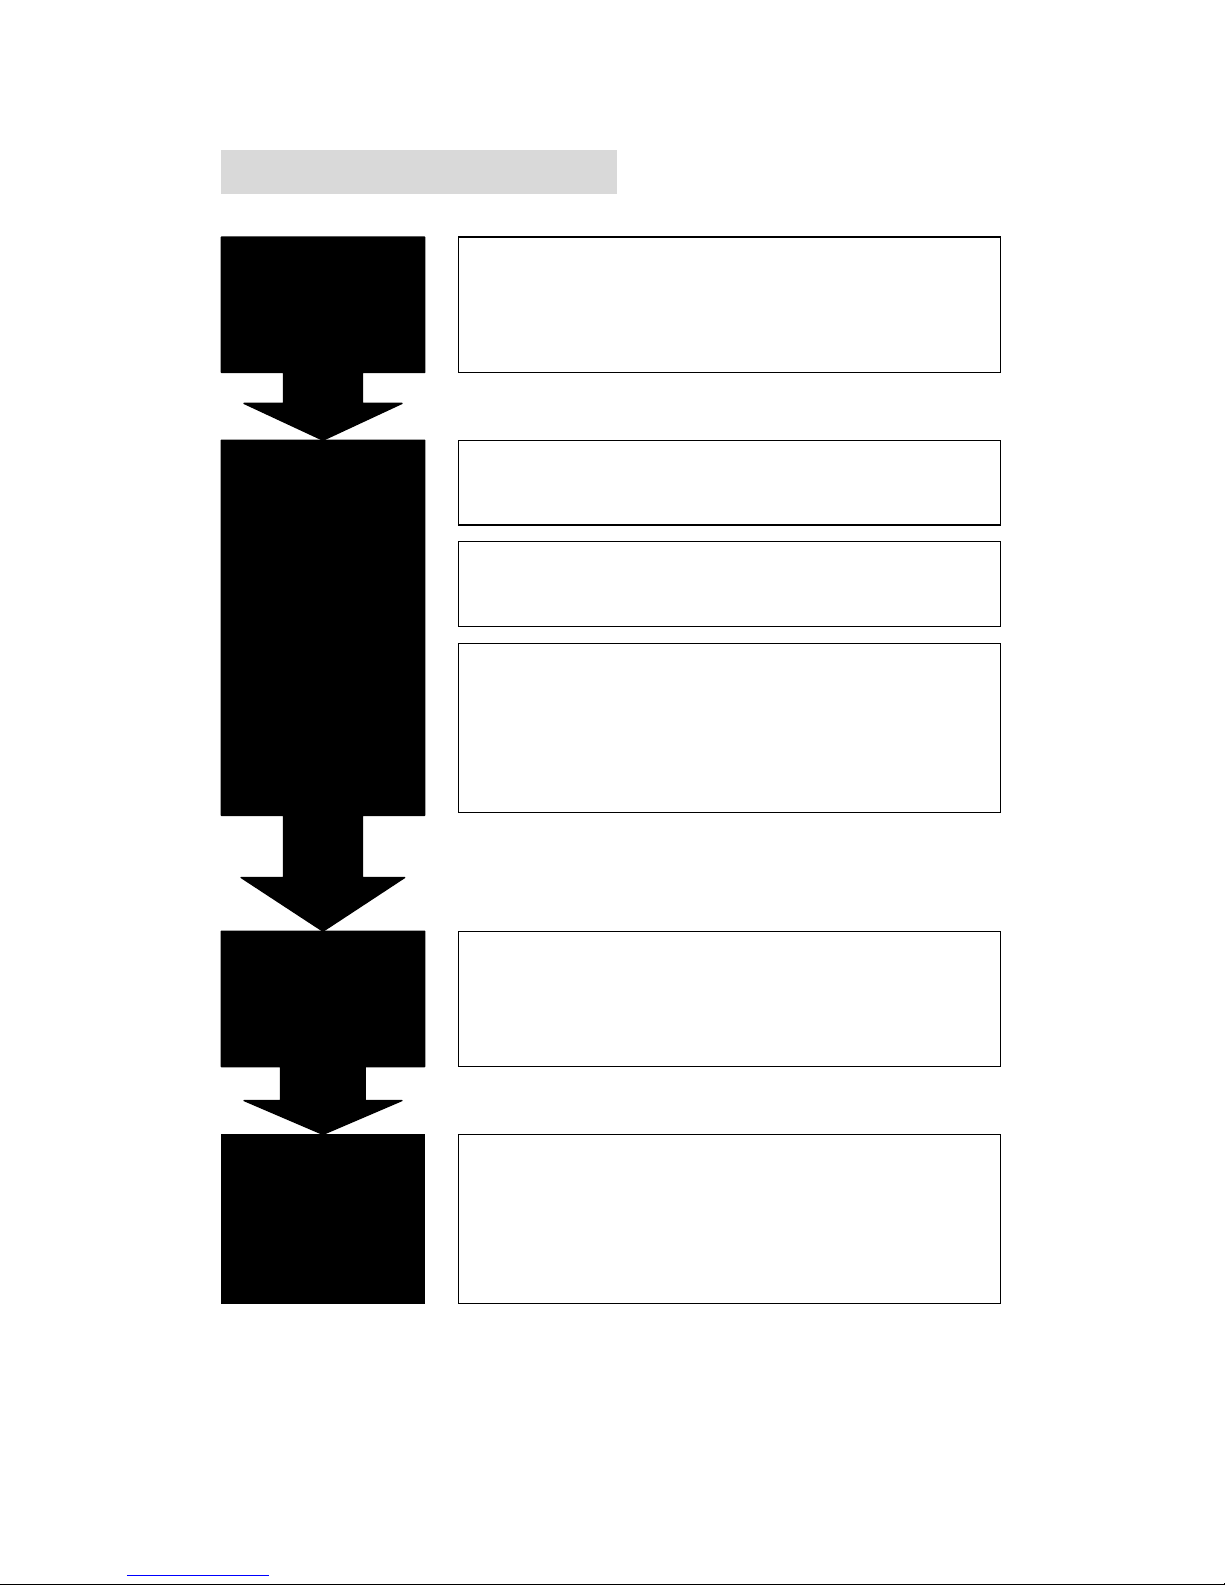
Steps in configuration
STEP 1
Start Up
To check out the peripheral equipments and
understand the feature of this gateway. Please
read this step very carefully b efore starting the
configuring.
Connecting the gateway and computer to start
configuring by WEB GUI.
STEP 2
How to
Setup and
Connect
basically
Setting the ip address for this gateway to make
sure that it coul d connect with the internet.
Setting the configurations of dialing, including the
Peer-To-Peer, GK mode and how to set these
tables to make calls by this gateway easily.
The other configurations of make call will be
discussed in t his step.
STEP 4
Command
List
STEP 3
Advanced
To explain the meaning of the command in the
command line interface and example the usage of
the command.
To get more usages or configuration in this step
and study about the command line configu ration.
Advanced configurations and special functions of
this gateway. Usin g the WEB GUI to show how to
set this table and explain the meaning of these
tables.
FXO H.323 Gateway User Manual Document Ver.: 118a
Release Sep, 2004
3
1. Start Up
1.1 Introduction
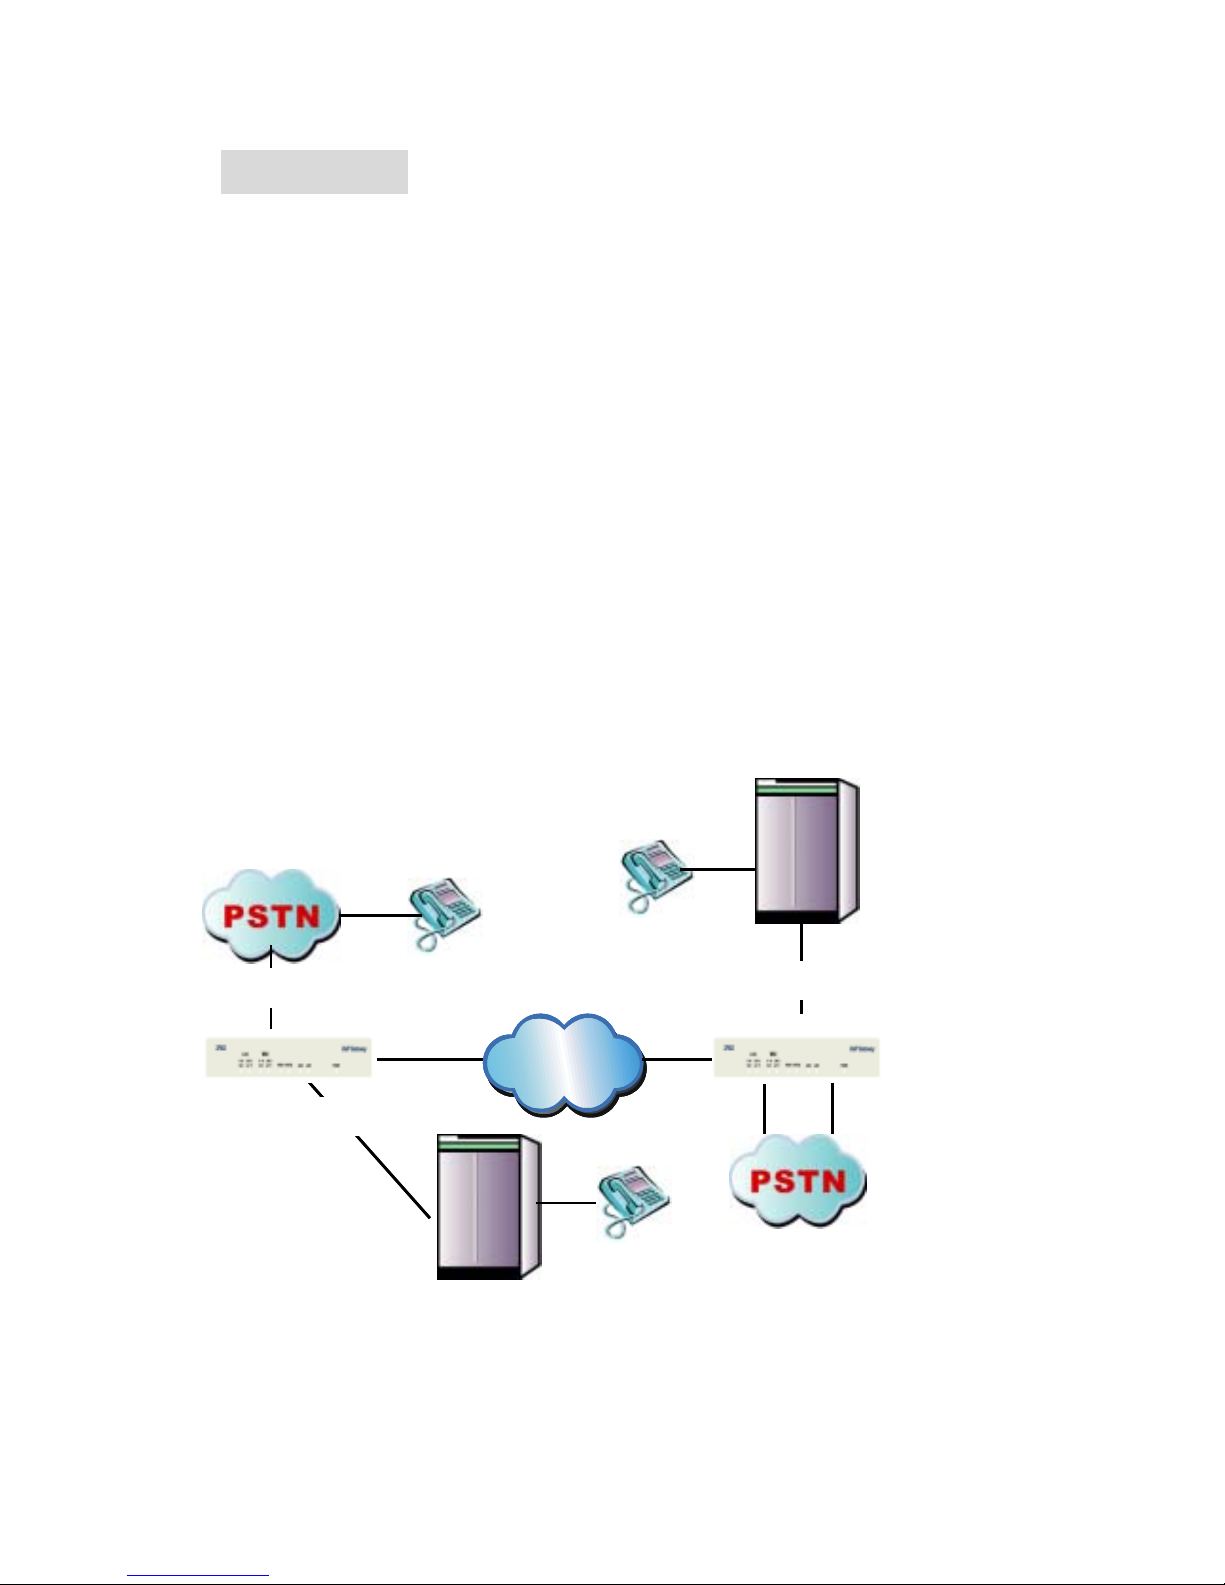
The FXO gateway provides voice/fax service over IP network with H.323
v3 protocol. By connecting to your existing ADSL or cable mo de m se r v ic e,
which allows the use of a single, network for voice and fax services with
consequent saving in network infrastructure and greatly reduced
telephone charges. Ideal solution for providing low cost communications
between headquarters and branch offices in the world, as well as for
SOHO and office telephony applications.
FXO Gateways provides analog lines to connect local PSTN/PTT
interface (FXO), and converts voice/fax signal onto IP network. The
management feature is via RS-232C COM port and TELNET.
Application Architecture
FXO ports can connect with PSTN Line or Extension Line of PBX
IP
Networ
k
PBX
FXS
FXO
FXO
PBX
Extension
Extension port
IP
Networ
k
IP
Networ
k
PBXPBX
FXO
FXO
FXO
FXO

FXO H.323 Gateway User Manual Document Ver.: 118a
Release Sep, 2004
4
1.2 Features and specification
Features
- ITU-T H.323 v4 compliance
- Automatically Gatekeeper Discovery
- Secondary GK support
- Peer-to-Peer mode (non-Gatekeeper)
- Support auto-attendant (2nddial Tone / Voice greeting)
- Dimensions: 221mm(W)*42mm(H)*217mm(L)
- Line hunting
- 2/4 RJ-11 FXO ports
- E.164 (Telephone Number Plan)
- DTMF dialing
- DTMF detection/generation
- TFTP software upgrade
- Remote configuration/reset via Telnet
- LED indication for system status
- LAN interface: One RJ-45 connector of 10Base-T
- Microsoft Netmeeting v3.0 compatible
- Support static IP and DHCP
- QoS by ToS (Type Of Service)
- SNTP (Simple Network Time Protocol)
- Security: Password setting
Audio feature
- Codec -- G.711 a/μlaw, G.723.1 (6.3K/bps), G.729A (Optional)
- VAD (Voice Activity Detection), CNG (Comfort Noise Generate)
- G.168/165-compliant adaptive echo cancellation
- Dynamic Jitter Buffer
- Bad Frame Interpolation
- Call Transfer (H.450.2)
- Call Forward (H.450.3)
- Call Hold (H.450.4)
- Gain Settings
- Provide Call Progress Tone: Dial tone, busy tone, call-hol ding tone an d
ring-back tone

FXO H.323 Gateway User Manual Document Ver.: 118a
Release Sep, 2004
5
Management Features:
Two easy ways for system configuration
- Console port: RS-232C port
- TELNET
- HTTP Brower (e.g. Internet Explorer)
1.3 Accessories and equipment
The voice gateway in 2/4 FXO ports models and only one RJ-45
connector (WAN).
The AC adapter.
The CD of user manual.
The connection cable in RS-232 interface.
1.4 Appearance
Front panel: The LED lights pr ovide related system messages of the gateway.
2FXOA
4FXOA
Power: Light on means Gateway is power on, and vice versa.
LINE: Light on means the line is in use (off-hook), and vice versa.
Status:
1. LED light on means Gateway has successfully registered to Proxy when it
is in the Proxy Mode.
2. LED flash means Gateway is not registered to the Proxy when it is in the
Proxy Mode.
3. Or when Gateway is in downloading mode, LED should be flash as well.
4. LED light off means Gateway is in Peer-to-Peer Mode.
FXO H.323 Gateway User Manual Document Ver.: 118a
Release Sep, 2004
6
Ready:
1. Light on and slow flash means Gateway is in normal mode.
2. Light on and fast flash means Gateway is in downloading mode.
WAN/LAN
10/100: Network Rate to be 10 Base-T or 100 Base-T.
Link: Light on means the G ateway was connected with the netw or k conn ector.
Act: LED should be light on and in flash display when data is transmitting.
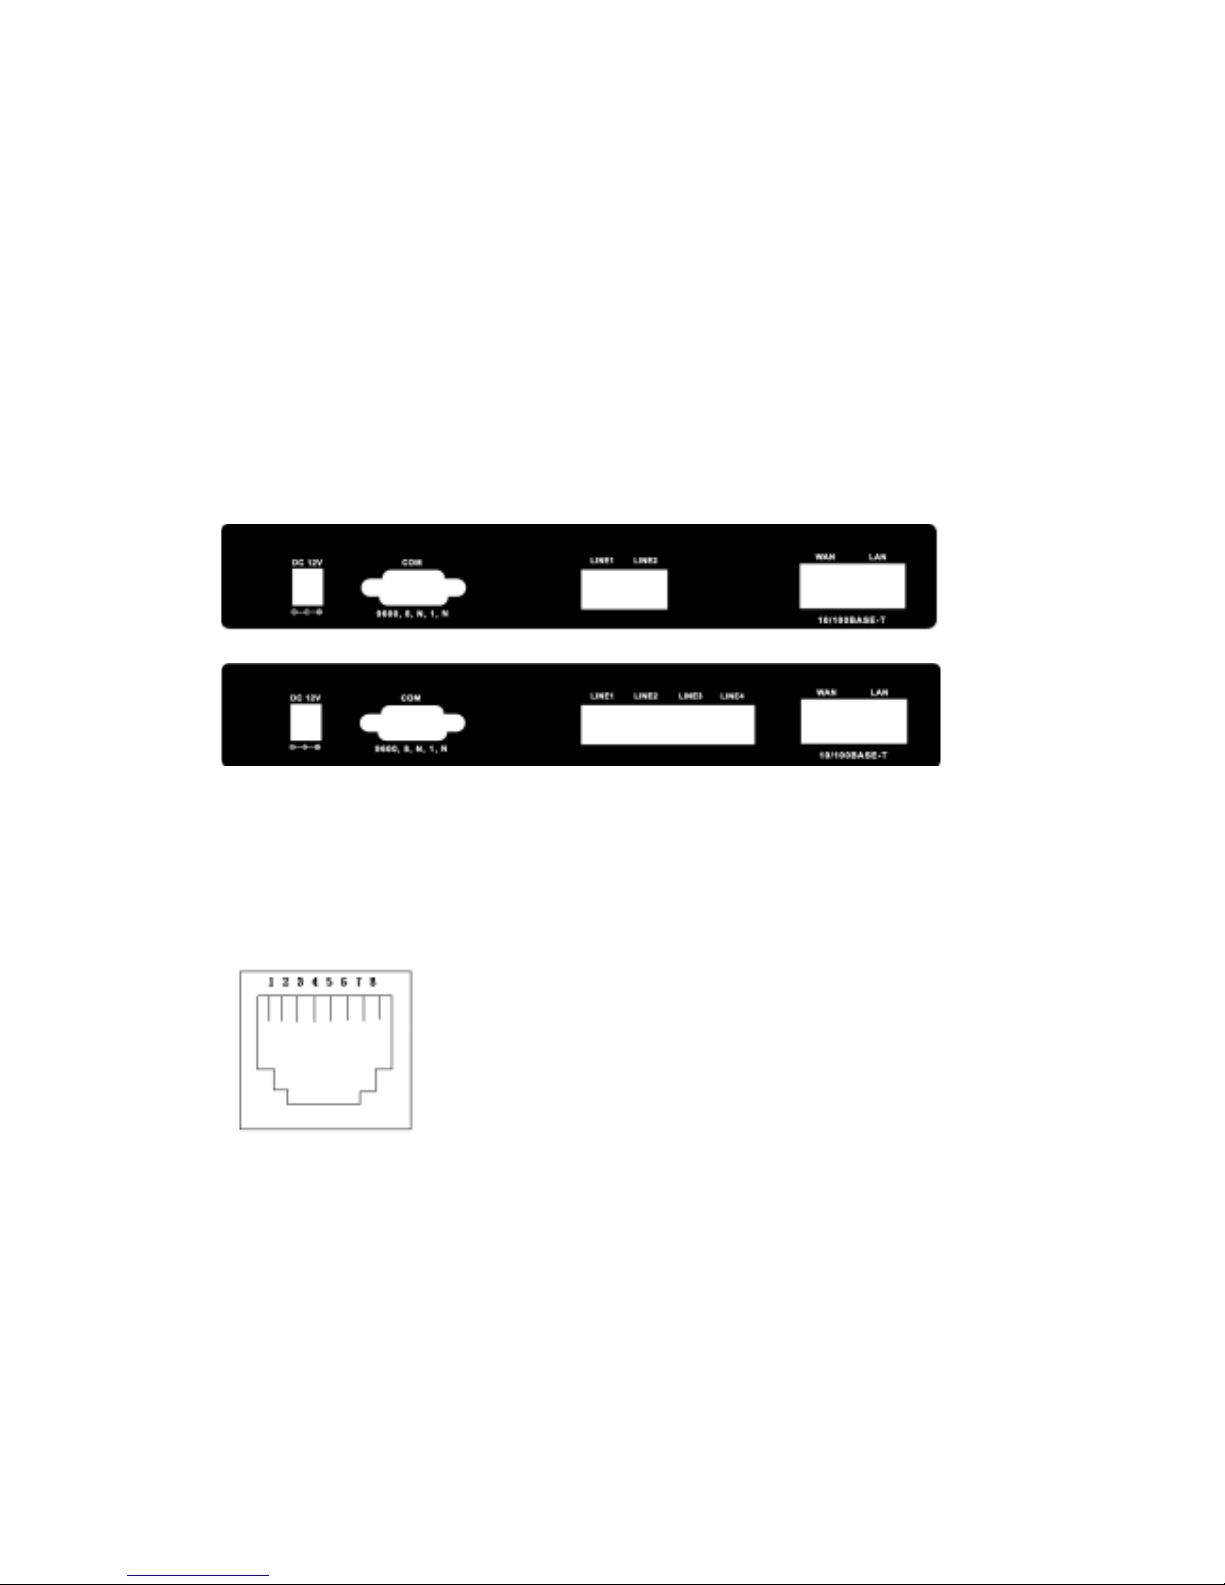
Back panel:
1. Ethernet Port
LAN/WAN: 10/100 Base-T; RJ-45 socket, complied with ETHERNET
10/100base-T.
The pin-out is as following:
PIN 1, 2: Transmit
PIN 3, 6: Receive
2. LINE:
RJ-11 connector, FXO interface is for connecting the extension line of
PABX or PSTN Line.

FXO H.323 Gateway User Manual Document Ver.: 118a
Release Sep, 2004
7
3. COM:
RS232 console port (DB-9pin male connector)
Note: use straightforward cable to connect to your computer.
PIN OUTS
Pin Name Dir Description
2 RXD Receive Data
3 TXD Transmit Data
5 GND System Ground
4. 12V DC:
Input AC 100V~120V; output DC12V.

FXO H.323 Gateway User Manual Document Ver.: 118a
Release Sep, 2004
8
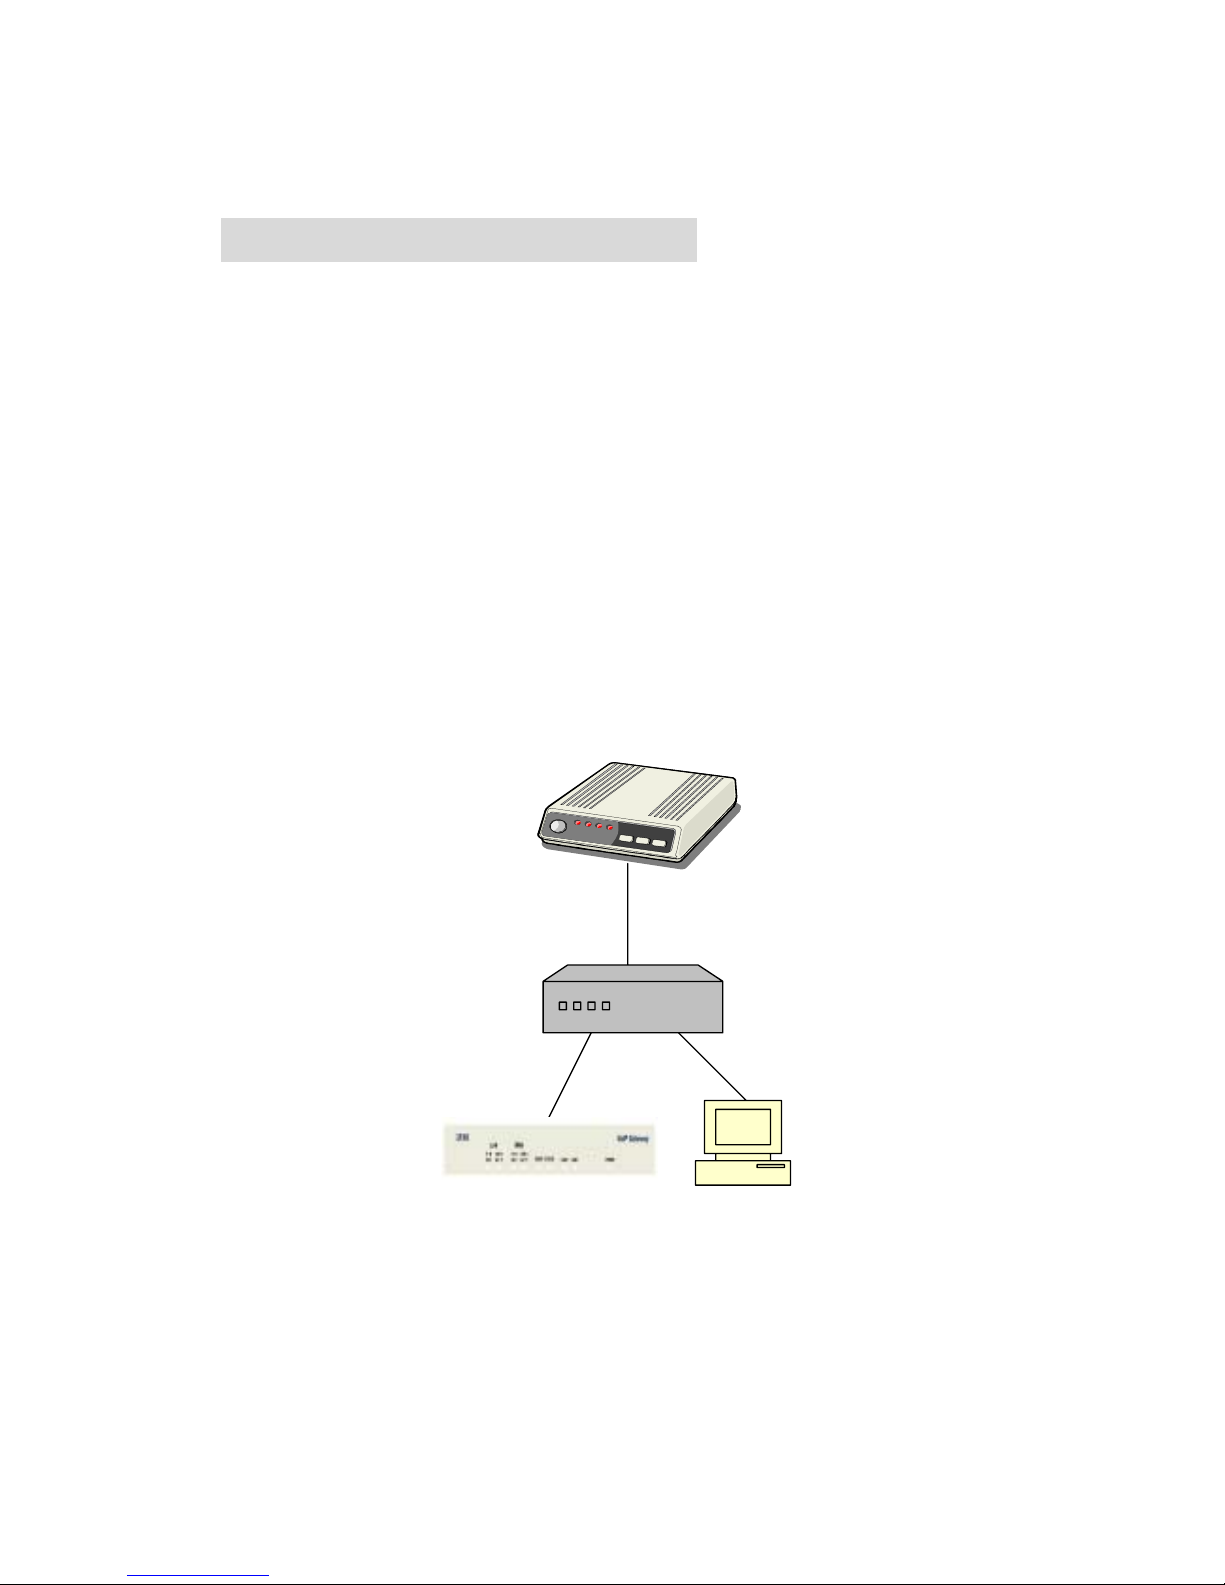
2. How to Setup and connect basically
2.1 System Requirement
1. One PC (a) Pentium 100 or above, 64 RAM, Windows 98 or above.
(b) Ethernet card or COM port
2. One standard straightforward RS-232 cable (female connector to Gateway
side).
3. PBX extension Lines or PSTN Lines.
4. Software tools (a) Hyper Terminal, TELNET, Web Browser.
(b) Gatekeeper (optional).

FXO H.323 Gateway User Manual Document Ver.: 118a
Release Sep, 2004
9
2.2 IP Environment Setting
User must prepar e a v alid IP addr ess, com plied w ith IP N etw ork, for Gatew ay ’ s
proper operation.
For testing the validation of chosen IP address, using the same IP
configuration in other PC or Notebook, and then try to connect to Public
Internet (go to well-known website, receive Internet mail, or ping a specific
public IP address). If it works, use the same IP address and network
configuration for Gateway.
Please follow up the step for the configuration of your computer or notebook.
2.2.1 For Windows 2000/NT
Please make sure that the network interface of your computer is working fine
and the cross over line (RJ-45) is connecting with the computer correctly or
you could use a hub to connect with your computer and this gateway. Turn on
your computer and configure the network parameter as follow:
1 Go to the start menu and enter the setting area. Click control panel.
2 Enter the network configuration.
Figure 2.1: Network Configuration

FXO H.323 Gateway User Manual Document Ver.: 118a
Release Sep, 2004
10
3 Select the Property of the LAN card.
4 Setup the ip address, subnet mask and default gateway as below:
Figure 2.2: Configure the network
5 Click OK after you finished the network setup.
The default ip address, netmask and default gateway address of the gateway
is 10.1.1.3, 255.0.0.0, 10.1.1.254.
FXO H.323 Gateway User Manual Document Ver.: 118a
Release Sep, 2004
11
2.3 Network configurations in your gateway
1 Key in the ip address of the gateway (http://10.1.1.3) with the browser
Figure 2.3: WEB Browser
2 After key in the ip address, you have to enter the user name and password
to enter the WEB configuration. (Username: root ; No password)
Figure 2.3: Login the username and password
FXO H.323 Gateway User Manual Document Ver.: 118a
Release Sep, 2004
12
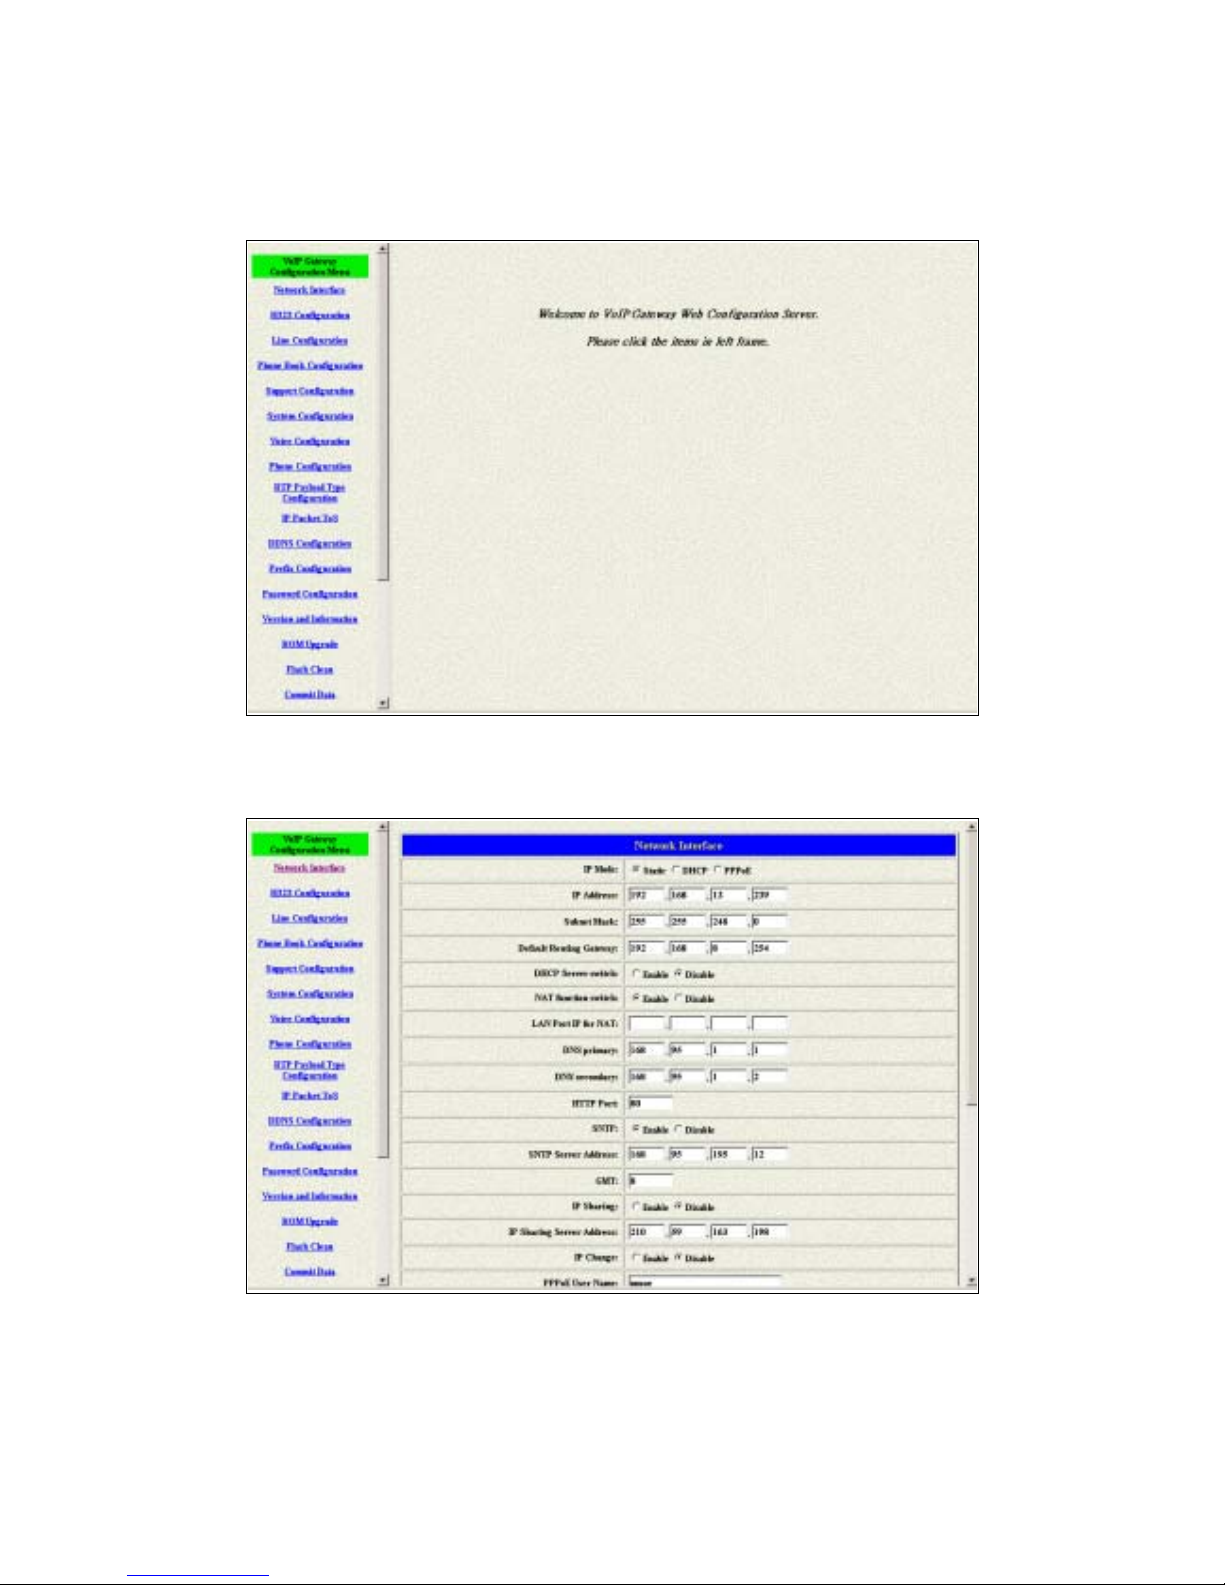
3 You will enter the main page of the configuration after key in the login name
and password correctly:
Figure 2.4: The main WEB configurati o n
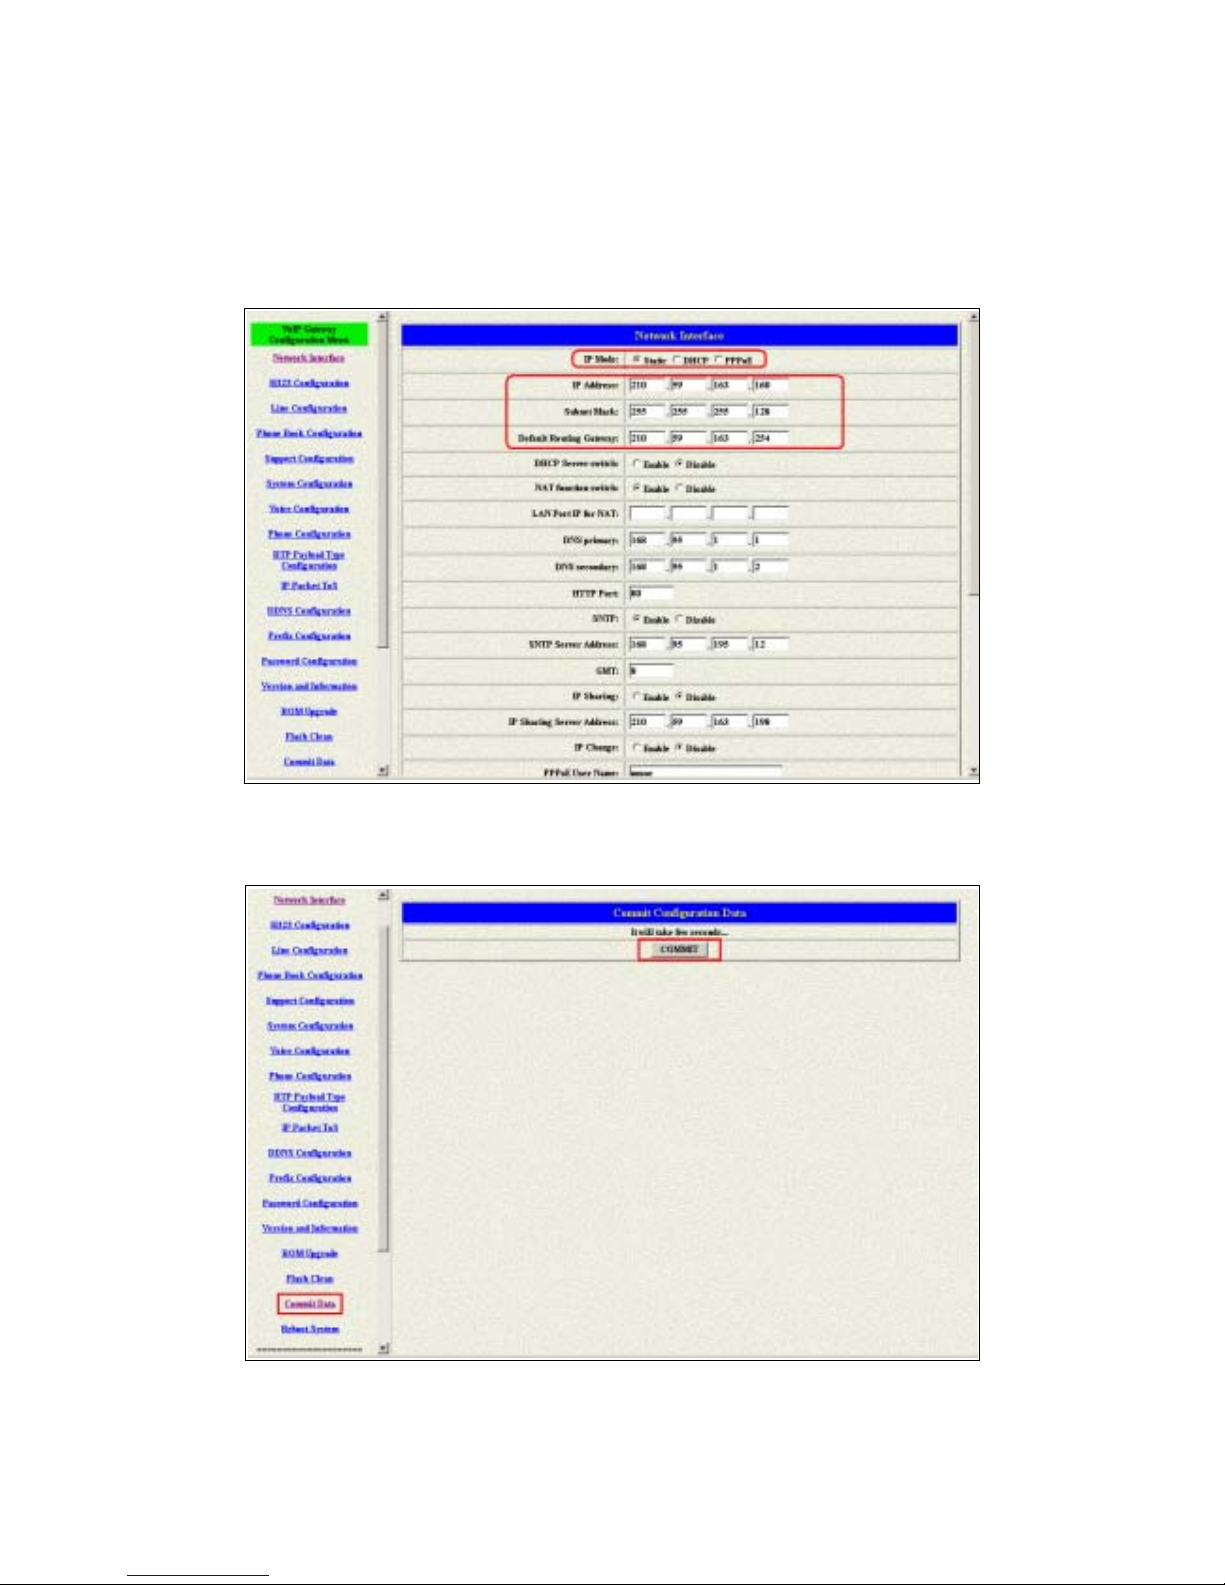
4 Press the Network Interface to configure the networking of your gateway:
Figure 2.5: The Network Interface
FXO H.323 Gateway User Manual Document Ver.: 118a
Release Sep, 2004
13
2.3.1 Static ip address
1 Please get the correct ip address, netmask and default gateway address
from your ISP first. Press the OK button if you finished.
Figure 2.5: Configure the static ip address
2 Press the commit if you finish the configuration.
Figure 2.6: Commit the data

FXO H.323 Gateway User Manual Document Ver.: 118a
Release Sep, 2004
14
3 Press the reboot if you want the configuration executed.
Figure 2.7: Reboot the system
2.3.2 DHCP mode
1 Enable the DHCP if you are using the cable modem or DHCP server.
Figure 2.8: Enable the DHCP function
FXO H.323 Gateway User Manual Document Ver.: 118a
Release Sep, 2004
15
2 Please commit the data an d r ebo ot th e m achine after you enable the DHC P
function.
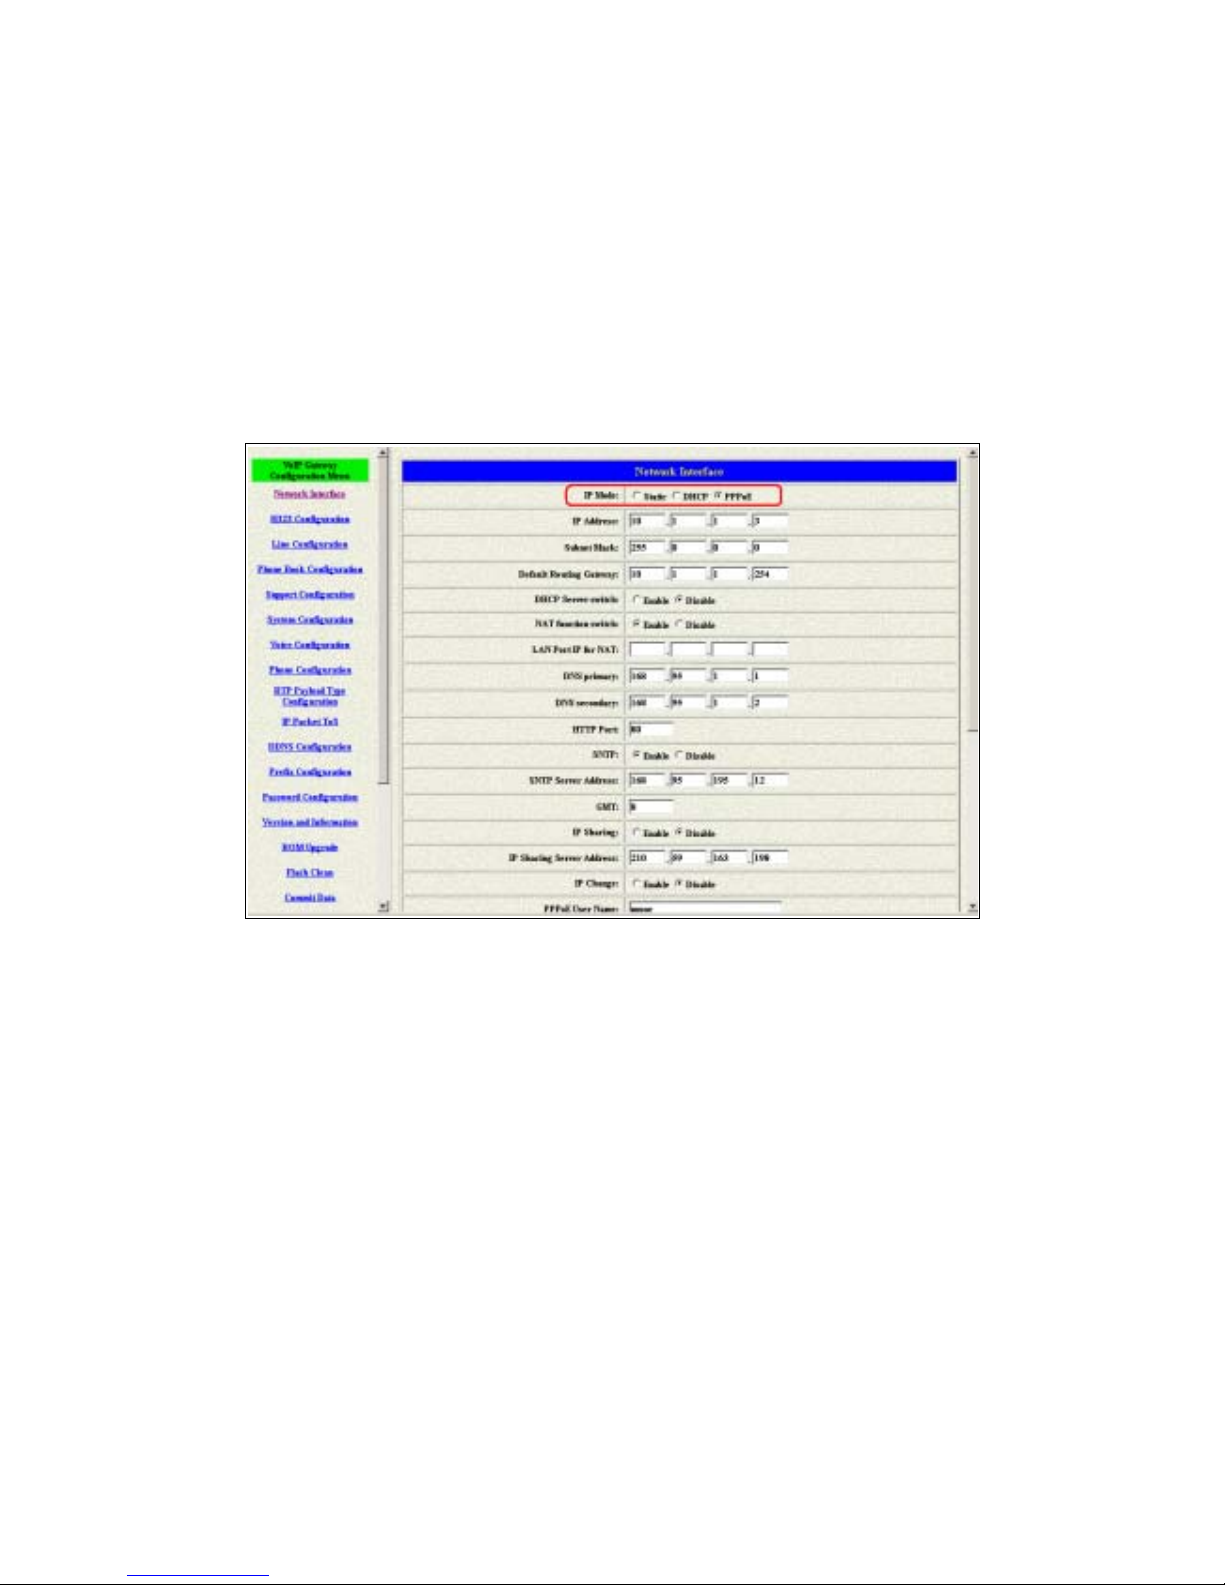
2.3.3 PPPoE mode
1 Enable the PPPoE and press the info about PPPoE configuration in the
correct table.
Figure 2.9: Switch to PPPoE function
FXO H.323 Gateway User Manual Document Ver.: 118a
Release Sep, 2004
16
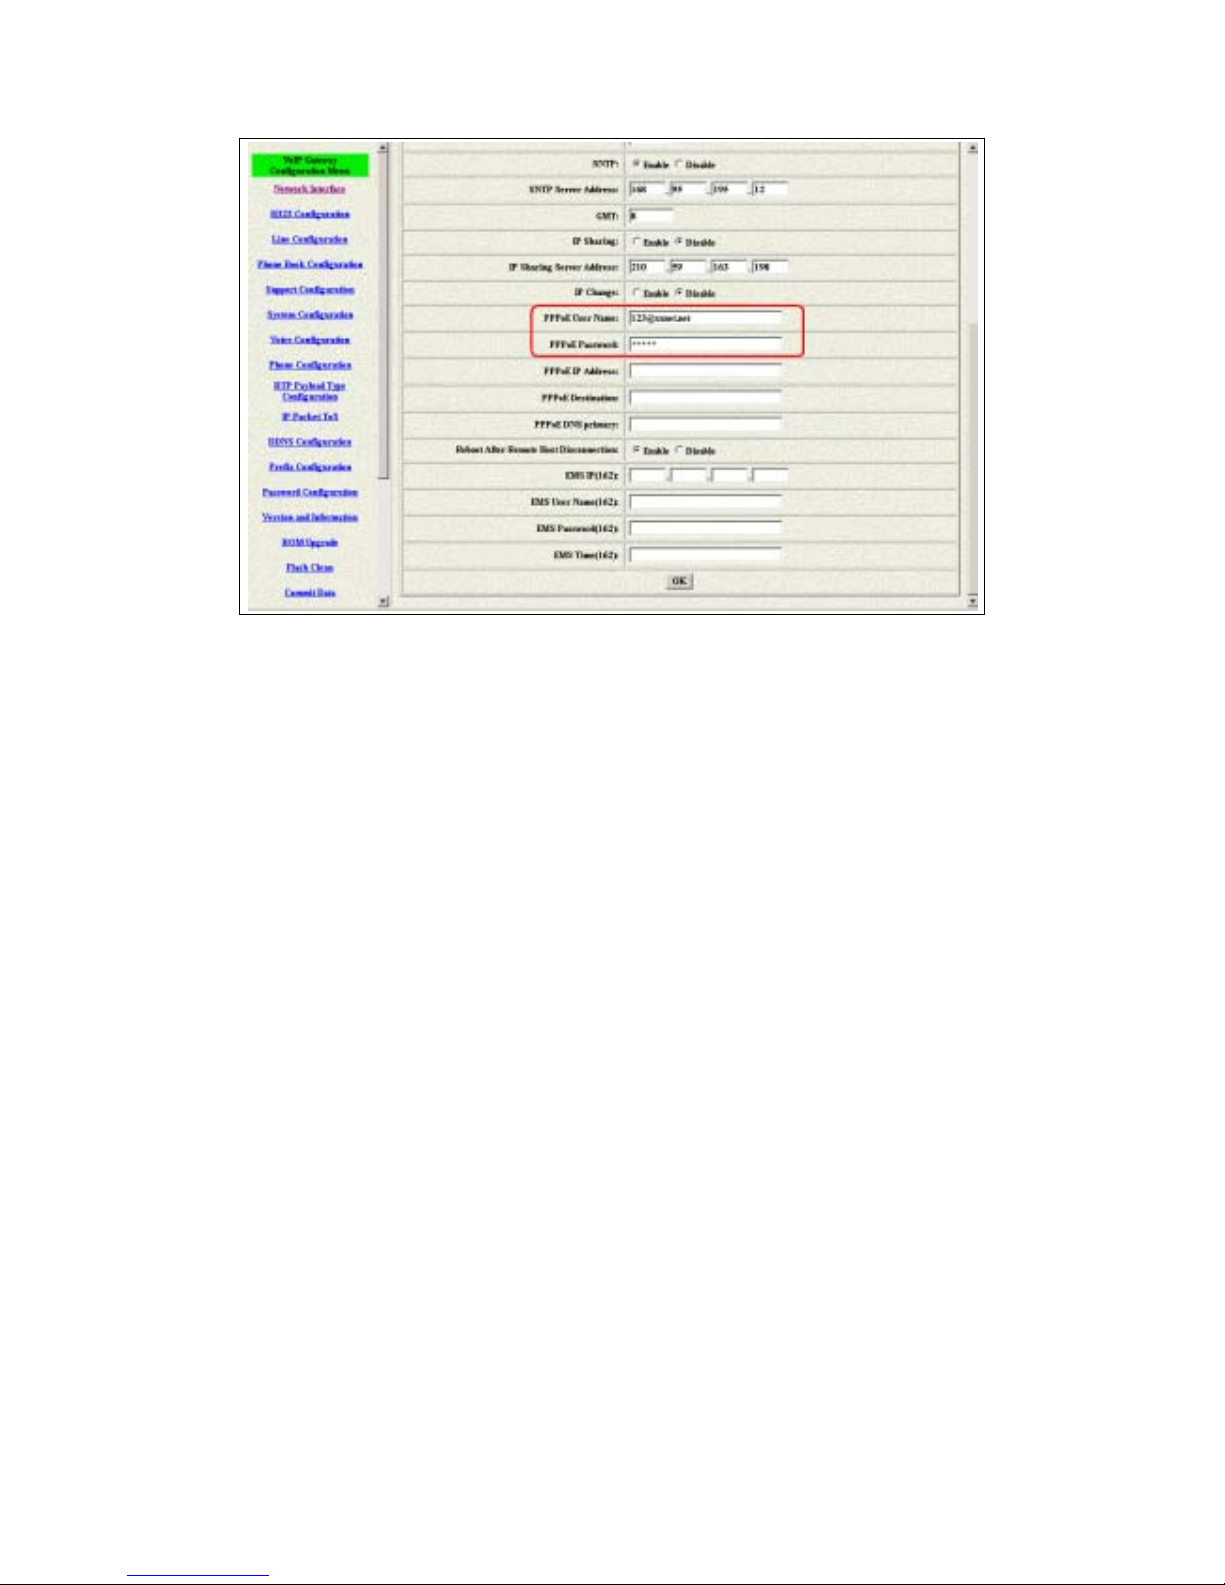
Figure 2.10: Configure the info about PPPoE
2 Please commit the data and reboot the machine after you finished the
configurat ion of PPPoE.
2.4 Making a VoIP Call
There are two modes that you could configure the gateway for making VoIP
calls. One is the Peer-to-Peer mode and another is GK routed mode. The
configurations and functions are different. Please make sure about the mode
you want and follow up the step to configure your gateway.
FXO H.323 Gateway User Manual Document Ver.: 118a
Release Sep, 2004
17
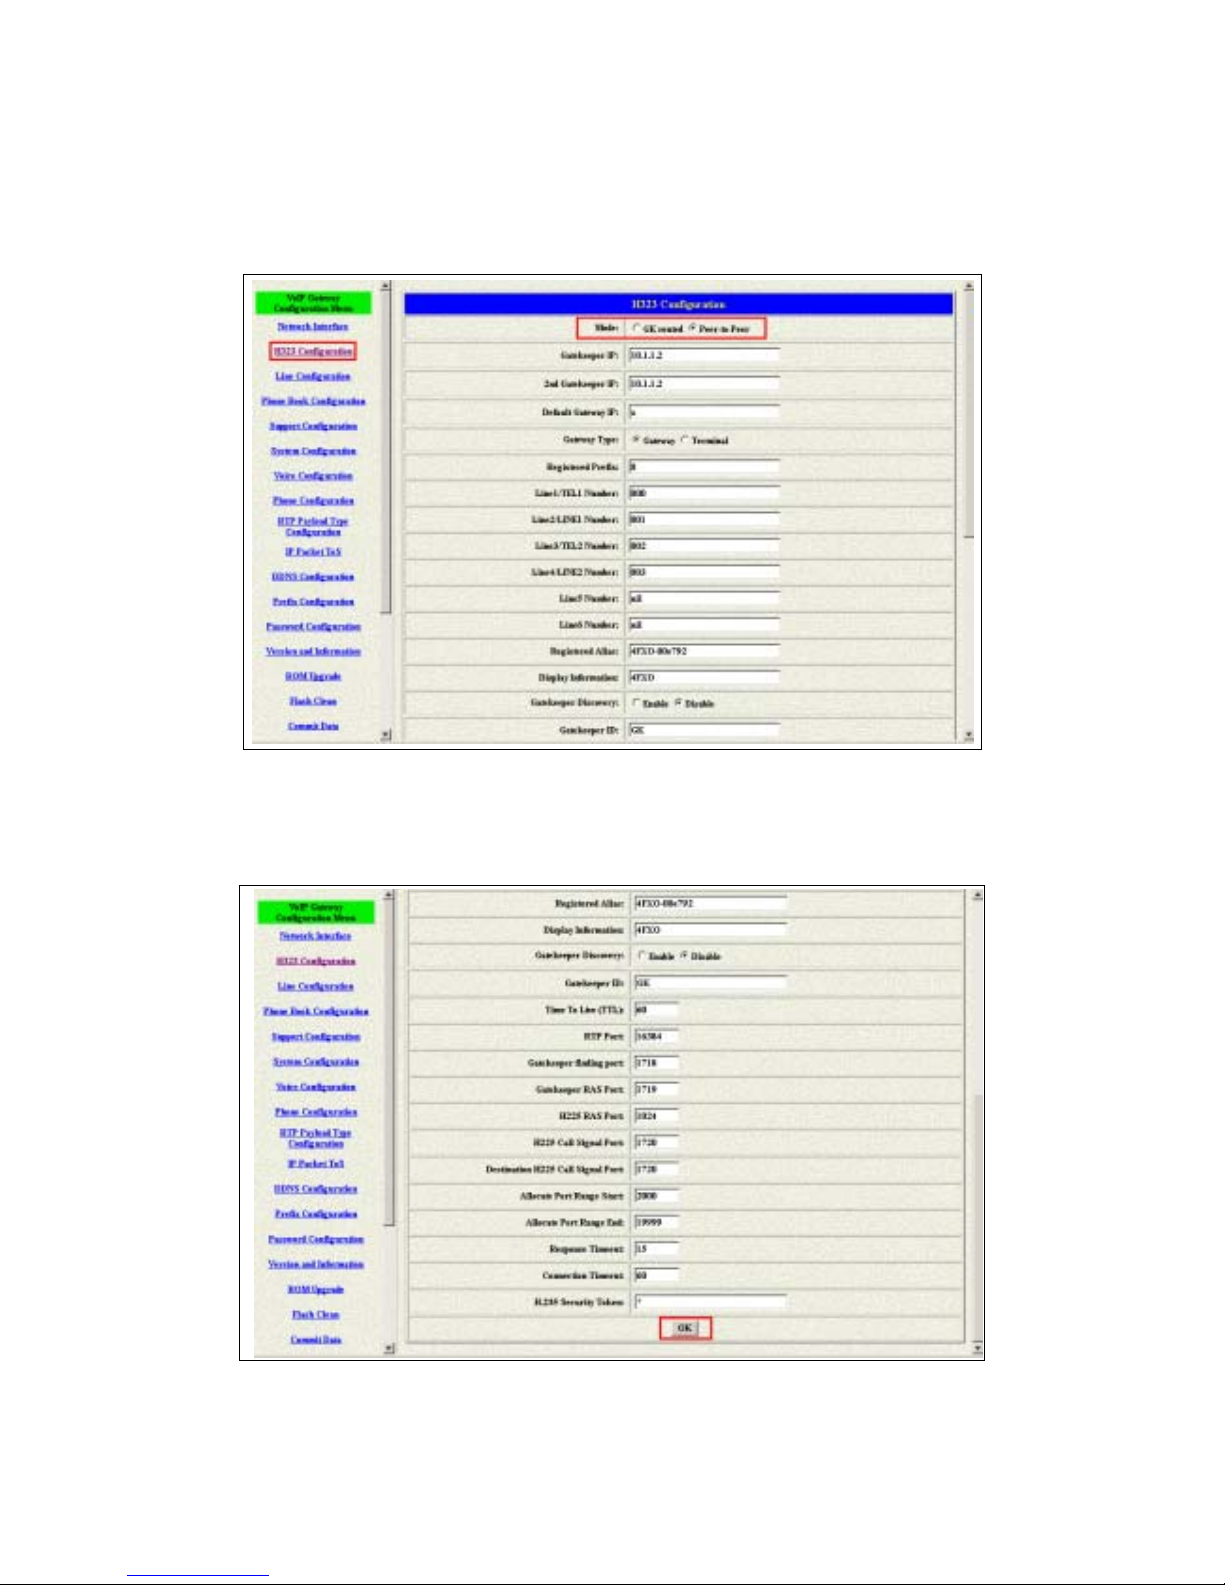
2.4.1 Configure the gateway into the Peer-to-Peer mode
1 Enter the H323 Configuration table and change the mode to Peer-to-Peer.
Figure 2.11: Configure the Peer-to-Peer mode
2 Press the OK button that is on the bottom of this page to save the
configuration.
Figure 2.12: The OK button
FXO H.323 Gateway User Manual Document Ver.: 118a
Release Sep, 2004
18
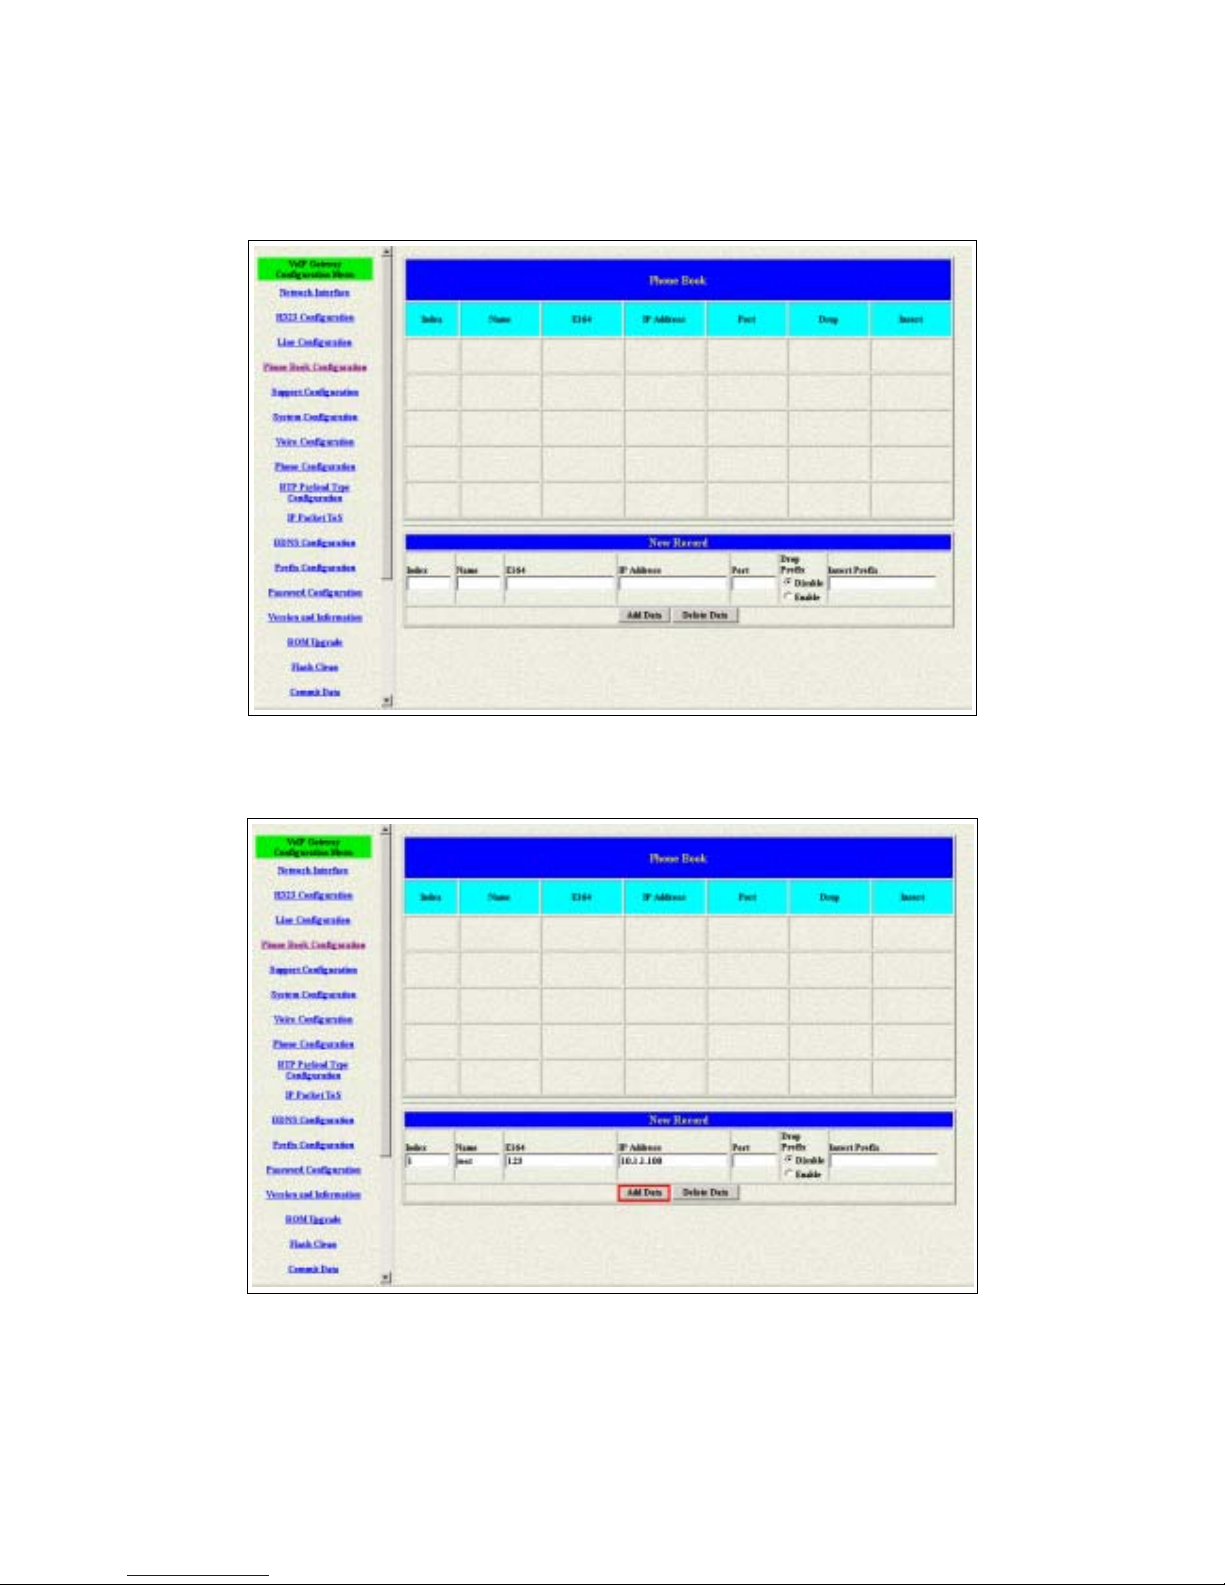
3 Enter the Phone Book configuration table and configure the name, ip
address and phone number of the destination.
Figure 2.11: Phone Book
【Example】
Figure 2.12: The example of Phone Book configuration
This is the first record of Phone Book. So the index is 1

FXO H.323 Gateway User Manual Document Ver.: 118a
Release Sep, 2004
19
The name of the destination: test
The E164 number (phone number) of the destination: 123
The ip address of the destination: 10.1.1.100
4 Press the “Add Data” button when you finished, and the new table will
display on the first index if you press the Phone Book configuration button.
Figure 2.13: To show the Phone Book record
5 Please Commit it and Reboot the system if the configuration is finished.
Please make sure about that the FXO port was connected with the PSTN
line or the extension line of the PABX before you start to make a voip call.
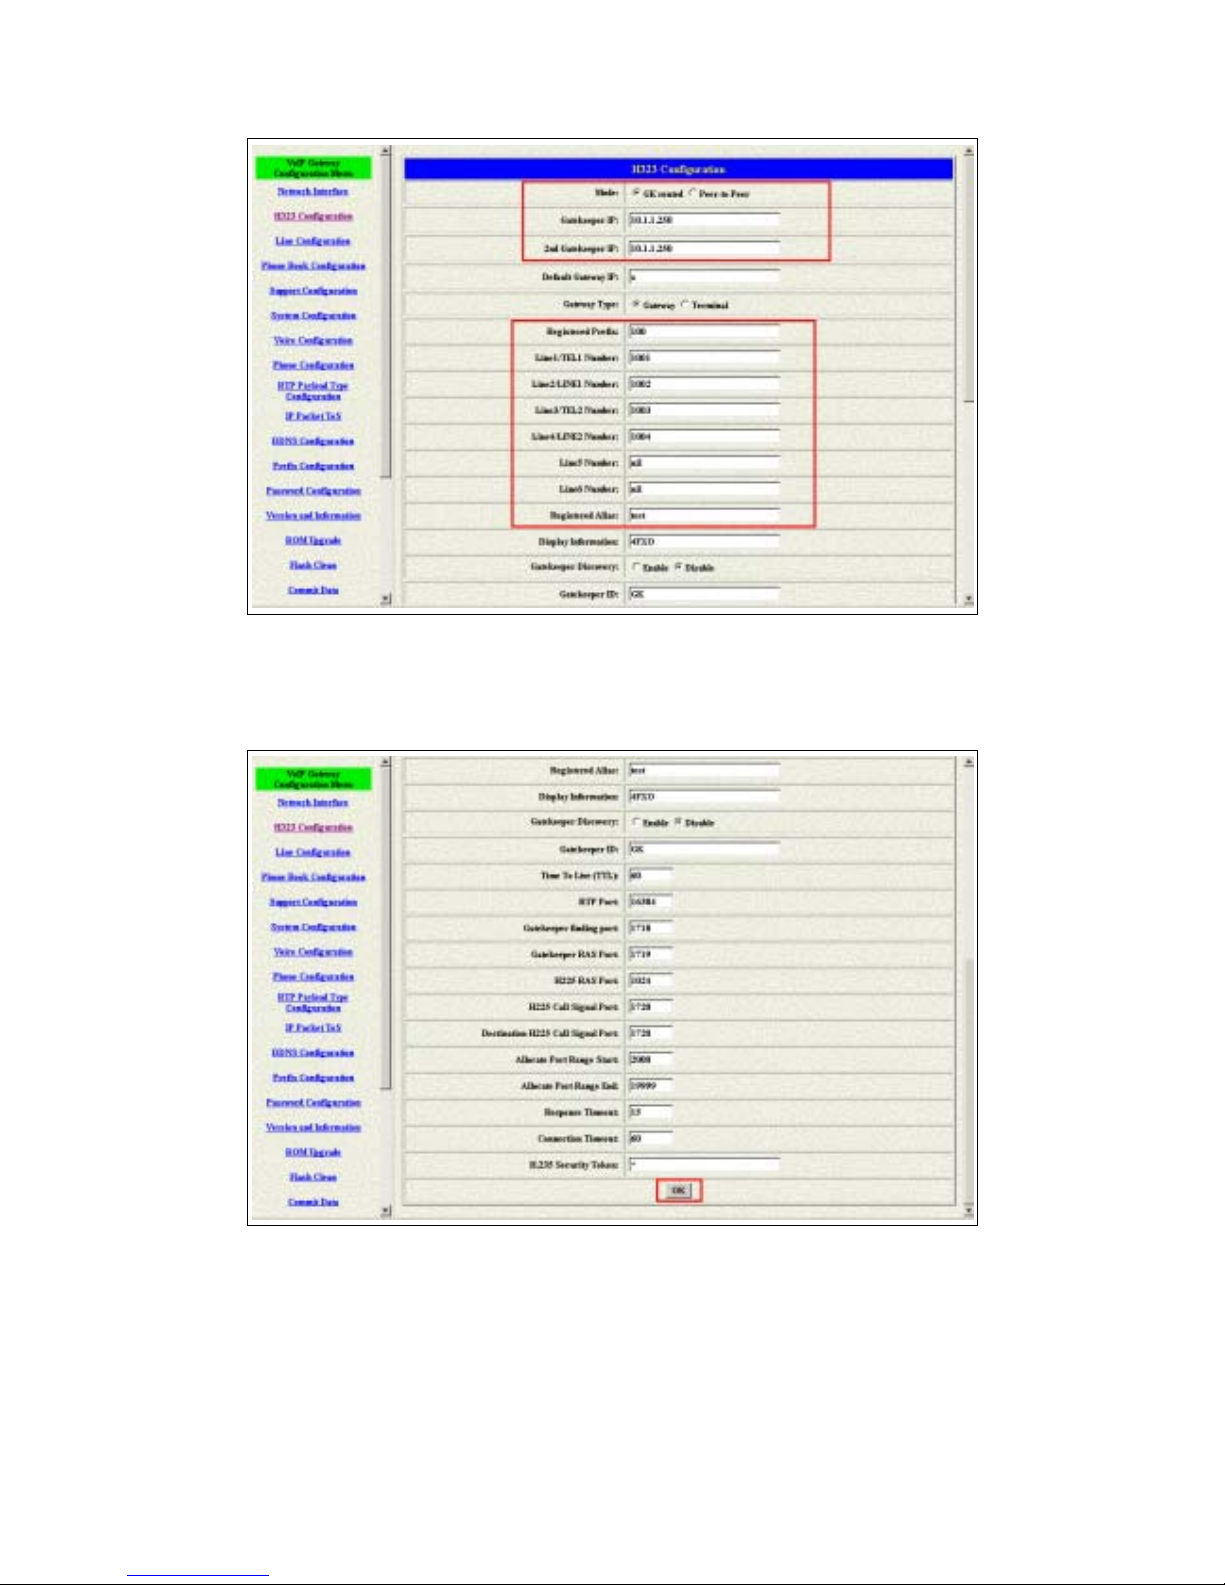
2.4.2 Configure the gateway into the GK routed mode
1 Enter the H323 Configurati on ta ble and ch ange the mod e from P eer-to-Pe er
to GK routed. To change the GK inform atio n from y our serv ice pr ov ider ( Ex:
The Gatekeeper IP, Registered Prefix and Registered Alias).
FXO H.323 Gateway User Manual Document Ver.: 118a
Release Sep, 2004
20
Figure 2.14: Configure the GK info
2 Press the OK button that is on the bottom of this page to save the
configuration.
Figure 2.15: Press OK to save the data
3 Press the Commit Data and Reboot System buttons when you finished the
configuration.

FXO H.323 Gateway User Manual Document Ver.: 118a
Release Sep, 2004
21
2.4.2.1 The type in GK routed mode
There are two types i n the G K rou ted mode y ou co uld ch oose. O ne i s Gatew ay
type and another is Terminal type. There are some different functions,
applications, and configurations between the Gateway type and Terminal type.
In FXO series gateway, the difference between the G ateway and Terminal type
is for registering o n t he Cisco GK. The Terminal type is needed i f the endpoints
want to register on the Cisco GK successfully. But all the configuration and
function is the same if you set the gateway in Gateway or Terminal type.
Another difference is for the one-stage-dialing function. Only the gateway type
could support the one-stage-dialing function.
FXO H.323 Gateway User Manual Document Ver.: 118a
Release Sep, 2004
22
3. Advance Configurations
There are too many advanced commands for the advanced users. The
following chapters are based on the application layer. Please get the info what
you need. If you need t he command, ple ase watchi ng the cha pter of Com mand
Line Interface.
3.1 IP Sharing
The function is only for the user who is using the IP Sharing device. It is said
Gateway is connected to the IP Sharing device.
The IP Sharing Device must support the DMZ or Virtual server functions
An example such as ADSL network is in the following.
A TU-R ADSL Modem
WAN ①
IP Sharing device⑤
LAN③ LAN ②
Gateway ④ PC
The WAN IP Address obtained from ADSL has two kinds of methods.
One is fixed IP Address, while user applies for one or more fixed IP
Addresses.
Another is dynamic IP Address while user applies for dial-up connection
way.

FXO H.323 Gateway User Manual Document Ver.: 118a
Release Sep, 2004
23
The LAN IP Address of User ’s PC can be set as DHCP client in order to
gain a valid one.
Another IP Address for Gateway must be set as an fixed one in order for
that IP Sharing device pass forwarding the relevant information from WAN
to LAN. Besides, a valid IP Address meets the IP Shar ing dev ic e (LAN site )
is the element.
Please configure your gateway just like below:
1 Enter the IP addres s, Netm ask an d th e de faul t g ateway in the network table.
Please follow up your IP Sharing device.
Figure 3.1: Network configuration
2 Enable the ip sharing function and put the static ip address in the server
address table.
FXO H.323 Gateway User Manual Document Ver.: 118a
Release Sep, 2004
24
Figure 3.2: Enable the ip sharing function
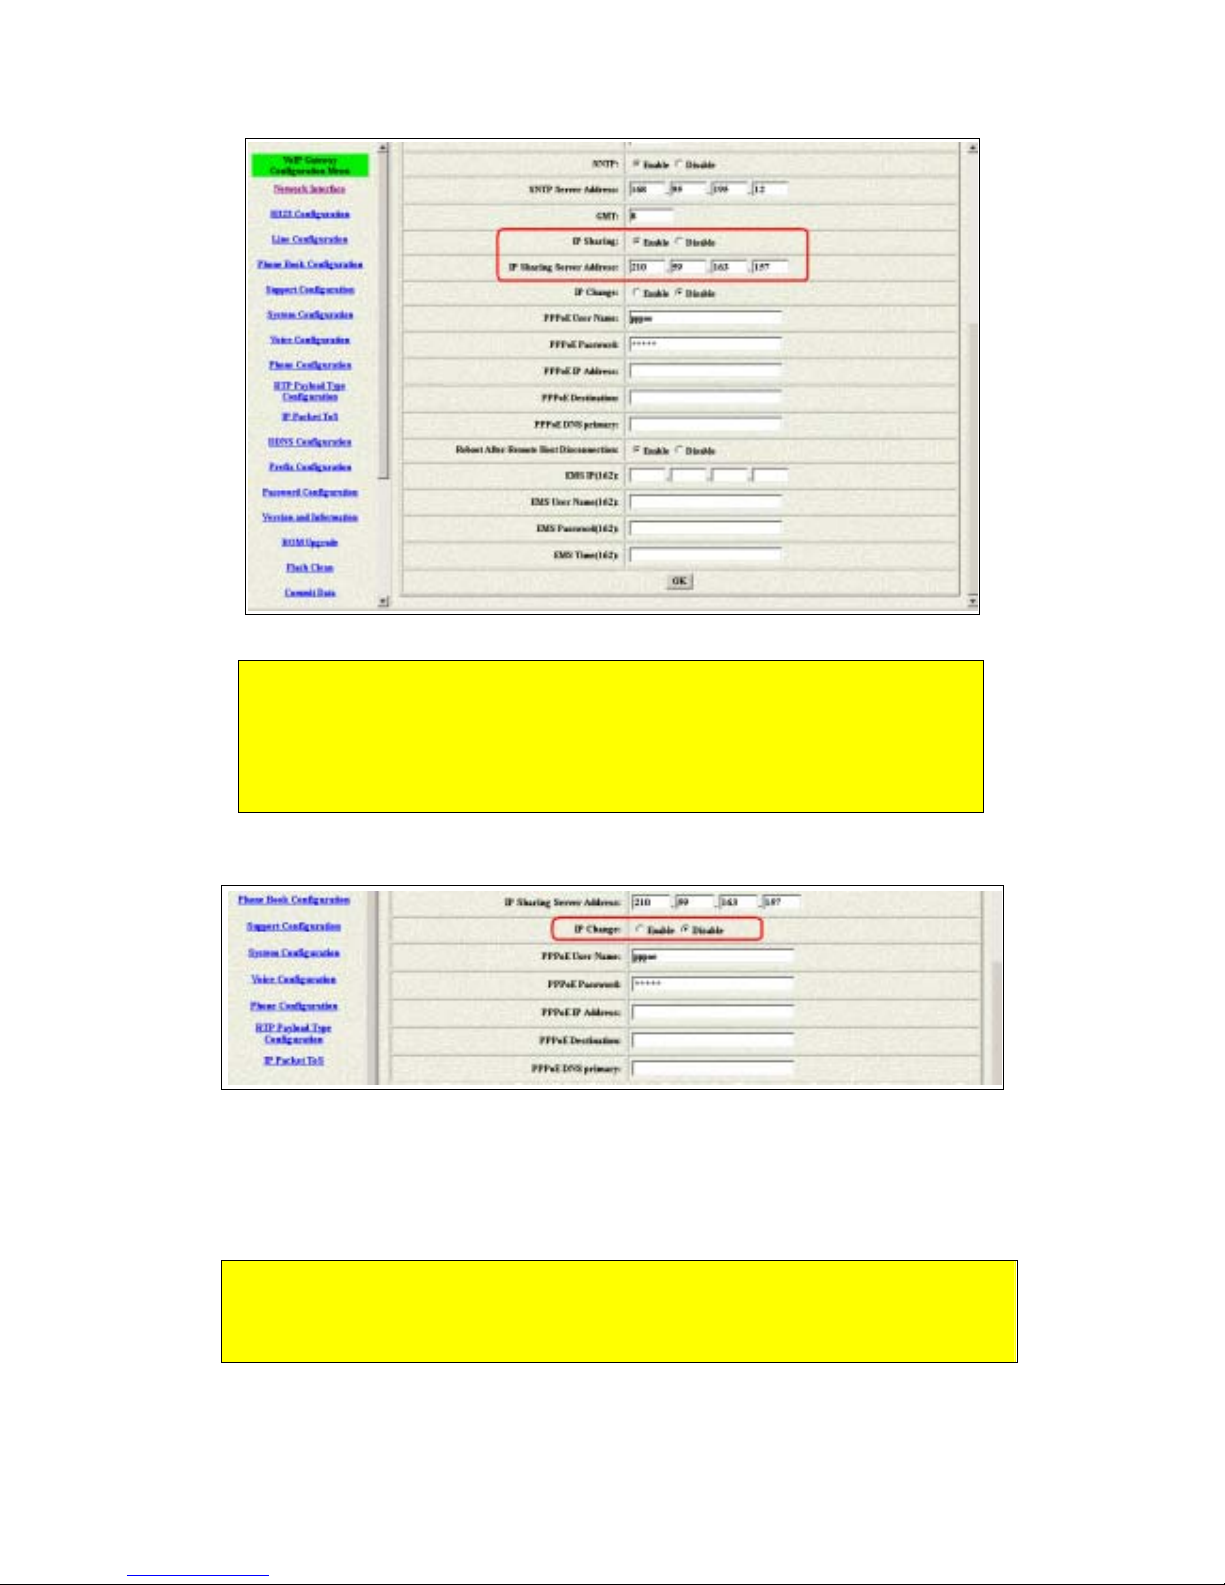
3 The IP change function is only for the special usage
Figure 3.3: IP Change
IP Change Function: The ip address of the IP Sharing Server Address will
use what you con fig ur ed in that table if you disable the IP C h ang e function.
It supports the static ip address. If user is using the dynamic ip address,
this function has to be enabled.
If the wan port of the ip sharing device is using the dynamic ip address,
the gateway couldn’t get the ip address if the GK isn’t from us. So the ip
change is only support the GK from us.
1. Fixed IP – Please put the ip address of the ip sharing device in
the IP Sharing Server Address table.
2. Dynamic IP – Please enable the ip change function and leave
the ip sharing server address.

FXO H.323 Gateway User Manual Document Ver.: 118a
Release Sep, 2004
25
4 Please Commit it and Reboot the system if the configuration is finished.
This chapter is focus on the DMZ function of the IP Sharing Device,
Please get another application from our web site.
FXO H.323 Gateway User Manual Document Ver.: 118a
Release Sep, 2004
26
3.2 Network Interface
Users have to configure the Network configurations in this page. This gateway
will be work while it is connecting with the internet network. Please get more
info from the following descriptions. (see fig ur e 3.4)
Figure 3.4: Network Interface
IP Mode – To configure the fixed or dynamic ip address for this unit.
Please configure to PPPoE if the ADSL is using the PPPoE type.
IP Address – Define the ip address for your networking if it is the fixed ip.
Please get this info from your ISP.
Subnet Mask – Define the mask address for your networking. Please get
this info from your ISP.
Default Gateway – Defi ne th e d e faul t g ateway for your networking. Please
get this info from your ISP.
DHCP Server switch – Enable the DHCP function for the LAN interface.
NAT function switch – To enable or disable the NAT function.
LAN port IP for NAT – To configure the lan port ip for the NAT device.
All of the FXO series units couldn’t support the NAT function. So these
three commands as above (Including the DHCP server, NAT and LAN ip
for NAT) couldn’t be work in the FXO units.

FXO H.323 Gateway User Manual Document Ver.: 118a
Release Sep, 2004
27
DNS primary – To configure the first ip address for the DNS server.
DNS secondary – To configure the second ip address for the DNS server.
HTTP Port – To configure the HTTP port for access this unit from the
remote side.
SNTP – Enable the SNTP server registering function if user wants to get
the correct time from the Command Line Interface.
SNTP Server Address – Enter the correct ip address of the SNTP server
or get the incorrect time from the Command Line Interface.
GMT – Configuring the time area for the time display in the Command
Line Interface.
IP Sharing – Enable this function if the gateway is behind the IP sharing
device.
IP Sharing Server Address – Enter the WAN IP address of the IP sharing
device if it is the fixed ip.
IP Change – Enable this function if the WAN IP address of the IP sharing
device is dynamic address.
PPPoE User Name – To configure the user name for the PPPoE
connection.
PPPoE Password – To configure the password for the PPPoE connection.
PPPoE IP Address – In the PPPoE mode, this table will show the ip
address that this unit gets from the ISP.
PPPoE Destination – In the PPPoE mode, this table will show the default
gateway address that this unit gets from the ISP.
PPPoE DNS primary – In the PPPoE mode, this table will show the DNS
ip address that this unit gets from the ISP.
After Remote Host Disconnection – This unit will reboot and re-connect to
the ISP
EMS Configuration
The IP change function could support the GK from us only. Please pa
y
more attentions about this function if your IP sharing device is using
the dynamic IP address.
The EMS function didn’t support this version as so far. This will be
working if the EMS function and server get ready.
FXO H.323 Gateway User Manual Document Ver.: 118a
Release Sep, 2004
28
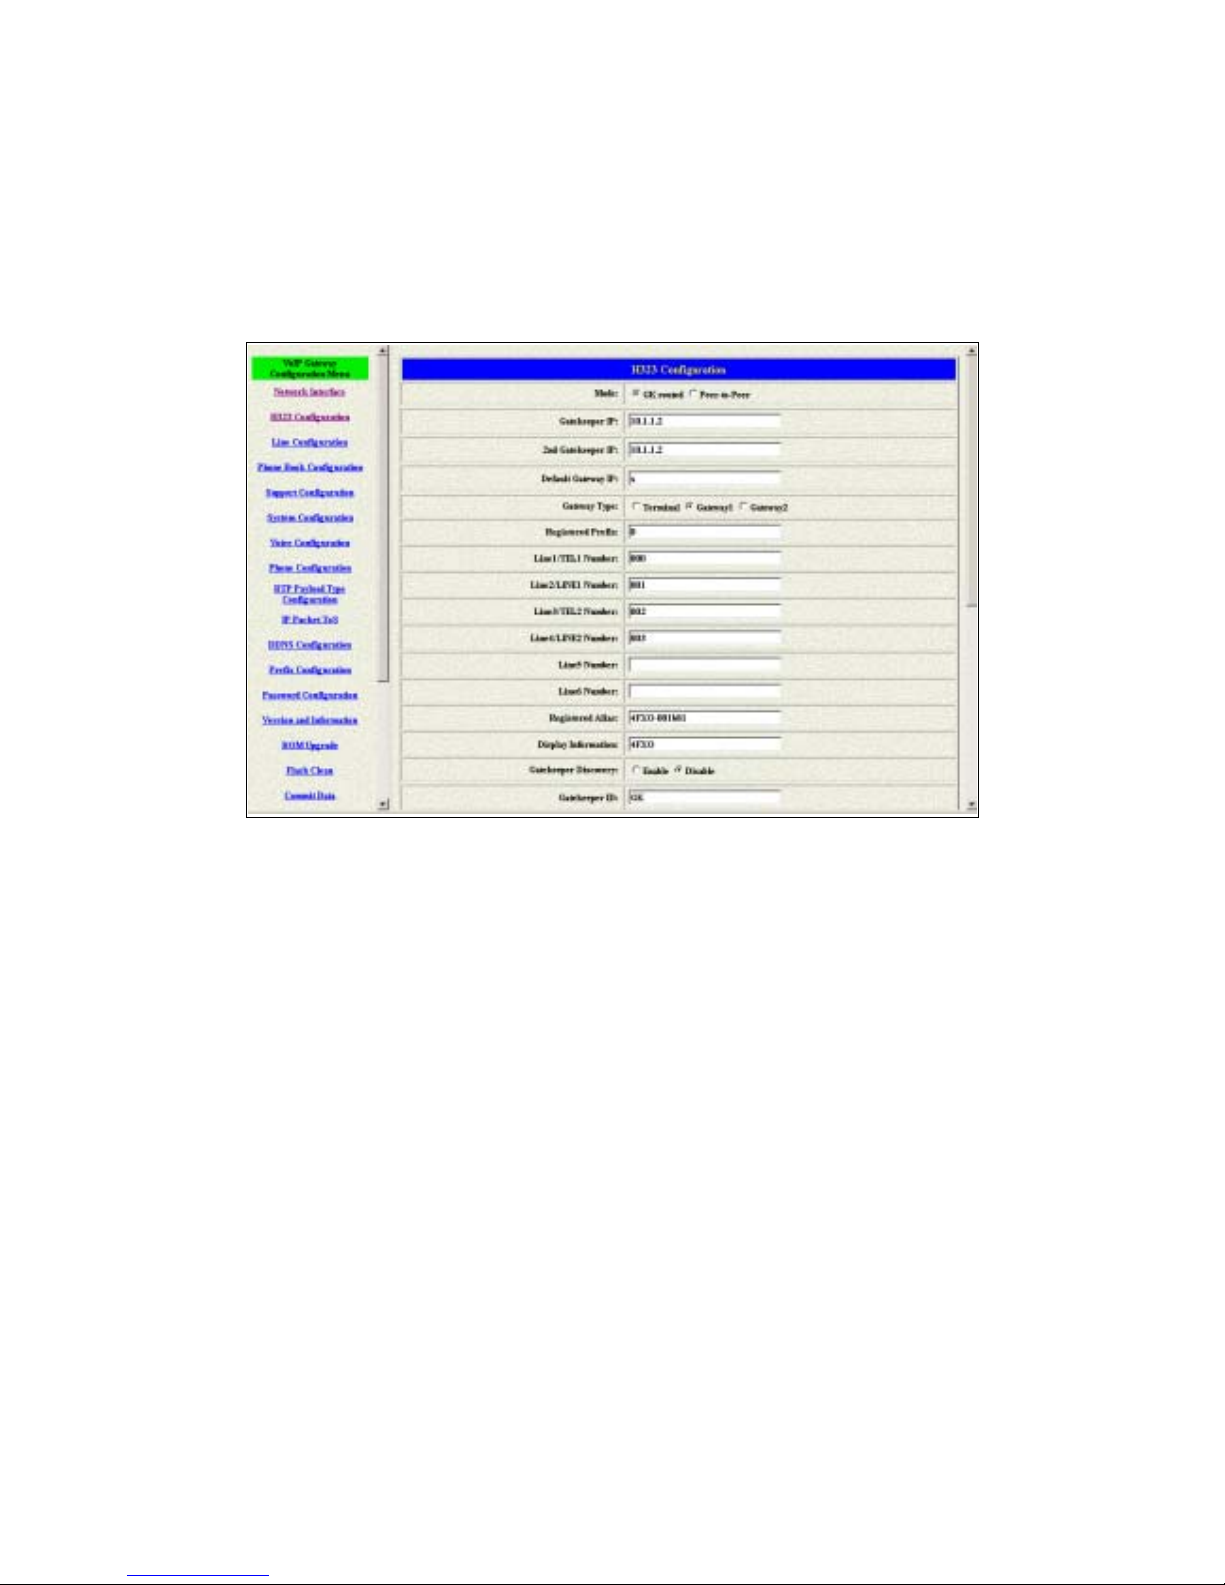
3.3 H323 Information
This WEB page will help user to configure the information about the dial mode,
GK information and some TCP/IP port for the communication. Please get more
info about this configuration from the below detail descriptions. (see figure 3.5)
Figure 3.5: H323 Information
Mode – Pick up the calling mode for this gateway.
GK routed : Users hav e t o regi stered on t he GK if users picked u p t his
option.
Direct : It only supports the peer-to-peer mode and users have to
define the phone book for this mode.
Gatekeeper IP Address – Enter the GK ip if users pick up the GK routed
mode. Support the GK mode only.
2nd Gatekeeper IP – Support the secondary GK function. Support the GK
mode only.
Gateway Type – Pick up the type for gateway. Support the GK mode only.
Terminal : Couldn’t support one-stage-dialing function.
Gateway1 : Could support one-stage-dialing function and the prefix
number is necessary for this type.
Gateway2 : Following the Cisco GK registration function.
Registered Prefix – Th e ph one number for the GK register i ng . Su pport the
GK mode only.
 Loading...