Page 1

PhotoKey 7 Pro user guide
Page 2

Table of Contents
1 Learning PhotoKey 7 Pro 4
2 New in PhotoKey 7 Pro 5
3 Installation & activation 6
4 Getting started & workflow 7
8About green screen photography
11Finding your way around
12Quick start guide
23Navigation bar
25Options
28Saving & loading projects
29Keyboard shortcuts
32Photoshop plugin
5 Features in detail 33
34Canvas
36Canvas view options
37Import
38Key
41Auto chroma key
48Spill suppression
55Masks
Page 3

58Filters
63Position
65Layers
68Effects
72Overlay
74Text
77Export
79Email export
83FTP upload
85Batch processing
86Batch import
87Working with multiple images
90Hot folders
91Batch Export
Page 4

1 Learning PhotoKey 7 Pro
PhotoKey 7 Pro is the world's most popular green screen photo software. There are many resources
available for learning how to use the software.
The user guide
This user guide contains information on all of PhotoKey's features and settings.
Free video tutorials
Photographer Erin Patel has created a series of tutorials to get you started with PhotoKey 7 Pro as
quickly as possible. Check them out at http://fxhome.com/photokey/learn.
Ask us questions
If you have a technical problem you can contact our support team by clicking here. We aim to respond
to all queries within 48 hours during office hours.
4
Page 5

2 New in PhotoKey 7 Pro
PhotoKey 7 Pro introduces several new features. If you're familiar with an earlier version of
PhotoKey, here's an overview of what's changed:
NEW Spill simulation pro: A new level of realism, replacing green spill light with ambient lighting
from your new background
IMPROVED chroma key: PhotoKey now identifies the best color for high quality results by
analyzing the source image based on common photographic setups
NEW client preview: display the PhotoKey canvas in a separate window with all interface removed,
so that you can showcase your work to clients
NEW RAW support: no need to convert your RAW images, as you can import them directly into
PhotoKey from your camera
IMPROVED hot folder: the latest image in your hot folder can be set to automatically load onto the
canvas - great for previewing your final image while you shoot
NEW FTP export: upload images directly to your own server via FTP, opening up new automation
possibilities
NEW Retina interface: PhotoKey's interface is sharper than ever, with Retina support on Mac OS X
NEW interface design: PhotoKey's new look makes it easier and faster to find the tools you need
IMPROVED color management
IMPROVED file and folder name handling
IMPROVED printer settings handling
5
Page 6

3 Installation & activation
The latest version of PhotoKey can always be downloaded from fxhome.com. If you're trying the
demo, you can find it here. If you've already purchased, you can download from your account.
Demo mode
After installation PhotoKey will start in demo mode. You can try out all the features but exports will
include a watermark.
Activating
If you have purchased PhotoKey you can activate it immediately to use all of its features.
When you start the software choose Activate from the welcome screen.
Follow the on-screen instructions to activate your software. If it's the first time you have activated the
software your serial code will be registered to your account at fxhome.com.
You can also activate by going to the File menu, choosing Options and using the Activation settings.
Installing on another computer
The PhotoKey 7 Pro license allows up to 3 concurrent activations.
If you exceed your number of activations your earliest activation will be deactivated and return to
demo mode.
You can transfer to a new machine and reinstall as many times as you want, so there's no need to
worry about losing your purchased software.
6
Page 7

4 Getting started & workflow
PhotoKey is very easy to use and it won't take you long to learn how to get great results.
This section takes you on a quick tour around all the major features so that you can get up and running
as fast as possible.
If you wa nt to know more informa tion a bout any fea ture, take a look at the other sections in this
manua l.
In this section you'll find information on how to find your way around the interface, how best to shoot
green screen photographs and how to get started with PhotoKey's main features.
It normally takes less than an hour for a new user to understand how to use PhotoKey. We do
recommend reading through the following chapters before using the software in the field.
7
Page 8
4.1 About green screen photography
Green screens and blue screens have been used for decades for filmmaking and photography and have
become an invaluable part of a photographer's toolkit. By photographing subjects against a green
screen or a blue screen, they can be easily isolated and placed onto a new background.
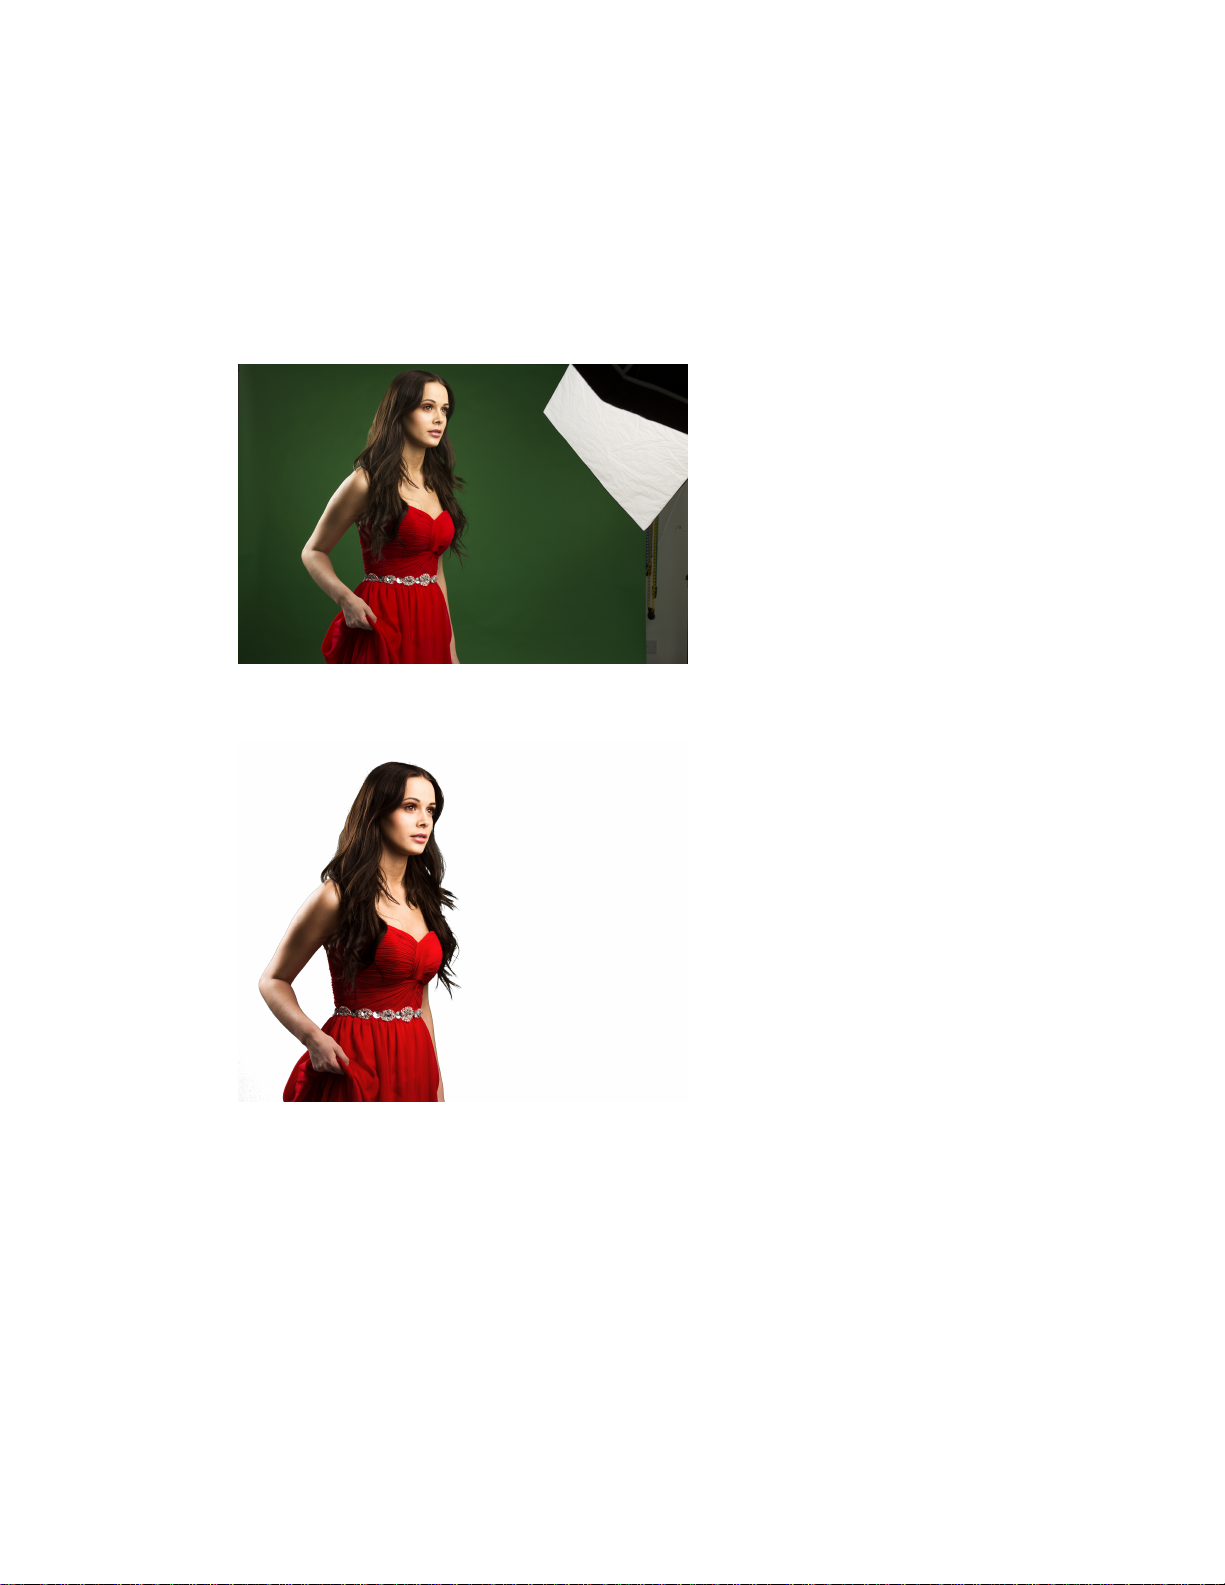
Here is an example of a model photographed against a green screen:
PhotoKey instantly removes the green screen background from the photo, leaving a cleanly isolated
version of the woman:
PhotoKey can then be used to add in a new background and make other adjustments to positioning and
appearance:
8
Page 9

Automatically removing the green screen or blue screen from the original image is known as 'keying', a
process designed to remove or reduce the amount of manual work required. PhotoKey 7 Pro is the
fastest and easiest green screen photographic software and is designed for both individual portrait
work and mass processing at major live events.
Green screen or blue screen?
The most important aspect of keying is to ensure that the background screen can be easily separated
from the foreground subject. You want your screen to be as different to your subject in color as
possible.
This is why red screens are not commonly used - due to the amount of red in human skin, it's
impossible to get good results with a red screen. Green and blue are both far less prominent in skin
tones and therefore work as successful keying colors. Take careful note of clothing, hair and other
objects in the shot and make sure that you choose an appropriate backdrop.
If you a bsolutely can't avoid some color clashes, take a look at the Masks cha pter.
Some digital cameras also have a tendency to retain more green data than blue, so if you are in a
position to freely use either green or blue it is generally advisable to choose green.
Blue screens and green screens can be purchased or rented, or you can build your own using
appropriate materials. For portability a fabric screen works well, as do pop-up screens (similar to popup reflectors). A pull-down paper screen which can be rolled up when not in use is ideal for a studio. If
you have a permanent studio space for green screen work you can also consider chroma green paint.
Setting up your green screen
Greenscreen and bluescreen photography has a few unique factors to bear in mind.
Taking a little more time during setup can save you a huge amount of time when you get on the
computer.
Make sure your material is matte, not shiny. Shiny backgrounds will reflect too much light and have
bright 'hotspots'.
9
Page 10

Avoid textured materials - go for smooth materials that won't cast any shadows. Textures can make
it difficult to separate the subject from the background.
Clear separation between screen and subject is the key to high quality results.
Avoid creases and wrinkles in the backdrop. These can cast shadows and cause imperfections in the
composite.
Always try to position your subject as far away from the backdrop as possible. This will reduce the
amount of green or blue that is reflected onto them and avoid casting shadows onto the screen. Aim
for a minimum of 6 feet when possible, although PhotoKey will still work in tighter setups.
Make sure your subject is not casting any unwanted shadows on the backdrop. Shadows will make
compositing much more difficult.
Light your backdrop independently from your subject. This enables you to light your background
smoothly while retaining a more dramatic setup for your subject.
If you are getting a lot of bounced green spill light on your subject try adding a very subtle magenta
light behind your subject. This can help to counter green spill light from the greenscreen and
increase separation.
10
Page 11
4.2 Finding your way around
When you start PhotoKey you are greeted with the Home screen. This provides quick access to your
project files, this user guide and tutorials.
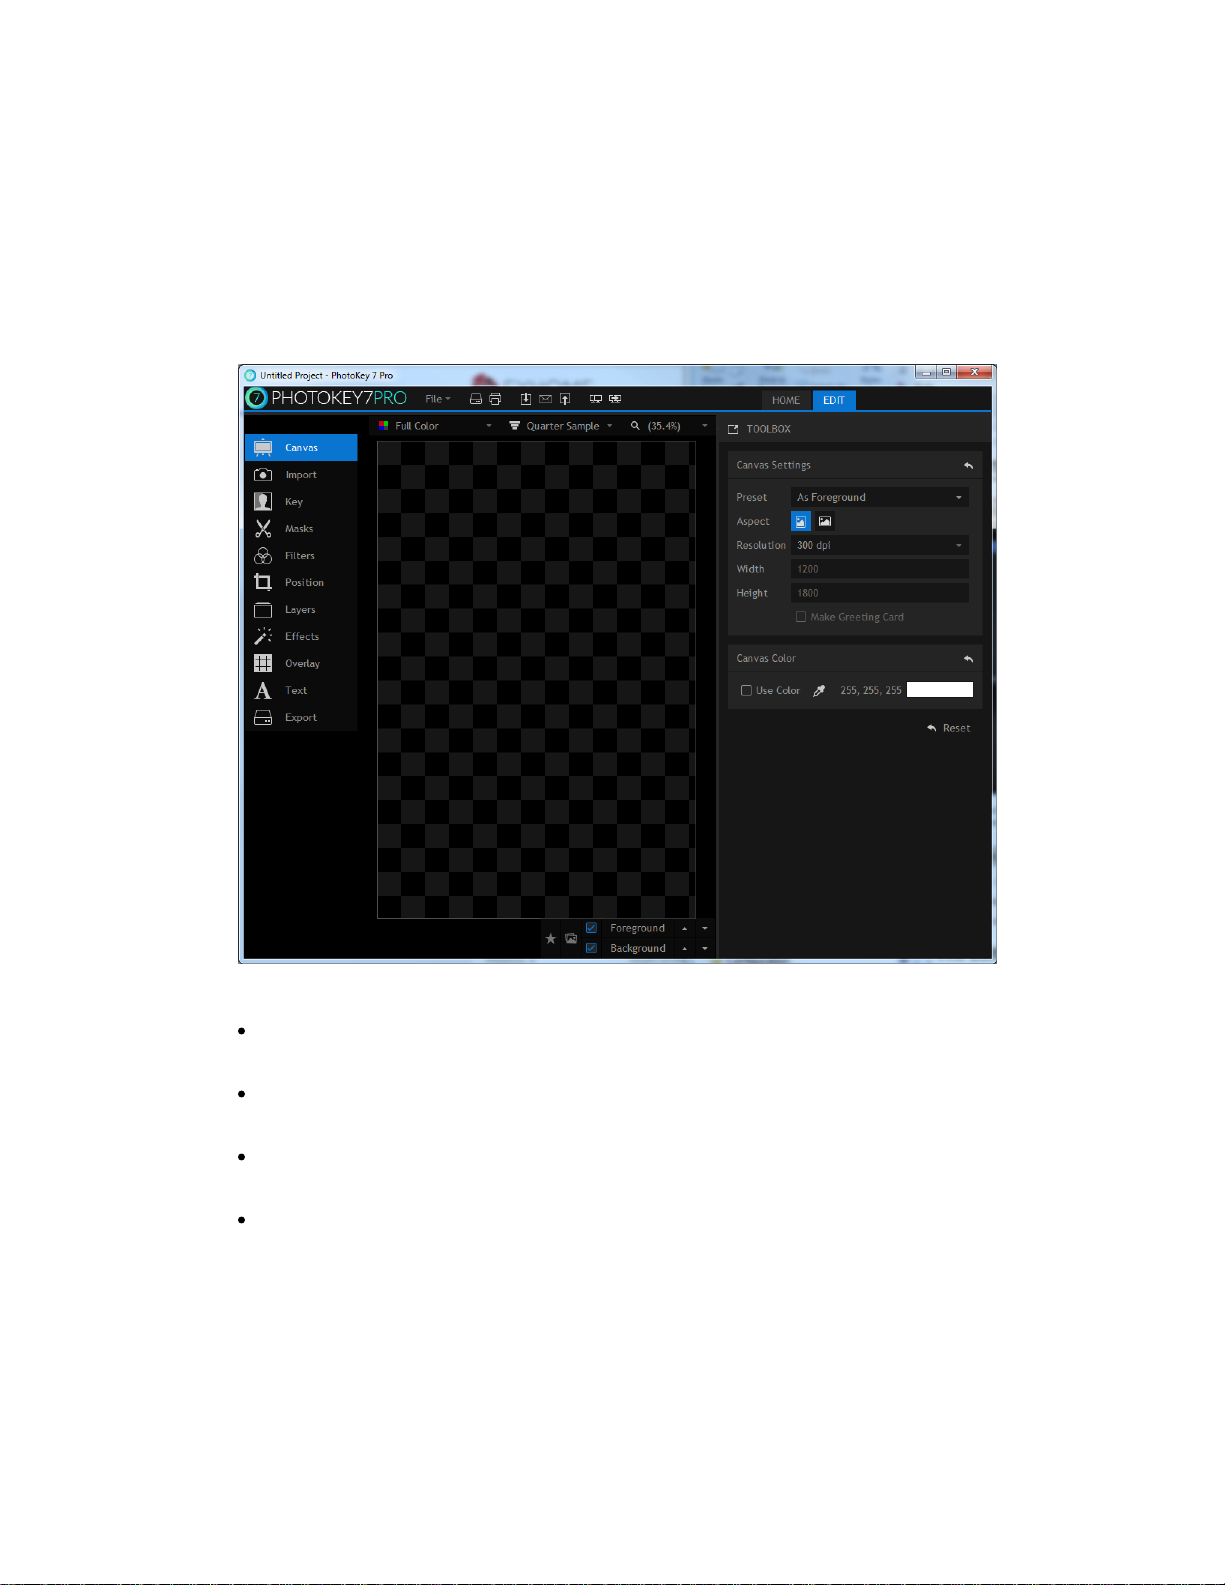
Clicking the New button will create a new project and switch to the Edit screen. This is where you do
all your PhotoKey work:
The interface has four main areas.
Navigation bar - along the top of the interface, next to the PhotoKey 7 Pro logo, are a series of
quick access buttons.
Toolset list - the list on the left shows all the available toolsets. Clicking on a toolset displays it in the
toolbox on the right.
Toolbox - this displays the currently selected toolset on the right. This is how you make changes to
your image.
Canvas - the center area displays the image you are currently working on.
Read the Your first image section for an introduction to using PhotoKey, or go to the Edit chapters for
full details.
11
Page 12
4.3 Quick start guide
This chapter guides you through PhotoKey's essential features.
The toolsets
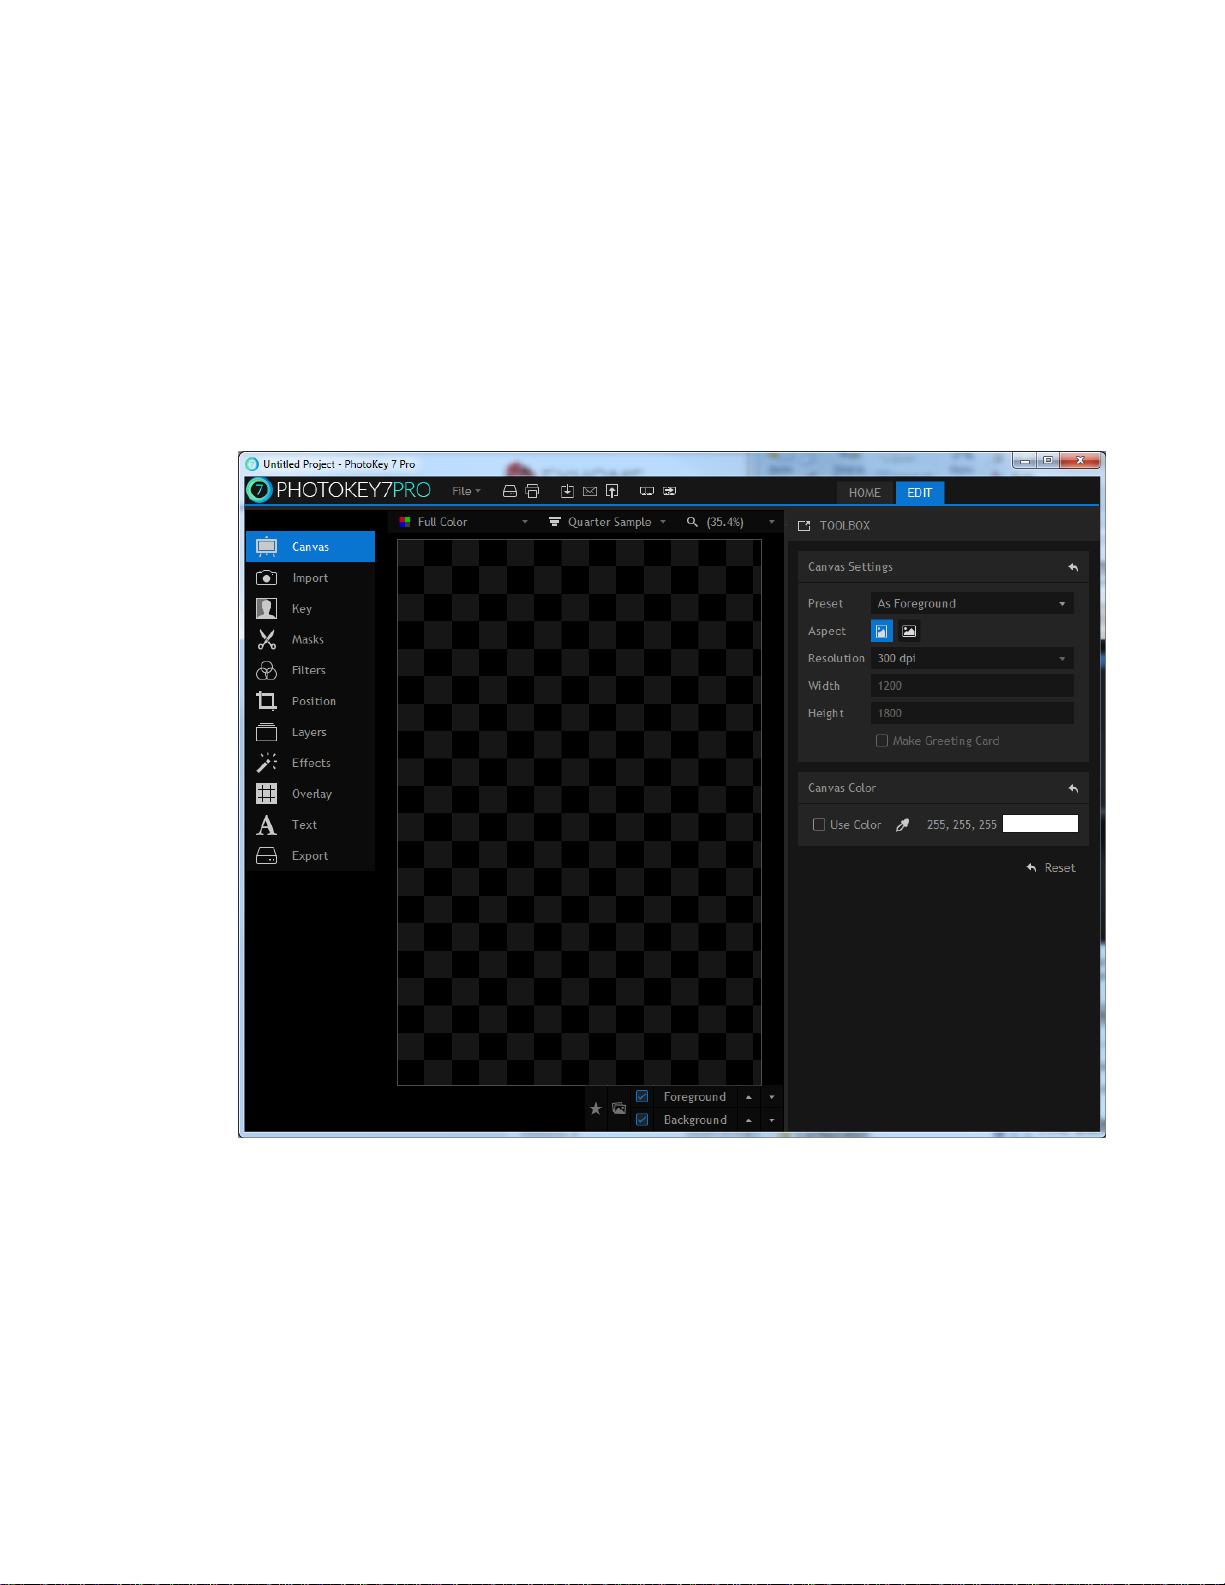
PhotoKey's features are organized into several toolsets. These are all listed on the left of the interface
and you can switch between any of them at any time while working on a project.
Selecting a toolset on the left displays it in the toolbox on the right.
The toolsets are listed in workflow order. You won't always use every single one, but you'll often start
by setting up your canvas, then switch to the import toolset to bring in your images, then go to the key
toolset to fine tune the results - and so on.
Setting up your Canvas
After starting PhotoKey, the first thing you'll notice is that there's a large rectangle in the middle of
the workspace that is filled with a checkerboard pattern. This area is your canvas and the pattern
represents transparent areas. As you have not yet imported any images, the entire canvas is
transparent.
12
Page 13
When saving to an image file or printing, the pattern will be not be visible. JPEG images a nd prints will
show tra nsparent areas as white, while PNG a nd TIF images will reta in the transpa rency.
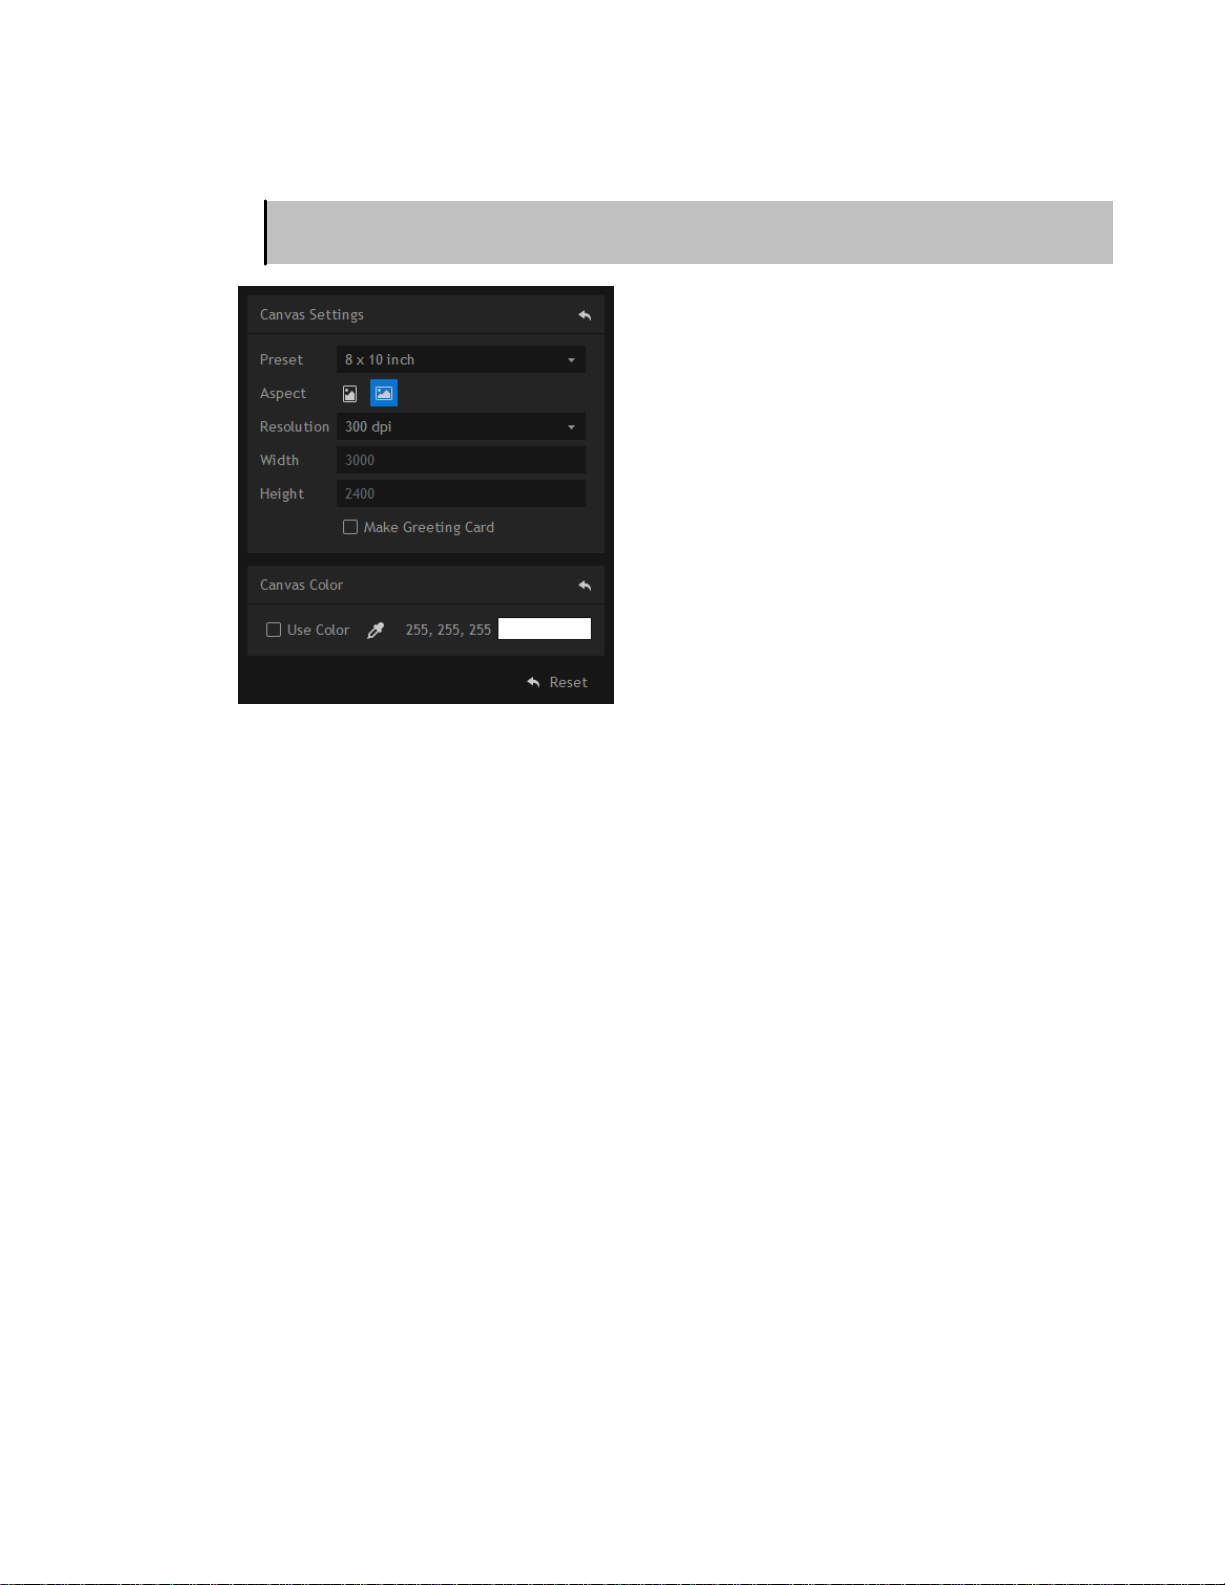
The canvas settings allow you to choose from several common photographic and paper sizes,
landscape or portrait layouts and a range of DPI resolutions.
If you're not sure what to use, setting the Preset to As Foreground will create a canvas to match your
green screen photograph.
In this example an 8 x 10 inch landscape canvas at 300dpi will suffice.
Check out the Canvas chapter for more details.
Import your images
The next thing to do is bring in some images. This is done using the Import toolset.
You can manage your foreground and background images separately, using the foreground/
background tabs at the top of the toolbox.
Images can be imported by clicking the Import button, then locating them on your computer. They will
then be listed in the toolbox and you can preview each image by clicking on it:
13
Page 14
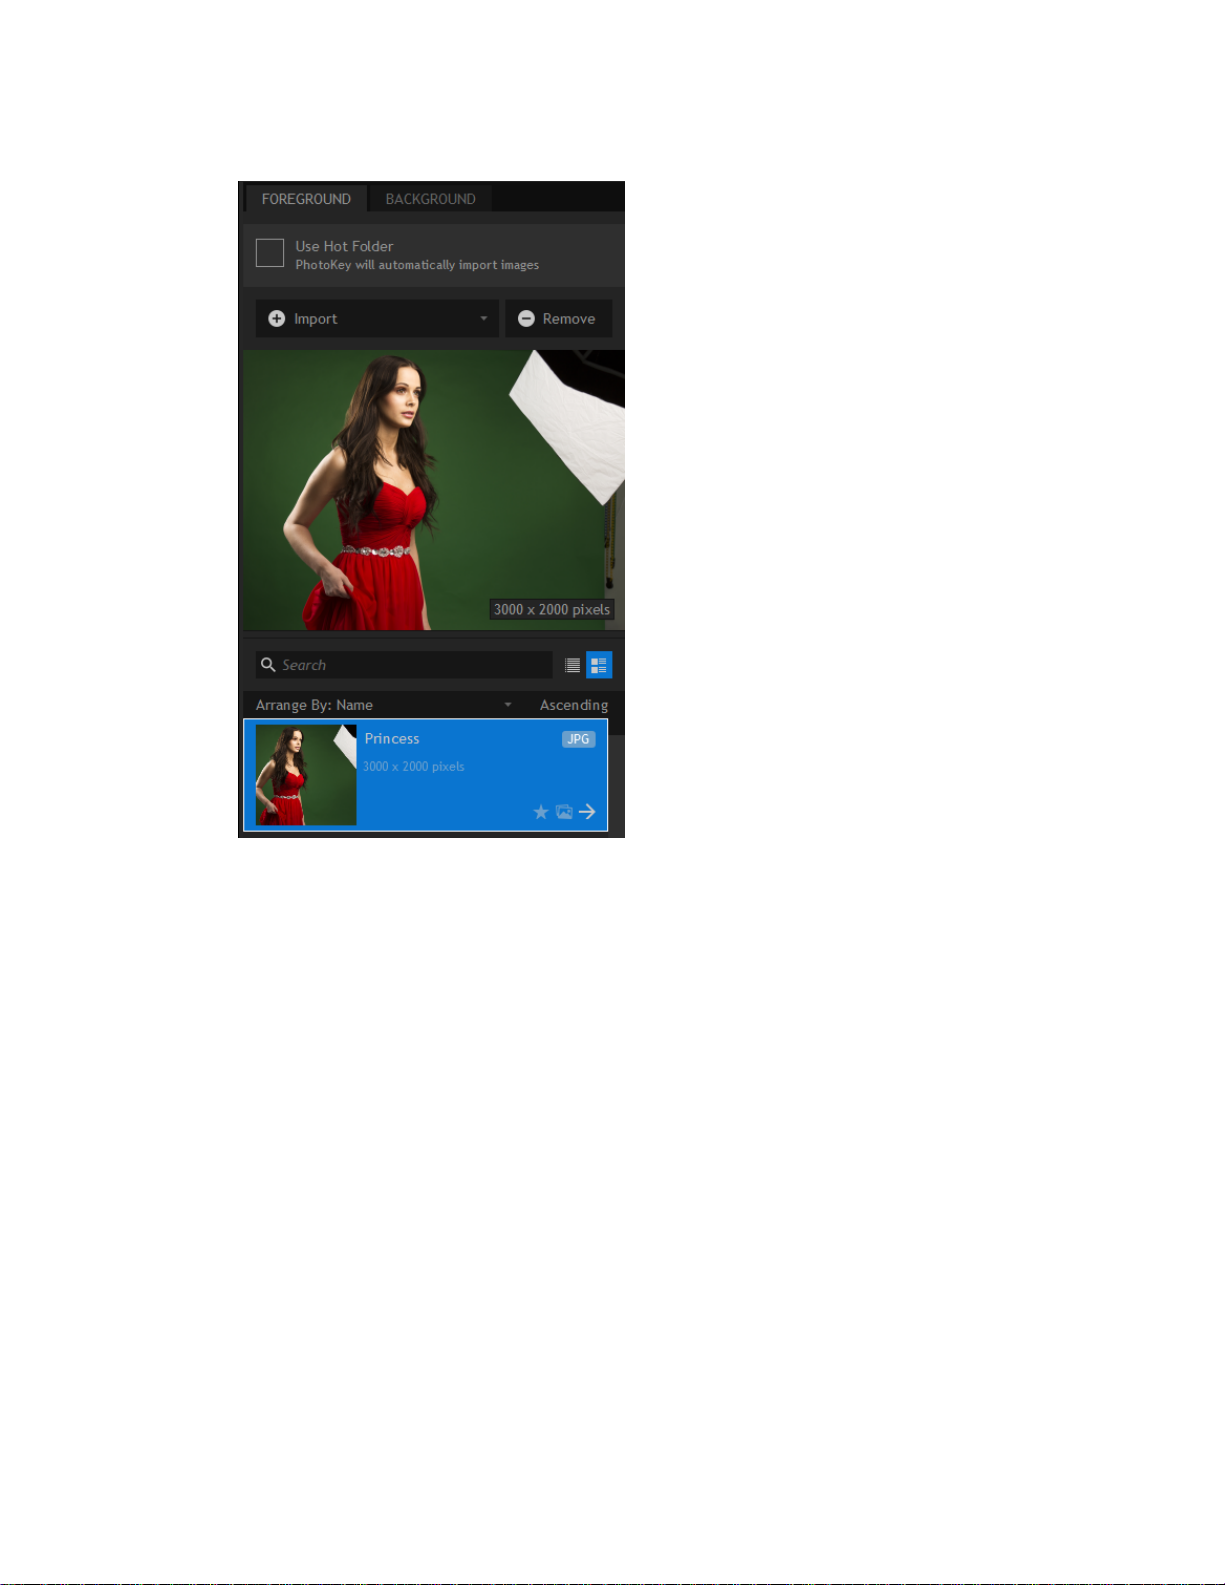
You can import multiple foreground and background images which is useful for batch processing. In
this tutorial we'll just be using a single image.
The image will also be displayed on the Canvas, with the green screen automatically removed.
By switching to the Background tab you can now import an image to place behind the keyed subject.
The foreground and background are automatically composited together:
14
Page 15
In many cases, this is all you need to do in PhotoKey to get a good result. It's a very fast way to work.
This particular image requires further customization, especially to remove the corner of the green
screen which is still visible in the top right of the canvas, which was not automatically removed.
See the Import chapter for more details.
Key out your green screen
The automatic removal of a green screen from an image is called keying. Although PhotoKey's default
settings create excellent results you will sometimes want to fine tune the settings.
There are multiple keying tools available but the three you will use most often are chroma key, spill
suppression and light wrap. When used together these three create very high quality results.
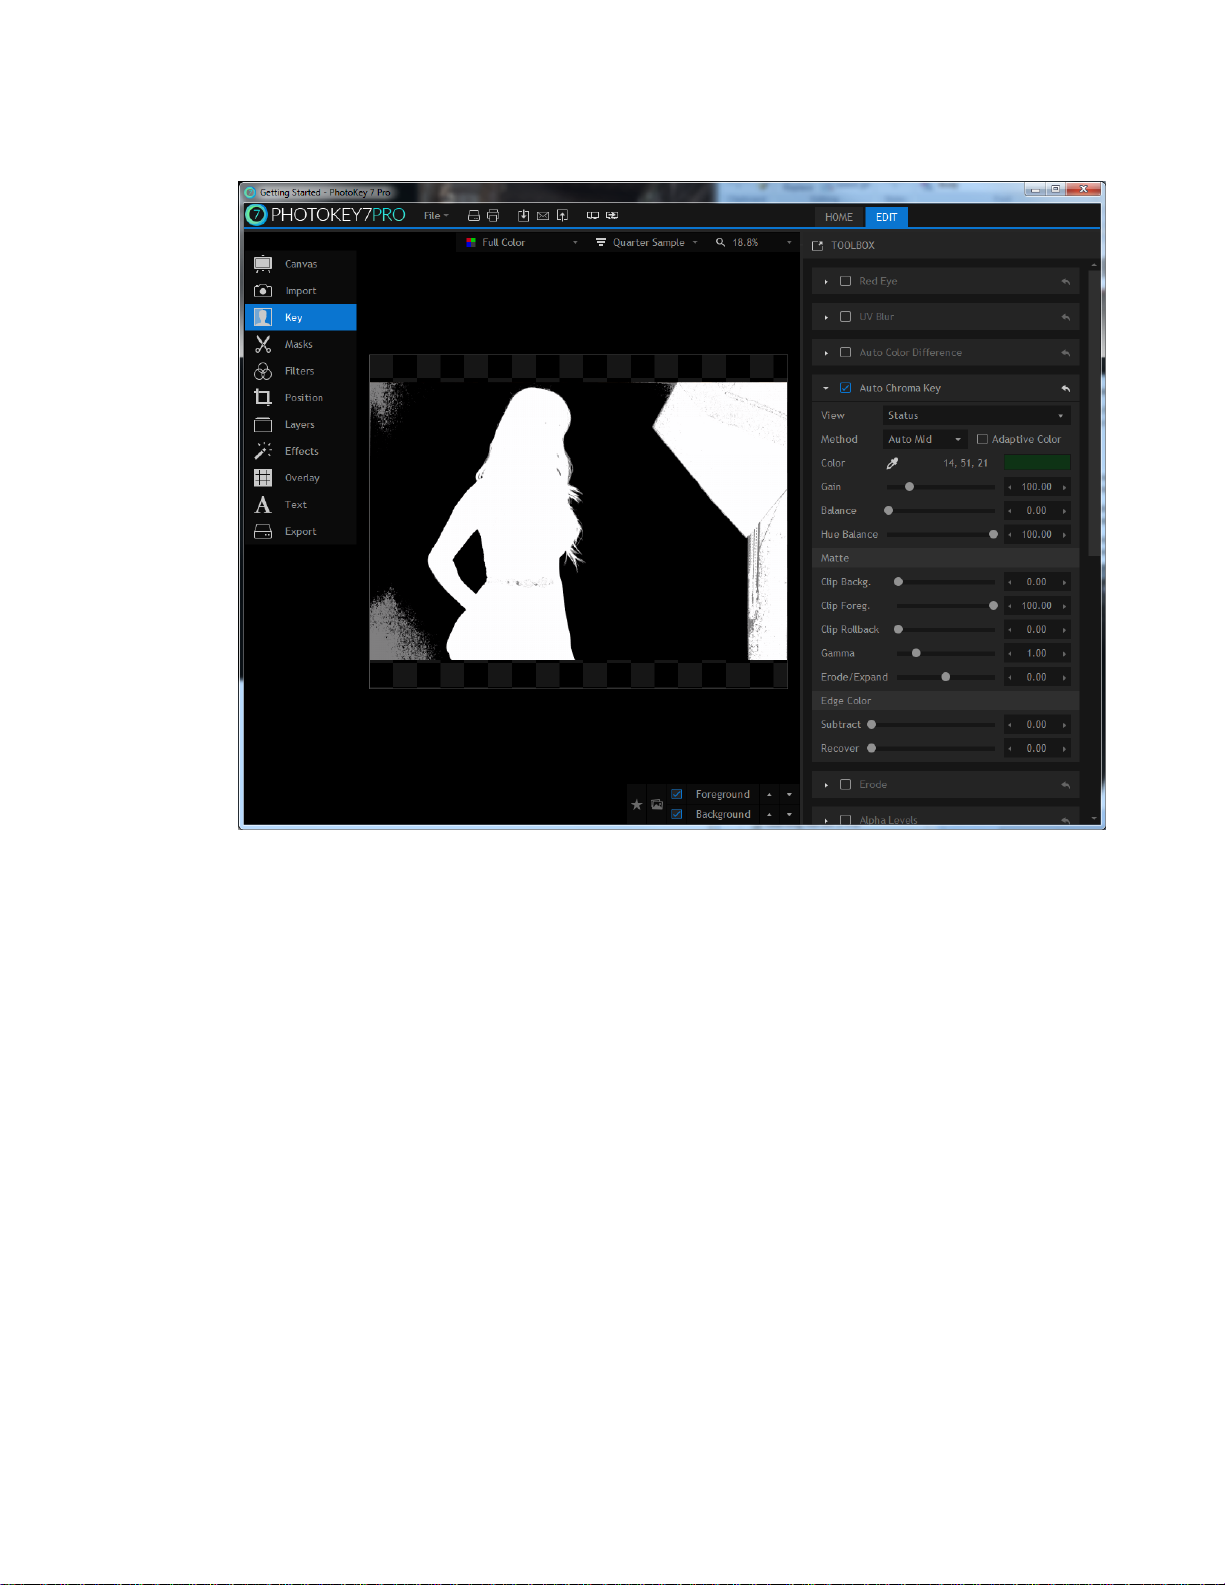
The chroma key tool is responsible for removing the green screen. The composite will sometimes look
good even when there are imperfections, so the View menu is used to create a more analytical display:
15
Page 16

Black areas represent fully transparent areas of the foreground.
White areas represent fully opaque areas of the foreground.
Gray areas represent semi-transparent areas of the foreground.
This makes it much easier to see at a glance where you need to make adjustments. In this case we
need to remove the studio area visible on the right, but there are also two patches of green screen
that need removing on the left.
Slightly increasing the Gain setting easily removes the patches on the left. The woman's belt has a
couple of transparent patches, and clipping the foreground is the easiest way to fix this.
16
Page 17
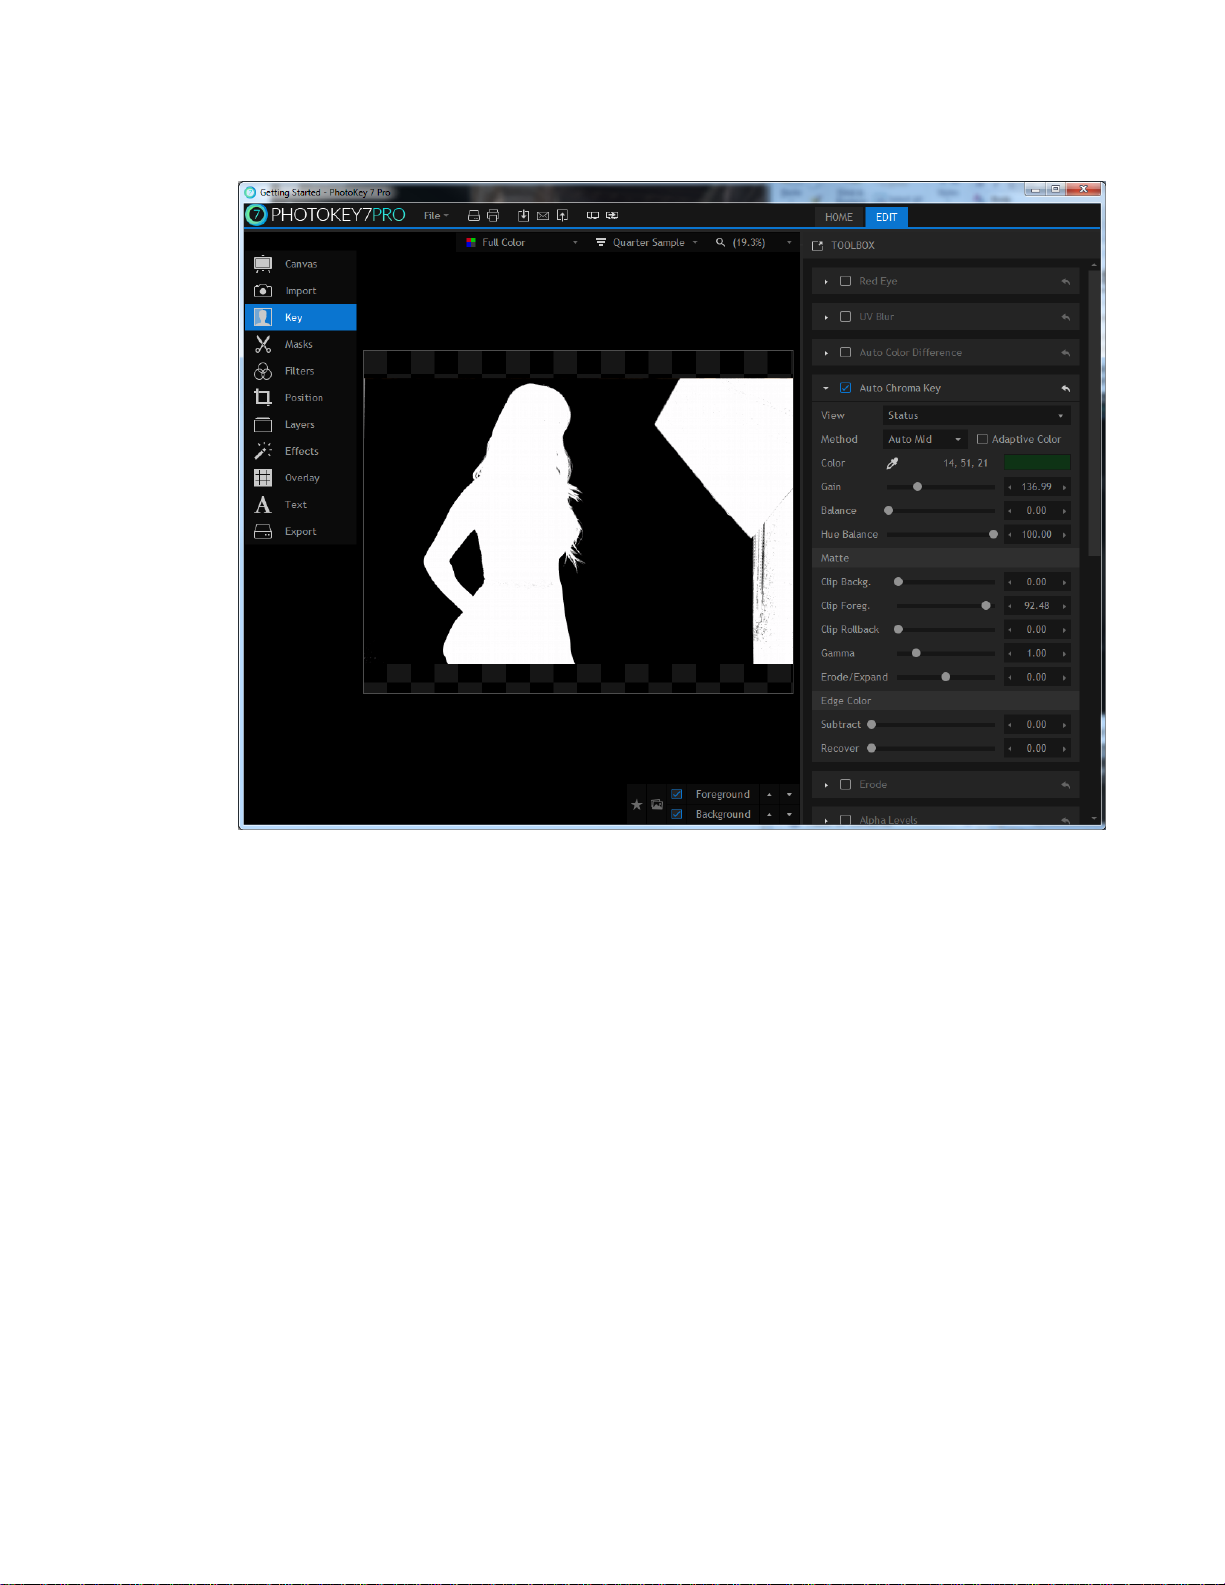
Don't forget to switch the View back to Result.
The spill suppression tool is integral to achieving realistic results. This tool is used to remove the
unwanted green spill light cast by bounced light from your green screen onto your subject. PhotoKey's
spill simulation pro feature automatically replaces the green spill with realistic spill taken from your
new background.
Increasing the hue range causes more of the foreground to be affected. In this case increasing the
huge range to 30 ensures that the woman's hair color accurately reflects the lighting of the
background. The luminance option should also be reduced in this case, to avoid unwanted brightening
of the hair's edges.
To compare the results, here is the image without spill suppression:
17
Page 18
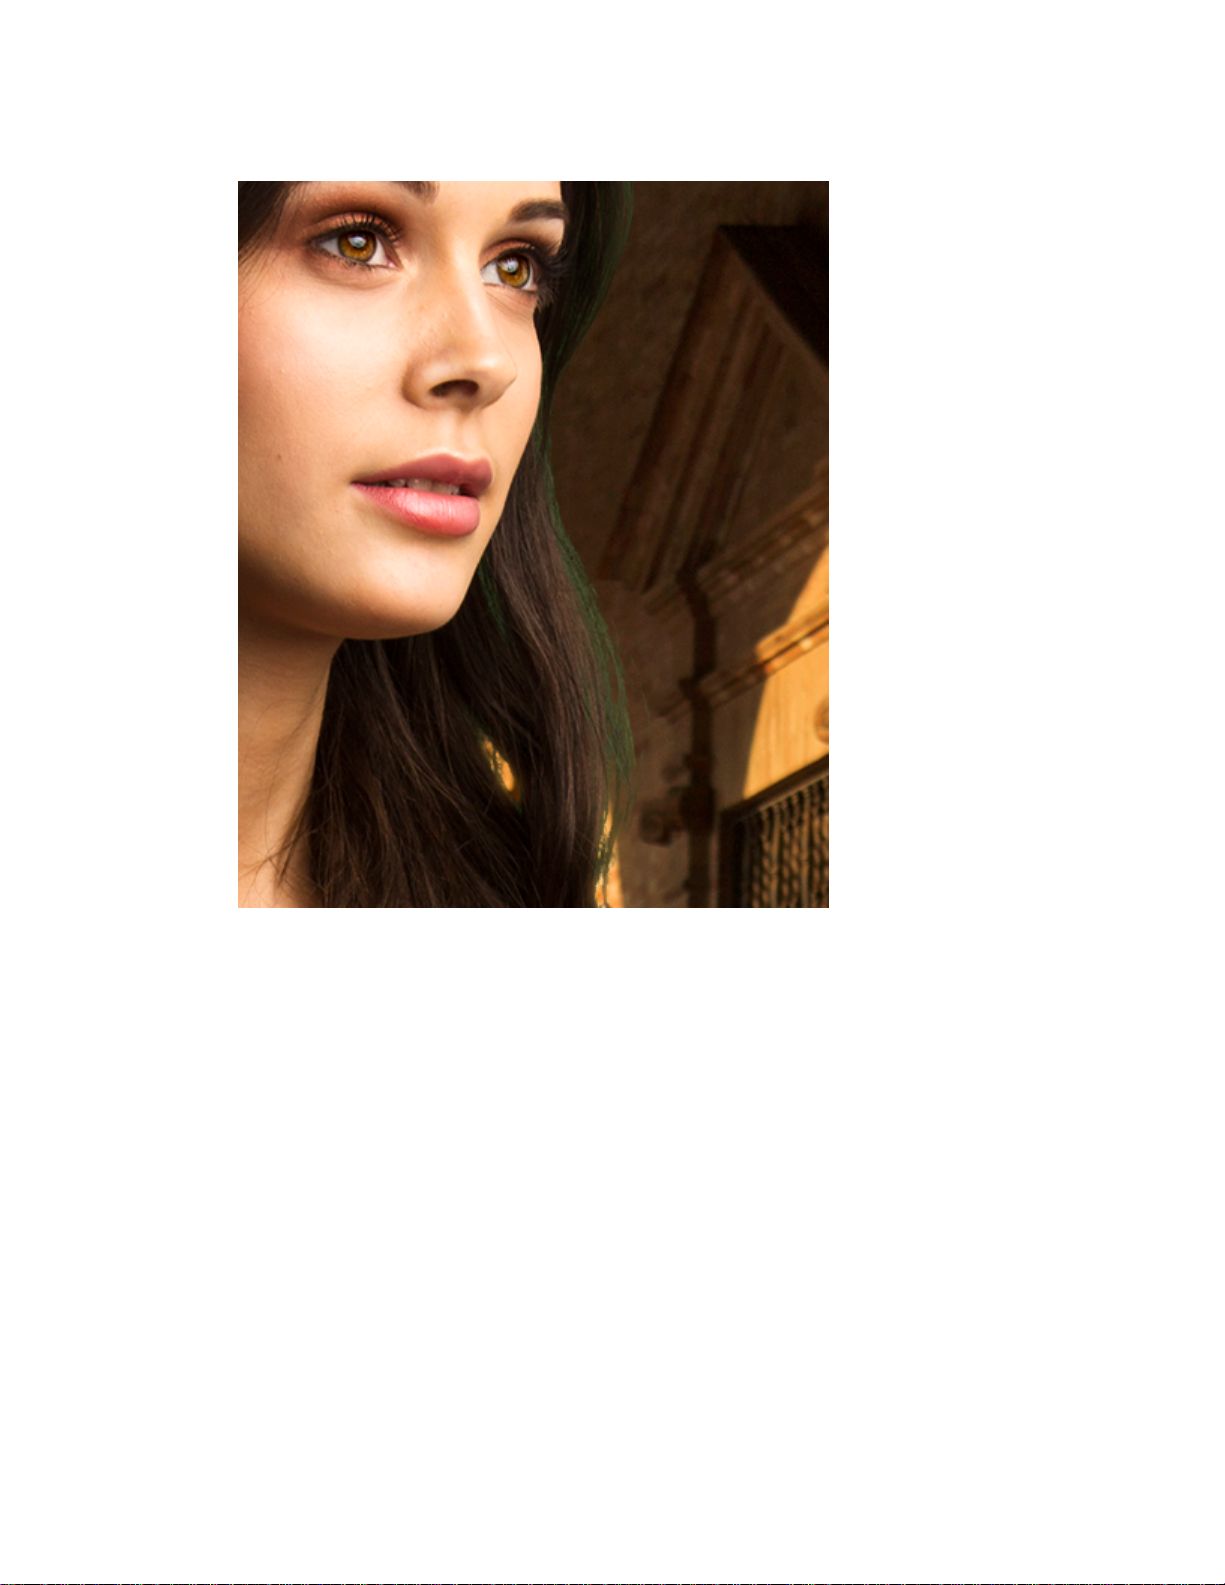
Note the visible green spill on the edges of the hair. And here is the same image with spill replacement
pro turned on:
18
Page 19
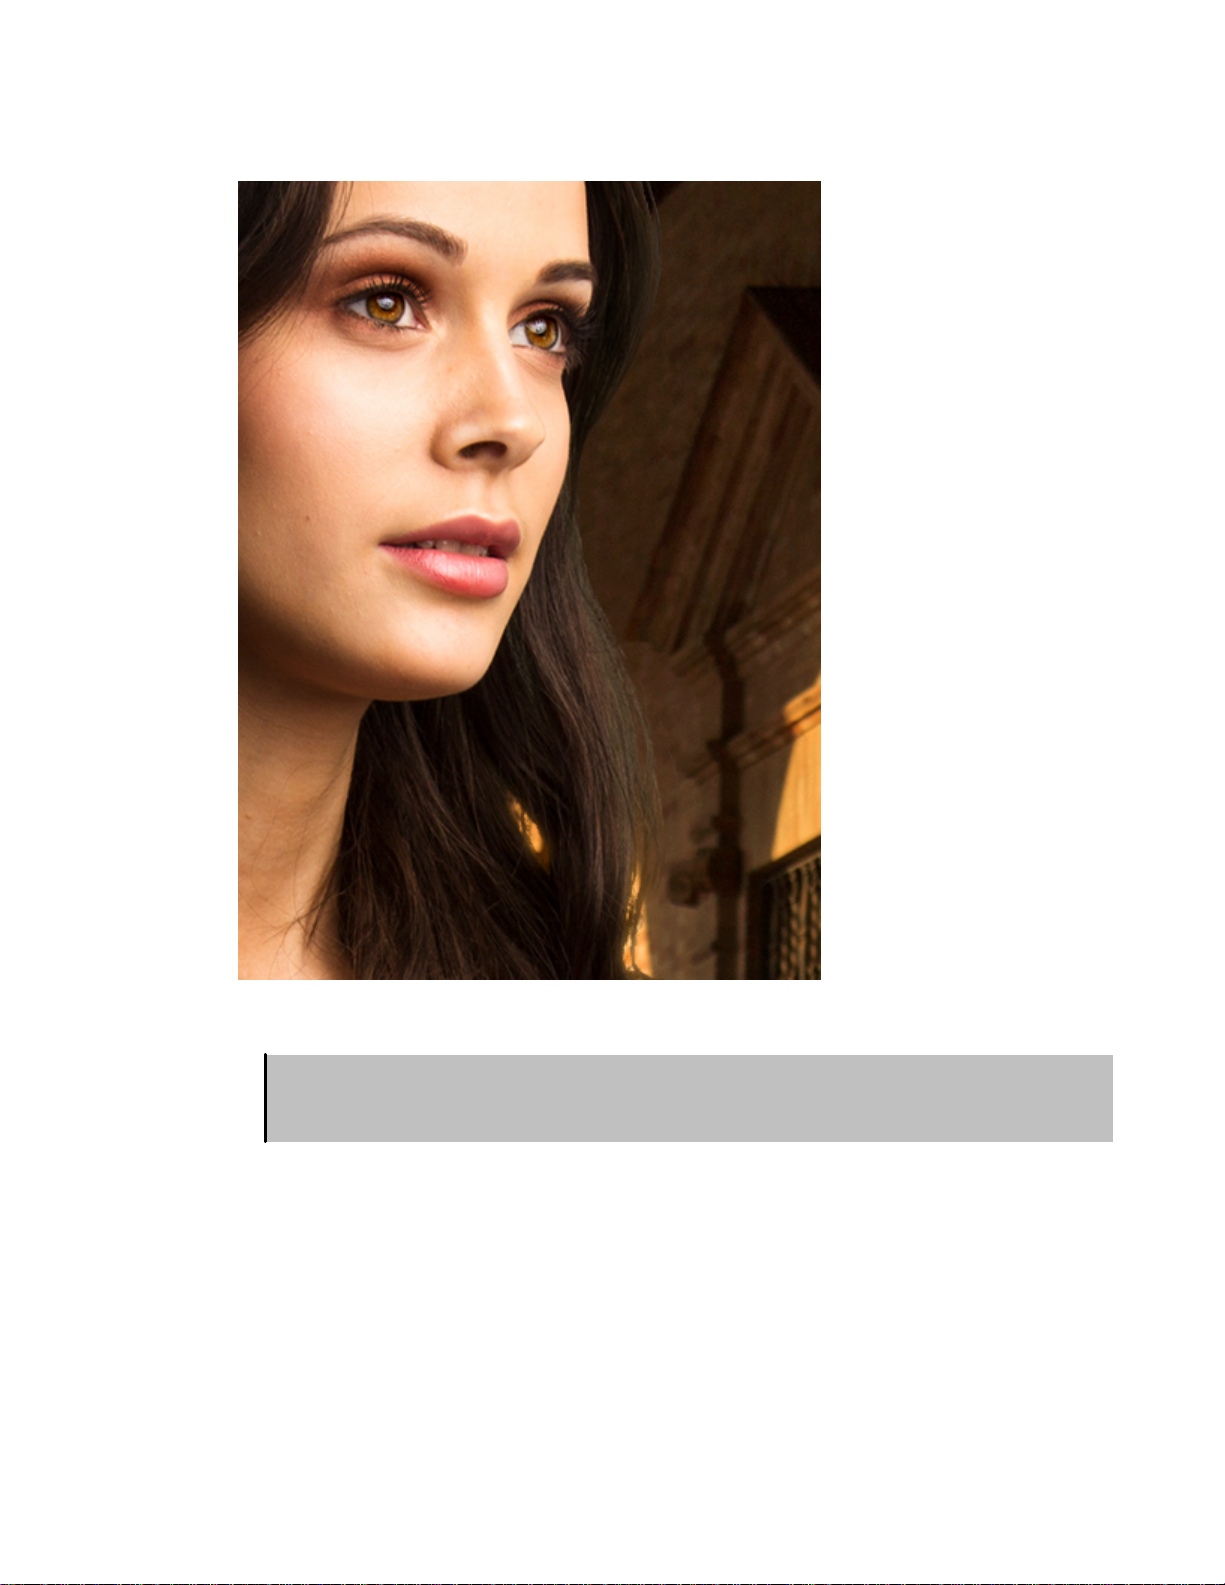
For detailed information on all the Keying tools, take a look at the Key chapter.
It's worth noting that if you have to drastica lly a djust your Key settings every time, it is worth
exa mining your green screen setup. A little extra time in the photography sta ge ca n sa ve a lot of time
during compositing.
Draw Masks
You should always aim to have your green screen fill the frame, as it makes the compositing stage
simpler. Sometimes however you will need to manually remove unwanted elements, and PhotoKey
has built-in tools to make this easy.
The Masks toolset is where you can add custom shapes to remove or retain specific parts of your
image. This example only needs a single mask, drawn around the right edge of the frame.
A new mask can be added with the Add mask button. The mask shape is then drawn directly onto the
canvas by clicking with your mouse. Clicking back on the first point will close and activate the mask.
19
Page 20
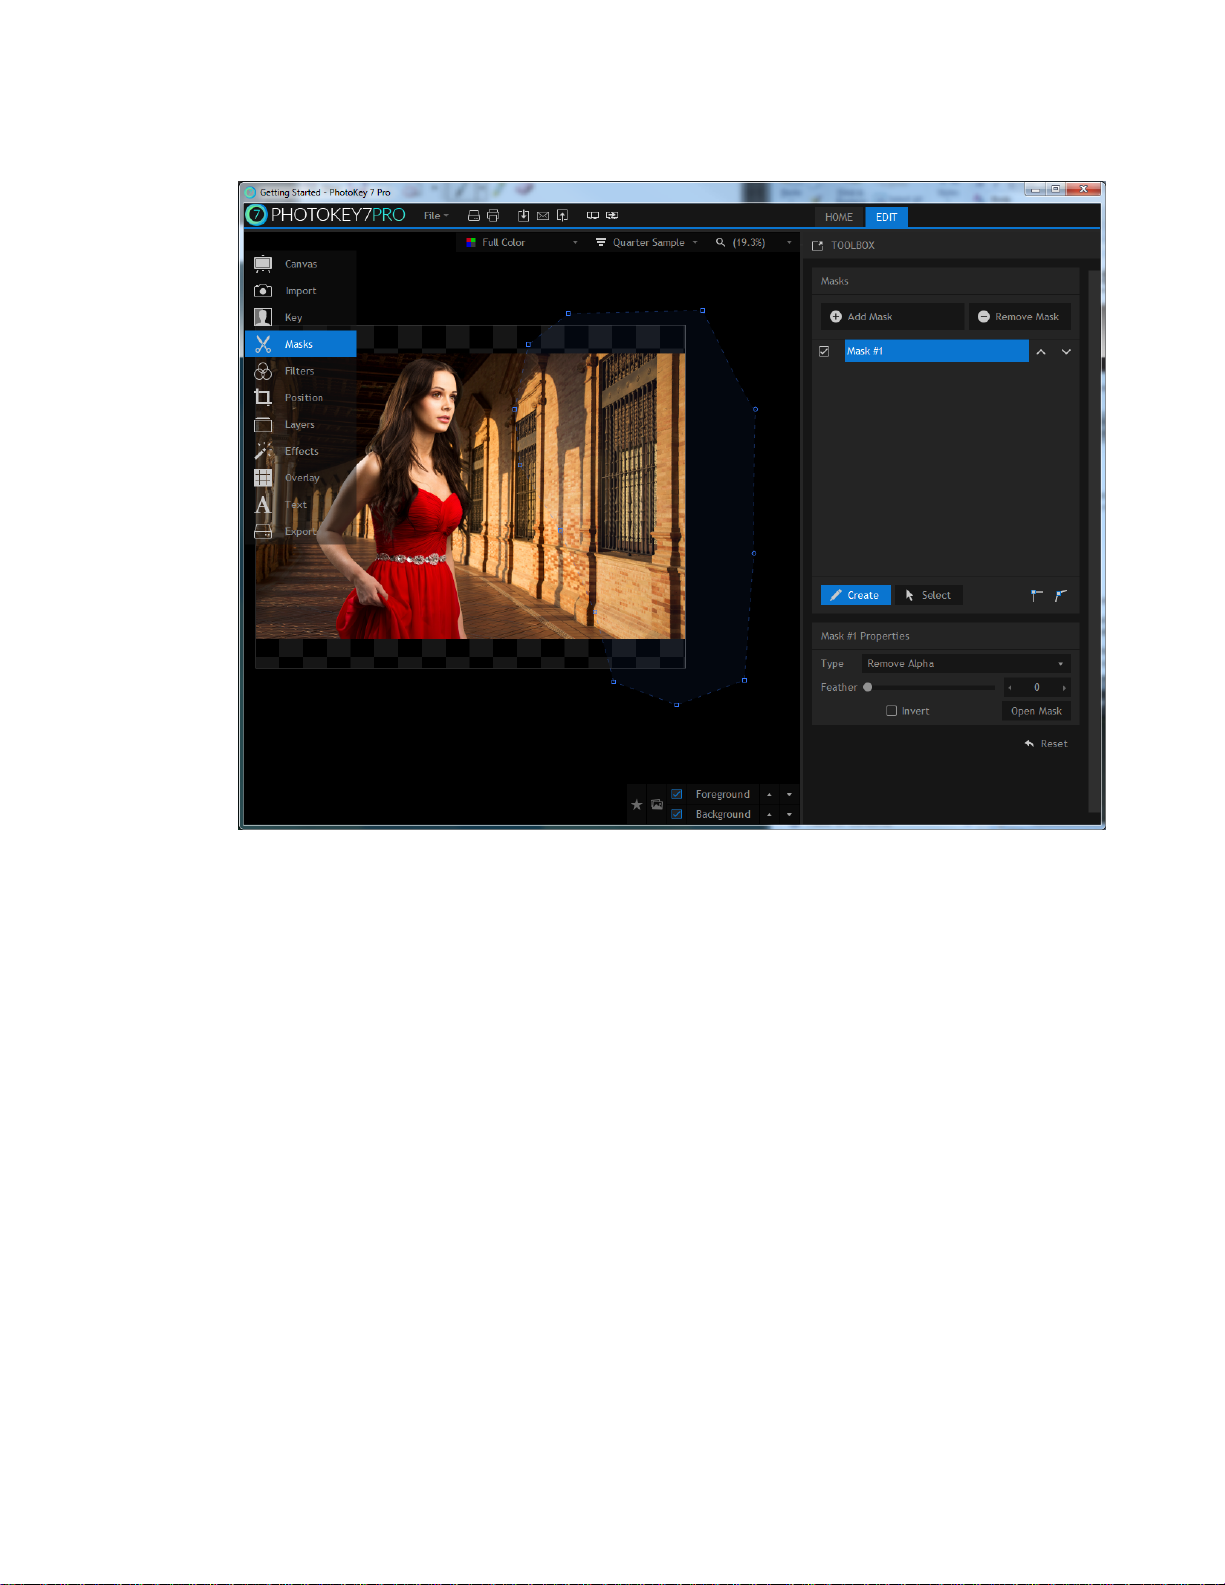
Read the Masks chapter for more details.
Position your layers
The images don't quite fit the chosen canvas. The foreground and background can be separately
adjusted using the Position tools.
When making position adjustments you can either use the toolbox sliders or the canvas controls. The
canvas is faster and easier, while the toolbox provides more precision.
Switching to the Background tab lets you adjust the background. Clicking and dragging on the blue
square on the canvas is a fast way to scale up the background to fit the canvas.
Now switch back to the foreground and adjust the image until you're happy with the composition.
20
Page 21
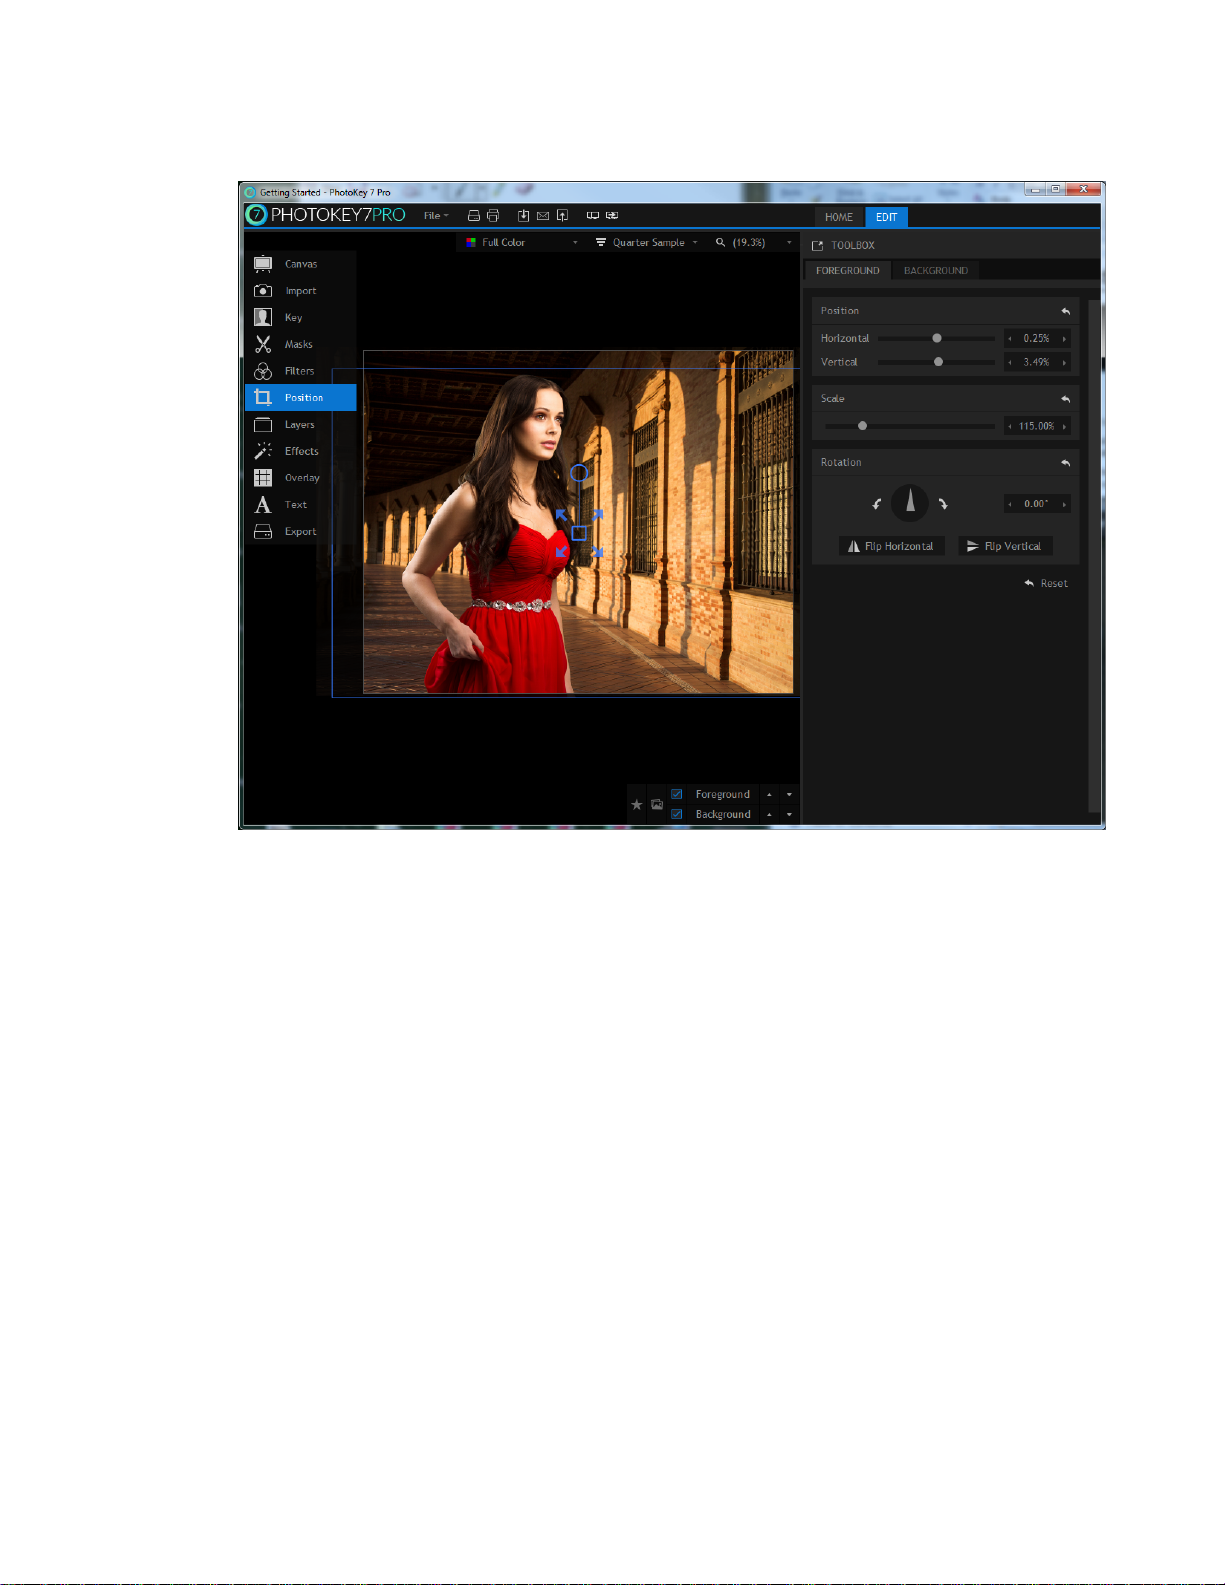
The Position chapter contains full details.
Add creative Filters & effects
PhotoKey 7 Pro includes a wide range of filters and effects that can be used to enhance the
appearance of your images.
Filters can be applied separately to the foreground or background, while Effects apply to the finished
image.
By default all effects and filters are turned off. Clicking on the name of an effect or filter activates it
and displays its settings.
In this case a subtle Bleach bypass effect looks good, with settings of Contrast: 0.45, Saturation: 0.95
and Strength: 60%.
Experiment with different combinations of effects and filters to create different looks.
For information see the Filters and Effects chapters.
Save your project
It is important while working in PhotoKey to save your project regularly. This way you can work on the
same project over several sessions, and won't lose any work in the event of a power failure.
21
Page 22

PhotoKey 7 Project files do not include the a ctual ima ge files. If you wa nt to tra nsfer the project to
another computer or a rchive it you will need to also include the associated ima ge files.
You can save your project at any time by clicking the save icon, or from the File menu.
PhotoKey 7 Projects cannot be opened in other software. If you wa nt to crea te a final ima ge from your
project to use in programs like Photoshop, you need to first Export it.
See Saving projects for more information.
Export your images
Once you are finished working on your image you can export it to a new image file. The export icon on
the toolbar is a quick way to export the currently displayed image, or you can choose 'Export canvas'
from the file menu.
See the Export chapter for full details, including information about batch processing.
22
Page 23
4.4 Navigation bar
The navigation bar runs horizontally along the top of the PhotoKey window and provides quick access
to common features.
File menu
The File menu makes it easy to create, open and save projects without having to change screen.
On the left of the menu you can see the main project commands:
New Project - creates a new project. PhotoKey can only have one project open at a time, so you will
be asked to save your current project file before creating a new one.
Open - opens a project file you've previously saved on your computer.
Save - saves your current project so that your work is safe. If it is the first time you have saved the
project you will need to choose a location for the file.
Save As - if you want to create an alternate version of your current project file, this will create a new
project file under a different name. After using Save As, the Save option will use the new filename
and location instead of the original.
Revert - discards any changes you have made and reloads your current project.
Export Canvas - exports the currently displayed image using your export settings.
Email Canvas - displays the email send window for the currently displayed image.
Print Canvas - sends the currently displayed image to the default printer system.
On the right of the File menu are your recently saved projects.
The Options button is where you can change PhotoKey's preferences.
The Exit button is another way to close the application when you've finished working on your
masterpiece for the day.
Quick tools
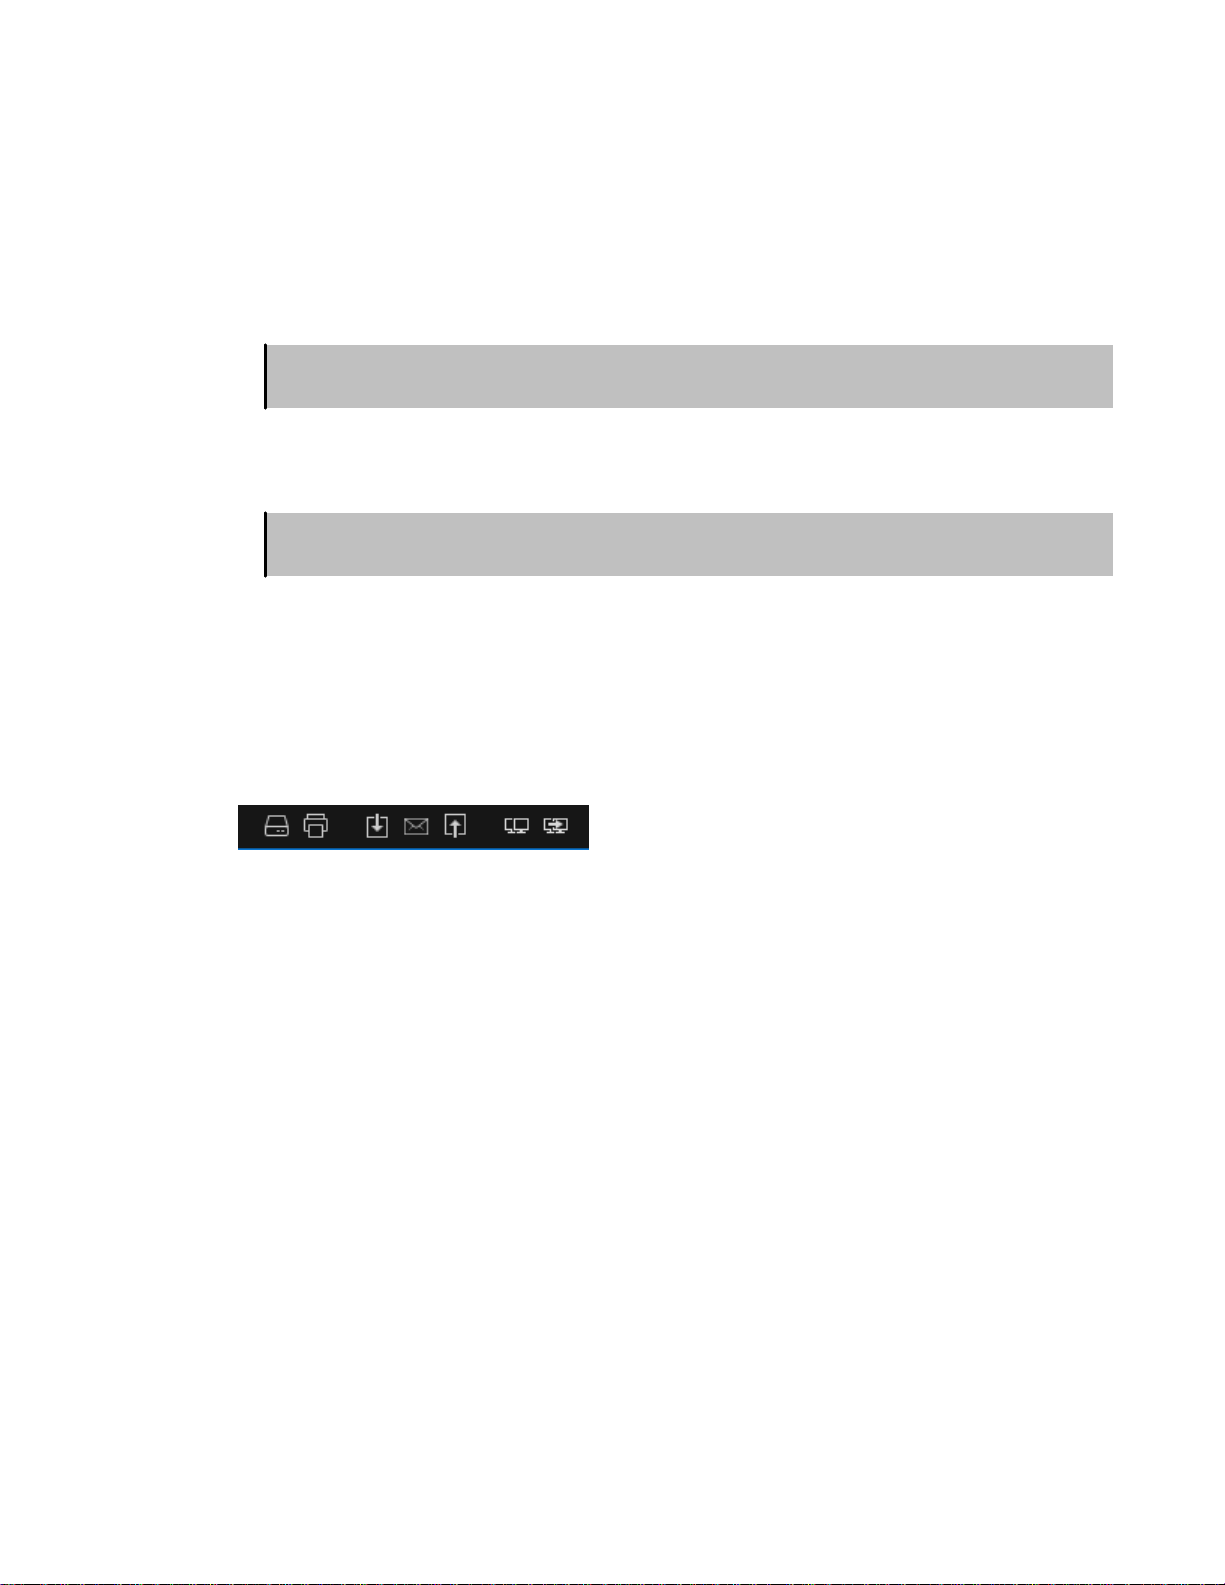
To the right of the File menu are quick access buttons.
Save - saves your current project so that your work is safe. If it is the first time you have saved the
project you will need to choose a location for the file.
Print - sends the currently displayed image to the default printer system.
Export - exports the currently displayed image using your export settings.
Email - displays the email sender for the currently displayed image.
FTP upload - exports the current image to an FTP server.
Show/hide client preview window - displays the client preview in a separate window.
23
Page 24

Render client preview - updates the image in the client preview window.
24
Page 25
Options
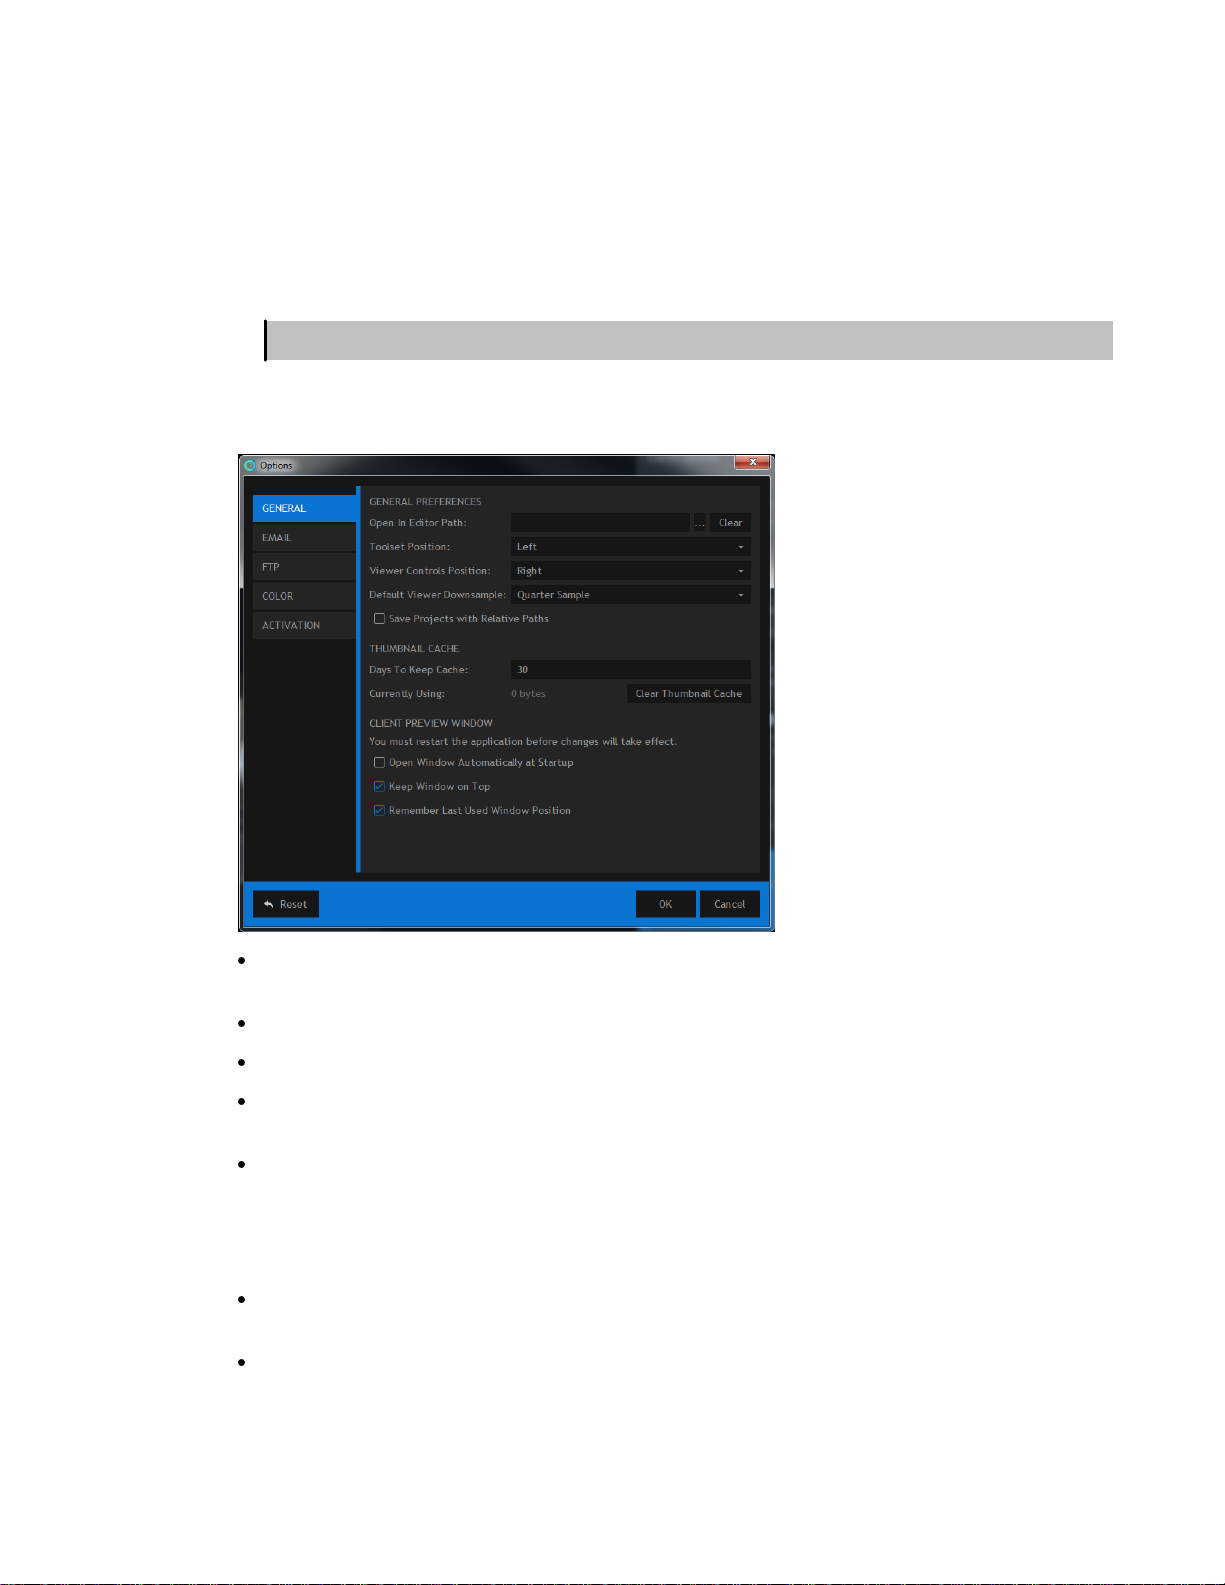
The Options window is where you change properties that will affect all of your PhotoKey 7 Projects.
The Options window can be displayed by choosing Options from the File menu.
It is recommended that only experienced users change properties in the Options window.
General
Open in editor path - PhotoKey will use the default associated program on your computer when you
use the Open in editor option. This option can be used to specify a preferred alternative.
Toolset position - the toolset list can be displayed on the left or right of the canvas.
Viewer controls position - the navigation controls can be displayed on the left or right of the canvas.
Default viewer downsample - alters the downsampling that occurs when settings are changed or
the canvas is moved.
Save projects with relative paths - project files include relative file paths, which is useful for
transferring entire projects and media between computers.
Thumbnail cache
Days to keep cache - the import list toolset stores thumbnails of your images for quick access.
Thumbnails older than this value will be automatically deleted to save disc space.
Clear thumbnail cache - removes all cached thumbnails. Thumbnails will need to be recreated when
opening saved projects.
25
Page 26
Email
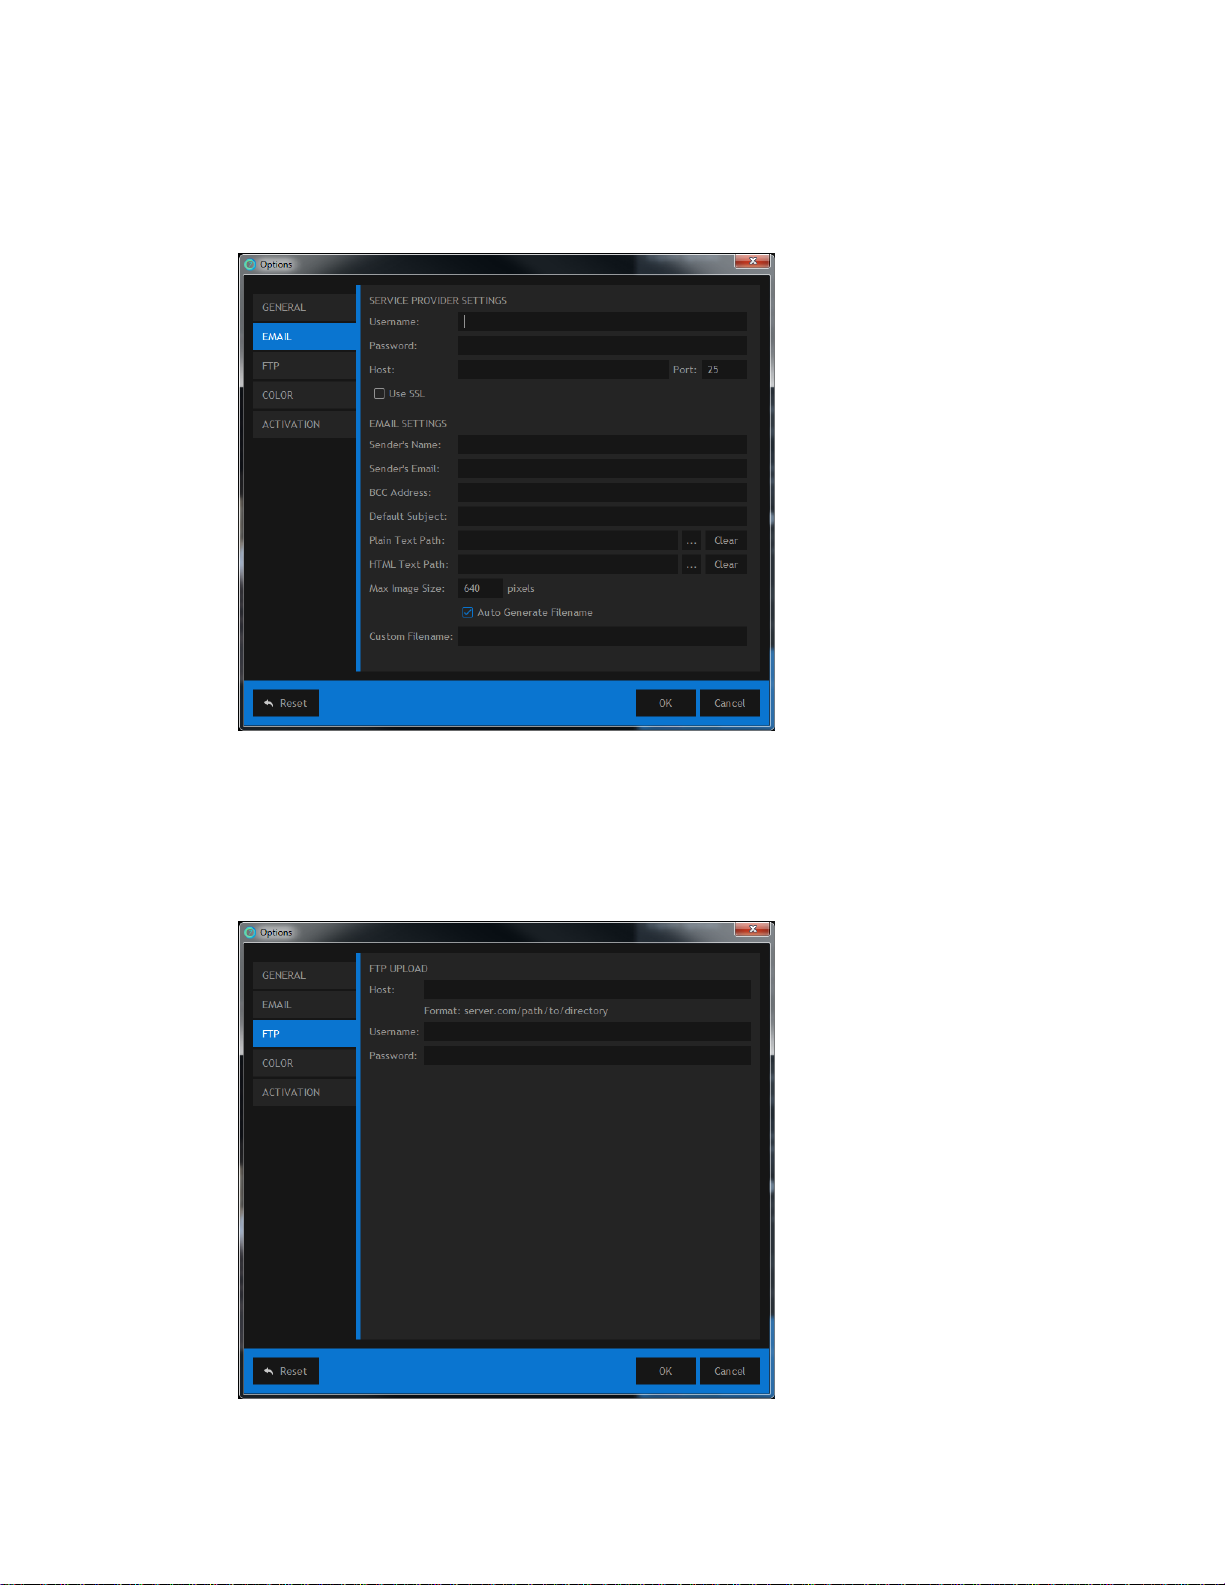
PhotoKey 7 Pro includes an integrated emailing system which can email images direct to clients, a
Facebook wall or a Flickr page.
For detailed information on the email system and options, please check out the Email export chapter.
FTP
26
Page 27
Color
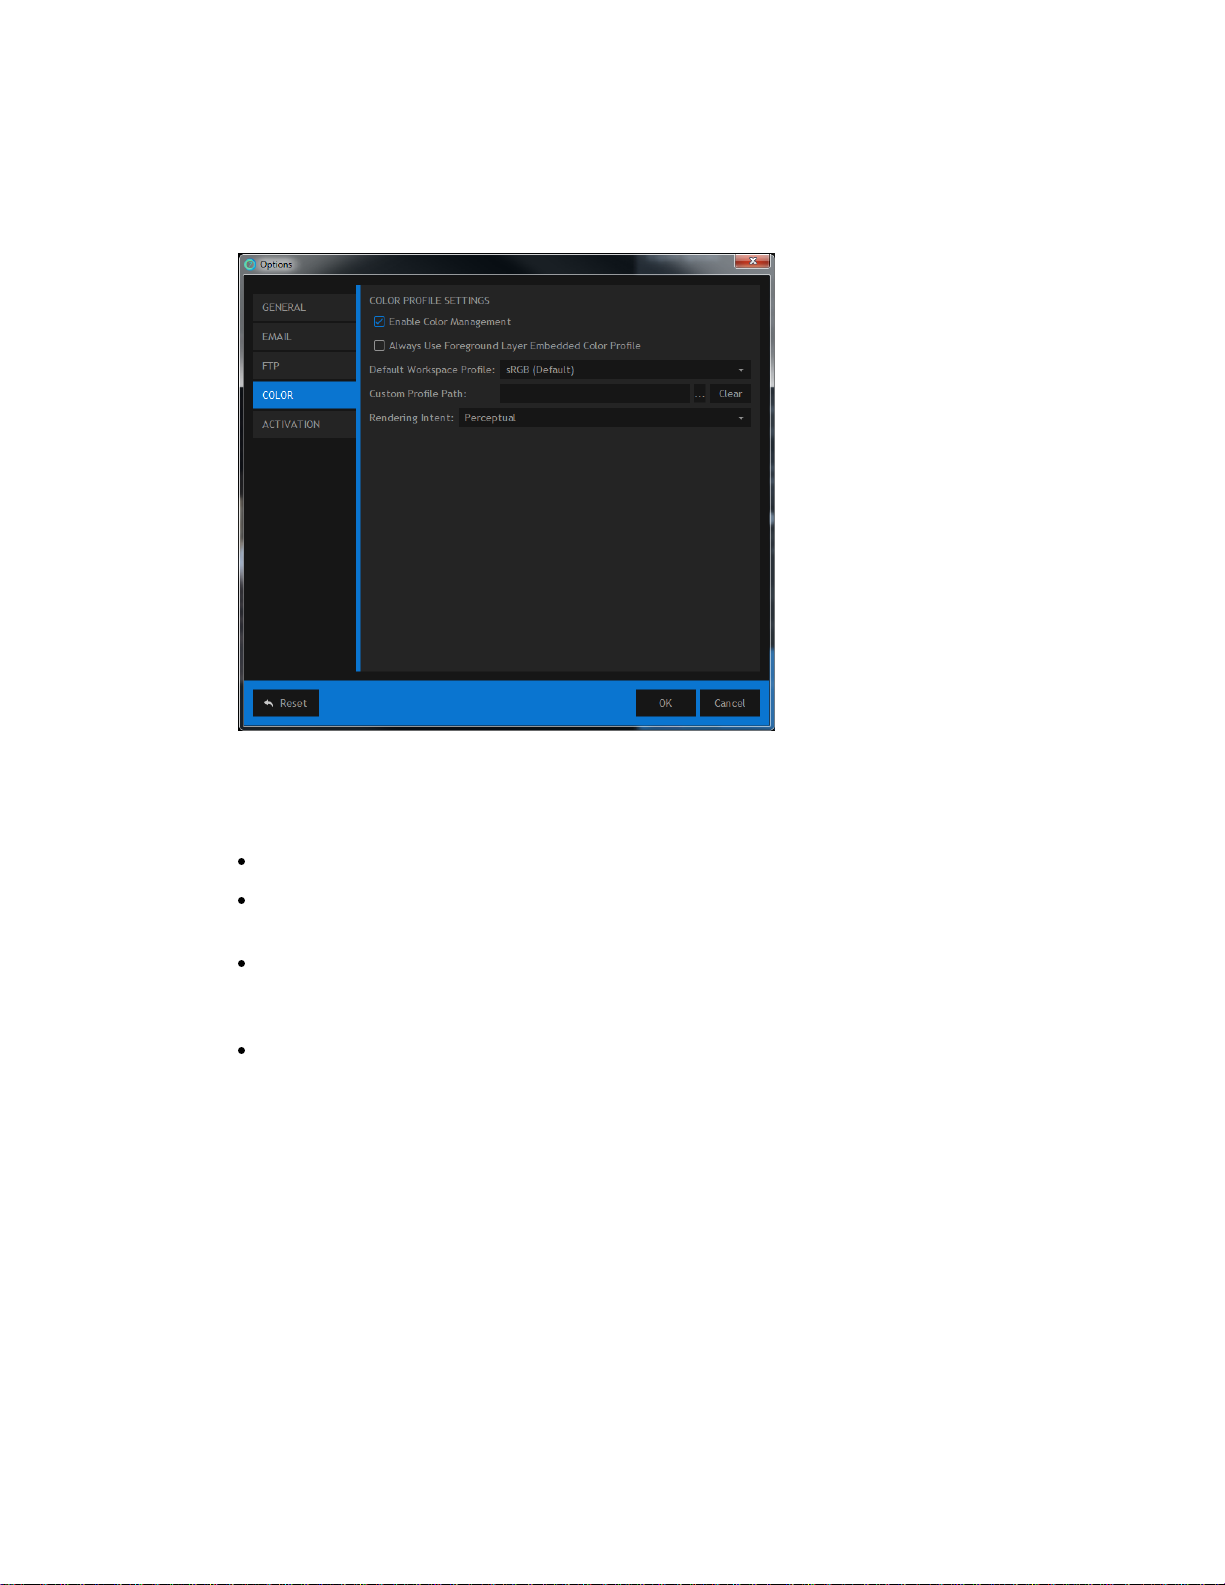
PhotoKey includes a color management system for use with color profiles.
Using color profiles throughout your workflow ensures accurate color reproduction from camera to
print.
Enable color management - turns the color management system on and off.
Always use foreground layer embedded color profile - when turned on, PhotoKey will always use
the current foreground image's embedded profile as the workspace.
Default workspace profile - if you are not using the foreground's color profile, you can instead
select a specific color profile. The custom profile path option can be used to select a specific ICC file
on your computer.
Rendering intent - if the source color space exceeds that of the destination, this setting determines
how the adjustment is handled. For further reading please see this Wikipedia article.
Activation
From here you can manage your software's activation status and find out your licensing details, which
you may need when contacting support.
See Installation & activation for details.
27
Page 28
4.5 Saving & loading projects
Saving a project file gives you the ability to work on a project over several sessions. All of your project
decisions are saved into a PhotoKey-specific project file. The next time you load the project file you
can continue from exactly where you left it.
Images a re not included in the project file. If you move the project file to a different computer or want
to archive it you will need to copy or tra nsfer the ima ge files a s well.
You should save your project at regular intervals, so that you don't have to worry about power loss or
other technical problems.
Saving your project does not crea te a n ima ge file that you can use outside of PhotoKey. If you want to
create an image file of your project to use in Photoshop and other editors you need to Export it.
Creating a new project
A new project can be created by clicking the New button on the Home screen, or by selecting New
from the File menu.
Saving a project
The quickest and easiest way to save your project is to click the Save button on the navigation bar.
This will update your saved project file. If it is the first time you have saved the project you will need
to specify a location for the file.
The File menu also has a Save option which works in the same way.
The Save As option creates an alternate version of your current project file, resulting in a new project
file under a different name. After using Save As, the Save option will use the new filename and
location instead of the original.
Opening a project
When you start PhotoKey your recent projects are listed on the Home screen, making it easy to
resume work.
You can also open a specific file using the File -> Open menu option.
28
Page 29

4.6 Keyboard shortcuts
PhotoKey can be operated using only the mouse but you will often find it faster to use a combination
of mouse and keyboard.
Certain key combinations can be used as shortcuts to common functions. They are listed here.
Windows shortcuts
General
New project - Ctrl+N
Open project - Ctrl+O
Save project - Ctrl+S
Save as - Ctrl+Shift+S
Exit/Quit - Alt+F4
Export canvas - Ctrl+E
Email - Ctrl+M
Print - Ctrl+P
Cycle toolset down - Ctrl+Tab
Cycle toolset up - Ctrl+Shift+Tab
Shift+A - switch to Import toolset
Shift+Z - switch to Key toolset
Shift+X - switch to Position toolset.
Viewer
Scale to fit - Home
Zoom in - Ctrl++
Zoom out - Ctrl+-
Toggle matte view - Insert
Canvas navigation
Set unique - Ctrl+U
Set batched - Ctrl+B
Select previous foreground - [
Select next foreground - ]
29
Page 30

Select previous background - Ctrl+[
Select next background - Ctrol+]
Import
Select all - Ctrl+A
Delete selected images - Delete
Rename selected image - F2
Screens
Jump to Home screen - Ctrl+1
Jump to Edit screen - Ctrl+2
Jump to Help screen - Ctrl+3
Mac shortcuts
General
New project - Cmd+N
Open project - Cmd+O
Save project - Cmd+S
Exit/Quit - Cmd+Q
Export canvas - Cmd+E
Email - Cmd+M
Print - Cmd+P
Cycle toolset down - Option+Tab
Cycle toolset up - Option+Shift+Tab
Viewer
Scale to fit - Home (or fn+left arrow)
Zoom in - Cmd++
Zoom out - Cmd+-
Toggle matte view - Cmd+option+M
Canvas navigation
30
Page 31

Set unique - Cmd+U
Set batched - Cmd+B
Select previous foreground - [
Select next foreground - ]
Select previous background - Cmd+[
Select next background - Cmd+]
Import (Pro only)
Select all - Cmd+A
Delete selected images - Delete (or fn+backspace)
Rename selected image - Enter
Screens
Jump to Home screen - Cmd+1
Jump to Edit screen - Cmd+2
Jump to Help screen - Cmd+3
Shift+A - switch to Import toolset
Shift+Z - switch to Key toolset
Shift+X - switch to Position toolset.
31
Page 32

4.7 Photoshop plugin
PhotoKey 7 Pro integrates into Adobe Photoshop CC and can be applied to any layer.
Some fea tures are not ava ilable when running in plugin mode.
Launching the plugin
To launch the plugin from inside Photoshop, go to the Filter menu and choose PhotoKey -> Edit in
PhotoKey 7 Pro.
PhotoKey 7 Pro will launch in plugin mode. This provides a streamlined keying experience designed
specifically for keying the chosen layer.
The available features work exactly the same as in the normal version of PhotoKey 7 Pro. See the Key
chapter for details.
Returning to Photoshop
Once you have keyed your layer, click the Send back to Photoshop button. This will close PhotoKey
and update the layer inside Photoshop.
Cancelling the plugin
If you change your mind you can click Cancel to return to Photoshop without any alterations.
You can a lso click Ca ncel on the pop-up window inside Photoshop.
32
Page 33

5 Features in detail
The following chapters detail each of PhotoKey 7 Pro's toolsets, examining each tool in detail.
Canvas - setting up your project canvas
Import - bringing in your foreground and background image, including batch
Key - fine tuning the green screen removal
Masks - drawing custom shapes to remove or retain areas of your foreground
Filters - color correction and grading
Position - move and scale your foreground and background
Layers - add additional layers of detail to your composite
Effects - create unique visual styles
Overlay - apply an overlay, such as a watermark
Text - create captions and titles
Export - export your finished image
Batch processing - set up automation for processing thousands of images at a time
33
Page 34

5.1 Canvas
The canvas is where your images are displayed while you work on them.
The Canvas toolset is where you set up the size and shape of your canvas, which will directly affect
your exported images.
For information on controlling and customizing the canvas view itself, check out the Canvas view
options chapter.
Canvas settings
Canvas settings affect the size of your exported images.
Although you can cha nge your ca nva s settings at any time, it's best to get them set up when you start
working on a project as changing them la ter can alter the composition of your images.
Preset
This menu contains a selection of standard photographic and paper sizes. Choosing a size will
immediately update the canvas dimensions.
If you want your canvas to be the exact same size as your original photograph, choose as foreground.
34
Page 35

Orientation
Switch between a portrait (tall) or landscape (wide) canvas.
Resolution
These standard resolutions are displayed in dots-per-inch. Make sure you choose a resolution suitable
for your printing requirements.
72dpi is suitable for viewing on a screen.
For high quality printing, be sure to use a resolution of at least 300dpi.
Width & height
The width and height of your canvas will normally be determined by your chosen preset. If you choose
custom you can then enter the width and height manually.
Make greeting card
If you want to design a greeting card make sure this box is ticked. The canvas will change to show the
outline of a greeting card. You will then be able to create a custom front cover for your card.
Canvas Color
By default the canvas is transparent, which is represented by a checkerboard pattern.
The checkerboa rd transparency pattern is not included in exported or printed ima ges.
Selecting Use color changes the canvas to a solid color. This is a quick way to generate a solid
background color without needing to import an image.
Background images will be shown on top of the canvas color.
The color of the background can be adjusted using the pipette icon or by clicking in the color box.
35
Page 36

Canvas view options
The canvas controls are found at the top-right of the canvas.
Matte view
You can switch between a Full color view and a Foreground alpha view at any time. This makes it easier
to identify compositing issues.
Full color - shows your fully composited images with all filters applied.
Foreground alpha - shows only the foreground image in a black and white alpha mode. Solid areas are
shown white and transparent areas are shown black. Grey represents semi-transparent areas. This is
useful for identifying areas that need cleaning up with the Key settings.
Downsampling
PhotoKey adjusts the quality of the canvas while you adjust settings so as to maintain good
performance. You can control this quality adjustment using the downsampling menu.
You can adjust this menu to suit your computer's capabilities. The default setting can be adjusted in
Options.
Quarter sample - the lowest quality mode is also the fastest.
Half sample - a balance of performance and quality.
Scale
The scale of the canvas can be adjusted. This lets you see your entire image or zoom in on specific
details.
A number of presets can be chosen from the scale menu, or you can select Scale to fit to ensure that
the canvas always fits into the available window space.
You can a lso cha nge the scale using the mouse wheel on the ca nva s.
You can move the canvas by holding the space bar and dragging with the mouse.
36
Page 37

5.2 Import
The Import toolset is where you select your green screen photos and background images.
You can switch between the Foreground and Background using the tabs at the top of the toolbox.
Foreground
The foreground layer is your green screen photograph.
You can import new foreground images by clicking the Import button.
Multiple images can be imported. Switch between images in the Foreground list by double-clicking on
one. For more information on working with multiple images see Batch processing.
Background
The background layer can be any image of your choice.
You can import new background images by clicking the Import button.
Multiple images can be imported. Change the currently active background image by double-clicking on
one. For more information on working with multiple images see Batch processing.
37
Page 38

5.3 Key
Red eye
The Key toolset is where you control the green screen removal process. With some green screen
photographs you may not need to make any adjustments, but if you need to fine tune the results this
is where to do it.
There are numerous filters in the Key toolset. You can use as many or as few as you want by turning
them on and off.
Simply click in the title bar of a filter to activate it.
If a photo suffers from 'red eye', caused by an on-board flash, you can correct it using the red eye
filter.
By default it is set to auto and will attempt to auto-detect any red eye present in the foreground
image.
If the auto-detect is not fixing the red eye in your photo, uncheck the auto option to enable manual
mode.
Clicking Select Eyes activates the manual selection mode. You can now click on each red eye in the
image to apply the correction.
Once you have finished selecting the affected eyes click the Complete button in the toolbox.
If incorrect areas of the image are being affected by the red eye filter, click the Clear button to reset
it.
UV blur
Some digital images lack the detail required for high quality keying, which can result in jagged edges to
a key. The UV blur can help to enhance the digital information and avoid this problem.
If you notice 'stepping' at the edges of your foreground layer, like a pixellated staircase, then the UV
blur should be turned on.
For high quality ima ges the UV blur is not needed.
Type
A variety of different blur types are available. Which looks best will depend upon the image itself and
the type of camera used. The gaussian blur is high quality and should suffice for most uses.
Blur
Adjust the amount of UV blur with this slider according to your own personal tastes.
Auto color difference
38
Page 39

There are two methods for removing the green screen from your photos. The auto color difference is
the simpler and less powerful option. See the for the Auto chroma key chapter for information on the
advanced keying method.
Color
When set to automatic, PhotoKey will attempt to automatically detect whether you are using a green
screen or a blue screen.
If your screen is not being removed at all, try specifying your ba ckdrop color manua lly.
Removal
By default, PhotoKey attempts to remove as much of the green screen as possible. With reflective
materials this can sometimes cause parts of your subject to disappear as well.
If parts of your foreground are disappearing try lowering the Removal setting.
Detail
The detail slider is useful if PhotoKey is not removing all of your green screen. This can be particularly
noticeable if the green screen is not lit properly.
Ideally you wa nt the detail set to 1 00%, which is designed for optimal green screens with correct
lighting and high quality images.
Lowering the detail will help to remove more of an unevenly lit green screen but may also reduce edge
detail on the subject.
Softness
The softness adjusts the edge of the removed area, as set by the detail slider.
A high softness setting will create a soft, subtle feathering around the edge.
A low softness will create a hard, solid line.
The softness setting only takes a ffect if the Removal setting is below 1 00%.
Auto chroma key
PhotoKey's advanced auto chroma key provides high quality, professional results. See Auto chroma
key for full details.
Erode
39
Page 40

Some cameras record to compressed formats which can introduce edge problems under some
conditions. Often the easiest way to fix this is to erode the keyed image, removing a layer of pixels
around the outer edge of the keyed subject matter.
Erode should be used sparingly and only when absolutely necessary.
If you are using the auto chroma key you can use the integrated Erode/Expand setting instead.
Alpha levels
Adjusting the contrast levels of the alpha channel allows you to fine tune your key. This can be
particularly useful with hair or lace and provides an additional level of control over the key.
Alpha blur
If you want a softer edge to your key you can add some alpha blur. This can also be useful if you are
working with low quality photographs and need to disguise a problematic edge.
Crop
The left, right, top and bottom sliders can be used to crop the edges of the foreground image. This can
be useful if your green screen did not fill the entire frame.
Spill suppression
Automatically removes light spill from your green screen and replaces it with natural spill from your
new background.
See Spill suppression for details.
Light wrap
This effect simulates the appearance of light from the background interacting with the foreground, as
would happen with the normal photographic process.
Size
Alters the intensity of the light wrap. Adjust this to match the lighting in the foreground and
background images.
Blend mode
There are several different light spill methods. Lighten tends to be the most realistic, while Soft Light
can be effective for dark backgrounds.
40
Page 41

Auto chroma key
The auto chroma key provides advanced green screen removal with professional quality results.
Auto chroma key gives you fine control over your keyed foreground.
View
The auto chroma key has three view modes in addition to the standard views available on the canvas.
These make it easier to identify and fix compositing issues.
Status view
The status view shows your foreground image as three colors.
Black = transparent.
White = opaque.
Grey = semi-transparent.
Here's an example of the status view:
In the above example you can see that the key has a good edge but still has a lot of unwanted
transparent areas, represented by the grey..
The status view is particularly useful because any pixel that is not solid or opaque is shown as grey,
making it very easy to identify areas that need work.
Matte view
The matte view is similar to the status view, except the full range of greys are used to represent semitransparency.
Here's the exact same image as shown above, instead using the matte view:
41
Page 42

In this version you can see that the transparency is shown more subtly, with darker areas being more
transparent and lighter areas being more opaque.
The matte view is useful for seeing exactly what the auto chroma key is doing to your foreground, but
it can also be difficult to spot problem areas if they are very close to black or very close to white.
Result
The result view shows the actual composited version of the foreground.
Here's the same shot as used above:
This shows why the status and matte view modes are very useful, as it's not always easy to see the
42
Page 43

transparent areas in the result view.
Switching to the other view modes makes it much easier to identify areas which need fixing.
Method
PhotoKey automatically identifies the primary background color and removes it from the image. The
Method options alter how PhotoKey analyzes the image to determine the screen color:
Manual - you can specify a color to key out yourself, using the Color settings (see below).
Auto low - takes the color from the low point of the image's peak hue.
Auto mid - often produces the best results, by taking a mid-point from the image's peak hue.
Auto high - selects the the highest point from the image's peak hue.
Auto classic - included for legacy compatibility. Selects the color from the low end of the image's
histogram, which can produce overly aggressive results.
Color
The auto chroma key can remove any color from an image. It is optimized to work with green screen
and blue screen, so you will always get better results using a professional green screen than you will
using another generic color.
By default the filter is set to Auto mode. This analyzes the image and picks the optimum color for
achieving good results.
If you want to pick your own color you can click the color box, or click and hold on the pipette icon to
select any color on the screen.
Clicking the Auto button at any time will revert back to the Auto mode.
Adaptive color
This method is particularly effective when working with uneven green screens. Even slight changes in
tone or brightness across your green screen can cause keying complications. Adaptive color aims to
improve results in such cases and can be particularly effective with fine detail areas such as lace and
hair.
Here is a close-up of a veil without adaptive color, in which some detail has been lost:
43
Page 44

With adaptive color turned on, extra detail in the veil and the hair on the right side of the image is
instantly apparent:
When adaptive color is activated the Gain setting will have a minimal effect. Key adjustments should
be made primarily using the clip foreground and clip background settings.
If your original photo has a lot of digita l noise or compression, these artefacts may be ma de more
evident when using a daptive color.
Gain
Gain is the base sensitivity of the chroma key.
This is best used for the initial background removal. It should be adjusted until the subject is isolated,
44
Page 45

though you don't want to push the gain too far as you will start to lose edge detail.
Let's look at an example of the effects of gain using this image:
. With the default setting of 100 this image looks like this when in status view mode:
The background has been successfully removed, while keeping detail in the foreground.
With a lower gain of 56, the status view is very different, with only some of the green screen having
been removed:
45
Page 46

Increasing the gain to 500 causes full background removal, but detail is also lost in the foreground:
Gain should therefore be adjusted to remove the background but should not be pushed any further
than is needed.
Balance & hue balance
These two settings adjust the emphasis of the chroma key, affecting the range of colors that are
affected.
In practical use, it is usually best to try them at the minimum and maximum values to see which best
suits your image.
46
Page 47

Clip background
Crushes the black point of the matte, so that more parts of the image are removed. If parts of your
green screen are still visible this should be used to remove them.
Clip foreground
Boosts the white point of the matte, returning detail to the foreground. If parts of your subject are
semi-transparent, you should reduce the clip foreground to make them fully opaque.
This is the main setting to cha nge if your foreground is losing detail.
Clip rollback
After adjusting the clip foreground you may want to return some of the semi-transparency to the
outer edges of your foreground. This helps to create a softer edge, although increasing this setting too
much will cause an undesirable band of semi-transparency around the edge.
Gamma
Adjusts the strength of the key. This can be useful for adjusting the fine detail at the edges of the key,
particularly around hair and semi-transparent areas.
Erode/Expand
This works in a similar way to the standalone Erode filter and can be used to expand or erode the alpha
matte. If you need to add or remove pixels from the edge of the key this can be very useful.
Subtract
Increasing the subtract setting removes the background color (for example, green if you're using a
green screen) from the semi-transparent areas of the image. This can be very effective for reclaiming
the correct color in semi-transparent areas, such as glass.
Recover
In some green screen photos you may see a thin, dark edge. This can be caused by lighting or
compression methods in digital cameras and is most often seen on white clothing or along the edges of
pale skin.
The recover setting can counter this problem by adjusting the colors of the outer pixels. Rather than
using their actual color, instead they will take on the color of the pixels further inside the foreground.
Although this ca n be use to remove da rk edging, if set to high you will see noticea ble color ba nding
around the edge of the key.
47
Page 48

Spill suppression
Even a perfectly composited image can still suffer from color spill. This is when the green or blue of
the screen is reflected on the subject. While this is often difficult to see in the original image, once it
has been composited it becomes extremely obvious, resulting in unwanted color fringing around
edges.
In this original photo the green spill is not immediately obvious to the naked eye:
Once the green screen is removed by PhotoKey, it is evident that there is green around the edges of
her hair:
48
Page 49

Here's a close-up view - note the green visible on the outside edge of the hair:
49
Page 50

With PhotoKey's spill suppression turned on, the green tint is replaced with a neutral color, without
the other colors being affected:
50
Page 51

Again, here is a close-up of the same area:
51
Page 52

The amount of spill will vary depending on the subject and your green screen setup. White clothing, for
example, can be particularly susceptible to bounced green light.
There are multiple types of spill suppression, each of which can be fine tuned.
Apply
Spill suppression can be applied before or after Masks.
If applied before, any masks that are set to retain parts of the foreground will include the original
coloring from the photo. This is useful if you are using masks to retain objects which are the same
color as the screen, such as green clothing, where you need to also retain the original color.
If applied after, the entire image will be spill suppressed, including any masked areas set to retain parts
of the foreground. This is useful if you are using masks to fix problems such as highly reflective
materials or crystal, where you want to retain detail but remove green spill.
Spill method
52
Page 53

There are five types of spill suppression: standard, extended, advanced, spill simulation and spill
simulation pro.
In most cases spill simulation pro will provide the best results.
Spill simulation pro
The spill simulation pro method gives you fine control and replaces the original green spill with natural,
simulated spill from your new background image. This creates the most realistic composite images.
View
You can switch to the despill view mode when using the spill simulation method. This shows exactly
which parts of the image will be spill suppressed.
White = suppressed area.
Grey = partially suppressed area.
Black = unsuppressed area.
You can use the despill view to make sure that only the areas that need spill suppressing are affected.
This can be very useful for avoiding discoloration of your subject.
Amount
Varies the strength of the spill suppression.
Hue range, balance & hue balance
These three sliders area used to adjust how much of the foreground image is affected by the spill
suppression. They are best adjusted when in the despill view, so you can see how much is affected.
Luminance
The brightness of the background can be used to influence the brightness of the spill suppressed
areas. The effectiveness of this will depend on the specific combination of lighting in your foreground
and background.
Blur
The background is used to generate a new, realistic spill that replaces the original spill from the green
screen. Increasing the blur generates a softer, more diffuse spill which doesn't correlate as directly
with the background details.
Spill simulation
This method works similarly to Spill simulation pro, but instead of using the background image for the
spill replacement it instead uses a single specified color.
The default is a neutral grey R128 G128 B128.
Standard, Extended and Advanced
These modes are provided primarily for legacy purposes. They remove spill using a less sophisticated
53
Page 54

method, with advanced providing specific control over each color channel.
54
Page 55

5.4 Masks
The mask tools are used to manually specify areas of your foreground images to be removed or
retained. This is useful if your subject is wearing an unavoidable item of green clothing, or if you need
to remove parts of the image outside of the green screen.
Note that PhotoKey's main advantage is in its automatic and fast keying tools. If you are needing to
regularly mask images we would recommend improving your green screen setup. A little time
improving the setup can save a huge amount of time in PhotoKey.
Mask creation
You can add multiple masks to your foreground image. Each mask is listed in the toolbox.
Add mask
A new mask can be added by clicking the add mask button.
Remove mask
This button will remove the currently selected mask.
55
Page 56

Mask list
Up to 10 masks can be added to an image. Masks you have added are displayed in the mask list.
Click on a mask in the list to edit it in the workspace.
Individual masks can be turned on and off using the checkboxes and their order can be adjusted using
the up and down arrows.
Create
When the Create button is activated you can draw your mask shape directly onto the canvas.
Single clicking will add points to the shape, connecting each of them with straight lines.
If you click and drag the point will be converted to a curved point, enabling you to make custom
curves. Additional handles will appear around the point that can be used individually to adjust the
curve angle. Holding Ctrl while clicking on a curve handle will select both of them at once.
Clicking anywhere on the mask line will add a new point.
Closing masks
A mask will not activate until it has been closed. This can be done by clicking the final point on top of
the first point or by using the Close Mask button in the toolbox.
Select
When the Select button is activated you can select and adjust your mask without accidentally adding
new points to the shape.
When in the Crea te mode, Select mode can be temporarily activated by holding down Ctrl.
Points can be moved using the mouse.
Multiple points can be selected by holding Ctrl while clicking, or you can drag a selection box around
them on the canvas.
Straight point
Clicking this converts the currently selected mask points to be straight.
Curved point
Clicking this converts the currently selected mask points to be curved.
Mask properties
Once you have added at least one mask the currently selected mask's properties are displayed
underneath the mask list.
56
Page 57

Type
Switches between the mask shape removing or retaining the selected area of the image.
Feather
A low feather setting creates a hard edge to the mask, while a high feather creates a soft, blurred line
that can often disguise the mask's position.
Invert
This toggle switches between the area inside or outside of your drawn shape being the selected area
for masking.
Open/Close mask
This toggle allows you to easily open or close your mask shape. A mask will only activate once it has
been closed.
57
Page 58

5.5 Filters
A selection of filters are available to enhance your images. These can be vital for blending the
foreground and background together realistically, or for creating a vivid style.
The order in which filters are processed can be changed using the up and down arrows that are
attached to each one. Filters at the top are processed first.
By defa ult all filters are turned off. To turn a filter on click a nywhere in its title bar.
Changing layer
The filters affect the foreground and background individually. You can switch between the foreground
and background using the tabs at the top of the toolbox.
Not a ll filters are available in both the foreground a nd background layers.
Filter list
Transparency
Alters the transparency of the foreground.
Auto levels, contrast & color
These automated filters apply quick color correction fixes to your images.
58
Page 59

Brightness
Alters the brightness, from completely black to completely white.
Contrast
Can be used to create extremely low contrast or high contrast images.
Saturation
Alters the saturation, from fully de-saturated to over-saturated.
Levels
These sliders can be used to adjust the black and white levels of the image.
The closer together the white and black levels, the higher the contrast.
Color temperature
Alters the color temperature. A low temperature shifts the image towards orange, while a high color
temperature shifts it towards blue.
Color balance
Individually adjusts the amount of red, green and blue.
Hue colorize
Enables you to add a tint to the image by altering the hue.
Hue
This slider determines which color to use as the tint.
Strength
Alters the strength of the colorize, from subtle to extreme.
Hue shift
Shifts the entire color spectrum.
Hue
Use the slider to determine the hue shift. The top half of the slider represents the original colors of
the image, while the bottom half represents the shifted colors.
Strength
59
Page 60

Adjust the intensity of the hue shift.
Sharpen
Can be used to sharpen the edges in an image.
Radius
Adjust the reference area for the sharpen filter.
Sharpness
Adjusts the intensity of the sharpen effect.
Blur
Applies a gaussian blur. This can be particularly effective when applied to the background of portraits.
Bilateral blur
The bilateral blur is effective for smoothing out skin and clothing textures, by blurring the image while
retaining edge sharpness. At high levels it can also create a cartoonish appearance.
Direction
Alters the direction of the blur.
Iterations
Increasing the iterations substantially exaggerates the effect.
Blur
Adjusts the amount of blur.
Threshold
Determines how much edge detail is retained.
Defocus
This is a special type of blur that also blooms the image, making it brighter. This can sometimes create
a more realistic 'out of focus' effect than the standard blur.
Blur
Alters the level of blur.
Bloom
Exaggerates brighter areas.
Diffuse
Creates a soft, smoothed appearance.
60
Page 61

Blur
Adjusts the size of the blur. Larger blurs will create a more dispersed effect, while smaller blurs will
create more of a 'ghost' image.
Strength
Alters the intensity of the diffusion.
Vibrance
Creates a more dynamic image by increasing local saturation, contrast and sharpness.
Recommended settings are to use a high radius and a medium threshold.
Leave color
Using similar technology to green screen removal, Leave color removes all color from an image except
for the selected color. This creates stylish splashes of color on black and white images.
The isolated color can be selected using the pipette tool or by clicking in the color box.
Half tone & half tone color
Converts the image to a series of differently sized dots, simulating the appearance of traditional
newspaper print.
The size of the dots can be adjusted using the resolution setting.
Silhouette
This effect turns your entire foreground layer to a uniform color.
You can change the color by clicking on the color box. To turn silhouette on and off use the checkbox to
the right of the filter's name.
Shadow cast
A convincing shadow can make all the difference when it comes to creating realistic composites. The
shadow cast effect provides a quick way to add a shadow from your foreground onto the background.
Shape
The shape menu contains four preset shapes for the shadow, providing useful shortcuts for common
uses.
Canvas controls
When you switch on the shadow cast new controls will appear on the canvas. These can be used to
manually position and warp the shadow according to the lighting and angle of the background.
Blur
61
Page 62

Use this to change the shadow from hard edged to soft edged, based on the requirements of the
scene.
Transparency
Alters the visibility of the shadow. Note that the blend mode also has a large impact on the shadow's
appearance.
Color
Clicking this button displays a color palette from which you can pick the shadow's color. The default
black suits most purposes.
Blend mode
The seven different blend modes mix the shadow with the background in different ways.
Depth of field
If you want to draw the eye towards your foreground, simulating depth of field can be a very useful
technique. Rather than blur the entire background image, this effect applies the blur gradually, shifting
from in-focus to out-of-focus.
Type
The depth of field focal area can have a horizontal or radial dividing line.
Origin
The depth of field only affects a specified area of the canvas. Click the origin button to display a
crosshairs on the canvas which you can use to pinpoint the area that will remain in focus. You can also
enter coordinates directly using the number boxes.
Angle
The in focus area is a rectangle that spans the full width of the canvas. The angle of this rectangle can
be adjusted using this rotation wheel.
Blur
Adjusts the level of blur in the out of focus area.
Spread
The shift from in focus to out of focus can be abrupt or very gradual. A higher spread percentage will
result in a more gradual shift.
Range
Adjusts the size of the in focus area. A larger percentage will retain a large in focus area.
Transparency
Can be used to adjust the intensity of the depth of field effect.
62
Page 63

5.6 Position
These tools enable you to move the foreground and background layers individually.
Changing layer
You can adjust the foreground and background layers individually. You can switch between the
foreground and background using the tabs at the top of the toolbox.
Canvas controls
When you're in the Position toolset additional controls are available on the canvas itself. You can use
these to quickly position your background and foreground.
Position
Dragging anywhere within the green bounding box will move the layer around the canvas.
Scale
63
Page 64

Dragging on the square area in the center of the image enables you to enlarge or shrink it.
Rotation
Dragging on the circular area near the center of the image enables you rotate it clockwise or counterclockwise.
Toolbox controls
Position
Allows movement horizontally and vertically.
Scale
Shrinks or enlarges the image.
Rotation
Rotates the image in either direction. The angle buttons can be used to rotate the image 90 degrees
clockwise or 90 degrees counter-clockwise.
Flip horizontal and Flip vertical buttons can be used to quickly mirror the image in a particular
direction.
64
Page 65

5.7 Layers
Additional layers can be added to your image using this toolset. This can be useful for adding props,
logos, watermarks, or depth layers.
Layers are standard image files, so you can use anything you like for your layers. Images that include
alpha transparency data (such as PNGs and TIFFs) are particularly useful, as in the above examples.
Creating layers
The Layers panel is where you manage your various layers.
Layers are not designed for green screen ima ges. Only the Foreground layer (found in the Import toolset)
will process green screen photographs.
The large area at the top is your Layers list. Initially you will only see the standard Foreground and
Background layers. The Foreground layer is you green screen photograph.
Up to 5 new layers can be added with the Add Layer button. Clicking the Remove Layer button will
remove the currently selected layer.
Layers can be moved up and down the list using the arrows, or turned on and off with the tickbox.
Understanding the layer order
PhotoKey composites from the bottom of the list to the top. Therefore layers higher up in the list will
be in front of layers lower in the list.
Any additional layers that are positioned below the Foreground in the list will appear behind the
Foreground.
65
Page 66

Layer Properties
The currently selected layer is displayed in the lower half of the toolbox. This is where you import the
layer's image and choose its settings.
Add/Change
Displays a standard file browser which can be used to locate the desired image for the layer.
Remove
The overlay image is optional. Clicking this button will remove it from the composite.
AutoFit
You can choose whether to have layers fit automatically or position them manually.
When this setting is turned off the position, scale and rotation tools become available.
The drop-down menu allows you to choose whether the overlay should autofit to the canvas, the
foreground or the background.
66
Page 67

Position
Allows movement horizontally and vertically.
Scale
Shrinks or enlarges the image.
Rotation
Rotates the image in either direction. The angle buttons can be used to rotate the image 90 degrees
clockwise or 90 degrees anti-clockwise.
67
Page 68

5.8 Effects
These additional filters enable special effects to be added to the entire composited image.
Effects do not affect overlays or text, but they will affect all other layers.
Three strip color
This simulates an old Technicolor film processing technique to provide particularly rich, defined colors.
The color strength settings can be used to adjust the intensity of the effect in each channel.
Bleach bypass
This simulates the technique of silver retention in film processing, resulting in a high contrast, low
saturation image.
Soft focus
PhotoKey 7 Pro exclusive.
A romantic, ethereal soft focus effect can be applied to your entire image.
By defa ult this effect is turned off. To switch it on, tick the small box at the top right of the soft focus
title.
68
Page 69

Blend mode
Each blend mode produces a slightly different soft focus effect. Experiment with each to see which
suits your composition the best.
Blur
Adjusts the spread of the soft focus effect.
Strength
Adjusts the intensity of the soft focus effect.
Focus blur
PhotoKey 7 Pro exclusive.
Using the same techniques as the Depth of field filter, the Focus blur can be used to apply a blur-based
vignette to your composited image. The defaults create a soft, circular vignette in the center of the
canvas.
Type
The focus blur can be in a radial or horizontal strip shape.
Origin
Click the origin button to display a crosshairs on the canvas which you can use to pinpoint the area that
will remain in focus. You can also enter coordinates directly using the number boxes.
Angle
When using the horizontal strip shape the angle of the rectangle can be adjusted using this rotation
wheel.
Blur
Adjusts the level of blur in the out of focus area.
Spread
The shift from in focus to out of focus can be abrupt or very gradual. A higher spread percentage will
result in a more gradual shift.
69
Page 70

Range
Adjusts the size of the in focus area. A larger percentage will retain a large in focus area.
Transparency
Can be used to adjust the intensity of the focus blur effect.
Vignette
A customizable vignette can be applied over the top of your images. This can be used for a variety of
attractive results.
By defa ult this filter is turned off. To switch it on, tick the sma ll box a t the top right of the vignette
title.
Some settings are only a va ilable in PhotoKey 7 Pro.
Color
Your vignette can be any color you want.
Light/Normal/Bold
These three presets enable you to quickly choose from three standard vignette styles.
Horizontal stretch
Widen or narrow the vignette on the horizontal.
Vertical stretch
Widen or narrow the vignette on the vertical.
Feather
Changes the edge of the vignette between a hard and soft edge.
Feather bias
Adjusts the weighting of the feather.
At '1.00' the feather is an even spread from transparent to the maximum strength level.
70
Page 71

At lower values the feather will be pushed towards the outer edge, keeping the center more
transparent.
At higher values the feather will be drawn towards the middle.
Strength
Adjusts the visibility of the vignette.
Tint
Applies a stylish tint to your image.
By defa ult this filter is turned off. To switch it on, tick the sma ll box a t the top right of the tint title.
Type
A wide variety of different tints are available.
Strength
Adjusts the intensity of the tint effect.
71
Page 72

5.9 Overlay
The optional overlay layer enables you to apply a partially transparent image.
Overlay ima ges must include an alpha channel to work correctly. Any decent ima ge editing program
such as Adobe Photoshop or GIMP ca n be used to create additional overlays.
Add/Change
You can import a new foreground image by clicking the Add button. Subsequently you can swap to a
new foreground image by clicking the Change button.
72
Page 73

Remove
The overlay image is optional. Clicking this button will remove it from the composite.
AutoFit
You can choose whether to have overlays fit automatically or position them manually.
When this setting is turned off the position, scale and rotation tools become available.
The drop-down menu allows you to choose whether the overlay should autofit to the canvas, the
foreground or the background.
Position
Allows movement horizontally and vertically.
Scale
Shrinks or enlarges the image.
Rotation
Rotates the image in either direction. The angle buttons can be used to rotate the image 90 degrees
clockwise or 90 degrees counter-clockwise.
73
Page 74

5.10Text
The text toolset can be used to apply multiple titles to your images.
Text items
The text items list can be used to add and remove text from your image.
Add text
Clicking this button adds up to 5 text items to your image.
Remove text
Removes the selected text items from the list.
Text listing
Click on a text item to edit it.
The tick boxes can be used to turn individual text items on and off.
The arrows can be used to change the layering of text items.
Text properties
74
Page 75

Item type
There are 3 types of text item.
Custom - displays a text box in which you can enter your own choice of text.
Use filename - automatically displays the current image's filename as the text item.
Use file path - automatically displays the current image's file path as the text item.
Font
Choose from your installed fonts for the current text item.
Formatting
Apply bold, italic and underline styles.
Alignment
Choose between left, right and center alignment.
Color
75
Page 76

Select a color for your text.
Size
Adjust the size of your text.
Opacity
Adjust the opacity of your text.
Angle
Rotates the text.
Canvas controls
The position, rotation and size of text can be adjusted directly on the canvas.
Position
Dragging anywhere within the green bounding box will move the text around the canvas.
Holding Ctrl while dragging will restrict the movement to either the horizontal or vertical depending on
the direction you move the mouse.
Scale
Dragging on the square area at the top left of the text enables you to enlarge or shrink it.
Rotation
Dragging on the circular area near the top left of the text enables you rotate it clockwise or anticlockwise.
Holding Ctrl while rotating will restrict the rota tion to 45 degree increments.
76
Page 77

5.11Export
The export system enables you to convert your project into standard images.
Exporting single images
To export a single image click the Export button on the Navigation bar, or use the Export Canvas
option from the File menu.
Exporting multiple images
PhotoKey can process multiple images at at time. For more information see Batch processing
Export options
This section allows you to change the format and filename settings for your exported images.
Format
Three output formats are available, PNG, TIFF and JPEG. Choose whichever one you prefer to work
with.
JPEG does not support an a lpha channel, so if you export without a background the transparency
information will not be reta ined. Instea d, the foreground will be composited directly onto white.
Compression & quality
Each format has a variety of compression and quality settings. High quality will produce larger filesizes.
Prefix
When exporting several batch images, it's often useful to add a prefix to the filename. You can enter a
prefix here if you wish, which will be applied before the filename.
77
Page 78

Suffix
If you also wish to add a suffix to the filename, you can do so here.
A preview of the filename is shown at the bottom of the options panel.
Embed workspace color profile
Includes the workspace color profile in the exported image. This ensures that you can retain the same
workspace if you continue processing or printing the image elsewhere. See Options for more
information on color management.
Preserve foreground EXIF/XMP/IPTC data
Metadata from the foreground image can be included in the export image, such as camera and lens
information.
78
Page 79

Email export
PhotoKey 7 Pro can send images by email from inside the software. This can be a very fast way to
send proofs or even finished images to clients. The system can also be used to publish images to
Facebook, Flickr and other social networks which support a custom email address for submissions.
Some ema il providers do not support this feature.
Setup & preferences
Before you use the email feature you need to set up your preferences.
To open the email preferences window select Options from the File menu, then switch to the email
section.
Service provider settings
PhotoKey requires access to an email SMTP provider for sending emails. Please check with your email
provider for login and host details. Note that TLS is not supported.
Username
The username you use for logging in to your email account.
Password
The password you use for logging in to your email account. PhotoKey stores this password in a secure,
encrypted form.
Host
79
Page 80

The address of your SMTP server. For example, a Google email address uses ‘smtp.gmail.com’ as its
host.
Port
The port for your SMTP server. For example, a Google email address uses ‘465’ for its port.
Use SSL
Some email servers require SSL to be activated for security.
Email settings
The email settings are applied to every email that is sent from PhotoKey.
Sender’s name
The displayed sender’s name. The recipient will see this in their email inbox.
Sender’s email
The displayed sender’s email. If the recipient replies to the email their reply will be sent to this email
address. Note that some email providers do not support sending emails with alternate email addresses.
BCC address
Emails can be sent via blind carbon copy to one additional email address. This is optional. This can be
used to easily publish images to a Facebook brand page (see below).
Note that all ema ils sent from PhotoKey will be sent to this email address.
Default subject
This will automatically define the subject line when sending an email. If you always use the same
subject this is more efficient than typing it in each time.
Plain text path
A text (.txt) file can be specified. Its contents will be used as the body of the email. Click the button
to select a text file. The Clear button removes the link to the file. Emails can be sent without a text file
80
Page 81

included.
HTML text path
An HTML (.htm or .html) file can be specified. Its contents will be used as the body of the email. Click
the button to select an HTML file. The Clear button removes the link to the file. Emails can be sent
without an HTML file included. Note that images cannot be embedded in the HTML email and must be
linked to externally.
Max image size
PhotoKey automatically resizes the canvas. This setting determines the pixel dimensions of the image,
with the setting specifying the size of the image’s longest edge. Note that larger image sizes will
create larger file sizes and that some email providers do not accept large attachments.
Emailing an image
To email your current image from inside PhotoKey, choose Email canvas from the File menu.
You can also click the email icon on the toolbar (a white envelope) or use the Ctrl+M keyboard
shortcut.
This will display the email window.
Send email settings
A subject must be specified before the email is sent. This can be pre-filled using the Default subject
setting in Options (see above).
The subject will be used as the caption for Facebook a nd Flickr published images.
One or more email addresses can be added to the To: field. If multiple email addresses are used they
should be separated by spaces or semi-colons (;).
Note that separating email addresses with commas (,) is not supported.
Email format details
Images are sent as email attachments. The images are in the JPEG format. The pixel dimensions (and
therefore file size) are set in the preferences (see above).
HTML or text content can also be optionally included in the body of the email. This enables you to
include a message with the image including additional information or branding.
BCC and Facebook integration
In addition to the main email recipient, who is specified at the point of sending, images can also be sent
automatically by BCC to another email address.
This can be used to automatically add images to a Facebook profile or brand page. To do this you first
need to find your Facebook page’s email address:
81
Page 82

1. Login to Facebook and go to your brand page.
2. Choose Edit page to view its details.
3. Go to the Mobile section.
4. An email address will be shown on this screen.
This email address can then be used in PhotoKey to send images directly to your Facebook page’s wall.
Note that Fa cebook will immedia tely publish ima ges that are sent to the page s email a ddress.
This same method can be used to publish to other social networks that provide a custom email
address, such as Flickr.
Sending an email
Once you have setup your email provider, you can export an image and send it via email by clicking the
email button on the navigation bar or by choosing Email Canvas from the File menu.
82
Page 83

FTP upload
PhotoKey 7 Pro can upload images via FTP to a specified server. This is useful for adding a finished
image to your own cataloguing system.
Setup & preferences
Before you use the FTP upload feature you need to set up your preferences.
To open the FTP preferences window select Options from the File menu, then switch to the FTP
section.
FTP settings
PhotoKey needs to know where to upload your images and how to login to the FTP server.
Host
The address of your FTP server, including the folder you want to upload the file into.
Username
The username you use to login to your FTP server.
Password
The password you use to login t your FTP server.
Uploading an image
Once you have setup your FT{ settings, you can export and upload the image by clicking the FTP
button on the navigation bar or by choosing FTP Upload from the File menu.
83
Page 84

You can also automate FTP upload for processing multiple images. See Batch Export for details.
84
Page 85

5.12Batch processing
PhotoKey 7 Pro includes powerful batch processing features which enable you to process hundreds or
even thousands of images at a time, with minimal user interaction required.
The batch features are versatile and can be used for multiple scenarios, including:
Automatically importing the latest image as you take photographs from a tethered camera.
Exporting your foreground image(s) to multiple background images, making it easier to offer your
clients choice.
Fully automated import, processing and export of images with zero user interaction - ideal for mass
volume photography during live events.
For more information see these chapters:
Batch import
Batch navigation
Batch Export
85
Page 86

Batch import
PhotoKey 7 Pro batch processing capabilities enable you to import multiple backgrounds and
foregrounds.
Importing images
Importing multiple images is exactly the same as importing a single image. As you import additional
images they will be added to the foreground and background lists in the Import toolset.
The image lists
The Foreground and Background sections have separate lists but both work in the same way.
Find
The search box can be used to locate a specific image by filename. As soon as you start typing into the
box the list will be filtered accordingly.
Click the small X symbol to clear the search.
Thumbnail or list view
The list can be shown with or without thumbnails. You can turn thumbnails on and off using the icons
to the right of the search box.
Arranging
The list can be ordered by several categories. Clicking the Arrange by button displays a menu of the
available categories. The list can then be sorted in ascending or descending order using the button to
the right of the Arrange by menu.
Hot folders
You can automate the importing of images using a hot folder. See Hot folders for details.
86
Page 87

Working with multiple images
Once you have imported your images you can swap between different foregrounds and backgrounds.
Import list navigation
You can change the image currently being displayed on the canvas using the Import toolset.
Single clicking an image in the foreground or background lists displays it in the preview window.
Double-clicking will show the image on the canvas.
You can change the displayed image in this way at any point.
Cha nging the currently selected ba ckground ima ge will change the background for a ll globa l images. To
cha nge the background for a unique ima ge, you must first select the unique foreground image, then
cha nge its ba ckground.
87
Page 88

You can a lso swipe through the images by dra gging the mouse up and down on the preview image.
Double-clicking the preview ima ge will then show tha t ima ge on the canvas.
Foreground image options
Multiple ima ges can be selected by holding the Ctrl or Shift keys while clicking.
Images in the foreground list have several tags that can be turned on or off. This can be done by
clicking the light grey icons in the list next to the relevant image.
Unique - if an image is set to unique it can be individually customized. By default all images share the
same global settings, so changing the settings for one image will change the settings for all images.
Unique images are also highlighted with a yellow outline on the canvas.
Batch - images marked with the batch symbol will be included in a batch export.
Exported - exported images are automatically marked with this symbol. You can also manually toggle
the symbol as a reference marker.
Menu options
Right clicking on an image (or multiple images) displays a menu with further options.
Import - an alternative to using the main Import button.
Set to unique - changes the selected images to unique status.
Add to batch list - activates batch processing for the selected images.
Open file location - opens a folder showing the location of the image on your computer.
Open in editor - sends the selected image to your designated external editor. You can specify this in
Options.
Remove - removes the selected images from the list. This does not delete the images from your
computer.
Rename - rename the selected image. This does not rename the image on your computer.
Select all - selects all images in the list.
Remove all - removes all images in the list.
Background image options
Double-clicking a background will make it the currently active background. Each background has its
own position settings.
PhotoKey can export each foreground image with multiple background images. To include a
background in a multi-background export, click the batch tag in the background list. Each foreground
will be exported multiple times, once for each batch tagged background.
See Batch Export for more information on batch exporting.
88
Page 89

Background images have most of the menu options found in the foreground image menu (see above
for details).
Canvas navigation widget
At the bottom right of the canvas are additional navigation controls. This lets you scroll through your
images without having to always be in the Import toolset.
The widget can be used to toggle unique and batch status for the currently displayed image, turn
foreground and background layers on or off and move one by one through your import list.
89
Page 90

Hot folders
PhotoKey 7 Pro can be set up to use a hot folder for foreground images. A hot folder is a specified
folder on your computer which PhotoKey watches for new images. As soon as a new image appears in
the folder it is automatically imported into your project.
This is most useful if you have tethered your camera to your computer. Most cameras come with
tethering software which automatically copies images into a specified folder as you take photographs.
By setting PhotoKey to watch this same folder you can import images as soon as you take them.
Activate the Hot Folder with the Use Hot Folder option at the top of the Import Foreground toolset.
Once activated, the Import buttons will be replaced with a folder destination path. This can be set by
clicking the ... button.
Checking the Auto-select newest image option will cause PhotoKey to automatically display the latest
imported image on the canvas. This is useful if you want photographs to appear as soon as you've
taken them, and is a convenient way to quickly check the quality of your composite without having to
interact with the computer.
The import list is a 'live' representation of your hot folder. Removing images from the hot folder on your
computer will a lso remove them from the import list inside PhotoKey 7 Pro.
The hot folder system can also be used in conjunction with auto export, which turns PhotoKey into a
fully automated in-to-out system.
90
Page 91

Batch Export
The batch export system enables you to process multiple images with minimal user interaction.
Export options
See the Export chapter for information on general export options.
Exporting with multiple backgrounds
During a batch export you can optionally use more than one background image by activating the Use
Batched Backgrounds option.
To select a background for batching in this way, make sure you activate its batch tag. See Working
with multiple images for more details.
Each batched foreground image will then be exported multiple times, once for each selected
background. Therefore if you have 5 backgrounds selected for batching and 2 foregrounds, 10 new
images will be generated.
Standard batch export
Clicking the Export button will export any foreground images which have been added to the batch list.
91
Page 92

You can export as many images at a time as you wish. Images must be tagged with the batch icon to be
included on the batch list. See Working with multiple images for details.
Fully automated hot folder export
This is only available when you are using a hot folder.
See the Hot folders chapter for informa tion on using hot folders.
Clicking the Hot Folder Export button will ask you to select an export folder, then PhotoKey will
switch to the fully automated export mode.
During auto export mode, PhotoKey functions as follows:
Any images which have not been exported will be processed and exported to the specified folder.
After an image is processed and exported it will be tagged with an arrow in the image list.
The hot folder will be monitored for any new images, which will be immediately imported, processed
and exported.
Once all images in the list have been exported, PhotoKey will remain in auto export mode. Any new
images that subsequently appear in the hot folder will be automatically processed.
To exit auto export mode simply click the Stop button.
After stopping an auto export you can resume it at any time by clicking the auto export button again.
Images that have already been exported (tagged by the arrow) will not be re-exported. You can
manually reset the export tag by clicking the arrow next to the image's name in the list.
The ba tch tag for foreground images does not a pply to automa ted hot folder export. All unprocessed
images in the hot folder are processed, rega rdless of their batch tag sta tus.
Automated FTP batch export
This functions much like the automated hot folder export, and is only available when you are using a
hot folder.
See the Hot folders chapter for informa tion on using hot folders.
The only difference between hot folder export and FTP export is that PhotoKey automatically uploads
to your FTP server. Otherwise the automation process is identical to that described above.
See FTP upload for information on setting up your FTP server.
92
 Loading...