

FXA FXAJD5506 Instruction Manual

FXAJD5506
Instruction manual (Original instructions) GB pg 7-20
Käyttöohje
(Alkuperäisten ohjeiden käännös) FI pg 21-34
Bruksanvisning
(Översättning av originalinstruktionerna) SE pg 35-48
Bruksanvisning
(Oversettelse av de opprinnelige instruksjonene) NO pg 49-62
Руководство пользователя
(Перевод исходных инструкций) RU pg 63-78
Kasutusjuhend (Tõlgitud originaal juhendist) EE pg 79-92
Instrukcijas (Tulkojums no oriģinālvalodas) LV pg 93-107
Instaliavimo instrukcijos
(Vertimas originali instrukcija) LT pg 108-121
Instrukcja obsługi
(oryginalna instrukcja) PL pg 122-137
2
(1)
7
6
5
4
11
13
8
1
12
14
10
3
2
9
15
16
17
19
18
17
3
(2) (3)
(4) (5)
(6) (7)
(8) (9)
4
(10) (11)
(12) (13)
(14) (15)
(16) (17)
B
C
A
60º
Max.

5
0°
15°
30°
45°
60°
75°
-15°
-30°
-
45°
-60°
(18) (19)
(20) (21)
(22) (23)
(24)
A
A
A
.050 in.
A
DC
B
E
F

6
Cutter side plates
Ruler
Gap
Guide bar
NORMAL
(25)
Cutter side plates
Ruler
No
Gap
Guide bar
WORN
(26)
T
op plate
Cutting tip
File position
Cutter
length
Depth gauge
Depth gauge
setting 0.025”
(27)
Sharpening angle
2
5º
L
eft-hand
cutter
File
direction
Saw chain direction
Outside
Inside
(28)
IMPORTANT! Read all safety warnings, instructions, illustrations and specifications provided with this
power tool.
TÄRKEÄÄ! Lue tarkkaavaisesti kaikki tämän työkalun kanssa toimitetut varoitukset, ohjeet ja
spesifikaatiot, ja katso lisäksi kuvat.
VIKTIGT! Läs uppmärksamt alla varningar, instruktioner och specifikationer som bifogas med
detta verktyg och studera bilderna.
VIKTIG! Les nøye gjennom alle advarslene, instruksene og spesifikasjonene som følger med
verktøyet, og se på tegningene.
ВАЖНО! Пpoчтитe вce yкaзaния, инcтpyкции, иллюcтpaции и cпeцификaции, поставляемые
c электроинструментом.
TÄHTIS! Lugege läbi kõik elektrilise tööriista kohta esitatud ohuhoiatused ning tutvuge
tööriista jooniste ja tehniliste andmetega.
SVARĪGI! Izlasiet visus drošības brīdinājumus, instrukcijas, specifikācijas un apskatiet attēlus šī
elektroinstrumenta dokumentācijā.
SVARBU! Perskaitykite visus saugos įspėjimus, visas instrukcijas, paveikslėlius ir techninius
reikalavimus, pateikiamus su šiuo elektriniu įrankiu.
WAŻNE! Prosimy przeczytać wszystkie dotyczące narzędzia ostrzeżenia i instrukcje oraz
przestudiować ilustracje i specyfikację.

7
I
NTRODUCTION
Thank you for purchasing this product which has
passed through our extensive quality assurance
process. Every care has been taken to ensure that it
r
eaches you in perfect condition.
S
AFETY FIRST
B
efore attempting to operate this power tool the
following basic safety precautions should always be
t
aken to reduce the risk of fire, electric shock and
p
ersonal injury. It is important to read the instruction
manual to understand the application, limitations and
potential hazards associated with this tool.
CERTIFICATE OF GUARANTEE
This product is guaranteed for a period of 2 Years,
with effect from the date of purchase and applies only
to the original purchaser. This guarantee only applies
to defects arising from, defective materials and or
faulty workmanship that become evident during the
guarantee period only and does not include
consumable items. The manufacturer will repair or
replace the product at their discretion subject to the
following. That the product has been used in
accordance with the guide lines as detailed in the
product manual and that it has not been
subjected to misuse, abuse or used for a purpose for
which it was not intended. That it has not been taken
apart or tampered with in any way whatsoever or has
been serviced by unauthorised persons or has been
used for hire purposes. Transit damage is excluded
from this guarantee, for such damage the transport
company is responsible. Claims made under this
guarantee must be made in the first instance, directly
to the retailer within the guarantee period. Only under
exceptional circumstances should the product be
returned to the manufacturer. In these case it shall be
the consumer’s responsibility to return the product at
their cost ensuring that the product is adequately
packed to prevent transit damage and must be
accompanied with a brief description of the fault and
a copy of the receipt or other proof of purchase. The
manufacturer shall not be liable for any special,
exemplary, direct, indirect, incidental, or consequential
loss or damage under this guarantee. This guarantee
is in addition to and does not affect any rights, which
the consumer may have by virtue of the Sale of Goods
Act 1973 as amended 1975 and 1999.
STATUTORY RIGHTS
This guarantee is in addition to and in no way affects
your statutory rights.
PRODUCT DISPOSAL
When this product reaches the end of it’s life or is
disposed of for any other reason, it must not be
disposed of in household waste. In order to preserve
natural resources, and to minimise adverse
environmental impact, please recycle or dispose of
this product in an environmentally friendly way. It
should be taken to your local waste recycling centre
or other authorised collection and disposal facility.
I
f in doubt consult your local waste authority for
information regarding available recycling and / or
disposal options.
IMPORTANT INFORMATION ABOUT THIS
PRODUCT
T
his product is specifically designed to work with the
F
XA XCLICK range of batteries and charger.
POLE SAW SPECIFIC SAFETY INSTRUCTIONS
The product is not intended for use by persons
(including children) with reduced physical, sensory or
mental capabilities, or lack of experience and
knowledge, unless they have been given supervision
or instruction concerning use of the product by a
person responsible for their safety.
Warning! Read and understand all instructions. Be
familiar with all controls and proper use of the
machine. Follow all safety instructions. Failure to
follow all instructions listed below may result in
electric shock, fire, and/or serious personal injury.
Check the grounds on which the machine will be used
and remove all objects that could be caught up and
violently flung out.
Wear eye protection with side shields, which is
marked to comply with ANSI Z87.1, along with head
protection when operating this equipment.
Dress Properly. Wear heavy long trousers, long
sleeves, boots, and gloves. Do not wear loose fitting
clothing, shorts, sandals, or go barefoot. Do not wear
jewellery of any kind.
Secure long hair above shoulder level to prevent
entanglement in moving parts.
Keep all bystanders, children, and pets at least 15m
away from the work area. If approached, switch off
the appliance immediately. Always keep in mind that
the machine operator or user is responsible for
accidents involving other persons and/or their
property.
Do not operate this unit when you are tired, ill, upset,
or under the influence of alcohol, drugs, or
medication.
Do not operate in poor lighting.
Always use face or dust mask if operation is dusty.
Remove battery from appliance when not in use,
before servicing, and when changing accessories
such as the bar chain.
Don’t Overreach. Keep proper footing and balance at
all times. Overreaching can result in loss of balance or
exposure to hot surfaces.
C
harger Battery
(Not Included) (Not Included)
F
XADL1051 FXAJDB180Li
F
XAJDB180Li-II

8
N
ever stand directly under the limb you are trimming.
Always position yourself out of the path of falling
debris.
Never stand on a step, ladder, rooftop, tree, or other
type of unstable support while using the Pole saw.
S
table footing on a solid surface enables better
c
ontrol of the product in unexpected situations.
Always use both hands to operate pole saw. Keep a
f
irm, steady pressure on the pole saw while cutting
b
ut do not try to force the saw through the wood. Do
not use the pole saw to cut limbs larger in diameter
than the length of the guide bar.
Keep all parts of your body away from any moving
part. Keep hands away from cutting area. Keep both
hands on handles when power is on.
Inspect the unit before each use for loose fasteners,
etc. Replace any damaged parts before use.
When not in use, product should be stored indoors in
a dry, locked up place out of the reach of children.
Do not, under any circumstance, use any attachment
or accessory on this product which was not provided
with the product or identified as appropriate for use
with this product in the operator’s manual.
Do not use the product in damp or wet locations. Do
not use in rain.
Do not use the product for any job except that for
which it is intended.
Do not force the product. It will do the job better and
with less likelihood of a risk of injury at the rate for
which it was designed.
CAUTION. The cutting blade coasts after being turned
off.
Do not grasp the exposed cutting blades or cutting
edges when picking up or holding the product.
Check damaged parts. Before further use of the
product, a guard or other part that is damaged should
be carefully checked to determine that it will operate
properly and perform its intended function. Check for
alignment of moving parts, binding of moving parts,
breakage of parts, mounting, and any other condition
that may affect its operation. A guard or other part
that is damaged should be properly repaired or
replaced by an authorized service center unless
indicated elsewhere in this manual.
ADDITIONAL SAFETY INSTRUCTIONS
Kickback is a dangerous reaction that can lead to
serious injury. Kickback may occur when the moving
chain contacts an object at the upper portion of the
tip of the guide bar or when the wood closes in and
pinches the chain in the cut. Contact at the upper
portion of the tip of the guide bar can cause the chain
to dig into the object and stop the chain for an instant.
The result is a lightning-fast, reverse reaction which
kicks the guide bar up and back toward the operator.
I
f the chain is pinched along the top of the guide bar,
the guide bar can be driven rapidly back toward the
operator, which can cause loss of control and may
result in serious injury. Do not rely exclusively upon
t
he safety devices built into the product.
W
ith a basic understanding of kickback, you can
r
educe or eliminate the element of surprise. Sudden
surprise contributes to accidents.
Use pole saw for cutting wood only. Do not use for
cutting non-wood items.
Make sure that the area in which you are cutting is
free from obstructions. Do not let the nose of the
guide bar contact a log, branch, fence, or any other
obstruction while you are operating the unit. Have a
planned retreat path.
Cut only when visibility and light are adequate for you
to see clearly.
To protect yourself from electrocution, do not operate
within 15m of overhead electrical lines.
Before starting the motor, make sure the chain is not
contacting any object.
To protect yourself from falling branches, do not stand
directly under the branch or limb being cut. This unit
should not be held at an angle over 60° from ground
level.
Turn off the motor and make sure cutting attachment
has stopped before setting unit down.
Do not operate the saw with one hand! Serious injury
to the operator, helpers, bystanders, or any
combination of these persons may result from one
hand operation. This saw is intended for two-handed
use.
Use extreme caution when cutting small-sized brush
and saplings because slender material may catch the
saw chain and be whipped toward you or pull you off
balance.
When cutting a limb that is under tension, be alert for
spring back so that you will not be struck when the
tension in the wood fibers is released.
To avoid accidental starting, never carry the unit with
the battery installed or with your finger on the switch
trigger.
Maintain Product With Care. Keep cutting edge sharp
and clean for best performance and to reduce the risk
of injury. Follow instructions for lubricating and
changing accessories. Inspect the battery charger
cord periodically, and if damaged, have it replaced or
repaired by an authorized service dealer.
Keep handles dry, clean, and free from oil and grease.
Service on the product must be performed by
qualified repair personnel only. Maintenance
performed by unqualified personnel could result in
injury to the user or damage to the product.

9
B
attery operated units do not have to be plugged into
an electrical outlet; therefore, they are always in
operating condition. Be aware of possible hazards
even when unit is not operating.
Remove the battery pack from the pole saw before
c
leaning, servicing, storing, removing material from
t
he unit, changing accessories such as the bar and
chain, or when not in use.
A battery pack must be recharged only with the
specified charger for the battery pack. A charger that
m
ay be suitable for one type of battery pack may
c
reate a risk of fire when used with another battery
pack. Use battery pack only with charger listed.
POLE HEDGE TRIMMER SPECIFIC SAFETY
INSTRUCTIONS
Keep all parts of the body away from the cutter
blades. A moment of inattention while operating the
product may result in serious personal injury.
Carry the pole hedge trimmer by the handle with
cutter blade stopped. When transporting or storing the
pole hedge trimmer always fit the cutting device
cover. Proper handling of the pole hedge trimmer will
reduce possible personal injury from the cutter blades.
Hold the power tool by insulated gripping surface
only, because the cutter blade may contact hidden
wiring. Cutter Blades contacting a “live” wire may
make exposed metal parts of the power tool “live” and
could give the operator an electric shock.
Clear the work area before each use. Remove all
objects such as cords, lights, wire, or string which can
be thrown or become entangled in the cutting means.
Beware of thrown objects; keep all bystanders,
children, and pets at least 15 m away from work area.
Check constantly for persons or animals behind or
inside any hedge or bush you intend to trim.
Do not operate in poor lighting. The operator requires
a clear view of the work area to identify potential
hazards.
Inspect the machine before each use. Check for loose
fasteners, etc. Make sure all guards, and handles are
properly and securely attached. Replace any
damaged parts before use.
Do not modify the product in any way.
Do not allow children or untrained individuals to use
this unit.
Wear full eye and hearing protection while operating
the product. If working in an area where there is a risk
of falling objects, head protection must be worn.
Wear heavy long trousers, boots, and gloves. Do not
wear loose fitting clothing, short trousers, jewellery of
any kind, or use with bare feet.
Secure long hair so it is above shoulder level to
prevent entanglement in moving parts.
D
o not use the product when you are tired, ill, or
under the influence of alcohol, drugs, or medication.
K
eep firm footing and balance. Do not overreach.
Overreaching can result in loss of balance and can
result in serious injury.
Before starting the product, make sure the cutting
blades will not come in contact with anything.
Ensure that the product is correctly located in a
d
esignated working position before starting the
p
roduct.
W
hile operating the pole hedge trimmer, always hold it
firmly with both hands by the two handles and ensure
that the operating position is safe and secure. The
manufacturer does not recommend the use of steps
or ladders.
Use the harness if it is supplied with your pole hedge
trimmer. It will assist you to support the weight of the
product during use and whilst moving between
trimming positions. Carefully adjust the harness to fit
comfortably.
Identify the quick release mechanism and practice
using it before you start using the product. Its correct
use may prevent serious injury in the case of an
emergency. Never wear additional clothing over the
harness or otherwise restrict access to the quick
release mechanism.
To protect yourself from electrocution, do not operate
within 10 m of overhead electrical lines.
Never use the pole hedge trimmer near fencing, posts,
buildings, or other immovable objects.
Blades are sharp. When handling the blade assembly,
wear non-slip, heavy-duty protective gloves. Do not
place your hand or fingers between blades or in any
position where they could get pinched or cut. Never
touch blade or service unit unless the battery pack is
removed.
Switch off and remove the battery pack before:
adjusting the working position of the cutting device
cleaning or clearing a blockage
leaving the product unattended
checking, maintenance or working on the product.
Do not force the pole hedge trimmer through heavy
shrubbery. This can cause the blades to bind and
slow down. If the blades slow down, reduce the pace.
Do not attempt to cut stems or twigs that are larger
than 18 mm thick, or those obviously too large to feed
into the cutting blade. Use a non-powered hand saw
or pruning saw to trim large stems.
Use of hearing protection reduces the ability to hear
warnings (shouts or alarms). The operator must pay
extra attention to what is going on in the working area.

10
D
o not operate the pole hedge trimmer with damaged
or excessively worn blades.
A
lways be aware of your surroundings and stay alert
for possible hazards that you may not hear due to the
noise of the product.
WARNING! If the product is dropped, suffers heavy
impact or begins to vibrate abnormally, immediately
s
top the product and inspect for damage or identify
the cause of the vibration. Any damage should be
properly repaired or replaced by an authorised service
c
entre.
WARNING! Check that all the shaft couplings on the
extension pole and tool are securely fastened before
each use and at frequent intervals.
ADDITIONAL SAFETY RULES CHARGERS
1. Before using the charger, read all the instructions
and cautionary markings on the charger and battery
pack as well as the instructions on using the battery
pack.
2. Only charge your batteries indoors as the charger is
designed for indoor use only.
3. DANGER! If the battery pack is cracked or
damaged in any other way, do not insert it in the
charger. There is a danger of electric shock or
electrocution.
4. WARNING! Do not allow any liquid to come into
contact with the charger. There is a danger of electric
shock.
5. The charger and battery packs supplied with it are
specifically designed to work together. Do not attempt
to charge the battery pack with any other charger than
the one supplied.
6. Do not pull on the power cord to disconnect it from
the mains supply socket.
7. Do not use the charger if it has been subjected to a
heavy knock, dropped or otherwise damaged in any
way. Take the charger to an authorised service centre
for a check or repair.
8. Do not disassemble the charger. Take it to an
authorised service centre when service or repair is
required. Incorrect re-assembly may result in the risk
of fire, electric shock or electrocution.
9. To reduce the risk of an electric shock, unplug the
charger from the power supply before attempting to
clean it. Removing the battery alone does not reduce
the risk.
ADDITIONAL SAFETY RULES FOR THE BATTERY
PACK
1. The battery pack for this tool has been shipped in a
low charge condition. You should charge the battery
pack fully before use.
2. Do not incinerate the battery pack even if it is
seriously damaged or can no longer hold a charge.
T
he battery pack can explode in a fire.
3
. A small leakage of liquid from the battery pack may
o
ccur under extreme usage or temperature conditions.
This does not necessarily indicate a failure of the
battery pack. However, if the outer seal is broken and
t
his leakage comes into contact with your skin wash
t
he affected area quickly with soap and water. If the
leakage gets in your eyes flush your eyes with clean
w
ater for a minimum of 10 minutes and seek
i
mmediate medical attention.
I
nform the medical staff that the liquid is a 25-35%
s
olution of potassium hydroxide.
4. Never attempt to open the battery pack for any
reason. If the plastic housing of the battery pack
breaks open or cracks, immediately discontinue its
use and do not recharge it.
5. Do not store or carry a spare battery pack in a
pocket or toolbox or any other place where it may
come into contact with metal objects. The battery
pack may be short- circuited causing damage to the
battery pack, burns or a fire.
BATTERY CHARGING INFORMATION
Charging rates for NiCad and/or Li-Ion NiCad and/or
Li-Ion battery charging rates are determined by the
time taken to fully charge the battery and are
determined by the charge current. The three most
commonly used charging rates are typically:
Fast charge.
Slow charge.
Trickle charge.
FAST CHARGE BATTERIES
The charging rates for fast charge batteries can vary
between 30 minutes and 90 minutes. The charging
rate for the battery supplied with a cordless power
tool is stated in the product manual.
SLOW CHARGE BATTERY
The charging rates for slow charge batteries are
between 3 hours and 5 hours.
TRICKLE CHARGE BATTERIES
The charging rates for trickle charge batteries are
between 7 hours and 9 hours.
IMPORTANT!
NICAD AND/OR LI-ION BATTERY CHARGING
INFORMATION.
ALWAYS FULLY DISCHARGE A NiCad and/or LiIon BATTERY BEFORE CHARGING AND NEVER
EXCEED THE CHARGING RATE TIME, EXCEPT
WHEN “CONDITIONING” A NEW BATTERY.
CHARGING PROCEDURE
When charging a new NiCad and/or Li-Ion battery it
should be fully discharged followed by a full charge
for the charging rate for the battery as stated in the
product manual plus 30 minutes.

11
T
his should then be followed by a full discharge and a
further full charge for the charging rate for the battery
as stated in the product manual plus 30 minutes. This
procedure will condition the battery and equalise the
c
ell voltages. Following this procedure will ensure the
optimum operation of the battery.
W
hen repeatedly using the charger to charge a
number of batteries always allow the charger to cool
d
own before charging another battery. It is
r
ecommended that the cooling down period is not
less than 30 to 45 minutes.
W
hen charging a battery that has been discharged
during heavy use allow the battery to cool down
before charging. It is recommended that the cooling
down period is not less than 30 to 45 minutes.
NICAD AND/OR LI-ION CHARGING & CHARGERS
NiCad and/or Li-Ion batteries need to be recharged
with a reasonable amount of care, largely because
they can be damaged by overcharging.
Overcharging can result in the battery temperature
and internal pressure to rise rapidly. This can cause
the cells to distort and lose electrolyte, and in extreme
cases where the internal pressure is extremely high
they can even explode.
This situation can also arise when an overcharged
battery is fitted to the product and is being used. In
order to avoid this extreme situation it is of vital
importance that NiCad and/or Li-Ion batteries are fully
discharged before charging and that the charge time
is not exceeded except when “Conditioning” a new
battery. Repeated charging of partially discharged
batteries could cause failure of one or more of the
cells.
SELF DISCHARGE
A lithium battery can self discharge and lose its stored
charge. Typically it can lose approximately 5% of its
charge in the first month after fully charging (when
stored at room temperature), and then loses it by a
further 3% per month. When stored at higher
temperatures the self discharge rate will be
accelerated.
BATTERY CHARGING INDOORS
This charger is designed to be used indoors. We do
not recommend that it is used inside your home.
Ideally batteries should be charged on a bench in a
workshop, garage or shed. If the charging operation is
to be carried out in your home the area must be well
ventilated and the charger must be placed on a non
combustible surface ensuring that the ventilation slots
are not blocked. Never exceed the charging time
except when “Conditioning” a new battery, as this
could damage the battery and charger.
BATTERY DISPOSAL
When the battery fails to charge or maintain its
charge, its usable life is exhausted. To preserve
natural resources, please recycle or dispose of the
b
attery pack properly. This battery pack contains
nickel-cadmium cells. Before disposal ensure that the
battery pack is fully discharged by operating your
cordless product then remove the battery pack from
t
he drill housing and cover the battery pack
connections with heavy duty tape, to prevent short
circuit and energy discharge which could result in a
fire. Do not attempt to open or remove any of the
components.
C
onsult your local waste authority for information
regarding available recycling and / or disposal
options.
SPECIFIC SAFETY INSTRUCTIONS
RE-CHARGEABLE BATTERIES.
Batteries may leak or explode if not charged or
handled correctly. Always observe the following
precautions when handling batteries. Ensure that the
machine is switched off before removing or fitting
batteries.
Do not use this battery with any other product.
Do not attempt to fit the battery the wrong way round.
Do not short out, or attempt to dismantle the battery.
Do not expose the battery to flames or excessive
heat.
Do not immerse in or expose the battery to water.
Do not store or transport the battery with loose metal
objects such drill and driver bits.
Batteries are prone to leakage when discharged. To
avoid damage to the product, remove or
re-charge the battery when no charge remains. Store
the battery in a cool place when not in use.
After prolonged use the battery may become hot.
Before removing the battery, switch the machine off
and allow the battery to cool down. Do not use the
battery if you notice any discoloration or distortion of
the battery casing.
GENERAL SAFETY RULES
WARNING! Read all instructions Failure to follow all
instructions listed below may result in electric shock,
fire and/or serious injury. The term "power tool" in all
of the warnings listed below refers to your mains
operated (corded) power tool or battery operated
(cordless) power tool.
SAVE THESE INSTRUCTIONS
1) WORK AREA
a) Keep work area clean and well lit. Cluttered and
dark areas invite accidents.
b) Do not operate power tools in explosive
atmospheres, such as in the presence of
flammable liquids, gases or dust. Power tools
create sparks which may ignite the dust or fumes.

12
c
) Keep children and bystanders away while
operating a power tool. Distractions can cause you
to lose control.
2) ELECTRICAL SAFETY
a) Power tool plugs must match the outlet. Never
modify the plug in any way. Do not use any
adapter plugs with earthed (grounded) power
t
ools. Unmodified plugs and matching outlets will
reduce risk of electric shock.
b) Avoid body contact with earthed or grounded
surfaces such as pipes, radiators, ranges and
refrigerators.
There is an increased risk of electric shock if your
body is earthed or grounded.
c) Do not expose power tools to rain or wet
conditions. Water entering a power tool will
increase the risk of electric shock.
d) Do not abuse the cord. Never use the cord for
carrying, pulling or unplugging the power tool.
Keep cord away from heat, oil, sharp edges or
moving parts. Damaged or entangled cords
increase the risk of electric shock.
e) When operating a power tool outdoors, use an
extension cord suitable for outdoor use. Use of a
cord suitable for outdoor use reduces the risk of
electric shock.
3) PERSONAL SAFETY
a) Stay alert, watch what you are doing and use
common sense when operating a power tool. Do
not use a power tool while you are tired or under
the influence of drugs, alcohol or medication.
A moment of inattention while operating power
tools may result in serious personal injury.
b) Use safety equipment. Always wear eye
protection. Safety equipment such as dust mask,
non-skid safety shoes, hard hat, or hearing
protection used for appropriate conditions will
reduce personal injuries.
c) Avoid accidental starting. Ensure the switch is in
the off position before plugging in. Carrying power
tools with your finger on the switch or plugging in
power tools that have the switch on invites
accidents.
d) Remove any adjusting key or wrench before
turning the power tool on.
A wrench or a key left attached to a rotating part
of the power tool may result in personal injury.
e) Do not overreach. Keep proper footing and
balance at all times. This enables better control of
the power tool in unexpected situations.
f) Dress properly. Do not wear loose clothing or
jewellery. Keep your hair, clothing and gloves
away from moving parts. Loose clothes, jewellery
or long hair can be caught in moving parts.
g
) If devices are provided for the connection of dust
extraction and collection facilities, ensure these
are connected and properly used. Use of these
devices can reduce dust related hazards.
4) POWER TOOL USE AND CARE
a) Do not force the power tool. Use the correct
power tool for your application. The correct power
t
ool will do the job better and safer at the rate for
which it was designed.
b) Do not use the power tool if the switch does not
turn it on and off. Any power tool that cannot be
controlled with the switch is dangerous and must
be repaired.
c) Disconnect the plug from the power source before
making any adjustments, changing accessories, or
storing power tools. Such preventive safety
measures reduce the risk of starting the power
tool accidentally.
d) Store idle power tools out of the reach of children
and do not allow persons unfamiliar with the
power tool or these instructions to operate the
power tool. Power tools are dangerous in the
hands of untrained users.
e) Maintain power tools. Check for misalignment or
binding of moving parts, breakage of parts and
any other condition that may affect the power
tools operation. If damaged, have the power tool
repaired before use. Many accidents are caused
by poorly maintained power tools.
f) Keep cutting tools sharp and clean. Properly
maintained cutting tools with sharp cutting edges
are less likely to bind and are easier to control.
g) Use the power tool, accessories and tool bits etc.,
in accordance with these instructions and in the
manner intended for the particular type of power
tool, taking into account the working conditions
and the work to be performed. Use of the power
tool for operations different from intended could
result in a hazardous situation.
5) BATTERY TOOL USE AND CARE
a) Recharge only with the charger specified by the
manufacturer. A charger that is suitable for one
type of battery pack may create a risk of fire when
used with another battery pack.
b) Use power tools only with specifically designated
battery packs. Use of any other battery packs may
create a risk of injury and fire.
c) When battery pack is not in use, keep it away from
other metal objects, like paper clips, coins, keys,
nails, screws or other small metal objects, that can
make a connection from one terminal to another.
Shorting the battery terminals together may cause
burns or a fire.

13
d) Under abusive conditions, liquid may be ejected
from the battery; avoid contact. If contact
accidentally occurs, flush with water. If liquid
c
ontacts eyes, additionally seek medical help.
Liquid ejected from the battery may cause irritation
or burns.
6
) SERVICE
a
) Have your power tool serviced by a qualified repair
person using only identical replacement parts. This
will ensure that the safety of the power tool is
m
aintained.
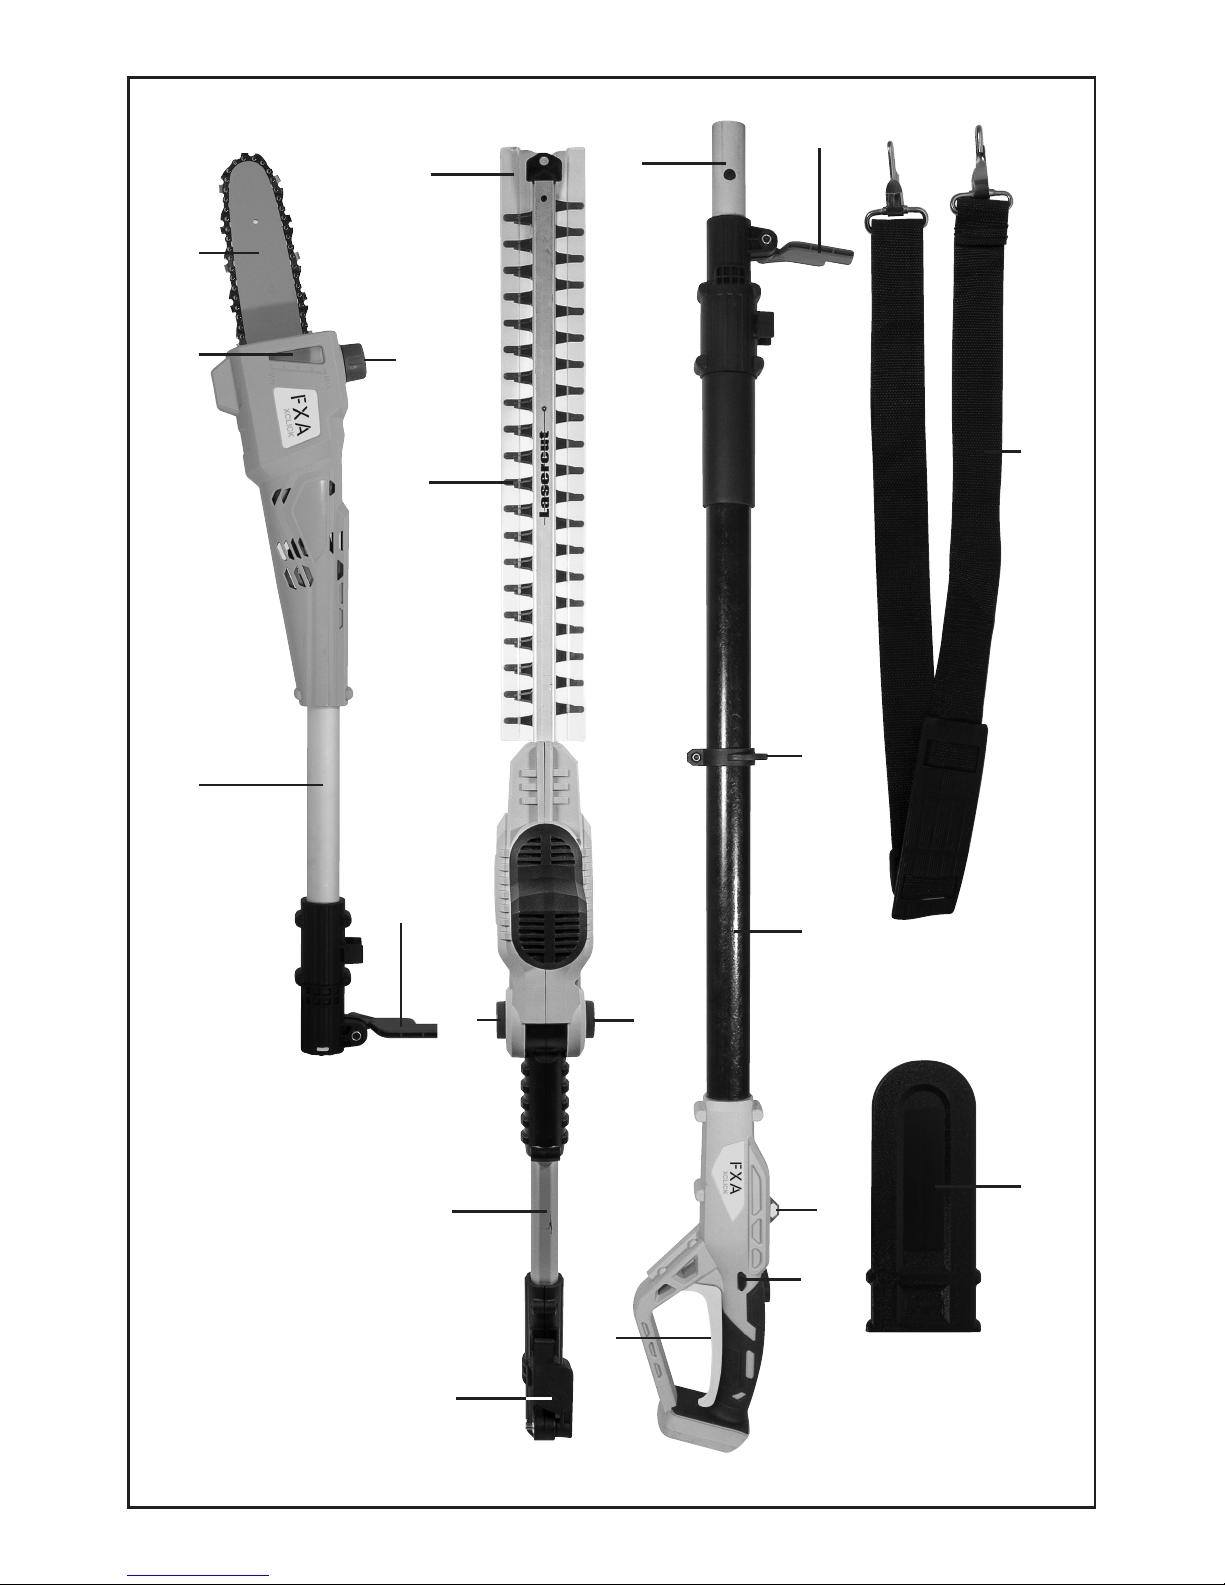
COMPONENTS & CONTROLS (FIG 1)
UNPACKING
Caution! This packaging contains sharp objects. Take
care when unpacking. Remove the machine, together
with the accessories supplied, from the packaging.
Check carefully to ensure that the machine is in good
condition and account for all the accessories listed in
this manual. Also make sure that all the accessories
are complete. If any parts are found to be missing, the
machine and its accessories should be returned
together in their original packaging to the retailer.
Do not throw the packaging away, keep it safe
throughout the guarantee period, then recycle if
possible, otherwise dispose of it by the proper means.
Do not let children play with empty plastic bags due to
the risk of suffocation.
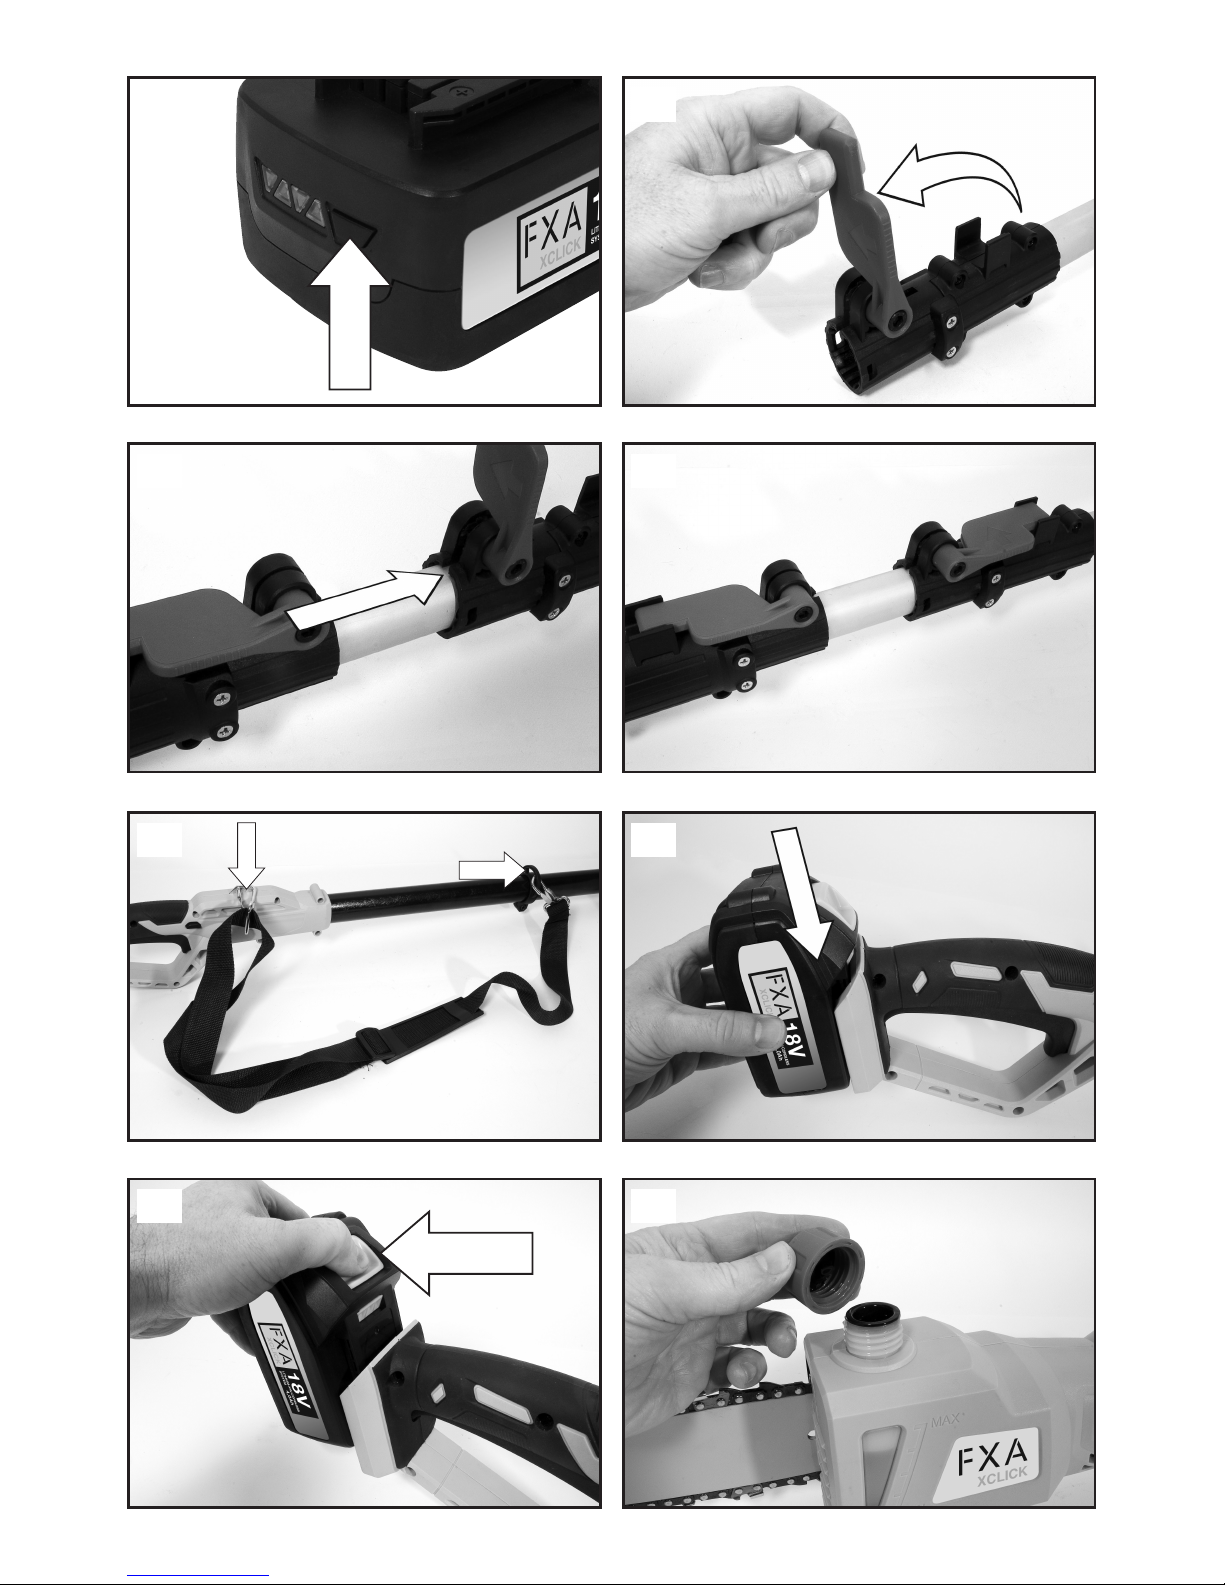
CHARGING THE BATTERY PACK
Warning! Only charge in compatible 18V chargers. Use
of other chargers may result in fire, damage or serious
p
ersonal injury.
T
he battery pack for this tool has been shipped in a
l
ow charge condition to prevent possible problems.
T
herefore, you should charge it until the green LED on
the front right hand side of the charger comes on.
Note: Batteries will not reach full charge the first time
they are charged. Allow several cycles (operation
f
ollowed by recharging) for them to become fully
c
harged.
First read the safety instructions then follow the
charging instructions.
Plug the charger into a standard 230V~50Hz mains
socket outlet, the green LED on the front left hand side
of the charger will illuminate.
Do not allow the cable to become knotted or kinked.
Place the battery pack into the charger base.
(Note the battery has raised ribs which allows it to fit
into the charger only one way). Time the charge for 60
minutes only.
The red LED on the front right hand side of the charger
will illuminate to indicate charging is in progress. A
green LED will illuminate when the battery is fully
charged.
Unplug the charger when not in use and store it in a
suitable storage cabinet.
Avoid charging your battery in freezing conditions as
charging power will not be sufficient.
When charging more than one battery pack in
succession allow at least 30 minutes for the charger to
cool down before charging an additional battery.
Always remove the battery pack and store it safely
when the tool is not in use.
Caution: If at any point during the charging process
none of the LEDs are lit, remove the battery pack from
the charger to avoid damaging the product. DO NOT
insert another battery.
1. Cutting head pole
2. Oil level indicator
3. Blade
4. Intermediate pole
5. Intermediate pole locking lever
6. Shoulder harness
7. Blade guard
8. On/Off trigger
9. Locking lever
10. Oil cap
11. Harness connection point 1
12. Handle pole
13. Harness connection point 2
14. On/Off trigger lock-out button
15. Blade guard
16. Blade
17. Pivoting button
18. Trimmer head pole
19. Locking lever
14
C
HARGE STATUS
To display the amount of charge left in the battery,
press the charge level indicator button, Fig.2.
ASSEMBLY
Warning! To prevent accidental starting that could
cause serious personal injury, always remove the
battery pack from the product when assembling parts.
CONNECTING THE POLES
Unlock the locking lever on the saw or trimmer cutting
head pole by lifting upwards, Fig.3. Ensure the
intermediate pole locking lever is in the locked
position to prevent the intermediate pole moving
whilst being connected. Insert the plug on the
intermediate pole into the socket on the saw or
trimmer cutting head pole and push together until the
locking tabs are fully seated, Fig.4. Lock the poles
together by closing the locking lever on the saw or
trimmer cutting head pole, Fig.5.
NOTE: When assembled correctly, the cutting head
pole should not be able to separate from the
intermediate pole when pulled. Repeat above steps if
pole can be separated from intermediate pole.
Warning! Failure to securely assembly and lock all
poles together as directed above could cause the
poles to separate and could result in serious personal
injury or death.
ATTACHING THE SHOULDER HARNESS
Connect the latches on the shoulder harness to the
harness connection points, Fig.6.
A
djust the strap to a comfortable position.
I
NSTALLING THE BATTERY PACK
W
arning! Always remove battery pack from your tool
when you are assembling parts, making adjustments,
cleaning, carrying, transporting or when not in use.
R
emoving battery pack will prevent accidental starting
t
hat could cause serious personal injury.
N
OTE: To avoid serious personal injury, always
remove the battery pack and keep hands clear of the
lock-out button when carrying or transporting the tool.
Slide the battery pack into the pole saw base, Fig 7.
(Note the battery has raised ribs which allows it to fit
into the pole saw only one way). Make sure the
battery pack snaps into place and that battery pack is
secured in the tool before beginning operation.
Improper installation of the battery pack can cause
damage to internal components.
REMOVING THE BATTERY PACK
Locate the battery release catch on the top of the
battery and press downwards, Fig 8. Whilst holding
down the battery release catch slide the battery pack
away from the tool.
ADDING BAR AND CHAIN LUBRICANT (POLE SAW
ONLY)
Use bar and chain lubricant. It is designed for chains
and chain oilers, and is formulated to perform over a
wide temperature range with no dilution required.
The bar and chain lubricant level should be checked
after every 20 minutes of use and refilled as needed.
Remove the oil cap, Fig.9. Carefully pour the bar and
chain lubricant into the bar lube reservoir.
Wipe off excess oil.
Check and fill the reservoir when the oil level indicator,
Fig.10, is below the second to last indicator line.
Repeat as needed.
NOTE: Do not use dirty, used or otherwise
contaminated oils. Damage may occur to the bar or
chain.
NOTE: It is normal for oil to seep from the saw when
not in use. To prevent seepage, empty the oil tank
after each use then run for one minute.
When storing the unit for a long period of time (three
months or longer) be sure the chain is lightly
lubricated; this will prevent rust on the chain and bar
sprocket.
OPERATION
Danger! Never cut near power lines, electric cords, or
other electric sources. If bar and chain jams on any
electrical cord or line, DO NOT TOUCH THE BAR OR
CHAIN! THEY CAN BECOME ELECTRICALLY LIVE
AND VERY DANGEROUS.
Charge level indicator Amount of charge
r
emaining
0
-10%
10-25%
25-50%
50-75%
75-100%

15
C
ontinue to hold the pole saw/trimmer by the
insulated rear handle or lay it down and away from
you in a safe manner. Disconnect the electrical service
to the damaged line or cord before attempting to free
t
he bar and chain from the line or cord. Contact with
the bar, chain, other conductive parts of the pole saw,
or live electric cords or lines will result in death by
electrocution or serious injury.
W
arning! Do not allow familiarity with this product to
m
ake you careless. Remember that a careless fraction
of a second is sufficient to inflict serious injury.
D
o not use any attachments or accessories not
recommended by the manufacturer of this product.
The use of attachments or accessories not
recommended can result in serious personal injury.
POLE SAW APPLICATIONS
You may use this product for the purposes listed
below:
Limbing and Pruning
POLE HEDGE TRIMMER APPLICATIONS
You may use this product for the purposes listed
below:
Cutting and trimming hedges, branches, bushes and
shrubs around your house or allotment.
POLE SAW OPERATION
STARTING AND STOPPING
Hold the pole saw as shown in Fig.11 and ensure that
you are well away from anything that may contact the
blade.
Press and hold the On/Off trigger lock-out button,
Fig.12.
Depress the On/Off trigger, Fig.13.
To stop the motor, release the trigger to stop the pole
saw. Upon release of the trigger, the On/Off trigger
lock-out button will automatically reset to the locked
position.
PREPARATION FOR CUTTING
Wear non-slip gloves for maximum grip and
protection. Maintain a proper grip on the unit
whenever the motor is running. Use your right hand to
firmly grip the rear handle while your left hand has a
firm grip on the pole shaft.
Hold unit firmly with both hands. Always keep your left
hand on the pole shaft and your right hand on the rear
handle, so your body is to the left of the chain line.
Never use a left-handed (cross-handed) grip, or any
stance that places your body or arm across the chain
line.
Never stand directly under the limb you are cutting.
BASIC CUTTING GUIDE
Follow the steps below to prevent damage to tree or
shrub bark. Do not use a back-and-forth sawing
motion.
M
ake a shallow first cut (1/4 of limb diameter) on the
underside of the limb close to the main limb or trunk,
Fig.15 (A).
Make a second cut, Fig.15 (B), from the top side of
the limb outwards from the first cut. Continue the cut
t
hrough the limb until the limb separates from the tree.
B
e prepared to balance the weight of the tool when
the limb falls.
Make a final cut close to trunk. Fig.15 (C).
NOTE: For second and final cuts (from top of limb or
branch), hold front cutting guide against the limb
being cut. This will help steady the limb and make it
easier to cut. Allow chain to cut for you; exert only
light downward pressure. If you force the cut, damage
to the bar, chain, or motor can result.
Release the trigger as soon as the cut is completed.
Failure to follow proper cutting procedures will result
in the bar and chain binding and becoming pinched or
trapped in the limb. If this should happen:
Stop the motor and remove the battery pack.
If the limb can be reached from the ground, lift the
limb while holding the saw. This should release the
“pinch” and free the saw.
If the saw is still trapped, call a professional for
assistance.
LIMBING AND PRUNING
This unit is designed for trimming small branches and
limbs up to 100mm in diameter. For best results,
observe the following precautions.
Plan the cut carefully. Be aware of the direction in
which the branch will fall. Never stand directly under
the limb you are cutting. Always position yourself out
of the path of falling debris.
The most typical cutting application is to position the
unit at an angle of 60° or less, Fig.16, depending on
the specific situation. As the angle of the pole saw
shaft to ground increases, the difficulty of making the
first cut (from the underside of limb) increases.
Remove long branches in several stages.
Cut lower branches first to allow the top branches
more room to fall.
Work slowly, keeping both hands on the saw with a
firm grip. Maintain secure footing and balance.
Keep the tree between you and the chain while
limbing. Cut from side of tree opposite branch you are
cutting.
Never stand on a ladder or other unstable support
while using the Pole Saw. Always avoid any position
which can cause you to loose your balance and cause
severe injury.

16
D
o not make the flush cut next to the main limb or
trunk until you have cut off the limb further out to
reduce the weight. Following proper cutting
procedures will prevent stripping the bark from the
m
ain member.
K
eep other persons at least 50 feet (15m) from the
w
ork area. Distractions can cause you to lose control.
E
lectrocution Hazard. To prevent shock, do not
operate within 50 feet (15m) of overhead electrical
lines. Always check surrounding area for hidden
e
lectrical lines.
Do not overreach. Make sure your footing is firm.
Keep feet apart. Divide your weight evenly on both
feet.
POLE HEDGE TRIMMER OPERATION
ADJUSTING THE CUTTING HEAD
The cutting head of the trimmer can be adjusted to
different angle, allowing you to comfortably cut in
different positions.
WARNING! Disconnect the battery before adjusting
the head. Do not attempt to adjust the head while the
blades are moving.
Grip the head of the trimmer and press and hold in
both pivoting buttons, Fig.17.
Rotate the head to the desired angle.
For trimming at high and low level, the motor unit can
be tilted at an angle of 75° to – 60° in 15° increments,
Fig.18.
Release the pivoting buttons to lock the head in your
selected position.
WARNING! Ensure the pivoting buttons and head are
securely locked in position before starting the trimmer.
STARTING AND STOPPING
Remove the blade cover.
Hold the pole hedge trimmer as shown in Fig.14 and
ensure that you are well away from anything that may
contact the blade.
Press and hold the On/Off trigger lock-out button,
Fig.12.
Depress the On/Off trigger, Fig.13.
To stop the motor, release the trigger to stop the pole
hedge trimmer. Upon release of the trigger, the On/Off
trigger lock-out button will automatically reset to the
locked position.
USING THE POLE HEDGE TRIMMER
Hold the trimmer with both hands. Stand in a secure
and stable position. Before cutting, check the hedge
for any objects such as wire fences that could
damage or jam the trimmer blade.
WARNING! Do not overload the hedge trimmer.
A
ttempting to force the trimmer to cut may damage
the motor. To prevent overloading check to see if the
hedge is very thick or dense. Cut thick or dense
foliage in stages with several lights cut as this will help
r
educe the load on the motor.
T
he maximum thickness of a branch that the pole
h
edge trimmer will cut is 16mm. This may be reduced
with certain bush and shrub types.
TIPS ON CUTTING
Hold the tool away from yourself using both hands,
a
nd stand in a secure and stable position.
When cutting move steadily along the line of cut, so
that the stems are fed directly into the cutter blades.
The double edge cutting blade enables cutting in
either a side to side action or an up and down motion.
Cut the sides of the hedge first then cut the top.
To keep the sides flat, cutting upwards with the
growth is recommended. To reach a level finish,
fasten a piece of string along the length of the hedge.
Cut the hedge just above the string to give an even
height.
Always take care to avoid cutting into objects such as
wire, which could cause damage to the cutting blades
and drive mechanism.
LUBRICATING THE BLADES (FIG.19)
If the trimming device overheats whilst working, it is
necessary to lubricate the internal surfaces of the
blades.
Warning! This operation must only be performed when
the blades have stopped, the trimmer is switched off
and the battery removed.
When you have finished your work:
• Switch off the motor as indicated
• Allow the motor to cool before storing in any
enclosure.
• To reduce fire hazards, clean the machine
thoroughly to get rid of any remains of grass,
leaves or excess grease, never leave containers
with the cut debris inside the storage area.
To increase the efficiency and working life of the
blades, clean and lubricate them carefully after each
work session.
• Use a soft cloth to clean the blades, along with a
brush to remove more difficult dirt and debris.
• Lubricate the blades with suitable oil.
MAINTENANCE
Before inspecting, cleaning, or servicing the unit, stop
the motor, wait for all moving parts to stop, and
remove the battery pack. Failure to follow these
instructions can result in serious personal injury or
property damage.

17
G
ENERAL MAINTENANCE
Avoid using solvents when cleaning plastic parts.
Most plastics are susceptible to damage from various
types of commercial solvents and may be damaged
b
y their use. Use clean cloths to remove dirt, dust, oil,
grease, etc.
D
o not at any time let brake fluids, gasoline,
petroleum-based products, penetrating oils, etc.,
c
ome in contact with plastic parts. Chemicals can
d
amage, weaken, or destroy plastic, which could
result in serious personal injury.
A
ll pole saw/trimmer service, other than the items
listed in these maintenance instructions, should be
performed by competent pole saw/trimmer service
personnel.
POLE SAW MAINTENANCE
CHAIN TENSION
Never touch or adjust the chain while the motor is
running. The saw chain is very sharp; always wear
protective gloves when performing maintenance to the
chain.
Stop the motor and remove the battery pack before
setting the chain tension.
Make sure the chain cover knob, Fig.20 is loose to
finger tight. Use a hex key to turn the chain tensioning
allen screw clockwise to tension the chain, Fig.21.
Do not over-tension the chain as this will lead to
excessive wear and will reduce the life of the bar and
chain. Overtensioning also reduces the amount of cuts
you will get per battery charge.
NOTE: A cold chain is correctly tensioned when there
is no slack on the underside of the guide bar, the
chain is snug, but it can be turned by hand without
binding.
The chain must be re-tensioned whenever the flats,
Fig.22 (A) on the drive links hang out of the bar groove
as shown in Fig.22.
During normal operation, the temperature of the chain
will increase. The drive links of a correctly tensioned
warm chain will hang approximately .050 in. out of the
bar groove, as shown in Fig. 23.
REPLACING THE BAR AND CHAIN
Remove the battery pack before replacing the bar,
chain to avoid possible serious injury.
Remove the chain cover knob, Fig.20, by turning it in
a anticlockwise direction. Place the chain cover knob
to one side and then remove the chain cover from the
chainsaw.
The bar contains a slot, Fig.24 (A) that fits over the
mounting post, Fig.24 (B). The bar also contains a
chain tensioning pin hole, Fig.24 (C) which fits over
the chain tensioning pin, Fig.24 (D).
Place the bar onto the mounting post so that the
chain tensioning pin fits into the chain tensioning pin
h
ole.
N
OTE: If necessary, rotate the chain tensioning allen
s
crew counterclockwise until the pin and hole can be
aligned. Fig.21.
Fit the chain, Fig.24 (E) over the sprocket, Fig.24 (F)
and into the bar groove. The cutters on the top of the
bar should face toward the bar tip, in the direction of
t
he chain rotation.
R
eplace the chain cover and tighten the chain cover
knob finger tight only.
T
he bar must be free to move for tension adjustment.
Remove all slack from chain by turning the chain
tensioning allen screw clockwise, assuring that the
chain seats into the bar groove during tensioning.
Tighten the chain cover knob securely.
NOTE: Chain is correctly tensioned when there is no
slack on the underside of the bar, the chain is snug,
but it can be turned by hand without binding. If chain
is too tight, it will not rotate. Loosen the chain cover
screw slightly and turn chain tensioning screw 1/4 turn
counterclockwise. Retighten chain cover screw
securely.
GUIDE BAR
Most guide bar problems can be avoided by keeping
the product well maintained. Incorrect filing and nonuniform cutter and depth gauge settings cause most
guide bar problems, primarily resulting in uneven bar
wear. As the bar wears unevenly, the rails widen,
which may cause chain clatter and difficulty in making
straight cuts. Insufficient guide bar lubrication and
operating the product with a chain this is too tight will
contribute to rapid bar wear. To help minimise bar
wear, the guide bar maintenance is recommended.
When the guide bar is dismounted, remove any
sawdust from the “GROOVE“ in the guide bar rail.
Disassemble the saw chain and guide bar in reversed
order of assembly.
The circular groove of the guide bar will wear
particularly on the lower edge with time. When
replacing the chain turn the chain bar 180° to allow
even wear, thus extending guide bar life.
Rotate the guide bar occasionally to prevent uneven
wear. The guide bar ‘rail’ should always have a square
edge.
To check the guide bar “RAIL“ for wear: Hold a ruler
(straight edge) against the side of the guide bar and
“CUTTER SIDE PLATES“.
If there is a gap between the ruler and guide bar the
guide bar “RAIL“ is normal. If there is no gap (ruler
flush against the side of the guide bar) the guide bar
“RAIL“ is worn and needs to be replaced.
(See Fig.25 & 26)

18
A
ssemble the guide bar and saw chain as described
under “Replacing The Bar And Chain”.
S
HARPENING THE CHAIN
WARNING! Only sharpen the saw chain yourself if you
are trained and have experience! Use proper tools to
s
harpen the saw chain!
It is highly recommended that, once the chain loses
i
t’s ability to cut cleanly and safely, it is replaced. It is
possible, however, to sharpen the existing chain if
done carefully.
Have your saw chain sharpened professionally at an
authorised service centre or sharpen the chain
yourself using a proper sharpening kit. Follow the
sharpening instructions supplied with a sharpening kit.
To sharpen the chain proceed as follows:
Tighten the chain tension enough that the chain does
not wobble. Do all of your filing at the midpoint of the
bar. Wear gloves for protection.
Use a round file, whose diameter is 1.1 times the
cutting tooth depth. Make sure 20% of the file
diameter is above the cutter’s top plate.
A file guide is available from most reputable tool
merchants and is the easiest way to hold the file at
the correct position. (Fig.27)
File at an angle perpendicular to the bar, and at an
angle of 25° to the direction of travel. (Fig.28)
File each tooth from the inside towards outside only.
File one side of the chain first than turn the product
around and repeat the process.
Sharpen each tooth equally by using the same
number of strokes.
Keep all cutter lengths equal.
Check the safety depth gauge height every 5
sharpenings.
If the depth gauges are also trimmed it is essential
that the original profile be restored.
Use a depth gauge measuring instrument to check the
height of the depth gauge.
Depth gauge measuring jigs are available from most
reputable tool merchants.
NOTE: Dull or improperly sharpened chain can cause
excessive motor speed during cutting which may
result in severe motor damage.
POLE HEDGE TRIMMER MAINTENANCE
BLADE MAINTENANCE
Wear gloves when handling or cleaning the blade.
Always clean the cutting blade after operation and
coat it with a lubricating oil or spray. This will prevent
the blade becoming seized or corroded during
storage.
D
uring longer cutting periods, 15 minutes or greater, it
is recommended to lubricate the blade, this will
improve cutting performance and extend the batteries
run time. A lack of lubrication to the blade can
s
everely effect the products run time and may cause
the blade to overheat.
V
isually check the condition of the cutting edges of
the cutting blade before each use. Check the
t
ightness of blade bolts.
When not in use ensure that the blade is covered with
t
he blade guard provided and that it has been
l
ubricated. Failure to do so may cause the blade to
corrode and will severely reduce cutting performance
and battery run times.
STORAGE
Clean all foreign material from the product. Store idle
unit indoors in a dry, well-ventilated area that is
inaccessible to children. Keep away from corrosive
agents such as garden chemicals and de-icing salts.
Always place the blade guard on the saw/trimmer
blade when transporting or storing the pole
saw/trimmer. The blade guard is a snug fit and must
be attached very carefully due to the sharp teeth on
the saw chain. This is best done by grasping the
blade guard at one end, in the centre portion of the
guard, and carefully sliding it over the chain. Use
caution to avoid the sharp teeth of the chain.
NOTE: The saw chain is very sharp. Always wear
protective gloves when handling the chain.
TECHNICAL SPECIFICATION (POLE SAW)
Motor 18V DC
Bar length 8 in.
Cutting capacity 150mm
Chain pitch 3/8 in.
No load speed 2500min
-1
± 10%
Chain linear speed 5m/s
Oil consumption > 3ml/min
Oil capacity 60ml
Pole extension 2 - 2.8m
Sound Pressure Level L
pA
78.2dB(A)
K=3dB(A)
Sound Power Level L
WA
91.8dB(A)
K=3dB(A)
Vibration Level 2.109m/s
2
, K=1.5m/s
2
19
T
ECHNICAL SPECIFICATION
(POLE HEDGE TRIMMER)
M
otor 18V DC
B
lade length 420mm
Blade action Dual
Branch cutting capacity 16mm
N
o load speed 2100min
-1
±
10%
Trimmer head angles 75º to -60º
S
ound Pressure Level L
p
A
7
7.3dB(A)
K=3dB(A)
Sound Power Level L
WA
88.1dB(A)
K=3dB(A)
Vibration Level 1.5m/s
2
, K=1.5m/s
2
ENVIRONMENTAL PROTECTION
Information for (private householders) for the environmentally responsible disposal of Waste Electrical and
Electronic Equipment (WEEE)
This symbol on products and or accompanying documents indicates that used and end of life
electrical and electronic equipment should not be disposed of in household waste. For the
proper disposal, treatment, recovery and recycling, please take these products to designated
collection points, where they will be accepted on a free of charge basis. Alternatively, in some
countries you may be able to return your products to your retailer upon the purchase of an
equivalent new product. Disposing of this product correctly will help to save valuable resources
and prevent any potential adverse effects on human health and the environment which could
otherwise arise from inappropriate waste disposal and handling. Please contact your local
authority for further details of your nearest designated collection point. Penalties may be applicable for incorrect
disposal of this waste in accordance with national legislation.
FOR BUSINESS USERS IN THE EUROPEAN UNION.
If you wish to discard electrical and electronic equipment, please contact your dealer or supplier for further
information.
Information on Disposal in other Countries outside the European Union.
This Symbol is only valid in the European Union.
If you wish to dispose of this product, please contact your local authorities or dealer and ask for the correct
method of disposal.
20
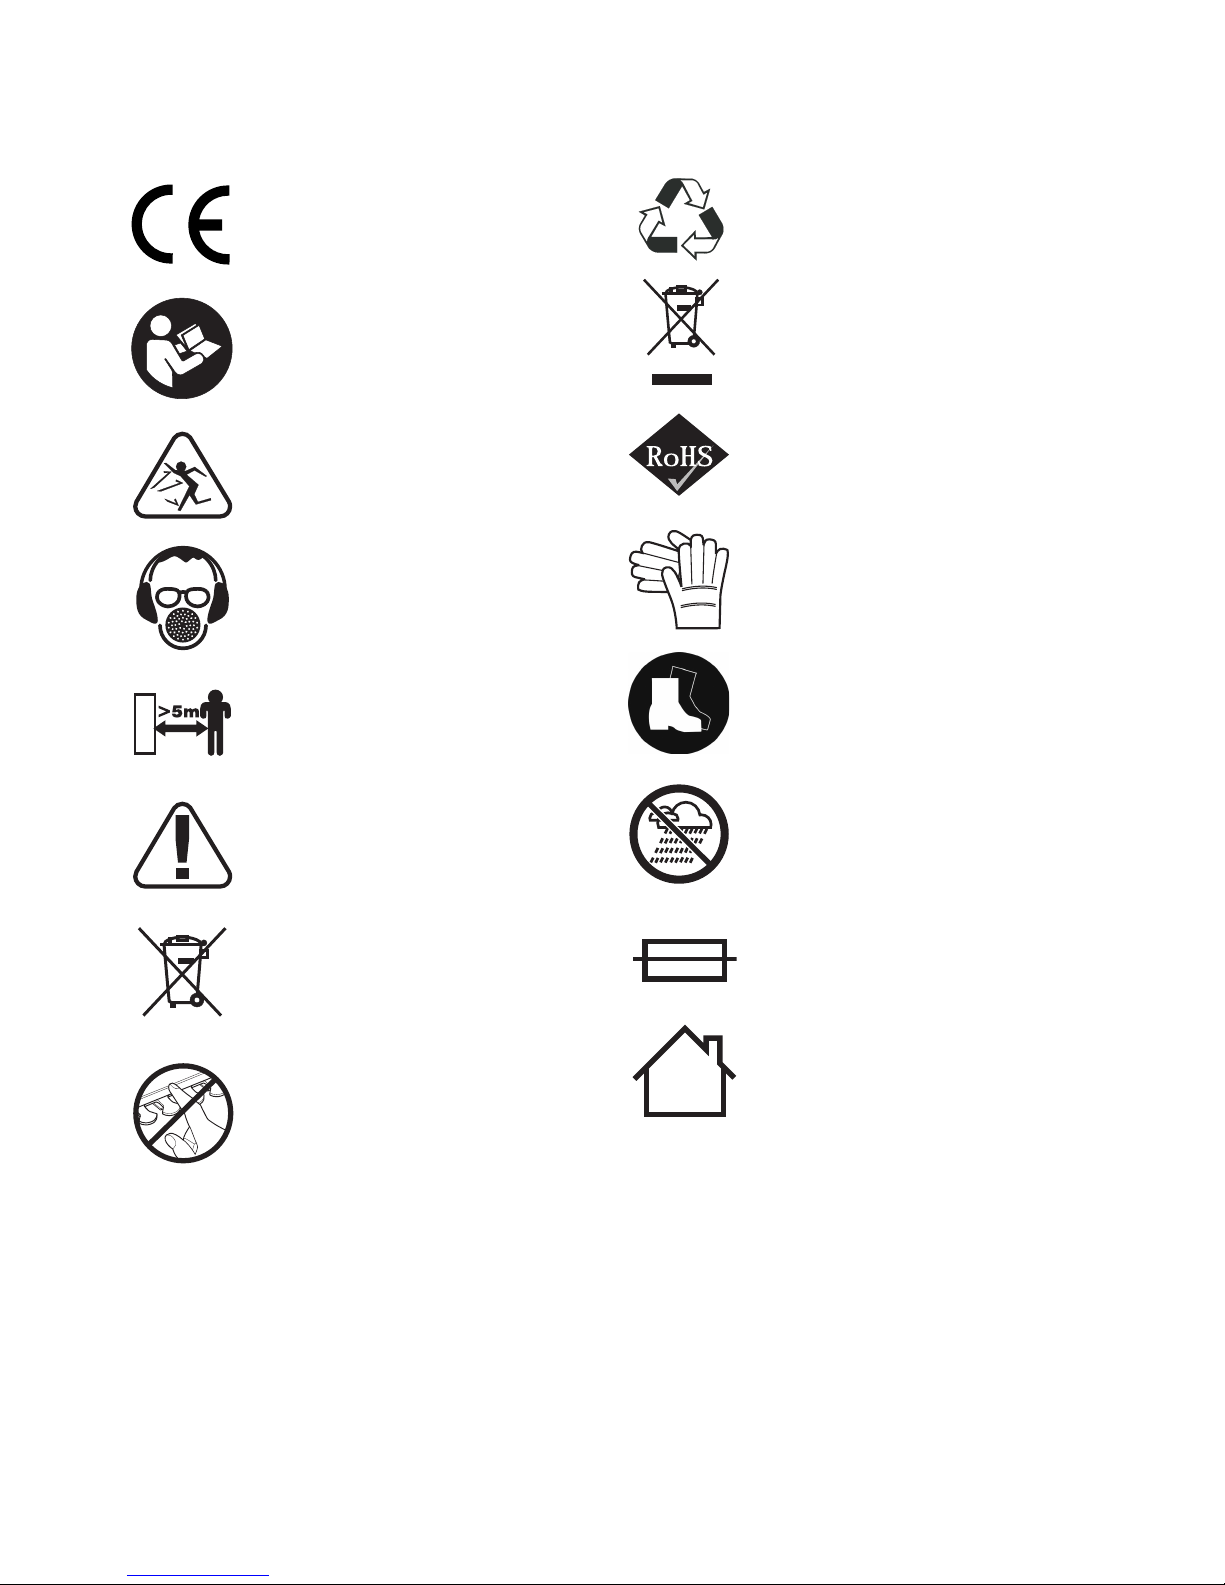
SYMBOLS
The rating plate on your tool may show symbols. These represent important information about the product or
instructions on its use.
C
onforms to relevant safety
s
tandards.
R
ead the instruction manual.
W
aste electrical products should not be
d
isposed of with household waste.
Please recycle where facilities exist.
Check with your Local Authority or
retailer for recycling advice.
Product conforms to RoHs
requirements.
Wear suitable clothing as debris may be
ejected from the machine.
For protection against injury wear ear
defenders and safety goggles.
Keep bystanders and pets clear of the
machine when in use.
Warning!
Caution: Wear protective gloves when
using the machine and handling debris.
130°C
Li-ion
This product is suitable for indoor use
Thermal link with operating temperature
Contains Lithium ion
Do not expose the machine to rain.
Store the machine in a dry place.
Caution: Wear safety boots
Beware of severing toes or fingers. Do
not put hands or feet near the blade.

21
E
SITTELY
Kiitos, että ostit tämän tuotteen, joka on läpäissyt
kattavan laatutarkastusprosessimme. Kaikki on tehty
sen varmistamiseksi, että saat sen täydellisessä
t
oimintakunnossa.
T
URVALLISUUS ENSIN
S
euraavat perusvarotoimet on tehtävä ennen
sähkötyökalun käyttämistä tulipalojen, sähköiskujen ja
h
enkilövahinkojen estämiseksi. On tärkeää lukea nämä
k
äyttöohjeet, jotta ymmärrät tämän työkalun käytön,
siihen liittyvät rajoitukset ja potentiaaliset vaarat.
T
AKUUTODISTUS
Tällä tuotteella on 2 vuoden takuu, joka alkaa
ostopäivästä ja koskee vain ensimmäistä ostajaa.
Tämä takuu kattaa vain virheet, jotka aiheutuvat
raaka-aine- ja valmistusvioista, ja jotka tulevat esille
takuuaikana. Takuu ei korvaa kuluvia osia. Valmistaja
korjaa tai vaihtaa tuotteen harkintansa mukaan
edellyttäen seuraavassa mainittuja asioita. Tuotetta on
käytetty käsikirjan ohjeiden mukaisesti, ja sitä ei ole
käytetty väärin tai huolimattomasti tai tarkoitukseen,
johon sitä ei ole tarkoitettu käytettäväksi. Laitetta ei
ole purettu osiin tai peukaloitu millään tavalla, sitä ei
ole huollatettu valtuuttamattomilla henkilöillä tai
käytetty vuokrauksen kohteena. Kuljetusvauriot eivät
kuulu tämän takuun piiriin. Niistä on vastuussa
kuljetusliike. Takuuvaateet on esitettävä ensisijaisesti
suoraan jälleenmyyjälle takuukauden aikana. Tuote
tulee palauttaa valmistajalle vain poikkeuksellisissa
tapauksissa. Näissä tapauksissa ostajan vastuulla on
tuotteen palauttaminen omalla kustannuksellaan ja
varmistaen, että se on asianmukaisesti pakattu
kuljetusvaurioiden estämiseksi. Mukaan tulee liittää
lyhyt kuvaus viasta ja kopio kuitista tai muusta
ostotodistuksesta. Valmistaja ei ole vastuussa mistään
erityisistä, esimerkillisistä, suorista, välillisistä,
satunnaisista tai epäsuorista menetyksistä tai
vahingoista takuun aikana. Tämä takuu tulee lisänä,
eikä vaikuta oikeuksiin, joita kuluttajalla saattaa olla
vuoden 1973 Tavaranmyyntilain ja siihen vuonna 1975
ja 1999 tehtyjen muutosten mukaisesti.
LAKISÄÄTEISET OIKEUDET
Tämä takuu on lisänä, eikä vaikuta lakisääteisiin
oikeuksiisi.
TUOTTEEN HÄVITTÄMINEN
Kun tuotteen käyttöikä loppuu tai se hävitetään
jostakin muusta syystä, sitä ei saa hävittää
kotitalousjätteen mukana. Luonnonvarojen
säilyttämiseksi ja haitallisten ympäristövaikutusten
minimoimiseksi, kierrätä tuote tai hävitä muulla
ympäristöystävällisellä tavalla. Tuote tulee viedä
paikalliseen kierrätyskeskukseen tai muuhun
viralliseen keräily- ja hävityspisteeseen.
Jos olet epävarma, kysy kierrätys- ja/tai
hävittämisvaihtoehdoista paikalliselta jäteliikkeeltä.
T
ÄRKEITÄ TIETOJA TUOTTEESTA
Tuote on suunniteltu toimimaan FXA XCLICK -sarjan
akkujen ja latureiden kanssa.
O
KSASAHAN ERITYISET TURVALLISUUSOHJEET
Laitetta ei ole tarkoitettu sellaisten henkilöiden
käyttöön (mukaan luettuna lapset), jotka ovat
fyysisesti, aistimuksellisesti tai mielellisesti
vajaakykyisiä tai joilla ei ole kokemusta tai tietämystä,
ellei heidän turvallisuudestaan vastaava henkilö ole
ohjannut tai opettanut heitä laitteen käytössä.
Varoitus! Lue kaikki ohjeet ja ymmärrä ne. Tutustu
kaikkiin säätimiin ja koneen oikeaan käyttöön.
Noudata kaikkia turvallisuusohjeita. Jos kaikkia
seuraavia ohjeita ei noudateta, seurauksena saattaa
olla sähköisku, tulipalo ja/tai vakava henkilövahinko.
Tarkista maasto, jossa konetta käytetään ja poista
kaikki esineet, jotka voivat tarttua kiinni ja sinkoutua
koneesta.
Käytä sivusuojuksilla varustettuja suojalaseja, joiden
on merkitty täyttävän ANSI Z87.1 vaatimukset sekä
kypärää, kun käytät laitetta.
Pukeudu asianmukaisesti. Käytä paksuja,
pitkälahkeisia housuja, saappaita ja suojakäsineitä. Älä
käytä löysiä vaatteita, shortseja, sandaaleja tai ole
paljain jaloin. Älä käytä minkäänlaisia koruja.
Kiinnitä pitkät hiukset siten, että ne eivät ulotu
olkapäille, jotta estät niiden takertumisen liikkuviin
osiin.
Pidä kaikki sivulliset, lapset ja lemmikkieläimet
vähintään 15 metrin etäisyydellä työskentelyalueelta.
Sammuta laite välittömästi, jos joku lähestyy. Muista,
että koneen käyttäjä on vastuussa vahingoista, joita
aiheutuu sivullisille ja/tai heidän omaisuudelleen.
Älä käytä työkalua väsyneenä, sairaana tai ollessasi
allapäin, eikä alkoholin, huumeiden tai lääkkeiden
vaikutuksen alaisena.
Älä käytä laitetta huonossa valaistuksessa.
Käytä aina kasvosuojaa tai hengityssuojaa, jos käyttö
aiheuttaa pölyä.
Poista akku laitteesta, kun laitetta ei käytetä, ennen
huoltotoimenpiteitä ja kun vaihdat lisävarusteita, kuten
teräketjua.
Älä kurottele. Säilytä aina tukeva asento ja hyvä
tasapaino. Kurottelu voi johtaa tasapainon
menetykseen tai altistumiseen kuumille pinnoille.
Älä koskaan seiso suoraan sen oksan alla, jota
katkaiset. Seiso aina poissa putoavien roskien reitiltä.
Laturi Akku
(ei ole mukana) (ei ole mukana)
FXADL1051 FXAJDB180Li
FXAJDB180Li-II

22
Ä
lä koskaan seiso rappusilla, tikkailla, katolla, puun
päällä tai muun epävakaan tuen päällä, kun käytät
oksasahaa. Tasapainoinen asento vakaalla alustalla
mahdollistaa laitteen paremman ohjauksen
o
dottamattomissa tilanteissa. Käytä oksasahaa aina
molemmilla käsillä. Paina oksasahaa vakaasti ja
tasaisesti katkaisun aikana, äläkä yritä pakottaa sahaa
puun läpi. Älä käytä oksasahaa halkaisijaltaan
terälevyä pitempien oksien katkaisemiseen.
P
idä kaikki kehonosat etäällä liikkuvista osista. Pidä
kätesi etäällä katkaisualueelta. Pidä molemmat kädet
kiinni kahvassa, kun virta on päällä.
Tarkasta laite ennen jokaista käyttökertaa löysien
liitäntöjen varalta. Vaihda kaikki vaurioituneet osat
ennen käyttöä.
Kun laitetta ei käytetä, se täytyy säilyttää sisätiloissa,
kuivassa ja lukitussa paikassa, poissa lasten
ulottuvilta.
Älä missään olosuhteissa käytä laitteessa mitään
lisäosaa tai lisävarustetta, joka ei ole tullut laitteen
mukana tai jota ei ole määritetty käyttöoppaassa
laitteeseen soveltuvaksi.
Älä käytä laitetta kosteissa tai märissä paikoissa. Älä
käytä sateessa.
Älä käytä laitetta mihinkään muuhun työhön kuin
siihen, mihin se on tarkoitettu.
Älä pakota laitetta. Se toimii paremmin ja aiheuttaa
epätodennäköisemmin loukkaantumisia, kun sitä
käytetään sille suunnitellulla teholla.
HUOMIO. Katkaisuterä pyörii vielä sammuttamisen
jälkeen.
Älä tartu paljaisiin teriin tai leikkuureunoihin, kun
nostat laitetta tai pitelet sitä.
Tarkista osat vaurioiden varalta. Ennen työn jatkamista
suojukset tai muut osat tulee huolellisesti tarkistaa
koneen toimivuuden arvioimiseksi ja tehtäväänsä
sopivuuden arvioimiseen. Tarkista liikkuvien osien
kohdistus, liikkuvien osien kiinnitys, osien vauriot,
asennus sekä kaikki muut seikat, jotka voivat vaikuttaa
toimintaan. Mikäli työkalun turvalaite tai muu osa on
vaurioitunut, se tulee korjata kunnolla tai vaihtaa
valtuutetun huoltoliikkeen toimesta, jollei muuta ole
mainittu tässä käyttöohjeessa.
LISÄTURVAOHJEET
Takapotku on vaarallinen reaktio, joka voi johtaa
vakavaan loukkaantumiseen. Takapotku saattaa
tapahtua, kun liikkuva ketju koskettaa jotakin esinettä
terälevyn kärjen yläosassa tai kun puu sulkeutuu ja
nipistää ketjun leikkauksen sisään. Kosketus terälevyn
yläkärjen kohdalla voi aiheuttaa ketjun pureutumisen
kohteeseen, mikä pysäyttää ketjun hetkeksi.
Seurauksena on salamannopea vastareaktio, joka
potkaisee terälevyn ylös ja taakse käyttäjää kohti. Jos
ketju puristuu terälevyn yläosaa pitkin, terälevy voi
ponnahtaa nopeasti taaksepäin kohti käyttäjää, mikä
v
oi aiheuttaa laitteen hallinnan menetyksen ja saattaa
aiheuttaa vakavan henkilövahingon. Älä luota
yksinomaan laitteen turvalaitteisiin.
Jos takapotkun periaatteet ymmärretään,
yllätyselementtiä voidaan vähentää tai se voidaan
p
oistaa. Äkillinen yllätys lisää onnettomuuksia.
Käytä oksasahaa vain puun katkaisemiseen. Älä
k
atkaise muita kuin puita.
V
armista, että työskentelyalue on esteetön. Älä anna
terälevyn pään koskettaa runkoa, oksia, aitaa tai
muuta estettä, kun käytät laitetta. Suunnittele
poistumisreitti.
Työskentele vain, kun näkyvyys ja valoisuus ovat
riittävät, jotta näet selvästi.
Suojaudu sähköiskuilta, älä käytä alle 15 metrin
etäisyydellä sähkölinjoista.
Varmista ennen moottorin käynnistämistä, että ketju ei
kosketa mitään kohteita.
Suojaudu putoavilta oksilta, älä seiso suoraan
katkaistavan oksan alla. Laitetta ei saa pitää yli 60
asteen kulmassa maanpinnan tasosta.
Sammuta moottori ja varmista, että leikkaavat osat
ovat pysähtyneet ennen kuin asetat laitteen alas.
Älä käytä sahaa yhdellä kädellä! Yhdellä kädellä
käyttäminen saattaa aiheuttaa käyttäjän, avustajien,
sivullisten tai näiden henkilöiden ryhmän vakavan
loukkaantumisen. Tämä saha on tarkoitettu
käytettäväksi kahdella kädellä.
Ole erityisen varovainen pieniä oksia ja taimikkoa
katkoessasi, ohuet oksat voivat tarttua teräketjuun,
sinkoutua sinua päin ja nykäistä sinut pois
tasapainosta.
Varo takapotkua jännityksessä olevia oksia
sahatessasi, sillä puukuitujen vapautuessa
jännityksestä oksa voi sinkoutua sinua päin.
Älä kanna laitetta akku asennettuna, äläkä kanna sitä
sormi liipaisimella, jotta vältät tahattoman
käynnistymisen.
Hoida laitetta huolellisesti Pidä leikkausreunat terävinä
ja puhtaina parhaan suorituskyvyn saavuttamiseksi ja
loukkaantumisten välttämiseksi. Noudata voitelemista
ja lisävarusteiden vaihtamista koskevia ohjeita.
Tarkasta akkulaturin johto säännöllisesti. Mikäli se on
vioittunut, se tulee vaihtaa tai korjata valtuutetussa
huoltoliikkeessä.
Pidät kahvat kuivina, puhtaina sekä öljyttöminä ja
rasvattomina.
Laitteen huollon saa suorittaa vain ammattitaitoinen
henkilö. Ammattitaidottoman henkilön suorittama
huolto voi aiheuttaa käyttäjän loukkaantumisen tai
laitteen vioittumisen.

23
A
kkukäyttöisiä laitteita ei tarvitse liittää
sähköverkkoon. Tästä syystä ne ovat aina
käyttökunnossa. Huomioi mahdolliset vaarat myös
silloin, kun laite ei ole käynnissä.
Poista akku oksasahasta ennen sen puhdistamista,
h
uoltamista, säilytykseen laittamista, materiaalin
p
oistamista, lisävarusteiden, kuten terälevyn ja ketjun,
vaihtamista tai jos laitetta ei käytetä.
Akku tulee ladata vain akun lataukseen tarkoitetulla
laturilla. Laturi, joka sopii yhdentyyppiselle akulle voi
a
iheuttaa tulipalovaaran, jos sitä käytetään
t
oisenlaisen akun kanssa. Käytä akkua vain luettelossa
mainittujen latureiden kanssa.
VARRELLISEN PENSASLEIKKURIN ERITYISET
TURVALLISUUSOHJEET
Pidä kaikki kehonosat etäällä leikkurin teristä.
Hetkellinenkin huolimattomuus laitteen käytön aikana
voi aiheuttaa vakavan vamman.
Kanna varrellista pensasleikkuria kahvasta leikkurin
terä pysäytettynä. Kuljeta varrellista pensasleikkuria ja
säilytä se aina teräsuojus kiinnitettynä. Varrellisen
pensasleikkurin asianmukainen käsittely vähentää
leikkuuterien mahdollisesti aiheuttamien
henkilövahinkojen vaaraa.
Tartu sähkötyökaluun vain eristetystä pinnasta, koska
leikkuuterä voi osua piilossa olevaan sähköjohtoon.
Jännitteiseen johtoon osuvat leikkuuterät voivat tehdä
sähkötyökalun näkyvät metalliosat jännitteisiksi ja
käyttäjä voi saada niistä sähköiskun.
Tyhjennä työskentelyalue ennen jokaista käyttöä.
Poista kaikki kohteet, kuten johdot, valot, vaijerit tai
langat, jotka voivat sinkoutua tai juuttua koneeseen.
Varo sinkoutuvia kohteita. Pidä kaikki sivulliset, lapset
ja lemmikkieläimet vähintään 15 metrin etäisyydellä
työskentelyalueelta.
Tarkasta jatkuvasti, ettei minkään leikattavan
pensasaidan tai pensaan takana tai sisällä ole ihmisiä
tai eläimiä.
Älä työskentele huonossa valaistuksessa.
Koneenkäyttäjällä täytyy olla esteetön näkymä
työskentelyalueelle mahdollisten vaarojen
tunnistamiseksi.
Tarkasta kone ennen jokaista käyttökertaa. Tarkasta
mahdolliset löysät liitännät yms. Varmista, että kaikki
suojukset ja kahvat ovat oikein ja kunnolla kiinnitetyt.
Vaihda kaikki vaurioituneet osat ennen käyttöä.
Älä koskaan muuntele laitetta millään tavoin.
Älä anna lasten tai opastamattomien henkilöiden
käyttää tätä laitetta.
Käytä täydellistä silmäsuojainta ja kuulosuojaimia
laitteen käytön aikana. Jos työskentelet paikassa,
jossa on putoavien esineiden vaara, kypärän käyttö on
pakollista.
K
äytä paksuja, pitkälahkeisia housuja, saappaita ja
suojakäsineitä. Älä käytä löysiä vaatteita, lyhytlahkeisia
housuja, minkäänlaisia koruja, äläkä työskentele
paljain jaloin.
Kiinnitä pitkät hiukset siten, että ne eivät ulotu
o
lkapäille, jotta estät niiden takertumisen liikkuviin
o
siin.
Ä
lä käytä tätä laitetta väsyneenä, sairaana tai
alkoholin, huumeiden tai lääkkeiden vaikutuksen
alaisena.
Seiso tukevasti ja tasapainossa. Älä kurottele.
Kurottelu voi johtaa tasapainon menetykseen ja
saattaa aiheuttaa vakavan henkilövahingon.
Varmista ennen laitteen käynnistämistä, etteivät
leikkuuterät osu mihinkään.
Varmista, että laite on oikein paikallaan halutussa
työskentelyasennossa ennen kuin käynnistät laitteen.
Käyttäessäsi varrellista pensasleikkuria pidä sitä kiinni
molemmin käsin ja kummastakin kahvasta, jotta
varmistat turvallisen käyttöasennon. Valmistaja ei
suosittele portaiden tai tikkaiden käyttöä.
Käytä valjaita, jos ne on toimitettu varrellisen
pensasleikkurin mukana. Ne auttavat sinua tukemalla
laitteen painoa käytön aikana ja kun siirryt
leikkuupaikkojen välillä. Säädä valjaat huolellisesti,
jotta ne istuvat miellyttävästi.
Tunnista pikavapautusmekanismi ja harjoittele sen
käyttöä ennen kuin aloitat laitteen käytön. Sen oikea
käyttö voi estää vakavan henkilövahingon
hätätilanteessa. Älä koskaan pue vaatteita valjaiden
päälle tai rajoita muulla tavalla
pikavapautusmekanismin käyttämistä.
Suojaudu sähköiskuilta, älä käytä alle 10 metrin
etäisyydellä sähkölinjoista.
Älä koskaan käytä varrellista pensasleikkuria lähellä
aitoja, valotolppia, rakennuksia tai muita kiinteitä
kohteita.
Terät ovat teräviä. Kun käsittelet teräjärjestelmää,
käytä liukumisen estäviä, kestäviä suojakäsineitä. Älä
laita kättä tai sormia terien väliin tai muuhun paikkaan,
jossa ne voivat jäädä puristuksiin tai leikkautua. Älä
koskaan kosketa teriä tai huolla laitetta, ellei akkua ole
irrotettu.
Kytke pois päältä ja poista akku ennen kuin:
säädät leikkuulaitteen työskentelyasentoa,
puhdistat tai selvität tukosta,
jätät laitteen ilman valvontaa,
tarkastat, huollat tai teet toimenpiteitä laitteelle.
Älä pakota varrellista pensasleikkuria tiheän pensaston
läpi. Terät voivat vääntyä ja niiden liike voi hidastua.
Jos terien liike hidastuu, hidasta leikkaustahtia.

24
Ä
lä yritä leikata varsia tai oksia, jotka ovat paksumpia
kuin 18 mm tai ovat todennäköisesti liian suuria
syötettäviksi leikkuuterään. Käytä isojen oksien
katkaisuun käsisahaa tai karsintasahaa, jotka eivät ole
s
ähkökäyttöisiä.
K
uulosuojainten käyttäminen heikentää
m
ahdollisuuksia kuulla varoituksia (huutoja tai
hälytyksiä). Käyttäjän on kiinnitettävä erityistä
h
uomiota ympärillä olevan alueen tapahtumiin.
Älä käytä varrellista pensasleikkuria, jos terä on
v
aurioitunut tai liian kulunut.
Ole aina tietoinen ympäristöstäsi ja ole varuillasi
mahdollisista vaaratilanteista, joita et välttämättä kuule
laitteen aiheuttaman melun vuoksi.
VAROITUS! Jos laite on pudonnut, siihen on
kohdistunut kova isku tai se alkaa täristä
epänormaalisti, pysäytä laite välittömästi ja tarkasta
vaurio tai etsi tärinän syy. Valtuutetun huoltoliikkeen
tulee korjata kaikki vauriot asianmukaisesti tai vaihtaa
laite uuteen.
VAROITUS! Tarkasta ennen jokaista käyttökertaa ja
säännöllisin välein, että kaikki jatkovarren ja työkalun
liitännät ovat kunnolla kiinni.
LATUREIDEN LISÄTURVAOHJEET
Lue ennen laturin käyttämistä kaikki ohjeet ja laturin ja
akun varoitusmerkinnät sekä myös akun käyttämistä
koskevat ohjeet.
Lataa akkuja vain sisätiloissa, sillä laturi on suunniteltu
vain sisäkäyttöön.
VAARA! Jos akku on murtunut tai jollain tavalla
vaurioitunut, älä laita sitä laturiin. Se aiheuttaa
sähköiskun tai tappavan sähköiskun vaaran.
VAROITUS! Älä päästä laturiin mitään nesteitä. Se
aiheuttaa sähköiskun vaaran.
Laturi ja sen mukana toimitettu akku on varta vasten
valmistettu toimimaan yhdessä. Älä yritä ladata akkua
muilla latureilla kuin laitteen mukana tulevalla.
Älä irrota virtajohtoa pistorasiasta johdosta vetämällä.
Älä käytä laturia, jos siihen on kohdistunut voimakas
isku, se on pudonnut tai vaurioitunut muulla tavalla.
Vie laturi valtuutettuun huoltoliikkeeseen
tarkastettavaksi tai korjattavaksi.
Älä pura laturia. Vie se valtuutettuun huoltoliikkeeseen,
jos se vaatii huoltamista tai korjauksia. Virheellinen
kokoaminen voi aiheuttaa tulipalon, sähköiskun tai
tappavan sähköiskun.
Voit vähentää sähköiskun vaaraa irrottamalla laturin
virtalähteestä, ennen kuin yrität sen puhdistamista.
Yksinään akun poistaminen ei vähennä tätä vaaraa.
AKKUA KOSKEVAT LISÄTURVAOHJEET
Työkalun akku toimitetaan alhaisen latauksen tilassa.
Sinun tulee ladata akku täyteen ennen laitteen
käyttämistä.
Ä
lä polta akkua vaikka se olisi pahasti vaurioitunut tai
se ei pitäisi enää varausta. Akku voi räjähtää tulessa.
A
kussa voi olla pientä nestevuotoa äärimmäisessä
käytössä tai äärimmäisissä lämpötiloissa. Tämä ei
välttämättä merkitse akun toimintahäiriötä. Jos
u
lkokuori on kuitenkin rikkoutunut ja vuotavaa
a
kkunestettä pääsee ihollesi, pese altistunut alue
nopeasti saippualla ja vedellä. Jos akkunestettä
p
ääsee silmiisi, huuhtele silmiä puhtaalla vedellä
v
ähintään 10 minuuttia ja hakeudu välittömästi
lääkäriin.
I
lmoita hoitohenkilökunnalle, että neste on 25–35 %
liuos kaliumhydroksidia.
Älä koskaan yritä avata akkua mistään syystä. Jos
akun muovinen kotelo rikkoutuu tai murtuu, lopeta heti
akun käyttö, äläkä lataa sitä enää uudelleen.
Älä säilytä tai kuljeta vara-akkua taskussa,
työkalulaatikossa tai muussa paikassa, jossa se
pääsee kosketuksiin metalliesineiden kanssa. Akku voi
joutua oikosulkuun, joka vaurioittaa akkua, aiheuttaa
palovammoja tai tulipalon.
TIETOA AKUN LATAAMISESTA
NiCad ja/tai Li-ion NiCad ja/tai Li-Ion-akkujen
lataustehot määrittää aika, jonka akun täyteen
lataaminen kestää. Tähän aikaan vaikuttaa latausvirta.
Kolme yleisintä lataustehoa ovat:
Nopea lataus.
Hidas lataus.
Ylläpitolataus.
NOPEASTI LADATTAVAT AKUT
Nopeasti ladattavien akkujen latausaika voi vaihdella
30 minuutin ja 90 minuutin välillä. Akkukäyttöisen
sähkötyökalun mukana tulevan akun latausaika on
merkitty tuotteen käyttöoppaaseen.
HITAASTI LADATTAVAT AKUT
Hitaasti ladattavien akkujen latausaika on 3 tunnin ja 5
tunnin välillä.
AKKUJEN YLLÄPITOLATAUS
Akkujen ylläpitolatauksen latausaika on 7 tunnin ja 9
tunnin välillä.
TÄRKEÄÄ!
NICAD- JA/TAI LI-ION-AKKUJA KOSKEVAA
LATAUSTIETOJA
PURA NICAD- JA/TAI LI-ION-AKKU AINA
KOKONAAN ENNEN LATAAMISTA, ÄLÄKÄ
KOSKAAN YLITÄ LATAUSAIKAA PAITSI JOS
KYSEESSÄ ON UUDEN AKUN ”KUNNOSTUS”.
LATAUSMENETTELY
Ladattaessa uutta NiCad- ja/tai Li-Ion-akkua, se tulee
purkaa aivan tyhjäksi ja ladata sen jälkeen aivan
täyteen akun latausajan mukaisesti, joka on ilmoitettu
tuotteen käyttöoppaassa plus 30 minuuttia.

25
T
ämän jälkeen se tulee purkaa uudelleen aivan
tyhjäksi ja ladata sen jälkeen uudelleen aivan täyteen
akun latausajan mukaisesti, joka on ilmoitettu tuotteen
käyttöoppaassa plus 30 minuuttia. Tämä toimenpide
k
unnostaa akun ja tasoittaa kennojännitteet. Tämä
toimenpide varmistaa akun optimaalisen toiminnan.
J
os käytät laturia toistuvasti useamman akun
peräkkäiseen lataamiseen, anna laturin jäähtyä
a
kkujen välillä. On suositeltavaa, että jäähtymisjakso
k
estää vähintään 30–45 minuuttia.
K
un lataat akkua, joka on purkaantunut kovassa
k
äytössä, anna akun jäähtyä ennen lataamista. On
suositeltavaa, että jäähtymisjakso kestää vähintään
30–45 minuuttia.
NICAD- JA/TAI LI-ION-AKKUJEN LATAAMINEN JA
LATURIT
NiCad- ja/tai Li-Ion-akkujen lataus on tehtävä
huolellisesti, koska ylilataaminen voi vaurioittaa niitä.
Ylilataus voi nostaa akun lämpötilaa ja sisäinen paine
voi nousta äkisti. Tämä voi aiheuttaa kennojen
vääntymistä ja elektrolyytin vuotoa, sekä niissä
äärimmäisissä tapauksissa, joissa sisäinen paine on
erittäin korkea, akut voivat räjähtää.
Tämä voi tapahtua myös, jos yliladattu akku
kiinnitetään laitteeseen ja laitetta aletaan käyttää.
Näiden äärimmäisten tilanteiden välttämiseksi on
tärkeää, että NiCad- ja/tai Li-Ion-akut tyhjennetään
täysin ennen latausta ja latausaika ei ylitä ilmoitettua
paitsi uuden akun ”kunnostuksessa”. Toistuva vain
osittain purkautuneiden akkujen lataaminen voi
aiheuttaa yhden tai useamman kennon toimintahäiriön.
ITSEPURKAUS
Litiumakku voi purkautua itsestään ja menettää
ladatun varauksen. Yleensä akku menettää noin 5 %
latauksesta ensimmäisen kuukauden aikana täyteen
lataamisen jälkeen (säilytettäessä huonelämpötilassa)
ja sen jälkeen 3 % kuukaudessa. Jos akkua
säilytetään korkeammassa lämpötilassa, itsepurkaus
nopeutuu.
AKUN LATAAMINEN SISÄTILOISSA
Tämä laturi on suunniteltu sisäkäyttöön. Emme
suosittele sen käyttämistä kuitenkaan asuintiloissa.
Akut olisi parasta ladata verstaan pöydällä,
autotallissa tai vajassa. Jos akku on pakko ladata
asuintiloissa, tilan pitää olla hyvin ilmastoitu ja laturi
tulee asettaa syttymättömälle alustalle varmistaen,
että ilmanvaihtoaukot ovat esteettömät. Älä koskaan
ylitä latausaikaa, paitsi uuden akun ”kunnostuksessa”,
sillä se voi vaurioittaa akkua ja laturia.
AKUN HÄVITTÄMINEN
Kun akku ei enää lataudu tai lataus ei pysy, akun
käyttöaika on loppunut. Kierrätä akku luonnon
resurssien säästämiseksi tai hävitä akku
asianmukaisesti. Tässä akussa on nikkeli-kadmiumkennot. Varmista ennen hävittämistä, että akku on
täysin purkautunut käyttämällä akkukäyttöistä
työkalua. Poista akku sitten työkalusta ja peitä akun
liitännät vahvalla teipillä, joka estää oikosulun
s
yntymisen ja sähkövirran purkautumisen, mikä voisi
aiheuttaa tulipalon. Älä yritä avata tai poistaa mitään
komponentteja.
Saat lisätietoja kierrättämisestä ja/tai
hävitysvaihtoehdoista ottamalla yhteyden paikallisiin
j
ätehuoltoviranomaisiin.
ERITYISET TURVAOHJEET
LADATTAVAT AKUT.
A
kut voivat vuotaa tai räjähtää, jos niitä ei ladata ja
käsitellä oikein. Noudata akkujen käsittelyssä aina
seuraavia varotoimia. Varmista, että kone on kytketty
pois päältä ennen akun irrottamista tai kiinnittämistä.
Älä käytä tätä akkua minkään muun laitteen kanssa.
Älä yritä kiinnittää akkua väärinpäin.
Älä oikosulje tai yritä purkaa akkua.
Älä altista akkua liekeille tai korkeille lämpötiloille.
Älä upota akkua veteen tai altista sitä vedelle.
Älä säilytä tai kuljeta akkua irrallisten metalliesineiden,
kuten poranterien, kanssa.
Akut voivat vuotaa, kun niitä puretaan. Vältä laitteen
vioittuminen poistamalla tai lataamalla akku, kun
varausta ei ole enää jäljellä. Säilytä akku viileässä
paikassa, kun se ei ole käytössä.
Akku saattaa kuumentua pitkäaikaisen käytön jälkeen.
Kytke kone pois päältä ennen kuin irrotat akun ja anna
akun jäähtyä. Älä käytä akkua, jos huomaat akun
kotelossa värjäytymiä tai vääntymiä.
YLEISET TURVALLISUUSSÄÄNNÖT
VAROITUS! Lue kaikki ohjeet
Alla olevien ohjeiden noudattamatta jättäminen voi
aiheuttaa sähköiskun, tulipalon ja/tai vakavan
vamman. Käsite ”sähkötyökalu” kaikissa alla
luetelluissa varoituksissa viittaa työkaluun tai
akkukäyttöiseen (johdotoomaan) sähkötyökaluun.
PIDÄ NÄMÄ OHJEET TALLELLA
1) TYÖALUE
a) Pidä työalue puhtaana ja hyvin valaistuna.
Roskaiset tai pimeät alueet lisäävät
onnettomuusriskiä.
b) Älä käytä työkaluja ympäristöissä, joissa on
räjähdysvaara, kuten helposti syttyvien nesteiden,
kaasujen tai pölyn läsnä ollessa. Työkalut
synnyttävät kipinöitä, jotka voivat sytyttää pölyn tai
höyryt tuleen.
c) Pidä lapset ja sivulliset poissa työkalua
käytettäessä. Häiriötekijät voivat haitata
keskittymistä.

26
2
) SAHKÖTURVALLISUUS
a
) Sähkötyökalun pistokkeiden tulee vastata
p
istorasiaa. Älä koskaan muuta pistoketta millään
tavalla. Älä käytä sovitinpistokkeita maadoitettujen
sähkötyökalujen kanssa. Muuttamattomat
p
istokkeet ja yhteensopivat pistorasiat vähentävät
s
ähköiskun vaaraa.
b
) Vältä vartalokosketusta maadoitettuihin pintoihin
kuten putkiin, lämmittimiin, liesiin tai jääkaappeihin.
Sähköiskun vaara kasvaa, josvartalosi on
m
aadoitettu.
c) Suojaa sähkötyökalut sateelta ja kosteudelta.
Sähkötyökalun sisään päässyt vesi lisää
sähköiskun vaaraa.
d) Älä käytä johtoa väärin. Älä koskaan käytä johtoa
sähkötyökalun kantamiseen, vetämiseen tai
irrottamiseen pistorasiasta. Pidä johto kaukana
lämmöstä, öljystä, terävistä reunoista ja liikkuvista
osista. Vaurioituneet tai sotkeutuneet johdot
lisäävät sähköiskun vaaraa.
e) Kun sähkötyökalua käytetään ulkotiloissa, käytä
jatkojohtoa, joka soveltuu ulkokäyttöön.
Ulkokäyttöön sopivan johdon käyttö vähentää
sähköiskun vaaraa.
3) HENKILÖTURVALLISUUS
a) Pysy valppaana, katso mitä teet ja käytä tervettä
järkeä käyttäessäsi työkalu. Älä käytä työkalu
ollessasi väsynyt tai huumeiden, alkoholin tai
lääkkeiden vaikutuksen alaisena. Hetkellinen
epähuomio työkalu käytettäessä voi johtaa
vakaviin henkilövammoihin.
b) Käytä suojavarustusta. Käytä aina suojalaseja.
Turvavarustus kuten hengityssuojain,
liukumattomat turvajalkineet, suojakypärä tai
kuulosuojain käytettynä asianmukaisissa
olosuhteissa vähentää henkilövammoja.
c) Vältä vahinkokäynnistyksiä. Varmista, että kytkin
on off-asennossa (sammutettuna) ennen virran
kytkemistä. Työkalun kantaminen sormi kytkimellä
tai virran kytkeminen päälle työkaluihin, joiden
kytkin on päällä, voi aiheuttaa onnettomuuksia.
d) Poista säätöavaimet tai jakoavaimet ennen
työkalun käynnistämistä. Jako- tai muu avain, joka
on jätetty kiinni työkalun pyörivään osaan voi
aiheuttaa henkilövamman.
e) Älä kurkottele. Pidä asianmukainen jalansija ja
tasapaino kaiken aikaa. Tämä mahdollistaa
työkalun paremman hallinnanodottamattomissa
tilanteissa.
f) Pukeudu asianmukaisesti. Älä pidä löysiä vaatteita
tai koruja. Pidä hiuksesi, vaatteesi ja käsineesi
poissa liikkuvista osista. Löysät vaatteet, korut tai
pitkä tukka voivat jäädä kiinni liikkuviin osiin.
g
) Jos pölynpoistoon tai keräyslaitteisiin kytkettäviä
laitteita on toimitettu, varmista, että ne on kytketty
ja niitä käytetään asianmukaisesti. Näiden
laitteiden käyttö voi vähentää pölyyn liittyviä
v
aaroja.
4
) TYÖKALUN KÄYTTÖ JA HUOLTO
a) Älä käytä voimaa työkaluun. Käytä
k
äyttötarkoitukseesi soveltuvaa työkalua.
Asianmukainen työkalu toimii paremmin ja
turvallisemmin teholla, jolla se on suunniteltu.
b) Älä käytä työkalua, jos kytkin ei käännä sitä päälle
ja pois päältä. Työkalu, jota ei voida kontrolloida
kytkimestä on vaarallinen, ja se tulee korjata.
c) Säilytä seisovat työkalut poissa lasten ulottuvilta,
äläkä anna henkilöiden, jotka eivät tunne työkalua
tai näitä ohjeita, käyttää työkalua. Työkalut ovat
vaarallisia kouluttamattomien käyttäjien käsissä.
d) Pidä työkalut kunnossa. Tarkasta liikkuvien osien
kohdistusvirheet tai kiinnitykset, osien murtumat ja
muut seikat, jotka voivat vaikuttaa sähkötyökalujen
käyttöön. Jos työkalu on vaurioitunut, korjauta se
ennen käyttöä. Monet onnettomuudet aiheutuvat
huonosti kunnossapidetyistä työkaluista.
e) Pidä leikkaustyökalut terävinä ja puhtaina.
Asianmukaisesti kunnossapidetyt leikkaustyökalut,
joissa on terävät leikkausreunat, eivät juutu
helposti ja niiden käsittely on helpompaa.
f) Käytä työkalua, lisävarusteita ja työkalupaloja tms.
näiden ohjeiden mukaisesti ja tavalla, johon
kyseessä oleva sähkötyökalu on tarkoitettu, ottaen
huomioon työolosuhteet ja suoritettava työ.
Työkalun käyttö toimintoihin, joihin sitä ei ole
tarkoitettu, voi johtaa vaaralliseen tilanteeseen.
5) AKKUTYÖKALUN KÄYTTÖ JA HUOLTO
a) Lataa vain valmistajan määrittämällä laturilla.
Yhdentyyppisen akun kanssa sopiva laturi voi
aiheuttaa palovaaran, jos sitä käytetään
toisentyyppisen akun kanssa.
b) Käytä sähkötyökaluja vain määritettyjen akkujen
kanssa. Muiden akkujen käyttäminen voi aiheuttaa
henkilövahingon tai tulipalovaaran.
c) Kun akku ei ole käytössä, pidä se erillään muista
metalliesineistä, kuten paperiliittimistä, kolikoista,
avaimista, nauloista, ruuveista tai muista pienistä
metalliesineistä, jotka voivat muodostaa kytkennän
navasta toiseen. Oikosulun luominen akun napojen
välille voi aiheuttaa palovammoja tai tulipalon.
d) Sopimattomissa olosuhteissa akusta voi vuotaa
nestettä; vältä kosketusta. Jos vahingossa altistut
nesteelle, huuhtele vedellä. Jos nestettä pääsee
silmiin, hakeudu lisäksi lääkärin hoitoon. Akusta
vuotanut neste voi aiheuttaa ärsytystä tai
palovammoja.

27
6
) HUOLTO
a
) Jätä työkalun huolto pätevälle korjaajalle, joka
k
äyttää ainoastaan täsmälleen samanlaisia
varaosia. Näin varmistetaan, että työkalun
turvallisuus säilyy.
OSAT JA SÄÄTIMET (KUVA 1)
PAKKAUKSESTA PURKU
Huomio! Tämä pakkaus sisältää teräviä osia. Ole
varovainen pakkausta purkaessasi. Poista laite sekä
mukana olevat tarvikkeet pakkauksesta. Tarkista
huolellisesti, että laite on hyvässä kunnossa ja kaikki
käyttöoppaassa luetellut tarvikkeet ovat mukana.
Varmista myös, että kaikki tarvikkeet ovat täydellisiä.
Jos jokin osa puuttuu, laite ja tarvikkeet tulee
palauttaa alkuperäisessä pakkauksessa
jälleenmyyjälle.
Älä heitä pakkausta pois, pidä se tallessa koko
takuuajan ja kierrätä sen jälkeen, mikäli mahdollista,
muutoin hävitä se asianmukaisella tavalla. Älä anna
lasten leikkiä tyhjillä muovipusseilla tukehtumisvaaran
takia.
AKUN LATAAMINEN
Varoitus! Lataa vain 18 V:n yhteensopivilla latureilla.
Muiden latureiden käyttö voi aiheuttaa tulipalon,
vaurioita tai vakavan henkilövahingon.
T
yökalun akku toimitetaan alhaisen latauksen tilassa,
jotta estetään mahdolliset ongelmat. Tästä syystä
akkua täytyy ladata, kunnes laturin oikealla puolella
oleva vihreä LED-valo syttyy.
Huomautus: Akut eivät saavuta täyttä latausta
e
nsimmäisellä latauskerralla. Kestää useita
t
yhjentymiskertoja (uudelleenlatauksen jälkeen) ennen
kuin ne lataantuvat täyteen.
Lue ensin turvallisuusohjeet ja noudata sitten
latausohjeita.
Yhdistä laturi normaaliin 230 V:n, 50 Hz:n pistorasiaan.
Vihreä LED-valo laturin edessä vasemmalla syttyy.
Älä anna kaapelin mennä solmuun tai kiertyä.
Aseta akku laturin pohjaan.
(Huomioi, että akussa on koholla olevat liitäntäpiikit,
joten akku sopii laturiin vain yhdellä tavalla).
Latausaika on vain 60 minuuttia.
Punainen LED-valo laturin edessä oikealla palaa
ilmaisten latauksen olevan käynnissä. Vihreä LED-valo
ilmaisee akun olevan täyteen ladattu.
Irrota laturi pistorasiasta, kun sitä ei käytetä ja säilytä
se sopivassa säilytyspaikassa.
Vältä akun lataamista pakkasta vastaavissa
lämpötiloissa, koska latausteho ei ole silloin riittävä.
Jos lataat useamman kuin yhden akun peräkkäin,
anna laturin jäähtyä vähintään 30 minuuttia aina ennen
seuraavan akun lataamista.
Poista akku ja säilytä se turvallisesti, kun työkalu ei ole
käytössä.
Huomio: Jos jossakin kohtaa latausta mikään LEDvalo ei pala, poista akku laturista laitteen
vaurioitumisen välttämiseksi. ÄLÄ aseta laturiin toista
akkua.
1
. Teräpään varsi
2
. Öljyntason ilmaisin.
3
. Terä
4
. Välivarsi
5. Välivarren lukitusvipu
6. Kantovaljaat
7. Terän suojus
8. Käynnistysliipaisin
9. Lukitusvipu
10. Öljysäiliön korkki
11. Kantovaljaiden kiinnityskohta 1
12. Kahvavarsi
13. Kantovaljaiden kiinnityskohta 2
14. Liipaisin, käynnistyspainike
15. Terän suojus
16. Terä
17. Kääntöpainike
18. Leikkuripään varsi
19. Lukitusvipu
28
LATAUKSEN TILA
Näet akun jäljellä olevan varauksen painamalla
lataustason ilmaisinpainiketta, kuva 2.
KOKOAMINEN
Varoitus! Poista akku aina laitteesta ennen osien
kokoamista estääksesi tahattomat käynnistymiset, jotka
voivat aiheuttaa vakavan henkilövahingon.
VARREN OSIEN YHDISTÄMINEN
Vapauta sahan tai trimmerin teräpään varren lukitusvipu
nostamalla sitä ylöspäin, kuva 3. Varmista, että
välivarren lukitusvipu on lukitussa asennossa, jotta
vältät sen liikkumisen yhdistämisen yhteydessä. Työnnä
välivarren pistotulppa sahan tai leikkurin teräpään
varren liitäntään ja työnnä yhteen, kunnes lukittuvat
ulokkeet ovat täysin paikoillaan, kuva 4. Lukitse varret
toisiinsa sulkemalla sahan tai leikkurin teräpään varren
lukitusvipu, kuva 5.
HUOMIOI: Jos kiinnitys on tehty oikein, teräpään vartta
ei voi irrottaa välivarresta vetämällä. Toista edellä
esitetyt vaiheet, jos se irtoaa välivarresta.
Varoitus! Jos kaikkia varren osia ei ole koottu oikein ja
lukittu, ne voivat päästä irti toisistaan. Tämä saattaa
aiheuttaa vakavan henkilövahingon tai kuoleman.
KANTOVALJAIDEN KIINNITTÄMINEN
Liitä kantovaljaiden salvat kantovaljaiden
kiinnityskohtiin, kuva 6.
Säädä hihna sopivaan asentoon.
AKUN ASENTAMINEN
Varoitus! Poista akku aina työkalusta, kun asennat
osia, teet säätöjä, puhdistat, kannat tai kuljetat laitetta
t
ai kun laite ei ole käytössä. Akun poistaminen estää
tahattomat käynnistymiset, jotka voivat aiheuttaa
vakavan henkilövahingon.
H
UOMIOI: Poista akku aina vakavien henkilövahinkojen
välttämiseksi, ja pidä kädet poissa lukituksen
v
apautuspainikkeelta, kun kannat tai kuljetat työkalua.
Liu'uta akku oksasahan pohjalle, kuten kuvassa 7.
(
Huomioi, että akussa on koholla olevat liitäntäpiikit,
j
oten akku sopii oksasahaan vain yhdellä tavalla).
V
armista, että akku napsahtaa paikoilleen ja akku
pysyy kunnolla kiinni työkalussa ennen kuin aloitat
työskentelyn. Akun virheellinen asentaminen voi
aiheuttaa vaurioita laitteen sisäisille osille.
AKUN POISTAMINEN
Etsi akun vapautussalpa sen päältä ja paina alaspäin,
kuva 8. Kun pidät akun vapautussalpaa painettuna,
liu'uta akku irti työkalusta.
TERÄLEVYN JA KETJUN VOITELUAINEEN
LISÄÄMINEN (VAIN OKSASAHA)
Käytä terälevyn ja ketjun voiteluainetta. Se on
suunniteltu ketjuille ja ketjuvoitelijoihin. Se on kehitetty
toimimaan laajalla lämpötila-alueella ilman
laimentamista.
Terälevyn ja ketjun voiteluainetaso tulee tarkistaa 20
käyttöminuutin välein ja voiteluainetta lisätään tarpeen
mukaan.
Irrota öljysäiliön korkki, kuva 9. Kaada terälevyn ja
ketjun voiteluainetta varovasti terälevyn
voiteluöljysäiliöön.
Pyyhi liika öljy pois.
Tarkista öljyn taso ja täytä säiliö, jos öljyntason ilmaisin,
kuva 10, on alimman ja toiseksi alimman viivan välissä.
Toista tarvittaessa.
HUOMIOI: Älä käytä likaista, käytettyä tai muuten
saastunutta öljyä. Se voi aiheuttaa vaurioita terälevyyn
tai ketjuun.
HUOMIOI: öljyn tihkuminen on normaalia, kun sahaa ei
käytetä. Tihkumisen voi välttää tyhjentämällä öljysäiliön
jokaisen käyttökerran jälkeen ja käyttämällä laitetta sen
jälkeen yhden minuutin ajan.
Jos laitetta pidetään varastossa pitkään (yli kolme
kuukautta), varmista, että ketju on kevyesti voideltu.
Tämä estää ketjun ja terälevyn hampaiden
ruostumisen.
KÄYTTÖ
Vaara! Älä koskaan työskentele lähellä sähkölinjoja,
sähköjohtoja tai muita sähkövirran lähteitä. Jos terälevy
ja ketju jäävät kiinni sähköjohtoon tai sähkölinjaan, ÄLÄ
KOSKE TERÄLEVYYN TAI KETJUUN! NE VOIVAT
OLLA JÄNNITTEELLISIÄ JA ERITTÄIN VAARALLISIA.
Lataustason merkkivalo Jäljellä oleva
varauksen määrä
0-10%
10-25%
25-50%
50-75%
75-100%

29
Voit jatkaa oksasahan/leikkurin pitämistä eristetystä
kahvasta tai voit laittaa sen maahan itsestäsi etäälle
turvallisella tavalla. Irrota sähkövirta vaurioituneesta
l
injasta tai johdosta ennen kuin yrität vapauttaa
terälevyä tai ketjua sähköjohdosta. Terälevyyn, ketjuun
tai oksasahan sähköä johtaviin osiin, jännitteellisiin
sähköjohtoihin tai sähkölinjoihin koskeminen aiheuttaa
kuoleman tai vakavan henkilövahingon.
V
aroitus! Älä sorru huolimattomuuteen, vaikka
t
untisitkin laitteen jo hyvin. Muista, että muutaman
s
adasosasekunnin huolimattomuus riittää aiheuttamaan
vakavan henkilövahingon.
Ä
lä käytä lisälaitteita tai lisävarusteita, jos tämän
laitteen valmistaja ei ole suositellut niitä. Muiden kuin
suositeltujen varusteiden ja lisätarvikkeiden käyttö
saattaa aiheuttaa vakavan henkilövahingon.
OKSASAHAN KÄYTTÖTARKOITUS
Voit käyttää laitetta alla lueteltuihin tarkoituksiin:
oksien karsiminen ja raivaus.
VARRELLISEN PENSASLEIKKURIN
KÄYTTÖTARKOITUS
Voit käyttää laitetta alla lueteltuihin tarkoituksiin:
talojen ja kesämökkien ympärillä olevien pensasaitojen,
oksien, pensaiden ja pensaikkojen katkaiseminen ja
leikkaaminen.
OKSASAHAN KÄYTTÄMINEN
KÄYNNISTÄMINEN JA PYSÄYTTÄMINEN
Pidä oksasahaa kuten kuvassa 11 näytetään. Varmista,
että mikään osa sinusta ei kosketa terää.
Paina ja pidä liipaisinkäynnistintä, kuva 12.
Vapauta liipaisinkäynnistin, kuva 13.
Pysäytä moottori vapauttamalla liipaisin, jolloin
oksasaha pysähtyy. Kun liipaisinkäynnistin
vapautetaan, se palautuu automaattisesti lukittuun
asentoon.
TYÖSKENTELYN VALMISTELU
Käytä luistamattomia ja suojaavia jalkineita. Pidä
kunnon ote laitteesta aina, kun moottori on käynnissä.
Pidä oikealla kädellä tukevasti takakahvasta ja pidä
vasenta kättä kiinni varressa.
Pidä laitetta kunnolla molemmin käsin. Pidä vasen käsi
aina kiinni varressa ja oikea käsi takakahvassa, näin
vartalosi on ketjulinjan vasemmalla puolella. Älä
koskaan käytä vasenkätistä (ristikkäistä) otetta tai asetu
siten, että vartalosi tai kätesi on ketjulinjan kohdalla.
Älä koskaan seiso suoraan sen oksan alla, jota
katkaiset.
KATKAISUN PERUSOHJEET
Noudata alla olevia vaiheita, jotta estät puun tai
pensaan vaurioitumisen. Älä käytä edestakaista
sahausliikettä.
Tee ensin lovi (1/4 oksan halkaisijasta) oksan
alapuolelle lähelle pääoksaa tai runkoa, kuva 15 (A).
Tee toinen sahaus, kuva 15 (B) oksan yläpuolelle
ulospäin ensimmäisestä sahauskohdasta. Jatka
sahausta, kunnes oksa irtoaa puusta. Ole valmis
p
itämään työkalun paino tasapainossa, kun oksa
putoaa.
T
ee lopullinen katkaisu läheltä runkoa. Kuva 15 (C).
HUOMIOI: Toisessa ja lopullisessa sahauksessa (oksan
p
äältä) pidä etuohjainta katkaistavaa oksaa vasten.
Tämä auttaa pitämään oksaa paikallaan ja helpottaa
katkaisemista. Anna ketjun tehdä katkaisu, käytä vain
k
evyttä alaspäin painamista. Jos pakotat sahaa,
v
aurioitat terälevyn, ketjun tai moottorin.
Vapauta liipaisin heti, kun oksa on irronnut.
Oikean katkaisutekniikan käyttämisen laiminlyöminen
aiheuttaa terälevyn ja ketjun puristumisen tai oksaan
tarttumisen. Jos näin tapahtuu:
Pysäytä moottori ja poista akku.
Jos oksaan ylettyy maasta, nosta oksaa samalla sahaa
pitäen. Tämän pitäisi vapauttaa ”puristus” ja sahan
pitäisi irrota.
Jos saha on vielä kiinni, pyydä ammattilaiselta apua.
OKSIEN KARSIMINEN JA RAIVAUS
Laite on tarkoitettu pienten halkaisijaltaan korkeintaan
100 mm olevien latvusten ja oksien katkaisemiseen.
Parhaan tuloksen saat noudattamalla seuraavia
varotoimia.
Suunnittele katkaisu huolellisesti. Ota huomioon
suunta, mihin oksa putoaa. Älä koskaan seiso suoraan
sen oksan alla, jota katkaiset. Seiso aina poissa
putoavien roskien reitiltä.
Tyypillisin katkaisu on sellainen, jossa laite asetetaan
enintään 60 asteen kulmaan, kuva 16, tilanteen
mukaan. Mikäli oksasahan varren kulma maahan
kasvaa, ensimmäisen katkaisuloven tekeminen (oksan
alapuolelle) vaikeutuu.
Katkaise pitkät oksat useassa osassa.
Katkaise alaoksat ensin, jotta yläoksilla on enemmän
tilaa pudota.
Työskentele rauhallisesti, pidä molemmilla käsillä
tukeva ote sahasta. Säilytä tukeva asento ja tasapaino.
Pidä puu itsesi ja sahan välissä, kun karsit oksia.
Katkaise puun sivusta katkaistavaa oksaa vastapäätä.
Älä koskaan seiso tikkailla tai muun epävakaan tuen
päällä, kun käytät oksasahaa. Vältä kaikkia asentoja,
joissa voit menettää tasapainosi. Se voi aiheuttaa
vakavan henkilövahingon.
Älä tee lopullista katkaisua pääoksan tai rungon
vierestä ennen kuin olet katkaissut oksan kauempaa
painon vähentämiseksi. Oikea sahaustekniikka estää
pääpuun vaurioitumisen.

30
P
idä muut ihmiset vähintään 15 metrin päässä
työskentelyalueelta. Häiriötekijät voivat aiheuttaa
laitteen hallinnan menettämisen.
Sähköiskun vaara. Suojaudu sähköiskuilta, älä käytä
alle 15 metrin etäisyydellä sähkölinjoista. Tarkista
y
mpäröivä alue aina piilossa olevien sähköjohtojen
v
aralta.
Ä
lä kurottele. Varmista, että seisot tukevasti. Seiso
haara-asennossa. Jaa paino tasaisesti kummallekin
jalalle.
VARRELLISEN PENSASLEIKKURIN KÄYTTÄMINEN
TERÄPÄÄN SÄÄTÄMINEN
Leikkurin teräpäätä voidaan säätää eri kulmiin, jolloin
leikkaaminen eri asennoissa on miellyttävämpää.
VAROITUS! Irrota akku ennen kuin säädät päätä. Älä
yritä säätää päätä, kun terät liikkuvat.
Tartu leikkurin päähän ja paina sisään kumpikin
kääntöpainike, kuva 17.
Käännä pää haluamaasi kulmaan.
Kun leikkuria käytetään korkealla tai matalalla tasolla,
moottori voidaan kallistaa 75 asteen kulmasta -60
asteen kulmaan 15 asteen askelin, kuva 18.
Lukitse pää valitsemaasi asentoon vapauttamalla
kääntöpainikkeet.
VAROITUS! Varmista, että kääntöpainikkeet ja pää
ovat turvallisesti lukittuina ennen leikkurin
käynnistämistä.
KÄYNNISTÄMINEN JA PYSÄYTTÄMINEN
Poista terän suojus.
Pidä varrellista pensasleikkuria, kuten kuvassa 14
näytetään. Varmista, että mikään osa sinusta ei
kosketa terää.
Paina ja pidä liipaisinkäynnistintä, kuva 12.
Vapauta liipaisinkäynnistin, kuva 13.
Pysäytä moottori vapauttamalla liipaisin, jolloin
varrellinen pensasleikkuri pysähtyy. Kun
liipaisinkäynnistin vapautetaan, se palautuu
automaattisesti lukittuun asentoon.
VARRELLISEN PENSASLEIKKURIN KÄYTTÄMINEN
Pidä leikkuria molemmin käsin. Seiso turvallisessa ja
vakaassa asennossa. Tarkasta ennen leikkaamista,
ettei pensaassa ole mitään sellaista, kuten verkkoaita,
joka voisi vaurioittaa leikkurin terää tai aiheuttaa terän
juuttumisen kiinni.
VAROITUS! Älä ylikuormita pensasleikkuria.
Leikkurin pakottaminen leikkaamaan voi vaurioittaa
moottoria. Vältät ylikuormituksen tarkastamalla, ettei
pensas ole kovin paksu tai tiheä. Leikkaa paksut tai
tiheät oksastot vaiheittain usealla leikkauksella. Tämä
vähentää moottorin kuormittumista.
V
arrellisella pensasleikkurilla voi leikata enintään 16
mm paksuja oksia. Paksuus voi olla jopa vielä
pienempi tietyillä pensastyypeillä.
LEIKKUUVINKKEJÄ
Pidä työkalua poispäin itsestäsi käyttäen molempia
k
äsiä. Seiso turvallisessa ja vakaassa asennossa.
Siirry leikatessa tasaisesti leikkuulinjaa pitkin siten,
e
ttä varret menevät suoraan leikkuuteriin.
Kaksireunainen leikkuuterä mahdollistaa leikkaamisen
joko puolelta toiselle tai liikuttamalla ylös ja alas.
L
eikkaa pensaan sivut ensin ja vasta sitten latvaosa.
Jotta sivuista tulisi tasaisia, suosittelemme
leikkaamaan ylöspäin kasvusuuntaan. Jotta saat
suoran leikkauslinjan, pingota naru pensasaidan koko
pituudelle. Leikkaa pensas hieman narun yläpuolelta,
näin saat tasaisen korkeuden.
Vältä aina osumista esimerkiksi metallilankoihin, koska
se voi vaurioittaa leikkuuteriä ja käyttömekanismia.
TERIEN VOITELU (KUVA 19)
Terien sisäpinnat tulee voidella, jos terät
ylikuumentuvat työskentelyn aikana.
Varoitus! Toimenpiteen saa tehdä vain silloin, kun terät
ovat pysähtyneet, leikkuri on kytketty pois päältä ja
akku on irrotettu.
Kun lopetat työskentelyn:
• Sammuta moottori ohjeiden mukaan
• Anna moottorin jäähtyä ennen säilyttämistä
suljetussa tilassa.
• Tulipalovaaran vähentämiseksi puhdista kone
kunnolla, poista kaikki ruohojätteet, lehdet ja
ylimääräinen rasva. Älä koskaan jätä leikkuujätettä
sisältäviä astioita varastointitilaan.
Voit lisätä terien suorituskykyä ja käyttöaikaa
puhdistamalla ja voitelemalla ne huolellisesti jokaisen
käyttökerran jälkeen.
• Käytä pehmeää liinaa terien puhdistamiseen, käytä
harjaa hyvin vaikean lian ja roskien poistamiseen.
• Voitele terät sopivalla öljyllä.
KUNNOSSAPITO
Pysäytä moottori, odota kaikkien liikkuvien osien
pysähtymistä ja poista akku ennen laitteen
tarkastamista, puhdistamista tai huoltamista. Näiden
ohjeiden noudattamatta jättäminen saattaa johtaa
vakavaan henkilövahinkoon tai omaisuusvahinkoon.
YLEINEN KUNNOSSAPITO
Vältä liuotinaineiden käyttöä, kun puhdistat muoviosia.
Useimmat muovit ovat herkkiä vaurioitumaan
erilaisista kaupallisista liuottimista ja voivat vaurioitua
niiden käytöstä. Poista lika, pöly, öljy, rasva jne.
puhtaalla liinalla.
 Loading...