

FXA FXAJ0G-ZP-185Li-JD Instruction Manual
FXAJ0G-ZP-185Li-JD
Instruction manual (Original instructions) GB pg 8-19
Käyttöohje
(Alkuperäisten ohjeiden käännös) FI pg 20-30
Bruksanvisning
(Översättning av originalinstruktionerna) SE pg 31-41
Bruksanvisning
(Oversettelse av de opprinnelige instruksjonene) NO pg 42-53
Руководство пользователя
(Перевод исходных инструкций) RU pg 54-66
Kasutusjuhend (Tõlgitud originaal juhendist) EE pg 67-77
Instrukcijas (Tulkojums no oriģinālvalodas) LV pg 78-89
Instaliavimo instrukcijos
(Vertimas originali instrukcija) LT pg 90-101
Instrukcja obsługi
(oryginalna instrukcja) PL pg 102-114
2
(1)
6
5
10
(3) (4)
1 2 3 4
7
8
9
13
12
1011
14
3
(2)
(5) (6)
2015 17
28
27 26
18 19
22
25
16 21
23
24
29
4
(7) (8)
(9) (10)
(11) (12)
(14)(13)
5
(15) (16)
(17) (18)
(19) (20)
(22)(21)
6
(23) (24)
(25) (26)
(27) (28)
(29) (30)

7
IMPORTANT! Read all safety warnings, instructions, illustrations and specifications provided with this
power tool.
TÄRKEÄÄ! Lue tarkkaavaisesti kaikki tämän työkalun kanssa toimitetut varoitukset, ohjeet ja
spesifikaatiot, ja katso lisäksi kuvat.
VIKTIGT! Läs uppmärksamt alla varningar, instruktioner och specifikationer som bifogas med
detta verktyg och studera bilderna.
VIKTIG! Les nøye gjennom alle advarslene, instruksene og spesifikasjonene som følger m
ed
verktøyet, og se på tegningene.
ВАЖНО! Пpoчтитe вce yкaзaния, инcтpyкции, иллюcтpaции и cпeцификaции, поставляемые
c электроинструментом.
TÄHTIS! Lugege läbi kõik elektrilise tööriista kohta esitatud ohuhoiatused ning tutvuge
tööriista jooniste ja tehniliste andmetega.
SVARĪGI! Izlasiet visus drošības brīdinājumus, instrukcijas, specifikācijas un apskatiet attēlus šī
elektroinstrumenta dokumentācijā.
SVARBU! Perskaitykite visus saugos įspėjimus, visas i
nstrukcijas, paveikslėlius ir techninius
reikalavimus, pateikiamus su šiuo elektriniu įrankiu.
WAŻNE! Prosimy przeczytać wszystkie dotyczące narzędzia ostrzeżenia i instrukcje oraz
przestudiować ilustracje i specyfikację.
8
INTRODUCTION
Thankyou for purchasing this product which has
passed through our extensive quality assurance
process. Every care has been taken to ensure that it
reaches you in perfect condition.
SAFETY FIRST
Before attempting to operate this power tool the
following basic safety precautions should always be
taken to reduce the risk of fire, electric shock and
personal injury. It is important to read the instruction
manual to understand the application, limitations and
p
otential hazards associated with this tool.
CERTIFICATE OF GUARANTEE
This product is guaranteed for a period of 2 Years,
with effect from the date of purchase and applies only
to the original purchaser. This guarantee only applies
to defects arising from, defective materials and or
faulty workmanship that become evident during the
guarantee period only and does not include
consumable items. The manufacturer will repair or
replace the product at their discretion subject t
o the
following. That the product has been used in
accordance with the guide lines as detailed in the
product manual and that it has not been
subjected to misuse, abuse or used for a purpose for
which it was not intended. That it has not been taken
apart or tampered with in any way whatsoever or has
been serviced by unauthorised persons or has been
used for hire purposes. Transit damage is excluded
from this guarantee, for such damage the transport
company is responsible. Claims m
ade under this
guarantee must be made in the first instance, directly
to the retailer within the guarantee period. Only under
exceptional circumstances should the product be
returned to the manufacturer. In these case it shall be
the consumer’s responsibility to return the product at
their cost ensuring that the product is adequately
packed to prevent transit damage and must be
accompanied with a brief description of the fault and
a copy of the receipt or other proof of purc
hase. The
manufacturer shall not be liable for any special,
exemplary, direct, indirect, incidental, or consequential
loss or damage under this guarantee. This guarantee
is in addition to and does not affect any rights, which
the consumer may have by virtue of the Sale of Goods
Act 1973 as amended 1975 and 1999.
STATUTORY RIGHTS
This guarantee is in addition to and in no way affects
your statutory rights.
PRODUCT DISPOSAL
When this product reaches the end of it’s life or is
disposed o
f for any other reason, it must not be
disposed of in household waste. In order to preserve
natural resources, and to minimise adverse
environmental impact, please recycle or dispose of
this product in an environmentally friendly way. It
should be taken to your local waste recycling centre
or other authorised collection and disposal facility.
If in doubt consult your local waste authority for
information regarding available recycling and / or
disposal options.
I
MPORTANT INFORMATION ABOUT THIS
PRODUCT
This product is specifically designed to work with the
FXA XCLICK range of batteries and charger.
SPECIFIC SAFETY INSTRUCTIONS
Read all these instructions before attempting to
operate this product and save these instructions.
BLADE SAFETY
WARNING: Rotating Saw Blades are extremely
dangerous and can cause serious injury and
amputation. Always keep fingers and hands at least
150mm (6”) away from the blade at all times. Never
attempt t
o retrieve sawn material until the cutting
head is in the raised position, the guard is fully closed
and the saw blade has stopped rotating. Only use saw
blades that are recommended by the manufacturer
and that comply with the requirements of EN 847-1
Do Not use saw blades that are damaged or
deformed as they could shatter and cause serious
injury to the operator or bystanders.
Do Not use saw blades that are manufactured from
high speed steel (HSS).
Do not stop the blade by forci
ng the machine or by
using sideways pressure.
Do not use blades that are deformed or have missing
teeth. This is highly dangerous and could result in a
serious accident to the operator and bystanders as
well as damaging the machine.
Do not use blades that are larger than specified, only
use blades that are rated for the machine. The
rotational speed (min
-1
) shown on the blade should
always be HIGHER than the rotational speed (min-1) of
the machine.
Ensure that the directional a
rrow marked on the blade
corresponds with the rotational direction of the motor.
The teeth of the blade should always point downward
as viewed from the front of the saw.
If the table insert becomes damaged or worn it must
be replaced with an identical one available from the
manufacturer as detailed in this manual.
PERSONAL PROTECTIVE EQUIPMENT (PPE)
Hearing protection should be worn in order to reduce
the risk of induced hearing loss.
Eye protection should be worn in order to p
revent the
possibility of the loss of sight from ejected chippings.
Charger Battery
(Not Included) (Not Included)
FXADL1051 FXAJDB180Li
FXAJDB180Li-II

9
Respiratory protection is also advised as some wood
and wood type products especially MDF (Medium
Density Fibreboard) can produce dust that can be
hazardous to your health. We recommend the use of
an approved face mask with replaceable filters when
using this machine in addition to using the dust
extraction facility.
Gloves should be worn when handling blades or
rough material. It is recommended that saw blades
should be carried in a holder wherever practical.
It is not advisable t
o wear gloves when operating the
mitre saw.
SAFE OPERATION
Always ensure that you have selected the correct saw
blade for the material being cut. Do not use this mitre
saw to cut materials other than those specified below:
Wood
Wood derived products (MDF, Chipboard, Plywood,
Blockboard, Hardboard etc)
Aluminium
Mild Steel (6mm / 1/4” Thickness)
When transporting a mitre saw ensure that the cutting
head is locked in the 90° down position (if a sliding
mitre saw ensur
e t
hat the slide bars are locked). Lift
the machine by gripping the outer edges of the base
with both hands (if a sliding mitre saw, transport using
the handles provided).
Under no circumstances shall the machine be lifted or
transported using the retractable guard or any part of
its operating mechanism.
Keep guards in place and in good working order. With
the machine disconnected from the mains supply
check the operation of the guard to ensure that it
operates correctly.
Lower t
he saw head so that the blade is in its lowest
position, carefully rotate the blade by hand to ensure
that it is free from obstruction.
Repeat this procedure at all maximum mitre and bevel
positions before commencing operation of the Mitre
Saw.
Keep the work bench and floor area clear of all debris
including sawdust, chips and off-cuts.
Always keep the blade securing arbor and collars
clean.
Where it is necessary to use spacer or reducing rings
these must be suitable for the intended p
urpose and
only as recommended by the manufacturer.
If the mitre saw is fitted with a laser it shall not be
replaced with a different type. If the laser fails to
operate it shall be repaired or replaced by an
authorised service agent.
Whenever replacing blades ensure that the recessed
surface of the blade collar fits snugly against the
surface of the blade.
Ensure that the blade securing bolt is securely
tightened using the wrenches provided. Do not over
tighten.
Never
attempt t
o retrieve off-cuts or any other part of
the work piece until the cutting head is in the raised
position, the guard is fully closed and the saw blade
has stopped rotating.
Wherever practicable always secure the work piece to
the saw table using the work clamp provided.
Always ensure that before each cut the mitre saw is
mounted in a stable position.
When cutting long work pieces use saw horses or
work benches to support the work piece, ensure that
all securing clamps are tight a
nd check for excessive
play.
WARNING: the operation of any mitre saw can result
in foreign objects being thrown towards your eyes,
which could result in severe eye damage. Before
beginning power tool operation, always wear safety
goggles or safety glasses with side shield or a full face
shield when needed.
WARNING: If any parts are missing, do not operate
your mitre saw until the missing parts are replaced.
Failure to follow this rule could result in serious
personal injury.
A
DDITIONAL SAFETY INSTRUCTIONS
Some wood and wood type products, especially MDF,
(Medium Density Fibreboard) can produce dust that
can be hazardous to your health. We recommend the
use of an approved face mask with replaceable filters
when using this machine in addition to using the dust
extraction facility. Ensure that power tools are
disconnected from the mains supply when not in use,
before servicing, lubricating or making adjustments
and when changing accessories s
uch as blades.
Before commencing any cut allow the blade to reach
its full speed, let it run for a few seconds. If any
unusual noise or vibration is heard STOP the machine
immediately, and investigate the cause.
Never try to cut free hand. Always ensure that the
work piece is securely pressed against the back fence
and table support surface.
Ensure that the work piece that is being cut off has
sufficient room to move sideways. Failure to do so
may result in the off cut binding against t
he blade.
If the work piece cannot be held securely by hand
then use the jig or clamp to hold it in place whilst it is
being cut.
Ensure that irregular or round pieces are held securely
so that they are unable to move or twist and pinch the
blade.

10
Never cut more than one piece at a time.
Never cut pieces that are too small to be held
securely against the back fence with the thumb and
index finger.
Use only blades that are recommended by the
manufacturer.
Do not start the machine with the blade in contact
with the work piece.
Check the work piece for any protruding nails, screw
heads or anything that could damage the blade.
Do not attempt to modify the machine or its
accessories in any way.
Do not use excessive force when feed
ing t
he work
piece to the blade.
Feeding the work piece gradually will reduce wear on
the machine and blade increasing its efficiency and
operating life.
Do not use the saw without guards in position.
Replace table insert when worn.
Do not use the saw to cut material other than
aluminum, wood or similar materials.
Connect mitre saws to a dust collecting device when
sawing.
Select saw blades in relation to the material to be cut.
Take care when slotting.
WARNING! DO NOT ATTEMPT TO
CUT M
ATERIAL
LARGER THAN THE MAXIMUM CUTTING CAPACITY.
ADDITIONAL SAFETY ADVICE CARRYING YOUR
MITRE SAW
Although compact, this mitre saw is heavy. To reduce
the risk of back injury, get competent help whenever
you have to lift the saw.
To reduce the risk of back injury, hold the tool close
to your body when lifting. Bending your knees so you
can lift with your legs, not your back. Lift by using the
handheld areas at each side of the machines base.
Before moving the mitre saw tighten t
he mitre and
bevel locking screws and the sliding carriage locking
screw to guard against sudden unexpected
movement.
Lock the cutting head in its lowest position. Ensure
that the cutting head locking pin is completely
engaged in its socket.
WARNING: Do not use the blade guard as a ‘lifting
point’. The battery must be removed before
attempting to move the machine.
ADDITIONAL SAFETY RULES CHARGERS
1. Before using the charger, read all the instructions
and cautionary marking
s on the charger and battery
pack as well as the instructions on using the battery
pack.
2. Only charge your batteries indoors as the charger is
designed for indoor use only.
3. DANGER! If the battery pack is cracked or
damaged in any other way, do not insert it in the
charger. There is a danger of electric shock or
electrocution.
4. WARNING! Do not allow any liquid to come into
contact with the charger. There is a danger of electric
shock.
5. The charger and battery packs supplied with i
t are
specifically designed to work together. Do not attempt
to charge the battery pack with any other charger than
the one supplied.
6. Do not pull on the power cord to disconnect it from
the mains supply socket.
7. Do not use the charger if it has been subjected to a
heavy knock, dropped or otherwise damaged in any
way. Take the charger to an authorised service centre
for a check or repair.
8. Do not disassemble the charger. Take it to an
authorised service centre when service or r
epair is
required. Incorrect re-assembly may result in the risk
of fire, electric shock or electrocution.
9. To reduce the risk of an electric shock, unplug the
charger from the power supply before attempting to
clean it. Removing the battery alone does not reduce
the risk.
ADDITIONAL SAFETY RULES FOR THE BATTERY
PACK
1. The battery pack for this tool has been shipped in a
low charge condition. You should charge the battery
pack fully before use.
2. Do not incinerate the battery p
ack even if it is
seriously damaged or can no longer hold a charge.
The battery pack can explode in a fire.
3. A small leakage of liquid from the battery pack may
occur under extreme usage or temperature conditions.
This does not necessarily indicate a failure of the
battery pack. However, if the outer seal is broken and
this leakage comes into contact with your skin wash
the affected area quickly with soap and water. If the
leakage gets in your eyes flush your eyes with clean
water f
or a minimum of 10 minutes and seek
immediate medical attention.
Inform the medical staff that the liquid is a 25-35%
solution of potassium hydroxide.
4. Never attempt to open the battery pack for any
reason. If the plastic housing of the battery pack
breaks open or cracks, immediately discontinue its
use and do not recharge it.

11
5. Do not store or carry a spare battery pack in a
pocket or toolbox or any other place where it may
come into contact with metal objects. The battery
pack may be short- circuited causing damage to the
battery pack, burns or a fire.
BATTERY CHARGING INFORMATION
Charging rates for NiCad and/or Li-Ion NiCad and/or
Li-Ion battery charging rates are determined by the
time taken to fully charge the battery and are
determined by the charge current. The three most
commonly used charging r
ates are typically:
BATTERY CHARGING INFORMATION
Charging rates for NiCad and/or Li-Ion NiCad and/or
Li-Ion battery charging rates are determined by the
time taken to fully charge the battery and are
determined by the charge current. The three most
commonly used charging rates are typically:
Fast charge.
Slow charge.
Trickle charge.
FAST CHARGE BATTERIES
The charging rates for fast charge batteries can vary
between 30 minutes and 90 minutes. The charging
rate for the b
attery supplied with a cordless power
tool is stated in the product manual.
SLOW CHARGE BATTERY
The charging rates for slow charge batteries are
between 3 hours and 5 hours.
TRICKLE CHARGE BATTERIES
The charging rates for trickle charge batteries are
between 7 hours and 9 hours.
IMPORTANT!
NICAD AND/OR LI-ION BATTERY CHARGING
INFORMATION.
ALWAYS FULLY DISCHARGE A NiCad and/or LiIon BATTERY BEFORE CHARGING AND NEVER
EXCEED THE CHARGING RATE TIME, EXCEPT
WHEN “CONDIT
IONING” A N
EW BATTERY.
CHARGING PROCEDURE
When charging a new NiCad and/or Li-Ion battery it
should be fully discharged followed by a full charge
for the charging rate for the battery as stated in the
product manual plus 30 minutes. This should then be
followed by a full discharge and a further full charge
for the charging rate for the battery as stated in the
product manual plus 30 minutes. This procedure will
condition the battery and equalise the cell voltages.
Following this p
rocedure will ensure the optimum
operation of the battery.
When repeatedly using the charger to charge a
number of batteries always allow the charger to cool
down before charging another battery. It is
recommended that the cooling down period is not
less than 30 to 45 minutes.
When charging a battery that has been discharged
during heavy use allow the battery to cool down
before charging. It is recommended that the cooling
down period is not less than 30 to 45 minutes.
NICAD AND/OR L
I-ION CHARGING & CHARGERS
NiCad and/or Li-Ion batteries need to be recharged
with a reasonable amount of care, largely because
they can be damaged by overcharging.
Overcharging can result in the battery temperature
and internal pressure to rise rapidly. This can cause
the cells to distort and lose electrolyte, and in extreme
cases where the internal pressure is extremely high
they can even explode.
This situation can also arise when an overcharged
battery is fitted t
o the product and is being used. In
order to avoid this extreme situation it is of vital
importance that NiCad and/or Li-Ion batteries are fully
discharged before charging and that the charge time
is not exceeded except when “Conditioning” a new
battery. Repeated charging of partially discharged
batteries could cause failure of one or more of the
cells.
SELF DISCHARGE
A lithium battery can self discharge and lose its stored
charge. Typically it can lose approximately 5% of i
ts
charge in the first month after fully charging (when
stored at room temperature), and then loses it by a
further 3% per month. When stored at higher
temperatures the self discharge rate will be
accelerated.
BATTERY CHARGING INDOORS
This charger is designed to be used indoors. We do
not recommend that it is used inside your home.
Ideally batteries should be charged on a bench in a
workshop, garage or shed. If the charging operation is
to be carried out in your home the area must b
e well
ventilated and the charger must be placed on a non
combustible surface ensuring that the ventilation slots
are not blocked. Never exceed the charging time
except when “Conditioning” a new battery, as this
could damage the battery and charger.
BATTERY DISPOSAL
When the battery fails to charge or maintain its
charge, its usable life is exhausted. To preserve
natural resources, please recycle or dispose of the
battery pack properly. This battery pack contains
nickel-cadm
ium cells. Before disposal ensure that the
battery pack is fully discharged by operating your
cordless product then remove the battery pack from
the drill housing and cover the battery pack
connections with heavy duty tape, to prevent short
circuit and energy discharge which could result in a
fire. Do not attempt to open or remove any of the
components.
Consult your local waste authority for information
regarding available recycling and / or disposal
options.

12
SPECIFIC SAFETY INSTRUCTIONS
RE-CHARGEABLE BATTERIES.
Batteries may leak or explode if not charged or
handled correctly. Always observe the following
precautions when handling batteries. Ensure that the
machine is switched off before removing or fitting
batteries.
Do not use this battery with any other product.
Do not attempt to fit the battery the wrong way round.
Do not short out, or attempt to dismantle the battery.
Do not expose the battery to flames or excessive
h
eat.
D
o not immerse in or expose the battery to water.
Do not store or transport the battery with loose metal
objects such drill and driver bits.
Batteries are prone to leakage when discharged. To
avoid damage to the product, remove or
re-charge the battery when no charge remains. Store
the battery in a cool place when not in use.
After prolonged use the battery may become hot.
Before removing the battery, switch the machine off
and allow the battery to cool down. Do not use the
battery i
f you notice any discoloration or distortion of
the battery casing.
GENERAL SAFETY RULES
WARNING! Read all instructions Failure to follow all
instructions listed below may result in electric shock,
fire and/or serious injury. The term "power tool" in all
of the warnings listed below refers to your mains
operated (corded) power tool or battery operated
(cordless) power tool.
SAVE THESE INSTRUCTIONS
1) WORK AREA
a) Keep work area clean and well lit. Cluttered and
dark areas i
nvite accidents.
b) Do not operate power tools in explosive
atmospheres, such as in the presence of
flammable liquids, gases or dust. Power tools
create sparks which may ignite the dust or fumes.
c) Keep children and bystanders away while
operating a power tool. Distractions can cause you
to lose control.
2) ELECTRICAL SAFETY
a) Power tool plugs must match the outlet. Never
modify the plug in any way. Do not use any
adapter plugs with earthed (grounded) power
tools. Unmodifie
d plugs and matching outlets will
reduce risk of electric shock.
b) Avoid body contact with earthed or grounded
surfaces such as pipes, radiators, ranges and
refrigerators.
There is an increased risk of electric shock if your
body is earthed or grounded.
c) Do not expose power tools to rain or wet
conditions. Water entering a power tool will
increase the risk of electric shock.
d) Do not abuse the cord. Never use the cord for
carrying, pulling or unplugging the power tool.
K
eep cord away from heat, oil, sharp edges or
moving parts. Damaged or entangled cords
increase the risk of electric shock.
e) When operating a power tool outdoors, use an
extension cord suitable for outdoor use. Use of a
cord suitable for outdoor use reduces the risk of
electric shock.
3) PERSONAL SAFETY
a) Stay alert, watch what you are doing and use
common sense when operating a power tool. Do
not use a power tool while you are tired or under
the influence of drugs, alcohol or medica
tion.
A moment of inattention while operating power
tools may result in serious personal injury.
b) Use safety equipment. Always wear eye
protection. Safety equipment such as dust mask,
non-skid safety shoes, hard hat, or hearing
protection used for appropriate conditions will
reduce personal injuries.
c) Avoid accidental starting. Ensure the switch is in
the off position before plugging in. Carrying power
tools with your finger on the switch or plugging in
power tools t
hat have the switch on invites
accidents.
d) Remove any adjusting key or wrench before
turning the power tool on.
A wrench or a key left attached to a rotating part
of the power tool may result in personal injury.
e) Do not overreach. Keep proper footing and
balance at all times. This enables better control of
the power tool in unexpected situations.
f) Dress properly. Do not wear loose clothing or
jewellery. Keep your hair, clothing and gloves
away from moving parts. Loose clothes, j
ewellery
or long hair can be caught in moving parts.
g) If devices are provided for the connection of dust
extraction and collection facilities, ensure these
are connected and properly used. Use of these
devices can reduce dust related hazards.
4) POWER TOOL USE AND CARE
a) Do not force the power tool. Use the correct
power tool for your application. The correct power
tool will do the job better and safer at the rate for
which it was designed.

13
b) Do not use the power tool if the switch does not
turn it on and off. Any power tool that cannot be
controlled with the switch is dangerous and must
be repaired.
c) Disconnect the plug from the power source before
making any adjustments, changing accessories, or
storing power tools. Such preventive safety
measures reduce the risk of starting the power
tool accidentally.
d) Store idle power tools out of the reach of children
and do not allow persons unfamiliar with the
power tool o
r these instructions to operate the
power tool. Power tools are dangerous in the
hands of untrained users.
e) Maintain power tools. Check for misalignment or
binding of moving parts, breakage of parts and
any other condition that may affect the power
tools operation. If damaged, have the power tool
repaired before use. Many accidents are caused
by poorly maintained power tools.
f) Keep cutting tools sharp and clean. Properly
maintained cutting tools with sharp cutting e
dges
are less likely to bind and are easier to control.
g) Use the power tool, accessories and tool bits etc.,
in accordance with these instructions and in the
manner intended for the particular type of power
tool, taking into account the working conditions
and the work to be performed. Use of the power
tool for operations different from intended could
result in a hazardous situation.
5) BATTERY TOOL USE AND CARE
a) Recharge only with the charger specified by the
manufacturer. A c
harger that is suitable for one
type of battery pack may create a risk of fire when
used with another battery pack.
b) Use power tools only with specifically designated
battery packs. Use of any other battery packs may
create a risk of injury and fire.
c) When battery pack is not in use, keep it away from
other metal objects, like paper clips, coins, keys,
nails, screws or other small metal objects, that can
make a connection from one terminal to another.
Shorting the battery terminals t
ogether may cause
burns or a fire.
d) Under abusive conditions, liquid may be ejected
from the battery; avoid contact. If contact
accidentally occurs, flush with water. If liquid
contacts eyes, additionally seek medical help.
Liquid ejected from the battery may cause irritation
or burns.
6) SERVICE
a) Have your power tool serviced by a qualified repair
person using only identical replacement parts. This
will ensure that the safety of the power tool is
maintained.
C
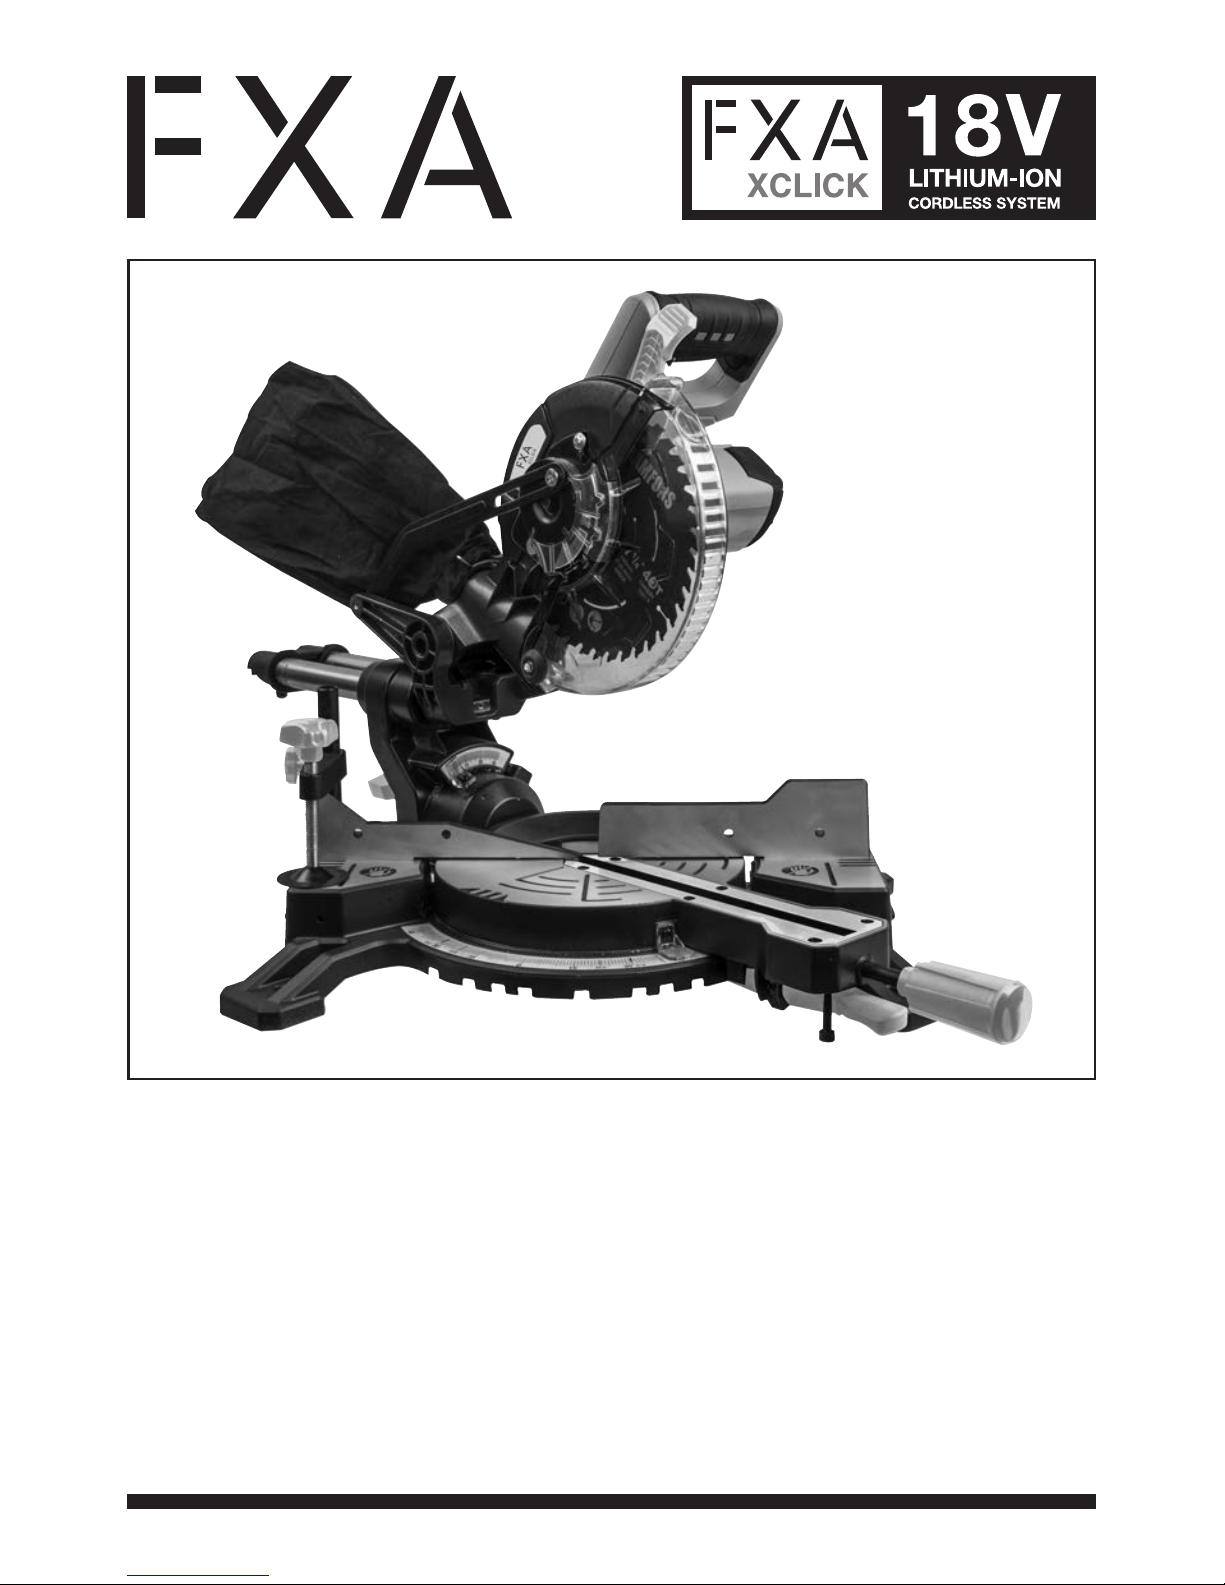
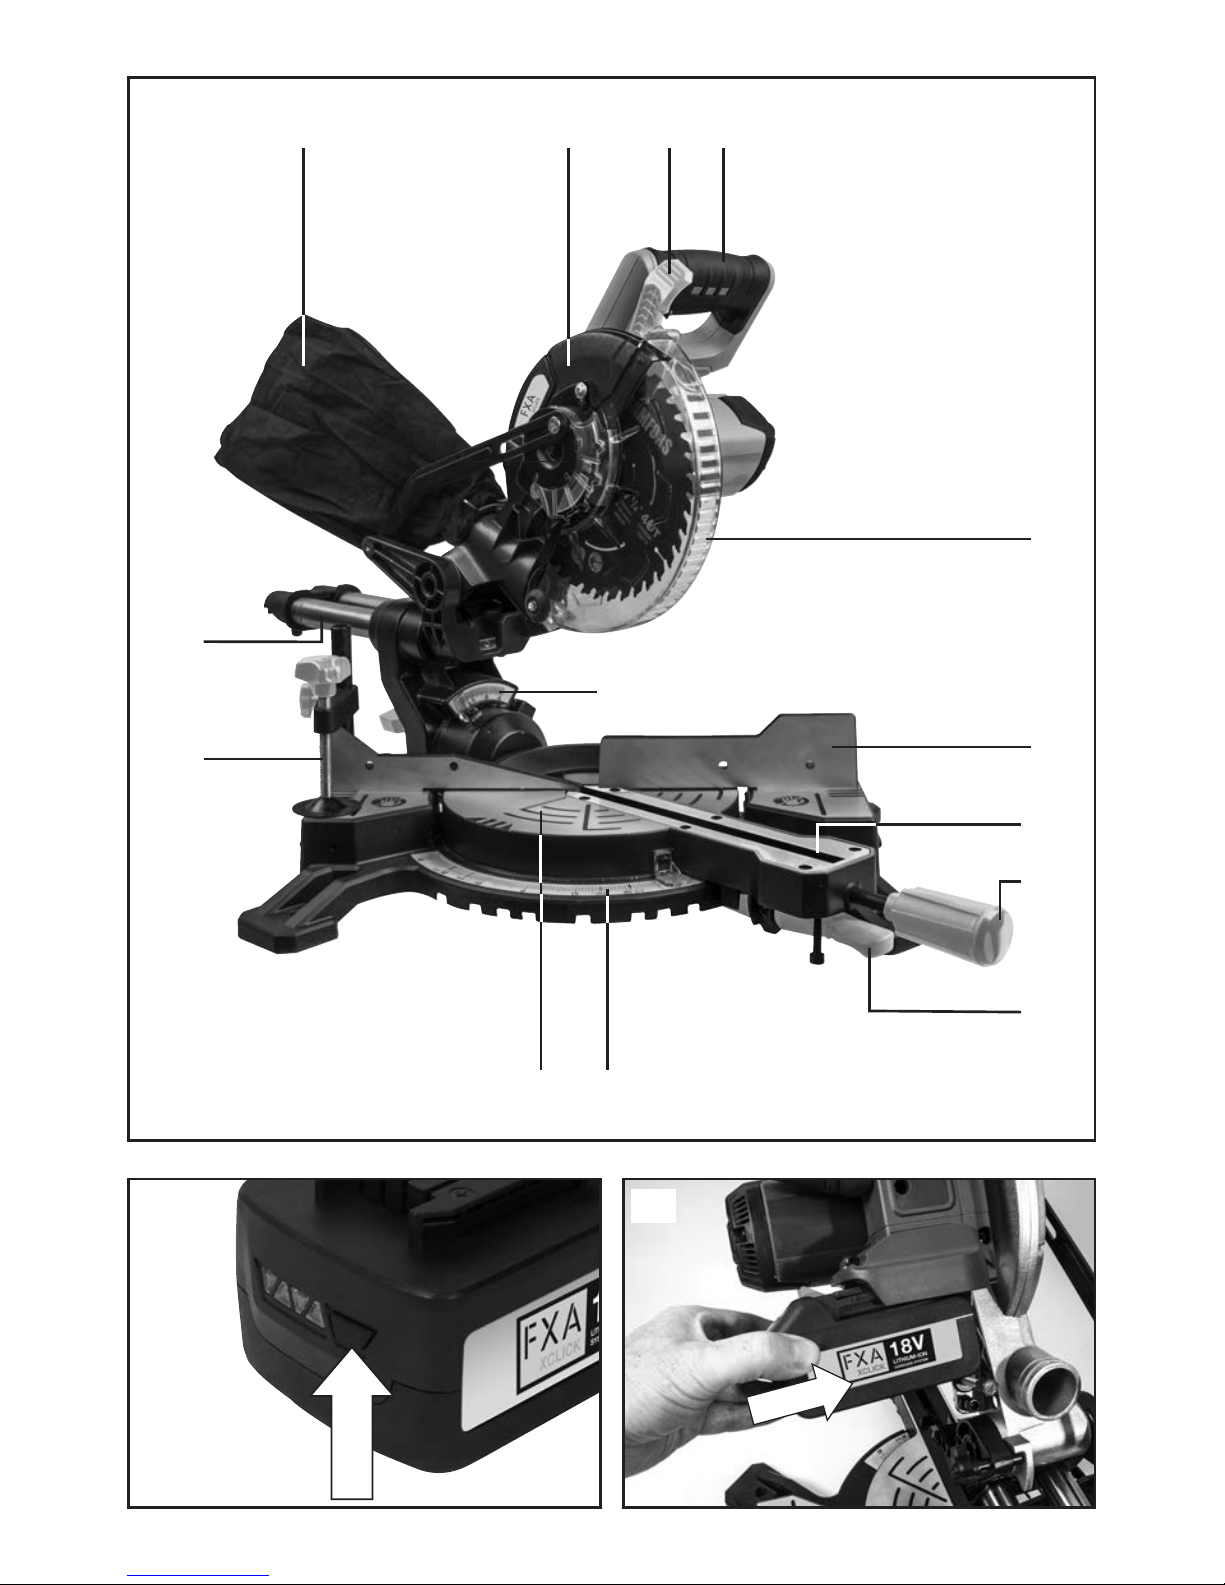
OMPONENTS & CONTROLS (FIG 1 & 2)
UNPACKING
Caution! This packaging contains sharp objects. Take
care when unpacking. Remove the machine, together
with the accessories supplied, from the packaging.
Check carefully to ensure that the machine is in good
condition and account for all the accessories listed in
this manual.
Also make sure that all the accessories are complete.
If any parts are found to be missing, the machine and
its accessories should be returned together in t
heir
original packaging to the retailer.
1. Dust bag
2. Upper fixed blade guard
3. Release latch
4. Operating handle
5. Rotating blade guard
6. Table fence
7. Table insert (kerf plate)
8. Mitre lock handle
9. Mitre lock release latch
10. Mitre scale
11. Mitre table
12. G clamp assembly
13. Slide bars
14. Bevel scale
15. On/Off switch trigger
16. Switch lock
17. Battery compartment
18. Trenching depth lock nut
19. Trenching depth adjustment screw
20. Dust extraction port
21. Guard retraction arm
22. Sliding arm locking
knob
2
3. 6mm hex key
24. Bevel locking knob
25. 0°Bevel adjustment screw
26. Mounting holes
27. Clamp assembly lock screw (x 2)
28. Release knob
29. Spindle lock
14
Do not throw the packaging away, keep it safe
throughout the guarantee period, then recycle if
possible, otherwise dispose of it by the proper means.
Do not let children play with empty plastic bags due
to the risk of suffocation.
CHARGING THE BATTERY PACK
Warning! Only charge in compatible 18V chargers.
Use of other chargers may result in fire, damage or
serious personal injury.
The battery pack for this tool has been shipped in a
low charge condition to prevent possible problems.
T
herefore, you should charge it until the green LED on
the front right hand side of the charger comes on.
Note: Batteries will not reach full charge the first time
they are charged. Allow several cycles (operation
followed by recharging) for them to become fully
charged.
First read the safety instructions then follow the
charging instructions.
Plug the charger into a standard 230V~50Hz mains
socket outlet, the green LED on the front left hand
side of the charger will illumin
ate.
Do not allow the cable to become knotted or kinked.
Place the battery pack into the charger base.
(Note the battery has raised ribs which allows it to fit
into the charger only one way). Time the charge for
60/130 minutes only.
2,0 Ah -battery, charge for 60 minutes
4,0 Ah -battery, charge for 130 minutes
The red LED on the front right hand side of the
charger will illuminate to indicate charging is in
progress. A green LED will illuminate when the battery
is fully charg
ed.
U
nplug the charger when not in use and store it in a
suitable storage cabinet.
Avoid charging your battery in freezing conditions as
charging power will not be sufficient.
When charging more than one battery pack in
succession allow at least 30 minutes for the charger
to cool down before charging an additional battery.
Always remove the battery pack and store it safely
when the tool is not in use.
Caution: If at any point during the charging process
none of the LEDs are lit, re
mov
e the battery pack from
the charger to avoid damaging the product. DO NOT
insert another battery.
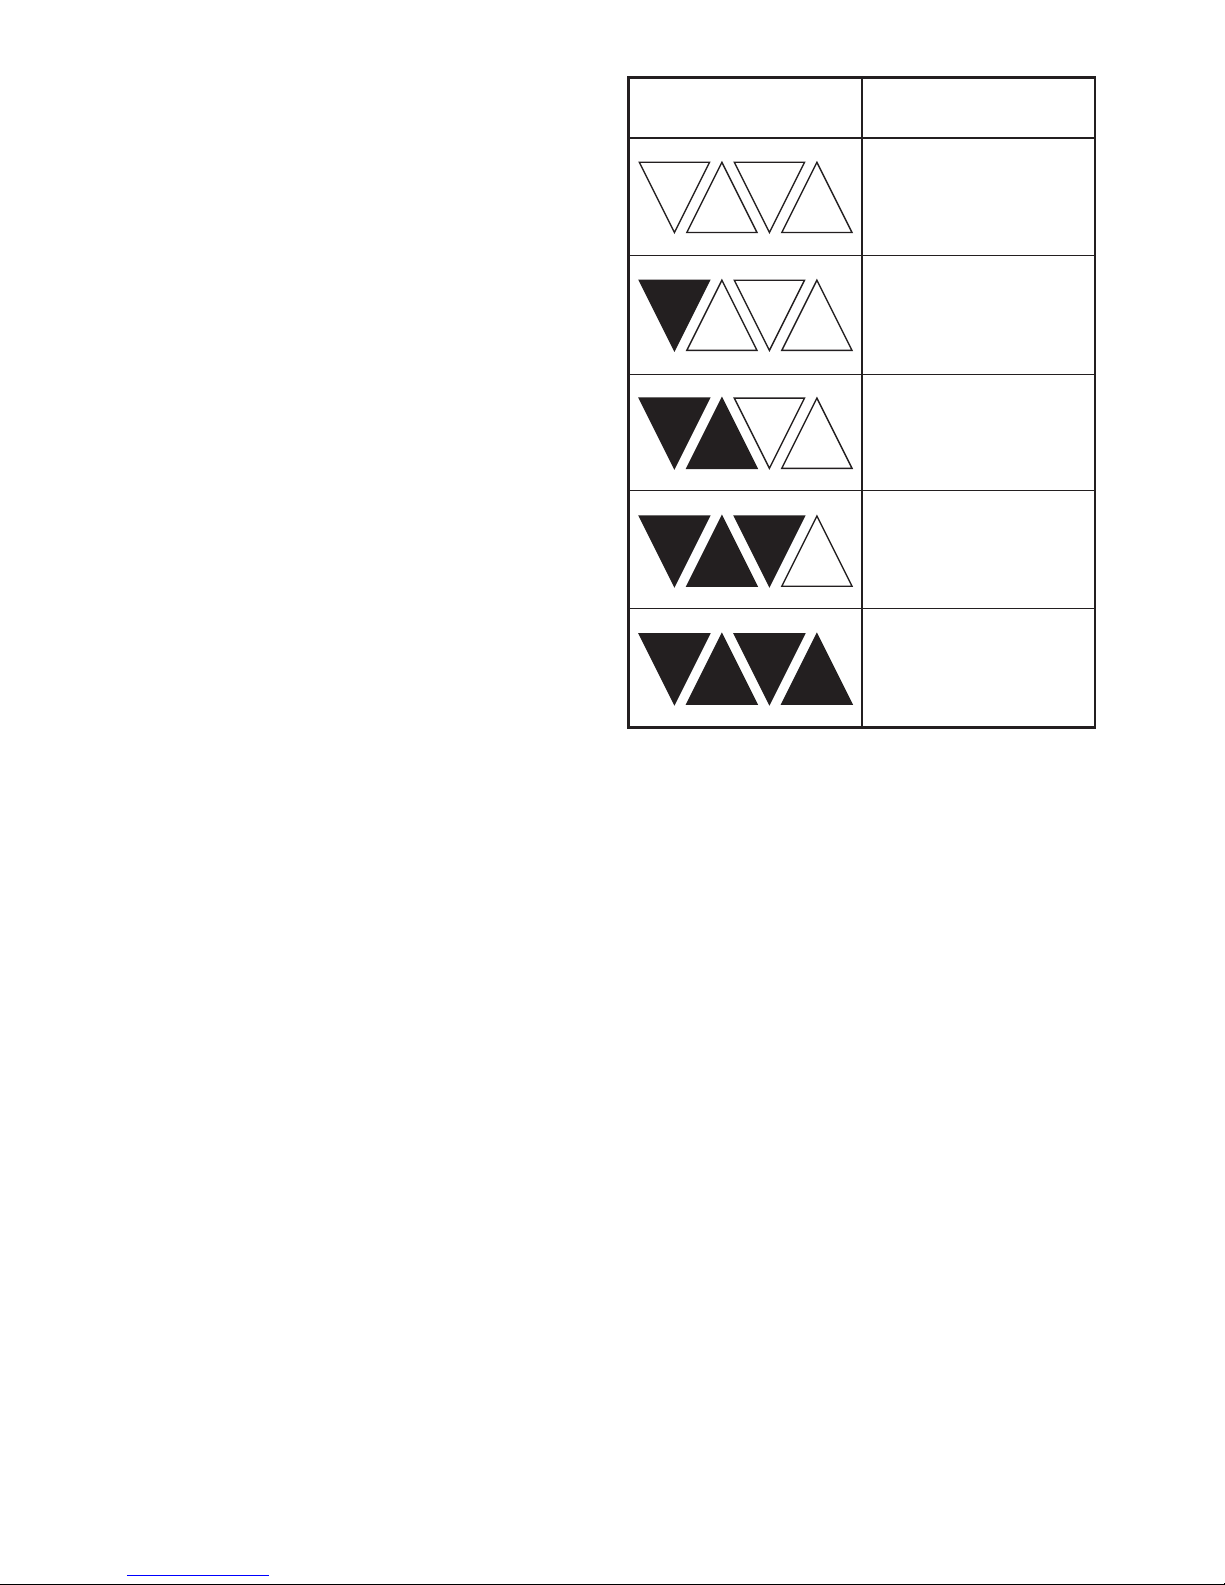
CHARGE STATUS
To display the amount of charge left in the battery,
press the charge level indicator button, Fig.3.
INSTALLING THE BATTERY PACK
Warning! Battery tools are always in operating
condition. Always remove battery pack from your tool
when you are assembling parts, making adjustments,
cleaning, or when not in use. Removing battery pack
will prevent accidental start
ing that could cause
serious personal injury.
Slide the battery pack into the tool base, Fig.4. (Note
the battery has raised ribs which allows it to fit into
the pole saw only one way). Make sure the battery
pack snaps into place and that battery pack is
secured in the tool before beginning operation.
Improper installation of the battery pack can cause
damage to internal components.
REMOVING THE BATTERY PACK
Locate the battery release catch on the top of the
battery and press downw
ards, Fig.5. Whilst holding
down the battery release catch slide the battery pack
away from the tool.
ACCESSORIES
Only fit genuine replacement parts which comply with
the speed and fit of the power tool.
The FXAJ0G-ZP-185Li-JD comes with the following
accessories:
• 40 Teeth blade (fitted)
• Dust bag
• G Work clamp
• 6mm saw blade allen key
Charge level indicator Amount of charge
remaining
0-10%
10-25%
25-50%
50-75%
75-100%

15
TRANSPORTATION
Lift the mitre saw only when the saw arm is locked in
the down position, the saw is switched off and the
battery is removed from the machine. You must only
lift the saw by the castings. Do not lift the saw using
the guards.
BENCH MOUNTING (FIG.6)
The saw base has 4 mounting holes to facilitate bench
mounting. Attach the saw to a level, horizontal bench
or work table using bolts (not supplied) though the
fixing holes in the saw base.
NOTE. If desired, you can mount the saw t
o a piece of
8 mm or thicker plywood which can then be clamped
to your work support or moved to other job sites and
reclamped.
CAUTION. Make sure that the mounting surface is not
warped as an uneven surface can cause binding and
inaccurate sawing.
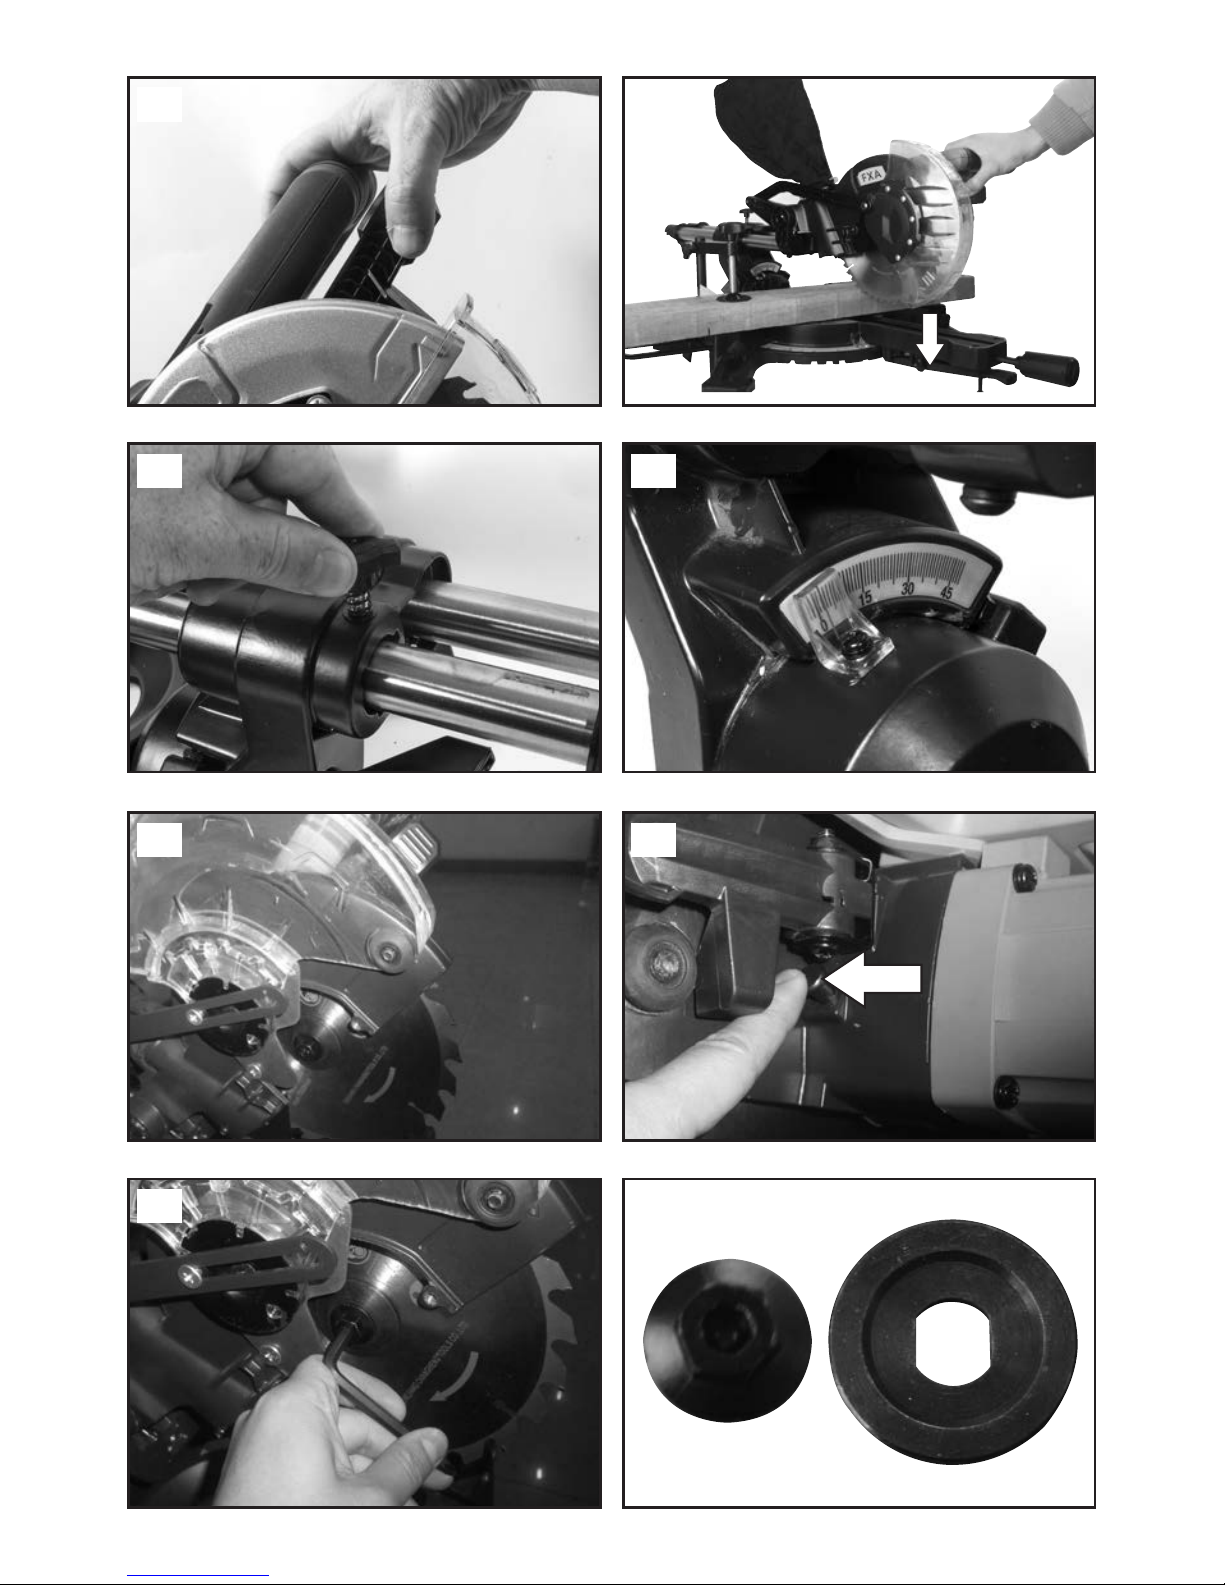
DUST BAG (FIG.7)
The dust bag fits onto the dust extractor port.
Squeeze the two metal tabs on the end of the dust
extraction bag to allow it to slide over the dust
extractor port.
For efficient operation, empty the dust bag when it is
no more t
han half full.
This allows better airflow through the bag. A dust
extraction system may also be connected to the dust
extraction port for a cleaner and safer work area.
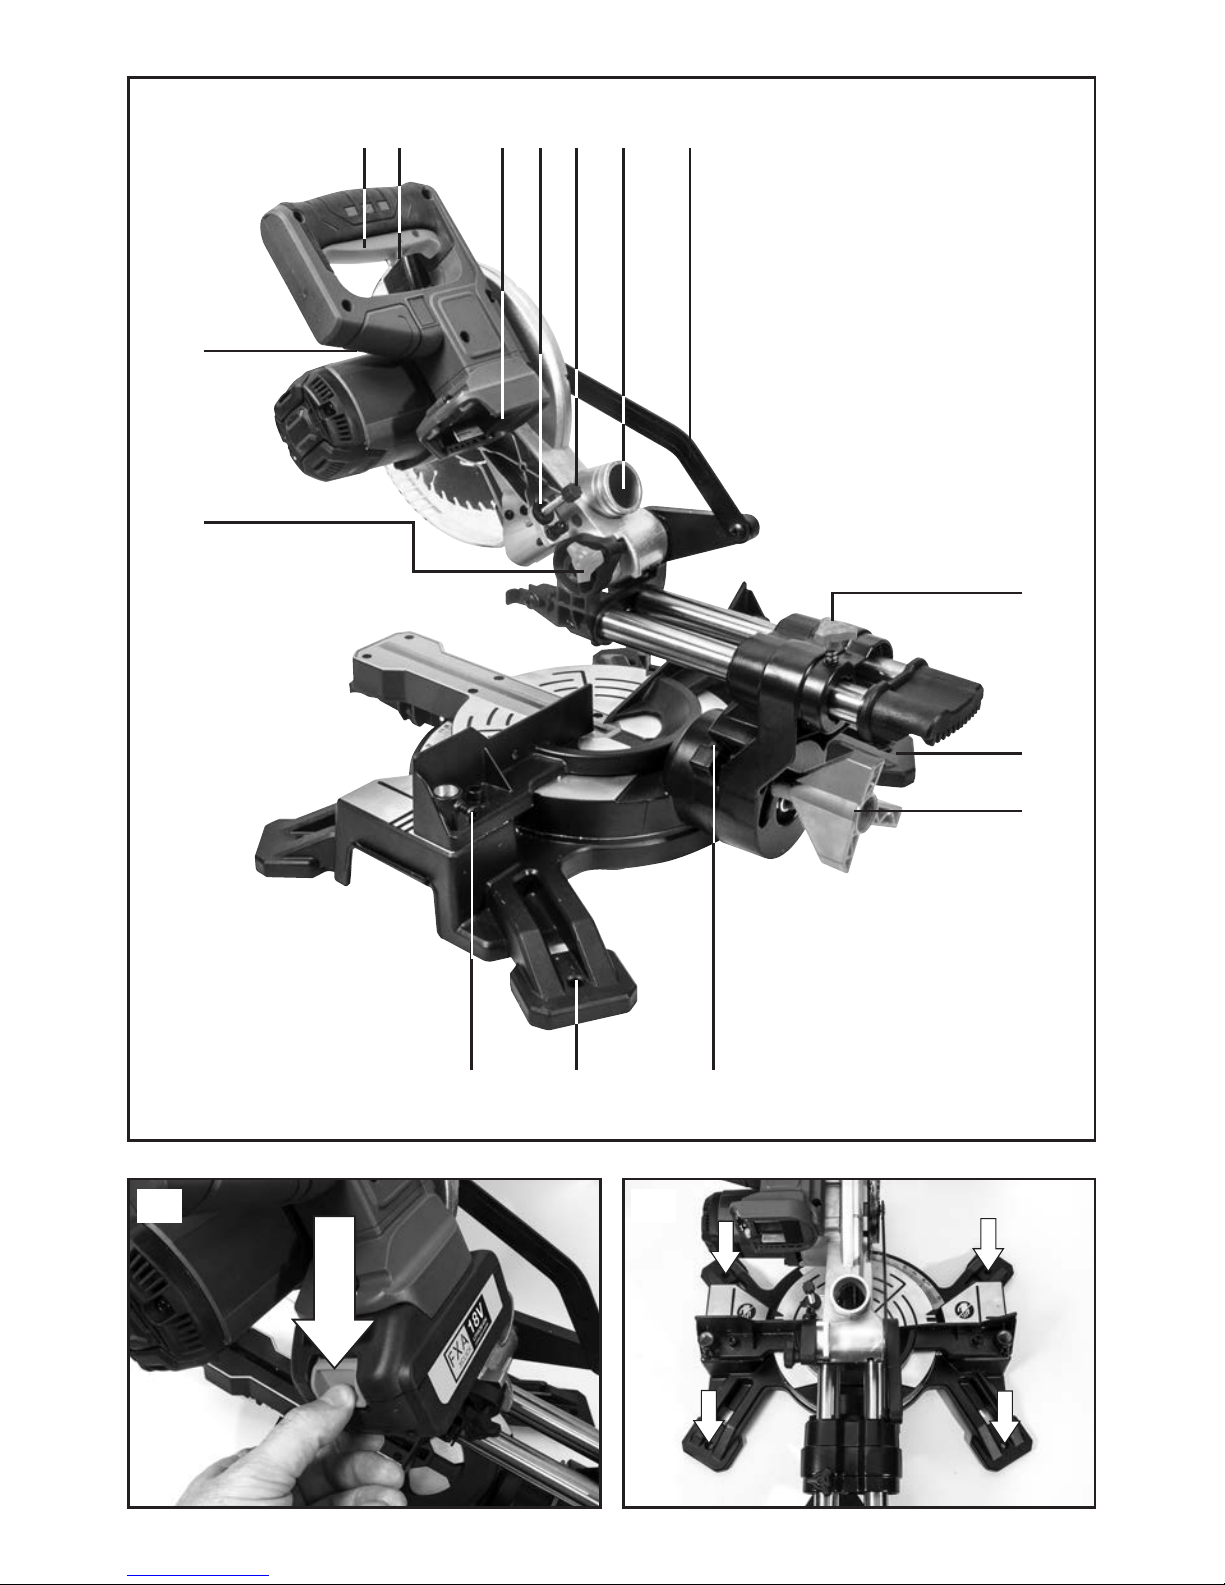
FITTING THE CLAMP ASSEMBLY (FIG.8)
Two sockets (one either side) are incorporated into the
rear of the machines fence. These sockets are for
positioning the Clamp Assembly.
Fit the clamp to the retaining socket that best suits
the cutting application, ensuring that it is fully pushed
down.
Using a screwdriver, t
ighten the clamp assembly lock
screw to lock the pillar of the clamp into the fence
socket, Fig.8.
Place the workpiece to be cut onto the saw table,
against the fence and in the desired position.
Adjust the clamp using the thumbscrews and handwheel so that it securely holds the workpiece to the
saw table.
Conduct a ‘dry run’ with the battery disconnected.
Ensure that the Clamp does not interfere with the path
of the blade, or with the path of any other part of the
cutting head a
s it is lowered.
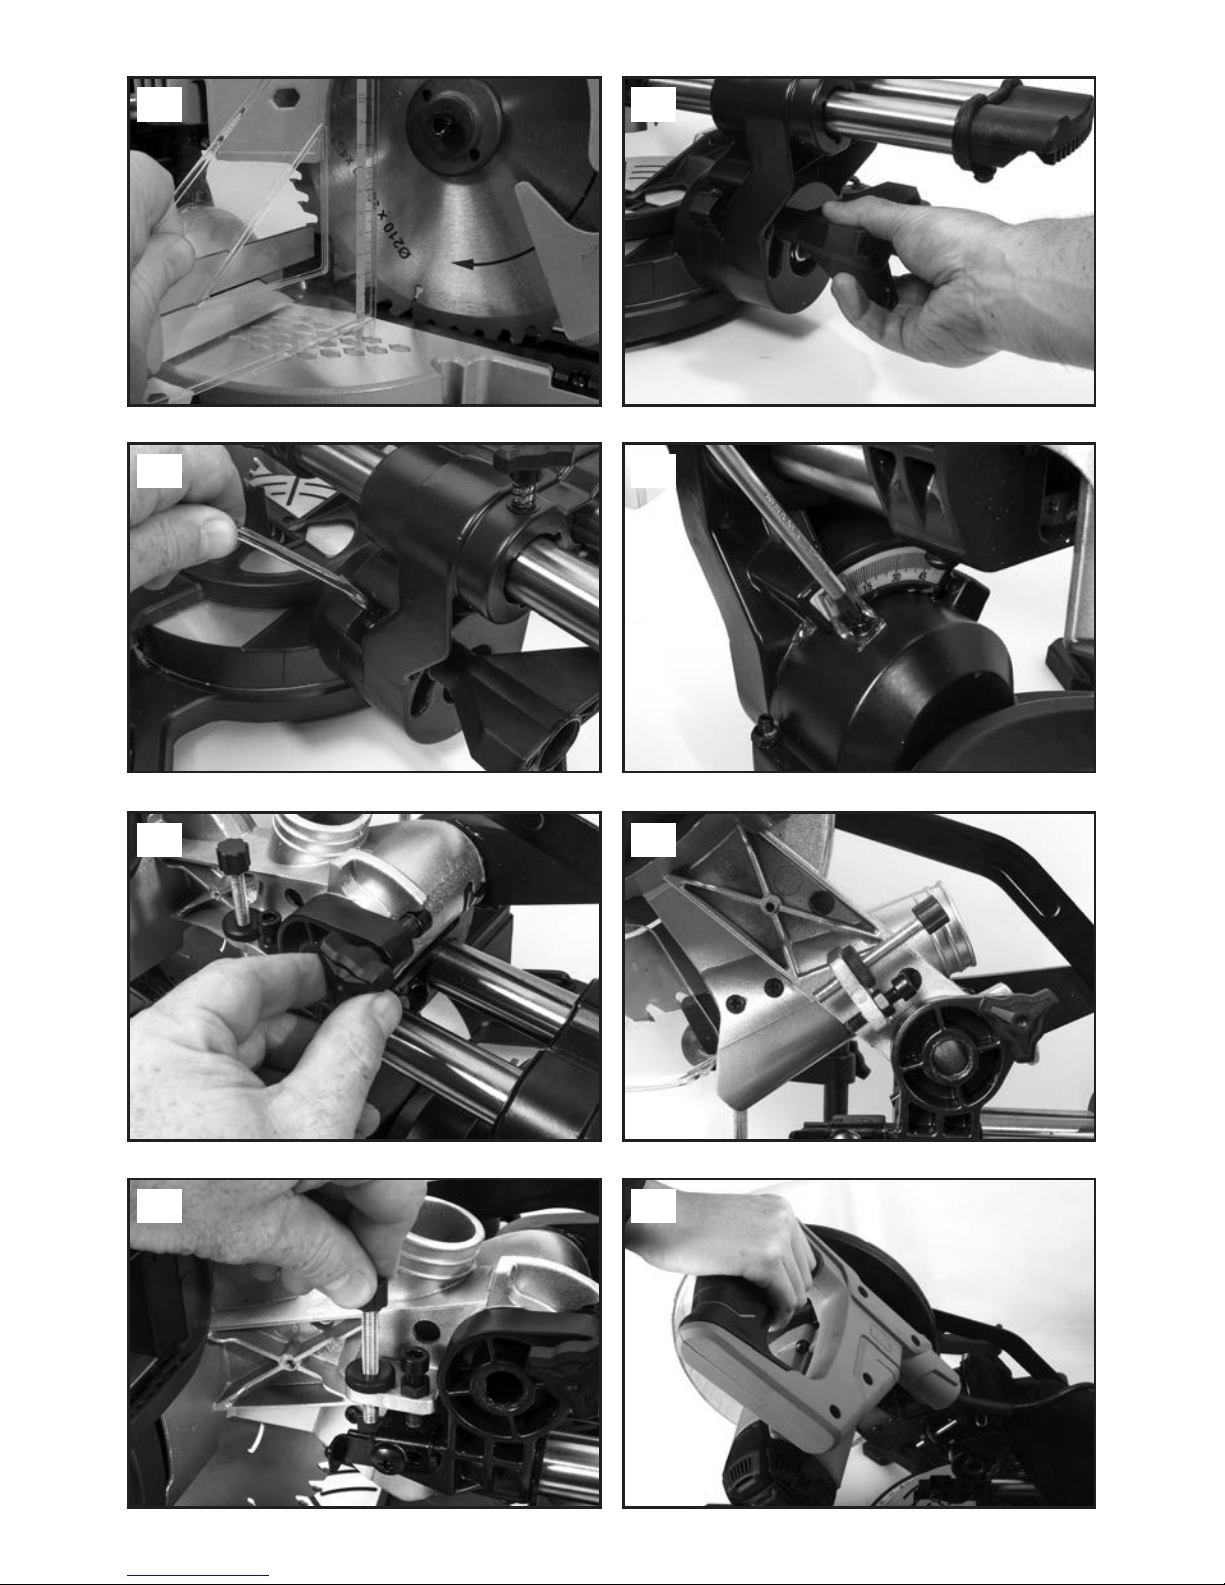
SETTING THE TABLE SQUARE WITH THE BLADE
Make sure that the battery is removed from the saw.
Push the saw arm down to its lowest position by
pressing the release latch, Fig.9, and engage the
release knob to hold the saw arm in the transport
position, Fig.10.
Fit the mitre lock handle (Fig.11).
Rotate the table until the pointer is positioned at 0º.
Tighten the mitre lock handle. (Fig.12)
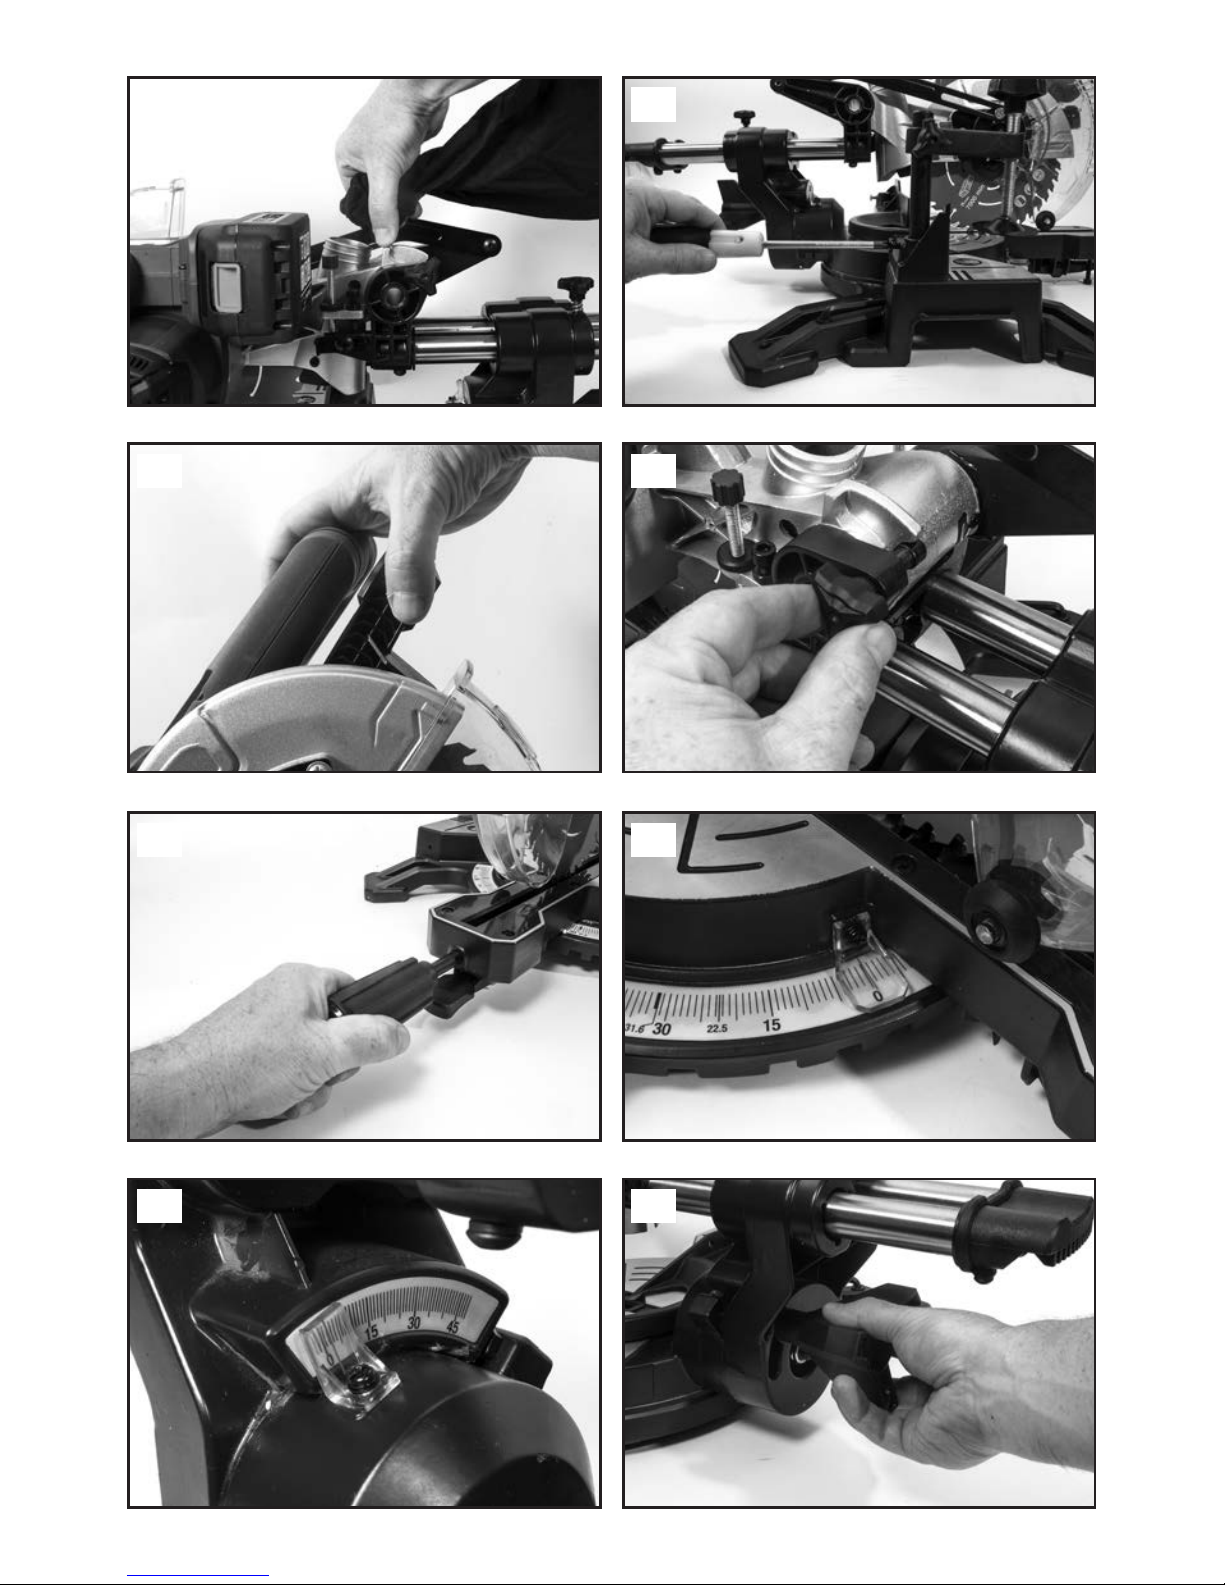
Loosen the bevel lock and set the saw arm at 0º bevel
(the blade at 90º to the mit
re t
able). (Fig.13)
Tighten the bevel lock, Fig.14.
Place a set square against the table and the flat part
of the blade (Fig.15).
NOTE. Make sure that the square contacts the flat
part of the saw blade, not the teeth. Rotate the blade
by hand and check the blade-to-table alignment at
several points. The edge of the set square and the
saw blade should be parallel.
If the saw blade angles away from the set square,
adjust as follows:
Loosen the bevel lock. (Fig.16)
Use 10mm spanner or a
djustable s
panner to adjust
the lock nut (Fig.17), make sure the edge of set
square and saw blade should be parallel.
Tighten the bevel lock.
Loosen the screw holding the pointer of the bevel
scale and adjust the position of the pointer so that it
accurately indicates zero on the scale. Retighten the
screw, Fig.18.
Retighten the bevel lock and the lock nut securing the
0° bevel adjustment screw.
NOTE. The above procedure can also be used to
check the angle of the saw blade to the table a
t 45º
bevel angle. The 45° bevel adjustment screw is on the
opposite side of the saw arm.
TRENCH DEPTH ADJUSTMENT
In its normal position, the trenching stop permits the
saw blade to cut right through a workpiece.
To adjust the trench stop pull out the release knob out
and fully raise the saw arm (Fig.19)
When the saw arm is lifted, the trenching stop can be
adjusted so that the trenching depth adjustment
screw contacts the stop as the saw arm is lowered.
Deploy the stop by moving it o
utwards, Fig.20. If the
trenching stop wont move, slightly loosen the screw
using a crosshead screwdriver.
This restricts the cut to a “trench” in the workpiece.
The depth of the trench can be adjusted with the
trenching depth adjustment screw and locked in
position with the trenching depth lock nut (Fig.21).

16
OPERATION
To turn the saw on press the switch lock to the left.
Hold the operating handle firmly and squeeze the
switch trigger, (Fig.22).
Press the release latch (Fig.23).
When the blade is at its maximum speed
(approximately 2 seconds), lower the blade through
the workpiece (Fig.24). After completing the cut,
release the switch trigger and allow the saw blade to
stop rotating before raising the blade out of the
workpiece. Wait until the blade stops before removing
the workpiece.
C
ROSS-CUTTING (WITHOUT SLIDING FUNCTION)
To saw narrow pieces of wood, the slide function is
not necessary. In these cases, ensure that the slide
lock is screwed down to prevent the saw arm from
sliding, Fig.25.
A crosscut is made by cutting across the grain of the
workpiece. A 90º crosscut is made with the mitre
table set at 0º. Mitre crosscuts are made with the
table set at some angle other than zero.
Pull on the release knob and lift the saw arm to its full
height.
Loosen the m
itre lock. Rotate the mitre table until the
pointer aligns with the desired angle. Retighten the
mitre lock.
WARNING. Be sure to tighten the mitre lock before
making a cut. Failure to do so could result in the table
moving during the cut and cause serious personal
injury.
Place the workpiece flat on the table with one edge
securely against the fence. If the board is warped,
place the convex side against the fence. If the
concave side is placed against the fence, the board
could b
reak and jam the blade.
When cutting long pieces of timber, support the
overhanging ends of the timber with the side
extension arms, a roller stand or a work surface that is
level with the saw table.
Use the clamp assembly to secure the workpiece
wherever possible.
It is possible to remove the clamp assembly by
loosening the clamp assembly lock and moving it to
the other side of the table. Make sure the clamp
assembly lock is tight before using the clamp.Before
turning on the saw, p
erform a dry run of the cutting
operation to check that there are no problems.
Press the switch lock to the left. Hold the operating
handle firmly and squeeze the switch trigger. Allow
the blade to reach maximum speed.
Press the release latch and slowly lower the blade into
and through the workpiece.
Release the switch trigger and allow the saw blade to
stop rotating before raising the blade out of the
workpiece. Wait until the blade stops before removing
the workpiece.
CROSS
-CUTTING (
WITH SLIDE ACTION)
When cutting wide workpieces, first unscrew the slide
lock, Fig.25.
Pull on the release knob, raise the saw arm to its
highest position and slide it towards you.
Press the switch lock to the left. Hold the handle
firmly and squeeze the switch trigger. Allow the blade
to reach maximum speed. Press the release latch and
slowly lower the blade into the workpiece and slide it
away from you at the same time until the workpiece is
cut.
Release the switch trigger a
nd allow the saw blade to
stop rotating before raising the blade out of the
workpiece.
Wait until the blade stops before removing the
workpiece.
BEVEL CUT
A bevel cut is made by cutting across the grain of the
workpiece with the blade angled to the fence and
mitre table. The mitre table is set at the zero degree
position and the blade set at an angle between 0º and
45º to the left, Fig.26.
Repeat the steps for cross-cutting (with or without
slide function).
Loosen the bevel lock and m
ove the saw arm to the
left to the desired bevel angle (between 0º and 45º).
Tighten the bevel lock.
WARNING: Always ensure that the bevel lock is fully
tightened before making a cut.
COMPOUND MITRE CUT
A compound mitre cut involves using a mitre angle
and a bevel angle at the same time.
It is used in making picture frames, to cut mouldings,
making boxes with sloping sides and for roof framing.
Always make a test cut on a piece of scrap wood
before cutting into the good material.
U
se t
he slide action when cutting wide workpieces.
MAINTENANCE & CARE
CHANGING A BLADE
DANGER: The blade is extremely sharp and care must
be observed when handling. Never try to use a blade
larger than the stated capacity of the saw. It might
come into contact with the blade guards. Never use a
blade that is too thick to allow the outer blade washer
to engage with the flats on the spindle.
It will prevent the blade bolt from properly securing
the blade on the spindle.
Do not use the saw to c
ut metal or masonry.

17
Ensure that any spacers and spindle rings that may be
required suit the spindle and the blade fitted.
Make sure that the battery is removed from the
machine.
Push down on the operating handle and pull the
release knob to disengage the saw arm.
The release knob can be turned so that it is held in the
retracted position.
Raise the saw arm to its highest position.
Rotate the lower blade guard (Fig.27) up and into the
upper blade guard and press the spindle lock button
(Fig.28). Rotat
e t
he blade until the spindle locks.
Use the 6mm Allen key wrench to remove the blade
bolt (Fig.29). (Loosen in a clockwise direction as the
blade screw has a left hand thread).
Remove the washer, outer blade flange and the blade.
Wipe a drop of oil onto the inner blade washer and
the outer blade washer where they contact the blade.
Fit the new blade onto the spindle taking care that the
inner blade washer sits behind the blade.
CAUTION. To ensure correct blade rotation, always
inst
all t
he blade with the blade teeth and the arrow
printed on the side of the blade pointing down
(Fig.29).
The direction of blade rotation is also stamped with an
arrow on the upper blade guard.
Replace the outer blade washer.
Depress the spindle lock button and replace the blade
bolt.
Use the 6mm Allen key wrench to tighten the blade
screw securely (anti-clockwise).
Check that the blade guard operates correctly and
covers the blade as the saw arm is lowered.
Connect the battery t
o t
he machine and run the saw
to make certain that it is operating correctly.
Note: Check the tightness of the blade securing bolt
before, during and after each use.
ATTACHING A BLADE WITH A Ø 20MM ARBOUR
(FIG.30)
Follow the instructions for changing a blade. Replace
the outer blade washer with the Ø20 mm washer and
tighten with the blade bolt.
MAINTENANCE
Always remove battery pack from your tool when you
are assembling parts, making adjustments, cleaning,
or when not in use.
Keep t
he tool's air vents unclogged and clean at all
times.
Regularly check to see if any dust or foreign matter
has entered the grills near the motor and around the
trigger switch. Use a soft brush to remove any
accumulated dust. Wear safety glasses to protect
your eyes whilst cleaning.
Re-lubricate all moving parts at regular intervals.
If the body of the saw needs cleaning, wipe it with a
soft damp cloth. A mild detergent can be used but
nothing like alcohol, petrol or other cleaning a
gent.
Never use caustic agents to clean plastic parts.
CAUTION. Water must never come into contact with
the saw.
GENERAL INSPECTION
Check regularly that all fixation screws are sufficiently
tightened. Check especially the outer flange. If there is
vibration, screws can loosen with time.
Store the tool, instruction manual and accessories in a
secure place. In this way you will always have all the
information and parts on hand.
TECHNICAL SPECIFICATION
Voltage 18V DC
No load speed 3600 min
-1
Saw Blade diameter Ø185mm
Teeth 40 HW
Saw Blade arbour Ø 16mm/Ø 20mm
Angle of mitre table -45°/0°/+45°
Bevel angles 45° to the left
Straight cut at 0° x 0° 200 x 51 mm
Mitre cut at 45° x 0° 152 x 51 mm
Bevel cut at 0° x 45° 200 x 35 mm
Combined Mitre cut at 152 x 35 mm
45° x 45°
Sound Pressure Level L
pA
83.14 dB(A)
K=3dB(A)
Sound Power Level L
WA
96.14 dB(A)
K=3dB(A)
Vibration Level <2.5 m/s
2
, K=1.5m/s
2
18
SYMBOLS
The rating plate on your tool may show symbols. These represent important information about the product or
instructions on its use.
Conforms to relevant safety
standards.
Read the instruction manual.
Product conforms to RoHs
requirements
Waste electrical products should
not be disposed of with
household waste. Please recycle
where facilities exist. Check with
your Local Authority or retailer for
recycling advice.
General warning
Double insulated for additional
protection.
Wear hearing protection.
Wear eye protection.
Wear respiratory protection.
Cutting danger.
Do NOT clean, lubricate or repair
while the machine is running
Danger! Splinter casing
Dangerous voltage.
Do NOT approach the machine
with loose clothing
Do NOT remove safety guards
and devices with the machine
operating
Protect the machine from foul
weather
Do NOT touch the moving blade
130°
Li-ion
Thermal link with operating
temperature
Contains Lithium Ion

19
ENVIRONMENTAL PROTECTION
Information for (private householders) for the environmentally responsible disposal of Waste Electrical and
Electronic Equipment (WEEE)
This symbol on products and or accompanying documents indicates that used and end of life
electrical and electronic equipment should not be disposed of in household waste. For the
proper disposal, treatment, recovery and recycling, please take these products to designated
collection points, where they w
ill be accepted on a free of charge basis. Alternatively, in some
countries you may be able to return your products to your retailer upon the purchase of an
equivalent new product. Disposing of this product correctly will help to save valuable resources
and prevent any potential adverse effects on human health and the environment which could
otherwise arise from inappropriate waste disposal and handling. Please contact your local
authority for further details of your nearest designated collection point. Penalties may be applicable for incorrect
disposal of this waste in accordance with national legislation.
FOR BUSINESS USERS IN THE EUROPEAN UNION.
If you wish to discard electrical and electronic equipment, please contact your dealer or supplier for further
information.
Information on Disposal in other Countries outside the European Union.
This Symbol is only valid in the European Union.
If you wish to dispose of this product, pleas
e contact your local authorities or dealer and ask for the correct
method of disposal.

20
ESITTELY
Kiitos, että ostit tämän tuotteen, joka on läpäissyt
kattavan laatutarkastusprosessimme. Kaikki on tehty
sen varmistamiseksi, että saat sen täydellisessä
toimintakunnossa.
TURVALLISUUS ENSIN
Seuraavat perusvarotoimet on tehtävä ennen
sähkötyökalun käyttämistä tulipalojen, sähköiskujen ja
henkilövahinkojen estämiseksi. On tärkeää lukea nämä
käyttöohjeet, jotta ymmärrät tämän työkalun käytön,
siihen liittyvät rajoitukset ja potentiaaliset v
aarat.
TAKUUTODISTUS
Tällä tuotteella on 2 vuoden takuu, joka alkaa
ostopäivästä ja koskee vain ensimmäistä ostajaa.
Tämä takuu kattaa vain virheet, jotka aiheutuvat
raaka-aine- ja valmistusvioista, ja jotka tulevat esille
takuuaikana. Takuu ei korvaa kuluvia osia. Valmistaja
korjaa tai vaihtaa tuotteen harkintansa mukaan
edellyttäen seuraavassa mainittuja asioita. Tuotetta on
käytetty käsikirjan ohjeiden mukaisesti, ja sitä ei ole
käytetty väärin tai huolimatto
masti tai tarkoitukseen,
johon sitä ei ole tarkoitettu käytettäväksi. Laitetta ei
ole purettu osiin tai peukaloitu millään tavalla, sitä ei
ole huollatettu valtuuttamattomilla henkilöillä tai
käytetty vuokrauksen kohteena. Kuljetusvauriot eivät
kuulu tämän takuun piiriin. Niistä on vastuussa
kuljetusliike. Takuuvaateet on esitettävä ensisijaisesti
suoraan jälleenmyyjälle takuukauden aikana. Tuote
tulee palauttaa valmistajalle vain poikkeuksellisissa
t
apauksissa. Näissä tapauksissa ostajan vastuulla on
tuotteen palauttaminen omalla kustannuksellaan ja
varmistaen, että se on asianmukaisesti pakattu
kuljetusvaurioiden estämiseksi. Mukaan tulee liittää
lyhyt kuvaus viasta ja kopio kuitista tai muusta
ostotodistuksesta. Valmistaja ei ole vastuussa mistään
erityisistä, esimerkillisistä, suorista, välillisistä,
satunnaisista tai epäsuorista menetyksistä tai
vahingoista takuun aikana. Tämä t
akuu tulee lisänä,
eikä vaikuta oikeuksiin, joita kuluttajalla saattaa olla
vuoden 1973 Tavaranmyyntilain ja siihen vuonna 1975
ja 1999 tehtyjen muutosten mukaisesti.
LAKISÄÄTEISET OIKEUDET
Tämä takuu on lisänä, eikä vaikuta lakisääteisiin
oikeuksiisi.
TUOTTEEN HÄVITTÄMINEN
Kun tuotteen käyttöikä loppuu tai se hävitetään
jostakin muusta syystä, sitä ei saa hävittää
kotitalousjätteen mukana. Luonnonvarojen
säilyttämiseksi ja haitallisten ympäristövaikutusten
m
inimoimiseksi, kierrätä tuote tai hävitä muulla
ympäristöystävällisellä tavalla. Tuote tulee viedä
paikalliseen kierrätyskeskukseen tai muuhun
viralliseen keräily- ja hävityspisteeseen.
Jos olet epävarma, kysy kierrätys- ja/tai
hävittämisvaihtoehdoista paikalliselta jäteliikkeeltä.
TÄRKEITÄ TIETOJA TUOTTEESTA
Tuote on suunniteltu toimimaan FXA XCLICK -sarjan
akkujen ja latureiden kanssa.
ERITYISET TURVAOHJEET
Lue kaikki ohjeet ennen k
uin yrität käyttää laitetta.
Säilytä nämä ohjeet.
TERÄN TURVALLISUUS
VAROITUS: Pyörivät sahanterät ovat erittäin vaarallisia
ja voivat aiheuttaa vakavia henkilövahinkoja ja raajojen
leikkautumisia. Pidä sormet ja kädet aina vähintään
150 mm:n etäisyydellä terästä. Älä yritä poistaa
sahattua materiaalia ennen kuin leikkuupää on
nostettu yläasentoon, suojus on täysin suljettu ja
sahanterä on lopettanut pyörimisen. Käytä vain
valmistajan suosittelemia ja standardin E
N 847-1
mukaisia sahanteriä.
Älä käytä sahanteriä, jotka ovat vaurioituneita tai
vääntyneitä, koska ne voivat haljeta ja aiheuttaa
vakavan henkilövahingon käyttäjälle tai sivullisille.
Älä käytä pikateräksestä (HSS) valmistettuja
sahanteriä.
Älä pysäytä terää pakottamalla tai käyttäen sivuttaista
painamista.
Älä käytä vääntyneitä teriä tai teriä, joista puuttuu
hampaita. Tämä on erittäin vaarallista ja saattaa
aiheuttaa vakavan vahingon käyttäjälle j
a vieressä
oleville sekä vaurioittaa konetta.
Älä käytä teriä, jotka ovat määriteltyä isompia. Käytä
vain koneelle mitoitettuja teriä. Terässä näkyvän
pyörimisnopeuden (min
-1
) tulee aina olla SUUREMPI
kuin koneen pyörimisnopeus (min
-1
).
Varmista, että terään merkitty suuntanuoli vastaa
moottorin pyörimissuuntaa. Terän hampaiden tulee
aina osoittaa alaspäin sahan edestä katsottuna.
Jos pöydän kitakappale vaurioituu tai kuluu, se täytyy
vaihtaa samanlaiseen. N
iitä saa valmistajalta tämän
käyttöoppaan ohjeiden mukaisesti.
HENKILÖNSUOJAIMET (PPE)
Käytä kuulosuojaimia kuulovaurioriskin
pienentämiseksi.
Suojalaseja tulee käyttää, jotta estetään sinkoutuvien
lastujen aiheuttama mahdollinen näkökyvyn menetys.
Hengityssuojain on myös suositeltava. Jotkin puut tai
puuntyyppiset tuotteet, etenkin MDF (puolikova
kuitulevy), voivat tuottaa pölyä, joka saattaa olla
vaarallista terveydellesi. Laitetta k
äytettäessä
suosittelemme käyttämään pölynpoistolaitteen lisäksi
hyväksyttyä kasvonaamiota, jossa on vaihdettavat
suodattimet.
Laturi Akku
(ei ole mukana) (ei ole mukana)
FXADL1051 FXAJDB180Li
FXAJDB180Li-II

21
Käytä käsineitä teriä tai karkeita materiaaleja
käsitellessäsi. Suosittelemme kuljettamaan sahanterät
kotelossa aina, kun mahdollista.
Emme suosittele käsineiden käyttöä, kun käytät
jiirisahaa.
TURVALLINEN KÄYTTÖ
Varmista, että olet valinnut oikean sahanterän
sahattavalle materiaalille. Älä käytä tätä jiirisahaa
muiden materiaalien kuin alla mainittujen
sahaamiseen:
Puu
Puuperäiset tuotteet (MDF, lastulevy, vaneri,
kimpilevy, kovalevy jne.)
Alu
miini
N
iukkahiilinen teräs (paksuus 6 mm/1/4”)
Kun kuljetat jiirisahaa, varmista, että sahanpää on
lukittu alas 90 asteen asentoon (jos liukuva jiirisaha,
varmista, että liukupalkit on lukittu). Nosta konetta
tarttumalla molemmilla käsillä sen pohjan
ulkoreunoista (jos liukuva jiirisaha, nosta siinä olevista
kahvoista).
Missään tapauksessa konetta ei saa nostaa tai
kuljettaa vetämällä suojuksesta tai mistään
käyttömekanismin osasta.
Pidä suojukset paikoillaan j
a hyvässä
toimintakunnossa. Tarkista suojusten moitteeton
toiminta, kun kone on irrotettuna verkkovirrasta.
Paina sahanpää alas niin, että terä on alimmassa
asennossaan, pyöritä terää varovasti kädellä
varmistaaksesi, että se pyörii esteettömästi.
Toista tämä toimenpide kaikissa maksimi viiste- ja
vinosahausasennoissa ennen kuin aloitat jiirisahan
käytön.
Pidä työpenkki ja lattia-alue puhtaana
irtomateriaalista, kuten lastuista ja sahatuista
kappaleista.
P
idä aina sahanterä ja sahanterän laippa puhtaina.
Jos aluslevyjen tai supistusrenkaiden käyttö on
välttämätöntä, niiden täytyy olla tarkoitukseen sopivia
ja valmistajan suosittelemia.
Jos jiirisaha on varustettu laserilla, älä vaihda laseria
toisen tyyppiseen. Jos laser ei toimi, se täytyy korjata
tai vaihtaa valtuutetussa huoltoliikkeessä.
Aina kun vaihdat teriä varmista, että sahanterän
kauluksen uritettu pinta on terän pintaa vasten.
Var
mista, e
ttä terän kiinnityspultti on kunnolla kiristetty
käyttäen mukana tullutta avainta. Älä kiristä liikaa.
Älä yritä poistaa sahattua materiaalia tai muita
työkappaleen osia ennen kuin leikkuupää on nostettu
yläasentoon, suojus on täysin suljettu ja sahanterä on
lopettanut pyörimisen.
Kiinnitä työkappale sahauspöytään puristinkiinnikkeillä
aina, kun se on mahdollista.
Varmista aina ennen jokaista sahausta, että jiirisaha on
asennettu vakaaseen asentoon.
P
itkiä kappaleita sahattaessa käytä sahapukkeja tai
työpenkkejä työkappaleen tukemiseen ja varmista,
että kaikki kiinnittimet on kiristetty ja tarkista liika
välys.
VAROITUS: minkä tahansa jiirisahan käyttö voi
aiheuttaa vieraiden esineiden sinkoutumisen kohti
silmiä ja aiheuttaa vakavan silmävaurion. Käytä aina
suojalaseja tai sivusuojilla varustettuja suojalaseja tai
kokonaamaria, kun käytät sähkötyökalua.
VAROITUS: Jos jiirisahasta puuttuu osia, ä
lä käytä sitä
ennen kuin osat on korvattu uusilla. Tämän säännön
noudattamatta jättäminen voi johtaa vakavaan
henkilövahinkoon.
LISÄTURVAOHJEET
Jotkin puut tai puuntyyppiset tuotteet, etenkin MDF
(puolikova kuitulevy), voivat tuottaa pölyä, joka saattaa
olla vaarallista terveydellesi. Laitetta käytettäessä
suosittelemme käyttämään pölynpoistolaitteen lisäksi
hyväksyttyä kasvonaamiota, jossa on vaihdettavat
suodattimet. Varmista, että sähkötyökalut o
n irrotettu
verkkovirrasta, kun niitä ei käytetä sekä ennen
huoltoa, voitelemista tai säätöjen tekemistä sekä
varusteiden, kuten terien, vaihdon aikana.
Anna sahanterän saavuttaa täysi nopeus ja käydä
tyhjäkäynnillä muutama sekunti ennen sahauksen
aloittamista. Mikäli havaitset epätavallista ääntä tai
tärinää, PYSÄYTÄ laite välittömästi ja tarkista
ongelman aiheuttaja.
Älä koskaan sahaa vapaalla kädellä. Varmista aina,
että työkappale on tiukasti p
ainettu takavastetta ja
pöydän tukipintaa vasten.
Varmista, että irti sahattavalla työkappaleella on
riittävä tila liikkua sivusuunnassa. Tämän
noudattamatta jättäminen saattaa johtaa irti
sahattavan osan jumittumiseen terää vasten.
Mikäli työstettävää kappaletta ei voida pitää kunnolla
kiinni käsin, käytä kiinnitintä tai puristinta pitämään
sitä paikallaan.
Varmista, että epäsäännölliset tai pyöreät kappaleet
on kiinnitetty kunnollisesti, jotta ne e
ivät pääse
liikkumaan tai kääntymään ja jumittamaan terää.
Älä koskaan sahaa enempää kuin yhden kappaleen
kerrallaan.
Älä koskaan työstä sellaisia kappaleita, jotka ovat liian
pieniä pideltäviksi peukalolla ja etusormella
takavastetta vasten.
Käytä vain valmistajan suosittelemia teriä.
Älä käynnistä laitetta siten, että terä koskettaa
työstettävää kappaletta.

22
Tarkista työstettävä kappale naulojen, ruuvinkantojen
tai minkä tahansa varalta, joka voisi vaurioittaa terää.
Älä yritä muuttaa konetta tai sen varusteita millään
tavalla.
Älä käytä liiallista voimaa työkappaleen syöttämisessä
sahalle.
Työstettävän kappaleen sahaaminen asteittain
vähentää koneen ja terän kulumista ja lisää
tehokkuutta ja käyttöikää.
Älä käytä sahaa ilman paikoillaan olevia suojuksia.
Vaihda kitapala, kun se on kulunut.
Älä käytä sahaa
muide
n materiaalien kuin alumiinin,
puun tai vastaavien materiaalien sahaamiseen.
Yhdistä jiirisahat pölynkeräyslaitteeseen sahauksen
ajaksi.
Valitse sahanterät sahattavan materiaalin mukaan.
Ole varovainen pistosahausta tehdessäsi.
VAROITUS! ÄLÄ YRITÄ SAHATA MATERIAALIA, JOKA
YLITTÄÄ MAKSIMI SAHAUSKAPASITEETIN.
JIIRISAHAN KANTAMISTA KOSKEVIA
LISÄTURVAOHJEITA
Jiirisaha on painava, vaikka se onkin kompakti. Pyydä
apua aina nostaessasi sahaa, jot
ta v
ältät
selkävammojen riskit.
Pidä työkalua noston aikana lähellä kehoasi
välttääksesi selkävammojen riskit. Taivuta polviasi,
jotta voit nostaa jalkavoimalla, ei selällä. Nosta käsille
tarkoitetuista kohdista kummallakin puolella koneen
pohjaa.
Ennen jiirisahan siirtämistä kiristä jiiri- ja
viistelukitusruuvit ja liukuvan kelkan lukitusruuvi, jotta
estät tahattomia, äkillisiä liikkeitä.
Lukitse sahanpää alimpaan asentoonsa. Varmista, että
sahanpään l
ukitustappi on kunnolla liitännässään.
VAROITUS: Älä käytä teräsuojusta ”nostokohtana”.
Akku tulee poistaa ennen kuin konetta siirretään.
LATUREIDEN LISÄTURVAOHJEET
Lue ennen laturin käyttämistä kaikki ohjeet ja laturin ja
akun varoitusmerkinnät sekä myös akun käyttämistä
koskevat ohjeet.
Lataa akkuja vain sisätiloissa, sillä laturi on suunniteltu
vain sisäkäyttöön.
VAARA! Jos akku on murtunut tai jollain tavalla
vaurioitunut, älä laita sitä laturiin. S
e aiheuttaa
sähköiskun tai tappavan sähköiskun vaaran.
VAROITUS! Älä päästä laturiin mitään nesteitä. Se
aiheuttaa sähköiskun vaaran.
Laturi ja sen mukana toimitettu akku on varta vasten
valmistettu toimimaan yhdessä. Älä yritä ladata akkua
muilla latureilla kuin laitteen mukana tulevalla.
Älä irrota virtajohtoa pistorasiasta johdosta vetämällä.
Älä käytä laturia, jos siihen on kohdistunut voimakas
isku, se on pudonnut tai vaurioitunut muulla tavalla.
Vie l
aturi valtuutettuun huoltoliikkeeseen
tarkastettavaksi tai korjattavaksi.
Älä pura laturia. Vie se valtuutettuun huoltoliikkeeseen,
jos se vaatii huoltamista tai korjauksia. Virheellinen
kokoaminen voi aiheuttaa tulipalon, sähköiskun tai
tappavan sähköiskun.
Voit vähentää sähköiskun vaaraa irrottamalla laturin
virtalähteestä, ennen kuin yrität sen puhdistamista.
Yksinään akun poistaminen ei vähennä tätä vaaraa.
AKKUA KOSKEVAT LISÄTURVAOHJEET
Työkalun a
kku toimitetaan alhaisen latauksen tilassa.
Sinun tulee ladata akku täyteen ennen laitteen
käyttämistä.
Älä polta akkua vaikka se olisi pahasti vaurioitunut tai
se ei pitäisi enää varausta. Akku voi räjähtää tulessa.
Akussa voi olla pientä nestevuotoa äärimmäisessä
käytössä tai äärimmäisissä lämpötiloissa. Tämä ei
välttämättä merkitse akun toimintahäiriötä. Jos
ulkokuori on kuitenkin rikkoutunut ja vuotavaa
akkunestettä pääsee ihollesi, pese altistunut a
lue
nopeasti saippualla ja vedellä. Jos akkunestettä
pääsee silmiisi, huuhtele silmiä puhtaalla vedellä
vähintään 10 minuuttia ja hakeudu välittömästi
lääkäriin.
Ilmoita hoitohenkilökunnalle, että neste on 25–35 %
liuos kaliumhydroksidia.
Älä koskaan yritä avata akkua mistään syystä. Jos
akun muovinen kotelo rikkoutuu tai murtuu, lopeta heti
akun käyttö, äläkä lataa sitä enää uudelleen.
Älä säilytä tai kuljeta vara-akkua taskussa,
työkalulaatikossa t
ai muussa paikassa, jossa se
pääsee kosketuksiin metalliesineiden kanssa. Akku voi
joutua oikosulkuun, joka vaurioittaa akkua, aiheuttaa
palovammoja tai tulipalon.
TIETOA AKUN LATAAMISESTA
NiCad ja/tai Li-ion NiCad ja/tai Li-Ion-akkujen
lataustehot määrittää aika, jonka akun täyteen
lataaminen kestää. Tähän aikaan vaikuttaa latausvirta.
Kolme yleisintä lataustehoa ovat:
Nopea lataus.
Hidas lataus.
Ylläpitolataus.
NOPEASTI LADATTAVAT AKUT
Nopeasti ladattavien a
kkujen latausaika voi vaihdella
30 minuutin ja 90 minuutin välillä. Akkukäyttöisen
sähkötyökalun mukana tulevan akun latausaika on
merkitty tuotteen käyttöoppaaseen.
HITAASTI LADATTAVAT AKUT
Hitaasti ladattavien akkujen latausaika on 3 tunnin ja 5
tunnin välillä.

23
AKKUJEN YLLÄPITOLATAUS
Akkujen ylläpitolatauksen latausaika on 7 tunnin ja 9
tunnin välillä.
TÄRKEÄÄ!
NICAD- JA/TAI LI-ION-AKKUJA KOSKEVAA
LATAUSTIETOJA
PURA NICAD- JA/TAI LI-ION-AKKU AINA
KOKONAAN ENNEN LATAAMISTA, ÄLÄKÄ
KOSKAAN YLITÄ LATAUSAIKAA PAITSI JOS
KYSEESSÄ ON UUDEN AKUN ”KUNNOSTUS”.
LATAUSMENETTELY
Ladattaessa uutta NiCad- ja/tai Li-Ion-akkua, se tulee
purkaa aivan tyhjäksi ja ladata sen jälkeen aivan
täyteen akun latausajan mukaisesti, joka o
n ilmoitettu
tuotteen käyttöoppaassa plus 30 minuuttia. Tämän
jälkeen se tulee purkaa uudelleen aivan tyhjäksi ja
ladata sen jälkeen uudelleen aivan täyteen akun
latausajan mukaisesti, joka on ilmoitettu tuotteen
käyttöoppaassa plus 30 minuuttia. Tämä toimenpide
kunnostaa akun ja tasoittaa kennojännitteet. Tämä
toimenpide varmistaa akun optimaalisen toiminnan.
Jos käytät laturia toistuvasti useamman akun
peräkkäiseen lataamiseen, anna laturin jäähtyä
akkujen v
älillä. On suositeltavaa, että jäähtymisjakso
kestää vähintään 30–45 minuuttia.
Kun lataat akkua, joka on purkaantunut kovassa
käytössä, anna akun jäähtyä ennen lataamista. On
suositeltavaa, että jäähtymisjakso kestää vähintään
30–45 minuuttia.
NICAD- JA/TAI LI-ION-AKKUJEN LATAAMINEN JA
LATURIT
NiCad- ja/tai Li-Ion-akkujen lataus on tehtävä
huolellisesti, koska ylilataaminen voi vaurioittaa niitä.
Ylilataus voi nostaa akun lämpötilaa ja sisäinen p
aine
voi nousta äkisti. Tämä voi aiheuttaa kennojen
vääntymistä ja elektrolyytin vuotoa, sekä niissä
äärimmäisissä tapauksissa, joissa sisäinen paine on
erittäin korkea, akut voivat räjähtää.
Tämä voi tapahtua myös, jos yliladattu akku
kiinnitetään laitteeseen ja laitetta aletaan käyttää.
Näiden äärimmäisten tilanteiden välttämiseksi on
tärkeää, että NiCad- ja/tai Li-Ion-akut tyhjennetään
täysin ennen latausta ja latausaika ei ylitä ilmoitettua
paitsi u
uden akun ”kunnostuksessa”. Toistuva vain
osittain purkautuneiden akkujen lataaminen voi
aiheuttaa yhden tai useamman kennon toimintahäiriön.
ITSEPURKAUS
Litiumakku voi purkautua itsestään ja menettää
ladatun varauksen. Yleensä akku menettää noin 5 %
latauksesta ensimmäisen kuukauden aikana täyteen
lataamisen jälkeen (säilytettäessä huonelämpötilassa)
ja sen jälkeen 3 % kuukaudessa. Jos akkua
säilytetään korkeammassa lämpötilassa, itsepurkaus
nopeutuu.
A
KUN LATAAMINEN SISÄTILOISSA
Tämä laturi on suunniteltu sisäkäyttöön. Emme
suosittele sen käyttämistä kuitenkaan asuintiloissa.
Akut olisi parasta ladata verstaan pöydällä,
autotallissa tai vajassa. Jos akku on pakko ladata
asuintiloissa, tilan pitää olla hyvin ilmastoitu ja laturi
tulee asettaa syttymättömälle alustalle varmistaen,
että ilmanvaihtoaukot ovat esteettömät. Älä koskaan
ylitä latausaikaa, paitsi uuden akun ”kunnostuksessa”,
sillä s
e voi vaurioittaa akkua ja laturia.
AKUN HÄVITTÄMINEN
Kun akku ei enää lataudu tai lataus ei pysy, akun
käyttöaika on loppunut. Kierrätä akku luonnon
resurssien säästämiseksi tai hävitä akku
asianmukaisesti. Tässä akussa on nikkeli-kadmiumkennot. Varmista ennen hävittämistä, että akku on
täysin purkautunut käyttämällä akkukäyttöistä
työkalua. Poista akku sitten työkalusta ja peitä akun
liitännät vahvalla teipillä, joka estää oikosulun
syntymisen ja sähkövirra
n purkautumisen, mikä voisi
aiheuttaa tulipalon. Älä yritä avata tai poistaa mitään
komponentteja.
Saat lisätietoja kierrättämisestä ja/tai
hävitysvaihtoehdoista ottamalla yhteyden paikallisiin
jätehuoltoviranomaisiin.
ERITYISET TURVAOHJEET
LADATTAVAT AKUT.
Akut voivat vuotaa tai räjähtää, jos niitä ei ladata ja
käsitellä oikein. Noudata akkujen käsittelyssä aina
seuraavia varotoimia. Varmista, että kone on kytketty
pois päältä ennen akun irrottam
ista tai kiinnittämistä.
Älä käytä tätä akkua minkään muun laitteen kanssa.
Älä yritä kiinnittää akkua väärinpäin.
Älä oikosulje tai yritä purkaa akkua.
Älä altista akkua liekeille tai korkeille lämpötiloille.
Älä upota akkua veteen tai altista sitä vedelle.
Älä säilytä tai kuljeta akkua irrallisten metalliesineiden,
kuten poranterien, kanssa.
Akut voivat vuotaa, kun niitä puretaan. Vältä laitteen
vioittuminen poistamalla tai lataamalla akku, kun
varaus
ta e
i ole enää jäljellä. Säilytä akku viileässä
paikassa, kun se ei ole käytössä.
Akku saattaa kuumentua pitkäaikaisen käytön jälkeen.
Kytke kone pois päältä ennen kuin irrotat akun ja anna
akun jäähtyä. Älä käytä akkua, jos huomaat akun
kotelossa värjäytymiä tai vääntymiä.
YLEISET TURVALLISUUSSÄÄNNÖT
VAROITUS! Lue kaikki ohjeet
Alla olevien ohjeiden noudattamatta jättäminen voi
aiheuttaa sähköiskun, tulipalon ja/tai vakavan
vamman. Käsite ”sähkötyökalu” kaikissa a
lla
luetelluissa varoituksissa viittaa työkaluun tai
akkukäyttöiseen (johdottomaan) sähkötyökaluun.

24
PIDÄ NÄMÄ OHJEET TALLELLA
1) TYÖALUE
a) Pidä työalue puhtaana ja hyvin valaistuna.
Roskaiset tai pimeät alueet lisäävät
onnettomuusriskiä.
b) Älä käytä työkaluja ympäristöissä, joissa on
räjähdysvaara, kuten helposti syttyvien nesteiden,
kaasujen tai pölyn läsnä ollessa. Työkalut
synnyttävät kipinöitä, jotka voivat sytyttää pölyn tai
höyryt tuleen.
c) Pidä lapset ja sivulliset poissa työkalua
käytettäessä. Häiriötekijät voivat haitata
keskittymistä.
2)
SAHKÖTU
RVALLISUUS
a) Sähkötyökalun pistokkeiden tulee vastata
pistorasiaa. Älä koskaan muuta pistoketta millään
tavalla. Älä käytä sovitinpistokkeita maadoitettujen
sähkötyökalujen kanssa. Muuttamattomat
pistokkeet ja yhteensopivat pistorasiat vähentävät
sähköiskun vaaraa.
b) Vältä vartalokosketusta maadoitettuihin pintoihin
kuten putkiin, lämmittimiin, liesiin tai jääkaappeihin.
Sähköiskun vaara kasvaa, jos vartalosi on
maadoitettu.
c) Suojaa s
ähkötyökalut sateelta ja kosteudelta.
Sähkötyökalun sisään päässyt vesi lisää
sähköiskun vaaraa.
d) Älä käytä johtoa väärin. Älä koskaan käytä johtoa
sähkötyökalun kantamiseen, vetämiseen tai
irrottamiseen pistorasiasta. Pidä johto kaukana
lämmöstä, öljystä, terävistä reunoista ja liikkuvista
osista. Vaurioituneet tai sotkeutuneet johdot
lisäävät sähköiskun vaaraa.
e) Kun sähkötyökalua käytetään ulkotiloissa, käytä
jatkojohtoa, joka soveltuu ulkokäy
ttöön.
Ulkokäyttöön sopivan johdon käyttö vähentää
sähköiskun vaaraa.
3) HENKILÖTURVALLISUUS
a) Pysy valppaana, katso mitä teet ja käytä tervettä
järkeä käyttäessäsi työkalu. Älä käytä työkalu
ollessasi väsynyt tai huumeiden, alkoholin tai
lääkkeiden vaikutuksen alaisena. Hetkellinen
epähuomio työkalu käytettäessä voi johtaa
vakaviin henkilövammoihin.
b) Käytä suojavarustusta. Käytä aina suojalaseja.
Turvavarustus kuten hengityssuojain,
liukumattomat t
urvajalkineet, suojakypärä tai
kuulosuojain käytettynä asianmukaisissa
olosuhteissa vähentää henkilövammoja.
c) Vältä vahinkokäynnistyksiä. Varmista, että kytkin
on off-asennossa (sammutettuna) ennen virran
kytkemistä. Työkalun kantaminen sormi kytkimellä
tai virran kytkeminen päälle työkaluihin, joiden
kytkin on päällä, voi aiheuttaa onnettomuuksia.
d) Poista säätöavaimet tai jakoavaimet ennen
työkalun käynnistämistä. Jako- tai muu avai
n, j
oka
on jätetty kiinni työkalun pyörivään osaan voi
aiheuttaa henkilövamman.
e) Älä kurkottele. Pidä asianmukainen jalansija ja
tasapaino kaiken aikaa. Tämä mahdollistaa
työkalun paremman hallinnanodottamattomissa
tilanteissa.
f) Pukeudu asianmukaisesti. Älä pidä löysiä vaatteita
tai koruja. Pidä hiuksesi, vaatteesi ja käsineesi
poissa liikkuvista osista. Löysät vaatteet, korut tai
pitkä tukka voivat jäädä kiinni liikkuviin osiin.
g) Jos pölynpoistoon t
ai keräyslaitteisiin kytkettäviä
laitteita on toimitettu, varmista, että ne on kytketty
ja niitä käytetään asianmukaisesti. Näiden
laitteiden käyttö voi vähentää pölyyn liittyviä
vaaroja.
4) TYÖKALUN KÄYTTÖ JA HUOLTO
a) Älä käytä voimaa työkaluun. Käytä
käyttötarkoitukseesi soveltuvaa työkalua.
Asianmukainen työkalu toimii paremmin ja
turvallisemmin teholla, jolla se on suunniteltu.
b) Älä käytä työkalua, jos kytkin ei käännä sitä päälle
ja pois päältä. Työkalu, j
ota ei voida kontrolloida
kytkimestä on vaarallinen, ja se tulee korjata.
c) Säilytä seisovat työkalut poissa lasten ulottuvilta,
äläkä anna henkilöiden, jotka eivät tunne työkalua
tai näitä ohjeita, käyttää työkalua. Työkalut ovat
vaarallisia kouluttamattomien käyttäjien käsissä.
d) Pidä työkalut kunnossa. Tarkasta liikkuvien osien
kohdistusvirheet tai kiinnitykset, osien murtumat ja
muut seikat, jotka voivat vaikuttaa sähkötyökalujen
käyttöön. J
os työkalu on vaurioitunut, korjauta se
ennen käyttöä. Monet onnettomuudet aiheutuvat
huonosti kunnossapidetyistä työkaluista.
e) Pidä leikkaustyökalut terävinä ja puhtaina.
Asianmukaisesti kunnossapidetyt leikkaustyökalut,
joissa on terävät leikkausreunat, eivät juutu
helposti ja niiden käsittely on helpompaa.
f) Käytä työkalua, lisävarusteita ja työkalupaloja tms.
näiden ohjeiden mukaisesti ja tavalla, johon
kyseessä oleva sähkötyökalu on tarkoitettu, o
ttaen
huomioon työolosuhteet ja suoritettava työ.
Työkalun käyttö toimintoihin, joihin sitä ei ole
tarkoitettu, voi johtaa vaaralliseen tilanteeseen.
5) AKKUTYÖKALUN KÄYTTÖ JA HUOLTO
a) Lataa vain valmistajan määrittämällä laturilla.
Yhdentyyppisen akun kanssa sopiva laturi voi
aiheuttaa palovaaran, jos sitä käytetään
toisentyyppisen akun kanssa.
b) Käytä sähkötyökaluja vain määritettyjen akkujen
kanssa. Muiden akkujen käyttäminen voi aiheuttaa
h
enkilövahingon tai tulipalovaaran.

25
c) Kun akku ei ole käytössä, pidä se erillään muista
metalliesineistä, kuten paperiliittimistä, kolikoista,
avaimista, nauloista, ruuveista tai muista pienistä
metalliesineistä, jotka voivat muodostaa kytkennän
navasta toiseen. Oikosulun luominen akun napojen
välille voi aiheuttaa palovammoja tai tulipalon.
d) Sopimattomissa olosuhteissa akusta voi vuotaa
nestettä; vältä kosketusta. Jos vahingossa altistut
nesteelle, huuhtele vedellä. Jos nestettä pääsee
s
ilmiin, hakeudu lisäksi lääkärin hoitoon. Akusta
vuotanut neste voi aiheuttaa ärsytystä tai
palovammoja.
6) HUOLTO
a) Jätä työkalun huolto pätevälle korjaajalle, joka
käyttää ainoastaan täsmälleen samanlaisia
varaosia. Näin varmistetaan, että työkalun
turvallisuus säilyy.
OSAT JA SÄÄTIMET (KUVAT 1 ja 2)
PAKKAUKSESTA PURKU
Huomio! Tämä pakkaus sisältää teräviä osia. Ole
varovainen pakkausta purkaessasi. Poista laite sekä
mukana olevat tarvikkeet pakkau
ksesta. Tarkista
huolellisesti, että laite on hyvässä kunnossa ja kaikki
käyttöoppaassa luetellut tarvikkeet ovat mukana.
Varmista myös, että kaikki tarvikkeet ovat täydellisiä.
Jos jokin osa puuttuu, laite ja tarvikkeet tulee
palauttaa alkuperäisessä pakkauksessa
jälleenmyyjälle.
Älä heitä pakkausta pois, pidä se tallessa koko
takuuajan ja kierrätä sen jälkeen, mikäli mahdollista,
muutoin hävitä se asianmukaisella tavalla. Älä anna
lasten leikkiä tyhjillä m
uovipusseilla tukehtumisvaaran
takia.
AKUN LATAAMINEN
Varoitus! Lataa vain 18 V:n yhteensopivilla latureilla.
Muiden latureiden käyttö voi aiheuttaa tulipalon,
vaurioita tai vakavan henkilövahingon.
Työkalun akku toimitetaan alhaisen latauksen tilassa,
jotta estetään mahdolliset ongelmat. Tästä syystä
akkua täytyy ladata, kunnes laturin oikealla puolella
oleva vihreä LED-valo syttyy.
Huomautus: Akut eivät saavuta täyttä latausta
ensimmäisellä l
atauskerralla. Kestää useita
tyhjentymiskertoja (uudelleenlatauksen jälkeen) ennen
kuin ne lataantuvat täyteen.
Lue ensin turvallisuusohjeet ja noudata sitten
latausohjeita.
Yhdistä laturi normaaliin 230 V:n, 50 Hz:n pistorasiaan.
Vihreä LED-valo laturin edessä vasemmalla syttyy.
Älä anna kaapelin mennä solmuun tai kiertyä.
Aseta akku laturin pohjaan.
(Huomioi, että akussa on koholla olevat liitäntäpiikit,
joten akku sopii laturiin vain yhdellä tava
lla).
L
atausaika on vain 60/130 minuuttia.
2,0 Ah akku, latausaika 60 minuuttia
4,0 Ah akku, latausaika 130 minuuttia
Punainen LED-valo laturin edessä oikealla palaa
ilmaisten latauksen olevan käynnissä. Vihreä LED-valo
ilmaisee akun olevan täyteen ladattu.
Irrota laturi pistorasiasta, kun sitä ei käytetä ja säilytä
se sopivassa säilytyspaikassa.
Vältä akun lataamista pakkasta vastaavissa
lämpötiloissa, koska latausteho ei ole silloin riittävä.
27. Puristimen lukon ruuvi (2 kpl)
28. Vapautusnuppi
29. Karan lukitus
1. Pölypussi
2. Ylempi kiinteä teräsuojus
3. Vapautussalpa
4. Käyttökahva
5. Kääntyvä teräsuojus
6. Pöydän vaste
7. Kitapala (kitalevy)
8. Jiirilukon kahva
9. Jiirilukon vapautussalpa
10. Jiiriasteikko
11. Jiiripöytä
12. G-puristin
13. Liukutangot
14. Viisteasteikko
15. Päälle/pois-virtaliipaisin
16. Kytkimen lukitus
17. Paristolokero
18. Sahaussyvyyden lukitusmutteri
19. Sahaussyvyyden säätöruuvi
20. Pölynpoistoliitäntä
21. Suojuksen nostovarsi
22.
Liukuvarren l
ukitusnuppi
23. 6 mm kuusioavain
24. Viisteen lukitusnuppi
25. 0°-viisteen säätöruuvi
26. Kiinnitysreiät
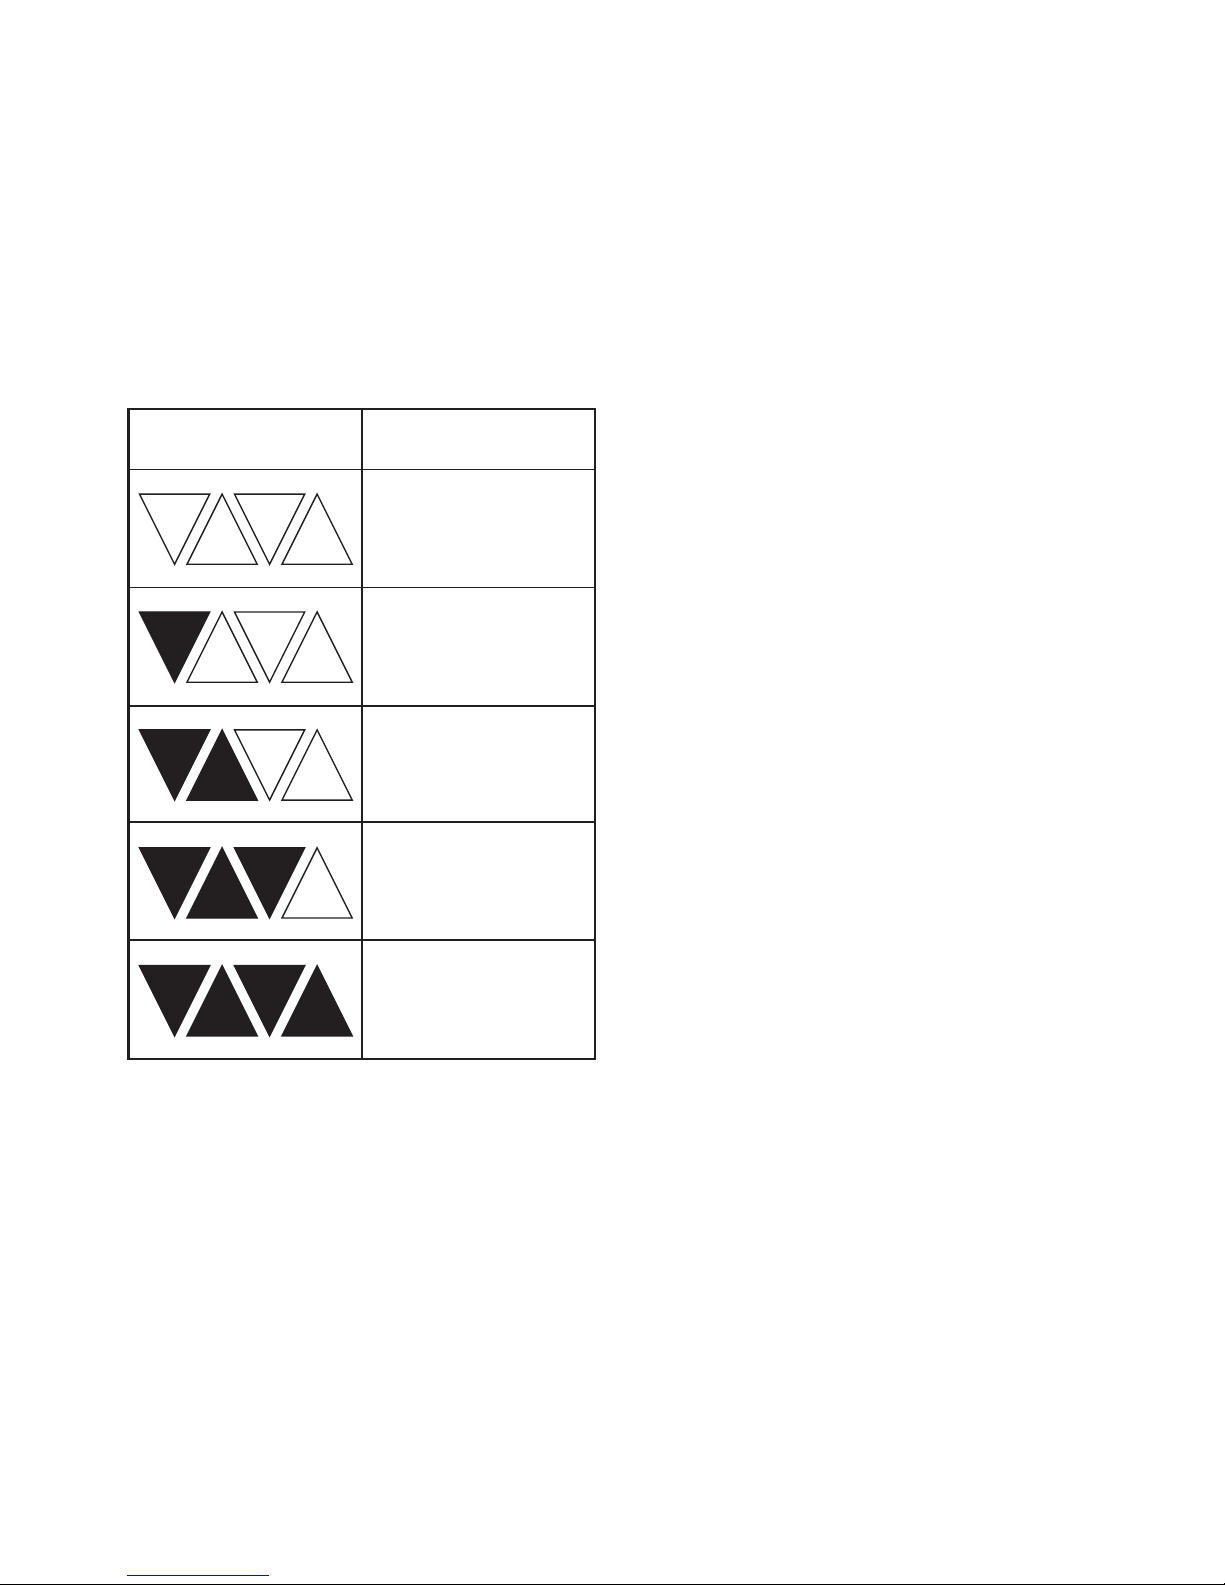
26
Jos lataat useamman kuin yhden akun peräkkäin,
anna laturin jäähtyä vähintään 30 minuuttia aina ennen
seuraavan akun lataamista.
Poista aina akku ja säilytä se turvallisesti, kun työkalu
ei ole käytössä.
Huomio: Jos jossakin kohtaa latausta mikään LEDvalo ei pala, poista akku laturista laitteen
vaurioitumisen välttämiseksi. ÄLÄ aseta laturiin toista
akkua.
LATAUKSEN TILA
Näet akun jäljellä olevan varauksen painamalla
lataustason ilmaisinpainiketta, kuva 3.
A
KUN ASENTAMINEN
Varoitus! Akkukäyttöiset työkalut ovat aina
käyttökunnossa. Poista aina akku työkalusta, kun
asennat osia, teet säätöjä tai puhdistat laitetta tai kun
laite ei ole käytössä. Akun poistaminen estää
tahattomat käynnistymiset, jotka voivat aiheuttaa
vakavan henkilövahingon.
Liu’uta akku työkalun pohjaan, kuva 4. (Huomioi, että
akussa on koholla olevat liitäntäpiikit, joten akku sopii
varsisahaan vain yhdellä tavalla). Varmista, että akku
napsahtaa p
aikoilleen ja akku pysyy kunnolla kiinni
työkalussa ennen kuin aloitat työskentelyn.
Akun virheellinen asentaminen voi aiheuttaa vaurioita
laitteen sisäisille osille.
AKUN POISTAMINEN
Etsi akun vapautussalpa sen päältä ja paina alaspäin,
kuva 5.
Kun pidät akun vapautussalpaa painettuna, liu'uta
akku irti työkalusta.
VARUSTEET
Käytä vain alkuperäisiä vaihto-osia, jotka vastaavat
sähkötyökalun nopeutta ja kiinnitystä.
FXAJ0G-ZP-185Li-JD-kone
en m
ukana toimitetaan
seuraavat varusteet:
• 40-hampainen terä (asennettuna)
• Pölypussi
• Työkappaleen G-puristin
• 6 mm sahanterän kuusioavain
KULJETTAMINEN
Nosta jiirisahaa vain, kun sahanvarsi on lukittuna alaasentoon, saha on pois päältä ja akku on irrotettu
koneesta. Nosta sahaa ainoastaan kotelon valuosista.
Älä nosta sahaa suojuksista.
TYÖPÖYTÄÄN KIINNITTÄMINEN (KUVA 6)
Sahan pohjassa on 4 asennusreikää työpöytään
kiinnittämistä varten. Kiinnitä saha t
asaiseen,
vaakasuoraan penkkiin tai työpöytään pulteilla (eivät
sisälly toimitukseen) sahan pohjassa olevien
asennusreikien läpi.
HUOMAUTUS. Sahan voi tarvittaessa asentaa
vähintään 8 mm:n vanerilevyyn, joka voidaan sitten
kiinnittää työtukeen tai siirtää muihin työkohteisiin ja
kiinnittää uudelleen.
HUOMIO. Varmista, että asennusalusta ei ole
vääntynyt. Epätasainen pinta voi aiheuttaa terän kiinni
jäämistä tai epätarkan sahaustuloksen.
PÖLYPUSSI (
KUVA 7)
Pölypussi kiinnitetään pölynpoistoliitäntään. Purista
kahta metalliuloketta pölypussin päässä, jotta se
liukuu pölynpoistoliitäntään.
Järjestelmä toimii tehokkaasti, kun pölypussi
tyhjennetään sen ollessa korkeintaan puolillaan.
Silloin ilmanvirtaus pussin läpi on parempi.
Pölynpoistoliitäntään voidaan liittää myös
pölynpoistojärjestelmä, jolloin työskentelyalue pysyy
puhtaana ja turvallisena.
PURISTIMIEN KIINNITTÄMINEN (KUVA 8)
Koneen v
asteen takana on kaksi liitäntää (yksi
kummallakin puolella). Nämä liitännät on tarkoitettu
puristimille.
Kiinnitä puristin liitäntään, joka parhaiten soveltuu
tehtävään sahaukseen, ja varmista, että se on painettu
kokonaan alas.
Käytä ruuvitalttaa, kiristä puristimen lukon ruuvi ja
lukitse puristimen pylväs vasteen liitäntään, kuva 8.
Aseta sahattava työkappale sahauspöydälle vastetta
vasten ja haluamaasi asentoon.
Säädä puristinta siipiruuvien j
a käsipyörän avulla siten,
että se pitää työkappaleen paikoillaan sahauspöydällä.
Lataustason merkkivalo Jäljellä oleva
varauksen määrä
0-10%
10-25%
25-50%
50-75%
75-100%

27
Tee ”kuiva harjoittelu” ilman akkua. Varmista, että
puristin ei häiritse terän kulkureittiä tai minkä tahansa
muun sahanpään osan liikkumista, kun sahanpää
lasketaan.
PÖYDÄN JA TERÄN VÄLISEN KULMAN
ASETTAMINEN
Varmista, että akku on irrotettu sahasta.
Paina sahanvarsi alimpaan asentoon vapautussalvasta,
kuva 9, ja pidä se kuljetusasennossa vapautusnupin
avulla, kuva 10.
Asenna jiirilukon kahva (kuva 11).
Käännä pöytää niin, että osoitin osoittaa kohtaa 0°.
Kiristä j
iirilukon kahva. (Kuva 12).
Avaa viistelukko ja aseta sahanvarren viisteeksi 0° (terä
on 90 asteen kulmassa jiiripöytään nähden). (Kuva 13)
Kiristä viistelukko, kuva 14.
Sijoita kulmamitta pöydän ja terän litteän osan väliin
(kuva 15).
HUOMAUTUS. Varmista, että kulmamitta koskettaa
terän litteää pintaa, ei hampaita. Käännä terää kädellä
ja tarkasta terän ja pöydän välinen kulma useasta
kohdasta. Kulmamitan reunan ja sahanterän tulee olla
samansuuntaiset.
J
os sahanterä menee vinoon kulmamitasta, säädä sitä
seuraavasti:
Löysää viistelukkoa. (Kuva 16)
Käytä 10 mm:n ruuviavainta tai säädettävää
ruuviavainta lukkomutterin säätämiseen (kuva 17).
Varmista, että asetetun kulmamitan reuna ja sahanterä
ovat samansuuntaiset.
Kiristä viistekulman lukitus.
Avaa viistekulman asteikon lukitusruuvi ja säädä
osoittimen asento siten, että se osoittaa tarkasti
nollakohtaa asteikolla. Kiristä ruuvi uudelleen, kuva 18
.
K
iristä viistelukko ja 0°-viistekulman säätöruuvin
lukitusmutteri.
HUOMAUTUS. Edellä kuvatulla tavalla voidaan myös
tarkastaa sahanterän ja pöydän välinen kulma
viistekulman ollessa 45°. 45°-viistekulman säätöruuvi
on sahanvarren vastakkaisella puolella.
SAHAUKSEN SYVYYDEN SÄÄTÄMINEN
Normaaliasennossa syvyysvaste sallii terän painumisen
työkappaleen läpi.
Voit säätää syvyysvastetta vetämällä vapautusnupin
ulos ja nostamalla sahanvarren täysin y
läasentoon
(kuva 19)
Kun sahanvarsi on ylhäällä, syvyysvastetta voidaan
säätää siten, että syvyyden säätöruuvi osuu
syvyysvasteeseen, kun sahanvarsi lasketaan.
Ota vaste käyttöön siirtämällä sitä ulospäin, kuva 20.
Jos syvyysvaste ei liiku, löysää hieman ruuvia
ristipääruuvitaltan avulla.
Tämä rajoittaa sahauksen syvyyden työkappaleessa.
Sahauksen syvyyttä voidaan säätää syvyyden
säätöruuvilla ja lukita haluttuun asentoon
syvyysvasteen lukitusmutterilla (
kuva 21).
KÄYTTÄMINEN
Kytke saha päälle painamalla kytkimen lukko
vasemmalle. Pidä hyvin kiinni käyttökahvasta ja purista
liipaisinkytkintä, (kuva 22).
Paina vapautussalpaa (kuva 23).
Kun terä on saavuttanut enimmäisnopeutensa (noin 2
sekunnin kuluttua), laske terä työkappaleen läpi (kuva
24). Kun sahaus on tehty, vapauta liipaisinkytkin ja
sahanterän pysähtyä kokonaan, ennen kuin nostat
terän irti työkappaleesta. Odota terän pysähtymistä
ennen kuin p
oistat työkappaleen.
KATKAISU (ILMAN LIUKUTOIMINTOA)
Pienien puukappaleiden sahaukseen ei tarvita
liukutoimintoa. Näissä tapauksissa liukukiskojen lukitus
on kierrettävä alas siten, että se estää sahanvarren
liukumisen, kuva 25.
Sahaus tehdään työkappaleen syiden poikki. 90 asteen
sahauksessa sahauspöydän kulman tulee olla 0°.
Kulmasahauksessa pöytä säädetään johonkin muuhun
kulmaan kuin nolla.
Vedä vapautusnuppia ja nosta sahavarsi sen täyteen
korke
uteen.
Avaa jiirilukko. Käännä sahauspöytää, kunnes osoitin
kohdistuu haluttuun kulmaan. Kiristä jiirilukko.
VAROITUS. Muista kiristää jiirilukko ennen sahauksen
aloittamista. Muutoin pöytä voi liikkua sahauksen
aikana ja aiheuttaa vakavan henkilövahingon.
Aseta työkappale pöydälle siten, että yksi reunoista on
kiinni vasteessa. Jos lauta on vääntynyt, aseta sen
kupera sivu kiinni vasteeseen. Mikäli kovera sivu
asetetaan vasteeseen, lauta voi murtua j
a terä jäädä
kiinni.
Pitkiä kappaleita katkaistaessa, puun ulompi pää on
tuettava sahauspöydän tasolle sivuttaistukien,
rullatelineen tai työtason avulla.
Kiinnitä työkappale puristimella aina kun se on
mahdollista.
Puristin voidaan ottaa pois löysäämällä puristimen
lukkoa ja siirtämällä puristin toiselle puolelle pöytää.
Varmista, että puristimen lukko on kiristetty ennen kuin
käytät puristinta. Tee kuiva harjoittelu ja testaa
sahanterän liike ennen kuin k
äynnistät sahan, jotta
varmistat kaiken olevan kunnossa.
Paina kytkimen lukko vasemmalle. Pidä hyvin kiinni
käyttökahvasta ja purista liipaisinkytkintä. Anna terän
saavuttaa enimmäisnopeutensa.

28
Paina vapautussalpaa ja laske terä hitaasti
työkappaleeseen ja sen läpi.
Vapauta liipaisinkytkin ja sahanterän pysähtyä
kokonaan, ennen kuin nostat terän irti työkappaleesta.
Odota terän pysähtymistä ennen kuin poistat
työkappaleen.
KATKAISU (LIUKUTOIMINTOA KÄYTTÄEN)
Leveitä työkappaleita sahattaessa ensin on avattava
liukukiskojen lukitus, kuva 25.
Vedä vapautusnuppia, nosta sahavarsi yläasentoon ja
liu’uta sitä itseesi päin.
Paina kytkimen lukko vasemmall
e. Pidä hyvin kiinni
kahvasta ja purista liipaisinkytkintä. Anna terän
saavuttaa enimmäisnopeutensa. Paina vapautussalpaa
ja laske terä hitaasti työkappaleeseen. Liu’uta sitä
itsestäsi poispäin, kunnes työkappale on sahattu
kokonaan.
Vapauta liipaisinkytkin ja sahanterän pysähtyä
kokonaan, ennen kuin nostat terän irti työkappaleesta.
Odota terän pysähtymistä ennen kuin poistat
työkappaleen.
VIISTESAHAUS
Viistesahauksessa työkappale sahataan syiden p
oikki
terän ollessa vinossa vastereunaan ja sahauspöytään
nähden. Sahauspöydän kulmasäätö on nolla astetta ja
terä on säädetty kulmaan vasemmalle välillä 0°–45°,
kuva 26.
Toista katkaisun vaiheet (liukutoiminnolla tai ilman).
Avaa viistekulman lukitus ja siirrä sahavarsi vasemmalle
haluttuun viistekulmaan (0°–45°).
Kiristä viistekulman lukitus.
VAROITUS: Varmista aina, että viistelukko on kiristetty
kunnolla ennen kuin sahaat mitään.
YHDISTETT
Y J
IIRI- JA VIISTESAHAUS
Yhdistetyssä jiiri- ja viistesahauksessa jiirikulmaa ja
viistekulmaa käytetään samanaikaisesti.
Sitä käytetään kuvakehyksien, muottien, viistoilla
sivuilla varustettujen laatikoiden ja kattotuolien
sahaamiseen.
Kokeile sahausta aina muutamaan koekappaleeseen
ennen hyvän materiaalin sahaamista.
Käytä liukutoimintoa, jos sahaat isoja työkappaleita.
KUNNOSSAPITO JA HOITO
TERÄN VAIHTAMINEN
VAARA: Terä on erittäin terävä ja se
n k
äsittelyssä on
oltava varovainen. Älä yritä käyttää isompaa terää kuin
sahan ilmoitettu kapasiteetti vaatii. Se saattaa ottaa
kiinni teräsuojukseen. Älä koskaan käytä terää, joka on
liian paksu salliakseen ulomman terän aluslevyn
kiinnittyä karan tasaisiin osiin.
Se estää terän pulttia kiinnittämästä terää kunnolla
karaan.
Älä käytä sahaa metallin tai kiviaineksen sahaamiseen.
Varmista, että kaikki aluslevyt ja mahdollisesti vaaditut
kararenkaat sopivat k
araan ja kiinnitettyyn terään.
Varmista, että akku on irrotettu koneesta.
Paina käyttökahva alas ja vedä vapautusnupista, jolloin
sahanvarsi irtoaa.
Vapautusnuppi voidaan kääntää siten, että se pysyy
ulosvedetyssä asennossa.
Nosta sahanvarsi ylimpään asentoon.
Käännä alempaa teräsuojusta (kuva 27) ylös ja
ylempään teräsuojukseen ja paina karan
lukituspainiketta (kuva 28). Pyöritä terää, kunnes kara
lukittuu.
Irrota terän pultti käyttämällä 6 mm:n kuusi
oavainta
(
kuva 29). (Löystyy myötäpäivään kierrettäessä, koska
terän ruuvissa on vasenkätinen kierre).
Irrota aluslevy, ulompi terälaippa ja terä.
Levitä pisara öljyä sisempään terän aluslevyyn ja
ulompaan terän aluslevyyn kohtaan, jossa ne
koskettavat terää.
Kiinnitä uusi terä karaan huolehtien siitä, että sisempi
terän aluslevy asettuu terän taakse.
HUOMIO. Varmistat terän oikean pyörimissuunnan, kun
asennat terän aina hampaat ja terän sivuun painettu
nuoli a
laspäin (kuva 29).
Terän pyörimissuunta on merkitty myös ylempään
teräsuojukseen nuolen avulla.
Vaihda ulompi terän aluslevy.
Paina karan lukituspainiketta ja vaihda sitten terän
pultti.
Käytä 6 mm:n kuusioavainta ja kiristä terän ruuvi
kunnollisesti (vastapäivään).
Tarkasta, että teräsuojus toimii oikein ja peittää terän,
kun sahanvarsi lasketaan alas.
Yhdistä akku koneeseen ja käytä sahaa, jotta varmistat
sen toiminnan virheettömyyden.
Huomaa: Tark
is
ta terän kiinnitysruuvin kireys ennen
jokaista käyttökertaa, käytön aikana ja jokaisen
käyttökerran jälkeen.
Ø 20 MM TUURNALLA VARUSTETUN TERÄN
KIINNITTÄMINEN (KUVA 30)
Noudata terän vaihtamista koskevia ohjeita. Vaihda
terän ulompi aluslevy Ø 20 mm:n aluslevyyn ja kiristä
terän pultti.
29
HUOLTO
Poista aina akku työkalusta, kun asennat osia, teet
säätöjä tai puhdistat laitetta tai kun laite ei ole
käytössä.
Pidä työkalun tuuletusaukot aina esteettöminä ja
puhtaina.
Tarkasta säännöllisesti, ettei pölyä tai vieraita esineitä
ole päässyt moottorin lähellä oleviin ritilöihin tai
liipaisinkytkimen ympärille. Poista mahdollisesti
kerääntynyt pöly pehmeällä harjalla. Käytä suojalaseja
suojaamaan silmiä puhdistuksen aikana.
Voitele kaikki liikkuvat o
sat säännöllisin väliajoin.
Mikäli sahan runko vaatii puhdistamista, pyyhi se
pehmeällä, kostealla liinalla. Mietoa pesuainetta voi
käyttää, mutta ei alkoholia, bensiiniä tai muita
puhdistusaineita.
Älä koskaan käytä muoviosien puhdistamiseen
syövyttäviä aineita.
HUOMIO. Saha ei saa päästä kosketuksiin veden
kanssa.
YLEINEN TARKASTUS
Tarkasta säännöllisesti, että kaikki kiinnitysruuvit ovat
riittävän kireällä. Tarkasta erityisesti uloin laippa.
R
uuvit voivat löystyä ajan mittaan, jos esiintyy
värähtelyä.
Säilytä työkalu, käyttöohjeet ja lisävarusteet
turvallisessa paikassa. Tällä tavalla sinulla on aina
kaikki tiedot ja osat saatavilla.
TEKNISET TIEDOT
Jännite 18 V DC
Joutokäyntinopeus 3600 min
-1
Sahanterän läpimitta Ø 185 mm
Hampaat 40 HW
Sahanterän kiinnitysreikä Ø 16mm/Ø 20mm
Jiiripöydän kulma -45°/0°/+45°
Viistekulmat 45° vasemmalle
Suora katkaisu 0° x 0° 200 x 51 mm
Jiirisahaus 45° x 0° 152 x 51 mm
Viistesahaus 0° x 45° 200 x 35 mm
Yhdistetty jiirisahaus
ja katkaisu 45° x 45° 152 x 35 mm
Äänenpainetaso L
pA
83,14 dB(A)
K=3dB(A)
Äänitehotaso L
WA
96,14 dB(A)
K=3dB(A)
Värähtelytaso <2.5 m/s
2
, K=1.5m/s
2
YMPÄRISTÖNSUOJELU
Tietoja (yksityisten kotitalouksien) käytetyn sähkö- ja elektroniikkalaitteiston (Waste Electrical and Electronic
Equipment, WEEE) ympäristöllisesti vastuullisesta hävittämisestä.
Tämä symboli tuotteissa ja tai sen mukana tulevissa asiakirjoissa osoittaa, että käytettyjä ja loppuun kuluneita
sähkö- ja elektroniikkalaitteita ei saa hävittää kotitalousjätteen mukana. Asianmukaista hävitystä, käsittelyä,
uudelleenkäyttöä ja kierrätystä v
arten vie nämä tuotteet nimettyihin keräyspisteisiin, joihin ne
hyväksytään ilmaiseksi. Vaihtoehtoisesti joissain maissa voit palauttaa ne vähittäismyyjällesi
ostaessasi uuttaa vastaavaa tuotetta. Kun hävität tämän tuotteen asianmukaisesti, autat
säilyttämään arvokkaita luonnonvaroja ja estämään sellaisia mahdollisia haitallisia vaikutuksia
ihmisterveydelle ja ympäristölle, joita voisi muutoin ilmetä virheellisestä jätteenhävittämisestä ja
-käsittelystä. Ota yhteyttä paikalliseen viranomaiseen saadaksesi lisätietoja lähimmästä
nimetystä keräyspisteestä. Tämän jätteen virheellisestä hävittämisestä voidaan määrätä
rangaistuksia kansallisen lainsäädännön mukaisesti.
YRITYSKÄYTTÄJILLE EUROOPAN UNIONISSA.
Jos haluat heittää pois sähkö- tai elektroniikkalaitteistoa, ota yhteyttä jälleenmyyjääsi tai tavarantoimittajaasi
saadaksesi lisätietoja.
Tietoja hävittämisestä muissa m
aissa Euroopan unionin ulkopuolella.
Tämä symboli on voimassa on vain Euroopan unionissa.
Jos haluat hävittää tämän tuotteen, ota yhteyttä paikallisiin viranomaisiin tai jälleenmyyjääsi ja kysy neuvoa
asianmukaisesta hävitysmenetelmästä.

30
SYMBOLIT
Työkalusi arvokilvessä voi olla symboleita. Ne näyttävät tärkeitä tietoja tuotteesta tai ohjeita sen käyttöön.
Vastaa voimassa olevia
turvallisuusstandardeja.
Lue käyttöohje.
Tuote vastaa RoHs-vaatimuksia
Vanhoja sähkölaitteita ei saa
hävittää kotitalousjätteen mukana.
Toimita ne kierrätystä varten
keräyspisteeseen. Pyydä
kierrätysohjeita paikallisilta
viranomaisilta tai jälleenmyyjältä.
Yleinen varoitus
Kaksoiseristetty lisäsuojan takia.
Käytä kuulosuojaimia.
Käytä suojalaseja.
Käytä hengityssuojaa.
Sahausvaara.
ÄLÄ puhdista, voitele tai korjaa
konetta sen käydessä
Vaara! Lastukotelo
Vaarallinen jännite.
ÄLÄ lähesty konetta, jossa sinulla
on väljä vaatetus
ÄLÄ poista suojuksia tai
turvalaitteita koneen ollessa
käynnissä
Suojaa kone huonolta säältä
ÄLÄ koske pyörivään terään
130°
Li-ion
Terminen yhteys ja käyttölämpötila
Sisältää litiumionia
 Loading...