

Page 1
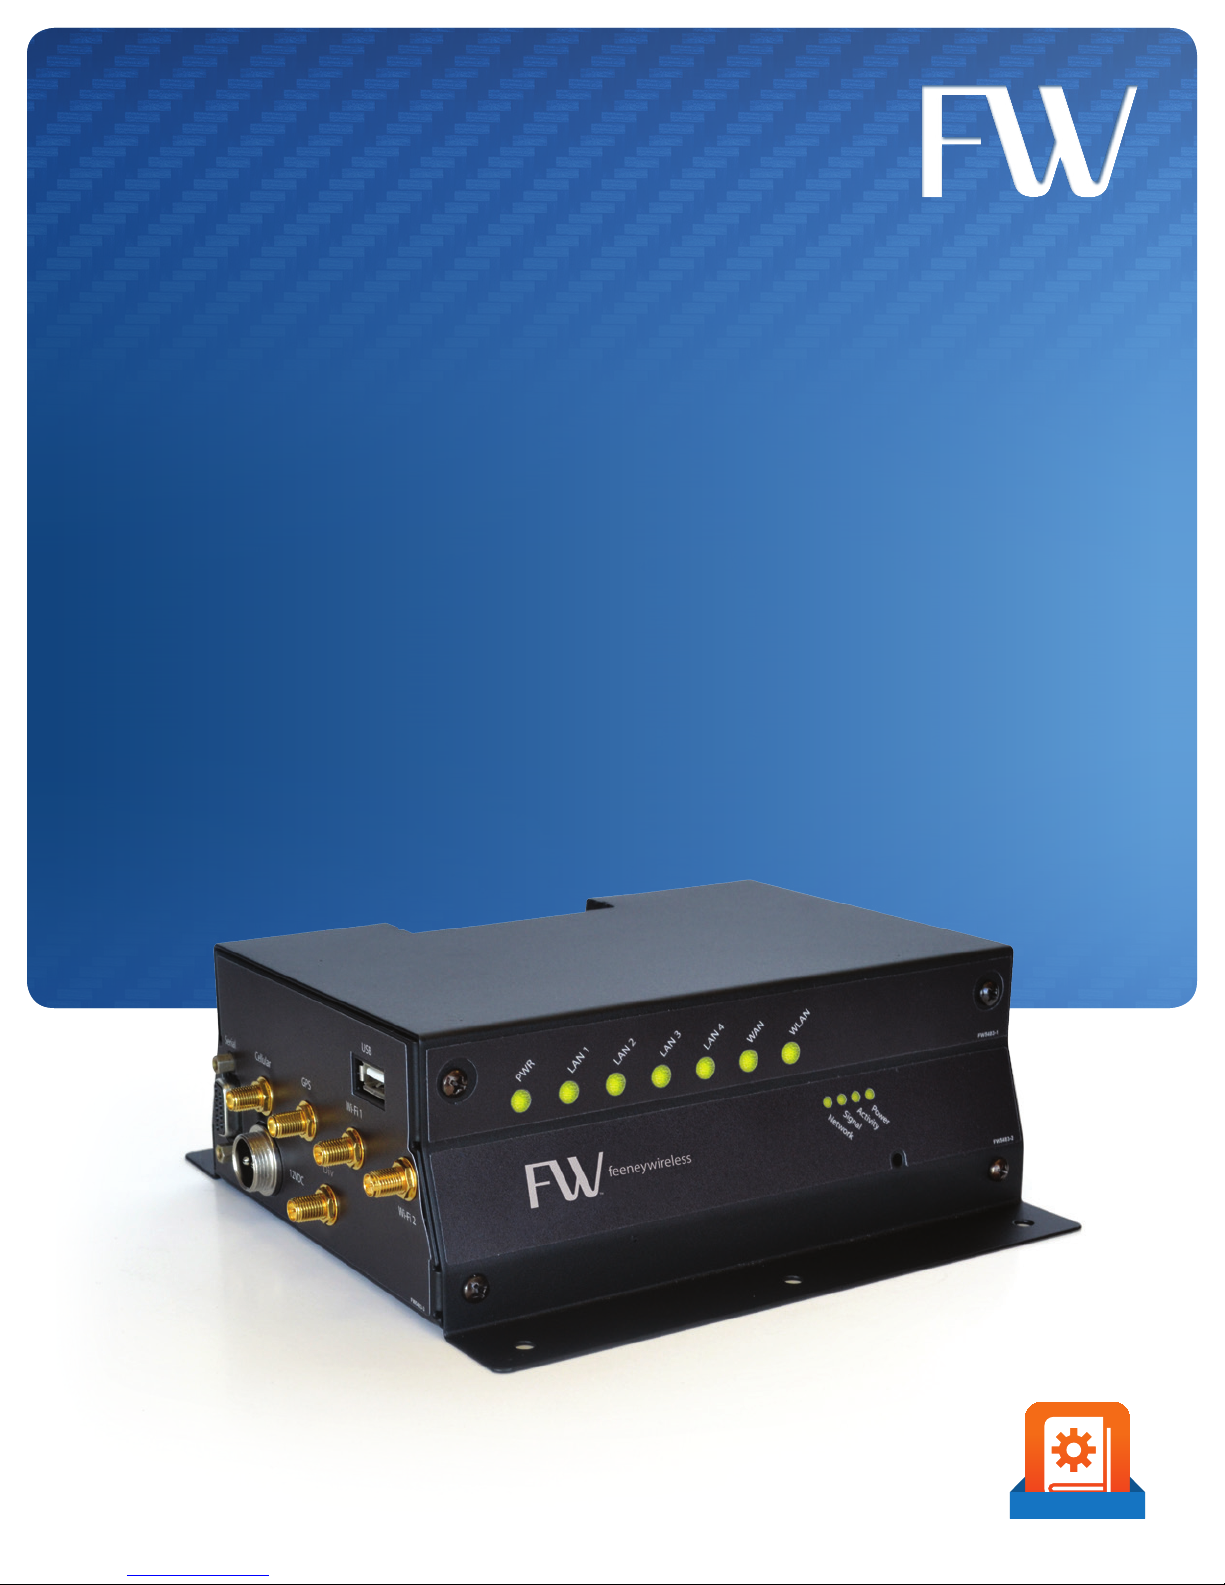
CIRA X2
User Manual
User Manual
Page 2

CIRA X2 User Manual
Preface
Copyright
Copyright ©2013 Feeney Wireless LLC. All rights reserved.
This document may not be copied in part or otherwise reproduced without prior written consent from Feeney
Wireless except where specically permitted under US and International copyright law.
Disclaimer
The information in this document is subject to change without notice. Feeney Wireless (“Feeney”) assumes no
responsibility for inaccuracies or omissions and specically disclaims any liabilities, losses, or risks, personal or
otherwise, incurred as a consequence, directly or indirectly, of the use or application of any of the contents of this
document. For the latest documentation, contact your local supplier or visit us online at www.feeneywireless.com.
This publication may contain examples of screen captures and reports used in daily operations. Examples may
include ctitious names or individuals and companies. Any similarity to names and addresses of actual businesses or
persons is entirely coincidental.
Trademarks and Patents
Feeney and the Feeney logo are trademarks of Feeney Wireless LLC.
Skyus, Skyus 3G, Skyus 4G, Skyus Global, CIRA, CIRA X, CIRA X2, and Axiom are trademarks of Feeney Wireless LLC.
VaraSight and the VaraSight logo are trademarks of Feeney Wireless LLC.
Other trade names used in this document may be trademarks or registered trademarks of the manufacturers or
vendors of the respective products.
Intended Use
Use this product only for the purpose it was designed for; refer to the datasheet and user documentation. For the
latest product information, visit us online at www.feeneywireless.com.
Page 3

CIRA X2 User Manual
Table of Contents
Overview ..................................................................................................................................................................... 1
Intended Audience .................................................................................................................................................................................... 1
Scope .............................................................................................................................................................................................................. 1
Specications ...............................................................................................................................................................................................1
Conguring the Cellular Modem ............................................................................................................................... 1
Logging into the CIRA X2 Cellular Modem ....................................................................................................................................... 1
Conguring the Cellular Modem APN ................................................................................................................................................ 3
Conguring the Access Point ..................................................................................................................................... 4
Logging into the CIRA X2 Access Point .............................................................................................................................................. 4
Access Point Main Page ........................................................................................................................................................................... 5
Monitoring Your CIRA X2 Access Point ...................................................................................................................... 6
System Log ...................................................................................................................................................................................................6
Log Settings Page ......................................................................................................................................................................................7
Remote Log Page ....................................................................................................................................................................................... 7
Bandwidth Management Monitor Page ............................................................................................................................................ 8
DHCP Client Table Monitor Page ..........................................................................................................................................................8
Packet Statistics Page................................................................................................................................................................................ 9
WLAN Station Status Page ...................................................................................................................................................................... 9
Mobile WAN Management Monitor Page .........................................................................................................................................10
Conguring Your CIRA X2 Access Point..................................................................................................................... 10
Wireless LAN General Conguration Page ........................................................................................................................................ 10
Wireless LAN Security Page .................................................................................................................................................................... 11
WLAN MAC Address Filtering Page ......................................................................................................................................................12
WLAN Advanced Page .............................................................................................................................................................................. 12
WLAN QoS Page ..........................................................................................................................................................................................13
WLAN Scheduling Page ........................................................................................................................................................................... 14
Mobile WAN Conguration Page .......................................................................................................................................................... 14
WAN Advanced Page ................................................................................................................................................................................ 16
WAN IGMP Snooping ................................................................................................................................................................................16
LAN IP Page ..................................................................................................................................................................................................17
LAN IP Alias Page ........................................................................................................................................................................................ 17
DHCP Server Conguration (General) Page ......................................................................................................................................18
DHCP Server Advanced Page ................................................................................................................................................................. 18
Network Address Translation (NAT) General Conguration Page ............................................................................................ 19
Network Address Translation (NAT) Application Conguration Page .....................................................................................19
Network Address Translation (NAT) Port Triggering Rules Conguration Page .................................................................. 20
Dynamic DNS General Settings Page ..................................................................................................................................................20
Open DNS General Settings Page ........................................................................................................................................................ 21
Page 4

CIRA X2 User Manual
Static Route Conguration Page ..........................................................................................................................................................21
Firewall General Settings Page ..............................................................................................................................................................22
Firewall Services Conguration Page ..................................................................................................................................................22
Content Filter Conguration Page ....................................................................................................................................................... 23
Bandwidth Management Conguration Page ................................................................................................................................23
Bandwidth Management Advanced Conguration Page ........................................................................................................... 24
Remote Management WWW Conguration Page .........................................................................................................................24
Remote Management SNMP Conguration Page .......................................................................................................................... 25
Universal Plug and Play (UPnP) Service Conguration Page ......................................................................................................25
Maintenance Options for Your CIRA X2 Access Point...............................................................................................26
Maintenance General Settings Page ................................................................................................................................................... 26
Password Settings Page ...........................................................................................................................................................................26
Time Conguration Page .........................................................................................................................................................................27
Firmware Upgrade Conguration Page ............................................................................................................................................. 27
System Conguration Backup/Restore/Reset Page ....................................................................................................................... 28
System Restart Conguration Page ..................................................................................................................................................... 28
System Operation Mode Conguration Page .................................................................................................................................. 29
System Alerts Conguration Page .......................................................................................................................................................29
Using a Terminal Application with AT Commands ................................................................................................... 30
Establish Your Connection ...................................................................................................................................................................... 30
AT Commands ............................................................................................................................................................................................. 31
USB Port Connection ................................................................................................................................................................................ 31
Contacting Feeney Wireless ....................................................................................................................................... 32
Online Library .............................................................................................................................................................................................. 32
Return and Warranty ................................................................................................................................................................................. 32
Further Specications ............................................................................................................................................................................... 32
FCC Compliance ......................................................................................................................................................... 33
Page 5

CIRA X2 User Manual
Overview
This document is provided to elaborate on conguring the CIRA X2 specic to each end user environment. It should
be used in addition to the CIRA X2 Quick Start Guide in order to fully utilize and implement your system setup.
NOTE: This document has been assembled for best viewing on a computer in order to keep the document page
count limited. While it is possible to print and use the document, the computer allows for the zooming in on images.
Intended Audience
This document is intended for users responsible for conguring the CIRA X2 above and beyond the initial installation.
The document assumes that the installer possesses a basic working knowledge of computer networking, wireless
routing and network administration.
For further information on using your device, please utilize the following documentation:
• CIRA X2 Quick Start Guide: Available via http://www.feeneywireless.com/documents
• ALEOS Conguration User Guide: Available via http://www.sierrawireless.com/
Scope
The CIRA X2 User Manual focuses on preparing your device for use in the end-environment. The User Manual will
focus on the conguration of the access point, with further information on the cellular modem available in the ALEOS
Conguration User Guide as mentioned above.
Specications
For Environmental specications, Power specications and Antenna specications, as well as default settings, please
reference the CIRA X2 Quick Start Guide as mentioned above.
Configuring the Cellular Modem
Although this document is not intended to provide a complete summary for conguring your cellular modem, this
document will give a brief overview on how to log-in to your cellular modem and congure the APN.
Logging into the CIRA X2 Cellular Modem
After the initial power up, to see if the device is properly connected and operating correctly, you can log-in to the
device via the methods listed below:
• Connect an Ethernet cable from a computer directly to one of the CIRA X2 LAN connections.
• Associate to the CIRA X2 Wi-Fi using the appropriate method as dened in the Quick Start Guide.
• If you know the CIRA X2’s public IP address you can also log-in to the device remotely.
• Remote Management URL: http//<modem ip>:9191 (:9191 is the port to route to your access point)
Once you have connected to the device perform the following steps:
1. Open a web browser on your connected device, specic browser does not matter.
2. In the browser’s address bar, enter the IP Address: http://192.168.13.31:9191
a. Please note, that steps 1 & 2 are only necessary if you are not logging in remotely.
1
Page 6
CIRA X2 User Manual
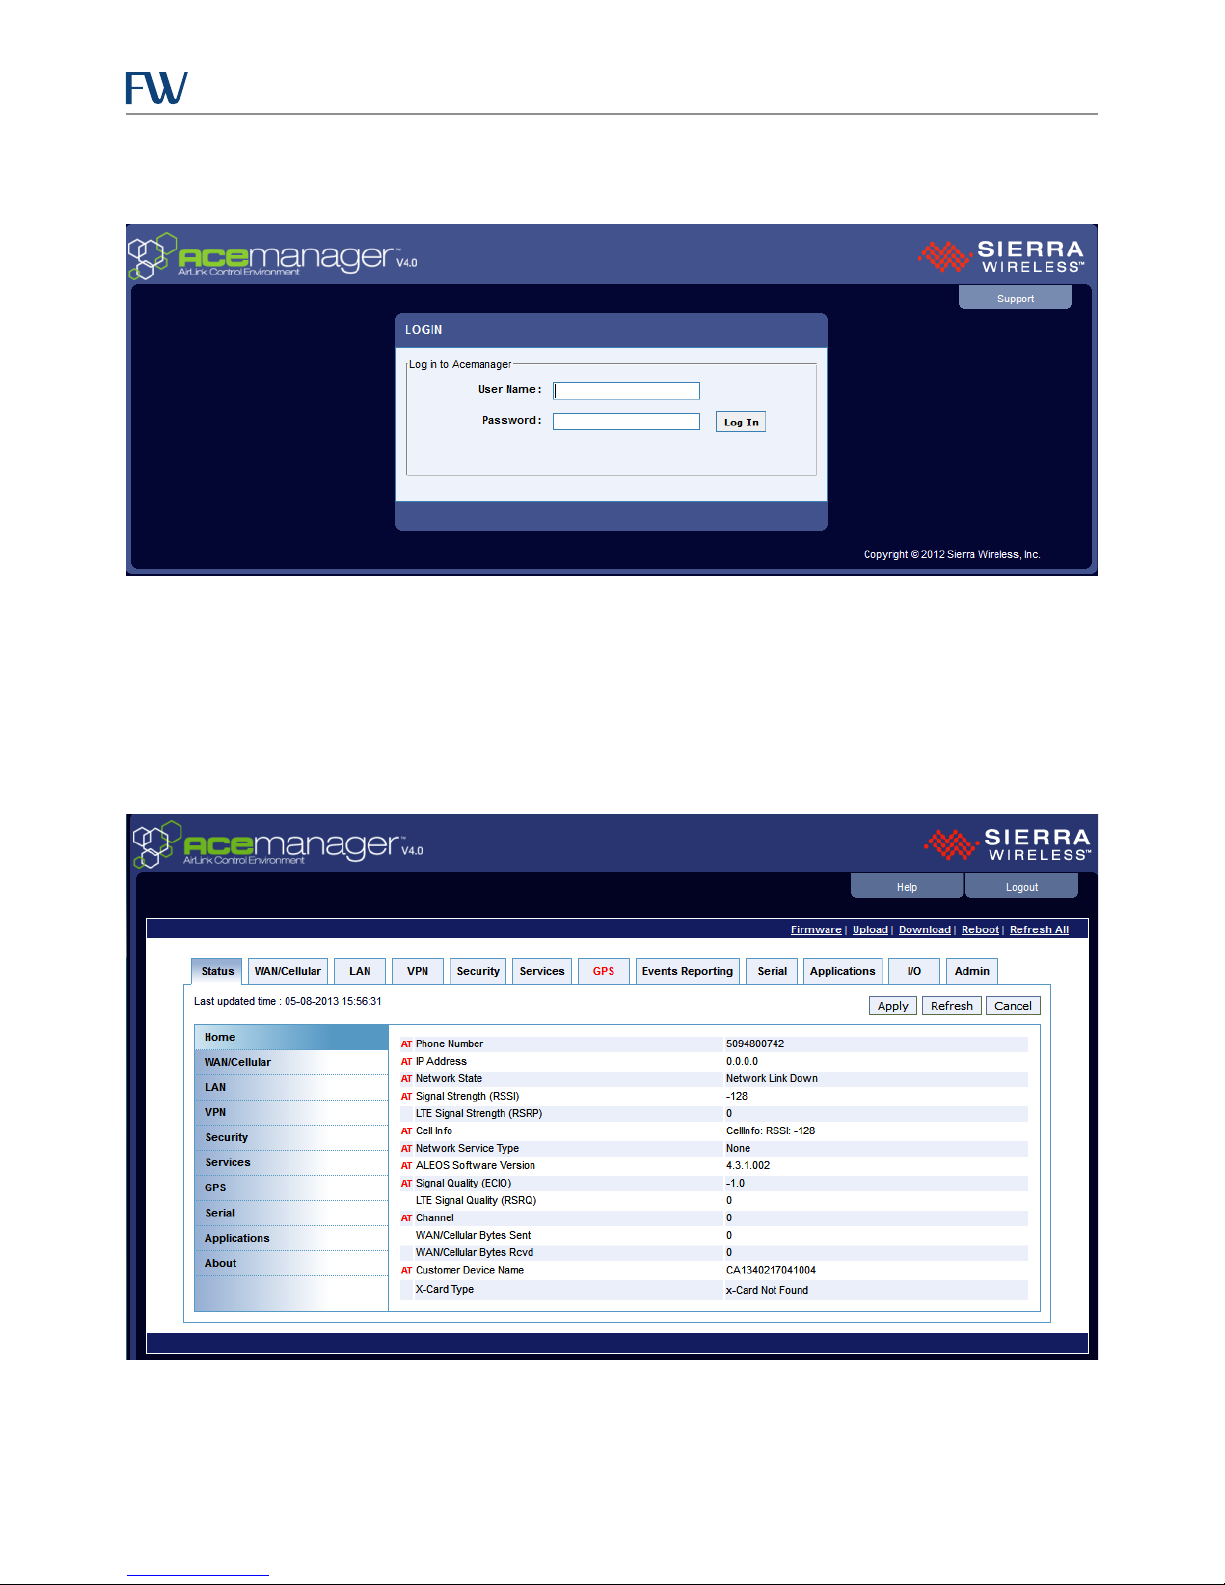
If you are successfully connected, the image below should appear:
Figure 1: ACE Manager Log-in Page
Upon initial conguration, the default User Name is user and the default system Password is 12345, if you have
changed the User Name/Password since then, please enter the appropriate log-in information.
Upon a successful log-in, your screen should appear as the image in Figure 2. Please note, the image is for reference
only and your values may or may not match.
Figure 2: ACE Manager Home Page
2
Page 7
CIRA X2 User Manual
Once a successful log-in is accomplished, please reference the ALEOS Conguration User Guide, which is available
at http://www.sierrawireless.com/ for conguration. Please contact your Feeney Wireless Support Representative if
further assistance is required.
Conguring the Cellular Modem APN
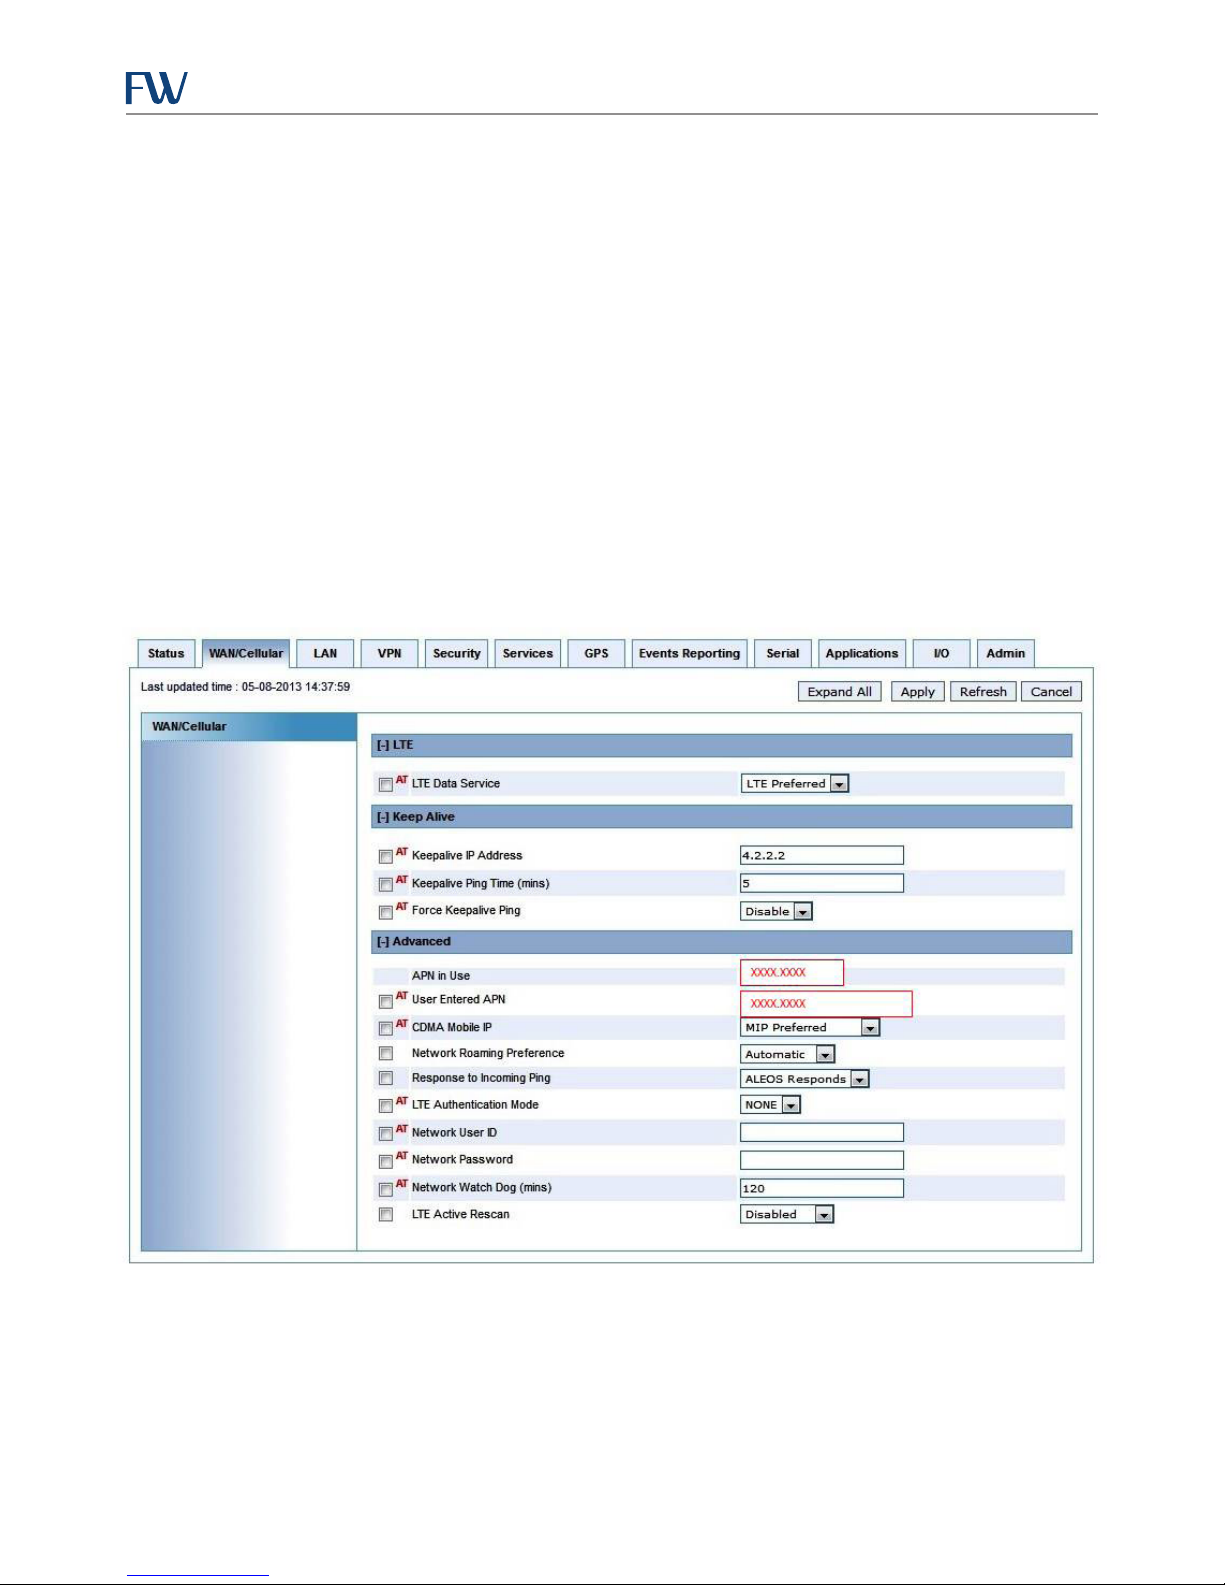
One of the more frequent requirements during initial conguration is to declare the APN. Through the tabs at the
top of menu selections, select WAN/Cellular. If not already, expand the Advanced section to display the APN
information. The page will show the APN in Use and provide the option for a User Entered APN. Once you have
entered the APN, click the Apply option in the upper right corner and wait for the cellular modem to apply the
changes.
NOTE: Conguring the APN is only potentially necessary for Verizon and ATT CIRA X2 Devices. For Sprint Devices, this
step is not applicable.
The image below shows an example of the proper procedure for performing this step:
Figure 3: Conguring the APN
3
Page 8
CIRA X2 User Manual
Configuring the Access Point
The following sections will provide information, in detail, on how to log-in to the CIRA X2 access point and congure
the device for your end environment. Please note, that all values shown are for reference only and may not match
those set in your device.
Logging into the CIRA X2 Access Point
After the initial power up, to see if the device is properly connected and operating correctly, you can log-in to the
device via the methods listed below:
• Connect an Ethernet cable from a computer directly to one of the CIRA X2 LAN connections.
• Associate to the CIRA X2 Wi-Fi using the appropriate method as dened in the Quick Start Guide.
• If you know the CIRA X2’s public IP address you can also log-in to the device remotely.
• Remote Management URL: http//<modem ip>:8080 (:8080 is the port to route to your access point)
Once you have connected to the device perform the following steps:
1. Open a web browser on your connected device, specic browser does not matter.
2. In the browser’s address bar, enter the IP Address: http://192.168.1.1:8080
a. Please note, that steps 1 & 2 are only necessary if you are not logging in remotely.
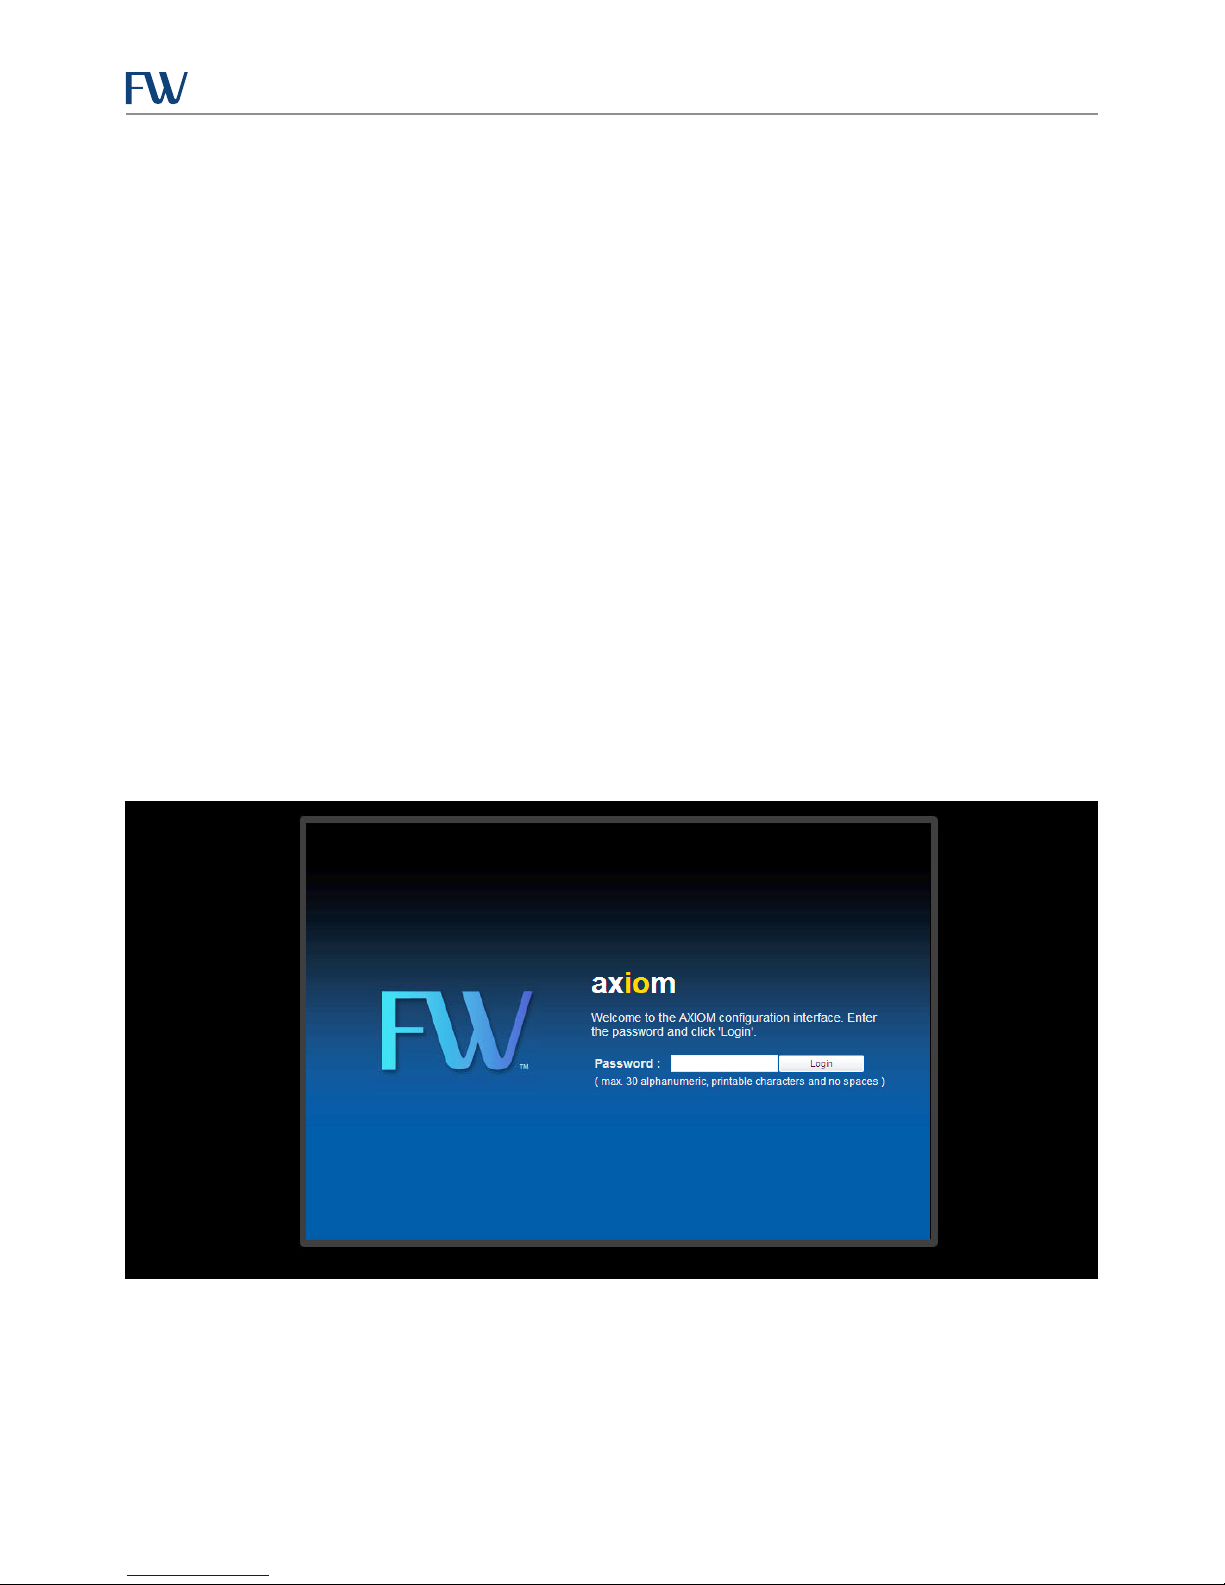
If you are successfully connected, the image in Figure 4 should appear:
Figure 4: Access Point Log-in Page
Upon initial conguration, the default system password is feeneyap, if you have changed the password since then,
please enter the appropriate password.
4
Page 9
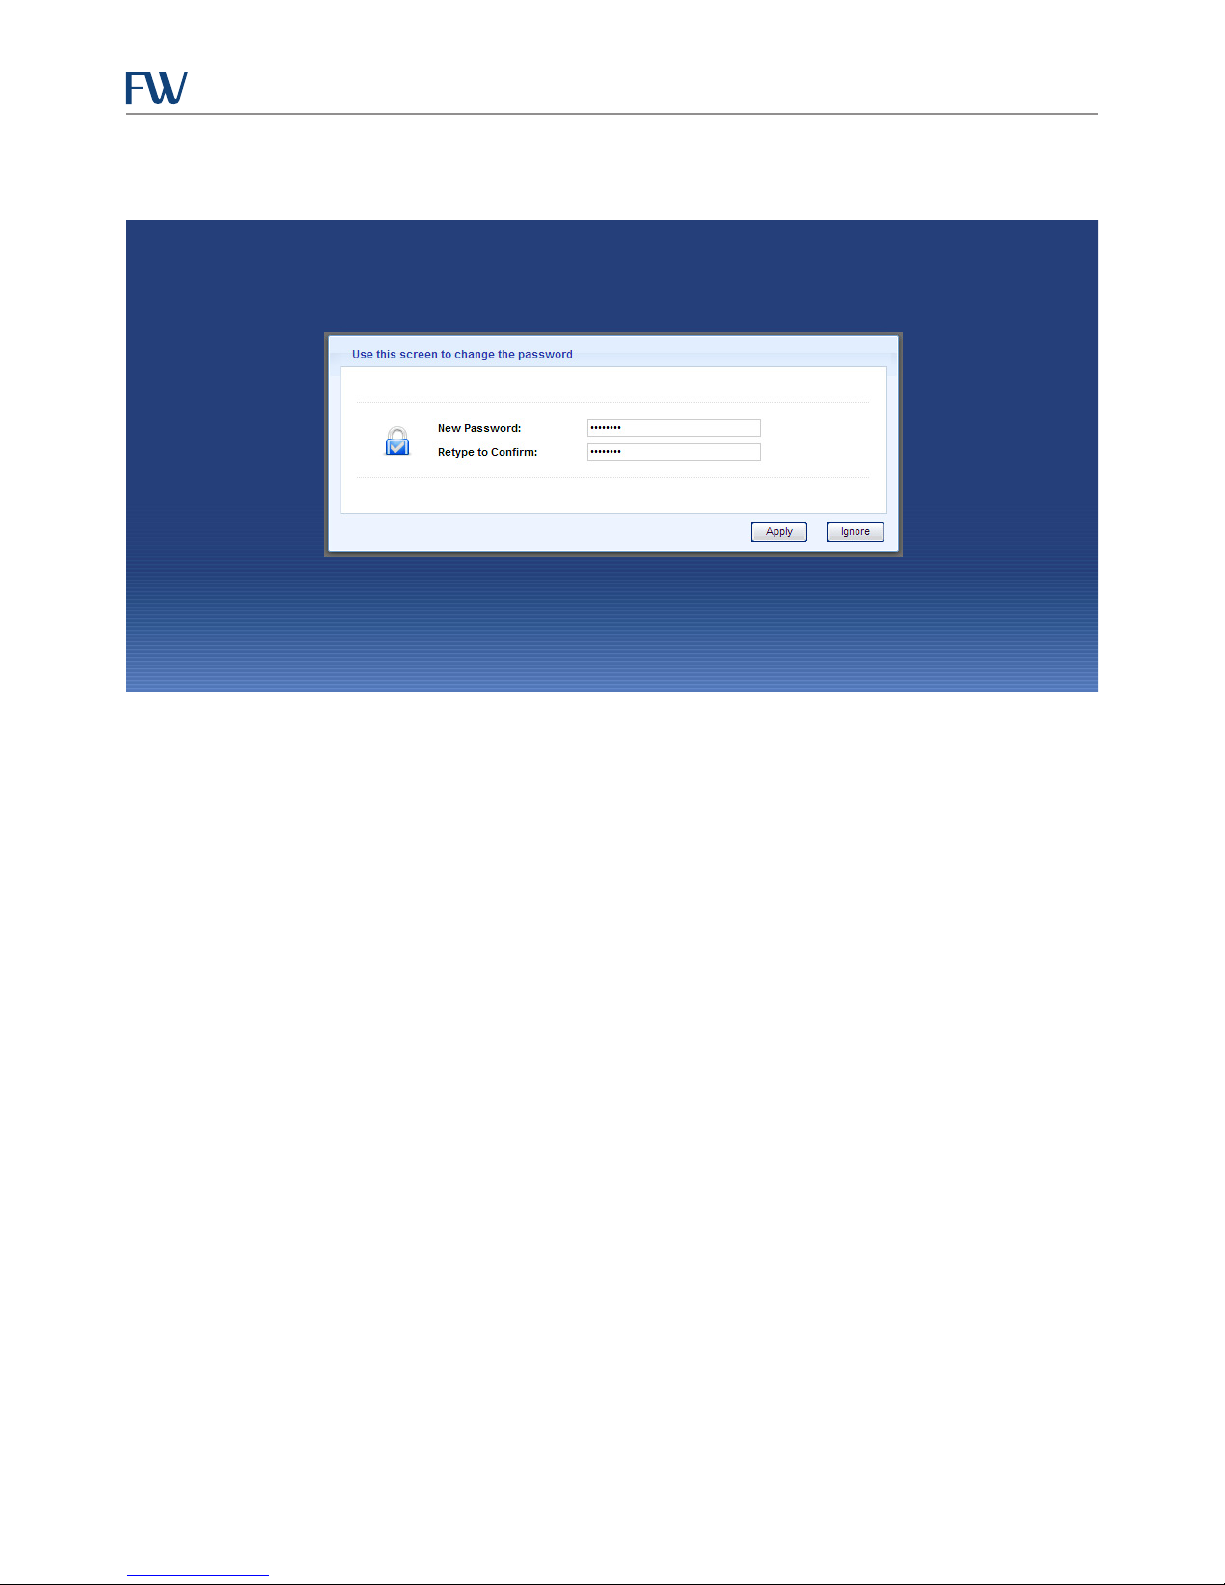
If it is the initial login, you will be prompted to change your password, as shown in Figure 5.
CIRA X2 User Manual
Figure 5: Change/Conrm Password Page
To leave the password as feeneyap, simply click the Ignore option.
If at this time you wish to change the system password you may enter the password of your choice in the New
Password eld. Enter it again in the Retype to Conrm section to conrm and your new password and click the
Apply option.
NOTE: Feeney Wireless recommends that you set the password away from the default and document it in a private
location to ensure the privacy of your network.
Access Point Main Page
Figure 6 shows the main status screen. After logging into the CIRA X2 web interface, this is the primary navigation
and system status screen. From this screen, a user can view:
• Status Parameters
• Connection Status
• Navigation Icons (left of the screen) for monitoring and conguring menus
5
Page 10

Figure 6: Access Point Main Status Page
CIRA X2 User Manual
Monitoring Your CIRA X2 Access Point
The access point provides system diagnostic and monitoring informational pages which are available by clicking the
Monitoring Icon located below the Status icon on the left side of the page.
Monitoring Icon
System Log
Figure 7 shows the system log display. This log will show information regarding system status, rewall status, access
to the system web interface, and status of Mobile WAN connection cards, such as 4G connection cards. By default
the CIRA X2 is congured to synchronize its system time online to GMT within a few seconds of obtaining an Internet
connection.
Figure 7: Access Point System Log
6
Page 11
CIRA X2 User Manual
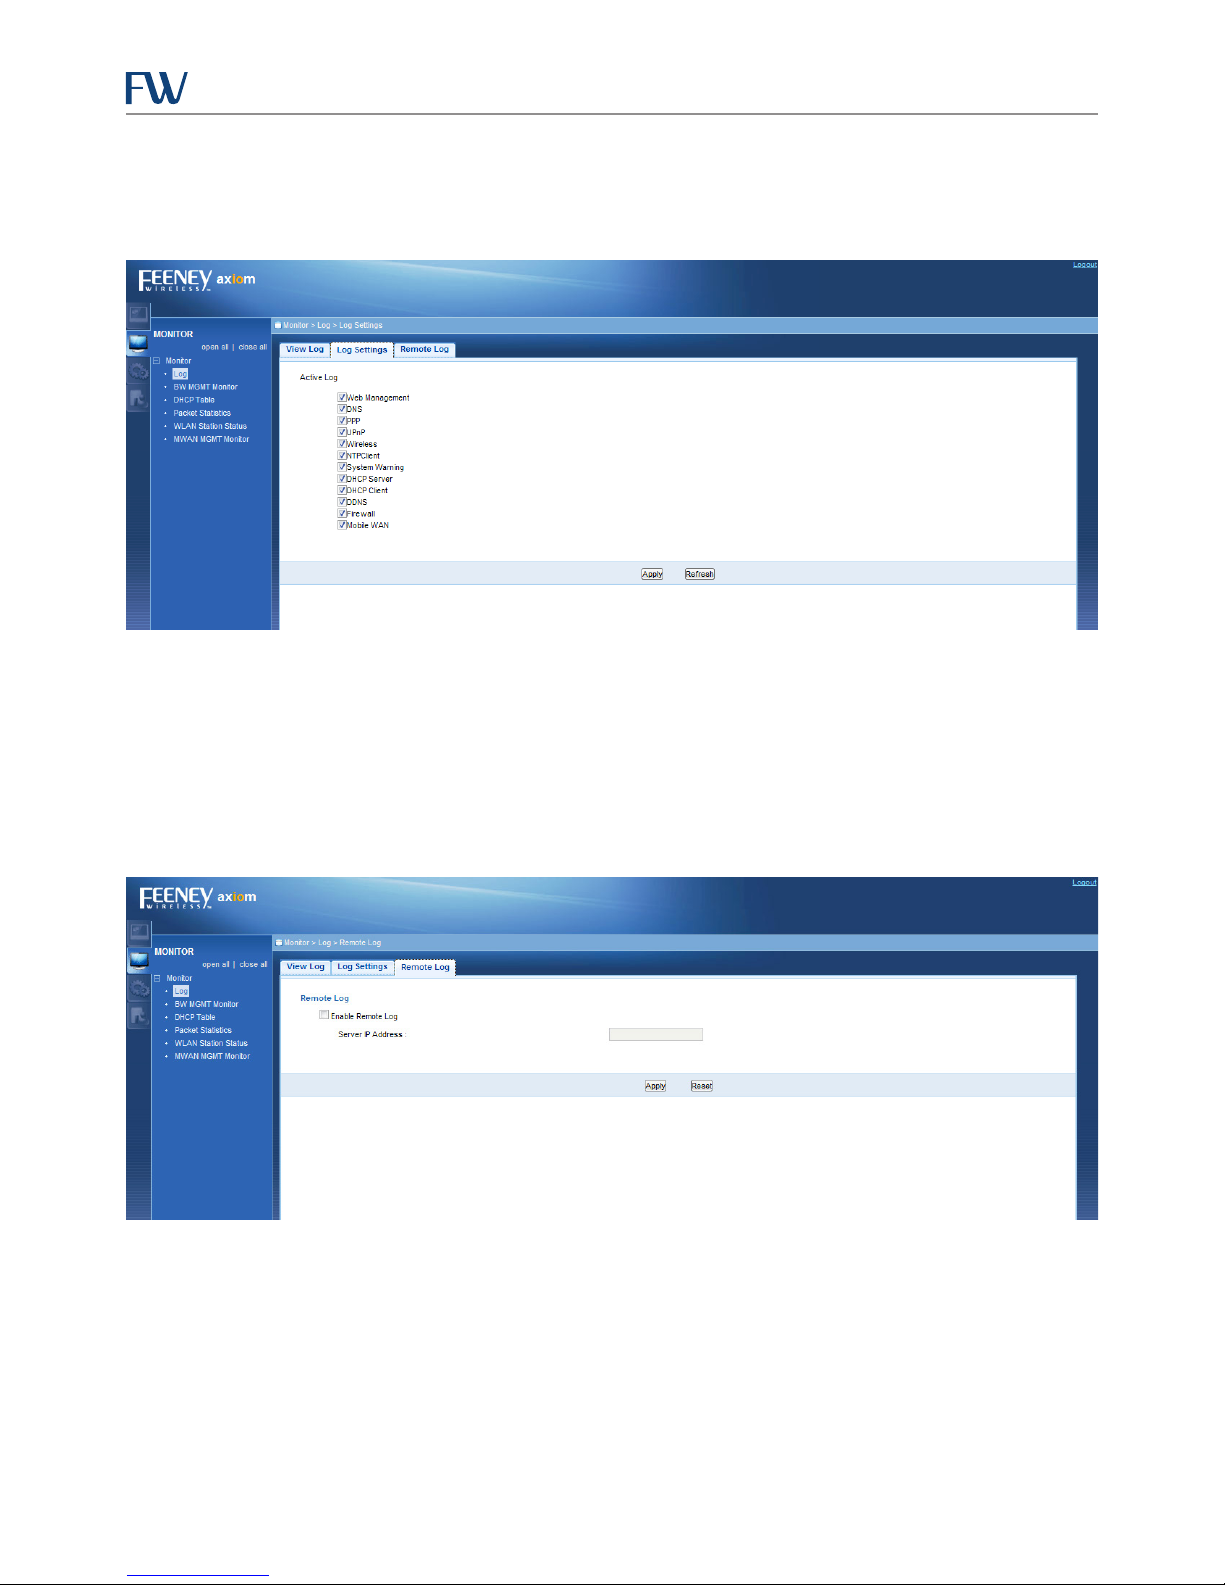
Log Settings Page
This page allows the user to congure the items, by type, that will be displayed in the system logs.
Figure 8: Access Point Log Settings Page
Remote Log Page
This page allows the user to enter a syslog Server IP Address for transmitting of log les to a remote server. By
checking the Enable Remote Log check box and entering an IP address in the Server IP Address eld, the system
logs can be sent over the Internet to a server compatible with syslog protocol.
NOTE: Enabling this feature will consume bandwidth on the cellular link
Figure 9: Access Point Remote Log Page
7
Page 12
CIRA X2 User Manual
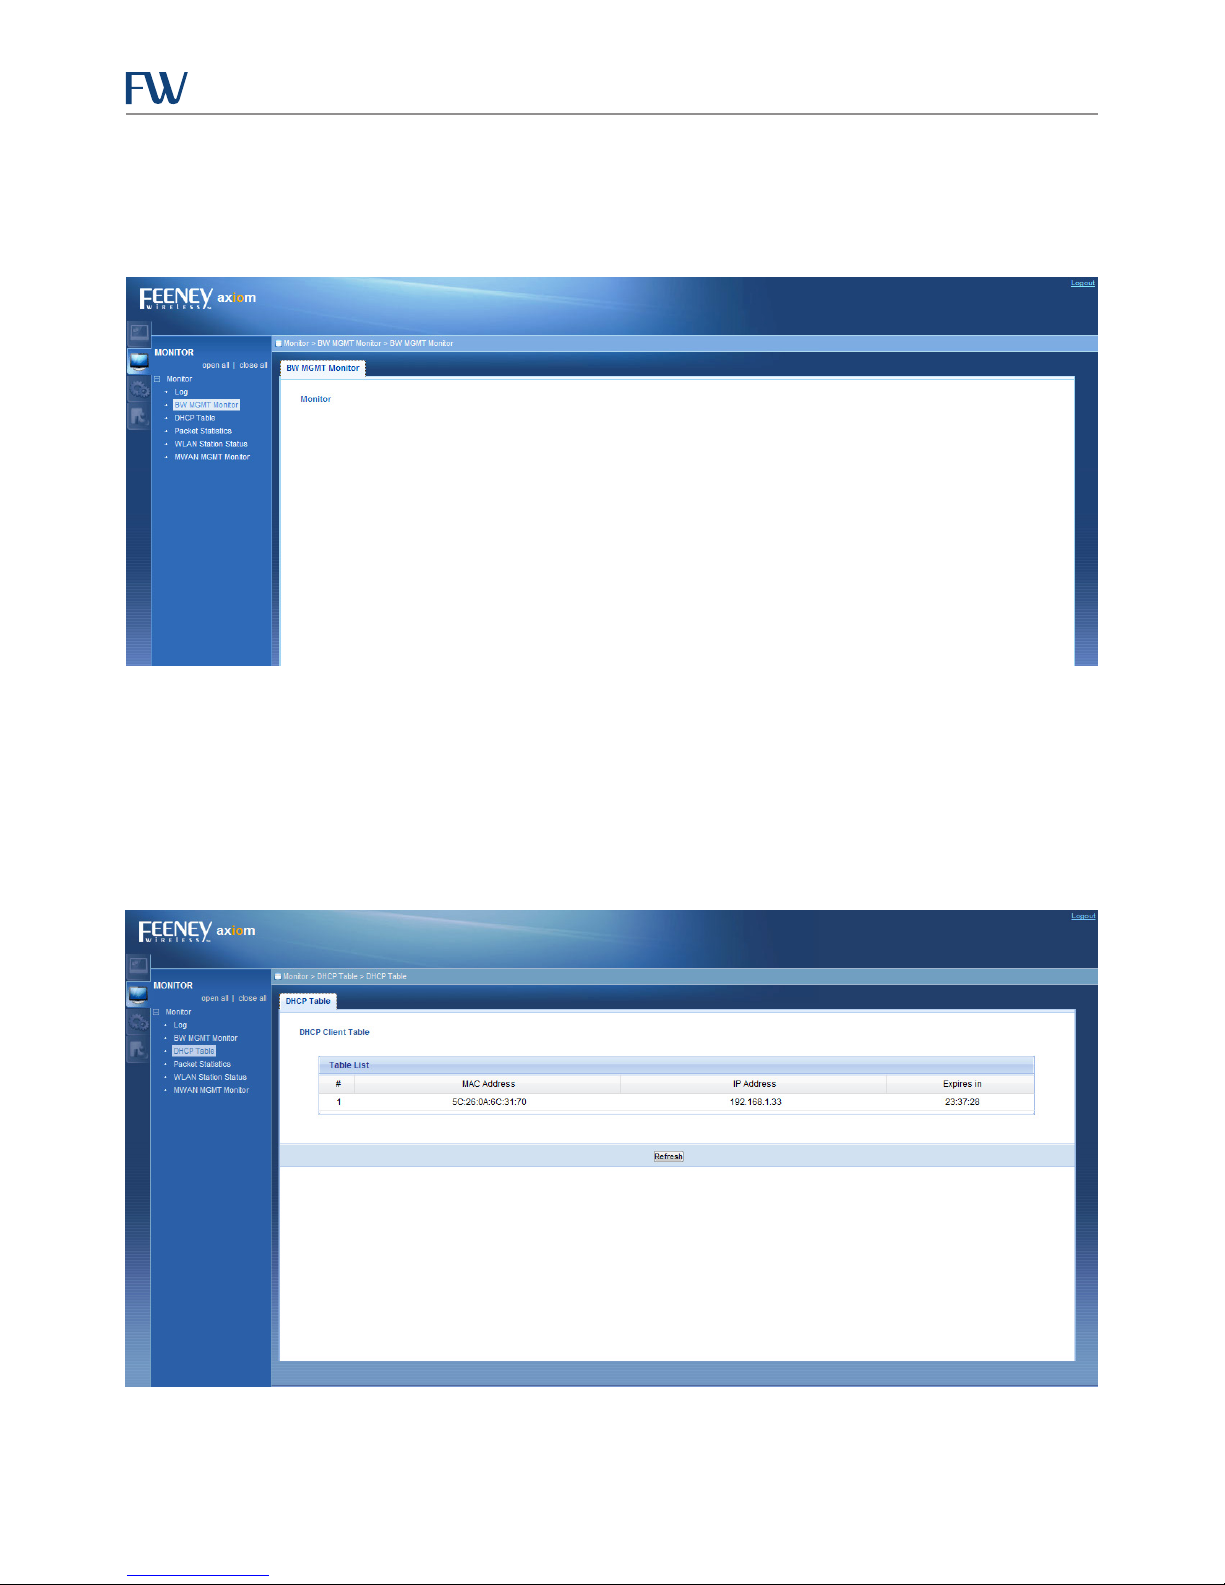
Bandwidth Management Monitor Page
When Bandwidth Management is disabled, as it is by default, the page will appear as blank. When the setting is
enabled, the screen will show interface data usage for bandwidth management categories that are enabled.
Figure 10: Bandwidth Management Monitor Page
DHCP Client Table Monitor Page
This option shows a list of currently connected Ethernet and Wi-Fi clients with DHCP IP assignments.
NOTE: If devices that are connected via Ethernet or Wi-Fi are congured with a Static IP address on the connected
device itself they will not show up on this list.
Figure 11: DHCP Table Monitor Page
8
Page 13
CIRA X2 User Manual
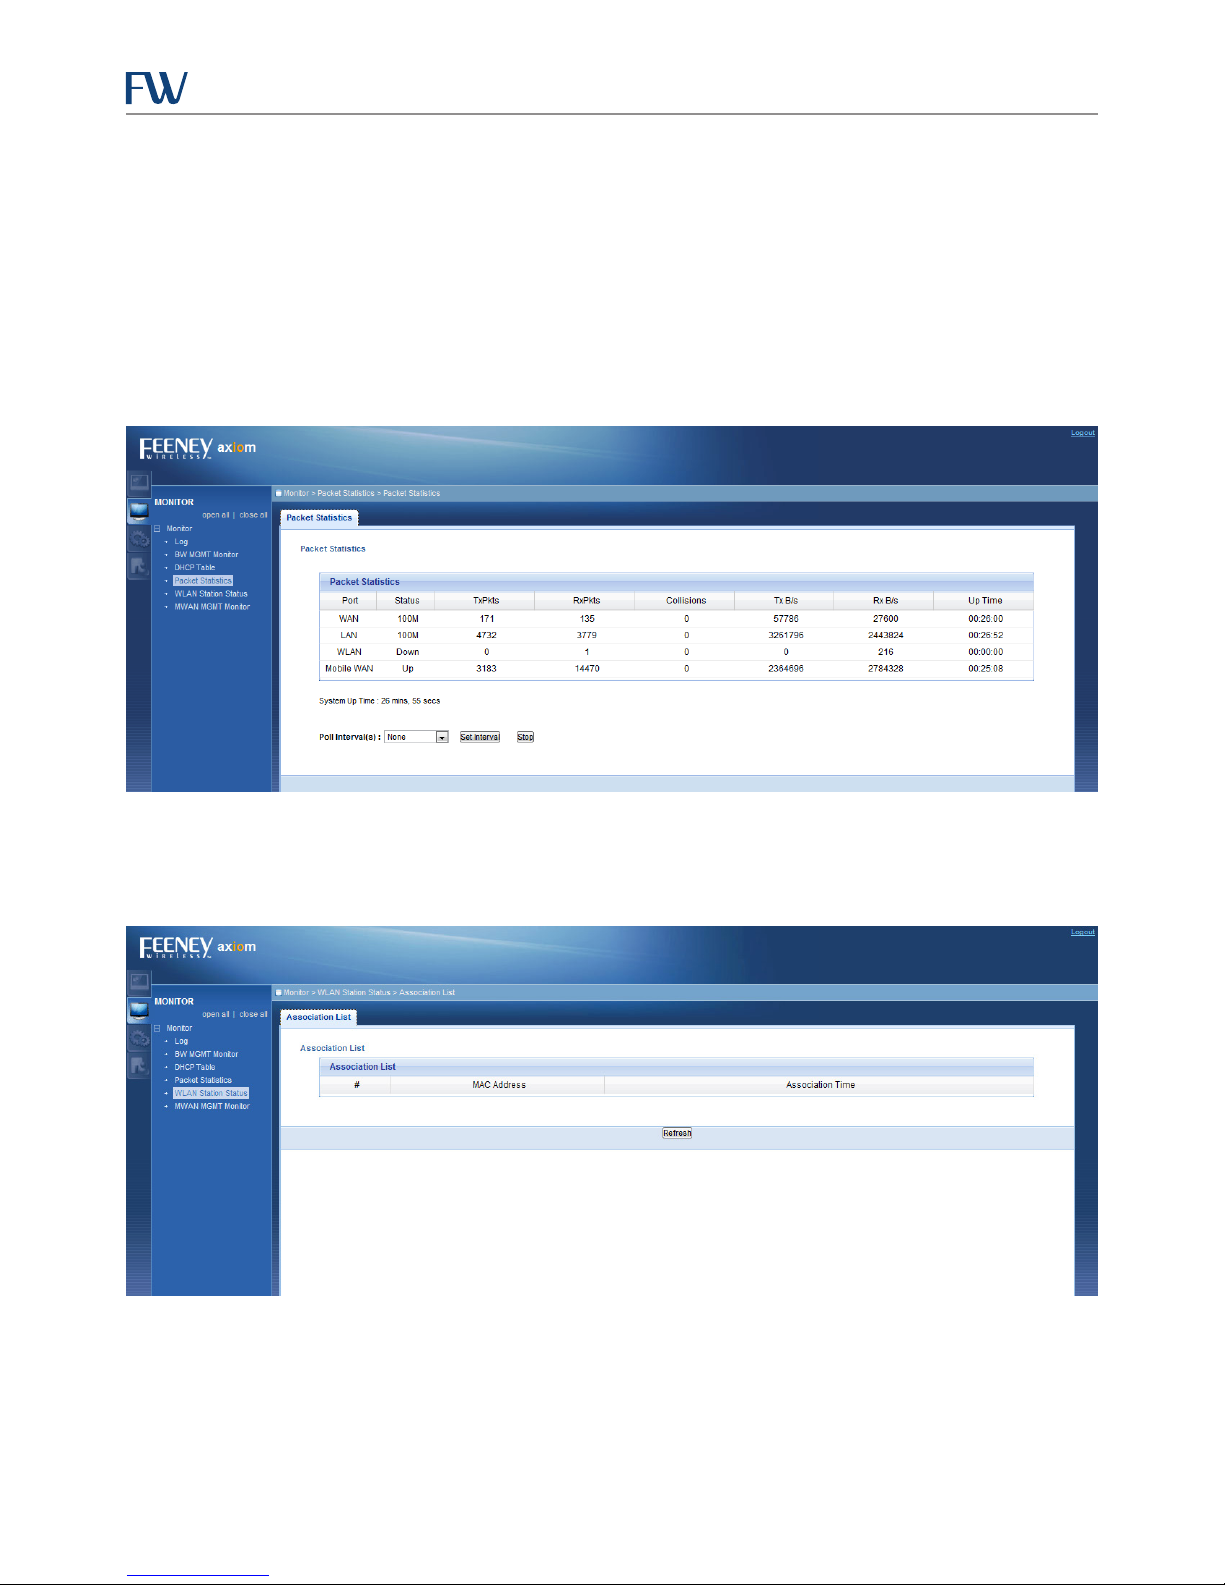
Packet Statistics Page
This screen shows system uptime as well as usage and status of Embedded WAN, LAN, Wi-Fi, and Mobile WAN (USB
Mobile Broadband Card) interfaces.
You have the ability to select a Polling Interval and then click Set Interval in order to have this screen automatically
refresh.
NOTE: The values listed in the ‘Tx B/s’ and ‘Rx B/s’ columns are usage in bytes since the initial system power up.
Figure 12: Packet Statistics Page
WLAN Station Status Page
This option shows any and all currently connected Wi-Fi clients.
Figure 13: WLAN Station Status Page
9
Page 14
CIRA X2 User Manual
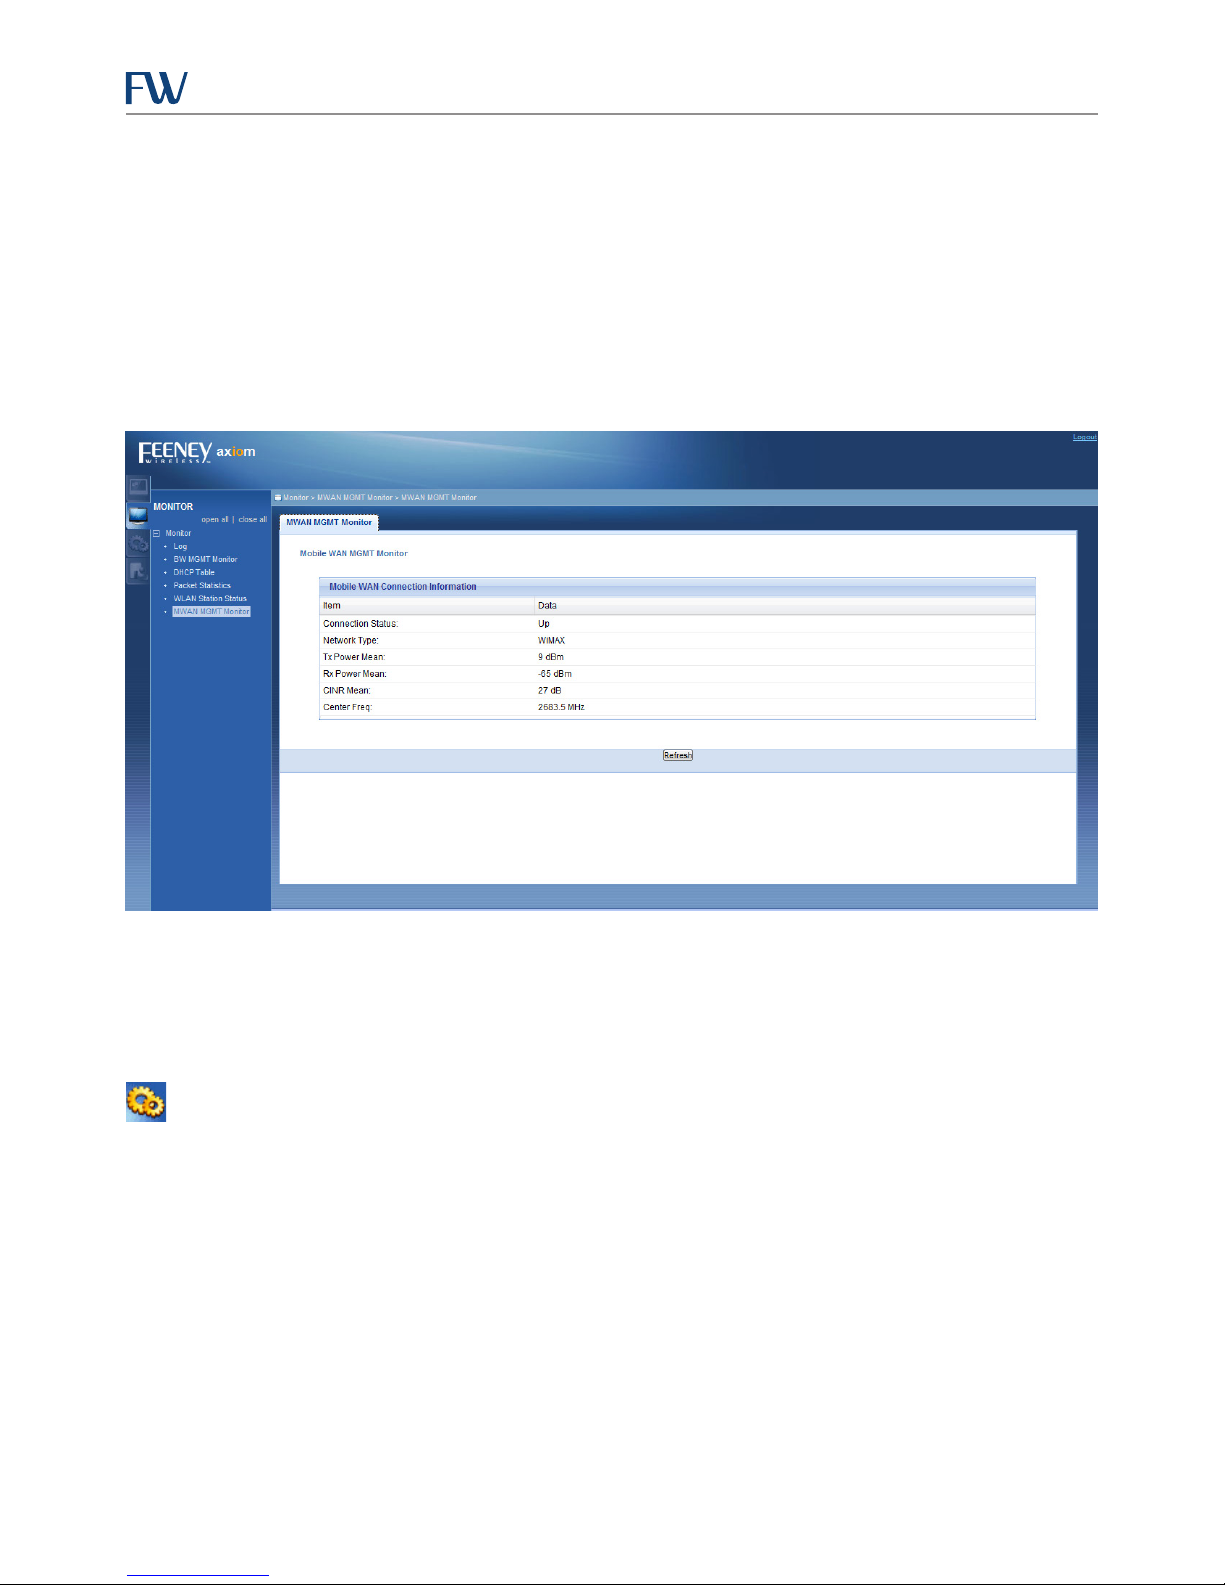
Mobile WAN Management Monitor Page
This option shows signal strength and connection status for USB connection card when they are being utilized.
NOTE: The system is not designed to facilitate hot swapping of USB connection cards. Detection of a USB connection
card is not guaranteed if inserted after system reboot.
To properly connect a USB connection card, power down the system, connect the card, and then power the system
back up.
Figure 14: Mobile WAN Management Monitor Page
Configuring Your CIRA X2 Access Point
The access point provides the ability for user conguration which is available by clicking the Conguration icon
located below the Monitoring icon on the left side of the page.
Conguration Icon
NOTE: Upon completion of conguring your device, Feeney Wireless recommends utilizing the Backup
Conguration option as described under the section called ‘System Conguration Backup/Restore/Reset Page’ on
page 28.
Wireless LAN General Conguration Page
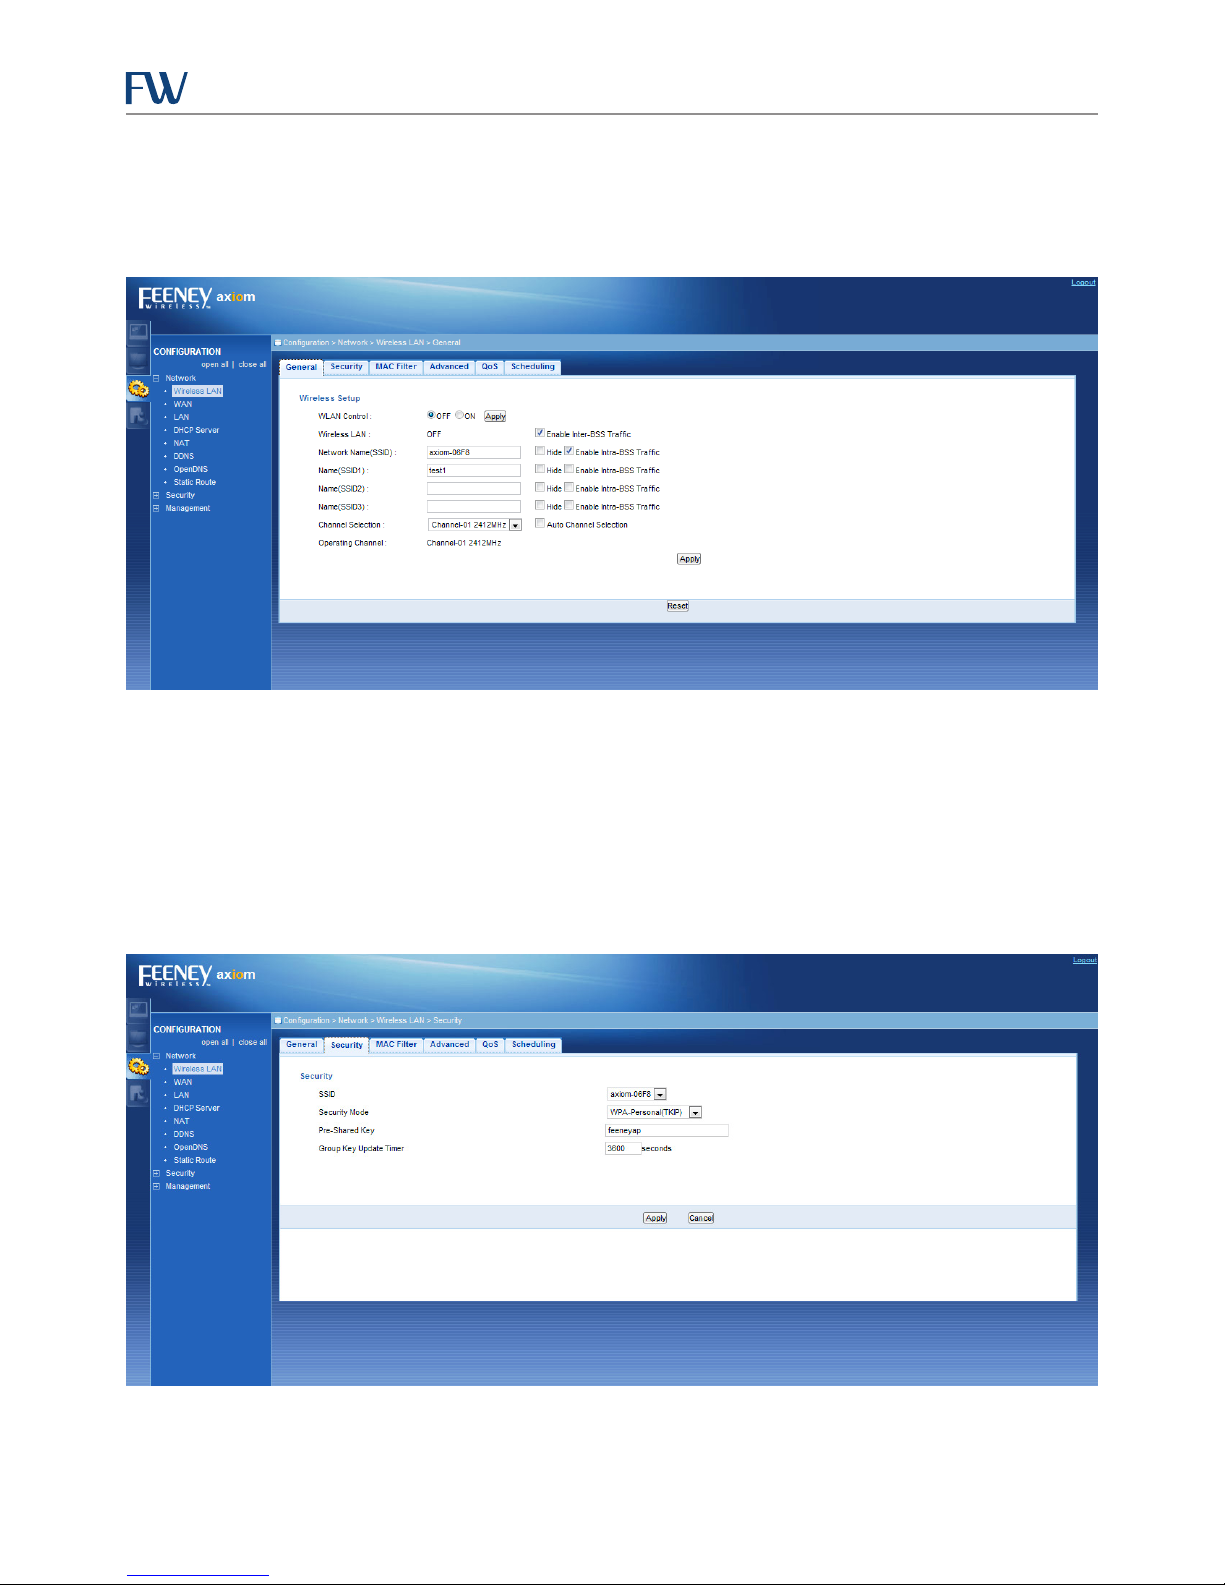
The Wireless LAN General Conguration Page is the default page displayed when selecting the Conguration icon
and provides the ability to do the following:
• WLAN Control – by toggling between OFF and ON, you can Enable or Disable the Wi-Fi radio.
• SSID Control – the page allows you to dene the operation of 4 simultaneous SSIDs.
• Checking the Hide box for a given SSID will disable the broadcasting of the associated SSID which will make it
more dicult for unauthorized users to detect and connect to your Wi-Fi network(s).
10
Page 15
CIRA X2 User Manual
• Channel Selection – this option allows you to set your Wi-Fi channel on the Channel Selection drop down menu.
• Auto Channel Selection – by checking this box, the CIRA X2 will automatically select a channel. Checking this
box is recommended by Feeney Wireless.
Figure 15: Wireless LAN General Conguration Page
Default System Settings are as follows:
• Wi-Fi = ON
• Primary System SSID = Axiom-(last 4 digits of MAC address located on CIRA X2 label)
Wireless LAN Security Page
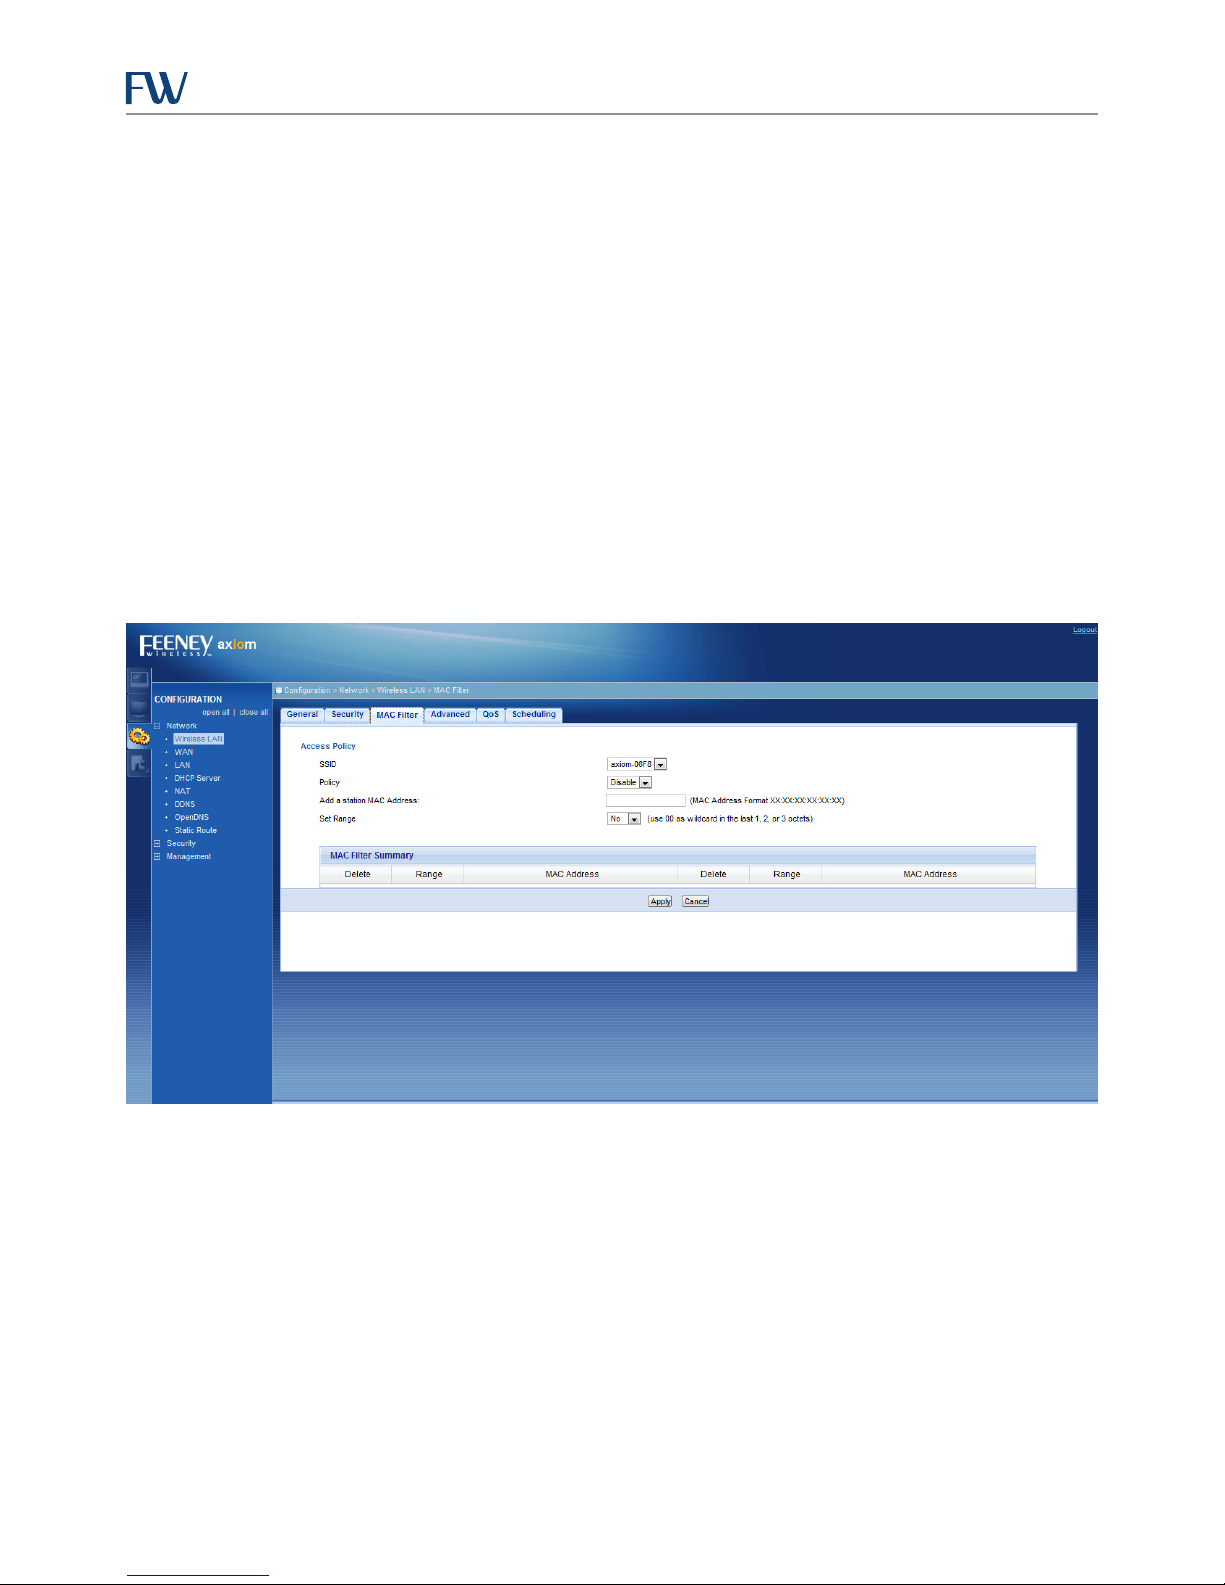
The Wireless LAN Security page allows the user to set the pass phrase for logging into the CIRA X2 Wi-Fi networks.
Figure 16: Wireless LAN Security Page
11
Page 16
CIRA X2 User Manual
The process for conguring the SSID is as follows:
1. To set the SSID pass phrase, use the SSID Drop Down list to select the desired SSID.
2. In the Security Mode Drop Down list to select the desired SSID security mode, WPA-Personal and WPA2-Personal
are recommended for maximum security.
3. Insert the pass phrase in the Pre-Shared Key dialog box and set the time in seconds for the Group Key Update
Timer in the related dialog box.
4. Once all settings are inserted, click the Apply button, and repeat as necessary for any other SSIDs being utilized.
Default System Settings are as follows:
• Security Mode = WPA-Personal(TKIP)
• Pre-Shared Key = feeneyap
WLAN MAC Address Filtering Page
In order to ensure not just any wireless client can join your Wi-Fi network, the CIRA X2 provides MAC Address
Filtering, which will allow you to congure a list of clients that are allowed to join the network.
Figure 17: Wireless MAC Address Filtering Page
You can congure your MAC address ltering by doing the following:
1. Select the proper SSID
2. Set the Policy to Enable MAC Address Filtering, or set disable to not lter.
3. Set a specic MAC Address or add a MAC Address range by leaving the last 1, 2, or 3 octets blank and toggle the
Set Range eld to ‘Yes’.
WLAN Advanced Page
On the WLAN Advanced page, you can modify Wi-Fi advanced parameters such as the output power level.
12
Page 17
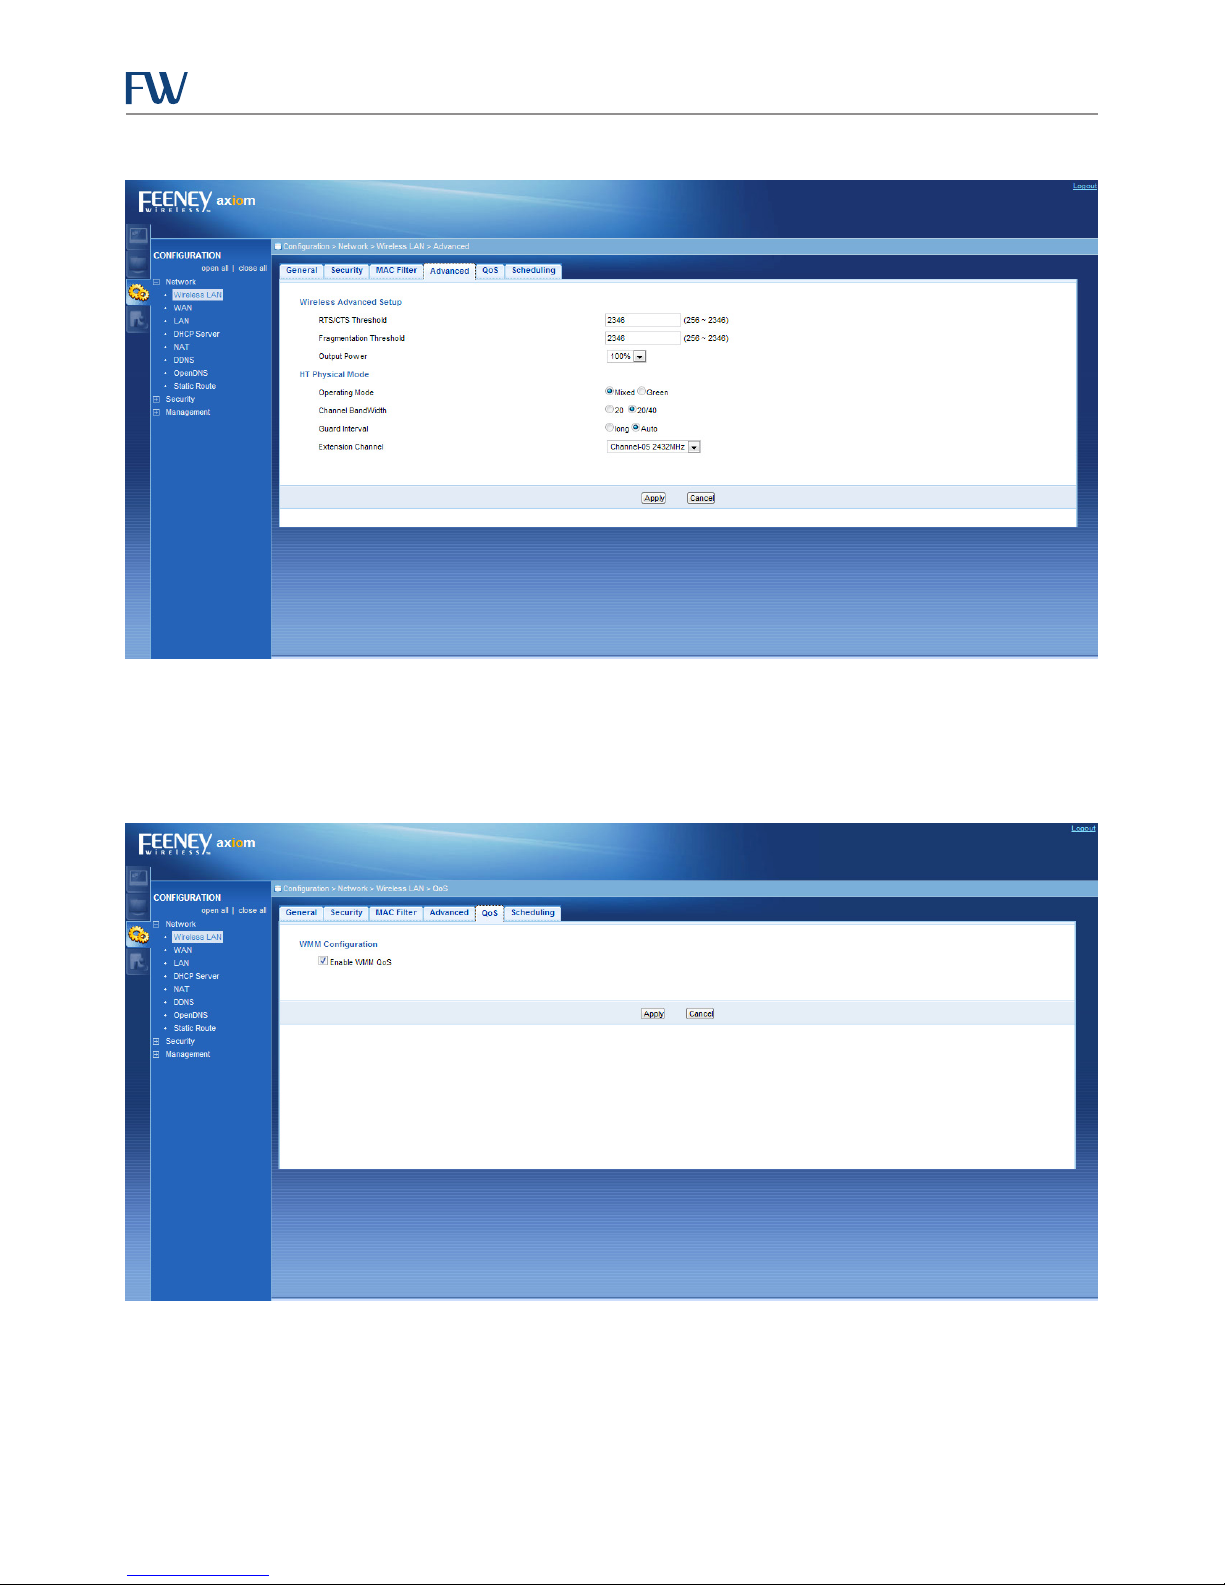
Figure 18: WLAN Advanced Page
CIRA X2 User Manual
WLAN QoS Page
On the WLAN QoS page you can enable or disable QoS. QoS enables you to use congestion management and
avoidance tools, which prevent trac from slowing down on you WLAN. The Default is enabled.
Figure 19: WLAN QoS Page
13
Page 18
CIRA X2 User Manual
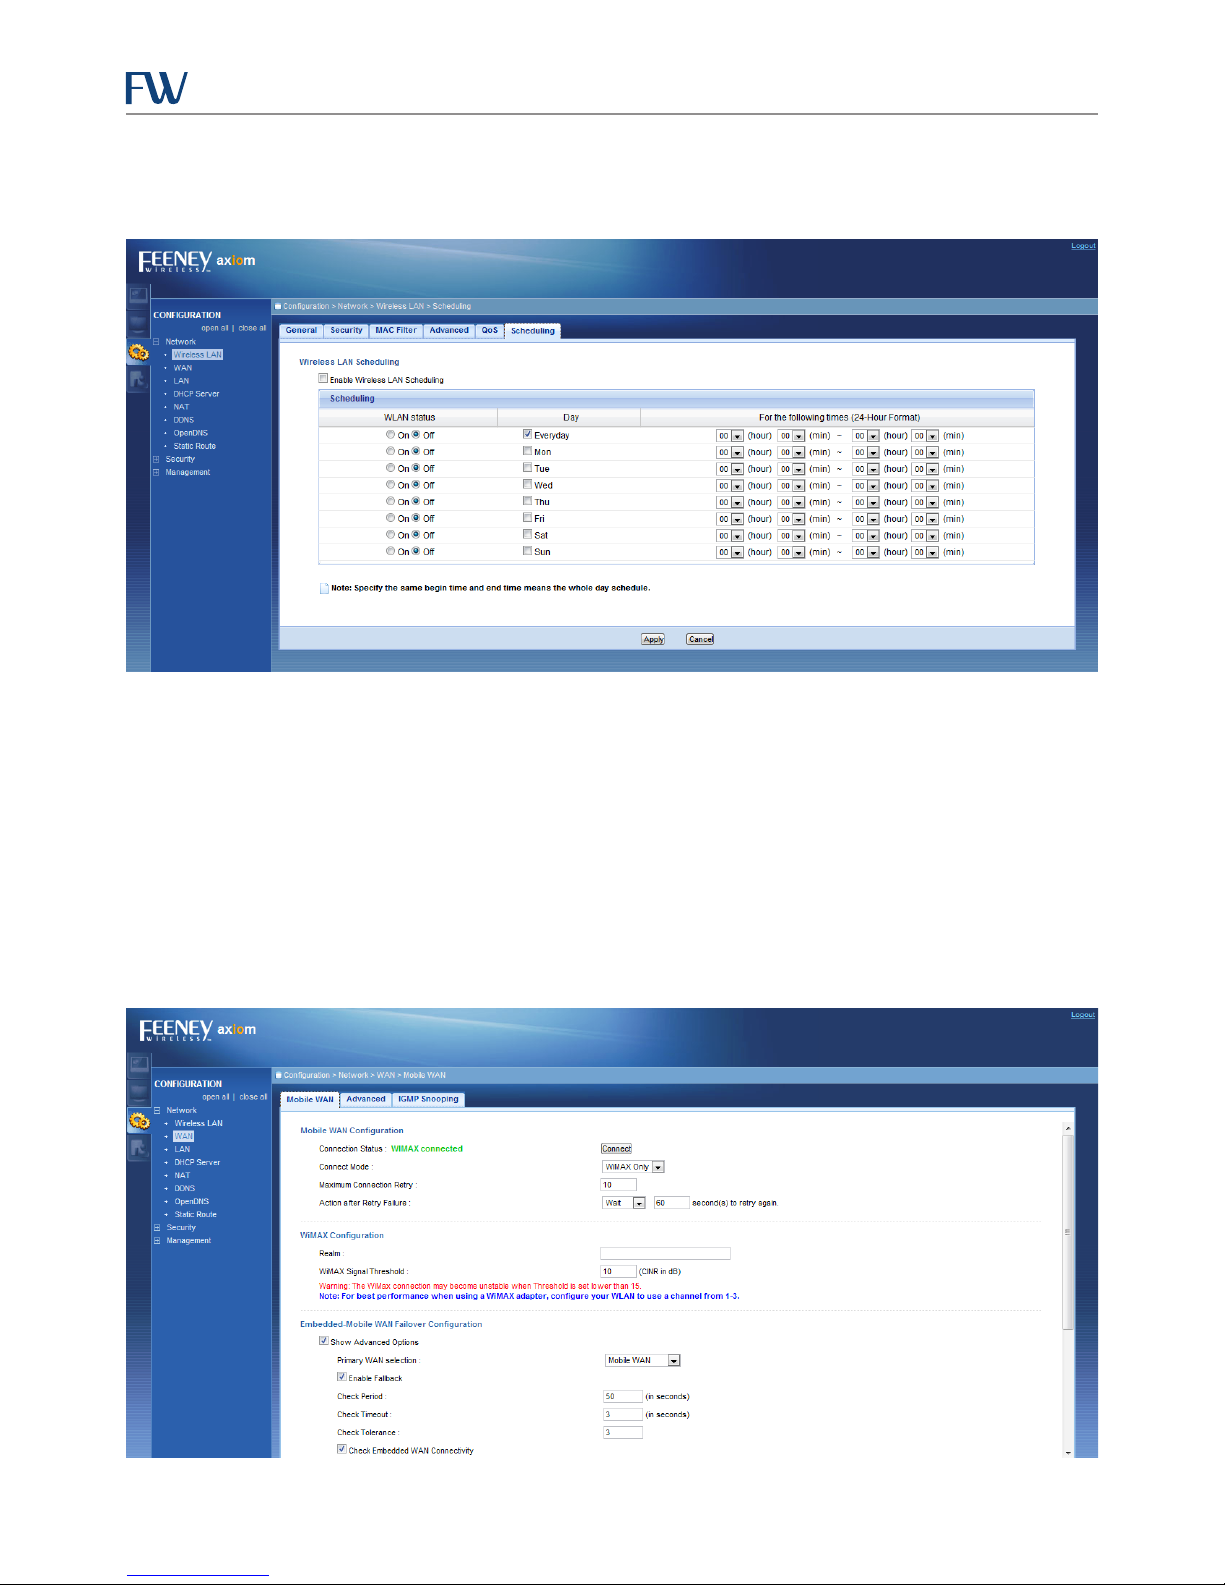
WLAN Scheduling Page
On the WLAN Scheduling page, you can dene a schedule to control when the Wi-Fi radio is enabled or disabled.
Figure 20: WLAN Scheduling Page
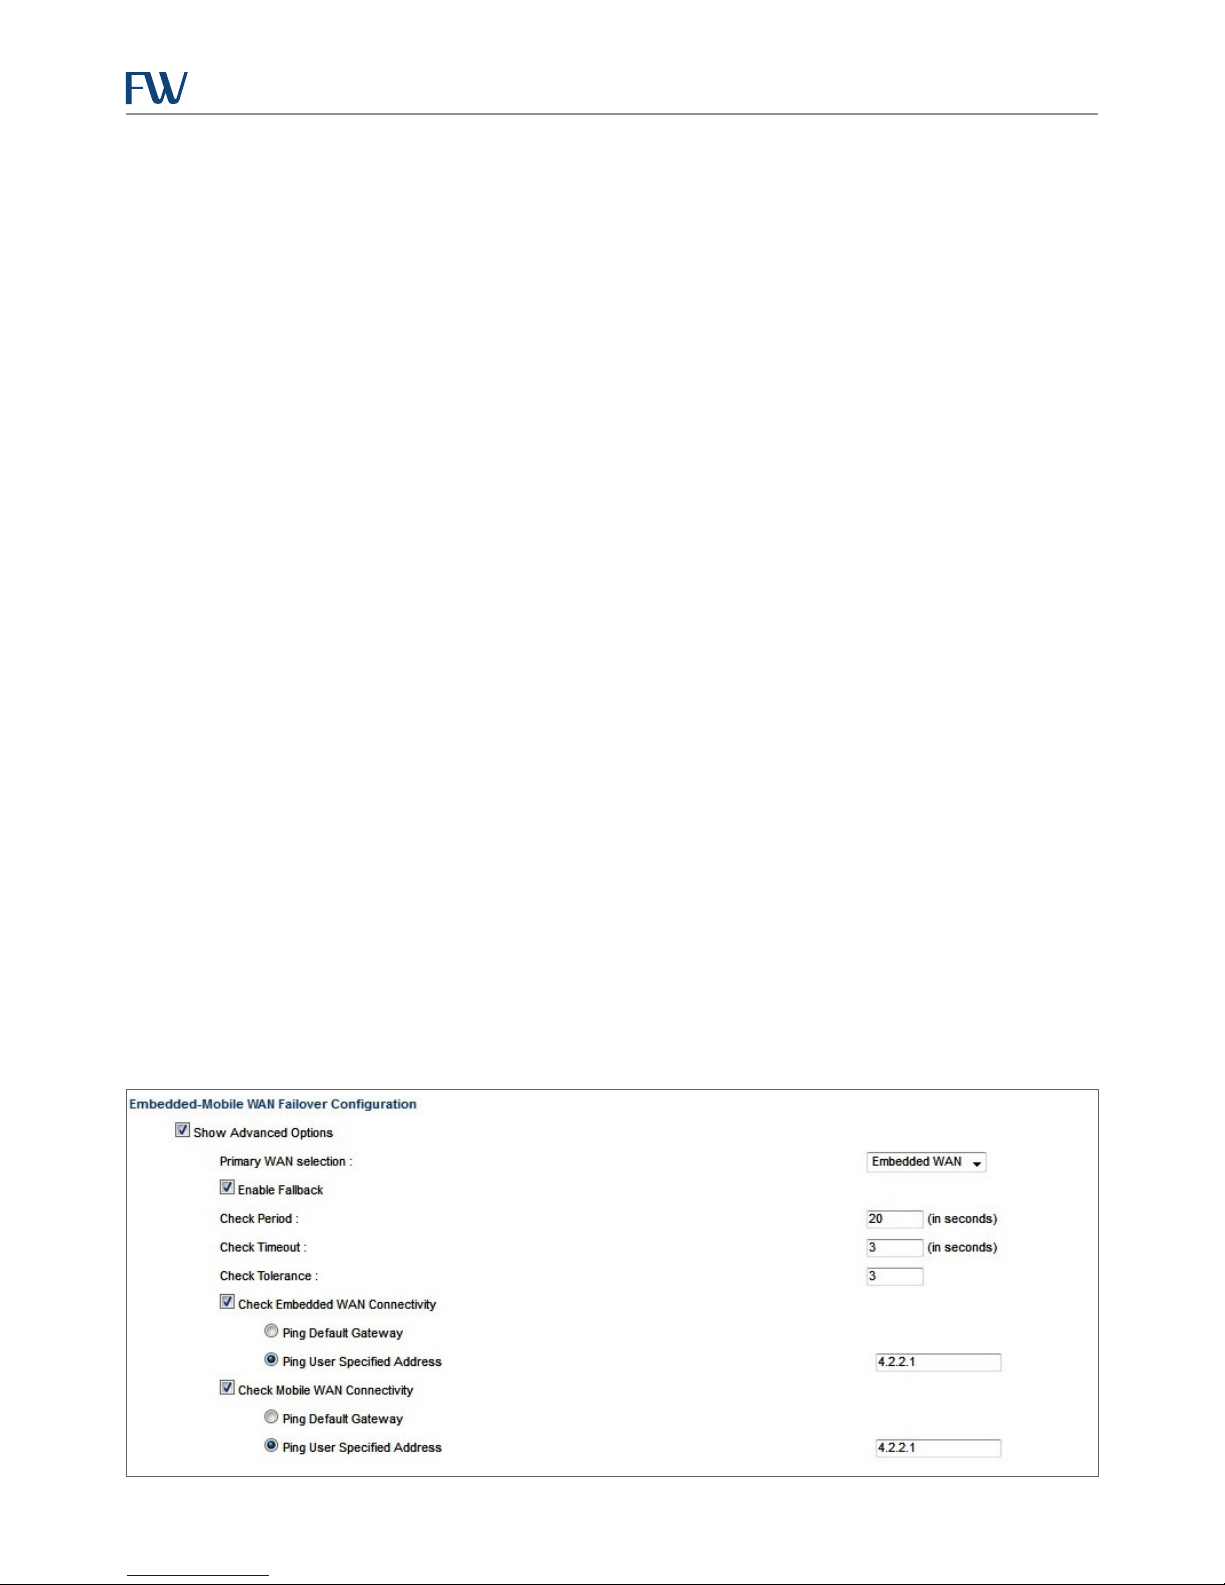
Mobile WAN Conguration Page
On the Mobile WAN Conguration page, the CIRA X2 allows the user to congure the settings to support USB
connection cards. Ocially supported devices for use are as follows:
• Skyus 3G Sprint
• Skyus 3G Verizon
• Skyus 3G GSM
• Skyus Global
For proper settings on your USB connection card, please contact your Feeney Wireless Support Representative.
Figure 21: Mobile WAN Conguration Page
14
Page 19
CIRA X2 User Manual
On WiMAX capable devices, set the Connect Mode to either WiMAX Only or Auto. When set to Auto then WiMAX
will be preferred but the connection will fall back to 3G if WiMAX is not present or available. Please ensure that the
Primary WAN selection is congured appropriately if Connect Mode is set to Auto to ensure use of the correct
primary WAN interface.
The CIRA X2 will attempt to detect a WiMAX signal with acceptable quality as congured by the WiMAX Signal
Threshold setting. The number of scan attempts is dened by the Maximum Connection Retry setting. If no
WiMAX network with acceptable signal strength is detected within the number of attempts dened in the Maximum
Connection Retry eld, then the Action after Retry Failure setting controls the behavior of the system.
For WiMAX devices it is recommended to set the Action after Retry Failure WAIT and set a wait time of at least
60 seconds. In this mode, a new series of scans will be started every 60 seconds, other options include NONE and
REBOOT. If NONE is selected, the system will make no further attempts to scan for a Wi-Max connection until the
system is power cycled. If the action is set to REBOOT, the system will perform a reboot if the scans do not detect a
WiMAX connection. This option can be useful if the system is designed in a WiMAX only connection scenario where
persistent connectivity is essential.
For LTE capable devices set LT E for Connect Mode.
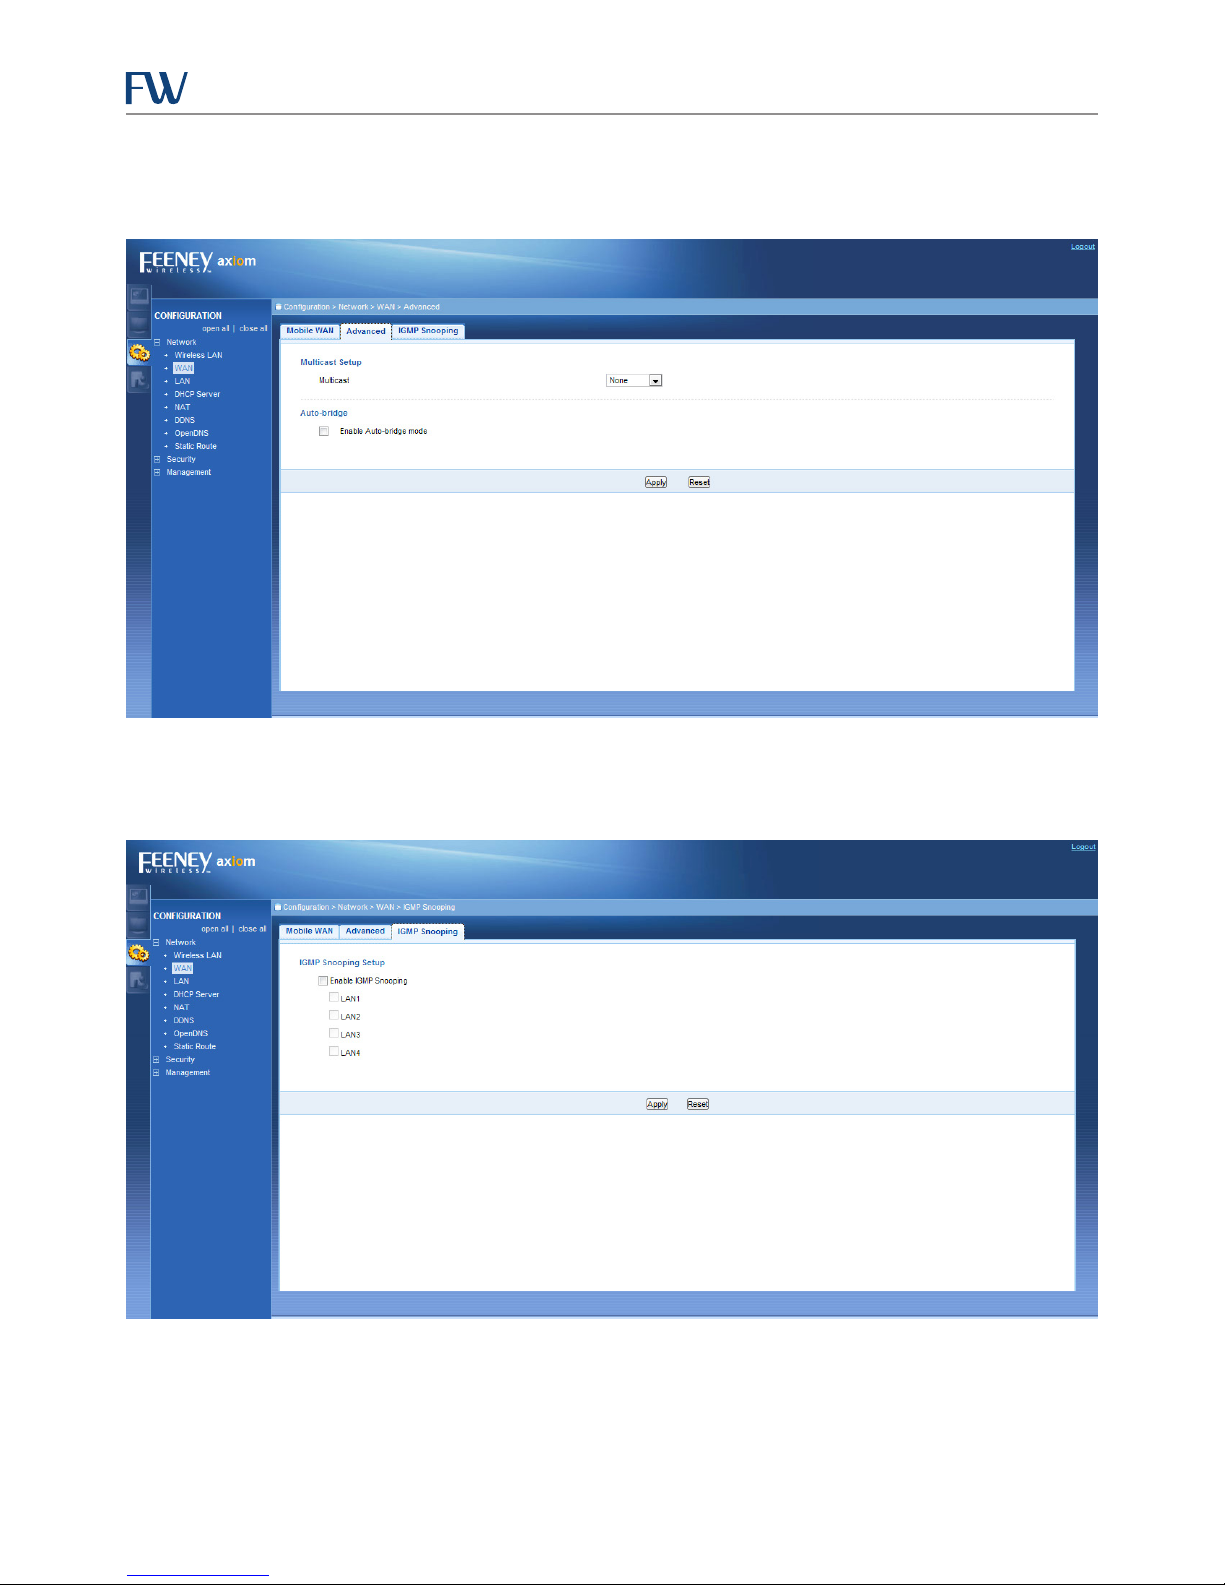
You can select your preferred WAN interface by checking the Show Advanced Options checkbox. You may then
select either the Embedded WAN or Mobile WAN by toggling the Primary WAN Selection setting.
If you are using both Embedded and Mobile WAN connections, setup the failover ping check function by checking
the Enable Fallback box. Set a Check Period in seconds to run the failover ping test.
NOTE: It is recommended not to set this value less than 45 seconds to avoid potential issues with cellular radios
being unable to enter a dormancy state. Should this value be set too short, you may nd that connections in rural
areas will be unable to transition to 3G from 2G or roaming states.
Setup the IP addresses to ping check by checking the Check Embedded WAN Connectivity and Check Mobile WAN
Connectivity check boxes. It is recommended to select the Ping User Specied Address for both WAN connections
and input an IP address which is known to be pingable.
Figure 22: Embedded-Mobile WAN Failover Conguration
15
Page 20
CIRA X2 User Manual
WAN Advanced Page
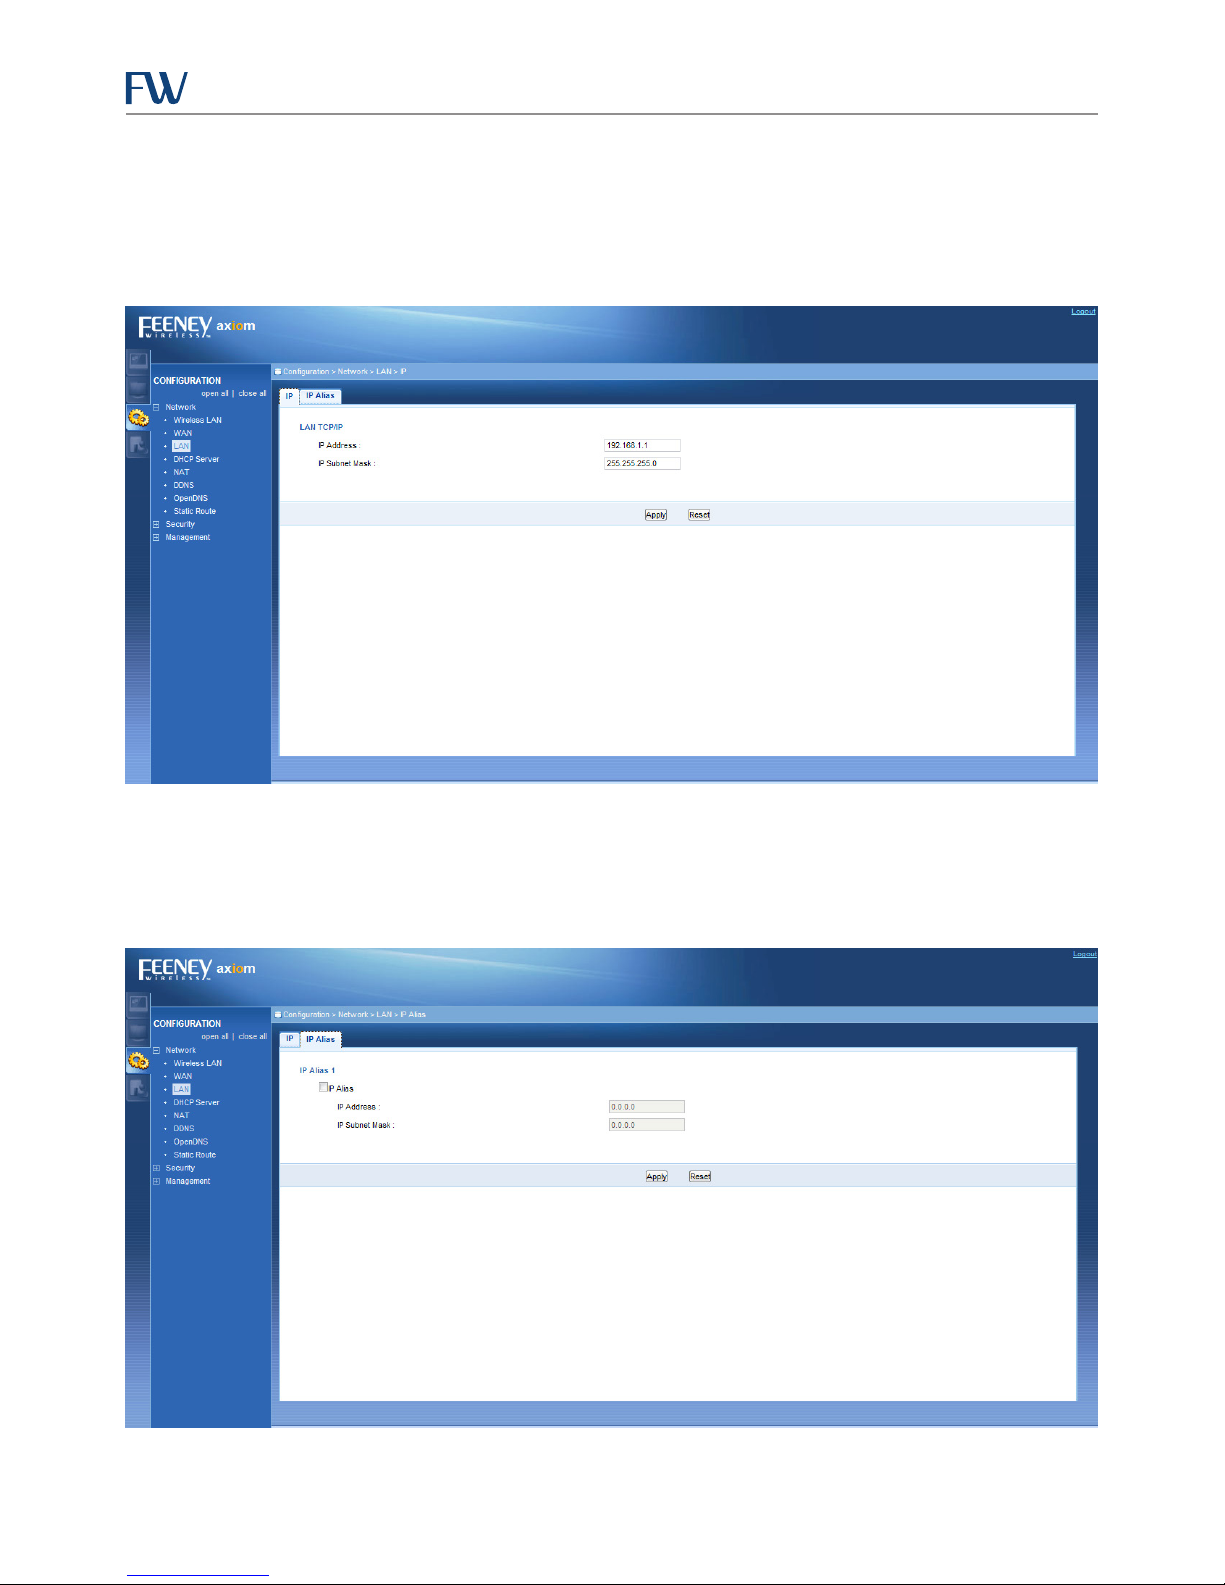
The WAN advanced page provides settings for multi-cast trac. By default this option is disabled.
Figure 23: WAN Advanced Page
WAN IGMP Snooping
The WAN IGMP snooping page provides settings for IGMP snooping. By default, this option is disabled.
Figure 24: WAN IGMP Snooping
16
Page 21
CIRA X2 User Manual
LAN IP Page
The LAN IP page allows you to set the access point LAN IP address and subnet mask. This is the local IP address and
subnet mask of the CIRA X2 on the LAN interface. By default, the IP Address is 192.168.1.1 and the default IP Subnet
Mask is 255.255.255.0.
Figure 25: LAN IP Conguration Page
LAN IP Alias Page
The LAN IP Alias page allows for conguration of a secondary IP address on the LAN interface. By default this option
is disabled.
Figure 26: LAN IP Alias Conguration Page
17
Page 22
CIRA X2 User Manual
DHCP Server Conguration (General) Page
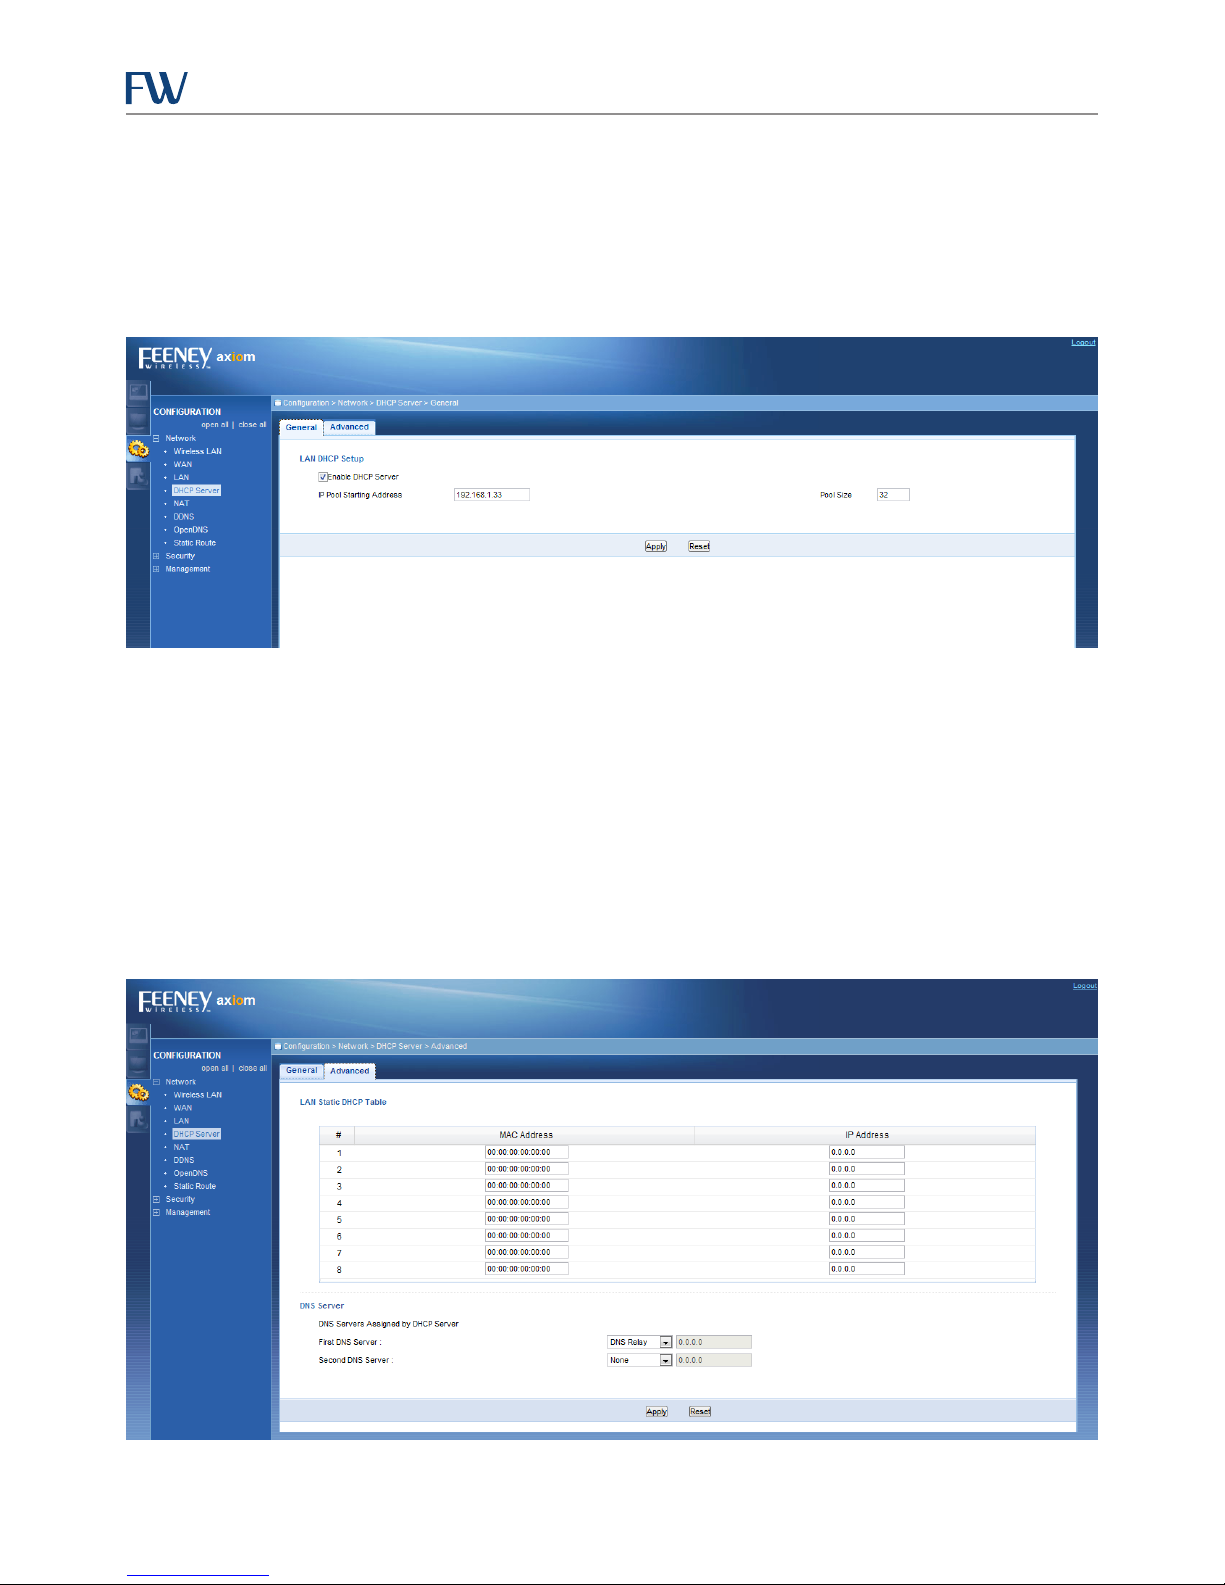
This option allows the user to dene the starting DHCP pool address and the pool size. By default, DHCP Server is
enabled with the IP Pool Starting Address at 192.168.1.33 and the Pool Size set to 32 IP addresses.
NOTE: To support additional wired and Wi-Fi clients, increase the Pool Size.
Figure 27: DHCP Server Conguration Page
DHCP Server Advanced Page
This option allows the user to assign static DHCP leases based on MAC addresses. This allows for the assignment of
the same IP address to a wired or wireless client. Enter the client’s MAC address and a desired IP address. IP addresses
must be on the same subnet as congured for the LAN interface of the CIRA X2 itself.
It is also necessary to dene DNS behavior for the DHCP server. By default, the First DNS Server is set to relay. This
setting will pass DNS requests to the DNS server assigned by the systems cellular carrier. Using the dialog boxes
located to the right of drop down lists, the user also has the option of statically dening both a rst and second DNS
server manually.
Figure 28: DHCP Server Advanced Page
18
Page 23
CIRA X2 User Manual
Network Address Translation (NAT) General Conguration Page
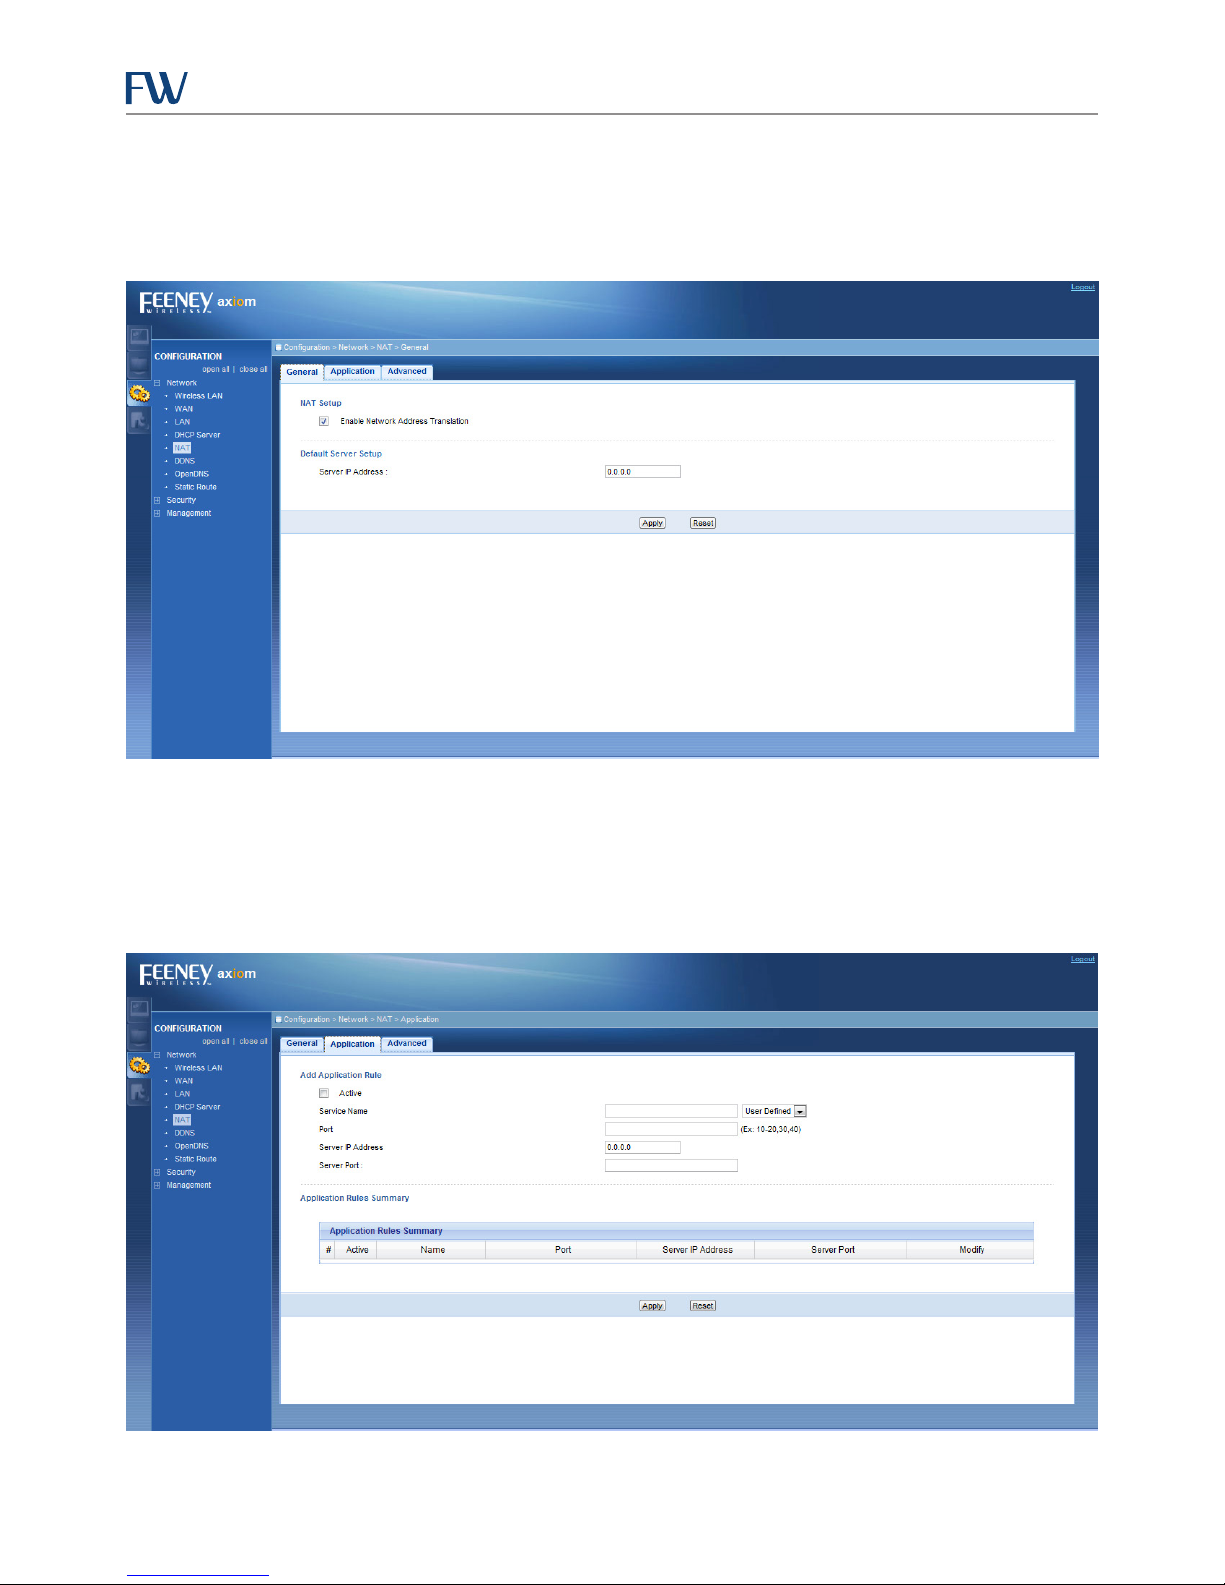
This option allows the assignment of a DMZ IP address if desired, by inputting a value into the Server IP Address
eld. Network Address Translation must be enabled to support multiple clients on LAN or Wi-Fi interfaces.
Figure 29: NAT General Conguration Page
Network Address Translation (NAT) Application Conguration Page
This option allows users to congure port forwarding rules. Port translation is supported, allowing a dierent
incoming port and translating to an internal (server) port. This is useful for forwarding to devices such as cameras
where port 80 may be blocked.
Figure 30: NAT Application Conguration Page
19
Page 24
CIRA X2 User Manual
To create a port forwarding rule, perform the following steps:
1. Check the Active Box.
2. Enter a name for the service in the Service Name eld.
3. In the Port eld, enter the TCP and/or UDP port number trac will be received on the WAN interface(s) of the
CIRA X2.
4. In the Server IP Address eld, enter the LAN IP address of the client connected via either the Ethernet or Wi-Fi to
the CIRA X2 you wish to forward the selected port to.
5. In the Server Port eld, enter the port you wish the trac to be forwarded to.
a. In many cases, this may be the same as the Port eld above. If you wish to translate from an outside port to
an inside port, you may do so by entering a dierent port number in the Server Port eld.
6. Click the Apply button so save the rule, or Reset to begin the process again.
Network Address Translation (NAT) Port Triggering Rules Conguration Page
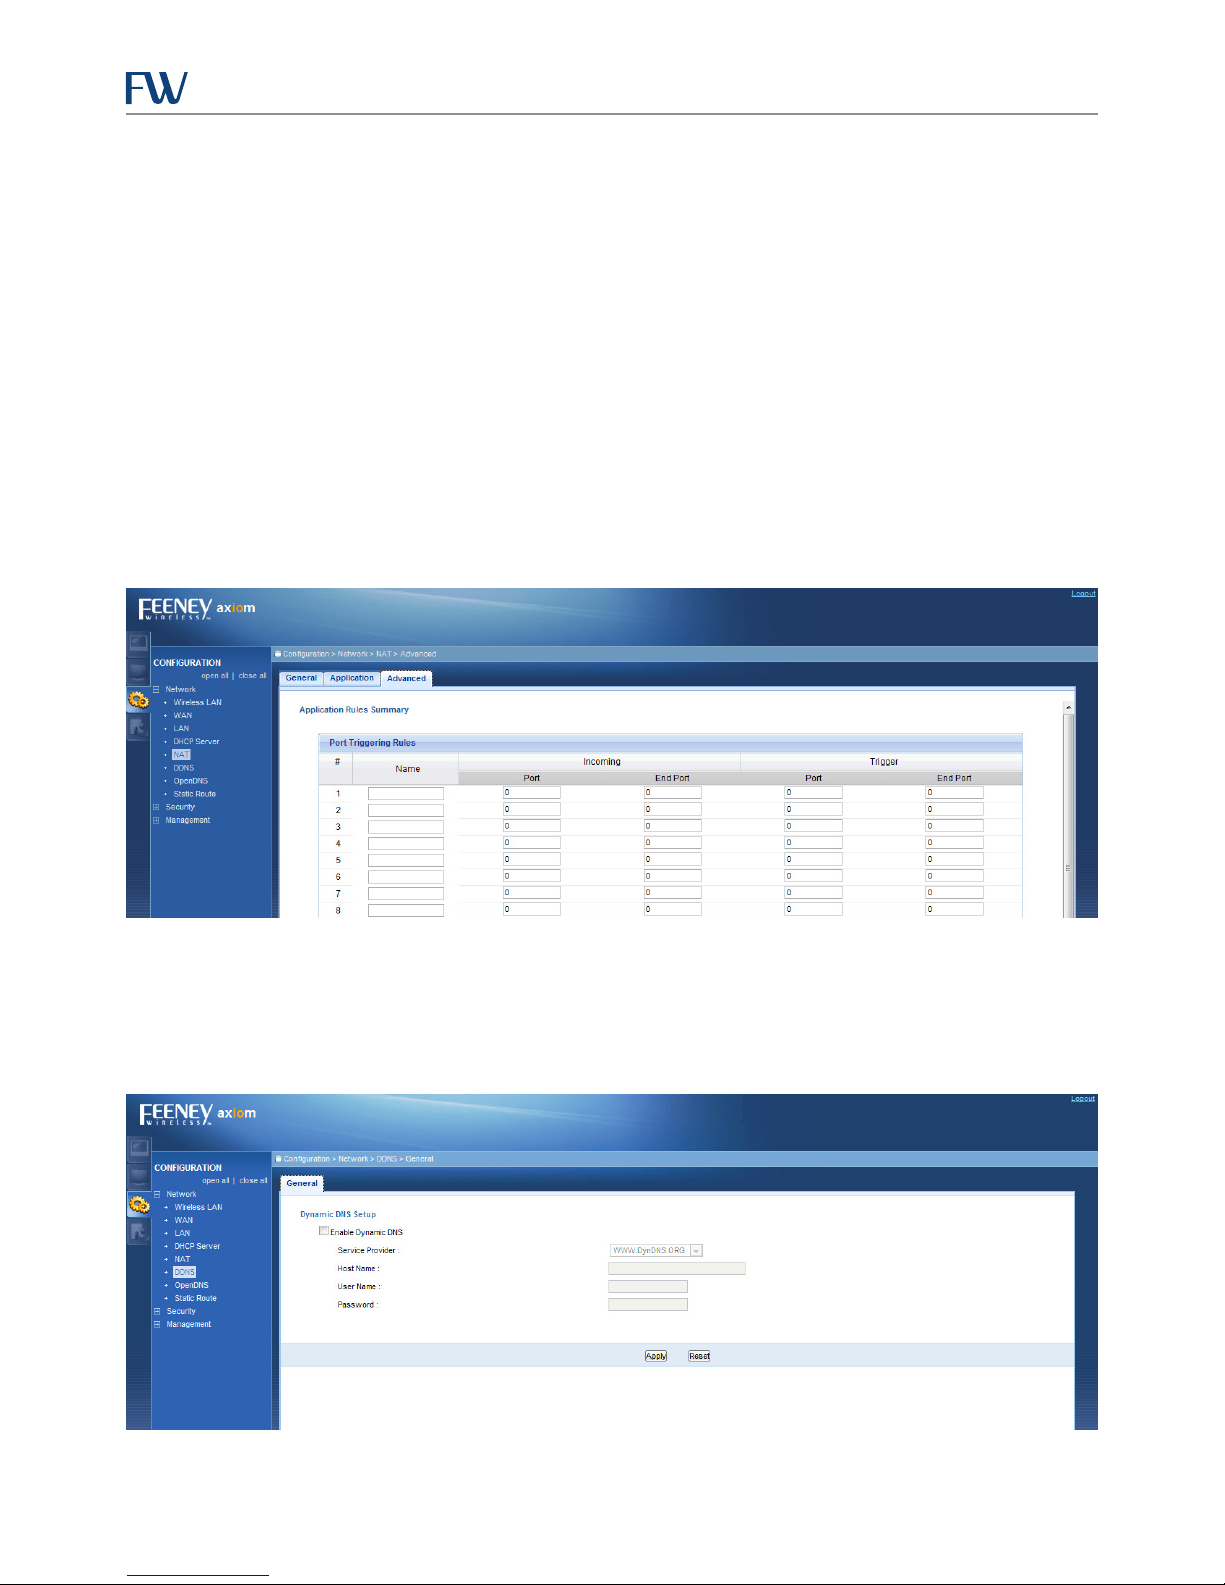
This option allows incoming trac on ports when trac is detected on a trigger port.
Figure 31: NAT Port Triggering Rules Conguration Page
Dynamic DNS General Settings Page
This option allows the user to transmit WAN IP addresses to many available DDNS service providers. This option can
be useful when WAN IP addresses are dynamic.
Figure 32: Dynamic DNS General Settings Page
20
Page 25
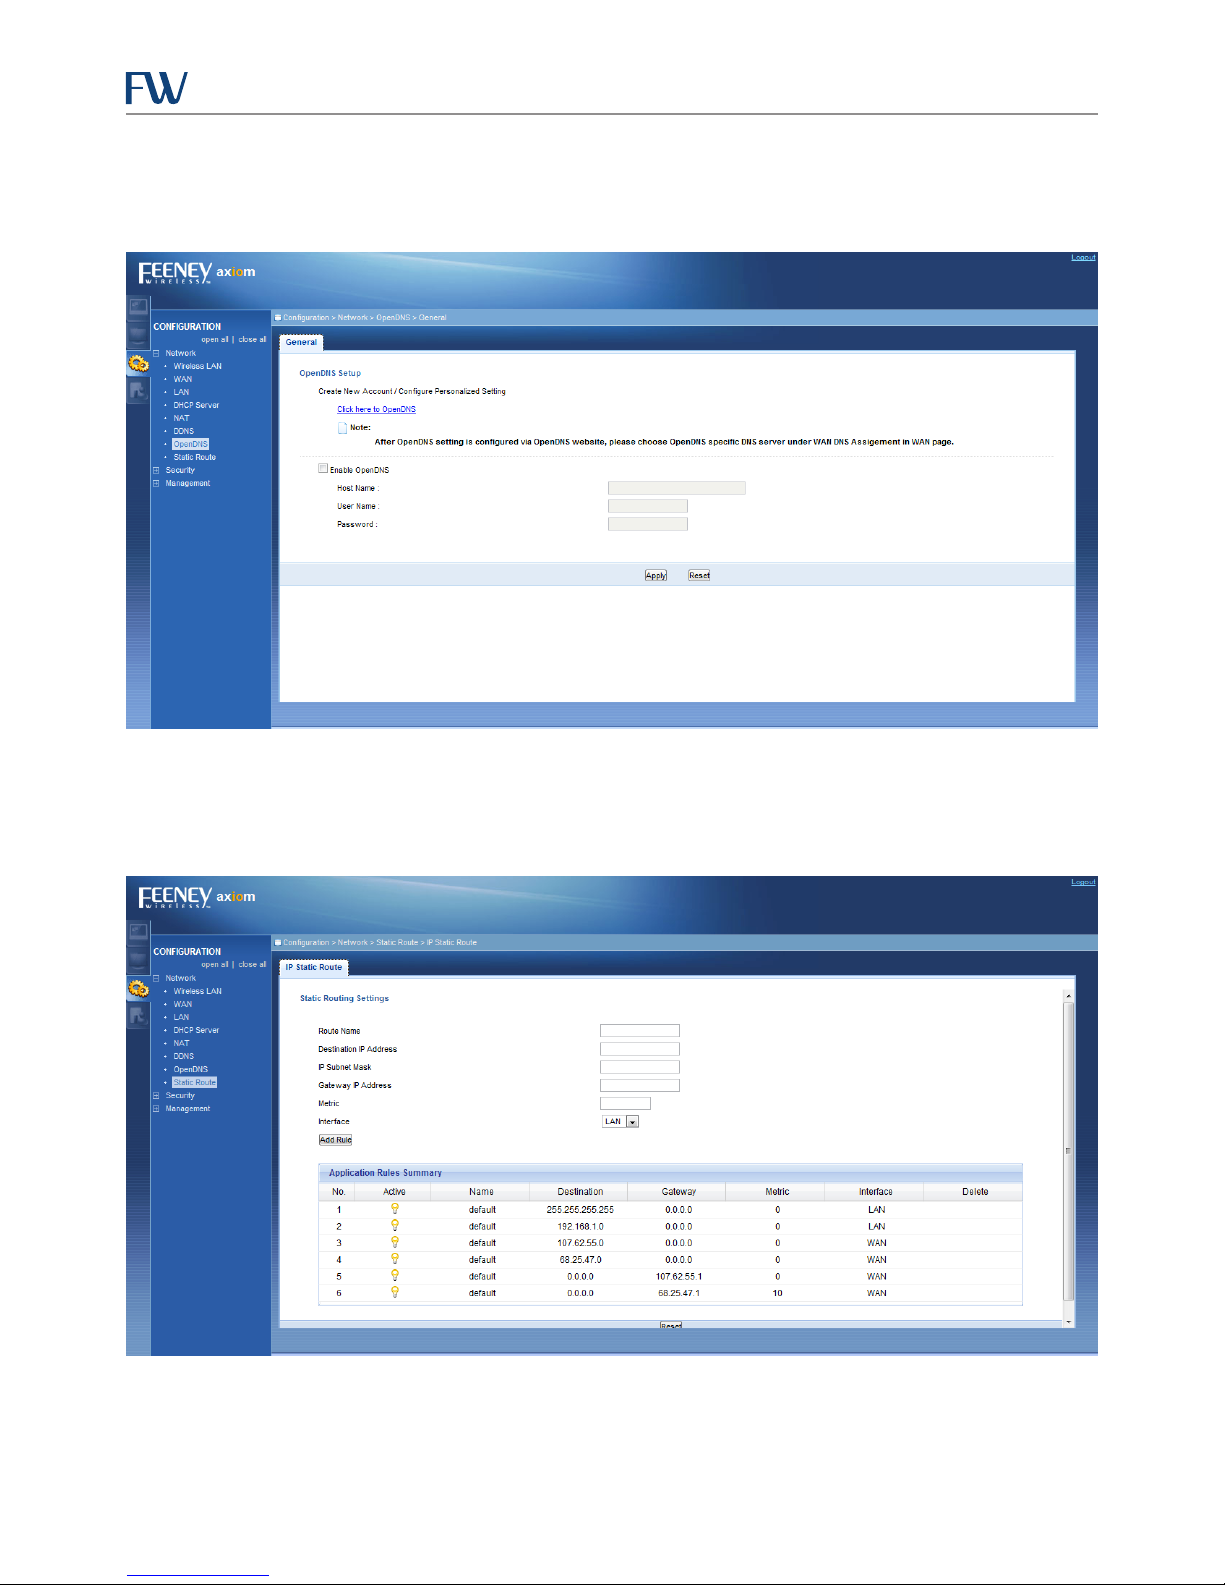
Open DNS General Settings Page
This option allows for Open DNS conguration.
CIRA X2 User Manual
Figure 33: Open DNS General Settings Page
Static Route Conguration Page
This option shows a routing table and allows for manually conguring and managing static routes.
Figure 34: Static Route Conguration Page
21
Page 26
CIRA X2 User Manual
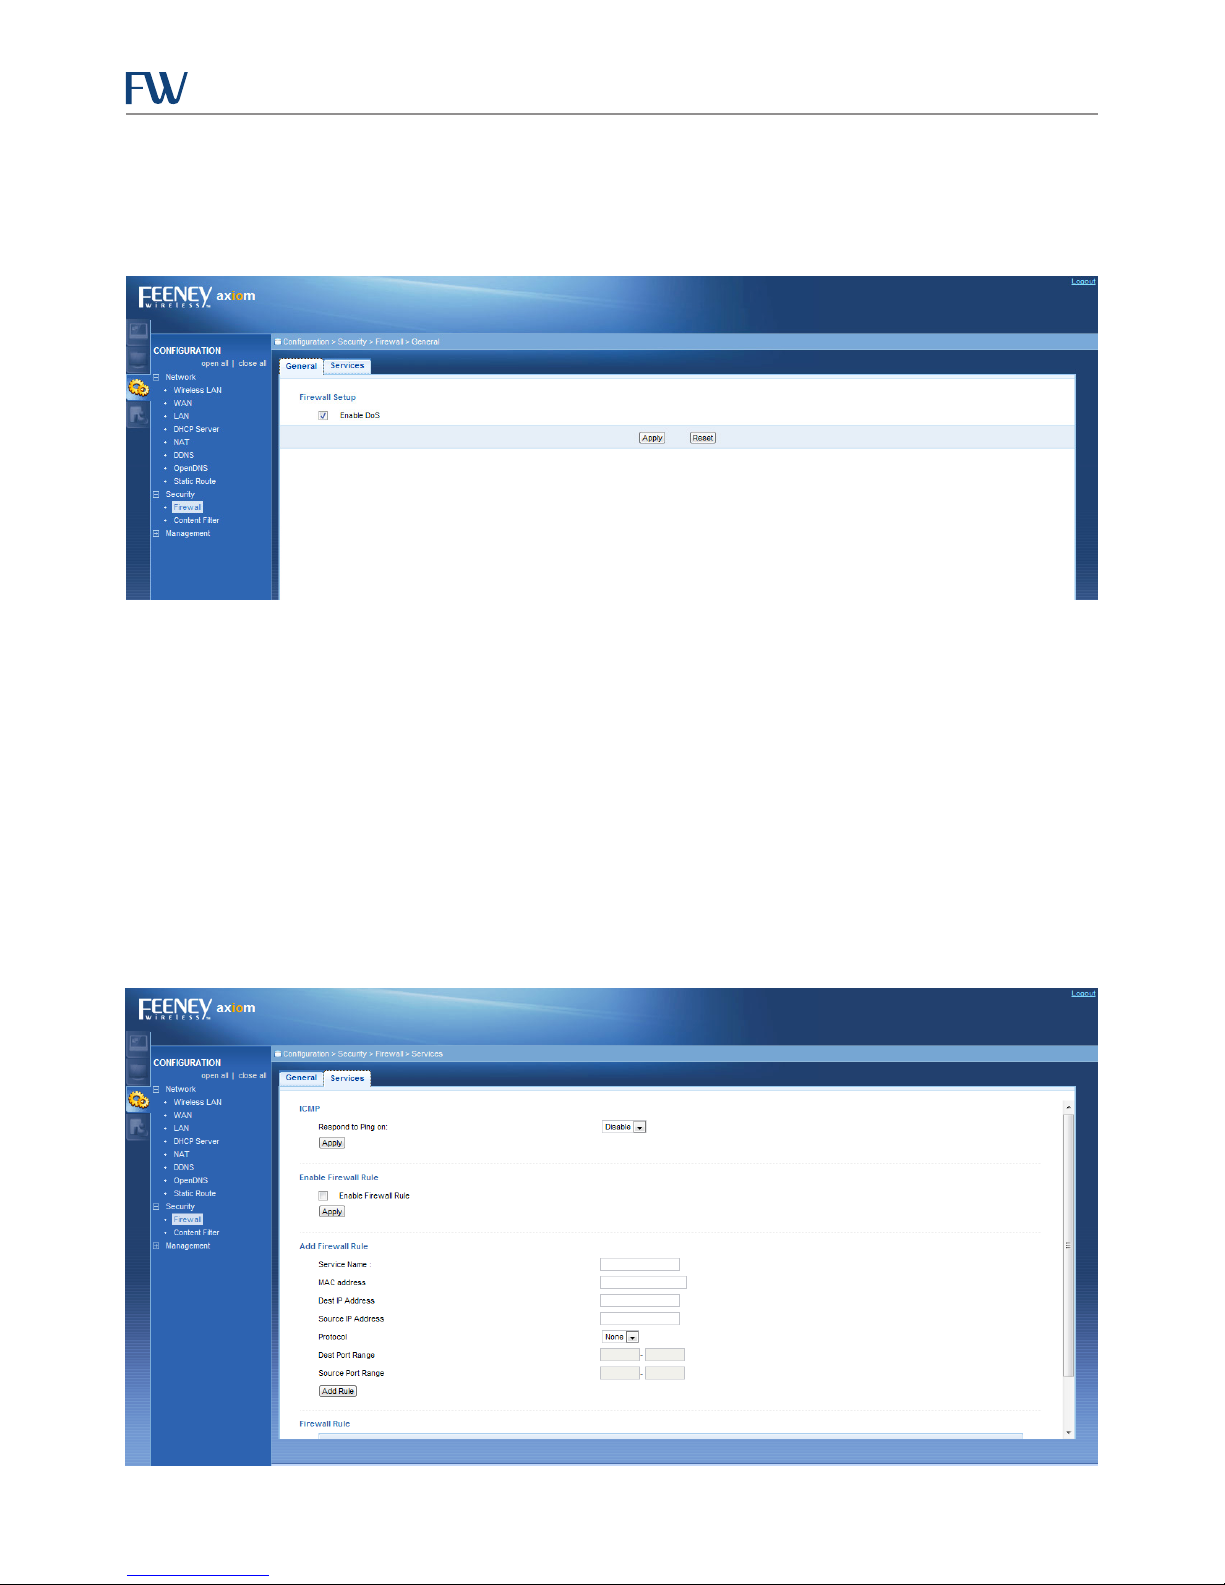
Firewall General Settings Page
This option allows for Enabling or Disabling Denial of Service (DoS) protection. By default, this option is set to
enabled.
Figure 35: Firewall General Settings Page
Firewall Services Conguration Page
This option provides the user the ability to create rules to block client services. By default, all incoming trac is
blocked with the exception of the HTTP web interface for the access point. The option also allows the user to choose
to reply to pings on the CIRA X2 WAN interfaces by toggling the Respond to Ping On settings box.
NOTE: Creating port forwarding rules under NAT application automatically creates a rewall rule to allow trac on
that port.
NOTE: Many cellular carriers block pings by default so on some carriers enabling this setting will not circumvent this
restriction.
Figure 36: Firewall Services Conguration Page
22
Page 27
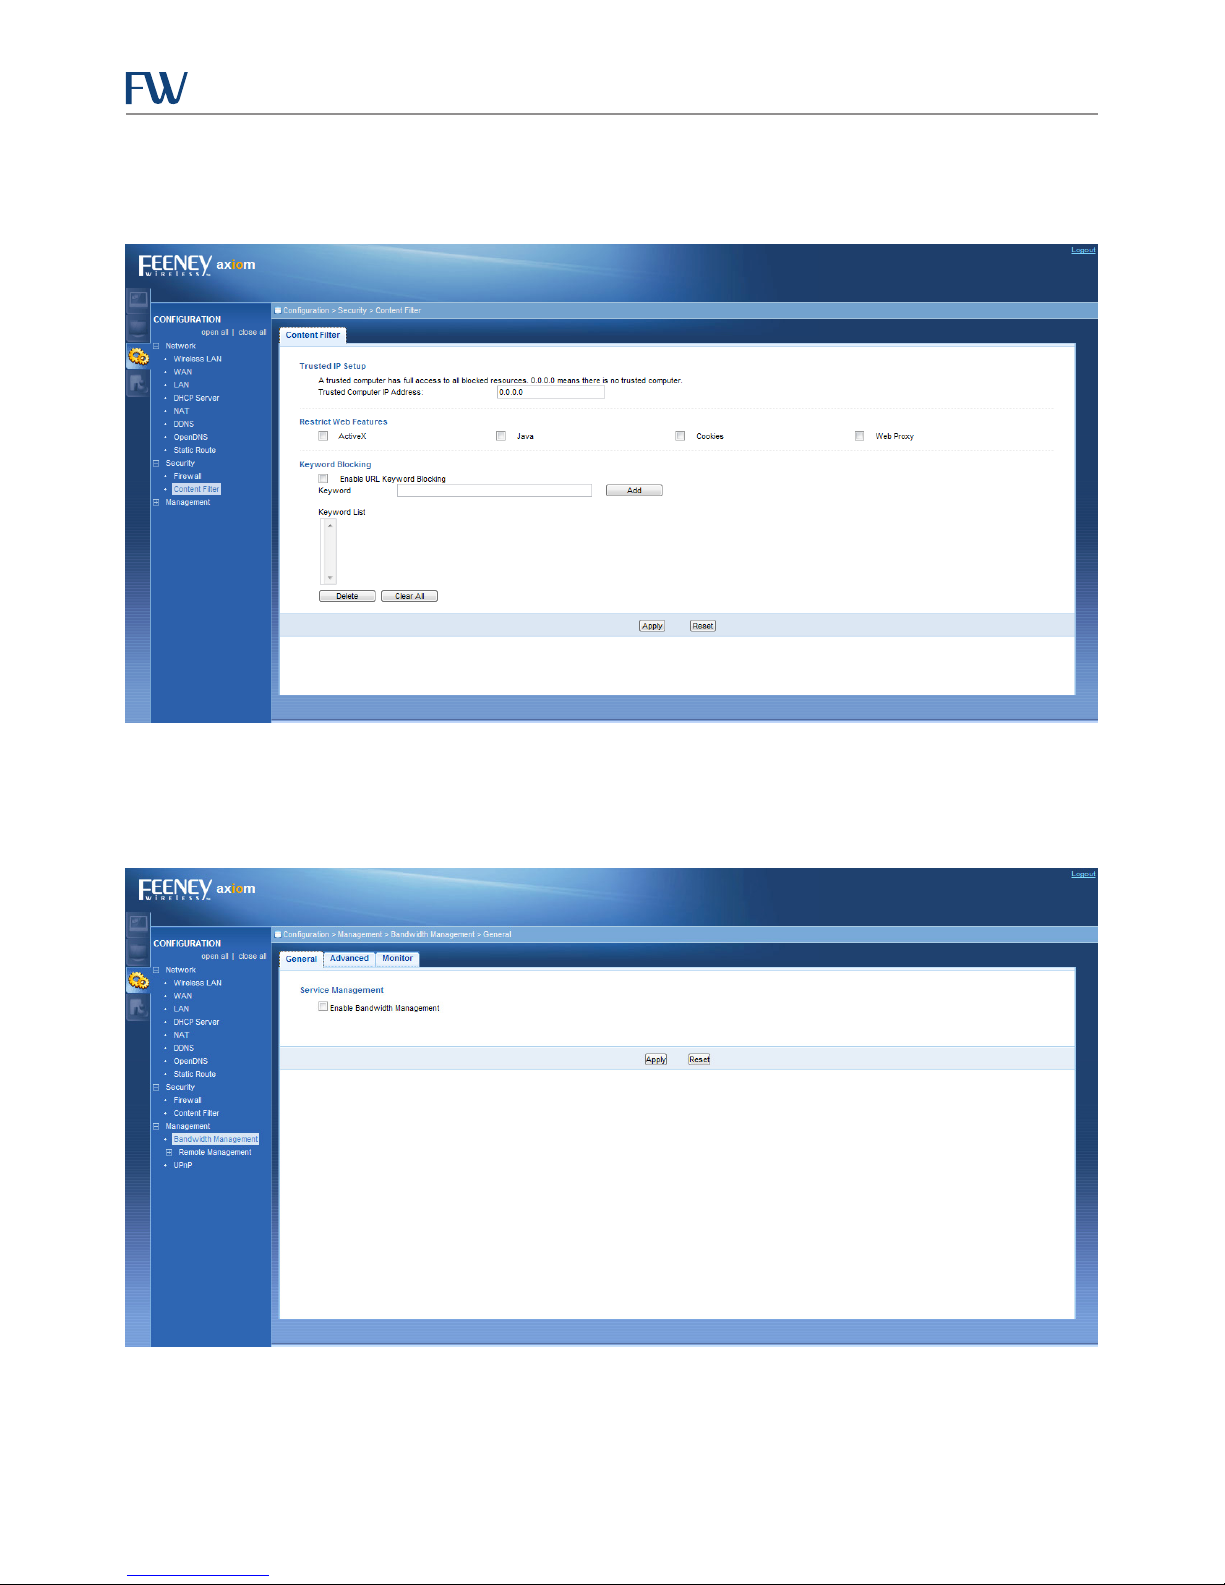
Content Filter Conguration Page
This option allows specically dened websites to be blocked.
CIRA X2 User Manual
Figure 37: Content Filter Conguration Page
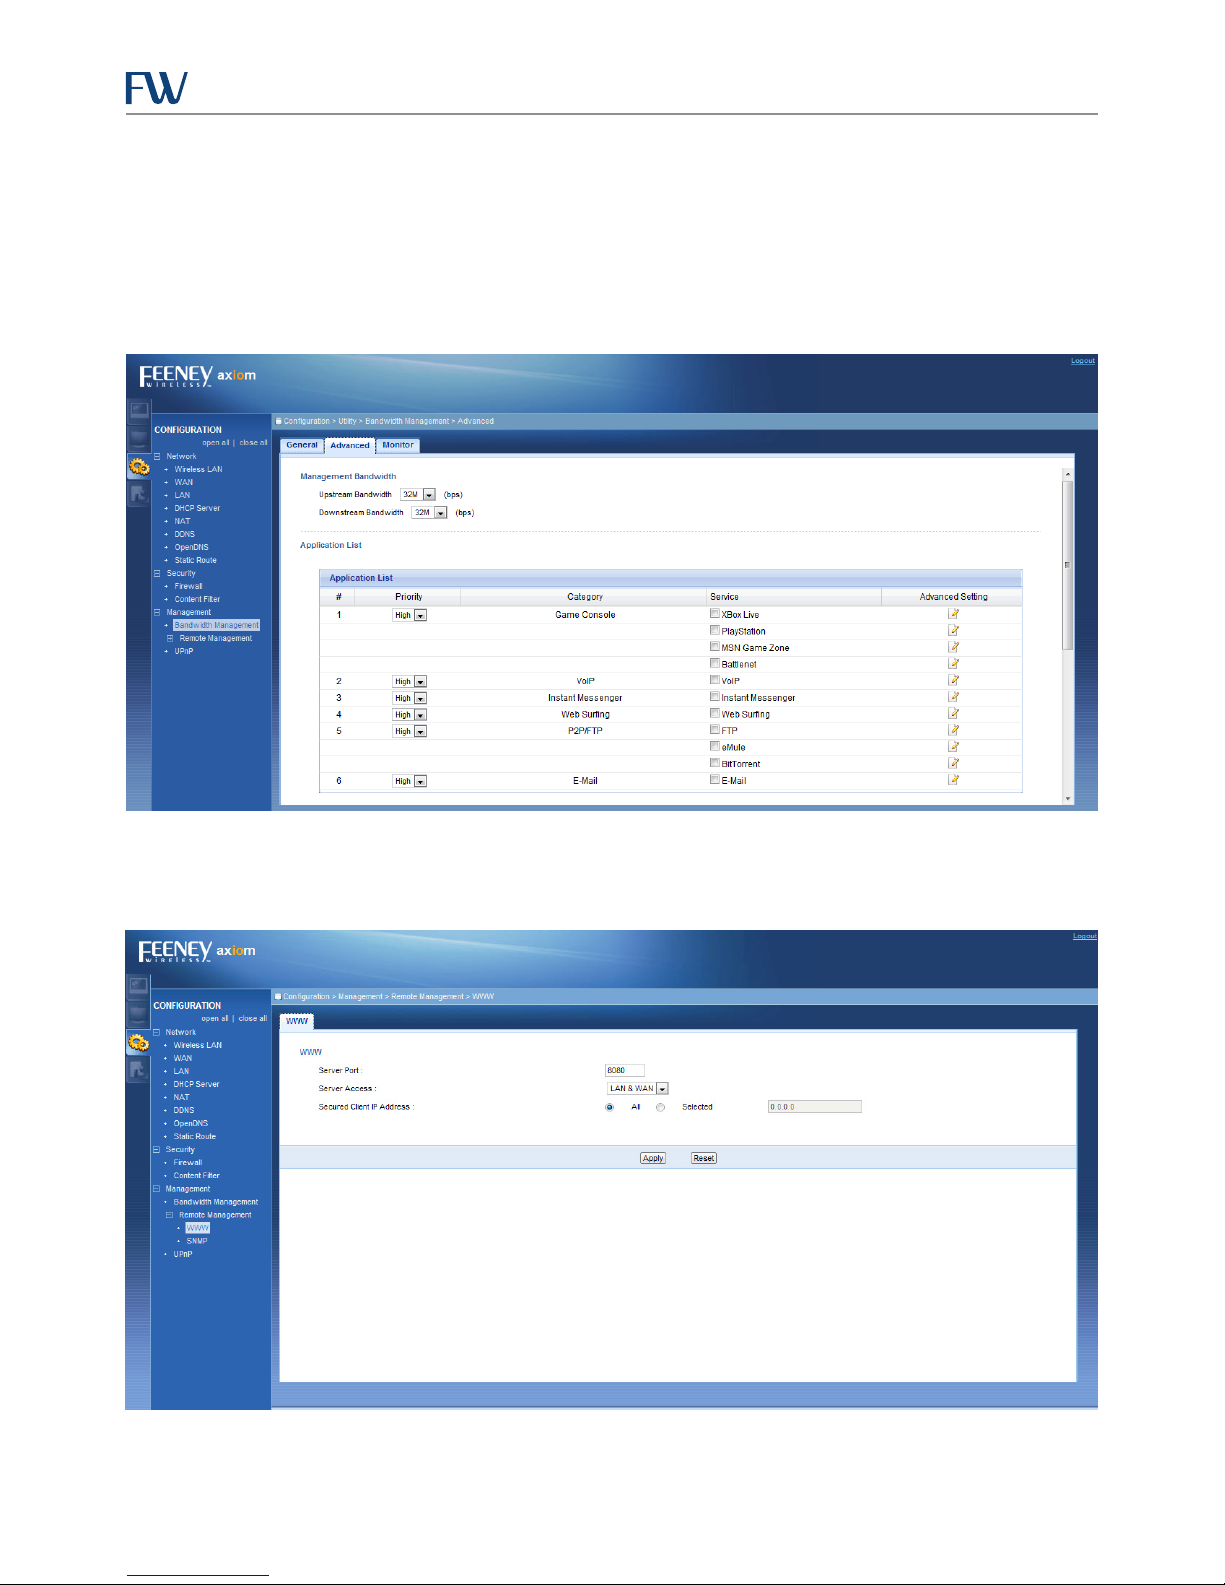
Bandwidth Management Conguration Page
This option allows the user to either Enable or Disable Bandwidth Management.
Figure 38: Bandwidth Management Conguration Page
23
Page 28
CIRA X2 User Manual
Bandwidth Management Advanced Conguration Page
This option allows the user to create bandwidth management rules. In order to create bandwidth management rules,
perform the following steps:
1. Select both an Upstream Bandwidth and Downstream Bandwidth from the drop down menus.
2. Set the Priority and check the boxes for the Service to which you wish to apply bandwidth management rules.
3. You may select the Advanced Settings or manually congure rules for each category as desired as well.
Figure 39: Bandwidth Management Advanced Conguration Page
Remote Management WWW Conguration Page
This page allows for the conguration of WWW remote management.
Figure 40: Remote Management WWW Conguration Page
24
Page 29
CIRA X2 User Manual
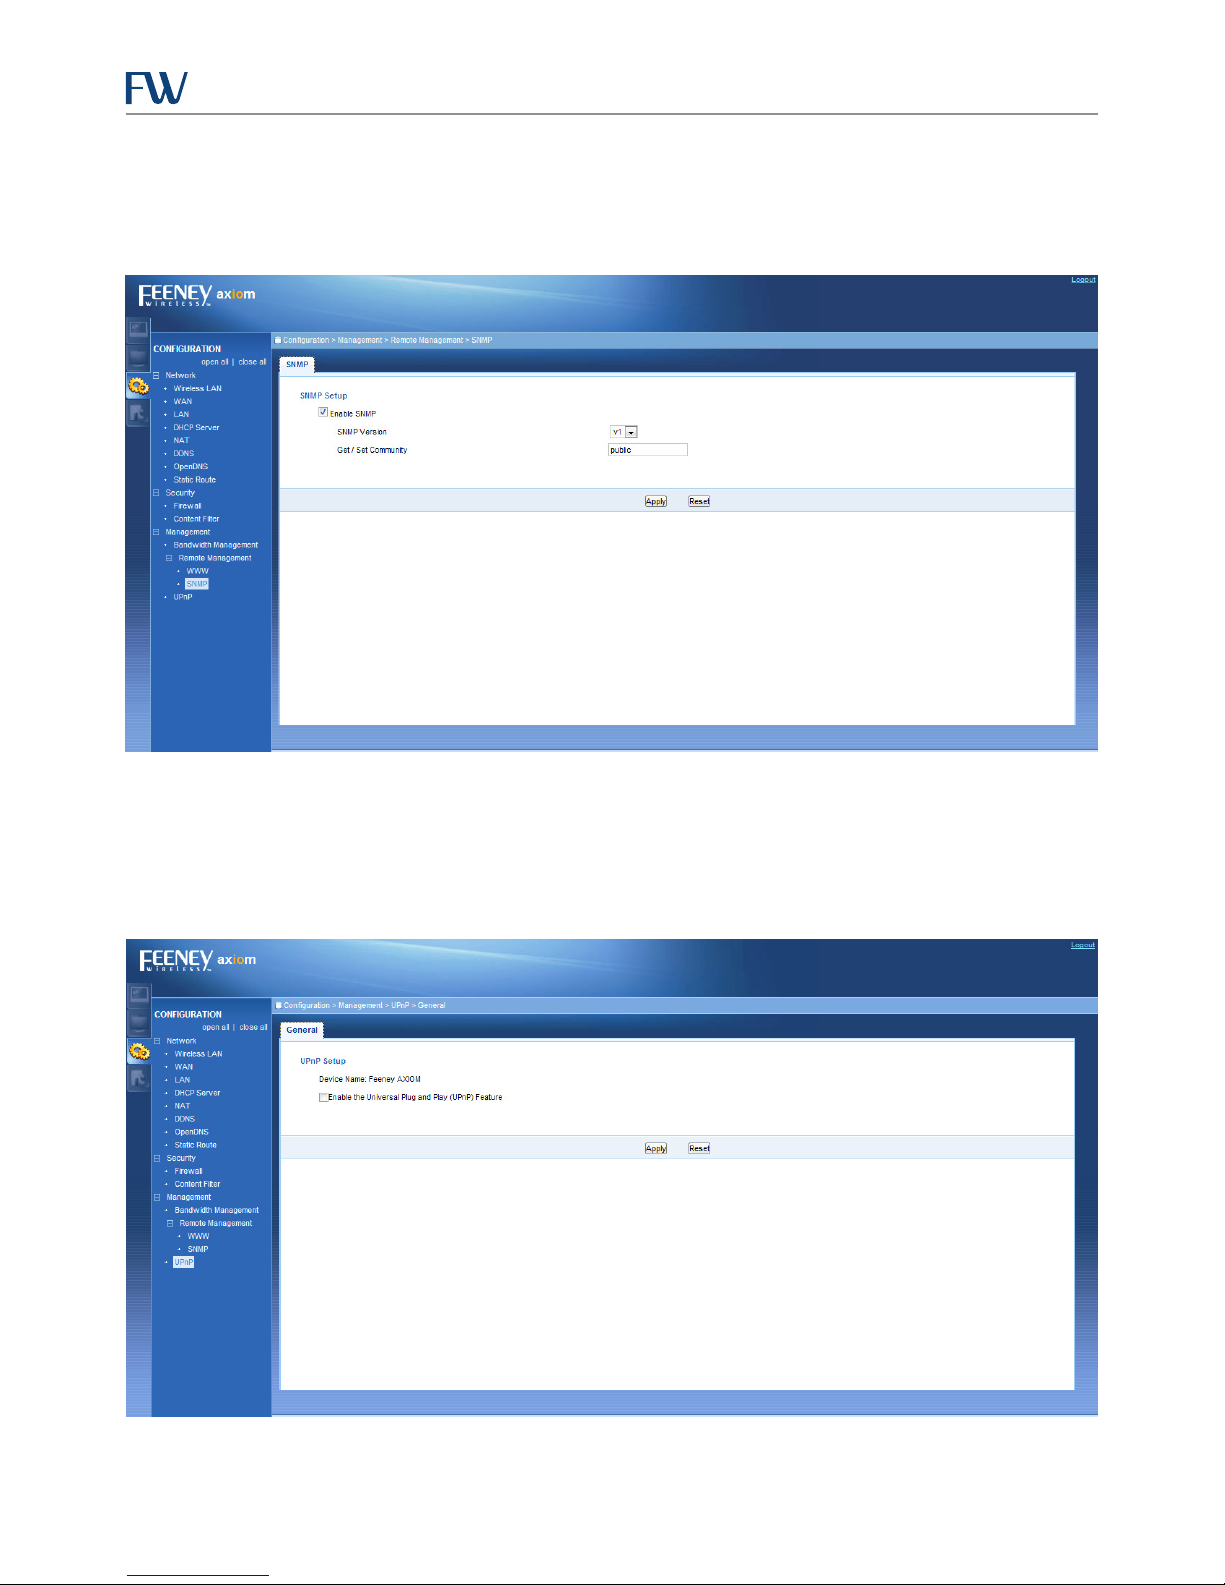
Remote Management SNMP Conguration Page
This page allows for SNMP to be enabled. By default it is disabled. To utilize, dene the community string for reading
of monitoring parameters via SNMP, then click Apply.
Figure 41: Remote Management SNMP Conguration Page
Universal Plug and Play (UPnP) Service Conguration Page
This page allows for UPnP to be enabled. By default it is disabled. UPnP automates the creation of rewall rules,
but the feature is not recommended for most customer application scenarios. Please contact your Feeney Wireless
Support Representative to determine if this feature is appropriate for your application.
Figure 42: UPnP Service Conguration Page
25
Page 30
CIRA X2 User Manual
Maintenance Options for Your CIRA X2 Access Point
The access point provides the ability for routine maintenance which is available by clicking the Maintenance icon
located at the bottom of the listings on the far left of the page.
Maintenance Icon
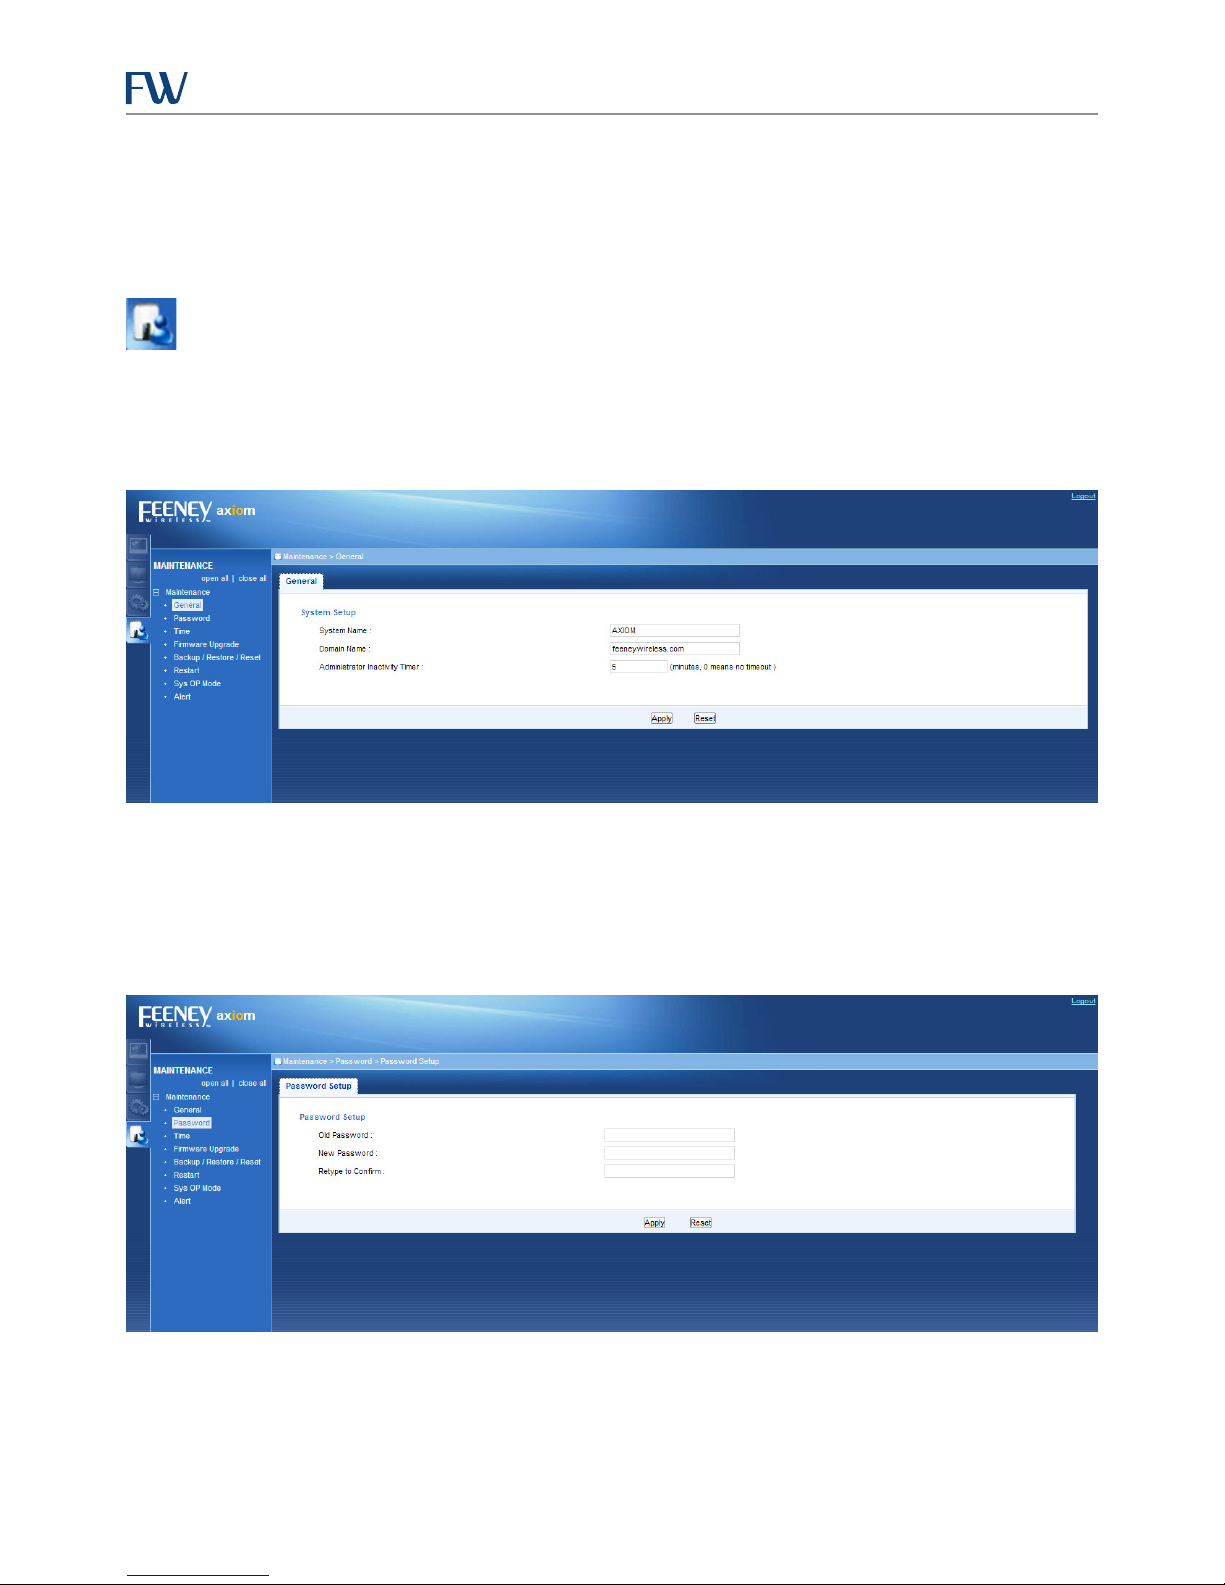
Maintenance General Settings Page
This page allows the user to set the System Name and the Domain Name. The page also provides the opportunity
to congure the web interface timeout via the Administrator Inactivity Timer, which by default, is set to 5 minutes.
Figure 43: Maintenance General Settings Page
Password Settings Page
This page allows the user to set the system password. To do so, you need to enter the existing, or Old Password, then
enter the New Password, and Retype to Conrm. Once all passwords have been entered, click Apply to save the
settings.
Figure 44: Maintenance Password Settings Page
26
Page 31
CIRA X2 User Manual
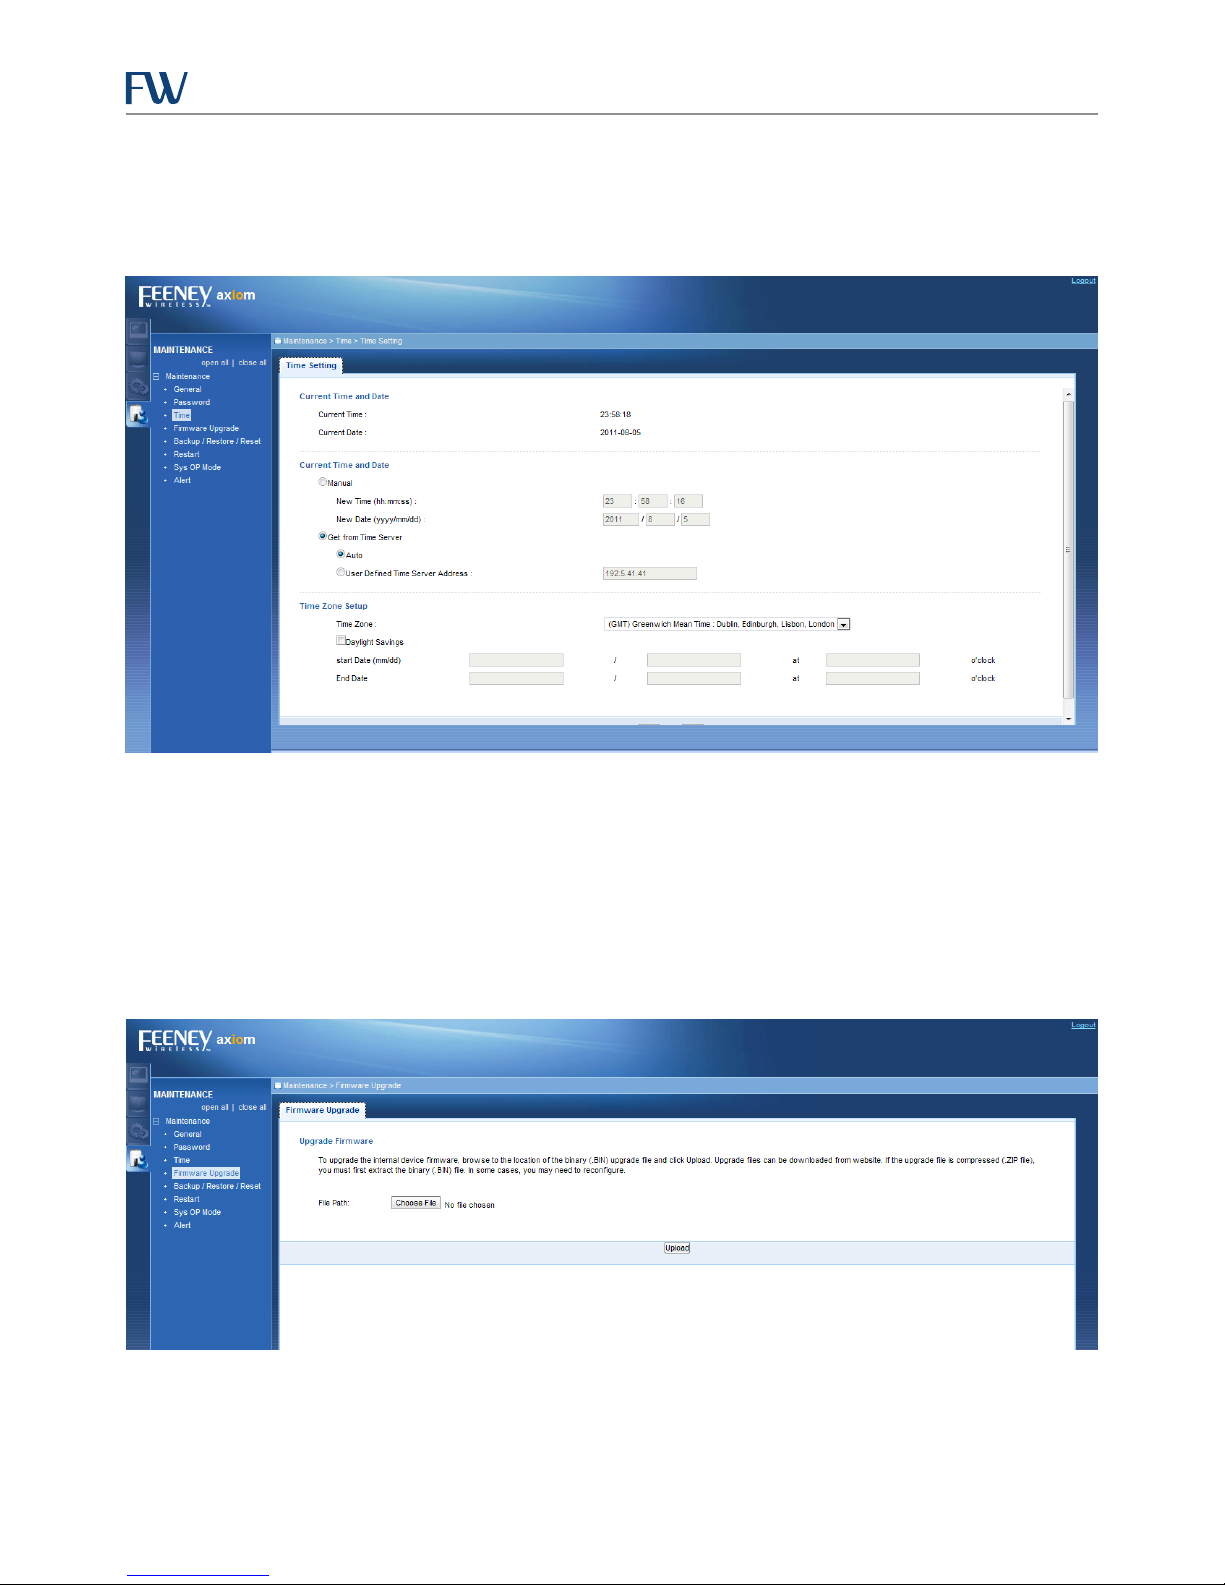
Time Conguration Page
This page provides the option to congure Network Time Protocol (NTP) to automatically set system time when a
WAN connection is available. By default, this option is enabled with the time set to GMT.
Figure 45: Time Conguration Page
Firmware Upgrade Conguration Page
This page provides the ability to upgrade the rmware of the access point via the web interface. Please contact
your Feeney Wireless Support Representative if you are unsure of whether or not you are operating with the latest
rmware.
NOTE: Feeney Wireless recommends that you update your rmware with a computer connected via Ethernet or Wi-Fi
whenever possible.
Figure 46: Firmware Upgrade Conguration Page
27
Page 32
CIRA X2 User Manual
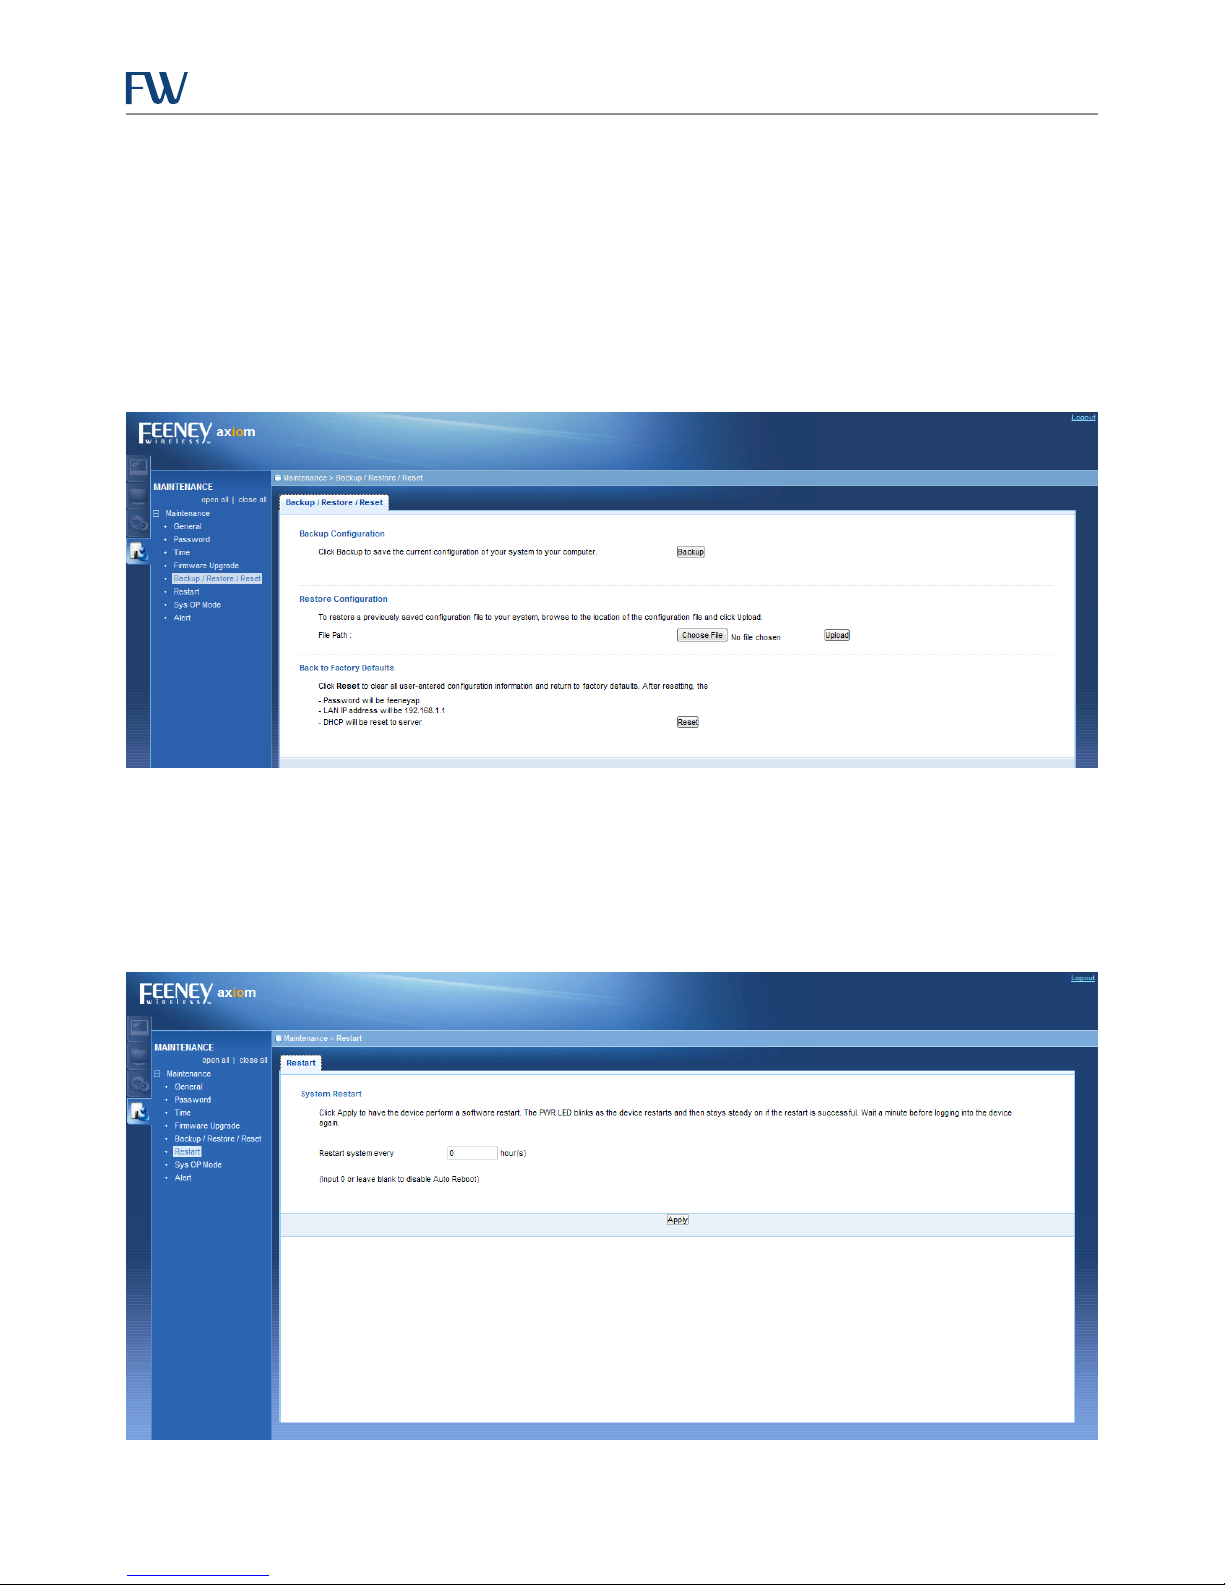
System Conguration Backup/Restore/Reset Page
This page provides the ability to backup and restore system settings. Functionality for each is as follows:
• Backup Conguration – allows the user to backup all of the user settings to provide a restore point should
something occur to erase these settings.
• Restore Conguration – allows the user to locate and upload the stored user settings should a factory reset occur.
• Back to Factory Defaults – clears all user-entered conguration settings and restores the system to Feeney
Wireless defaults.
Figure 47: System Backup/Restore/Reset Page
System Restart Conguration Page
This option allows the user to set an access point reboot automatically after a certain number of hours have elapsed.
By default, this option is set to 0, which disables the option.
With the option set to ‘0’, clicking Apply will initiate a single reboot of the system.
Figure 48: System Restart Conguration Page
28
Page 33
CIRA X2 User Manual
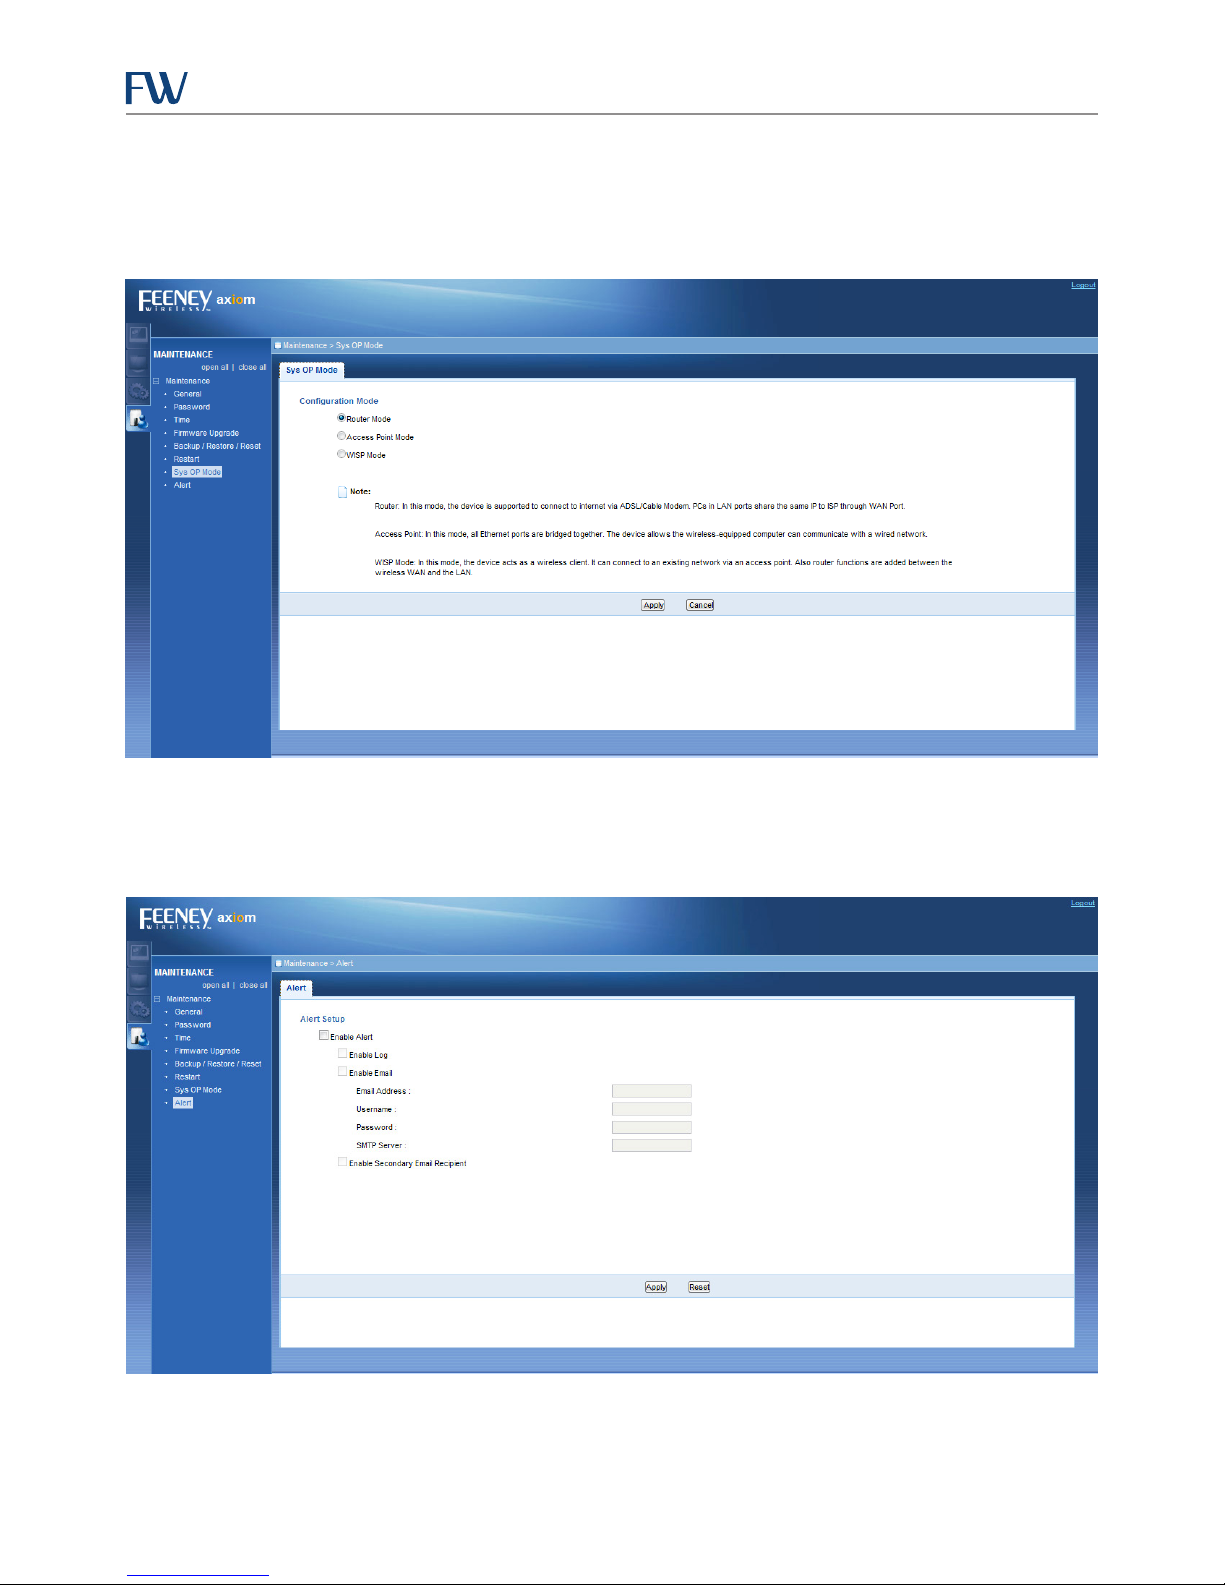
System Operation Mode Conguration Page
This option allows the user to congure the operation of the system. Please see the page for a description of the
settings.
Figure 49: System Operation Mode Conguration Page
System Alerts Conguration Page
This option allows for the conguration of system alerts.
Figure 50: System Alerts Conguration Page
29
Page 34
CIRA X2 User Manual
Using a Terminal Application with AT Commands
It is possible to access and congure your cellular modem using Microsoft HyperTerminal, PuTTY, or a similar terminal
emulator application. The following are directions for use with Microsofts Hyperterminal. Please contact your Feeney
Wireless Support Representative for instructions on using other terminal emulator applications.
Establish Your Connection
1. Choose a name and icon for your connection:
a. Choose a name for your connection, such as CIRA X2. The name and icon are only for your own reference so
that the connection can be found easily at a later date.
b. Select OK.
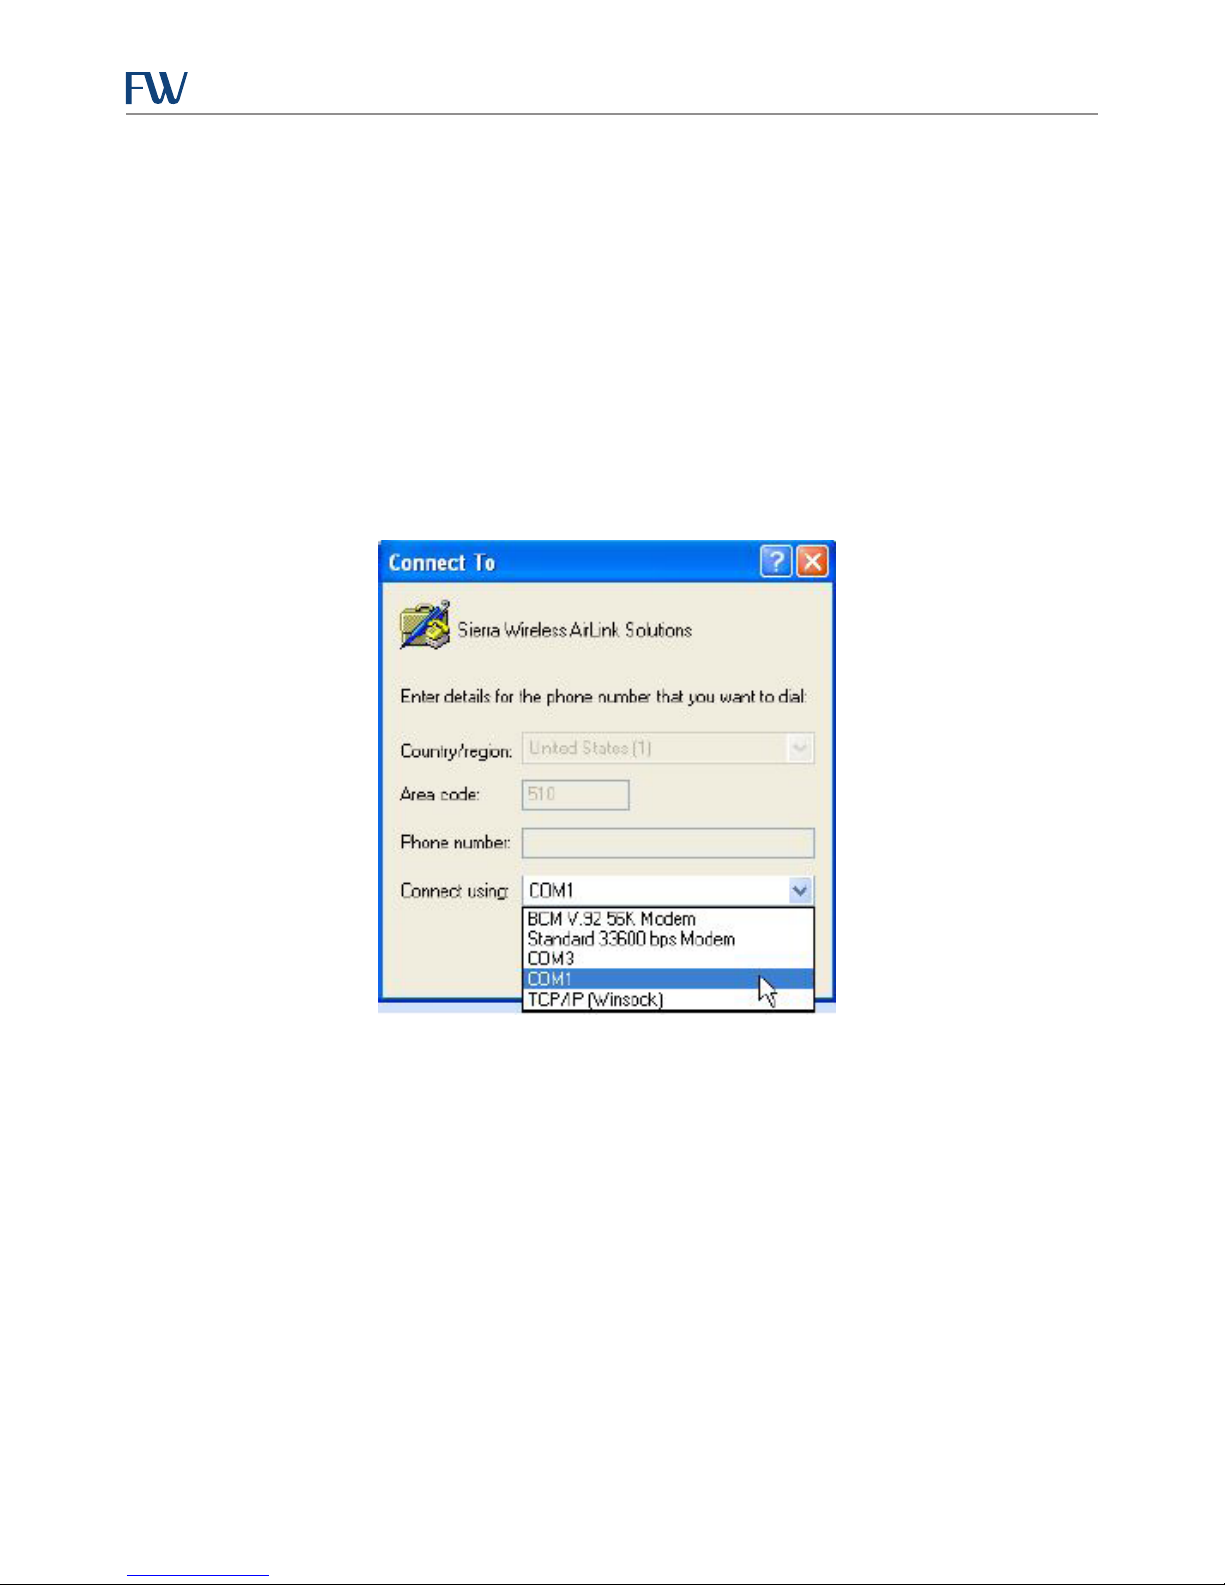
2. At the Connect to window, using serial:
a. Select the COM port to which the device is connected, for the “Connect using” option.
Figure 51: Connect To Window
b. Change or verify the settings when the COM Properties window appears:
• Bits per Second: 115200 (default)
• Data Bits: 8
• Parity: None
• Stop Bits: 1
• Flow Control: Hardware (or None)
• NOTE: If you have congured your CIRA X2 via the ALEOS Conguration Guide for settings dierent than
the defaults for Bits per Second, Data Bits, Parity, and/or Stop Bits, you must use your changed settings.
• Select OK
30
Page 35

CIRA X2 User Manual
Figure 52: Port Settings
AT Commands
For a full listing of supported AT Commands, please reference the ALEOS User Guide available at:
http://www.sierrawireless.com. When using a terminal application, you will need to manually type in each command.
• For most commands, when you are entering them using a terminal connection, you will need to preface the
command with AT (exceptions are noted), i.e., ATA which is listed as A.
• Some commands have specic parameters while other commands will take whatever you type.
• Required variable parameters are denoted with italicized text, example, Dn. The n is variable.
• Acceptable parameters and/or specic formats are listed with each command
• Most commands with parameters can be entered with ? to read the current value. For example AT&D? will
respond with “2” if the default has not been changed.
• Optional parameters are denoted with square brackets [].
• AT Commands are not case sensitive.
• When you are using a terminal connection, if you enter a command which is recognized by the CIRA X2, it will
respond with “OK”. If the command is not recognized, the response will be “ERROR”.
• Any commands applicable only to certain model numbers of the CIRA X2 will be noted.
NOTE: Symbols listed with commands, such as *, /, &, or ?, are part of the command and must be included.
Commands with symbols other than * may require PassThru mode.
USB Port Connection
As mentioned in the CIRA X2 Quick Start Guide, the device can be congured to support redundant 3G. For
conrmation of supported devices, please contact your Feeney Wireless Support Representative. For information on
conguring your device to operate with a USB Mobile Cellular connection, please see the section entitled ‘Mobile
WAN Conguration Page’ on page 14.
31
Page 36
CIRA X2 User Manual
Contacting Feeney Wireless
For help with installing, operating, maintaining, and troubleshooting this product, refer to this document and any
other documentation provided.
If you still have questions, contact us during business hours:
Monday through Friday, excluding holidays, between 8 a.m. and 5 p.m. Pacic Time.
Support E-mail [email protected]
Telephone (800) 683-4818
Website www.feeneywireless.com
Mailing Address P.O. Box 2549, Eugene, OR 97402
When contacting technical support, please have the following information on-hand:
1. Serial Number
2. Date that you received your device
3. Brief description of the problem
Online Library
For other documentation, see our online document library at:
http://feeneywireless.com/documents
Return and Warranty
Feeney Wireless oers a standard one-year warranty on all hardware. For returns or warranty information, call our 800
number.
Further Specications
For more specications please see the CIRA X2 Quick Start Guide.
32
Page 37

CIRA X2 User Manual
FCC Compliance
This equipment has been tested and found to comply with the limits for a Class B digital device, pursuant to part 15
of the FCC rules. These limits are designed to provide reasonable protection against harmful interference when the
equipment is operated in a residential environment. This equipment generates, uses, and can radiate radio frequency
energy and, if not installed and used in accordance with the instruction manual, may cause harmful interference to
radio communication. Feeney Wireless does not guarantee that interference will not occur in a particular installation.
Operation is subject to the following conditions:
a. This device may not cause harmful interference.
b. This device must accept any interference received, including interference that may cause undesired operation.
Changes or modications not expressly approved by the party responsible for compliance could void the user’s
authority to operate the equipment.
If this equipment does cause harmful interference to radio or television reception, which can be determined by
tuning the equipment o and on, the user is encouraged to try and correct the interference by one or more of the
following measures:
a. Reorient or relocate the receiving antenna.
b. Increase the distance between the equipment and the receiver.
c. Connect the equipment to outlet on a circuit dierent from that to which the receiver is connected.
d. Consult the dealer or an experienced radio/TV technician for help.
Exposure to RF radiation - To comply with FCC RF exposure compliance requirements, for mobile congurations, a
separation distance of at least 20cm must be maintained between the antenna of this device and all persons. Do not
collocate or operate this device in conjunction with any other antenna or transmitter.
Contains TX module FCC ID: N7N-MC7750
Contains TX Module IC: 2417C-MC7750
Document number 25-52-001-03 Rev E1
33
 Loading...