

- 1 -
Assembly and
Operating Instructions
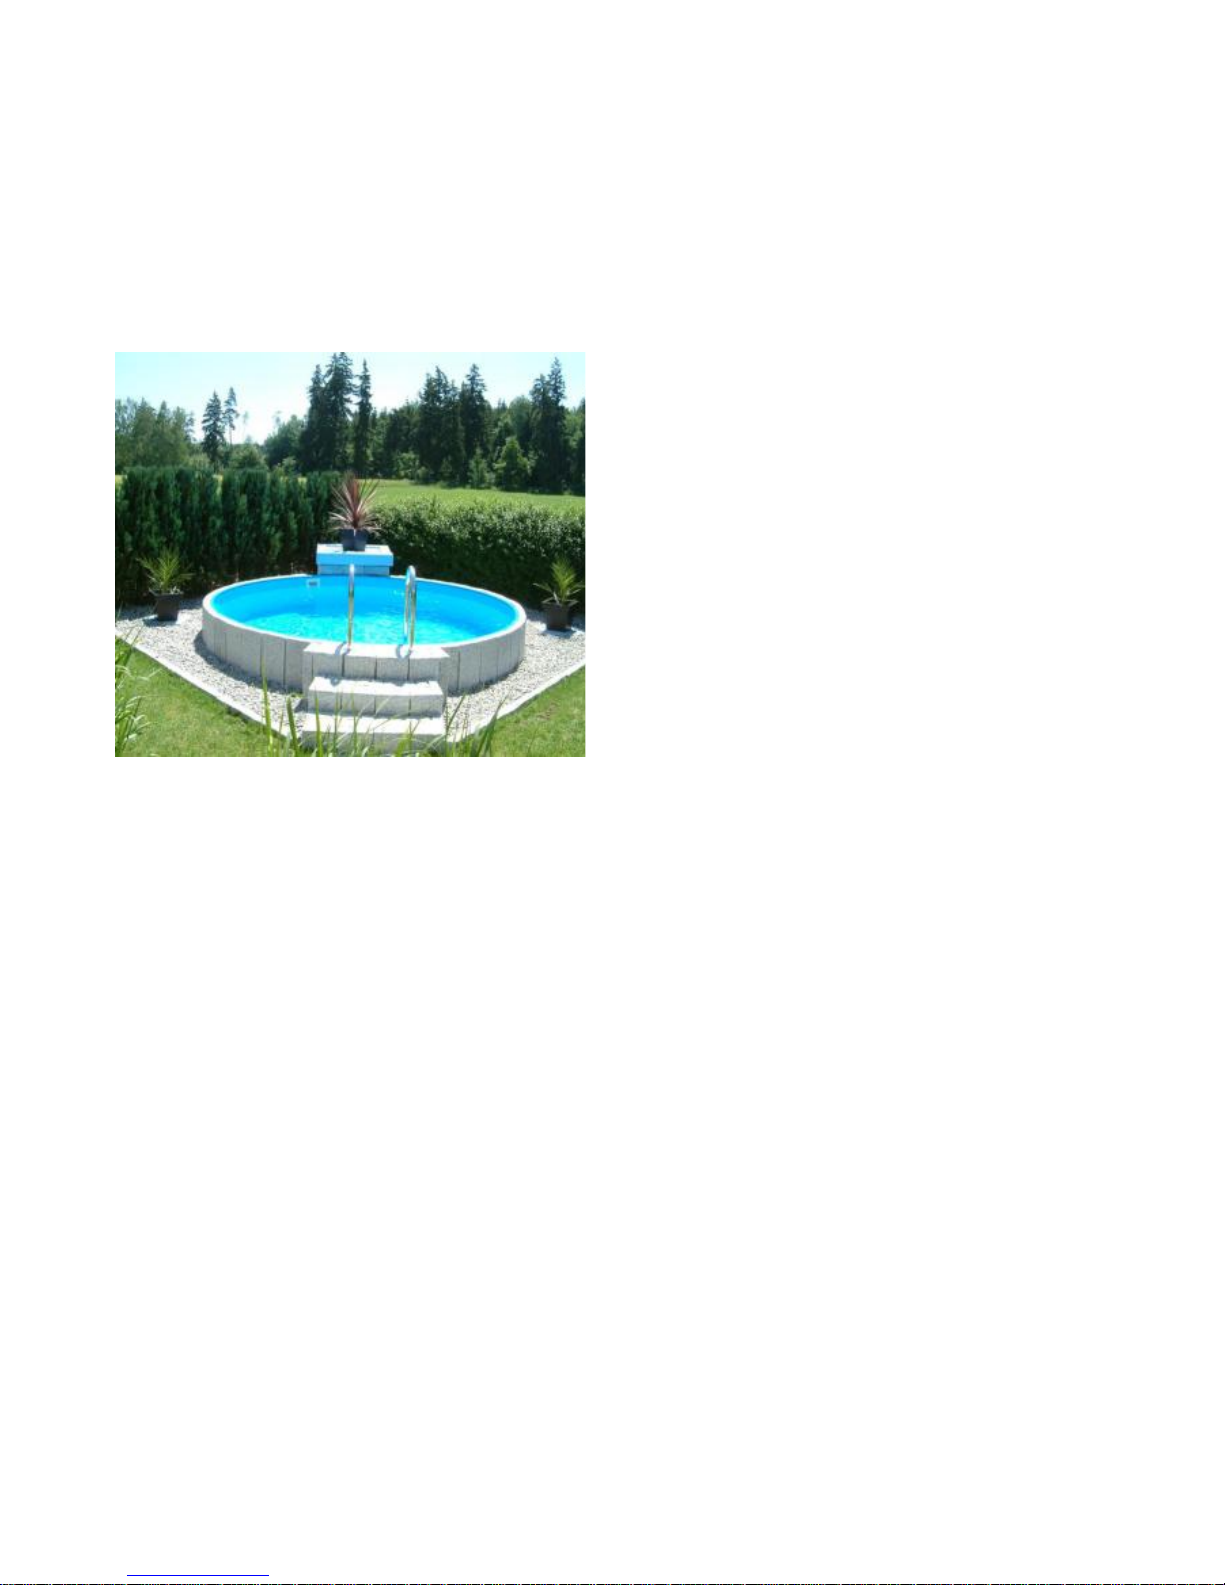
Round Pool
FUN
Important notes:
Please first read all parts of these instructions very carefully
and follow the advice given.
Before beginning with installation, check the swimming pool
components and make sure that nothing is missing. Also
ensure that all components are in perfect condition. We cannot accept any liability for transport damage on parts which
have already been assembled or installed.
We reserve the right to make alterations which reflect technical progress.
If you fit your swimming pool with electrical equipment (e.g.
filter system, underwater spotlights, counter-current unit
etc.), all electrical work involved must be carried out by a
recognised specialist company in accordance with relevant
DIN and VDE regulations (e.g. DIN VDE 0100 Section
702).
Before beginning installation, you must observe
the following points:
Preparing the foundations:
The ground location for the swimming pool must be firm and
completely level; any sloping areas must therefore be dug
out.
The ground under the swimming pool must consist of naturally compacted soil and not simply filled in.
Filled-in soil must be compacted so that the pool does not
sink into it.
The soil must be freed from any pieces of wood or other
debris which could damage the PVC liner. Unevenness can
be covered using a layer of fine-sand.
In the case of an asphalt or concrete base the PVC liner must
be protected from direct contact with the ground. We recommend the use of our PE protective ground tarpaulins for
this, or insulating and protective matting.
Please be sure that the PVC liner only comes into contact
with materials which are compatible with PVC. We
therefore always recommend Future Pool PE protective
ground tarpaulins or insulating and protective matting as
underlay.
Temperature
The PVC liner of your swimming pool is made of thermoplastic material. You should therefore make sure that you
assemble your pool under external temperature conditions of
approx. + 15° C to +25° C. And you should also not hang the
liner in the pool in strong sunlight; on warm and sunny days
you should wait until evening before hanging the liner.
Above-ground or in-ground?
Erecting the pool in sloping locations
The location surface for the swimming pool must not be
made up of filled-in soil. The area which is prepared for the
pool must be a location with natural, well-compacted soil.
The uphill side of the pool must either be flanked by a shallow slope or a wall. On no account must the pool wall shore
up the slope!
Please make sure that in forming a shallow slope the pool
cannot be undermined by rainwater. Drainage must be installed if you meet any groundwater.
Pool installation
Swimming pools from Future Pool can at any time be
installed in the ground as in-ground pools if you comply with
the following rules. If in doubt you should consult a building
expert, as we accept no liability for in-ground installations.
Partial or complete in-ground installation:
When planning an in-ground swimming pool, make sure that
you do not encroach into the groundwater zone when excavating. Assembly of the pool is carried out in the same way
as for an above-ground model. The dimensions of the pit to
be excavated must be at least 20 cm larger than the pool
itself. Pools which are either partially or completely installed
in the ground must be backfilled with lean concrete.
Caution:
Pools with a depth of 1.50 m cannot be erected as completely
free-standing, but absolutely must be installed to a depth of
at least 50 cm in the ground. The section located in the
ground must be surrounded by a backfill of lean concrete.
- 2 -
Greater depth of water
With all swimming pools you can achieve a greater depth of
water by excavating the soil in the shape of a cone towards
the middle of the pool. The liner foil expands to the extent
that it has no problem in adapting to the greater depth. An
approximate guide to the permissible additional depth is set
out in the table below.
Pool diameter in cm
320
350
400
420
500
550
600
700
800
900
1000
Additional depth in the centre of the pool in cm: approx.
7 7 10
10
12
12
12
15
15
15
20
Pool assembly
Pool assembly should be carried out by 2 persons. We recommend that you wear gloves when erecting the steel wall.
Marking out the pool ground plan
After you have prepared the foundations for your swimming
pool, mark the outline of the pool on the ground. You can
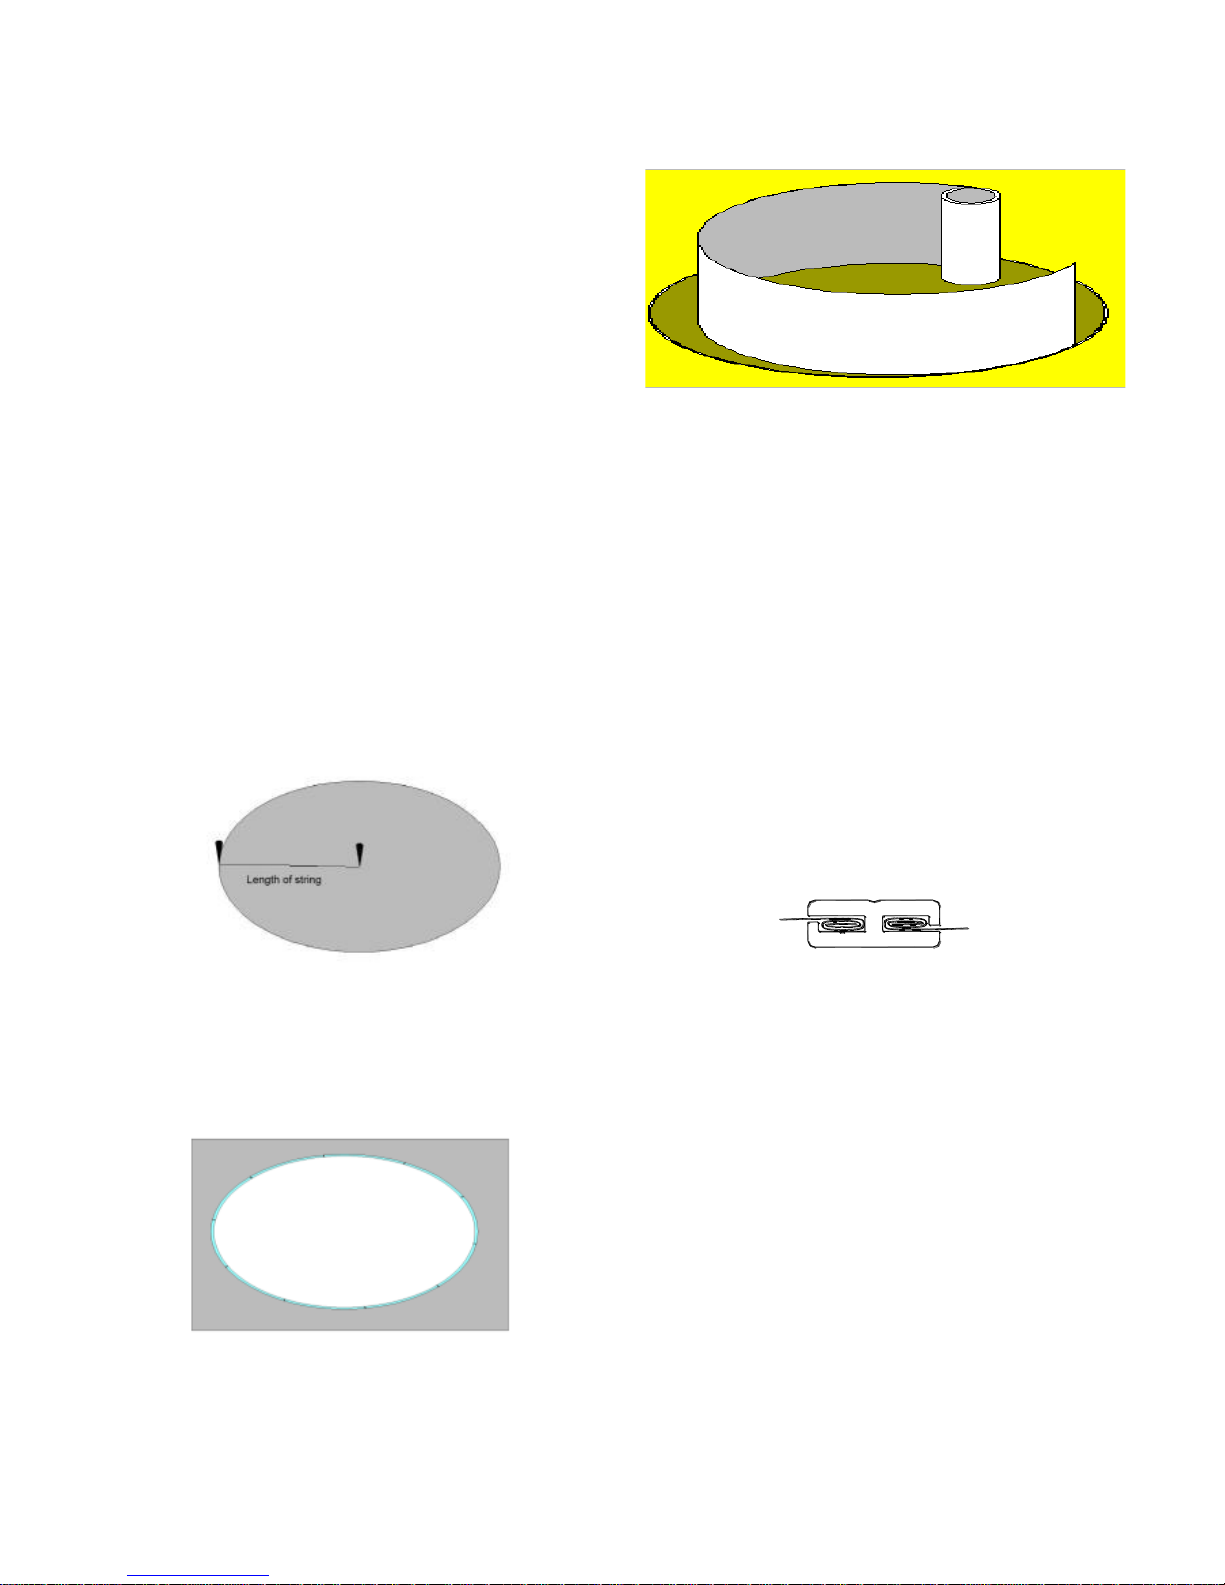
best mark out the circle using a piece of string fixed to a post
at the centre of the pool area. The string should be approx.
10 cm longer than the pool radius. Clearly mark out the circle outline or trace it out with sand.
Floor drain: If you plan to install a floor drain in your pool,
you should now also dig a trench to the pool’s deepest point.
Allow for a slight slope in the piping and prefit pipes to the
floor drain. Fill in the trench again with soil or concrete.
Laying out the wall tracks:
Plug together the individual hard-PVC wall tracks (width
approx. 22 mm) in each case with two connecting pins and
lay these out in the shape of a circle.
Caution: The wall tracks must not sink into the ground! It
may be necessary to lay down concrete slabs as supports.
Uncoiling the steel wall
Together with your helpers, place the steel wall on strong
planks in the middle of the circle of wall tracks. Uncoil the
steel wall and locate it in the wall tracks.
Make sure that the white-coated side is on the outside and
that the pre-punched holes for the skimmer and the inlet
nozzle are at the top.
Caution: The pre-punched skimmer hole is located approx.
200 cm away from the outer wall end. Make sure when locating the steel wall in the wall tracks that the skimmer hole
is also located in the correct required place. In the case of
swimming pools with 2 steel walls the skimmer hole is located in Wall 1.
The location of the skimmer should be at the downwind end
of the pool relative to the direction of the prevailing wind, so
that air movement reinforces the effectiveness of the filter
system by driving surface dirt towards the skimmer.
Important tip: So that the steel wall can provisionally be
kept in a circular shape during assembly it is necessary to
locate several upper handrail sections on top of the steel
wall. Also always make sure that the steel wall is standing in
the wall tracks.
Connecting the ends of the steel wall using the
plug-in section
The clearance between the steel-wall ends should be approx.
5 mm. Depending on the overlap of the wall tracks, they
must be correspondingly shortened. Make sure that you lay
out a perfect circle with the wall tracks. Check the symmetry
of the circle.
The plug-in section is sitting correctly when the bevelled
side is on the inside and at the top. By gently rocking the
plug-in rail back and forth you can ease insertion into the
plug-in section. To further facilitate insertion of the plug-in
rail you can lubricate both ends of the steel wall with engineering Vaseline.
Preparing openings for connections
If built-in components are to be installed (skimmer, inlet
nozzle), you must break out the corresponding pre-punched
holes. Carefully remove burrs and treat with an anticorrosion agent.
Caution: Follow the instructions for built-in components!!!

- 3 -
Earthing the swimming pool
According to statutory regulations, swimming pools and all
large-area metallic parts must be connected to a potential
equaliser.
Caution: All electrical work must be carried out by a recognised specialist company in accordance with the relevant
DIN and VDE regulations (e.g. DIN VDE 0100 Part 702).
Laying out the protective matting or protective
ground tarpaulin (not supplied)
We recommend the use of a protective ground tarpaulin or
matting to protect the liner from direct contact with the
ground or with any materials which may be harmful to PVC.
Thoroughly clean the ground again and lay out the protective
matting, overlapping the individual sheets by approx. 5 – 10
cm. Cut the protective ground tarpaulin or matting 5 – 10 cm
larger than the pool outline and tape the resulting overlap
firmly to the steel wall. Pull the edges over the wall tracks.
To do this, use PVC-compatible adhesive tape (e.g. parcel
tape). Pull the protective ground tarpaulin or matting tight to
straighten out any creases.
Hanging the liner
Caution: Hang the liner at temperatures between +15 and
+25° C, but not in strong sunshine! If the temperature is too
high the foil becomes soft and elastic and too large. If the
temperature is too low the liner becomes hard, inelastic and
too small.
Clean the inside of the pool again. Now place the liner in the
middle of the pool and spread it out, so that the outer bonded
seams lie up against the steel wall. The liner has a shaped
hanging fringe bonded onto the main liner. Push the outer
edges of the liner with the shaped fringe over the upper edge
of the steel wall. Provisionally fix in place with several individual handrail sections.
Caution: Only walk on the PVC liner barefoot or wearing
suitable shoes (no rough-studded rubber boots!).
Smoothing out the creases
Smooth the creases on the floor outwards towards the pool
wall. Now let water into the pool until the middle is covered
to a depth of approx. 2 – 3 cm. Smooth any creases outwards
from the centre by hand.
If the creases cannot be smoothed out:
Have the wall tracks sunk into the ground below the pool?
Lift them up! Is your foundation pit too shallow? Dig it
deeper! Have you overstretched the liner when hanging it in
the pool? Rehang the liner, perhaps after waiting for cooler
weather. Do not pull on the liner when hanging it! Is there
too much tension in the liner? If so, you have probably excavated the foundations too deeply. Then it is essential to fill in
as necessary, not forgetting to firmly compact any fill.
Caution: from a water depth of approx. 5 – 6 cm the liner
can no longer be smoothed out on account of the high water
pressure.
Caution: It is essential to check that the pool is standing
absolutely vertically.
Cover the pool floor with approx. 10 cm of water. Measure
the distance between the waterline and the upper edge of the
pool at several points. If the measured values differ by
more than 2 cm the pool has been incorrectly erected. In
this case the manufacturer’s guarantee is no longer valid!
Attaching the handrail sections
Join the handrail sections (width approx. 40mm) together in
each case with two round connectors; press them onto the
edge of the pool by banging with the flat of the hand or using
a rubber hammer, at the same time firmly fixing the shaped
hanging fringe. If necessary, shorten one handrail section.
Correct any liner creases along the side wall by pushing the
liner sideways. When the liner is sitting correctly, completely press down the handrail by banging down with the
flat of the hand or using a rubber hammer. If you want to
use silicon when flanging built-in components, then it
must be suitable for use in swimming-pool areas. Other-
Wrong!
Important!
Gap for intermediate piece 2 mm
observed during assembly
handrail.

- 4 -
wise there is the danger that the PVC foil will stretch in
the long term and that foil creases will develop.
Lean-concrete backfill for in-ground pools
Fill the fully assembled and installed pool with water (to a
depth of approx. 60 cm). Attach Styropor panels (thickness
15 – 25 mm) around the outside of the pool to insulate and
protect the outside of the steel wall. Backfill the pool wall in
several layers (each maximum 50 cm.) with damp lean concrete BN 10. In the case of naturally compacted soil (e.g.
cohesive clay), the concrete backfill must be at least 10 cm
thick. For yielding soils we recommend a backfill layer of
approx. 30 cm. When backfilling, the water level in the pool
must always be approx. 30 cm above the external concrete
fill. Pouring of the second and third layers should only be
done after the respective previous layer has set. When backfilling the pool with concrete you must take care that the
pool wall does not lose shape because of the pressure from
the concrete.
We recommend letting the pool coping project by about 10
cm in order to provide protection against contamination by
small animals, dust, leaves etc.
Repairs/Spare parts
Damage to the swimming-pool liner can easily be repaired
using a Future Pool Repair Set. Please be sure to follow the
instructions in the repair pack.
Further notes or advice on filter systems, water treatment,
heating, solar absorbers, canopies and accessories can be
obtained from your specialist swimming-pool dealer or our
customer-service representatives.
Care and maintenance
The combination of mechanical water purification and
chemical water treatment ensures clean and clear water at all
times.
Mechanical water purification
Prevent contamination by dirt (e.g. leaves, grass, hair) by
installing a filter system from Future Pool. Remove coarse
dirt (leaves, insects) with a net and/or floor cleaner from the
Future Pool range.
Chemical water treatment
Future Pool supplies the complete Future Pro-Aqua watertreatment range with outstandingly suitable products which
are also compatible with healthy swimming.
Additional recommendations and advice on water treatment
are available from your specialist swimming-pool dealer or
from your Future Pool customer-service representative.
Please send for our detailed water-care instructions.
Overwintering
Above-ground swimming pools:
All above-ground pools should remain filled with water
throughout the winter. The metal components are sufficiently
elastic to withstand ice pressure.
Partially in-ground pools:
Leave filled with water throughout the winter.
In-ground pools:
All in-ground pools must remain filled with water throughout the winter in order to compensate for ground pressure.
Dismantling and storage
Dismantle pools in the reverse order to that for assembly.
Clean and dry the individual components and store them in a
frost-free location. Do not fold the liner too small (do not
cause any sharp creases). The liner should be stored at room
temperature. Roll up the steel wall in generous coils and take
care not to cause any buckling.
Safety advice
General precautions
Never allow children to play in or close to the swimming
pool without supervision; explain the possible dangers to
them. If necessary, teach children to swim. Cover the pool if
it is not being used. Go into the water very slowly after a
meal or after sunbathing. Otherwise there is a danger of
circulatory collapse or heart failure!
Immediate action after a swimming accident:
Rescue the casualty without delay. Check the casualty’s
pulse and breathing. If necessary, immediately apply mouthto-mouth resuscitation and heart massage. Alert the emergency services.
Ordering spare parts / Advice
Do you need spare parts, accessories or advice?
Please contact the dealer from whom you bought your
swimming pool. There you will be able to obtain all available spare parts as well as the whole range of Future Pool
products.
Copying and reproduction – including extracts – require the
written approval of:
Future Pool GmbH
Innovative Products for Swimming Pools
Daimlerstr. 6
D-63741 Aschaffenburg
Telephone +49 (0) 6021 / 79750-0
Fax +49 (0) 6021 / 79750-10
As at 23.07.2012
 Loading...