

Page 1
© Copyright
Nachdruck verboten!
Reproduction prohibited!
Réproduction interdit!
BEDIENUNGSANLEITUNG
USER MANUAL
MODE D'EMPLOI
(;
'0;&RQWUROOHU
Version 2.2
Für weiteren Gebrauch aufbewahren!
Keep this manual for future needs!
Gardez ce mode d’emploi pour des
utilisations ultérieures!
Page 2
Weitere Produkte aus dem FUTURELIGHT-Sortiment:
Further products from the FUTURELIGHT-range:
Autres produits de l’assortiment de FUTURELIGHT:
www.futurelight.com
FUTURELIGHT LICHTEFFEKTE
FUTURELIGHT LIGHTING EFFECTS
FUTURELIGHT EFFETS LUMINEUX
FUTURELIGHT EFECTOS LUMINOSOS
FUTURELIGHT RT-240 lighting effect 51830510
FUTURELIGHT SPIDER centre-piece 51832065
FUTURELIGHT DF-250 lighting effect 51832085
FUTURELIGHT MIRACLE HMI 1200 W lighting effect 51832092
FUTURELIGHT CC-150 color-changer 51832100
FUTURELIGHT CC-200 PRO color-changer 51832200
FUTURELIGHT SC-240 scanner 51832281
FUTURELIGHT SC-250 scanner 51832283
FUTURELIGHT SC-375 scanner 51832288
FUTURELIGHT SC-335 scanner 51832304
FUTURELIGHT SC-570 scanner 51832307
FUTURELIGHT SC-740 scanner 51832317
FUTURELIGHT SC-780 scanner 51832320
FUTURELIGHT SC-940 scanner 51832323
FUTURELIGHT SC-980 scanner 51832325
FUTURELIGHT H-150 scanner 51832330
FUTURELIGHT Dominator MKII centre-piece 51832603
FUTURELIGHT MH-640 Moving-Head Washlight 51833000
FUTURELIGHT MH-640 Moving-Head silver Washlight 51833010
FUTURELIGHT MH-660 Moving-Head Spot 51833020
FUTURELIGHT MH-660 Moving-Head silver Spot 51833030
FUTURELIGHT MH-840 Moving-Head Washlight 51833040
FUTURELIGHT MH-860 Moving-Head Spot 51833060
FUTURELIGHT MH-670 Moving-Head Display 51833032
FUTURELIGHT MH-675 Moving-Head 51833035
FUTURELIGHT MH-680 Moving-Head white 51833037
FUTURELIGHT MH-680 Moving-Head black 51833038
FUTURELIGHT MH-680 Moving-Head silver 51833039
FUTURELIGHT Exterlight 250 CMY black 51833550
FUTURELIGHT Exterlight 250 CMY white 51833551
FUTURELIGHT Exterlight 250 CMY grey 51833552
FUTURELIGHT CONTROLLER
FUTURELIGHT CONTROLLERS
FUTURELIGHT CONTROLEURS
FUTURELIGHT CONTROLADORES
FUTURELIGHT HC-controller 51834020
FUTURELIGHT EX-1 controller 51834035
19" installation-frame for EX-1 controller 51834036
FUTURELIGHT EX-4 controller 51834040
19" installation-frame for EX-4 controller 51834041
FUTURELIGHT CP-192 controller 51834260
FUTURELIGHT CP-256 controller 51834285
FUTURELIGHT ist eine eingetragene Marke der Steinigke Showtechnic GmbH, Deutschland.
FUTURELIGHT is a registered trademark of Steinigke Showtechnic GmbH, Germany.
FUTURELIGHT est une marque déposée du groupe Steinigke Showtechnic GmbH, Allemagne.
Page 3

(;'0;&RQWUROOHU
8VHUPDQXDO
Table of contents
Introduction......................................................................................................................13
Safety instructions .........................................................................................................13
Operating determinations ..............................................................................................14
Description of the device ................................................................................................14
Features ........................................................................................................................14
Overview........................................................................................................................14
Setup.................................................................................................................................16
Sound-control ................................................................................................................16
DMX-512 connection with the projector.........................................................................16
Connection to the mains................................................................................................17
Operation..........................................................................................................................17
Cleaning and maintenance .............................................................................................18
Technical specifications .................................................................................................19
Page 4

CAUTION!
Keep this device away from rain and moisture!
Unplug mains lead before opening the housing!
FOR YOUR OWN SAFETY, PLEASE READ THIS USER MANUAL CAREFULLY
BEFORE YOU INITIAL START - UP!
Introduction
Thank you for having chosen a FUTURELIGHT EX-4 controller. If you follow the instructions given in this
manual, we can assure you that you will enjoy this device for many years.
Unpack your FUTURELIGHT EX-4.
Please make sure that there are no obvious transport damages. Should you notice any damages on the A/C
connection cable or on the casing, do not take the device into operation and immediately consult your local
dealer.
Safety instructions
CAUTION!
Be careful with your operations. With a dangerous voltage you can suffer a dangerous
electric shock when touching the wires!
This device has left our premises in absolutely perfect condition. In order to maintain this condition and to
ensure a safe operation, it is absolutely necessary for the user to follow the safety instructions and warning
notes written in this user manual.
Important:
Damages caused by the disregard of this user manual are not subject to warranty. The dealer
will not accept liability for any resulting defects or problems.
If the device has been exposed to drastic temperature fluctuation (e.g. after transportation), do not switch it
on immediately. The arising condensation water might damage your device. Leave the device switched off
until it has reached room temperature.
This device falls under protection-class I. The power plug must only be plugged into a protection class I
outlet.
Always plug in the power plug least. Make sure that the power-switch is set to OFF position before you
connect the device to the mains.
Never let the power-cord come into contact with other cables! Handle the power-cord and all connections
with the mains with particular caution!
Make sure that the available voltage is not higher than stated on the rear panel.
Make sure that the power-cord is never crimped or damaged by sharp edges. Check the device and the
power-cord from time to time.
Always disconnect from the mains, when the device is not in use or before cleaning it. Only handle the
power-cord by the plug. Never pull out the plug by tugging the power-cord.
Keep away children and amateurs!
Page 5

Operating determinations
This device is a DMX-controller for controlling DMX-effects. This product is only allowed to be operated with
an alternating current of 230 V, 50 Hz and was designed for indoor use only.
Do not shake the device. Avoid brute force when installing or operating the device.
When choosing the installation-spot, please make sure that the device is not exposed to extreme heat,
moisture or dust. There should not be any cables lying around. You endanger your own and the safety of
others!
Operate the device only after having familiarized with its functions. Do not permit operation by persons not
qualified for operating the device. Most damages are the result of unprofessional operation!
Please use the original packaging if the device is to be transported.
Please consider that unauthorized modifications on the device are forbidden due to safety reasons!
Never remove the serial barcode from the device as this would make the guarantee void.
If this device will be operated in any way different to the one described in this manual, the product may suffer
damages and the guarantee becomes void. Furthermore, any other operation may lead to dangers like shortcircuit, burns, electric shock, etc.
Description of the device
Features
Programmable DMX-controller
For FUTURELIGHT CC-200, SC-240, SC-250, SC-330, SC-335, SC-370, SC-375 • For all DMX-projectors
with up to 6 control-channels • 4 different addresses can individually be controlled • Further devices can be
connected with the same address and will run synchronically • The number of devices connected with each
address is unlimited • 10 freely programmable chasers with up to 32 steps • Joystick for manual mirror
movement • Fixture selection via fixture keys • Program-Run for running all programs • Program-Run also
possible via random-function • Strobe-button for strobe-function • Three different program-speeds •
Segment-display and control-LEDs • Sound-control via ¼” mono jack-socket or built-in microphone •
Blackout • 24 control-channels • Optional installation-frame for 19"-rack mounting
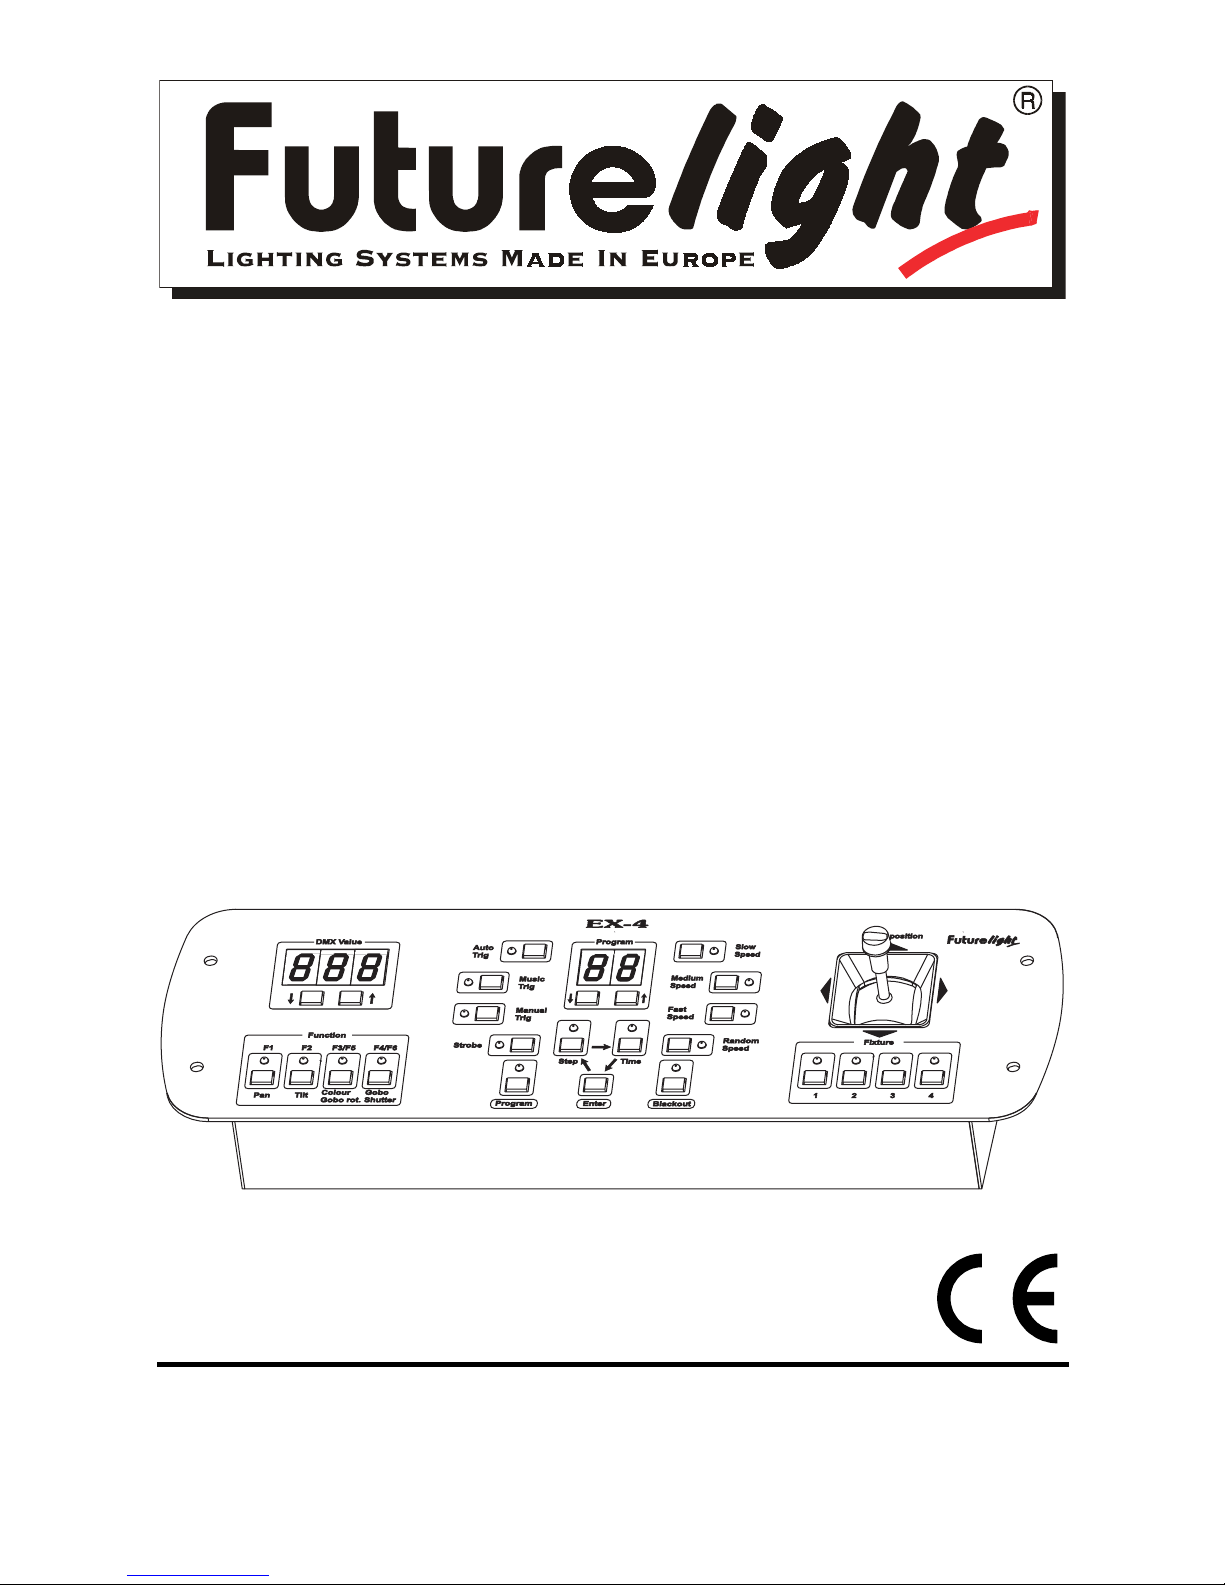
Overview
Rear panel:
1
2
3
4
1) Power plug
2) Power supply socket
3) Audio input socket
4) DMX output socket
Page 6

Overview on the control elements
5) DMX VALUE UP/DOWN BUTTONS
For setting DMX value.
6) DMX VALUE- DISPLAY
Shows current DMX value.
7) MANUAL TRIG BUTTON
With the Manual Trig -key, you can jump from one step to another.
8) MUSIC TRIG BUTTON
If this LED shines the controller is in Audio-mode (operation with sound-control).
9) AUTO TRIG BUTTON
If the LED shines, the controller is in Auto-mode (normal operation without sound-control).
10) PROGRAM-DISPLAY
Shows program steps.
11) PROGRAM UP/DOWN BUTTONS
For selecting the program.
12) SLOW SPEED BUTTON
For adjusting the program to slow movement.
13) MEDIUM SPEED BUTTON
For adjusting the program to medium movement.
14) FAST SPEED BUTTON
For adjusting the program to fast movement.
15) JOYSTICK
With the joystick you can move the light beam manually.
16) FUNCTION BUTTONS
The buttons F3 and F4 have two functions: F3/F5 (Colour/gobo-rotation), F4/F6 (gobo/shutter)
17) STROBE BUTTON
By pressing the Strobe-key all fixtures are being strobed.
18) PROGRAM BUTTON
Button for programming.
19) STEP BUTTON
Button for modification of programs.
20) ENTER BUTTON
Confirming button for programming.
21) TIME BUTTON
Button for setting of minimum period of last program.step in SLOW, MEDIUM and FAST modes.
22) BLACKOUT BUTTON
The Blackout-function closes the light output of all connected projectors via the shutter.
Caution:
The Blackout-key has to be pressed (LED is off), as soon as a program is called up. Otherwise
there will not be any light output.
23) RANDOM SPEED BUTTON
For adjusting the program to random movement.
24) FIXTURE SELECT BUTTONS
With the fixture select buttons you can choose the desired projector.
Page 7

Setup
Sound-control
The sound-control either works via the ¼” mono jack-socket or the built-in microphone.
If the EX-4 is supposed to work via a soundsignal at the Audio In-socket, connect the ¼" jack socket with the
soundsignal of your headphones output or a second adjustable output (if existing) of your mixer, or with the
loud-speaker output of your amplifier.
Tip: Data +
Sleeve: Ground
Caution:
Never connect the sound input with the DMX-output, as this will destroy the electric (DMX-driver).
DMX-512 connection with the projector
The wires must not come into contact with each other, otherwise
the fixtures will not work at all, or will not work properly.
Only use a stereo shielded cable and 3-pin XLR-plugs and connectors in order to connect the controller with
the fixture or one fixture with another.
Occupation of the XLR-connection:
If you are using the recommended FUTURELIGHT-controllers, you can connect the DMX-output of the
controller directly with the DMX-input of the first fixture in the DMX-chain. If you wish to connect DMXcontrollers with other DMX-outputs, you need to use adapter-cables.
Building a serial DMX-chain:
Connect the DMX-output of the EX-4 with the DMX-input of the nearest projector. Always connect one output
with the input of the next fixture until all fixtures are connected.
Caution:
At the last fixture, the DMX-cable has to be terminated with a terminator. Solder a 120
Ω
resistor
between Signal (–) and Signal (+) into a 3-pin XLR-plug and plug it in the DMX-output of the last fixture.
Page 8

Projector addressing
Please note that the EX-1 assigns the DMX-starting addresses every 6 steps. You have to address every
projector to the respective starting address. Otherwise, the channel assignment will not be correct. All
projectors with the same starting address work synchronically.
Projector Starting address Projector Starting address
Projector 1 1 Projector 3 13
Projector 2 7 Projector 4 19
Connection to the mains
Connect the fixture to the mains with the power-plug.
The occupation of the connection-cables is as follows:
Cable Pin International
Brown Live L
Blue Neutral N
Yellow/Green Earth
The earth has to be connected!
Operation
Preperation
Press and hold the PROGRAM UP/DOWN-buttons and switch the Power switch on.
The PROGRAM-DISPLAY shows the current DMX channel and the DMX VALUE-DISPLAY shows setting
value for this channel, if STROBE-LED shines. You can assign the channel to the desired button by pressing
the PAN, TILT, COLOR or GOBO button. If you wish to assign the next 2 channels (gobo-rotation and
shutter) press and hold the Color or Gobo-button until the LED flashes. If the BLACKOUT-LED shines, the
channel will be subject to the BLACKOUT BUTTON in standard mode. You can choose the desired DMX
channel for modification with PROGRAM UP/DOWN buttons.
If these settings shall be taken over by all projectors, press and hold the Step- and Time-button.
If you want delete dedicated the times of the program steps and set the programs no. 11-30 to minimum
length (1 step), press and hold the PROGRAM button and then press the ENTER button. Hold both buttons
until the reset has run (approximately 3 s).
Set up mode is finished by pressing the ENTER button. Setting all LED diodes in this moment is written in
EEPROM and will be used as an initial state of the controller. Before finishing the adjusting mode, set up the
trigger mode (AUTO, MUSIC, TRIG) and the speed mode (SLOW, MEDIUM, FAST) for every fixture.
Calling up a program
Select the desired program between
1- 10, CH, rn
via the PROGRAM UP/DOWN buttons.The program runs
1.5 s after showing on the PROGRAM-DISPLAY. These programs are written for SC-240, SC-335, SC-375
and SC-250 and can be modified at any time.
The selection
„CH“
means that the programs 1-10 will be run through (chain).
The selection
„rn“
means that the programs 1-10 will be run randomly selected.
Programs from 1 to 30 - freely-programmable chasers.
Programs from 1 to 10 - pre-programed (but you can modify them).
Note:
Only programs 1-10 are used for the options "CH" and "rn"
Adjusting the program-speed
The programs run through the selected program step by step with the programmed speed. You can adjust
the program-speed via the SLOW SPEED button, MEDIUM SPEED button or FAST SPEED button.
Jump from one step to another
Via the MANUAL TRIG button, you have the possibility to jump from one step to another.
If a program is run and the MANUAL TRIG button is pressed, the projector jumps to the next step after
finishing the current step. The MANUAL TRIG-LED shines and the program is stopped.
If you wish to start the program once more, press the AUTO TRIG button or the MUSIC TRIG button.
Page 9

Activating the sound-control
If the sound-control is activated, the program moves in the bass-tact of the music.
Press the MUSIC TRIG button (LED shines) and the sound-control is activated.
Strobe-function
Via the Strobe-key, you can strobe all fixtures at the same time (You can strobe PAN or TILT position too).
Manual control of fixtures
If LED-diode of some FIXTURE button shines, the fixture responds to a joystick movement. You can also
change the desired value by pressing the FUNCTION button and the UP/DOWN buttons on DMX VALUEDISPLAY. The function which was changed does not respond to the running program (function is excluded).
To return the fixture to the program press the respective FIXTURE button and shortly the PROGRAM button.
The FIXTURE-LED will switch off and fixture is returned to the program and at the same time the LED diodes
of FIXTURES , which are chosen from the program, will shine.
To return all fixtures to the program, press shortly twice the PROGRAM button.
Programming
Choose one of the freely programmable chasers between 1 and 30 with the PROGRAM UP/DOWN buttons.
Press and hold the PROGRAM button until its LED flashing. The PROGRAM-DISPLAY shows the number of
the programmed steps and the STEP-LED shines. Now you can set the values of the DMX channels for the
current step.
Press the TIME button and set the time on the PROGRAM-DISPLAY. The Time-value can be between 0 and
5 sec. This value is the minimum period of last the program step in SLOW and MEDIUM mode (waiting on
the termination of PAN and TILT movement).The value TIME will be immediately be carried out in the FAST
mode (without waiting on the termination of PAN and TILT movement).
Creation of program
By pressing the ENTER button, the current step is written into memory and simultaneously it is replicated
into the next step. The STEP-LED shines and the new step is shown. You can repeat this procedure as
requested. The maximum number of programmable steps per program is 32.
Modification of program
In order to enter the programming-mode, press and hold the Program and Enter-button until the ProgramLED is shining. Now you can modify the program.
By pressing the STEP-button, the change is written into memory and the PROGRAM-DISPLAY shows the
number of the current step. You can change either step. For example, if you want to shorten the program, set
the desired step as last by pressing the STEP button repeatedly. The little dot shines behind the number of
step. If you press the STEP button again, the little dot will be switched Off. By this procedure you can change
all steps.
Completion of programming
Press and hold the ENTER button and let the Program-button loose so that the PROGRAM-LED stops
flashing.The current step is written into memory and the programming mode is finished.
Cleaning and maintenance
Disconnect from mains before starting maintenance operation!
DANGER TO LIFE!
We recommend a frequent cleaning of the device. Please use a soft lint-free and moistened cloth. Never use
alcohol or solvents!
There are no servicable parts inside the device. Maintenance and service operations are only to be carried
out by authorized dealers.
Should you need any spare parts, please use genuine parts.
Page 10

If the power supply cable of this device will be damaged, it has to be replaced by authorized dealers only in
order to avoid hazards.
Should you have further questions, please contact your dealer.
Technical specifications
Power supply: 230 V AC, 50 Hz ~
Power consumption: 5 W
Number of control-channels: 24
Sound-control: either via ¼” Jack or built-in microphone
Sound-input: ¼” mono Jack
Audio-sensitivity: 0.3 - 1 V
DMX 512-output: 3-pin XLR-connector
Free chasers: 10
Dimensions (LxWxH): 340 x 120 x 93 mm
Weight: 2 kg
All rights reserved (including those of translations in other languages). No part of this user manual
may be reproduced or changed without written permission from the publisher.
Please note: Every information is subject to change without prior notice. 09/01 ©
 Loading...