

Page 1

Page 2
2
Page 3
BEDIENUNGSANLEITUNG
&3&21752//(5
Lesen Sie vor der ersten Inbetriebnahme zur eigenen Sicherheit diese Bedienungsanleitung
sorgfältig durch!
Alle Personen, die mit der Aufstellung, Inbetriebnahme, Bedienung, Wartung und Instandhaltung dieses
Gerätes zu tun haben, müssen
- entsprechend qualifiziert sein
- diese Betriebsanleitung genau beachten.
EINFÜHRUNG
Wir freuen uns, daß Sie sich für einen CP16 CONTROLLER entschieden haben.
Der FUTURELIGHT CP16 CONTROLLER ist ein DMX Controller, der speziell auf den FUTURELIGHT SCAN
H-250 Mks bzw. D-200 abgestimmt ist. Dieser Controller arbeitet nicht mit Scheinwerfersystemen anderer
Hersteller.
Der FUTURELIGHT CP16 kann vier Adressen mit FUTURELIGHT Scans steuern. Die Anzahl von
FUTURELIGHT Scans pro Adresse ist unbegrenzt.
Entnehmen Sie den CP16 CONTROLLER aus der Verpackung.
Prüfen Sie zuerst, ob Transportschäden vorliegen. In diesem Fall nehm en Sie das Gerät nic ht in Betrieb und
setzen sich bitte mit Ihrem Fachhändler in Verbindung.
SICHERHEITSHINWEISE
Dieses Gerät hat das Werk in sicherheitstechnisch einwandfreiem Zustand verlassen. Um diesen
Zustand zu erhalten und einen gefahrlosen Betrieb sicherzustellen, muß der Anwender die
Sicherheitshinweise und die Warnvermerke unbedingt beachten, die in dieser Gebrauchsanweisung
enthalten sind.
Unbedingt lesen:
Bei Schäden, die durch Nichtbeachtung dieser Bedienungsanleitung v erursacht werden, erlis cht der
Garantieanspruch. Für daraus resultierende Folgeschäden übernimmt der Hersteller keine Haftung.
Das Gerät darf nicht in Betrieb genommen werden, nachdem es von einem kalten in einen warmen Raum
gebracht wurde. Das dabei entstehende Kondenswasser k ann unter Ums tänden Ihr Gerät zerstören. Las sen
Sie das Gerät solange uneingeschaltet, bis es Zimmertemperatur erreicht hat!
Lassen Sie das Netzkabel nicht mit anderen Kabeln in Kontak t kom men! Seien Sie vorsichtig beim Umgang
mit Netzkabeln und -anschlüssen. Fassen Sie diese Teile nie mit nassen Händen an!
Vergewissern Sie sich, daß die anzuschließende Netzspannung nicht höher ist, als auf dem Gerät
angegeben. Stecken Sie das Stromkabel nur in geeignete Schukosteckdosen ein.
3
Page 4

Beachten Sie bitte, daß Schäden, die durch manuelle Veränderungen an diesem Gerät verurs acht werden,
nicht unter den Garantieanspruch fallen.
Kinder und Laien vom Gerät fernhalten!
Im Geräteinneren befinden sich keine zu wartenden Teile. Wartungs- und Servicearbeiten sind ausschließlich
dem autorisierten Fachhandel vorbehalten!
BESTIMMUNGSGEMÄSSE VERWENDUNG
Der FUTURELIGHT CP16 CONTROLLER ist ausschließlich für die Steuerung der FUTURELIGHT SCAN H250 Mks und D-200 zu verwenden.
Nur in geschlossenen Räumen verwenden.
Stellen Sie keine Flüssigkeitsbehälter, die leicht umf allen können, auf dem Gerät oder in dessen Nähe ab.
Falls doch einmal Flüssigk eit in das Ger äteinnere gelangen sollte, s ofort Netzstecker ziehen. Lassen Sie das
Gerät von einem qualifizierten Servicetec hniker prüfen, bevor es erneut benutzt wird. Besc hädigungen, die
durch Flüssigkeiten im Gerät hervorgerufen wurden, sind von der Garantie ausgeschlossen.
Das Gerät kann an jedem beliebigen Ort installiert werden. Achten Sie jedoch dar auf, daß das Gerät nic ht zu
großer Hitze, Feuchtigkeit und Staub ausgesetzt wird. Vergewissern Sie sich, daß keine Kabel frei
herumliegen. Sie gefährden Ihre eigene und die Sicherheit Dritter!
Nehmen Sie das Gerät erst in Betrieb, nachdem Sie sich m it seinen Funktionen vertraut gemacht haben.
Lassen Sie das Gerät nicht von Personen bedienen, die sich nicht mit dem Gerät auskennen. Wenn Geräte
nicht mehr korrekt funktionieren, ist das meist das Ergebnis von unsachgemäßer Bedienung!
Reinigen Sie das Gerät niemals mit Lösungsmitteln oder scharfen Reinigungsmitteln, sondern verwenden Sie
ein angefeuchtetes Tuch.
Soll das Gerät transportiert werden verwenden Sie bitte die Originalverpackung, um Transportschäden zu
vermeiden.
Beachten Sie bitte, daß eigenmächtige Veränderungen an dem Gerät aus Sicherheitsgründen verboten sind.
INBETRIEBNAHME
Schließen Sie den FUTURELIGHT CP16 mit dem Netzkabel an Ihre Spannungsversorgung (230V/50Hz) an.
Wenn der FUT URELIGHT CP16 über ein Soundsignal arbeiten soll, verbinden Sie die Klinkenbuchse mit
dem Soundsignal des Kopfhörerausganges bzw. des zweiten regelbaren Ausganges (falls vorhanden) des
Mixers oder mit einem Lautsprecherausgang des Verstärkers.
ACHTUNG: Verbinden Sie niemals den Soundinput mit dem DMX-Output, da ansonsten die Elektronik
(DMX-Treiber) zerstört werden würde.
Verbinden Sie den DMX-Ausgang des FUTURELIGHT CP16 mit dem DMX-Eingang des nähesten
FUTURELIGHT Scans. Ein Splitten der Datenleitung ist nicht möglich.
Verwenden Sie ein für den RS-485, 250Kbaud Datengebrauch entsprechendes Datenkabel oder ein
qualitativ hochwertiges, zweiadriges, abgeschirmtes Kabel. Als Steckkontakte verwenden Sie Stereo
Klinkenstecker mit folgender Belegung:
Spitze: Data +
Mittlerer Ring: Data Hinterer Ring: Masse
Abschlußwiderstände an den DMX-Leitungen werden automatisch durch die Geräte angeschlossen.
ACHTUNG: Wenn Sie das Gerät anschalten, befindet sich der Controller im Blackout-Modus (LED leuchtet).
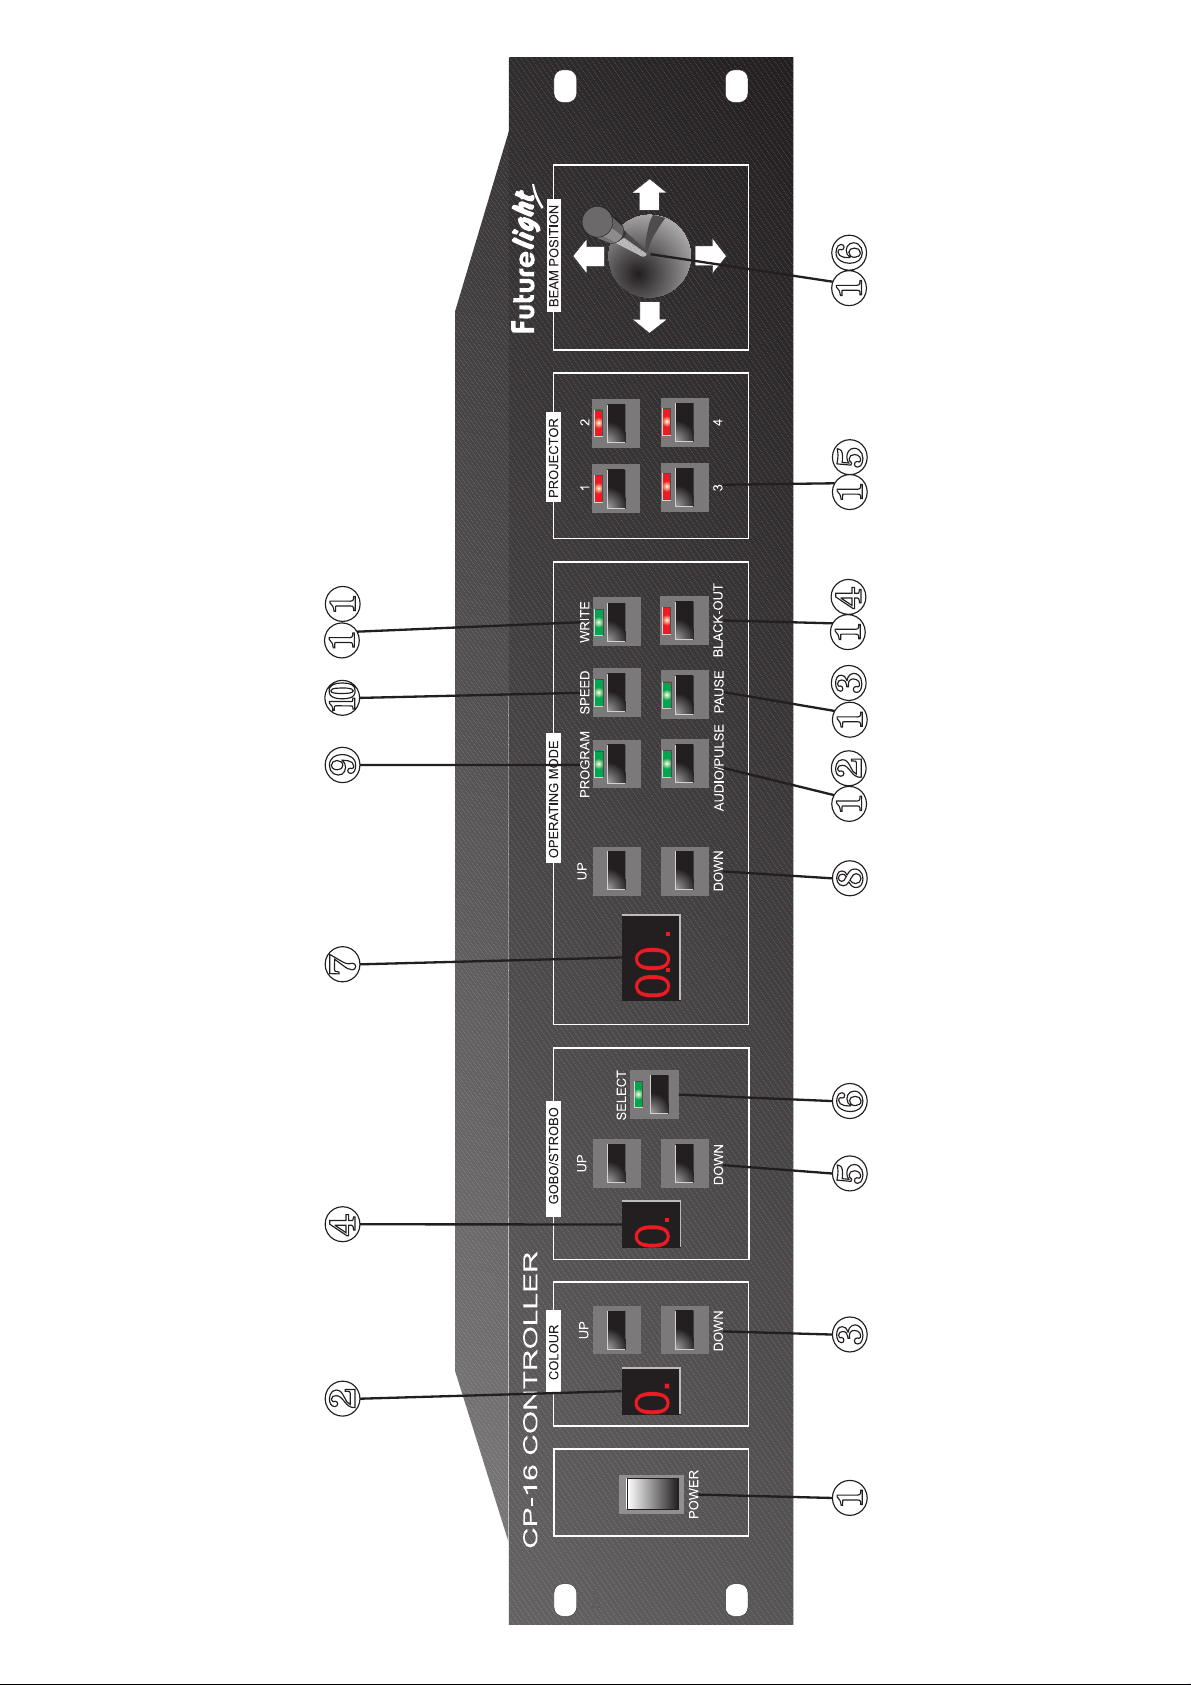
ÜBERSICHT ÜBER DIE FUNKTIONSTASTEN
4
Page 5

1) NETZSCHALTER
2) ANZEIGE FARBAUSWAHL
3) FARBAUSWAHLTASTEN
4) ANZEIGE GOBO/STROBO-AUSWAHL
5) GOBO/STROBO-AUSWAHLTASTEN
6) UMSCHALTER GOBO/STROBO
Wenn die LED leuchtet, k önnen Sie das gewünschte Gobo auswählen. Leuchtet die LED nicht, wählen Sie
den Stroboeffekt.
7) BETRIEBSANZEIGE
8) BETRIEBSWAHLTASTEN
9) PROGRAM-TASTE
Mit der Program-Taste können Sie die verschiedenen Programme anwählen:
1-10 Frei programmierbare Programme
11-30 Fest gespeicherte Scannerprogramme, davon
26-30 Langsame Programme
10) SPEED-TASTE
11) WRITE-TASTE
12) AUDIO/PULSE-TASTE
13) PAUSE-TASTE
Mit der Pause-Taste können Sie die Spiegelbewegung anhalten.
14) BLACKOUT-TASTE
Wenn die LED leuchtet, befindet sich der entsprechende Scanner im Stand-by Modus.
15) PROJEKTORAUSWAHLTASTEN
Zur Auswahl des gewünschten Projektors . Leuchtet die LED nicht, bef indet sich der entsprec hende Projek tor
im Blackout-Modus. Leuchtet die LED permanent, durchläuft der Pr ojektor das aktuelle Pr ogramm . Blink t die
LED, kann der Projektor manuell gesteuert bzw. programmiert werden. Werden mehrere Scanner angewählt,
arbeiten diese synchron.
16) JOYSTICK
Verwenden Sie den Joystick, um den Ablenkspiegel manuell zu bewegen.
BEDIENUNG
Manuelle Steuerung:
Projektorauswahl durch die Projektor -Tasten 1-4 (LED blinkt). Dabei können Sie m ehr er e Scanner anwählen,
die dann synchron arbeiten. Das Programm wird so lange durchlaufen, bis Sie den Joystick berühren oder
die Einstellungen ändern.
-Bewegung des Ablenkspiegels über Joystick möglich
-Farbauswahl durch die Colour UP-DOWN Tasten
Die verschiedenen Werte der Farbanzeige bedeuten:
- = Gerät arbeitet im Programm
0 = Weiß
1 = Grün
2 = Rot
3 = Cyan
4 = Magenta
5 = Gelb
5
Page 6
6 = Blau
7 = Zweifarbig
8 = Rainbow
9 = Automatischer Wechsel der Farben
-Goboauswahl durch die Gobo/Strobo UP-DOWN Tasten
Die verschiedenen Werte der Goboanzeige bedeuten:
Select LED an (Goboauswahl) Select LED aus (Strobowahl)
- Programm Programm
0 Blackout Blackout
1 Vollkreis Vollkreis
2 Gobo 1 Strobegeschwindigkeit 1 synchron
3 Gobo 2 Strobegeschwindigkeit 2 synchron
4 Gobo 3 Strobegeschwindigkeit 3 synchron
5 Gobo 4 Strobeprogramm
6 Gobo 5 Strobeprogramm
7 Synchronwechsel gleicher Gobos Strobeprogramm
8 Synchronwechsel verschied. Gobos Strobeprogramm
9 Statisch Strobeprogramm
Abruf der fest gespeicherten Programme:
-Wählen Sie die gewünschten Projektoren über die Projektorwahltasten 1-4 aus (LED muß permanent
leuchten).
-Blackout-Funktion abschalten (LED aus)
-Programm 11-30 auswählen
Geschwindigkeitswahl
Wenn die Audio/Pulse-Taste in der „PULSE“-Position (LED leuchtet nicht) steht, bewegen sich die
FUTURELIGHT SCANS mit der Geschwindigkeit, die über die Speed-Taste eingestellt wurde. In der
gedrückten Position (LED leuchtet) bewegen sich die FUTURELIGHT SCANS zu jedem Baßschlag der
Musik.
ACHTUNG: Um die Soundsteuerung aktivieren zu können, muß zuvor eine Verbindung zwischen Controller
und Musikmischpult hergestellt werden. Liegt kein Musiksignal an, bewegt sich der Ablenkspiegel nicht.
Geschwindigkeitsänderung im Pulse-Modus
Die Speed-Taste hat nur im Pr ogrammablauf- und im Program miermodus eine Funktion. Dr ücken Sie die
Speed-Taste, und auf dem Display erscheint der aktuelle Wert. Dieser kann durch die UP/DOW N-Tasten
verändert werden.
Verbinden der Programme
Wählen Sie das zuerst abzuspielende Programm aus, und drücken Sie die Programmtaste. Im Display
erscheint ein Punkt neben der Program mnummer. W ählen Sie mit den UP/DOWN-Tasten die ander en zu
verbindenden Programme aus , und bestätigen sie jedes von ihnen durch Drücken der Pr ogrammtaste. Die
ausgewählten und bestätigten Programme werden jeweils einmal von der kleinsten zur größten Nummer
durchlaufen. Der Controller durchläuft die Kette solange, bis Sie das Programm wieder stoppen, indem Sie
den Punkt durch erneutes Drücken der Program-Taste entfernen.
ACHTUNG: Die Programmabfolge wird nicht gespeichert. Sobald Sie das Gerät ausschalten, geht die
Programmabfolge verloren.
Programmierung:
Wählen Sie einen der f rei programmierbaren Chaser zwischen 1 und 10 mit der Pr ogram-Taste aus (z.B.
Programm 1). Drücken Sie die Write-Taste und die Anzeige „00“ beginnt zu blinken. Wählen Sie den
gewünschten Scanner über die Projektor-Taste an. Dabei muß die entsprechende LED blinken.
Drücken Sie die Speed-Taste, um die Geschwindigk eit festzulegen. Auf der Anzeige erscheint die aktuelle
Geschwindigkeit. Wählen Sie z.B. die Standardgeschwindigkeit 5, wodurch eine hohe Speicherfrequenz
(10x/Sek.) und eine kurze Program mdauer gegeben ist. Dadurch ist diese Geschwindigkeit besonders für
langsame Bewegungen geeignet, weil die hohe Frequenz für eine weiche Strahlenbewegung sorgt. Wählen
Sie die gewünschte Geschwindigkeit zwischen 1 (50x/Sek.) und 99 (1x/2Sek.) aus.
Wählen Sie die gewünschten Einstellungen mit den Gobo/Strobo- sowie den Colourauswahltasten aus.
6
Page 7

Bewegen Sie den Spiegel mit dem Joystick zur gewünschten Startposition.
ACHTUNG: Sobald die Write-Taste gedrückt wird, ist die Programmierung aktiviert.
Drücken Sie die Write-Taste, und die zwei Balken „--“ im Display bewegen sich. Führen Sie jetzt die
gewünschte Bewegung mit dem Joystick aus und verändern Sie die Einstellungen nach Ihrem Geschmack.
Wollen Sie die Programmierung beenden, drücken Sie erneut die Write-Taste. Ansonsten stoppt die
Programmierung, sobald die Speicherkapazität erschöpft ist (abhängig von der gewählten Geschwindigkeit).
ACHTUNG: Die Programmierung wird nur in einem flüchtigen Speicher gespeichert. Sobald Sie bei dem
Controller ein RESET durchführen, gehen alle frei programmierten Programme verloren.
Kürzen eines frei programmierten Chasers:
Wählen Sie den frei programmierten Chaser mit der Program-Taste aus. Wählen Sie den gewünschten
Scanner über die Projektor-Taste an. Dabei muß die entsprechende LED permanent leuchten.
Drücken Sie die W rite-Taste, der Chaser läuft und die zwei Balken „--“ im Display bewegen sich. Beenden
Sie das Programm durch erneutes Drücken der Write-Taste.
Löschen des flüchtigen Speichers (RESET):
Achtung: Alle 10 frei programmierbaren Programme werden gelöscht. Die 20 fest gespeicherten
Scannerprogramme gehen dabei jedoch nicht verloren.
Gerät abschalten, wieder einschalten - während des LED-Check s die Progr am-T aste drücken und halten bis
alle LEDs blinken. Drücken Sie dann die Write-Taste, um den RESET zu bestätigen.
TECHNISCHE DATEN CP16:
Spannungsversorgung:
Leistungsaufnahme:
Sicherung:
Soundeingang:
Impedanz:
DMX-Ausgang:
Anschluß:
Abmessungen:
Gewicht:
Bitte beachten Sie: Technische Änderungen bleiben ohne vorherige Ankündigung vorbehalten.
12/96 © Alle Angaben ohne Gewähr!
230V/50Hz
10VA
100mA träge
¼ " (6,3mm) Monoklinke
15KOhm
¼ " (6,3mm) Stereoklinke
DMX-512, Kanäle 1-16
Tip=Data+, 1. Ring=Data, 2. Ring=Masse
483 x 88 x 80 mm
1,7 kg
7
Page 8

USER MANUAL
&3&21752//(5
For your own safety, please read this user manual carefully before your initial start-up.
Every person involved with the installation, operation and maintenance of this device have to:
- be qualilfied
- follow the instructions of this manual
INTRODUCTION
Thank you for having chosen a CP16 CONTROLLER.
The CP16 CONTROLLER is a DMX controller especially designed for the FUTURELIGHT SCANS H-250
Mks and D-200. It does not work with scanners from other manufacturers.
The CP16 CONTROLLER features four addresses. The number of Scans per address is unlimited.
Unpack your CP16 CONTROLLER.
Before your first start-up please make sure that there are no damages caused by transportation. Should there
be any, do not take the device into operation and consult your dealer.
SAFETY INSTRUCTIONS
This device has left our prem ises in absolutely perfect condition. In order to maintain this condition and to
ensure a safe operation, it is absolutely necessary for the user to follow the safety instructions and warning
notes written in this user manual.
Important:
Damages caused by the disregard of this user manual are not subject to warranty. The dealer
will not accept liability for any resulting defects or problems.
If the device has been exposed to drastic temperature fluctuation (e.g. after tr ansportation), do not switch it
on immediately. The arising c ondensation water might damage your device. Leave the devic e switched off
until it has reached room temperature.
Never let the AC-cord come into contac t with other cables! Handle the AC-cor d and all AC-connections with
particular caution! Never touch these parts with wet hands!
Make sure that the available voltage is not higher than stated on the device.
Please consider that damages caused by manual modifications to the device are not subject to warranty.
8
Page 9

Keep away children and amateurs!
There are no servicable parts inside the device. Maintenance and service operations are only to be carried
out by authorized dealers.
OPERATING DETERMINATIONS
This controller is only to be be used for FUTURELIGHT Scan H-250 Mks and Scan D-200.
Use in closed rooms only.
Never put any liquids on the device or close to it. Should any liquid enter the device nevertheles s, disc onnect
from mains immediately. Please let the device be checked by a qualified service technician before you
operate it again. Any damages caused by liquids having entered the device are not subject to warranty!
You can install the device at any desired place. Please make sure that the device is not exposed to extrem e
heat, moisture or dust. T here should not be any cables lying around. You endanger your own and the safety
of others!
Operate the device only after having familiarized with its functions. Do not perm it operation by persons not
qualified for operating the device. Most damages are the result of unprofessional operation!
Never use solvents or aggressive detergents in order to clean the device! Rather use a soft and damp cloth.
If you want to move the device please use the original packaging in order to avoid transport damages.
Please consider that unauthorized modifications on the device are forbidden due to safety reasons!
START-UP
Connect the Futurelight CP16 to the mains (230V/50Hz).
Is the Futurelight CP16 supposed to work via a soundsignal, c onnect the ¼ " jack plug with the soundsignal
of your headphones output or a second adjustable output (if ex isting) of your mixer, or with the loud-speaker
output of your amplifier.
CAUTION: Never connect the sound input with the DMX output, as this will destroy the electric (DMX driver).
Connect the DMX output of the Futurelight CP16 with the DMX input of the nearest Futurelight Scan H-250 /
D-200. A splitting of the data line is not possible.
Use a data line appropriate for RS-485, 250Kbaud data use or a shielded quality double-wire cable. As plug
contact use ¼ " jack plugs stereo, the terminals of which are as follows:
Tip: Data +
Ring: Data Sleeve: Mass
Termination is not necessary.
CAUTION: When you turn the device on, the controller is in blackout-mode (Blackout-LED on).
9
Page 10

OVERVIEW OVER THE FUNCTION BUTTONS
1) POWER SWITCH
2) COLOUR DISPLAY
3) COLOUR UP/DOWN BUTTONS
4) GOBO/STROBO DISPLAY
5) GOBO/STROBO UP/DOWN BUTTONS
6) GOBO/STROBO SELECTOR BUTTON
If the LED is on, you can choose the desired gobo. If the LED is off, you can choose the strobe effect.
7) OPERATING DISPLAY
8) OPERATING UP/DOWN BUTTONS
9) PROGRAM BUTTON
With the program button you can choose the different programs
1-10 Freely programmable chasers
11-30 Memorized scanner programs, of which
26-30 are slow programs
10) SPEED BUTTON
11) WRITE BUTTON
12) AUDIO/PULSE BUTTON
13) PAUSE BUTTON
With the pause button you can stop the mirror movement.
14) BLACKOUT BUTTON
If the LED is on, the respective scanner is in stand-by mode.
15) PROJECTOR SELECT BUTTONS
With the projector select buttons you can choose the desired projector. If the LED is off, the respective
scanner is in blackout mode. If the LED is perm anently on, the projector runs thr ough the current progr am. If
the LED flashes, the scanner can be contr olled m anually or be programm ed. If sever al scanners are chosen,
they will be synchronized.
16) JOYSTICK
With the joystick you can move the mirror manually.
OPERATION
Manual control
Choose the desired projectors with the projector select switches 1-4 (LED flashes). You can also choose
several scanners, which will be synchronized then. The proj ector runs through the program until you move
the joystick or change any setting.
-You can move the mirror with the joystick
-You can choose the colour with the colour UP-DOWN buttons
The different values of the colour display are:
- = Device runs through the program
0 = White
1 = Green
2 = Red
3 = Cyan
4 = Magenta
5 = Yellow
6 = Blue
10
Page 11

7 = Split colour
8 = Rainbow
9 = Automatic colour changer
-You can choose the desired gobo with the Gobo/Strobo UP-DOWN buttons
The different values of the Gobo/Strobo display are:
Select LED on (selection of gobos) Select LED off (strobe selection)
- Program Program
0 Blackout Blackout
1 Full circle Full circle
2 Gobo 1 Strobe speed 1 synchronized
3 Gobo 2 Strobe speed 2 synchronized
4 Gobo 3 Strobe speed 3 synchronized
5 Gobo 4 Strobe program
6 Gobo 5 Strobe program
7 Synchronized change of similar gobos Strobe program
8 Synchronized change of different gobos Strobe program
9 Static Strobe program
Call up pre-programmed scanner programs:
-Choose the desired projectors with the projector select switches 1-4 (LED is permanently on)
-Switch off the blackout-function (LED off)
-Choose program 11-30
Speed selection
If the Audio/Pulse button is in the „PULSE“-position (LED is off), the FUTURELIGHT SCANS move at the
speed adjusted with the speed button. If the Audio/Pulse button is pr essed (LED is off), the FUTURELIGHT
SCANS move at every beat of the music.
CAUTION: In order to activate the sound control, you have to connect the controller to the mixer first. If the
controller does not receive a sound signal, the mirror does not move.
Speed adjustment in the pulse-mode
The speed-button only works in the program r un and in the progr am mode. If you press the speed button, the
display shows the current value. You can adjust the speed with the UP/DOWN buttons.
Connecting one program with another
Choose the desired program and pres s the program button. The display shows a dot next to the program
number. With the UP/DOWN buttons you can choose the progr ams to be connected and conf ir m by pressing
the program button. The programs you have chosen are once run through from the lowest to the highest
number. The controller runs through the program run until you stop it by erasing the dot. You can erase the
dot by pressing the program button once more.
CAUTION: The program run is not memorized. As soon as you turn the device off, the program run is lost.
Programming:
Choose one of the freely programm able c haser s between 1 and 10 with the program button ( e.g. progr am 1).
Press the write button and the display shows „00“ (flashing). Choose the des ired pr ojector s with the proj ector
select buttons. The respective LED has to flash.
Press the speed button in order to adjust the s peed. The display shows the current speed. Choose e.g. the
standard speed 5, which provides a high mem ory frequency (10x/sec.) and a short program duration. This
speed is particularly suitable for slow movements as the high f requency provides sof t beam m ovem ents. You
can choose the speed between 1 (50x/Sec.) and 99 (1x/2Sec.).
Adjust the settings with the Gobo/Strobo Up/Down buttons and the Colour Up/Down buttons.
Move the mirror with the joystick to the starting position.
CAUTION: As soon as you press the write button, the program starts running.
Press the write button and the two bars „--“ on the display start moving. Make the beam movement with the
joystick and adjust the settings as desired.
If you want to stop the programming, press the write button once more. Otherwise, the programming stops as
soon as the program runs out of memory capacity (depending on the speed you have chosen).
11
Page 12

CAUTION: The programming is only memorized in a volatile memory. This means that all freely
programmable programs are lost if you reset the controller.
Shortening a freely-programmable chaser:
Choose the freely-programmable chaser with the program button. Choose the desired projectors with the
projector select buttons. The projector LED has to be permanently on.
Press the write button, the chaser starts running and the two bars „--“ on the display start moving. Stop the
program by pressing the write button once more.
Erasing the volatile memory (RESET):
CAUTION: All of the 10 freely-programmable chasers are erased. The 20 pre-programmed scanner
programs cannot be deleted.
Turn the controller off, turn it on again. W hile the c ontroller checks the LEDs, press the program button and
hold it until all LEDs start flashing. Press the write button in order to confirm the RESET.
TECHNICHAL SPECIFICATIONS CP16:
Power supply 230V/50Hz
Power consumption: 10VA
Fuse: 100mA slow blow
Sound input: ¼ " (6,3mm) Jack plug mono
Impedance: 15KOhm
DMX-Output: ¼ " jack plug stereo
DMX-512, channels 1-16
Plug connection: Tip=Data+, Ring=Data-, Sleeve=Mass
Dimensions: 483 x 88 x 80 mm
Weight: 1.7 kg
Please note: All specifications are subject to change withour prior notice.
12/96 © Errors and omissions excepted.
12
Page 13

MODE D’EMPLOI
&21752/(85&3
Pour votre propre sécurité, veuillez lire ce mode d'emploi avec attention avant la première mise en service.
Toute personne ayant à faire avec le montage. la mise en marche. le maniement et l’entretien de cet
appareildoit
- être suffisamment qualifiée
- suivre strictement les instructions de service suivantes.
INTRODUCTION
Nous vous remercions d'avoir choisi un contrôleur FUTURELITE CP16. Vous êtes en possession d'un
appareil très performant.
Le contrôleur FUTURELIGHT CP16 est un contrôleur DMX spécialement adapté aux scanners
FUTURELIGHT SCAN H-250 Mks et D-200 et n'est pas prévu pour travailler avec des s ystêmes lumineux
d'autres marques.
Le FUTURELIGHT CP16 peut contrôler quatre adresses avec les scanner s FUTURELIGHT la quantité de
scanners FUTURELIGHT par adresse est illimitée.
Sortez le contrôleur CP16 de son emballage.
Avant tout, assurez vous que l'appareil n'a pas subi de domm ages lors de son transport. Si tel était le cas,
contactez immédiatement votre revendeur.
INSTRUCTIONS DE SÉCURITÉ
Cet appareil a quitté les ateliers dans un état irréprochable. Pour assurer un bon fonctionnement, sans
danger, l'utilisateur doit suivre les instructions contenues dans ce mode d'emploi.
Attention:
Tout dommage occ as ionné par la non obs ervation des ins truc tions de montage ou d'utilisation n'est
pas couvert par la garantie.
Ne déposez jamais de récipient contenant un liquide sur le dessus de l'appar eil ou à proxim ité imm édiate de
celui-ci. Si toutefois, du liquide devait s'inf iltrer dans l'appareil, le débrancher imm édiatement, puis le faire
vérifier par un technicien com pétent avant de le réutiliser. Les dom m ages causés par l' infiltration de liquides
ne sont pas couverts par la garantie.
13
Page 14

Ne laissez pas le câble d'alimentation en contact avec d'autres câbles. Soyez prudent; lorsque vous
manipulez les câbles et les connexions, vous êtes soumis à des risques d'électrocutions! Ne manipulez
jamais les parties sous tension avec des mains mouillées!
Tenez l'appareil éloigné de toute source de chaleur.
L'appareil ne devrait pas être mis en ser vice lorsqu'il à été transpor té d'un endroit froid à un endr oit chaud. Il
se forme de la condensation qui pourrait endommager l'appareil. Laissez celui-ci atteindre la température
ambiante avant de le mettre en service.
Assurez vous que la tension électrique ne soit pas supérieure à celle indiquée sur la fiche technique de
l'appareil. Branchez la prise d'alimentation dans une fiche adaptée.
Toute modification effectuée sur cet appareil annule la garantie.
Tenir les enfants et les novices éloignés de l'appareil.
L'intérieur de l'appareil ne contient pas de parties nécéssitant un entretien. L'entretien et les réparations
doivent être effectuées par un technicien compétent!
EMPLOI SELON LES PRESCRIPTIONS
Le contrôleur FUTURELIGHT CP16 a été conçu exclusivement pour commander les scanners
FUTURELIGHT H-250 Mks et D-200.
Cet appareil doit être utilisé dans des locaux clos. (à l'abri des intempéries)
Ne pas utiliser l'appareil lorsque la tem pérature ambiante es t supérieure à 35°C ou inférieure à 5°C. Ne pas
exposer l'appareil directement aux rayons solaires (lors d'un transport dans un véhicule fermé par exemple).
L'appareil peut être installé à l'endroit de votre choix. Evitez toutef ois les endroits hum ides, poussiéreux ou
trop chauds. Assurez vous que les câbles ne trainent pas au sol. Il en va de votre propre s écurité et de celle
d'autrui.
N'utilisez l'appareil qu'après avoir pris conaissance de ses fonctions et possibilités. Ne laissez pas des
personnes incompétentes utiliser cet appareil. La plupart des pannes s urvenant sur cet appareil sont dues à
une utilisation inappropriée par des personnes incompétentes.
Ne nettoyez pas l'appareil avec des produits de nettoyages trop puissants ou abrasifs. Utilisez un chiffon
doux, humide.
Si vous deviez transporter l'appareil, utilisez l'emballage d'origine pour éviter tout dommage.
Notez que pour des raisons de sécurité, il est interdit d'entreprendre toute modifications sur l'appareil.
MISE EN SERVICE
Branchez le FUTURELIGHT CP16 au secteur (230V/50Hz) grâce au câble d'alimentation.
Si le FUTURELIGHT CP 16 doit travailler en mode "contrôle par le son", connectez la fiche Jack au signal
son (fiche de sortie éc outeurs, seconde sortie réglable de la table de m ixage (si disponible) ou sortie hautparleur de l'amplificateur).
ATTENTION!!! : ne connectez jamais l'entrée son à la sortie DMX: Cela peut détruire les transistors
électroniques.
Connectez la sortie DMX du FUTURELIGHT CP16 à l'entrée DMX du scanner FUTURELIGHT le plus
proche. Une division des cables n'est pas possible.
14
Page 15

Utilisez un câble de qualité adapté à la conductions des données RS-485, 250 Kbaud les contacts devr ont
être assurés par des prises Jack stéréo:
extrémité: Data +
anneau central: Data anneau arrière: Masse
La résistance finale du circuit DMX est assurée autom atiquement par le dernier scanner , si la sortie DMX de
celui-ci n'est pas occupée.
ATTENTION!!! Lorsque vous mettez en route le contrôleur, celui-ci sera en mode "blackout". (la diode
électroluminescente sera allumée)
DESCRIPTION DES TOUCHES DE FONCTIONS
(1) Interrupteur marche/arrêt ("POWER")
(2) Affichage de la sélection des couleurs
(3) Touches de sélection des couleurs ("UP/DOWN")
(4) Affichage de la sélection des gobos/strobo
(5) Touches de sélection des gobos/strobo ("UP/DOWN")
(6) Interrupteur gobo/strobo ("SELECT")
Lorsque la diode électroluminescent est allumée, vous pouvez sélectionner le gobo désiré.
Lorsqu'elle est éteinte, vous pouvez sélectionner l'effet stroboscopique.
(7) Affichage des fonctions
(8) Touches de sélection des fonctions ("UP/DOWN")
(9) Touche de programmes ("PROGRAM")
ces touches permettent de sélectionner les différents programmes:
1-10 Programmes individuellement programmables
11-30 Programmes intégrée dont:
26-30 Programmes intégrés lents
(10) Touche vitesse ("SPEED")
(11) Touche de programmation ("WRITE")
(12) Touche de sélection du mode de contrôle ("AUDIO/PULSE")
(13) Touche pause ("PAUSE")
Cette touche vous permet de stopper le mouvement du (des) mirroir(s)
(14) Touche repos ("BLACKOUT")
Lorsque la diode électroluminescente est allumée, le scanner se trouve en position stand-by.
(15) Touches de sélection des projecteur ("1 à 4")
Permet de choisir le projec teur désir é. Lors que la diode élec troluminescente est éteinte, le pr ojec teur
se trouve en mode blackout. Lorsque la diode électrolum ines cente es t allumée, le projecteur effectue
le programme actuel. Lorsque la diode électroluminescente clignote, le projecteur peut être contrôlé
manuellement ou être programmé. Si plusieurs scanners sont sélectionnés, ceux-ci travailleront en
sychronisation.
(16) Joystick
Permet de contrôler manuellement le mouvement du mirroir.
UTILISATION
Contrôle manuel
En utilisant les touches de sélection des projecteurs (15) "1 à 4", vous pouvez choisir un ou plusieurs
projecteurs. Si vous choisissez plusieurs projecteurs, ceux-c i travailleront en synchronisation et effectueront
le programme sélectionné jusqu'à ce que le joystick (16) soit utilisé ou une autre fonction sélectionnée.
- Le mouvement du mirroir peut être contrôlé par le joystick (16)
- Sélection des couleurs par les touches (3) "UP-DOWN" de la section "COULOUR"
Les valeurs indiquées sur l'affichage de la section "COLOURS" signifient:
- = Le projecteur travaille en mode programme
0 = Blanc
1 = Vert
2 = Rouge
3 = Cyan
4 = Magenta
5 = Jaune
15
Page 16

6 = Bleu
7 = Bicolore
8 = Rainbow
9 = Changement automatique des couleurs
-Sélection des gobos par les touches (5) "UP-DOWN" de la section "GOBO/STROBO".
Les valeurs indiquées sur l'affichage de la section "GOBO/STROBO" signifient:
Diode "SELECT" allumée
sélection des gobos
- Programme Programme
0 Blackout Blackout
1 Cercle plein Cercle plein
2 Gobo 1 Vitesse 1 strobe synchronisé
3 Gobo 2 Vitesse 2 strobe synchronisé
4 Gobo 3 Vitesse 3 strobe synchronisé
5 Gobo 4 Programme stroboscopique 1
6 Gobo 5 Programme stroboscopique 2
7 Changement synchronisé de gobos
identiques
8 Changement synchronisé de gobos
différents
9 Statique Programme stroboscopique 5
Rappel des programmes intégrés:
-Sélectionnez le(s) projecteur(s) désiré(s) grâce aux touches de sélection des projecteurs (15) "1 à 4" (la
diode électroluminescente doit être allumée)
-Sortez de la fonction repos en appuyant sur la touche (14) "BLACKOUT" (diode éteinte)
-Sélectionnez l'un des programmes intégrés (des numéros 11 à 30)
Sélection du mode de contrôle
Par la touche de sélection du mode de contrôle (12) "AUDIO/PULSE"
-Position "PULSE" (diode éteinte): les projecteurs travailleront à la vites se qui a été déf inie par l'interm édiair e
de la fonction speed.
-Position "AUDIO" (diode allumée): les mouvements des mirroirs sont commandés par le rythme de la
musique (basse)
ATTENTION: Pour permettre un contrôle par le son, le contrôleur doit être connecté à une s ortie son (table
de mixage, sortie écouteurs...). Si un signal son n'est pas disponible, les mirroirs ne bougeront pas en
position "AUDIO".
Changement de la vitesse en mode pulse:
La touche (10) "SPEED" n'est active qu'en mode progr amm e ou program m ation. Appuyez sur la touche (10)
"SPEED": la valeur actuelle s'affiche et peut être c hangée grâce aux touches (8) "UP/DO WN" de la section
"OPERATING MODE"
Programme stroboscopique 3
Programme stroboscopique 4
Diode "SELECT" éteinte
sélection de l'effet stroboscopique
Enchaînement des programmes:
Sélectionnez d'abord le programme désiré et appuyez sur la touche (9) "PROGRAM". Un point apparaît sur
l'affichage à côté du numéro du programme. Sélectionnez les programmes que vous désirez combiner; à
l'aide des touches (8) "UP/DOWN" et confirmez chacun d'entr'eux et appuyant sur la touche (9)
"PROGRAM". Les programmes sélectionnés et mémorisés défileront à la suite les uns des autres dans
l'ordre croissant de leur numéros. Les programmes seront lus dans cet ordre sans interruption jusqu'à ce que
la touche (9) "PROGRAM" soit à nouveau enfoncée et que le point n'apparaisse plus sur l'aff ic hage à c ôté du
numéro du programme.
ATTENTION: L'enchaînement des programmes n'est pas mémorisable. Ces données seront perdues
lorsque l'appareil aura été éteint.
Programmation:
Choisissez l'un des programmes libres (1 à 10) à l'aide des touches de sélection des programmes (8).
Appuyez sur la touche (11) "WRITE". "00" CLIGNOTE sur l'affichage. Sélectionnez un scanner avec la
touche de sélection des projecteurs (15); la diode électroluminescente correspondante doit clignoter.
16
Page 17

Pressez la touche (10) "SPEED" pour déterminer la vitesse. La vitesse actuelle apparaît sur l'affichage.
Choisissez par exemple la vitesse standard 5; elle permet d'avoir une haute fréquence de mémorisation (10x/
sec.) et une durée de programmation courte. Cette vitesse et donc idéale pour programmer des mouvements
lents puisque la haute fréquence de mémorisation permet d'obtenir des mouvements doux et réguliers.
Choisissez la vitesse désirée entre 1 (50x/sec) et 99 (1x/2sec).
Choisissez les gobo et strobo ainsi que les couleurs grâce aux touches correspondantes (3, 5 et 6)
Mettez le mirroir dans la position de départ désirée à l'aide du joystick (16).
Attention: Une fois que vous aurez préssé la touche (11) "WRITE", la programmation sera activée.
Pressez le touche (11) "WRITE". "--" apparaît sur l'affichage. Utilisez maintenant le joystick pour faire
effectuer aux mirroirs les mouvem ents désirés et changez les param êtres à votre guise. Lorsque vous avez
terminé la programmation, pressez une nouvelle fois la touche (11) "WRITE". Si cette touche n'est pas
préssée une seconde fois, la progr ammation sera achevée lorsque la capacité de mémorisation m aximale
sera atteinte (indépendamment de la vitesse choisie)
Attention: Ces programmes ne sont m émorisés que superf iciellement. Ils seront perdus dès que l'appareil
sera éteint.
Raccourcir un programme libre:
Choisissez le programme désiré grâce à la touche de sélection des programmes (8). Choisissez le projecteur
désiré grâce à la touche (15) de sélection des projecteurs. Les diodes correspondantes doivent rester
allumées. Pressez la touche (11) "WRITE". Le programme commence à défiler et "--" apparaît sur l'affichage.
Terminez le programme à l'endroit désiré en pressant une seconde fois sur la touche (11) "WRITE".
Effacement des programmes libres (RESET):
Attention: Les dix programmes libres seront effacés. Les vingt programmes intégrés resteront mémorisés.
Etteignez et rallumez le contrôleur. Pendant la phase de test des diodes, enfoncez la touche (9) "PROGRAM"
et maintenez la enfoncée jusqu'à ce que toutes les diodes électroluminescentes clignotent puis pressez la
touche (11) "WRITE" pour confirmer le reset.
CHARACTÉRISTIQUES TÉCHNIQUES CP16:
Alimentation
Puissance nominale
Fusible
Entrée son
Impédance
Sortie DMX
Contacts prise
Dimensions
Poids
Attention! Les caractéristiques techniques sont susceptibles d’être modifiées sans préavis.
12/96 © Caractéristiques techniques sous réserves d’erreurs au de fautes de frappes.
230V/50Hz
10VA
100mA à action retardée
Fiche Jack mono 6,3mm
15KOhm
Fiche Jack stéréo 6,3mm
DMX-512, canaux 1-16
Tip=Data+, Ring=Data-, Sleeve=Masse
483 x 88 x 80 mm
1,7 kg
17
 Loading...