


The Gold Standard in Teat Prep
User Guide
For FutureCow ELITE & ELITE2
Includes Product Manual and Troubleshooting Guide
Revision 3.0

CONTENTS
1 ABOUT THIS GUIDE .................................................................................................................................................. 3
1.1 USERS ..................................................................................................................................................................... 3
1.2 PURPOSE ................................................................................................................................................................ 3
1.3 SCOPE ..................................................................................................................................................................... 3
1.4 S
2 INTRODUCTION ......................................................................................................................................................... 4
AFETY..................................................................................................................................................................... 3
2.1 S
2.2 G
YSTEM DESCRIPTION ............................................................................................................................................. 4
ENERAL GUIDELINES ............................................................................................................................................. 4
3 WARRANTY ................................................................................................................................................................. 5
3.1 G
ENERAL.................................................................................................................................................................. 5
4 SETUP, USAGE, MAINTENANCE ............................................................................................................................ 6
4.1 S
CREEN NAVIGATION BASICS .................................................................................................................................. 6
4.1.1 FUNCTION KEYS ............................................................................................................................................ 6
4.2 T
EAT SCRUBBER SETUP ........................................................................................................................................... 7
4.2.1 DRYTIME/OVERLOAD ................................................................................................................................... 8
4.2.2 COW COUNT SETTINGS ................................................................................................................................ 9
4.2.3 DATABASE SETTINGS .................................................................................................................................... 9
4.2.4 DATA TABLE DISPLAY ................................................................................................................................ 10
4.2.5 NETWORKING .............................................................................................................................................. 10
4.2.6 MICRO SD CARD .......................................................................................................................................... 12
4.3 L
4.4 U
OGIN AS MAINTENAN CE ...................................................................................................................................... 13
PGRADI NG SOFTWARE ......................................................................................................................................... 13
5 PARTS LIST ................................................................................................................................................................ 14
6 TROUBLESHOOTING GUIDE ................................................................................................................................ 15
7 TECHNICAL SPECIFICATIONS ............................................................................................................................ 17
7.1 C
7.2 ELITE
7.3 ELITE²
ONTROL BOX TECHNICAL DATA ......................................................................................................................... 17
CONTROL BOX SCHEMATIC ....................................................................................................................... 18
CONTROL BOX SCHEMATIC ...................................................................................................................... 19
2 | Page
FutureCow User Guide Copyright © 2018 Alpha
Revision 3.0 Technology USA Corporation

1 ABOUT THIS GUIDE
1.1 USERS
This guide is intended for users of different degrees of knowledge and experience with the FutureCow ELITE and ELITE
system:
Users: Users can learn how to operate the FutureCow ELITE products, including but not limited to, using the
PLC, priming the pump, general maintenance and troubleshooting.
Technicians: Technicians should refer to this manual for setup and/or troubleshooting instruction prior to
contacting a FutureCow representative for assistance. Should an issue arise that is not detailed in this
manual, contact Alpha Technology at 855-388-7269.
1.2 PURPOSE
The purpose of this document is to define the functionality, operation and maintenance of the FutureCow ELITE line of
systems that has been manufactured by Alpha Technology. This document serves as a reference for the system functionality and operation to be delivered by the FutureCow ELITE system to the end-user. Any change to the scope of functional
or operational specifications require prior agreement from Alpha Technology. This manual should be read in its entirety
before installing the system. It should be kept on-hand to be referenced for maintenance and ordering replacement parts
throughout the life of the system.
2
1.3 SCOPE
The purpose of this manual is to provide an overview of the FutureCow ELITE line of systems; features, benefits, overall
use and maintenance. Additionally, this document serves to reiterate the covenants of the sales agreement regarding
Intellectual Property and Warranty in that Alpha Technology possesses comprehensive intellectual property rights of the
FutureCow line of products as an integrated system, as well as the individual components thereof. No license for the
use of the product has been granted except for the right of beneficial use to be expressly limited to this purpose, at the
location to which the product has been installed. It is understood that the sale or lease of the product or any component thereof to a third party is expressly prohibited.
1.4 SAFETY
• Keep out of reach of children.
• Entanglement hazard - Use caution when working around the teatscrubber brushes and secure any loose
jewelry, long hair, and clothing.
• Chemical solution is harmful if swallowed. Avoid contact with skin or eyes. Use in a well-ventilated area.
• Wear all suggested safety gear when handling the chemical solution.
• In case of spill, flood with large amounts of water prior to discarding to drain.
• The level of sound emitted by the Teatscrubber is 58 db.
FutureCow User Guide Copyright © 2018 Alpha
Revision 3.0 Technology USA Corporation
3 | Page

2 INTRODUCTION
2.1 SYSTEM DESCRIPTION
As a global leader in dairy innovation, Alpha Technology is the manufacturer of the FutureCow ELITE line of controls as
well as the FutureCow line of Teatscrubbers. The FutureCow ELITE control panel has been designed to provide a reliable
way to operate your FutureCow Teatscrubber and to provide improved data management capabilities. The Elite line of
controls feature a Programmable Logic Controller (PLC), allowing users to accurately track the number of cows that have
been prepped correctly as well as chemical consumption. It is easy to use and easy to incorporate with any FutureCow
Teatscrubber system.
2.2 GENERAL GUIDELINES
Regular attention and maintenance to the system will ensure efficient and reliable operation.
The FutureCow ELITE line of systems is intended for use on dairy cows.
During service or electrical maintenance, incoming power to the FutureCow ELITE must be disconnected.
The ongoing setting of the PLC is the sole responsibility of the user; however, we strongly suggest adherence
to the recommended settings given by the manufacturer to prevent equipment damage.
It is the responsibility of the user to change the brushes when necessary. It is recommended to replace the
top brushes every 10,000 milkings and the bottom brush every 20,000 milkings, or every other brush change.
It is the responsibility of the user to order and replace broken or worn parts when necessary.
It is the responsibility of the user to track the chemical levels and order new chemical when necessary.
It is the responsibility of the user to follow all suggested safety precautions when handling the chemical
solution. Refer to the Safety Data Sheets included in this guide for further instructions.
FutureCow User Guide Copyright © 2018 Alpha
Revision 3.0 Technology USA Corporation
4 | Page

3 WARRANTY
3.1 GENERAL
A. For three (3) years from initial installation, FutureCow warrants proper functioning of the control system which actuates
the moving, replaceable parts of the Product. Tubing and plumbing fittings are warranted for (30) days against defects
and all other external components are warranted against defects in material and workmanship for a period of six (6)
months. FutureCow warrants proper functioning of the scrubber unit for up to 200,000 milkings or thirteen (13) months
from the date of shipment from FutureCow warehouse, whichever occurs first. The additional, replaceable parts and
constituent parts are warranted for thirty (30) days. This warranty does not apply to defects resulting from any Customer
actions, such as mishandling, operation outside of design limits, misapplication, improper repair, opening sealed units or
parts, or unauthorized modification. FutureCow reserves the right to amend its warranty at any time upon notice to its
customers. FutureCow will not be obligated to honor any warranty unless it has been paid in full for the Products. ANY
AND ALL OTHER WARRANTIES, INCLUDING WITHOUT LIMITATION THE IMPLIED WARRANTIES OF MERCHANTABILITY AND
FITNESS FOR A PARTICULAR PURPOSE, ARE HEREBY EXPRESSLY EXCLUDED.
B. Notwithstanding anything to the contrary in this Agreement or any applicable FutureCow warranty, no warranty of any
kind shall attach or apply in any fashion to loss claimed to be attributable to the condition of dairy animals cleaned by any
Product, including infectious diseases, mastitis, changes or elevations in somatic cell count, standard platelet count, or
any other factor that may affect the salability, merchantability, or price of the milk produced. In addition, any injuries or
loss of productivity claimed to be attributable to the functioning of the Product are hereby excluded.
C. Buyer acknowledges that component parts and chemical agents provided are an integrated system specifically engi-
neered to function together. In the event that Buyer utilizes or permits the use of any component part, device, or
chemical agent not provided or authorized by FutureCow with any Products, the terms of FutureCow’s warranty shall
be null and void ab initio, and of no legal force or effect.
D. Buyer's remedy for breach of warranty is hereby expressly limited to repair or replacement of defective parts at no
additional cost. No other remedy at law or equity shall be actionable in any forum. All additional components of claimed
damage, such as claims for lost profits or other consequential, special, indirect, incidental and exemplary (punitive)
damages are hereby excluded even if FutureCow has been advised of the possibility of such damages. FUTURECOW’S
MAXIMUM LIABILITY HEREUNDER SHALL NOT EXCEED THE AGGREGATE DOLLAR AMOUNT PAID BY BUYER FOR THE
PURCHASE OF THE PRODUCTS AT ISSUE.
FutureCow User Guide Copyright © 2018 Alpha
Revision 3.0 Technology USA Corporation
5 | Page
- Enter
4 SETUP, USAGE, MAINTENANCE
4.1 SCREEN NAVIGATION BASICS
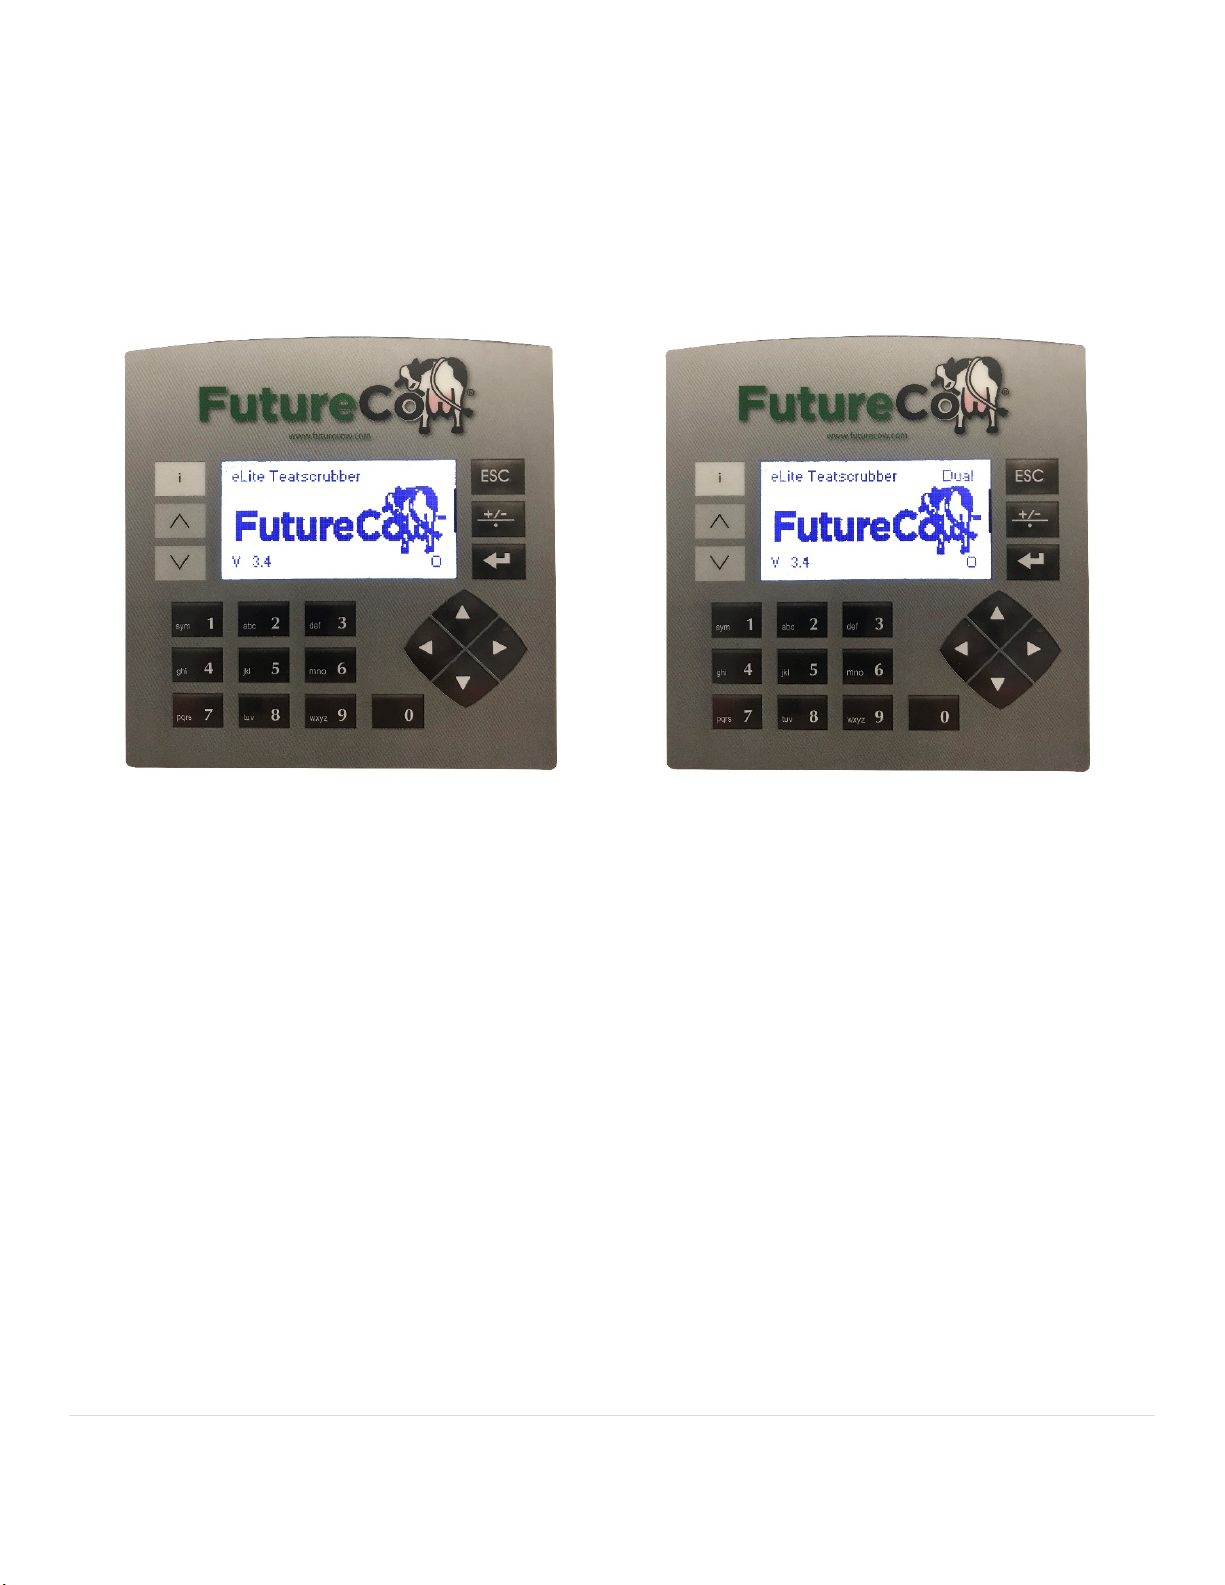
The Home screen on your PLC will display the product description, Future Cow logo, and the current software revision.
Figure 1 Figure 2
4.1.1 FUNCTION KEYS
ESC - Return to home page
˄/v – Scroll through TS pages
i - Help screens
Arrow keys – Used to navigate data entry fields
+/- Used to toggle a specific function on defined screens.
↵
FutureCow User Guide Copyright © 2018 Alpha
Revision 3.0 Technology USA Corporation
6 | Page

4.2 TEAT SCRUBBER SETUP
Your Elite control panel is preset to Eastern Standard Time. To change the time press and hold the “i” button (Figure 3)
for 5 seconds. Input the password: 1111. Press Enter (Figure 3). Press #2: System (Figure 3.1). From the system screen
press #4: Time and Date (Figure 3.2). Set time and date by using the number pad. Press enter to save the new time and
date in 24-hour format (Figure 3.3). Press ESC until you return to the home screen.
Figure 3 Figure 3.1
Figure 3.2 Figure 3.3
Figure 3.2 Figure 3.3
Figure 3.2 Figure 3.3
FutureCow User Guide Copyright © 2018 Alpha
Revision 3.0 Technology USA Corporation
7 | Page

• From the home screen, press the ˄ button to navigate to the Teatscrubber Monitor screen. (Figure 4)
2
• For the Elite
, Scrubber A is the unit plugged into the left side of the control panel. Scrubber B is the unit plugged
into the right side of the control panel. (Figure 4.1)
Figure 4 Figure 4.1
• Motor X.X A is the live reading of the brush motor load as measured in amps.
• Wet Count is the count of the number of teats cleaned with disinfectant solution while the trigger is held down.
(This is for informational purposes only)
• Dry Count is the count of the number of teats dried while the trigger is released. (This is for informational purposes
only)
• Cows is a live count of cows prepped properly using the settings on the COW COUNT SETTINGS screen. To get a
cow count, the preset number of teats must be cleaned with the trigger held down followed by being dried with
the trigger released. Each pull of the trigger will reset the count.
4.2.1 DRYTIME/OVERLOAD
• Press ˄ to navigate to the next screen, TEATSCRUBBER SETTINGS.
o Dry Time is the duration of time the brushes run after the trig-
ger is released. This is preset at 8 seconds. To make changes
to this screen you must first be logged in as maintenance. (Refer to section 6.3)
o Overload is a safety feature to prevent injury to the cow/user
and is preset at 5.0 Amps, the maximum setting. If the amp
draw of the teatscrubber reaches the overload amps, the
brushes will stop turning. This may happen if loose clothing or
a tail become caught.
FutureCow User Guide Copyright © 2018 Alpha
Revision 3.0 Technology USA Corporation
8 | Page

4.2.2 COW COUNT SETTINGS
• Press ˄ to navigate to the COW COUNT SETTINGS screen.
o You will calibrate the Teatscrubber in this screen.
o Ensure that the Teatscrubber head is free of obstructions
and the brushes are clear. Do not calibrate the Teatscrubber in a bucket of water or with a load applied to the
brushes, as it will register higher no-load amps, which will
result in improper functionality of the cow count feature.
o Press #1 to calibrate scrubber A and #2 for scrubber B on
the Elite².
o The brushes will rotate for 3 seconds and the No Load amps
value will be updated. This is the amps drawn by the teatscrubber under no load.
o It is recommended to do this periodically and whenever in-
stalling a new scrubber to compensate for mechanical
wear.
o Teat High reflects the No Load amps plus the Teat Thresh-
old (Thshld) percentage. This is the value in amps that reg-
isters the load of a teat in the brushes to count cows.
o # Teats is the number of teats that must be prepped with
the wash cycle followed by the dry cycle to achieve 1 cow
count. This value is adjustable between 2-4 teats. This is the number of teats that must be sequentially
washed with the trigger held down followed by being dried with the trigger released before counting a
prepped cow.
o NOTE: The Algorithm used for cow counting is designed to count ONLY properly processed cows using the
Future Cow Teat Scrubbing System. If operators use different prep routines that significantly vary from
the prescribed method called out in this procedure, the cow counting results may vary as well.
4.2.3 DATABASE SETTINGS
• Start Time is the start time of each milking. For only 2 shifts, set shift 3 start time equal to shift 2 start
time.
• Expected Cows is the expected number of cows to be processed per shift.
• Flow Rate is the amount of chemical dispensed per minute in milliliters. This must be calibrated if you
intend to track the flow rates. To calibrate, hold the trigger down on the scrubber for one minute while
collecting the chemical solution in a bucket. Measure the amount of chemical dispensed and input the
number. Repeat for each side if using an ELITE², or whenever a pump has been replaced.
• Auto Calibrate is an automatic calibration feature for the Teatscubber. The Teatscubber will automatically
calibrate after ten minutes in an idle state, if within a 20% range of last calibration. The percentage may
be changed by the user.
FutureCow User Guide Copyright © 2018 Alpha
Revision 3.0 Technology USA Corporation
9 | Page

4.2.4 DATA TABLE DISPLAY
• Data is saved at the end of each shift and a select group is dis-
played on this screen. A total of 1-year (3 shifts) of accumulated
data is stored internally in the PLC and is available to scroll
through using the up /down arrow keys. Note that the date is in
DD/MM format. Data is also saved in a *.CSV file if the micro SD
card is installed in the PLC. A new file is created at the beginning
of each year. These files can be read by removing the SD card
and inserting it into a computer. You should always power down
the PLC when removing the SD card. Detailed information on the
logged data can be found under Micro SD Card in the ensuing
pages.
4.2.5 NETWORKING
• The unit can be connected to a network to view data in real
time and access the data base. This may be done using the
local network or remotely if desired, allowing for viewing with
a computer or mobile device. To network to the Elite or Elite²:
o Run an ethernet cable to the panel and plug into the
ethernet port on the PLC. For multiple panels, an
ethernet switch may be used to eliminate the need to
run multiple ethernet cables.
o Find an unused IP address on the network. This can
be done using the Command Prompt tool on your
computer. Open Command Prompt, type “arp -a”
then hit enter. This is a list of all used IP addresses on
your network. The last 3 digits range from 1 to 255.
Pick an unused number from these digits to use for
the PLC.
o On the PLC, press and hold the “i” button until the password screen comes up. Input the password
(1111) and press the Enter key.
o Select Communication by pressing the number 3 from the Info Main Menu.
o Select Ethernet by pressing the number 2 from the Communication screen.
FutureCow User Guide Copyright © 2018 Alpha
Revision 3.0 Technology USA Corporation
10 | Page

o Select IP by pressing the number 4 from the Ethernet screen.
o Highlight IP using the Up/Down arrows on the directional pad and press Enter.
o Input the IP address that was determined to be unused from above. Press Enter. Verify that the
PLC is being communicated with by using Command Prompt from your computer. Type ping followed by a space and the IP address used for the PLC. You should receive a reply and ping statistics. If the request is timed out, the PLC is not being communicated with. Verify the IP addresses
before attempting again.
o Once a connection has been established, type the IP address of the PLC into your browser to pull
up real time data. This can be done from any device when connected to the network.
o Below is an example of the published webpage.
FutureCow User Guide Copyright © 2018 Alpha
Revision 3.0 Technology USA Corporation
11 | Page

Date DDMM Shift A - Cow count A - Expected Cows A - ratio A - Chemical Min
A - mL/cow A - Brush min A - Cows/Min A - NoLoad Amps Time HHMM
Panel S/N
1711
1 778 1000 77.8
64.83333333 800 181.533333 1.620833333 1.53 1500 5555
1711 2 800 1000
80 66.66666667
800 186.666667 1.666666667 1.41 2300 5555
1711 3 923 1000 92.3 76.91666667 800 215.366667 1.922916667 1.41 700 5555
1811 1
827 1000 82.7 68.91666667 800 192.966667 1.722916667 1.29 1500 5555
1811 2 763 1000 76.3 63.58333333 800 178.033333 1.589583333
1.26
2300 5555
1811 3 915 1000 91.5 76.25 800 213.5 1.90625 1.17 700 5555
1911 1 912 1000 91.2 76
800 212.8 1.9 0.98 1500 5555
1911 2 875 1000
87.5 72.91666667 800 204.166667 1.822916667 0.96 2300 5555
1911
3
903 1000
90.3 75.25 800 210.7 1.88125 0.93
700 5555
4.2.6 MICRO SD CARD
• It is also possible to retrieve the logged data from the PLC without networking by removing the Micro SD
card located on the side of the PLC and inserting it into your computer.
o Turn off the power and remove the Micro SD card from the PLC. This is located on the left side of
the PLC inside the panel.
o Insert the Micro SD card into your computer. In most cases, a Micro SD adapter will be required.
o Under my computer, open the SD removable storage device titled ELITE.
o Open the file titled EXCEL.
o Open the file titled EXCEL1.
o Open the file under this folder. The file name will reflect the year in which the data was logged.
• The following data is stored on the SD card:
o Date - Date of logged data in DD/MM format.
o Shift – The shift number of the logged data.
o Cow Count - Number of cows prepped correctly. Resets on shift change.
o Expected Cows - Number of cows expected to be processed per shift.
o Ratio - Percentage of the number of cows prepped correctly vs the number of expected cows.
o Chemical Minutes – The total amount of time in minutes that the trigger was held down with
disinfectant solution flowing.
o mL/Cow – The average amount of disinfectant solution used per cow.
o Brush Minutes – The total amount of time in minutes the Teatscrubber ran.
o Cows/Minute – The average number of cows processed per minute. The number reflects the cow
count divided by the length of the shift.
o No Load Amps – The calibrated no load amp draws of the Teatscrubber per shift.
o Time HHMM - The time the data was logged from the shift. It will always be at the beginning of
the next shift.
o Panel S/N – The serial number of the panel, if configured.
o PPM Setpoint, pH Setpoint, and pH Measured are unused.
o An example of the data in Excel is shown below.
FutureCow User Guide Copyright © 2018 Alpha
Revision 3.0 Technology USA Corporation
12 | Page

4.3 LOGIN AS MAINTENANCE
• You will need to login as maintenance to gain access and enter changes to the parameters on the PLC.
• Press ^ to navigate to the Login screen.
• Press the enter key to input the password (923). Press the enter key. The screen should change to read “Logged
in Maintenance”.
• Note that to log out of maintenance you must return to the login screen to change back to Operator.
• Press ESC to get back to the home screen. Note that the bottom right of the home screen will display “M” when
in maintenance mode, and “O” when in operator mode.
• Press ^ to navigate to the desired screen.
• Use the left arrow to scroll up and the right arrow to scroll down.
• Use the enter key to select the value. After changing, press enter to save the value.
4.4 UPGRADING SOFTWARE
• Turn off control panel
• Insert new micro SD card into slot in rear of PLC
• Turn on control panel
• Press and hold the “i” button until “ENTER PASSWORD” appears
• Enter the password “1111” and press the ENTER button
• Press number 2 for SYSTEM
• Press number 7 for SD
• Press number 1 for RESTORE FROM SD
• Press number 5 for CLONING
• Choose the latest file if more than one is listed. They are listed by date.
• Confirm by pressing ENTER button.
FutureCow User Guide Copyright © 2018 Alpha
Revision 3.0 Technology USA Corporation
13 | Page

Alpha Part #
GEA Part #
Item Description
E-FEMINST
7751-6600-505
Plug Insert, Female 6 Pin
E-PANELVR
7751-6600-029
Panel Lever
861SSR115-DD
7751-6603-114
DC Solid State Relay
CA202
7751-6600-128
End Stop
CGT4U
7751-6600-134
Terminal Block, Ground, Green/Yellow
CTS2.5U-N
7751-6600-137
Terminal Block, Gray
SDR-240-24-7
7751-6600-240
Power Supply
E-POWCHD
7751-6602-101
Power Cord
VX232HZ2ALXB
7751-6600-035
24VDC Solenoid
E-MALECONNTR
7751-6600-251
Taper Male Connector
CB-1/2CDGRP
7751-6603-105
1/2" Cord Grip w/Nut
E-CB1AMP
7751-6600-021
Circuit Breaker, 1A
E-CB6AMP
7751-6600-942
Circuit Breaker, 6A
E-CB10AMP
7751-6600-138
Circuit Breaker, 10A
R-TBNG-THV
7751-6600-705
1/4" THV Tubing
CM-V130-J-RA22
7751-6600-139
PLC, 24VDC
E-CR5211-5
7751-6600-057
Current Transducer
TS-120019
7751-6600-874
Solenoid Bracket
E-1/4F-T-STRAINER
7751-6602-514
1/4" Female T-Strainer
E-51205K132
7751-6600-133
1/4" x 1/4" SS Hex Nipple
E-F4ME2
7751-6600-130
Elbow, 1/8" MNPT x 1/4" PTC, Kynar
E-KQG2E07-N02
7751-6600-131
Bulkhead, 1/4" FNPT x 1/4" PTC, SS
E-F4ME4
7751-6600-140
Elbow, 1/4" MNPT x 1/4" PTC, Kynar
E-1/4PTC-TEE
7751-6600-129
Tee, 1/4" PTC, Kynar
E-4GBSD
7751-6600-141
4GB Micro SD Card
E-SOL-PLUG-A
7751-6600-135
Solenoid Plug Assembly
E-KNFASM
7751-6601-065
KNF Pump Assembly
E-KNFBLADERASSEM
7751-6600-065
KNF Bladder Assembly
5 PARTS LIST
FutureCow User Guide Copyright © 2018 Alpha
Revision 3.0 Technology USA Corporation
14 | Page

Problem
Possible cause
Solution
Check Power. Open case
Check breakers CB1, CB2, or
Substitute with another
Remove plug housings at
Brushes run when Trigger is not
Trigger assembly in gun likely
Return down scrubber and
6 TROUBLESHOOTING GUIDE
No Power to Unit
Tripped Circuit Breaker
door and check if indicator
light is on power supply. If
yes, unit has power. If no,
unit does not have power.
Check that power switch is
on. Check that outlet has
power.
CB3 are on. If tripped, reset
by pushing toggle lever up.
The window is RED when
on.
Pull Trigger and nothing happens.
pulled
Scrubber Unit may be broken
Wiring in Plug housings both in
Parlor and Control Box unit
shorted
scrubber unit. If new unit
works, 1st scrubber is bad
and needs to be returned
and replaced. If 2nd gun
does not work, check wiring.
both locations and check
connections. Roll wires in
places and look for any broken wires. Also check if
contact pins are corroded.
Replace plugs if this is the
case.
replace with new one.
FutureCow User Guide Copyright © 2018 Alpha
Revision 3.0 Technology USA Corporation
15 | Page

Check the cabling between
Use a 2nd scrubber unit. If
The pump and solenoid
Solenoid broken
Replace with new solenoid
Disconnected solution line
Check connection
Check for and remove any
Tripped Fuses
Reset
Motor runs, brushes do not turn.
Broken gear in assembly
Replace scrubber
Pull Trigger and solution starts but
brushes do not spin.
Pull Trigger and brushes spin but
there is no solution flowing.
Malfunction occurs with multiple units
Broken scrubber unit
Water pump not on
Blocked solution line
the control panel and the
teat scrubber.
unit works fine, 1st scrubber
unit is bad and needs to be
returned and replaced.
should both be on. If solenoid is on but pump is not,
the pump may be faulty.
blockage of fluid line.
FutureCow User Guide Copyright © 2018 Alpha
Revision 3.0 Technology USA Corporation
16 | Page

7 TECHNICAL SPECIFICATIONS
7.1 CONTROL BOX TECHNICAL DATA
Input: 115 – 265 VAC, 50/60 Hz, 6 Amp
Output: 24 Volts DC @ 10 amps, current limited
Maximum Flow Rate: 38 oz/min
Wall Plate: 14” W x 30” H, 316 Stainless Steel
Mounting Holes: 10.5” W x 28.25” H,
Plumbing Type: Chemically resistant plastic & Elastomers
FutureCow User Guide Copyright © 2018 Alpha
Revision 3.0 Technology USA Corporation
17 | Page

7.2 ELITE CONTROL BOX SCHEMATIC
FutureCow User Guide Copyright © 2018 Alpha
Revision 3.0 Technology USA Corporation
18 | Page

7.3 ELITE² CONTROL BOX SCHEMATIC
FutureCow User Guide Copyright © 2018 Alpha
Revision 3.0 Technology USA Corporation
19 | Page
 Loading...