

Page 1
Page 2
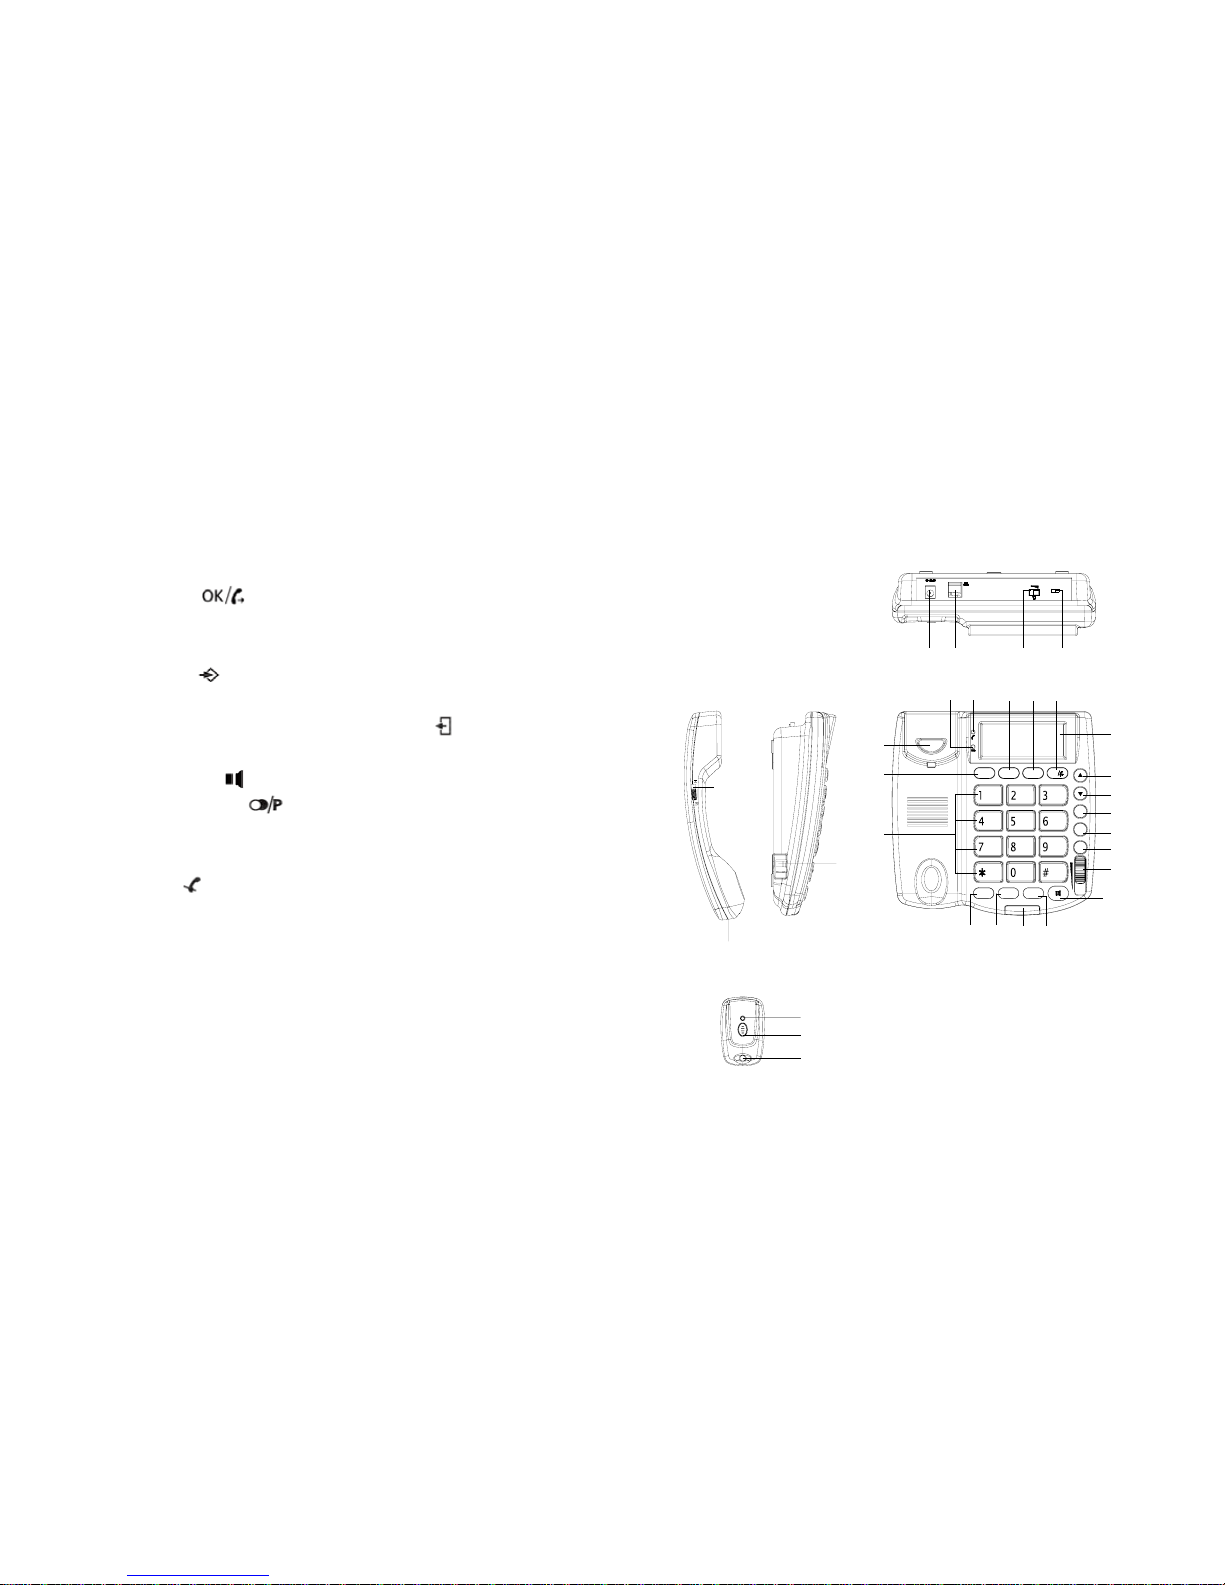
2 Buttons/connections
(See picture)
1. LCD display
2. Direct memory keys M1
3. Direct memory 911 keys
4. OK/dial key ( )
5. Up key (▲)
6. Down key (▼)
7. MENU key ( )
8. Delete key (Ø)
9. Phonebook / Caller ID list / Exit select key (
)
10. Handsfree volume
11. Handsfree key ( )
12. Redial/Pause key ( )
13. Ringer LED
14. Flash key ( R)
15. Mute key ( )
16. Curl cord connector (RJ9)
17. Numeric keypad
18. SOS key
19. Low battery/No battery LED
20. Hook switch
21. In-use LED
22. Menu key ON/OFF switch
23. Ringer volume switch
24. Line connection (RJ11)
25. Power adapter connection
26. Curl cord connection (RJ9)
27. Handset volume switch
28. Wireless pendant
29. Pendant SOS button
30. Pendant transmission LED
17
12131415
5
6
7
8
9
10
11
1
18
20
24
19
21 3
22232425
ON/OFF
MENU
OK911M1
SOS
DC 9V
WXYZ
TUVPQRS
GHI JKL
MNO
DEF
ABC
PRO
DEL
PB/D
RD/PFLASHMUTE
30
29
28
27
26
16
2 / 11
Page 3

3 Installation
Put batteries in the battery compartment to activate the display:
z Open the battery compartment at the bottom of the unit.
z Insert 4 Alkaline AA (LR06,1.5V) batteries.
z Close the battery compartment.
z Connect one end of the line cord to the telephone line wall
socket and the other end to the backside of the telephone.
z Connect the power adapter to the connection at the back panel
and to an available power socket.
Note:
z If you do not install the batteries the Low battery/No battery LED
will stay flashing until you do so.
z When replacing batteries, pick up the handset first, and then replace
the batteries, otherwise time clock setting will be lost.
4 Description of display
Upper line displays the basic information, middle line displays the
number and bottom line displays the name of caller
z “ ” means Low or No battery indicator
z “REPEAT” means the repeat of the incoming call
z “VOICE” means voice reporting indicator
z “NEW” appears when there are new incoming calls
z “SOS” means emergency calls indicator
z “XX:XX XX/XX” means Hour: Minute and Month/Date
respectively
z “ ” means phonebook indicator
z “CLIP” means incoming Caller ID list
z “CALL #” means the total amount of incoming calls
A. If the time and date of incoming call is different from the Telephone
Company, the telephone will adjust the time and date automatically
according to Telecom Provider when receiving calls.
B. If there is no operation or no incoming calls more than 20 seconds, LCD
only displays time and date, total amount of received calls and amount of
new incoming calls.
The telephone line needs to be disconnected prior to
opening the battery door!
C. This telephone can store up to 64 incoming calls. If there is a new
call after the 64th call, the oldest one will be erased automatically
and the new call will be stored.
5 Settings
Setting MENU item for select MENU switch (22) to ON.
The setting menu including:
z LCD Contrast (see 5.3)
z Enter Time/Date (see 5.4)
z Store Number (see 5.8)
z Name Recording (see 5.9)
z Record Message (see 5.10)
z Check Message (see 5.11)
z LCD Language (see 5.1)
z Voice (see 5.2)
z Set Flash Time (see 5.7)
z Set Dial Mode (see 5.6)
z Pair New Pendant (see 5.12)
3 / 11
Page 4
z Local Area Code (see 5.5)
5.1 Language Setting
The telephone has eleven display languages: English(ENGLISH),
French(FRANCAIS), German(DEUTSCH), Spanish(ESPANOL),
Italian(ITALIANO), Dutch(NEDERLANDS),Swedish(SVENSKA),
Finnish(SUOMI), Danish(DANSK), Polish(POLSKI) and
Portuguese(PORTUGUES).
To select the language please go through the following steps:
z Press .
z Press 6 x ▲ to select “LCD LANGUAGE”.
z Press to enter the settings.
z Now use ▲ and ▼ to select the languages.
z Press to confirm.
z Press to leave the menu.
5.2 Voice guidance
The telephone has a voice guided menu and will also repeat every
dialed digit by voice.
You can select out of six different voice languages:
English(ENGLISH), French(FRENCH), German(GERMAN),
Spanish(SPANISH), Italian(ITALIAN), Dutch(DUTCH) or you can
disable the voice.
z Press .
z Press 7x ▲ to select “VOICE”.
z Press to enter the settings.
z Now use ▲ and ▼ to select the voice guidance.
z Press to confirm.
z Press to leave the menu.
5.3 LCD contrast
You can set the LCD display contrast to 5 different levels:
z Press .
z Press to select “LCD CONTRAST”.
z Now use ▲and ▼to select the best level.
z Press to confirm.
z Press to leave the menu.
5.4 Enter the time and date
When you have a subscription to the Caller ID service and your
telephone provider sends the date and time together with the
telephone number, the phone’s clock will be set automatically.
z Press .
z Press 1 x ▲ to select “ENTER TIME/DATE”.
z Press to enter the settings.
z Now use ▲ and ▼ to change the hour.
z Press to confirm.
z Use ▲ and ▼ to change the minutes.
z Press to confirm.
z Use ▲ and ▼ to change the month.
z Press to confirm.
z Now use ▲ and ▼ to change the date.
z Press to confirm.
z Press to leave the menu.
If you don’t want voice guidance you can select
“VOICE NO”.
5.5 Set the area code
When you have a subscription to the Caller ID service it can be
4 / 11
Page 5

necessary in some countries to enter your area code. When the
telephone receives a Caller ID it will remove the entered area
code from the incoming number.
You can set up to 5 digits for the area code.
z Press .
z Press 1 x ▼ to select “LOCAL AREA CODE”.
z Press to enter the settings.
z Now use ▲ and ▼ to change the digit.
z Press to move to the next digit.
z Repeat this sequence until all digits are set. Leave unused
digits as “-”.
z Press to leave the menu.
5.6 Set the dial mode-Pulse or Tone (DTMF)
The telephone can dial in Tone (DTMF) or Pulse mode. By default
the telephone is set to Tone (DTMF) mode.
z Press .
z Press 3 x ▼ to select “SET DIAL MODE”.
z Press to enter the settings.
z Now use ▲ or ▼ to select “PULSE” and “TONE”.
z Press to confirm.
z Press to leave the menu.
5.7 Set the flash time
The R-key (flash) is used for services like ‘Call waiting’ (if this
service is provided by your telephone company) or to transfer calls
when the telephone is connected to a PBX-system.
Depending on the country, this flash-time can be different. The
telephone supports 3 possibilities: 100,300,600 msec.
z Press .
z Press 4 x ▼ to select “SET FLASH TIME”.
z Press to enter the settings.
z Now use ▲ or ▼ to select the desired flash time.
z Press to confirm.
z Press to leave the menu.
5.8 Store telephone numbers
5.8.1 Store phonebook numbers
You can store up to 30 phone numbers/names in the telephone.
Each number can be set as an emergency number.
z Press .
z Press 2 x ▲ to select “STORE NUMBER”.
z Press to enter.
z Now enter the telephone number to be stored.
Press Ø to delete a wrong entered digit.
Use ▲ and ▼ to move bask and forward through the number.
z Press to confirm.
z Now enter the name using characters on the numeric keypad.
Press Ø to delete a wrong entered character.
Use ▲ and ▼ to move bask and forward through the entered
characters.
z Press to confirm.
z Now select “EMERGENSY OFF” or “EMERGENCY ON”.
In case of “EMERGENCY ON” you need to select the position of
this number.
- Use ▲ or ▼ to select the position.
- Press
to confirm.
In case you want to overwrite an existing position you will have to
5 / 11
Page 6
confirm “OVERWRITE?” by pressing .
When the number is saved the menu will automatically go to
“NAME RECORDING”.
z Press and hold and wait for the beep.
After the beep, please say the name of the stored contact.
Now release the button to finish the recording.
z Press to leave the menu.
5.8.2 Store a number in the direct memory key (M1)
z Press .
z Press 2 x ▲ to select “STORE NUMBER”.
z Press to enter.
z Now enter the telephone number to be stored.
Press Ø to delete a wrong entered digit.
Use ▲ and ▼ to move back and forward through the number.
z Press to confirm.
z Press M1 key.
z Press to save.
z Press to leave the menu.
Disconnecting 911 Key
As the 911 key is preprogramed from the factory if you need to
disconnect the 911 key you may program any other number you wish
or just the digit “1” into this key by the following.....
z Press .
z Press 2 x ▲ to select “STORE NUMBER”.
“MEMORY FULL” will appear when the maximum of 30
records has been reached.
z Press to enter.
z Now enter the digit “1” or the telephone number to be stored.
Press Ø to delete a wrong entered digit.
Use ▲ and ▼ to move back and forward through the number.
z Press to confirm.
z Press 911 key.
z Press to save.
z Press to leave the menu.
The maximum length of this recording is 3 seconds.
5.9 Name recording
Once a number/name is stored in the telephone you can record
the name.
You can change the name you have recorded while storing a
number/name in previous chapter.
z Press .
z Press 3x ▲ to select “NAME RECORDING”.
z Press to enter.
z Now use ▲ or ▼ to navigate through all stored
number/names.
You will hear the recorded name while navigating
through the stored contacts.
Press Ø to erase the recording.
z When you have selected the contact, press and hold
and wait for the beep. “VOICE” icon is flashing.
z After the beep, please say the name of the stored contact.
6 / 11
Page 7
z Now release the button to finish the recording.
z Press to leave the menu.
5.10 Record message
For SOS calls, the telephone will broadcast a standard
per-recorded message, unless you record your own message.
z Press .
z Press 4 x ▲ to select “RECORD MESSAGE”.
z Press and hold and wait for the beep, “VOICE” icon is
flashing.
z After the beep, please say the message.
z Now release the button to finish the recording.
z Press to leave the menu.
5.11 Check message
The message you recorded in previous chapter can be verified.
z Press .
z Press 5 x ▲ to select “CHECK MESSAGE”.
z Press to listen to the recorded message.
z Press to leave the menu.
5.12 Pair new pendant / Remove pendant
The pendant is registered in the telephone by its ID code. In case
of repair or other reasons it can be necessary to register the
pendant to the telephone. The pendant can also be deleted from
the telephone.
The maximum length of this recording is 3 seconds.
To pair a pendant:
z Press .
z Press 2 x ▼ to select “PAIR NEW PENDANT”.
z Press “PAIRING” will be displayed.
z Press to start the pairing process.
Now press the button on the pendant.
“DONE” will appear if the pairing is successful.
z Press to leave the menu.
To remove a pendant:
The maximum length of this recording is 20 seconds.
z Press .
z Press 2 x ▼ to select “PAIR NEW PENDANT”.
The default message is: “THIS IS AN EMERGENCY CALL,
TO ACCEPT THIS CALL PRES ZERO”
z Press “PAIRING” will be displayed.
z Press ▲ or ▼ to select “DELETE?”.
z Press to delete the pendant.
z Press to leave the menu.
6 Using the telephone
During a call the In-Use LED will brightness.
6.1 Making a call
z Enter the telephone number.
To erase the recording, press Ø during playback.
z Press Ø to delete a wrongly entered digit.
7 / 11
Page 8
z Pick up the handset or press or to make a
hands-free call.
Or
z Pick up the handset or press to off-hook state.
z Enter the telephone number.
The call duration timer will start in the display 4 seconds after the
number was dialed.
6.2 Receiving a call
z When a call comes in, the phone will ring and the ringer LED
will blink.
z Pick up the handset or press or the pendant button to take
the call hands-free.
Use switch (23) to set the ringer volume.
A call that has been accepted by use of the pendant
button can also be terminated by pressing the pendant
button again.
The volume of the handset can be set to HI or LO by
using switch (27).
6.3 Deactivating the microphone
During a call you can deactivate the microphone and talk freely
without the caller hearing you.
z Press and hold to mute the microphone.
During a call made with the handset you can switch to
hands-free by pressing
and hanging up the
handset.
The hands-free volume can be adjusted using the
volume button (10).
6.4 Flash function
z If the dialing number is busy or the conversation is completed,
press the R key to cut off the line for dialing other number.
When in an office equipped with PABX, this telephone makes it easy to
transfer calls.
In cast the telephone is connected to a PBX system it
might be necessary to add a pause after the PBX access
code. The phone can generate a 4 second pause time.
Example: 0 P 012345678
Press
to enter a pause.
z Press R key for call-waiting.
z Dial the extension number which caller intended.
z When the party answers, just hang up the handset.
z When the line is busy or nobody answers, press R key again to
reconnect with the caller.
6.5 Last number redial
The telephone will remember the last dialed number.
z Pickup the handset or press for hands-free.
z Now press to redial last number
6.6 Incoming Caller ID list
The telephone can store up to 64 calls in the caller ID list.
The display will show the number of total calls and the number of
8 / 11
Page 9
new calls.
z To review the incoming calls, press to make sure “CLIP” is
displayed next to the date.
z Use ▲ and ▼ to navigate through the incoming calls.
6.6.1 Making a call from the caller ID list
z Select a number from the caller ID list.
z Press to dial the number.
z If press 2 x , Add “0” afore the number, Then will be
dialed out the number.
6.6.2 Copy a number from the caller ID list to the phonebook
z Select a number from the caller ID list.
z Press and hold for 2 seconds. “COPY TO MEMORY” will
be displayed.
z Press to store the number.
6.6.3 Delete a number form the caller ID list
z Select a number from the caller ID list.
z Press Ø. “DELETE?” will appear in the display.
z Press and hold Ø for 3 seconds. The number will be deleted.
6.6.4 Delete all number form the caller ID list
z In the caller ID list.
z Press and hold Ø for 3 seconds. “DELETE ALL?” will appear
in the display.
z Again press and hold Ø for 3 seconds. The all number will be
deleted.
6.6.5 Receiving Call ID information
z Incoming Call Display:
When there is an incoming call, the LCD will display the
number, area code, name, time and date of the call.
Please note the following indicator:
z “OUT OF AREA”
The call is made through a telephone company, which does
not offer Caller ID service or does not transfer calls by long
distance net.
z “PRIVATE CALL”
Some areas allow the option for callers to prevent the
telephone data from being displayed on others’ telephone. If
you received such a call, “PRIVATE CALL” will be shown on
LCD.
6.7 Using the phonebook
z To go to phonebook mode, press to make sure “ “ is
displayed next to the date.
z Use ▲ and ▼ to navigate through the phonebook.
SOS will appear in front of the clock in the display for
emergency numbers.
6.7.1 Making a call from the phonebook
z Select a number from the phonebook.
z Press to dial the number.
6.7.2 Edit a number/name in the phonebook
z Select a number from the phonebook.
z Press and hold until “EDIT?” appears on the display.
z Press .
z Now start modifying the number, name and emergency type
according chapter “5.8 Store telephone numbers”. Refer to
chapter “5.9 Name recording” to record a name.
6.7.3 Delete a number from the phonebook
z Select a number from the phonebook.
9 / 11
Page 10
z Press Ø. “DELETE?” will appear in the display.
z Press and hold Ø for 3 seconds. The number will be deleted.
6.7.4 Delete all number from the phonebook
z In the phonebook.
z Press and hold Ø for 3 seconds. “DELETE ALL?” will appear
in the display.
z Again press and hold Ø for 3 seconds. The all number will be
deleted.
6.8 Using the direct memory keys M1, 911
z Press M1 or 911.
z Now Press to dial the number.
Or
z Pickup the handset or press for hands-free mode.
z Press M1 or 911 to dial the direct memory number.
7 The SOS function
Please read carefully how the SOS scenario works in chapter“1.1
Intended purpose”.
7.1 Active the SOS function
z Press the pendant button.
z Or press and hold the SOS key of the telephone for at least 3
seconds.
7.2 Deactivate the SOS function
z Press the pendant button.
z Or press the SOS key of the telephone.
7.3 Receiving party operate
Press 0 accept the emergency call
Press 1 5 extend the call for another 2 minutes and
deactivated the emergency call
Press 1 9 deactivated and terminated the emergency call
It is important that the receiving partly of an emergency
call presses “0” to accept the call。
If the emergency call is not accepted,the telephone will
call the next number from the emergency number list.
After 1 minutes 50 seconds a beep tone will indicate
that the emergency call will be terminated. The
receiving party should press “1 5” to add an extra 2
minutes to the emergency call.
Once the receiving party has pressed “1 5” during the
emergency call (or after 2 minutes to extend the call for
another 2 minutes), the SOS function will be
deactivated.
Once the receiving party has pressed “1 9” during the
emergency call, the emergency call will be deactivated
and terminated.
If the receiving party did not press “1 5” during the
emergency, After the 2 minutes to the SOS function will
not be deactivated and the telephone will call the next
number from the emergency number list.
10 / 11
Page 11

SERVICE
According to FCC regulation. This equipment which has been certified and
registered by the FCC, may only be repaired by authorized person, the FCC
certification may be voided. Should you encounter any problems, please call
the FUTURE CALL LLC.
Toll-free Customer Hotline for assistance:
1-888-934-CALL (2255) Monday - Friday between the hours of 9:00 am - 6:00
pm PST
For general inquires, you can e-mail to [email protected] or visit our
website at www.future-call.com
FOR WARRANTY AND OUT-OF WARRANTY SERVICE:
You may call our toll-free hot line on 1-888-934-CALL (2255) 9 AM-6 PM PST or
E-mail to [email protected]
QUESTIONS?
STOP...doesn’t take unit back to the store.
LOOK...for the toll-free “help” telephone number.
LISTEN... as our experts talk you through the problem.
LIMITED WARRANTY AND SERVICE
FUTURE CALL LLC. warrants this product to be free from defective materials
or factory workmanship and will replace or repair this unit or any part thereof,
except batteries, if it proves to be defective in normal use or service within 90
days from
date of original purchase. Our obligation under this warranty is the repair or
replacement of the defective instrument or any part thereof, except batteries.
This warranty will be considered void if unit is tampered with, improperly
serviced, or subjected to misuse, negligence or accidental damage. There are
no other
Each time the phone dials an emergency number, the
telephone line will be occupied for 2 minutes, even
when the receiving party hung up the call.
express warranties other than those stated herein.
This warranty gives you specific legal rights, and you may also have other
rights which varies from state to state. TO OBTAIN SERVICE PLEASE E-MAIL
US ON
[email protected] OR CALL US TOLL FREE 1-888-934-CALL (2255) 9 AM-6
PM PST (IF THE UNIT IS UNDER WARRANTY PROOF OF PURCHASE MUST
BE PROVEN.
11 / 11
 Loading...