

Page 1

Page 2

1
Vorwort
Herzlichen Glückwunsch zum Kauf des MIDI LOOPERs und herzlich Willkommen als Future
Artist.
Der MIDI LOOPER hilft dir dabei, dich auf dein Musikspielen zu konzentrieren. Einfach
Spielen und Spaß haben. Dabei ist die Steuerung so einfach wie möglich gehalten. Der
MIDI LOOPER fokussiert auf seine grundlegenden Funktionen und ist für das einfache
Handling während deiner Live Performance optimiert. Er verzichtet daher auf zusätzliche
Anzeigen und komplexe Steuerungsmöglichkeiten.
Das einfache Loopen von MIDI Signalen eröffnet dir neue bislang unbekannte
Möglichkeiten. Schnell wirst du merken, welche Flexibilität du beim Musikspielen
gewonnen hast und welche komplexen Möglichkeiten sich dir plötzlich auf einfache Weise
bieten.
Nun also viel Vergnügen.
Hab Spaß. Spiel einfach.
Dein Team von Future Artist
PS: Wir entwickeln den MIDI LOOPER künftig auch weiter und stellen dir Hinweise und
Informationen zum Spielen zur Verfügung. Besuche also hin und wieder unsere Website
und du erhältst neue Infos, Neuigkeiten und Software Updates für den MIDI LOOPER.
Besuche uns auf unserer Website: www.future-artist.com
Page 3

2
Inhalt
Vorwort ..................................................................................................................................... 1
Inhalt.......................................................................................................................................... 2
Diese Hinweise solltest du bitte beachten .............................................................................. 3
Das findest du im Lieferumfang ............................................................................................... 3
So hilft dir der MIDI LOOPER.................................................................................................... 3
Schnellstart................................................................................................................................ 4
So startest du den MIDI LOOPER: ............................................................................................ 6
Diese Möglichkeiten für Setups hast du ........................................................................... 7
MIDI LOOPER mit E-Piano oder Keyboard Synthesizer .............................................. 7
MIDI LOOPER mit MIDI Controller und Synthesizer ................................................... 7
MIDI LOOPER mit MIDI Controller und Computer ..................................................... 8
So steuerst du den MIDI LOOPER ............................................................................................ 8
Steuerelemente Übersicht ................................................................................................. 8
Hinweis zur Nutzung eines Fußschalters ........................................................................ 11
Ein Anwendungsbeispiel zum Nachmachen ................................................................... 11
Der Sonderfall „alle Tracks selektiert“ ............................................................................ 12
Hinweise zur Track-Länge ................................................................................................. 14
Das Optionsmenü ............................................................................................................. 14
Anlage A Kurzübersicht Optionsmenü .................................................................................. 16
Anlage B MIDI Implementation Table ................................................................................... 17
Anlage C Tech Facts ................................................................................................................ 19
Anlage D Firmware Update .................................................................................................... 20
Page 4

3
Diese Hinweise solltest du bitte beachten
• Lese bitte dieses Handbuch.
• Bitte verwende zur Stromversorgung des MIDI LOOPERs das beigelegte USB-Kabel
und schließe dies an die USB Buchse eines Computers an. Wenn du ein USB Netzteil
nutzt, beachte bitte die elektrischen Vorgaben.
• Bitte verwende zum Anschluss von Geräten (Synthesizer, Masterkeyboard,
Fußschalter, etc.) an den MIDI LOOPER ausschließlich von uns empfohlenes Zubehör
und im Musikfachhandel erhältliche MIDI Kabel.
Das findest du im Lieferumfang
• 1x MIDI LOOPER
• 1x USB-Kabel (zur Stromversorgung sowie zum Anschluss an einen Computer; auf
ein zusätzliches Netzteil haben wir der Umwelt zuliebe verzichtet)
• 1x Klinkenadapter 3,5 mm Stecker auf 6,3 mm Buchse (zum Anschluss eines
handelsüblichen Fußschalters, siehe Hinweis zur Nutzung eines Fußschalters)
• 1x Dieses Handbuch
So hilft dir der MIDI LOOPER
Der MIDI LOOPER zeichnet die von dir gespielten Noten als zusammengehörende Einheit
(„Track“) auf und spielt sie in einer Endlosschleife („Loop“) wieder ab. Es stehen dir vier
unabhängige Tracks zur Verfügung, welche du individuell aufnehmen, abspielen und
verändern kannst.
Jeden Track kannst du bis zu 255 mal mit weiteren Noten „Überspielen“ („Overdub“) und
jedes Überspielen auch wieder rückgängig machen bzw. aus dem Track löschen („Undo“).
Du kannst einen Track mit bis zu 250 Noten (sowie zusätzlich 250 Controller-Werte)
aufnehmen. Bei der ersten Aufnahme bestimmst du selbst die Länge des Tracks anhand
der Aufnahmedauer (in Sekunden). Aus der Aufnahmedauer werden nach Aufnahmeende
automatisch die Track-Länge (1..256 Vierteltakte) und die Abspielgeschwindigkeit
(60..210bpm) berechnet.
Page 5
4
Schnellstart
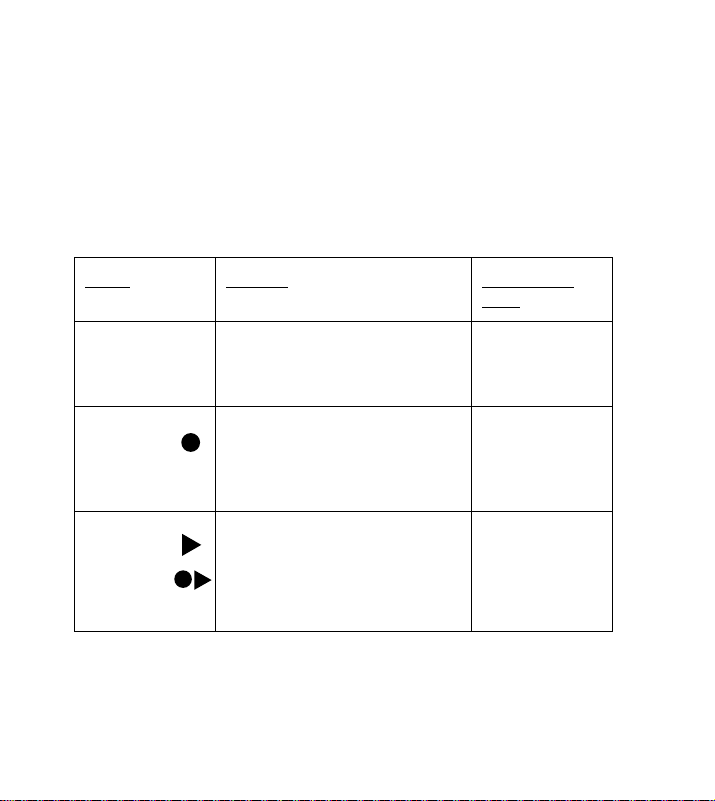
Der rechte Taster zeigt dir den gewählten Track (blau, violett, pink, orange). Der linke
Taster zeigt dir den Zustand des gewählten Tracks (weiß = Leer, rot = Aufnehmen, grün =
Abspielen, gelb = Pause).
Der linke Drehknopf dient dir zum Durchschalten zwischen den Tracks. Der rechte
Drehknopf dient dir zum Einstellen der Quantisierung.
Modus
Anleitung
Anzeige Linker
Taster
Einschalten
Verbinde den MIDI LOOPER mit
deinem Setup (siehe Kapitel „
Diese Möglichkeiten für Setups hast
du“)
Weiß
Aufnehmen
(1) Drücke linken Taster
(2) Spiele mit MIDI Eingabegerät
Oder
Drücke erneut linken Taster
(1) Blinkt Rot =
Bereit zur
Aufnahme
(2) Leuchtet Rot =
Aufnahme läuft
Abspielen
/ Overdub
Drücke linken Taster
Du wechselst zwischen Abspielen
und Aufnehmen (bzw. Overdub)
beim Drücken des linken Tasters
Grün
/ Rot
Page 6
5
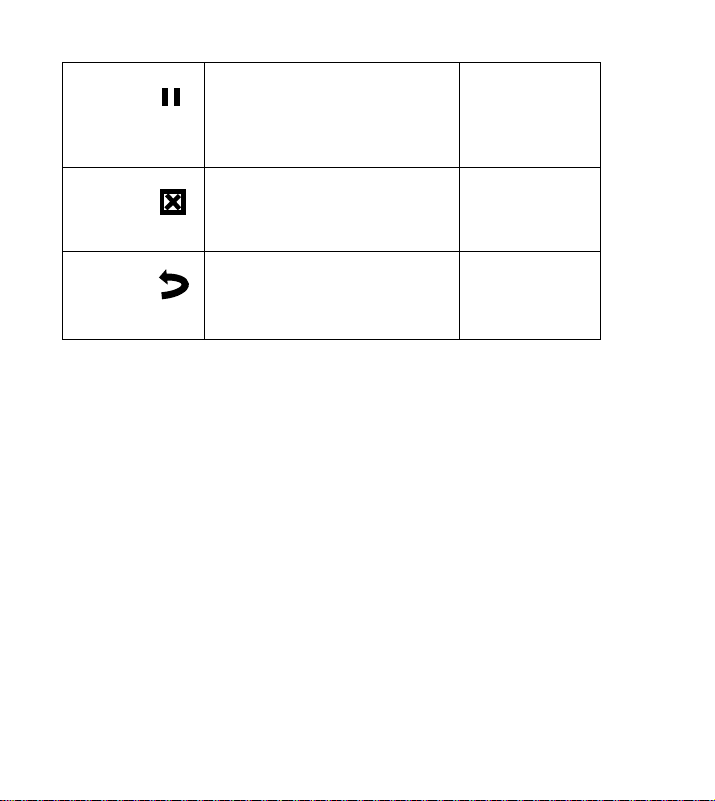
Pausieren
Wenn im Abspielen
Drücke rechten Taster
Du wechselst zwischen Abspielen
und Pause beim Drücken des linken
und dann rechten Tasters
Gelb
Löschen
Drücke rechten Taster während
Pause und halte ihn für eine
Sekunde gedrückt
Weiß
Undo
Drücke rechten Taster während
Aufnahme/Overdub und du
verwirfst die zuletzt aufgezeichnete
Notenschicht
Rot
Weitere Tipps für den leichteren Einstieg sowie ein ausführliches Beispiel zum
Nachmachen findest du im Kapitel „Ein Anwendungsbeispiel zum Nachmachen“
Du kannst die Quantisierung anpassen und weitere Optionen einstellen. Wie das
funktioniert, erfährst du in diesem Handbuch.
Jetzt viel Spaß beim Spielen.
Hab Spaß! Spiel einfach! ☺
Page 7
6
So startest du den MIDI LOOPER:
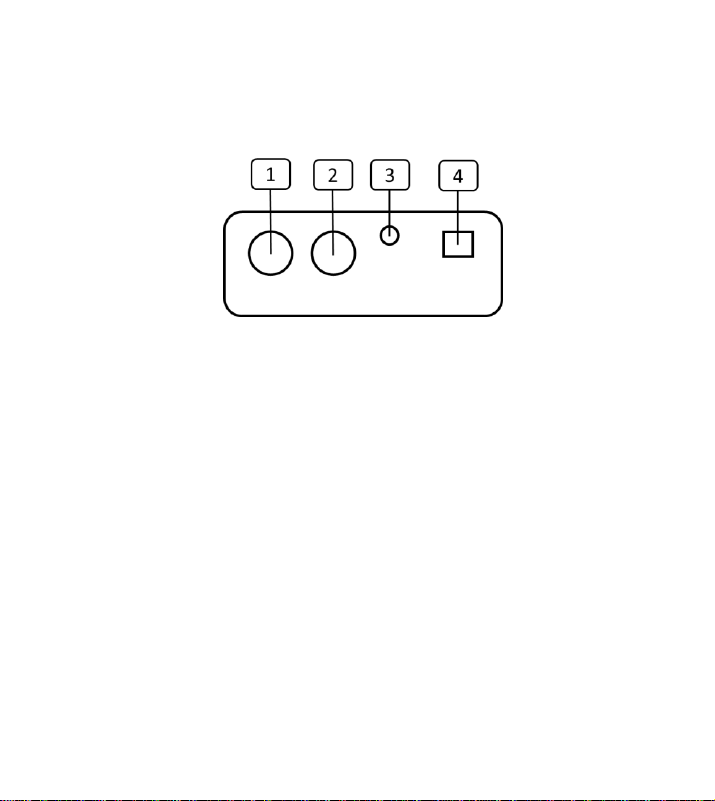
Beim MIDI LOOPER siehst du auf der Rückseite zwei MIDI Ports (1) und (2), eine 3,5mm
Klinkenbuchse (3) und eine USB Buchse (4).
(1) MIDI Ausgang: Stecke hier deinen Klangerzeuger zum Empfang von MIDI
Signalen an (z.B. einen Synthesizer)
(2) MIDI Eingang: Stecke hier deinen MIDI Controller ein (z.B. ein MIDI Keyboard)
(3) Klinkenbuchse: Stecke hier deinen Fußschalter ein. In der Packung befindet
sich auch ein Klinkenadapter von 3,5 mm auf 6,3mm.
(4) USB Buchse: Stecke hier das mitgelieferte USB Kabel ein und am anderen
Kabelende entweder einen Computer oder zur reinen Stromversorgung ein
USB Netzteil.
Page 8
7
Diese Möglichkeiten für Setups hast du
MIDI LOOPER mit E-Piano oder Keyboard Synthesizer
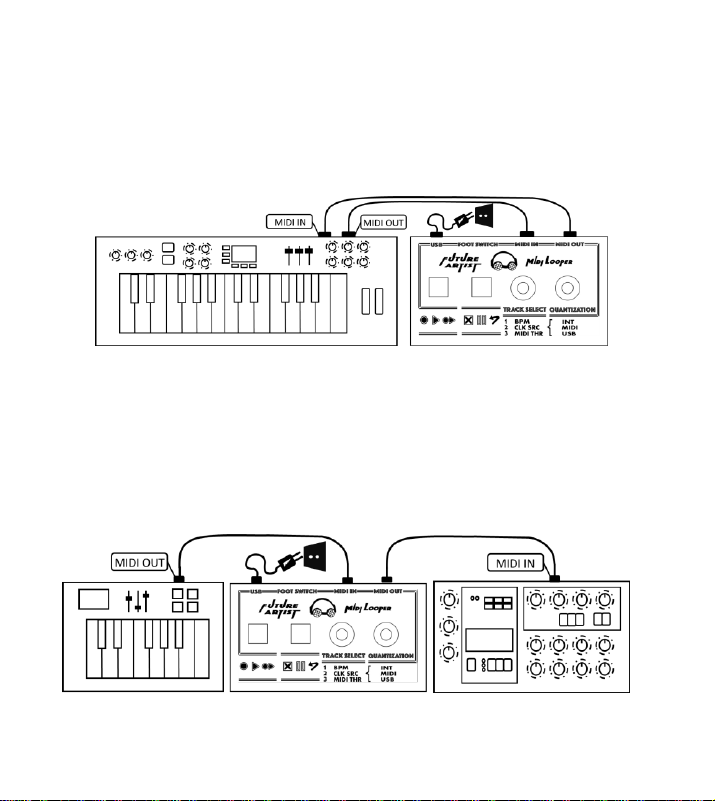
Der MIDI LOOPER ist alleine lauffähig mit interner MIDI Clock. Den USB Eingang nutzt du
zur Stromversorgung.
Verbinde den MIDI Ausgang des E-Pianos mit dem MIDI Eingang des MIDI LOOPERs und
den MIDI Ausgang des MIDI LOOPERs mit dem MIDI Eingang deines E-Piano (bzw.
Keyboard Synthesizer). Den USB Port des MIDI LOOPERs nutzt du zur Stromversorgung.
Stecke hierzu das mitgelieferte Kabel in ein von uns empfohlenes USB Netzteil.
MIDI LOOPER mit MIDI Controller und Synthesizer
Der MIDI LOOPER ist alleine lauffähig mit interner MIDI Clock. Den USB Eingang nutzt du
zur Stromversorgung.
Page 9
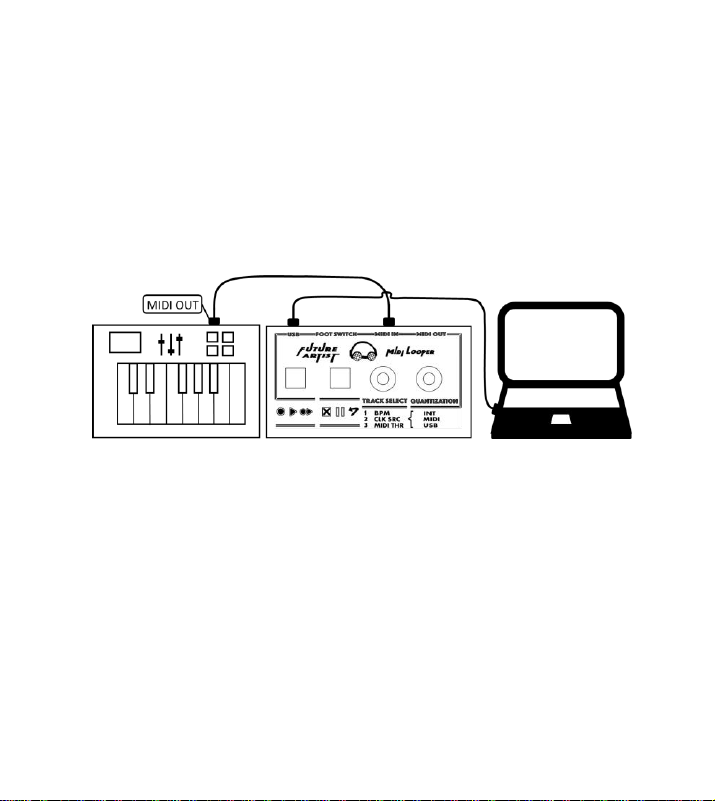
8
Verbinde den MIDI Ausgang deines MIDI Controllers (im Beispiel der Abbildung ein MIDI
Keyboard) mit dem MIDI Eingang des MIDI LOOPERs und den MIDI Ausgang vom MIDI
LOOPER mit dem MIDI Eingang deines Synthesizers. Den USB Port des MIDI LOOPERs
nutzt du zur Stromversorgung. Stecke hierzu das mitgelieferte Kabel in ein von uns
empfohlenes USB Netzteil.
MIDI LOOPER mit MIDI Controller und Computer
Der MIDI LOOPER funktioniert als USB Class Compliant MIDI Device zu einer externen
MIDI Clock (MIDI Clock Einstellungen siehe Kapitel „Das Optionsmenü“)
Verbinde den MIDI Ausgang deines MIDI Controllers (im Beispiel der Abbildung ein MIDI
Keyboard) mit dem MIDI Eingang des MIDI LOOPERs und den USB Port mit dem
Computer. Den Computer nutzt du in diesem Fall als Soundgenerator.
So steuerst du den MIDI LOOPER
Steuerelemente Übersicht
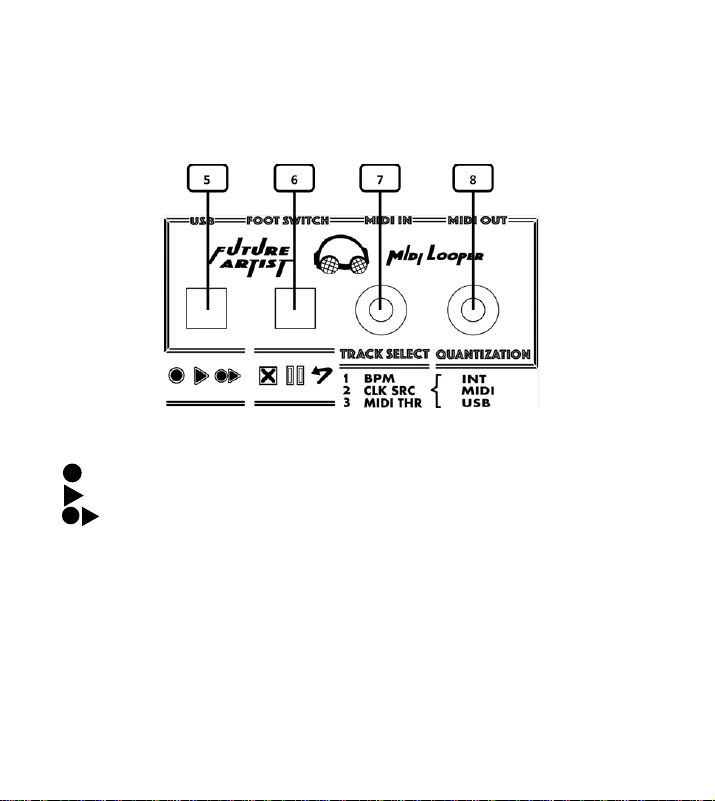
Der MIDI LOOPER hat zwei beleuchtete Taster (5) und (6) und zwei Drehknöpfe (7) und (8),
welche du auch drücken kannst. Mit den beiden Tastern steuerst du die Hauptfunktionen:
Aufnahme, Abspielen, Pause und Löschen (siehe auch Symbole unterhalb der Taster).
Außerdem kannst du, am rechten Taster (6) den ausgewählten Track (Erklärung zu den
Farben, siehe unten) und am linken Taster (5) den aktuellen Zustand/Status des Tracks
ablesen.
Page 10
9
Den linken Drehknopf (7) nutzt du zur Auswahl des gewünschten Tracks, den rechten
Drehknopf (8) für das Variieren der Wiedergabe-Quantisierung des ausgewählten Tracks.
Außerdem bieten dir die beiden Drehknöpfe die Konfiguration weiterer Funktionen im
Optionsmenü (siehe hierzu Kapitel „Optionsmenü“).
(5) Mit dem linken Taster kannst du:
• Die Aufnahme starten
• Das Abspielen starten
• Weitere Schichten aufnehmen („Overdub“)
Der linke Taster leuchtet:
• weiß, wenn der Track leer ist
• grün, wenn der Track abspielt
• gelb, wenn der Track pausiert
• rot, wenn der Track aufnimmt (blinkt = bereit; leuchtet = nimmt auf)
• Im Optionsmenü: entsprechend der aktuell angewählten Option (siehe hierzu
Kapitel „Optionsmenü“)
Die LED blinkt im Vierteltakt der aktuell eingestellten BPM Wiedergabegeschwindigkeit.
Page 11

10
(6) Mit dem rechten Taster kannst du:
• Den Track pausieren (während Aufnahme / Overdub)
• Den Track löschen (während Pause)
• Undo der letzten Notenschicht (während Overdub). Dies entfernt die zuletzt
aufgenommene Notenschicht.
Der rechte Taster leuchtet:
• orange / blau / violett / pink als Kennzeichnung des aktuell gewählten Tracks
sowie weiß, wenn alle Tracks gemeinsam ausgewählt werden
• Im Optionsmenü: entsprechend der Konfiguration der aktuell gewählten
Option (siehe hierzu Kapitel „Optionsmenü“)
Der rechte Taster blinkt immer grün wenn beim Abspielen die Loop von vorne beginnt.
Außerdem pulsiert der Taster gemäß der im Track abgespielten Notensignale.
(7) Mit dem linken Drehknopf kannst du:
• wenn du drehst, den gewünschten Track auswählen
• wenn du drückst, alle Tracks auf einmal auswählen
• im Optionsmenü: den Wert der aktuell ausgewählten Option anpassen
(siehe hierzu Kapitel „Optionsmenü“)
Wenn du den Drehknopf nutzt, zeigen dir die beiden Taster die entsprechenden Werte an
(siehe hierzu Erklärung Taster (1) und (2))
(8) Mit dem rechten Drehknopf kannst du:
• wenn du drehst, die Quantisierung für den ausgewählten Track anpassen.
Folgende Quantisierungen kannst du einstellen: 1/96, 1/32, 1/24, 1/16, 1/12,
1/8, 1/6, 1/4. Drehe nach links für eine feinere Quantisierung (bis 1/96) und
drehe nach rechts für eine gröbere Quantisierung (bis 1/4).
Hinweis: Alle Noten werden mit der Quantisierung 1/96 aufgezeichnet, jedoch mit der
Quantisierungseinstellung des jeweiligen Tracks abgespielt.
• Wenn du drückst, das Optionsmenü aufrufen bzw. beenden
• Im Optionsmenü: die gewünschte Option auswählen (Kapitel „Optionsmenü“)
Page 12

11
Hinweis zur Nutzung eines Fußschalters
Wenn du einen Fußschalter an die dafür vorgesehene Klinkenbuchse anschließt, kannst du
die Hauptfunktionen des MIDI LOOPERs auch mit dem Fuß steuern.
Bei einem Fußschalter mit zwei Schaltern nutzt du den linken Schalter wie d en linken
Taster (5) und den rechten Schalter wie den rechten Taster (6). Bei einem Fußschalter mit
drei Schaltern nutzt du den linken Schalter wie den linken Taster (5), den mittleren
Schalter wie den rechten Taster (6) sowie zusätzlich den rechten Schalter zur Auswahl des
gewählten Tracks, ähnlich wie mit dem linken Drehknopf (7).
Ein Anwendungsbeispiel zum Nachmachen
Angefangen bei einem leeren Track (Leer = linker Taster leuchtet weiß):
• Drücke den linken Taster. Der Taster blinkt rot. Der MIDI LOOPER steht zur
Aufnahme bereit.
• Du hast nun zwei Möglichkeiten, die Aufnahme zu starten:
(a) Drücke den linken Taster nochmal und er leuchtet dauerhaft rot. Der MIDI
LOOPER ist jetzt im Modus „Aufnehmen“.
(b) Spiele Noten mit deinem MIDI Controller. Sobald du die erste Note
spielst, wechselt der MIDI LOOPER automatisch in die Aufnahme. Der
linke Taster leuchtet währenddessen rot.
Tipps:
a. Stelle vor der ersten Aufnahme die gewünschte Taktgeschwindigkeit ein (siehe
hierzu Option „BPM“ im Kapitel „Das Optionsmenü“). Starte mit dem
Aufnehmen einer leeren Loop. Zähle hierbei die Taktschläge mit (1-2-3-4-1) und
beende die Aufnahme bei der zweiten „1“, welche der erste Taktschlag des
nachfolgenden Taktes ist. Dies erleichtert dir die Aufnahme eines vollständigen
Taktes bei gewünschtem Tempo als nahtlose Loop.
b. Wenn du am Ende der Aufnahme keinen „Leerlauf“ aufnehmen möchtest,
solltest du direkt nach der von dir eingespielten Notensequenz auf Abspielen
schalten (also den nächsten Schritt ausführen und auf die linke Taste drücken).
Ansonsten nimmst du auch während der Zeit weiter auf, in welcher du keine
Noten mehr spielst.
Page 13

12
• Drücke nun den linken Taster wieder und der Track wechselt in Abspielen. Nun
werden die Noten in einer Endlosschleife abgespielt (Taster leuchtet grün).
• Mit dem linken Taster kannst du nun zwischen Aufnahme / Overdub und
Abspielen hin und her wechseln.
• Drücke den linken Taster um eine weitere Schicht („Overdub“) an Noten
aufzunehmen. (Taster leuchtet wieder rot)
Hinweis: Wenn du Noten aufnimmst, werden diese direkt in die Schleife mit aufgenommen
und auch sofort abgespielt. Du hörst also weiterhin alle aufgezeichneten Noten.
• Drücke den rechten Taster, und du verwirfst damit die zuletzt aufgenommene
Schicht an Noten („Undo“). Der MIDI LOOPER verbleibt dabei in Aufnahme und
der linke Taster leuchtet weiterhin rot.
Hinweis: Du kannst bis zu 255 Schichten in einem Track aufnehmen und diese jederzeit
mittels „Undo“ nacheinander wieder aus dem Track löschen.
• Drücke den linken Taster und du landest wieder beim reinen Abspielen der
Noten aus dem Track. (Taster leuchtet grün)
• Drücke nun den rechten Taster und der Track wechselt nach Pause (Taster
leuchtet gelb).
• Drücke den linken Taster und du wechselst wieder zum Abspielen. Die Loop
startet zum nächsten Vierteltakt.
• Drücke den rechten Taster und du gehst wieder in Pause (Taster leuchtet gelb)
• Drücke den rechten Taster nochmal und halte ihn für eine Sekunde gedrückt.
Damit löschst du alle Noten des Tracks und der Track ist nun wieder leer.
(Taster leuchtet weiß)
Der Sonderfall „alle Tracks selektiert“
Du drückst den linken Drehknopf und selektierst damit alle Tracks gleichzeitig. Alle
Aktionen haben nun Auswirkung auf alle Tracks gleichzeitig.
Ausnahme: Die Quantisierung kann bei gleichzeitiger Auswahl aller Tracks nicht verändert
werden!
Wenn alle vier Tracks in unterschiedlichen Zuständen sind (z.B. violetter Track leer, pinker
Page 14

13
Track auf Aufnahme, oranger Track auf Play und blauer Track auf Pause), was zeigt dann
der linke Taster an?
Wenn du alle Tracks auf einmal anwählst, und
• mindestens einen Track aufnimmst (z.B. pinkfarbener Track nimmt auf,
orangefarbene Track pausiert), dann leuchtet der linke Taster rot
• auf keinem Track aufnimmst und mindestens einen Track spielst, dann leuchtet
der linke Taster im grün
• auf keinem Track aufnimmst und keinen Track spielst und mindestens einen
Track pausierst, dann leuchtet der linke Taster gelb
• wenn alle Tracks leer sind, dann leuchtet der linke Taster weiß
Was passiert, wenn du einen Taster drückst, während alle Tracks selektiert sind?
Hinweis: Du kannst, wenn gleichzeitig alle Tracks selektiert sind, nur zwischen Abspielen
und Pausieren wählen. Leuchtet bei Auswahl aller Tracks der linke Taster rot, bedeutet dies,
dass du in mindestens einem Track aufnimmst (siehe Beschreibung oben). Jedoch bewirkt
ein Tastendruck nicht, dass alle Tracks gleichzeitig in den Aufnahmemodus wechseln.
• Wenn du den rechten Taster drückst, dann pausierst du alle Tracks gleichzeitig.
Der linke Taster leuchtet gelb.
• Wenn du den rechten Taster nochmal drückst, während alle Tracks pausiert
sind, dann stoppst du damit die interne Clock. Es wird kein MIDI Clock Signal
mehr über MIDI OUT oder USB ausgegeben. Der linke Taster leuchtet gelb.
• Wenn du den rechten Taster nun nochmal für mindestens 2s drückst, während
die interne Clock pausiert ist, löschst du damit alle Tracks:
➢ Alle Noten und Controller Daten werden gelöscht.
➢ Die Quantisierung aller Tracks wird auf Default (96tel) gesetzt.
➢ Die Optionen (bpm, clock source int/ext/usb, soft thru an/aus)
bleiben unverändert.
• Die Clock startet wieder, sobald du einen oder alle Tracks gleichzeitig startest
(indem du den linken Taster drückst, oder über ein externes MIDI Start
Kommando). Wenn du den linken Taster drückst, dann spielst du alle Tracks
gleichzeitig. Der linke Taster leuchtet grün. Alle Tracks starten am Anfang und
nicht an der Stelle, an der sie pausiert wurden.
Page 15

14
Hinweise zur Track-Länge
Die Länge eines Tracks (in Vierteltakten) ergibt sich aus der ersten Aufnahme im jeweiligen
Track. Dabei unterscheidet sich das Verhalten abhängig davon, ob bei laufender oder bei
gestoppter interner Clock (Zeitbasis) die Aufnahme gestartet wird.
Hinweis: Die Clock ist gestoppt beim Einschalten des MIDI LOOPERs. Außerdem, wenn du
sie explizit stoppst, wie oben im Kapitel „Was passiert, wenn du einen Taster drückst,
während alle Tracks selektiert sind?“ beschrieben.
• Aufnahmestart bei gestoppter Clock (Option Clock Source = interne Clock):
Die Länge des Tracks darf exakt 1 Vierteltakt oder 1… 64 Takte betragen. Die
automatische bpm-Erkennung entscheidet anhand der Aufnahmedauer (in
Sekunden), wie viele Takte daraus abgeleitet werden.
➢ kürzer als 1 Sekunde: Track-Länge ist 1 Vierteltakt
➢ ab 1 Sekunde: Track-Länge wird auf ganze Taktanzahl (1… 64)
gerundet
• Aufnahmestart bei laufender Clock:
Die Track-Länge wird entsprechend der Aufnahmedauer (in Sekunden) auf 1…
16 Vierteltakte gerundet. Ab 17 Vierteltakten wird die Track-Länge auf ganze
Takte (5... 64) gerundet.
Das Optionsmenü
Hinweis: In „Anlage A Kurzübersicht Optionsmenü“ findest du eine Kurzübersicht
Drücke den rechten Drehknopf und du gelangst ins Optionsmenü. Der linke Taster
leuchtet nicht, der rechte Taster leuchtet gelb und blinkt, denn der erste
Optionsmenüpunkt ist bereits selektiert (Geschwindigkeit in BPM), siehe Erklärung weiter
unten.
Drehe den rechten Drehknopf, um zwischen den Optionen zu wechseln (Drehe im
Uhrzeigersinn und du gelangst zur nächsten Option, gegen den Uhrzeigersinn gelangst du
zur vorherigen Option). Drehe den linken Drehknopf, um den Wert der aktuell
ausgewählten Option anzupassen. Der linke Taster zeigt dir an, welche Option du gerade
gewählt hast:
Page 16

15
• Linker Taster aus (leuchtet nicht): BPM einstellen
Die rechte LED blinkt gelb in der Geschwindigkeit der eingestellten BPM. Drehe
den linken Drehknopf oder tippe den linken Taster („Tap Tempo“) als
Taktschlag, um die Geschwindigkeit (in BPM) einzustellen.
Tipp: Gib das Tempo ein indem du den linken Taster oder den linken Fußschalter
„antippst“ (‚Tap Tempo‘).
• Linker Taster leuchtet blau: Clock Source wählen
Der rechte Taster zeigt dir an, welche Quelle du ausgewählt hast. Drehe den
linken Drehknopf und wähle zwischen:
1. Rechter Taster leuchtet rot: interne Clock
Der MIDI LOOPER taktet nun in der BPM Geschwindigkeit, welche du im
MIDI LOOPER auswählen kannst (siehe hierzu erste Menüoption, wenn
linke LED aus)
2. Rechter Taster leuchtet gelb: Clock von MIDI IN
3. Rechter Taster leuchtet grün: Clock von USB
Hinweis: Du kannst den MIDI LOOPER über MIDI Signale stoppen und starten (MIDI Start
Kommando).
• Linker Taster leuchtet rosa: MIDI Thru und USB Thru ein-/ausschalten
Der rechte Taster zeigt dir an, ob du MIDI Thru ein- oder ausgeschaltet hast.
Drehe den linken Drehknopf und wähle zwischen:
1. Rechter Taster leuchtet rot: MIDI Thru und USB Thru sind ausgeschaltet
2. Rechter Taster leuchtet grün: MIDI Thru und USB Thru sind eingeschaltet
Hinweis: Die MIDI Thru Funktion bewirkt, dass am MIDI IN empfangene Daten sofort am
MIDI OUT wieder ausgegeben werden. Das entspricht dem Verhalten eines MIDI Thru
Anschlusses.
Die USB Thru Funktion bewirkt, dass am MIDI IN empfangene Daten sofort am USB wieder
ausgegeben werden. Das entspricht der Funktionalität eines MIDI-USB-Interface und
ermöglicht das direkte Spielen von Software Instrumenten.
MIDI Thru und USB Thru können je nach Einsatzzweck nützlich oder unerwün scht sein. Sie
können nur gemeinsam ein- und ausgeschaltet werden.
Nach Start des MIDI LOOPERs sind MIDI Thru und USB Thru immer eingeschaltet.
Page 17
16
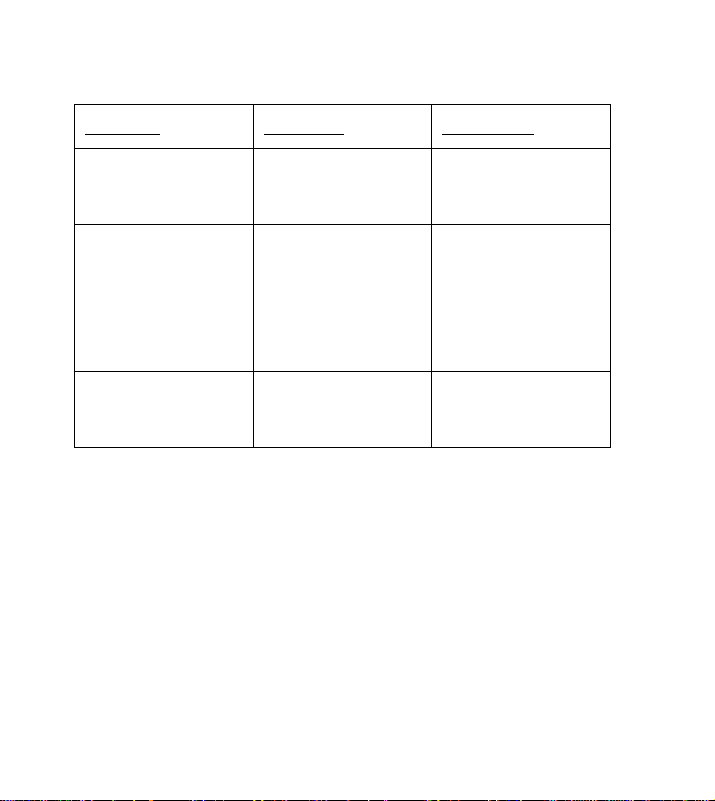
Anlage A Kurzübersicht Optionsmenü
Menüpunkt
Linker Taster
Rechter Taster
BPM
Aus
(leuchtet nicht)
Blinkt gelb
im Takt der BPM
Clock Source
Blau
Rot: Interne Clock
Gelb: Clock Signal von
MIDI In
Grün: Clock Signal von
USB
MIDI Thru
USB Thru
Rosa
Rot: aus
Grün: ein
Page 18
17
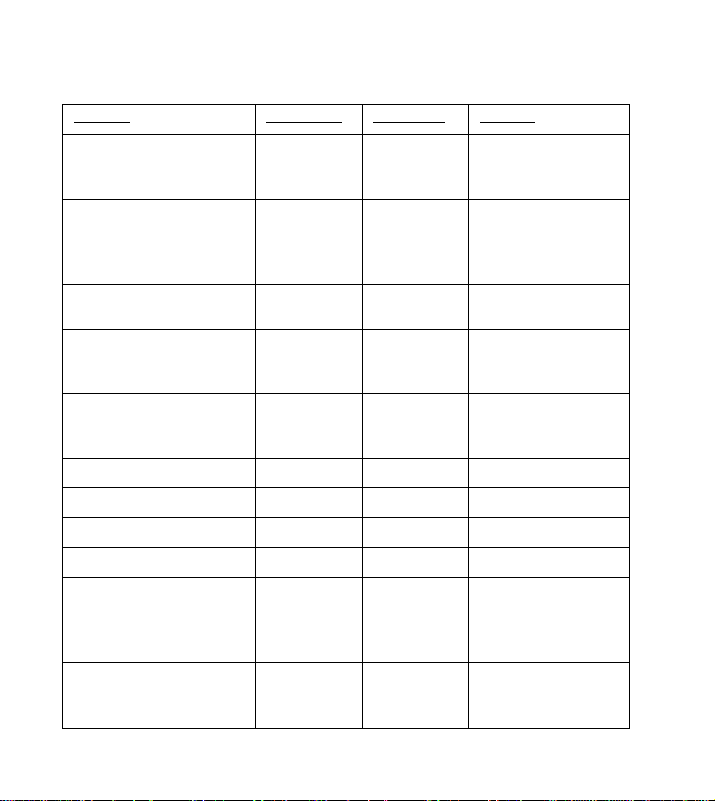
Anlage B MIDI Implementation Table
Function
Transmitted
Recognized
Remarks
Basic Channel
Default
Changed
1 - 16
1 - 16
1 - 16
1 - 16
all channels are
active all the time
Mode
Default
Messages
Altered
Mode 1
X
X
X
X
X
Note Number
True Voice
0 - 127
0 - 127
0 - 127
0 - 127
Velocity
Note ON
Note OFF
O
O
O
O
After Touch
Key's
Ch's
O
O
O
O
Pitch Bend O O
Control Change
O
O
Prog Change
X
X
System Exclusive
X
X
System Common
Song Pos
Song Sel
Tune
X
X
X
X
X
X
System Real Time
Clock
Commands
O
O
O
O
MIDI Clock
Start, Stop
Page 19
18
Aux Messages
Local ON/OFF
All Notes OFF
Active Sense
Reset
X
X
X
X
X
X
X
X
Notes O = Yes, X = No
Page 20

19
Anlage C Tech Facts
• Aufzeichnung und gleichzeitige Wiedergabe von MIDI-Noten sowie MIDI-Controller-
Daten
• Visuelles Feedback bei Aufnahme und Wiedergabe (Anzeige von Noten-Aktivität und
Taktgeschwindigkeit)
• 4 eigenständig bedienbare Tracks mit individueller Länge (1…256 Vierteltakte)
• Aufnahme von bis zu 1000 Noten und 1000 Controller-Werte (maximal 250 Noten +
250 Controller-Werte je Track)
• 64-fache Polyphonie
• Quantisierung der Notenposition während Wiedergabe jederzeit einstellbar
(Schritte: 1/96, 1/32, 1/24, 1/16, 1/12, 1/8, 1/6, 1/4 Takt)
• Ta ktgeschwindigkeit jederzeit einstellbar (60…210bpm)
• Ausgabe von MIDI Clock via MIDI OUT und USB als MIDI Clock Master (Konfiguration
der Zeitbasis = „intern“)
• Synchronisierbar zu MIDI Clock via MIDI IN und USB als MIDI Clock Slave
(Konfiguration der Zeitbasis = „extern MIDI“ bzw. „extern USB“)
• Zwei mehrfarbig beleuchtete Taster
• 2 Endlosdrehknopf mit integriertem Taster
• Optional verwendbar: Fußschalter
Page 21

20
Anlage D Firmware Update
Auf unserer Website www.future-artist.com findest du einen link zur aktuellen Firmware.
Besuche hin und wieder unsere Website, um Aktualisierungen zu erhalten. Im Download
findest du auch jeweils Release Notes und eine Installationsanleitung. Hier findest du auch
die Beschreibung, wie du erkennst, welche Firmware Version auf deinem MIDI LOOPER
läuft.
Page 22

21
Page 23

22
Introduction
Congratulations on the purchase of your MIDI LOOPER and welcome as a Future Artist.
The MIDI LOOPER will help you with concentrating on your music playing. Simply have fun
and play. Thereby, the control has been designed as simple and intuitive as possible. The
MIDI LOOPER is focused on fundamental functions and is optimized on easy handling
during your live performance. Therefore, it waives additional displays and complex control
capabilities.
The easy looping of MIDI signals will open up new, previously unknown possibilities. You
will find out, which flexibility you gained and which complex possibilities are offered.
Have a good time.
Have fun. Just play.
Your team of Future Artist
PS: We are further developing MIDI LOOPER and provide hints and information about
playing music. We recommend visiting our website from time to time and you will get new
information and Software Updates for the MIDI LOOPER.
Visit us on our website at: www.future-artist.com
Page 24

23
Table of contents
Introduction ............................................................................................................................ 22
Table of contents .................................................................................................................... 23
Please note the following information .................................................................................. 24
Scope of delivery .................................................................................................................... 24
How the MIDI LOOPER will help you ..................................................................................... 24
Quickstart ................................................................................................................................ 25
How to start the MIDI LOOPER .............................................................................................. 27
Which setup options you have ........................................................................................ 28
MIDI LOOPER with E-piano or keyboard synthesizer ............................................... 28
MIDI LOOPER with MIDI Controller and synthesizer ............................................... 28
MIDI LOOPER with MIDI Controller and computer .................................................. 29
How to control the MIDI LOOPER .......................................................................................... 29
Control elements .............................................................................................................. 29
Hints for using a foot switch ............................................................................................ 32
An application example.................................................................................................... 32
Special case: all Tracks selected....................................................................................... 33
Details about the track length ......................................................................................... 35
Options menu ................................................................................................................... 35
Appendix A Short view options menu ................................................................................... 37
Appendix B MIDI Implementation Table ............................................................................... 38
Appendix C Technical facts ..................................................................................................... 40
Appendix D Firmware Update ............................................................................................... 41
Page 25

24
Please note the following information
• Please read this manual.
• Please use the attached USB cable for power supply of the MIDI LOOPER. Plug
it into a USB port of a computer. Use only power adapter which meet the
electrical specifications.
• Please use for connecting devices (synthesizer, masterkeyboard, foot switch
etc.) to MIDI LOOPER only accessories recommended by us and commercial
MIDI cable, which are available in stores for music equipment.
Scope of delivery
• 1x MIDI LOOPER
• 1x USB cable (for power supply, as well as connection to the computer; for the
sake of the environment we haven´t included an additional power supply)
• 1x jack adapter 3.5 mm plug on 6.3 mm socket (for connection of a
commercial foot switch, see chapter “Hints for using a foot switch”)
• 1x this manual
How the MIDI LOOPER will help you
The MIDI LOOPER will record your played music as a coherent entity ("track“) and will play
it back as an endless loop. Four independent tracks are available, which you can
individually record, play and modify.
You can overdub every track up to 255 times with further music notes and undo the
overdubs one by one. You can record up to 250 music notes (as well as 250 controller data
values) per track. You can determine the length of the track (measured in absolute time)
by the first recording. From the recording time, the track length (1..256 beats) and the
playback speed (60..210bpm) are derived automatically at the end of recording.
Page 26
25
Quickstart
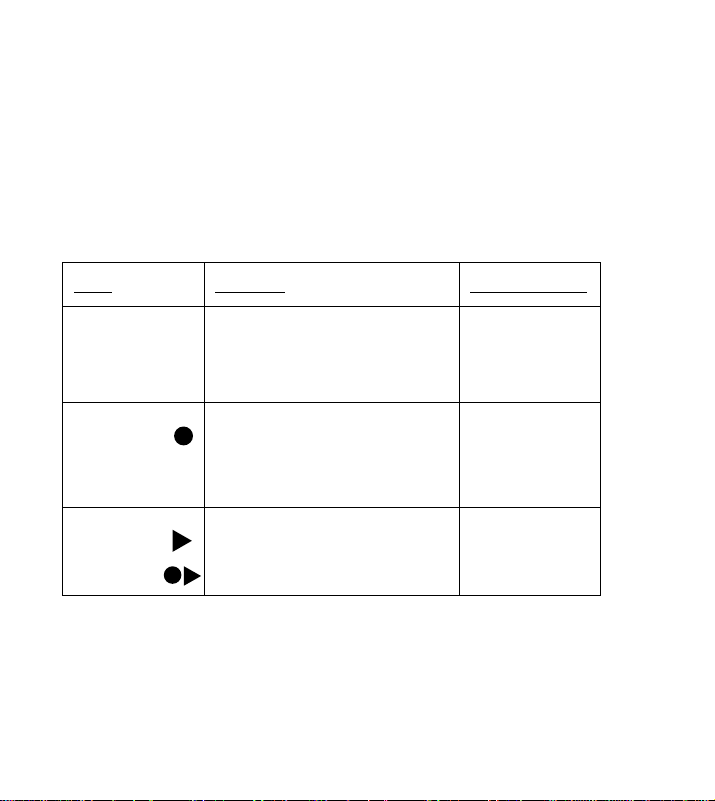
The right button shows the selected track (blue, violet, pink, orange). The left button
shows the status of the selected track (white = empty, red = record, green = play, yellow =
pause).
The left knob serves for switching between the tracks. The right knob serves for adjusting
the quantization.
Mode
Instruction
Display left button
Switch on
Connect the MIDI LOOPER with your
setup (see chapter “
Which setup options you have”)
white
Record
(1) Push the left button
(2) Play with MIDI input device or
Push the left button again
(1) flashes red =
ready for
recording
(2) light red =
recording
Play
/ Overdub
Push the left button
When you push the left button , you
are switching between play and
overdub
green
/ red
Page 27
26
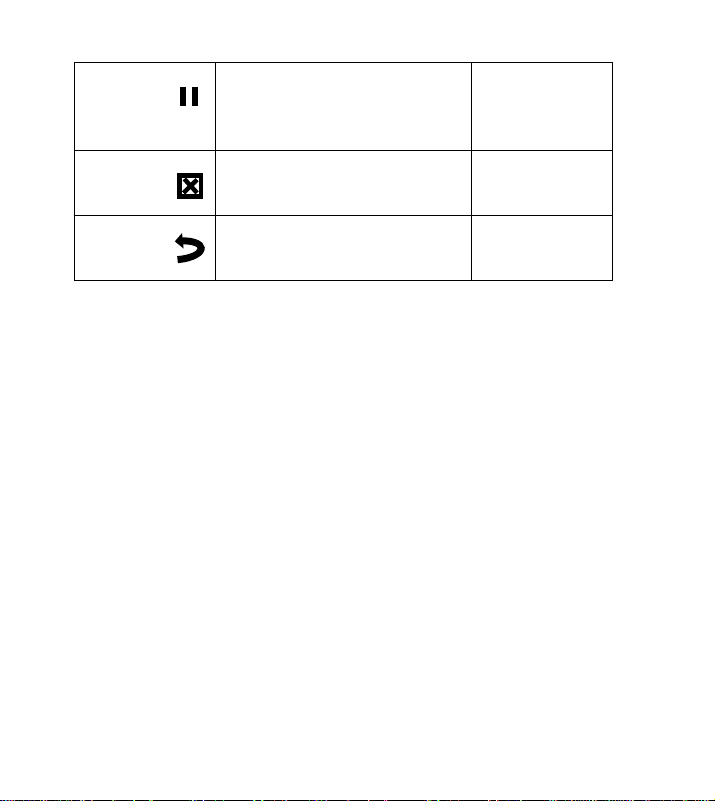
Pause
Push the right button during play
When you push the left / right
button, you switch between play /
pause
yellow
Delete
Push the right button when in pause
and hold for one second
white
Undo
Push the right button when in
overdub and you reject the latest
recorded layer of music notes
red
Further hints for easy beginning as well as a detailed example for copy can be found in
chapter " An application example for copy".
You can adjust the quantization and set further options. You can read in the manual, how
this works.
Have fun! Just play! ☺
Page 28
27
How to start the MIDI LOOPER
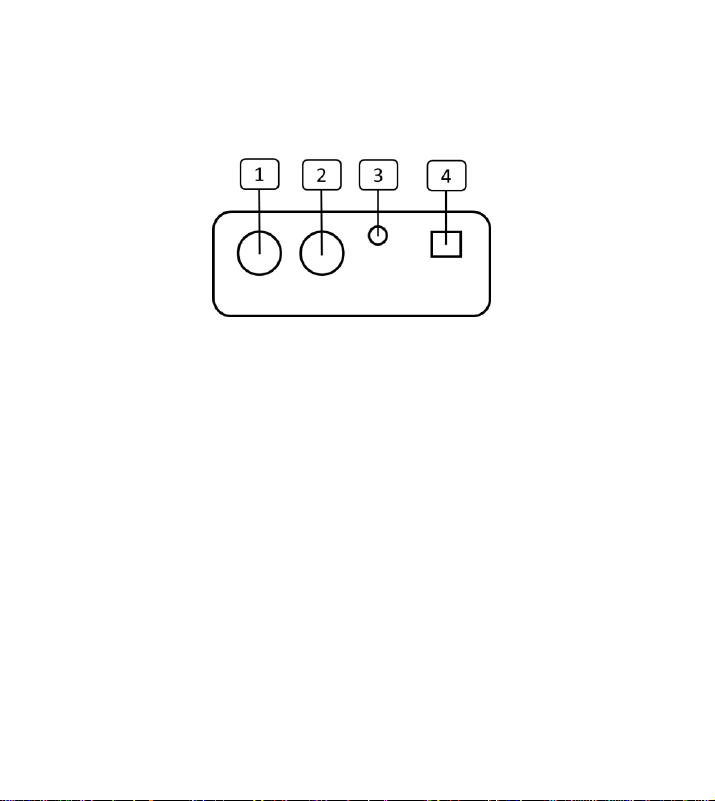
You will find two MIDI ports (1) and (2) on the back of the MIDI LOOPER, a 3.5 mm jack
adapter (3) and a USB socket (4).
(1) MIDI output: Plug your sound generator (e.g. a synthesizer) for receiving MIDI
signals in the output.
(2) MIDI input: Plug your MIDI Controller (e.g. a MINI Pad Control) in the input.
(3) Jack adapter: Plug your foot switch in the jack adapter. You will find a jack
adapter with 3.5 mm on 6.3 mm in the package.
(4) USB socket: Plug the supplied USB cable into the USB socket. Connect the
other cable end with a computer or for power supply with a USB power sup ply.
Page 29
28
Which setup options you have
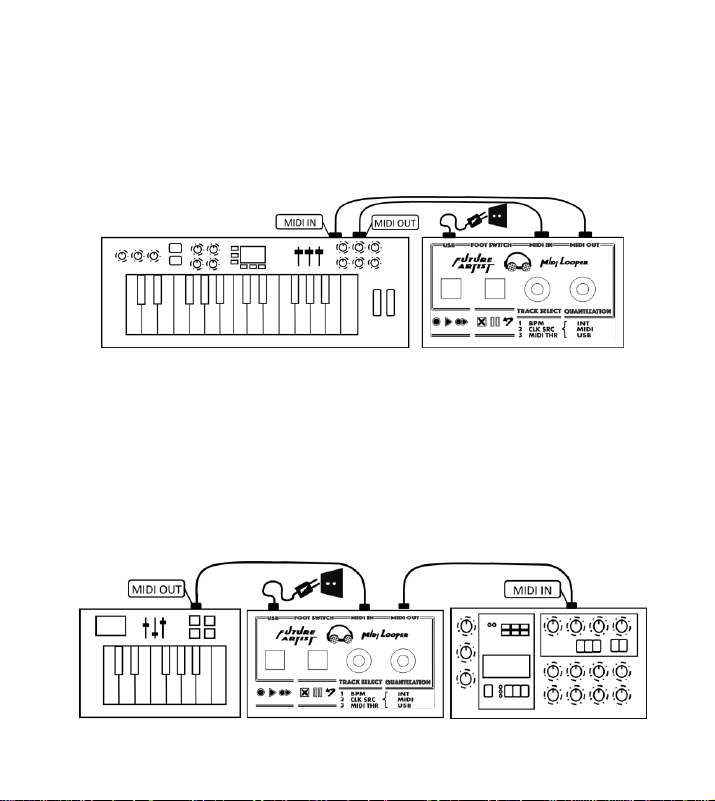
MIDI LOOPER with E-piano or keyboard synthesizer
The MIDI LOOPER can be run standalone with an internal MIDI Clock. The USB input is
used for power supply.
Connect the MIDI output of your E-piano with the MIDI input of the MIDI LOOPER and the
MIDI output of the MIDI LOOPER with the MIDI input of your E-piano (or keyboard
synthesizer). The USB port of the MIDI LOOPER is used for power supply. For this purpose,
plug the supplied cable in an USB power supply recommended by us.
MIDI LOOPER with MIDI Controller and synthesizer
The MIDI LOOPER can be run standalone with an internal MIDI Clock. The USB input is
used for power supply.
Page 30
29
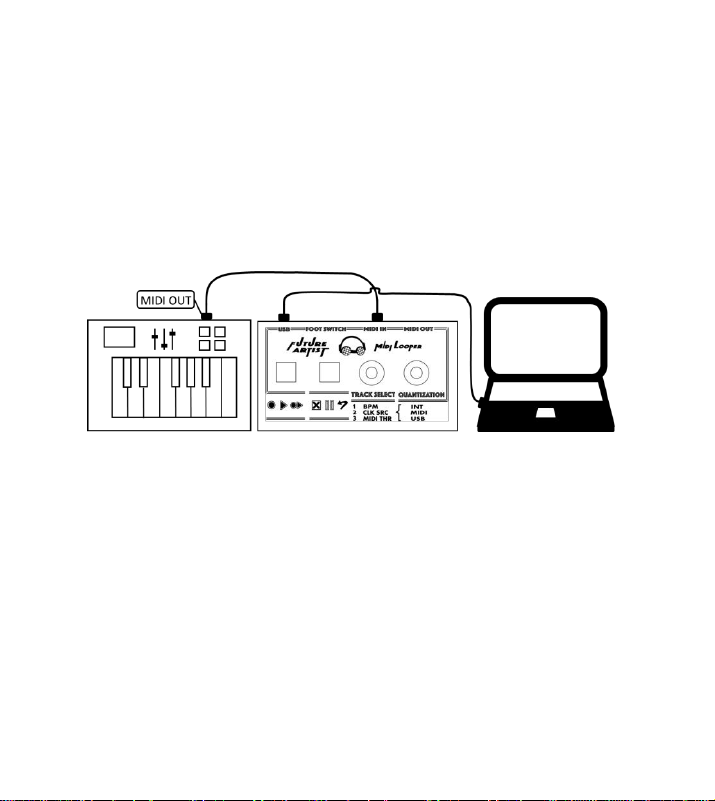
Connect the MIDI output of your MIDI Controller (in the example in the figure a MIDI
Keyboard) with the MIDI input of the MIDI LOOPER and the MIDI output of the MIDI
LOOPER with the MIDI input of your synthesizer. The USB port of the MIDI LOOPER is used
for power supply. For this purpose, plug the supplied cable in an USB power supply
recommended by us.
MIDI LOOPER with MIDI Controller and computer
The MIDI LOOPER functions as an USB Class Compliant MIDI Device to an external MIDI
Clock (MIDI Clock settings see chapter "Options menu“).
Connect the MIDI output of your MIDI Controller (in the example in the figure a MIDI
Keyboard) with the MIDI input of the MIDI LOOPER and the USB port with the computer.
The computer functions as a sound generator.
How to control the MIDI LOOPER
Control elements
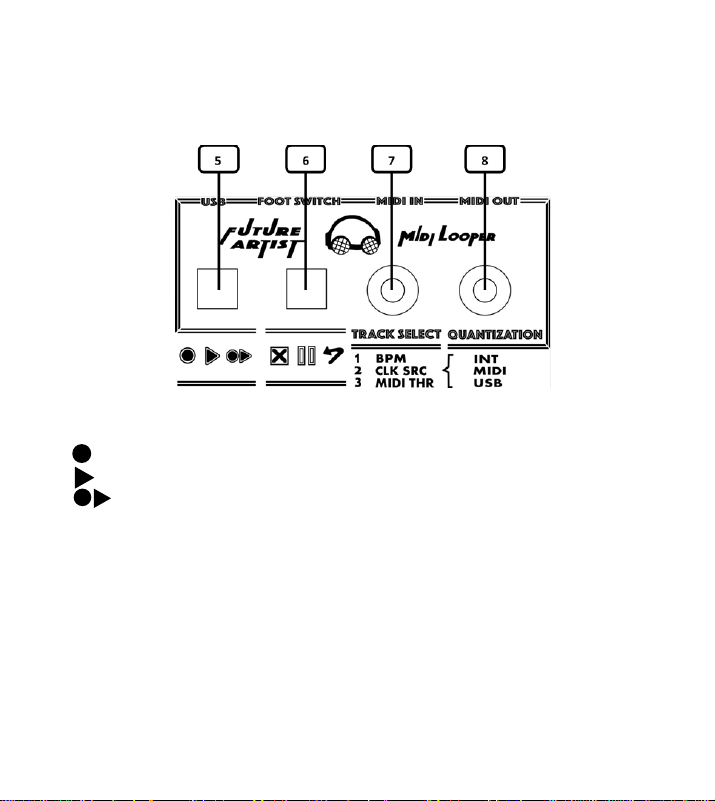
The MIDI LOOPER has two illuminated buttons (5) and (6) and two knobs (7) and (8),
which can also be pushed. You control the main functions with both buttons: record, play,
pause and delete (see also symbols below the buttons). You can also see the selected
track (explanations of the colors can be seen below) on the right button (6) and the
momentary track status on the left button (5).
Page 31
30
The left knob (7) is used for selection of the desired track, the right knob (8) is used for
varying the quantization of the selected track during playing. Both knobs offer
configuration of other functions in the options menu (see chapter "options menu").
(5) With the left button you can:
• Start record
• Start play
• Start overdub
The left buttons shines:
• white, if the track is empty
• green, if the track is playing
• yellow, if the track is paused
• red, if the track is recording
• In the options menu: according to the current selected option (see chapter
"options menu")
The LED flashes in quarter note of the current set playback clock speed (“BPM”).
Page 32

31
(6) With the right button you can:
• Pause the track (during play)
• Delete the track (during pause)
• Undo the latest overdub. This removes the top layer of music note signals
(during record and overdub) last recorded.
The right button shines:
• orange / blue / violet / pink as marking of the current selected track as well as
white, if all tracks are selected at once
• In the options menu: according to the current selected option (see chapter
"options menu")
The right button flashes in green at every beginning of the loop. Furthermore, right
button pulsates due to playback notes in the track.
(7) With the left knob you can:
• select the required track, if you turn it
• select all tracks at once, if you push it
• In the options menu: adjust the value of the current selected option
(see chapter „Options menu“)
If you are using the knob, both buttons will show you the appropriated values (see
explanation button (1) and (2))
(8) With the right knob you can:
• adjust the quantization of the selected track, if you turn it. The following
quantization can be adjusted: 1/96, 1/32, 1/24, 1/16, 1/12, 1/8, 1/6, 1/4. Turn
left to gain a sensitive quantization (to 1/96) and turn right for a rough
quantization (to1/4).
Note: All notes are recorded with quantization 1/96, but are played back with actual
quantization setting of the respective track.
• Enter or Leave the options menu by pushing it
• In the options menu: select the desired option (see chapter "Options menu“)
Page 33

32
Hints for using a foot switch
If you connect a foot switch into the jack socket, you can control the main functions of the
MIDI LOOPER with your foot.
Use the left button of the foot switch like the left button (5) and the right button of the
foot switch like the right button (6) at foot switches with two buttons. At foot switches
with three buttons, use the left button of the foot switch like the left button (5) of the
MIDI LOOPER, the middle button of the foot switch like the right button (6), as well as
additionally the right button of the foot switch to select tracks like using the left knob (7).
An application example
We start with an empty track (Empty = left button shines white):
• Push the left button. The button flashes red. The MIDI LOOPER is ready for
recording.
• Now you can select one of two ways to proceed:
(a) Push the left button again and it shines red. The MIDI LOOPER is now in
the mode "Record“.
(b) Play notes with your MIDI Controller. As soon as you play the first music
note, the MIDI LOOPER switches automatically to the recording.
Meanwhile, the left button shines red.
Hints:
a. First you should set the clock rate (see option “BPM” in chapter “ Options
menu”). Start to record from an empty loop. Count the beats with (1-2-3-4-1)
and finish recording at the second "1“ which symbolizes the first beat of a
second bar. This simplifies the recording of a complete 4/4 bar at required clock
speed as a seamless loop.
b. If you want to avoid getting empty space at the loop end, you should switch
directly to play back after you finished recording your music notes. Do so by
pushing the left button. Otherwise recording will continue during the time, in
which you do not play any music notes.
• Push the left button again and the track switches to play. Now, the music notes
are played in an infinite loop (button shines green).
Page 34

33
• You can now switch between record and play with the left button.
• Push the left button to record another layer of music notes ("Overdub“). (Again
the button shines red)
Hint: If you record music notes, these will be recorded directly into the loop and
immediately played. You will hear all recorded music notes.
• Push the right button, and you reject the last recorded layer of music notes
("Undo"). The MIDI LOOPER remains in Record and the left button is still
shining in red.
Hint: You can record up to 255 layers in a single track and delete them with "Undo" one
after the other from the track.
• Push the left button and you will get back to playing of the music notes from
the track. (Button shines green)
• Now push the right button and the track switches to pause (Button shines
yellow).
• Push the left button and you switch back to Play. The loop is starting with the
next quarter note.
• Push the right button and you switch again to Pause (Button shines yellow)
• Push the right button again and hold for one second. Now you delete all music
notes of this track and the track is empty again. (Button shines white)
Special case: all Tracks selected
You push the left knob and select all tracks at once. All actions will have effects on all
tracks.
Exception: You cannot change the quantization, if you have selected all tracks at once!
If all four tracks are in different conditions (e. g. violet track empty, pink track RECORD,
orange track PLAY and blue track PAUSE), what will the left button show when all Tracks
selected simultaneously?
Page 35

34
If you select all tracks at once and
• at least record one track (e. g. pink track records, orange track paused), the left
button shines red
• record no track and at least play one track, the left button shines green
• record and play no track and at least one track is paused, the left button shines
yellow
• all tracks are empty, the left button shines white
What happens, if you push a button when all Tracks selected simultaneously?
Hint: You can only switch between play and pause when all tracks selected simultaneously.
If the left button shines red at selection of all tracks, it means that you record in at least
one track (see description above). However, to push a button does not effect, that all
tracks at once switch to record mode.
• If you push the right button all tracks are paused at once. The left button
shines yellow.
• If you push the right button again, while all tracks are paused, then you stop
the internal clock. No MIDI Clock signal is sent any longer via MIDI OUT or USB.
any more. Left button shines yellow.
• If you push the right button again for at least 2s, while the internal clock is
paused, you will delete all tracks:
➢ All notes and controller data are deleted.
➢ The quantization is set to default (96th).
➢ The options (bpm, clock source, int/ext/usb, soft thru on/off)
remain unchanged.
The clock starts again as soon as you start one or all tracks simultaneously (by
pushing the left button or by an external MIDI start command).
• If you push the left button, you will play all tracks at the same time. The left
button shines green. All tracks start at the beginning and not at the point
where they were paused.
Page 36

35
Details about the track length
The length of a track (measured in beats) results from the first recording in the respective
track. The behavior differs depending on whether the recording is started while the
internal clock (time base) is running or while the internal clock is stopped.
Note: The clock is stopped when the MIDI LOOPER is powered up. This is also the case, if
you explicitly stop it as described in the chapter "What happens when you press a button
while all tracks are selected?".
• Recording mode with stopped clock (Clock Source = internal clock):
The length of the track may be exactly 1 quarter notes or 1 ... 64 bars. The
automatic bpm detection determines how many bars are derived from the
recording duration (in seconds).
➢ less than 1 second: track length is 1 quarter note
➢ from 1 second: the track length is rounded to a whole number of
bars (1 ... 64)
• Recording mode with clock running:
The track length will be rounded to 1 to 16 quarter notes according to the
recording time (in seconds). From the beginning of the 17th quarter note the
track length is rounded up to whole bars (5 ... 64).
Options menu
Hint: In “Appendix A Short view options menu” you will find a short view
Push the right knob and you get to the options menu. The left button does not shine, the
right button flashes yellow, because the first options menu item is already selected (clock
speed in BPM), see explanation below.
Turn the right knob to switch between the options (turn with clockwise and you get to the
next option, turn against clockwise and you get to the previous option). Turn the left knob
to adjust the value of the current selected option.
Page 37

36
The left button shows which option is actually selected:
• Button off (does not shine): adjust BPM
The right LED flashes yellow in the clock speed of the adjusted BPM. Turn the
left knob or tap the left button ("Tap Tempo") as beat to adjust the clock speed
(in BPM).
Hint: Enter the clock speed by tapping the left button ("Tap Tempo") or the left foot switch.
• Left Button shines blue: select Clock Source
The right button shows which source is selected. Turn the left knob and select
between:
1. Right Button shines red: internal Clock
The MIDI LOOPER clocks in BPM clock speed, which you can select in the
MIDI LOOPER (see hereto first menu option, if left LED is off)
2. Right button shines yellow: Clock of MIDI In
3. Right button shines green: Clock of USB
Note: You can stop and start the MIDI LOOPER via MIDI signals (MIDI Start command).
• Left Button shines pink: MIDI Thru and USB Thru on-/off
The right button shows, if MIDI Thru is on or off. Turn the left knob and select
between:
1. Right button shines red: MIDI Thru is off
2. Right button shines green: MIDI Thru is on
Note: The MIDI Thru function means that data received at the MIDI IN will be output to
the MIDI OUT immediately. This corresponds to the behavior of a MIDI thru connector.
The USB Thru function means that data received at the MIDI IN is immediately output to
the USB. This corresponds to the functionality of a MIDI USB interface and allows the direct
playing of software instruments.
MIDI Thru and USB Thru can be useful or unwanted, depending on the application. They
can only be switched on and off together.
After starting the MIDI LOOPER, MIDI Thru and USB Thru are always switched on.
Page 38
37
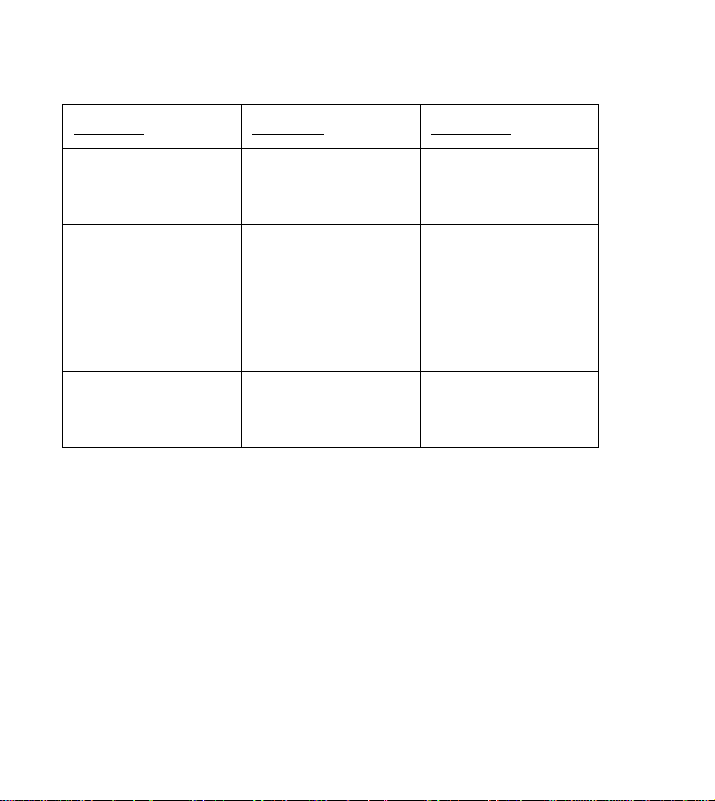
Appendix A Short view options menu
menu item
Left button
Right button
BPM
Off
(does not shine)
Flashes yellow
in beat of BPM
Clock Source
blue
Red: Internal Clock
Yellow: Clock Signal of
MIDI In
Green: Clock Signal of
USB
MIDI Thru
USB Thru
Pink
Red: off
Green: on
Page 39
38
Appendix B MIDI Implementation Table
Function
Transmitted
Recognized
Remarks
Basic Channel
Default
Changed
1 - 16
1 - 16
1 - 16
1 - 16
all channels are
active all the time
Mode
Default
Messages
Altered
Mode 1
X
X
X
X
X
Note Number
True Voice
0 - 127
0 - 127
0 - 127
0 - 127
Velocity
Note ON
Note OFF
O
O
O
O
After Touch
Key's
Ch's
O
O
O
O
Pitch Bend O O
Control Change
O
O
Prog Change
X
X
System Exclusive
X
X
System Common
Song Pos
Song Sel
Tune
X
X
X
X
X
X
System Real Time
Clock
Commands
O
O
O
O
MIDI Clock
Start, Stop
Page 40
39
Aux Messages
Local ON/OFF
All Notes OFF
Active Sense
Reset
X
X
X
X
X
X
X
X
Notes O = Yes, X = No
Page 41

40
Appendix C Technical facts
• Recording and simultaneous playback of MIDI music notes as well as MIDI
Controller data
• Visual feedback at recordings and playbacks (display of music notes activities
and clock speed)
• 4 independent operable tracks with individual length (1…256 quarter notes)
• Record of up to 1000 music notes and 1000 controller values (maximum 250
music notes + 250 controller values per track)
• 64 times polyphony
• Quantization of position of music notes during playing is adjustable at every
time (Steps: 1/96, 1/32, 1/24, 1/16, 1/12, 1/8, 1/6, 1/4 beat)
• Clock speed is adjustable at every time (60…210bpm)
• Output of MIDI Clock via MIDI OUT and USB as MIDI Clock Master
(configuration of time base = "internal“)
• Can be synchronized to MIDI Clock via MIDI IN and USB as MIDI Clock Slave
(configuration of time base = "external MIDI“ or "external USB“)
• Two multi-colour illuminated buttons
• 2 knobs (rotary encoders) with integrated button
• Optional usable: foot switch
Page 42

41
Appendix D Firmware Update
On our website www.future-artist.com you will find a link to the current firmware. Visit
our website occasionally to get future updates. At the download on our website you will
also find release notes and an installation guide. Here you also find how to check out
which firmware version is running on your MIDI LOOPER.
 Loading...