

Page 1

LED Digital Panel Heater
FCV1000
FCV1500
FCV2000
REGISTER YOUR GUARANTEE
www. .co.uk/guarantee
Page 2

User Manual— Please read and retain for future reference
Contents
Parts List
Technical Information
Safety Instructions
Using your unit
Maintenance
Warranty
!
!
!
!
!
!
!
!
!
!
Parts List
No.
Description
No.
Description
1
Front Panel
14
Tip Over Switch Box (Bottom)
2
Hook Rack (Top)
15
Tip Over Switch
3
Thermostat
16
Tip Over Switch Box (Top)
4
Waterproof Cover
17
Control Box Dam-board
5
Rear Cover
18
Control Box Cover
6
Hook Rack (Bottom)
19
Stopper Cover
7
Feet
20
Decoration Cover
8
Support Frame
21
Sticker
9
Heating Element Support
22
Small Panel
10
Heating Element
23
PCB
11
Sensor Dam-board
24
Controller
12
Sensor Fixed Cover
25
Power Switch
13
Sensor Fixed Part
26
Tension Disc
Page 3

Exploded Assembly Diagram
NOTICE: Actual product may vary from pictures shown.
Technical Information
LED Digital panel heater
Model: FCV1000
Rated Voltage: 230V ~ 50Ha
Rated Power: 1000W
IP rating: IPX4
Machine Size (without feet): 54x8x40cm (Length x Width x Height)
Page 4

Model: FCV1500
Rated Voltage: 230V ~ 50Ha
Rated Power: 1500W
IP rating: IPX4
Machine Size (without feet): 70x8x40cm (Length x Width x Height)
Model: FCV2000
Rated Voltage: 230V ~ 50Ha
Rated Power: 2000W
IP rating: IPX4
Machine Size (without feet): 86x8x40cm (Length x Width x Height)
Read this entire manual before using this product. Failure
to do so can result in serious injury. Save this manual for
future reference.
Copyright© 2018 by FUTURA Direct Ltd. All rights reserved. This manual or any
artwork contained herein must not be reproduced in any shape or form without the
express written consent of FUTURA Direct Ltd. Diagrams within this manual may
not be drawn proportionally. Due to continuing improvements, actual product may
differ slightly from the product described herein.
Safety Instructions
Read this owner's manual completely and make sure you understand all of
its safety guidelines.
WARNING! To avoid electric shock or damage due to the heat, always make sure the
plug is pulled out before the heater is moved or cleaned.
1. Read the instructions carefully.
2. The product is intended for home use only.
3. Make sure the heater is connected to the house's regular mains (230 V), as it
indicated on the heater.
4. New heaters will produce a specific odor when used the first time. This will stop
after a short time and is completely harmless.
5. Check for any pieces of packing foam or cardboard that may have fallen into the
heating elements of the heater. These pieces must be removed in order to avoid
unpleasant odors.
6. Prevent the heater from overheating – do not cover.
7. Always turn off the heater and unplug it when not used for a long time.
8. Pay special attention if the heater is used in rooms where children, the
handicapped or elderly reside.
9. The heater should not be set up directly beneath an electrical socket outlet.
10. The cord must not be laid under any kind of carpet. Make sure the cord is laid in
such a way that nobody can trip on it.
Page 5

11. The heater must not be used if either the cord or plug is damaged. The heater
must not be used if it has been dropped on the floor or is damaged in any other
way causing it to malfunction.
12. The cord must be repaired by the manufacturer or by an expert if it has been
damaged, to avoid dangerous situations.
13. Avoid using extension cords, which may overheat and could possibly start a fire.
14. Never cover the air vents on the heater. Avoid potential fire hazards by making
sure the air intakes are not blocked or covered. The heater should be used in
rooms with normal flat floors.
15. The heater should not be installed in close proximity to flammable materials of
any kind because there can always be a risk of fire.
16. The heater must never be used in rooms where gasoline, paint or other
flammable liquids are stored, such as in a garage.
17. The heater is approved for use in zone 2 in bathrooms.
18. Never touch an electric heater with wet hands. The heater should be installed
so a person showering or taking a bath cannot come into direct contact with it.
19. The heater becomes hot when it is on. Therefore, be careful and avoid burning
or scorching your skin.
20. The heater must be switched off, the plug removed and the heater must cool
down before it is moved.
21. Avoid overloading the mains (the circuit) where the heater is connected. The
heater may overload the electrical circuit if other electrical devices are plugged
into the same socket outlet.
22. The device cannot be used by children under 8 years of age and persons with
reduced physical or mental abilities or lack of experience and knowledge unless
they have been given supervision or instruction in the safe use of the device and
understand the hazards involved.
23. Children should not play with the device. Cleaning and maintenance should not
be done by unsupervised children.
24. Children under the age of 3 should be kept away from the device, unless they
are under constant supervision.
25. Children aged 3 to 8 years are only permitted to turn the device ON/OFF,
assuming the device is mounted according to the assembly instructions and the
children have received instruction or supervision in the safe use of the device and
understand the hazards involved.
26. STORE THIS INSTRUCTION MANUAL FOR FUTURE USE!
27. NEVER TOUCH YOUR PANEL HEATER OR ITS CASING WITH WET HANDS!
See Fig. 1
Fig. 1
Page 6

Unpacking
Carefully remove the product and any accessories from the box. Make sure that all
items listed in the packing list are included.
Packing List
A) Panel heater
B) Manual
Using your unit
Operation Instruction
Assembly
For wall mounted
Fig. 2
Fig. 3
Fig. 4
Front Panel
Back Panel
Power Switch
Air Outlet
Control Box
Feet
Page 7

Fig. 7
1. Be sure to keep the distance between the heater and floor, wall and so on at least
30cm as picture (Fig. 3).
2. Use drill dimension paper to drill top two holes (Φ8) on the wall and put the
expansion screws in the holes as picture (Fig. 4).
3. The hook racks are pre-assembled on the back of the heater, hang the top two
hook racks on the screws as picture (Fig. 5). Mark the two bottom hook rack’s
position on the wall and take away the heater, then drill bottom two holes (Φ8)
on the wall and put expansion screw’s plastic cover in the holes as picture (Fig. 5).
4. Hang the heater on the wall and put the expansion screws in the bottom two holes
as picture (Fig. 6).
For Stand (Fig. 7)
1. Fit the foot onto the bottom of the
body.
2. Fasten the foot with 4 screws.
Fig. 5
Fig. 6
Page 8

Fig. 9
Electronic thermostat – Instructions
Control panel for electronic thermostat:
1, Display (shows the desired room temperature by default)
2, Control light - Night function
3, Control button (+) (increase temperature)
4, Night function
5, Control light - day function
6, Power indicator
7, Control button (–) (reduce temperature)
8, Day function
9, Function button (F) / Open window function
Warning: Before the heater is turned on, it must be attached to a wall or
stand. If the heater is not installed correctly or is installed askew, this may
cause the heater to malfunction or in the worst case, be damaged.
If the temperature sensor is not functioning properly, you will see the symbol
on the display. Please contact the dealer or importer.
Set the desired temperature
Press the arrow buttons to set the
desired temperature. See Fig. 10.
Day/night thermostat – Instructions
Tip! The thermostat can be used as a regular electronic thermostat (i.e. the heater
will maintain a constant temperature 24 hours a day). Please see the section on the
electronic thermostat for further information!
Fig. 8
2 9 3
4
7
5
8
6
1
Page 9

Fig. 10
Fig. 11
Fig. 12
Fig. 13
Fig. 14
Fig. 15
1) Daytime setback
When you want the heater to reduce
the temperature during the day (set for
weekdays from now on) press . The
display shows " ".
Use the arrow buttons to enter the
correct weekday. (Monday=1,
Tuesday=2, Wednesday=3,
Thursday=4, Friday=5, Saturday=6,
Sunday=7). Save by pressing .
Enter the desired temperature for
daytime setback. Save by pressing .
Enter the desired number of hours for
daytime setback. Save by pressing
.
*Control light is steady green when the heater is in an active setback period. The
control light is steady red when the setback period is inactive, but has been
programmed.
2) Nighttime setback
When you want the heater to reduce
the temperature in the evening
(applicable every evening/night from
now on) press . The display shows
.
Enter the desired temperature for
nighttime setback. Save by pressing
.
Page 10
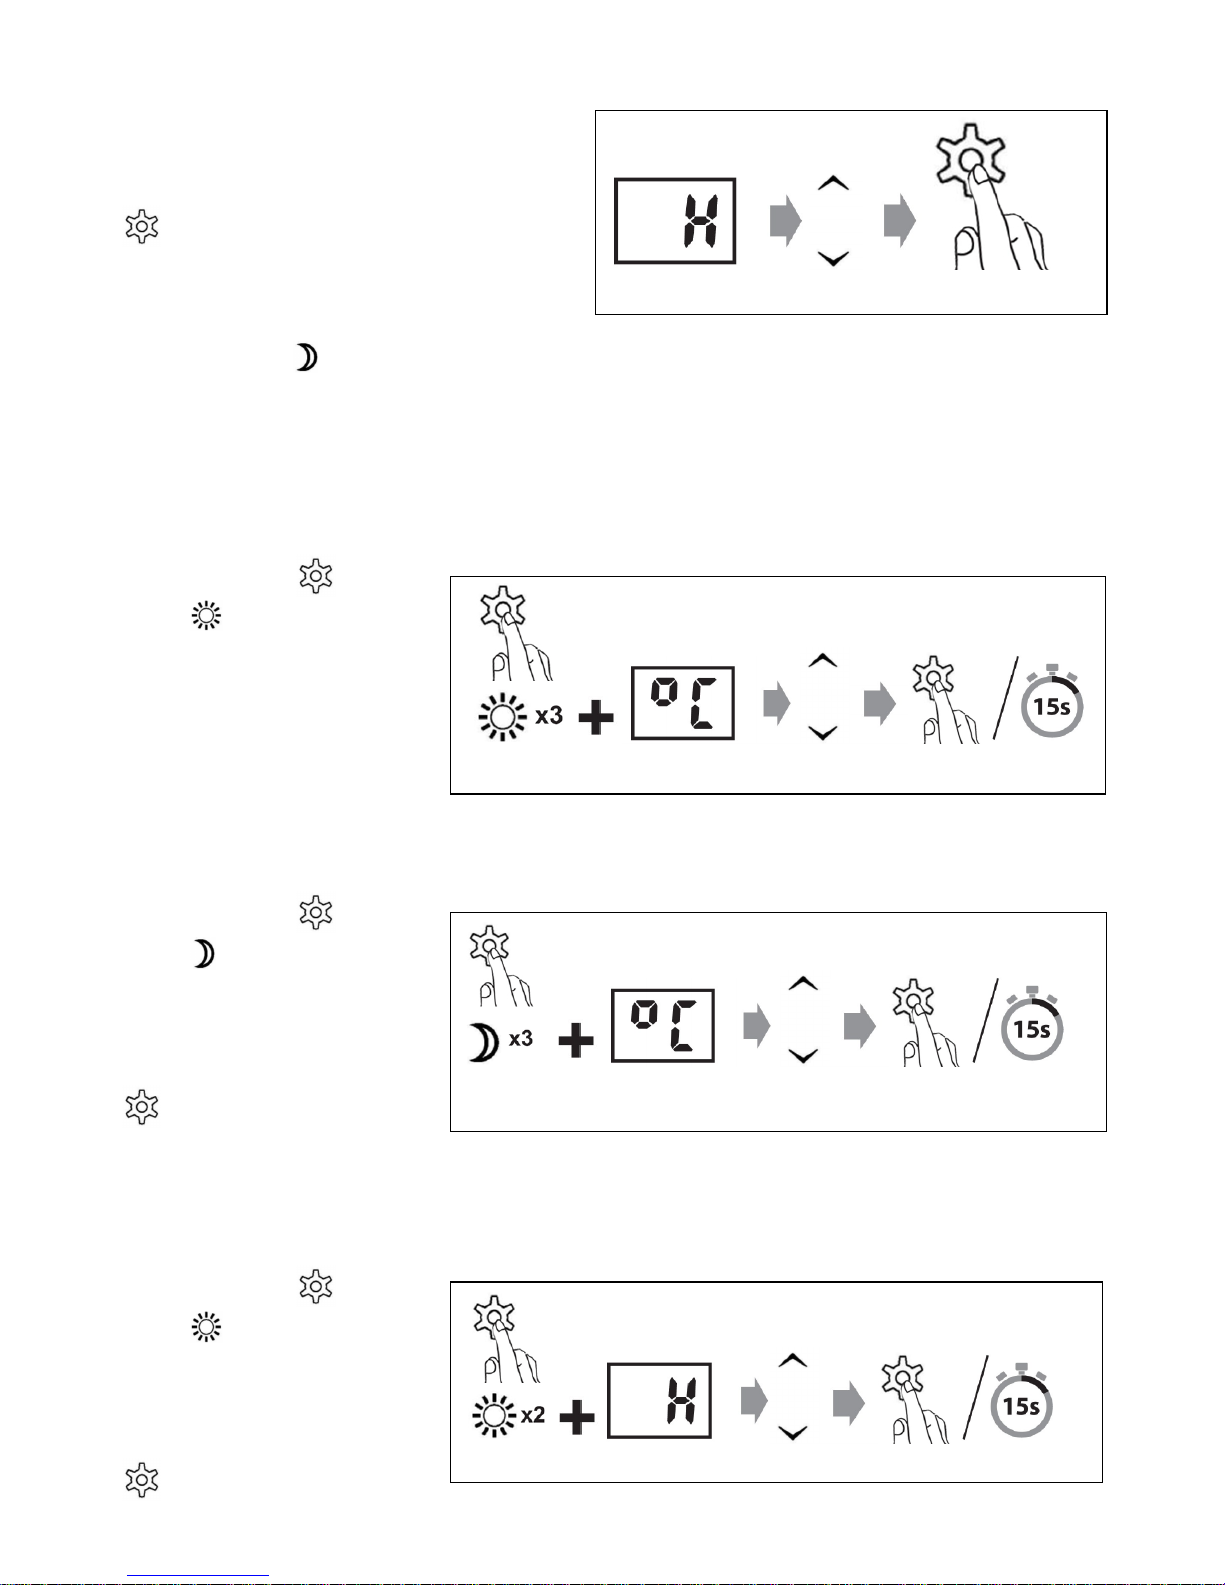
Fig. 17
Fig. 16
Fig. 18
Fig. 19
Enter the desired number of hours for
nighttime setback. Save by pressing
.
*Control light is steady green when the heater is in an active setback period. The
control light is steady red when the setback period is inactive, but has been
programmed.
3) Change setback temperature — Daytime
Press and hold and
press 3 times.
Enter the desired
temperature for daytime
setback. Save by pressing
or wait 15 seconds for
automatic confirmation.
4) Change setback temperature — Nighttime
Press and hold and
press 3 times.
Enter the desired
temperature for nighttime
setback. Save by pressing
or wait 15 seconds for
automatic confirmation.
5) Change number of hours — Daytime
Press and hold and
press 2 times.
Enter the desired number
of hours for daytime
setback. Save by pressing
or wait 15 seconds for
Page 11

Fig. 20
Fig. 21
Fig. 22
Fig. 23
Fig. 24
automatic confirmation.
6) Change number of hours — Nighttime
Press and hold and
press 2 times.
Enter the desired number
of hours for nighttime
setback. Save by pressing
or wait 15 seconds for
automatic confirmation.
7) Cancel (skip) setback period
Press and hold and press or
once (depending on which
setback period you want to cancel).
*The heater will skip an active
setback period or the next
setback period.
*During the next setback period,
the heater will automatically
resume the programmed
temperature reduction.
8) Delete a setback program
Press and hold or (depending
on which setback period you want
to cancel) for 3 seconds.
Page 12

9) Open window function
The heater has open window function.
If you open a window widely in the space where the heater is located and the
temperature drop 2 or more than 2 in two minutes, a sensor will detect the sharp
drop in temperature. The heater will switch out automatically and show in
display.
The heater will be reignited automatically after 10 minutes. However you can
manually relight the radiator before the 10 minutes end by pressing . The icon
disappears and show previous operation mode.
Default setting of open window function is closed.
Press and hold button for 5 seconds, display show , then press button to
open open window function, display show icon “ON” and flash for 15 seconds to
confirm automatically, or you can press to confirm directly.
If open window function is opened, and you want to close, then press and hold
button for 5 seconds, display show , then press button to close open window
function, display show icon “OF” and flash for 15 seconds to confirm automatically, or
you can press to confirm directly.
10) Resetting the heater
Turn off the heater's main switch.
Press and hold while you turn on the heater's main switch.
11) Memory function
*The heater remembers free mode’s temperature settings and will automatically
return to the desired temperature after a power failure. But it can’t remember the
settings for day mode and night mode.
Maintenance
1. For cleaning, always unplug the heater and leave it to cool.
2. Wipe the heater regularly with a damp cloth and dry the surface before turning
on the heater again.
3. The heater must be cleaned at least once a month during the heating season.
4. Dust etc. should be removed with a soft cloth.
5. The heater can be stored in a dry and clean place.
CAUTION! The heater should never be immersed in water.
Avoid using detergents to clean the heater.
Never let any water get inside the heater; this can be hazardous.
Page 13

Disposal
Power tools, accessories and packaging should be sorted for environmentally-friendly
recycling.
Only for EC countries:
Do not dispose of power tools into household waste!
According to the European Directive 2002/96/EC on waste electrical and
electronic equipment and its incorporation into national right, products that are
no longer suitable for use must be separately collected and sent for recovery in an
environmentally-friendly manner.
Declaration of Conformity
The declaration is to certify that it conforms to CE, EMC, LVD and RoHS
directives:
EN55014-1/A2: 2011
EN55014-2/A2: 2008
EN61000-3-2: 2014
EN61000-3-3: 2013
All provisions of Annex 1 of Council Directive 2014/30/EU – EMC directive
EN60335-1: 2014
EN60335-2-30/A11: 2012
EN62233: 2008
All provisions of Annex 1 of Council Directive 2014/35/EU – the Low
Voltage Directive
RoHs 2011/65/EU
Mr. Paul Kaye, UK QA Manager
Page 14

Please read the following carefully
FUTURA Direct Ltd. and/or its distributor have provided the parts list and assembly
diagram as a reference tool only. Neither FUTURA Direct Ltd. or its distributor makes
any representation or warranty of any kind to the buyer that he or she is qualified to
do any repairs or replace any parts of this product. FUTURA Direct Ltd. and its
distributor expressly state that all repairs or parts replacement should be done by
certified or licensed technicians. The buyer assumes all risk and liability arising out of
his or her repairs or parts replacement to the original product.
24 Months Limited Warranty
If within 24 months from the date of purchase you experience any problems with
your product, please return the product to its distributor/dealer for repair or
replacement. This warranty DOES NOT COVER normal wear, or any damage as a
result of accidents, misuse, abuse or negligence.
REGISTER YOUR GUARANTEE
Page 15

www. .co.uk/guarantee
!
Contact us at www.futuradirect.co.uk/contact
Register at www. .co.uk/ guarantee
We FUTURA Direct Ltd, England DN6 7AY declare that the panel heater is exclusively manufactured for Futura
Direct Ltd and has been manufactured according to our full quality assurance procedures.
 Loading...