

Page 1
T14SG SOFTWARE UPDATE MANUAL
[Updating procedure]
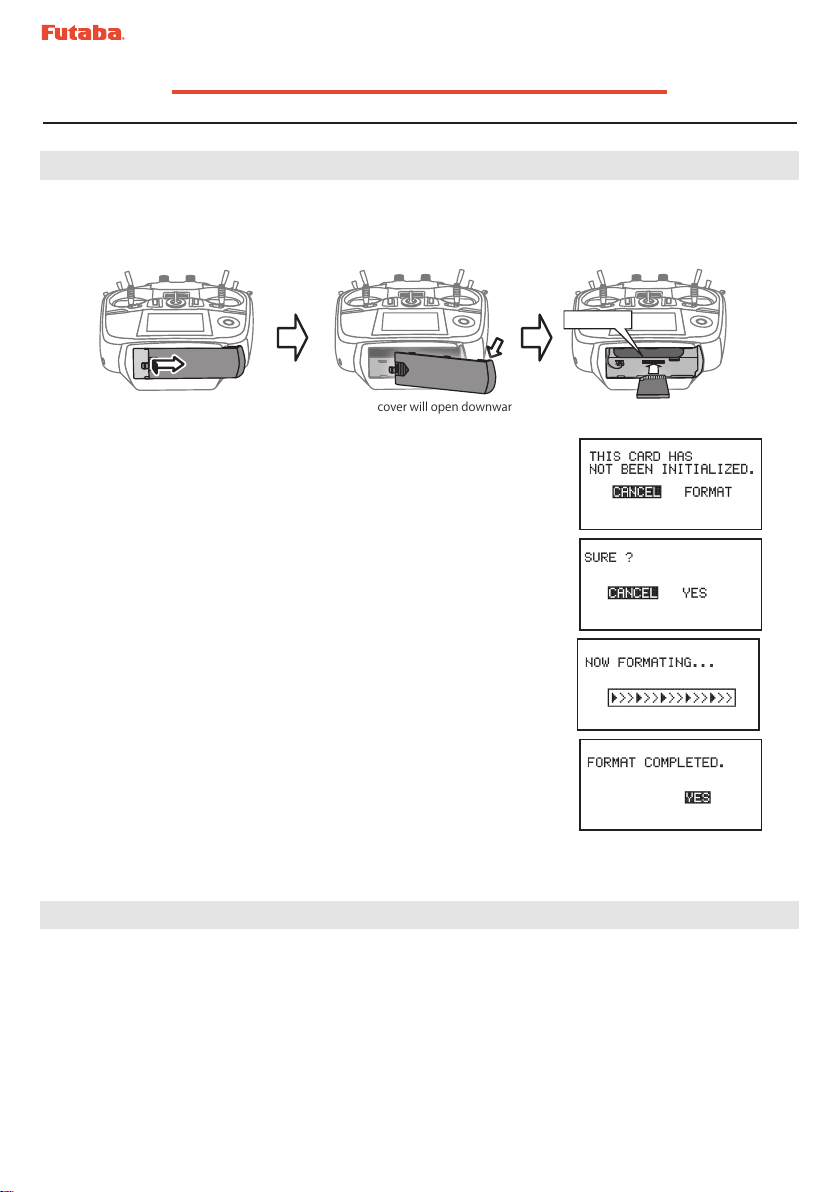
1. SD card format
1. You will rst want to format your SD card to the 14SG. If you are using an existing
SD card, any data previously saved to it will be deleted during the "format". We
suggest you either save this data on your computer or purchase a new card.
SD card slot
① Push to open.
②Slide in the direction of the
arrow on the battery cover.
③ Battery cover will open downward. ④ Insert the SD card in the
slot as shown above.
2. After inserting the new SD card into the transmitter, turn
on the power switch. You will see the word "FORMAT" if
you have not previously used this card in the transmitter.
3. Please select "YES" and touch “RTN” .
4. The following screen is displayed during
formatting.
5. When the format is completed, the following screen is
displayed.
6. Turn o the power switch and remove the SD card from
its slot.
2. Preparing the software update card.
1. Please unzip the zipped le. The following les will be created.
・T14sgUpdate.exe ... File copy utility
・T14sgUpdate.dat ... Information le for T14sgUpdate.exe
・T14SG_UPDATE.dat … Identied le of T14SG
・T14SG_TS.bin ... Update le of T14SG (piece 3)
・T14SG_AP.bin ... Update le of T14SG (piece 2)
・T14SG_UPLD.bin ... Update le of T14SG (piece 1)
-1-
Page 2
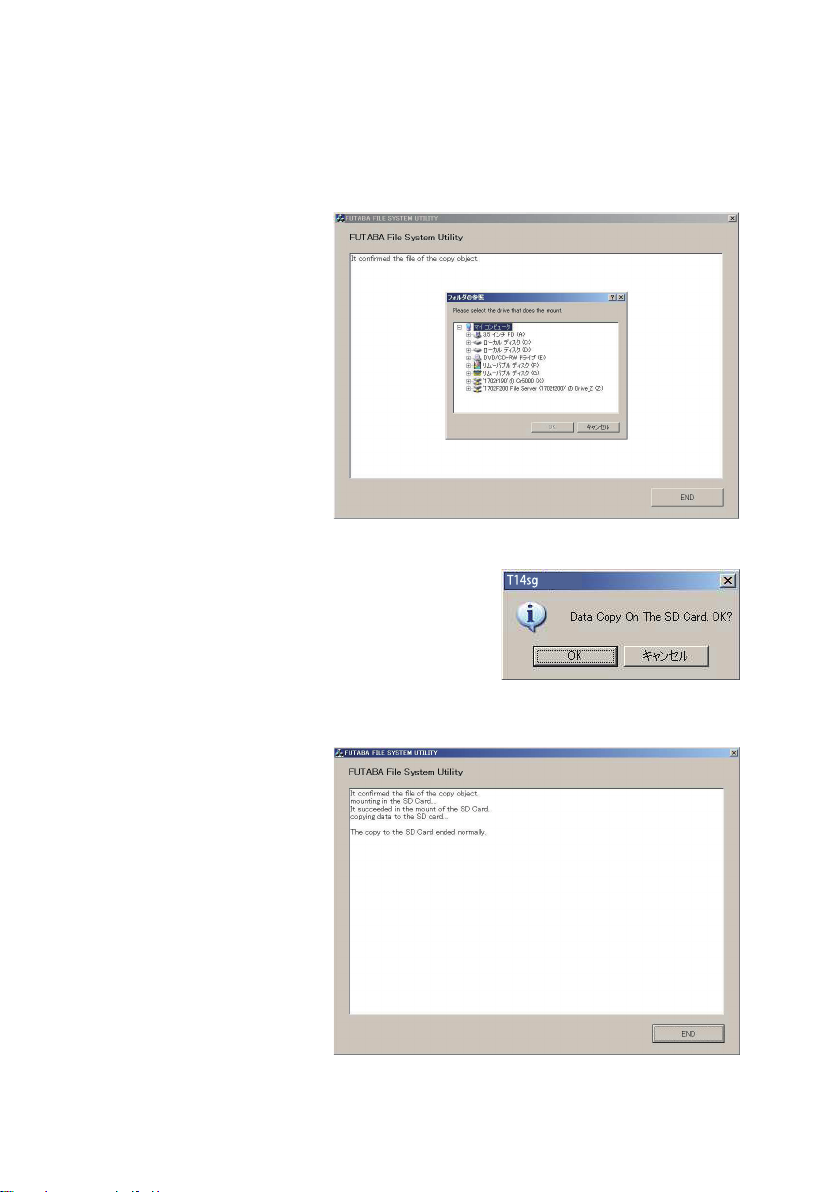
2. Insert the 'formatted" SD card into a card reader in your PC.
3. Please run "T14sgUpdate.exe".
4. Select the drive that your card reader is
Update
assigned to in your PC.
5. After the Update les are copied to the SD card, the following screens are displayed.
Click the "End" button.
-2-
Page 3

3. Update software of T14SG
PROGRAM UPDATE
START : PUSH MON . 3SEC
PROGRAM UPDATE
PROGRAM UPDATE
COMPLETED
1. Please insert the SD card which includes the update le.
2. Push the HOME/EXIT button.
3. While still holding the HOME/EXIT button, power
on the transmitter.
HOME/EXIT
button
4. After a few seconds, the following screen is displayed.
5. Push the U.MENU/MON. button for three
seconds. The software update will begin.
6. When the update is complete, the following screen is
displayed. Turn o the power switch.
7. Remove the SD card.
8. Please check the software version at INFO in SYSTEM
menu.
U.MENU/MON.
button
UP LOADING
-3-
Page 4

T14SG Installing Speech Data
Before installing the speech data, you will need to update your T14SG software to
Version 2.0 or later.
If the software version of T14SG is before Ver.2.0, the speech data can not be installed.
There are three language versions, English, German, and Japanese, in speech data. It is
possible to install only one language.
If you install a second language, it will override the rst one that you installed.
[Installing procedure]
1. Making of card for installing speech data
1. Please unzip the zipped le. The following les will be created.
English Version
・T14sgInstallSoundEng.exe
・T14sgUpdate.dat
・T14SG_INSTALL_SOUND.dat … Identied le
・T14sgSpeechEng1.bin
・T14sgSpeechEng2.bin
・T14sgSpeechEng3.bin
German Version
・T14sgInstallSoundEng.exe
・T14sgUpdate.dat
・T14SG_INSTALL_SOUND.dat … Identied le
・T14sgSpeechGer1.bin ... Data le (piece 1)
・T14sgSpeechGer2.bin ... Data le (piece 2)
・T14sgSpeechGer3.bin ... Data le (piece 3)
... File copy utility
... Information le for T14sgInstallSoundEng.exe
... Data le (piece 1)
... Data le (piece 2)
... Data le (piece 3)
... File copy utility
... Information le for T14sgInstallSoundEng.exe
Japanese Version
・T14sgInstallSoundEng.exe
・T14sgUpdate.dat
... File copy utility
... Information le for T14sgInstallSoundEng.exe
・T14SG_INSTALL_SOUND.dat … Identied le
・T14sgSpeechJpn1.bin
・T14sgSpeechJpn2.bin
・T14sgSpeechJpn3.bin
... Data le (piece 1)
... Data le (piece 2)
... Data le (piece 3)
-4-
Page 5

2. Install the already formatted SD card into your PC's card reader.
3. Please run "T14sgInstallSound***.exe".
4. Select the drive that your card reader is
Update
assigned to in your PC. Click "OK".
5. After the Update les are copied to the SD card, the following screens are displayed.
Click the "End" button.
-5-
Page 6

2. Install speech data of T14SG
INSTALLSOUND
START : PUSH MON . 3SEC
INSTALLSOUND
INSTALLSOUND
INSTALLSOUND
INSTALLSOUND
COMPLETED
1. Please insert the SD card which includes the installing speech data.
2. Push the HOME/EXIT button.
3. Still holding the HOME/EXIT button, power
on the transmitter.
HOME/EXIT
button
4. After a few seconds, the following screen is displayed.
5. Press the U.MENU/MON. button for three seconds. The
speech data begins to install.
6. After about 16 seconds, uploading reaches the right of the
progress bar, and then begins again after a pause.
7. The uploading may appear to progress slowly.
8. The progress bar will again upload. This can take a few
minutes.(About. 2 min.)
And, “COMPLETED” is displayed. Please turn o the power.
(Don't turn o the power before COMPLETED is
displayed.)
U.MENU/MON.
button
INSTALLING
INSTALLING
9. Please detach SD card.
10. Please check the language at TELEM.SET. menu in LINKAGE menu.
FUTABA CORPORATION Phone: +81 475 32 6982, Facsimile: +81 475 32 6983
1080 Yabutsuka, Chosei-mura, Chosei-gun, Chiba 299-4395, Japan
-6-
©FUTABA CORPORATION 2013, 8 (1)
Page 7

T14SG Software Update Changes
(Version 2.0)
This software update modies features found on the 14SG. If you have questions about these updated directions,
please consult your instruction manual or futaba-rc.com for further details. Refer to the original manual where
applicable but replace the steps indicated below with these instructions.
1.TELEMETRY MONITOR
The telemetry screen is modied.
It pushes from
HOME screen.
To TELEMETRY MONITOR
● TELEMETRY MONITOR set up
① The HOME/EXIT button is pushed from
HOME screen and TELEMETRY MONITOR
is called.
② Move the cursor to the "RECEIVER" or
"SENSOR" (SBS-XXX etc.) and touch the
RTN button.
You can display any items on the telemetry screen
up to 4 items at FASSTest 14CH mode. The benet
of expansion of a character will be obtained by
choosing the display items 1 and 2.
Ex. 1 item is displayed Ex. 2 items are displayed
If a cursor is moved to items (Rx-BATT,
EXT-VOL, TEMP. etc.) and RTN is touched,
the alarm setting screen of the item will be
displayed.
③ You will use the "Display" function to
choose how many sensors are shown on
your Telemetry monitor.
If the numeric part
(included "+","-",",")
is over the 6 letters, it
becomes the smaller size
automatically. It is same
size as 2 items screen.
The Telemetry Monitor is accessed by a quick tap of the
will activate Key Lock.
Key-Lock
Lock or unlock is done either by pressing and holding the S1 key or by pressing and holding the
In FASSTest12CH mode,
they are only 1 and 2 item
displays.
Ex. 4 items are displayedEx. 3 items are displayed
[ Display position ]
1
HOME/EXIT
key. Do not press and hold as this
1
2
1 3
2 4
HOME/EXIT
key.
- 1 -
Page 8

④ If you want to show two sensors on your
Telemetry screen, select 2 in "Display".
Then move down to the Sensor to select
which other item is shown.
When using a sensor that has two or more
functions, you will want to scroll to select
which will be displayed. (ALTITUDE,VARIO,
etc.)
⑤ If you want to show three sensors
on your Telemetry screen, select 3
in "Display". Then move down to the
Sensor to select which other item is
shown.
2. Telemetry Speech function
■ There is not only a software update, but also a
Speech update that must be done.
■ There are two languages available in the
Speech data, English and German.
■ The language chosen for the Speech data will
affect only the Speech function. It will not
change the language used in the transmitter's
text display.
■ The Speech function can only be used with
headphones plugged into the phone jack.
■ You will need to purchase headphones or
earphones with a 3.5plug.
⑥ To SENSOR " ----------" selection will
reduce a display item.
1 3
2
1
2
Earphone plug
● TELEM.SET. menu is added to the
LINKAGE MENU.
The speech language installed is
indicated. When the speech data is
not installed, "----------" is displayed.
The version No. of the speech data
file is indicated. When the speech
data is not installed, nothing is
displayed.
- 2 -
The interval of speech can be set.
The setting range is from 0 [Sec] to
30 [Sec].
Page 9

● The phone volume is added to SOUND
menu in SYSTEM MENU.
*The format of the speech output is
"warning" [sensor type][data][unit]
Ex. Rx battery
「warning」「battery」「four point zero」「volt」
*If the telemetry data is changed frequently, the
speech data will not be the same as the displayed
data.
The setting range is from 0 to 30.
0 is silence.
● ACT/INH button and ON/OFF switch
button of the speech function are added
to the telemetry alert screen.
ACT/INH button ON/OFF button
When the speech function is valid, "on" is displayed.
When the speech function is INH or the switch is off,
nothing is displayed.
The speech function does not work when the
telemetry data is not received, even if "on" is
displayed.
*The format of the speech output is
[sensor type][data][unit][data][data][data][data]
Ex. Rx battery
「battery」「seven point four」「volt」「seven point
four」「seven point four」「seven point four」「seven
point four」
*If the telemetry data is changed frequently, the
speech data will not be the same as the displayed
data.
● When the telemetry alert occurred, the
speech function works.
● The vario melody outputs from the
phone jack.
When the melody function
is active, the vario melody
outputs from the phone jack.
The priority of the phone output is below;
Speaking Alarm >> Speaking data >> Vario Melody
(High priority) (Low priority)
3. The setting range of the threshold of
temperature sensors is modied.
-19 ℃ ~ 200 ℃ ( ↑ THRESHOLD >
↓ THRESHOLD)
at both of SBS-01T and Temp125
When the ALERT button is ACT, the
speech function works when the alert
occurs.
-20 ℃ ~ 199 ℃ ( ↑ THRESHOLD >
↓ THRESHOLD)
at both of SBS-01T and Temp125
- 3 -
Page 10

©Copyright 2013. No part of this manual may be reproduced in any form without prior permission. The contents of this manual are
subject to change without prior notice. While this manual has been carefully written, there may be inadvertent errors or omissions.
Please contact our service center if you feel that any corrections or clarications should be made.
FUTABA CORPORATION Phone: +81 475 32 6982, Facsimile: +81 475 32 6983
1080 Yabutsuka, Chosei-mura, Chosei-gun, Chiba 299-4395, Japan
©FUTABA CORPORATION 2013, 8 (1)
- 4 -
 Loading...