

Page 1
Operating
Manual
Model # MT1020-1
FOR HOUSEHOLD USE.
Please read and
save this manual.
Warranty Information Inside
Page 2

2
Important Safeguards . . . . . . . . . . . . .3
Safety Features . . . . . . . . . . . . . . . .4
Parts List . . . . . . . . . . . . . . . . . . .5
Disassembly . . . . . . . . . . . . . . . . 6–7
Assembly . . . . . . . . . . . . . . . . . 8–9
Step-by-Step Guide to Juicing . . . . . . 10–16
Cleaning Your Juicer . . . . . . . . . . . 16–17
Troubleshooting . . . . . . . . . . . . . . . 18
Warranty . . . . . . . . . . . . . . . . . . 19
Common Questions & Answers . . . . .20–21
TABLE OF CONTENTS
Page 3

IMPORTANT SAFEGUARDS
READ THESE SAFEGUARDS CAREFULLY
BEFORE USING THIS PRODUCT!
When using electrical appliances, basic safety precautions should always
be followed including the following:
• Read all instructions.
• NOT FOR USE BY CHILDREN! Keep out of the reach of children to avoid
injury. This appliance is not a toy.
• Do not operate this or any appliance with a damaged AC cord or plug.
• Do not operate if appliance malfunctions, has been dropped or appears
damaged in any manner. Never attempt home repairs. Only a qualied
appliance technician should repair appliance before re-use.
• To avoid electric shock or serious personal injury, do not use any
attachments or utensils that were not recommended or supplied by
the manufacturer.
• To protect against risk of electrical shock or injury, never immerse power
cord, plug, or main unit in water, or other liquids.
• Do not let power cord hang over the edge of table, counter, or come in
direct contact with hot surfaces such as stoves.
• Make sure the lid is attached properly and is securely locked before
operating the Fusion Juicer. (See Assembly Step 5.)
• Make sure the motor stops completely and the unit is unplugged from
the electrical outlet before disassembling, assembling or cleaning.
• If juicer stops due to improper operation or if there is excessive noise, turn
power off, wait for blade to stop spinning, unplug from electrical outlet,
disassemble, clean all components then reassemble machine.
• To avoid risk of personal injury keep hands and utensils out of the juicer
and away from its sharp blade during operation. Use the pusher, not
ngers or utensils, to feed the produce into the juicer.
• Never disengage the locking bar during operation.
• The juicer blade is extremely sharp. Use extreme caution when handling.
• Should food become lodged in the chute, and moderate pusher pressure
will not pass it through, turn the power switch off, allow the motor to stop
completely, then unplug the AC cord, disassemble the juicer and remove
the blocked food.
• To reduce the risk of personal injury, never place blade on base without
properly assembling the unit.
• The juicer will not run if the unit is not properly assembled. The motor has
a built-in safety feature that will not allow the power to turn on unless the
locking bar is locked in place.
Page 4

4
• If juicer jams, turn power switch off immediately and remove AC cord from
electrical outlet, disassemble, and clean.
• Do not use outdoors.
• Be sure to turn switch to OFF position after each use of your juicer. Make
sure the motor stops completely before disassembling.
• Do not use the appliance if the rotating lter is damaged.
* This appliance has a polarized plug (one blade is wider than the
other). To reduce the risk of electric shock, this plug will t in a
polarized outlet only one way. If the plug does not t fully in the
outlet, reverse the plug. If it still does not t, contact a qualied
electrician. Do not modify or force the plug in any way.
• Do not operate without the pulp container in place.
SAFETY FEATURES
The Fusion Juicer was made with safety in mind. We have added two
important safety features: the Automatic Shut Off and the Locking Bar.
Built-In Thermal Cut Off Switch/Automatic Shut Off
Unlike other juicers, the Fusion Juicer is equipped with a special feature
that automatically shuts off the motor should the unit become jammed or
overheated by food during the juicing process. Prior to shut down, you will
most likely hear the juicer get louder. This will indicate that something has
caused the motor to strain. Should this happen, simply turn the power switch
off and unplug the unit… follow the Disassembly, Cleaning and Assembly
process, then allow the unit to cool for 10 minutes. The unit will restart and
you may resume the juicing process. There are some additional reasons that
could cause a “shut down”. You can nd them in the trouble shooting section
of your operating manual on page18.
The Locking Bar
The Locking Bar holds the juicer Lid/Pulp Guard in place and is connected to
an auto shut-off switch. If the Locking Bar is not in its full upright and locked
position, the juicer will not start. This is to prevent accidental contact with the
spinning blade. If the machine is not locked, the motor will not engage and
the blade will not spin.
SAVE THESE INSTRUCTIONS
Page 5
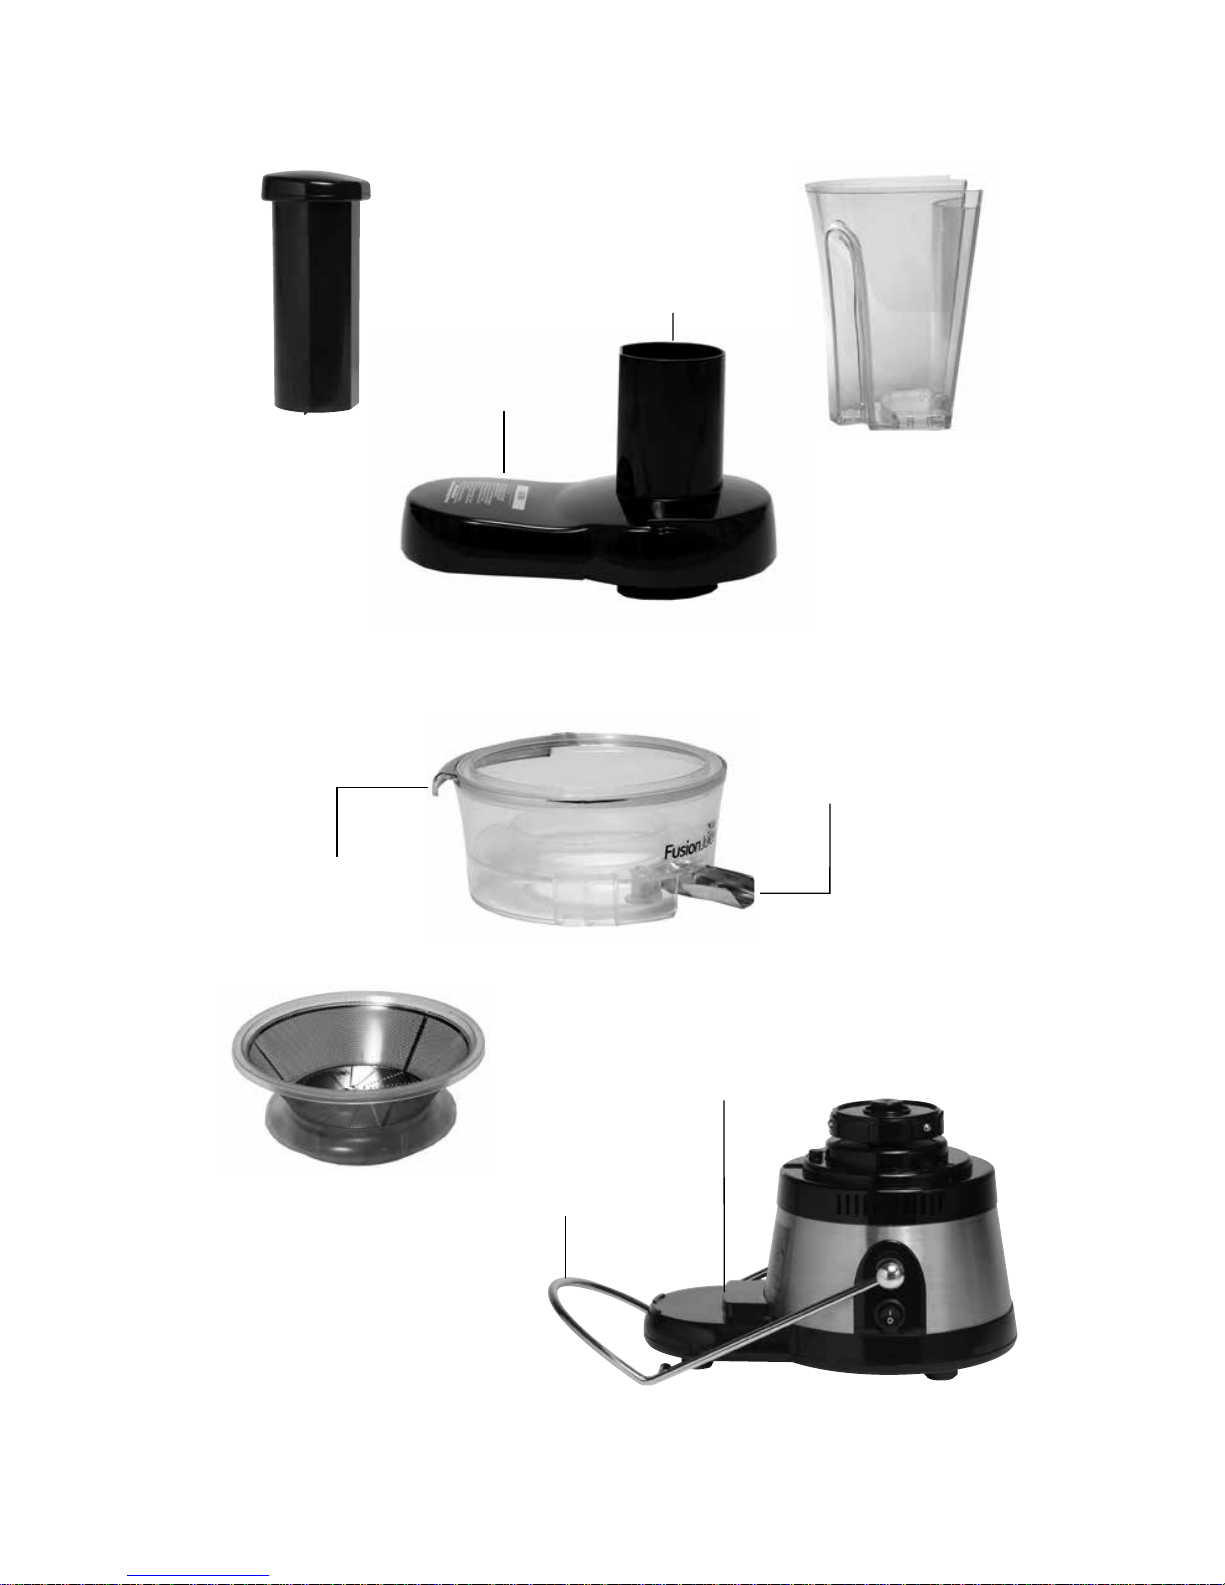
PARTS LIST
Lid with Built-in
Pulp Guard
Pulp Collector
Filter/Blade
Pusher
Locking Bar
Base
Safety Micro Switch
(Located on reverse side)
Receptacle
Removable
Non-Drip Spout
Lip
Chute
Pulp Guard
Page 6
6
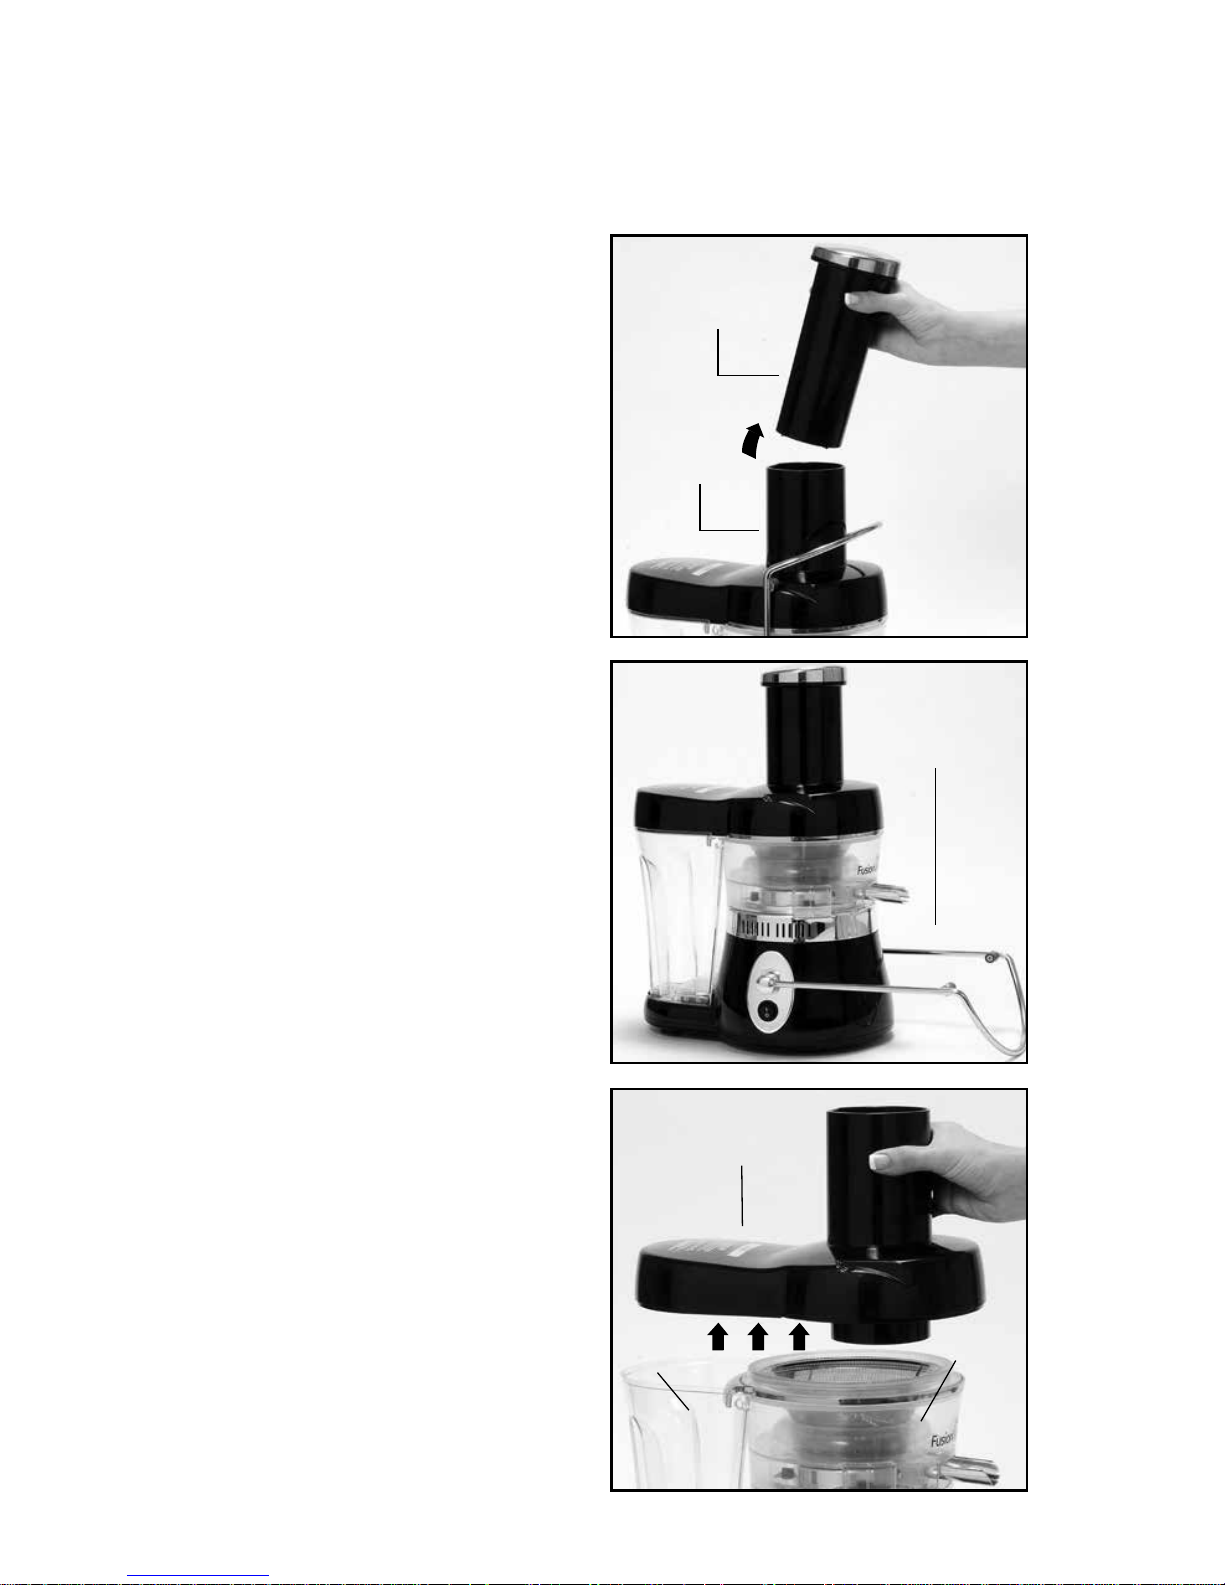
DISASSEMBLY
STEP 1
Remove pusher from the chute.
STEP 2
Lower the locking bar (silver)
into the disengaged position
as shown.
STEP 3
Remove lid with built-in
pulp guard by pulling off
of receptacle.
IMPORTANT: Before disassembling the unit make sure you turn the power
OFF and unplug the AC cord from the electrical outlet.
1
2
Locking Bar
3
Pulp
Collector
Chute
Pusher
Receptacle
Lid with Built-
In Pulp Guard
Page 7
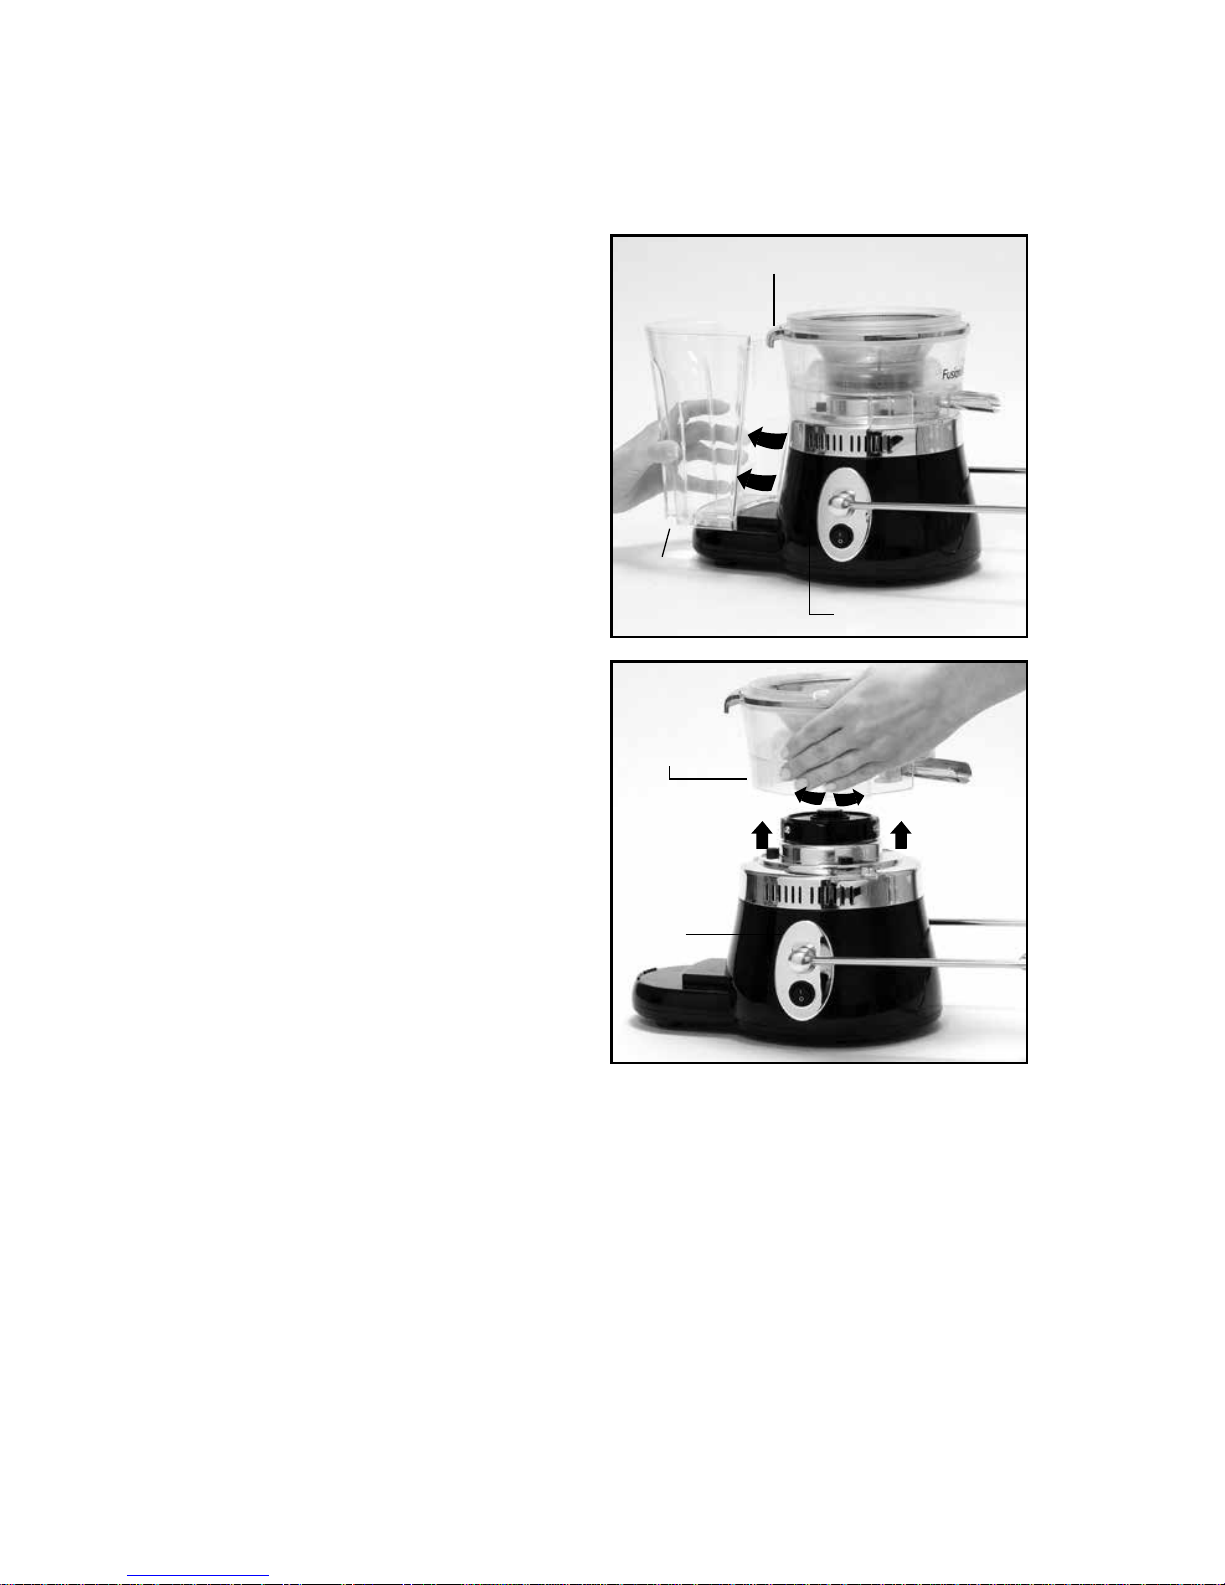
STEP 5
Remove lter/blade/receptacle
unit from base by grasping
the receptacle with two hands.
Then lift receptacle and twist in
either a clockwise or counterclockwise direction while pulling
in an upward direction until
lter/blade/receptacle unit is
separated from the main base.
STEP 4
Remove pulp collector by sliding
the bottom away from the base in
the direction of the arrows while
unhooking from under lip
on receptacle.
DISASSEMBLY (Cont.)
4
5
Note:
Do not remove screws from blade. The lter and the blade are one
piece. They are not meant to be separated.
Pulp
Collector
Lip
Base
Base
Receptacle
(Lift and Twist)
Page 8
8
ASSEMBLY
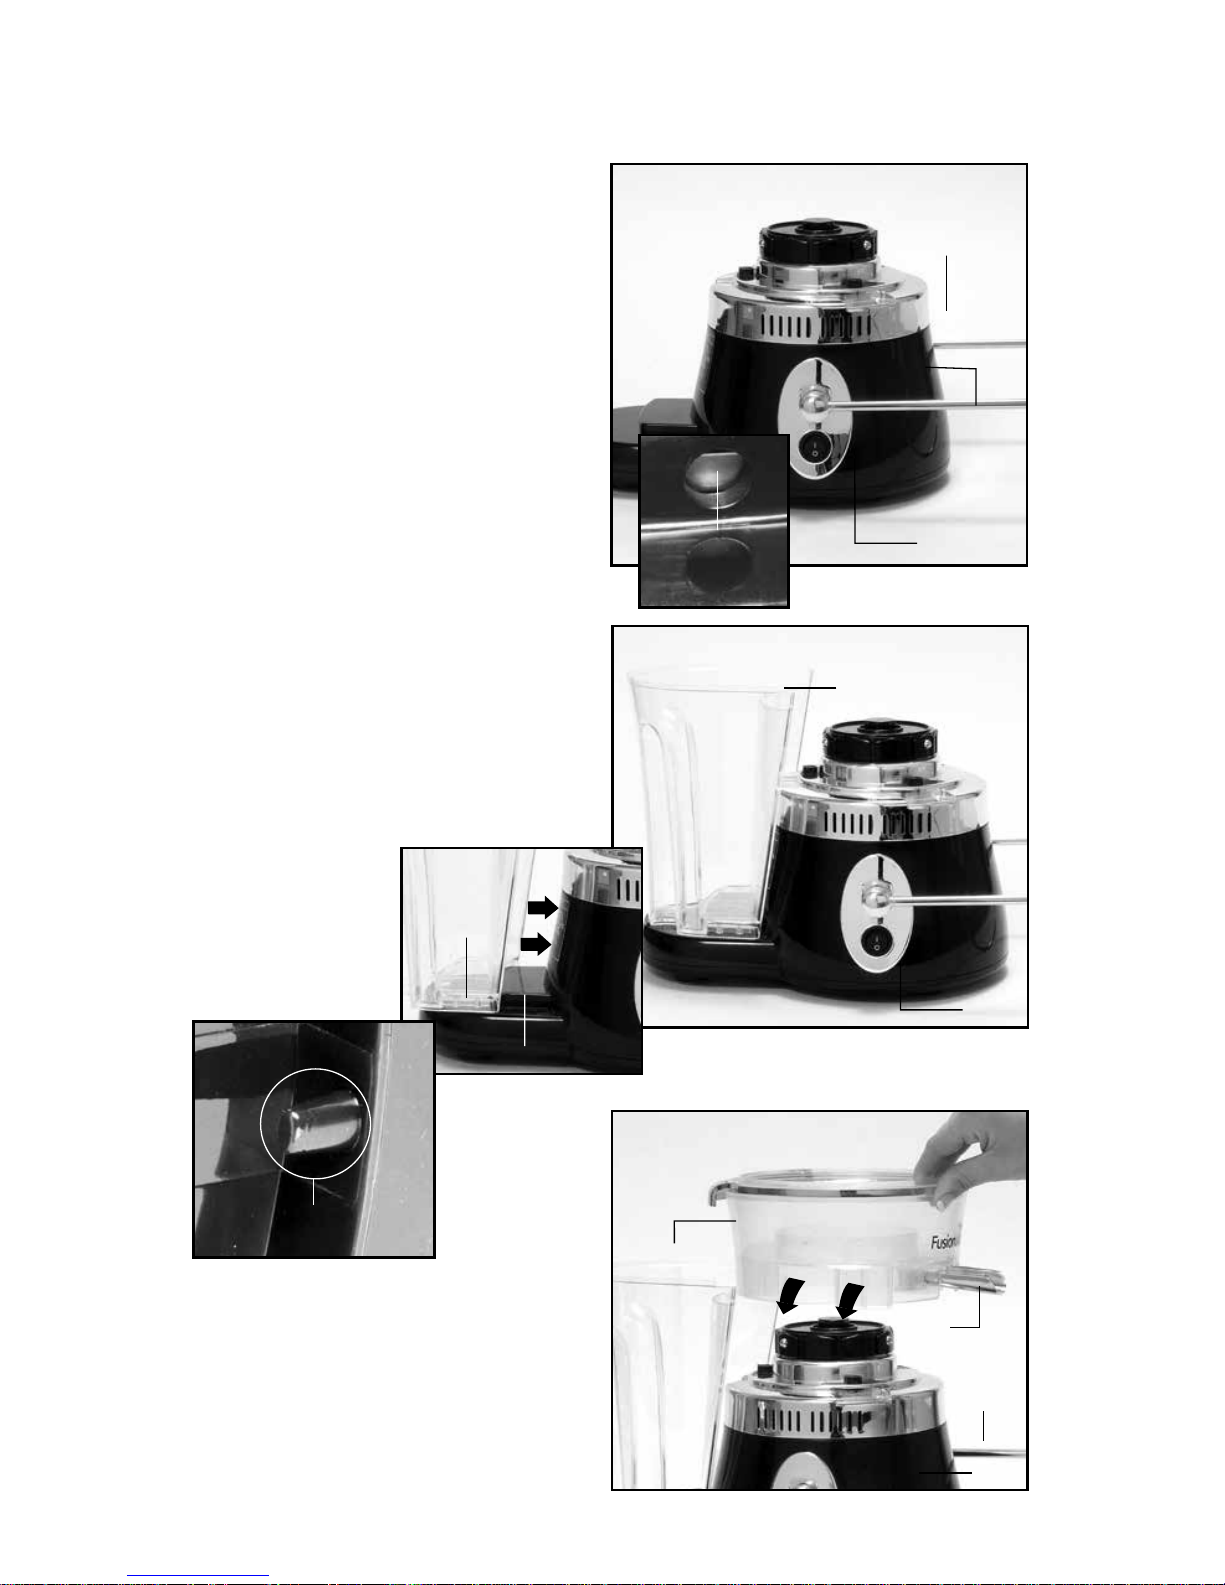
STEP 1
Place base on a dry at surface with locking bar in
down position as shown. In front of the machine
(spout side).
IMPORTANT: There is a Safety MicroSwitch
located in the back center of the base. This
mechanism is an added safety feature. Once the pulp
collector is in place the Activating Pin on the bottom
of the pulp collector activates the Safety MicroSwitch.
This will protect you from accidentally putting hands
or ngers under the machine while the blade is
turning. Once the pulp collector is removed from the
main base the motor will not run.
STEP 2
Align grooves on the bottom of pulp collector with
tracks on the base.
Note: The Safety MicroSwitch is located in the back
center of the base. Slide pulp collector with Activating
Pin towards base in the direction of arrows. Make sure
the pulp collector is rmly in place
against base.
IMPORTANT:
The motor will not run
if pulp collector is not
properly assembled.
1
Locking
Bar
2
STEP 3
Place receptacle on the base, with juicer spout
facing direction of locking bar. Settle receptacle into
alignment.
3
Front of
Machine
Safety
MicroSwitch
Base
Base
Pulp
Collector
Locking
Bar
Receptacle
Juice
Spout
Base
Pulp
Collector
(Bottom)
Base (Tracks)
Activating Pin
Page 9
5
7
4
6
Top Rim
ASSEMBLY (Cont.)
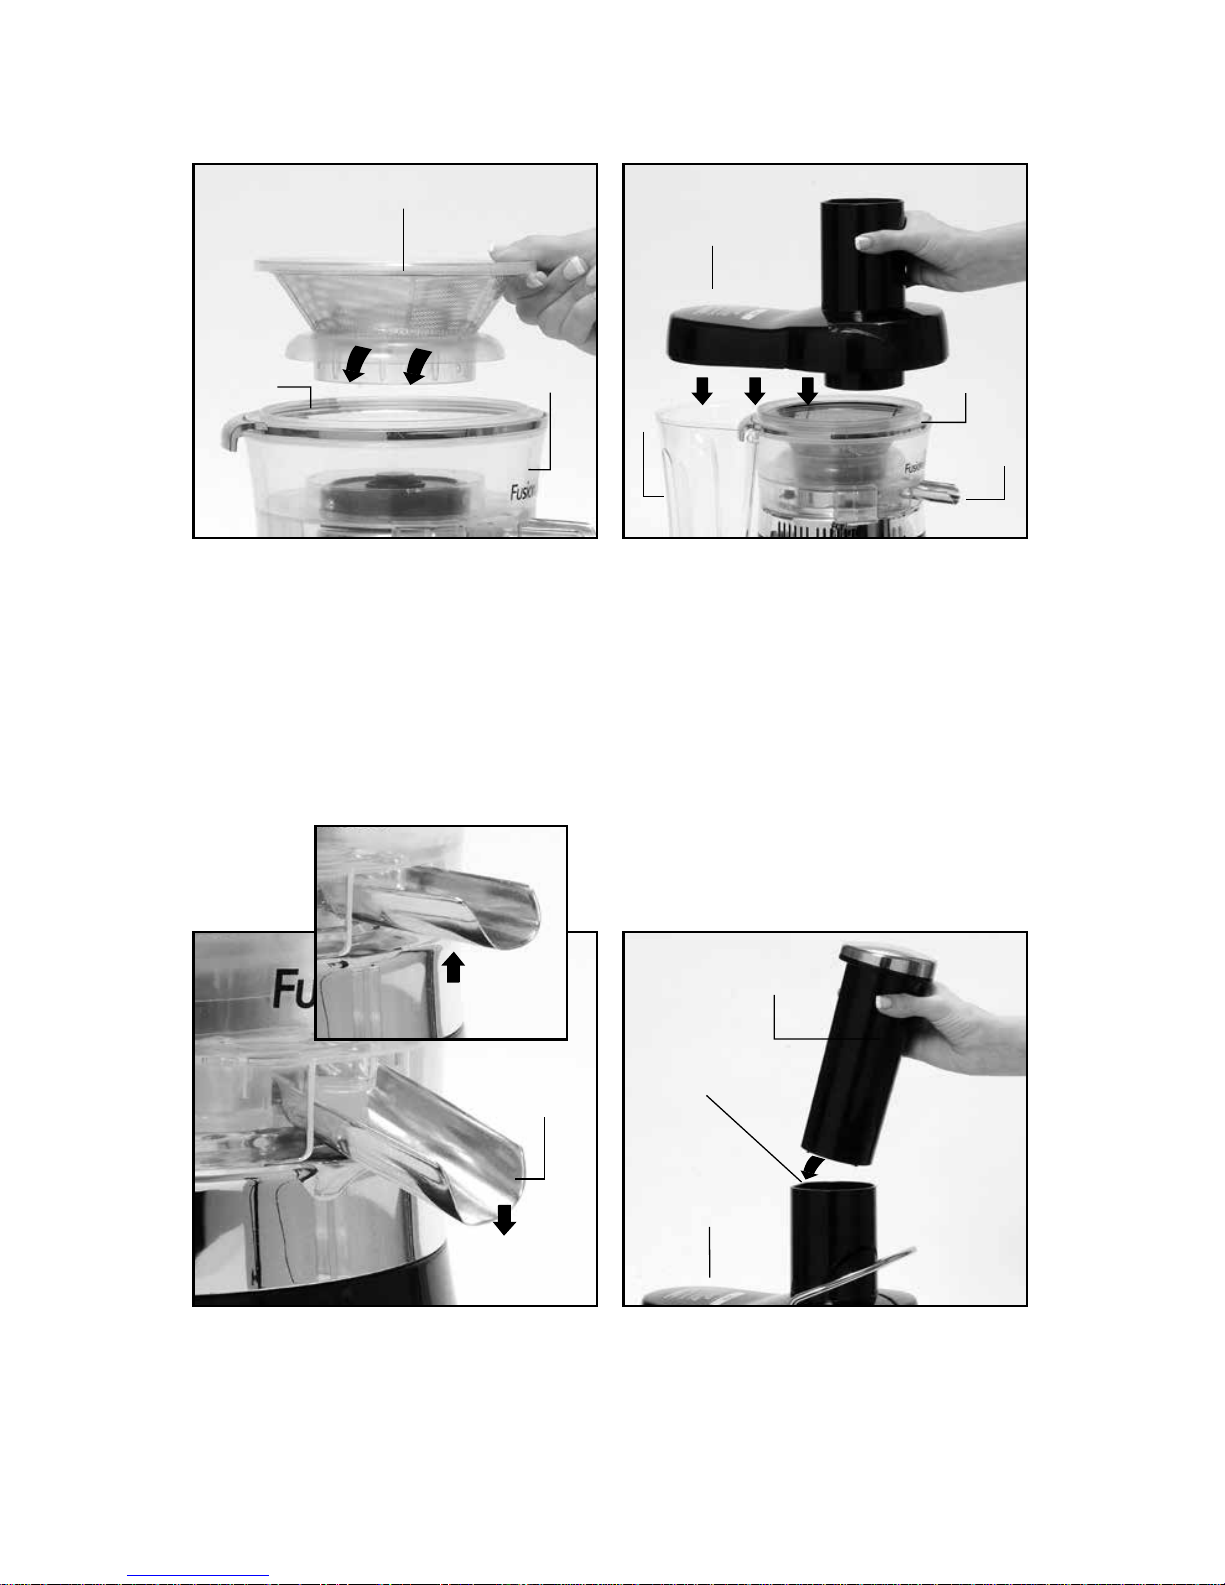
STEP 4
Place lter/blade inside receptacle. Rotate the lter/
blade allowing it to settle into alignment. Press down
on rim of lter/blade rmly to secure.
IMPORTANT: The unit will not start until lter/blade
is secure and rmly in place. The motor will not start
until the unit is properly assembled.
STEP 6
Make sure juice spout is in the downward position. If
the juice spout is left in the upright position the juice
will not ow. It will stay in the receptacle and may
overow from the sides.
STEP 7
Insert pusher into chute. Always use pusher to feed
fruits and vegetables into unit. Push gently, never
force. The blade will do the work.
STEP 5
Place lid with built-in pulp guard on top of receptacle,
making certain it is securely aligned with the pulp
guard facing in the opposite direction of juice spout.
Lock lid into place by lifting locking bar up until it
clicks into grooves located on both sides of the lid.
Make sure locking bar is in the full upright, locked
position.
IMPORTANT: The unit will not start until this bar
is properly locked in place and the pulp collector is
properly assembled.
UPWARD POSITION
DOWNWARD
POSITION
Juice Spout
Lid with Built-In
Pulp Guard
Receptacle
Receptacle
Juice
Spout
Pulp
Collector
Lid with Built-In
Pulp Guard
Pusher
Chute
Filter/Blade
Page 10

10
Congratulations on your purchase of the Fusion Juicer. In order to assure
that your rst and every juicing experience will be a pleasant one, we
have included this “Step-by-Step Guide to Juicing”. Juicing is a quick and
satisfying way to get the vitamins, nutrients, and minerals from fresh fruits and
vegetables… a few minutes well spent for a lifetime of good health benets!
STEP-BY-STEP GUIDE TO JUICING
5 Simple Steps to Get Started
Before You Begin
While we manufacture and ship under the highest standards,
we recommend you clean your Fusion Juicer before rst use.
Step 1
Remove all packing materials including those found inside the machine
between the lid and the blade.
NOTE: If you do not remove the paper disk insert from the inside of the
machine before starting the motor, you will hear a loud noise and possibly
cause the machine to temporarily shut down.
Step 2
Disassemble and wash before rst use. Re-assemble making sure the blade
is secure and locking bar is locked into place. The motor will not turn on if
machine is not assembled properly.
Note: See Assembly and Disassembly instructions on pages 6–9 in this
Operating Manual.
Step 3
Lower the Juice Spout into the downward position.
Step 4
Plug the AC cord into a 110 V wall outlet and let the juicer run for
approximately 5–10 seconds before you begin juicing. This will balance the
blade. During the manufacturing process, a few drops of motor lubricant
may have dripped into the motor housing causing a vapor burn off odor.
This is normal and will dissipate with initial use.
Step 5
Remove pusher, insert produce then replace pusher quickly. Do not force
produce down the chute. Apply a gentle pressure with a slight twisting
motion. This will help the pusher process the produce.
Important: If you apply too much pressure it can cause the motor to strain
and possibly shut down. See Built-In Thermal Cut Off Switch/Automatic
Shut Off on page 4.
Page 11

Helpful Tips
For easy to follow additional information, you can visit our website
at www.powerjuicer.com and select: “Juicing Tips” for, instructional
videos to “help you get started”, “how to make juice”, or “how to
clean your Fusion Juicer” and more.
Balancing The Blade, 5–10 Seconds is All it Takes
It is necessary to run the machine for approximately 5–10 seconds before
inserting any produce to be juiced. This lets the blade balance itself before
coming into contact with the item to be juiced. Hard produce such as carrots
can cause the blade to become unbalanced. If this should happen, continue
to process until the blade comes back to balance. If the blade doesn’t
re-balance, turn the power off and wait for the blade to stop spinning.
Disassemble the machine to check for any pieces that may be stuck on the
blade causing this unbalance.
Important: One of the great features of the Fusion Juicer is its extra large
chute, which speeds up the juicing process by cutting down on prep time.
Still you must be careful not to force anything into the opening that is
too big and might result in jamming the blade, causing “Built-In Thermal
Cut Off Switch/ Automatic Shut Off” to engage and shut down the unit
temporarily. Always put softer fruits and vegetables in rst followed by
harder to juice ones. When inserting produce into the chute, you must
replace the pusher quickly to prevent the produce from popping out
of the chute.
“Auto-Motor-Saver Shutdown” Feature
Unlike other juicers, the Fusion Juicer is equipped with a special feature that
automatically shuts off the motor should the unit become jammed during
the juicing process. Should this happen, simply follow the Disassembly,
Cleaning, and Assembly process, then allow the unit to cool for 10 minutes.
The unit will restart and you may resume the juicing process.
Gentle Pressure Using the Pusher
When juicing, applying gentle pressure with the pusher is sufcient.
Never apply excessive force to the pusher as this may stop the blade.
The Non-Drip Spout
Make sure to lower the Juice Spout. The Juicer comes packed with the spout
in the upright (closed) position. If you forget to lower the spout, juice will
back up in the receptacle and may overow from the sides. This back up
could also cause the motor to seize.
Page 12

12
Helpful Tips
Noise and Vibration
Sometimes when you juice you’ll hear a bit more noise than the normal
whisper quiet juicing you’ve come to expect from your Fusion Juicer. This
noise may also be accompanied by a little extra vibrating. This is alright; it is
just the juicer processing the food. Be patient and let the Fusion Juicer work.
The Benets of Juicing
We are not suggesting you replace the regular daily consumption of
fruits and vegetables with juicing… they should be done in conjunction.
Consuming whole fruits and vegetables daily helps you get the much
needed ber they have to offer. Juicing is just a quicker way to get many
of the health benets you need from fresh food, including antioxidants and
nutrients that help your body stay healthy. It just eliminates the digestion
process for quicker absorption.
Get the Most From Your Fusion Juicer
Some varieties of produce are more difcult to juice than others. The chart
on pages 15-16 will help take the guess work out of juicing. The amount of
juice you produce, depends on which fruits and vegetables you select. That’s
because some fruits and vegetables have much more/less juice than others.
Produce such as oranges, apples, melons, and cucumbers tend to yield more
juice and should be mixed with others that don’t.
General Guidelines for Juicing
Due to personal preferences and nutritional opinions, it is difcult to
determine an individuals’ eating habits. Therefore, we recommend juicing
produce the way you would normally consume it with the exception of
cooking. Before juicing any produce, it is important to wash it thoroughly
to remove all contaminants including soil and pesticides.
Skins, Stems and Seeds
Skins Juicing with the skins on is a personal preference with most produce.
Stems The only stems that are benecial to process are grape stems.
All others should be removed as they have nothing to offer.
Seeds Removing seeds is discretionary due to certain health risks associated
with certain produce.
Page 13

Helpful Tips
Carrots
Carrots can be a bit challenging to juice due to their dense nature and
irregular shape. Do not over stuff the chute. Leave some room on the sides
to be able to maneuver the carrots while juicing. They tend to bounce around
inside the chute. Use the pusher to guide them to the blade.
Citrus Fruits
In our Recipes for Healthy Living book we recommend you remove the
skins from citrus fruits. They certainly can be juiced with the skin on and
some recipes we actually tell you to juice with the skin. The reason we
recommend you remove the skin is mostly due to the tart avor. It is a
personal preference. It may be a bit more difcult to juice with the skin on as
it is very thick. To juice with the skin on, use a slow gentle, twisting pressure
to process. Apply a bit more pressure if necessary, but do not use excessive
force with the pusher.
Juicing Leaves
Leaves process best when rolled in a bunch then followed by a fruit or
vegetable containing a larger volume of juice such as celery, tomato,
or cucumber. See chart pages 15–16.
Mango, Apricot and Peaches
Important: Always remove large pits.
Do not put any produce in the juicer with large pits. Pits will damage the
blade and possibly seize the motor.
Pomegranates and Cherries
These wonder fruits can absolutely be juiced. When juicing cherries it is
necessary to remove the pits. We recommend using a cherry pitter. When
juicing pomegranate (seeds) it is necessary to separate the seeds from the
outer skin and the inner membrane before they can be processed.
Pineapple and Melons
Although the juicer can process the rind on these fruits, they taste best
when the rind is removed. Again, this is a personal preference. When
juicing pineapple, especially very ripe pineapple you may need to clean the
spout often. Pineapple is stringy in nature and can cause a blockage at the
opening of the spout. This can cause juice to back up in the receptacle.
Page 14

14
Helpful Tips
Berries and Small Fruits
Juicing berries may seem a bit challenging at rst but once you get the hang
of it you will love the great avors they add to your juice. Not to mention the
health benets they have to offer. When juicing berries (except cranberries)
you will need to add something that contains a larger volume of juice such as
an apple or orange. Strawberries contain the most juice as they tend to be
large. For example, process the berries rst (you may not see a lot of juice
come out at rst), then add an apple or an orange, something that is juicy.
Once you process this you will see the berry juice come pouring out.
Fresh Juice Looks Different Than Bottled
You will be making FRESH JUICE. With no additives, food coloring or sugar,
so it may look and taste different from what you’re used to with store bought
juice. Fresh juice tends to have a thin layer of foam on top, if you don’t like it
that way; use a spoon to give it a quick stir or to skim it off completely.
The Power of Pulp
We like to say that with the Fusion Juicer, nothing is wasted, that’s why we
have also included some easy food recipes for soups, mufns, salsa, and
more. If you like pulp in your juice, take some from the pulp collector and
add it back to your juice with a quick stir to mix it in.
Keeping the Pulp Collector Clean
When juicing in large volume be sure to empty the pulp collector often.
Larger quantities of produce can cause the pulp to back up into the lter
causing the motor to shut off. Insert a plastic bag inside the pulp collector.
When you are done juicing, the bag can be lifted out and disposed of easily
leaving the pulp collector clean.
Following these tips
your juicing experience
is sure to be a delightful one!
Page 15

Apricot
Basil
Beets
Blackberries
Blueberries
Broccoli
Carrots
Cauliower
Collard greens
Dandelion greens
Endive
Green beans
Green peas
Peaches (very ripe)
Pears (very ripe)
Peppermint
Pineapple (very
ripe)
Plums
Raspberries
Spinach
Swiss chard
Tomatoes (very ripe)
Turnip
Watercress
Wheat grass
Kale
Kiwi (very ripe)
Leafy greens
Leeks
Mango
Mint
Mushroom
Mustard greens
Nectarines (very ripe)
Okra (skin removed)
Papaya
Parsley
Passion fruit
Apples
Asparagus
Brussels sprouts
Cabbages
Cantaloupe
Celery
Cherries (pitted)
Clementines
Cranberries
Cucumber
Fennel
Garlic
Ginger
Grapefruits
Fruits and Vegetables: Ideal for Juicing
Peaches (harder)
Pears (harder)
Peppers
Pineapple
Pomegranate seeds
Potatoes
Pumpkin
Radicchio
Radishes
Squashes
Strawberries
Tangerines
Tomatoes
Watermelon
Grapes
Guava
Honeydew Melon
Horseradish
Jicama
Kiwi
Kohlrabi
Lemon
Lettuces
Lime
Nectarines
Onion
Oranges
Parsnip
Fruits and Vegetables: More Challenging to Juice
Page 16

16
Fruits and Vegetables: Containing a Large Juice
Content
Apples
Cantaloupe
Celery
Clementines
Cranberries
Cucumber
Grapefruits
Grapes
Honeydew Melon
Lemon
Lime
Oranges
Peppers
Pineapple
Tangerines
Tomatoes
Watermelon
DO NOT JUICE
Some fruits and vegetables cannot be juiced due to their inability to produce
juice. Although they are unable to be juiced, that does not mean we should
not enjoy them on a daily basis as part of a healthy diet. Examples are:
avocado, banana, and coconut.
Never use the green tops of rhubarb. Oxalic acid is toxic in the leaves. There
are so many other healthy fruits and vegetables available that it’s just easier
and safer to skip rhubarb as a juice source.
CLEANING YOUR JUICER
We have made juicer clean up as easy as possible. All of the components,
with exception of the motor base, can be put in your home dishwasher.
We recommend top rack placement as temperatures near the bottom drying
element may vary with manufacturer.
CAUTION: Some commercial and foreign made dishwashers may reach
internal temperatures that are higher than machines made for home use by
U.S. standards. Do not use these dishwashers with your Fusion Juicer.
The higher temperatures may cause damage to your juicer. Check with
your dishwasher manufacturer before using.
For easiest clean up, we recommend you rinse/clean your Fusion Juicer
immediately after juicing. This will help prevent fruit/vegetable bers from
hardening on the components, making it more difcult to clean.
• Turn off the power switch and wait until the motor completely stops.
• With dry hands, unplug the AC cord from electrical outlet.
• Disassemble the machine. (See disassembly instructions pages 6–7.)
Page 17
• Wipe base with a soft damp cloth or sponge. Do not submerge base
in water. Do not spray the base with water or any other liquid. Base is
not dishwasher safe. Important: Do not use abrasive sponges, cloths, or
cleansers as these can damage the nish.
• Clean all other parts in warm, soapy water. A mild detergent is
recommended. Rinse well and dry thoroughly.
• To clean the lter and blade, hold them under warm running water. Use a
bristled dish washing brush to gently clean pulp from lter. Rinse the
lter from the outside under running water. If your sink has a spray hose
attachment, this is especially effective for loosening ber from the lter and
the blade before placing them in the dishwasher.
• Dry components thoroughly then assemble the machine and turn the power
on to spin out any excess water.
• Make sure unit and parts are completely dry, then store in a cool, dry place.
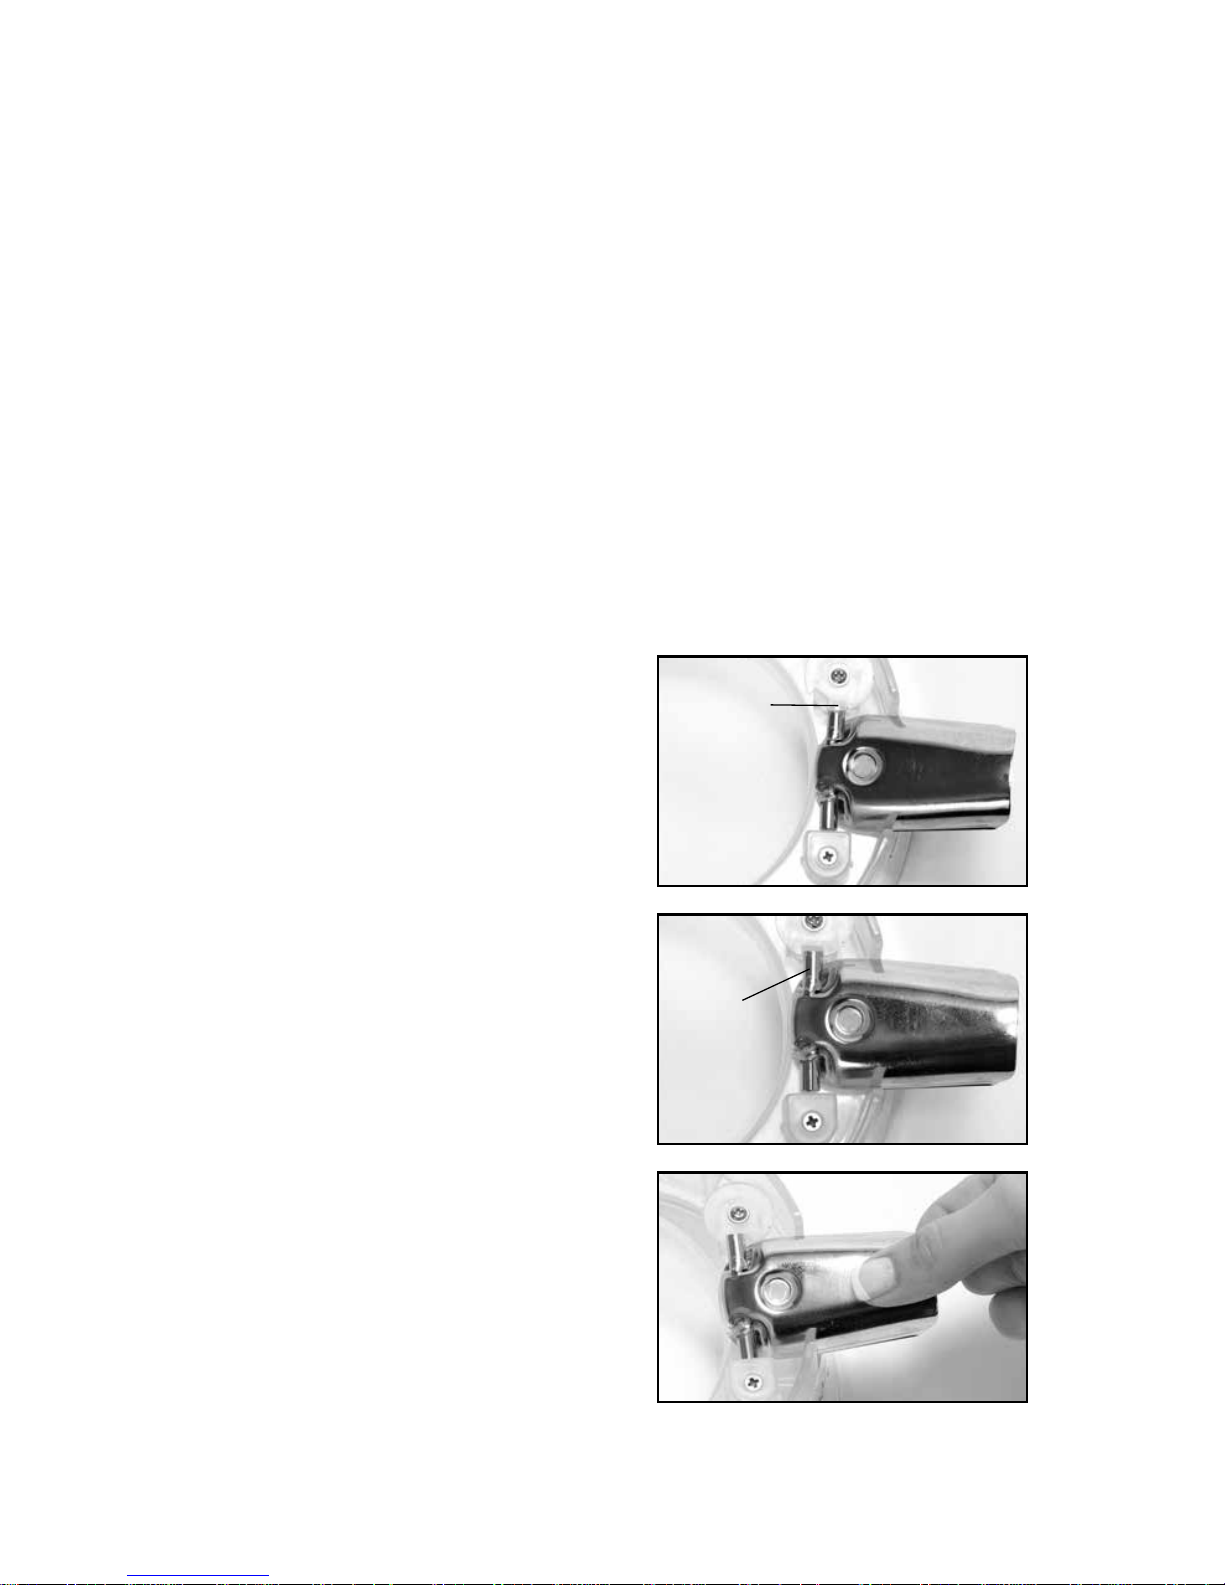
To Clean Juice Spout:
STEP 1
Locate removable juice spout locking
mechanism on the bottom side of
receptacle. Note: Juice spout will be in
the locked position.
STEP 3
Lift up juice spout carefully from
receptacle and remove to clean. To
Reattach: insert juice spout back into
original position and turn the locking
mechanism clockwise to lock into place.
STEP 2
To unlock, turn locking mechanism
counter-clockwise, lining up notch
with juicer spout hinge pivot arm.
IMPORTANT: When reattaching juice spout back into original position make
sure juice spout is in the locked position and tightly secured before use.
UNLOCKED
POSITION
Hinge
Pivot Arm
LOCKED
POSITION
Locking
Mechanism
Page 18

18
TROUBLESHOOTING
• Check to see if unit is plugged in.
• Locking bar is not locked in place properly.
• Check if all parts are assembled properly.
• Check if there is any residue left between
blade and receptacle.
• Make sure you wait 5–10 minutes to restart
if machine automatically shuts down.
• Check that all parts are assembled properly
and in the correct position.
• Juicing overripe fruit may result in too much
pulp and will clog the lter. Turn machine off
and clean the lter.
• You may have applied too much pressure
with the pusher while processing caus
ing the motor to accidentally over heat.
This activates the built-in Thermal Cut Off
Switch. The motor will temporarily stop
working for approximately 10 minutes to
cool down. See additional information on
page 4.
• The motor needs to warm up for 5–10
seconds before rst use.
• The fruits and vegetables may be soft or
overripe.
• There may be too much pulp in the lter.
Turn machine off and clean the lter.
• This is normal.
• Make sure the non-drip spout is in the down
position while juicing. If it is in the upright
position the juice will not come out. It may
overow out the bottom sides
The motor does not
run after being
switched on.
The motor is
running with a loud
noise and excessive
vibration.
The motor overheats
causing the power
to automatically
shut off.
Juice splashes
from the rim
of the receptacle.
No juice is coming
out of the spout.
Problem
Possible Reasons and Solution
Page 19

Fusion Juicer
Limited Lifetime Warranty
The manufacturer warrants that your Fusion Juicer is free of defects
in materials and workmanship and will, at its option, repair or
replace any defective juicer that is returned. The Fusion Juicer motor
is warranted for the lifetime of the original purchaser, and all other
parts and components are warranted for 60 days from the original
date of purchase. This warranty is valid only in accordance with the
conditions set forth below:
1. This warranty applies to consumer use only, and is void if the
product is used in a commercial or institutional setting.
2. The warranty extends only to the original consumer purchaser
and is not transferable. In addition, proof of purchase must be
demonstrated. This warranty is void if the product has been subject
to accident, misuse, abuse, improper maintenance or repair, or
unauthorized modication.
3. This limited warranty is the only written or express warranty given
by the manufacturer. Any implied warranty of merchantability or
tness for a particular purpose on this product is limited in duration
to the duration of this warranty. Some states do not allow limitations
on how long an implied warranty lasts, so the above limitation may
not apply to you.
4. Repair or replacement of the product (or, if repair or replacement is
not feasible, a refund of the purchase price) is the exclusive remedy
of the consumer under this warranty. The manufacturer shall not be
liable for any incidental or consequential damages for breach of this
warranty or any implied warranty on this product. Some states do
not allow the exclusion or limitation of incidental or consequential
damages, so the above limitation or exclusion may not apply to you.
5. This warranty gives you specic legal rights, and you may also have
otherrights which vary from state to state.
Procedure for Warranty Repairs or Replacement
If warranty service is necessary, the original purchaser must pack
the product securely and send it postage paid with a description
of the defect, proof of purchase, and a check or money order for
$29.99 to cover return postage and handling to the following address:
Fusion Juicer, P.O. Box 3007, Wallingford, CT 06492. This warranty
is non-transferable.
Page 20

20
Q. Why won’t the power turn on?
A. First, check that the switch is in the on position. Then, check that all parts are assembled properly. The unit
has a built-in safety device that will not let the motor turn on if not assembled properly. The Fusion Juicer also
has a built-in Thermal Cut Off Safety Switch. If the machine was running, then shut down due to accidental
overheating, then there is a 10 minute cooling time before the machine will restart. This helps to protect the
motor from seizing.
Q. Can I order spare parts?
A. Yes, you can visit us on the web at www.fusionjuicer.com under the parts heading. Replacement parts kits are
also available on back inside cover of the operating manual or call 973-287-5187.
Q. Why is my Fusion Juicer clogged?
A. This may happen for a number of reasons:
1. If the fruit you are using is over ripe.
2. If there is too much pulp in the filter. Turn the machine off, unplug the AC power cord, and clean the filter.
3. Fruits such as avocados or bananas cannot be juiced in the Fusion Juicer.
4. The spout may be blocked by a piece of pulp that may have passed through the filter causing the juice to
collect in the receptacle and overflow. Turn the machine off, unplug the AC power cord, wait for the blade to
stop spinning and inspect the spout. Clear the blockage so the juice can flow freely.
Q. Can I put the whole fruit in the Fusion Juicer?
A. Yes, as long as it fits in the chute and does not have large pits, hard skins or stems. Due to personal
preferences and nutritional opinions it is difficult to determine an individuals eating habits. Therefore, we
recommend juicing produce the way you would normally consume it with the exception of cooking. Before
juicing any produce it is important to wash it thoroughly to remove all contaminants including soil and
pesticides.
Q. Can I put whole fruits with large pits in the Fusion Juicer?
A. No, remove large pits such as mango, peach, etc., as they will damage the blade and possibly the unit.
Q. Can I put all components in the dishwasher?
A. All components are dishwasher safe with the exception of the motor housing in a regular household
dishwasher. Not for use in a European import or commercial dishwasher as temperatures may vary due to
different manufacturers. Some commercial and foreign made dishwashers may reach internal temperatures that
are higher than machines made for home use by US standards. Do not use these dishwashers with your Fusion
Juicer. The higher temperatures may cause damage to your juicer voiding your warranty. Check with your
dishwasher manufacturer before using.
Q. How can I make smoothies if you can not add milk, yogurt, ice or bananas to the Fusion Juicer?
A. The Fusion Juicer will not make smoothies, only fresh juice for smoothies. Add all smoothie
ingredients separately in a blender.
Q. What is the diameter of the feed chute?
A. The inside diameter of the chute is approximately 3”.
Q. How can I juice carrots?
A. Carrots can be a bit challenging to juice due to their dense nature and irregular shape. Do not over stuff the
chute. Leave some room on the sides to be able to maneuver the carrots while juicing. They tend to bounce
around in the chute. Use the pusher to guide them to the blade.
Common Questions
about the Fusion Juicer
This summary briefly answers common questions. Read operating manual before use.
Page 21

Q. Can I add ice or liquid to the Fusion Juicer?
A. No, ice turns to water and any other liquid that is poured in will cause an abundance of liquid in the receptacle.
It will overflow and run out the sides of the receptacle. Add these items separately in a glass, pitcher or blender.
Q. How can I get berry juice to come out of the receptacle?
A. Follow the berries with a fruit or vegetable that contains a larger volume of juice. These fruits will produce more
juice and push the berry juice through the receptacle. If you choose to juice only berries then take the machine
apart and empty juice from receptacle into a glass or bowl.
Q. How can I get more pulp for cooking recipes?
A. Unfortunately you may have to juice quite a bit to get a lot of pulp. The Fusion Juicer gives up to 30% more
juice than other juicers so there is usually not a lot of pulp left. The good news is you can freeze the pulp in
airtight bags or containers. So every time you make fresh juice, just freeze the pulp until you are ready to use it.
Q. How long does the fresh juice last?
A. To get the full benefits of fresh juice it is best if you drink it right away. As fresh juice sits it looses significant
amounts of vitamins and nutrients. Some juices last longer than others and refrigerate well as long as they are
in a sealed container. They can only be kept for a few hours. Preferably in a glass covered container so the
flavor is not altered. You can add a few drops of lemon juice to help maintain the flavor. Here is a list of juices
that refrigerate well: carrot, apple, orange, pear, grape, grapefruit, pineapple, kiwi, prune, peach, celery, and
beet juice. You can also freeze fresh juice the same way. Juice can be frozen in an airtight container for up to
one month.
Q. How long does the pulp last?
A. Fruit and vegetable pulp can be frozen. It is best if it is in an airtight container or freezer bag. Discard after one
month. We recommend that you use a separate container or bag for each pulp.
Q. Is there a customer service number I can call?
A. Yes, should you have any problems our friendly customer service staff is here to help you if you have a question.
We are available at 973-287-5187.
Q. Can I use wheatgrass in my Fusion Juicer?
A. Yes, it works best if you roll it up in something leafy such as spinach and follow with something juicy such as
pineapple. If you choose to juice wheatgrass alone just roll it up and insert it in the Fusion Juicer.
Q. Can I use cherries whole in my Fusion Juicer?
A. Yes, but only if the pits have been removed prior to juicing. A quick, easy way to do this is by using a cherry
pitter.
Q. Can I use grapes with seeds and stems?
A. Yes, we recommend you wash them thoroughly prior to juicing.
Q. Can I put a rind of the melon in the Fusion Juicer?
A. Yes, we recommend you wash them thoroughly prior to juicing. We do not recommend leaving the rind on the
cantaloupe due to recent cases of salmonella contamination. This is a personal preference.
Q. Can my Fusion Juicer be used as a food processor? Is there a special attachment I need?
A. No, there is no attachment that turns the Fusion Juicer into a food processor. However, the Fusion Juicer leaves
behind pulp from the fruits and vegetables that is used to cook with or freeze to make delicious frozen treats.
Use the pulp to make healthy sauces, salsas, dips, muffins and more.
Page 22

22
NOTES
Page 23

Page 24

We are very proud of the design and quality of our
Fusion Juicer. This product has been manufactured to the
highest standards. Should you have any problem our
friendly customer service staff is here to help you.
973-287-5187
Tristar Products, Inc.
Faireld, NJ 07004
Distributed By:
© 2013 Tristar Products, Inc.
All rights reserved.
FJ_IB_TP_ENG_V3_130625
www.fusionjuicer.com
 Loading...