

Fusion Premiere Movie Server Installation Manual

FUSION RESEARCH
Premiere Movie Server
Installation Guide
April 2012


TABLE OF CONTENTS
Chapter 1: Before you get started... the basics ............................ 4
Chapter 2: Setting up your Premiere Movie Server ........................ 9
Chapter 3: Loading movies on a Fusion server ............................. 18
Chapter 4: Navigating your Fusion system ................................. 26
Chapter 5: Managing you movie collection ................................. 38
Chapter 6: Adding additional zone players .................................. 43
Chapter 7: Adding additional storage capacity .............................. 44
Chapter 8: Warranty and repair information ................................ 45
Premiere Movie Server Installation Manual
Premiere Movie Server Installation Manual
4
Chapter 1
Before you get started... the basics
THE BASICS:
Fusion’s Premiere Movie Server is as easy to install and use as a standard
DVD player. There are, however, a few ways to hook it up, depending on
the components you have in your entertainment system.
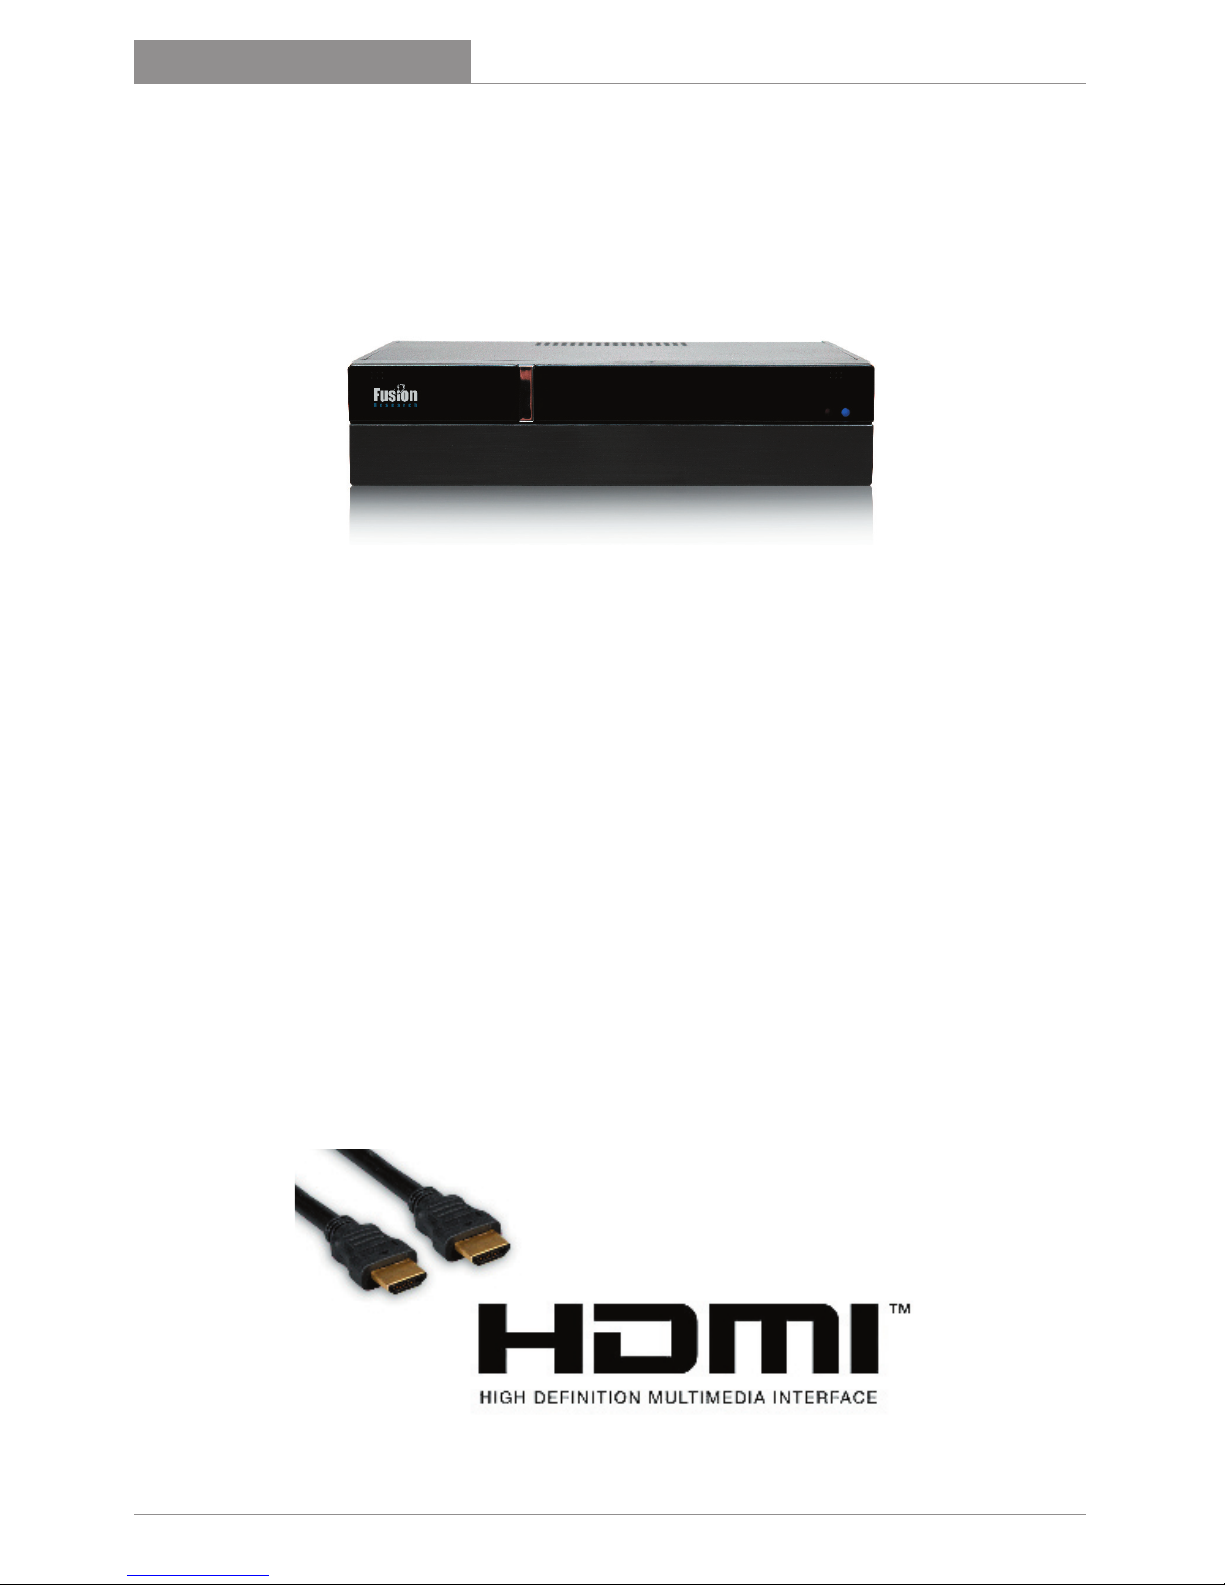
This movie server is an HDMI based product, which means that the HDMI
cable outputs both video and audio together, with up to 1080p stunning
resolution and HD surround sound. We’ll cover the following:
• Fusion’s HDMI requires two-way communication
• Test your HDMI handshaking for errors
• Setting up component for your system (if necessary)
HDMI cables offer the highest quality sound and picture for getting movies
onto your television. These cables carry both the audio and the video making them a great choice for simple and clean connections and up to 1080p
high definition resolution.
If your television or receiver doesn’t support HDMI, don’t worry, we’ll cover
that later. (Your TV must support 720p or higher – older standard definition
TVs are not supported)
Premiere Movie Server Installation Manual
5
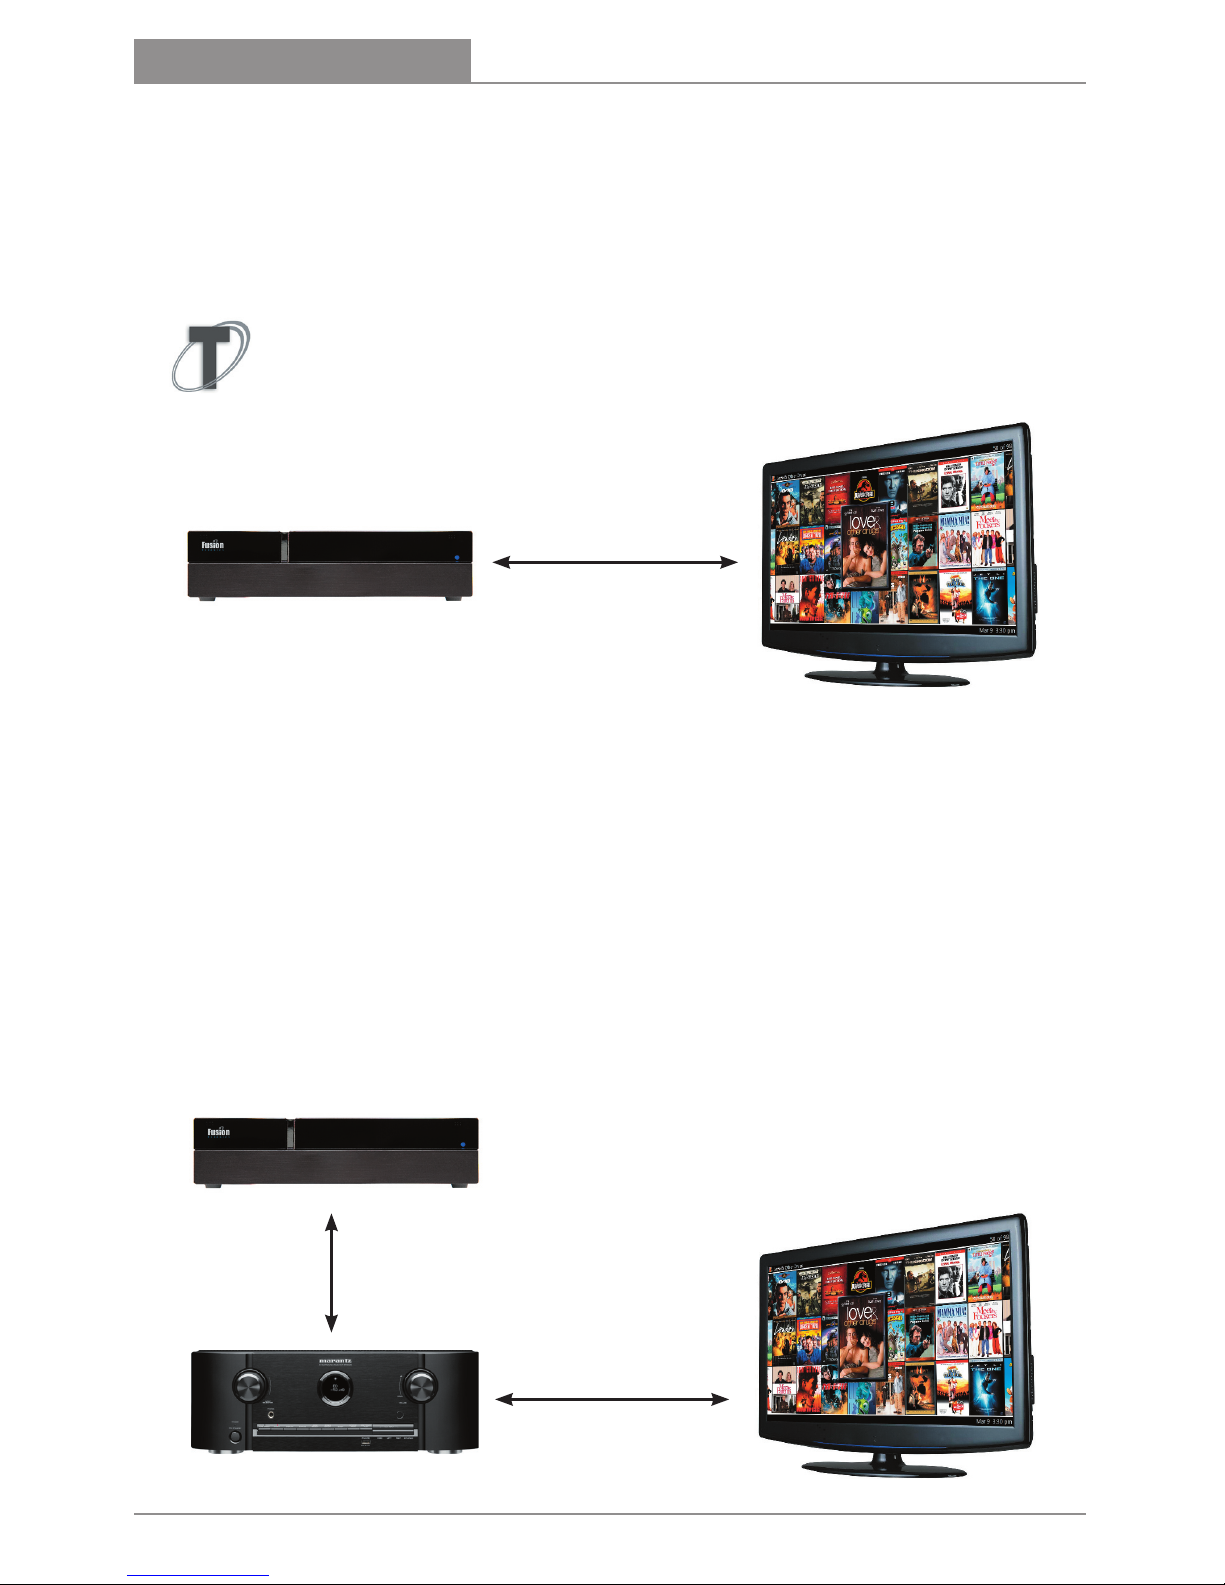
CONNECTING HDMI DIRECTLY TO YOUR TV:
You may connect the HDMI cable directly from your movie server to the TV
for both sound & video. Sound will come from the speakers in the TV and
the audio output will be two-channel stereo.
Tech Tip: In the Setup Menu, you will want to set the Audio Wizard
to output “HDMI - Stereo Output” (see Chapter 2 for details) as
most televisions cannot down-mix surround sound.
CONNECTING HDMI TO A RECEIVER (w/HDMI INPUTS):
Connect the HDMI cable from the movie server to the receiver for both
sound and video. The receiver will take the audio from the HDMI cable and
send the video to the TV.
Note: If you are plugging into a receiver that is powering more than 2
speakers (surround sound), you will want to change your audio setting on
the movie server to “HDMI - Surround Sound”.
Chapter 1
Before you get started... the basics
Premiere Movie Server Installation Manual
6
Chapter 1
Before you get started... the basics
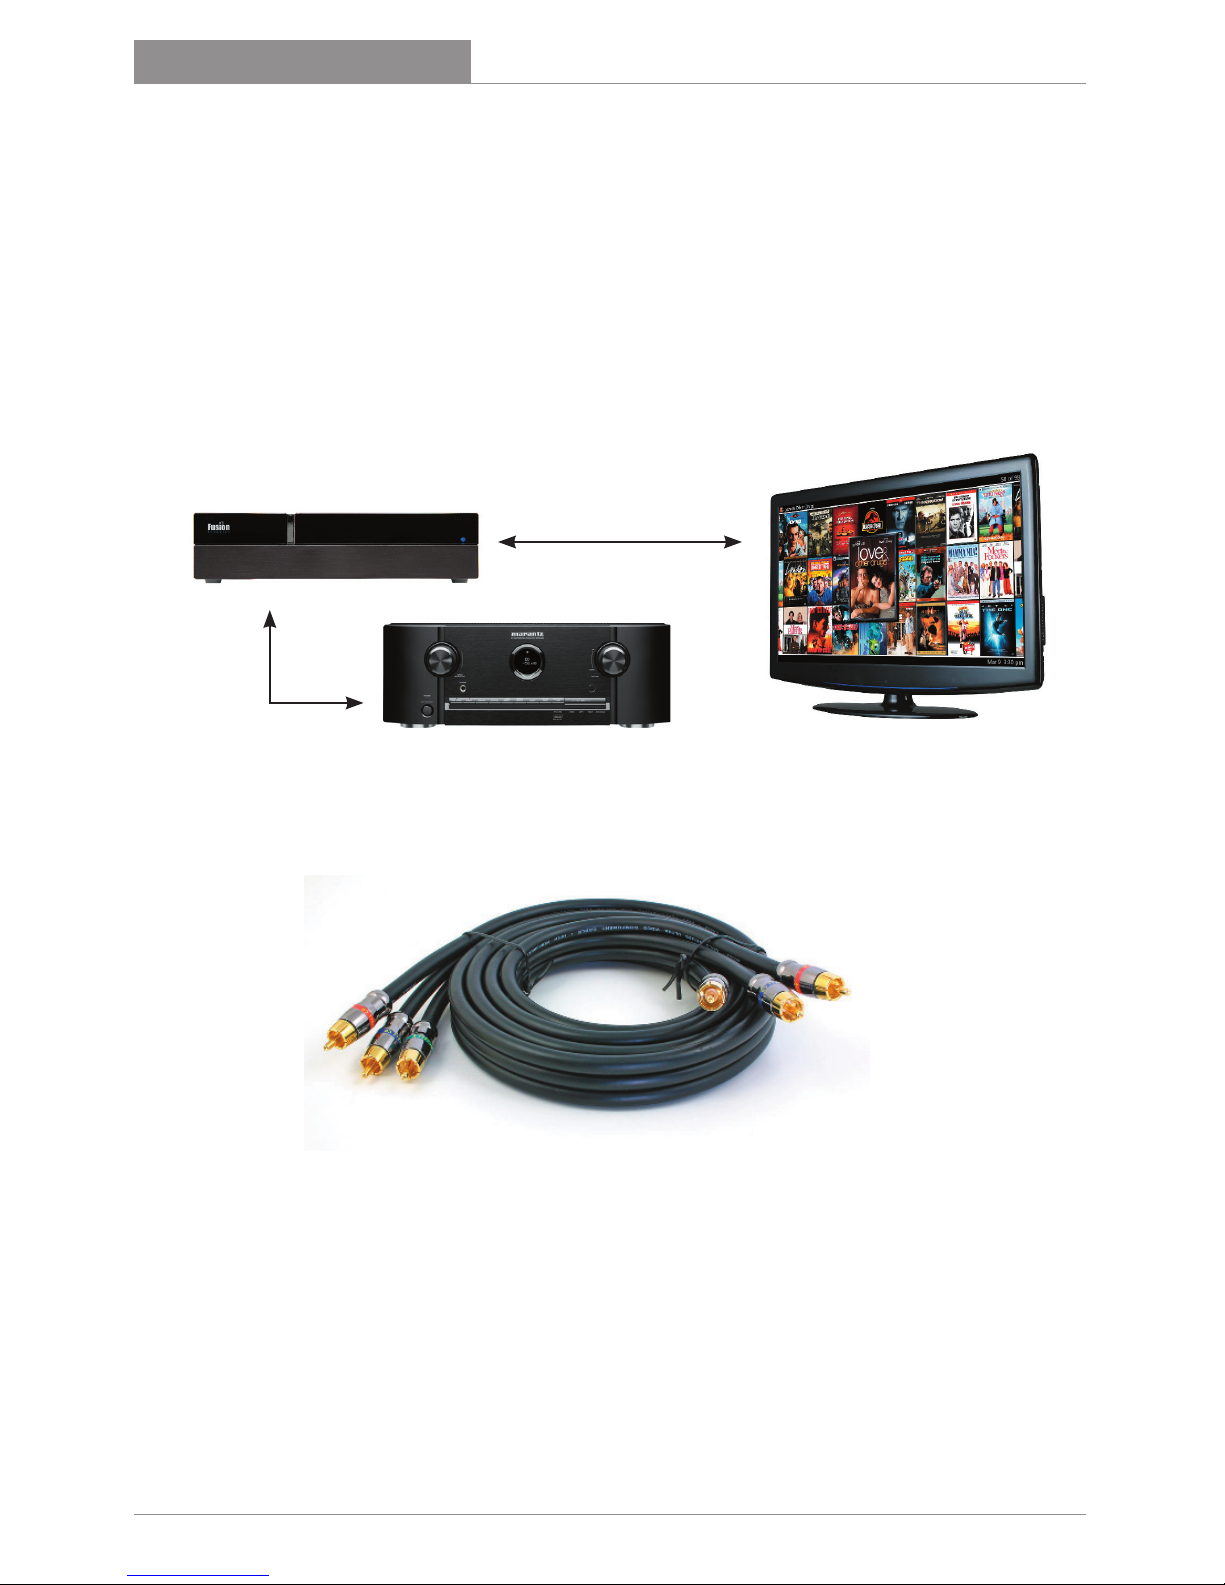
CONNECTING TO A RECEIVER (w/out HDMI INPUTS):
Connect the HDMI cable directly from the movie server to your television
for video. Connect an optical cable (digital toslink) directly from the
movie server to your receiver for audio.
Note which input you’ve plugged the optical cable into on the receiver so
you can select the appropriate input on the front of the receiver.
Using the same Audio Wizard we spoke of earlier, you must set the audio to
“Optical Digital Output”.
CONNECTING USING COMPONENT VIDEO CABLES:
Currently, CV cables are typically only used for component distribution or
for older displays or projectors that only support component video. To
connect a movie server to a display with component video, requires an approved HDMI to component adapter.
You can purchase one of these by calling Fusion Research at 925-217-1233
and asking for an FR-COM, if you require a composite or S-Video input,
please let us know, we also have an adapter for these as well.
HDMI cable
Optical cable
Premiere Movie Server Installation Manual
7
Chapter 1
Before you get started... the basics
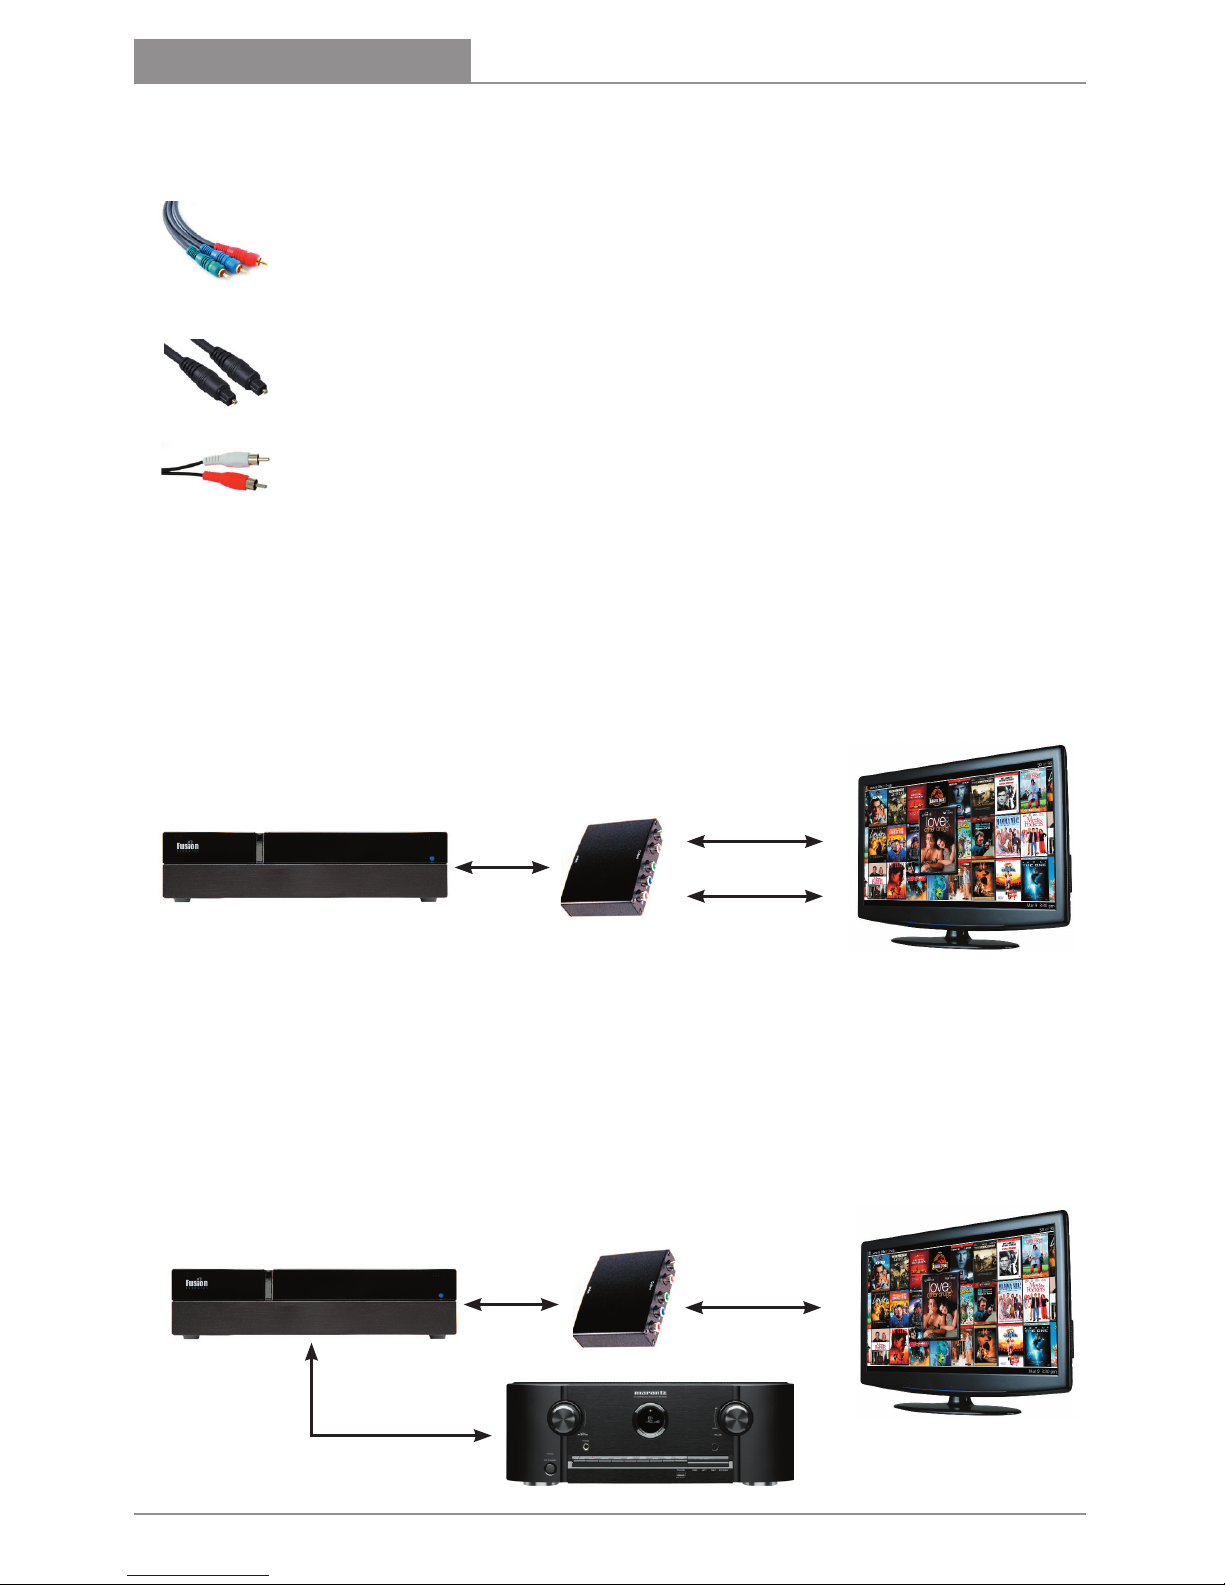
CABLES REQUIRED FOR COMPONENT VIDEO INSTALLATION:
Component Video cables can support both 720p and 1080i video
resolution, but no sound. You will need to connect a separate
audio cable for the type of sound you need (one of two types
shown below)
Digital Optical cable for your receiver, which supports 5.1 Dolby
surround sound.
Stereo analog cables, which typically connect directly to the
television.
CONNECTING VIA COMPONENT, USING A TELEVISION FOR
PICTURE AND SOUND:
Connect the HDMI cable to the FR-COM component adapter. Then plug your
three component video RGB or red-green-blue cables into your TV. Connect
your audio cables (red & white) from the FR-COM
to the television for sound.
CONNECTING VIA COMPONENT, USING A TELEVISION FOR
PICTURE, A RECEIVER FOR SOUND:
Connect the HDMI cable to the FR-COM component adapter. Then plug your
three component video RGB or red-green-blue cables into your TV. Connect
your optical audio cable from the server directly to the receiver.
Remember the input you selected for the server on the receiver.
Component cable
Stereo analog cable
HDMI
Component cable
HDMI
Optical cable
FR-COM
FR-COM

Premiere Movie Server Installation Manual
8
Chapter 1
Before you get started... the basics
HDMI HANDSHAKING:
HDMI is by far the most efficient (and in many cases the only) method of
transmitting audio and video
from one component to another. Unfortunately there
are many issues that go along
with this performance and
convenience. The primary
one is losing the “handshake”
between two devices.
The first important step is to determine if you even have an HDMI problem.
Movie servers are different from simpler devices like DVD players or cable
boxes; they require full two-way communication with the display device.
Step one is to run a quick and simple test during your installation. All Fu
sion systems are designed to run 24/7 and typically are left powered on
(although this is not a requirement). Every evening, the unit will reset
itself at approximately 4AM unless a movie is playing on the unit.
Some receivers or displays do not maintain their EDID output (or hand-
shake) when powered off. When this happens the Fusion server will lose its
HDMI connection and no longer will have the correct and required EDID for
maintaining proper video output. This is very easy to check for and can be
remedied if discovered.
TESTING FOR HDMI HANDSHAKING ISSUES:
Turn your receiver and TV off, then power off and restart the Fusion server.
After the server has completely restarted (one full minute), power on the
receiver and TV and check for correct video output. If your equipment
maintains its EDID properly the video will be fine. If however, you have a
black screen, the resolution is incorrect, or the picture has shifted, you
have an HDMI handshaking issue.
These types of problems are common enough that there are a number of
manufacturers that make and sell EDID learning devices to fix this problem.
Gefen & Atlona both make EDID learning devices which are small adapters that can be used in-line to maintain EDID. Gefen’s HDMI detective is a
very popular solution, another simple solution is to use a small HDMI switch
which maintains EDID. Be sure to remember NEVER to hot swap or plug
and unplug HDMI cables when equipment is powered up!
Premiere Movie Server Installation Manual
9
Chapter 2
Setting up your Premiere Movie Server
POWERING UP THE SYSTEM:
Your Premiere system is a hard drive based server with the ability to store
all your DVD and Blu-rays as well as play them back.
When placing the system in your equipment rack or elsewhere, it is important to provide adequate ventilation. All server based products will generate some heat and will require ventilation, failure to provide adequate
airflow may result in hard drive damage or other hardware issues.
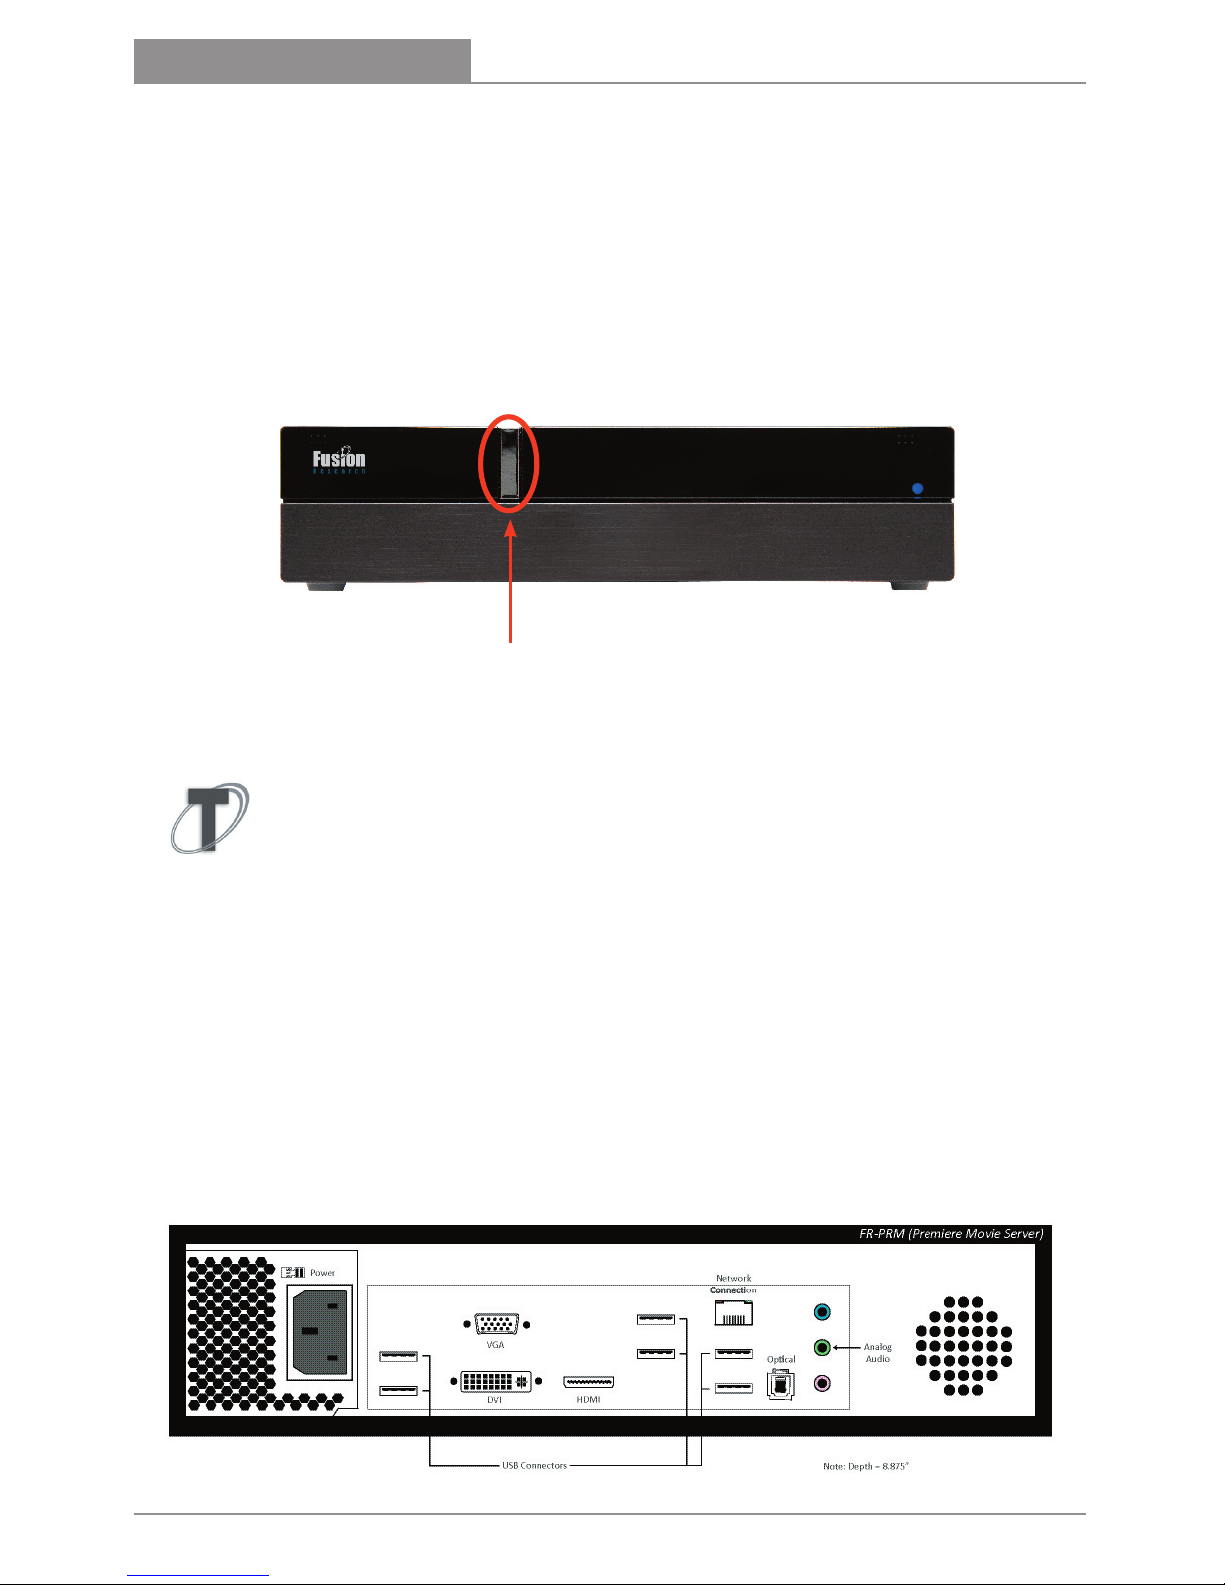
To power the unit up or down, touch the front silver power button once
and release. DO NOT hold the power button down to force the unit to
shutdown. Doing so may damage the operating system.
Tech Tip:
Great effort has been made to engineer this server to
be as quiet as possible; however it is important to understand that
this is both a player and a powerful server. The system will still
emit some fan noise, especially under load and thought must be given to
the placement of the unit to keep it cool and well ventilated.
CONNECTIONS ON THE PREMIERE MOVIE SERVER:
To begin setting up your server, plug in the power (Note: Fusion servers
should always be plugged into a UPS device.) Connect the HDMI cable to
your display, connect to your home’s internet service (required for importing movies) and connect the USB-based IR device for the supplied remote
control.
Premiere Movie Server Installation Manual
10
Chapter 2
Setting up your Premiere Movie Server
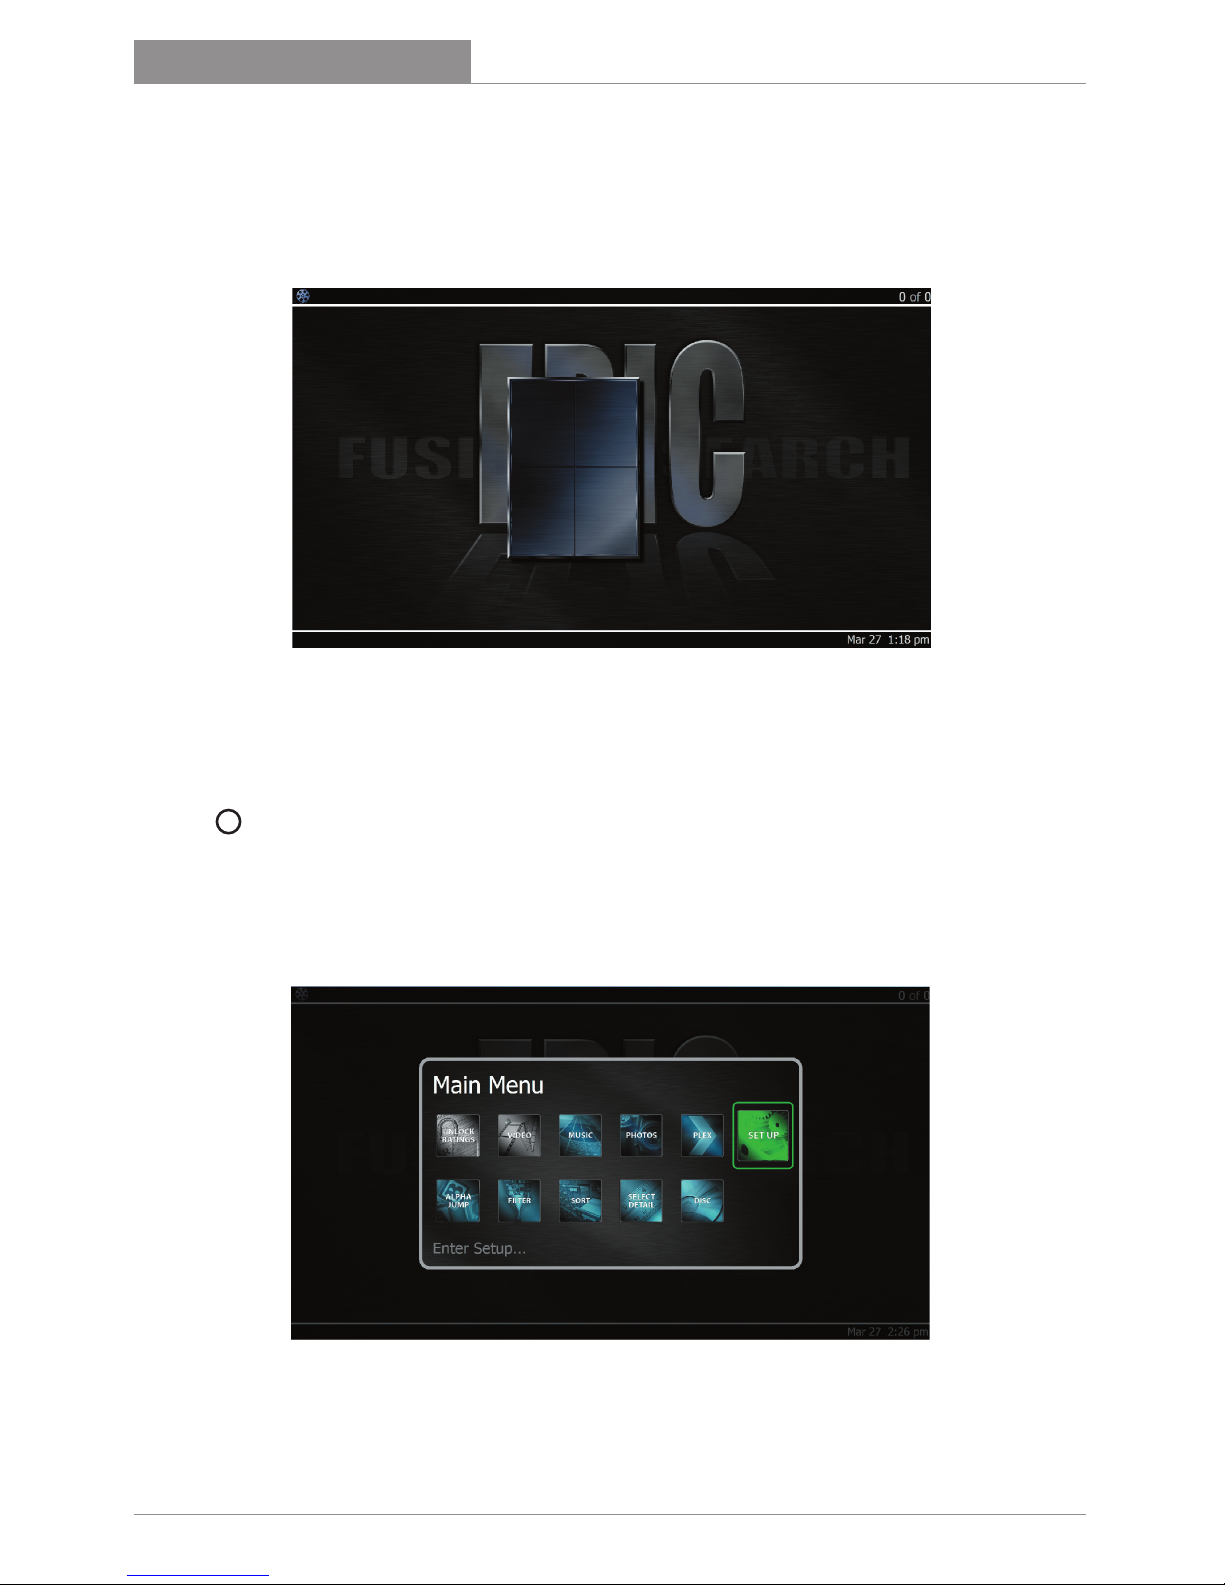
INITIAL SETUP:
Once you have all the connections in place, power the system on and you
should see the screen below.
Note: Fusion may have pre-installed 1 or 2 movies in its prep for shipment
To complete the setup of the system, use the supplied IR remote and hit
the i button to bring up the following screen. From here you will be able
to complete the setup of the system using the remote.

Premiere Movie Server Installation Manual
11
REMOTE CONTROL FUNCTIONS:
Fusion servers and players ship with supplied generic media center IR remotes. Fusion is not a media center product, we’ve merely shared the IR
codes, making the use of many types of remotes possible.
These remotes can be used for controlling the system, however their
main purpose is to help you setup a universal-type IR remote or IP
control system. Here are some of the functions available on the remote:
Chapter 2
Setting up your Premiere Movie Server
Navigation buttons:
Up, Down, Left &
Right.
The [OK] button
selects the various
onscreen options.
Menu Button:
Brings up system
menus as well as
disc menus when in
playback mode.
Transport
buttons:
All the standard
movie playback
functions
Exit Button
Disc Menu Button
(When playing a movie)
Page Up & Down
Sidebar Menu (in GUI)
OSD Menu
(When playing a movie)
Sort Movies
Filter Movies
% Button:
Allows you to skip to
a percentage of the
movie collection or
into the movie itself.
i.e. 3 = 30%, 6 = 60%
Premiere Movie Server Installation Manual
12
Chapter 2
Setting up your Premiere Movie Server
REQUIRED SOFTWARE:
This Fusion system has been designed to store home movies and
unencrypted DVD & Blu-ray movies. Fusion does not condone any other use
for this product and suggests owners should respect the copyrights of others.
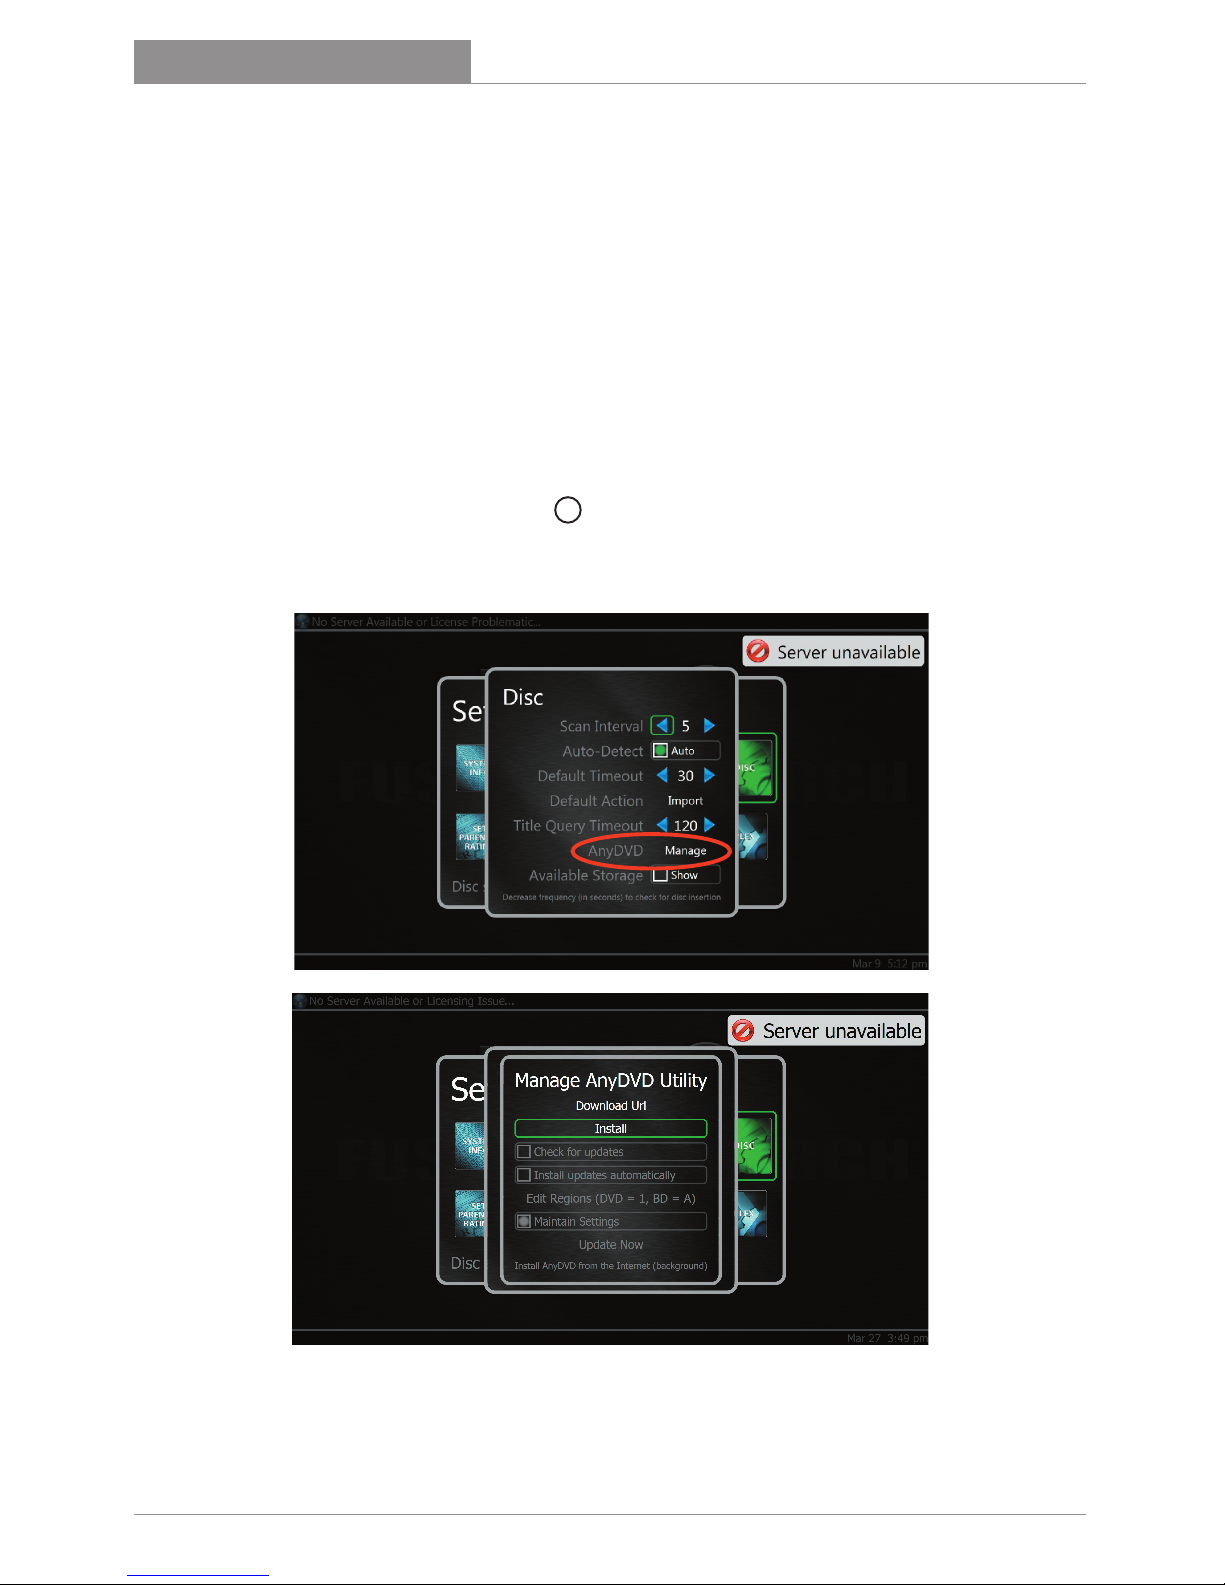
If you are going to store your own commercially encrypted DVDs or Blu-ray
you will first need to purchase a license of AnyDVD HD. Once you have
purchased a license you will need to take the registration key they email to
you and put it on a USB key. Insert that USB key into an available USB slot
on your server.
Once you’ve done that, push the i button on the remote to bring up the
[Main Menu], select [Setup Menu] and then [Disc]. You will then navigate
down to the Manage AnyDVD utility, click [Manage], then [Install].
Once the AnyDVD HD has finished installing, it will automatically reboot the
system. When the GUI comes back up you will now be able to insert a DVD
or Blu-ray into the drive and the system will automatically find the movie
Premiere Movie Server Installation Manual
13
Chapter 2
Setting up your Premiere Movie Server
COMMERCIALLY ENCRYPTED MOVIES:
Fusion fully respects the rights of IP and media copyright holders. Fusion does not
condone illegal copying or distribution of any copyrighted materials. No Fusion
product ships with decryption software that may be used to violate copyright laws.
Any use of Fusion products for any illegal purpose is strictly prohibited. All users of
Fusion products should own all content stored on the product including, music and
videos. All other content license rules and regulations as defined by the copyright
holder shall be adhered to including but not limited to the prohibition of any il-
legal distribution or copying of any content that has been loaded onto the server.
In no event shall Fusion or its resellers be liable for any losses dues to illegal use
of this product or any incidental, exemplary, special, or consequential damages
regardless of whether Fusion was advised of the possibility of such damages.
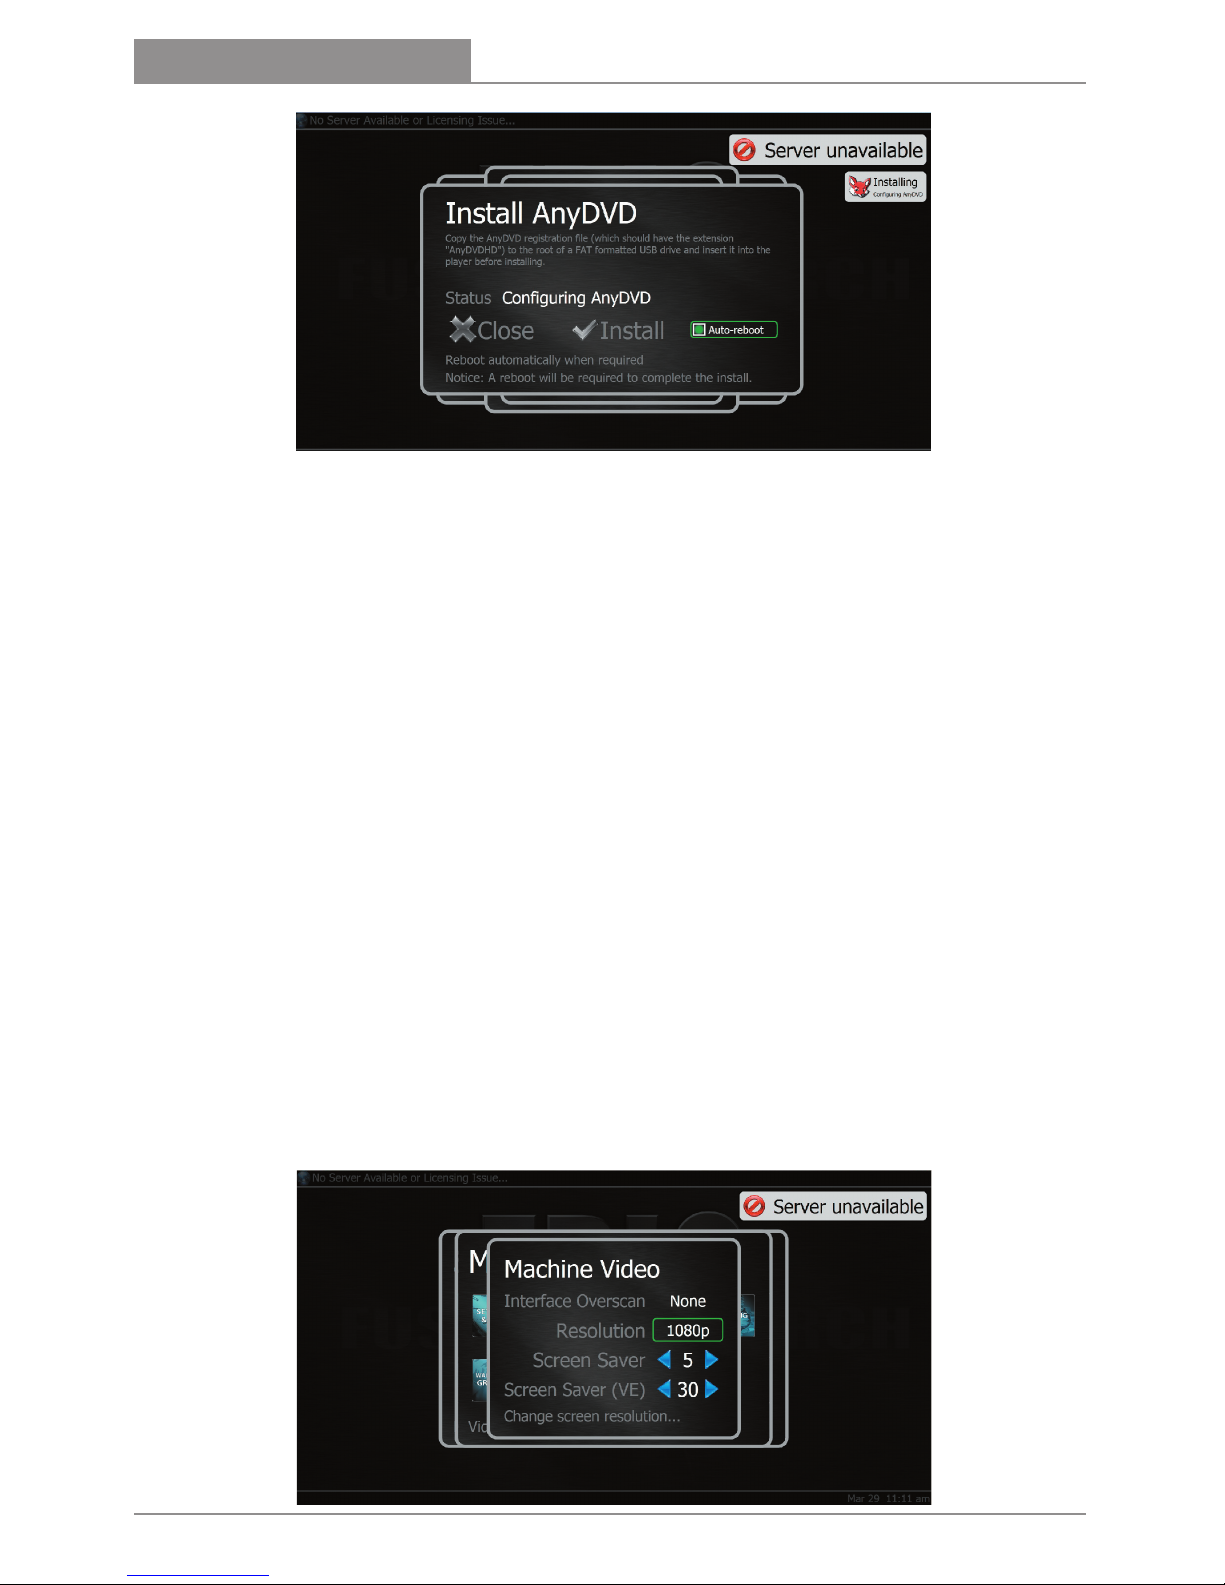
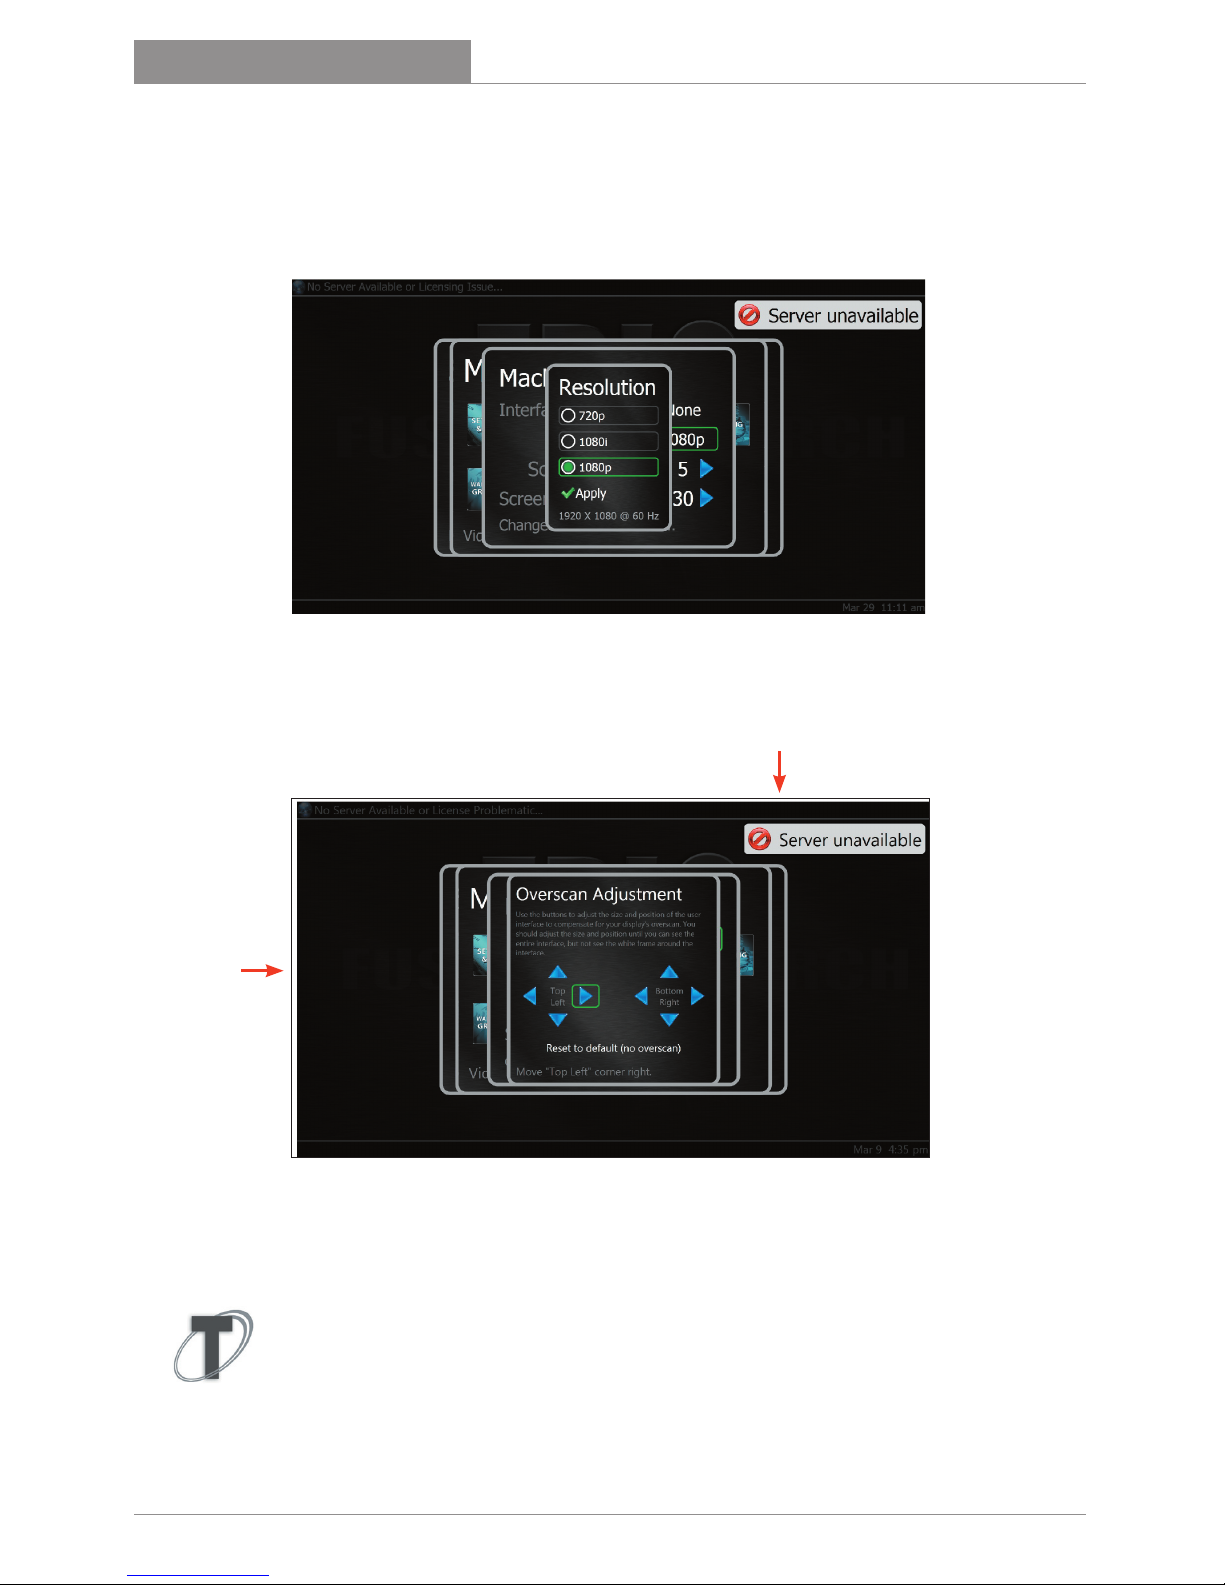
VIDEO RESOLUTION SETUP:
If connecting via HDMI, the system may set the correct resolution for the
display automatically. If it does not, it’s easy to set in the menu.
Go to [Main Menu], select [Setup Menu]/[Machine]/[Set Up Video ]. You
should be looking at the screen below.
Premiere Movie Server Installation Manual
14
Chapter 2
Setting up your Premiere Movie Server
To adjust the resolution, select the resolution option and adjust to the
desired setting.
NOTE: Once you hit apply, you will need to reboot the system for the settings
to take affect.
Along with the resolution you can adjust the screen saver timer (by minute) or turn it off completely.
FUSION INTERFACE ADJUSTMENTS:
You can also adjust the graphic user interface or GUI overscan settings.
You’ll want to do this when the GUI is larger than the display itself, (i.e.
a Plasma display).
TechTip:
Fusion does something unique by decoupling the GUI
(the movie interface) from the video playback engine (the movie
itself). This enables the user to set the GUI separately. You’d
want to use this when setting up a server in a projector system with an
anamorphic lens and a 2.35-1 ratio screen. The GUI will be full screen but
the movie will still be untouched and ready for an anamorphic lens.
 Loading...