

Page 1

OPERATION MANUAL
VEHICLE SECURITY SYSTEM
CE-SS200
Page 2

FUSION CULTURE
There’s no point doing something if no one notices. We’ve always
believed the way to make things happen is by getting noticed. From
our product, to our demo cars, to our events, FUSION is about
making some noise.
Now you are ready. Step out of the shadows and announce you’ve
arrived in a world where the old limits are left behind. Where
technology is creatively combined with the latest in product
innovation. Where new levels of entertainment are delivered with
outstanding performance and quality. Our development team create
distinctively different products; subwoofers, amplifiers, speakers and
peripherals that redefine what can be done in car audio.
Leave the old behind and push the limits of what can be achieved in
car audio. Make some noise.
For more information about FUSION Electronics visit our website at
www.fusionelectronics.com
or email technical@fusionelectronics.co.nz
TABLE OF CONTENTS
• REMOTE OPERATION. . . . . . . . . . . . . . . . . . . . . . . . . . . . . . . . . . . . . . . pg 4
• INDICATOR LIGHTS . . . . . . . . . . . . . . . . . . . . . . . . . . . . . . . . . . . . . . . . pg 4
• LED INDICATORS . . . . . . . . . . . . . . . . . . . . . . . . . . . . . . . . . . . . . . . . . . pg 5
• SIREN INDICATORS . . . . . . . . . . . . . . . . . . . . . . . . . . . . . . . . . . . . . . . . pg 5
• ACTIVE ARMING - LOCK & ARM . . . . . . . . . . . . . . . . . . . . . . . . . . . . . pg 6
• PASSIVE ARMING . . . . . . . . . . . . . . . . . . . . . . . . . . . . . . . . . . . . . . . . . pg 6
• PASSIVE DOOR LOCKING . . . . . . . . . . . . . . . . . . . . . . . . . . . . . . . . . . . pg 7
• ACTIVE DISARMING. . . . . . . . . . . . . . . . . . . . . . . . . . . . . . . . . . . . . . . . pg 7
• DISARMING WITHOUT A REMOTE . . . . . . . . . . . . . . . . . . . . . . . . . . . pg 7
• VALET MODE. . . . . . . . . . . . . . . . . . . . . . . . . . . . . . . . . . . . . . . . . . . . . . pg 8
• PANIC FUNCTION. . . . . . . . . . . . . . . . . . . . . . . . . . . . . . . . . . . . . . . . . . pg 8
• TRIGGER THE SYSTEM . . . . . . . . . . . . . . . . . . . . . . . . . . . . . . . . . . . . . pg 9
• ANTI CAR - JACKING . . . . . . . . . . . . . . . . . . . . . . . . . . . . . . . . . . . . . . . pg 9
• CAR LOCATOR . . . . . . . . . . . . . . . . . . . . . . . . . . . . . . . . . . . . . . . . . . . .pg 10
• BOOT/TRUNK RELEASE. . . . . . . . . . . . . . . . . . . . . . . . . . . . . . . . . . . . pg 10
• TROUBLE SHOOTING. . . . . . . . . . . . . . . . . . . . . . . . . . . . . . . . . . . . . . . pg 11
RECORD YOUR PRODUCT DETAILS HERE:
MODEL NUMBER _______________________________ DATE OF PURCHASE________________
AFFIX RECEIPT HERE
V 2.0
2
3
Page 3
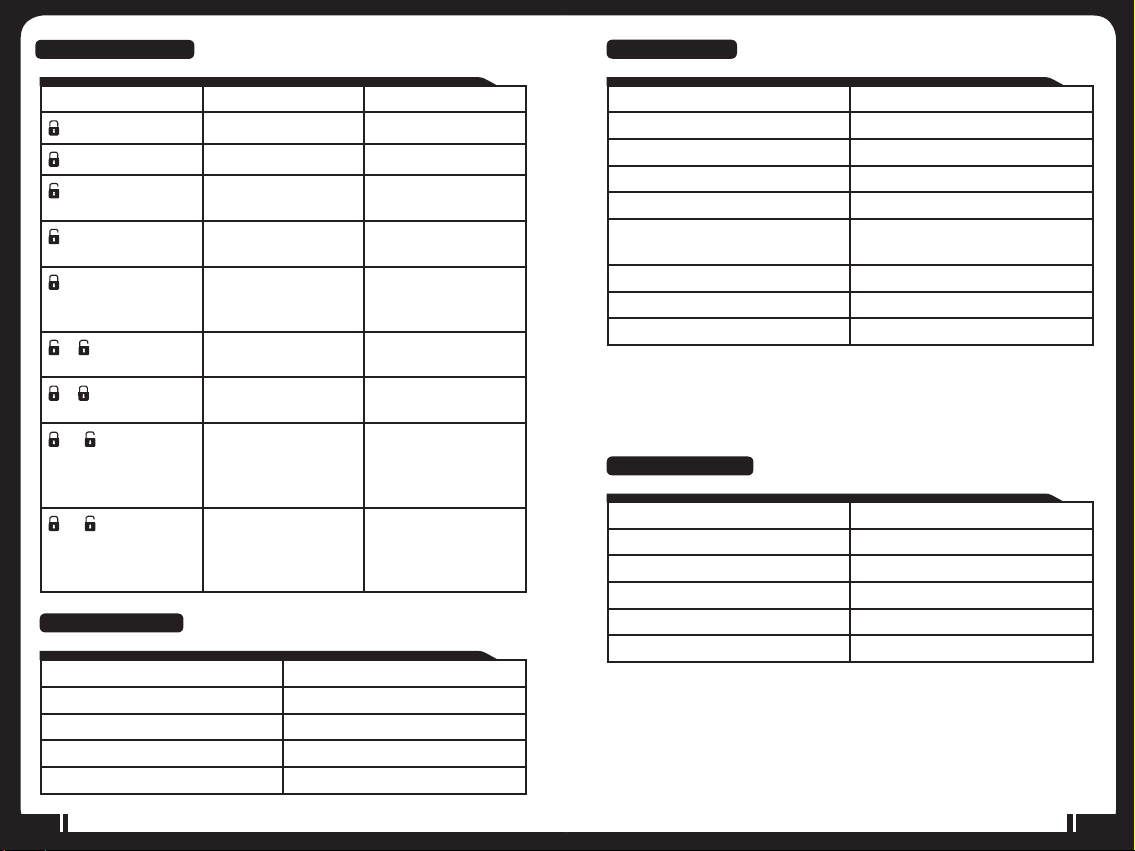
REMOTE OPERATION
LED INDICATORS
Remote Button System Function Comment
Arm & lock doors
Car locator While armed
Disarm & unlock
doors
(2 seconds)
(3 seconds)
-
-
+
+ (2 seconds)
INDICATOR LIGHTS
Indicator light Function
1 flash Arm
2 flashes Disarm
3 flashes Disarm / After activation
12 flashes Car locator
Disarm & pop
trunk / boot release
Panic function Press and hold for 3
Disarm & two step
door unlock
Arm & bypass the
shock sensor
Silent arm / disarm While the ignition is
Activate anti
car-jacking
Press and hold for 2
seconds
seconds - Activates
siren
Press unlock twice
within 3 seconds
Press lock twice
within 3 seconds
OFF press both lock
& unlock
simultaneously
While the ignition is
ON press both lock &
unlock
simultaneously
LED Function
Off Disarmed
Slow Flash Armed
Fast Flash Passive arming
On (Solid) Valet mode
2 Flashes... pause Trigger on trunk / boot or
hood / bonnet
3 Flashes... pause Trigger on door switch
4 Flashes... pause Trigger on Dual Zone Shock Sensor
5 Flashes... pause Trigger on ignition switch
SIREN INDICATORS
Chirp Function
1 Chirp Arm
2 Chirps Disarm
3 Chirps Ajar Warning
4 Chirps Disarm / After activation
6 Chirps Car locator
4
5
Page 4

ACTIVE ARMING – LOCK & ARM
PASSIVE DOOR LOCKING
1. Press (Lock) button on remote.
2. The siren will chirp once and indicator lights will flash once indicating
that the system is now armed. The vehicle doors will lock upon arming
when interfaced with the security system.
Ajar Warning: If the siren sounds 3 chirps, then you have left a door,
trunk / boot or hood / bonnet lid ajar.
Silent Arming / Disarming: Pressing the
buttons at same time will arm or disarm your security system, No
siren chirp will be heard, arm / disarm confirmation will be through
the vehicles indicator lights only.
Shock Sensor By-Pass: Press the (Lock) button two times within 3
seconds, this will arm the security system and by-pass the shock
sensor. The system will chirp one additional time to confirm the
sensor bypass mode was activated.
Note: The sensor bypass feature is programmed to activate for one
arming cycle only. The security system will return to normal operation
during the next arming cycle.
PASSIVE ARMING
The CE-SS200 security system is equipped with an optional passive
arming feature, (programming feature II) which allows the security
system to arm 30 seconds after the last door is closed. Operation is as
follows.
1. Turn the ignition to the “OFF” position and exit the vehicle.
2. After all entrances are closed, the security system LED will flash fast
for 30 seconds. If you reopen any door or trunk / boot or hood /
bonnet, the security system LED will stop flashing. It will begin flashing
again once all the vehicle entrances have been closed.
(Lock) and (Unlock)
The vehicle doors will automatically lock after passive arming cycle has
been completed.
ACTIVE DISARMING – UNLOCK & DISARM
1. Press (Unlock) button on the remote.
2. The siren will chirp twice and the indicator lights will flash twice
indicating that the security system is now disarmed. The vehicle doors will
unlock while disarming when interfaced with the security system.
Tamper Disarm: If the CE-SS200 security system has been triggered
upon disarming the system the siren will chirp 4 times and the indicator
lights will flash 3 times.
Two Step Door Unlock: This feature will independently unlock the drivers
door only when disarming the security system. Pushing the
button on the remote a second time within 3 seconds will unlock the
entire vehicle.
Automatic Re-Arm: If this feature is selected (programming feature I in
the Installation Guide), the security system will automatically re-arm itself
60 seconds after disarming with remote. Automatic rearm will cancel if
any door is opened before the 60 seconds timer has elapsed.
DISARMING WITHOUT A REMOTE
The override function must be used if the remote is lost or inoperative.
1. Enter the vehicle and turn the ignition switch to ‘ON’ position
(alarm will sound.)
2. Within 10 seconds, push and release the valet switch. The alarm will
stop sounding and enter the disarm mode. You can now start and
operate the vehicle normally.
(Unlock)
3. After the 30-second timer has elapsed, the security system will
automatically “ARM”. The siren will chirp once and the indicator
lights will flash once.
6
7
Page 5

VALET MODE
TRIGGER THE SYSTEM
The valet switch allows you to temporarily bypass all alarm function,
eliminating the need to hand your remote to parking attendants or
garage mechanics. When the system is in valet mode, all alarm functions
are bypassed, except the remote panic feature and remote door locks
which remain operational.
Enter Valet Mode:
1. Turn the ignition to “ON” position.
2. Push and hold the valet switch for 2 seconds until the LED turns on.
The LED will remain on as long as the system is in ‘valet mode’.
Exit Valet Mode:
1. Return to normal operation, turn ignition ‘ON’.
2. Push and hold valet switch for 2 seconds, The LED will turn off
indicating the system has exited the valet mode.
PANIC FUNCTION
The remote can be used as a remote panic switch to manually trigger the
alarm in case of emergency.
1. Press and hold (Lock) button on the remote for 3 seconds. The
siren will immediately sound.
2. To stop the siren sounding and exit the panic function, press and
hold (Lock) button on the remote for 3 seconds.
Note: If the button is not pressed, the siren will automatically stop after
30 seconds.
When the CE-SS200 security system is armed, your vehicle is protected
as follows:
1. Light impacts will trigger the warn-away signal. (A long chirp
from siren).
2. Heavy impacts / doors open / hood/bonnet open / trunk/boot open
or turning on the ignition switch will trigger the programmed
sequence. The starter disable relay (if installed) prevents the vehicle’s
starter from cranking. The siren and indicator lights will turn on to
alert of an intrusion for 30 seconds. Then it will stop and
automatically reset and re-arm. If one of the sensors or detectors
are still active, the alarm system will sound a maximum of 6 times of
30 seconds cycles.
ANTI CAR - JACKING
Warning: The default setting for anti-car jacking is off. See below to
activate anti-car jacking feature.
Activate Anti Car Jacking Mode:
1. When the ignition is in the “On” position, press and hold the
remote (Lock) and (Unlock) buttons at the same time for 2
seconds. The indicator lights will turn on for 1.5 seconds to indicate
the system has entered the anti-car jacking mode.
2. Once the system is in anti-car jacking mode, If you are forced from the
vehicle, the system will trigger when the door is opened and closed
while the ignition is “ON”.
8
9
Page 6

Trigger The Anti-Car-Jacking Mode:
a). 50 seconds after the system has been triggered the siren will
start chirping for 15 seconds.
Note: During this 15 seconds period of chirping, the user may push
the valet switch once to turn off the anti-car jacking feature. If not, it will
enter second timer anti-car jacking.
b). 65 seconds after the system has beer triggered. The siren starts
sounding and the indicator lights start flashing.
c). 90 seconds after the system has beer triggered
1. The siren will still sound and the parking lights will continue to flash.
2. The starter disable will activate to prevent the vehicle from starting.
3. It will remain active until the vehicle’s battery power is exhausted.
To Turn Off Anti-Car Jacking:
Turn the ignition switch from OFF to ON, and within 10 seconds push the
valet switch, the siren will stop and the system will disarm.
CAR LOCATOR
While armed, press (Lock) button on the remote to activate car locator
function. The siren will chirp 6 times and the indicator lights will flash12
times, for you to easily locate your car.
BOOT/TRUNK RELEASE
Press and hold (Unlock) button on remote for 2 seconds to open the
boot / trunk release or other electric devices. (Only applicable if additional
products are installed)
TROUBLE SHOOTING
PROBLEM POSSIBLE CAUSE ACTION
No Operation No power to alarm Check power
In valet mode Check LED for
No siren sound or
quiet sound
Alarm will not
arm / disarm
No indicator
response
Faulty siren Replace siren
Water in siren cone Drain water, dry and
Poorly earthed unit Rewire or relocate
Faulty connection to
siren
In valet mode Turn valet mode off
Remote battery flat Place vehicle into
Vehicle battery flat Re charge vehicle
Remote not
programmed
Fuse blown Replace Fuse and
connection, main
fuse, fuse holder and
ground connection.
Check battery.
constant illumination
and disable valet
mode
relocate siren
the earth wire and
affix securely
Check connections
valet mode. Override
system and get new
battery
battery
Re-program remote
(pg4 Installation
manual)
check
10
11
Page 7

TROUBLE SHOOTING NOTES
PROBLEM POSSIBLE CAUSE ACTION
Remote only operates
central locking
Alarm arms itself Alarm is in passive
Unit is false alarming Faulty or poorly
Alarm will not enter
valet mode
Vehicle will not start Engine disable
Alarm does not sound
when door is opened
Alarm will not sound
when the boot /
trunk is opened
Alarm will not sound
when the bonnet /
hood is opened
Alarm does not sound
when impact applied
System in valet mode Turn off Valet mode
arming mode.
installed pin / door
switches
Shock sensor is set
too sensitive
Ignition not turned on
or incorrectly wired
engaged
Door switches not
operating or not
wired correctly
Trunk / Boot circuit
not connected
Bonnet / hood circuit
not connected
Shock sensor
adjusted incorrectly
(pg8 operation
manual)
Turn off passive
arming feature
(pg6 Installation
manual)
Check pin switch
installation, clean
factory door switches
Adjust shock sensor
settings
(pg8 Installation
manual)
Switch on ignition
before pushing the
valet button
Disarm alarm system
before starting
vehicle
Check wiring and
door switches
Check wiring
Check wiring
Adjust sensitivity
refer to shock sensor
(pg8 Installation
manual)
YOU CAN HELP PROTECT THE ENVIRONMENT!
Please remember to respect the local regulations:
Hand in the non-working electrical equipment
to an appropriate waste disposal center.
PUBLISHED BY FUSION ELECTRONICS LIMITED:
© Copyright 2007 by FUSION Electronics Limited.
All rights reserved. Specifications and design are
subject to change without notice.
12
13
Page 8

• • Specifications and design are subject to change without notice • •
 Loading...