

Page 1

Fax User Guide
03/09/2016
USER GUIDE
Page 2

USER GUIDE
Contents:
Access Fusion Fax Service � � � � � � � � � � � � � � � � � � � � � � � � � � � � � � � � � � � � � � � � � � � � � � � � � � � � � � � � � � � � � � � � � � � � � � � � � � � � � � � � � � � � � � � � � 3
Search Tab � � � � � � � � � � � � � � � � � � � � � � � � � � � � � � � � � � � � � � � � � � � � � � � � � � � � � � � � � � � � � � � � � � � � � � � � � � � � � � � � � � � � � � � � � � � � � � � � � � � � � � 3
View Tab � � � � � � � � � � � � � � � � � � � � � � � � � � � � � � � � � � � � � � � � � � � � � � � � � � � � � � � � � � � � � � � � � � � � � � � � � � � � � � � � � � � � � � � � � � � � � � � � � � � � � � � � 5
To E-mail From View Page � � � � � � � � � � � � � � � � � � � � � � � � � � � � � � � � � � � � � � � � � � � � � � � � � � � � � � � � � � � � � � � � � � � � � � � � � � � � � � � � � � � � � � � 5
Send Tab � � � � � � � � � � � � � � � � � � � � � � � � � � � � � � � � � � � � � � � � � � � � � � � � � � � � � � � � � � � � � � � � � � � � � � � � � � � � � � � � � � � � � � � � � � � � � � � � � � � � � � � � 7
Recipient Info Section � � � � � � � � � � � � � � � � � � � � � � � � � � � � � � � � � � � � � � � � � � � � � � � � � � � � � � � � � � � � � � � � � � � � � � � � � � � � � � � � � � � � � � � � � � 7
Attachments Section � � � � � � � � � � � � � � � � � � � � � � � � � � � � � � � � � � � � � � � � � � � � � � � � � � � � � � � � � � � � � � � � � � � � � � � � � � � � � � � � � � � � � � � � � � � 7
Preview Fax Section � � � � � � � � � � � � � � � � � � � � � � � � � � � � � � � � � � � � � � � � � � � � � � � � � � � � � � � � � � � � � � � � � � � � � � � � � � � � � � � � � � � � � � � � � � � � 8
Send Fax Section � � � � � � � � � � � � � � � � � � � � � � � � � � � � � � � � � � � � � � � � � � � � � � � � � � � � � � � � � � � � � � � � � � � � � � � � � � � � � � � � � � � � � � � � � � � � � � 9
Conrmation Section � � � � � � � � � � � � � � � � � � � � � � � � � � � � � � � � � � � � � � � � � � � � � � � � � � � � � � � � � � � � � � � � � � � � � � � � � � � � � � � � � � � � � � � � � � 10
Settings Tab � � � � � � � � � � � � � � � � � � � � � � � � � � � � � � � � � � � � � � � � � � � � � � � � � � � � � � � � � � � � � � � � � � � � � � � � � � � � � � � � � � � � � � � � � � � � � � � � � � � � 11
Prole Section � � � � � � � � � � � � � � � � � � � � � � � � � � � � � � � � � � � � � � � � � � � � � � � � � � � � � � � � � � � � � � � � � � � � � � � � � � � � � � � � � � � � � � � � � � � � � � � 11
Filters Section � � � � � � � � � � � � � � � � � � � � � � � � � � � � � � � � � � � � � � � � � � � � � � � � � � � � � � � � � � � � � � � � � � � � � � � � � � � � � � � � � � � � � � � � � � � � � � � 11
Password Section � � � � � � � � � � � � � � � � � � � � � � � � � � � � � � � � � � � � � � � � � � � � � � � � � � � � � � � � � � � � � � � � � � � � � � � � � � � � � � � � � � � � � � � � � � � � 12
Notications Section � � � � � � � � � � � � � � � � � � � � � � � � � � � � � � � � � � � � � � � � � � � � � � � � � � � � � � � � � � � � � � � � � � � � � � � � � � � � � � � � � � � � � � � � � � 13
Permissions Section � � � � � � � � � � � � � � � � � � � � � � � � � � � � � � � � � � � � � � � � � � � � � � � � � � � � � � � � � � � � � � � � � � � � � � � � � � � � � � � � � � � � � � � � � � 13
Send Fax Via Print Driver � � � � � � � � � � � � � � � � � � � � � � � � � � � � � � � � � � � � � � � � � � � � � � � � � � � � � � � � � � � � � � � � � � � � � � � � � � � � � � � � � � � � � � � � � � 14
Print Driver Option � � � � � � � � � � � � � � � � � � � � � � � � � � � � � � � � � � � � � � � � � � � � � � � � � � � � � � � � � � � � � � � � � � � � � � � � � � � � � � � � � � � � � � � � � � � � 14
Fax Preview Section � � � � � � � � � � � � � � � � � � � � � � � � � � � � � � � � � � � � � � � � � � � � � � � � � � � � � � � � � � � � � � � � � � � � � � � � � � � � � � � � � � � � � � � � � � � 16
Send Fax Section � � � � � � � � � � � � � � � � � � � � � � � � � � � � � � � � � � � � � � � � � � � � � � � � � � � � � � � � � � � � � � � � � � � � � � � � � � � � � � � � � � � � � � � � � � � � � 16
Conrmation Section � � � � � � � � � � � � � � � � � � � � � � � � � � � � � � � � � � � � � � � � � � � � � � � � � � � � � � � � � � � � � � � � � � � � � � � � � � � � � � � � � � � � � � � � � � 17
SEND FAX VIA E-MAIL � � � � � � � � � � � � � � � � � � � � � � � � � � � � � � � � � � � � � � � � � � � � � � � � � � � � � � � � � � � � � � � � � � � � � � � � � � � � � � � � � � � � � � � � � � � � 18
MORE ABOUT FUSION � � � � � � � � � � � � � � � � � � � � � � � � � � � � � � � � � � � � � � � � � � � � � � � � � � � � � � � � � � � � � � � � � � � � � � � � � � � � � � � � � � � � � � � � � � � � 18
Copyright ©2016– Fusion, All rights reserved
2
Page 3
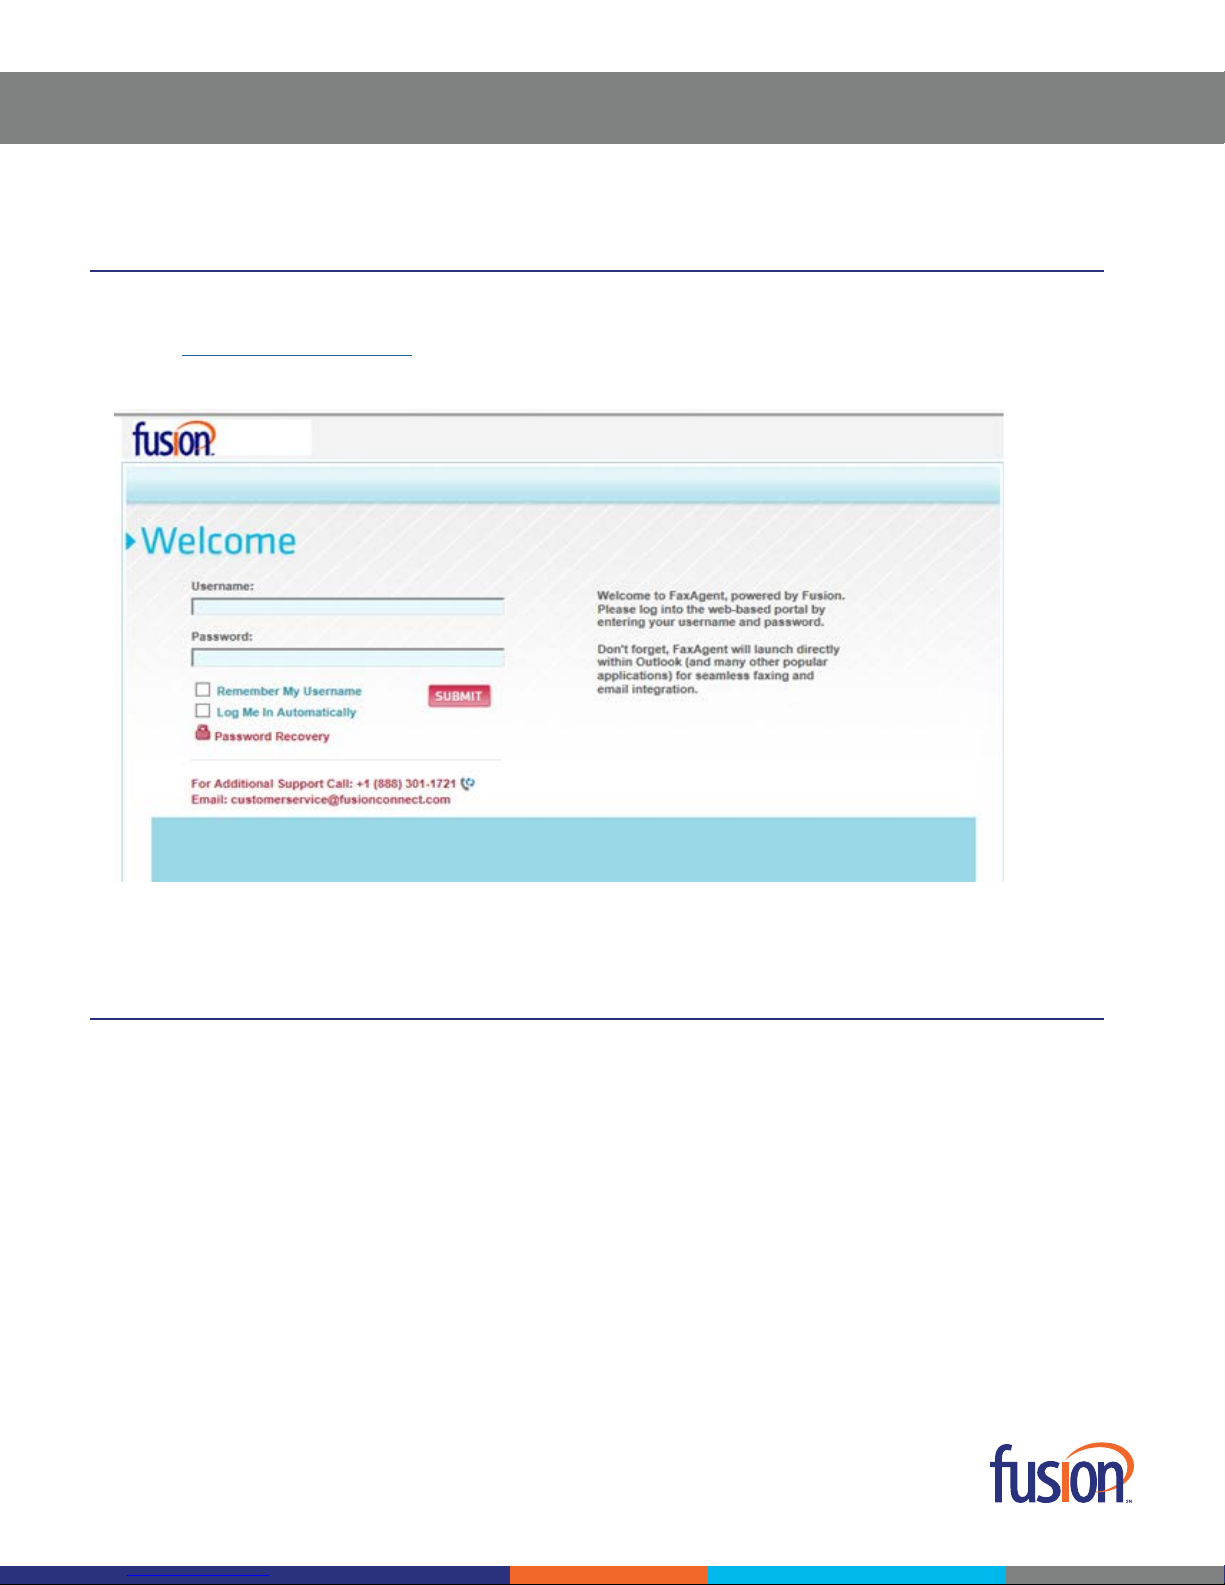
Access Fusion Fax Service
To access the Fusion Fax Service Portal:
1� Go to http://fax�fusionconnect�com (we recommend using MS Internet Explorer)�
2� At Welcome Screen enter your own unique User ID and Password�
USER GUIDE
Search Tab
Reviewing the menu choices in the upper right of the screen, the rst item listed is the “SEARCH” tab. Once logged in you will see the
“Search” screen pop up if you have sent or received any fax documents previously. Using the “SEARCH” tab you can search through
existing documents by several different criteria�
Copyright ©2016– Fusion, All rights reserved
3
Page 4
USER GUIDE
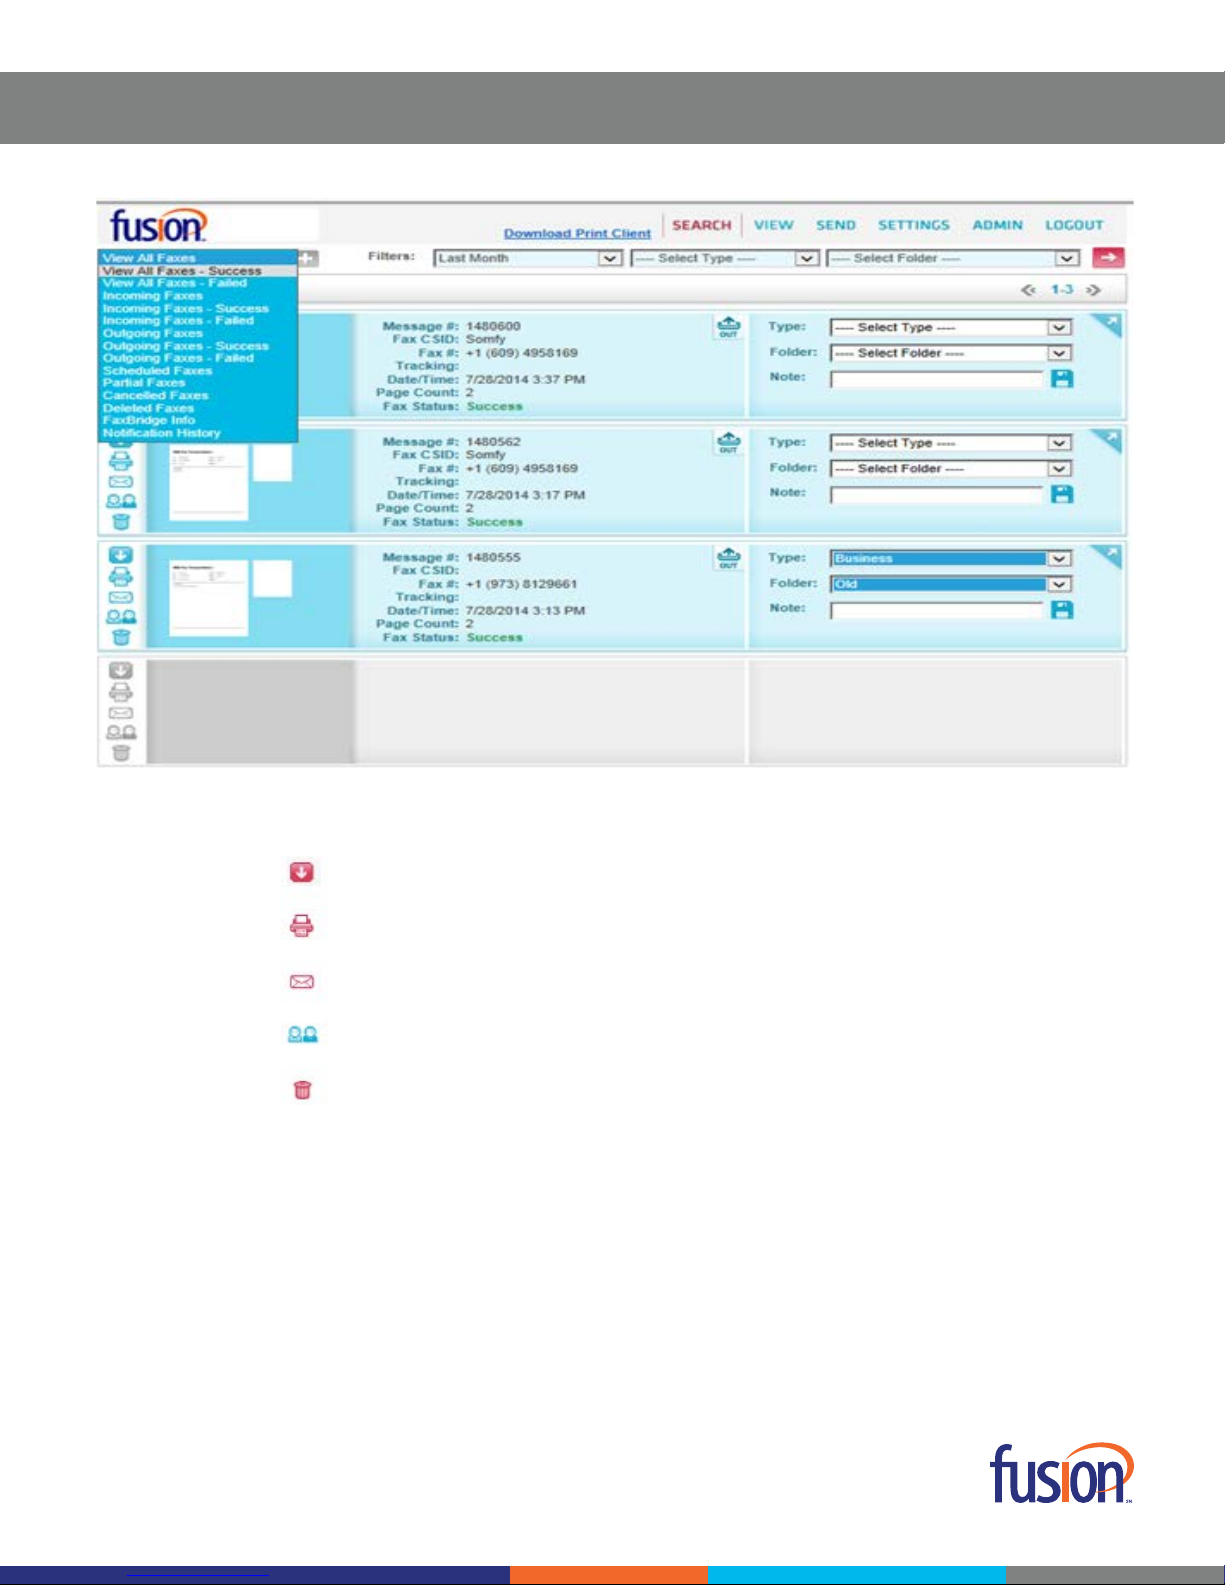
When you click the Icons along left side of page the following functions will be performed:
1� Download
2� Print Preview
3� E-Mail
4� Assign
5� Delete
There is also one icon along the right border of the page (Launch)�
This launches the “View” page (in a separate window) for that particular document.
The Search Tab allows you to search Incoming, Outgoing or Cancelled faxes, by date, type (business, personal, etc�) and within New or
Old Folders� You can also print or preview a copy of any of the documents listed on the page with the click of a single button�
Copyright ©2016– Fusion, All rights reserved
4
Page 5
USER GUIDE
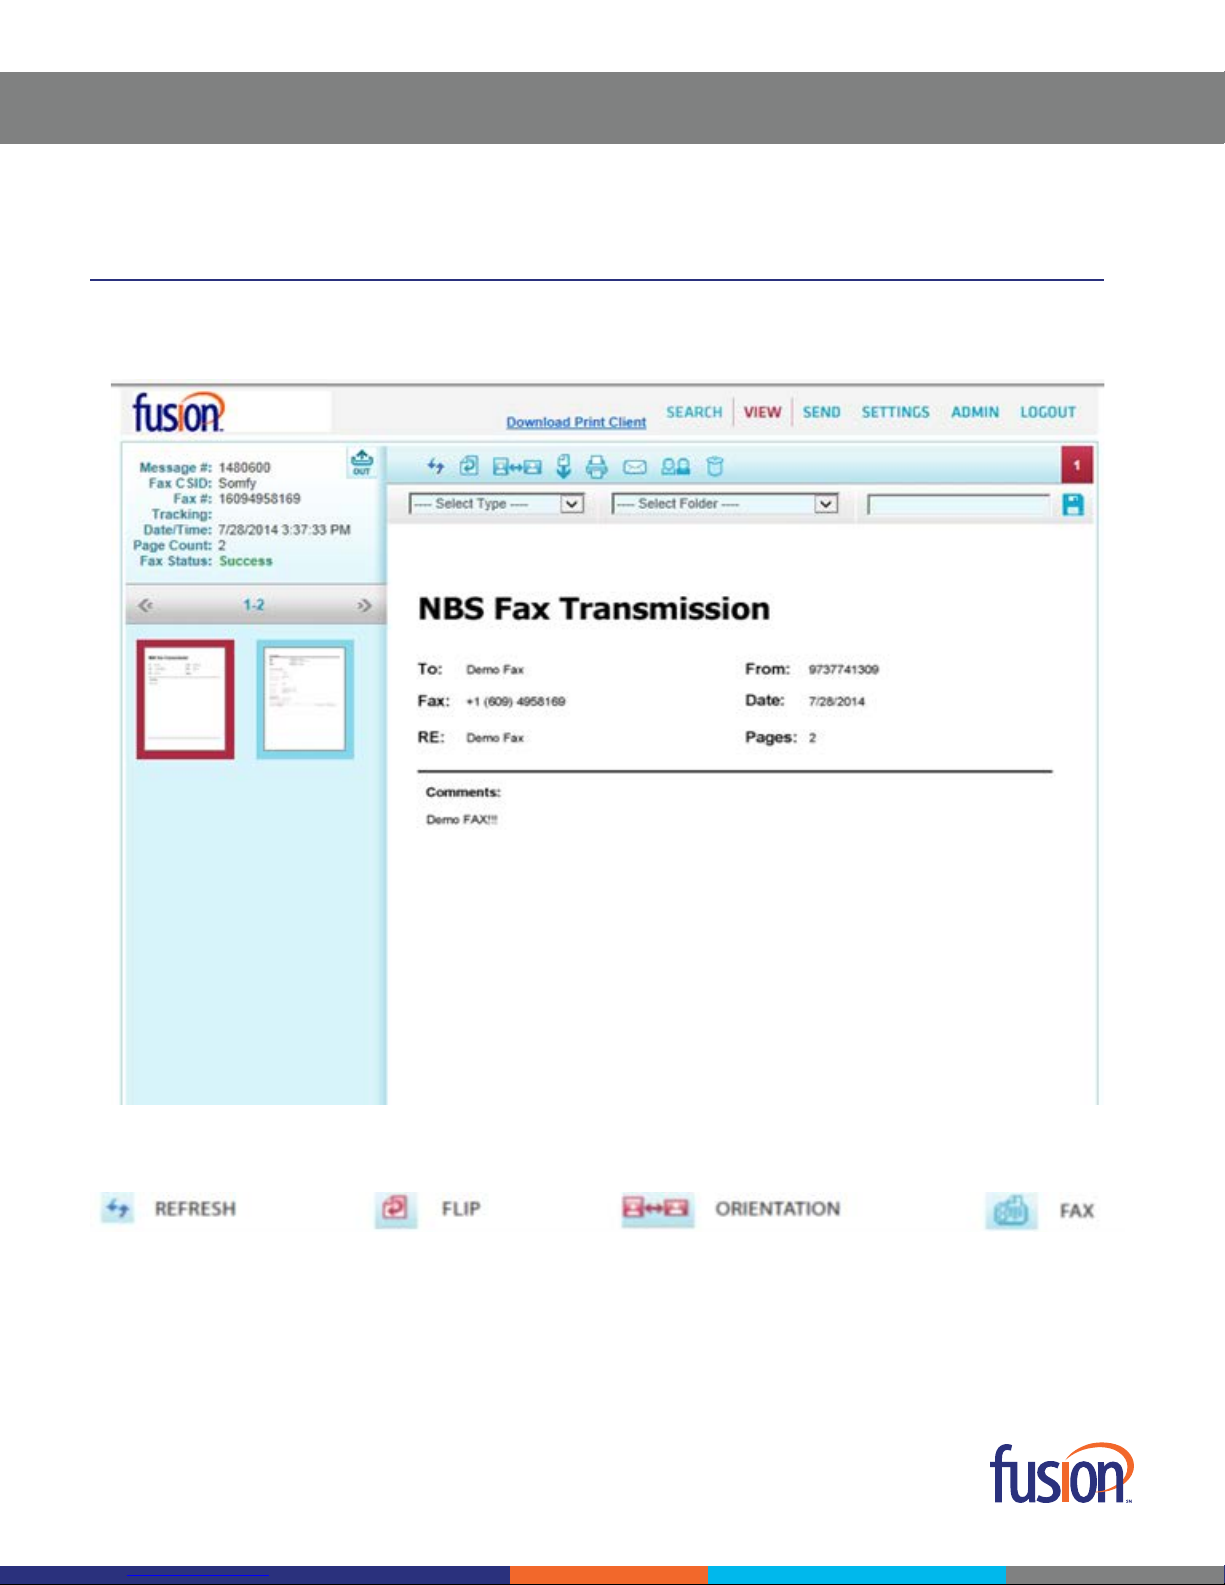
View Tab
The VIEW tab allows you to view documents along with their delivery, tracking and status information� You can also UPDATE the TYPE
and FOLDER status of the document so that it can be archived and searched for later�
The Icons along top of the page perform the following functions (note: download, print preview, e-mail and delete icons are the same):
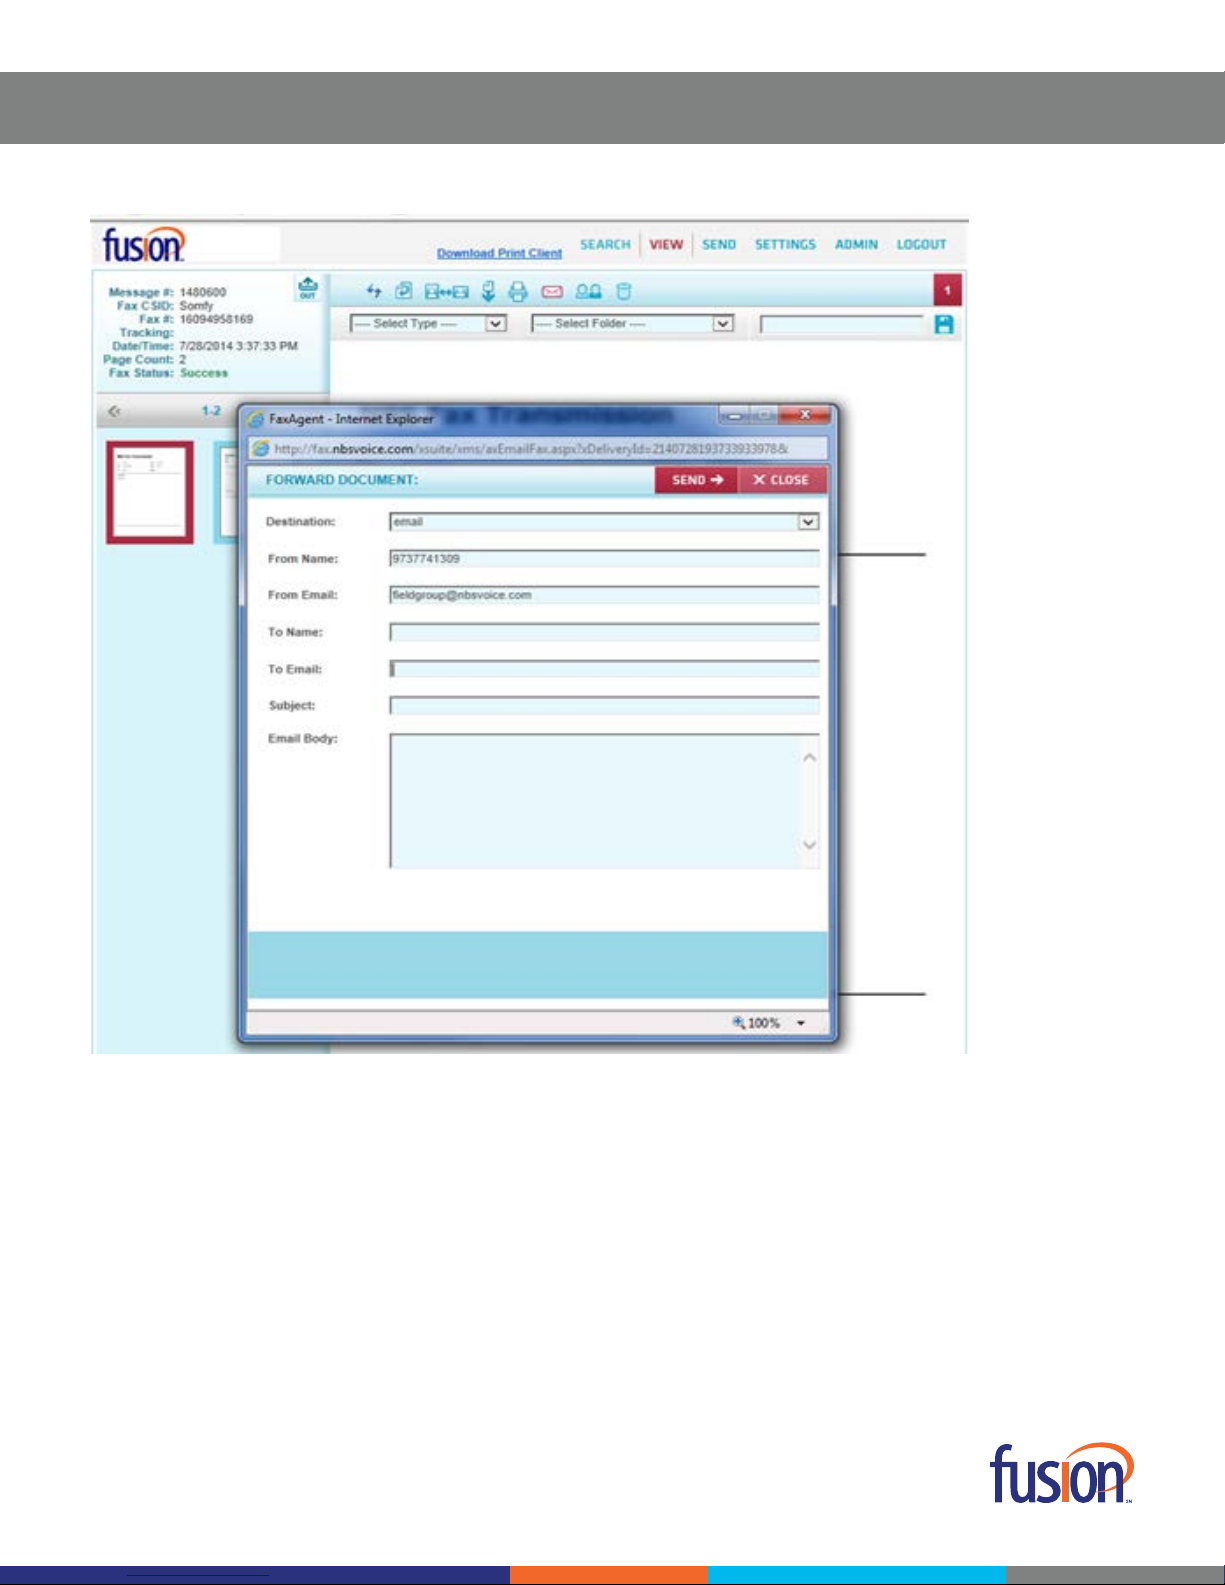
To E-mail From View Page
Clicking on the “email” icon here will pull up a separate “send” window that will allow you to e-mail an electronic copy of the document.
Copyright ©2016– Fusion, All rights reserved
5
Page 6
USER GUIDE
Fill in the Name and Email Address of the intended recipient� Then enter the Subject and Email Body or message and press SEND�
Copyright ©2016– Fusion, All rights reserved
6
Page 7

USER GUIDE
Send Tab
Recipient Info Section
A fax can be sent with or without a “Cover Page” (click the drop down menu to choose). If you choose to include a Cover Page a small
preview image of the page will display in the small box on the right side of the page�
You can also “Schedule” when to send your fax. You can pick “send immediately” or “today” or any day within a two week period.
Attachments Section
To add le “Attachments” to your Fax click the “Browse” button and choose any le from your computer. Multiple le formats can be
accepted and attached to follow your cover page. A list of these le formats is provided on the “Attachments” page.
Copyright ©2016– Fusion, All rights reserved
7
Page 8

USER GUIDE
Once the le is attached it will show up under “Selected Files” and can be removed and replaced with another le if you change your
mind�
Preview Fax Section
The PREVIEW FAX page displays a “Page Review” that shows you a small image of the Cover Page (along the top of the page) and it
also indicates whether or not you have a le attached.
Copyright ©2016– Fusion, All rights reserved
8
Page 9

USER GUIDE
The large Cover Page image shows how your cover page will be laid out. It substitutes strings of letters and symbols in the elds where
your message and contact details will be listed. The data you entered in the “Recipient Info” section will populate these elds in the
actual cover page that is sent�
Send Fax Section
Before sending your fax, the system gives you the option to “Set Filters for Easy Archiving.” Pull downs ask you to choose a Type and
Folder and there is a box where you can add a Note�
Copyright ©2016– Fusion, All rights reserved
9
Page 10

USER GUIDE
In addition, copies of your fax can be sent to up to 4 other recipients� There are options for sending each copy to either a Fax or Email
address, and a place to ll in the name of each recipient.
When nished, press the “SEND” button to initiate your fax transmission.
Conrmation Section
Your fax is now queued for delivery and a message tracking number is created so that you can search for the document later� Click on
the “Search” tab to view the new document and its transmission status.
Copyright ©2016– Fusion, All rights reserved 10
Page 11

USER GUIDE
There are “More Options” along the bottom of the page that allow you to either send another copy of this document, or to send a new
fax altogether�
Settings Tab
Prole Section
The Prole section allows the user to choose default settings for the use of cover pages, return e-mail address, how and when you are
notied of fax status and other self-identifying information.
Some of the settings on this page are set by the System Administrator based on the options chosen by the customer when the service
is initiated�
Filters Section
Filters are used to archive and organize your Fax. documents. Documents can be designated as “Business” or “Personal” (or any other
category you want to created) and saved in “New” or “Old” folders.
Copyright ©2016– Fusion, All rights reserved
11
Page 12

USER GUIDE
You can change, delete or add items in each of these categories by using the “+” and “-” buttons along the bottom of the page.
Password Section
The PASSWORD section of the SETTINGS tab will allow the user to change their login password at any time� Your original login is set
by Fusion, but once the portal is accessed for the rst time, the user can change it to his or her own liking to ensure a higher level of
security�
Copyright ©2016– Fusion, All rights reserved
12
Page 13

USER GUIDE
Notications Section
Notications are used to let the User know the status of a message. As previously shown in the PROFILE section of the SETTINGS
tab, a user can be notied (on Send and/or Receive) by print or e-mail. E-mail notications can be sent as a message link only, or as a
message link as well as with the actual faxed document attached�
Permissions Section
Permissions enables the user to activate, authenticate or allow certain security features based on privilege levels� There are also
several advanced settings related to concurrent faxes and billing issues that should be set by your administrator�
Copyright ©2016– Fusion, All rights reserved
13
Page 14

USER GUIDE
Send Fax Via Print Driver
Print Driver Option
Fusion’s Fax Service also has the ability to send a fax directly from any Windows application with a Print Driver function� Simply install
the Client Print Driver on your machine so that you can invoke the “FaxAgent” print function from the Fax Service. To download the
driver look for the “Download Print Client” link on the top of each page within the Fusion Fax service. When installing make sure in the
“Server Connection Conguration” pane you list the Fusion Fax URL in the “Server Hostname” box (enter “fax.fusionconnect.com” in
that box if it is not already there)�
Copyright ©2016– Fusion, All rights reserved 14
Page 15

USER GUIDE
Once installed open any document you wish to fax and simply choose to “Print” the document using the “FaxAgent” driver as your
selected printer� The document will be sent to the Fusion Fax queue and a preview of the page you wish to send will appear in the
FaxAgent Printer window�
Press “Continue” and the Fusion Fax Service page will automatically pop up (within the Send section) with the Recipient Info ready to
be lled in.
Copyright ©2015– Fusion, All rights reserved 15
Page 16

USER GUIDE
Once that information is completed you would just press “Next” to see the Page Review just like in the Fax Preview section previously
mentioned in this guide
Fax Preview Section
Once again the PREVIEW FAX section displays a “Page Review” that shows you a small image of the Cover Page and a small image of
any page or pages from the document you chose to print with the FaxAgent printer option�
Send Fax Section
Before sending the fax the Optional Set Filters page will display� Filters allow you to categorize and label these faxed documents so
that they can be quickly located in the future� There are also options here for you to add additional recipients either by fax or email�
Copyright ©2016– Fusion, All rights reserved 16
Page 17

USER GUIDE
Conrmation Section
At this point the user would press the “SEND” button. Once “SEND” is clicked the document will be sent to the Fusion Fax Service client
queue and a conrmation message (stating “Fax queued for delivery” with a tracking number) will appear. You can also check the
status of the fax by going to the Fusion Fax Service Web Portal and clicking on the SEARCH tab. If the fax does not immediately appear
click your browser’s REFRESH button and you will see it listed with the Fax Status and all other relevant details.
Your Fax has now been sent, recorded and archived for later search and retrieval�
Copyright ©2016– Fusion, All rights reserved 17
Page 18

USER GUIDE
SEND FAX VIA E-MAIL
Fusion Fax Service also supports outgoing faxes sent directly from an outlook/mail client�
In this scenario the user would send an email to: faxnumber@fax�fusionconnect�com (i�e�: 9738129661@fax�fusionconnect�com)�
Any attachments to this e-mail message would be sent as a fax via our Fusion Fax Service�
Please note that the email MUST come from the primary email address listed as the username in the fax server� This is how the fax
server determines what user the fax is coming from. At this point only one primary email address can be dened on the fax server (no
matter the user)�
Additional questions about Fusion Fax Service? Contact Fusion Technical Support at 1-888-301-1721 (option 2)�
MORE ABOUT FUSION
Fusion delivers a comprehensive suite of innovative, yet proven cloud solutions to businesses of all sizes� Our advanced, high
availability service platform enables the integration of leading edge solutions in the cloud, including cloud communications, cloud
connectivity, cloud computing and additional cloud services such as storage and security� Fusion’s cloud solutions reduce our
customers’ cost of ownership, and deliver new levels of security, flexibility, scalability and speed of deployment�
Further information available at www�fusionconnect�com
Copyright ©2016– Fusion, All rights reserved 2�78-FUS-WP-FUSIONFAX-20160309
 Loading...