


MANUAL INSTRUCTION
1
MODEL 920
BRUSHLESS DC MOTER
1 Technical data
1.1 Specifications
● Dimension : 206x52x53mm (LxWxH)
● Weight : A5 - 470g / 1.04lb
A5 Plus - 530g / 1.17lb
● BRUSHLESS DC motor
● Motor power : 40W / 36W
● Motor life : 30,000 hours
● Total recharging time : A5-1.5 hours
A5 Plus - 2.5 hours
● Run time : A5 - 2 hours
A5 Plus - 5 hours
● Strokes per minute : 3500 spm
● LED indicator : smart charging led indicator
100%. 75%. 40%. 10%
● Torque : 10 kgf-m
● Power adapter : 1.2M cord (12V/3A power adapter)
● Battery : Lithium-ion
● Battery pack (circuit protection)
● Cord pack (12V/2A) : 1.2M cord
● Charging stand : charging LED indicator
● Charging stand dimension (LxWxH) :
95x90x51 mm
● 12V/2A cable (for 40800 power bank) :
20cm cord (support 12V/2A DC out)
● 1-Year limited motor warranty

4
7
1. Battery
2. Clipper
3.
Smart charging led
indicator
100%. 75%. 40%. 10%
4. Switch lever
5. Clipper head
6. Interlock clipper head
7. Interlock battery
Fig. 1
Fig. 2
4
2
2 Assembly and function
1
2
3
5 6 8
10
9
2.1 Component as Figure
1. Clipper machine
2. Blade
A5 - A1A12 #10-1.5mm
A5 PLUS - A5A12 #30W-0.5mm
3. Battery pack (1.2M cord)
Run Time 5 hours
4. Charge stand
5. Cord pack (optional)
6. Power adapter (1.2M cord)
13.5V/2A
7. 40800 Power bank (optional)
8. 12V/2A Cable
(for 40800 Power bank)(optional)
9. 100ml Blade oil
10. Cleaning brush
2.2 Overview

Fig. 8
The clipper serves to clip dogs, cats, cattle
and horses.
Two comb-shaped blades are the cutting
tool.
The bottom blade facing the skin (3) is
standing firm and is fixed on the blade
hinge (4).
The top is agitated crossways that one.
The top blade is moving by the help of
a turning lever (1).
Fig. 3
Fig. 4 Switch in OFF-position (“0”)
Fig. 5 Switch in ON-position (“I”)
Fig. 6 Interlock clipper head
Fig. 7 Interlock battery
1. Charging station
2. Power adapter
3. Apart charging cavity for the battery
4. Charging cavity for the clipper
with integrated battery
3
2.3 Abstract
2.4 Operating elements
2.5 Charging station

1. Interlock battery
2. Contacts
1. Place the charging station on a
firm, even, dry, clean and free
underground.
2. Plug the charging station in the
power outlet.
Fig. 9
Fig. 10
4
2.6 Battery
3 Operation
3.1 Initial startup
3.1.1 Setting up the charging station
●
Observe all technical data according to the operating conditions (3 Technical Data).
●
The installation surface must be even and must dispose of sufficient stability and payload.
●
The location of installation must be protected against humidity and rain.
●
Power outlets in the outer area must be equipped with a residual current circuit breaker (FI).
●
The workplace must dispose of sufficient illumination and ventilation.
●
The location of installation must be out of reach of children.
3. The charging station has electronics that constantly check its functions.
A switchover may therefore last up to 3 seconds.
4. Correctly to the power outlet and the charging station is ready for use.
5. If the battery is very depleted, the charging station wakes the battery.
This may require up to 5 minutes. After that the normal charging process will start.

Fig. 11
Fig. 12
Fig. 13
Fig. 13
1. Test the contacts of the clipper
(1) and the battery (2) for foreign
particles and contamination.
2. Assure, that the switch lever of
the clipper is in OFF-position
(“0”) (fig. 4).
3. Insert the battery (2)
in the clipper (3),
until the battery interlock (1)
is engaged on both sides.
4. Put the clipper with the inserted
battery (1) or spare battery (2)
from above without force into the
provided charging cavity of the
charging station.
5. Waiting for the battery charging
time (1 specifications).
6. Battery is charging. During the
charging time the control light is
illuminating red (3). As soon as
the battery has been charged to
a min. 90%, the indicator lamp
will change to blue and the
charging station switch to “trickle
charging”.
7. Hold the charger firmly with one hand
and pull the clipper (1) or the battery
(2) out with the other.
5
3.1.2 Charge battery

1. If the blade hinge (2) is accidentally
closed, lift the latter up using a
screwdriver (1) while simultaneously
pressing the blade lock.
2. Fit the clipper head (1) on the open blade
hinge (2).
3. Fold the clipper head (2) by light
pressure on to the clipper (1)
which is switched on.
4. Make sure, that the clipper head (1) is
engaged firmly.
Fig. 14
Fig. 15
Fig. 16
Fig. 17
6
3.1.3 Fitting the clipper head
NOTE!
For proper operation make sure that the clipper head (1) is engaged correctly.

Fig. 18
Fig. 19
1. Move the switch to position
“0” (fig. 4).
2. Push the battery interlock (2)
on both sides inward and pull
the battery (1) out of the
clipper.
3. Insert charged battery (1) into
the shearer (2), until the
battery lock is locked in on
both sides.
1. Move the switch to position “0” (fig. 4).
2. Push the interlock clipper head.
Fig. 20
7
3.2 Activities during operation
3.2.1 Clipping
1. Fix and calm the animal sufficiently before clipping.
2. Switch on the clipper already in the field of vision of the animal.
3. Approach to the animal from ahead.
4. During clipping, look at the behaviour of the animal.
3.2.2 Changing the battery
When the battery is unloaded, the clipper is turned off by a protective circuit.
3.2.3 Changing the clipper head

3. Fold the clipper head ahead when the interlock
clipper head is pressed.
4. Take off the clipper head.
5. Clean the opened hinge by the help of the
provided brush.
Fig. 21
The blades must be oiled before,
during and after every use.
When the blades of the clipper are leaving
stripes or are running with reduced speed,
this is a signal that oil is required.
Place a few drops of oil ahead and laterally
on the clipper blades (see arrows in Fig. 22).
Wipe off the excessive oil with a smooth,
dry cloth.
Lubrication sprays do not have sufficient oil
for a good lubrication, but serve for cooling
the blades.
Immediately change damaged or crenated
blades to avoid injuries.
Fig. 22
8
6. Fit the favoured clipper head to the blade hinge and fold it on to the switched-on clipper by
light pressure. (Fig. 15, 16, 17).
3.2.4 Lubrication
To receive good clipping results and to increase the durability of the clipper and the clipper
head, it is necessary to apply a thin oil coat between top and bottom blade (Fig. 22).
CAUTION!
Insufficient lubrication of the clipper head causes heating and a reduced durability of clipper
and blades, as well as a reduction of the battery runtime.
Therefore:
●
Lubricate the blades sufficiently during the clipping (at least every 15 minutes),
so that they do not drain (Fig. 22).
●
Only use the lubricants prescribed by the manufacturer.

1. Disconnect the charging station from the
power supply.
2. If necessary, take away hairs from charging
cavities.
3. If required, clean the contacts (1) with a dry
cloth.
4. Clean the contacts of the battery and the
shearer with a dry cloth as necessary.
5. (2)
LED indicator
Red light display charging
Blue light display fully charged
Fig. 23
Fig. 24-1
Fig. 24-2
9
CAUTION!
Remove all the leaking, used up or excessive grease from all the lubrication points,
and it is to be disposed in accordance with the local regulations.
3.2.5 Cleaning
To receive good clipping results and to increase the durability of the clipper
and the clipper head, it is necessary to apply a thin oil coat between top and
bottom blade (3.2.4 Lubrication).
Clipper head and hinge
Clean clipper heads und hinge between the different clippings.
Charging station
3.3.1 Cord use
(1)
Cord pack
(2)
Power adapter

Fig. 25
Fig. 26
Fig. 35
Fig. 36
Fig. 37
Fig. 38
10
3.3.2 Support Vac attachment (optional)
(1)
Vac board
(2)
Screwdriver
(3)
Vac attachment

40800 Specifications
● Battery : li-ion rechargeable battery
● Power indicator : 4 LED lights display battery life
● Output :
12V/2A & 15V/3A,
2 USB 5V/1A & 5V/2A
● Input : 12V/3A
● Capacity : 24000mAh Lithium-ion
● Operating time :
12V/2A : 8.5 ~ 9 hours (for 920.610 Clipper),
15V/3A : 4.5 ~ 5 hours (for 614.611 Clipper)
● Charging time : 4.5 ~ 5 hours
● Weight : 560gm / 1.23lb
● Dimension : 150x75x60mm
● The optional cigarette lighter plug charger lets
you charge 40800 power bank on the way to
and from the course using any 12V auto outlet
● With dual USB 5V/1A 5V/2A output charger
suitable for all 5V devices,
cell phone, tablet, and 3C products
Fig. 39
Fig. 40
Fig. 41
Fig. 42
11
3.3.3 Support 40800 power bank (optional)
(1)
Cord pack
(2)
12V/2A Cable
(3)
40800 power bank
(4)
920 Clipper

Fig. 25
Fig. 26
Fig. 27
Fig. 28
Fig. 29
Fig. 30
12
4 Replacement Part
4.1 Swinging head
(1)
Vac board
(5)
Small spring
(2)
Screwdriver
(6)
Small bearing
(3)
Upper board
(7)
(4)
Swinging head
Screw
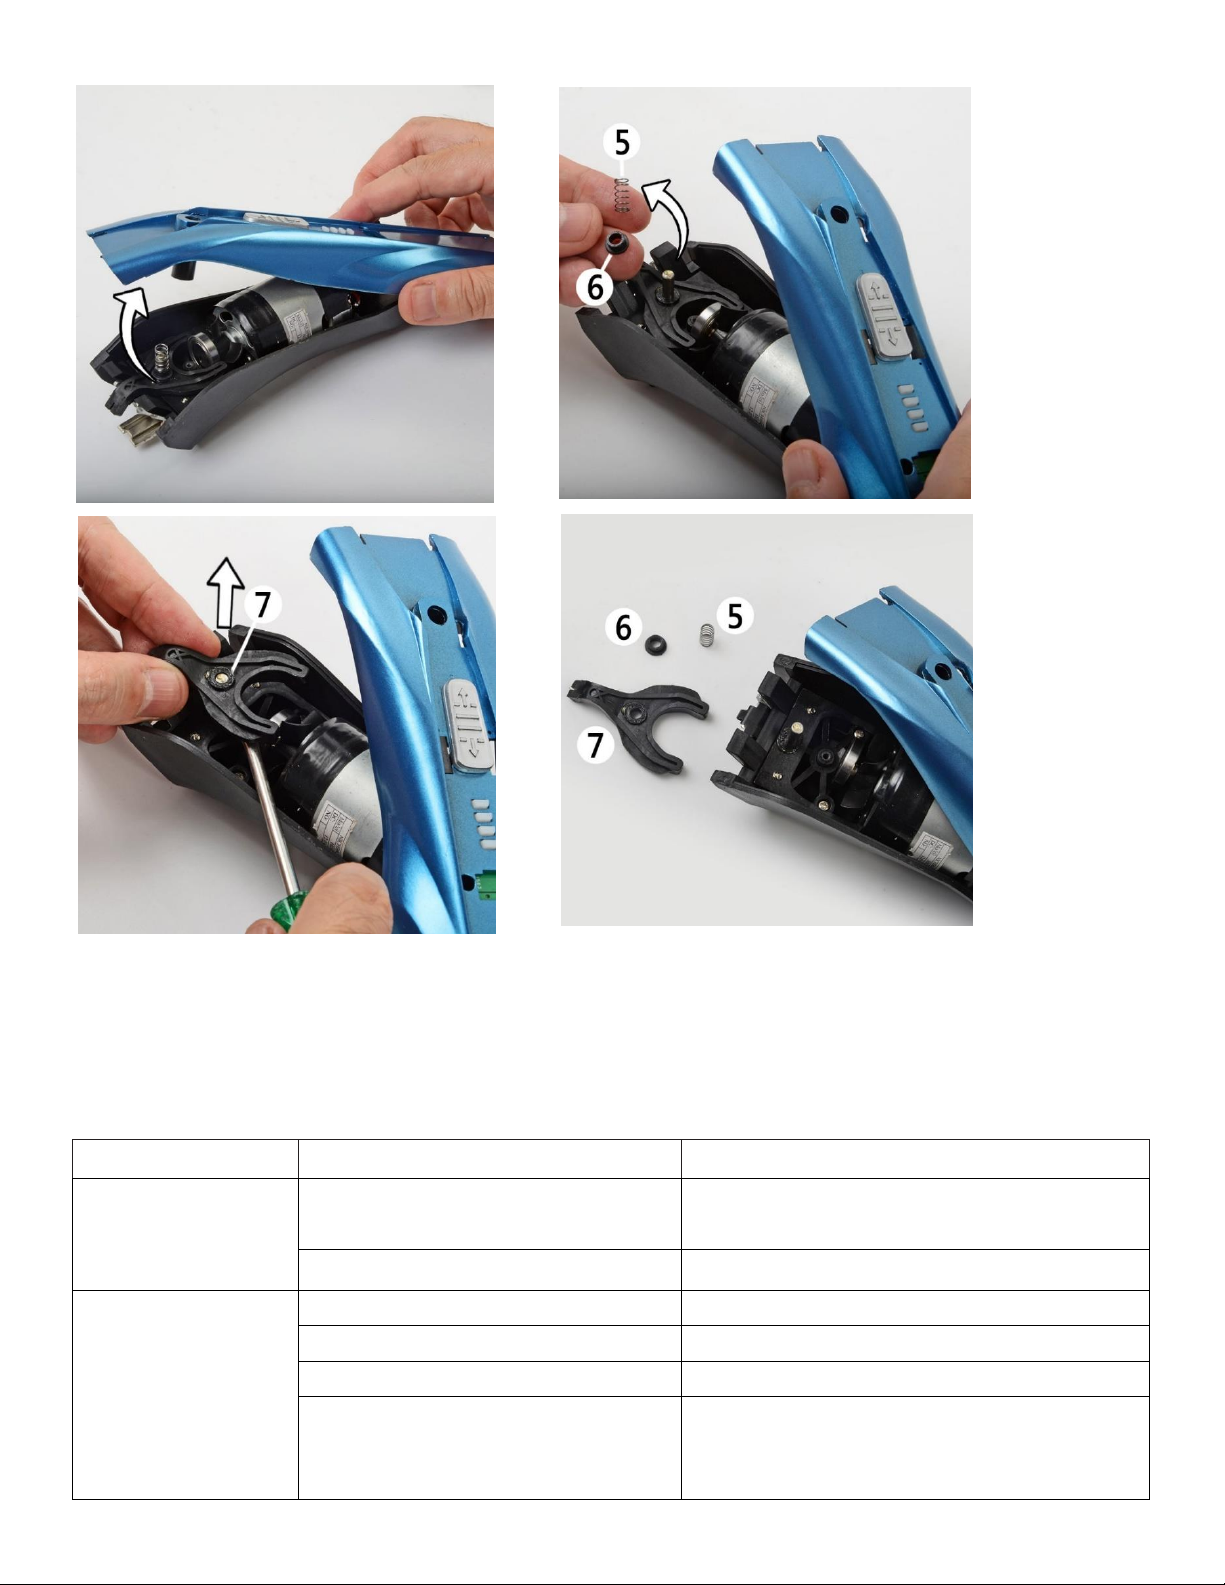
Fig. 31
Fig. 32
Fig. 33
Fig. 34
13
Malfunction
Cause
Rectification
Top blade does not
move
Clipper head is not well engaged
Engage the clipper head correctly when
the motor is running
Turning lever is defective
Replace turning lever (S)
Motor is not
running
Battery is dead
Charge battery
Contacts dirty
Switch clipper off and clean the contacts
Faulty battery
Replace battery
Smell of burning from
the motor housing. Motor
burned out
Have motor and / or electronics
replaced (S)
5 Troubleshooting
●
The here described tasks for troubleshooting can be done mostly by the operator.
●
Some tasks only may be done by especially trained personal or by an authorised service
centre. These tasks are marked with (S).

14
Malfunction
Cause
Rectification
Clipper cuts badly
or not at all
Clipper blade is blunt
Have top and bottom blades resharpened by service centre (S)
Clipper blades have not been
correctly ground
Clipper blades are not oiled
Oil clipper blades every 15 minutes
The animal‘s hair is wet
Only clip dry hair
Hairs jammed between top and
bottom blades
Take off clipper head, push the top
blade half away from the clip- per head,
take away hairs between top and
bottom blade
Clipper head has too little
clipping pressure
Have clipper head inspected (S)
Motor does not
work
Faulty motor and / or electronics
Have motor and / or electronics
replaced (S)
Clipper head blocked
Clean and oil clipper head
Motor runs very
slowly
Clipper blades were not
oiled sufficiently
Oil clipper blades
Running time of a
fully charged
battery is too short
and / or blades are
getting hot
Clipper blades were not
oiled sufficiently
Oil clipper blades
Dead, not fully charged or
defective battery has been used
Only use intact and completely charged
original battery
The control light of
the charging
station in not on
Charging station is not
connected to the power supply
Connect the charging station to the
power supply
Charging station is faulty
Have charging station inspected (S)
When the battery
is fully charged,
the light does not
change from red to
blue
Contacts of battery and / or
charging station are dirty
Clean contacts
Faulty battery
Replace battery
Contacts of the charging station
are deformed
Have the charging station re- paired
(S)
CARE AND MAINTENANCE
The cleaning and maintenance procedure must be carried out after every use.
All maintenance or blade change operations must be carried out with the appliance
switched OFF and removed from the mains adapter.
Never immerse the appliance in water.
After every use, remove the guide comb then use the small brush to eliminate any hair
from the cutting head and its seat.
Clean the outside of the appliance with a soft cloth. Never use solvents or abrasive
detergents.
Remove the cutting blade (fig. 20, 21). and evenly oil the blades and the seat of the motor
pin which is located on the inside.

PLACE
STAMP
HERE
15
If after prolonged use, and despite regular cleaning and lubrication, the cutting ability of
FURZONE
CUT ON LINE
the appliance appears to be diminished, the cutting blade must be replaced.
Once the appliance has been cleaned, the guide comb can be fitted back in place since it
also helps to protect the blade.
Use this appliance only for its intended purpose.
WARNINGS:
1. Keep the appliance dry. DO NOT place or use this appliance near bathtub, bathing sink,
showers or other liquid area.
2. DO NOT allow children to play with the appliance, never leave children or handicapped
individuals unattended with access to professional equipment.
3. NEVER reach for any electrical appliance that may have fallen into water or any other
liquid to avoid electric shock.
4. NEVER use in bathing area or while washing wet animals to avoid electric shock.
5. If the appliance is damaged, do not disassemble or repair this unit yourself. It must be
replaced by the manufacturer or its service agent in order to avoid a hazard.
6. NEVER use any appliance or component of an appliance in any manner except for that
which it was designed. Do not make alternations to any appliance or component which
may lead to personal or environmental harm .NEVER use a defective unit or component.
7. The elements used to pack the unit (plastic bags, cardboard box, etc.) must be kept out of
reach of children as they are a potential danger to them.
8. The manufacturer accepts no responsibility for damage caused by improper or erroneous
use.
9. Do not leave the appliance on charge in wet places and do not recharge the appliance
when it is wet.
10. The appliance comes equipped with a Lithium battery. have the battery removed by
qualified technical personnel or by the treatment and recycling center .
11. Keep the battery away from magnetic fields, sources of heat and naked flames.
12. Do not use a comb or a set of blades if they are damaged. Replaced them immediately as
they may cause injury.
13. Take care not to scratch the skin when handling the appliance with the set of blades
without combs.

16
GUARANTEE:
FURZONE WARRANTY REGISTRATION
Important: Completely fill out and mail within 10 days purchase.
NAME : ________________________________________________________________
ADDRESS : _____________________________________________________________
CITY STATE, ZIP CODE ___________________________________________________
PHONE ( ____ ) __________________ DATE PURCHASED______________________
MODEL : _______________________________________________________________
PURCHASED FROM : _____________________________________________________
I HAVE READ AND CLEARLY UNDERSTAND THE WARRANTY TERMS.
_______________________ _______________________
SIGNATURE DATE D
CUT ON LINE
FURZONE guarantees the appliance you have bought at following conditions:
1. The guarantee conditions for this appliance are as defined by our dealer in the country of
sale. The guarantee period is 12 months starts from the date of purchase as stated on the
Present guarantee card regularly filled out and stamped by the dealer or on the sale’s
invoice.
2. The guarantee is applicable only against submission of the present guarantee card or the
sale’s invoice.
3. The guarantee covers the elimination of all defects arisen during the guarantee period
resulting from proven faults in material or workmanship. The elimination of the defects will
be made either by repairing the appliance or exchanging it. The guarantee does not cover
any damage arising from incorrect connection to the power supply, improper use,
breakage, normal wear and non-compliance with the instructions for Use.
4. The guarantee service is carried out free of charge; it does not affect the expiry date of the
guarantee.
5. The guarantee becomes void if repairs are undertaken by unauthorized persons.
In case of defect, please return the appliance well packed and together with the guarantee
card regularly dated and stamped to one of our FURZONE Service Centers or to the dealer who
will send it to the official importer for the guarantee service.
 Loading...