

Furuno USA 9ZWRTR090, 9ZWRTR095, 9ZWRTR091, 9ZWRTR093 Users Manual

Chapter 2: Chart Plotter Operation
Stop following a point
You can stop following a point in two ways: select the point directly on the screen, or
select the Points and Stop ROTOkeys.
1. Use the Cursorpad to select the point you want to stop following.
2. Push the right-button key to show the Points pop-up menu.
3. Rotate the Rotary Knob to select Inactive and push the Rotary Knob.
The dotted line from own vessel to the point is erased from the screen. If you want to
once again follow the point:
1) Select the point on the screen.
2) Open the Points pop-up menu.
3) Choose Go To and push the Rotary Knob.
Navigation is then restarted from the point at which it was stopped.
2-18

Chapter 2: Chart Plotter Operation
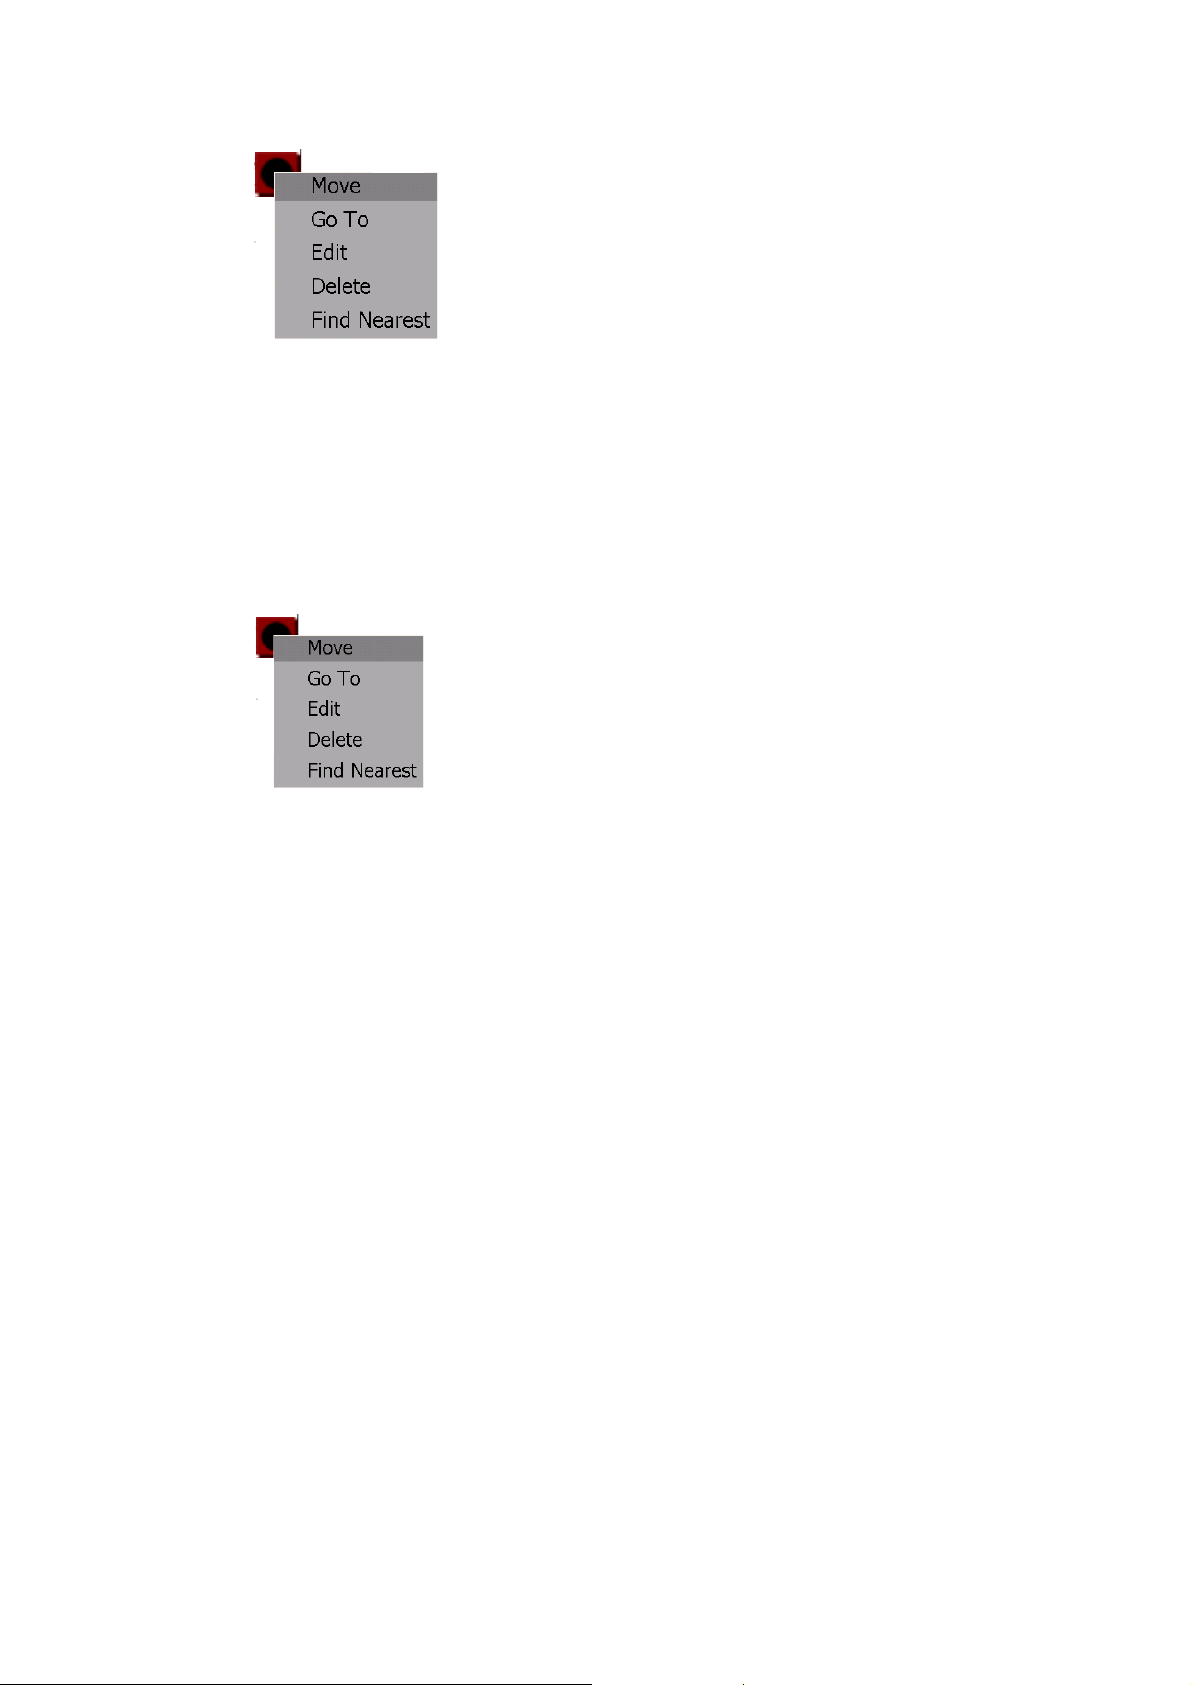
Moving a Point
You can move a point two ways:
• Drag its symbol to a new location
• Enter new position manually on the Points list
Moving a point on screen
1. Set the cursor on the point you wish to move. When the point is correctly selected
it is magnified.
2. Hit the right-button key to show the point pop-up menu.
Point pop-up menu
3. The cursor is selecting Move; push the Rotary Knob.
4. Using the Cursorpad, drag the symbol to new location and push the Rotary Knob
to fix the point symbol to the new location.
Moving point position at the Points list
1. Long-push the GO TO/LIST key to open the Alpha list.
2. Rotate the Rotary Knob to choose the point to edit and push the Rotary Knob.The
Point edit pop-up menu appears and the screen is split in halves, with the chart on
the right zoomed to show location of point.
Waypoiint list pop-up menu
3. Rotate the Rotary Knob to select Edit and push the Rotary Knob. The chart is then
replaced with the point’s attributes and details.
4. The cursor is selecting the Position combo box. Push the Rotary Knob.
5. Enter position as follows:
1)Rotate the Rotary Knob to display latitude degree desired and push the Rotary
Knob.
2)Push the Rotary Knob and the cursor jumps to latitude minutes thousandths/
hundreds place. Rotate the Rotary Knob to display desired value and then
push it.
3)The cursor is now selecting the latitude minutes tens/ones place. Push the
Rotary Knob. Rotate the Rotary Knob to display desired value and then push it.
2-19
Chapter 2: Chart Plotter Operation
4)The cursor is on the position coordinate, N or S. Rotate the Rotary Knob to
switch coordinate to N or S or vice versa and then push it.
5)The cursor is now on the longitude field. Use the Rotary Knob to enter longitude, similar to how you entered latitude.
6. Rotate the Rotary Knob to choose the OK button on the display and then push the
Rotary Knob.
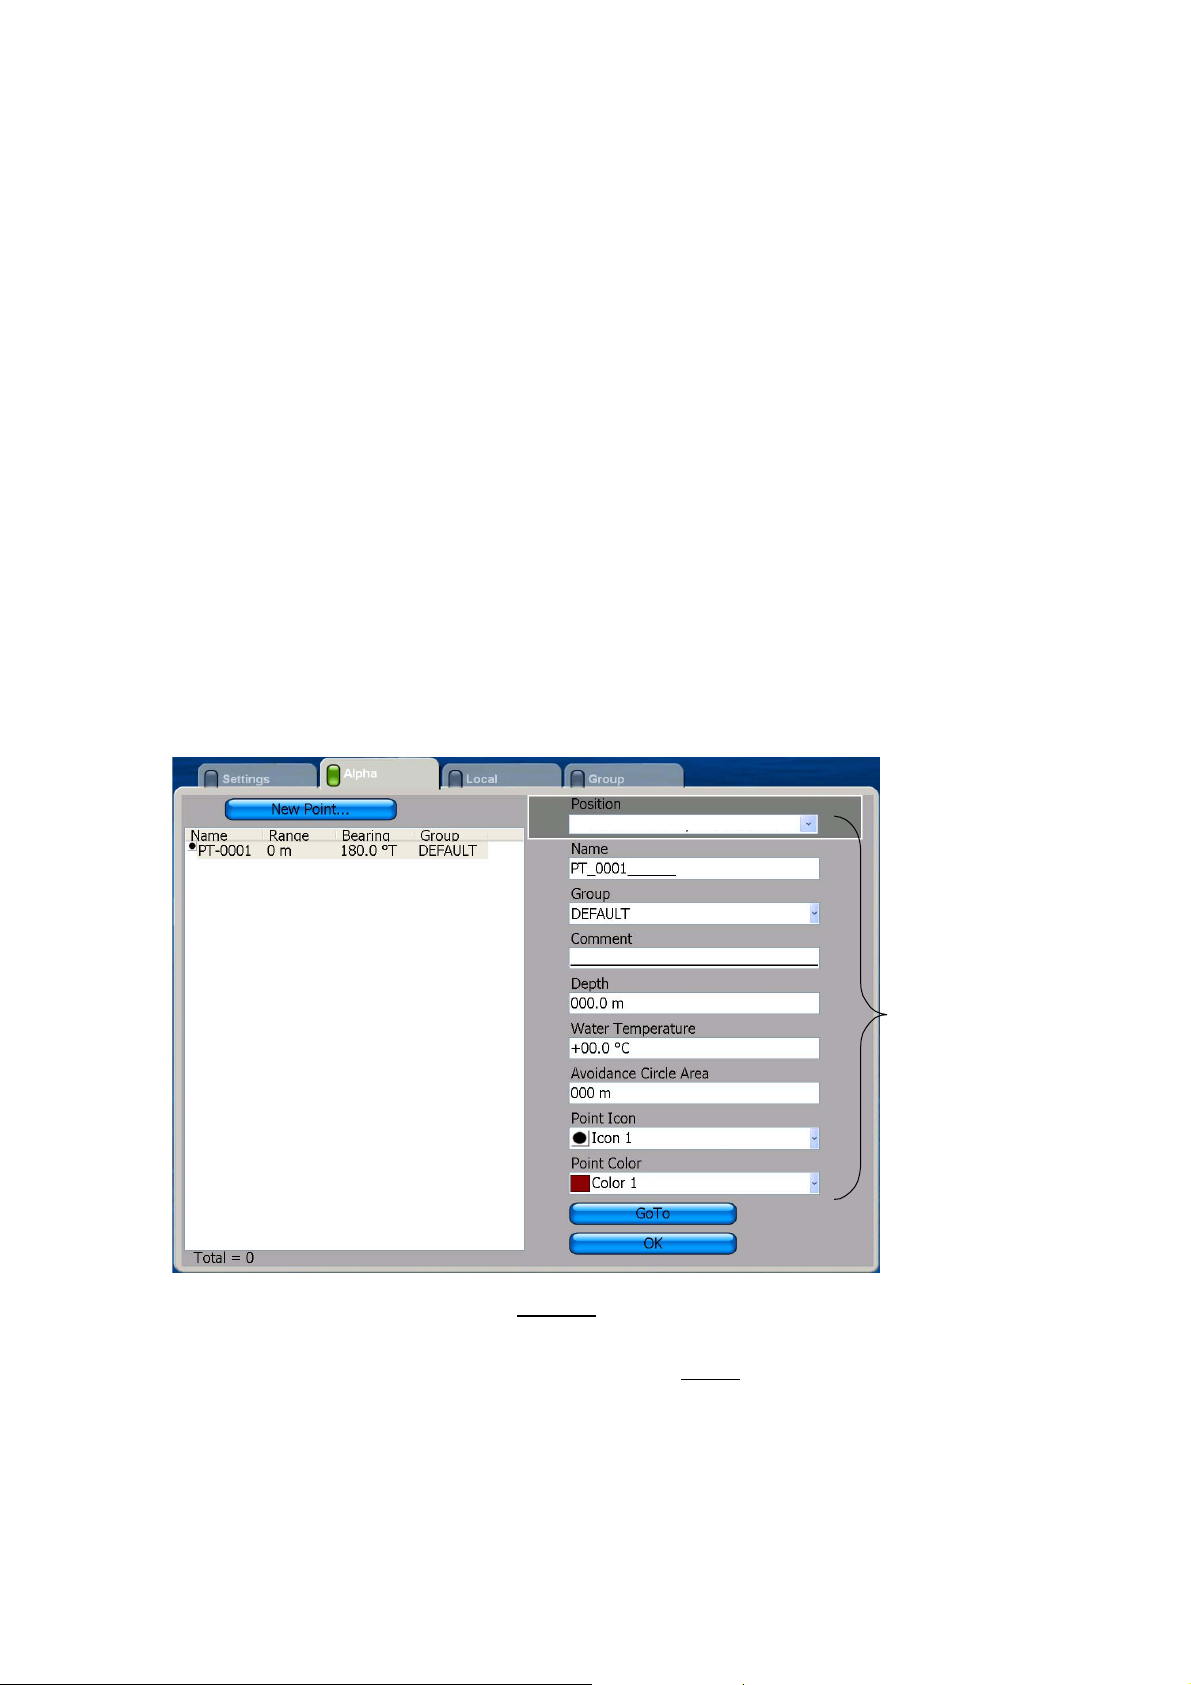
Editing Attributes and Details for a Point
You can choose the point to edit in two ways:
• Use the cursor to select the point on screen
• View point data on the Points list
1. Do one of the following to display the Points list:
1)Choose the point on the screen and push the right-button key, or
2)Open the Points menu and then select the Alpha Points list.
2. Push the Rotary Knob to put the cursor in the Points list.
3. Rotate the Rotary Knob to select the point you want to edit.
4. Push the Rotary Knob to show the point Edit pop-up menu.
5. Rotate the Rotary Knob to choose Edit and push the Rotary Knob. Then, the
point’s attributes and details appear on the right-halve of the screen.
01°12.9158'S; 000°30.9755'W
Waypoint
attributes
and details
2-20
6. The cursor is selecting the Position
combo box. If necessary, push the Rotary
Knob and enter position, referring to section 2.4 for the procedure.
7. To change the name of the point, select the Name
box. Change the name as fol-
lows:
1)Push the Rotary Knob consecutively to select location (character) to edit and
push the Rotary Knob. (To clear a line of data, use the Rotary Knob.)
2)Rotate the Rotary Knob to select desired alphanumeric character and push
the Rotary Knob.
Chapter 2: Chart Plotter Operation
3)Repeat steps 1 and 2 to complete the name. A name can have up to 32 alphanumeric characters.
8. Select Group
into one of those groups. Choose the name of the group from the combo box and
push the Rotary Knob.
9. Select Comment
the same manner as Name. You can use up to 32 alphanumeric characters for a
comment.
10.Depth
tion at the time of entry. Applicable sensors are necessary to display this data. If
necessary you can change this data.
11.Use Avoidance Circle Area
which alerts you when own ship is within "x" miles from a point. For details about
the proximity alarm, see the section on alarms.
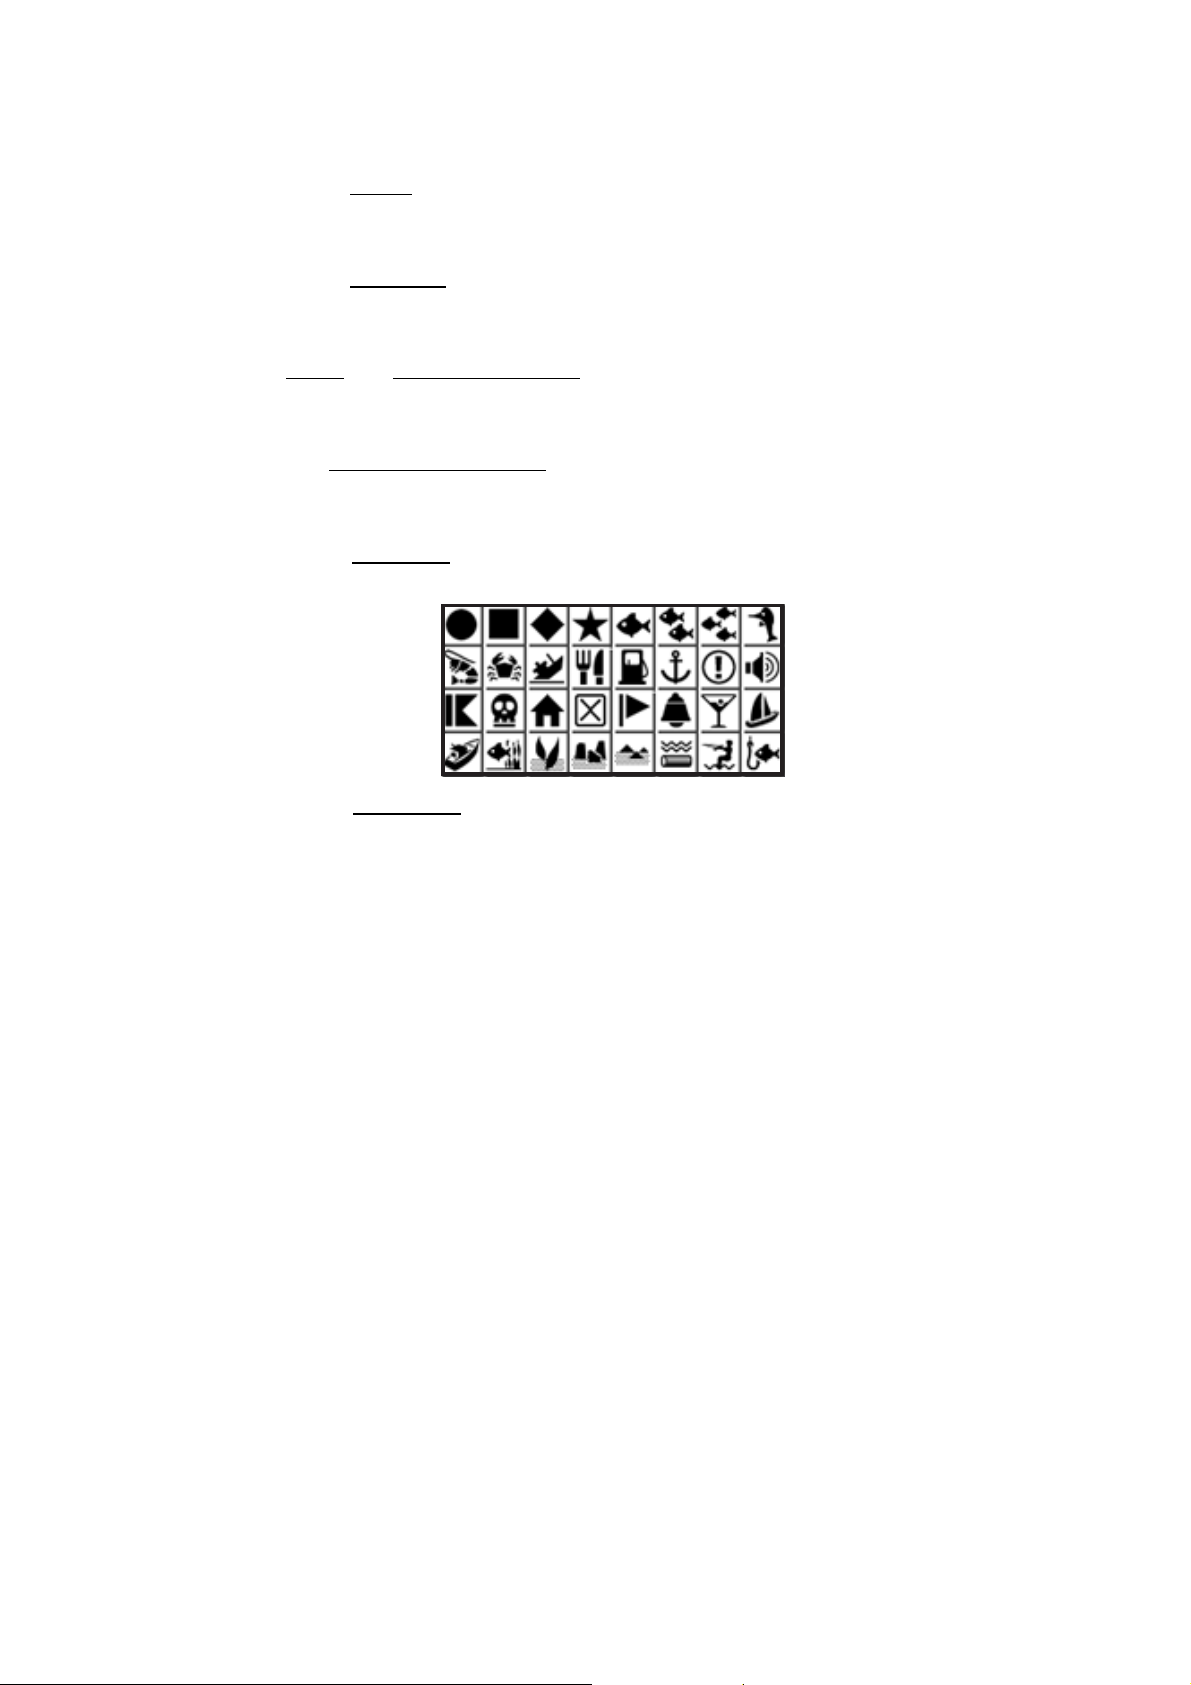
12.Select Point Icon
symbols are available.
and Water Temperature are the depth and water temperature of the loca-
if you have some groups registered and you want to put this point
to provide a comment about the point. A comment is entered in
to specify the distance to use for the proximity alarm,
if you want to change the point symbol for the point selected, 32
13.Select Point Color
colors are available: red, yellow, green, light blue, purple, dark blue, and gray.
14.To finish, select the OK button and push the Rotary Knob.
to change the color of the square in the point symbol. Seven
Finding a Point on a Map
You can easily find the position of a point on your map from the Alpha list.
1. Long-push the GO TO/LIST key to show the Alpha list.
2. Choose the point and push the Rotary Knob. The Points list pop-up menu
appears.
3. Rotate the Rotary Knob to choose Find on Map and then push the Rotary Knob.
4. The menu is closed and the full-screen map window appears, with the point
selected at the center of the map.
Finding Nearest Port from a Point
You can easily find the port nearest a point as follows.
1. Put the cursor on the point from which you want to know where the nearest port is
located.
2-21
Chapter 2: Chart Plotter Operation
2. Push the Rotary Knob to show the Points pop-up menu.
3. Rotate the Rotary Knob to select Find Nearest and push the Rotary Knob.
Deleting a Point
A point can be deleted two ways: on the screen and from the Points list.
Deleting a point on the screen
1. Put the cursor on the point to delete.
2. Push the right-button key to show the Points list pop-up menu.
3. Rotate the Rotary Knob to select Delete and push the Rotary Knob to delete the
point.
The point is deleted from both the screen and the Points list.
Deleting a point at the Points list
To delete a point on the Points list:
1. Long-push the GO TO/LIST key to show the Alpha list.
2. Select the point to delete and push the Rotary Knob. The Points list pop-up menu
appears.
3. Rotate the Rotary Knob to select Delete and push the Rotary Knob to delete the
point.
The point is deleted from both the screen and the Points list.
Deleting All Points
All points may be deleted. A points currently being followed cannot be deleted.
1. Press the MENU key to open the menu.
2. Open the Points menu.
2-22
3. Open the Settings sub menu.
4. Choose Delete All Points and push the Rotary Knob. You are asked to confirm if
you are sure to delete all points.
5. Rotate the Rotary Knob to choose Yes and push the Rotary Knob.

Chapter 2: Chart Plotter Operation
Globally Showing, Hiding Points
All points can be globally shown or hidden. A point which is currently being followed
cannot be removed from the screen until following is stopped.
1. Long-push the Rotary Knob to show the ROTOkeys.
2. Choose Points and push the Rotary Knob.
3. Choose Points and push the Rotary Knob to alternately show and hide all points.
2-23
Chapter 2: Chart Plotter Operation
2.13 Routes
Often a trip from one place to another involves several course changes, requiring a
series of route points (up to 100) which you navigate to, one after another. The sequence of points leading to the ultimate destination is called a route. The route database stores 200 routes.
You create a route by pointing and clicking locations route points on the screen. Route
points are marked with solid blue circles in the default setting. If desired you can mark
route points with points. This can be done from the Routes menu.
Once you have created a route you can follow it, using the GOTO feature. When you
follow a route, the current leg is shown as a dotted line and previous legs are erased
from the screen. (points remain on the screen if route points are marked with point
symbols.)
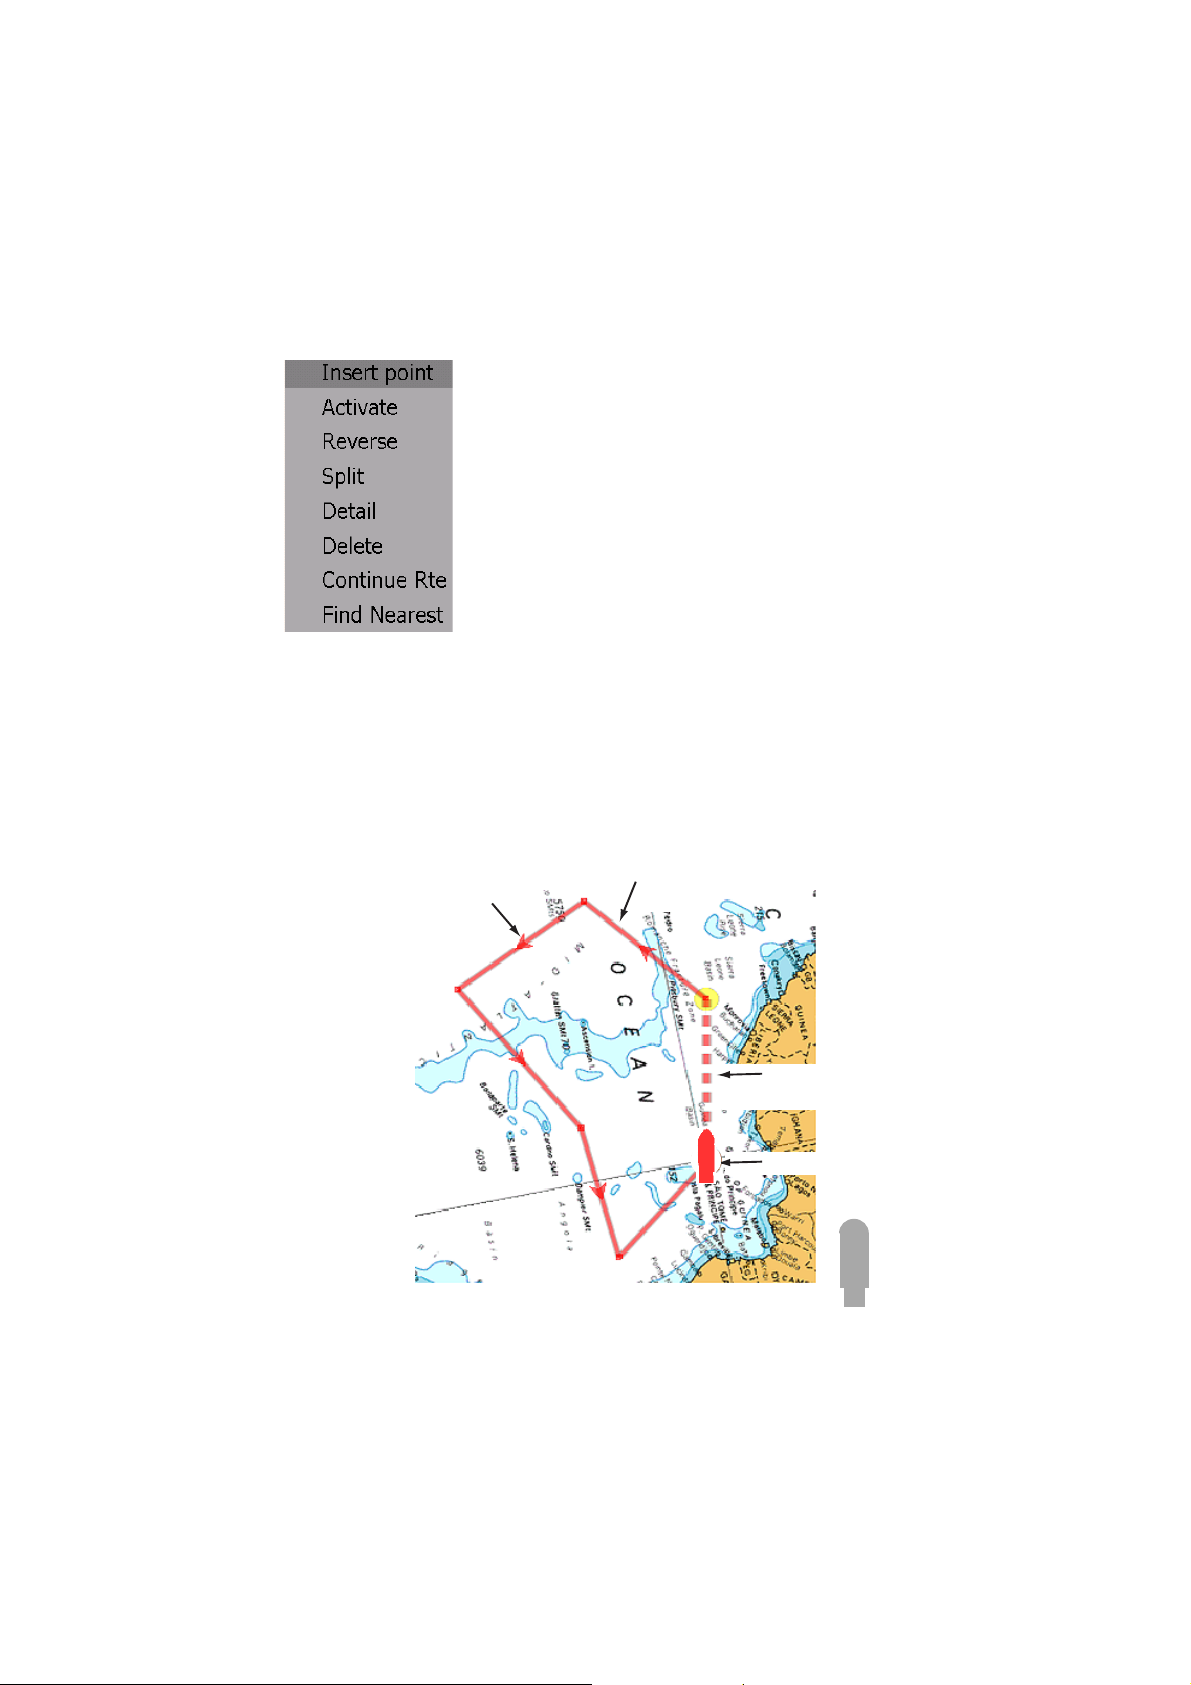
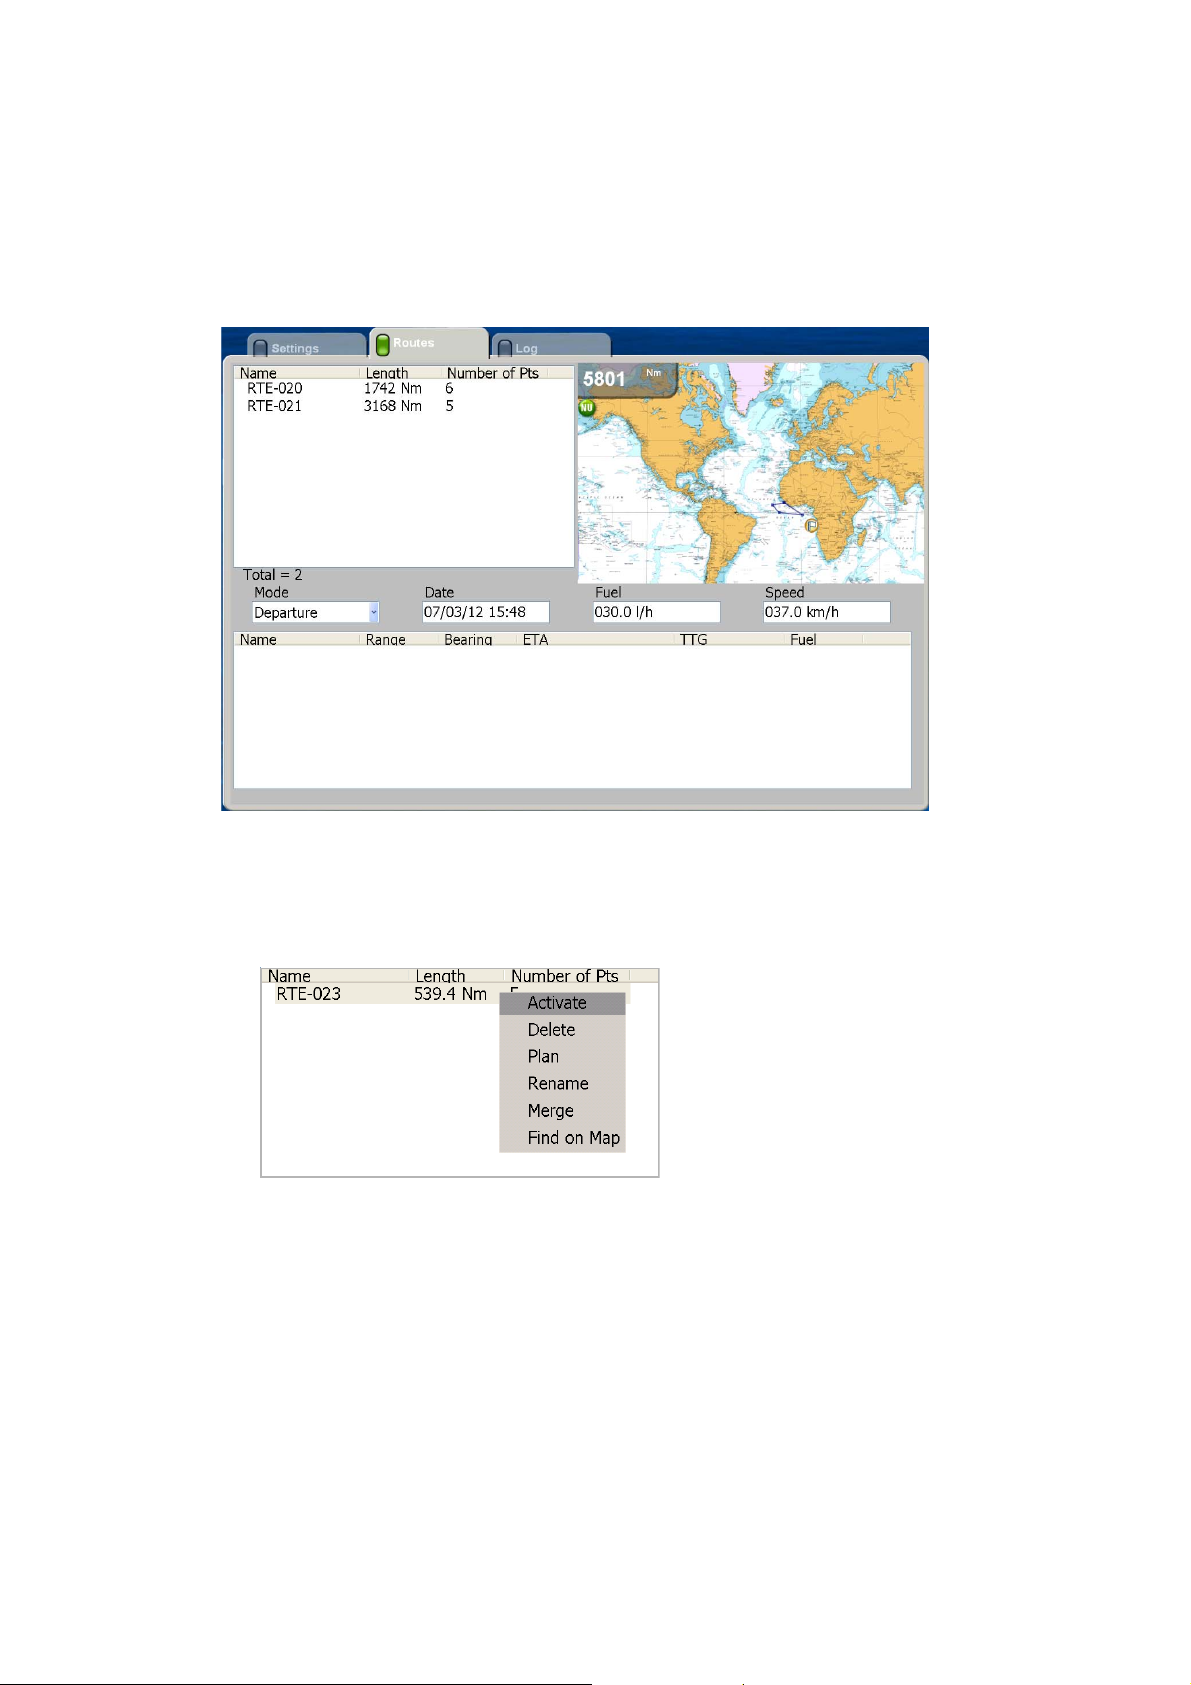
• On-screen routes can easily be edited by displaying the Routes pop-up menu. With
the pop-up menu, you can
• Insert a point
• Activate a route
• Reverse route direction
• Split the result
• Find details about the route
• Delete a route
• Add new point(s) at the end or beginning of a route
• Skip a route point when following a route
• Find nearest port, etc.
Creating a New Route
In the default setting, route points are marked with a blue circle. Alternatively, you can
enter them as points, saving each point to the Points list. For details see "
route points as waypoints" on the next page.
1. Long-push the POINTS/ROUTE key. (The ROTOkeys Route and New also
enable route creation.) The route point placement cursor appears together with
the cursor.
Route point
placement
cursor
Entering
2-24
Cursor
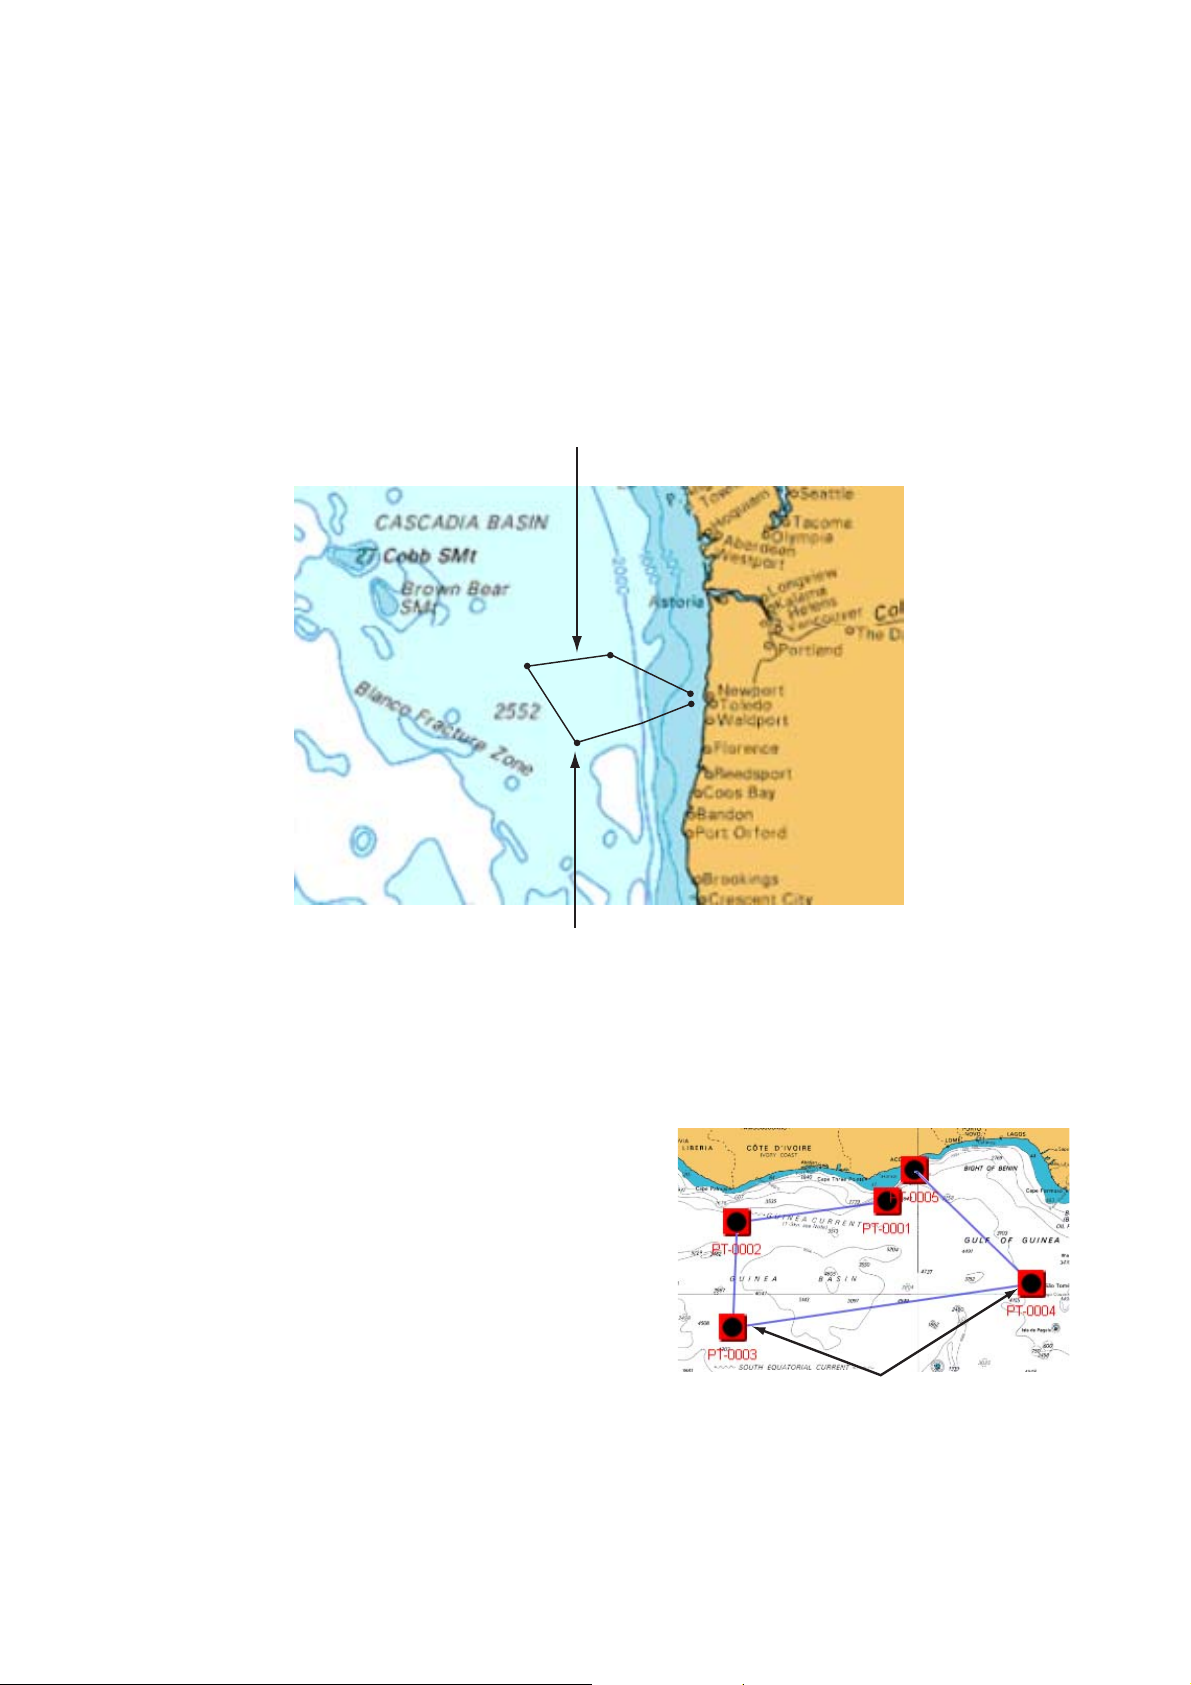
Chapter 2: Chart Plotter Operation
Route leg (blue)
Route point (blue)
2. Place the cursor on the 1st point of the route and hit the left-button key or right-
button key.
3. Use the cursor to drag the placement cursor to next point in the route. As you do
so, a dashed line extends from the origin to the cursor location.
4. Press the left-button key or right-button key. The line between the first point and
second point is now solid.
5. Drag the placement cursor to the next point in the route and press the left-button
key or right-button key. Repeat this step to enter all route points.
6. At the final route point, push the Rotary Knob to complete the route and save it to
the route database. All segments in the route are connected with a solid line.
The route is saved to the route list under the youngest empty point number, with the
prefix "RTE-". A solid blue line runs between route points and blue dots mark route
points.
Entering route points as waypoints
In the default setting route points are
marked with a solid circle. If desired, you
may enter route points as points. Any
route point entered is saved to the Points
list as a point, under the youngest empty
point number.
1. Press the MENU key to open the
menu.
2. Open the Routes menu.
3. Open the Settings sub menu.
4. Use the Rotary Knob to choose Create True Erupts when Building Re.
5. Push the Rotary Knob to color the square green to enter route points as points, or
gray to enter them as simple route points.
6. Press the Rotary Knob to close the menu.
Points
2-25

Chapter 2: Chart Plotter Operation
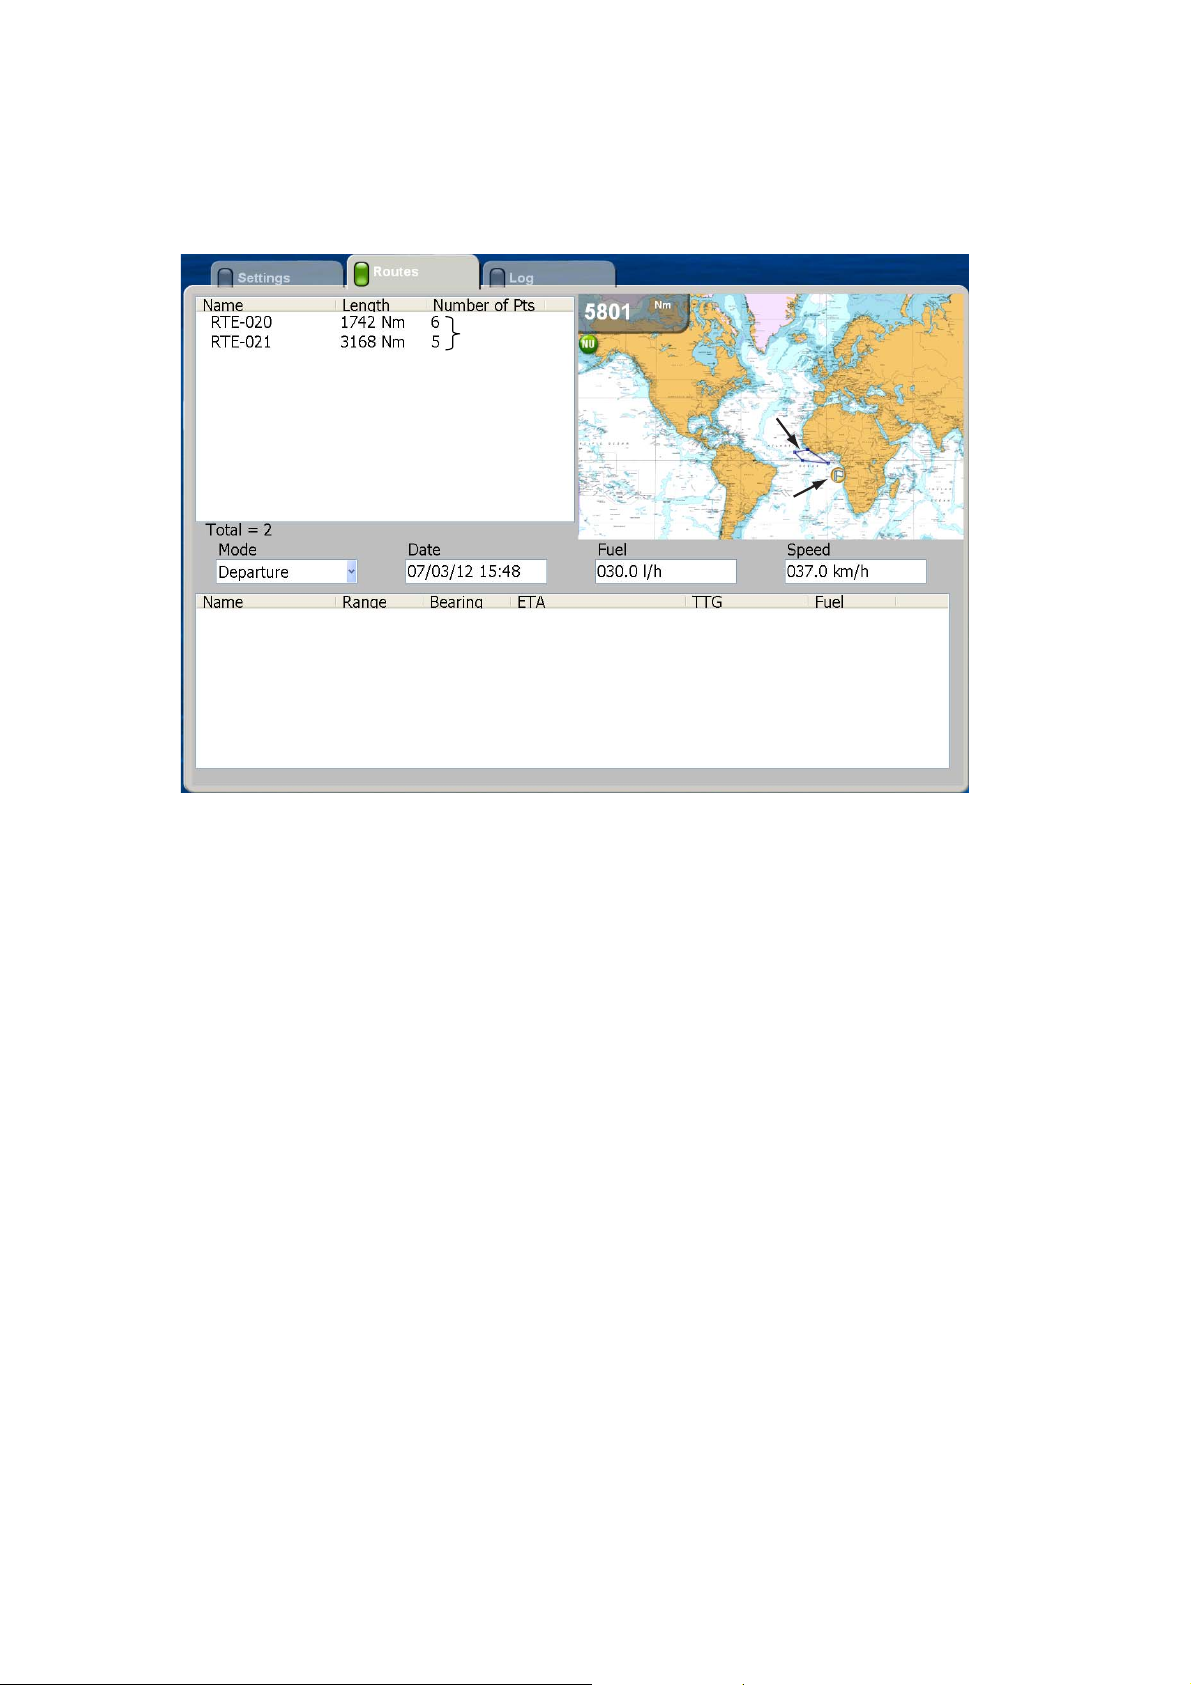
Route List
Saved routes are stored in the Route list. The list stores the following route data for
each route:
• Name of route
• Length of route
• Number of route points
• Range between legs
• Bearing between legs
• Length between legs and total length
• ETA between legs and total ETA
• TTG between legs and total TTG
• Fuel consumption both between legs and total
To show the Route list, do as follows:
1. Press the MENU key to open the menu.
2. Open the Routes list.
3. Push the Rotary Knob to put the cursor in the Route box.
4. Rotate the Rotary Knob to choose the route to view and push the Rotary Knob.
2-26
5. Press the MENU key to close the menu.
Chapter 2: Chart Plotter Operation
Following a Route
Before attempting to follow a route, you should first check that the path along the way
is safe. Be sure to zoom your chart to check for hazards which might not appear on a
smaller scale.
Selecting a Route Currently Displayed
1. Put the cursor on a leg of the route to follow and push the right-button key to
show the Route pop-up menu.
2. Rotate the Rotary Knob to choose Activate and push the Rotary Knob.
When a route currently displayed is selected to follow:
• The course-up mode is automatically selected.
• The color of all route legs changes from blue to red and a dashed line runs between
current position and 1st route point.
• Arrows pointing in the direction to follow the route are placed on the route.
Route leg (red line)
Arrow points in direction
to follow route
Course to 1st route point
(red dashed line)
Current position
2-27
Chapter 2: Chart Plotter Operation
Selecting a Route from the Routes List
1. Press the MENU key to open the menu.
2. Open the Routes menu.
3. Open the Routes sub menu.
Saved
routes
Route
Other route
4. Choose a route and push the Rotary Knob to show the Route pop-up menu.
5. The cursor is selecting Activate; push the Rotary Knob.
When you select a route to follow at the Routes list:
• The course-up mode is automatically selected.
• The route legs are red and red dashed line connects between current position and
1st route point.
• Arrows on the route show the direction in which to follow the route.
2-28
Chapter 2: Chart Plotter Operation
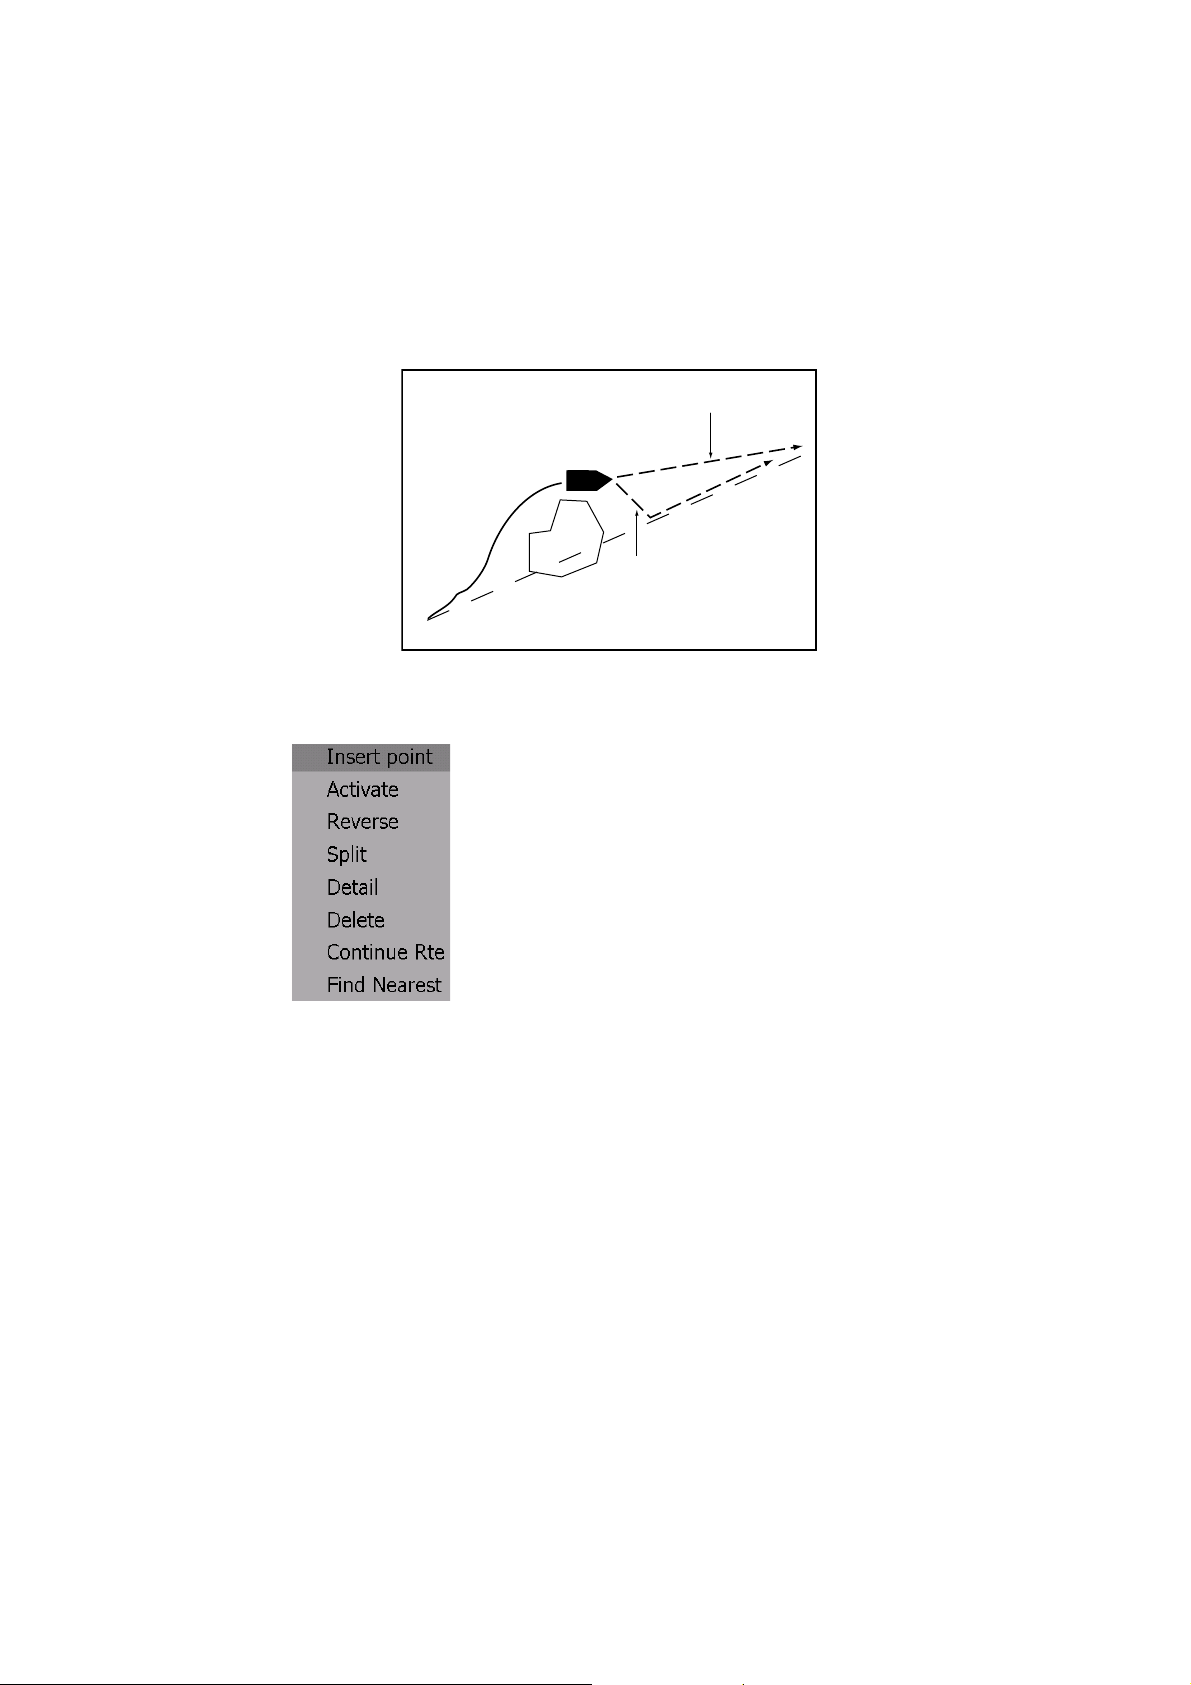
Route Follow Options
Restarting XTE
While you are following a point, you can restart the XTE. This will reset the XTE to zero
and restart XTE from actual position.
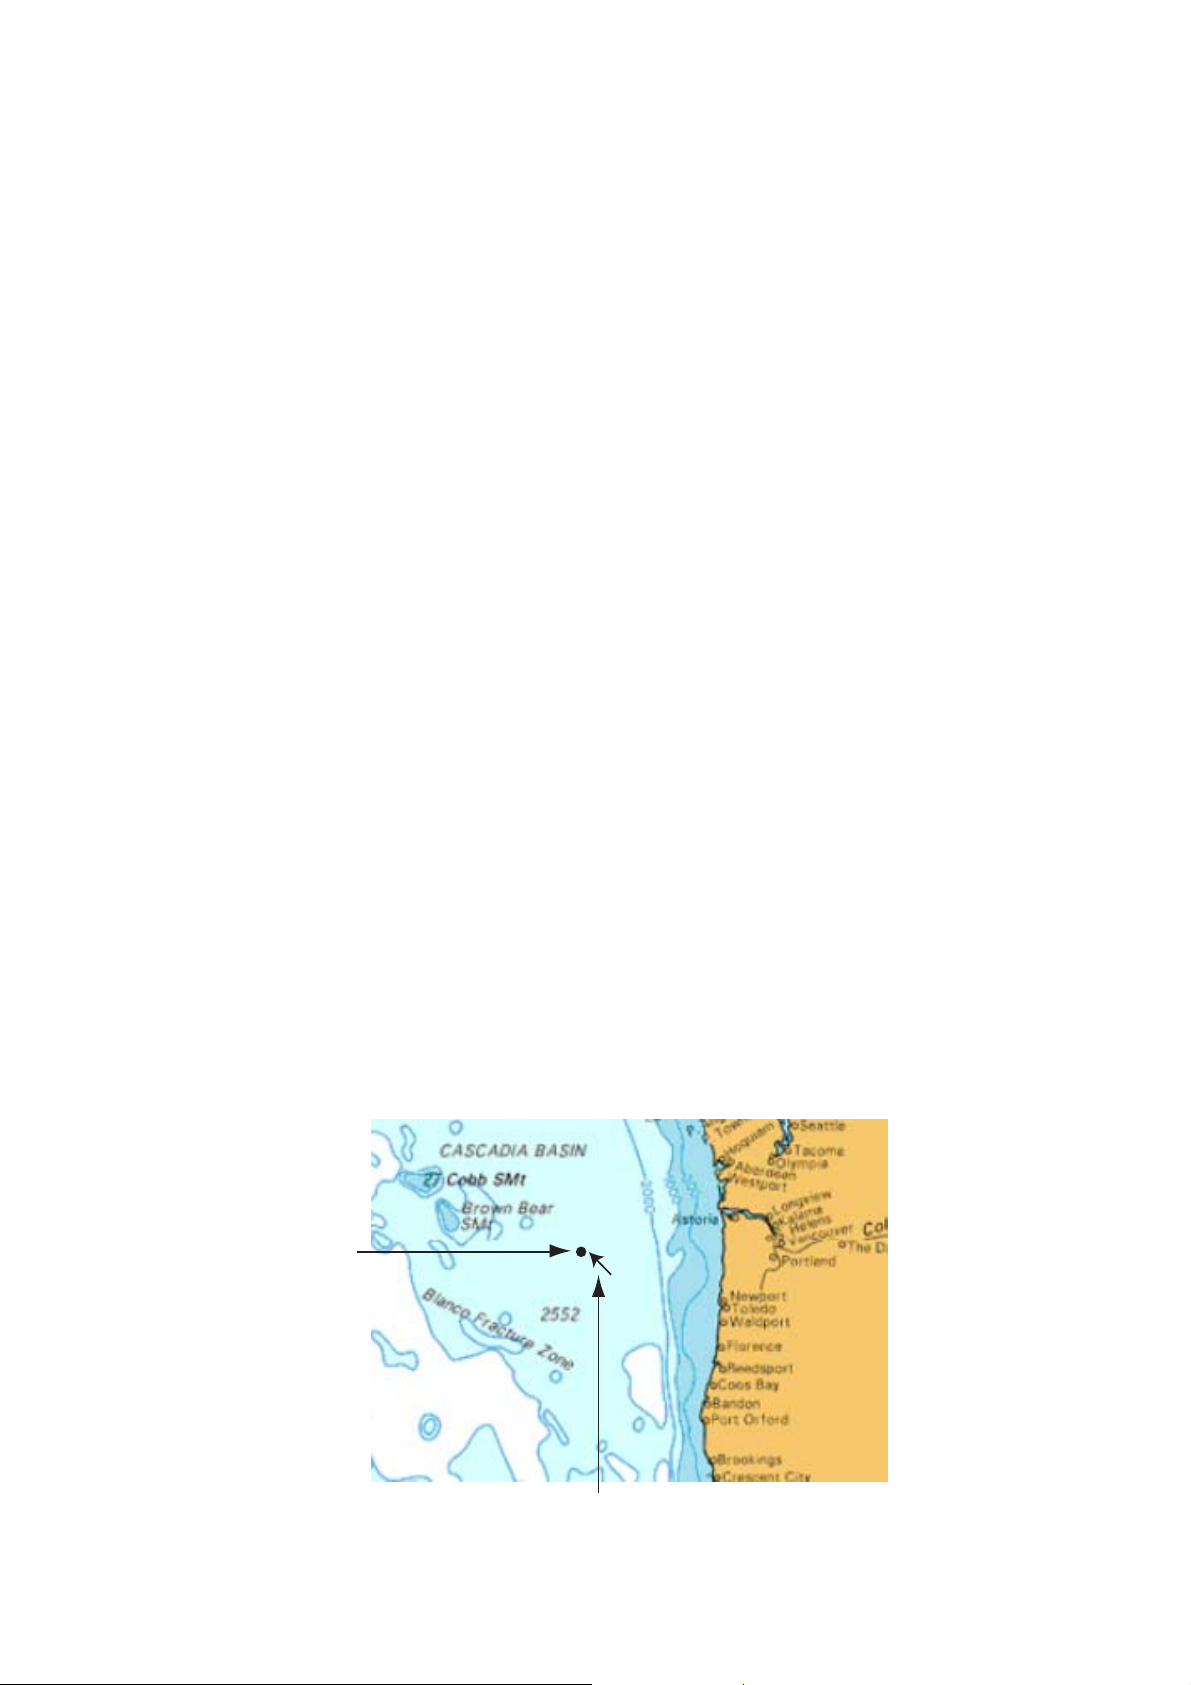
When you steer to avoid an obstacle or the vessel drifts, you may go off your intended
course, as in Line 1 in the figure below. If you don't need to return to the original
course, you can go directly to point, as in Line 2 in the figure below.
Line 2
Obstacle
Original course
1. Put the cursor on the current leg and push the right-button key to show the Route
pop-up menu.
2. Rotate the Rotary Knob to choose XTE Init and push the Rotary Knob.
The route origin shifts to current position. You can also restart XTE by using the
Routes-XTE ROTOkey.
Line 1
Reversing following direction
The current route can be followed in reverse. This is useful when you have decided
not to follow the entire route in the original direction and want to return to point of origin
via the same route.
1. Put the cursor on the current leg of the route.
2. Push the Rotary Knob to show the Routes pop-up menu.
3. Rotate the Rotary Knob to choose Reverse and push the Rotary Knob.
You can also reverse following direction by selecting the Route and Reverse ROTOkeys.
2-29
Chapter 2: Chart Plotter Operation
Stop following a route
You can stop following a route in two ways: select the route directly on the screen, or
select it at the Routes list. Below is the method for selecting the route on the screen.
1. Use the Cursorpad to select the route you want to stop following.
2. Push the Rotary Knob to show the Routes pop-up menu.
3. Rotate the Rotary Knob to select Inactive and push the Rotary Knob.
You can also stop following a route by selecting the Routes and Stop ROTOkeys.
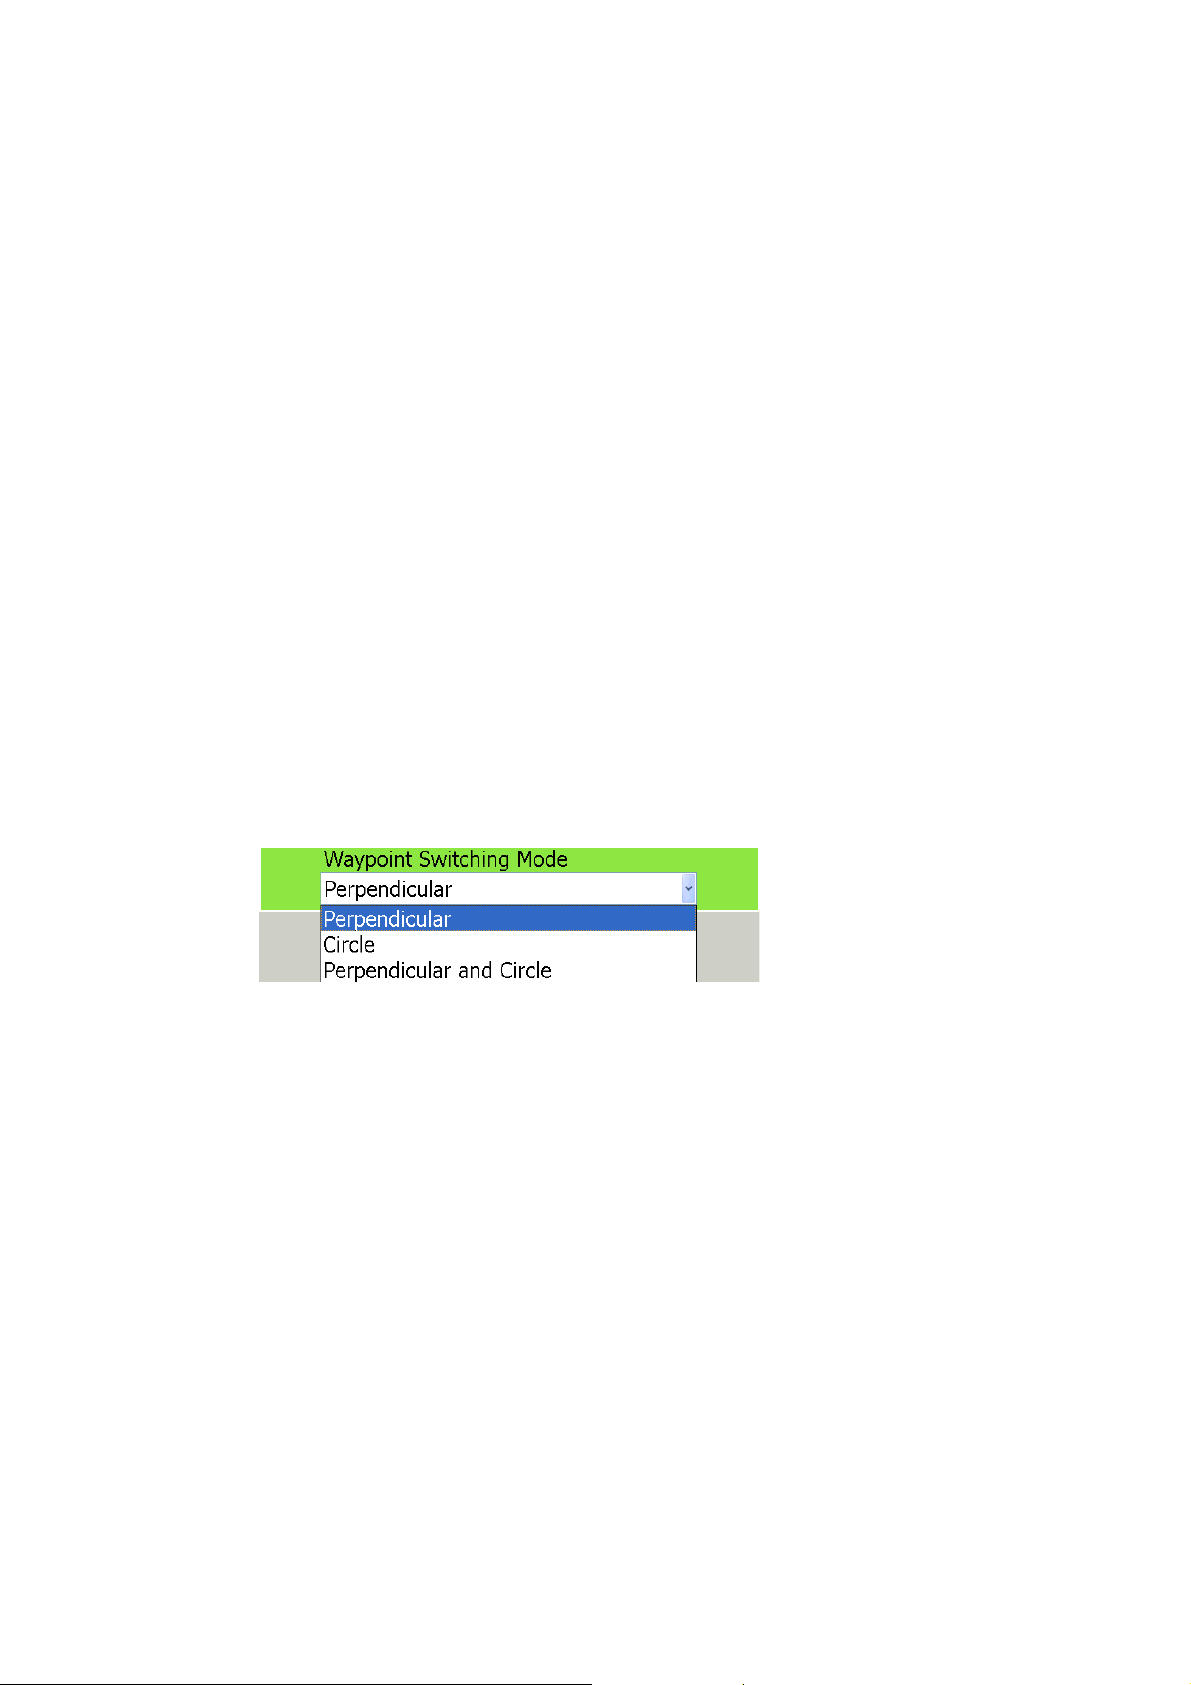
Route point switching mode
When you arrive to a route point on a route, you can switch to the next point by one of
the three methods below.
Perpendicular: Automatically switch the destination point when the boat passes
an imaginary perpendicular line passing through the center of the destination
point, or the boat comes within the arrival alarm range.
Circle: Destination point is automatically switched when the boat comes within the
circle.
Perpendicular and Circle: Destination point is automatically switched when
either of the perpendicular or circle condition above is satisfied.
1. Press the MENU key to open the menu.
2. Open the Routes menu.
3. Open the Settings sub menu.
4. Choose Waypoint Switching Mode and push the Rotary Knob.
5. Choose appropriate option, referring to the description above, and push the
Rotary Knob.
6. If you choose Circle or Perpendicular and Circle, choose Switching Mode Circle
Value and push the Rotary Knob.
7. Enter the distance from a route point at which to switch to next point and push the
Rotary Knob.
8. Press the MENU key to close the menu.
Route auto zoom
2-30
Range can be automatically changed to show the next point after passing current
point. This is useful for locating the next point without changing the range.
1. Press the MENU key to open the menu.
2. Open the Routes menu.
3. Open the Settings sub menu.
4. Choice Route Auto Zoom and push the Rotary Knob to turn on or off as desired.
5. Press the MENU key to close the menu.
Chapter 2: Chart Plotter Operation
XTE alarm display on chart
You may digitally show the XTE alarm value (set on the Alarm menu) at both sides of
the route.
1. Press the MENU key to open the menu.
2. Open the Routes menu.
3. Open the Settings sub menu.
4. Choice XTE Alarm DIsplay upon Chart and push the Rotary Knob to turn on or off
as desired.
5. Press the MENU key to close the menu.
Route Log
The route log provides a convenient means for monitoring progress in a route. The log
shows
• Range between route points
• Bearing between route points
• ETA to each route point
• TTG to each point
• Estimated fuel consumption between route points.
2-31
Chapter 2: Chart Plotter Operation
Reviewing Passage Plan
A navigation calculator is provided to help you plan navigation. You can set date of
departure or arrival, amount of fuel to use and projected speed. Your unit then calculates ETA, TTG and fuel consumption.
1. Press the MENU key to open the menu.
2. Open the Routes list on the Routes menu.
Saved
routes
Route
Other route
3. Push the Rotary Knob to put the cursor in the Route box.
4. Rotate the Rotary Knob to choose the route for which you want to review its passage plan.
5. Push the Rotary Knob to show the Route list pop-up menu.
2-32

Chapter 2: Chart Plotter Operation
6. Rotate the Rotary Knob to choose Plan and push the Rotary Knob.
The cursor is selecting the Mode combo box.
Route data and calculations
7. Push the Rotary Knob to show the options for Mode.
8. Select Departure or Arrival as applicable and push the Rotary Knob.
9. Rotate the Rotary Knob to select the Date input box and push the Rotary Knob.
10.Enter date and time of departure (or arrival) and push the Rotary Knob.
11.Rotate the Rotary Knob to select the Fuel input box and push the Rotary Knob.
12.Enter estimated fuel consumption (liters per hour) and push the Rotary Knob.
13.Rotate the Rotary Knob to select the Speed input box and push the Rotary Knob.
14.Enter speed (kilometers per hour) and push the Rotary Knob.The route data at the
bottom of the screen changes accordingly.
15.Press the MENU key to close the menu.
2-33
Chapter 2: Chart Plotter Operation
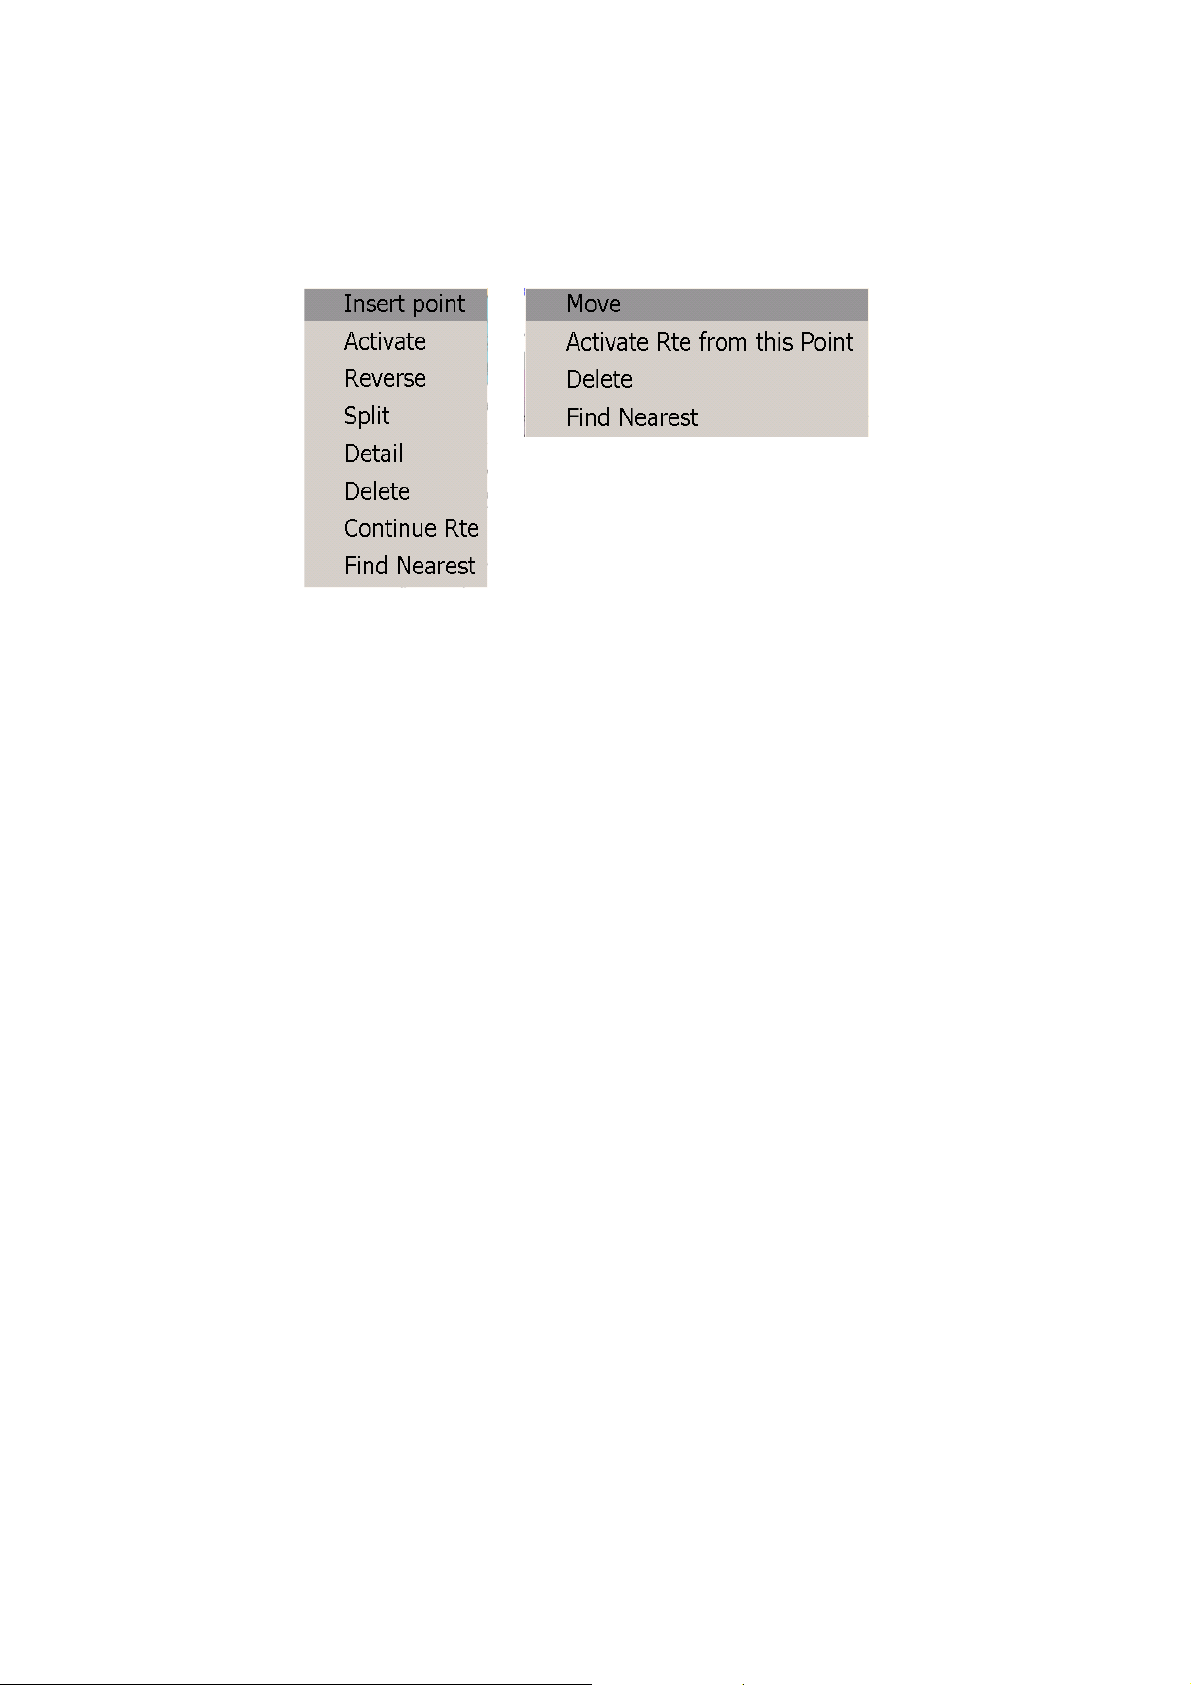
Editing a Route On-screen
A route currently displayed on-screen can be edited by opening the Route pop-up
menu. A route point can be inserted and route leg deleted.
1. Put the cursor on the route point or route segment you wish to edit and push the
right-button key. The applicable pop-up menu appears
Route pop-up
(route leg)
Route pop-up (route point)
2. Rotate the Rotary Knob to choose appropriate item.
3. Follow the applicable instructions below.
Editing a route leg
Insert point: Place the cursor on the leg to edit. A dashed line runs between the
two points of the leg. Use the Cursorpad to drag the dashed line to a new location.
Split: This function erases the selected leg.
Delete: Delete the route selected. The route is erased from the screen and deleted
from the route database.
Editing a route point
Move: Drag the point to a new location. Select the point, use the Cursorpad to drag
it to a new location and the push the Rotary Knob.
Delete: Delete the point selected.
4. Push the Rotary Knob to finish.
2-34
 Loading...