

Furuno USA 9ZWFM8900S User Manual
5. MENU OPERATION
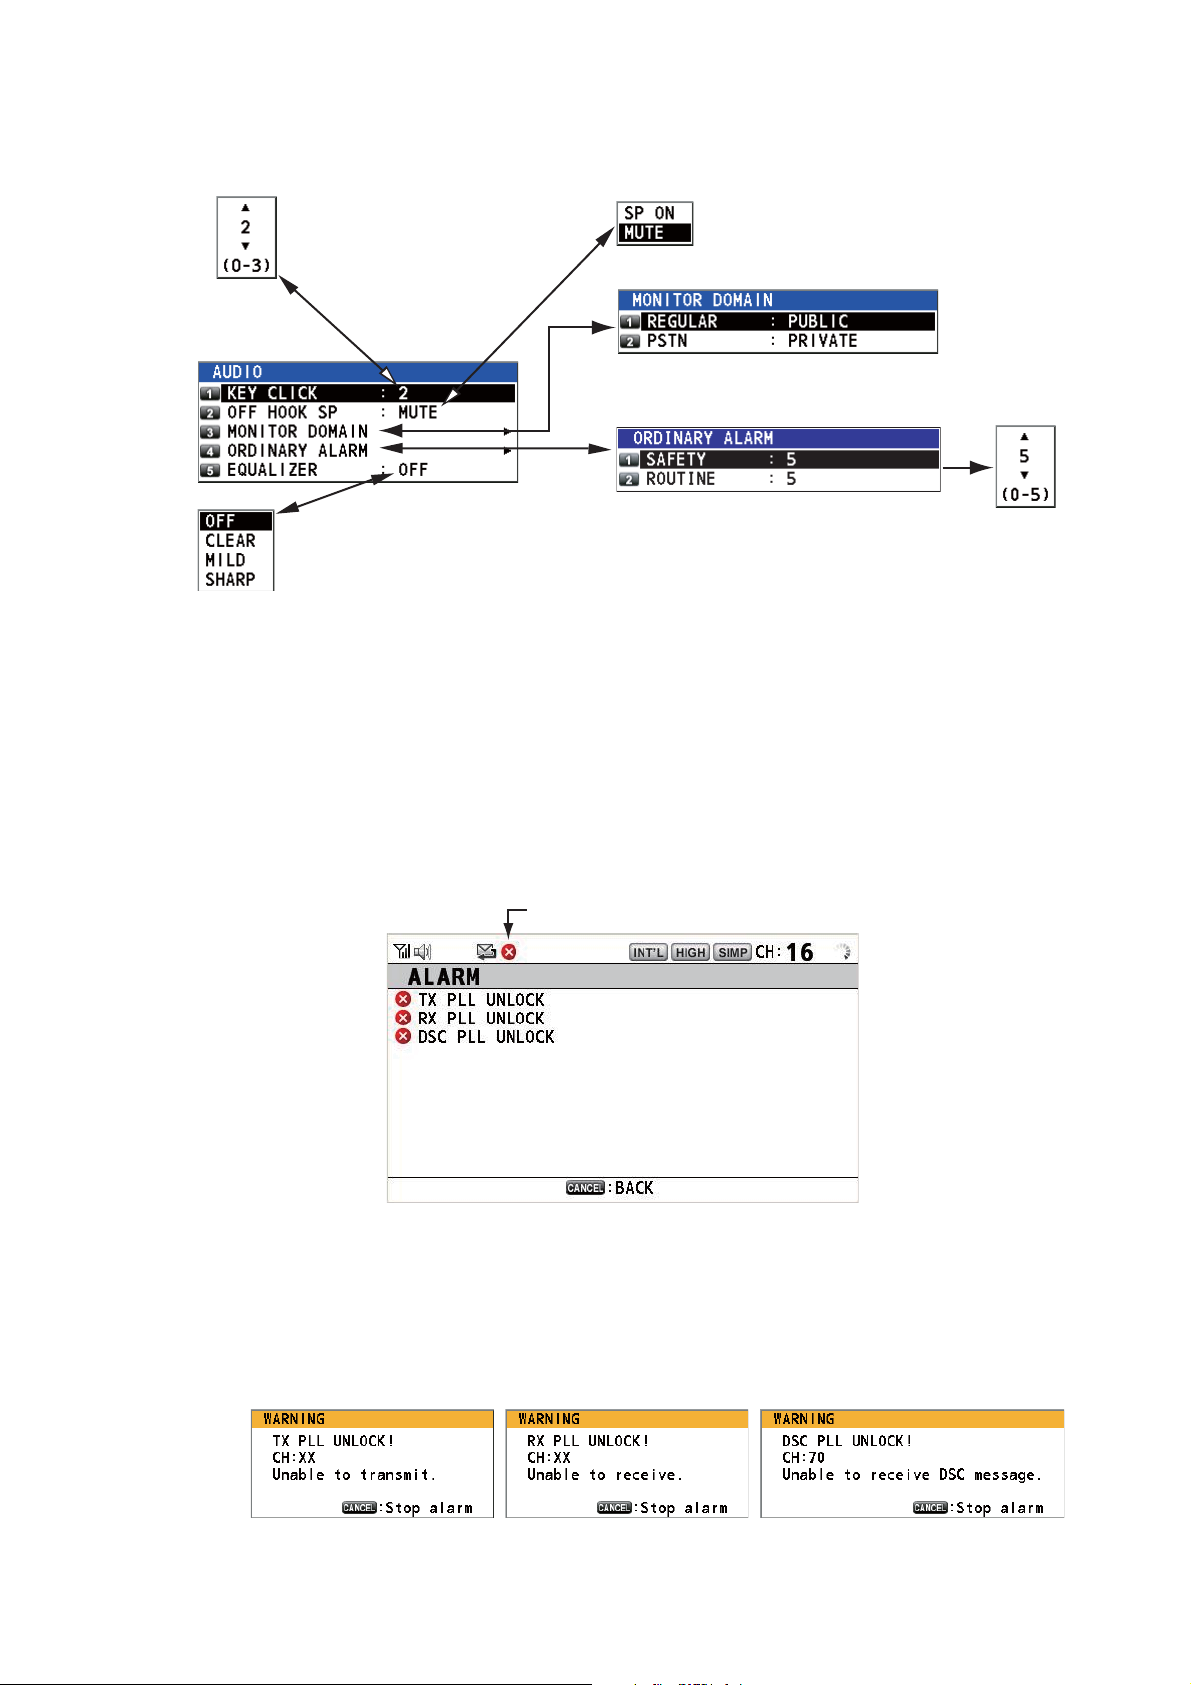
Rotate the CHANNEL/ENTER knob to select [AUDIO] on the [MENU] screen then
push the knob.
Default: [2]
Turn beep on (setting: [1] - [3])
or off (setting: [0]) when a key
is pressed.
Default: [OFF]
Adjust tone quality for speaker.
5.20 Alarm Lists
The [ALARM] menu shows all currently violated alarms. When an error occurs, a popup message and a flashing error icon appear on the screen. Press the CANCEL key
to close the pop-up message and stop the flashing of the error icon. When the error is
removed, the error icon disappears.
Default: [MUTE]
Turn the speaker on or off
when the handset is off hook.
Turn the speakers except in-use one on or off.
[PUBLIC]: On, [PRIVATE]: Off
Rotate the CHANNEL/ENTER knob to set volume
then push the knob.
Rotate the CHANNEL/ENTER knob to select [ALARM] on the [MENU] screen then
push the knob. The following screen appears.
Error icon
There are three kinds of errors: [TX PLL UNLOCK], [RX PLL UNLOCK], [DSC PLL
UNLOCK].
Errors are displayed in the order shown above, not in the order of occurrence. An error
is deleted from the list when the cause for the error is removed.
These alarms are listed when the following messages appear.
5-21

5. MENU OPERATION
This page is intentionally left blank.
5-22
6. REMOTE HANDSET
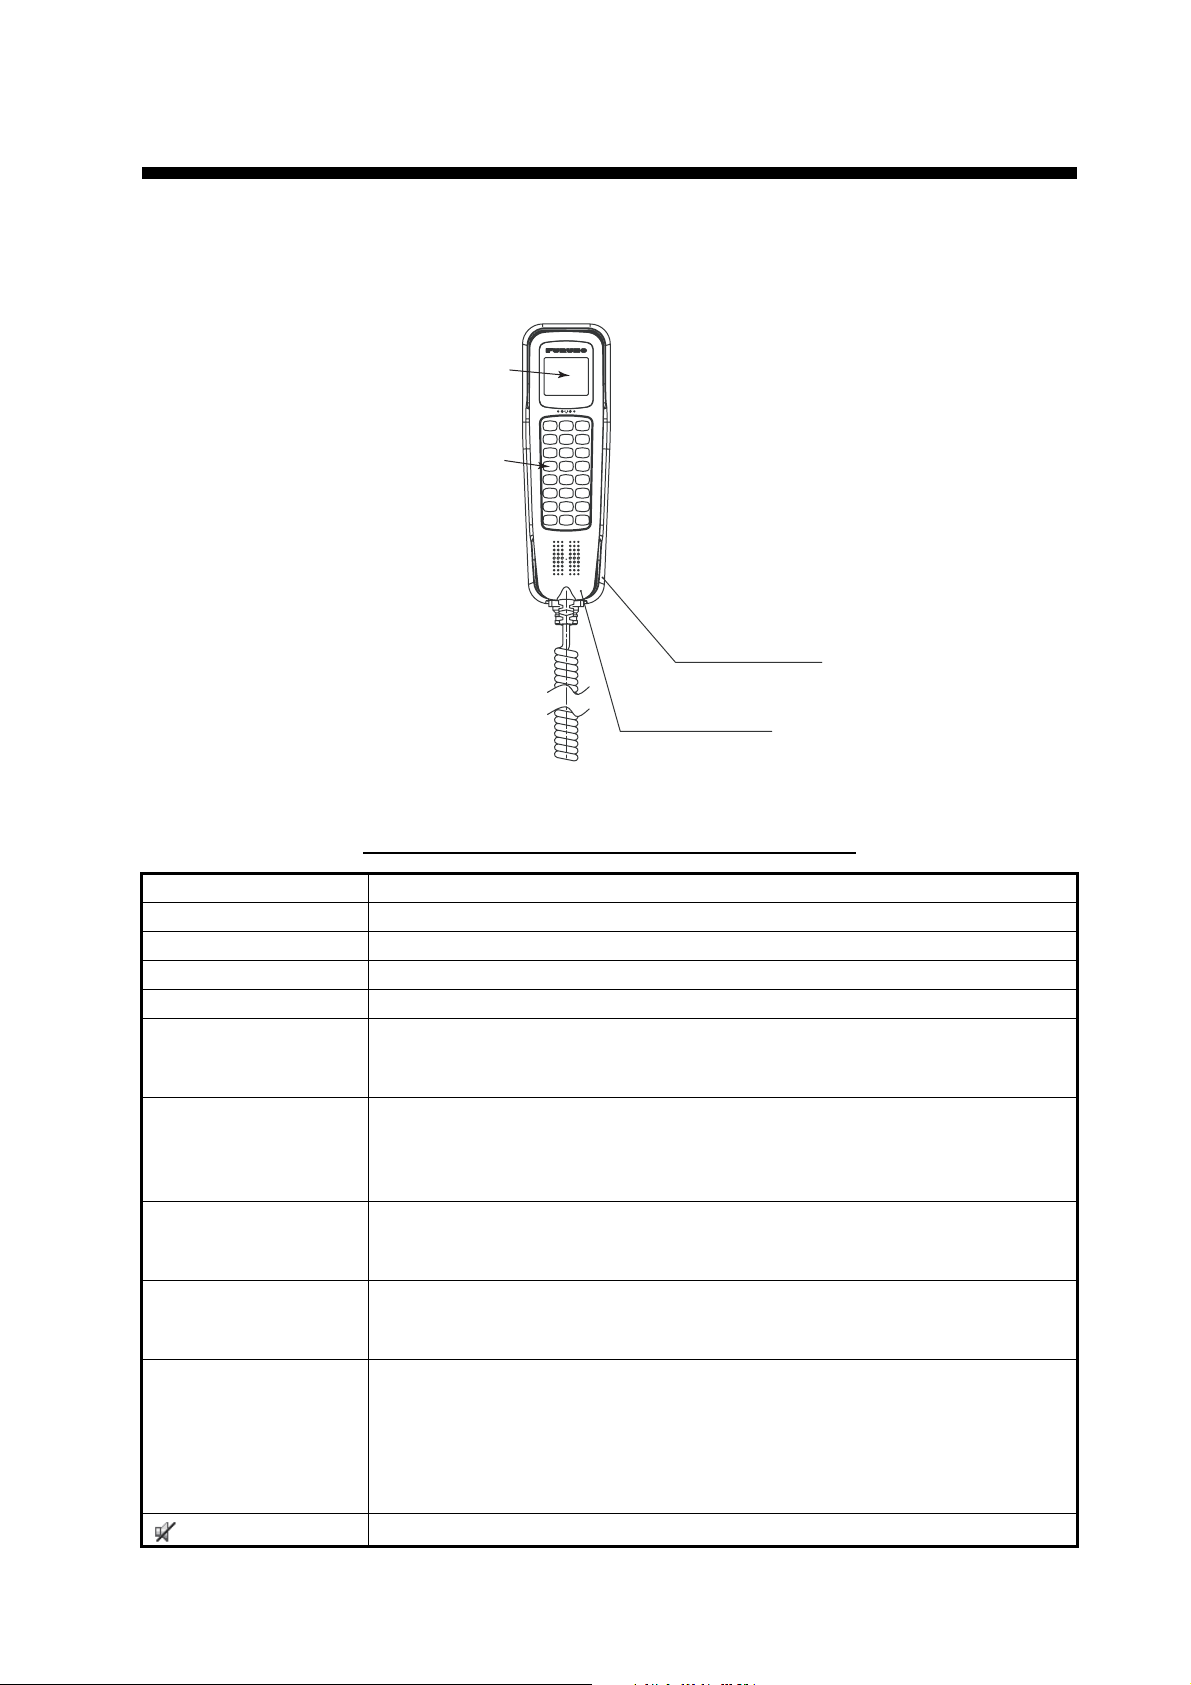
6.1 Controls
LCD
Keyboard
HG-8900(-W)
Handset hanger
HS-8900(-W)
Remote handset
Remote station RB-8900(-W) (option)
Description of controls for remote station (handset)
Control Function
DW key Turns the DW function on or off (see section 1.9).
HI/LO key Changes the output power to high (25 W) or low (1 W).
CH16 key Switches to the RT (radiotelephone) screen and sets CH16.
SCAN key Turns the scan function on or off (see section 1.10).
S, T keys • Selects the menu items.
• Selects the channel on the RT screen.
• Adjusts the setting values.
SQ key Adjusts the squelch. Press the SQ key on the RT/OCCUPIED screen then
press the S or T key within three seconds to adjust the squelch (setting
range: AUTO, 0 to 10). To get auto squelch adjustment, press the T key
with the setting 0 (indication: SQA).
VOL key Adjusts the volume. Press the VOL key on the RT/OCCUPIED screen then
press the S or T key within three seconds to adjust the volume (setting
range: 0 to 10).
ENTER key • Moves down one layer when you save the menu option in a layer other
than the lowest one. In the undermost layer, opens the setting window.
• Confirms a selection.
CANCEL key • Silences the audio alarm.
• Returns one layer in a multi-layer menu. In the top layer, closes the menu
then displays the RT screen.
• Cancels the setting in the setting window then goes back one layer in the
menu.
• Cancels the intercom call.
key
Turns the loudspeaker on or off.
6-1
6. REMOTE HANDSET
Control Function
MENU key Opens/closes the menu.
0 to 9 keys • Enters the channel on the RT screen.
• Selects the menu items.
CONTRAST key Short press: Opens the contrast setup screen. Press the S or T key to
adjust the contrast.
Long press (more than three seconds): Restores the contrast to the default setting.
BRILL key Opens the brill setup screen. Press the S or T key to adjust the brill. You
can also use the BRILL key.
6.2 How to Turn On/Off the Power
A handset does not have a power key. Turn on or off the power from the transceiver
unit.
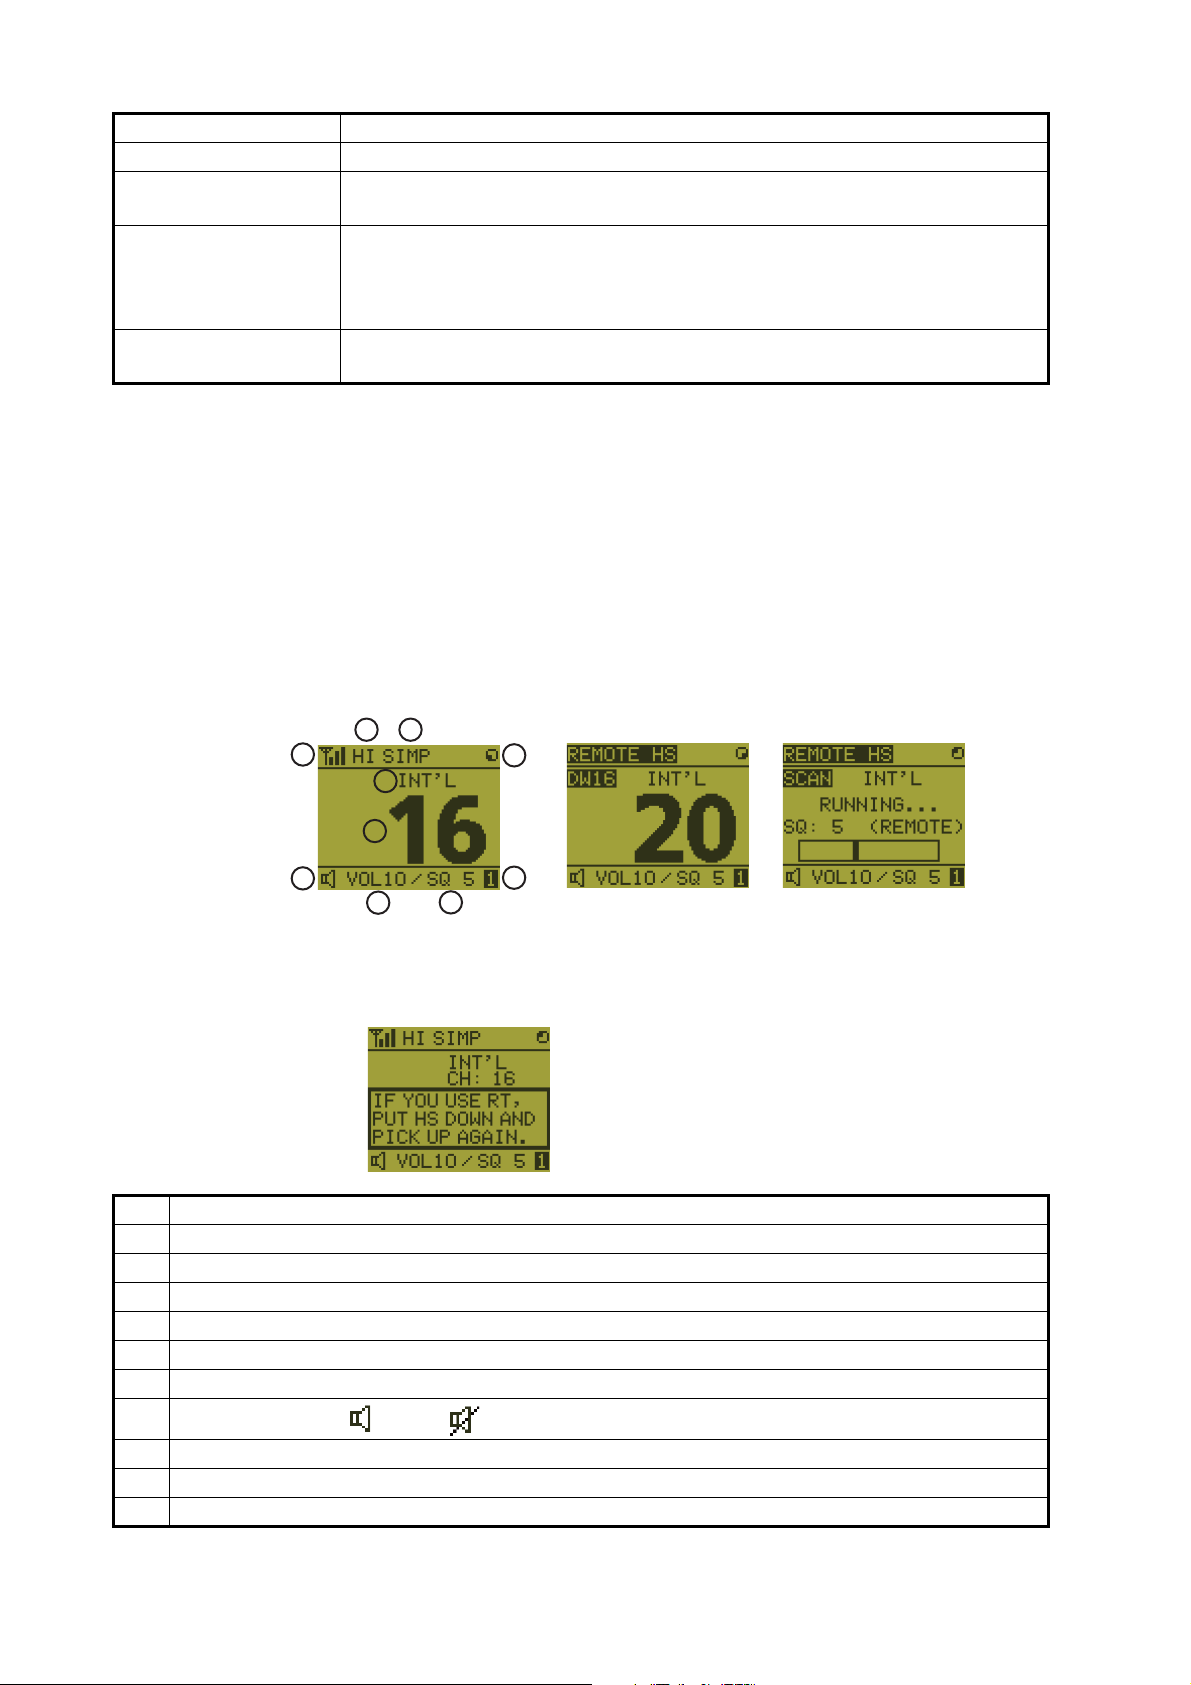
6.3 Radiotelephone (RT) Screen
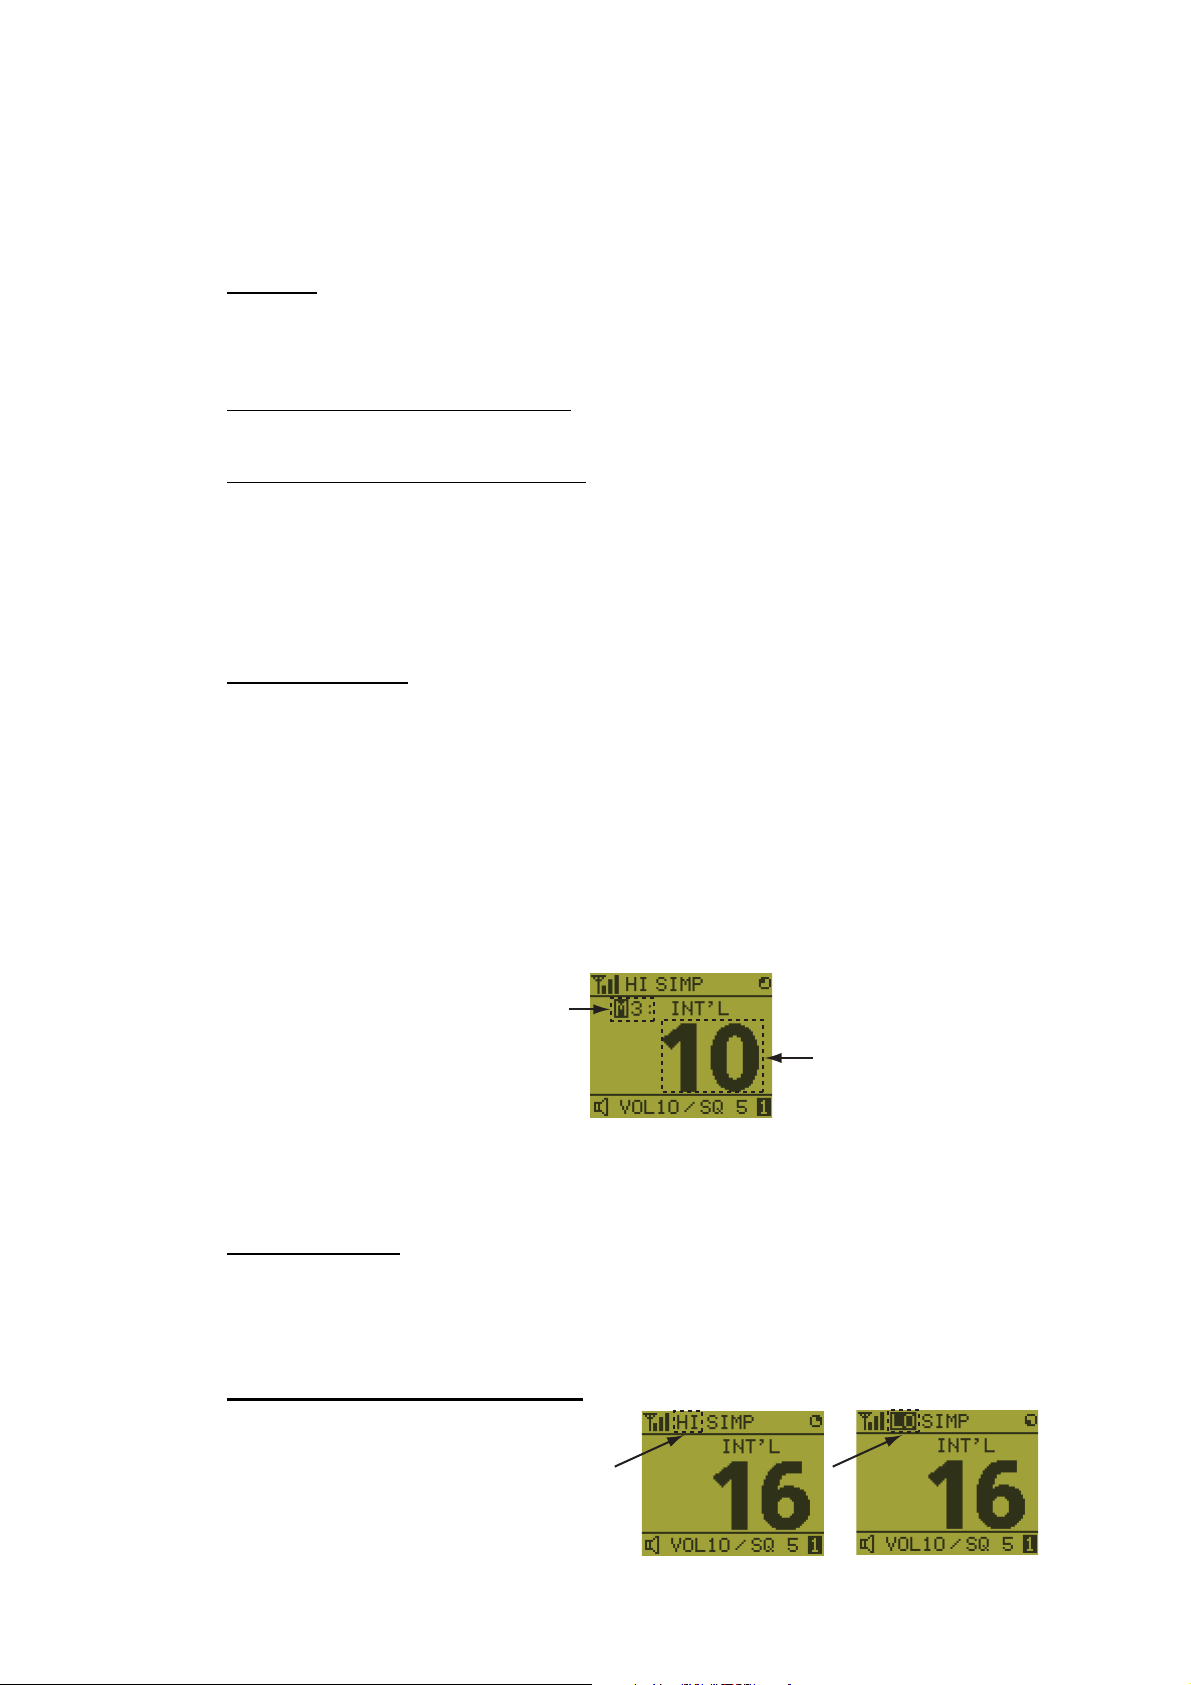
Below are the radiotelephone (RT) screens on the remote handset.
213
4
5
6
7
8
Common RT screen
When no terminal has operation right and a remote handset is off hook,
the following screen appears.
No. Meaning
1 RX signal strength (This icon does not appear while transmitting.)
2 Output power ([HI]: High, [LO]: Low)
3 Channel type ([SIMP]: Simplex, [DUP]: Duplex)
4 Spinner rotates when the equipment is functioning normally.
5 Channel region ([INT’L], [USA], [CANADA], [INLAND-W], [PRIVATE])
6 Channel
10
9
DW screen
A remote handset can get the
operation right if you hook on
then hook off.
Scan screen
7
Loudspeaker on ( ) or off ( )
8 Volume for loudspeaker (0 to 10)
9 Squelch level (0 to 10, AUTO (Indication is [SQA].))
10 Terminal ID ([L]: Left wing handset, [R]: Right wing handset, [1] to [4]: Remote handset 1 to 4)
6-2
6. REMOTE HANDSET
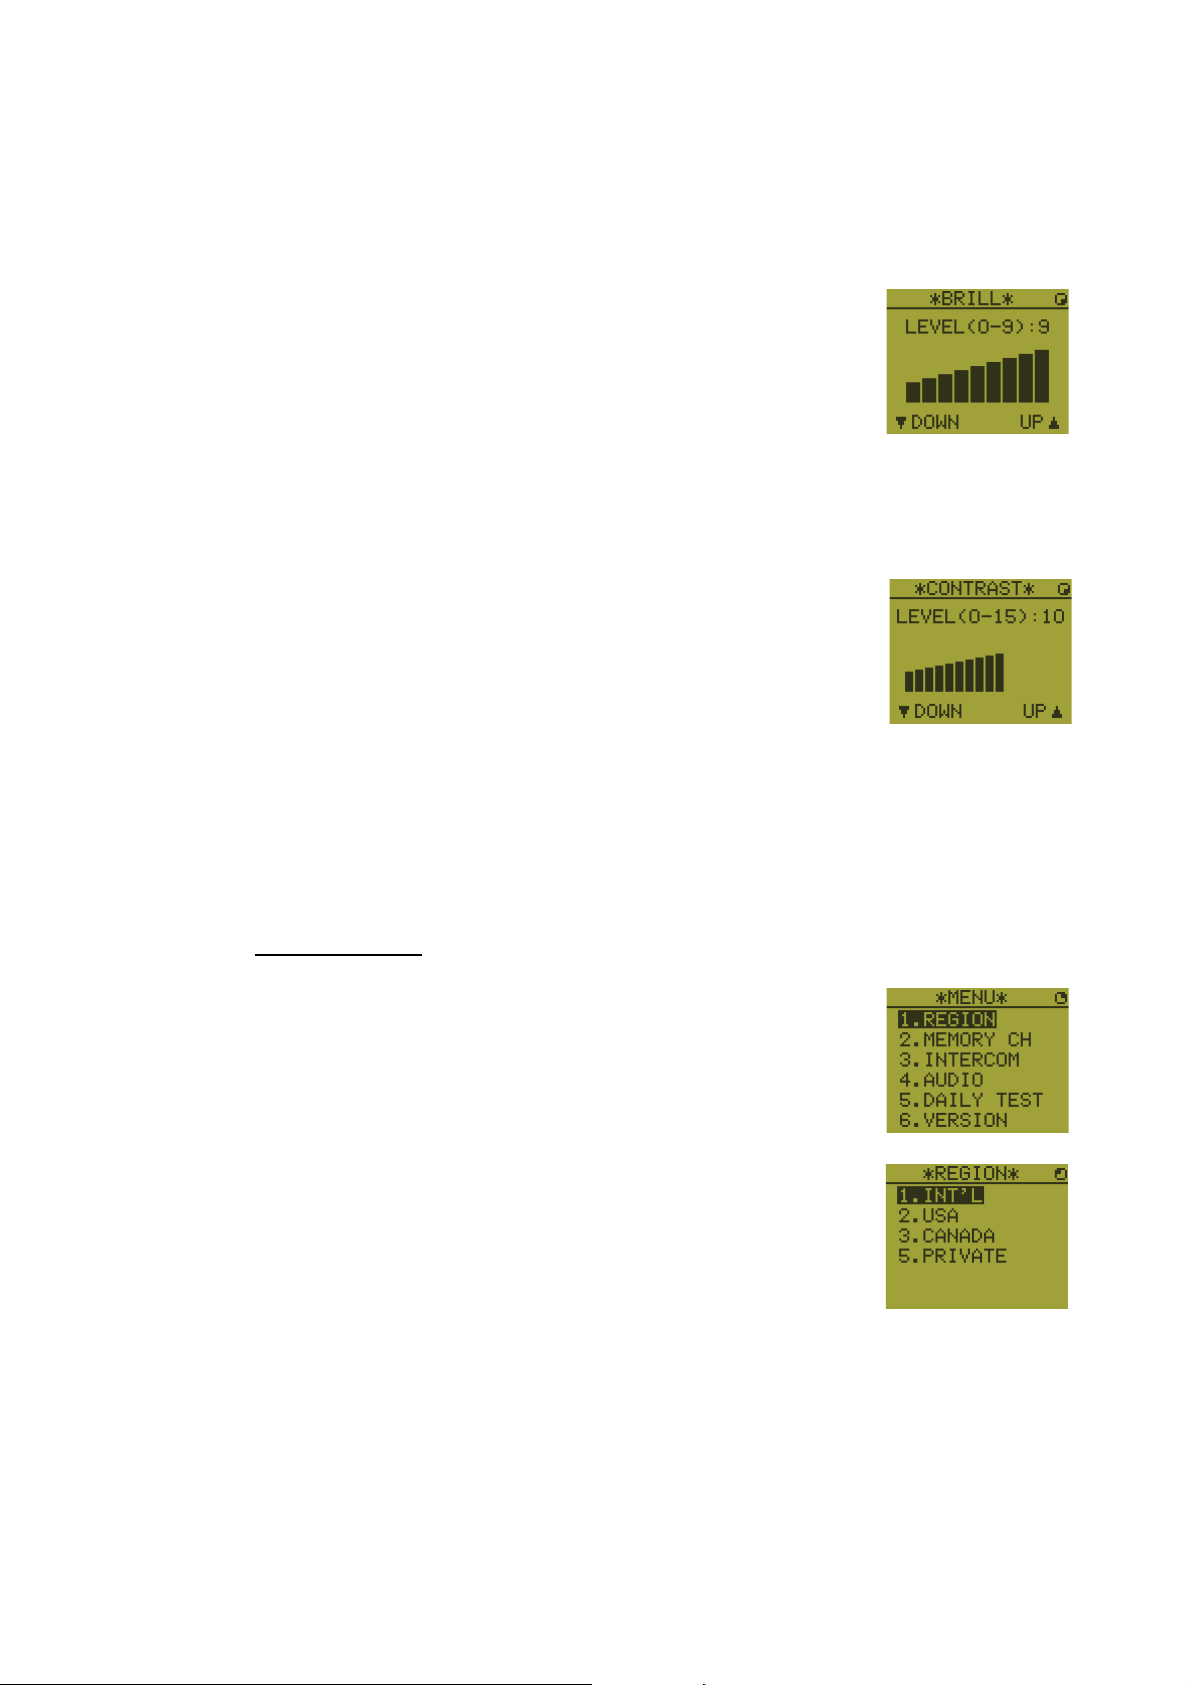
6.4 How to Adjust the Brilliance and Contrast
You can adjust the brilliance of the display and the panel for each remote handset separately. Also, you can adjust the contrast for each remote handset.
Brilliance
1. Press the BRILL key to show the [BRILL] setting window.
2. Press the S or T key to adjust the brilliance.
3. Press the ENTER key to save the settings and close the
window. To cancel the settings, press the CANCEL key instead of the ENTER key to close the window.
Note: The [BRILL] setting window automatically closes when there is no menu operation for three seconds.
Contrast
1. Press the CONTRAST key to show the [CONTRAST] set-
ting window.
2. Press the S or T key to adjust the contrast.
3. Press the ENTER key to save the settings and close the
window. To cancel the settings, press the CANCEL key instead of the ENTER key to close the window.
Note: The [CONTRAST] setting window automatically closes when there is no menu
operation for three seconds.
6.5 How to Select the Channel Region, Channel
Channel region
1. Press the MENU key to open the [MENU] screen.
2. Press the S or T key to select [REGION] then press the
ENTER key.
3. Press the S or T key to select the channel mode desired then press the ENTER
key. The following modes are available.
• [INT’L]: International mode
• [USA]
• [CANADA]: CANADA mode
• [INLAND-W]: Inland waterway mode
• [PRIVATE]: Private channel
: USA mode
6-3
6. REMOTE HANDSET
Note 1: Only permitted channel regions are displayed, which are set by the installer of the equipment.
Note 2: Private channels are available only where permitted by the authorities.
The [USA], [CANADA], [INLAND-W], [PRIVATE] can also be set by a qualified
service technician.
Channel
The channel can be set manually on the RT screen. Enter the channel by one of the
methods below.
Enter channel with the
Press the S or T key on the RT screen.
Enter channel with the numeric keys:
Use the numeric keys to enter channel on the RT screen. (It is not necessary to press
the ENTER key after entering the channel; the setting is confirmed one second after
it is entered.)
Note: When the transceiver unit is in on hook condition, you can change the channel
with the remote handset.
S or T key:
Memory channel
You can easily call up a channel which you registered in the transceiver unit as a memory channel (see section 5.4).
1. Press the MENU key to open the [MENU] screen.
2. Press the S or T key to select [MEMORY CH] then press the ENTER key.
3. Press the S or T key to select [ON] or [OFF] then press the ENTER key.
When you select [ON], "M" appears on the screen. On the RT screen, you can select a memory channel by pressing the S or T key. The following figure shows
the example for CH 10.
“3” means that you turned 3
channels of the selected
channel region to [ON] in
the [MEMORY CONFIG]
menu in the transceiver unit.
6.6 Transmission
How to transmit
Press the PTT (Push-to-talk) switch on the handset to talk, and release it to listen for
a response. "TX" appears at the top left-hand corner of the screen during transmission.
How to change the output power
Press the HI/LO key to change the
output power to high and low alternately. "HI" or "LO" appears on the
screen depending on your selection.
Channel number
6-4
6. REMOTE HANDSET
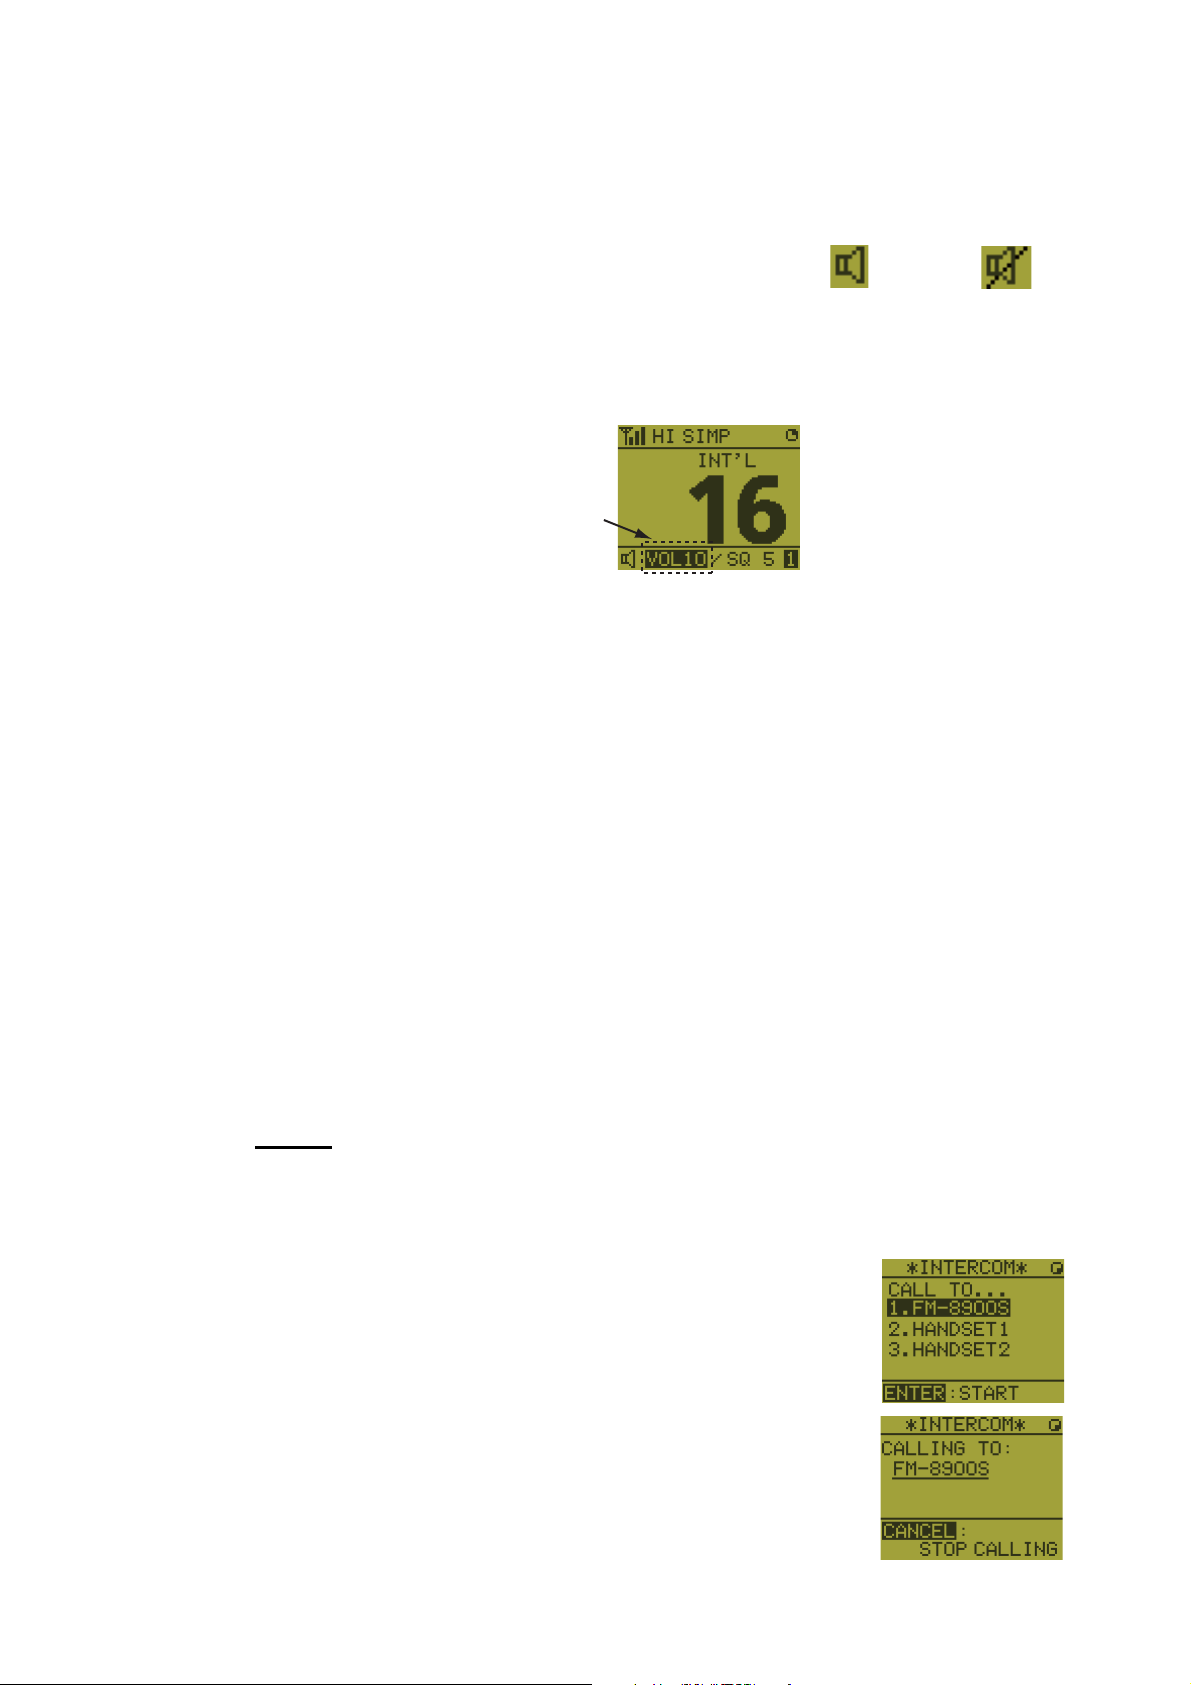
6.7 How to Turn On/Off the Loudspeaker
You can turn the loudspeaker (other than DSC communication, error, and key beep)
on or off.
1. Press the SPK key to alternately disable or enable the loudspeaker.
Speaker ON
2. To adjust the volume of the loudspeaker, press the VOL key. The screen changes
as below.
Reverse highlighting
3. Press the S or T key to adjust the volume within three seconds. The time for reverse highlighting is three seconds.
Speaker OFF
6.8 Quick Selection of CH16
Press the CH16 key to select CH16. The CH16 (156.8 MHz) is the international frequency for distress traffic and for calling by radiotelephone. The CH16 can also be
used by ship stations for call and reply. To facilitate the reception of distress calls and
distress traffic, all transmissions on CH16 should be kept to a minimum and should not
exceed one minute. Before transmitting on the CH16, a station should listen on this
frequency for a reasonable period to make sure that no distress traffic is being sent.
6.9 Intercom
The built-in intercom permits voice communications between two control units. The
combination of two controls is transceiver unit & remote handset, or remote handset
& remote handset.
Calling
You can call over the intercom only in off hook condition.
1. Press the MENU key to open the [MENU] screen.
2. Press the S or T key to select [INTERCOM] then press
the ENTER key.
3. Press the S or T key to select the called party’s control
unit then press the ENTER key.
The called party’s control unit and yours ring.
To cancel calling, press the CANCEL key.
6-5

6. REMOTE HANDSET
4. When the called party picks up their handset, the screen
as shown in the right figure appears. Start communications.
Note: You do not have to press the PTT switch to commu-
nicate.
5. Hang up the handset or press the CANCEL or the CH16 key to turn the intercom
off. The RT screen appears.
Answering
1. The control unit rings and the following screen appears. To cancel reply, press the
CANCEL key.
Off hook condition
2. Press the ENTER key with off hook condition or pick up the handset with on hook
condition to start communications.
3. Hang up the handset or press the CANCEL key to turn the intercom off. The RT
screen appears.
On hook condition
Earpiece volume
You can adjust the volume of the earpiece during intercom communication by pressing
the S or T key. After intercom communication, the earpiece volume is reverted to the
setting value you set on [EARPIECE LEVEL] (see section 6.11).
Note: Neither key click nor key error sounds during intercom communication.
6.10 How to Change the Terminal ID
1. Turn off the remote handset by the transceiver unit.
2. While you hold the MENU key, turn on the remote handset by the transceiver unit.
The setting window for terminal ID appears.
3. Enter the terminal ID, using the 1 to 6 keys, then press the ENTER key. Do not
assign the same number to multiple remote stations.
Note: Restart the remote handset by the transceiver unit after changing terminal ID.
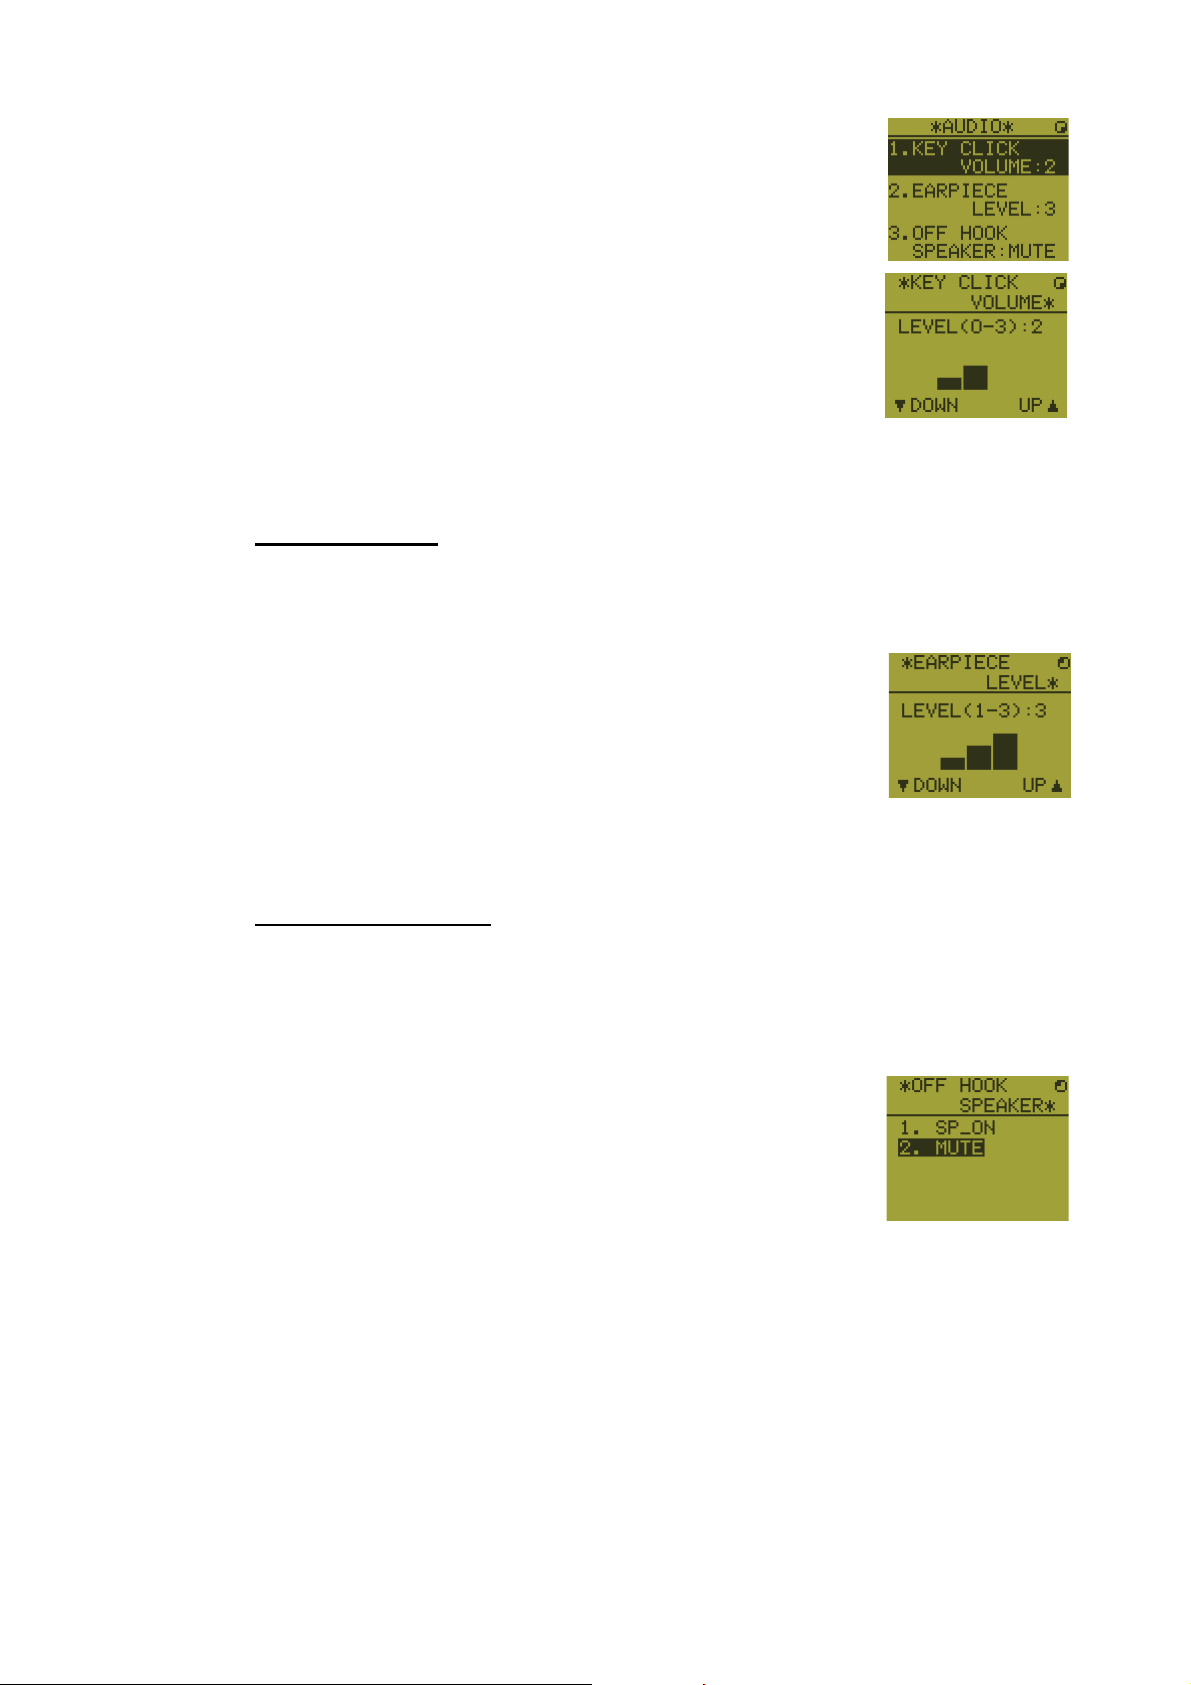
6.11 Audio setting
The [AUDIO] menu enables or disables key beep and adjusts the volume of the earpiece and off hook loudspeaker.
Key click
1. Press the MENU key to open the [MENU] screen.
6-6
6. REMOTE HANDSET
2. Press the S or T key to select [AUDIO] then press the EN-
TER key.
3. Press the S or T key to select [KEY CLICK VOLUME] then
press the ENTER key.
4. Press the S or T key to set the key click level (setting range: 0 (OFF), 1, 2 or 3).
5. Press the ENTER key. To cancel the setting, press the CANCEL key.
Earpiece volume
1. Press the MENU key to open the [MENU] screen.
2. Press the S or T key to select [AUDIO] then press the ENTER key.
3. Press the S or T key to select [EARPIECE LEVEL] then
press the ENTER key.
Note: Neither key click nor key error sounds during the
[EARPIECE LEVEL] display.
4. Press the S or T key to set the earpiece volume level (setting range: 1 to 3).
5. Press the ENTER key. To cancel the setting, press the CANCEL key.
Off hook loudspeaker
You can set the loudspeaker on or off according to off hook condition.
1. Press the MENU key to open the [MENU] screen.
2. Press the S or T key to select [AUDIO] then press the ENTER key.
3. Press the S or T key to select [OFF HOOK SPEAKER]
then press the ENTER key.
4. Press the S or T key to select [SP_ON] or [MUTE].
[SP_ON]: Loudspeaker is activated when off hook.
[MUTE]: Loudspeaker is deactivated when off hook.
5. Press the ENTER key. To cancel the setting, press the CANCEL key.
6-7
6. REMOTE HANDSET
6.12 How to Test FM-8900S from a Remote Handset
1. Press the MENU key to open the [MENU] screen.
2. Press the S or T key to select [DAILY TEST] then press
the ENTER key.
3. Press the ENTER key to start the test. You can confirm the test results for FM8900S with the 1 or 3 key.
These items are displayed
only when entering own
ship’s MMSI.
This item is not displayed when
there is no alarm unit.
Press the 3 key for the next page and the 1 key for the previous page.
6.13 How to Display the Program Versions
1. Press the MENU key to open the [MENU] screen.
2. Press the S or T key to select [VERSION] then press the ENTER key. The program versions for FM-8900S and HS-8900 appear.
6.14 Squelch
• The squelch value is common to all remote handsets. If you change a squelch value
for a remote handset, squelch values for all other remote handsets are changed accordingly.
• You can not change a squelch value for a remote handset while the squelch is being
adjusted by another remote handset.
• When the DW or scan is active, the squelch value from the terminal (transceiver unit
or remote handset) that initiated the DW or scan is used.
6-8
7. MAINTENANCE &
WARNING
TROUBLESHOOTING
WARNING
ELECTRICAL SHOCK HAZARD
Do not open the equipment.
Only qualified personnel
should work inside the
equipment.
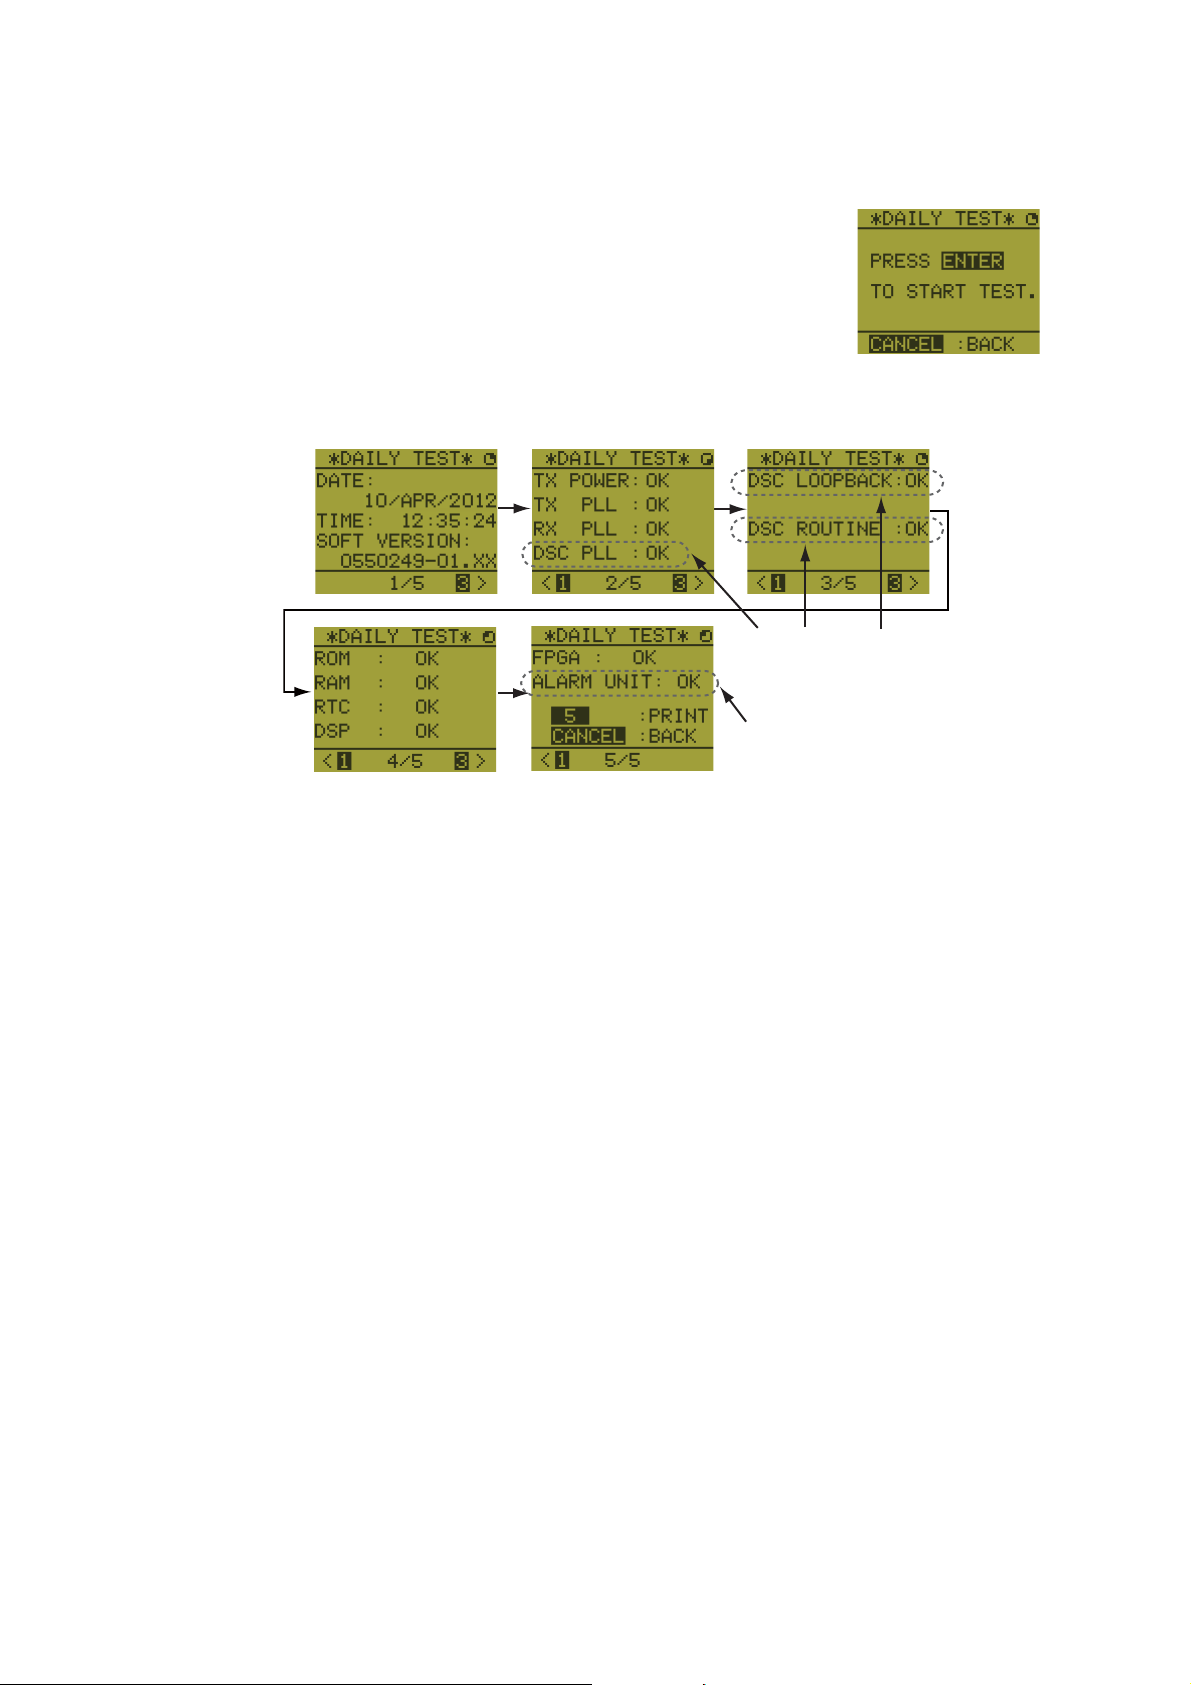
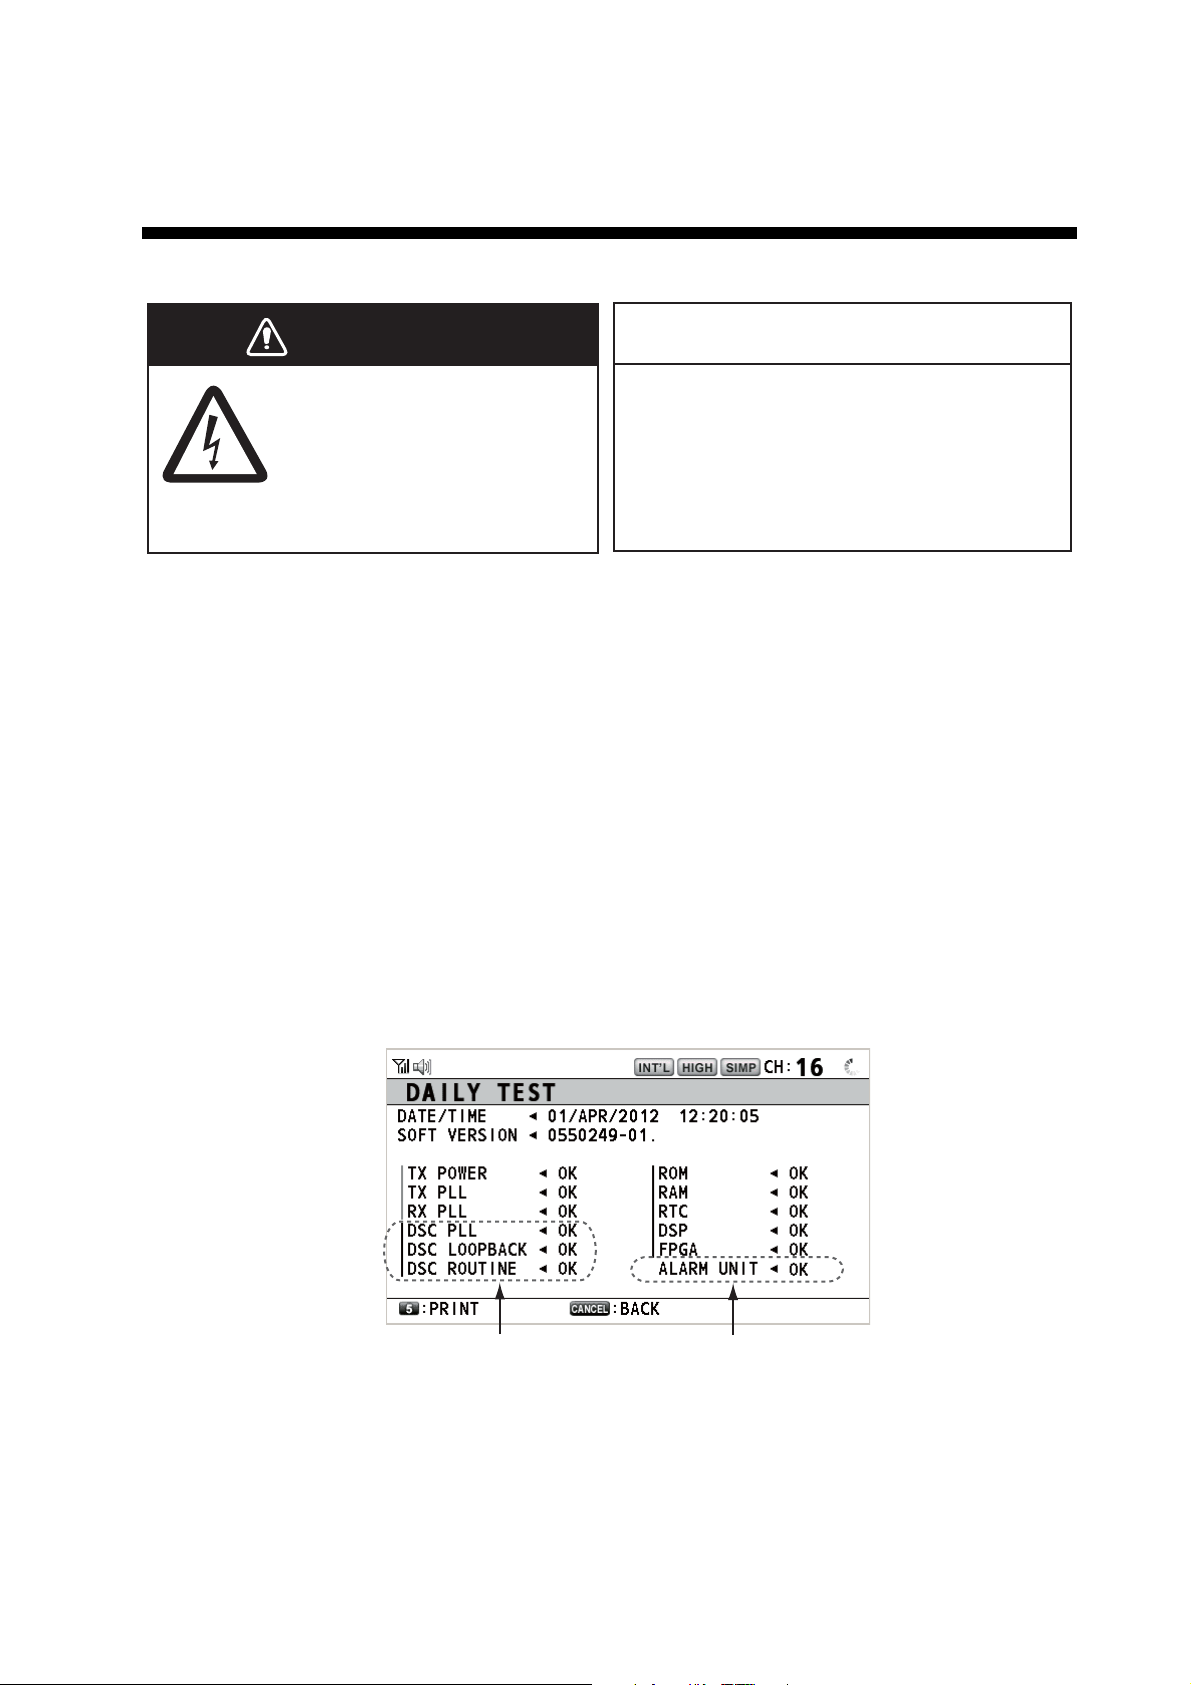
7.1 Daily Test
Do the daily test to check the radiotelephone for proper operation.
Rotate the CHANNEL/ENTER knob to select [TEST] on the [MENU] screen then push
the knob. The daily test starts. After the test is completed, the audio alarm sounds and
the screen shown below appears. This screen shows:
• Test date
• Program version number
• Test results for TX power, TX PLL, RX PLL, DSC PLL, DSC loopback, DSC routine,
ROM, RAM, RTC, DSP, FPGA and alarm unit (only when connecting the alarm
unit), shown as [OK] or [NG] (No Good). For NG, contact your dealer for advice. The
DSC test checks, using a DSC signal, the encode and decode functions of the signal processor.
NOTICE
Do not apply paint, anti-corrosive sealant
or contact spray to plastic parts or
equipment coating.
Those items contain products that can
damage plastic parts and equipment coating.
To print out the test result manually, press the 5 key. Automatic printing of the daily
test is available. See section 5.5.
These items are not
available when not entering own ship’s MMSI.
x x
This item is not available
when not connecting the
alarm unit.
7-1

7. MAINTENANCE & TROUBLESHOOTING
7.2 Maintenance
Regular maintenance helps to keep your equipment in good condition and prevents
future problems. Check the items shown in the table below.
Item Check point Remedy/Remarks
Antenna Check for physical damage and corrosion. Replace damaged parts.
Wire
antenna
Insulators
for antenna
Transceiver
unit
Check that the antenna is properly spanned
and separated sufficiently from metallic
structures.
Check for salt water deposits on insulators.
Check that connection at the lead-in insulator is tight and rust-free.
• Check ground connection.
• Check connection at signal cable, coaxial
cable, control cable, power cable and external equipment (including navigator).
• Confirm that there are no objects on the
top of the transceiver unit.
• Remove dust from transceiver unit with
soft cloth.
Note: Do not use chemical cleaners to
clean the transceiver unit; they can remove
paint or markings and deform the equipment.
If necessary, re-span antenna.
Replace damaged insulator(s). Remove
salt water deposits. Clean with fresh
water, then dry. Remove rust, then
tighten bolts and lock nuts. Cover metallic surface with sealing compound.
• Tighten the loosened connections;
remove foreign materials from connectors.
• Remove any objects.
• Wipe the LCD carefully to prevent
scratching, using tissue paper and an
LCD cleaner. To remove dirt or salt
deposits, use an LCD cleaner, wiping
slowly with tissue paper so as to dissolve the dirt or salt. Change paper
frequently so the salt or dirt does not
scratch the LCD.
Power
supply
Power fuse Check if a power fuse (7A) has blown. If the fuse has blown, find out the cause
Check that the supply voltage at transmission is within the rated range (21.6 to 31.2
VDC at the power connector).
If not within the range, check power
source. Low voltage may cause erratic
operation.
before replacing it (Type: FGBO 125V
7A PBF). If it blows after replacement,
contact your dealer.
7.3 Simple Troubleshooting
The table below provides possible problems and the means with which to restore normal operation. If normal operation cannot be restored, do not attempt to check inside
the equipment. Any servicing should be referred to a qualified technician.
Problem Probable cause Remedy
Power cannot be
turned on.
Display indications
do not appear.
Power is on but no
sound from the main
speaker.
Output power reduced to LOW
• Mains switchboard is off.
• (DC) voltage is too high or too low.
• Battery has discharged, or poor
contact at terminals.
Display brilliance is too low. Press the BRILL key to adjust the
Main speaker is off.
Power is automatically reduced to protect against overheating due to continuous transmission.
• Turn on the mains switchboard.
• Check supply voltage.
• Recharge the battery and tighten
the battery terminals.
display brilliance.
Press the key to turn on the main
speaker.
Wait until the unit cools.
7-2
 Loading...