


User’s Manual
Version 1.0

Preface
Congratulations on your purchase of this product. Read this manual carefully and keep it in a safe place for
future reference.
About this manual
This user manual has been designed to help you make the most of your IP camera and its many features and
functions. Information in this document has been carefully checked for accuracy; however, no guarantee is
given to the correctness of the contents. The information in this document is subject to change without notice.
Copyright
© Copyright 2008
This manual contains proprietary information, protected by copyright. All rights reserved

Contents
W X
3
Contents
Introduction..................................................................................................................................6
Key Features............................................................................................................................................... 6
System Requirements................................................................................................................................8
Computer System Requirements........................................................................................................... 8
Box System Requirements .................................................................................................................... 8
Specification ............................................................................................................................................... 9
Package Contents..................................................................................................................................... 10
Identifying Parts and Controls................................................................................................................. 11
Front Panel ...........................................................................................................................................11
Rear Panel........................................................................................................................................... 13
Installation..................................................................................................................................15
Hardware Installation................................................................................................................................15
Software Installation................................................................................................................................. 20
Contents
W X
4
Remove Software......................................................................................................................................22
Network Configuration ..............................................................................................................23
Easy Setup ................................................................................................................................................23
Change the Network configuration ...................................................................................................... 23
Analyze the unknown network configuration........................................................................................ 31
UPnP Testing....................................................................................................................................... 39
The setting for UPnP-disabled or non-UPnP routers.............................................................................43
Get internet access via the DMZ function of the router ........................................................................ 52
Getting to know netTV Player...................................................................................................54
For the initial operation............................................................................................................................54
Main Panel Instructions ........................................................................................................................... 58
Remote Control Interface Instructions ...................................................................................................61
Mouse and keyboard operations............................................................................................................. 65
Property Setting Page Instructions......................................................................................................... 69
Local File Interface Instructions.............................................................................................................. 78

Contents
W X
5
Using netTV Player ....................................................................................................................79
Settings of the Virtual Remote Control...................................................................................................79
To Load Profile..........................................................................................................................................85
USB Recording Device.............................................................................................................................88
Download/Playback the recorded files from netTV Box........................................................................ 91
Favorite Channel Setting .........................................................................................................................93
Firmware Update........................................................................................................................95
Troubleshooting.........................................................................................................................99
Introduction
W X
6
Introduction
netTV Box is an IPTV Box receiving TV sources from Wall or Set-Top-Box via TV Tuner, RCA or S-Video on the
one end, compressing the video in the format of H.264 & the audio in the format of AAC, and transmitting the
compressed media to the internet or intranet on the other end. With the application software installed on your
computer, 3G mobile phone or Wi-Fi PDA, you could control the TV Tuner or Set-Top-Box via IR connection between
IPTV Box & Set-Top-Box, and watch & record TV programs on the go.
Key Features
No monthly fee. (All TV contents can be accessed.)
Using a high-performance H.264 video compression chipset, requires smaller bandwidth and implements better
video quality.
Network video and security monitoring.
With the player installed on PC, 3G mobile phone or Wi-Fi PDA, the user could control the TV Tuner or
Set-Top-Box via IR connection between IPTV Box & Set-Top-Box, and watch & record TV programs on the go
(Option).
D1/Half-D1/DCIF/CIF/QCIF Real Time Compression Supported.
Automatic adjustment of encoder parameters based on dynamic algorithm of the available network bandwidth
Introduction
W X
7
ensures the smooth video stream transport on the network.
P2P service and UPnP compatibility make an easy network connection.
The IR Remote Control Learning function supports all types of A/V devices including PVRs, Digital Cable Boxes,
and Satellite TV Receivers.
Scheduled or real-time recording on PC or Box (by USB port) supported.
TV sources can be received from Wall (Cable) via TV Tuner of this netTV Box, or from Set-Top-Box via RCA or
S-Video of this netTV Box.
System Software Upgrade via Network supported.
NTSC and PAL standards auto detection supported.
External USB hard disk support.
**TV Tuner supports both PAL and NTSC TV standards.
Introduction
W X
8
System Requirements
In general, if your desktop PC or laptop is purchased within 3 to 4 years, and runs a modern OS like Windows XP
or Windows Vista, you should be able to install the player. Please see the specific requirements below:
Computer System Requirements
CPU:Intel Pentium 4 2.0GHz or above
RAM:512MB or above
Operating system:Windows XP SP2 or Windows Vista
Hard disk:at least 100MB capacity or above
Windows-compatible Graphics Card with DirectDraw Overlay Support
Sound Card:PCI sound card or on-board audio
Network:10/100Mbps Ethernet LAN port connection ability
Microsoft DirectX 9.0c or above
Box System Requirements
Router with NAT and UPnP features
Broadband Internet Access (Cable Modem or ADSL) with minimum upload bandwidth of 512Kbps or faster
TV signal (Air or Cable) or external input (Set-top box or DVD player)
Introduction
W X
9
Specification
Processor: Multi Core: ARM 9 CPU + DSP,240Mhz SDRAM: 32MB
Flash: 16MB
Network Interface: RJ-45 Ethernet (10/100Mbps auto
switching)
Network protocol: HTTP,UDP, TCP/IP,SMTP,
FTP, PPPoE, DHCP, NTP, DDNS TBA
Video Input/Output: 1.NTSC + PAL TV Tuner (IEC
169-2 ); 2.Composite video (Female RCA);
3.S-Video (Female4-pin mini-DIN)
Audio Input/Output: L/R Stereo Audio (Female RCA) Video Frame Rate: Up to 30fps
Video Bitrate (Auto Mode): Automatic bitrate
adjustment depending on network condition
Video Bitrate (Manual Mode): Adjustable from
64Kbps to 2Mbps
Video Compression: H.264 (Hardware Encode)
Video Resolution: D1、HALF-D1、CIF、QCIF
Supported Client OS: Windows XP / Vista Power Requirement: 5VDC, 2A
IR Blaster: To control an external cable/satellite box Dimension: 185(L)x124(W)x28.5(H)mm
Weight: 875g (Full Package)
Environment Conditions: Operating temperature
0~45
o
C;
Storage temperature -20~60
o
C
Introduction
W X
10
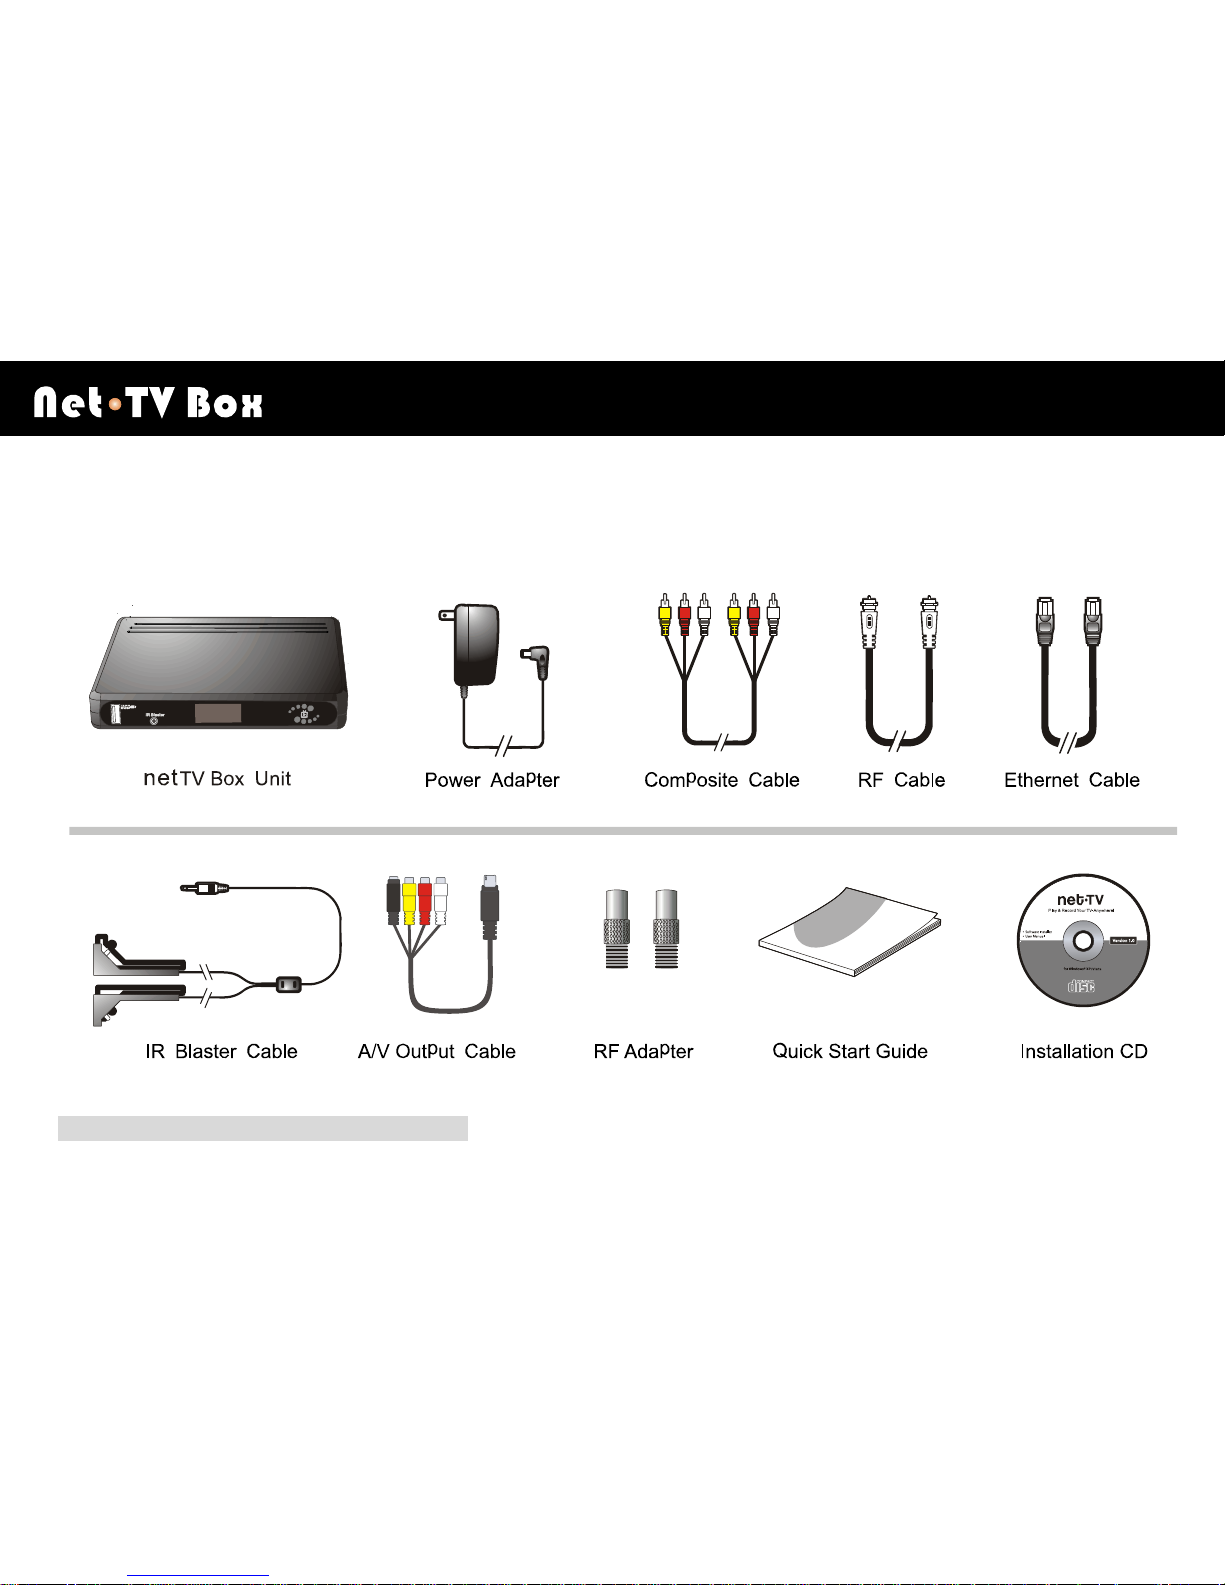
Package Contents
After unpacking, check that all the following items have been included:
*One ID key for netTV Player is enclosed.
Introduction
W X
11
Identifying Parts and Controls
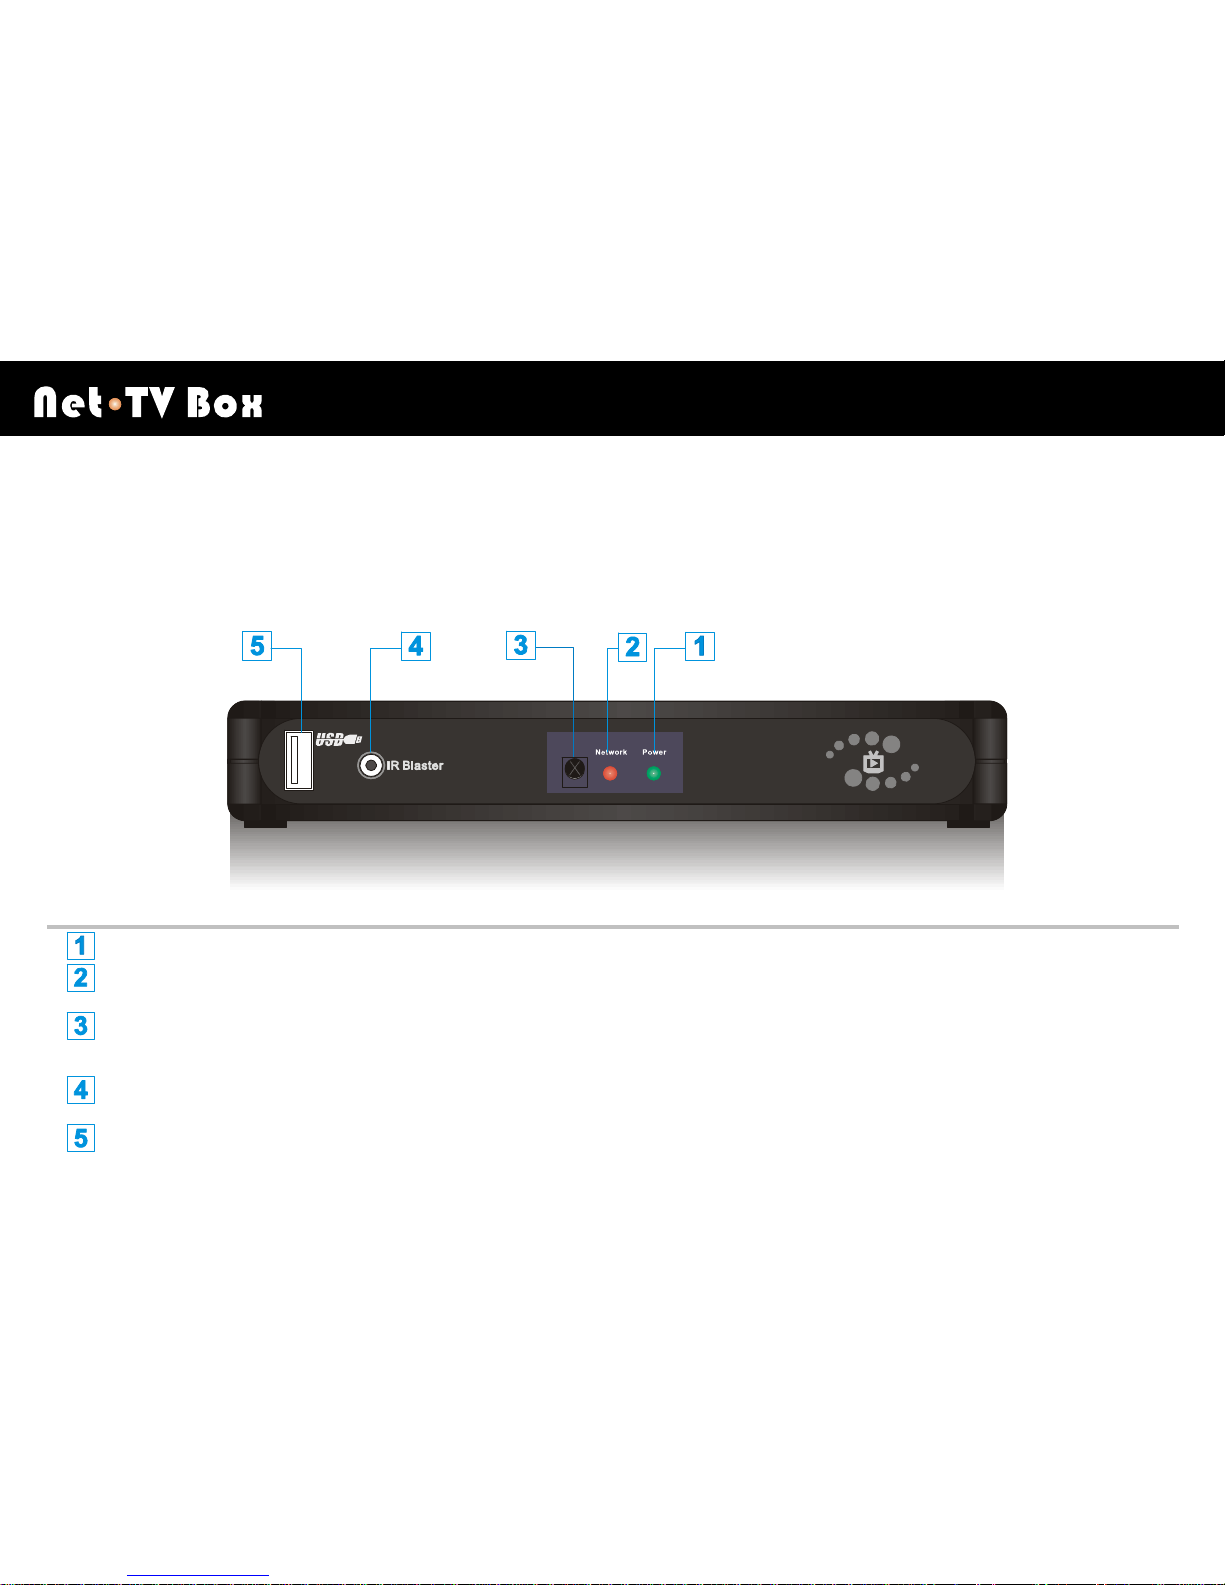
Front Panel
Green LED Indicator (Power Light):It is lit when netTV Box is powered on.
Red LED Indicator (Network Activity Light):It is lit when netTV Box is connected to network.
Remote Sensor: It receives the IR signals from the IR remote control to implement the Remote Control
Button Learning function.
IR Blaster: It connects the enclosed IR Blaster Cable which aims at the IR receiver of the STB or DVR on the
other end. Then, the netTV Player can control the STB or DVR remotely.
USB:For use of external storage.
Introduction
W X
12
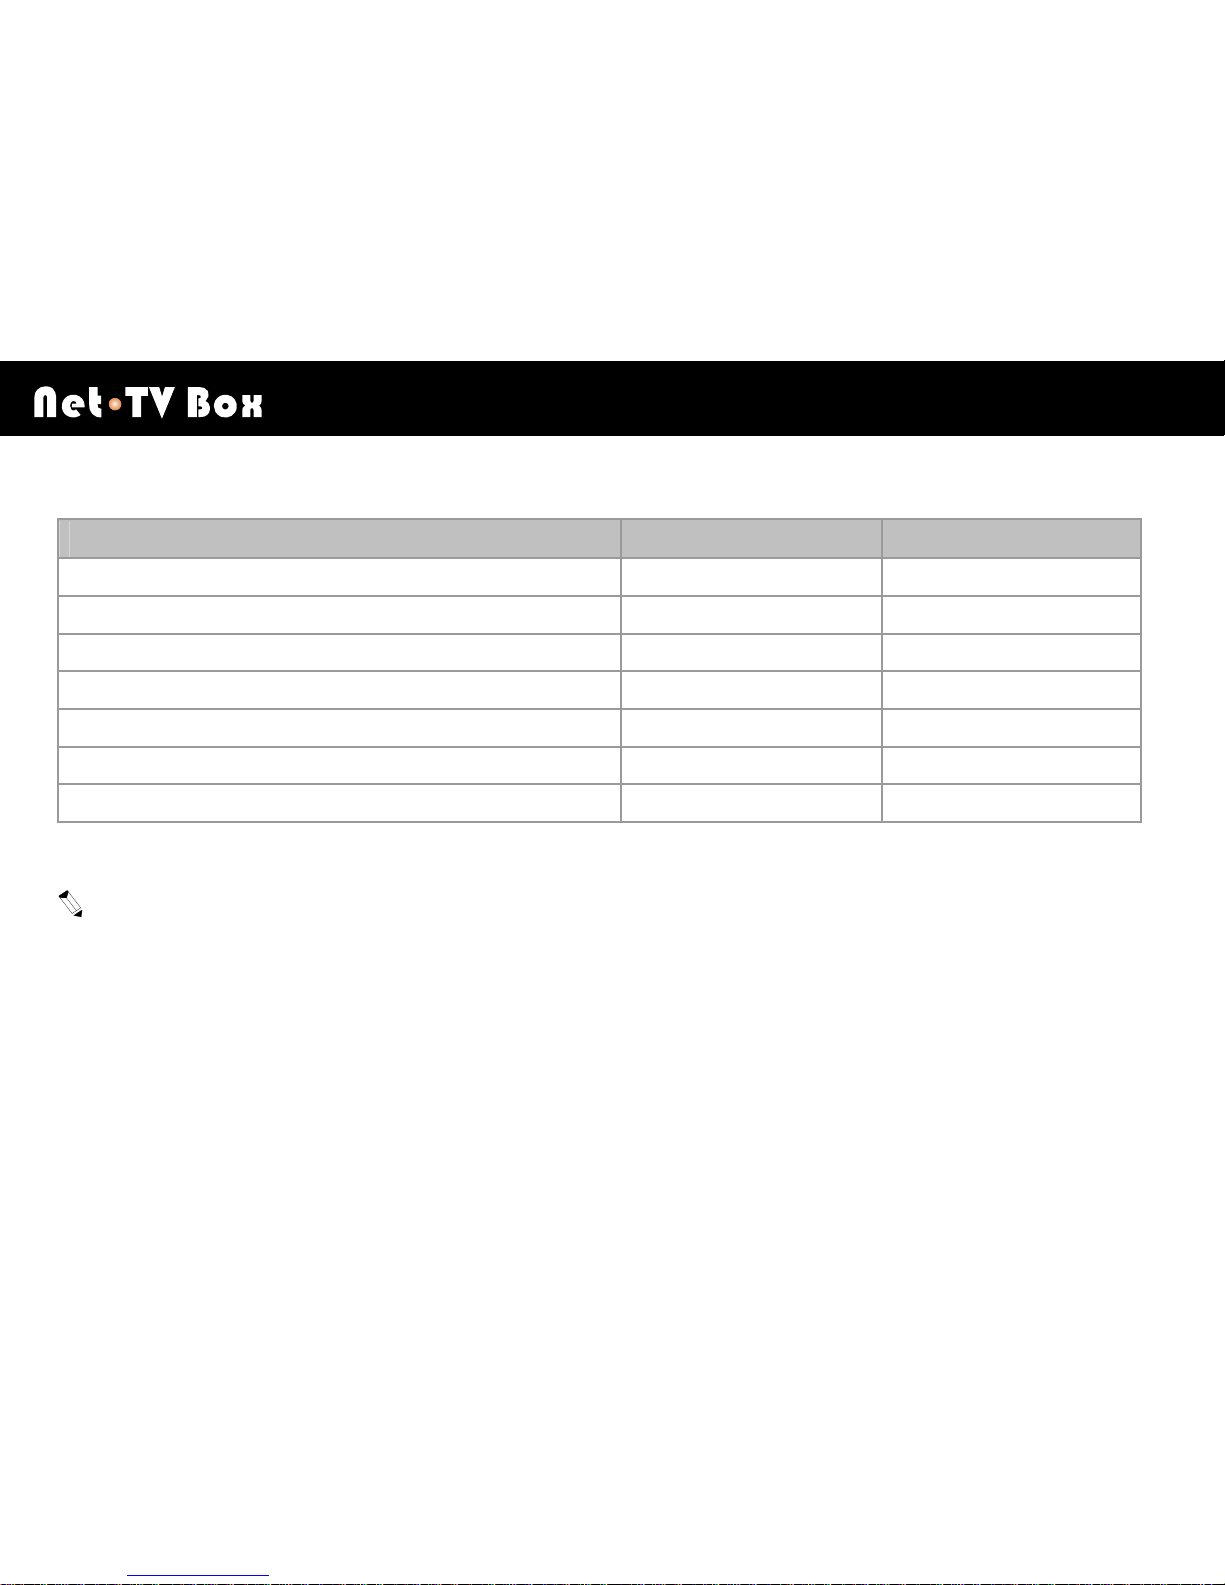
Status Description of LED Indicators 1(Power Light) & 2(Network Activity Light)
Status
Green LED(Power) Red LED(Network)
Power on(8 seconds)
On
Off
Starting (12 seconds) Blinking Off
Starting completed, internet connect setting successful On On
Starting completed, internet connect setting failed On Off
Login (working) On
Quick blinking
IR Learning Quick blinking 2 times
Blinking
Reset (3 seconds) Blinking 3 times
Blinking 3 times
Above table related connect ways to internet all mean the Box’s connect way to internet. When the box is on standby,
the red led indicator is constantly on. It means that Box is successfully connected to internet.
Introduction
W X
13
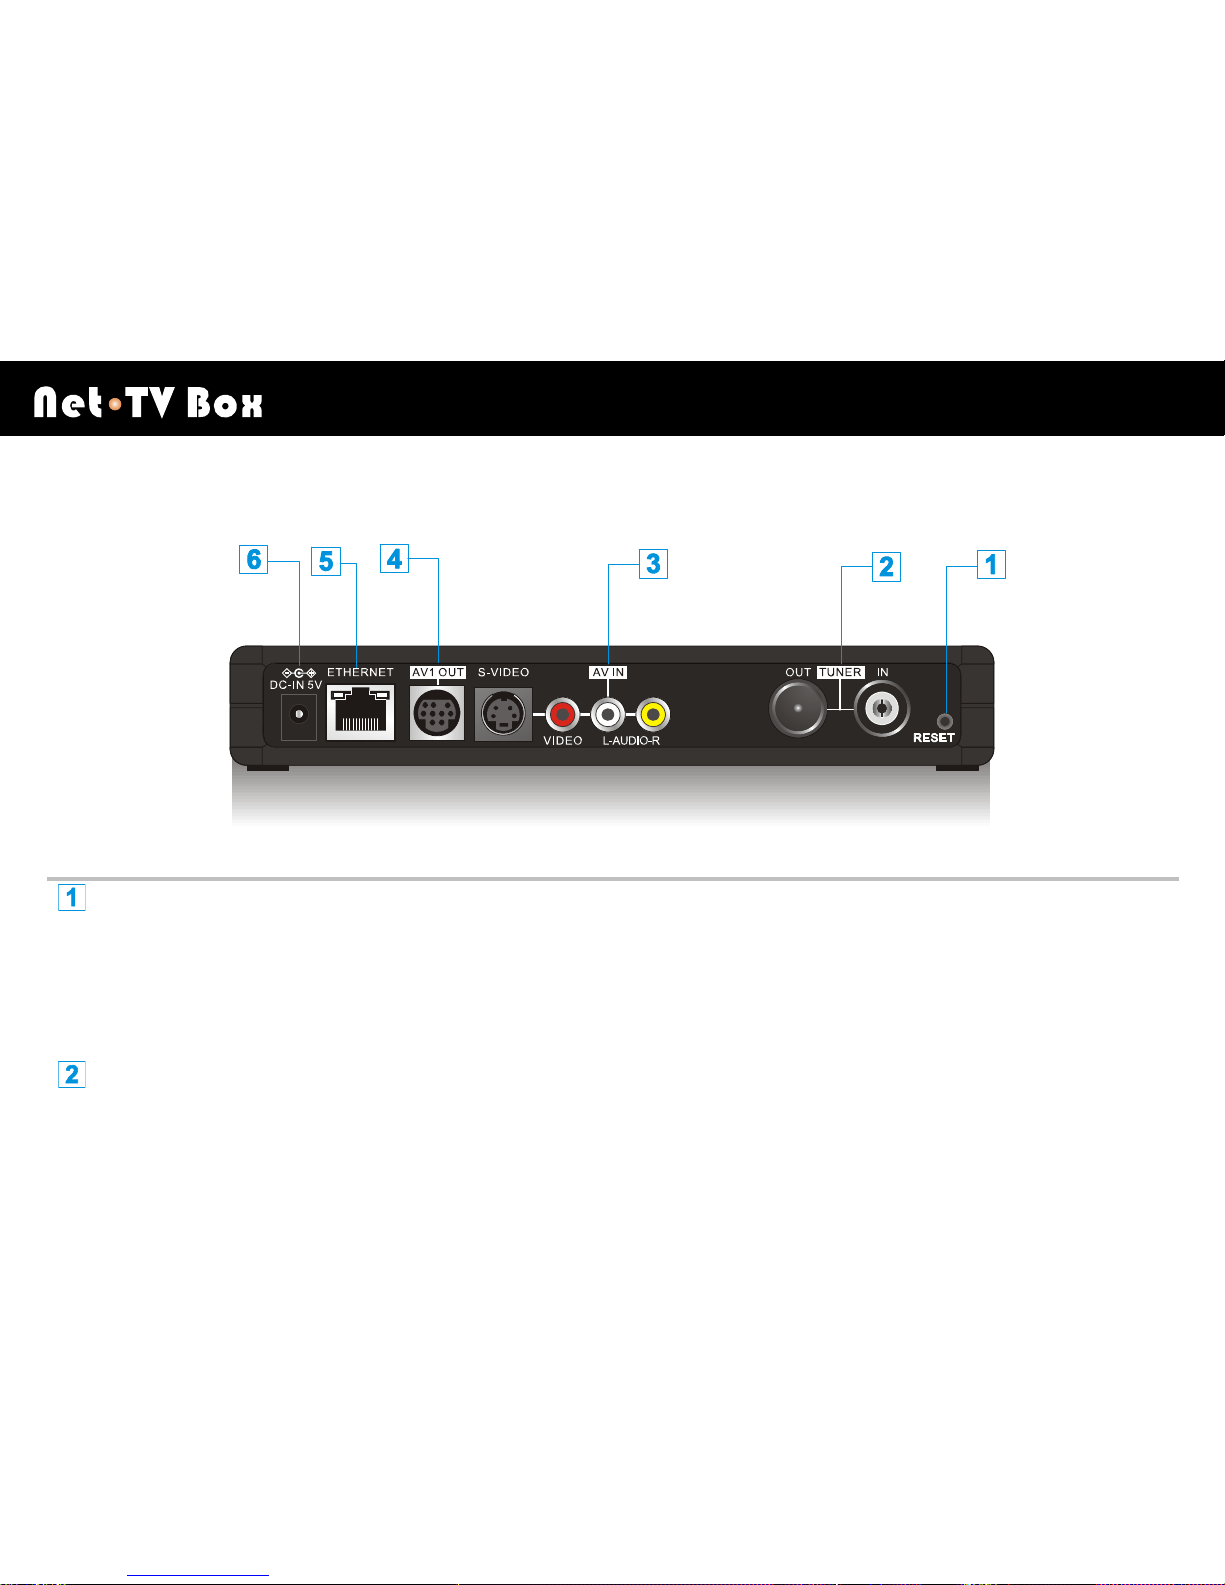
Rear Panel
RESET:Press and hold for 3 seconds, the green led and the red led both blink three times at the same time
(blinking one time per second), then the box has been reset to factory defaults. If the power is off suddenly
before the leds blink, the [RESET] won’t take effect, but you can start your box. If the power is off suddenly
when the leds are blinking, the [RESET] has been effective, after finishing the [RESET], the box will proceed
to [Power on] and [Starting]. (Caution: The use of this button will result in the loss of existing
configuration. Maybe you should reset the network configuration of Box to connect to internet. )
TUNER: IN: It connects the CATV cable to receive the TV RF signals. OUT: It connects the RF IN of
your TV set via the enclosed Coaxial Cable to loop through the TV RF signals.
Introduction
W X
14
AV1 IN: (S-VIDEO/VIDEO/AUDIO) terminal: Connect audio cables and either a video or S-Video cable from
your STB or DVR or Camera.
AV1 OUT: Loop through the Audio/Video signals from AV1 IN to your TV set.
ETHERNET:RJ-45 Connector for IP Router or ADSL/ Cable Modem.
DC IN:DC Power input (Specification: 5V DC 2A)
Please use the [Reset] button carefully, all parameters of hardware of the Box will restore to factory default after
[Reset]. Before [Reset], we recommend save the restoring information, such as channel table, IR learning files .rpl
format), and network configuration.
Installation
W X
15
Installation
Hardware Installation
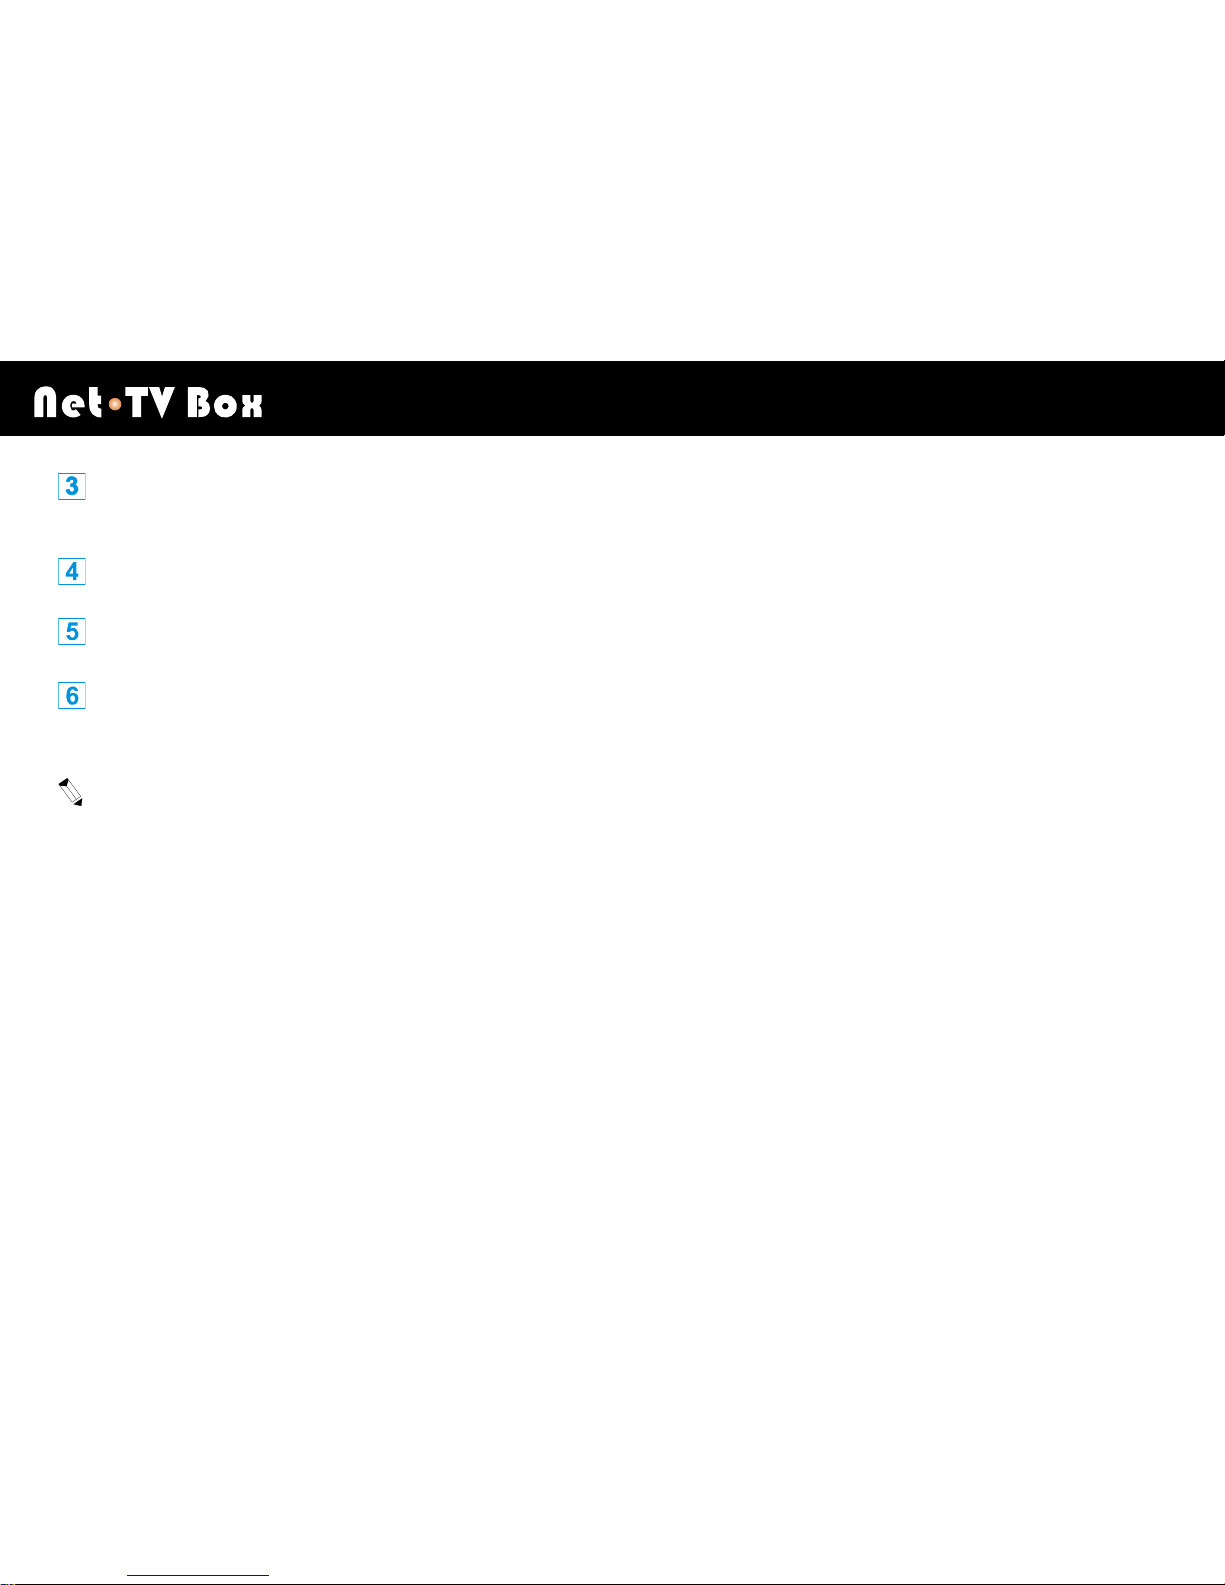
Step1: Verify Your Network Condition
netTV Box is a plug-n-play IP TV Box. As long as your home network is the same as the diagram below, you could
easily complete the installation and start enjoying your TV on the go - just through the following simple steps.(
If your
connection structure is not the same as the following diagram, please refer to the next Chapter [Network
Configuration] for help.)
Use IP Router with UPnP function to connect netTV Box to your ADSL/Cable Modem which directs you to internet. (If
you have a switch or hub, you can also connect it between the netTV Box and IP Router or between the IP Router
and Modem for your convenience.)
Installation
W X
16
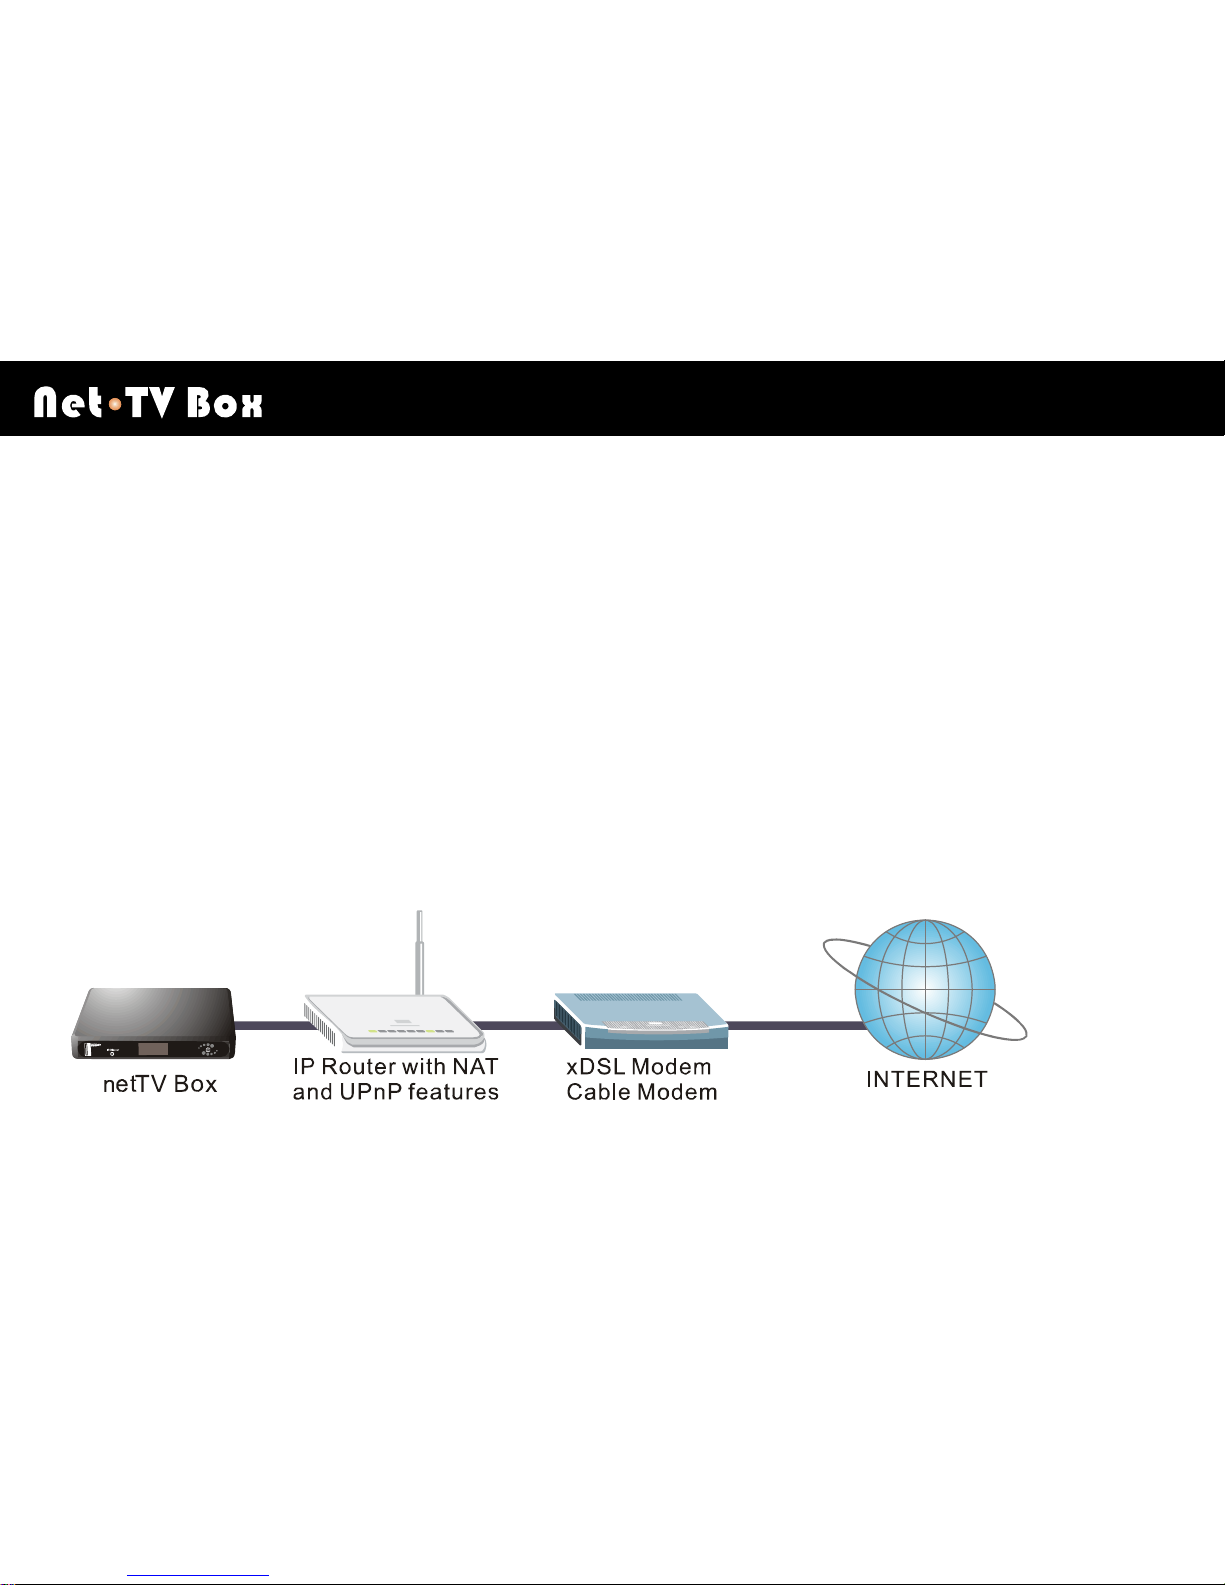
Step 2: Connect to Your Network
Take the enclosed RJ-45 Ethernet Cable and plug it into
the LAN port of your IP router; plug the other end of the
RJ-45 Ethernet Cable into the ETHERNET port at the back
of netTV Box.
Installation
W X
17
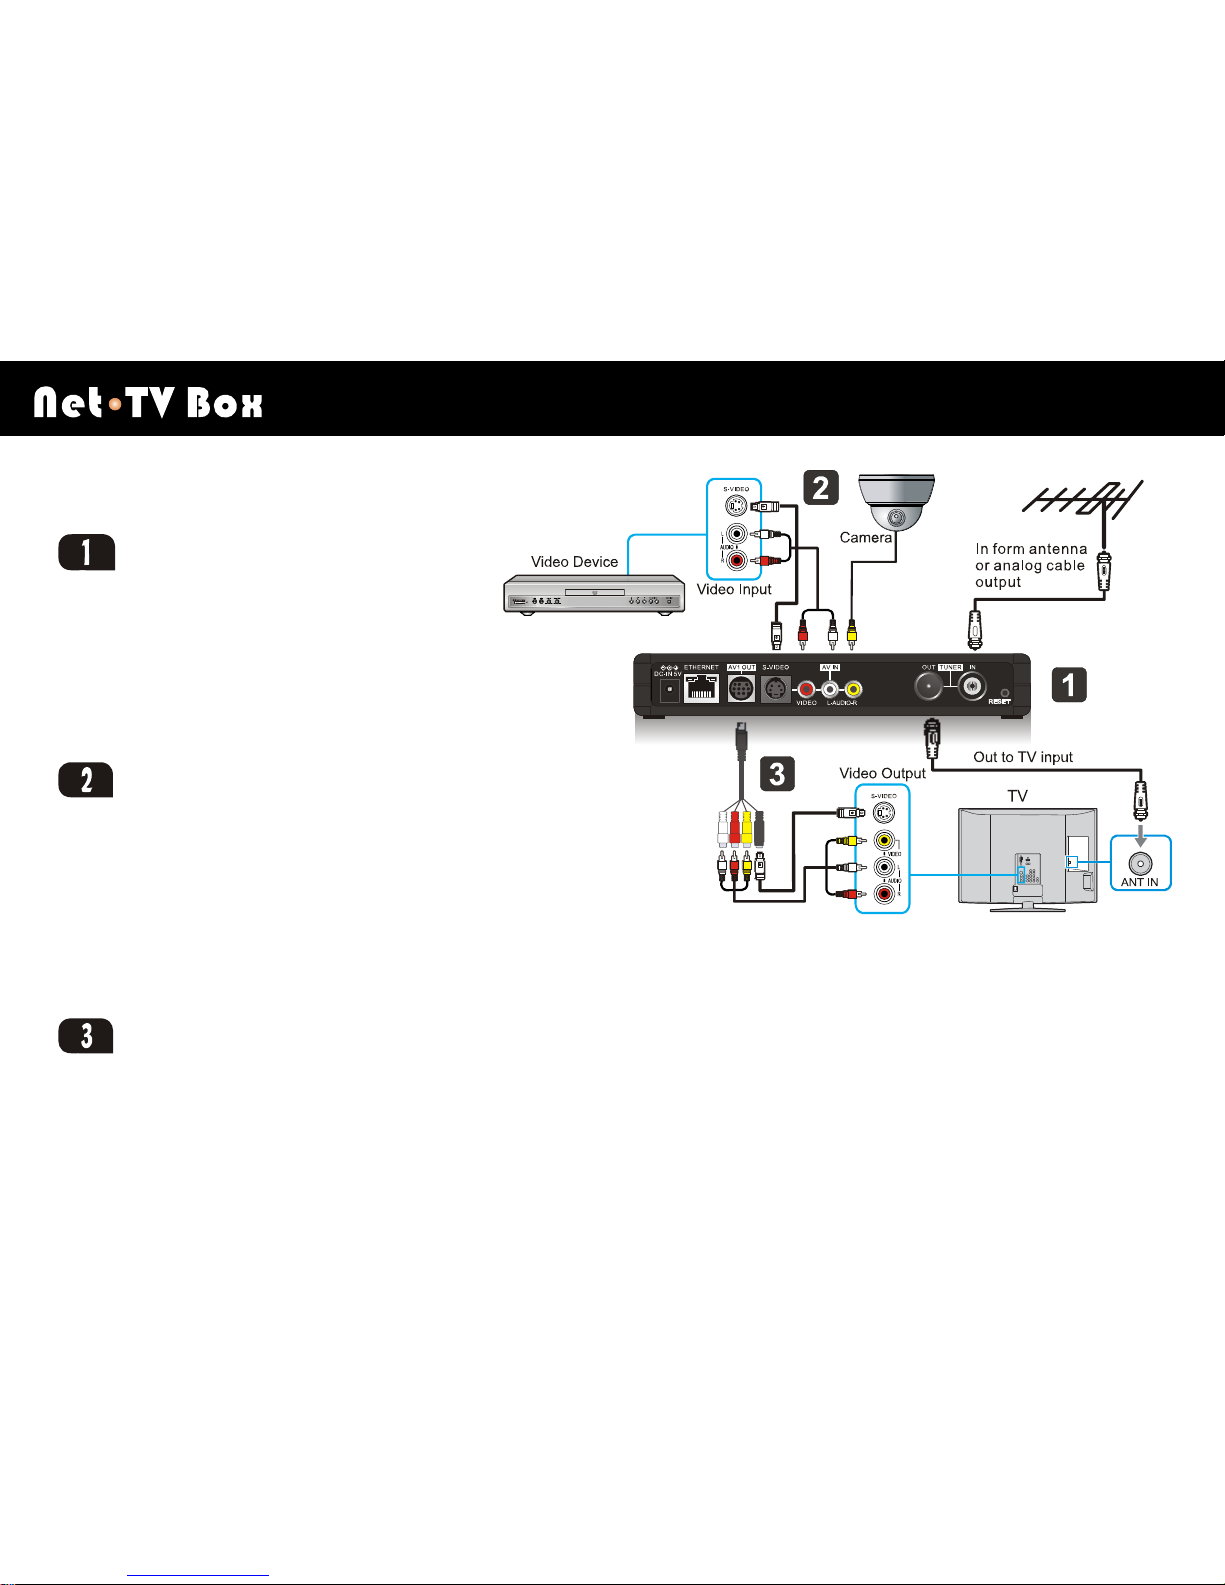
Step 3: Connect to TV Sources
CONNECTING CABLE OR
ANTENNA
Disconnect the existing Coaxial/RF cable from
your TV's RF/Antenna IN and reconnect it to
the Antenna IN of netTV Box.
Use the enclosed RF cable and RF adapter to
connect the Antenna OUT of your netTV Box to
the RF IN of your TV.
CONNECT AUDIO/VIDEO
SOURCE
Use the enclosed Composite Cable or S-Video
Cable(i.e., not supplied) to connect the AV
OUT of your video device to the AV1 IN of
netTV Box labeled VIDEO, AUDIO-L, AUDIO-R,S-VIDEO.
We recommend you to connect Video IN to a Camera and S-Video & Audio IN to your Cable/Satellite box or DVR devices.
Therefore, you could have a better video quality and the optimal use of the video inputs of this product.
CONNECT OUTPUT (OPTIONAL)
Use the enclosed A/V output cable to connect the terminal marked “AV1 OUT” on the netTV Box. Connect the same cable
type for the output back to your TV as you used for the input to the netTV Box
Installation
W X
18
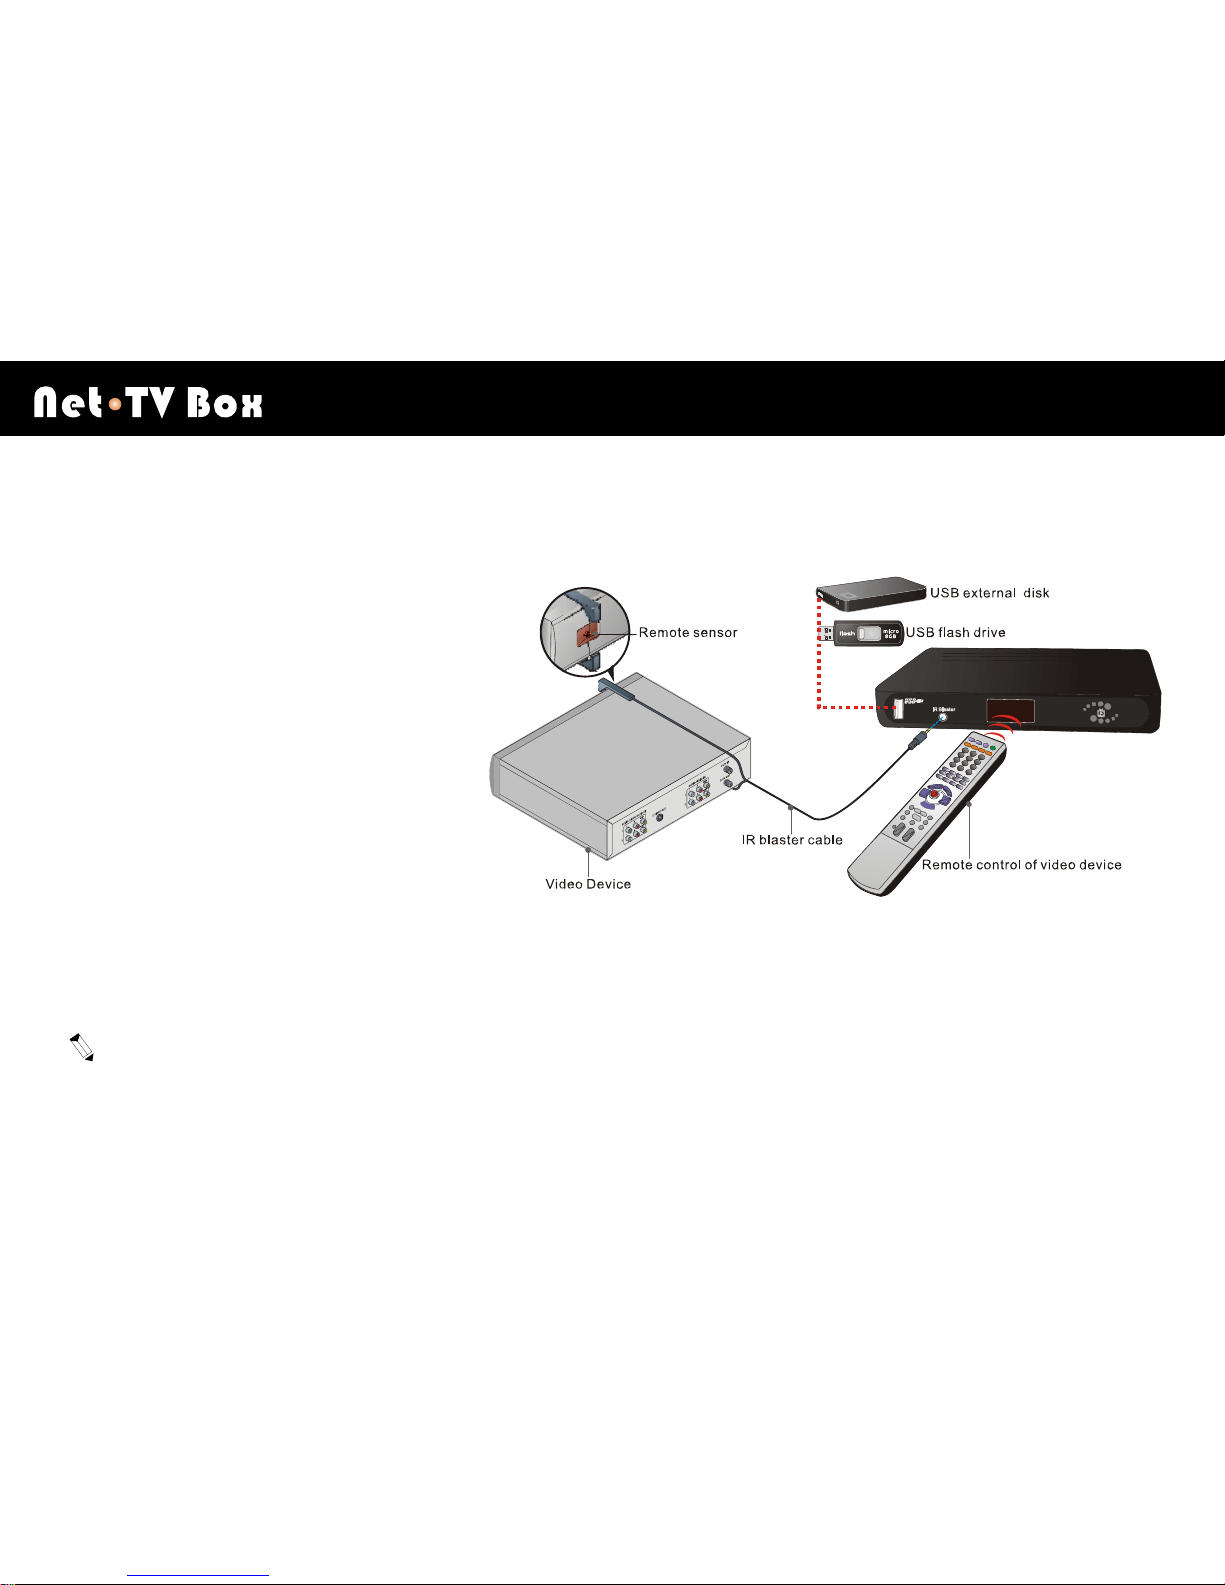
Step 4: Connect the IR Blaster Cable
(If you don’t install other video sources except TV, skip the step)
With netTV Player, the netTV Box can learn
signals of the remote control of a video
device to control the video devices with the
on-screen virtual remote control. Place the
IR Blaster cable heads on the top and
bottom of your video device so they point at
its remote sensor.
Connect the IR Blaster cable to the IR
Blaster port on the front of netTV Box.
While conducting the learning of the
physical remote control, please aim your physical remote control at the front LED cap of netTV Box. Keep the distance
between the physical remote control and netTV Box within 2 inches.
In order to learn remote control precisely, please move far from the devices with IR function. (i.e., move far from
mobile phone, notebook and so on.)
Installation
W X
19
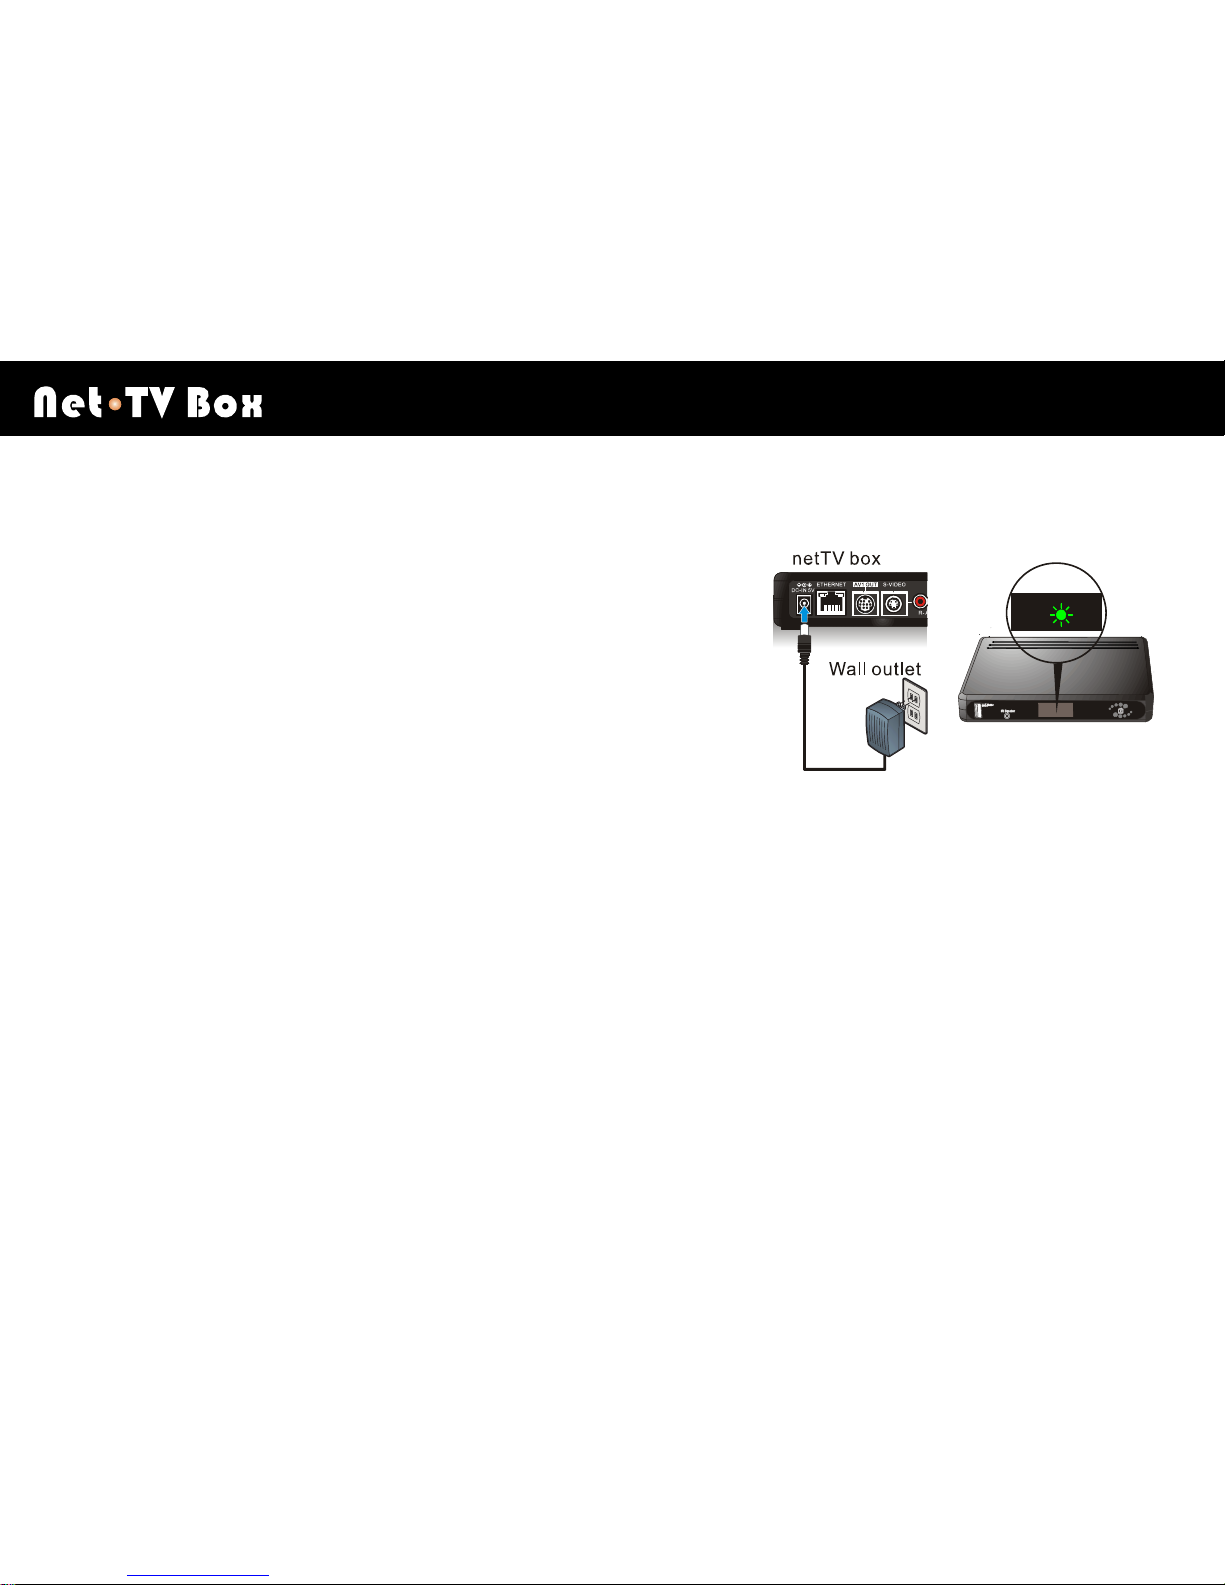
Step 5: Connect Power Source
Connect the power adapter to netTV Box’s port labeled DC IN. Plug the
power adapter into an electrical outlet.
When plugged in, the power light comes on, and the light blinks many times
as the netTV Box starts up.
Installation
W X
20
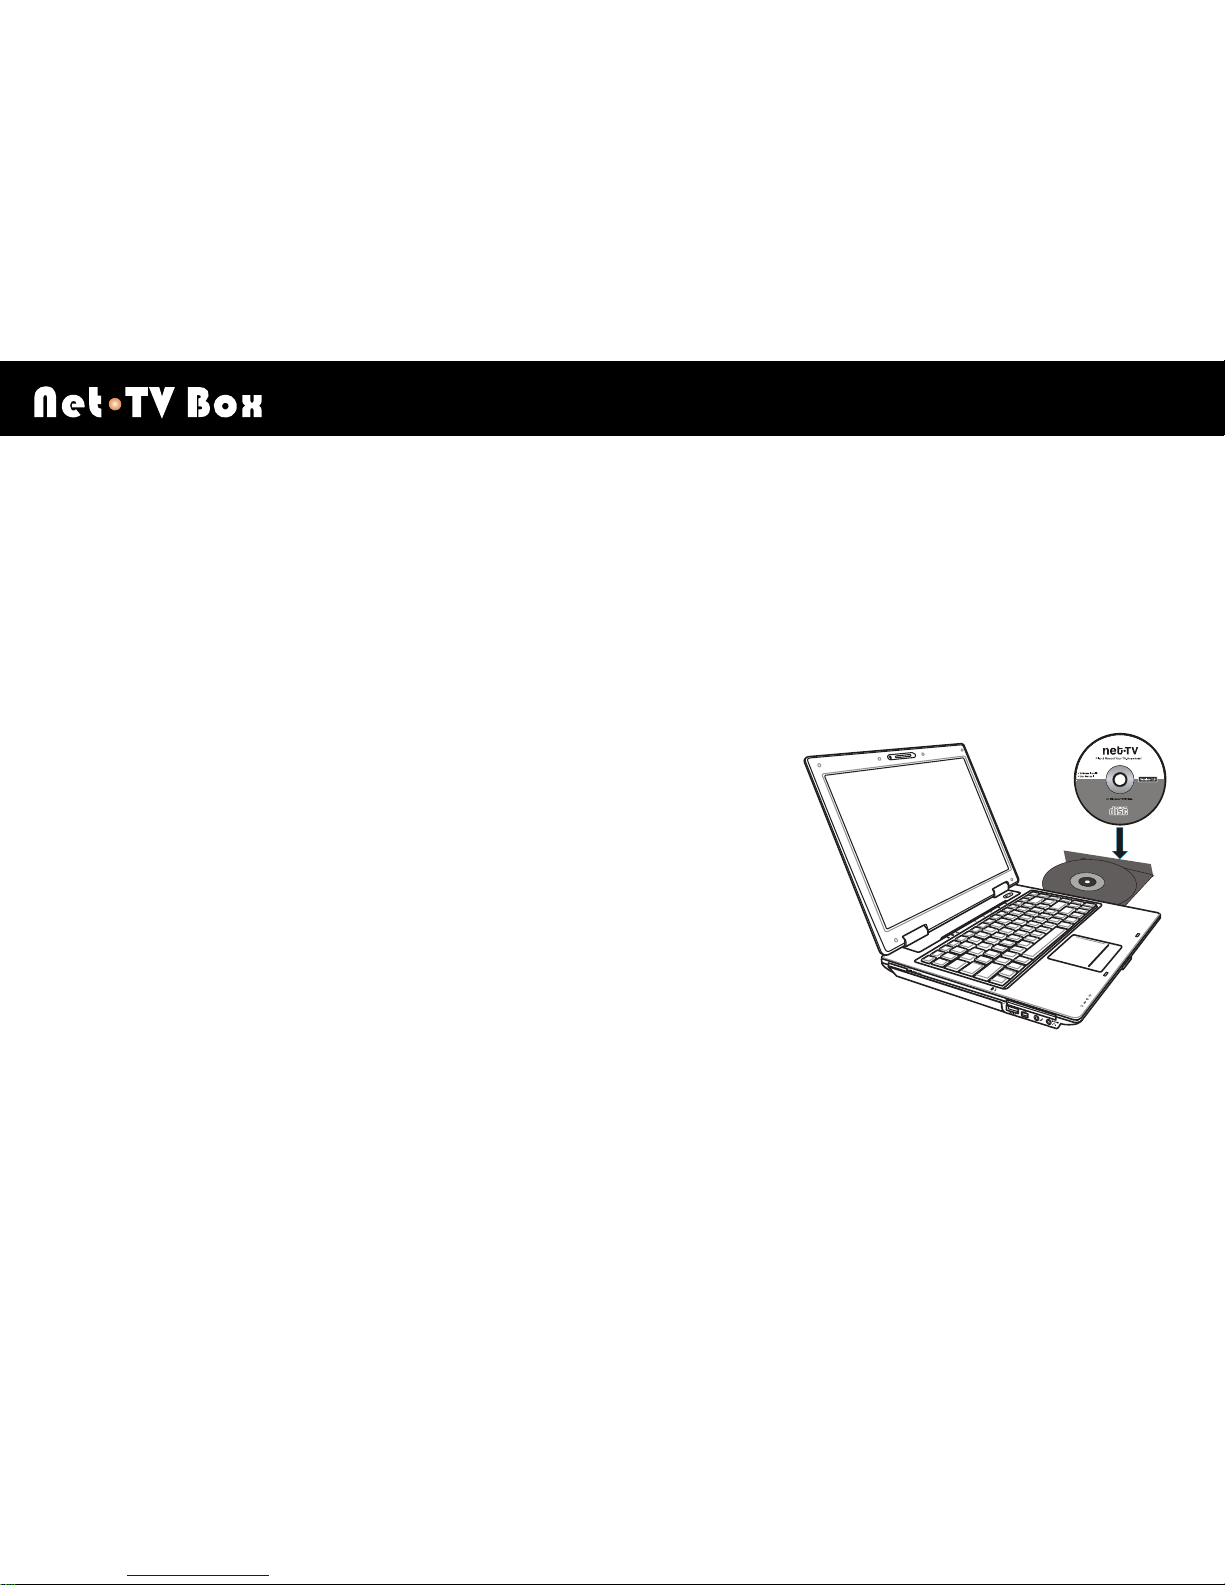
Software Installation
Before installing netTV Box, please make sure the package contents are in accordance with the product
checklist including all cables required for getting onto the Internet equipment via RJ-45 WAN Port. Ensure that your
PC meets the minimum system requirement and is equipped with a CD drive and a HDD of at least 100MB free
space.
Install netTV Player on your computer:
Under the Operating System of Windows XP / Windows Vista, put the
enclosed CD onto your CD drive and run the 「setup」file of the CD.
Installation
W X
21
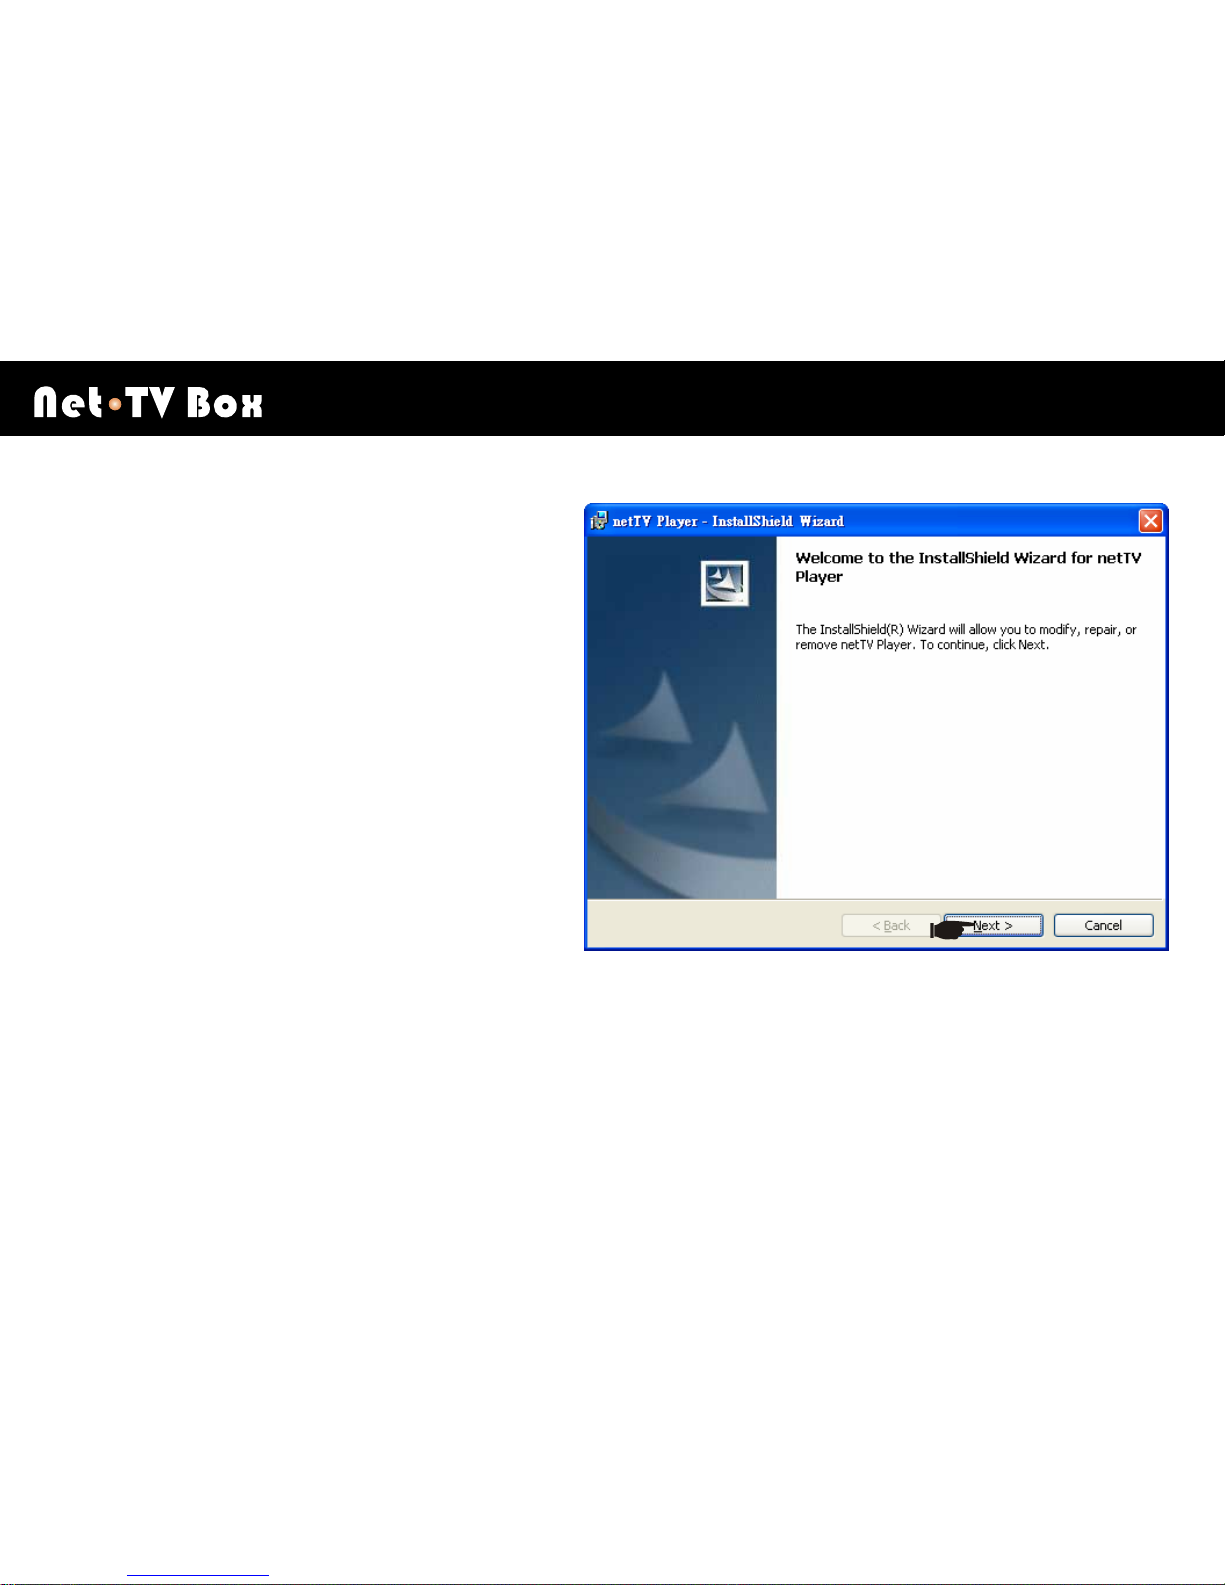
Follow the Wizard screens to complete the
installation:
1. This is the first screen you will see. Click the
Next to begin the installation. Following the
on-screen instructions.
There is a software license agreement that you
must accept to continue with the installation.
Also choose the destination folder where netTV
player will reside. It defaults to the location as
other programs as other programs installed on
your computer. Once the installation is complete,
the Wizard places a shortcut to netTV player on
your desktop. This is what you will double-click to
watch your netTV Box.
2. Click Finish to exit the installation Wizard.

Installation
W X
22
Remove Software
1. Click [Start ► Programs ►netTV ► netTV Player ► Uninstall netTV Player] to start to remove the software.
2. It will pop up dialog asked “Are you want to uninstall this product?”. Click “Yes” to uninstall the program.
3. When the program is completed, you have finished removing netTV player application software (Include
EasySetup software).
Network Configuration
W X
23
Network Configuration
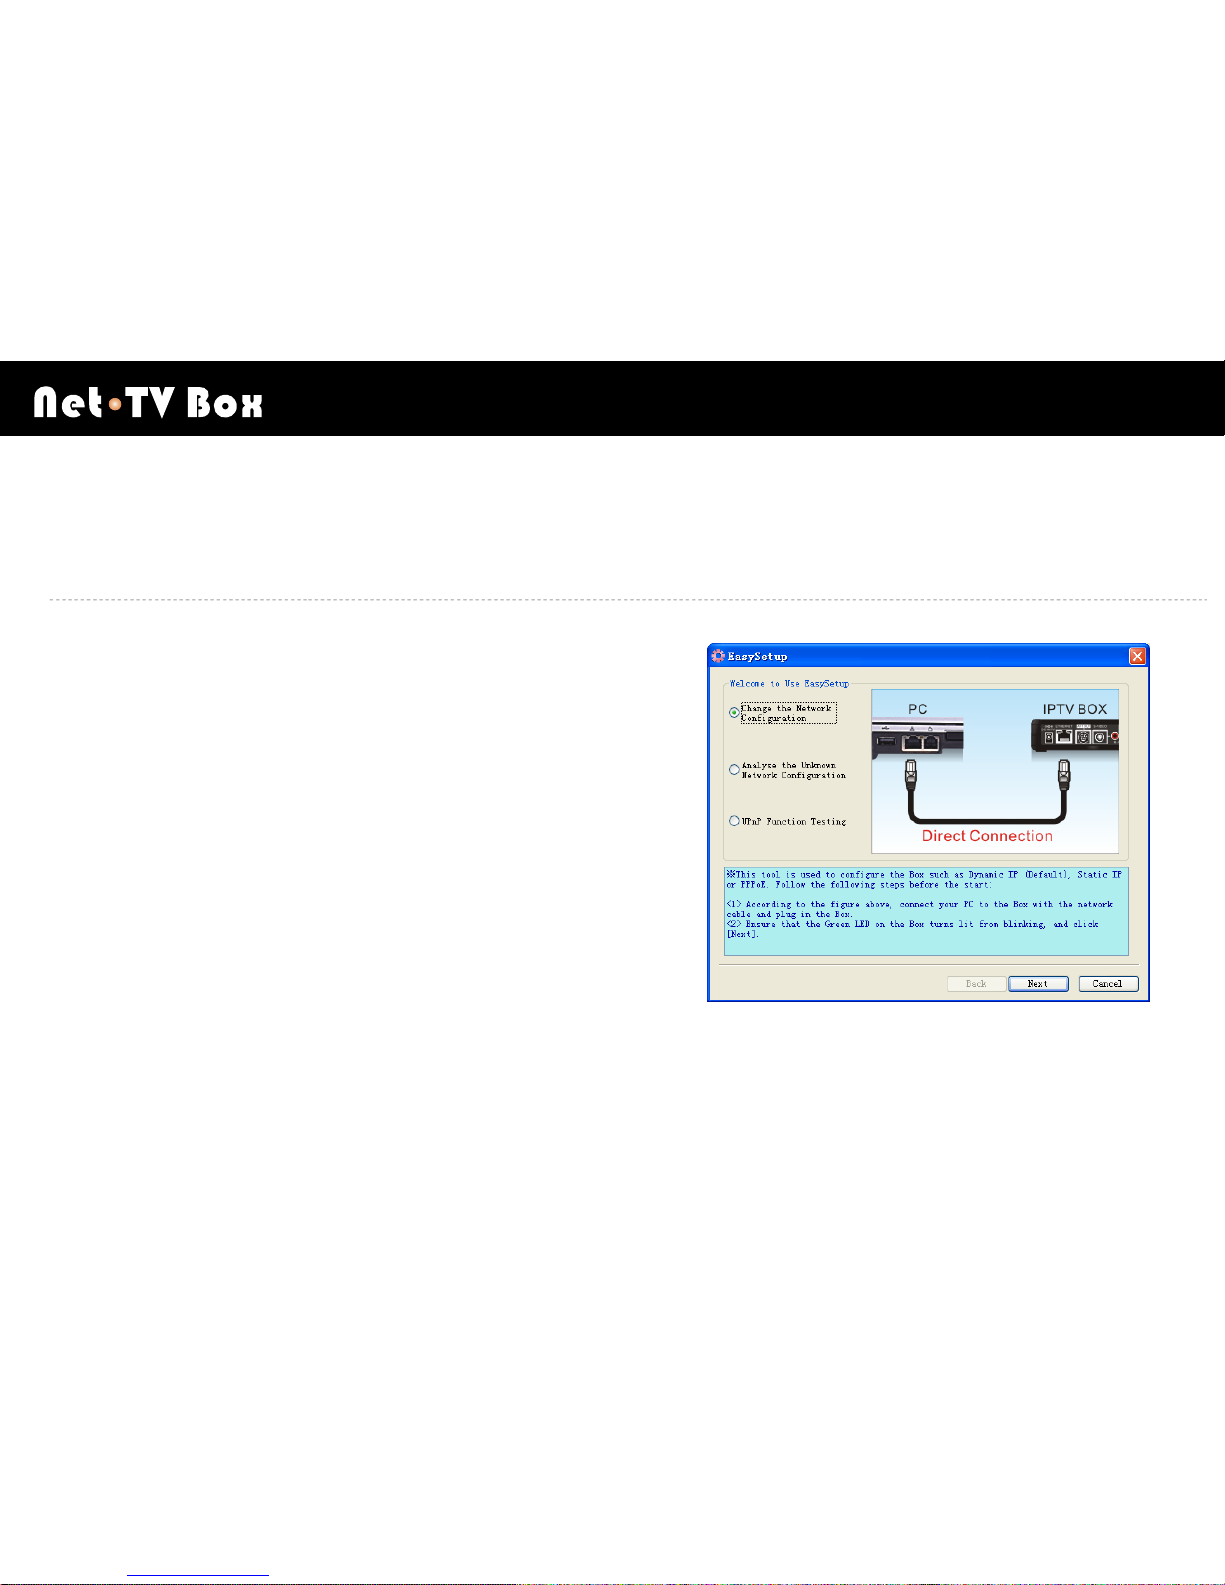
Easy Setup
Easy Setup helps you complete the Network configuration of netTV Box easily. If your network device doesn’t
support the plug-n-play function of netTV Box or you don’t know the network configuration that you are going to
install your Network Video Box in, you can use Easy Setup to complete the Network configuration of netTV Box.
Change the Network configuration
If network device doesn’t support the plug-n-play function of netTV Box, you must manually set the network
configuration of the netTV Box to connect to internet.
Before manually changing the Network configuration of the netTV Box, please install the software of the netTV Box
on your PC.
Network Configuration
W X
24
Step 1
Click [Start ► All Programs ► netTV ► netTV Player ► EasySetup] to run the Configuration Wizard and start the
configuration processes.
Step 2
Click and select the [Change the Network configuration] option.
Network Configuration
W X
25
Step 3
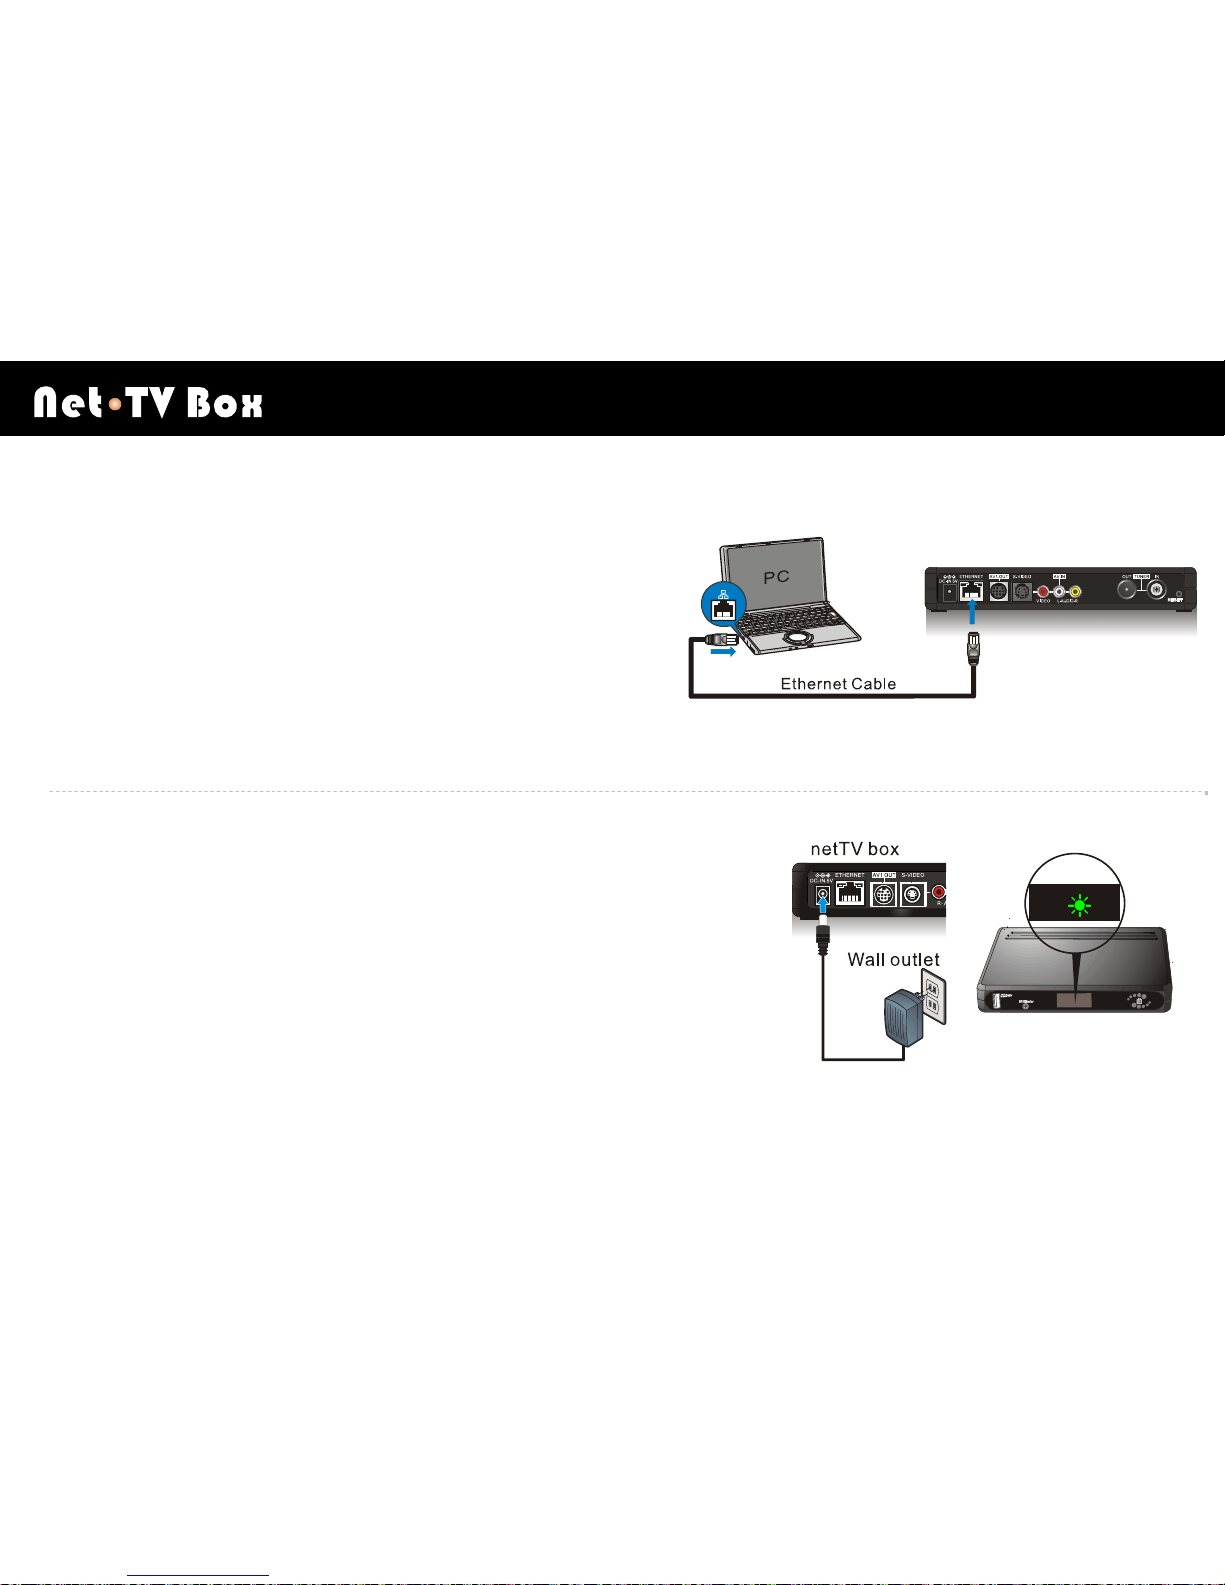
Please use the enclosed Ethernet Cable to connect the netTV
Box labeled in “Ethernet” to the PC which have installed the
software of the netTV Box. As following picture:
Step 4
Plug the enclosed power adapter to the netTV Box labeled in “DC-IN 5V”,
the other end plug in an electrical outlet, as following picture. The green
led comes on (constantly on for 8 seconds), and the light blinks a few
times as the netTV Box starts up (the blinking status will keep for about 12
seconds). Completed the start up, green led turns constant on from
blinking.
Network Configuration
W X
26
Step 5
Click [Next] to forward to the next step.
Step 6
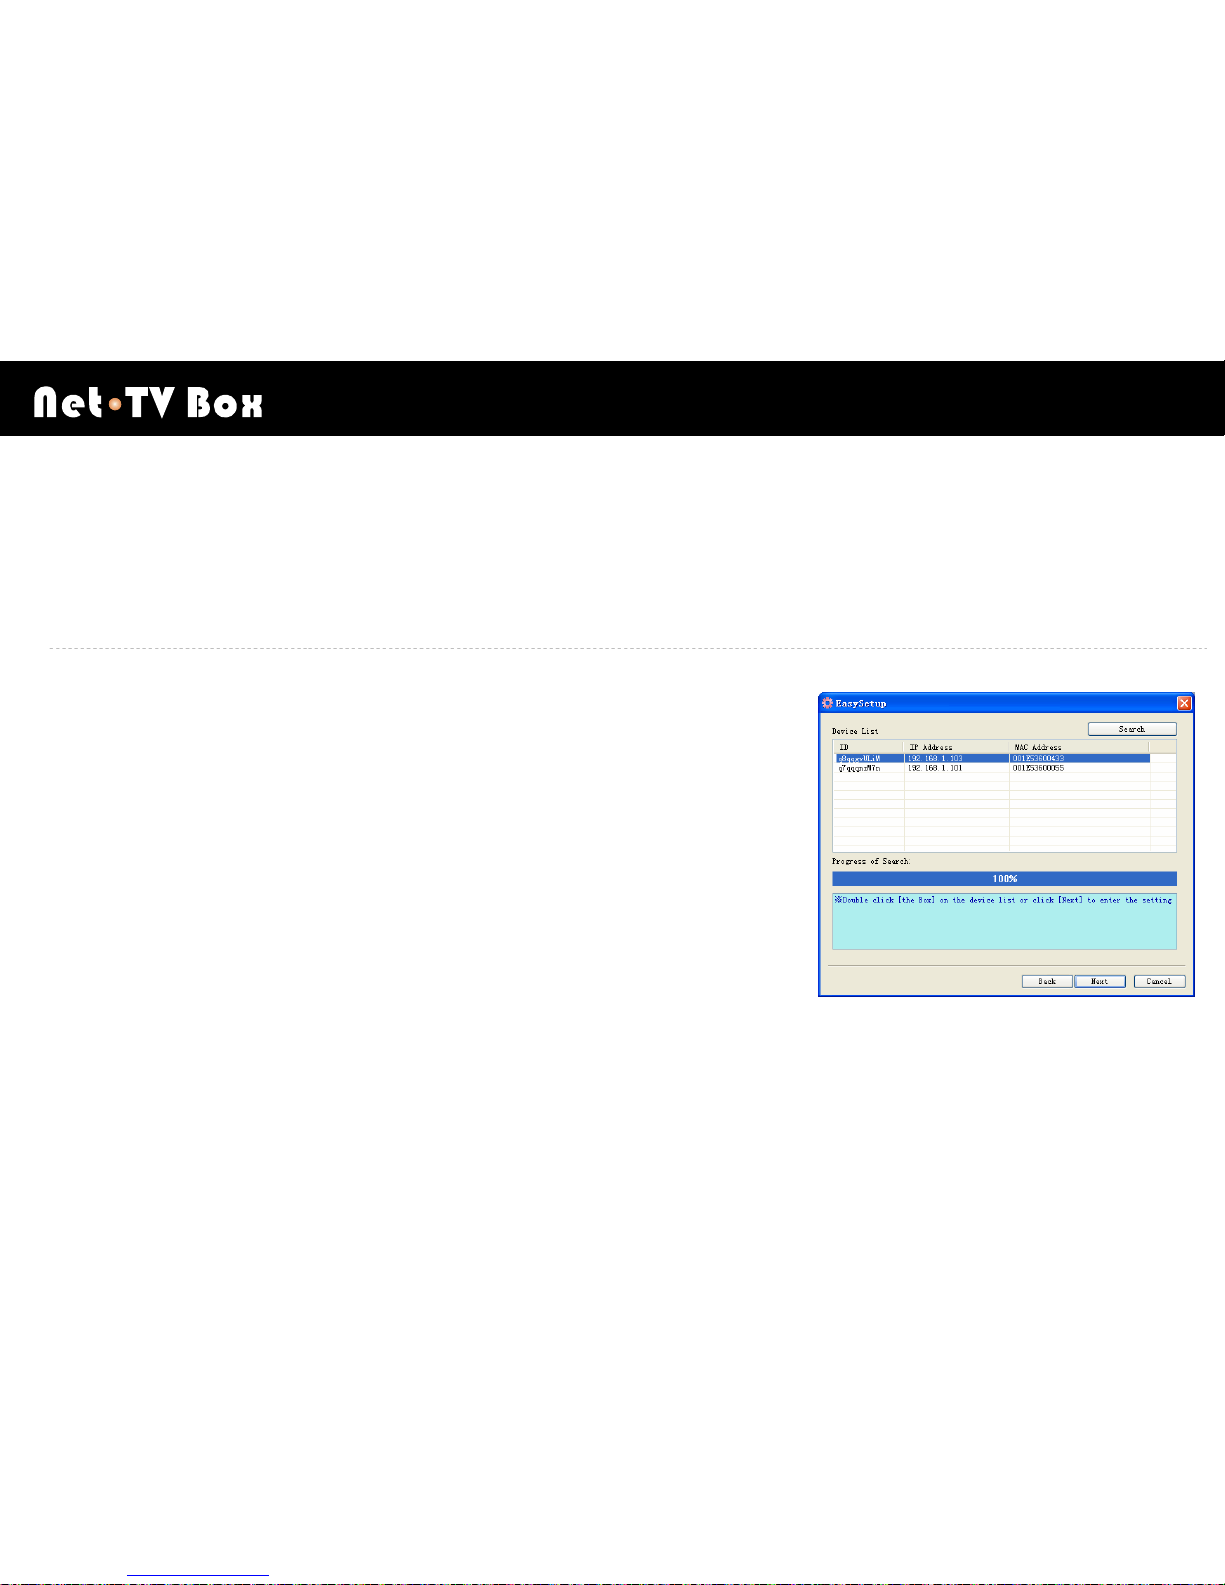
PC will search and list ID of netTV Box on the [Device List]. Select the ID of
the netTV Box that you are going to configure on the [Device List] and click
[Next] to forward to the next step.
(If PC can’t search any netTV Box, please follow the instruction to do RESET,
then search again. If PC still can’t search any netTV Box, please contact your
distributor for help. Don’t open the Box privately.)
Network Configuration
W X
27
Step 7
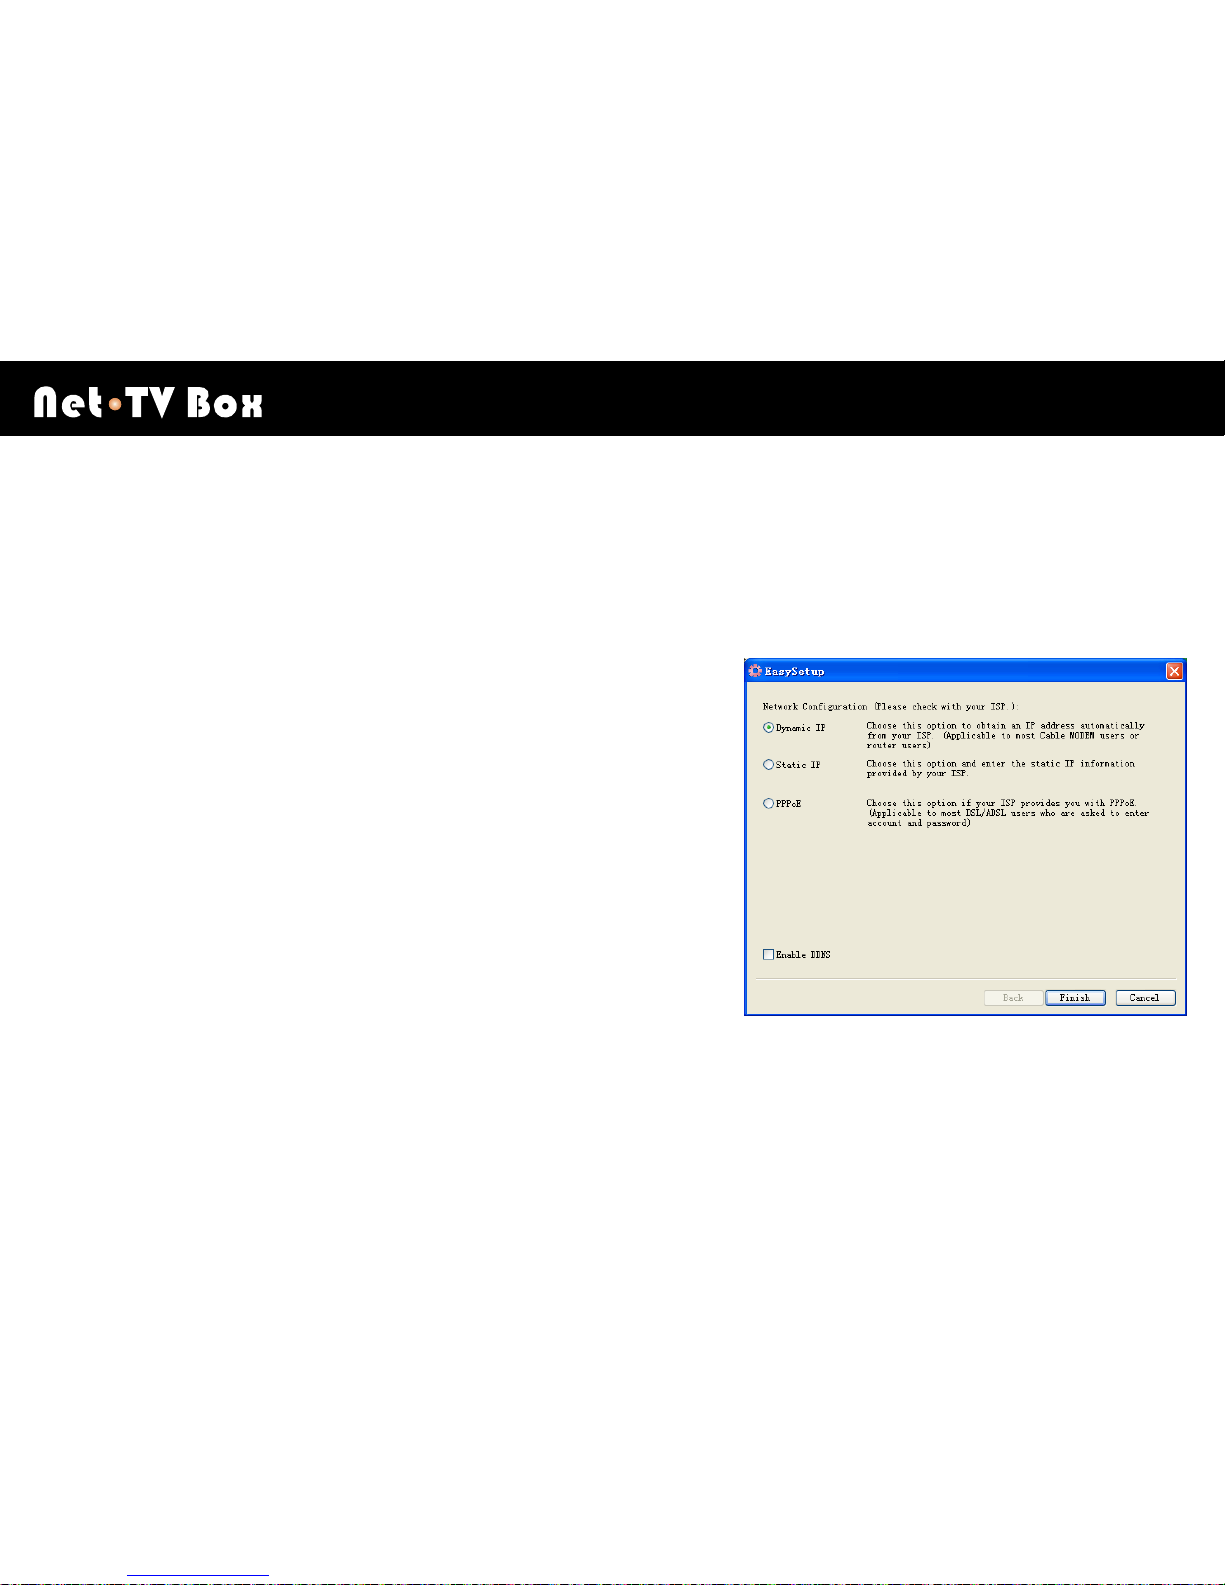
Then you will get into the [Network Configuration] page.
The page list three categories of network connections.
(If there are any questions, please contact your distributor to confirm the category of the network connection.)
a: Dynamic IP
Choose this option to obtain an IP address automatically from your
ISP. (Applicable to most Cable MODEM users or router users)
b: Static IP
Choose this option and enter the static IP information provided by
your ISP.
C: PPPoE
Choose this option if your ISP provides with PPPoE. (Applicable to
most DSL/ADSL users who are asked to enter account and password)
Choose connection category and enter the accordant data, click [Finish].
Network Configuration
W X
28
Step 8
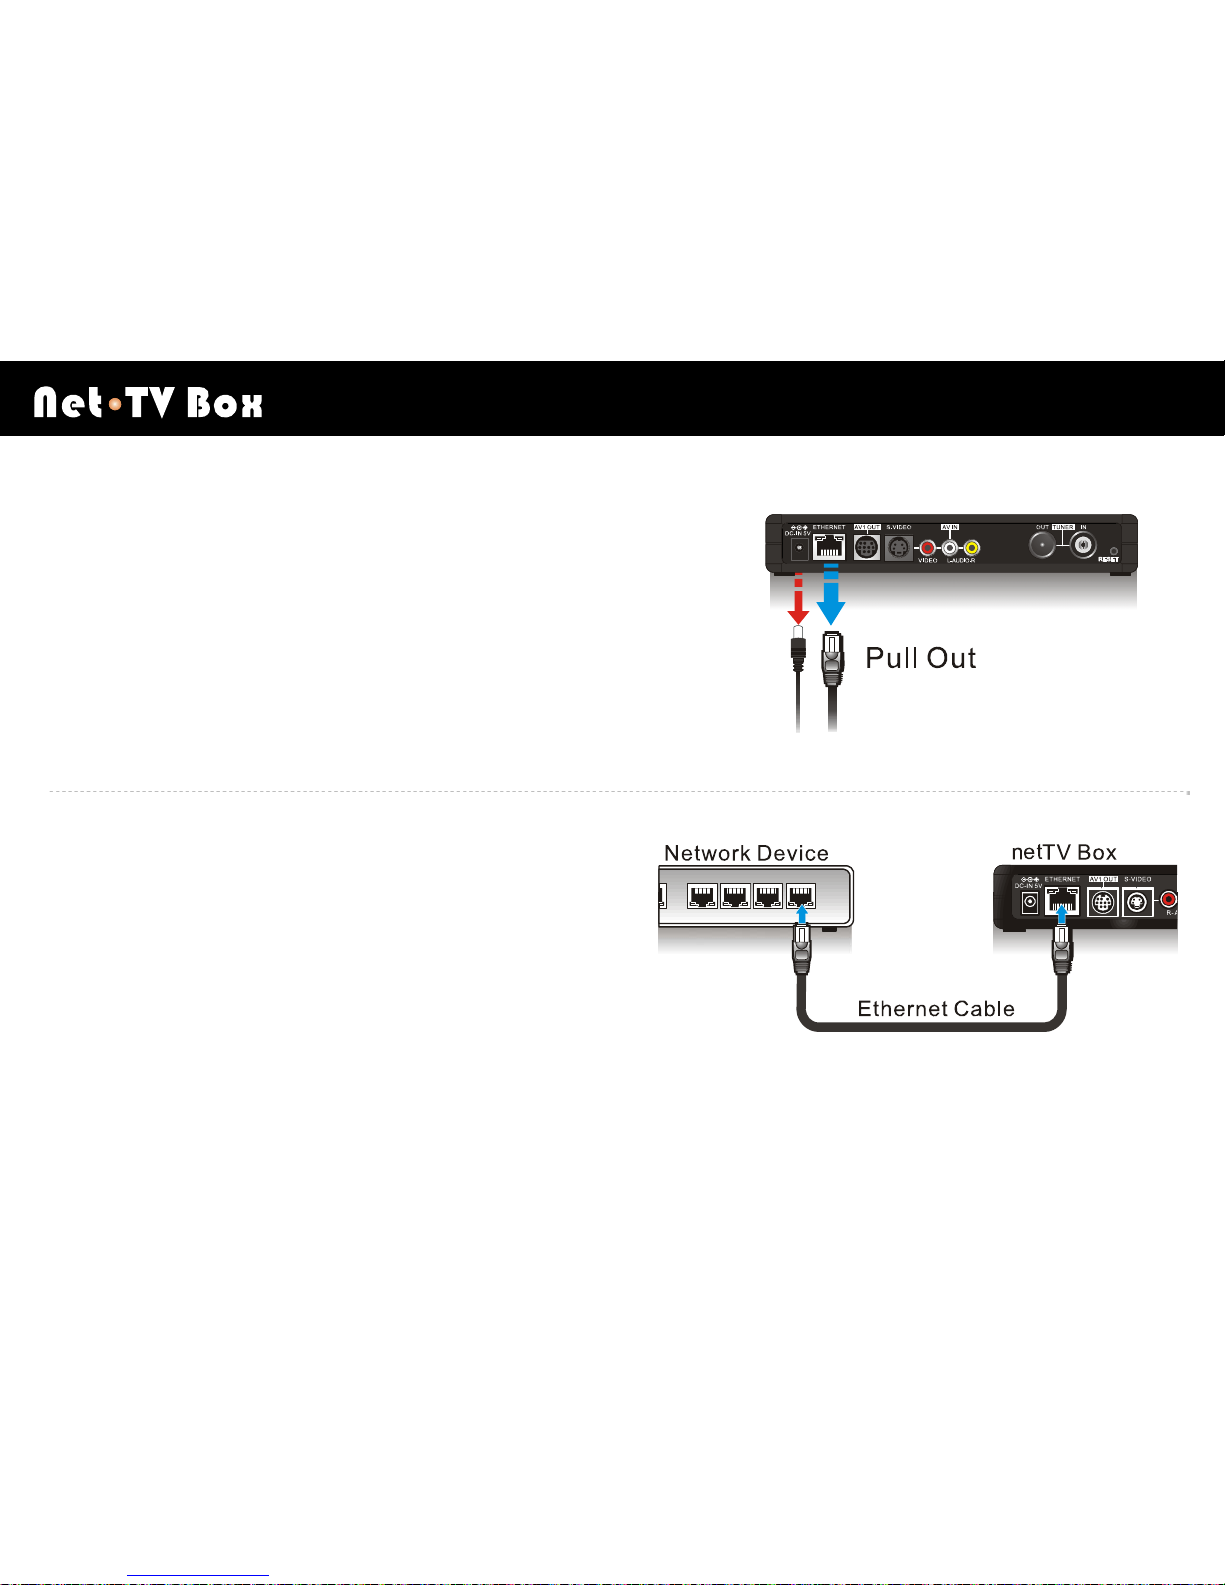
Unplug the power adapter from netTV Box and PC. As right picture:
Step 9
Use the Ethernet Cable to connect the netTV Box and
network device. Picture as below:
Network Configuration
W X
29
Step 10
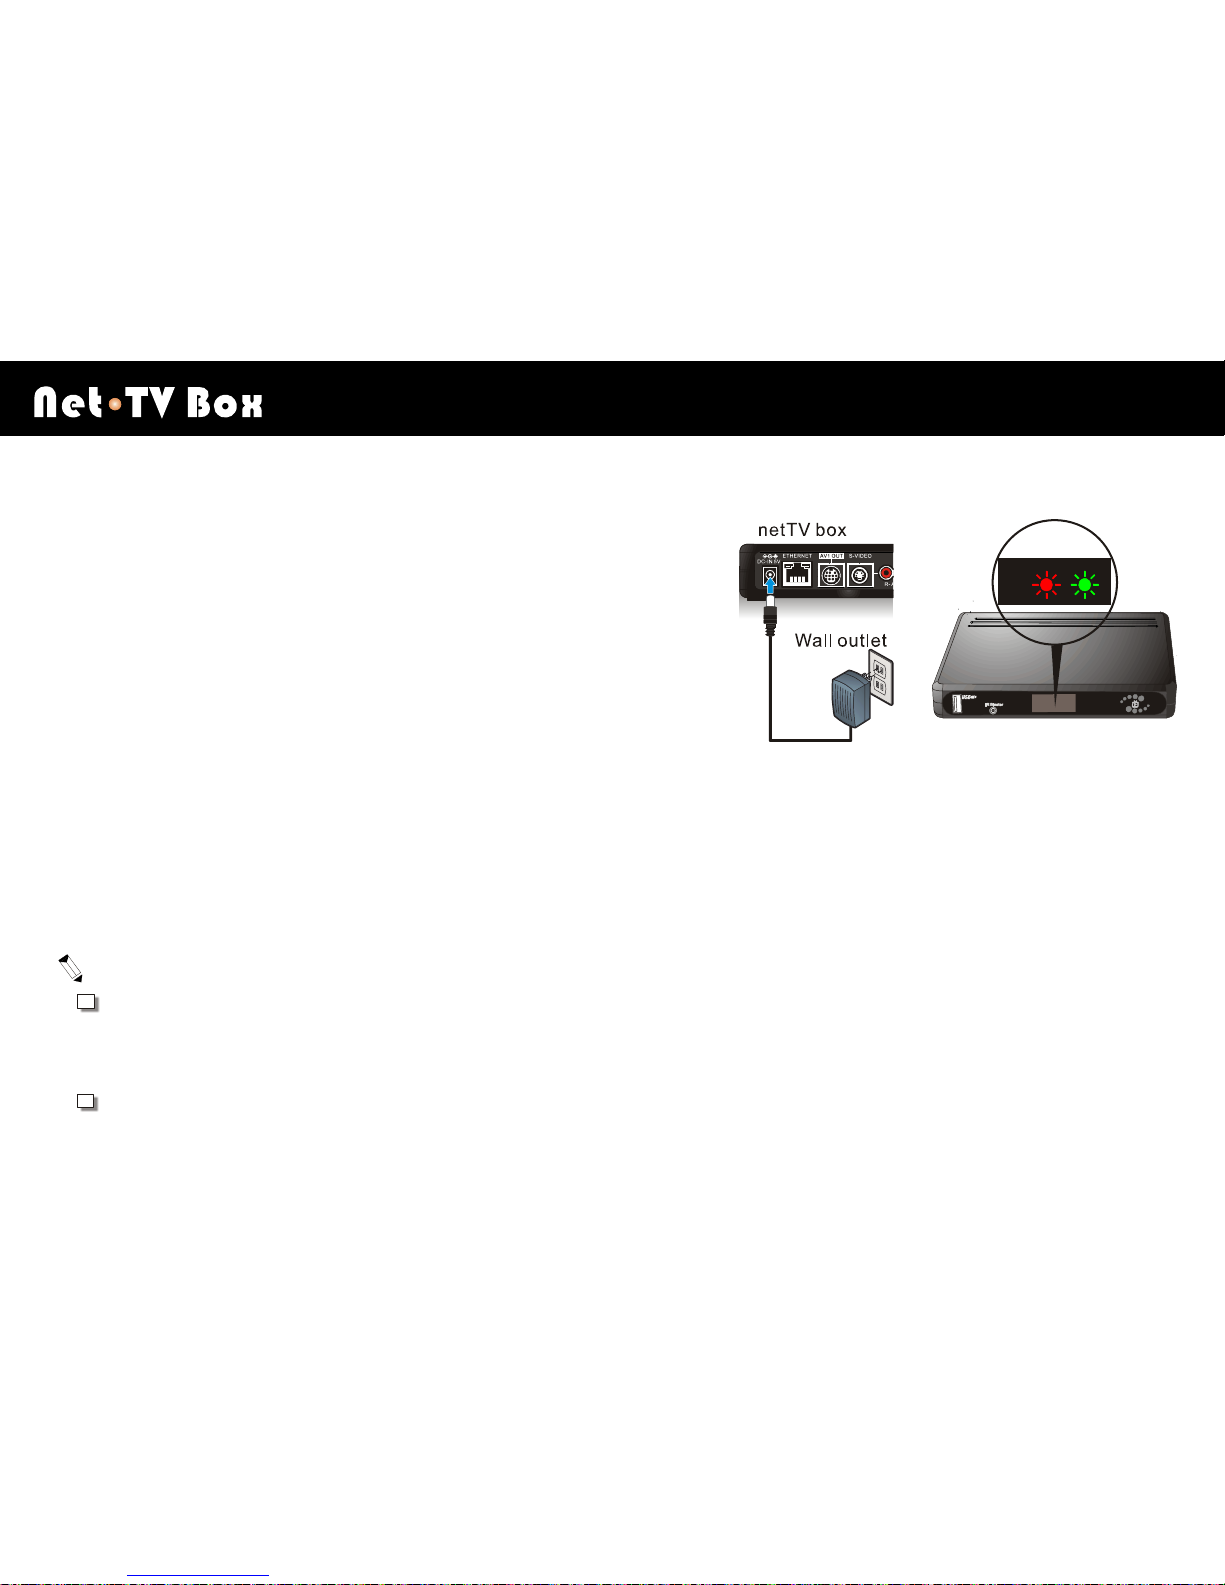
After completing the above steps, use enclosed power adapter to
plug in the netTV Box labeled in “DC-IN 5V”, the other end plug in
an electrical outlet.
Then green light comes on (constantly on for 8 seconds), and the
red light blinks a few times as the netTV Box starts up (the blinking
status will keep for about 12 seconds). Completed the start up,
green led turn constant on from blinking. Then the red light comes
on (It means that the Box has been connected to internet), you have finished the setting of the network connection of
netTV Box.
You could redo the [Easy Setup] anytime to change network configuration. But if the current network connection
of your netTV Box is [Static IP], you must do [Reset] to restore factory default first, then you can redo [Easy
Setup].
If the current network connection of your netTV Box is [DHCP] or [PPPoE], you can redo [Reset] with
EasySetup software directly to change the network configuration of netTV Box without [Reset].

Network Configuration
W X
30
If you want to use DDNS to login the netTV Box (It is not suggested
common users to use), select option [Enable DDNS], and click [Next]
to forward to the next step.
Select a DDNS server from the [Service Provider] (www.3322.org
& www.dyndns.com ) pull-down menu. Then you
should go to service provider's website to apply for your [Domain Name]. After getting your [Domain Name]
successfully, enter your [Domain Name], [Account] and [Password] accordingly. Click [Save] to save the DDNS data.
Click the [Finish] button to complete the configuration.

Network Configuration
W X
31
Analyze the unknown network configuration
If you don’t know the network configuration that you are going to install your Network Video Box in, please use the
method to complete the network configuration.
Before analyzing the unknown network configuration, please install the software of the netTV Box on your PC.

Network Configuration
W X
32
Step 1
Please use the enclosed Ethernet Cable to connect the
netTV Box labeled “Ethernet” to the PC which have
installed the software of the netTV Box. As following
picture:
Step 2
By through the above Ethernet port, config the PC which have installed the [Easy Setup] software to connect internet
(Please contact your ISP to know the way to internet of PC).
Step 3
Before analyzing the unknown network configuration, If the PC have more than one network card, please enable only
one network card which is related to the network configuration of the netTV Box. Please refer to below
“Disable/Enable network facility” for help.
Disable/Enable network facility
¾ Move your mouse cursor to the icon “My Network Places”
on the desktop, right click to enter the property

Network Configuration
W X
33
page.
¾ The page will list all your network facilities.
¾ Right click on the network facilities that you don’t need, select the “Disable” to disable the network facility.
¾ The disabled network facility will display in grey.
¾ Enable the disabled network facility: Right click on the disabled network facility, select “Enable”, then the network
facility will be restored for use.
※ After finishing the network configuration of the netTV Box, please enable the disabled network card before by
yourself.

Network Configuration
W X
34
Please confirm the PC can connect to internet again. Then you can continue the following install steps.
Step 4
Click [Start ► All Programs ► netTV ► netTV Player ► EasySetup] to run the Configuration Wizard and start the
configuration processes.
Step 5
Select the option “Analyze the Unknown Network Configuration”, and
click [Next] to start the network test.
In the process, you should exit the security software on your PC. After
the testing, you can restart the firewall software.

Network Configuration
W X
35
Step 6
Waiting for test result. After testing completed, it will pop up accordant window to display the testing result. Please
follow the instructions and steps to config network connection of the netTV Box.
1. Connect the internet failed, please confirm PC can
smoothly connect to internet (please contact your ISP).
After confirming PC can smoothly connect to internet,
click [OK] to exit the window, then select [Entire Test] to
reanalyze network configuration.
2. Please confirm you have closed the firewall and security software, click [OK] to exit the window, then select [Entire
Test] to reanalyze network configuration.

Network Configuration
W X
36
3. This network configuration is compatible with the UPnP. Please connect the Box to the network device with the
network cable, and plug in the Box. After the red LED of the Box is lit, the setting is completed. Click [OK] to exit the
setting page.
4. The network port is from router, but the router isn’t
compatible with the UPnP. Please click [Help] to obtain
more information on router’s UPnP settings.

Network Configuration
W X
37
5. This network configuration is PPPoE. Please disconnect the network cable between the PC and the network
device. According to the picture, connect the PC and the Box with the network cable, and plug in the Box. After the
green LED of the Box turns lit from blinking, the booting is completed. Click [OK] to move onto the PPPOE setting
page.
Please enter Account/Password, click [Finish]. Then disconnect the network cable and power cable of the Box.
Connect the network cable to the Box labeled “Ethernet”, then plug in the power, waiting for the booting completed,
the red led and green led of the Box are both lit. Then setting is finished.

Network Configuration
W X
38
6. Network configuration is Static IP, please disconnect the network cable of PC from the network device, according
to the picture, tack the network cable to connect the PC and the Box, and then connect the power adapter to netTV
Box’s port labeled DC IN. Plug the power adapter into an electrical outlet. Waiting for the booting completed, the red
led and green led of the Box are both lit. Then click [OK] to move onto the next step.
Enter the accordant information and click [Finish] to complete setting. Then disconnect the network cable and power
cable of the Box. Connect the network cable to the Box labeled “Ethernet”, then plug in the power, waiting for the
booting completed, the red led and green led of the Box are both lit. Then setting is finished.

Network Configuration
W X
39
UPnP Testing
Test the router whether supports the UPnP or not, that is to say, whether open the UPnP and connect to box
successfully.
※It’s an option action of setting network configuration of netTV Box. If you don’t use router, you can skip the action.

Network Configuration
W X
40
Step 1
Click [Start ► All Programs ► netTV ► netTV Player ► EasySetup] to run the Configuration Wizard and start the
configuration processes.
Step 2
Select option ”UPnP Function Testing ”, and then click [Test] to
start the testing.

Network Configuration
W X
41
Step 3
When test is finished, test result will be shown on the below column.
1. If test result is fail, it will show the red font as below picture:

Network Configuration
W X
42
2. If test result is success, it will show the red font as below picture:

Network Configuration
W X
43
The setting for UPnP-disabled or non-UPnP routers
1.
If your router is not UPnP enabled, please set the UPnP on in your router. (Note: with UPnP (universal plug and
play) function, it can easily setup and configure an entire network, enable discovery and control of network devices
and services.)
How to set the UPnP on in the router:
<EX: D-Link >
Step1
Open the web browser and type the IP address of the router.

Network Configuration
W X
44
Step 2:
Type “admin” in the User name and click OK button.

Network Configuration
W X
45
Step 3
Administration page will appear and go to the “Tool” tab in the horizontal navigation bar.

Network Configuration
W X
46
Step 4
Go to [UPnP setting] and select [Enabled]. Then click [Apply] to save your setting.

Network Configuration
W X
47
The netTV Box has to connect to the UPnP enabled router rather than the hub or switch after the router.
It is fine that either the router connected to the netTV Box or the router connected to the PC is UPnP enabled.
We suggest that the router connected to the netTV Box be UPnP enabled since you may use a different PC to
connect the netTV Box.

Network Configuration
W X
48
2. If your router is a non-UPnP router (or UPnP is enabled but it does not work). You could configure your router
using Port Mapping/Port Forwarding.
How to configure the router using Port Mapping/Port Forwarding:
<EX: D-Link >
Step1
Open the web browser and type the IP address of the router.
Step 2
Type “admin” in the User name and click OK button.
Network Configuration
W X
49
Step 3
Below you could find how to connect the network Video Box which is connected to a non-UPnP router (or UPnP is
enabled but it does not work).
Under the DHCP connection, since the Router will reassign an IP address to the device connected after the power is
restarted, and it may change the correspondence between the Network Video Box and the DMZ or Virtual Server,
you have to fix the IP of the Network Video Box by setting Static DHCP (or Address Reservation) on your router to
bind the IP assigned to the Network Video Box to its MAC address.
Note:
Static DHCP or Address Reservation may be given a different name from router to router.
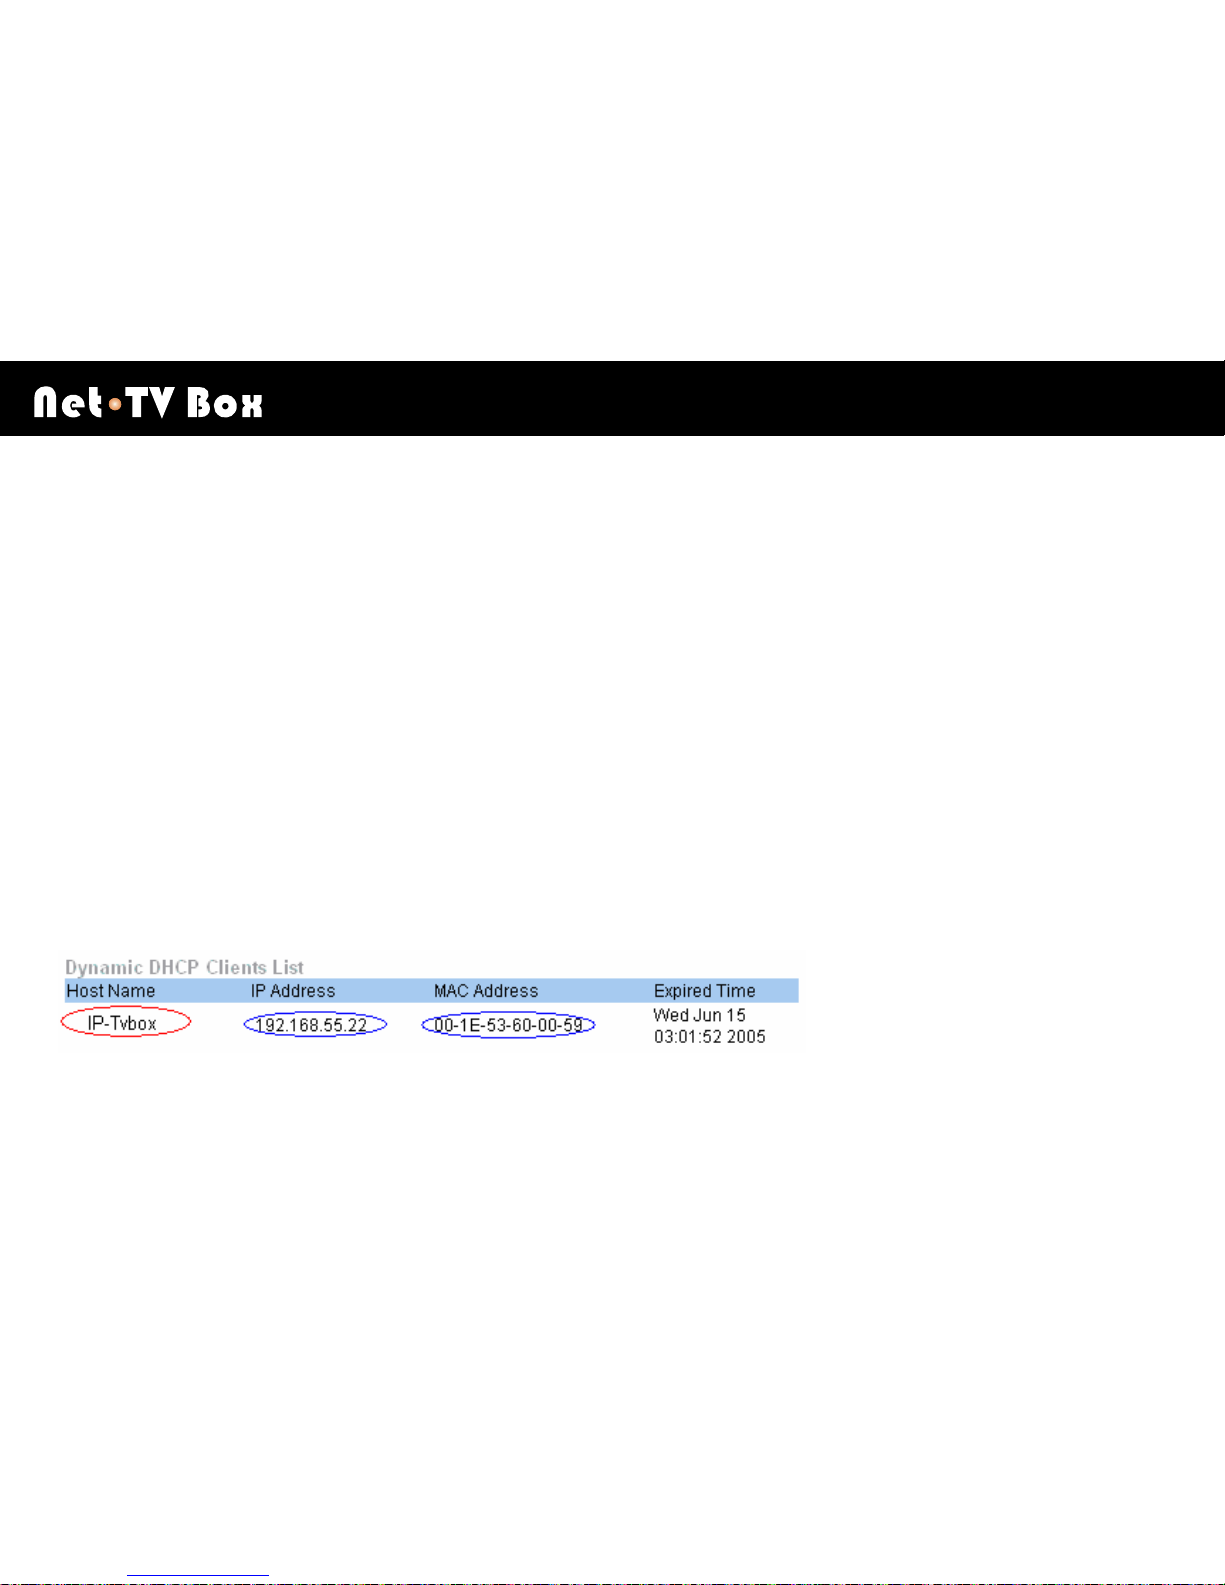
First of all, enter the setting page of your router and locate the DHCP setting. Select [Dynamic DHCP Clients List] to
check up the IP assigned to the Network Video Box and its MAC address. (Remarks: the MAC address of the
Network Video Box could be located on the sticker at the bottom of the Box.)

Network Configuration
W X
50
After learning the IP address assigned to the Network Video Box and its MAC address, you could then enter the
Static DHCP (or Address Reservation) setting page for the further setting

Network Configuration
W X
51
Step 4
Get internet access via the [Virtual Server] function of the router (Port Forwarding or Port Mapping).
Enter the setting page of the router, locate the [Virtual Server] setting page, select Enabled, fill the blank of Private IP
with the IP address of the box, select Both in the [Protocol Type] field, fill the blanks of [Private Port] & [Public Port]
with 5000 & 5020 , select Always in the [Schedule] field. Last, click the Apply button,add the 5000 port mapping
rule to the [Virtual Server list]. Follow the same steps, add 5020 port mapping rule to the [Virtual Server list] too.

Network Configuration
W X
52
Get internet access via the DMZ function of the router
You can also get internet access via the DMZ function of the router
Enter the setting page of the router, locate the DMZ setting page, fill the blank of IP address with the IP address of
the box and enable the DMZ function.

Network Configuration
W X
53
In the following network condition, you can’t connect the netTV Box.
If you are in the multistage subnet systems (two or more subnet systems), you can’t connect to netTV Box.
If your network configuration is that you have to get the internet access via authentication on a website (i.e., by
entering Account & Password), you could not connect the netTV Box under this kind of network configuration.
Getting to know netTV Player
W X
54
Getting to know netTV Player
For the initial operation
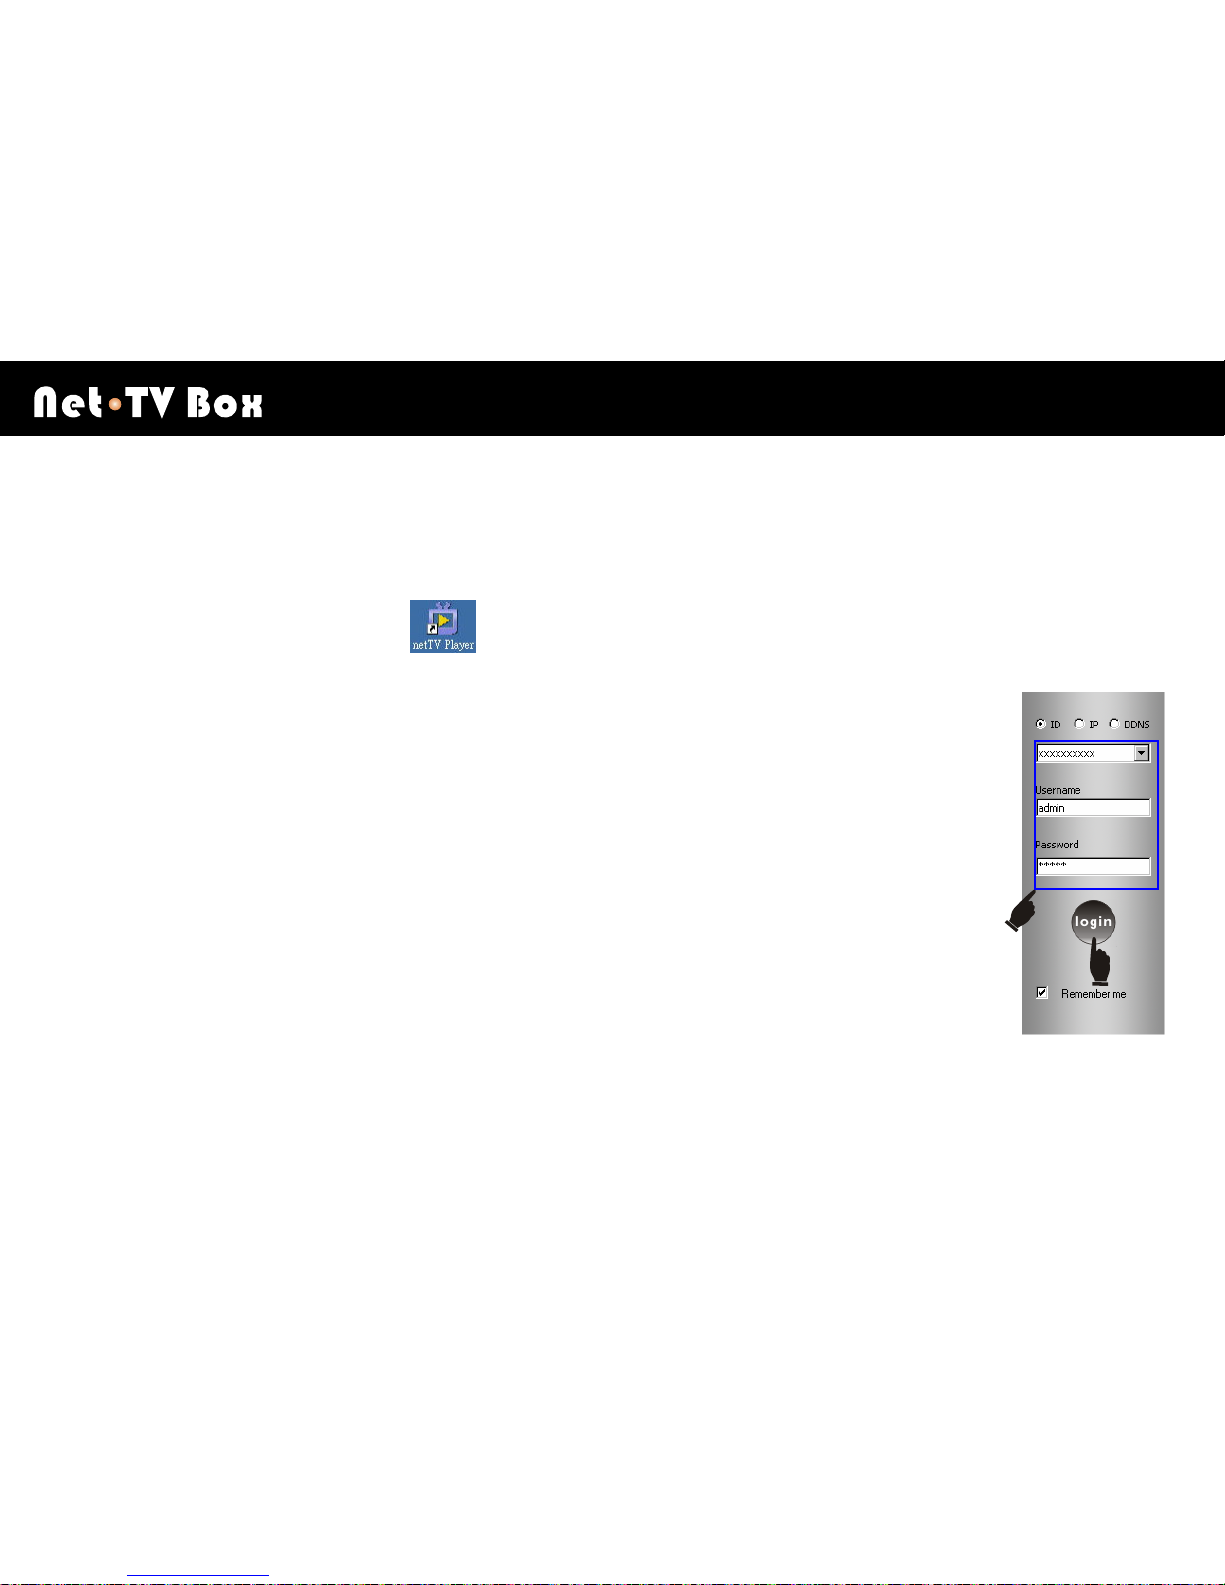
Double click the [netTV Player] icon on your desktop to launch your netTV Player.
Login
netTV Player can login the netTV Box from any place via network. The user can auto search the
remote netTV Box and build up connection by clicking 「login」.
The login window is attached to the right of the player window. It comes out along with the player
window.

Getting to know netTV Player
W X
55
Locate the ID, Username, and Password on the CD envelope. (If you
lost CD envelope, please find it from the sticker labeled on the bottom of
the unit, so you can have the ID no. for this box. And the default
Username and Password are admin.)
There are three ways to login, by ID or IP or DDNS. You can choose one
way for your like, enter the according data the same as in your
[EasySetup] setting. Under the three ways, the Username and
Password are all 「admin」 in your first login. (Note: The default
Username and Password are「admin」, and you could change Password on the setting page after login.)

Getting to know netTV Player
W X
56
Channel Scan
After login was success, it will show a window for channel searching.
Please press “Yes” to proceed.
Please set as following steps:
1. Choose in “Country or region” as where the box has been
install.
2. Select the corresponding signal setting,
3. And then click “Scan” to start.
After Channel Scan, click “OK” button to return the main panel to
enjoy your TV program.

Getting to know netTV Player
W X
57
Switching Video Inputs
While streaming from your netTV Box, select Video Input from the netTV Player main panel. Choose the input you
want to watch.
“TV CTRL+T”——Video source of Cable or Antenna input
“CV CTRL+C”——Video source of composite input
“SV CTRL+S”——Video source of S-VIDEO input

Getting to know netTV Player
W X
58
Main Panel Instructions
After you log in netTV Box successfully, you could switch the
video source between TV, CV and SV. The remote control
panel will pop up the corresponding interface in accordance
with the selected video source. (Notice: The remote control
panel of CV & SV can be used only after the IR Learning
Process.) The panel can display the bit rate under current
resolution. The user can manually adjust the bit rate according
to his network bandwidth condition.
The TV/CV/SV interface provides the recording function which
allows the users to record from the analog TV, digital TV and
other video sources (e.g., DVD).

Getting to know netTV Player
W X
59
Display the video playing time.
Video Source: Display and control the video source between TV/CV/SV.
Remote Control: Click to pop up the corresponding remote control panel (TV Remote Control, CV/SV Remote
Control).
Resolution & Bit Rate: Display the video resolution and the corresponding bit rate.
Record: Click to start or stop recording.
Snapshot: Click to capture a still picture.
Volume control.
Local video file: Click to open the file window; the user could select the file for playing.
Change skin colors
Settings: Click to pop up the property setting page.

Getting to know netTV Player
W X
60
Click to pop up the login window; click again to restore.

Getting to know netTV Player
W X
61
Remote Control Interface Instructions
There are two kinds of remote control panel, TV Remote Control Panel and CV/SV Remote Control Panel, under
different video sources, it will show accordant remote control panel.
1. TV Remote Control Panel
Display the current Channel Number.
Channel Number Button Area
Return to the previous channel.
After selecting channel number, press this button to switch
immediately. (Otherwise, the channel will be switched in 3 seconds of
default.)
Switch to the favorite channel set by the user. (Please refer to
Channel Setting Page for details). After clicking the button
marked , the button will be shown in red. Then you can switch
among the favorite channels that you have set by clicking the buttons
marked .

Getting to know netTV Player
W X
62
Channel Up & Channel Down

Getting to know netTV Player
W X
63
2. CV/SV Remote Control Panel
Power Button
Menu Button
Buttons Defined by Users
Number Buttons
Direction & OK Buttons
Volume Up & Down Buttons
Channel Up & Down Buttons
Playing Control & Record Buttons

Getting to know netTV Player
W X
64
This panel is not usable before experiencing the IR Learning Process. Conduct the IR Learning Process and save
the [*.rpl] file. After loading the file, you could then use the panel.

Getting to know netTV Player
W X
65
Mouse and keyboard operations
You can perform the following netTV Player operations with your computer’s mouse and keyboard.
Mouse operations
Items Operations
Scroll wheel up & down Volume control
Scroll wheel click Mute
Right click Right clicking anywhere inside the window displays a context menu as described below.

Getting to know netTV Player
W X
66
Right click menu
When you run netTV Box, you could move your mouse cursor and right click to open the pop-up menus. The
commands on this pop-up menu are the same with those on the control panel but you could find some more options.
The pop-up menus are shown right side.
Items Operations
Stop Stop the video
Pause Pause the video
Record Record the video
Snapshot Capture the still pictures
Schedule Scheduled Recording
Video Source Select the video source from CV1, CV2 and SV.
Language Select the language from English, Simplified Chinese and Traditional Chinese.
Aspect Select the aspect ratio from Free, 4:3 and Wide Screen.
Always on top Place the Player Window on top as always when several windows are opened.
Mute Mute the player.
Setting Open the property setting page.
OSD Enable or Disable the OSD.
Download file from box Download box’s USB record file to your PC
About netAV Player Show H/W and S/W version

Getting to know netTV Player
W X
67
Keyboard operation
Shortcut Key Operations
A Pop-up the property setting page.
B Pop-up the right-click menu.
F1 Open the online help system.
I Video input source selection.
M Mute or restore sound.
O Properties window.
[Space Bar] Play/Pause
W Full screen
P Capture image
V Schedule
X Exit
C Change Skin color
[Home] Record
[End] Stop
→ Volume UP
← Volume Down
↑ Channel Up
↓ Channel Down
+
Brightness Up
Getting to know netTV Player
W X
68
-
Brightness Down
(0~9) Jump to Channel Numeric keypad.
Ctrl + T Select CV1 video source.
Ctrl + C Select CV2 video source.
Ctrl + S Select SV video source.
[Enter] Confirm the channel selection.
D Enable or Disable OSD
R Pop up remote control panel.
T Always on top

Getting to know netTV Player
W X
69
Property Setting Page Instructions
Channel Page
This page implements the settings of the [Country or Region] selection, [Signal] selection, [Scan] channels, [Load]
channels, [Save] channels.
Functions Description
Country or
Region
Select where you are going to install the netTV
Box.
Select the TV signal reception mode including
Cable TV, Air TV and Frequency Scan.
Signal
Load Load the channel table you saved beforehand.
After you scan channels, you could set the favorite
channels by marking a channel and pressing the
[Favorite] button. Then, the left column of the
channel table will show a [Red Heart] logo, which
means the favorite channel setting is successful.
You could then set the next favorite channel in the
same way.
Favorite
Change the channel name into an
easily-remembered one.
Rename

Getting to know netTV Player
W X
70
System Page
This page implements the settings of the save [Path], [Snapshot format], [Language], and [Transform Port].
Functions Description
Snapshot
Path
Select the directory path to save the captured
files.
Record
Path
Select the directory path to save the recorded
files.
Snapshot
Format
Select the snapshot format from BMP and JPEG.
Language
Select the player language from English,
Simplified Chinese and Traditional Chinese.
Transform
Port
Define the transport port. Notice: Before you
define a transport port, please make sure it is not
occupied yet.

Getting to know netTV Player
W X
71
Video Page
This page implements the settings of the basic adjustment and video quality adjustment.
Functions Description
Adjust
Adjust the Brightness, Contrast, Hue and
Saturation. Press the 「Default」 button to get
back to the default values. Preview the effect
of the adjustment from the small screen on right.
Select Resolution depending on the network
bandwidth.(Please refer to the following
Resolution Table)
The default is 「Auto」. If you unchecked auto
adjust , you could then adjust [Frame Rate] and
[Bit Rate], Please adjust those values according
to your network bandwidth. If your bandwidth is
not enough, the adjustment may not be
successful.
Video Rate
Audio Encode can be selected for 32kbps or
64kbps.

Getting to know netTV Player
W X
72
Resolution Table:
Resolution PAL NTSC
QCIF 176*144 176*120
CIF 352*288 352*240
DCIF 528*384 528*320
Half-D1 704*288 704*240
D1 704*576 704*480

Getting to know netTV Player
W X
73
Remoter Page
This page implements the CV/SV IR Learning Process.

Getting to know netTV Player
W X
74
Functions Description
New
Press the 「New」 button to build a new [*.rpl] file. Before you can control a new remote
control via the remote control panel of the NetTV Player, you have to built a new [*.rpl] file to
save the corresponding buttons of your physic remote control. If you have more than one
remote control, you could conduct the IR learning process again to save more [*.rpl] files.
Learn
Press the 「Learn」 button to start the remote control button learning after building a new [*.rpl]
file. Learning Steps: (1) On the CV/SV Remote Control Panel of the NetTV Player, press a
button (e.g., 「1」). (2) Aim the physic remote control at the 「IR-IN」 on the LED Cap of the
netTV Box , and press the 「1」 button. (3) Check the list frame which shows the learning
information to see if this button Learning is successful. Repeat those 3 Learning Steps to
complete all buttons learning. You could test the button learning result on the small screen.
The [*.rpl] file will be saved automatically after you complete the Learning Steps.
Delete
Select a [*.rpl] file from the pull-down list. Press the 「Delete」 button to delete the selected
[*.rpl] file.
Load
Profile
Load the [*.rpl] file.

Getting to know netTV Player
W X
75
Schedule Page
This page implements the setting of the scheduled recording.
Functions Description
Add
Press the 「Add」 button to start the schedule
setting. You could select [One Time Only] or
[Any Days on a week]. Then, define [Start
Date], [Start Time], [Record Duration], [Video
Source] and [Channel]. Press 「 OK 」 to
complete the [Adding Task Schedule].
Edit
Press the 「Edit」 button to edit the schedule
information.
Delete
Press the 「Delete」 button to delete the selected
task schedule.
Remove All
Press the 「Remove All」 button to remove all the
task schedule.

Getting to know netTV Player
W X
76
User Page
This page implements the user management. You could locate the ID of the netTV Box here. Only the administrator
can access this page.
Functions Description
The ID number of the netTV Box. (ID is unique,
can’t be changed.)
ID
User List Display the current effective User Names.
Update List Update the [User List].
Add User
Press the 「Add」 button to add a new user of the
netTV Box. An [Add User] window pops up then.
Enter the new User Name & Password, and check
the Password. Press 「Add」 to complete [Add
User].
Only the administrator has the priority, the
administrator can add 5 users in all.
Press the 「Delete」 button to delete the selected
user. The [User List] will then be auto updated. Delete User
Only the administrator has the priority.

Getting to know netTV Player
W X
77
My Account Page
This page shows the current user information.
Click the 「Modify Password」 button, the [Modify Information] square will
pop up, Enter the [Old Password] and [New Password], and check New.
Press 「Modify」 to complete the [Modify Information] process.
Alias: You can login by using the alias that you have set. Enter the alias
that you want, and then click [OK] to complete alias setting. Next time you
can enter the alias to login. (If no setting alias for ID, its default alias is
same as the Box’s ID.)
When you are going to login, you can right click the ID column to pop up
the menu, and then select [Show Alias].
If you Select Delete this ID or Delete the all ID on the right clicked menu,
the corresponding alias of ID will also be deleted.

Getting to know netTV Player
W X
78
Local File Interface Instructions
Regardless of login, the netTV Player can choose to open the video file (*.mp4) from the local hard drive and play it.
When you play the local video, both the「Video Source」and 「Record」buttons are not available.
Display the video playing time.
: , Play or Pause the video; , Slow motion (0.5X,
0.25X);
, Stop the video; , Fast Forward (1X, 2X).
Time bar to display the playing status. Drag and drop the time bar
to browse the video contents.

Using netTV Player
W X
79
Using netTV Player
Settings of the Virtual Remote Control
Step 1
Click the setting button at the bottom of playing window.
Step 2
Select the [Remoter] page on [Property Setting]. (Note: There is [Remoter] page only under CV source and SV
source. There is no [Remoter] page under TV source.)

Using netTV Player
W X
80
Step 3
Click the [New] button to build a new profile name.
Step 4
Fill a profile name in the blank of [Enter Device Name], and click [OK].

Using netTV Player
W X
81
Step 5
The newly built profile name will show up in the following red rectangle
and click the [Learn] button in the following blue circle.

Using netTV Player
W X
82
Step 6
Here comes a virtual remote control shown as follows.
The profile name, [New] and [Delete] in the following red
rectangle will become concealed and uncontrollable.
[Start learning……] will show up in the message window in
the following blue Ellipse.

Using netTV Player
W X
83
Step 7
You could start learning the physical remote control key by key. For instance, you’d like to learn the
[OK] key of the physical remote control. Click the [OK] key of the virtual remote control. Then, all
the keys of the virtual remote control will be concealed. Aim your physical remote control at the LED
cap of netTV Box, and press the [OK] key. If the learning is successful, [KEY:xxxx Learn successful]
will show up in the message window, and the [OK] key of the virtual remote control will turn blue. The
[Power] key is an exception - it will turn red.
Step 8
According to the step above, complete learning all the keys of the physical remote control. While you are learning
one key but netTV Box doesn’t receive the IR signals, the [fail] message will show up. You merely need to press the
[failed-to-learn] key of the virtual remote control again, aim your physical remote control at the LED cap of netTV Box,
and press the [failed-to-learn] key of the physical remote control to learn this key again.

Using netTV Player
W X
84
Step 9
After the completion of learning all the keys, click the [Stop] button.
Click [OK] to return to the player.
On the virtual remote control, those which have been learned shown in white. Those which have not been learned
shown in gray.
If CV and SV connect to two different video devices, IR learning file will be two different “.rpl” files. When you are
under CV source or SV source, you want to use Remote Control Panel of the netTV Box to control CV source or SV
source, then you should select accordant IR learning files under “Profile” in [Remoter] page.

Using netTV Player
W X
85
To Load Profile
If your Box reset to factory default because some causes, the IR learning files will be clear up. In order to decrease
your fussy IR learning process, you can upload the “.rpl” files saved in PC to the BOX through the function “Load
Profile”. If you have more than one Box connected to same video devices, you can also upload the “.rpl” files that
have been learned to other Boxes, thus decreasing much repeat IR learning process.
1. Click [Load Profile] button on the [Remoter] page, then it will pop up the
menu displayed three selections: “From Box”, “From File” and “Upload To
Box”.
From Box: You can download the “.rpl” files from netTV Box to PC.
From File: You can find all the “.rpl” files from PC.
Upload To Box: You can upload “.rpl” files saved in to PC to Box.

Using netTV Player
W X
86
2. Select and click “From File”, find the “.rpl” file that you want to upload to the Box in the pop up dialog.
Frequency table and IR learning table of every netTV Box are all in the UserData file of each netTV Box in install
directory, named by each ID in the property file.
3. Find the property file named by ID which has finished IR learning in the UserData file. Open the file, selected the
wanted “.rpl” file.
4. Select and click “Upload To Box”, upload the selected “.rpl” file to the Box.
5. Then select and click “From Box”, download the IR table of Box to the
“.rpl” file of box which connected to PC.
Then click on the pull-down menu, you can see the IR table of the box
has been downloaded to the PC, select the accordant IR table of external
video source which is now connected to Box, thus you can use the remote
control panel to control the video device remotely.

Using netTV Player
W X
87
Different physical remote controls correspond to different IR learning files. The names of the files are given by the
users. One file can only be used to control the corresponding video device. You have to select a correct file to
control the corresponding video device.

Using netTV Player
W X
88
USB Recording Device
1. Select the [Schedule] page out of the following [Property Setting]
page.
2. Select [To Box (USB)] on the [Schedule] page and start to
schedule the USB Recording.
3. Select the time zone of your netTV Box on the pull-down menu
of [Time Zone].
If time isn’t adjusted to the corresponding Time Zone, please
manually adjust the Box’s time to the current local time, then
click [Update] to update the Box’s time.
4. Click the [Add] button to add a USB recording task.
The external connect USB device must be FAT32 format. If there is no external storage on the Box or the Box can’t
recognize the external storage, the [Add] button shown in gray, it will take no effect.

Using netTV Player
W X
89
5. Select [Once] for one-time recording and this USB recording task
will be automatically terminated after it is completed. Select [Times]
for regular recording by Daily [Everyday] or [Weekly].
The selection [Recycling record mode] of bottom will be enabled when you select [Times]. When external USB
device’s free space isn’t enough for new recording file, netTV Box will automatically delete the foremost recording files
to accommodate the new recording files.

Using netTV Player
W X
90
6. Set the [Start Date] and the [Start Time].
The [Start Time] must be set 3 minutes later of Box time, or you can’t add recording task. (When select [Times],
[Start Time] can’t be control.)
7. Select a disk partition on the pull-down menu of [Disk] (i.e., only FAT32 formatted partitions are listed), and its
available capacity will be indicated on [Capacity].
8. Set your recording time period in [Video].
9. Name your recording file on the blank of [File Name].
10. Select a video source for recording in the pull-down menu of [Video].
11. Select [Add] to complete your settings. The newly added task will show up on the following scheduled task list.
You could click [Add], [Edit], [Delete] or [Remove All] to add a task, edit the selected task, delete the selected task
or remove all tasks.
Every 2 hours come into being a recording file. For example, you record 3 hours, it will automatically come into being
2 files, one file is 2 hours long, and the other is 1 hour long.

Using netTV Player
W X
91
Download/Playback the recorded files from netTV Box
1. Login the netTV Box. Right click the image window and select [Download/Playback file from netTV Box] on the
popup menu.
2. On the setting page, [Box file list] will list down all the recorded files. If
there is no USB device connected to the netTV Box or the connected
USB device has no recorded files, the [Box file list] is empty.
3. Select “Download” and the wanted file, click [ADD>>] to add the file to
the “Download list”.
4. The Remove Task: You could remove the files from [Download list].
Select a to-be-removed file on [Download list], and click the [Remove]
button.
5. Click the [OK] button to confirm the file download task.

Using netTV Player
W X
92
6. If there are too many recorded files and they occupy too many USB storage space, you could delete the selected
files from your USB device remotely. You could select a single file and click the [delete the selected item] button
at the bottom to delete the selected file. You could also check [Select All] to select all files and click [delete the
selected item] to delete all files on the USB device.
7. Select “Playback” in the top and the wanted playback file, click [ADD>>] to
add the file to the “Download list”, and then click [OK] to playback the
video file remotely on the internet.
Play the recording file of higher solution need higher upload bandwidth.

Using netTV Player
W X
93
Favorite Channel Setting
1. After scanning the TV channels, you could set the channels you
like for [Favorite Channels]. For instance, you like Channel 2
and would like to set it for your [Favorite Channel]. Select
Channel 2 in the channel list.
2. Click the [Favorite] button. Here comes a [Red Heart] at the
beginning of Channel 2. Then, Channel 2 becomes your
[Favorite Channel].
3. Follow the same steps to set other channels you like for your [Favorite Channels].

Using netTV Player
W X
94
4. After you exit the [Channel] setting page, pop up the virtual remote control. If you would like to use the functions
of [Favorite Channel], click
on the virtual remote control and the [Heart] will turn red into . It proves
that the functions of [Favorite Channels] have been enabled.
:[Ordinary] Mode: [CH+] and [CH-] could be switched among all the channels.
:[Favorite Channel] Mode: [CH+] and [CH-] could be switched only among the favorite channels set
hereinbefore.
5. After the [Favorite Channel] mode is enabled, you could only switch [CH+] and [CH-] among the favorite
channels set hereinbefore. For instance, Channels 2, 8 and 10 are set for your [Favorite Channels]. After the
[Favorite Channel] mode is enabled, you could only switch [CH+] and [CH-] among Channels 2, 8 and 10. Just
click
to exit the [Favorite Channel] mode and return to of the [Ordinary] mode.

Firmware Update
W X
95
Firmware Update
To upgrade the netTV Box firmware, follow these instructions:
When you upgrade the netTV Box firmware, you will lose current configuration settings, so make sure you backup
the netTV Box settings before you upgrade its firmware.
Step 1
Download the latest firmware upgrade file from the manufacturer website.

Firmware Update
W X
96
Step 2
Login netTV Player, right-click the image window to get the pop-up menu
shown as the following figure. Then, select [About netTV Player] on the
pop-up menu.
Step 3
Click the [Update] button on the following pop-up window.

Firmware Update
W X
97
Step 4
Click Browse to view the folders and select the downloaded file.
Step 5
The Firmware update procedure is illustrated below, totally 2
phases.

Firmware Update
W X
98
During the firmware update, do NOT switch off the product itself or cancel the activity, otherwise the product can be
out of order. We won’t take responsibility for this crisis.
Step 6
After the completion of the firmware update, the following window will pop up.
Step 7
It takes about 1 minute for the product itself to restart. After that, please re-login and
redo [Step 2] to check out the Firmware Version. If the Firmware Version is not correct,
please redo [Step 2] to [Step6].

Troubleshooting
W X
99
Troubleshooting
¾ Install and setting
Q: How many computers can software of netTV Box be installed on?
A: There is no sum limitation of software installation, but at the same time only one user can login the netTV Box.
Q: Does the netTV Box need big bandwidth?
A: As long as the uplink in the place where netTV Box is installed is above 256kbps, you can enjoy the smooth video
service.
Q: Does the netTV Box also support ADSL or Cable Modem in the home? Whether need Static IP?
A: netTV Box supports many network connect ways, i.e., PPPoE、DHCP、Static IP and so on, and also support all
kinds of network environment in the current market. Needn’t static IP, dynamic IP is ok for installation.
Q: How to update the Firmware of the netTV Box?
A: Download the new version of firmware, then login the netTV Box,
right click the playing window to pop up the function menu, then select [About netTV Player], select [Update] to
find the Firmware that you have downloaded to your PC to update Firmware.(Please refer to chapter “Firmware
Update” for more information.)

Troubleshooting
W X
100
Q: Which OS does playing software of netTV Box support?
A: netTV Box support Windows XP and Windows vista OS at the present time.
 Loading...