

Please contact us if you need further assistance:
Website: http://furiousfpv.com/
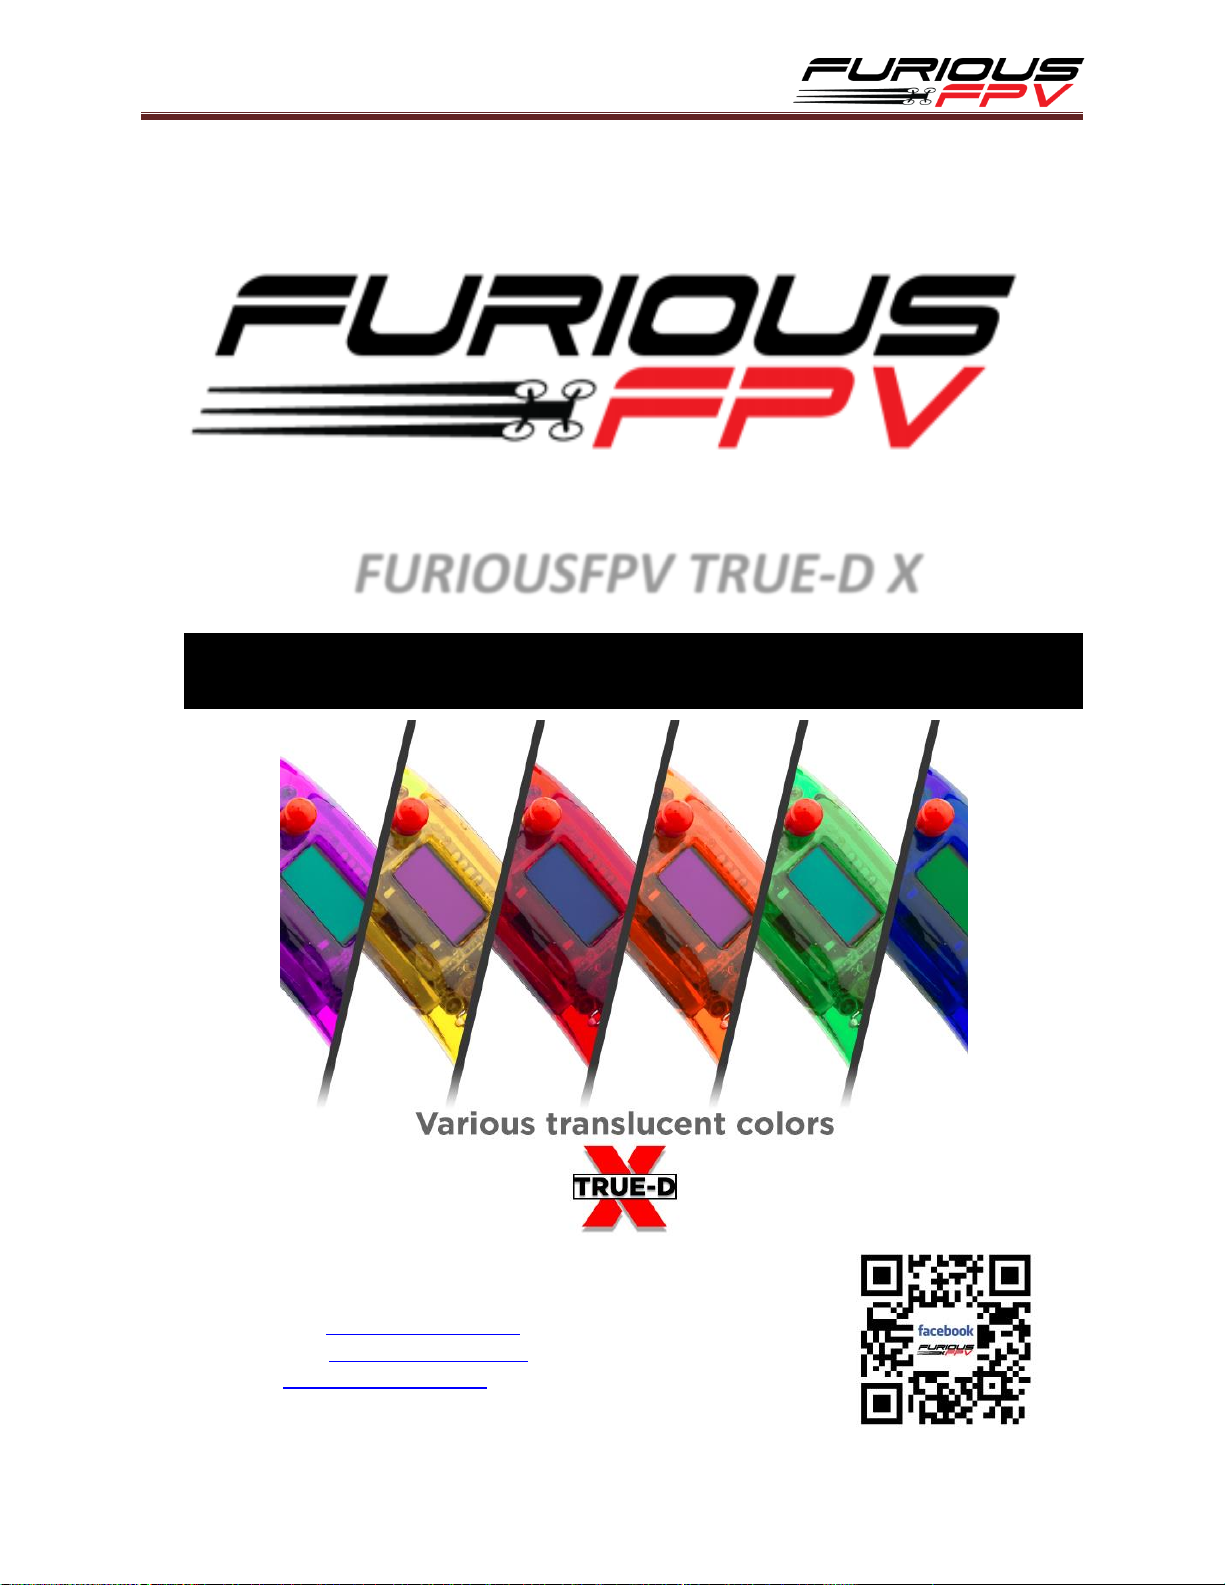
FURIOUSFPV TRUE-D X
USER MANUAL
Tech support: tech@furiousfpv.com
Sales support: sales@furiousfpv.com
1

Contents
Specifications ................................................................................................................................................ 3
Product Layout ............................................................................................................................................. 4
Usage ............................................................................................................................................................ 5
Logo Screen ....................................................................................................................................... 7
Active Channel .................................................................................................................................. 7
Saved Channels ................................................................................................................................. 8
All Channels ....................................................................................................................................... 8
Smart Search ..................................................................................................................................... 8
Band Scanner .................................................................................................................................... 9
Settings .............................................................................................................................................. 9
True-D X mode: ............................................................................................................................. 9
Auto Lock BTN: ........................................................................................................................... 10
Trackball mode: .......................................................................................................................... 10
About: ......................................................................................................................................... 10
Restore: ....................................................................................................................................... 10
Save & Exit: ................................................................................................................................. 11
OSD Layout ...................................................................................................................................... 11
Lap Timer ........................................................................................................................................ 11
Bluetooth ........................................................................................................................................ 13
Find Mode ....................................................................................................................................... 14
Support ....................................................................................................................................................... 14
2
Specifications
Goggles type
How to use
Fatshark HDO
Plug & play
FatShark Dominator V1, V2 & V3
Modify according to the tutorial clip link
below:
https://youtu.be/QGKLciPJlAM
FatShark HD V1, V2 & V3
Antenna Connection: SMA Female connector
Working Frequency: BT:2402-2480MHz, RX:5GHz
Input Power: 5V-500mA
Number of Channels: 48 Channels
CE/FCC certified
Compatibility:
Package includes:
- True-D X
- Replacement trackball
- Adapter board
- Ribbon cables
- Manual
3
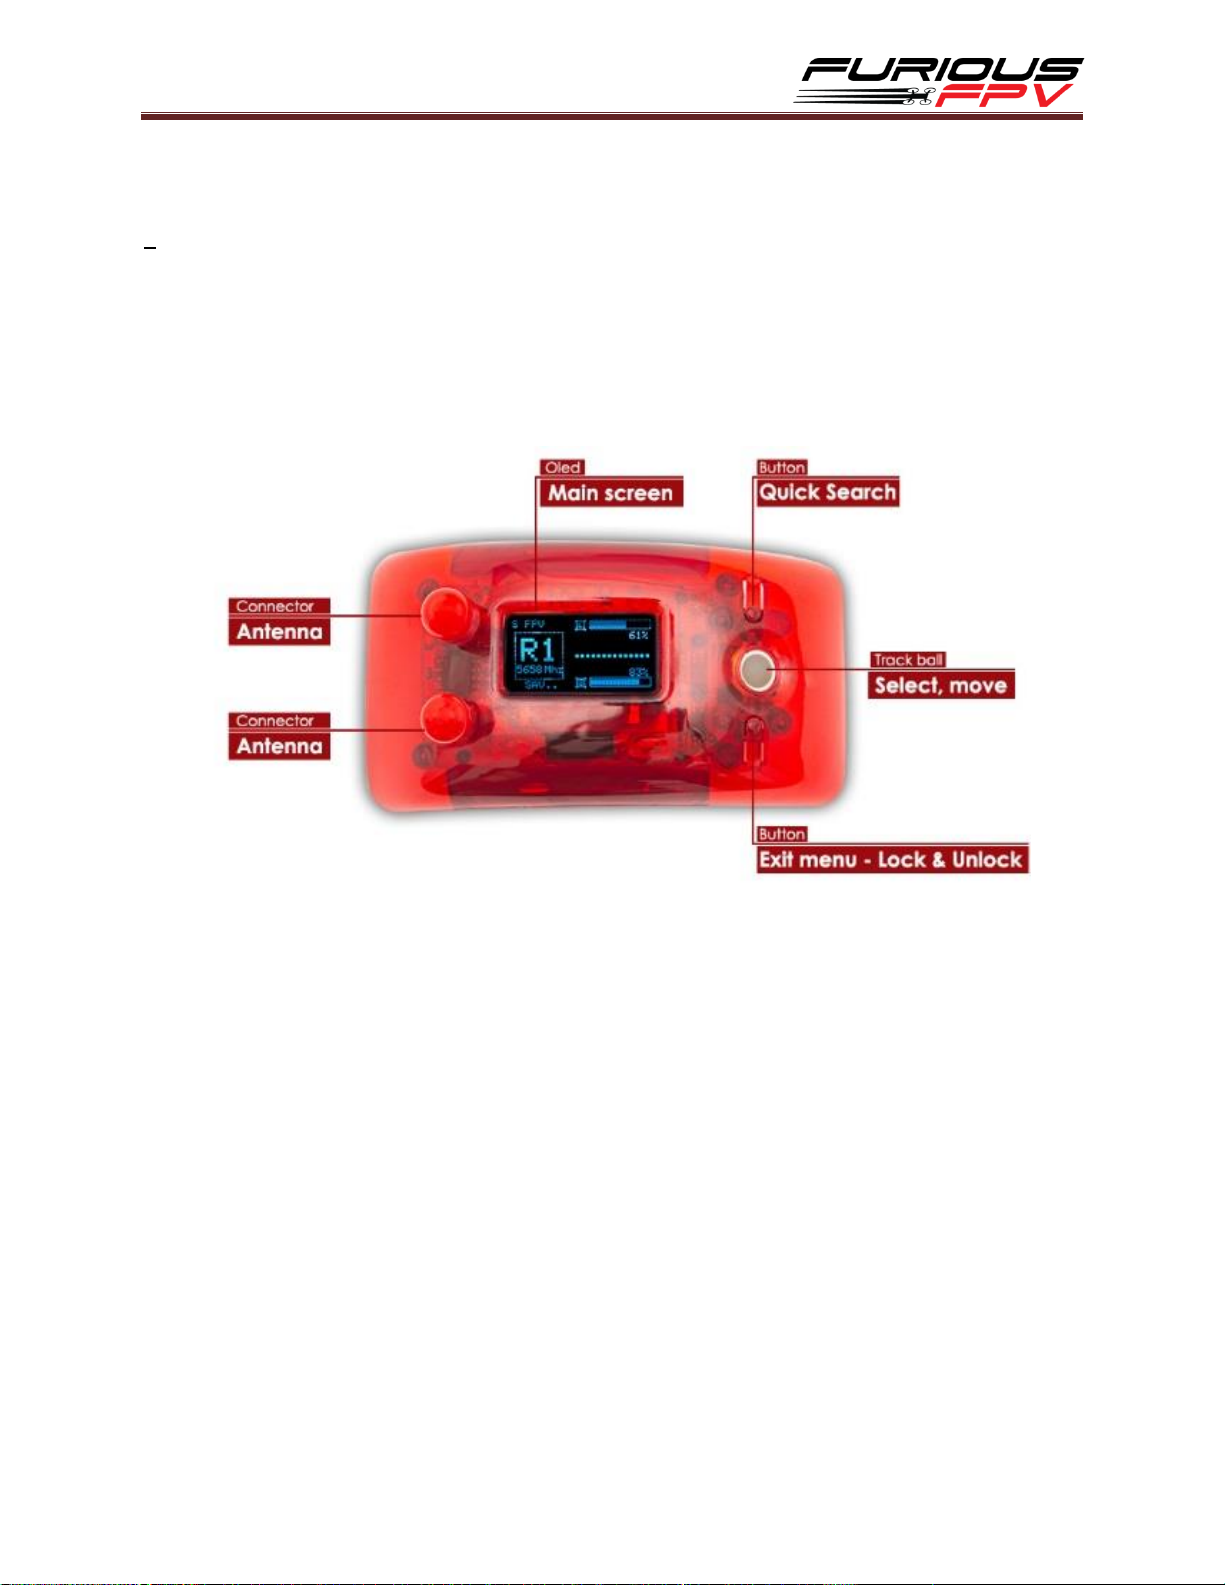
Product Layout
Trackball is utilized for menu navigation.
Exit Menu and Quick Search buttons are utilized for quick access to button lock &
unlock, smart search and channel modes.
SMA female is compatible with many popular antennas.
4
Usage
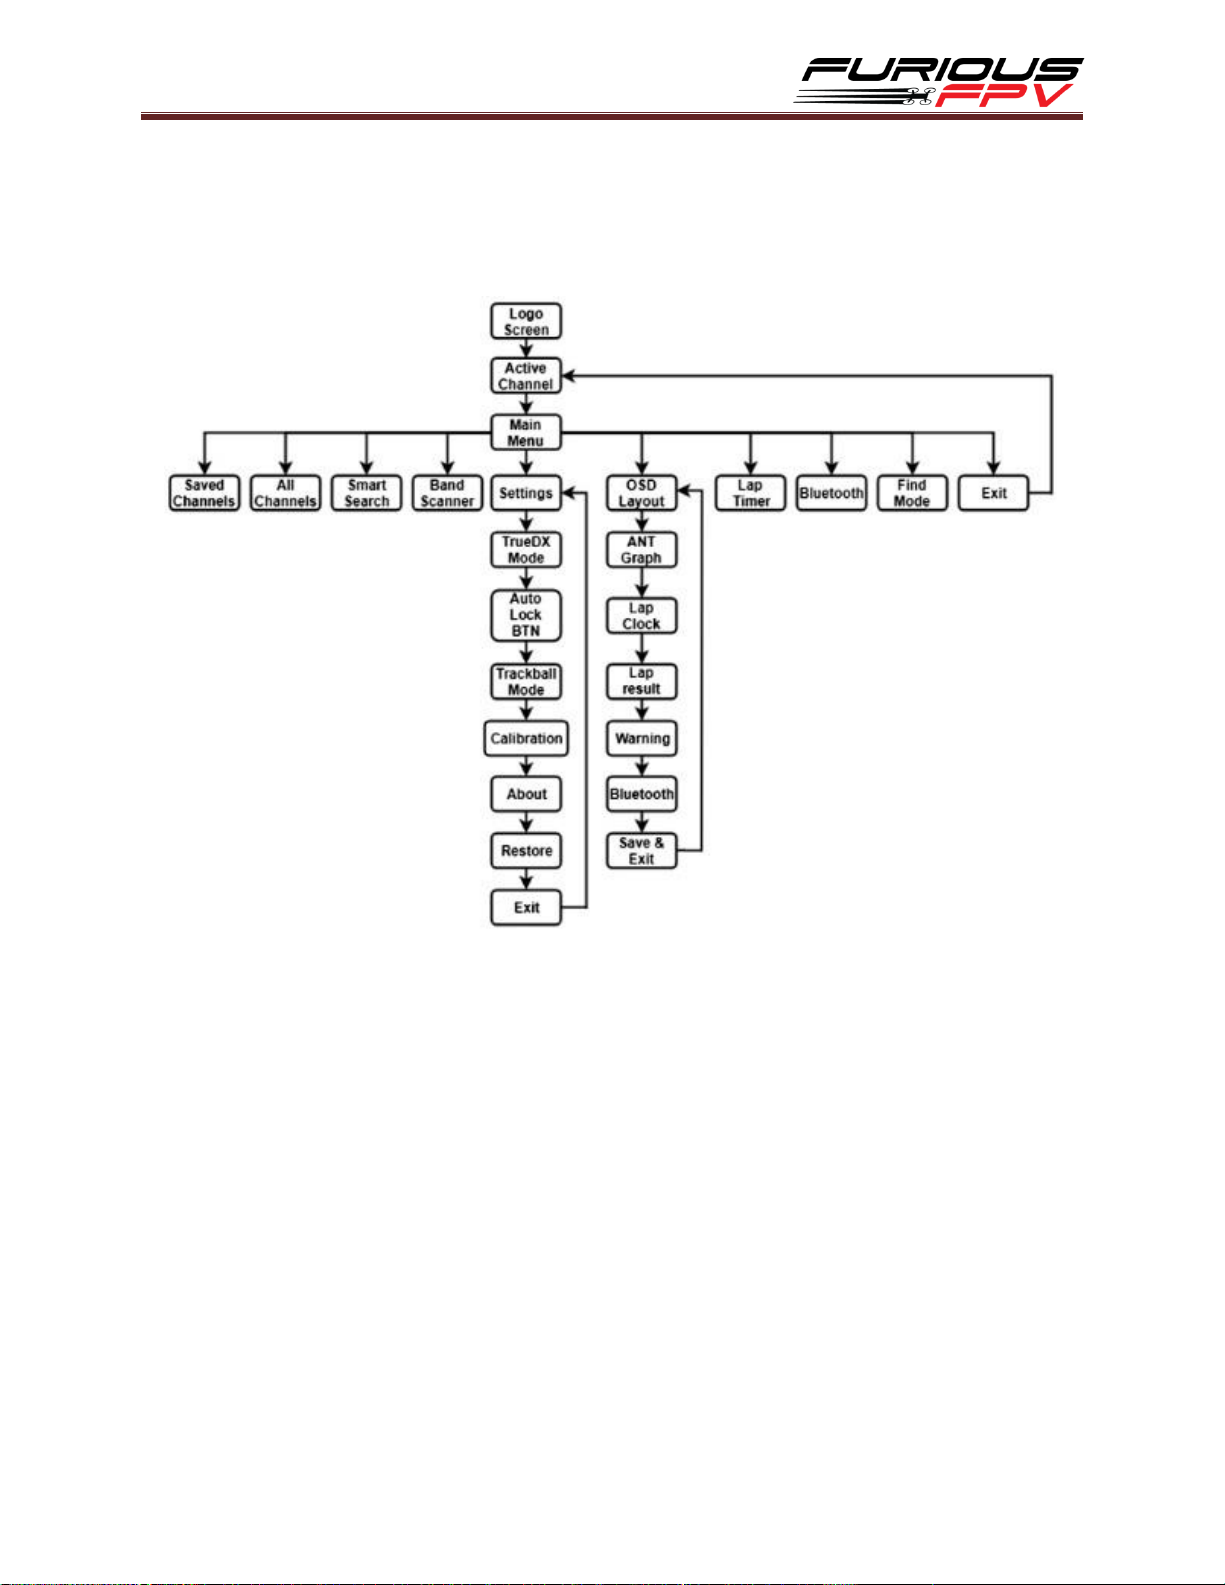
The Furious FPV True-D X Menu Flowchart:
5

MAIN MENU
Saved Channels
All Channels
Smart Search
Band Scanner
Settings
Osd Layout
Lap Timer
Bluetooth
Find Mode
*Note:
While in the different menus if no button is pressed within 15s, True-D X will
In the Main Menu, Press Quick Search/Exit Menu button to exit to Active
automatically exit to "Active Channel" display.
Channel.
6

Logo Screen
When powering on the goggles, the OLED screen will display the FuriousFPV Logo or
Custom Logo and the firmware version.
If the OLED screen displays a low power warning. Please modify your goggles
according to the Specifications section.
Active Channel
Shows the band, channel number, frequency and call sign
Press & hold Trackball for 2s on Active Channel display, a pop-up will show:
BTN: lock or unlock trackball
TYP: select antenna RSSI display type
GRA: set real-time RSSI graph On/Off
S&E: save and exit
Hold Quick Search button for quick access to smart search
Hold Exit Menu button to quickly lock or unlock the trackball
Press Exit Menu button to switch between Saved channels/All channels
7

Saved Channels
Show all saved band and channel numbers
There are two profiles available and maximum of 8 channels for each profile
Press Trackball for 2s, a pop-up will show:
Change: Change the selected channel to another one
Delete: delete selected channel
Profile: change to the other profile by pressing the Trackball
Exit: exit pop-up
*Note: While in this menu, you can hold the Quick Search button to switch back
and forth between the two profiles.
All Channels
Show all bands, channel numbers and frequencies
Hold Trackball: save the highlighted channel
Press Trackball: select the highlighted channel and exit to Active Channel
Smart Search
The module will automatically find and show all the detected channels (the channels
closest to your VTX transmission frequency will be displayed although it will prioritize
channels which you have saved) sorted by corresponding signal strength.
Hold Trackball button for 2s, the pop-up will display:
Save: save the selected channel
ReSearch: search again
Exit: exit to Active Channel
8

*Note: Hold the Quick Search button when in the Active Channel display to quickly
access smart search.
Band Scanner
Scans the 5.8GHz band and displays the RSSI of each frequency in a graph. You can
use this mode to check the transmission of video transmitters or to find a channel
with the lowest noise floor.
*Note: Press Exit Menu button to exit to the Main Menu.
Settings
True-D X mode:
Indoor: The signal is improved with image processing technology, most notably
improved video in multipathing environments.
Outdoor: Optimized for long range and freestyle or racing outdoors. Video is
adjusted only when a low signal is detected.
9

Auto Lock BTN:
Auto locks the buttons after 5s and doesn’t allow channel changes by just moving
the trackball. You can unlock by holding down the trackball or the Exit Menu
button.
The options are as follows: ON/OFF.
Trackball mode:
This determines the scrolling behavior of the trackball. It can be set to match the
icon movement on the OLED or in the OSD.
OLED: used when looking directly at the OLED screen
OSD: used when looking at the OSD display on in your goggles
About:
Shows Hardware, Firmware versions and input voltage.
Restore:
Press & hold Trackball button for 2s to restore the defaults.
10

Save & Exit:
Press Trackball button to save changes and exit Settings.
OSD Layout
Individual OSD elements can be turned on and off from this menu. You can also
change the position of these icons in the OSD.
There are five OSD elements available: ANT & Graph, Lap Clock, Lap Result,
Warnings, Bluetooth.
To adjust the position of the icons in the OSD, on the element that you want to
change the position of: press the Trackball and use the Trackball to adjust the icon
to your desired position. Press Trackball button again to go back to the OSD Layout
menu.
Lap Timer
Race Type:
Lap Count: Set target laps
11

Lap Counter
Best Lap
Last Lap
Race Time
Fixed Time: Set time limit (Max: 29 Laps)
Practice: For training purpose (Max: 29 Laps)
Lap Timer Display
Start Time From:
Start Tone: Race time starts on the tone
First to Gate: Race time starts when passing the gate
Start Time Delay: Delay time to race start after pressing Start (From 4s to 120s)
Number of Laps: Number of laps to race (From 1 to 30 Laps)
Antenna Laps: Select desired antenna for RSSI comparison (used to calculate a
pass)
Sensitivity: Adjusts the sensitivity of the antenna
Min laps Time: Minimum time required to complete one lap (From 3s to 120s)
Threshold: Sets the minimum RSSI for detection of a pass
12

Warning Low Signal
Threshold
Low Signal Warning: fixed warning level is 30%. If your signal is lower, you cannot
use the Personal Lap Timer feature
Channel: Set the channel for the lap timer to operate on
Last Result: review your last results. To go back to the Lap Timer menu, press the
Exit Menu button.
*Note in the Lap Timer menu:
Press Exit Menu button: Exit to Main Menu.
Press the Trackball twice: Start the Personal Lap Timer.
Bluetooth
Slave mode: used to update Firmware & Logo by IOS/Android App
Master mode: used to connect with Flight Controllers, Betaflight, adjust VTX, etc.,
Video tutorial on how to connect to True-D X with Bluetooth:
https://www.youtube.com/watch?v=lWpYUP-wCW4
13

Thanks for using our product
Find Mode
In case you lose your drone while flying. The Graphical interface will guide you to the
drone with a buzzer warning in the direction that it detects the strongest signal along
with a RSSI graph. However, this can only work if your drone is still transmitting
(battery still plugged in).
Press Exit Menu button to exit this mode.
Support
The dealer you purchased your product from handles the first line of support. If you
encounter any problems with your Furious FPV products, please contact them first for
issues involving equipment from other brands and general support for Furious FPV
products.
Please contact us if you need further assistance:
Tech support: tech@furiousfpv.com
Sales support: sales@furiousfpv.com
14

FCC Caution:
This device complies with part 15 of the FCC Rules. Operation is subject to the
following two conditions: (1) This device may not cause harmful interference, and (2)
this device must accept any interference received, including interference that may
cause undesired operation.
Any Changes or modifications not expressly approved by the party responsible for
compliance could void the user's authority to operate the equipment.
Note: This equipment has been tested and found to comply with the limits for a Class
B digital device, pursuant to part 15 of the FCC Rules. These limits are designed to
provide reasonable protection against harmful interference in a residential installation.
This equipment generates uses and can radiate radio frequency energy and, if not
installed and used in accordance with the instructions, may cause harmful interference
to radio communications. However, there is no guarantee that interference will not
occur in a particular installation. If this equipment does cause harmful interference to
radio or television reception, which can be determined by turning the equipment off
and on, the user is encouraged to try to correct the interference by one or more of the
following measures:
-Reorient or relocate the receiving antenna.
-Increase the separation between the equipment and receiver.
-Connect the equipment into an outlet on a circuit different from that to which the
receiver is connected.
-Consult the dealer or an experienced radio/TV technician for help.
The device has been evaluated to meet general RF exposure requirement. The device
can be used in portable exposure condition without restriction.
 Loading...