

Funtronix Score-N-Time SNT-130MP, Score-N-Time SNT-230M, Score-N-Time SNT-130M, Score-N-Time SNT-230MP Operating Manual

®
FUNTRONIX
SCORE-N-TIME
TM
PORTABLE WIRELESS
MULTISPORT ELECTRONIC
SCOREBOARD
OPERATING MANUAL
Models:
SNT-130M, SNT-130MP
SNT-230M, SNT-230MP
Revised May 7, 2013
1
The contents of the package may contain parts and packing materials that can be hazardous to
children under 3 years old. These components must be handled with adult supervision.
While the optional wall-mount power supply is UL approved, care must be taken when plugging
the power supply into a standard wall outlet, as this is a source of dangerous high voltage.
ADDITIONAL WARNINGS:
1. Staring directly at the s coreboard display at close range for long periods of time may cause eye
strain or eye damage.
2. Close proximity to the horn while it is sounding may cause hearing loss or damage. Make certain
everyone maintains a safe distance whenever the horn is sounded.
Thank you for purchasing a Funtronix Score-N-TimeTM Portable Electronic Scoreboard. At
Funtronix, our motto is “Electronic Fun for Everyone”. By offering a line of affordable
electronic scoreboards, our goal is to add a little fun to your sports and leisure activities.
Before using your new scoreboard, please read the following precautions. Doing so will
reward you with many years of enjoyment with your new scoreboard. Failure to follow them
may cause bodily harm or may damage the scoreboard beyond the terms of the warranty.
1. DO NOT expose the scoreboard or keypad to rain or other conde nsed moisture.
2. DO NOT store the scoreboard or keypad in direct sunlight for extended periods of time.
3. DO NOT drop or hit the scoreboard, as this may result in injury and/or void the warranty.
4. Do NOT use abrasives or spray cleaning solutions onto the scoreboard or keypad. See
Section 14 for care and maintenance.
5. DO read the entire owner’s manual so that you will utilize the full potential and versatility of
your new scoreboard.
2
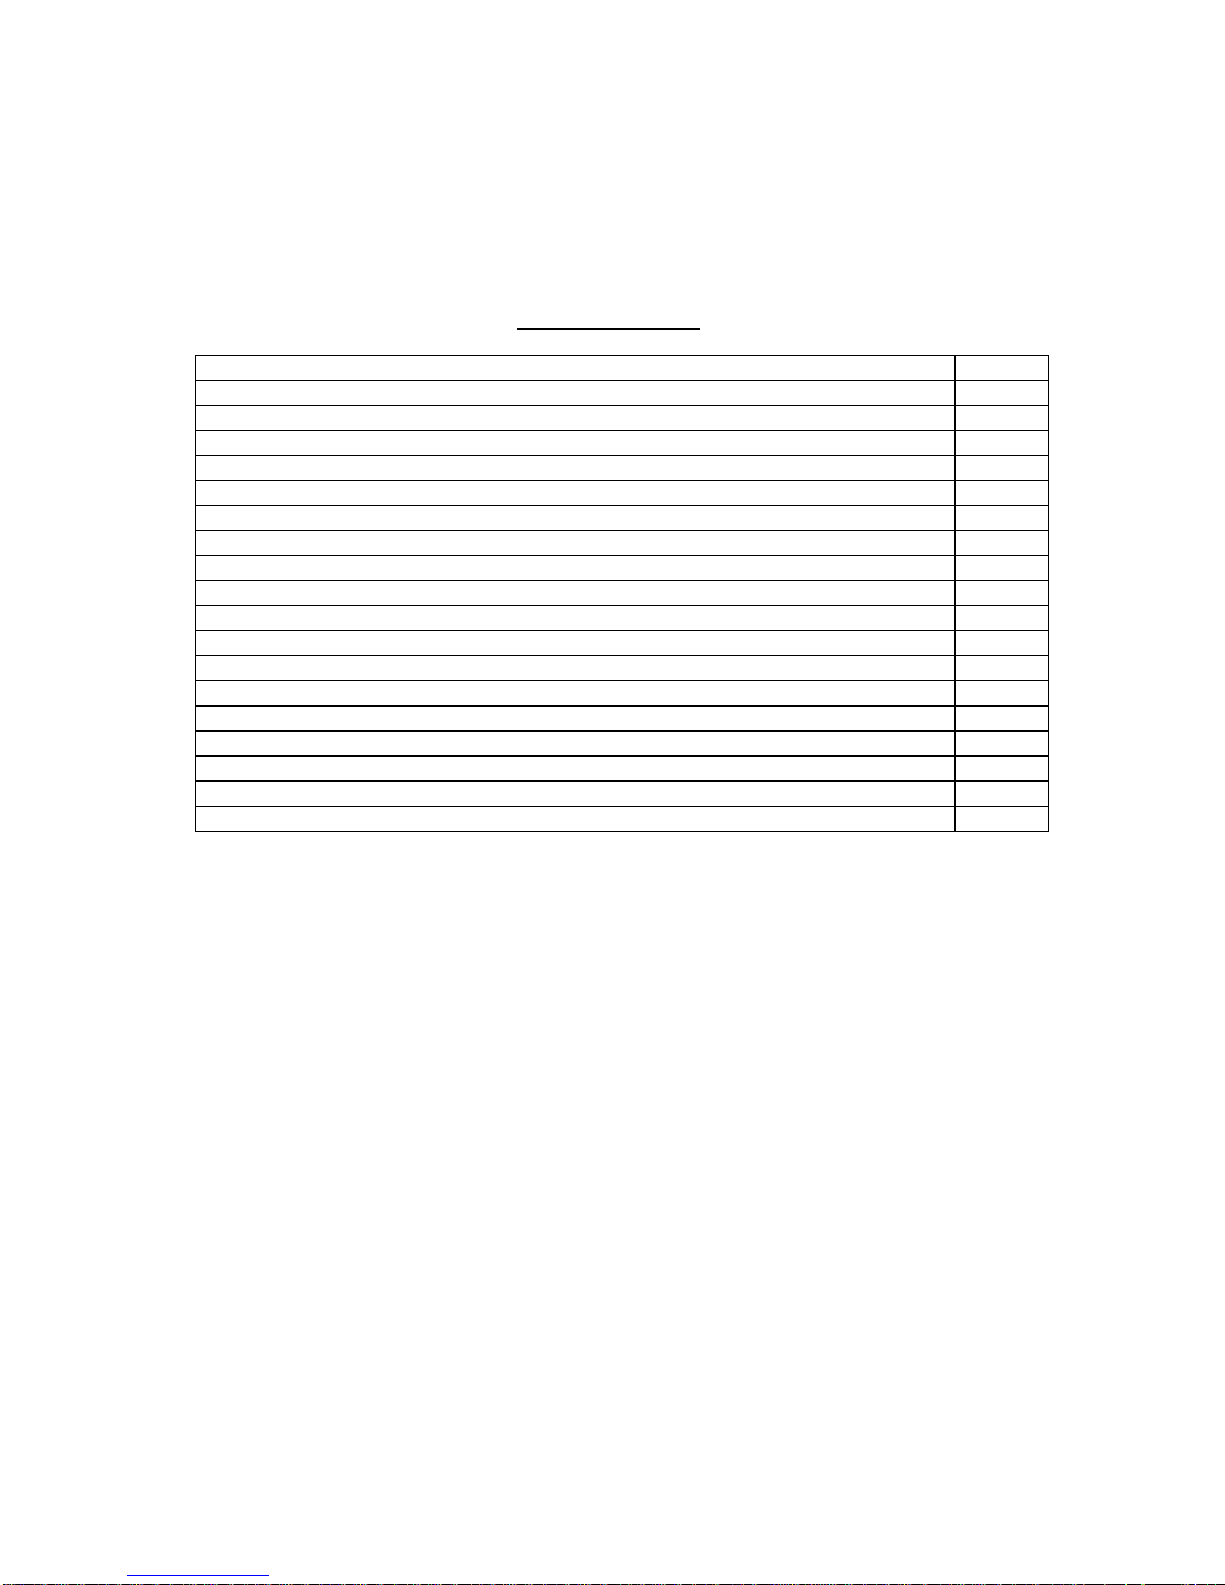
TABLE OF CONT ENTS
SECTION PAGE
Product Features and Highlights 4
Section 1: Scoreboard Setup 5
Section 2: Using the common modes of the SNT-130M/230M & SNT-130MP/230MP scoreboards 6
Section 3: Using the added modes of the SNT-130MP/230MP Multisport-Pro scoreboard 8
Section 4: Using the Tournament mode 12
Section 5: Using the Workout Timer 13
Section 6: Using your scoreboard for Bocce Ball 15
Section 7: Using the Stopwatch 16
Section 8: Using the Game Clock as a Co u nt-Down Clock or Count-Up Timer 17
Section 9: Halftime and Overtime Periods 18
Section 10: Short and Long Timeouts 19
Section 11: Changing the batteries in the keypad remote 20
Section 12: Pairing the scoreboard and keypad 20
Section 13: Detailed keypad button descriptions and usage 21
Section 14: Care and Maintenance 22
Section 15 Troubleshooting Guide 22
Section 16: Product Spec ifications 23
Warranty 24
3
MODEL SNT-130M
MODEL SNT-230M
MODEL SNT-130MP
MODEL SNT-230MP
STANDARD MULTISPORT MODEL SNT-130M & SNT-230M
Wireless RF remote-controlled keypad operates up to
200 feet from scoreboard*
Large, easy-to-read displays can be seen up to 100
feet distance for SNT-130 series, and up to 200 feet
distance for SNT-230 series scoreboards
Loud 110 dB internal horn** for end-of-period and
other alerts
Outdoor-readable LED display with multiple
brightness settings
Game clock adjustable from 5 seconds to 99 minutes.
Up to 9 periods plus adjus table halftime and overtime
Adjustable Short and Long Timeouts
Displays team scores up to 199 points
Team possession arrows and bonus indi ca tors can
be disabled if not used
Stopwatch mode with split time
MULTISPORT-PRO MODEL SNT-130MP & SNT-230MP
Includes everything listed in the SNT-130M/230M, plus an extra display used with seven additional operating
modes:
Timed and untimed baseball modes with Balls,
Strikes, and Outs display
Basketball modes with 3 programmable shot clock
functions
* Outdoor open-field environment.
** Horn loudness will vary as the batteries are depleted. Use fresh batteries or AC adapter for best
performance.
*** Batteries sold separately. SNT-130 family scoreboards require 6 AA-size alkaline batteries, while the
SNT-230 family scoreboards require 8 C-size alkaline batteries.
Game clock functions as a count-down timer or
count-up clock in several play modes
Fully-configurable Workout Timer
Tournament mode with sudden-death final round
Bocce Ball Mode can be co nfigured for timed or
untimed matches.
Save-game feature allows current game data to
be saved and recalled at a later time
Tenth-second game clock resolution when
remaining time is less than 1 minute
Sturdy tabletop swivel-out support legs
Power save feature tur n s display off when game
has been idle for an extended period of time
Powered by batteries*** for portability or optional
AC adapter (purchased separately)
Black powder-coated aluminum frame
construction
Soccer/Hockey/Basketball modes with team
fouls display
Football mode with Downs and Yards-To-First-
Down display
4
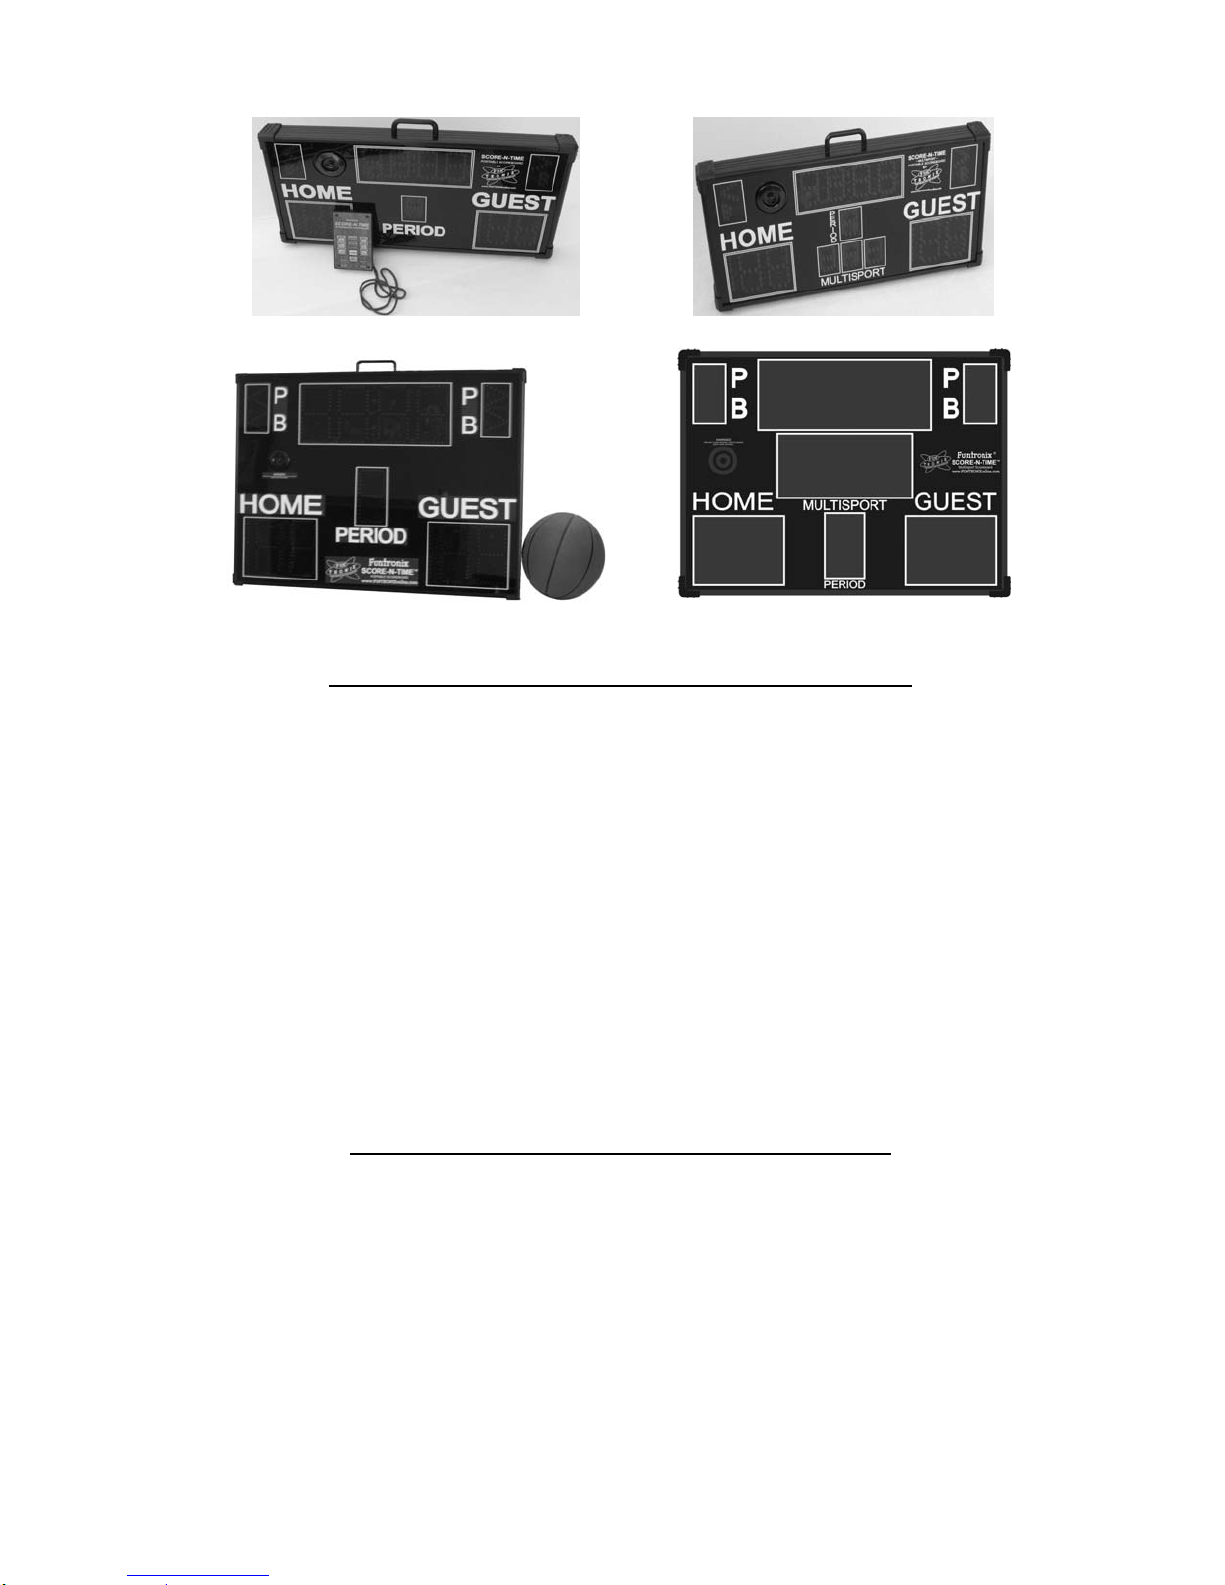
SECTION 1: SCOREBOARD SETUP
1. If you are using the scoreboard without an AC adapter, remove/open the battery cover(s) located on
the rear of the scoreboard and install six AA-size alkaline batteries (SNT-130 series) or 8 C-cell
alkaline batteries (SNT-230 series). Re-attach/close the battery cover(s).
2. Extend the support stand/legs as shown below:
SNT-130 series support legs
SNT-230 series support stand
3. Install two AAA-size batteries (not included) in the keypad as described in Section 11.
4. Use the optional AC adapter if operating the scoreboard near an electrical outlet to conserve batteries.
NOTE: If you are using the scoreboard outdoors, aim the display away from the sun for best
visibility.
5. Place the scoreboard in a desired location near your playing field. The best location is mid-court on the
sidelines. This will provide the best view of the display. It can also be placed in the corner of the
playing field, as long as everyone in the opposite corner of the field can view it and is within radio range
of the keypad.
6. Turn the scoreboard on using the power switch
located on the back of the scoreboard. If the
scoreboard is displaying the message shown at
right, press and hold the
button on the
keypad for up to 10 seconds to establish
communications between the scoreboard and
keypad. The keypad will beep twice if the
connection is good, or 3 times if the connection
failed. Repeat this step if necessary to
establish a connection. Proceed to Step 7
(SNT-130MP SHOWN)
below when the connection is comp lete.
7. Select the display bri ghtn ess by pressi ng a nd hol ding th e button for approximately 3 sec onds .
Each press and hold of this button will toggle between the low, mid, and high brightness levels.
8. Test the operation of your scoreboard to verify performance over the distance between the keypad and
scoreboard prior to the start of your game. Move the scoreboard closer to the keypad if it does not
respond as expected.
9. You are now ready to use your scoreboard. Proceed to Section 2 for using the various operating
modes. Additional modes of the SNT-130MP/230MP scoreboard are detailed in Section 3.
5
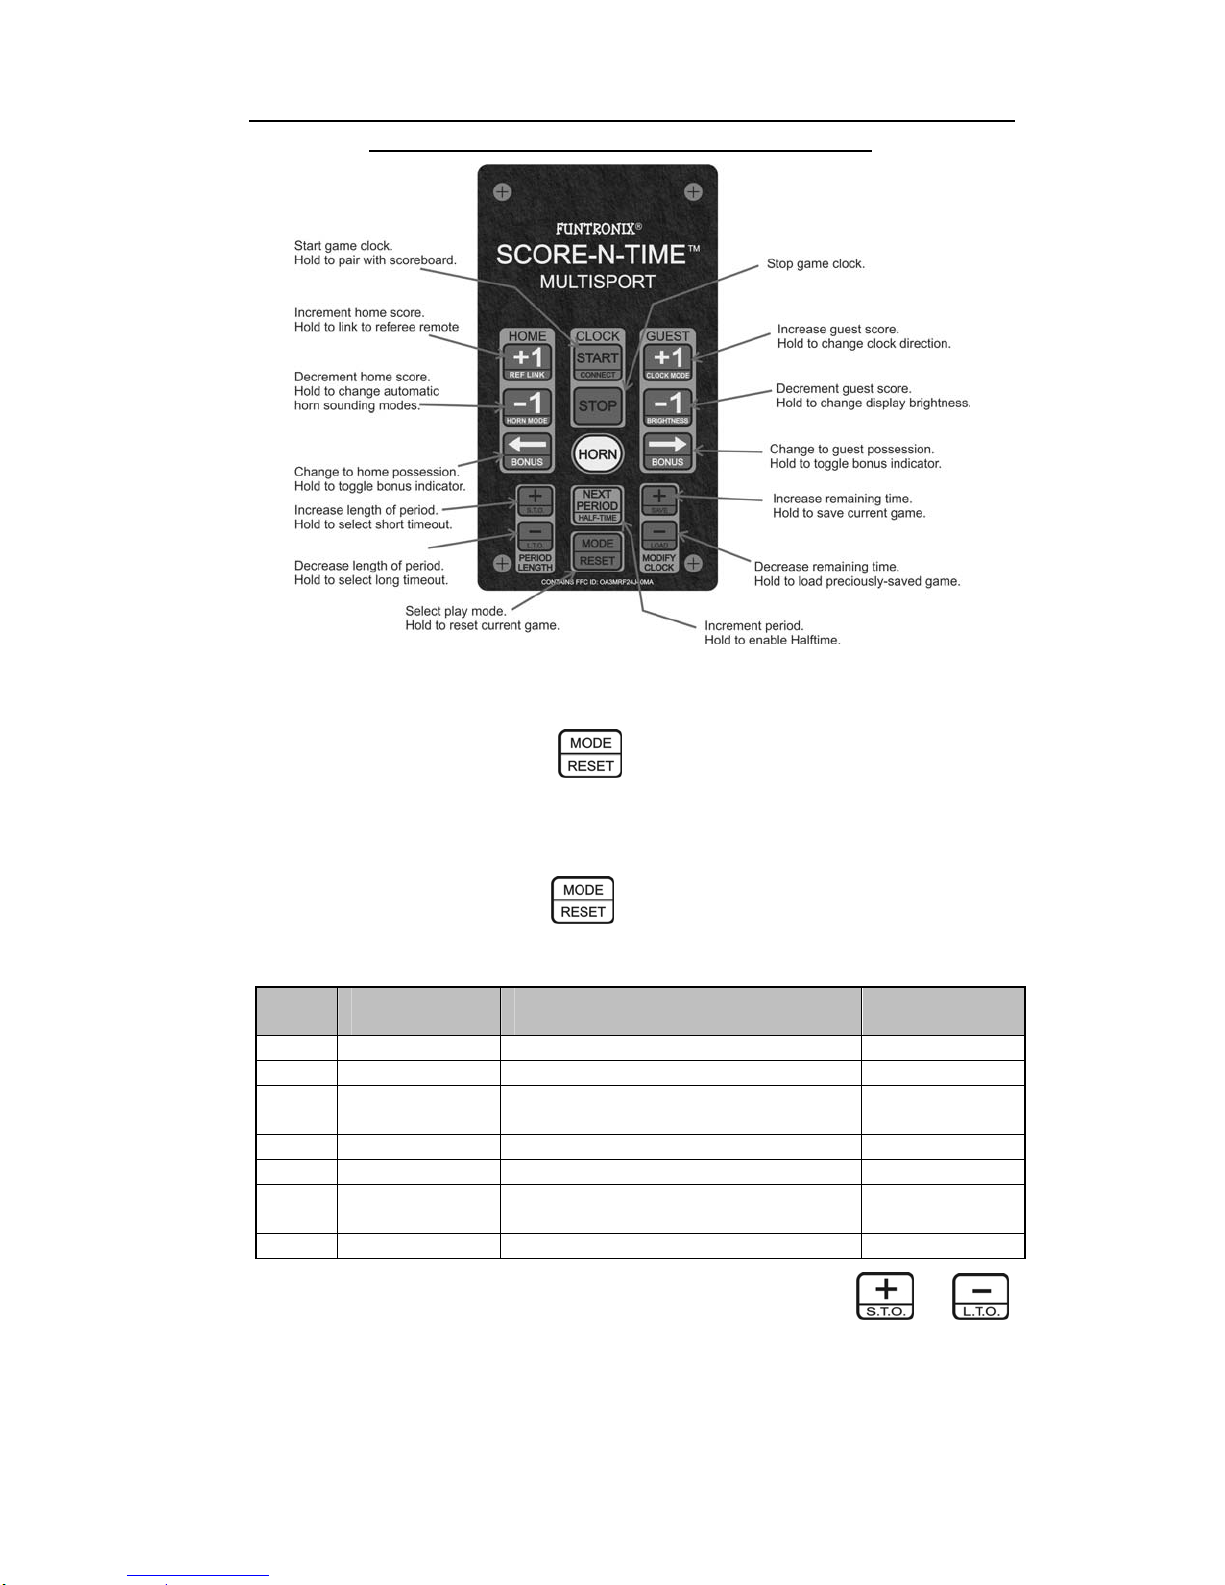
SECTION 2: USING THE PLAY MODES COMMON TO BOTH SNT-130M/230M
AND SNT-130MP/230MP SCOREBOARD MODELS
LAYOUT OF THE SNT-130M/230M SCOREBOARD KEYPAD
1. Prior to the start of a game, pr ess the button to select a play mode. Each press of this
button will cycle through the different play modes of the scoreboard. If a game is already in
progress, hold this button down for 3 seconds to reset the current game. Changing the play mode
is only allowed prior to the start of a game and cannot be changed once a game has begun.
If you are unable to change play modes, make certain the game clock is stopped (if
applicable) and press and hold the
and to enable the ability to select a new play mode.
button for 3 seconds to reset the current game
List of available play modes in the SNT-130M/230M scoreboards
Play
mode
Name
Uses/Features
Go To
1 Timed mode Soccer, Hockey, Basketball Section 2 Step 2
2 Untimed mode Volleyball, Table Tennis Section 2 Step 3
3 Tournament
mode
2 or more timed rounds plus an untimed
sudden death round
Section 4
4 Workout timer Sparring, exercising. Includes resting round Section 5
5 Bocce Ball Timed or u ntimed play with sc ores only Section 6
6 Clock/Timer Only Use as a count-up timer or count-down
Section 7
clock.
7 Stopwatch Includes split times Section 8
2. If the game clock is being used, set the desired length of each period with the and
buttons. The period length can be preset in 5 second interv als up to 1 minute, then 1 minute 30
seconds, and then in 1-minute increments from 2 to 99 minutes. All periods (except overtime and
halftime) will start with this time and will be stored in the scoreboard even after power is turned off.
The ability to set the length of the current period is disabled once the period has started.
6
3. The possession arrows can be enabled or disabled at any time before or during a game. If the
possession indicators are disabled, pressing the
or button will enable the
possession indicator for the respective side. Pressing the same button again will disable the
possession indicator. P ressing the oppos ite team’s possessi on button when the arrows are on will
simply switch the indicator to that team’s indicator.
4. The scoreboard horn can be configured to automatically sound for differe nt conditions (aside from
manually sounding it with the ‘HORN’ button). The game clock must be enabled for the
automatic horn sounding to be enabled:
Press and hold the
described below.
HORN
MODE
Automatic horn sound disabled – no horn when period
1
expires or when clock started/stopped
button for 3 seconds to cycle through each of the three modes
DESCRIPTION OF HORN MODE
INDICATED BY
Display blinking
once when selected
2 Horn sounds when period ends (default) Horn beeps once
3 Horn sounds when clock starts/stops, and when period ends Horn beeps twice
NOTE: The display may dim or go off while the horn is sounding when the scoreboard is
5. To start and stop the game clock, press the or buttons, respectively.
6. Use the , , , and
powered with batteries. Thi s is a sign that the batteries are near th e end of their life.
buttons to control the team scores. Use the
and buttons to control the possession arrows (i.e., indicate who has controlling
serve in a game of table tennis, or to indicate who has control of the ball).
7. The SNT-130MP scoreboard has the ability to display fouls for each team when using play mode 1.
Simply press the
respectively
Press and release the
.
and
buttons to increment the Home and Guest team’s fouls,
button t o clear the fouls display.
8. After approximately 10 minutes of non-use (game clock stopped, no buttons pressed), the
scoreboard display will shut off and the game clock decimal point will blink to indicate the
scoreboard is still on and in power save mode. Pressing any button on the remote will re-awaken
the scoreboard with the previous status of the game play information intact.
9. To a djust the remainin g time in a period durin g game play (i.e., disputed call requiring adding time
back onto the game clock): stop the game clock and press the
and buttons to add
or subtract time from the game clock, respectively. Game play can resume by pressing the
button. This adjustment will not affect the length of the remaining periods.
10. If your game goes into overtime, set the period digit to ‘0’ by repeated presses of the
button and then set the length of the overtime period time using the
and
buttons.
See Section 9 for details on using the halftime and overtime periods.
11. Your scoreboard features a short and long timeout function when using play modes 1 or 2. Refer to
Section 10 for details on using the short and long timeout feature.
7
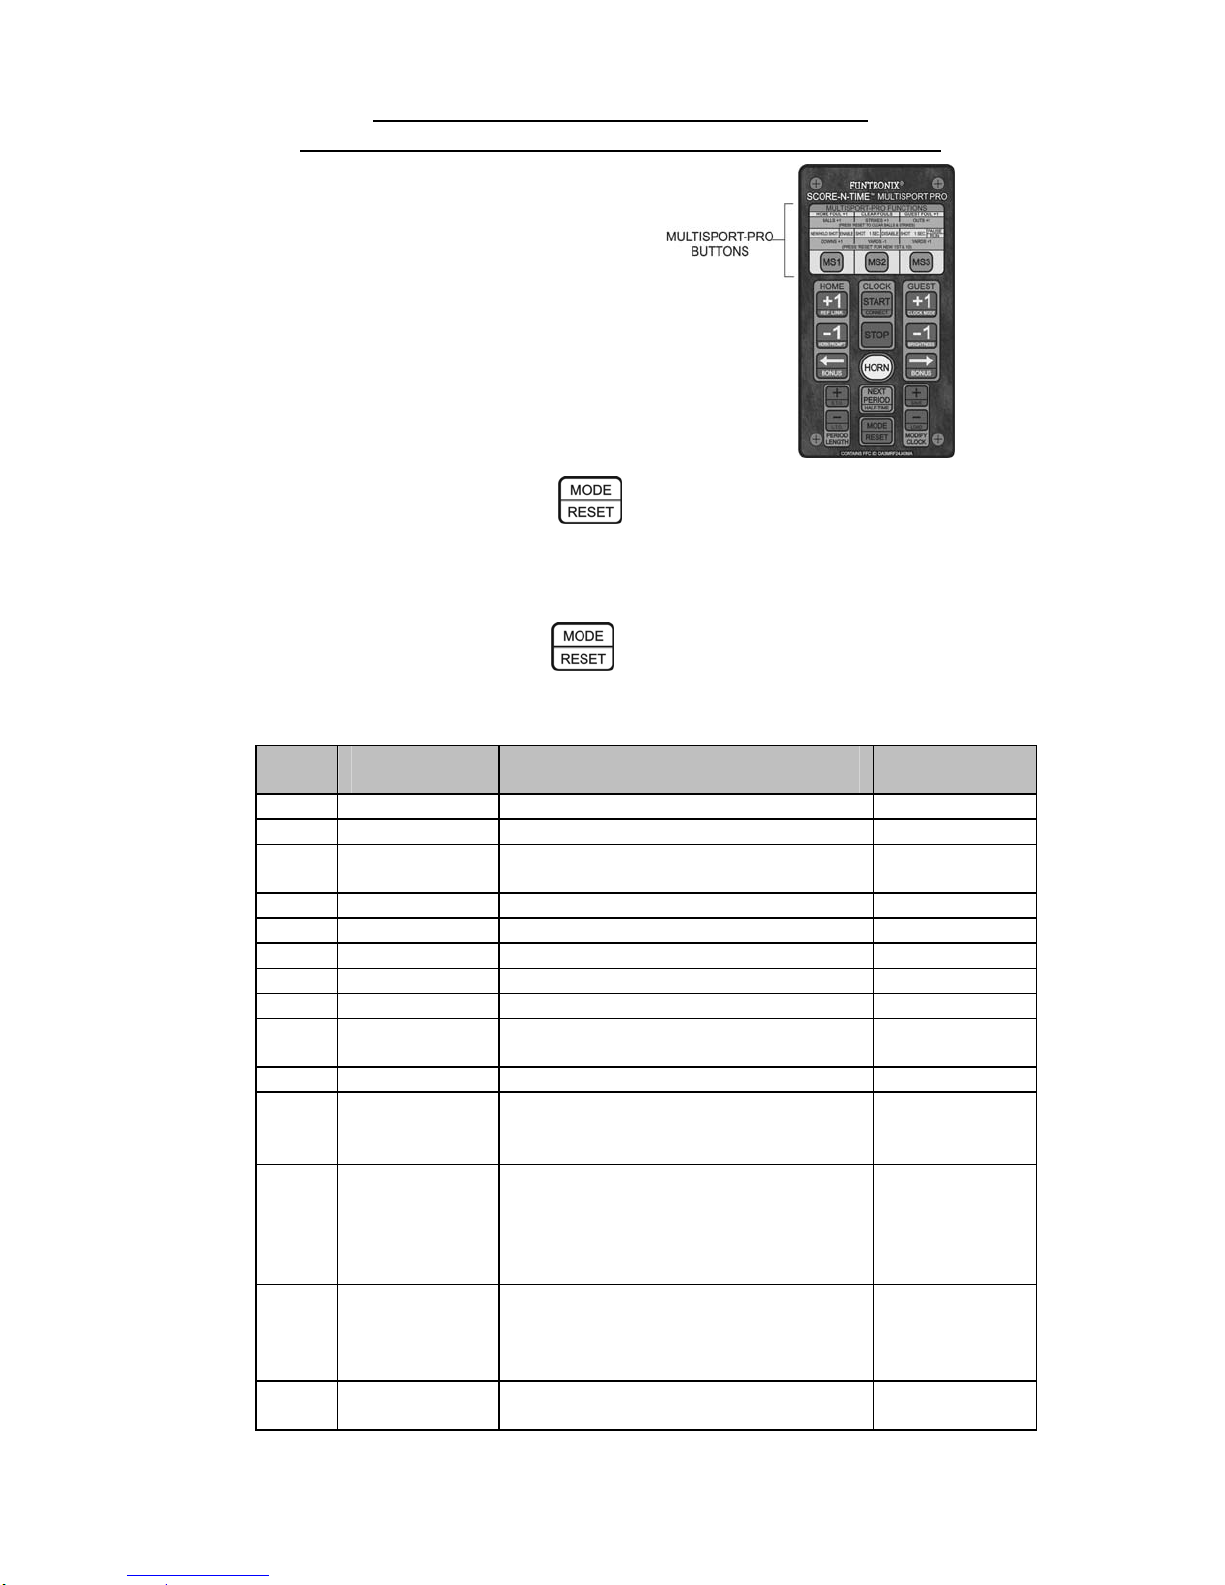
SECTION 3: USING THE ADDED MODES OF THE
MULTISPORT-PRO SCOREBOARD: MODEL SNT-130MP/230MP
Additional keypad buttons for use with the enhanced
features of the SNT-130MP/230MP
1. Prior to the start of a game, p ress the button to select a play mode. Each press of this
button will cycle through the different play modes of the scoreboard. If a game is already in
progress, hold this button down fo r 3 seco nds to reset t he current gam e. Changing the play mode
is only allowed prior to the start of a game and cannot be changed once a game has begun.
If you are unable to change play modes, make certain the game clock is stopped (if
applicable) and press and hold the
button for 3 seconds to reset the current game
and to enable the ability to select a new play mode.
List of available play modes in the SNT-130MP/230MP scoreb oards
Play
mode Configuration
Uses/Features
Owner’s Manual
Section
1 Timed Soccer, hockey, basketball Section 2 Step 2
2 Untimed Volleyball, table tennis Section 2 Step 3
3 Tournament
mode
2 or more timed rounds plus an untimed
sudden death round
Section 4
4 Workout timer Sparring, exercising. Includes resting round Section 5
5 Bocce Ball Timed or untimed play with sc ores only Section 6
6 Clock/Timer Only Use as a count-up timer or count-down clock Section 7
7 Stopwatch Includes split times Section 8
8 Untimed Baseball Shows balls, strikes and outs Section 3 Step 2
9 Timed Baseball Timed play with balls, strikes and outs
Section 3 Step 2
Display
10 Timed with fouls Any timed sport needing team fouls display Section 3 Step 2
11 Basketball
w/Shot Clock
Shot clock can be set from 1 to 60 seconds.
Expired shot clock stops the game clock.
Section 3 Step 2
Default setting is 24-second shot clock.
12 Basketball
w/Shot Clock
Shot clock can be set from 1 to 60 seconds.
Game clock will continue to run if shot clock
Section 3 Step 2
expires unless the remaining period time is
two minutes or less. Default setting is 30-
second shot clock.
13 Basketball
w/Shot Clock
Shot clock can be set from 1 to 60 seconds.
Shot clock is self-resetting and causes
Section 3 Step 2
possession to toggle each time it expires.
Default setting is 35-second shot clock.
14 Football Timed play with downs and yards-to-first-
Section 3 Step 2
down display
8

Detailed information for each additional play mode in the SNT-130MP/230MP scoreboard is shown below.
(SNT-130MP shown for reference)
---------------------------------------------------------------------------------------------------------------------------
Mode 8: Untimed Baseball/Kickball
Mode 9: Timed Baseball/Kickball
Left multisport digit = Balls
Middle multisport digit = Strikes
Right multisport digit = Outs
The possession arrows represent the top and bottom of the
inning.
Mode 8:
Untimed Baseball Mode
A press and quick release of the
button will reset the
Balls and Strikes to zero.
--------------------------------------------------------------------------------------------------------------------------Mode 10: Timed with Fouls/Penalties Display
Left multisport digit = Ho me Fouls
Right multisport digit = Guest Fo uls
Up to 9 fouls/penalties per team (SNT-130MP), or 19
fouls/penalties per team (SNT-230MP). A press and quick
release o f the
button will reset both team fouls to zero.
Mode 10:
Soccer with Fouls Mode
---------------------------------------------------------------------------------------------------------------------------
Basketball Modes
Mode 11: Shot clock stops game clock when expired
Mode 12: Shot clock stops the game clock if the remaining
period time is less than 2 :00 minutes
Mode 13: Shot clock is self-resetting and toggle s team
possession each time it expires
The middle and right multisport digits display the shot clock.
Mode 11 Shown:
Basketball
w/24-Second Shot Clock
Prior to the start of a game, s et th e l engt h of the s ho t cloc k fr om 1 to 60 seco nds. The shot clock
cannot be programmed once a game has begun.
---------------------------------------------------------------------------------------------------------------------------
Mode 14: Football
The Left Multisport Digit indicates Downs, and the Middle &
Right Multisport Digit indicate Yards to First Down. For ‘X
Down and Goal’, where X is the current down, Yards to First
Down can be set to display ‘- -‘.
Mode 14:
Football Mode
A press and quick release of the
button will reset the
Downs and Yards-To-First-Down display.
---------------------------------------------------------------------------------------------------------------------------
9

Refer to the following table for a description of the keypad functions for each Play Mode.
TABLE 1: MULTISPORT BUTTON FUNCTIONS
PLAY MODE
BASEBALL/KICKBALL (Mode 8 & 9)
SOCCER/HOCKEY/BASKETBALL
With Foul/Penalty Display (Mode 10)
BASKETBALL
(Modes 11, 12, and 13)
FOOTBALL (Mode 14)
Increment Balls
Increment Home Team
Fouls by 1
Reset Shot Clock
HOLDING THIS
BUTTON DOWN WILL
KEEP THE SHOT
CLOCK AT RESET.
Increment Downs
Increment Strikes
Clear Fouls
Before Start of Game:
Used to set length of
shot clock during game.
Decrement 1 second
Game Clock Stopped:
Decrement Shot Clock
by 1 Second
Game Clock Running:
Disable/Enable Shot
Clock
Decrement Yards to
First Down by 1
Increment Outs
Increment Guest Team
Fouls by 1
Before Start of Game:
Used to set length of
shot clock during game.
Increment 1 second
Game Clock Stopped:
Increment Shot Clock
by 1 Second
Game Clock Running:
Pause & un-pause
Shot Clock
Increment Yards to
First Down by 1
2. If the game clock is being used, set the desired length of each period with the
and
buttons. The period length can be preset in 5 second intervals up to 1 minute, then 1 minute 30
seconds, and then in 1-minute increments from 2 to 99 minutes. All periods (except overtime and
halftime) will start with this time and will be stored in the scoreboard even after power is turned off.
The ability to set the length of the current period is disabled once the period has started.
3. The possession arrows can be enabled or disabled at any time before or during a game. If the
possession indicators are disabled, pressing the
or button will enable the
possession indicator for the respective side. Pressing the same button again will disable the
possession indicator. P ressing the oppos ite team’s possessi on button when the arrows are on will
simply switch the indicator to that team’s indicator.
4. The scoreboard horn can be configured to automatically sound for differe nt conditions (aside from
manually sounding it with the ‘HORN’ button). The game clock must be enabled for the
automatic horn sounding to be enabled:
Press and hold the
button for 3 seconds to cycle through each of the three modes
described below.
HORN
MODE
1
DESCRIPTION OF HORN MODE
Automatic horn sound disabled – no horn when period
expires or when clock started/stopped
INDICATED BY
Display blinking once
when selected
2 Horn sounds when period ends (default) Horn beeps once
3
Horn sounds when clock starts/stops, and when period
ends
Horn beeps twice
NOTE: The display may dim or go off while the horn is sounding when the scoreboard is
powered with batteries. Thi s is a sign that the batteries are near th e end of their life.
10

5. To start or stop the game clock, press the
6. Use the home
team scores. Use the
and
buttons or guest
and buttons to control the possession arrows (i.e. indicate
or butto n s , r es p ec t ively.
and buttons to control the
who has controlling serv e in a ga m e of table tennis, or to indicate who has control of the ball).
7. When a period ends (game clock is enabled) and horn mode 2 or 3 are selected, the horn will sound
for approximately 3 seconds. The horn can also be sounded manually (with the game clock
stopped or disabled) by pressing the
button.
NOTE: The display may dim or go off while the horn is sounding when the scoreboard is
powered with batteries. This is an indication that the batteries are near the end of their life.
8. After approximately 10 minutes of non-use (game clock stopped, no buttons pressed), the
scoreboard display will shut off and a blinking red light will be visible to indicate the scoreboard is
still on and in power save mode. Pressing any button on the remote will re-awaken the scoreboard
with the previous status of the g a m e play information intact.
9. To a djust the remainin g time in a period durin g game play (i.e., disputed call requiring adding time
back onto the game clock): stop the game clock and press the
and buttons to add
or subtract time from the game clock . Game play can resume by pressing the
button.
This adjustment will not affect the length of the remaining periods.
10. If your game goes into overtime, set the period digit to ‘0’ by repeated presses of the
button and then set the length of the overtime period time using the
and
buttons.
See Section 9 for details on using the overtime period.
11. Your scoreboard features a short and long timeout function in play modes 1, 2, and 10 through 14.
Refer to Section 10 for details on using the short and long timeout feature.
11

SECTION 4: USING THE TOURNAMENT MODE
Tournament Mode is great for events where multiple rounds of timed play occur, and a final round is set up
as a sudden-death round. Your SNT-130/230 scor eboard can be set up to have any number of timed rounds
(up to 9 total) and one sudden-death round. The timed rounds can be set up in two different ways:
Option 1: The first round has a different time than all remaining rounds.
Option 2: All rounds have the same time
The default configuration of th e Tournament Mode is as follows:
Round 1 is a 3-minute timed round
Round 2 is a 2-minute timed round
Round 3 is a sudden-death round
To select the Tournament Mode (Mode 3) and to set up the times of the rounds, simply follow these steps:
1. Select play mode 3 of the scoreboard as d escribed in Section 2.
2. Set the length of the first round using the
3. Press the
button to select the second round.
and
4. Set the length of the second (and all remaining) rounds using the
5. Press and hold the
button to reset the Tournament Mode to the first round. Setup is complete.
buttons.
and
buttons.
Using The Tournament Mode:
1. To start or stop the clock, press the and
2. Change the Home and Guest scores using the home
and buttons.
3. When each round has expired, press the
buttons, respectively.
button to advance to the next round.
and
buttons and guest
4. Each round following round 2 defaults to a sudden death round, but can be changed to a timed
round by simply pressing the
button (and then pressing this button again to start the clock),
and can be turned back into a sudden-death round by pressing the
stopping the clock)
This allows you to have a different number of timed rounds following a sudden
.
death round for greatest flexibility.
5. If you are using the SNT-130MP scoreboard, each press of the
increment the penalties for the home and guest player, respectively.
12
button (after first
or buttons will

SECTION 5: USING THE WORKOUT TIMER
The workout timer is completely configurable for use in a variety of events, including sparing, exercise
routines, speech timing and debates. Each workout round can be set to a unique time. The resting period
can be set from 15 seconds to 99 minutes. And the total number of rounds can be set from 1 to 10 rounds,
or placed in a continuous-cycle mode.
Setting up the Workout Timer:
1. Select play mode 4 of the scoreboard as d escribed in Section 2.
2. Set the length of the workout rounds using the
button will select the next workout round. The tenth round is indicated by period “0”, and
and
buttons. Each quick press of the
continuous-loop mode is indicated with the period displaying “C”.
3. Press and hold the
your workout round is about to end (indicated by an ‘A’ on the period display). Use the
buttons to set this time. Choices are 10, 20, 30, 40, and 50 seconds, or ‘- -‘ to indicate no wa rning
button for approximately 3 seconds to set the warning time for indicating that
and
sound. The default setting is 30 seconds.
4. Press and hold the
an ‘r’ on the period display). Set the length of the resting period using the
5. Repeatedly press the
button for approximately 3 seconds to select the resting periods (indicated by
and
button to select the desired number of rounds. The period digit will display
buttons.
a ‘0’ for round 10 and a ‘C’ for continuous-cycle mode. Pressing this button once more after displaying a
‘C’ will cycle back to 1 round.
6. Your workout timer is now set up. Simply press the
begin your workout, or press and hold the
button for 3 seconds to reset the workout timer to the
button to reset the workout timer and to
first round to get it ready for use.
Example workout timer setup:
Let’s say we want a workout routine with the following times:
Round 1: 2 minute workout
Round 2: 3 minute workout
Round 3: 4 minute workout
A 20-second warning that the round is about to end
A 1-minute resting round
Follow these steps to setup and run t he workout timer:
1. Hold the
2. Set the Round 1 time using the
3. Press and hold the
The period digit will show an “A”. Use the
time to “:20” on the display.
button for approximately 3 seconds to reset the current event.
and
button for approximate ly 3 seconds to select the warning time setup.
buttons until “2:00” is displayed on the clock.
and
buttons to select set the warning
13

4. Press and hold the
button button for approximately 3 seconds to sele ct the resting round
time. The period digit will show a “r”. Use the
time to “1:00” on the display.
5. Press and release the
workout time using the
6. Press and release the
time using the
and
button to select the second workout round. Set the Round 2
and
button to select the third workout round. Set the Round 3 workout
buttons until “4:00” is displayed.
buttons until “3:00” is displayed.
and
buttons to select set the resting
7. Use the and buttons to start and stop the clock. The horn will beep once each
time the clock started and stopped.
8. The score digits are normally defaulted to off, but incrementing either the Home or Guest scores will
enable them for scoring events with the workout timer.
9. The horn will emit a 2-beep alarm (if enabled) to let you know you r workout round is about to end
(as described in Step 3 above).
10. The horn will emit 3 beeps when your workout round has expired, at which time the resting period
will begin. If only 1 workout round is selected then the workout timer will stop at the end of the first
round.
11. At the end of each resting period the horn will beep once to announce the beginning of the next
workout round (if set to more than 1 round).
12. Press and hold the
button for 3 seconds to reset the workout timer to the beginning and to
enable changes to its settings, or simply press
The clock must be stopped prior to this action.
14
to reset and start another workout round.

SECTION 6: USING YOUR SCOREBOARD FOR BOCCE BALL
The Bocce Ball mode is configurable for different variations of use: the match can be timed or untimed, with
timed matches settable from 15 minutes to 99 hours (default is 4 hours). The possession arrows default to
disabled but can be enabled to indicate team turns, and the period digit can be used to indicate rounds of
play.
Setting Up the Bocce Ball Scoreboard:
1. Select play mode 5 of the scoreboard as d escribed in Section 2.
2. For timed match e s , press the
and
buttons to enable and set the match clock. Time
is indicated in hours and minutes in this mode.
3. To enable the possession arrows, simply press either
or
buttons.
Using the Bocce Ball Scoreboard:
1. Use the
when the clock is running.
2. Use the home
scores.
3. Use the
4. Press the
5. When a match or round is over, you have the option to clear just the score digits (for multiple rounds in a
match), or you can reset the entire scoreboard for a new match.
and buttons to start and stop the match clock. The colon will blink to indicate
and
buttons or guest
and buttons to control the team
and buttons to control the possession arrows.
button to increment the period/round.
5.1 To clear just the scores, press and release the
button quickly.
5.2 To reset the entire scoreboard to start a new match, make sure the match clock is stopped
(if used) and then hold the
notice the match clock and arrows will also be disabled. Simply press either
button to re-enable the arrows and press either the
re-enable the match clock (the time on the clock will be the same as the previous match
time).
6. Repeat from Step 1 above to play a new match.
button for 3 seconds to begin a new match. You will
and
button to
15
or

SECTION 7: USING THE STOPWATCH FUNCTION
The stopwatch function offers two ways to time an event: individually-run team time and simultaneous timing
with split function. Follow the instructions below to set up and operate the stopwatch.
1. Select play mode 7 of the scoreboard as described in Section 2.
Stopwatch Mode. The main cloc k displa y shows the elapsed
minutes and seconds, and the guest score displa y shows the
tenths and hundredths of seconds. (SNT-130M shown for reference)
If you are unable to change play modes, hold the
button down for 3 seconds to reset
the current game in progress. Remember; you cannot change play modes if the scoreboard is
in the middle of a game – you first must reset the current game to allow the mode to be
changed.
2. To time a home team race followed by a guest team race (no split times), simply press the
button to start the clock, followed by the
button to stop the clock. You can then change
possession to the opposite team and repeat the same start and stop function. Toggling between the
home and guest possession will show you the time for each team. Press and hold the
for 3 seconds to reset the stopwatch.
3. To time both teams simultaneously (using the split fun ction), follow these steps:
3.1 Press the
button to start both team’s clocks.
button
3.2 To stop a team’s clock, simply press their respective possession b utto n (either the
button).
3.3 Press the second team’s possession button to stop its team clock.
3.4 Once both team’s clocks have been stoppe d, toggling between the home and guest possessions
will display each team’s time.
3.5 Press and hold the
button for 3 seconds to reset the stopwatch.
16
or

SECTION 8: USING THE CLOCK/TIMER FUNCTION
In several play modes, the game clock can be configured as a count-down timer or count-up clock. Follow
the next few steps to configure the game clock.
1. Select one of the following play modes that support the count up/down clock mode functio n:
Play mode 1 – soccer/hockey/baskeball
Play mode 6 – clock/timer only
Play mode 10 – soccer/hockey/basketball with team fouls/penalties
Play mode 14 – Football mode
2. The clock/timer defaults to a count-down clock. To select the count-up timer function, press and hold the
guest
button for approximately 3 seconds. The display will show “.0” indicating a start time of
zero second s.
3. Use the
and buttons to start and stop the clock/timer. The first minute of the count-up
timer or remaining minute of the count-down clock will display seconds and tenth-second time.
4. To reset the clock/timer, press and hold the
button for approximately 3 seconds. The
clock/timer must be stopped prior to this action.
17

SECTION 9: HALFTIME AND OVERTIME PERIODS
The SNT-130M/230M and SNT-130MP/230MP scoreboards feature an adjustable halftime period and
overtime period. The halftime period can be inserted between any of the regular periods 1 through 9. It
can be adjusted from 5 seconds to 99 minutes, and is independent of regulation period times. The
overtime period can be called up when regulation play time has ended and an overtime period is required.
It can be set for 5 seconds to 99 minutes and is independent of regulation period times.
NOTE: The halftime function is not available in play modes where the game clock is configured as a
count-up timer.
To initiate a halftime p eriod, follow these steps:
1. You must be in a play mode that uses the period digit and game clock to enable the halftime
period.
2. Wait until the current period of play comes to an end.
3. Press and hold the
4. Use the
5. Press the
and
button to start the halftime clock.
6. When halftime is over, press and release the
button for 3 seconds. The period digit will change to an ‘H’.
buttons to adjust the length of the halftime period.
button to advance to the next regular
period.
To initiate an ove rti me period, follow t hese steps:
1. You must be in a play mode that uses the period digit and game clock to enable the overtime
period.
2. Wait until the current period of play comes to an end and the end-of-period horn has sounded.
3. Press the
button repeatedly until the period digit shows a ‘O’.
4. Use the
and
buttons to adjust the length of the overtime period.
5. Press the
button to start the overtime clock.
6. When the overtime period ends and another overtime period is required, simply repeat Steps 4
and 5 to add time back to the clock and restart it. The game clock must be stopped in order to
set the time.
18

SECTION 10: SHORT AND LONG TIMEOUTS
Your scoreboard features an adjustable short timeout and long timeout function. Follow the steps below
to initiate a timeout.
1. Make sure the game clock has been stopped.
2. Press and hold either the or button for approximately 3 seconds to init iate a short
timeout or a long timeout, respectively. The period digit will blink to indicate you are in a timeout.
3. Adjust the length of your timeout using the same or buttons (without holding them
down).
4. Press the button to begin your timeout clock. Press to stop the timeout clock.
5. You can cancel your timeout by first stopping the timeout clock and then pressing either the
or button. Pressing either of these buttons during a timeout will not reset your
game or change the period.
Note: Your timeout settings will be saved in memory for the next time you use them.
19

SECTION 11: INSTALLING BATTERIES IN THE KEYPAD REMOTE
If the low-battery warning chirp is sounding in the keypad, it is time to replace the batteries. This warning
chirp will occur following each press of a keypad button.
1. If you are in the middle of a game and the game clock is being used, make certain the game clock is
stopped before proceeding, and that the scoreboard is not in the power-down mode.
2. Remove the four screws using a Philips-head screwdriver. Rotate each screw counter-clockwise to
remove.
3. Remove the keypad cover by turning the unit upside-down and gently tapping on the keypad housing.
4. Locate the battery holder near the bottom-area of the circuit board.
5. Insert two new AAA-size alkaline batteries. Make certain the ‘+’ contact is properly orie nted.
6. Assemble the keypad housing. Turn the screws clockwise until resistance is felt when tightening.
DO NOT OVERTIGHTEN SCREWS AS THIS WILL DAMAGE THE KEYPAD HOUSING.
NOTE: Always replace both batteries at the same time for best performance.
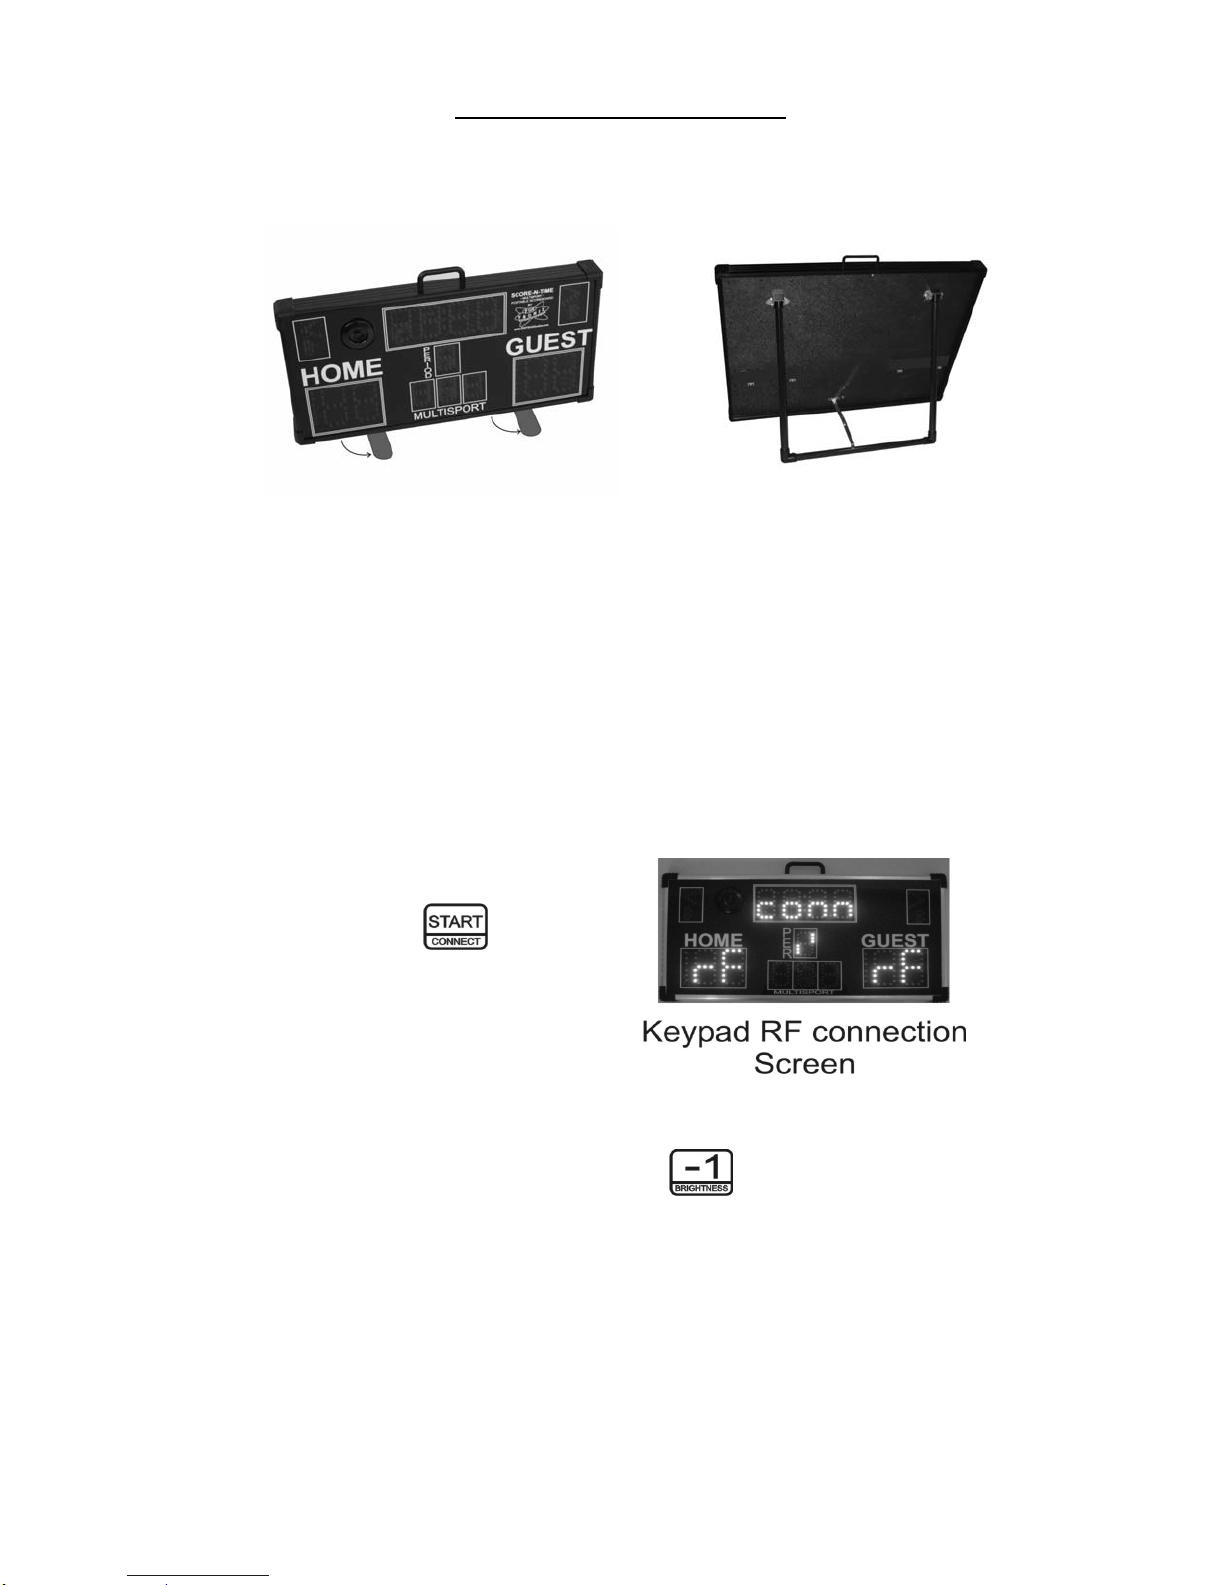
SECTION 12: PAIRING THE SCOREBOARD AND KEYPAD
1. Cycle the scoreboard power off and on (waiting 3
seconds before each turn-on) until the scoreboard is
displaying the keypad RF connection screen shown
below at right. Make certain only one scoreboard in
the vicinity is showin g this display at any given time ,
otherwise the pairing process will fail.
2. Press and hold the
beep). The scoreboard will go through a process of reconnecting to the keypad and will respond
after a few seconds by displaying the radio channel number. The keypad will beep twice if the
connection is good, or 3 times if the connection failed. Repeat this step if necessary to establish a
connection.
3. After a couple seconds the scoreboard will show a normal di splay and is then ready for action.
(SNT-130MP shown for reference)
button on the keypad for up to 10 seconds (until the keypad emits a
20

SECTION 13: DETAILED KEYPAD BUTTON DESCRIPTIONS AND USAGE
Buttons that have multiple functions will have a dividing line through them. Any function below the line on
the button requires you to hold the button down to activate that particular function.
BUTTON FUNCTION
Start the game clock (if applicable). Holding this button down for up to 10 seconds will initiate a connection to the
scoreboard (see Section 12 for details).
Stop the game clock (if applicable).
Manually sounds the horn on the scoreboard for approximately 1-2 seconds.
With the game clock stopped (if appl icable), each p ress of this butto n increments the period di git by one. Hold ing
this button down for approximately 3 seconds (with game clock stopped) will enable the half-time period. In play
mode 4, this button is used in the setup of the workout timer (refer to Section 5).
Before the start of a game, repeated presses of this button will toggle through the various play modes. In baseball
mode (SNT-130MP/230MP) pressing this button will clear the balls and strikes digits. In Football mode (SNT130MP/230MP) pressi ng this button will re set the Downs and Yards-To-First-Down display. Pressing and holding this
button for 3 seconds (with game clock stopped – if applicable) will reset the current game.
Increment the home score one point. Pressing and holding this button for approximately 3 seconds will enable the
linking process to the wireless referee wrist remote keypad.
Decrement the home s core by one point. Pressing an d holding this button for appr oximately 3 seconds will cy cle
through the three automatic horn-sounding options. See Section 2 Step 4 for details.
Selects the Home-Po ssession arrow. In pl ay mode 1 and 2; ho lding this button d own for approxim ately 3 seconds
after a game has started wi ll toggle the team bonus light on or off. If this team ’s possessi on indicator is curre ntly
selected, each press and release of this button will cycle through disabling and enabling the possession indicato r.
Prior to starting a game, each press of this button
function can only b e used when the game cloc k is enabled and is dis abled if a game is in progres s. Holding this
button down for approximately 3 seconds will initiate a short timeout (in certain modes). Refer to Section 10 for
increases the game clock time for each period in the game. This
details.
Prior to starting a game, eac h press of this button d ecreases the g ame cl ock time for each peri od in the game. T his
function can only be used when the game clock is enabled and is disabled if a game is in progress Holding this
button down for appro ximately 3 seconds will initiate a lon g timeout (in certain modes). Refer to Section 10 for
details.
Increment the guest score one point. In several play modes, holding this button down for approximately 3 seconds
(prior to start of game) will change the clock to a count-up timer. See Section 8 for details.
Decrement the guest score by one point. Holding this button down for approximately 3 seconds toggles between the
different display brightness levels.
Selects the Guest-Possession arrow. In play mode 1 and 2; holding this button down for approximately 3 seconds
after a game has started wi ll toggle the team bonus light on or off. If this team ’s possessi on indicator is curre ntly
selected, each press and release of this button will cycle through disabling and enabling the possession indicato r.
In play modes usi ng the gam e cl oc k (wi th th e game cl oc k stopp ed); e a ch p res s of this b utton wi ll i ncr eas e the ti me o f
the current period by one second (if remaining time is greater than 1 minute) or one tenth of a second (if remaining
time is less than 1 mi nu te). Holding this button down for a p pr oximately 3 seconds wi ll s av e the cu rr ent ga me da ta fo r
recall at a later date.
In play modes using the game clock (w ith the game clock stopped); each press of this button will decrease the time of
the current period by one s econd (if remaining time is gre ater than 1 minute) or one tenth o f a second (if remaining
time is less than 1 mi nute). Holding this button down for approxi mately 3 seconds will retrieve a previously -saved
game.
Team Fouls: Increments the home team fouls. Basketball Mode: Resets the shot clock – stays at reset while button
is held pressed. Baseball Mode: Increments the “balls” digit. Football Mode: Increments the “downs” digit.
Team Fouls Mode: Clear team fouls. Basketball Mode: Decrements the shot clock by 1 second (game clock
stopped) or disabl es the shot cloc k (game clock running). Baseball Mode: Increments the “s trikes” digi t. Football
Mode: Decrements the remaining “yards-to-first-down” by 1 yard.
Team Fouls Mode: Increments the guest team fouls. Basketball Mode: Increments the shot clock by 1 second
(when game clock stopped) or pauses the shot clock (when game clock running). Baseball Mode: Increments the
“outs” digit. Football Mode: Increments the remaining “yards-to-first-down” by 1 yard.
21

SECTION 14: CARE AND MAINTENANCE
Keep your scoreboard clean for optimum viewing of the display.
Never spray cleaning solutions directly onto the scoreboard or keypad.
Use only ammonia-free window cleaning solution.
To clean your scoreboard, spray the cleaner onto a clean cloth. Lightly wipe the scoreboard or keypad
with the damp cloth until clean. To eliminate fine scratches on the front panel – apply a small amount of
carnuba car wax on a terry cloth and lightly wipe the front panel.
SECTION 15: TROUBLESHOOTING GUIDE
Symptom: Keypad remote doesn’t appear to work or scoreboard fails to connect to keypad.
Solutions: 1. Keypad-scoreboard range may be too far. Move the scoreboard closer to the keypad.
2. Replace the batteries in the keypad remote. See Section 11 for details.
3. Re-establish radio connection between scoreboard and keypad as described in Section 12.
Symptom: Game clock is not displayed.
Solution: Follow instructions in Section 2 and/or Section 3 to select a play mode that uses the game
clock.
Symptom: Scoreb o ard won’ t tu rn on or display is dim.
Solutions: 1. Screen brightness is on low setting: Press and hold the
change brightness.
2. Replace the batteries in the scoreboard.
Symptom: Display ‘blinks’ when a button is pressed on the keypad.
Solution: This is normal.
button for 3 seconds to
22

SECTION 16: PRODUCT SPECIFICATIONS
(Product specifications subject to change without notice)
FUNCTIONAL SPECIFICATIONS:
Score Digit Range: 0 to 199 points
Game Clock Range: 5 seconds to 99 minutes (all modes except Bocce Ball)
1 minute to 99 hours (Bocce Ball mode)
Total Number of Periods: 1 to 9, plus 0 for overtime
Timeout Settings: Short: 5 to 55 seconds, in 5-second increments
Long: 1 to 99 minutes
Keypad Operating Range: up to 200 feet (outdoors open-field with fresh batteries installed in
the keypad)
Stopwatch resolution/accuracy: .02 second resolution, +/- .001 second accura cy
ELECTRICAL SPECIFICATIONS:
Operating Voltage: SNT-130 series: 9 volts DC
SNT-230 series: 12 Volts DC
BATTERY REQUIREMENTS / LIFE EXPECTANCY
SNT-130 SERIES SNT-230 SERIES
Battery Quantity x Type 6 AA-size Alkaline 8 C-size Alkaline
Life: Low- Brightness Up to 40 hours Up to 50 hours
Life: Mid-Brightness Up to 28 hours Up to 30 hours
Life: High-Brightness Up to 14 hours Up to 20 hours
POWER ADAPTER SPECIFICATION:
Output Connector: 2.1mm x 5.5mm barrel, center-positive
Compatible AC Adapters:
SNT-130 series: Funtronix PN PS-9V-1400
SNT-230 series: Funtronix PN PS-12V-3000
MECHANICAL SPECIFICATIONS:
Dimensions:
SNT-130 SERIES: 24 inches wide, 12 inches tall, 2.2 inches deep
SNT-230 SERIES: 32 inches wide, 24 inches tall, 2.5 inches deep
Weight:
SNT-130 SERIES: Approximately 6 pounds
SNT-230 SERIES: Approximately 14 pounds
ENVIRONMENTAL SPECIFICATIONS:
Operating Temperature: 0 C to 50 C
Storage Temperature: -10 C to +55 C
Humidity: 0 to 95% non-condensing
23

Warranty
1 YEAR LIMITED WARRANTY
Funtronix LLC warrants your product against defects in materials and workmanship for one (1) year from date of
shipment to the original purchaser. Should any part of the scoreboard, keypad, or AC adapter be proven defective in
material or workmanship within this period, such defect(s) will be repaired or replaced (with new or rebuilt parts) at
Funtronix’s discretion, without charge for parts or labor directly related to the defect(s).
This Warranty extends only to consumers who purchase the scoreboard in the United States or Canada and is nontransferable or assignable.
This Warranty does not apply to:
Product subjected to abnormal use or conditions, accident, mishandling, neglect, unauthorized alteration,
misuse, improper installation or repair, or improper storage.
Product in which the serial number has been removed, altered, or defaced.
Damage from exposure to moisture, humidity, excessive temperatures, or extreme environmental conditions.
Damage resulting from connection to, or use of any accessory or other product not approved or authorized by
Funtronix LLC.
Defects in appearance (cosmetic, decorative), or structural items such as product housing/enclosure
components.
Product damaged from external causes such as fire, flooding, dirt, sand, weather conditions, battery leakage,
theft, or improper usage of any electrical source.
To obtain repairs or replacement within the terms of this Warranty, contact Funtronix to obtain a Return Material
Authorization (RMA) number prior to shipping the product. The product should be shipped with proof of Warranty
coverage (e.g., dated sales receipt), the consumer’s return address, daytime phone number and/or fax number, and
complete description of the problem, to Funtronix LLC at the address shown below:
Funtronix LLC
29834 N. Cave Creek Rd
Suite 118-273
Cave Creek, AZ 853 3 1
THE EXTENT OF FUNTRONIX LLC’s LIABILITY UNDER THIS WARRANTY IS LIMITED TO THE REPAIR OR
REPLACEMENT PROVIDED ABOVE AND, IN NO EVENT, SHALL FUNTRONIX LLC’s LIABILITY EXCEED THE
PURCHASE PRICE PAID BY THE PURCHASER FOR THE PRODUCT.
ANY IMPLIED WARRANTIES, INCLUDING ANY IMPLIED WARRANTY OF MERCHANTABILITY OR FITNESS FOR A
PARTICULAR PURPOSE, SHALL BE LIMITED TO THE DURATION OF THIS WRITTEN WARRANTY. ANY ACTION
FOR BREACH OF ANY WARRANTY MUST BE BROUGHT WITHIN A PERIOD OF 130 DAYS FROM DATE OF
ORIGINAL PURCHASE. IN NO CASE SHALL FUNTRONIX LLC BE LIABLE FOR ANY SPECIAL CONSEQUENTIAL
OR INCIDENTAL DAMAGES FOR BREACH OF THIS OR ANY OTHER WARRANTY, EXPRESS OR IMPLIED,
WHATSOEVER. FUNTRONIX LLC SHALL NOT BE LIABLE FOR ANY DELAY IN RENDERING SERVICE UNDER
THIS WARRANTY OR LOSS OF USE DURING THE TIME THE PR ODU CT IS BEING REPAIRED OR REPLACED.
No person or representative is authorized to assume for Funtronix LLC any liability other than expressed herein in
connection with the sale of this product.
Some states or provinces do not allow limitations on how long an implied warranty lasts or the exclusion or limitation of
incidental or consequential damage so the above limitation or exclusions may not apply to you. This Warranty gives you
specific legal rights and you may have other rights, which vary from state to state or province to province.
24

Write down your product serial number for your records.
SN: _________________________
Please visit our website for new products and accessories for your scoreboard:
www.funtronixonline.com
25
 Loading...