

Page 1
NU_FMS5752
_000_08012015_EN
IInnffoottaaiinnm
meenntt SSyyssttee
m
m
Introduction
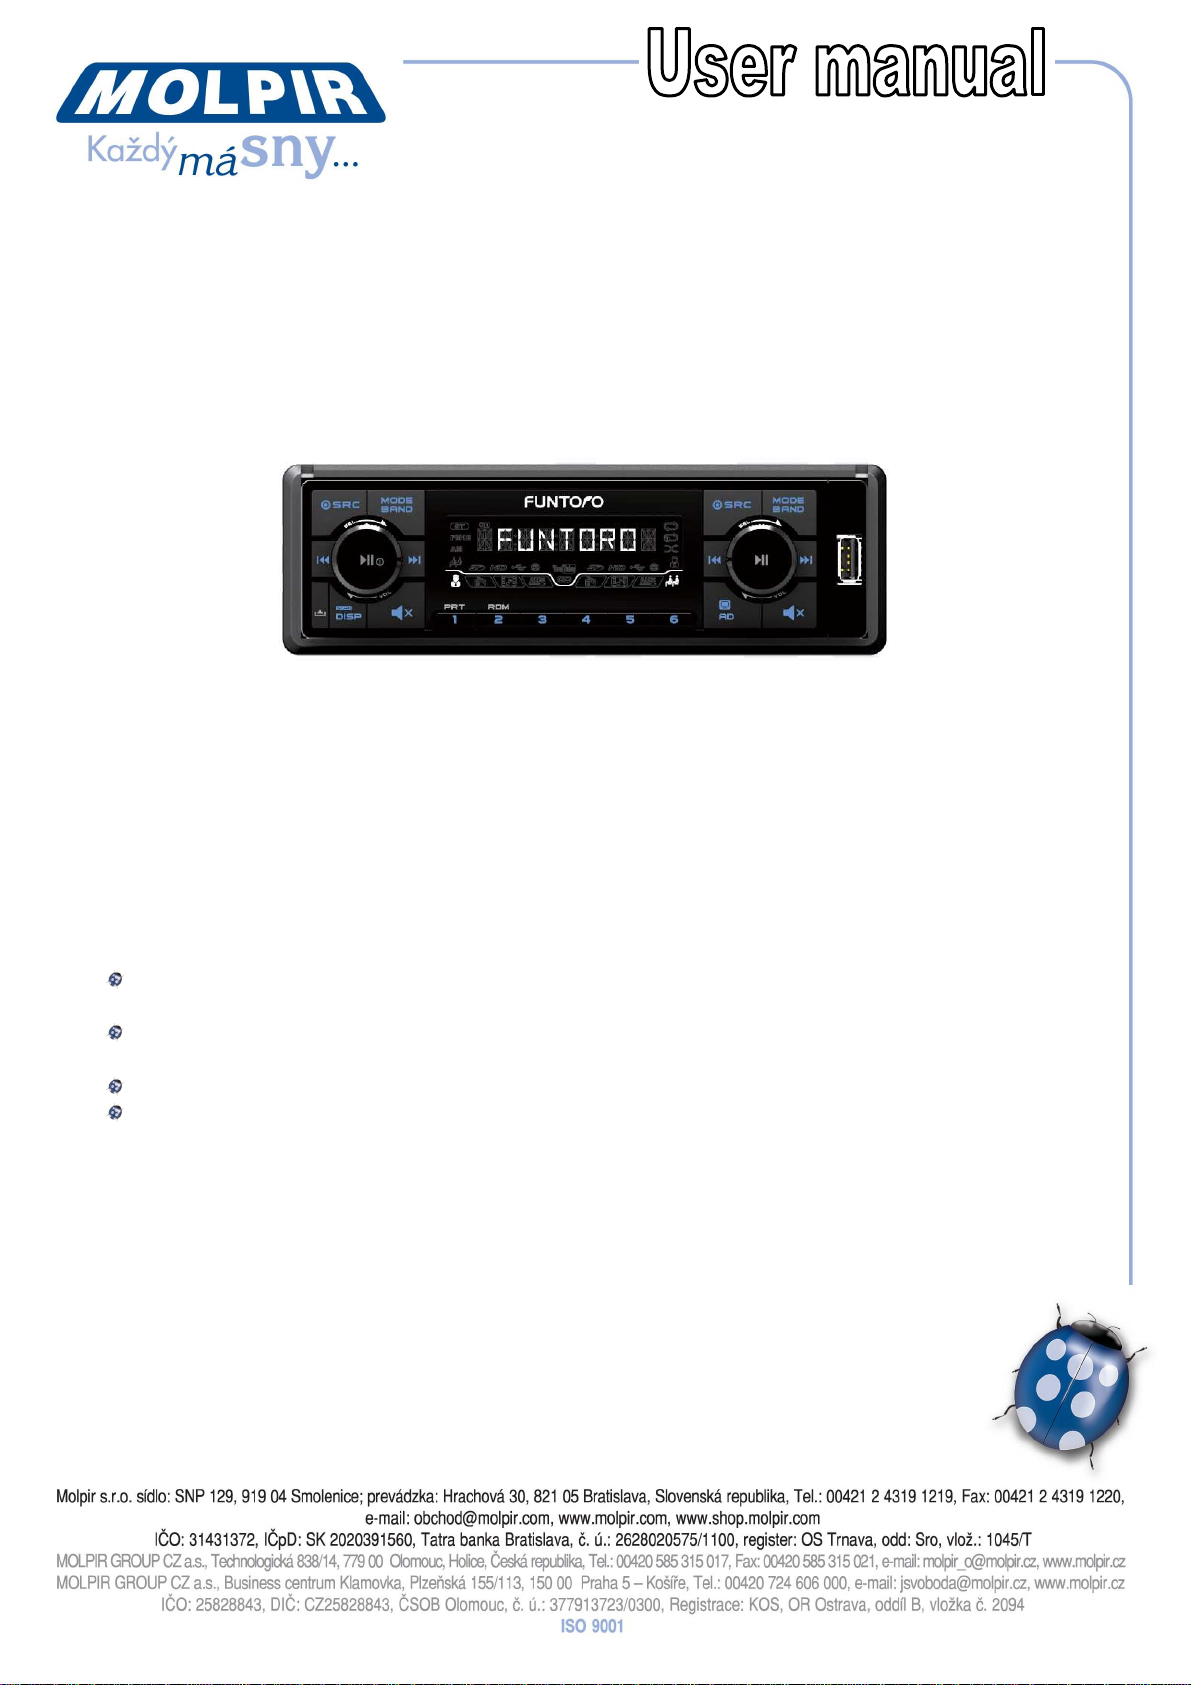
Thank you for purchasing our product – MS 5752 infotainment system. This product is
specially designed for buses and coaches. In order to ensure more safety when using this
product, please be sure to read this manual thoroughly before installing and using it.
Besides, please notice the installation instructions and keep it for future reference!
The system can be installed and maintained by qualified installation and maintenance
personnel.
Please read each item of this manual thoroughly before installing and using this
system.
It is prohibited to spread the content of this manual without permission.
This manual is only for reference of related information; please make the actual
product as the standard and some items may be subject to change without notice.
Date: 08.01.2015 Page 1 / 16
Page 2
NU_FMS5752
_000_08012015_EN
Catalog
☆
Introduction 1
☆
Catalog 2
☆
Main Functions 3
☆
Specification 4
☆
Panel Description 7
☆
Panel Display 8~9
☆
Function Description 9
☆
Profile Description 9
☆
Specific Description 10
☆
Software Update 10~12
☆
Installation Guide 13
☆
System Architecture HDMI 14
☆
System Architecture VGA 15
☆
Trouble Shooting 16
☆
Remark 16
Date: 08.01.2015 Page 2 / 16
Page 3
NU_F
MS5752
_000_08012015_EN
D
ate:
08.01.201
5
Page
3 / 16
Main Functions
Infotainment
Maximum resolution: 1920 X 1080 for HDMI, and 1024x768 for LVDS
Video format: MP4, AVI, MKV, 3GP, MOV, FLV, F4V, VOB, and MPG
Audio format: MP3, ACC, AMR, M4A, OGG and WAV
Photo format: JPG
Storage: USB (on the front panel), SD Card (2G–32G), SSD (support up to 64G-2TB
with EXT2 and NTFS)
Support Last Good function (the source from SSD, SD Card and USB )
Announcement
There are 2 lines microphones, one is for the driver and the other is for the attendant.
The announcement can be automatically started and stopped via microphone switch.
When it is in the mode of Announcement, other function modes like radio or media
are all in state of Pause.
Dual Zone Control
For passengers: can select “RADIO(FM/AM)–MEDIA–AUX–OFF” by circle
For the driver: can select “RADIO(FM/AM)–MEDIA–AUX–OFF” by circle
Page 4
NU_FMS5752
_000_08012015_EN
D
ate:
08.01.201
5
Page
4 / 16
Specification
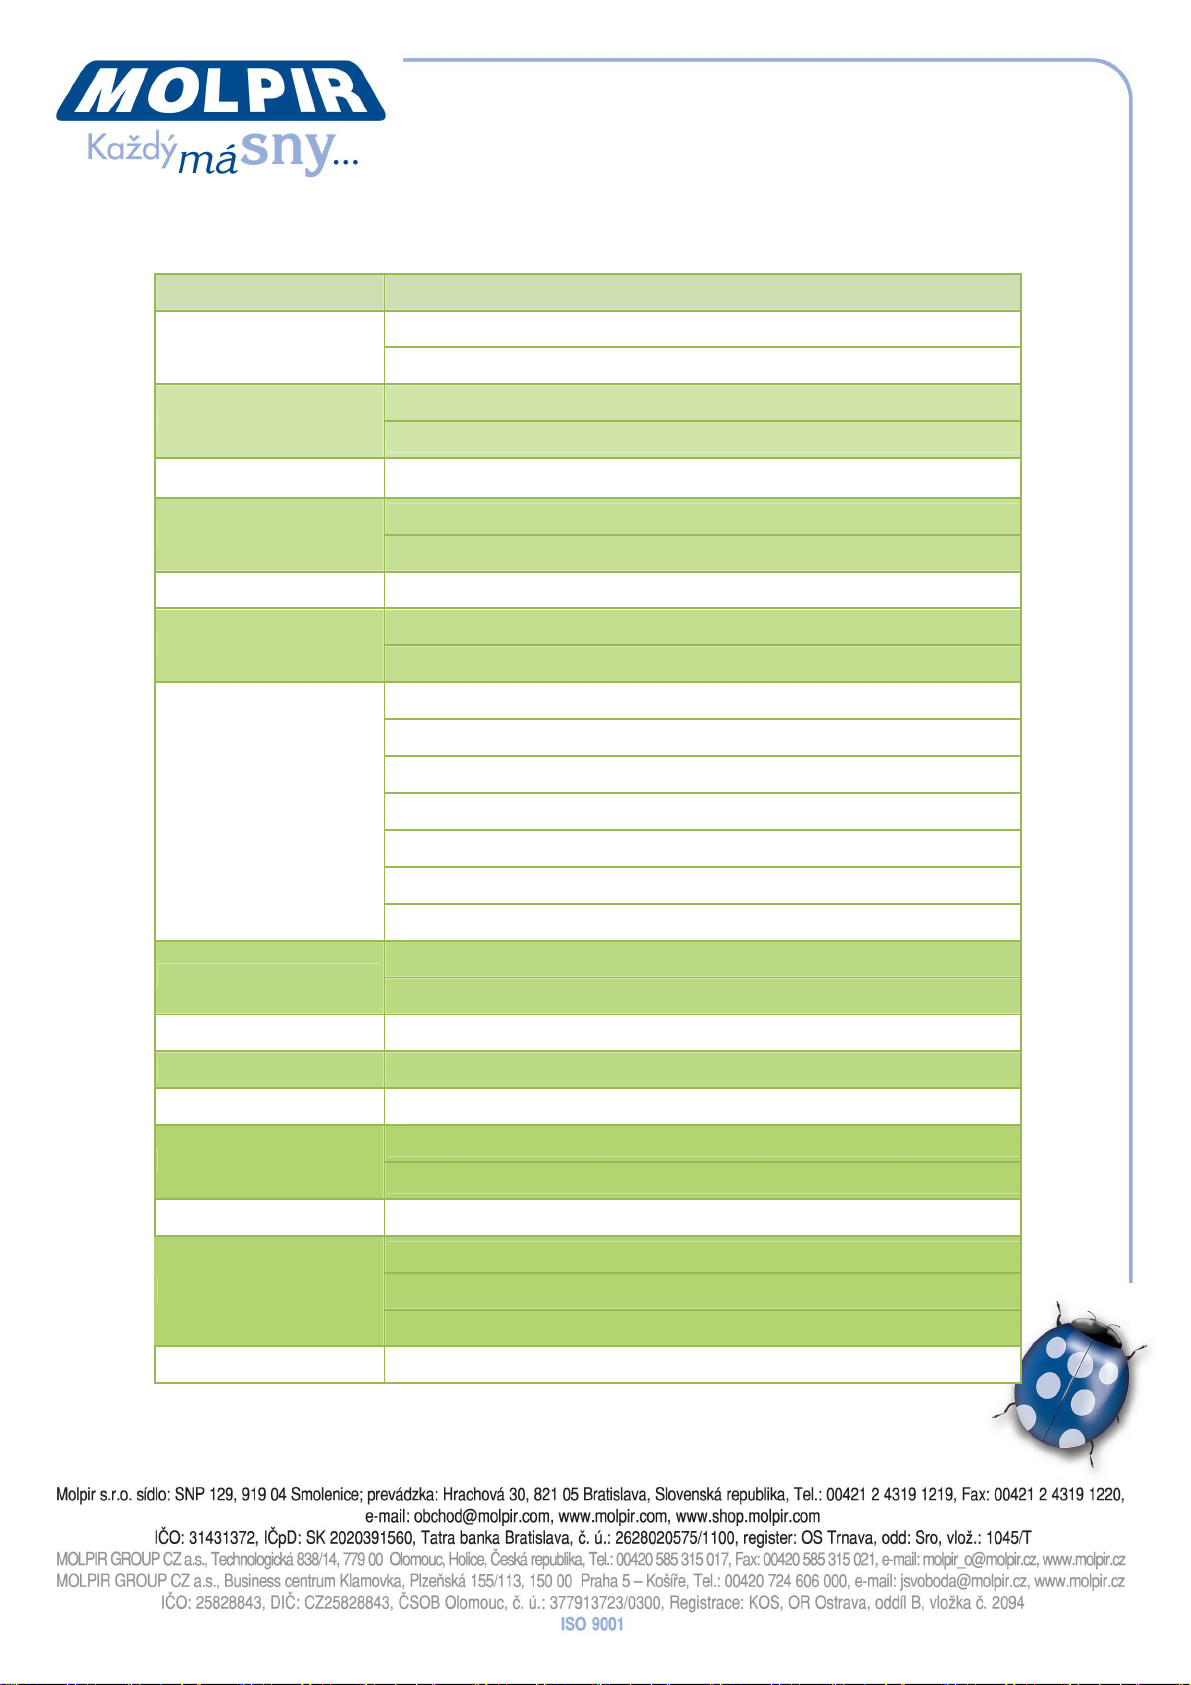
Chipset Freescale i.MX6 Dual Core
Display
Memory
Storage Swappable SATA 2.5” SSD , Standard SD & Micro SD slot
Radio
HDMI HDMI In/out (1080P)
USB
I/O
LCM module (72mm × 23mm)
Detachable with anti-thief design
2GB DDR3 SDRAM
8GB eMMC storage
FM Tuning range (76.0MHz-108.0MHz )
AM Tuning range (522.0KHz-1269.0KHz )
Front: USB 2.0 *1
Back: USB 2.0 *2
VGA out × 2 (S-8 green *1 + DB15*1)
Video out × 1 (CVBS, Yellow)
AV-in × 1 (RCA, R/W/Y)
RS232 × 2
Audio Line out × 6 (2+4, 45W)
MIC-In × 2 (4-pin connector)
CAR I/O wire reserved × 4
Connectivity
Power Wide range 9~36V vehicle power
Operation System Android 4.2.2
Remote
Environment
Dimension 7.2inch (W) × 2.11inch (H) × 6.1 inch (D)
Accessory Cables
Certification CE, FCC, BSMI, E-mark
Giga LAN for ext. device (ex. 3G router)
Support Mini-PCIe slot
Support Cloud platform (FTR Cloud 4.0 )
Operation Temperature: -20° ~ 70° C
Storage Temperature: -40° ~ 85° C
PWR+SPK cable *1
Media IO cable *1
CAR IO+MIC cable*1
Page 5
NU_FMS5752
_000_08012015_EN
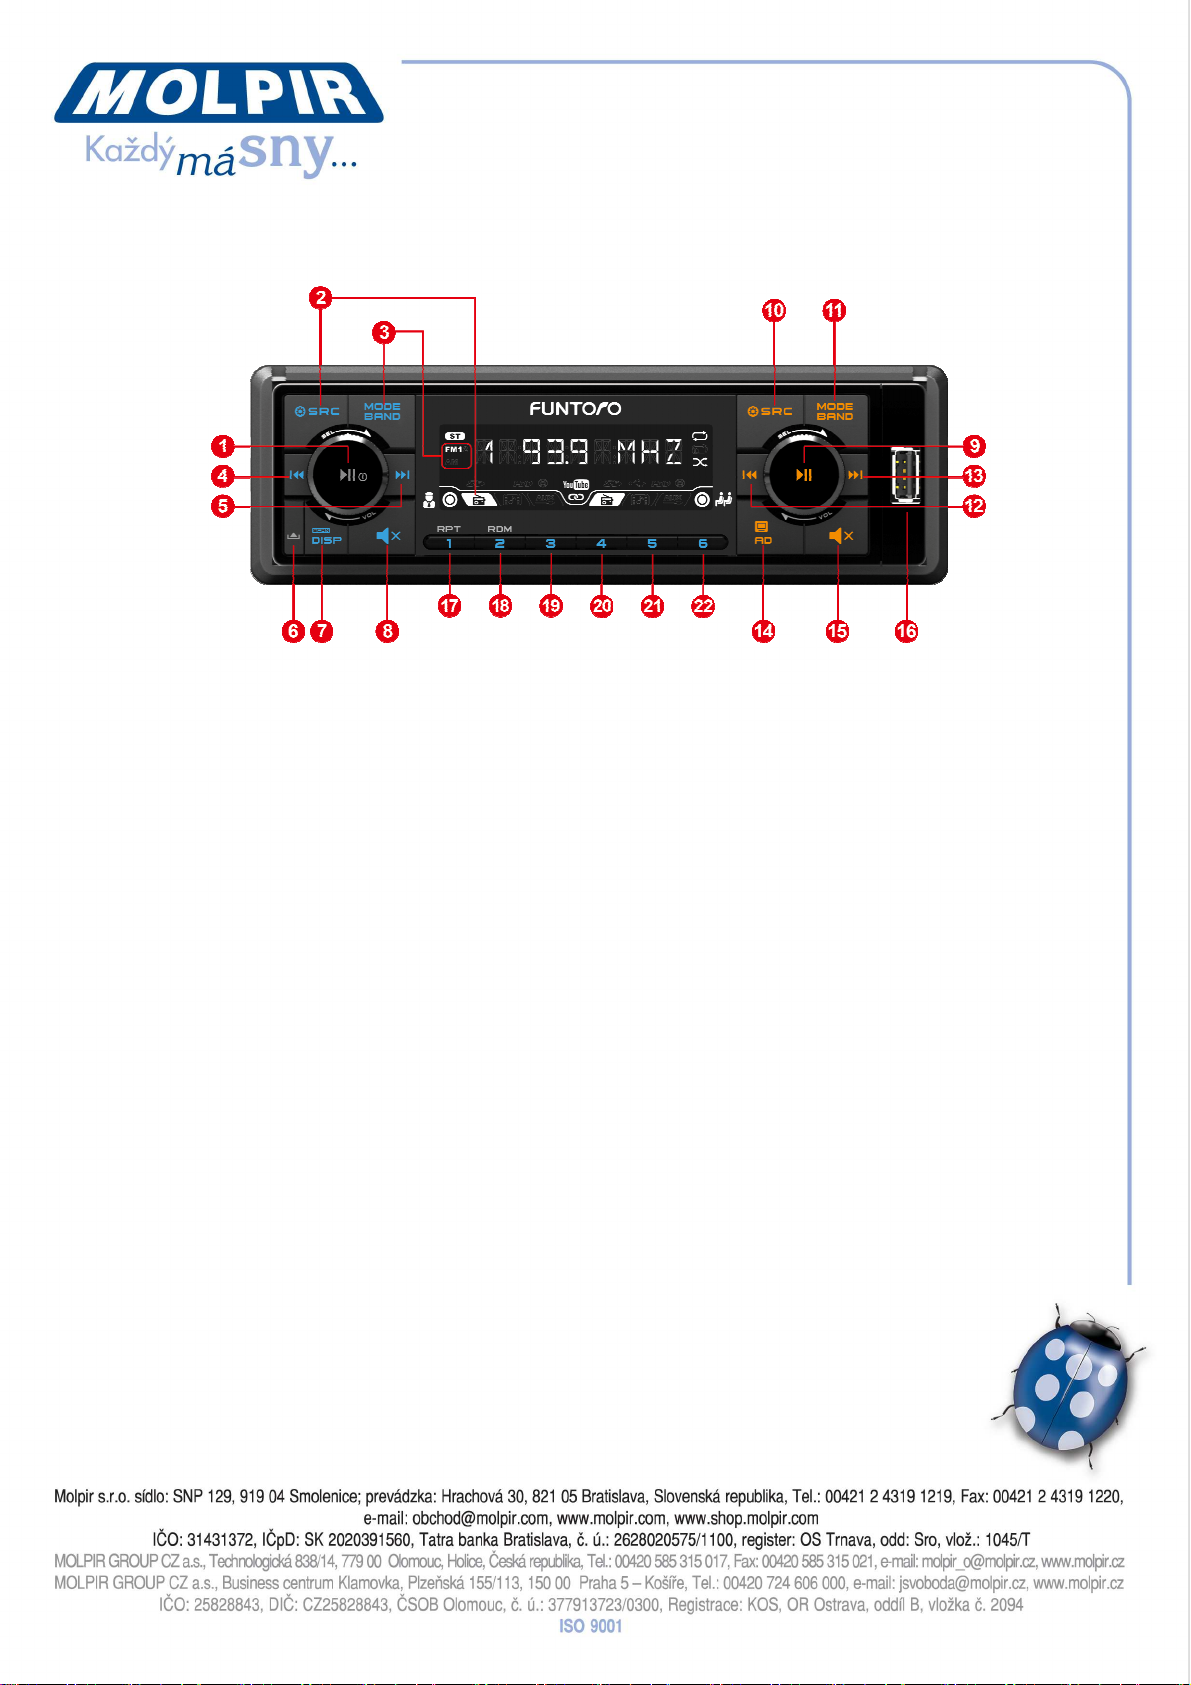
Panel Description
Please change the above picture to English version
1. Power on/Power off/Play/Pause/VOL/SETTING/SEL
Short press: you can play or pause in state of Media; adjust or finish the setting of
the item in state of Setting; select specified media file in state of Media List mode.
Long press: you can power on in state of Power off; power off in state of Power on.
Turn: in general state, turn left to volume down and turn right to volume up; in
setting mode, you can adjust or select BASS / TREBLE / BLA / FAD / LOUD / EQ /
UPDATE / DIAGNOSIS; in Media list mode, you can quickly select the file in play
list.
2. SRC/Setting
Short press: switch to RADIO/MEDIA/AUX/OFF
Long press: enter to setting mode or exist from setting mode
3. MODE/BAND
Short press: in state of Media, you can select to switch Movie/Music/Photo (in
SSD/SD/USB)/Internet Radio or YouTube; in state of Radio, you can switch to
FM1/FM2/AM.
Long press: no action
4. Turn Back
Short press: in state of Media, short press to the previous file (movie music, photo,
youtube and e-radio); in state of radio, short press to decrease 0.1MHz of FM band
and 100 Hz of AM band; in state of Turn Back, you can switch to
(2X/4X/8X/16X/20X/32X); in state of Media list mode, select the previous media
file in play list.
Long press: in state of Media, long press to turn back; in state of Radio, long press
to backward search the nearest available radio channel. Press any key to stop long
press action.
5. Fast Forward
Short press: in state of Media, short press to the next file (movie music,
Date: 08.01.2015 Page 5 / 16
Page 6
NU_FMS5752
_000_08012015_EN
photo, YouTube and e-radio); in state of radio, short press to increase 0.1MHz of FM
band and 100 Hz of AM band; in state of Fast Forward, you can switch to
(2X/4X/8X/16X/20X/32X); in state of Media list mode, select the next media file in
play list.
Long press: in state of Media, long press to fast forward; in state of Radio, long
press to forward search the nearest available radio channel. Press any key to stop
long press action.
6. Release the front panel. Open the cover of bottom left and remove the screw, then
close the cover and press the button to release the front panel for SSD or SD card
change.
7. DISP/SCAN
Short press: switch to 3 kinds of display states (Driver, Passenger and Time).
Long press: scan all bands of radio, and then select the 6 bands with the best
reception and record in hotkeys.
8. MUTE
Short press: mute at the driver side
Long press: no reaction
9. Power on/Power off/Play/Pause/VOL/SETTING/SEL
Short press: you can play or pause in state of Media; adjust or finish the
setting of the item in state of Setting; select specified media file in state
of Media List mode.
Long press: you can power on in state of Power off; power off in state of Power on.
Turn: in general state, turn left to volume down and turn right to volume up; in
setting mode, you can adjust or select BASS / TREBLE / BLA / FAD / LOUD / EQ /
UPDATE / DIAGNOSIS; in Media list mode, you can quickly select the files in play
list.
10. SRC/Setting
Short press: switch to RADIO/MEDIA/AUX/OFF
Long press: enter to setting mode or exit from setting mode.
11. MODE/BAND
Short press: in state of Media, you can select to switch Movie/Music/Photo (in
SSD/SD/USB)/Internet Radio or YouTube; in state of Radio, you can switch to
FM1/FM2/AM.
Long press: in states of Media, long press to open play list.
12. Turn Back
Short press: in state of Media, short press to the previous file (movie music, photo,
YouTube and e-radio); in state of radio, short press to decrease 0.1MHz of FM band
and 100 Hz of AM band; in state of Turn Back, short press to switch to
(2X/4X/8X/16X/20X/32X); in state of Media list mode, select the previous media
file in play list.
Long press: in state of Media, long press to turn back; in state of Radio, long press
to backward search the nearest available radio channel. Press any key to stop long
press action.
13. Fast Forward
Short press: in state of Media, short press to the next file (movie music,
photo, YouTube and e-radio); in state of radio, short press to increase 0.1MHz
Date: 08.01.2015 Page 6 / 16
Page 7
NU_FMS5752
_000_08012015_EN
of FM band and 100 Hz of AM band; in state of Fast Forward, you can switch to
(2X/4X/8X/16X/20X/32X); in state of Media list mode, select the next media
file in play list.
Long press: in state of Media, long press to fast forward; in state of Radio,
long press to forward search the nearest available radio channel. Press any key to
stop long press action.
14. Monitor/AD
Short press: play the specified AD movie with hotkey 1 to 6
Long press: open or close the lift-type screen.
15. MUTE
Short press: mute at passenger side
Long press: no reaction
16. USB Slot
Used for USB flash drive, as content of media source or of software update. Cell
phone can plug-in to USB slot as USB flash drive.
17. Hotkey 1
Short press: in state of Radio, short press to switch to channel 1; in state of Media,
short press to set Repeat All/Repeat One/None; in mode of AD, short press to play
the first movie.
Long press: in state of Radio, save the current band to channel 1.
18. Hotkey 2
Short press: in state of Radio, short press to switch to channel 2; in state of Media,
short press to set Random or Sequence; in mode of AD, short press to play the
second movie.
Long press: in state of Radio, save the band to channel 2.
19. Hotkey 3
Short press: in state of Radio, short press to switch to channel 3; in mode of AD,
short press to play the third movie.
Long press: in state of Radio, save the band to channel 3.
20. Hotkey 4
Short press: in state of Radio, short press to switch to channel 4; in mode of AD,
short press to play the fourth movie.
Long press: in state of Radio, save the band to channel 4.
21. Hotkey 5
Short press: in state of Radio, short press to switch to channel 5; in mode of AD,
short press to play the fourth movie.
Long press: in state of Radio, save the band to channel 5.
22. Hotkey 6
Short press: in state of Radio, short press to switch to channel 6; in mode of AD,
short press to play the fourth movie.
Long press: in state of Radio, save the band to channel 6.
Date: 08.01.2015 Page 7 / 16
Page 8
NU_FMS5752
_000_08012015_EN
D
ate:
08.01.201
5
Page
8 / 16
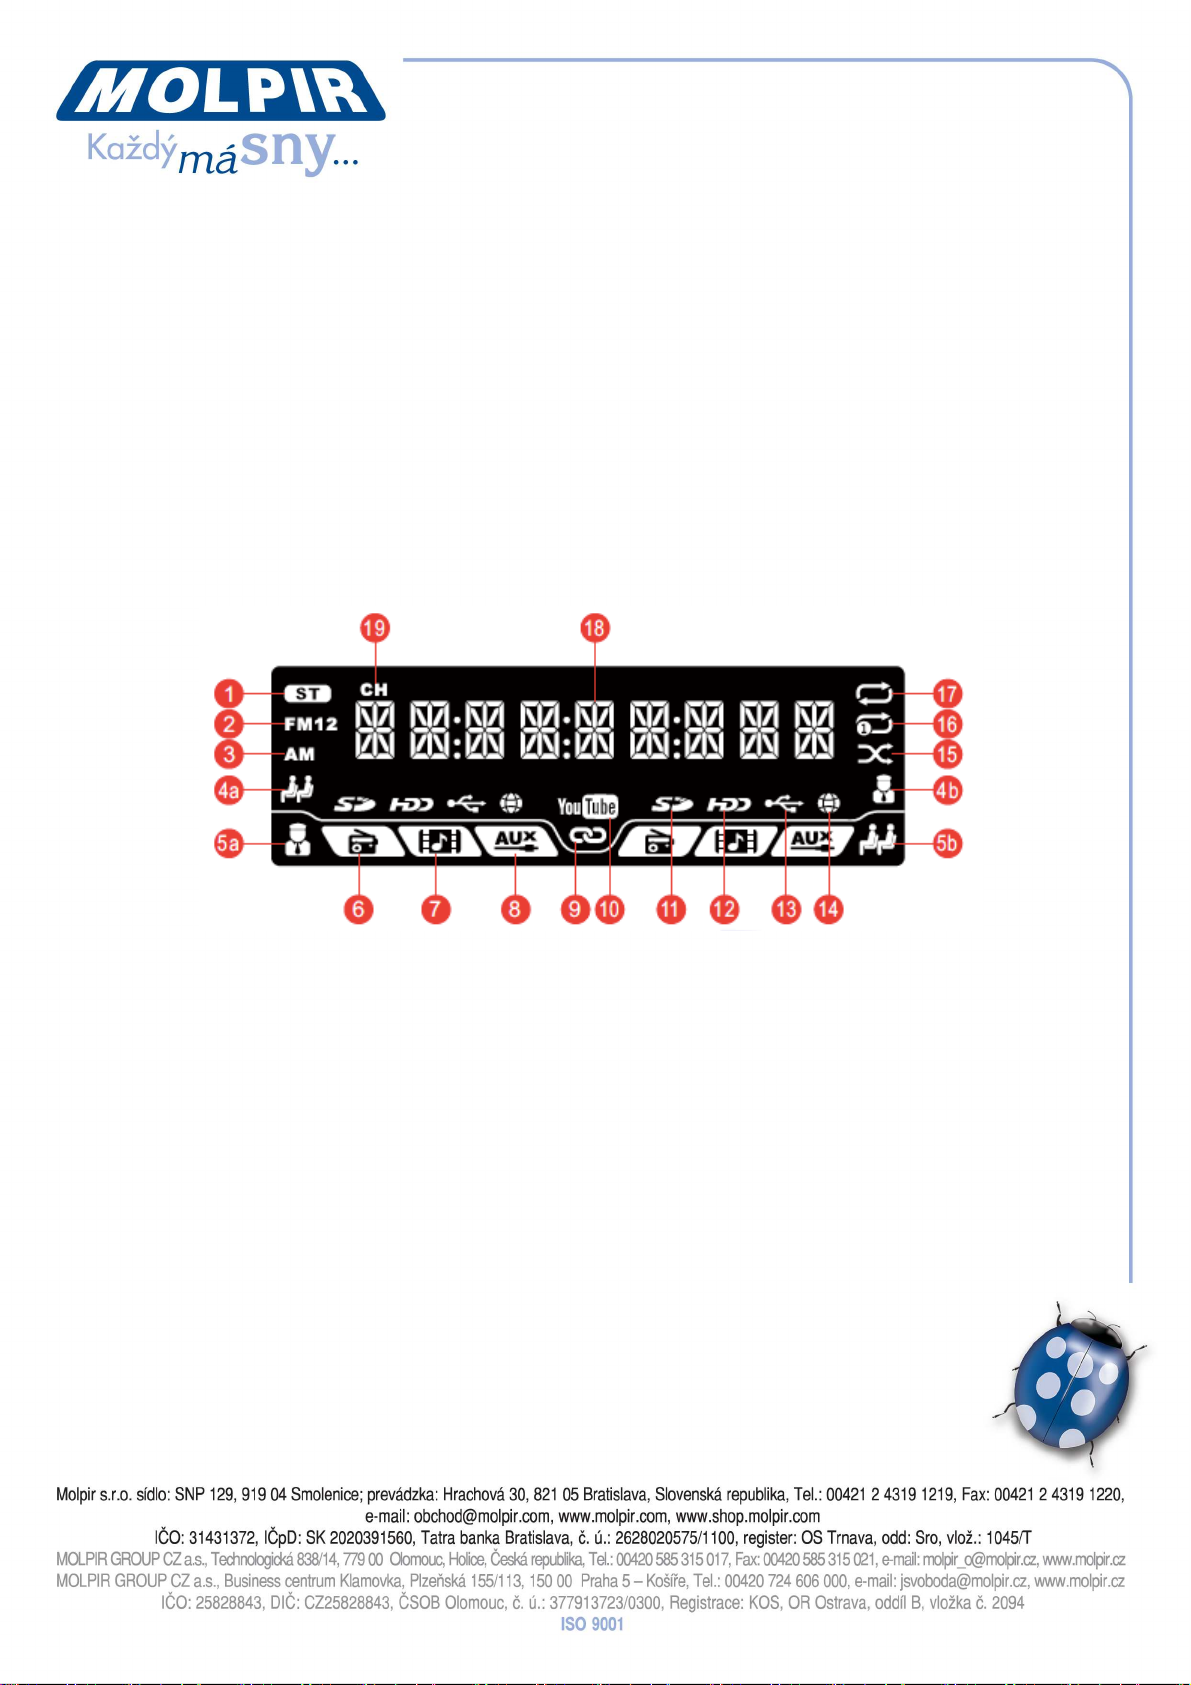
Panel Display
There are 3 kinds of display modes, Driver Mode, Passenger Mode and Time Display
Mode. As for display function, it’s mainly based on Driver Mode while Passenger Mode
subsidiary.
1. In normal status, the function of panel display is mainly based on Driver Mode.
2. If the driver needs to operate some functions for passengers, like play content
(movie or music), the panel display will show information of Passenger Mode.
However, if no any function in Passenger Mode is operated within 8 seconds, the
function of panel display will be returned to Driver Mode.
3. Press “DISP” key, then the driver can switch to Passenger Mode or Time Display
Mode. However, if no any function in Passenger Mode is operated within 8
seconds, the function of panel display will be returned to Driver Mode.
1 – Stereo / mono broadcasting
2 – FM1 / FM2 Radio
3 – AM radio
4 – Present the passenger zone is on the left side and the driver zone is on the right
side. It is not default setting, so the icon is hidden unless modified the setting.
5 – Present the driver zone is on the left side and the passenger zone is on the right
side. It is default setting, so the icon is showed up.
6 – Source: Radio
7 – Source: Multi media
8 – Source: AUX in
9 – When the 2 zones are set in the same source, they are synchronized and this icon
will be showed up
10 – Current media mode is YouTube
11 – Current media content is from SD card
12 – Current media content is from hard disc
13 – Current media content is from USB drive
14 – Current media mode is internet radio
Page 9
NU_FMS5752
_000_08012015_EN
D
ate:
08.01.201
5
Page
9 / 16
15 – Random
16 – Repeat one
17 – Repeat all
18 – Time, file name, radio band, playing information, setting items and so on.
19 – The preset radio stations (1 to 6)
Function Description
1. Driver zone and passenger zone can play different source. For example, driver zone
is radio, and passenger is movie
2. Support MTP (Media Transfer Protocol). With this engine, cell phone’s music can be
played via front USB slot
3. Support AD play by schedule
With function of schedule play.
The screen can be split with functions of banner and marquee.
Can be published from FUNTORO Cloud
4. Trace car by GPS signal from cloud
5. Upload movie, music and AD playing statistic data to cloud.
6. Preset the URL of YouTube and Internet radio URL to profile
7. Support HUAWEI 3G module (Mini PCIE)
8. Support Ralink WiFi module (Mini PCIE)
Profile Description
Profile is necessary files for running SuperDIN function. It is stored in SuperDIN flash.
1. Installation guide
Copy all profiles to external storage (USB, SD card or SSD) “\funtoro\conf_new”
folder.
Create a new file “new.flag” under “\funtoro\conf_new” folder.
Plug-In the external storage to SuperDIN
System will automatically do copy process.
If success, the new.flag in external storage will be removed.
2. Important Profiles
A. conf\properties.xml:
set system language, time zone, radio channel and so forth default settings.
B. conf\fan_control.cfg:
set default temperature to open or close FAN.
C. conf\resolution.cfg:
set default HDMI and LVDS output resolution. For HDMI, it can be 920x1080M@60,
1280x720M@60, 720x480M@60 or 720x576M@50.
For LVDS, it can 800x480 or 1024x768
D. conf\RemoteConfig.xml:
set cloud address and which data type to be uploaded to cloud.
E. conf\volume_am.curve, volume_aux.curve, volume_fm.curve
Page 10
NU_FMS5752
_000_08012015_EN
and volume_mp3.curve:
set each volume step’s DB gain for AM, FM, MP3 and AUX-IN.
F. resources\com.funtoro.posreporter\properties.xml: set cloud GPS server
information
G. resources\com.funtoro.onedin.funtoroframework\properties.xml: set AD download
path and other system needed path name.
H. resources\com.funtoro.central.siam.register\properties.xml:
set password and other needed setting for running Diagnostic function
Specific Description
When panel display is in state of Power off, you can press F1 to F3 on keyboard.
1. Press F1:Android Applications List
2. Press F2:File Management(Delete File)
3. Press F3:SuperDIN Information
4. Press F4:Run In (For Factory)
Software Update
Operator can update system software by below two ways via USB Flash drive.
System software includes:
OS Image (file name: update.zip)
MCU application (file name: ms57521AP.hex)
MCU bootloader (file name: ms57521BL.hex)
Audio board Application (file name: ms57522AP.hex)
Audio board bootloader (file name: ms57522BL.hex)
Before update, operator must copy these files to USB root path.
Update Software by LCM panel:
1. Insert USB into the front USB slot.
2. After booting of SuperDIN, long press the SRC button
3. System enter the Setting mode
4. Clockwise rotate the Knob button until LCM shows “UPDATE”,
5. Press the Power button to enter the updating mode
6. Rotate the Knob button again until the item you want to update appears.
7. LCM will display the item name and version alternatively
8. Operator can long press SRC button to exit, or rotate the knob counterclockwise until
“SKIP” appears. Then press Power button to exit.
9. Short press the Power button while the updated item blinking to start
updating process.
10. If success, system will be rebooted and prompt beep sound.
Date: 08.01.2015 Page 10 / 16
Page 11
NU_FMS5752
_000_08012015_EN
11. If fail, LCM will display “Update Fail” string.
12. When the software is updating, the panel LED (blue/orange) will have a cross flash.
After the update is finished, the system will re-boot automatically and enter a normal
mode.
Update Software by Android APK:
1. Insert USB into the front USB slot.
2. Plug-in keyboard and mouse to backend USB port
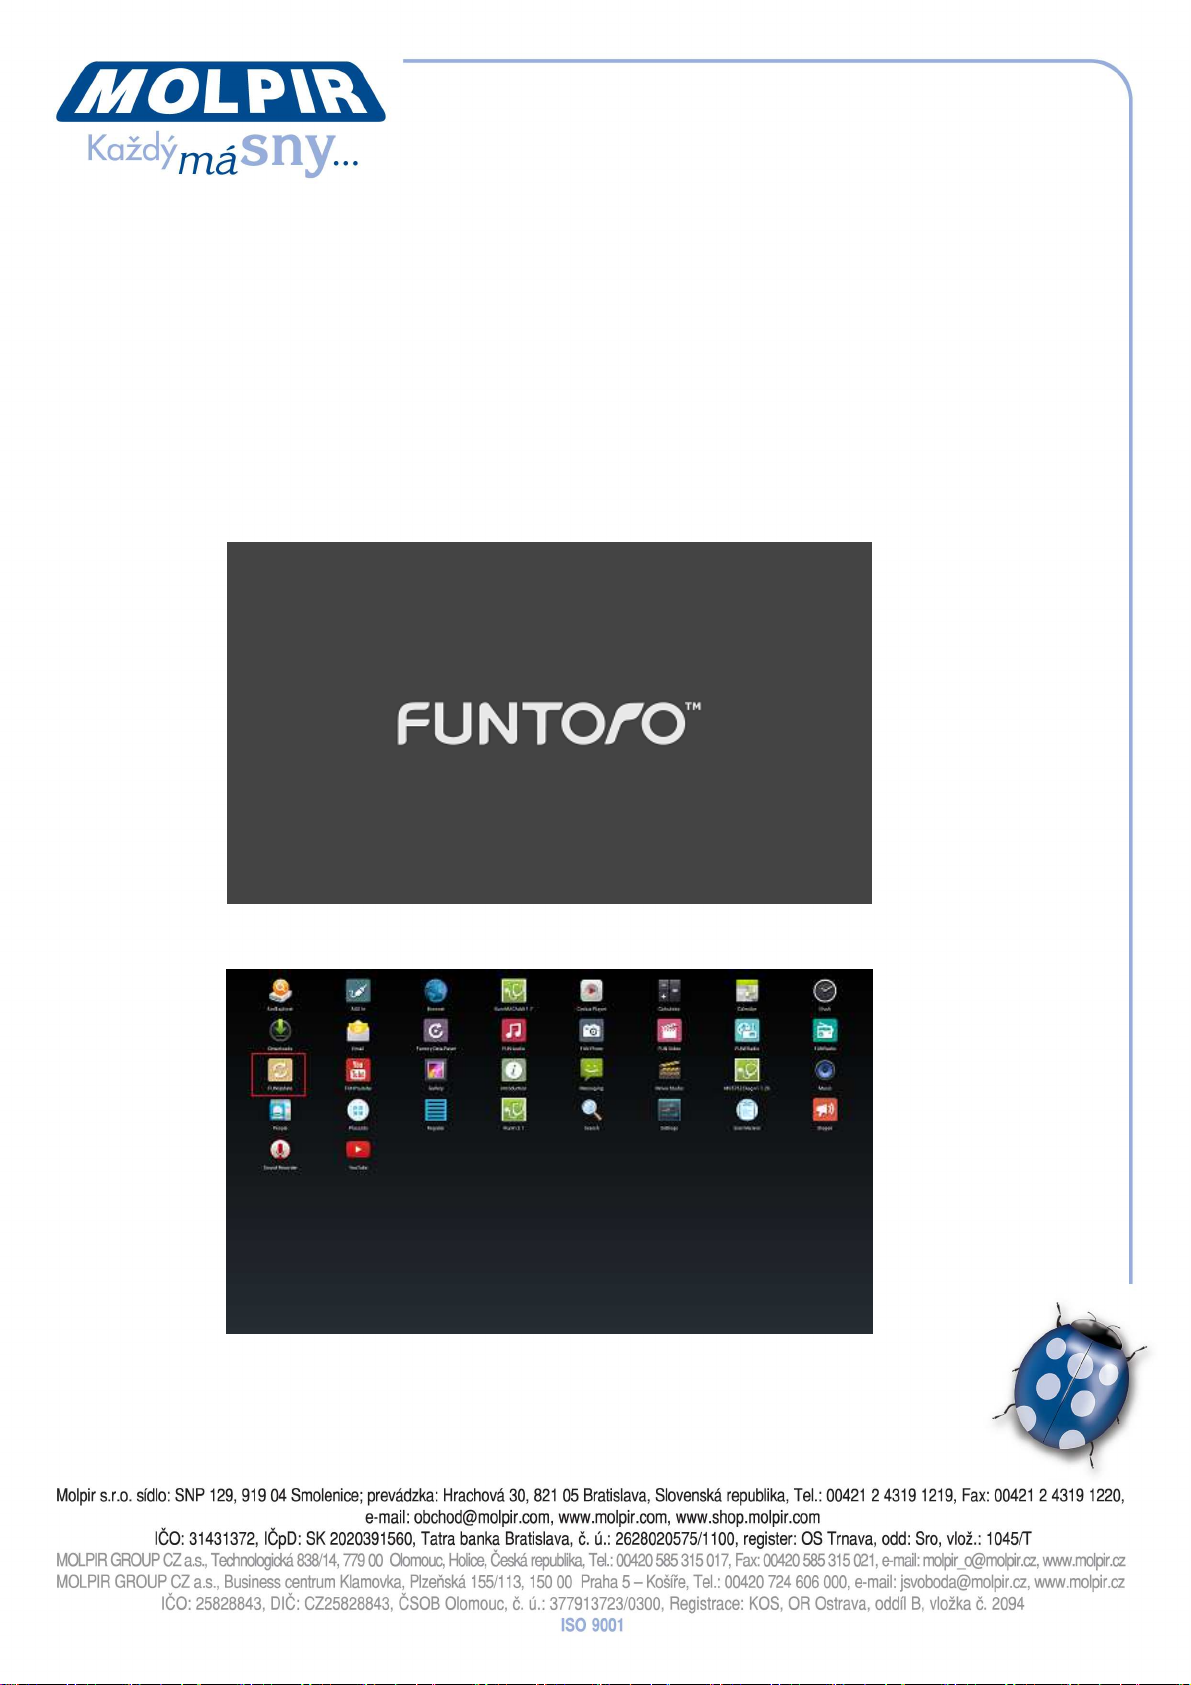
3. Boot SuperDIN if it is in ACC off state.
4. Let the device in Power off state, otherwise long press the Power button to enter
power off state. In power off state, the below page is launched.
5.
Press F1 on keyboard to enter Android Application
6.
Click FUNUpdate icon to launch Update page
Date: 08.01.2015 Page 11 / 16
Page 12
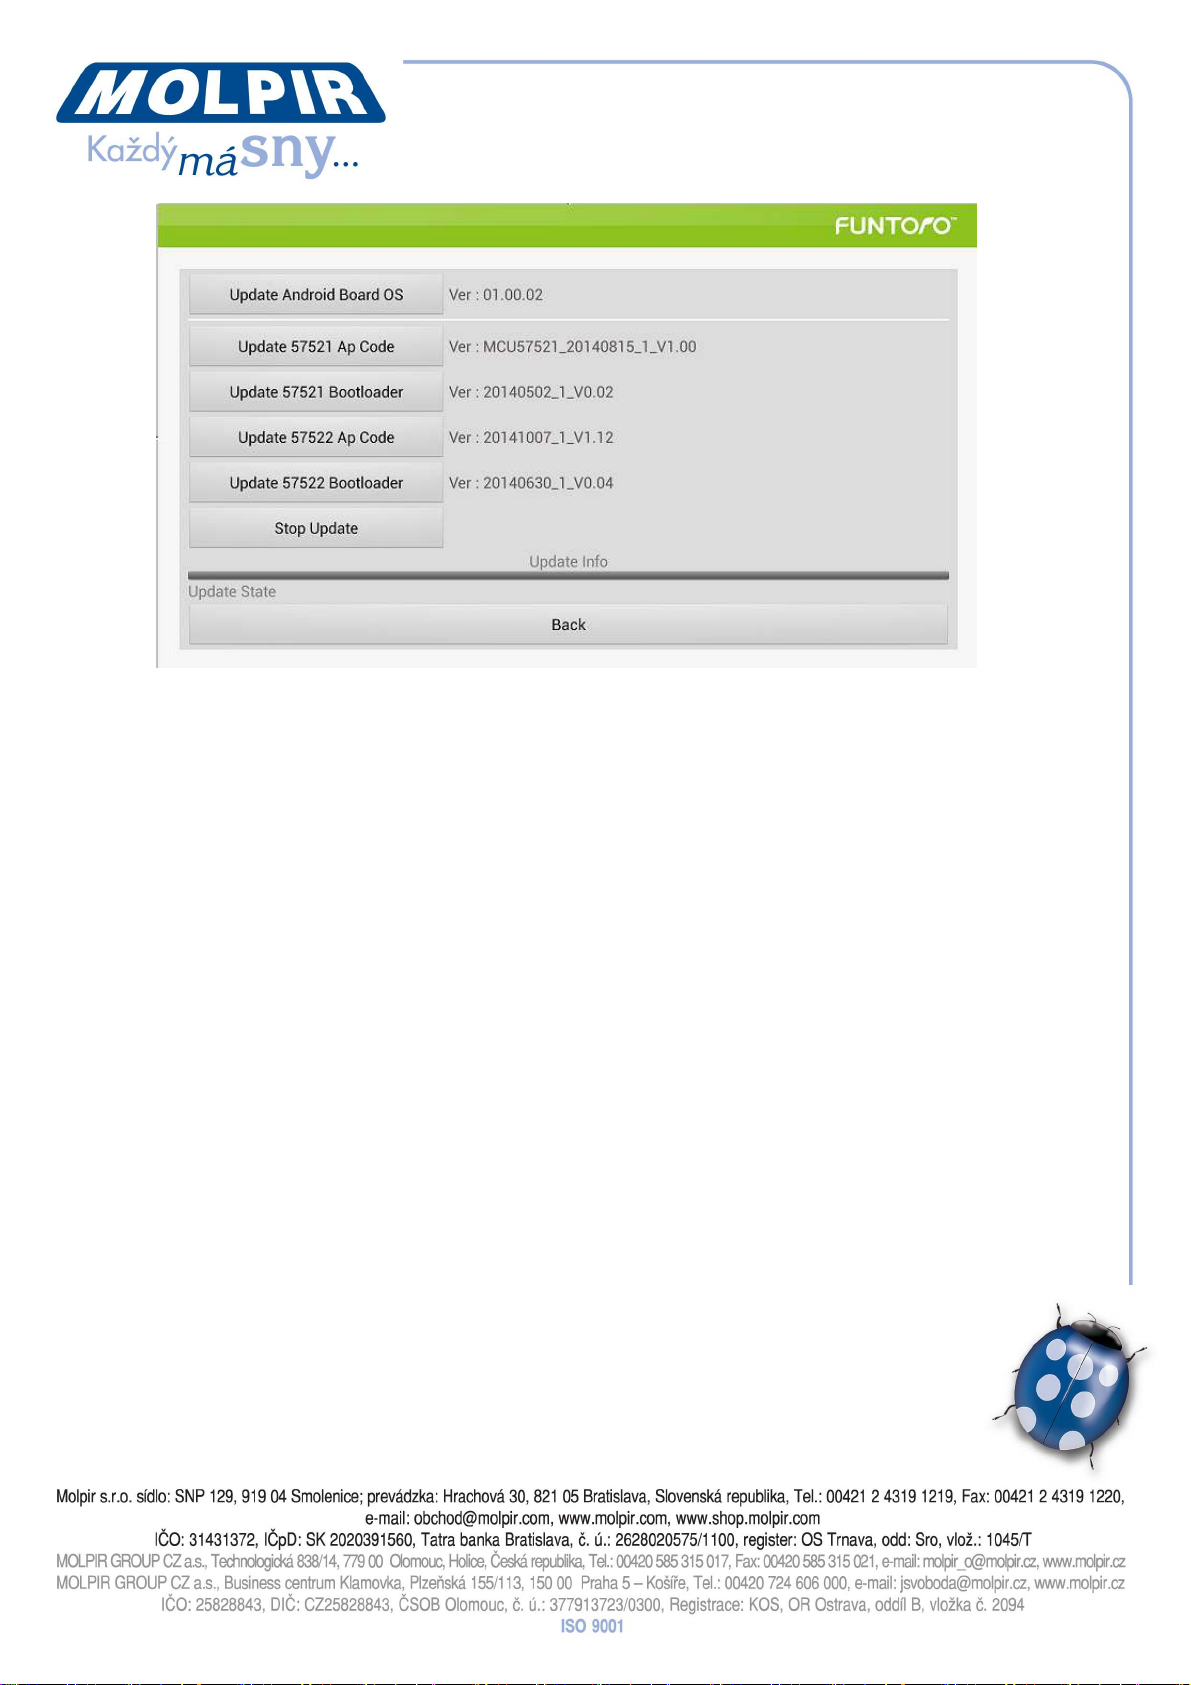
NU_FMS5752
_000_08012015_EN
7. Click the item you want to update.
8. If success, the progress bar will have a moving thumb, and system will be reboot
after finish.
9. If fail, the progress bar becomes empty. Operator can try again.
Date: 08.01.2015 Page 12 / 16
Page 13
NU_FMS5752
_000_08012015_EN
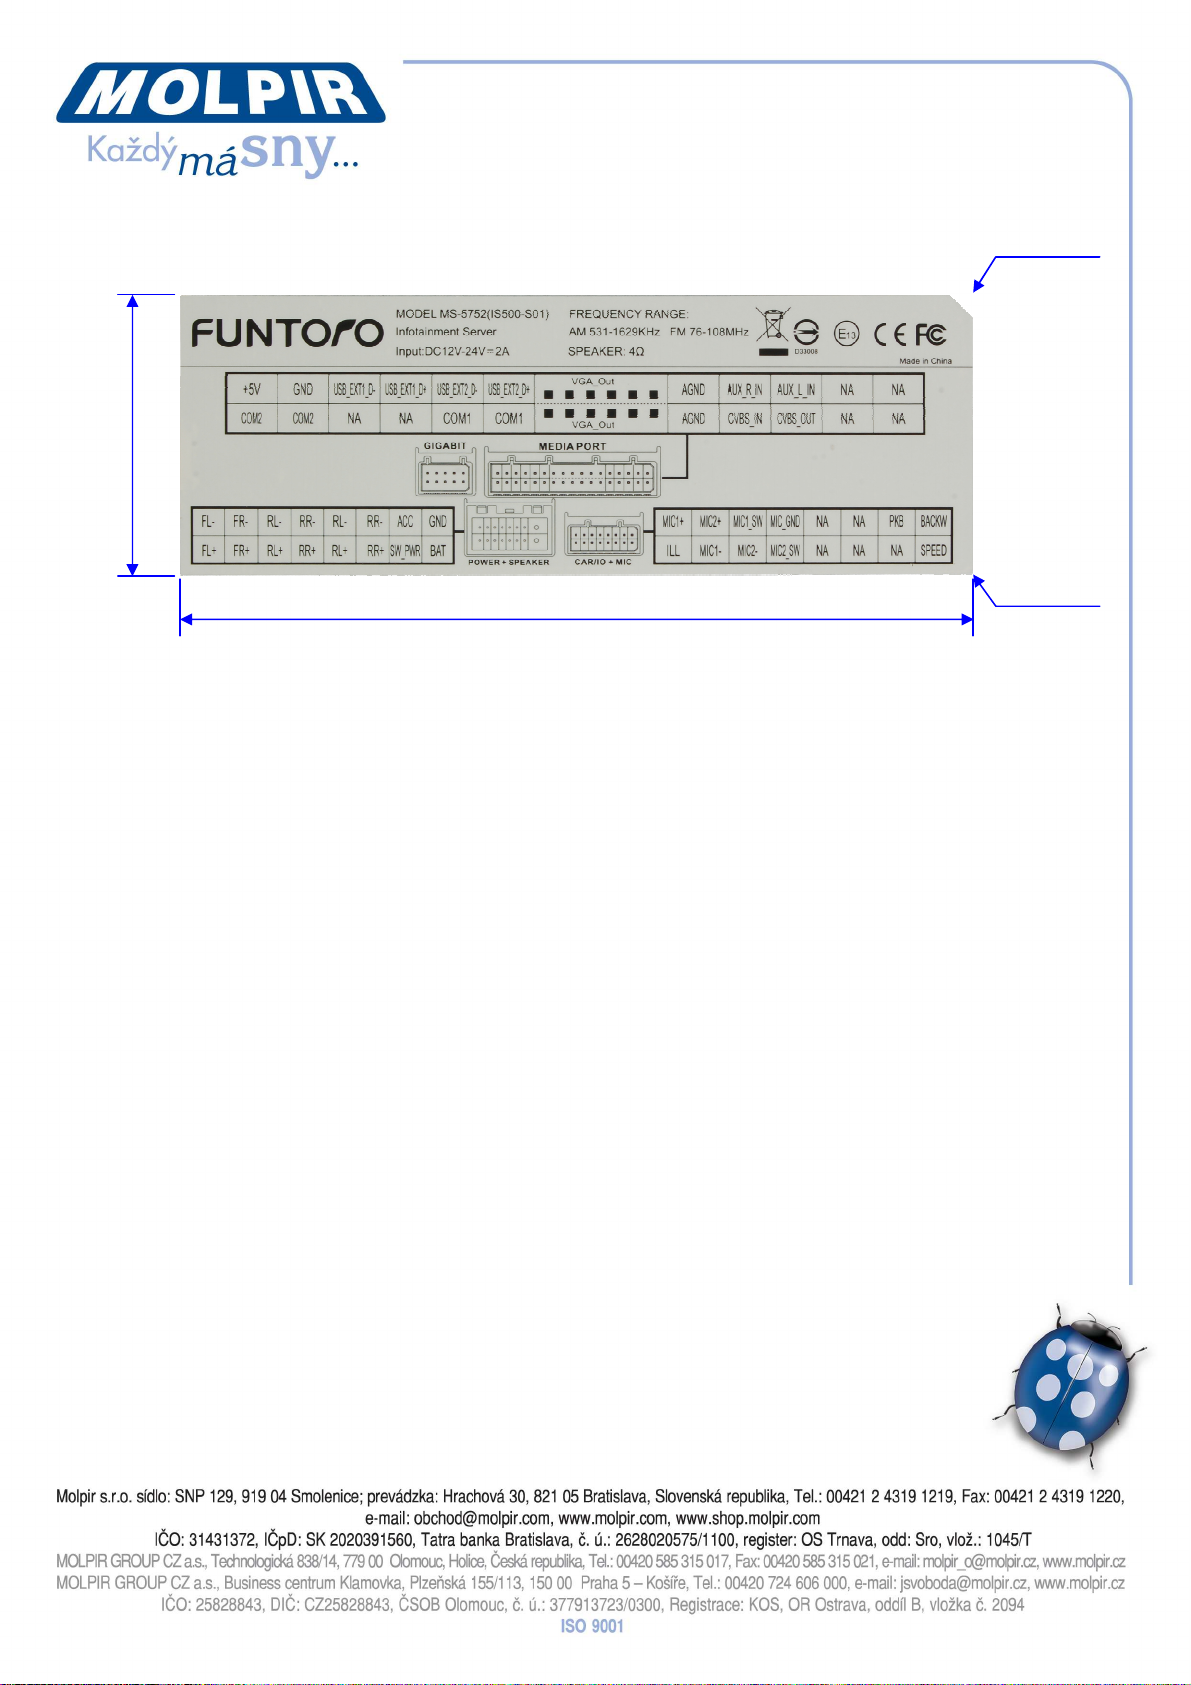
Installation Guide
60 mm
R 0.5x4
C 5mm
170 mm
The steps to install:
Please turn off the power and switch of the device before installation. Do not power
on before connecting well.
1. Put the holder into the hole of super DIN in the car.
2. Connect the circuit in the car according to the directions of cables.
3. Insert the connector and make sure it is fixed properly.
4. Finally, put the device into the holder until it is fixed properly.
Date: 08.01.2015 Page 13 / 16
Page 14
Motor
controller
F-SPK
(L)(+)White
F-SPK(L)(
-
)White
/Black
F-SPK(R)(+)
Gray
F-SPK(R)(-)White
/Black
R-SPK(L)
SPK1(+)Green
R-SPK(L)
SPK1(-)Green/Black
R-SPK(R)
SPK2
(+)Purple
R-SPK(R)
SPK2(-)Purple/Black
R-SPK(L)
SPK3
(+)
Green
R-SPK(L)SPK3(
-
)Green/Black
R-SPK(R)
SPK4
(+)
Purple
R-SPK(R)
SPK4(-)Purple/Black
Series Series
Series
Series Series
Series
Series Series
Series
Series
Series Series
Parallel
Parallel
Sys Sw
Bus ACC
24V
MIC for
MIC for
Steward
3G Router
MIC #2
HDMI Connector
GIGA Connector
to
POWER+SPEAKER
Parallel
Parallel
Parallel
Parallel
NU
_
FMS5752
_
00
0
_
08012015_EN
D
ate:
08
.
01
.201
5
Page
1
4
/
16
HDMI Splitter
HDMI IN
HDMI IN
LCD Monitor
LCD Monitor
Speaker for Driver
Speaker for Passenger
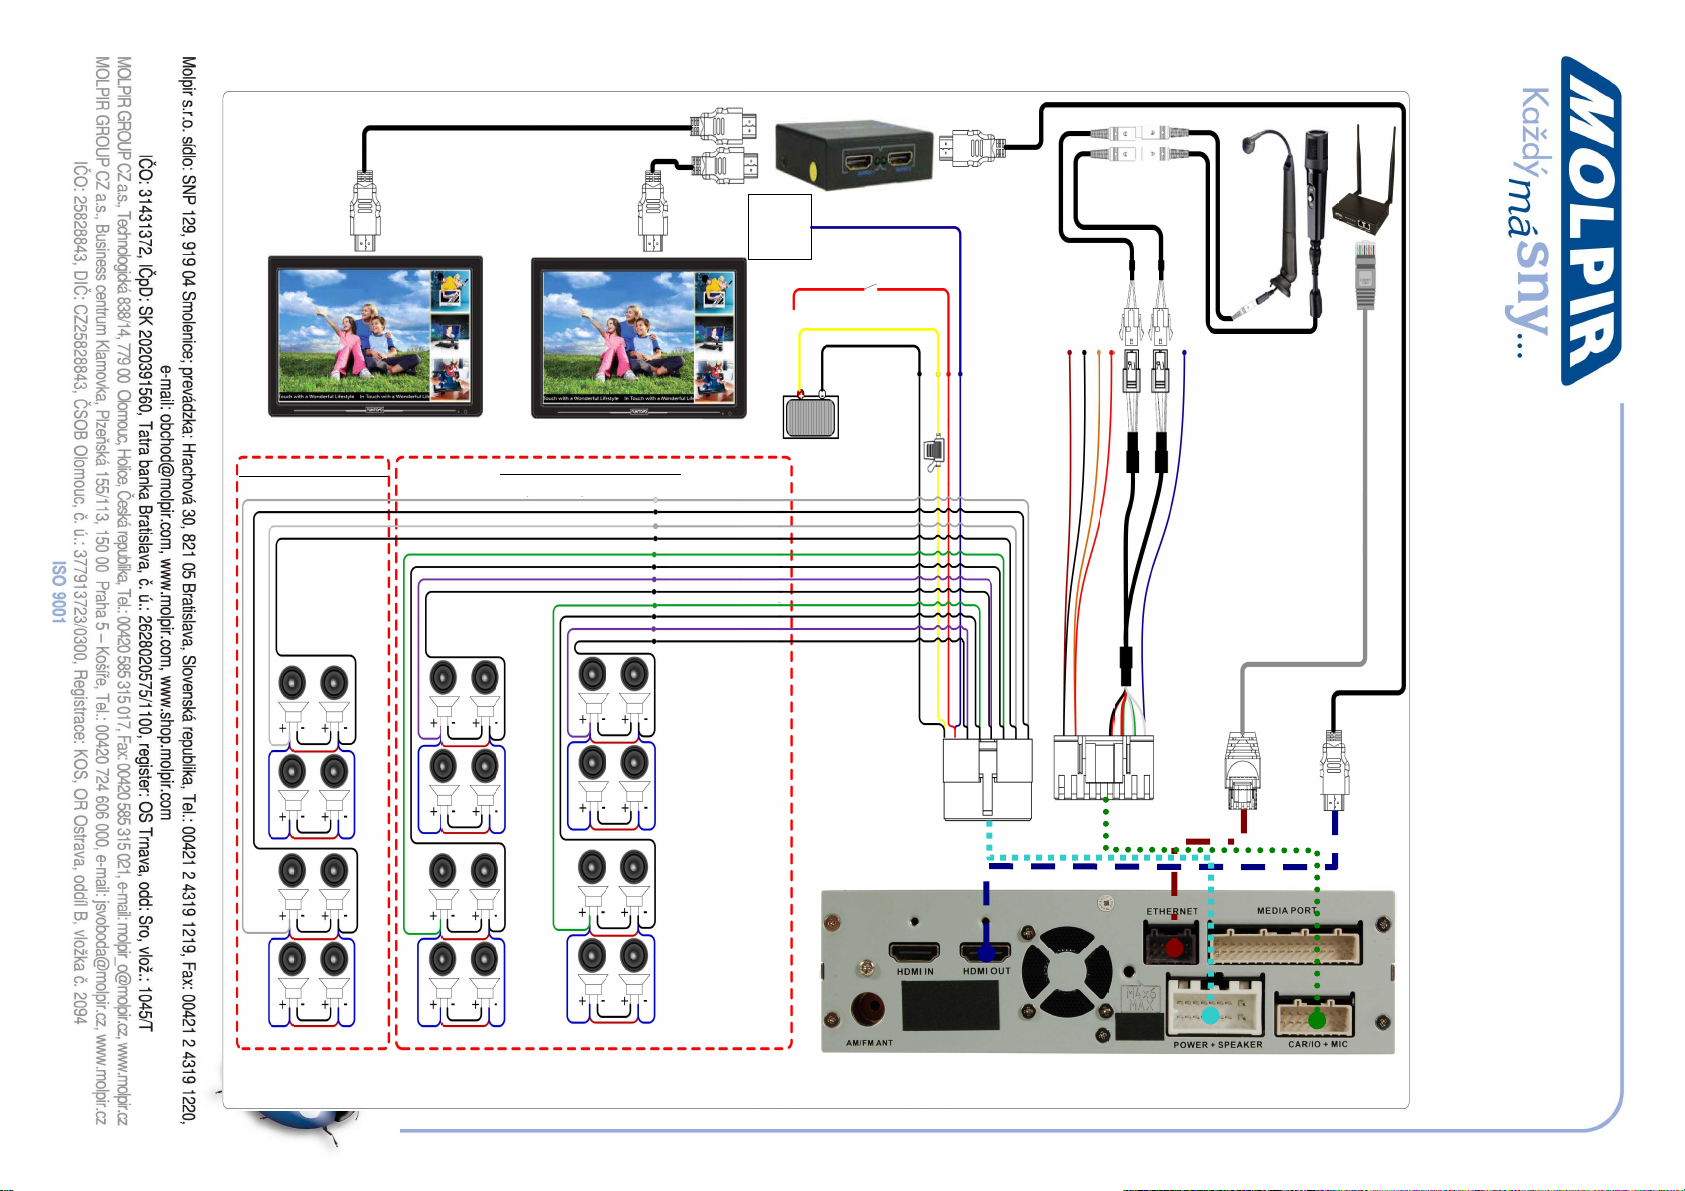
The rear view I/O of FMS5752
PH3.0 2x2P WAFER
to DIN 4P/F Cable
for Flip
down
(DC24V)
ILL
MIC #1
(EMPTY)
PKB
SPEED
BACKW
BATT
sw out
ACC
GND
Battery
Impedance 4Ω
Impedance 4Ω
5A Fuse
P/N: K10-3016029-E06
P/N: K1G-3016006-E06
to CAR/IO+MIC
Driver
Giga to RJ45 Cable
to ETHERNET
to HDMI OUT
System Architecture HDMI
HDMI Cable
Page 15
Motor
controller
F-SPK(L)(+)White
F-SPK(R)(+)
Gray
F-SPK(R)(-)White
/Black
R-SPK(L)
SPK1(+)Green
R-SPK(R)
SPK2
(+)
Purple
R-SPK(R)
SPK2(-)Purple/Black
R-SPK(L)SPK3(
-
)Green/Black
R-SPK(R)
SPK4(-)Purple/Black
Series Series
Series
Series Series
Series
Series Series
Series
Series
Series Series
Parallel
Parallel
Sys Sw
Bus ACC
24V
MIC for
MIC for
Steward
3G Router
PH
3.0 2x2P WAFER
GIGA Connector
JAM
-
SMD 34PIN Connector
to POWER+SPEAKER
MIC #
2
Parallel
Parallel
Parallel
Parallel
F-SPK(L)(
-
)White
/Black
R-SPK(L)
SPK1(-)Green/Black
R-SPK(L)SPK3(
+
)Green
R-SPK(R)
SPK4(+)Purple
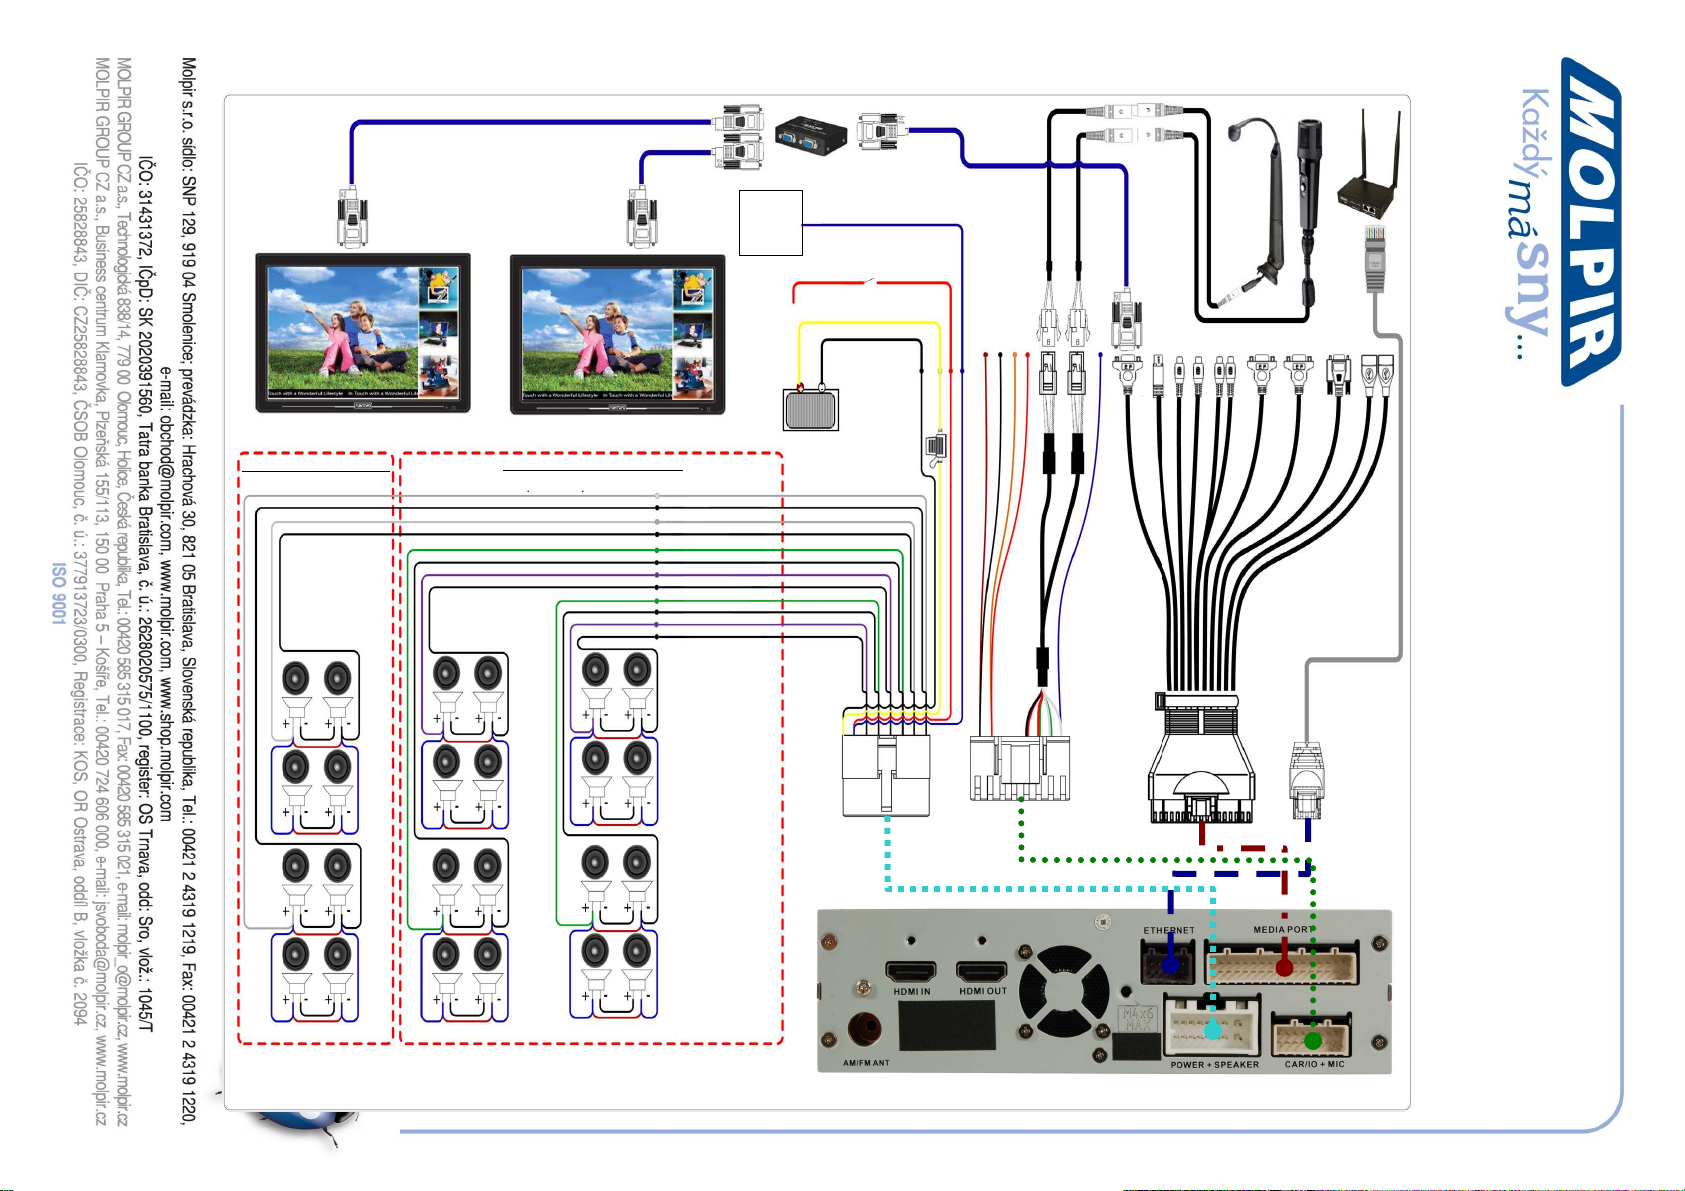
to CAR/IO+MIC
NU
_
FMS5752
_
00
0
_
08012015_EN
D
ate:
08
.
01
.20
1
5
Page
1
5
/
16
VGA
Splitter
VGA IN
VGA IN
LCD Monitor
LCD Monitor
Speaker for Driver
Speaker for Passenger
The rear view I/O of FMS5752
Driver
System Architecture VGA
for Flip
down
(DC24V)
to DIN 4P/F Cable
DEBUG
RS232
(EMPTY)
SPEED
PKB
BACKW
BATT
ACC
sw out
GND
ILL
CVBS OUT
CVBS IN
VGA OUT
VGA OUT
MIC #1
RS232 for G-Mouse
Audio IN
Battery
Impedance 4Ω
Impedance 4Ω
P/N: K1G-3016006-E06
5A Fuse
Giga to RJ45 Cable
ASS“Y Cable
P/N: K10-3016029-E06
P/N: K32-3011002-E06
to MEDIA PORT
to ETHERNET
Page 16
Note ! Specifications subject to change without notice.
NU_
FMS5752
_000_08012015_EN
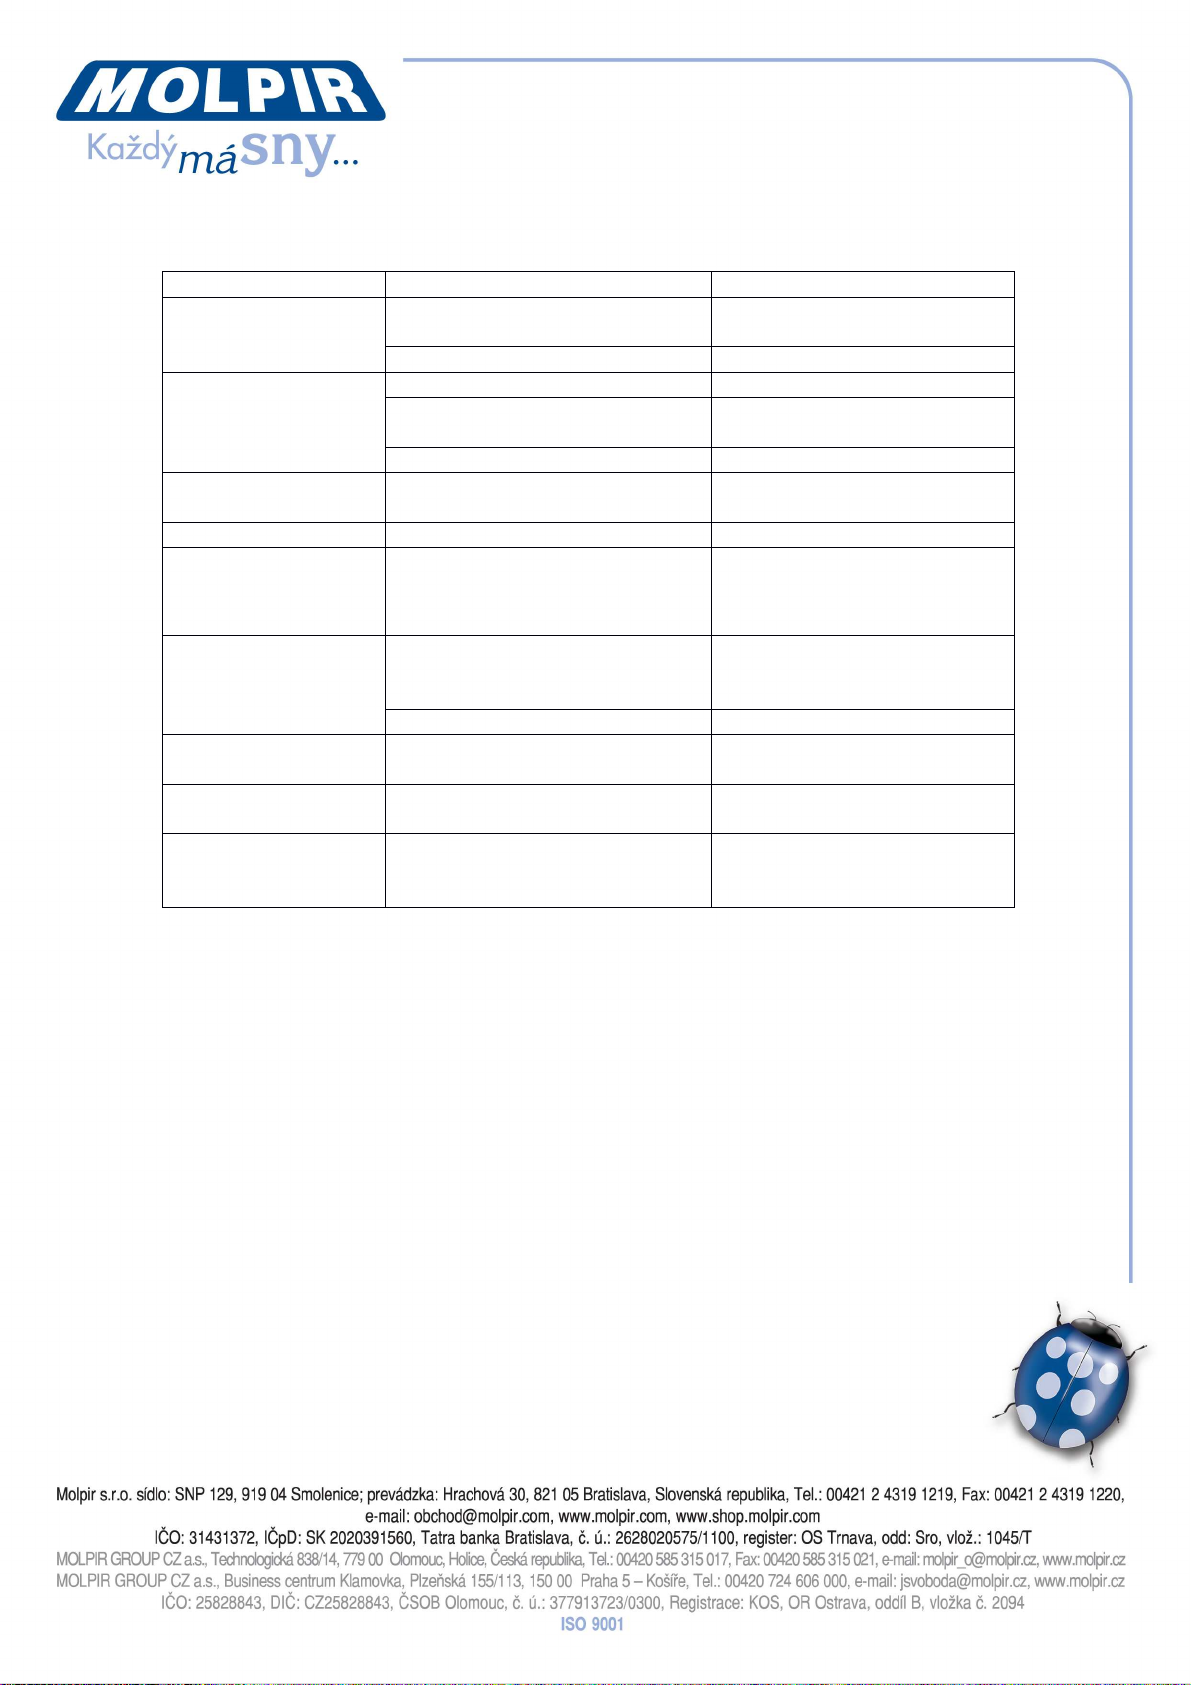
Trouble Shooting
Failure description Reasons Solutions
Power off
No sound
Unstable image
No color image Format error Adjust to correct format.
Power polarity error
The fuse is burned out. Change the fuse
Turn on the volume Adjust the volume
The speaker is not properly
connected.
The device is muted. Turn off the mute function.
The cable is not connected
well.
Check the power cable is
connected properly.
Check the circuit and
connect properly.
Check and connect
properly.
The key is no
reaction
Constant noise
Abnormal sound The program is disordered.
No sound when
changing songs
Shutdown
MCU error
Antenna has problems.
The signal is too weak. Seek the band available.
The process of operation is
too fast.
Due to unstable voltage and
current, the main program
will protect automatically.
Re-install the front panel
and re-boot.
Adjust the length of
antenna properly and put
the antenna grounded.
Re-start 3 seconds after
power off.
Wait or power off to reboot.
Re-start 10 seconds after
power off.
Remark
1. Before installation, please make sure the circuit is connected properly and the
system can work normally.
2. Regarding the device connection, please refer to the manual. Wrong connection will
lead to the damage of the device.
3. Please only use the accessories of this device for proper installation. If you use the
parts not authorized, it might have a breakdown.
4. Please make sure all the power is fixed properly before installation.
5. When connecting to power supply of the battery, it should connect cables from the
negative of battery. If you connect from the positive side, it might cause danger.
Remark:
If you still cannot solve your problems by above solutions, please ask a professional
technician or your agent for further help instead of removing and repairing
the device by yourself.
Date: 08.01.2015 Page 16 / 16
 Loading...