

Page 1
Operating instructions
Page 2

Declaration of conformity and CE mark
This device meets the requirements of the following EC directive R&TTE 1999/5/EG:
»Directive 1999/5/ECof theEuropean Parliament andof theCouncil of9 March 1999 on radioequip
-
mentand telecommunications terminalequipmentandthe mutual recognitionoftheir conformity«.
You can also request this EC declaration of conformity at the following Internet URL:
http://www.funkwerk-ec.com.
The waste container symbol with the “X” through it on the device indicates that the device must be
disposed of separatelyfromnormal domesticwasteat an appropriatewastedisposal facility atthe end
of its useful service life.
© 2007 Funkwerk Enterprise Communications gmbH - All rights reserved.
Reprinting of thisdocument, even excerpts,is permitted onlywith the expressconsent of thepublisher and withpre
-
cise source information, regardless of the media used (mechanical or electronic).
Function descriptions includedin this documentation which refer to software productsof other manufacturers are
based on the software used and valid at the date the documentation was prepared or published. The product and
company names used in this documentation may be protected by trademarks.
Page 3

Table of contents
Symbols . . . . . . . . . . . . . . . . . . . . . . . . . . . . . . . . . . . . . . . . . . . . . . . . . . . . . . . . . . . 11
Telephone display . . . . . . . . . . . . . . . . . . . . . . . . . . . . . . . . . . . . . . . . . . . . . . . . . . . . . 12
Simple Log-in of a »funkwerk IP 50« to a PABX.. . . . . . . . . . . . . . . . . . . . . . . . . . . . . . . . . . . . 13
Telephony . . . . . . . . . . . . . . . . . . . . . . . . . . . . . . . . . . . . . . . . . . . . . . . . . . . . . . . . . 14
Call history . . . . . . . . . . . . . . . . . . . . . . . . . . . . . . . . . . . . . . . . . . . . . . . . . . . . . . . . . 18
Phone settings . . . . . . . . . . . . . . . . . . . . . . . . . . . . . . . . . . . . . . . . . . . . . . . . . . . . . . . 20
Setting the date / time . . . . . . . . . . . . . . . . . . . . . . . . . . . . . . . . . . . . . . . . . . . . . . . . . . . 21
Volume & Gain. . . . . . . . . . . . . . . . . . . . . . . . . . . . . . . . . . . . . . . . . . . . . . . . . . . . . . . 23
Network. . . . . . . . . . . . . . . . . . . . . . . . . . . . . . . . . . . . . . . . . . . . . . . . . . . . . . . . . . . 25
SIP Settings . . . . . . . . . . . . . . . . . . . . . . . . . . . . . . . . . . . . . . . . . . . . . . . . . . . . . . . . . 29
Administrator settings . . . . . . . . . . . . . . . . . . . . . . . . . . . . . . . . . . . . . . . . . . . . . . . . . . 31
Login . . . . . . . . . . . . . . . . . . . . . . . . . . . . . . . . . . . . . . . . . . . . . . . . . . . . . . . . . . . . 33
Phone Book, Speed Dial (Speed Dial Settings) . . . . . . . . . . . . . . . . . . . . . . . . . . . . . . . . . . . . . 34
Network. . . . . . . . . . . . . . . . . . . . . . . . . . . . . . . . . . . . . . . . . . . . . . . . . . . . . . . . . . . 43
PPTP-Settings . . . . . . . . . . . . . . . . . . . . . . . . . . . . . . . . . . . . . . . . . . . . . . . . . . . . . . . 48
SIP Settings . . . . . . . . . . . . . . . . . . . . . . . . . . . . . . . . . . . . . . . . . . . . . . . . . . . . . . . . . 48
Automatic Configuration Setup (Auto Config) . . . . . . . . . . . . . . . . . . . . . . . . . . . . . . . . . . . . . 52
Save Changes . . . . . . . . . . . . . . . . . . . . . . . . . . . . . . . . . . . . . . . . . . . . . . . . . . . . . . . . 55
Update . . . . . . . . . . . . . . . . . . . . . . . . . . . . . . . . . . . . . . . . . . . . . . . . . . . . . . . . . . . 56
Configuration . . . . . . . . . . . . . . . . . . . . . . . . . . . . . . . . . . . . . . . . . . . . . . . . . . . . . . . 60
Login to phone . . . . . . . . . . . . . . . . . . . . . . . . . . . . . . . . . . . . . . . . . . . . . . . . . . . . . . . 60
Configuration using the command line interpreter (CLI) . . . . . . . . . . . . . . . . . . . . . . . . . . . . . . 61
Software Overview . . . . . . . . . . . . . . . . . . . . . . . . . . . . . . . . . . . . . . . . . . . . . . . . . . . . . 72
Table of contents
I
Page 4

Telephone description
IP isthe abbreviation for Internet Protocol. An IPphone isa telephone transporting voice bygrouping datapackage
of IP protocol.
An IP phone transports voice message over data communication network at extremely low price but of excellent
sound qualityjust likeordinary fixedtelephone linesdo. With our »funkwerk IP 50« Internet phone, you’re going to
save dramatically on internetional calls.
»funkwerk IP 50«Internet phone functionsmuch like anordinary telephone switchingbetween innerandout line,it
brings great convenience to the users. In the internal mode, calls between your »funkwerk IP 50« and any other
»funkwerk IP 50« are free of charge . When IP 50 series IPnet phoneis ingeneralized outline mode,it canplace calls
to every ordinary telephones in the world at an extremely low price.
With itsstability, sound quality, compatibility andrich functionalities,»funkwerk IP50« leveragesyour wealth with
high quality communications!
Safety notes
•
Mind the storageand operationtemperatures forthe device listedin thetechnical specifications.Only connect
the devicewhen the permissible ambient operating temperature hasbeen reached.
•
Please note that condensation on or in the unit must be prevented when moving from cold to warm surroun
dings. Only remove the unit fromthe package whenthe permissible ambient operating temperature has been
reached.
•
You shouldnot make callsor connector disconnectany linesduring thunderstorms.
PUNKT 5 = Be sure to connect all cords and cables only to their designated ports.
PUNKT 5 = Be sure to route cords and cables so nobody can trip over them.
•
Avoid thefollowing:
Direct sunlight
Sources ofheat (for example radiators)
Electronic devices(for example stereo components, office equipment ormicrowave devices)
Ingress of moisture or liquids
Aggressive fluids or vapors
Dusty environment
PUNKT 5 = Do not use the unit in moist areas or where there is a risk of explosion.
PUNKT 5 =Do not exposeany internal partsof the unitunless you areinstructed to doso by theinstallation and ope
-
rating manual.
PUNKT 5 = Do not touch any connector pins with sharp metallic items or damp objects.
PUNKT 5 = If the unit is not fixed to a surface, place it and its accessories on an anti-skid mat or equivalent.
PUNKT 5 = Clean the unit using only a slightly dampened piece of cloth.
•
Only useapproved accessories.
•
Only terminalswith SELVand/or which comply with ETS300047 maybe connected to the unit. This regulati
on isfulfilled whenapproved terminal devices are usedas intended.
Plug-in power supply
•
Use only approved power plug-in units.
•
Do notuse power plug-in units with visible defectsor damage(fissures, cracks,etc. )
Elektrostatic charges (protection against electrostatic charges)
•
The telephone is supplied with enhanced ESD protection against the effects of electrostatic discharge that ex
ceeds the protection level cited inthe approval specification. Elevated ESD levels shouldnevertheless be avoi
ded to the greatest possible extent. In somecases, electrostatic discharge levels can far exceed the approval li
mits or the resistance levels already implemented in your telephones. Eliminate the causes or conditions that
promote these elevated ESD levels, such as insufficient humidity or carpeting. The telephone manufacturer
does notassume any liability for damagecaused undersuch circumstances.
Telephone description
2
Page 5

Unpacking and placing the telephone
•
funkwerk IP50
•
Handset with handset connecting cord
•
Cat.5 Connectioncable, approx. 2 m
•
Brief descriptionof functions
•
CD-ROM withUser Manual
Safety notes
1
Page 6
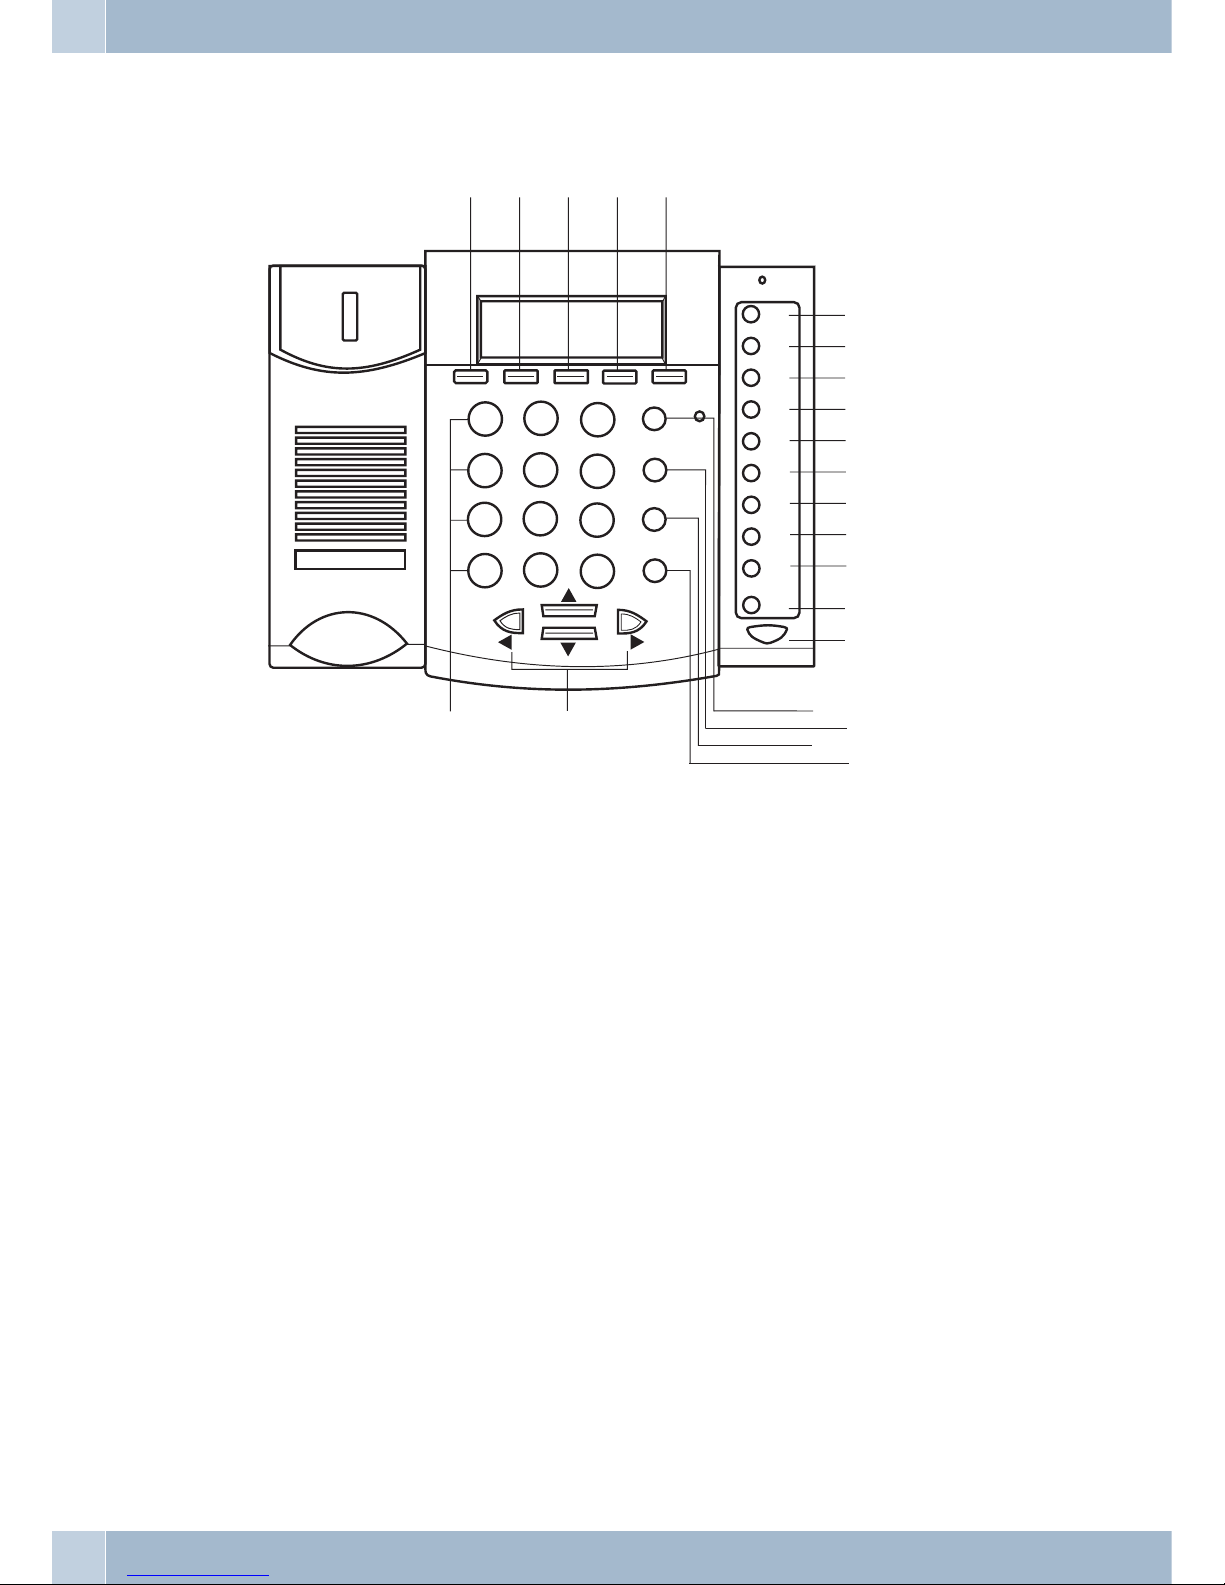
User interface
1
Call in Completion of call with last caller
2
Call Out Completion of call with last called party
3
Phone Book Access to the telephone directory
4
Menu Access for polling/configuration
5
OK Confirmation of an entry
6
IP Retrieving the telephones IP-address
7
FWD »Call forwarding« on or off
8
DND »Silent signalling« on or off
9
M1 1st speed dial button
0
M2 2nd speed dial button
ß
M3 3rd Speed dial button
°
L1 Communication using provider 1
§
L2 Communication using provider 2
$
L3 Communication using provider 3
%
Mute Activating or deactivating the microphone (room inquiry)
&
H/F Hands free calling on or off
/
Conf. Conference on
(
Transfer Transferring a call put on hold to another party
)
Hold Room inquiry / Broker’s call button
=
Redial Redialing
Q
Selection buttons
W
Dial buttons
User interface
2
2
1
ABC
DEF
GHI
JKL
MNO
PQRS
TUV
WXYZ
3
4
5
6
7
8
9
0
*
#
Call in Call out
Phone book
Menue
OK
IP
FWD
M1
M2
M3
L1
L2
L3
Mute
H/F
DND
1
2
3
4
5
6
7
8
9
10
11
12
13
14
15
16
17
18
19
2
0
21
22
Conf.
Transfer
Hold
Redial
Page 7

Keypad features
The assignments for the keypad for entering letters, digits and special characters are as follows:
But
-
ton
Number of actuations
12 3456789
1
1- ,!?
2
2a bcABC
3
3d efDEF
4
4g hiGHI
5
5j klJKL
6
6m noMNO
7
7p qrsPQRS
8
8t uvTUV
9
9w xyzWXYZ
0
0 Space
*
*. : @
#
Dial initiation
1
Severalspecial characters areassignedtothebutton »1«.
Forex.: »-«, »,«,»!«,»?«
Whenyou pressthe1 button thefirsttime a »1«isinserted. Whenyoupressthis keyasecondtime severalspecialcharacters are shown in the display. Press the appropriate key to select the corresponding special characters 1 … 9.
Keypad features
3
Page 8
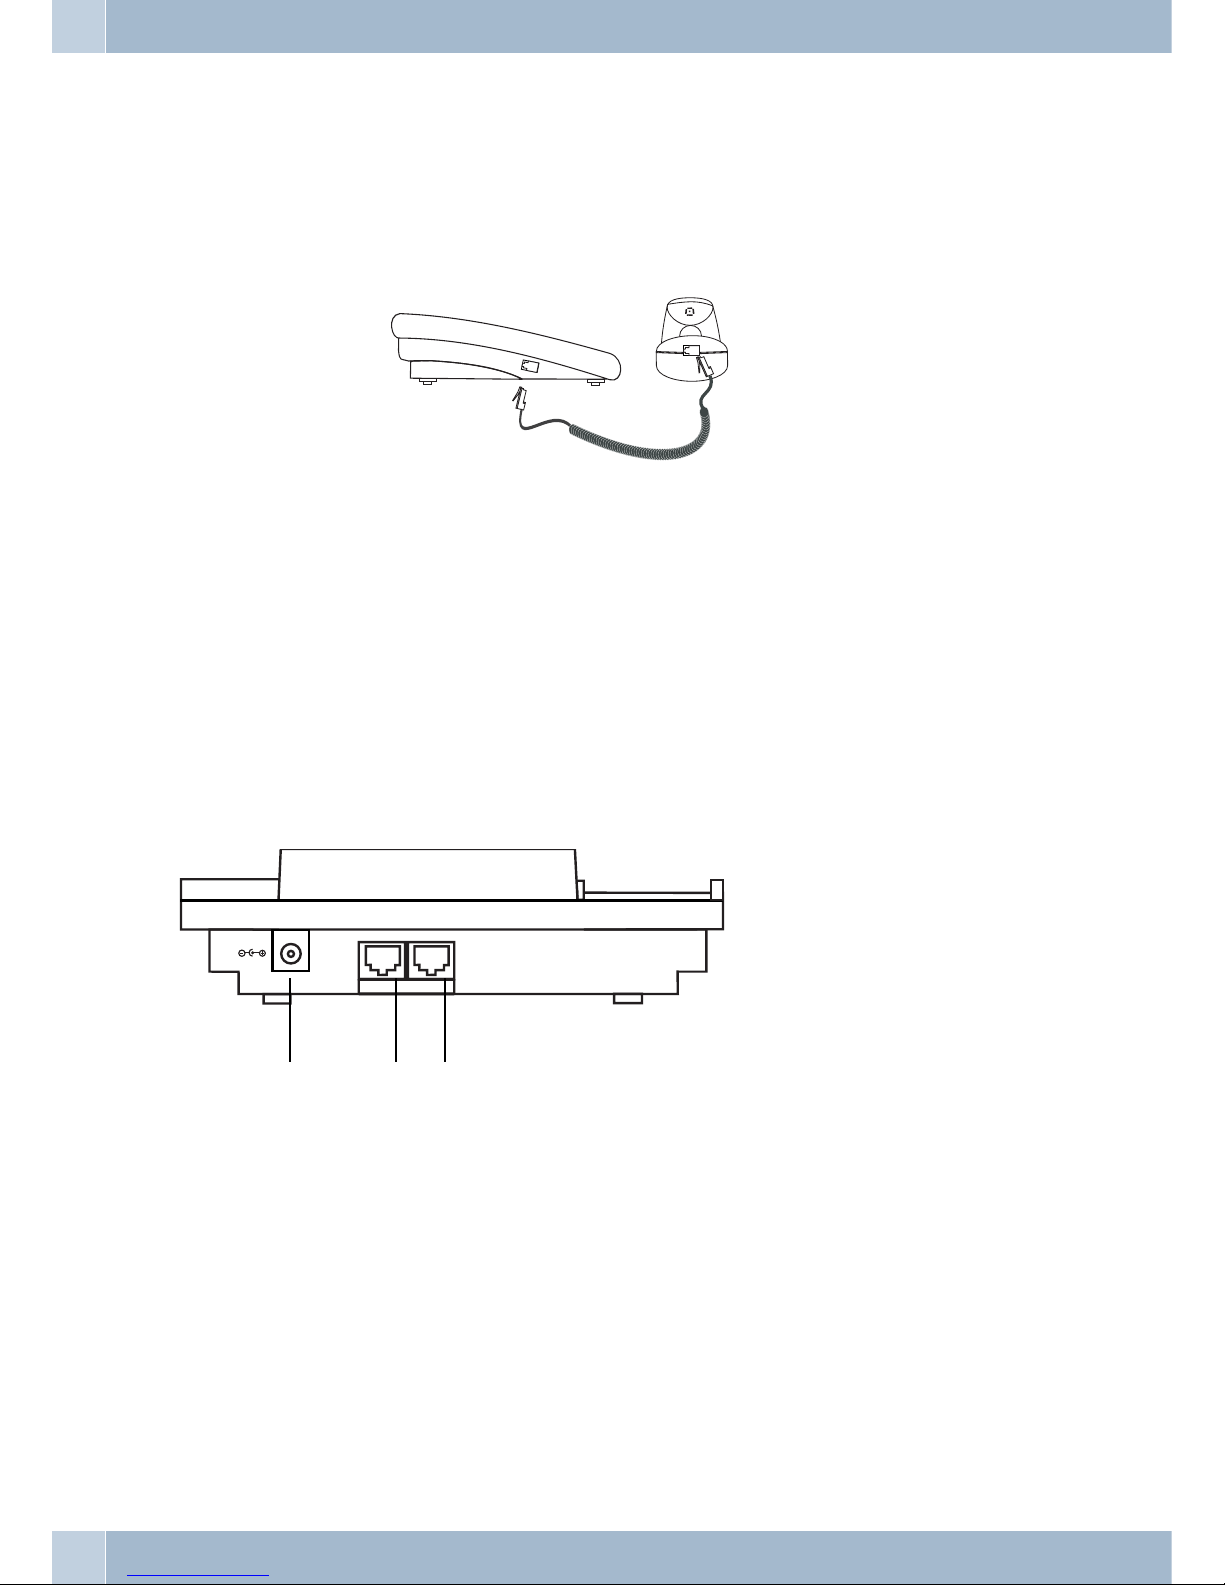
Connecting the IP phone
Connecting the handset cord
Connectingthe handset tothebase
:
insert handset cord into handset jack at the left side of the base.
Telephone rear view
thetelephone withthe Internet
connecting:
Plug theRJ-45 Ethernetcable intothe Ethernet jack named »WAN« of
the phone. Plug the other end of the cable into anappropriate LAN or
DSL/Cable router port or a HUB.
ConnectIP phone toa
computerif necessary.
Plug the RJ-45 Ethernet cable into the Ethernet jack named »LAN« of
the phone. Plug the other end of the cable to a computer.
Activatingthe telephone: Plug the power adapter into the power jack of the phone. Then plug
the other end of the power adapter
into the appropriate 230 VAC wall outlet.
1
To the power adaptor
2
PC-port
3
To the LAN- or DSL/router port or hub
Connecting the IP phone
4
2
1
LAN WAN
23
DC 9V
Page 9

Installing the IP Phone
Before installing your IP phone, it is useful to know what kind of IP addressing your LAN or router is using.
Most networks, includingthe Internet,useidentification codesIP (InternetProtocol)addresses toidentify and loca
-
te the devices that share their services.
DHCP-addressing
•
With thissystem, your LAN or routerautomatically assignsall therequired IPparameters to any
device connectedto it when the device logs on.(Some ISPswho useDHCP requirea host name,
which mustbe entered manually.)
Your phone is shipped from the factory with DHCP on, or enabled. So, if your LAN or router is configured to use
DHCP addressing, your IP Phone’s LAN parameters will automatically be configured as soon as it is connected to
the LAN or router and powered up.
Press the »IP« button if you wish to view the IP address.
Static addressing
•
If yourLAN does not use DHCPaddressing, eachdevice concurrentlyconnected to it must beas
signed itsown unique IPaddress. Inthis case,your LAN’sconfiguration information must be
manually entered into the phone. Youwill needto know the following parameters:
• IP address
• Subnet mask
• Gateway address
• Primary DNS address
• Secondary DNS address(required by some systems)
If your network uses static addressing,ask your network administrator for the parametersneeded for configuring
your IP Phone.
Installing the IP Phone
5
Page 10

Configuring the telephone using the keypad
Features
Telephone directory
Search:
EINR50 = Search Phone Book.
Addingan entry: Add new phone number to phone book
Speeddial: Add speed dial phone number to speed dial list.
Deleteall: Deleting all numbers stored in the phone book.
Call history
Incomingcalls:
Displaying all inbound calls.
Dialednumbers: Displaying all stored numbers.
Deleting data records / deleting call history.
All: Deleting all stored numbers.
Incoming: Deleting all inbound calls.
Selected: Deleting all previously dialed numbers.
Phone setting
Call forward
Forwarding all calls
Activate: To Enabled/Disabled this function.
Telephonenumber: Forward to a speed dial number.
Busy Forward
Activate: To Enable/Disable this function.
Telephonenumber: Forward to a speed dial number.
Forwarding calls at no answer
Activate: To Enable/Disable this function.
Telephonenumber: Forward to a speed dial number.
Ring Timeout
Timeinterval before
forwardinga call
atno answer:
For example, if20is setforthis, the callwill be reroutedtothe specified
target number after 20 seconds.
Do Not Disturb
Always: Block all the incoming calls
pertime: Block all the incoming calls within a period of time.
Configuring the telephone using the keypad
6
Page 11

Timeinterval: Enter start and end time for inhibition.
Appointments
Activate: To Enable/Disable this function.
Time: Setting the time for an appointment. It is in 24 hours format.
Date/Time setting
Date& Time:
Set the IP Phone Date and Time.
SNTP setting
SNTP: Enable / Disable SNTP.
PrimarySNTP-server: Set Primary SNTP server IP address.
SecondarySNTP server: Set Secondary SNTP server IP address.
Timezone: Set Time zone.
Synchronisationtime: Set adjustment time period.
Volume & Gain
Handsetvolume: Set Handset volume from 0...15 (max.).
Speaker
volume:
Set Speaker phone volume from 0...15 (max.).
Handsetvolume: Set Handset gain from 0...15 (max.).
Speakergain: Set Speaker gain from 0...15 (max.).
Ringer
Dialtone gain: Ringer volume setting from 0...15.
Tone: Selecting the ringer tone 1...4.
AutoDial: Set Auto Dial time from 3...9 seconds.
Network
WLAN Setup
IPtype Client with fixed IP
DHCP-Client
PPPoE-Client
FixedIP setting IP-address
Subnet mask
Default Gateway
MAC-address
PPPoEsetting User name
Password
Features
7
Page 12

LAN Setup
Bridge
NAT
DNS
PrimaryDNS
SecondaryDNS
VLAN
Activate
VID:
Select VID Priority (VID 2-4094).
CFI: Canonical Format Indicator(0...1).
Status: Show WAN and LAN IP addresses.
SIP Settings
Service domain
Firstrealm Activate
User Name
Display name
Register name
Register password
Proxy-Server
Domain Server
Outbound proxy
SecondRealm Activate
User name
Displayed name
Login-Name
Login password
Proxy-Server Proxy
Domain-Server
Outbound proxy
Thirdrealm Activate
User name
Displayed name
Features
8
Page 13

Login-Name
Login password
Proxy-Server Proxy
Domain-Server
Outbound proxy
Codec
CodecType
G.711uLaw
G.711aLaw
G.723
G.729
G.726-16
G.726-24
G.726-32
G.726-40
VAD:
To Enable/Disable the Voice Active Detection function.
RTP setting
OutbandDTMF
DuplicateRTP
No duplicate.
One duplicate.
Two duplicate.
RPortSetting RPort Enabled/Disabled.
Holdby RFC: Enable/ disable the hold feature (RCF:3261).
Status First Realm: First SIP server register status.
Second Realm: Second SIP server register status.
Dritter Realm: Third realm register status.
NAT Transversal
STUNsettings
STUN: To Enable/Disable this function.
STUN server
Features
9
Page 14

Administrator
Auto Config
Configurationmode Deactivate
TFTP
FTP
TFTP-Server: Setting the TFTP server IP address.
FTP-server: Setting the FTP server IP address.
FTPLogin name: Setting the FTP login name.
FTP-password: EINR50 = Setting the FTP password.
Upgrade system
Immediateupgrade: Immediate device upgrade.
Status: The time for next checking of updated firmware.
Timerreset: Reset the update time.
Default setting
System Authentication:
Inorder tosettheSIP using the keypadyou need toinputthe password
first. Default is »24234880«.
Version
Watch dog
Restart
Features
10
Page 15

Operation
Symbols
Symbol Reference
b Thissymbol prompts youtoliftup the handsetofyourtelephone.
g Thissymbol indicates thecallstatus.Youhave lifted thehandsetofyour telephone.
a Thissymbolpromptsyou toreplacethehandsetofyour phoneinthecarriage,orthetelephone isidle.
l Thissymbolindicatessomekindofsignalingactivityat yourterminal, for example, thatyourphoneis
ringing.
t Thissymbol prompts youtodiala number.
1x9
*#
Oneof these symbolsindicatesthatyou should dialthedigitshown, or acertaincharacter.
R
Thissymbol prompts youtopressthe »Hold« button.
r
Usethis button todialthelast number once again(redialbutton).
T
Usethis button toinitiateathree-party conference call.
N
Usethis button totransferacallto another party.
O
Thissymbol prompts youtopressthe OK button(Enter).
M
Usethis button toenterthephone’sconfiguration menu.
S
Phone book
Usethis button toaccessthetelephonedirectory.
S
Call out
Usethis button toaccessthecalledparty list.
S
Call in
Usethis button toaccessthecallerlist for calls.
q Thissymbol indicates thatanacknowledgementsignalcan be heardinthehandset.
d Thissymbol indicates thataconferencecallis active.
Symbols Operation
11
Page 16

Telephone display
Telephone display when not enrolled.
a
When the telephone is idle (not yet enrolled) the
display shows the following:
Date (MM-TT) and time (hh:mm) in the upper line,
as for example 01.12 8:26 a.m.
»No service« signifies that none of the performance
features such as call transfer or »Do not disturb« has
been activated.
The green LED will be lit after enrolling the telepho
-
ne with a SIP-provider or with a pabx.
12-01 08:26
No service
Display for an enrolled telephone
a
When the telephone is idle, the display shows the
following:
Daten and time on the first line.
The entered name (»Display Name«) on the second
line.
The green LED is lit. The telephone has been enrol
-
led with a SIP-provider or with a pabx.
12-01 08:26
< IP-50>
Lifting up the handset without dialing
b
If you lift up the handset but do not start dialing, the
dial mode will be switched off after approximately
20 seconds. The text shown here is then displayed
for around 10 seconds and you will hear the busy tone. The display then returns to idle state. However,
you will not hear any tone from the handset.
Replace the handset.
Time out...
Call
a
With an incoming call, the numer of the caller is
displayed on the upper and the lower line.
12
12
Whether ornot the name of the caller isdisplayed dependson the provider. The numbermay bedisplayed on both
lines.
a
The display will be as shown here, if a caller termi
nates the call without establishing a connection. In
this example here two calls were not accepted.
The caller list contains more information on these
calls (»2.Call history«).
12-01 08:26
2 Missed Call
Making a call
b
After lifting up the handset or activating the
hands-free mode you can start dialing. To have the
entered number dialed immediately, press the #
button. The user is called.
IP Dialing 12
12345
Ringback
1234
Call connection
g You are connected with the other party. Description
of the display:
L1:10 = Connected with call number 10.
Timer = Connected for 1 hour, 2 minutes and 3
seconds.
L1:10
Timer=01:02:03
Operation Telephone display
12
Page 17

Room inquiry
g You are connected with the other party. IP Dialing
Timer=01:02:03
Simple Log-in of a »funkwerk IP 50« to a PABX.
Enroll yourtelephone at the pabx andspecify a number for theSIP-phone (e.g. 13);save thechanges made. If requi
-
red enter all other information according to the pabx description.
Connectthe pabxandthe»funkwerk IP 50«throughEthernet.Connect the powersupplyfor the »funkwerkIP50«.
Begin as follows:
a Thehandset remains onhook.
M
Pressthe »Menu« button.
t
Selectthe function 411.Eswird»*DHCP Client«angezeigt.
O
Confirm»DHCP Client«usingthe»OK« button.
M
Pressthe »Menu« button.
t
Selectthe function 74.Eswird»Password« angezeigt.
t Enterthe password: 24234880(factory default).
O
Confirmyour entry usingthe»OK«button.
M
Pressthe »Menu«.
t
Selectthe function 5111.Thedisplayshows »*Enabled«.
O
Confirm»*Enabled« using the»OK«button.
M
Pressthe »Menu« button.
<>
Select»1.Activation «.
O
Confirmusing the »OK«button.
O
Confirm»*Enabled« using the»OK«button.
M
Pressthe »Menu« button.
<>
Select»2.User name «. Enter one ofthenumbersyouhave specified whenconfiguringthepabx.
O
Confirmusing the »OK«button.
<>
Select»2.Display name«. Enterthenameyou wish tohavedisplayed.
O
Confirmusing the »OK«button.
After a restart your »funkwerk IP 50« will be ready for operation.
If required, enter all other information as desribed in the pabx manual.
Simple Log-in of a »funkwerk IP 50« to a PABX. Operation
13
Page 18

Telephony
When subscribers are put on hold they hear waiting music, depending on the provider.
Note! When you press anyof the numericalbuttons, the phone will start dialing, even with the handset on hook or
hands-free mode switched off.
The following proceduresoften begin with»Lift up handset« and end with »Replace handset«. Activating or deacti
-
vating the hands-free mode has exactly the same effect.
Starting a call
bt
#
ga
Lift up handset Dial call number Terminate dialing by pressing the #
key.
Conduct your call Terminate your call
Dialing from the phone book
You can store up to 140names and numbersin the telephone directory. To select a name, you canpage through the
directory using the arrow buttons, or enter the specific first letter(s) of the name using the push-button set.
b
S
t
O<>
b
Handset on hook
Phone book
Enter first letter
OK
Select subscriber Lift up handset
Accepting calls
lbga
Telephone rings Lift up handset Conversation Terminate your call
Speed dial using the M1..M3 buttons
b or a
ga
Lift up handset or handset on hook
M1...M3
Conduct your call Terminate your call
Room inquiry
g
You are conducting a call.
You would like to call another
party.
Mute button
»Mute«
The other party can no longer hear you.
Mute button
»Mute«
The other party can hear you again.
Inquiry Call
You can call another party at any time during an ongoing call.
g
R
tg
R
You are conducting a call.
You would like to call another
party.
Press the System-parked inquiry but
-
ton»Hold«.
You hear the dial tone from the earpie
-
ce.
Dial the number of the party you
wish to call. Speak to the desired
party.
Press the System-parked inquiry
button»Hold« once again to return
to the first caller.
Operation Telephony
14
Page 19

Accepting a waiting call (room inquiry with waiting caller)
g
R
g
You are conducting a call.
A second party calls you. You hear the call
waiting signal.
Press the System-parked inquiry but
-
ton»Hold«.
You hear the dial tone from the earpiece.
You will be connected with the waiting party. Your first call is
put on hold (see »Inquiry call«). For further procedures refer
also to »Broker’s call« or »Three-party conference call«.
Broker’s Call
g
R
tg g
You are in a call but wish to speak
to a third party.
Press the System-parked inquiry but
-
ton»Hold«.
You hear the dial tone from the earpie
-
ce.
Dial the number of the party you
wish to call. Speak to the desired
party.
You are conducting the call.
The first call is put on hold.
T
d
Press the System-parkedinquiry button»Hold«, to returnto the firstcaller, thesecond caller willbe
puton hold. Press»Hold«toswitchback and forthbetweenthetwocallers.
If you switchback and forthbetweentwo externalparties(broker’s call)andthen hangupyour handset, thecurrent
call is terminated and the caller on hold will call you by way of the »Recall«.
Call switching
g
R
tg g
or
a
You are conducting a call
and wish to transfer the call
to another party.
Press »Transfer«.
You hear the dial tone from the
earpiece.
Dial the number of the
party you wish to call.
You can now speak
with that person.
Replace the handset. The
two parties are then connected.
If the called party does not answer, press »Transfer« once again to return to the first party.
Three-Party Conferencing
g
R
tg
You are conducting a call with one party and wish to
include a further party in the call.
Press the System-parked inquiry
button»Hold«.
You hear the dial tone from the ear
-
piece.
Dial the number of
the party you wish
to call.
You would like to include this
party in the first call.
R
Pressthe System-parked inquirybutton»Hold«. Conductyour three-party conferencecall.
dd
The conferenceis ended when you hangup yourhandset. A party included inthe conferencecall can hang up atany
time and the party which initiated the call can then continue the conference with the remaining callers.
If you are in a conference call andyou hang up,your call isterminated and thetwo parties fromyour conference re
-
main connected with each other!
Telephony Operation
15
Page 20

Settings
Temporary handset volume setting (Volume)
The telephone is idle, or you wish to change the handset or speaker volume during an ongoing call.
<>
Use the arrow keys to adjust the handset or speaker
volume. The display shows volume control values
from »Volume= 0« tos »Volume= 15«.
12-01 08:26
Volume= 10
Viewing the IP address
c
IP
Press the »IP« function button. The display then
shows the IP address currently assigned to your
phone.
12-01 08:26
192.168.001.053
Do not disturb Settings (DND)
c
DND
Press »DND« (Do not Disturb). The feature is active
when »DND« shows on the display.
12-01 08:26
# DND #
Activate call forwarding (FWD)
Usethis key toactivatecall forwarding. Callforwardingmust have beenconfiguredpreviouslyin the phoneforthis.
c
FWD
Press the function key »FWD«. Call forwarding is
active when »Empty FWD Number« shows on the display.
12-01 08:26
AF10
When you replace the handset, the following appears in the display, for example »AF 10«. This indicates
that you have configured call forwarding to subscriber 10. When you replace the handset after completing a call, the text in the display »#Forward#« notifies
you of an existing call forwarding setting.
12-01 08:26
Empty FWD Number
#Forward#
Speed dial
You can save a speeddialing number atkeys M1 to M3; the number is then dialed when youpress one ofthese keys.
Thesethree keysassignthelocations »Phone1«- »Phone 3«forthe »Speed DialPhoneList« intheWeb configuration
for the phone. You can configure these three locations either with Web configuration, or using the phone. You can
overwrite this number using your phone.
Configuring speed dialing destinations for a function key
at The handset remains on hook.
Dial the number you wish to call.
IP Dialing..
1234567
c
M1
Press »M1«, »M2« or »M3«. In this example »M1«.
1234567
Save to M1 <ENT>
O
Press »OK« to save the entry.
Speed Dial M1 :
1234567
Configuration using the telephone
Configuration at the phone is performed using corresponding menus that can be selected with the arrow keys after
pressing »Menu«.
Settings
16
Page 21

Eachentry isnumbered. After pressing »Menu«youcanalso reachtherequiredmenu bypressingthecorresponding
number fora specific menu. Example: Pressing»Menu«, key»3«, key »1« will moveyou to the menu for call forwar
-
ding (»1.All Forward«.
During configuration the handset remains in the cradle and hands-free calling (key »H/F«) is de-activated.
M
Press the »Menu« button.
The first display shows the settings
Phone book) for the phone book and
Call history) for the call history
1.Phone book
2.Call history
>
Press the arrow button to have the following menu
items displayed.
3.Phone setting
4.Network
The corresponding number will flash when the cur
-
sor is located above the selected menu.
5.SIP setting
6.NAT transversa
7.Administrator
1.Phone book
M
17
You can also use the numbers to select a specific
menu. Press the key »Menu« and then enter a num
ber from 1 to 7. The menu is then selected and you
can see the first submenu directly, such as for entering »1«: 1.Search und 2. Add entry.
1.Search
2.Add entry
Telephone directory setup
Begin as follows:
a
M<>O
»Menu« button
1.Phone book
<>
O
Select »2.Add entry«.
Confirm your entry using the »OK« button.
1. Serch
2.Add entry
Enter the desired name. For ex.: »Carlos«. Name:
Carlos
O
Confirm your entry using the »OK« button.
Enter the telephone number.
Number:
123456
O
Confirm your entry using the »OK« button>«. Im
-
put further entries as needed.
2.Add entry
3.Speed dial
Searching phone book entries (Search)
Begin as follows:
a
M<>O
»Menu« button
1.Phone book
Configuration using the telephone
17
Page 22

<>
O
Select »1.Search«.
Confirm your entry using the »OK« button.
1. Search
2.Add entry
O
The display shows the number of telephone directo
ry entries (in this example: 4 entries).
Enter the first letter of the name of the party you
wish to talk to.
Confirm your entry using the »OK« button.
Search [ 4]
Activate speed dial
Begin as follows:
a
M<>O
»Menu« button
1.Phone book
<>
O
Select »3.Speed dial«.
Confirm your entry using the »OK« button.
3.Speed dial
4.Erase all
t
Enter the telephone number you wish to assign to
any one of the buttons M1 ... M3 and confirm your
entry using the »OK« button.
Number:
1234
ccc
M1 M2 M3
1x0
Press »M1«, »M2« or »M3« or use the keypad buttons 1 through 0. The desired number is now stored
under this button.
Press M1..Mx to
store number
3.Speed dial
4.Erase all
Press »M1«, »M2« or »M3« or use the keypad buttons 1 through.
Delete phone book (speed dial)
Begin as follows:
a
M<>O
»Menu« button
1.Phone book
<>
O
Select »4.Erase all«.
Confirm your entry using the »OK« button.
3.Speed dial
4.Erase all
<>
O
Select »»1.Yes« in order to delete.
Confirm your entry using the »OK« button.
1.Yes
2*No
3.Speed dial
4.Erase all
Call history
Begin as follows:
a
M<>O
»Menu« button
2.Call history
Configuration using the telephone Call history
18
Page 23

Displaying the call history
<>
O
For the caller list select »1.Incoming calls«.
For the dialed numbers list select »2.Dialed numbers«.
Confirm your entry using the »OK« button.
1.Incoming calls
2.Dialed numbers
<>
O
Select »1.Incoming calls«.
.
Confirm your entry using the »OK« button>«. In
the first example you will see:
< 1> =first caller.
12-01= Date 1. December.
03:23= 3.23 a.m.
M = Call without conversation.
V = Call connection.
10 = Call from subscriber with call number 10.
< 1>12-01 03:23M
10
< 1>12-01 03:23V
10
<>
Use the arrow keys to select an entry. In the exam
-
ple shown here, either add or delete the 12th
= subscriber in the call list to/from the phone book
You have selecteda subscriber from the caller or callhistory list and now wish to add that subscriber to yourphone
book.
<>
O
Use the arrow keys to select an entry. In this example call number 12 with subscriber 15. Confirm
your entry using the »OK« button.
<12>12 01 04:23M
15
<>
<>
O
Select »2.Erase« to delete the entry.
Or select »1*Save« to the entry from the list.
Confirm your entry using the »OK« button.
1*Save
2.Erase
t
O
Here you can enter the party’s name.
Confirm your entry using the »OK« button.
Name:
10 Carlo
t
O
Enter here the number of the caller.
Confirm your entry using the »OK« button.
Phone:
10
Deleting the call history
You can also delete the entire contents of the lists simultaneously.
<>
O
For the caller list select »3.Erase record«.
Confirm your entry using the »OK« button.
2.Dialed numbers
3.Erase record
<>
O
Select »1*All« if you wish to remove all entries from
the list.
Or select »2.Incomming« to remove the callers from the
list.
Or select »3.Dialed« to remove all outgoing calls from
the list.
Confirm your entry using the »OK« button.
2.Incomming
3.Dialed
Call history Configuration using the telephone
19
Page 24

Phone settings
Call forwarding (Call Forward)
The following call forwarding options are available:
Selectthe call forwarding
type:
1.Call forwarding continu
-
ous(All forwards)
2.Call forwarding onbusy
(Busyforward)
3.Call forwarding onnoans
-
wer(No answer fwd.).
1.All forwards
2.Busy forward
O
Confirm your entry using the »OK« button.
2.Busy forward
3.No answer fwd.
<>
Select either »1.Activation« to activate call forwarding,
or »2.Number» to input the destination number for
call forwarding.
1.Activation
2.Number
O
Confirm your entry using the »OK« button.
O
»1.Enabled«. This activates call forwarding. In the ex
ample shown here, »*« indicates that this function
has been configured.
Confirm your entry using the »OK« button.
1*Enabled
2.Disabled
»2.Disabled«. This de-activates call forwarding, but the
destination number remains configured.
1.Enabled
2*Disabled
O
Confirm your entry using the »OK« button.
<>
If you have selected »3.No answer fwd.«, under »4.Ring Ti-
meout« you can set the number of calls (2...8) after
which call forwarding is to be carried out.
3.No answer fwd.
4.Ring Timeout
O
Confirm your entry using the »OK« button.
Silent signalling (Do not Disturb)
Begin as follows:
a
M<>O<>O
»Menu« button
3.Phone setting 2.Do not Disturb
To enter the time, move the arrow (cursor) to the proper position and input the correct digits.
<>
O
Select either »1.Allways« for permanent Idle, or »2.By
Period» to define a time period in which no acoustic
signals will be issued at your phone.
Confirm your entry using the »OK« button.
1.Allways
2.By Period
Configuration using the telephone Phone settings
20
Page 25

<>
O
If you have selected »3.By Period«, under »4.Period Time«
you can set the time at which no acoustic signal is to
be issued by your phone.
Confirm your entry using the »OK« button.
2.By Period
3.Period Time
t
O
Here, enter the time period in which station guar
ding is to be activated at your phone (in the example
shown here from 12:30 to 13:00).
Confirm your entry using the »OK« button.
1.Period Time:
12:30 13:00
Appointment reminder calls (Alarm setting)
Your phone can also activate an appointment reminder call at a time which you can define.
Begin as follows:
a
M<>O<>O
»Menu« button
3.Phone setting 3.Alarm setting
To enter the time, move the arrow (cursor) to the proper position and input the correct digits.
O<>
Select »1.Activation«.
Confirm your entry using the »OK« button>«.
1.Activation
2.Alarm time
<>
»1.Enabled«. This activates the appointment reminder
call.
1*Enabled
2.Disabled
<>
O
»2.Disabled«. This de-activates the appointment reminder call.
Confirm your entry using the »OK« button.
1.Enabled
2*Disabled
<>
O
Select »2.Alarm time«.
Confirm your entry using the »OK« button>«.
1.Activation
2.Alarm time
t
O
Here, enter the time at which the reminder call is to
be placed (in the example shown here, 12:30).
Confirm your entry using the »OK« button.
1.Alarm Time:
12:30
Setting the date / time
It is useful to configure a timer server in your phone so that your Telephone remains synchronized within the net
work. This servercan be installed at an external location in the Internetas a so-called Public Time Server orin your
own network. SNTP server access must be de-activated for this. This settingmust be made when you donot receive
the time automatically via an SNTP server.
Begin as follows:
a
M<>O<>O<>O
»Menu« but
-
ton
3.Phone setting 4.Date/Time sett 1.Date & Time
To enter the time, move the arrow (cursor) to the proper position and input the correct digits.
If your SNTP server is still configured you will be requested to de-activate it.
Setting the date / time Configuration using the telephone
21
Page 26

M
When you see this message strike the key »Menu«
and select »2.SNTP setting«.
SNTP must be
disabled first !
<>
Select »1.SNTP«.
Confirm your entry using the »OK« button>«.
1.SNTP
2.Primary SNTP
<>
O
»2.Disabled«. This de-activates SNTP server access.
Confirm your entry using the »OK« button.
1*Enabled
2.Disabled
<>
O
Select »1.Date & Time««.
Confirm your entry using the »OK« button>«.
1.Date & Time
2.SNTP setting
t
O
Here, enter the date and time in the format
YY.MM.DD. hh:mm (in the example shown here
24.12.2006, 19.00).
Confirm your entry using the »OK« button.
Date & Time:
2006-12-24 19:00
Activating / De-activating the SNTP server (SNTP settings)
Begin as follows:
a
M<>O<>O<>O
»Menu« but-
ton
3.Phone setting 4.Date/Time set 2.SNTP setting
O
Select »1.SNTP«.
Confirm your entry using the »OK« button>«.
1.SNTP
2.Primary SNTP
<>
O
»1.Enabled«. This activates SNTP server access.
Confirm your entry using the »OK« button.
1*Enabled
2.Disabled
M
Press»Menu« once again.
Underthe »Primary SNTP« and »SecondarySNTP«setupitems, enter the IP addresses ofthe»timesynchronization
sources«. Here, you can enter two different addresses. This allows the time to be acceptedvia a secondserver in the
event of loss of the first server. Any time server that has already been entered is displayed.
<>
O
Select »2.Primary SNTP«.
Or, select a further SNTP server »3.Secondary SNTP«.
Confirm your entry using the »OK« button>«.
1.SNTP
2.Primary SNTP
t
Enter the IP address for the SNTP-server.
Confirm your entry using the »OK« button.
SNTP Server IP:
time.windows.com
<>
If required, you can then select a second time server;
enter the address as described above.
2.Primary SNTP
3.Secondary SNTP
Time Zone
Here, enter the time difference between the standard time »Greenwich (Mean) Time« and your own location. For
Central Europe the time zone needs to be set to + one hour (1). Also observe the difference between standard and
daylight savings time.
Configuration using the telephone Setting the date / time
22
Page 27

Begin as follows:
a
M<>O<>O<>O
»Menu« but
-
ton
3.Phone setting 4.Date/Time set 2.SNTP setting
<>
O
Select »4.Time zone«.
Confirm your entry using the »OK« button.
3.Secondary SNTP
4.Time zone
t
O
Enter the time difference.
Confirm your entry using the »OK« button.
(-11 to +11)
1
Adjustment Time
This option lets you specify the »Time zone« for resynchronizing the time setting.
Begin as follows:
a
M<>O<>O<>O
»Menu« but
-
ton
3.Phone setting 4.Date/Time set 2.SNTP setting
<>
O
Select »5.Adjustment Tim«.
Confirm your entry using the »OK« button.
4.Time zone
5.Adjustment Tim
t
O
Enter the time.
Confirm your entry using the »OK« button.
(1..24)
24
Volume & Gain
This option letsyouset the volumesfor voice communication.Whatyou set herearethe signallevelsdelivered to and
received from the phone.
Handset Volume Setting
Begin as follows:
a
M<>O<>O
»Menu« button
3.Phone setting 5.Volume & Gain
<>
M
Select »1.Handset volume«.
Confirm your entry using the »OK« button.
1.Handset volume
2.Speaker volume
<>
O
You can set the volume in 15 steps. Select the desi
red value.
Confirm your entry using the »OK« button>«.
Handset volume:
1 (15=Max)
Volume & Gain Configuration using the telephone
23
Page 28

Speaker volume
Begin as follows:
a
M<>O<>O
»Menu« button
3.Phone setting 5.Volume & Gain
<>
O
Select »2.Speaker volume«.
Confirm your entry using the »OK« button.
1.Handset volume
2.Speaker volume
<>
O
You can set the volume in 15 steps. Select the desi
-
red value.
Confirm your entry using the »OK« button>«.
Speaker volume:
8 (15=Max)
Microphone gain (handset gain)
Use thissetting todefine thelevel ofamplification to be applied to the voice signal fromyour microphonebefore the
signal is transmitted to the other party.
Begin as follows:
a
M<>O<>O
»Menu« button
3.Phone setting 5.Volume & Gain
<>
O
Select »3.Handset gain«.
Confirm your entry using the »OK« button.
2.Speaker volume
3.Handset gain
<>
O
15 levels (steps) are provided for the amplification
setting. Select the desired value.
Confirm your entry using the »OK« button>«.
Handset gain:
8 (15=Max)
Speaker gain
Use this setting to define the level of amplification to be applied to the incoming voice signal.
Begin as follows:
a
M<>O<>O
Menu button
3.Phone setting 5.Volume & Gain
<>
O
Select »4.Speaker gain«.
Confirm your entry using the »OK« button.
3.Handset gain
4.speaker gain
<>
O
15 levels (steps) are provided for the amplification
setting. Select the desired value.
Confirm your entry using the »OK« button>«.
Speaker gain:
8 (15=Max)
Configuration using the telephone Volume & Gain
24
Page 29

Ringer setting
Use this setting to define the ringing melody you wish to use and its volume.
Begin as follows:
a
M<>O<>O
»Menu« button
3.Phone setting 6.Ringer
Ringer volume
<>
O
Select »1.Ringer volume«.
Confirm your entry using the »OK« button.
1.Ringer volume
2.Ringer type
<>
O
You can set the volume in 10 steps. Select the desi
red value.
Confirm your entry using the »OK« button.
Ringer volume:
6 (10=Max)
Tone setting
<>
O
Select »1.Ringer type«.
Confirm your entry using the »OK« button.
1.Ringer volume
2.Ringer type
<>
O
You can set 4 different ringing melodies. Select the
desired melody.
Confirm your entry using the »OK« button.
Ringer type:
3 (4=Max)
Auto Dial Time
Ifyou enterdigitsforcomposing asubscribernumber,the phone musthavesomemeans of recognizingwhendialing
ends. During manual dialing, you mark out the endof a dialed number bypressing thenumber (#) key. If the number key (#) is not pressed after dialing a phone number, dialing will assume to be completed only when the defined
time period starting after which thelast number was entered expires (»Auto dial«) You can adjust the length of that
period of time between 3 and 9.
Begin as follows:
a
M<>O<>O
»Menu« button
3.Phone setting 7.Auto dial
<>
O
The time between dialing can be set in steps of 3...9
seconds. Select the desired value.
Confirm your entry using the »OK« button.
Auto dial:
3 (3-9 seconds)
Network
Remember that some settings may not be effective until the phone is restarted.
Your phone is equipped with two Ethernet ports: LAN and WAN. The WAN port is linked to the router or modem.
The LAN port represents a dedicated network and must be configured as such.
Here, you can configure the network ports for WAN and LAN.
Begin as follows:
a
M<>O
»Menu« button
4.Network
Network Configuration using the telephone
25
Page 30

WAN Settings
<>
O
Select »1.WAN Setup«.
Confirm your entry using the »OK« button.
1.WAN Setup
2.LAN Setup
<>
O
Select »1.IP Type«.
Confirm your entry using the »OK« button.
1.IP Type
2.Fixed IP setti
<>
If the IP address is obtained automatically by a rou
-
ter or a PABX system activate »2.DHCP-Client«.
If fixed IP addresses are to be assigned in the net
-
work activate »1.Fixed IP clien«
If your phone is connected directly to a DSL or cable
modem activate »3. PPPoE client«
1.Fixed IP clien
2*DHCP client
3.PPPoE client
O
Confirm your entry using the »OK« button>«.
Configuring a fixed IP-address
Begin as follows:
a
M<>O<>O <> O
»Menu« but-
ton
4.Network 1.WAN Setup 2.fixed IP setti
<>
O
Select 1.IP Adress«.
Confirm your entry using the »OK« button.
1.IP Adress
2.Subnet mask
t
O
Enter an IP-address from your network (in this example 192.168.1.45
Confirm your entry using the »OK« button.
IP adress:
192.168.001.045
<>
O
Select »2.Subnet mask«.
Confirm your entry using the »OK« button.
1.IP Adress
2.Subnet mask
t
O
Enter the subnet address of your network (in this
example 255.255.255.0)
Confirm your entry using the »OK« button.
Subnet mask:
255.255.255.000
<>
O
Select »3.Defaul Gateway«.
Confirm your entry using the »OK« button.
2.Subnet mask
3.Defaul Gateway
t
O
Enter the gateway address of your network (in this
example: 255.255.255.0)
Confirm your entry using the »OK« button.
Gateway IP:
192.168.001.250
Configuration using the telephone Network
26
Page 31

DSL- or cable modem access (PPPoE)
Begin as follows:
a
M<>O<>O
»Menu« button
4.Network 1.WAN Setup
<>
O
Select 3.PPPoE«.
Confirm your entry using the »OK« button.
2.Fixed IP setti
3.PPPoE setting
t
O
Under »1.User Name « and »2.Password« enter the user
name and password assigned to you by your provi
der.
Confirm your entry using the »OK« button.
1.User Name
2.Password
If theuser name orpassword containsspecial charactersthat are not supported bythe phone,these entriesmust be
made using the »Web Configurator«.
LAN Settings
•
If theLAN setting is at «Bridge«,the twoEthernet portsare linkedtransparently with one anot
-
her. Youneed this option if the phone is interconnected withan externalNAT router.
• If the LANsetting is at»NAT«, theintegrated NATis activated.This setting is useful forADSL
users who don’t have accessto aNAT router.
Begin as follows:
a
M<>O<>O
»Menu« button
4.Network 2.LAN Setup
<>
O
Select 1.Bridge « or »2.NAT«.
Confirm your entry using the »OK« button.
1.Bridge
2*NAT
(DNS Settings
The DNS, orDomain Name Systementry is aservice on theInternet that canprovide a fixedhost name fora dynamic
IP address. This services allows a PC to be addressed using an invariable domain name.
Begin as follows:
a
M<>O<>O
»Menu« button
4.Network 3.DNS
<>
O
Select »1.Primary DNS« for the preferred DNS.
Confirm your entry using the »OK« button.
1.Primary DNS
2.Secondary DNS
t
O
Enter the IP-address.
Confirm your entry using the »OK« button.
Primary DNS:
168.095.192.001
The »Secondary DNS« is configured in the same manner as the »Primary DNS«.
Network Configuration using the telephone
27
Page 32

VLAN Settings
A VirtualLocal Area Network(VLAN) is a local virtualnetwork that resides in a physical network. Itmost widely
used implementation is specified in the IEEE 8021Q standard.
VLAN activation
When youactivate the VLAN option, all incoming packets are checked on thebasis oftheir IPaddress andVID, pro
-
vided you have defined the settings for VID, User Priority and CFI.
Begin as follows:
a
M<>O<>O
»Menu« button
4.Network 4.VLAN
<>
O
Select »1.Activation« in order to activate.
Confirm your entry using the »OK« button.
1.Activation
2.VID
VID setup
Set the VID as specified in the information from your service provider.
<>
O
Select »2.VID« in order to set up VID.
Confirm your entry using the »OK« button.
1.Activation
2.VID
t
O
Here, enter the value specified by your provider.
Confirm your entry using the »OK« button.
VID (2-4094):
136
Priority
defines a userpriorityusingeight differentprioritylevels (2^3). IEEE802.1Pspecifies the useofthe threeuserpriority bits. Normally, this value is defined by your Service Provider.
<>
O
Select »2.VID« in order to set up priority.
Confirm your entry using the »OK« button.
2.VID
3.Priority
t
O
Here, enter the value specified by your provider.
Confirm your entry using the »OK« button.
Priority (0-7):
0
CFI
The CanonicalFormat Indicator is always set to zero by EthernetSwitches. CFIis usedto ensurethe compatibilityof
Ethernet andToken Ringnetworks. Whenan Ethernetinterface receivesa frame with a CFI value of“One”, thatfra
-
me should not be forwarded to an unmarked interface without any processing.
If you activatethe VLAN optionandenter valuesforVID, UserPriorityand CFI,allincoming packetsthatbear theIP
address of the phone and the sameVID willbe accepted.Packets that have the IPaddress ofthe phonebut adifferent
VID are rejected by the phone.
defines a userpriorityusingeight differentprioritylevels (2^3). IEEE802.1Pspecifies the useofthe threeuserpriori
-
ty bits. Normally, this value is defined by your Service Provider.
Configuration using the telephone Network
28
Page 33

Status
Here, you can view the IP address and MAC address of your phone.
Begin as follows:
a
M<>O<>O
»Menu« button
4.Network 5.Status
The IP address and MAC address are shown here. A
»W« is placed in front of the WLAN address, an »L«
in front of the LAN address.
L192.123.123.001
W192.168.001.052
MAC:00094551ee08
SIP Settings
This menu itemletsyou set theServiceDomain, makeCodecsettings, Codec IDsettingsand miscellaneousotherset
-
tings. Followyour provider’sinstructions for these settings, as they are specific for each different provider. Configu
-
ration can only be completed via the »Web Configurator«.
Administrator (Authentication)
You must login withyour password (factorydefault setting»24234880«) beforeyou can makeany SIP settings.Only
after you have successfully logged in can you make the following settings.
Begin as follows:
a
M<>O<>O
»Menu« button
7.Administrator 4.System Authent
t Enter the password »Password«. Password:
24234880
O
Confirm your entry using the »OK« button>«. »Cor-
rect!« will appear in the display when your password
is accepted.
Correct!
You can now make any entries that require previous authentication.
Entering provider data.
Your phone canutilize services fromthreedifferent providers.Three function keys(L1....L3)are providedfor this on
the telephone.You canpermanently select a provider usingthese functionkeys. Enterthe datafor eachprovider un
-
der »First realm«, »Second realm« and »Third realm«.
Begin as follows:
a
M<>O
»Menu« button
5.SIP setting
The »First realm« is set when the phone is restarted.
<>
O
Select »1.Service domain« in order to activate.
Confirm your entry using the »OK« button.
1.Service domain
2.Codec
SIP Settings Configuration using the telephone
29
Page 34

<>
O
Select the realm in which you wish to enter the pro
vider.
Confirm your entry using the »OK« button.
1.First realm
2.Second realm
3.Third realm
<>
O
Select »1.Activation« in order to activate.
Confirm your entry using the »OK« button.
1.Activation
2.User name
<>
O
»1.Enabled«. This activates the provider.
»2.Disabled«. This de-activates the provider.
Confirm your entry using the »OK« button.
1*Enabled
2.Disabled
<>
O
Select one of the entries 2...8 « and enter the data of
your provider.
Confirm your entry using the »OK« button.
1.Activation
2.User name
PABX connection: Under »2.User name« enter one of the numbers you have specified when configuring the pabx.
Enter the name that you wish to have displayed. 3.Display name
Enter the register name specified by your provider. 4.Register name
Enter the register password specified by your provider.
5.Register passw
Enter the Proxy Server specified by your provider. 6.Proxy Server
Enter the Domain Server specified by your provider. 7.Domain Server
Enter the Outbound Proxy address used by your
provider. If unknown, you may skip his option. The
same steps are required when registering with a different provider.
8.Outband proxy
Confirm your entry using the »OK« button.
O
Port settings (RTP setting)
RTP = Real-Time Transport – a network protocol for transmitting continuous data (streams).
Under »Port Setting« you can specify the SIP and the RTP port numbers. Providers can use different SIP/RTP port
settings; ask your provider about this so that you can enter the correct port number.
Begin as follows:
a
M<>O<>O
»Menu« button
5.SIP setting 3.RTP setting
<>
O
Select the entry that you wish to activate or de-acti
vate.
Confirm your entry using the »OK« button.
1.Outband DTMF
2.Duplicate RTP
Configuration using the telephone SIP Settings
30
Page 35

Displaying the status
You can use this item to view registration at the given provider.
Begin as follows:
a
M<>O<>O
»Menu« button
5.SIP setting 6.Status
<>
Select the entry that you wish to view. In the exam
ple given here the phone has not been registered
with the provider, or the phone is not logged on to a
PABX system.
First realm
Unregister
STUN Setting
Under »STUN Setting« you can setup the STUN server for the SIP service. The STUN functionmust be activated in
order for a telephone registered with the SIP server to work correctly downstream from a SIP server.
Begin as follows:
a
M<>O<>O
»Menu« button
6.Nat transversa 1.Stun setting
<>
O
Select »1.STUN« to activate or deactivate.
Confirm your entry using the »OK« button.
1.STUN
2.STUN server
<>
O
Select »2.STUN.server« to register with the server (in
this example »stun.xten.com«).
Confirm your entry using the »OK« button.
1.STUN
2.STUN server
Registered
stun.xten.com
Administrator settings
You canhave yourphone configuredusing apreset or stored configuration file. You willneed tospecify thelocation
for the configuration data.
Selecting the configuration data server
Begin as follows:
a
M<>O<>O
»Menu« button
7.Administrator 1.Auto config
<>
O
Select »1.Auto config« to specify the server on which
the configuration data are stored.
Confirm your entry using the »OK« button.
1.Auto config
2.Upgrade System
<>
O
Select »1.Config mode« to activate the server. The follo
wing servers are available:
»1.Disable« (deactivating server access)
»2.TFTP«
»3.FTP«
Administrator settings Configuration using the telephone
31
Page 36

»4.HTTP«
Confirm your entry using the »OK« button.
1.*Disabled
2.TFTP
<>
O
Select the activated server type and enter the IP ad
dress, user name (»Login Name«) and the password
(»Password«) for the FTP server.
Confirm your entry using the »OK« button.
2.TFTP
3.FTP
4.HTTP
(Upgrading the telephone software
Begin as follows:
a
M<>O<>O
»Menu« button
7.Administrator 2.Upgrade system
The correspondingentries must be made forthe following settings using theWeb Configurator. These procedures
are then carried out in the functions that are described.
<>
O
Select »3.Status« to view the current software and the
preset time for the next automatic upgrade.
Confirm your entry using the »OK« button.
3.Status
4.Reset Time
M
Press the »Menu« button.
<>
O
Click »2.Upgrade via« to select the server on which the
file to upgrade is located.
»1.Disable« (deactivating server access)
»2.TFTP«
»3.FTP«
»4.HTTP.
Confirm your entry using the »OK« button>«
2.Upgrade via
3.Status
M
Press the »Menu« button.
<>
O
Select »1.Upgrade Now« to view the current software.
Confirm your entry using the »OK« button.
1.Upgrate Now
2.Upgrade via
<>
O
Select whether you wish to continue »Yes« or whet
her you wish to quit the upgrade »No«.
Confirm your entry using the »OK« button.
1.Yes
2*No
<>
O
Select »4.Reset Time« to have the upgrade done at the
time specified in the Web configurator.
Confirm your entry using the »OK« button.
4.Reset Time
1.Upgrate Now
<>
O
Select whether you wish to continue »Yes« or whet
her you wish to quit the upgrade »No«.
Confirm your entry using the »OK« button.
1.Yes
2*No
Configuration using the telephone Administrator settings
32
Page 37
Configuring the phone using the Web browser
You phone isalso equippedwith anintegratedWeb interfacethat you canuse toconfigure the phone.First, enterthe
IP address at the Web site. Example: http://192.168.1.100. This IP address is obtained automatically from the con
-
nected PC via DHCP. You can view the IP address when you press the »IP« key on your phone.
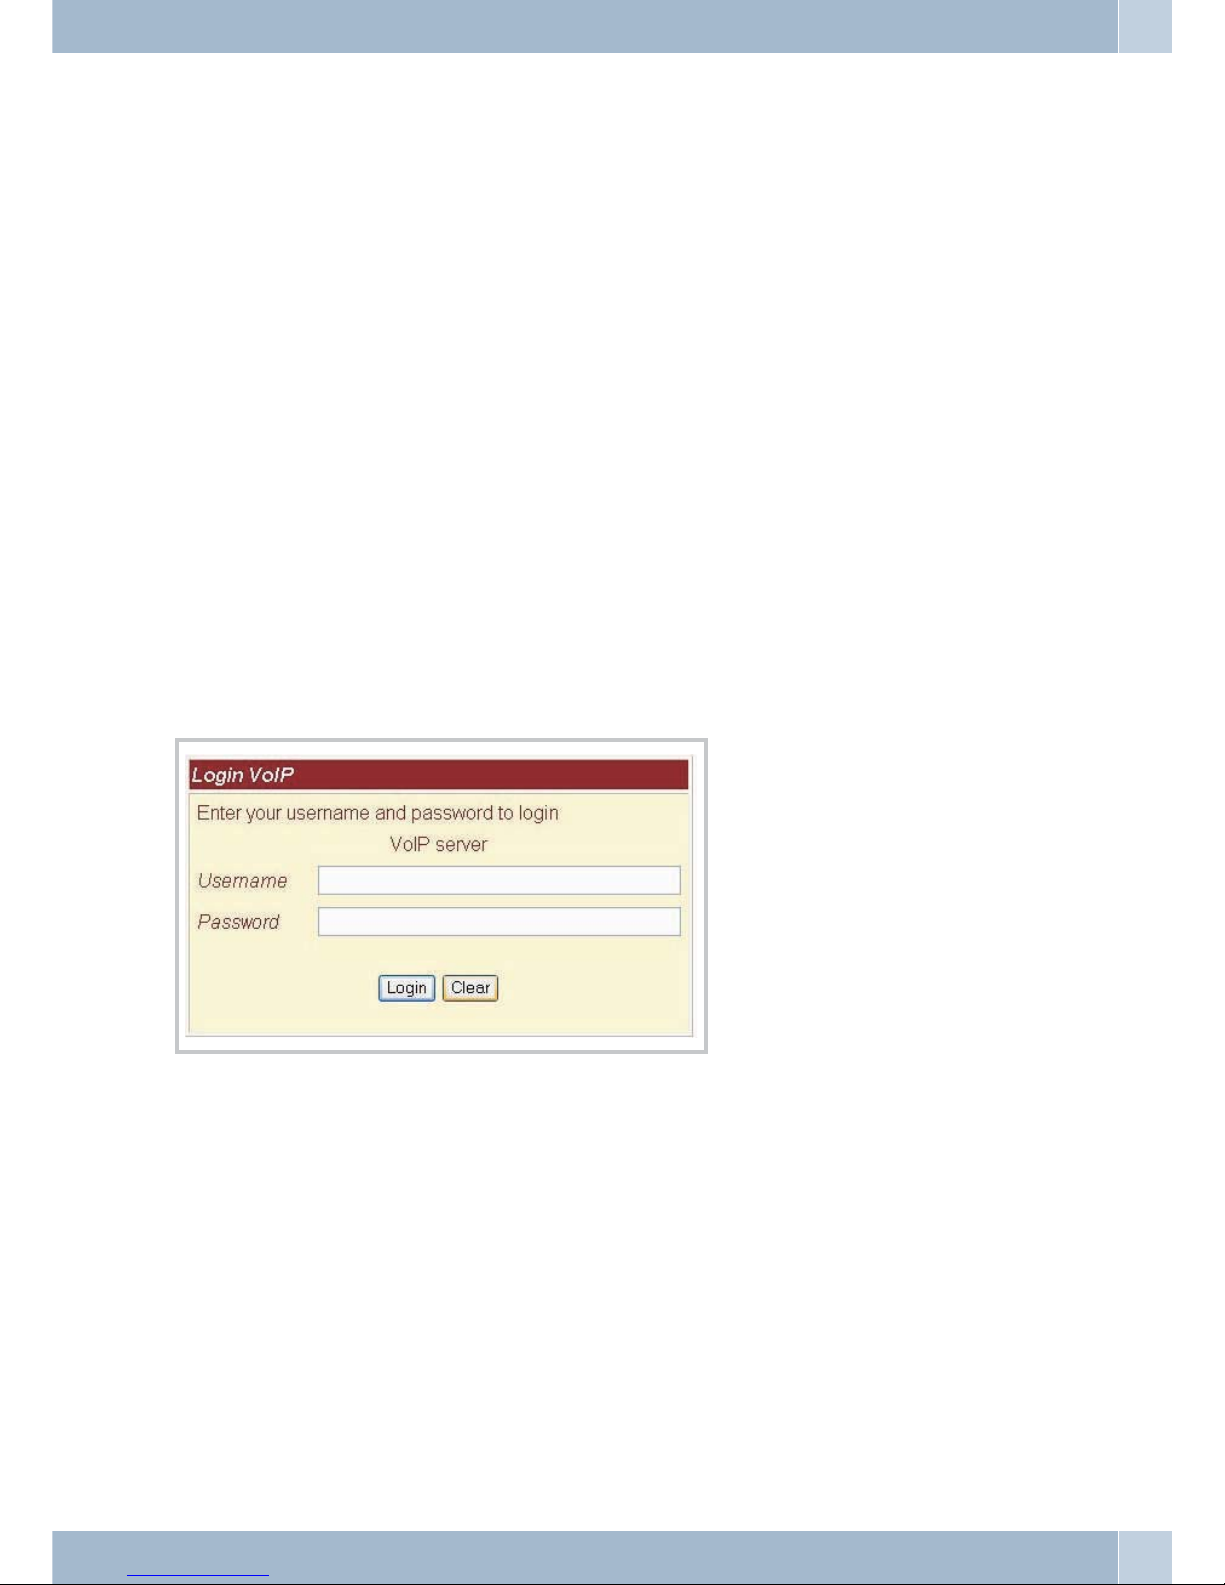
Login
Enter the User Name and Password in the empty text boxes provided for that purpose.
Default settings:
•
The username for the admin is»admin« andthe passwordis: »24234880«.As anAdministrator,
you areauthorized to make any configurationsettings yourequire.
•
The username for genericusers is:»user« andthe passwordis: »user«. Asa standardUser youare
not authorizedto perform SIP configuration, for example.
•
When youclick the »Login« button theWeb-based informationmanagement menuis loaded to
your phone.
•
You mustconfirm any changesyou maketo thismenu byclicking the button »Submit«. When
you arefinished making changesto themenu clickthe button»Save« in the menu »SaveChange«
to saveall your changes. The modifiedsettings willonly beactivated afteryou restartyour sys
tem. Todo this, click the button »Reboot« locatedat theleft. Thesystem isthen restarted with the
new configurationparameters.
Telephone system data
When you have successfully logged on to the Web site, the current system data for your phone is displayed, such as
firmware version, model name, etc.
Alist ofthefunctionsis shown ontheleft side. Selectthefunctionyou wish tosetby clicking itwiththe mouse key.
Login Configuring the phone using the Web browser
33
Page 38

Phone Book, Speed Dial (Speed Dial Settings)
Phone Book/
Use themenu item »Phone Book« to configure the phone book. You canadd, changeor deletespeed dialnumbers in
the speed dial list ( »Speed Dial Phone List«).
Phone book entries
You can add new phone book entries using »Add New Phone«.
•
Under »Position« you may choose one outof 140speed dialdestinations (000...139). Use
»Name« to enter a namefor theentry.
• For »URL« enter either the phone number, theURL, orthe IPaddress ofthe subscriber.
• When you are done, click the »Add Phone«button.
• By clicking the »Reset« button youcan deletethe entriesmade under»Add New Phone«.
• Once an entry has been addedto the»Speed DialPhone List«you cannotedit it anymore, only de-
lete oroverwrite.
Entry Delete
• Go to the»Select« column, choose the entriesyou wantto remove,and clickthe »Delete Selected«
button.
•
If youwish to remove all subscribernumbers inone go,you neednot choose all entries inthe »Se
-
lect« column.Simply click the »Delete All« button instead.
Telephone system data Phone Book, Speed Dial (Speed Dial Settings)
34
Page 39

Speed dial(Speed Dial Phone List)
Use the menuoption »Speed DialPhone List«in order toconfigure thespeeddial feature.You can add,change or de
-
lete speed dial numbers in the speed dial list ( »Speed Dial Phone List«).
Entering a Speed Dial Destination
Under »Add New Phone« you can enter a new speed dial destination.
•
Under »Position« you may choose one outof 10speed dialdestinations (0...9). The digits 0
through 9each represent a subscriber number.The phonedials thesedestination numbersauto
-
matically wheneveryou enter the appropriate digit for the desired subscriber.
•
Under »Name« you can entera namefor eachspeed dialdestination.
•
Under »URL« you enter eitherthe phonenumber, theURL, orthe IPaddress of the subscriber
you wishto store under this speeddial destination.
•
When youare done, click the »Add Phone« button.
•
By clickingthe »Reset« buttonyou candelete theentries madeunder »Add New Phone«.
Once an entry has been added to the »Speed Dial Phone List« you cannot edit it anymore.
Entry Delete
•
Go tothe »Select« column, choose theentries youwant toremove, andclick the»Delete Selected«
button.
Phone Book, Speed Dial (Speed Dial Settings) Telephone system data
35
Page 40

•
If youwish to remove all subscribernumbers inone go,you neednot choose all entries inthe »Se
-
lect« column.Simply click the »Delete All« button instead.
Telephone Settings (Phone Setting)
Here you can define the settings for the telephony functions.
Call Forward
This feature lets you redirect your phone calls and incoming telefax messages to a location of your choice.
Please note that not all providers support call forwarding. Before setting up this feature, you should therefore ask
your provider for advice.
On the page »Forward Setting«you canselectthe forwardingmode, thenenterthe destinationURL(phone number,
phone number inURL format orIP address) towhich incoming callsshould be forwarded,as wellasa name.Thefol
-
lowing call forwarding options are available:
UnconditionalCall Forwar
-
ding
(AllForward):
All incoming calls will be forwarded to the specified phone number,
URL or IP address.
CallForward on
Busy(Busy Forward):
An incoming call will be forwarded to the specified phone number,
URL or IP address only if the called subscriber is busy.
Callforwarding on
(NoAnswer
Forward):
An incoming call will be forwarded to the specified phone number,
phone number in URL format, or IP address if the called subscriber
does not pick up the handset within a specified time (as entered in
»Time Out.
Telephone Settings (Phone Setting) Phone Book, Speed Dial (Speed Dial Settings)
36
Page 41

Set Up Call Forwarding
You mayenable all three call forwarding modes at the same time. In this casethe TAwill onlyuse »CallForward Un
conditional« (All Forward). Thiscall forwarding mode has the highest priority. The two remaining call forwarding
modes may be active concurrently.
•
To enablethe desired call forwarding mode, choose »On«.
• Under »All Fwd No.:«, »Busy Fwd No.:« or »No AnswerFwd No.:«you canuse the»Name« text
box toenter a name for theforwarding destination.
• Under »URL« you entereither thephone number,the phonenumber inURL format or the IPaddress of the subscriber to whom callsshould beforwarded.
• Under »No Answer Fwd Time Out«you specifythe numberof callsafter whichCall Forwarding
on NoAnswer should kickin andredirect callsto thespecified destination.You canchoose any
number between 2 and 8 ringing tones(»2~8 Ring«).
• Confirm your entriesby clicking the »Submit« button.
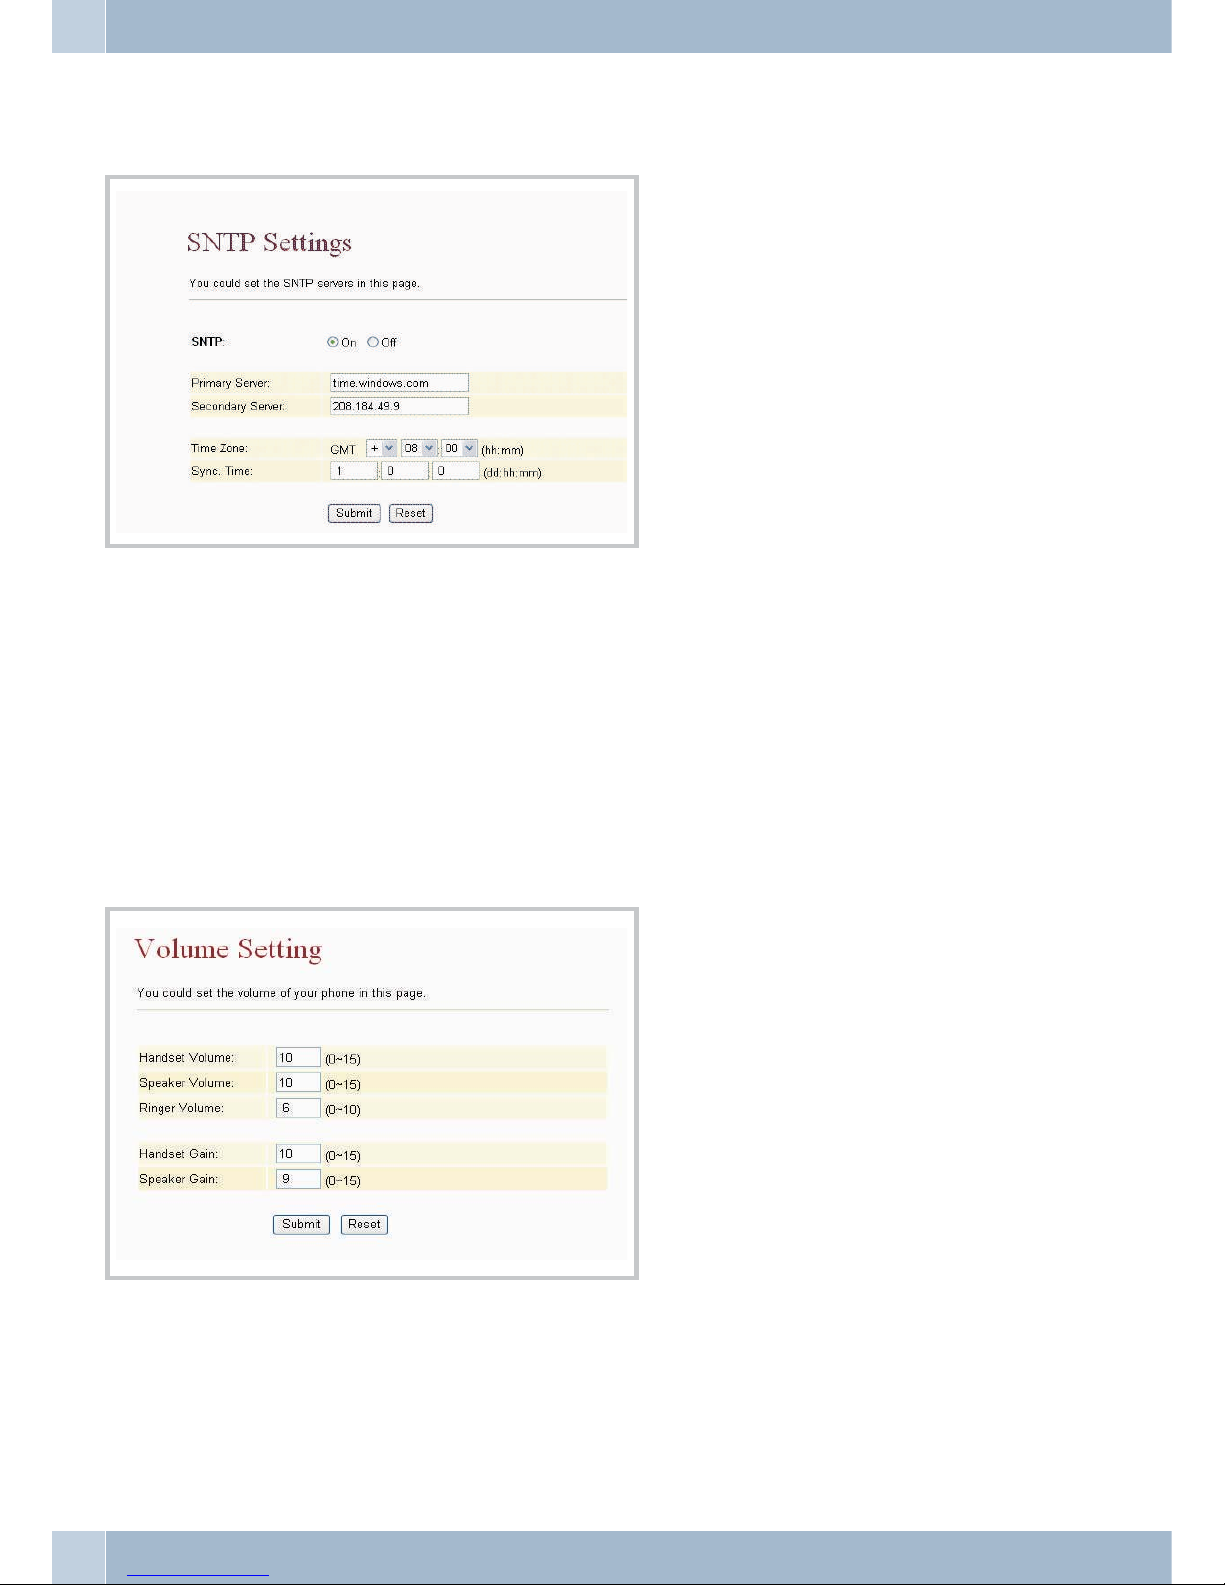
Time Synchronization Setup (SNTP Settings)
It isuseful toconfigure atimer server in your network so thatyour Telephoneremains synchronizedwithin thenet
work. This servercan be installed at an external location in the Internetas a so-called Public Time Server orin your
own network. Ifyou have configureda computer withinyour network asthe Time Server,enter the IPaddress of that
computer here.
SNTP
•
Here, youcan activate time acceptance. Select»On«.
Time Synchronization
(Time Server)
•
Under the »Primary Server« and »Secondary Server« setupitems, enterthe IP addresses of the
»time synchronizationsources«. Here, youcan entertwo differentaddresses. Thisallows the
time tobe accepted via a secondserver inthe eventof lossof thefirst server.
Time Zone
(Time Zone)
•
Here, enterthe time difference between the standard time»Greenwich (Mean)Time« andyour
own location.For CentralEurope the time zone needsto beset to+ onehour (+ 01:00). Please
note thatDaylight Saving Time may bein forcewhen settingthe timezone.
Synchronization Time
(Sync. Time)
•
Here, enterthe time (»Sync. Time«) afterwhich anew timesynchronization attemptis to be
made.
Phone Book, Speed Dial (Speed Dial Settings) Telephone Settings (Phone Setting)
37
Page 42
•
Confirm yourentries by clicking the »Submit«button.
Volume Setting
You can set the handset volume, the dial tone gain and the handset gain. Click »Submit« to confirm.
• Under » »Handset Volume«you canset thehandset volume.
• Under » »Speakter Volume« you canset thespeaker volume.
• Under » »Ringer Volume« you canset thedial tonegain.
• Under » »Handset Gain«you canset handsetgain.
• Under »Speaker Gain« you can setthe microphonegain.
Melody Setting
You can choose between 4 different ringing melodies.
Volume Setting Phone Book, Speed Dial (Speed Dial Settings)
38
Page 43

.
Confirm your entries using the »Submit« button.
Block Settings (Do Not Disturb)
On this pageyou can setupthe »Blocking«feature.Select whethercalls are notto be signaledatany time,oronly fora
defined period atthis phone (»DNDAlways « setto »On«), orwhether the phoneis to beset to »Idle«for a definedpe
riod (»DNDPeriod«).
No Ringing (DND Always)
Incoming calls will not ring your phone until you deactivate this function.
• To enable »Blocking« (DND Always) choose»On«.
No Call Signaling by time (DND Period)
• Here, you can activate »Idle« (DNDPeriod) fora definedperiod. Select»On«.
• In the »From« and »To« textboxes enterthe startand endtimes of the period during which rin-
ging shouldbe suppressed. If the timeof dayspecified for»From« occurslater thanthe onespecified for»To«, ringingwill be suppressed until thattime onthe followingday.
• Confirm your entriesby clicking the »Submit« button.
Phone Book, Speed Dial (Speed Dial Settings) Melody Setting
39
Page 44

Dial Plan feature
You phone can complete and dial numbers automatically when the first few numbers that you dial match the pro
-
grammed ”Replacement rules”. When you have made your settings click the button »Submit« to confirm them.
Description of Symbols
x 0,1,2,3,4,5,6,7,8,9
+or
• Drop Prefix: Whenset to»No«, the number present inthe frontfield isplaced infront ofthe phone number,as defined by the replacementrule. Whenset to»Yes«, thenumber in the front field
is usedin place of the numberin therear field,as definedby thereplacement rule.
• Replace rule: Defining the Replacement Rule.
•
Auto Dial Time: Time period prior to the beginning of automaticdialing afterinputting thelast
digit ofthe phonenumber. The default setting is5 seconds.
Example:
Dial Plan feature Phone Book, Speed Dial (Speed Dial Settings)
40
Page 45
Replace rule 1 (Ersetzungsregel)
Example: After entering the first four digits 8163 (or 8662), the digit sequence »002« is placed in front of the phone
number.
The number »002+8163+xxxxx…« is then dialed (or »002+8662+xxxxx…«).
Replace rule 2:
The digit sequences 002, 003, 004, 005, 007 and009 are replaced by the digit string 006. In theexample shown here,
the number »006+xxxxx…« is dialed.
Replace rule 3:
If 12 isinput asthe first digitstring, thedigit string »009«will beplaced in frontof itfor dialing.The number thatwill
then be dialed is »009+12+xxxxx…«.
Replace rule 4:
•
After inputtingthe digit 5 and three other digits, 007 will be placedin frontof thenumber. Inthe
example shownhere, the number »007+5xxx« isthen dialed.
•
After inputtingthe digit 5 and four other digits, 007 isnot placedin frontof thenumber. Inthe
example shownhere, the number »5xxxx« isthen dialed.
•
After inputtingthe digit string 35 (or 21) andtwo otherdigits, 007is placedin frontof thenum
-
ber. Inthe example shown here, the number »007+35xx«(or »007+21xx«)is thendialed.
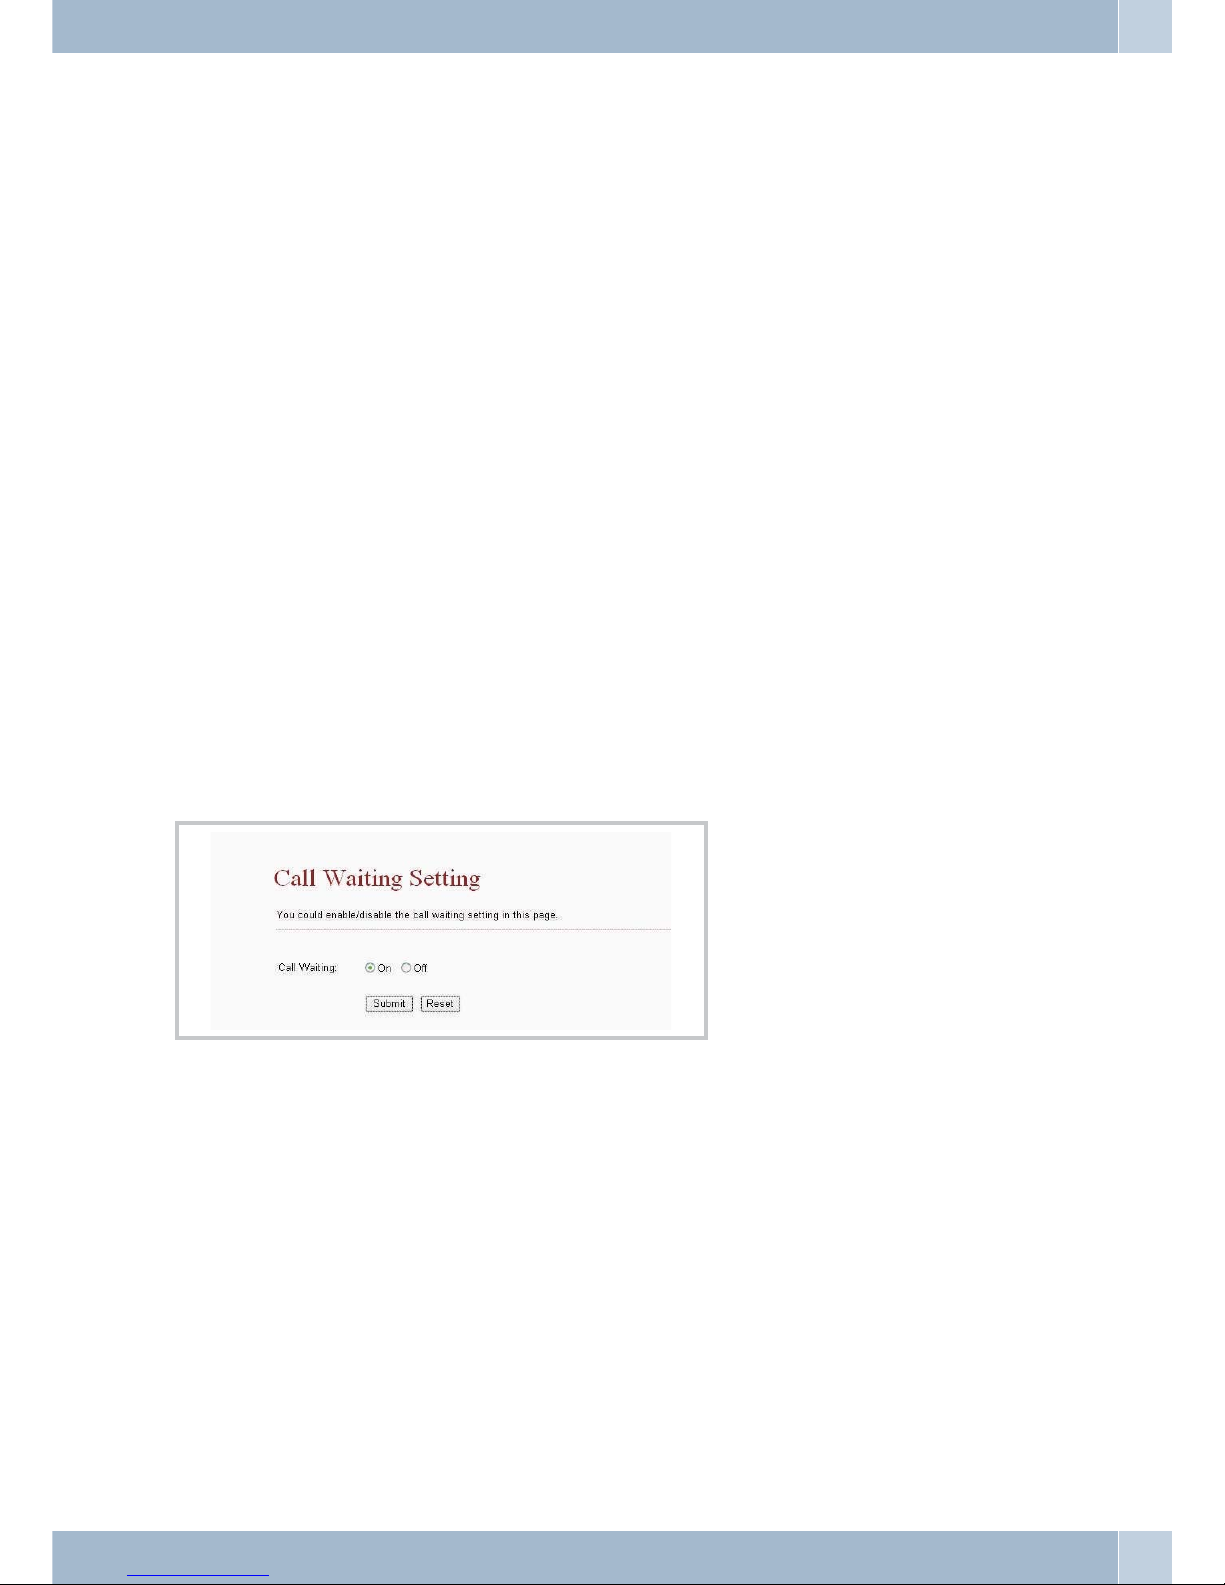
Call waiting setting
Where required, the Call waiting function can be de-activated so that no further incoming call is signaled.
Softkey Setting
Youcan alsoconfigurecorrespondingkeys for »Pick-up«and»Voice Mail«. Thesekeysmust be presentonthe phone
before the function can work properly however.
•
Pick upkey: Enter the key thatis tobe usedfor acceptingincoming calls.
•
Voice mailkey: Enter the key for Voice Mail.
Phone Book, Speed Dial (Speed Dial Settings) Call waiting setting
41
Page 46
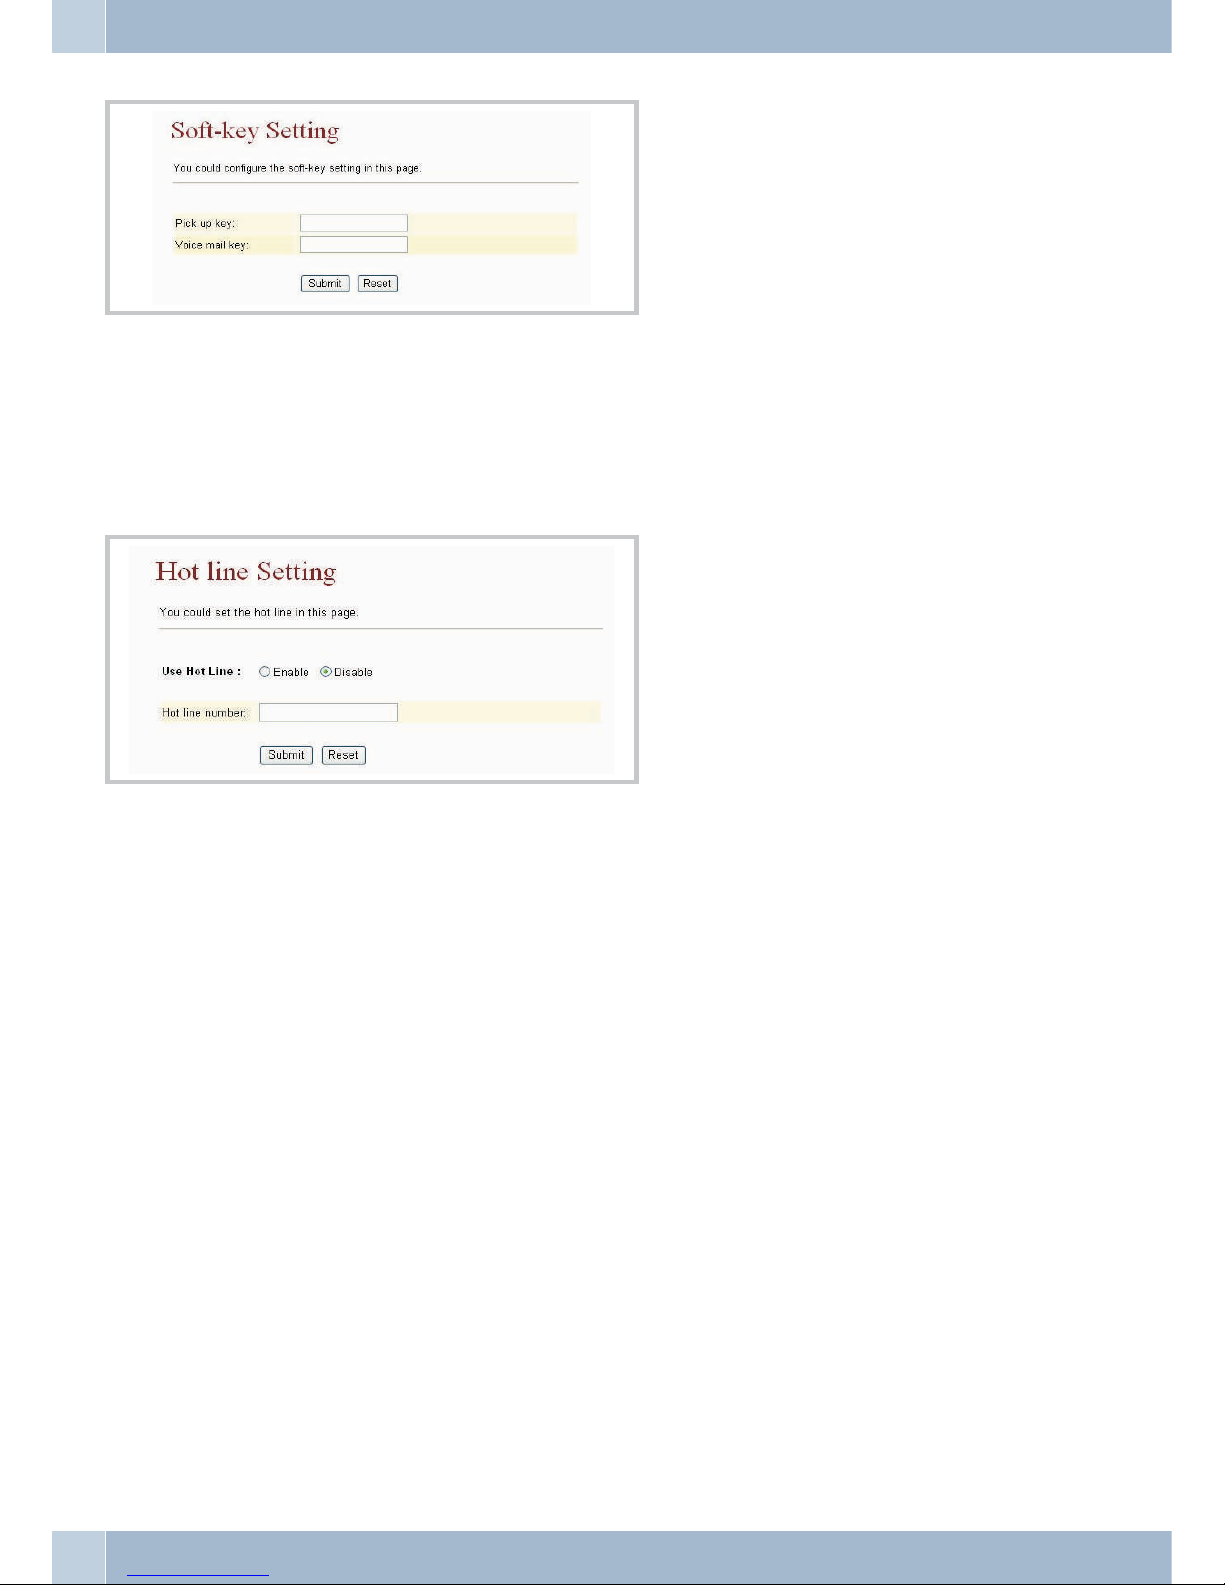
Automatic dialing (Hot Line Setting)
When you lift the handset the number you have configured is dialed automatically.
Programming a direct dial-in
• Under »Use Hotline« check »Enable« toactivate thehotline function.
• Under »Hotline number« enter the hotlinenumber asthe IPaddress, orthe registered user name.
Confirm your entries by clicking the »Submit« button.
Appointment reminder calls (Alarm setting)
Your phone will then issue a signal each day at the programmed time.
•
Alarm: Activate/De-activatethe appointment function using »On«/ »Off«.
•
Alarm Time: Input the appointmenttime inthe 24-hourformat.
Automatic dialing (Hot Line Setting) Phone Book, Speed Dial (Speed Dial Settings)
42
Page 47
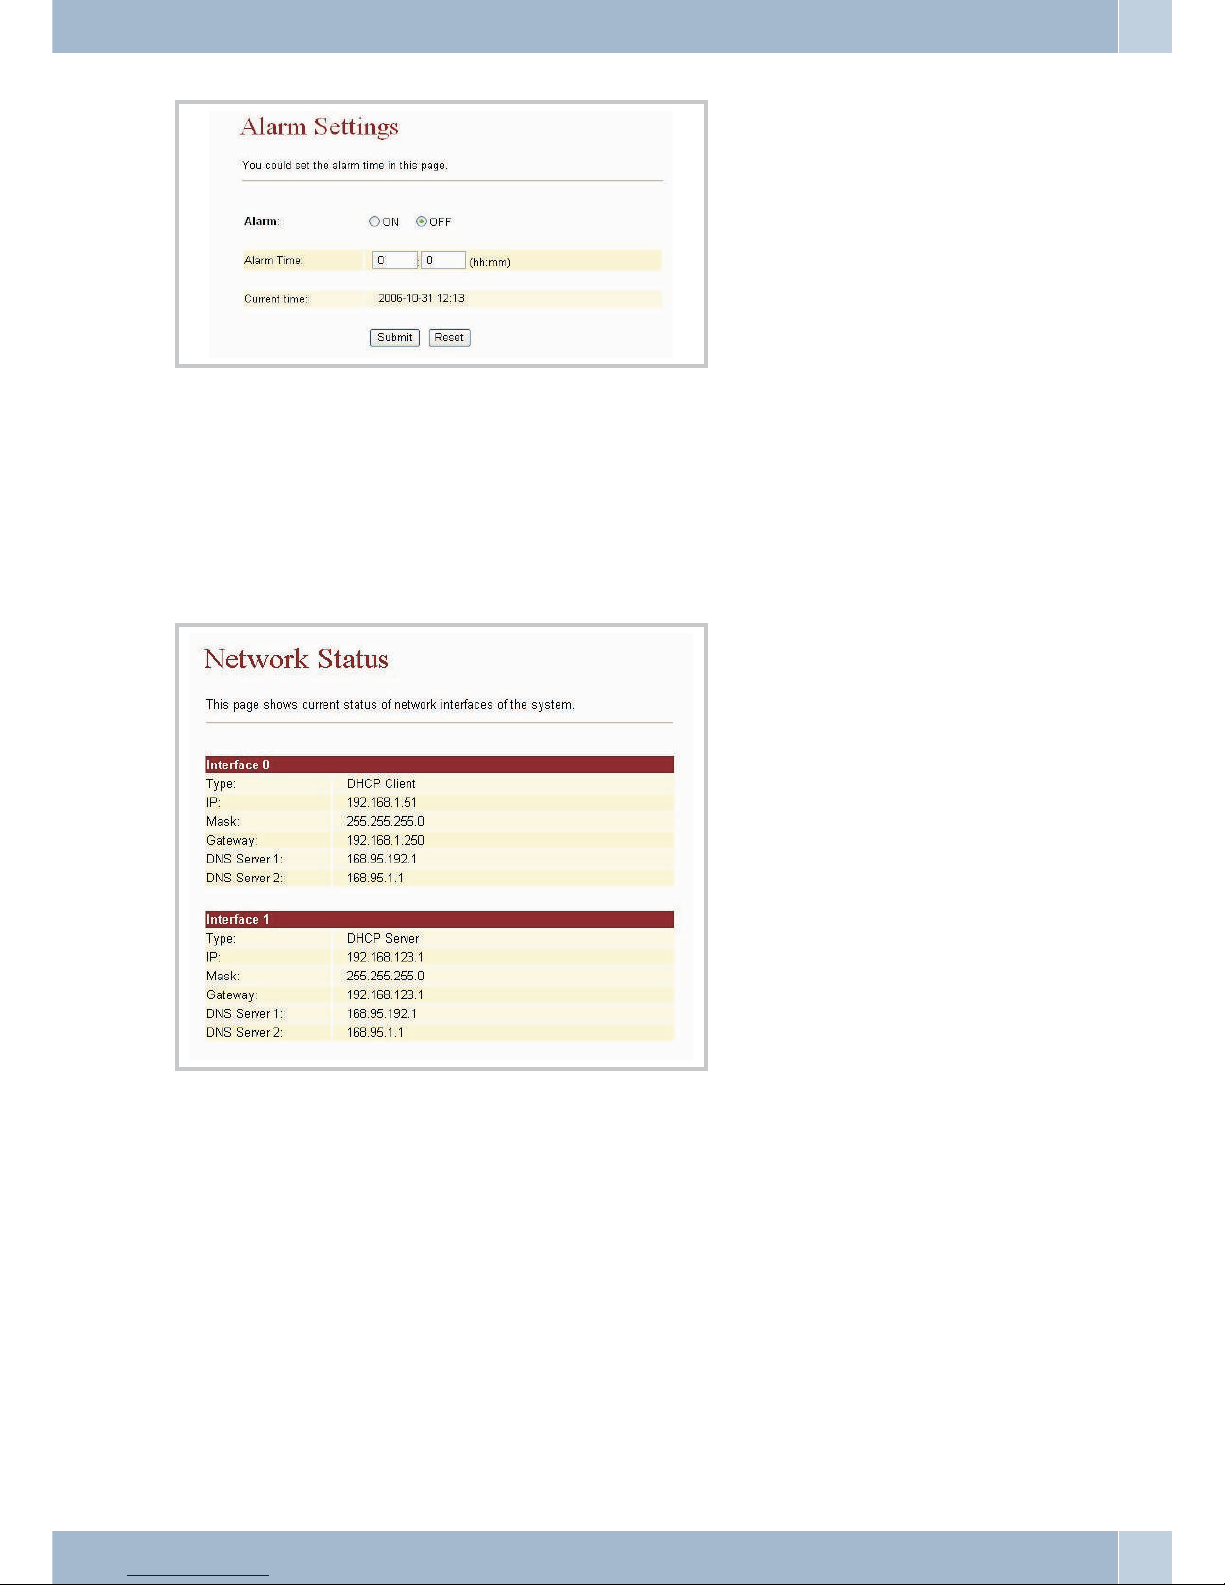
Network
Network Status
By using the »Network Status« menu item you can check the current status of the WAN and LAN settings.
WAN Settings
This page lets you configure the network setup of the WAN port on the phone.
LAN Mode
•
If LANMode is setto »Bridge«both Ethernetports arephysically interconnectedin a fully trans
-
parent fashion.You need this option if the phone is interconnectedwith anexternal NATrouter.
•
If LANMode is setto »NAT«,the integratedNAT isactivated. Thissetting is usefulfor ADSL
users who don’t have accessto aNAT router.
IP Type
•
Fixed IP:
Sets afixed IP address for the WAN port.
•
DHCP Client:
The IPaddress the phone has obtainedfrom anupstream routeror cablemodem is shown.
Network Appointment reminder calls (Alarm setting)
43
Page 48

PPPoE
•
Under «PPPoE Setting« you enter the »UserName« and»Password« givento you by your provi
der. Inthis mode the phone getsthe IPaddress andthe appropriatesubnet maskfrom the DHCP
server of your provider. Entries for the DNS servermust bemade manually.You mayalso enter a
virtual MACaddress if you have obtainedone fromyour provider.
•
Confirm yourentries by clicking the »Submit«button.
LAN Settings
If you wish to set up the phone’s integrated NAT on this page, you must deactivate Bridge mode beforehand.
LAN Settings
•
The «LANSettings« page letsyou setup addresstranslation forthe network. Also featured on
this pageare options for setting the local IPaddress (IP),the subnetmask (Mask), andthe MAC
address (MAC).
DHCP Server
•
These options enable (On) anddisable (Off)the DHCPServer.
•
Settings under»LAN Settings« are»Start IP«,»End IP«,the lifetimein daysand hours of a dyna
mic IPaddress allocated by the DHCPserver (»LeaseTime«), aswell asthe activation statusof
the DHCPservers.
Appointment reminder calls (Alarm setting) Network
44
Page 49
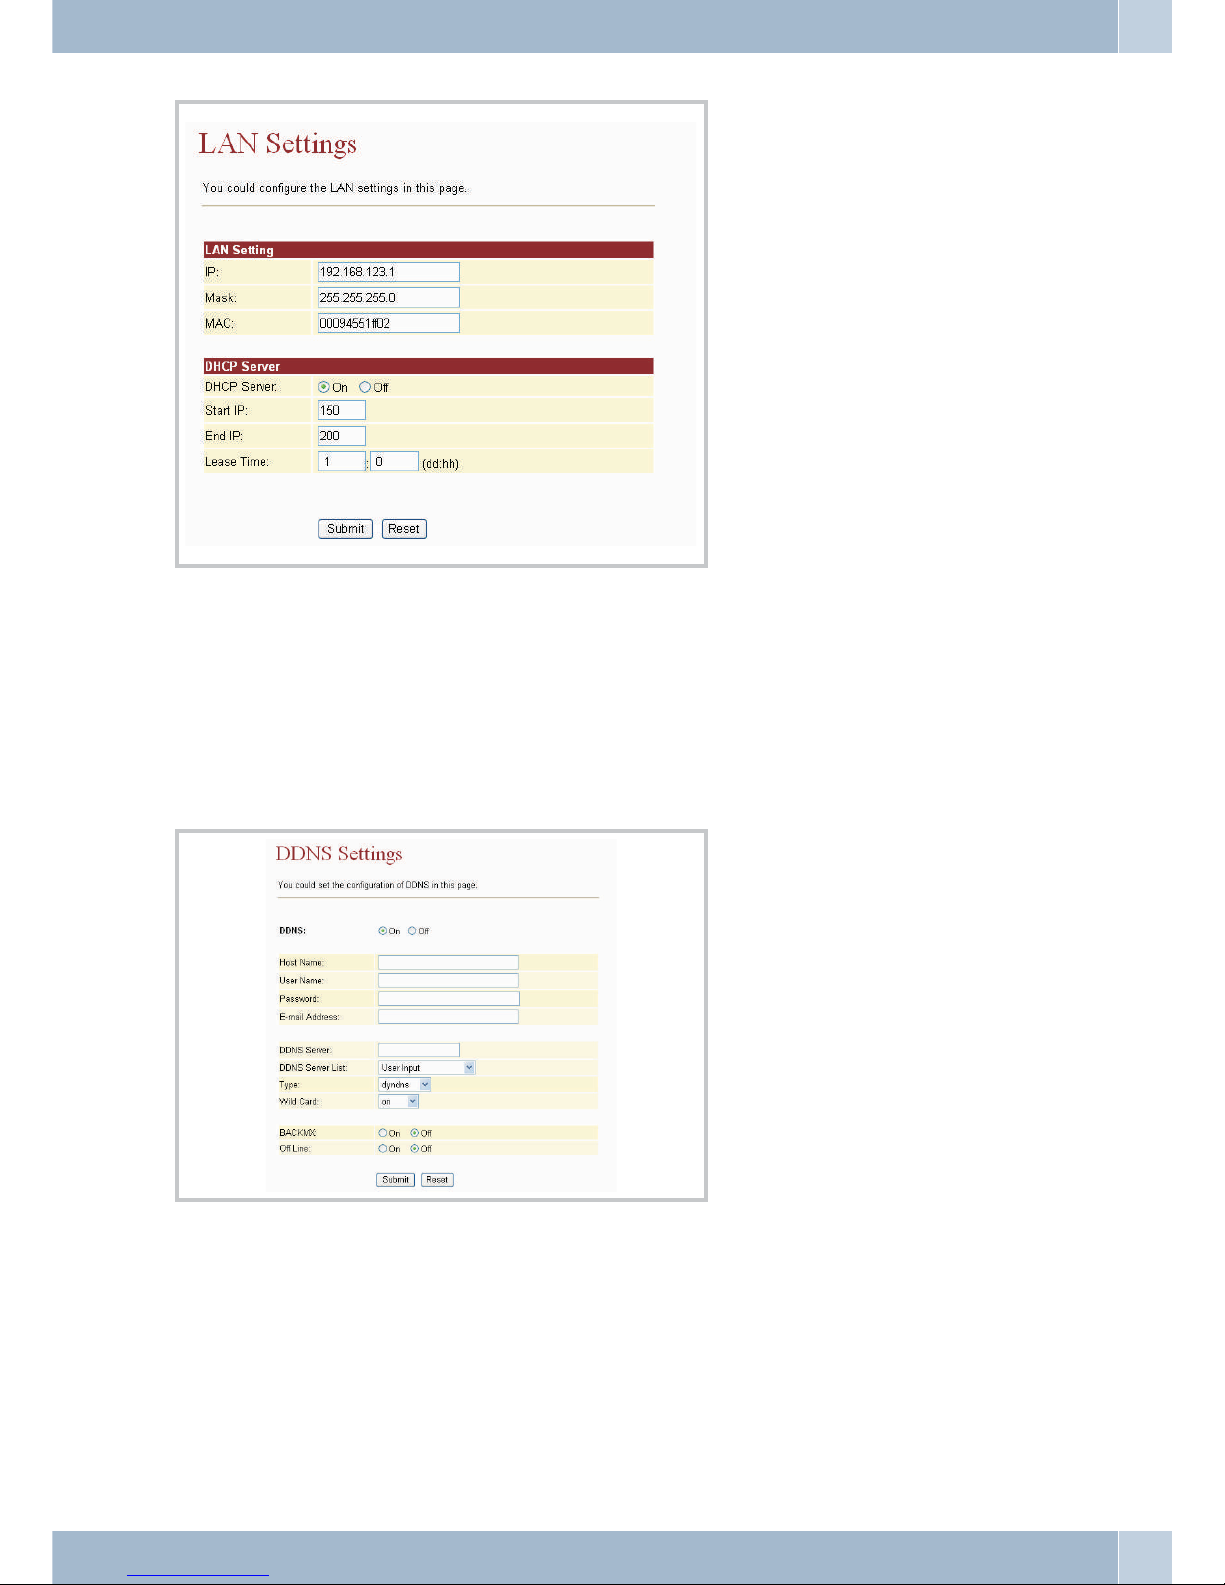
DynDNS Settings
DynDNS or DynamicDomain Name System is a service on the Internet thatmaintains a fixed host name allocation
for devices with a dynamically changing IP address. This services allows a PC to be addressed using an invariable
domain name.
The »DDNS Settings« page lets you configure the DynDNS setup. Prior to entering the necessary information you
need a DDNS account. Confirm your entries by clicking the »Submit« button.
VLAN Settings
A Virtual Local Area Network (VLAN) is a local virtual network that resides in a physical network. It most widely
used implementation is specified in the IEEE 8021Q standard.
Network Appointment reminder calls (Alarm setting)
45
Page 50

There are two sections for configuring VLAN settings:
•
one forVoIP packets that get throughto thetelephone,
•
one forVLAN settings in NAT mode
Two kinds of packets may be received:
•
VoIP packets
•
Packets routed to the PC via theLAN port.
VLAN packets:
• If you activate the »VLAN packets«option, allincoming packetsare verifiedfor acorrect IP ad-
dress and VID, provided that you havemade theappropriate settingsfor VID,User Priorityand
CFI.
VID:
• Please set the VID as specified by yourService Provider.
User Priority:
• defines a userpriority using eight different priority levels (2^3). IEEE 802.1Pspecifies theuse of
the threeuser priority bits. Normally, this value isdefined byyour ServiceProvider.
CFI:
• The Canonical Format Indicator is alwaysset tozero byEthernet Switches.CFI isused to ensure
the compatibilityof Ethernetand Token Ringnetworks. Whenan Ethernetinterface receivesa
frame witha CFI value of “One”, that frameshould notbe forwardedto anunmarked interface
without anyprocessing.
•
If youactivate the VLAN Packets optionand entervalues forVID, UserPriority and CFI, all inco
ming packetsthat bear the IP addressof thephone andthe sameVID will be accepted. Packets
that havethe phone IP address, buta differentVID arerejected bythe phone.Packets with a dif
-
ferent IPaddress are routed to thePC viathe LANinterface.
DMZ-Setting
•
DMZ: Whenset to »On«, all packets(except forSIP-specific ones)will beforwarded tothe IPad
-
dress that has been enteredunder »DMZHost IP«.
•
DMZ HostIP: Input the IP addressthat isto beused forthe DMZ.
Appointment reminder calls (Alarm setting) Network
46
Page 51
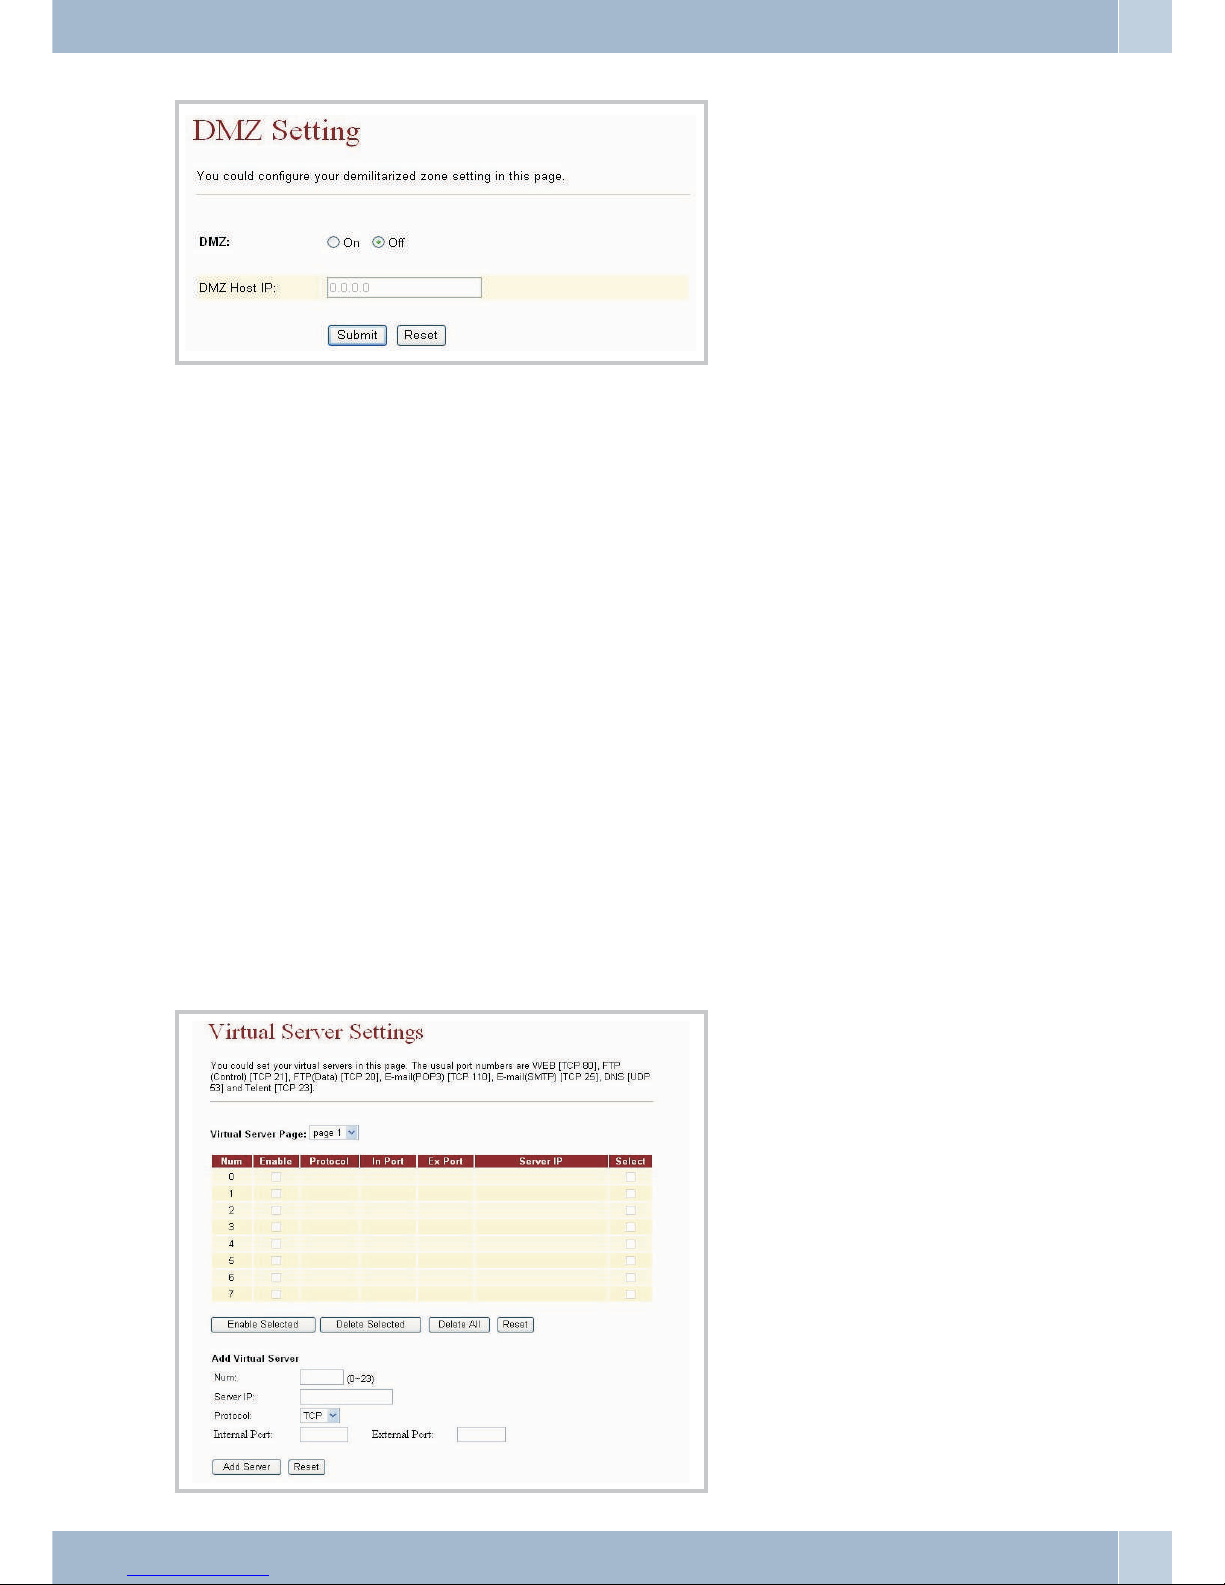
Configuring a virtual server (Virtual Server Settings)
You can configure the virtual server on this page.
•
Virtual ServerPage: You can configure upto 24»Virtual Servers«.
•
Enable: Activatingthe specific server.
•
Protocol: Definingthe TCPor UDPprotocol.
• In Port: Definingthe internal port.
• Ex Port: Definingthe externalport.
• Server IP: Setupof Server IP Address.
• Select: Selecting theconfiguration
• Enable Selected: Activatingthe selected server.
• Delete Selected: Deletethe selectedserver.
• Delete All: Deleteall entries.
• Reset: Resetting all entries.
•
Add Server:Adding a configuration.
Network Appointment reminder calls (Alarm setting)
47
Page 52

PPTP-Settings
The Point-to-Point Tunneling Protocol (PPTP) is a protocol used to set up a Virtual Private Network (VPN). This
permits tunneling of the point-to-point protocol through an IP network, with the individual PPP packets in turn
being grouped into GREPackets.
SIP Settings
This menu item lets you set the Service Domain, make Codec settings, Codec ID settings and miscellaneous other
settings.
You can make calls to and receive calls from other parties through the SIP account.
Active: Click«ON« to settheServiceDomain to «Active«status,thenenter the followingdatayouhave recei-
vedfrom your serviceprovider:
DisplayName: Enter the namethatyouwishto have displayed.
UserName: Enterthe user name.
RegisterName: Enter theregistrationname.
RegisterPassword:Enterthe registration password.
DomainServer: Enter theDomainServer.
ProxyServer: EntertheProxyServer.
OutboundProxy:Enter theOutboundProxy.If unknown, you mayskiphisoption.
•
If the»Status« row reads »Registered«, thisindicates successfulregistration withthe provider.
The »PHONE«LED starts flashingin thatcase. Thephone isnow readyfor VoIP calls.
•
If youhave more than one SIPaccount, pleasecarry outall ofthe steps described above inorder
to registerwith the alternative providers.
•
Confirm yourentries using the »Submit« button.
•
If youhave more than one SIPaccount youcan logon to other service providers in onlya feweasy
steps.
•
To concludethe configuration click »Submit«.
Appointment reminder calls (Alarm setting) PPTP-Settings
48
Page 53

Port Setting
Under »Port Setting«you can specify theSIP and the RTPport numbers. Providers mayuse different SIP/RTP port
settings. Pleaseconsult withyour providerin order to learn about the correctport numbersto beentered here.Con
-
firm your entries by clicking the »Submit« button.
Factory Default Setting:
SIP-Port 5060, RTP-Port 60000.
Codec Settings
The »Codec Settings« page lets you set »Codec Priority«, »RTP packet length« and configure the VAD function. Be
sure to enter this data exactly as specified by your provider.
SIP Settings Appointment reminder calls (Alarm setting)
49
Page 54
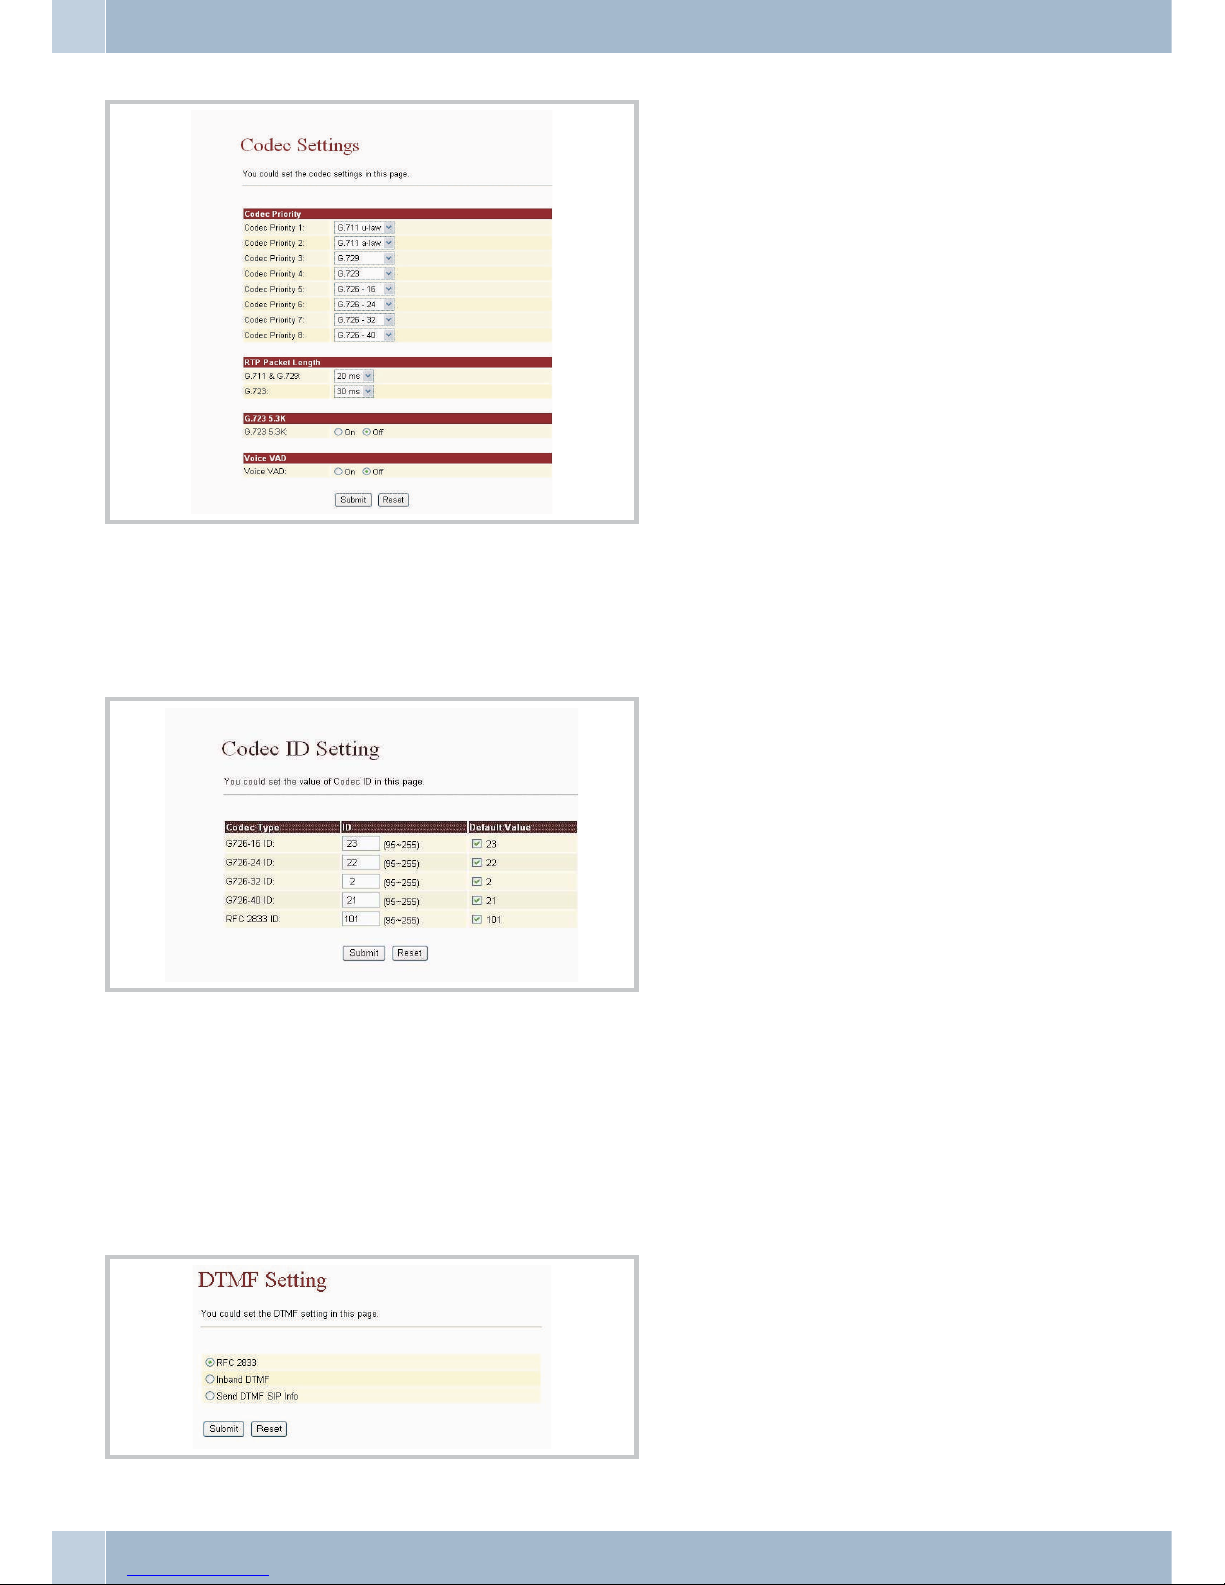
Codec ID Setting
On the »Codec ID Setting« page,you can specify the Codec ID. Besure to enterthis data exactly as specified by your
provider.
DTMF Setting
Under »DTMF Setting«,you can specifyoptions for DTMFdialing. The optionsinclude RFC 2833(Outband DTMF),
Inband DTMF,and DTMF SIP Info. Thefactory setting is Inband-DTMF. Touse DTMF in-call dialing (forexample
2833), you mayhaveto selecttheInband DTMF option.Youmay needDTMFin-call dialing whenyou call, forexam
ple, a public agency and your calls are handled by an automated interactivevoice recognition system. Once you are
connected the voice recognition system may prompt you toenter a certain sequence of digits. By doing so, youmay
be automatically put through to a department that can answer your inquiry.
Appointment reminder calls (Alarm setting) SIP Settings
50
Page 55

RPort function
You can activate/de-activate the »RPort« on this page. You can obtain helpful information about this from your
provider.
Other Settings
On the»Other Settings«page youcan configureHold modethrough RFCand QoS(Quality of Service). Please follow
the instructions given by your providers when changing these settings.
Confirm your entries by clicking the »Submit« button.
The QoS value allows for prioritizing voice packets.Higher values mean higher priority for voice packets on the In
-
ternet. It should be noted that any intervening systems on the Internet must support the QoS function.
NAT Trans.
Under » »NAT Trans.« you can set up the STUN server for the SIP service.
STUN Setting
The STUN function must be activated in order for a telephone registered with the SIP server to work correctly
downstream from a SIP server. You can enter the IP address of the STUN server and the STUN port number.
SIP Settings NAT Trans.
51
Page 56
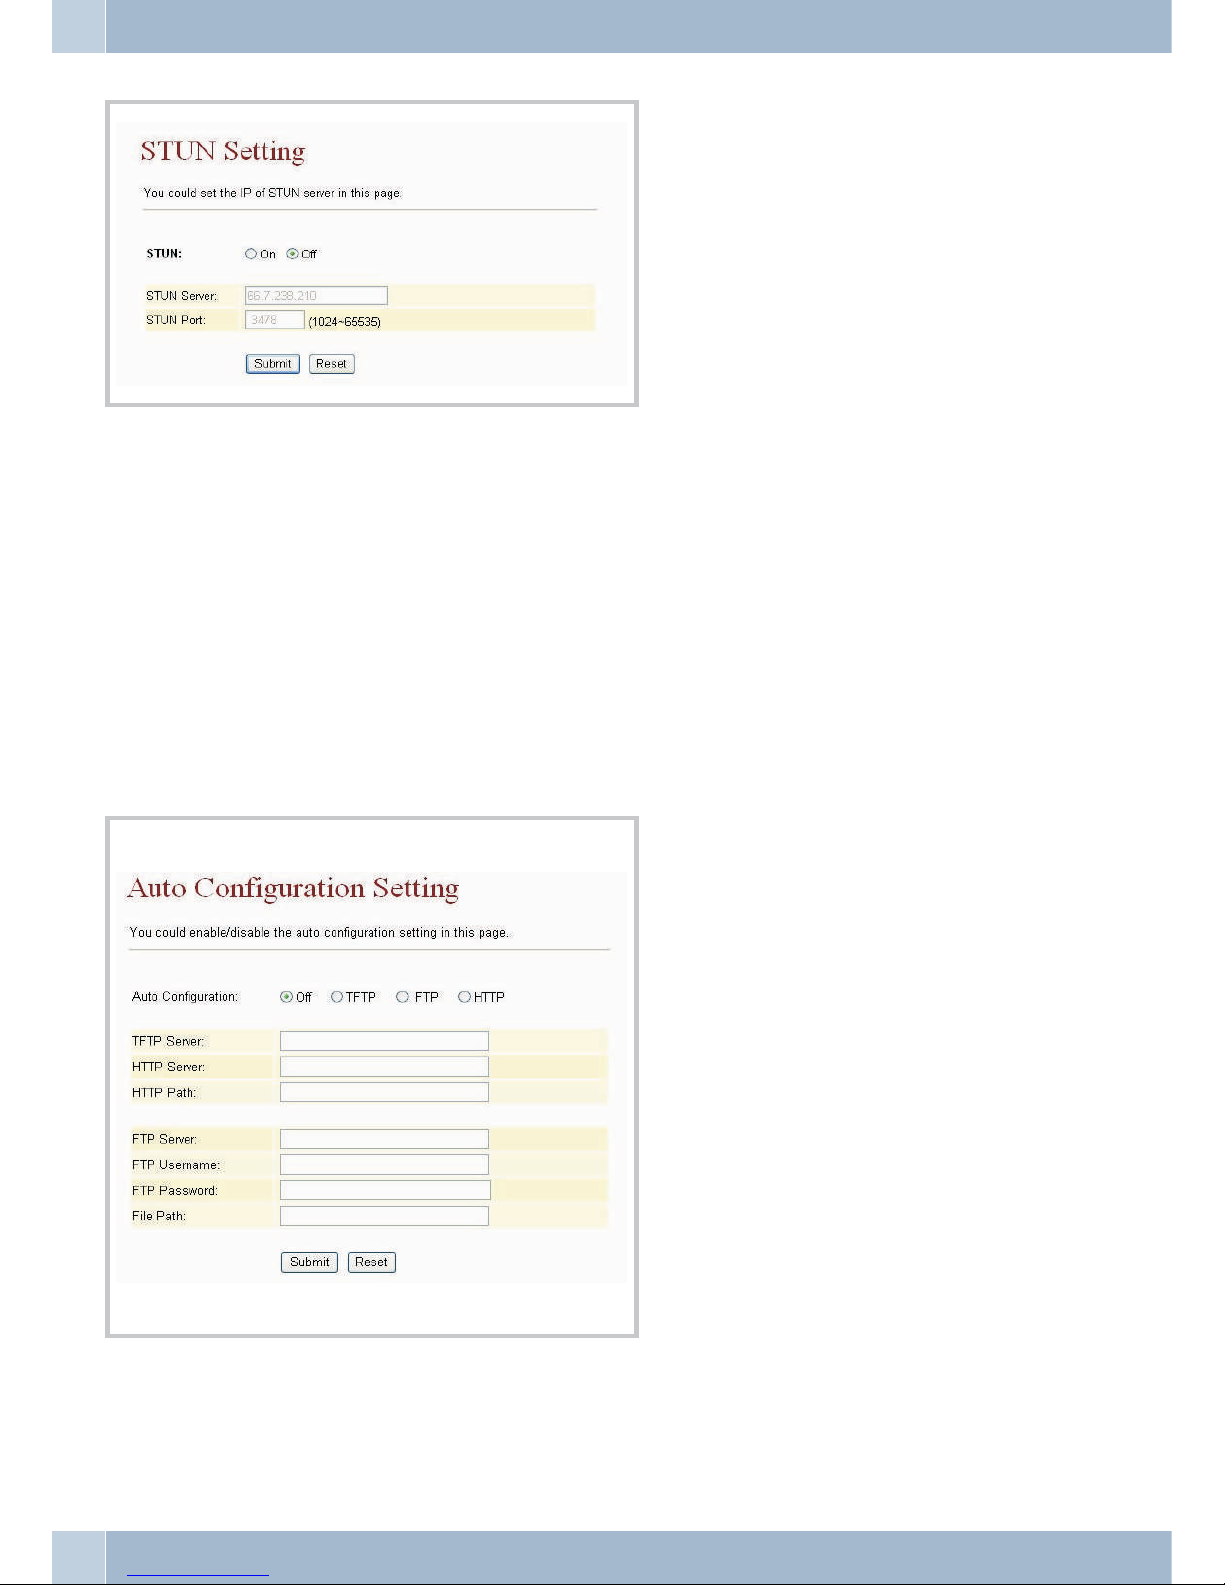
Other features
You can use the Auto Configuration Setting function to have the phone configured automatically.
Automatic Configuration Setup (Auto Config)
The »Auto Config«menu item takesyouto the»AutoConfiguration Setting«page. This pageallowsyou todownload
configurations stored onaTFTP or FTPserverusing the autoconfiguration function. Thissetupapproach may come
in handy for new users,allowing themto getstarted right awayby automaticallydownloading aready-for-use configuration setup.Before you can activate Auto Configuration, youmust goto the »Network« setup page and selectthe
»Bridge« and »Fixed IP« modes. After activating that function by clicking »On«, click the »Submit« button. Do not
forget to click the »Save« button in the »Save Change« window. The telephone reboots now, then downloads the
predefined setup automatically from the TFTP or FTP server.
Copying the MAC address (MAC Clone Setting)
Copying theMAC address forthe PCconnected tothe phoneLAN port tothe phone’sWAN port.To conclude confi
guration click »Submit«.
Other features Automatic Configuration Setup (Auto Config)
52
Page 57

Tone Settings
You can set the acoustic signals and their speeds on this page.
DialTone
Dial tone
RingBack Tone Call waiting tone
BusyTone Busy tone
ErrorTone Negative acknowledgement signal
RingTone Ringing signal
InsertTone Positive acknowledgement signal
Automatic Configuration Setup (Auto Config) Other features
53
Page 58
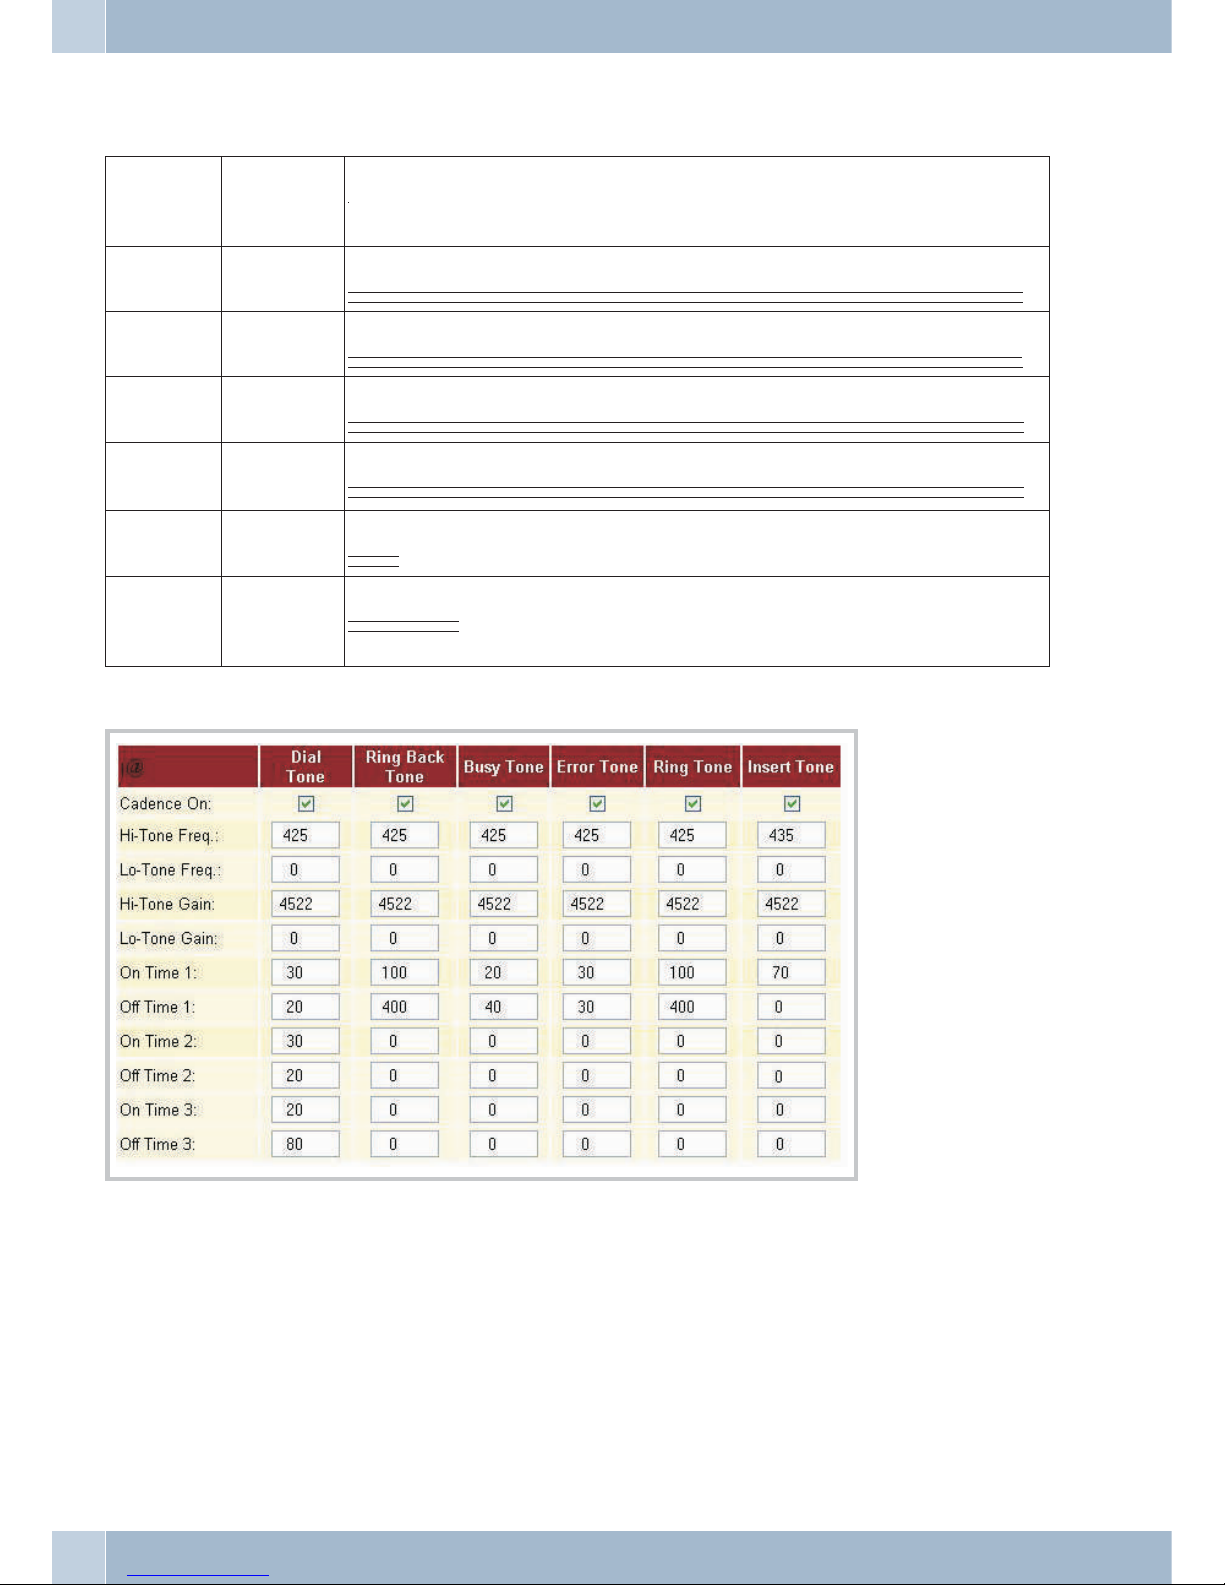
Example for calling cycles and acoustic signals of pabx systems in DE, AT, BE, HU, PL, SL, GR
Acoustic sig
-
nals
Frequency (Hz).
Attenuation
(dB)
Cycle rate for sound / pauses in milliseconds
Dial tone 420 / -8 200, 300, 200, 300, 200, 800 ...
//___//___//________//___//___//________//___//___//________//___//___//________//___//___/
Busy tone 420 / -8 200, 400 ...
//____//____//____//____//____//____//____//____//____//____//____//____//____//____//____/
Ringing signal 420 / -8 1000, 4000 ...
//////////________________________________________//////////_______________________________
Call waiting to
-
ne
420 / -8 200, 300, 200, 1300 ...
//___//_____________//___//_____________//___//_____________//___//_____________//___//____
Ack. signal 320+420/ -8 700
///////
Neg. ac
-
knowledge
-
ment
320+420/ -8 300, 300, 300,300, 300
///___///___///
Setup example
Advanced Setting
ICMP Not Echo
•
Activating reply barring for a »Ping signal.
Send Anonymous CID
•
Activating number suppression.
Send Flash Event
•
Activating flash signaling as DTMFEVENT oras SIPINFO.
SIP Encrypt
•
Encrypting SIP packets using INFINET,AVS, WALKERSUN1or WALKERSUN2.
Other features Automatic Configuration Setup (Auto Config)
54
Page 59

System Authority
User Password
The »User Password«menuitem takes youtothe »UserPassword«page. On thispage,you canchangeyour »Userna
-
me« and »Password«.
New username
• Use this text box to enter your newUser Name.
New password
• Use this text box to enter a newpassword.
Confirmed password
• Use this text box to enter your newpassword onemore time.
Confirm your entries by clicking the »Submit« button.
Save Changes
On the »Save Changes« page you can permanently save the changes you made to the phone setup.
•
Click the»Save« button.
Save Changes System Authority
55
Page 60
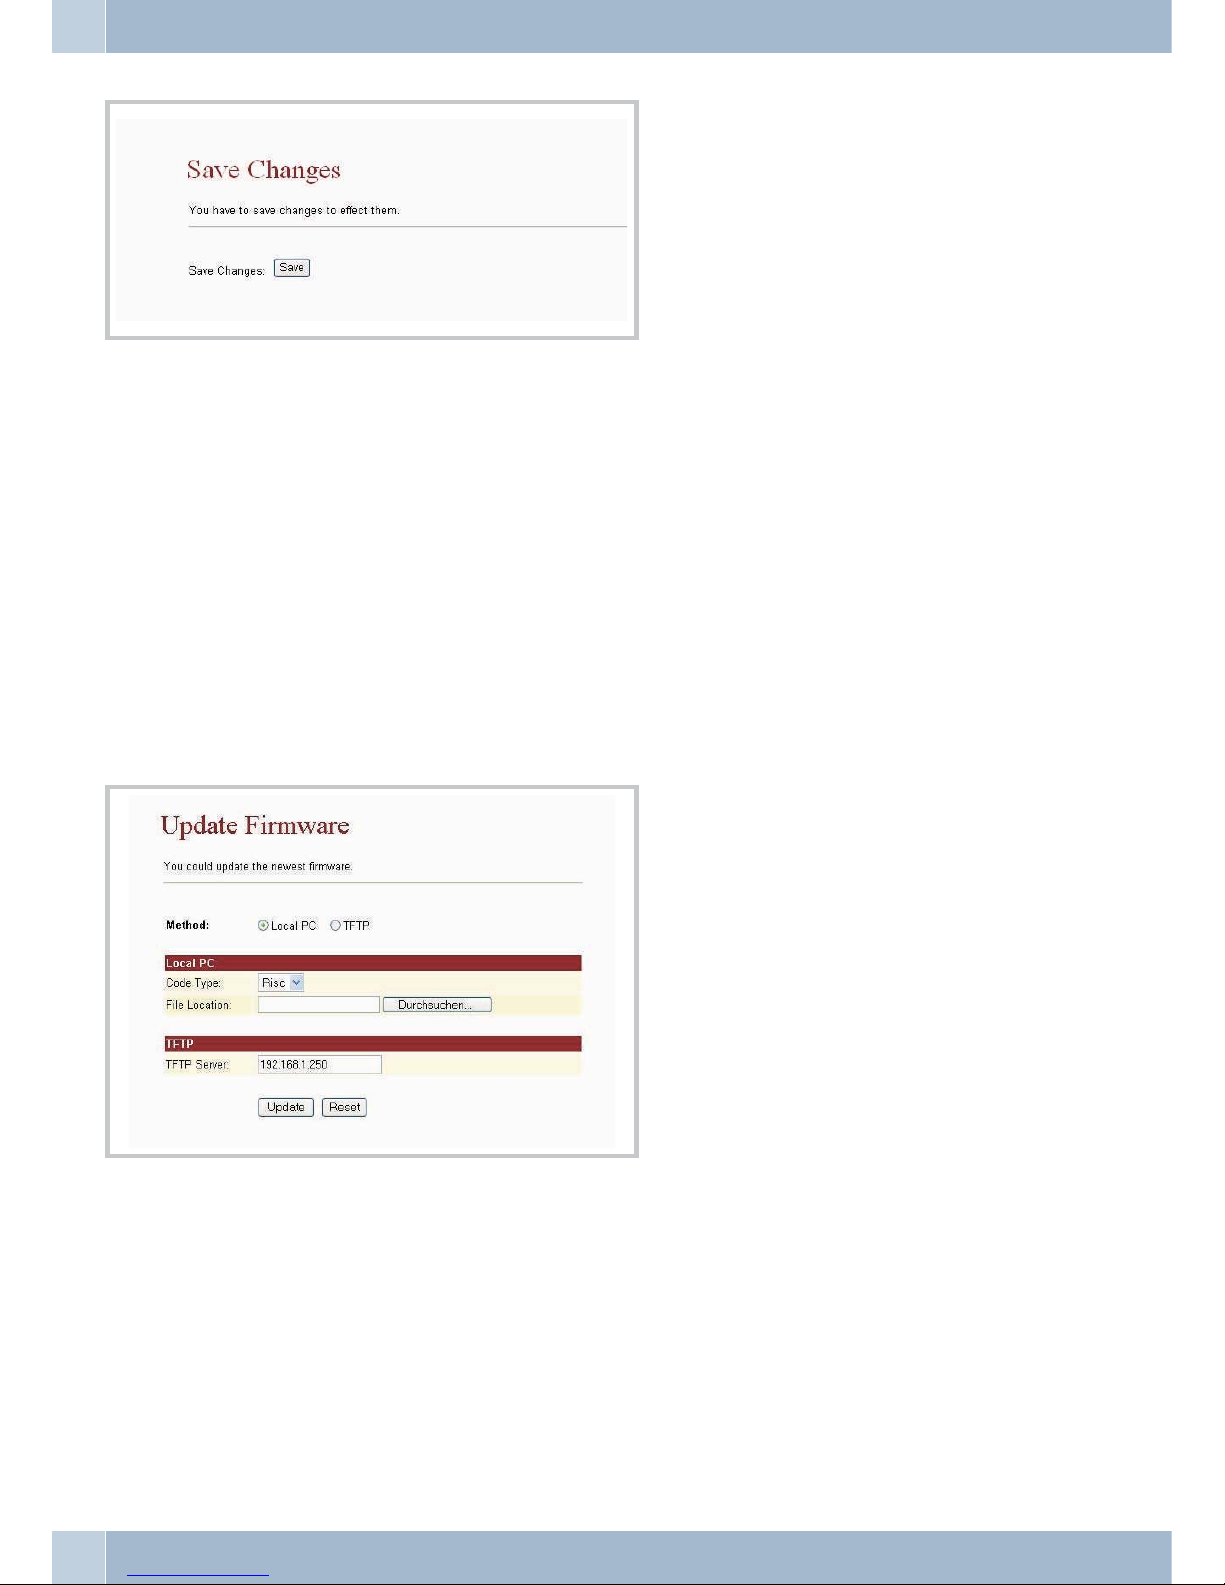
Update
With the »Update«menu item andthe »New Firmware«submenuitem thephoneoffers twomethods for loadingthe
latest firmware in a Local PC or TFTP session.
•
Select thedesired type of server, HTTP or TFTP.
Local PC
•
Now selectthe type of firmware code (»Code Type«):Risc orDSP code(Risc codeis theprefer
-
able option).
•
Code Type:
Click the»Browse« button in order toselect thestorage locationfor LocalPC.
• When you are done, click the »Update« button.
TFTP
• Enter the IP address of the TFTP serverfrom whichyou wishto downloadfirmware.
• When you are done, click the »Update« button.
System Authority Update
56
Page 61

Automatic UpdateAuto Update
Simple update
You shoulduse this versionwhen updatingyour phone.Use of the functions describedbelow requiresa greatdeal of
expertise in this field. This is why only the various setting options are indicated there.
First, enter the IP address to be used for the update on the Web page. Example: http://192.168.1.100:9999/upda
-
te.htm. In the example shown here, 192.168.1.100 is the IP address for your phone.
•
Use »Search« to search for, and thenload therequired »ROM«file. Thenclick thebutton »Update«.
•
While the updateis running,ensurethat thereis no interruptionof powersupply,or anydisruption of theconnection toyour PC.
Advanced update
Automatic firmware update. The settings on this page must match those on the page Auto Configuration Setting.
Update System Authority
57
Page 62

Update via
Selecting the automatic update process.
Check new firmware
•
At the»Power ON« setting, a searchis conductedfor newfirmware whenthe phoneis switched
on. Atthe setting »Scheduling«, a searchis conductedfor newfirmware basedon theprogram
-
med timeschedule.
Scheduling (Date)
•
Inputting the duration (number ofdays) duringwhich asearch isconducted for new firmware.
Scheduling (Time)
•
Inputting the period during which a searchis conductedfor newfirmware. Thesearch willthen
be performedat any time during thisperiod.
Automatic Update
•
At the»Notify only« setting, the useris notifiedof availablenew firmwareby amessage on
screen. No automatic update is conducted however.At the»Automatic« setting,the firmware
will beupdated fully automatically.
Firmware File Prefix
•
Normally, thisis also the product name. A specificsearch ismade forfirmware witha similar
product name.
Next update time
• The time forthe next search for firmware and updating.
Programming an auto update file:
• The file namemust consist ofthe »FirmwareFile Prefix«+ _ver.dat;here inour examplePHO-
NE_ver.dat
• The following informationmust be contained in thefile (example):
• Version: 0609100, Name:PHONE_
• ‘0609100« is thedesignation for the updated firmware; »PHONE_« is the productdesignation
(Firmware FilePrefix).
The system readsthe PHONE_ver.dat fileand then checksthe version number.If the versionnumber is morerecent,
updating is then performed fully automatically.It must alsobe noted that the designation + theversion should also
be contained in the file name; in the example shown here PHONE_0609100.gz. Ensure that the file name is spelled
correctly.
Copy the filePHONE_ver.dat, togetherwiththe updatedfirmwareto thehttp, FTP orTFTP server thatyouhave spe
cified in the path for automatic updates.
System Authority Update
58
Page 63
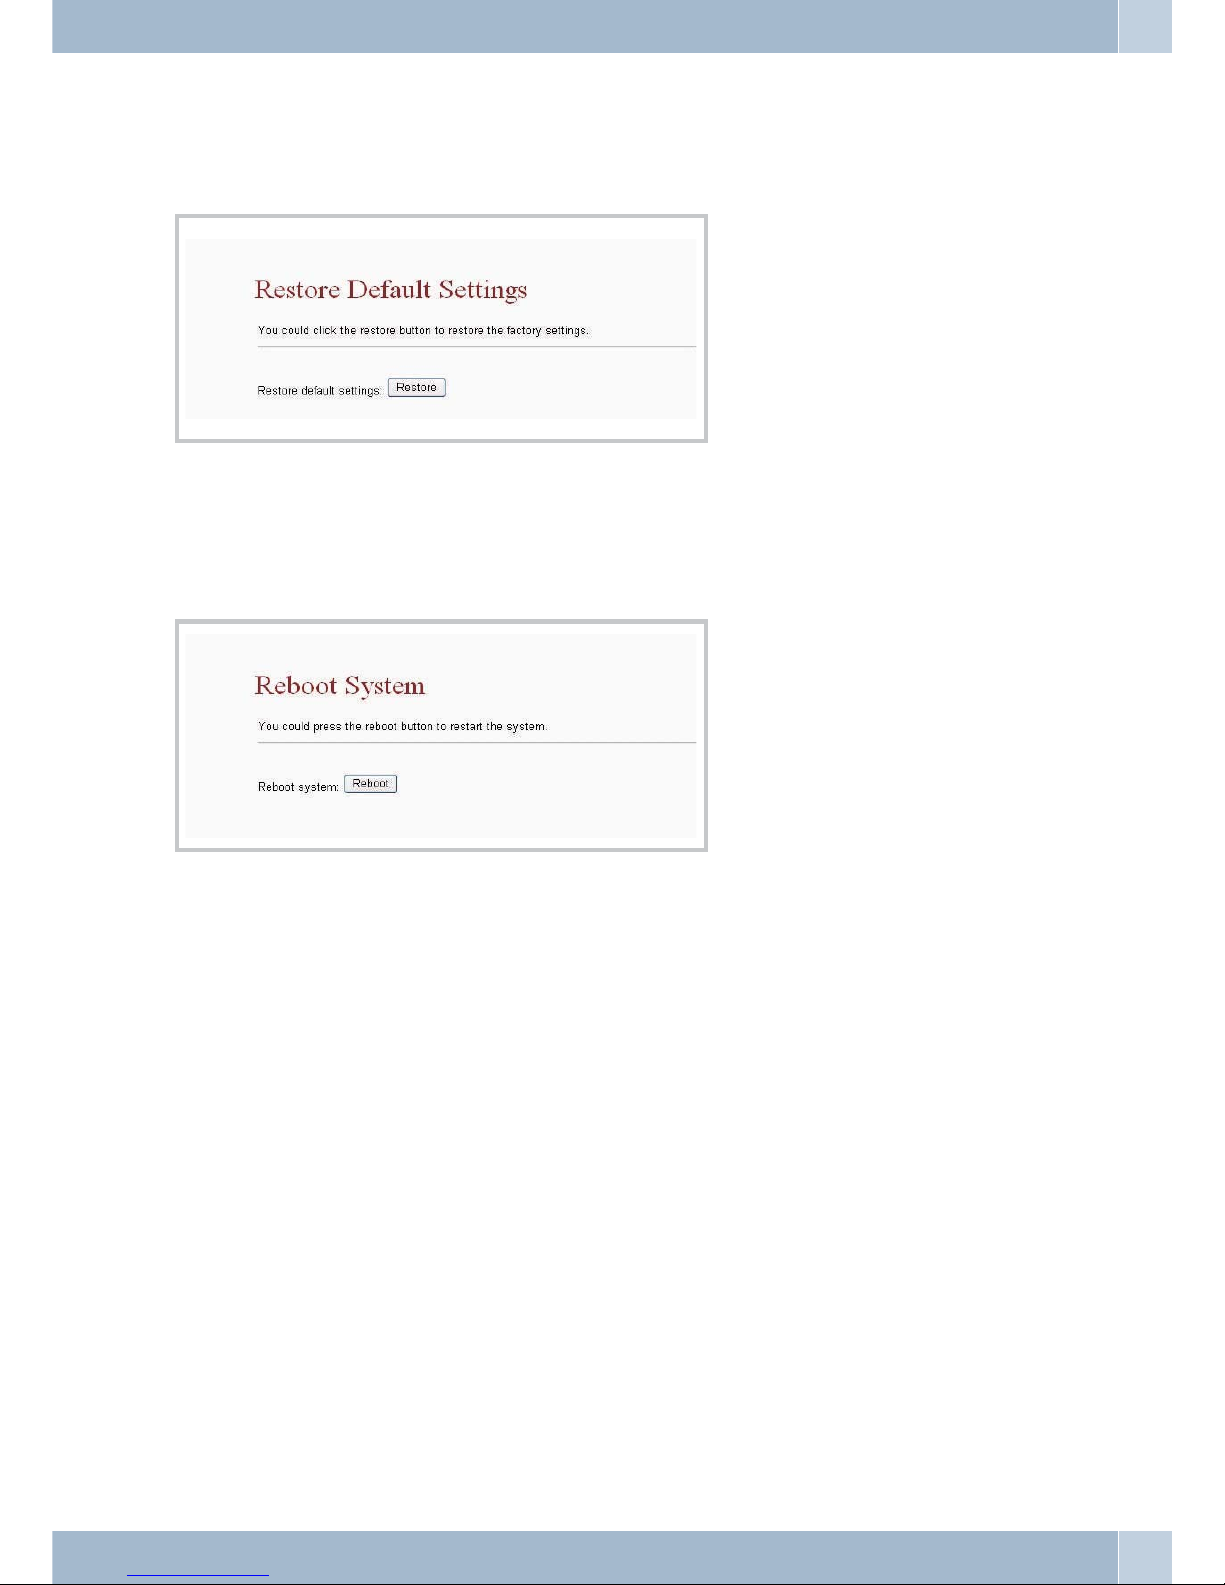
Standard Configuration (Default Setting)
You can restore the standard factory settings for your phone with Default Setting. To do this, just click the button
Restore. Your phone will then carry out a restart using the standard factory settings.
Reboot
You canrestart your phoneusing the Reboot function. You only need toclick the buttonReboot for this.The phone
takes care of everything else automatically.
Update Reboot
59
Page 64

Configuring the phone via Telnet (only under Windows XP)
Configuration
On the PCclick »Start« andselect the option»Run«. An inputdialog window isthen displayed inwhich you canenter
the telnetaddress 192.168.1.100.Start theprocedure by clicking »OK«. As an alternative to this, you can open a DOS
window and enter the telnet address 192.168.1.100 there. The following display is then shown on the screen:
Login to phone
When you press »Enter« atthe hyperterminal,the »Login:» line is displayed. Enter»admin« andconfirm yourinput
by pressing »Enter«. The »Password:« line then appears. ». Enter »24234880« and confirm your input by pressing
»Enter«. You are now logged on to your phone.
Configuring the phone via Telnet (only under Windows XP) Configuration
60
Page 65

Configuration using the command line interpreter (CLI)
CLI Command line:
Itno Command Description
1 ? Show CLI Command
2 arp ARP Configuration
3 ipconfig Interface Configuration
4 save Save to flash
5 reboot Reboot
6 exit Exit
7 debugmode Enter Debug Mode
8 update Update Flash Code/RAM
9 auth Change User Name and Password
10 nat NAT Configuration
11 dns DNS Configuration
12 ping ping [-lN] [IP-addr|host-name]
13 sip SIP Configuration
14 ddns DDNS Configuration
15 sntp SNTP Configuration
16 vlan VLAN Configuration
17 time Get System Time
18 mactab Show MAC Learning Table
19 dump Read/Write Memory
20 book Edit phone book
21 reload Reload Factory Setting
22 watchdog WatchDog Function
23 phone Phone Setting
24 weblogo Change Web’s logo
25 dsp Show dsp type
26 addport Add Nat Port Mapping
27 cid Select slic Cid
28 slic read or write slic registers
29 ver Firmware Version
Configuration using the command line interpreter (CLI) Configuring the phone via Telnet (only underWindows XP)
61
Page 66

arp-function
Itno Command Description
1 ? Show ‘arp’ Option
2 -a Show ARP Table
3 -d Delete ARP Table
4 -s Set Static ARP Table
5 (null) Show ARP Table
ipconfig-function
Itno Command Description
1 ? Show ‘ipconfig’ Option
2 -if0 Interface 0
3 -if1 Interface 1
4 -if2 Interface 2
5 -h Set Host Name
6 -a Set ARP Cache Expire
7 -r Restore Current Setting
8 (null) Show IP Setting
ipconfig –ifN-function N is 0, 1, 2
Itno Command Description
1 ? Show ‘ipconfig -ifN’ Option
2 -t Set Host Type
3 -m Set MAC Address
4 -i Set IP Address
5 -nm Set Net Mask
6 -g Set Gateway
7 -dns0 Set Primary DNS server
8 -dns1 Set Secondary DNS server
9 -dr Set Default Route
10 -nat Set NAT
11 on Enable Interface
12 off Disable Interface
Configuring the phone via Telnet (only under Windows XP) Configuration using the command lineinterpreter (CLI)
62
Page 67

13 -dhcps DHCP Server Setting
14 -ddns Set DDNS
15 -bridge Set Bridge
16 -dev0 Set Device 0 Setting
17 -dev1 Set Device 1 Setting
18 -dev2 Set Device 2 Setting
19 (null) Show Interface Setting
save function
Itno Command Description
1 ? Show ‘save’ Option
2 -book Save phone book
3 -sys Save system setting
reboot function
Rebootingthe telephone.
exit function
Terminatingentry through CLI.
debugmode
Launchingthe debug mode.
updat-function
Itno Command Description
1 ? Show ‘update’ Option
2 -os Update OSImage(IP filename)
3 -dsp Update DSP Image(IP filename)
4 -all Update All Image(IP filename)
5 -server Update Server (IP filename length)
6 -pcm PCM(IP filename)
-alaw alaw (IP filename)
-ulaw ulaw (IP filename)
-g729 g729 (IP filename)
-g723 g723 (IP filename)
-g726.16 g726.16 (IP filename)
Configuration using the command line interpreter (CLI) Configuring the phone via Telnet (only underWindows XP)
63
Page 68
-g726.24 g726.24 (IP filename)
-g726.32 g726.32 (IP filename)
-g726.40 g726.40 (IP filename)
IP is the IP-address for the TFTP-server, the filename for downloading into the system.
»IP« is the IP-address for the TFTP-server, the »filename« for downloading into the system.
auth-function
Itno Command Description
1 ? Show ‘auth’ Option
2 -admin Change Administrator user name/password
3 -sys0 Change System user0 user name/password
4 -sys1 Change System user1 user name/password
5 -sys2 Change System user2 user name/password
6 -sys3 Change System user3 user name/password
7 -sys4 Change System user4 user name/password
8 -norm0 Change Normal user0 user name/password
9 -norm1 Change Normal user1 user name/password
10 -norm2 Change Normal user2 user name/password
11 -norm3 Change Normal user3 user name/password
12 -norm4 Change Normal user4 user name/password
13 -ppp Change PPP user name/password
14 (null) Show auth Setting
Always possible as an addendum
Itno Command Description
1 ? Show ‘auth’ Option
2 -user Change User Name.’auth -sys3 -user xxx ‘
3 -pass Change Password. ‘auth -sys3 -pass xxx xxx’
4 (null) Show auth’s System/PPP Setting
You will have to enter the new password twice on the command line if you wish to change the old password.
nat-function
Itno Command Description
Configuring the phone via Telnet (only under Windows XP) Configuration using the command lineinterpreter (CLI)
64
Page 69

1 ? Show ‘nat’ Option
2 -vs Set ‘nat -vs’ Option
3 -dmz Set ‘nat -dmz’ Option
4 (null) Show NAT Setting
DMZ-input only
Itno Command Description
1 ? Show ‘nat -dmz’ Option
2 on EnableDMZ
3 off EnableDMZ
4 -ip Set DMZ IP address
5 (null) Show DMZ Setting
dns -function
Itno Command Description
1 ? Show ‘dns’ Option
2 -q DNS query. dns -q domain-name
3 (null) Show DNS Table
ping -function
Itno Command Description
1 ? Show ‘ping’ Option
2 -l ping [-l N] [IP-addr|host-name]
3 (null) ping [IP-addr|host-name]
sip -function
Itno Command Description
1 ? Show ‘sip’ Option
2 -proxy0 sip -proxy0
3 -proxy1 sip -proxy1
4 -proxy2 sip -proxy2
Configuration using the command line interpreter (CLI) Configuring the phone via Telnet (only underWindows XP)
65
Page 70

5 -upnp sip -upnp on/off/show
6 -exts sip -exts sip upnp external-port
7 -extr sip -extr rtp upnp external-port
8 -sipp sip udp port
9 -rtpp sip rtp port
10 -stun sip -stun on/off
11 -rport sip -rport on/off
12 -sserver sip -sserver stun-server
13 -out sip -out outbound-proxy
14 -dump sip –dump
15 -log sip -log on/off
16 -drtp sip -drtp 0/1/2
17 -rtpnc sip -rtpnc on/off
18 -wanip sip –wanip
19 -nattype sip –nattype
20 -hbyrfc sip –hbyrfc
21 -dereg sip -dereg
22 -restart sip -restart
23 -jbt sip -jitter buffer Threshold
24 (null) Show SIP Setting
ddns -function
Itno Command Description
1 ? Show ‘ddns’ Option
2 -type Set DDNS Type
3 -host Set Host Name
4 -wild Set Wild Card Mode
5 -mx Set Mail Exchanger
6 -backmx Set Mail Exchanger Mode
7 -offline Set Offline Mode
8 -user Set Login User Name
9 -pass Set Login Password
10 (null) Show DDNS Setting
Configuring the phone via Telnet (only under Windows XP) Configuration using the command lineinterpreter (CLI)
66
Page 71
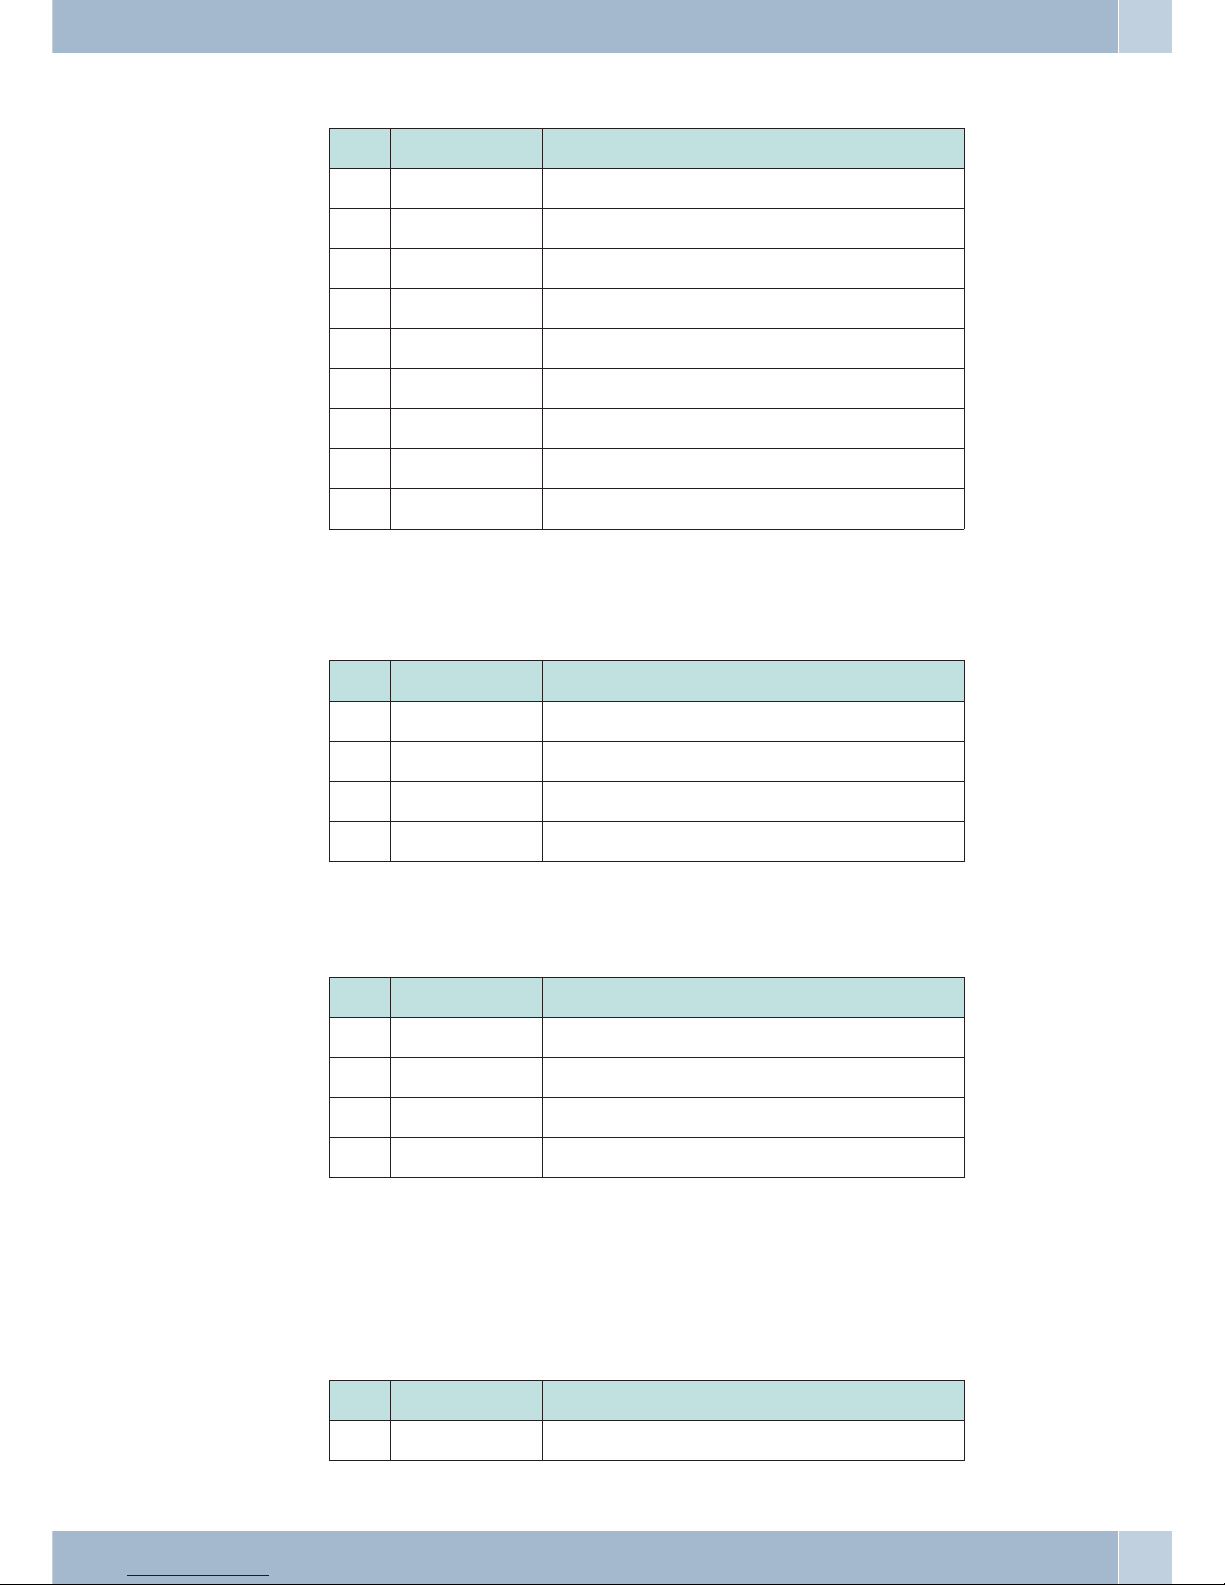
sntp -function
Itno Command Description
1 ? Show ‘sntp’ Option
2 -on Enable SNTP Client
3 -off Disable SNTP Client
4 -ip1 Set SNTP Server1 IP
5 -ip2 Set SNTP Server2 IP
6 -mode Set SNTP Client Mode
7 -zone Set GMT Time Zone: [+|-][hour]:[min]
8 -adjust Set Adjustment Time: [second]
9 (null) Show SNTP Setting
vlan -function
Itno Command Description
1 ? Show ‘vlan’ Option
2 -tx Tx Vlan setting
3 -rx Rx Vlan setting
4 (null) Show Vlan Setting
time -function
Itno Command Description
1 ? Show ‘Time’ Option
2 -t Modify Time: hour:min:sec
3 -d Modify date: year:mon:date
4 (null) Show Data & Time
mactab -function
MAClearning table.
dump -function
Itno Command Description
1 ? Show ‘dump’ Option
Configuration using the command line interpreter (CLI) Configuring the phone via Telnet (only underWindows XP)
67
Page 72

2 -r dump -r XXXXxxxx
3 -w dump -w XXXXxxxx XX
book -function
Itno Command Description
1 ? Show ‘book’ Option
2 -a Show answer list
3 -c Show call list
4 -s speed dial
5 -p phone book
Reload function
Reloadingthe factory defaults.
watchdog -function
Itno Command Description
1 ? Show ‘WatchDog’ Option
2 on Enable WatchDog
3 off Disable WatchDog
4 (null) Show WatchDog Setting
phone -Funktion
Itno Command Description
1 ? Show ‘phone’ Option
2 -autoanswer phone auto answer
3 -vol Volume setting
4 -block Block Incoming call
5 -ring Set Melody Ringer
6 -forward Auto-forward Incall to Phone[0-9] in Book
7 (null) Show Phone Setting
Configuring the phone via Telnet (only under Windows XP) Configuration using the command lineinterpreter (CLI)
68
Page 73

weblogo -function
Itno Command Description
1 ? Show ‘weblogo’ Option
2 -on Vender Logo
3 -off Crystal media Logo
4 (null) Show weblogo Setting
dsp function
Showsthe DSP-code type.
addport -function
cid -functions
Itno Command Description
1 ? Show ‘cid’ Option
2 -off Disable Slic Cid signal
3 -1 Tx FSK after 1st Ring
4 -2 Tx FSK before 1st Ring
5 -3 Tx DTMF before 1st Ring
6 -4 Tx FSK with Line reversal before 1st Ring
7 -5 Tx DTMF with Line reversal before 1st Ring
8 -time FSK cid with time message
9 -single Single type FSK CID
10 (null) Show Cid Option
slic -function
Itno Command Description
1 ? Show ‘slic’ Option
2 -ring Issue Ring signal
3 -r read slic addr
4 -w write slic addr
5 -a read all slic reg
6 (null) Show slic register
Configuration using the command line interpreter (CLI) Configuring the phone via Telnet (only underWindows XP)
69
Page 74

ver function
Displayingthe current firmwareversion.
Configuring the phone via Telnet (only under Windows XP) Configuration using the command lineinterpreter (CLI)
70
Page 75

Appendix
Setting up an FWD account
•
You canset up anaccount forVoIP communicationat theWeb site (www.freeworlddi
alup.com;0;;;0;www.freeworlddialup.com). Afteryou haveentered allthe requireddata you will
receive ane-mail from the FWD mail system containingyour registrationdata.
•
You canmake the requiredsettings inyour phoneafter youhave successfullyset up yourac
-
count.
•
You canuse a Webbrowser, Telnetor thehyperterminal andCLI commandsto do this. You must
enter theproxy name, the domain name,your username anda password here. You can also spe
-
cify thename that is to bedisplayed toother subscribers(nickname).
•
After successfullylogging on to the SIPserver youcan callother subscriberswho are also logged
on tothat server. For this you only needto enterthe subscriber’suser name(login name) and
then press»#«.
•
To makecalls to other subscribers overthe Internetyou firsthave to log on to a proxyserver
(with SIPserver IP, domain IP, username andpassword); besure toactivate the stunfunction
first beforeyour first attempt at placing calls.
Appendix
71
Page 76

Technical specifications
Hardware Overview
•
Chip set– CM5000
•
Data memory– 16M
•
Program memory– 64M
•
Ethernet ports:- 2 x10/100M
Software Overview
Network Protocols
•
SIP V1(RFC2543), V2(RFC3261)
•
IP/TCP/UDP/RTP/RTCP
•
ICMP/ARP/RARP/SNTP
•
TFTP-Client/DHCP-Client/ PPPoE-Client,Static IP
• Telnet/HTTP server
• DNS-Client
Codec
• G.711
• G.723
• G.726
• G.729A
• G.729B
IP Assignment
•
Static IP
•
DHCP
•
PPPoE
Voice Quality
•
VAD (VoiceActivity Detection)
•
CNG (ComfortableNoise Generator)
•
_LEC (LineEcho Canceller)
•
Packet Loss Compensation
•
Adaptive JitterBuffer
Security
•
HTTP 1.1 Basic/Digest Authentication for web-based applications
•
_MD5 forSIP authentication (RFC2069/ RFC 2617)
Configuration
•
Internet Browser
Technical specifications Software Overview
72
Page 77

•
Telnet
•
Keypad configuration
Firmware Upgrade
•
TFTP
•
HTTP
Operating requirements:
•
Operating temperature:0 to 50 ºC
•
Storage temperature:-10 to 60 ºC
•
relative humidity:10 to90% no dew
Electric requirements:
•
Operating voltage:9V DC
• Power supply: Input:230 AC, Output: 9 VDC, 1,000mA
• Network interface: 2X RJ-45 Ethernet connectors
Size:
• 198 x 176x 60 mm (L xW xH)
Software Overview Operating requirements:
73
Page 78

Index
A
Accepting a waiting call. . . . . . . . . . . . . . . . . . . . 15
Accepting calls. . . . . . . . . . . . . . . . . . . . . . . . . 14
Activate call forwarding . . . . . . . . . . . . . . . . . . . 16
Activating the SNTP server. . . . . . . . . . . . . . . . . . 22
addport function is to add Nat Port Mapping . . . . . . . 69
Administrator. . . . . . . . . . . . . . . . . . . . 10,29,31-32
Administrator settings . . . . . . . . . . . . . . . . . . 31-32
Advanced Setting . . . . . . . . . . . . . . . . . . . . . . . 54
Advanced Settings. . . . . . . . . . . . . . . . . . . . . . . 54
Alarm setting . . . . . . . . . . . . . . . . . . . . . . 21,42-50
All Forward . . . . . . . . . . . . . . . . . . . . . . . . . . . 6
Always Block. . . . . . . . . . . . . . . . . . . . . . . . . . 39
Appendix . . . . . . . . . . . . . . . . . . . . . . . . . . . . 71
Appointment reminder calls . . . . . . . . . . . . . 21,42-50
Appointments . . . . . . . . . . . . . . . . . . . . . . . . . . 7
arp function . . . . . . . . . . . . . . . . . . . . . . . . . . 62
auth function. . . . . . . . . . . . . . . . . . . . . . . . . . 64
Authentication. . . . . . . . . . . . . . . . . . . . . . . . . 29
Auto Config. . . . . . . . . . . . . . . . . . . . . . . 10,52-54
Auto Dial Time . . . . . . . . . . . . . . . . . . . . . . . . 25
Auto Update . . . . . . . . . . . . . . . . . . . . . . . . . . 57
Automatic Configuration Setup . . . . . . . . . . . . . 52-54
Automatic Dial Time . . . . . . . . . . . . . . . . . . . . . 25
Automatic dialing . . . . . . . . . . . . . . . . . . . . . . . 42
Automatic Updating . . . . . . . . . . . . . . . . . . . . . 57
B
Block Period . . . . . . . . . . . . . . . . . . . . . . . . . . 39
Block Settings . . . . . . . . . . . . . . . . . . . . . . . . . 39
book function . . . . . . . . . . . . . . . . . . . . . . . . . 68
Bridge . . . . . . . . . . . . . . . . . . . . . . . . . . . . . . 8
Busy Forward . . . . . . . . . . . . . . . . . . . . . . . . 6,36
C
Call forward . . . . . . . . . . . . . . . . . . . . . . . . . . . 6
Call Forward . . . . . . . . . . . . . . . . . . . . . . . . . . 36
Call forwarding forwarding on no answer . . . . . . . . . 36
Call Forwarding on Busy . . . . . . . . . . . . . . . . . . . 36
Call Forwarding on No Answer . . . . . . . . . . . . . . . 37
Call history . . . . . . . . . . . . . . . . . . . . . . . . 6,18-19
Call list . . . . . . . . . . . . . . . . . . . . . . . . . . . 18-19
Call number . . . . . . . . . . . . . . . . . . . . . . . . . . 13
Call switching . . . . . . . . . . . . . . . . . . . . . . . . . 15
Call waiting. . . . . . . . . . . . . . . . . . . . . . . . . . . 41
Call Waiting Setting. . . . . . . . . . . . . . . . . . . . . . 41
Caller list . . . . . . . . . . . . . . . . . . . . . . . . . . 18-19
CFI . . . . . . . . . . . . . . . . . . . . . . . . . . . . . . 8,28
cid function . . . . . . . . . . . . . . . . . . . . . . . . . . 69
CLI Command line . . . . . . . . . . . . . . . . . . . . . . 61
Codec . . . . . . . . . . . . . . . . . . . . . . . . . . . . . 9,49
Codec . . . . . . . . . . . . . . . . . . . . . . . . . . . . . . 72
Codec ID . . . . . . . . . . . . . . . . . . . . . . . . . . . . 50
Codec ID Setting. . . . . . . . . . . . . . . . . . . . . . . . 50
Codec Settings . . . . . . . . . . . . . . . . . . . . . . . . . 49
Codec type . . . . . . . . . . . . . . . . . . . . . . . . . . . . 9
Command line interpreter . . . . . . . . . . . . . . . . 61-70
Command line interpreter CLI . . . . . . . . . . . . . 61-70
Configuration . . . . . . . . . . . . . . . . . . . . . . . . . 72
Configuration mode. . . . . . . . . . . . . . . . . . . . . . 10
Configuration using the telephone . . . . . . . . . . . 16-32
Configuring a virtual server . . . . . . . . . . . . . . . . . 47
Configuring speed dialing destinations for a function key 16
Configuring the phone using the Web browser . . . . . . 33
Confirmed password . . . . . . . . . . . . . . . . . . . . . 55
Connecting the IP phone. . . . . . . . . . . . . . . . . . . . 4
Copying the MAC address . . . . . . . . . . . . . . . . . . 52
D
Date/Time setting . . . . . . . . . . . . . . . . . . . . 7,21-22
DDNS . . . . . . . . . . . . . . . . . . . . . . . . . . . . . . 45
ddns function . . . . . . . . . . . . . . . . . . . . . . . . . 66
DDNS Settings . . . . . . . . . . . . . . . . . . . . . . . . . 45
Debugmode function is to enter the debugmode. . . . . . 63
Default setting . . . . . . . . . . . . . . . . . . . . . . . . . 10
Default Setting . . . . . . . . . . . . . . . . . . . . . . . . . 59
Delete phone directory / speed dial . . . . . . . . . . . . . 18
Deleting data records. . . . . . . . . . . . . . . . . . . . . . 6
Description of symbols . . . . . . . . . . . . . . . . . . . . 40
DHCP Server. . . . . . . . . . . . . . . . . . . . . . . . . . 44
Dial plan . . . . . . . . . . . . . . . . . . . . . . . . . . . . 40
Dialing from the phone book . . . . . . . . . . . . . . . . 14
Display name . . . . . . . . . . . . . . . . . . . . . . . . . . 8
Display Name . . . . . . . . . . . . . . . . . . . . . . . . . 48
DMZ-input . . . . . . . . . . . . . . . . . . . . . . . . . . . 65
DMZ-Setting . . . . . . . . . . . . . . . . . . . . . . . . . . 46
Index
74
Page 79

DND. . . . . . . . . . . . . . . . . . . . . . . . . . . . . . . 16
DNS. . . . . . . . . . . . . . . . . . . . . . . . . . . . . . . . 8
dns function . . . . . . . . . . . . . . . . . . . . . . . . . . 65
DNS Settings . . . . . . . . . . . . . . . . . . . . . . . . . . 27
DNS-Setting . . . . . . . . . . . . . . . . . . . . . . . . . . 27
Do not Disturb . . . . . . . . . . . . . . . . . . . . . 16,20,39
Do Not Disturb . . . . . . . . . . . . . . . . . . . . . . . . . 6
Do not disturb settings . . . . . . . . . . . . . . . . . . . . 16
Domain Server. . . . . . . . . . . . . . . . . . . . . . . . 8,48
dsp function is to show dsp code type. . . . . . . . . . . . 69
DSP-Code Type . . . . . . . . . . . . . . . . . . . . . . . . 69
DTMF. . . . . . . . . . . . . . . . . . . . . . . . . . . . . . 50
DTMF Setting . . . . . . . . . . . . . . . . . . . . . . . . . 50
dump function. . . . . . . . . . . . . . . . . . . . . . . . . 67
Duplicate RTP. . . . . . . . . . . . . . . . . . . . . . . . . . 9
E
Electric requirements . . . . . . . . . . . . . . . . . . . . . 73
Electrostatic charges . . . . . . . . . . . . . . . . . . . . . . 2
Empty FWD Number . . . . . . . . . . . . . . . . . . . . . 16
Ersetzungsregel 1 . . . . . . . . . . . . . . . . . . . . . . . 41
exit function is to exit the CLI.. . . . . . . . . . . . . . . . 63
F
Factory Default Setting . . . . . . . . . . . . . . . . . . . . 49
Firmware Upgrade . . . . . . . . . . . . . . . . . . . . . . 73
First realm . . . . . . . . . . . . . . . . . . . . . . . . . . . . 8
Fixed IP setting . . . . . . . . . . . . . . . . . . . . . . . . . 7
Forward . . . . . . . . . . . . . . . . . . . . . . . . . . . . 16
Forwarding calls at no answer . . . . . . . . . . . . . . . . 6
FTP . . . . . . . . . . . . . . . . . . . . . . . . . . . . . . . 10
FWD . . . . . . . . . . . . . . . . . . . . . . . . . . . . . . 16
G
Gain . . . . . . . . . . . . . . . . . . . . . . . . . . . . . 23-24
Gateway address . . . . . . . . . . . . . . . . . . . . . . . . 5
H
Handset gain . . . . . . . . . . . . . . . . . . . . . . . . . . 24
Handset volume . . . . . . . . . . . . . . . . . . . . . . . . 23
Hardware Overview . . . . . . . . . . . . . . . . . . . . . . 72
Hot Line Setting . . . . . . . . . . . . . . . . . . . . . . . . 42
I
Inquiry Call . . . . . . . . . . . . . . . . . . . . . . . . . . 14
Installing the IP Phone . . . . . . . . . . . . . . . . . . . . . 5
IP address . . . . . . . . . . . . . . . . . . . . . . . . . . . . 5
IP Assignment . . . . . . . . . . . . . . . . . . . . . . . . . 72
IP Type . . . . . . . . . . . . . . . . . . . . . . . . . . . . . 43
ipconfig \endash ifN function N is 0, 1, 2 . . . . . . . . . 62
ipconfig function . . . . . . . . . . . . . . . . . . . . . . . 62
IP-Type. . . . . . . . . . . . . . . . . . . . . . . . . . . . . . 7
K
Keypad features . . . . . . . . . . . . . . . . . . . . . . . . . 3
L
LAN . . . . . . . . . . . . . . . . . . . . . . . . . . . . . . . 44
LAN Mode . . . . . . . . . . . . . . . . . . . . . . . . . . . 43
LAN Setting . . . . . . . . . . . . . . . . . . . . . . . . . . 44
LAN Settings . . . . . . . . . . . . . . . . . . . . . . . . 27,44
LAN Setup . . . . . . . . . . . . . . . . . . . . . . . . . . . . 8
Launching the Debug mode . . . . . . . . . . . . . . . . . 63
List of calls . . . . . . . . . . . . . . . . . . . . . . . . . 18-19
Listed calls . . . . . . . . . . . . . . . . . . . . . . . . . 18-19
Loading factory defaults . . . . . . . . . . . . . . . . . . . 68
Local PC . . . . . . . . . . . . . . . . . . . . . . . . . . . . 56
Login . . . . . . . . . . . . . . . . . . . . . . . . . . . . . . 33
Log-in. . . . . . . . . . . . . . . . . . . . . . . . . . . . . . 13
Login to phone. . . . . . . . . . . . . . . . . . . . . . . . . 60
M
MAC Clone Setting . . . . . . . . . . . . . . . . . . . . . . 52
MAC learning table . . . . . . . . . . . . . . . . . . . . . . 67
mactab function is to show MAC learning table. . . . . . 67
Making telephone calls
accepting calls . . . . . . . . . . . . . . . . . . . 14
broker\rquote s call . . . . . . . . . . . . . . . . 15
inquiry call . . . . . . . . . . . . . . . . . . . . . 14
room Inquiry . . . . . . . . . . . . . . . . . . . . 14
three-party conferencing . . . . . . . . . . . . . 15
Making Telephone Calls
Speed Dialing from the Phone Book . . . . . 14-15
Melody Setting. . . . . . . . . . . . . . . . . . . . . . . 38-39
Microphone volume. . . . . . . . . . . . . . . . . . . . . . 24
N
NAT . . . . . . . . . . . . . . . . . . . . . . . . . . . . . . . 8
nat function . . . . . . . . . . . . . . . . . . . . . . . . . . 64
NAT Trans.. . . . . . . . . . . . . . . . . . . . . . . . . . . 51
Index
75
Page 80

NAT Transversal . . . . . . . . . . . . . . . . . . . . . . . . 9
Net. . . . . . . . . . . . . . . . . . . . . . . . . . . . . . 43-47
Network . . . . . . . . . . . . . . . . . . . . . . 7,25-28,43-47
Network Protocols . . . . . . . . . . . . . . . . . . . . . . 72
Network Status . . . . . . . . . . . . . . . . . . . . . . . . 43
New password . . . . . . . . . . . . . . . . . . . . . . . . . 55
New username . . . . . . . . . . . . . . . . . . . . . . . . . 55
No Answer Forward. . . . . . . . . . . . . . . . . . . . . . 36
No Call Signaling by time. . . . . . . . . . . . . . . . . . . 39
No Ringing . . . . . . . . . . . . . . . . . . . . . . . . . . . 39
O
Open listening volume . . . . . . . . . . . . . . . . . . . . 24
Operating requirements . . . . . . . . . . . . . . . . . . . 73
Other features . . . . . . . . . . . . . . . . . . . . . . . 52-54
Other Settings . . . . . . . . . . . . . . . . . . . . . . . . . 51
Outband DTMF . . . . . . . . . . . . . . . . . . . . . . . . . 9
Outbound proxy . . . . . . . . . . . . . . . . . . . . . . . . 8
Outbound Proxy. . . . . . . . . . . . . . . . . . . . . . . . 48
P
PABX . . . . . . . . . . . . . . . . . . . . . . . . . . . . . . 13
pabx connection . . . . . . . . . . . . . . . . . . . . . . . . 30
Phone book. . . . . . . . . . . . . . . . . . . . . . . . . . . 34
Phone Book . . . . . . . . . . . . . . . . . . . . . . . . 34-42
phone function . . . . . . . . . . . . . . . . . . . . . . . . 68
Phone setting . . . . . . . . . . . . . . . . . . . . . . . . . . 6
Phone Setting . . . . . . . . . . . . . . . . . . . . . . . 36-37
Phone settings . . . . . . . . . . . . . . . . . . . . . . . . . 20
Phone setup . . . . . . . . . . . . . . . . . . . . . . . . . . 20
ping function. . . . . . . . . . . . . . . . . . . . . . . . . . 65
Port . . . . . . . . . . . . . . . . . . . . . . . . . . . . . . . 49
Port Setting. . . . . . . . . . . . . . . . . . . . . . . . . . . 49
Port settings . . . . . . . . . . . . . . . . . . . . . . . . . . 30
PPPoE . . . . . . . . . . . . . . . . . . . . . . . . . . . . 27,44
PPPoE setting . . . . . . . . . . . . . . . . . . . . . . . . . . 7
Primary DNS . . . . . . . . . . . . . . . . . . . . . . . . . . 8
Primary DNS address . . . . . . . . . . . . . . . . . . . . . 5
Priority . . . . . . . . . . . . . . . . . . . . . . . . . . . . . 28
Programming an auto update file . . . . . . . . . . . . . . 58
Protection against electrostatic charges . . . . . . . . . . . 2
Proxy Server . . . . . . . . . . . . . . . . . . . . . . . . . . 48
Proxy-Server. . . . . . . . . . . . . . . . . . . . . . . . . . . 8
R
Reboot . . . . . . . . . . . . . . . . . . . . . . . . . . . . . 59
reboot function is to restart the system. . . . . . . . . . . 63
Register name . . . . . . . . . . . . . . . . . . . . . . . . . . 8
Register Name . . . . . . . . . . . . . . . . . . . . . . . . . 48
Register password . . . . . . . . . . . . . . . . . . . . . . . 8
Register Password . . . . . . . . . . . . . . . . . . . . . . . 48
reload -function . . . . . . . . . . . . . . . . . . . . . . . . 68
Restart . . . . . . . . . . . . . . . . . . . . . . . . . . . . . 10
Ring Timeout . . . . . . . . . . . . . . . . . . . . . . . . . . 6
Ringer. . . . . . . . . . . . . . . . . . . . . . . . . . . . . 7,25
Room inquiry . . . . . . . . . . . . . . . . . . . . . . . . . 14
Room inquiry with waiting caller . . . . . . . . . . . . . . 15
RPort Function . . . . . . . . . . . . . . . . . . . . . . . . 51
RPort Setting . . . . . . . . . . . . . . . . . . . . . . . . . . 9
RTP setting. . . . . . . . . . . . . . . . . . . . . . . . . . 9,30
S
Save Changes. . . . . . . . . . . . . . . . . . . . . . . . . . 55
save function. . . . . . . . . . . . . . . . . . . . . . . . . . 63
Saving Changes . . . . . . . . . . . . . . . . . . . . . . . . 55
Search. . . . . . . . . . . . . . . . . . . . . . . . . . . . . . 17
Searching phone book entries . . . . . . . . . . . . . . . . 17
Second realm . . . . . . . . . . . . . . . . . . . . . . . . . . 8
Secondary DNS . . . . . . . . . . . . . . . . . . . . . . . . . 8
Security . . . . . . . . . . . . . . . . . . . . . . . . . . . . . 72
Service domain . . . . . . . . . . . . . . . . . . . . . . . . . 8
Set Up Call Forwarding . . . . . . . . . . . . . . . . . . . . 37
Setting signaling tones . . . . . . . . . . . . . . . . . . . . 53
Setting the time and the date. . . . . . . . . . . . . . . 21-22
Setting the volume . . . . . . . . . . . . . . . . . . . . . . 38
Setting up an FWD account . . . . . . . . . . . . . . . . . 71
Settings . . . . . . . . . . . . . . . . . . . . . . . . . . . 16,51
Silent signalling . . . . . . . . . . . . . . . . . . . . . . . . 20
SIP . . . . . . . . . . . . . . . . . . . . . . . . . . 29-30,48-51
sip -Funktion. . . . . . . . . . . . . . . . . . . . . . . . . . 65
SIP Settings . . . . . . . . . . . . . . . . . . . . 8,29-30,48-51
Size . . . . . . . . . . . . . . . . . . . . . . . . . . . . . . . 73
slic function . . . . . . . . . . . . . . . . . . . . . . . . . . 69
SNTP . . . . . . . . . . . . . . . . . . . . . . . . . . . . . . 37
sntp function. . . . . . . . . . . . . . . . . . . . . . . . . . 67
SNTP setting. . . . . . . . . . . . . . . . . . . . . . . . . . . 7
SNTP settings . . . . . . . . . . . . . . . . . . . . . . . . . 22
Softkey setting . . . . . . . . . . . . . . . . . . . . . . . . . 41
Index
76
Page 81

Software Overview . . . . . . . . . . . . . . . . . . . . 72-73
Software update . . . . . . . . . . . . . . . . . . . . . . . . 32
Speaker gain . . . . . . . . . . . . . . . . . . . . . . . . . . 24
Speaker volume . . . . . . . . . . . . . . . . . . . . . . . . 24
Speed dial . . . . . . . . . . . . . . . . . . . . . . 16,18,34-42
Speed Dial . . . . . . . . . . . . . . . . . . . . . . . . . 34-42
Speed dial activation . . . . . . . . . . . . . . . . . . . . . 18
Speed Dial Phone List. . . . . . . . . . . . . . . . . . . . . 35
Speed Dial Settings . . . . . . . . . . . . . . . . . . . . . . 34
Standard Configuration . . . . . . . . . . . . . . . . . . . 59
Starting a call . . . . . . . . . . . . . . . . . . . . . . . . . 14
Status . . . . . . . . . . . . . . . . . . . . . . . . . . . 8,29,43
STUN Setting. . . . . . . . . . . . . . . . . . . . . . . . 31,51
STUN settings . . . . . . . . . . . . . . . . . . . . . . 9,31,51
STUN-Server . . . . . . . . . . . . . . . . . . . . . . . . . . 9
Subnet mask. . . . . . . . . . . . . . . . . . . . . . . . . . . 5
Symbol Reference . . . . . . . . . . . . . . . . . . . . . . . 11
Sync. Time . . . . . . . . . . . . . . . . . . . . . . . . . 23,37
Synchonisation time . . . . . . . . . . . . . . . . . . . . . 23
Synchronization Time . . . . . . . . . . . . . . . . . . . . 37
System Authority . . . . . . . . . . . . . . . . . . . . . 55-58
System management . . . . . . . . . . . . . . . . . . . 55-58
T
technical specifications . . . . . . . . . . . . . . . . . . . . 72
Telephone description . . . . . . . . . . . . . . . . . . . . . 2
Telephone directory. . . . . . . . . . . . . . . . . . . 6,34-42
Telephone directory setup . . . . . . . . . . . . . . . . . . 17
Telephone display . . . . . . . . . . . . . . . . . . . . . . . 12
Telephone number . . . . . . . . . . . . . . . . . . . . . . 13
Telephone reboot . . . . . . . . . . . . . . . . . . . . . . . 63
Telephone settings . . . . . . . . . . . . . . . . . . . . 36-37
Telephone system data . . . . . . . . . . . . . . . . . . 33-35
Telnet . . . . . . . . . . . . . . . . . . . . . . . . . . . . 60-70
Temporary handset volume setting . . . . . . . . . . . . . 16
TFTP . . . . . . . . . . . . . . . . . . . . . . . . . . . . 10,56
Third realm . . . . . . . . . . . . . . . . . . . . . . . . . . . 8
time function. . . . . . . . . . . . . . . . . . . . . . . . . . 67
Time Server . . . . . . . . . . . . . . . . . . . . . . . . . . 37
Time Synchronization . . . . . . . . . . . . . . . . . . . . 37
Time Synchronization Setup (SNTP Settings) . . . . . . . 37
Time zone . . . . . . . . . . . . . . . . . . . . . . . . . . . 22
Time Zone . . . . . . . . . . . . . . . . . . . . . . . . . . . 37
Time Zone . . . . . . . . . . . . . . . . . . . . . . . . . . . 37
Tone setting . . . . . . . . . . . . . . . . . . . . . . . . . . 25
Tone settings. . . . . . . . . . . . . . . . . . . . . . . . 38-39
Tone Settings . . . . . . . . . . . . . . . . . . . . . . . . . 53
U
Unconditional Call Forwarding . . . . . . . . . . . . . . . 36
Unpacking and placing the telephone . . . . . . . . . . . . 1
Update . . . . . . . . . . . . . . . . . . . . . . . . . . . 56-59
update function . . . . . . . . . . . . . . . . . . . . . . . . 63
Update via . . . . . . . . . . . . . . . . . . . . . . . . . . . 58
Upgrade system . . . . . . . . . . . . . . . . . . . . . . 10,32
User interface . . . . . . . . . . . . . . . . . . . . . . . . . . 2
User Name . . . . . . . . . . . . . . . . . . . . . . . . . . 8,48
User Password . . . . . . . . . . . . . . . . . . . . . . . . . 55
V
VAD . . . . . . . . . . . . . . . . . . . . . . . . . . . . . . . 9
ver function is to show Firmware Version.. . . . . . . . . 70
Version . . . . . . . . . . . . . . . . . . . . . . . . . . . . . 10
VID . . . . . . . . . . . . . . . . . . . . . . . . . . . . . . . . 8
Viewing the IP-address . . . . . . . . . . . . . . . . . . . . 16
Virtual Server Settings . . . . . . . . . . . . . . . . . . . . 47
VLAN . . . . . . . . . . . . . . . . . . . . . . . . . . . 8,28,45
vlan function. . . . . . . . . . . . . . . . . . . . . . . . . . 67
VLAN Settings . . . . . . . . . . . . . . . . . . . . . . . 28,45
Voice Quality. . . . . . . . . . . . . . . . . . . . . . . . . . 72
Volume . . . . . . . . . . . . . . . . . . . . . . . . . 16,23-24
Volume & Gain . . . . . . . . . . . . . . . . . . . . . . . . . 7
Volume and gain . . . . . . . . . . . . . . . . . . . . . 23-24
Volume setting . . . . . . . . . . . . . . . . . . . . . . . . 23
Volume Setting . . . . . . . . . . . . . . . . . . . . . . . . 38
Volume& Gain . . . . . . . . . . . . . . . . . . . . . . . 23-24
W
WAN settings . . . . . . . . . . . . . . . . . . . . . . . . . 26
WAN Settings . . . . . . . . . . . . . . . . . . . . . . . 26,43
Watch dog . . . . . . . . . . . . . . . . . . . . . . . . . . . 10
watchdog function . . . . . . . . . . . . . . . . . . . . . . 68
Web Interface . . . . . . . . . . . . . . . . . . . . . . . . . 33
weblogo function . . . . . . . . . . . . . . . . . . . . . . . 69
WLAN Setup . . . . . . . . . . . . . . . . . . . . . . . . . . 7
Index
77
Page 82

78
Page 83

Operating instructions
 Loading...