

Funkwerk elmeg CS290, elmeg CS290-U, elmeg IP-S290, elmeg IP-S290 plus Operating Instructions Manual
Page 1

Page 2
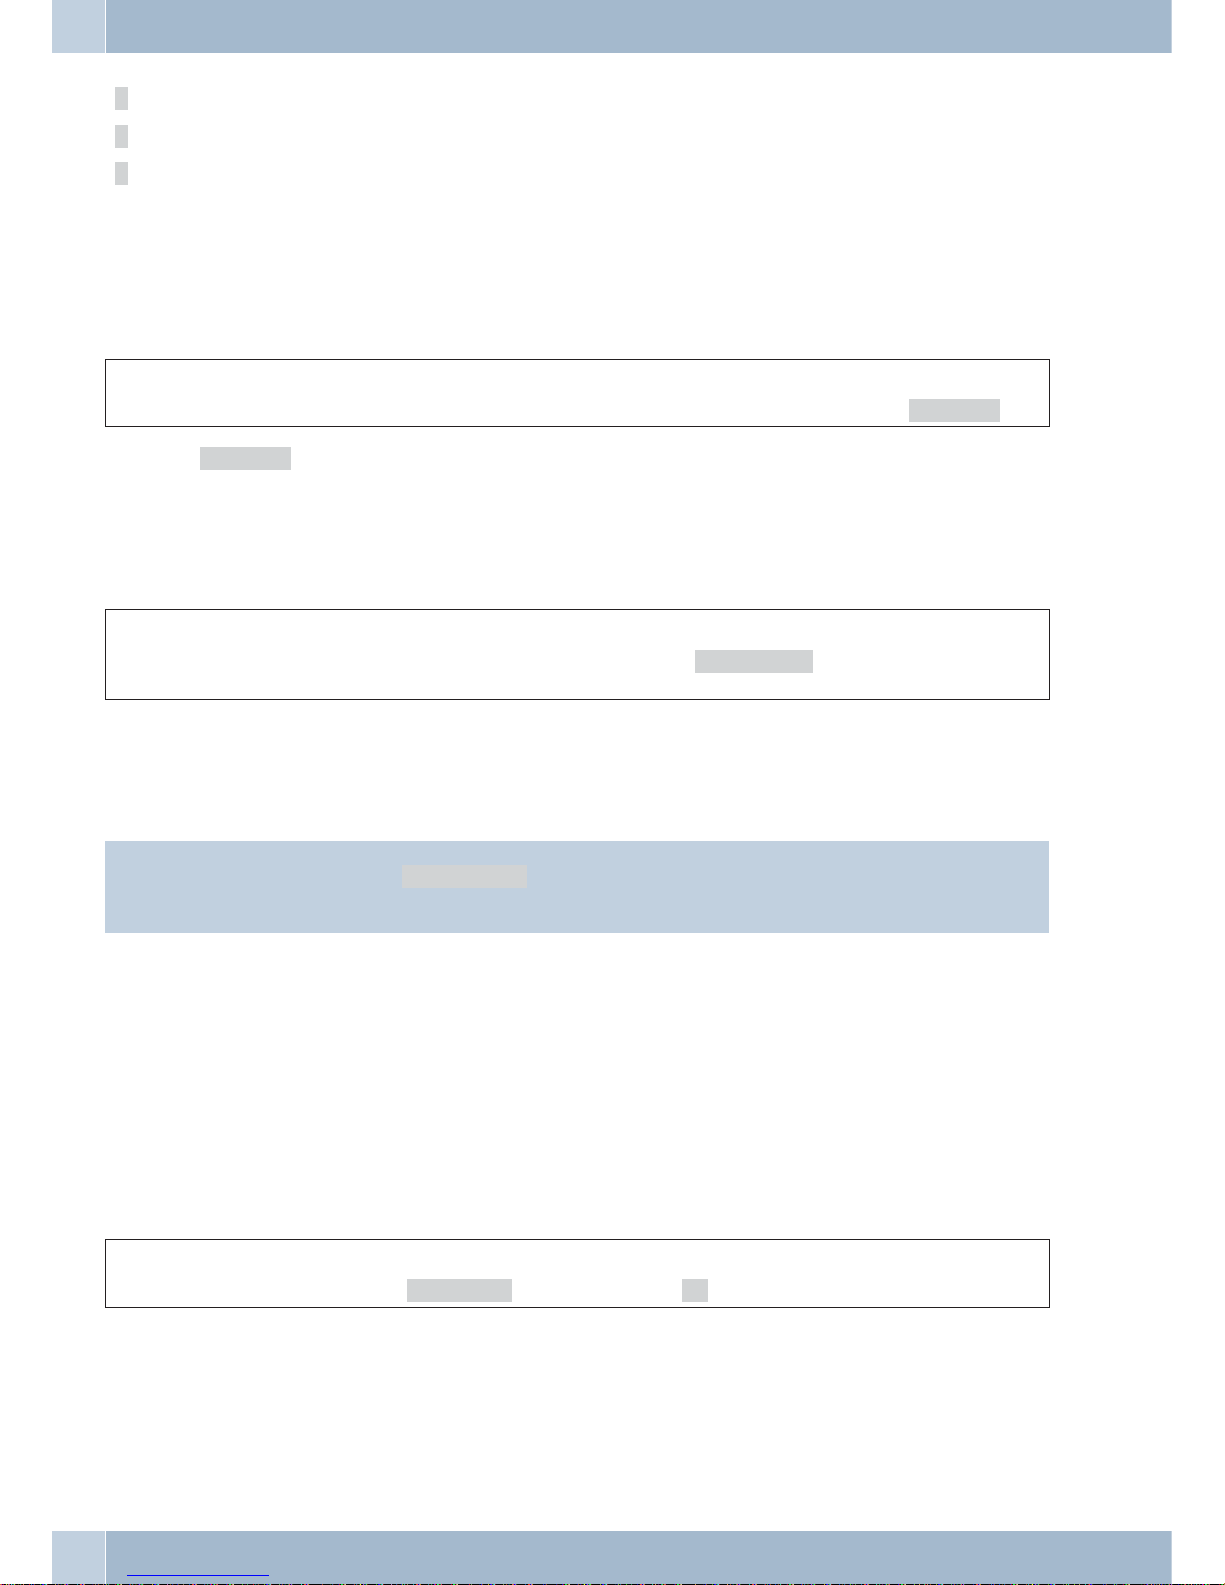
Declaration of conformity and CE mark
This device meets the requirements of the following EC directive R&TTE 1999/5/EG:
»Directive 1999/5/ECof theEuropeanParliament andof theCouncil of9 March 1999on radioequip
-
mentand telecommunications terminalequipmentandthe mutualrecognitionoftheir conformity«.
Youcan also requestthisECdeclaration ofconformityatthe followingInternetURL:http://www.funkwerk-ec.com.
Thewaste containersymbolwith the "X"throughit onthedeviceindicates thatthedevice mustbedis
posed of separatelyfrom normaldomestic wasteat an appropriatewaste disposalfacility atthe end of
its useful service life.
© 2009 Funkwerk Enterprise Communications GmbH - All rights reserved.
Reprintingof thisdocument,even excerpts,ispermitted onlywith the expressconsentof thepublisher and withprecise source information, regardless of the media used (mechanical or electronic).
Function descriptions includedin this documentation whichrefer to software productsof other manufacturers are
based on the software used and valid at the date the documentation was prepared or published. The product and
company names used in this documentation may be protected by trademarks.
Page 3

Table of contents
User interface . . . . . . . . . . . . . . . . . . . . . . . . . . . . . . . . . . . . . . . . . . . . . . . . . . . . . . 1
Description and installation . . . . . . . . . . . . . . . . . . . . . . . . . . . . . . . . . . . . . . . . . . . . . 2
elmeg CS290 . . . . . . . . . . . . . . . . . . . . . . . . . . . . . . . . . . . . . . . . . . . . . . . . . . . . . . . . 2
elmeg CS290-U. . . . . . . . . . . . . . . . . . . . . . . . . . . . . . . . . . . . . . . . . . . . . . . . . . . . . . . 2
elmeg IP-S290 . . . . . . . . . . . . . . . . . . . . . . . . . . . . . . . . . . . . . . . . . . . . . . . . . . . . . . . 2
Setting up/ Configuring the system telephone . . . . . . . . . . . . . . . . . . . . . . . . . . . . . . . . . . . . . 2
Safety notes . . . . . . . . . . . . . . . . . . . . . . . . . . . . . . . . . . . . . . . . . . . . . . . . . . . . . . . 3
Plug-in power supply . . . . . . . . . . . . . . . . . . . . . . . . . . . . . . . . . . . . . . . . . . . . . . . . . . . 3
Elektrostatic charges (protection against electrostatic charges) . . . . . . . . . . . . . . . . . . . . . . . . . . . 3
Contents of package . . . . . . . . . . . . . . . . . . . . . . . . . . . . . . . . . . . . . . . . . . . . . . . . . . . . 3
Care and maintenance . . . . . . . . . . . . . . . . . . . . . . . . . . . . . . . . . . . . . . . . . . . . . . . . . . 3
Telephone location . . . . . . . . . . . . . . . . . . . . . . . . . . . . . . . . . . . . . . . . . . . . . . . . . . . . 3
Telephone installation . . . . . . . . . . . . . . . . . . . . . . . . . . . . . . . . . . . . . . . . . . . . . . . . . 4
Connecting the handset cord . . . . . . . . . . . . . . . . . . . . . . . . . . . . . . . . . . . . . . . . . . . . . . . 4
elmeg CS290 at the ISDN port . . . . . . . . . . . . . . . . . . . . . . . . . . . . . . . . . . . . . . . . . . . . . . 4
elmeg CS 290-U at the UP0 port. . . . . . . . . . . . . . . . . . . . . . . . . . . . . . . . . . . . . . . . . . . . . 4
Important notes for the UP0 connection . . . . . . . . . . . . . . . . . . . . . . . . . . . . . . . . . . . . . . . . 4
elmeg IP-S290 / IP-S290plus at Ethernet port . . . . . . . . . . . . . . . . . . . . . . . . . . . . . . . . . . . . . 4
elmeg IP-S290 at the Ethernet port . . . . . . . . . . . . . . . . . . . . . . . . . . . . . . . . . . . . . . . . . . . 5
Audio in / Audio out . . . . . . . . . . . . . . . . . . . . . . . . . . . . . . . . . . . . . . . . . . . . . . . . . . . 5
Connecting a headsets (not included in the scope of supply) . . . . . . . . . . . . . . . . . . . . . . . . . . . . . 5
Headset »Firefly F142 N« from Plantronics (not for IP-S290) . . . . . . . . . . . . . . . . . . . . . . . . . . . . 5
Changing the label . . . . . . . . . . . . . . . . . . . . . . . . . . . . . . . . . . . . . . . . . . . . . . . . . . . . . 6
Pictographs. . . . . . . . . . . . . . . . . . . . . . . . . . . . . . . . . . . . . . . . . . . . . . . . . . . . . . . . . 6
System telephone settings . . . . . . . . . . . . . . . . . . . . . . . . . . . . . . . . . . . . . . . . . . . . . . . 7
Connecting to and operating the system telephone at the PABX system (basic function including DHCP) . . . 7
System telephone configuration . . . . . . . . . . . . . . . . . . . . . . . . . . . . . . . . . . . . . . . . . . . . . 8
Setting the display language . . . . . . . . . . . . . . . . . . . . . . . . . . . . . . . . . . . . . . . . . . . . . . . 8
Entering letters and numbers . . . . . . . . . . . . . . . . . . . . . . . . . . . . . . . . . . . . . . . . . . . . . . 8
Display information when the system telephone is idle . . . . . . . . . . . . . . . . . . . . . . . . . . . . . . . . 9
Additional information in the display . . . . . . . . . . . . . . . . . . . . . . . . . . . . . . . . . . . . . . . . . . 9
Display . . . . . . . . . . . . . . . . . . . . . . . . . . . . . . . . . . . . . . . . . . . . . . . . . . . . . . . . . . . 9
Softkey »mail« . . . . . . . . . . . . . . . . . . . . . . . . . . . . . . . . . . . . . . . . . . . . . . . . . . . . . . . 9
UUS . . . . . . . . . . . . . . . . . . . . . . . . . . . . . . . . . . . . . . . . . . . . . . . . . . . . . . . . . . . . . 9
Making Calls . . . . . . . . . . . . . . . . . . . . . . . . . . . . . . . . . . . . . . . . . . . . . . . . . . . . . . 11
Starting a call . . . . . . . . . . . . . . . . . . . . . . . . . . . . . . . . . . . . . . . . . . . . . . . . . . . . . . . 11
Dial number - no correction possible . . . . . . . . . . . . . . . . . . . . . . . . . . . . . . . . . . . . . . . . . 11
Dial call number - correction possible . . . . . . . . . . . . . . . . . . . . . . . . . . . . . . . . . . . . . . . . . 11
Dialing from the PABX telephone directory . . . . . . . . . . . . . . . . . . . . . . . . . . . . . . . . . . . . . 11
Dialing from the VIP memory . . . . . . . . . . . . . . . . . . . . . . . . . . . . . . . . . . . . . . . . . . . . . 11
Direct dial-in using function buttons . . . . . . . . . . . . . . . . . . . . . . . . . . . . . . . . . . . . . . . . . 12
Dialing from the caller list. . . . . . . . . . . . . . . . . . . . . . . . . . . . . . . . . . . . . . . . . . . . . . . . 12
Accepting / refusing a call . . . . . . . . . . . . . . . . . . . . . . . . . . . . . . . . . . . . . . . . . . . . . . . . 12
Table of contents
I
Page 4

Call Deflection . . . . . . . . . . . . . . . . . . . . . . . . . . . . . . . . . . . . . . . . . . . . . . . . . . . . . . 12
Calling line identification restriction (anonymous call) . . . . . . . . . . . . . . . . . . . . . . . . . . . . . . . 13
Starting a call with a fixed MSN extension number . . . . . . . . . . . . . . . . . . . . . . . . . . . . . . . . . 13
Redialing . . . . . . . . . . . . . . . . . . . . . . . . . . . . . . . . . . . . . . . . . . . . . . . . . . . . . . . . . 13
Extended last number redial . . . . . . . . . . . . . . . . . . . . . . . . . . . . . . . . . . . . . . . . . . . . . . 13
Deleting a call number from extended redialing . . . . . . . . . . . . . . . . . . . . . . . . . . . . . . . . . . . 14
Automatic redialing . . . . . . . . . . . . . . . . . . . . . . . . . . . . . . . . . . . . . . . . . . . . . . . . . . . 14
Suspending automatic redialing . . . . . . . . . . . . . . . . . . . . . . . . . . . . . . . . . . . . . . . . . . . . 14
Deactivating automatic redialing . . . . . . . . . . . . . . . . . . . . . . . . . . . . . . . . . . . . . . . . . . . . 14
Mute on/ off, Open listening . . . . . . . . . . . . . . . . . . . . . . . . . . . . . . . . . . . . . . . . . . . . . . 15
Mute on/off . . . . . . . . . . . . . . . . . . . . . . . . . . . . . . . . . . . . . . . . . . . . . . . . . . . . . . . . 15
Open listening . . . . . . . . . . . . . . . . . . . . . . . . . . . . . . . . . . . . . . . . . . . . . . . . . . . . . . 15
Hands-free calling (IP-S290) . . . . . . . . . . . . . . . . . . . . . . . . . . . . . . . . . . . . . . . . . . . . . . 15
Using headsets . . . . . . . . . . . . . . . . . . . . . . . . . . . . . . . . . . . . . . . . . . . . . . . . . . . . . . 15
Activating and deactivating the headset . . . . . . . . . . . . . . . . . . . . . . . . . . . . . . . . . . . . . . . . 15
Activating and deactivating open listening while using the headset . . . . . . . . . . . . . . . . . . . . . . . . 15
Announcement . . . . . . . . . . . . . . . . . . . . . . . . . . . . . . . . . . . . . . . . . . . . . . . . . . . . . . 16
Making announcements. . . . . . . . . . . . . . . . . . . . . . . . . . . . . . . . . . . . . . . . . . . . . . . . . 16
Automatic recall . . . . . . . . . . . . . . . . . . . . . . . . . . . . . . . . . . . . . . . . . . . . . . . . . . . . . 16
Automatic completion of call to busy subscriber (CCBS) . . . . . . . . . . . . . . . . . . . . . . . . . . . . . . 16
Programming completion of call on busy . . . . . . . . . . . . . . . . . . . . . . . . . . . . . . . . . . . . . . . 16
Viewing and clearing call-back calls . . . . . . . . . . . . . . . . . . . . . . . . . . . . . . . . . . . . . . . . . . 16
Tracing (MCID) . . . . . . . . . . . . . . . . . . . . . . . . . . . . . . . . . . . . . . . . . . . . . . . . . . . . . 17
Malicious call identification during ongoing call . . . . . . . . . . . . . . . . . . . . . . . . . . . . . . . . . . . 17
After the caller has hung up the handset. . . . . . . . . . . . . . . . . . . . . . . . . . . . . . . . . . . . . . . . 17
Keypad and tone frequency dialing (DTMF dialing) . . . . . . . . . . . . . . . . . . . . . . . . . . . . . . . . . 17
Keypad. . . . . . . . . . . . . . . . . . . . . . . . . . . . . . . . . . . . . . . . . . . . . . . . . . . . . . . . . . . 17
Tone dialing (dtmf dialing) . . . . . . . . . . . . . . . . . . . . . . . . . . . . . . . . . . . . . . . . . . . . . . . 18
Conducting calls with several subscribers . . . . . . . . . . . . . . . . . . . . . . . . . . . . . . . . . . . . . 18
Call waiting . . . . . . . . . . . . . . . . . . . . . . . . . . . . . . . . . . . . . . . . . . . . . . . . . . . . . . . . 18
Inquiry Call . . . . . . . . . . . . . . . . . . . . . . . . . . . . . . . . . . . . . . . . . . . . . . . . . . . . . . . . 18
Switching calls from a system-parked inquiry to a busy subscriber . . . . . . . . . . . . . . . . . . . . . . . . 18
Call switching. . . . . . . . . . . . . . . . . . . . . . . . . . . . . . . . . . . . . . . . . . . . . . . . . . . . . . . 18
Broker`s call . . . . . . . . . . . . . . . . . . . . . . . . . . . . . . . . . . . . . . . . . . . . . . . . . . . . . . . 19
Conference call . . . . . . . . . . . . . . . . . . . . . . . . . . . . . . . . . . . . . . . . . . . . . . . . . . . . . . 19
Telephone operation . . . . . . . . . . . . . . . . . . . . . . . . . . . . . . . . . . . . . . . . . . . . . . . . . 20
VIP memory . . . . . . . . . . . . . . . . . . . . . . . . . . . . . . . . . . . . . . . . . . . . . . . . . . . . . . . 20
Programming VIP entries . . . . . . . . . . . . . . . . . . . . . . . . . . . . . . . . . . . . . . . . . . . . . . . . 20
Editing VIP entries . . . . . . . . . . . . . . . . . . . . . . . . . . . . . . . . . . . . . . . . . . . . . . . . . . . . 20
Caller list . . . . . . . . . . . . . . . . . . . . . . . . . . . . . . . . . . . . . . . . . . . . . . . . . . . . . . . . . 20
Caller list . . . . . . . . . . . . . . . . . . . . . . . . . . . . . . . . . . . . . . . . . . . . . . . . . . . . . . . . . 21
SMS / UUS1 messages . . . . . . . . . . . . . . . . . . . . . . . . . . . . . . . . . . . . . . . . . . . . . . . . . . 21
UUS1 inhibiting filter . . . . . . . . . . . . . . . . . . . . . . . . . . . . . . . . . . . . . . . . . . . . . . . . . . 21
(MWI Message Waiting Indication) (for example T-NetBox).. . . . . . . . . . . . . . . . . . . . . . . . . . . 21
Displaying the caller list . . . . . . . . . . . . . . . . . . . . . . . . . . . . . . . . . . . . . . . . . . . . . . . . . 21
Deleting the caller list . . . . . . . . . . . . . . . . . . . . . . . . . . . . . . . . . . . . . . . . . . . . . . . . . . 22
SMS and UUS1 text messages. . . . . . . . . . . . . . . . . . . . . . . . . . . . . . . . . . . . . . . . . . . . . . 22
SMS Text Messages (subject to terms of network provider) . . . . . . . . . . . . . . . . . . . . . . . . . . . . . 22
UUS1 text messages . . . . . . . . . . . . . . . . . . . . . . . . . . . . . . . . . . . . . . . . . . . . . . . . . . . 23
Creating and sending text messages . . . . . . . . . . . . . . . . . . . . . . . . . . . . . . . . . . . . . . . . . 23
Example: Creating a UUS1 text message. . . . . . . . . . . . . . . . . . . . . . . . . . . . . . . . . . . . . . . . 23
Table of contents
II
Page 5

Important notes for entering numbers with SMS transmission. . . . . . . . . . . . . . . . . . . . . . . . . . . 23
Viewing newly received text messages . . . . . . . . . . . . . . . . . . . . . . . . . . . . . . . . . . . . . . . . . 23
Displaying received or sent text messages . . . . . . . . . . . . . . . . . . . . . . . . . . . . . . . . . . . . . . . 23
Example: Reading a received UUS1 message . . . . . . . . . . . . . . . . . . . . . . . . . . . . . . . . . . . . . 24
Permanently stored text messages (UUS1 only) . . . . . . . . . . . . . . . . . . . . . . . . . . . . . . . . . . . 24
Automatic sending of text messages (UUS1 only) . . . . . . . . . . . . . . . . . . . . . . . . . . . . . . . . . . 25
Configuring the text message reception mode (UUS1 only). . . . . . . . . . . . . . . . . . . . . . . . . . . . . 25
Error while receiving an SMS . . . . . . . . . . . . . . . . . . . . . . . . . . . . . . . . . . . . . . . . . . . . . . 25
Monitoring costs . . . . . . . . . . . . . . . . . . . . . . . . . . . . . . . . . . . . . . . . . . . . . . . . . . . 26
Procedures for charge rate transmission. . . . . . . . . . . . . . . . . . . . . . . . . . . . . . . . . . . . . . . . 26
Viewing and deleting costs . . . . . . . . . . . . . . . . . . . . . . . . . . . . . . . . . . . . . . . . . . . . . . . 26
Viewing/deleting costs for the last call . . . . . . . . . . . . . . . . . . . . . . . . . . . . . . . . . . . . . . . . . 26
Viewing and deleting total costs . . . . . . . . . . . . . . . . . . . . . . . . . . . . . . . . . . . . . . . . . . . . 26
Viewing/deleting costs for specific MSN extension numbers . . . . . . . . . . . . . . . . . . . . . . . . . . . . 27
Setting the tariff factor and the currency designation . . . . . . . . . . . . . . . . . . . . . . . . . . . . . . . . 27
Programming call number display (CLIP/CLIR/COLP/COLR) . . . . . . . . . . . . . . . . . . . . . . . . . . . 27
System telephony . . . . . . . . . . . . . . . . . . . . . . . . . . . . . . . . . . . . . . . . . . . . . . . . . . . 28
Advanced telephone settings . . . . . . . . . . . . . . . . . . . . . . . . . . . . . . . . . . . . . . . . . . . . . . 28
Activating the extended configuration mode . . . . . . . . . . . . . . . . . . . . . . . . . . . . . . . . . . . . . 28
Deactivating the extended configuration mode . . . . . . . . . . . . . . . . . . . . . . . . . . . . . . . . . . . . 28
Entering or modifying MSN extension numbers . . . . . . . . . . . . . . . . . . . . . . . . . . . . . . . . . . . 28
Connected to a PABX . . . . . . . . . . . . . . . . . . . . . . . . . . . . . . . . . . . . . . . . . . . . . . . . . . 29
Setting capital or small letters for the display . . . . . . . . . . . . . . . . . . . . . . . . . . . . . . . . . . . . . 29
Setting the User Interface . . . . . . . . . . . . . . . . . . . . . . . . . . . . . . . . . . . . . . . . . . . . . . . . 29
Caller list LED . . . . . . . . . . . . . . . . . . . . . . . . . . . . . . . . . . . . . . . . . . . . . . . . . . . . . . 29
Programming buttons . . . . . . . . . . . . . . . . . . . . . . . . . . . . . . . . . . . . . . . . . . . . . . . . . . 30
Function keys . . . . . . . . . . . . . . . . . . . . . . . . . . . . . . . . . . . . . . . . . . . . . . . . . . . . . . 30
Description of the key functions . . . . . . . . . . . . . . . . . . . . . . . . . . . . . . . . . . . . . . . . . . . . 31
System menu of elmeg PABX systems . . . . . . . . . . . . . . . . . . . . . . . . . . . . . . . . . . . . . . . . . 34
Configuring and setting up the system telephone . . . . . . . . . . . . . . . . . . . . . . . . . . . . . . . . 38
Acoustic . . . . . . . . . . . . . . . . . . . . . . . . . . . . . . . . . . . . . . . . . . . . . . . . . . . . . . . . . . 38
Headset . . . . . . . . . . . . . . . . . . . . . . . . . . . . . . . . . . . . . . . . . . . . . . . . . . . . . . . . . . 38
Selecting a headset . . . . . . . . . . . . . . . . . . . . . . . . . . . . . . . . . . . . . . . . . . . . . . . . . . . . 38
Speaker volume setting . . . . . . . . . . . . . . . . . . . . . . . . . . . . . . . . . . . . . . . . . . . . . . . . . 38
Setting the volume of the handset . . . . . . . . . . . . . . . . . . . . . . . . . . . . . . . . . . . . . . . . . . . 38
Setting the volume while making a call . . . . . . . . . . . . . . . . . . . . . . . . . . . . . . . . . . . . . . . . 38
Setting the acknowdledgement signals . . . . . . . . . . . . . . . . . . . . . . . . . . . . . . . . . . . . . . . . 38
Setting the call waiting signal . . . . . . . . . . . . . . . . . . . . . . . . . . . . . . . . . . . . . . . . . . . . . . 39
Notice tone . . . . . . . . . . . . . . . . . . . . . . . . . . . . . . . . . . . . . . . . . . . . . . . . . . . . . . . . 39
Programming call rerouting. . . . . . . . . . . . . . . . . . . . . . . . . . . . . . . . . . . . . . . . . . . . . . . 39
Activate call forwarding . . . . . . . . . . . . . . . . . . . . . . . . . . . . . . . . . . . . . . . . . . . . . . . . . 40
Viewing current call forwarding . . . . . . . . . . . . . . . . . . . . . . . . . . . . . . . . . . . . . . . . . . . . 40
Deactivating call rerouting . . . . . . . . . . . . . . . . . . . . . . . . . . . . . . . . . . . . . . . . . . . . . . . 40
Call waiting . . . . . . . . . . . . . . . . . . . . . . . . . . . . . . . . . . . . . . . . . . . . . . . . . . . . . . . . 40
The following entries are possible for the call waiting feature: . . . . . . . . . . . . . . . . . . . . . . . . . . . 40
Setting the contrast (»Settings« menu). . . . . . . . . . . . . . . . . . . . . . . . . . . . . . . . . . . . . . . . . 41
Configuration . . . . . . . . . . . . . . . . . . . . . . . . . . . . . . . . . . . . . . . . . . . . . . . . . . . . . 41
Inhibiting (dial ranges) . . . . . . . . . . . . . . . . . . . . . . . . . . . . . . . . . . . . . . . . . . . . . . . . . 41
inhibit »list«. . . . . . . . . . . . . . . . . . . . . . . . . . . . . . . . . . . . . . . . . . . . . . . . . . . . . . . . 41
inhibit »Outgoing calls« . . . . . . . . . . . . . . . . . . . . . . . . . . . . . . . . . . . . . . . . . . . . . . . . . 41
Setting the language of the display . . . . . . . . . . . . . . . . . . . . . . . . . . . . . . . . . . . . . . . . . . . 41
Connection to a PABX . . . . . . . . . . . . . . . . . . . . . . . . . . . . . . . . . . . . . . . . . . . . . . . . . . 42
Table of contents
III
Page 6

Extension numbers (MSN) . . . . . . . . . . . . . . . . . . . . . . . . . . . . . . . . . . . . . . . . . . . . . . . 42
Entering or editing an MSN extension number . . . . . . . . . . . . . . . . . . . . . . . . . . . . . . . . . . . . 42
Viewing an MSN extension number . . . . . . . . . . . . . . . . . . . . . . . . . . . . . . . . . . . . . . . . . . 43
Setting the call signaling melody and volume . . . . . . . . . . . . . . . . . . . . . . . . . . . . . . . . . . . . 43
Setting the melody . . . . . . . . . . . . . . . . . . . . . . . . . . . . . . . . . . . . . . . . . . . . . . . . . . . . 43
Setting the ringer melody volume . . . . . . . . . . . . . . . . . . . . . . . . . . . . . . . . . . . . . . . . . . . 43
Assigning a name to the MSN. . . . . . . . . . . . . . . . . . . . . . . . . . . . . . . . . . . . . . . . . . . . . . 43
Programming a default call forwarding number . . . . . . . . . . . . . . . . . . . . . . . . . . . . . . . . . . . 44
Setting »Info at end of call« . . . . . . . . . . . . . . . . . . . . . . . . . . . . . . . . . . . . . . . . . . . . . . . 44
Setting for »UUS Dummy Message« . . . . . . . . . . . . . . . . . . . . . . . . . . . . . . . . . . . . . . . . . . 44
Configuring the system telephone elmeg IP-S290 . . . . . . . . . . . . . . . . . . . . . . . . . . . . . . . . . . 45
IP settings . . . . . . . . . . . . . . . . . . . . . . . . . . . . . . . . . . . . . . . . . . . . . . . . . . . . . . . . . 45
Service. . . . . . . . . . . . . . . . . . . . . . . . . . . . . . . . . . . . . . . . . . . . . . . . . . . . . . . . . . 46
Name . . . . . . . . . . . . . . . . . . . . . . . . . . . . . . . . . . . . . . . . . . . . . . . . . . . . . . . . . . . 46
SMS . . . . . . . . . . . . . . . . . . . . . . . . . . . . . . . . . . . . . . . . . . . . . . . . . . . . . . . . . . . . 46
Version . . . . . . . . . . . . . . . . . . . . . . . . . . . . . . . . . . . . . . . . . . . . . . . . . . . . . . . . . . 46
Data . . . . . . . . . . . . . . . . . . . . . . . . . . . . . . . . . . . . . . . . . . . . . . . . . . . . . . . . . . . . 47
Software . . . . . . . . . . . . . . . . . . . . . . . . . . . . . . . . . . . . . . . . . . . . . . . . . . . . . . . . . . 48
Telephone BIOS (CS290, CS290-U): . . . . . . . . . . . . . . . . . . . . . . . . . . . . . . . . . . . . . . . . . . 49
The following functions are available in the telephone's BIOS . . . . . . . . . . . . . . . . . . . . . . . . . . . 49
Downloading new firmware over the external ISDN connection (CS290, CS290-U) . . . . . . . . . . . . . . . 49
Country . . . . . . . . . . . . . . . . . . . . . . . . . . . . . . . . . . . . . . . . . . . . . . . . . . . . . . . . . . 49
Index . . . . . . . . . . . . . . . . . . . . . . . . . . . . . . . . . . . . . . . . . . . . . . . . . . . . . . . . . . 51
Brief description of functions . . . . . . . . . . . . . . . . . . . . . . . . . . . . . . . . . . . . . . . . . . . . 55
Table of contents
IV
Page 7
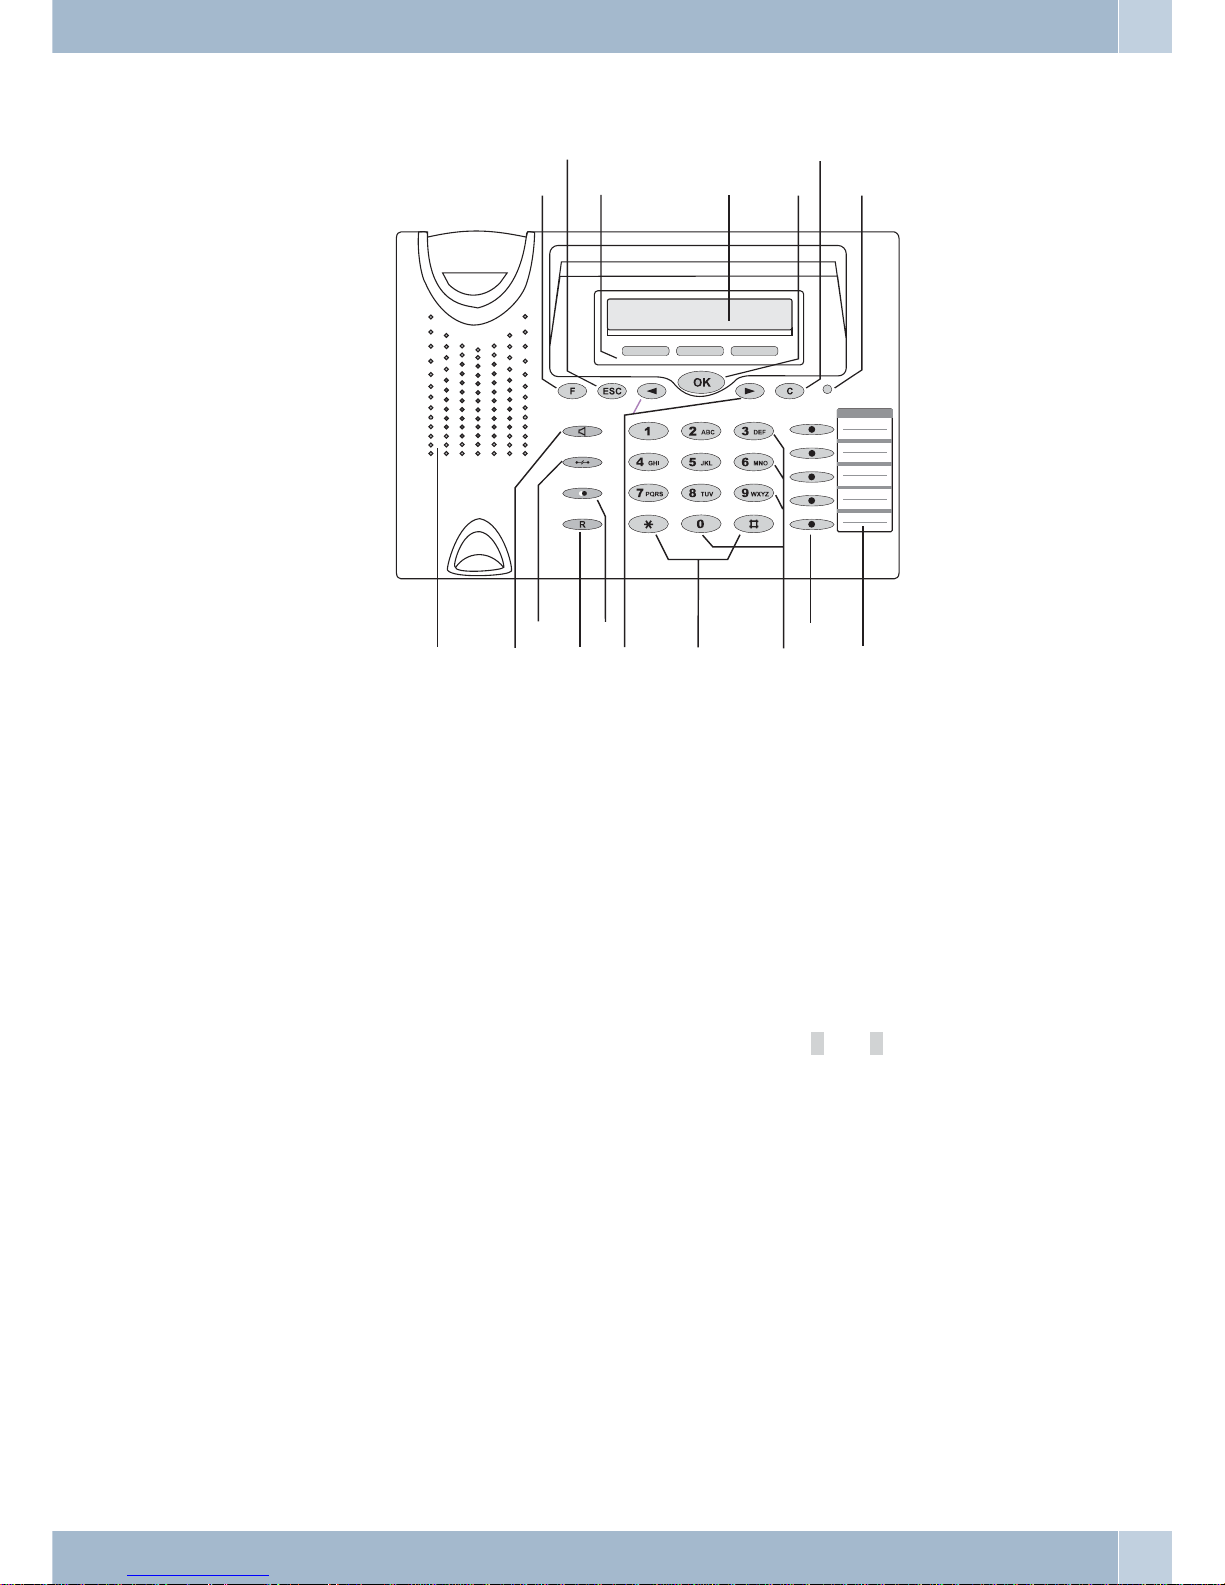
User interface
1
Function button: This key opens the programming menu. If you are already located in a menu and then
press the key, either menu-specific functions are shown, or you are moved back one programming step.
2 Escape button: Pressing the Esc button during programming returns the telephone to its idle status.
3 3 softkeys
The functions of the softkeys are displayed in capital or small letters (depending on your settings).
4 Display: The date and time appear on the top line of the display when you connect the unit to the power
supply system (IPS 290), or to the internal ISDN or UP0 (CS 290, CS290-U) portof the PABX system.The
dateand timeareimportedautomatically fromthePABXsystem. The textdisplayedfor a functiononline 2
isalways locatedabovethecorresponding softkey. Whenyoupressthe softkey,thenextlevel is displayed.
If not all information fits into the screen, this will be indicated by »«« or »««.
5 OK button: Press this button to store a setting in the telephone. You then hear the acknowledgement
signal.
6 C key: Press this button to moveback one menu step in the menu. If you are currently in the input mode,
this button can be used to delete individual characters.
7 Call LED: Incoming calls are signaled by a rapidly flashing LED.
8 Speaker
9 Open listening button (hands-free button IP-S290)
0 End a call
ß Inquiry button
° Last number redial button
User interface
1
01.01.09 08:30 }
tbuch vip
1
2
3
4
5
6
7
8
9
0
ß
°
§
$
%
&
/
Figure: 1
Page 8

§ Arrow buttons:The arrows »{« and»}« in the right corner onthe top lineof the display indicatethat you
can call up further functions on the lower lines using the arrow buttons.
$ Asterisk key, number sign key
% Dial keys / VIP keys
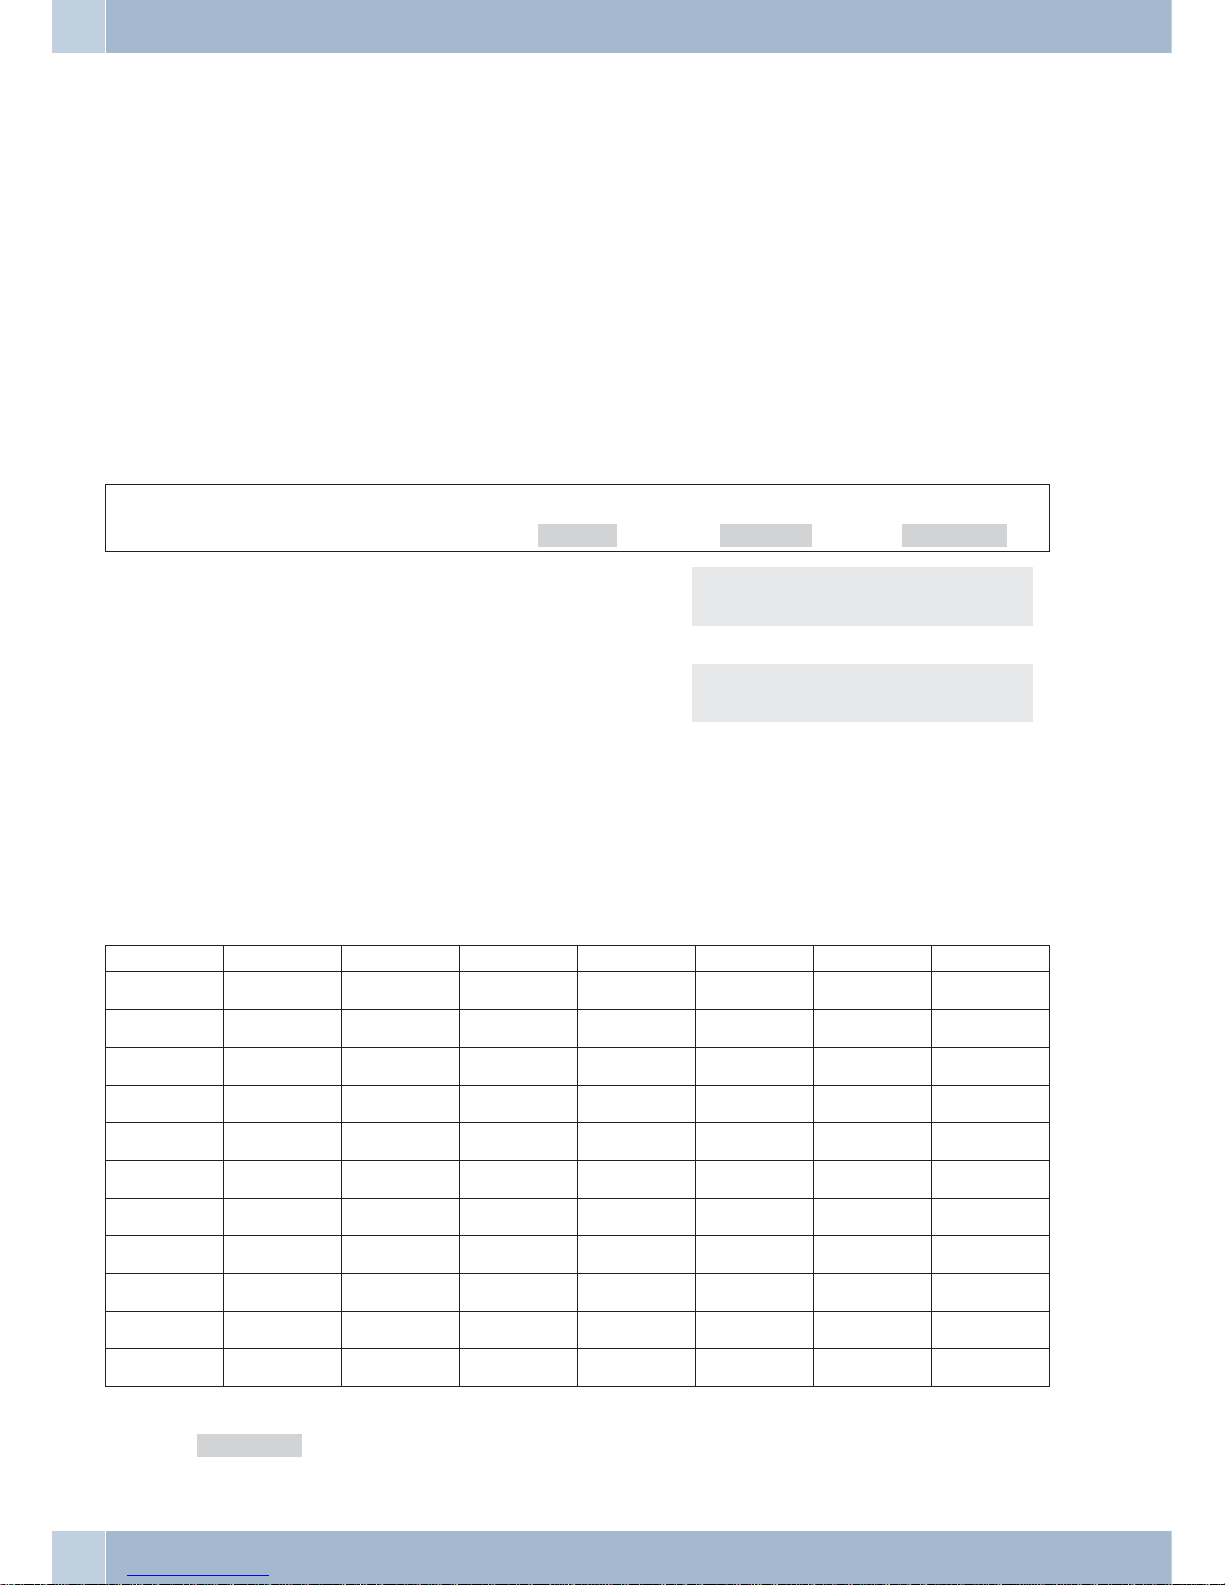
& IP-S290plus, CS290-U: 5 Five programmablefunction keys withLED: Each buttonhas an insettwo-color
LED (level 1 - red / level 2 - yellow). These LEDs can be used to indicate certain functions.
IP-S290: The LEDs for all of these keys are single-colored (Level 1 - red).
CS290: Each button has an LED (red) assigned to it. TheLEDs for the two function keys aredual-colored
(Level 1 - red / Level 2 - yellow).These LEDs can be used to indicate certain functions
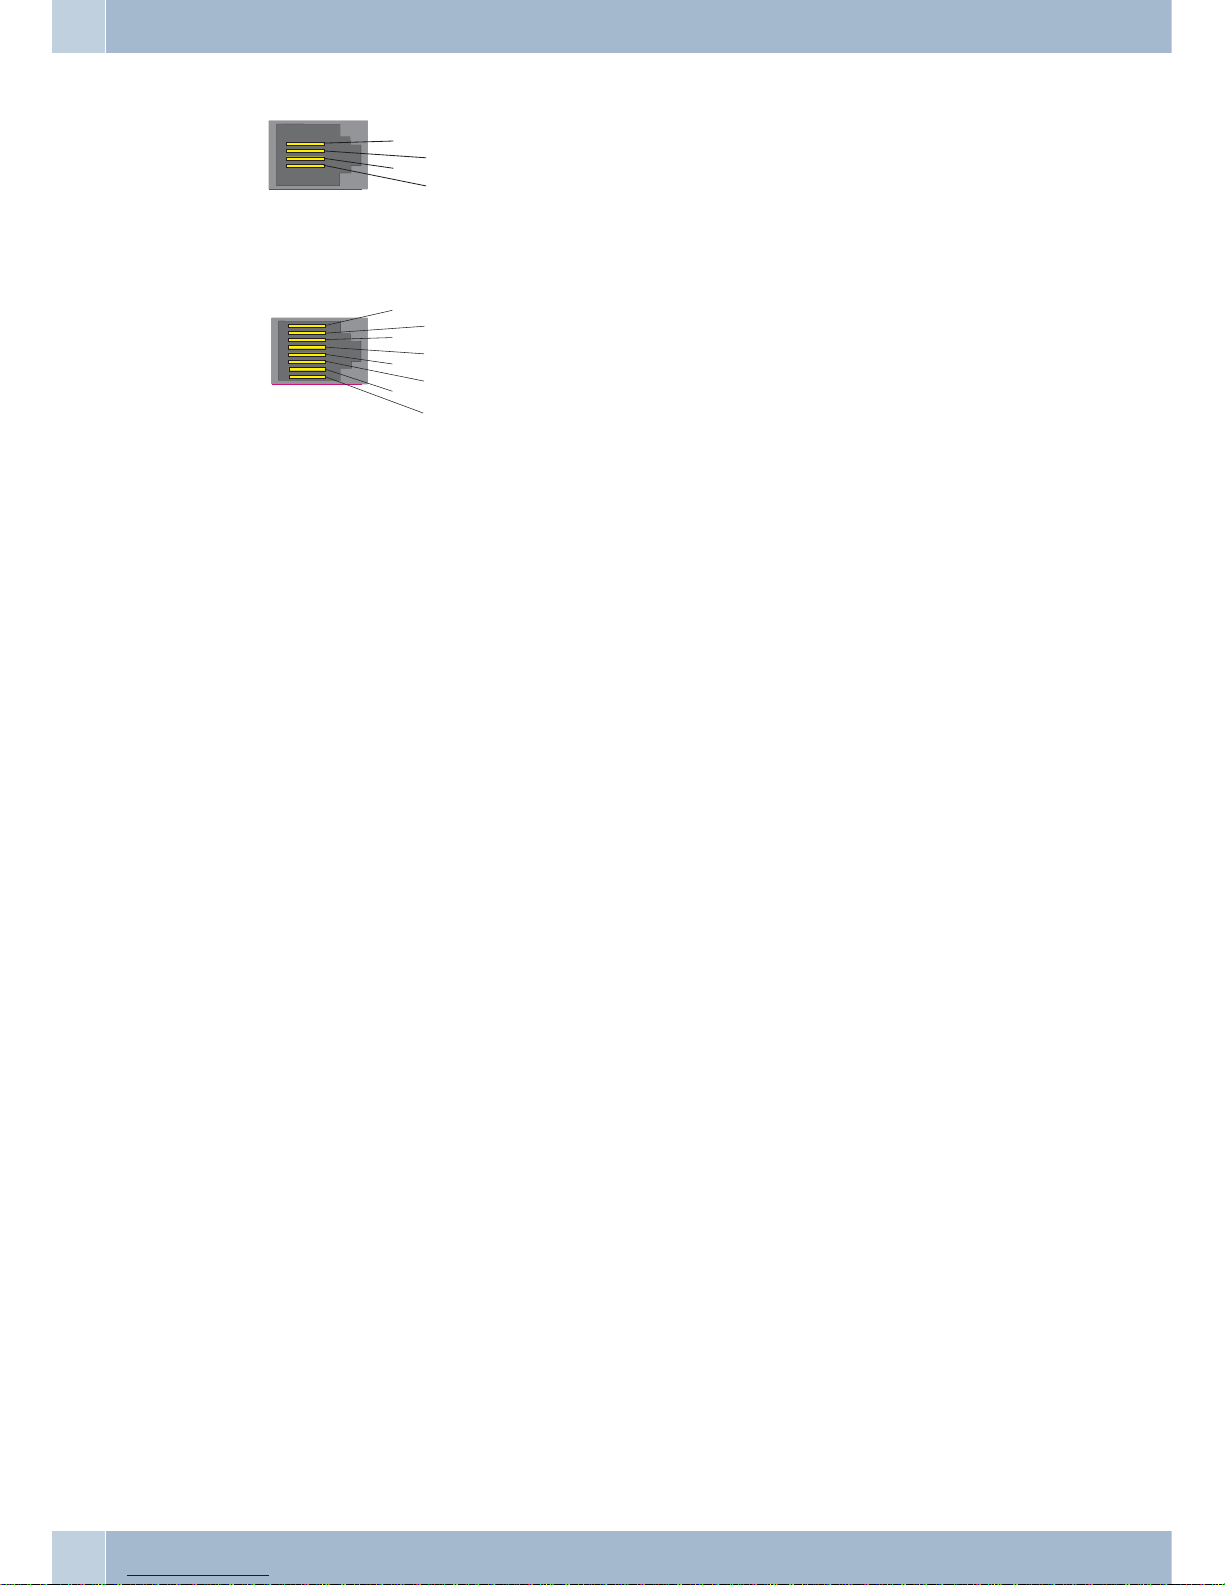
/ Label panel for programmable function keys
Description and installation
You canconnect the systemtelephone atthe internal port(S0, Up0 orEthernet) of aPABX system.The system tele
phone is connected to the internal port through an ISDN jack (Western or RJ45).
The system telephone provides system features when connected to certain PABX systems. For example:
·
Dialing fromthe PABXtelephone directory
·
Sending andreceiving SMS messages
·
Messaging with other system telephonesconnected tothe PABX
·
Function keysfor controlling specialPABX features(switching callmodes, teamlog-in/off, line
buttons, extension buttons).
The statusofthe programmedfeatures canbe displayedby meansof LEDsassigned to thespecific
function keys.
·
Accessing the PABXsystem menu.This menuprovides furtherPABX features.
The internal connection ofthe PABXsystems automaticallyinterfaceswith thesystem telephone.Please referto the
operating instructionsof your PABXto determinewhether these typicalsystem features are provided with the various system telephones.
elmeg CS290
This system telephone is designed for connection to an internal S0-port (4 wires) of an elmeg PABX system.
elmeg CS290-U
This system telephone is designed for connection to an internal Up0-port (2 wires) of an elmeg PABX system. The
system telephone comes with an ISDN port to which further ISDN terminal devices can be connected.
elmeg IP-S290
Connect thissystem telephoneto thecorresponding LANport (ornetwork) ofthe PABXsystem usinga Cat.5 cable.
The system telephone comes with a PC port to which further IP terminal devices can be connected.
Setting up/ Configuring the system telephone
On the system telephone itself you can only carry out a limited configuration of the supported features. Complete
configuration of the system telephone is possible only via the appropriate ports of the elmeg PABX system.
Description and installation
2
Page 9

Safety notes
•
Mind the storageand operationtemperatures forthedevice listedin thetechnical specifications.Only connect
the devicewhen the permissible ambient operatingtemperature hasbeen reached.
•
Pleasenote thatcondensationon orinthe unit mayoccurwhen movingfromcold towarmsurroundings.Only
remove the telephone from the package when the permissible ambient operating temperature has been rea
-
ched.
•
You shouldnot make callsor connector disconnectany linesduring thunderstorms.
•
Only attachthe connecting cordsat theconnections provided.
•
Make sure phonecables areinstalled ina safemanner toprevent tripping.
•
Avoid thefollowing:
Direct sunlight
Sources ofheat (for exampleradiators)
Electronic devices(for example stereocomponents, officeequipment ormicrowave devices)
Ingress of moistureor liquids
Aggressive fluids or vapors
Dusty environment
•
Do notuse the unitin excessivelyhumid roomsor hazardouslocations.
•
Only openthose sections ofthe devicespecified inthe assembly/ operatinginstructions.
•
Do nottouch plug connectorswith pointed,metal, ormoist objects.
•
If youdo not permanentlymount thedevice orany accessories,be sureto place it/them on anon-slip surface.
•
When required,clean the unitwith aslightly moistenedcloth.
•
Only useapproved accessories.
·
Only terminalswith SELV and/orwhich complywith ETS300047 maybe connectedto theunit.
This regulationis fulfilled when approved terminaldevices areused asintended.
Plug-in power supply
·
Use only approved power plug-inunits (DSA-0101F-05UP orL15 D52AB DDLAWO).
·
Do notuse power plug-inunits withvisible defectsor damage(fissures, cracks,etc.)
Elektrostatic charges (protection against electrostatic charges)
Thetelephone issuppliedwithenhanced ESDprotectionagainstthe effects ofelectrostaticdischarge that exceedsthe
protection level citedin the approval specification. Elevated ESD levels should nevertheless be avoided to the grea
test possible extent. In some cases,electrostatic discharge levelscan far exceedthe approval limits orthe resistance
levels alreadyimplemented inyour telephones. Eliminate the causes or conditions that promote theseelevated ESD
levels, suchas insufficienthumidity or carpeting. The telephonemanufacturer doesnot assumeany liability forda
mage caused under such circumstances.
Contents of package
System telephone, handset with connection cord, connection cable, 2 feet, operating instructions, label panel for
programmable function keys. Adapter cord (CS290-U) for headsets equipped with 4-pin connecting cord (8-pin
plug / 4-pin cord).
Care and maintenance
The ISDN system telephonehas been manufactured for normal, everydayuse. When required, clean the ISDNsys
temtelephone withaslightly moistenedcloth,or withananti-static cloth. Neverusea solventtoclean the phone!Ne
ver use adry cloth; electrostatic chargescould damagethe electronicsinthe system. It isessential thatno liquidspe
netrate into the inside of the ISDN system telephone, as this could destroy the phone.
Telephone location
Before installingthe telephoneyou must mountthe rearfeet forthe telephone atthe positions(6) shown in figure 2.
Depending on theheight ofthese twofeet you canadjust thedisplay angle ofyour phoneto yourpersonalangle ofvi
-
Safety notes
3
Page 10
sion. Ensure that the two feet have the same height.
To adjustthe height, pull thefeet off of thebottom of the telephone, rotate them around60° and placethem back in
the enclosure.By turning thefeet by around60° (around thelongitudinal axis) eachtime you can set threedifferent
heights for the phone.
Please notethat the plastic feet ofyour ISDN system telephone mayleave markson sensitive surfaces, such asfurni
ture. Themanufacturer of the telephoneis notliable forany suchdamage. Therefore, useappropriate non-skidding
pads under the phone.
Telephone installation
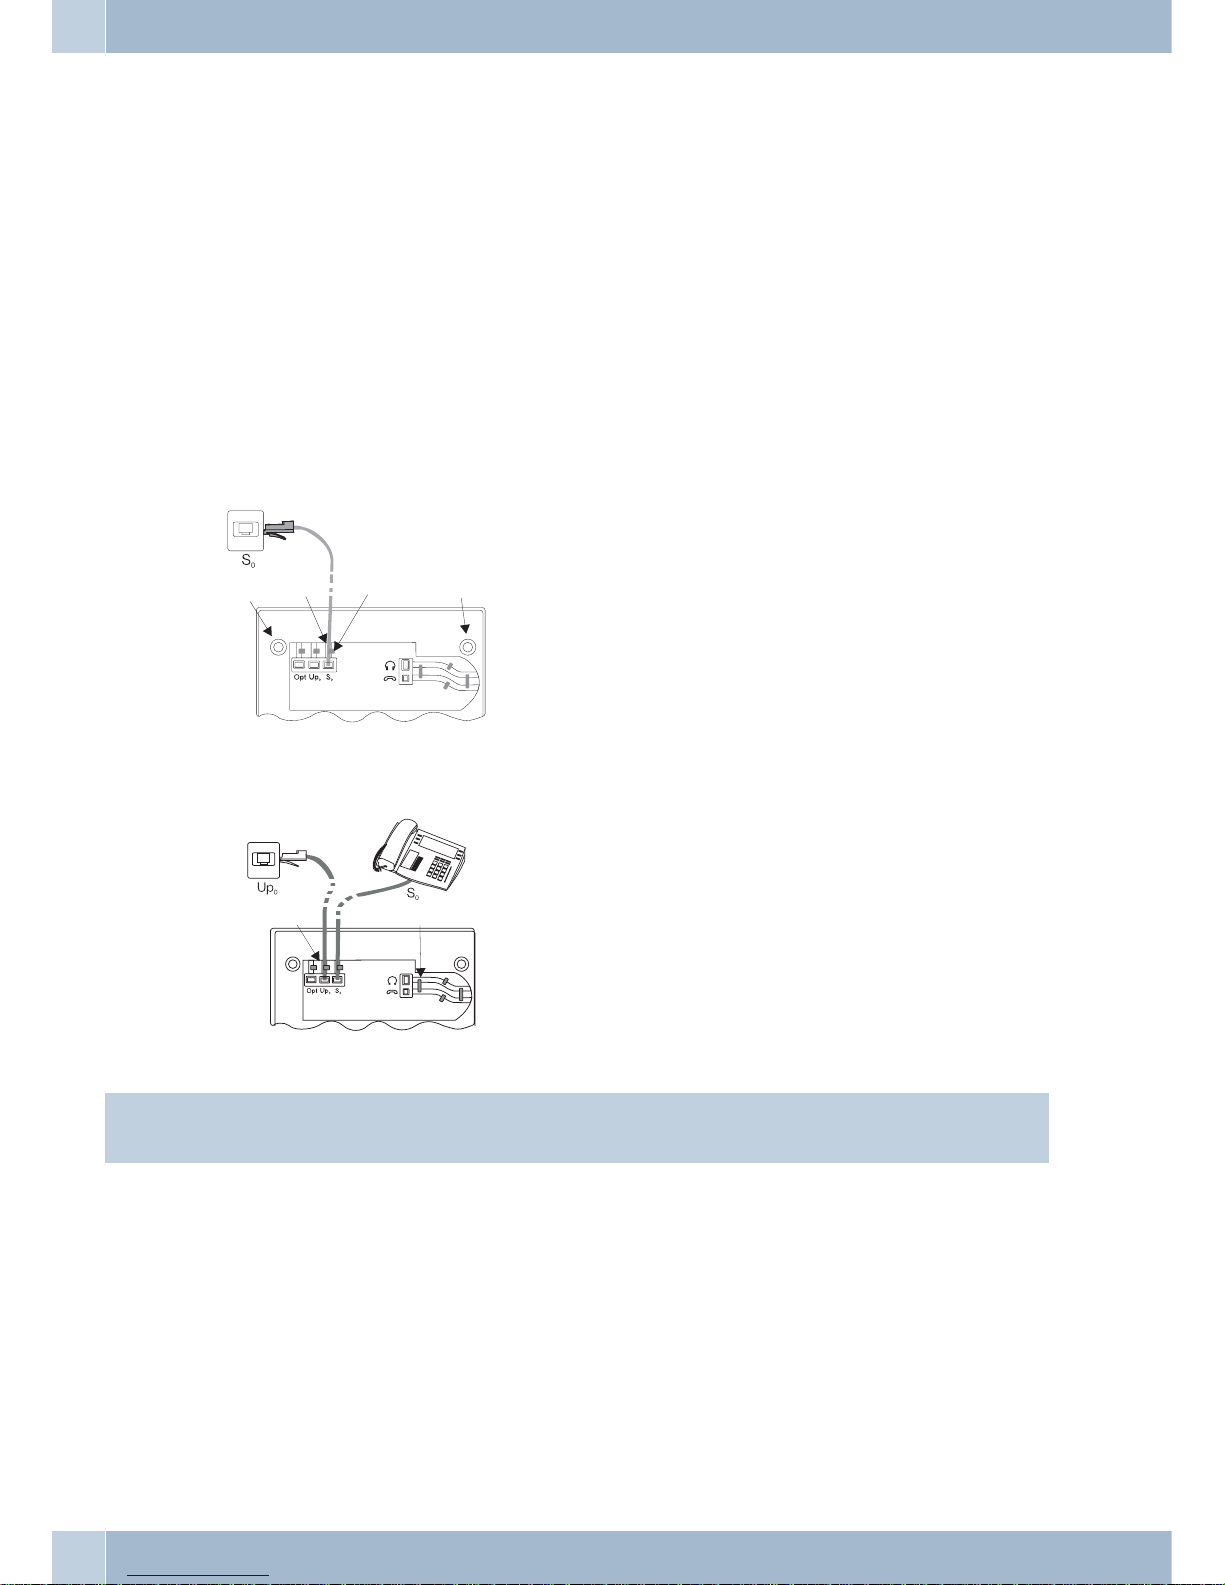
Connecting the handset cord
Connect the handset cord
1
as shown in figure 5. Lay the handset cord in the cord groove2and lock it below the
two cord retainers
3
.
elmeg CS290 at the ISDN port
Connect the ISDN-cord
1
to the S0-jackas shown
in figure 4. Ensure that the longer ISDN connector
is pluggedinto the ISDNjack and theshorter ISDN
connector into the ISDN socket on the telephone.
Then lay the ISDN cord in the cord groove
2
and
lock it below the two cord retainers
3
.
elmeg CS 290-U at the UP0 port
Connect theISDN cord
1
to theUP0jack asshown
in figure 2. Ensure that the longer ISDN connector
is pluggedinto the ISDNjack and theshorter ISDN
connector into the ISDN socket on the telephone.
Then lay the ISDN cord in the cord groove
2
and
lock it below the two cord retainers
3
. Figure 2
shows adownstream ISDNtelephone connected to
the S0 port of the elmeg 290-U.
Information:
CS290-U phones may not be connected through the S0 jack to the ISDN connection.
Important notes for the UP0 connection
·
An ISDN terminal device equippedwith S0port canbe connectedto thephone's S0jack.
·
The maximumlinedistance betweenthe elmegCS290-U andany downstreamISDN terminalde
-
vices maynotexceed 10meters.
·
Terminating resistors maynot beconnected.
elmeg IP-S290 / IP-S290plus at Ethernet port
TheIP-S290plus systemphone can bepowered throughtheEthernet portasdefined inIEEEStd 802.3af-2003(PoE),
with power being supplied via Ethernet from the hubor switch. Atthe port, »AlternativeA« and »Alternative B«, as
defined byIEEEStd 802.3af-2003,and »Powerclassification 1«(upto 4W) issupported.The PoEport isnot polarity
sensitive.
Telephone installation
4
1
2
3
6
6
Figure: 2
5
4
3
2
1
Figure: 2
Page 11
PIN assignment for PoE
1
= Transmit Data +
2
= Transmit Data -
3
= Receive Data +
6
= Receive Data -
4/5
connected = power supply
7/8
connected = power supply
elmeg IP-S290 at the Ethernet port
1
Connection for plug-in power supply unit
2
Plug-in power supply unit
3
Ethernet PC connection
4
PC or other IP telephone
5
Ethernet port of the PABX
6
elmeg pbx
7
Audio-In connection (microphone)
8
Audio-Out connection (handset)
9
Headset with two 2.5mm stereo-connectors.
Audio in / Audio out
Thetelephone isequippedwithan input
7
andan output8foraudio signals.Theseportsare providedforheadsets.
The jacks are linked to the corresponding ports for the headset jacks on the bottom of the telephones.
Connecting a headsets (not included in the scope of supply)
Recommended: Headsets supplied by Plantronics mit U10PS Connection cable or GN Netcom.
Connect the headset as shown in figure 5. Then lay the headset cord
3
in the cord groove4and lock it below the
cord retainers
5
.
You can use the handset or the headset for making calls.
Headset »Firefly F142 N« from Plantronics (not for IP-S290)
The LED in the mike arm of this headset is activated using the headset button on the telephone.
Telephone installation
5
1
2
3
5
4
7
8
9
6
Figure: 4
2
3
4
5
6
7
4
6
1
Figure: 5
8
7
6
5
4
3
2
1
Page 12
Pin assignments of the headsets
Headset jack CS290, IP-S290
1
- Microphone +
2
- Handset (ground)
3
- Handset
4
- Microphone (ground)
Headset jack CS290-U
1
- DSHG receiver
2
- Ground
3
- Microphone +
4
- Handset (ground)
5
- Handset (3.3 V switchable via resistor)
6
- Microphone (ground)
7
- V+ (3.3V)
8
- DSHG transmitter
Changing the label
The labelsfor the functionkeys are providedon the lastpage of thisoperating manual. Cutout the labelyou wish to
use.
To changethe label panel, press the flexible covertogether between yourindex finger andthumb and liftit out. The
label panel can now be changed.
You can fillin thelabel panelvia yourPC yourself.The CD ROMsupplied withthe PABXcontains anAdobeAcrobat
file with templates.
Pictographs
The pictographs(symbols) describedbelow have been used inthese operatinginstructions toillustrate someprocedures for setting and using the telephone.
b Liftup the handsetorstartprepareddialing.
a Replacehandset.
Thetelephone is idle.
l Acallis signaled.
Theringer melody sounds.
g Youare conducting acall.
d Athree-party conference callisinitiated.
q Youhear the positiveornegativeacknowledgementsignal.
t Selectthe call number,code,characterortext.
0...9
*
,#
Presstheappropriate buttononthepush-buttonset.
<> Usethearrow buttonsinordertoswitch fromonedisplaytextto thenext.
F Usethisfunction buttontostarttheconfiguration andsetup mode.
S Thisis a softkeywhosefunctionisdisplayed above.
O UsetheOK buttontoconfirmanentry.
Z Youwill then beaskedtopressa functionbuttonoradirect dial-in key.
z Youwill then beaskedtopressa specificfunctionbuttonordirect dial-inkey.
Telephone installation
6
8
7
6
5
4
3
2
1
4
3
2
1
Page 13

E Press Escape tocancel aconfiguration attemptwithout storingit. Thetelephone thenreturns toidle
state.With the IP-S290,pressEscapeto terminate entriesforIPfeaturesand havethem stored.
C Use the clear button to delete specific entrieslike telephone numbers or names.Each timeyou press
thisbuttonthe lastcharacterisdeleted.
R Usethisbutton toopenasystemparked inquiry.
W PresstheRedialbuttononce toredialthelastnumberorrepeatedlytostartextended lastnumberredi
-
alor automatic redial.
T Usethedisconnect buttontoterminate existingconnections.
L Usetheopen listeningbuttontoactivateor deactivateOpen listeningatyoursystem telephone.
# Whenyouenterthenumberfordialingviaan SIPprovider,dialingisnotperformeduntilaround5se
condsafterthelastdigithasbeen entered. Dialingis performedimmediately whenyoupressthe#key
after entering the number. In this case, the terminal device mustalso be capable of dialing into the
phonesystemwith the#.
System telephone settings
Connecting to and operating the system telephone at the PABX system (basic function
including DHCP)
Consult the installation instructions for the PABX system to determine which port can be used for connecting the
IP-S290. Connect this port with the Ethernet PABX port on the system telephone.
·
Configure yourPABX system foruse withIP systemtelephones.
· Definethe MSNsfor theIP systemtelephones withinthe PABXsystem.
·
Switch onthe power(plug-in power supplyunit) tothe IPsystem telephoneand waituntil thetelephone hasbeen initialized.
Once the IP system telephone has been initialized you will be requested to select the language in the display.
·
Select thedisplay language.
Press the arrow buttons to view the available
languages and confirm your selection by pres
-
sing S.
Welche Sprache? }
deutsch english polski
·
Enter one of the MSNsthat hasbeen inputto thePABX system(in the exampleshown here,12) .
Confirm your entry by pressing O. Program dial number
MSN-1>12
If noPIN has been entered inthe systemconfiguration, pressbutton O and buttonO again afterbeing requested
to do so.
Please enter login PIN
TNM-1->
Swtich to »Use DHCP?«.
Select »on«. Use DHCP?
off on
·
The telephoneand PABX systemare synchronized.
Information:
Ifthere isno connection tothe PABX(noLAN connection,DHCPswitched off,SYS-server not availableor telepho
-
ne not logged on) the display shows the »©-----/ /----‰« symbol instead of the time.
System telephone settings
7
Page 14
Possible error:
IP address , IP gateway, IP subnetmask, IP SYS server.
This MSN has not been entered in the PABX or has multiple assignments.
A PIN / logon name has been entered in the PABX but not in the telephone.
There are no subscribers configured in the PABX.
You can now use the IP system telephone just like any other system phone at the ISDN or UP0 port.
System telephone configuration
Setting the display language
You can select the language of your display.
Begin as follows:
a
FSSS
Replace handset.
config Display language
English Press the arrow buttons to view the available
languages.
Which language? }
deutsch english polski
Example:
English Press the arrow buttons to view the available
languages.
Which language? }
deutsch english polski
S Press the softkey below the desired language. The
display switches to the changed language immediately.
Entering letters and numbers
You can advance through the characters (letters or numbers) by pressing the appropriate button repeatedly.
The following buttons are configured for the entry of figures and numbers:
Button 1
st
2nd press 3rd press 4th press 5th press 6th press 7th press
1
1
2
ABC2ÄÅÆ
3
DEF3
4
GH I 4
5
JKL5
6
MNO 6 Ö Ø
7
PQRS 7ß$
8
TUV8Ü
9
WX Y Z 9
*
*
#
#
Every letter that you enter is shown as capitals.
Example: »FUNKWERK«.
System telephone settings
8
Page 15

Several special characters are assigned to the button »0«.
For ex.: »!«, »&«, »?«, »+«, »-«, »=«, »(«, »)«, »@«, »$«, …
When you pressthe 0 key the first time a space is inserted. When you press this key a second time several special
characters are shown in the display. Press the appropriate keyto select the correspondingspecial characters 1 …
9. If you wish to view further special characters, press the 0 key.
Display information when the system telephone is idle
When the telephone is idle, the top row displays the date and the time and the bottom row shows the information
tbook and VIP.
22.11.05 08:30 S U }
tbook vip
Additional information in the display
When thetelephone isin theidle state,additional informationabout functionsthat have beenconfigured areshown
on the top line of the display.
22.11.05 08:30 S U }
tbook vip
»S« The dial filterfor the telephone has beenconfigured viathe PC configuration program. Phonenumbers or
partial numbers are now enabled or inhibited for calling.
»U« Call rerouting configured.
»i« A status info text is available (for example router button).
>
S
Press the right arrow button and then the softkey
below the configured function if you wish to get more information about the configured functions.
22.11.05 08:30 i S U {
mail charge info
Display
Softkey »mail«
Select »uus« and SMS«. Messages
uus sms
UUS
Select »liste« und »new«. Messages / UUS }
list new
Use the arrow buttons to select any one of 5 messa
ges. Press O to select the entry you wish to
edit.
Select text {}
1: HELLO
S Press the corresponding softkey to have the message
sent or deleted. »send« oder »delete?« (in this
example: »send«).
1/ HELLO
send delete?
S Press the softkey » UUS< Hello«. Send mail (Abc)
UUS> HELLO
System telephone settings
9
Page 16

S You can select the target telephone number for the
UUS message from »direct«, » vip« , »repe
-
at« or »new«. Press the appropriate softkey
Send mail / UUS }
direct vip new
System telephone settings
10
Page 17
Making Calls
Starting a call
Dial number - no correction possible
btg
Lift up handset Dial number Phone call
Dial call number - correction possible
atbg
Replace handset. Dial number Lift up handset Phone call
To change thenumber or to correcta wrong entry, select the incorrect figure with thearrow buttons and pressC to
delete it. Now enter the correct number.
Ifyou wishtoconduct thecallusing the handset,justlift itupafter dialingthenumber. Any timeduringa callyoucan
switch back and forth between hands-free calling (IP-S290 only), open listening and normal use of the handset.
After you have entered the number you can also press the speaker button to have the number dialed and to use
hands-free calling (IP-S290 only).
Ifyou wishtoconduct thecallusing the handset,justlift itupafter dialingthenumber. Any timeduringa callyoucan
switch back and forth between speaker function and use of the handset.
After you have entered the number you can also press the speaker button to have the number dialed.
Ifa callcannotbe put through(e.g.number isinhibitedviathe dialrangescontrol),a correspondingmessagewillappear in the display. For ex.: »inhibited: msn«, if dial range control is active.
When you liftthe handsetandthere isstill noconnectionset up,youcan pickup awaitingcall usingthe»pick up«
softkey without replacingthe handsetagain. Youare notifiedof thecallin advanceby abrief message.Ifyou haveset
up a connection button, you can accept the call immediately simply by pressing this button.
Other options for dialing without lifting the handset
Theoption ofdialingwithoutlifting thehandsetandof correctingoraddingto a numberalsoexistsduring dialing:
•
from thelast number redialingmemory (seepage 13).
•
from thecaller list (seepage 20).
•
from thePABX telephone directory (see page20).
•
from theVIP memory (seepage 20).
•
with thefunction keys (seepage 12).
•
via CTI(TAPI) feature ofthe PABX (CS290/ CS290-U).
If you are using one of these options, you can make further entriesprior to initiating the call. You can define which
number (MSN), if any, is to be transmitted to the party being called.
Dialing from the PABX telephone directory
When you usethis telephone with a PABXsystem that supports system telephony, you can dial from thetelephone
directory of the PABX.
a
S
t
O<>O
bg
Replace
handset.
tbook
Enter first let
-
ter
Select
entry
Lift up hand
-
set
Conversation
Dialing from the VIP memory
You can programVIP numbersfor eachofthe tendial buttons1 … 0including aname (20charactersmax.) anda te
-
lephone number (26 digits max.).
Making Calls
11
Page 18

a
S
or
tbg
Replace hand
-
set.
VIP
Select VIP
destination
Select VIP
destination
Lift up handset Conversation
For information on how to program VIP entries, please refer to page 20 of these operating instructions.
Direct dial-in using function buttons
Directdialing isinitiatedusingthe directdialingkeys. Each ofthefive keyscanbeprogrammed withtwofunctionsor
direct dialing numbers.
a
Z
bg
Replace handset. Press the function key Lift up handset Conversation
Use the function keys to select the desired number.
If youwish todial anumber fromthe secondlevel, pressthe correspondingkey two times. If youwish todial anum
-
ber from the second level, press the corresponding key rapidly two times.
You canprogram thedirect dialing/ functionkeys viathe PC configurationprogram forthe telephoneor duringex
-
tended configuration.
Dialing from the caller list
Thistelephone hasacaller listAmaximum of 10entries(calls, SMSorUUS1- messages)arestored in thislist.Entries
in the caller list are indicated by the »list« softkey.
a
S<>
bg
Replace handset.
list
Select entry Lift up handset Conversation
For more information about the caller list, please refer to page 20 of these operating instructions.
Accepting / refusing a call
In its initialstatus thetelephone willaccept allcalls, regardless ofthe selectedMSN. If twocalls aresignaled simultaneously the first one isaccepted whenyou liftup thehandset. The secondcall canstill besignaledy acallwaiting signal.
The telephonedisplay shows thecaller's numberor thenumber thecaller hasdialed (MSN-1… MSN-3, or the assig
-
ned name). If only MSN-1 has been entered, the name will be displayed but not the number.
albg
Replace handset. Lift up handset Conversation
If youare unable,or do notwish toaccept a call,you havethe option ofrejecting thiscall. Press the»reject« soft
keyand thecallwill nolongerbe signaled atyourtelephone. Ifyouare amemberofa team,thenthis callwillcontinue
to besignaled at thephones ofyour team. If the call wassignaled onlyat yourphone, thecaller willhear thebusysig
nal when the call is rejected.
al
S
Replace handset.
reject
Call Deflection
If youareunable, ordo notwish toaccept acall, youhavethe optionof forwardingthis call.Press the»x-fer« soft
key if you wish to forward this call directly to another subscriber. The call number of the forwarding target can be
preset for each call number (msn) when configuring the telephone.
Afterpressing the »x-fer«softkey,you can forwardthecallto thepresetcallnumber orenteranew call number.
Making Calls
12
Page 19
al
S
t
O
Replace handset.
x-fer
Dialing a number (no
preset number availa
-
ble)
Calling line identification restriction (anonymous call)
You can block the display of your telephone number at your caller's telephone if desired. You can set this function
specifically forthe nextcall, orpermanently (seepage 27).The »Completionof callon busy«feature mustbe applied
for at your service provider for this.
Suppressing calling line identification for the next call
During anexternal orinternal call, you can preventthe numberfrom beingtransmitted (displayed)to the partyyou
have called.
at
OFS
bg
Replace hand
-
set.
Dial call num
-
ber
secret
Lift up handset Conversation
When acall issignaled, youcan decide before acceptingthe callwhether yournumber is to be transmitted to the cal
ler. If yourphone isthe finaldestinationof callrerouting youcanuse thisprocedure toprevent the callerfrom seeing
the final destination phone number (i. e. yours).
al
>S
bg
Replace handset.
secret
Lift up handset Conversation
Starting a call with a fixed MSN extension number
You can conductan internal orexternal callsuchthat adefined number(MSN)is transferredfromyour telephoneto
the party you arecalling. This number must have been entered previously in your telephone. Whenyou call, either
number that is transmitted is shown in the second line of the display(»MSN-1«...»MSN-3«) or the name that you
have assigned to this number (MSN).
You can initiate dialing using the set extension number (MSN) as explained in the following, or you can usea programmed function key for this (MSN assignment or user button).
at
OFSS
bg
Replace
handset.
Dial call
number
msn msn-1 …
msn-3
Lift up hand
-
set
Conversation
Redialing
The previously dialed call number is stored in the redial memory.
a
W
g
Replace handset. Conversation
Extended last number redial
In the extended redialing function the telephone numbers of the last 10 calls, connections, connection attempts or
text messages are stored. You can view these by pressing the redial button or the arrow buttons and subsequently
have them redialed automatically.
a
WWO
bg
Replace handset. Select entry Lift up handset Conversation
Thelast dialednumberis displayed.At the endof the secondline the statusof this entryis indicated bythe lettersdis
played there.
Making Calls
13
Page 20
»V« Connection
»A« Call
»M« Mail(extensionnumbers, towhichSMSorUUS1 messageswere sent)
»|«
Callsconfigured for automaticredialing.
noentry Youplaced a calltosomebodybutdid notreachhim/her,or his/her linewasbusy.
Deleting a call number from extended redialing
a
WWFS
Replace handset. Select entry
delete?
Press the »delete?« softkey to delete the displayed entry immediately. The next telephone number is then
displayed.
Automatic redialing
If you placeda calltoa subscriberwhose numberisbusy orwho does notanswer, youcanthen activateautomatic re
-
dialing which will call that same subscriber again after about 10 seconds.
atg
W
or
SO
a
Replace
handset.
Dial call
number
Subscriber
busy
auto_dial
Replace
handset.
After around 10 seconds the phone is activated and the number is dialed automatically. This is repeated for up to
around 2 minutes.auto_dial
Up to 20 call attempts aremade if thesubscriber can still not be reached. After20 unsuccessful attempts,automatic
redialing will be cancelled. You will hear the negative acknowledgement signal in that case.
Information:
Ifautomatic redialingisactive,the » auto_dial« softkeyisshownon the display.Presstheright arrowbuttonto
return to the normal display when the telephone is idle.
Suspending automatic redialing
You can suspend automatic redialing that you have started any time using the appropriate procedure and place a
normal call. To suspend automatic redialing, press the open listening button during automatic redialing.
After the call automatic redialing starts again.
Deactivating automatic redialing
You can deactivate automatic redialing at any time. No further calls will be attempted.
To deactivate automatic redialing during the dialing process press ESC.
If you like to deactivate automatic redialing in the idle state of the phone, proceed as follows:
a
SS
Replace handset.
autodial ok
Making Calls
14
Page 21

Mute on/ off, Open listening
Mute on/off
The mute functionallows you to switch offthe handset microphone during anormal call. The party youare calling
will thennolonger beable tohearthe conversationyou conduct withpersons inthe room (roominquiry). However,
you will continue to be able to hear the party on the phone.
g
S
Room inquiry
S
g
Conversation
silent speak
Conversation
Information:
Call duration and cost logging are continued even if the microphone has been muted.
Open listening
The "Open listening"function canbeactivated whenthereare otherpersons intheroom whowish to alsoparticipate
inthe call.Youcontinue totalkinto thehandsetwhile thisfunctionis active. Youcanset thevolumeduring thecallas
desired.
Pleaseinform thepartyyouare calling thatopenlisteningis activated.»|«indicatesthat openlisteningisactivated.
g
LL
g
Conversation Begin open listening End open listening Conversation
Whenyou hang upthehandsetwhile openlisteningisactive, bothopenlisteningand the callitselfare terminated.
Hands-free calling (IP-S290)
The handset remains in its cradleduring hands freecalling. The built-in microphoneand the speakerare activated.
Any actionsare carried out using the open listening / hands-free button only. You can switch back to normal »handset« calls at any time during hands free calling by merely lifting up the handset. You can also switch from normal
»handset« calling tohands free calling when youhang up the handsetafter pressing the open listening/ hands-free
button. During hands-free calling acoustic signals such as the call waiting signal are not transmitted.
Please inform theparty you arecalling that hands-free callingis activated. »|« shows that hands freecalling is activated.
a
L
tg
L
Handset on hook Starting hands-free
calling
Dial the number of
the subscriber
Conversation
Terminate your call
Using headsets
You can connect a headset to your telephone. You can use the handset or the headset for making calls.
Activating and deactivating the headset
Forheadset operation,oneofthe functionsbuttonsmustbe configuredasaheadset key. TheLEDassigned to thiskey
indicates, whether the headset in switched on or off (LED on or off).
a
z
tg
z
Replace handset. activate headset Dial call number Call via headset Deactivate headset
Activating and deactivating open listening while using the headset
g
L
g
L
g
z
Call via headset Activate open lis
-
tening
Call via headset
and open listening
Deactivate open
listening
Call via headset Deactivate headset
Making Calls
15
Page 22

Announcement
Themessage function allowsyouto establish aconnectionto a differenttelephone,without thisconnectionhavingto
be actively accepted (picking up the handset or loudspeaker activation). This is a simplex (one-way) call in which
only the subscriber that initiated the message will be heard.
You will hear a brief acoustic tone before the actual message.
Making announcements
To start an announcement, enter the code given in the operating instructions for the elmeg PABX.
When a messagecomes in for your telephone, the number orthe name of theparty sending the messageappears in
the display. The message can be terminated at any time by pressing the ESC key.
Messages are accepted automatically by the phones being called by activating the pen listening function when:
•
the phoneis idle.
•
messaging has beenenabled forthe PABX(control bymeans ofthe » Enable messages«).
Announcements canalso bestarted by pressinga programmedfunction button. Youcan alsoinitiate a messagedu
-
ring an ongoing call (inquiry call) using the corresponding function key.
Information:
You can only utilize this function if the messaging feature has been enabled in the PABX for your MSN extension
number.
Automatic recall
Ifyou placedacallto asubscriberwhose number isbusyyou can thenactivateautomatic redialing whichwillcall that
samesubscriber again.Youare thennotified that thesubscriber for whichrecall hasbeenconfigured cannowbe reached. You receivethisinformation from theexchangeoffice for externalcall-backsandfrom thePABXsystemfor internal call-backs.
The telephone displaythen indicates »clbckbusy«. Thisdisplay alternates every 2 seconds between thenumber
or name of the desired party. As soon as you accept this information (by picking up the handset, for example), the
selected subscriber is called automatically.
Automatic completion of call to busy subscriber (CCBS)
You hear thebusy signalwhen callingtheextension ofthe personyou are tryingto reach.»Recall tobusysubscriber«
allows you to call the extension as soon as the other subscriber hangs up his or her telephone.
Programming completion of call on busy
btg
S
a
Lift up handset Dial call number Subscriber busy
clbckbusy
Replace handset.
The »Clbckbusy« softkey is only displayed when automatic completion of calls is possible with the exchange
office or withthe PABX.Thefeature »Completionof call onbusy« mustbeapplied foratyour serviceprovider for ex
-
ternal call-backs.
You canconfigure three call-backsat a time.If you areusing an LCRprocedure (e. g.the LCR procedureof the pho
ne), the »Completion of call to busy subscriber« function is carried out automatically via your standard network
service provider.
Information:
If automatic redialing is active, the »clbckbusy« softkey is shown on the display.
Viewing and clearing call-back calls
When the phone is in idle, any call-back calls that are initiated can be viewed in the display by pressing the
»clbckbusy« softkey. Press this softkey to view thecall-back calls. You canthen view the individualcompletion
calls usingthe arrow keys.If youwish to deletea call completion,select thiscall using thearrow keys and then press
the Fbutton, followed by »delete?«.
Making Calls
16
Page 23

All completionsof call areautomatically deletedafter apredefined period.This timeis set bythe serviceprovider for
external call-backs and by the PABX system for internal call-backs.
Information:
If theISDN telephone is disconnected from the ISDN network, (for exampleby unplugging theISDN connector of
the phone or by switching off or resetting the PABX), all requested call completions will be lost.
Tracing (MCID)
If you receive a prank or malicious call, you can arrange for the number of the caller to be saved at the exchange.
To enable this feature (Malicious call identification), it must first be applied for at your network service provider.
Information:
Identification ofthecaller iseffected inthe exchangeand the numberstored therewith informationon the number
of the caller, the date and the time of the call.
You can use this feature in 2 situations.
Malicious call identification during ongoing call
g
You want to identify a
caller.
>S
The telephone num
-
ber can then be estab
-
lished in the exchan
-
ge.
a
Call with subscriber
mcid
Replace handset.
After the caller has hung up the handset
g
You wish to determine the
caller, but he/she has alrea-
dy hung up the handset.
S
The telephone number
can then be established
in the exchange.
a
Call with sub-
scriber
mcid
Replace handset.
Keypad and tone frequency dialing (DTMF dialing)
Duringan ongoingcallyoucantake advantageofotherfeatures usingkeypadsequencesorDTMF dialing.Inthetele
phone configurationprogram youcan setwhetherecall flashbuttonpad sequencesor DTMF dialing is tobe possible
in the initial status of the telephone. The display indicates which other functions (keypad or DTMF) are possible.
Softkey»Keypad« isdis
-
played.
DTMF sequences can be entered right away and keypad sequences only after you
press this softkey.
Softkey»dtmf« is displayed. keypad sequences can be entered right away and DTMF equences only after you
press this softkey.
Information:
Keypad and DTMF sequences can also be stored for function keys, which can then be used during a call.
Keypad
Using the Keypad functionyou can manage service or featuresin the PABX system or inthe network of the service
provider by entering character stringsand digit sequencesvia the keypad.Ask your networkservice provider about
this and consult the manual for your PABX to determine whether »Keypad« is supported.
g
S
t
Conversation
keypad
Input of character strings and digit
sequences
Making Calls
17
Page 24

Tone dialing (dtmf dialing)
Using tone frequencydialing, youcan transmitmultifrequency signals (DTMFsignals) duringan ongoing callin or
der, forexample, to poll your answeringmachine. Ifcall waiting is active foran ongoingconnection, tone frequency
suffix dialing can not be utilized.
g
S
t
Conversation
DTMF
Input of character strings and digit
sequences
Conducting calls with several subscribers
Call waiting
If, duringanongoing call,a secondcall comes infor you,the secondcall is signaledwhen »Call waiting on«is
set.
g
waiting call
(subscriber 2)
S
g
Call with subscriber 1
take
Call with subscriber 2;
Subscriber 1 in hold condition
Inquiry Call
You havethe optionof establishingup totwo other connections during an ongoing callusing theinquiry callfunction. You can also use the MSN assignment key, a line key or an extension key to initiate an inquiry connection.
g
R
tg
Call with subscriber Subscriber 1 in hold condition Dial call number Call with subscriber 2
If you wish to set up further connections, proceed as described above.
Anactive connectioncanbeterminated bypressingthekey forendinga call.Youcanreturn tothecallthat waspreviously put on hold. If there are no other calls on hold, a new connection can then be set up.
Switching calls from a system-parked inquiry to a busy subscriber
Thisperformance featureis possible whenonly one callis on hold.You would liketo transfer asystem-parkedinqui
ry call to a busy subscriber.
g
R
tg
S
a
Call with subscri
-
ber 1
Subscriber 1 in
hold condition
Dial call number Subscriber 2 is busy
x-fer
Replace handset.
Subscriber1 puton hold willhear musiconhold. Assoonas subscriber2hangs up,he/she will berecalled bysubscri
ber 1.
Call switching
When acall is transferred,the active subscriberand the subscriber for the connection previously puton hold areal
ways connected with one another.
You can initiate an inquiry call yourself (e.g. in order to announce the call) and can then transfer the call.
g
R
tg
S
Call with sub
-
scriber 1
Subscriber 1 in
hold condition
Dial call number Call with sub
-
scriber 2
x-sfer
Conducting calls with several subscribers
18
Page 25

Broker`s call
If you have more than one connection active at your telephone (call waiting or inquiry call) (max. of three connec
-
tions),you cantalkto thesepartiesalternately (Broker'scall).For this,there are upto three softkeysavailable, depen
-
ding on the number of connections on hold (»conn1«,... »conn3«).
g
>S
g
>S
g
Call with sub
-
scriber
conn1
...
conn3
Call with desi
-
red subscriber
conn1
...
conn3
Call with desi
-
red subscriber
If you have configured extension and line keys you can also carry out Broker's calls between different callers using
these keys.
To terminate an active connection, press the disconnect key. Lift up the handset or start prepared dialing.
Conference call
Ifyou haveanactive connectionandaconnection onholdat yoursystemtelephone, you caninitiatea conferencecall
with these two subscribers. All three subscribers can speak to one another.
Conference calls are not possible with more than two (2) connections at your phone.
g
S
g
S
d
Call with subscriber 1
take
Call with subscriber 2
conf
Conference with sub
-
scriber 1 and 2
Toend thethree-partyconference, press »back«.Youare reconnectedwiththesubscriber ofthelast previous active
connection. The other subscriber is put on hold.
Conducting calls with several subscribers
19
Page 26

Telephone operation
VIP memory
Youcan programVIP numbers foreach oftheten dialbuttons1 …0 including aname (20charactersmax. )anda te
lephone number (26 digits max.
Programming VIP entries
Begin as follows:
a
FSSS<>O
Replace handset.
adjust vip new
Select VIP des
-
tination
t
O
Enter the name of the VIP target. In this example:
»Funkwerk«.
Confirm your entry with OK.
Pro
gram VIP nam (Abcd
V0> Funkwerk
t Enter the telephone number.
In this example: »012345«.
Confirm your entry with OK.
Program VIP number.
V0> 012345
Editing VIP entries
Begin as follows:
a
FSSS<>O
Replace handset.
adjust vip list
Select VIP des-
tination
t Edit the name.
In this example: »Funkwerk, PE«.
Confirm your entry with OK.
Program VIP nam (Abcd
V0> Funkwerk,PE
t Change the number.
In this example: »01122334455«.
Confirm your entry with OK.
Program VIP number.
V0> 01122334455
Caller list
This telephone hasa callerlistA maximumof 10entries(calls, SMSor UUS1 messages) arestored inthislist. Entries
inthe callerlistareindicated bythe»list«softkey. Youalwayshavethe most current10entriesin thelist.Themost
recent entry is displayed first.
When youpress thissoftkey thenumber ofnew entriesis shownon thedisplay (forexample: »New calls: 4!«)
together with the number of new SMS or UUS1 messages (for example: »Messages: 2«).
Alsoshown in frontofeach entry isthenumberfor thatentryinthe list andthetotal number ofallentriesin thelist.
For ex.: »3/10: 1122334455...... *«.
If thenumber in this entry isidentical toa numberfor aVIP inthe telephonedirectory thename isdisplayed instead
of thenumber.You canalso viewadditional information(if applicable) abouteach entry.If youlift upthehandset of
your phonewhile youare viewing an entry inthe list,that calleris thencalled automatically.Single entriescan bese
lectedfor deletion.Entriesfrom the PABXtelephonebook canbedisplayedwith theirnames.Allname entrieswillbe
deleted after restarting the telephone.
Telephone operation
20
Page 27

Caller list
Calls that you do not accept, or that you specifically refuse, are stored in the caller list.
Whena callismade with asubscriberfrom thecallerlist (youcalloryou arecalled),the entryisautomaticallydeleted
and transferred into the redial memory.
SMS / UUS1 messages
When you receivea newmessage the numberof messagesyouhave receivedup tothat time isdisplayed whenthe te
lephone is in the idle state. The phone number, or the name of the party who sent the message, and information
about thetype of message(SMS or UUS1)are shown inthe caller list.When you pressthe F buttonyou can readthe
received message immediately, or save it in the list of SMS or UUS1 messages for reading at a later time.
After youview anew messagethat is located in thelist ofsaved UUS1 or SMS messages,that messageis thendeleted
from the caller list. All these entries will be deleted after restarting the telephone.
UUS1 inhibiting filter
Use the Professional Configurator or the system telephone to inhibit or enable reception of internal and external
UUS1 messages.
(MWI Message Waiting Indication) (for example T-NetBox).
The T-NetBox is ananswering machinethat canbe provided within networks ofthe DeutscheTelekom AG,T-Com
(GermanTelecom, T-Com).Withthe performancefeatureMWI (MessageWaitingIndication)active youwillbe no
tified when a new message is received by your T-NetBox.
The notification is stored as an entry in the caller list. By selecting the entry and lifting the handsetyou can set upa
connectionto yourT-NetBoxto listen tothenew messageforexample. Theentryinthe callerlistis deletedautomatically if no new messages are present, for example at your T-NetBox. You can also delete the entry manually.
You can onlyuse this function when your ISDN connection and your phone system support the MWI performance
feature.
Displaying the caller list
a The telephone is idle. The softkey »list« in the lo-
wer row of the display indicates that an entry is present in the list.
Press this softkey.
New call!
Messages: 1
UUS today 14:33 {}
1/4: 05171717171
F This message can be read and stored. 1/20 *}
read
save
The upperdisplay lines showthe type ofentry (»Call«, »UUS«, »SMS« ), the date (forthe first twodays »Today«
or »Yesterday«), the time and the dialed extension (msn).
»*«
»a«
»I«
Newcall or newUUS1orSMS text message
Call
Informationaboutnew messages,forexampleinyour T-Netbox(MWI)
Information:
When you view the caller list again, entries that you have already viewed but not deleted are no longer marked by
»*« on the display, but rather by »a«.
You can view other entries using the arrow buttons. Call today 08:50 {}
1/02:12 a
Telephone operation
21
Page 28

F If you wish to view more information about the en
-
try or delete it, press the F button.
»delete?« The entry isremovedimmediately.
»Info« Viewingfurther information aboutthecall.
Forex.: The MSN extensionnumberto whichthemessagewas sentandthe telephone numberofthe
sender.
Press »info« to display additional information.
The display now shows information about the call.
If not all information fits into the screen, use the ar
row keys to display more.
Press the C-button to leave the menu.
1/121 a
delete info
Deleting the caller list
Deleting an entry
a
S<>F S
Replace handset.
list
Select entry
delete?
SMS and UUS1 text messages
With thisphone youcan send andreceive SMSor UUS1messages (SMS Short MessageService, UUS1 User to User
Signalling). You can inputa text message using thekeypad on the phone. The assignments for the keypad for entering letters, digits and special characters are described on page 8.
Sending and receivingof textmessagesis onlypossiblewhen thesenderhas his/hernumbertransmitted tothe receiving party, where it is also displayed. This is why text messages arenot transmitted when the phone number is not
transmitted with the message.
An incoming text message is signaled by two brief acoustic tones in the phone. If the phone is idle, the number of
messages received is displayed, along with information about these messages in the caller list.
The telephone stores all SMS/UUS1 messages you have received or sent in a list. Up to 10 received and 2
sent SMS/UUS1 messages can be stored. Please note that freestorage space mustbe available toreceive SMS/UUS1
messages. Youcan not receiveany further SMS/UUS text messagesif you alreadyhave 5 SMS/UUSmessages stored
(note on the display).
SMSmessages youhavesent arestoredtemporarily. AllstoredSMS/UUS messagescanbeaccessed untiloverwritten
by a newSMS/UUS1 messages sent.
All these entries will be deleted after restarting the telephone.
UUS1 textmessages can also be sentto internal andexternal telephones. You can onlyuse this featurewith external
telephones if »SMS/UUS1 (User to User Signaling)« has been applied for for your ISDN connection.
SMS Text Messages (subject to terms of network provider)
SMS allowsyou to sendand receive textmessages to/from otherphones in afixed-line network orto/from cell pho
-
nes. Sending/Receiving of SMS messages is only possible:
•
When youusethis telephonewith asystem telephonyPABX systemthat supportsthe SMS feature.
•
When you haveregistered this feature at your network serviceprovider, or the providerof the SMS centerfor
your ISDNconnection.
•
When thephone number forthe SMScenter isstored inthe telephone.
•
Be sureto enter theline accessdigit forthe PABXas well.
Telephone operation
22
Page 29

Consult the providerof theSMS centerthat hasbeenconfigured toestablish inwhich networks(fixed-line ormobile
communication network)SMS messagescan besent andthe costsfor sendingand receivingSMS messages.This te
-
lephone does not support the transmission of SMS messages with special content (for example images, audio).
UUS1 text messages
You can send text messagesfrom one telephone to another without having to call that particular subscriber. UUS1
text messages are limited to 31 characters.
Note thatall terminal devicesthat are used(telephones, PABX systems)must support the»UUS1 (User toUser Sig
-
nalling)« feature.
Creating and sending text messages
You can send a text messageto a number stored in your telephone (telephone directory, VIP memoryor direct dia
-
ling memory), orinput a new numberfor sending. To dothis, press the correspondingsoftkey in the menu»Send
mail« »direct«, »VIP«, »new« or »redial«.
To select anumber assigned toa functionkey(»direct«) orstored under theredial button, you canalsopress that
corresponding key.
Information:
When sending textmessages thefirst number(»MSN-1«) entered inthe telephoneor thenumber specifiedby me
-
ans of the user button are transmitted with the message.
Begin as follows:
a
>SSS
Replace handset.
mail uus or SMS new
Example: Creating a UUS1 text message
t Enter the text.
In this example: »Meeting 9. 00 to 11.00
«.
Confirm your entry with OK.
Send mail (Abc)
Meeting 9. 00 to 1
s Press the corresponding softkey to select a number
stored in your telephone, or press »New« to enter a
new phone number. For ex.: »new«.
Enter the telephone number.
For ex.: »2200«. Confirm your entry with OK. The
text message is transferred to the defined recipient.
Define targt. numb.
> 2200
Important notes for entering numbers with SMS transmission
If the»Direct exchangeline access« feature is switchedoff for your telephone, donot enterthe line accessdigit enter
the line access digit before the target number. The line access digit must be stored in the telephone.
When the telephone is connected to a PABX has been programmed, you can dial the target number directly.
Viewing newly received text messages
A new message can be displayed from the caller list (see page 20) or from the received textmessages list. Once you
have read a message from the list of temporarily stored text messages, it is deleted from the caller list.
Displaying received or sent text messages
The following features are available when viewing temporarily stored text messages:
Telephone operation
23
Page 30

•
Resending a textmessage.
You canedit a textmessage beforeactually resendingit.
•
Deleting atext message.
•
Putting atext message intothe listof permanentlystored messages(UUS1 only).
Begin as follows:
a
>SSS
Replace handset.
mail uus or SMS read
Example: Reading a received UUS1 message
Themost recentlyaddedtextmessage is displayedfirst.A new,unreadtextmessageis markedwithan»*«.The follo
-
wing information can be displayed for a text message:
•
Number of the text messagein thelist (inthis example:»1/3«).
•
Number, forwhich thetext message wassent (inthis example:»MSN-1«).
•
Number of the sender /receiver (inthis example:»2200«).
O
Press the arrow keys to view the entire text messa
ges.
Press OK to access the next menu with further op
-
tions.
UUS 1/2 { 2200
TxT
S In the upper row of the display you see the date and
the time, when you received the message. To select
an action, press the corresponding softkey.
UUS 1 today 14:21 }
send delete? more
»send« Editingand then sendingthetextmessage.
To send thetext message,pleaseproceed asdescribed for»Creatingand sendingtext messages« (see
page<$R[P#,Textnachrichterstellen undversenden,1,,0,#282]>).
»delete?« Deleting atextmessage.
»more« Viewingthe next temporarilystoredtextmessage.
> Press the arrow button and select »list«. UUS 1 today 14:21 {
list
Use the arrow buttons to select the desired message
and then confirm with OK.
Save text {}
1: TxT
Permanently stored text messages (UUS1 only)
You canstore up tofive UUS1 textmessages permanently in your telephone. You can thenedit, delete orsend these
text messages. You can only input these messages directly into your telephone.
Begin as follows:
a
>SSS
Replace handset.
mail uus list
Press the arrow keys to select a text message. Select text {}
1: TxT
O Press the OK to enter or change that text message.
Confirm your entries by pressing OK.
Telephone operation
24
Page 31

F Press the F button to send or delete a message. 1/ TXT
send delete?
»send« Editingandthen sendingthetextmessage.
To send thetext message,pleaseproceed asdescribed for»Creatingand sendingtext messages« (see
page23).
»delete?« Deleting atext message.
Automatic sending of text messages (UUS1 only)
Youcan sendaUUS1 textmessageautomatically to acaller. For this,message 1 inthe list ofpermanently stored mes
-
sages is used.
Begin as follows:
a
>SS>S
Replace handset.
mail uus incoming
S Press »incoming«, to activate or deactivate auto
-
matic transmission.
Send Text 1 with call?
no ok
Configuring the text message reception mode (UUS1 only)
You can programyour telephoneforexternal orinternal UUS1textmessage reception.Reception of externaland internal text messages can be inhibited separately.
Begin as follows:
a
> S S>S
Replace handset.
mail uus uus_reception
S Press the »External« or »Internal« softkey
to enable or inhibit reception of UUS1 messages.
For ex.:
»external«: Reception of external messages inhibited.
»internal«: Reception of internal messages is
possible.
Inhibit reception {
internal external
Error while receiving an SMS
There may be various reasons for it not being possible to receive an SMS, or for only having voice output:
•
A correspondingerror code isdisplayed in theevent that forsome unseen reason it isnot possible totransmit
anSMS. ContacttheSMS Servicecenterof yournetworkservice provider/carrier tofindout whicherrorcodes
are displayed.
•
The feature SMShas notbeenapplied for(and approved) atyour networkserviceprovider and/orthe provider
of theSMS ServiceCenter.
•
The SMShas been transferredby outsideservice providerswhich didnot transmitthis messageas an SMS.
•
Permanent number suppression(inhibit) isactivated foryour ISDNconnection.
•
Five SMS messages have already been stored in your telephone, preventing any further SMS messages from
being received.
•
Check thesettings made forthe systemtelephone andthe PABX
Telephone operation
25
Page 32

Monitoring costs
You havethe optionof logging the accrued communication costs foryour telephone.You canonly utilizethis possi
-
bility if the AOCD / AOCE feature has been enabled by the NSP for your ISDN access.
Askyou serviceprovider aboutthepossibilities ofof chargedatatransmission. Pleasenote thattransferof allcost in
-
formation from theexchange officetoyour telephonemay not alwaysbe possiblefortechnical reasons.Anyprice re
-
ductionsand specialratesorconvenience featuresutilizedmayresult indifferencesbetween the datastoredin thete
-
lephone and information listed in the phone bill.
Procedures for charge rate transmission
There areseveral standardizedprocedures fortransmitting callcharge rates.Usually thesame procedureis employ
-
ed at one connection that is recognized and stored automatically for future use by the telephone.
In the eventthat thetype ofchargeinformation transmissionis notstored in thephone, »Wrong charge type«
then appears in the display.
In this caseyou should delete all charge information stored in the telephone (seealso: viewing/deleting total costs).
Recognition and saving of the procedure that is used for transfer of cost information is then re-activated.
Information:
Youcan set thetarifffactor and thecurrencywhileconfiguring yourtelephonewiththe PCorinAdvanced Settings.
Viewing and deleting costs
You canview andreset accruedunits andthe callcharge costsfor individualcalls or for all calls.You canalso usethe
Professional Configurator for viewing and deleting conversation costs.
Viewing/deleting costs for the last call
Begin as follows:
a
>S
Replace handset.
rate
S The charges for the last call are shown. To delete
them, press the »delete?« softkey.
Last conn.: 0. 18 EUR }
single delete? sum
Viewing and deleting total costs
Begin as follows:
a
>SS
Replace handset.
rate total
You can view the sum of the charges accrued for all
MSN extension numbers. To delete them, press the
»delete?« softkey.
Total: 0.31 EUR }
single delete? sum
Information:
If thesum ofthe costsis deleted, all MSN costaccounts arealso deletedsimultaneously andrecognition andsaving
of the procedure that is used for transfer of cost information is then re-activated.
Monitoring costs
26
Page 33

Viewing/deleting costs for specific MSN extension numbers
Begin as follows:
a
>S>S
Replace handset.
rate MSN-2
You can view the sum of the charges accrued for a
particular MSN extension number. In this example
for »MSN-2«.
MSN-2: 0.06 EUR {
msn-1 msn-2 msn-3
<
S
To delete the total costs for the selected extension
number (in this example MSN-2), press the left ar
-
row button and then the »delete?« softkey.
MSN-2: 0. 18 EUR }
single delete?
sum
Setting the tariff factor and the currency designation
Begin as follows:
a
FSS
Replace handset.
config rate
»charge« Enterthe newcharge factor andconfirm yourentry byclicking »OK«. Thecharge factorlength isre-
strictedto 4 characters.Toenteracomma, usethe asteriskkey.
»currency« Enter thenew currency andconfirm yourentryby pressingOK. Thecurrencyname isrestricted to6
characters.The assignmentsforthe keypadforentering letters,digitsand specialcharactersare describedon page 8.
»delete?« All charge data storedin the telephone are deleted.Recognition and saving of the procedure that is
usedfor transfer ofcostinformation(seepage 26)isthenre-activated.
Programming call number display (CLIP/CLIR/COLP/COLR)
Begin as follows:
a
FSSS
Replace handset.
config Display tnumb
»incoming« Press »incoming«,»ok - no«tohave the numberdisplayedornotdisplayed atthecallingparty.
»outgoing« Press »outgoing«,»ok - no«tohave the numberdisplayedornotdisplayed atthecalledparty.
Monitoring costs
27
Page 34

System telephony
The system telephone is designed for being connected to the internal connection of PABX systems.
When operated at these PABX systems, your telephone offers you a variety of typical features. For example:
•
Dialing fromthe PABXtelephone directory (seepage 11).
•
Announcement(see page16 ).
•
Special functionkeys (see page28).
•
Access to thesystem menuof thePABX (seepage 34).
Information:
Please refer to the operating instructions of your elmeg PABX to determine whether these typical system features
are provided with this particular telephone.
Advanced telephone settings
In general, yourtelephone allows for a limitedconfiguration only of the supportedfeatures. You can set up various
additional features using»Advanced Settings«.You canonly perform acomplete configurationviathe inter
-
nal port of an elmeg PABX system.
If yourtelephone (CS290 only)is notconnected to anelmeg PABXsystem, the advancedsettings modeis automati
-
cally activated and certain features can momentarily not be used.
Activating the extended configuration mode
Begin as follows:
atq
Replace handset. Enter the code number*) acknowledgement
*)Code »**46782551##« (Vanity format »**INSTALL1##«).
Information:
Release for remote access of the phone is effected for 30 minutes.
Deactivating the extended configuration mode
Begin as follows:
atq
Replace handset. Enter the code number*) acknowledgement
*)Code »**46782550##« (Vanity format »**INSTALL0##«).
If the ISDN telephone is disconnected from the ISDN network, (for example by unplugging the ISDN connector of
the phone or by switching off or resetting the PABX), the extended configuration mode will be automatically swit
-
ched off.
Entering or modifying MSN extension numbers
Begin as follows:
a
FSSSS
Replace handset.
config msn
msn1...msn3
tnumb
Enter or edit the MSN extension numbers for the te
-
lephone (in this example 22).
Program dial number
MSN-1>22
System telephony
28
Page 35

IP-S290:If you have entered an MSN extension
number that is inhibited by your PABX or has been
assigned twice, you will see this entry when che
-
cking it.
Currently inactive MSNs
MSN-1
Connected to a PABX
Thisfeature isnormally set inthe PABXsystem.If thisisnot possible,you can usethe telephone instead.Please enter
the line access code first.
Begin as follows:
a
FS>S
Replace handset.
config pabx
·
Number length (softkey»number«)
The maximumlengthfor internalnumbers thatare assignedto differentinternal extensionswit
-
hin yourPABX system;
·
Direct exchangeline access (softkey»ln. access«)
With directexchange line access,you donot haveto dialthe lineaccess digitfor conductingout
-
going calls.Please enter theline accesscode ifyou wishto usethis feature.
·
Line accesscode(softkey »extern«)
Line accessdigitfor thePABX; theline accessdigit isplaced automaticallyin frontof thenumber
of thecaller for the external calls.
Setting capital or small letters for the display
All texts can be displayed with capital or small letters.
Begin as follows:
a
FS>S
Replace handset.
adjust use
·
Press the softkey under »softkeys«. Select (»ok«or»no«.Press »ok«to change anexisting
setting. Press»no« if youwish tokeep theexisting setting.
Setting the User Interface
Begin as follows:
a
FS>S
Replace handset.
adjust use
·
Connecting /usinga headset(softkey »headset«)
Configuring aheadset; For headset operation, usethe »headset«function key.You mayalso
want tousethe »auto-answer« function key.
·
Default settingfor an ongoingconnection (softkey»keypad«)
Select whetherin theinitial settings »DTMF«or»keypad«is possibleduring anongoing call.
Caller list LED
Begin as follows:
a
FS>S>S
Replace handset.
adjust use list
S Confirm your selection with this softkey.
»off« : No message will be signaled.
System telephony
29
Page 36

»on« : All calls, UUS1 and SMS messages and MWI
information will be signaled.
»messages« : Only UUS1/SMS messages and
MWI information will be signaled.
Incoming calls are signaled by a flashing LED.
Caller list LED?
off messages on
Programming buttons
You can program the five function keys on two levels with different functions via the PC configuration program or
theAdvanced Settings forthetelephone. Each keyisequippedwith anLEDthatis usedtodisplaythe active function.
The LEDs for the two bottom keys of the CS290 (keys 4 and 5) have two colors.
The LEDs for the buttons on the CS290 have two colors
Each color is assigned to a particular level for the function key.
Press the key two times to reach the second level for the function keys.
Programing a telephone number for a direct dial-in button (dtmf or keypad sequence).
Begin as follows:
a
FS>SS><O
Replace handset.
adjust direct new
Select entry
t Enter the number and confirm by pressing OK.
.
prog. new direct dial
1_>
Switching keypad / dtmf
R If you wish to configure this key as a keypad /DTMF
switchover key, press R instead of Enter and use this
key to select between the DTMF (T), keypad (K) or
target number key and enter the proper sequence.
Confirm your entry by pressing OK.
prog. new DTMF-key
1_>T123699#####9#####9
prog. new keypad-key
1_>K#*123
Programming function keys
Begin as follows:
a
FS>SS O
Replace handset.
adjust direct function
Select entry
Use the arrow buttons to select the function keys for
which you wish to program new functions. Press the
softkey below (in this example »Extension
key«)
Function for key 5a? {}
extension key
Enter the telephone number. Confirm your selection
by pressing OK (in this example: an extension key).
5a / Extension key
Number> 234
Function keys
You can program the following functions:
Button type
headset
extension key auto. accept on/off
line key answer machine
System telephony
30
Page 37
MSN assignment (Carrier / provider preselection) user on / off
day/night all trunk key
day / night team status info
team on/off connection
Announcement sy.pkd. enq.
Announcement on/off
call forwarding
voice mail
Using the function key
Press the key rapidly two times to reach the second level for the function keys.
Description of the key functions
Direct dialing buttons (see page 12)
Dtmf / keypad sequences (see page 17, 30)
Extension keys
You can configure dialing to an internal extension using an extension key. When the corresponding key is pressed
open listening is activated and the listed internal subscriber called.
Ifyou presstheextensionkey duringanongoingconversation, thecurrentcallis putonhold andthetarget subcriber
called.
If a call for the listed subscriber is signaled you can accept the call by pressing the extension key.
Ifyou haveconfiguredyourphone for automaticheadsetuse,the headsetisswitchedon insteadofopenlistening.
The LEDof this extensionkey startsflashing to indicatethat a callis waiting for this extensionnumber. The callcan
be picked up by any member within the group just by pressing this extension key.
Team keys
A teamkey is anormal line keyto which theinternal number fora team isassigned. When thecorresponding key is
pressed open listening is activated and the listed team called.
If a call for the listed team is signaled you can accept the call by pressing the team key.
Line keys
Anexternal channelisconfigured fora line key(e.g. theB-channelof anexternalISDN connection).Whenthis keyis
pressed, openlistening isactivated automaticallyand the correspondingB channelof theISDN connection is acces
sed. You will hear the external dial tone.
If an external call is signaled at a different in-house telephone you can accept this call by pressing the line key.
MSN assignment (defining the extension number for the next call)
You can conductan internal orexternal callsuchthat adefined number(MSN)is transferredfromyour telephoneto
the party you are calling. This number must have been entered previously in your telephone.
Day / night mode all / teams
You can configure a key so that you can switch between the call switching modes of the PABX (Day/Night modes)
when that key is pressed. The PABX uses call modes for signaling team or door terminal calls, for example.
Team log-on/log-off
If you are enteredas a subscriber in the call switching modes of one or moreteams you can configure a key so as to
control the callsignaling ofyour telephone. Whenyou arelogged in, teamcalls willbe signaled atyour telephone.No
team calls are signaled at your phone if you are not logged in.
Announcement (see: Page 16)
Announcement enable on/off
You can also explicitly inhibit or enable receiving of messages using a corresponding function key.
System telephony
31
Page 38

Call rerouting (call forwarding)
You can configure a button such that call rerouting is setup for a specific extension number (MSN) of your phone.
Press this button to activate or deactive call forwarding (see page 40).
Voice Mail-Button
If you are using a voice mail system at the PABX to which your phone is connected (for instance a Discofone voice
mailsystem) youcanalsoconfigure abuttonfor controllingvoicemail functions. Youcanthen setupaconnection to
your voice mail box by pressing this button.
Headset
If you have a headsetconnected to your telephone and ready configured, youcan operate it by means of a function
key. In the factory default setting, buttons 4 (headset) and 5 (auto-answer) are programmed for this.
Press the headset key to initiate, accept or end a call.
Auto-Answer
Please setup a headsetbutton if youwish to usethis feature. Yourtelephone can accept calls automatically,without
you havingto liftthe handset or press thespeakerecall flashbutton. Thetime interval, afterwhich acall isautomati
cally answered, is programmed during telephone configuration with the PC. The auto-answer feature is activated
and deactivated by means of dedicated function key.
Extension key for AM
This keyis aspecial linekey towhich theinternal numberfor theanswering machineis assigned.A DTMFsequence
can also be assigned to this key.
When youpress this keythe number of the answering machine is dialedand the storedDTMF sequence thentrans
mitted.You canemploythe DTMF sequencetoactivate remote control(polling)of theansweringmachineand listen
to newmessages, forexample. Whenthe answering machineis calledthe speakeris activated. Youcan alsoaccept a
call signaled at the answering machine by pressing this key.
User button On/Off
Normally, the first number entered in the telephone (MSN-1) is used as the default number for all settings and actions. You can set the default number for your telephone usingthe Userecall flash button. When you press this key
the default number for the telephone is changed to the corresponding phone number (MSN). The changed default
number is then used when you initiate a call and when you send SMS or UUS messages.
Trunk group buttons
Ifseveral externalportscanbe compiled toformtrunk groups youcanassignthem toonetrunkgroup key.Whenthis
keyis pressed,openlistening isactivatedautomatically andafree channelofthe correspondingtrunkgroup isaccessed. You will hear the external dial tone.
Status info button
Status info / Record
This button can be configured as »Router button« (code 01) or »Recording button« (code 02).
Router button (01)
Ifyou haveconfigureda statusinformationkey youcanterminate ongoingInternetconnectionsand setupnew ones
using the provider entered in the configuration data at the click of a button. The LED for the function key indicates
the status of the Internet connection:
LED off: no connection.
LED to:: Connection through WAN.
LED flashes: Connection through ISDN
Recording button (02)
(Only ifthis functionis supported bythe PABXsystem). When you press theLog keyduring an ongoing call, thelog
function is then activated (LED lights up).
Connection keys
You havethe optionof configuringfurther »Connectionkeys« forthe systemtelephone in addition to the»conn1«
softkeys and use these for Broker's calls. In this case, two to three of these keys must be configured.
Information:
You may want to use the connection keys for switching calls when Call Waiting is active.
·
No otherkeys may beconfigured betweenconnection keys.
System telephony
32
Page 39
·
The numberof possible connectionsdepends onthe numberof connectionkeys that areconfigu
-
red. Iffewer thanthree (3) keysare configured,the functionsCall Waiting,Call Switchingand In
-
quiry Callare only availablein alimited scope.
·
If severalconnectionsare »Idle«,the callsignaled firstis pickedup whenthe handsetis lifted.
·
If severalconnectionkeys areavailable, thecorresponding connectionkey canbe used toselect
the callto be pickedup whenseveral callsare waiting.Note herehowever thatonly onesystem te
lephone shouldbe operated at the ISDNport, andthat onlysimple callwaiting isconfigured. Only
then isit possible togive preferenceto asecond waitingcall overan ongoingcall (bothcallers
require oneB channel each).
·
If acall is nowsignaled, afurther connectioncan beset upwithout liftingthe handsetusinga furt
-
her connectionkey.
·
Connection keyscanbe usedfor aBroker's Call.
·
Allocation ofa connection, orof acall, isretained untilthe callor connectionis ended,in contrast
to the»conn1« softkeys.
·
A connectioncanbe setup usinga connectionkey andthenpressing aline key.
·
During anongoing call itis possibleto setup afurther connectionby pressingthe connection key.
·
Pressing the terminating key discontinuesthe currentconnection andthe connectionwith the
last callthat was onhold.
·
If youwish to connectan ongoingcall withone thatis onhold youmust click thesoftkey
»transfer« andthen pressthe connection keyfor thecall thatis onhold.
»System parked inquiry« Button
The called subscriberuses the system-parked inquiry call feature to dialthe default numeric code.The telephone is
now available for other uses, for example an announcement or message. A different subscriber can accept the call
when he/she lifts the handset and dials the corresponding number for the call on hold. The code numbersgiven by
thePABX systemcanalso beenteredin thefunctionkeys foroneor severalsystemtelephones. If acall is placedin the
system-parkedinquiry queueby pressing afunction key,thisis indicatedbythe LEDsof thefunctionkeys flashingat
the systemtelephones configured for this feature. The call can be picked up by pressing the corresponding function
key. You can only accept calls when the phone is idle (no caller put on hold). LED functions
Function key / LED lit flashes flickers
System parked inquiry Conversation held in a sys
-
tem-parked inquiry
Extension key Connection Connection on hold Incoming call / Call wai
-
ting
Line key Connection Connection on hold Incoming call
Status info button (01) WAN connection ISDN connection
Team key Incoming call
Trunk group button no B-channel available Incoming call
Extension key AM Connection with the ans
-
wering machine
AM holds active connecti
-
on with caller
Incoming answering ma
-
chine call
Voice Mail key Connection with Voice
mailbox
New messages available
System telephony
33
Page 40

Function key / LED lit not lit
MSN assignment Connection established by means of
the key
Team function log-on/log-off logged in logged out
Day/ night mode Night active Day active
Announcement own message
Message enable on/off enabled inhibited
Call rerouting active not active
Headset on/off Connection or
connection establishment
no connection
Auto-Answer active not active
User button modified number Default number
Function key / LED lit flashes flickers not lit
Connection keys Existing connection Connection being put
on hold
Call status No connection
Information:
Eachfunction keywithautomatic LEDfunctions(e.g. extensionkeys,line keys)mayonlybe programmedonetime
for each system.
Important notes for LED functions
The status of the LEDs is not updated permanently in the systemtelephone. The status of the LEDs is not changed
whenthese functionsarechangedorswitched usingacodeor PCconfigurationforthe PABXsystem.Ifthe system telephoneis disconnectedfromtheISDN network theLEDswill be offwhenthesystem telephoneispluggedin again.
The display for the assigned LED is changed and the corresponding feature activated/de-activated in the PABX
system when you press a function key.
Example: You activate the messageto your system telephone using the functionkey and someone else de-activates
the announcementvia the PABX system PCconfiguration. Whenyou pressthe functionkey youalso de-activatethe
message and the assigned LED is switched accordingly.
System menu of elmeg PABX systems
elmegPABX systemprovidea specialmenuwith further systemspecificfunctions. Thismenuand the featuresthatit
containsare managed entirelyinthe PABX butcanbeused byanyauthorizedsubscriber. Setup andactivation/ deac
-
tivationis configured in the PABX.
Information:
The descriptionof the menuand the featureswhich are available to you in this menuare given inthe operating in
-
structions for your PABX system.
a
SF
Replace handset.
tbook
Press F right after that.
Select the menu with the arrow buttons.
1 = Directory (Telephone directory for the
PABX)
2 = Follow me
3 = Dir.call (Direct dial-in)
4 = Day / night
System telephony
34
Page 41

5 = Call metering (Cost registration)
6 = LCR
7 = Hotel functions
Confirm your selection by pressing OK.
OK/figure confirmed {}
Directory /1
You canalso select themenu usingthe digits1...7 onthe keypad(3 =direct dial-in).Press theF-button tomove back
one menu step and return to the menu selection.
Dialing from the PABX telephone directory
O Please follow the instructions given on page 11. Dis
play: »Directory« . Confirm your selection by
pressing OK. Enter the first 1 ... 8 letters or digits for
the desired entry and then confirm by pressing OK.
The entry that matches your input will be displayed.
Please enter
letter:
Setting up a Follow me
O Display: »Follow me«. Confirm your selection by
pressing OK. Enter the number you wish to call and
confirm by pressing OK.
Press the softkey below the entered number or the
OK button to delete the entry.
Press the arrow button to reconfigure an existing
call forwarding.
Followme from
Number: 11
Activating Follow me
S Press the »Activate« button. Follow me is then
fully set up and switched on. Press Ok to move back
to the PABX menu.
OK/figure confirmed {}
activate / 1
Follow me from
N° 11 act.
Programming a direct dial-in
O Display: »Dir.call« . Confirm your selection by
pressing OK. Enter the telephone number for the di
rect dial-in.
Dir. call on MSN n°:
20_ /1
O Dir. call {}
set up
Deactivating or deleting a direct dial-in:
S Press the softkey below the entered number or the
OK button to deactivate the direct dial-in.
Press the arrow button if you wish to cancel or dele
-
te an existing direct dial-in.
OK/figure confirmed {}
20
OK/figure confirmed {}
Turn On
System telephony
35
Page 42

Day / Night setup
O »Day / Night« . Confirm your selection by
pressing OK. Use the arrow buttons to select »Cen
-
tral«, »Teams« or »I/C« and confirm your se
-
lection by pressing OK.
OK/figure confirmed {}
Day / Night / 4
OK/figure confirmed {}
Central
S »central«: If you select this entry, you can furt
her select »Day« or »Night«. Confirm your entry
by pressing OK (in this example: »Day«).
All day or night modes set up in the PABX system
are activated.
OK/figure confirmed {}
Day /1
Day service
set up
S »Teams« : If you select this entry, confirm by pres
-
sing OK.
OK/figure confirmed {}
Teams
Enter the team number or »*« for all teams of the
PABX. Confirm your entry by pressing Ok.
Enter team no.
(*=all):_
Cost registration
O »Call metering« . Confirm your selection by
pressing OK.
OK/figure confirmed {}
Call metering /5
S Enter the die 6-digit PIN (default PIN for the PABX
is 000000).
Pls enter
PIN: 000000
If the PIN you have entered is wrong, press OK to
move back to the menu selection.
You are not
authorised!
Charge counter
S
Use the arrow buttons to select »Call meter«
or »Charge record«. Please note that not all el
-
meg PABX systems support printing charges. Con
-
firm your selection by pressing OK.
OK/figure confirmed {}
Call meter /1
S Confirm »Read« by pressing OK. OK/figure confirmed {}
Read out
Enter the desired telephone number (in this exam
-
ple 11). Confirm your selection by pressing OK.
Meter value for
Number: 11
The charges accrued for the selected subscriber are
displayed.
N° 11
0.24EUR
Print charges
S Confirm your selection by pressing OK. OK/figure confirmed {}
Charges record /2
System telephony
36
Page 43

S Confirm your selection with this softkey. OK/figure confirmed {}
Turn On /1
S Use this softkey to activate or deactive the printing
of accrued charges.
Charges record
on
LCR
O Press »Status info« for more information on
LCR download.
OK/figure confirmed {}
Status inquiry /1
Hotel functions
O Confirm your selection with this softkey OK/figure confirmed {}
Hotel functions /7
S Enter the number for the desired room (in this ex
ample 20). Confirm your selection by pressing OK.
Use the arrow buttons to select »Check-in«,
»Check-out« or » Wakeup« (in this example
»Check-In«)
Please enter
room number:20
OK/figure confirmed {}
Check-in /1
Check-Out
Use the arrow buttons to select »Check-in«,
»Check-out« or » Wakeup« (in this example
»Check-out«).
OK/figure confirmed {}
Check-out /2
For a check-out, press the corresponding softkeys to
display the next steps such as charge dipslay or
charge printing on the printer connected to the
PABX. Printing of charges is not supported by all
PABX systems?
Check-In: 22.11. 11:11
Check-out guest?
Room: 20
0.000EUR
Charging data
Print out?
Check-out compl.
successfully
Wake-up call
O Select » Wakeup« with the arrow buttons. Con
-
firm your selection by pressing OK.
OK/figure confirmed {}
Wakeup 2
This telephone can be programmed for a one-time
wake-up call » One-time wakeup call« or
for several consecutive days »Dly. wakeup
call«. Confirm your selection by pressing OK.
OK/figure confirmed {}
Sgl.wakeup call /1
Enter the wake-up time and then confirm by pres
sing OK. You may then want to select the wake-up
melody you wish the guest to hear when picking up
the handset. Confirm your selection by pressing OK.
Sgl.wakeup call
at: 06:00 on 22.11.
System telephony
37
Page 44

Configuring and setting up the system telephone
Acoustic
Headset
Selecting a headset
Ifa specialsupportfeature isstoredin yourCS290or CS290-Utelephonefor theheadsetyour areusing,set your pho
ne forthat headsetmodel. Forexample, theLED inthe microphone extension for »FireflyF142 N«from Plantronics
can be activated by the telephone.
Begin as follows to configure the headset:
a
FS>S
Replace handset.
audib headset
S Press the appropriate softkey to configure the con
-
nected headset.
Headset / Audib? }
standard silicomp
Or use the arrow buttons to select the desired head
set. The entry depends on the telephone type being
used.
plantonics firefly
gn netcom 2100/2200
Speaker volume setting
In the menu »Volume etc.« press »louds«.
O Use the arrow buttons to set the volume.
Confirm your entry with OK.
Loudspeaker loudness {}
- ©©©--- +
Setting the volume of the handset
In the menu »Volume etc.« press »handset«.
O Use the arrow buttons to set the volume.
Confirm your entry with OK.
Handset loudness {}
- ©©©--- +
Setting the volume while making a call
You can change the handset volume or the speaker volume during hands free calling while making a normal call.
Press the F button. Use the arrow buttons to set the volume as desired.
Press ESCin orderto return tothe normaldisplay during an ongoing call. If youconfirm yourentry by pressingOK
instead of ESC, the permanently set value is overwritten by the newly set one.
Setting the acknowdledgement signals
With your telephone you can select whether the acknowledgement signals are always active (»ok«), never active
(»no«)or onlyactivewhen an incorrectentryis made(»error«).The default settinghasthe acknowledgementsig
-
nal always active.
In the menu »Volume etc.« press »beep«.
S Press the softkey below the desired function. Acknowledge signalactiv?
no error ok
Configuring and setting up the system telephone
38
Page 45

Positiveacknowledgement
signal(1long tone):
Your entry has been received and stored by the phone.
Negativeacknowledgement
signal(3short beeps):
Incorrect input not accepted by the phone. The desired action cannot be carried out.
Setting the call waiting signal
Ifthe callwaitingfunction (see page41)is enabled onyourtelephone youcansetthe volumeofthecall waitingsignal.
You can also select whether a waiting call is signaled only once, or several times.
In the menu »Call wait. tone« press »repeat«.
S If you want the waiting call to be signalled only on
ce, press the softkey below »no«. To have a waiting
call signalled several times, press the softkey below
»ok«.
Repeat call wt. tone.?
no ok
In the menu »Call wait. tone« press »volume«.
O Use the arrow buttons to set the volume of the call
waiting signal.
Confirm your entry with OK.
Call wait.tone vol {}
- ©©©--- +
Notice tone
You can set the volume of the acknowledgement tone.
Begin as follows:
a
FS>S
Replace handset.
audib beep_tone
O Use the arrow buttons to set the volume. The bar in
the display indicates the current status.
Confirm your entry with OK.
Beep tone volume {}
- ©©©--- +
Intercom
- ©©©--- +
Programming call rerouting
Call rerouting can be configured separately for any of the entered numbers (MSN).
The following settings are possible for all MSN extension numbers.
»delay« Delayedcall forwarding:
Callsaresignaledfirst atyourtelephoneafteranamountoftimepresetinthePABXandthenrerouted.
»busy« Callforwarding on busy:
Thecallsfor adefinednumberareforwarded onlywhenthetelephoneis busy.
(Forexample:There are alreadytwo (2)connectionsmade,oroneconnectionhas been madeand call
waitingis not permitted.)
»fixed« Unconditionalcallforwarding:
Allcallsare forwarded.Yourtelephonewill notring, whenthisnumberis called.
Information:
The following example describes the master authorization of a delayed call rerouting for the extension number
Configuring and setting up the system telephone
39
Page 46

MSN1.
Activate call forwarding
Begin as follows:
a
FSS
Replace handset.
adjust forward
In the menu »Delayed call forwarding« press »msn-1«.
t Enter the number to which the calls are to be for
warded.
In this example: »0123456789«.
Call forwarding delay
MSN-1>0123456789_
O Confirm your entry with OK.
Call rerouting has been registered. The three dots at
the right lower corner flash alternately.
Delayed call forwarding
MSN1>0123456789 ...
Viewing current call forwarding
When the telephoneis idle,a »U« on thetop lineindicates thatcall forwardinghas been activated.If youwish toview
the call forwarding setting, proceed as described on page 9.
Deactivating call rerouting
In the »Call forwarding« menu press »off«.
S Indicate the type of call rerouting you wish to deac-
tivate.
Call forwarding quit }
allfixed
Select the telephone number for which you wish to
deativate the call forwarding feature.
S Call forwarding quit?
msn-1
Call forwarding is deactivated. The three dots at the
right lower corner flash alternately.
Call forwarding quit
MSN-1 ...
Call waiting
A waiting callis indicated by abrief acoustic signal in the speaker and also displayed. You can set the volume of the
call waiting signal and select whether a waiting call is to be signaled only one time, or several times.
The following entries are possible for the call waiting feature:
»no« Withanongoingconnection orwhileaconnection is beingestablished,no further callswillbe signa
-
led.The caller hearsthebusysignal.
»ok« Callwaiting ispossiblewhenthereisonlyoneactivecallwaitingandnoother call iswaiting atyour te
-
lephone.
In the menu »adjust« press » wait« and then select »internal« or »external«.
S Select the appropriate setting by pressing either
»no« or »ok«.
Call waiting enable?
no ok
Configuring and setting up the system telephone
40
Page 47

Setting the contrast (»Settings« menu)
You can set individual contrast levels.
In the »Settings« menu press »contrast«.
O Use the arrow buttons to set the contrast.
Confirm your entry with OK.
Display contrast {}
- ©©©©-- +
Configuration
Inhibiting (dial ranges)
Begin as follows:
a
F S >> S
Replace handset.
config
*
inhibit
* With the elmeg IP-S290 press the arrow button two times.
Press »inhibit« and then enter PIN for »inhi
-
bit« (0000) or press OK. This PIN cannot be chan
-
ged and serves only for confirmation purposes.
Input PIN please
>0000
inhibit »list«
S Press »list« in order to program restricted and
unrestricted numbers.
Config. inhibit filter
list outgoing
O Use the arrow buttons to select the storage position
(1...7 uenabled and 1... 7 inhibit numbers). Confirm
your selection by pressing OK.
Inhib./Enable tel. no {}
inhib-1:
t Enter the desired restricted and unrestricted num-
bers. Confirm your selection by pressing OK.
Inhib./Enable tel. no {}
Enable-1:
inhibit »Outgoing calls«
S Press »outgoing« to inhibit »outgoing calls«. Config. inhibit filter
list outgoing
S Select:
»All calls« :All unrestricted numbers can be
dialed.
»list« : All telephone numbers not included in
the restricted numbers list can be dialed.
»no« All telephone numbers can be dialed.
Inhib. outgoing calls?
no list complete
Setting the language of the display
You can select the language of your display.
Begin as follows:
a
FSSS
Replace handset.
config Display language
Configuration
41
Page 48

Press the arrow buttons to view the available
languages.
Which language? }
deutsch english polski
S Press the softkey below the desired language. The
display switches to the changed language immedi
-
ately.
Connection to a PABX
Information:
This feature requires an »Extended Configuration« to show on the display.
If you operate your phone with a PABX, you can make all entries required here.
Begin as follows:
a
FS>S
Replace handset.
config PABX
PABX
number ln.access extern
S »number«:
Maximum length for internal extension numbers
assignable to subscribers connected to the PABX.
PABX Numb. length
>4
S »extern« :
You will need this Line Access Digit for programming a direct exchange line access for your PABX.
The line access digit is placed automatically in front
of the number of the caller for the external calls.
Input external line
Extern> 9
Extension numbers (MSN)
You canenter upto 3 phonenumbers (MSNs)via PC configurationthat canbe used bythe telephoneat the internal
connection for the PABX system. Please observe the instructions in the PABX manual.
When youenter anMSN or extension number inyour ISDNsystem telephone you are essentiallydefining thatyour
ISDN system telephoneis called usingthis MSNorextension numberwhena callismade. Ifyouenter morethanone
MSN extension number in your telephone, your phone will ring each time one of these MSN extension numbers is
called.
CS290, CS290-U
If you do not enter an extension number, your phone will ring at each incoming call for the internal connection, to
which it is connected.
IP-S290
Ifyou donotenter anextensionnumberfor yourtelephone,no callswillbe signaled.Thetelephone isthenregistered
for guestaccessonly. Onlyinternal callsarepossible (unless »Exchange lineaccess authorization«has been configu
-
red). How to configure an MSN extension number is described in the following example with »msn-1«.
Entering or editing an MSN extension number
Entering or editing a phone numbercan only beperformed via the PCconfiguration program or the Advanced Set
-
tings for the telephone.
a
FSS
Replace handset.
config msn
Configuration
42
Page 49

Viewing an MSN extension number
In the menu »Program dial number« press »tnumb«.
Setting the call signaling melody and volume
You can defineand set a specific melody and its volume foreach extension number thatyou enter. If you areusing
the telephone atan internalISDN / UP0or Ethernetconnection, you canprogram specialringing melodies anda dif
-
ferent volume for internal calls.
Information:
In theinitial setting ofthe telephone, 10 different melodies are storedfor call signaling.These 10 melodiescan not
be changed.
Setting the melody
In the menu »Program MSN-1« press » sound« and then »internal« or »external«.
O Use the arrow buttons to set the desired melody.
Confirm your entry with OK.
Select melody {}
-©©©------- 2
Setting the ringer melody volume
In the menu » MSN-1 program« press »volume« and then »internal« or »external«.
O Use the arrow buttons to set the volume.
Confirm your entry with OK.
Select call signal {}
MSN-1 - ©--- +
Assigning a name to the MSN
You can assign your own names (max. 5 characters) to the MSN extension numbers.
In the menu »MSN-1 Program « press and then »msn-name«.
t Enter the name desired name.
In this example:»STORE«.
Confirm your entry with OK.
Own MSN designati (Abc)
MSN-1>STORE
Once a name has been enteredfor a number, the softkey designations »msn-1«,»msn-2«or»msn-3« are repla
-
ced by the corresponding names in the menu. In this example here »STORE« is displayed instead of »msn-1«.
Entering the Log-in PIN (MSN)
Begin as follows:
a
SS S>>S
Replace handset.
konfig MSN MSN-1...MSN10 Login_pin
S Enter the »Login_PIN«. MSN-1 Programm {
login-pin login-name
Please enter login PIN
MSN-1>
t Enter the »Log-in PIN«. When you press the 0
key several times in a row the possible special cha
racters that can be used are displayed, along with
their current position on the key panel. Up to 4 le
-
vels are displayed each time you press the 0 key.
Configuration
43
Page 50

When you then press a key 0...9 the character dis
played for that particular key is selected. Wait until
the cursor moves forward one field before attemp
ting to enter the next character. Only the character
that is currently being entered is visible; characters
that have already been entered are hidden by the as
terisk symbol.
Example: Press the key 0 one time and then key 6;
the @ symbol is selected.
1=! 2=% 3=? 7=, 8=. 9=0
4= 5=: 6=@ 0=more
O
E
Confirm your entry by pressing OK.
Press the E button.
·
Synchronizing oftelephone andPABXsystem.
Information:
Please note that logging in and synchronization may take several moments!
If there is no connection to the PABX system (no LAN link, or the telephone has not been logged in, »©-----/
/---‰ « will be shown in the display instead of the time.
Programming a default call forwarding number
If you do not wish to accept a call, you can forward this call directly to a different phone number.
If you frequentlyforward callsto the samenumber, youcanuse thisnumber asadefault settingin yourphone.If you
then wish to forward a call, the default number will be presented first for you to use.
The default setting for such a number is made separately for each number (MSN) entered in the telephone.
In the menu »Program MSN-1« press the arrow button and then »x-fer«.
Enter the desired telephone number. In this example 12345.
Call forward. number
MSN-> 12345
Press C in order to delete an existing number.
Setting »Info at end of call«
Begin as follows:
a
FSSS
Replace handset.
config Display end
tS At the completion of a call, information about that
call (for example, duration, or charges accrued) can
be shown in the display.
Info at end of call?
no ok
Setting for »UUS Dummy Message«
This feature isneeded only when required by your service provider. Pleaseask your provider for details in case you
experience problems when sending UUS1 messages. This feature can be deactivated if required.
Configuration
44
Page 51

Begin as follows:
a
FS>S>S
Replace handset.
config Service uus
S Select the settings with the softkeys. UUS Dummy-Message?
off on
Configuring the system telephone elmeg IP-S290
IP settings
Begin as follows:
a
F S>S
Replace handset.
config ip
Please observe the configuration parameters and presettings for the PABX or the network when setting the elmeg
IP-S290.
S Significance of the softkeys:
»dhcp«: If your PABX is used as DHCP server,
press this softkey followed by »on«. This completes
the settings for the system telephone. You will now
have to enter the MSN extension number specified
in the PABX into your telephone.
»ip«: If DHCP is not active, please enter here the IP
address for your telephone.
»gateway«: If DHCP is not active, please enter here the IP address for the PABX (gateway).
IP-settings
dhcp ip_addr gateway
> Press the arrow button. IP settings {
subnet sys
S »subnet«: Here you enter the subnet mask. Subnet mask
INA> 0. 0. 0. 0.!
S »sys«:
If you press »ok« then you confirm that the gateway
in your LAN is an elmeg PABX or an elmeg gateway.
If you press »no« then you will have to enter the IP
addres for the elmeg PABX or the elmeg gateway in
your LAN.
When you have finished editing, press E to restart
your system telephone.
Act. Sys srv Gateway?
no ok
IP address of Sys server
INA>192.168. 1,250!
Configuration
45
Page 52

Service
Name
Telephone name
You canassign aname (20characters max. ) to thetelephone toprovide it withunique identificationwithin a PABX
system. You will need the telephone name for example for configuringthe telephone through the internal port ofa
connected PABX. The default name entered is the telephone's serial number.
Begin as follows:
a
FS>S>S
Replace handset.
config service Name
t Enter a name for the telephone (max. 20 characters)
and confirm your entry by pressing Ok.
Device name (Abc)
Name> 0000000923
SMS
Number for the SMS center
Information:
These numbers can be edited using »Advanced Settings« only. It is possible to display the numbers and
change the TX server (transmission server).
With this system telephone you can send and receive SMS messages (text messages) to/from other phones in a fixed-line network or to/from mobile phones. (see page 22).
Information:
However, sending and receiving SMS messages is only possible when this phone is connected to specific elmeg
PABX systems. Please refer to the operating instructions for your PABX to determine whether SMS features are
provided with this particular telephone.
The numberfor the SMSservice provider (max.three providers)must be storedin the telephonein order for you to
sendand receive SMSswithyour telephone. Messagescanbereceived usinganyofthethree storedSMSservers,whe
-
reastransmitting ofmessagesis carriedoutusing only theserver you haveenabledfor this.Inthe initial(default)set
-
tings for this telephone the number»0193010« is entered for the SMS center for Deutsche Telekom (German Tele
-
com) and can be changed as described below.
Begin as follows:
a
FS>S>S
Replace handset.
config service sms
O
Select the SMS server or enter the number for your
SMS service provider.
For example: »0193010«.
Confirm your entry with OK.
Number for SMS exchg. {}
1:0193010 TX
2:
3:
Version
Reading the firmware version
Youcan havetheversion andthemodel ofyourphone displayedsothat youcandetermine, forexample,which firm
-
ware version is available in your phone.
Service
46
Page 53

Begin as follows:
a
FS>SS
Replace handset.
config service version
C The display shows information about your telepho
ne.
For ex.: Firmware version, name, …
Press the arrow key to display further information.
Press the C button to exit the menu.
Software-Identification{}
Type: CS290 V4.xx
Software-Identification}
Time 11/11/05 11:11
Software-Identification{}
:V4.xx 14 00 01 01
Software-Identification{}
Name: 003002272
The parameters below are shown only on the elmeg
IP-S290.
Software-Identification{}
SNr.: 007074
Software-Identification{}
MAC: 11:22:33:44:55:10
Software-Identification{}
IP: 192.168.1.57
Software-Identification{}
GW: 192.168.1.250
Data
Reset Restoring the default telephone settings
You can resetthe telephoneto its initialstate usingthe procedure describedbelow. Allof thedatathat youhave ente
red previouslywill be deleted.Or you delete user-specific datasuch as: VIP targets, SMS/UUS1 messages,caller list
and redial list. Any function keys configured for these features will not be deleted.
Begin as follows:
a
FS>SS
Replace handset.
config service data
S Press the »ok« to reset the telephone to its initial
state. If you do not wish to have the data deleted
press »no«.
Press »user« to delete user specific data only.
Sure to delete all?
no user ok
When you press the »ok« softkey, the telephone is
reset to the default state. All data is deleted, the tele
phone starts new. This could take several seconds to
complete.
Service
47
Page 54

Software
Downloading new firmware
»Funkwerk Enterprise Communications GmbH« provides aserver PC which canbe used for loadingnew firmware
into your CS290 and CS290-U system telephones. Inthis case, the firmware is downloaded through the ISDN con
nection. Download can take12 minutes approximately, depending on the size of the firmware file. Pleasenote that
there is a charge for loading firmware via an external ISDN connection.
With theIP-S290 you canuse theProfessional Configurator (WIN Tools forthe PABX) under »System telephones«,
»Indirect softwaredownload« totrigger amanual firmwaredownload. Inthe ProfessionalConfigurator youcan en
ter the Internet address for the firmware download. For this, no keys need to be pressed on the system telephone.
Information:
For more information about firmware download, refer to the »Firmware Download IP« description on your CD.
With the CS290-Uyou canusethe ProfessionalConfigurator (WIN Toolsfor thePABX)under »Systemtelephones«,
»Indirect software download« to trigger a manual firmware download. For this, no keys need to be pressed on the
system telephone.
•
Do notpress any keys(unless prompted to do so)or plug inor unplug anyconnectors while data transfer isin
progress. If theconnecting line is interrupted during a download, restart the download programand proceed
as described previously.
•
Once the newfirmware has been loaded completely the telephone performs a RESET andis then available for
use again.
•
In some circumstances all of the data in your phone may be deleted after a firmware download. If this is the
case, a notice is given prior to starting the download. Prior to downloading, save all of your telephone data
(configuration, phonedirectory) to yourPC (usingthe PCconfigurator).
Information:
Important notice for export variants:
Please ask your specialized dealer/distributor for the access number of the download server for your country!
Download server (CS290 / CS290-U Call number
Server PC Funkwerk Enterprise Communications
GmbH
++49-(0)5171-901190
Triggering a new firmware download at the telephone (CS290, CS290-U):
Begin as follows:
a
FS>SS
Replace handset.
config service software
The telephone then restars from the BIOS.
S Press »Update«. Load new software?
no ok
t Enter the line access digit to obtain external line ac
cess, and then the number for the download server.
In this example: »005171901190«.
If you are using your telephone with a PABX system
for which automatic exchange line access is active,
enter the number for the download server without
the line access digit.
Please dial
ABORT
Firmware Update
005171901190 ABORT
Service
48
Page 55

Information:
To cancel a download already in progress press the »Abort« softkey or ESC.
Insome circumstancesall ofthe data inyourphone maybedeletedafter afirmwaredownload. If thisisthe case,ano
tice is given prior to starting the download: »All data will be deleted Continue?«. The firmware
download is startedonly afteryouhave confirmedthisprompt bypressing »ok«. Ifthe dataforthe telephoneare not
deleted during the download, the download is started without first displaying the above prompt.
Telephone BIOS (CS290, CS290-U):
Thistelephone isequipped with aBIOS (basic functions)inEnglish. TheBIOSfunctions alsoremainavailable evenif
the firmware of the telephone does not operate properly, or if new firmware was not loaded completely.
The following functions are available in the telephone's BIOS
•
All phonecalls are signaled.No number(MSN) hasbeen enteredin thetelephone.
•
Dialing ofoutgoing callsis possible afterlifting thehandset (nocall preparation,no openlistening).
•
Loading newtelephone firmware over the externalISDN connection.
Downloading new firmware over the external ISDN connection (CS290, CS290-U)
S You are shown the BIOS menu for the telephone.
If you wish to load new firmware via the ISDN con
-
nection, press this softkey.
CS290-bios 1.04 by ps
INFO SET UPDATE
Now proceed as described on page 48 of these operating instructions.
Country
Country specific settings
Certainspecific parametersneedto besetif the telephoneisto beusedin a countryotherthan thecountryconfigured
as default.
This includes setting the language, the currency and certain default specific parameters for a country's ISDN network.
Checkas describedbelowwhether youneedtoset countryspecificparameters for thecountryin whichthetelephone
is to be used.
Begin as follows:
a
FS>S>S
Replace handset.
config service Country
S Press the arrow keys to view the countries, for
which specific settings are available.
Press the softkey for the desired country. For exam
-
ple »uk«.
Which Country (Prot.)?}
germany uk poland
Information:
The system telephone is then restarted!
All country specific settings take effect immediately.
The telephone data will not be deleted. The cost set
-
tings, however, will be reset.
11.11.05 07:00 }
tbook vip
Service
49
Page 56

Service
50
Page 57

Index
A
Accepting a call . . . . . . . . . . . . . . . . . . 12
waiting call . . . . . . . . . . . . . . . . . . . 18
Acknowledgement signals . . . . . . . . . . . . 38
Acoustic . . . . . . . . . . . . . . . . . . . . . . 38
Activate Follow me . . . . . . . . . . . . . . . . 35
Advanced settings. . . . . . . . . . . . . . . . . 28
Announcement . . . . . . . . . . . . . . . . 16,31
Announcement filter . . . . . . . . . . . . . . . 31
Anonymus call. . . . . . . . . . . . . . . . . . . 13
Audio in / Audio out . . . . . . . . . . . . . . . . 5
Auto-Answer . . . . . . . . . . . . . . . . . . . 32
Automatic recall. . . . . . . . . . . . . . . . . . 16
at busy: . . . . . . . . . . . . . . . . . . . . . 16
Automatic redialing. . . . . . . . . . . . . . . . 14
deactivate . . . . . . . . . . . . . . . . . . . 14
suspend . . . . . . . . . . . . . . . . . . . . 14
B
Broker's call . . . . . . . . . . . . . . . . . . . . 19
C
Call Deflection. . . . . . . . . . . . . . . . . . . 12
Call forwarding . . . . . . . . . . . . . . . . . . 39
Call rerouting . . . . . . . . . . . . . . . . . 32,39
Call signaling melody
setting for each number (MSN) . . . . . . . 43
setting the volume. . . . . . . . . . . . . . . 43
Call switching . . . . . . . . . . . . . . . . . . . 18
Call waiting . . . . . . . . . . . . . . . . . . . . 18
setting . . . . . . . . . . . . . . . . . . . . . 39
Call waiting enable / inhibit . . . . . . . . . . . 40
Caller list . . . . . . . . . . . . . . . . . . . . 20-21
dialing a numer . . . . . . . . . . . . . . . . 12
display . . . . . . . . . . . . . . . . . . . . . 21
Caller list LED . . . . . . . . . . . . . . . . . . . 29
Care and maintenance . . . . . . . . . . . . . . . 3
CCBS (recall to busy subscriber) . . . . . . . . 16
Check-Out-In . . . . . . . . . . . . . . . . . . . 37
Cleaning the telephone. . . . . . . . . . . . . . . 3
CLIP/CLIR/COLP/COLR . . . . . . . . . . . . . 27
Completion of call on busy, automatic . . . . . 16
Completion of call to busy subscriber (CCBS) . 16
Conference. . . . . . . . . . . . . . . . . . . . . 19
Configuration . . . . . . . . . . . . . . . . . 38-45
Configuration . . . . . . . . . . . . . . . . . . . 8
Configuration Extended . . . . . . . . . . . . . 28
Connection keys. . . . . . . . . . . . . . . . . . 32
Connection to a pabx . . . . . . . . . . . . . . . 42
Contents of package . . . . . . . . . . . . . . . . 3
Conversation
call switching / transfer . . . . . . . . . . . . 18
Cost registration. . . . . . . . . . . . . . . . . . 36
Country-specific settings . . . . . . . . . . . . . 49
D
Data. . . . . . . . . . . . . . . . . . . . . . . . . 47
Day / night mode . . . . . . . . . . . . . . . . . 31
Day / Night setup . . . . . . . . . . . . . . . . . 36
Default telephone settings
reset. . . . . . . . . . . . . . . . . . . . . . . 47
Deflecting a call . . . . . . . . . . . . . . . . . . 12
dhcp . . . . . . . . . . . . . . . . . . . . . . . . 45
Dialing control . . . . . . . . . . . . . . . . . . 41
Dialing from the pabx telephone directory. . . 35
Direct dial-in button (dtmf or keypad sequence)30
Direct dial-in using function buttons . . . . . . 12
Direct exchange line access . . . . . . . . . . . 29
Downloading new firmware . . . . . . . . . . . 48
dtmf dialing . . . . . . . . . . . . . . . . . . . . 18
Index
51
Page 58

E
Editing VIP-entries . . . . . . . . . . . . . . . . 20
elmeg IP-S290 at the Ethernet port . . . . . . . . 5
Enter or modify MSN extension numbers . . . 28
Entering texts . . . . . . . . . . . . . . . . . . . . 8
Extended last number redial . . . . . . . . . . . 13
Extension key . . . . . . . . . . . . . . . . . . . 31
Extension key for an answering machine. . . . 32
Extension number (MSN) . . . . . . . . . . . . 42
defining for the next call . . . . . . . . . . . 31
F
Fault indicator of the IP-S290 . . . . . . . . . . . 7
Firmware version . . . . . . . . . . . . . . . . . 46
Function keys
announcement. . . . . . . . . . . . . . . . . 31
announcement on/off. . . . . . . . . . . . . 31
auto-answer . . . . . . . . . . . . . . . . . . 32
call rerouting. . . . . . . . . . . . . . . . . . 32
day / night modes . . . . . . . . . . . . . . . 31
direct dial / DTMF-/ keypad sequences . . . 31
extension key . . . . . . . . . . . . . . . . . 31
headset on/off . . . . . . . . . . . . . . . . . 32
line key . . . . . . . . . . . . . . . . . . . . . 31
log-on/log-off . . . . . . . . . . . . . . . . . 31
MSN assignment . . . . . . . . . . . . . . . 31
router button. . . . . . . . . . . . . . . . . . 32
status info . . . . . . . . . . . . . . . . . . . 32
team key . . . . . . . . . . . . . . . . . . . . 31
trunk group button . . . . . . . . . . . . . . 32
user on/off . . . . . . . . . . . . . . . . . . . 32
Voice Mail-Button. . . . . . . . . . . . . . . 32
H
Headset. . . . . . . . . . . . . . . . . . . . . . . 15
Headset on/off. . . . . . . . . . . . . . . . . . . 32
Hotel functions . . . . . . . . . . . . . . . . . . 37
I
Inactive MSN . . . . . . . . . . . . . . . . . . . 29
Info at end of call?. . . . . . . . . . . . . . . . . 44
inhibit . . . . . . . . . . . . . . . . . . . . . . . 41
Inquiry Call . . . . . . . . . . . . . . . . . . . . 18
IP-S290 . . . . . . . . . . . . . . . . . . . . . . . 45
IP-settings . . . . . . . . . . . . . . . . . . . . . 45
K
Key functions . . . . . . . . . . . . . . . . . . . 31
Keypad . . . . . . . . . . . . . . . . . . . . . . . 17
L
Label panel . . . . . . . . . . . . . . . . . . . . . 6
LCR . . . . . . . . . . . . . . . . . . . . . . . . . 37
LED functions . . . . . . . . . . . . . . . . . . . 33
LEDs (LED) . . . . . . . . . . . . . . . . . . . . . 1
Line key . . . . . . . . . . . . . . . . . . . . . . 31
Loading firmware . . . . . . . . . . . . . . . . . 48
Loading new firmware . . . . . . . . . . . . . . 48
from the telephone BIOS . . . . . . . . . . . 49
Log off (team) . . . . . . . . . . . . . . . . . . . 31
Log on (team) . . . . . . . . . . . . . . . . . . . 31
M
Malicious call identification (MCID)
after a call . . . . . . . . . . . . . . . . . . . 17
during an ongoing call . . . . . . . . . . . . 17
MCID (Tracing) . . . . . . . . . . . . . . . . . . 17
Message Waiting Indication (MWI) . . . . . . 21
Microphone on/off . . . . . . . . . . . . . . . . 15
Monitoring costs . . . . . . . . . . . . . . . 26-27
Mounting the telephone feet . . . . . . . . . . . 3
MSN
assigning a name . . . . . . . . . . . . . . . 43
entering. . . . . . . . . . . . . . . . . . . . . 42
MSN (extension number) . . . . . . . . . . . . 42
Index
52
Page 59

defining for the next call . . . . . . . . . . . 31
MSN assignment . . . . . . . . . . . . . . . . . 13
Muting . . . . . . . . . . . . . . . . . . . . . . . 15
MWI . . . . . . . . . . . . . . . . . . . . . . . . 21
N
Name . . . . . . . . . . . . . . . . . . . . . . . . 46
Notice tone (announcement) . . . . . . . . . . 39
Number for the SMS center . . . . . . . . . . . 46
O
Open listening . . . . . . . . . . . . . . . . . . . 15
P
PABX . . . . . . . . . . . . . . . . . . . . . . . . 42
system menu. . . . . . . . . . . . . . . . . . 34
Pictographs . . . . . . . . . . . . . . . . . . . . . 6
Placing the telephone . . . . . . . . . . . . . . . 3
Programming a direct dial-in . . . . . . . . . . 35
Programming call number display . . . . . . . 27
for the next call . . . . . . . . . . . . . . . . 13
Programming numbers. . . . . . . . . . . . . . 20
Programming VIP-entries . . . . . . . . . . . . 20
R
Recording button . . . . . . . . . . . . . . . . . 32
Redialing . . . . . . . . . . . . . . . . . . . . . . 13
automatic. . . . . . . . . . . . . . . . . . . . 14
extended . . . . . . . . . . . . . . . . . . . . 13
Refusing a call . . . . . . . . . . . . . . . . . . . 12
Reset . . . . . . . . . . . . . . . . . . . . . . . . 47
Router button . . . . . . . . . . . . . . . . . . . 32
S
Service . . . . . . . . . . . . . . . . . . . . . 46-50
Setting calling line identification
for the next call . . . . . . . . . . . . . . . . 13
Setting the contrast . . . . . . . . . . . . . . . . 41
Setting the headset type . . . . . . . . . . . . . 38
Setting the language . . . . . . . . . . . . . . . 41
Setting the ringing tone volume for each number
(MSN) . . . . . . . . . . . . . . . . . . . . . . . 43
Setting the ringing tones . . . . . . . . . . . . . 43
Setting the ringing volume . . . . . . . . . . . . 43
Setting the volume
handset . . . . . . . . . . . . . . . . . . . . . 38
speaker . . . . . . . . . . . . . . . . . . . . . 38
Setting up a Follow me . . . . . . . . . . . . . . 35
Settings, country-specific. . . . . . . . . . . . . 49
SMS / UUS1 messages . . . . . . . . . . . . . . 21
SMS Center . . . . . . . . . . . . . . . . . . . . 46
SMS messages . . . . . . . . . . . . . . . . . . . 22
display . . . . . . . . . . . . . . . . . . . . . 23
SMS text message
error while receiving . . . . . . . . . . . . . 25
SMS text messages
creating and sending . . . . . . . . . . . . . 23
Software . . . . . . . . . . . . . . . . . . . . . . 48
Specifying the outgoing number. . . . . . . . . 13
Starting a call . . . . . . . . . . . . . . . . . . . 11
dialing from the caller list . . . . . . . . . . 12
dialing from the VIP memory . . . . . . . . 11
direct dial-in with functin buttons . . . . . 12
with fixed extension number (MSN) . . . . 13
Starting ca call
without number display (CLIR) . . . . . . . 13
Status info . . . . . . . . . . . . . . . . . . . . . 32
Status info button . . . . . . . . . . . . . . . . . 32
subnet . . . . . . . . . . . . . . . . . . . . . . . 45
Suppressing the telephone number . . . . . . . 27
at the next call . . . . . . . . . . . . . . . . . 13
Switching call modes . . . . . . . . . . . . . . . 31
Switching calls to a busy subscriber. . . . . . . 18
sys. . . . . . . . . . . . . . . . . . . . . . . . . . 45
system menu of pabx systems . . . . . . . . . . 34
Index
53
Page 60

System parked inquiry . . . . . . . . . . . . . . 33
System telephony . . . . . . . . . . . . . . . 28-37
T
Team keys . . . . . . . . . . . . . . . . . . . . . 31
Team log-on/log-off . . . . . . . . . . . . . . . 31
Telephone BIOS . . . . . . . . . . . . . . . . . . 49
Telephone buttons . . . . . . . . . . . . . . . . . 1
Telephone directory for the PABX . . . . . . . 11
Telephone name. . . . . . . . . . . . . . . . . . 46
Telephone number (MSN)
setting the call signaling melody. . . . . . . 43
viewing . . . . . . . . . . . . . . . . . . . . . 43
Text messages . . . . . . . . . . . . . . . . . . . 22
configuring the reception mode (UUS1 only) 25
creating and sending . . . . . . . . . . . . . 23
display . . . . . . . . . . . . . . . . . . . . . 23
save (UUS1 only) . . . . . . . . . . . . . . . 24
Tone dialing . . . . . . . . . . . . . . . . . . . . 18
Tracing (MCID) . . . . . . . . . . . . . . . . . . 17
Transferring a call. . . . . . . . . . . . . . . . . 18
Trunk group button. . . . . . . . . . . . . . . . 32
U
Upper or lower case letters. . . . . . . . . . . . 29
User button on/off . . . . . . . . . . . . . . . . 32
User interface . . . . . . . . . . . . . . . . . . . . 1
UUS Dummy Mesage. . . . . . . . . . . . . . . 44
UUS1 text messages. . . . . . . . . . . . . . . . 22
automatic sending (UUS1 only) . . . . . . . 25
configuring the reception mode . . . . . . . 25
creating and sending . . . . . . . . . . . . . 23
display . . . . . . . . . . . . . . . . . . . . . 23
save . . . . . . . . . . . . . . . . . . . . . . . 24
UUS1filter . . . . . . . . . . . . . . . . . . . . . 21
V
Version. . . . . . . . . . . . . . . . . . . . . . . 46
Viewing and deleting costs. . . . . . . . . . . . 26
last call . . . . . . . . . . . . . . . . . . . . . 26
specific extension numbers (MSN) . . . . . 27
total costs. . . . . . . . . . . . . . . . . . . . 26
VIP-memory. . . . . . . . . . . . . . . . . . . . 20
dial call number . . . . . . . . . . . . . . . . 11
edit entries . . . . . . . . . . . . . . . . . . . 20
programming entries . . . . . . . . . . . . . 20
Voice Mail . . . . . . . . . . . . . . . . . . . . . 32
Voice Mail-Button . . . . . . . . . . . . . . . . 32
W
Wake-up call. . . . . . . . . . . . . . . . . . . . 37
Index
54
Page 61
Brief description of functions
Room inquiry
bg
R
tg
Lift up handset Conversation Dial call number
Broker`s call
bg
R
tg
>S
Lift up handset Conversation Dial call number
conn1...
conn2
Conference
bg
R
tg
S
Lift up handset Conversation Dial call number
Conf
Call transfer with prior notice
bt g
R
tg
S
Lift up handset Dial call number Conversation Dial call number
x-fer
Call forwarding
al
S
t
O
Replace handset.
x-fer
Dial call number
Extended last number redial
a
WW
or
<> O
bg
Replace hand-
set.
Search call
number
Search call
number
Lift up hand-
set
Conversation
Recall to busy subscriber
btg
S
a
Lift up handset Dial call number Subscriber busy
clbckbusy
Replace handset.
Selection of outgoing numbers (MSN)
at
OFSS
bg
Replace
handset.
Dial call
number
msn msn-1...
msn-3
Lift up hand
-
set
Conversation
Activate call forwarding
a
FSSSS
t
O
Replace
handset.
adjust forward delayed
busy fixed
msn-1...
msn-3
Dial call
number
Deactivating call rerouting
a
FSSSSO
Replace
handset.
adjust forward off msn-1...
msn-3
Brief description of functions
55
Page 62

Dialing from caller list, telephone directory or VIP memory
a
S<>
bg
Replace handset.
list
Select entry Lift up handset Conversation
Brief description of functions
56
Page 63

Brief description of functions
57
( (
Page 64

Brief description of functions
58
Page 65

59
Page 66

Funkwerk Enterprise Communications GmbH
Südwestpark 94
D-90449 Nürnberg
For information on support and service offerings please visit our Website
at:www.funkwerk-ec.com
There, you will find a Service / Support area.
Subject to modifications
Ausgabe 4 / 010109
 Loading...