

Funkwerk elmeg DECT 400 Series, elmeg DECT 400-20, elmeg DECT 400-40, elmeg DECT 300 Series Operating Instructions Manual
Page 1
Page 2
Declaration of conformity and CE mark
Declaration of conformity and CE mark
This device meets the requirements of the following EC directive R&TTE 1999/5/EG:
»Directive 1999/5/EC of the European Parliament and of the Council of 9 March 1999 on radio
equipmentandtelecommunicationsterminalequipmentandthemutualrecognitionof their con
formity«.
You can also request this EC declaration of conformity at the following Internet URL:
http://www.funkwerk-ec.com.
-
The wastecontainer symbol withthe "X"through it onthe deviceindicates that the device mustbe disposed of sepa
rately from normal domestic waste at anappropriate wastedisposal facility at the end of itsuseful
service life.
© 2009 Funkwerk Enterprise Communications gmbH - All rights reserved.
Reprintingof this document,evenexcerpts,ispermittedonlywiththe express consent of thepublisherandwithprecise source information, regardless of the media used (mechanical or electronic).
Function descriptions includedin this documentation which refer to software products of other manufacturers are
based on the software used and valid at the date the documentation was prepared or published. The product and
company names used in this documentation may be protected by trademarks.
-
2
Page 3

Contents
Contents
Declaration of conformity and CE mark . . . . . . . . . . . . . . . . . . . . . . . . . . . . . . . . . . . . . . 2
Function and Control Elements . . . . . . . . . . . . . . . . . . . . . . . . . . . . . . . . . . . . . . . . . . . 1
Intended Use. . . . . . . . . . . . . . . . . . . . . . . . . . . . . . . . . . . . . . . . . . . . . . . . . . . . . . . 2
Safety notes . . . . . . . . . . . . . . . . . . . . . . . . . . . . . . . . . . . . . . . . . . . . . . . . . . . . . . . 2
Contents of package . . . . . . . . . . . . . . . . . . . . . . . . . . . . . . . . . . . . . . . . . . . . . . . . . . 3
Commissioning . . . . . . . . . . . . . . . . . . . . . . . . . . . . . . . . . . . . . . . . . . . . . . . . . . . . . 3
Description of the team keys . . . . . . . . . . . . . . . . . . . . . . . . . . . . . . . . . . . . . . . . . . . . . 4
Activating / De-activating the handset . . . . . . . . . . . . . . . . . . . . . . . . . . . . . . . . . . . . . . . 4
Logging on the handsets at an elmeg DECT 300 system . . . . . . . . . . . . . . . . . . . . . . . . . . . . . 4
Logging on the handsets at an elmeg DECT 400 system. . . . . . . . . . . . . . . . . . . . . . . . . . . . . . 7
Automatic and manual system selection . . . . . . . . . . . . . . . . . . . . . . . . . . . . . . . . . . . . . . 7
Logging off handsets . . . . . . . . . . . . . . . . . . . . . . . . . . . . . . . . . . . . . . . . . . . . . . . . . . 8
Profil Setting . . . . . . . . . . . . . . . . . . . . . . . . . . . . . . . . . . . . . . . . . . . . . . . . . . . . . . 9
Battery Capacity . . . . . . . . . . . . . . . . . . . . . . . . . . . . . . . . . . . . . . . . . . . . . . . . . . . . 11
Redial / Caller List* . . . . . . . . . . . . . . . . . . . . . . . . . . . . . . . . . . . . . . . . . . . . . . . . . . 12
Tel. drctry . . . . . . . . . . . . . . . . . . . . . . . . . . . . . . . . . . . . . . . . . . . . . . . . . . . . . . . 12
Setting the volume . . . . . . . . . . . . . . . . . . . . . . . . . . . . . . . . . . . . . . . . . . . . . . . . . . 14
Muting . . . . . . . . . . . . . . . . . . . . . . . . . . . . . . . . . . . . . . . . . . . . . . . . . . . . . . . . . 14
Headset . . . . . . . . . . . . . . . . . . . . . . . . . . . . . . . . . . . . . . . . . . . . . . . . . . . . . . . . . 14
Enquiry button . . . . . . . . . . . . . . . . . . . . . . . . . . . . . . . . . . . . . . . . . . . . . . . . . . . . 14
Muting the call signaling tone . . . . . . . . . . . . . . . . . . . . . . . . . . . . . . . . . . . . . . . . . . . . 14
Key lock . . . . . . . . . . . . . . . . . . . . . . . . . . . . . . . . . . . . . . . . . . . . . . . . . . . . . . . . . 14
Shortcuts . . . . . . . . . . . . . . . . . . . . . . . . . . . . . . . . . . . . . . . . . . . . . . . . . . . . . . . . 15
Troubleshooting. . . . . . . . . . . . . . . . . . . . . . . . . . . . . . . . . . . . . . . . . . . . . . . . . . . . 15
Features with elmeg PABX Systems . . . . . . . . . . . . . . . . . . . . . . . . . . . . . . . . . . . . . . . . 15
Using thesystem menufor the PABX (DECT400) . . . . . . . . . . . . . . . . . . . . . . . . . . . . . . . . . . . 15
Technical specifications . . . . . . . . . . . . . . . . . . . . . . . . . . . . . . . . . . . . . . . . . . . . . . . 18
Accessories . . . . . . . . . . . . . . . . . . . . . . . . . . . . . . . . . . . . . . . . . . . . . . . . . . . . . . . 18
3
Page 4

Contents
Approvals . . . . . . . . . . . . . . . . . . . . . . . . . . . . . . . . . . . . . . . . . . . . . . . . . . . . . . . 18
4
Page 5
Function and Control Elements
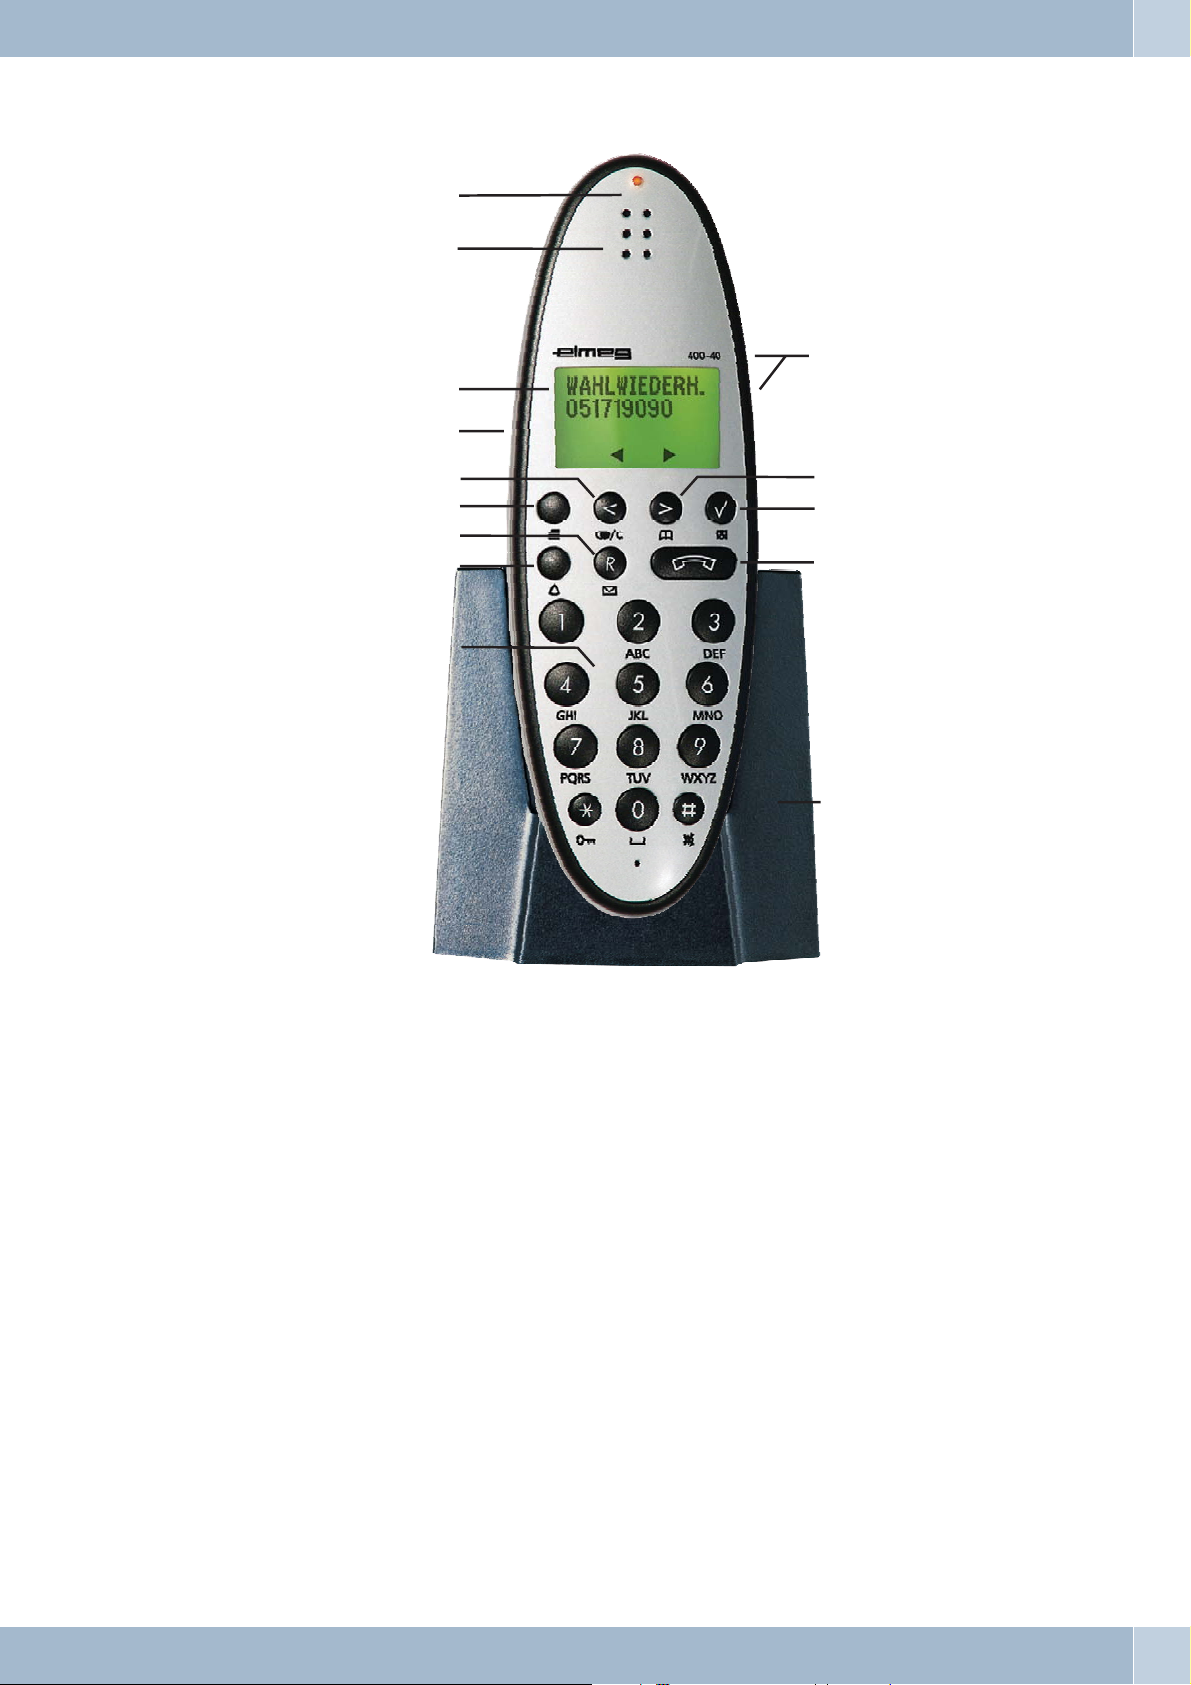
Function and Control Elements
1
2
3
4
0
5
6
7
8
9
LED
1
Speaker
2
Display
3
Headset socket (only for handset 400-40)
4
Redialing, Cursor to the left
5
Accessing the Menu
6
Enquiry Call
7
Accessing the PABX telephone directory
8
Alphanumeric keypad
9
Setting the volume
0
Internal telephone directory, cursor to the right
ß
OK, OFF, microphone-mute
°
handset-key: ON, Lift up handset, Replace handset
§
Charger
$
ß
°
§
$
1
Page 6

Intended Use
Intended Use
The elmegDECT handsetis acordless DECT telephone for connection to elmeg PABX systems using the elmeg sys
tems DECT 300 or DECT 400.
Safety notes
Mind the storageand operation temperatures forthe devicelisted inthe technicalspecifications.
•
Only connect thedevice when the permissibleambient operatingtemperature hasbeen reached.
Please notethat condensationon orin theunit mustbe preventedwhen movingfrom cold to warm surroundings.
Only remove the unit from the package when the permissible ambient operating temperature has been reached.
You should notmake callsor connector disconnectany lines during thunderstorms.
•
Only attach theconnecting cordsat theconnections provided.
•
Make sure phonecables areinstalled ina safemanner to prevent tripping.
•
Avoid thefollowing:
•
Direct sunlight
Sources of heat(for example radiators)
Electronic devices (forexample stereo components, officeequipment ormicrowave devices
Ingress of moistureor liquids
Aggressive fluids orvapors
Dusty environment
Do notuse theunit in excessively humidrooms orhazardous locations.
•
Only open thosesections of the devicespecified in the assembly/ operatinginstructions.
•
Do nottouch plugconnectors with pointed, metal,or moist objects.
•
If you donot permanently mount thedevice orany accessories, besure toplace it/themon anon-slip surface.
•
When required, cleanthe unit with aslightly moistenedcloth.
•
Only use approvedaccessories.
•
Only terminalswith SELVand/or which complywith ETS 300047may beconnected to theunit. This regulati-
•
on is fulfilledwhen approved terminal devicesare used as intended.
-
Mains connection (230VAC)
Ensure that the electrical installation(grounding outlet) for the unit(and for additional devices whererequi
•
red) is installedby a qualified electricianto preventpersonal andmaterial risks!
Connect any operationalgrounding providedfor your device beforeconnecting thedevice tothe mains power
•
supply.
Plug-in power supply
Use only approvedpower plug-in units.
•
Do notuse powerplug-in units with visibledefects or damage (fissures,cracks, etc.).
•
Working on an open device (e.g. terminal panel)
Unplug the connectorbefore removingthe coverand workingon the cableterminal bay.Replace thecover be
•
fore reconnectingthe mainsconnector.
Battery-operated devices
Use only approvedbattery packs.
•
Use the batterypack onlyas intended.Never usea damaged or exhaustedbattery pack.
•
Do not allow contact between the charging and battery contacts and conducting objects such askeys, paper
•
clips, rings,or bracelets.
-
-
-
2
Page 7
Contents of package
Dispose ofthe exhausted battery packaccording to localrules and regulations. Recycle!Do not exposebattery
•
cells to openfire.
Radio devices (e.g. DECT, Bluetooth)
It ispossible in somecases that medicaldevices are affectedby powered-upradio devices.Please comply with
•
local rulesand regulationsconcerning DECTdevices.
Do notoperate radiodevices in vehiclesor hazardouslocations.
•
Contents of package
elmeg DECT handsetwith battery
•
Operating instructions
•
Commissioning
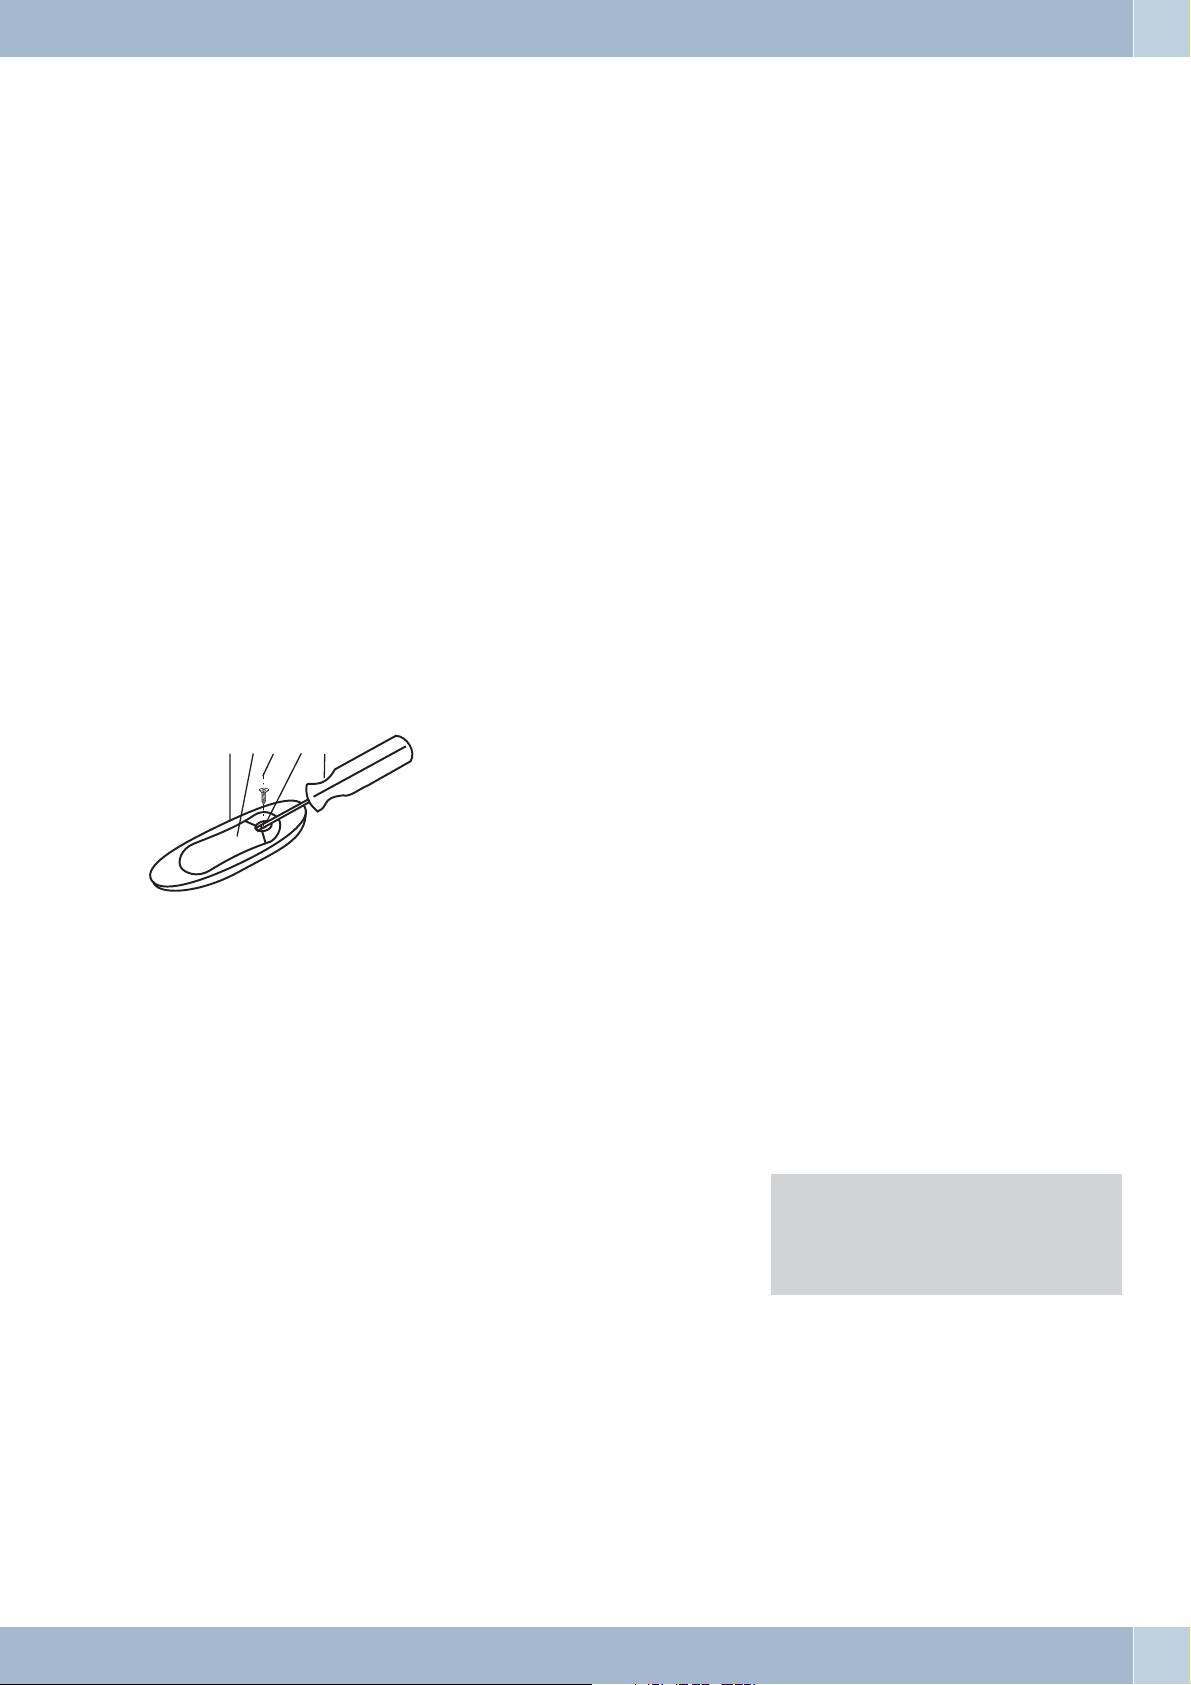
Changing the battery
Open the batterycover (2),remove thescrew (3)from the handsetback (1)and thentake offthe round cover(4). Use
1
3
4
2
5
Charging the battery
Thebatterymust becharged after it has beeninstalled.Todothis,firstconnectthe plug-inpower unittothecharger.
Place the handset in the charger.
The handset isthen charged. The chargingstatus isshown on the3rd line in thedisplay. The LED flasheswhile char
ging is in progress and lights up permanently when charging has been completed.
a screwdriver (5) tolift the cover(2) out ofthe battery compartment.Please refer
to the accompanyingfigure. Connect the battery plugwith the jackin the battery
compartment. Place the battery in the batterycompartment with the labeling facing upward. Replace the cover and tighten the screws.
ˆ ELMEG
ˆ
-
ˆ©©©©©©©_____
Initial charging lastsaround 3.5 hoursand shouldnot be disrupted.Charging shouldonly takeplace atroom tempe
ratures between5 and 25C°. Thebattery packmust be chargedwhen »Battery empty« appearsin the display,
or when the handset can not be switched on.
Thevibratorfunction andautomatic accepting of calls arenotactivatedwhenthehandset isplaced inthecharger.
-
3
Page 8

Description of the team keys
M Menu key:
Go to handset menu / Exit the menu.
< Left arrow key:
In the menu:left, cursorleft, behinda character:Delete lastcharacter, keyheld down:Delete allcharacters.
When idle: Redialing menu.
> Right arrow key:
In themenu: right, cursorright, behind acharacter: saves telephone numberto thetelephone book. When
idle: Telephone book menu.
O OK button:
Confirm entry, or move to next submenu.
During a call: Microphone mute (Mute). Key held down: Switch off handset.
During a call: Muting the call signaling tone.
A Telephone directory key:
Accessing the PABX telephone directory. Switching to tone frequency dialing during a call.
Description of the team keys
R Recall flash button:
During a call: Inquiry call to a subscriber.
handset key for lifting and replacing the handset. Re-activate (after switching off previously with the OK
key).
* Key lock (all keys are locked, calls can however be accepted. Switching from capitals to small case letters
and vice versa.
1 Entering digits or letters (names and telephone numbers).
# Muting the call signaling tone.
You canset thevolume fora call using thetwo keys on theright side ofthe handset. The volumeis increased/decrea
sed in increments each time you press one of these two keys.
Activating / De-activating the handset
To switchoff thehandset, pressand hold downthe OKkey formore than3 seconds.The handset isthen completely
switched off (power save mode) and can not be reached by the system. Calls are no longer signaled.
To reactivate, press and hold down the handset key longer than one 1/2 second.
-
Connection with a base station
If yourhandset is logged onat an elmeg DECTsystem, the symbol
set is within the range of the elmeg DECT system.
Attention: If thehandset isout ofthe rangeof the base station, this symbolwill go out. When you return to within the
range of the base station it may take as long as 30 seconds before this symbol re-appears in the display.
is shownin the display, indicatingthat the hand
F
Logging on the handsets at an elmeg DECT 300 system
You can enroll (log on) up to 8 handsets at an elmeg DECT300 system.A new (non-programmed)system is put di
rectly into the programming mode for logging on the first handset as soon as the plug-in power unit is connected.
This first handset automatically becomes the »master handset«and retains the sole privilege of logging on further
4
-
-
Page 9

Logging on the handsets at an elmeg DECT 300 system
handsets(1 -7) inthe system.Astheyarelogged in,each handsetis automaticallyassignedananalogport forthe base
station.
handset0 -Connection 1
handset 4 - Connection 5
handset1 -Connection 2 handset 5 - Connection 6
handset2 -Connection 3 handset 6 - Connection 7
handset3 -Connection 4 handset 7 - Connection 8
Enrolling the master handset
Connect the DECT300 systemto theplug-in powerunit andplug thepower unit into a230 V~outlet. TheLED inthe
base station will begin to flash rapidly.
Perform the following steps on the master handset:
M Press the menu key. ˆ Profile
ˆ Setting
< Use the arrow buttons to select the menu »Lo
gin« (2x to the left).
-
ˆ Menu
ˆ Login
O Confirm your selection by pressing OK. ˆ Menu
ˆSelect Login
> Use the arrow buttons to select the menu »Ein-
buchung -Neu« (1x to the left ).
ˆSubscription
ˆ Create
O Press OK. ˆSubscription
ˆ Search ID
ˆ------------
The handsetwill searchfor systemsthat arein theprogramming mode.These systemstransmit their ID code to the
displayofthehandset.If morethan onesystemisfound, thisis indicatedby anarrowinthedisplay.TheID codeis the
serial number for the system and is also given on the nameplate on the back of the station. Select your system and
confirm your selection by pressing the OK key.
> Each handset can be enrolled at up to 10 sys
tems. When a system is enrolled it is stored un
der a specific number (»1«…»10«).
-
-
ˆ Create
ˆ System 1
ˆAC:________
O Confirm your entries by pressing OK. ˆ Subscription
ˆ Wait!
5
Page 10

Logging on the handsets at an elmeg DECT 300 system
Once you havesuccessfully completedlogging onyour unitthis isindicated by anacoustic signalfollowed aftera few
seconds by this symbol
in the display of your handset.
F
If themessage »Subscription Failed« appears in the display, acknowledge by pressing theOK buttonand
repeat the entire procedure.
Press the menu button to return to the handset’s idle state.
Logging on other handsets using the master handset
Before you canlog on further handsets at the system youmust first enterthe serial numbers for these units into the
system. The serial number for the handset is located on the nameplate beneath the battery.
Perform the following steps on the master handset:
M Press the menu key. ˆ Profile
ˆ Setting
> Use the arrow buttons to select the »Servi
ce«menu (1x to the right).
-
ˆ Menu
ˆ ELMEG
O Confirm your selection by pressing OK. ˆ View
ˆ CLIP-Stack
ˆ <Enter>
< Use the arrow buttons to select the
»Read/Write - Userdata« menu (2x to
the left).
O Confirm your selection by pressing OK. The se-
rial number for the master handset is then displayed on channel 0 (first handset).
> Use the arrow keys to select the channel for the
handset that you are logging on and enter the se
rial number for that unit.
-
ˆ Read/Write
ˆ Userdata
ˆ <Enter>
ˆ Chan. 0
ˆ IPEI
ˆ012345678901
ˆ Chan. 1
ˆ IPEI
ˆ123456789012
O Confirm your entries by pressing OK.
Now, enter the telephone number for the handset (internal number for PABX system). Z.B. »41«.
This MSN extension number is displayed when the handset is idle and is stored in the system’s telephone book.
Chan. 1
ˆ Localno.
ˆ41__________
6
Page 11

Logging on the handsets at an elmeg DECT 400 system
O Confirm your entries by pressing OK.
Afteryouhave enteredthe serialnumbersforallof thehandsets youcanexitthemenu bypressing the menu key.
You must alsoinput thisinternal phone number forchannel 0of the master handset.This numberis thenshown in
the display when you switch the master handset off and then back on.
Enrolling other handsets
You canenroll (log on) theother new handsets atthe system after theserial numbersfor the units havebeen entered
in the system using the master handset. The procedure for the handsets is the same as the one used for the master
handset (see page 4).
Logging on the handsets at an elmeg DECT 400 system
The DECT400system is designedfor being connectedto elmeg ICTpabx systems. After the DECTmodule has been
assembled and started, 8 DECT-subscribers are automatically configured. The possible number of DECT-subscri
bers depends on the pabx system being used and can be programmed using the Professional Configurator.
Loggin on aDECT-subscriber into thesystem must firsthave been enabled. Enrolling the handset is enabled using
the ProfessionalConfigurator, or withthe code ** - PABX PIN - 782* entered ona telephone connected to
the PABX. The LED on the PABX module flickers aslong as enrollingis possible. To enroll thehandset, proceed as
described onpage 4. Thehandset is storedat the nextavailable position ofthe DECT moduleand the corresponding
internal extension number is assigned to it.
-
If you wish toassign a specificinternal extensionnumber to thathandset, storethe handsets’serial numberat the de
sired positionof theDECT-module (ProfessionalConfigurator). Then proceed as described on page4. Thehandset
is stored at the selected position and the corresponding internal extension number is assigned to it.
To enroll a handset, an unassigned DECT-subcriber must be available.
Once you havesuccessfully completedlogging onyour unitthis isindicated by anacoustic signalfollowed aftera few
secondsbythis symbol
inthe display of yourhandset. In addition, theinternal extension number or thename assig-
F
ned to the handset are displayed on the display of the pabx system.
If themessage »Subscription Failed« appears in the display, acknowledge by pressing theOK buttonand
repeat the entire procedure.
Press the menu button to return to the handset’s idle state.
Loggin off a handset:
Proceed asdescribed onpage
•
Deleting thehandset’s serialnumber from the pabxconfiguration.
•
Please observe the information given in the pabx manual for the DECT 400 system.
Automatic and manual system selection
Each handset canbe enrolledat upto 10 systems,e. g.:at severalelmeg DECT300 /400 systemsin your companyand
in your private quarters. Changeover between these systems can be performed either automatically or manually.
When the automatic changeover mode is activated, the system with the best reception is always selected.
M Press the menu key. ˆ Profile
ˆ Setting
-
< Use the arrow buttons to select the menu »Lo
gin« (2x to the left).
-
ˆ Menu
ˆ Login
O Confirm your selection by pressing OK. ˆ Menu
ˆSelect Login
7
Page 12

Logging off handsets
O Press OK.
The serial number for the first base station is
shown.
ˆSelect Login
ˆ System 1*
ˆ001122334455
Using the arrowkeys, youcan selectthe system(1-10) in whichyou wishto activate yourhandset. Automaticsystem
selection can alsobe activated here(»Login- Automatic Select.«). The »*« behind the system number
indicates the system that is currently activated. Conclude this setting procedure by pressing the OK key.
Logging off handsets
To log out a handset from a system, proceed as follows on the handset you are logging out:
M Press the menu key. ˆ Profile
ˆSetting
< Use the arrow buttons to select the menu »Lo
gin« (2x to the left).
-
ˆ Menu
ˆ Login
O Confirm your selection by pressing OK. ˆ Menu
ˆSelect Login
< Use the arrow buttons to select the »Sub-
scription Remove« menu (1x to the left
ˆ Subscription
ˆ Remove
).
O Confirm your selection by pressing OK: ˆ Delete?
ˆ Password:
ˆ ____
O Enter your password and confirm by pressing
OK.
ˆ Delete?
ˆ Password
ˆ ****
the default password is »0000«.
O Press OK. ˆ Subscription
ˆ Delete?
> Use the arrow buttons to select the system you
want to unsubscribe. Confirm your selection by
pressing OK.
ˆ Remove
ˆ System 1*
ˆ001122334455
The asterisk behind the serial number (“*”) indicates the system in which you are currently logged in.
8
Page 13

Profil Setting
Making Calls
Initiating a Call (Dialing)
An outgoing call can be initiated a number of ways:
Enter the telephonenumber usingthe keypadand thenpress the handset key.
•
Press the handsetkey andthen enterthe telephonenumber.
•
Accepting calls
A call is signaled optically (in display) and acoustically (see »Profile Settings«). Press the handset key to accept the
call.
Thetelephonehandsetsymbol isshown inthedisplayduringacall,orwhileacallisbeingset up.To terminateacall,
press the handset key again.
Hands-free calling for the handset 400-40
Toactivatethe hands-freemode duringa call, pressthe“Accesstophonedirectory”button. Pressthis buttonagainto
deactivate.
Profil Setting
You can configure a profilefor using the handset (forexample key click, displayillumination) and for call signaling
(call signal tone, volume).
Select the individual menu items for aprofile usingthe arrow keys. To changea setting, confirm theselection of the
corresponding menu by pressing the OK key. Press the menu key if you wish to exit the menu.
Display language
handset displays areavailable insix different languages. An additionallanguage canbe programmedby your authorized dealer.
M Press the menu key. ˆ Profile
ˆ Setting
O Confirm your selection by pressing OK.
> Use the arrow buttons to select the »Langua
ge« menu (2x to the left).
-
ˆ Edit
ˆ Language
O Confirm your selection by pressing OK. ˆ Language
ˆ
ˆ ELMEG
Select the desird language with the arrow keys and confirm by pressing the OK button.
Setting the Ringer Tone
Use the arrow keys to select the menu »Ringer Tone« and confirm your selection by pressing OK.
> Use the arrow buttons to set the desired tone
/melody (1 ... 9).
ˆ Ringer Tone
ˆ Tone
ˆ 1
9
Page 14

Profil Setting
O Confirm your settings by pressing OK.
Setting the Ringer Volume
Use the arrow keys to select the menu »Ringer Vol. « and confirm your selection by pressing OK.
> Use the arrow buttons to set the desired volume. ˆ Ringer Vol.
ˆˆ ©©©__
O Confirm your settings by pressing OK.
Setting the Key Click
Use the arrow keys to select the »Key Click« menu and confirm your selection by pressing OK.
> Use the arrow buttons to set the desired key click
volume.
ˆKey Click
ˆ ©©©__
O Confirm your settings by pressing OK.
Setting the Vibrator (only for handset 400-40)
Use the arrow keys to select the »Vibrator« menu and confirm your selection by pressing OK.
> Press the arrow keys to switch the vibrator on or
off.
ˆ Vibrator
ˆ On
O Confirm your settings by pressing OK.
Setting the Auto-Answer Function
Automatic accepting of calls allows you to accept a call without having to press the handset key.
For example, with a headset connected.
Use the arrow keys to select the »Auto. accept« menu and confirm your selection by pressing OK.
> Use the arrow keys to activate or deactivate auto
matic accepting of calls.
-
ˆAuto. Answer
ˆ ON
O Confirm your settings by pressing OK.
Setting the Volume of the handset
Use the arrow keys to select the menu »Start Volume« and confirm your selection by pressing OK.
O Use the arrow buttons to set the desired start vo
lume.
-
ˆStart Volume
ˆ ©©©__
O Confirm your settings by pressing OK.
10
Page 15

Battery Capacity
Setting the Out of Range Alarm Tone
An alarm signal can indicate poor reception (for example when leaving a cell).
Use the arrow keys to select the »Out of Range« menu and confirm your selection by pressing OK.
> Press the arrow keys to switch the out of range
tone on or off.
ˆOut of Range
ˆ Tone On
O Confirm your settings by pressing OK.
Automatic key lock
This featureautomatically activatesthe keylock 60seconds afterthe last key waspressed. To deactivate thekey lock
feature, press the menu button and then the asterisk key.
Use the arrow keys to select the »Auto key lock« menu and confirm your selection by pressing OK.
> Use the arrow keys to activate or deactivate the
automatic key lock feature.
ˆAuto keylock
ˆ On
O Confirm your settings by pressing OK.
Setting the Backlight
Use the arrow keys to select the »Backlight« menu and confirm your selection by pressing OK.
> Press the arrow keys to switch the backlight on
or off.
ˆ Backlight
ˆ On
O Confirm your settings by pressing OK.
Battery Capacity
The remainingbattery capacityis displayedin the Batterymenu asa barchart. If 3 orless bars are shownit is timeto
charge up the handset.
M Press the menu key. ˆ Profile
ˆ Setting
> Use the arrow keys to select the »Battery«
menu (2x to the right).
ˆ Menu
ˆ Battery
O Confirm your selection by pressing OK. ˆ Battery
ˆ Capacity
ˆ ©©©_____
11
Page 16

Redial / Caller List*
Redial / Caller List*
Thelast10previouslydialedphonenumbersorcallsarestoredinthehandset.Ifyouhavereceivedacallandhavenot
yet accepted it the LED will flash slowly.
< Press the left arrow key. ˆ Redial
ˆ
ˆ0123456789
You can scroll through the dialed numbers, or the call memory, by repeatedly pressing the arrow keys *.
You can call the displayed telephone number by pressing the handset key.
To delete entries, use the arrow keys to select a number and then confirm your selection by pressing the OK key.
O The entry is permanently deleted when you press
the OK key again; if you wish to delete all entries,
press the left arrow key »Delete all«.
ˆ Delete?
ˆ0123456789
* DECT300 System:
The caller listfeature isonly availableon elmegPABX systems which areconnected tothe base stationvia anoptio
nal serial link (RS232 / V. 24, CLIP cable set).
You can reach the»Calls« menu as describedpreviously, orby pressingthe OKkey andthen thearrow keys(4x to
the right).
Tel. drctry
You can store up to 65 numbers (24 characters max.) and numbers (24 digits each) in the phone book.
Storing a Number and a Name in the Phone Book
Usethealphanumerickeypad toenter thetelephone number that is to be saved in the telephone book. This number is
then shown in the display.
> Press the right arrow key. ˆ Store No.
ˆ1234567890
O If you want the number stored press OK.
Enter the name using the alphanumeric keypad.
-
ˆ Name
O Confirm your entry by pressing Ok. The entry will then be stored.
If the storage capacity (memory) for the telephone book is full, the following is shown in the display: »Memory
full«.
12
Page 17

Tel. drctry
Key assignments
Key Assignment
1
2
3
4
5
6
7
8
9
0
#
*
? ! 1 - + * / = & ( ) % ¿ ¡
A B C 2 Ä Ä Á À Â Æ Ç
D E F 3 È É Ê Ë
G H I 4 Ì Í Î Ï
J K L 5
M N O 6 Ñ Ö Ò Ó Ô Õ Ø
P Q R S 7 ß
T U V 8 Ü Ú Ù Û
W X Y Z 9
Space , . 0 : ; _" ` ^ ~
# @ E $ £ ¥ § < > { I ] [ \ ]
Capital/ small letters
Dialing from the telephone directory
> Press the right arrow key. The first entry will be
shown.
Scroll throughthe entriesin the telephonebook byrepeatedly pressingthe arrow keys.You caninitiate a fastsearch
by simply inputting the first letter of the name.
Press the handset key to then dial the selected number.
Deleting or Editing Phone Book Entries
To delete an entry, first select it using the arrow keys (see “Dialing from telephone book”).
ˆ Tony
ˆ1234567890
O Press OK. ˆ Delete?
1234567890
> Use the arrow keys to select any one of the op
tions »Delete?«, »Edit No. ?« or
»Edit Name?« auswählen.
-
ˆ Edit No. ?
ˆ1234567890
ˆ
ˆEdit Name?
ˆ Tony
O Confirm your selection by pressing OK.
Use the arrowkeys andthen thealphanumeric keypadto edit atelephone numberor name.Conclude thisprocedure
by pressing the OK key.
You can reach the»Phone Book« menuin themanner describerabove, orby pressingthe OKkey andthen thear
row keys (3x right).
-
13
Page 18

Setting the volume
Setting the volume
You can adjust the volumeof the speakerindividually duringa callusing the twoseparate keyson the rightside ofthe
handset.
The top key increases the volume.
The bottom key decreases the volume.
Thesetvolumeisindicatedbyabardiagram. The bigger the bar, the higher thevolume for the speaker. The volume is
reset to the default setting given under the »Profile« menu item on conclusion of the call.
Muting
You can temporarily mute the microphone during a call.
O Press OK. ˆMic. muted
The microphone is re-activated by pressing the OK key again.
Headset
A jack for connecting a headset is located on the left side of the handset 400-40. The built-in microphone and the
speaker are then deactivated automatically.
Enquiry button
TheRecall flash button is usedfor transferringcalls within thePABX system andfor initiating thefeatures Conference call and Broker’s call. For more details refer to the operating manual of your PABX system.
Muting the call signaling tone
Youcan temporarily deactivate thecall signalingtone by pressingthe menukey and then therhombus key. “Mute”is
then shown in the display.
In this status, incoming calls are signaled only by the LED and (when activated) the vibrator (only for handset
400-40).
You can deactivate muting by pressing the menu key and then the rhombus key again.
If a callis alreadybeing signaled, pressOK toswitch off the ringingtone. Theringing tone is re-activatedby pressing
the OK key again.
Key lock
You can lock the keypad by pressing the menu key and then the asterisk key.
The message: »Key locked« then appears in the display.
You canstill accept incoming calls usingthe handsetkey whenthe keypadis locked.All otherbuttons are,however,
locked.
14
Page 19

Shortcuts
You can also activate the automatic key lock feature during profile programming. The key lock activates automati
cally 60 second after the last key was pressed.
Deactivate the keypad lock by pressing the menu key and then the asterisk key again.
Shortcuts
Some of thefeatures ofthe handsetcan beactivated / deactivatedmore rapidlyusing keycombinations thanwith the
corresponding menu.
Mute
desAnruftones:
Menukey, rhombuskey
(displayshows: »mute«)
Keylock: Menukey, asteriskkey
(menushows: »Key lock«)
Troubleshooting
Possible error Causes/ Remedy
handset blocked. Remove battery pack and re-install. Press the handset key for
restart.
-
handset does not ring. Check the programming for the settings.
System ID not transferred to handset on log-in. Check to ensure that the system is in the programming mode.
Keys do not respond. Check whetherecall flash button blocking is activated.
Call channels permanently busy,
radio signal flashes.
handset can not be switched on. Check to ensure that battery is connected properly.
Contact your specialized dealer.
Check charging level of battery.
Features with elmeg PABX Systems
Ifyourelmeg DECT300/ 400System is connected toanelmegICTPABXsystem youcan utilize the following features
throughout thesystem. The descriptionof the menuand the features whichare available toyou in thismenu aregi
ven in the operating instructions for your PABX system.
Using the system menu for the PABX (DECT400)
The DECT400 system is designed for being connected to elmeg ICT pabx systems. These devices provide a special
menuwith further system-specific functions. This menu and the features that itcontains are managed entirely inthe
PABX.
-
Accessing the system menu
M Press the menu key. ˆ Profile
ˆ Setting
> Use the arrow keys to select the »ELMEG« menu
(1x to the right).
ˆ Menu
ˆ ELMEG
15
Page 20

Using the system menu for the PABX (DECT400)
O Confirm your selection by pressing OK. ˆ>Tel. drctry
ˆ Xfer
ˆ Conv. feat.
The descriptionof the menu andthe features which are available to you in this menu are given in the operatingin
structions for your PABX system.
Examples for features at the date these operating instructions were printed:
Access to thePABX’s telephonedirectory
•
Programming a fixed call forwardingto your handset (Follow me)or as long as thehandset is not in thechar
•
ger.
Programming a directcall
•
Cost registration/ LeastCost Routing
•
Swichting callmodes forthe pabx
•
Announcement / Intercom
•
Hotel functions (Check-in/ Check-out / Wake-upcall)
•
Special menu operation features
O Use the arrow keys to select a feature and confirm by pressing OK.
R Use the Recall flash button to access the next menu level.
<
When entering the firstcharacters fora phonebook entryor thefirst digitsfor atelephone numberyou can
move to next entry position by pressing the arrow keys shortly.
>
< To delete the selected character, press a bit longer on the left arrow key.
-
-
M Press the menu key or the handset key to leave the menu.
Dialing from the telephone directory, Announcement or Intercom
Press OKto select a phone book entry or confirm anumber you have entered for an announcement / intercom. You
must then begin dialing within five seconds (press handset key).
Brief introduction:
Dialing from the PABX telephone directory
A Press the telephone directory key. ˆ Enter
ˆ letter
ˆplease:
O Use the alphanumeric keypad to enter the first
characters of the desired name. Confirm your
entry by pressing Ok.
ˆ ELMEG_
16
Page 21

Using the system menu for the PABX (DECT400)
>
O
Use the arrow buttons to select the desired entry
and then press OK to confirm.
The number is dialed immediately.
ˆ elmeg-Hotin
ˆ>elmeg-Vertr
ˆ Enders, H.
ˆelmeg-Vertri
ˆeb
ˆ0123456789
SMS and Mail will be supported later. Please refer to the Funkwerk Internet sites for detailed information on laun
ching dates.
-
17
Page 22

Technical specifications
Weight: 121 g including battery
Technical specifications
Size(inmm)
LxHxW:
Talktime: 12 hours
Standbytime: 120 hours
143 x 48 x 26
Accessories
elmeg DECT battery
•
elmeg DECT beltclip
•
elmeg DECT leathercase
•
Approvals
Acoustics: TBR 10
RFtest: TBR 6 (DECT RF)
Subscriptionprofile: GAP (TBR 22)
EMC: ETS 300 329 (CE - mark)
18
Page 23

Approvals
19
Page 24

[<*1.]
Funkwerk Enterprise Communications GmbH
Südwestpark 94
D-90449 Nürnberg
For information on support and service offerings please visit our Website
at:www.funkwerk-ec.com
There, you will find a Service / Support area.
Subject to modifications
Ausgabe 4 / 010109
 Loading...