

Page 1
elmeg CS410 / CS410-U
Modul Anrufbeantworter - Answering machine module
Module répondeur - Modulo voice-mail
Page 2

Dieses Modul / diese Erweiterung ist zum Betrieb in oder an elmeg Produkten (z.B. Telefonen, TK-Anlagen) be
stimmt. Beachten Sie die Hinweise in den Dokumentationen der entsprechenden Produkte:
Verwendungszweck desModuls / der Erweiterung
•
Sicherheits- undMontagebestimmungen
•
Gewährleistung
•
Konformität
•
Schutzrechte Dritter
•
Das auf dem Gerät befindliche Symbol mit dem durchgekreuzten Müllcontainer bedeutet, dass das Gerät
am Ende der Nutzungsdauer bei den hierfür vorgesehenen Entsorgungsstellen getrennt vom normalen
Hausmüll zu entsorgen ist.
This module / expansion moduleis designed for use in,or connection with elmeg products(e.g. telephones, PABX
systems). Please observe the instructions in the user’s manuals for the products involved.
Intended useof the module /expansion module
•
Safety andassembly instructions
•
Warranty
•
Conformity
•
Third partyrights
•
The wastecontainer symbol with the"X" through iton thedevice indicatesthat thedevice must be disposed
of separatelyfrom normaldomestic wasteat anappropriate wastedisposal facility atthe endof its usefulservice life.
Ce module/ cetteextension est destiné/e àêtre employé/e dans ouavec les produits elmeg(par ex. téléphones, autocommutateurs). Veuillez observer les instructions fournies dans la documentation des produits correspondants:
Utilisation dumodule / de l’extension
•
Instructions desécurité et demontage
•
Garantie
•
Conformité
•
Droits depropriété de tiers
•
Le symbole se trouvant sur l'appareil et qui représente un conteneur à ordures signifie que l'appareil, une
fois que sa durée d'utilisationa expiré, doit être éliminédans des poubelles spéciales prévuesà cet effet, de
manière séparée des ordures ménagères courantes.
-
Questo modulo/ questo modulod’espansione èdestinato all’uso ino con prodotti elmeg(ad es. telefoni,PABX). Os
servare le informazioni contenute nella documentazione dei rispettivi prodotti:
Destinazione d’usodel modulo / delmodulo d’espansione
•
Norme perla sicurezza eper il montaggio
•
Garanzia
•
Conformità
•
Diritti dimarchio di terzi
•
Il simbolo raffiguranteil bidone della spazzatura barratoa croce, riportatosull'apparecchiatura, indica che
alla finedel suo utilizzol'apparecchiatura dovrà esseresmaltita neirispettivi punti di raccoltadifferenziata,
separata dai rifiuti domestici normali.
-
Page 3

Deutsch
Inhaltsverzeichnis
Beschreibung und Installation. . . . . . . . . . . . . . . . . . . . . . . . . 1
Funktionen des Anrufbeantworter . . . . . . . . . . . . . . . . . . . . . . . . . . . . . . . . . . . 1
Lieferumfang. . . . . . . . . . . . . . . . . . . . . . . . . . . . . . . . . . . . . . . . . . . . . . . . 1
Montage . . . . . . . . . . . . . . . . . . . . . . . . . . . . . . . . . . . . . . . . . . . 1
Vorbereiten der Installation (siehe Bild 1) . . . . . . . . . . . . . . . . . . . . . . . . . . . . . . . 2
Installation des Moduls (siehe Bild 2) . . . . . . . . . . . . . . . . . . . . . . . . . . . . . . . . . 2
Anschließen der Audio-Buchsen (Audio in / Audio out) . . . . . . . . . . . . . . . . . . . . . . . 3
Anrufbeantworter nutzen . . . . . . . . . . . . . . . . . . . . . . . . . . . . . . . . . . . . . . . . 4
Anrufbeantworter konfigurieren . . . . . . . . . . . . . . . . . . . . . . . . . . . . . . . . . . . . 4
Allgemeine Konfigurierung. . . . . . . . . . . . . . . . . . . . . . . . . . . . . . . . 5
Anrufbeantworter ein-/ ausschalten . . . . . . . . . . . . . . . . . . . . . . . . . . . . . . . . . . 5
Mithören einstellen . . . . . . . . . . . . . . . . . . . . . . . . . . . . . . . . . . . . . . . . . . . . 5
Automatisches Benachrichtigen (Weitermelden) bei aufgezeichneten Nachrichten . . . . . . . 5
Ablauf der Weitermeldung. . . . . . . . . . . . . . . . . . . . . . . . . . . . . . . . . . . . . . . . 6
Textnachricht für die Weitermeldung (SMS / UUS1) speichern. . . . . . . . . . . . . . . . . . . 7
Alle Anrufe, alle Diktate oder alle Texte löschen . . . . . . . . . . . . . . . . . . . . . . . . . . .7
Fernbedienung einstellen . . . . . . . . . . . . . . . . . . . . . . . . . . . . . . . . . . . . . . . . 8
Sprachqualität der Ansagen einstellen . . . . . . . . . . . . . . . . . . . . . . . . . . . . . . . . . 8
Abhören von Anrufen / Nachrichten nach Rufnummer (MSN) sortiert . . . . . . . . . . . . . . 9
Ansagen, Infotexte und Diktate . . . . . . . . . . . . . . . . . . . . . . . . . . . . 10
Ansagen aufzeichnen, anhören oder löschen . . . . . . . . . . . . . . . . . . . . . . . . . . . . . 10
Ansage am Telefon aufsprechen:. . . . . . . . . . . . . . . . . . . . . . . . . . . . . . . . . . . . 11
Ansage über die Audio-Buchse (Audio In) laden: . . . . . . . . . . . . . . . . . . . . . . . . . . 11
Ansagen anhören oder löschen. . . . . . . . . . . . . . . . . . . . . . . . . . . . . . . . . . . . . 11
Info-Texte und Diktate . . . . . . . . . . . . . . . . . . . . . . . . . . . . . . . . . . . . . . . . . 12
Aktivieren der Nachrichtenaufzeichnung je Rufnummer (MSN) . . . . . . . . . 12
Betriebsart einstellen . . . . . . . . . . . . . . . . . . . . . . . . . . . . . . . . . . . . . . . . . . 13
Dauer der Rufsignalisierung einstellen . . . . . . . . . . . . . . . . . . . . . . . . . . . . . . . . 13
Ansage auswählen . . . . . . . . . . . . . . . . . . . . . . . . . . . . . . . . . . . . . . . . . . . . 13
Ansage für die Rufnummer (MSN) einschalten . . . . . . . . . . . . . . . . . . . . . . . . . . . 13
I
Page 4

Deutsch
Schlusstext einschalten . . . . . . . . . . . . . . . . . . . . . . . . . . . . . . . . . . . . . . . . . 14
Nachrichtenlänge . . . . . . . . . . . . . . . . . . . . . . . . . . . . . . . . . . . . . . . . . . . . 14
Zeitsteuerung. . . . . . . . . . . . . . . . . . . . . . . . . . . . . . . . . . . . . . . . . . . . . . . 15
Zeiten festlegen. . . . . . . . . . . . . . . . . . . . . . . . . . . . . . . . . . . . . . . . . . . . . . 15
Zeitsteuerung »Täglich«. . . . . . . . . . . . . . . . . . . . . . . . . . . . . . . . . . . . . . . . . 16
Zeitsteuerung »Wochenprofil« . . . . . . . . . . . . . . . . . . . . . . . . . . . . . . . . . . . . . 17
Hauptzeiten einrichten . . . . . . . . . . . . . . . . . . . . . . . . . . . . . . . . . . . . . . . . . 18
Restzeit einrichten . . . . . . . . . . . . . . . . . . . . . . . . . . . . . . . . . . . . . . . . . . . . 18
Bedienung . . . . . . . . . . . . . . . . . . . . . . . . . . . . . . . . . . . . . . . . . 20
Neue Nachrichten abhören . . . . . . . . . . . . . . . . . . . . . . . . . . . . . . . . . . . . . . . 20
Alle Nachrichten, Diktate, Info-Texte oder Mitschnitte abhören . . . . . . . . . . . . . . . . . 21
Nachrichten über die Audio-Buchse (Audio Out) ausgeben . . . . . . . . . . . . . . . . . . . . 22
Ein Gespräch vom Anrufbeantworter übernehmen . . . . . . . . . . . . . . . . . . . . . . . . . 22
Einen Anruf zum Anrufbeantworter übergeben . . . . . . . . . . . . . . . . . . . . . . . . . . . 23
Ein Gespräch mitschneiden. . . . . . . . . . . . . . . . . . . . . . . . . . . . . . . . . . . . . . . 23
Fernbedienung . . . . . . . . . . . . . . . . . . . . . . . . . . . . . . . . . . . . . . 24
Folgende Bedienungen / Einstellungen sind aus der Ferne möglich: . . . . . . . . . . . . . . . 24
Töne während der Fernbedienung. . . . . . . . . . . . . . . . . . . . . . . . . . . . . . . . . . . 24
Fernbedienung einleiten (Anrufbeantworter ist eingeschaltet) . . . . . . . . . . . . . . . . . . 25
Ausgeschalteten Anrufbeantworter aus der Ferne einschalten . . . . . . . . . . . . . . . . . . . 25
Automatische Benachrichtigung (Weitermeldung) annehmen . . . . . . . . . . . . . . . . . . 25
Kennziffern der Fernbedienung . . . . . . . . . . . . . . . . . . . . . . . . . . . . 26
Allgemeine Kennziffern . . . . . . . . . . . . . . . . . . . . . . . . . . . . . . . . . . . . . . . . . 26
Nachrichten abhören oder löschen, Info-Texte abhören . . . . . . . . . . . . . . . . . . . . . . 26
Ansagen abhören, löschen oder neue Ansagen aufsprechen . . . . . . . . . . . . . . . . . . . . 27
Aktivieren / Deaktivieren von Ansagen für eine Rufnummer (MSN) . . . . . . . . . . . . . . . 27
Automatische Benachrichtigung (Weitermeldung) . . . . . . . . . . . . . . . . . . . . . . . . . 28
Anrufbeantworter durch ein anderes Telefon nutzen. . . . . . . . . . . . . . . . 28
Voice-Mail-Box für »MSN-10« aktivieren . . . . . . . . . . . . . . . . . . . . . . . . . . . . . . 29
Wichtige Hinweise. . . . . . . . . . . . . . . . . . . . . . . . . . . . . . . . . . . . . . . . . . . . 29
Voice-Mail-Box vom anderen Telefon aus nutzen . . . . . . . . . . . . . . . . . . . . . . . . . . 30
Fernbedienung einleiten (Anrufbeantworter ist eingeschaltet) . . . . . . . . . . . . . . . . . . 30
Nachrichten abhören oder löschen, Info-Texte abhören . . . . . . . . . . . . . . . . . . . . . . 30
II
Page 5

Deutsch
Beschreibung und Installation
Für denBetrieb diesesModuls benötigenSie dieFirmware V4.20für IhrSystemtelefon.
Mit demModul Anrufbeantworter könnenSie IhrSystemtelefon um einendigitalen Anrufbeantwor
ter mit vielfältigen Funktionen erweitern. Diese Dokumentation beschreibt den Einsatz des Moduls
in den Systemtelefonenelmeg CS410 undelmeg CS410-U. DieUnterstützung des ModulsAnrufbe
antworter ist in der Software dieser Systemtelefone bereits vorbereitet.
Der Funktionsumfangdes Anrufbeantworters istdabei jedochvon derim Systemtelefon eingesetzten
Software abhängig.Die in dieserDokumentation beschriebenen Funktionenbasieren aufder zurZeit
der Erstellung oder Drucklegung aktuellen Softwareversion der Systemtelefone.
Funktionen des Anrufbeantworter
Bis zu48 MinutenAufzeichnungskapazität fürnormale Sprachaufzeichnungen.
•
Spezielle Anrufbeantworter-Tastezum Ein-oder Ausschalten.
•
Erweiterte Funktionen derAnruf-LED. Ineiner weiteren Farbe leuchtetdiese LED,wenn der
•
Anrufbeantworter eingeschaltet ist und blinkt bei neuen, noch nicht abgehörten Nachrichten.
10 Ansagen,4 Infotexte, Weiterleitungsansage,Schlussansage und Ansagebei vollem Anruf-
•
beantworter.
Aufzeichnung vonDiktaten.
•
Individuelle Konfigurationund Abfrageder Nachrichtenaufzeichnungje Rufnummer (MSN)
•
möglich.
Zeitsteuerung derAnsage fürjede Rufnummer (täglich)oder fürdie Rufnummern»MSN-1«
•
bis »MSN-3«(Wochenprofil).
Aufzeichnungsqualität derAnsagen einstellbar (normal,gut, sehr gut).
•
Mitschneiden vonGesprächen.
•
Mithören währendder Nachrichtenaufzeichnung.
•
Fernbedienung überPIN geschützt.
•
Automatische Benachrichtigung (Weitermeldung) bei aufgezeichneten Anrufen via Anruf,
•
UUS1 oderSMS.
-
-
Lieferumfang
Modul Anrufbeantworter
•
PC-Audioschnur (3,5mmStereo-Klinkenstecker, ca.2,5m)
•
Typenschild, selbstklebend
•
Bedienungsanleitung
•
Montage
Die Montage des Moduls Anrufbeantworter darf nur vom Fachhandel oder befugtem
Service-Personal durchgeführt werden.
1
Page 6
Deutsch
Vorbereiten der Installation (siehe Bild 1)
Bitte beachten Sie die Sicherheitshinweise in den Dokumentationen Ihres Telefons.
Ziehen Sie den ISDN-Stecker des Telefons aus der ISDN-Anschlussdose heraus.
Legen Sie dasTelefon mit der Vorderseiteso auf eine weicheUnterlage, dass Siedas Typenschild auf
der Unterseite des Telefons von vorn lesen können.
Entfernen Sie alle vorhandenen Anschlussschnüre (1) (z.B. ISDN-Anschluss, Hörer, Headset, PC).
Entfernen Siedie beidenhinteren Gerätefüße(2) undlösen Sieanschließend die dreiSchrauben (3).
Heben Sie die Unterschale des Telefons vorsichtig ab. Sie sehen dann die Leiterplatte des Telefons.
1
3
3
2
Opt
S0
UP0
2
3
1
1
Bild 1
Installation des Moduls (siehe Bild 2)
Die Stiftleiste(3) fürden Anschlussdes ModulsAnrufbeantworter befindet sichauf dem rechten Teil
der Leiterplatte des Telefons (4), in der Nähe der Hörer- und Headsetbuchsen.
Stecken Sie dieBuchsenleiste (2) desModuls Anrufbeantworter (1) aufdie Stiftleiste derLeiterplatte
(3) und überprüfen Sie den richtigen Sitz.
Schließen Siedas Gehäuse,indem Siedie Unterschalewieder aufsetzenund durchdie beidenSchrau
ben befestigen. Stecken Sie die Gerätefüße.
Zur Kennzeichnung des Anrufbeantworters im Telefon kleben Sie das beiliegende Typenschild auf
die Unterseite des Telefons.
Schließen Siezum Abschlussder Installationdie Anschlussschnüre(z.B. ISDN-Anschluss,Hörer, He
adset, PC) wieder am Telefon an.
2
-
-
Page 7

Deutsch
1
2
3
4
Bild 2
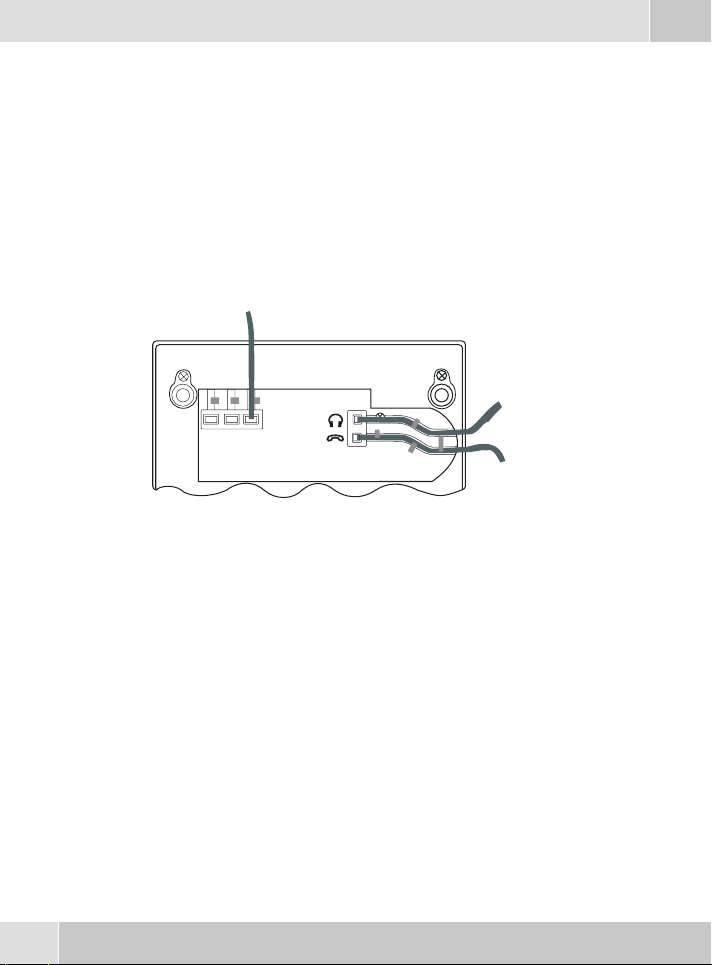
Anschließen der Audio-Buchsen (Audio in / Audio out)
Das Telefonverfügt über einenEingang (1) undeinen Ausgang (2)für Audio-Signale.Diese Anschüsse sind als Buchse für 3,5mm Stereo-Klinkenstecker ausgeführt. Sie können das Telefon über diese
Anschlüsse an die Soundkarte Ihres PCs anschließen, um Ansagen zum Telefon zu übertragen oder
aufgezeichnete Nachrichten auf dem PC zu sichern.
Schließen Sie dasTelefon wie in Bild3 gezeigt andie Soundkarte Ihres PCan. Verwenden Siehierfür
die mitgelieferten Audioschnüre (3).
Telefon Audio in (1) ---> PC, z.B. Soundkarte Line Out (5)
Telefon Audio out (2) ---> PC, z.B. Soundkarte Line In (4)
Beachten Sie dieHinweise zu denAudioanschlüssen des verwendeten PCoder der ver
wendeten Soundkarte.
-
3
Page 8

Deutsch
12
3
3
Bild 3
Befinden Sie sich im Anrufbeantworter-Menü und die Funktionen Audio-In oder Au
dio-Out sind aktiv, werden ankommende Anrufe nichtsignalisiert. Dem Anrufer wird
Besetzt signalisert.
4
5
-
Anrufbeantworter nutzen
Sie erreichen das Anrufbeantworter-Menü des Telefons durch
Betätigen Menu-Taste und des Softkeys »Anrufbeantwor-
ter«.
Anrufbeantworter }
Restzeit 48:54 Aus
Ansagen
Aktivierung
Nachrichten
Lokal
Anrufbeantworter konfigurieren
Der Anrufbeantworter kann direkt am Telefon oder über den Professional Configurator der
WIN-Tools CD-ROM konfiguriert werden. Beachten Sie hierzu dieHinweise in der Dokumentation
des Telefons.
4
Page 9

Deutsch
Allgemeine Konfigurierung
Anrufbeantworter ein-/ ausschalten
A
Mithören einstellen
Sie können das Hinterlassen einer Nachricht über den Lautsprecher des Telefons mithören. Diese
Funktion könnenSie in derKonfiguration füralle eingehendenAnrufe oder währendeiner laufenden
Aufzeichnung für einzelne Anrufe einstellen.
Betätigen Sie den Softkey »Mithören«. Das Mithören wird ein- oder ausgeschaltet.
Wird neben dem Softkey ein Häkchen (»®«) angezeigt, ist die Funktion eingeschaltet. Betätigen Sie
den Softkey erneut, um die Funktion wieder auszuschalten. Das Häkchen wird gelöscht.
Automatisches Benachrichtigen (Weitermelden) bei aufgezeichneten Nachrichten
Sie könnenden Anrufbeantworter soeinstellen, dassbei einerbestimmten Anzahlvon aufgezeichne
ten Anrufen (Nachrichten) diese an eine voreingestellte Rufnummer weitergemeldet werden.
Zum Ein- oder Ausschalten des Anrufbeantworters betätigen Sie die Anrufbeantwor
ter-Taste (rechteroberer Softkey). DieAnruf-LED leuchtetbei eingeschaltetemAnrufbe
antworter.
Sie können den Anrufbeantworternur einschalten, wenn dieAufzeichnung von Anru
fen für mindestens eine Rufnummer (MSN) aktiviert wurde (siehe Seite 12).
Beginnen Sie wie folgt:
a
Ms >
Anrufbeantworter
Anrufbeantworter {}
Weitermeldung
Texte löschen
Fernbedienung
Menü
Mithören
-
-
-
-
Beginnen Sie wie folgt:
a
Wird neben dem Softkey ein Häkchen (»®«) angezeigt, ist die Funktion eingeschaltet.
Ms>s
Anrufbeantworter Weitermeldung
5
Page 10

Deutsch
In den ersten Displayzeilen sehen Sie die aktuelle Einstellung
(»Aus«).
Weitermeldung:
zu>_
Anzahl Anrufe: 10
speichern
Aus
Aus
zurück
t Geben Sieüber die Tastaturdes Telefonsdie Rufnummerein (max. 20Ziffern), zuder die
Anrufe weitergemeldet werden sollen. Ist bereits eine Rufnummer vorhanden, löschen
Sie diese mit der linken Pfeiltaste.
s Betätigen Sieden Softkey»Anzahl Anrufe:«, umdie Anzahlder Anrufe(Nachrich
s Betätigen Sieden Softkey»Aus«, umdie Weitermeldungeinzuschalten. DurchBetätigen
»Ein,Ansage« Die Weitermeldung erfolgt durch einen Anruf mit der Wei-
»Ein,Nachricht/SMS« Mit dem Versand einer SMS-Textnachrichtwird auf die neu-
»Ein,Nachricht/UUS« Mit dem Versand einer UUS1-Textnachricht wird auf die
s Betätigen Sieden Softkey»speichern«, umdie neuenEinstellungen zu übernehmen.
ten) einzustellen,bei der dieautomatische Weitermeldung erfolgensoll. DurchBetätigen
des Softkeys werden nacheinander die verschiedenen Möglichkeiten angezeigt.
Z.B.: »1«, »2«, ...., »10«, »15«, »20« oder »30«.
des Softkeys werden nacheinander die verschiedenen Möglichkeiten angezeigt.
termeldungsansage oder einen Aufforderungston. Anschließend können die neuen Nachrichten abgehört werden.
en Nachrichten hingewiesen.
neuen Nachrichten hingewiesen.
Mit dem Softkey »zurück« können Sie das Menü verlassen, ohne dass die Einstellungen gespeichert werden.
-
Haben Siedie automatischeBenachrichtigung eingeschaltet,wird diesim Ruhezustand
des Displays mit »×« angezeigt. Die bei der automatischen Benachrichtigung entste
henden Kosten werdendem ISDN-Anschluss (der MSN)zugeordnet, an demdas Tele
fon angeschlossen ist.
-
-
Ablauf der Weitermeldung
Ist die eingestellte Anzahlder aufgezeichneten Nachrichten erreicht,wird die automatischeBenach
richtigung zu der voreingestelltenRufnummer eingeleitet (Anruf, UUS1- oderSMS-Versand). Nach
einer erfolgreichen Weitermeldung wirdder Zähler fürdie Anzahl der aufgezeichnetenNachrichten
gelöscht. Dienächste Benachrichtigung erfolgt,wenn die eingestellteAnzahl der Nachrichtenerneut
erreicht ist.
6
-
Page 11

Deutsch
Kann die Weitermeldung nicht erfolgen (z.B. Der Teilnehmer ist bei einem Anruf Besetzt), werden
bis zu fünf Anwahlversuche unternommen. Nach fünf erfolglosen Anwahlversuchen wird die Wei
termeldung abgebrochen und nach der nächsten neuen Nachricht erneut gestartet.
Textnachricht für die Weitermeldung (SMS / UUS1) speichern
Beginnen Sie wie folgt:
-
a
t
O
Wenn keine Text gespeichert ist, wird für den Versand der Textnachricht (SMS oder
UUS1) ein im Telefon gespeicherter Standardtext verwendet.
>s s
Nachrichten Text bei Weitermeldg.
Geben Sieden Text ein.Die Länge des Textesist auf
160 Zeichen (SMS) oder 31 Zeichen (UUS1) be
grenzt.
Im Beispiel:»Zu Hause 5 neue Nachrich
ten auf dem AB.«.
Bestätigen Sie die Eingabe mit OK.
Text bei Weitermeldg.
Anrufbeantworter
-
SMS>Zu Hause 5 neue
Nachrichten auf dem
AB.
¬¬¬¬¬¬¬¬¬¬¬¬¬¬¬¬¬¬¬¬¬¬
Alle Anrufe, alle Diktate oder alle Texte löschen
Sie können Anrufe, Diktate oder alle Texte des Anrufbeantworters löschen.
Beginnen Sie wie folgt:
a
s Wählen Sie, ob Sie die Anrufe, Diktate oder alle
Texte des Anrufbeantworterslöschen möchten, in
dem Sie den zugehörigen Softkey betätigen.
Z. B.: »Alle Anrufe löschen«.
s Möchten Siemit demLöschen fortsetzen,betätigen
Sie den Softkey neben »Ja«.
Sollen diegespeicherten Anrufe nicht gelöschtwer
den, betätigen Sie den Softkey »Nein«.
Ms>s
Anrufbeantworter Texte löschen
Texte löschen
Alle Texte löschen
-
Alle Anrufe löschen
Alle Diktate löschen
Wollen Sie wirklich
alle Anrufe löschen
-
Nein
¬¬¬¬¬¬¬¬¬¬¬¬¬¬¬¬¬¬¬¬¬¬
zurück
Ja
7
Page 12

Deutsch
Achtung: WennSie alle Textelöschen, werdenauch alle Einstellungendes Anrufbeant
worters gelöscht. Die Grundeinstellungen des Anrufbeantworters werden damit wie
derhergestellt.
-
-
Fernbedienung einstellen
Sie könnenden Anrufbeantworter soeinstellen, dassdieser ausder Ferne voneinem anderenTelefon
bedient werden kann.
Die Fernbedienung des Anrufbeantworters ist durch die PIN des Telefons geschützt
und nur über die Wahl der ersten im Telefon eingetragene Rufnummer (»MSN-1«)
möglich.
Bedienung aus der Ferne: z. B. Anrufbeantworter ein-/ ausschalten, Nachrichten abhören oder lö
schen, Ansagen abhören, löschen oder aufsprechen, Aktivierung von Ansagen für die einzelnen
MSNs, Automatisches Benachrichtigen bei aufgezeichneten Nachrichten einrichten
Beginnen Sie wie folgt:
a
Ms >
Anrufbeantworter
Betätigen Sieden Softkey»Fernbedienung«. DieFernbedienung wirdein- oderausgeschaltet.
Wird neben dem Softkey ein Häkchen (»®«) angezeigt, ist die Funktion eingeschaltet. Betätigen Sie
den Softkey erneut, um die Funktion wieder auszuschalten. Das Häkchen wird gelöscht.
Haben Siedie Fernbedienung eingeschaltet,wird diesim Ruhezustanddes Displays mit
»×« angezeigt.
Anrufbeantworter- }
Texte löschen
Menü
Mithören
Weitermeldung
Fernbedienung
Sprachqualität der Ansagen einstellen
Sie können für alle am Telefon aufgesprochenen Texte (Ansagen, Info-Texte und Diktate) drei ver
schiedene Sprachqualitäten (»Normal«, »Gut« oder »Sehr gut«) einstellen. Mit steigender
Sprachqualität verringert sich die maximale Aufzeichnungskapazität.
Aufgezeichnete Nachrichten vonAnrufern und Mitschnittewerden immer mit »Normaler«Qualität
aufgezeichnet.
-
-
8
Page 13

Beginnen Sie wie folgt:
a
M s >> s
Deutsch
Anrufbeantworter Sprachqualität
s Betätigen Sie denSoftkey der gewünschten Sprach
qualität. DasHäkchen zeigtden aktuellen Standan.
Z. B.: »Gut ®«.
Zum Verlassen des Menüs betätigen Sie den Soft
key »zurück«.
Im »Anrufbeantworter-Menü« wird neben dem Softkey »Sprachqualität« der aktuelle Stand ange
zeigt (keine Zeichen - Normal, »+« - Gut, »++« - Sehr gut).
Sprachqualität
-
Restzeit 48:54
Sehr gut
-
Normal
Gut ®
zurück
Abhören von Anrufen / Nachrichten nach Rufnummer (MSN) sortiert
Auf dem Anrufbeantworter hinterlassene Nachrichten werden in Listen gespeichert. Für das Abhören von Nachrichten können Sie einstellen, dass dieseListen nach den Rufnummern (MSN), für die
die Nachrichten hinterlassen wurden, sortiert werden.
Beginnen Sie wie folgt:
a
Ms>>
Anrufbeantworter
Betätigen Sie den Softkey »Anrufe MSN-sortiert«.
Wird neben dem Softkey ein Häkchen (»®«) angezeigt, ist die Funktion eingeschaltet. Betätigen Sie
den Softkey erneut, um die Funktion wieder auszuschalten. Das Häkchen wird gelöscht.
In der Grundeinstellung des Anrufbeantworters werden die Nachrichten für alle Rufnummern
(MSN) in einergemeinsamen Liste gespeichert. HabenSie die Sortierungder Nachrichten nachRuf
nummern (MSN) eingerichtet, können Sie vor dem Abhören von Nachrichten die entsprechende
Rufnummer (MSN) der abzuhörenden Nachrichten auswählen.
Anrufbeantworter-{
Anrufe MSN-sortiert®
Menü
Sprachqualität
-
-
9
Page 14

Deutsch
Ansagen, Infotexte und Diktate
Auf dem Anrufbeantworter können Sie verschiedene Ansagen, Infotexte oder Diktate speichern.
Ansagen: Sie können bis zu 10 Ansagen speichern.Nimmt der Anrufbeantworter einGespräch ent
gegen, erhält der Anrufer die Ansage, die der gewählten Rufnummer (MSN) zugewiesen ist.
Schlusstext: Spezielle Ansage, die ein Anrufer nach dem Hinterlassen einer Nachricht erhält, wenn
die Aufnahme zeitlich begrenzt ist.
Weitermeldungsansage: Spezielle Ansage, die als Hinweistext zu Beginn einer automatischen Be
nachrichtigung (siehe Seite 5) verwendet werden kann. Nach dem Aufsprechen muss diese Ansage
gezielt eingeschaltet werden.
Ansage für vollen AB: Ansage, die ein Anrufer bei zu geringer Speicherkapazität erhält.
1.) wenn vor dem Hinterlassen einer Nachricht weniger als 30 Sekunden Aufnahmekapazität frei
sind.
2.) wenn während des Aufsprechens einer Nachricht kein Speicherplatz mehr verfügbar ist.
Nach dem Aufsprechen muss diese Ansage gezielt eingeschaltet werden.
Info-Texte: Aufzeichnung von bis zu vier Texten, dieeinzeln gespeichert werden und als Nachricht
für z.B. andere Nutzer des Telefons ein- oder ausgeschaltet werden können.
Diktate: Aufzeichnung von Texten (max. 99, je nach verbleibender Aufzeichnungskapazität), die
nacheinander gespeichert werden.
Das Aufzeichnenvon Ansagen, Info-Textenoder Diktatenist im Folgendenam Beispiel
des Ansage-Textes 1 beschrieben.
Ansagen aufzeichnen, anhören oder löschen
Beginnen Sie wie folgt:
-
-
a
Ms s<>s
Anrufbeantworter Ansagen
Ansage auswählen
Ansage 1
10
Page 15

Ansage am Telefon aufsprechen:
Deutsch
bs Heben Sie denHörer des Telefonsab und betätigen
Sie anschließend den Softkey »Aufnahme«.
s Sprechen Sieüber den Hörerdes Telefons dieAnsa
ge auf. Beenden Sie die Aufnahme durch Betätigen
-
Ansage-1
Restzeit 48:54
Aufnahme, Audio-In
Aufnahme
¬¬¬¬¬¬¬¬¬¬¬¬¬¬¬¬¬¬¬¬¬¬
Ansage-1
-- Aufnahme läuft -
des Softkeys »Stop«.
Stop
Ansage über die Audio-Buchse (Audio In) laden:
Über die Audio-InBuchse des Telefons können Sievon einem PC Ansagenin das Telefon laden.Auf
der beiliegenden CD-ROMbefinden sich Wave-Dateien, die Sieals Begrüßungs- oderSchlussansage
in das Telefon laden können.
Verwenden Sie zumÜbertragen der Wave-Dateien ein geeignetesProgramm (z.B. Media Player).
s Betätigen Sie den Softkey »Aufnahme,Au-
dio-In« und starten Sie das Abspielen der ge-
wünschten Datei am PC.
s Beenden Sie die Aufnahme durch Betätigen des
Softkeys »Stop«.
Ansage-1
Restzeit 48:54
Aufnahme,Audio-In
Aufnahme
¬¬¬¬¬¬¬¬¬¬¬¬¬¬¬¬¬¬¬¬¬¬
Ansage-1
-- Aufnahme läuft -
Audio-In
Stop
Ansagen anhören oder löschen
Möchten Sie die aufgezeichnete Ansage anhören, betätigen Sie
den Softkey»anhören«. BetätigenSie denSoftkey »Aufnah
me« um dieAnsage neu aufzuzeichnen. Dievorhandene Ansage
wird dabei gelöscht.Um die gespeicherteAnsage zu löschen,be
-
-
tätigen Sie den Softkey »löschen«.
In den Menüs zeigt ein Häkchen bei dem entsprechenden Eintrag (z.B. »Ansage-1
®«), dass für diesen Eintrag ein Text gespeichert ist.
Ansage-1
Restzeit 48:01
Aufnahme, Audio-In
Aufnahme
löschen
anhören
11
Page 16

Deutsch
Info-Texte und Diktate
Beginnen Sie wie folgt:
Lokal Nachrichten
a
Ms s
Anrufbeantworter Lokal
Betätigen Sie den entsprechenden Softkey, um Info-Texte oder Diktate aufzuzeichnen. Gehen Sie
beim Aufzeichnen vor, wie für Ansage 1 beschrieben.
Nach dem Aufsprechen muss ein Infotext gezielt eingeschaltet werden.
aufnehmen/einstelle
Info-Text-1 ®
Info-Text-2
Info-Text-3
Info-Text-4
Diktate
Aktivieren der Nachrichtenaufzeichnung je Rufnummer (MSN)
Sie können den Anrufbeantworter für jede gespeicherte Rufnummern (MSN) separat oder gemeinsam für alle gespeicherten Rufnummern konfigurieren.
Der Anrufbeantworter kann nur konfiguriert werden, wenn:
die Rufnummer (MSN) inder Konfigurierung des Telefons gespeichert ist. Haben Sie in der
•
Konfigurierung desTelefons einer Rufnummereinen Namen zugewiesen,werden in denMenüs dieSoftkey-Bezeichnungen »MSN-1«…»MSN-10« durchden entsprechenden Namen
ersetzt.
mindestens eineAnsage gespeichert wurde(siehe Seite 10).
•
Beginnen Sie wie folgt:
Aktivierung der }
a
Ms s
Anrufbeantworter Aktivierung
Der Softkeyfür eine MSNwird nurangezeigt, wenn dieMSN in der Konfigurierungdes
Telefons gespeichert ist.
Das Konfigurieren desAnrufbeantworters ist im Folgenden amBeispiel der Rufnummer MSN-1be
schrieben. Betätigen Sie den Softkey »MSN-1«.
MSN-1
MSN-2
Ansage
MSN-3
MSN-4
MSN-5
-
12
Page 17

Deutsch
In denersten Displayzeilen sehenSie denStatus desAnrufbeant
worters für diegewählte Rufnummer (»MSN-1:Aus«). In den
weiteren Displayzeilen können dieverschiedenen Einstellungen
über die zugehörigen Softkeys vorgenommen werden.
Nach Betätigen des Softkey »Optionen« erreichen Sie ein
Menü mit weiterenEinstellungen. In derZeile unter einem Soft
key sehen Sie den Status für die entsprechende Funktion.
Zum Verlassen eines Menüs betätigen Sie die C-Taste.
Einstellung MSN-1:
-
Aktiv nach: 2 sec
Ansage wählen
Optionen für MSN-1
Schlusstext:
-
Zeitsteuerung:
Nachrichtenlänge:
Aufsprechen
Einschalten
Optionen
Endlos
Augs
Aus
Aus
Betriebsart einstellen
s Betätigen Sie den Softkey »Aufsprechen«, um die Betriebsart des Anrufbeantwor-
ters einzustellen. Durch Betätigen desSoftkeys werden nacheinander die verschiedenen
Möglichkeiten angezeigt.
»Aufsprechen« Ein Anruferhört zuerstdie eingestellte Ansageund kannnach demSignalton
»Nur Ansage« Ein AnruferhörtnurdieeingestellteAnsageundkannkeineNachrichthinter-
eine Nachrichthinterlassen.
lassen.
Dauer der Rufsignalisierung einstellen
s Betätigen Sie den Softkey »Aktiv nach:« um die Zeit (in Sekunden) einzustellen,
nach welcher der Anrufbeantworter einen Anruf annehmen soll. Durch Betätigen des
Softkeys werden nacheinander die folgenden Möglichkeiten angezeigt und eingestellt:
»0 sec«, »2 sec«, »5 sec«, »10 sec«, »15 sec«, »20 sec«, »25 sec«, »30
sec«, »60 sec« oder »120 sec«.
Ansage auswählen
s Betätigen Sieden Softkey »Ansage wählen«, umdie Ansage zuwählen, die einAnru
fer hören soll. Sind mehrere Ansagen verfügbar, können durch Betätigen des Softkeys
»nächste Ansage« nacheinander alle gespeicherten Ansagen angezeigt werden.
Gleichzeitig hörenSie die ausgewählteAnsage über denLautsprecher oderden Hörer des
Telefons.
Z.B.: »Ansage-1«, »Ansage-2«, ...., »Ansage-9« oder »Ansage-10«.
Ansage für die Rufnummer (MSN) einschalten
s Betätigen Sieden Softkey»Einschalten«, umdie Ansagefür dieRufnummer MSN-1
einzuschalten. In den ersten Displayzeilen wird der Status in »MSN-1: Ein« und der
13
-
Page 18

Deutsch
Softkey in Zeilein »Ausschalten« geändert.Zum Ausschalten derAnsage betätigen
Sie diesen Softkey.
Nach der Konfiguration des Anrufbeantworters sehen Sie alle
wichtigen Informationen z.B. die nebenstehende Displayanzei
ge.
Betätigen Sie denSoftkey »Optionen« umweitere Einstellun
gen vorzunehmen.
Einstellung MSN-1:
-
Aktiv nach: 20sec
-
Ansage-2
Aufsprechen
Ausschalten
Optionen
Ein
Schlusstext einschalten
Der Schlusstext ist einespezielle Ansage, die einAnrufer zusätzlich zu derfür die gewählte Rufnum
mer (MSN) eingestellte Ansage hört. DerSchlusstext kann nur eingeschaltet werden, wenn er zuvor
aufgesprochen wurde (siehe Seite 10).
Bei der Einstellung »Aufsprechen« hört ein Anrufer zuerst die eingestellte Ansage und kann
nach dem Signalton eineNachricht hinterlassen. Ist die zulässige Nachrichtenlängeerreicht und ein
Schlusstext gespeichert, hört der Anrufer den Schlusstext.
Bei der Einstellung »Nur Ansage« kann ein Anrufer keine Nachricht hinterlassen. Er hört zuerst
die eingestellte Ansage und anschließend den gespeicherten Schlusstext.
Beginnen Sie wie folgt:
a
Ms s ss
Anrufbeantworter Aktivierung MSN-1 Optionen
-
s Betätigen Sie den Softkey »Schlusstext«. Der
Schlusstext wird ein- oder ausgeschaltet.
In der Zeileunter dem Softkey sehenSie den Status
für die Funktion (»Ein« oder »Aus«).
Optionen für MSN-1
Schlusstext
Zeitsteuerung
Nachrichtenlänge
Endlos
Aus
Aus
Nachrichtenlänge
Sie können einstellen, wie viel Zeit einemAnrufer zum Aufsprechen einer Nachricht zur Verfügung
steht. In Abhängigkeit von dereingestellten Betriebsart wird die Aufzeichnung nachAblauf der ein
gestellten Zeit beendet.
In der Grundeinstellung des Anrufbeantworters ist die Nachrichtenlänge auf »End
los« eingestellt.Bei derBetriebsart »Aufsprechen« undeingeschaltetem Schluss
-
-
text ist die Nachrichtenlänge in der Grundeinstellung auf »30sec« eingestellt.
14
-
Page 19

Beginnen Sie wie folgt:
a
Ms s s s s
Anrufbe
antworter
-
Aktivie
rung
MSN-1 Optio
nen
Nachrichten
-
Deutsch
länge
-
s Betätigen Sie den Softkey der gewünschten Nach
richtenlänge. Ein Häkchen zeigt die aktuelle Ein
stellung.
C Nach denvorgenommenen Einstellungen sehenSie
z.B. die nebenstehende Displayanzeige. Betätigen
Sie die C-Taste, um das Menü »Optionen«zu
verlassen.
Nachrichtenlänge
-
-
begrenzen
30 sec
60 sec ®
Optionen für MSN-1
Schlusstext:
Zeitsteuerung:
Nachrichtenlänge
120 sec
Endlos
Aus
Aus
60 sec
Zeitsteuerung
Mit einer Zeitsteuerung legen Sie fest, dass Anrufer zu verschiedenen Tageszeiten unterschiedliche
Ansagen hören. Die Zeitsteuerung kann nur eingeschaltet werden, wenn der Anrufbeantworter für
die gewählte Rufnummer (MSN) bereits eingeschaltet wurde.
Haben Sieeine Zeitsteuerungeingeschaltet, wirddies imRuhezustand desDisplays mit
»×« angezeigt.
Beginnen Sie wie folgt:
a
Ms s s s s
Anrufbe
antworter
-
Aktivie
In diesemMenü könnenSie dieZeiträume und dieZeitsteuerung
für eine Rufnummer (MSN) einrichten. Ein Wochenprofil kann
nur für Rufnummern MSN-1 bis MSN-3 eingerichtet werden.
rung
-
MSN-1 Optio
-
nen
Wochenprofil: Aus
Täglich: Aus
Zeiten festlegen
¬¬¬¬¬¬¬¬¬¬¬¬¬¬¬¬¬¬¬¬¬¬
Zeitsteue
rung
Zeitsteuerung
-
Zeiten festlegen
Sie können an Ihrem Telefon neun verschiedene Zeiträume (»Zeit 1« ...»Zeit 9«) einrichten,
die Sie dann in den Zeitsteuerungen für die einzelnen Rufnummern (MSN) verwenden können.
15
Page 20

Deutsch
Die eingerichtetenZeiträume gelten füralle Rufnummern (MSN). WennSie eine Zeit ändern,die be
reits in einer anderen Zeitsteuerung verwendet wird,wirkt sich diese Änderung auchauf die andere
Zeitsteuerung aus.
Betätigen Sie im Menü »Zeitsteuerung« den Softkey »Zeiten festlegen«.
<
>
O
t
O
Wählen Sie einen Zeitraum mit denPfeiltasten aus
und bestätigen Sie die Auswahl mit OK.
Im Beispiel: »Zeit 1«.
Geben Sie überdie Tastatur den gewünschtenZeit
raum ein. Der Cursor unterhalb der Zeitangaben
zeigt die aktuelle Eingabeposition.
Bestätigen Sie die Eingabe mit OK.
Die Zeiten eines festgelegten Zeitraumes gelten immerfür den selben Tag. Weisen Sie
zum Beispiel Montagden Zeitraum 18:00Uhr bis08:00 Uhr zu,bedeutet dies: Montagmorgen 00:00 Uhr bis 08:00 Uhr und Montagabend 18:00 Uhr bis 24:00 Uhr.
Zeiten festlegen {}
Zeit 1:
08:00 bis 13:00
Zeit 2:
13:00 bis 13:30
¬¬¬¬¬¬¬¬¬¬¬¬¬¬¬¬¬¬¬¬¬¬
Zeiten festlegen:
-
Zeitraum (1) von
14:00 bis 18:00
Zeit 1
zurück
Zeitsteuerung »Täglich«
Bei dieser Zeitsteuerungweisen Sie einerRufnummer (MSN) einen Zeitraumzu (die sog.»Haupt
zeit«), indem Anrufer einebestimmte Ansage erhalten.Für dieweitere Zeit außerhalb diesesZeit
raums (die sog. »Restzeit«) können Sie eine andere Ansage einstellen. Diese Zeitsteuerung gilt
für jeden Tag und ist für alle Rufnummern (MSN) einrichtbar.
Betätigen Sie im Menü »Zeitsteuerung« den Softkey »Täglich«.
-
-
-
s Betätigen Sie die entsprechenden Softkeys, um die
Zeitsteuerung einzurichten.
Täglich/MSN-1:
Hauptzeit: Aus
nicht aktiv (-)
Restzeit: Aus
¬¬¬¬¬¬¬¬¬¬¬¬¬¬¬¬¬¬¬¬¬¬
Einschalten
Aus
s Durch Betätigen des Softkeys»nicht aktiv« werden nacheinander die eingerichte
ten Zeiträume angezeigt.
s Betätigen Sie den Softkey »Hauptzeit«, um die Ansage einzustellen, die Anrufer in
nerhalb des gewählten Zeitraumes hören sollen. Über den Softkey »Restzeit« wird
16
-
-
Page 21

Deutsch
die Ansage eingestellt, die Anrufer außerhalb dieses Zeitraumes hören.
Sind mehrere Ansagen verfügbar, können durch Betätigen des Softkeys »nächste
Ansage« nacheinander alle gespeicherten Ansagen angezeigt / angehört werden.
Z.B.: »Ansage-1«, »Ansage-2«, ...., »Ansage-9« oder »Ansage-10«.
s Betätigen Sie den Softkey »Einschalten«, um die Zeitsteuerung einzuschalten.In
den ersten Displayzeilen wird der Status in »Ein« und der entsprechende Softkey in
»Ausschalten« geändert.
Zum Ausschalten des Wochenprofils betätigen Sie diesen Softkey.
O Bestätigen Sie die Einstellungen mit OK, um das
Menü Zeitsteuerung zu verlassen.
Zeitsteuerung »Wochenprofil«
Für die Rufnummern »MSN-1«, »MSN-2« und»MSN-3«, können Sie alternativ ein Wochenprofil
als Zeitsteuerung einstellen. In einem Wochenprofil können Sie jedem Tagverschiedene Zeiträume
zuweisen, in denen verschiedene Ansagen zu hören sind (die sog. Hauptzeit).
In derZeit außerhalb dergewählten Zeiträume (diesog. »Restzeit«) könnenSie eine andereAnsage einrichten. DieseAnsage ist für alleTage des Wochenprofilsidentisch. Weiterhin können Siein
einem Wochenprofil der Restzeit eine andere Betriebsart wie der Hauptzeit zuweisen. Zum Beispiel
können Sie so in der Hauptzeit das Hinterlassen von Nachrichten zulassen, während in der Restzeit
keine Nachrichten aufgesprochen werden können.
Betätigen Sie im Menü »Zeitsteuerung« den Softkey »Wochenprofil«.
Täglich/MSN-1:
Hauptzeit: Ansage 1
13:00 bis 13:30 (2)
Restzeit: Ansage 3
¬¬¬¬¬¬¬¬¬¬¬¬¬¬¬¬¬¬¬¬¬¬
Ausschalten
Ein
s Betätigen Sie den entsprechenden Softkey, um die
Haupt- / Restzeiten festzulegen oder die Zeitsteue
rung einzuschalten.
Wochenprofil/MSN-1:
-
Hauptzeiten festlegen
Restzeit festlegen
Einschalten
Aus
s Betätigen Sie denSoftkey »Hauptzeiten festlegen«, um für dieeinzelnen Wo
chentage die Zeiträume und die Ansage für die sog. Hauptzeit festzulegen.
s Um Ansage und Betriebsart für die verbleibenden Zeiträume aller Wochentage einzu
richten, betätigen Sie den Softkey »Restzeit festlegen«.
s Betätigen Sie den Softkey »Einschalten«, um das Wochenprofil einzuschalten.In
den ersten Displayzeilen wird der Status in »Ein« und der entsprechende Softkey in
17
-
-
Page 22

Deutsch
»Ausschalten« geändert.
Zum Ausschalten des Wochenprofils betätigen Sie diesen Softkey.
Wenn Sie dasWochenprofil einschalten, wird eineeingeschaltete tägliche Zeitsteuerung
automatisch ausgeschaltet.
Hauptzeiten einrichten
Betätigen Sie im Menü »Wochenprofil« den Softkey »Hauptzeiten festlegen«.
Betätigen Sie die entsprechenden Tasten und Softkeys, um die
Ansage und die Zeiträumeder Hauptzeit für die einzelnen Tage
des Wochenprofils festzulegen. Im Beispiel: »Montag«.
Hauptzeit
festlegen: Montag
nicht aktiv (-)
nicht aktiv (-)
Anrufbeantw. inaktiv
¬¬¬¬¬¬¬¬¬¬¬¬¬¬¬¬¬¬¬¬¬¬
s Betätigen Sieden Softkey »Anrufbeantw. inaktiv«, um dieAnsage einzustellen,
die Anrufer innerhalb der gewählten Zeiträume hören sollen.
Sind mehrere Ansagen verfügbar, können durch Betätigen des Softkeys »nächste
Ansage« nacheinander alle gespeicherten Ansagen angezeigt werden.
Z.B.: »Ansage-1«, »Ansage-2«, ...., »Ansage-9« oder »Ansage-10«.
s Durch Betätigen des Softkeys»nicht aktiv« werden nacheinander die eingerichte-
ten Zeiträume angezeigt. Z. B.: »Zeit 1«, »Zeit 2«, …, »Zeit 9«.
Sie können zwei Zeiträume festlegen, bei denen ein Anrufer die gewählte Ansage hört.
Möchten Sie weitere Tage einrichten, betätigen Sie die Pfeiltasten.
O Bestätigen Sie die Konfiguration der Hauptzeiten
des Wochenprofils mit OK.
Hauptzeit {}
festlegen: Sonntag
08:00 bis 13:00 (1)
15:00 bis 18:00 (4)
Ansage -1
¬¬¬¬¬¬¬¬¬¬¬¬¬¬¬¬¬¬¬¬¬¬
Restzeit einrichten
Betätigen Sie im Menü »Wochenprofil« den Softkey »Restzeit festlegen«.
s Betätigen Sie den entsprechenden Softkey, um die
Betriebsart unddie Ansage fürdie Restzeitfestzule
gen. Diese Einstellungen gelten für alle Wochenta
ge.
Restzeit festlegen
-
-
Schlusstext:
Restzeit:
Anrufbeantw. inaktiv
Aufsprechen
Aus
s Betätigen Sie den Softkey »Aufsprechen«, um die Betriebsart während der Restzeit
einzustellen. Durch Betätigen des Softkeys werden nacheinander die verschiedenen
Möglichkeiten (siehe Seite 13) angezeigt.
18
Page 23

Deutsch
s Betätigen Sie den Softkey »Schlusstext«, um den Schlusstext (siehe Seite 14) ein-
oder auszuschalten.
s Betätigen Sie denSoftkey »Restzeit«, um dieAnsage für Anrufer außerhalbder ein
gerichteten Hauptzeiten festzulegen.
Sind mehrere Ansagen verfügbar, können durch Betätigen des Softkeys »nächste
Ansage« nacheinander alle gespeicherten Ansagen angezeigt werden.
Z.B.: »Ansage-1«, »Ansage-2«, ...., »Ansage-9« oder »Ansage-10«.
O Bestätigen Sie die Konfiguration der Restzeit des
Wochenprofils mit OK.
Restzeit festlegen
Schlusstext:
Restzeit:
Aufsprechen
Ansage-04
Ein
-
19
Page 24

Deutsch
Bedienung
Sind neue Nachrichten,neue Diktate odereingeschaltete Info-Texte aufdem Anrufbeantworter vor
handen, werdendiese bei eingeschaltetem Anrufbeantworterdurch dieblinkende Anruf-LED signa
lisiert. Im Display sehen Sie Informationen über die Anzahl der neuen Nachrichten.
-
-
Neue Nachrichten aufdem Anrufbeantworter, die kürzer alszwei Sekunden sind,wer
den nichtgespeichert. Z.B.: EinAnrufer beendetnach demAufforderungston zum Hin
-
-
terlassen einer Nachricht die Verbindung, ohne eine Nachricht zu hinterlassen.
Während des Abhörens von Nachrichten können Sie die Lautstärke des
Lautsprechers oder des Hörers ändern.
Betätigen Sie hierzudie Menu-Taste undanschließend die Pfeiltasten.Um zu dernormalen Display
anzeige während des Abhörens zurückzukehren, betätigen Sie dieESC-Taste. Wenn Sie die Eingabe
anstelle der ESC-Taste mit der OK-Taste bestätigen, überschreiben Sie den bisher fest eingestellten
Wert (siehe akustische Einstellungen des Telefons).
Neue Nachrichten abhören
s Im Display sehen Sie die Anzahl der neuen Nach-
richten.
Betätigen Sie den Softkey »Nachrichten
AB:«.
Die folgende Displayanzeige sehen Sie nur, wenn mehrere neue Nachrichten auf dem
Anrufbeantworter gespeichert sind.
s Sie sehen nun detaillierte Informationen über die
Art der neuen Nachrichten.
Betätigen Sie den Softkey neben den Nachrichten,
die Sie abhören möchten.
s Haben Sie für das Abhören von Nachrichten die
MSN-Sortierung eingerichtet, betätigen Sie den
Softkey für die Rufnummer (MSN), für welche die
Nachrichten abgehört werden sollen.
Das Abhören von Nachrichten ist im Folgenden am Beispiel der neuen Anrufe be
schrieben. Betätigen Sie den Softkey »Neue Anrufe«.
29.05.03 07:21 }
Info -T-S-r-×-
Nachrichten AB:8
Telefonbuch
¬¬¬¬¬¬¬¬¬¬¬¬¬¬¬¬¬¬¬¬¬¬
Anrufbeantworter
Neue Anrufe =4
Neue Diktate =3
Info Texte =1
¬¬¬¬¬¬¬¬¬¬¬¬¬¬¬¬¬¬¬¬¬¬
Neue Anrufe {}
sortiert
02=MSN-1
¬¬¬¬¬¬¬¬¬¬¬¬¬¬¬¬¬¬¬¬¬¬
MSN-3=00
MSN-4=01
-
-
20
Page 25

Deutsch
Nach Betätigen dieses Softkeys werden automatisch alle neuen
Nachrichten nacheinander abgespielt.Betätigen Sie eineweitere
Taste, wird die automatische Wiedergabe beendet. Sie können
nun die Wiedergabe der Nachrichten mit den nachfolgend be
schriebenen Tasten manuell steuern.
Neuer Anruf-01 {}
Datum: 29.05.03 07:21
Pause
-
löschen
MSN-1
wiederholen
Stop
»<« oder »>« Vonder aktuellenNachricht wirdzu dervorhergehenden (»<«)oder zuder
nächsten(»>«) Nachricht gewechselt.
»Pause« Betätigen Sieden Softkey »Pause«,um dasAbhören einer Nachricht zuun
terbrechen.
Möchten Siedas Abhörender Nachricht fortsetzen,betätigen Sieden Softkey
»PAUSE BEENDEN«.
»wiederholen« Betätigen Sie den Softkey»wiederholen«, um die zuletzt gehörteNach
richtnochmal vonAnfang anzuhören.
»Stop« BetätigenSiedenSoftkey»Stop«,um dieWiedergabederNachrichtzu been-
den.
Indem darauffolgendem Menükönnen Siedie Nachricht erneutabhören, löschen oderdie übermittelteRufnummer desAnrufers ansehen.Betätigen Sie
dazu den entsprechenden Softkey »anhören«, »löschen«oder »Ruf-
nummer«.
Haben Sie eine neueNachricht vollständig abgehört, wirddiese aus der Liste derneuen Nachrichten
gelöscht und in die Liste mit den alten Nachrichten verschoben.
Haben Sie alle neuen Anrufe abgehört, sehen Sie wieder das nebenstehende Display. Um weitereneue Nachrichten anzuhören,
gehen Sie vor, wie für »Neue Anrufe« beschrieben.
Anrufbeantworter
Neue Anrufe =0
Neue Diktate =3
¬¬¬¬¬¬¬¬¬¬¬¬¬¬¬¬¬¬¬¬¬¬
-
-
Alle Nachrichten, Diktate, Info-Texte oder Mitschnitte abhören
Beginnen Sie wie folgt:
Nachrichtenabfrage }
a
Ms s
Anrufbeantworter Nachrichten
Anrufe Neu=00
Diktate Neu=03
Info-Texte Ein=01
Alt=04
Alt=00
Aus=00
21
Page 26

Deutsch
> Sie sehen Art und Anzahl der neuen undalten (be
reits abgehörten) Nachrichten. Nach Betätigen der
rechten Pfeiltaste wird die Anzahl der Gesprächs
mitschnitte (siehe Seite 23) angezeigt.
Nachrichtenabfrage {
-
-
Mitschnitte =00
Audio-Out: Aus
s Betätigen Sie den entsprechenden Softkey, um die Nachrichten abzuhören. Zum weite
ren Abhören der Nachrichten gehen Sie vor, wie auf Seite 20 beschrieben.
Nachrichten über die Audio-Buchse (Audio Out) ausgeben
Das Telefon verfügt über einen Audio-Ausgang (Audio-Out). Aufgezeichnete Nachrichten können
über diesenAusgang ausgegebenund z.B.auf aufeinem PC mitSound-Anschlüssen gespeichertwer
den (siehe Seite 4).
Beginnen Sie wie folgt:
a
Ms s>s
Anrufbeantworter Nachrichten Audio-Out
Durch Betätigendes Softkeys »Audio-Out«,wird dieAusgabe
der Nachrichten ein- oderausgeschaltet. Neben dem Softkey sehen Sie die aktuelle Einstellung.
»Ein«: Lautsprecher/Hörer und Audio-Out.
»Aus«: Nur Lautsprecher/Hörer.
Die Ausgabevon Nachrichten überdie Buchse»Audio-Out« istnur bei aufgelegtemHö
rer (Funktion »Lauthören«) möglich.
Verwenden Sie zum Aufzeichnen von Nachrichten auf dem PC ein geeignetes Pro
gramm.
Nachrichtenabfrage {
Mitschnitte =01
Audio-Out: Ein
-
-
-
-
Ein Gespräch vom Anrufbeantworter übernehmen
Um einen Anrufer anzunehmen, der gerade eine Nachricht auf dem Anrufbeantworter hinterlässt,
muss das Mithören (sieheSeite 5) eingeschaltet sein. DasMithören können Sie inder Konfiguration
für alleeingehenden Anrufeoder währendeiner laufenden Aufzeichnungfür einzelne Anrufeeinstel
len.
22
-
Page 27

Deutsch
Während einer Aufzeichnung des Anrufbeantworters sehen Sie
das nebenstehende Display.
Mithören:
»Mithören ein« zeigt, dass das Mithören durch Betätigen
dieser Taste eingeschaltet werden kann.
»Mithören aus« zeigt,dass dasMithören bereitseingeschal
tet ist und durch Betätigen des Softkeys ausgeschaltet werden
kann.
bg Um das Gespräch zu übernehmen, heben Sie bei
eingeschaltetem Mithören den Hörer des Telefons
ab.
2200
---Aufnahme läuft--
Anruf für MSN-1
Mithören ein
¬¬¬¬¬¬¬¬¬¬¬¬¬¬¬¬¬¬¬¬¬¬
ªªªªªªªªªªªªªªªªªªªªªª
-
Anruf für MSN-1
Mithören aus
¬¬¬¬¬¬¬¬¬¬¬¬¬¬¬¬¬¬¬¬¬¬
2200 }
00:35 MSN-1
anzeigen
¬¬¬¬¬¬¬¬¬¬¬¬¬¬¬¬¬¬¬¬¬¬
Notiz
Einen Anruf zum Anrufbeantworter übergeben
Ein Anruf kann dem Anrufbeantworter nur übergeben werden, wenn für die signalisierte Rufnummer (MSN) eineAnsage zugewiesen und aktiviert wurde.Dieses ist auchbei ausgeschaltetem Anrufbeantworter möglich.
al
>s
AB übergeben
Ein Gespräch mitschneiden
Haben Sie einenAnruf angenommen, können Siedieses Gespräch mitschneiden. DerMitschnitt des
Gespräches wird im Anrufbeantworter des Telefons gespeichert.
Achtung: Weisen Sie Ihren Gesprächspartner darauf hin, dass Sie das Gespräch mit
schneiden. Das Mitschneiden von Gesprächen ist nur möglich, wenn keine laufende
Aufzeichnung auf dem Anrufbeantworter erfolgt.
-
alb g
Gespräch ohne Mitschneiden
>
s
Betätigen Siedie rechte Pfeiltasteund anschließend
den Softkey »mitschneiden«, um den Mit
schnitt des Gespräches einzuleiten.
2200 }
00:55 MSN-1
-
anzeigen
¬¬¬¬¬¬¬¬¬¬¬¬¬¬¬¬¬¬¬¬¬¬
Notiz
23
Page 28

Deutsch
s Betätigen Sie den Softkey »Stop«, um den Mit
schnitt zu beenden und zu speichern. Möchten Sie
den Mitschnitt beenden, ohnediesen zu speichern,
betätigen Sie den Softkey »löschen«.
-
g Sie können jetzt das Gespräch weiterführen. Das
Display zeigt wieder die normale Anzeigewährend
einer Verbindung an.
Das Mitschneiden von Gesprächen ist während des Telefonierens mit einem oder mit
mehreren Gesprächspartnern (Konferenz) möglich.
Um einenMitschnitt anzuhören,gehen Sievor, wieauf Seite21 dieserBedienungsanleitung beschrie
ben.
Mitschnitt-01
-- Aufnahme läuft -
löschen
2200 {
03:51
¬¬¬¬¬¬¬¬¬¬¬¬¬¬¬¬¬¬¬¬¬¬
mitschneiden
Stop
Fernbedienung
Sie könnenvon einembeliebigen Telefon mittelsMFV-Nachwahl aus derFerne einenZugriff aufden
Anrufbeantworter einleiten, um z. B. Nachrichten anzuhören. Die Fernbedienung ist nur über die
erste im Telefon eingetragene Rufnummer »MSN-1« möglich.
Die Fernbedienung des Anrufbeantworters ist durch die PIN des Telefons geschützt
und nur möglich, wenn diese am Telefon (siehe Seite 8) eingeschaltet ist.
Folgende Bedienungen / Einstellungen sind aus der Ferne möglich:
Anrufbeantworter ein-oder ausschalten
•
verfügbare Speicherkapazitätabfragen
•
neue undalte Nachrichtenoder eingeschaltete Info-Texteabhören
•
einzelne Nachrichtenlöschen
•
alle Nachrichtenlöschen
•
Ansagen abhören,löschen oderneue Ansagen aufsprechen
•
Aktivieren /Deaktivieren von Ansagenfür eine Rufnummern (MSN)
•
automatische Benachrichtigung(Weitermeldung) ein-/ ausschaltenoder konfigurieren
•
-
Töne während der Fernbedienung
Während der Fernbedienung hören Sie verschiedene Töne, die Sie über den Zustand der einzelnen
Eingaben oder Aktionen informieren.
24
Page 29
Deutsch
Positiver Quittungston
(1 langer Ton):
Aufforderungston
(2 kurze Töne):
Negativer Quittungston
(4 kurze Töne):
Die Eingabe wurde vom Telefon angenommen und ggf. ge
speichert.
Das Telefon erwartet die Eingabe einer Kennziffer oder das
Aufsprechen einer neuen Ansage.
Die Eingabe war fehlerhaft und wurdevom Telefon nicht an
genommen. Die eingegebeneKennziffer oder diegewünschte
Aktion kann nicht ausgeführt werden.
Z. B.: Aktivierung einer Ansage für eine Rufnummer (MSN),
die nicht im Telefon gespeichert ist.
Fernbedienung einleiten (Anrufbeantworter ist eingeschaltet)
b t g #t#q
Rufnummer 1
(MSN-1) wählen
Achtung: DieEingabe »# PIN #« musswährend der Ansageerfolgen. Nachdem Ertönen despositiven Quittungstones können Sie weitere Prozeduren aus der Ferne durchführen.
Ausgeschalteten Anrufbeantworter aus der Ferne einschalten
bt
Rufnummer 1
(MSN-1) wählen
Ansage des Anruf
beantworters
nach ca. 90 Se-
kunden
-
PIN einge
ben
-
qq # PIN # q *01 q
-
Aufforde
rungston
PIN
eingeben
Anrufbeantworter
einschalten
-
-
Die Fernbedienungeines ausgeschalteten Anrufbeantwortersist nur möglich,wenn für dieRufnum
mer 1 (MSN-1) eine Ansage eingerichtet und aktiviert wurde.
Nach demErtönen despositiven Quittungstones könnenSie die weiteren Prozedurender Fernbedie
nung durchführen.
Automatische Benachrichtigung (Weitermeldung) annehmen
lb g # t #q
Sie hören einen Aufforderungston oder die
Weitermeldungsansage
PIN eingeben
25
-
-
Page 30

Deutsch
Sofern aufgesprochen, wird zu Beginn der Benachrichtigung die »Weitermeldungsansage«
wiedergegeben. Ist diese Ansage nicht aufgesprochen und eingeschaltet, hören Sie einen Aufforde
rungston.
Wird die Benachrichtigung durchdie Eingabe der »# PIN #« angenommen, können Sie die weite
ren Kennziffern der Fernbedienung durchführen.
Kennziffern der Fernbedienung
Nach erfolgreicherEinleitung der Fernbedienungkönnen Siemit den folgendenKennziffern dieein
zelnen Funktionen bedienen.
Um dieFernbedienung zu beenden,legen Sie nachEingabe derletzten Kennzifferden Hörer desTele
fons auf.
Eingerückte Kennziffern sind nur während des Abhörens von Texten (Nachrichten,
Ansagen, Info-Texte) nutzbar.
Allgemeine Kennziffern
*00q Anrufbeantworter ausschalten
*02q Abfrageder verfügbaren Speicherkapazität
Die verfügbare Speicherkapazität zum Hinterlassen von Nachrichten wird
durch einzelne Töne wiedergegeben. JederTon steht für drei Minuten Speicherkapazität.
Nachrichten abhören oder löschen, Info-Texte abhören
10q neue Nachrichten abhören
11q alte Nachrichten abhören
12q eingeschaltete Info-Texteabhören
#q nächste Nachricht abhören
*q vorherigeNachricht abhören
0q Wiedergabe derlaufenden Nachrichtbeenden
2q Löschen deraktuell abgehörtenNachricht
22q Löschenaller abgehörtenNachrichten
-
-
-
-
26
Page 31

Deutsch
Ansagen abhören, löschen oder neue Ansagen aufsprechen
Die laufende Wiedergabe / Aufnahme einer Ansage wird durch Betätigen der Taste »0« beendet.
Wird während der Wiedergabe / Aufnahme die Taste »2« betätigt, wird diese Ansage gelöscht.
Beim Löscheneiner Ansage, diebereits einerRufnummer (MSN)zugewiesen ist,werden alle dazuge
hörigen Einstellungen (z. B. Betriebsart, Dauer der Rufsignalisierung, Nachrichtenlänge und Zeit
steuerung) gelöscht.
Möchten Sieeine vorhandene Ansageändern, könnenSie diese neuaufsprechen, ohnedass die Ansa
ge zuvor gelöschtwird. Die "alte" Ansage wirddurch die neu aufgesprocheneAnsage überschrieben.
Alle zugehörigen Einstellungen fürdiese Ansage und diezugewiesene Rufnummer (MSN) (z. B. Be
triebsart, Dauer der Rufsignalisierung, Nachrichtenlänge und Zeitsteuerung) bleiben erhalten.
0q Wiedergabe /Aufsprechen der laufenden Ansagenbeenden
2q Löschen deraktuell abgehörten/ aufgesprochenenAnsage
13Xq Ansageabhören
X:! … ),= Ansage auswählen(1...9,10)
23Xq Ansagelöschen
X:! … ),= Ansage auswählen(1...9,10)
33Xq Ansageaufsprechen
X:! … ),= Ansage auswählen(1...9,10)
Die Ansage,die der erstenRufnummer (MSN-1) zugewiesenist, kann nichtaus der Ferne gelöscht werden.
Aktivieren / Deaktivieren von Ansagen für eine Rufnummer (MSN)
Eine Ansage kannnur während ihrerWiedergabe für eine Rufnummer (MSN)aktiviert / deaktiviert
werden. Die Aktivierung einer Ansage für eine Rufnummer (MSN) erfolgt mitden folgenden festen
Einstellungen:
Dauer der Rufsignalisierung: »05 Sekunden«, Betriebsart: »Aufsprechen«, Nachrichtenlänge: »End
los« und Zeitsteuerung ausgeschaltet.
-
-
-
-
-
**X*q Aktivierungder aktuellen Ansagefür eineRufnummer:
X:! … ),= Rufnummer (MSN)auswählen (1...9, 10)
oder* für alleRufnummern (MSN)
*#X*q Deaktivierungder aktuellenAnsage füreine Rufnummer:
X:! … ),= Rufnummer (MSN)auswählen (1...9, 10)
oder* für alleRufnummern (MSN)
Die Ansage,die der erstenRufnummer (MSN-1) zugewiesenist, kann nichtaus der Fer
ne deaktiviert werden.
-
27
Page 32

Deutsch
Automatische Benachrichtigung (Weitermeldung)
Bitte beachtenSie, dassvor demEinschalten der automatischenBenachrichtigung dieAnzahl derAn
rufe /Nachrichten (1 ....10) unddie Rufnummer,zu derdie Weitermeldung erfolgensoll, eingegeben
werden muss.
-
*51q Weitermeldungvon Anrufeneinschalten. DieWeitermeldung erfolgtmit der
Weitermeldungsansage.
*52q Weitermeldung vonAnrufen ausschalten
*53Xq Weitermeldungvon Anrufenkonfigurieren
X: !… ),= Anzahlder Anrufe,nach derdie Weitermeldungerfolgen soll
(1...9,10)
*54t
*q
Zielrufnummer fürdie Weitermeldungkonfigurieren
t:Rufnummer,zu derdie Weitermeldungerfolgen soll(max. 20Ziffern)
# Eingabeder Rufnummerfür dieAnrufweitermeldung abbrechen
*55q Weitermeldung von Anrufeneinschalten. Die Weitermeldung erfolgtdurch
denVersand einerUUS1-Nachricht.
*56q Weitermeldung von Anrufeneinschalten. Die Weitermeldung erfolgtdurch
denVersand einerSMS-Nachricht.
Anrufbeantworter durch ein anderes Telefon nutzen
Sie können den Anrufbeantworter des Telefonsgemeinsam mit einem anderen Telefon nutzen. Dabei wird die »MSN-10« Ihres Telefons als »Voice-Mail-Box« eingerichtet und dem anderen Telefon
als Anrufbeantworterzur Verfügunggestellt. DiesesTelefon kanndann seineAnrufe durcheine Ruf
umleitung oder eine Team-Anrufvariante (an elmeg TK-Anlagen) auf diese »MSN-10« und damit
zum entsprechenden Anrufbeantworter weiterleiten.
Wenn die Voice-Mail-Box für »MSN-10« und der Anrufbeantworter eingerichtet und eingeschaltet
sind:
sind keineweiteren Telefonie-Einstellungen (z.B.Klang, Lautstärke) für»MSN-10« möglich.
•
werden die Anrufe für MSN-10 nur noch am Anrufbeantworter signalisiert. Im Display er
•
scheint einHinweis aufden Anruf.
kann bei Anrufen für »MSN-10« die Funktion »Mithören« nicht genutzt und das Gespräch
•
auch nichtübernommen werden.
wird dieFernbedienung des Anrufbeantworter für»MSN-10« automatisch aktiviert. Dasan
•
dere Telefonkann dannaus derFerne Nachrichten abhörenoder löschen.
-
-
-
28
Page 33

Deutsch
können bei der weiteren Fernbedienung des Anrufbeantworters die Nachrichten für
•
»MSN-10« nichtmit angehört werden.
sollte der Anrufbeantworter nur dannausgeschaltet werden, wenn auch dieVoice-Mail-Box
•
von MSN-10 nicht benötigt wird. Einzelne MSN'skönnen jedoch gezielt deaktiviert werden,
damit dieVoice-Mail-Box fürMSN-10 weiterhinerreichbar ist.
Voice-Mail-Box für »MSN-10« aktivieren
Beginnen Sie wie folgt:
a
Ms s>s>s
Konfiguration MSN MSN-10 Voice-Mail
t
O
Im Menü »MSN-10 programmieren« können jetzt nur noch Einstellungenunter den Softkeys
»Rufnummer«, »MSN Name« und »Voice-Mail« durchgeführt werden. Die MSN-10 wird im
Menü mit »×« gekennzeichnet. Der Anrufbeantworterfür »MSN-10«wird wie inder Bedienungsan-
leitung im Abschnitt »Anrufbeantworter« beschrieben eingerichtet und eingeschaltet. Im Menü
»Anrufbeantworter «-»Aktivierung« wird anstelle des Namens für »MSN-10« der Be-
zeichnung »Voice-Mail« angezeigt.
Geben Sie die Rufnummer des Telefons ein, wel
ches den Anrufbeantworter nutzen soll. Z.B.:
»1234«.
Bestätigen Sie die Eingabe mit OK.
-
Rufnr.vom AB-
Mitbenutzer
MSN-10>1234_
¬¬¬¬¬¬¬¬¬¬¬¬¬¬¬¬¬¬¬¬¬¬
Wichtige Hinweise
Die gemeinsame Nutzung des Anrufbeantworters basiert auf Vertrauen der Benutzer. Beim lokalen
Abhören von Nachrichten können die Nachrichten aller Rufnummern (MSN’s) abgehört werden.
Wir empfehlen Ihnen daher, die Sortierung von Nachrichten nach Rufnummer (»Anrufe MSN-sor
tiert«), so dassSie vor demAbhören von Nachrichtendie entsprechende Rufnummer (MSN)der ab
zuhörenden Nachrichten auswählen können.
Sofern Sie den Anrufbeantworter für »Alle MSN« aktiviert haben, kann das andere Telefonden An
rufbeantworter von »MSN-10« nicht mehr nutzen.
Bei der Fernbedienungdes Anrufbeantworters (für »MSN-1«bis »MSN-9«) können die Nachrichten
für »MSN-10«nicht abgehörtwerden. Wirdaber ausder Fernedie Kennziffer »22«für dasLöschenal
ler Nachrichten gesendet, werden auch die Nachrichten für »MSN-10« gelöscht.
Werden die Nachrichten für »MSN-10« aus der Ferne abgehört, kann das Telefon für die Dauer der
Fernbedienung nicht genutzt werden.
-
-
-
-
29
Page 34

Deutsch
Voice-Mail-Box vom anderen Telefon aus nutzen
Das andere Telefon kann die Voice-Mail-Box nur mit der Rufnummer nutzen, die im Anrufbeant
worter-Telefon als »AB-Mitbenutzer« eingetragen ist. Anrufe für dieses Telefon können durch eine
Rufumleitung odereine Team-Anrufvariante (elmegTK-Anlagen) zumAnrufbeantworter weiterge
leitet werden.
Bei neuen Nachrichten auf demAnrufbeantworter erhält das andere Telefon eine Benachrichtigung
durch eine UUS-Textnachricht.
Ist dasandere Telefon einSystemtelefon (z.B. CS300),können Sie an diesemden Status desAnrufbe
antworters durch die Funktions-Taste »Linie-AB« erkennen. Durch Betätigen dieser Taste können
Sie einGespräch übernehmen odereine Verbindung zum Anrufbeantworteraufbauen (z.B.zum Ab
hören vonNachrichten). DasÜbernehmen von Gesprächen isterst ab Version6 derTK-Anlage mög
lich.
Außerdem kann der Anrufbeantworter für »MSN-10« wie folgt aus der Ferne bedient werden:
Fernbedienung einleiten (Anrufbeantworter ist eingeschaltet)
bt g #t#q
Rufnummer 10
(MSN-10) wählen
Achtung: DieEingabe »# PIN #«muss währendder Ansageerfolgen. Nach erfolgreicherEinleitung
der Fernbedienung(positiver Quittungston) könnenSie mit denfolgenden Kennzifferndie einzelnen
Funktionen bedienen.
Um dieFernbedienung zu beenden,legen Sie nachEingabe derletzten Kennzifferden Hörer desTelefons auf.
Eingerückte Kennziffern sind nur während des Abhörens von Texten (Nachrichten,
Ansagen, Info-Texte) nutzbar.
Ansage des Anrufbe-
antworters
PIN eingeben
-
-
-
-
-
Nachrichten abhören oder löschen, Info-Texte abhören
10q neue Nachrichten abhören
11q alte Nachrichten abhören
#q nächste Nachricht abhören
*q vorherigeNachricht abhören
0q Wiedergabe derlaufenden Nachrichtbeenden
2q Löschen deraktuell abgehörtenNachricht
30
Page 35

Stichwortverzeichnis
Deutsch
A
AB ein-/ ausschalten . . . . . . . . . . . . . . 5
Abhören MSN-sortiert. . . . . . . . . . . . . 9
Anruf annehmen
mitschneiden/aufzeichnen . . . . . . . 23
Anruf dem AB übergeben . . . . . . . . . . 23
Anrufbeantworter (AB)
automatisches Benachrichtigen. . . . . 5
Fernbedienung . . . . . . . . . . . . . 26
Mithören ein-/ ausschalten . . . . . . . 5
Nachrichten abhören . . . . . . . . 20,21
Nachrichtenlänge . . . . . . . . . . . . 14
Sprachqualität einstellen. . . . . . . . . 8
Texte löschen . . . . . . . . . . . . . . . 7
Zeitsteuerung . . . . . . . . . . . . . . 15
Anrufbeantworter für MSN konfigurieren
Ansage auswählen. . . . . . . . . . . . 13
aus der Ferne . . . . . . . . . . . . . . 27
Betriebsart . . . . . . . . . . . . . . . . 13
Dauer der Rufsignalisierung . . . . . . 13
ein-/ ausschalten . . . . . . . . . . . . 13
Nachrichtenlänge . . . . . . . . . . . . 14
Zeitsteuerung . . . . . . . . . . . . . . 15
Ansage für vollen AB . . . . . . . . . . . . . 10
Ansagen . . . . . . . . . . . . . . . . . . . . 10
Ansagen abhören oder löschen . . . . . . . 11
Ansagen aufzeichnen . . . . . . . . . . . . . 10
aus der Ferne . . . . . . . . . . . . . . 27
Audio in / Audio out . . . . . . . . . . . . . . 3
Audio-Buchsen anschließen . . . . . . . . . 3
Ausgeschalteten AB aus der Ferne einschalten
. . . . . . . . . . . . . . . . . . . . . . . . . 25
Ausschalten des AB . . . . . . . . . . . . . . 5
Automatisches Benachrichtigen
annehmen . . . . . . . . . . . . . . . . 25
aus der Ferne einrichten . . . . . . . . 28
einrichten . . . . . . . . . . . . . . . . . 5
B
Betriebsarten (AB) einstellen . . . . . . . . 13
D
Diktate
abhören. . . . . . . . . . . . . . . . . . 20
aufzeichnen . . . . . . . . . . . . . . . 12
löschen. . . . . . . . . . . . . . . . . . . 7
E
Einschalten des AB. . . . . . . . . . . . . . . 5
F
Fernbedienung des AB . . . . . . . . . . . . 24
Ansagen abhören oder löschen . . . . 27
einleiten (AB ausgeschaltet) . . . . . . 25
einleiten (AB eingeschaltet) . . . . . . 25
einrichten . . . . . . . . . . . . . . . . . 8
Kennziffern . . . . . . . . . . . . . . . 26
Töne . . . . . . . . . . . . . . . . . . . 24
Funktionen des Anrufbeantworter . . . . . . 1
G
Gespräch
aufzeichnen/mitschneiden . . . . . . . 23
vom AB übernehmen . . . . . . . . . . 22
Gesprächsmitschnitt abhören . . . . . . . . 21
Grundeinstellungen des AB wiederherstellen8
31
Page 36

Deutsch
H
Hauptzeit . . . . . . . . . . . . . . . . . . . 15
I
Info-Texte
am Telefon abhören. . . . . . . . . . . 20
aufzeichnen . . . . . . . . . . . . . . . 12
aus der Ferne abhören . . . . . . . . . 26
aus der Ferne anhören . . . . . . . . . 30
Installation des Moduls . . . . . . . . . . . . 2
Vorbereitung . . . . . . . . . . . . . . . 2
K
Kennziffern für Fernbedienung . . . . . . . 26
L
Lieferumfang . . . . . . . . . . . . . . . . . . 1
Löschen des AB-Speicher . . . . . . . . . . . 7
M
Mithören ein-/ ausschalten . . . . . . . . . . 5
Mitschneiden eines Gespräches . . . . . . . 23
einleiten . . . . . . . . . . . . . . . . . 23
Mitschnitt abhören . . . . . . . . . . . 21
Modul AB installieren . . . . . . . . . . . . . 2
MSN-10 als Voice-Mail-Box . . . . . . . . . 29
MSN-sortiert . . . . . . . . . . . . . . . . . . 9
N
Nachrichten abhören
am Telefon . . . . . . . . . . . . . . . . 20
aus der Ferne . . . . . . . . . . . . . . 26
Ausgabe über Audio-Out. . . . . . . . 22
Nachrichtenlänge einstellen . . . . . . . . . 14
P
PC anschließen . . . . . . . . . . . . . . . . . 3
PIN (Passwort)
für Fernbedienung des AB. . . . . . . . 8
R
Restzeit. . . . . . . . . . . . . . . . . . . . . 15
S
Schlusstext . . . . . . . . . . . . . . . . . 10,14
Sicherheitshinweise . . . . . . . . . . . . . . 2
Sortieren von Nachrichten . . . . . . . . . . 9
Sprachqualität der Ansagen einstellen. . . . 8
Systemtelefone . . . . . . . . . . . . . . . . . 1
T
Tägliche Zeitsteuerung . . . . . . . . . . . . 16
V
Voice-Mail-Box (MSN-10). . . . . . . . . . 29
vom anderen Telefon nutzen . . . . . 30
W
Weitermeldung von neuen Nachrichten
annehmen . . . . . . . . . . . . . . . . 25
einrichten . . . . . . . . . . . . . . . . . 5
Weitermeldungsansage . . . . . . . . . . . 10
Wochenprofil . . . . . . . . . . . . . . . . . 17
Hauptzeiten . . . . . . . . . . . . . . . 18
Restzeit . . . . . . . . . . . . . . . . . . 18
Z
Zeitsteuerung einrichten . . . . . . . . . . . 15
»Täglich« . . . . . . . . . . . . . . . . . 16
»Wochenprofil« . . . . . . . . . . . . . 17
Zeiten festlegen . . . . . . . . . . . . . 15
32
Page 37

English
Table of contents
Description and Installation . . . . . . . . . . . . . . . . . . . . . . . . . . 1
Answering machine functions . . . . . . . . . . . . . . . . . . . . . . . . . . . . . . . . . . . . . . 1
Contents of package. . . . . . . . . . . . . . . . . . . . . . . . . . . . . . . . . . . . . . . . . . . . 1
Installation . . . . . . . . . . . . . . . . . . . . . . . . . . . . . . . . . . . . . . . . . 1
Preparations for Installation (see figure 1) . . . . . . . . . . . . . . . . . . . . . . . . . . . . . . . 2
Installing the module (see figure 2) . . . . . . . . . . . . . . . . . . . . . . . . . . . . . . . . . . . 2
Connecting the audio sockets (Audio in / Audio out). . . . . . . . . . . . . . . . . . . . . . . . . 3
Answering machine operation. . . . . . . . . . . . . . . . . . . . . . . . . . . . . . . . . . . . . . 4
Configuring the answering machine . . . . . . . . . . . . . . . . . . . . . . . . . . . . . . . . . . 4
General configuration . . . . . . . . . . . . . . . . . . . . . . . . . . . . . . . . . . . 5
Activating/ deactivating the answering machine . . . . . . . . . . . . . . . . . . . . . . . . . . . 5
Activating listening . . . . . . . . . . . . . . . . . . . . . . . . . . . . . . . . . . . . . . . . . . . 5
Automatic forwarding (relaying) for recorded messages . . . . . . . . . . . . . . . . . . . . . . 5
Forwarding procedure . . . . . . . . . . . . . . . . . . . . . . . . . . . . . . . . . . . . . . . . . . 6
Saving a forwarding text (SMS / UUS1) . . . . . . . . . . . . . . . . . . . . . . . . . . . . . . . . 7
Deleting all calls, all dictations or all texts . . . . . . . . . . . . . . . . . . . . . . . . . . . . . . . 7
Remote polling. . . . . . . . . . . . . . . . . . . . . . . . . . . . . . . . . . . . . . . . . . . . . . . 8
Setting the speech quality . . . . . . . . . . . . . . . . . . . . . . . . . . . . . . . . . . . . . . . . 8
Listening to calls / messages sorted by number (MSN) . . . . . . . . . . . . . . . . . . . . . . . 9
Announcements, info texts and dictations . . . . . . . . . . . . . . . . . . . . . . 10
Recording, listening to or deleting announcements . . . . . . . . . . . . . . . . . . . . . . . . . 10
Recording an announcement with the telephone: . . . . . . . . . . . . . . . . . . . . . . . . . . 10
Downloading an announcemt via Audio In: . . . . . . . . . . . . . . . . . . . . . . . . . . . . . 11
Listening to or deleting announcements . . . . . . . . . . . . . . . . . . . . . . . . . . . . . . .11
Info texts and dictations . . . . . . . . . . . . . . . . . . . . . . . . . . . . . . . . . . . . . . . . 12
Activating message recording for indicvidual MSNs . . . . . . . . . . . . . . . . 12
Setting the mode of operation . . . . . . . . . . . . . . . . . . . . . . . . . . . . . . . . . . . . . 13
Setting the call signal duration . . . . . . . . . . . . . . . . . . . . . . . . . . . . . . . . . . . . . 13
Selecting an announcement . . . . . . . . . . . . . . . . . . . . . . . . . . . . . . . . . . . . . . 13
Activating an announcement for a specific MSN extension number . . . . . . . . . . . . . . . 14
I
Page 38

English
Activating a sign-off text . . . . . . . . . . . . . . . . . . . . . . . . . . . . . . . . . . . . . . . . 14
Message length . . . . . . . . . . . . . . . . . . . . . . . . . . . . . . . . . . . . . . . . . . . . . . 14
Time control . . . . . . . . . . . . . . . . . . . . . . . . . . . . . . . . . . . . . . . . . . . . . . . 15
Setting times . . . . . . . . . . . . . . . . . . . . . . . . . . . . . . . . . . . . . . . . . . . . . . . 16
»Daily« time control function . . . . . . . . . . . . . . . . . . . . . . . . . . . . . . . . . . . . . 16
Configuring »Weekly profile« time control function . . . . . . . . . . . . . . . . . . . . . . . . 17
Configuring main times. . . . . . . . . . . . . . . . . . . . . . . . . . . . . . . . . . . . . . . . . 18
Configuring remaining times. . . . . . . . . . . . . . . . . . . . . . . . . . . . . . . . . . . . . . 19
Operation . . . . . . . . . . . . . . . . . . . . . . . . . . . . . . . . . . . . . . . . . 20
Listening to new messages . . . . . . . . . . . . . . . . . . . . . . . . . . . . . . . . . . . . . . . 20
Listening to all messages, dictations, info-texts or recordings . . . . . . . . . . . . . . . . . . . 21
Listening to messages by means of the audio socket (Audio Out) . . . . . . . . . . . . . . . . . 22
Accepting a call from the answering machine . . . . . . . . . . . . . . . . . . . . . . . . . . . . 22
Transferring a call to the answering machine . . . . . . . . . . . . . . . . . . . . . . . . . . . . 23
Recording a call . . . . . . . . . . . . . . . . . . . . . . . . . . . . . . . . . . . . . . . . . . . . . 23
Remote polling of the answering machine . . . . . . . . . . . . . . . . . . . . . . 24
Operations/ settings possible via remote access: . . . . . . . . . . . . . . . . . . . . . . . . . . . 24
Acoustic signals during remote polling . . . . . . . . . . . . . . . . . . . . . . . . . . . . . . . . 24
Initiating remote polling (answering machine switched on) . . . . . . . . . . . . . . . . . . . . 25
Remote activation of a switched off answering machine . . . . . . . . . . . . . . . . . . . . . . 25
Automatic forwarding (relaying) for new messages . . . . . . . . . . . . . . . . . . . . . . . . . 25
Code numbers for remote polling . . . . . . . . . . . . . . . . . . . . . . . . . . . 26
General code numbers . . . . . . . . . . . . . . . . . . . . . . . . . . . . . . . . . . . . . . . . . 26
Listening to or deleting messages, listening to information texts . . . . . . . . . . . . . . . . . 26
Listening to or deleting announcements or recording new announcements . . . . . . . . . . . 26
Activating / Deactivating announcements for a particular MSN extension number. . . . . . . 27
Automatic forwarding (relaying) . . . . . . . . . . . . . . . . . . . . . . . . . . . . . . . . . . . 27
Using the answering machine from a different telephone . . . . . . . . . . . . . 28
Activating the voice mailbox for »MSN-10« . . . . . . . . . . . . . . . . . . . . . . . . . . . . . 29
Important notes . . . . . . . . . . . . . . . . . . . . . . . . . . . . . . . . . . . . . . . . . . . . . 29
Using the voice mailbox with another telephone . . . . . . . . . . . . . . . . . . . . . . . . . . 29
Initiating remote polling (answering machine switched on) . . . . . . . . . . . . . . . . . . . . 30
Listening to or deleting messages, listening to info-texts . . . . . . . . . . . . . . . . . . . . . . 30
II
Page 39

English
Description and Installation
System telephone firmware V4.20 is required to operate this module.
This moduleprovides your systemtelephone witha multi-function digitalanswering machine. These
operating instructionsdescribe howto usethis module inconjunction with thesystem telephones el
meg CS410and elmeg CS410-U.The software oftheses telephones alreadysupports use ofan answe
ring machine module.
The scopeof functionsoffered by theanswering machinedepends on thesoftware usedin the system
telephone. The features described in this operation manual are based on the software status for the
system telephones valid at the time of printing.
Answering machine functions
Up to48 minutesrecording capacityfor normalspeech recordings.
•
Dedicated keyfor activatingand deactivatingthe answering machine.
•
Extended functionsfor thecall LED.The LEDlights upin adifferent colorwhen theanswering
•
machine isswitched onand flasheswhen newmessages arepresent that havenot yet been listened to.
10 announcements, 4information texts, forwardingannouncement, sign-off announcement
•
and announcementwith fullanswering machine.
Dictation recording
•
Individual configuration and polling of message recording possible for each MSN extension
•
number.
Time-controlled announcement for each number (daily), or for the numbers »MSN-1«to
•
»MSN-3« (weeklyprofile).
Adjustable recordingquality (normal, good,very good).
•
Logging ofcalls.
•
Listening whilea messageis beingrecorded.
•
Remote, PIN-protectedpolling.
•
Automatic forwarding(relaying) of newlyrecorded messages bymeans of acall or aUUS1 or
•
SMS message.
-
-
Contents of package
Answering machinemodule
•
PC-audio cable(3.5 mmstereo plug,approx. 2.5m)
•
Self-adhevise name-plate
•
Operating instructions
•
Installation
The answeringmachine modulemay onlybe installedby aspecialized dealer,or byaut
horized service personnel.
-
1
Page 40

English
Preparations for Installation (see figure 1)
Please observe the safety notes in the instruction manuals for your telephone.
Unplug the ISDN connector for the telephone from the ISDN outlet.
Place the telephone face down on asoft surface so that you can read the nameplate onthe bottom of
the phone.
Unplug any connecting cords (1) that may be attached (ISDN, handset, headset, PC).
Remove the two rear feet (2) and then loosen the three screws (3).
Carefully liftoff thebottom enclosurehalf ofthe telephone. Youwill thenbe ableto seethe printed cir
cuit board (pcb) of the telephone.
1
3
3
-
2
Opt
S0
UP0
2
3
1
1
Figure 1
Installing the module (see figure 2)
The plug connector (3)for connecting the answeringmachine module is located onthe right section
of the telephone pcb (4) near the handset and headset jacks.
Plug the socket connector (2) for the answering machine module (1)into the plug connector for the
pcb (3) and ensure that it fits properly and snugly.
Close the enclosure by replacing the bottom half and tightening the two screws. Insert the rubber
supports.
You canalso attach theadhesive nameplateincluded withthe systemto thebottom of thephone tola
bel the answering machine in the telephone.
To complete installation,re-connect the connectingcords (forexample ISDN port,handset, headset,
PC) to the telephone.
2
-
Page 41

English
1
2
3
4
Figure 2
Connecting the audio sockets (Audio in / Audio out)
The telephoneis equippedwith aninput (1)and anoutput (2)for audiosignals. Both theseports have
a 3.5mm stereo socket.You canconnect thetelephone via theseports tothe PCsound cardin order to
upload announcements into the phone or save recorded messages on the PC.
Connect thetelephone tothe PCsound card asshown infigure 3.Use the suppliedaudio cables(3) for
this purpose.
Telefon Audio in (1) —-> PC, e.g. sound card Line Out (5)
Telephone Audio out (2) —-> PC, e.g. sound card Line In (4)
Please observethe instructionsgiven forthe audioconnections ofthe PCor soundcard.
3
Page 42

English
12
3
3
Figure 3
Incoming calls will not be signaled if you are in the answering machine menu and the
functions Audio In or Audio Out are active. The caller will hear the busy signal.
4
5
Answering machine operation
To access the telephone’s answering machine menu, press the
menu buttonand thenthe »Answering machine« softkey.
Ans. mac. }
Time rem. 48:54 Off
Anncs.
Activate
Messages
Local
Configuring the answering machine
You canconfigure theanswering machine rightat thetelephone itself orby means ofthe Professional
Configurator suppliedon theWIN-Tools CD-ROM.Please observethe instructionsin thesystem tele
phone manuals.
-
4
Page 43

English
General configuration
Activating/ deactivating the answering machine
A To activate or deactivate the answering machine, press the answering machine button
Activating listening
You canlisten while amessage is beingleft on youranswering machine usingthe speaker ofyour pho
ne. You can setthis feature inthe configuration programfor allincoming calls, orduring recording of
individual calls.
Press the »Listen« softkey. The listening feature is activated or deactivated.
A checkmark (»®«)displayed next tothe softkey indicates thatthe feature isactive.Press this softkey
again to deactivate this feature. The check mark disappears.
Automatic forwarding (relaying) for recorded messages
You canset theanswering machineso thatwhen adefined numberof recordedcalls (messages) isrea
ched these calls are then relayed to a set number.
(softkey atthe topright). Whenthe answering machineis switchedon, thecall-LED lights
up.
You can only switch on the answering machine if recording of calls has been activated
for at least one MSN extension number (see page 12).
Begin as follows:
Answ. machine menu
a
Ms >
Answering machine
{}
Messge. contin.
Delete texts
Remote polling
Listen
-
-
Begin as follows:
a
Ms> s
Answering machine Messge. contin.
A checkmark (»®«) displayed next to the softkey indicates that the feature is active.
5
Page 44

English
The current setting is shown on the first lines of the display
(»Off«).
Messge. contin.:
to>_«
Number of calls: 10
save
Off
Off
back
t Using thekey panel ofthe telephone,enter the number(20 digitsmax.), towhich the calls
are tobe forwarded.If anumber is alreadygiven, youcan deleteit usingthe leftarrow key.
s Press the »Number of calls:« softkey to set the number of calls (messages) after
s Press the »Off«softkey , if youwish to enableautomatic relaying ofmessages. The vari
»On,Anncm.« Forwardingis carried out with a call having a forwarding an-
»On,Message/SMS« The SMS sent informs you that new messages have been re-
»On,Message/UUS« The UUS1 message sent informs youthat new messages have
s Press the softkey »save«, to memorize the new settings. Press the »back« softkey to
which automatic relaying of messages begins. The various options are shown one after
the other when the softkey is pressed.
For example:»1«, »2«, ....,»10«, »15«, »20« or »30«.
ous options are shown one after the other when the softkey is pressed.
nouncement, or a request signal. You can then play back the
new messages.
corded.
been recorded.
quit the menu without saving the settings.
When you haveset your telephone forautomatic relaying ofmessages, this willbe indi
cated inthe idlestate ofthe phoneby an»×« onthe display. Any costswhich areaccrued
for automatic forwarding are allocatedto the ISDN connection (for theMSN) at which
the telephone is connected.
-
-
Forwarding procedure
Automatic forwarding tothe set number isinitiated when the definednumber of recorded messages
is reached (call, UUS1 or SMS message). After a successful forwarding attempt, the counter for the
number of recorded messages iscleared. The next automatic forwarding ismade when the set num
ber of messages is again reached.
If thisautomatic notitication cannot besubmitted (e.g. whenthe lineis busy),five moreattempts will
be made.After fiveunsuccessful attempts, theforwarding process iscanceled andstarts againwhen a
new message is recorded.
6
-
Page 45

Saving a forwarding text (SMS / UUS1)
Begin as follows:
a
>s s
Message Text on forwarding
English
t
O
Enter the text. The text length is restricted to 160
characters (SMS) or 31 characters (UUS1).
In this example: »Five new messages on
your answering machine at home.«.
Confirm your entry by pressing OK.
If notext has beenstored previously astandard text stored inthe telephone willbe used
for sending the text message (SMS or UUS1).
Text on forwarding
Answering machine
SMS>Five new messages
on your answering
machine at home
¬¬¬¬¬¬¬¬¬¬¬¬¬¬¬¬¬¬¬¬¬¬
Deleting all calls, all dictations or all texts
You can delete all calls, dictations or all texts stored.
Begin as follows:
a
Ms> s
Answering machine Delete texts
s Select whether you wish to delete specific calls or
specific dictationsor allmessages on theanswering
machine by pressing the corresponding softkey.
For example: »Delete all calls«.
s If you wish to continue with deleting items, press
the softkey next to »yes«.
If youdo notwish thememorized callsdeleted press
the softkey »No«.
Attention: When youdelete all texts, all answering machine settings willbe deleted as
well. This restores the answering machine to its initial state.
Delete texts
Delete all texts
Delete all calls
Delete all dictations
Delete all calls?
No
¬¬¬¬¬¬¬¬¬¬¬¬¬¬¬¬¬¬¬¬¬¬
back
yes
7
Page 46

English
Remote polling
You can set the answering machine so that it can be operated remotely from a different telephone.
Remote accessto theanswering machine isprotected bythe telephonePIN andis possi
ble only with the first extension number (»MSN-1«) entered in telephone directory.
Remote polling: e.g. activating/deactivating the answeringmachine, listening to ordeleting messa
ges, listening to,deleting or recording announcements, activatingannouncements for aspecifc MSN
and configuring automatic forwarding for recorded messages.
Begin as follows:
a
Ms >
Answering machine
Press the »Remote polling« softkey. Remote polling is activated or deactivated.
A checkmark(»®«) displayed nextto thesoftkey indicates thatthe feature isactive. Press thissoftkey
again to deactivate this feature. The check mark disappears.
When youhave activated remotepolling, thiswill be indicatedin theidle stateby an»×«
on the display.
Answ. machine menu }
Messge. contin.
Delete texts
Remote polling
-
Listen
Setting the speech quality
You can set three different levels ofspeech quality for all texts recorded (announcements, info-texts
and dictations) (»normal«, »good«or»very good«). The maximum recording capacity de-
creases with increasing speech quality.
Recorded messages from callers and loggings are always recorded in »normal« quality.
-
Begin as follows:
a
M s >> s
8
Answering machine Speech quality
Page 47

English
s Press thesoftkey forthe desiredspeech quality. The
check mark inthe display indicates thecurrent sta
tus. For example:»good ®«.
To quit this menu, press the »back« softkey.
In the answering machinemenu the current setting isdisplayed next to the »Speechquality« softkey
(no marking - Normal, »+« - Good, »++« - Very good).
Speech quality
Time rem. 48:54
-
very good
normal
good ®
back
Listening to calls / messages sorted by number (MSN)
Messages left on the answering machine are stored in lists. To listen to the messages you can define
that these lists are sorted by the numbers (MSN) for which the message was left.
Begin as follows:
a
Ms>>
Answering machine
Press the »Calls sort. by MSNs« softkey.
A checkmark(»®«) displayednext tothe softkey indicatesthat the feature isactive. Press thissoftkey
again to deactivate this feature. The check mark disappears.
In the initial setting ofthe answering machine, messages are saved in a commonlist for all numbers
(MSN). If youhave configured sortingof messages by numbers(MSN), you canselect the correspon
ding MSN for the message you wish to listen to.
Answ. machine menu {
Speech quality
Calls sort. by MSNs®
-
9
Page 48

English
Announcements, info texts and dictations
You can record various announcements, info texts and dictations on the answering machine.
Announcement: Youcan record upto 10announcements. When theanswering machinetakes acall,
the caller will hear the announcement assigned to that particular MSN.
Sign-off text: Specialannouncement given to acaller after he/she hasleft a message whenrecording
is limited to a certain time.
Notification announcement:Special announcement whichcan be used atthe beginning ofautoma
tic forwarding. This announcement must be activated explicitly after it has been recorded.
Announcementwhen answeringmachine isfull: Announcement thata callerreceives oninadequa
te storage capacity of the answering machine.
1.) when less than 30 seconds are available for leaving a message.
2.) when storage capacity is exhausted while a message is being recorded.
This announcement must be activated explicitly after it has been recorded.
Info-texts:Recordingof upto four textsthat canbe storedindividually andactivated ordeactivated as
messages for other telephone users.
Dictations: Recording of texts (max. 99, depending on remaining storage capacity) that are stored
one after the other.
Recording of announcements, information texts or dictations are described as follows
by the example of announcement text 1.
Recording, listening to or deleting announcements
Begin as follows:
-
-
a
Ms s<>s
Answering machine Anncs.
Select announce
ment
Anncm.- 1
-
Recording an announcement with the telephone:
b
s
Lift the handset of your telephone and then press
the softkey »Record«.
Time rem. 48:54
Record
¬¬¬¬¬¬¬¬¬¬¬¬¬¬¬¬¬¬¬¬¬¬
Anncm.-1
Record, Audio In
10
Page 49

English
s Record the announcement by speaking into the
handset of your phone. End recording by pressing
------Recording----
Anncm.-1
the softkey »Stop«.
Stop
Downloading an announcemt via Audio In:
The telephone’s Audio-In allows you to download announcements from the PC. The supplied
CD-ROM contains Wave file, which you can use as welcome or sign-off announcement.
Use appropriate software for downloading these Wave files (e.g. Media Player).
s Press the »Record,Audio In« softkey to start
play-back of the desired file on the PC.
s End recording by pressing the softkey »Stop«. Anncm.-1
Time rem. 48:54
Record
¬¬¬¬¬¬¬¬¬¬¬¬¬¬¬¬¬¬¬¬¬¬
------Recording----
Anncm.-1
Record, Audio In
Audio In
Stop
Listening to or deleting announcements
If you want to listen into the announcement, press the softkey
»listen«. Press the softkey »Record« to record a new an
nouncement. The existing announcement is then deleted. To
delete the recorded announcement, press the softkey »dele
te«.
Time rem. 48:01
-
Record
delete
In themenus, acheckmark next tothe corresponding entry (e.g.»Anncm.-1 ®«), in
dicates that a text has been stored for this entry.
Anncm.-1
Record, Audio In
listen
-
11
Page 50

English
Info texts and dictations
Begin as follows:
Record/Set local
a
Ms s
Answering ma
chine
-
local
Info-1 ®
Info-2
message
Info-3
Info-4
Dicts.
Press the corresponding softkey for recording info texts or dictations. When recording, proceed as
described for announcement 1
An information text must be activated explicitly after it has been recorded.
Activating message recording for indicvidual MSNs
You can configure the answering machine for each separate number (MSN) that has been saved, or
collectively for all numbers that have been stored.
You can only configure the answering machine when:
the number (MSN) has been stored in the telephone configuration. If you have assigned a
•
name to a phone number in the configuration of your telephone, the softkey designations
»MSN-1«…»MSN-10« are replacedby thecorresponding names inthe menus.
at leastone announcement hasbeen recorded andstored (see page10).
•
Begin as follows:
Activate }
a
Ms s
Answering
machine
Activate
The softkeyfor anMSN is displayedonly whenthis MSNhas been storedin thetelepho
ne configuration.
Configuration ofthe answering machineis described asfollows using MSN-1as anexample. Pressthe
»MSN-1« softkey.
announcement
MSN-1
MSN-2
MSN-3
MSN-4
MSN-5
-
12
Page 51

English
The upper display linesshow the status of theanswering machi
ne for the number that has been dialed (»MSN-1:Off«). The
various settingscan thenbe madeon theother linesof thedisplay
using the associated softkeys.
When you press the »Options« softkey, a menu appears con
taining other settings.The status forthe corresponding function
is shown on the line below the softkey.
Press the C button to quit.
Setting MSN-1:
-
Active after: 2 sec
Anncm. dial
Options for MSN-1
-
Sign-off:
Time-controlled:
Message length:
Options
infini
Off
Speak
ON
Off
Off
Setting the mode of operation
s Press thesoftkey »Speak«,to set theanswering machine’smode ofoperation. The vari-
ous options are shown one after the other when the softkey is pressed.
»Speak« Firstthecaller hearsthe setannouncement, andcan thenleave amessage after
the acousticsignal.
»Announcement
only«
Acaller hearsonly the setannouncement andcan notleave amessage.
Setting the call signal duration
s Press the Active after:«softkey» to set the time interval(in seconds), after which
you wish the answering machine take the call. The various options are shown one after
the other when the softkey is pressed.
»0 sec«, »2 sec«, »5 sec«, »10 sec«, »15 sec«, »20 sec«, »25 sec«, »30
sec«, »60 sec« or »120 sec«.
Selecting an announcement
s Press thesoftkey»Anncm. dial« toselect theannouncement you wisha caller tohear.
If several announcementsare available you candisplay all savedannouncements one af
ter the other by pressing the »Next announc.« softkey. At the same time you can
hear the selected announcement over the speaker or the handset of the telephone.
For example:»Anncm.-1«, »Anncm.-2«, ...., »Anncm.-9« or »Anncm.-10«.
13
-
Page 52

English
Activating an announcement for a specific MSN extension number
s Press the»ON« softkey,if youwish toenable theannouncement for MSN-1.On thefirst li
nes ofthe displaythe statusis switchedto »MSN-1: On« and thesoftkey inthe thirdline
changes to »OFF«.To deactivate the announcement, press this softkey.
The display illustrated here is shown once you have configured
the answering machine.
Press the »Options« softkey if you wish to carry out further
settings.
Activating a sign-off text
The sign-off textis a specialannouncement that the callerwill hear inaddition to theannouncement
set forthe MSNthat isdialed. Thesign-off textcan only beactivated ifit hasbeen previously recorded
(see page 10).
With thesetting »Speak«, firstthe callerhears the setannouncement, and canthen leave amessage
after the acoustic signal. If thepermissible message length is reached and a sign-off hasbeen stored,
the caller will hear the sign-off.
With thesetting »Announcement only«, thecaller cannot leavea message.First, the callerhears
the set announcement, followed by the stored sign-off.
Begin as follows:
a
Ms sss
Answering machine Activate MSN-1 Options
Setting MSN-1:
Active after: 20sec
Anncm.-2
On
Speak
OFF
Options
-
s Press the »Sign-off« softkey. The sign-off text
is activated or deactivated.
The current status is shown below the softkey
(»On« or »Off«).
Options for MSN-1
Sign-off
Time-controlled
Message length
infini
Off
Off
Message length
You canset thetime available toa caller forleaving amessage. Depending on theset operatingmode,
recording is ended when the set time expires.
14
Page 53

In the default setting the message length is set to »infini«. In the »Speak« mode
with actvated sign-off text, the default message length is set to »30 sec«.
Begin as follows:
a
Ms s s s s
Answering
machine
Activate MSN-1 Options Message
length
English
s Press thesoftkey for thedesired message lengthset
-
Limit message
ting. A check mark indicates the currently active
setting.
C Once you have made your settings, you will be
shown the display illustrated here, for example.
Press theC-button toleave themenu »Options«.
30 sec
60 sec ®
Options for MSN-1
Sign-off:
Time-controlled:
Message length
120 sec
infini
60 sec
Off
Off
Time control
Using a time-control function you can define that different announcements be played for callers at
different times of day. The time-controlled function can only be activated, if you have already switched the answering machine on for that number (MSN).
When you haveactivated the timecontrol feature, thiswill be indicatedin the idlestate
of the display by an »×«.
Begin as follows:
a
Ms s s s s
Answering
machine
Activate MSN-1 Options Time-con
trolled
-
15
Page 54

English
Use this menuto program time intervalsand time controlfeatu
res for an MSN extension number. Weekly profiles can only be
programmed for the extension numbers MSN-1 to MSN-3.
Time-controlled
-
Weekly prof.: Off
Daily: Off
Define times
¬¬¬¬¬¬¬¬¬¬¬¬¬¬¬¬¬¬¬¬¬¬
Setting times
You canconfigure nine(9) differenttime periods inyour telephone (»Time 1«, ...»Time 9«) which
you can then use in the time control functions for the individual numbers (MSNs).
The time intervals you haveprogrammed apply to all MSN extensionnumbers. If you change a time
that isalready beingused ina differenttime controlfunction, thischange willalso affectthe othertime
control function.
In the »Time-controlled« menu press the »Define times« softkey.
<
>
O
t
O
Use the arrow buttonsto select the desiredtime interval and confirm your selection by pressing OK.
In this example: »Time 1«.
Enter the desired time period using the key panel.
The cursor located below the times indicates the
current input position.
Confirm your entry by pressing OK.
The timesdefined for aset period alwaysapply for thesame day. For example, ifyou as
sign a time period from 6 PMto 8 AM for Monday this means: Monday morningmid
night to 8 AM and Monday evening from 6 PM to midnight.
Define times {}
Time 1:
08:00 to 13:00
Time 2:
13:00 to 13:30
¬¬¬¬¬¬¬¬¬¬¬¬¬¬¬¬¬¬¬¬¬¬
Define times:
Time fr.
14:00 to 18:00
Time 1
back
-
-
»Daily« time control function
With this time-control function you can assign a defined time period to a certain MSN extension
number (the so-called »Main time«), during which the caller receives a specific announcement.
For other times outside of this period ( »Remaining«) you can configure a different announce
ment. This time-control function applies for each day and can be configured for all MSN.
In the menu »Time-controlled« press the softkey »Daily«.
16
-
Page 55

English
s Press theappropriate softkeys toconfigure yourde
sired time control period.
Daily/MSN-1:
-
Main time: Off
not active (-)
Remaining: Off
¬¬¬¬¬¬¬¬¬¬¬¬¬¬¬¬¬¬¬¬¬¬
Off
ON
s Press the »not active« softkey to view the configuredtime periods one after the ot
her.
s Press the softkey »Main time« to set the announcement thatis to be played to callers
within theset time period. Use the »Remaining«softkey todefine the announcement
to be played for callers outside of this time period.
If several announcementsare available you candisplay all savedannouncements one af
ter the other by pressing the »Next announc.«softkey.
For example:»Anncm.-1«, »Anncm.-2«, ...., »Anncm.-9« or »Anncm.-10«.
s Press the »ON«softkey to activatethe time-controlled function.The status is switchedto
»ON« and the corresponding softkey changes to »OFF«.
Press this softkey to deactivate the weekly profile.
O Confirm your settings with OK to leave the
Time-controlled menu.
Configuring »Weekly profile« time control function
As analternative, you candefine aweekly profile asthe time-control function forthe extension num
bers »MSN-1«,»MSN-2« and»MSN-3«. Ina weekly profileyou can assign differenttime periods to
each day during which different announcements are played ( main time).
In thetime outside ofthe selected periods( »Remaining«) youcan configurea differentannounce
ment. This announcement is identical forall days definedin the weeklyprofile. In addition, you can
also assign anoperating mode inthe weekly profile forthe Remaining timethat is different thanthat
for the Maintime. For example,you can define thatduring the Maintime messages canbe left, while
during the Remaing time it is not possible.
In the menu »Time-controlled« press the softkey »Weekly prof.«.
Daily/MSN-1:
Main time: Anncm.- 1
13:00 to 13:30 (2)
Remaining: Anncm.- 3
¬¬¬¬¬¬¬¬¬¬¬¬¬¬¬¬¬¬¬¬¬¬
On
OFF
-
-
-
-
17
Page 56

English
s Press the appropriatesoftkey to determinemain ti
mes and remaining times or activate the time con
trol feature.
Weekly prof./MSN-1:
-
-
Define main times
Define rem. Time
Off
ON
s Press thesoftkey »Define main times«, to configurethe time intervalsand thean
nouncements for each day of the week during the so-called main time.
s Press the softkey »Define rem. Time« to configure the announcement and the
mode of operation for the remaing time for each day of the week.
s Press the softkey »ON«,to activate the weekly profile. Onthe first lines ofthe display the
status is switched to »=ON« and the corresponding softkey changes to »OFF«.
Press this softkey to deactivate the weekly profile.
When you activate the weekly profile any daily time control that may be active will be
de-activated automatically.
Configuring main times
In the menu »Weekly prof. « press the softkey »Define main times«.
Press the appropriate buttons and softkey to configure the announcement and set the main time intervals for each day of the
weekly profile. In this example: »Monday«.
Define
main times: Monday
not active (-)
not active (-)
Ans. mach. inactive
¬¬¬¬¬¬¬¬¬¬¬¬¬¬¬¬¬¬¬¬¬¬
s Press the softkey »Ans. mach. inactive« to set the announcement that is to be
played to callers within the set time period.
If several announcementsare available you candisplay all savedannouncements one af
ter the other by pressing the »Next announc.«softkey.
For example:»Anncm.-1«, »Anncm.-2«, ...., »Anncm.-9« or »Anncm.-10«.
s Press the »not active« softkey to view the configuredtime periods one after the ot
her. For example: »Time 1«, »Time 2«, …, »Time 9«.
You can define two time intervals, during which a caller hears the announcement you
have determined.
To make settings for other days of the week, press the arrow buttons.
-
-
-
18
Page 57

English
O Press OK to confirm yourconfiguration of the core
time periods for the weekly profile.
Define {}
main times: Sunday
08:00 to 13:00 (1)
15:00 to 18:00 (4)
Anncm. -1
¬¬¬¬¬¬¬¬¬¬¬¬¬¬¬¬¬¬¬¬¬¬
Configuring remaining times
In the menu »Weekly prof.« press the softkey »Define rem. Time«.
s Press the appropriate softkey to set the mode of
opeartion and select the announcement for the re
maining time. These settings will then applyfor all
days of the week.
Define rem. Time
-
Sign-off:
Remaining:
Ans. mach. inactive
Speak
Off
s Press the»Speak« softkey, toset theanswering machine’smode ofoperation during the
Remaining time. The various options are shown one after the other when the softkey is
pressed (see page 13).
s Press the»Sign-off« softkeyto activateor deactivatethe sign-offtext (seepage 14).
s Press the »Remaining«softkey to set theannouncement that is to beplayed to callers
outside the set main time periods.
If several announcementsare available you candisplay all savedannouncements one after the other by pressing the »Next announc.«softkey.
For example:»Anncm.-1«, »Anncm.-2«, ...., »Anncm.-9« or
»Anncm.-10«.
O Press OK to confirm your configuration of the
non-core periods for the weekly profile.
Define rem. Time
Sign-off:
Remaining:
Anncm.-4
Speak
On
19
Page 58

English
Operation
If messages,dictations orinformation textsare presenton theanswering machine, thesewill besigna
led by a flashing LED, provided that the answering machine is switched on. Information about the
number of new messages is shown on the display.
-
New messages that are shorter than 2 seconds will notbe stored by the answering ma
chine. For example: A caller invited to leave a message hangs up after the announce
ment text without actually leaving a message for you.
-
-
You can change the volume of the speaker or of the handset while listening to
messages.
To dothis, press themenu key followedby the arrowkeys. Press ESC inorder to returnto the normal
display forlistening to messages.If youconfirm your entryby pressingOK insteadof ESC, theperma
nently set value is overwritten by the newly set one (see telephone volume settings).
Listening to new messages
s Information about the number of new messages is
shown on the display.
Press the »Ans.mac. messag.:« softkey.
The following display appears only with several new messages recorded by the answering machine.
s You arethen shown detailedinformation about the
type of new messages that are present.
Press the softkey next tothe message that you wish
to listen to.
s If you have configuredMSN sorting forlistening to
announcements press the softkey for the MSN for
which the message is to be played.
Listening to messages is described as follows using new calls as an example. Press the
softkey »New calls«.
29.05.03 07:21 }
Info -T-S-r-×-
Ans.mac.mess.:8
Tel. drctry
¬¬¬¬¬¬¬¬¬¬¬¬¬¬¬¬¬¬¬¬¬¬
Answering machine
New calls =04
Nwe dictations =03
Info texts =01
¬¬¬¬¬¬¬¬¬¬¬¬¬¬¬¬¬¬¬¬¬¬
New calls sorted {}
02=MSN-1
¬¬¬¬¬¬¬¬¬¬¬¬¬¬¬¬¬¬¬¬¬¬
MSN-3=00
MSN-4=01
-
20
Page 59

English
When this softkey is pressed, all new messages are then played
automatically one afterthe other. Automatic play-back is halted
if you press a further key. You can also manually control the
play-back of messages using the keys described below.
New call-01 {}
Date: 29.05.03 07:21
Pause
delete
MSN-1
repeat
Stop
»<« or »>« The answering machine switches from the current to the previous message
(»<«)or tothe nextone (»>«).
»Pause« Pressthe »Pause«softkey tohalt listeningto amessage.
If youwish to continuewith listening toa message, pressthe »END PAUSE«
softkey.
»repeat« Pressthe »repeat«softkey tolisten tothe samemessage againfrom thebe
ginning.
»Stop« Pressthe »Stop«softkey, toend play-backof amessage.
Inthe subsequentmenu youcan listento amessageagain, deletea messageor
view the number of the caller. Press the corresponding softkey »listen«,
»delete«or»number«.
Once you have listened to a new message completely, it is deleted fromthe list of new messages and
moved to the list with the old messages.
Once you have listened to all new calls, the display illustrated
here isthen shownagain. To listento other messages,proceed as
described for »New calls«.
Answering machine
New calls =0
New dictations =3
¬¬¬¬¬¬¬¬¬¬¬¬¬¬¬¬¬¬¬¬¬¬
Listening to all messages, dictations, info-texts or recordings
Begin as follows:
Poll message }
a
Ms s
Answering
machine
Messages
> The type andnumber of the newand old (ones that
have already beenlistened to) messages areshown.
When you press the right arrow key the number of
logged calls (see page 23) is shown.
Calls New=00
Dicts. New=03
Infos On=01
Poll message {
Logs =00
Audio Out: Off
Old=04
Old=00
Off=00
-
21
Page 60

English
s Press the appropriate softkey to listen to the message. To listen to other messages, pro
ceed as described on page 20.
Listening to messages by means of the audio socket (Audio Out)
The telephone isequipped with anaudio output (Audio-Out jack).Recorded messages can beoutput
via Audio-Out or stored on a PC fitted with a sound card (see page 4).
Begin as follows:
a
Ms s>s
Answering machine Messages Audio Out
Press the »Audio Out« softkey to activate or deactivate the
message output. The current status is displayed next tothe soft
key.
»On«: Speaker/handset and Audio-Out.
»off«: Only speaker/handset.
You canonly output message via"Audio-Out" with thereceiver on hook(»speaker« feature active).
Use appropriate software for recording messages on your PC.
Accepting a call from the answering machine
The listening function (see page 5) must be activated inorder to accept a caller who is currently lea
ving amessage onthe answeringmachine. You canset thelistening functionin theconfiguration pro
gram for all incoming calls, or during recording of individual calls.
While theanswering machine isrecording acall, the displayillu
strated here is shown.
Listening:
»Listen ON« indicates that thelistening function canbe acti
vated by pressing this key.
»Listen OFF« indicates that the listening functionis already
activated and can be deactivated by pressing the corresponding
softkey.
Poll message }
-
Logs =01
Audio Out: On
-
2200
------Recording----
Caller MSN-1
-
Listen ON
¬¬¬¬¬¬¬¬¬¬¬¬¬¬¬¬¬¬¬¬¬¬
ªªªªªªªªªªªªªªªªªªªªªª
Caller MSN-1
Listen OFF
¬¬¬¬¬¬¬¬¬¬¬¬¬¬¬¬¬¬¬¬¬¬
-
-
-
22
Page 61

English
bg To acceptthe call,lift up thehandset of the telepho
ne with the listening function active.
2200 }
-
00:35 MSN-1
display
¬¬¬¬¬¬¬¬¬¬¬¬¬¬¬¬¬¬¬¬¬¬
Memo
Transferring a call to the answering machine
In orderto transfera call tothe answering machine, youmust have previously assignedand activated
an announcement forthat extension number (MSN). Thisis also possible withthe answering machi
ne switched off.
a
s
To ans. mac.
Recording a call
You canlog a callonce you haveaccepted it. The loggingof the callis stored inthe answeringmachine
for the telephone.
Attention: Inform the other party on the phone that you arelogging the call. You can
only log calls with no call being recorded by the answering machine.
abg
Call without recording
>
s
s Press »stop«to stop recordingthe call and saveit.
Press the right arrow button followed by the
»edit« softkey , to start recording the call.
If you wish to stop recording without saving press
the softkey »delete«.
2200 }
00:55 MSN-1
memo
¬¬¬¬¬¬¬¬¬¬¬¬¬¬¬¬¬¬¬¬¬¬
Log-01
----- Recording -----
Display
-
delete
Stop
23
Page 62

English
g You can now continue with your call. The display
returns to normal state.
You canlog callswhile talkingon thephone withone ormore parties (conferencecall).
To replay a recorded call proceed as described on page 21 of these operating instructions.
2200 {
03:51
¬¬¬¬¬¬¬¬¬¬¬¬¬¬¬¬¬¬¬¬¬¬
edit
Remote polling of the answering machine
You caninitiate remote accessvia dtmf post-selection tothe answering machine fromany telephone,
in order to listen to messages. Remote polling is possible only via the first number entered into
»MSN-1«.
Remote accessto theanswering machine isprotected bythe telephonePIN andis possi
ble only when remote polling has been activated at the telephone (see page 8).
Operations/ settings possible via remote access:
Remote activation/deactivation ofthe answering machine
•
Query foravailable storagecapacity
•
Listen tonew /old messagesor activatedinformation text
•
Delete messagesindividually
•
Delete allmessages
•
Listen toor deleteannouncements orrecord newannouncements
•
Activate /Deactivate announcements fora particular number (MSN)
•
Activate /Deactivate orconfigure automatic forwarding(relaying) for recordedmessages
•
Acoustic signals during remote polling
During remote access to the answering machine, you will hear various acoustic signals that inform
you about the current status of individual entries or actions.
Positive acknowledgement
signal (1 long tone):
Request signal
(2 short beeps):
Negative acknowledgement
signal (4 short beeps):
Your entry has been received and stored by the phone.
The phone iswaiting for acode number or fora new announ
cement.
Incorrect input not accepted by the phone. Thecode number
you have entered is incorrect or the desired action cannot be
carried out.
For example: activation of an announcement for a number
(MSN) not stored in the telephone directory.
-
-
24
Page 63

English
Initiating remote polling (answering machine switched on)
bt g #t#q
Dial number
(MSN-1)
Voice announcement
of the answering ma
chine
-
Enter PIN 1
Attention: Youhave topress »#PIN #«during theon-going announcement. You cancarry outfurt
her remote polling procedures after the positive acknowledgement signal is given.
Remote activation of a switched off answering machine
bt
Dial number
(MSN-1)
Remote access to a switched off answering machine requires that extension number 1 (MSN-1) has
been set up an activated for an announcement.
You can carryout further remote polling proceduresafter the positiveacknowledgement signal isgiven.
After around
90 seconds
qq # PIN # q *01 q
Request signal
Enter
PIN
Switch on answe
ring machine
-
Automatic forwarding (relaying) for new messages
bg#t#q
You then hear the request signal, or an infor-
mation text
When stored, an »Forwarding announc.« will be playedback at the beginning ofthe forwar
ding. If this text has not been stored or switched on, you will hear a request signal only.
If the forwardingis accepted byentering the »# PIN #« the remote pollingmode for theanswering
machine becomes active.
Enter PIN 1
-
-
25
Page 64

English
Code numbers for remote polling
After successfullyinitiating remote polling,you can usethe individual functionsby entering thefollo
wing codes.
To terminateremote polling,hang upthe handsetof thetelephone afterentering therequired code.
All indentedcodes canbe used whilelistening totexts only(messages, announcements,
info texts).
General code numbers
*00q Switchoffanswering machine
*02q Query foravailable storagecapacity
Available storage capacities for leaving messages are identified by acoustic
signals. Eachacoustic signalstandsfor athree minutestorage capacity.
Listening to or deleting messages, listening to information texts
10q Listen tonew message
11q Listen toold message
12q Listen toactivated informationtext
#q Listento nextmessage
*q Listento previous message
0q Endplay-back ofcurrent message
2q Deletingof thelast messagethat waslistened to
22q Deleting ofall messagesthat havebeen listenedto
-
Listening to or deleting announcements or recording new announcements
You canterminate the playbackor recordingof an announcementby pressing»0«. If you press»2«
during an ongoing playback / recording, the announcement will be deleted.
If you delete an announcement that has alreadybeen assigned to an extension number (MSN), then
all settingsassociated with thisnumber (for examplemode of operation,call signal duration,message
length and time control function) will also be deleted.
26
Page 65

English
If you wish to change an existing announcement, record it anew,without deleting the old one. Your
new announcementwill thenoverwrite the“old” one. Allsettings associatedwith thisnumber (MSN)
and thisannouncement (e.g. modeof operation, callsignal duration,message lengthand timecontrol
function) will then remain unchanged.
q Endplay-back /recording ofcurrent announcement
q Deletingthe announcementthat hasbeen listenedto /recorded
13Xq Listening toan announcement
X:! … ),= Select announcement(1... 9,10)
23Xq Deleting anannouncement
X:! … ),= Select announcement(1... 9,10)
33Xq Recording anannouncement
X:! … ),= Select announcement(1... 9,10)
The announcement assigned tothe first number(MSN-1) cannot be deletedduring re
mote access.
Activating / Deactivating announcements for a particular MSN extension number
You canonly activate /deactivate an announcement fora particular MSNwhile the announcement is
being playedback. When activated fora particularMSN extensionnumber, theannouncement parameters are as follows:
Call signalingduration:»05 seconds«, modeof operation:»Speak«, messagelength: »infini«with time
control function deactivated.
-
**X*q Activatingan announcementfor aparticular extensionnumber:
X:! … ),= Select extensionnumber (MSN)(1...9, 10)
or* for allMSNextension numbers.
*#X*q Activatingan announcementfor aparticular (MSN):
X:! … ),= Select extensionnumber (MSN)(1...9, 10)
or* for allMSNextension numbers.
The announcementassigned tothe firstnumber (MSN-1) cannotbe deactivatedduring
remote access.
Automatic forwarding (relaying)
You haveto setthe number ofcalls /messages (1.... 10) and thetelephone number youwant themes
sage to be forwarded to, before you can activate the automatic relaying function.
27
-
Page 66

English
*51q Activatingforwarding ofcalls. Relayingis performedusing therelay announ
cement.
*52q Deactivating forwardingof calls
*53Xq Configuringforwarding ofcalls
X:! … ),= Number ofcalls totrigger theforwarding function(1... 9,10)
*54t
*q
Programming theforwarding targetnumber
t:Number ofthe forwardingtarget (max.20 digits)
# Cancellingphone numberinput forautomatic forwarding.
*55q Activatingforwarding ofcalls. Relayingisperformed bysending aUUS1 mes
sage.
*56q Activatingforwarding ofcalls. Relayingisperformed bysending anSMS mes
sage.
Using the answering machine from a different telephone
You canuse the telephoneanswering machine jointlywith another telephone.When this isdone, the
»MSN-10« foryour telephoneis configured asa »Voicemailbox« andthis made availableto theother
telephone as an answering machine. This telephone can then forward calls made to it using the call
forwarding function,or ateam variable callmode (withelmeg PABX systems)to this »MSN-10«and,
thus, to the corresponding answering machine.
The following applies after the voice mail function for »MSN-10« and the answering machine have
been configured and activated:
No furthertelephony settings(e.g. tone, volume)possible for »MSN-10«.
•
Calls forMSN-10 aresignaled onlyat theanswering machine.You are notifiedof thecall inthe
•
display.
For calls made to »MSN-10« thefunction »Listen« can not be utilized, nor can thecall be ac
•
cepted.
Remote controlfunction forthe answering machineis activatedautomatically for»MSN-10«.
•
You canthen listen toor deletemessages at theanswering machine ata remote locationfrom
the otherphone.
Messages for »MSN-10« can not be listened to jointly when the answering machine remote
•
control functioncontinues tobe used.
The answeringmachine should onlybe switched offif thevoice mailboxfor MSN-10 isno lon
•
ger needed.Otherwise switchoff theanswering machine byde-activating individual MSNs to
allow thevoice mailboxfor MSN-10to continueto beavailable.
-
-
-
-
-
28
Page 67

Activating the voice mailbox for »MSN-10«
Begin as follows:
a
Ms s>s>s
Configuration MSN MSN-10 Voice mail
English
t
O
In the »Program MSN-10« menu you can now only make settings using the softkeys »MSN
ext.«, »MSN Name« and»Voice mail«. MSN-10is marked inthe menu withan »×«.Configure
and activate theanswering machine for »MSN-10«as described inthe operator’s manual in thesecti
on »Answeringmachine«. Inthe menu»Answering machine«-»Activate«the designation
»Voice mail« is displayed in place of the name for »MSN-10«.
Enter thenumber for thetelephone that isto usethe
answering machine. For example:»33«.
Confirm your entry by pressing OK.
AnsMc Voice-box
user
MSN-10>1234_
¬¬¬¬¬¬¬¬¬¬¬¬¬¬¬¬¬¬¬¬¬¬
Important notes
Joint useof theanswering machineis basedon trust.Messages forall numbers(MSNs) canbe listened
to duringlocal pollingof messages.We therefore recommendhaving themessages sorted bynumber
(»Calls sort. by MSNs«) so that, prior to listening to any messages, you can select the appropriate
number (MSN) for the message you wish to listen to.
If youhave activatedthe answeringmachines for»All MSNs«,the othertelephone can notuse the answering machine for »MSN-10«.
You cannot listento the messagesfor »MSN-10«when usingthe remote controlfunction for theans
wering machine (for »MSN-1« to »MSN-9«).However, if the code »22« (for deletingall messages) is
executed from a remote location the messages for »MSN-10« will also be deleted.
If themessages for»MSN-10« arelistened tofrom aremote locationthat telephone cannot be usedas
long as the remote control function is in progress.
Using the voice mailbox with another telephone
The othertelephone canonly utilize thevoice mail functionwith thenumber that hasbeen entered in
the answeringmachine telephone as»AncMc voice-boxuser«. Calls forthis telephonecan be forwar
dedto theanswering machine byCall rerouting,or ateam variablecall mode(elmeg PABXsystems).
When new messagesarrive at theanswering machine the othertelephone is notifiedof this bya UUS
text message.
-
-
-
29
Page 68

English
If theother telephone isa systemtelephone (for exampleCS300) the statusof the answering machine
can be indicated by pressing the function key »Line AM«. When you press this key you can accept a
call, or establish aconnection to the answering machine(for listening to messages forexample). Ac
cepting of calls is only possible from Version 6 of the PABX system.
In addition,you canalso operatethe answering machinefor »MSN-10« froma remotelocation asfol
lows:
Initiating remote polling (answering machine switched on)
bt g #t#q
Dial number
(MSN-1)
Voice announcement of
the answering machine
Enter PIN 1
-
-
Attention: You haveto press »#PIN #« duringthe on-going announcement. After successfully in
itiating remote polling (positive acknowledgement signal), you can use the individual functions by
entering the following code.
To terminateremote polling,hang upthe handsetof thetelephone afterentering therequired code.
All indentedcodes canbe used whilelistening totexts only(messages, announcements,
info texts).
Listening to or deleting messages, listening to info-texts
10q Listento newmessage
11q Listento oldmessage
#q Listen tonext message
*q Listen toprevious message
0q End play-backof currentmessage
2q Deleting ofthe lastmessage thatwas listenedto
-
30
Page 69

Index
English
A
Accepting a call
recording/logging . . . . . . . . . . . . 23
Activating message recording for indicvidual
MSNs . . . . . . . . . . . . . . . . . . . . . . 12
Activating the answering machine . . . . . . 5
Activating/ deactivating listening . . . . . . 5
Activating/deactivating AM. . . . . . . . . . 5
Announcement when answering machine is
full . . . . . . . . . . . . . . . . . . . . . . . 10
Announcements . . . . . . . . . . . . . . . 10
Answering machine
activating listening . . . . . . . . . . . . 5
automatic forwarding . . . . . . . . . . 5
deleting texts . . . . . . . . . . . . . . . 7
listening to messages . . . . . . . . 20,21
message length . . . . . . . . . . . . . 14
remote polling . . . . . . . . . . . . . . 26
setting the speech quality . . . . . . . . 8
time control . . . . . . . . . . . . . . . 15
Answering machine functions . . . . . . . . 1
Audio in / Audio out . . . . . . . . . . . . . . 3
Automatic forwarding . . . . . . . . . . . . . 5
accept . . . . . . . . . . . . . . . . . . . 25
remote configuration . . . . . . . . . . 27
C
Call
accepting from the answering machine
. . . . . . . . . . . . . . . . . . . . . . 22
recording/ logging. . . . . . . . . . . . 23
Code numbers for remote polling. . . . . . 26
Configuring AM for an MSN extension num
ber
activating/ deactivating. . . . . . . . . 14
call signal duration . . . . . . . . . . . 13
message length . . . . . . . . . . . . . 14
mode of operation. . . . . . . . . . . . 13
remote polling . . . . . . . . . . . . . . 27
selecting announcement . . . . . . . . 13
time control . . . . . . . . . . . . . . . 15
Configuring time control. . . . . . . . . . . 15
»Daily« . . . . . . . . . . . . . . . . . . 16
»Weekly profile« . . . . . . . . . . . . 17
Connecting the audio sockets . . . . . . . . . 3
Connecting the PC . . . . . . . . . . . . . . . 3
Contents of package . . . . . . . . . . . . . . 1
D
Daily profile . . . . . . . . . . . . . . . . . . 16
Deactivating the answering machine . . . . 5
Deleting the answering machine's memory . 7
Dictations
deleting . . . . . . . . . . . . . . . . . . 7
listening . . . . . . . . . . . . . . . . . 20
recording . . . . . . . . . . . . . . . . . 12
F
Forwarding announcement . . . . . . . . . 10
Forwarding for new messages
accept . . . . . . . . . . . . . . . . . . . 25
I
Info texts . . . . . . . . . . . . . . . . . . . . 10
listening on the phone . . . . . . . . . 20
recording . . . . . . . . . . . . . . . . . 12
-
31
Page 70

English
remote polling . . . . . . . . . . . . 26,30
Installing the module . . . . . . . . . . . . . 2
preparations. . . . . . . . . . . . . . . . 2
L
Listening sorted by MSN extension number 9
Listening to messages
on the phone . . . . . . . . . . . . . . . 20
output by means of Audio-Out . . . . 22
remote polling . . . . . . . . . . . . . . 26
Listening to or deleting announcements . . 11
Listening to recordings. . . . . . . . . . . . 21
M
Main time . . . . . . . . . . . . . . . . . . . 15
Message length . . . . . . . . . . . . . . . . 14
MSN extension numbers sorted . . . . . . . 9
MSN-10 used as voice mailbox . . . . . . . 29
P
PIN (password)
for remote polling of the answering ma-
chine . . . . . . . . . . . . . . . . . . . . 8
Programming time control
setting times . . . . . . . . . . . . . . . 16
R
Recording a call . . . . . . . . . . . . . . . . 23
initiate . . . . . . . . . . . . . . . . . . 23
listening . . . . . . . . . . . . . . . . . 21
Recording announcements . . . . . . . . . 10
remote access . . . . . . . . . . . . . . 26
Relaying of new answering machine messages
setup . . . . . . . . . . . . . . . . . . . . 5
Remaining time . . . . . . . . . . . . . . . . 15
Remote activation of a switched off AM . . 25
Remote polling . . . . . . . . . . . . . . . 8,24
acoustic signals . . . . . . . . . . . . . 24
code numbers . . . . . . . . . . . . . . 26
initiate (answering machine switched off)
25
initiate (answering machine switched on)
25
listening to or deleting announcements
. . . . . . . . . . . . . . . . . . . . . . 26
Resetting the answering machine to default
state . . . . . . . . . . . . . . . . . . . . . . . 7
S
Safety notes . . . . . . . . . . . . . . . . . . . 2
Setting the mode of operation (AM) . . . . 13
Setting the speech quality . . . . . . . . . . . 8
Sign-off. . . . . . . . . . . . . . . . . . . . . 14
Sign-off text . . . . . . . . . . . . . . . . . . 10
Sorting of messages . . . . . . . . . . . . . . 9
System telephone. . . . . . . . . . . . . . . . 1
T
Transfer a call to the answering machine . 23
V
Voice mailbox (MSN-10) . . . . . . . . . . 29
using with another telephone . . . . . 29
W
Weekly profile. . . . . . . . . . . . . . . . . 17
main times . . . . . . . . . . . . . . . . 18
remaining time . . . . . . . . . . . . . 19
32
Page 71

Français
Table des matières
Description et installation . . . . . . . . . . . . . . . . . . . . . . . . . . . 1
Fonctions du répondeur . . . . . . . . . . . . . . . . . . . . . . . . . . . . . . . . . . . . . . . . . 1
Etendu de la livraison . . . . . . . . . . . . . . . . . . . . . . . . . . . . . . . . . . . . . . . . . . . 1
Montage . . . . . . . . . . . . . . . . . . . . . . . . . . . . . . . . . . . . . . . . . . . 1
Préparation de l’installation (voir figure 1) . . . . . . . . . . . . . . . . . . . . . . . . . . . . . . 2
Installation du module (voir figure 2) . . . . . . . . . . . . . . . . . . . . . . . . . . . . . . . . . 2
Raccordement des prises audio (Audio in / Audio out). . . . . . . . . . . . . . . . . . . . . . . . 3
Utiliser le répondeur . . . . . . . . . . . . . . . . . . . . . . . . . . . . . . . . . . . . . . . . . . . 4
Configuration du répondeur . . . . . . . . . . . . . . . . . . . . . . . . . . . . . . . . . . . . . . . 4
Configuration, généralités . . . . . . . . . . . . . . . . . . . . . . . . . . . . . . . . 5
Activer/ désactiver le répondeur. . . . . . . . . . . . . . . . . . . . . . . . . . . . . . . . . . . . . 5
Réglage de l’écoute . . . . . . . . . . . . . . . . . . . . . . . . . . . . . . . . . . . . . . . . . . . . 5
Notification automatique lorsque (acheminement) des messages ont été enregistrés . . . . . . 5
Déroulement du procédé de notification . . . . . . . . . . . . . . . . . . . . . . . . . . . . . . . . 6
Mémoriser un message textuel pour le service de notification (SMS / UUS1) . . . . . . . . . . . 7
Effacer tous les appels, toutes les dictées ou tous les textes . . . . . . . . . . . . . . . . . . . . . 7
Commande à distance du répondeur . . . . . . . . . . . . . . . . . . . . . . . . . . . . . . . . . . 8
Régler la qualité vocale des annonces . . . . . . . . . . . . . . . . . . . . . . . . . . . . . . . . . 8
Ecouter les enregistrements / messages classés par multinuméro (TNM) . . . . . . . . . . . . . 9
Annonces, textes infos et dictées . . . . . . . . . . . . . . . . . . . . . . . . . . . . 10
Enregistrer, écouter ou supprimer les annonces . . . . . . . . . . . . . . . . . . . . . . . . . . 10
Enregistrer une annonce en utilisant le téléphone: . . . . . . . . . . . . . . . . . . . . . . . . . 11
Charger une annonce par l’intermédiaire de la prise audio (Audio In): . . . . . . . . . . . . . . 11
Ecouter ou supprimer des annonces. . . . . . . . . . . . . . . . . . . . . . . . . . . . . . . . . . 11
Textes infos et dictées . . . . . . . . . . . . . . . . . . . . . . . . . . . . . . . . . . . . . . . . . . 12
Activation de l’enregistrement de messages par multinuméro . . . . . . . . . . 12
Ajustage du mode de fonctionnement . . . . . . . . . . . . . . . . . . . . . . . . . . . . . . . .13
Ajustage de la durée de signalisation d’appel . . . . . . . . . . . . . . . . . . . . . . . . . . . . . 13
Sélectionner une annonce. . . . . . . . . . . . . . . . . . . . . . . . . . . . . . . . . . . . . . . . 13
Activer l’annonce pour un multinuméro . . . . . . . . . . . . . . . . . . . . . . . . . . . . . . .14
I
Page 72

Français
Activer le texte de fin . . . . . . . . . . . . . . . . . . . . . . . . . . . . . . . . . . . . . . . . . . 14
Longueur de message . . . . . . . . . . . . . . . . . . . . . . . . . . . . . . . . . . . . . . . . . . 15
Commande différée . . . . . . . . . . . . . . . . . . . . . . . . . . . . . . . . . . . . . . . . . . . 15
Paramétrer les horaires . . . . . . . . . . . . . . . . . . . . . . . . . . . . . . . . . . . . . . . . . 16
Commande différée »journalier«. . . . . . . . . . . . . . . . . . . . . . . . . . . . . . . . . . . . 17
Commande différée »Paramétrer le Profil hebdomadaire« . . . . . . . . . . . . . . . . . . . . . 18
Paramétrer les heures principales . . . . . . . . . . . . . . . . . . . . . . . . . . . . . . . . . . . 18
Paramétrer le temps restant . . . . . . . . . . . . . . . . . . . . . . . . . . . . . . . . . . . . . . 19
Utilisation . . . . . . . . . . . . . . . . . . . . . . . . . . . . . . . . . . . . . . . . . 21
Ecouter les nouveaux messages . . . . . . . . . . . . . . . . . . . . . . . . . . . . . . . . . . . . 21
Ecouter tous les messages, dictées, textes info ou tous les enregistrements . . . . . . . . . . . 22
Editer les messages par la fiche audio (Audio Out) . . . . . . . . . . . . . . . . . . . . . . . . . 23
Reprise d’un appel du répondeur . . . . . . . . . . . . . . . . . . . . . . . . . . . . . . . . . . . 23
Transmettre un appel au répondeur . . . . . . . . . . . . . . . . . . . . . . . . . . . . . . . . . 24
Enregistrement d’une conversation . . . . . . . . . . . . . . . . . . . . . . . . . . . . . . . . . . 24
Commande à distance . . . . . . . . . . . . . . . . . . . . . . . . . . . . . . . . . . 25
Les services et réglages spécifiés ci-après sont possibles par l’accès à distance: . . . . . . . . . 25
Tonalités pendant la commande à distance . . . . . . . . . . . . . . . . . . . . . . . . . . . . . 26
Lancer la commande à distance (le répondeur a été activé) . . . . . . . . . . . . . . . . . . . . 26
Mise en marche du répondeur, lorsque celui-ci est désactivé . . . . . . . . . . . . . . . . . . . 26
Configurer la notification automatique (Acheminement) . . . . . . . . . . . . . . . . . . . . . 27
Codes de commande à distance. . . . . . . . . . . . . . . . . . . . . . . . . . . . . 27
Numéros d’identification principaux . . . . . . . . . . . . . . . . . . . . . . . . . . . . . . . . . 27
Ecouter ou effacer les messages, écouter les textes info . . . . . . . . . . . . . . . . . . . . . . . 27
Ecouter et supprimer les annonces, enregistrer une nouvelle annonce . . . . . . . . . . . . . . 28
Activation / Désactivation d’annonces par numéro d’appel (multinuméro) . . . . . . . . . . . 28
Notification automatique (acheminement). . . . . . . . . . . . . . . . . . . . . . . . . . . . . . 29
Utiliser le répondeur depuis un autre téléphone. . . . . . . . . . . . . . . . . . . 29
Activer la boîte vocale pour »TNM-10« . . . . . . . . . . . . . . . . . . . . . . . . . . . . . . . . 30
Remarques importantes. . . . . . . . . . . . . . . . . . . . . . . . . . . . . . . . . . . . . . . . . 31
Utilisation de la Voice-Mail-Box depuis l’autre téléphone . . . . . . . . . . . . . . . . . . . . . 31
Initialiser la commande à distance (le répondeur est en marche) . . . . . . . . . . . . . . . . . 31
Ecouter ou effacer les messages, écouter les textes info . . . . . . . . . . . . . . . . . . . . . . . 32
II
Page 73

Description et installation
Français
Pour faire fonctionner cemodule, vous avez besoindu firmware V4.20 pourvotre télé
phone système.
Le module répondeur vous permet d’étendre votre téléphone à système d’un répondeur numérique
disposant de nombreuses fonctions variées. Cette documentation décrit l’emploi d’un module dans
les téléphones à systèmeelmeg CS410 et elmegCS410-U. La compatibilitédu modulerépondeur est
déjà préparée dans le logiciel de ces téléphones à système.
L’étendue des fonctions du répondeur dépend du logiciel utilisé pour le téléphone à système. Les
fonctions décrites dansla présente sebasent sur l’état deslogiciels des téléphonesde système utilisés
lors de la mise sous presse.
-
Fonctions du répondeur
Capacité dejusqu’à 48minutes pourles enregistrements vocauxnormaux.
•
Touche dédiéepour activerou désactiverle répondeur.
•
Fonctions élargie de ladiode de signalisation d’un appelentrant. La DEL a uneautre couleur
•
quand le répondeur est allumé et clignotesi des nouveaux messages pas encore écoutés sont
enregistrés.
10 annonces, 4 textesinfo, annonce de transmission, annoncede fin et annonce pourrépon-
•
deur plein.
Enregistrement dedictées.
•
Configuration individuelle et interrogation de l’enregistrement des messages pour chaque
•
multinuméro possible.
Synchronisation de l’annonce pour chaque multinuméro (chaque jour) ou pour les numéro
•
»TNM-1«à»TNM-3« (profil hebdomadaire).
Qualité d’enregistrementréglable (normal, bien,très bien).
•
Enregistrement pendantles entretiens.
•
Ecoute pendantl’enregistrement des messages.
•
Interrogation àdistance protégéepar PIN.
•
Notification automatique (acheminement) lorsque des appels sont enregistrés via appel,
•
UUS1 ouSMS.
Etendu de la livraison
Module répondeur
•
Cordon audiopour PC(prise femellestéréo 3,5mm, env.2,5m)
•
Plaque signalétique,auto-adhésive
•
Notice d’utilisation
•
Montage
Le montagedu modulerépondeur ne doitêtre réaliséque parle commercespécialisé ou
du personnel autorisé du service après-vente.
1
Page 74

Français
Préparation de l’installation (voir figure 1)
Veuillez respecter les remarques de sécurité dans la documentation de votre téléphone.
Tirez la fiche mâle RNIS du téléphone hors de la prise RNIS.
Mettez letéléphone avec sonavant sur un supportmou demanière que vouspuissiez lire de l’avantla
plaque signalétique apposée sur le fond du téléphone.
Enlevez tous lesfils souples de raccordéventuellement existants (1) (par ex.raccord RNIS, combiné,
casque, PC).
Enlevez les deux pieds appareils de l’appareil (2) et dévissez ensuite trois vis (3).
Enlevez avecprécaution la coquilleinférieure dutéléphone. Vouspouvez voirainsi le circuitimprimé
du téléphone.
1
3
3
2
Opt
S0
UP0
2
3
1
1
Figure 1
Installation du module (voir figure 2)
La rangéede broches(3) pourle raccorddu modulerépondeur setrouve sur lapartie droite ducircuit
imprimé du téléphone (4), près des prises écouteur et casque.
Enfichez la barrette (2) du module répondeur (1) sur la rangée de broches du circuit imprimé (3) et
contrôler sa fixation.
Fermez le bâti en remontant la coquille inférieure et fixez-le avec les deux vis.Insérez les pieds.
Afin d’identifierle répondeur dansle téléphone,vous avez lapossibilité decoller l’étiquette signaléti
que fournie dessous le téléphone.
Pour achever l’installation, veuillez rebrancher les cordons au téléphone (par ex. ligne RNIS, écou
teur, casque, PC).
2
-
-
Page 75

Français
1
2
3
4
Figure 2
Raccordement des prises audio (Audio in / Audio out)
Le téléphone dispose d’une entrée (1) et d’une sortie (2) pour les signaux audio. Ces raccords sont
fournis entant que prisefemelle 3,5 mm.Par l’intermédiaire deces raccords, vouspouvez également
brancher le téléphoneà la carteson de votre PCafin de transférerdes annonces autéléphone ou bien
afin de sauvegarder des messages enregistrés sur votre PC.
Raccordez le téléphone à la carte de son de votre ordinateur (voir la figure 3). Veuillez employer les
cordons audio livrés (3).
Audio in du téléphone(1) —-> PC, par ex. Line Out de la carte de son (5)
Audio out du téléphone (2) —-> PC, par ex. Line In de la carte de son (4)
Veuillez consulter les indications concernant les branchements audio du PC employé
ou de la carte son utilisée.
3
Page 76

Français
12
3
3
Figure 3
Si vous vous trouvez dans le menu du répondeur et que les fonctions Ent. Aud. et Sor.
Audio sontactives, lesappels entrant neseront passignalés. L’appelant entendle signal
occupé.
4
5
Utiliser le répondeur
Pour accéder au menu de répondeur du téléphone, appuyez sur
la touche Menu et la touche programmable »Répondeur«.
Répondeur }
Tem.rest 48:54 Arrêt
Annoncer
Activation
Messages
Local
Configuration du répondeur
Le répondeur peut être configuré directement depuis le téléphone ou bien à l’aide du Professional
Configurator duCD-ROM desWIN-Tools. Veuillezconsulter les instructionsdans la documentation
livrée avec votre téléphone.
4
Page 77

Français
Configuration, généralités
Activer/ désactiver le répondeur
A Pour activer ou désactiver le répondeur, appuyez surla touche de répondeur (touche en
Réglage de l’écoute
Vous pouvez écouterun message par lehaut-parleur du téléphonependant qu’il estenregistré. Vous
avez lapossibilité de programmercette fonction pourtous lesappels entrantsou pourdes appels indi
viduels pendant un enregistrement en cours.
Appuyez surla toucheprogrammable »Ecouter«.La fonctiond’écoute estactivée oudésactivée.
Le crochet àcôté de latouche programmable (»®«)vous indique, que lafonction est activée. Actionnez la touche programmable encore une fois pour désactiver la fonction.Le crochet est effacé.
Notification automatique lorsque (acheminement) des messages ont été
enregistrés
Vous pouvez configurer le répondeur de telle sorte que, dès qu’un certain nombre d’appels (messa
ges) sontenregistrés, cesderniers sontacheminés àun numérode téléphone auparavantprogrammé.
haut àdroite). Ladiode designalisation d’appel s’allume,lorsque lerépondeur estenclen
ché.
Vous ne pouvez activer le répondeur que si l’enregistrement d’appels a été activé pour
au moins un multinuméro (voir page 12).
Procédez de la manière suivante:
a
Ms >
Répondeur
Menu du répondeur }
Tr. d'app. au num.
Effacer textes
comd. à distance
Ecouter
-
-
-
Procédez de la manière suivante:
a
Ms> s
Répondeur Tr. d'app. au num.
Le crochet à côté de la touche programmable (»®«) vous indique, que la fonction est activée.
5
Page 78

Français
Vous pouvez voir l’état actuel (»ARR«) sur la première ligne de
l’afficheur.
Tr. d'app. au num.:
à>_
Nombre d'appels: 10
Mémoriser
Arrêt
Arrêt
retour
t Tapez à l’aide du clavier le numéro de téléphone (20 chiffres), auquel les appels doivent
être acheminés.Si unnuméro detéléphone existe déjà,effacez cedernier àl’aide dela tou
che de curseur gauche.
s Appuyez sur latouche programmable »Nombre d'appels:«, afin d’ajusterle nom
s Appuyez surla touche programmable»Arrêt«, pouractiver letransfert d’appels. Lors
»On,Annonce« La notification s’effectue par un appel accompagné de
»On,Message/SMS« La présence de nouveaux messages enregistrés vous est indi-
»On,Message/UUS« La présence de nouveaux messages enregistrés vous est indi-
s Appuyez sur latouche programmable »Mémoriser«, pourvalider les réglages.Latou
bre d’appels (messages) après lesquels l’acheminement automatique doit être activé.
Lorsqu’on appuie sur la touche programmable, les différentes possibilités offertes sont
successivement affichées.
Par exemple: »1«, »2«, ...., »10«, »15«, »20« ou »30«.
qu’on appuie sur la touche programmable, les différentes possibilités offertes sont successivement affichées.
l’annonce denotification ou parun signald’inivite. Vouspouvez ensuite écouter les nouveaux messages enregistrés.
quée par un message SMS.
quée par un message UUS1.
che programmable»retour« vous permetde quitter lemenu sans mémoriserles régla
ges.
-
-
-
-
-
A l’état de veille du téléphone, un »×« sur l’afficheur vous indique, que la notification
automatique estactivée. Les coûts occasionnéspar l’acheminement automatiquesont à
la charge de l’abonné RNIS (du multinuméro) chez qui le téléphone est raccordé.
Déroulement du procédé de notification
Dès quele nombre programméde messages sontenregistrés, l’acheminement automatiqueau numé
ro de téléphone auparavant programmé s’active (appel, transmission d’un message SMS ou UUS1).
Après cinqtentatives d’acheminement, le compteurde messages enregistrésest remis àzéro. Lepro
chain acheminementsera activéla prochainefois quele nombrede messages programméest atteint.
6
-
-
Page 79

Français
Lorsque la notification a échoué (par exemple, lorsque l’abonné est occupé), jusqu’à cinq tentatives
d’appel seront effectuées. Aubout de cinq tentatives d’appeln’aboutissant pas, l’acheminement sera
interrompu et repris au début après le prochain nouveau message.
Mémoriser un message textuel pour le service de notification (SMS / UUS1)
Procédez de la manière suivante:
a
>s s
Message Texte de l'annonce
t
O
Entrez le texte souhaité.La longueur du texte est li
mitée à 160 caractères (SMS) et à 31 caractères
(UUS1) respectivement.
Dans l’exemple: »Ilya5nouveaux mes
sages sur le répondeur«.
Confirmez avec OK.
Si aucun texten’est sauvegardé, untexte standard mémorisé dansle téléphone seraenvoyé pour l’envoi de messages textuels (SMS ou UUS1).
Texte de l'annonce
-
-
Répondeur
SMS>Ilya5nouveaux
messages sur le
répondeur
¬¬¬¬¬¬¬¬¬¬¬¬¬¬¬¬¬¬¬¬¬¬
Effacer tous les appels, toutes les dictées ou tous les textes
Vous avezla possibilité d’effacerles appels, lesdictées oules textesmémorisés dansle répondeurdans
leur ensemble.
Procédez de la manière suivante:
a
Ms> s
Répondeur Effacer textes
s Pour indiquer si vous souhaitez effacer tous lesap
pels, dictéesou tousles textesdu répondeur, action
nez la touche programmable correspondante. Par
exemple: »Effacer tous les appe«.
-
Effacer textes
Effacer tous les text
-
Effacer tous les appe
Effacer tous les mémo
retour
7
Page 80

Français
s Si voussouhaitez continuerl’effacement, actionnez
la touche programmable se trouvant à côté de
»Oui«.
Si les appels enregistrés nedoivent pas être effacés,
actionnez la touche programmable »Non«.
Attention: Sivous effacez tousles textes, tous lesparamètres ajustés pourle répondeur
seront également effacés. Le répondeur sera ainsi ramené à son état initial.
Voulez vraim effacer
tous les appels?
Non
¬¬¬¬¬¬¬¬¬¬¬¬¬¬¬¬¬¬¬¬¬¬
Oui
Commande à distance du répondeur
Vous pouvezconfigurer lerépondeur detelle sorteque cedernier puisseêtre commandé àdistance (à
partir d’un autre branchement/téléphone).
La commandeà distance durépondeur estprotégée par lePIN du téléphoneet n’estau
torisée que via le premier numéro enregistré dans le téléphone (»TNM-1«).
Commande à distance: par exemple:Connecter/déconnecter le répondeur, Ecouter ou effacer les
messages, Ecouter, effacerou enregistrer les annonces,Activer des annonces pourles multinuméros
individuels, Configurer l’acheminement automatique des nouveaux messages enregistrés
Procédez de la manière suivante:
a
Ms >
Répondeur
Appuyez sur la touche programmable »comd. à distance«. La commande à distance est acti
vée ou désactivée.
Le crochet à côtéde la touche programmable (»®«) vous indique, que lafonction est activée. Action
nez la touche programmable encore une fois pour désactiver la fonction.Le crochet est effacé.
A l’état de veille dutéléphone, un »×« sur l’afficheur vous indique,que la commande à
distance est activée.
Menu du répondeur }
Tr. d'app. au num.
Effacer textes
comd. à distance
-
Ecouter
-
-
Régler la qualité vocale des annonces
Vous pouvez ajustertrois qualités vocalesdifférentes (»Normal«, »Bien«ou»tr. bien«) pour
tous les textes enregistrés par téléphone (annonces, textes infos et dictées).La capacité
d’enregistrement maximale diminue d’autant plus que la qualité ajustée est meilleure.
Les messages d’appelants enregistrés sont toujours enregistrés en qualité »Normal«.
8
Page 81

Procédez de la manière suivante:
a
Ms > s
Répondeur Qualité vocale
Français
s Appuyez sur la touche programmable de la qualité
souhaitée .Le crochetindique l’étatactuel desrégla
ges. Par exemple:»Bien ®«.
Pour quitterle menu,actionnez latouche program
mable »retour«.
Dans le menu durépondeur, l’état actuel (sans indication- Normal, »+«- Bien, »++« -tr. bien) vous
est indiqué à coté de la touche »Qualité vocale«.
Qualité vocale
Tem.rest. 48:54
-
tr. bien
-
Normal
Bien ®
retour
Ecouter les enregistrements / messages classés par multinuméro (TNM)
Les messages laissés sur le répondeur sont sauvegardés dans des listes. Pour écouter les messages,
vous pouvezfaire un réglageclassant ces listespar numéros detéléphones (multinuméros), pourlesquels les messages ont été laissés.
Procédez de la manière suivante:
a
Ms s
Répondeur Local
Appuyez sur la touche programmable »appels clas. p. TNM«.
Le crochet àcôté de latouche programmable (»®«)vous indique, que lafonction est activée. Action
nez la touche programmable encore une fois pour désactiver la fonction.Le crochet est effacé.
Dans leréglage debase du répondeur,les messages pourl’ensemble des multinuméros sontmémori
sés dans une listecommune. Après avoir classé lesmessages par multinuméros, vous pouvez choisir
le numéro de téléphone correspondant (multinuméro) des messages à écouter avant d’écouter les
messages.
Menu du répondeur{
Qualité vocale
appels clas. p.TNM®
-
-
9
Page 82

Français
Annonces, textes infos et dictées
Vous pouvez enregistrer sur le répondeur de différents annonces, textes informatiques ou dictées.
Annonces: Vous pouvez enregistrer jusqu’à 10 annonces.Lorsque le répondeur répond à un appel,
l’annonce affectée au multinuméro composé est reproduite à l’appelant.
Texte de fin:Annonce spéciale reproduite àun appelant après que cedernier a laissé unmessage, ce
dans le cas où le temps d’enregistrement est limité.
Annonce denotification: Une annonce dédiéepouvant être employée entant qu’informationau dé
but d’une notification automatique (voir page 5). Après avoir enregistré le texte, cette annonce doit
être activée.
Annonce pour répondeur plein: Un appelant reçoit cette annonce, lorsque la capacité demémoire
est insuffisante.
1.) lorsque, avant qu’on ne laisse unmessage, la capacité d’enregistrement est inférieure à 30 secon
des.
2.) lorsque, pendant l’enregistrement d’un message, la mémoire s’épuise.
Après avoir enregistré le texte, cette annonce doit être activée.
Textes infos:Enregistrement de jusqu’à4 textes pouvant êtreenregistrés individuellement etactivés
ou désactivés comme messages par exemple pour d’autres utilisateurs du téléphone.
Mémos: Enregistrement detextes (99 aumaximum, en fonction dela capacité d’enregistrement restante) pouvant être mémorisés l’un à la suite de l’autre.
L’enregistrement d’annonces, textes infos ou dictées est décrit ci-après à l’exemple du
texte d’annonce 1.
Enregistrer, écouter ou supprimer les annonces
-
-
Procédez de la manière suivante:
a
Ms s<>s
Répondeur Annonces
Sélectionner
l’annonce
Annonce 1
10
Page 83

Enregistrer une annonce en utilisant le téléphone:
Français
bs Décrochez lecombiné et appuyezensuite surla tou
che programmable »Enreg.«.
s Enregistrez l’annonce à l’aide du combiné du télé
phone. Pour terminer l’enregistrement, appuyez
-
-
Annonce-1
Tem.rest. 48:54
Enreg., Ent. Aud.
Enreg.
¬¬¬¬¬¬¬¬¬¬¬¬¬¬¬¬¬¬¬¬¬¬
Annonce-1
---Enregistrement--
sur la touche programmable »Arrêt«.
Arrêt
Charger une annonce par l’intermédiaire de la prise audio (Audio In):
La prise Audio In du téléphone vous permet de télécharger des annonces mémorisées dans
l’ordinateur. LeCD-ROM fourni contientdes fichiersWave, que vouspouvez utilisés commeannon
ce d’acceuil ou comme texte de fin.
Veuillez utiliser un logicielapproprié (par ex. le Media Player)pour transmettre ces fichiers Wave.
s Actionnez la touche programmable »Enreg.,
Ent. Aud.« pour interpréter le fichier souhaité
sur le PC.
s Pour terminerl’enregistrement, appuyez surla tou-
che programmable »Arrêt«.
Annonce-1
Tem.rest. 48:54
Enreg, Ent. Aud.
Enreg.
¬¬¬¬¬¬¬¬¬¬¬¬¬¬¬¬¬¬¬¬¬¬
Annonce-1
---Enregistrement--
Ent. Aud.
Arrêt
-
Ecouter ou supprimer des annonces
Si vousvoulez écouterl’annonce enregistrée, actionnezla touche
programmable »écouter«. Pour enregistrer de nouveau
l’annonce, actionnez la touche programmable »Enreg.«.
L’annonce existante sera alors effacée. Si vous désirez effacer
l’annonce enregistrée, appuyez sur la touche programmable
»Effacer«.
Un crochet affiché dans les menus pour une entrée (par ex. »Annonce-1 ®«), vous
indique, qu’un texte a été enregistré.
Annonce-1
Tem.rest. 48:01
Enreg., Ent. Aud.
Enreg.
Effacer
Ecouter
11
Page 84

Français
Textes infos et dictées
Procédez de la manière suivante:
Enreg. / régler en
a
Ms s
Répondeur Local
Appuyez sur la touche programmable appropriée pour enregistrer des textes informatiques ou des
dictées. Procédez tel que décrit pour l’annonce 1.
Après avoir enregistré le texte, ce text informatique doit être activé.
local des messages
Txt. Info-1 ®
Txt. Info-2
Txt. Info-3
Txt. Info-4
Mémos
Activation de l’enregistrement de messages par multinuméro
Vous avezla possibilité deprogrammer le répondeurindividuellement pour chacundes mulitnuméros ou pour l’ensemble des numéros mémorisés.
Cependant, le répondeur ne peut être programmé que lorsque:
le multinuméroa étéconfiguré etmémorisé dansle téléphone. Lorsquevous avez affecté,lors
•
de laconfiguration du téléphone,des nomsà unnuméro d’appel,les désignationsdes touches
programmes dans les menus »TNM-1«…»TNM-10« sont remplacées par les noms corre-
spondants.
au moinsune annoncea été enregistréeet mémorisée (voir page10).
•
Procédez de la manière suivante:
a
Ms s
Répondeur Activation
La toucheprogrammable affectée à unmultinuméro n’est affichée,que lorsque cemul
tinuméro est mémorisé dans le téléphone.
La configuration du répondeur estdécrite ci-après à l’exemple du numéro d’appelTNM-1. Appuyez
sur la touche programmable»TNM-1«.
Activation annonce }
TNM-1
TNM-2
TNM-3
TNM-4
TNM-5
-
12
Page 85

Français
Vous voyezsur les premièreslignes del’afficheur l’étatdu répon
deur pour le numérod’appel sélectionné (»TNM-1=ARR«). Sur
les autres lignes de l’afficheur, on peut procéder aux différents
réglages à l’aide des touches programmables correspondantes.
La touche programmable »Options«vous permet d’accéder à
un menuavec despossibilités de réglagesupplémentaires. Lalig
ne en dessousde la toucheprogrammable vous indique l’étatac
tuel de la fonction concernée.
Pour quitter un menu, appuyez sur la touche C.
Paramètre TNM-1:
-
Actif après: 02sec
choisir un message
Options pour TNM-1
Txt. de fin:
-
-
Comm. différée:
Long. de message:
Parler
Options
ss fin
Arrêt
ON
Arrêt
Arrêt
Ajustage du mode de fonctionnement
s Appuyez sur latouche programmable »Parler«, poursélectionner le modeopératoire
du répondeur.Lorsqu’on appuie surla touche programmable, les différentespossibilités
offertes sont successivement affichées.
»Parler« Unappelant entendratoutd’abordl’annonceprogrammée,puispourralaisser
unmessage aprèsle bipsonore.
»Annonce seule« Un appelantentend uniquementl’annonce programméeet nepeut laisserau-
cunmessage.
Ajustage de la durée de signalisation d’appel
s Actionnez latouche programmable »Actif après:« pourajuster ladurée (en secon
des) aprèslaquelle lerépondeur doitrépondre àun appel.Lorsqu’on appuiesur latouche
programmable, les possibilités suivantes sont successivement affichées et ajustées:
»0 sec«, »2 sec«, »5 sec«, »10 sec«, »15 sec«, »20 sec«, »25 sec«, »30
sec«, »60 sec« ou »120 sec«.
-
Sélectionner une annonce
s Actionnez la toucheprogrammable »Annonce« poursélectionner l’annonce qu’unap
pelant doitentendre. Siplusieurs annoncessont disponibles, ilsuffit d’appuyersur latou
che programmable»proch. message« pour afficher les unesaprès les autres toutes
les annonces enregistrées. En même temps, vous entendez l’annonce sélectionnée via le
haut-parleur ou dans le combiné.
Par exemple: »Annonce-1«, »Annonce-2«, ...., »Annonce-9«ou»Annon
ce-10«.
13
-
-
-
Page 86

Français
Activer l’annonce pour un multinuméro
s Activez la touche programmable »MAR«, pour activer l’annonce pour le multinuméro
TNM-1. L’étatpasse à»TNM-1: Mar.« surla première lignede l’écranet latouche pro
grammable à »ARR« Pour désactiver l’annonce, actionnez cette touche programmable.
Après la configuration du répondeur, vous voyez par exemple
l’affichage ci-contre.
Afin de procéder à d’autres réglages, actionnez la touche pro
grammable »Options«.
Activer le texte de fin
Le texte final est une annonce spéciale qu’un appelant entenden plus de l’annonce du multinuméro
appelé. Le texte final ne peut être activé que lorsqu’il a été enregistré auparavant (voir page 10).
Lors du réglage »Parler« un appelant entend tout d’abord l’annonce configurée et peut ensuite
laisser unmessage après lebip sonore. Si lalongueur de message admissibleest atteinte et untexte de
fin est enregistré, ce dernier texte sera reproduit à l’appelant.
Avec le réglage »Annonce seule«, un appelant ne peut laisser aucun message. Il entend tout
d’abord l’annonce programmée, puis le texte de fin enregistré.
Procédez de la manière suivante:
a
Ms s ss
Répondeur Activation TNM-1 Options
Paramètre TNM-1:
-
Actif après: 20sec
Annonce-2
Parler
Options
Mar.
ARR
-
s Appuyez sur la touche programmable »Txt. de
fin«. L’annonce de fin est activée ou désactivée.
L’état actuelde la fonctionest affiché sous latouche
programmable (»Mar.« ou »Arrêt«).
14
Options pour TNM-1
Txt. de fin
Comm. différée
Long. de message
Arrêt
Arrêt
ss fin
Page 87

Français
Longueur de message
Vous pouvezdéfinir ladurée dontdispose chaqueappelant pourenregistrer sonmessage. En fonction
du mode de fonctionnement ajusté, l’enregistrement sera terminé après écoulement du temps pro
grammé.
Dans l’étatde basedu répondeur,la longueurde messageest réglée sur»ss fin«. Si le
mode deservice est »Parler«et que letexte defin est activé,la longueurdes messages
dans les réglages de base est réglée sur »30 sec«.
Procédez de la manière suivante:
a
Ms s ss s
Répondeur Activation TNM-1 Options Long. de
message
-
s Appuyez sur latouche programmable dela longeur
Limiter la long.
de messagesouhaitée . Uncrochet indique lavaleur
actuelle du paramètre.
C Après avoir procédé à la configuration, vous voyez
par exemple l’affichage ci-contre. Pour quitter le
menu »Options«, appuyez sur la touche C.
30 sec
60 sec ®
Options pour TNM-1
Txt. de fin:
Comm. différée:
Long. de message
120 sec
ss fin
Arrêt
Arrêt
60 sec
Commande différée
Avec unecommande différée, lecorrespondant entenddifférentes annoncesà différentsmoments de
la journée.Vous ne pouvez activer la commande différée que lorsque vous avez déjà activé le service
répondeur pour le multinuméro appelé.
A l’étatde veilledu téléphone,un »×«sur l’afficheurvous indique, quela commandedif
-
férée est activée.
15
Page 88

Français
Procédez de la manière suivante:
a
Ms s ss s
Répondeur Activation TNM-1 Options Comm. diffé
rée
-
Ce menu vous permet de programmer les horaires ainsi que les
paramètres de la commande différée pour un multinuméro. Le
profil hebdomadaire ne peut être configuré que pour les multi
numéros TNM-1 à TNM-3.
Comm. différée
profil hebdomad.:
-
journalier: Arrêt
déterminer horaires
¬¬¬¬¬¬¬¬¬¬¬¬¬¬¬¬¬¬¬¬¬¬
Arr
Paramétrer les horaires
Pour ceci, vous pouvez installer neuf horaires pour votre téléphone (»heure 1«, ...»heure 9«)
que vous pouvez utiliser dans les commandes différées pour chaque multinuméro.
Les horaires programmés sont valables pour tous les multinuméros. Si vous utilisez un horaire déjà
utilisé pour uneautre commande selonhoraire, cette modificationaura des répercussions sur l’autre
commande selon horaire.
Dans le menu »Comm. différée« appuyez sur la touche programmable »déterminer ho-
raires«.
<
>
O
t
O
Sélectionnez uneplage detemps avecles touchesde
curseur et confirmez par OK.
Dans l’exemple: »heure 1«.
Entrez la plage de temps souhaitée à l’aide du cla
vier. Le curseur au-dessous des paramètres de
temps indique la position actuelle de l’entrée.
Confirmez avec OK.
déterminer horaires
heure 1:
08:00 ju. 13:00
heure 2:
13:00 ju. 13:30
¬¬¬¬¬¬¬¬¬¬¬¬¬¬¬¬¬¬¬¬¬¬
-
déterminer horaires:
Période (1) de
14:00 ju. 18:00
heure 1
{}
retour
Les horairesd’une période fixéesont toujoursvalables pour lemême jour. Par exemple,
si vous attribuez à la journée Lundi, l’horaire 18:00 à 08:00, cela signifie: Lundi matin
00:00 bis 08:00 et Lundi soir 18:00 bis 24:00.
16
Page 89

Français
Commande différée »journalier«
Avec ce réglage, vous attribuez unepériode à un multinuméro (le soi-disant»Heure pr. «), pen
dant laquelleune annonce précisesera reproduite auxappelants. Pour lereste du tempshors de cette
plage (lesoi-disant »Tps. Rest«), vous pouvezprogrammer une autreannonce. Cette commande
différée est valable pour chaque jour et peut être installée pour tous les multinuméros.
Dans le menu »Comm. différée« appuyez sur la touche programmable »journalier«.
-
s Actionnez la touche programmable appropriée
pour paramétrer la commande différée.
Journalier/TNM-1:
Heure pr.: Arrêt
non actif (-)
Tps rest.: Arrêt
¬¬¬¬¬¬¬¬¬¬¬¬¬¬¬¬¬¬¬¬¬¬
Arrêt
ON
s Lorsqu’on appuie surla toucheprogrammable »non actif«, les plagesde temps pro
grammées sont successivement affichées.
s Actionnez la touche programmable »Heure pr.«, pour programmer l’annonce qui
sera reproduiteaux appelantspendant laplage de tempsajustée. Actionnezla toucheprogrammable »Tps rest.«, pour programmer l’annoncequi sera reproduite auxappelants en dehors de cette plage de temps.
Si plusieurs annonces sont disponibles, il suffit d’appuyer sur la touche programmable
»proch. message« pour afficher/écouterles unes après lesautres toutes lesannonces enregistrées.
Par exemple: »Annonce-1«, »Annonce-2«, ...., »Annonce-9«ou»Annon-
ce-10«.
s Actionnez la touche programmable »MAR«, pour activer la commande différée. L’état
passe à»On« dansla première lignede l’écran et latouche programmable correspondan
te à »ARR«.
Pour désactiver le profil hebdomadaire, actionnez cette touche programmable.
O Appuyez surla touche OKpour valider vos réglages
et quitter le menu de Commande différée.
Journalier/TNM-1:
Heure pr.: Annonce 1
13:00 ju. 13:30 (2)
Tps rest.: Annonce 3
¬¬¬¬¬¬¬¬¬¬¬¬¬¬¬¬¬¬¬¬¬¬
Mar.
ARR
-
-
17
Page 90

Français
Commande différée »Paramétrer le Profil hebdomadaire«
Pour lesmultinuméros »TNM-1«, »TNM-2«et»TNM-3«, vouspouvez régler unprofil hebdomadai
re commeréglage d’horaire.Dans unprofil hebdomadaire,vous pouvezattribuer àune journéediffé
rentes périodes,pendant lesquelles onentend plusieursannonces. (lesoi-disant Horaireprincipal).
Pour letemps horsde cette plage(le soi-disant »Tps rest.«), vous pouvez programmerune autre
annonce. Cette annonceest la même pourtous les joursdu profil hebdomadaire.Vous pouvez égale
ment attribuer des modes opératoires différents au »Tps rest.« et à l’ »Heure pr.«. Par exemple vous
pouvez pendant l’"heure pr" accepter l’enregistrement de messages, alors que ceci n’est pas possible
pendant le"tps. rest.".
Dans le menu »Comm. différée« appuyez sur la touche programmable »profil hebdo
mad.«.
-
-
-
-
s Actionnez la touche programmable correspondan
te pour définir les temps principaux / restants ou
activer la commande différée.
profil hebdomad./MSN-
-
déterm. hor. princip
déterm. temps rest.
Arrêt
ON
s Actionnez la touche programmable »déterm. hor. princip«, afin de définir
pour chaque jour de la semaine les plages de temps et l’annonce.
s Afin de programmer l’annonceet le mode opératoire pourles périodes restantes detous
les jours de la semaine, actionnez la touche programmable »déterm. temps
rest«.
s Actionnez la touche programmable »ON«, pour activer le profil hebdomadaire. L’état
passe à »Mar.«dans la première lignede l’écran etla touche programmable correspon
dante à »OFF«.
Pour désactiver le profil hebdomadaire, actionnez cette touche programmable.
Lors de la commutationd’un profil journalier au profilhebdomadaire, le profile journa
lier est automatiquement désactivé.
Paramétrer les heures principales
Dans le menu »profil hebdomad.« appuyez sur la touche programmable »déterm. hor.
princip«.
-
-
18
Page 91

Français
Pour choisir l’annonce et les périodes de l’heure principale de
chaque jour,appuyez sur lestouches et lestouches programmab
les correspondantes. Dans l’exemple: »Lundi«.
déterm. hor. {}
princip: Lundi
-
non actif (-)
non actif (-)
Répondeur inactif
¬¬¬¬¬¬¬¬¬¬¬¬¬¬¬¬¬¬¬¬¬¬
s Actionnez la touche programmable »Répondeur inactif«, pour programmer
l’annonce qui sera reproduite aux appelants pendant la plage de temps ajustée.
Si plusieurs annonces sont disponibles, il suffit d’appuyer sur la touche programmable
»proch. message« pour afficher lesunes après les autres toutesles annonces enre
gistrées.
Par exemple: »Annonce-1«, »Annonce-2«, ...., »Annonce-9«ou»Annon
ce-10«.
s Lorsqu’on appuie surla toucheprogrammable »non actif«, les plagesde temps pro
grammées sont successivement affichées.par exemple: »heure 1«, »heure 2«, …,
»heure 9«.
Vous pouvez choisirdeux horaires, pendant lesquels lecorrespondant entend l’annonce
choisie.
Actionnez les touches de curseur, si vous souhaitez paramétrer les autres jours de la semaine.
O Validez la configuration des heures principales du
profil hebdomadaireen appuyantsur latouche OK.
Paramétrer le temps restant
Dans lemenu »profil hebdomad.« appuyezsur latouche programmable »déterm. temps
rest.«.
déterm. hor. {}
princip: Dimanche
08:00 ju. 13:00 (1)
15:00 ju. 18:00 (4)
Annonce -1
¬¬¬¬¬¬¬¬¬¬¬¬¬¬¬¬¬¬¬¬¬¬
-
-
-
19
Page 92

Français
s Actionnez la touche programmable appropriée,
pour déterminer le mode opératoire et l’annonce
pour le temps restant. Ces réglages sont valables
pour tous les jours de la semaine.
déterm. temps rest.
Txt. de fin:
Tps rest.:
Répondeur inactif
Parler
Arrêt
s Appuyez sur latouche programmable »Parler«, poursélectionner le modeopératoire
du répondeur pendant le temps restant. Lorsqu’on appuie sur latouche programmable,
les différentes possibilités offertes sont successivement affichées (voir page 13).
s Actionnez latouche programmable»Txt. de fin«, pour activerou désactiverle texte
de fin (voir page 14).
s Actionnez la touche programmable »Tps rest.«, afin de déterminer les annonces
pour les appelants en dehors des heures principales réglées.
Si plusieurs annonces sont disponibles, il suffit d’appuyer sur la touche programma
ble»prochaine annonce« pour afficher les unes après les autrestoutes les annonces enregistrées.
Par exemple: »Annonce-1«, »Annonce-2«, ...., »Annonce-9«ou»Annon-
ce-10«.
O Validez la configuration du temps restant et du
profil hebdomadaireen appuyantsur latouche OK.
déterm. temps rest.
Txt. de fin:
Tps rest.:
Parler
Mar.
Annonce-04
-
20
Page 93

Français
Utilisation
Si denouveaux messages,dictées outextes infos ontété enregistréspar lerépondeur, ces dernierssont
signalés, le répondeur étant sous tension, par le clignotement de la DEL de la touche Répondeur.
L’afficheur comporte des informations sur le nombre de nouveaux messages.
Les nouveaux messages plus courtsque 2 secondes, ne seront pasmémorisés par le ré
pondeur. Par ex.: Le correspondant interromptla communication sans laisser de mes
sage, après avoir entendu le texte del’annonce et le signal sonore l’invitant àlaisser un
message.
Pendant l’écoute de messages, vous pouvez modifier le volume du haut-parleur ou
du combiné.
Pour cefaire, appuyez surla toucheMenu et ensuitesur les touchesde curseur. Pour revenirà l’écran
de veillependant l’écoute, actionnezla touche ESC.Si vous appuyezsur la toucheOK et nonsur la tou
che ESC, vousmodifiez le réglagedu volume sonore (voirréglages des tonalitéset des volumes sono
res du téléphone).
Ecouter les nouveaux messages
s L’afficheur comporte le nombre de nouveaux mes-
sages.
Appuyez sur la touche programmable
»Mess.répondeur:«.
Vous ne voyez lesaffichages d’écran suivants que si plusieurs nouveauxmessages sont
enregistrés sur le répondeur.
29.05.03 07:21 }
info -D-V-r-×-
Mess.répondeur:8
Répertoire
¬¬¬¬¬¬¬¬¬¬¬¬¬¬¬¬¬¬¬¬¬¬
-
-
-
-
s Vous voyezmaintenant des informationsdétaillées
sur le type de nouveaux messages.
Actionnez la toucheprogrammable à côté desmes
sages que vous souhaitez écouter.
s Une fois que vous avez classé les multinuméros
-
Répondeur
nouveaux appels =04
Nouveaux mémos =03
Txt. Info =01
¬¬¬¬¬¬¬¬¬¬¬¬¬¬¬¬¬¬¬¬¬¬
nouv. appels {}
pour l’écoute des messages, appuyez sur la touche
programmable pour les numéros de téléphone
(multinuméros), pour lesquels des messages sont
enregistrés.
02=TNM-1
¬¬¬¬¬¬¬¬¬¬¬¬¬¬¬¬¬¬¬¬¬¬
L’écoute demessages estdécrite ci-aprèsà l’exemple desnouveaux appels. Appuyez sur
la touche programmable »nouv. appels«.
classés
TNM-3=00
TNM-4=01
21
Page 94

Français
Après l’actionnement de cette touche programmable, tous les
nouveaux messages sont automatiquement reproduits l’un à la
suite del’autre. Lorsque vousappuyez surune autretouche, lare
production automatiques’arrête. Vous pouvezmaintenant com
mander manuellement lareproduction des messagesà l’aide des
touches décrites ci-après.
nouvel appel-01 {}
Date: 29.05.03 07:21
-
Pause
-
Effacer
TNM-1
Répéter
Arrêt
»<« ou »>« On passedu messageactuel aumessage précédent(»<«) ouau messagesui
vant (»>«).
»Pause« Actionnez la touche programmable »Pause«, pour interrompre l’écoute
d’unmessage.
Pour poursuivre l’écoute du message, actionnez la touche programmable
»Terminer Pause«.
»répéter« Actionnezla toucheprogrammable »répéter«,pour écouterde nouveaule
message dèsle début.
»Arrêt« Appuyez surla toucheprogrammable »Arrêt«,pour terminerla reproduc-
tiondu message.
Dans le menu qui suit,vous pouvez réécouter le message, l’effacer ouvoir le
numéro detéléphone éventuellement transmisde l’appelant. Actionnez àcet
effet la touche programmable»écouter«, »supprimer«ou»Numéro
d'appel«.
Dès quevous avezécouté intégralementun message, cedernier est effacéde laliste denouveaux messages et décalé dans la liste d’anciens messages.
Après l’écoute de tous les nouveaux messages, vous revoyez
l’affichage ci-contre. Pour écouter d’autres nouveaux messages,
procédez comme décrit pour »nouveaux appels«.
Répondeur
nouveaux appels =00
Nouveaux mémos =03
¬¬¬¬¬¬¬¬¬¬¬¬¬¬¬¬¬¬¬¬¬¬
-
Ecouter tous les messages, dictées, textes info ou tous les enregistrements
Procédez de la manière suivante:
Interr. des message }
a
Ms s
Répondeur Messages
Appels Nv.=00
Mémos Nv.=03
Txt. Info Mar.=01
Arrêt=00
22
Anc=04
Anc=00
Page 95

Français
> Vous voyez letype et le nombrede nouveaux et an
ciens messages (c’est-à-dire pour ces derniers déjà
écoutés).Lorsqu’on appuie surla touche decurseur
vers la droite, le nombre de messages enregistrés
(voir page 24) est affiché.
Interr. des message{
-
Enr. pdt com. =00
Sor. Audio: Arrêt
s Actionnez la touche programmable correspondante pour écouter les messages. Pour
écouter les autres messages, procédez comme décrit à la page 21.
Editer les messages par la fiche audio (Audio Out)
Le téléphone disposed’une sortie audio (Audio-Out).Il est possibled’éditer les messages enregistrés
depuis cette sortie et par exemple de les sauvegarder sur un pc grâce à un branchement audio (voir
page 4).
Procédez de la manière suivante:
a
Ms s>s
Répondeur Messages Sor. Audio
Appuyez surla touche programmable»Sor. Audio«pour activer ou désactiver l’édition des messages. À côté de la touche
programmable apparaissent les réglages actuels.
»Mar.«: Haut-parleur/combiné et sortie Audio.
»Arrêt«: Seulement haut-parleur/combiné.
Vous ne pouvez reproduire les messages par "Audio-Out" que lorsque le combiné est
raccroché (fonction »écoute amplifiée« activée).
Veuillez employer un programme compatible afin d’enregistrer les messages sur pc.
Interr. des message{
Enr. pdt com. =01
Sor. Audio: Mar.
Reprise d’un appel du répondeur
Afin qu’ilsoit possiblede répondreà unappelant justeen trainde laisser unmessage surle répondeur,
la fonction d’écoutedoit être activée(voir page 5). Vouspouvez ajuster lafonction d’écoute lors dela
configuration pourtous lesappels reçusou encours d’unenregistrement pourdes appelsindividuels.
23
Page 96

Français
Pendant l’enregistrement par le répondeur, vous voyez
l’affichage ci-contre.
Ecouter:
»éc. amp. mar« signifie que lafonction d’écoute estdéjà ac
tivée etpeut êtredésactivée en actionnantla touche programma
ble.
»Ecuter de« signifie que la fonction d’écouteest déjà activée
et peut être désactivée en actionnant la touche programmable.
bg Pour prendrel’appel, décrochez lecombiné dutélé
phone, la fonction d’écoute étant activée.
2200
---Enregistrement--
appel pour TNM-1
-
éc. amp. arr.
-
¬¬¬¬¬¬¬¬¬¬¬¬¬¬¬¬¬¬¬¬¬¬
ªªªªªªªªªªªªªªªªªªªªªª
appel pour TNM-1
Ecuter de
¬¬¬¬¬¬¬¬¬¬¬¬¬¬¬¬¬¬¬¬¬¬
2200 }
-
00:35 TNM-1
Afficher
¬¬¬¬¬¬¬¬¬¬¬¬¬¬¬¬¬¬¬¬¬¬
Mémo
Transmettre un appel au répondeur
Vous nepouvez transmettre unappel aurépondeur que siune annonce aété affectéeet activée pourle
multinuméro signalé. Cela est également possible, lorsque le répondeur est désactivé.
al
s
Transm. rép.
Enregistrement d’une conversation
Lorsque vous avez répondu à un appel, vous pouvez enregistrer la conversation. L’enregistrement
parallèle de la conversation est mémorisé dans le répondeur du téléphone.
Attention: Informez votre interlocuteur du fait que vous enregistrez la conversation.
L’enregistrement d’une conversation n’est possible que le répondeurn’est pas en train
d’enregistrer un nouveau message.
alb g
Conversation sans enregistrement
>
s
Actionnez la touche de curseur vers la droite eten
suite la touche programmable »Enr.pdt
com.«, pour commencer l’enregistrement.
-
2200 }
00:55 TNM-1
Afficher
¬¬¬¬¬¬¬¬¬¬¬¬¬¬¬¬¬¬¬¬¬¬
24
Mémo
Page 97

Français
s Actionnez latouche programmable »Arrêt«pour
arrêter l’enregistrement et le mémoriser. Si vous
voulez arrêter l’enregistrement sans qu’il soit sto
cké en mémoire, actionnez la touche programma
ble »effacer«.
g Vous pouvez maintenant poursuivre la conversati
on. L’affichage redevient normal comme pendant
une connexion standard.
Pendant une communication téléphonique avec unou plusieurs correspondants (con
férence), il est possible d’enregistrer les communications.
Afin d’écouterun enregistrement quevous avez effectué,procédez comme décrit àla page 22 decette
notice d’utilisation.
---Enregistrement--
-
-
Effacer
2200 {
-
03:51
¬¬¬¬¬¬¬¬¬¬¬¬¬¬¬¬¬¬¬¬¬¬
Coupe 1
Arrêt
Enr.pdt com.
-
Commande à distance
Par post-sélectionen DTMF, vouspouvez initialiserun accèsà distance aurépondeur àpartir d’untéléphone quelconqueafin d’écouter desmessages par exemple.L’accès àdistance n’estautorisé quevia
le premier numéro enregistré dans le téléphone »TNM-1«.
La commandeà distance durépondeur est protégée parle PIN dutéléphone et n’estautorisé que si ce dernier a été activé (voir page 8).
Les services et réglages spécifiés ci-après sont possibles par l’accès à distance:
activer etdésactiver lerépondeur
•
interrogation dela capacitéd’enregistrement disponible
•
écouter lesnouveaux /anciens messages oules textes info enclenchés
•
supprimer desmessages individuels
•
supprimer tousles messages
•
écouter, effacerou enregistrerles annonces
•
activer /désactiver desannonces pour unnuméro (multinuméro)
•
activer /désactiverou configurerla notificationautomatique (acheminement)
•
25
Page 98

Français
Tonalités pendant la commande à distance
Pendant la commande à distance, vouspouvez entendre différents sons vous informant del’état des
entrées ou des actions.
Tonalité de validation positive
(1 signal long):
Signal d’inivite
(2 bips cours):
Tonalité de validation négative
(4 bips cours):
Cette tonalité voussignale que ce quevous avez entréa été ac
cepté et mémorisé.
Le téléphone vous invite à saisir un code ou enregistrer une
nouvelle annonce.
Cette tonalité voussignale que ceque vous avezentré a étéer
roné etn’a pas étémémorisé par letéléphone. Le codesaisi ou
le service souhaité ne peuvent pas être exécutés.
Par exemple:activation d’uneannonce pourun numéro(mul
tinuméro), qui n’est pas enregistré dans le téléphone.
Lancer la commande à distance (le répondeur a été activé)
b t g# t#q
Sélectionner le numéro
d’appel 1 (TNM-1)
Attention: Il vousfaut entrer le»# PIN #« pendantl’annonce. Après le retentissementdu signal de
validation positif, vous pouvez exécuter d’autres procédures de commande à distance.
Mise en marche du répondeur, lorsque celui-ci est désactivé
bt
Sélectionner le numéro
d’appel 1 (TNM-1)
Annonce du ré-
pondeur
après environ 90
secondes
Entrez PIN
qq # pin # q *01 q
Signal
d’inivite
Entrez
PIN
Commuter le
répondeur
-
-
-
Vous nepouvez activerla commande àdistance d’un répondeur désactivéque si un messagea étéen
registré et activé pour le numéro 1 (TNM-1).
Après leretentissement du signalde validation positif, vouspouvez exécuter les autresprocédures de
commande à distance.
26
-
Page 99

Français
Configurer la notification automatique (Acheminement)
lb g # t #q
Vous entendez le signal du répondeur ou
bien l’annonce programmée pour le service
Une fois enregistrée, au débutde la notification une »Autre ann. p. déf.« est émise. Si cette
annonce n’estni enregistrée niactivée, vousn’entendez qu’unsignal sonoreinvitant àlaisser unmes
sage.
Après avoir accepté la notification en entrant le »# PIN #« vous vous trouvez en mode
d’interrogation à distance du répondeur.
notification
Entrez PIN
Codes de commande à distance
Après avoir correctementinitialisé la commande àdistance, vous pouvezcommander les différentes
fonctions à l’aide des codes suivants.
Pour mettre fin à l’accès à distance, raccrochez le combiné du téléphone après avoir entré les codes
souhaités.
Les numéros d’identification rentrés ne peuvent être utilisés que pendant l’écoute de
textes (messages, annonces, textes infos).
Numéros d’identification principaux
*00q Déconnecter lerépondeur
*02q Interrogationde lacapacité d’enregistrementdisponible
La capacitérésiduelle disponiblepour l’enregistrementde messagesest iden
tifiéepardes signauxacoustiques,chaque signalreprésentant unecapacité ré
siduelle detrois minutes.
-
-
-
Ecouter ou effacer les messages, écouter les textes info
10q Ecouter lesnouveaux messages
11q Ecouter lesanciens messages
12q Ecouter lestextes infosactivés
#q Ecouterle messagesuivant
*q Ecouterle messageprécédent
0q Arrêterla reproductiondesmessages
27
Page 100

Français
2q Effacerle messageque vousêtes actuellementen traind’écouter
22q Effacer tousles messagesécoutés
Ecouter et supprimer les annonces, enregistrer une nouvelle annonce
Pour mettre finà la reproductionou l’enregistrement d’uneannonce en cours,appuyez sur latouche
»0«.Si vous actionnez, pendant la reproduction / l’enregistrement d’une annonce, la touche »2«
l’annonce en question est effacée.
L’effacement d’une annonce déjà affectée à un multinuméro a pour conséquence que tous les pro
grammations y relatives (par exemple le mode opératoire, la durée de signalisation, la longueur de
messages et les paramètres de la commande différée) seront également éffacées.
Vous désirez changerune annonce existante,vous pouvez enregistrer lenouveau texte sans pour au
tant devoir effacer l’annonce. L’ancienne annonce est automatiquement remplacée par la nouvelle.
Tous les réglages correspondants pour cette annonce et les numéros de téléphones (multinuméros)
attribués (par ex.mode de service, duréedu signal d’appel,longueur des messages etcommande différée) sont conservés.
0q Terminerla reproduction/ l’enregistrementd’annonces
2q Effacerl’annonce quevousêtesactuellemententraind’écouter/d’enregistrer
13Xq Ecouter l’annonce
X:! … ),= Sélectionner l’annonce (1...9,10)
23Xq Effacerl’annonce
X:! … ),= Sélectionner l’annonce (1...9,10)
33Xq Enregistrer l’annonce
X:! … ),= Sélectionner l’annonce (1...9,10)
-
-
L’annonce quevous avezaffectée aupremier numéro (TNM-1)ne peut pasêtre effacéeà
distance.
Activation / Désactivation d’annonces par numéro d’appel (multinuméro)
Une annoncepeut être seulementactivée / désactivéependant sareproduction pour unnuméro de té
léphone (multinuméro).Les réglagesfixes suivantesseront valables, sivous activezune annoncepour
un multinuméro individuel:
28
-
 Loading...