

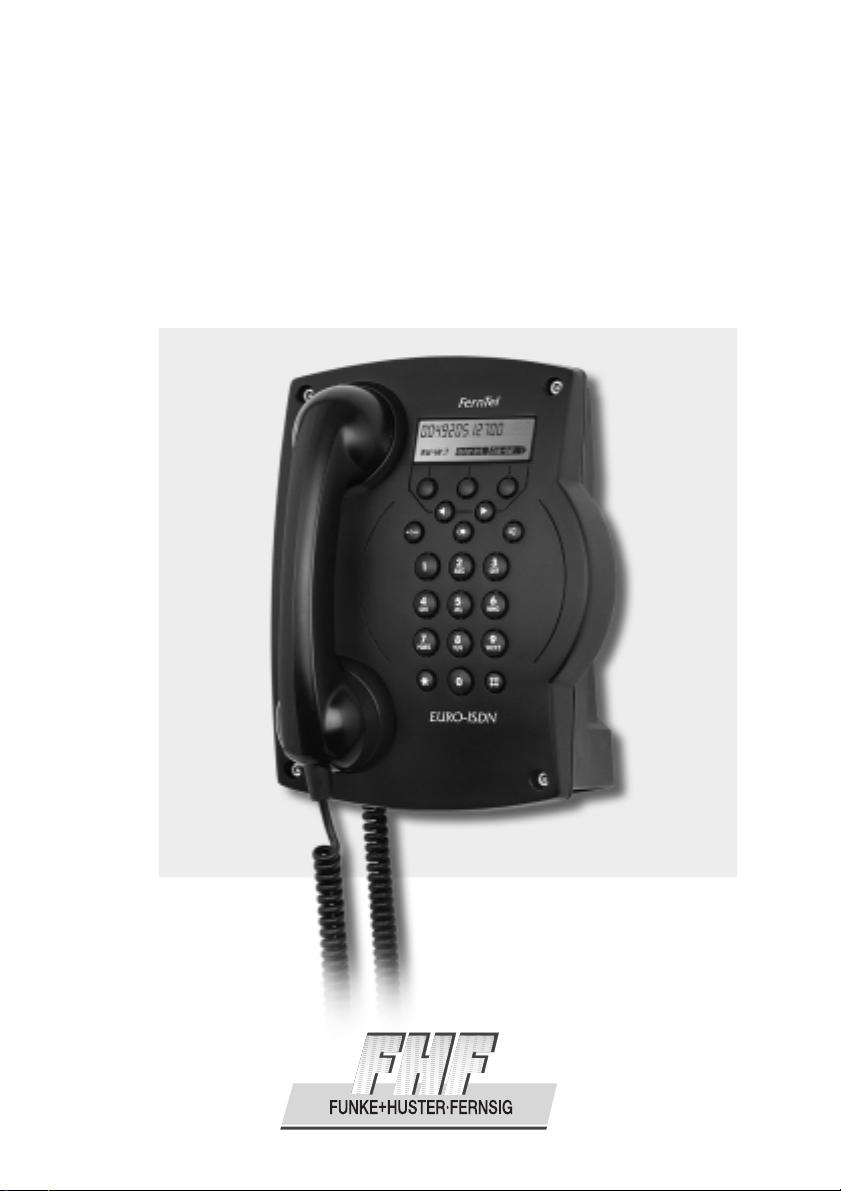
Weatherproof Telephone
Weatherproof telephone
Téléphone résistant aux intempéries
Fer nTel
EURO-ISDN
User manual
System Overview
Wall mounted
Desk mounted
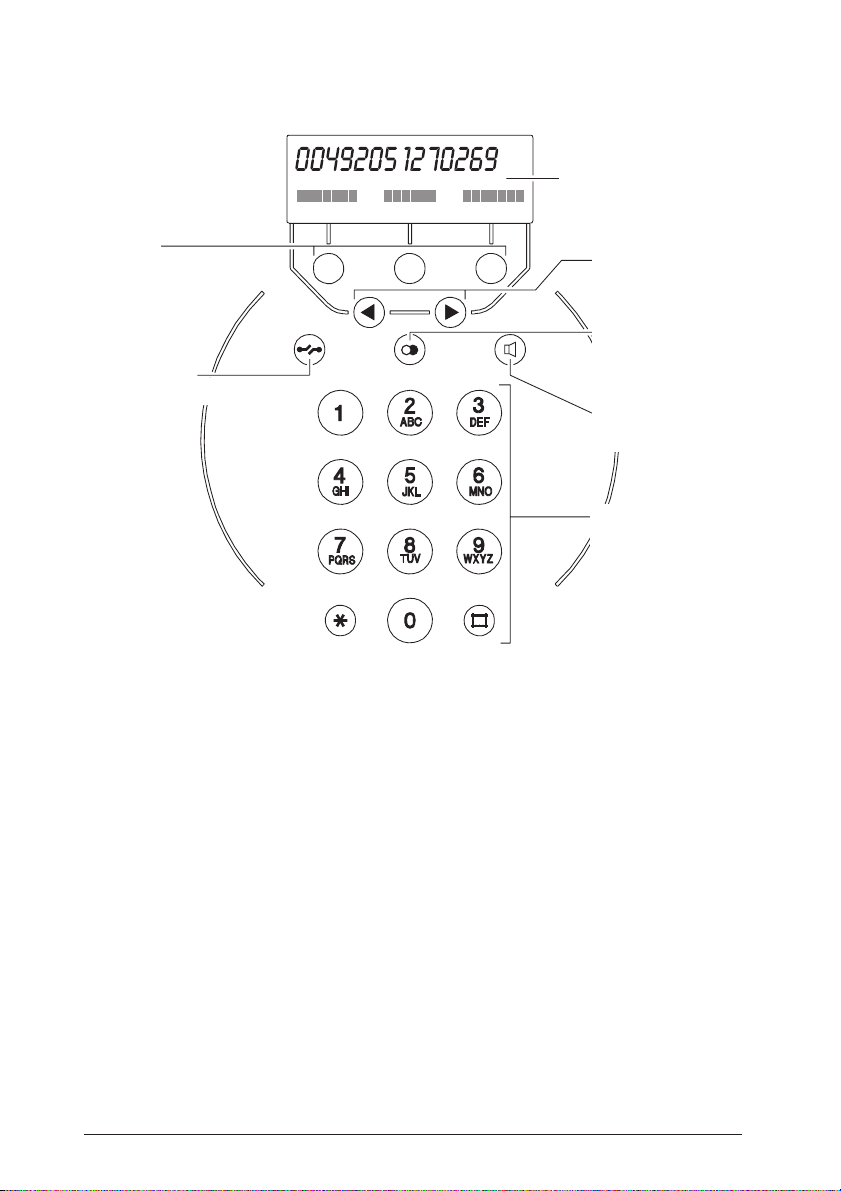
Display and Keypad
Display:
The first line shows telephone
numbers, the second text and menus.
Softkeys:
Use these keys to operate
the menu functions.
Disconnect Key:
Use this key to
terminate a call.
Scroll Keys:
Use these keys to scroll
through the menus.
Last Number Redial:
Using this key, you can redial any
of the last five telephone numbers
dialed from the telephone.
Loudspeaker:
Use this key to switch
the loudspeaker on/off.
Number Keypad:
Use these keys to enter
telephone numbers and text.
Your FernTel EURO-ISDN has a two-line display, a numeric keypad, function keys as
well as five keys for menu control. You use the “menu” keys to operate the functions
and features of the FernTel EURO-ISDN telephone and your ISDN connection.
The remaining keys of your FernTel EURO-ISDN have pre-defined functions.
The * and # keys function as part of the number keypad.
The display of your FernTel EURO-ISDN shows digits in the upper line, e.g. telephone
numbers or the current time, and messages in the lower line, e.g. texts and the menus
with the telephone functions. The current status is also displayed here, e.g. active call
forwarding.
lf you switch the call charge display on, the lower line of the display also contains the
accumulated call charges.
The contents of the lower line of the display depend on the given situation: during a call,
you will see a different softkey assignment to that shown in the idle state. lf your telephone displays a message ( e.g. error message ), the specification of the menus ( softkey assignment ) will be superimposed by the message text for approx. 2 seconds. The
message then disappears and you will, once again, see the current softkey assignments.

Contents
System Overview
Display and Keypad . . . . . . . . . . . . . .2
Contents . . . . . . . . . . . . . . . . . . . . . . .3
Note . . . . . . . . . . . . . . . . . . . . . . . . . . .4
Package Contents . . . . . . . . . . . . . . .4
Setting up the Telephone . . . . . . . . . .4
Mounting of the Telephone as Wall Unit .4
Connection Diagram . . . . . . . . . . . . . .4
Setting up the Telephone on a Desktop .5
Connecting to the Ring Indicator Relay .5
Function of the Ring Indicator Relay . .5
Switch Position Diagram . . . . . . . . . . .5
Terminating Resistors . . . . . . . . . . . . .6
Maximum Length of Connection Line .6
Overview . . . . . . . . . . . . . . . . . . . . . . .7
Emergency Operation . . . . . . . . . . . . .7
Menu Control . . . . . . . . . . . . . . . . . . .8
Making a Call . . . . . . . . . . . . . . . . . . .9
Last Number Redial . . . . . . . . . . . . . . .9
Automatic Redial . . . . . . . . . . . . . . . .10
Automatic Dialing . . . . . . . . . . . . . . .11
Consultation . . . . . . . . . . . . . . . . . . .12
MSN Selection during
Automatic Dialing . . . . . . . . . . . . . . .13
Suppression of MSN Transmission . .14
Dialing with a Sub-Address . . . . . . . .15
Telephone Book . . . . . . . . . . . . . . . .16
Postdialing from the
Telephone Book . . . . . . . . . . . . . . . .17
Handset Volume . . . . . . . . . . . . . . . .18
Loudspeaker Volume . . . . . . . . . . . . .19
On-Hook Dialing . . . . . . . . . . . . . . . .20
Automatic Callback . . . . . . . . . . . . . .21
Answering Calls . . . . . . . . . . . . . . . . .22
Rejecting Calls . . . . . . . . . . . . . . . . . .23
Call Deflection . . . . . . . . . . . . . . . . . .24
Accepting/Rejecting a Waiting Call . .25
Toggle . . . . . . . . . . . . . . . . . . . . . . . .26
Conference . . . . . . . . . . . . . . . . . . . .27
Switching from a Conference to Toggle 28
Disconnecting a Party in a Conference 29
Scratchpad . . . . . . . . . . . . . . . . . . . .30
Call parking . . . . . . . . . . . . . . . . . . . .31
Continuing a Parked Call . . . . . . . . . .32
Malicious Caller Identification . . . . . . .33
Dialing DTMF Tones / Querying . . . . .34
Keypad Protocol . . . . . . . . . . . . . . . .35
Call List . . . . . . . . . . . . . . . . . . . . . . .36
Making a Callback from the Call List .37
Features . . . . . . . . . . . . . . . . . . . . . . .38
Call Filter . . . . . . . . . . . . . . . . . . . . . .38
Switching the Call Charge
Display ON/OFF . . . . . . . . . . . . . . . .39
Telephone Lock . . . . . . . . . . . . . . . . .40
Lock with Direct Call . . . . . . . . . . . . .41
Total Lock . . . . . . . . . . . . . . . . . . . . .42
Partial Lock . . . . . . . . . . . . . . . . . . . .43
Call Diversion . . . . . . . . . . . . . . . . . . .44
Deleting Call Diversion . . . . . . . . . . . .46
Telephone Programming . . . . . . . . .48
Telephone Programming –
ISDN-Functions . . . . . . . . . . . . . . . .49
MSN Programming . . . . . . . . . . . . . .49
Call Waiting Signalling . . . . . . . . . . . .51
Telephone Number for Call Deflection .52
Telephone Programming –
Terminal Functions . . . . . . . . . . . . . .53
MSN Signalling . . . . . . . . . . . . . . . . .53
Changing the Prefix Memory . . . . . . .54
Deleting the Charge Memory . . . . . . .55
Setting the Price per Call Charge Unit .56
PIN Assignment . . . . . . . . . . . . . . . . .57
Switching Key Click On/Off . . . . . . . .58
Selecting the Display Language . . . . .59
Terminal Reset . . . . . . . . . . . . . . . . . .60
Setting the Ringing Tone . . . . . . . . . .61
Telephone Programming –
Telephone Book . . . . . . . . . . . . . . . .62
Making a Telephone Book Entry . . . .63
Deleting/Editing a
Telephone Book Entry . . . . . . . . . . . .64
Deleting Last Number Redial Memory .65
Deleting All Telephone Book Entries .66
Glossary . . . . . . . . . . . . . . . . . . . . . . .67
General Notes . . . . . . . . . . . . . . . . . .69
Service . . . . . . . . . . . . . . . . . . . . . . .69
Maintenance and Cleaning . . . . . . . .69
Warning and Safety Notes . . . . . . . . .69
CE-Lable . . . . . . . . . . . . . . . . . . . . . .70
Technical Data . . . . . . . . . . . . . . . . .71
33
Note
The instruction manual must be read carefully before the telephone is installed.
The contents of the package must be checked for completeness.
Package Contents
The delivery consists of:
– 1 Telephone, FernTel EURO-ISDN
– 4 rubber feet (for desktop version)
– 1 user manual
– 2 terminating resistors (100 ohm)
Setting up the Telephone
Mounting of the Telephone as Wall Unit
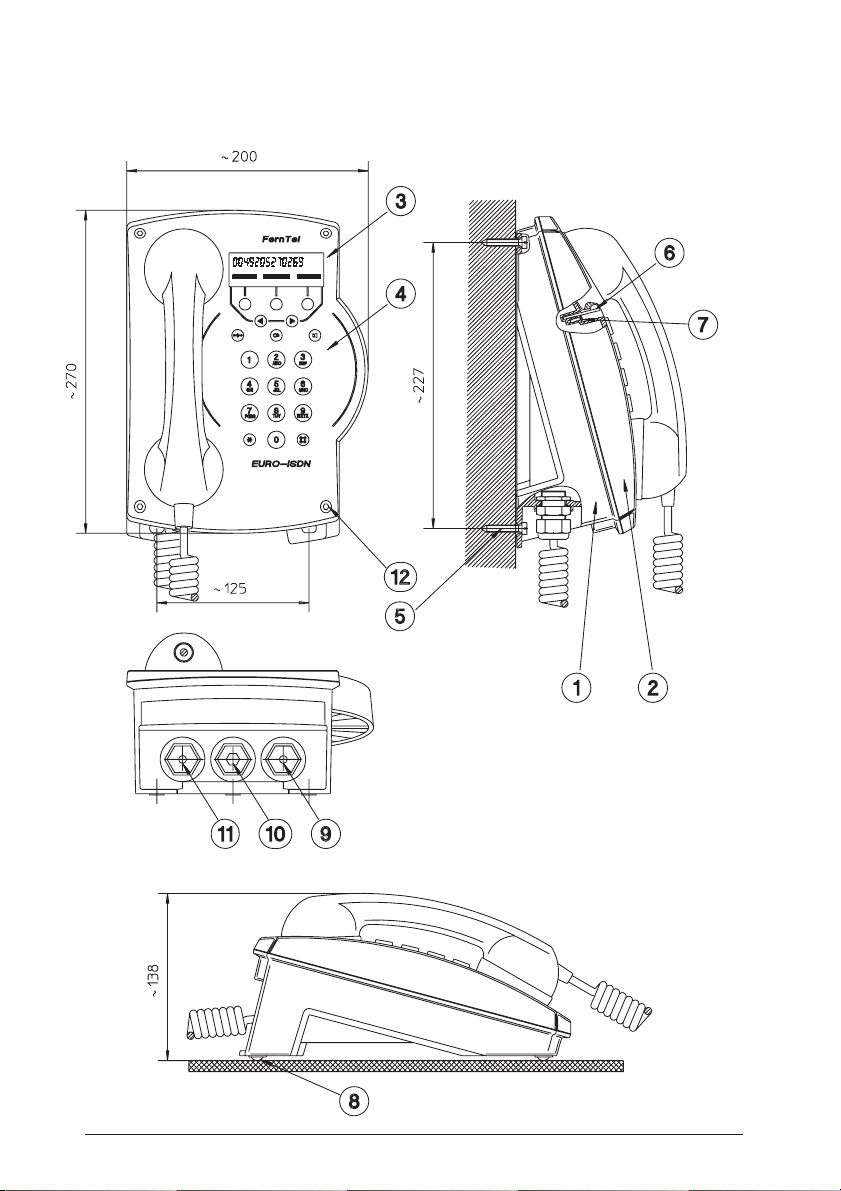
Open the telephone by loosening the four cover screws (12) and mount the bottom (1) on
the wall or other back support with three screws (see System Overview). Use screws
(5) with a head diameter of 6 to 8 mm (do not use screws with an external hexagon head).
The back surface must be such that the telephone lies flat against it with its three feet.
Connect the telephone according to the connection diagram. Only cables with a
diameter in the range of 5 to 9 mm should be used. Otherwise the IP protection degree
will not be achieved. When all connections have been made, mount the lid (2) on
base (1) with the four screws (12).
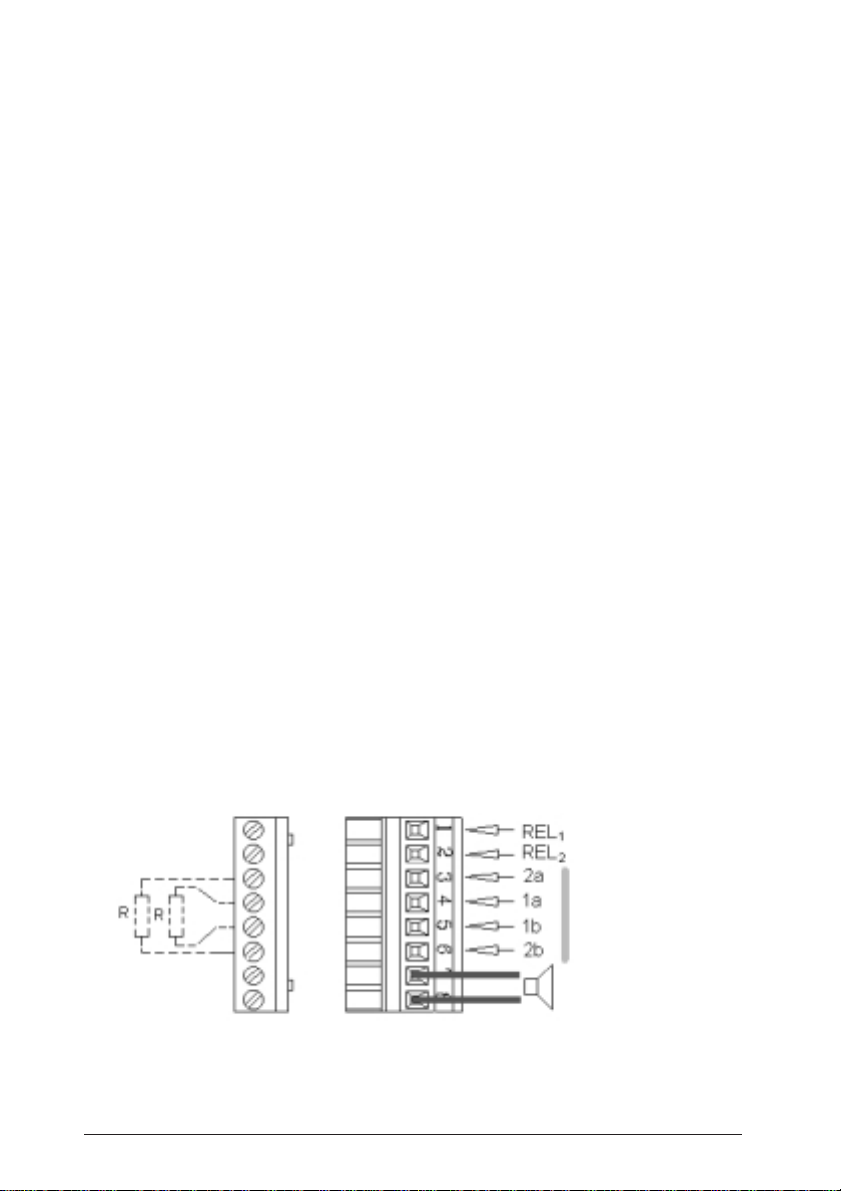
Connection Diagram
44
Ring Indicator
Relay Terminals
S/T-Bus
Terminals
Loudspeaker TerminalsTerminating Resistors

Setting up the Telephone on a Desktop
Open the telephone by loosening the four cover screws (12). Connect the telephone
according to the connection diagram. Only cables with a diameter in the range of 5 to
9 mm should be used. Otherwise the IP protection degree will not be achieved. Now
turn lid (2) 180° and mount on base (1) with the four screws (12). It is recommended
to remove latching hook by unscrewing screw (7). The four self adhesive rubber feet (8)
should be placed in the corresponding recesses in the base.
Connecting to the Ringer Indicator Relay Terminals
The FernTel EURO-ISDN comprises a Ringer Indicator Relay which is activated by an
incoming call. If the relay contacts shall be used to control signalling devices, replace
the plug (10) with a cable gland M 20 x 1.5 IP 66. Please note that the cable diameter
must comply with the corresponding dimensions of the cable gland, otherwise the
IP protection degree will not be achieved. The cable has to be connected to the ringer
indicator relay contacts via terminals REL
made mount lid (2) on base (1) with the four srews (12).
and REL2. When all connections have been
1
Function of the Ringer Indicator Relay
The telephone comprises a ringer indicator relay, which is activated when an incoming
call is received. Additional signalling devices, e.g. hooters and signalling lights, can thus
be actuated.
Two modes of operation of the connecting relay can be set with switch 1 on the circuit
board inside the telephone:
switch on the relay is switched on continuously
as long as the telephone rings
or
switch off the relay is switched on and off once per second
as long as the telephone rings.
Which mode is best depends on the signalling devices that are to be actuated.
Note: The ringer indicator relay does not work during emergency operation !
Switch Setting
Ring Indicator Relay Timing
Emergency Operation Permission
55

Terminating Resistors
The end of an ISDN-S/T-Line has to be terminated with 100 ohm resistors.
If your telephone is located at the line end the terminating resistors can be connected
to the S/T bus terminals according to the connection diagram. Mating resistors are
delivered with the telephone.
Maximum Length of Connection Line
The maximum line length basically depends on the cable being used and the configuration
at the ISDN-S/T line.
The ISDN-S/T line is a so-called bus connection, i.e. several ISDN devices can be
connected to it at the same time.
A distinction is drawn between a short passive bus, in which all devices are connected
to the bus in approximately equal spacing, a long passive bus, in which all devices are
connected at the end of the bus, and a point-to-point connection, in which only your
telephone is connected to the ISDN-S/T line. Depending on the capacity of the cable,
the following ranges are achieved:
Cable capacity Range in m Range in m Range in m
in nF/km short long point-to-point
passive bus passive bus connection
30 220 900 1100
40 200 750 1000
50 180 690 920
60 165 615 820
80 145 550 730
100 130 500 660
120 120 450 600
66

Overview
In purchasing the FernTel EURO-ISDN, you have acquired an ISDN telephone which
provides you with easy access to the services of your digital telephone network.
The following text fully details the features of the FernTel EURO-ISDN. However before
you start, please note the following information. The FernTel EURO-ISDN was designed
for connection to a Euro-ISDN (ISDN with DSS 1 protocol) multi-terminal connection.
A Euro-ISDN multi-terminal connection has two voice/data channels which can both be
used simultaneously for making calls; furthermore the connection is assigned several,
usually three, telephone numbers (Multiple Subscriber Numbers, MSNs).
Your FernTel EURO-ISDN does not come programmed for your connection; therefore
it does not know for which MSN it should ring*. Before making any calls, you should
first enter a few settings, as described in the “MSN Programming” of this User Manual.
You can, of course, immediately use your FernTel EURO-ISDN to make and receive
calls without first completing this programming.
All functions and features are controlled and set via integrated menus. You can acquaint
yourself with the basic functions of the menus, the control keys and the softkeys by
reading the “Menu Control” section.
Your network provider may offer some ISDN features at extra cost; therefore, it is possible
that some of the features described in these instructions are not available from your
connection. Some features are, for example, mutually exklusive. You should contact your
network provider to find out which features are standard for your connection and which
features are optional.
Please read this User Manual before initial installation and operation of your telephone.
For operation with a private branch exchange, refer to the user instructions for the telephone system.
Emergency Operation
lf the local power supply fails, a power feed is supplied to the ISDN connection directly
from the exchange. This remote feed is only adequate for the operation of a single
telephone.
During emergency operation, the idle display is switched off and you must lift the
handset off hook to make a call. Thus, if several terminals are operated from the same
connection, only one of these can be authorized for emergency operation. You can
authorize your telephone for emergency operation using the switch inside the telephone.
This is done by setting the switch 2 to position on (see Switch Setting).
* lf you do not change the default setting, your telephone will signal calls to all MSNs.
77

Menu Control
The FernTel EURO-ISDN is operated on the basis of interactive menus. With these
menus, you can access all ISDN functions using only five keys.
You control the menus using the softkeys together with the forward and back scrolling
keys ( , ).
The softkeys are the three keys below the display. These keys do not have fixed functions;
they are assigned different functions depending on the given situation. The functions
that the keys currently have are specified in the display of your FernTel EURO-ISDN: the
name of the function appears in white in the lower line of the display.
In addition to the key assignments, the display will usually also contain small arrows
pointing to the right and/or to the left. These arrows indicate that you can display other
menu functions using the scroll keys. Each time you press one of the scroll keys, the
functions of the softkeys change accordingly, allowing you to “scroll” through the menu.
As previously mentioned, the menu displayed depends on what you are doing.
During a conversation, for instance, you don’t need the functions helpful during dialing.
When reading the explanations given below for the individual functions of your FernTel
EURO-ISDN, always refer to the accompanying display illustrations. The first display
illustrated represents the menu branch from which you can call up the function currently
being explained; you can scroll to this branch by pressing the scroll keys until you
reach the illustrated softkey assignment.
Practice using the menus. You’ll quickly learn which functions are available and where
you can find them.
88
Making a Call
You can make calls with your FernTel EURO-ISDN in the usual way. Lift the handset
off the hook and simply dial a telephone number. You can also answer calls the usual
way by lifting the handset off the hook.
The following pages explain the basic functions of your telephone. The enhanced
functions are explained in the “Features” section.
Last Number Redial
Lift the handset off the hook and press
the Last Number Redial Key.
Your FernTel EURO-ISDN will now dial the
last telephone number that you entered
or
Press the Last Number Redial Key
repeatedly (handset is on the hook).
You will see the last five telephone
numbers you dialed, one after the
other. lf you lift the handset off the
hook, the number shown will be dialed.
99

Making a Call
lf you attempt to make a call and the connection cannot be made,
your FernTel EURO-ISDN can automatically redial the number.
Automatic Redial
You make a call, but the connection
cannot be made.
Press the “Auto Dial” softkey and replace
the handset on the hook.
Your FernTel EURO-ISDN will now attempt to redial the number every 90 seconds,
for a maximum of five attempts. If dialing is successful (connection is made), your
FernTel EURO-ISDN will ring the same way it does when you receive a normal call.
lf you wish to discontinue the automatic
redialing, press “Cancel”.
10

Making a Call
You can enter the telephone number of a desired destination without lifting the handset
off the hook. The dialing process is now set and commences as soon as you lift the
handset off the hook or press the Loudspeaker Key.
Automatic Dialing
Enter a subscriber number, i.e. a telephone
number. You can delete the last digit
entered, by pressing the key. You can
also call up a telephone number from the
telephone book or from the last number
redial memory.
Lift the handset off the hook.
The number will now be dialed.
You must use automatic dialing when you dial telephone numbers from the Call Box or
the last number redial memory. You select a telephone number and start the automatic
dialing by lifting the handset off the hook or by pressing the Loudspeaker Key.
11
Making a Call
Your ISDN connection has two voice/data channels which can both be used simultaneously for calls. You can thus also make a second call during a conversation, whereby
the original call is put on hold. This function is know as consultation.
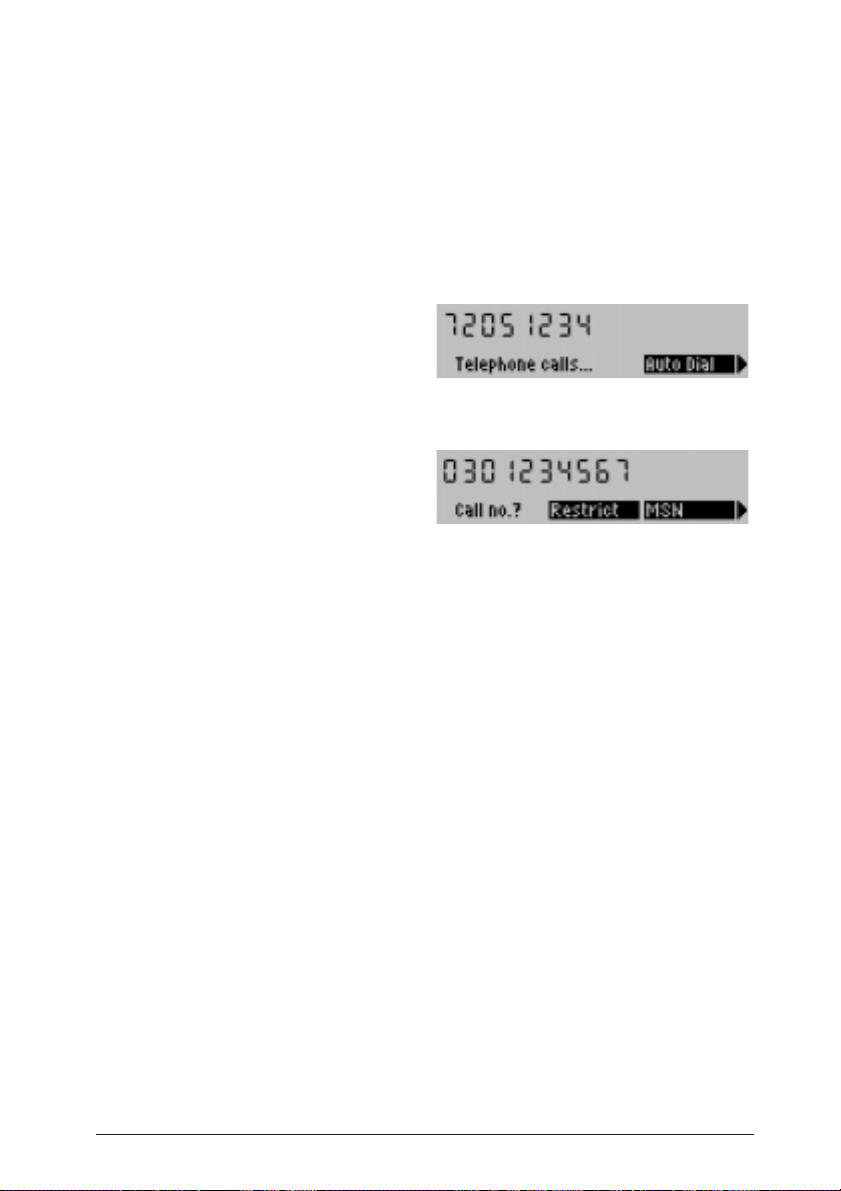
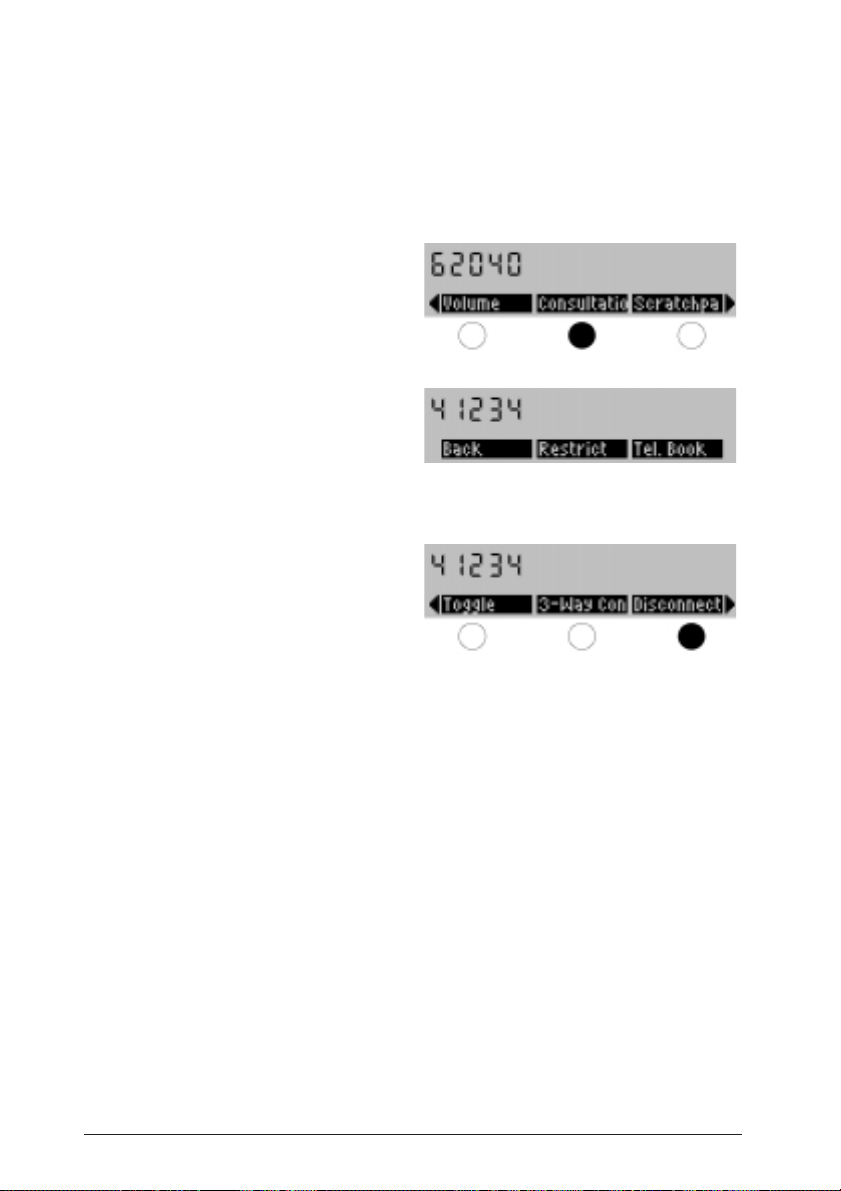
Consultation
You are holding a conversation and
you now wish to make a consultation call.
Press the “Consultation” softkey.
Your current conversation is put on hold
and you can now make the consultation
call.
Dial the desired number or select the
number required from the telephone
book.
To end the consultation call, press the
“Disconnect” softkey, not the keypad
Disconnect Key.
12
Making a Call
Whenever you make a call, your FernTel EURO-ISDN transmits your telephone number
(one of your MSNs) to your call partner. You can select which MSN will be transmitted
when you use automatic dialing*.
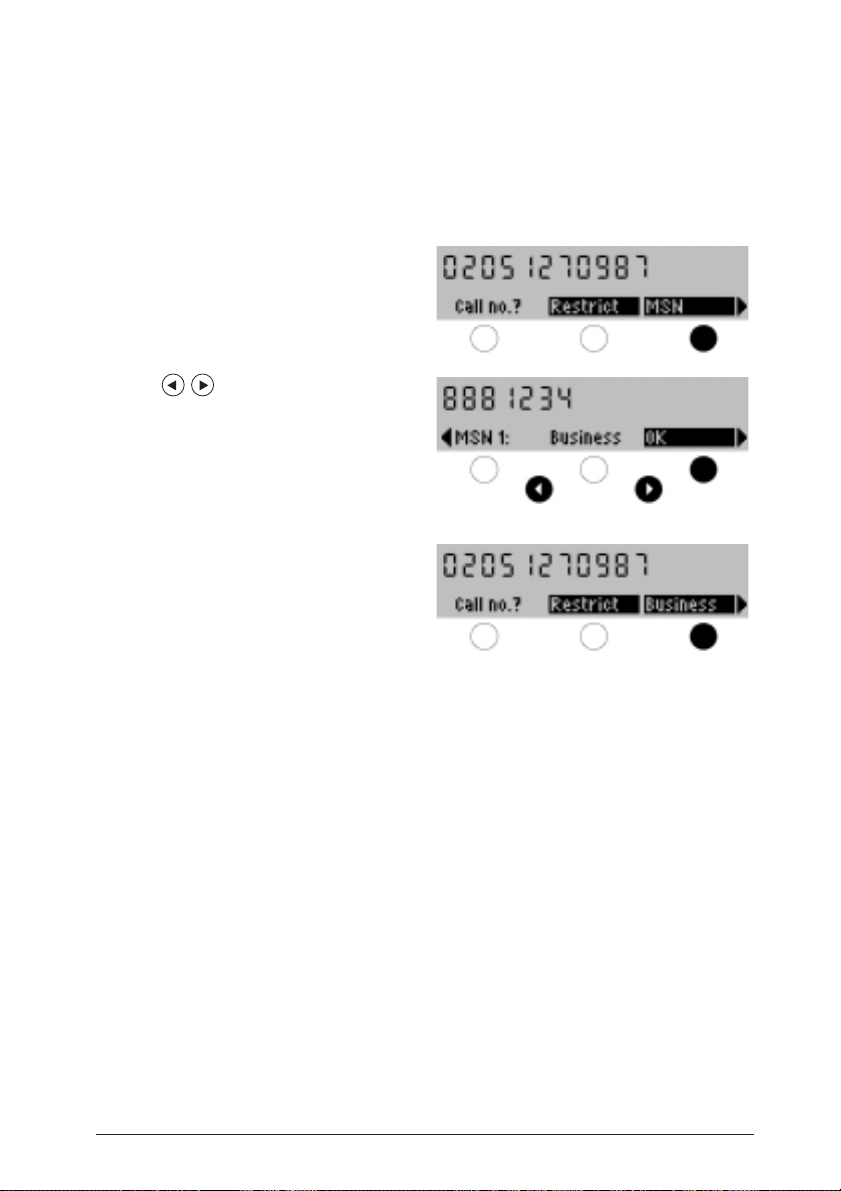
MSN Selection during Automatic Dialing
First, enter the destination number
or select it from the telephone book, last
number redial memory or the Call Box.
Now press the “MSN” softkey.
Use the , keys to select
the MSN which should be transmitted
to the destination. Now press “OK”.
lf you have made a wrong selection,
you can choose another MSN.
The first programmed MSN will be transmitted whenever you do not explicitly select an
MSN or suppress the transmission of your telephone number.
* The MSNs must be stored as described in the “MSN Programming” section.
lf no MSN has been programmed, the MSN of the connection may be set by the exchange.
13
Making a Call
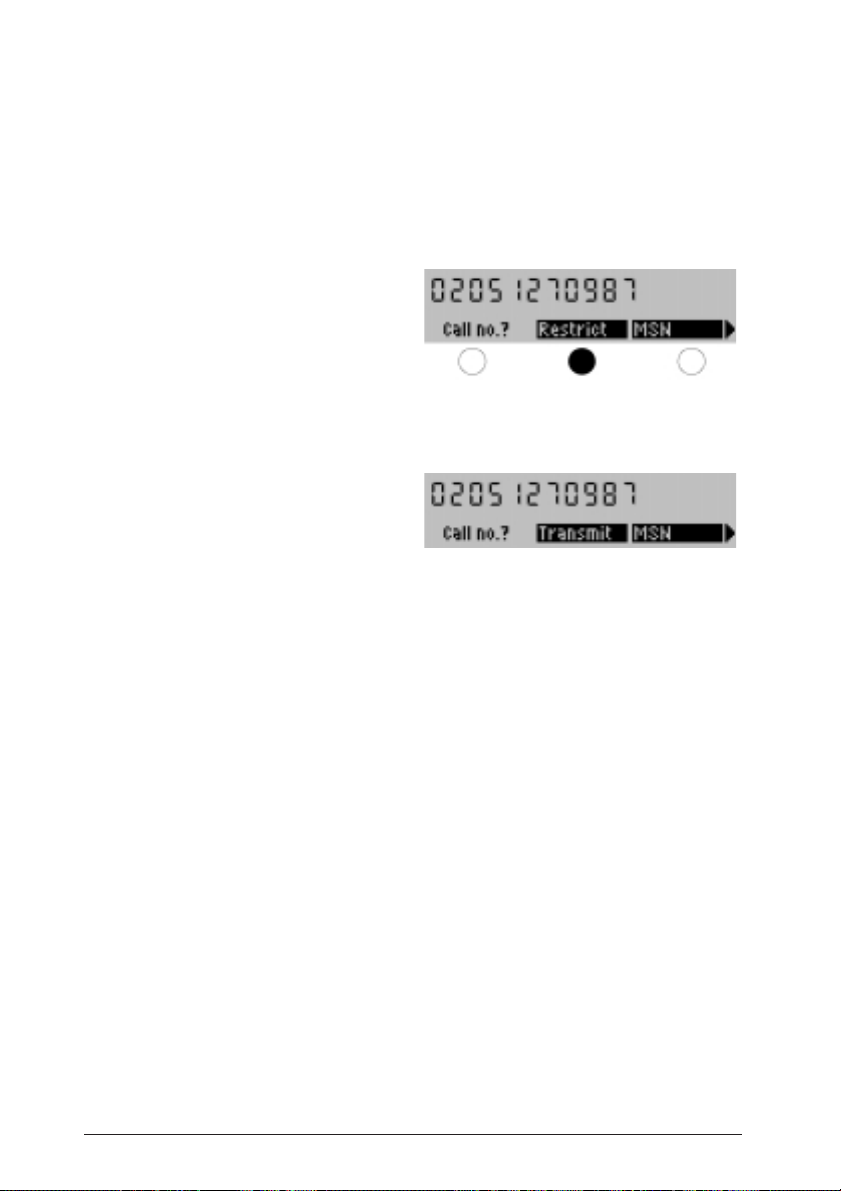
Whenever you make a call, your FernTel EURO-ISDN transmits your telephone number
(one of your MSNs) to your call partner. Under certain circumstances, you might not
want to transmit your number. In such cases, you can suppress the transmission of
your telephone number*.
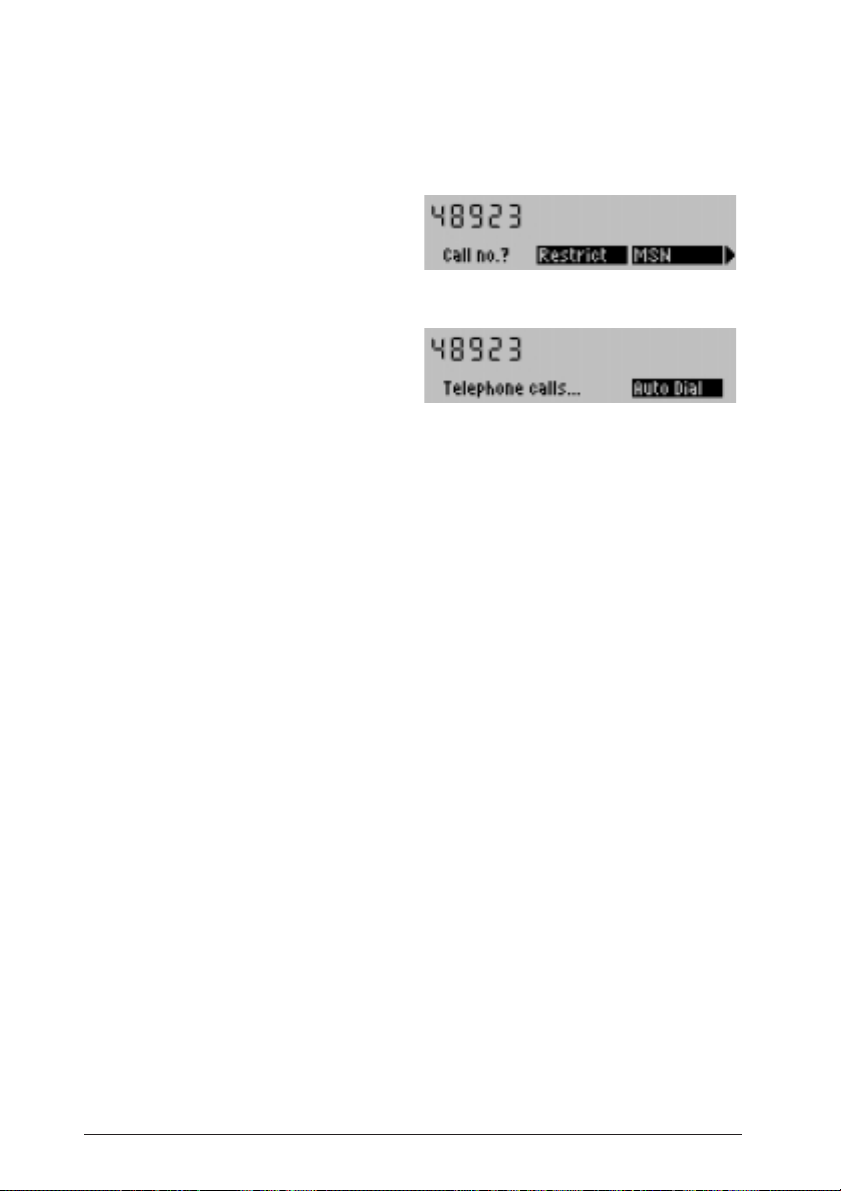
Suppression of MSN Transmission
First, enter the destination number
or select it from the telephone book,
last number redial memory or
Call Box.
Now press the “Restrict” softkey
to suppress the transmission of
your telephone number.
Start the automatic dialing by
pressing the Loudspeaker Key or
lifting the handset off the hook.
* With some network providers, this service is only available on request.
14
Making a Call
To make use of certain services, you might have to transmit a sub-address with the
telephone number. During dialing, this sub-address is then transmitted to the terminal
at the destination dialed which can then evaluate it accordingly.
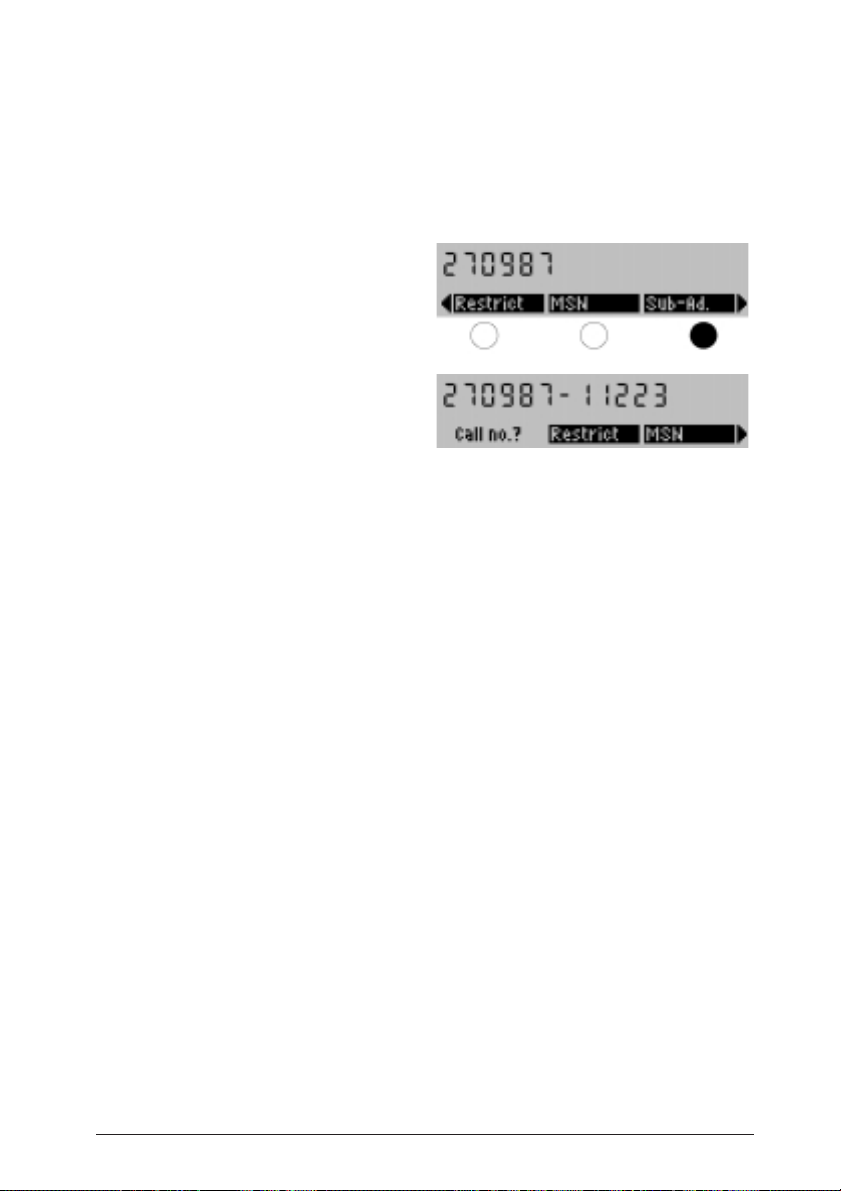
Dialing with a Sub-Address
First, enter the telephone number.
Now press the “Sub-Ad.” softkey
(Sub-Address).
Now enter the sub-address. A dash
appears in the display between the
telephone number and the sub-address.
Start the automatic dialing by pressing
the Loudspeaker Key or lifting the handset
off the hook.
The sub-address can contain up to 20 characters. The FernTel EURO-ISDN can only
transmit sub-addresses that contain digits; letters cannot be transmitted.
15
Making a Call
Your FernTel EURO-ISDN contains a telephone book from which you can dial telephone numbers.
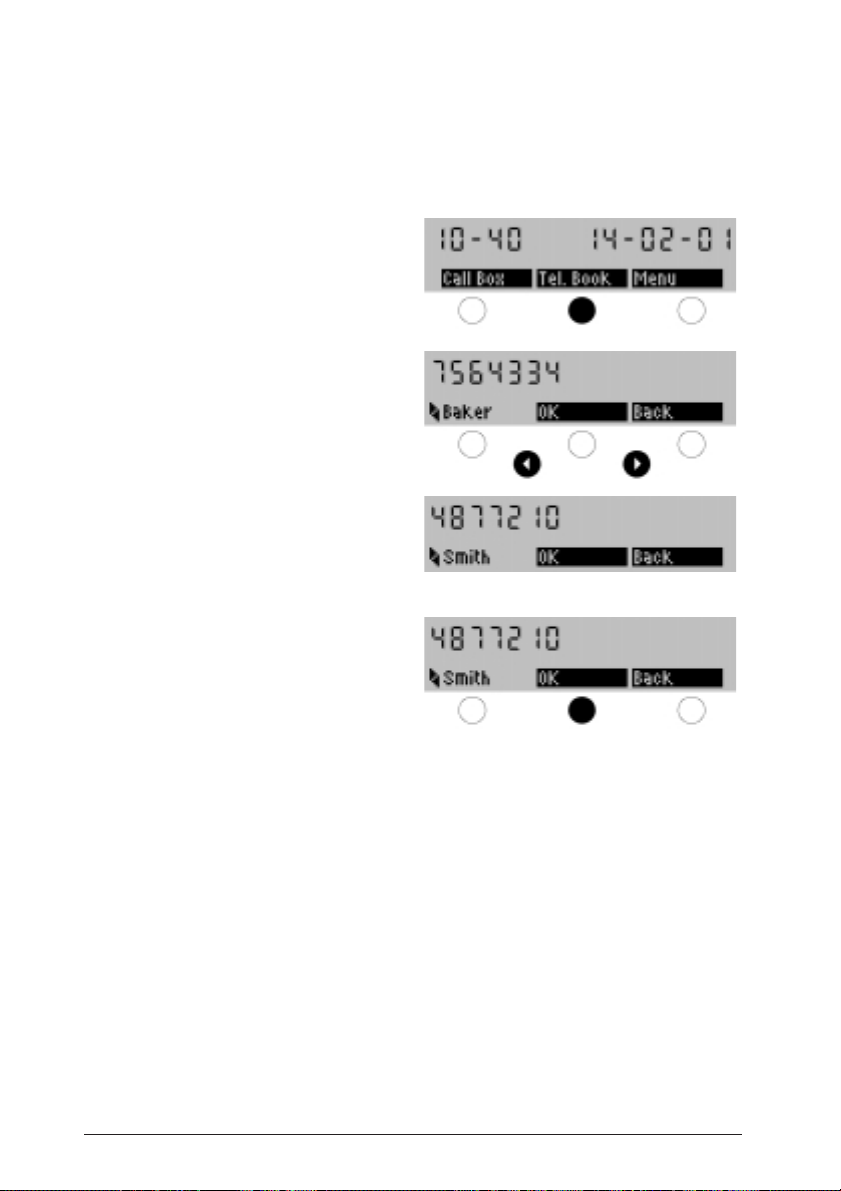
Telephone Book
Press the “Tel. Book” softkey
(Telephone Book).
The first entry in the telephone book
appears. Using the scroll keys, you can
now scroll, one entry after the other,
through the telephone book.
or
Enter the first letter of a name by pressing
the appropriate key.
Press “OK”.
You can now dial the telephone number
by lifting the handset off the hook, or you
can expand the telephone number by
entering additional digits (e.g. the extension number).
After selecting a number from the telephone book and pressing the “OK” softkey, you
can still select whether or not your telephone number should be transmitted during
setup of the connection. lf you do not select an option, the first MSN programmed will
always be transmitted to the destination.
16
Making a Call
You can also postdial parts of telephone numbers, either manually or from the telephone book. This can be be practical if you often make calls to different users of a telephone system. You can then save the extensions of the individual users in the telephone
book.
Postdialing from the Telephone Book
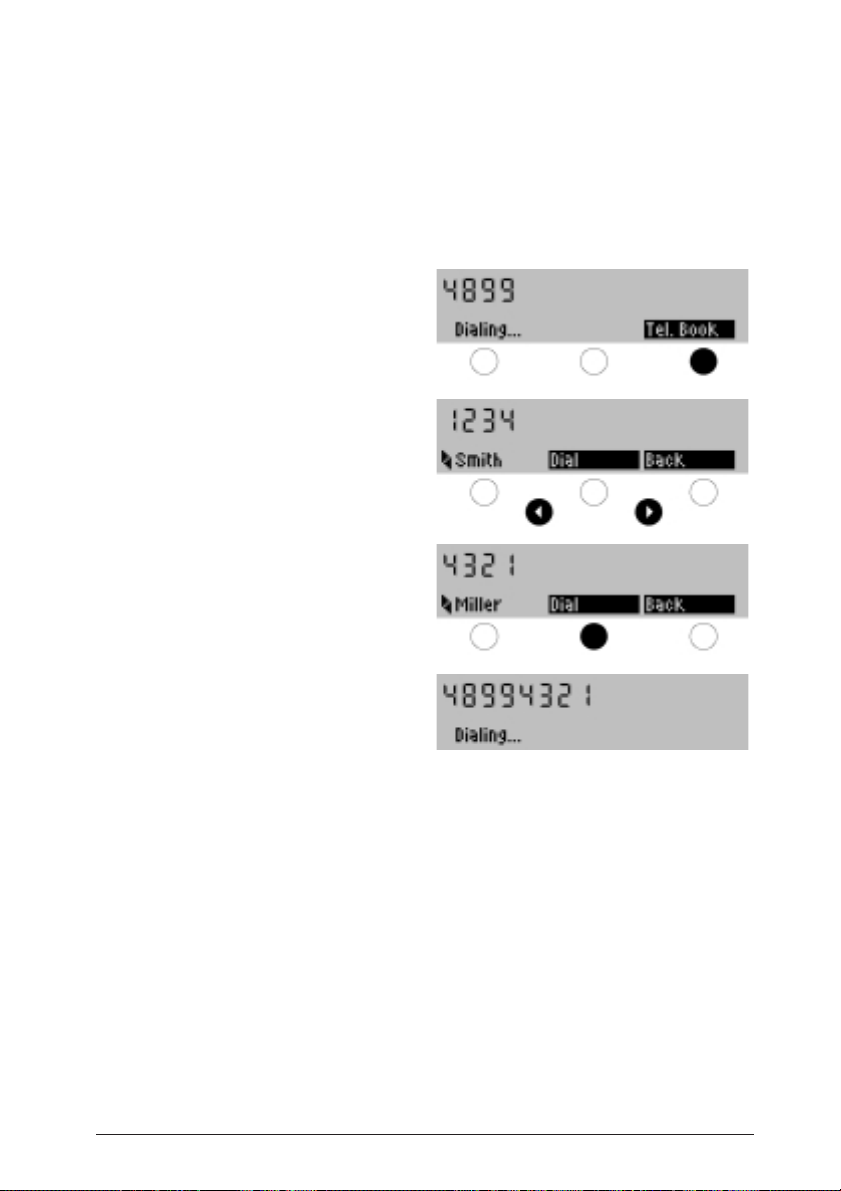
With the handset off the hook, you have
already dialed the first digits of a telephone
number. Press the “Tel. Book” softkey.
Use the arrow keys to select an entry.
Confirm your selection by pressing “Dial”.
The telephone number is dialed.
lf you have selected the first part of a telephone number from the telephone book with
the handset on the hook, lift the handset off the hook and use the number keys to dial
the extension.
17
Making a Call
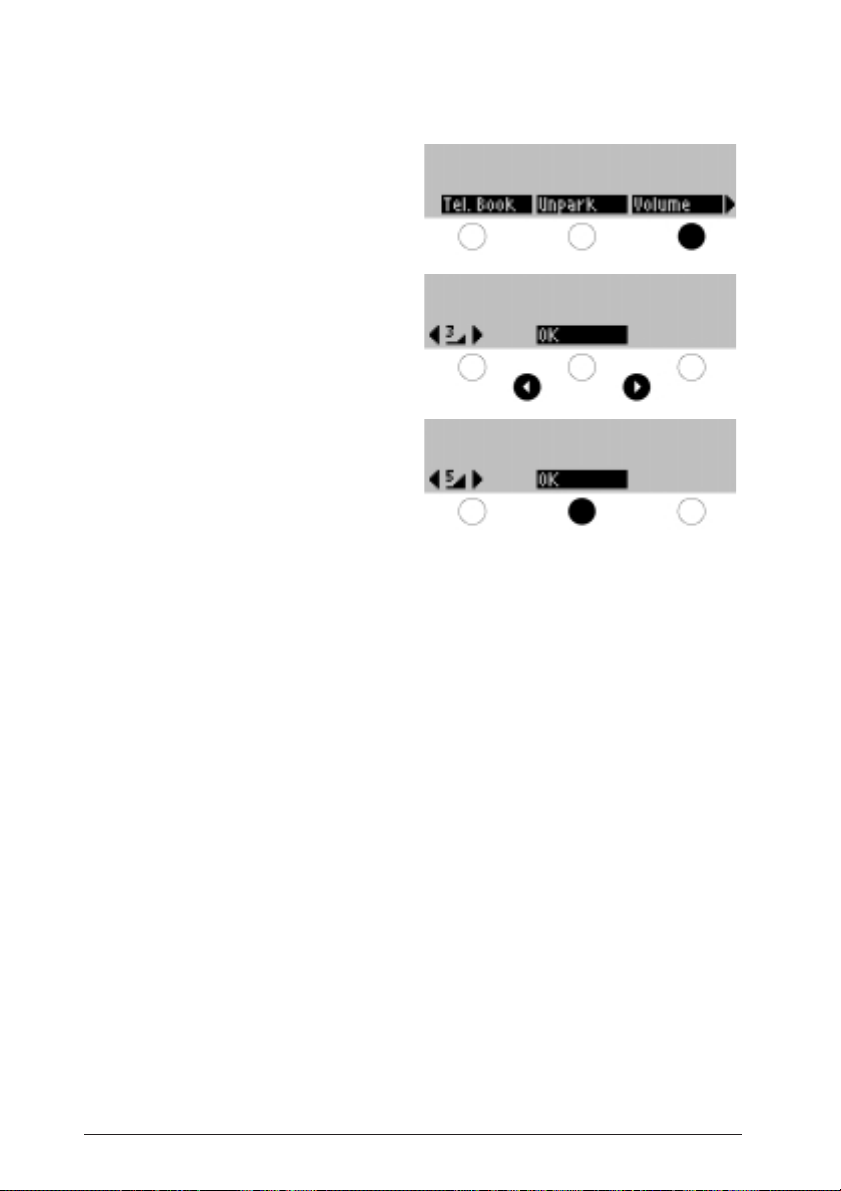
Handset Volume
Lift the handset off the hook and press
the “Volume” softkey.
Use the scroll keys to set the desired
volume.
Press “OK.”
After you place the handset on the hook,
the original volume setting (3) is reset.
Please note that you can only adjust the handset volume if the loudspeaker
is deactivated. When the loudspeaker is activated, you can only adjust the
loudspeaker volume.
The handset volume cannot be set permanently.
18

Making a Call
Loudspeaker Volume
Switch the loudspeaker on using the
Loudspeaker Key and then press the
“Volume” softkey.
Use the scroll keys to set the desired
volume.
Press “OK”.
The volume setting is changed
accordingly. After you place the handset
on the hook, the loudspeaker returns
to the original volume setting.
or
Press the “Save” softkey.
The volume set is then saved.
19
Making a Call
You can also dial a telephone number without lifting the handset off the hook.
On-Hook Dialing
Enter a telephone number and then press
the Loudspeaker Key.
Your FernTel EURO-ISDN switches the
loudspeaker on and dials the telephone
number you entered.
When the called party answers, simply lift
the handset off the hook.
To cancel the dialing process (e.g. when the line is busy) while leaving the loudspeaker
on, press the Disconnect Key. To cancel the dialing and switch off the loudspeaker,
press the Loudspeaker Key.
You can also use automatic dialing without lifting the handset. You select a telephone
number from the telephone book or the last number redial memory or enter it manually,
and then start dialing by pressing the Loudspeaker Key (automatic dialing). You can
also press the Loudspeaker Key first, and then dial the number directly (manual dialing).
With the exception of the last dialed number, telephone numbers from the last number
redial memory can only be dialed using automatic dialing.
Please note that when the connection is made, you will be able to hear your call partner
via the loudspeaker, however, he/she will only be able to hear you once you have lifted
the handset off the hook.
20
Making a Call
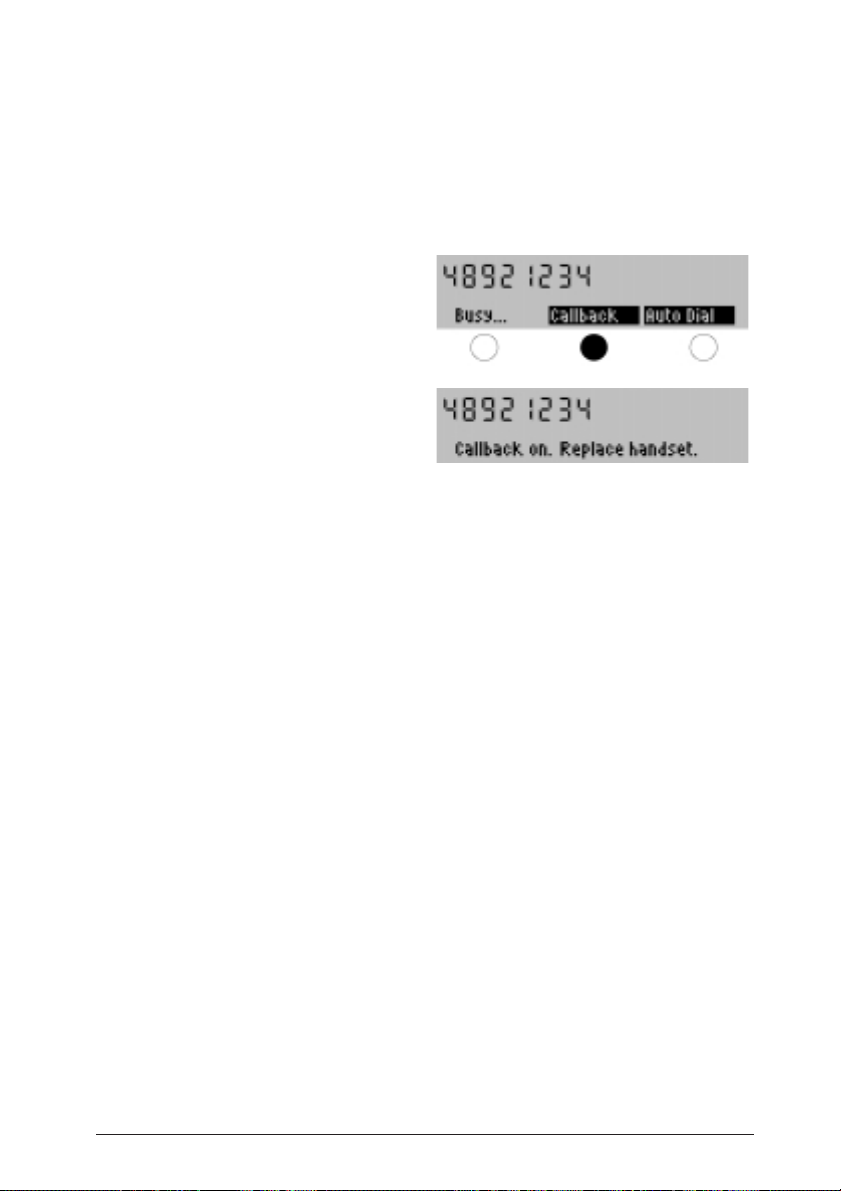
lf the number you are calling is busy, you can initiate an automatic callback.
As soon as the desired party finishes his/her conversation your telephone will be called,
just as if he/she had called you back.
Automatic Callback
Press the “Callback” softkey
After a few seconds, a message appears
informing you that your callback request
has been accepted and stored via ISDN.
You can now hang up the handset.
A callback request is stored by the telephone network, not in your telephone and not
in the telephone of the party called. Therefore, automatic callback may not be available
for all telephone numbers; if callback is not possible with the party you have called,
an error message will appear. To delete a callback, simply press the Disconnect Key
when the callback call is signaled.
Normally, the charge for the callback connection is billed to you*.
Please note that the “Callback” softkey does not appear in the display when the callback function is not available.
* For further information on the callback function, contact your network provider.
21

Making a Call
With the FernTel EURO-ISDN you can answer an incoming call in the usual way, i.e. by
lifting the handset off the hook. You can also reject a call or deflect it to another telephone
number; for more information, see the “Rejecting Calls” section and the “Call Diversion”
section.
As your ISDN connection offers more than one voice/data channel, you can receive a
second incoming call during a telephone conversation. In this instance, you’ll hear a
call waiting tone (“knocking”). This situation is described in greater detail in the “Accepting / Rejecting a Waiting Call” section.
When you receive a call, you can see the telephone number of the caller in the display*.
lf this telephone number is entered in the telephone book of your FernTel EURO-ISDN
the second line of the display also contains the name of the caller as saved in your
telephone book.
Answering Calls
Your telephone rings.
The telephone number of the caller
appears in the display and, if available,
his/her name.
Your telephone rings.
lf this is an automatic callback, you will
see a corresponding text in the display.
While the telephone is ringing, the lower
line of the display alternates between the
name of the caller and the assignment of
the softkeys.
lf you answer the call, your telephone number is transmitted to the caller. The caller
can then see who he has reached**. Before you lift the handset off the hook, you can
prevent transmission of your number using the “Restrict” softkey (Suppression of MSN
Transmission).
Please note that the softkeys only work when the softkey assignments are displayed;
when the second line of the display contains the name of the caller, the softkeys are
thus not available.
* You receive the number of the incoming caller only when he/she uses a digital network and
does not suppress the transmission of his/her number.
**This telephone number can deviate from the number dialed by the caller, e.g. when the call
was redirected to your connection.
22

Making a Call
You can also reject an incoming call.
When you receive a call, you can see the telephone number of the caller in the
display*. lf this telephone number is in the telephone book of your FernTel Euro-ISDN,
the second line of the display also contains the name of the caller as saved in your
telephone book.
Rejecting CaIls
Your telephone rings.
The telephone number of the caller
appears in the display and, if available,
his/her name.
While the telephone is ringing, the lower
line of the display alternates between
the name of the caller and the assignment
of the softkeys.
Press the “Reject” softkey.
The call is rejected and your telephone
stops ringing.
lf you reject a call, it will not be entered into the Call Box.
Your caller does not know that you have rejected his/her call. lf you have several terminals
connected to the same ISDN connection, the other terminals will still be able to process
the call.
* You receive the number of the incoming caller only when he/she uses a digital network and
does not suppress the transmission of his/her number.
23

Making a Call
When you receive a call, you can deflect it to a telephone number from the telephone
book or to a telephone number you have saved for call deflection.
For more Information on how to program this number, see the “Telephone Number for
Call Deflection” section.
This feature is not available with all network providers.
Call Deflection
Your telephone rings.
The telephone number and the name of
the caller appear in the display.
While the telephone is ringing, the lower
line of the display alternates between
the name of the caller and the assignment
of the softkeys.
Press the “RouteDiv.” softkey (deflection).
Now select whether you want to deflect
the call to the standard call deflection
number or to a number from the telephone
book.
Select the telephone number for the
deflection from the telephone book
with the same procedure used for dialing
from the telephone book.
Now press the “RouteDiv.” softkey
(deflection).
When you deflect a call, your telephone stops ringing. lf the call cannot be deflected,
e.g. because the destination is busy, an error message is displayed.
Call deflection is a function of the ISDN; therefore, it can take a few seconds before
you receive feedback from the network.
The calculation of the connection charge varies according to the network provider;
usually, the incoming caller is charged for the connection to your telephone and you
are charged for the connection from your telephone to the deflection destination.
24

Making a Call
When you receive a second incoming call during a telephone conversation, you will
hear a call waiting tone (“knocking”) in the handset; the display also tells you that there
is a waiting call.
You can now accept the waiting call, reject it or alternately conduct both calls (toggle).
Accepting / Rejecting a Waiting Call
You are holding a conversation and you
hear the call waiting tone. The telephone
number of the waiting caller and the call
waiting menu appear in the display.
Press the “Accept” softkey to answer
the new call.
You are connected to the
new caller and the first caller is
put on hold,
or
First you press the key and then the
softkey to suppress the transmission of
your telephone number. In this case, you
also accept the second call (the first call is
put on hold). The waiting caller, however,
does not receive your telephone number,
or
Press the “Reject” key.
The call waiting signal is cancelled.
Other telephones connected to
your ISDN terminal will continue to
signal the call.
Please note that whenever you accept a waiting call, the original call is always
put on hold.
25

Making a Call
lf you are holding a conversation and another call is on hold, you can alternately
conduct both calls (toggle).
Toggle
You are holding a conversation.
A second call is on hold.
Press the “Toggle” softkey.
You are able to talk with
the second caller.
Using the “Toggle” softkey, you can switch between call partners.
When you press the “Disconnect” softkey, the call that you are currently conducting is
terminated. You then continue your call with the party that was on hold.
lf you hang up the handset, both calls will be disconnected.
26

Making a Call
lf you are conducting a telephone conversation and another call is on hold, you can
initiate a three-way conference. During the conference, each caller can hear the other
two parties.
Conference
You are conducting a telephone
conversation. A second call is on hold.
Press the “3-Way Con” softkey (ThreeWay Conference).
The conference is active.
lf you hang up during a conference call you initiated, the conference will be ended,
i.e. the connections to both call partners will be disconnected.
lf you initiated a conference and one of your call partners hangs up, you will be able
to continue a normal conversation with the remaining caller.
You can end the conference by hanging up (see above). You can also switch over
to toggle and converse with the call partners alternately or end the connection with
one of the call partners. These options are described in the following pages.
27

Making a Call
You can switch from a conference to the toggle feature and then converse with
the two call partners alternately.
Switching from a Conference to Toggle
You are conducting a conversation
in a three-way conference.
Press the “Toggle” softkey.
Now enter the call partner with
whom you want to continue your
conversation.
The other call partner is put on hold,
or
Press the “Back” softkey to return back
to the conference. You continue your
conversation in a three-way conference.
Alternating between conversations with two partners is described in the “Toggle” section.
Instead of the names (Andy and Mike in the example above), the respective telephone
numbers appear when the numbers are avaiIable, but the callers cannot be identified
using your telephone book.
28

Making a Call
During a conference, you can disconnect the connection to one of the two
conference partners. You then continue a normal telephone conversation with the
remaining caller.
Disconnecting a Party in a Conference
You are holding a conversation in a
three-way conference.
Press the “Disconnect” softkey.
Press the softkey for the call
partner, whose connection you want
to disconnect.
or
Press the “Back” softkey to return back
to the conference. You continue holding a
conversation in a three-way conference.
Instead of the names (Andy and Mike in the example above), the respective telephone
numbers appear when the numbers are available, but the callers cannot be identified
using your telephone book.
29

Making a Call
Using the scratchpad function, you can note a telephone number during a call.
The telephone number noted is then entered in the telephone book.
You can complete this entry later by adding a name. You can also save the telephone
number of a caller in the scratchpad.
Scratchpad
You are holding a conversation and you
want to note a telephone number.
Press the “Scratchpad” softkey.
Now enter the desired telephone
number. lf you have made a mistake,
you can delete the last digit using
the key.
lf you wish to save the telephone
number of a caller in the telephone
book, press the Last Number Redial
key instead of entering the telephone
number.
Press “OK”. The telephone number noted
(without name) is saved in the telephone
book. A new entry overwrites the last
telephone number saved.
The note is written as the last entry in the telephone book and can be assigned a name.
30

Making a Call
You can “park” a call you are currently conducting. A parked call is not disconnected,
and you can continue it later.
You can also go to another telephone connected to the same ISDN terminal and continue your conversation with the parked call. Using this function, you can, for example,
transfer the call to a cordless phone.
Call Parking
You are holding a conversation and
you want to park the call.
Press the “Park Call” softkey.
Now enter a park code.
You can continue the call later using
this code.
Press the “Park Call” softkey again.
lf the call was parked successfully,
you receive an acknowledgment from
the network.
The code is used to identify the parked call when “unparking”. You can use any digit as
the code. The call can only be reinstated later by entering this code.
lf the call cannot be parked, you will receive an appropriate error message.
Parked calls which are not reinstated are automatically disconnected after 180 seconds.
Please note that your call partner does not receive an announcement while the call is
parked; for him/her, the line appears to be dead.
31

Making a Call
You can continue a parked call at any time.
Continuing a Parked Call
Lift the handset off the hook and press
the “Unpark” softkey to retrieve the
parked call.
lf, after lifting the handset, the message “All trunks busy” (both B-channels busy,
one of which is used for the parked call) appears in the display, you can still continue
the parked call with the handset on the hook using “Menu – ISDN – Unpark”.
Now enter the code under which
the call was parked.
You are reconnected with the
call partner.
lf there is no parked call or the parked caller has hung up, you will receive the message
“No call parked” when you press the “Unpark” softkey.
32

Making a Call
Some network providers offer you the option of registering malicious calls.
The network provider then records and stores the date, time, your telephone number
as well as the telephone number of the malicious caller you want to identfy.
This service is not available with all network providers. This service is normally only
available upon special request.
Malicious CaIler Identification
You want to determine a
malicious caller.
Press the “Intercept” softkey.
The network provider attempts to determine the telephone number of the caller.
This process can take a few seconds.
Afterwards, you will receive an acknowledgement from the network.
For more information related to this service contact your network provider.
lt is not always possible to intercept a call. You will receive an appropriate error message
if the investigation into the caller’s telephone number cannot be completed.
33

Making a Call
When you are conducting a call, you can use the number keys and the * and # keys, to
transmit standard DTMF tones, e.g. to control answering machines, VoiceMail systems
etc.
Dialing DTMF Tones / Querying an Answering Machine
You are conducting a call and want to
enter DTMF tones, for example, to
retrieve messages from an answering
machine.
Press the appropriate digits. The corresponding DTMF tones are produced.
34

Making a Call
lf you use the keypad during a call, your FernTel EURO-ISDN produces the
corresponding standard DTMF tones. These tones are used to control answering
machines or for the input of messages to pager services.
You can however switch to the keypad protocol, for example, to control new
ISDN services in the exchange.
Keypad Protocol
You are holding a conversation.
Press the “Keypad” softkey.
The keypad keys no longer transmit
DTMF tones, instead they now transmit
the keypad protocol codes.
Press the “DTMF” softkey to reinstate
DTMF transmission (touch-tone).
35

Making a Call
Whenever an incoming call isn’t answered, your FernTel EURO-ISDN saves the
telephone number of the caller in the Call Box*. You can then call back the numbers
saved in the list.
Call Box
Press the “Call Box” softkey.
The latest entry in the Call Box is displayed. lf the telephone number is in the
telephone book, the name of the caller is
displayed.
Use the , keys to scroll through the
entries in the Call Box. Use the option
softkey to display the date and time of the
call as well as other options for dialing the
telephone number displayed.
To transfer the telephone number into the
telephone book, press the “Tel. Book”
softkey (Telephone Book). The telephone
number of the caller is entered into
the telephone book and you can enter a
corresponding name.
lf you want to delete an entry from the
Call Box, press the “Delete” softkey.
For more information on how to enter a name in the telephone book, see the “Making
a Telephone Book Entry” section.
The Call Box can contain a maximum of 10 numbers. Calls answered by another terminal
connected to your ISDN connection will not be registered in the Call Box.
If the FernTel EURO-ISDN is disconnected from the telephone network or the private
branch exchange all data of the Call Box will be lost.
* The number of the incoming caller can be registered only when he/she uses a digital network
and does not suppress the transmission of his/her number.
36

Making a Call
lf you have missed a call, you can easily call back the party using the corresponding
entry in the Call Box.
Making a Callback from the Call Box
Press the “Call Box” softkey.
The latest entry in the Call Box is displayed. lf the telephone number is in the
telephone book, the name of the caller is
displayed. Use the , keys to scroll
through the entries in the Call Box.
Lift the handset off the hook or press the
Loudspeaker Key.
The telephone number displayed is dialed.
Whenever you call back a number in the Call Box, it will be marked in the list as
completed, but it will not be deleted. Marked calls are identified in the Call Box by
a check to the right of the entry.
Whenever you initiate a callback, you can select a specific MSN for transmission
by pressing the “Option” and “MSN” softkeys. lf you want to prevent transmission of
the MSN, press the “Option” and “Restrict” softkeys.
You cannot attach a sub-address when dialing a telephone number from the Call Box.
37

Features
Your FernTel EURO-ISDN and your ISDN connection offer many functions which go
far beyond mere telephony. Some of these features are network features, e.g. call
diversion, conference, display of caller's telephone number etc., which you can utilize
in conjunction with your telephone.
Other features are functions of your FernTel EURO-ISDN, e.g. call filter, transmission
of your telephone number when making a call, display of call charges, telephone lock,
etc. In the sections that follow, you will learn how to use these enhanced features of
the ISDN and your FernTel EURO-ISDN.
You can activate a call filter. lf the filter is switched on, your telephone will only ring when
the incoming caller can be identified using your telephone book. The filter is applied
to all incoming calls, even calls received during a conversation (e.g. via call waiting).
Call Filter
Press the “Menu” softkey.
Select the terminal menu using the
“Terminal” softkey.
Press the “Filter On” or the “Filter Off”
softkey.
The call filter is switched on or off
accordingly.
Whenever the filter is on, the “Filter Off” softkey is displayed and vice versa. This way
you always know whether or not the filter is on and can switch it on or off.
Calls from parties who have suppressed the transmission of their number cannot be
identified via the telephone book and will therefore not be signaled when the filter is
active.
When the filter is active, you will see an arrow pointing to the right in the idle display.
To determine which feature is active, simply press the right scroll key.
38

Features
Some network providers offer call charge transmission as an option.
lf you receive call charges, you can turn off the call charge display of your FernTel
EURO-ISDN during or after a call. Even if the call charge display is deactivated,
your telephone continues to add the charges in its four charge counters. You can
query the accumulated total at any time.
Switching the Call Charge Display On/Off
Press the “Menu” softkey.
Select the terminal menu by pressing the
“Terminal” softkey.
Select the charge menu by pressing
the “Charge” softkey.
Enter the PIN.
This step is only required when you have
set up a PIN.
Activate or deactivate the automatic
charge display by pressing either the
“Display” or the “Off” softkey.
Whenever the call charge display is on, the “Off” softkey is displayed; when the call
charge display is switched off, the “Display” softkey is displayed. Your network provider
transmits either the total charge of each call (display of call charges at end of call) or a
charge pulse for every charge unit accumulated (display of charges during call). Both
types of charge display are usually optional services, provided by your network at extra
charge. For further information contact your network provider.
39

Features
You can lock your telephone to prevent or limit its use. You can, of course, always
dial the emergency telephone number 112, even when the telephone is locked.
(Other emergency numbers cannot be dialed.)
You can lock your FernTel EURO-ISDN in three different ways:
– You can activate a total lock which allows you to receive, but not to dial calls.
– You can activate a lock with a pre-defined direct call, i.e. one number that is dialed
as soon as any key is pressed.
– You can activate a partial lock, specifying up to three sets of digits. You can then
only dial calls to numbers that begin with one of these sets.
Telephone Lock
To set the telephone lock, press the
“Menu” softkey.
Select the terminal menu by pressing the
“Terminal” softkey.
Select the “Block” softkey
(Telephone Lock).
Enter the PIN.
This step is only required when you have
set up a PIN.
The following text explains how to setup the three different kinds of locks: direct call,
total lock and partial lock.
40

Features
With the direct call feature you program one telephone number. If the lock is active,
your FernTel EURO-ISDN automatically dials this number when any key is pressed.
Lock with Direct Call
Select the “Direct Call” softkey.
If a direct call number is already saved,
you will see it in the first line of the display.
Now enter the telephone number for the
direct call or change the existing number.
Using the key, you can delete the
existing number.
To activate the direct call, press the “On”
softkey.
The direct call feature is activated.
The idle display no longer shows the
menu. The first line shows the number
dialed when any key is pressed.
To deactivate the direct call feature,
press the “Release” softkey.
Now enter your PIN.
You have to enter your PIN to release the direct call, even if the default setting (“0000”)
has not been changed.
41

Features
The total lock allows you to receive, but not to dial calls. No telephone calls can be
made from your telephone when the total lock is activated.
Total Lock
Select the “Ttl. Lock” softkey
(Total Lock).
The telephone is locked.
To unlock the telephone, press
the “Release” softkey.
Now enter your PIN.
You must enter your PIN to unlock the telephone. lf the PIN is not entered correctly,
the lock remains active.
You can answer calls, even when the lock is active.
Please note that the lock only applies to your telephone; if required, you can continue
to make calls from other telephones connected to the same ISDN connection.
You can, of course, always dial the German emergency telephone number 112, even
when the telephone is locked. (Other emergency numbers cannot be dialed.)
42

Features
The partial lock also prevents outgoing calls, but allows you to specify exceptions.
Partial Lock
Select the “Part. Lock” softkey
(Partial Lock).
Now enter up to three exceptions
to the lock.
Separate the individual telephone
numbers by pressing the key.
Finally, press “OK”.
The lelephone is locked.
To unlock the telephone, press the
“Release” softkey.
Now enter your PIN.
Whenever the partial lock is active, you can only dial those telephone numbers
that begin with the digits entered as exceptions to the lock. In the example above,
you could dial calls to telephone numbers beginning with 0130, 110 and 030.
You can enter a maximum of three exceptions.
You can, of course, always dial the emergency telephone number 112, even when
112, 11 or 1 are not included as exceptions to the partial lock.
43

Features
You can divert calls for each of your MSNs to another telephone number. For further
information on this ISDN function, contact your network provider*.
Usually, there are three different types of call diversion available: unconditional, when
busy and on no reply (see below).
Please note that call diversion is an automatic function of your FernTel EURO-ISDN
in conjunction with the ISDN. Call deflection is a manual function: you can manually
deflect each call as required (refer to “Call Deflection”).
Call Diversion
Start the programming process by
pressing the “Menu” softkey.
Select the ISDN menu.
Press the “Divert” softkey
(Call Diversion).
Now use the , keys to select
the MSN for which you want to activate
the call diversion and then press “OK”.
To divert all MSNs connected to your
S / T-bus, press the “All” softkey.
When call diversion is already active,
the settings for the diversion are
displayed. Press to display the menu.
* A surcharge is usually raised for this service.
44

Features
To change the call diversion, press the
“New” softkey.
Now select which services should be
diverted. Note that the softkey for voice
service has been incorrectly translated
as “Language”. Information related to the
ISDN services is given below.
Now enter the telephone number to
which the calls for the MSN should be
diverted and press the softkey for
the variation of call diversion required.
Whenever call diversion is active, you will see an arrow pointing to the right in the idle
display. By pressing the right scroll key you will be able to see which feature is active.
There are three different types of call diversion:
– With unconditional call diversion, all calls for the diverted MSN are redirected to
the destination number.
– With no reply call diversion, your telephone signals incoming calls as usual.
lf you do not answer within the delay time set, the call is diverted.
– With call diversion when busy, incoming calls are only diverted when your ISDN
terminal is busy, that is when both voice/data channels are in use.
You can setup call diversions for each of the three MSNs allocated to your
FernTel EURO-ISDN ; each MSN can be assigned a different type of call diversion
(unconditional, no reply, when busy) and a different destination number.
The ISDN is an integrated service network. Services separated in analog networks are
all available in one ISDN. Thus, for example, telephony (voice), telefax (graphical data),
data transmission etc. are all managed together in the ISDN. On connection setup,
every ISDN terminal transmits a service identification that tells the terminal being called
which service should be used.
With call diversion, you can determine whether all calls should be diverted (voice and
data) or just voice calls.
lf you only divert voice calls, calls which have a data service identification (e.g. fax
group 4) will continue to be signaled at your ISDN connection and will not be diverted
to the call diversion destination.
45

Features
Deleting Call Diversion
Start the programming process by
pressing the “Menu” softkey.
Select the ISDN menu.
Press the “Divert” softkey
(Call Diversion).
Now use the , keys to select
the MSN for which you want to delete
the call diversion and then press “OK”.
The display now shows the data related
to the active call diversion. Press .
lf you have diverted all services, you will
see the data related to the different
services, one after the other, followed by
the menu.
Press the “Delete” softkey.
46

Features
Now select which services should
no longer be diverted. Note that the
softkey for voice service has been
incorrectly translated as “Language”.
To delete the call diversion for
all services, press the “All” softkey.
Now confirm the type of call diversion
to be deleted.
You must enter the type which is active.
Please note that the ISDN processes all three types of call diversion (unconditional,
no reply und when busy) separately. Therefore, you must delete the type of call diversion
which is currently active.
47

Telephone Programming
Your FernTel EURO-ISDN is programmed at the factory to enable you to make
calls immediately.
However, in order to make use of the full spectrum of features of the ISDN
and your FernTel EURO-ISDN, you may have to make several settings which are
then stored in your telephone memory. We refer to the setting procedure as
“programming”. Most of the programming is performed when the telephone is in
the idle state, i.e. when the handset is on the hook.
You start the programming of all features, with the exception of the scratchpad
and the volume, by pressing the “Menu” softkey in the idle display.
The programming tasks are divided into three groups available in three
different menus:
– ISDN functions
This menu contains all settings related to features of the ISDN.
These include programming of the MSN, call deflection, call diversion and the
signaling of call waiting (“knocking”).
– Telephone Book
This menu contains all settings for the internal telephone book of your
FernTel EURO-ISDN.
– Terminal Functions
This menu contains all settings that affect your terminal, i.e. the display
language, PIN, call filter, key click, ringing tone pitch and volume, telephone lock,
call signalling (ringing tone), charge display and reset (reset terminal back to
original programmed state).
Some of these settings may be protected with a PIN (personal identification number).
Only those people who know the PIN can change the settings.
The default PIN “0000” is set at the factory (all settings can be changed).
The individual setting possibilities are explained in the pages that follow.
48

Telephone Programming – ISDN Functions
Your ISDN connection has several telephone numbers (Multiple Subscriber Numbers,
MSNs), usually three. Each of these telephone numbers has the same access rights.
You can program up to three MSNs in your FernTel EURO-ISDN, so that your telephone
“knows” which telephone numbers are allocated to it.
When you make the settings for your telephone, you can specify whether your telephone
should signal calls to each MSN programmed (refer to the “MSN Signaling” section.
MSN Programming
Start the programming process
by pressing the “Menu” softkey.
Select the ISDN menu.
Press the “Prog. MSN” softkey
(MSN Programming).
Enter the PIN.
This step is only required when you have
set up a PIN.
Press the softkey for the MSN that you
want to change or enter.
49

Telephone Programming – ISDN Functions
lf the MSN selected has already been
programmed, the telephone number
saved appears in the first line of the display.
Using the number keypad, enter one of
your MSNs. Do not include the prefix or
area code.
lf you have made a mistake, you can
delete the last digit using the key.
Press the “OK” softkey to save your
settings or press the “Name” softkey.
You can now enter a name for this
MSN, e.g. “Business”, “Private”, etc.
Press the “OK” softkey to save your
settings.
You can allocate a different name to each of the three MSNs.
MSN 1 plays a special role. Whenever you make a call, the ISDN transmits this telephone
number to your call partner. * With the FernTel EURO-ISDN you can select which one
of the programmed MSNs will be transmitted. Whenever you do not select an MSN for
transmission or do not use automatic dialing, your FernTel EURO-ISDN will transmit
MSN 1.
The names you save to the MSNs will be used when displaying the call charges incurred.
The accumulated charges are always assigned to the MSN which was transmitted to
the caller during dialing.
* lf required, you can suppress this transmission as described in the “Suppression of MSN
Transmission” section.
50

Telephone Programming – ISDN Functions
When an incoming call arrives and you are already conducting a call, you can have an
additional incoming call signaled via a call waiting tone (“knocking”).
You can deactivate this feature, as required.
Call Waiting Signalling
Start the programming process
by pressing the “Menu” softkey.
Select the ISDN menu.
Press the “Call waiting” softkey to
activate or deactivate the call waiting.
After pressing the “Call waiting” softkey the display shows “Call waiting switched off”
or “Call waiting switched on”.
When another telephone on your connection rings, the caller hears the normal ringing
tone; the call can be signaled and answered by another ISDN telephone.
51

Telephone Programming – ISDN Functions
You can enter a telephone number for call deflection. Whenever you receive a call, you can
then decide to deflect it to this number. Do not confuse call deflection with the automatic call diversion also available with your FernTel EURO-ISDN (refer to the “Call Diversion” section). Call deflection allows you to manually deflect each incoming call as
required.
Telephone Number for Call Deflection
Start the programming process
by pressing the “Menu” softkey.
Select the ISDN menu.
Press the softkey for the call deflection
telephone number (“RouteDiv.”).
lf a telephone number is already programmed, you will see it in the
first line of the display.
Enter the desired telephone number
and then press the “OK” softkey.
You can use call deflection manually on a call by call basis, or you can activate automatic
call diversion (refer to the “Call Diversion” section).
Whenever you receive an incoming call and use the call deflection, you have the option
of deflecting it to the telephone number programmed in this section or to a telephone
number from the telephone book (refer to “Call Deflection”).
52

Telephone Programming – Terminal Functions
lf you have allocated at least one MSN to your FernTel EURO-ISDN (refer to “MSN
Programming” section), you can specify whether this MSN should be signaled as well
as the ringing tone used.
MSN Signalling
Start the programming process by
pressing the “Menu” softkey.
Select the terminal menu.
Press the “Ring” softkey.
Use the scroll keys to select the MSN
which you want to make the settings for,
then press the “OK” softkey.
Now determine how this MSN should be
signaled.
Use the arrow keys to set the volume.
Use the digits 0–9 to set the tone. To save
your settings, press the “OK” softkey.
After you complete your settings, you will hear a confirmation tone.
lf an MSN has been allocated to your FernTel EURO-ISDN, but you do not want your
FernTel EURO-ISDN to ring when incoming calls arrive for this MSN (e.g. when the
MSN is reserved for fax), simply set the volume to zero; even when the ringing tone is
switched off, you can still make a call using this MSN.
53

Telephone Programming – Terminal Functions
When you receive calls from the national network outside your local network, the digital
telephone network transmits the prefix without the leading zeros. Thus, when you receive
a call from Hertfordshire, the display will show only 1442 and the telephone number.
In order for you to make return calls from the call box to callers who were unable to
reach you, your FernTel EURO-ISDN will add 0 to national telephone numbers and 00
to international telephone numbers. For other European countries, it may be necessary
to change this setting. For operation on a telephone system, you may need to enter
the exchange code (Exch.code.) to seize the exchange line, if the system does not add
this automatically.
Changing the Prefix Display
Press the “Menu” softkey.
Press the “Terminal” softkey.
Press the “Prefix” softkey.
Select National, International or
Exch.code.
Enter the digits that are to be
displayed, and press the “OK”
softkey. You can delete displayed
digits with the key.
54

Telephone Programming – Terminal Functions
Your FernTel EURO-ISDN saves all charge data received from the ISDN. The charges
are saved in four memories. One for each MSN (if programmed) and an “unassigned”
memory which is used if you have not programmed an MSN. You can delete the
contents of each memory separately.
The sum of all charges incurred is calculated from the individual memories, and you
can retrieve this sum using the “Total” softkey. When you switch from the display of call
charge units to the display of the call charges, you have to delete the charge memory.
Deleting the Charge Memory
Start the programming process by
pressing the “Menu” softkey.
Select the terminal menu.
Press the “Charge” softkey.
Enter the PIN. This step is only required
when you have set up a PIN.
Press the “Delete” key.
Now use the , keys to select the
memory that you want to delete and
press “Delete” again. The contents of this
memory are then deleted.
55

Telephone Programming – Terminal Functions
Your FernTel EURO-ISDN saves accumulated connection charges for all calls made
from the terminal. lt receives the necessary data from the network* in call charge units.
You enter the price per call charge unit using the following procedure.
Setting the Price per Call Charge Unit
Start the programming process
by pressing the “Menu” softkey.
Select the terminal menu.
Press the “Charge”softkey.
Enter the PIN. This step is only required
when you have set up a PIN.
Press the “Factor” softkey (call charge
factor = price per call charge unit).
Enter the call charge per unit which should
be used for the calculation of charges
and then press “OK”. When you delete the
factor using the key, your FernTel
EURO-ISDN displays the charge units.
The charge factor is a monetary value which you have to enter (in DM and Pfennige
or pounds and pence). Enter the decimal point using the # key. Note that the decimal
is displayed as a comma. The maximum value possible is 600,00.
* With some network providers, a surcharge is raised for the transmission of charge pulsing.
56

Telephone Programming – Terminal Functions
By entering a PIN (Personal Identification Number) using the procedure described
below, you can protect many of your telephone settings from unauthorized changes.
PIN Assignment
Start the programming process
by pressing the “Menu” softkey.
Select the terminal menu.
Press the “New PIN” softkey.
Now enter the old PIN.
Now enter the new PIN.
Confirm your input by re-entering
the new PIN.
The new PIN is now saved.
The PIN always consists of four digits. You do not have to press the “OK” softkey
after entering your PIN: as soon as you enter the fourth digit, your FernTel EURO-ISDN
automatically evaluates the PIN. lf the input and confirmation of the new PIN do not
agree, you will receive an error message. In such a case, the old PIN remains effective.
Your FernTel EURO-ISDN comes with the default PIN “0000”. The FernTel EURO-ISDN
only requests PIN entry when you have changed this default PIN. lf you want to stop
using the PIN, enter and confirm “0000” as the new PIN. The PIN is then deactivated.
57

Telephone Programming – Terminal Functions
You can have your FernTel EURO-ISDN produce a short tone in the loudspeaker each
time you press a key; this feedback can assist you when making entries.
Switching Key Click On / Off
Start the programming process
by pressing the “Menu” softkey.
Select the terminal menu.
Press the “Click On” softkey.
or
Press the “Click Off” softkey.
lf you currently have the key tone feature on, the “Click Off” softkey is displayed and
vice versa.
58

Telephone Programming – Terminal Functions
Your FernTel EURO-ISDN is equipped with display texts in several languages. Your
FernTel EURO-ISDN comes with the language set to “German.”
Selecting the Display Language
Start the programming process
by pressing the “Menu” softkey.
Select the terminal menu.
Press the “Language” softkey.
Select the desired language.
The following languages are available: Dutch, English, Finnish, French, German, Italian,
Spanish and Swedish.
59

Telephone Programming – Terminal Functions
You can reinstate your terminal’s default settings as programmed at the factory.
Terminal Reset
Start the programming process
by pressing the “Menu” softkey.
Select the terminal menu.
Press the “Reset” softkey.
lf you reset the settings to their default values, all settings you have made are deleted.
The display language is set to “German”.
The telephone book is deleted.
The MSN programming is deleted.
However, please note that settings for your ISDN connection will not be deleted
by a terminal reset.
You cannot reinstate the default settings when call diversion is active. You must
deactivate call diversion before attempting a reset.
60

Telephone Programming – Terminal Functions
You can set and adjust the sound and the volume of the ringing tone. There are two
special sound sequences which are exclusively available to this terminal.
Setting the Ringing Tone
Start the programming process
by pressing the “Menu” softkey.
Select the terminal menu.
Press the “Ring” softkey.
You will see an MSN in the display.
Confirm with “OK” or select
another MSN.
Select a sound sequence using the
number keypad 0 to 9, and *.
Set the volume using the scroll keys.
Confirm with “OK”.
61

Telephone Programming – Telephone Book
Your FernTel EURO-ISDN contains a memory for up to 77 names and telephone
numbers: the telephone book.
You can use the numbers in the telephone book in three ways. First, you can easily
dial numbers in the telephone book. Second, if you assign names to the telephone
numbers, your FernTel EURO-ISDN displays not only the number but also the
name of the caller. Third, you can use a call filter function with the telephone book:
when the filter is active, calls will only be signaled if the caller can be identified in the
telephone book.
Making a Telephone Book Entry
Start the programming process
by pressing the “Menu” softkey.
Select the telephone book menu
(“Tel. Book” softkey).
Press the “New” softkey.
Now enter the telephone number or
press the last number redial key
to retrieve the number from the last
number redial memory, then press
the “Name” softkey.
Now enter the name for this telephone
number. Refer to the table on the next
page. To save your entry, press the “OK”
softkey.
62

Telephone Programming – Telephone Book
lf you want to enter a sub-address for the
telephone number, press the “Sub-Ad.”
softkey.
Now enter the sub-address and press
the “OK” softkey.
The combined telephone number and
sub-address cannot exceed 27 digits.
Information related to sub-addresses is
given in the “Dialing with a Sub-Address”
section.
You enter the names for the telephone book using the number keypad.
lf you press a number key (repeatedly), the characters appear, one after the other, as
shown in the table below. You switch between the two groups of characters (upper
and lower case) by keeping the key depressed for approx. 1 second.
Key Assignment After Shift
1 1-?!,.:" `&()$ £@ 1-?!,.:" `&()$ £@
2 ABC2ДЕАБГВЖЗ abc2деабгвжз
3 DEF3ÈÉËÊ def3èéëê
4 GHI4ÌÍÎ ghi4ìíî
5 JKL5 jkl5
6 MNO6СЦТУФ mno6сцтуф
7 PQRS7ß pqrs7ß
8 TUV8ÜÙÚÛ tuv8üùúû
9 WXYZ9 wxyz9
00 0
# (space) (space)
lf you want to return to the telephone number entry while entering the name, press the
Last Number Redial Key. lf you want to delete the last character you entered, press
the key.
63

Telephone Programming – Telephone Book
Use the following procedure to delete entries from your telephone book.
Deleting / Editing a Telephone Book Entry
Start the programming process
by pressing the “Menu” softkey.
Select the telephone book menu
(“Tel. Book” softkey).
To delete or edit an entry, press the
“Delete” or “Edit” softkey.
Select whether you want to change the
telephone number or name.
Enter the PIN. This step is only required
when you have set up a PIN.
To delete an entry in the telephone book,
press the “Entry” softkey.
The first telephone book entry will
be displayed. Scroll through until you
reach the entry that you want to delete
and then press the “Delete” softkey.
The entry shown is then deleted.
64

Telephone Programming – Telephone Book
You can delete the contents of the last number redial memory using the following
procedure. This procedure deletes all five entries at one time.
Deleting the Last Number Redial Memory
Start the programming process
by pressing the “Menu” softkey.
Select the telephone book menu
(“Tel. Book” softkey).
Press the “Delete” softkey.
Enter the PIN. This step is only required
when you have set up a PIN.
Press the “Redial” softkey.
The last number redial memory is deleted.
65

Telephone Programming – Telephone Book
If you so desire, you can completely delete all telephone book entries.
Deleting All Telephone Book Entries
Start the programming process
by pressing the “Menu” softkey.
Select the telephone book menu
(“Tel. Book” softkey).
Press the “Delete” softkey.
Enter the PIN.
Press the “All” softkey
(delete all entries).
Press the “Yes” softkey. All entries in the
telephone book are deleted.
The scratchpad memory is deleted with the telephone book entries as it is a part of the
telephone book. The last number redial memory remains intact.
66

Glossary
Automatic Dialing This feature allows you to enter the telephone number before
you lift the handset. You prepare dialing in advance, then initiate
it by lifting the handset off the hook. When you use automatic
dialing, you can also make use of other options, e.g. selection of
an MSN.
Call Waiting Is a feature of the ISDN. When you are conducting a telephone
conversation and a second incoming call arrives, call waiting
displays the incoming call. You can accept or reject the waiting
call on a case-to-case basis.
Conference Using your FernTel EURO-ISDN, you can converse with two call
partners simultaneously. This function is known as conference
or three-way conference. During a conference, each caller can
hear the other two callers at all times.
Consultation During a call, you can hold a consultation call with another party,
e.g. to ask a question. This function is known as consultation.
DTMF Dual Tone Multi-Frequency. The DTMF tones are internationally
standardized tones allocated to the digits, the star (*) and the
hash (#) of the dialing keypad. These tones are used to control
answering machines (remote query), for the input of pager service
messages (mobile call services) or similar applications.
In analog networks, telephone numbers are also dialed using
these tones (this process is also known as touch tone). Your
FernTel EURO-ISDN can also transmit DTMF tones during a call.
Euro-ISDN A variation of the ISDN which is standardized throughout Europe.
Your FernTel EURO-ISDN only functions with Euro-ISDN terminal
connections.
ISDN Integrated Service Digital Network. The ISDN is a communications
network that can be used for the universal transmission of digital
data. Your FernTel EURO-ISDN uses the ISDN for the transmission
of speech.
67

Glossary
Keypad Protocol The keypad protocol is a simple method of transmitting key-
strokes in the ISDN during a connection, e.g. to make use of
additional services. Your FernTel EURO-ISDN can transmit
keypad protocol keystrokes using the digits, the star (*) and
the hash (#) of the dialing keypad.
Lock with Direct Call You can activate a lock with a pre-defined direct call, i.e. one
number that is dialed as soon as any key is pressed (with the
exception of the loudspeaker key when the handset is off the
hook); no other telephone number can be dialed.
MSN Multiple Subscriber Number. A Euro-ISDN terminal can have
at least three MSN telephone numbers. Calls for each of the
MSNs can be signalled and accepted at all terminals connected
to your Euro-ISDN connection. You can set which MSNs your
FernTel EURO-ISDN signals.
On-Hook Dialing Using the FernTel EURO-ISDN you can dial a telephone number
without lifting the handset off the hook. For this purpose, you
use the loudspeaker. The FernTel EURO-ISDN does not allow
you to conduct a call without the handset (hands-free talking).
PIN Personal Identification Number. You can protect many of the set-
tings of your FernTel EURO-ISDN from unauthorized alteration
by programming a PIN. Only those people who know the PIN
can then change the protected settings.
Softkey A key with an alternating function. The FernTel EURO-ISDN has
three softkeys, the functions of which are shown in the display.
Toggle In telephone systems, speaking to different call partners in turn
is know as toggling (also know as “brokering”, because of
the similarity in the job of a broker who speaks alternately with
different customers).
Using your FernTel EURO-ISDN you can toggle between two
parties or you can converse simultaneously with two parties in
a conference call (refer to Conference).
Touch Tone Refer to DTMF.
68

General Notes
Service
You have purchased a modern FHF product, which has been subject to a rigid quality
control. If you have any questions about this telephone or if malfunction should occur –
even after the guarantee period – please contact your FHF dealer. Before you make the
call, however, please find the type and product numbers on the product name plate.
Maintenance and Cleaning
The telephone is maintenance free. If it is operated in areas where it is subjected to large
amounts of dust, grease, oil etc. the telephone should be cleaned from time to time.
Use a moist cloth to wipe off the device.
Warning! Never use sharp or pointed instruments to clean the telephone.
Do not use other cleaning agents.
Warning and Security Notes
This device is a weatherproof telephone designed for use in a rough industry environment. The following warning and safety notes must be observed:
1. The telephone has been constructed according to Class II and may be connected
to and operated with the voltage of an ISDN S/T subscriber line only. Make sure the
telephone is properly connected. The connecting wire must be routed in a way to
prevent persons from tripping over it.
2. The telephone may be operated under the environmental conditions laid down in
Technical Data only. Operation in hostile environmental conditions, for instance too
high or too low ambient temperatures, is not allowed, as this may cause electronic
parts to malfunction. In the safe temperature range below -10°C the readability of
the display decreases with decreasing temperature.
3. Make sure neither telephone nor connecting wire nor any other parts of the telephone
are damaged. If the telephone has been damaged it should not be operated.
4. During operation of the telephone legal and professional regulations, regulations to
prevent accidents, and electrical regulations must be observed.
5. If the telephone has to be repaired, the repair must be done professionally, using
original spare parts only. Spare parts from other sources may cause damage.
Exclusion of warranty.
6. Prior to maintenance or replacement of the telephone the line must be disconnected.
Maintenance or repair works which have to be carried out while electrical power is
connected may be carried out by trained and skilled personnel only.
7. Observe the prescribed operation positions of the telephone.
8. The listening quality may be marginally reduced due to the influence of strong external
magnetic fields.
9. The manufacturer of this product reserves the right to technical alterations without
further notice.
69

General Notes
CE-Lable
The FernTel EURO-ISDN complies with the requirements of the R&TTE-directive99/5 EC (Radio equipment and Telecommunications Terminal equipment and the
mutual recognition of their conformity).
The conformity of the FernTel EURO ISDN with the directive mentioned above is
confirmed by the CE-Lable.
In detail the FernTel EURO-ISDN complies with the following standards:
TBR 8 Acoustics
TBR 3 Net Access
EN 55024, EN 55022 Electromagnetic Compatibility
EN 60950 Safety of Information Technology Equipment
70

Technical Data
Connecting Physical Interface ISDN-S/T-Interface, 4 lines
Data
Housing Dimensions approx. 270 x 200 x 138 mm
Handset Mouthpiece Electret-foil microphone
Acoustics Ringer 11 melodies, 7 sound pressure levels
Operating Handset Mode
Modes
Connections Connection Terminals Conductors up to 2.5 mm
Environmental Ambient Operation -20°C ... 60°C
Conditions Temperatures
Conformity Acoustics TBR 8
Transfer Protocol Euro-ISDN (DSS1)
Power Consumption Normal mode/deactivated:
= TEEF* 100 mW/2
PS1
max
TEEF = 3
PS1
= 150 mW
max
otherwise according to TBR 3
Ring Indicator Relay Max. switching voltage 60 V
dc
/48 V
Max. switching current 1 A
Max. switching power 30 W/48 VA
Weight approx. 1.6 kg
Display 16 digits with 7 segments,
digit height 7 mm, 128 x 8 matrixline,
height 4.5 mm, LED backlight
Operating Position Desktop or wall mounting
Colours black; black/yellow
Earpiece Dynamic receiver inset with
hearing aid compatibility
Maximum Ringer Volume approx. 96 dB(A) in 1m distance
Receiver Volume 6 adjustable temporary levels
Loudspeaker Volume 6 adjustable, temporary and
permament levels
Open Listening via internal Loudspeaker
Automatic Dialing
On-Hook Dialing
Calling Ring indicator relay active
2
Subscriber Line a1, a2, b1, b2
Ring Indicator Relay REL1, REL
2
Loudspeaker permanently connected
Handset modular construction
Transport and Storage Temp.-30°C ... 70°C
Degree of Protection IP 66
Net Access TBR 3
EMC EN 55022, EN 55024
Electrical Safety EN 60950
ac
* (TEEF: Terminal Equipment Equivalence Factor)
71

Ident. Nr. BA 9600-2
Edition 02/2001difications
Subject to change without notice
FHF Funke + Huster Fernsig GmbH
Eintrachtstraße 95 · D-42551 Velbert
Telephone +49 / 20 51/ 270-0 · Telefax +49/ 2051 /270-286
http://www.fhfcom.com · e-mail: info@fhf.de
 Loading...