

Page 1
AUDIO OUTPUT
LRLRLRPb
Y
Pr
VIDEO 3 INPT
VIDEO
S-VIDEO
AUDIO
ANT. IN
COMPONENT VIDEO-INPUT
VIDEO 1 INPT
FULL 90 DAY WARRANTY
Registered Trademark / TM Trademark /
SM
Service Mark of Sears, Roebuck and Co.
Marca Registrada /
TM
Marca de Fábrica / SM Marca de Servicio de Sears, Roebuck and Co.
MC
Marque de commerce / MD Marque déposée de Sears, Roebuck and Co. © Sears, Roebuck and Co.
Get it fixed, at your home or ours!
Our Home
For repair of carry-in items like vacuums, lawn equipment,
and electronics, call or go on-line for the location of your nearest
Sears Parts & Repair Center.
1-800-488-1222
Call anytime, day or night (U.S.A. only)
www.sears.com
To purchase a protection agreement on a product serviced by Sears:
1-800-827-6655 (U.S.A.) 1-800-361-6665 (Canada)
Para pedir servicio de reparación
a domicilio, y para ordenar piezas:
1-888-SU-HOGAR
SM
(1-888-784-6427)
Au Canada pour service en français:
1-800-LE-FOYER
MC
(1-800-533-6937)
www.sears.ca
Your Home
For repair- in your home -of all major brand appliances,
lawn and garden equipment, or heating and cooling systems,
no matter who made it, no matter who sold it!
For the replacement parts, accessories and
owner's manuals that you need to do-it-yourself.
For Sears professional installation of home appliances
and items like garage door openers and water heaters.
1-800-4-MY-HOME
R
(1-800-469-4663)
Call anytime, day or night
(U.S.A. and Canada)
www.sears.com www.sears.ca
R
R
For 90 days from the date of purchase, Sears will repair any defect in material or workmanship in this TV, free of
charge. For one year from the date of purchase, Sears will supply, at no charge, replacement for defective parts.
Tw o (2) years for Picture Tube. Certain parts are excluded from this warranty.
The above warranty coverage applies only to TV which are used for private household purposes.
TO OBTAIN WARRANTY SERVICE, SIMPLY RETURN THE TV TO THE NEAREST SEARS SERVICE CEN-
TER IN THE UNITED STATES.
This warranty gives you specific legal rights, and you may also have other rights which vary from state to state.
Sears Roebuck and Co., Dept. 817WA Hoffman Estates, IL 60179
For the location of a Sears Service Center in your area : 1-800-488-1222
1EMN20073 Printed in Malaysia
L2935UF * * * * *
Owner’s
Manual
32 INCH
COLOR TELEVISION
SRT2432P
FEATURES
●
AV MEMORY (MANUAL/SPORT/NEWS/MOVIE/GAME)
●
Flat Screen Picture Tube
●
MTS/SAP Tuner
●
V-CHIP PASSWORD
●
181 Channel Selection- All VHF/UHF channels plus up to 125 cable channels.
●
PLL Frequency Synthesized Tuning- The latest PLL frequency synthesized electronic tuning system provides free and easy channel selection, and lets you tune directly to any channel
using the channel number buttons (0~9 and +100-key) on the remote control.
●
On-Screen Function Display
●
Full-Function Remote Control
●
Sleep Timer
●
Closed Caption Decoder- You may view specially labeled (cc) TV programs, movies, news,
prerecorded tapes, etc. with either a dialogue caption or text display added to the program.
●
Auto Shut Off Function- If there is no air signal input from the antenna terminal and no
user operation for 15 minutes, the TV will turn itself off automatically.
●
V-CHIP- Enables parents to prevent their children from watching inappropriate material on TV.
●
S-VIDEO Input- allows you to get better picture detail and clarity.
●
Front / Rear AV Input
●
Component VIDEO Input- Provides best signal connection.
●
Rear Audio Output- To connect TV sound to a home audio system
PRECAUTIONS
● Place your TV in a room with adequate ventilation.
● Keep your TV set away from sources of direct heat, such as heat registers or direct sunlight.
● Do not place your TV on soft surfaces, such as rugs or blankets.
● Leave enough room for air to circulate around the bottom, top and back of the set.
The serial number of this product may be found on the back of the TV. No others have the same
serial number as yours. You should record the number and other vital information here and retain
this book as a permanent record of your purchase to aid identification in case of theft.
Date of Purchase
Dealer Purchase from
Dealer Address
IF YOU NEED ADDITIONAL ASSISTANCE FOR SET-UP OR OPERATING
AFTER READING OWNER’S MANUAL, PLEASE CALL TOLL FREE
1-800-968-3429.
Dealer Phone No.
Model No.
Serial No.
.
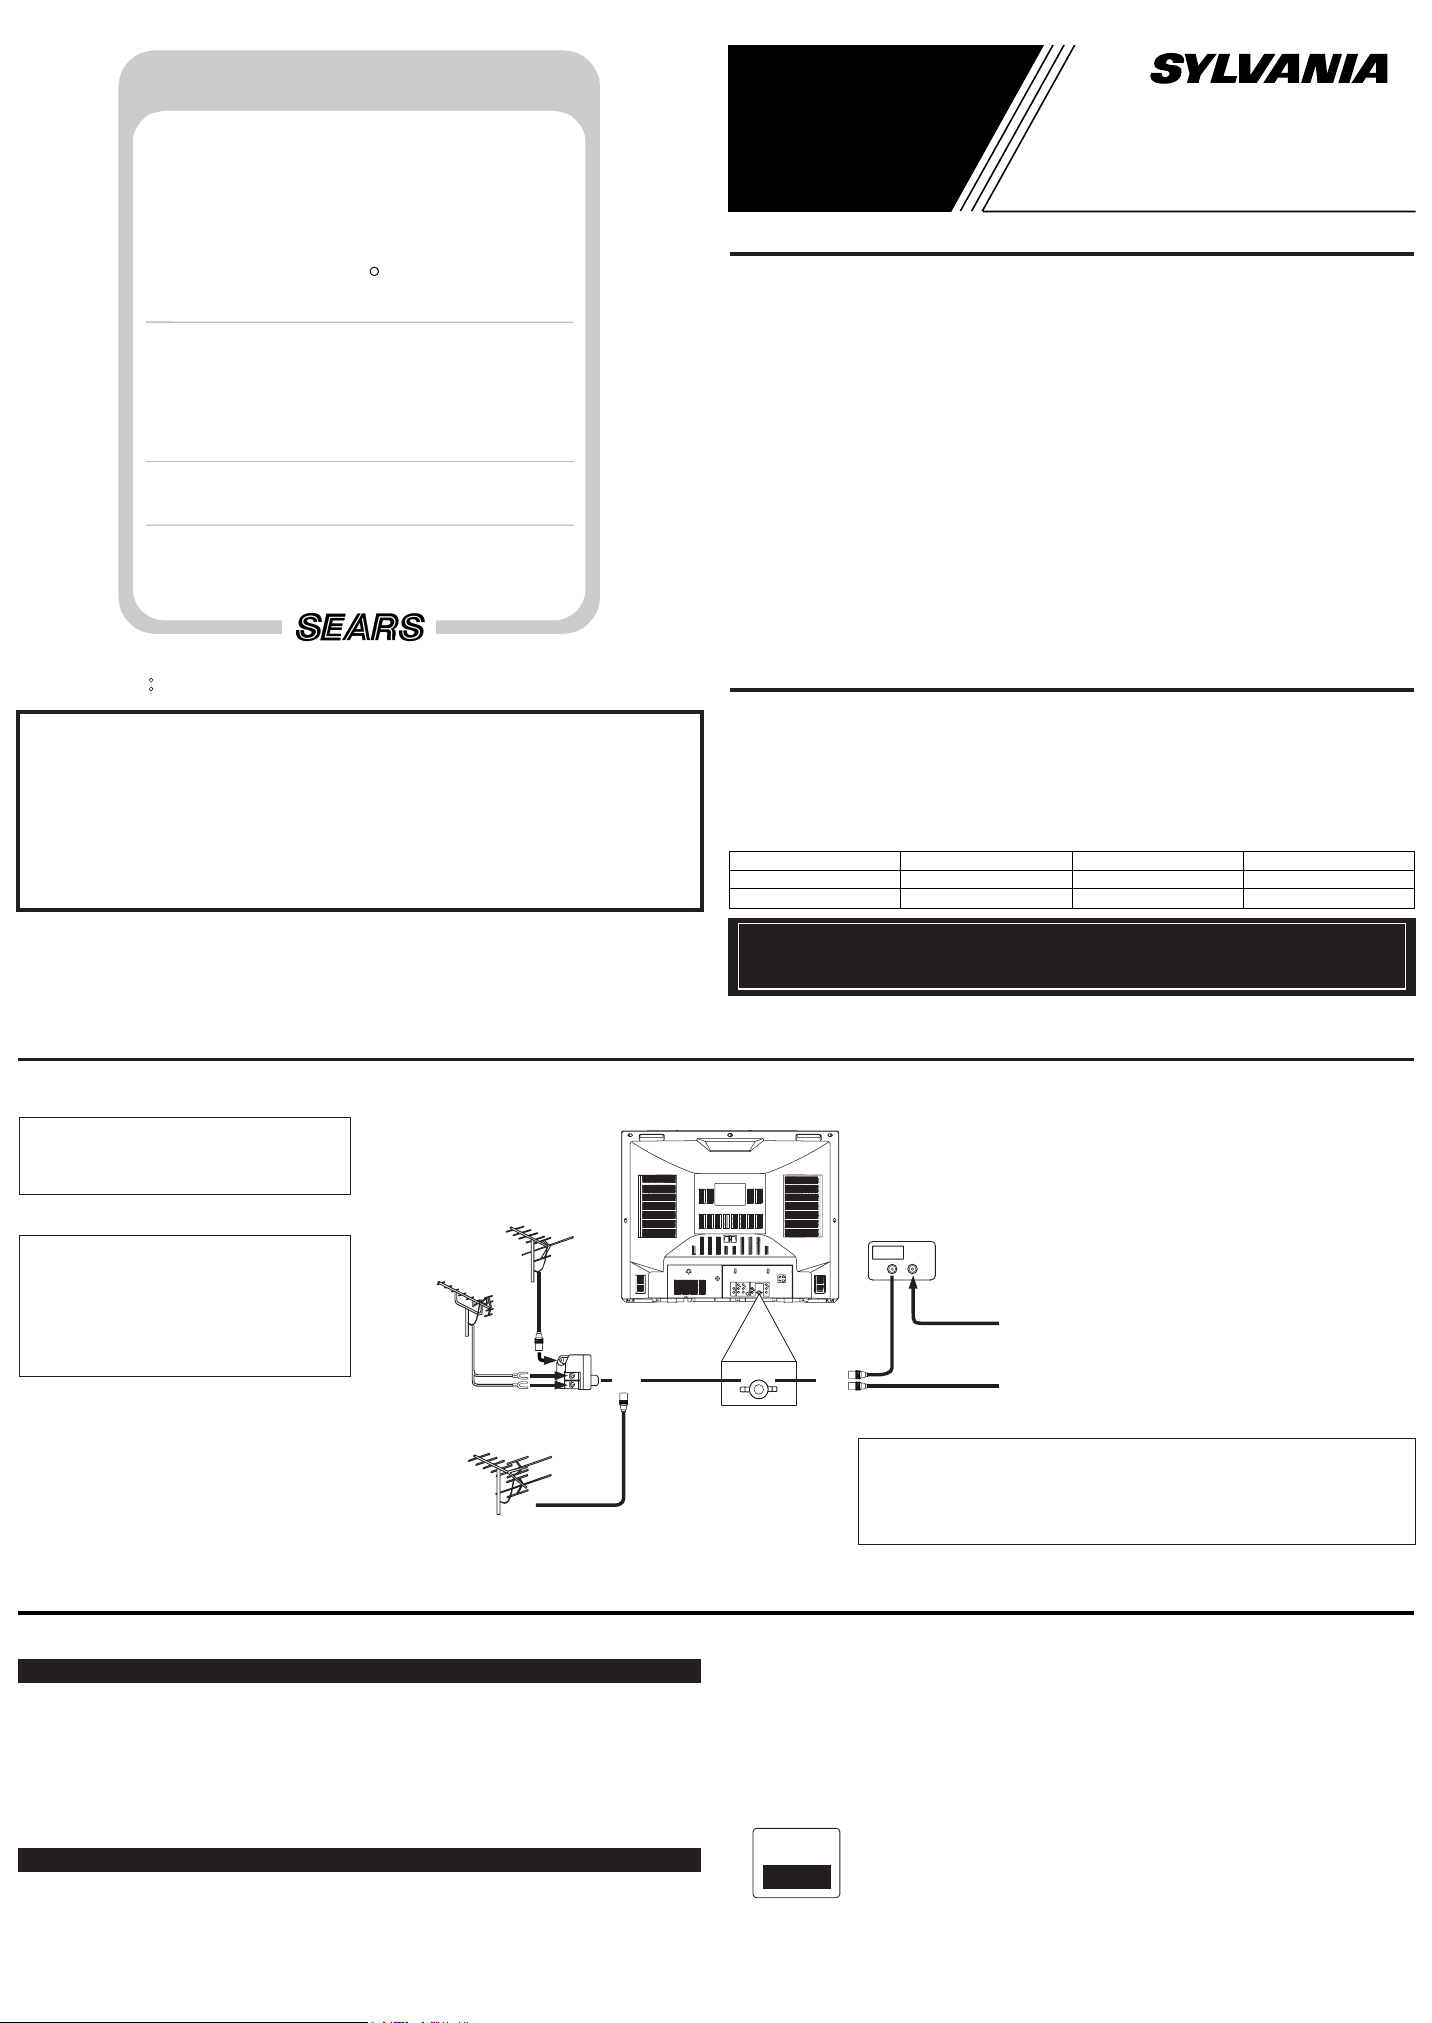
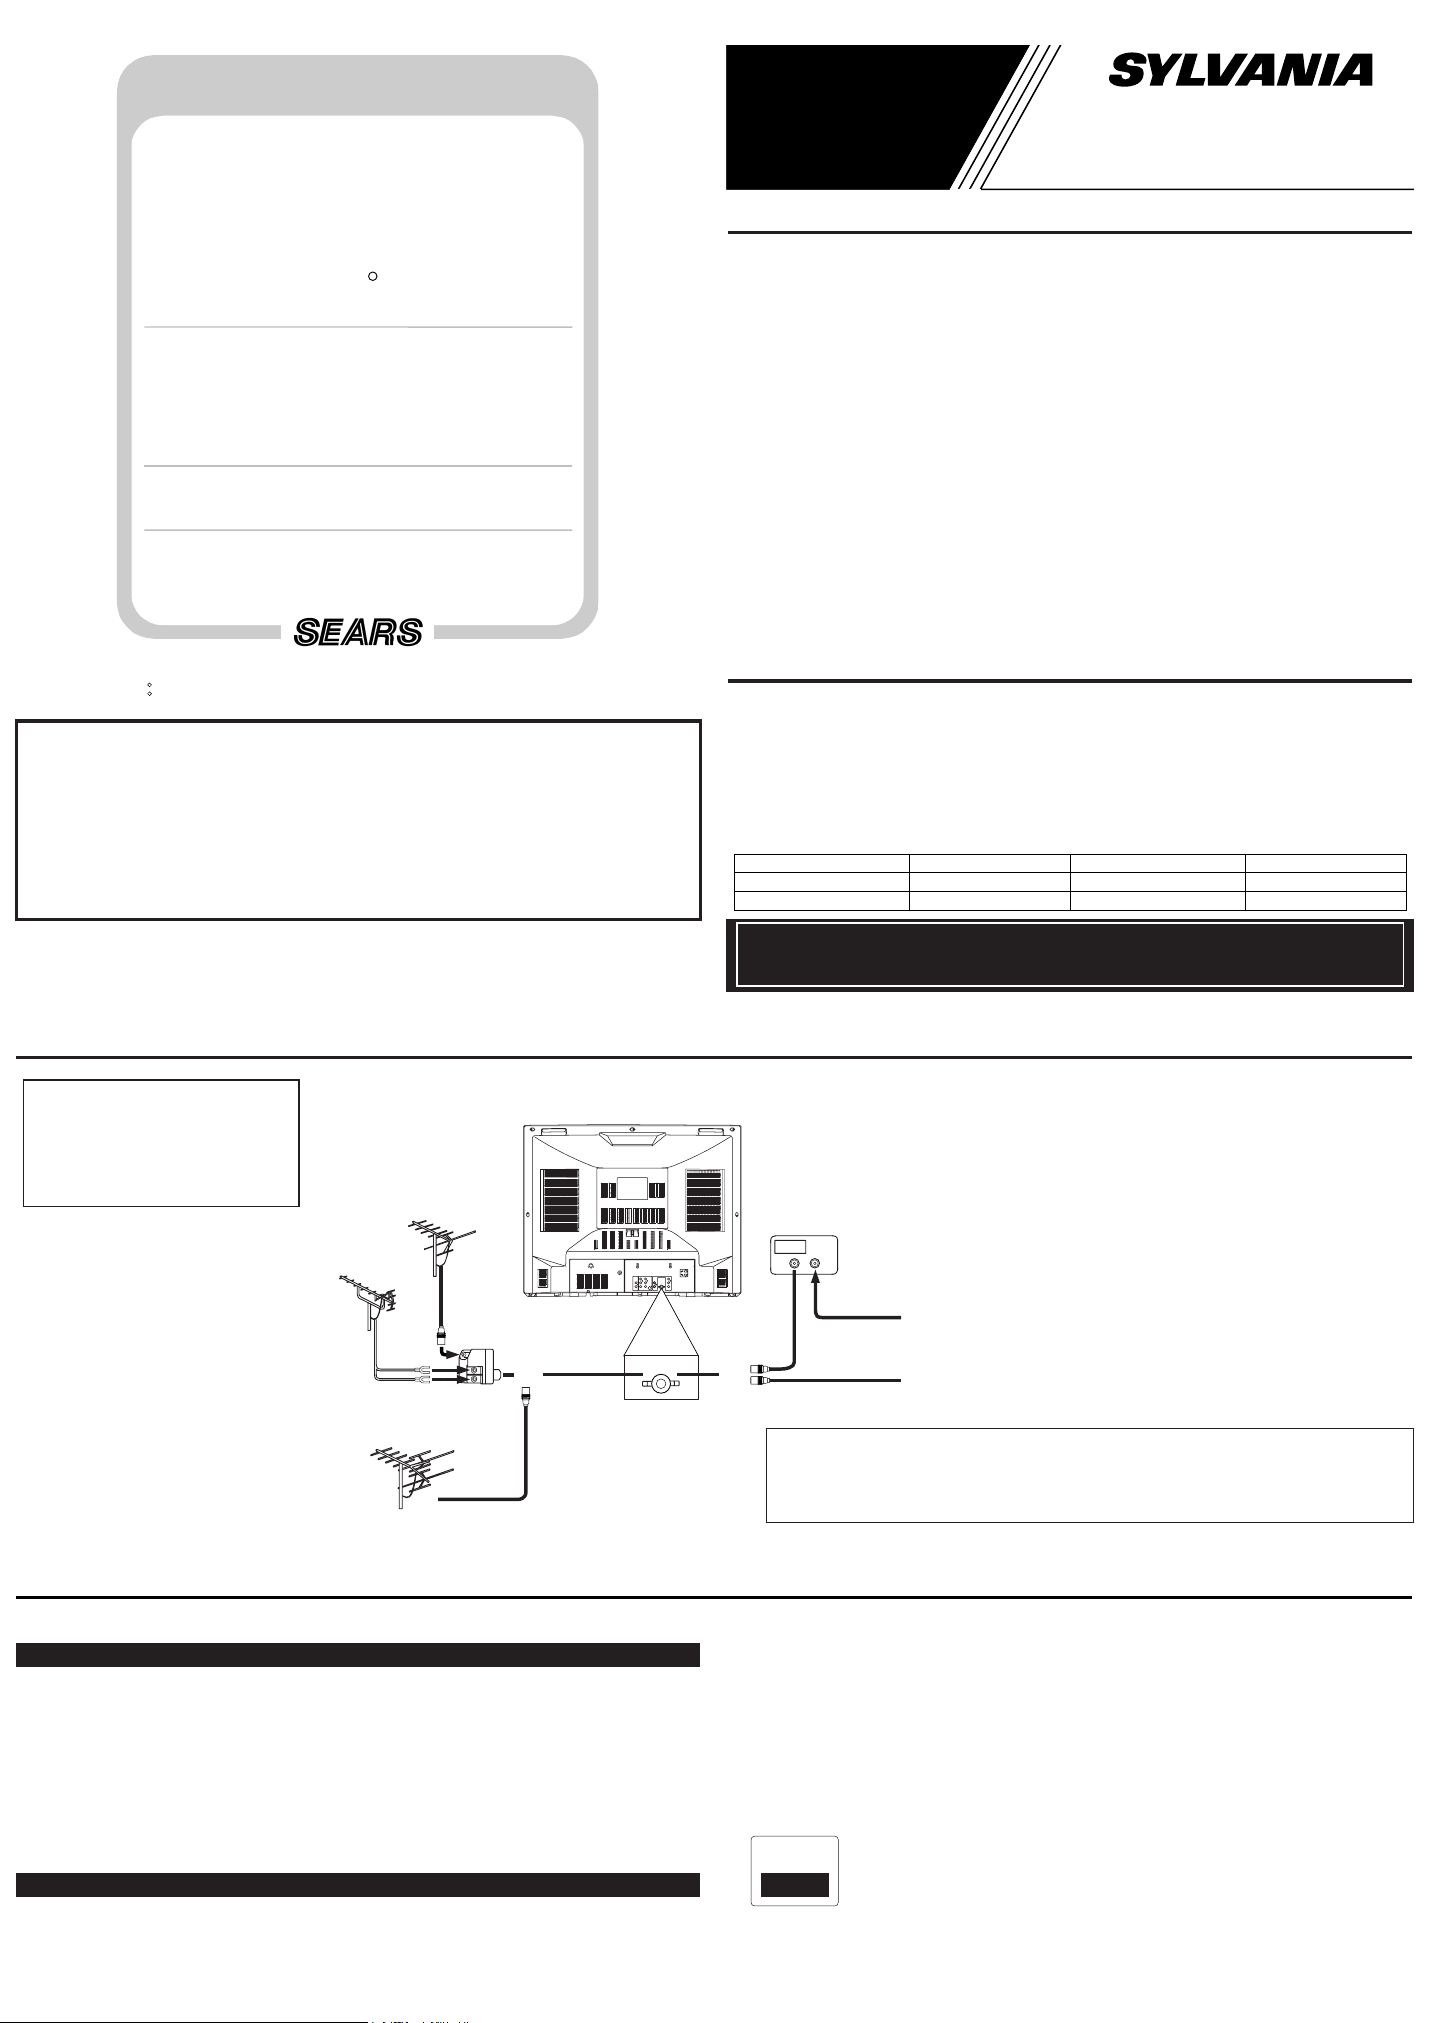
ANTENNA/CABLE CONNECTIONS
CAUTION: TO PREVENT ELECTRIC
SHOCK, MATCH WIDE BLADE OF
PLUG TO WIDE SLOT, FULLY INSERT.
ATTENTION:
POUR ÉVITER LES CHOCS ÉLECTRIQUES,
UHF
Antenna
(Not supplied)
INTRODUIRE LA LAME LA PLUS LARGE
DE LA FICHE DANS LA BORNE CORRESPONDANTE DE LA PRISE ET POUSSER
JUSQU’AU FOND.
CLOSED CAPTION
This TV can receive C1 and C2 Caption and Text.
CAPTION MODE
1) Closed Caption Characters can be displayed on the TV screen only when the received broadcast signal contains Caption Signals.
Paint-on mode: Displays input characters on the screen immediately.
2)
Pop-on mode: Once characters are stored in memory, they are displayed all at once.
Roll-up mode: Displays the characters continuously by scrolling (max. 4 lines).
Note: If CAPTION C1 or C2 is selected but a Closed Caption signal is not included, characters
will not be displayed.
VHF/UHF
Combination Antenna
(Not supplied)
VHF
Antenna
(Not supplied)
VHF/UHF Combiner
(Not supplied)
OR
*Some cable TV systems use scram-
bled signals and require a special converter to receive these channels.
Consult your local cable company.
CATV Box
or Satellite Box
(Not supplied)
OUT IN
ANT. IN
OR
Note to CATV system installer:
This reminder is provided to call the CATV system installer's attention to Article 82040 of the NEC that provides guidelines for proper grounding and, in particular, specifies that the cable ground shall be connected to the grounding system of the building
as close to the point of cable entry as practical.
Notes:
• When your TV receives a special effects playback signal (i.e., Search, Slow, Still) from a
VCR’s video output channel (CH3 or CH4), your TV may not display the correct caption or
text.
• Captions and texts may not match the TV voice exactly.
• Interference may cause the closed caption system not to function properly.
• The caption or text characters will not be displayed while the menu display or functions display
is shown.
If you see this screen:
•
*
75-ohm
Coaxial Cable
From Cable System
or Satellite Antenna
75-ohm
Coaxial Cable
From Cable System
FCC WARNING- This equipment may generate or use radio
frequency energy. Changes or
modifications to this equipment
may cause harmful interference
unless the modifications are
expressly approved in the
instruction manual. The user
could lose the authority to operate this equipment if an unauthorized change or modification
is made.
TEXT MODE
1) Displays the text on the screen by scrolling (max. 7 lines).
2) If the received broadcast signal does not contain caption or text signals, no change will occur.
If your TV displays a black box on the screen, this means that your TV is set to TEXT mode.
To clear screen, select CAPTION C1, C2 or CAPTION [OFF].
Page 2
WARNING:
FIGURE A
EXAMPLE OF ANTENNA GROUNDING AS PER
NATIONAL ELECTRICAL CODE
ELECTRIC
SERVICE
EQUIPMENT
GROUND
CLAMP
NEC - NATIONAL ELECTRICAL CODE POWER SERVICE GROUNDING
ELECTRODE SYSTEM
(NEC ART 250, PART H)
S2898A
GROUND CLAMPS
GROUNDING CONDUCTORS
(NEC SECTION 810-21)
ANTENNA
DISCHARGE UNIT
(NEC SECTION 810-20)
ANTENNA
LEAD IN
WIRE
VIDEO L - AUDIO - R
MENU
VOLUME
CHANNEL
POWER
4 5
67
12 3
1917211516 18 20
PWR
123
456
789
0 +100
DISPLAY
VOL
CH
CH
VOL
SLEEP
CHANNEL
RETURN
INPUT
SELECT
6
8
4
3
9
12
11
10
13
MUTE
MENU
5
GAME
14
TO REDUCE THE RISK OF FIRE OR ELECTRIC SHOCK, DO NOT EXPOSE THIS APPLIANCE TO RAIN OR MOISTURE.
RISK OF ELECTRIC SHOCK
DO NOT OPEN
CAUTION: TO REDUCE THE RISK OF ELECTRIC
SHOCK, DO NOT REMOVE COVER (OR BACK) NO
USER SERVICEABLE PARTS INSIDE. REFER SERVICING TO QUALIFIED SERVICE PERSONNEL.
The important note is located on the rear of the cabinet.
CAUTION
THIS SYMBOL INDICATES THAT DANGEROUS VOLTAGE CONSTITUTING A
RISK OF ELECTRIC SHOCK IS PRESENT WITHIN THIS UNIT.
THIS SYMBOL INDICATES THAT
THERE ARE IMPORTANT OPERATING
AND MAINTENANCE INSTRUCTIONS
IN THE LITERATURE ACCOMPANYING
THE APPLIANCE.
IMPORTANT SAFEGUARDS
1. Read instructions-All the safety and operating instructions should be read before the appliance is operated.
2. Retain Instructions-The safety and operating instructions should be retained for future reference.
3. Heed Warnings-All warnings on the appliance and in
the operating instructions should be adhered to.
4. Follow Instructions-All operating and use instructions
should be followed.
5. Cleaning-Unplug TV from the wall outlet before cleaning. Do not use liquid cleaners or aerosol cleaners. Use
a damp cloth for cleaning.
EXCEPTION: A product that is meant for uninterrupted service and, that for some specific reason, such as
the possibility of the loss of an authorization code for a
CATV converter, is not intended to be unplugged by
the user for cleaning or any other purpose, may
exclude the reference to unplugging the appliance in
the cleaning description otherwise required in item 5.
6. Attachments-Do not use attachments not recommended
by the TV manufacturer as they may cause hazards.
7. Water and Moisture-Do not use this TV near water, for
example, near a bath tub, wash bowl, kitchen sink, or
laundry tub, in a wet basement, or near a swimming
pool, and the like.
8. Accessories-Do not place this TV on an unstable cart,
stand, tripod, bracket, or table. The TV may fall, causing serious injury to someone, and serious damage to
the appliance. Use only with a cart, stand, tripod,
bracket, or table recommended by the manufacturer, or
sold with the TV.
Any mounting of the appliance should follow the manufacturer’s instructions and should
use a mounting accessory recommended by the manufacturer. An
appliance and cart combination
should be moved with care. Quick
stops, excessive force, and uneven
surfaces may cause the appliance
and cart combination to overturn.
PORTABLE CART WARNING
S3126A
AMEUBLES- Cet appareil ne doit être placé que sur un
meuble (avec ou sans roulettes) recommandé par le
fabricant. Si vous l’installez sur
un meuble à roulettes, déplacez
les deux ensembles avec précaution. Un arrêt brusque, l’utilisation
d’une force excessive et des surfaces irrégulières risquent de
déstabiliser l’ensemble et de le
renverser.
9. Ventilation-Slots and openings in the cabinet and the
back or bottom are provided for ventilation and to
ensure reliable operation of the TV and to protect it
from overheating, these openings must not be blocked
or covered. The openings should never be blocked by
placing the TV on a bed, sofa, rug, or other similar surface. This TV should never be placed near or over a
radiator or heat register. This TV should not be placed
in a built-in installation such as a bookcase or rack
unless proper ventilation is provided or the manufacturer’s instructions have been adhered to .
10. Power Sources-This TV should be operated only from
the type of power source indicated on the marking
label. If you are not sure of the type of power supply to
your home, consult your appliance dealer or local
power company. For TVs intended to operate from battery power, or other sources, refer to the operating
instructions.
11. Grounding or Polarization-This TV is equipped with a
polarized alternating-current line plug(a plug having
one blade wider than the other). This plug will fit into
the power outlet only one way. This is a safety feature.
If you are unable to insert the plug fully into the outlet,
try reversing the plug. If the plug should still fail to fit,
contact your electrician to replace your obsolete outlet.
Do not defeat the safety purpose of the polarized plug.
SYMBOLE D'AVERTISSEMENT POUR
LES COMPOSANTES
APPAREIL ET MEUBLE A ROULETTES
S3126A
12. Power-Cord Protection-Power-supply cords should be
routed so that they are not likely to be walked on or
pinched by items placed upon or against them, paying
particular attention to cords at plugs, convenience
receptacles, and the point where they exit from the
appliance.
13. Outdoor Antenna grounding-If an outside antenna or
cable system is connected to the TV, be sure the antenna or cable system is grounded so as to provide some
protection against voltage surges and built-up static
charges. Article 810 of the National Electrical Code,
ANSI/NFPANo. 70, provides information with respect
to proper grounding of the mast and supporting structure, grounding of the lead-in wire to an antenna discharge unit, size of grounding conductors, location of
antenna-discharge unit, connection to grounding electrodes, and requirements for the grounding electrode.
(Fig. A)
14. Lightning-For added protection for this TV receiver
during a lightning storm, or when it is left unattended
and unused for long periods of time, unplug it from the
wall outlet and disconnect the antenna or cable system.
This will prevent damage to the TV due to lightning
and power-line surges.
15. Power Lines-An outside antenna system should not be
located in the vicinity of overhead power lines or other
electric light of power circuits, or where it can fall into
such power lines or circuits. When installing an outside
antenna system, extreme care should be taken to keep
from touching such power lines or circuits as contact
with them might be fatal.
16. Overloading-Do not overload wall outlets and extension
cords as this can result in a risk of fire or electric shock.
17. Object and Liquid Entry-Never push objects of any
kind into this TV through openings as they may touch
dangerous voltage points or short out parts that could
result in a fire or electric shock. Never spill liquid of
any kind on the TV.
18. Servicing-Do not attempt to service this TV yourself as
opening or removing covers may expose you to dangerous voltage or other hazards. Refer all servicing to
qualified service personnel.
19. Damage Requiring Service-Unplug this TV from the
wall outlet and refer servicing to qualified service personnel under the following conditions:
a. When the power supply cord or plug is damaged or
frayed.
b. If liquid has been spilled, or objects have fallen into
the TV.
c. If the TV has been exposed to rain or water.
d. If the TV does not operate normally by following the
operating instructions. Adjust only those controls that
are covered by the operating instructions, as improper
adjustment of other controls may result in damage and
will often require extensive work by a qualified technician to restore the TV to its normal operation.
e. If the TV has been dropped or damaged in any way.
f. When the TV exhibits a distinct change in perfor-
mance-this indicates a need for service.
20. Replacement Parts-When replacement parts are
required, be sure the service technician uses replacement parts specified by the manufacturer that have the
same characteristics as the original part. Unauthorized
substitutions may result in fire, electric shock, injury to
persons or other hazards.
21. Safety Check-Upon completion of any service or
repairs to this TV, ask the service technician to perform
routine safety checks to determine that the TV is in
proper operating condition.
22. Heat-This TV product should be situated away from
heat sources such as radiators, heat registers, stoves, or
other products (including amplifiers) that produce heat.
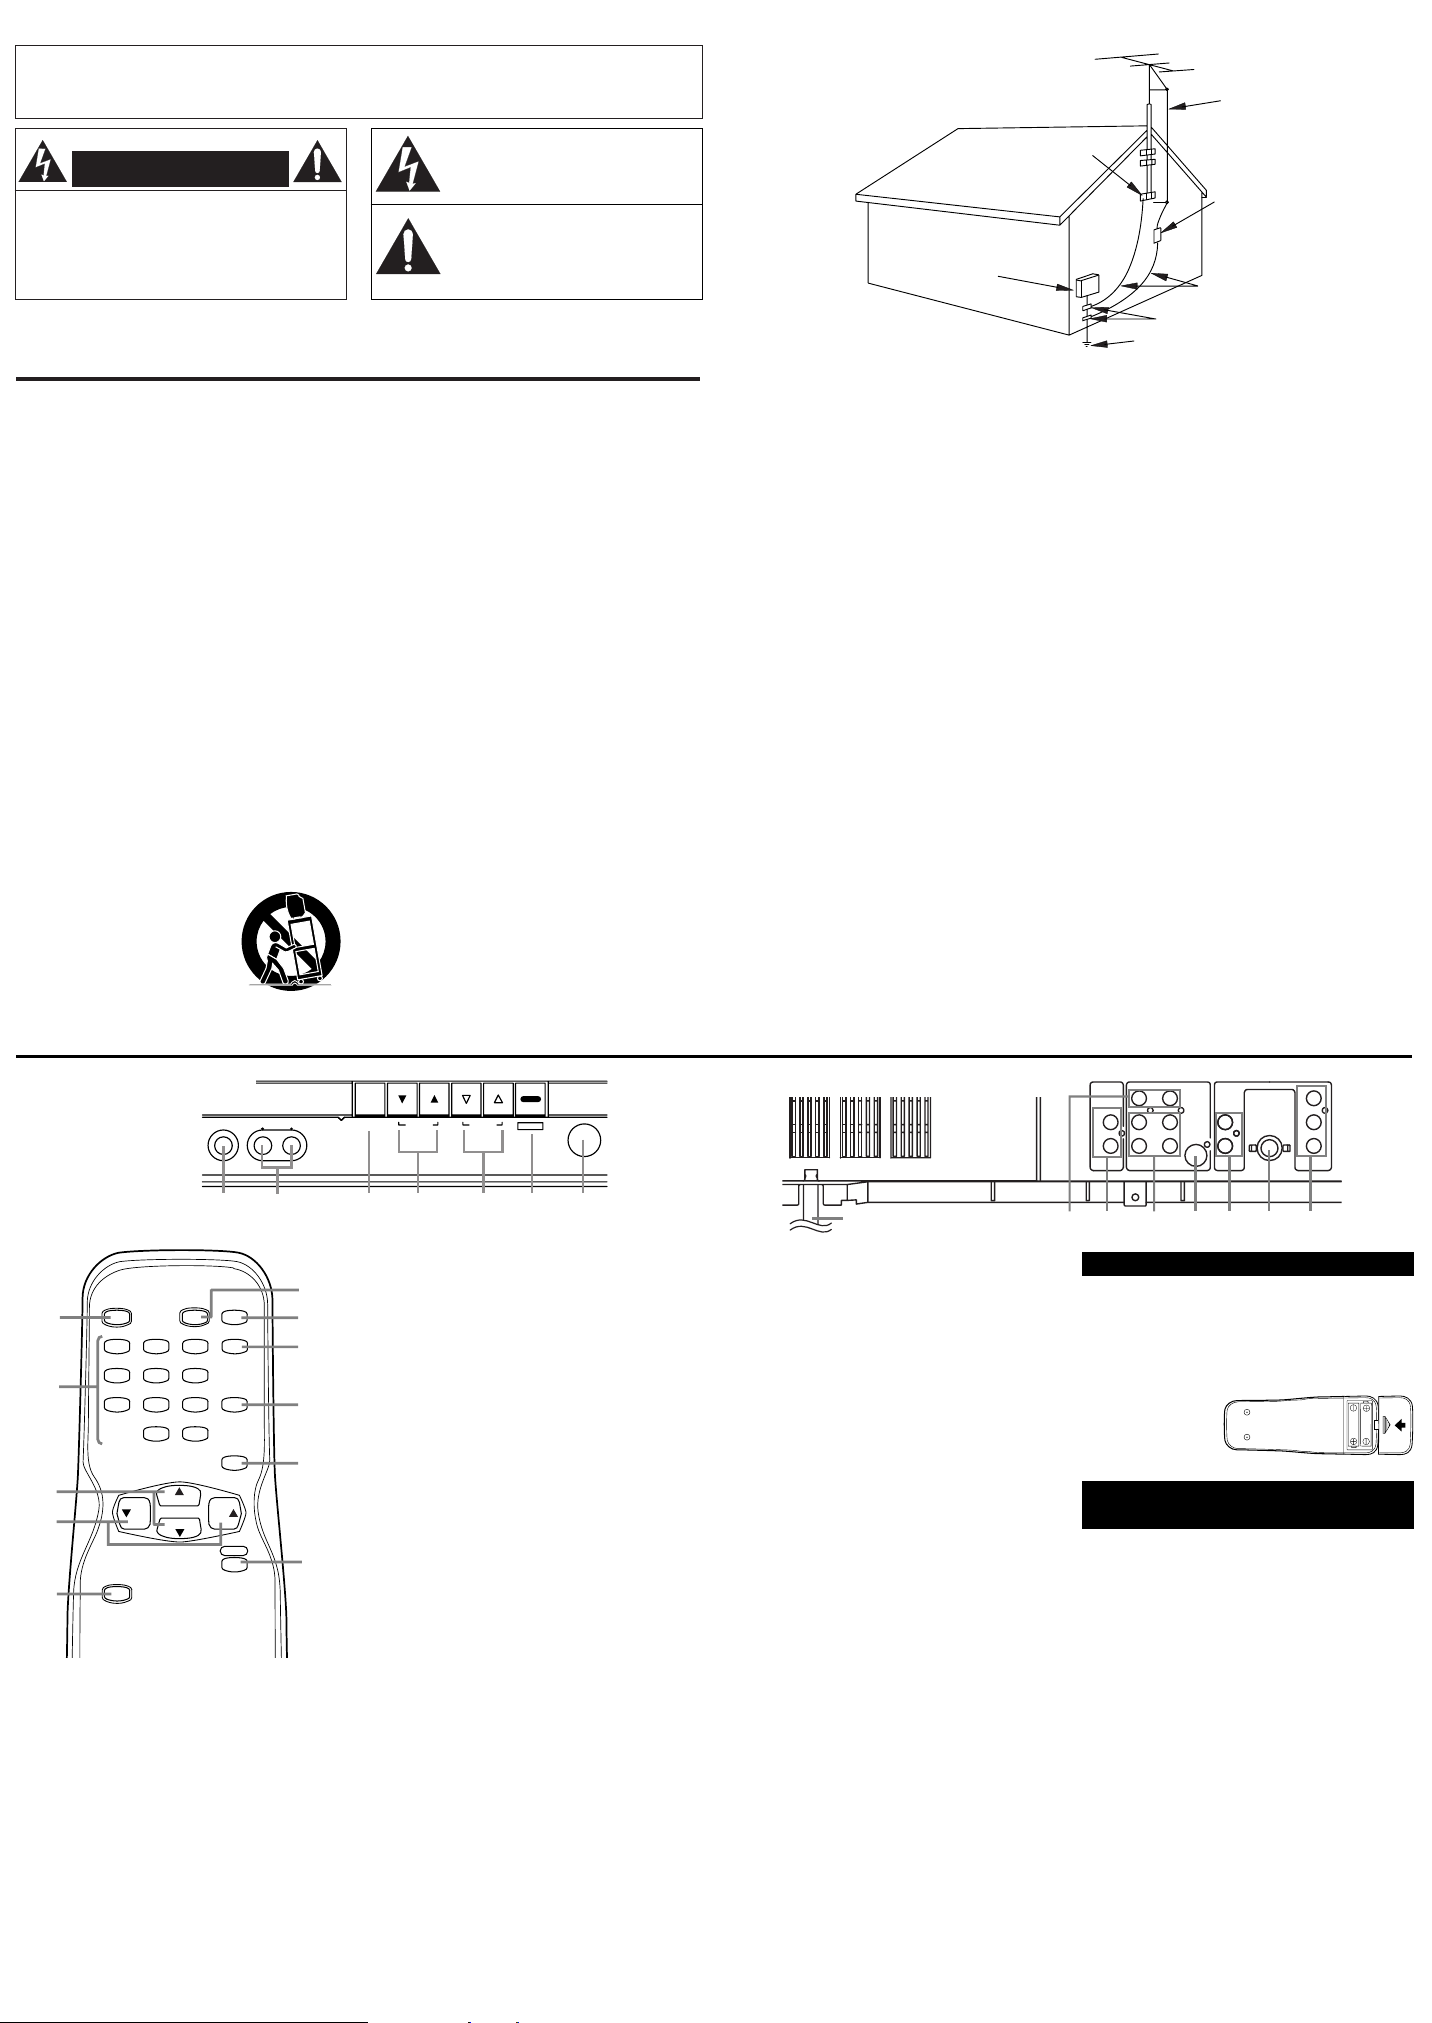
OPERATING CONTROLS AND FUNCTIONS
- FRONT PANEL - - REAR PANEL -
- REMOTE CONTROL -
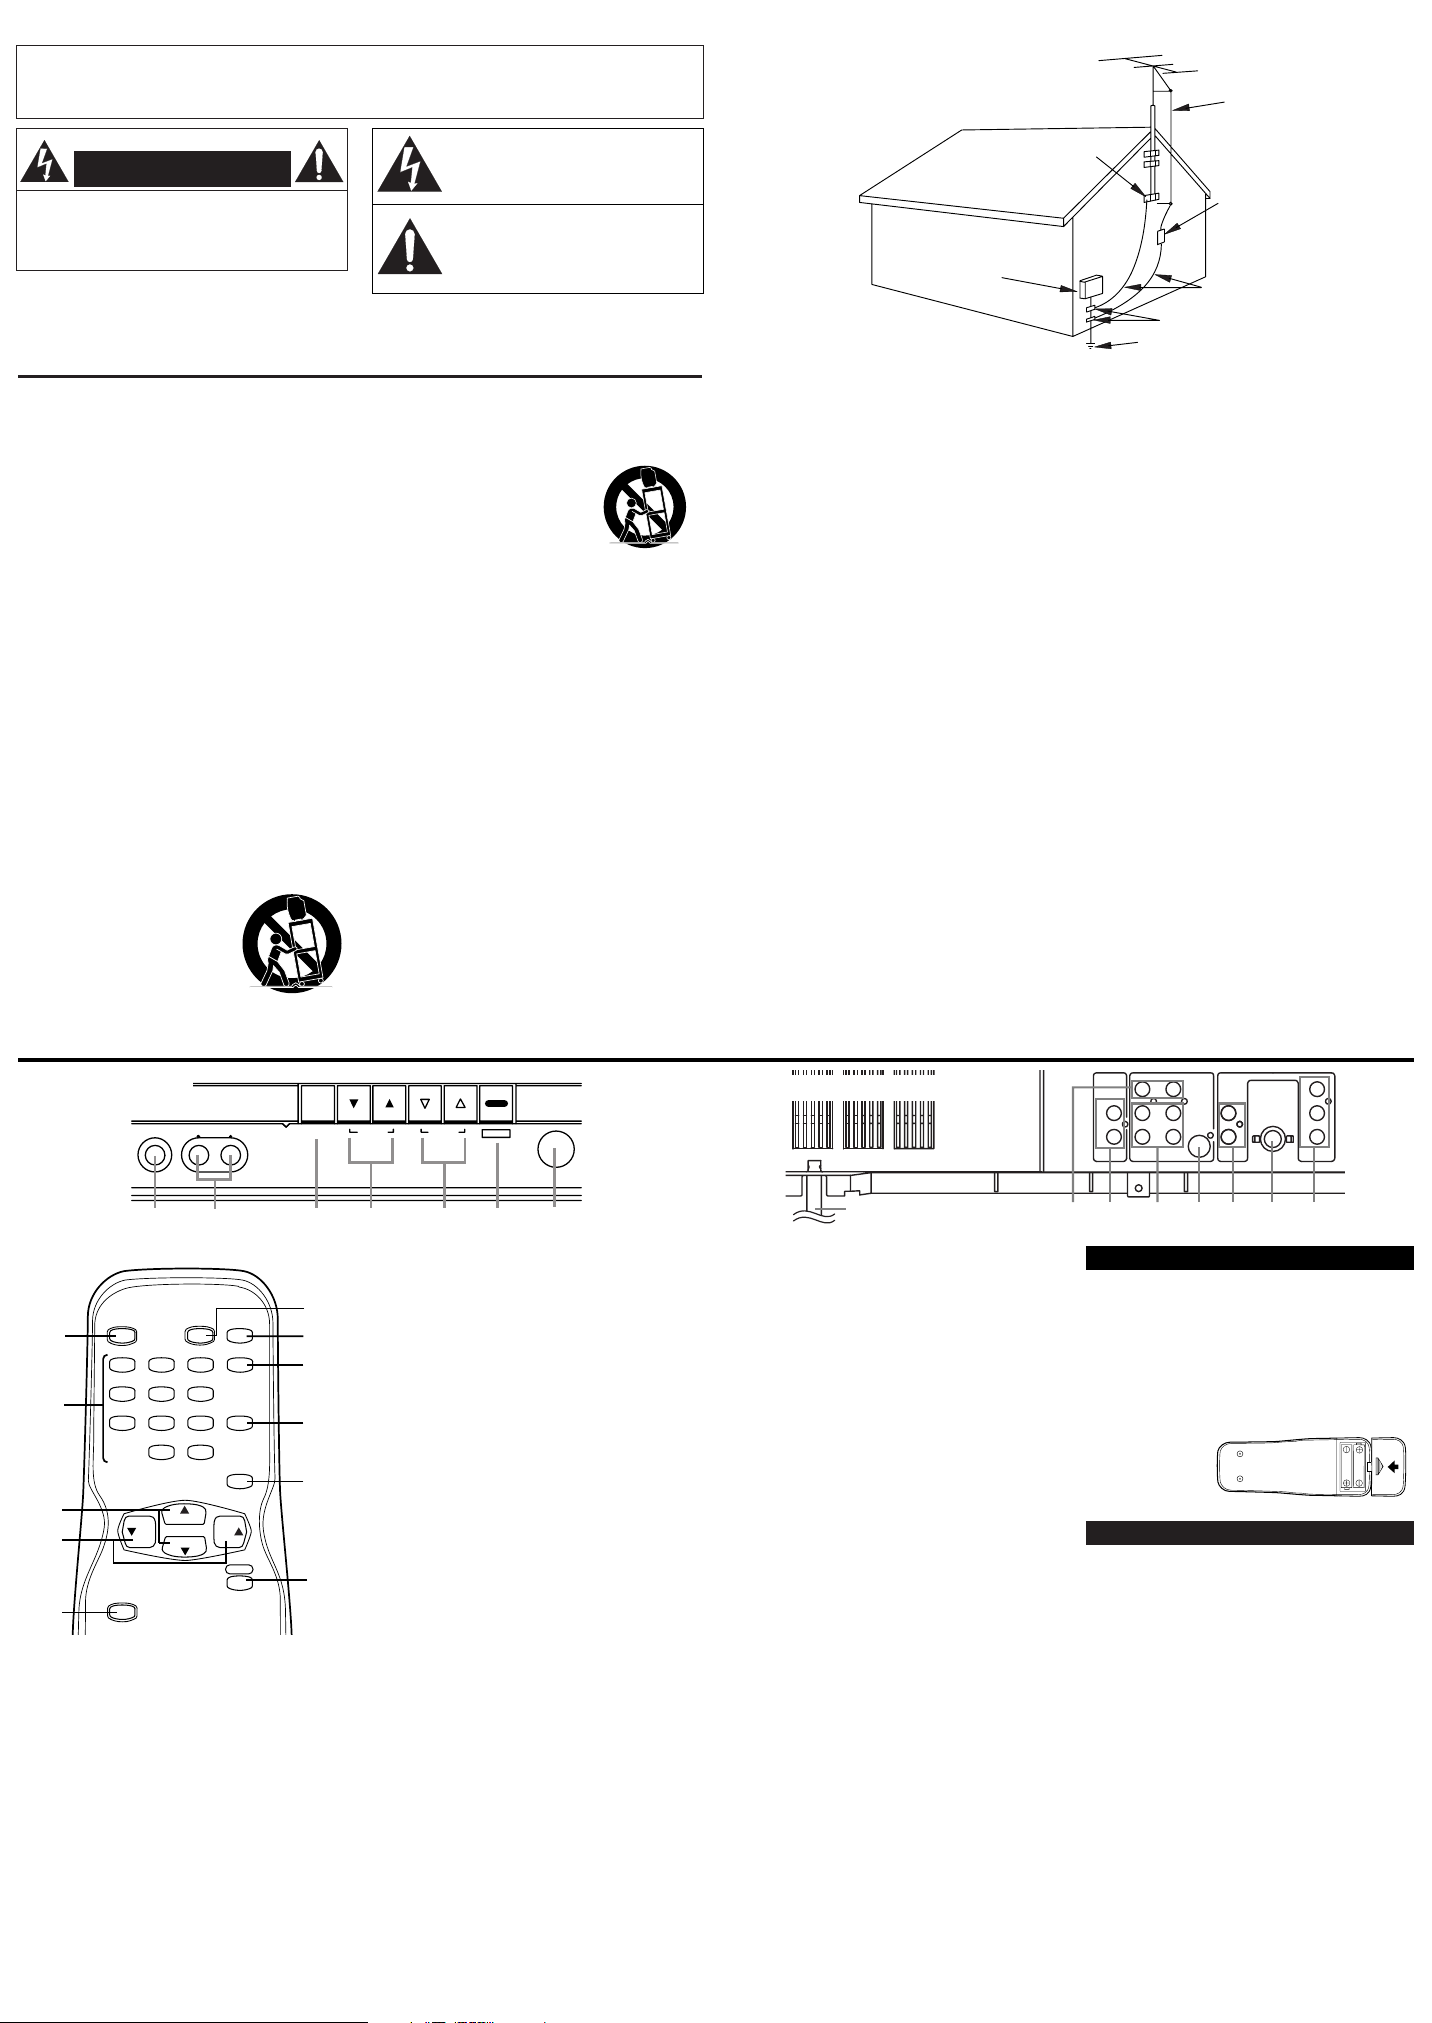
1. VIDEO (INPT) jack- Connect to the video
output jack of a video camera, VCR, or
video game.
2. AUDIO L/R (INPT) jacks- Connect to the
left/right channel audio output jacks of a
video camera, VCR, or video game.
Note: The AUDIO L (INPT) jack is for
mono input. The sound is heard from both
speakers. Use this jack for connecting
monaural audio equipment.
3. MENU button- Press to display the menu
on the TV screen.
4. VOLUME (VOL) ▲/▼ buttons- Press to
control the volume level.
Press to determine the setting mode from the
menu on the TV screen (only the VOL ▲
button).
Press to select or adjust from a particular
menu (for example: Language Selection,
Channel Presetting, Closed Caption Selection,
Picture Adjustment, V-CHIP Set Up).
CHANNEL (CH) ▲/▼ buttons- Press to
5.
select memorized channel.
Press to select the setting mode from the
menu on the TV screen.
Press to select item you want to adjust in
the picture control mode.
POWER (PWR) button- Press to turn the
6.
TV ON and OFF.
7. Infrared Sensor Window- Receives the
infrared control signals from the remote
control.
8. Channel number buttons- Press two digits
to directly access the desired channel.
Remember to press a "0" before a single
digit channel.
+100 button- Press to select cable channels
higher than 99.
MUTE button- Press to turn off the sound
9.
portion of the TV program (Volume level
display turns LIGHT RED from LIGHT
BLUE). Press this button again or press the
VOL(ume)
INPUT SELECT button- Press to select
10.
TV or the external input (VIDEO1 or
VIDEO2 or VIDEO3 or COMPONENT)
(See USING AUDIO/VIDEO INPUT JACKS).
▲ or ▼ button to restore sound.
11. CHANNEL RETURN button- Press to go
back to the previously viewed channel. For
example, pressing this button once will
change channel display from CH 3 (present
channel) to CH 10 (previously viewed
channel), and pressing it a second time will
return from CH 10 to CH 3.
12.
DISPLAY button- Press to display the
channel number on the screen. If you press
it again, the channel number will disappear.
13.SLEEP button- Press to display the sleep
timer and begin the timer. The shut off time
can be set by the number of times you press
the button (0, 10, 20, 30,..90, 0 minutes).
14.GAME button- Press to set Game mode
and to select the front A/V input at the same
time. To exit, press the INPUT SELECT button (See USING AUDIO/VIDEO INPUT
JACKS and PICTURE ADJUSTMENT).
15.AC cord- Connect to a standard AC outlet
(120V/60Hz).
Note: Unwrap the AC cord completely
from the backcover before plugging the
cord into an AC outlet.
16.AUDIO L/R OUT jacks- Connect to the
left/right channel audio input jacks of a
home stereo system.
17.
S-VIDEO input jack- Connect to the
S-VIDEO output jack of a video camera,
VCR, or video game system using the
S-VIDEO cable (not supplied).
Note: The S-VIDEO jack on the rear panel is
given priority over the VIDEO (Rear) jack.
18.COMPONENT AUDIO input jacks-
Connect to the left/right channel audio output jacks of DVD player when using the
COMPONENT VIDEO INPUT jacks.
19.ANT(enna). IN jack- Connect to an anten-
na, cable system, or satellite system.
COMPONENT VIDEO INPUT jacks-
20.
Connect to the Component Video output
jacks of DVD player.
Note: This TV can only accept a 480i
(interlaced) video signal.
S-VIDEO
COMPONENT VIDEO-INPUT
AUDIO
L
R
ANT. IN
Y
Pb
Pr
AUDIO OUTPUT
L
R
VIDEO 3 INPT
VIDEO
VIDEO 1 INPT
L
R
INSTALLING THE BATTERIES
1) Slide the battery compartment cover back
on the remote unit.
2) Insert 2 "AA" penlight batteries into battery
compartment in the direction as indicated
by the polarity (+ / -) markings. Batteries
installed with incorrect polarity may damage the remote unit.
3) Replace the cover.
USING AUDIO/VIDEO INPUT JACKS
When you use the AUDIO/VIDEO input jacks
or COMPONENT VIDEO INPUT jacks, select
“VIDEO1”, “VIDEO2”, “VIDEO3” or “COMPONENT” mode by pressing the INPUT
SELECT button on the remote control.
•To select the VIDEO1 INPUT jacks on the
rear of the TV, select “VIDEO1”.
•To select the jacks on the front of the TV,
select “VIDEO2”.
•To select the VIDEO3 INPUT jacks on the
rear of the TV, select “VIDEO3”.
•To select the COMPONENT VIDEO INPUT
jacks on the rear of the TV, select “COMPONENT”.
Notes:
•You may also set the Game mode by press-
ing the GAME button on the remote control.
"GAME" appears on the TV screen and the
TV input switches to the front A/V input
(See PICTURE ADJUSTMENT).
• When you use the S-VIDEO connection,
S-VIDEO jack is given priority over the
VIDEO jack on the rear panel.
Page 3
PREPARATION FOR USE
PICTURE
CHANNEL SET
[ENGLISH]ESPAÑOL
V-CHIP SET UP
CAPTION [OFF]
TV SOUND [MAIN]
PICTURE
CHANNEL SET
[ENGLISH]ESPAÑOL
V-CHIP SET UP
CAPTION [ C1]
TV SOUND [MAIN]
PICTURE
CHANNEL SET
[ENGLISH]ESPAÑOL
V-CHIP SET UP
CAPTION [ C2]
TV SOUND [MAIN]
PICTURE
CHANNEL SET
[ENGLISH]ESPAÑOL
V-CHIP SET UP
CAPTION [ T1]
TV SOUND [MAIN]
PICTURE
CHANNEL SET
[ENGLISH]ESPAÑOL
V-CHIP SET UP
CAPTION [ T2]
TV SOUND [MAIN]
PICTURE
CHANNEL SET
[ENGLISH]ESPAÑOL
V-CHIP SET UP
CAPTION [OFF]
TV SOUND [MAIN]
PICTURE
CHANNEL SET
[ENGLISH]ESPAÑOL
V-CHIP SET UP
CAPTION [ C1]
TV SOUND [MAIN]
PICTURE
CHANNEL SET
[ENGLISH]ESPAÑOL
V-CHIP SET UP
CAPTION [ C2]
TV SOUND [MAIN]
PICTURE
CHANNEL SET
[ENGLISH]ESPAÑOL
V-CHIP SET UP
CAPTION [ T1]
TV SOUND [MAIN]
PICTURE
CHANNEL SET
[ENGLISH]ESPAÑOL
V-CHIP SET UP
CAPTION [ T2]
TV SOUND [MAIN]
BRIGHT
CONTRAST
COLOR
TINT
SHARPNESS
to increase
brightness
to increase
contrast
to brilliant
to green
to clear
to decrease
brightness
to decrease
contrast
to pale
to purple
to soft
VOL(ume)
VOL(ume)
[-]
SHARPNESS
[+]
[-]
CONTRAST
[+] [-]
COLOR
[+] [-]
TINT
[+]
[-]
BRIGHT
[+]
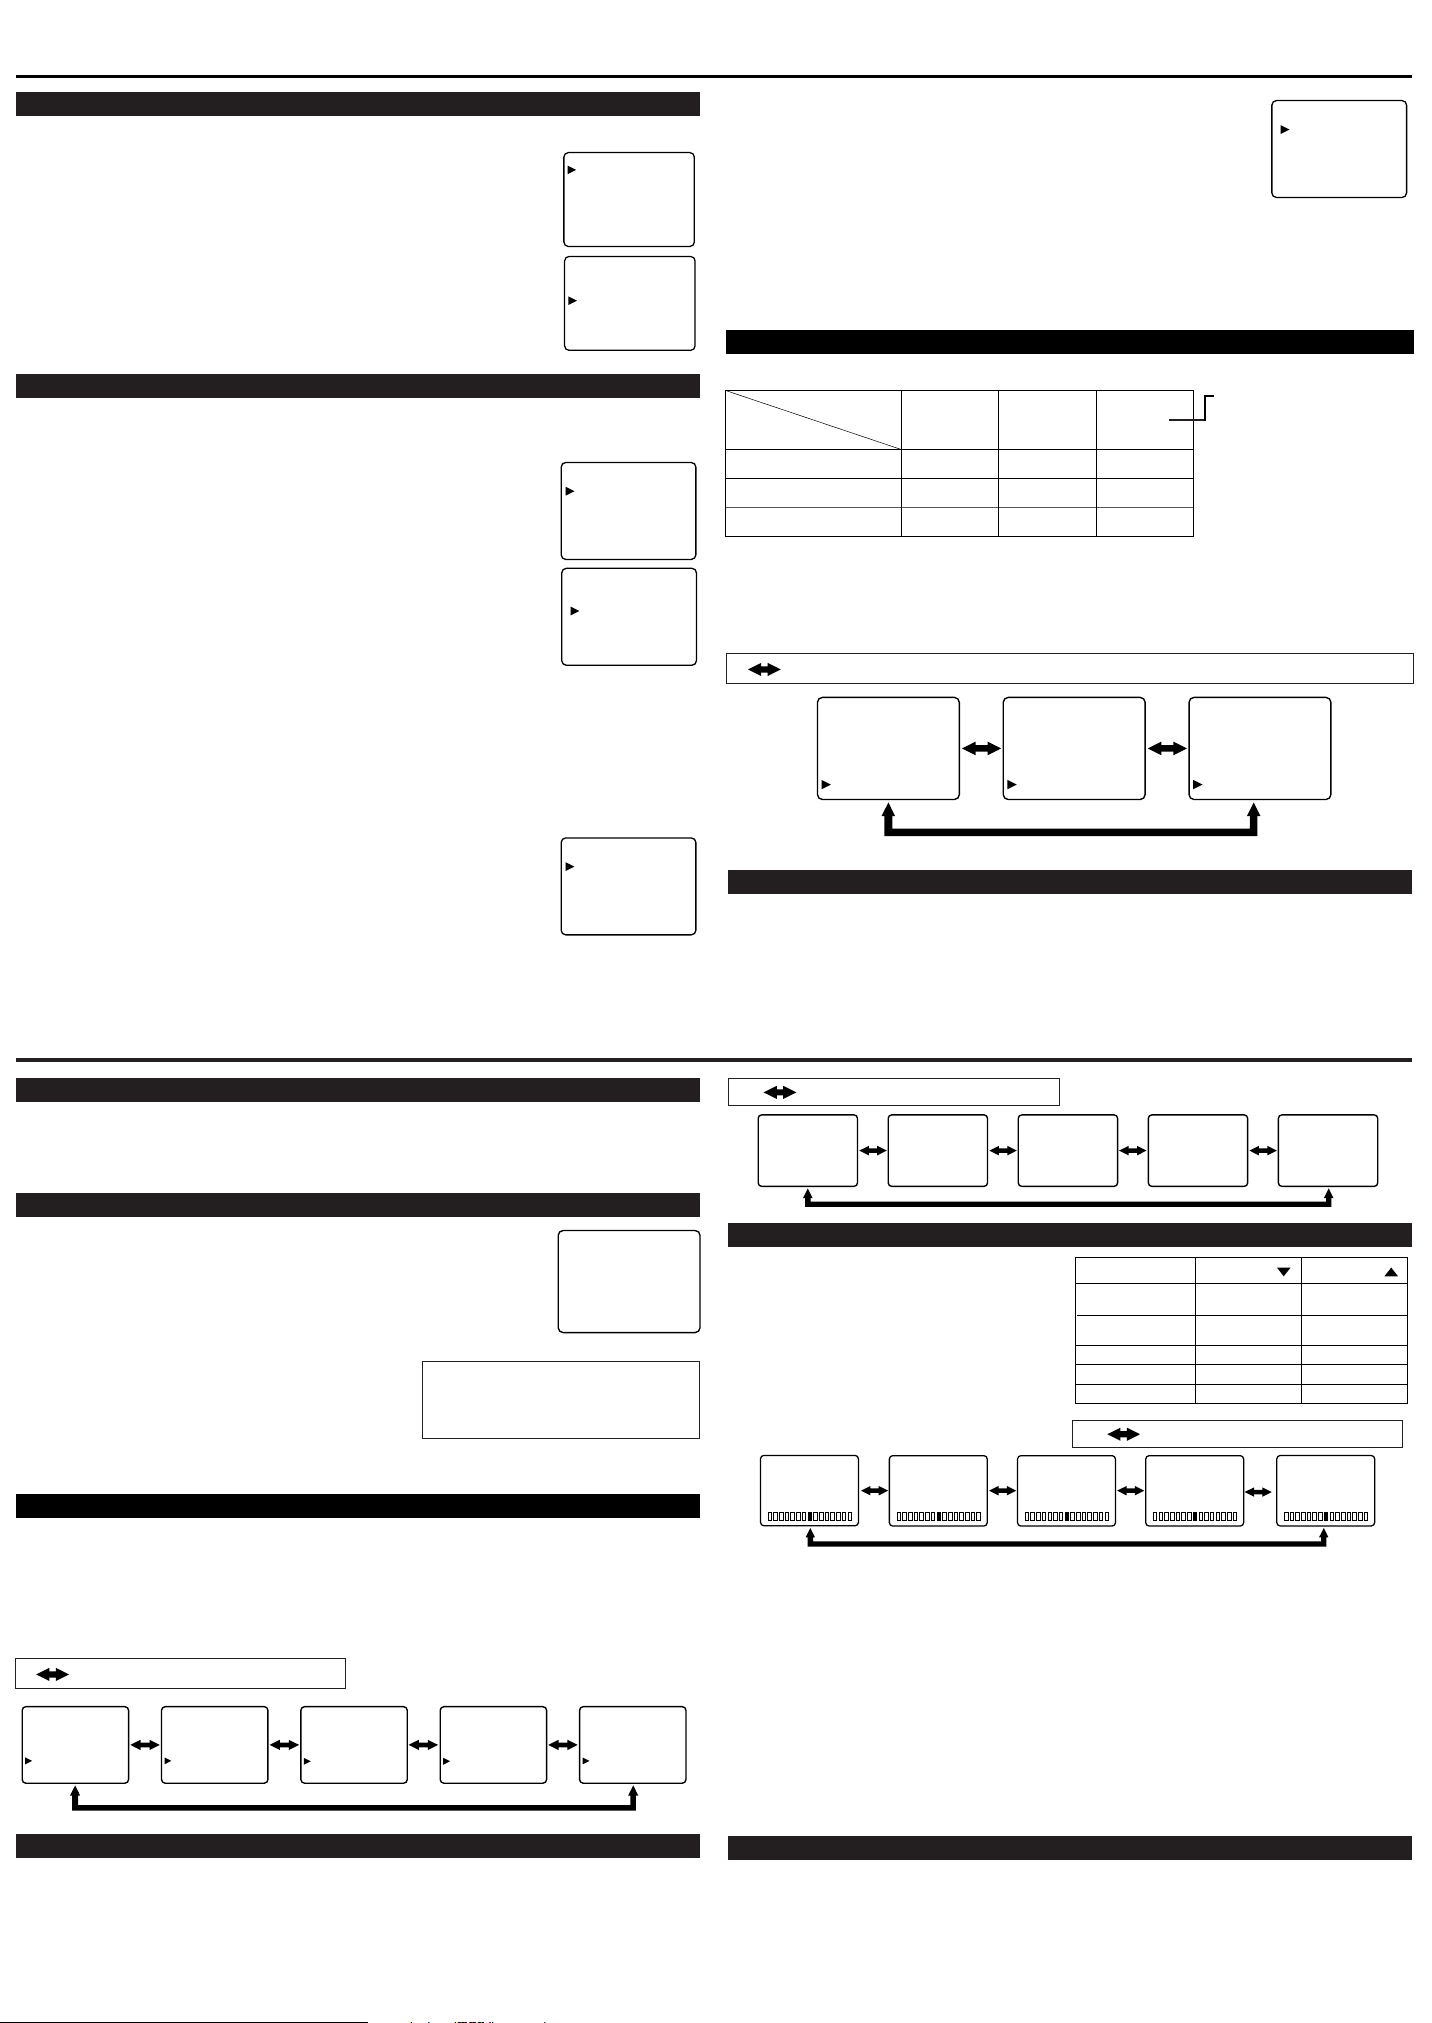
LANGUAGE SELECTION
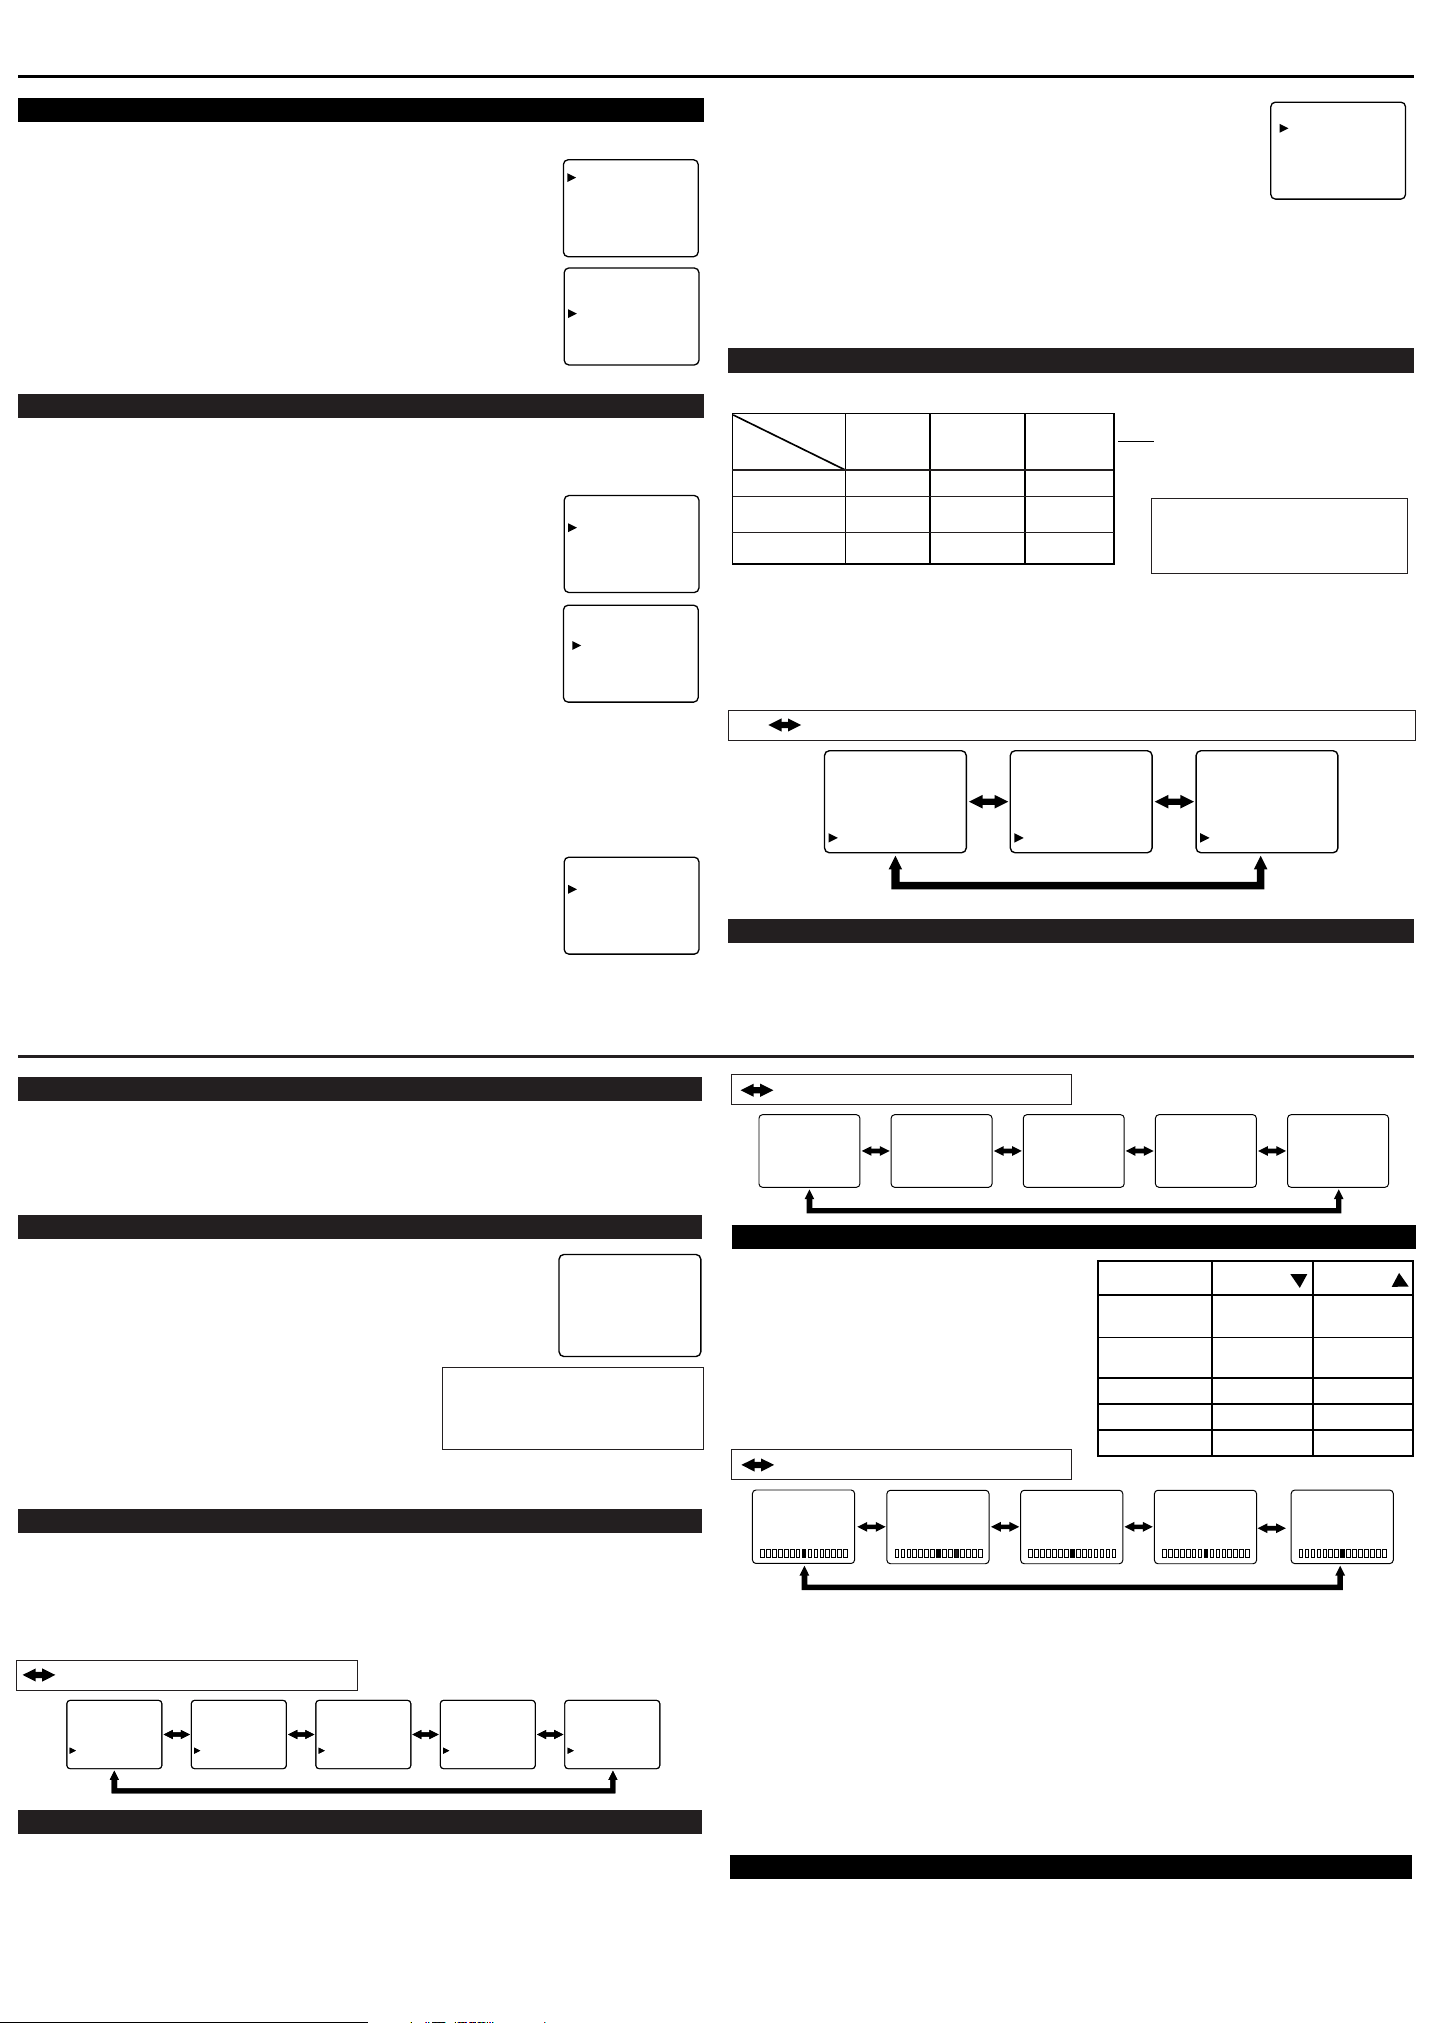
If you want to change the language of the on-screen menu, follow the procedure below.
1) Connect the power cord to a standard AC outlet.
Note: If some digits appear in the corner of the screen, press the POWER
button without unplugging the power cord.
2) Press the POWER button to turn on the TV.
3) Press the MENU button so that the menu display appears
PICTURE
CHANNEL SET
[ENGLISH]ESPAÑOL
V-CHIP SET UP
CAPTION [OFF]
TV SOUND [MAIN]
on the TV screen.
4) Press the CH(annel)
5) Select "ENGLISH" or "ESPAÑOL" = Spanish by using
the VOL(ume)
6) Press the MENU button to exit the menu.
▲ or ▼ button to point to "[ENGLISH]".
▲ or ▼ button.
PICTURE
CHANNEL SET
[ENGLISH]ESPAÑOL
V-CHIP SET UP
CAPTION [OFF]
TV SOUND [MAIN]
CHANNEL PRESETTING
To preset a channel or to change a preset channel, follow the procedure below.
1) Press the POWER button to turn on the TV.
2) Press the MENU button so that the menu display appears
on the TV screen.
3) Press the CH(annel)
Then press the VOL(ume)
4) Press the CH(annel)
Then press the VOL(ume)
▲ or ▼ button to point to "CHANNEL SET".
▲ button.
▲ or ▼ button to point to "AUTO PRESET CH".
▲ button.
The tuner scans and memorizes all active channels in your area.
● The TV distinguishes between standard TV channels and cable (CATV)
channels.
● When AUTO PRESET CH action is completed, the lowest memorized
channel reappears on the screen.
● When you press the CH(annel) ▲ or ▼ button after selecting "AUTO
PRESET CH", the tuner will stop at the memorized channels only.
● The TV may memorize TV channels as CATV channels if the reception conditions are poor. If
this happens, try AUTO PRESET CH action again when reception conditions are better.
● When AUTO PRESET CH is activated where there is no TV signal input, "NO TV SIGNALS"
will appear on the display after the completion of the channel scanning.
[ADD/DELETE FUNCTION]
1) Press the MENU button so that the menu display appears on the TV
screen.
2) Press the CH(annel)
Then press the VOL(ume)
▲ or ▼ button to point to "CHANNEL SET".
▲ button.
PICTURE
CHANNEL SET
[ENGLISH]ESPAÑOL
V-CHIP SET UP
CAPTION [OFF]
TV SOUND [MAIN]
ADD/DELETE
AUTO PRESET CH
PICTURE
CHANNEL SET
[ENGLISH]ESPAÑOL
V-CHIP SET UP
CAPTION [OFF]
TV SOUND [MAIN]
3) Press the VOL(ume)
4) Use the CH(annel)
into memory or to erase from memory.
▲ button so that "ADD/DELETE" is selected.
▲ or ▼ button to select the channel you wish to put
ADD/DELETE
AUTO PRESET CH
Note: The menu will disappear automatically in about 10 seconds.
Perform "ADD/DELETE" function while this display appears on the
screen.
●
Press the VOL(ume) ▲ or ▼ button to light up the channel number
in LIGHT BLUE if you wish to add the channel into memory.
●
Press the VOL(ume) ▲ or ▼ button to light up the channel number
in LIGHT RED if you wish to erase the channel from memory.
5) Press the MENU button to exit the menu.
MTS (Multi-Channel Television Sound) SYSTEM
You can listen to a program in MTS stereo by following the steps below.
Menu
Menu
Selection
Typ e of
Typ e of
broadcast
broadcast
Regular
Regular
Stereo
Stereo
broadcast
broadcast
SAP
SAP
Selection
MAIN
MAIN
-None-
-None-
STEREO
STEREO
MAIN
MAIN
SAP
MONO
MONO
-None- -None-
-None- -None-
MONO
MONO
MAIN
MAIN
SAP
STEREO
STEREO
SAP
SAP
To show the status, press the
DISPLAY button on the remote
control.
SAP: Second Audio Program,
which means your program, can
also be received in a second language or sometimes a radio station.
[To Select STEREO, MONO or SAP in Stereo broadcast]
1) Press the MENU button so that the menu display appears on the TV screen.
2) Press the CH(annel) ▲ or ▼ button to point to "TV SOUND".
3) Press the VOL(ume)
▲ or ▼ button to select your desired stereo mode ([MAIN], [MONO] or
[SAP]).
: Press the VOL(ume) ▲ or ▼ button.
Menu
PICTURE
Selection
CHANNEL SET
Typ e of
[ENGLISH]ESPAÑOL
broadcast
V-CHIP SET UP
Regular
CAPTION [OFF]
TV SOUND [MAIN]
Stereo
broadcast
SAP
MAIN
-None-
STEREO
MAIN
PICTURE
MONO
CHANNEL SET
[ENGLISH]ESPAÑOL
V-CHIP SET UP
-None- -None-
CAPTION [OFF]
TV SOUND [MONO]
MONO
MAIN
SAP
STEREO
SAP
PICTURE
CHANNEL SET
[ENGLISH]ESPAÑOL
V-CHIP SET UP
CAPTION [OFF]
TV SOUND [SAP]
RESUME FUNCTION
If the power fails or is disconnected while the TV is powered on, the TV will turn on automatically when the power resumes.
OPERATIONS
WATCHING A TV PROGRAM
1) Press the POWER button to turn on the TV.
2) Select the desired channel with the CH(annel) ▲ or ▼ button.
3) Adjust the volume to the desired listening level using the VOL(ume)
4) Adjust picture controls for a natural looking image (See "PICTURE ADJUSTMENT").
SETTING THE SLEEP TIMER
The sleep timer function allows you to have the POWER automatically turn
off after a set time period.
1) Press the POWER button to turn on the TV and press the SLEEP button
on the remote control .
2) You may change the sleep time by pressing the SLEEP button on the
remote control repeatedly. The timer can be set up to 90
minutes. Each time the SLEEP button is pressed the time
increases by 10 minutes. (The timer display counts up and
sleep timer will be displayed on the screen when you
press the SLEEP button on remote control).
To cancel the sleep timer:
Press the SLEEP button repeatedly until "SLEEP 0" is displayed.
Note: When you disconnect the unit from the AC outlet or when you have a power failure, the
sleep time will be lost.
CLOSED CAPTION SELECTION
You may view specially labeled (cc) TV programs, movies, news, prerecorded tapes, etc.
with either a dialogue caption or text display
added to the program.
: Press the VOL(ume) ▲ or ▼ button.
AV MEMORY
This feature allows you to quickly adjust picture settings for MANUAL, SPORT, NEWS, MOVIE
and GAME to match the program you are watching.
1) Press the MENU button so that the menu display appears on the TV screen.
2) Press the VOL(ume)
3) Select the item with the CH(annel)
Note: See “PICTURE ADJUSTMENT” to manually customize the picture.
▲ button so that "PICTURE" is selected.
▲ or ▼ button.
1) Press the MENU button so that the menu
display appears on the TV screen.
2) Press the CH(annel) ▲ or ▼ button to point
to "CAPTION".
3) Press the VOL(ume) ▲ or ▼ button to select
the mode you wish.
4) When done, press the MENU button to exit
the menu.
▲ or ▼ button.
SLEEP 10
: Press the CH(annel) ▲ or ▼ button.
MANUAL
NEWSSPORT MOVIE GAME
PICTURE ADJUSTMENT
1) Press the MENU button so that the menu display appears on the TV screen.
2) Press the VOL(ume)
▲ button so that
"PICTURE" is selected.
3) Press the CH(annel)
“MANUAL”. Then press the VOL(ume)
▲ or ▼ button to select
▲
button.
4) Select the feature you wish to adjust with the
CH(annel)
VOL(ume)
Note:
●
In the above steps, the picture adjustment display will disappear from the TV screen automati-
▲ or ▼ button and adjust it with the
▲ or ▼ button.
: Press the CH(annel)
▲ or ▼ button.
cally after about 10 seconds if you do not press any buttons. Press the MENU and VOL(ume)
▲ button so that "PICTURE" is selected. Then press the CH(annel) ▲ or ▼ button repeatedly
until the display returns to the screen.
[USING THE GAME BUTTON]
You can set Game mode and select the front AUDIO/VIDEO input at the same time by pressing
the GAME button on the remote control. “GAME” appears on the TV screen.
●
To exit Game mode and front A/V input, press the INPUT SELECT button on the remote control.
●
To cancel Game mode only, follow the steps in “PICTURE ADJUSTMENT” or “AV MEMORY”
section. “VIDEO2” (front AUDIO/VIDEO input) appears on the TV screen.
●
If you press the GAME button when the TV is off, the TV turns on and will be in Game mode
and will select front A/V input automatically.
V-CHIP SET UP
V- CHIP enables parents to prevent their children from watching inappropriate material on TV.
V- CHIP reads the ratings for programming (except for news and sports programs, unedited
movies on premium cable channels and Emergency Broadcast System signals), then denies access
to programming if the program's rating meets or exceeds the limitations you select. In this case,
"PROTECTED PROGRAM by ..." message appears on the TV screen.
To block certain ratings, follow the steps below.
Page 4
QUICK SERVICE CHECK LIST
PROBLEM
POSSIBLE REMEDY
Remote Control Doesn’t Work
Bars On Screen
Picture Distorted
Picture Rolls Vertically
No Color
Poor Reception on Some Channels
Weak Picture
Lines or Streaks in Picture
Ghosts in picture
Picture Blurred
Sound OK, Picture Poor
Picture OK, Sound Poor
No Picture or Sound
Different color marks on screen
Try a new channel, if OK, then possible station trouble.
Is TV plugged in?
Power at outlet?
Is TV's POWER button on?
If outside antenna or cable TV system is being used,
check for broken wire or loose connection.
Is antenna/cable TV connected to terminal on back of the TV?
Check for local interference.
Turn off with POWER button and then turn it on after about a minute.
Adjust COLOR control.
Adjust CONTRAST & BRIGHT control.
Check batteries in Remote Control.
Move the TV away from the nearby speakers and appliances which generate a
magnetic field.
Turn off using the POWER button, then turn it on again 30 minutes later or so.
As an ENERGY STAR® Partner, our company has determined that this product meets
the E
NERGY STAR
®
guidelines for energy efficiency. ENERGY STAR® is a U.S. registered mark.
OPERATIONS (Continued)
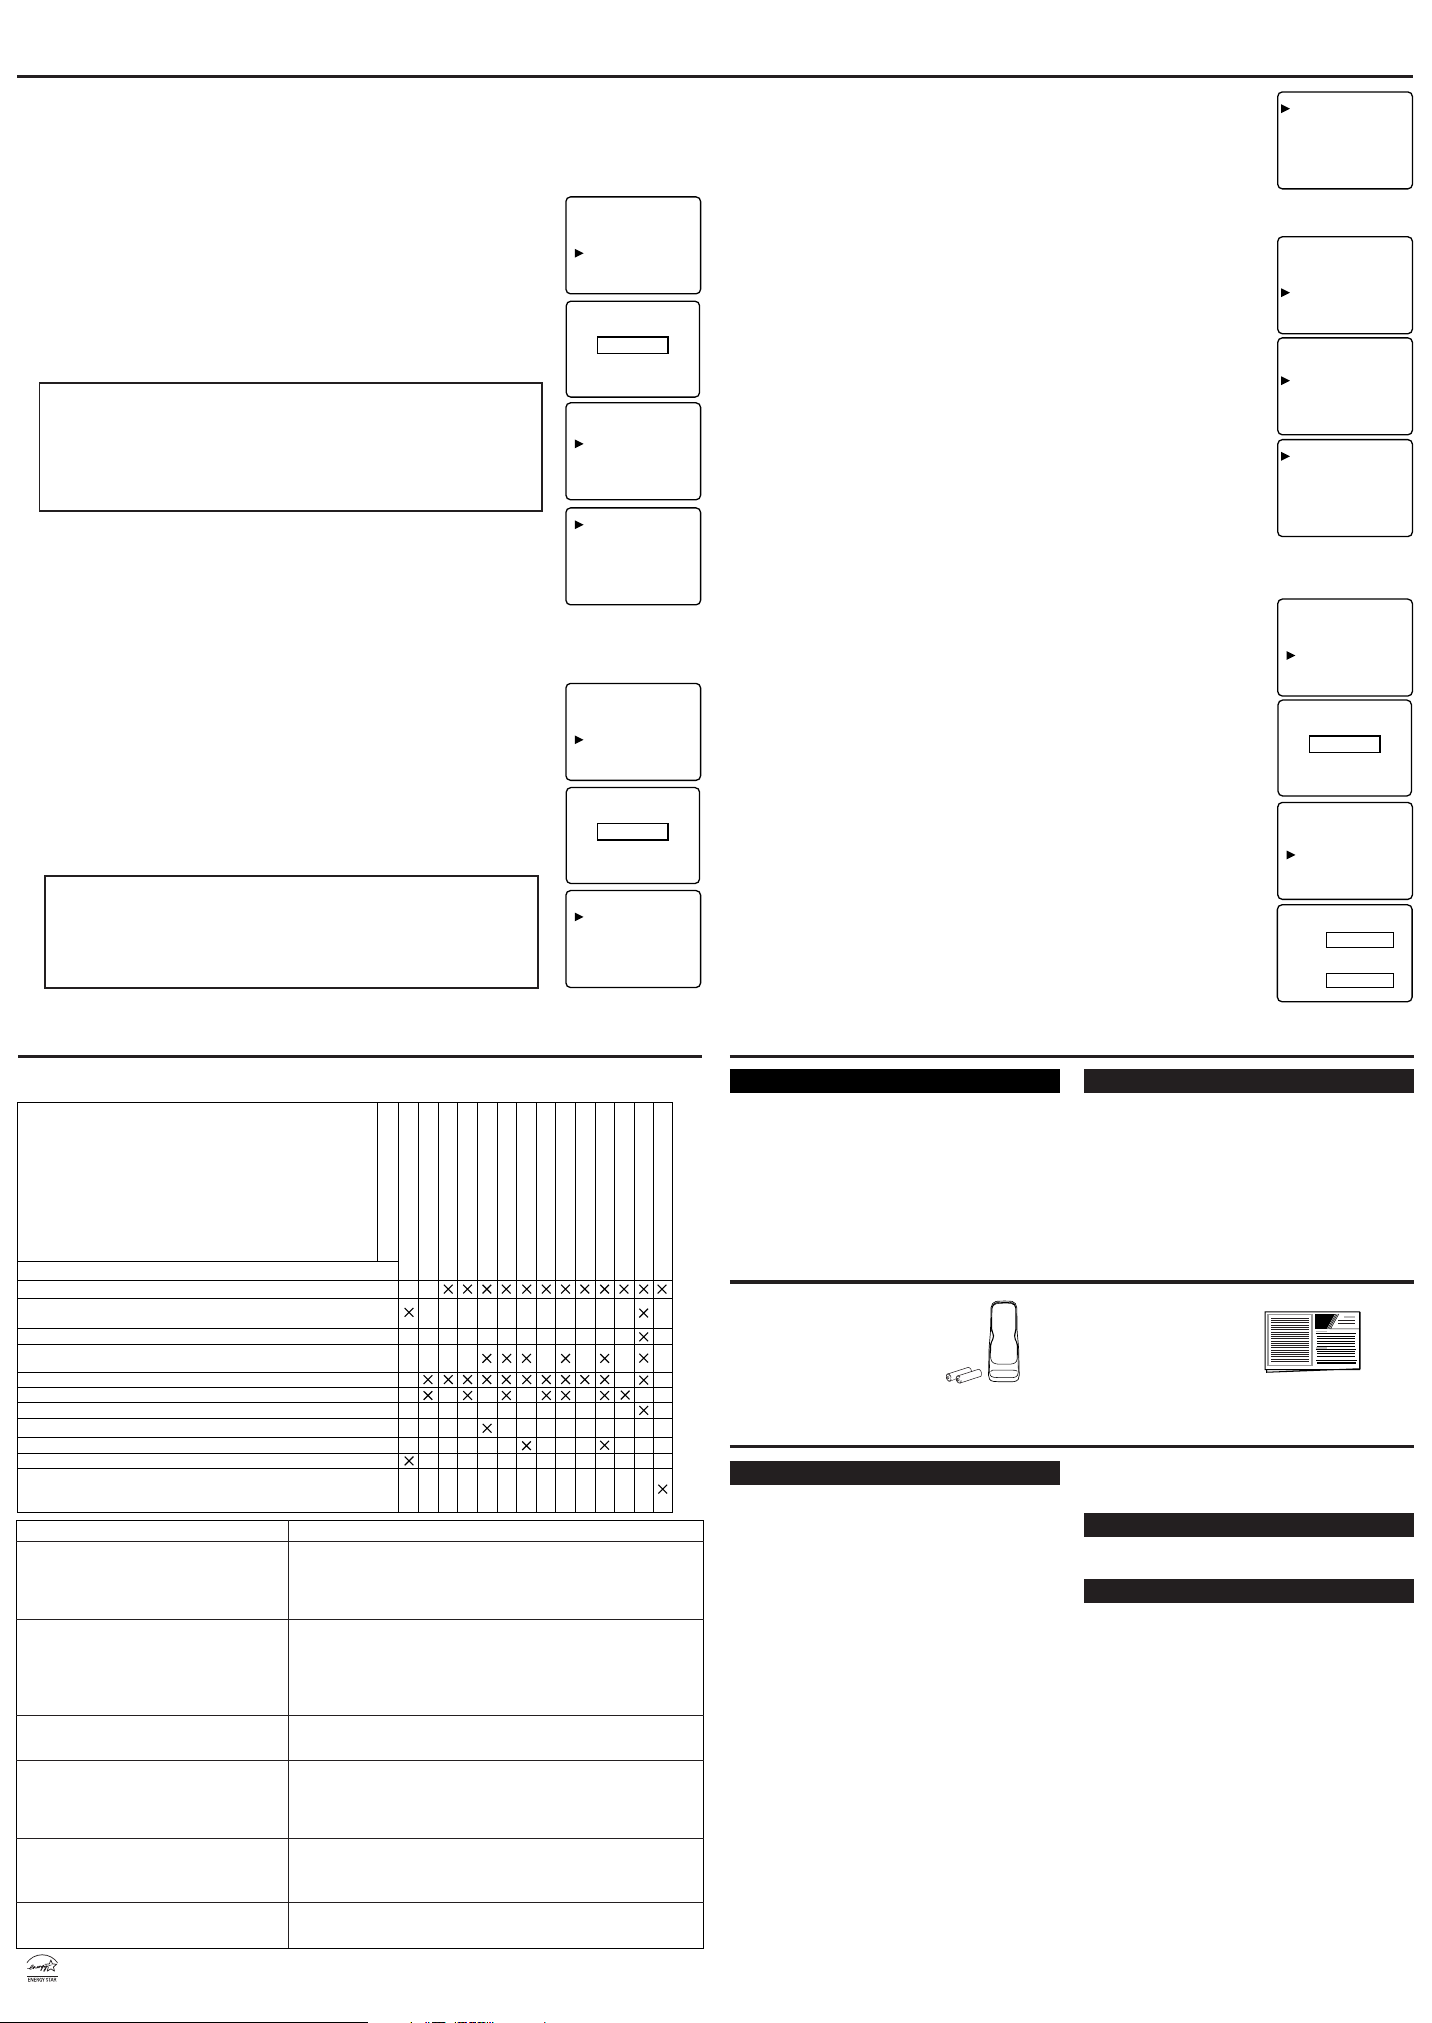
● Programming may be rated by the Motion Picture Association of America (MPAA) or accord-
ing to the Television Parental Guidelines. In order to block any inappropriate programming, set
your limits in both places (MPAA RATING and TV RATING).
● You cannot access the menu when the "PROTECTED PROGRAM by ..." message appears. In
this case, change to an unblocked channel, then press the MENU button.
[MPAA RATING SET UP]
1) Press the MENU button so that the menu display appears on the TV screen.
2) Press the CH(annel) ▲ or ▼ button to point to "V-CHIP SET UP".
Then press the VOL(ume) ▲ button.
3) Use the number buttons to enter 4-digit access code. The default access
code is 0000. If you have not set up your personal access code, you should
PICTURE
CHANNEL SET
[ENGLISH] ESPAÑOL
V-CHIP SET UP
CAPTION [OFF]
TV SOUND [MAIN]
use 0000.
4) Press the CH(annel) ▲ or ▼ button to point to "MPAA RATING".
Then press the VOL(ume) ▲ button.
5) Press the CH(annel) ▲ or ▼ button to point to your desired item.
ACCESS CODE
_ _ _ _
Then press the VOL(ume) ▲ button to select [BLOCK] or [VIEW].
<Selection> <Rating Category Explanations>
• G: General Audience
• PG: Parental Guidance suggested.
• PG-13: Unsuitable for children under 13
• R: Restricted; under 17 requires accompanying parent or
• NC-17: No one under 17 admitted
• X: Mature audience only
● When you select the rating category and set it to [BLOCK], the higher rat-
adult guardian
ing will change to [BLOCK] automatically. Also, the lower rating will
change to [VIEW] automatically.
● When you change "G" to [BLOCK] or [VIEW], the all ratings will change
to [BLOCK] or [VIEW] automatically.
● When you change "X" to [VIEW], then all ratings will change to [VIEW]
TV RATING
MPAA RATING
CHANGE CODE
G [VIEW]
[VIEW]
PG
[VIEW]
PG-13
[VIEW]
R
[VIEW]
NC-17
[VIEW]
X
automatically.
6) Press the MENU button to exit the menu.
[TV RATING SET UP]
1) Press the MENU button so that the menu display appears on the TV screen.
2) Press the CH(annel) ▲ or ▼ button to point to "V-CHIP SET UP".
Then press the VOL(ume)
▲ button.
3) Use the number buttons to enter 4-digit access code. The default access
code is 0000. If you have not set up your personal access code, you should
PICTURE
CHANNEL SET
[ENGLISH] ESPAÑOL
V-CHIP SET UP
CAPTION [OFF]
TV SOUND [MAIN]
use 0000.
4) Press the CH(annel)
Then press the VOL(ume)
5) Press the CH(annel)
Then press the VOL(ume)
<Selection> <Rating Category Explanations>
• TV-Y: Appropriate for all children
• TV-Y7: Appropriate for children seven and older
• TV-G: General Audience
• TV-PG: Parental Guidance suggested.
• TV-14: Unsuitable for children under 14
• TV-MA: Mature audience only
▲ or ▼ button to point to "TV RATING".
▲ button.
▲ or ▼ button to point to your desired item.
▲ button to select [BLOCK] or [VIEW].
ACCESS CODE
_ _ _ _
TV RATING
MPAA RATING
CHANGE CODE
● When you select the rating category and set it to [BLOCK], the higher rat-
ing will change to [BLOCK] automatically. Also, the lower rating will
change to [VIEW] automatically.
● When you change "TV-Y" to [BLOCK] or [VIEW], then all ratings will
change to [BLOCK] or [VIEW] automatically.
● When you change "TV-MA" to [VIEW], then all ratings will change to
[VIEW] automatically.
[V-CHIP SET UP SUB RATINGS]
When you select TV-Y7, TV-PG, TV-14 or TV-MA and you press the
VOL(ume) ▲ button, the sub-ratings will appear on the TV screen.
If you select the rating category (example: TV-PG) and set it to [BLOCK] or
[VIEW], the sub-ratings (example: V for Violence) will change to [BLOCK]
or [VIEW] automatically.
You can set the sub-ratings to [BLOCK] or [VIEW] individually when the
rating category is set to [BLOCK]. To set the sub-ratings individually, follow
the steps below.
● When you select [TV-Y7]:
Press the CH(annel) ▲ or ▼ button to select "FV" (Fantasy Violence).
Then press the VOL(ume) ▲ button to select [BLOCK] or [VIEW].
● When you select [TV-PG], [TV-14] or [TV-MA]:
Press the CH(annel) ▲ or ▼ button to select "D" (Suggestive Dialog),
"L"(Coarse Language), "S"(Sexual Situation) or "V" (Violence). Then
press the VOL(ume)
▲ button to select [BLOCK] or [VIEW].
Notes:
● When you select [TV-MA], "D" does not appear on the TV screen.
● The sub-ratings set to [BLOCK] appear next to the rating category in the
TV RATING menu.
6) Press the MENU button to exit the menu.
[V-CHIPACCESS CODE]
To change access code, follow steps.
1) Press the MENU button, then press the CH(annel)
▲ or ▼ button to select
V- CHIP SET UP. Press the VOL(ume) ▲ button to continue.
2) Press the number buttons to enter your old access code. If you have never
set up your personal access code, use 0000.
3) Press the CH(annel) ▲ or ▼ button to select CHANGE CODE. Then press
the VOL(ume) ▲ button to continue.
4) Use the number buttons to enter your desired access code in the NEW
CODE space. Then enter the same code in the CONFIRM CODE space.
Your new access code is set. You will return to the "V-CHIP SET UP".
If the code in the CONFIRM CODE space does not match the code in the
NEW CODE space, repeat step 4, making sure you enter the same new code
exactly in the CONFIRM CODE space.
Notes:
• If a power failure occurs, the default code, 0000 will be the access code.
• If you connect the power cord to an AC outlet that is controlled by a wall
switch, your personal access code will be erased every time you turn off the
power at the wall switch. The default code will return to 0000.
[IF YOU FORGET YOUR ACCESS CODE]
You should restore the access code to 0000 as your access code, unplug the
TV’s power cord for 10 seconds, then plug it in again.
TV-Y
[VIEW]
TV-Y7 (
TV-G
TV-PG
TV-14
TV-MA (
TV-Y7
FV
TV-PG
D
L
S
V
TV-Y
TV-Y7 (
TV-G
TV-PG
TV-14
TV-MA (
PICTURE
CHANNEL SET
[ENGLISH] ESPAÑOL
V-CHIP SET UP
CAPTION [OFF]
TV SOUND [MAIN]
) [VIEW]
( ) [VIEW]
( ) [VIEW]
)
) [VIEW]
(DLSV) [BLOCK]
(DLSV) [BLOCK]
LSV) [BLOCK]
ACCESS CODE
[VIEW]
[VIEW]
[BLOCK]
[BLOCK]
[BLOCK]
[BLOCK]
[BLOCK]
[BLOCK]
[BLOCK]
[VIEW]
[BLOCK]
_ _ _ _
TV RATING
MPAA RATING
CHANGE CODE
NEW CODE
_ _ _ _
COMFIRM CODE
_ _ _ _
TROUBLESHOOTING GUIDE
Sometimes a performance problem can be easily solved by checking seemingly apparent but often overlooked possibilities. Before arranging for service, check these items. It could save you time and money.
Closed Caption Problem Possible Remedy
My TV is showing captions that are
misspelled.
My TV will not show the text in its entirety
or there is a delay of what is being said.
My captions are scrambled with white
boxes on the TV screen.
My program guide listed a TV show as
being closed captioned
but none of the captions were displayed.
My prerecorded videotape does not show
any captions. The tape box mentions it
being closed captioned.
My TV screen shows a black box on certain
channels.
You are watching a live broadcast and spelling errors made by the
closed captioning production company may pass through uncorrected. A prerecorded program will not show any misspelled words
because of the normal time available for editing the captions.
Captions that are delayed a few seconds behind the actual dialogue
are common for live broadcasts. Most captioning production companies can display a dialogue to a maximum of 220 words per minute.
If a dialogue exceeds that rate, selective editing is used to insure that
the captions remain up-to-date with the current TV screen dialogue.
Interference caused by building, power lines, thunderstorms, etc.
may cause scrambled or incomplete captions to appear.
Broadcasters may at times use a time compression process to the
actual program so that additional advertising time can be given.
Since the decoder cannot read the compressed information, captions
will be lost.
The videotape was either an illegal copy or the tape duplicating
company accidentally left out the captioning signals during the
copying process.
You are in the TEXT mode. Select CAPTION mode or CAPTION
[OFF].
MAINTENANCE
CABINET CLEANING
●
Wipe the front panel and other exterior surfaces of the TV with a soft cloth immersed
in lukewarm water and wrung dry.
●
Never use a solvent or alcohol. Do not spray
insecticide liquid near the TV. Such chemicals may cause damage and discoloration to
the exposed surfaces.
Wipe the picture tube of the TV with a soft
cloth. Before cleaning the picture tube, disconnect the power cord.
SUPPLIED ACCESSORIES
Remote control unit
(NE139UD)
Batteries ("AA" x 2)
Owner’s Manual
(1EMN20073)
SPECIFICATIONS
GENERAL SPECIFICATIONS
Television system: NTSC-M
Closed Caption
System: §15.119/FCC
Channel coverage
VHF: 2 ~ 13
UHF: 14 ~ 69
CATV: 2 ~ 13, A ~ W,
Tuning System 181 channel
Channel access: Direct access keyboard,
Terminals
Antenna input: VHF/UHF/CATV
S-Video input: Mini DIN 4-pin jack
Component Video Input
One pin jack (Y) / 1Vpp (75 ohm)
Two pin jack (P
Video input: RCA connector x 3
Audio out/input: RCA connector x 10
TV Standard
W+1 ~ W+84,
A-5 ~ A-1, 5A
frequency synthesized
tuning system
programmable
scan and up/down
75 ohm unbalanced
(F-type)
B/PR) / 700m Vpp (75 ohm)
Stereo Sound System
2 speakers
Sound output: 2W, 8 ohm x2
Remote control: Digital encoded
Operating
temperature: 5°C to 40°C
Power requirements: AC120V, 60Hz
Power consumption
(Maximum): 138W
Picture tube: 32"PF
Dimensions: H : 26-15/16” (684mm)
Weight: 149.9 lbs. (68kg)
•Designs and specifications are subject to
change without notice and without our
legal obligation.
•If there is a discrepancy between languages,
the default language will be English.
PICTURE TUBE CLEANING
Owner’s
Manual
ELECTRICAL SPECIFICATIONS
OTHER SPECIFICATIONS
infrared light system
(41°F~104°F)
W: 33-15/16” (862mm)
D: 22-1/16” (560mm)
Page 5
Fecha de compra
Empresa vendedora
Dirección de la empresa
Teléfono de la empresa
Modelo No.
Serie No.
AUDIO OUTPUT
LRLRLRPb
Y
Pr
VIDEO 3 INPT
VIDEO
S-VIDEO
AUDIO
ANT. IN
COMPONENT VIDEO-INPUT
VIDEO 1 INPT
PLENA GARANTÍA DURANTE 90 DÍAS
Registered Trademark / TM Trademark /
SM
Service Mark of Sears, Roebuck and Co.
Marca Registrada /
TM
Marca de Fábrica / SM Marca de Servicio de Sears, Roebuck and Co.
MC
Marque de commerce / MD Marque déposée de Sears, Roebuck and Co. © Sears, Roebuck and Co.
¡
Solucione el problema, en su casa o en la nuestra
!
En nuestra casa
Sears Parts & Repair Center.
1-800-488-1222
Llame a cualquier hora, del día o de la noche (EE.UU. solamente)
www.sears.com
Para contratar un acuerdo de protección de un producto bajo el servicio de Sears:
1-800-827-6655 (EE.UU.) 1-800-361-6665 (Canadá)
Para pedir servicio de reparación
a domicilio, y para ordenar piezas:
1-888-SU-HOGAR
SM
(1-888-784-6427)
Au Canada pour service en français:
1-800-LE-FOYER
MC
(1-800-533-6937)
www.sears.ca
En su casa
1-800-4-MY-HOME
R
(1-800-469-4663)
Llame a cualquier hora, del día o de la noche (EE.UU. y Canadá)
www.sears.com www.sears.ca
R
R
Para reparar aparatos en su casa, de todas las principales marcas,
equipos para el césped y el jardín o sistemas de calefacción o enfriamiento,
¡sin importar quién los fabricó ni quién los vendió!
Para las piezas de recambio, accesorios y manuales del propietario que
usted necesite para hacer por sí mismo las reparaciones.
Para la instalación profesional por Sears de aparatos para el hogar y
productos como abridores de puerta del garaje y calefones de agua.
Para reparar aparatos traídos al taller como aspiradoras, equipos para
césped y aparatos electrónicos, llámenos o vaya en línea para buscar el
más cercano Centro de Piezas y Reparaciones
Durante 90 días a partir de la fecha de compra, Sears reparará gratis cualquier defecto de material o mano de
obra que tenga esta televisor. Además, durante un año a partir de la fecha de compra, Sears suministrará,
también gratis, los recambios de las piezas defectuosas.
Dos (2) años para el tubo de imagen. Algunas piezas son excluidas de esta garantía.p
La cobertura de la garantía de arriba sólo se aplica a las televisor utilizadas en casas privadas.
PARA OBTENER LOS SERVICIOS DE LA GARANTÍA, DEVUELVA SIMPLEMENTE LA TELEVISOR AL
CENTRO DE SERVICIO SEARS MÁS CERCANO EN LOS ESTADOS UNIDOS.
Esta garantía le ofrece derechos legales específicos, y usted tal vez tenga también otros derechos que
cambian de estado a estado.
Manual del
Usuario
32 PULGADAS
TELEVISOR A COLOR
SRT2432P
CARACTERÍSTICAS
●
MEMORIA AV (MANUAL/DEPORTE/NOTICIA/CINE/GAME)
●
Tubo de imagen de pantalla plana
●
Sintonizador MTS/SAP
●
CONTRASEÑA V-CHIP
●
Selección de 181 canales- Todos los canales de VHF/UHF más un máximo de 125 canales de
televisión por cable.
●
Sintonización sintetizada de frecuencias PLL- El más reciente sistema electrónico de
sintonización sintetizada de frecuencias PLL proporciona una selección libre y sencilla de los
canales, y le permite sintonizar directamente cualquier canal utilizando los botones de números de
canales (0-9, y el botón +100) del mando a distancia.
●
Visualización de funciones en la pantalla
●
Mando a distancia para todas las funciones
●
Temporizador para dormir
●
Descodificador de subtítulos- Podrá ver programas de TV, películas, noticias, cintas
pregrabadas, etc., etiquetados especialmente (cc), bien con subtítulos del diálogo o con visualización
del texto añadidos al programa.
●
Función de apagado automático- Si entran señales por el terminal de la antena y el televisor
no se utiliza durante 15 minutos, éste se apagará automáticamente.
●
V-CHIP- Permite a los padres impedir que sus hijos vean en el televisor programas no apropiados
para ellos.
●
Entrada S-AUX- Le permite obtener una imagen con más detalle y claridad.
●
Entrada de
●
Entrada de VIDEO componente
●
Salida de audio trasera- Para conectar sonido de TV a un sistema de audio de uso doméstico.
PRECAUCIONES
●
Coloque su televisor en un lugar con buena ventilación.
●
Mantenga su aparato de TV alejado de las fuentes de calor directo, tales como los rayos
directos del sol o los registros de calefacción.
●
No coloque su TV sobre superficies blandas, como alfombras o frazadas.
●
Deje suficiente espacio para que circule el aire alrededor, debajo y arriba del aparato.
El número de serie de este producto puede encontrarlo en la parte posterior de la unidad. Ninguna
otra tiene el mismo número de serie que la suya. Le recomendamos que registre aquí ese número
y cualquier otra información vital y conserve este libro como un registro permanente de su
compra, para ayudarlo a indentificarla en caso de robo.
AUDIO/VIDEO
en derantero/trasero
Sears Roebuck and Co., Dept. 817WA Hoffman Estates, IL 60179
Para conocer la ubicación de un Centro de Servicio Sears en su zona, llame al: 1-800-488-1222.
L2935UF
CONEXIONES DE LA ANTENA/CABLE
PRECAUCIÓN: PARA IMPEDIR
DESCARGAS ELÉCTRICAS,
INTRODUZCA LA PATILLA
ANCHA EN LA RANURA ANCHA
E INSERTE A FONDO LA
CLAVIJA.
Antena UHF
(no incluído)
SUBTITULOS NARRATIVOS
Este aparato de TV puede recibir los C1 y C2 de Subtítulos y Texto.
MODO DE SUBTÍTULOS
1) El caracteres puede verse en la pantalla de la TV cuando la señal de la transmisión recibida
contiene las Señales de Subtítulos.
Modo Paint-on: Muestra inmediatamente en la pantalla el caracteres de entrada.
2)
Modo Pop-on: Una vez que el caracteres ha sido almacenado en la memoria, aparece todo de
Antena
combinada de
VHF/UHF
(no incluído)
repente.
Modo Roll-up: Muestra el caracteres en forma continuada como si fuera enrollado (máx. 4
Nota: Si se selecciona TITULO C1 o C2 pero no se incluye la señal de subtítulos, los caracteres
no aparecerán.
MODO DE TEXTO
1) Muestra el texto en la pantalla por enrollado (máx. 7 líneas).
líneas).
2) Si la señal de transmisión recibida no contiene la señal y el texto de subtítulos, no ocurrirá
ningún cambio.
Antena VHF
(no incluído)
Combinador de
VHF/UHF
(no incluído)
o
ANT. IN
Si usted necesita asistencia adicional para la instalacìón u operación después
de leer el manual del usuario, por favor llame por la línea pre-pagada al:
1-800-968-3429.
*Algunos sistemas de Cable TV utilizan señales codificadas y
requieren un convertidor especial para recibir esos canales.
Consulte con su compañía local de Cable.
Caja de CATV
o caja de emisiones vía
satélite (no incluído)
OUT
o
*
IN
Cable coaxil
de 75 ohm
Desde el cable coaxil o
caja de emisiones vía
satélite de 75 ohm del
sistema de Cable
Desde el
sistema de Cable
Nota para la persona que instale el sistema CATV
Este recordatorio se agrega para llamar la atención de quien instale el sistema CATV, con respecto al
Artículo 820-40 de la NEC que provee directivas guía para realizar una conexión adecuada a tierra
y, en particular, especifica que el cable de puesta a tierra debe ser conectado al sistema de terminal a
tierra del edificio lo más cercano al punto de entrada del cable como sea posible.
Notas:
• Cuando su TV recibe una señal de reproducción de efectos especiales (por ej , Search, Lento,
Fijo) desde un CANAL (CH3 o CH4) de salida de video de una videograbadora, su TV quizás
no indique el texto o subtítulo correcto.
• Es posible que los textos y subtítulos no correspondan exactamente con la voz de la TV.
• Si hay interferencia, puede ocasionar que el Sistema de Subtítulos Narrativos no funcione
adecuadamente.
• Los caracteres del texto o subtítulo no se mostrarán mientras se está mostrando la pantalla del
menú o de funciones.
Si usted ve esta pantalla:
•
Si su televisor muestra un cuadrado negro en la pantalla, esto significa que su TV ha sido fijado
en el modo TEXT. Para borrar la pantalla, seleccione TITULO C1, C2 o TITULO [OFF].
ADVERTENCIA DE LA FCCEste equipo puede generar o
utilizar energía de radiofrecuencia.
Los cambios o modificaciones del
equipo pueden causar serias
interferencias si dichos cambios o
modificaciones no han sido
expresamente aprobados en el
manual de instrucciones. El
usuario podrá perder la autoridad
para operar este equipo si efectúa
una modificación o cambio no
autorizado.
Page 6
ADVERTENCIA:
FIGURA A
EJEMPLO DE CONEXION A TIERRA DE LA ANTENA
SEGUN EL CODIGO NACIONAL ELECTRICO
Equipo de
servicio
eléctrico
Sujetador
a tierra
NEC - Código Nacional Eléctrico Sistema del electrodo a tierra
del servicio de alimentación
(NEC Art.250, PART H)
S2898A
Sujetadores a tierra
Conductores de puesta a tierra
(NEC Sección 810-21)
Unidad de descarga
de la antena
(NEC Sección 810-20)
Alambre
conductor
de la antena
VIDEO L - AUDIO - R
MENU
VOLUME
CHANNEL
POWER
4 5
67
12 3
1917211516 18 20
PWR
123
456
789
0 +100
DISPLAY
VOL
CH
CH
VOL
SLEEP
CHANNEL
RETURN
INPUT
SELECT
6
8
4
3
9
12
11
10
13
MUTE
MENU
5
GAME
14
PARA REDUCIR EL RIESGO DE INCENDIO O DE SHOCK ELÉCTRICO, NO EXPONGA
ESTE ARTEFACTO A LA LLUVIA O LA HUMEDAD.
PRECAUCION
RIESGO DE SHOCK
ELECTRICO NO ABRIR
PRECAUCION: PARA REDUCIR EL RIESGO DE
SHOCK ELECTRICO, NO QUITE LA CUBIERTA (O
LA TAPAPOSTERIOR). EL APARATO NO TIENE
ADENTRO PIEZAS QUE PUEDAN REPARARSE.
DEJE LA REPARACION AL PERSONAL DE
SERVICIO CALIFICADO.
La nota importante está colocada en la parte trasera del gabinete.
ESTE SIMBOLO INDICA QUE EN ESTA
UNIDAD HAYVOLTAJE PELIGROSO LO
CUAL CONSTITUYE UN RIESGO DE
SHOCK ELECTRICO.
ESTE SIMBOLO INDICA QUE HAY
INSTRUCCIONES IMPORTAN ES DE
MANTENIMIENTO Y OPERACION EN
LA LITERATURA QUE ACOMPAÑAA
ESTE ARTEFACTO.
IMPORTANTE PARA SU SEGURIDAD
1. Lea las instrucciones-Lea detenidamente todas las
instrucciones de seguridad y operación antes de usar el
aparato.
2. Conserve las instrucciones-Conserve las instrucciones de
seguridad y operación para consultas futuras.
3. Respete las advertencias-Observe estrictamente todas las
advertencias impresas en el aparato y las incluidas en el
manual de instrucciones.
4. Siga las instrucciones-Siga todas las instrucciones de
operación.
5. Limpieza-Desconecte el TV del tomacorriente mural
antes de limpiarlo. No use limpiadores líquidos ni
aerosol. Use un paño húmedo para la limpieza del
aparato.
EXCEPCION: Un producto diseñado para servicio
ininterrumpido y que por alguna razón, como ser la
posibilidad de pérdida del código de autorización para
un convertidor CATV, no debe ser desconectado por el
usuario para limpieza u otro propósito, puede no incluir
la advertencia en cuanto a no desconectar el aparato, en
la descripción del procedimiento de limpieza (5).
6. Enchufes-No use enchufes no recomendados por el
fabricante del TV, ya que podría ser peligroso.
7. Agua y humedad-No use este TV cerca del agua, por
ejemplo, cerca de una bañera o lavamanos, cerca del
fregadero de la cocina o lavandería, en un piso mojado,
cerca de una piscina, etc.
8. Accesorios-No instale este TV en un carro, soporte,
trípode o mesa inestables. El TV podría caerse, causando
serias lesiones a un niño o adulto, resultando también
severamente dañado. Uselo sólo el un carro, soporte,
trípode o mesa recomendados por el
fabricante, o vendidos con el TV.
Toda instalación del aparato debe
hacerse de acuerdo a las
instrucciones del fabricante,
empleando los accesorios de
instalación recomendados por el
mismo. La combinación de aparato
ADVERTENCIA DE CARRETA PORTATIL
S3126A
y carro deberán ser movida con cuidado. Las
detenciones bruscas, la fuerza excesiva y las superficies
disparejas podr n hacer que el aparato y el carro se
vuelquen
9. Ventilación-El gabinete del aparato tiene ranuras y
aberturas de ventilación que garantizan el
funcionamiento confiable del TV, evitando que se
recaliente. Estas aberturas no deberán ser bloqueadas ni
cubiertas. Para evitar bloquear las aberturas, nunca sitúe
el TV encima de una cama, sofá, alfombra u otra
superficie similar. Tampoco instale el TV cerca o encima
de un radiador o calefactor. El TV no debe ser instalado
en un mueble empotrado, como ser una repisa para
libros o bastidor, a menos que se pueda garantizar una
ventilación adecuada, o cuando las instrucciones del
fabricante así lo especifiquen.
10. Alimentación-Este TV sólo debe ser operado mediante
el tipo de fuente de alimentación especificado en la
etiqueta indicadora. Si no esté seguro del tipo de fuente
de alimentación que tiene en su casa, consulte a su
distribuidor o a la compañía de electricidad local. En el
caso de TV diseñados para funcionar a pilas o con otras
fuentes de alimentación, consulte el manual de
instrucciones respectivo.
11. Conexión a tierra o polarización-Este TV est equipado
con una clavija polarizada de corriente alterna (una
clavija que tiene una espiga m s ancha que la otra). Esta
clavija solamente podrá ser insertada en el tomacorriente
en una sola dirección. Esta es una medida de seguridad.
Si no pudiera insertar completamente la clavija en el
tomacorriente, vuelva a intentarlo invirtiendo la clavija.
Si aún no fuera posible insertar la clavija, tome contacto
con un electricista para que repare su tomacorriente
obsoleto. No modifique las características de seguridad
de la clavija polarizada.
12. Protección del cable de alimentación-Los cables de
alimentación deberán ser tendidos de manera tal que la
probabilidad de que sean pisados o aplastados por otros
objetos sea mínima. Preste especial atención a las
clavijas de los cables, a los receptáculos, y al punto por
donde salen del aparato.
13. Conexión a tierra de la antena exterior-Si conecta una
antena exterior o sistema de cable al TV, asegúrese de
conectar a tierra la antena o el sistema de cable para
tener una cierta protección contra alzas repentinas de
tensión y cargas de electricidad está tica. Las Artículo
810 del Código Nacional de Electricidad, ANSI/NFPA,
núm. 70, entrega información acerca de la manera
correcta de conectar a tierra el mástil y la estructura
soportante, tamaño de los conductores de puesta a tierra,
ubicación de la unidad de descarga de la antena,
conexión a los electrodos de tierra, y requisitos para el
electrodo de tierra. (Fig. A)
14. Tormentas eléctricas-Como medida adicional de
protección durante tormentas eléctricas, o cuando el
grabador de videocassettes permanezca sin uso durante
períodos prolongados de tiempo, desconéctelo del
tomacorriente mural y desconecte la antena o sistema de
cable. Esto evita que el TV resulte dañado por tormentas
eléctricas o sobretensiones en la línea de alimentación.
15. Líneas de alimentación-Un antena exterior no debe ser
instalada en la cercanía de líneas de alimentación aéreas
ni de otros circuitos de potencia para iluminación
eléctrica, o donde pueda caerse y hacer contacto con
tales líneas o circuitos. Al instalar un sistema de antena
exterior, tenga mucho cuidado de no tocar tales líneas o
circuitos de alimentación, ya que el contacto con ellos
podría ser fatal.
16. Sobrecarga-No sobrecargue los tomacorrientes murales
ni los cables de extensión, ya que esto podría causar
incendios o descargas eléctricas.
17. Entrada de objetos y líquidos-Nunca introduzca objetos
de ningún tipo por las aberturas de este TV, ya que
podría tocar peligrosos puntos de alta tensión o piezas
de cortocircuito, provocando incendios o descargas
eléctricas. Nunca derrame ningún tipo de líquido sobre
el TV
18. Servicio-No intente reparar el TV usted mismo; al abrir
o desmontar las cubiertas usted se expondrá a alta
tensión y a otros peligros. Solicite todo servicio a
personal calificado.
19. Daños que requieran reparación-En los siguientes casos,
desconecte el TV del tomacorriente mural y llame a un
técnico de servicio calificado:
a. Cuando el cable de alimentación o la clavija estén
dañados.
b. Si se ha derramado líquido sobre la unidad, o si algún
objeto ha caído dentro del TV.
c. Si el TV ha sido expuesto a la lluvia o al agua.
d. Cuando a pesar de haber seguido las instrucciones de
operación, el TV no funcione normalmente. Ajuste
solamente los controles mencionados en el manual de
instrucciones; el ajuste incorrecto de otros controles
podr causar daños a la unidad, la que por lo general
requerir de un prolongado trabajo de reparación (por un
técnico calificado) para que sus condiciones normales de
operación puedan ser restablecidas.
e. Si el TV se ha caído o si el gabinete se ha dañado.
f. Cuando el grabador de videocassettes muestre un
cambio notorio en su rendimiento.
20. Piezas de repuesto-Cuando sea necesario reemplazar
piezas, asegúrese de que el técnico de servicio emplee
las piezas de repuesto especificadas por el fabricante, o
piezas que tengan las mismas características que las
piezas originales. Las sustituciones no autorizadas
podrán causar incendios, descargas eléctricas y otros
problemas.
21. Revisión de seguridad-Al finalizar cualquier servicio de
mantenimiento o reparación de este TV, solicítele al
técnico que efectúe comprobaciones de seguridad para
determinar si el TV se encuentra o no en condiciones
óptimas de operación.
22. Calor-Esto producto TV deben colocarse fuera del
alcance de fuentes de calor tales como radiadores,
rejillas de calefacción, estufas o cualquier otro aparato
destinado a producir calor, incluyendo los
amplificadores.
CONTROLES DE OPERACIÓN Y SUS FUNCIONES
- PANEL DELANTERO -
- CONTROL REMOTO -
1. Toma de entrada VIDEO- Conéctela a la
2. Tomas de entrada AUDIO L/R-
toma de salida de vídeo de una videocámara, videograbadora o juego de vídeo.
Conéctelas a las tomas de salida de audio
de los canales izquierdo/derecho de una
videocámara, videograbadora o juego de
vídeo.
Nota: La tomas AUDIO L es para la
entrada mono. El sonido se oye por ambos
altavoces. Utilice esta toma para el equipo
monofónico que se conecte.
Botón MENU- Púlselo para visualizar el
3.
menú en la pantalla del televisor.
4.
Botones VOLUME (VOL) K/L- Púlselos
para controlar el nivel del volumen.
Pulse el botón VOL K para determinar un
modo de ajuste del menú en la pantalla del
televisor.
Pulse estos botones para seleccionar o
ajustar de un menú particular (por ejemplo:
Selección de Idioma, Preajuste de Canales,
Selección de Subtítulos, Ajuste de Imagen,
Ajuste de V-CHIP).
Botones CHANNEL (CH) K/L- Púlselos
5.
para seleccionar un canal memorizado.
Púlselos para seleccionar un modo de ajuste
del menú en la pantalla del televisor.
Pulse estos botones para seleccionar un
artículo que desee ajustar en el modo del
control de imagen.
6. Botón POWER (PWR)- Púlselo para
encender y apagar el televisor.
7. Ventanilla sensora de infrarrojos- Recibe
las señales de control infrarrojas
procedentes del mando a distancia.
8. Botones de números de canales - Pulse
dos dígitos para acceder directamente al
canal deseado. Recuerde pulsar "0" antes de
pulsar el número de un canal de un solo
dígito.
Botón +100- Púlselo para seleccionar
canales de televisión por cable cuyo número
sea igual o superior al 100.
9. Botón MUTE-Púlselo para apagar el
sonido del programa de TV (La visualización del nivel del volumen cambia del
color AZUL CLARO a ROJO CLARO).
Pulse de nuevo
VOL K o L para reponer el sonido.
10.
Botón INPUT SELECT- Púlselo para
seleccionar el modo de entrada del televisor
o de un equipo externo (AUX1, AUX2,
este botón
AUX3 o COMPONENT)
ZACIÓN DE LAS TOMAS DE ENTRADA
AUDIO/AUX).
11. B
otón CHANNEL RETURN- Púlselo para
volver al canal previamente visto. Por
ejemplo, al pulsar este botón una vez, la
visualización de canales cambiará de CH 3
(canal actual) a CH 10 (canal visto con
anterioridad), y al pulsarlo por segunda vez,
la visualización cambiará de CH 10 a CH 3.
o los botones
(Consulte UTILI-
- PANEL TRASERO -
12.Botón DISPLAY- Púlselo para visualizar
13.Botón SLEEP-
14.Botón GAME- Púlselo para establecer el
15.Cable de alimentación de CA- Conéctelo
16.Tomas AUDIO L/R OUTPUT- Conéctelas
17.
18.
19.Toma de entrada ANT. IN- Conéctela a
20.Tomas COMPONENT VIDEO INPUT-
el número del canal en la pantalla. Si lo
pulsa de nuevo, el número del canal
desaparecerá.
Púlselo
para visualizar el
temporizador para dormir y activarlo. La
hora de apagado se puede establecer
mediante el número de veces que usted
pulsa el botón (0, 10, 20, 30.. 90, 0
minutos).
modo de juego y para seleccionar al mismo
tiempo la entrada A/V delantera. Para salir,
pulse
el botón
INPUT SELECT (Consulte
UTILIZACIÓN DE LAS TOMAS DE
ENTRADA AUDIO/AUX y AJUSTE DE
IMAGEN).
a una toma de CA estándar (120V/60Hz).
a las tomas de entrada de audio del canal
izquierdo/derecho de un systema estéreo de
uso doméstico.
Toma de entrada S-VIDEO- Conéctela a la
toma de salida S-AUX de una videocámara,
videograbadora o sistema de juegos de vídeo
utilizando el cable S-AUX (no suministrado).
Nota:
La toma S-VIDEO del panel trasero
tiene prioridad sobre la toma VIDEO
(trasero).
Tomas de entrada COMPONENT AUDIO-
Conéctelas a las tomas de salida de audio de
los canales derecho/izquierdo de un
reproductor DVD cuando utilice las tomas de
entrada de vídeo componente.
una antena, sistema de TV por cable o
sistema de TV por satélite.
Conéctelas a las tomas de salida de vídeo
componente de un reproductor DVD.
Nota: Este televisor sólo puede aceptar una
señal de vídeo 480i (entrelazada).
S-VIDEO
COMPONENT VIDEO-INPUT
AUDIO
L
R
ANT. IN
Y
Pb
Pr
AUDIO OUTPUT
L
R
VIDEO 3 INPT
VIDEO
VIDEO 1 INPT
L
R
INSTALACION DE LAS PILAS
1) Quite deslizando la tapa del
compartimiento de las pilas en la unidad
del control remoto.
2) Inserte 2 pilas pequeñas "AA" en el
compartimiento de las pilas, en la posición
indicada por las marcas de polaridad (+ / -).
3) Instale la tapa.
UTILIZACIÓN DE LAS TOMAS
DE ENTRADA AUDIO/AUX
Cuando utilice las tomas de entrada
AUDIO/VIDEO o las tomas COMPONENT
VIDEO INPUT, seleccione el modo "AUX1",
“AUX2”, “AUX3” o “COMPONENTES”
pulsando el botón INPUT SELECT del control
remoto.
• Para usar las tomas VIDEO1 INPUT del
panel trasero del TV, seleccione "AUX1".
• Para usar las tomas del panel frontal del TV,
seleccione "AUX2".
• Para usar las tomas VIDEO3 INPUT del
panel trasero del TV, seleccione "AUX3".
• Para usar las tomas de COMPONENT
VIDEO INPUT del panel trasero del TV,
seleccione "COMPONENTES".
Notas:
• También puede establecer el modo de juego
pulsando el botón GAME del control remoto.
"GAME" aparecerá en la pantalla del TV. En
este caso, conecte la fuente externa a las
tomas AUDIO/VIDEO del panel frontal
(Consulte AJUSTE DE IMAGEN.)
• Cuando utilice la conexión S-AUX, la toma
S-AUX tendrá prioridad sobre la toma
VIDEO del panel trasero.
Page 7
IMAGEN
CANAL PREP.
[ESPAÑOL]ENGLISH
AJUSTE DE V-CHIP
TITULO [OFF]
SONIDO TV [MAIN]
IMAGEN
CANAL PREP.
[ESPAÑOL]ENGLISH
AJUSTE DE V-CHIP
TITULO [ C1]
SONIDO TV [MAIN]
IMAGEN
CANAL PREP.
[ESPAÑOL]ENGLISH
AJUSTE DE V-CHIP
TITULO [ C2]
SONIDO TV [MAIN]
IMAGEN
CANAL PREP.
[ESPAÑOL]ENGLISH
AJUSTE DE V-CHIP
TITULO [ T1]
SONIDO TV [MAIN]
IMAGEN
CANAL PREP.
[ESPAÑOL]ENGLISH
AJUSTE DE V-CHIP
TITULO [ T2]
SONIDO TV [MAIN]
[-]
AGUDEZA
[+]
[-]
CONTRASTE
[+] [-]
COLOR
[+] [-]
MATIZ
[+]
[-]
CLARIDAD
[+]
PREPARACIÓN PARA LA UTILIZACIÓN
CLARIDAD
CONTRASTE
COLOR
MATIZ
AGUDEZA
VOL(ume)
VOL(ume)
Para disminuir
el brillo
Para disminuir
el contraste
más pálido
más púrpura
más suave
Para aumentar
el brillo
Para aumentar
el contraste
más brillante
más verde
más claro
IMAGEN
CANAL PREP.
[ESPAÑOL]ENGLISH
AJUSTE DE V-CHIP
TITULO [OFF]
SONIDO TV [MAIN]
IMAGEN
CANAL PREP.
[ESPAÑOL]ENGLISH
AJUSTE DE V-CHIP
TITULO [OFF]
SONIDO TV [MONO]
IMAGEN
CANAL PREP.
[ESPAÑOL]ENGLISH
AJUSTE DE V-CHIP
TITULO [OFF]
SONIDO TV [SAP]
MANUAL
NOTICIADEPORTE CINE GAME
SELECCIÓN DE IDIOMA
Si desea cambiar el idioma del menú en pantalla, siga el procedimiento de abajo.
1) Conecte el cable de alimentación a una toma de CA estándar.
Nota: Si aparezcan algunos digitos en el rincón de la pantalla,
pulse el botón POWER sin desenchufar el cable de alimentación.
2) Pulse el botón POWER para encender el televisor.
3) Pulse el botón MENU para que aparezca la visualización del
menú en el televisor.
4) Pulse el botón CH(annel) K o L para indicar "[ENGLISH]".
5) Seleccione "ENGLISH" o "ESPAÑOL" utilizando el botón
VOL(ume) K o L.
6) Pulse el botón MENU para salir del menú.
PICTURE
CHANNEL SET
[ENGLISH]ESPAÑOL
V-CHIP SET UP
CAPTION [OFF]
TV SOUND [MAIN]
PICTURE
CHANNEL SET
[ENGLISH]ESPAÑOL
V-CHIP SET UP
CAPTION [OFF]
TV SOUND [MAIN]
PREAJUSTE DE CANALES
Para preajustar un canal o cambiar un canal preajustado, siga el procedimiento de abajo.
1) Pulse el botón POWER para encender el televisor.
2) Pulse el botón MENU para que la visualización del menú
aparezca en la pantalla del televisor.
3) Pulse el botón CH(annel)
Luego, pulse el botón VOL(ume)
4) Pulse el botón CH(annel)
Luego, pulse el botón VOL(ume)
K o L para indicar "CANAL PREP.".
K.
K o L para indicar "PREA. AUTO CA.".
K.
El sintonizador sintoniza y memoriza todos los canales activos en su zona.
●
El televisor distingue entre los canales de TV común y los canales de TV
por cable.
●
Cuando finaliza la operación de PREA. AUTO CA., el canal menor
memorizado reaparecerá en la pantalla.
●
Cuando pulse el botón CH(annel) K o L después de seleccionar la PREA. AUTO CA., el
sintonizador se parará en los canales memorizados solamente.
●
La unidad de televisor puede reconocer los canales de TV como ellos de TV por cable a causa
de los condiciones de recepcción. En este caso, pruebe el preajuste automático de nuevo en los
condiciones finas de recepción.
●
Cuando se activa PREA. AUTO CA. donde no existe entrada de señal de TV, aparecerá "NO
HAY SEÑAL DE TV" en la pantalla después de que finaliza la exploración de canales.
IMAGEN
CANAL PREP.
[ESPAÑOL] ENGLISH
AJUSTE DE V-CHIP
TITULO [OFF]
SONIDO TV [MAIN]
AGREGAR/BORRAR
PREA. AUTO CA.
3) Pulse el botón VOL(ume) K para seleccionar "AGREGAR/BORRAR".
4) Utilice el botón CH(annel)
memorizar o borrar de la memoria.
K o L para seleccionar el canal que desee
AGREGAR/BORRAR
PREA. AUTO CA.
Nota: La visualización volverá a la pantalla en unos 10 segundos.
Realice la función "AGREGAR/BORRAR" mientras esta visualización
aparece en la pantalla.
●
Pulse el botón VOL(ume) K o L para encender el número de canal en AZUL CLARO si desea
añadir el canal a la memoria.
●
Pulse el botón VOL(ume) K o L para encender el número de canal en
ROJO CLARO si desea borrar el canal de la memoria.
5) Pulse el botón MENU para salir del menú.
SISTEMA MTS (Sonido de Televisión Multicanal)
Podrá escuchar un programa en estéreo MTS siguiendo los pasos dados a continuación.
SELECCIÓN
DE MENU
Tipo de
emisión
Normal
Emisión estéreo
SAP
MAIN MONO SAP
-
Ninguna -- Ninguna -- Ninguna
ESTEREO MONO ESTEREO
MAIN MAIN SAP
[Para seleccionar ESTEREO, MONO o SAP con una emisión estéreo]
1) Pulse el botón MENU para que la visualización del menú aparezca en la pantalla del televisor.
2) Pulse el botón CH(annel)
o o p para indicar a "SONIDO TV".
3) Pulse el botón VOL(ume) o o p para seleccionar MAIN, MONO o SAP.
: Pulse el botón VOL(ume) K o L.
Para mostrar el estado,
pulse el botón DISPLAY en
el mando a distancia.
-
SAP: Segundo programa de
audio, es decir, su programa
también se puede recibir en
otro idioma, o algunas
veces una emisora de radio.
[FUNCIÓN DE AGREGAR/BORRAR]
1) Pulse el botón MENU para que la visualización del menú aparezca en la
pantalla del televisor.
2) Pulse le botón CH(annel)
pulse el botón VOL(ume)
OPERACIONES
OPERACIONES
K o L hasta indicar "CANAL PREP.". Luego,
K.
IMAGEN
CANAL PREP.
[ESPAÑOL] ENGLISH
AJUSTE DE V-CHIP
TITULO [OFF]
SONIDO TV [MAIN]
PARA VER UN PROGRAMA DE TV
1) Pulse el botón POWER para encender el televisor.
2) Seleccione el canal deseado con el botón CH(annel) K o L.
3) Ajuste el volumen al nivel deseado utilizando el botón VOL(ume) K o L.
4)
Ajuste los controles de imagen para obtener una imagen natural. (Consulte "AJUSTE DE IMAGEN".)
AJUSTE DEL TEMPORIZADOR PARA DORMIR
La función del temporizador para dormir le permite desconectar la
alimentación, sin pulsar el botón POWER, una vez transcurrido un periodo
de tiempo deseado.
1) Pulse el botón POWER para encender el televisor y pulse SLEEP del
mando a distancia.
Podrá elegir el tiempo tras el cual se va a desconectar la alimentación pulsando
2)
repetidamente el botón SLEEP del mando a distancia. El tiempo máximo es de 90
minutos. El tiempo aumenta 10 minutos cada vez que se
pulsa el botón SLEEP.
(La visualización del temporizador
aumentará y la indicación del temporizador para dormir
aparecerá en la pantalla cuando usted pulse el botón
SLEEP del mando a distancia.)
Para cancelar el temporizador
para dormir
Pulse repetidamente el botón SLEEP
hasta que se visualice "REPOSAR 0".
Nota: Cuando desconecte la unidad de la toma de CA, o si se produce un fallo en la
alimentación, el tiempo establecido para el temporizador para dormir se perderá.
REPOSAR 10
FUNCIÓN DE CONTINUACIÓN
Si falla o se desconecte la alimentación mientras el televisor está encendida, el televisor se pondrá
automáticamente después de la restitución de alimentación.
: Pulse el botón CH(annel) K o L.
AJUSTE DE IMAGEN
1) Pulse el botón MENU para que la visualización
del menú aparezca en la pantalla del televisor.
2) Pulse el botón VOL(ume) K para seleccionar
"
IMAGEN".
3) Pulse el botón CH(annel) K o L para seleccionar
"
MANUAL". Luego, pulse el botón
VOL(ume) K.
4) Seleccione la característica que desee ajustar
con el botón CH(annel) K o L y ajústela con
el botón VOL(ume) K o L.
: Pulse el botón CH(annel) K o L.
SELECCIÓN DE SUBTÍTULOS
Podrá ver programas de TV, películas, noticias,
cintas pregrabadas, etc., etiquetados
especialmente (cc), bien con subtítulos del
diálogo o con visualización del texto añadidos
al programa.
: Pulse el botón VOL(ume) K o L.
MEMORIA AV
Esta función le permite ajustar rápidamente la configuración de imagen para MANUAL,
DEPORTE, NOTICIA, CINE o GAME según el programa que usted está viendo.
1) Pulse el botón MENU para que la visualización del menú aparezca en la pantalla del televisor.
2) Pulse el botón VOL(ume)
3) Seleccione el elemento con el botón CH(annel)
Note: Consulte “Ajuste de imagen” para personalizar manualmente la imagen.
▲ para seleccionar “IMAGEN”.
1) Pulse el botón MENU para que la
visualización del menú aparezca en la
pantalla del televisor.
2) Pulse el botón CH(annel) K o L para indicar
"
TITULO".
3) Pulse el botón VOL(ume) K o L para
seleccionar el modo deseado.
4) Cuando termine, pulse el botón MENU para
salir del menú.
▲ o ▼.
Nota:
●
En los pasos de arriba, la visualización de ajuste de la imagen desaparecerá de la pantalla del
televisor después de unos 10 segundos a menos que pulse cualquier botón, aunque no haya
terminado. Pulse los botones MENU y VOL(ume)
K para seleccionar "IMAGEN". Luego,
pulse repetidamente el botón CH(annel) K o L hasta que la visualización vuelva a la pantalla.
[USO DEL BOTÓN GAME]
Se pueden seleccionar también el modo de juego y el modo de entrada AUDIO/VIDEO frontal al
mismo tiempo, pulsando el botón GAME del mando a distancia. "GAME" aparece en la pantalla del
televisor.
●
Para salir del modo de juegos y de la entrada frontal A/V, pulse el botón INPUT SELECT del
mando a distancia.
●
Para cancelar el modo de juego solamente, siga los pasos de la sección "AJUSTE DE
IMAGEN" o "MEMORIA AV". "AUX2" (modo de entrada AUDIO/VIDEO delantera) aparece
en la pantalla del televisor.
●
Cuando se pulse el botón GAME mientras el televisor está desactivado, el televisor se enciende
y se ajustará automáticamente en el modo de juegos y seleccionará la entrada A/V frontal.
AJUSTE DE V-CHIP
V- CHIP permite a los padres impedir que sus hijos vean en el televisor programas no apropiados
para ellos. V-CHIP lee la calificación de la programación (excepto noticias y programas de
deportes, películas sin editar de los canales de televisión por cable de interés general, y señales de
sistemas de emisión de emergencia), y luego impide el acceso a la programación si la calificación
de los programas encuentra las limitaciones que usted selecciona. En este caso, el mensaje
"PROGRAMA PROHIBIDO por ..." aparece en la pantalla del televisor.
Para bloquear la programación, siga los pasos de abajo.
Page 8
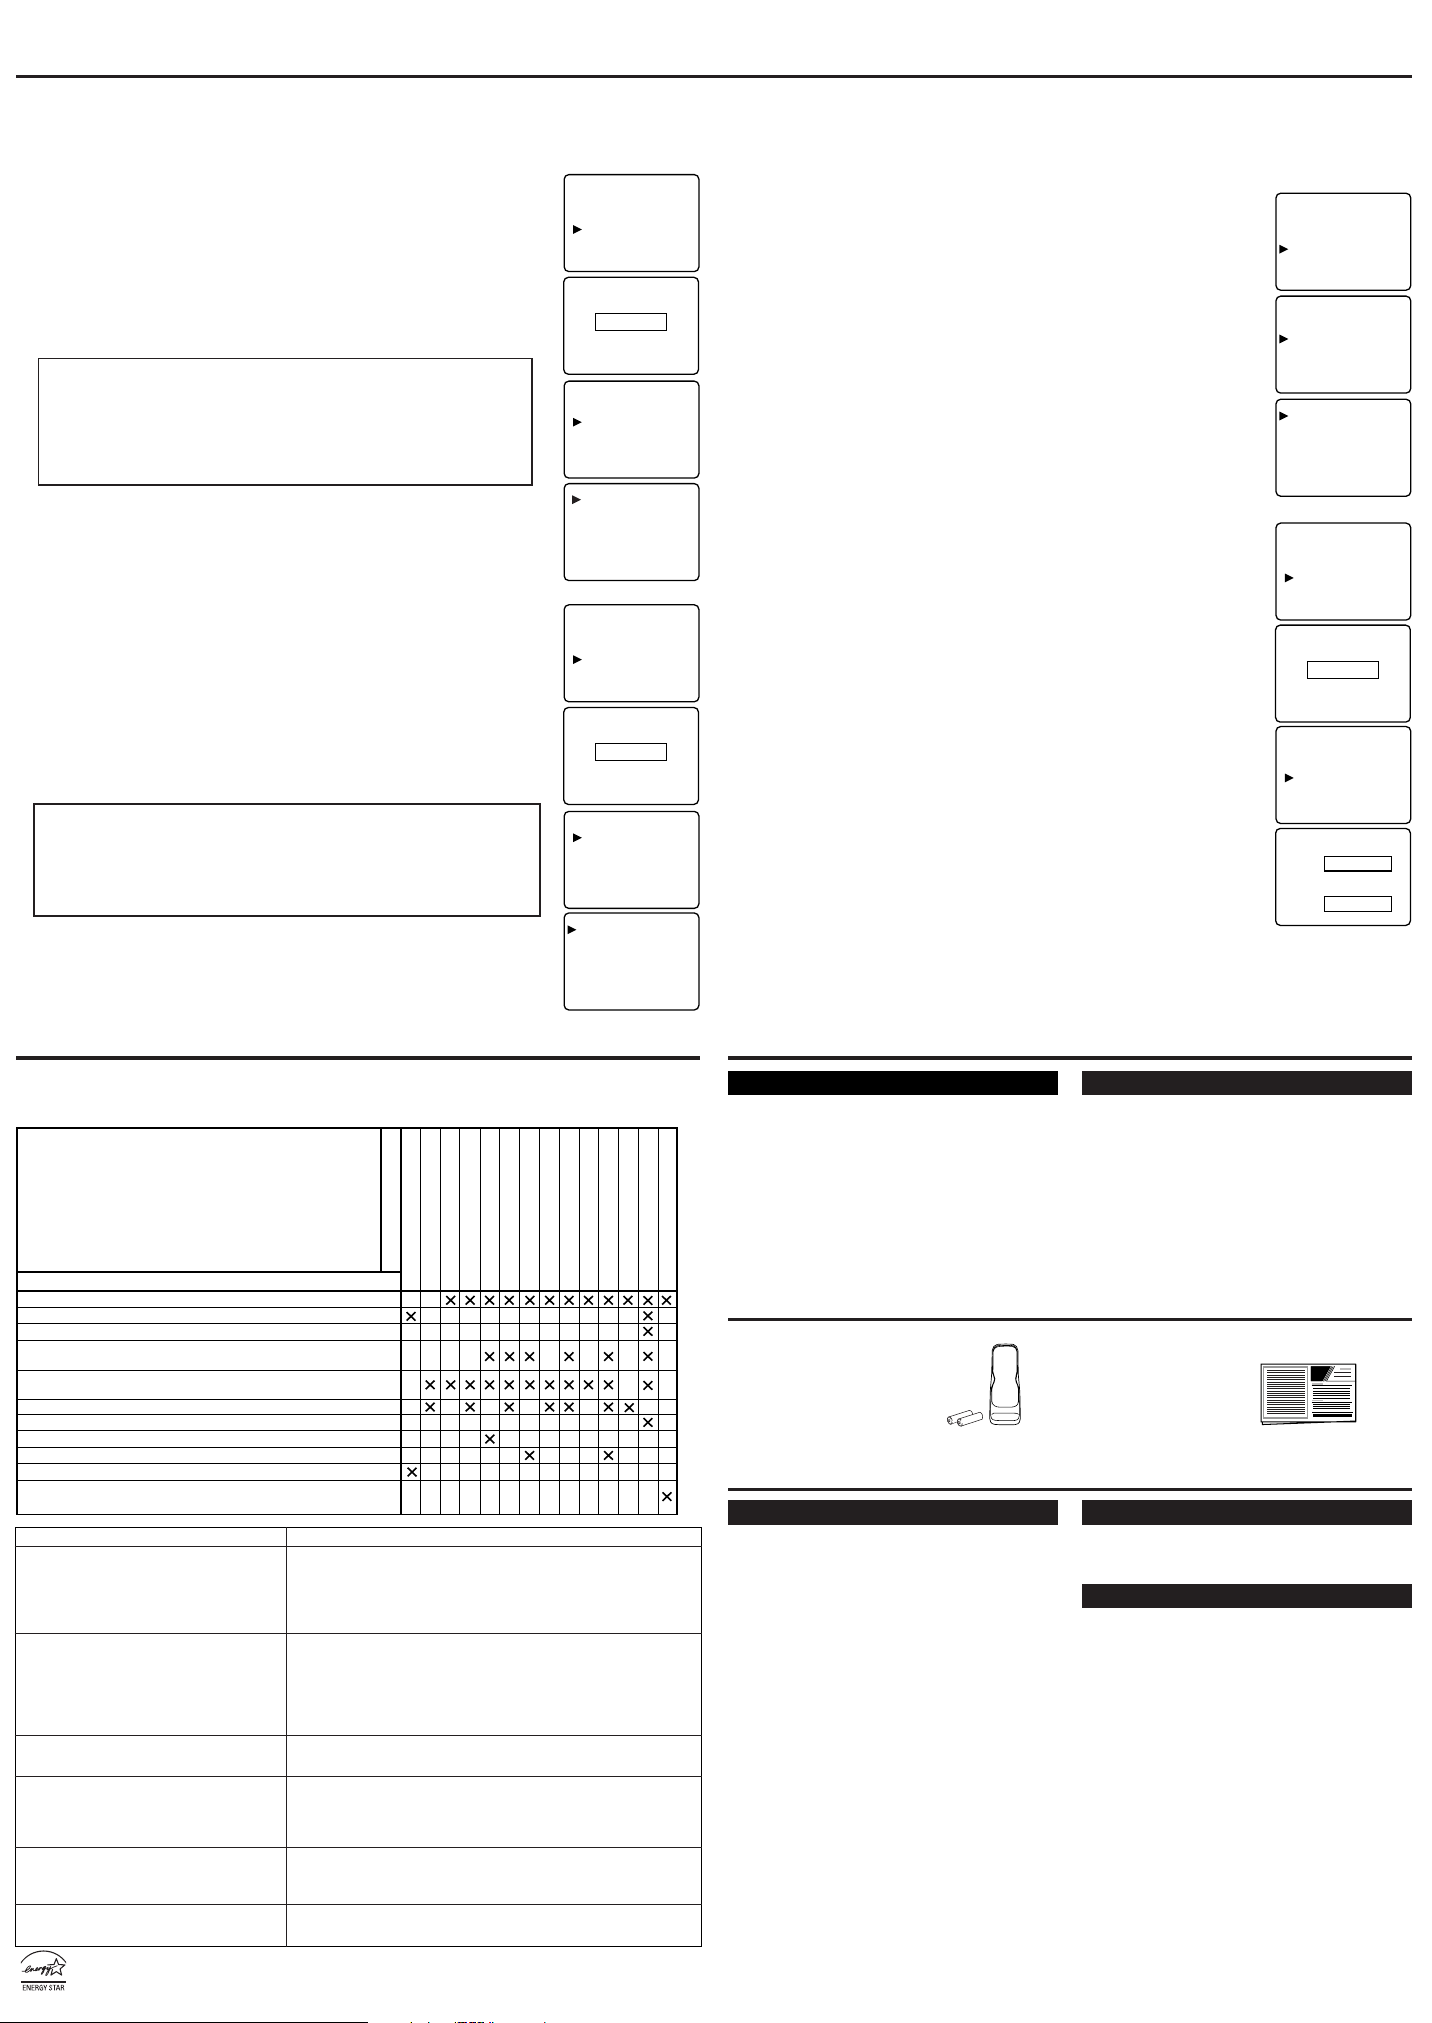
LISTA DE INSPECCION RAPIDA DE MANTENIMIENTO
PROBLEMA
POSIBLE REMEDIO
Pruebe un canal nuevo, si está bien, posibles problemas en estación transmisora.
Está enchufada la TV? Hay corriente?
El botón de la TV está en ON?
Verifique si hay interferencia local.
Apague el botón POWER y encienda luego de aprox. un minuto.
Regule el control de COLOR.
Regule el control de CONTRASTE & CLARIDAD.
Verifique pilas en control remoto.
Control remoto no funciona
Barras en pantallaPicture Distorted
Imagen distorsionadaNo Color
Imagen corre verticalmente
No hay color
Mala recepción en algunos canales
Imagen débil
Líneas o rayas en la imagen
Fantasma en la imagen
Imagen borrosa
Sonido bueno,mala imagen
Imagen buena, sonido malo
Sin imagen ni sonido
Aparecen colores diferentes en la pantalla
Aleje la TV de los altavoces y aparatos cercanos que generen un campo magnético.
Apáguelo con el interruptor de la alimentación
y luego vuelva a encenderlo después de pasar 30 minutos.
¿Está la antena/sistema de televisión por cable conectado al terminal del panel
posterior del televisor?
Si se está utilizando una antena exterior o un sistema de televisión por cable,
compruebe que no haya ningún cable roto ni ninguna conexión floja.
®
®
®
Como asociada de ENERGY STAR , nuestra compañía ha determinado que este producto cumple con las directrices
de E
NERGY STAR para el consumo eficiente de energía. ENERGY STAR es una marca registrada en los Estados
Unidos de América.
OPERACIONES (Seguimiento)
● La programación puede haber sido calificada por la Motion Picture Association of America
(MPAA) o según los consejos de Television Parental Guidelines. Para bloquear cualquier
programación inapropiada, establezca sus límites en "CLASE DE MPAA" y "CLASE DE TV"
● No puede tener acceso al menú mientras el mensaje "PROGRAMA PROHIBIDO por ..."
aparece. En este caso, cambie a un canal desbloquado, luego pulse el botón MENU.
[AJUSTE DE LA CALIFICAIÓN DE MPAA]
1) Pulse el botón MENU para que el menú aparezca en la pantalla del televisor.
2) Pulse el botón CH(annel) ▲ o ▼ para indicar "AJUSTE DE V-CHIP".
Luego, pulse el botón VOL(ume) ▲.
3) Utilice los botones de números para introducir el código de acceso de 4
dígitos. El código de acceso predeterminado es el 0000. Si no ha establecido
su código de acceso personal, usted tendrá que utilizar el código 0000.
4) Pulse el botón CH(annel)
Luego, pulse el botón VOL(ume) ▲.
5) Pulse el botón CH(annel)
Luego, pulse el botón VOL(ume) ▲ para seleccionar [BLOQ.] o [MIRAR].
<Selección> <Categorías de calificación>
• G: Para el público en general
• PG: Se sugiere supervisión de los padres
• PG-13: No apropiada para niños de menos de 13 años
• R: Restringida: Con menos de 17 años se requiereque la persona vaya
• NC-17: Menores de 17 años no admitidos
• X: Para adultos solamente
● Cuando seleccione la categoría de calificación y activa [BLOQ.], la
calificación más se alta activará [BLOQ.] automáticamente. La calificación
más baja también activará [MIRAR] automáticamente.
● Cuando ponga "G" en [BLOQ.] o [MIRAR], todas las calificaciones se
activarán [BLOQ.] o [MIRAR] automáticamente.
● Cuando ponga "X" en [MIRAR], todas las calificaciones activarán
[MIRAR] automáticamente.
6) Pulse el botón MENU para salir del menú.
acompañada por los padreso un adulto
▲ o ▼ para indicar "CLASE DE MPAA".
▲ o ▼ para indicar una calificación deseada.
[AJUSTE DE LA CALIFICACIÓN DE TV]
1) Pulse el botón MENU para que el menú aparezca en la pantalla del televisor.
2) Pulse el botón CH(annel) ▲ o ▼ para indicar "AJUSTE DE V-CHIP".
Luego, pulse el botón VOL(ume) ▲.
3) Utilice los botones de números para introducir el código de acceso de 4
dígitos. El código de acceso predeterminado es el 0000. Si no ha establecido
su código de acceso personal, usted tendrá que utilizar el código 0000.
4) Pulse el botón CH(annel) ▲ o ▼ para indicar "CLASE DE TV". Luego,
pulse el botón VOL(ume) ▲.
5)
Pulse el botón CH(annel) ▲ o ▼ para indicar una calificación deseada.
Luego, pulse el botón VOL(ume) ▲ para seleccionar [BLOQ.] o [MIRAR].
<Selección> <Categorías de calificación>
• TV-Y: Apropiada para niños
• TV-Y7: Apropiada para niños de siete años en adelante
• TV-G: Para el público en general
• TV-PG: Se sugiere supervisión de los padres
• TV-14: No apropiada para niños de menos de 14 años
• TV-MA: Para adultos solamente
● Cuando seleccione la categoría de calificación y activa [BLOQ.], la
calificación más alta se activará [BLOQ.] automáticamente. La calificación
más baja también se activará [MIRAR] automáticamente.
● Cuando ponga "TV-Y" en [BLOQ.] o [MIRAR], todas las calificaciones se
activarán [BLOQ.] o [MIRAR] automáticamente.
IMAGEN
CANAL PREP.
[ESPAÑOL] ENGLISH
AJUSTE DE V-CHIP
TITULO [OFF]
SONIDO TV [MAIN]
CODIGO DE ACCESO
_ _ _ _
CLASE DE TV
CLASE DE MPAA
CAMBIAR CODIGO
G [MIRAR]
[MIRAR]
PG
[MIRAR]
PG-13
[MIRAR]
R
[MIRAR]
NC-17
[MIRAR]
X
IMAGEN
CANAL PREP.
[ESPAÑOL] ENGLISH
AJUSTE DE V-CHIP
TITULO [OFF]
SONIDO TV [MAIN]
CODIGO DE ACCESO
_ _ _ _
CLASE DE TV
CLASE DE MPAA
CAMBIAR CODIGO
TV-Y
TV-Y7 (
)
TV-G
( )
TV-PG
( )
TV-14
)
TV-MA (
[MIRAR]
[MIRAR]
[MIRAR]
[MIRAR]
[MIRAR]
[MIRAR]
● Cuando ponga "TV-MA" en [MIRAR], todas las calificaciones se activarán [MIRAR]
automáticamente.
[AJUSTE DE V-CHIP -LAS CALIFICACIONES SECUNDARIAS]
Cuando seleccione TV-Y7, TV-PG, TV-14 o TV-MA y pulse el botón VOL(ume) ▲, las
calificaciones secundarias aparecerán en la pantalla del televisor.
Si selecciona la categoría de calificación (ejemplo: TV-PG) y activa [BLOQ.]
o [MIRAR], las calificaciones secundarias (ejemplo: V para Violencia) se
activarán [BLOQ.] o [MIRAR] automáticamente.
Podrá poner las calificaciones secundarias en [BLOQ.] o [MIRAR] cuando la
categoría de la calificación se ponga en [BLOQ.]. Para ajustar
individualmente las calificaciones secundarias, siga los pasos de abajo.
● Cuando usted seleccione [TV-Y7]:
Pulse el botón CH(annel) ▲ o ▼ para seleccionar "FV" (Violencia de
fantasía). Luego, pulse el botón VOL(ume) ▲ para seleccionar [BLOQ.] o
[MIRAR].
● Cuando usted seleccione [TV-PG], [TV-14] o [TV-MA]:
Pulse el botón CH(annel) ▲ o ▼ para seleccionar "D" (Diálogo sugestivo),
"L" (Lengua grosera), "S" (Situación sexual) o "V" (Violencia). Luego,
pulse el botón VOL(ume) ▲ para seleccionar [BLOQ.] o [MIRAR].
Notas:
● Cuando se seleccione [TV-MA], "D" no aparece en la pantalla del televisor.
● Las calificaciones secundarias que se ponen en [BLOQ.] aparecen al lado
de la categoría de la clafificación en el menú CLASE DE TV.
6) Pulse el botón MENU para salir del menú.
TV-Y7
FV
TV-PG
D
L
S
V
TV-Y
)
TV-Y7 (
TV-G
(DLSV ) [BLOQ.]
TV-PG
(DLSV ) [BLOQ.]
TV-14
LSV ) [BLOQ.]
TV-MA (
[CODIGODE ACCESSO V-CHIP]
Para cambiar el código de acceso, siga estos pasos.
1) Pulse el botón MENU, y luego pulse el botón CH(annel) ▲ o ▼ para
seleccionar AJUSTE DE V-CHIP. Pulse el botón VOL(ume)
continuar.
2) Pulse los botones de números para introducir su código de acceso viejo. Si no
ha establecido nunca su código de acceso personal, utilice el código 0000.
3) Pulse el botón CH(annel) ▲ o ▼ para seleccionar CAMBIAR CODIGO.
Luego, pulse el botón VOL(ume) ▲ para continuar.
4)
Utilice los botones de números para introducir su código de acceso deseado
en el espacio CODIGO NUEVO. Luego, introduzca el mismo código en el
espacio CODIGO CONFIRMADO. Su nuevo código de acceso queda
establecido. Usted volverá a AJUSTE DE V-CHIP.
Si el código del espacio CODIGO CONFIRMADO no es exactamente el
mismo que el código del espacio CODIGO NUEVO, repita el paso 4,
asegurándose de introducir exactamente el nuevo código en el espacio
CODIGO CONFIRMADO.
Notas:
● Si se produce un fallo en el suministro de alimentación, el código
predeterminado, 0000, se convertirá de nuevo en el código de acceso
activado.
● Si conecta el cable de alimentación a una toma de CA que está controlada
por un interruptor de pared, su código de acceso personal será borrado cada
vez que desconecte la alimentación con el interruptor de pared. El código
predeterminado volverá a ser 0000.
▲ para
[SI OLVIDA SU CÓDIGO DE ACCESO]
En este caso, el código de acceso deberá volver a ser el código
predeterminado, es decir, el 0000. Para restaurar 0000 como su código de acceso personal,
desenchufe el cable de alimentación del televisor durante 10 segundos, y luego vuelva a
enchufarlo.
IMAGEN
CANAL PREP.
[ESPAÑOL] ENGLISH
AJUSTE DE V-CHIP
TITULO [OFF]
SONIDO TV [MAIN]
CODIGO DE ACCESO
_ _ _ _
CLASE DE TV
CLASE DE MPAA
CAMBIAR CODIGO
CODIGO NUEVO
_ _ _ _
CODIGO CONFIRMADO
_ _ _ _
[BLOQ.]
[BLOQ.]
[BLOQ.]
[BLOQ.]
[BLOQ.]
[BLOQ.]
[BLOQ.]
[MIRAR]
[MIRAR]
[BLOQ.]
GUIA EN CASO DE FALLAS
Algunas veces ocurren problemas de funcionamiento que pueden ser solucionados fácilmente
verificando posibilidades al parecer evidentes pero que frecuentemente son pasadas por alto.
Antes de pedir la reparación, verifique estos items. Con ello puede ahorrar tiempo y dinero.
Problema Posible solución
Mi TV muestra errores de
ortografía en subtítulos.
Mi TV no muestra el texto por completo o hay
demora en lo que se está diciendo.
Mis subutítulos están mezclados con cuadros
blancos en la pantalía.
Mi guía de programas indicaba que un show
de TV era de subtítulos cerrados, pero no
apareció ningún subtítulo.
Mi videotape pregrabado no muestra ningún
subtítulo. La caja de la cinta indica que es del
sistama (cc).
Mi pantalla de TV muestra un cuadro negro en
ciertos canales.
Usted está viendo una transmisión en vivo y puede ocurrir que errores
de ortografía hechos por la compañía productora de subtítulos cerrados
queden sin corregir. Un programa pregrabado no presentará errores de
ortografía por el tiempo del que dispone normalmente para corregir los
subtítulos.
Los subtítulos que se demoran unos segundos en aparecer con relación
al diálogo son comunes en las tansmisiones en vivo. La mayor parte de
las compañías productoras de subtítulos pueden mostrar un diálogo de
un máximo de 220 palabras por minuto. Si el diálogo se excede de ese
promedio, se usa una edición selectiva para asegurar que el subtítulo
continúa actualizado con el diálogo actual en la pantalla de TV.
Interferencia causada por edificios, líneas eléctricas, tormentas, etc.
puede ocasionar la aparición mezclada o incompleta de los subtítulos.
Las transmisoras pueden usar a veces un proceso de compresión del
tiempo para apurar un programa actual y dar tiempo adicional para los
comerciales Puesto que el decodificador no puede leer la información
comprimida, los subtítulos se pierden.
El videotape es una copia hecha en casa o la compañía que duplicó la
cinta no grabó accidentalmente las señales de subtítulos durante el
proceso de copiado.
Usted está en el modo TEXT (texto). Seleccione el modo CAPTION
(subtítulo) o TITULO [OFF].
MANTENIMIENTO
LIMPIEZA DEL GABINETE
●
Limpie el panel frontal y las demás
superficies exteriores de la TV con una tela
suave sumergida en agua tibia y bien
exprimida.
●
Nunca use solventes o alcohol. No rocíe con
insecticidas líquidos cerca de la TV. Esos
productos químicos pueden causar daños y
decoloración en las superficies expuestas.
ACCESORIOS INCLUIDOS
Unidad de control remoto
(NE139UD)
Pilas ("AA" x 2)
ESPECIFICACIONES
ESPECIFICACIONES GENERALES
Sistema de televisión: TV NTSC-M Estándar
Sistema de Subtítulos:§15,119/FCC
Cerrados
Cobertura de canales
VHF: 2 ~ 13
UHF: 14 ~ 69
CATV: 2 ~ 13, A ~ W,
Sistema de Sistema de sintonización
sintonización: sintetizada de frecuencia
Acceso al canal: Teclado de acceso
Terminales
Entrada de antena: VHF/UHF 75 ohms
Entrada de vídeo S: Minitoma DIN de 4
Entrada de vídeo componente
Toma de un pasador (Y) / 1Vpp (75 ohmios)
Toma de dos pasadores (PB/PR) /700 m Vpp
Entrada de vídeo: 3 conectores RCA
Salida/entrada de audio: 10 conectores RCA
Sistema de sonido de estereofonia
W+1 ~ W+84,
A-5 ~ A-1, 5A
de 181 canales
directo, explorador
programable y
ascendente/descendente
asimétrica
contactos
(75 ohmios)
LIMPIEZA DEL TUBO CATODICO
Limpie el tubo de reproducción de la TV con
una tela suave. Antes de limpiarlo, desconecte
el cable de alimentación de energía.
Manual del usuario
(1EMN20073)
Owner’s
Manual
ESPECIFICACIONES ELECTRICAS
Salida de sonido: 2W, 8 ohm x 2
OTRAS ESPECIFICACIONES
Control remoto: Sistema de luz infrarroja
Temperatura de uso: 5°C a 40°C (41°F~104°F)
Requisitos de
alimentación: AC120V, 60Hz
Consumo de energía
(máxima): 138W
Tubo catódico: 32" PP
Dimensiones: (Alt)
Peso: 149,9 lbs. (68kg)
• Diseños y especificaciones están sujetos a
cambios sin previo aviso y sin obiigación
legal de nuestra parte.
• Si hay cualquiera diferencia entre los
idiomas, el idioma implícito es inglés.
digital codificada.
26-15/16
” (684mm)
(Anc) 33-15/16” (862mm)
(Prof) 22-1/16” (560mm)
 Loading...