

Page 1
OWNER’S
VIDEO
CASSETTE
MANUAL
RECORDER
SF225B
TABLE OF CONTENTS
■
IMPORTANT SAFEGUARDS ..................................... 2
■
PRECAUTIONS ............................................................ 3
■
FEATURES ................................................................... 4
■
OPERATING CONTROLS AND FUNCTIONS......... 4
■
PREPARATION FOR USE.......................................... 6
■
INITIAL SET UP FOR USE ........................................ 7
■
SET UP FOR USE AGAIN....... .................................... 8
■
PLAYBACK FUNCTION.............................................. 9
■
RECORDING FUNCTION ........................................ 10
■
TIMER RECORDING.......................... .... .... .... .. .... .... . 11
■
SPECIAL FEATURES................................................ 12
INSTRUCCIONES EN ESP AÑOL INCLUIDAS.
NERGY STAR
®
®
is
If you need additional operating assistance after reading this
owner’s manual or to order replacement accessories, please call
TOLL FREE : 1-800-242-7158.
As an E
NERGY STAR
Partner, our company has
determined that this product meets
NERGY STAR
the E
energy efficiency. E
a U.S. registered mark.
®
guidelines for
■
TROUBLESHOOTIN G G UI DE...... .. ......................... 12
■
SPECIFICATIONS................ .. .. .............. .............. ..... 13
■
MAINTENANCE......................................................... 13
■
INSTRUCCIONES EN ESPAÑOL............................ 14
■
WARRANTY ................. .. .. .... .. .... .. .. .... .. .... .. .. .... .. .... .. ... 16
SUPPLIED ACCESSORIES
ACCESSORIES PART NO.
Coaxial Cable WPZ0102LG006/
WPZ0102TM012
Remote Control Unit N9373UD / N9376UD
Batteries AA x 2
H7740
Please read before using this equipment.
- 1 - EN
Page 2
WARNING:
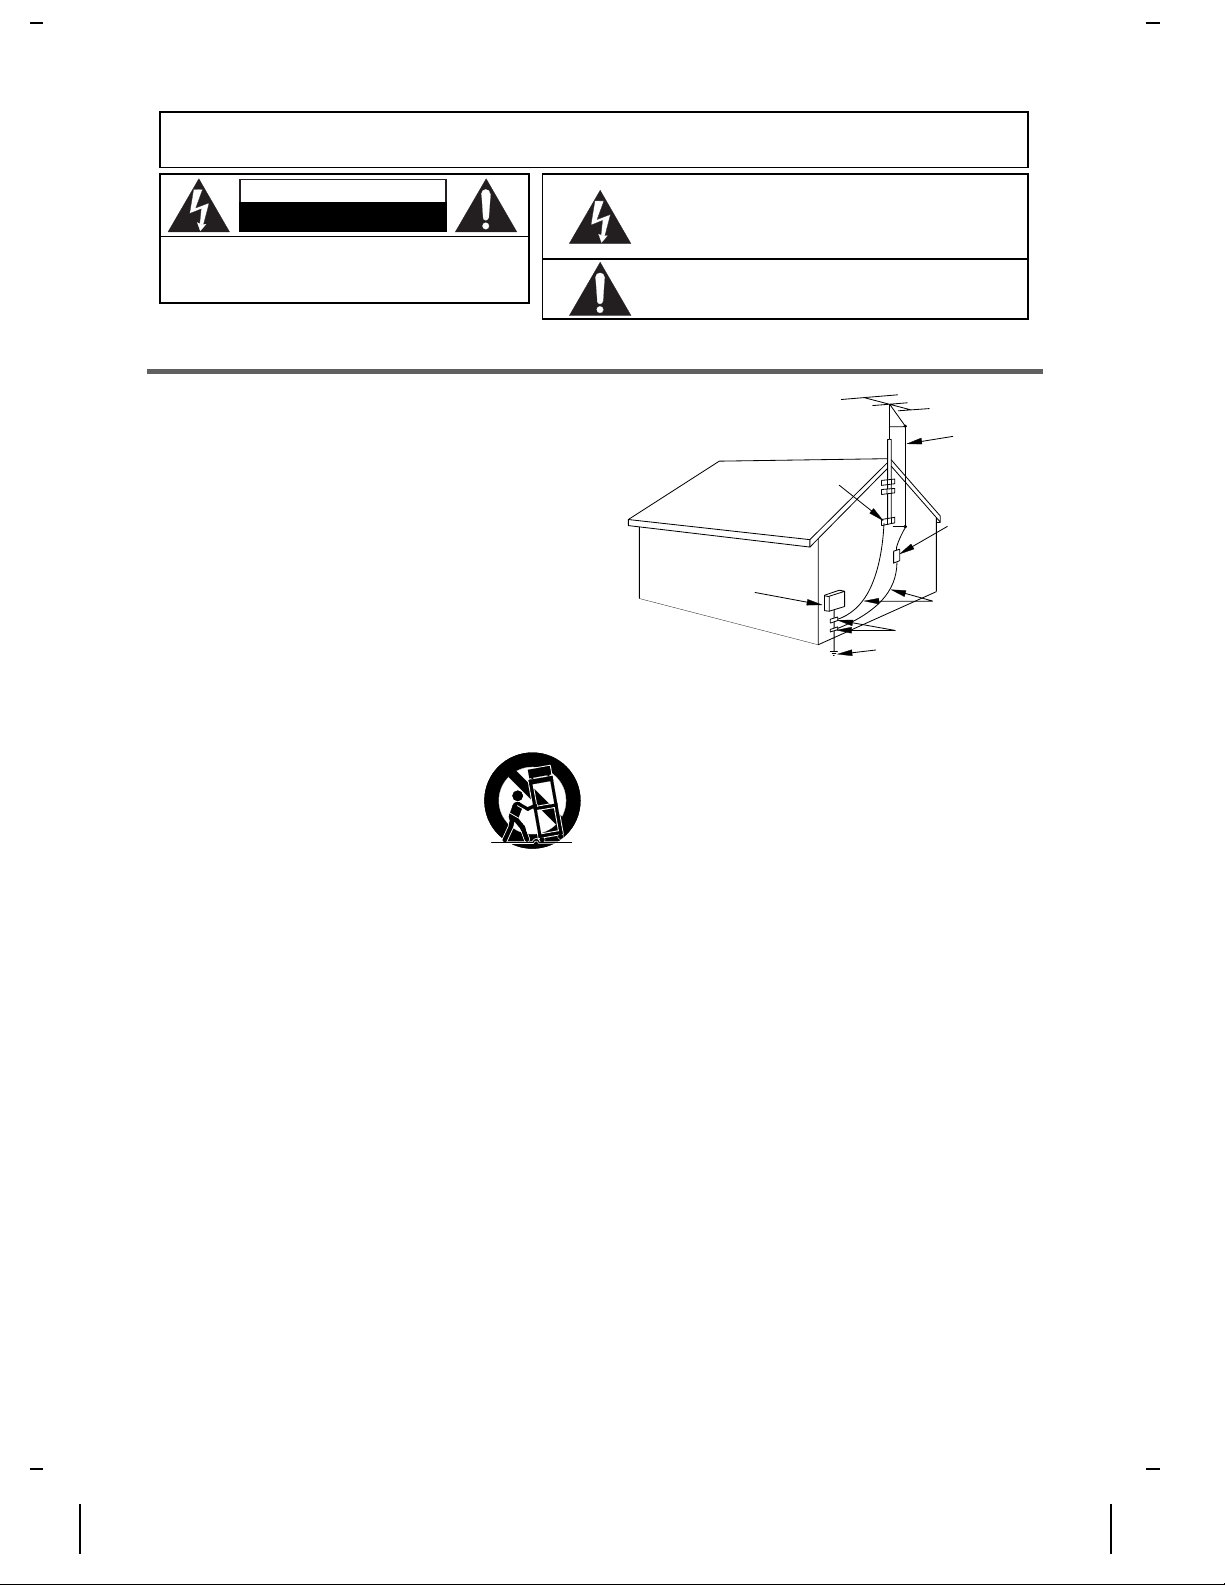
GROUND CL AMPS
NEC - NAT ION AL EL ECTRI CAL C ODE
EXAMPLE OF ANT ENNA GRO UNDING A S PER
NATIONAL EL ECT RICAL CODE
S2898A
WIRE
DISCHARGE UNIT
(NEC SECTION 810-20)
GROUNDING CONDUCTORS
(NEC SECTION 810-2 1)
ELECTRODE SYSTEM
(NEC ART 250, PART H)
SERVICE
EQUIPMENT
CLAMP
ANTENNA
LEAD IN
ANTENNA
POWER SERVICE GROUNDI NG
GROUND
ELECTRIC
FIGURE A
CAUTION
RISK OF ELECTRIC SHOCK
DO NOT OPEN
CAUTION: TO REDUCE THE RISK OF ELECTRIC
SHOCK, DO NOT REMOVE COVER (OR BACK).
NO USER SERVICEABLE PARTS INSIDE. REFER
SERVICING TO QUALIFIED SERVICE PERSONNEL.
TO REDUCE THE RISK OF FIRE OR ELECTRIC SHOCK,
DO NOT EXPOSE THIS APPLIANCE TO RAIN OR MOISTURE.
The caution marking is located on the rear of the cabinet.
IMPORTANT SAFEGUARDS
The lightning flash with arrowhead symbol, within
an equilateral triangle, is intended to alert the user
to the presence of uninsulated "dangerous voltage"
within the product’s enclosure that may be of sufficient magnitude to constitute a risk of electric
shock to persons.
The exclamation point within an equilateral triangle
is intended to alert the user to the presence of important operating and maintenance (servicing) instructions in the literature accompanying the product.
1. Read Instructions
before the appliance is operated.
2. Retain Instructions
tained for future reference.
3. Heed Warnings
tions should be adhered to.
4. Follow Instructions
5. Cleaning
Do not use liquid cleaners or aerosol c leaners. Use a da mp cloth for cleaning.
EXCEPTION
for some specific reason, such as the possibility of the loss of an authorization code for a CATV converter, is not intended to be unplugged by the user
for cleaning or any other purpose, may exclude the ref erence to unplugging
the appliance in the cleaning description otherwise required in item 5.
6. Attachments
manufacturer as they may cause hazards.
7. Water and Moisture
near a bath tub, wash bowl, kitchen sink, or laundry tub, in a wet ba sement,
or near a swimming pool, and the like.
8. Accessories
pod, bracket, or table. The video product may fall, causing serious injury to
a child or adult, and serious damage to the appliance.
Use only with a cart, stand, tripod, bracket, or ta ble rec ommended by the manufacturer, or sold with the video
product. Any mounting of the appliance should follow
the manufacturer’s instructions and should use a mounting accessory recommended by the manufacturer. An
appliance and cart combination should be moved with
care. Quick stops, excessive force, and uneven surf ac es
may cause the appliance and cart combination to overturn.
9. Ventilation
and to ensure reliable operation of the video product and to protect it from
overheating, and these openings must not be blocked or covered. The openings should never be blocked by placing the video product on a bed, sofa,
rug, or other similar surface. This video product should not be placed in a
built-in installation such as a bookcase or rack unless proper ventilation is
provided or the manufacturer’s instructions have been adhered to .
10. Power Sources
of power source indicated on the marking label. If you are not sure of the
type of power supply to your home, consult your appliance dealer or local
power company. For products intended to operate from battery power, or
other sources, refer to the operating instructions.
11. Grounding or Polarization
ized alternating-current line plug (a plug having one blade wider than the
other). This plug will fit into the power outlet only one way. This is a safety
feature. If you are unable to insert the plug fully into the outlet, try revers ing
the plug. If the plug should still fail to fit, contact your electrician to replace
your obsolete outlet. Do not defeat the safety purpos e of the polar ized plug.
12. Power Cord Protection
are not likely to be walked on or pinched by items placed upon or against
them, paying particular attention to cords at plugs, convenience receptacles,
and the point where they exit from the appliance.
13. Outdoor Antenna Grounding
connected to the video prod uct, be sure the antenna or cable system is
grounded so as to provide some protection against voltage surges and builtup static charges. Article 810 of the National Electrical Code, ANSI/NFPA
No. 70, provides information with regard to proper grounding of the mast
and supporting structure, grounding of the lead-in wire to an antenna discharge unit, size of grounding conductors, location of antenna-discharge
unit, connection to grounding electrodes, and requirements for the grounding electrode. (Fig. A)
-All the safety and operating instructions should be read
-The safety and operating instructions should be re-
-All warnings on the appliance and in the operating instruc -
-All operating and use instructions should be followed.
-Unplug this video product from the wall outlet before cleaning.
: A product that is meant for uninterrupted service and, that
-Do not use attachments not recommended by the video product
-Do not use this video product near water, for example,
-Do not place this video product on an unstable cart, stand, tri-
PORTABLE CART WARNING
(Symbol provided by RETAC)
S3125A
-Slots and openings in the cabinet are provided for ventilation
-This video product should be operated only from the type
- This video product is equipped with a polar-
-Power supply cords should be routed so that they
-If an outside antenna or cable system is
14. Lightning
15. Power Lines
16. Overloading
17. Object and Liquid Entry
18. Servicing
19. Damage Requiring Service
a.
b.
c.
d.
e.
f.
20. Replacement Parts
21. Safety Check
22. Heat
-For added protection for this video product during a lightning storm,
or when it is left unattended and unused for long periods of time, unplug it from
the wall outlet and disconnect the antenna or cable system. This will prevent
damage to the video product due to lightning and power-line surges.
ity of overhead power lines or other electric light or power circuits, or where
it can fall into such power lines or circuits. When installing an outside antenna system, extreme care should be taken to keep from touching such
power lines or circuits as contact with them might be fatal.
result in a risk of fire or electric shock.
product through any openings as they may touch dangerous voltage points
or short-out parts that could result in a fire or electric shock. Never spill
liquid of any kind on the video product.
or removing covers may expose you to dangerous voltage or other hazards.
Refer all servicing to qualified service personnel.
refer ser vic ing to qua lif ie d se r vic e pe rs onne l unde r the foll ow ing c ond it ions :
-An outside antenna system should not be located in the vicin-
-Do not overload wall outlets and extension cords as this can
-Never push objects of any kind into this video
-Do not attempt to service this video product your se lf as opening
-Unplug this video product from the wall outlet and
When the power-supply cord or plug is damaged.
If liquid has been spilled, or objects have fallen into the video product.
If the video product has been exposed to rain or water.
If the video product does not operate normally by following the operating
instructions. Adjust only those controls that are covered by the operating
instructions as an improper adjustment of other controls may result in damage and will often require extensive work by a qualified technician to restore
the video product to its normal operation.
If the video product has been dropped or damaged in any way.
When the video product exhibits a distinct change in performance-this in-
dicates a need for service.
ice technician has used replacement parts specified by the manufacturer or
have the same characteristics as the original part. Unauthorized substitutions
may result in fire, electric shock or other hazards.
uct, ask the service technician to perform safety checks to determine that the
video product is in proper operating condition.
-This video product should be situated away from heat sources such a s
radiators, heat registers, stoves, or other products (including a mplifiers) that
produce heat.
-When replacement parts are requir ed, be sure the s erv-
-Upon completion of any service or repairs to this video prod-
- 2 - EN
0J11
H7740
Page 3
PRECAUTIONS
INSTALL LOCATION
For safety and optimum performance of your VCR:
●
Install the VCR in a horizontal and stable position.
Do not place anything directly on top of the VCR. Do
not place the VCR directly on top of the TV.
●
Shield it from direct sunlight and keep it away from
sources of intense heat. Avoid dusty or hu mid places.
Avoid places with insufficient ventilation for pr oper
heat dissipation. Do not block the ventilation holes
on the sides of the VCR. Avoid locations subject to
strong vibration or strong magnetic fields.
AVOID THE HAZARDS OF ELECTRI CAL
SHOCK AND FIRE
●
Do not handle the power cord with wet hands.
●
Do not pull on the power cord when disconnecting it
from AC wall outlet. Grasp it by the plug.
●
If, by accident, water is spilled on your VCR, unplug
the power cord immediately and take the unit to our
Authorized Service Center for servicing.
●
Do not put your fin gers or ob jects into t he VCR cas sette holder.
MOISTURE CONDENSATION
WARNING
Moisture condensation may occur inside the unit when
it is moved from a cold place to a warm place, or after
heating a cold room or under conditions of high humidity. Do not use the VCR at least for 2 hours until its inside
is dry.
VIDEO CASSETTE TAPE
●
This VCR will operate with any cassette that has the
mark. For best results, we recommen d the use
of high-quality tapes. Do not use poor quality or damaged tapes.
●
Avoid moisture. Moisture condensation may occur
on the tape if it is moved from a co ld place to a war m
place or visa versa. Before using a tape with these
conditions, to avoid damage of the t ape and your
VCR, wait until the tape has warmed to room temperature and the moisture has evaporated.
●
Avoid extre me heat, high humidi ty and magnetic
fields.
●
Do not tamper with the cassette mechanism.
●
Do not touch the tape with your fingers.
●
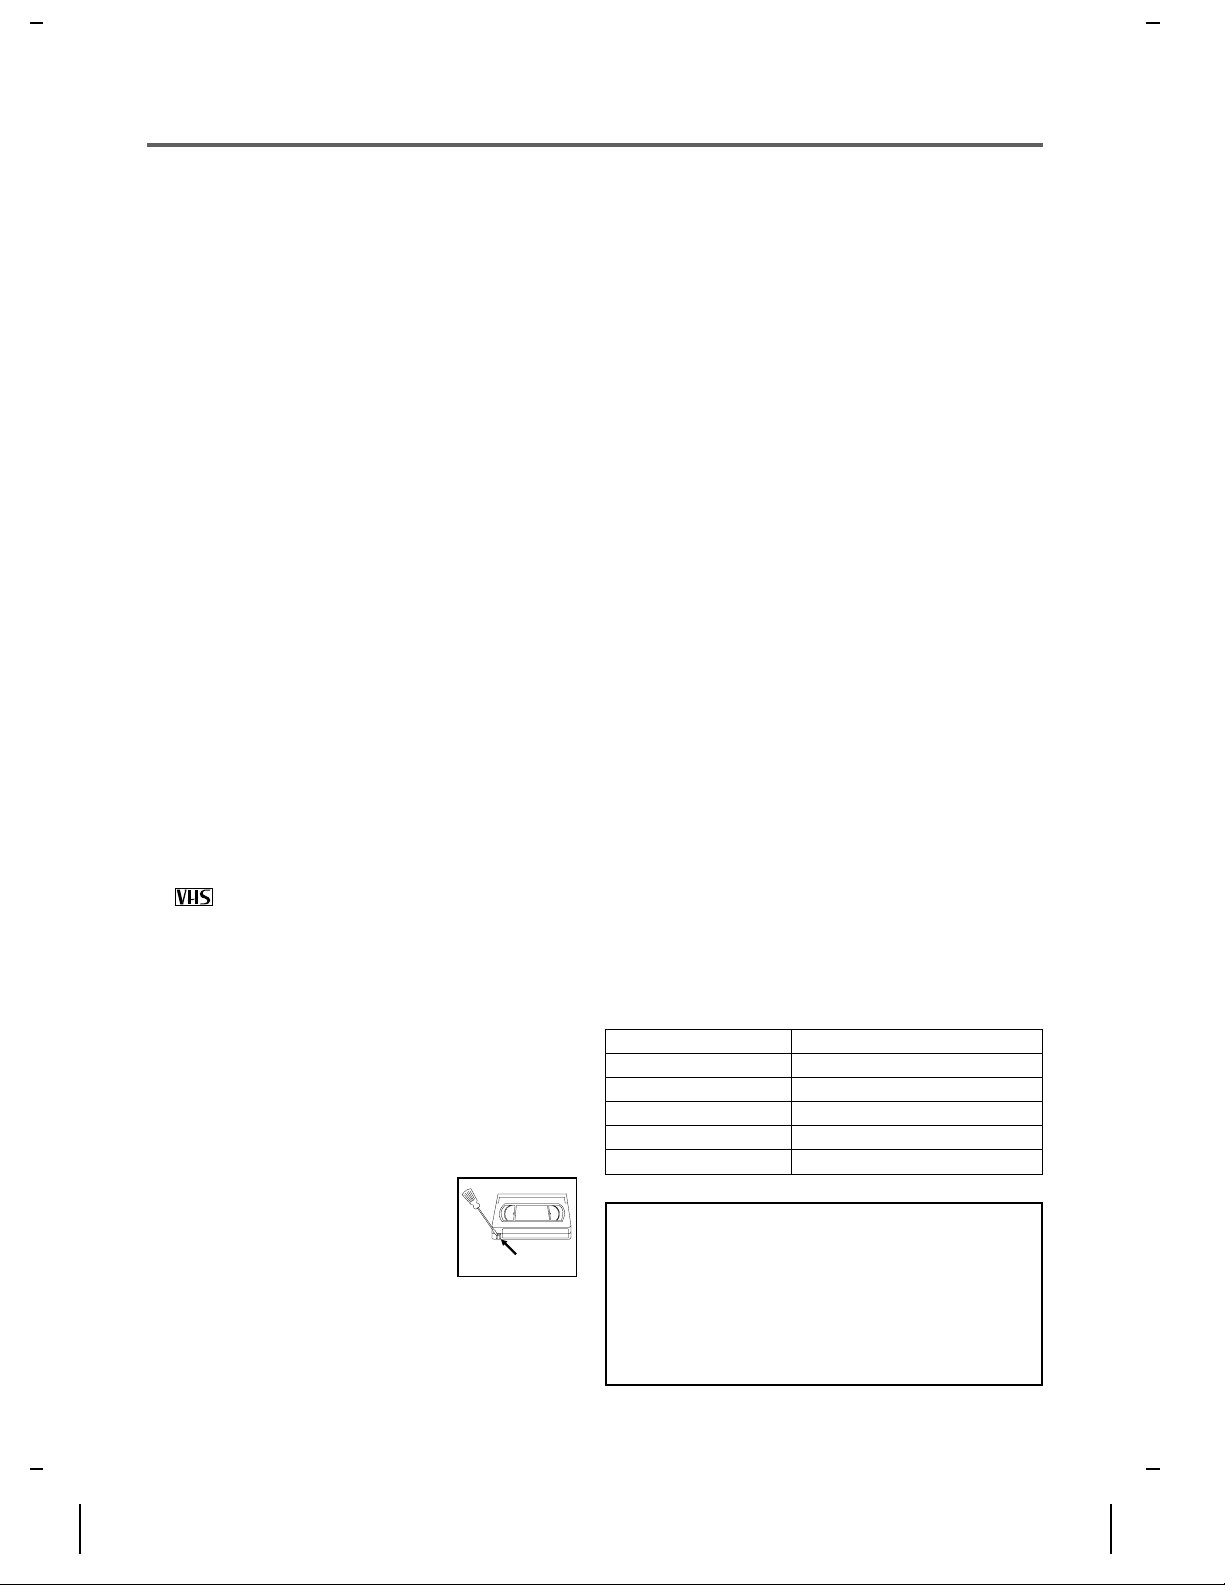
You can prevent accidental er asing
of a recording by breaking off the
tab on the back edge of the cassette.
●
If you decide to record on the tape
again, cover the hole with plastic
tape.
Tab
REMOTE CONTROL
W e do n ot recommen d the use o f universal r emote con trols. Not all of the functions may be controlled with a
universal remote control.
If you decide to use a universal remote control with this
unit, please be aware that the code number given may
not operate this unit. In this case, please call the manufacturer of the universal remote control.
FCC WARNING
This equipme nt may generate or use radio frequency
energy . Changes or modifi cations to this equipment may
cause harmful interference unless the mo dification s are
expressly approved in the instruction manual. The user
could lose the authority to operate this equipment if an
unauthorized change or modi fication is made.
IMPORTANT COPYRIGHT INFORMATION
Unauthorized recording or use of broadcast television
programming, video tape, film or other copyrighted material may violate applicable copyright laws. We assume no responsibility for the unauthorized duplication,
use, or other acts which infringe upon the rights of copyright owners.
A NOTE ABOUT RECYCLING
This product’s packaging materials are recyclable and
can be reused. Please dispos e of any materials in accordance with your local recycling regulations.
Batteries should never be thrown away or incinerated
but disposed of in accordance with your local regulations concerning chemical wastes.
SERIAL NUMBER
The serial nu mbe r o f th is pr od uct ma y b e fo un d o n th e
back of the VCR. No other VCR has the same serial
number as yours. You should record the number and
other vital information here and retain this book as a
permanent record of your purchase to aid identificatio n
in case of theft. Serial numbers are not kept on file.
Date of Purchase
Dealer Purchase from
Dealer Address
Dealer Phone No.
Model No.
Serial No.
CAUTION: TO PREVENT ELECTRIC SHOCK,
MATCH WIDE BLADE OF PLUG TO WIDE SLOT,
FULLY INSERT.
ATTENTION: POUR ÉVITER LES CHOC ÉLEC-
TRIQUES, INTRODUIRE LA LAME LA PLUS
LARGE DE LA FICHE DANS LA BORNE CORRESPONDANTE DE LA PRISE ET POUSSER
JUSQU’AU FOND.
H7740
- 3 - EN
0J11
Page 4
FEATURES
Hardware specifications
●
Auto Head Cleaner
●
Bilingual on-screen menu display selectable in
English or Spanish
●
181 channel capability PLL frequency synthesizer
tuner with direc t station call
Automatic functions
●
Auto power on and off system
●
Digital Auto Tracking (DT R)
OPERATING CONTROLS AND FUNCTIONS
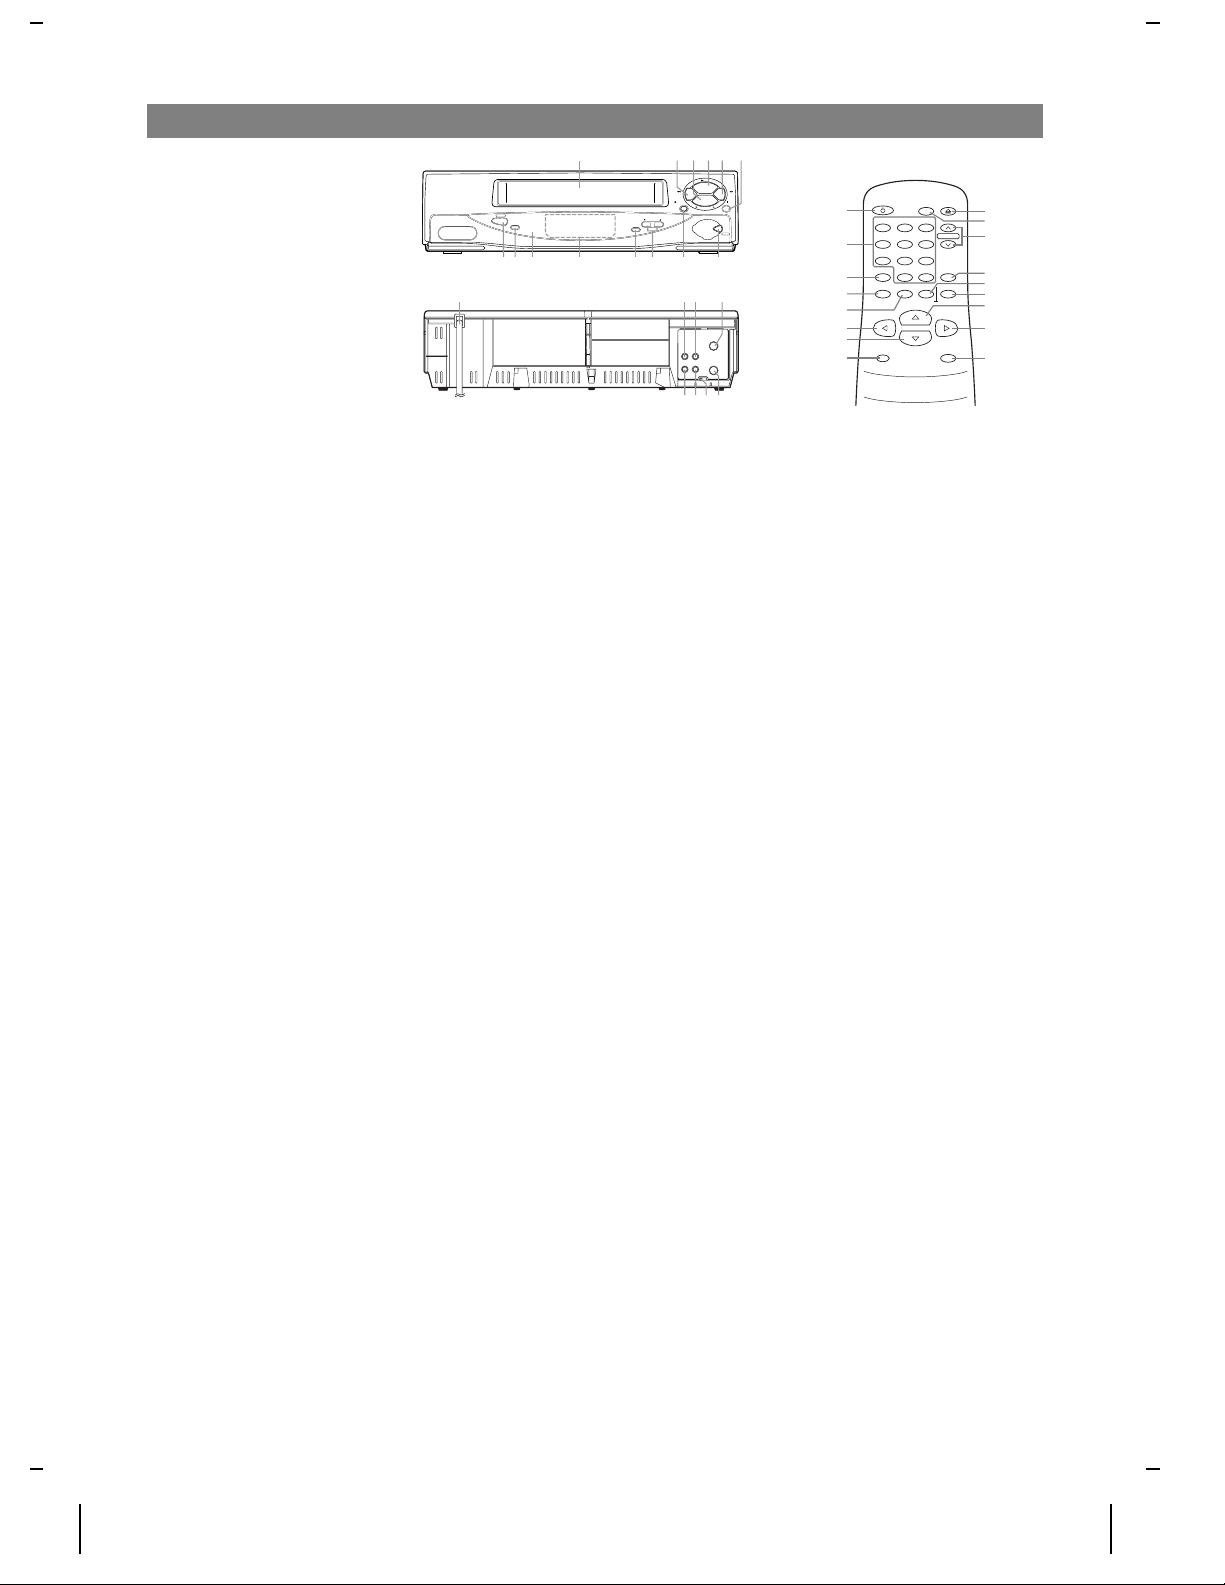
VCR FRONT PANEL
POWER
VCR REAR PANEL
20 2122 23
78 12
VCR/TV
123456
Playback
●
Auto Repeat
●
2 Step Picture Search Oper a ti on
●
S-VHS Quasi Playback (SQPB)
Recording
●
1 Year, 7 events (including Daily and Weekly
Timer Recording)
●
OTR (One Touch Recording)
REMOTE CONTROL
P
L
A
Y
S
T
CH3 CH4
F.FWD
PAUSE
STILL
T
O
C
P
E
/
J
E
MENU
15
14
16
11
POWER
7
MENU
DISPLAY SPEED
REW F.FWD
VCR/TV
123
456
789
0 +100
AUTO REPEAT
EXIT
PLAY
EJECT
CHANNEL
COUNTER
MEMORYRESET
2
3
ANT
IN
OUT
13
RECORD
STOP
PAUSE/STILL
REW
REC
OTR
CHANNEL
TAPE
SPEED
1310 11 149
AUDIO
OUT IN
VIDEO
12
19
18
17
3
8
4
5
6
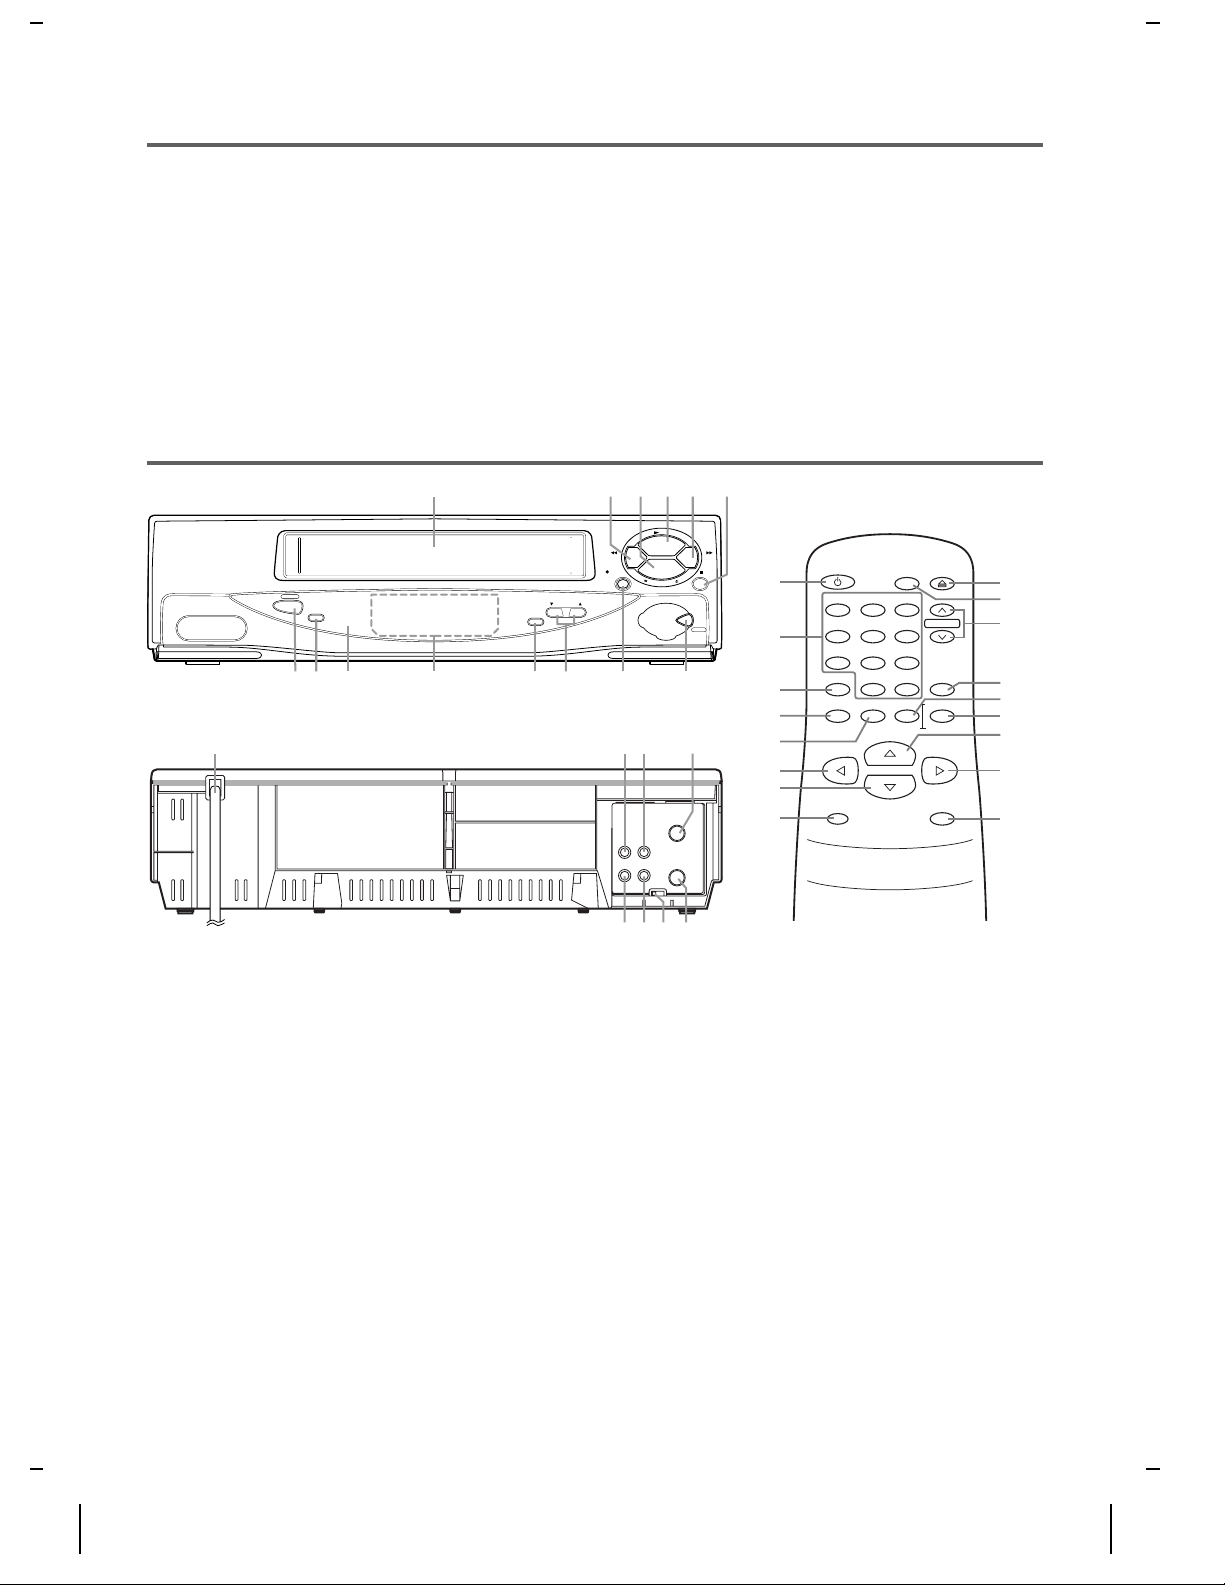
1.
Cassette Compartment
2.
REW button–
Press to rewind the tape, or to view
the picture rapidly in reverse during the playback
mode. (Rewind Search)
s button–
Press to cancel a setting of timer program.
Press to correct digits when setting program (For example: setting clock or timer program). Press to add or
delete channel numbers during channel preset.
3.
EJECT button–
Press to remove the tape from the
VCR.
STOP button–
button–
▼
Press to stop the tape motion.
Press to enter digits when setting program (For example: setting clock or timer program).
Press to select the setting modes from the on screen
menu.
4.
PLAY button–
button–
▲
Press to begin playback.
Press to enter digits when setting program (For example: setting clock or timer program).
2425 2726
Press to select the setting modes from the on screen
menu.
5.
F.FWD button–
Press to rapidly advance the tape, or
view the picture rapidly in forwar d du ring play back.
(Forward Search)
B button–
When setting program (For example:
setting clock or timer program), press to determine
your selection and proceed to the next step you want
to input. Press to determine the setting modes from
the on screen menu. Press to add or delete channel
numbers during channel preset.
6.
PAUSE/STILL button–
Press to temporarily stop
the tape during recording or to view a still picture
during playback.
7.
POWER button–
Press to turn VCR on and off.
Press to activate timer recording, when the timer program has been set.
- 4 - EN
0J11
H7740
Page 5
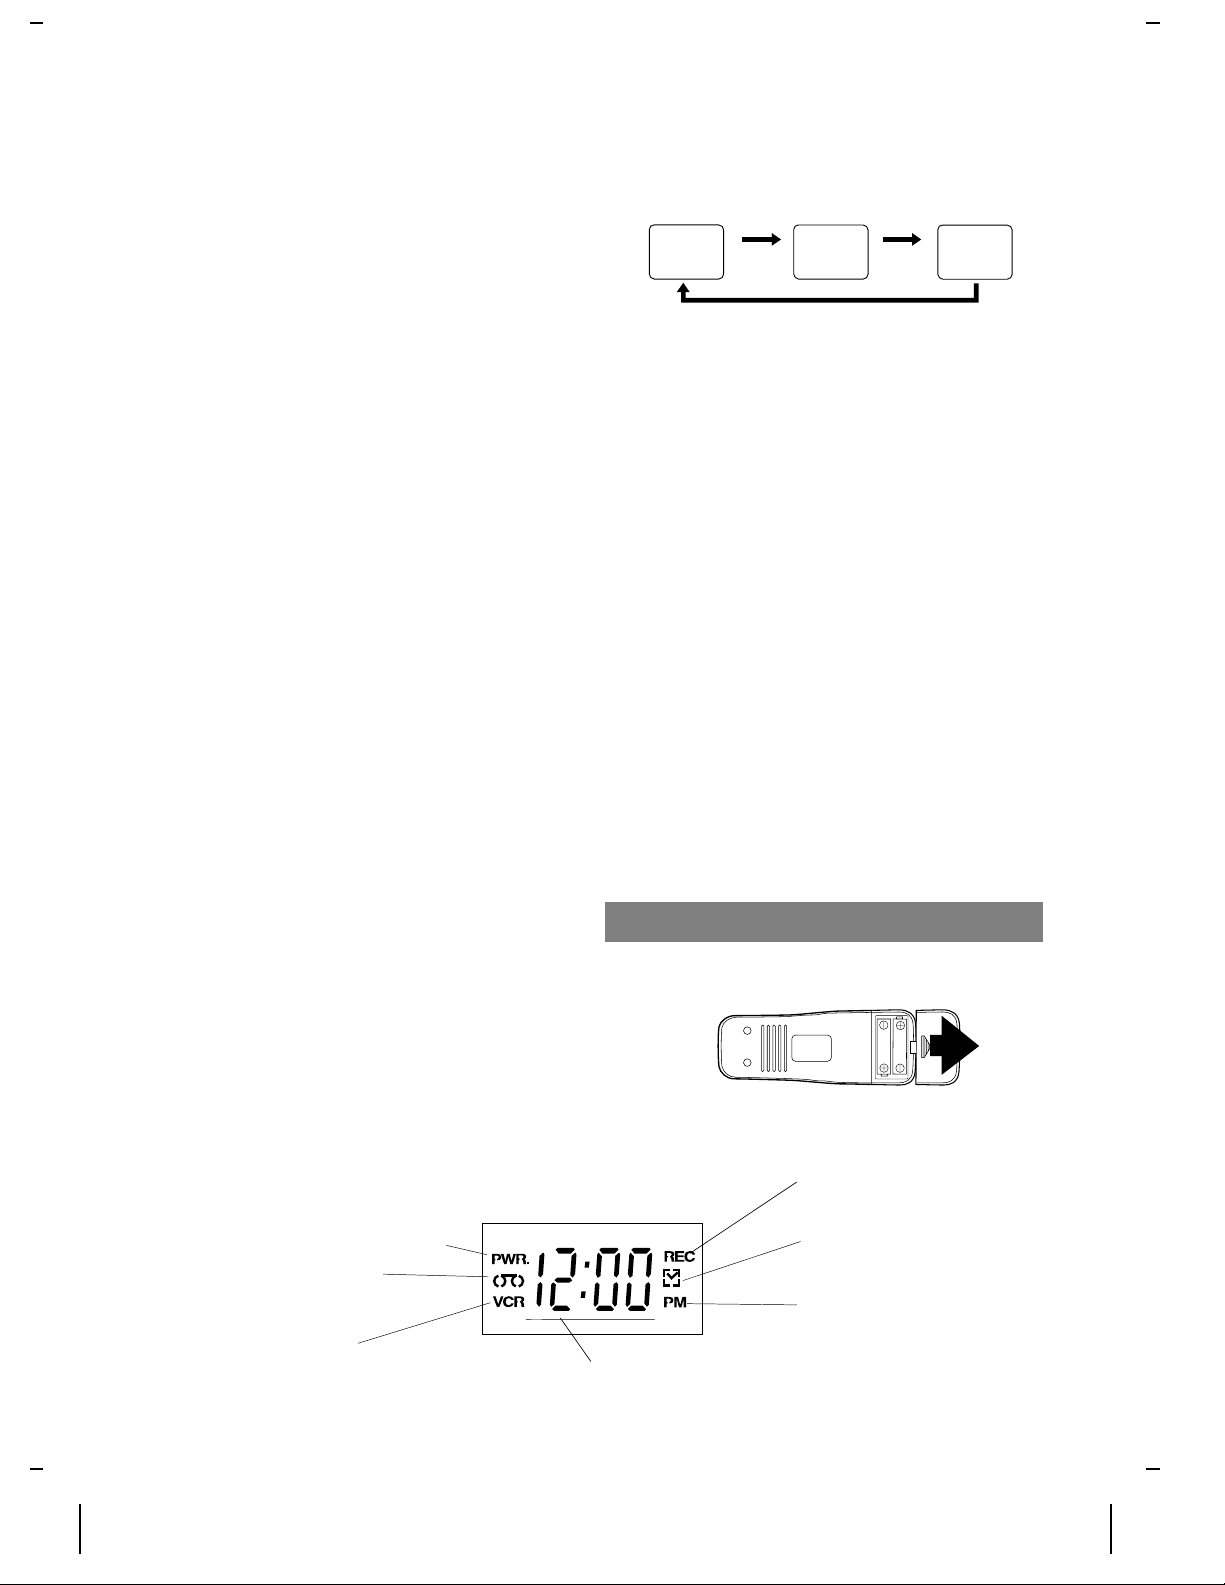
8.
VCR/TV button–
Press to select TV or VCR mode.
VCR position: to view playbac k, to monitor video
recordings or watch TV using the VCR tuner.
TV position: to watch TV or to view one program
while recording another.
9.
Remote sensor windo w –
Receives the infrared
signals from the remote control.
10.
Indicators
PWR. (power) indicator–
Indicates when the VCR
is turned on.
VCR indicator–
Indicates when the VCR is in the
VCR position.
TAPE IN indicator–
Indicates when there is a tape
in the VCR.
TIMER indicator–
Indicates when the timer record-
ing or OTR has been set.
REC indicator–
Indicates during recording. Flashes
when a recording is paused.
CLOCK indicator–
Displays current time. PM indi-
cator lits when p.m.
11.
TAPE SPEED button–
Press to choose the desired
recording speed : SP/SLP.
12.
CHANNEL Up or Down buttons–
Press to select
the desired channels for vi ewing or recording.
Tracking function –
Press to minimize vide o ‘noise’
(lines or dots on screen) during play back (only on th e
VCR).
Press to stabilize the picture in the Still mode when
the picture begins to vibrate vertically.
13.
RECORD button–
OTR button–
Press for manual re cording.
Press to activate One Touch Record-
ing. (only on the VCR)
14.
MENU button–
Press to display the menu on the TV
screen. Press to exit the menu on the TV screen.
15.
NUMBER buttons–
Press to select desired channels
for viewing or recording. To select channels from 1
to 9, first press "0" button then 1 to 9. (only on the
remote control)
+100 button –
When selecting cable channels which
are higher than 99, press this button first, then press
the last two digits. (To select channel 125, first press
"+100" button then press "2" and "5"). (only on the
remote control)
16.
DISPLAY button–
Press to display the current time,
channel number, real time tape counter, an d other information on the TV scr een. (only on the r emote control)
Each time yo u press this button, TV screen will
change as shown. The status display (STOP, PLAY
etc.) and the tape speed display (SP, LP (playback
only), or SLP) will disappear after 5 seconds.
<OFF mode>
17.
COUNTER MEMORY button–
<COUNT mode> <CLOCK mode>
Press
once
STOP
SP 0:12:34
Press once
Press
once
STOP
SP
Press to set counter
5:40PM
CH 02
memory on and off. (only on the remote control)
18.
COUNTER RESET button–
Press to reset counter
to 0:00:00. (only on the remote control)
EXIT button–
Press to exit the menu on the TV
screen. (only on the remote control)
19.
AUTO REPEAT button–
Press to repeat playback
automatically. (only on the remote control)
20.
Power cord–
Connect to a standard AC outlet
(120V/60Hz).
21.
AUDIO OUT jack–
Connect to the audio input jack
of your audio equipment or another VCR.
22.
AUDIO IN jack–
Connect to the audio output jack of
your audio equipment or another VCR.
23.
ANT. IN terminal–
Connect to an antenna, Cable
system or Satellite system.
24.
VIDEO OUT jack–
Connect to the video input jack
of your video camera or another VCR.
25.
VIDEO IN jack–
Connect to the video output jack of
your video camera or another VCR.
26.
CH3/CH4 selector switch–
Use to se lect a video
output channel (3 or 4) for VCR pl ay back .
27.
ANT. OUT terminal–
Connects to the antenna input
terminal on your TV.
INSTALLING THE BATTERY
Make sure the polarity of battery to install to the remote
control unit.
Install 2 X AA battery
H7740
INDICATORS
PWR. (power) indicator
Indicador de alimentación
TA P E IN indicator
Indicador de videocasete
introducido
VCR indicator
Indicador de videograb adora
REC (record) indicator
Indicador de grabación (RE C )
TIMER indicato
Indicador del tem porizador
PM indicator
Indicador del tarde (PM)
CLOCK indicator / Indicador del reloj
- 5 - EN
0J11
Page 6
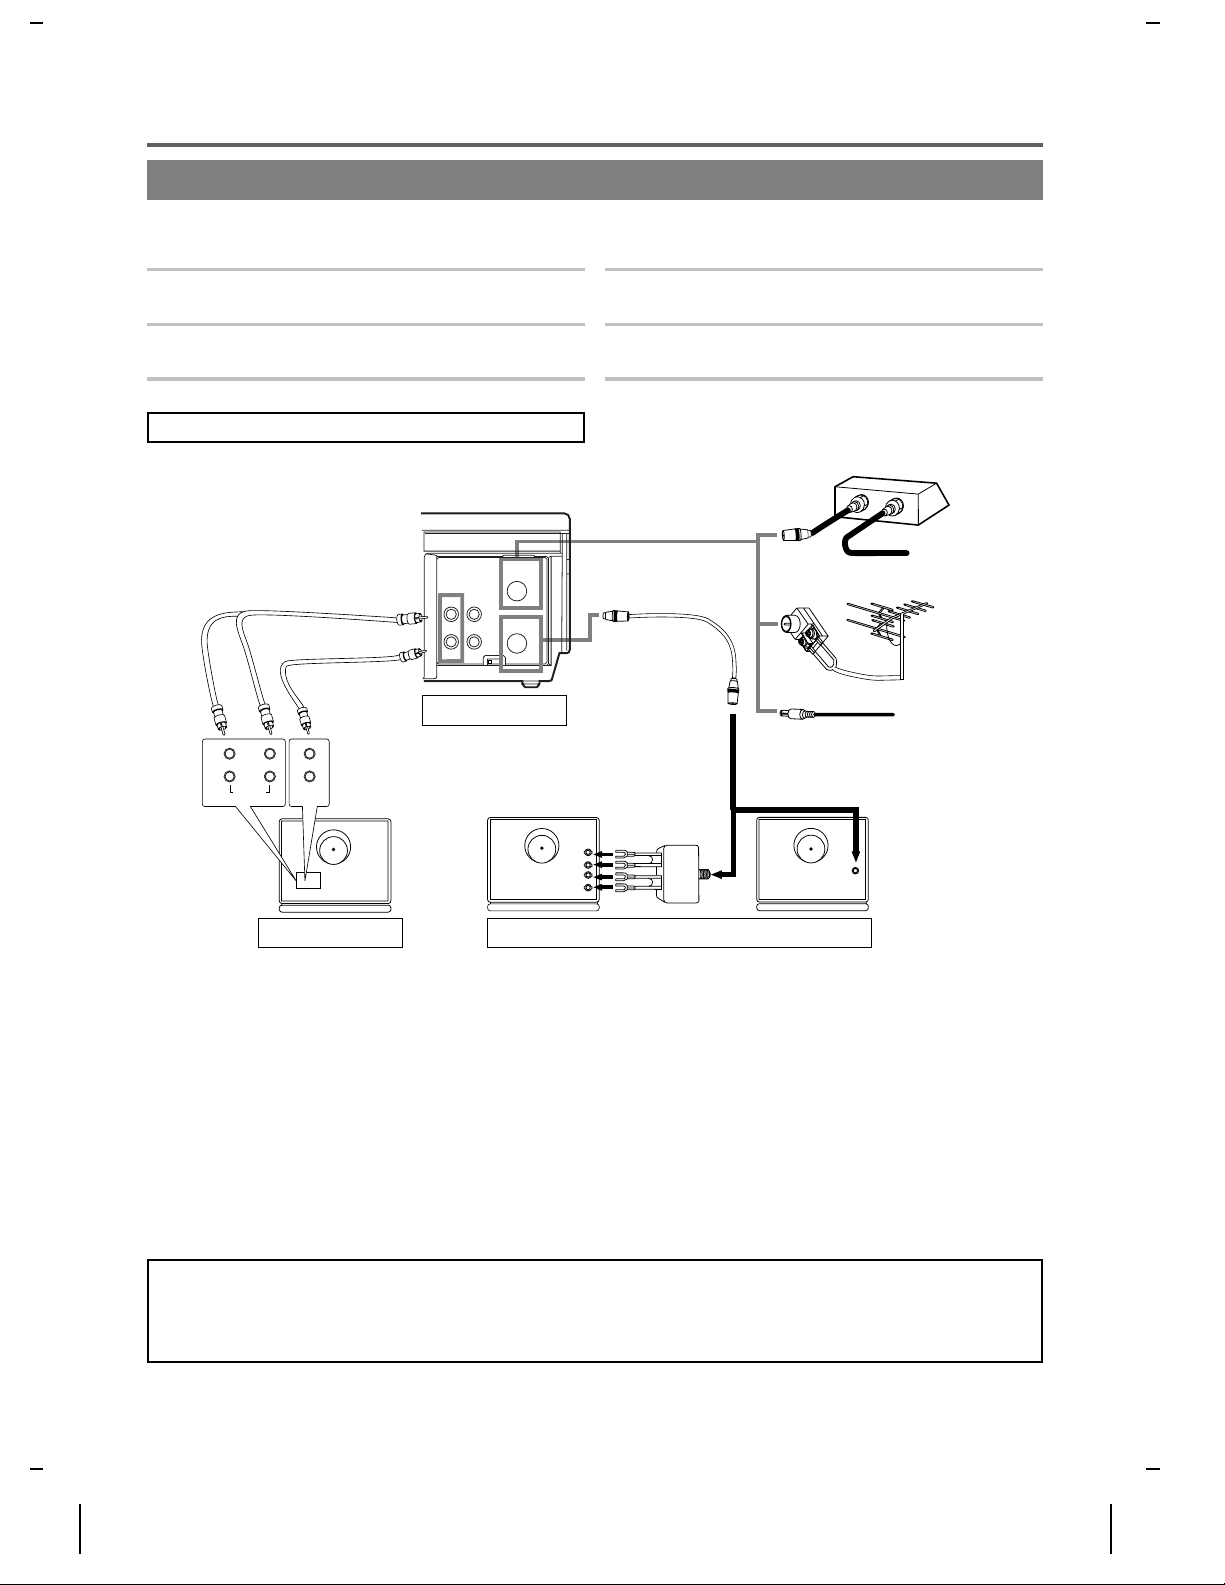
PREPARA TION FOR USE
ANTENNA/CABLE CONNECTIONS
For some of the most common typ es of con nectio ns, please refer to the following s. Use only one connection. For
any further complex connections, please contact your local dealer. (You may need additional accessories which
are not supplied).
1
Disconnect the antenna or cable from your TV.
2
Connect the antenna or cable to the ANT .IN (T op jack)
of your VCR.
3
Connect one end of the coaxial cable (supplied) to
the ANT.OUT (Bottom jack) of your VCR.
Basic Connections
AUDIO
OUT IN
CH3 CH4
VIDEO
Back of the VCR
AUDIO
IN
VIDEO
IN
LR
ANT
OUT
4
Connect the other end of the coaxial cable (supplied)
to the UHF/VHF antenna jack of your TV.
[Cable Box or Satellite Box]
OUT
IN
Coaxial Cable
(Supplied)
VHF
UHF
VHF
UHF
OR
OR
OR
ANT in
IN
From
Cable or
Satellite
Company
Indoor or
Outdoor
Antenna
From
Cable Company
(No Cable Box)
TV A/V Terminal TV Antenna Terminal
USING OPTIONAL AUDIO/VIDEO
OUTPUT JACKS
If your TV has A/V input jacks, you may connect your
VCR’s AUDIO/VIDEO OUTPUT jacks to the
audio/video input jack s on back of your TV.
Direct audio/video connections usually result in a better
USING AUDIO/VIDEO INPUT JACKS
You can use A/V inp ut jack s on back p anel.
●
When you connect the External source to jacks on
back panel, select "Line-in" position for recording by
pressing the 0, 0 on the remote control or CHANNEL
Up/Down button.
picture and sound quality for tape playback. Please see
your TV’s owner’s manual for A/V input co nnections.
Note to CATV system installer
This reminder is provided to call the CATV system installer’s attention to Article 820-40 of the NEC that
provides guidelines for proper grounding and, in particular, specifies that the cable ground shall be connected
to the grounding system of the building, as close to the point of cable entry as practical.
- 6 - EN
0J11
H7740
Page 7
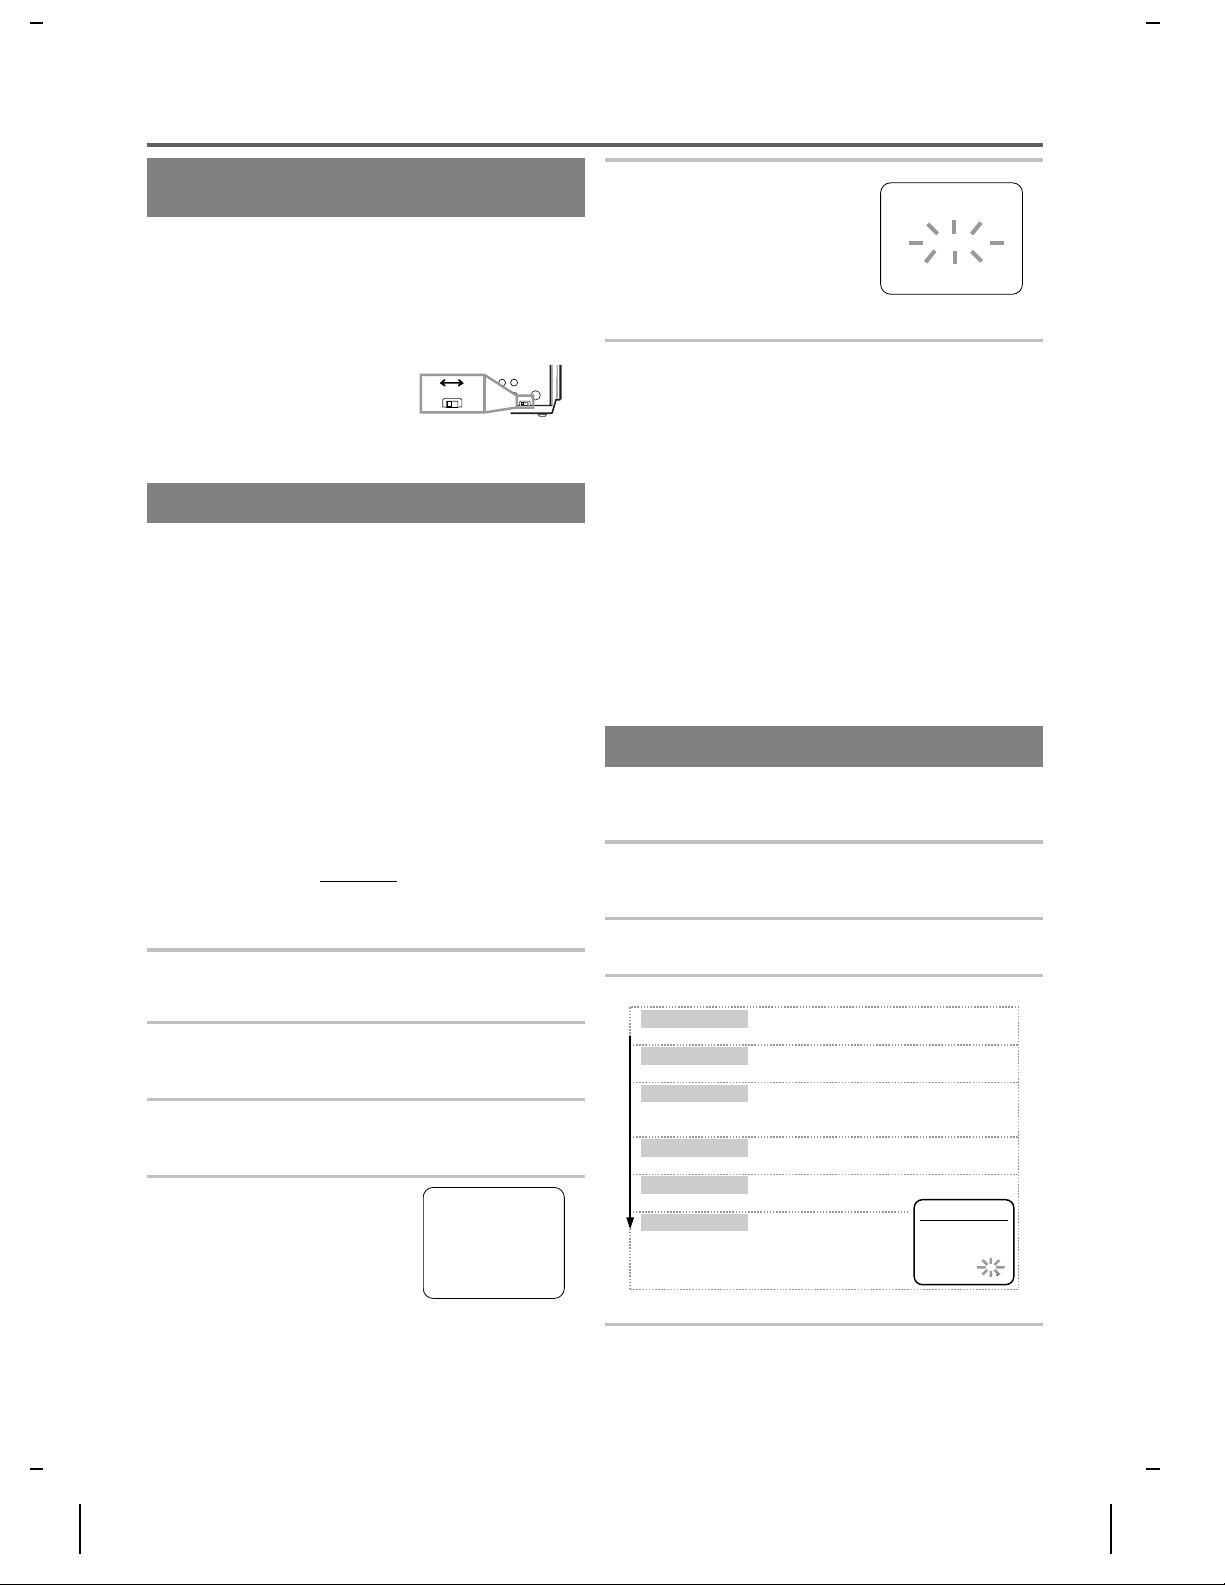
INITIAL SET UP FOR USE
SETTING THE CH3/CH4
SWITCH
If your TV does not have A/V ter m inals:
When the VCR is in the Playback mode or when the
VCR is in the VCR position, your TV will receive signals from the VCR on either chan nel 3 o r 4 .
T o use the VCR with your TV, set the selector switch to
CH3 or CH4 (which is located
in the back of your VCR),
whichever is not used for normal broadcasts in your area.
Then set your TV to the same
channel.
CH3 CH4
[Back of the VCR]
OUT
CH4
CH3
5
Begin channel preset
by pressing the B button
CH 01
once. The tuner scans and
memorizes all active channels
AUTO SET UP
in your area.
●
The VCR distinguishes between standard TV channels
and cable channels.
6
After scanning,
the tuner stops on the lowest
memorized channel. The TV screen returns to TV
mode.
●
If "AUTO SET UP" appears on the TV screen again,
check the cable connections. Pres s the B button once
again and the VCR will begin preset again.
AUTOMATIC CHANNEL SET UP
You can automatically program the tuner to scan only
the channels you receive in your area.
●
Channel memory programming is
when you connected the VCR to a cable box or
satellite box
as in "Basic connections" on page 6. In
this case, select the VCR and TV to channel 3 or 4
the same channel as the CH3 or CH4 switch on the
back of the VCR. Then, the channel you want to record or view may be selected at the cable box or s atellite box.
●
Follow the steps below once. Repeat it only if there
is a power failure or if the VCR is unplugged for more
than 30 seconds. (In these cases, the programmed
channels are erased.)
●
You must follow the steps below before attempting
to play or record a vi d eo ta p e. I f y ou w ant to play or
record a video tape BEFORE programming the tuner,
you can cancel it by pressing the RESET/EXIT button. To program the tuner again, see "CHAN NEL
SET UP AGAIN" on the next page.
1
You n eed to con nect an tenn a/cab le to the V CR fi rst.
Then, connect the VCR power plug into a standard
AC outlet.
2
Turn on the TV and set the TV to channel 3 or 4.
Now set the CH3/CH4 switch on the back of the VCR
to match the channel selected on the TV.
3
Turn o n th e VCR
by pressing the POWER button.
Both the PWR. indicator and the VCR indicator on
the VCR come on.
4
Select the On Screen Language ("ENGLISH" or
"ESPAÑOL")
by pressing
the ▲ or ▼ button. Then,
press the B button.
NOT needed
LANGUAGE SELECT
————————————————
B
ENGLISH [ON]
ESPAÑOL
TO SELECT A DESIRED CHANNEL
Y o u can select the desired channel by using the CHANNEL Up or Down button or directl y pressing the number
buttons on the remote control.
Note for using the number buttons:
●
When selecting cable channels which are higher th an
99, press the +100 button first, then press the last two
digits.
●
You must precede single-digit channel numb ers with
a zero (For example: 02, 03, 04 and s o on ).
CLOCK SET UP
Set the clock accurately for proper automatic timer recording. We suggest that you use a TV or radio station
as your time source.
1
Select main menu
(If the clock is not set, the CLOCK SET menu appears first. In this case, follow step [3].)
2
Select "CLOCK SET"
ton. Then, press the B button.
3
Set the clock.
Set the month
Set the day
Set the year
Set the hour
Set the minute
Set the AM or PM
●
To go back one step, press the s button.
by pressing the MENU button.
by pressing the ▲ or ▼ but-
Press the ▲ or ▼ button repeatedly.
Then, press the B button.
Press the ▲ or ▼ button repeatedly.
Then, press the B button.
Press the ▲ or ▼ button repeatedly.
Then, press the B button.
The day of the week will appear automatically.
Press the ▲ or ▼ button repeatedly.
Then, press the B button.
Press the ▲ or ▼ button repeatedly.
Then, press the B button.
Press the ▲ or ▼ button
repeatedly.
CLOCK SET
MONTH DAY YEAR
03 / 19 MON 2001
HOUR MINUTE AM/PM
05 : 40 PM AM
PM
H7740
4
Start the clock
by pressing the R ESET/EXIT or
B
button after setting the AM or PM.
- 7 - EN
0J11
Page 8
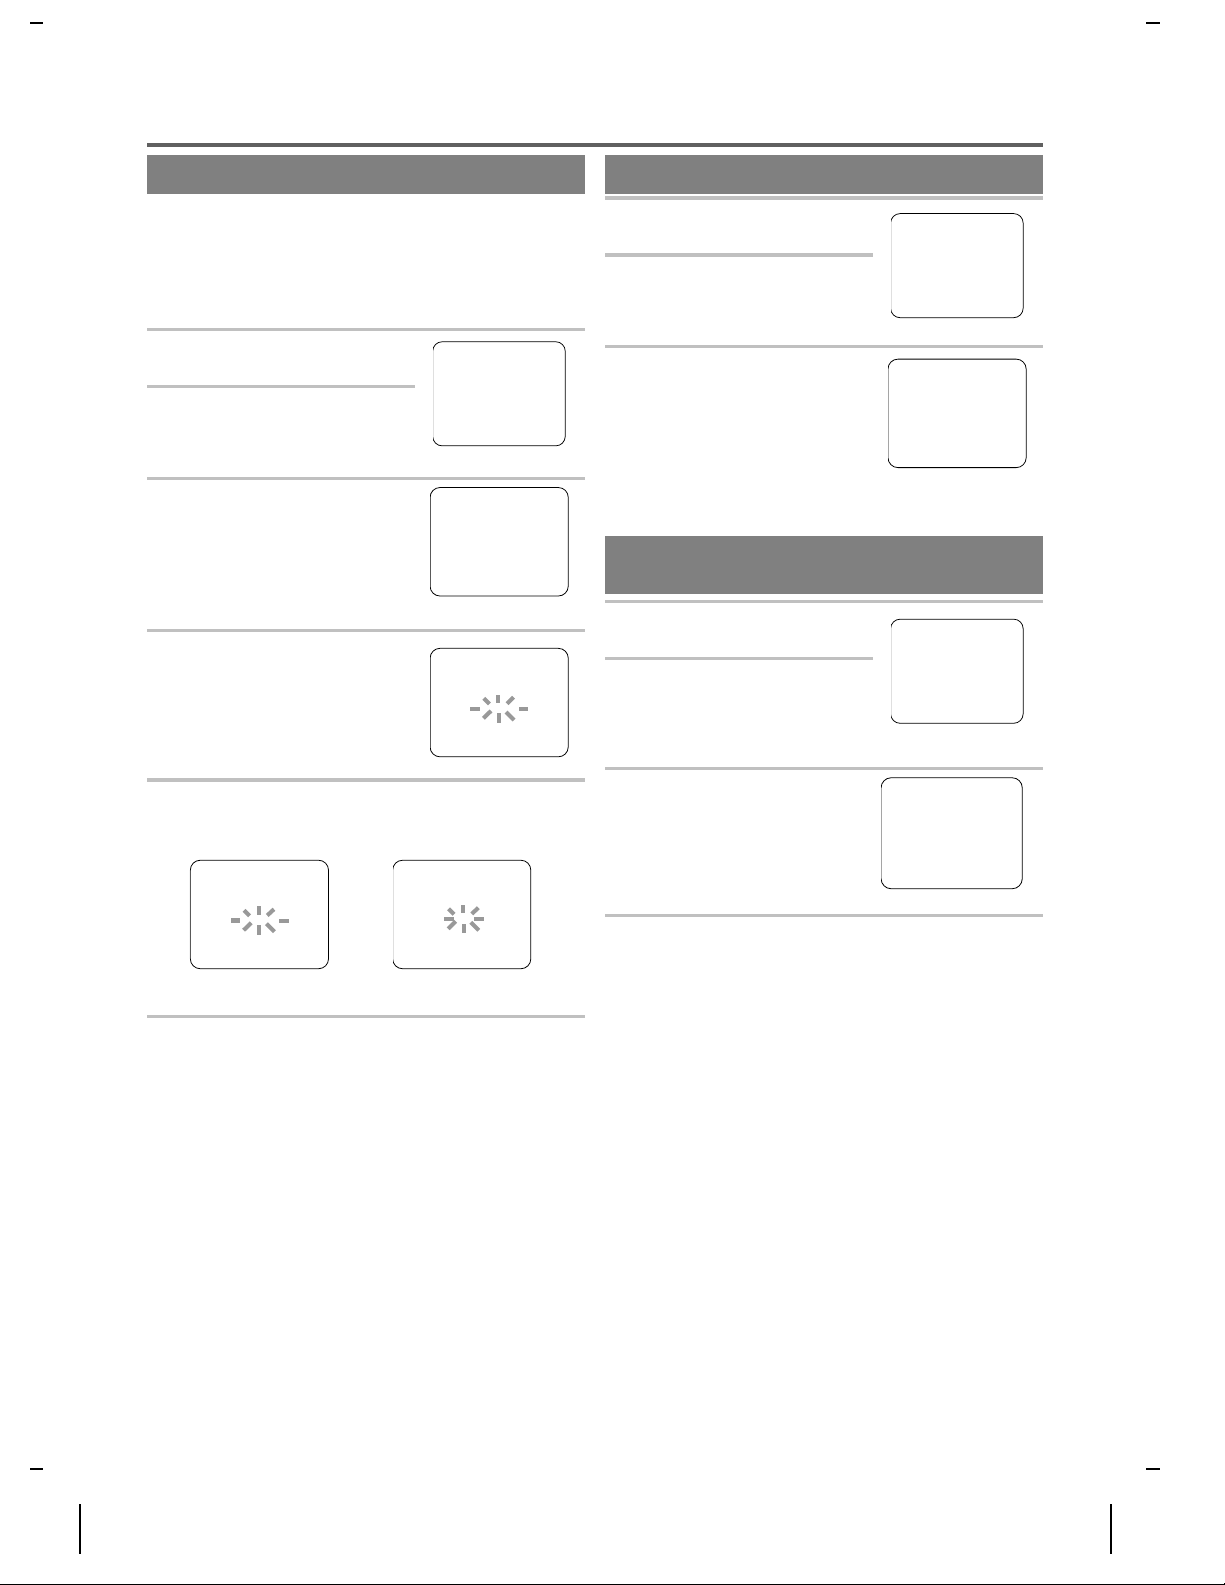
SET UP FOR USE AGAIN
TO ADD/DELETE CHANNELS
When the VCR automatically program the tuner to scan
only the channels you receive in your area, some channels may be skipped du e to weak signal . You can manually add the channel in the VCR memory. (Of course,
you can later delete the added channel from the memory
again.)
1
Select main menu
ing the MENU button.
2
Select "CHANNEL SET UP"
by pressing the ▲ or ▼ button.
Then, press the B button.
3
Select "MANUAL SET UP"
by pressing the ▲ or ▼ button.
Then, press the B button.
4
Enter the desired channel
number
by pressing the ▲ or
▼ button.
by press-
- M E N U -
TIMER PROGRAMMING
AUTO REPEAT [OFF]
B
CHANNEL SET UP
CLOCK SET
LANGUAGE SELECT
CHANNEL SET UP
———————————— ——————
AUTO SET UP
B
MANUAL SET UP
MANUAL SET UP
———————————————
CHANNEL 30 ( TV )
DELETE
CHANNEL SET UP AGAIN
1
Select main menu
ing the MENU button.
2
Select "CHANNEL SET UP"
by pressing the ▲ or ▼ button.
Then, pres s t he B button.
3
Select "AUTO SET UP"
pressing the ▲ or ▼ button.
Then, press the B button. After
scanning, the tuner stops at the
lowest memorized channel.
●
The VCR distinguishes between standard TV channels and cable channels.
by press-
by
- M E N U -
TIMER PROGRAMMING
AUTO REPEAT [OFF]
B
CHANNEL SET UP
CLOCK SET
LANGUAGE SELECT
CHANNEL SET UP
——————————————————
B
AUTO SET UP
MANUAL SET UP
SELECTING THE ON SCREEN
LANGUAGE
1
Select main menu
ing the MENU button.
2
Select "LANGUAGE SE-
by pressing the ▲ or
LECT"
▼ button. Then, press the
button.
by press-
B
- M E N U -
TIMER PROGRAMMING
AUTO REPEAT [OFF]
CHANNEL SET UP
CLOCK SET
B
LANGUAGE SELECT
5
Add or Delete it from memory
button so that "ADD" or "DELETE" flashes on
s
by pressing the B or
the TV screen according ly.
MANUAL SET UP
———————————————
CHANNEL 30 ( TV )
DELETE
DELETED
-
6
Exit the preset mode
- -
by pressing the RESET/EXIT
MANUAL SET UP
———————————————
CHANNEL 30 ( TV )
ADD
MEMORIZED
button.
3
Select the On Screen Language ("ENGLISH" or
"ESPAÑOL")
by pressing
the ▲ or ▼ button.
4
Exit the preset mode
by pressing the RESET/EXIT
LANGUAGE SELECT
————————————————
B
ENGLISH [ON]
ESPAÑOL
button.
-
H7740
- 8 - EN
0J11
Page 9

PLAYBACK FUNCTION
NORMAL PLAYBACK
1
Insert the prerecorded tape.
The VCR will turn on. If the
safety tab has been remove d,
the VCR will start playback
automatically.
2
Turn on the TV and set the TV to channel 3 or 4.
Now set the CH3/CH4 switch on the back of the VCR
to match the channel selected on the TV.
3
Begin playback
●
Tracking adjustment will be set automatically (Digi-
by pressing the PLAY button.
tal Tr acking func tion) when yo u start playbac k. To
adjust the tracking manually, press the CHANNEL
Up or Down button
●
When a tape has reached the end, the VCR will re-
on the VCR
.
wind the tape to the beginning, eject the tape, and turn
off the VCR automatically.
●
S-VHS Quasi Playback (SQPB)
This unit allows you to view a tape recorded in S-VHS
format. (Noise lines may appear on the picture.)
4
To stop playback,
press the STOP button.
STILL
Y ou can freeze the picture on TV screen by pressing the
PAUSE/STI LL button during play back .
●
Usually there will be video "noise" lines (black and
white streaks or dots) on the screen.
fault of the machine but is a by-product of the
technology involved in producing a 2 Head VCR.
Only a tape recorded in the SLP mode will show a
clear picture. You can change position of the noise
lines on a still picture by pressing the PAUSE/STILL
button repeatedly.
●
After the VCR has been in Still mode for 5 minutes,
it will stop automatically to protect the tape and the
video head.
●
To return playback, press the PLAY button.
This is not a
AUTO REPEAT PLAYBACK
Use this feature allows you to play a tape over and ov er .
1) Select main menu by pressing the MENU button.
2) Select "AUTO REPEAT" by pressing the ▲ or ▼
button.
3) Begin auto repeat playback by pressing the B button
so that [ON] will appear next to "AUTO REPEAT"
on the TV screen.
●
If the on-screen menu still remains, press the RESET/EXIT button to exit the menu.
●
You can set AUTO REPEAT to ON or OFF by pressing the AUTO REPEAT button on the remote control.
●
To cancel the auto repeat mode, press the B button
at step [3] so that [OFF] appear next to "AUTO REPEAT" on the TV screen.
●
When you set the auto repeat mode to [ON] while the
counter memory mode is ON, the VCR will exit the
counter memory mode automatically.
PICTURE SEARCH
If you jump or repeat the some s cene in the playing program, press the F.FWD or REW button.
●
Press it again and the VCR will now search in super
high speed. (in the LP / SLP modes on l y)
H7740
- 9 - EN
0J11
Page 10
RECORDING FUNCTION
Before recording, make sure:
●
The desired channel is selected by p ressing the number buttons on the remote control or the CHANNE L
Up/Down button. (If you connected the VCR to a
cable box or satellite box as in "Basic connections"
on page 6, select the VCR to channel 3 or 4 the same
channel as the CH3 or CH4 switch o n the back of the
VCR. Then, select the channel you wan t to r ecord at
the cable box or satellite box. In this case, you can
ONLY record and view the SAME channel. )
●
There is a tape with its safety tab into the VCR.
●
The desired recording speed is selected in SP(s tan dard play) or SLP( super long play) mode by pressing
the TAPE SPEED button.
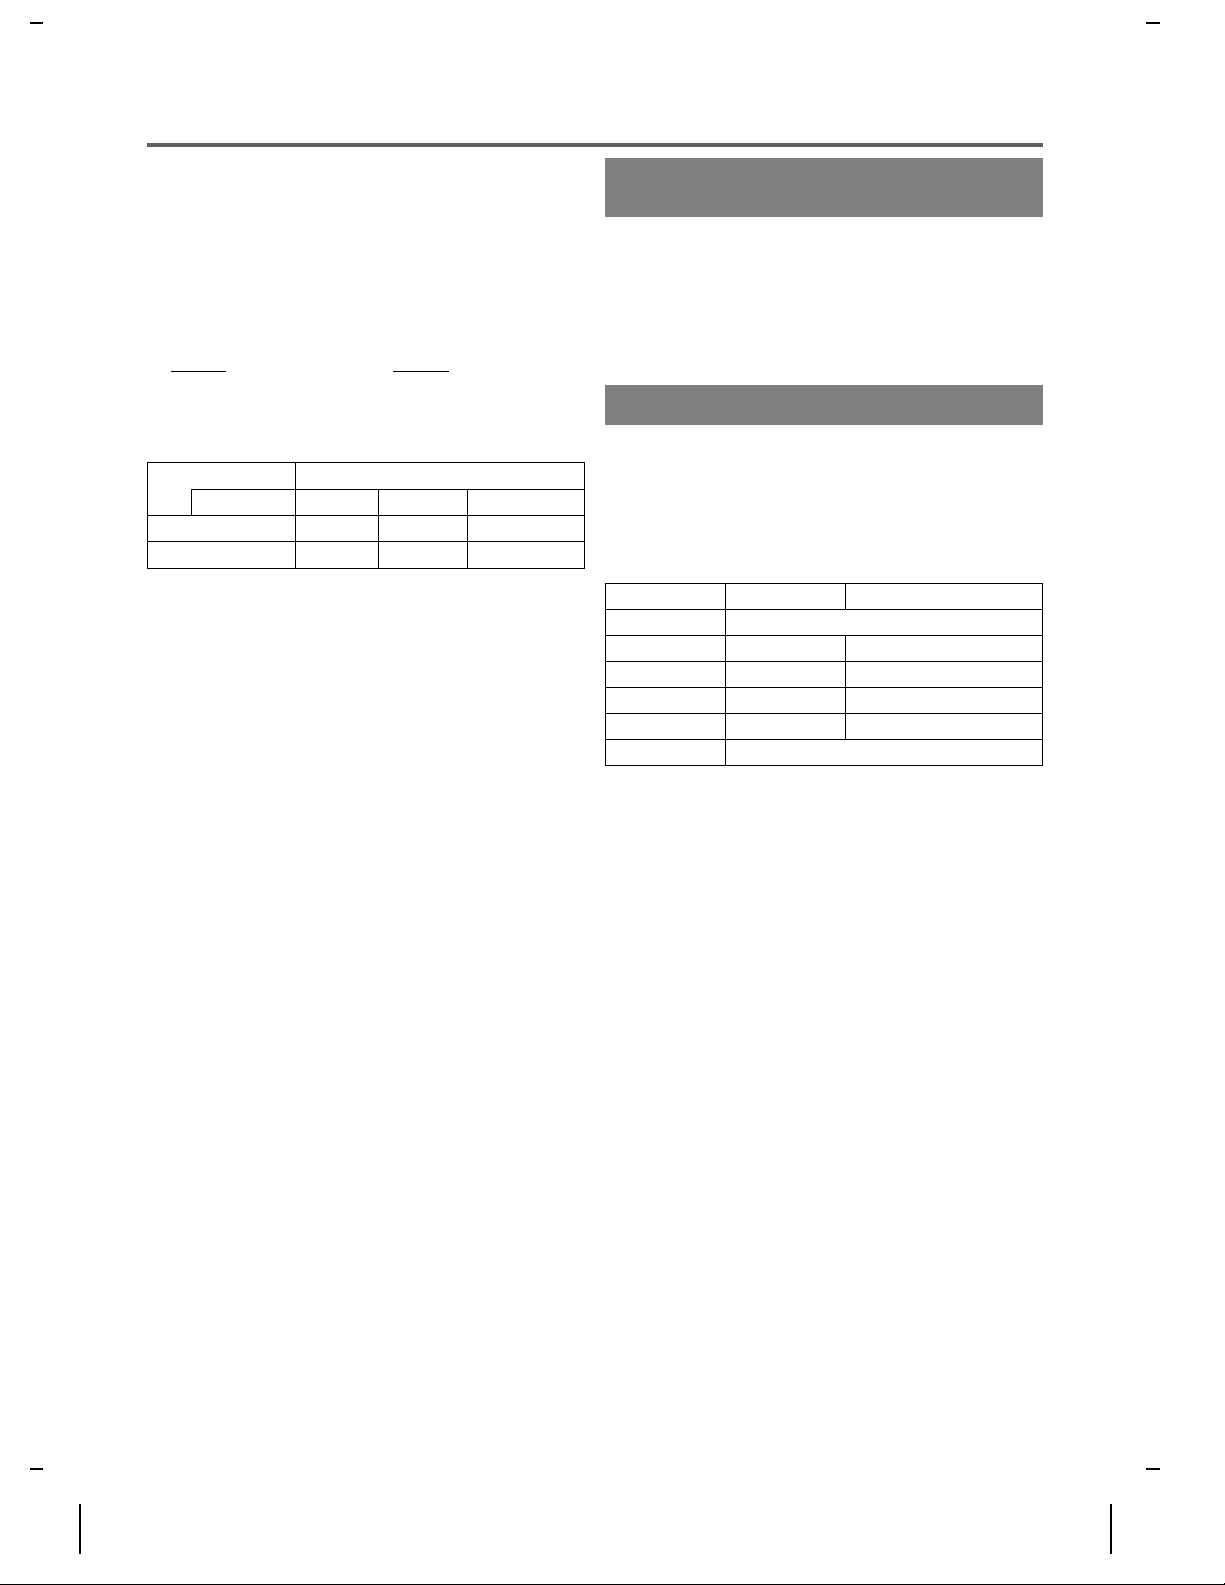
Tape Speed Recording/Playback Time
T ype of tape
T60 T120 T160
SP mode 1 hour 2 hours 2-2/3 hours
SLP mode 3 hours 6 hours 8 hours
VIEWING AND RECORDING
THE SAME PROGRAM
1) Begin the recording by pressing the RECORD button.
●
To temporarily stop recording or resume it, press the
PAUSE/STILL button. After the VCR has been in
Pause mode for 5 minutes, it will stop automatically
to protect the tape and the video head.
2) Stop t he recording by pressing the STOP button
when recording is completed.
OTR(One Touch Recording)
This function enables you to set the recording length simply by pressing the REC/OTR button
1) Begin OTR by pressing the REC/OTR button
VCR
repeatedly until the desired recording length
appears.
●
Recording stops when 0:00 is reached.
Press Display Recorded Length
1 press (normal recording)
2 presses 0:30 30 minutes
3 presses 1:00 60 minutes
↓↓ ↓
17 presses 8:00 480 minutes
18 presses (normal recording)
on the VCR.
on the
H7740
- 10 - EN
0J11
Page 11
TIMER RECORDING
Y ou may set the VCR to st art and end time for a r ecording while you are away. You can set seven programs to
record on specific days, daily o r weekly within a 1 year
period.
1) Insert a tape with its safety tab into the VCR.
2) Select main menu by pressing the MENU button.
3) Select "TIMER PROGRAMMING" by pressing the
▲ or ▼ button. Then, press the B button.
●
If you have not yet set the clock, "CLOCK SET" appears. If so, follow the steps [3] and [4] in "CLOCK
SET UP " section. Then, set the timer recording.
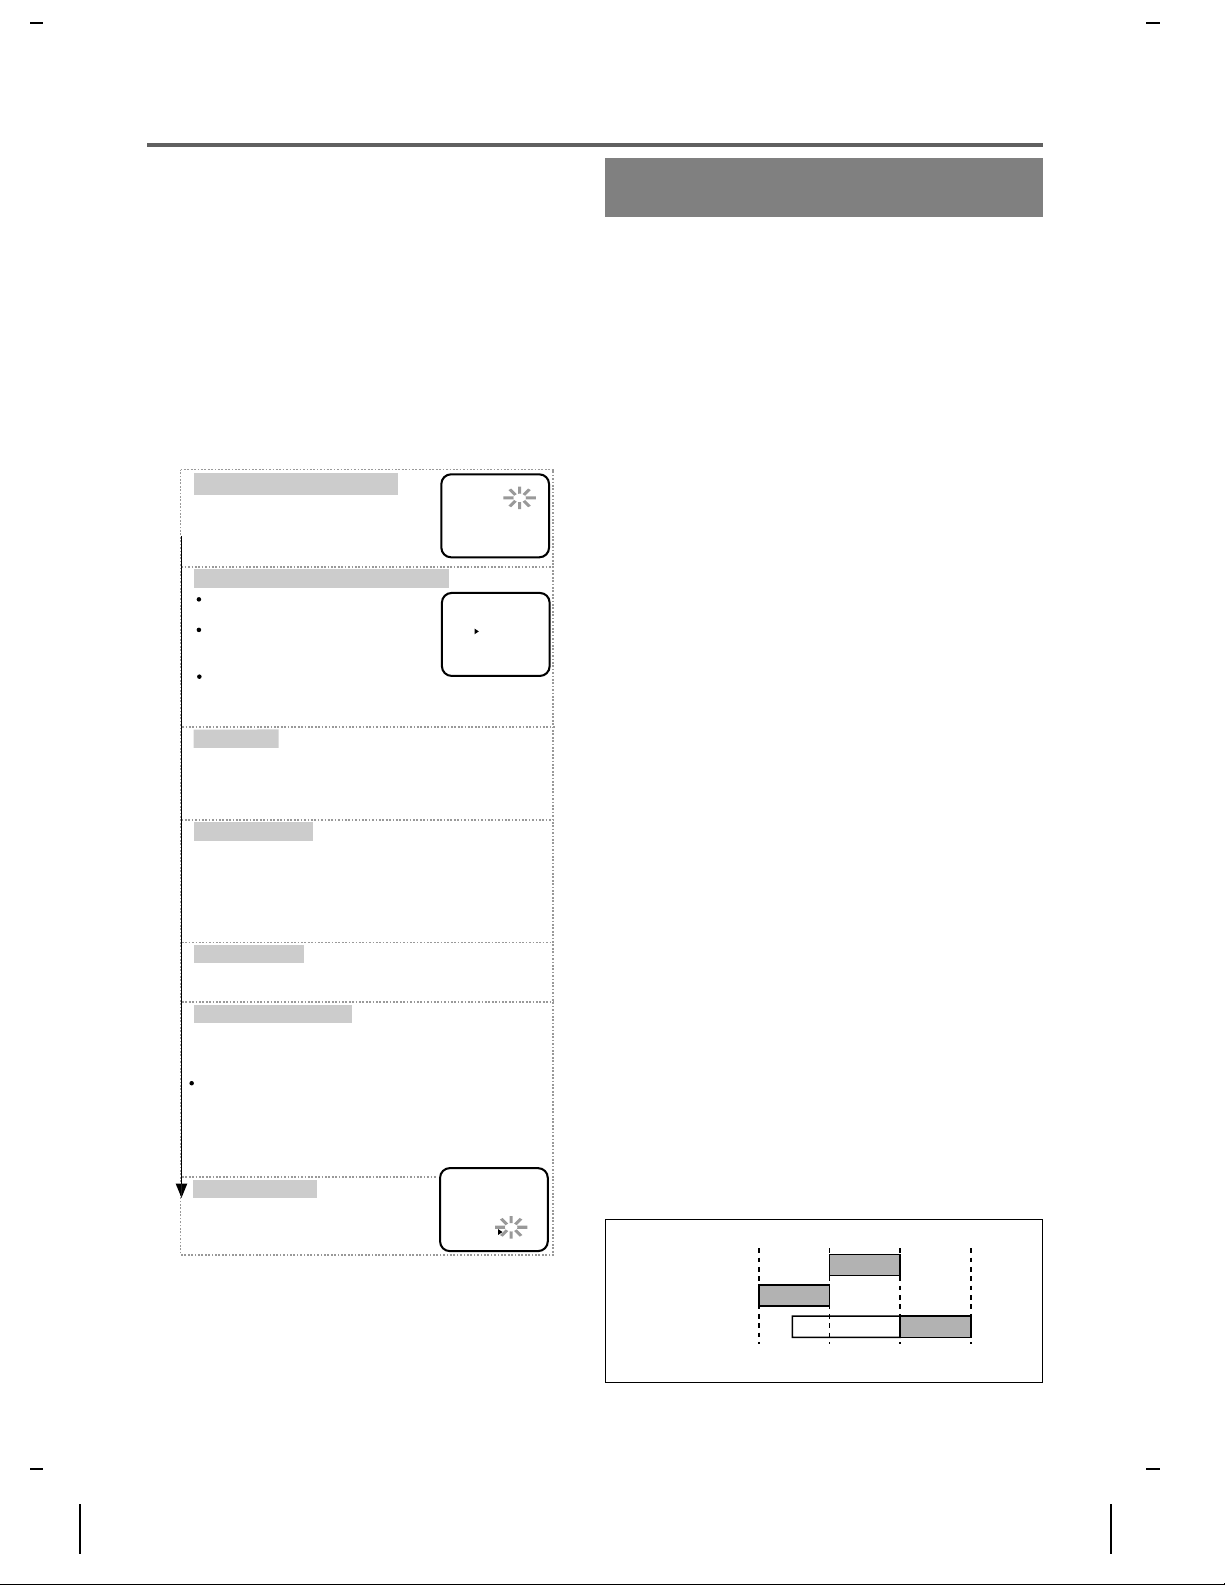
4) Set the timer.
Set the program number (1~7)
Program number which is not set up flashes.
Press the ▲ or ▼ button repeatedly
for the desired program number.
Then, press the
Select once, daily or weekly recording
For once: Press the
to point to "ONCE".
For daily (Monday~Friday):
Press the
to point to "DAILY".
For weekly: Press the
to point to "WEEKLY".
Then, press the
Set the date
First, press the
then, press the B button.
Next, press the
Then, press the
Set the start time
First, press the
then, press the B button.
Next, press the
then, press the B button.
And then, press the
Then, press the
Set the end time
Follow the instructions of "Set the start time"
to set the end time.
Set the channel number
Press the ▲ or ▼ button repeatedly
for the desired channel number.
Then, press the
If you connected the VCR to a cable box or satellite box as in
"Basic connections" on page 6, select the VCR to channel 3
or 4 the same channel as the CH3 or CH4 switch on the back
of the VCR. Then, select the channel you want to record at
the cable box or satellite box. Leave the cable box or satellite
box on for timer recording.
Set the tape speed
Press the ▲ or ▼ button repeatedly
for the desired tape speed.
Then, press the B button.
●
To go back one step, press the s button.
B button.
▲ or ▼ button
▲ or ▼ button
B button.
▲ or ▼ button
▲ or ▼ button
B button.
▲ or ▼ button
▲ or ▼ button
▲ or ▼ button
B button.
B button.
▲ or ▼ button
for the month,
for the day.
for the hour,
for the minute,
PROGRAM NUMBER 4
DATE - - / - START TIME - - : - - - END TIME - - : - - - CHANNEL - REC SPEED - -
PROGRAM NUMBER 4
ONCE
DAILY
WEEKLY
for AM or PM.
ONE TIME PROGRAM
PROGRAM NUMBER 4
DATE 05/03 THU
START TIME 07:30 PM
END TIME 08:30 PM
CHANNEL 16
REC SPEED SP
SP
SLP
5) To set another progr am, repeat step [4]. To exit, pres s
the RESET/EXIT button.
6) Pr ess th e POW ER bu tton to set th e tim er. The TIMER
indicator on the VCR comes on.
HINTS FOR TIMER
RECORDING
●
If there is a power failure or the VCR is unplugged
for more than 30 seconds, the clock setting and all
timer settin gs will b e l ost .
●
If the tape runs out before the end time, the VCR will
switch to the Stop mode immediately, eject the tape
and the VCR power will be turned off. The TIMER
indicator will flash.
●
If a tape is not in the VCR or does not have the safety
tab, the TIMER indicator flashes and timer recording
cannot be performed. Please ins ert a record able tape.
TO STOP A STARTED AUTOMATIC
TIMER PROGRAM
Press the STOP/EJECT button
TO CHECK, CORRECT, OR CANCEL AN
AUTOMATIC TIMER PROGRAM
1) Turn the power on.
2) Select main menu by pressing the MENU button.
3) Select "TIMER PROGRAMMING" by pressing the
▲ or ▼ button. Then, press the B button.
4) Select the program number which you want to
check by pressing the ▲ or ▼ button. The details
of the selected program appears on the TV screen.
●
Go to the digit you want to change by pressing the
or s butto n. Then, enter correct numbers by
B
pressing the ▲ or ▼ button.
●
You may cancel the entire program by pressing the
button during the program number flashes.
s
5) Press the RESET/EXIT button to exit.
6) Press the POWER button to return to timer standby mode.
AVOID OVERLAP OF PROGRAMS ...
There is a case that a program will not be performed.
When programs overlap:
●
The program with the earliest start time has priority.
●
Once the earliest program finishes, the overlapping
program with the lower number will begin recording
in sequence.
●
The illustration below demonstrates the sequence of
recordings.
Program 1
(10:00AM-11:00AM)
Program 2
(9:00AM-10:00AM)
Program 3
(9:30AM-12:00PM)
9:00AM 10:00AM 12:00PM
*Recording period is SHADED
on the VCR
Recording Sequence
11:00AM
.
H7740
- 11 - EN
0J11
Page 12
SPECIAL FEATURES
AUTO REWIND
When a tape has reached the end duri ng recording, playback, or fast-forward, the tape will automatically rewind
to the beginning. After rewinding finishes, the VCR will
eject the tape and turn itself to off.
●
The tape will not auto-rewind during timer recording
or One Touch Recording.
●
When the Counter Memory is activated, the tape will
rewind to the M0:00:00 and the VCR will go into the
Stop mode.
COUNTER MEMORY FUNCTION
Use this feature to memorize the beginning o f recording
start point.
1) Press the COUNTER RESET button on the remote
control to reset the counter.
2) Press the COUNTER
MEMORY button on the
remote control so that "M"
appears on the TV screen.
REC
SP M 0:00:00
3) Record the program .
REAL TIME TAPE COUNTER
●
This shows the elapsed recording or playback time in
hours, minute s, and seconds. (The displayed time
will not change during blank portions on the tape.)
●
The "–" indication will appear when the tape is rewound further than "0:00:00" on the tape counter.
4) Afte r recording, press the STOP button then the
REW button.
●
When "0:00: 00" is reached, rewinding operation
goes to stop. And you can view the recording program.
●
The COUNTER MEMORY button does not function
if the auto repeat mode is set to [ON]. In this case, set
the auto repeat mode to [OFF].
●
To cancel the counter memory mode, press the
COUNTER MEMORY button so that "M" disappears from the TV screen.
TROUBLESHOOT ING GUIDE
If you have followed the instructions contained in this manual and have difficulty in operating your VCR, locate
the PROBLEM in the left column below. Check the corresponding CORRECTIVE ACTION column to remedy
the problem.
PROBLEM CORRECTIVE ACTION
●
No power.
Timer recording is not possible.
Cannot go into Record mode.
Playback picture is partially noisy.
Cannot view a tape but the audio is
OK.
No picture or poor picture on
playback.
On-the-air TV programs cannot be
seen.
No operation from the infrared
Remote Contr ol .
Video or color fades in and out when
making a copy of a video tape.
Make sure the power plug is connected to an AC outlet.
●
Make sure the power is turned on.
●
Make sure the timer recording is set correctly.
●
Make sure the power is off.
●
Make sure the VCR clock is set correctly.
●
Make sure the tape has a safety tab. If needed, cover the hole with
plastic tape.
●
Adjust tracking control for a better picture by pressing the
CHANNEL Up or Down button on the VCR.
●
Head cleaning may be necessary. Refer to "AUTO HEAD
CLEANING" .
●
Make sure the VCR is not in the Menu mode.
●
Set your TV to the VCR mode and/or press the VCR/TV button so that
the VCR indicator on the VCR comes on.
●
Fine tune your TV.
●
Re-check the ANT. IN and ANT. OUT connections. See page 6.
●
Set your TV to the TV mode and/or press the VCR/TV button so that
the VCR indicator on the VCR disappears.
●
Make sure the power plug is connected to an AC outlet.
●
Check batteries in remote control.
●
You cannot copy a copyrighted video tape. You are exp erien cing
copy guard protection.
H7740
- 12 - EN
0J11
Page 13

SPECIFICATIONS
Television system : NTSC, TV standard
Video heads : Rotary two-head
Tape cassette : video cassette
T ape s peed
Recording : SP, SLP
Playback : SP, LP, SLP
Tuner channel
VHF : #2~#13
UHF : #14~#69
Cable channel : 5A, A-5 ~ A-1, A ~ W+84
RF converter : Built-in VHF converter
Converter output : VHF Channel 3 or 4.
Timer indication : AM/PM 12-hour system
Operating temperature : 5
o
C~40oC (41oF~104oF)
Terminals
Antenna input : F type connector x 1
Antenna output : F type connector x 1
Video input/output : RCA connector x 2
Audio input/output : RCA connector x 2
MAINTENANCE
SERVICING
Should your VCR become inoperative, do not try to correct the problem by yourself. There are no us er-serviceable parts insi de. Turn off, unpl ug the powe r plug, an d
please call our help line at 1-800-242-7158, to locate an
Authorized Service Center.
CABINET CLEANING
●
Wipe the front panel and other exterior surfaces of
the VCR with a s oft cloth immersed in lukewarm
water and wrun g dry.
●
Never use a solvent or alcohol. Do not spray insecti-
cide liquid near the VCR. Such chemicals may cause
damage and discoloration to the exposed surfaces.
Video output level : 1Vp-p
Vi d eo ou t pu t im ped ance : 75Ω
Audio output level : -6dBv (1KHz)
Video input level : 0.5~2.0Vp-p
Audio input level : -10dBv
Power requirement : 120V, 60Hz
Power consumption : 12 Watts
Dimensions : W 14-1/4" (360mm)
H 3-5/8" (92mm)
D 8-1/2" (215.5mm)
W eight : 5.1 lbs. (2.3 Kg.) (approx.)
●
Designs and specifications are subject to change
without notice and without legal obligation.
●
If there is a di scr epa n cy bet we en la ng uag e s, th e de fault language will be English.
AUTO HEAD CLEANING
●
Automatically cleans video heads as you insert o r remove a cassette, so you can see a clear picture.
●
Playback picture may become blurred or in terrup ted
while the TV program reception is clear. Dirt accumulated on the video heads aft er long peri ods of use,
or the usage of rental or worn tapes can cause this
problem.
If a streaky or snowy picture appears during playback, the video heads in your VCR may need to be
cleaned.
1. Please visit your local Audio/Video st ore and purchase a good quality VHS Video Head Cleaner.
2. If a Video Head Cleaner does not solve the problem,
please call our help li ne at 1-800- 242-7158, t o locate
an Authorized Service Center.
NOTES:
●
Remember to read the instructions included with the
video head cleaner before use.
●
Clean video heads only when problems occu r.
H7740
- 13 - EN
0J11
Page 14
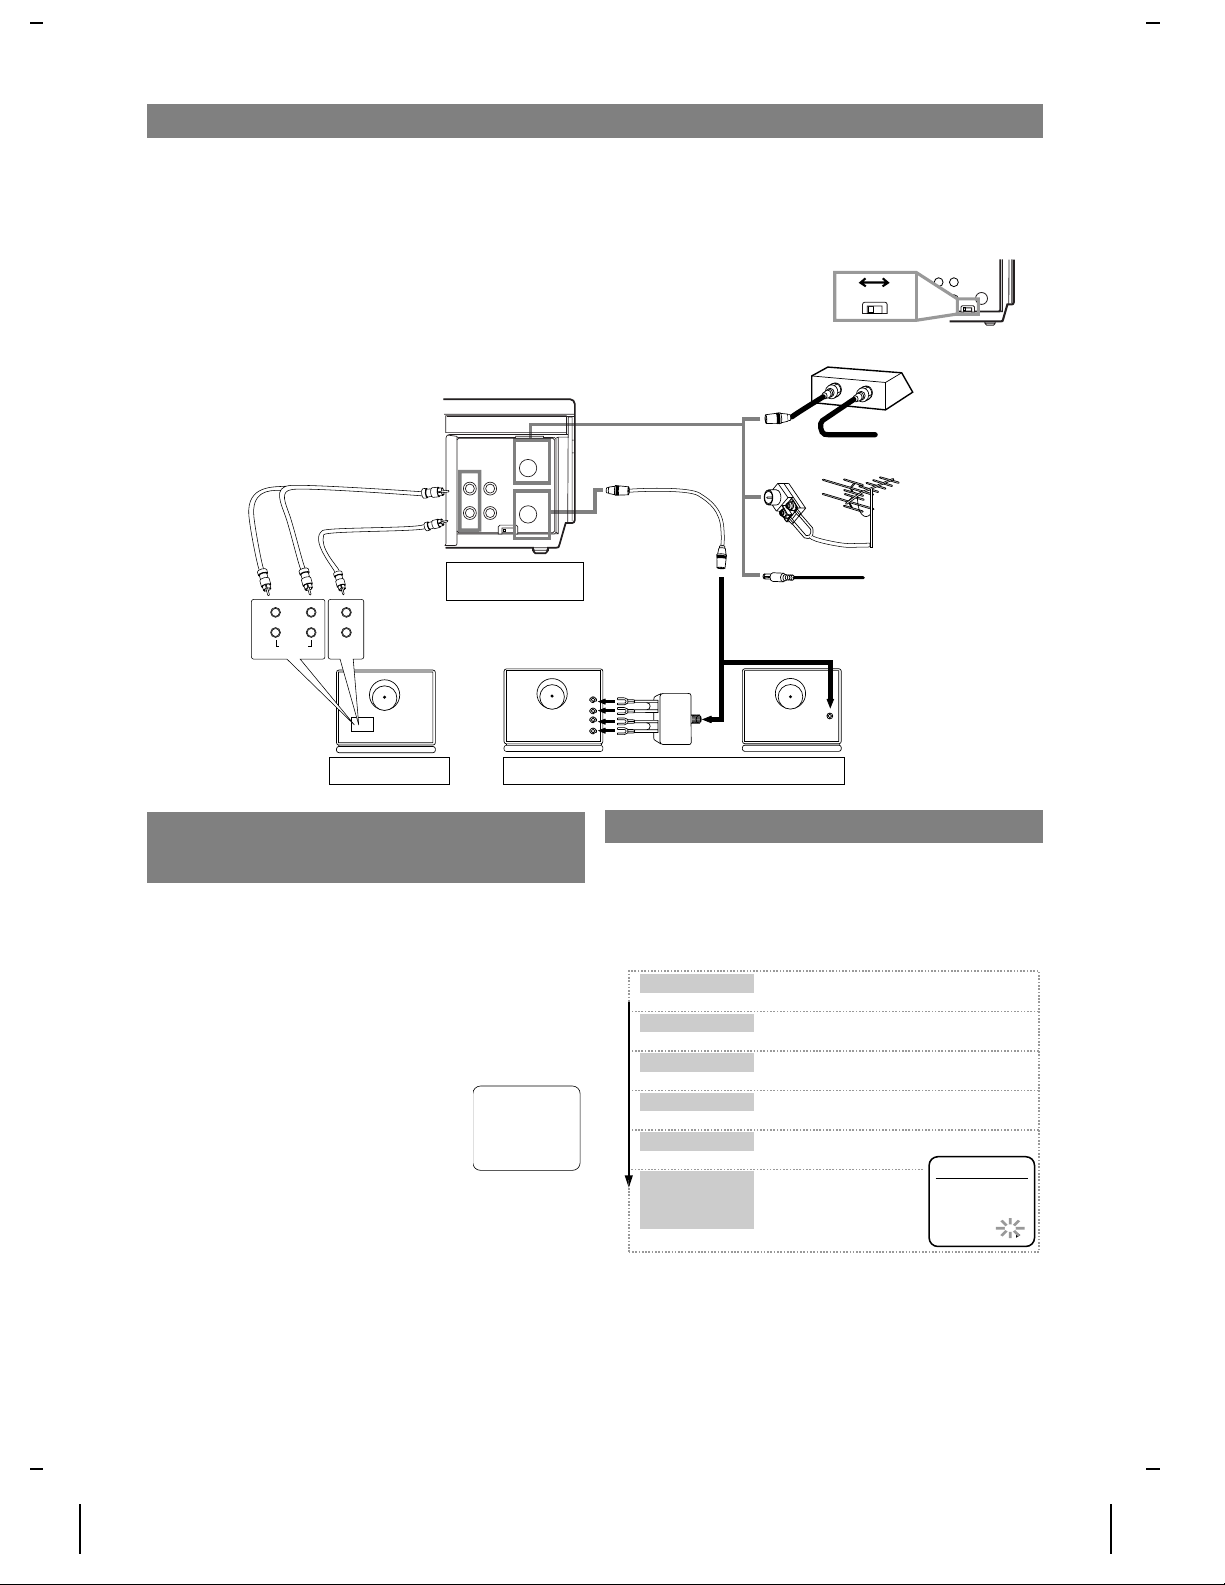
CONEXIONES DE ANTENA/TELEVISIÓN POR CABLE
Para conocer algunos de los tipos de conexión más comunes, consulte
las explicaciones siguientes. Utilice solamente una conexión. Para hacer conexiones más complejas, consulte a su concesionario local. (Tal
vez necesite accesorios adicionales que no han sido incluidos.)
NOTA:
Para obtener más información, consulte la sección "Conexio-
nes de antena/televisión por cable" en la página 6.
1. Desconecte la antena o la caja de t elevi sión por cable de su t el evisor.
2. Conecte la antena o la caja de televisión por cable a ANT.IN (toma
superior) de su videograbadora.
Conexiones básicas
ANT
CH3 CH4
IN
OUT
IN
LR
AUDIO
IN
VIDEO
AUDIO
OUT IN
VIDEO
Parte trasera de
la videograbadora
3. Conecte un extremo del cable coaxial (suministrado) a ANT.OUT
(toma inferior) de su videograbadora.
4. Conecte el otro extremo del cable coaxial (suministrado) a la toma
de antena UHF/VHF de su televisor.
5. Si su televisor no tiene terminales A/V: Ponga el conmuta dor se-
lector en CH3 o CH4 (en la parte trasera de su videograbadora), el
que no se utilice para las
emisiones normales en su
zona. Luego ajuste el televi-
CH3 CH4
OUT
CH4
CH3
sor al mismo canal.
[Parte trasera de la videograbadora]
[Caja de televisión por cable o caja de emisiones de satélite]
O
Cable coaxial
(suministrado)
O
O
OUT
IN
De empresa
de televisión
por cable o
de emisiones
de satélite
Antena
interior o
exterior
De empresa
de televisión
por cable
(Ninguna caja
de televisión
por cable)
Terminal TV A/V Terminal de antena del televisor
PREPARACIÓN DE CANALES
(La antena o la caja de televisión por ca-
ble deberá estar conectada)
NOTA:
Cuando utilice su nueva videograbadora por primera vez, o
en el caso de ser necesario después de producirse un fallo en la alimentación, la videograba dora se pondrá ini cialmente en e l modo de
preajuste cuando se pulse el botón POWER.
Si conecta una caja de televisión por cable o una caja de emisiones vía
satélite, consulte la sección "Pre paración aut omática de canale s" del
manual del propietario.
1. Encienda el televisor y ponga el televisor en el canal 3 ó 4. Ahora
ponga el conmutador de la parte trasera de la videograbadora para
que concuerde con el canal seleccionado en el televisor.
2. Pulse el botón POWER para encender la video-
grabadora.
3. Seleccione "ENGLISH" o "ESPAÑOL" (Spa-
nish) pulsando el botón ▲ o ▼. Y luego pulse
el botón B.
4. Pulse una vez el botón B.
El sintonizador explora y memoriza todos los canales acti vos de
su zona. Tras la exploración, el sintonizador se detiene en el canal
memorizado más bajo.
SELEC. IDIOMA
———————————————
ENGLISH
B ESPAÑOL [ON]
VHF
UHF
VHF
UHF
ANT in
PREPARACIÓN DEL RELOJ
1. Pulse el botón MENU hasta que aparezca el menú principal.
(Si el reloj no está puesto en hora y se pulsa el bot ón MENU, el
menú AJUSTE DE RELO J aparec e en prim er lug ar. En es te cas o,
siga el paso 3.)
2. Pulse el botón ▲ o ▼ para indicar a "AJUSTE DE RELOJ". Luego,
pulse el botón B.
3.
Ajuste el mes.
Ajuste el día.
Ajuste el año.
Ajuste la ora.
Ajuste el minuto.
Ajuste la
mañana (AM) o
la tarde (PM).
●
Para volver atrás un paso, pulse el botón s.
4. Después de establecer AM o PM, pulse el botón RESET/EXIT o
B para poner en funcionamiento el reloj.
Pulse repetidamente el botón ▲ o ▼ .
Luego, pulse el botón B .
Pulse repetidamente el botón ▲ o ▼ .
Luego, pulse el botón B .
Pulse repetidamente el botón ▲ o ▼ .
Luego, pulse el botón B .
Pulse repetidamente el botón ▲ o ▼ .
Luego, pulse el botón B .
Pulse repetidamente el botón ▲ o ▼ .
Luego, pulse el botón B .
Pulse repetidamente
el botón ▲ o ▼ .
MES DIA AÑO
0 3 / 1 9 LUN 2001
HORA MINUTO AM/PM
05 : 40 PM AM
PM
AJUSTE DE RELOJ
H7740ES
INSTRUCCIONES EN ESPAÑOL
- 14 - ES
0J01
Page 15
CONTROLES DE FUNCIONAMIENTO Y FUNCIO NES
PANEL DELANTERO
DE LA VIDEOGRABADORA
PANEL TRASERO DE LA
VIDEOGRABADORA
Compartimiento del videocasete
1.
Botón de rebobinado (REW) -
2.
ver rápidamente la imagen en retroceso durante el modo de reproducción.
(Búsqueda con rebobinado)
Botón s -
Púlselo para corregir los dígitos al programar (por ejemplo: puesta en hora
del reloj o un programa de temporizador). Púlselo para añadir o borrar números de canales durante el preajuste de canales.
Botón de expulsión (EJECT) -
3.
videograbadora.
Botón de parada (STOP) -
Botón ▼ -
(por ejemplo: puesta en hora del reloj o un programa de temporizador).
Púlselo para seleccionar los modos de ajuste en el menú en pantalla.
Botón de reproducción (PLAY) -
4.
Botón ▲ -
(por ejemplo: puesta en hora del reloj o un programa de temporizador).
Púlselo para selecciona r los modos de ajuste en el menú en pa ntalla .
Botón de avance rápido (F.FWD) -
5.
la cinta o para ver rápidamente la imagen en avance durante la reproducción.
(Búsqueda en avance)
Botón B -
del reloj o un programa de temporizador), púlselo para determinar su selec ción y proseguir con el siguiente paso que desee introducir. Púlselo para
determinar los modos de ajuste del menú en pantalla. Púlselo para añadir o
borrar números de canales durante el preajuste de canales.
Botón de pausa/imagen fija (PAUSE/STILL) -
6.
temporalmente la cinta durante la grabación o para ver una imagen fija durante la reproducción.
Botón de la alimentación (POWER) -
7.
la videograbadora. Púlselo para activar la grabación con temporizador cuando ésta haya sido establecida.
Botón de videograbadora/televisor (VCR/TV) -
8.
cionar el modo de la videograbadora (VCR) o del televisor (TV).
Posición VC R:
o ver programas de TV utilizando el sintonizador de la videograbadora.
Posición TV:
graba otro.
Ventanilla sensora del mando a distancia -
9.
frarrojas procedentes del mando a distancia.
Indicadores [Consulte las ilustraciones de las página 5.]
10.
Indicador de alimentación (PWR.) -
conectada.
Indicador de videograbadora/televisor (VCR) -
grabadora está activada.
Indicador de videocasete introducido (TAPE IN) -
un videocasete en la videograbadora.
Indicador del temporizador (TIMER) -
la grabación con temporizador u OTR.
Indicador de grabación (REC) -
bando. Parpadea cuando la grabación ha hecho una pausa.
Indicador del reloj y tarde(PM) -
está ajustado. Indica PM a la tarde.
Botón de velocidad de cinta (TAPE SPEED) -
11.
velocidad de grabación deseada: SP/SLP.
Púlselo para cancelar un ajuste de programa de temporizador.
Púlselo para introducir los dígitos cuando establez ca programas
Púlselo para introducir los dígitos cuando establez ca programas
Cuando establezca un programa (por ejemplo: puesta en hora
para ver la reproducción, comprobar las grabaciones de vídeo
para ver programas de TV o para ver un programa mientras se
Púlselo para rebobinar la cinta o para
Púlselo para sacar el videocasete de la
Púlselo para detener la cinta.
Púlselo para iniciar la reproducción.
Indica que la videograbadora está gra -
Indica la hora actual cuando el reloj
20 2122 23
Púlselo para avanzar rápidamente
Púlselo para detener
Púlselo para encender y apagar
Púlselo para se lec-
Recibe las señales in-
Indica que la alimentación está
Indica que la video-
Indica que ha sido establecida
Púlselo para elegir la
POWER
VCR/TV
78 12
Indica que hay
123456
P
L
A
Y
F.FWD
REW
REC
PAUSE
OTR
STILL
S
T
T
O
C
P
E
/
J
E
CHANNEL
TAPE
SPEED
Botones de selección de canales (CHANNEL) -
12.
1310 11 149
AUDIO
OUT IN
VIDEO
2425 2726
MENU
ANT
IN
OUT
CH3CH4
MANDO A DISTANCIA
POWER
7
15
14
16
11
2
3
13
VCR/TV
123
456
789
MENU
0 +100
DISPLAY SPEED
EXIT
PLAY
REW F.FWD
STOP
RECORD
leccionar los canales deseados para ver o grabar.
Función de seguimiento –
Pulse los botones para minimizar el "ruido"
de vídeo (líneas o puntos en la pa ntalla ) dur a nte la reproducción (sólo en la
videograbadora).
Púlselo para estabilizar la imagen en el modo de imagen fija cuando ésta
empieza a vibrar vertical mente.
Botón de grabación (RECORD) -
13.
Púlselo para realizar la grabación
manual.
Botón de grabación con un toque (OTR) -
Púl selo para activar la
grabación con un toque. (Sólo en la videogr abadora)
Botón de menús (MENU) -
14.
Púlselo para visualizar los menús en la pantalla del televisor. Y vuelva a pulsarlo para salir de los menús de la pantalla
del televisor.
Botones de números (NUMBER) -
15.
Púlselos para seleccionar los canales deseados para ver o grabar. Para selecciona r los cana les del 1 al 9, pulse
primero el botón "0" y luego el botón 1 a 9. (Sólo en el mando a distancia)
Botón +100 -
Cuando seleccione canales de televisión por cable cuyo número sea superior al 99, pulse primero este botón, y luego pulse los dos
últimos dígitos. (Para seleccionar el can al 125, pulse primero el botón
"+100" y luego el "2" y el "5".) (Sólo en el mando a distancia)
Botón del visualizador (DISPLAY) -
16.
Púlselo para visualizar en la pantalla del televisor la hora actual, el número del canal, el contador de cinta en
tiempo real y otra información. (Sólo en el mando a distancia)
Cada vez que pulse este botón, la pantalla del televisor cambiará. La visu alización del estado (PARAR, REPRODUCIR, etc.) y la visualización de
velocidad de la cinta [SP, LP (reproducción solame nte) o SLP] desapar ecerá
después de 5 segundos.
Botón de memoria del contador (COUNTER MEMORY) -
17.
para activar y desactivar la memoria del contador. (Sólo en el mando a distancia)
Botón de reposición del contador (COUNTER RESET ) -
18.
para reponer el contador a 0:00:00. (Sólo en el mando a distancia)
Botón de salida (EXIT) -
Púlselo para salir de los menús en pantalla.
(Sólo en el mando a distancia)
Botón de repetición automática (AUTO REPEAT) -
19.
repetir automáticamente la reproducción. (Sólo en el mando a distancia)
Cable de alimentación -
20.
Conéctelo a una toma de CA estánd ar (120
V/60 Hz).
Toma de salida de audio (AUDIO OUT) -
21.
Conéctela a la t oma d e en -
trada de audio de su equipo de audio o de otra videograbadora.
Toma de entrada de audio (AUDIO IN) -
22.
Conéctela a la toma de sali-
da de audio de su equipo de audio o de otra videograbadora.
Terminal de entrada de antena (ANT. IN) -
23.
Aquí se conecta una ante-
na, sistema de televisión por ca ble o sistema de emisiones vía satélite.
Toma de salida de vídeo (VIDEO OUT) -
24.
Conéctela a la toma de en-
trada de vídeo de su videocámara o de otra videograbadora.
Toma de entrada de vídeo (VIDEO IN) -
25.
Conéctela a la toma de salida
de vídeo de su videocámara o de otra videogra badora.
Conmutador selector de canales CH3/CH4 -
26.
Se utiliza para seleccio-
nar un canal de salida de vídeo (3 ó 4) para la reproducción de la videograbadora.
Terminal de salida de antena (ANT. OUT) -
27.
Conéctelo al terminal de
entrada de la antena de su televisor.
EJECT
3
8
CHANNEL
12
AUTO REPEAT
19
18
COUNTER
17
MEMORYRESET
4
5
PAUSE/STILL
6
Púlselos para se-
P ú lselo
Púlselo
Púlselo para
H7740ES
- 15 - ES
0J01
Page 16

FUNAI CORPORATION
LIMITED WARRANTY
Funai Corporation will exchange or repair this product, at its option, in the event of defect in materials or workmanship as follows:
EXCHANGE DURATION:
1-90 DAYS:
91-365 DAYS:
REPAIR DURATION:
LABOR:
PARTS:
LIMITS AND EXCLUSIONS:
This warranty is extended only to the original retail purchase r. A purc hase rec eipt or othe r proof of original re tail purchas e will be require d together with
the product to obtain exchange or service under this warranty.
This warranty shall not be extended to any other person or transferee.
This warranty is void and of no effect if any serial numbers on the product are altered, replaced, defaced or missing. This FUNAI CORPORATION
Limited warranty applies only to product purchased and used in the United States.
This warranty only covers failures due to defects in material or workmanship, which occur dur ing normal use. It does not cover damage which occur s in
shipment, or failures which are cause d by repa irs, a lterations, or par ts not supplied by FUNAI CORP ORATION, or damage which results from accident,
misuse, abuse, mishandling, misapplication, alteration, faulty installation, improper maintenance, commercial use such as hotel, rental or office use of
this product, or damage which results from fire, flood, lightning or other acts of God.
THIS WARRANTY DOES NOT COVER PACKING MATERIALS, ANY ACCESSORIES (EXCEPT REMOTE CONTROL UNITS), ANY
COSMETIC PARTS, COMPLETE ASSEMB LY PART S , DEMONS TR ATION OR F LOOR MODELS.
FUNAI CORPORATION AND ITS REPRESENTATIVES OR AGENTS SHALL IN NO EVENT BE LIABLE FOR ANY GENERAL, INDIRECT
OR CONSEQUENTIAL DAMAGES ARISING OUT OF OR OCCASIONED BY THE USE OF OR THE INABILITY TO USE THIS PRODUCT.
THIS WARRANTY IS MADE IN LIEU OF ALL OTHER WARRANTIES INCLUDING THE WARRANTY OF MERCHANT ABILITY, AND
FITNESS FOR A PARTICULAR PURPOSE, THAT ARE HEREBY DISCLAIMED BY FUNAI CORPORATION AND ITS REPRESENTATIVES
OR AGENTS IN THE UNITED STATES.
ALL WARRANTY INSPECTIONS AND REPAIRS MUST BE PERFORMED BY A FUNAI AUTHORIZED CENTER. THIS WARRANTY IS
VALID WHEN THE PRODUCT IS DELIVERED PREPAID TO A FUNAI AUTHORIZED SERVICE FACILITY.
PRIOR TO RETURNING THIS PRODUCT TO THE FACTORY SERVIC E CENTER FOR REPAIR, CONTACT THE FUNAI SERVICE DEPARTMENT TO RECEIVE A RETURN FOR REPAIR AUTHORIZATION. ANY POSTAGE, INSURANCE, AND SHIPPING COSTS INCURRED IN
PRESENTING PRODUCT FOR REPAIR ARE THE SHIPPER’S RESPONSIBILITIES.
CAREFULLY PACK WITH PROPER PACKI NG MATERIALS , PREFER ABLY IN THE ORIGINAL CARTON OR PACKING MATERI ALS AND
CARTON OBTAINED FROM FUNAI CORPORATION.
ENCLOSE WRITTEN DOCUMENTATION DETAILING THE COMPLAINT. PLACE INSIDE THE CARTON OR IN A PACKING SLIP
ENVELOPE ON THE OUTSIDE OF THE CARTON.
A COPY OF THE ORIGINAL RETAIL PURCHASE RECEIPT MUST ACCOMPANY THE PRODUCT. IF NO PROOF OF PURCHASE IS
INCLUDED, THE WARRANTY WILL NOT BE HONORED.
IMPORTANT:
THIS LIMITED WARRANTY GIVES YOU SPECIFIC LEGAL RIGHTS, YOU MAY HAVE OTHER RIGHTS THAT VARY FROM STATE TO
STATE, IF AT ANY TIME DURING THE WARRANTY PERIOD YOU ARE UNABLE TO OBTAIN SATISFACTION WITH THE EXCHANGE
OR REPAIR OF THIS PRODUCT, PLEASE CONTACT FUNAI COR P ORAT I ON.
ATTENTION:
FUNAI CORPORATION RESERVES THE RIGHT TO MODIFY ANY DESIGN OF THIS PRODUCT WITHOUT PR I OR NOTIC E.
For information about your product, or for information on how to exchange or repair your product, telephone or write to the following:
FUNAI CORPORATION will exchange for a new unit without charge for a period of ninety (90) days
from the date of original retail purchase.
FUNAI CORPORATION will exchange for a factory-service-to-new-condition unit for a charge of
$49.00 for the period of ninety on e (91) day s to three hu ndred sixty five (365 ) day s from the date of
original retail pur c hase .
FUNAI CORPORATION will provide the labor without charge for a period of ninety (90) days from
the date of original retail purchase.
FUNAI CORPORATION will provide parts to replace defective parts without charge for a period of
one (1) year from the date of original retail purchase. Two (2) years for Picture Tube. Certain parts
are excluded from this warranty.
FUNAI CORPORATION
Customer Service
100 North Street; Teterboro, NJ 07608
Telephone (800)242-7158
PLEASE DO NOT SHIP YOUR UNIT TO THE TETERBORO ADDRESS.
Printed in China 0VMN0????
H7740BCV
WARRANTY
H7740UD
★★★★★
Page 17

documentation manual, user maintenance, brochure, user reference, pdf manual
This file has been downloaded from:
User Manual and User Guide for many equipments like mobile phones, photo cameras, monther board, monitors, software, tv, dvd, and othes..
Manual users, user manuals, user guide manual, owners manual, instruction manual, manual owner, manual owner's, manual guide,
manual operation, operating manual, user's manual, operating instructions, manual operators, manual operator, manual product,
 Loading...