

Page 1
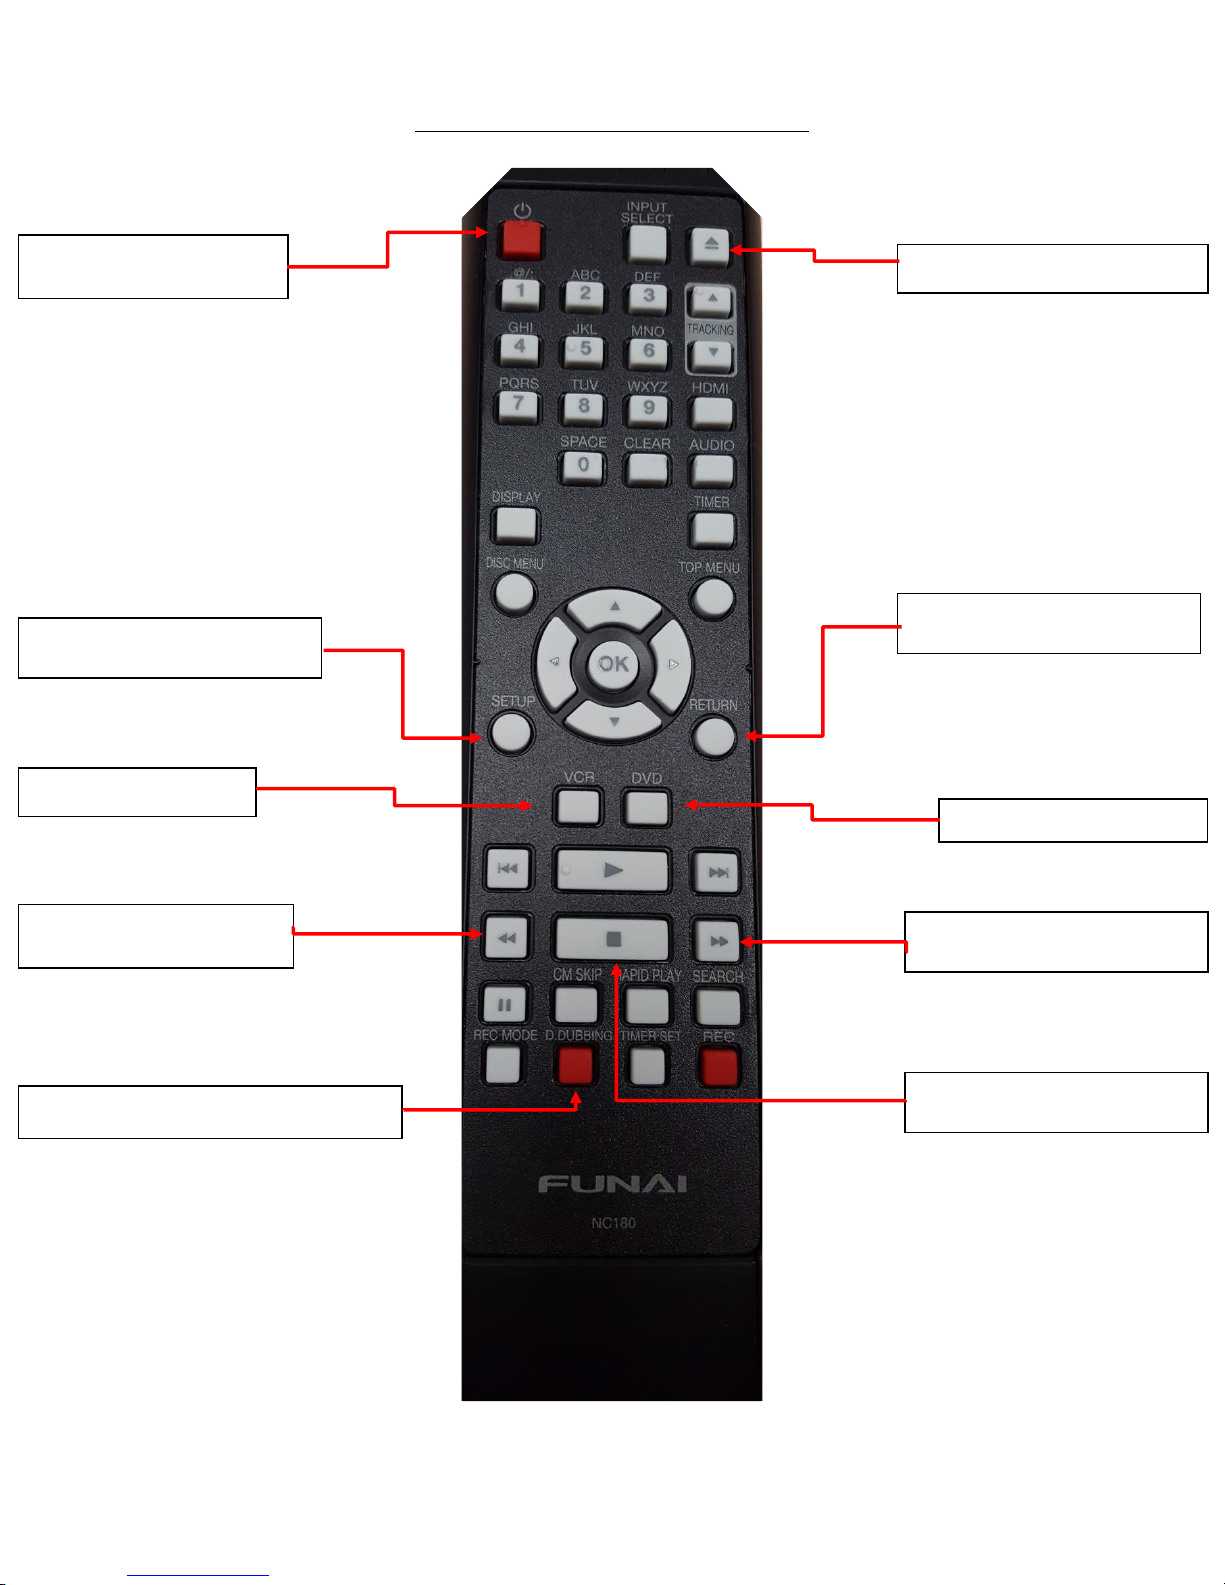
Funai VHS to DVD Converter Remote Guide
1. Power Button
2. Open Tray / Eject Button
5. VCR Button
6. DVD Button
7. Rewind Button
8. Fast Forward Button
9. D. DUBBING BUTTON
10. STOP button
3. Setup Button
4. Return Button
Page 2

Basic Recording Steps- Funai VHS to DVD Converter/Recorder
1. Using remotes, turn on monitor (Panasonic Remote: red power button on
the Top left of remote) and Funai recorder (Funai Remote: top Left red
button).
2. Open Funai disc tray using remote. Push the DVD button on remote first
(#6), then the OPEN TRAY/EJECT button (top right, #2) and insert your blank
disc into tray. Then push the OPEN TRAY button (#2) again to close.
3. Wait for disc to load. Discs that will work: DVD-R and DVD-RW. Using a
DVD+R or +RW will give you an error. The default setting for discs is set for
4 hours total recording time. If you want this setting altered, please ask a
staff member for assistance.
4. Insert your VHS tape into the Funai recorder on left side making sure to
follow arrows on your tape as a guide for which side goes in first. Wait for
tape to load.
5. You may need rewind your tape or navigate to the part of the tape that
you’d like to record before recording. To do so:
Press the VCR Button (#5) .
Use either the rewind (#7) or fast forward buttons (#8) on the
remote to rewind or advance the tape.
Press the STOP button (#10) once you’ve arrived at where you’d like
to begin recording.
6. Using the Funai remote, press VCR button (#5), followed immediately by
the D DUBBING button (red button at bottom of remote, #9). This will begin
the recording process.
Page 3

7. When you are finished recording, press the STOP button (#10). Wait for the
recorder to complete ‘WRITING TO DISC’.
8. Before finalizing your disc, you may want to check how much space is used
and determine if there’s room to add more.
Press the SETUP button (middle of remote, #3)
Next use the directional arrows in the middle of remote to select
TITLE MENU (press OK to select)
Here you can see what’s been recorded and the length of time used.
If you have room and wish to add more from another tape, simply
repeat steps 4-6.
To exit the TITLE MENU page, press the RETURN button (#4).
9. Once you’re finished, you will need to FINALIZE your disc so that you can
then play it in other devices. If you don’t FINALIZE your disc, it will NOT play
back anywhere else! However, be aware that once you do FINALIZE the disc
you cannot add anything else if you’re using a DVD-R disc.
To FINALIZE:
Press SETUP BUTTON (#3),
Select DVD MENU on screen
Select FINALIZE and at prompt select YES. The finalizing will begin and
may take a few minutes.
10. When your disc is finished finalizing, use the OPEN TRAY/EJECT (#2) button
to remove your disc, then press the VCR button(#5) and the OPEN
TRAY/EJECT (#2) button to eject the VHS tape.
11. Turn off both the recorder and monitor using the respective remotes by
pressing the POWER buttons (#1).
 Loading...